incident mgmtremedytrainingstudentguide
TRANSCRIPT
SSttuuddeenntt GGuuiiddee
RReemmeeddyy IInncciiddeenntt MMaannaaggeemmeenntt
VVeerrssiioonn 11..44
MMooddiiffiieedd:: 0055//1100//22001122


RReemmeeddyy IInncciiddeenntt MMaannaaggeemmeenntt SSttuuddeenntt GGuuiiddee
Print Date: 05/10/2012 Manitoba eHealth Page 1 of 40
Table of Contents Introduction....................................................................................................................................... 3
Purpose ............................................................................................................................................................... 3 Scope .................................................................................................................................................................. 3 Manitoba eHealth Incident Management ................................................................................................................. 3 Icons ................................................................................................................................................................... 3
Remedy Features ............................................................................................................................... 4 Login to Remedy .................................................................................................................................................. 4 Overview Console ................................................................................................................................................. 4 Navigating Remedy............................................................................................................................................... 5 Auto-fill Fields ...................................................................................................................................................... 5 Incident Console .................................................................................................................................................. 6
View Broadcast .............................................................................................................................................. 6 List Filtering ................................................................................................................................................... 6 Quick Links .................................................................................................................................................... 9 Details and Tasks ........................................................................................................................................... 9 Functions ..................................................................................................................................................... 10 Managing your Profile ................................................................................................................................... 11 Application Preferences ................................................................................................................................. 12
Search Incident .................................................................................................................................................. 13 Basic Search ................................................................................................................................................ 13 Advanced Search .......................................................................................................................................... 14 Working with Searches ................................................................................................................................. 14 Export or Print Search Results ....................................................................................................................... 15 Global Search ............................................................................................................................................... 16
Remedy Help ..................................................................................................................................................... 16
Incident Management Procedures .................................................................................................. 17 Process Flow Wizard ........................................................................................................................................... 17 Stages of an Incident .......................................................................................................................................... 17 Identification and Recording ................................................................................................................................ 17
Create the Incident ....................................................................................................................................... 18 Customer & Contact Information ................................................................................................................... 19 Customer’s Incidents .................................................................................................................................... 22 Categorizations ............................................................................................................................................ 22 Incident request Information ......................................................................................................................... 24 Assignment Information ................................................................................................................................ 25 Status Information ....................................................................................................................................... 26 Incident Matching ......................................................................................................................................... 27 Work Detail Tab ........................................................................................................................................... 29 Attachments Tab .......................................................................................................................................... 30 Save the Incident/Advance a Stage ................................................................................................................ 30
Investigation and Diagnosis ................................................................................................................................. 31
RReemmeeddyy IInncciiddeenntt MMaannaaggeemmeenntt SSttuuddeenntt GGuuiiddee
Print Date: 05/10/2012 Manitoba eHealth Page 2 of 40
Status & Response ....................................................................................................................................... 31 Save the Incident ......................................................................................................................................... 32 Relationships Tab ......................................................................................................................................... 32 Email System ............................................................................................................................................... 33 Tasks .......................................................................................................................................................... 34 Pending ....................................................................................................................................................... 34 Date/System Tab ......................................................................................................................................... 35 Advance a Stage .......................................................................................................................................... 36
Resolution and Recovery ..................................................................................................................................... 38 Advance a Stage .......................................................................................................................................... 38
Incident Closure ................................................................................................................................................. 39 Closed ............................................................................................................................................................... 39
References ....................................................................................................................................... 40
Definitions ....................................................................................................................................... 40

RReemmeeddyy IInncciiddeenntt MMaannaaggeemmeenntt SSttuuddeenntt GGuuiiddee
Print Date: 05/10/2012 Manitoba eHealth Page 3 of 40
INTRODUCTION
Purpose
The purpose of this guide is to provide users with the necessary procedures to execute the activities and tasks within the Remedy Incident Management process.
The primary objective of the Incident Management Process is to restore normal service operation as quickly as possible and minimize the adverse impact on business operations, thus ensuring that the best possible levels of service quality and availability are maintained.
Scope
The Manitoba eHealth Incident Management Process Guide provides more detail on the Incident Management Process and is accessible from SharePoint.
http://ehealthsharepoint.manitoba-ehealth.ca/bestpractices/process_services/Published%20Process%20Services%20Documents/Forms/AllItems.aspx
Manitoba eHealth Incident Management
Throughout this Guide, references are made to the relevant business rules from the Incident Management Process Guide. These policies, principles and standards are relevant for all roles within the Incident Management Process.
More details on policies, principles and standards are in the Incident Management Process Guide and the Incident Management Process Principle Guide located on SharePoint.
The Incident Management process is triggered when a user requests support or a monitoring tool detects an event that indicates an Incident has occurred or is about to occur.
Icons
This icon will point to reference sources that contain more information on the topic.
This icon indicates that the information is an important business rule, principle or standard in the Incident Management process.
This icon warns of the consequences of doing or not doing a certain action.
This icon identifies a tip or a shortcut.

RReemmeeddyy IInncciiddeenntt MMaannaaggeemmeenntt SSttuuddeenntt GGuuiiddee
Print Date: 05/10/2012 Manitoba eHealth Page 4 of 40
REMEDY FEATURES
This section will highlight some of the key Remedy Tool functionalities that a Remedy user will need to perform. Not all functionalities within Remedy are described below, but some of the key features are identified that will enable you to raise and manage Remedy tickets.
Login to Remedy Log into the Remedy environment using your network ID and password. The URL is https://remedy.manitoba-ehealth.ca/arsys/
Supported browsers in Remedy = Firefox, Internet Explorer
Enter your User Name and Password, then click Log In.
You MUST use the LOGOUT buttons at top of console. Do NOT close console browser by selecting “X” to close your Remedy session. (This will leave your Remedy license running – it must be closed out when you leave Remedy.)
You cannot change your password in Remedy. Your password is managed through your network login ID.
Overview Console The default home page in Remedy is the Overview Console. This is a summary view that shows all types of tickets.
RReemmeeddyy IInncciiddeenntt MMaannaaggeemmeenntt SSttuuddeenntt GGuuiiddee
Print Date: 05/10/2012 Manitoba eHealth Page 5 of 40
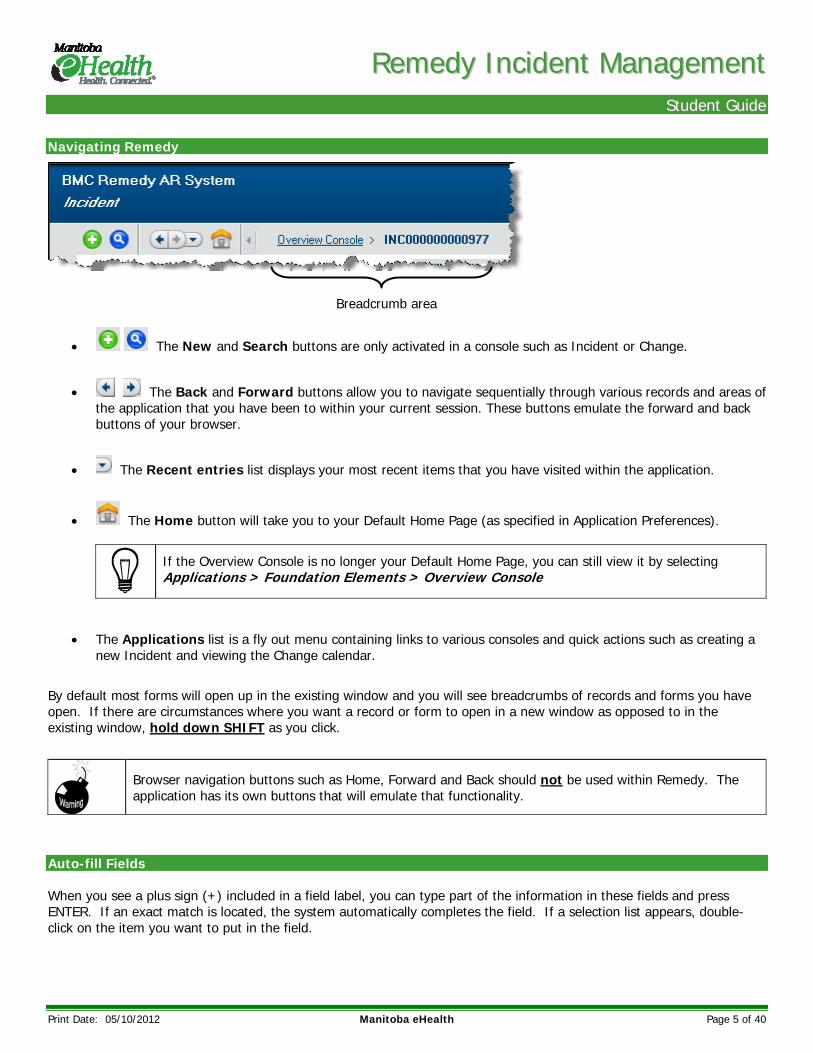
Navigating Remedy
The New and Search buttons are only activated in a console such as Incident or Change.
The Back and Forward buttons allow you to navigate sequentially through various records and areas of the application that you have been to within your current session. These buttons emulate the forward and back buttons of your browser.
The Recent entries list displays your most recent items that you have visited within the application.
The Home button will take you to your Default Home Page (as specified in Application Preferences).
If the Overview Console is no longer your Default Home Page, you can still view it by selecting Applications > Foundation Elements > Overview Console
The Applications list is a fly out menu containing links to various consoles and quick actions such as creating a new Incident and viewing the Change calendar.
By default most forms will open up in the existing window and you will see breadcrumbs of records and forms you have open. If there are circumstances where you want a record or form to open in a new window as opposed to in the existing window, hold down SHIFT as you click.
Browser navigation buttons such as Home, Forward and Back should not be used within Remedy. The application has its own buttons that will emulate that functionality.
Auto-fill Fields When you see a plus sign (+) included in a field label, you can type part of the information in these fields and press ENTER. If an exact match is located, the system automatically completes the field. If a selection list appears, double-click on the item you want to put in the field.
Breadcrumb area
RReemmeeddyy IInncciiddeenntt MMaannaaggeemmeenntt SSttuuddeenntt GGuuiiddee
Print Date: 05/10/2012 Manitoba eHealth Page 6 of 40
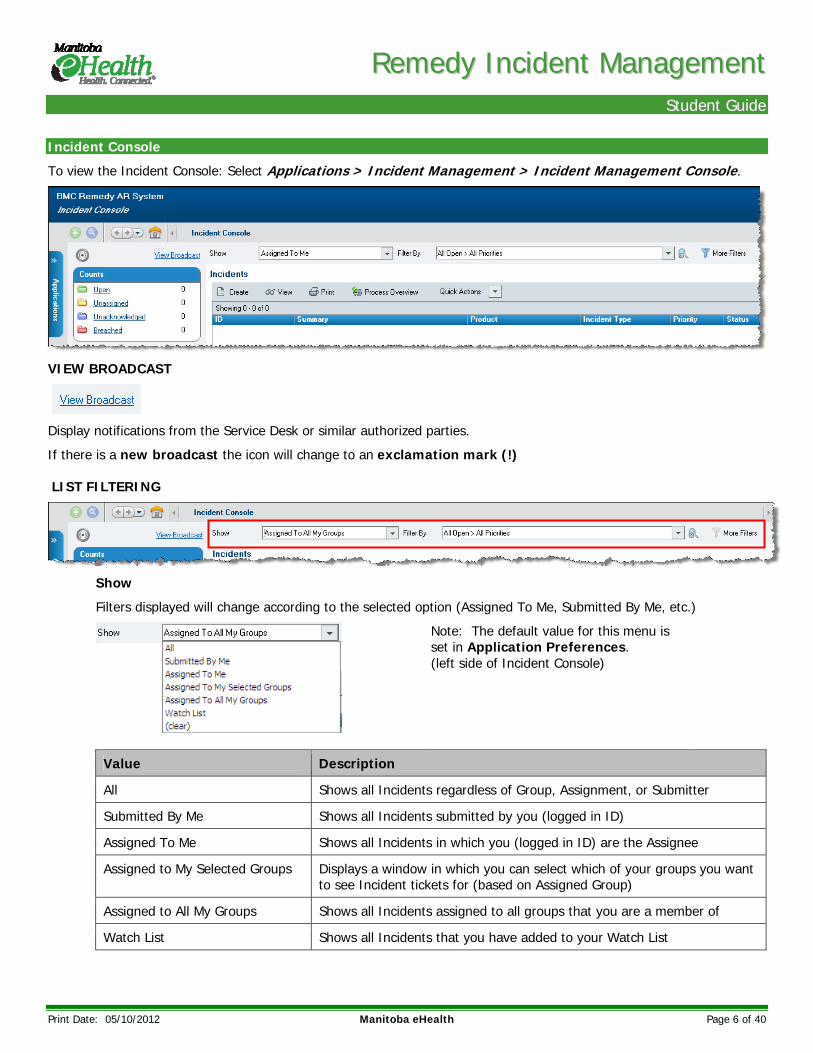
Incident Console
To view the Incident Console: Select Applications > Incident Management > Incident Management Console.
VIEW BROADCAST
Display notifications from the Service Desk or similar authorized parties.
If there is a new broadcast the icon will change to an exclamation mark (!)
LIST FILTERING
Show
Filters displayed will change according to the selected option (Assigned To Me, Submitted By Me, etc.)
Note: The default value for this menu is set in Application Preferences. (left side of Incident Console)
Value Description
All Shows all Incidents regardless of Group, Assignment, or Submitter
Submitted By Me Shows all Incidents submitted by you (logged in ID)
Assigned To Me Shows all Incidents in which you (logged in ID) are the Assignee
Assigned to My Selected Groups Displays a window in which you can select which of your groups you want to see Incident tickets for (based on Assigned Group)
Assigned to All My Groups Shows all Incidents assigned to all groups that you are a member of
Watch List Shows all Incidents that you have added to your Watch List

RReemmeeddyy IInncciiddeenntt MMaannaaggeemmeenntt SSttuuddeenntt GGuuiiddee
Print Date: 05/10/2012 Manitoba eHealth Page 7 of 40
Filter By
Working in conjunction with the selected Show option, the listed changes can be filtered further. You can choose from the defined filters, as well as create your own.
Filter Type Description
All Open Incidents that are not Closed
All Open Unacknowledged Incidents that are not Closed and have not yet been changed to a Status of In Progress
All Open Unassigned Incidents that are not Closed and have not yet been assigned to an individual
All Open Escalated Incidents that are not Closed and have triggered an escalation notification
All Open SLA Breached Incidents that are not Closed and have exceeded the resolution target
Manage My Filters
Create and save your own filters. Once saved, your filters will appear in the Filter By drop down list.

RReemmeeddyy IInncciiddeenntt MMaannaaggeemmeenntt SSttuuddeenntt GGuuiiddee
Print Date: 05/10/2012 Manitoba eHealth Page 8 of 40
More Filters
More Filters may be used to display Change tickets based on criteria that you enter in the form field(s).
Counts
Displays a summary count of records shown in the list to the right. Clicking on each title (such as Open) filters the list accordingly.

RReemmeeddyy IInncciiddeenntt MMaannaaggeemmeenntt SSttuuddeenntt GGuuiiddee
Print Date: 05/10/2012 Manitoba eHealth Page 9 of 40
QUICK LINKS
Create
Launches a new incident
View
Opens the selected incident
Launches a print preview of the selected incident
Process Overview
Launches an interactive guide of the Incident Service Management and Problem Management process
Quick Actions
Allows you to perform single click actions on the selected incident(s) such as assign to group yourself or other members of your group
Add to Watch List
A watch list allows you to track an incident independent of who it is assigned to or what status it is in. Once added to your watch list, the list is viewable using the corresponding option.
Refresh
Manually refresh the displayed incidents
Preferences
Allows customization of the viewable columns (only removal of shown columns) and the refresh interval
DETAILS AND TASKS
Gives a quick summary of the selected incident including the work information added.
You also have the ability to quickly add additional work info without opening the incident.
You can view tasks by clicking on the Show Tasks link.
RReemmeeddyy IInncciiddeenntt MMaannaaggeemmeenntt SSttuuddeenntt GGuuiiddee
Print Date: 05/10/2012 Manitoba eHealth Page 10 of 40
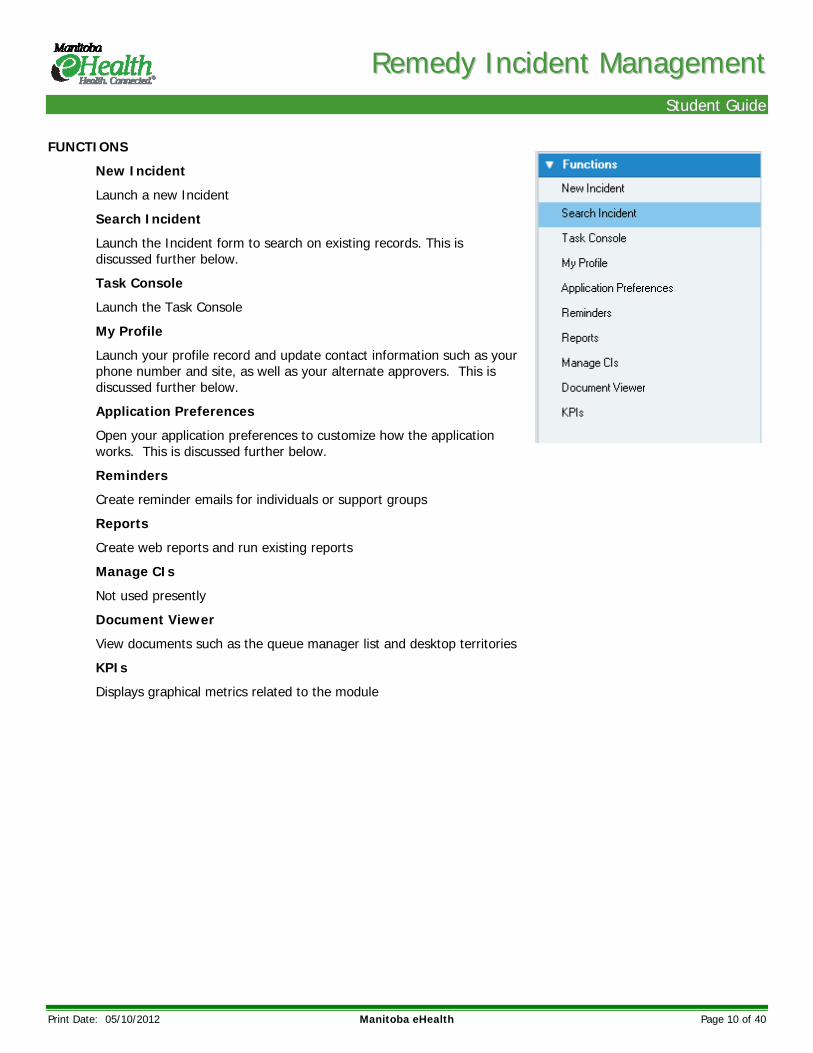
FUNCTIONS
New Incident
Launch a new Incident
Search Incident
Launch the Incident form to search on existing records. This is discussed further below.
Task Console
Launch the Task Console
My Profile
Launch your profile record and update contact information such as your phone number and site, as well as your alternate approvers. This is discussed further below.
Application Preferences
Open your application preferences to customize how the application works. This is discussed further below.
Reminders
Create reminder emails for individuals or support groups
Reports
Create web reports and run existing reports
Manage CIs
Not used presently
Document Viewer
View documents such as the queue manager list and desktop territories
KPIs
Displays graphical metrics related to the module

RReemmeeddyy IInncciiddeenntt MMaannaaggeemmeenntt SSttuuddeenntt GGuuiiddee
Print Date: 05/10/2012 Manitoba eHealth Page 11 of 40
MANAGING YOUR PROFILE
To change your profile settings, select My Profile in the Functions section on the left side of the Incident Console.
My Profile allows you to update your user information including contact and site.
Some profile settings are not available to you. Other profile settings can adversely affect the way in which the system interacts with you. Contact your Remedy Administrator if you are unsure about any settings in your profile.
Your Profile settings are stored on the server and will be in effect on any workstation that you log onto.
If you make changes in your profile, they will NOT be populated into any other system within eHealth.
For further details refer to Viewing your profile in the BMC Remedy Incident Management Help.
RReemmeeddyy IInncciiddeenntt MMaannaaggeemmeenntt SSttuuddeenntt GGuuiiddee
Print Date: 05/10/2012 Manitoba eHealth Page 12 of 40
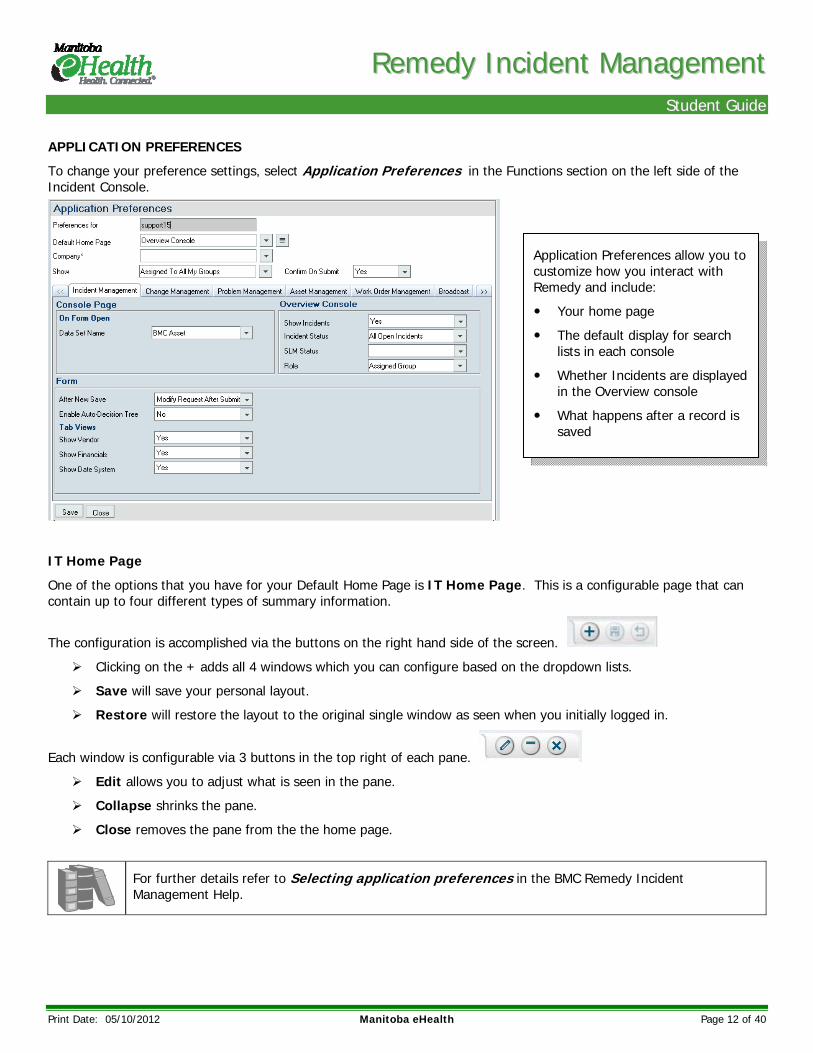
APPLICATION PREFERENCES
To change your preference settings, select Application Preferences in the Functions section on the left side of the Incident Console.
IT Home Page
One of the options that you have for your Default Home Page is IT Home Page. This is a configurable page that can contain up to four different types of summary information.
The configuration is accomplished via the buttons on the right hand side of the screen.
Clicking on the + adds all 4 windows which you can configure based on the dropdown lists.
Save will save your personal layout.
Restore will restore the layout to the original single window as seen when you initially logged in.
Each window is configurable via 3 buttons in the top right of each pane.
Edit allows you to adjust what is seen in the pane.
Collapse shrinks the pane.
Close removes the pane from the the home page.
For further details refer to Selecting application preferences in the BMC Remedy Incident Management Help.
Application Preferences allow you to customize how you interact with Remedy and include:
Your home page
The default display for search lists in each console
Whether Incidents are displayed in the Overview console
What happens after a record is saved

RReemmeeddyy IInncciiddeenntt MMaannaaggeemmeenntt SSttuuddeenntt GGuuiiddee
Print Date: 05/10/2012 Manitoba eHealth Page 13 of 40
Search Incident
To search Incident tickets, select Applications > Incident Management > Search Incident.
If you are in the Incident Console, you may also launch Search by clicking on one of the following:
- Search Incident, located under Functions on the left hand menu
- The Magnifying Glass in the top left corner
BASIC SEARCH
To do a basic search:
1. Enter criteria into the form field(s).
2. Click Search or press Enter. Records that match the criteria appear in a results pane at the top of the search form.
When you double-click a record in the results pane at the top of the Search window, the Incident will open in a separate window.
The percent symbol (%) may be used as a wildcard character.

RReemmeeddyy IInncciiddeenntt MMaannaaggeemmeenntt SSttuuddeenntt GGuuiiddee
Print Date: 05/10/2012 Manitoba eHealth Page 14 of 40
ADVANCED SEARCH
To do an advanced search:
1. Click the Advanced search button. A search bar is displayed at the bottom of the window.
2. Enter criteria into the search bar.
3. Click Search. Records that match the criteria appear in a results pane at the top of the search form.
Syntax Examples
All Incidents created in April 2012 and assigned to Support Staff15:
'Submit Date' >= "4/1/2012" AND 'Submit Date' <= "4/30/2012" AND 'Assignee+' = "Support Staff15"
All open Incidents assigned to any eChart group:
'Status*' != "Closed" AND 'Assigned Group*+' LIKE "%echart%"
All Incidents that are in a status of Pending and assigned to either the Infra group or the MS-Citrix group:
'Status*'="Pending" AND ('Assigned Group*+'="Infra" OR 'Assigned Group*+'="MS-Citrix" )
WORKING WITH SEARCHES
Objective Instructions Button
Clear the current search criteria and results Click the New search button.
Run a recent search Select Searches > Run Recent.
Load recently used criteria into the form or search bar
Select Searches > Load Recent.
Save a search 1. Run the search. 2. Select Searches > Save Search. 3. Type a Search Name. 4. Click OK.
Run a saved search Select Searches > Run My Searches.
Load saved search criteria into the form or search bar
Select Searches > Load My Searches.
Delete a search 1. Select Searches > Manage My Searches. 2. Select the search to be deleted. 3. Click Delete and then Save.
RReemmeeddyy IInncciiddeenntt MMaannaaggeemmeenntt SSttuuddeenntt GGuuiiddee
Print Date: 05/10/2012 Manitoba eHealth Page 15 of 40
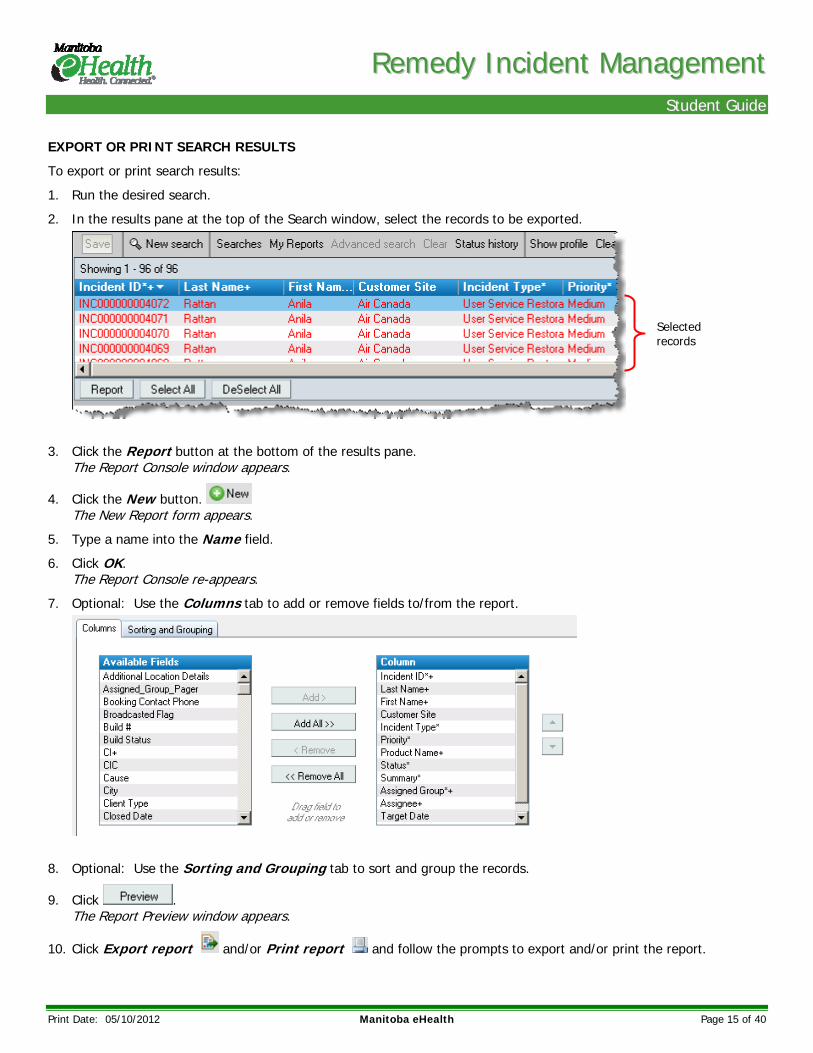
EXPORT OR PRINT SEARCH RESULTS
To export or print search results:
1. Run the desired search.
2. In the results pane at the top of the Search window, select the records to be exported.
3. Click the Report button at the bottom of the results pane. The Report Console window appears.
4. Click the New button. The New Report form appears.
5. Type a name into the Name field.
6. Click OK. The Report Console re-appears.
7. Optional: Use the Columns tab to add or remove fields to/from the report.
8. Optional: Use the Sorting and Grouping tab to sort and group the records.
9. Click . The Report Preview window appears.
10. Click Export report and/or Print report and follow the prompts to export and/or print the report.
Selected records
RReemmeeddyy IInncciiddeenntt MMaannaaggeemmeenntt SSttuuddeenntt GGuuiiddee
Print Date: 05/10/2012 Manitoba eHealth Page 16 of 40
11. Close the Report Preview window.
12. Close the Report Console window.
This is a one-time export of data, not a dynamic report that can be refreshed.
GLOBAL SEARCH
You can also perform a search by entering criteria into the Global Search field to the right of the breadcrumb bar. This feature searches across multiple forms.
Use the wildcard character (%) to search for a particular ticket number. E.g. %1402
For further details refer to Searching for records in the BMC Remedy Incident Management Help.
Remedy Help
Click on the Help link located in the top right corner of the screen to access the application help files.

RReemmeeddyy IInncciiddeenntt MMaannaaggeemmeenntt SSttuuddeenntt GGuuiiddee
Print Date: 05/10/2012 Manitoba eHealth Page 17 of 40
INCIDENT MANAGEMENT PROCEDURES
Process Flow Wizard
The Process Flow Status/Wizard accelerates a user through the Incident process from start to finish. It provides an optional visual mechanism to track the states of an Incident.
The Process Flow Status area displays the sequence of the Incident Management Lifecycle stages from the initial Recording stage to the Closed state. The current stage of the Incident is highlighted. To advance through the Incident, click the process flow accelerators to move to the next stage.
Stages of an Incident
Identification and Recording
This stage initiates the Incident Management process. The purpose of this stage is to accurately record and recognize disruptions to services provided by IT to its customers.
Logical layout of information in Remedy Incident Management
Remedy Incident Management displays information in a Best Practice view which means that the fields most commonly used for creating, resolving, and updating incident requests are immediately visible. You can access additional, less frequently used functionality from the tabbed sections of the form or from links in the Navigation pane. Some of the tabs and links are required during multiple stages of the Incident Lifecycle. These tabs and links are defined only once in this document.
Refer to Figure 1: Incident Request lifecycle in the BMC Remedy Incident Management Help.

RReemmeeddyy IInncciiddeenntt MMaannaaggeemmeenntt SSttuuddeenntt GGuuiiddee
Print Date: 05/10/2012 Manitoba eHealth Page 18 of 40
CREATE THE INCIDENT
1. Display the Applications menu on the left side of the screen.
2. Select Incident Management > New Incident.
The new “Incident” form is displayed. An Incident ID is automatically assigned.
Fields with bold labels are mandatory.
Mandatory fields must be filled in for the Incident to be saved in Remedy. The fields that are required will vary depending on the stage that the Incident is in.

RReemmeeddyy IInncciiddeenntt MMaannaaggeemmeenntt SSttuuddeenntt GGuuiiddee
Print Date: 05/10/2012 Manitoba eHealth Page 19 of 40
CUSTOMER & CONTACT INFORMATION
Propagate the following Customer fields:
Company *+ This field will fill in automatically once you select the Customer.
Customer *+ Type the Customer’s LAST name and hit Enter. If Remedy only finds one match for the name, it will populate the corresponding Customer fields in the form. If it finds more than one match, it will bring up the “People Search” utility and display all entries for the last name.
After the “People” window has closed, you may re-open it by selecting the button.
To clear the current Customer information, click the button.
Customer Phone *+ This field will fill in automatically once you select the Customer. If the Customer Phone
number is incorrect, the information can be edited by selecting the button.
Customer Site
This field will fill in automatically once you select the Customer. This information is automatically populated by the system. If the Customer is located at a different site, the
information can be edited by selecting the button.
Entering Customer Information First
Entering Customer information is the recommended starting point for Incident Recording.
Fields with a “+” sign behind them indicate that there is automated workflow that is initiated when you hit the Enter key while in that field. For the “Customer” and “Contact” fields, this means that when you enter some information about a customer, the system can help you by filling in some of the remaining information automatically.
RReemmeeddyy IInncciiddeenntt MMaannaaggeemmeenntt SSttuuddeenntt GGuuiiddee
Print Date: 05/10/2012 Manitoba eHealth Page 20 of 40
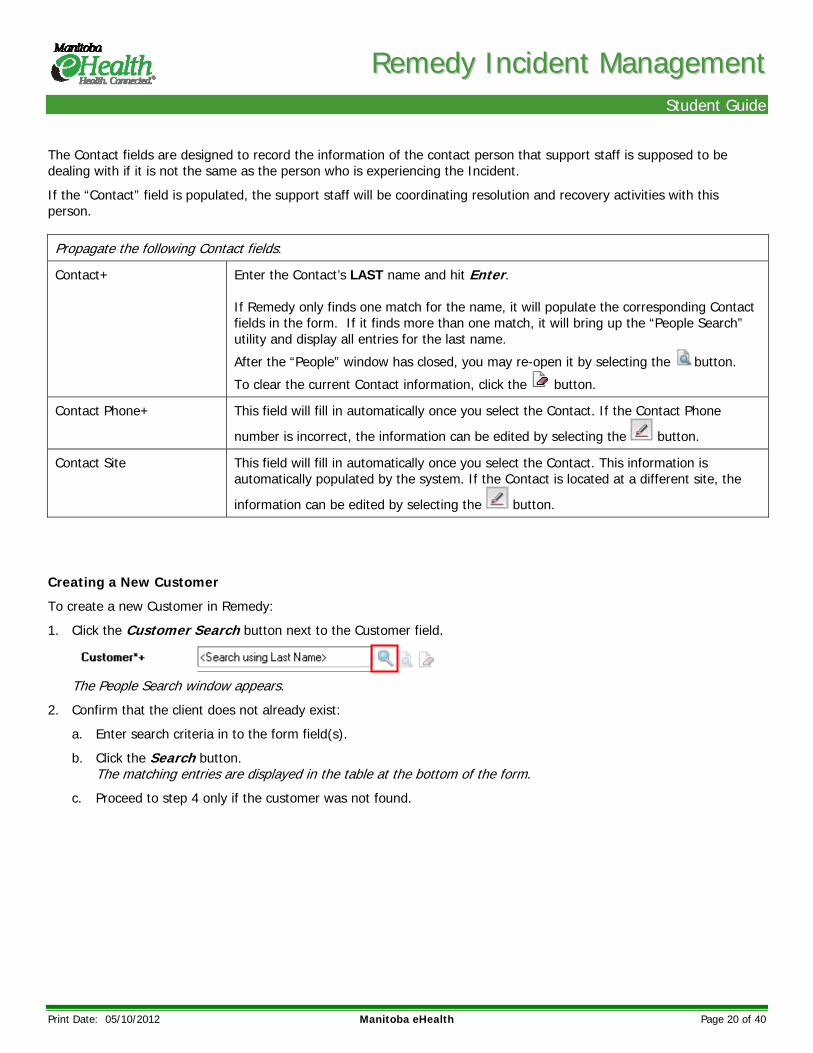
The Contact fields are designed to record the information of the contact person that support staff is supposed to be dealing with if it is not the same as the person who is experiencing the Incident.
If the “Contact” field is populated, the support staff will be coordinating resolution and recovery activities with this person.
Propagate the following Contact fields:
Contact+ Enter the Contact’s LAST name and hit Enter. If Remedy only finds one match for the name, it will populate the corresponding Contact fields in the form. If it finds more than one match, it will bring up the “People Search” utility and display all entries for the last name.
After the “People” window has closed, you may re-open it by selecting the button.
To clear the current Contact information, click the button.
Contact Phone+ This field will fill in automatically once you select the Contact. If the Contact Phone
number is incorrect, the information can be edited by selecting the button.
Contact Site This field will fill in automatically once you select the Contact. This information is automatically populated by the system. If the Contact is located at a different site, the
information can be edited by selecting the button.
Creating a New Customer
To create a new Customer in Remedy:
1. Click the Customer Search button next to the Customer field.
The People Search window appears.
2. Confirm that the client does not already exist:
a. Enter search criteria in to the form field(s).
b. Click the Search button. The matching entries are displayed in the table at the bottom of the form.
c. Proceed to step 4 only if the customer was not found.

RReemmeeddyy IInncciiddeenntt MMaannaaggeemmeenntt SSttuuddeenntt GGuuiiddee
Print Date: 05/10/2012 Manitoba eHealth Page 21 of 40
3. Click the Create button. The People window appears.
4. Enter the customer details into the form.
Bold field labels indicate required fields.
Click the “pencil” icon to modify the corresponding field(s).
Note: After entering a phone number in the Business*+ field, the Phone details window may re-appear. If this happens, click the Cancel button at the bottom of the form.
5. Click Save.
RReemmeeddyy IInncciiddeenntt MMaannaaggeemmeenntt SSttuuddeenntt GGuuiiddee
Print Date: 05/10/2012 Manitoba eHealth Page 22 of 40
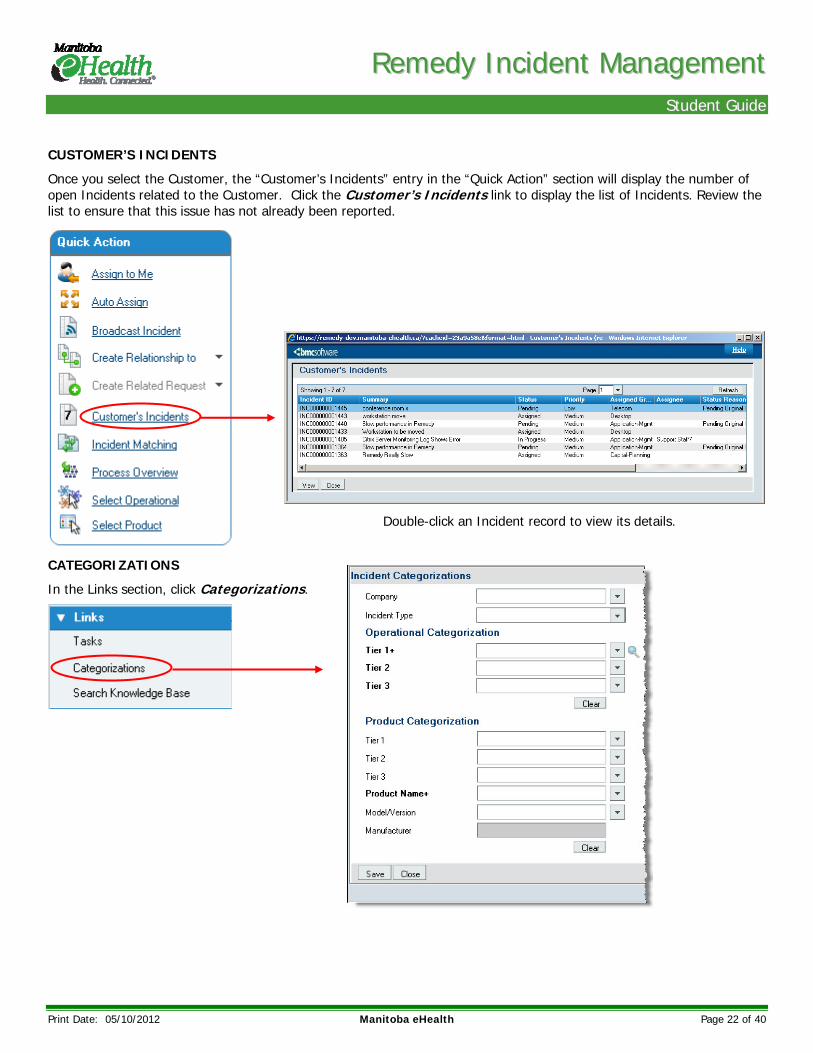
CUSTOMER’S INCIDENTS
Once you select the Customer, the “Customer’s Incidents” entry in the “Quick Action” section will display the number of open Incidents related to the Customer. Click the Customer’s Incidents link to display the list of Incidents. Review the list to ensure that this issue has not already been reported.
CATEGORIZATIONS
In the Links section, click Categorizations.
Double-click an Incident record to view its details.

RReemmeeddyy IInncciiddeenntt MMaannaaggeemmeenntt SSttuuddeenntt GGuuiiddee
Print Date: 05/10/2012 Manitoba eHealth Page 23 of 40
Mandatory Categorization Fields!
These fields have been made mandatory in order to facilitate the production of quality management information. Current and future reporting requirements will be met through the successful categorization of Incidents.
Propagate the following fields in the “Incident Categorizations” form:
Company This field will be populated based on the Customer information.
Incident Type Select an Incident Type.
For a detailed definition of the Incident Types, please refer to Creating an incident request record without a template in Classic View in the BMC Remedy Incident Management Help.
Operational Categorization
Operational categories are used to define what is being done or what the issue is. (type of issue or request) Tier 1+ – What is impacted? Tier 2 – What components are impacted? Tier 3 – Symptom/Action
Product Categorization Product categories are used to define the system or application that is impacted. (the ‘thing’ that is impacted or requested) Tier 1 - Product Category (e.g. Hardware, Software) Tier 2 - Product Group (e.g. Printer, Application) Tier 3 - Product Type (e.g. MBT, Pharmacy) Product Name + Model/Version Manufacturer
What to do when no Product Categorization applies
The system has the option of selecting any of the following products: Other Hardware Other Software Other Mobile Devices Non eHealth Supported Software
These selections will allow the tool’s support team an easy way to query records that couldn’t be classified in the existing structure. These records will be used to modify and improve the structure over time.
RReemmeeddyy IInncciiddeenntt MMaannaaggeemmeenntt SSttuuddeenntt GGuuiiddee
Print Date: 05/10/2012 Manitoba eHealth Page 24 of 40
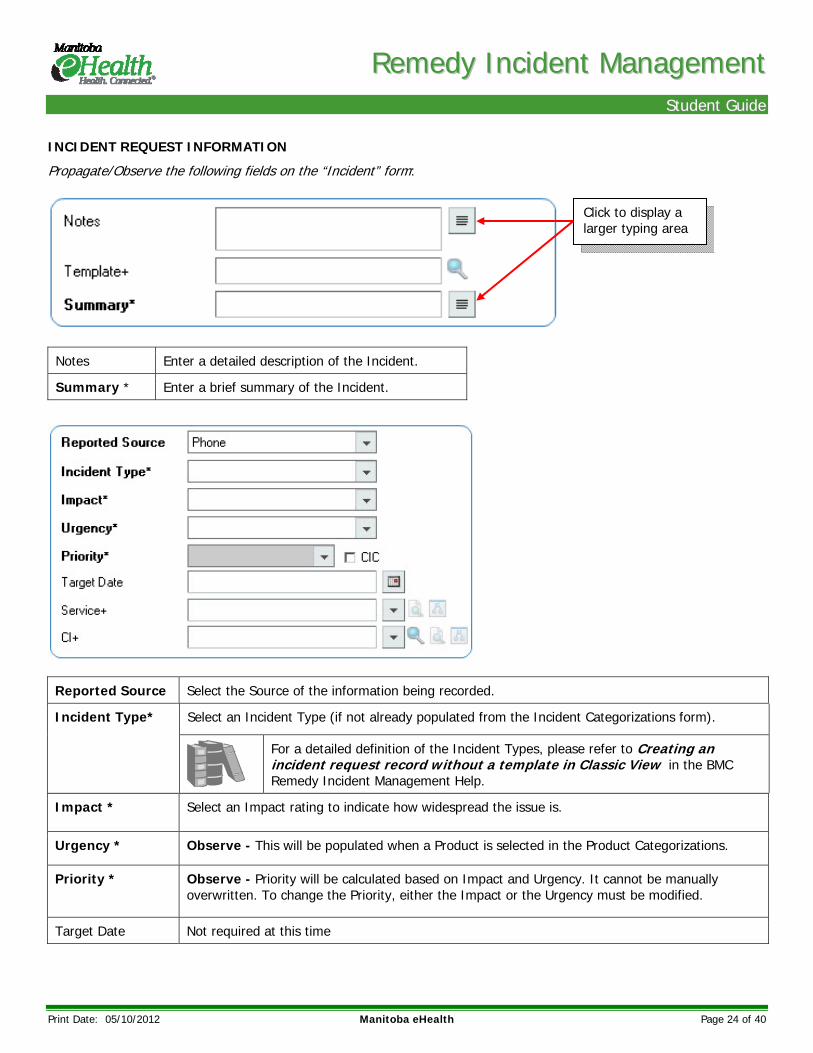
INCIDENT REQUEST INFORMATION
Propagate/Observe the following fields on the “Incident” form:
Notes Enter a detailed description of the Incident.
Summary * Enter a brief summary of the Incident.
Reported Source Select the Source of the information being recorded.
Incident Type* Select an Incident Type (if not already populated from the Incident Categorizations form).
For a detailed definition of the Incident Types, please refer to Creating an incident request record without a template in Classic View in the BMC Remedy Incident Management Help.
Impact * Select an Impact rating to indicate how widespread the issue is.
Urgency * Observe - This will be populated when a Product is selected in the Product Categorizations.
Priority * Observe - Priority will be calculated based on Impact and Urgency. It cannot be manually overwritten. To change the Priority, either the Impact or the Urgency must be modified.
Target Date Not required at this time
Click to display a larger typing area
RReemmeeddyy IInncciiddeenntt MMaannaaggeemmeenntt SSttuuddeenntt GGuuiiddee
Print Date: 05/10/2012 Manitoba eHealth Page 25 of 40
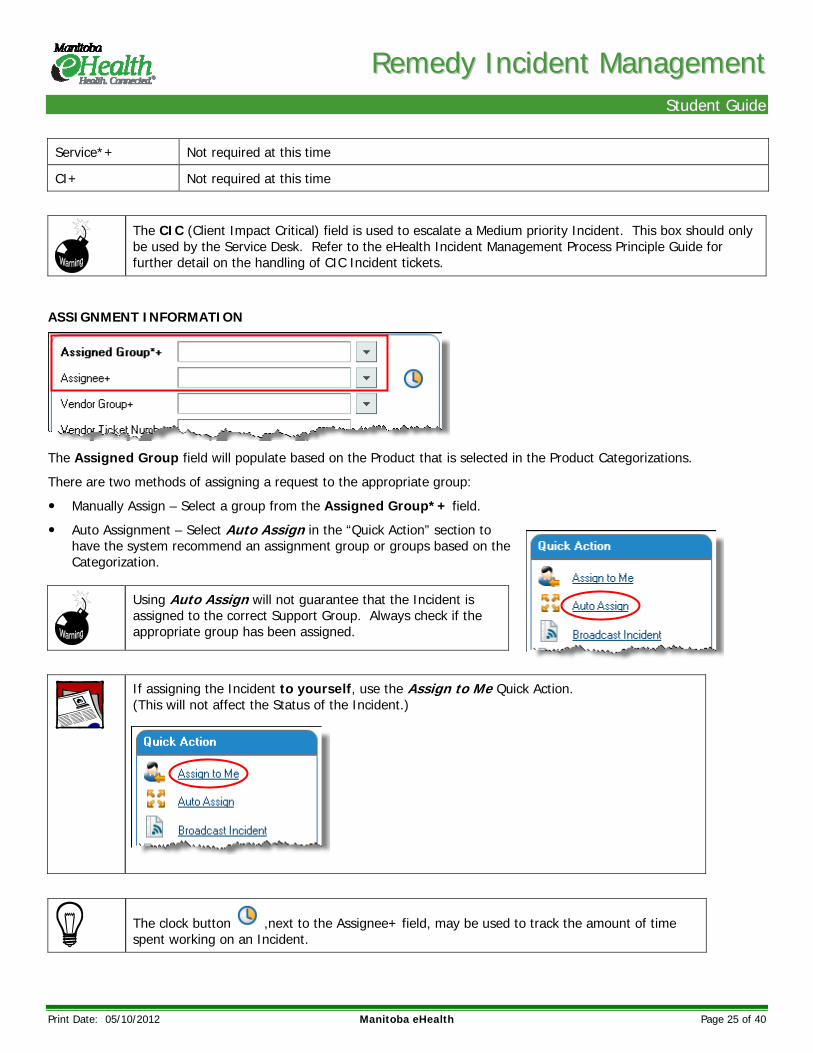
Service*+ Not required at this time
CI+ Not required at this time
The CIC (Client Impact Critical) field is used to escalate a Medium priority Incident. This box should only be used by the Service Desk. Refer to the eHealth Incident Management Process Principle Guide for further detail on the handling of CIC Incident tickets.
ASSIGNMENT INFORMATION
The Assigned Group field will populate based on the Product that is selected in the Product Categorizations.
There are two methods of assigning a request to the appropriate group:
Manually Assign – Select a group from the Assigned Group*+ field.
Auto Assignment – Select Auto Assign in the “Quick Action” section to have the system recommend an assignment group or groups based on the Categorization.
Using Auto Assign will not guarantee that the Incident is assigned to the correct Support Group. Always check if the appropriate group has been assigned.
If assigning the Incident to yourself, use the Assign to Me Quick Action. (This will not affect the Status of the Incident.)
The clock button ,next to the Assignee+ field, may be used to track the amount of time spent working on an Incident.
RReemmeeddyy IInncciiddeenntt MMaannaaggeemmeenntt SSttuuddeenntt GGuuiiddee
Print Date: 05/10/2012 Manitoba eHealth Page 26 of 40
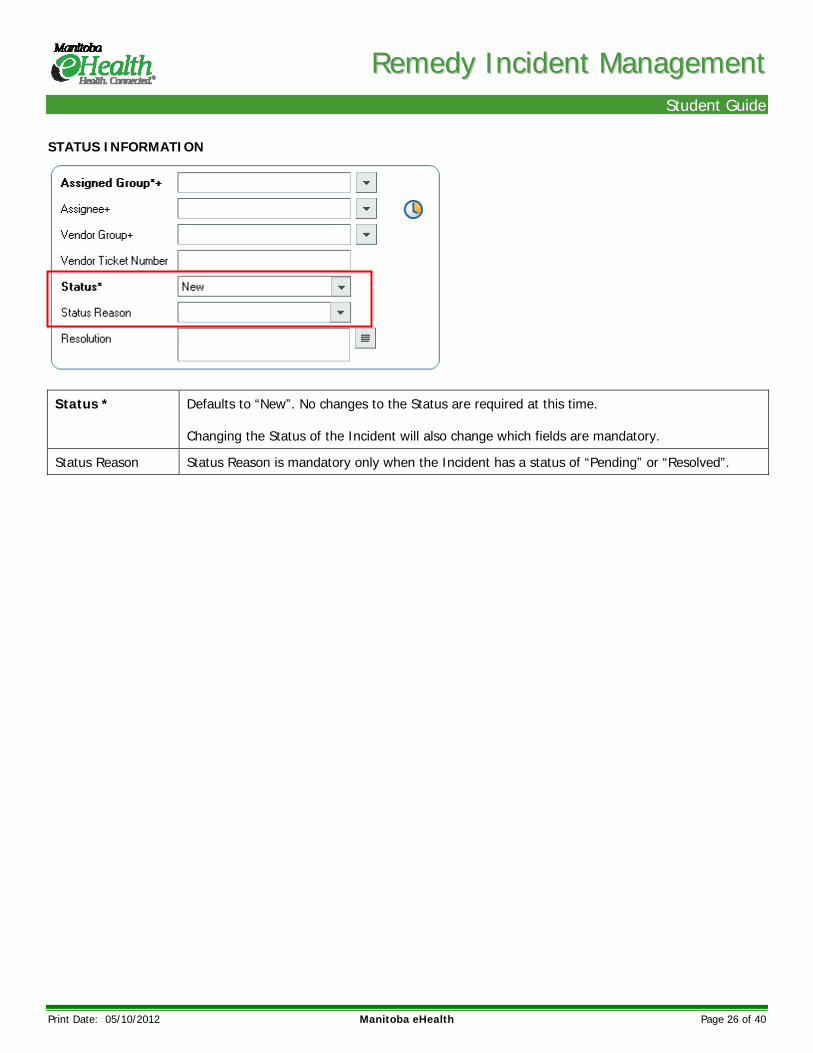
STATUS INFORMATION
Status * Defaults to “New”. No changes to the Status are required at this time. Changing the Status of the Incident will also change which fields are mandatory.
Status Reason Status Reason is mandatory only when the Incident has a status of “Pending” or “Resolved”.
RReemmeeddyy IInncciiddeenntt MMaannaaggeemmeenntt SSttuuddeenntt GGuuiiddee
Print Date: 05/10/2012 Manitoba eHealth Page 27 of 40
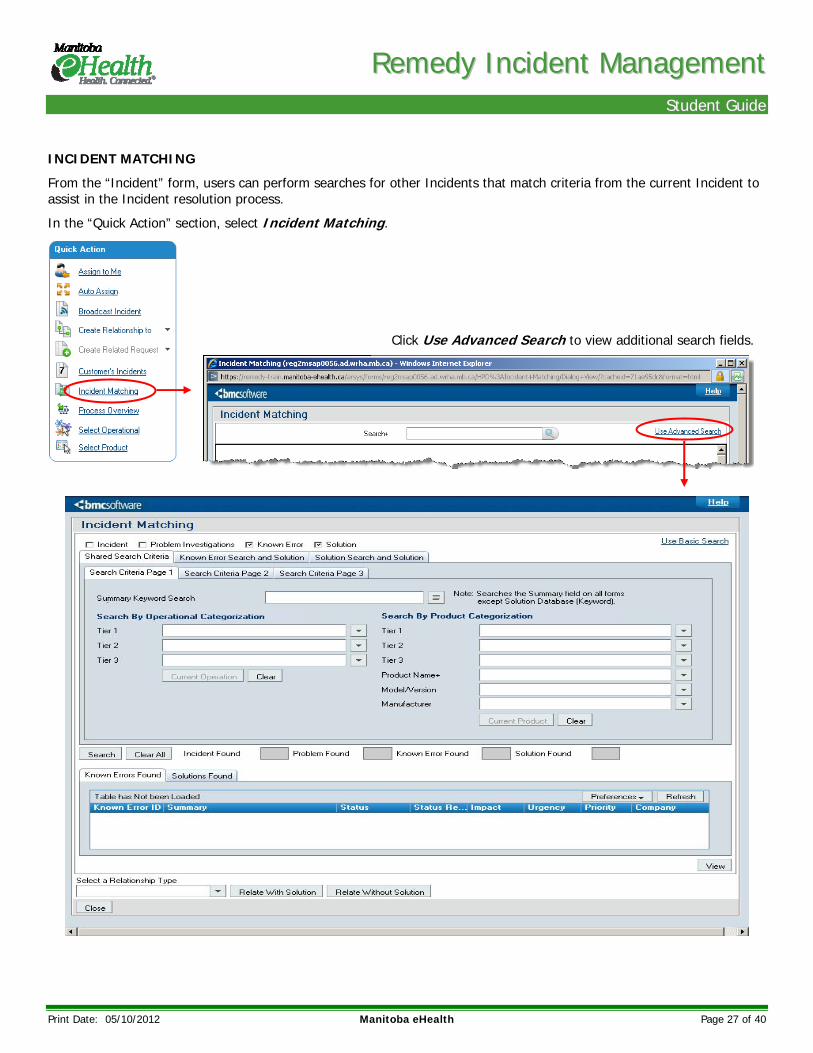
INCIDENT MATCHING
From the “Incident” form, users can perform searches for other Incidents that match criteria from the current Incident to assist in the Incident resolution process.
In the “Quick Action” section, select Incident Matching.
Click Use Advanced Search to view additional search fields.

RReemmeeddyy IInncciiddeenntt MMaannaaggeemmeenntt SSttuuddeenntt GGuuiiddee
Print Date: 05/10/2012 Manitoba eHealth Page 28 of 40
Propagate any information from the current Incident that you wish to search for. Once you click on Search all records that match your criteria will be returned and you will be given the opportunity to relate the Incidents to each other.
Summary Keyword Search Searches the summary fields in the Database for keyword matches.
Operational Categorization You can enter any of the Operational Categorization tiers that you want. (If the information was already entered in the current Incident, you can select
and populate the fields with the values from the current Incident.)
Product Categorization You can enter any of the Product Categorization tiers that you want.
Search Criteria Page 2 Gives you the option to search based on location, Impact, Urgency and Priority.
Search Criteria Page 3 Gives you the option to search based on Assignee Information.
Select a Relationship Type Allows you to establish a relationship between the current Incident and the selected record. Relationship Types are: “Duplicate of”: Should be used when you identify that the Incident is a duplicate of another Incident that is open. If you choose this relationship type, the current request becomes a child of the master (selected request). When the master ticket is closed, all child records are closed as well. “Resolved By”: Should be used when you identify that the Incident is the same as a previous Incident and you can use the resolution from the previous Incident.
Relate With Solution If the solution identified in the selected record is being used to resolve the current record.
Relate Without Solution If the solution identified in the selected record is not being used to resolve the current record.
Initially only Known Errors and Solutions will be searched. To search Incidents or Problems as well, select the Incident or Problem Investigations check box.

RReemmeeddyy IInncciiddeenntt MMaannaaggeemmeenntt SSttuuddeenntt GGuuiiddee
Print Date: 05/10/2012 Manitoba eHealth Page 29 of 40
WORK DETAIL TAB
The Work Detail tab is designed to record details of the actions taken to progress the Incident through the lifecycle. This information can be categorized into different type categories resulting in information that is easier to search and manage.
Propagate the following fields in the “Work Detail” Tab:
Work Info Type Select a value that best corresponds with the type of note you are adding.
Notes Enter a detailed summary of the Work Detail.
Locked Determine if you want to lock this record. Locking a record prevents anyone from editing the record at a future time.
Work Info History A line is displayed for every Work Detail record that has been entered. You can view
records by selecting them and clicking on or if you want to print them, you can
choose .

RReemmeeddyy IInncciiddeenntt MMaannaaggeemmeenntt SSttuuddeenntt GGuuiiddee
Print Date: 05/10/2012 Manitoba eHealth Page 30 of 40
ATTACHMENTS TAB
Add a document to the attachment table by clicking or add a web link by clicking .
SAVE THE INCIDENT/ADVANCE A STAGE
There are two methods that you can use to save the Incident and move it to the next stage.
Click the button at the bottom of the Incident form. -OR-
Select Identification and Recording > Next Stage > Investigation and Diagnosis.
The Incident has been saved and is now in the Investigation and Diagnosis stage.
Remedy Wizard Form The Remedy Wizard form will appear if any information is missing that is required to advance the Incident to the stage you have selected. This form is designed to summarize the minimum information that is required at that time.
The contents of the Remedy Wizard Dialog Box will vary based on: 1. Information already entered through the tabs. 2. The stage you are going to. 3. The stage that you are coming from.

RReemmeeddyy IInncciiddeenntt MMaannaaggeemmeenntt SSttuuddeenntt GGuuiiddee
Print Date: 05/10/2012 Manitoba eHealth Page 31 of 40
Investigation and Diagnosis
In this stage, you can search existing information to identify a possible solution.
If the Service Desk should have been able to resolve the ticket or if they have misrouted the ticket, clearly document the reasons why you feel so on the “Work Detail” tab.
The “Notes” for the work log entry should clearly identify the steps the Service Desk should take the next time this type of Incident occurs.
The Target Date field on the Incident form indicates when the Incident should be Resolved in order to meet the Resolution target.
STATUS & RESPONSE
When you begin working on an Incident, select Status > In Progress and Response > Yes.
If the Response field is not set to Yes, the Response Target escalations will continue.
When the Response field is set to Yes, Remedy populates the Responded Date on the Date/System tab and the escalations stop.
If the Response field is not visible at the bottom of the Incident form, it is not required for this particular Incident (depends on the Reported Source).
RReemmeeddyy IInncciiddeenntt MMaannaaggeemmeenntt SSttuuddeenntt GGuuiiddee
Print Date: 05/10/2012 Manitoba eHealth Page 32 of 40
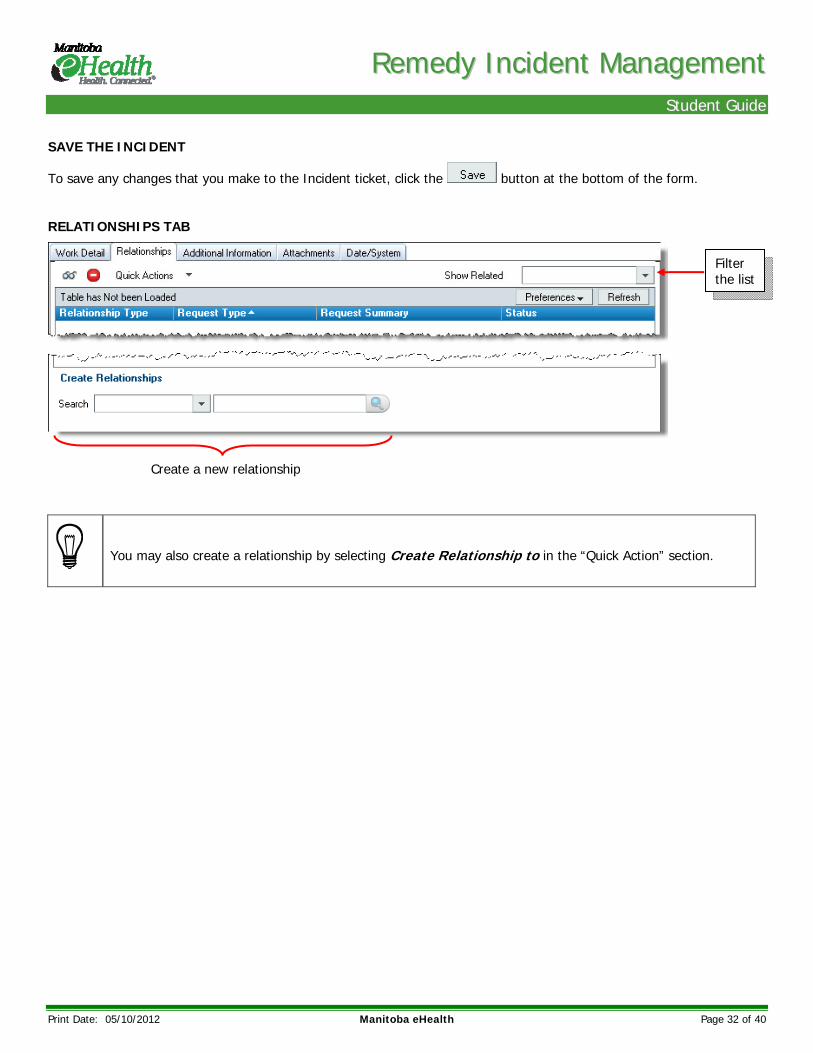
SAVE THE INCIDENT
To save any changes that you make to the Incident ticket, click the button at the bottom of the form.
RELATIONSHIPS TAB
You may also create a relationship by selecting Create Relationship to in the “Quick Action” section.
Filter the list
Create a new relationship
RReemmeeddyy IInncciiddeenntt MMaannaaggeemmeenntt SSttuuddeenntt GGuuiiddee
Print Date: 05/10/2012 Manitoba eHealth Page 33 of 40
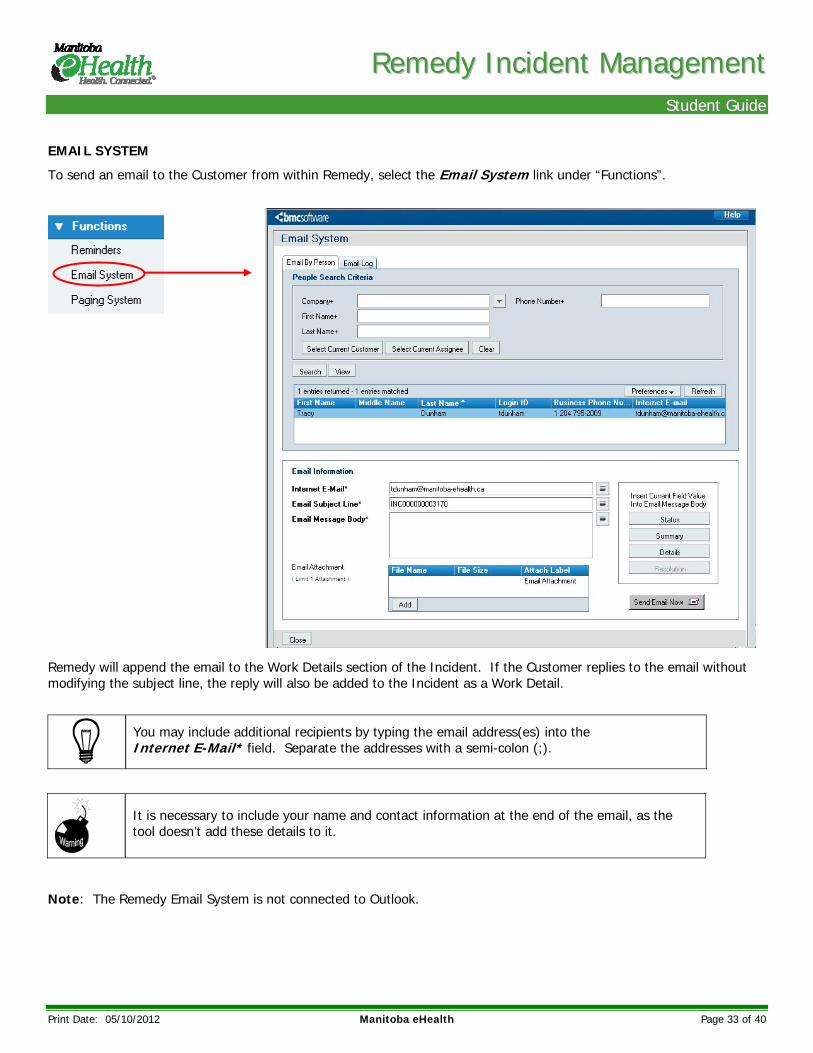
EMAIL SYSTEM
To send an email to the Customer from within Remedy, select the Email System link under “Functions”.
Remedy will append the email to the Work Details section of the Incident. If the Customer replies to the email without modifying the subject line, the reply will also be added to the Incident as a Work Detail.
You may include additional recipients by typing the email address(es) into the Internet E-Mail* field. Separate the addresses with a semi-colon (;).
It is necessary to include your name and contact information at the end of the email, as the tool doesn’t add these details to it.
Note: The Remedy Email System is not connected to Outlook.
RReemmeeddyy IInncciiddeenntt MMaannaaggeemmeenntt SSttuuddeenntt GGuuiiddee
Print Date: 05/10/2012 Manitoba eHealth Page 34 of 40
TASKS
Tasks should only be used when Incident Type = User Service Request.
For information on working with Tasks, please refer to the Manitoba eHealth Remedy Tasks Student Guide or Creating and monitoring tasks in the BMC Remedy Incident Management Help.
PENDING
If you are unable to proceed with work on an Incident (E.g. waiting for a part, or waiting for a call back from the customer or vendor), place the ticket in Pending status.
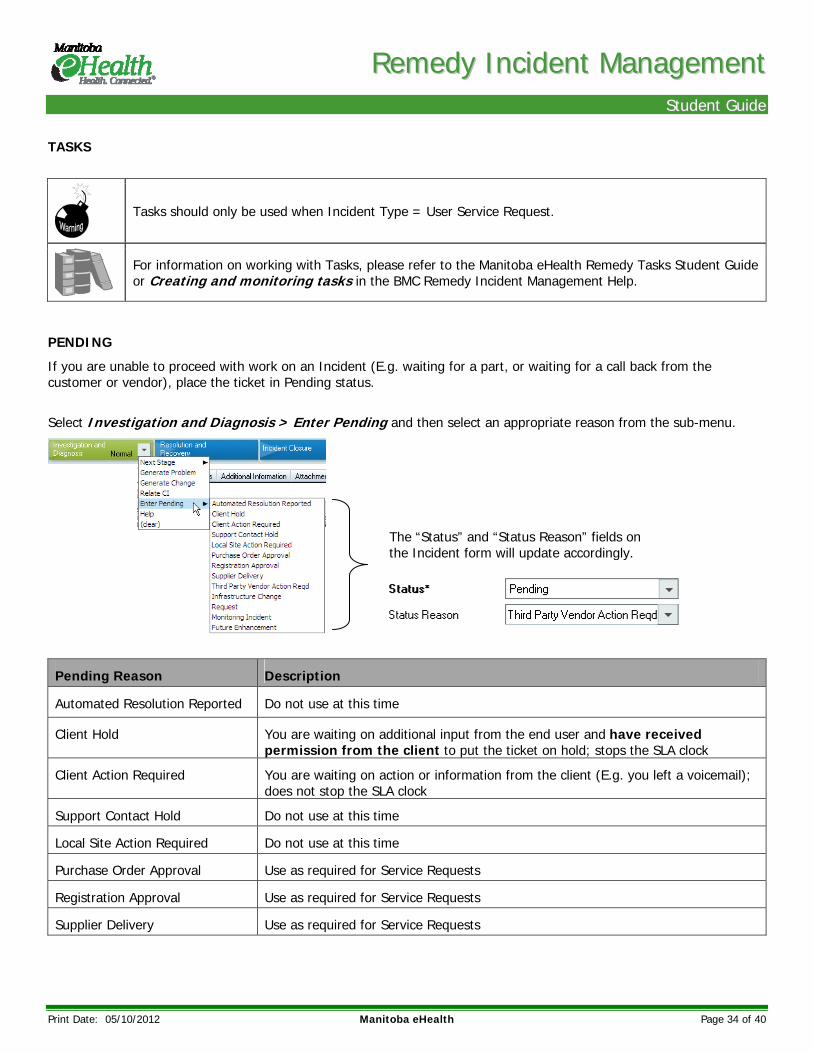
Select Investigation and Diagnosis > Enter Pending and then select an appropriate reason from the sub-menu.
Pending Reason Description
Automated Resolution Reported Do not use at this time
Client Hold You are waiting on additional input from the end user and have received permission from the client to put the ticket on hold; stops the SLA clock
Client Action Required You are waiting on action or information from the client (E.g. you left a voicemail); does not stop the SLA clock
Support Contact Hold Do not use at this time
Local Site Action Required Do not use at this time
Purchase Order Approval Use as required for Service Requests
Registration Approval Use as required for Service Requests
Supplier Delivery Use as required for Service Requests
The “Status” and “Status Reason” fields on the Incident form will update accordingly.

RReemmeeddyy IInncciiddeenntt MMaannaaggeemmeenntt SSttuuddeenntt GGuuiiddee
Print Date: 05/10/2012 Manitoba eHealth Page 35 of 40
Pending Reason Description
Third Party Vendor Action Reqd You are waiting on a vendor; does not stop the SLA clock
Infrastructure Change Incident resolution depends on an RFC; does not stop the SLA clock
Request Do not use at this time
Monitoring Incident Process is to resolve the Incident; not recommended
Future Enhancement Incident resolution depends on a future enhancement; does not stop the SLA clock
To take the Incident out of Pending status, select Investigation and Diagnosis > Resume.
DATE/SYSTEM TAB
Date Field Description
Reported Date+ When the ticket was created
Required Resolution Date Time Client requested target date (optional); manually populated
Responded Date+ When the Response field was set to Yes; stops Response target escalations
Last Resolved Date When the Status of the ticket changed to Resolved; stops Resolve target escalations
Closed Date When the Status of the ticket changed to Closed
Submit Date When the ticket was first saved
Last Modified Date When the ticket was last modified
The “Date/System” tab displays information about key dates and requestor information related to the Incident.

RReemmeeddyy IInncciiddeenntt MMaannaaggeemmeenntt SSttuuddeenntt GGuuiiddee
Print Date: 05/10/2012 Manitoba eHealth Page 36 of 40
ADVANCE A STAGE
Once a resolution has been found, move the Incident to the next stage:
1. Select Investigation and Diagnosis > Next Stage > Resolution and Recovery.
Another way to move the ticket to the next stage is to click the
button at the bottom of the Incident form.
The Modify Incident form appears.

RReemmeeddyy IInncciiddeenntt MMaannaaggeemmeenntt SSttuuddeenntt GGuuiiddee
Print Date: 05/10/2012 Manitoba eHealth Page 37 of 40
2. Fill in the mandatory fields in the form.
Resolution* - steps taken to resolve the issue; will populate the Resolution field on the Incident form
Resolution Categorization
Tier 1 - What is impacted?
Tier 2 – What components are impacted?
Tier 3 – Action taken to resolve
3. Optional: Fill in the Resolution Product Categorization.
Note: This section may be used to indicate the corresponding product was different than what was initially indicated in the Product Categorization.
Tier 1 - Product Category (e.g. Hardware, Software)
Tier 2 - Product Group (e.g. Printer, Application)
Tier 3 - Product Type (e.g. MBT, Pharmacy)
Product Name (R)+
Model Version (R)
Manufacturer (R)
4. Click at the bottom of the form. The Modify Incident form closes.
The Incident is in the Resolution and Recovery stage. The Status remains In Progress.
If you have already confirmed that the resolution has fixed the issue, you may click the
button at the bottom of the Incident form instead of moving the ticket to the next stage as indicated above. Remedy will prompt you for the information required to Resolve the Incident. The ticket will by-pass the Resolution and Recovery stage.

RReemmeeddyy IInncciiddeenntt MMaannaaggeemmeenntt SSttuuddeenntt GGuuiiddee
Print Date: 05/10/2012 Manitoba eHealth Page 38 of 40
Resolution and Recovery
In this stage, you resolve and recover from the service disruption to enable the Customer to resume work. You make sure that the resolution has successfully restored the service to the Customer and that the Customer is satisfied with the outcome.
ADVANCE A STAGE
Once you have confirmed that the issue has been resolved, move the Incident to the next stage:
1. Select Resolution and Recovery > Next Stage > Incident Closure.
The Modify Incident form appears.
2. Select a Status Reason.

RReemmeeddyy IInncciiddeenntt MMaannaaggeemmeenntt SSttuuddeenntt GGuuiiddee
Print Date: 05/10/2012 Manitoba eHealth Page 39 of 40
3. Review the other information in the form and edit as required.
4. Click at the bottom of the form. The Modify Incident form closes.
The Incident is in the Incident Closure stage. The Status has changed to Resolved. When the Status changes to Resolved, Remedy automatically populates the Last Resolved Date on the Date/System tab. This stops the Resolution Target escalations.
The FCR (First Call Resolution) field at the bottom of the Incident form should be used by the Service Desk only. It is used to indicate that the Incident was resolved when the Customer first called the Service Desk.
Incident Closure
The status of the Incident in this phase is “Resolved”. If the resolution is sufficient, no further action is required by support staff. The Customer has 10 days to respond to the resolution notification if they are not satisfied with the outcome.
In 10 days, the Status will change to “Closed”.
To manually close the Incident, select Incident Closure > Close.
Closed
The status of the Incident in this phase is “Closed”. No further activities are performed on the Incident; however, Work Details may still be added to the ticket if required.
RReemmeeddyy IInncciiddeenntt MMaannaaggeemmeenntt SSttuuddeenntt GGuuiiddee
Print Date: 05/10/2012 Manitoba eHealth Page 40 of 40
REFERENCES
Section Page Number
Item
All All BMC Remedy Incident Management Help
All All Incident Management Process Guide
All All Incident Management Process Principle Guide
DEFINITIONS
Definitions can be found in the Incident Management Process Guide or in the Incident Management Process Principle Guide.