i.mx 7ds power consumption measurement · 2019-06-10 · overview of i.mx 7ds voltage supplies i.mx...
TRANSCRIPT

© 2016-2019 NXP B.V.
i.MX 7DS Power Consumption
Measurement
1. Introduction
This application note helps you to design power
management systems. It illustrates the current drain
measurements of the i.MX 7DS Applications
Processors taken on the NXP SABRE SD Platform
through several use cases. You may choose the
appropriate power supply domains for the i.MX 7DS
chips and become familiar with the expected chip
power in various scenarios.
Because the data presented in this application note is
based on empirical measurements taken on a small
sample size, the presented results are not guaranteed.
NXP Semiconductors Document Number: AN5383
Application Note Rev. 1 , 05/2019
Contents
1. Introduction ........................................................................ 1
2. Overview of i.MX 7DS Voltage Supplies .......................... 2
3. Internal Power Measurement of the i.MX 7DS Processor .. 5
3.1. VDDA_1P8 power .................................................. 5
3.2. DDR I/O power ....................................................... 5
3.3. Voltage levels and DVFS usage in the measurement
process 6
3.4. Temperature measurements .................................... 7
3.5. Hardware and software used ................................... 7
3.6. Board setup used for the power measurements ........ 8
3.7. Measuring points on the SABRE platform .............. 8
4. Use Cases and Measurement Results ................................. 8
4.1. Low-power mode use cases .................................... 8
4.2. Use case two: system idle, M4 idle mode ............... 9
4.3. Use case three: Audio_Playback, M4 idle ............. 10
4.4. Dhrystone benchmark ........................................... 11
4.5. SNVS .................................................................... 12
5. Reducing Power Consumption ......................................... 13
5.1. Steps to be performed before entering the Suspend
(Deep-Sleep) mode ............................................................. 15
5.2. Steps to be performed after exiting the Suspend
mode 15
6. Use Case Configuration and Usage Guidelines ................ 16
6.1. Deep-Sleep mode ................................................. 16
6.2. System Idle mode .................................................. 16
6.3. Dhrystone on Cortex-A7 (1 GHz) ......................... 18
6.4. Heavy Loading use case ........................................ 20
6.5. SNVS .................................................................... 23
6.6. Important commands ............................................. 23
7. Revision History .............................................................. 23
Overview of i.MX 7DS Voltage Supplies
i.MX 7DS Power Consumption Measurement, Application Note, Rev. 1, 05/2019
2 NXP Semiconductors
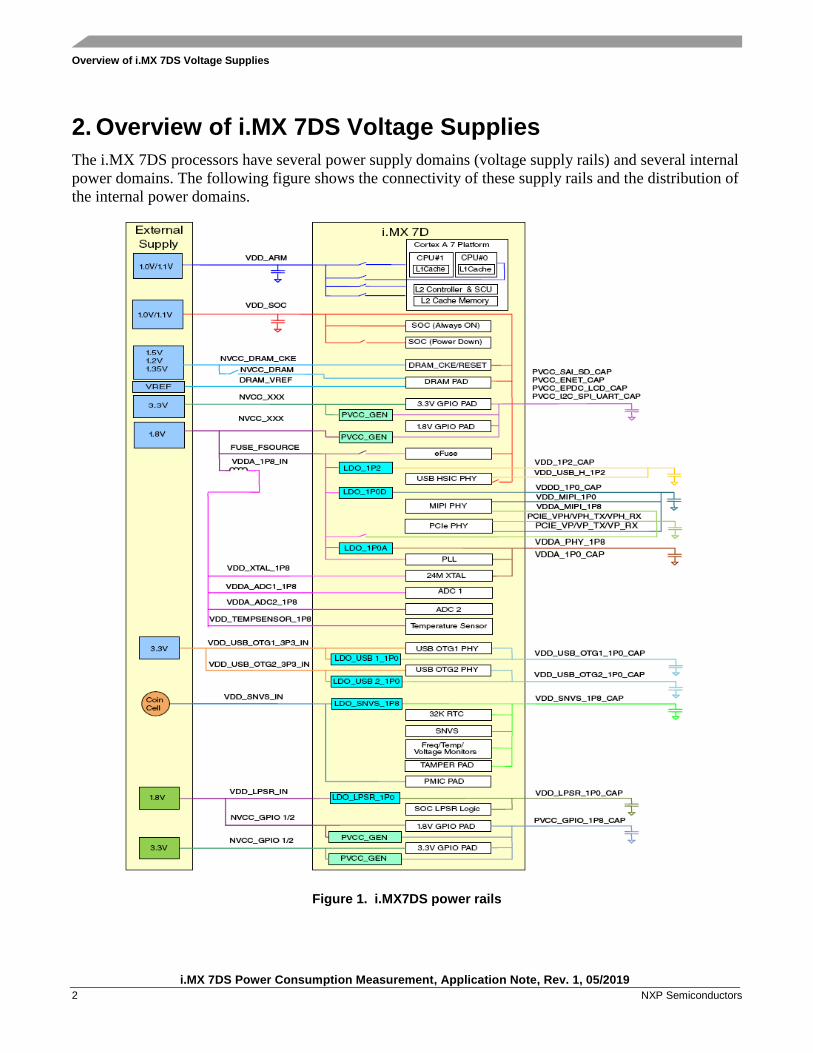
2. Overview of i.MX 7DS Voltage Supplies
The i.MX 7DS processors have several power supply domains (voltage supply rails) and several internal
power domains. The following figure shows the connectivity of these supply rails and the distribution of
the internal power domains.
Figure 1. i.MX7DS power rails

Overview of i.MX 7DS Voltage Supplies
i.MX 7DS Power Consumption Measurement, Application Note, Rev. 1, 05/2019
NXP Semiconductors 3
NOTE
See the i.MX 7DS datasheet for consumer products (document
IMX7DCEC) for the recommended operating conditions of each supply
rail and for a detailed description of the groups of pins that are powered by
each I/O voltage supply.
For more details regarding the i.MX 7DS power rails, see the “Power
Management Unit (PMU)” chapter in the i.MX 7DS Applications
Processor Reference Manual (document IMX7DRM).
The diagram below is a snippet from the IMX7D SABRE Board schematic showing power distribution.

Overview of i.MX 7DS Voltage Supplies
i.MX 7DS Power Consumption Measurement, Application Note, Rev. 1, 05/2019
4 NXP Semiconductors
Figure 2. IMX7D power schematic

Internal Power Measurement of the i.MX 7DS Processor
i.MX 7DS Power Consumption Measurement, Application Note, Rev. 1, 05/2019
NXP Semiconductors 5
3. Internal Power Measurement of the i.MX 7DS Processor
Several use cases (described in Section 6, “Use Case Configuration and Usage Guidelines”) are run on
the SABRE platform (Revision D). The measurements are taken mainly for the following power supply
domains:
• VDD_ARM: ARM® Cortex®-A7 core supply.
• VDD_SOC: platform’s supply.
These supply domains consume the majority of the processor’s internal power. For relevant use cases,
the power of additional supply domains is added. However, the power of these supply domains does not
depend on specific use cases, but on whether or not these modules are used. The power consumption of
the SNVS is comparatively negligible (except for the Deep-Sleep mode).
The NVCC_* power consumption depends primarily on the board-level configuration and the components.
Therefore, it is not included in the i.MX7DS internal power analysis.
The power consumption for these supplies (in different use cases) is provided in Table 2 through to
Error! Reference source not found..
NOTE
Unless stated otherwise, all measurements were taken on a typical process
silicon, at a room temperature (approximately 25 °C).
3.1. VDDA_1P8 power
The VDD_1P8 voltage domain is generated from the PMIC. This domain powers the following circuits:
• On-chip LDOs (LDO_1P0D, LDO_1P0A, LDO_1P2).
• PHY power supplies (MIPI, PCIe, USB HSIC).
• Analog part of the PLLs.
3.2. DDR I/O power
The DDR I/O is supplied from the NVCC_DRAM which provides the power for the DDR I/O pads. The
target voltage for this supply depends on the DDR interface used. The target voltages for the different DDR
interfaces are as follows:
• 1.5 V for DDR3
• 1.35 V for DDR3L
• 1.2 V for LPDDR2/3
The power consumption for the NVCC_DRAM supply is affected by various factors, including the
following:
• The amount of activity on the DDR interface.
• On-Die Termination (ODT): enabled/disabled, termination value, which is used for the DDR
controller and the DDR memories.
• The board termination for the DDR control and the address bus.

Internal Power Measurement of the i.MX 7DS Processor
i.MX 7DS Power Consumption Measurement, Application Note, Rev. 1, 05/2019
6 NXP Semiconductors
• The configuration of the DDR pads (such as the drive strength).
• The board layout.
• The load of the DDR memory devices.
NOTE
Due to the factors specified in the previous paragraph, the measurements
provided in the following tables vary from one system to another. The
provided data is for guidance only and should not be treated as a
specification.
The measured current on the SABRE Platform also includes the current of
the on-board DDR3L memory devices. This board (on which the
measurements were taken) includes two DDR3L devices, with a total
capacity of 1024 MB. The SABRE Platform does not require board-level
resistor terminations. This further reduces the DDR I/O power usage.
3.2.1. ODT settings
The ODT is a feature of the DDR3/DDR3L SDRAM that allows the DRAM to turn the termination
resistance for each DQ, DQS, DQS#, and DM signal on or off. The ODT feature is designed to improve
the signal integrity of the memory channel by allowing the DRAM controller to independently turn the
termination resistance for any (or all) DRAM devices on or off.
The use of weaker ODT settings can greatly reduce the power of the DDR I/O. The required ODT
settings are system-dependent and may vary among different board designs. These settings must be
carefully selected for the power optimization while ensuring that the JEDEC requirements for the DDR
parameters are still met. The default settings that are used in the Linux BSP release may need to be
modified by the system designers to fit for different systems.
3.3. Voltage levels and DVFS usage in the measurement process
The voltage levels of all the supplies (except for the VDD_ARM) are set to the typical voltage levels, as
defined in the i.MX 7DS datasheet for consumer products (document IMX7DCEC).
The VDD_ARM supplies require a special explanation. To save power, the VDD_ARM voltage is
changed using DVFS (Dynamic Voltage and Frequency Scaling) during the run time of the use cases.
The voltage levels of these supplies can be changed to standby voltage levels in low-power modes.
3.3.1. VDD_ARM voltage levels
The target voltage levels for the VDD_ARM can vary according to the DVFS set-point used, which is
selected by the DVFS (also named CPUFREQ) driver. There are several factors that contribute to the
set-point decisions, with the CPU load being the most important. The other factors are CPU latency
requirements, thermal restrictions, and peripheral I/O performance requirements. The voltage and
frequency set-points used for the measurements are provided in Table 1.

Internal Power Measurement of the i.MX 7DS Processor
i.MX 7DS Power Consumption Measurement, Application Note, Rev. 1, 05/2019
NXP Semiconductors 7
NOTE
See the operating ranges table in the i.MX 7DS datasheet for consumer
products (document IMX7DCEC) for the official operating points.
Most of the measurements are performed using these voltage levels, and the power data that appears in
this document is according to these values. If the measurement is done at different voltage levels, the
power consumption scales with the voltage change. In real applications, when the DVFS is applied, the
software (in conjunction with the hardware) automatically adjusts the voltage and frequency values
based on the use case requirements.
The voltage used for the power calculation is the average voltage between those set-points. It depends
on the amount of time spent at each set-point.
3.3.2. VDD_SOC voltage levels
See the operating ranges table in the i.MX 7DS datasheet for the official operating points.
Table 1. VDDARM voltage levels (for reference only)
ARM frequency VDD_ARM
Below 800 MHz 1.0 V
800 MHz – 1 GHz 1.1 V
3.4. Temperature measurements
In some of the use cases, the die temperature is measured. The temperature measurements were taken
using the on-chip thermal sensor on a thermally calibrated part. While measuring the temperature, it is
recommended to wait until the temperature stabilizes.
NOTE
The measured temperatures are for reference only and vary on different
systems due to the differences in board, enclosure, and heat spreading
techniques. When using the same board type, the measured temperature
may vary due to factors such as the environment, silicon variations, and
measurement errors.
3.5. Hardware and software used
The software versions used for the measurements are as follows:
• Yocto rootfs, Linux Kernel version: L4.1.15.2.0_GA.
• The board used for the measurements is the i.MX7D SABRE platform.
• The measurements were performed using the Agilent 34401A 6½ Digital Multimeter.
Use Cases and Measurement Results
i.MX 7DS Power Consumption Measurement, Application Note, Rev. 1, 05/2019
8 NXP Semiconductors
3.6. Board setup used for the power measurements
The power measurements are taken using the default voltages of the supplies. The default input voltages
are as follows:
• VDD_ARM at the appropriate values based on the frequency.
• VDD_SOC at 0.975 V.
• NVCC_DRAM at 1.35 V.
3.7. Measuring points on the SABRE platform
The power data is obtained by measuring the average voltage drop over the measurement points and
dividing it by the resistor value to determine the average current. The tolerance of the 0.02 Ω resistors
on the SABRE board is 1 %. The measuring points for the various supply domains are as follows:
• VDD_ARM: The A7 ARM complex current is measured on R20. For the low-power
measurements, the resistance value is 0.02 Ω.
• VDD_SOC: The chip domain current is measured on R24 and the recommended resistance value
for this measurement is 0.02 Ω.
• VDD_1P8: The VDD_1P8 domain current is measured on R326 and the recommended
resistance value for this measurement is 0.02 Ω.
• DDR3L I/O plus memories: The current in this domain includes the NVCC_DRAM current and
the overall current of the on-board DDR3L memory devices. The current in this domain is
measured on R23 and the recommended resistance value for this measurement is 0.02 Ω.
4. Use Cases and Measurement Results
The main use cases and subtypes, which form the benchmarks for the i.MX 7DS internal power
measurements on the SABRE platform, are described in the following sections.
4.1. Low-power mode use cases
The use-case scenarios that have been tested are:
• System Idle.
• Deep Sleep Mode (DSM).
• Audio Playback.
• A7 Dhrystone.
• A7 Dhrystone with the M4 running Coremark.
Use Cases and Measurement Results
i.MX 7DS Power Consumption Measurement, Application Note, Rev. 1, 05/2019
NXP Semiconductors 9
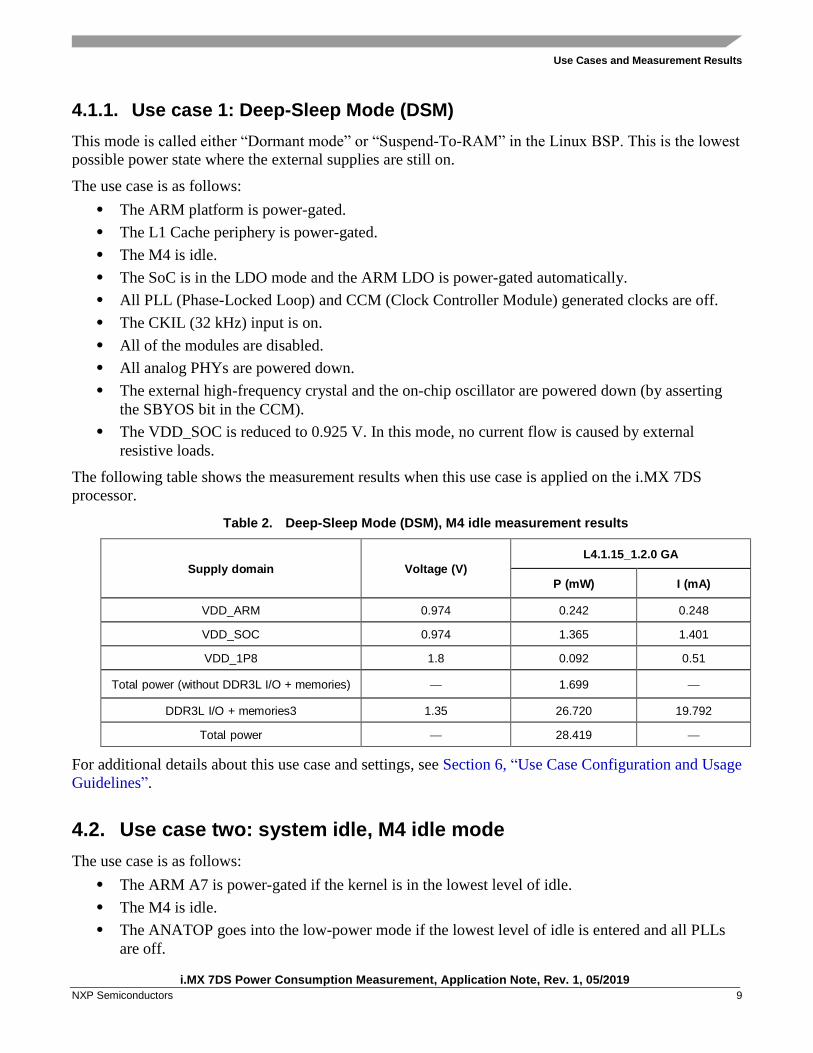
4.1.1. Use case 1: Deep-Sleep Mode (DSM)
This mode is called either “Dormant mode” or “Suspend-To-RAM” in the Linux BSP. This is the lowest
possible power state where the external supplies are still on.
The use case is as follows:
• The ARM platform is power-gated.
• The L1 Cache periphery is power-gated.
• The M4 is idle.
• The SoC is in the LDO mode and the ARM LDO is power-gated automatically.
• All PLL (Phase-Locked Loop) and CCM (Clock Controller Module) generated clocks are off.
• The CKIL (32 kHz) input is on.
• All of the modules are disabled.
• All analog PHYs are powered down.
• The external high-frequency crystal and the on-chip oscillator are powered down (by asserting
the SBYOS bit in the CCM).
• The VDD_SOC is reduced to 0.925 V. In this mode, no current flow is caused by external
resistive loads.
The following table shows the measurement results when this use case is applied on the i.MX 7DS
processor.
Table 2. Deep-Sleep Mode (DSM), M4 idle measurement results
Supply domain Voltage (V)
L4.1.15_1.2.0 GA
P (mW) I (mA)
VDD_ARM 0.974 0.242 0.248
VDD_SOC 0.974 1.365 1.401
VDD_1P8 1.8 0.092 0.51
Total power (without DDR3L I/O + memories) — 1.699 —
DDR3L I/O + memories3 1.35 26.720 19.792
Total power — 28.419 —
For additional details about this use case and settings, see Section 6, “Use Case Configuration and Usage
Guidelines”.
4.2. Use case two: system idle, M4 idle mode
The use case is as follows:
• The ARM A7 is power-gated if the kernel is in the lowest level of idle.
• The M4 is idle.
• The ANATOP goes into the low-power mode if the lowest level of idle is entered and all PLLs
are off.

Use Cases and Measurement Results
i.MX 7DS Power Consumption Measurement, Application Note, Rev. 1, 05/2019
10 NXP Semiconductors
• The operating system is on.
The following table shows the measurement results when this use case is applied on the i.MX 7D
processor.
Table 3. System idle mode measurement results
Supply domain
L4.1.15_1.2.0 GA
Voltage (V) P (mW) I (mA)
VDD_ARM 0.974 0.196 0.201
VDD_SOC 0.974 21.265 21.822
VDD_1P8 1.8 0.283 0.158
Total power (without DDR3L I/O + memories) — 21.744 —
DDR3L I/O + memories 1.35 30.210 22.383
Total power — 51.954 —
For additional details on this use case and settings, see Section 6, “Use Case Configuration and Usage
Guidelines”.
4.3. Use case three: Audio_Playback, M4 idle
The use case is as follows:
• The DDR clock is 100 MHz.
• The AXI clock is 24 MHz.
• The AHB clock is 24 MHz.
• The IPG clock is 12 MHz.
Table 4. Audio playback mode measurement results
Supply domain
L4.1.15_1.2.0 GA
Voltage (V) P (mW) I (mA)
VDD_ARM 0.974 14.203 14.585
VDD_SOC 0.974 66.005 67.662
VDD_1P8 1.8 18.687 10.420
Total power (without DDR3L I/O + memories) — 98.895 —
DDR3L I/O + memories 1.35 71.390 52.893
Total power — 170.285 —

Use Cases and Measurement Results
i.MX 7DS Power Consumption Measurement, Application Note, Rev. 1, 05/2019
NXP Semiconductors 11
4.4. Dhrystone benchmark
Dhrystone is a synthetic benchmark used to measure the integer computational performance of
processors and compilers. The small size of the Dhrystone benchmark enables it to fit into the L1 cache
and minimizes accesses to the L2 cache and DDR.
4.4.1. Use case 1: Dhrystone benchmark on Cortex-A7 (1 GHz), M4 idle
In this use case, the Dhrystone test is performed by both Cortex-A7 cores. Both Cortex-A7 cores run the
test in a loop at a frequency of 996 MHz.
• The DDR clock is 1066 MHz.
• The AXI clock is 332 MHz.
• The AHB clock is 135 MHz.
• The IPG clock is 67.5 MHz.
The following table shows the measurement results when this use case is applied on the i.MX 7DS
processor.
Table 5. Dhrystone benchmark measurement results on Cortex-A7 (996 MHz)
Supply domain
L4.1.15_1.2.0 GA
Voltage (V) P (mW) I (mA)
VDD_ARM 1.079 241.675 224.046
VDD_SOC 0.974 55.485 56.881
VDD_1P8 1.8 15.325 8.544
Total power (without DDR3L I/O + memories) — 312.485 —
DDR3L I/O + memories 1.35 40.257 29.825
Total power — 352.742 —
4.4.2. Use case 2: Dhrystone benchmark on Cortex-A7 (1 GHz), M4
Coremark
In this use case, the Dhrystone test is performed on both Cortex-A7 cores and the M4 is running the
Coremark benchmark. This use case has all cores running at maximum frequencies.
• The DDR clock is 1066 MHz.
• The AXI clock is 332 MHz.
• The AHB clock is 135 MHz.
• The IPG clock is 67.5 MHz.
• The M4 clock is 240 MHz.

Use Cases and Measurement Results
i.MX 7DS Power Consumption Measurement, Application Note, Rev. 1, 05/2019
12 NXP Semiconductors
Table 6. Dhrystone benchmark on Cortex-A7 and Coremark benchmark on M4 (240 MHz)
Supply domain
L4.1.15_1.2.0 GA
Voltage (V) P (mW) I (mA)
VDD_ARM 1.079 244.027 226.222
VDD_SOC 0.978 191.343 195.555
VDD_1P8 1.8 16.091 8.970
Total power (without DDR3L I/O + memories) — 312.485 —
DDR3L I/O + memories 1.35 71.703 53.124
Total power — 352.742 —
4.5. SNVS
In this mode, most of the power rails on the boards are off, except for the VDD_SNVS domain.
VDD_SNVS is kept on to ensure that the RTC and the other logic in the SNVS domain remain powered
on. Tamper use cases should be considered for VDD_SNVS power reduction. Measurements under
different tamper cases are presented here for reference.
NOTE
1. Tamper0~8 are used for detection, while Tamper9 is used for
NVCC_DRAM power switch for LPSR by default. In this
measurement Tamper9 was fused to tamper detection function (=>
fuse prog -y 1 3 0x80000000), which reduced the consumption
significantly. But PIN9 could not be GPIO any longer once fused.
2. Besides, R280 was removed to exclude consumption of PWRON
PIN on the PMIC.
Table 7. SNVS mode measurement results
L4.14.98_2.0.0_GA
Supply domain Use case of TAMPER0~9 Voltage(V) P(μW) I(μA)
VDD_SNVS
(System total
power)
All pins are unused 2.997 12.719 4.244
All pins for passive tamper
(active high)
2.997 11.688 3.900
All pins for passive tamper
(active low)
2.997 72.854 24.309
5 pairs for active tamper 2.997 44.089 14.711
4 pairs for active tamper;
one pin for passive (active high)
tamper;
one pin for passive (active low)
tamper.
2.997 40.483 13.508

Reducing Power Consumption
i.MX 7DS Power Consumption Measurement, Application Note, Rev. 1, 05/2019
NXP Semiconductors 13
The recommended circuits for tamper detection for different use cases are showed in the Figure 3. Since
the Mesh traces connected to tamper pins are usually very long, these pins could be very sensitive to the
environment noises. To improve the system EMC immunity, RC filters should be placed closely to the
tamper inputs on the PCB.
About software(register) configurations please refer to Chapter 9 in the Security Reference Manual for
i.MX7Dual and 7Solo Applications Processors, or DOC-342423 on the NXP community
(https://community.nxp.com/docs/DOC-342423).
Figure 3. Circuits for Tamper detection
5. Reducing Power Consumption
The overall system power consumption depends on both the software optimization and how the system
hardware is implemented. Below is a list of suggestions that may help to reduce the system power. Some

Reducing Power Consumption
i.MX 7DS Power Consumption Measurement, Application Note, Rev. 1, 05/2019
14 NXP Semiconductors
of these are already implemented in the Linux BSP. Further optimizations can be done on the individual
customer’s system.
• Apply the clock gating whenever the clocks or modules are not used by configuring the CCGR
registers in the Clock Controller Module (CCM).
• Reduce the number of operating PLLs: applicable mainly in the Audio_Playback or Idle modes.
• Core DVFS and system bus scaling: applying the DVFS for ARM and scaling the frequencies of
the AXI, AHB, and IPG bus clocks can significantly reduce the power consumption of the
VDD_ARM and VDD_SOC domains. However, due to the reduced operation frequency, the
accesses to the DDR take longer, which increases the power consumption of the DDR I/O and
memories. This trade-off must be taken into account for each mode to quantify the overall effect
on the system power.
• Put the i.MX 7DS into the low-power modes (WAIT, STOP) whenever possible. See the “Clock
Controller Module (CCM)” chapter in the i.MX 7DS Applications Processor Reference Manual
(document IMX7DRM) for details.
• DDR interface optimization:
— Employ careful board routing of the DDR memories, maintaining the PCB trace lengths
as short as possible.
— Use as reduced an ODT (On-Die Termination) setting as possible. The termination used
greatly influences the power consumption of the DDR interface pins.
— Use a proper output driver impedance for the DDR interface pins that provide good
impedance matching. Select the lowest possible drive strength that provides the required
performance to reduce the current flowing through the DDR I/O pins.
— Choose the on-board resistors so that the least amount of current is wasted; for example,
when selecting the impedance matching resistors between CLK and CLK_B (when using
DDR3L memories).
— In the lower-performance use cases, switching to the DLL Off mode greatly reduces the
DDR frequency. This disables or reduces the termination, and reduces the drive strength.
Thus, the power consumption of the DDR interface pins can be reduced significantly.
— Float the i.MX 7DS DDR interface pins (set to high Z) when the DDR memory is in the
Self-Refresh mode, and keep DDR_SDCKE0 and DDR_SDCKE1 at a low value. If
DDR_SDCKE0 and DDR_SDCKE1 are kept at a low value using external pull-down
resistors, make sure that there is no on-board termination on these pins during this mode.
— If possible (depending on the system stability), configure the DDR input pins to the
CMOS mode instead of the Differential mode. This can be done by clearing the
DDR_INPUT bit in the corresponding registers in the IOMUXC. This setting is mostly
recommended when operating at low frequencies, such as in the DLL Off mode.
— The use of the LV DDR3L memory devices (operating at a low I/O voltage) can further
reduce the I/O power by 20 %.
— The use of the DDR memory offerings in the latest process technology can significantly
reduce the power consumption of the DDR devices and the DDR I/O.
The various steps involved in floating the i.MX 7DS DDR interface pins are shown below.

Reducing Power Consumption
i.MX 7DS Power Consumption Measurement, Application Note, Rev. 1, 05/2019
NXP Semiconductors 15
NOTE
All the programming steps below are performed when the code is running
from the internal RAM rather than the DDR memory. The code is
non-cacheable.
5.1. Steps to be performed before entering the Suspend (Deep-Sleep)
mode
1. Read the power saving status in the MMDC in the MAPSR register (automatic power saving is
enabled) to make sure that the DDR is in the Self-Refresh mode.
2. Do the following:
a) If there is no on-board termination for the DDR control and the address bus, set the
DSE (drive strength selection, in IOMUXC) for all DDR IF I/O to 0 (High Z), except for
CKE0 and CKE1.
b) If the DDR control and the address bus have on-board termination resistors connected
to VTT, such as in the case where SODIMM is used:
— Option 1: As per 2a, keep SDCKE0/1 active. This causes some extra current from the
pins sharing the same DSE control in the IOMUXC_SW_PAD_CTL_GRP_CTLDS
register. The pins are DRAM_CS0, DRAM_CS1, DRAM_SDBA2, DRAM_SDCKE0,
DRAM_SDCKE1, and DRAM_SDWE.
— Option 2 (requires on-board pull-down resistors on the DRARM_SDCKE0/1 pins):
– Set the supply of the termination resistor to be floated (this can be done through the
pins with the GPIO capability).
– Set the DSE (drive strength selection, in IOMUXC) for all DDR IF I/O to 0 (High Z).
3. Enter the Suspend mode.
5.2. Steps to be performed after exiting the Suspend mode
1. Restore all the settings for the DDR I/O to the required values.
2. The system proceeds to the Run mode.
NOTE
If the system can ensure that there are no masters accessing the DDR, the
following may be applied to the other scenarios besides the Deep-Sleep
mode: The DDR pins can be floated in the same manner (even when the
Suspend mode is not entered) and the DDR can be manually put into the
Self-Refresh mode to save power. This happens when the CPU is not
running or running from the internal RAM.
Use Case Configuration and Usage Guidelines
i.MX 7DS Power Consumption Measurement, Application Note, Rev. 1, 05/2019
16 NXP Semiconductors
6. Use Case Configuration and Usage Guidelines
6.1. Deep-Sleep mode
In this use case, all clocks and PLLs are turned off, except for the 32 kHz clock which is used for the
system wakeup.
1. Boot up the Linux image.
2. Run this command to put the system into the DSM mode:
echo mem > /sys/power/state
3. Measure the power and record the result.
6.2. System Idle mode
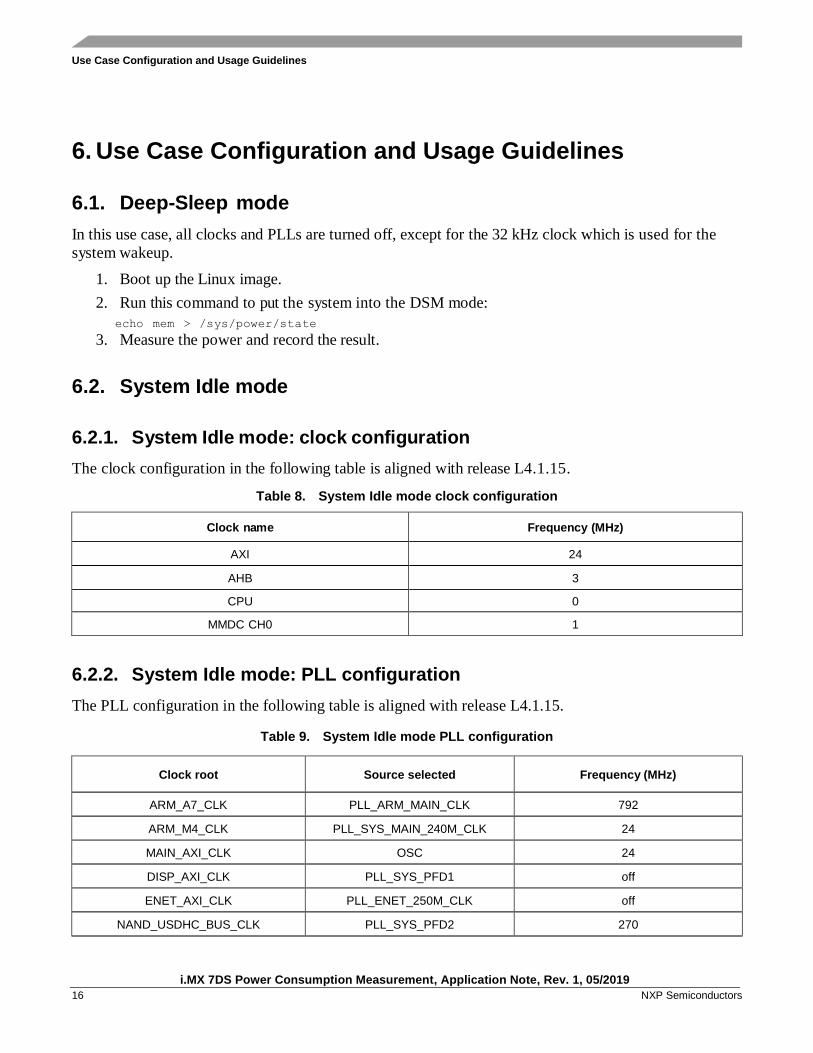
6.2.1. System Idle mode: clock configuration
The clock configuration in the following table is aligned with release L4.1.15.
Table 8. System Idle mode clock configuration
Clock name Frequency (MHz)
AXI 24
AHB 3
CPU 0
MMDC CH0 1
6.2.2. System Idle mode: PLL configuration
The PLL configuration in the following table is aligned with release L4.1.15.
Table 9. System Idle mode PLL configuration
Clock root Source selected Frequency (MHz)
ARM_A7_CLK PLL_ARM_MAIN_CLK 792
ARM_M4_CLK PLL_SYS_MAIN_240M_CLK 24
MAIN_AXI_CLK OSC 24
DISP_AXI_CLK PLL_SYS_PFD1 off
ENET_AXI_CLK PLL_ENET_250M_CLK off
NAND_USDHC_BUS_CLK PLL_SYS_PFD2 270

Use Case Configuration and Usage Guidelines
i.MX 7DS Power Consumption Measurement, Application Note, Rev. 1, 05/2019
NXP Semiconductors 17
Table 9. System Idle mode PLL configuration
Clock root Source selected Frequency (MHz)
AHB_CLK_ROOT OSC 24
IPG_CLK AHB_CLK_ROOT 12
DRAM_CLK DRAM_ALT_CLK 24
DRAM_PHYM_ALT_CLK OSC 24
DRAM_ALT_CLK OSC 24
USB_HSIC_CLK PLL_SYS_MAIN_CLK off
PCIE_CTRL_CLK PLL_ENET_250M_CLK off
EPDC_PIXEL_CLK PLL_SYS_MAIN_CLK off
LCDIF_PIXEL_CLK PLL_VIDEO_POST_DIV off
MIPI_DSI_CLK OSC off
MIPI_CSI_CLK PLL_SYS_PFD3 24
MPI_DPHY_REF_CLK OSC 24
SAIx_CLK OSC off
ENETx_REF_CLK PLL_ENET_125M_CLK off
ENETx_TIME_CLK PLL_ENET_100M_CLK off
ENET_PHY_REF_CLK PLL_ENET_25M_CLK off
EIM_CLK PLL_SYS_MAIN_120M_CLK off
NAND_CLK PLL_SYS_MAIN_CLK off
QSPI_CLK PLL_SYS_PFD4_CLK off
USHDCx_CLK PLL_SYS_PFD0_392M_CLK off
CANx_CLK OSC off
I2Cx_CLK OSC off
UARTx_CLk OSC 24
ECSPIx_CLK PLL_SYS_MAIN_240M_CLK off
PWMx_CLK OSC off
FLEXTIMERCx_CLK OSC off
SIMx_CLK PLL_SYS_MAIN_120M_CLK off
GPTx_CLK OSC 24
TRACE_CLK OSC off
WDOG_CLK OSC 24
CSI_MCLK_CLK OSC off
AUDIO_MCLK_CLK PLL_AUDIO_POST_DIV off

Use Case Configuration and Usage Guidelines
i.MX 7DS Power Consumption Measurement, Application Note, Rev. 1, 05/2019
18 NXP Semiconductors
6.2.3. System Idle mode: system setup
Disconnect everything except for the SD.
1. Boot up the Linux image by entering “x11=false uart_from_osc” into the command line.
2. Run the following script to put the system into the “powersave” governor:
#!/bin/bash
echo 8 > /proc/sys/kernel/printk
ifconfig eth0 down ifconfig eth1 down
echo powersave > /sys/devices/system/cpu/cpu0/cpufreq/scaling_governor echo 1 >
/sys/class/graphics/fb0/blank
3. Measure the power and record the result.
6.3. Dhrystone on Cortex-A7 (1 GHz)
6.3.1. Dhrystone on Cortex-A7 (1 GHz): clock configuration
The clock configuration in the following table is aligned with release L4.1.15.
Table 10. Dhrystone clock configuration
Clock name Frequency (MHz)
AXI —
AHB —
CPU 1 GHz
MMDC CH0 —
6.3.2. Dhrystone on Cortex-A7 (1 GHz): PLL configuration
The PLL configuration in the following table is aligned with release L4.1.15_1.2.0 GA.
Table 11. Dhrystone PLL configuration
Clock root Source selected Frequency (MHz)
ARM_A7_CLK PLL_ARM_MAIN_CLK 996
ARM_M4_CLK PLL_SYS_MAIN_240M_CLK off
MAIN_AXI_CLK PLL_SYS_PFD1_332M_CLK 332
DISP_AXI_CLK PLL_SYS_PFD1_332M_CLK 332
ENET_AXI_CLK PLL_ENET_250M_CLK 250
NAND_USDHC_BUS_CLK PLL_SYSY_PFD2_270M_CLK 270
AHB_CLK_ROOT PLL_SYSY_PFD2_270M_CLK 135
IPG_CLK AHB_ROOT_CLK 67.5
DRAM_CLK PLL_DRAM_MAIN_CLK 533

Use Case Configuration and Usage Guidelines
i.MX 7DS Power Consumption Measurement, Application Note, Rev. 1, 05/2019
NXP Semiconductors 19
Table 11. Dhrystone PLL configuration
Clock root Source selected Frequency (MHz)
DRAM_PHYM_ALT_CLK PLL_DRAM_MAIN_CLK 1066
DRAM_ALT_CLK OSC 24
USB_HSIC_CLK PLL_SYS_MAIN_CLK off
PCIE_CTRL_CLK PLL_ENET_250M_CLK off
EPDC_PIXEL_CLK PLL_SYS_MAIN_CLK off
LCDIF_PIXEL_CLK PLL_VIDEO_POST_DIV 92
MIPI_DSI_CLK OSC off
MIPI_CSI_CLK PLL_SYS_PFD3_CLK 240
MPI_DPHY_REF_CLK OSC 24
SAIx_CLK PLL_AUDIO_POST_DIV 36.8
ENETx_REF_CLK PLL_ENET_125M_CLK 125
ENETx_TIME_CLK PLL_ENET_100M_CLK 100
ENET_PHY_REF_CLK PLL_ENET_25M_CLK 25
EIM_CLK PLL_SYS_MAIN_120M_CLK off
NAND_CLK PLL_SYS_MAIN_CLK off
QSPI_CLK PLL_SYS_PFD4_CLK off
USHDCx_CLK PLL_SYS_PFD0_392M_CLK 392
CANx_CLK OSC off
I2Cx_CLK OSC 24
QSPI_CLK PLL_SYS_PFD4_CLK off
USHDCx_CLK — —
CANx_CLK — —
I2Cx_CLK — —
UARTx_CLk OSC 24
ECSPIx_CLK PLL_SYS_MAIN_240M_CLK off
PWMx_CLK OSC 24
FLEXTIMERCx_CLK OSC off
SIMx_CLK PLL_SYS_MAIN_120M_CLK off
GPTx_CLK OSC 24
TRACE_CLK OSC off
WDOG_CLK OSC off
CSI_MCLK_CLK OSC off
AUDIO_MCLK_CLK PLL_AUDIO_POST_DIV off

Use Case Configuration and Usage Guidelines
i.MX 7DS Power Consumption Measurement, Application Note, Rev. 1, 05/2019
20 NXP Semiconductors
6.3.3. Dhrystone on Cortex-A7 (1 GHz ): system setup
• SD boot.
• Connect the LCD panel.
6.3.4. Dhrystone on Cortex-A7 (1 GHz ): steps
1. Boot up the Linux image and boot the board to the SD rootfs.
2. Run the following script to measure at 1 GHz.
#!/bin/sh ifconfig eth0 down ifconfig eth1 down
echo 1 > /sys/class/graphics/fb0/blank;
echo userspace > /sys/devices/system/cpu/cpu0/cpufreq/scaling_governor; echo 996000
> /sys/devices/system/cpu/cpu0/cpufreq/scaling_setspeed;
3. Run dry2 and measure:
while true; do dry2; done
4. Measure the power and record the result.
6.4. Heavy Loading use case
A7 Dhrystone with M4 running Coremark.
6.4.1. Heavy Loading: clock configuration
The clock configuration in the following table is aligned with release L4.1.15_1.2.0 GA.
Table 12. Maximum power clock configuration
Clock name Frequency (MHz)
DDR clock 1066
AXI 332
AHB 135
IPG 67.5
A7 CPU’s 996
M4 240
MMDC CH0 396
Use Case Configuration and Usage Guidelines
i.MX 7DS Power Consumption Measurement, Application Note, Rev. 1, 05/2019
NXP Semiconductors 21
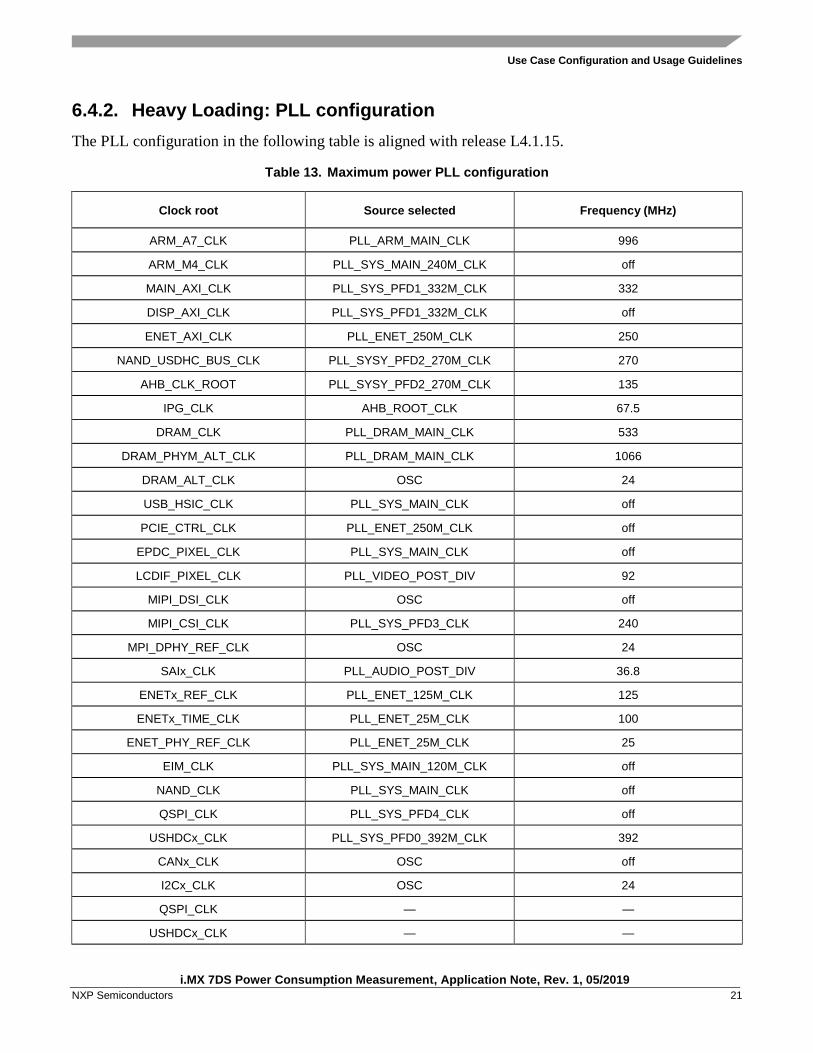
6.4.2. Heavy Loading: PLL configuration
The PLL configuration in the following table is aligned with release L4.1.15.
Table 13. Maximum power PLL configuration
Clock root Source selected Frequency (MHz)
ARM_A7_CLK PLL_ARM_MAIN_CLK 996
ARM_M4_CLK PLL_SYS_MAIN_240M_CLK off
MAIN_AXI_CLK PLL_SYS_PFD1_332M_CLK 332
DISP_AXI_CLK PLL_SYS_PFD1_332M_CLK off
ENET_AXI_CLK PLL_ENET_250M_CLK 250
NAND_USDHC_BUS_CLK PLL_SYSY_PFD2_270M_CLK 270
AHB_CLK_ROOT PLL_SYSY_PFD2_270M_CLK 135
IPG_CLK AHB_ROOT_CLK 67.5
DRAM_CLK PLL_DRAM_MAIN_CLK 533
DRAM_PHYM_ALT_CLK PLL_DRAM_MAIN_CLK 1066
DRAM_ALT_CLK OSC 24
USB_HSIC_CLK PLL_SYS_MAIN_CLK off
PCIE_CTRL_CLK PLL_ENET_250M_CLK off
EPDC_PIXEL_CLK PLL_SYS_MAIN_CLK off
LCDIF_PIXEL_CLK PLL_VIDEO_POST_DIV 92
MIPI_DSI_CLK OSC off
MIPI_CSI_CLK PLL_SYS_PFD3_CLK 240
MPI_DPHY_REF_CLK OSC 24
SAIx_CLK PLL_AUDIO_POST_DIV 36.8
ENETx_REF_CLK PLL_ENET_125M_CLK 125
ENETx_TIME_CLK PLL_ENET_25M_CLK 100
ENET_PHY_REF_CLK PLL_ENET_25M_CLK 25
EIM_CLK PLL_SYS_MAIN_120M_CLK off
NAND_CLK PLL_SYS_MAIN_CLK off
QSPI_CLK PLL_SYS_PFD4_CLK off
USHDCx_CLK PLL_SYS_PFD0_392M_CLK 392
CANx_CLK OSC off
I2Cx_CLK OSC 24
QSPI_CLK — —
USHDCx_CLK — —

Use Case Configuration and Usage Guidelines
i.MX 7DS Power Consumption Measurement, Application Note, Rev. 1, 05/2019
22 NXP Semiconductors
Table 13. Maximum power PLL configuration
Clock root Source selected Frequency (MHz)
CANx_CLK — —
I2Cx_CLK — —
UARTx_CLk OSC 24
ECSPIx_CLK PLL_SYS_MAIN_240M_CLK off
PWMx_CLK OSC 24
FLEXTIMERCx_CLK OSC off
SIMx_CLK PLL_SYS_MAIN_120M_CLK off
GPTx_CLK OSC 24
TRACE_CLK OSC 24
WDOG_CLK OSC 24
CSI_MCLK_CLK OSC off
AUDIO_MCLK_CLK PLL_AUDIO_POST_DIV 12.2
6.4.3. Heavy Loading: system setup
• SD boot to the U-boot.
• Load/Run the M4 code.
• Boot the Linux.
6.4.4. Heavy Loading: steps
1. Boot the U-boot.
2. Load/Run the M4 code.
Setenv m4image m4_coremark
Run m4boot
NOTE
The M4 Coremark code is used for testing and not available for
distribution.
3. Boot up the Linux image and boot the board to the SD rootfs.
4. Run the following script to measure at 996 MHz:
#!/bin/sh
echo userspace > /sys/devices/system/cpu/cpu0/cpufreq/scaling_governor; echo 996000
> /sys/devices/system/cpu/cpu0/cpufreq/scaling_setspeed; echo 0 >
/sys/class/graphics/fb0/blank
5. Measure the power and record the result.

Revision History
i.MX 7DS Power Consumption Measurement, Application Note, Rev. 1, 05/2019
NXP Semiconductors 23
6.5. SNVS
6.5.1. SNVS: steps
1. Boot up the Linux image and boot the board to the SD rootfs.
2. Press and hold the power (on/off) key for about five seconds so that the board powers down.
3. Measure the power and record the result.
6.6. Important commands
In the U-boot console:
• printenv: displays the environment variables.
• setenv: updates the environment variables.
— setenv <name> <value> ...
– Sets the environment variable “name” to “value ...”.
— setenv <name>
– Deletes the environment variable “name”.
• saveenv: saves the updates to the environment variables.
• bootargs: passes to the kernel, which are called kernel command lines.
In the Linux OS console:
• cat /proc/cmdline: displays the command line.
• cat /sys/devices/virtual/thermal/thermal_zone0/temp: prints the temperature to the screen
(the chip should be calibrated).
• cat /sys/kernel/debug/clk/clk_summary: prints all clks to the screen.
7. Revision History
The following table summarizes the changes made to this document since the initial release:
Table 14. Revision history
Revision number Date Substantive changes
0 11/2016 Initial release
1 05/2019 Table 7 , corrected

Document Number: AN5383 Rev. 1
05/2019
How to Reach Us:
Home Page:
nxp.com
Web Support:
nxp.com/support
Information in this document is provided solely to enable system and software
implementers to use NXP products. There are no express or implied copyright licenses
granted hereunder to design or fabricate any integrated circuits based on the information in
this document. NXP reserves the right to make changes without further notice to any
products herein.
NXP makes no warranty, representation, or guarantee regarding the suitability of its
products for any particular purpose, nor does NXP assume any liability arising out of the
application or use of any product or circuit, and specifically disclaims any and all liability,
including without limitation consequential or incidental damages. “Typical” parameters that
may be provided in NXP data sheets and/or specifications can and do vary in different
applications, and actual performance may vary over time. All operating parameters,
including “typicals,” must be validated for each customer application by customer's
technical experts. NXP does not convey any license under its patent rights nor the rights of
others. NXP sells products pursuant to standard terms and conditions of sale, which can be
found at the following address: nxp.com/SalesTermsandConditions.
While NXP has implemented advanced security features, all products may be subject to
unidentified vulnerabilities. Customers are responsible for the design and operation of their
applications and products to reduce the effect of these vulnerabilities on customer’s
applications and products, and NXP accepts no liability for any vulnerability that is
discovered. Customers should implement appropriate design and operating safeguards to
minimize the risks associated with their applications and products.
NXP, the NXP logo, NXP SECURE CONNECTIONS FOR A SMARTER WORLD,
COOLFLUX, EMBRACE, GREENCHIP, HITAG, I2C BUS, ICODE, JCOP, LIFE VIBES,
MIFARE, MIFARE CLASSIC, MIFARE DESFire, MIFARE PLUS, MIFARE FLEX, MANTIS,
MIFARE ULTRALIGHT, MIFARE4MOBILE, MIGLO, NTAG, ROADLINK, SMARTLX,
SMARTMX, STARPLUG, TOPFET, TRENCHMOS, UCODE, Freescale, the Freescale
logo, AltiVec, C 5, CodeTEST, CodeWarrior, ColdFire, ColdFire+, C Ware, the Energy
Efficient Solutions logo, Kinetis, Layerscape, MagniV, mobileGT, PEG, PowerQUICC,
Processor Expert, QorIQ, QorIQ Qonverge, Ready Play, SafeAssure, the SafeAssure logo,
StarCore, Symphony, VortiQa, Vybrid, Airfast, BeeKit, BeeStack, CoreNet, Flexis, MXC,
Platform in a Package, QUICC Engine, SMARTMOS, Tower, TurboLink, and UMEMS are
trademarks of NXP B.V. All other product or service names are the property of their
respective owners. Arm, AMBA, Arm Powered, Artisan, Cortex, Jazelle, Keil, SecurCore,
Thumb, TrustZone, and μVision are registered trademarks of Arm Limited (or its
subsidiaries) in the EU and/or elsewhere. Arm7, Arm9, Arm11, big.LITTLE, CoreLink,
CoreSight, DesignStart, Mali, Mbed, NEON, POP, Sensinode, Socrates, ULINK and
Versatile are trademarks of Arm Limited (or its subsidiaries) in the EU and/or elsewhere. All
rights reserved. Oracle and Java are registered trademarks of Oracle and/or its affiliates.
The Power Architecture and Power.org word marks and the Power and Power.org logos
and related marks are trademarks and service marks licensed by Power.org.
© 2016-2019 NXP B.V.