important notice · where to get help if you purchased your photopc in the united states or canada,...
TRANSCRIPT

A

IMPORTANT NOTICEDISCLAIMER OF WARRANTY
Epson America makes no representations or warranties, either express or implied, by or with respect to anything in this manual, and shall not be liable for any implied warranties of merchantability and fitness for a particular purpose or for any indirect, special, or consequential damages. Some states do not allow the exclusion of incidental or consequential damages, so this exclusion may not apply to you.
COPYRIGHT NOTICEAll rights reserved. No part of this publication may be reproduced, stored in a retrieval system, or transmitted, in any form or by any means, electronic, mechanical, photocopying, recording, or otherwise, without the prior written permission of Epson America, Inc. No patent liability is assumed with respect to the use of information contained herein. Nor is any liability assumed for damages resulting from the use of the information contained herein. Further, this publication and features described herein are subject to change without notice.
TRADEMARKSEPSON is a registered trademark of Seiko Epson Corporation.
PhotoPC and PhotoSpan are trademarks of Epson America, Inc.
EPSON Connection is a service mark of Epson America, Inc.
EasyPhoto and the EasyPhoto logo are trademarks of Storm Software, Inc.
General notice: Other product names used herein are for identification purposes only and may be trademarks of their respective owners. EPSON disclaims any and all rights in those marks.
Copyright © 1995 by Epson America, Inc. 6360472037Torrance, California, USA 11/951AG6P1P0253 Printed in Japan
A NOTE CONCERNING RESPONSIBLE USE OF COPYRIGHTED MATERIALS
Like photocopiers, digital cameras can be misused by improper photographing of copyrighted material. Although Section 107 of the U.S. Copyright Act of 1976 (Title 17, United States Code), the “fair use” doctrine, permits limited copying in certain circumstances, those circumstances may not be as broad as some people assume. Unless you have the advice of a knowledgeable attorney, be responsible and respectful by not photographing published material without the permission of the copyright holder.

A
B
FCC COMPLIANCE STATEMENT
FOR AMERICAN USERS
This equipment has been tested and found to comply with the limits for a class B digital device, pursuant to Part 15 of the FCC Rules. These limits are designed to provide reasonable protection against harmful interference in a residential installation. This equipment generates, uses, and can radiate radio frequency energy and, if not installed and used in accordance with the instructions, may cause harmful interference to radio and television reception. However, there is no guarantee that interference will not occur in a particular installation. If this equipment does cause interference to radio and television reception, which can be determined by turning the equipment off and on, the user is encouraged to try to correct the interference by one or more of the following measures:
❙ Reorient or relocate the receiving antenna
❙ Increase the separation between the equipment and receiver
❙ Connect the equipment into an outlet on a circuit different from that to which the receiver is connected
❙ Consult an experienced radio/TV technician for help.
WARNING
The connection of a non-shielded equipment interface cable to this equipment will invalidate the FCC Certification of this device and may cause interference levels that exceed the limits established by the FCC for this equipment. It is the responsibility of the user to obtain and use a shielded equipment interface cable with this device. If this equipment has more than one interface connector, do not leave cables connected to unused interfaces.
Changes or modifications not expressly approved by the manufacturer could void the user's authority to operate the equipment.
FOR CANADIAN USERS
This digital apparatus does not exceed the Class B limits for radio noise emissions from digital apparatus as set out in the radio interference regulations of the Canadian Department of Communications.
Le présent appareil numérique n'émet pas de bruits radioélectriques dépassant les limites applicables aux appareils numériques de Classe B prescrites dans le règlement sur le brouillage radioélectrique édicté par le Ministère des Communications du Canada.

Introduction 1
A
B
Introduction
our new EPSON® PhotoPC is a revolutionary,
easy-to-use digital camera that enables you to take full-color
pictures and immediately use them with your computer. PhotoPC comes
with everything you need, including software that lets you transfer your
pictures to your computer’s hard disk drive. You can then edit, enhance,
and organize your pictures or simply place
them into your documents.
Create professional letters, documents, and presentations with real life
images right on your desktop. Share pictures with business colleagues or
friends over the Internet. Add color and visual appeal to your
newsletters, flyers, and brochures. Anything you can display on your
screen or print will look better with PhotoPC pictures.
PhotoPC Features PhotoPC is a complete system for capturing digital images, and includes
the following features:
YLaguna Beach Community Newsletter / Vol 8
Around Town
Local Spotlight
Main Street Flower Shop
Just opened this month, Main Street
Flower Shop is featuring fresh cut
sunflowers at 40% off the regular
price. Besides flowers, Main Street
Flower Shop also sells arts and crafts
made by local artisans. Free delivery
Moon River Cafe
The local hotspot for southwestern cuisine has
been re-opened after being closed for renovation
since December of last year. Owner Julio
Chavez believes the renovation will be a pleas-
ant surprise to all the old faithful and welcoming
to the new customers. The expansion will hope-
fully bring more people in to the restaurant for
drinks and appetizers while entertaining those
waiting to be seated in the dining room.
Be sure to call for reservations on the weekends.
Beach Regatta
Beginning Friday at 5:00pm the 27th
Annual Laguna Beach Regatta will
officially kick off. This year’s entries
have increased to 220 competing
attendees, up from 187 last year. Jim
Smelt of Dana Point is back for a try
at his fourth straight win. The race
will start at 7:00am Saturday morn-
Restaurants Page 2
Mayor Race Page 3
Health Tips Page 4
Events Page 5
Sports Page 6
Horoscope Page 6
Inside This Issue

2 Introduction
❙ Base unit with 1MB internal memory for 16 high-resolution images
(640 x 480 pixels) or 32 standard-resolution images (320 x 240
pixels)
❙ 24-bit color image capture
❙ Built-in flash with both automatic and manual settings
❙ Self-timer
❙ Automatic shut-off to save batteries
❙ Variable shutter speed
❙ Automatic date and time recording for each picture
❙ Serial cable for transferring photos to your computer
❙ EasyPhoto software that lets you transfer, organize, enhance, and
print your pictures
❙ Use your pictures with any Windows® application
❙ Print out your pictures on any color or black and white printer.
The following optional accessories are available from EPSON for
enhancing your PhotoPC:
❙ 2MB and 4MB PhotoSpan memory modules
❙ AC adapter to use with a standard electric outlet.
You can also use standard 37 mm video camcorder lenses and filters
available from leading suppliers, such as Tiffen®.
System Requirements ❙ IBM®-compatible PC with 486 or higher processor
❙ 3.5-inch high-density diskette drive
❙ Serial port with standard RS-232C interface
❙ 8MB RAM
❙ Hard disk drive with at least 15MB free space
❙ VGA or SVGA monitor with at least 256-color display
❙ Microsoft® Windows 3.1 or later, Microsoft Windows for
Workgroups 3.11 or later, or Windows 95.
Where to Get Help If you purchased your PhotoPC in the United States or Canada, EPSON
provides customer support and service through a network of Authorized
EPSON Customer Care Centers. EPSON also provides the following
services when you dial (800) 922-8911:
❙ Technical assistance with the installation, configuration, and
operation of EPSON products

Introduction 3
A
B
❙ Assistance in locating your nearest Authorized EPSON Reseller or
Customer Care Center
❙ Customer relations
❙ EPSON technical information library fax service
❙ Product literature on current and new products.
You can purchase accessories, printed manuals, or parts for EPSON
products from EPSON Accessories at (800) 873-7766 (U.S. sales only).
In Canada, call (800) BUY-EPSON.
If you purchased your PhotoPC outside the United States or Canada,
contact your EPSON dealer or the marketing location nearest you for
customer support and service.
If you need help with EasyPhoto software, call Storm Software at (415)
969-9555.
Electronic Support Services
If you have a modem, the fastest way to access helpful tips,
specifications, drivers, application notes, and bulletins for EPSON
products is through the online services listed below.
World Wide Web
If you are connected to the Internet and have a Web browser, you can
access EPSON’s World Wide Web site at http://
www.epson.com. EPSON’s home page links users to What’s New,
EPSON Products, EPSON ConnectionSM, Corporate Info, and EPSON
Contacts.
Link to the EPSON Connection for the latest drivers and FAQs
(Frequently Asked Questions) and the EPSON Chat area. To get in touch
with EPSON around the world, EPSON Contacts includes contact
information for local EPSON subsidiaries.
EPSON Bulletin Board Service
You can call the EPSON Bulletin Board Service (BBS) at (310) 782-
4531. No membership is required. Make sure your communications
software is set to 8 data bits with 1 stop bit, no parity bit, and a modem
speed up to 28.8 Kbps. See the documentation that came with your
communications software for more information.
CompuServe Online Support
CompuServe members can call the Epson America Forum on
CompuServe. If you are already a member, simply type GO EPSON at
the menu prompt to reach the Forum.
4 Introduction
If you are not currently a member of CompuServe, you are eligible for a
free introductory membership as an owner of an EPSON product. This
membership entitles you to:
❙ An introductory credit on CompuServe
❙ Your own user ID and password
❙ A complimentary subscription to CompuServe Magazine,
CompuServe’s monthly publication.
To take advantage of this offer, call (800) 848-8199 in the United States
and Canada and ask for representative #529. In other countries, call the
following U.S. telephone number: (614) 529-1611, or your local
CompuServe access number.
RegistrationPlease take a minute to fill out the registration card included with
PhotoPC and mail it back to us. This will enable you to receive special
information on software upgrades, accessories, and new products. You’ll
get immediate attention if you have a problem with your PhotoPC.
Safety Instructions Read all of these instructions and save them for later reference. Follow
all warnings and instructions marked on the camera.
❙ To reduce the risk of electric shock, do not remove the camera’s
cover or open any compartments except as instructed in this User’s
Guide.

Introduction 5
A
B
❙ To prevent fire or electric shock, do not expose the camera to rain
or moisture.
❙ Do not use outdoors during a thunderstorm.
❙ If the camera shows unusual signs such as noise, odor, or smoke,
stop using it and turn it off immediately. Remove the batteries and/
or disconnect the AC adapter.
❙ Do not use harsh or abrasive cleaners. Wipe off dust with a clean,
dry cloth.
❙ To avoid damage to the optics of the camera, do not expose the lens
to direct sunlight for extended periods of time.
❙ Do not store the camera near sources of bright light, direct sunlight,
high humidity, heat, excessive dirt or dust, or where it will be
exposed to strong vibrations or magnetic fields.
❙ To prevent possible eye injury, do not take flash pictures of faces at
close range.
❙ Avoid sudden temperature changes, which can cause moisture to
condense on the camera. Keep the camera in a case or bag if you
need to move it from a cold environment to a warm one. Allow
time for the camera to adjust to temperature changes before
using it.
iii
A
B
IntroductionPhotoPC Features 2System Requirements 2Where to Get Help 3
Electronic Support Services 3Registration 4Safety Instructions 4
Chapter 1: Getting Started
Unpacking Your PhotoPC 1-1Getting to Know the Camera 1-1Installing Batteries 1-2
Handling Batteries 1-3Attaching the Hand Strap 1-4Installing Your EasyPhoto Software 1-5
Chapter 2: Taking Pictures with PhotoPC
Turning the Camera On and Off 2-2Auto Shut-off 2-2The EasyTouch™ Control Panel 2-2Checking the Battery Icon 2-3
Table of Contents
Snapping the Shutter 2-3Picture-taking Range 2-4Adjusting Settings 2-4
Flash 2-5Resolution 2-6Timer 2-8
Erasing Pictures 2-9Checking the Picture Counter 2-9
Chapter 3: Using PhotoPC with Your Computer
Connecting PhotoPC to Your Computer 3-1Transferring Pictures to Your Computer 3-3Erasing Pictures from Your Camera 3-5Using Pictures in Your Documents 3-6
Inserting a Picture with Copy and Paste 3-6Inserting a Picture with Drag and Drop 3-7Inserting a Picture by Importing 3-8
Closing EasyPhoto 3-8

iv
Chapter 4: Working with Your Pictures
Using Photo Galleries 4-2Adding or Changing Picture Information 4-2Finding a Picture 4-3
Making Changes with the Photo Workshop 4-5Cropping 4-6Resizing 4-6Rotating 4-6Adjusting Brightness and Contrast 4-7Adjusting Colors 4-7
Saving, Moving, and Printing Your Pictures 4-7Changing File Information 4-8
Chapter 5: Using Advanced Features
Getting Ready to Use Advanced Features 5-1Setting the Clock 5-2Setting Auto Shut-off 5-2Setting the Shutter Speed 5-3Adjusting Port Settings 5-4Taking Pictures from Your Computer 5-5
Snapping the Shutter 5-7
Chapter 6: Maintenance and Troubleshooting
Caring for the Camera 6-1Camera Problems 6-2Picture Problems 6-3
Appendix A: Using Optional AccessoriesExpanding Your PhotoPC Memory A-1Installing PhotoSpan Memory Modules A-2Using the AC Adapter A-3Using Optional Lenses A-5
Appendix B: SpecificationsPhysical Dimensions B-1Power B-1Technical B-1Photographic B-2
Index

Getting Started 1-1
B
1
1 Getting Started
TITLE
Cam1-01.epsDATE
6/26/95DRAWN BY
L.Oliver
camera
diskettes
batterieshand strap
serial cable
his chapter helps you get ready to use your
PhotoPC. It covers the following:
❙ Unpacking your PhotoPC
❙ Getting to know the camera
❙ Installing the batteries
❙ Attaching the hand strap
❙ Installing your EasyPhoto software.
Unpacking Your PhotoPCMake sure you have all the parts shown to the left.
Getting to Know the CameraAfter you unpack your PhotoPC, take a few minutes to learn about its
features, as shown on page 1-2.
T

1-2 Getting Started
Installing Batteries Your PhotoPC comes with four AA alkaline batteries. Make sure the
camera is turned off, and follow these steps to insert the batteries:
1 Slide the battery cover lock to the right to release the cover.
EPSON AMERICA, INC.TITLE
Cam1-02.eps
viewfinderred timer lightflash
lensbattery cover
light sensor
power switch
port cover
EPSON AMERICA, INC.Documentation Department20770 Madrona Avenue, Torrance, CA 90503(310) 782-0770
TITLE
Cam1-03.epsDATE
6/26/95DRAWN BY
L.Oliver
viewfinder
green standby light
shutter button
battery cover lock
control panel
hand strap holder
EPSON AMERICA, INC.Documentation Department20770 Madrona Avenue, Torrance, CA 90503(310) 782-0770
TITLE
Cam1-04.epsDATE
8/15/95DRAWN BY
L.Oliver

1
Getting Started 1-3
A
2 Grasp the battery cover and pull it away from the camera body as
shown.
3 Insert all four batteries into the compartment, positioning the + and
- ends as shown in the compartment. Arrange the ribbon under the
batteries so you can use it to pull them out when you need to
replace them. Press down on the batteries to snap them into place.
4 Replace the battery cover.
Handling Batteries
When your PhotoPC batteries wear out, you can replace them with any
of the following:
❙ Single-use AA alkaline batteries
❙ Single-use AA lithium batteries (longest battery life)
❙ Rechargeable AA Ni-Cad batteries.
cam1-05
EPSON AMERICA, INC.Documentation Department20770 Madrona Avenue, Torrance, CA 90503(310) 782-0770
TITLE
Cam1-05.epsDATE
8/15/95DRAWN BY
L Oliver
EPSON AMERICA, INC.Documentation Department20770 Madrona Avenue, Torrance, CA 90503(310) 782-0770
TITLE
Cam1-06.epsDATE
6/26/95DRAWN BY
L Oliver
1-4 Getting Started
WARNING
To avoid the danger of fire or explosion, do not mix different types of
batteries. Do not allow the battery contacts to touch metal objects such
as coins or keys, which could short out the battery’s circuits.
Note the following when handling batteries:
❙ Do not use manganese batteries.
❙ Replace all four batteries at the same time.
❙ Do not drop, puncture, disassemble, or mutilate batteries. Do not
get them wet or expose them to fire.
❙ When the camera is not used for long periods of time, remove the
batteries and store them at a low temperature in a dry location.
❙ Dispose of used batteries according to the battery manufacturer’s
instructions and in compliance with all applicable laws. Contact
your local government agency for information about battery
recycling and disposal.
❙ If you use rechargeable Ni-Cad batteries, replace them with four
fully-charged batteries. If you find that your batteries run out faster
after you recharge them a number of times, make sure you
discharge them completely before recharging.
Attaching the Hand Strap To attach the hand strap, loop the strap around the holder on the side of
the camera as shown below.
TITLE
C 1 07

1
Getting Started 1-5
A
Installing Your EasyPhoto Software PhotoPC comes with EasyPhoto, a software application that lets you
transfer your pictures from the camera to your computer and place them
into documents. You can also use EasyPhoto to organize, enhance, and
print your pictures. Follow these steps to install EasyPhoto:
1 Insert EasyPhoto diskette 1 in your diskette drive.
2 From the Windows 3.1 Program Manager screen, select Run from
the File menu. In Windows 95, click the Start button, and then click
Run.
3 In the box, type: A:\SETUP. If the diskette drive you are using is
not drive A, substitute the correct letter.
4 Click OK and follow the instructions on the screen.
NOTE
If you want to have the time and date of each picture automatically
recorded, see page 5-2 for instructions.
You’re now ready to take pictures with your PhotoPC. Turn to Chapter 2
for simple, step-by-step instructions.

2
Taking Pictures with PhotoPC 2-1
B
2 Taking Pictures with PhotoPC
35,&('ý$7ýùëå
äñäíí
/RYHO\ýIDPLO\ýKR
PHýLQýDýJUHDWýQH
LJKERUKRRG
êýEHGURRPVñýëýED
WKVñýPDVWHUýVXLWH
%HDXWLIXOO\ýODQGV
FDSHGý\DUGýZLWKýS
RROýDQGýVSD
5HPRGHOHGýNLWFK
HQ
)DPLO\ýURRPýZLW
KýILUHSODFH
CALL KAREN BERGEN
555-4038. Ext. 125
1474 Hart ford A ve., Torr ance, CA 90405
ANCHORREALTORS
© Corel Corporation
sing PhotoPC to take pictures is similar to using
a traditional “point and shoot” camera. This chapter shows you
everything you need to know, including the following information:
❙ Turning the camera on and off
❙ Auto shut-off
❙ The control panel
❙ Checking the battery icon
❙ Snapping the shutter
❙ Picture-taking range
❙ Adjusting settings
❙ Erasing pictures
❙ Checking the picture counter.
U
2-2 Taking Pictures with PhotoPC
Turning the Camera On and Off To turn the camera on, simply slide the power switch to the ON position.
The lens cover opens and the control panel on the top of the camera
lights up. The green standby light on the back of the camera flashes for a
few seconds. When it stops flashing and stays fully lit, the camera is
ready to take pictures.
Slide the power switch to the OFF position to turn off the camera. The
lens cover closes and the control panel turns off.
Auto Shut-off If you wait more than 60 seconds before taking a picture, the camera
turns off automatically to save battery power. To turn the camera back
on, slide the power switch OFF, and then ON. Or press the shutter
button. You will have to press the shutter button again to take a picture.
If you want, you can change the 60-second time period for auto shut-off.
For more information, see page 5-3.
The EasyTouch™ Control PanelThe control panel keeps track of how many pictures you’ve taken and
gives you important information about the status of your battery and
various settings you’re using.
power switch
control panelgreen standbylight
AUTO
EPSON AMERICA, INC.Documentation Department20770 Madrona Avenue, Torrance, CA 90503(310) 782-0770
TITLE
Cam2-03.epsDATE
6/26/95DRAWN BY
resolution mode
timer
erase last picturepictures taken
flash modebattery level
pictures remaining
Taking Pictures with PhotoPC 2-3
A
2
Checking the Battery IconBefore you take pictures, check the battery icon on the control panel.
The icon shows how much battery power you have left, in the following
four stages:
Full battery power (or AC adapter in use)
Battery power is decreasing
Battery power is almost out
Change batteries
The battery icon is not precise, so you should use it only as a guide to
remaining power. Note that several factors can affect battery life,
including the surrounding temperature and the type of batteries you use.
Low temperatures (especially below 50° F) will weaken your batteries.
See page 1-2 for information about changing batteries.
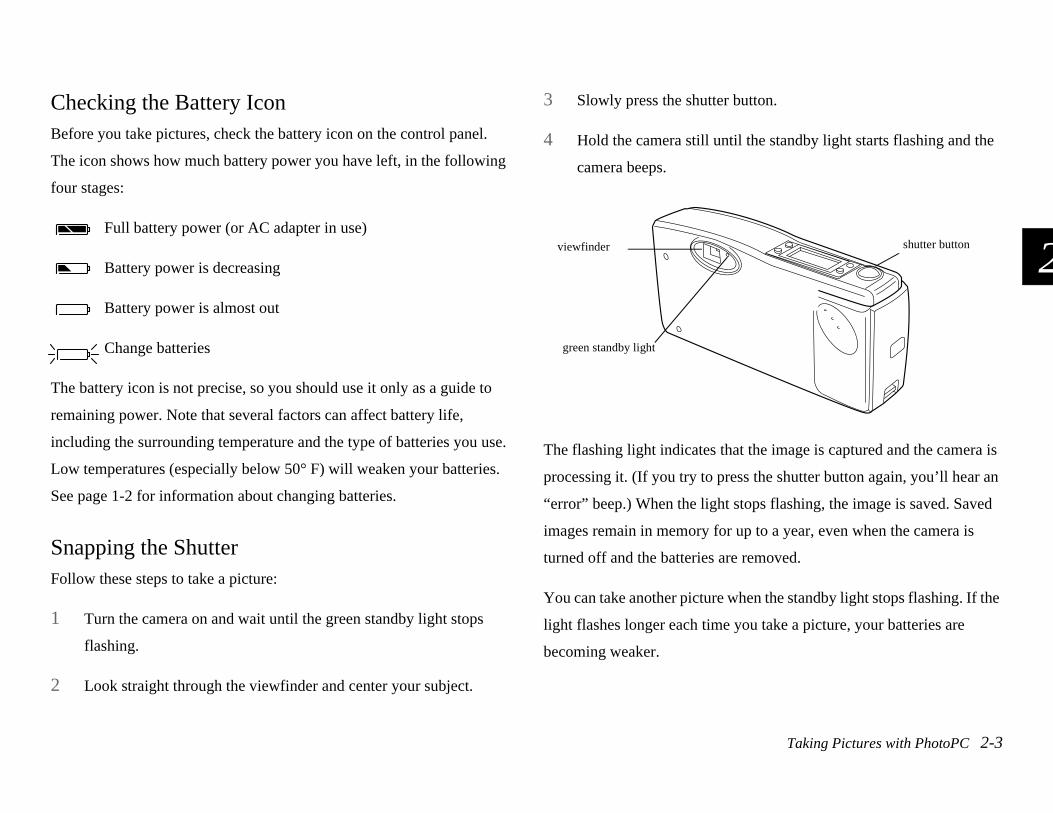
Snapping the ShutterFollow these steps to take a picture:
1 Turn the camera on and wait until the green standby light stops
flashing.
2 Look straight through the viewfinder and center your subject.
3 Slowly press the shutter button.
4 Hold the camera still until the standby light starts flashing and the
camera beeps.
The flashing light indicates that the image is captured and the camera is
processing it. (If you try to press the shutter button again, you’ll hear an
“error” beep.) When the light stops flashing, the image is saved. Saved
images remain in memory for up to a year, even when the camera is
turned off and the batteries are removed.
You can take another picture when the standby light stops flashing. If the
light flashes longer each time you take a picture, your batteries are
becoming weaker.
viewfinder
green standby light
shutter button

2-4 Taking Pictures with PhotoPC
Picture-taking Range You should be at least 2 feet (60 cm) away from the subject you are
photographing. If you want to take pictures at a closer range, you should
use a 37 mm video camcorder close-up lens. See page A-5 for
instructions.
However, if you use a close-up or “macro” lens, the viewfinder will not
give you an accurate image of your picture. You may want to connect
the camera to your computer and view your close-up images on the
screen before you capture them. See page 5-6 for information on
viewing and taking pictures from your computer.
You can take flash pictures within a range of 3 to 10 feet, as described on
page 2-5.
TIP
When you’re taking pictures outdoors, make sure the sun is at your back.
In very bright light (at the beach or in snow, for example) your pictures
may come out too light. You can use an ND filter to reduce the amount of
light. See page 6-4 for more information.
Adjusting SettingsYou can adjust the following three settings on PhotoPC using the
EasyTouch control buttons on the top of
the camera:
❙ Flash
❙ Resolution
❙ Timer.
All control button settings (except the timer) remain in effect even after
you turn off the camera.
NOTE
The controls return to their factory settings when you remove or change
the batteries.

Taking Pictures with PhotoPC 2-5
A
2
.
Flash
PhotoPC’s built-in flash has three settings as listed below, which are
effective within a range of 3 to 10 feet. Press the flash control button to
cycle from one setting to another. The settings appear on the control
panel as shown.
Auto
The flash goes off automatically whenever it’s needed for
adequate lighting (factory setting).
Forced Flash
The flash goes off with every picture you take. Use this setting
to compensate for backlighting; for example, when you are
facing the sun.
Flash Off
The flash is disabled, even when adequate lighting is not
available. Use this setting for special effects, or where flash
photography is prohibited.
AUTO
EPSON AMERICA, INC.Documentation Department20770 Madrona Avenue, Torrance, CA 90503(310) 782-0770
TITLE
Cam2-07.epsDATE
6/26/95DRAWN BY
L.Oliver
timer eraseresolution flash
AUTO

2-6 Taking Pictures with PhotoPC
Resolution
PhotoPC has two resolution settings, high and standard. Press the
resolution control button to switch from one setting to the other. The
settings appear on the control panel as shown.
.
High resolution
Images are captured at 640 x 480 pixels. Your pictures include
more detail, but the camera only holds 16 pictures (factory
setting).
Standard resolution
Images are captured at 320 x 240 pixels. The camera holds 32
pictures, but the images include less detail.
You can switch freely between the two settings and mix standard and
high resolution pictures in the camera. The camera’s capacity will vary
accordingly. For example, the camera will hold 24 pictures if you take 8
at high resolution and 16 at standard resolution.
TIP
Choose high resolution if you want “snapshot”-size or larger pictures.
Standard resolution is sufficient for “wallet”-size pictures.
The following examples show the same image captured at standard and
high resolution.
resolution button
S

Taking Pictures with PhotoPC 2-7
A
2
High resolution image
640 x 480 pixelsStandard resolution image
320 x 240 pixels

2-8 Taking Pictures with PhotoPC
Timer
Setting the timer creates a 10-second delay between the time
you press the shutter button and the actual image capture. This
allows you to take a picture of yourself. The timer icon on the
control panel flashes when you use the timer.
Follow these steps to take a picture with the timer:
1 Secure the camera on a flat surface.
2 Press the timer button. The timer icon on the control panel flashes.
3 Press the shutter button. The red timer light on the front of the
camera turns on and stays lit for 7 seconds. Then it flashes 3 times. The camera beeps when the image is captured. The green standby
light on the back of the camera flashes as PhotoPC processes the
image. When the green light stops flashing, the timer is off and you
can take another picture.
EPSON AMERICA, INC.Documentation Department20770 Madrona Avenue, Torrance, CA 90503(310) 782-0770
TITLE
Cam2-14.epsDATE
6/26/95DRAWN BY
L.Oliver
timer button
red timer light
shutter button

Taking Pictures with PhotoPC 2-9
A
2
Erasing Pictures If you don’t want to keep a picture after you take it, you can
erase it from the camera’s memory. Using a small pointed
object such as a ballpoint pen, press the erase button on the top
of the camera. The erase icon on the control panel flashes when
you press the button.
After a few seconds, the last picture you took is erased from the
camera’s memory. The picture counter (number of pictures taken)
decreases by one. You can continue pressing the button to erase more
pictures.
TIP
You can also erase all the pictures in the camera’s memory. Press the
erase button. While you hold it down, press and hold the timer button.
The erase icon flashes until all pictures are deleted.
Checking the Picture Counter The large number in the center of the control panel below shows you
how many pictures you have taken. The smaller number shows how
many pictures you can take.
The number of pictures remaining depends on the resolution setting you
have chosen. If you switch between standard resolution and high
resolution, the number of pictures remaining will change. For example,
if the counter shows 2 pictures remaining at high resolution, it will
change to 4 when you switch to standard resolution.
AUTO
pictures takenpictures remaining

2-10 Taking Pictures with PhotoPC
NOTE
Depending on the type of images you capture, your camera may hold
more than 16 pictures at high resolution or 32 at standard resolution.
When you take the last picture, the number of pictures remaining may
show one instead of zero. When this happens, you can take an extra
picture—or several extra pictures. As long as the control panel shows
one picture remaining, you can take another picture.
When the camera’s memory is full, the number of pictures remaining is
0. The green standby light on the back of the camera turns off, and you
can’t press the shutter button. You need to connect the camera to your
computer and transfer the pictures. Then you can erase the images and
start taking pictures again.
Turn to Chapter 3 to find out how to connect the camera to your
computer and transfer your pictures.
Using PhotoPC with Your Computer 3-1
B
3
hen you’re finished taking pictures, you can
connect the camera to your computer and transfer the images.
Then you can use them in your letters, presentations, or just about
anything you create on your computer. This chapter tells you how,
including:
❙ Connecting PhotoPC to your computer
❙ Transferring pictures to your computer
❙ Erasing pictures from the camera
❙ Using pictures in your documents
❙ Closing EasyPhoto.
3 Using PhotoPC with Your Computer
W Connecting PhotoPC to Your Computer Before you start, locate the serial cable that came with your PhotoPC.
Make sure the camera is finished processing. If you have the optional
AC adapter, you can save on batteries by using the adapter whenever
you connect the camera to your computer.
The AC adapter should be available where you bought your PhotoPC.
To order an AC adapter, call EPSON Accessories at (800) 873-7766
(U.S. sales only). In Canada, call (800) BUY-EPSON.

3-2 Using PhotoPC with Your Computer
Follow these steps to connect the camera:
1 Locate the port cover on the side of the camera. Press on the arrows
and slide the cover down to open it.
2 Line up the arrow on the cable connector with the notch on the
camera’s serial port. Then insert the connector.
3 Locate a serial port on the back of your computer. You may have
two serial ports labeled COM1 and COM2, or the ports may be
labeled with icons. If you have two serial ports available, use port 1
to connect your camera.
4 Line up the serial connector on the cable with one of the serial ports
on your computer, and insert the connector. Then tighten the
screws.
arrows
EPSON AMERICA, INC.Documentation Department20770 Madrona Avenue, Torrance, CA 90503(310) 782-0770
TITLE
Cam3-02.epsDATE
6/26/95DRAWN BY
L.Oliver
serial port
arrow
notch

3
Using PhotoPC with Your Computer 3-3
A
5 Turn on the camera and your computer system. A frame appears
around the picture counter on the camera’s control panel.
NOTE
When the camera is connected to your computer, you can’t use any of
the control buttons or the shutter button on the camera. You can only
operate the camera through your computer.
The camera’s auto shut-off feature remains in effect when the camera is
connected to your computer, but it takes place after 5 minutes of
inactivity. To turn the camera back on, you can slide the power switch
off and on again, or you can use any of the software camera controls on
your computer, as explained in Chapter 5.
Transferring Pictures to Your Computer Once your camera and computer are connected and turned on, you’re
ready to transfer your pictures. You can use the EasyPhoto software that
came with PhotoPC. If you haven’t installed the software yet, do it now,
following the instructions on page 1-5.
serial port on computer
serial cable
AUTO
TITLE
Line indicates that the camera is connected to your computer.
3-4 Using PhotoPC with Your Computer
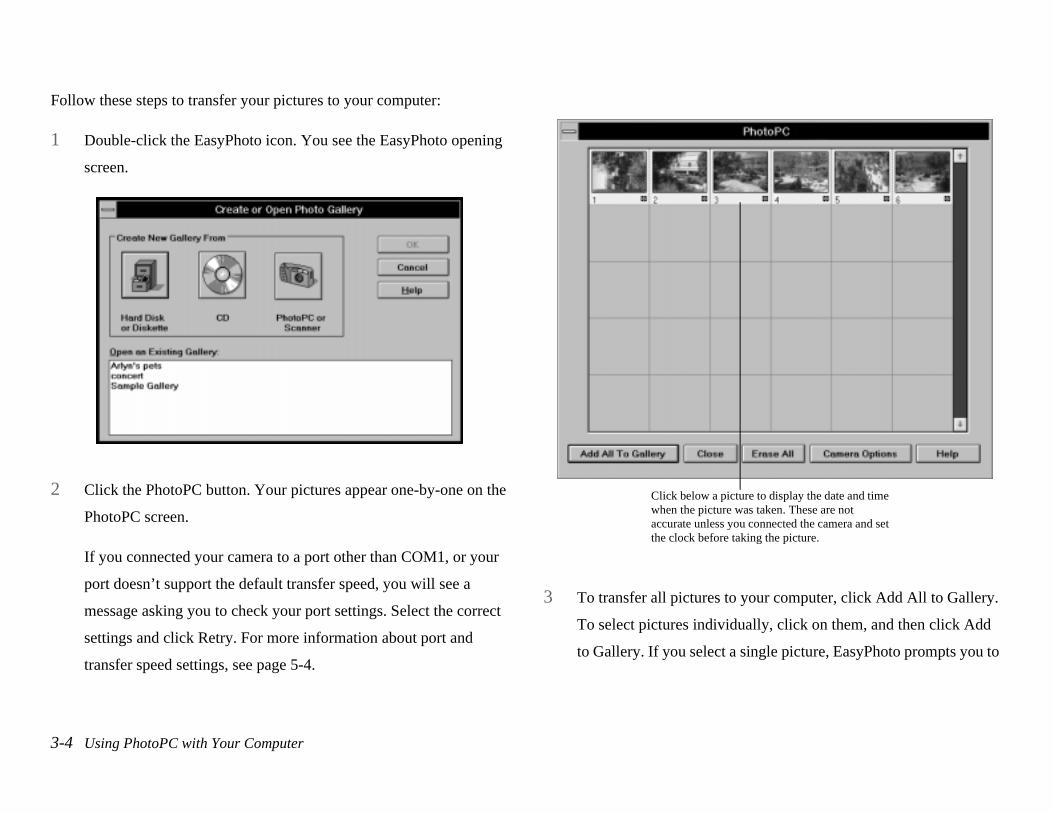
Follow these steps to transfer your pictures to your computer:
1 Double-click the EasyPhoto icon. You see the EasyPhoto opening
screen.
2 Click the PhotoPC button. Your pictures appear one-by-one on the
PhotoPC screen.
If you connected your camera to a port other than COM1, or your
port doesn’t support the default transfer speed, you will see a
message asking you to check your port settings. Select the correct
settings and click Retry. For more information about port and
transfer speed settings, see page 5-4.
3 To transfer all pictures to your computer, click Add All to Gallery.
To select pictures individually, click on them, and then click Add
to Gallery. If you select a single picture, EasyPhoto prompts you to
Click below a picture to display the date and time when the picture was taken. These are not accurate unless you connected the camera and set the clock before taking the picture.

3
Using PhotoPC with Your Computer 3-5
A
name it for the gallery. (This doesn’t affect the picture’s file name.)
You don’t have to wait for all the pictures to appear before you
select pictures to transfer.
EasyPhoto displays its progress as it transfers each picture. To help you
organize your pictures, they are added to a new photo gallery, which
displays small “thumbnail” versions of the images. EasyPhoto labels
your pictures with the current date and numbers them in order. After the
transfer is finished, you can double-click on a picture in the gallery to
view it at full size.
NOTE
Once you install EasyPhoto, you can use any program that supports
TWAIN (such as Adobe® PhotoshopTM or Picture Publisher®) to transfer
your pictures. Select PhotoPC as the source when you acquire an image.
You will see the PhotoPC screen. You may need to transfer your pictures
individually or in small groups, rather than all at once.
Erasing Pictures from Your Camera After you have viewed your pictures and transferred them to your
computer, you can erase them from your camera. Follow these steps:
1 From the PhotoPC screen, click Erase All. EasyPhoto asks you to
confirm that you want to erase all the pictures in the camera.
2 Click Yes. Your pictures disappear from the screen, and the camera
resets its counter to 0.
3 Click Close if you are finished.
4 Turn off the camera. The transfer process uses a lot of power, and
your batteries can run out quickly.
NOTE
You can also use the Camera Controls screen to erase pictures. See page
5-7 for more information.
Using Pictures in Your DocumentsWhen your pictures are saved in a photo gallery (or in several galleries),
you can insert them in your documents. You can use your pictures in
many different types of software applications, such as word processors,
presentation programs, spreadsheets, database managers, page layout
and desktop publishing packages.
If you want to change a picture before you insert it, you can use the
EasyPhoto Workshop to crop, resize, rotate, or make other kinds of
enhancements. (You can also use your software application to change

3-6 Using PhotoPC with Your Computer
the size and position of your picture after you insert it.) For more
information about the Photo Workshop, see Chapter 4 or click the
EasyPhoto Help button.
You can use three methods to add pictures to your documents:
❙ Copy and paste
❙ Drag and drop
❙ Importing.
Inserting a Picture with Copy and Paste
You can use this method to insert a picture in any Windows application.
Follow these steps:
1 Make sure the picture you want to use is showing in the photo
gallery on your screen.
2 Click on the picture to select it. You can also double-click on the
picture to open it in the Photo Workshop. You may find that your
pictures look better when you copy them from the Workshop.
3 Choose Copy from the Edit menu. (In the Workshop, you have to
choose Select Entire Photo from the Edit menu before you can
choose Copy.)
4 Start your word processor or other application.
5 Open the document or file where you want to use the picture.
6 Position the cursor where you want to insert the picture.

3
Using PhotoPC with Your Computer 3-7
A
7 Choose Paste (or Paste Special) from the Edit menu. A copy of the
picture appears in your document.
Inserting a Picture with Drag and Drop
You can use this method with any Windows application that supports
OLE 2.0 (object linking and embedding)—for example, Microsoft®
Word 6.0 or WordPerfect® 6.1. If you’re not sure, give it a try. If it
doesn’t work, you can always use the copy and paste method.
Follow these steps to drag and drop a picture into your document:
1 Make sure the picture you want to use is showing in the photo
gallery on your screen.
2 Start your application.
3 Open the document or file where you want to use the picture. You
should have both the document and photo gallery windows
displayed on your screen.
4 Drag the picture from the photo gallery to your document. After a
few seconds you see the drop cursor. If your application does not
support drag and drop, you see a message on the screen instead of
the drop cursor.
5 Position the drop cursor where you want the picture and release the
mouse button. A copy of the picture appears in your document.
Inserting a Picture by Importing
If your Windows application can’t import a JPEG file, you need to
change the picture’s file type to BMP. See page 4-8 for instructions.
Then follow these steps:
1 Start your application.
2 Open the document or file where you want to use the picture.

3-8 Using PhotoPC with Your Computer
3 Position the cursor where you want to insert the picture.
4 Choose the Insert Picture or Import File command. The command
may have a different name in your application. It may appear on the
File menu, the Insert menu, or another menu.
After you choose the command, you see a box where you can enter
the file name for your picture or choose from a list of files.
5 Enter the file name or use the lists to locate and select your picture.
6 Click OK. The picture appears in your document.
Closing EasyPhoto When you are finished working with your pictures, follow these steps to
close EasyPhoto:
1 Select Exit from the File menu. EasyPhoto asks if you want to save
the new photo gallery.
2 Click Yes. EasyPhoto then prompts you to name the photo gallery.
3 Type any name up to 32 characters, and click OK. The photo
gallery is saved, and you can use it to access your pictures
whenever you want.
NOTE
Double-click the Getting Started icon for a quick lesson on using
EasyPhoto with pictures from other sources, such as scanners and photo
CDs. You can use EasyPhoto to work with picture files in the following
formats: JPEG (read/write), BMP (read/write), TIFF (read), Photo CD
(read), and GIF (read).

Working with Your Pictures 4-1
B
4
4 Working with Your Pictures
sing your EasyPhoto software, you can organize
your pictures in photo galleries, enhance the images with the
Photo Workshop, and add visual impact to almost any kind of document
with your photos. To find out how to transfer pictures to your computer
and insert them in your documents, see Chapter 3. You can also use the
EasyPhoto Help feature to get software instructions.
This chapter describes the following EasyPhoto activities:
❙ Using photo galleries
❙ Making changes with the Photo Workshop
❙ Printing your pictures
❙ Changing file information.
Using Photo GalleriesWhen you transfer your pictures from the PhotoPC camera to your
computer, they are stored in a photo gallery.
UProposal: City of Tor rance
MLS+Associates have been working
with City Urban Planning Commissions
for the last 45 years. The availability of
a senior architect throughout a project is
one of the main reasons we have been
MLS+ Associates Architects
awarded more than 75% of the contracts
proposed in the last two decades. Our
experience working with people has cre-
ated a unique working relationship where
everyone in the community has a chance to voice
their concerns and ideas. This approach has
helped us form lasting relationships with all the communities we have had the privilege
to work with. MLS+Associates takes great pride in the work we create and feel the
voices of the communities from past projects give the best insight into our success.
MLS+ Associates Architects
➤Urban Planning
➤RecreationaLocaions
➤Corporate Parks
➤Commercial Buildings
➤Residential Designing

4-2 Working with Your Pictures
You can easily rearrange the pictures in a photo gallery by clicking and
dragging. You can also open several photo galleries at once and transfer
pictures between them. This lets you organize your pictures by subject
matter, project, or in any way you want.
Photo galleries appear “on top” of any other windows on your screen. If
you don’t want the photo gallery on top, you can turn off this feature. In
the photo gallery menu area, choose Always on Top from the File menu.
Adding or Changing Picture Information
In addition to displaying small “thumbnail” versions of your pictures
and short titles, galleries also store important information about each
image.
Click to display information
Click to edit information
Photo gallery showing picture information
Click to change “Always on Top” feature
4
Working with Your Pictures 4-3
A
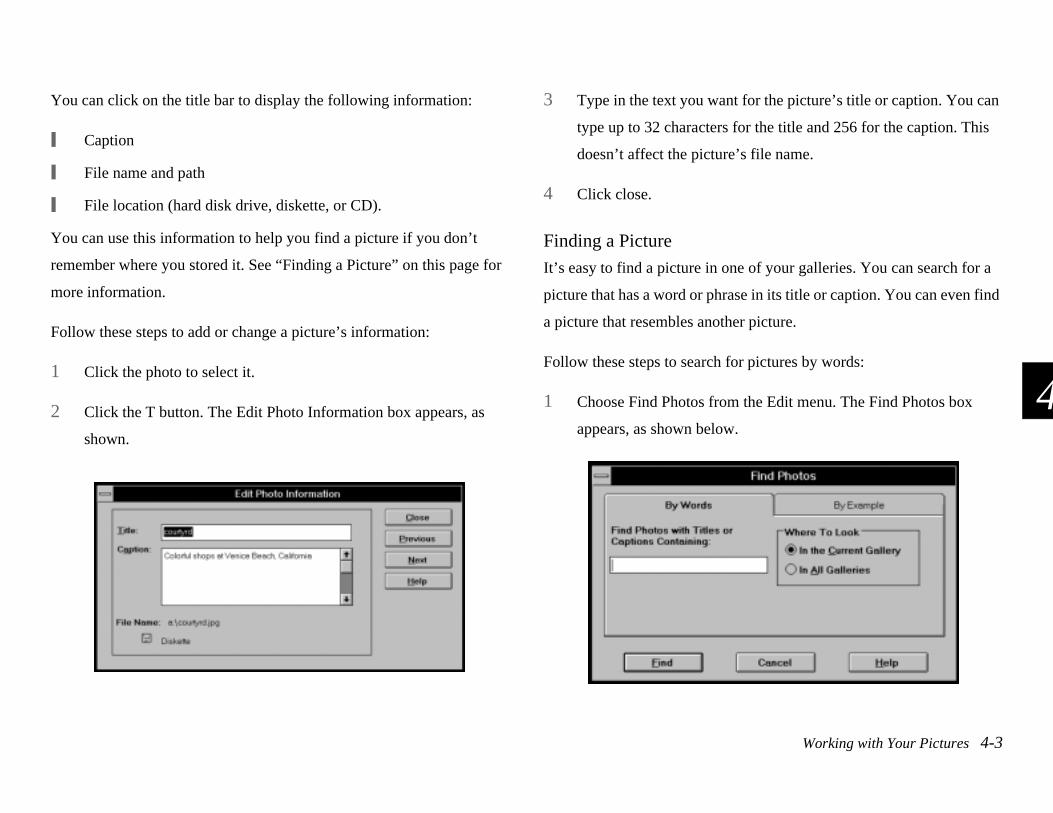
You can click on the title bar to display the following information:
❙ Caption
❙ File name and path
❙ File location (hard disk drive, diskette, or CD).
You can use this information to help you find a picture if you don’t
remember where you stored it. See “Finding a Picture” on this page for
more information.
Follow these steps to add or change a picture’s information:
1 Click the photo to select it.
2 Click the T button. The Edit Photo Information box appears, as
shown.
3 Type in the text you want for the picture’s title or caption. You can
type up to 32 characters for the title and 256 for the caption. This
doesn’t affect the picture’s file name.
4 Click close.
Finding a Picture
It’s easy to find a picture in one of your galleries. You can search for a
picture that has a word or phrase in its title or caption. You can even find
a picture that resembles another picture.
Follow these steps to search for pictures by words:
1 Choose Find Photos from the Edit menu. The Find Photos box
appears, as shown below.

4-4 Working with Your Pictures
2 Click the By Words tab, if necessary.
3 Type the word or phrase you’re looking for.
4 Under Where To Look, click In the Current Photo Gallery or In All
Galleries.
5 Click Find. EasyPhoto displays a new photo gallery with all
pictures that have your word or phrase in their title or caption.
Follow these steps to search for pictures by resemblance:
1 In the photo gallery, select the picture you want to use as an
example.
2 Choose Find Photos from the Edit menu. The Find Photos box
appears.
3 Click the By Example tab. The By Example screen appears, as
shown below.
4 Under Where To Look, click In the Current Photo Gallery or In All
Galleries.
5 Click Find. EasyPhoto displays a new photo gallery with all
pictures that resemble the example picture.
Making Changes with the Photo WorkshopEasyPhoto’s Photo Workshop lets you make the following kinds of
changes to your pictures:
❙ Cropping
❙ Resizing

4
Working with Your Pictures 4-5
A
❙ Rotating
❙ Adjusting brightness and contrast
❙ Adjusting colors.
You can apply the change to the whole picture or to part of the picture.
To start the Photo Workshop, double-click a picture in the photo gallery.
You see your picture in the Photo Workshop window, as shown on the
right.
NOTE
You can also use TWAIN-compliant image editing software such as
Micrografx Picture Publisher or Adobe Photoshop to further
enhance or modify your pictures.
If you need a closer look at your picture, you can use the zoom feature.
Click the Zoom In button, and then click on your picture. Click the
Zoom Out button, and then click on your picture again to return to your
original view.
Select Rectangle
Select Freehand
Crop
Resize Rotate
Adjust Brightness and Contrast
Adjust ColorsMove Zoom Out
Zoom In
Save

4-6 Working with Your Pictures
Cropping
You can crop your pictures by selecting either a rectangular area or a
freehand area to keep; everything outside of the area is cut away. Follow
these steps:
1 Click either the Select Rectangle button or the Select Freehand
button.
2 Drag the mouse to enclose the area you want to keep. A dotted line
moves around the selected area.
3 Click the Crop button. EasyPhoto deletes everything outside of the
selected area.
Resizing
When you change the size of your picture, EasyPhoto automatically
keeps the original proportions, so your picture is never distorted. Follow
these steps:
1 Click the Resize button. Arrows appear in the corners of your
picture.
2 Drag one of the arrows to change your picture’s size. Size
information is displayed at the bottom of the window.
3 Release the mouse button when the picture is the size you want.
NOTE
You can also use your word processor or other software to change the
size of a picture after you import it.
Rotating
You can rotate your picture and tilt it at any angle you want. Follow
these steps:
1 Click the Rotate button. Curved arrows appear around your picture.
2 Drag one of the arrows to rotate your picture. Rotation information
is displayed at the bottom of the window.
3 Release the mouse button when the picture is turned the way you
want it.
Adjusting Brightness and Contrast
Changing the brightness of a picture lets you make it lighter or darker;
changing the contrast adjusts the difference between the picture’s light
and dark areas. Follow these steps:
1 Click the Brightness and Contrast button. You see a screen like the
one below.

4
Working with Your Pictures 4-7
A
2 Drag the sliders to make the adjustments you want. The Before and
After samples show you the results of your changes.
3 Click OK when you are ready to make the changes to your picture.
Adjusting Colors
You can change the way your picture looks by adjusting the intensity
and relationship of the three primary colors on your screen: red, green,
and blue. Follow these steps:
1 Click the Adjust Color button. You see a screen like the one below.
2 Drag the sliders to change the red, green, and blue colors in your
picture. The Before and After samples show you the results of your
changes.
3 Click OK when you are ready to make the changes to your picture.
Saving, Moving, and Printing Your PicturesWhen you’re finished working with your picture in the Photo Workshop,
you can save it, move it to a document, or print it out.
❙ Click the Save button to save your picture.
❙ To move your picture to a document, follow the instructions on
page 3-7, but click the Move button before you drag the picture
from the Photo Workshop screen.
❙ To print your picture, choose Print from the File menu.
Drag to adjust contrastDrag to adjust brightness
Drag to adjust colors
D dj l
Zoom in
Zoom out
Drag to move picture in window
4-8 Working with Your Pictures
Changing File InformationWhen you work with EasyPhoto, you don’t need to keep track of your
picture files. EasyPhoto does it for you. However, you can change a
picture’s file name, file type, or location if you want. Follow these steps:
1 From the Photo Workshop screen, choose Save As from the File
menu. The Save As box appears.
EasyPhoto automatically stores your picture files in the
C:\EZPHOTO\PHOTO directory. The files are named according to
the date and order in which they were transferred from the camera.
The file type is JPEG (*.JPG), which provides high image quality
in small, compressed files.
2 Choose the drive and directory where you want to save the file.
3 Choose the file type: either JPEG or BMP. BMP files are larger (in
bytes) than JPEG files, but they can be inserted or imported into
most Windows software applications.
4 Type a name for the file in the File Name box. The name you type
replaces the name originally displayed.
5 Click OK. EasyPhoto saves a copy of your picture with the new
information.
When you exit the Photo Workshop and return to the photo gallery, you
see a copy of your picture displaying the new file name as its title. You
have two copies of the picture: one with the new file information and
one with the original file information. You can delete the original if you
don’t need it.

Using Advanced Features 5-1
B
5
hen PhotoPC is connected to your computer, you
can customize several of the camera’s features to work the way
you want. You can also take pictures by controlling the camera
directly from your computer. This chapter describes the following:
❙ Getting ready to use advanced features
❙ Setting the clock
❙ Setting auto shut-off
❙ Setting the shutter speed
❙ Adjusting port settings
❙ Taking pictures from your computer.
Getting Ready to Use Advanced Features You use the PhotoPC Settings software to work with advanced features.
Follow these steps to get started:
1 Connect the camera to your computer as described in Chapter 3.
5 Using Advanced Features
W 2 Turn on both the camera and your computer system.
3 Double-click the PhotoPC Settings icon in the PhotoPC software
group or folder, as shown below.
The Setup screen appears, as shown on page 5-2.

5-2 Using Advanced Features
You can switch between the Setup screen and the Controls screen by
clicking on the tab.
Setting the Clock PhotoPC can record the date and time of your pictures automatically.
When you transfer the pictures from the camera to your computer, you
can see exactly when each shot was taken.
In order to have the time and date recorded, you need to set the camera’s
clock from your computer. The PhotoPC clock will continue to keep
time accurately until you replace the batteries; at that point you will have
to connect the camera to your computer again and reset the clock.
Follow these steps to set the camera’s clock:
1 Connect the camera to your computer and open the Setup screen as
described on page 5-1.
The Date/Time box shows the current values in your camera’s
internal clock. You can use the arrow buttons to change these
values if necessary.
2 Click OK. EasyPhoto updates the date and time in your camera.
Setting Auto Shut-off PhotoPC’s power-saving feature automatically shuts off the camera if
you wait more than 60 seconds before taking a picture.
Drag to customize auto shut-off
Click to change date and time, if necessary

5
Using Advanced Features 5-3
A
You can adjust this time period by connecting the camera to your
computer and using PhotoPC settings. Follow these steps:
1 Connect the camera to your computer and open the Setup screen as
described on page 5-1.
The Auto Shut-off slider is set to 1 minute, as shown on page 5-2.
2 Drag the slider to the left to reduce the time period, and to the right
to increase it.
As you move the slider, the number of minutes is shown on the
screen. You can select from 0 to 5 minutes. If you select 0, the
camera shuts off immediately after your picture is captured and
saved to memory. When you turn it back on, you have just 30
seconds to take a picture after the standby light stops flashing.
Auto Shut-off takes place after 5 minutes when the camera is
connected to your computer. You can’t change this time period.
3 When you are finished, click OK.
Setting the Shutter Speed When the camera is connected to your computer, you can use PhotoPC
Settings to adjust the shutter speed. Slower shutter speeds allow more
light to strike the lens; faster speeds allow you to take “stop-action”
pictures of moving subjects. Shutter speed settings remain in effect only
while the camera is connected to your computer.
The factory setting for PhotoPC is Auto, which means that the shutter
speed is adjusted automatically based on the amount of light available to
the camera. You will probably want to use this setting most of the time,
unless you are planning to take stop-action pictures or use special
lighting effects.
NOTE
When you adjust the shutter speed manually, you can’t use the auto flash
setting on the camera. To take a picture with the flash, you have to use
the forced flash setting.
To set the shutter speed, follow these steps:
1 Connect the camera to your computer and open the Setup screen as
described above.

5-4 Using Advanced Features
The Shutter Speed slider is set to Auto.
2 Drag the slider to the left to reduce the shutter speed, and to the
right to increase the shutter speed. The shutter speed range is from
1/30 second to 1/10,000 second.
3 When you are finished, click OK.
Adjusting Port Settings You can use PhotoPC Settings to adjust the serial port connection for
PhotoPC. You will need to adjust these settings if you see an error
message when you connect the camera. You may also want to
experiment with the speed setting to decrease the time it takes to transfer
pictures to your computer.
Click to change port for camera connection
Click to change speed for transferring pictures
Drag to set shutter speed

5
Using Advanced Features 5-5
A
Follow these steps to set the port and speed for your PhotoPC
connection:
1 Connect the camera to your computer and open the Setup screen as
described on page 5-1. The Computer Connection box shows the
current port settings.
2 Click the arrow to change the Port setting. You can select from
COM1, COM2, COM3, or COM4.
NOTE
Do not change the Port setting unless you want to use a different
port or you get an error message. When you change the Port
setting, you lose the connection between the camera and your
computer.
In most cases, you should select either COM1 or COM2,
depending on which serial port you connected the camera to.
If you have a serial device connected to one port and an internal
modem on the other, you can try COM3 or COM4. You may have
to reconfigure your ports in the Windows Control Panel. If you get
an error message, see page 6-3 for more information.
3 Click the arrow to change the Speed setting.
EasyPhoto automatically chooses 38,400 baud, a speed that works
with most computers. You can experiment to choose the fastest
speed that works on your system. Increasing your port speed will
make pictures transfer much faster from the camera to your
computer.
4 When you are finished, click OK.
Taking Pictures from Your Computer When the camera is connected to your computer, you can take pictures
and use PhotoPC features through the software on your computer. The
only control you can use on the camera itself is the power switch.

5-6 Using Advanced Features
When you take pictures from your computer, you can see each image on
your screen before you capture it. This “live preview” feature works
something like a video camera, except that the image moves more
slowly. Live preview is especially helpful when you are using a close-up
lens.
NOTE
Taking pictures from your computer with live preview uses a lot of
battery power. If you don’t have the PhotoPC AC adapter, you may want
to consider purchasing it. See Appendix A for more information about
using the AC adapter.
The auto shut-off feature remains in effect when the camera is connected
to your computer (except when you use live preview). However, it takes
place after 5 minutes of inactivity. To turn the camera back on, slide the
power switch off and on again.
Follow these steps to take pictures from your computer:
1 Connect the camera to your computer as described in Chapter 3.
2 Position the camera facing the subject. Using a tripod will give you
the maximum flexibility in setting up your shots.
3 Turn on both the camera and your computer system.
4 Double-click the EasyPhoto icon. The EasyPhoto opening screen
appears.
5 Click the PhotoPC button. The PhotoPC screen appears.
6 Click the Camera Options button. The Camera Controls screen
appears, as shown on page 5-7.
7 Click Show Live Preview to display your image in the viewfinder
window.
You can move or tilt the camera until you see the image you want
to capture in the window. The image is updated every three
seconds.
You can click the buttons on your screen to set the resolution, flash,
timer and erase features, just as you use the buttons on the camera. The
control panel on your screen displays the same information as the
control panel on the camera itself. For more information about the
control panel, see Chapter 2.
5
Using Advanced Features 5-7
A
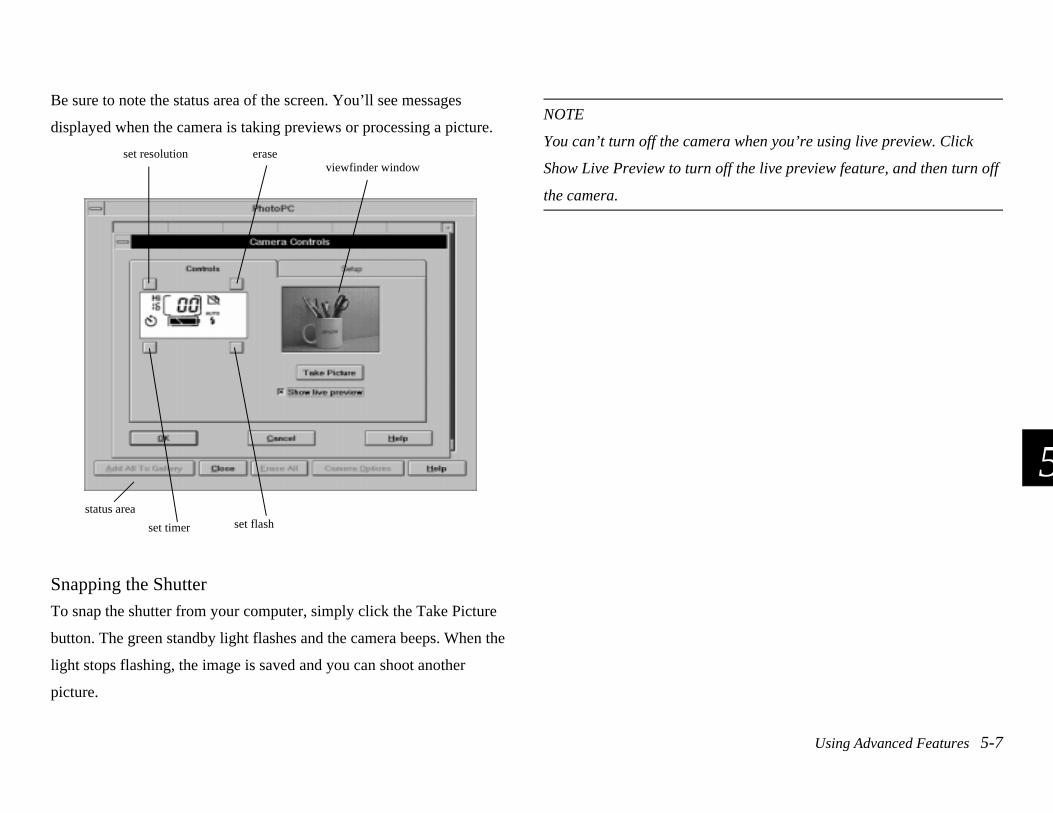
Be sure to note the status area of the screen. You’ll see messages
displayed when the camera is taking previews or processing a picture.
Snapping the Shutter
To snap the shutter from your computer, simply click the Take Picture
button. The green standby light flashes and the camera beeps. When the
light stops flashing, the image is saved and you can shoot another
picture.
NOTE
You can’t turn off the camera when you’re using live preview. Click
Show Live Preview to turn off the live preview feature, and then turn off
the camera.
set resolution erase
set timer set flash
viewfinder window
status area
Maintenance and Troubleshooting 6-1
B
6
our PhotoPC is easy to take care of, and any
problems you may have are easy to solve.
Caring for the Camera Your PhotoPC camera requires only the most basic care. Before you
do any maintenance procedures on the camera, be sure to read the
Safety Instructions in the Introduction. Then follow these guidelines:
❙ Use a clean, dry cloth to keep the camera free of dust.
❙ Don’t use harsh or abrasive cleaners.
❙ To clean the lens, first blow off any loose dust or dirt. Then
breathe on the lens and wipe off all moisture with a soft, lint-
free cloth or lens cleaning tissue.
6 Maintenance and Troubleshooting
Y ❙ To avoid scratching the lens, don’t press too hard.
❙ Keep the lens covered (power switched off) when you’re not using
the camera.
❙ If necessary, clean the battery contacts with a dry cloth.
Don’t store the camera in the following locations:
❙ Where it will be exposed to direct sunlight, for example, on a car
dashboard
❙ Near sources of bright light or high humidity
❙ Near heat sources or in a closed car
❙ In areas of excessive dirt or dust
❙ Where it will be exposed to strong vibrations or magnetic fields.
Camera Problems Before you call for help, check this list of problems and possible
solutions.
6-2 Maintenance and Troubleshooting
The camera has no power.
❙ Check the power switch and make sure the camera is turned on.
❙ The camera may have shut off automatically. Slide the power
switch off and then on.
❙ Check the batteries and make sure they are installed correctly.
Replace the batteries if necessary, following the instructions on
page 1-2.
❙ If you are using the AC adapter, make sure it is plugged into a
working outlet.
You can’t take a picture with the camera.
❙ The flash may be recharging. Wait until you see the green standby
light, and try again.
❙ The camera may be full. Check the picture counter on the control
panel. Erase a picture using the erase button, or transfer the pictures
to your computer and then erase them. See Chapter 3 for
information about transferring your pictures and erasing them with
your computer.
❙ The camera may be connected to your computer. When it’s
connected, you can’t use any of the controls on the camera itself.
See page 5-5 for instructions on taking pictures from your
computer.
The flash doesn’t work.
❙ Make sure the flash setting is either automatic or forced flash.
❙ Check the batteries and make sure they are installed correctly.
Replace the batteries if necessary, following the instructions on
page 1-2.
You get an error message when you try to transfer your pictures from
the camera to your computer.
❙ Make sure the cable is connected correctly, as described on page
3-1.
❙ Make sure the camera is turned on and the batteries have enough
power.
❙ Check the serial port settings in your PhotoPC software. You may
need to change the settings for the Port and Speed of your serial
connection.
If you have an internal modem on one port and a serial device
connected to the other port, you may not be able to use COM1 or
COM2. You can select COM3 or COM4. However, you may need
to reconfigure your ports in order to use these settings.

6
Maintenance and Troubleshooting 6-3
A
You can use the Windows Control Panel to reconfigure your ports.
Make sure you select a different IRQ for each port you want to use.
For more information, see your Windows documentation and the
manuals that came with your computer and other equipment.
Picture Problems If you’re not satisfied with the pictures you get from PhotoPC, you may
need to adjust some of the camera settings. Or maybe you need to brush
up on your photography techniques. Read the suggestions listed below
and give them a try.
Your pictures display poor image quality on the screen or when you
print them out.
❙ PhotoPC captures images in 24-bit color (16.7 million colors).
Your pictures will not display maximum image quality if your
monitor or your computer’s video controller don’t support this
color depth. You may need to upgrade your system to achieve the
best possible image quality.
❙ If your pictures look better on the screen than when you print them
out, you may need to upgrade your printer. An EPSON color ink jet
printer, for example, will provide excellent image quality.
Your picture is blurry or out of focus.
❙ Make sure your subject is within the camera’s range. You should
be at least 2 feet away to take a picture without the flash, and 3 to
10 feet away to take a picture with the flash.
❙ Make sure you hold the camera steady, and your subject isn’t
moving.
❙ If you want to photograph a moving subject, try increasing the
shutter speed. For information about changing the shutter speed,
see page 5-3.
❙ Make sure your flash setting is either automatic or forced flash.
Your picture is too dark (underexposed).
❙ You may need to use the flash. Make sure the setting is either
automatic or forced flash.
❙ If you’re using the flash, make sure your subject is within the range
of 3 to 10 feet.
❙ Use EasyPhoto or another image editing program to adjust the
picture’s brightness and contrast. See
page 4-7 for instructions.
Your picture is too light (overexposed).
❙ If you’re using the forced flash setting, it may be too bright. Try
setting the flash to auto.
6-4 Maintenance and Troubleshooting
❙ The camera’s light sensor may be covered or dirty. Make sure
you’re not blocking it when you take pictures. You may need to
clean it with a soft, dry cloth.
❙ If you’re facing a bright light source, you may need to shoot your
picture from a different angle.
❙ If you’re taking pictures in the snow or at the beach on a sunny day,
you may need to use an ND-filter. A 37 mm ND-4 camcorder filter
should work in most cases.
❙ Use EasyPhoto or another image editing program to adjust the
picture’s brightness and contrast. See
page 4-7 for instructions.
Part of your picture is missing.
❙ Make sure you’re not blocking the lens with your finger, hand
strap, clothing, or other object.
A horizontal or vertical red line appears on your picture.
❙ Red lines are caused by glare. Avoid photographing very shiny
surfaces that reflect a glare of light into your lens.
❙ In very bright light, you may need to use an ND filter to avoid
glare. Try a 37 mm ND-4 camcorder filter.
The wrong date and/or time are displayed on your pictures.
❙ You need to connect the camera to your computer and reset the
camera’s clock. See page 5-2 for instructions. Whenever you
change batteries in the camera you need to reset the clock.
The colors in your picture don’t look right.
❙ When you take pictures under certain artificial lighting conditions,
the colors may be slightly distorted. You can use EasyPhoto to
adjust the colors. See page 4-7 for instructions.
Your pictures don’t look as good as they used to.
❙ Your camera’s lens may be dirty or dusty. Try cleaning it following
the instruction on page 6-1.

A-1
AB
hotoPC’s flexibility allows you to use the camera
with a variety of options. You can increase the camera’s
storage capacity by installing a 2MB or 4MB PhotoSpan™ memory
module. To help you save battery power, particularly when
transferring pictures to your computer, you can use the optional AC
adapter. The PhotoSpan module and AC adapter should be available
where you bought your PhotoPC. You can also order them from
EPSON Accessories at (800) 873-7766 (U.S. sales only). In Canada,
call (800) BUY-EPSON. For close-ups, wide-angle pictures, and
special effects, you can use any standard 37 mm video camcorder
lens or filter.
Expanding Your PhotoPC Memory PhotoPC comes with 1MB of internal memory, which holds up to 16
pictures at high resolution or 32 pictures at standard resolution. You
can increase the camera’s
A Using Optional Accessories
P capacity by installing a 2MB or 4MB PhotoSpan external memory
module (flash memory board), as described in this table:
CAUTION
Once you install a PhotoSpan module, you can’t remove it. Make
sure you think about your future needs before you decide whether
to install the 2MB module or the 4MB module.
PhotoPC capacity
Number of photos1MB internal memory
With 2MB PhotoSpanA882401
With 4MB PhotoSpanA882411
At high resolution 16 48 80
At standard resolution 32 96 160
A-2
Installing PhotoSpan Memory Modules Before you install a PhotoSpan module, make sure you erase all pictures
in the camera and turn it off.
CAUTION
PhotoSpan modules are sensitive to static electricity and easily
damaged. Be sure you ground yourself by touching a metal object before
you handle the module, and never touch the module’s metallic area.
Follow these steps to install a PhotoSpan module:
1 Open the battery compartment and remove the batteries.
2 Place the camera on end to access the memory socket cover tabs.
3 Press down on the tabs with your fingers while pushing up on the
socket cover with your thumbs.
4 Position the module so that the notch is aligned with the rounded
corner of the socket.
5 Slide the module into the socket at an angle as shown, pressing
along the edge until it clicks into place.
memory socket cover tabs
notch
rounded corner

A-3
B
A
6 Press down on the module until it snaps into the retaining clips at
the sides of the socket.
7 Place the socket cover on the camera body and press down until it
snaps into place.
8 Replace the batteries in the battery compartment and replace the
battery cover.
You’ll see the camera’s expanded capacity reflected in the control panel
(number of pictures remaining) when you take your first picture.
With expanded memory, you may notice a delay between the time you
press the shutter button and when the camera beeps. You can reduce this
delay by pressing the button down halfway, holding it as long as
necessary, and then pressing it down the rest of the way when you’re
ready to take the picture.
Using the AC Adapter The AC adapter (A882421, model PCDC002) allows you to connect
your PhotoPC camera to a standard electrical outlet. This is especially
useful when you are transferring pictures and operating the camera from
your computer. The adapter powers the camera, but does not charge the
batteries.
retaining clip
A-4
WARNING
Use only the AC adapter (A882421) designed for PhotoPC. Use of any
other adapter could cause fire, electrical shock, or injury. Do not alter
the plug on the AC adapter, and do not use the adapter for any purpose
other than powering your PhotoPC camera. If the adapter’s plug
doesn’t fit your outlet, have a proper outlet installed by a qualified
electrician. To avoid radiation danger, do not expose or remove the
ferrite core.
To avoid losing any images or settings, make sure the camera is finished
processing and turned off before you connect or disconnect the AC
adapter. Then follow these steps:
1 Locate the port cover on the side of the camera. Press on the arrows
and slide the cover down to open it.
2 Plug the adapter cable into the DC port on the camera.
TITLE
Cam3 01 eps
arrows
EPSON AMERICA, INC.Documentation Department20770 Madrona Avenue, Torrance, CA 90503(310) 782-0770
TITLE
Cam3-02.epsDATE
6/26/95DRAWN BY
L Oliver
DC port

A-5
B
A
3 Connect the other end of the adapter to an electrical outlet.
Using Optional LensesAlthough you can use any standard 37 mm video camcorder lens or filter
with PhotoPC, lenses manufactured by Tiffen® are recommended. Call
(800) 522–7835 for ordering information.
To attach a lens, screw it onto the camera as shown below.
When you use a close-up lens, the viewfinder will not give you an
accurate image of your picture. The best way to take close-up pictures is
by connecting the camera to your computer. You can use the live
preview feature to see your images on the screen before you capture
them. See
page 5-5 for more information about taking pictures from your
computer.
CAUTION
Handle the camera carefully and avoid jarring it when using an optional
lens.

B
Specifications B-1
A
Physical Dimensions
B Specifications
Width 6.5 in. (166 mm)
Height 3.5 in. (88 mm)
Depth 1.9 in. (47 mm)
Weight(without batteries)
11 oz. (310 g)
Power
Technical
Sources 4 AA batteries (single-use alkaline, single-use lithium, or rechargeable Ni–Cad)
Optional AC adapter (A882421)
Consumption Approximately 100 milliwattat power-on
Approximately 4 W during image
processing
Maximum 12 W during flash discharge
Product type CCD (charge coupled device)still frame camera

B-2 Specifications
PhotographicImage size 640 x 480 pixels (high resolution)
320 x 240 pixels (standard resolution)
Bit depth 16 million colors, 24-bit
Serial interface 8-pin DIN (camera); RS-232C (computer)
Internal memory 1MB flash memory
Optional expansion memory
2MB (0.5MB flash memory x 4 chips)
4MB (0.5MB flash memory x 8 chips)
Lens f = 6 mm (equivalent to a 43 mm lens on a 35 mm camera)
Range 2 ft (60 cm) to infinity
Exposure Equivalent to ISO 130
Shutter Automatic electronic shutter, 1/30 to 1/10,000 second
Viewfinder Optical
Aperture f5.6
Flash modes Auto, forced flash, off
Flash range 3 ft to 10 ft (1 m to 3 m)

Index 1
A
B
AAC Adapter, A-3Accessories (optional), Intro-2, A-1–A-5Adding picture information 4-2Adjusting
brightness and contrast, 4-6colors, 4-7port settings, 5-4settings
flash, 2-5resolution, 2-6timer, 2-8
Advanced featuresgetting ready to use, 5-1
Attaching the hand strap, 1-4Auto flash setting, 2-5Auto shut-off, 2-2, 3-3, 5-6
Index
BBatteries
handling, 1-3installing, 1-2power levels, 2-3
Bulletin Board Service (EPSON), Intro-3
CCamera
maintenance, 6-1problems, 6-1
Changing file information, 4-8Changing picture information, 4-3Changing your pictures using Photo Workshop, 4-5Checking the battery icon, 2-3Close-up lens, A-5Closing EasyPhoto, 3-8CompuServe Online Support (Epson America Forum),
Intro-4

2 Index
Connecting the camera to your computer, 3-1Control panel, 2-2Cropping your pictures, 4-6Customer support services and phone numbers, Intro-3
DDocuments, using pictures in, 3-6
EEasyPhoto
closing 3-8installing, 1-5making changes with Photo Workshop, 4-5organizing your pictures, 4-1using advanced features, 5-1
EasyTouch control panel, 2-2EPSON
Bulletin Board Service (BBS), Intro-4customer support services and phone numbers, Intro-3Epson America Forum on CompuServe, Intro-4
Erasing a picture, 2-9, 3-5Expanding memory, A-1
FFeatures, Intro-2, 1-1File information, changing, 4-8Finding a picture in a gallery, 4-3Flash settings, 2-5
GGalleries (photo), 4-2Getting help, Intro-3
HHandling batteries, 1-3High resolution setting, 2-6
IInserting a picture into a document
importing, 3-8using copy and paste, 3-6using drag and drop, 3-7
Installingbatteries, 1-2EasyPhoto software, 1-5memory modules, A-2
LLens, using, A-5Live preview, 5-6
MMaintenance
cleaning, 6-1storage, 6-1

Index 3
A
B
OOptional lenses, A-5Organizing your pictures, 4-2
PPhoto galleries
adding or changing picture information, 4-3using, 4-2
Photo Workshop, 4-5–4-8PhotoPC
accessories Intro-2advanced features, 5-1capacity, A-1connecting the camera to your computer 3-1features, Intro-2how to take pictures, 2-1maintenance, 6-1options
AC adapter, A-3adding memory, A-1
problems and solutions, 6-2registration card, Intro-4safety instructions, Intro-4specifications, B-1system requirements Intro-2
PhotoSpan memory module, A-1, A-2Picture counters, 2-9Picture problems, 6-3Printing your pictures, 4-8
RRecording time and date, 5-2Registering your PhotoPC, Intro-4Resizing your pictures, 4-6Resolution settings (high and standard), 2-6Rotating your pictures, 4-6
SSafety instructions, Intro-4Saving your pictures, 4-8Searching for a picture
by resemblance, 4-4by words, 4-4
Settingauto shut-off, 5-3clock, 5-2flash, 2-4port and speed, 5-4resolution, 2-6shutter speed, 5-3timer, 2-8
Show live preview, 5-6Shutter speed, 5-3Snapping the shutter
from your computer, 5-7on the camera, 2-3
Specifications, B-1Standard resolution setting, 2-6System requirements, Intro-2

4 Index
TTaking a picture
from your computer, 5-5outdoors, 2-4snapping the shutter, 2-3with the timer, 2-8
Timer settings, 2-8Transferring pictures to your computer, 3-3Troubleshooting, 6-2Turning the camera on and off, 2-2
UUsing advanced features
adjusting port settings 5-4setting auto shut-off, 5-3setting shutter speed, 5-3setting the clock, 5-2snapping the shutter, 5-7taking pictures from your computer, 5-5
Using pictures in your documents, 3-6
WWorld Wide Web, Intro-3
ZZoom feature, 4-5