implementing microsoft directaccess and nat in the … web services – implementing directaccess...
TRANSCRIPT
Implementing Microsoft DirectAccess and NAT in the AWS
Cloud
Scott Roberts
November 2014

Amazon Web Services – Implementing DirectAccess and NAT in the AWS Cloud November 2014
Page 2 of 36
Contents Contents 2
Abstract 3
Introduction 3
Overview 3
Scope and Best Practice 4
Knowledge Prerequisites 4
Topics Covered 4
Test Lab Overview 5
Setting Up AWS Tools for PowerShell and Configuring Defaults 6
Step 1: Set Up the AWS tools for PowerShell Environment 6
Step 2: Run the PowerShell Setup Script and Configure the Defaults 7
Step 3: Prep the AWS Toolkit for Visual Studio 10
Step 4: Build the DirectAccess Single Network Adapter Test Lab 10
Building the DMZ, NAT Device, and Domain Controller 13
Review the Windows NAT Script 13
Script and Template Walkthrough 14
Environment Setup 14
Configuration Details 15
Building the DirectAccess Single Network Adapter Topology 23
Review the DirectAccess Configuration 23
Script and Template Walkthrough 24
Environment Setup 24
Building the Client Network 32
Review the DirectAccess Configuration 32
Script and Template Walkthrough 33
Environment Setup 33
Conclusion 36
Amazon Web Services – Implementing DirectAccess and NAT in the AWS Cloud November 2014
Page 3 of 36
Abstract This whitepaper demonstrates using various services in Amazon Web Services (AWS) to deploy Microsoft Windows Server 2012 R2 as a Network Address Translation (NAT) device and deploy the Microsoft DirectAccess Windows Server role. Tools such as AWS Toolkit for Microsoft Visual Studio and AWS Toolkit for Windows PowerShell are used to automate the deployments. The target audience is IT infrastructure administrators and developer operations personnel.
Introduction Overview Amazon Web Services (AWS) provides a broad set of services and tools for deploying Microsoft Windows-based workloads on its reliable and secure cloud infrastructure. AWS CloudFormation gives you an easy way to create the set of resources needed to run your application, such as Amazon EC2 instances from Amazon Elastic Compute Cloud (EC2), DNS records from Amazon Route 53, and load balancers from Elastic Load Balancing (ELB).
An AWS CloudFormation text template describes what resources you need. Then AWS CloudFormation takes care of the how: provisioning the resources in an orderly and predictable fashion and handling and recovering from any failures or issues. For more details, see the AWS CloudFormation product detail page.
AWS CloudFormation takes care of provisioning all the resources. The next question is how will your application software be deployed, configured, and executed on the Amazon EC2 instances. There are many options, each of which will affect how quickly your application will be ready and how flexible you will need to be in terms of deploying new versions of the software. This whitepaper shows you how to use the AWS CloudFormation bootstrap helper scripts to deploy Windows Server 2012 R2 instances. It builds on the features of AWS CloudFormation introduced in the article Bootstrapping Applications with AWS CloudFormation.

Amazon Web Services – Implementing DirectAccess and NAT in the AWS Cloud November 2014
Page 4 of 36
Scope and Best Practice A goal of this whitepaper is to use Windows Server for all of the instances in the deployment for technical demonstration purposes. In other Windows guides, there is often a Linux-based NAT role that is used. There are also guides that demonstrate how to build highly available NAT solutions using these Linux images. Using Linux for the NAT role is perfectly acceptable and should work with Microsoft DirectAccess. It is also possible to achieve a valid DirectAccess configuration without using the NAT role or requiring multiple subnets. This whitepaper builds a test lab for educational purposes that matches the existing Microsoft test lab guides for DirectAccess with a Single Network Adapter as closely as possible. In future whitepapers, we will demonstrate highly available implementations, as well as integration with AWS services such as ELB and Microsoft Windows Network Load Balancing (NLB), for global geo-aware high availability (HA) solutions.
Note that by using the single network interface controller (NIC) behind a NAT topology for DirectAccess, protocols such as 6to4 and Teredo are not used. It is possible to achieve a functional multi-NIC DirectAccess configuration that meets the requirements of these protocols (such as two consecutive IPv4 addresses). However, these topics are out of scope for this whitepaper, but they are under consideration for a future one.
Knowledge Prerequisites To successfully complete this guide, you should already be familiar with the following technologies:
• Amazon EC2
• Amazon Virtual Private Cloud (VPC)
• Windows Server 2012 R2
• Windows Server Active Directory and Domain Name System (DNS)
• Windows PowerShell
Topics Covered This whitepaper covers the following topics:
• Deployment tools: AWS CloudFormation, Windows PowerShell, Visual Studio
• Networking: Amazon VPC, administrative ingress and egress (Remote Desktop Gateway (RDGW) and NAT), Internet gateway, routing
• Windows Server RRAS NAT configuration
• Windows Server Unified Remote Access/DirectAccess configuration
Amazon Web Services – Implementing DirectAccess and NAT in the AWS Cloud November 2014
Page 5 of 36
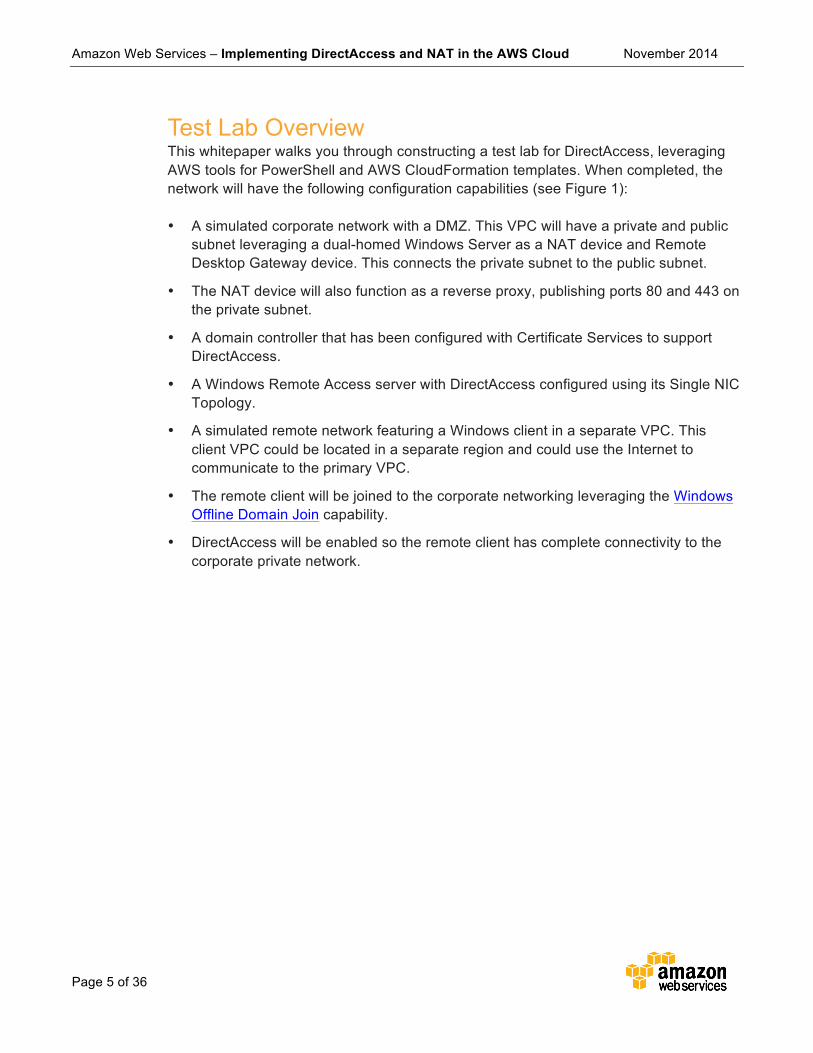
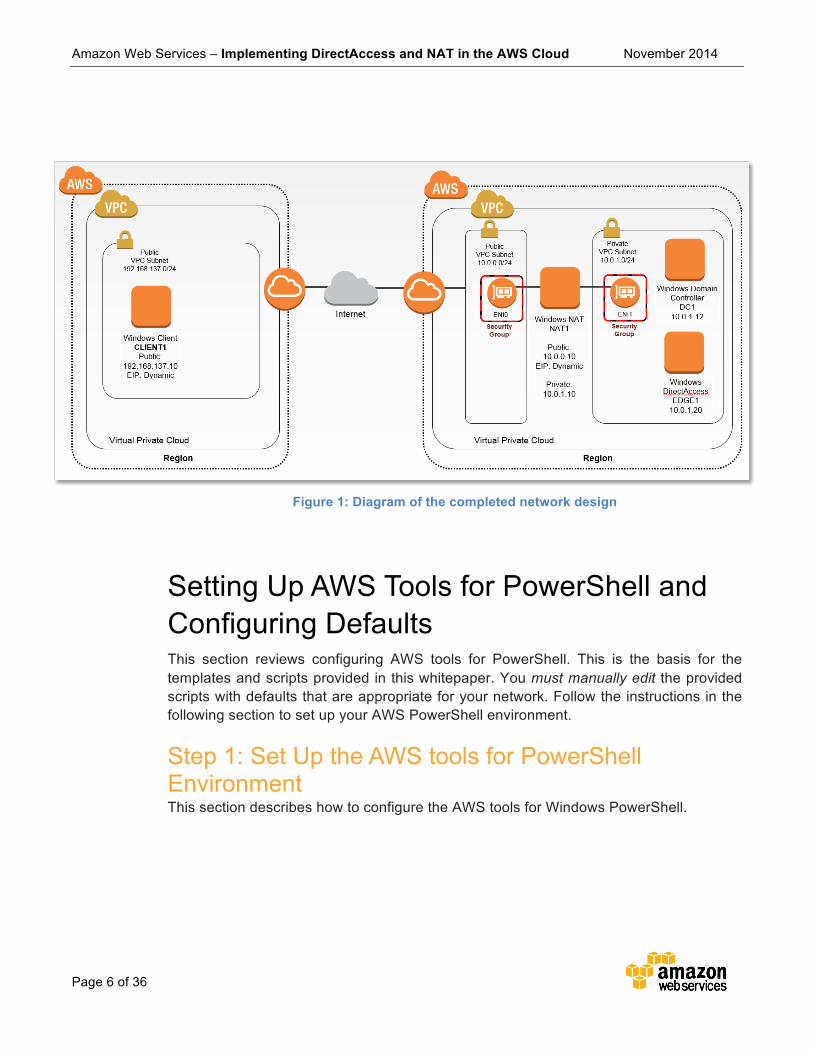
Test Lab Overview This whitepaper walks you through constructing a test lab for DirectAccess, leveraging AWS tools for PowerShell and AWS CloudFormation templates. When completed, the network will have the following configuration capabilities (see Figure 1):
• A simulated corporate network with a DMZ. This VPC will have a private and public subnet leveraging a dual-homed Windows Server as a NAT device and Remote Desktop Gateway device. This connects the private subnet to the public subnet.
• The NAT device will also function as a reverse proxy, publishing ports 80 and 443 on the private subnet.
• A domain controller that has been configured with Certificate Services to support DirectAccess.
• A Windows Remote Access server with DirectAccess configured using its Single NIC Topology.
• A simulated remote network featuring a Windows client in a separate VPC. This client VPC could be located in a separate region and could use the Internet to communicate to the primary VPC.
• The remote client will be joined to the corporate networking leveraging the Windows Offline Domain Join capability.
• DirectAccess will be enabled so the remote client has complete connectivity to the corporate private network.
Amazon Web Services – Implementing DirectAccess and NAT in the AWS Cloud November 2014
Page 6 of 36
Figure 1: Diagram of the completed network design
Setting Up AWS Tools for PowerShell and Configuring Defaults This section reviews configuring AWS tools for PowerShell. This is the basis for the templates and scripts provided in this whitepaper. You must manually edit the provided scripts with defaults that are appropriate for your network. Follow the instructions in the following section to set up your AWS PowerShell environment.
Step 1: Set Up the AWS tools for PowerShell Environment This section describes how to configure the AWS tools for Windows PowerShell.

Amazon Web Services – Implementing DirectAccess and NAT in the AWS Cloud November 2014
Page 7 of 36
Note
These examples and scripts will create resources in AWS. There will be billing charges associated with this usage.
To configure the AWS Tools for Windows PowerShell
1. Set up your AWS PowerShell environment:
http://docs.aws.amazon.com/powershell/latest/userguide/
2. The example scripts in this whitepaper assume the AWS US-West-2 region as their default configuration.
Step 2: Run the PowerShell Setup Script and Configure the Defaults Now that you have set up PowerShell it’s time execute a command and verify access. You will need to replace sections of the examples that follow with your own credentials. These examples assume you are running Windows 7 or later as the local operating system.
1. On the Start menu open Windows PowerShell for AWS. Launch this with Administrative permissions.
2. At the Administrative PowerShell prompt enter:
Get-CFNSTack
3. Since you have not created any CloudFormation stacks yet, this command should not return any results (unless you have separately created a stack). In executing this command you are verifying correct access to AWS. If you receive an access denied or other error, you must resolve that before continuing.
4. Set the PowerShell script execution policy:
Set-ExecutionPolicy -ExecutionPolicy unrestricted
5. Manually download the initial provisioning script and note the download location:
Amazon Web Services – Implementing DirectAccess and NAT in the AWS Cloud November 2014
Page 8 of 36
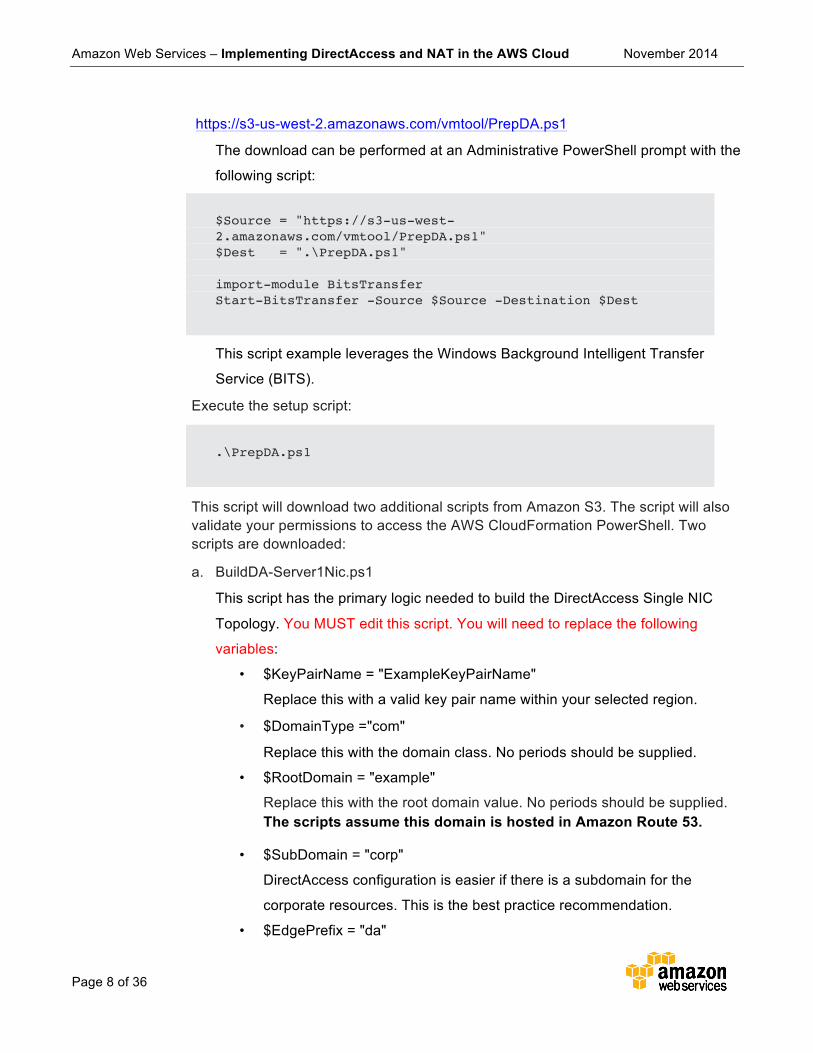
https://s3-us-west-2.amazonaws.com/vmtool/PrepDA.ps1
The download can be performed at an Administrative PowerShell prompt with the
following script:
$Source = "https://s3-us-west-2.amazonaws.com/vmtool/PrepDA.ps1" $Dest = ".\PrepDA.ps1" import-module BitsTransfer Start-BitsTransfer -Source $Source -Destination $Dest
This script example leverages the Windows Background Intelligent Transfer
Service (BITS).
Execute the setup script:
.\PrepDA.ps1
This script will download two additional scripts from Amazon S3. The script will also validate your permissions to access the AWS CloudFormation PowerShell. Two scripts are downloaded:
a. BuildDA-Server1Nic.ps1
This script has the primary logic needed to build the DirectAccess Single NIC
Topology. You MUST edit this script. You will need to replace the following
variables:
• $KeyPairName = "ExampleKeyPairName"
Replace this with a valid key pair name within your selected region.
• $DomainType ="com"
Replace this with the domain class. No periods should be supplied.
• $RootDomain = "example"
Replace this with the root domain value. No periods should be supplied. The scripts assume this domain is hosted in Amazon Route 53.
• $SubDomain = "corp"
DirectAccess configuration is easier if there is a subdomain for the
corporate resources. This is the best practice recommendation.
• $EdgePrefix = "da"

Amazon Web Services – Implementing DirectAccess and NAT in the AWS Cloud November 2014
Page 9 of 36
This will be the fully qualified domain name (FQDN) that is mapped to the
external IP address of the NAT1 instance, and then forwarded to the
EDGE1 server.
• Script notes:
This script uses Amazon Route 53 and automatically creates an A record
for this FQDN (based on the above examples): da.example.com will be
mapped to the NAT1 Elastic IP address. For this script to work as
designed, you must use a domain that is hosted by Amazon Route
53 with an account that has permission to create A records.
This script is also is designed to demonstrate the agility and flexibility
gained by using AWS PowerShell locally to orchestrate multiple
CloudFormation templates. Structuring each network role into a separate
template also improves the modularity and potential reuse of each of the
templates.
It’s possible to parameterize these variables, as well as provide a single
FQDN input that is split into separate parts. For educational purposes,
this example script is simple in order to require administrators to edit and
review the scripts prior to use.
b. CFNFunctions.ps1
No modification should be required. You can view this script and see the various
functions that are used to create a stack, monitor a stack as it is being built,
retrieve outputs from a stack, and pass those outputs to another stack. For
example, the subnet ID will be retrieved from the Windows NAT1 stack and
passed to the other stacks.
You will also notice a function called Get-Server2012R2AMIID. Windows
Amazon Machine Image (AMI) IDs vary from AWS region to AWS region. They
also change monthly as new AMIs are published each month, with that month’s
updates included. Instead of having to manually figure out the current AMI ID for

Amazon Web Services – Implementing DirectAccess and NAT in the AWS Cloud November 2014
Page 10 of 36
Windows Server 2012 R2, this script retrieves it dynamically and passes it to
each of the stack scripts.
Step 3: Prep the AWS Toolkit for Visual Studio We recommend viewing the AWS CloudFormation templates using the AWS Toolkit for Visual Studio. However, this is not required and the files can be viewed with any text editor. While you will use PowerShell for command execution, installing the AWS Toolkit for Visual Studio will make it much easier to view and edit the AWS CloudFormation templates.
1. Install Visual Studio 2010 and AWS Toolkit for Microsoft Visual Studio
If you have Microsoft Visual Studio 2010 Professional edition or higher installed on your Windows workstation, download and install the AWS Toolkit for Microsoft Visual Studio from http://aws.amazon.com/visualstudio/. If you don’t have Microsoft Visual Studio installed, you can use any other JSON editor (e.g., Notepad++)
2. Acquire an Admin user account:
You will need an access key ID and a secret access key.
This web site provides more information about IAM users: http://docs.aws.amazon.com/IAM/latest/UserGuide/IAMBestPractices.html
3. Download and view the NAT1 template:
Download the NAT1 template by opening the script provided earlier (https://s3-us-west-2.amazonaws.com/vmtool/BuildDA-Server1Nic.ps1), retrieve the NAT1 template URL, and download the file locally.
You can review the template by double-clicking it from within Windows Explorer.
Step 4: Build the DirectAccess Single Network Adapter Test Lab The remainder of this whitepaper explains the scripts that are used to build this test lab. If you have successfully edited the default values, you can simply execute the script, without further interaction. You will have a fully functioning DirectAccess Single Network Adapter test lab. This script should take about 1.5 hours to run successfully.
To build the DirectAccess test lab
Amazon Web Services – Implementing DirectAccess and NAT in the AWS Cloud November 2014
Page 11 of 36
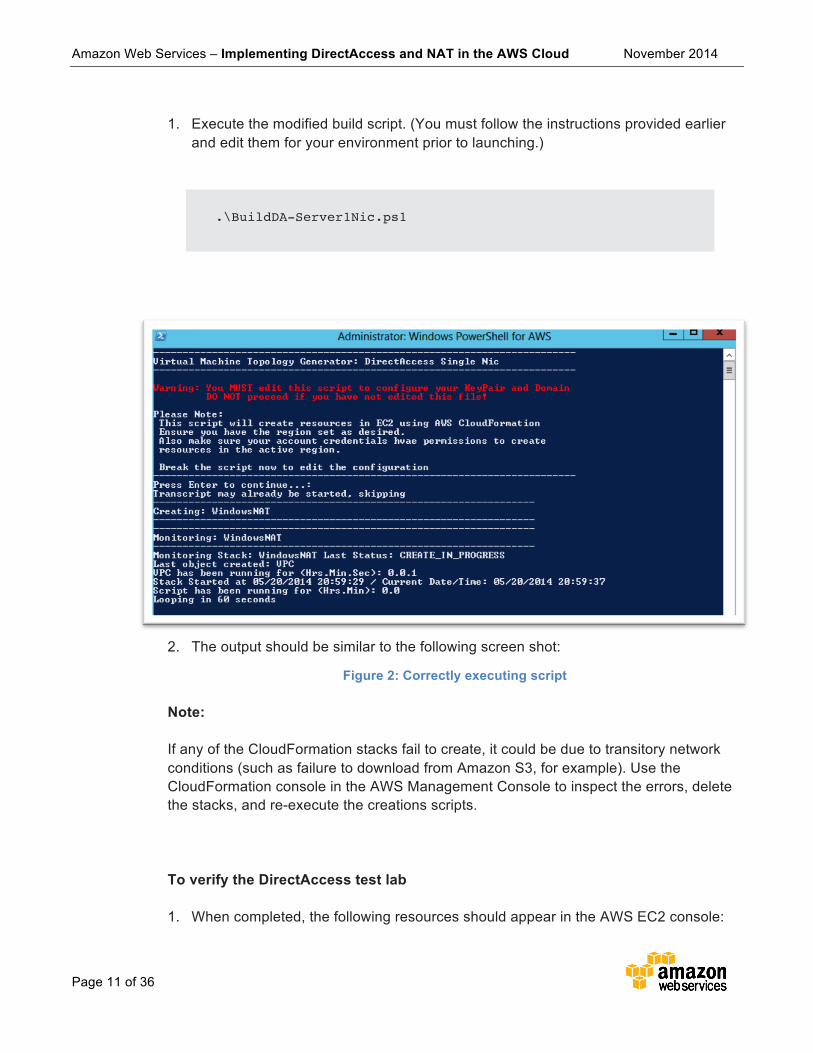
1. Execute the modified build script. (You must follow the instructions provided earlier and edit them for your environment prior to launching.)
.\BuildDA-Server1Nic.ps1
2. The output should be similar to the following screen shot:
Figure 2: Correctly executing script
Note:
If any of the CloudFormation stacks fail to create, it could be due to transitory network conditions (such as failure to download from Amazon S3, for example). Use the CloudFormation console in the AWS Management Console to inspect the errors, delete the stacks, and re-execute the creations scripts.
To verify the DirectAccess test lab
1. When completed, the following resources should appear in the AWS EC2 console:

Amazon Web Services – Implementing DirectAccess and NAT in the AWS Cloud November 2014
Page 12 of 36
Figure 3: Example of completed deployment
2. Retrieve the IP address of the CLIENT1 instance. Select the CLIENT1 instance, click Connect, and then click Download Remote Desktop File. Also note the IP address of the NAT1 instance.
3. To connect to the CLIENT1 instance, use the CORP\StackAdmin account, with the password ‘Password123’. If DirectAccess is functioning correctly, you are logged on to the CLIENT1 instance, over the DirectAccess connection to the domain controller (DC1).
If you fail to log on, this means that an element of the build scripts failed. Script logs are stored on the instance in the c:\cfn\logs directory. In some cases, items such as the offline domain join file fails to download. This might be reported at the stack level. Simply delete at least the CLIENT1, DC1, EDGE1 stacks and re-execute the script. It’s not necessary to rebuild the NAT1 instance each time. The scripts will detect the existence of the NAT1 stack and not create it.
4. After logon, disable the Internet Explorer Enhanced Security (http://blogs.technet.com/b/chenley/archive/2011/03/10/how-to-turn-off-ie-esc.aspx)
5. Press the Start button and then type ‘iexplore.exe’ to load the desktop version of Internet Explorer and then attempt to view http://dc1.subdomain.domainname.com.
If this fails, proceed with standard DirectAccess troubleshooting. Here are some good resources:
http://technet.microsoft.com/en-us/library/ee624056(v=WS.10).aspx
http://directaccessguide.com/2014/02/18/directaccess-client-troubleshooting-guide/
Please also report any failures that you cannot debug to [email protected].

Amazon Web Services – Implementing DirectAccess and NAT in the AWS Cloud November 2014
Page 13 of 36
Building the DMZ, NAT Device, and Domain Controller In this section you learn in more detail how the script builds the first step of the network. This will construct the initial VPC, the public and private subnets, the domain controller, and it will configure the NAT1 instance to function as the NAT router and reverse proxy.
Review the Windows NAT Script This section walks through the elements of the AWS CloudFormation template and explains the key parts that enable the configuration. It will not explain every element of the templates. Please review the AWS CloudFormation documentation for a full description of every element. Documentation: http://docs.aws.amazon.com/AWSCloudFormation/latest/UserGuide/template-guide.html
The script is based on existing Windows Server related templates. For details about the VPC, the public and private subnets, and the core domain controller entries in the template, please review the Microsoft SharePoint 2010 on AWS: Advanced Implementation Guide (http://aws.amazon.com/whitepapers/sharepoint-implementation-guide/), particularly the section that explains public and private subnet creation.
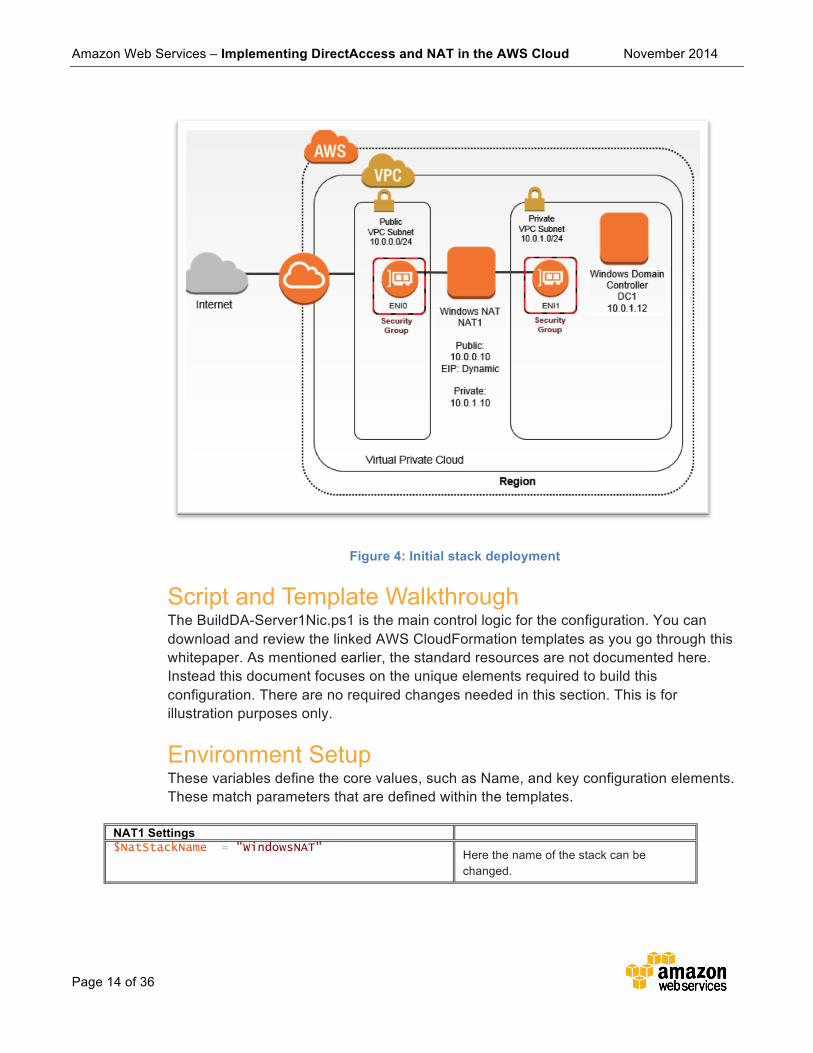
The BuildDA-Server1Nic.ps1 script creates four CloudFormation stacks. WindowsNAT is the first stack. DC1 is the second stack. When these two stacks are complete, the network is at the build stage shown in Figure 4. It contains a VPC, Internet gateway, and public and private subnets. It also contains the NAT1 and DC1 resources.
Amazon Web Services – Implementing DirectAccess and NAT in the AWS Cloud November 2014
Page 14 of 36
Figure 4: Initial stack deployment
Script and Template Walkthrough The BuildDA-Server1Nic.ps1 is the main control logic for the configuration. You can download and review the linked AWS CloudFormation templates as you go through this whitepaper. As mentioned earlier, the standard resources are not documented here. Instead this document focuses on the unique elements required to build this configuration. There are no required changes needed in this section. This is for illustration purposes only.
Environment Setup These variables define the core values, such as Name, and key configuration elements. These match parameters that are defined within the templates.
NAT1 Settings $NatStackName = "WindowsNAT"
Here the name of the stack can be changed.
Amazon Web Services – Implementing DirectAccess and NAT in the AWS Cloud November 2014
Page 15 of 36
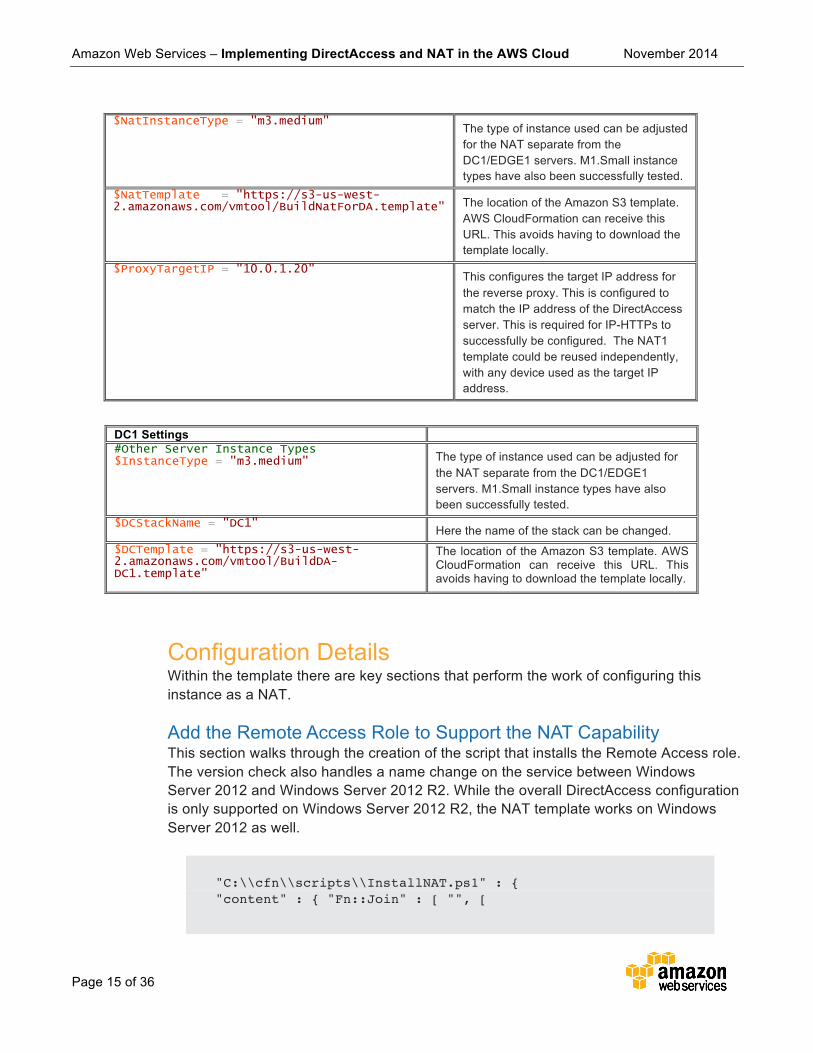
$NatInstanceType = "m3.medium" The type of instance used can be adjusted for the NAT separate from the DC1/EDGE1 servers. M1.Small instance types have also been successfully tested.
$NatTemplate = "https://s3-us-west-2.amazonaws.com/vmtool/BuildNatForDA.template" The location of the Amazon S3 template.
AWS CloudFormation can receive this URL. This avoids having to download the template locally.
$ProxyTargetIP = "10.0.1.20" This configures the target IP address for the reverse proxy. This is configured to match the IP address of the DirectAccess server. This is required for IP-HTTPs to successfully be configured. The NAT1 template could be reused independently, with any device used as the target IP address.
DC1 Settings #Other Server Instance Types $InstanceType = "m3.medium"
The type of instance used can be adjusted for the NAT separate from the DC1/EDGE1 servers. M1.Small instance types have also been successfully tested.
$DCStackName = "DC1" Here the name of the stack can be changed. $DCTemplate = "https://s3-us-west-2.amazonaws.com/vmtool/BuildDA-DC1.template"
The location of the Amazon S3 template. AWS CloudFormation can receive this URL. This avoids having to download the template locally.
Configuration Details Within the template there are key sections that perform the work of configuring this instance as a NAT.
Add the Remote Access Role to Support the NAT Capability This section walks through the creation of the script that installs the Remote Access role. The version check also handles a name change on the service between Windows Server 2012 and Windows Server 2012 R2. While the overall DirectAccess configuration is only supported on Windows Server 2012 R2, the NAT template works on Windows Server 2012 as well.
"C:\\cfn\\scripts\\InstallNAT.ps1" : { "content" : { "Fn::Join" : [ "", [

Amazon Web Services – Implementing DirectAccess and NAT in the AWS Cloud November 2014
Page 16 of 36
"Import-Module ServerManager", "\n", "Add-WindowsFeature RemoteAccess -ea stop -verbose ", "\n",
"$OS = Gwmi Win32_OperatingSystem","\n", "If ($OS.Version -eq \"6.3.9600\") {Add-WindowsFeature DirectAccess-VPN} ","\n", "Add-WindowsFeature RSAT-RemoteAccess -verbose", "\n", "Add-WindowsFeature RSAT-RemoteAccess-MGMT -verbose", "\n" ]]} }
Adjusting the Standard NAT Template While there are existing NAT AWS CloudFormation templates, most of them only feature a single network interface. In AWS, even with multiple subnets present, the traffic would often flow in the single NAT network interface and then back out the same interface routed to the private network. In this way, that NAT is only serving a NAT function, and not handling the network routing functions (which are left to the VPC routers).
In this configuration the NAT1 device connects the public and private networks with multiple network adapters. This aligns to the way that Microsoft’s Remote Access Roles were expected to be used. In Figure 5, notice the existence of both public and private subnets, routes, and associations. You will also notice NAT1PublicNic and NAT1PrivateNic network interfaces that are created.
In particular notice that the PrivateRoute1 object (which is the private subnet route table) uses the NAT1PrivateNic as the destination for its 0.0.0.0/0 route. This ensures that all the private network traffic is forwarded to the NAT1 instance. It is important to realize the security implications that exist with this configuration. Incorrect VPC route configuration allows traffic to directly flow between these subnets and bypass NAT1.

Amazon Web Services – Implementing DirectAccess and NAT in the AWS Cloud November 2014
Page 17 of 36
Figure 5:
NAT1
resources
Configure the NAT Network Interfaces It is easier to work with a dual network adapter configuration if each network adapter has a name that matches the network that it is connected to. In this walkthrough you can query to find the network adapter that has the matching address based on values defined in the template. We then pass that network reference to the Rename-NetAdapter command.
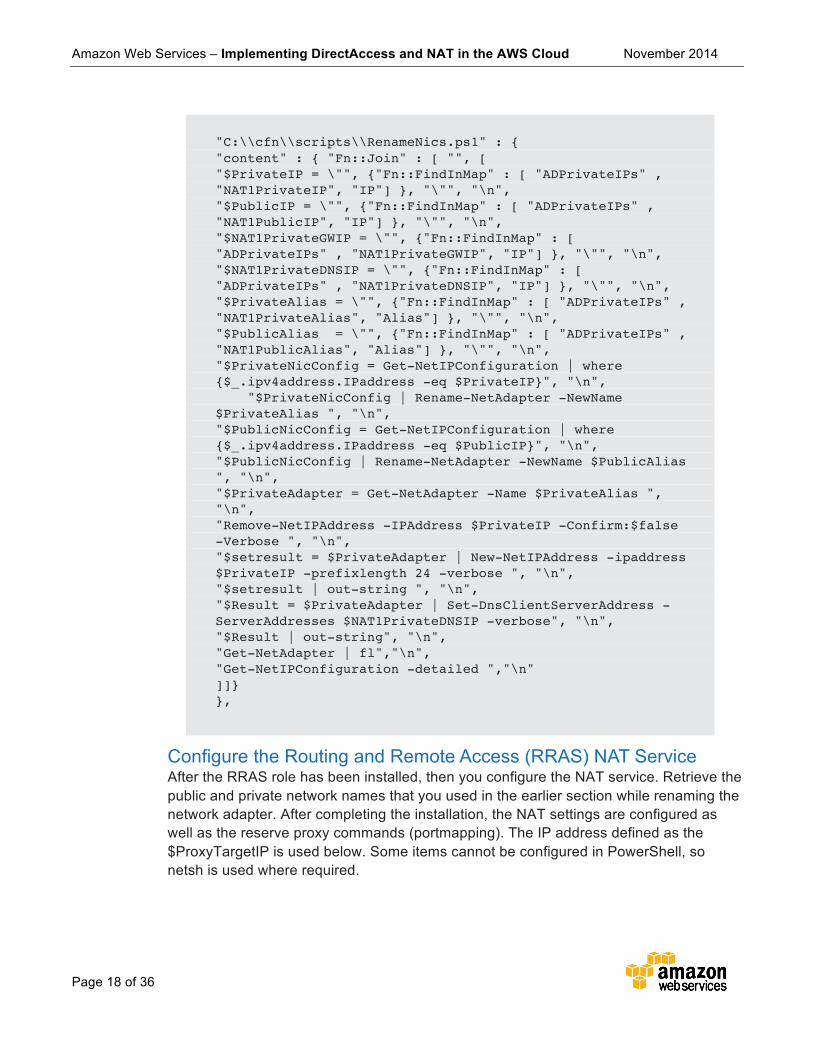
By default, when a Windows computer receives two network interfaces using the Dynamic Host Configuration Protocol (DHCP), each of those interfaces contains a default gateway address. This creates a routing table inside the instance that will prevent it from correctly forwarding the packets as required for this scenario. While there are several ways to address this, the easiest way is to remove the DHCP setting from the private subnet-connected interface by statically configuring the IP address on the private network interface. (This is shown below.) This is performed by the New-NetIPAddress cmdlet. This has the downside of not being able to receive a new IP address dynamically from Amazon EC2.
Amazon Web Services – Implementing DirectAccess and NAT in the AWS Cloud November 2014
Page 18 of 36
"C:\\cfn\\scripts\\RenameNics.ps1" : { "content" : { "Fn::Join" : [ "", [ "$PrivateIP = \"", {"Fn::FindInMap" : [ "ADPrivateIPs" , "NAT1PrivateIP", "IP"] }, "\"", "\n", "$PublicIP = \"", {"Fn::FindInMap" : [ "ADPrivateIPs" , "NAT1PublicIP", "IP"] }, "\"", "\n", "$NAT1PrivateGWIP = \"", {"Fn::FindInMap" : [ "ADPrivateIPs" , "NAT1PrivateGWIP", "IP"] }, "\"", "\n", "$NAT1PrivateDNSIP = \"", {"Fn::FindInMap" : [ "ADPrivateIPs" , "NAT1PrivateDNSIP", "IP"] }, "\"", "\n", "$PrivateAlias = \"", {"Fn::FindInMap" : [ "ADPrivateIPs" , "NAT1PrivateAlias", "Alias"] }, "\"", "\n", "$PublicAlias = \"", {"Fn::FindInMap" : [ "ADPrivateIPs" , "NAT1PublicAlias", "Alias"] }, "\"", "\n", "$PrivateNicConfig = Get-NetIPConfiguration | where {$_.ipv4address.IPaddress -eq $PrivateIP}", "\n", "$PrivateNicConfig | Rename-NetAdapter -NewName $PrivateAlias ", "\n", "$PublicNicConfig = Get-NetIPConfiguration | where {$_.ipv4address.IPaddress -eq $PublicIP}", "\n", "$PublicNicConfig | Rename-NetAdapter -NewName $PublicAlias ", "\n", "$PrivateAdapter = Get-NetAdapter -Name $PrivateAlias ", "\n", "Remove-NetIPAddress -IPAddress $PrivateIP -Confirm:$false -Verbose ", "\n", "$setresult = $PrivateAdapter | New-NetIPAddress -ipaddress $PrivateIP -prefixlength 24 -verbose ", "\n", "$setresult | out-string ", "\n", "$Result = $PrivateAdapter | Set-DnsClientServerAddress -ServerAddresses $NAT1PrivateDNSIP -verbose", "\n", "$Result | out-string", "\n", "Get-NetAdapter | fl","\n", "Get-NetIPConfiguration -detailed ","\n" ]]} },
Configure the Routing and Remote Access (RRAS) NAT Service After the RRAS role has been installed, then you configure the NAT service. Retrieve the public and private network names that you used in the earlier section while renaming the network adapter. After completing the installation, the NAT settings are configured as well as the reserve proxy commands (portmapping). The IP address defined as the $ProxyTargetIP is used below. Some items cannot be configured in PowerShell, so netsh is used where required.

Amazon Web Services – Implementing DirectAccess and NAT in the AWS Cloud November 2014
Page 19 of 36
"C:\\cfn\\scripts\\ConfigureNAT.ps1" : { "content" : { "Fn::Join" : [ "", [
"$PrivateAlias = \"\"\"", {"Fn::FindInMap" : [ "ADPrivateIPs" , "NAT1PrivateAlias", "Alias"] },"\"\"\" ", "\n", "$PublicAlias = \"\"\"", {"Fn::FindInMap" : [ "ADPrivateIPs" , "NAT1PublicAlias", "Alias"] }, "\"\"\" ", "\n", "$ProxyTargetIP = \"", {"Ref" : "ProxyTargetIP"}, "\"", "\n", "Import-Module ServerManager", "\n", "Add-WindowsFeature Routing -ea stop -verbose ", "\n", "install-remoteaccess -vpntype vpn -verbose ", "\n", "cmd.exe /c \"netsh routing ip nat install \" ", "\n", "cmd.exe /c \"netsh routing ip nat add interface $PublicAlias \" ", "\n", "cmd.exe /c \"netsh routing ip nat set int name=$PublicAlias mode=full\" ", "\n", "cmd.exe /c \"netsh routing ip nat add interface $PrivateAlias \" ", "\n", "cmd.exe /c \"netsh routing ip nat set int name=$PrivateAlias mode=private\" ", "\n", "cmd.exe /c \"netsh routing ip nat add portmapping name=$PublicAlias proto=tcp publicip=0.0.0.0 publicport=80 privateip=$ProxyTargetIP privateport=80\" ", "\n", "cmd.exe /c \"netsh routing ip nat add portmapping name=$PublicAlias proto=tcp publicip=0.0.0.0 publicport=443 privateip=$ProxyTargetIP privateport=443\" ", "\n" ]]} }
Configure the Domain Controller In the Microsoft SharePoint 2010 on AWS: Advanced Implementation Guide the domain controller configuration is well documented. For purposes of working with DirectAccess, the primary modification to domain controller configuration is the addition of a web server and a certificate authority. The web server is used for testing purposes. It could also serve as a distribution point for the certificate revocation list, although this element is not configured in the provided scripts. A certificate authority is not technically required for the DirectAccess Single NIC topology. However, because this script will be used as the basis to build and test all the DirectAccess scenarios, it has been included.

Amazon Web Services – Implementing DirectAccess and NAT in the AWS Cloud November 2014
Page 20 of 36
Set the domain name variables used throughout the configuration The BuildDA-Server1Nic.ps1 script has a section for providing the domain names and other values mentioned earlier. Inside the downloaded CFNFunctions.ps1 script, these variables are then combined in the BuildValues function in the various combinations necessary for different configuration elements. This prevents the user from having multiple variables to edit. For example, a domain name is required, such as “example.com”, however, elements of DNS configuration require the trailing period to be provided as well. You can prevent errors by asking for these values once, and then combining as required. Here’s another example using the subdomain to help construct the name of the certificate authority:
#Create DNS Name $1ExternalDomainDNSName = $EdgePrefix+"."+$RootDomain+"."+$DomainType $2Route53ExternalDomainDNSName = $EdgePrefix+"."+$RootDomain+"."+$DomainType+"." $3Route53HostedDNSZoneName = $RootDomain+"."+$DomainType+"." $4DomainDNSName = $SubDomain+"."+$RootDomain+"."+$DomainType $DomainX500 = "DC="+$subDomain+",DC="+$RootDomain+",DC="+$DomainType $CAName = $SubDomain+"-dc1-CA"
Build the Web Server It’s helpful if each server has a web server, so that simple end-to-end connectivity testing can be performed. The code that follows installs the Internet Information Services (IIS) role, and then configures the default home page. The new home page reads the client and server IP addresses and displays the IP address information on the web page. This is very helpful during test lab debugging. The default access control lists (ACLs) on the web server directory are also changed to enable this web page creation. This is not designed for production use, because you would want to ensure proper ACLs are present on the file system during a production deployment. A similar change is also used on the DirectAccess server to support the publishing of the offline domain join files.
"C:\\cfn\\scripts\\BuildWebServer.ps1" : { "content" : { "Fn::Join" : [ "", [ "Import-Module ServerManager", "\n", "Add-WindowsFeature Web-ASP ", "\n", "Add-WindowsFeature Web-Server ","\n", "Add-WindowsFeature Web-Mgmt-Console ","\n", "Add-WindowsFeature Web-ASP-NET45 ","\n", "Add-WindowsFeature Web-Windows-Auth ","\n", "Add-WindowsFeature Web-Http-Tracing ","\n",

Amazon Web Services – Implementing DirectAccess and NAT in the AWS Cloud November 2014
Page 21 of 36
"write-host \"Allowing everyone write to web server directory\" " , "\n", "cmd.exe /c \"icacls \"\"c:\\inetpub\"\" /grant \"\"everyone\"\":(OI)(CI)F /inheritance:r \" " , "\n", "$ID = hostname ","\n", "$SimpleHomePage=\" <% `n \" ","\n", "$SimpleHomePage+=\" ip = Request.ServerVariables(\"\"REMOTE_ADDR\"\") `n \" ","\n", "$SimpleHomePage+=\" name = Request.ServerVariables(\"\"SERVER_NAME\"\") `n \" ","\n", "$SimpleHomePage+=\" lip = Request.ServerVariables(\"\"LOCAL_ADDR\"\") `n \" ","\n", "$SimpleHomePage+=\" %> `n \" ","\n", "$SimpleHomePage+=\" <html><head><title>Welcome to $ID !</title></head><body><h1>Welcome to $ID! <BR></h1><h3>Your IP is <u><%= ip %></u></h3><p>Server IP: <%= lip %></p></body></html> `n \" ","\n", "$SimpleHomepage | out-file c:\\inetpub\\wwwroot\\default.asp -Encoding ascii -force ","\n" ]]} },
Build and Configure the Certificate Authority The next section of the template (shown below) installs and configures the certificate authority. There is a helper script (ClientHelperFunctions.ps1) that is downloaded and used to perform the configuration. This script enables machine auto enrollment as well as changes the permissions on the server authentication and machine certificate templates. This assists in the other DirectAccess access topologies, as well as facilitates the dynamic creation of the necessary SSL certificates. This script source was another DirectAccess project and then augmented for AWS: http://aka.ms/vmt.
"C:\\cfn\\scripts\\VMT_InstallCA.ps1" : { "content" : { "Fn::Join" : [ "", [ ". C:\\cfn\\scripts\\ClientHelperfunctions.ps1", "\n", "#Building CA using Powershell", "\n", "import-module servermanager ", "\n", "add-windowsfeature adcs-cert-authority" , "\n", "add-windowsfeature RSAT-adcs -IncludeallSubFeature ", "\n", "Install-ADCSCertificationAuthority -catype enterpriserootca -force ", "\n" ]]} }, "C:\\cfn\\scripts\\VMT_BuildCA.ps1" : { "content" : { "Fn::Join" : [ "", [

Amazon Web Services – Implementing DirectAccess and NAT in the AWS Cloud November 2014
Page 22 of 36
". C:\\cfn\\scripts\\ClientHelperfunctions.ps1", "\n", "#BuildCAWrapper", "\n", "$Verify = \"c:\\cfn\\log\\VMT_BuildCA_Done.txt \" ", "\n", "$Loglocation = StartTranscriptedCmd -FunctionCall BuildCA -VerificationFile $Verify ", "\n", "$Loglocation", "\n" ]]} },
In building this template, it was helpful to leverage PowerShell transcription to catch additional messages that were not always visible in the AWS CloudFormation logs. The helper function StartTranscriptedCmd simply receives a standard PowerShell command, enables transcription based on the provided log file name, executes the command, and then stops transcription. These files can be used to debug issues with the installation.
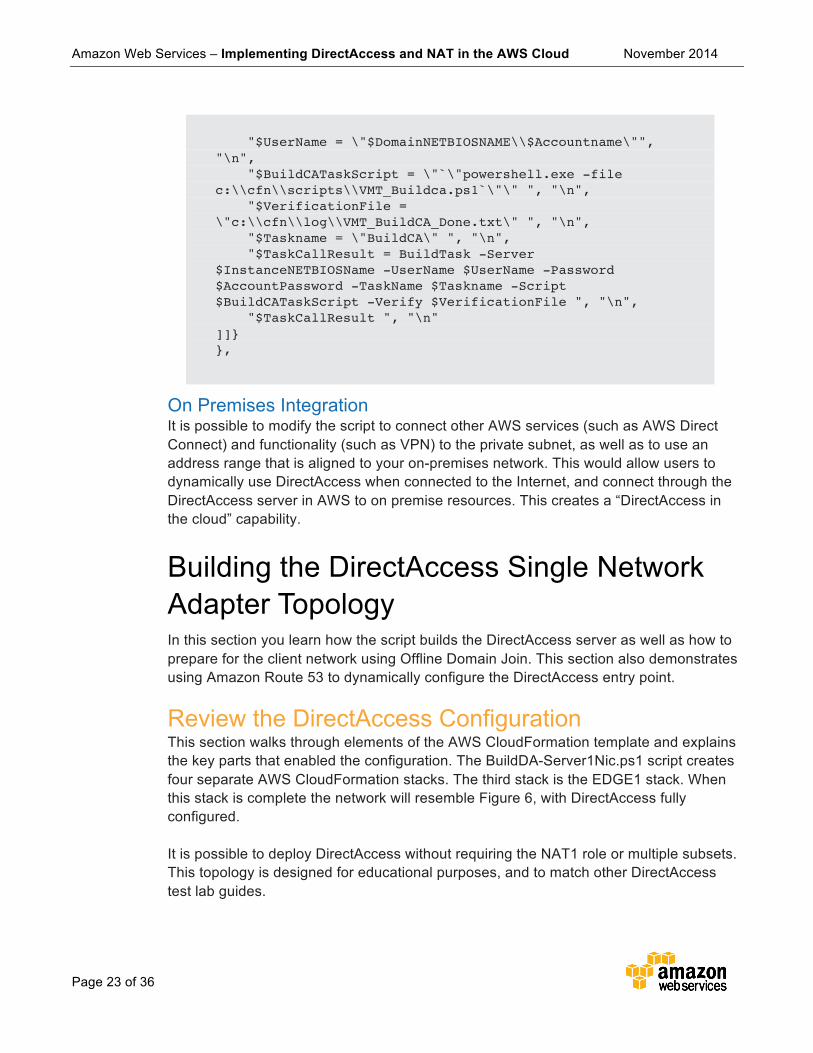
Running Commands as Another User in the Background The helper function BuildTask (shown below) is used to complete the certificate authority configuration. At times it’s necessary to run commands under a particular user context: For example, if you use the CORP\StackAdmin account instead of the machine local administrator account. There are a number of ways to achieve this, including using other AWS CloudFormation-based methods. This script creates a scheduled task to perform a function, then immediately manually runs the scheduled task, and then removes the scheduled task. Given the limitation of the RunAs command, this is an easy was to provide this capability that can be used in any environment. This function uses the $VerificationFile to indicate when the step is complete so the rest of script can continue to execute.
"C:\\cfn\\scripts\\VMT_BuildCATask.ps1" : { "content" : { "Fn::Join" : [ "", [ ". C:\\cfn\\scripts\\ClientHelperfunctions.ps1", "\n", "$AccountName = \"", { "Ref" : "DomainAdminUser" }, "\"" ,"\n", "$AccountPassword = \"", { "Ref" : "DomainAdminPassword" }, "\"", "\n", "$InstanceNETBIOSName = \"", {"Fn::FindInMap" : [ "InstanceNETBIOSName" , "DomainController1", "Name"] }, "\"", "\n", "$DomainNETBIOSName = \"", { "Ref" : "DomainNetBIOSName" }, "\"", "\n", "$DomainDNSName = \"",{ "Ref" : "4DomainDNSName" }, "\"", "\n",
Amazon Web Services – Implementing DirectAccess and NAT in the AWS Cloud November 2014
Page 23 of 36
"$UserName = \"$DomainNETBIOSNAME\\$Accountname\"", "\n", "$BuildCATaskScript = \"`\"powershell.exe -file c:\\cfn\\scripts\\VMT_Buildca.ps1`\"\" ", "\n", "$VerificationFile = \"c:\\cfn\\log\\VMT_BuildCA_Done.txt\" ", "\n", "$Taskname = \"BuildCA\" ", "\n", "$TaskCallResult = BuildTask -Server $InstanceNETBIOSName -UserName $UserName -Password $AccountPassword -TaskName $Taskname -Script $BuildCATaskScript -Verify $VerificationFile ", "\n", "$TaskCallResult ", "\n" ]]} },
On Premises Integration It is possible to modify the script to connect other AWS services (such as AWS Direct Connect) and functionality (such as VPN) to the private subnet, as well as to use an address range that is aligned to your on-premises network. This would allow users to dynamically use DirectAccess when connected to the Internet, and connect through the DirectAccess server in AWS to on premise resources. This creates a “DirectAccess in the cloud” capability.
Building the DirectAccess Single Network Adapter Topology In this section you learn how the script builds the DirectAccess server as well as how to prepare for the client network using Offline Domain Join. This section also demonstrates using Amazon Route 53 to dynamically configure the DirectAccess entry point.
Review the DirectAccess Configuration This section walks through elements of the AWS CloudFormation template and explains the key parts that enabled the configuration. The BuildDA-Server1Nic.ps1 script creates four separate AWS CloudFormation stacks. The third stack is the EDGE1 stack. When this stack is complete the network will resemble Figure 6, with DirectAccess fully configured.
It is possible to deploy DirectAccess without requiring the NAT1 role or multiple subsets. This topology is designed for educational purposes, and to match other DirectAccess test lab guides.

Amazon Web Services – Implementing DirectAccess and NAT in the AWS Cloud November 2014
Page 24 of 36
In order to use Remote Desktop Protocol (RDP) to access DC1 or EDGE1, you must first RDP to NAT1.
Figure 6: Additional EDGE1 server added to the network
Script and Template Walkthrough The BuildDA-Server1Nic.ps1 is the main control logic for the configuration. The linked AWS CloudFormation templates can be downloaded and reviewed as you are going through this guide. No changes are required; this is for illustration purposes only.
Environment Setup These variables define the core values such as stack name and key configuration elements. These match parameters that are defined within the templates. The other values are read from the output of the existing stacks and passed through to this stack in order to reduce the amount of entry that is required.
EDGE1 Settings $DAStackName = "EDGE1" Here the name of the stack can be changed.

Amazon Web Services – Implementing DirectAccess and NAT in the AWS Cloud November 2014
Page 25 of 36
$DATemplate = "https://s3-us-west-2.amazonaws.com/vmtool/BuildDA-Server1Nic.template"
The location of the Amazon S3 template. AWS CloudFormation can receive this URL. This avoids having to download the template locally.
Create the DNS Entry The DirectAccess template contains the section that publishes the external Elastic IP address into Amazon Route 53. At this stage there is a successful domain controller installation, and these domain names are valid to use. While dynamically publishing the external IP address is technically not required, in order to automate the client portion of the network setup and access the offline domain join script, it was necessary to actually have these entries published on the Internet and then pass that information to the client stack. This enables the client to complete its configuration over the Internet. This model could be used for a production deployment if access to the domain join file is restricted to the appropriate user accounts.
"Route53DNSRecord" : { "Type" : "AWS::Route53::RecordSet", "Properties" : { "HostedZoneName" : { "Ref" : "3Route53HostedDNSZoneName" }, "Comment" : "A records for the external DA server.", "Name" : { "Ref" : "2Route53ExternalDomainDNSName" }, "Type" : "A", "TTL" : "50", "ResourceRecords" : [ { "Ref" : "NAT1EIP" } ] } },
Configure the DirectAccess Server—Enable TCP/IP v6 The DirectAccess server is also configured as a web server as well as a remote access server. In this whitepaper only the remote access elements are documented. First, TCP/IPv6 must be enabled. Although only IPv4 will be seen inbound, and only IPv4 is used on the private subnet (thanks to the built in NAT 6/4 provided by DirectAccess), Windows requires IPv6 to be enabled on the DirectAccess server itself.
"C:\\cfn\\scripts\\VMT_EnableV6.ps1" : { "content" : { "Fn::Join" : [ "", [ "write-host \"Enabling Advertising for v6 interfaces \" ", "\n", "Get-NetAdapterBinding -Name Ethernet ", "\n",

Amazon Web Services – Implementing DirectAccess and NAT in the AWS Cloud November 2014
Page 26 of 36
"Set-NetAdapterBinding -ComponentID ms_tcpip6 -enabled $true -Name Ethernet ", "\n", "Get-netipinterface -InterfaceAlias Ethernet -AddressFamily ipv6 | fl ", "\n",
"write-host \"Performing:Set-NetIPInterface -AddressFamily IPv6 -InterfaceAlias Ethernet -advertising enabled\" ", "\n", "$Result = Set-NetIPInterface -AddressFamily IPv6 -InterfaceAlias Ethernet -advertising enabled ", "\n", "$Result", "\n", "Get-netipinterface -InterfaceAlias Ethernet -AddressFamily ipv6 | fl ", "\n" ]]} },
Pre-Create the Needed Certificates Although DirectAccess can create self-signed certificates for several of its needs, it’s better to create the certificates using a certificate authority. If you use known good certificates it reduces the number of issues that could occur. This section reads the name of the domain controller, certificate authority, and FQDN from the template. It then leverages the helper functions Get-MachineCerts and Get-SSLCerts in order to build IPsec-capable machine certificates (edge1.corp.domainname.com) as well as SSL certificates for the external FQDN (da.domainname.com). IPsec machine certificates are not required for the single network adapter topology. This is being performed to leverage this infrastructure for additional DirectAccess topologies.
"C:\\cfn\\scripts\\VMT_BuildCerts.ps1" : { "content" : { "Fn::Join" : [ "", [ ". C:\\cfn\\scripts\\ClientHelperfunctions.ps1", "\n", "$DomainDNSName = \"",{ "Ref" : "4DomainDNSName" }, "\"", "\n", "$InstanceNETBIOSName = \"", {"Fn::FindInMap" : [ "InstanceNETBIOSName" , "DAServer1", "Name"] }, "\"", "\n", "$DC1NETBIOSName = \"", {"Fn::FindInMap" : [ "InstanceNETBIOSName" , "DomainController1", "Name"] }, "\"", "\n", "$FQDN = $InstanceNETBIOSName+\".\"+$DomainDNSName ", "\n", "$DCFQDN = $DC1NETBIOSName+\".\"+$DomainDNSName ", "\n", "$ExternalFQDN = \"",{ "Ref" : "1ExternalDomainDNSName" }, "\"", "\n", "$CANAME = \"",{ "Ref" : "CAName" }, "\"", "\n", "$Verify1 = \"c:\\cfn\\log\\VMT_BuildCerts_Done.txt\" ", "\n",

Amazon Web Services – Implementing DirectAccess and NAT in the AWS Cloud November 2014
Page 27 of 36
"$Verify2 = \"c:\\cfn\\log\\VMT_BuildSSLCerts_Done.txt\" ", "\n", "write-host \"Creating Machine Certs for $FQDN using $DCFQDN and CA $CANAME \" ", "\n", "write-host \"SSL Cert is for $ExternalFQDN\" ", "\n", "$Loglocation=StartTranscriptedCmd -FunctionCall \"Get-MachineCerts $FQDN\" -VerificationFile $Verify1 ", "\n", "$Loglocation ", "\n", "$Loglocation=StartTranscriptedCmd -FunctionCall \"Get-SSLCerts $ExternalFQDN\" -VerificationFile $Verify2 ", "\n", "$Loglocation ", "\n" ]]} },
Primary DirectAccess Configuration The core DirectAccess configuration is then performed as shown in this next template example.
Five main commands are performed. The function of each is explained in the following table:

Amazon Web Services – Implementing DirectAccess and NAT in the AWS Cloud November 2014
Page 28 of 36
"C:\\cfn\\scripts\\VMT_BuildDA.ps1" : { "content" : { "Fn::Join" : [ "", [ ". C:\\cfn\\scripts\\ClientHelperfunctions.ps1", "\n", "#BuildDA", "\n", "$DomainDNSName = \"",{ "Ref" : "4DomainDNSName" }, "\"", "\n", "$InstanceNETBIOSName = \"", {"Fn::FindInMap" : [ "InstanceNETBIOSName" , "DAServer1", "Name"] }, "\"", "\n", "$FQDN = $InstanceNETBIOSName+\".\"+$DomainDNSName ", "\n", "$ExternalFQDN = \"",{ "Ref" : "1ExternalDomainDNSName" }, "\"", "\n", "$DomainNETBIOSName = \"", { "Ref" : "DomainNetBIOSName" }, "\"", "\n", "$ServerGPOName=$DomainDNSName+\"\\DirectAccess Server Settings\" ", "\n", "$ClientGPOName= $DomainDNSName+\"\\DirectAccess Client Settings\" ", "\n",
Load the helpful functions.
Read the values from template.
Create variables that represent the name of the Group Policy Objects.
"$FunctionCall= \"Install-RemoteAccess -NoPrerequisite -Force -PassThru -ServerGpoName \"\"$ServerGPOName\"\" -ClientGpoName \"\"$ClientGPOName\"\" -DAInstallType \"\"FullInstall\"\" -InternetInterface Ethernet -InternalInterface Ethernet -ConnectToAddress $ExternalFQDN -DeployNat -Verbose -ComputerName $FQDN \" ", "\n", "Write \"Starting DA Config: $FunctionCall \" ", "\n", "$Verify = \"c:\\cfn\\log\\VMT_BuildDA_Done.txt\" ", "\n", "$Loglocation = StartTranscriptedCmd -FunctionCall $FunctionCall -VerificationFile $Verify ", "\n", "$Loglocation", "\n",
Primary installation command. It defines the names of the GPOs. It also defines which interfaces to use. Notice that the Internet Interface and internal Interface are the same name. This demonstrates the single network adapter configuration. It also indicates the use of the 6to4 NAT.
Amazon Web Services – Implementing DirectAccess and NAT in the AWS Cloud November 2014
Page 29 of 36
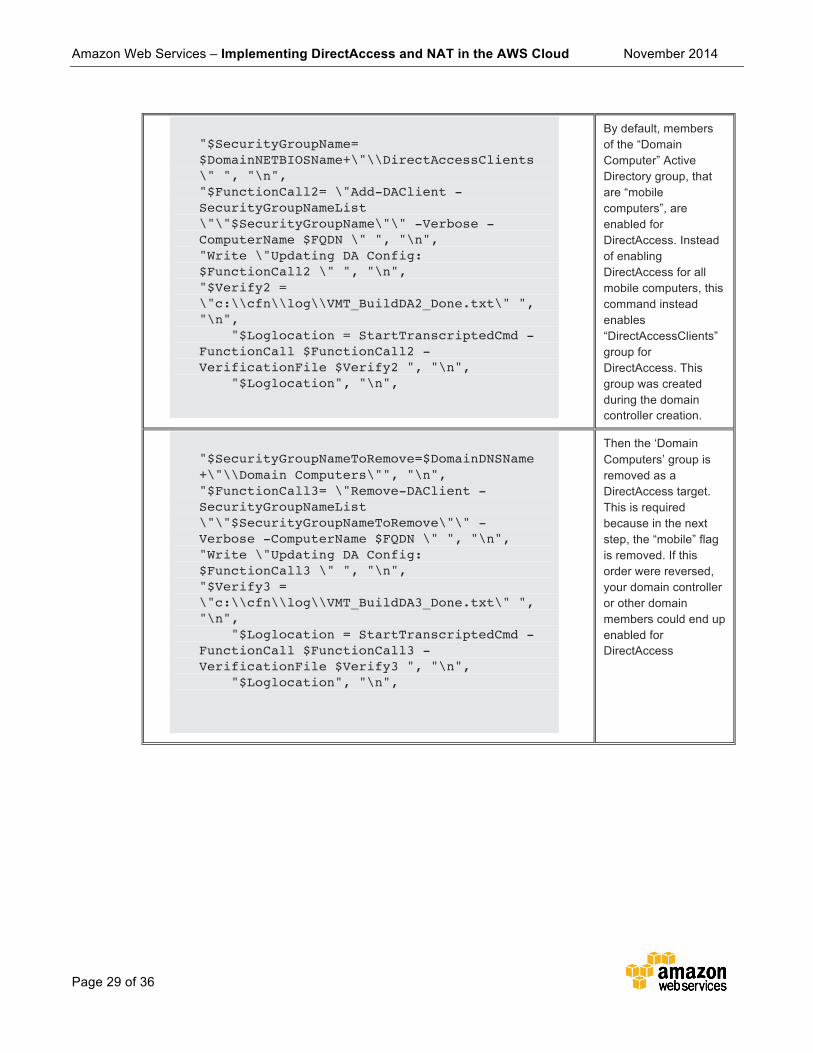
"$SecurityGroupName= $DomainNETBIOSName+\"\\DirectAccessClients\" ", "\n", "$FunctionCall2= \"Add-DAClient -SecurityGroupNameList \"\"$SecurityGroupName\"\" -Verbose -ComputerName $FQDN \" ", "\n", "Write \"Updating DA Config: $FunctionCall2 \" ", "\n", "$Verify2 = \"c:\\cfn\\log\\VMT_BuildDA2_Done.txt\" ", "\n", "$Loglocation = StartTranscriptedCmd -FunctionCall $FunctionCall2 -VerificationFile $Verify2 ", "\n", "$Loglocation", "\n",
By default, members of the “Domain Computer” Active Directory group, that are “mobile computers”, are enabled for DirectAccess. Instead of enabling DirectAccess for all mobile computers, this command instead enables “DirectAccessClients” group for DirectAccess. This group was created during the domain controller creation.
"$SecurityGroupNameToRemove=$DomainDNSName+\"\\Domain Computers\"", "\n", "$FunctionCall3= \"Remove-DAClient -SecurityGroupNameList \"\"$SecurityGroupNameToRemove\"\" -Verbose -ComputerName $FQDN \" ", "\n", "Write \"Updating DA Config: $FunctionCall3 \" ", "\n", "$Verify3 = \"c:\\cfn\\log\\VMT_BuildDA3_Done.txt\" ", "\n", "$Loglocation = StartTranscriptedCmd -FunctionCall $FunctionCall3 -VerificationFile $Verify3 ", "\n", "$Loglocation", "\n",
Then the ‘Domain Computers’ group is removed as a DirectAccess target. This is required because in the next step, the “mobile” flag is removed. If this order were reversed, your domain controller or other domain members could end up enabled for DirectAccess

Amazon Web Services – Implementing DirectAccess and NAT in the AWS Cloud November 2014
Page 30 of 36
"$FunctionCall4= \"Set-DAClient -OnlyRemoteComputers Disabled -Verbose -ComputerName $FQDN \" ", "\n", "Write \"Updating DA Config: $FunctionCall4 \" ", "\n", "$Verify4 = \"c:\\cfn\\log\\VMT_BuildDA4_Done.txt\" ", "\n", "$Loglocation = StartTranscriptedCmd -FunctionCall $FunctionCall4 -VerificationFile $Verify4 ", "\n", "$Loglocation", "\n",
Now that a group is targeted for DirectAccess, the ‘OnlyRemoteComputers’ attribute can be removed from the configuration. This is required because our test client is a virtual machine that is not considered to be a ‘mobile’ client.
"$CorporateResource= @(\"HTTP:http://directaccess-WebProbeHost.\"+$DomainDNSName)", "\n", "$FunctionCall5= \"Set-DAClientExperienceConfiguration -SupportEmail \"\"[email protected]\"\" -FriendlyName \"\"Workplace Connection\"\" -PreferLocalNamesAllowed `$False -PolicyStore \"\"$ClientGPOName\"\" -CorporateResources $CorporateResource \" ", "\n", "Write \"Updating DA Config: $FunctionCall5 \" ", "\n", "$Verify5 = \"c:\\cfn\\log\\VMT_BuildDA5_Done.txt\" ", "\n", "$Loglocation = StartTranscriptedCmd -FunctionCall $FunctionCall5 -VerificationFile $Verify5 ", "\n", "$Loglocation", "\n" ]]} },
This command configures the DirectAccess web probe, and enables the client troubleshooting UI by configuring a troubleshooting support email account. If you wanted to change the email or the display name to your company name, this is where you would configure that option.
Amazon Web Services – Implementing DirectAccess and NAT in the AWS Cloud November 2014
Page 31 of 36
Create the Offline Domain Join File It’s common in a DirectAccess test lab to have the client on the “inside” of the network. The client would then join the domain, receive the DirectAccess settings through group policy, and then move outside the network. Once outside, test if DirectAccess is working. However, this test procedure is not straightforward in AWS because it’s not possible to change the VPC membership of an instance. You can migrate an instance to a new VPC but it is a complicated process. After performing the domain join, you would need to copy the disk volume of this instance, and then create a new instance in another VPC based on this volume.
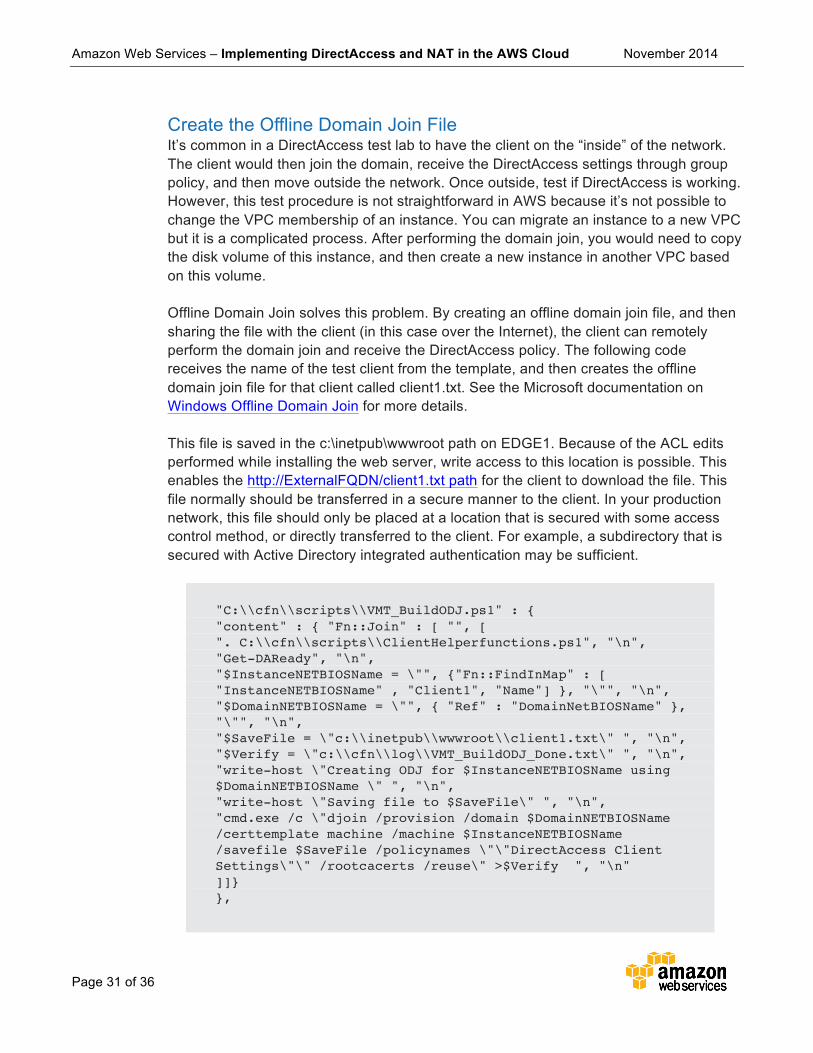
Offline Domain Join solves this problem. By creating an offline domain join file, and then sharing the file with the client (in this case over the Internet), the client can remotely perform the domain join and receive the DirectAccess policy. The following code receives the name of the test client from the template, and then creates the offline domain join file for that client called client1.txt. See the Microsoft documentation on Windows Offline Domain Join for more details.
This file is saved in the c:\inetpub\wwwroot path on EDGE1. Because of the ACL edits performed while installing the web server, write access to this location is possible. This enables the http://ExternalFQDN/client1.txt path for the client to download the file. This file normally should be transferred in a secure manner to the client. In your production network, this file should only be placed at a location that is secured with some access control method, or directly transferred to the client. For example, a subdirectory that is secured with Active Directory integrated authentication may be sufficient.
"C:\\cfn\\scripts\\VMT_BuildODJ.ps1" : { "content" : { "Fn::Join" : [ "", [ ". C:\\cfn\\scripts\\ClientHelperfunctions.ps1", "\n", "Get-DAReady", "\n", "$InstanceNETBIOSName = \"", {"Fn::FindInMap" : [ "InstanceNETBIOSName" , "Client1", "Name"] }, "\"", "\n", "$DomainNETBIOSName = \"", { "Ref" : "DomainNetBIOSName" }, "\"", "\n", "$SaveFile = \"c:\\inetpub\\wwwroot\\client1.txt\" ", "\n", "$Verify = \"c:\\cfn\\log\\VMT_BuildODJ_Done.txt\" ", "\n", "write-host \"Creating ODJ for $InstanceNETBIOSName using $DomainNETBIOSName \" ", "\n", "write-host \"Saving file to $SaveFile\" ", "\n", "cmd.exe /c \"djoin /provision /domain $DomainNETBIOSName /certtemplate machine /machine $InstanceNETBIOSName /savefile $SaveFile /policynames \"\"DirectAccess Client Settings\"\" /rootcacerts /reuse\" >$Verify ", "\n" ]]} },
Amazon Web Services – Implementing DirectAccess and NAT in the AWS Cloud November 2014
Page 32 of 36
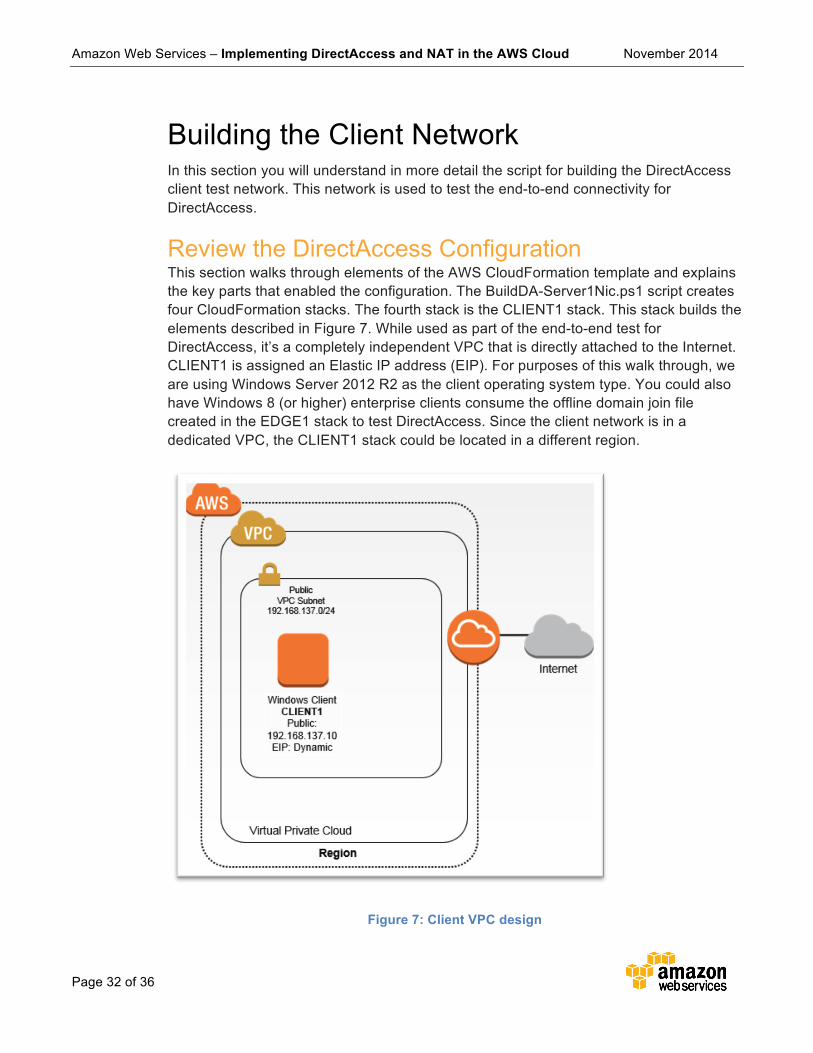
Building the Client Network In this section you will understand in more detail the script for building the DirectAccess client test network. This network is used to test the end-to-end connectivity for DirectAccess.
Review the DirectAccess Configuration This section walks through elements of the AWS CloudFormation template and explains the key parts that enabled the configuration. The BuildDA-Server1Nic.ps1 script creates four CloudFormation stacks. The fourth stack is the CLIENT1 stack. This stack builds the elements described in Figure 7. While used as part of the end-to-end test for DirectAccess, it’s a completely independent VPC that is directly attached to the Internet. CLIENT1 is assigned an Elastic IP address (EIP). For purposes of this walk through, we are using Windows Server 2012 R2 as the client operating system type. You could also have Windows 8 (or higher) enterprise clients consume the offline domain join file created in the EDGE1 stack to test DirectAccess. Since the client network is in a dedicated VPC, the CLIENT1 stack could be located in a different region.
Figure 7: Client VPC design
Amazon Web Services – Implementing DirectAccess and NAT in the AWS Cloud November 2014
Page 33 of 36
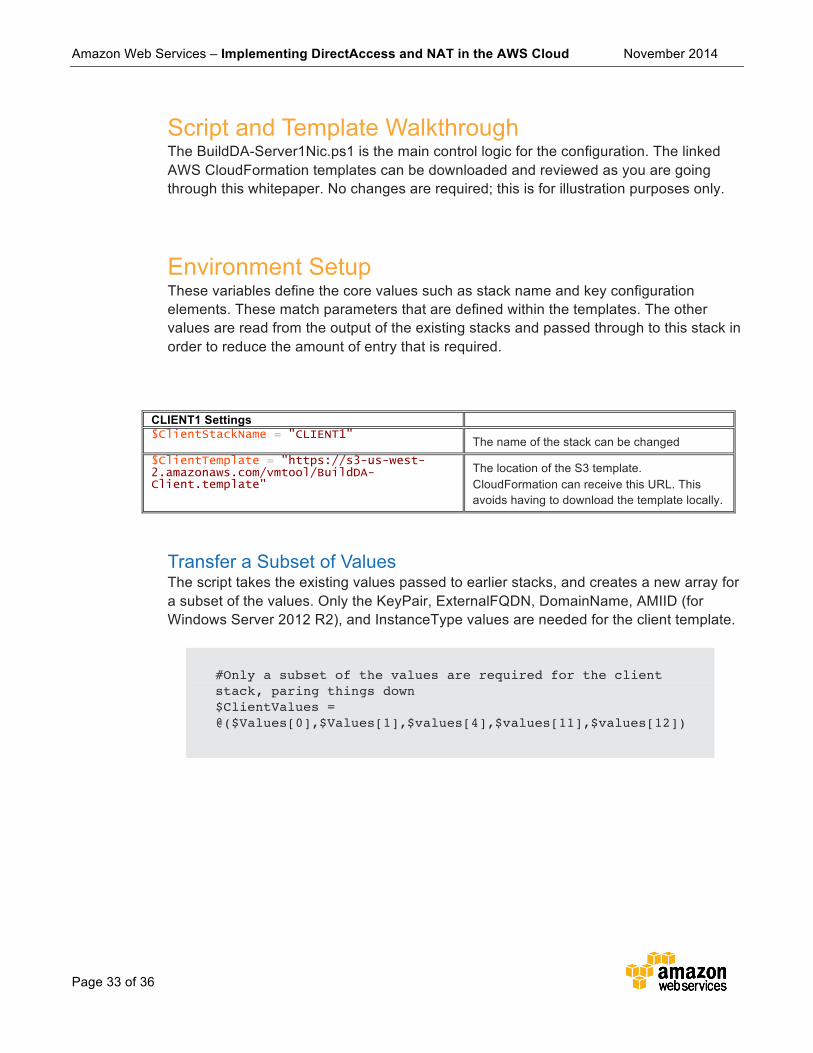
Script and Template Walkthrough The BuildDA-Server1Nic.ps1 is the main control logic for the configuration. The linked AWS CloudFormation templates can be downloaded and reviewed as you are going through this whitepaper. No changes are required; this is for illustration purposes only.
Environment Setup These variables define the core values such as stack name and key configuration elements. These match parameters that are defined within the templates. The other values are read from the output of the existing stacks and passed through to this stack in order to reduce the amount of entry that is required.
CLIENT1 Settings $ClientStackName = "CLIENT1" The name of the stack can be changed $ClientTemplate = "https://s3-us-west-2.amazonaws.com/vmtool/BuildDA-Client.template"
The location of the S3 template. CloudFormation can receive this URL. This avoids having to download the template locally.
Transfer a Subset of Values The script takes the existing values passed to earlier stacks, and creates a new array for a subset of the values. Only the KeyPair, ExternalFQDN, DomainName, AMIID (for Windows Server 2012 R2), and InstanceType values are needed for the client template.
#Only a subset of the values are required for the client stack, paring things down $ClientValues = @($Values[0],$Values[1],$values[4],$values[11],$values[12])

Amazon Web Services – Implementing DirectAccess and NAT in the AWS Cloud November 2014
Page 34 of 36
Client Offline Domain Join (ODJ) The client template is provided the external domain name and path required to download the ODJ file.
"C:\\cfn\\scripts\\ODJ.ps1" : { "content" : { "Fn::Join" : ["", [ "import-module BitsTransfer", "\n", "$ClientFileName = \"client1.txt\" ", "\n", "$ExternalFQDN = \"",{ "Ref" : "1ExternalDomainDNSName" }, "\"", "\n", "$FiletoDownload = \"http://\"+$ExternalFQDN+\"/\"+$ClientFileName ", "\n", "$DestinationFile = \"c:\\cfn\\scripts\\\"+$ClientFileName ", "\n", "Start-BitsTransfer -Source $FiletoDownload -Destination $DestinationFile", "\n", "Write-host \"Applying ODJ file\" ","\n", "cmd.exe /c \"Djoin /requestodj /loadfile $DestinationFile /windowspath %windir% /localos \" ", "\n" ]]} },
Testing the Configuration After applying the offline domain join file, the system restarts. After restart, you should be able to logon to the client using CORP\StackAdmin with the password ‘Password123’. After logon, manually disable Internet Explorer Enhanced Security Configuration through Server Manager, in order to enable web browsing. Then access http://dc1.corp.example.com to test the complete end-to-end connectivity. You should see a screen similar to the one in Figure 8.
Figure 8: Accessing DC1 over DirectAccess from Client1
Amazon Web Services – Implementing DirectAccess and NAT in the AWS Cloud November 2014
Page 35 of 36
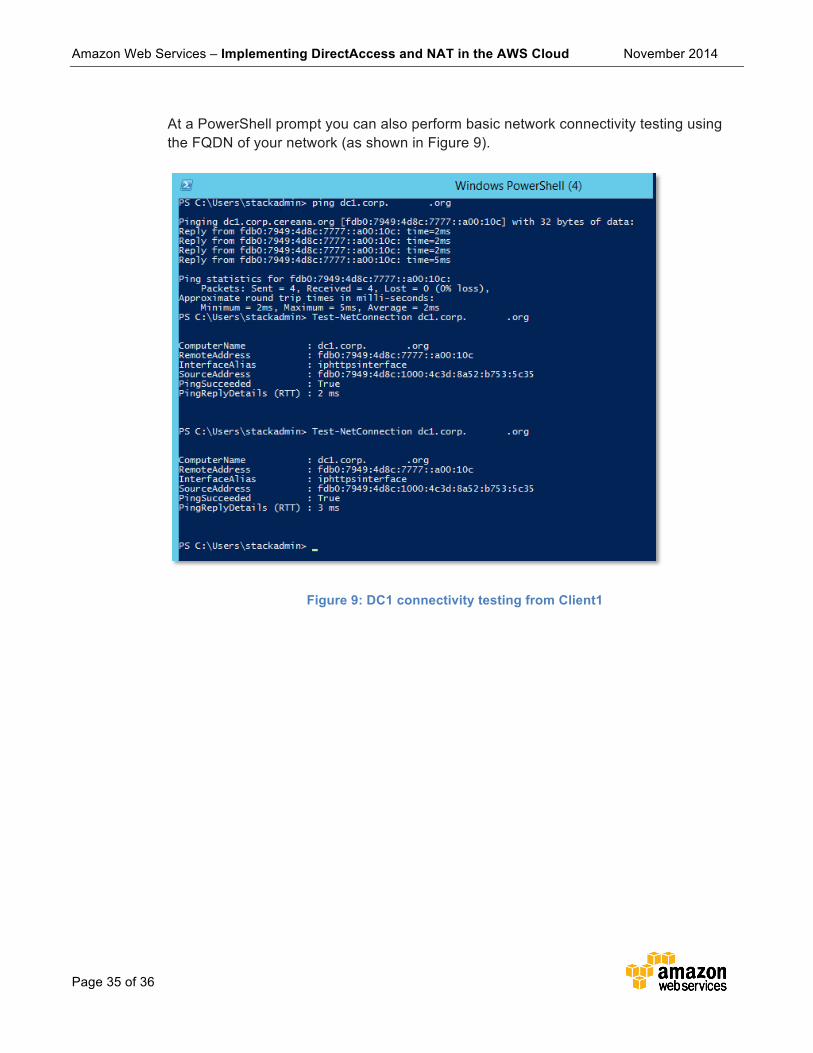
At a PowerShell prompt you can also perform basic network connectivity testing using the FQDN of your network (as shown in Figure 9).
Figure 9: DC1 connectivity testing from Client1

Amazon Web Services – Implementing DirectAccess and NAT in the AWS Cloud November 2014
Page 36 of 36
Conclusion Congratulations! You now have successfully built the following:
A simulated corporate network with a DMZ. This VPC will have a private and public subnet leveraging a dual-homed Windows Server as a NAT and Remote Desktop Gateway device. This connects the private subnet to the public subnet.
The NAT device will also function as a reverse proxy, publishing ports 80 and 443 on the private subnet.
A domain controller that has been configured with Certificate Services to support DirectAccess.
A Windows Remote Access server with DirectAccess configured using its Single NIC Topology.
A simulated remote network featuring a Windows server as a remote client in a separate VPC.
The remote client will be joined to the corporate networking leveraging the Windows Offline Domain Join capability.
DirectAccess will be enabled so the remote client has complete connectivity to the corporate private network.
Notices © 2014, Amazon Web Services, Inc., or its affiliates. All rights reserved. This document is provided for informational purposes only. It represents AWS’s current product offerings as of the date of issue of this document, which are subject to change without notice. Customers are responsible for making their own independent assessment of the information in this document and any use of AWS’s products or services, each of which is provided “as is” without warranty of any kind, whether express or implied. This document does not create any warranties, representations, contractual commitments, conditions or assurances from AWS, its affiliates, suppliers or licensors. The responsibilities and liabilities of AWS to its customers are controlled by AWS agreements, and this document is not part of, nor does it modify, any agreement between AWS and its customers.