implementation getting started with your sales cloud oracle
TRANSCRIPT

OracleSales CloudGetting Started with YourImplementation
Release 9

Oracle® Sales Cloud Getting Started with Your Implementation
Part Number E57784-02
Copyright © 2011-2014, Oracle and/or its affiliates. All rights reserved.
Author: Jiri Weiss, Robyn King, Carmen Myrick, Kristin Penaskovic, Gowri Sudhindra, Abhishek Sura, Jacqueline Wood, Judy Wood
Contributor: Ellen Beres, Steve Buchan, Brian Casey, Josephine Cassidy, Francis Chang, Cheryl Dajczak, Sidhartha Das, Damien Joly, Ruth Kale-Fok, Virinder Kaur, Bernice Lam, Srikanth Mattegunta, Sayuri Nagase, Brian Oden, Ou-Dan Peng, Vijayanand Rajkumar, Muhammad Rehman, Anne Romano, Indrajit Sen, Krasimir Sofijski, Jaya Sridhar, Vijay Tiwary, Sudeep Vaidyanathan, John Vakoc, Padmaja Varanasi, Nicholas Vautier, Catherine You, Waldemar Zdanowicz
This software and related documentation are provided under a license agreement containing restrictions on use and disclosure and are protected byintellectual property laws. Except as expressly permitted in your license agreement or allowed by law, you may not use, copy, reproduce, translate, broadcast,modify, license, transmit, distribute, exhibit, perform, publish, or display any part, in any form, or by any means. Reverse engineering, disassembly, ordecompilation of this software, unless required by law for interoperability, is prohibited.
The information contained herein is subject to change without notice and is not warranted to be error-free. If you find any errors, please report them tous in writing.
If this is software or related documentation that is delivered to the U.S. Government or anyone licensing it on behalf of the U.S. Government, the followingnotice is applicable:
U.S. GOVERNMENT END USERS: Oracle programs, including any operating system, integrated software, any programs installed on the hardware, and/or documentation, delivered to U.S. Government end users are "commercial computer software" pursuant to the applicable Federal Acquisition Regulationand agency-specific supplemental regulations. As such, use, duplication, disclosure, modification, and adaptation of the programs, including any operatingsystem, integrated software, any programs installed on the hardware, and/or documentation, shall be subject to license terms and license restrictionsapplicable to the programs. No other rights are granted to the U.S. Government.
This software or hardware is developed for general use in a variety of information management applications. It is not developed or intended for use inany inherently dangerous applications, including applications that may create a risk of personal injury. If you use this software or hardware in dangerousapplications, then you shall be responsible to take all appropriate fail-safe, backup, redundancy, and other measures to ensure its safe use. OracleCorporation and its affiliates disclaim any liability for any damages caused by use of this software or hardware in dangerous applications.
Oracle and Java are registered trademarks of Oracle Corporation and/or its affiliates. Other names may be trademarks of their respective owners.
Intel and Intel Xeon are trademarks or registered trademarks of Intel Corporation. All SPARC trademarks are used under license and are trademarks orregistered trademarks of SPARC International, Inc. AMD, Opteron, the AMD logo, and the AMD Opteron logo are trademarks or registered trademarks ofAdvanced Micro Devices. UNIX is a registered trademark of The Open Group.
This software or hardware and documentation may provide access to or information on content, products and services from third parties. Oracle Corporationand its affiliates are not responsible for and expressly disclaim all warranties of any kind with respect to third-party content, products, and services. OracleCorporation and its affiliates will not be responsible for any loss, costs, or damages incurred due to your access to or use of third-party content, products,or services.
For information about Oracle's commitment to accessibility, visit the Oracle Accessibility Program website at http://www.oracle.com/pls/topic/lookup?ctx=acc&id=docacc
Oracle customers have access to electronic support through My Oracle Support. For information, visit http://www.oracle.com/pls/topic/lookup?ctx=acc&id=info or visit http://www.oracle.com/pls/topic/lookup?ctx=acc&id=trs if you are hearing impaired.

Oracle Sales CloudGetting Started with Your Implementation
Contents
Preface i
1 About This Guide 1Prerequisites ............................................................................................................................................................. 1
Purpose and Scope .................................................................................................................................................. 1
What You Will Be Able to Do After Completing the Setups in This Guide .................................................................. 1
Case Study ............................................................................................................................................................... 2
2 Signing in and Getting Oriented 3Signing In for the First Time ...................................................................................................................................... 3
Available User Interfaces ........................................................................................................................................... 4
Getting Oriented in Oracle Sales Cloud .................................................................................................................... 6
3 Setup Process Overview 12Setup Tasks Completed for You in Oracle Sales Cloud .......................................................................................... 12
Setup Task Summary ............................................................................................................................................. 14
4 Creating Other Setup Users 18About Creating Setup Users ................................................................................................................................... 18
Creating a Job for Provisioning Setup Users ........................................................................................................... 19
Creating the Provisioning Rule for Setup Users ....................................................................................................... 22
Creating the Provisioning Rule for the Employee Abstract Role ............................................................................... 24
Creating a Setup User ............................................................................................................................................ 24
5 Getting Ready to Create Sales Users 27What You Must Do Before Creating Sales Users .................................................................................................... 27
Creating Additional Resource Roles ........................................................................................................................ 28
Creating a Resource Organization ........................................................................................................................... 29
Designating a Resource Organization as the Top of the Sales Hierarchy ................................................................. 30
Creating Rules to Automatically Provision Roles to Sales Users .............................................................................. 31
Designating a Single User to Receive All Credential E-Mails .................................................................................... 33
Oracle Sales CloudGetting Started with Your Implementation
6 Creating Sales Users in the UI 35About Creating Sales Users in the UI ..................................................................................................................... 35
Creating Sales Users in the UI ................................................................................................................................ 35
7 Importing Users from a File 39About Importing Users ............................................................................................................................................ 39
Downloading a Template for Importing Your Data from a File ................................................................................. 40
Understanding the User Import Template ............................................................................................................... 42
Appending Additional Attributes to Your User Import File ........................................................................................ 46
Copying and Modifying the Import Mapping ........................................................................................................... 47
Importing Your User Data File ................................................................................................................................. 49
Enabling Search for Imported Users ....................................................................................................................... 51
8 Specifying Your Corporate Currency 53About Specifying Corporate Currency ..................................................................................................................... 53
Specifying Corporate Currency in Oracle Sales Cloud ............................................................................................. 53
9 Setting Up the Accounting Calendar 55About Setting Up the Accounting Calendar for Oracle Sales Cloud ......................................................................... 55
Creating the Accounting Calendar .......................................................................................................................... 55
Enabling the Accounting Calendar You Created ..................................................................................................... 57
10 Setting Up Geography Reference Data for Territories and Addresses 59About Setting Up Geography Reference Data ......................................................................................................... 59
Importing Nokia Geography Reference Data ........................................................................................................... 59
Setting Up Geography Validation ............................................................................................................................ 62
11 Creating Your Sales Catalog 65About Creating the Sales Catalog ........................................................................................................................... 65
Creating Product Groups ........................................................................................................................................ 67
Importing Product Groups ...................................................................................................................................... 69
Publishing and Validating the Sales Catalog ............................................................................................................ 86

Oracle Sales CloudGetting Started with Your Implementation
12 Enabling and Configuring Search 89About Enabling and Configuring Search ................................................................................................................. 89
Running the Work Area Search Index Process ....................................................................................................... 90
Enabling the Global Search Profile Option .............................................................................................................. 93
Activating and Configuring Application Objects for Global Search ........................................................................... 94
Enabling the Objects You Activated as Filters in the Global Search UI ..................................................................... 97
Changing the Behavior of Global Search Automatic Suggestions ............................................................................ 98
13 Importing Accounts and Contacts 101About Importing Accounts and Contacts .............................................................................................................. 101
Downloading Templates You Can Use for Import ................................................................................................. 101
Registering the Source System of Your Customer Data Import ............................................................................. 102
Importing Accounts ............................................................................................................................................... 103
Importing Contacts ............................................................................................................................................... 107
14 Setting Up Sales Territories and Assignment 111About Setting Up Sales Territories and Assignment .............................................................................................. 111
Preparing to Create Territories .............................................................................................................................. 116
Creating the Sales Territory Hierarchy ................................................................................................................... 121
Setting Assignment Options .................................................................................................................................. 129
Disabling Deal Protection on Opportunities ........................................................................................................... 129
Running Assignment Processes ............................................................................................................................ 130
15 Configuring Opportunity Behavior 138About Configuring Opportunity Behavior ............................................................................................................... 138
Configuring Sales Methods ................................................................................................................................... 138
Configuring Opportunity Close Behavior ................................................................................................................ 140
16 Setting Up Forecasting 143About Setting Up Forecasting ............................................................................................................................... 143
Creating a Forecast .............................................................................................................................................. 143
Generating Your Forecasts ................................................................................................................................... 147
17 Setting Up Oracle Social Network 150About Setting Up Oracle Social Network with Oracle Sales Cloud ........................................................................ 150
Setting Up Oracle Sales Cloud for Oracle Social Network ..................................................................................... 150
Enabling Oracle Sales Cloud Object Records for Oracle Social Network ............................................................... 155
Oracle Sales CloudGetting Started with Your Implementation
18 Setting Up Microsoft Outlook 160Overview of Oracle Sales Cloud for Outlook ......................................................................................................... 160
Overview of Oracle Sales Cloud for Outlook Installation ........................................................................................ 160
Installing the Oracle Sales Cloud for Outlook Application ...................................................................................... 161
19 Setting Up Mobile 163Oracle Sales Cloud Mobile Setup Overview .......................................................................................................... 163
What are the supported platforms for Oracle Sales Cloud Mobile? ....................................................................... 163
Determining Your Company's Host URL for Oracle Sales Cloud Mobile ................................................................ 164
Installing the Oracle Sales Cloud Mobile iPhone Application .................................................................................. 164
Installing the Oracle Sales Cloud Mobile Android Application ................................................................................ 165
Installing the Oracle Sales Cloud Mobile BlackBerry Application ............................................................................ 165
Reviewing Oracle Sales Cloud Mobile's Features .................................................................................................. 165
Oracle Sales Cloud Mobile Extensibility Overview .................................................................................................. 166
Customizing Oracle Sales Cloud Mobile ................................................................................................................ 167
Adding or Removing Object Icons From the Sales Cloud Mobile Home Page ........................................................ 167
Displaying a List of Products for Revenue Items ................................................................................................... 168
How can I set up the automatic password saving on smartphones and tablets? ................................................... 168
Setting Up RSS Feeds .......................................................................................................................................... 168
Testing Oracle Sales Cloud Mobile Customizations ............................................................................................... 169
Rolling Out Oracle Sales Mobile to Your Sales Team ............................................................................................ 169
20 Additional Learning Resources 171Oracle Sales Cloud Additional Resources ............................................................................................................. 171
Oracle Sales CloudGetting Started with Your Implementation
Preface
i
PrefaceThis Preface introduces information sources available to help you use Oracle Applications.
Oracle Applications HelpUse the help icon to access Oracle Applications Help in the application.
Note
If you don't see any help icons on your page, click the Show Help button in the global area. Not all pages havehelp icons.
You can also access Oracle Applications Help at https://fusionhelp.oracle.com/.
Oracle Applications GuidesTo find other guides for Oracle Applications, go to:
• Oracle Applications Help, and select Documentation Library from the Navigator menu.
• Oracle Help Center at http://docs.oracle.com/
Other Information Sources
My Oracle SupportOracle customers have access to electronic support through My Oracle Support. For information, visit http://www.oracle.com/pls/topic/lookup?ctx=acc&id=info or visit http://www.oracle.com/pls/topic/lookup?ctx=acc&id=trs if youare hearing impaired.
Oracle Enterprise Repository for Oracle Fusion ApplicationsOracle Enterprise Repository for Oracle Fusion Applications (http://fusionappsoer.oracle.com) provides details on assets (suchas services, integration tables, and composites) to help you manage the lifecycle of your software.
Documentation AccessibilityFor information about Oracle's commitment to accessibility, visit the Oracle Accessibility Program website at http://www.oracle.com/pls/topic/lookup?ctx=acc&id=docacc.
Comments and SuggestionsPlease give us feedback about Oracle Applications Help and guides! - Send e-mail to:[email protected]. - Click your user name in the global area of Oracle Applications Help,and select Send Feedback to Oracle.
Oracle Sales CloudGetting Started with Your Implementation
Chapter 1About This Guide
1
1 About This Guide
PrerequisitesThis guide assumes that you have subscribed to Oracle Sales Cloud and have received the e-mail with your environment andinitial sign-on information.
Purpose and ScopeThis guide is intended for administrators tasked with learning how to set up sales automation capabilities in Oracle SalesCloud. This document uses a case study to provide you with the concepts and procedures you'll need to implement salesautomation in a test environment. This guide does not provide detailed explanations of all available features and settings.
What You Will Be Able to Do After Completing theSetups in This GuideAfter completing the setups in this guide, you will be able to:
• Manage account and contact information
◦ Track your team's interactions with account contacts
◦ Schedule meetings, calls, and demos for the whole team
• Share and collaborate on sales documents
◦ Share documents, images, and other rich media between people and groups
◦ Make it possible for everyone to annotate and discuss each document
• Manage opportunities
◦ Automatically assign the right sales people to each opportunity
◦ Have your sales team manage the opportunity life cycle using a standard sales process
◦ Leverage the experience of your entire organization to help teams sell through social interactions
• Manage the sales team
◦ Assign tasks and deadlines to ensure the work gets done
◦ Provide management with reports on your team's activities
Oracle Sales CloudGetting Started with Your Implementation
Chapter 1About This Guide
2
• Forecast your revenue
◦ Your salespeople submit their forecasts based on criteria you choose
◦ Managers can adjust the forecasts, if necessary
• Work on multiple devices
◦ Manage all your customer-facing information, forecasts, and other activities on mobile devices and in MicrosoftOutlook
Setting up Outlook and mobile devices is optional. If you want, you can leave this setup for later.
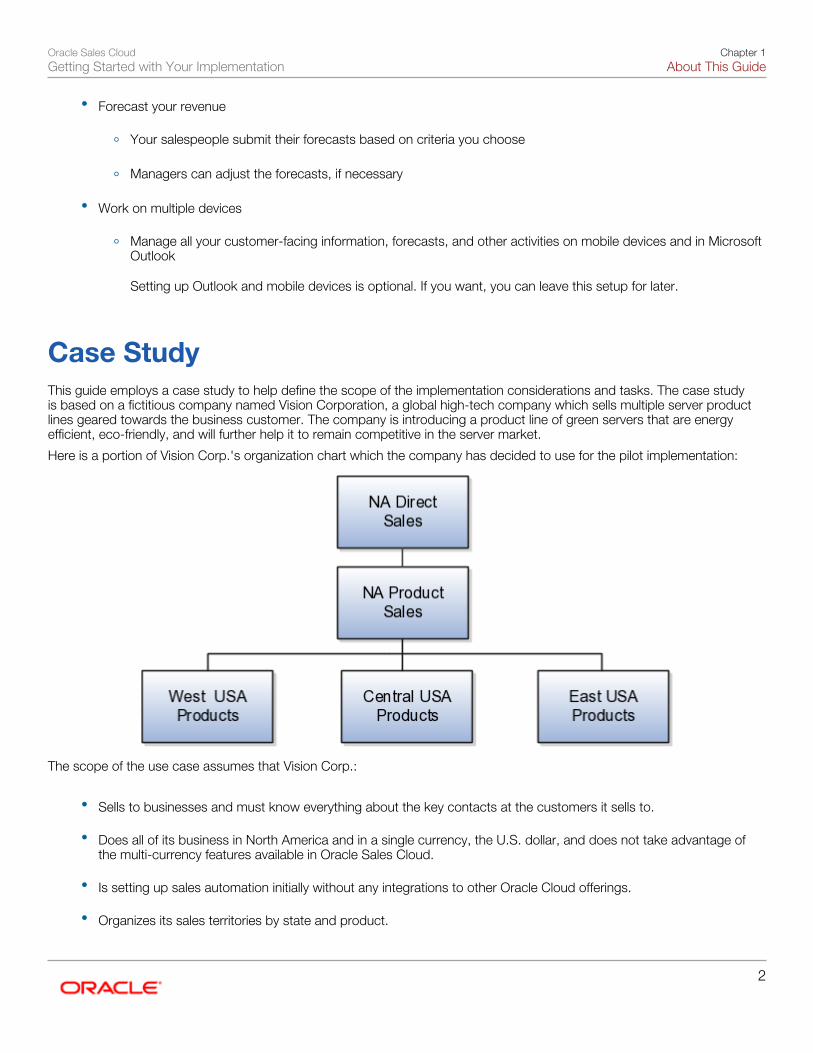
Case StudyThis guide employs a case study to help define the scope of the implementation considerations and tasks. The case studyis based on a fictitious company named Vision Corporation, a global high-tech company which sells multiple server productlines geared towards the business customer. The company is introducing a product line of green servers that are energyefficient, eco-friendly, and will further help it to remain competitive in the server market.
Here is a portion of Vision Corp.'s organization chart which the company has decided to use for the pilot implementation:
The scope of the use case assumes that Vision Corp.:
• Sells to businesses and must know everything about the key contacts at the customers it sells to.
• Does all of its business in North America and in a single currency, the U.S. dollar, and does not take advantage ofthe multi-currency features available in Oracle Sales Cloud.
• Is setting up sales automation initially without any integrations to other Oracle Cloud offerings.
• Organizes its sales territories by state and product.
Oracle Sales CloudGetting Started with Your Implementation
Chapter 2Signing in and Getting Oriented
3
2 Signing in and Getting Oriented
Signing In for the First TimeWhen your test environment is ready, Oracle sends an e-mail to the person designated as the administrator when you signedup with Oracle Sales Cloud. This e-mail includes the link to your service, a temporary password, and instructions on how toaccess the Oracle Sales Cloud Welcome Note (Doc ID 1491026.1) on My Oracle Support (support.oracle.com). You mustread this note and follow the instructions before signing in.

Oracle Sales CloudGetting Started with Your Implementation
Chapter 2Signing in and Getting Oriented
4
Available User InterfacesSales team members can work in multiple user interfaces (UIs) that are optimized for different uses:
• The simplified UI provides the efficiency and speed sales personnel need to do their work.
Oracle Sales CloudGetting Started with Your Implementation
Chapter 2Signing in and Getting Oriented
5
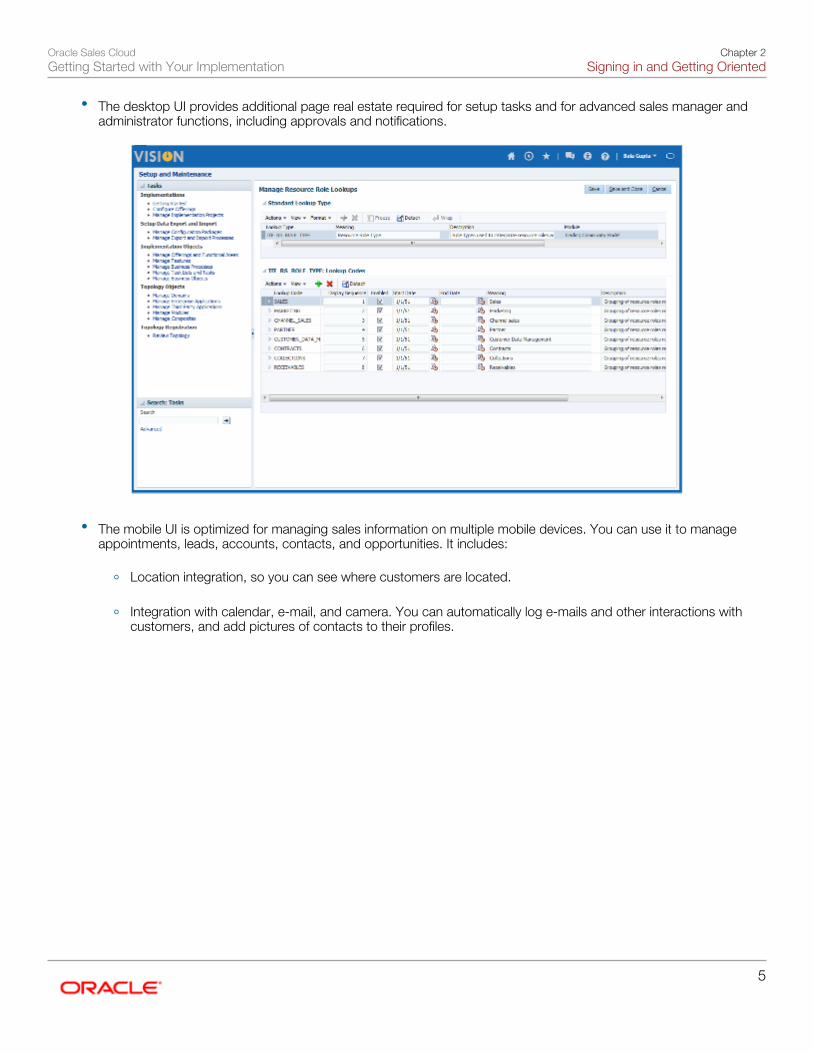
• The desktop UI provides additional page real estate required for setup tasks and for advanced sales manager andadministrator functions, including approvals and notifications.
• The mobile UI is optimized for managing sales information on multiple mobile devices. You can use it to manageappointments, leads, accounts, contacts, and opportunities. It includes:
◦ Location integration, so you can see where customers are located.
◦ Integration with calendar, e-mail, and camera. You can automatically log e-mails and other interactions withcustomers, and add pictures of contacts to their profiles.

Oracle Sales CloudGetting Started with Your Implementation
Chapter 2Signing in and Getting Oriented
6
◦ A disconnected mode that makes it possible for your sales organization to continue working even whendisconnected from the network.
Getting Oriented in Oracle Sales CloudWhen setting up Oracle Sales Cloud, you will be primarily using the desktop and simplified user interfaces (UIs):
• You will perform setup tasks in the desktop UI.
• You will use the simplified UI primarily for testing.
Navigating to Setup TasksWhen you sign in, you are automatically directed to the simplified UI.
To navigate to setup tasks and different application work areas, you click on the Navigator icon and make a selection fromthe menu. The menu selections are identical in both the simplified and desktop UIs.

Oracle Sales CloudGetting Started with Your Implementation
Chapter 2Signing in and Getting Oriented
7
The Navigator shows all of the application work areas that are available to you based on the permissions assigned to you,rather than on the features you have purchased. Because a setup user has a broad range of permissions assigned, not all ofthe selections are applicable to your setup.
For setup, you will be using only a small number of the available work areas accessible from the Navigator menu. The mostimportant of these include:
• Manager Resources
◦ Manage Users
Use this work area for creating and managing individual users. If you want to create users in bulk by importingthem, you must use the file import tasks available from the Setup and Maintenance work area.
• Tools
◦ Setup and Maintenance
Use this work area to launch implementation tasks.

Oracle Sales CloudGetting Started with Your Implementation
Chapter 2Signing in and Getting Oriented
8
◦ Scheduled Processes
Use this work area for scheduling and monitoring background processes.
NoteThe initial user provided by Oracle is not provisioned with the Employee abstract role and so doesnot have the permission to run or monitor scheduled processes, including geography import. Youshould sign in as one of he setup users described in this guide to perform these tasks.
◦ Application Composer
Use Application Composer work area to customize and extend your application.
• Sales
You will be using the different work areas under this heading to set up and test functional aspects of your salesapplication.
Desktop UI OrganizationThe desktop UI is divided into different areas. You can have up to four areas on a single page, but most pages have just twoor three:
• The top of the page, called the Global area, remains no matter where in the application you are.
• The center of the page, called the Transactional area, is the work area.
• The left side of the page, the Regional, lists tasks available in the work area and provides some useful widgets,including a search that you can use to quickly get to a task.
• On some pages, there is an additional area on the right, called the Contextual Area. It provides more information onthe particular record or task you are working on.

Oracle Sales CloudGetting Started with Your Implementation
Chapter 2Signing in and Getting Oriented
9
Both the left and right regions are collapsible, to give you more space to do your work.

Oracle Sales CloudGetting Started with Your Implementation
Chapter 2Signing in and Getting Oriented
10
Useful Toolbar ItemsHere are the most useful toolbar items in the Global area:
Accessing Setup TasksYou will perform many of the setup tasks required to get your application up and running in the Setup and Maintenancework area. This work area is part of the Functional Setup Manager, which you can use to create implementation projects andmanage the assignment of setup tasks to implementation teams. For the setups covered in this guide, you will access tasksby searching on their names.
There are two ways of searching for setup tasks:
1. You can search for the task name on the All Tasks tab on the Overview page in the Setup and Maintenance workarea.
NoteThe first time you navigate to the Setup and Maintenance work area, the application displays the GettingStarted with Oracle Fusion Applications page. You can reach the Overview page, by clicking Done.
2. You can use the search for the task in the left-hand Regional area.The Regional search provides the quickest way of searching for a task because you don't have to navigate to theOverview page first, but this search is only available when you are working in the Setup and Maintenance work area.

Oracle Sales CloudGetting Started with Your Implementation
Chapter 2Signing in and Getting Oriented
11
The following figure shows the two areas where you can search for setup tasks.
TipWhen searching for setup tasks, use the percent sign (%) to represent missing letters or words. For example, tosearch for the Manage HCM Role Provisioning Rules task, you can search on manage hcm%rules. The searches arenot case sensitive.
Oracle Sales CloudGetting Started with Your Implementation
Chapter 3Setup Process Overview
12
3 Setup Process Overview
Setup Tasks Completed for You in Oracle Sales CloudOracle completes the setup tasks listed in this topic according to the information you provided when you signed up for OracleSales Cloud. You can verify or edit the values for each task using the navigation provided in this topic.
NoteIf you purchased Oracle Sales Cloud together with another cloud service, such as Oracle Global HumanResources Cloud or Oracle Enterprise Resource Planning (ERP) Cloud, then your environment will have a differentstarting point.
The following table lists the completed tasks in the order they are implemented. You can review each setup task and makeany necessary changes by searching for the task name in the Setup and Maintenance work area and clicking the Go to Taskbutton.
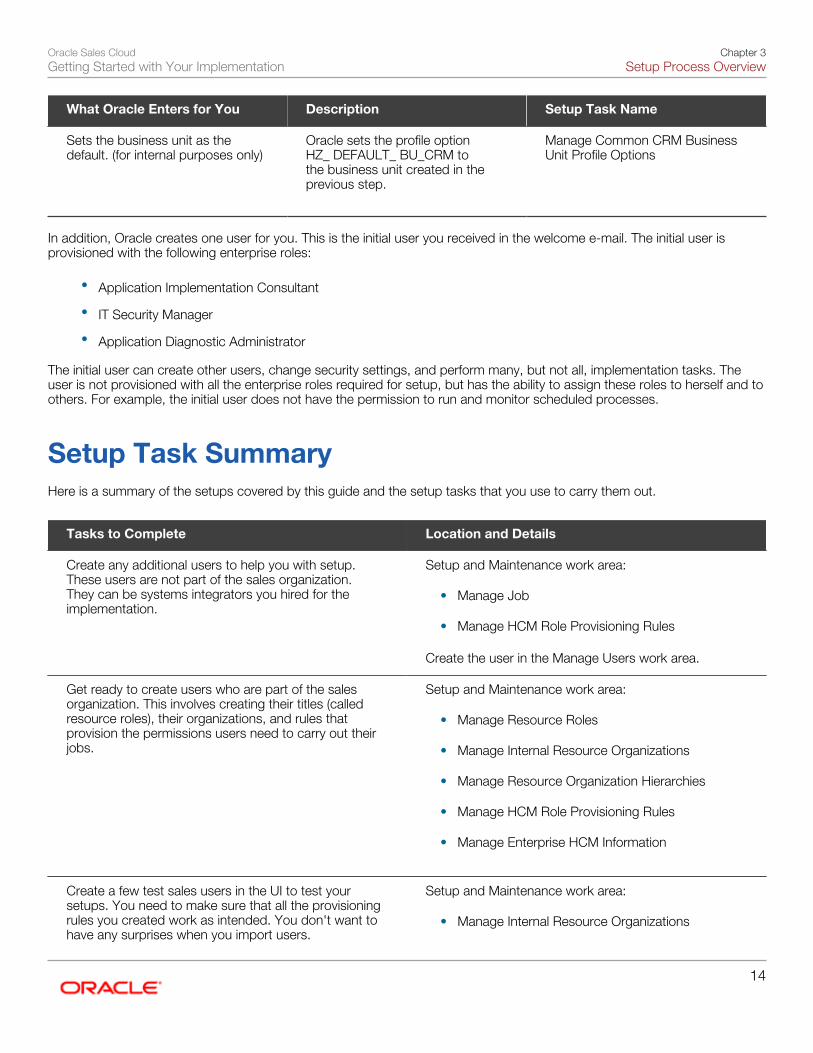
What Oracle Enters for You Description Setup Task Name
Your company name
Oracle enters the company nameyou provided. Most of the otherfields on the Edit Enterprise pageare for human capital management(HCM) purposes, and so they arenot relevant for Oracle Sales Cloud.One exception is the User and RoleProvisioning Information region thatyou can use to modify options forcreating users. These options arecovered in separate topics and notrelevant here.
Manage Enterprise HCMInformation
Your corporate address
This is the address you provided.As a best practice, use the samelegal corporate address used fortax information. To review andedit the address, you must searchfor it first by the country whereit is located. If you do make anychanges, you must rememberto click Save and Close for thechanges to be saved.
Manage Legal Address

Oracle Sales CloudGetting Started with Your Implementation
Chapter 3Setup Process Overview
13
What Oracle Enters for You Description Setup Task Name
A legislative data group (for internalapplication purposes only)
The legislative data group isrequired for creating a legalemployer. Legislative data groupsare used for partitioning payrolland related data so they are notimportant unless you have suchintegrations. At least one legislativedata group is required for eachcountry where the enterpriseoperates. Sales Cloud-onlyimplementations require only onedata group. Oracle enters thelegislative data group name as theenterprise name with a LDG suffix.
Manage Legislative Data Groups
A legal entity (for internal applicationpurposes only)
When you create a user who is anemployee, you must specify thelegal entity created in this setuptask. In the Create User UI, thelegal entity is called the LegalEmployer. You can set up multiple legalentities if your business requiresthem; but, for Sales Cloud-onlyimplementations, you can assignall employees to just one corporatelegal employer created for you.The legal entity name Oracle entersfor you is your enterprise namefollowed by the suffix LE. All of theother entries should be kept as is.
Manage Legal Entity
An association between thelegislative data group and the legalentity (for internal purposes only)
In this task, Oracle associated thelegislative data group defined inthe Manage Legislative Data Grouptask with the Legal Entity HCMInformation.
Manage Legal Entity HCMInformation
A business unit (for internalpurposes only)
Oracle creates one business unitfor creating your employee users.The business unit name is yourenterprise name followed by thesuffix BU. Because all Sales Cloudtransactions occur in one businessunit, you can assign all employeesto the same corporate businessunit.
Manage Business Unit
Oracle Sales CloudGetting Started with Your Implementation
Chapter 3Setup Process Overview
14
What Oracle Enters for You Description Setup Task Name
Sets the business unit as thedefault. (for internal purposes only)
Oracle sets the profile optionHZ_ DEFAULT_ BU_CRM tothe business unit created in theprevious step.
Manage Common CRM BusinessUnit Profile Options
In addition, Oracle creates one user for you. This is the initial user you received in the welcome e-mail. The initial user isprovisioned with the following enterprise roles:
• Application Implementation Consultant
• IT Security Manager
• Application Diagnostic Administrator
The initial user can create other users, change security settings, and perform many, but not all, implementation tasks. Theuser is not provisioned with all the enterprise roles required for setup, but has the ability to assign these roles to herself and toothers. For example, the initial user does not have the permission to run and monitor scheduled processes.
Setup Task SummaryHere is a summary of the setups covered by this guide and the setup tasks that you use to carry them out.
Tasks to Complete Location and Details
Create any additional users to help you with setup.These users are not part of the sales organization.They can be systems integrators you hired for theimplementation.
Setup and Maintenance work area:
• Manage Job
• Manage HCM Role Provisioning Rules
Create the user in the Manage Users work area.
Get ready to create users who are part of the salesorganization. This involves creating their titles (calledresource roles), their organizations, and rules thatprovision the permissions users need to carry out theirjobs.
Setup and Maintenance work area:
• Manage Resource Roles
• Manage Internal Resource Organizations
• Manage Resource Organization Hierarchies
• Manage HCM Role Provisioning Rules
• Manage Enterprise HCM Information
Create a few test sales users in the UI to test yoursetups. You need to make sure that all the provisioningrules you created work as intended. You don't want tohave any surprises when you import users.
Setup and Maintenance work area:
• Manage Internal Resource Organizations

Oracle Sales CloudGetting Started with Your Implementation
Chapter 3Setup Process Overview
15
Tasks to Complete Location and Details
You must create at least one sales administrator userwho will set up and maintain territories, sales methods,and other sales-related standards.
Create users in the Manage Users work area.
Import the rest of the sales organization hierarchy byusing the template provided by Oracle.
Setup and Maintenance work area:
• Manage Enterprise HCM Information
• Manage File Import Mappings
• Manage File Import Activities
The corporate currency for your application is set to U.S.Dollar. If you use a different currency, then specify thecurrency by setting a system profile.
Setup and Maintenance work area:
• Manage Currency Profile Options
• Manage Currencies
Set up the periods you will need for your sales forecastsand reports by creating an accounting calendar.
Setup and Maintenance work area:
• Manage Accounting Calendars
• Manage Calendar Profile Option
Import geography reference data for the countries whereyou do business and set up validation for those addresselements that will be used in sales territories andforecasts. This step is required if you want to validateaddresses and set up sales territories and forecastingbased on geographical regions.
Setup and Maintenance work area:
• Manage Geographies
Create the sales catalog listing the goods and servicesyou sell. You create the top of the catalog hierarchymanually in the UI and import the rest.
Setup and Maintenance work area:
• Manage Product Groups
• Manage Product Group Usage
• Manage File Import Mappings
• Manage File Import Activities

Oracle Sales CloudGetting Started with Your Implementation
Chapter 3Setup Process Overview
16
Tasks to Complete Location and Details
Configure the sales territory management feature so thatyou are ready to create the sales territory hierarchy.
Setup and Maintenance work area:
• Manage Territory Geographies
• Manage Territory Hierarchies
Territories and Quotas work area:
• Enable Dimensions and Metrics
Enable and configure the two types of search in OracleSales Cloud: the global search at the top of each pageand the work area searches.
Scheduled Processes work area:
• Set up the Synchronize Database Search Indexesfor CRM Objects process to run every five minutes.
Setup and Maintenance work area:
• Complete the tasks in the Define Global SearchConfiguration task group.
Register the system that's the source of your accountand contacts data and import your accounts andcontacts from a file using templates you can downloadand modify.
Setup and Maintenance work area:
• Manage Community Source Systems
• Manage File Import Mappings
• Manage File Import Activities
Set up your sales territory hierarchy.
Territories and Quotas work area:
• Manage Territory Proposals
Set the following opportunity profile options:
• Set opportunity assignment to automatic by settingAssignment Submission at Save Enabled to Yes.(Account assignment is automatic by default)
• Disable deal protection by setting OpportunityResource Deal Protection Period to 0.
Setup and Maintenance work area:
• Manage Opportunity Profile Options
Run account and opportunity assignment processes:Request Sales Account Assignments and RevenueTerritory Based Assignment.
To schedule a process, select Scheduled Processunder the Tools heading in the Navigator.

Oracle Sales CloudGetting Started with Your Implementation
Chapter 3Setup Process Overview
17
Tasks to Complete Location and Details
Optionally, configure sales methods and stages andopportunity close behavior.
Setup and Maintenance work area:
• Manage Opportunity Profile Options
• Manage Sales Methods and Stages
Set up forecasting options and criteria.
Setup and Maintenance work area:
• Select Forecasting Options
• Manage Sales Forecasting Escheatable Processes
Optionally, set up Oracle Social Network.
Setup and Maintenance work area:
• Manage Oracle Social Network Objects
Optionally, enable Microsoft Outlook integration.
Select Set Preferences from the Personalizationmenu.
Optionally, set up Oracle Sales Cloud Mobile on yourmobile devices.
Installation involves downloading the application on yourmobile device and entering the correct URL.
Customize the application as required. If you are sellingto consumers, then you must expose a few additionalfields in the simplified user interface.
Different methods are available for customizing list ofvalues, layouts, and different user interfaces. See Getting Started with Oracle Sales CloudCustomizations guide available on docs. oracle.comand the customization topics in the Set Up Sales CloudMobile chapter of this guide.

Oracle Sales CloudGetting Started with Your Implementation
Chapter 4Creating Other Setup Users
18
4 Creating Other Setup Users
About Creating Setup UsersAfter you have signed in for the first time, you are ready to create other users who will help you with application setup. Theinitial user is intended for performing security tasks, which include the creation of other users and the granting of additionalprivileges either to herself or to others.
Although the initial user can perform many of the setup tasks in this guide, this user cannot perform all of them withoutadditional privileges. For example, the initial user cannot run scheduled processes, including the geography import task andindexing for searches.
In Oracle Sales Cloud, the privileges are bundled in what are called enterprise roles. There are two types of enterprise roles.There are job roles, which correspond to the jobs that the person is doing in your organization, and abstract roles, whichpermit users to carry on tasks that are common to employees and resources.
You provision the setup users we create in this chapter with all the job roles granted to the initial user and you will add oneadditional job role (Customer Relationship Management Application Administrator) and one abstract role (Employee) to makesure that they can carry out all the tasks specified in this guide. Here is the complete list:
• Application Implementation Consultant (job role)
Provides access to all setup tasks across all products.
• IT Security Manager (job role)
Provides access to security tasks, including the ability to assign other enterprise roles.
• Application Diagnostic Administrator (job role)
Provides access to diagnostic tests and data.
• Customer Relationship Management Application Administrator (job role)
Provides the ability to administer and manage all aspects of the Oracle Sales Cloud application. This includesconfiguration, customization, and the resolution of technical issues faced by users.
• Employee (abstract role)
Provides access to BI reports and the ability to run and monitor background processes.
The setup users are not part of the sales organization, so we don't want them to appear in the sales organization directory.However, there is nothing to stop you from providing the same setup permissions to users in the sales organization, if youneed to. And these super users are not the only ones who do setup. In the next chapter, you will learn how to set up salesadministrator users who can set up sales territories and perform a wide variety of sales-related setup tasks but do not havethese broad permissions.
Before we get started describing the setup you must understand what tasks the application performs when you create users.The application:
• Creates accounts, user names, and temporary passwords
• Sends users an e-mail with their sign-in credentials
• Provisions the users with all the security permissions they need to carry out their jobs

Oracle Sales CloudGetting Started with Your Implementation
Chapter 4Creating Other Setup Users
19
The application provisions the permissions to users automatically based on provisioning rules that you must set up. Each ruleis made up of the condition the user must meet and the sets of permissions you want to assign to the user.
Oracle follows the industry standard Role Based Access Control (RBAC) approach to security. See the Securing Oracle SalesCloud guide and the Oracle Sales Security Reference Guide for more information about how these roles are organized andwhat permissions they provide.
Setup Overview
1. Create a job, called Customer Administrator, by using the Manage Job task from the Setup and Maintenance workarea.
You provision setup users with the job roles they need when they are assigned the Customer Administrator job youcreate in this step. What job you create doesn't really matter because jobs aren't used in Oracle Sales Cloud. Youare creating the job only so you can use it as a condition in the rule. Jobs themselves become important only if youimplement Oracle HCM Cloud.
For details, see Creating a Job for Provisioning Setup Users in this chapter.
2. Create a provisioning rule that automatically provisions the following job roles to all users with the CustomerAdministrator job:
◦ Application Implementation Consultant
◦ IT Security Manager
◦ Application Diagnostic Administrator
◦ Customer Relationship Management Application Administrator
For details, see Creating the Provisioning Rule for Setup Users.
3. Create a separate provisioning rule that provisions every user of type employee with the Employee abstract role. Allof your users are employees, so they all receive this role.
For details, see Creating a Rule to Provision the Employee Abstract Role.
4. Create each setup user as a user of type employee with the Customer Administrator job.
For details, see Creating a Setup User.
Creating a Job for Provisioning Setup UsersUse this procedure to create a job that you can use to assign setup users with the same implementation privileges as theinitial user. You will use this job as a condition in the provisioning rule you create and add it to the user.
Creating the Job
1. Sign in as the initial user.
2. In the Navigator menu, select Setup and Maintenance under the Tools heading.
Oracle Sales CloudGetting Started with Your Implementation
Chapter 4Creating Other Setup Users
20
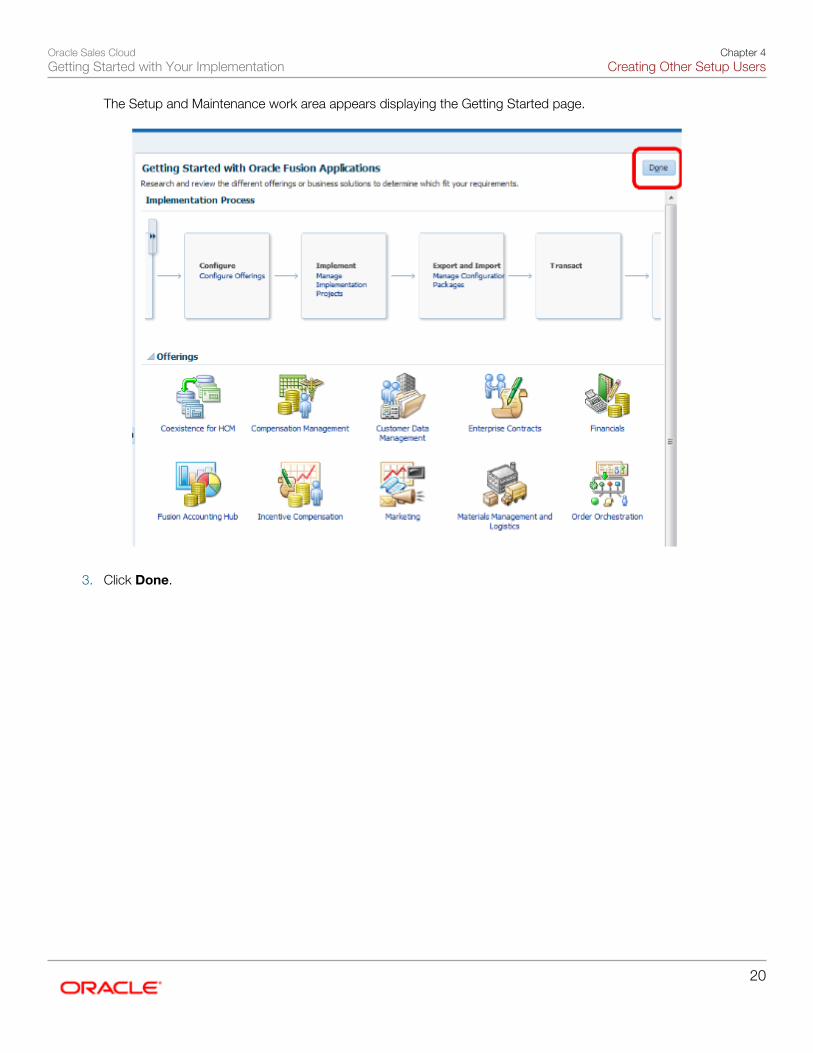
The Setup and Maintenance work area appears displaying the Getting Started page.
3. Click Done.
Oracle Sales CloudGetting Started with Your Implementation
Chapter 4Creating Other Setup Users
21
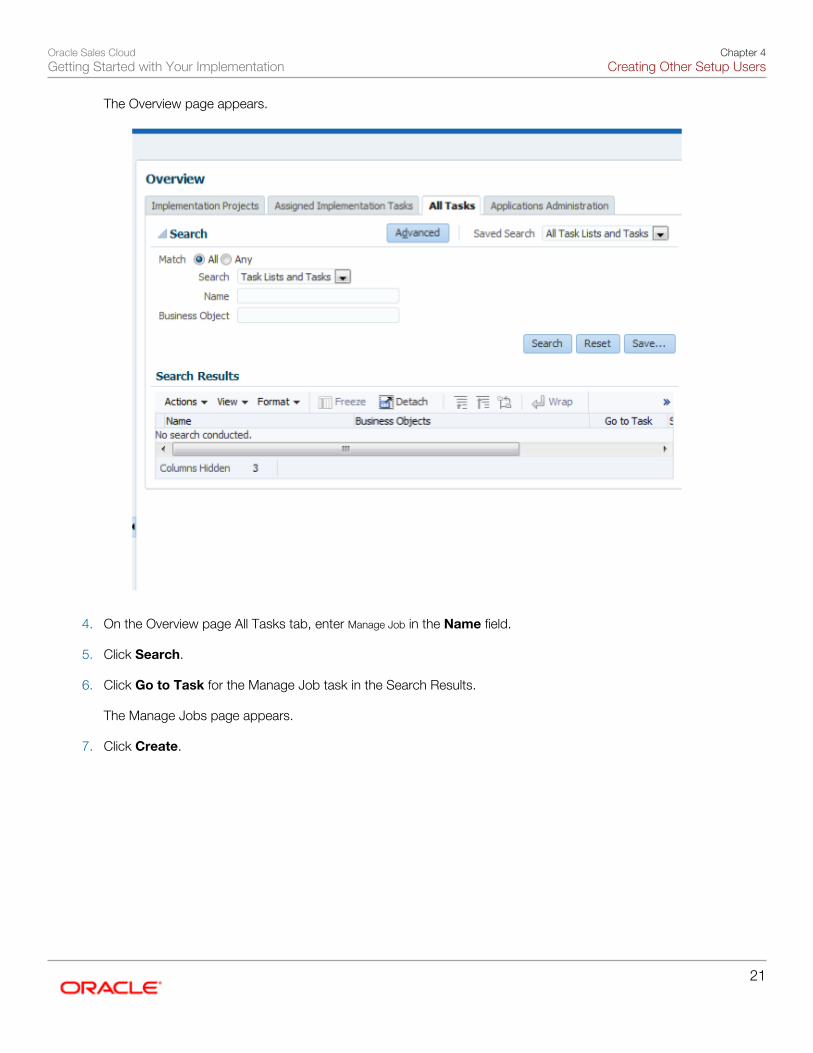
The Overview page appears.
4. On the Overview page All Tasks tab, enter Manage Job in the Name field.
5. Click Search.
6. Click Go to Task for the Manage Job task in the Search Results.
The Manage Jobs page appears.
7. Click Create.

Oracle Sales CloudGetting Started with Your Implementation
Chapter 4Creating Other Setup Users
22
The Create Job: Basic Details page appears.
8. Enter Customer Administrator in the Name field.
9. Enter a name without spaces, for example CustomerAdministrator, in the Code field.
10. You can keep the other field values as they are because they are not used in Oracle Sales Cloud.
11. Click Next at the top of the page.
12. Click Submit on the next page, and dismiss the warning by clicking OK.
The job may take a couple of minutes to create. You will receive an e-mail notification that the job was created.
Creating the Provisioning Rule for Setup UsersUse this procedure to create the provisioning rule which automatically provisions users assigned the Customer Administratorjob with the job roles required to do all of the setup in this guide..
Creating the Provisioning Rule
1. Sign in as a setup user and search for the Manage HCM Role Provisioning Rules task in the Setup and Maintenancework area.
2. Click Go to Task.
The Manage Role Mappings page appears.
3. Click Create.
Oracle Sales CloudGetting Started with Your Implementation
Chapter 4Creating Other Setup Users
23
The Create Role Mapping page appears.
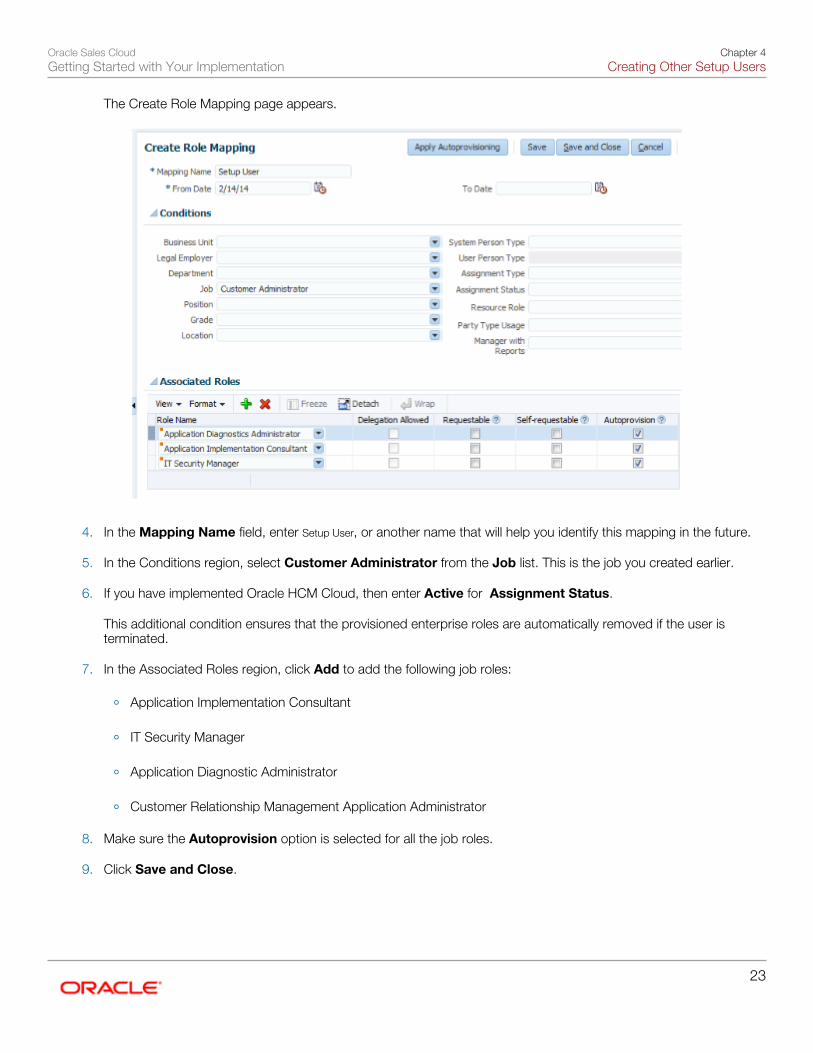
4. In the Mapping Name field, enter Setup User, or another name that will help you identify this mapping in the future.
5. In the Conditions region, select Customer Administrator from the Job list. This is the job you created earlier.
6. If you have implemented Oracle HCM Cloud, then enter Active for Assignment Status.
This additional condition ensures that the provisioned enterprise roles are automatically removed if the user isterminated.
7. In the Associated Roles region, click Add to add the following job roles:
◦ Application Implementation Consultant
◦ IT Security Manager
◦ Application Diagnostic Administrator
◦ Customer Relationship Management Application Administrator
8. Make sure the Autoprovision option is selected for all the job roles.
9. Click Save and Close.

Oracle Sales CloudGetting Started with Your Implementation
Chapter 4Creating Other Setup Users
24
Creating the Provisioning Rule for the EmployeeAbstract RoleUse this procedure to create a rule to provision the Employee abstract role to all users who are employees. This is a one-timesetup. You can reuse the same rule for all employee users.
Creating the Provisioning Rule
1. While signed in as a setup user, search for the Manage HCM Role Provisioning Rules task in the Setup andMaintenance work area.
2. Click Go to Task.
3. In the Manage HCM Role Provisioning page, click Create.
4. In Mapping Name, enter Employee to make the rule easy to identify.
5. In the Conditions region, select Employee from the Assignment Type list.
6. If you have Oracle HCM implemented, then enter Active for Assignment Status.
This additional condition ensures that the provisioned enterprise roles are automatically removed if the user isterminated.
7. In the Associated Roles region, click Add and add the Employee role.
8. Make sure the Autoprovision option is selected.
9. Click Save and Close.
Creating a Setup UserAfter you have created the provisioning rules, you are ready to create other setup users in the UI.
Creating a Setup User
1. While signed in as a setup user, select the Manage Users link under the Manager Resources heading in theNavigator.
2. On the Manage Users page, click Create.
The Create User page appears.
3. Enter the user's name and a unique e-mail address in the Personal Details region.
The application automatically sends the initial sign-in credentials to this e-mail address when you save the record.
Oracle Sales CloudGetting Started with Your Implementation
Chapter 4Creating Other Setup Users
25
Optionally, you can enter a Hire Date or leave this field set to the current date. The Hire Date and the remainingfields in this region are not used by Oracle Sales Cloud.
4. In the User Details region, enter the user name.
If you leave the User Name field blank, then the application automatically creates a user name for you. By default,the application uses the e-mail as the user name.
5. In the User Notification region, leave the Send User Name and Password option selected because you want thesetup users to receive their initial e-mails right away.
6. In the Employment Information region, enter the following:
◦ Select Employee from the Person Type list. The provisioning rule you set up is based on the employee's job.
◦ From the Legal Employer list, select the legal employer Oracle created for you using the information youprovided when you signed up with Oracle Sales Cloud. There should be only one value available.
◦ From the Business Unit list, select the business unit created for you when you signed up. There should beonly one entry.
◦ From the Job list, select Customer Administrator, the job you just created.
7. Click Autoprovision Roles.

Oracle Sales CloudGetting Started with Your Implementation
Chapter 4Creating Other Setup Users
26
The Roles region displays the following roles:
◦ Application Diagnostics Administrator
◦ Application Implementation Consultant
◦ Customer Relationship Management Application Administrator
◦ IT Security Manager
◦ Employee
8. Click Save and Close.
The application sends the e-mail with the initial credentials.

Oracle Sales CloudGetting Started with Your Implementation
Chapter 5Getting Ready to Create Sales Users
27
5 Getting Ready to Create Sales Users
What You Must Do Before Creating Sales UsersCreating sales application users requires a bit more preparation than creating setup users. When you create sales applicationusers either in the UI or by importing them from a file, you not only provision the permissions the users need to do theirjobs, but you also build the organization chart for your sales organization. This means that you must set up not only theprovisioning rules, but also the elements that the application will use to create the organization chart. These include the rootof the organization chart and the names of the roles the resources play in the organization.
You are getting ready to create two types of application users. There are members of the sales team without any systemadministration duties. These are the salespersons, the sales managers, and the sales vice presidents. And there must be atleast one sales administrator user who will set up and administer the sales territories and sales processes.
Setup Overview
1. You must assign a resource role, a name describing the role each resource plays in the organization, to each salesuser you create. The resource roles display right underneath user names in the resource directory and elsewhere inthe UI.
You also use the resource roles as conditions in your provisioning rules. For example, you assign the Sales Managerjob role to a user with the Sales Manager resource role.
Oracle provides standard resource roles, which correspond to the available job roles. For sales, these resourceroles include:
◦ Sales Administrator
◦ Sales Manager
◦ Sales Vice President
◦ Salesperson
If you want other job titles to display for your users, or if you want to provision some users with special privileges,then you must create additional resource roles using the Manage Resource Roles task from the Setup andMaintenance work area.
For example, you must create a CEO resource role if you want to include the CEO title in your organization chart.It's not one of the resource roles created for you.
You must also create additional resource roles, if you want to provide a small subset of resources with additionalprivileges. For example, if one of the sales managers in the organization is also in charge of maintaining territoriesand sales processes, you want to create a new resource role that you can provision with both the sales managerand the sales administrator job roles.
In our case study, Vision Corp. creates just two additional resource roles: CEO and Sales Operations Manager. Thesales operations manager is provisioned with the Sales Administrator job role so that he can set up and administerterritories and sales processes.
Oracle Sales CloudGetting Started with Your Implementation
Chapter 5Getting Ready to Create Sales Users
28
For details, see Creating Additional Resource Roles in this chapter.
2. Create a resource organization for the top manager in your hierarchy using the Manage Internal ResourceOrganizations task from the Setup and Maintenance work area.
You must assign resource organizations to all the manager users you create. All direct reports who are notmanagers inherit the organization.
While you must use the Manage Internal Resource Organizations task to create the resource organization for themanager at the top of the hierarchy, you can create the rest of the resource organizations while creating users in theUI or while importing them.
As you create users, the application creates an organization hierarchy that you can use to browse through the salesorganization's resource directory.
For details, see Creating a Resource Organization in this chapter.
3. Next, you must designate the resource organization you just created as the top of your organization hierarchy, byusing the Manage Resource Organization Hierarchies task in the Setup and Maintenance work area.
For details, see Designating a Resource Organization as the Top of the Sales Hierarchy in this chapter.
4. Decide what job roles you want to assign to your users.
Remember that you are not restricted to assigning one job role to a user. For example, you will want to provision thesales manager in charge of determining sales territories and sales processes with the Sales Administrator job role inaddition to the Sales Manager job role. This will enable this resource to perform the required sales setups.
You must create at least one user with the Sales Administrator job role to perform these setups.
5. Using the Manage HCM Role Provisioning Rules task, set up the provisioning rules to automatically provision theappropriate job roles and the Resource abstract role to your users based on their resource role. You must create aprovisioning rule for every resource role. This includes the resource roles Oracle provides and those you created.
For details, see Creating Rules to Automatically Provision Enterprise Roles to Sales Users in this chapter.
6. When you create users, the application automatically sends e-mails with the sign-in credentials. Because youdo not want members of the sales organization signing into your environment while you are setting it up, you willredirect these e-mails to one of the setup users. This is accomplished by entering the alternate e-mail address in theEdit Enterprise page, which you can access by using the Manage Enterprise HCM Information task from the Setupand Maintenance work area.
For details, see Designating a Single User to Receive All Credential E-Mails in this chapter.
Creating Additional Resource RolesThis topic describes how to create additional resource roles.
After you create a resource role, you must create the appropriate provisioning rules to provision the user with the required joband abstract roles. The resource role by itself is only a title.
Creating a Resource Role1. Sign in as a setup user and search for the Manage Resource Roles task in the Setup and Maintenance work area.

Oracle Sales CloudGetting Started with Your Implementation
Chapter 5Getting Ready to Create Sales Users
29
2. Click Go to Task.
The Manage Resource Roles page appears.
3. If you want to review all the existing resource roles to verify that it is necessary to create a new role, then clickSearch without entering search criteria.
All the available resource roles are listed. Roles that are predefined by Oracle are labeled System.
4. Click Create to create a new resource role.
The Create Role page appears.
5. In the Role Name field, enter the name of the resource role as it will appear in the application UI, for example, CEO.
6. In the Role Code field, enter a unique internal name. No spaces are permitted. If you are importing users from a file,then you must include this code in your file rather than the name.
7. Select the Manager option, if the resource role belongs to a manager, or the Member option, if the resource rolebelongs to an individual contributor.
8. From the Role Type list, select Sales to classify the role that you are creating.
9. Click Save and Close.
Creating a Resource OrganizationUse this procedure to create the resource organization for the top manager in your sales organization, usually the CEO.
You must create a resource organization for every manager in your sales organization, but you can save time by creating theresource organizations while you creating users in the UI or by importing them. When you import users from a file, you cancreate the resource organizations automatically from the information you include in the file itself.

Oracle Sales CloudGetting Started with Your Implementation
Chapter 5Getting Ready to Create Sales Users
30
Creating a Resource Organization
1. While signed in as a setup user, search for the Manage Internal Resource Organizations task in the Setup andMaintenance work area.
2. Click Go to Task.
The Manage Internal Resource Organizations page appears.
3. Click Create.
The Create Organization: Select Creation Method page appears.
4. Select Option 2: Create New Organization.
5. Click Next.
6. Enter the name of the resource organization in the Name field. This is the name that will be visible in the resourcedirectory.
Note that:
◦ Each resource organization name you enter must be unique.
◦ The names do not have to correspond to any formal organization in your enterprise. They are there solely tocreate a resource directory.
◦ Do not use managers' names, as you may want to reassign the organizations to others later.
7. In the Organization Usages region, click Add Row and select Sales Organization.
8. Click Finish.
Designating a Resource Organization as the Top ofthe Sales HierarchyAfter you have created the resource organization for the top person in the sales organization hierarchy, designate thatresource organization as the top of the sales hierarchy in the application.
Designating the Organization You Created as the Top of theSales Hierarchy
1. Sign in as a setup user and search for the Manage Resource Organization Hierarchies task in the Setup andMaintenance work area.
2. Click Go to Task.
The Manage Resource Organization Hierarchies page appears.
3. Click Search.
Oracle Sales CloudGetting Started with Your Implementation
Chapter 5Getting Ready to Create Sales Users
31
4. In the search results, select the Internal Resource Organization Hierarchy link. This value is supplied by Oracle.
The View Organization Hierarchy: Internal Resource Organization Hierarchy page appears.
5. From the Action menu at the top right-hand corner of the page, select Edit This Hierarchy Version.
The Edit Organization Hierarchy Version page appears.
6. Click Add in the Internal Resource Organization Hierarchy region.
The Add Tree Node window appears.
7. Click Search.
The Search Node window appears.
8. Click Search again in the Search Node window.
9. In the Search Results list, select the resource organization that you created for the top person in the hierarchy.
10. Click OK.
The application returns you to the Edit Organization Hierarchy Version page.
11. Click Save and Close.
12. When a warning appears, click Yes.
Creating Rules to Automatically Provision Roles toSales UsersYou must create rules to automatically provision Oracle Sales Cloud application users with the job and abstract roles theyrequire to perform their jobs before you create users. The provisioning is based on the resource role that you assign to a user,so you must create a rule for every resource role you use in your organization. You must create rules to provision all of theresource roles provided by Oracle as well as all the additional resource roles you created, such as the CEO.
Creating a Provisioning Rule
1. Sign in as a setup user.
2. Navigate to the Setup and Maintenance work area and search for the Manage HCM Role Provisioning Rules task.

Oracle Sales CloudGetting Started with Your Implementation
Chapter 5Getting Ready to Create Sales Users
32
3. Click Go to Task.
The Manage Role Mappings page appears.
4. Click Create.
The Create Role Mapping page appears.
5. In the Mapping Name field, enter a name that will help you identify the mapping, for example, Sales Vice President.
6. In the Conditions region, select the resource role you want to provision from the Resource Role list. For example,Sales Vice President.
7. If you have implemented Oracle Global Human Resources Cloud Service, then enter Active for AssignmentStatus.
This additional condition ensures that the provisioned roles are automatically removed if the user is terminated inGlobal Human Resources.
8. In the Associated Roles region, click Add to add the roles you want to provision. For the sales vice president, youadd the following:
◦ Sales Vice President
◦ Resource
NoteEach sales resource must be provisioned with both the Resource and Employee abstract roles. Youalready created a rule to provision the Employee abstract role when you created setup users.

Oracle Sales CloudGetting Started with Your Implementation
Chapter 5Getting Ready to Create Sales Users
33
9. Make sure the Autoprovision option is selected for all the roles.
10. Click Save and Close.
Designating a Single User to Receive All Credential E-MailsYou can redirect the e-mails with user credentials and temporary passwords to a single user. For example, you may wantto send all of the credential e-mails to one of the setup users, so that you can sign in as different sales users and test yoursetups.
NoteThe application sends the e-mails with initial passwords only once, so, if you choose to send the initial e-mail to asetup user, you will have to forward the credentials to the real user yourself.
Designating a Single User to Receive the Credential E-Mails
1. While signed in as a setup user, navigate to the Setup and Maintenance work area and search for the task ManageEnterprise HCM Information.
2. Click Go to Task.
3. Click Edit in the top right hand corner of the Enterprise page, and select Correct.
The Edit Enterprise page appears.
4. In the User and Role Provisioning Information region, enter the e-mail address of the user to receive the credentiale-mails in the Alternate Contact E-Mail Address field.

Oracle Sales CloudGetting Started with Your Implementation
Chapter 5Getting Ready to Create Sales Users
34
5. Make sure the Send User Name and Password option is set to Yes.
6. Click Submit.
7. Click Done.
8. Dismiss the warning by clicking Yes.
The user e-mail you specified will continue to receive all credentials e-mails until you clear the Alternate Contact E-MailAddress field.
Oracle Sales CloudGetting Started with Your Implementation
Chapter 6Creating Sales Users in the UI
35
6 Creating Sales Users in the UI
About Creating Sales Users in the UIAfter you have defined the top of resource organization hierarchy and set up the provisioning rules, you are ready to testyour setup by creating a few users in the UI. You should create the top user in the hierarchy, a user with sales administratorprivileges and a few others to make sure your provisioning rules work correctly. You will probably want to import the rest ofthe users as described in the next chapter.
Setup Overview
1. Create the top user in the hierarchy and assign her the top resource organization you created in the previouschapter. You do not assign a manager for this user.
2. Create the rest of the users, starting right below the top of the hierarchy. You work your way down because youmust select the manager for every user you create.For details, see Creating Sales Users in the UI topic in this chapter.
Creating Sales Users in the UIUse this procedure to create sales users in the UI.
Creating a Sales User in the UI
1. While signed in as a setup user, select the Manage Users link under the Manager Resources heading in theNavigator.
2. On the Manage Users page, click Create.The Create User page appears.
3. Enter the user's name and a unique e-mail address in the Personal Details region.The application normally sends the initial sign-in credentials to this e-mail address when you save the record, but,because you earlier specified an alternate e-mail address in the Enterprise page, the e-mail will be sent to thealternate e-mail address instead.You can leave the Hire Date as is or enter another date. The hire date and the remaining fields are not used byOracle Sales Cloud. They are important only if you implement Oracle Human Capital Management Cloud.
4. In the User Details region, enter the user name.
Oracle Sales CloudGetting Started with Your Implementation
Chapter 6Creating Sales Users in the UI
36
If you leave the User Name field blank, then the application automatically creates a user name for you. By default,the application uses the e-mail as the user name.
5. In the User Notification region, leave the Send User Name and Password option selected. You want thecredentials e-mail to be sent to the alternate user you specified.
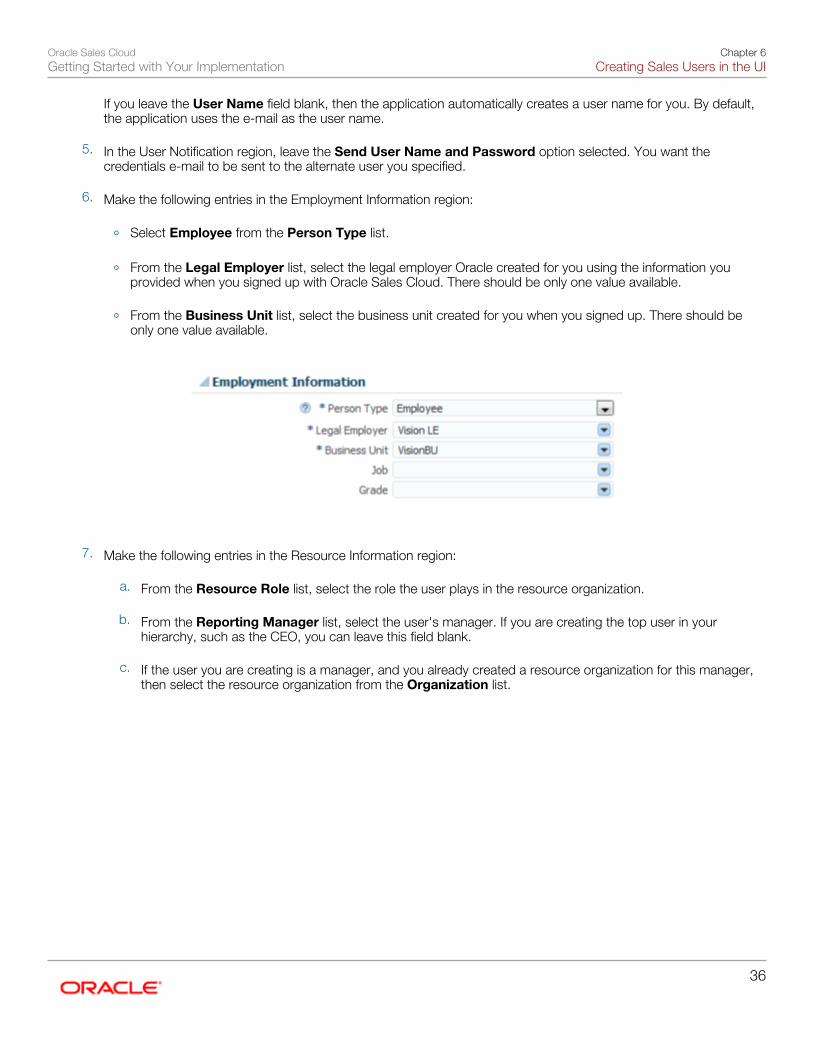
6. Make the following entries in the Employment Information region:
◦ Select Employee from the Person Type list.
◦ From the Legal Employer list, select the legal employer Oracle created for you using the information youprovided when you signed up with Oracle Sales Cloud. There should be only one value available.
◦ From the Business Unit list, select the business unit created for you when you signed up. There should beonly one value available.
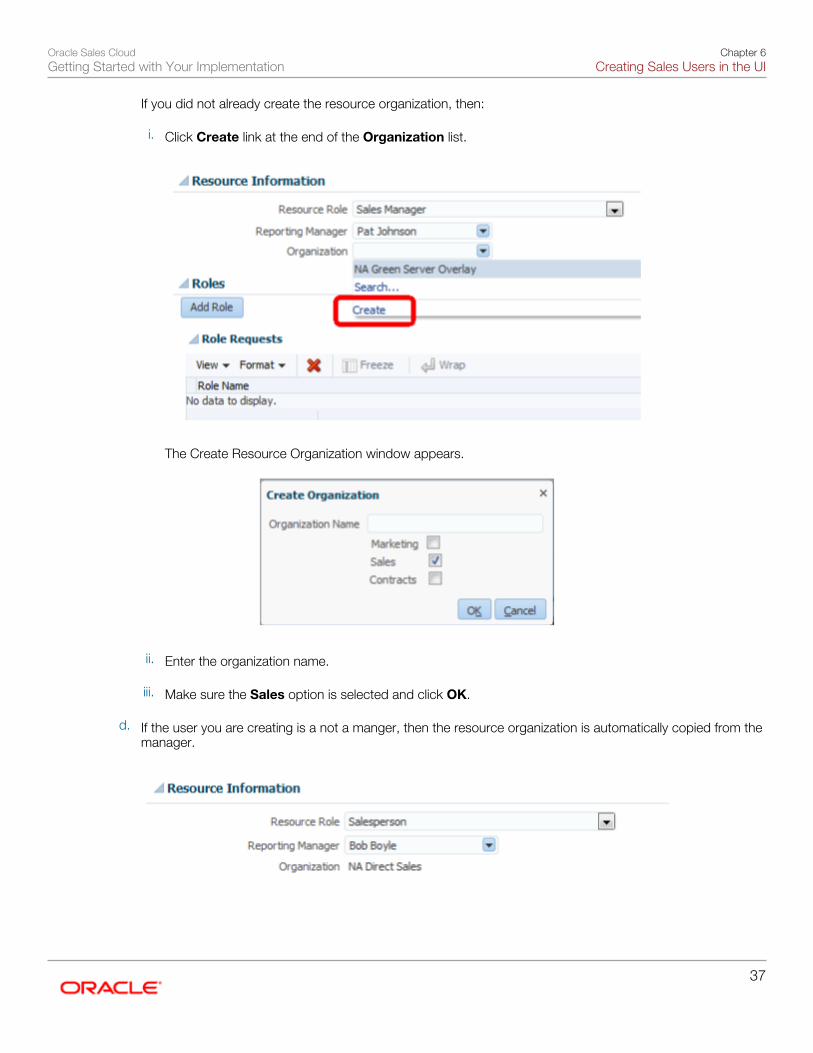
7. Make the following entries in the Resource Information region:
a. From the Resource Role list, select the role the user plays in the resource organization.
b. From the Reporting Manager list, select the user's manager. If you are creating the top user in yourhierarchy, such as the CEO, you can leave this field blank.
c. If the user you are creating is a manager, and you already created a resource organization for this manager,then select the resource organization from the Organization list.
Oracle Sales CloudGetting Started with Your Implementation
Chapter 6Creating Sales Users in the UI
37
If you did not already create the resource organization, then:
i. Click Create link at the end of the Organization list.
The Create Resource Organization window appears.
ii. Enter the organization name.
iii. Make sure the Sales option is selected and click OK.
d. If the user you are creating is a not a manger, then the resource organization is automatically copied from themanager.

Oracle Sales CloudGetting Started with Your Implementation
Chapter 6Creating Sales Users in the UI
38
8. Click Autoprovision Roles.
The application provisions enterprise roles according to the provisioning rules you set up. Each user must have boththe Resource and the Employee abstract roles in addition to the job roles.

Oracle Sales CloudGetting Started with Your Implementation
Chapter 7Importing Users from a File
39
7 Importing Users from a File
About Importing UsersNow that you have created several users in the user interface to test your setup, you are ready to import the rest of the usersfrom a file. When you import, you create users and the resource organizations that you must assign to managers.
To import your user data, you must:
• Create a text file with your user data.• Create a mapping of the attributes in the file to the attributes in the application.• Create an import activity where you upload the data file and specify the mapping you will use for the import.
To help you with the import, you will download a template from the application which contains most of the attributes you willneed for your import. The template comes with a predefined mapping which you will copy and modify.
Setup Overview
1. Use the Manage File Import Mappings task in the Setup and Maintenance work area to download the template forthe Employee Resource object. The template includes all the required and many of the common attributes youwill need to import.For detailed steps, see Downloading a Template for Importing Your Data from a File.
2. Replace the sample data in the template with your data, preserving the order of the columns.You must add some values the application expects. For example, you must include the names of the business unitand the legal entity and you must include the codes for the resource roles you are using.For details on the values that the template expects and how to obtain them, see Understanding the User ImportTemplate topic in this chapter.
3. As described in a previous chapter, the application is set up to immediately send all users that you create an e-mailwith their sign-in credentials. Because you don't want users signing into your test environment as you are setting itup, you will want to prevent the bulk of the e-mails from being sent. For the few users you want to use for testing,you will redirect the e-mails to a single user on the setup team. This way you can sign in as different users in thesales organization for testing.To do this, you:
◦ Designate one of the setup users as the person to receive the e-mails as described in the Designating a SingleUser to Receive All Credential E-Mails topic in the Getting Ready to Create Sales Users chapter.
◦ Append to your import file the WorkerProfile_SendCredentialsEmail attribute. Using this optional attribute,you specify which user records generate the credentials e-mail.For details, see Appending Additional Attributes to Your User Import File topic in this chapter.
4. Save the file with your user data as a text (.csv) file.5. Create a new mapping file for your import by copying the predefined mapping and adding the extra attributes. A
mapping tells the application which column in your file corresponds to which attribute in the application.
Oracle Sales CloudGetting Started with Your Implementation
Chapter 7Importing Users from a File
40
For details, see Copying and Modifying the Import Mapping topic in this chapter.
6. Import the file by using the Manage File Import Activity task available from the Setup and Maintenance work area.Use the mapping you copied and modified.
See Importing Your User Data File topic in this chapter for details.
7. Enable searching of the imported users.
For details, see Enabling the Search for Imported Users topic in this chapter.
Downloading a Template for Importing Your Datafrom a FileYou can download templates to help you import data with the file-based import tool. The templates include all the commonand required fields.
Downloading the Import Template
1. Sign in as a setup or a sales administrator user.
2. Navigate to the Setup and Maintenance work area and search for the Manage File Import Mappings task.
3. Click Go to Task.
The Manage File Import Mappings page appears.

Oracle Sales CloudGetting Started with Your Implementation
Chapter 7Importing Users from a File
41
4. In the Search region, select Employee resource from the Object list.
5. Click Search.
6. Select the Employee Resource Seeded Mapping name link.
The Edit Import Mapping page appears.
Oracle Sales CloudGetting Started with Your Implementation
Chapter 7Importing Users from a File
42
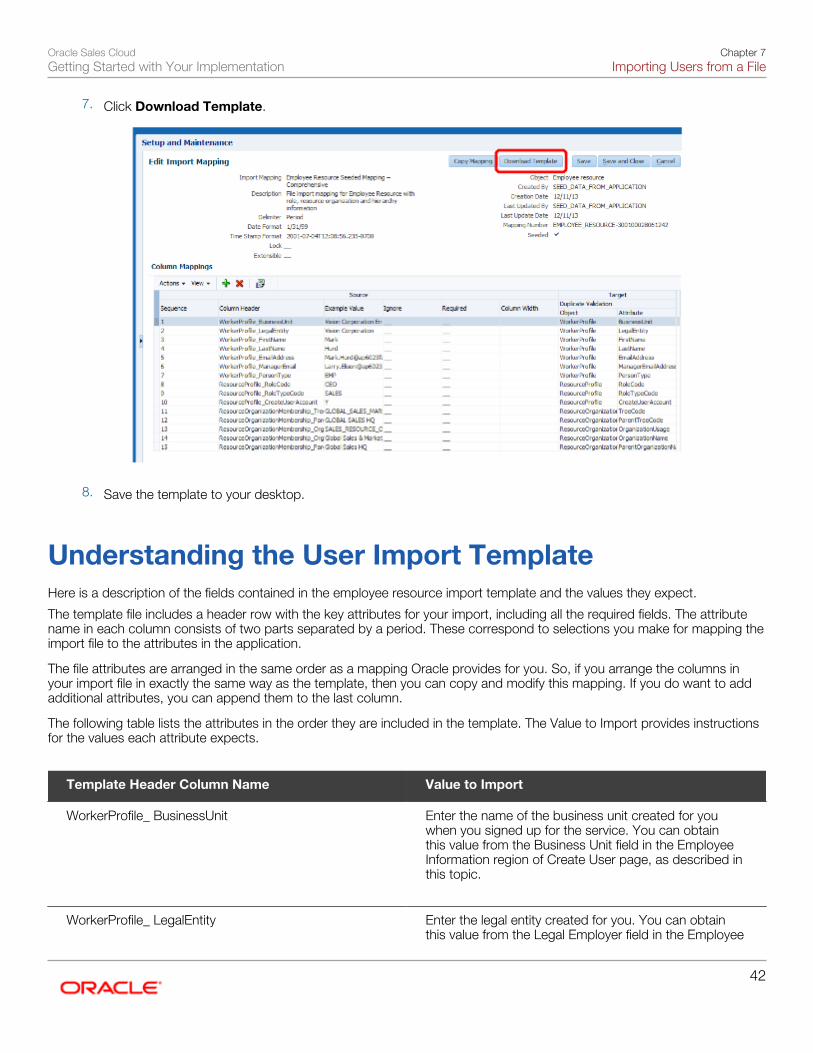
7. Click Download Template.
8. Save the template to your desktop.
Understanding the User Import TemplateHere is a description of the fields contained in the employee resource import template and the values they expect.
The template file includes a header row with the key attributes for your import, including all the required fields. The attributename in each column consists of two parts separated by a period. These correspond to selections you make for mapping theimport file to the attributes in the application.
The file attributes are arranged in the same order as a mapping Oracle provides for you. So, if you arrange the columns inyour import file in exactly the same way as the template, then you can copy and modify this mapping. If you do want to addadditional attributes, you can append them to the last column.
The following table lists the attributes in the order they are included in the template. The Value to Import provides instructionsfor the values each attribute expects.
Template Header Column Name Value to Import
WorkerProfile_ BusinessUnit
Enter the name of the business unit created for youwhen you signed up for the service. You can obtainthis value from the Business Unit field in the EmployeeInformation region of Create User page, as described inthis topic.
WorkerProfile_ LegalEntity
Enter the legal entity created for you. You can obtainthis value from the Legal Employer field in the Employee

Oracle Sales CloudGetting Started with Your Implementation
Chapter 7Importing Users from a File
43
Template Header Column Name Value to Import
Information region of Create User page, as described inthis topic.
WorkerProfile_ FirstName
Enter the first name as you want it to appear in the salesapplication.
WorkerProfile_ LastName
Enter the last name as you want it to appear in the salesapplication.
WorkerProfile_ EmailAddress
You must enter a unique e-mail address. The applicationsends the initial sign-in credentials to this address unlessyou:
• Redirect the e-mail to an alternate user
• Delay the sending of the e-mail.
These options are described in related topics.
WorkerProfile_ ManagerEmail
Enter the manager's e-mail address. The applicationuses this address to build the management hierarchy,so it must match the e-mail address you entered for themanager.
ResourceProfile_ RoleCode
You must include the internal code rather than thename.For sales, resource role codes provided by Oracleinclude:
• SALES_VP
• SALES_MANAGER
• SALES_REPRESENTATIVE
• SALES_ADMINISTRATOR
Follow the procedure in this topic to obtain additionalcodes.
ResourceProfile_ RoleTypeCode
Always enter SALES (uppercase) in all rows.
ResourceProfile_ CreateUserAccount
Enter a Y to create the user account.
ResourceOrganizationMembership_ TreeCode
Enter GLOBAL_ SALES_ MARKETING.

Oracle Sales CloudGetting Started with Your Implementation
Chapter 7Importing Users from a File
44
Template Header Column Name Value to Import
ResourceOrganizationMembership_ ParentTreeCode
Enter the organization code you entered when youcreated the top of the resource organization hierarchy.
ResourceOrganizationMembership_ OrganizationUsage
Enter SALES_ RESOURCE_ORG
ResourceOrganizationMembership_ OrganizationName
For each manager, you must enter the name of theresource organization you want to create. This isthe name that will appear in the resource directoryand elsewhere in the UI. Leave this field blank foreach resource role that's not a manager, such as asalesperson.
ResourceOrganizationMembership_ParentOrganizationName
You must enter the name of the resource organizationassigned to the manger of each user. Entry is requiredfor both managers and employees. The application uses these organization names to buildthe hierarchy of your organization, so the names mustmatch exactly.
Obtaining the Names of the Business Unit and Legal Entity
1. Sign in as a setup user.
2. In the Navigator, select Manage Users under the Manage Resources heading.
3. Click Create.
The Create User page appears.
4. In the Employment Information region, select Employee as the Person Type.
5. You can obtain the business unit and legal entity values for your file from the Business Unit and Legal Entity lists.

Oracle Sales CloudGetting Started with Your Implementation
Chapter 7Importing Users from a File
45
Obtaining the Resource Role Codes
1. Sign in as a setup user.2. Search for the Manage Resource Roles task in the Setup and Maintenance Work area.3. Click Go to Task.4. To obtain a list of resource roles for sales, select Sales from the Role Type list and click Search.
5. Click Edit for each resource role that you want to import. The value in the Role Code field is the value you mustinclude in your file.

Oracle Sales CloudGetting Started with Your Implementation
Chapter 7Importing Users from a File
46
Appending Additional Attributes to Your User ImportFileYou may want to add additional attributes to your file to alter the application's default behavior or import additional user data.Here are a couple of examples.
Specifying Your Own User NamesBy default, the application creates user names from the e-mails you enter. If you want to create user names of your ownchoosing, then append a column to your file with the header WorkerProfile_Username and enter the user names.
Selecting Which Users Generate Credentials E-MailsBy default, the application sends an e-mail for every user you create. You can specify which users will generate the e-mail, byappending a column to your file with the header WorkerProfile_SendCredentialsEmail.
For users you want to generate the credentials e-mail, enter Y. For all the others, enter N.
Researching Additional Attributes for InclusionYou can review other user attributes you may want to append to your file by reviewing the documentation in the OracleEnterprise Repository:
1. Using your browser, navigate to fusionappsoer.oracle.com
2. Sign in as Guest.
3. Search for Employee Resource Import.
4. On the Details tab, select the HZ_IMP_GROUP_MEMBERS_Reference link and save the file.
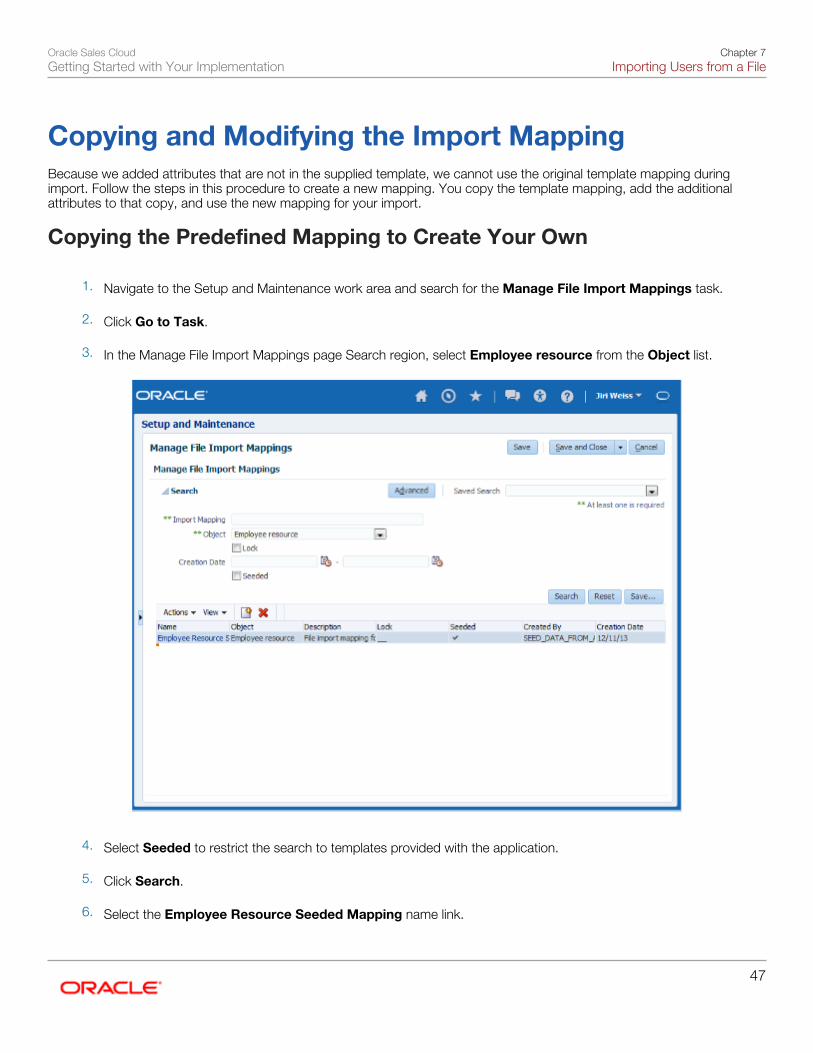
Oracle Sales CloudGetting Started with Your Implementation
Chapter 7Importing Users from a File
47
Copying and Modifying the Import MappingBecause we added attributes that are not in the supplied template, we cannot use the original template mapping duringimport. Follow the steps in this procedure to create a new mapping. You copy the template mapping, add the additionalattributes to that copy, and use the new mapping for your import.
Copying the Predefined Mapping to Create Your Own
1. Navigate to the Setup and Maintenance work area and search for the Manage File Import Mappings task.
2. Click Go to Task.
3. In the Manage File Import Mappings page Search region, select Employee resource from the Object list.
4. Select Seeded to restrict the search to templates provided with the application.
5. Click Search.
6. Select the Employee Resource Seeded Mapping name link.
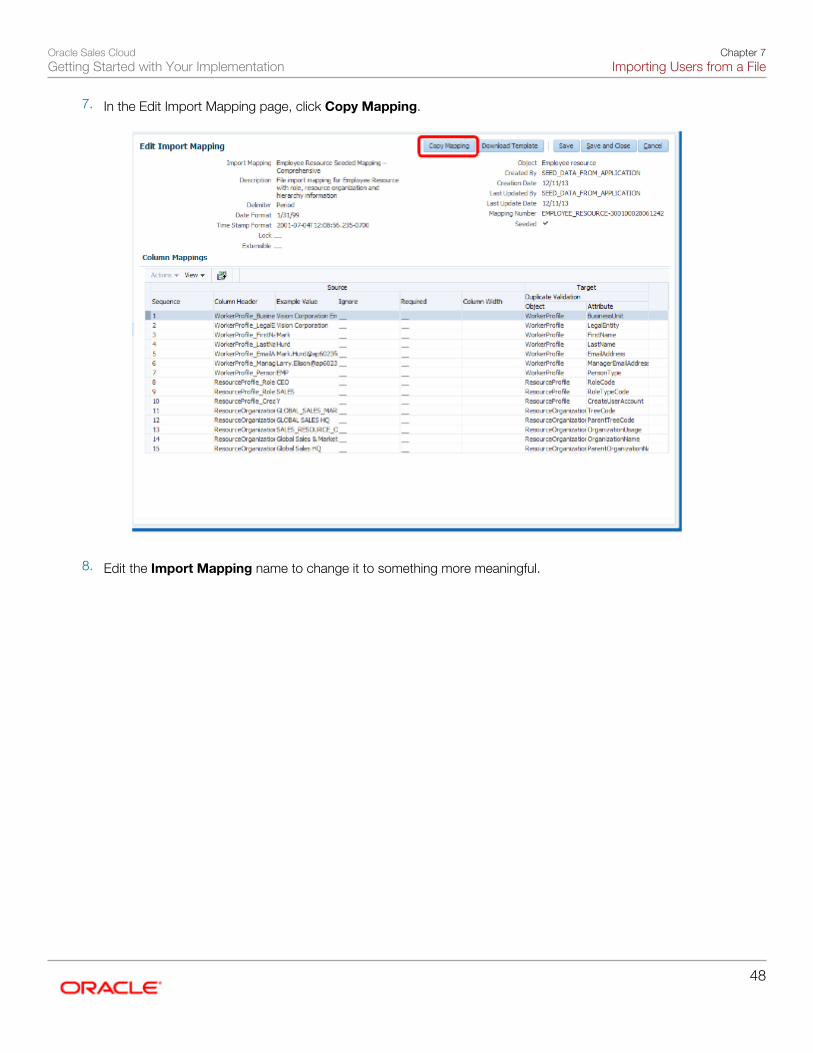
Oracle Sales CloudGetting Started with Your Implementation
Chapter 7Importing Users from a File
48
7. In the Edit Import Mapping page, click Copy Mapping.
8. Edit the Import Mapping name to change it to something more meaningful.
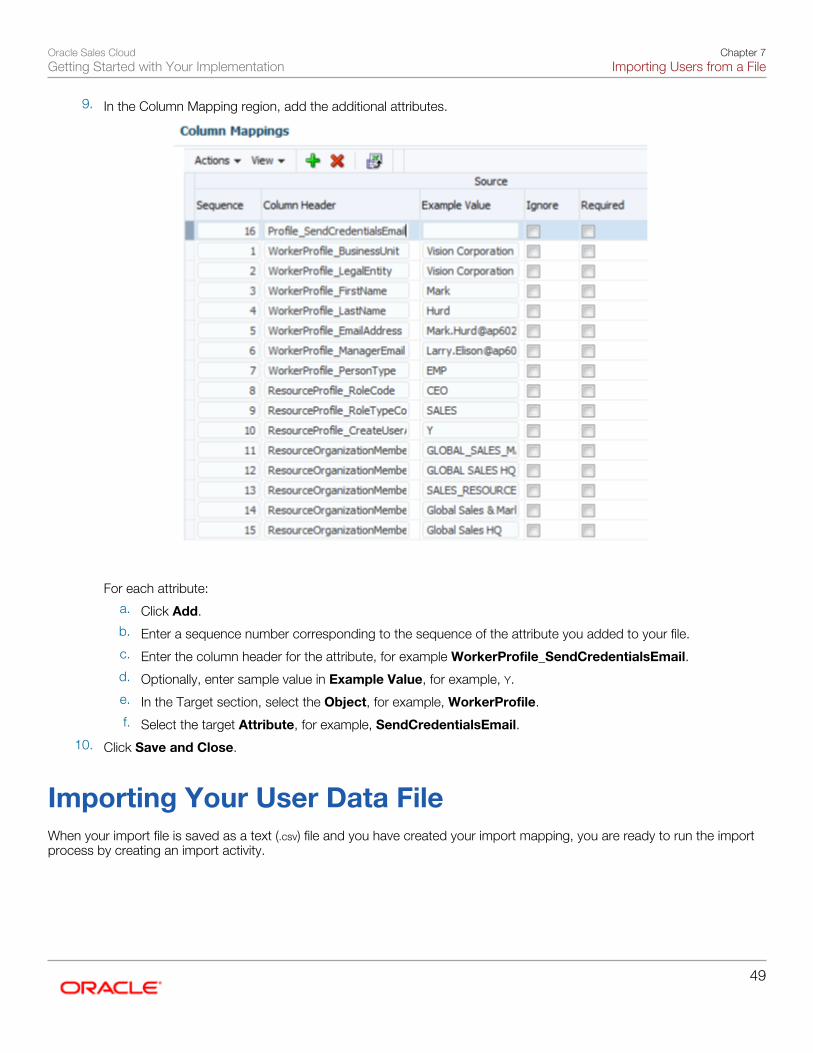
Oracle Sales CloudGetting Started with Your Implementation
Chapter 7Importing Users from a File
49
9. In the Column Mapping region, add the additional attributes.
For each attribute:
a. Click Add.
b. Enter a sequence number corresponding to the sequence of the attribute you added to your file.
c. Enter the column header for the attribute, for example WorkerProfile_SendCredentialsEmail.
d. Optionally, enter sample value in Example Value, for example, Y.
e. In the Target section, select the Object, for example, WorkerProfile.
f. Select the target Attribute, for example, SendCredentialsEmail.
10. Click Save and Close.
Importing Your User Data FileWhen your import file is saved as a text (.csv) file and you have created your import mapping, you are ready to run the importprocess by creating an import activity.
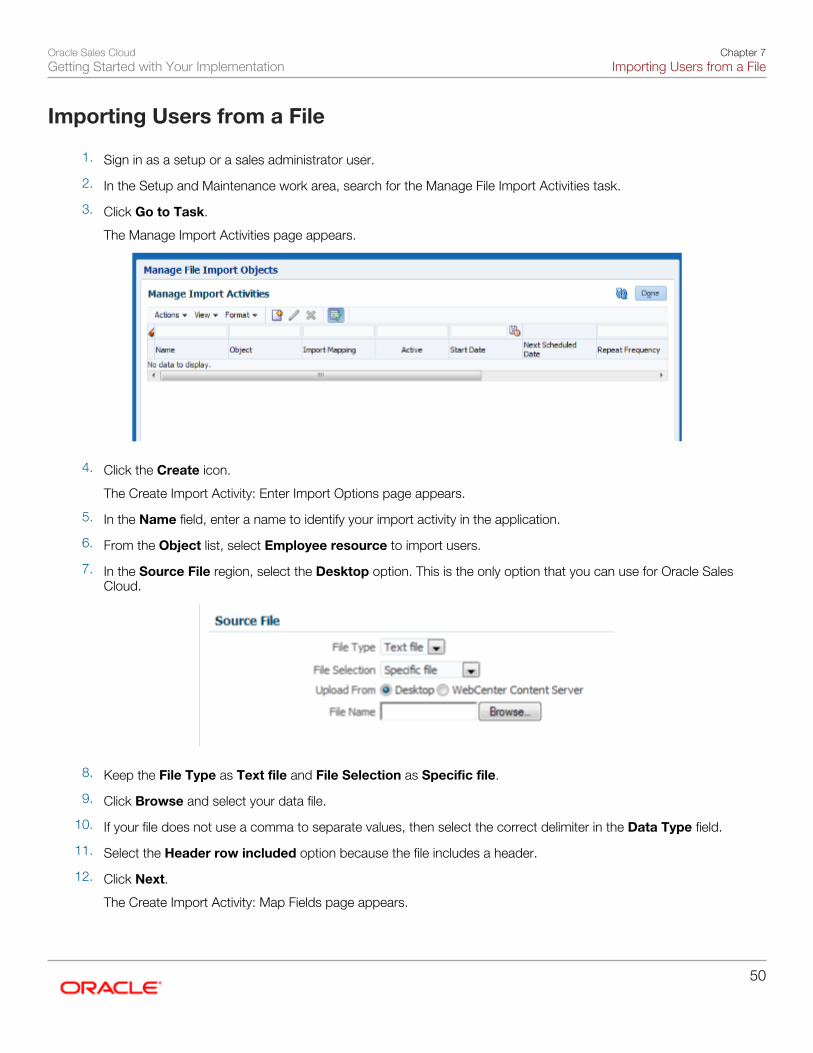
Oracle Sales CloudGetting Started with Your Implementation
Chapter 7Importing Users from a File
50
Importing Users from a File
1. Sign in as a setup or a sales administrator user.
2. In the Setup and Maintenance work area, search for the Manage File Import Activities task.
3. Click Go to Task.
The Manage Import Activities page appears.
4. Click the Create icon.
The Create Import Activity: Enter Import Options page appears.
5. In the Name field, enter a name to identify your import activity in the application.
6. From the Object list, select Employee resource to import users.
7. In the Source File region, select the Desktop option. This is the only option that you can use for Oracle SalesCloud.
8. Keep the File Type as Text file and File Selection as Specific file.
9. Click Browse and select your data file.
10. If your file does not use a comma to separate values, then select the correct delimiter in the Data Type field.
11. Select the Header row included option because the file includes a header.
12. Click Next.
The Create Import Activity: Map Fields page appears.

Oracle Sales CloudGetting Started with Your Implementation
Chapter 7Importing Users from a File
51
13. From the Import Mapping list in the Select Import Mapping region, select the mapping you created.
The Map Fields region displays your mapping.
14. Click Next.
The Create Import Activity: Schedule page appears.
15. Click Next.
The Create Import Activity: Review and Activate page appears.
16. Click Activate.
17. You return to the Manage Import Activities page to view the status of your import. You may have to scroll tothe right to see the status and periodically refresh the page. An import activity with a status of Completed orCompleted with Errors indicates that the import activity completed. To obtain error details, click the import statusto see the logs.
Enabling Search for Imported UsersUse this procedure to set a parameter that enables application search for users you imported. The setting makes it possibleto search for the imported users in the Manage Users work area and elsewhere in the application.

Oracle Sales CloudGetting Started with Your Implementation
Chapter 7Importing Users from a File
52
Setting the Search Parameter
1. Sign in as a setup user.
2. From the Setup and Maintenance work area, search for the Manage HCM Configuration for Coexistence task.
3. Scroll down to the Enable Keyword Crawler parameter.
4. Change the Enable Keyword Crawler parameter value from N to Y.
5. Click Submit.
The application runs a process to enable to you to search for the users you imported.
Oracle Sales CloudGetting Started with Your Implementation
Chapter 8Specifying Your Corporate Currency
53
8 Specifying Your Corporate Currency
About Specifying Corporate CurrencyOracle Sales Cloud supports multiple currencies, multiple daily rates, and currency rate conversion. However, in the use casefor this guide, Vision Corporation is enabling only one currency, the U.S. Dollar, which is enabled by default. If you're usinganother currency as the default currency, you'll need to specify that. For steps, see the topic in this guide, Specifying theCorporate Currency.
The setup of multiple currencies is not covered in this guide. You can find more information on setting up multiple currenciesin the help and in the article, How to Setup Additional Currencies For Lead and Opportunity Management (Doc ID1447018.1), available on My Oracle Support (support.oracle.com).
Specifying Corporate Currency in Oracle Sales CloudThe default currency, the U.S. Dollar, is enabled by default in Oracle Sales Cloud, and is the default corporate currency. Ifyou're going to be using another currency as the corporate currency, you must specify it, following the steps in this topic.
Following are the high-level implementation steps.
1. Set the default currency profile option, which specifies the corporate currency. You only need to do this if you areusing a currency other than the default, the U.S. Dollar.
2. Disable unused currencies, to limit the values in the Currency list of values.
NoteUpon initial setup, all currencies display as "enabled" in the Manage Currencies setup area. However, eventhough they show as enabled, the setup of multiple currencies requires the completion of several additional steps.For more information on setting up multiple currencies see the help and the article, How to Setup AdditionalCurrencies For Lead and Opportunity Management. (Doc ID 1447018.1), available on My Oracle Support(support.oracle.com).
Setting the Default Currency Profile OptionPerform the following steps to specify your corporate currency in the default currency profile option.
NoteYour corporate currency generally will remain unchanged. Oracle strongly recommends that you do not changethe Corporate Currency Default profile option value for ZCA_COMMON_CORPORATE_CURRENCY once it isbeing used in transactions.
1. As a user with access to the profile options pages, such as a setup user, navigate to Setup and Maintenance.
2. Search for the task, Manage Currency Profile Options, and click the Go to Task icon. The Manage Currency ProfileOptions page appears.

Oracle Sales CloudGetting Started with Your Implementation
Chapter 8Specifying Your Corporate Currency
54
3. Click ZCA_COMMON_CORPORATE_CURRENCY.
4. Ensure that the profile option is set to US Dollar at the site level.
5. Click Save and Close.
Disabling Unused CurrenciesOracle recommends that you disable unused currencies to reduce the currency lists of values and make the list moremanageable for users. Perform the following steps to set any unused currencies as disabled:
1. As a setup user, navigate to Setup and Maintenance and search for the task, Manage Currencies.
2. Click the Go to Task icon. The Manage Currencies page appears.
3. In the Manage Currencies page, click Search to search for all currencies, without entering any search criteria.
4. Deselect the Enabled option for each unused currency.
5. Click Save and Close.

Oracle Sales CloudGetting Started with Your Implementation
Chapter 9Setting Up the Accounting Calendar
55
9 Setting Up the Accounting Calendar
About Setting Up the Accounting Calendar for OracleSales CloudThe accounting calendar defines time periods including the exact dates for each period. These defined periods, often calledenterprise periods, are used for many purposes in Oracle Sales Cloud. Examples include:
• Reports that provide amounts by enterprise period, such as a sales pipeline analysis
• Metrics calculations by period for territory analysis
• The ability to adjust forecast amounts by time period
• Distribution of quota amounts by time period
The period frequency set in your fiscal calendar is the shortest period you can use. Therefore, if you set the period frequencyto yearly, then your reports and activities can be for each year, but can't be broken down by month. If you set the periodfrequency to monthly, then you can break down activities and reports by month and summarize by quarter and year.However, if you set the period frequency to weekly, then you can perform activities and reports by week, quarter, and year,but not by month because the number of weeks per month varies.
Setup OverviewSetting up your accounting calendar requires two steps:
1. Create the calendar. For Oracle Sales Cloud you create only one calendar.
For details, see Creating the Accounting Calendar.
2. Designate the calendar you just created as the calendar you will use by setting the Accounting Calendar Defaultprofile option.
For details, see Enabling the Accounting Calendar You Created.
Creating the Accounting CalendarUse this procedure to create the accounting calendar, which sets the exact start and end dates for each period, for eachyear.
Creating the Calendar
1. Sign in as a setup user.
2. In Setup and Maintenance, search for the Manage Accounting Calendars task.
3. Click Go To Task.

Oracle Sales CloudGetting Started with Your Implementation
Chapter 9Setting Up the Accounting Calendar
56
4. On the Create Accounting Calendars page, click Create.
5. Name your calendar, for example, Sales Calendar.
6. Leave the Adjusting Period Frequency set to None.
7. For Start Date, Vision is using 1/1/10.
You cannot change the settings after you start using the application, so consider setting the date to the first datethat your company was created. Then you can upload historical data later, if necessary.
8. For Period Frequency, select the shortest time period you want to use for reports and activities. For VisionCorporation, we choose Monthly. The period starts on the first of the month and ends on the last day of themonth, regardless of the number of days or weeks in each month. Another choice, for example, is where the firsttwo months consist of four weeks, and the third month contains 5 weeks.
9. For Vision Corporation, choose None for the Separator.
10. Select the format to use for period names.

Oracle Sales CloudGetting Started with Your Implementation
Chapter 9Setting Up the Accounting Calendar
57
11. Click Next. The application generates the periods, with start and end dates, for the first year (2010 for VisionCorporation).
12. If needed, you can manually change the details for each period. Click Save and Close.
13. Now you need to generate the periods for each additional year, including the current, or coming year. Open thecalendar.
14. Click Add Year.
15. Click Save and Close.
16. Repeat the last three steps for each year you want to add.
17. Click Done.
RestrictionYou cannot change your calendar options after you start using the calendar, such as by generating forecasts.
Enabling the Accounting Calendar You CreatedYou enable the calendar you created by selecting it to be the default calendar. Many features of Oracle Sales Cloud use thecommon calendar, so changing the selected calendar in the future can result in the loss of data.

Oracle Sales CloudGetting Started with Your Implementation
Chapter 9Setting Up the Accounting Calendar
58
Enabling the Calendar
1. Sign in as a setup user or sales administrator.
2. Search for the Manage Calendar Profile Option task.
3. Click the Go To Task icon.
4. On the Manage Calendar Profile Option page, select the Accounting Calendar Default profile option.
5. In the Profile Values table, click New.
6. For Profile Value, select Site.
7. Click the Profile Value list, and select the name of the calendar you created.
8. Click Save and Close.

Oracle Sales CloudGetting Started with Your Implementation
Chapter 10Setting Up Geography Reference Data for Territories and
Addresses
59
10 Setting Up Geography Reference Data forTerritories and Addresses
About Setting Up Geography Reference DataYou must import and set up reference geography data for the countries where you do business if you are setting up salesterritories based on geography or want to validate address entry.
Vision Corp., in our case study, is doing both. It plans to set up sales territories based on states in the U.S., so it mustimport geography data for the U.S. Also, Vision Corp. wants its salespeople to use a list of values to enter the states in theiraddresses. The state in the address must be validated because invalid entries would cause opportunities to get left out offorecasts.
You must enable validation to the level of granularity you need for your territories. For example, if Vision Corp. decided to setup territories at the postal code level, the company would have to set up validation for state, city, county, and postal code.
Geography Setup Overview
To import and set up geography data:
1. Import geography data for the countries where you do business. You can import Oracle-licensed Nokia data forthose countries where the data is available. This includes the U.S., used in our case study, and a growing list ofother countries.If the licensed Nokia data is not available for a particular country, then the Import Nokia Data action is disabled. Inthis case, you must license geography data from another vendor and import it from a file. For more information onimporting third party geography data, see the Importing Geographies chapter of the Oracle Sales Cloud File-BasedData Import Guide (Doc ID: 1564536.1).For more information, see Importing Nokia Geography Reference Data in this chapter.
2. For the countries you imported, enable validation down to address level required for your territories and specifywhich address elements will require lists of values. When you enable validation on an address element, theapplication suggests alternatives during address entry. Enabling a list of values requires the user to make a selectionfrom a list. Both validation and lists of values are enforced in the desktop and simplified UIs.In our example, Vision Corp.:
◦ Enables list of values for entering states in addresses.
◦ Enables validation for states because its territories are defined at the state level.
For more information, see Setting Up Geography Validation in this chapter.
Importing Nokia Geography Reference DataUse this procedure to import Nokia geography reference data licensed by Oracle. If the country data you want to import is notavailable, then the Import Nokia Data action is disabled.

Oracle Sales CloudGetting Started with Your Implementation
Chapter 10Setting Up Geography Reference Data for Territories and
Addresses
60
NoteThe geography data is provided by Nokia and is third-party content. As per Oracle policy, this software anddocumentation may provide access to or information on content and services from third parties. OracleCorporation and its affiliates are not responsible for and expressly disclaim all warranties of any kind with respectto third-party content and services. Oracle Corporation and its affiliates will not be responsible for any loss, costs,or damages incurred due to your access to or use of third-party content, products, or services.
Importing Nokia Geography Reference Data
1. Sign is as a setup user.
2. In the Setup and Maintenance work area, search for the Manage Geographies task.
3. Click Go to Task.
The Manage Geographies page appears.
4. Enter either the country name or the two-letter ISO code ( for example, US or AT).
5. Click Search.
The Search Results display the country.

Oracle Sales CloudGetting Started with Your Implementation
Chapter 10Setting Up Geography Reference Data for Territories and
Addresses
61
6. Before you import, you must ensure that no geography structure or hierarchy already exist for the country you areimporting. Existing data is indicated by green check mark icons. For some countries, such as the U.S., a geographystructure is already provided for you, so you must delete it:
a. Click on the Structure Defined check mark icon.The Manage Geography Structure page appears.
b. Delete all structure levels by clicking Delete.c. Click Save and Close.
7. Select the country in the search results.8. Select Import Nokia Data from the Actions menu.9. Click OK to dismiss the warning message.
10. Click OK to dismiss the confirmation message.
The import of larger countries may require several hours to complete.
You can track the progress of the import process by selecting Scheduled Processes from the Navigator menu.
NoteTo access the Scheduled Processes work area, you must be signed in as a user with the Employee abstract role.The initial user does not have this role assigned, but the other users you created do.

Oracle Sales CloudGetting Started with Your Implementation
Chapter 10Setting Up Geography Reference Data for Territories and
Addresses
62
After the import is complete, you can search for the country again in the Manage Geographies page. Check marks nowappear in the Structure Defined and Hierarchy Defined columns indicating the import completed successfully.
The Geocoding Defined and Address Cleansing Defined columns are used for additional features which you must licensefrom Oracle and set up separately.
• Geocoding makes it possible to display customers in the vicinity of a mobile address. You set up GeocodingEnabled for those countries where you are using Around Me functionality in Sales Cloud Mobile.
• Cleansing makes it possible to validate addresses down to the street level.
Setting Up Geography ValidationYou must set up geography validation for those geography elements that you plan to use in your sales territories. Setting upvalidation also helps users fill in missing address information, and validate addresses during entry. For example, you can haveusers select states or other address elements from lists to ensure accuracy during entry and you can have the application fillin missing values. For example, when the user enters a postal code, the application can retrieve the city and state.
Vision Corp., in our case study, wants its salespeople to use a list of values to enter the states in their addresses. Also, itplans to set up territories at the state level. So validation must be set up at the state level.
Setting Up Geography Validation
1. In the Setup and Maintenance work area, search for the Manage Geographies task.
2. Click Go to Task.
The Manage Geographies page appears.
3. Search for a country you imported using either its name or its two letter ISO code. For example, you can search byentering either the country name United States or the two letter ISO code US, and clicking Search.
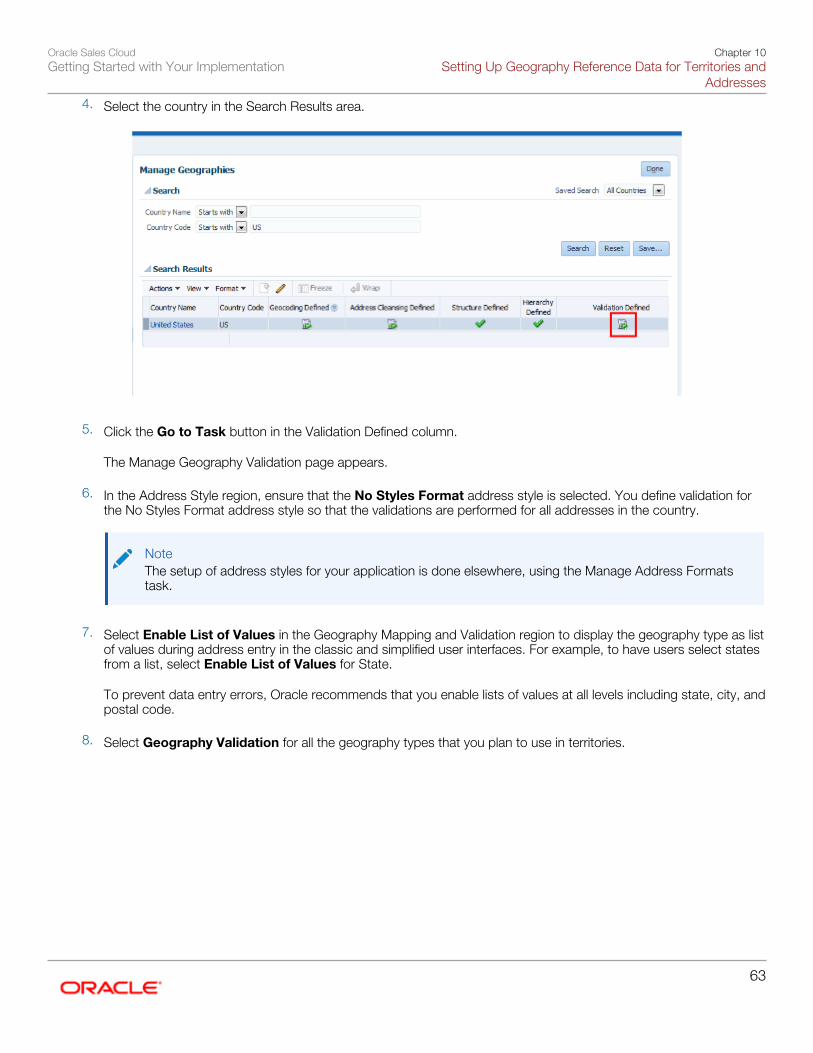
Oracle Sales CloudGetting Started with Your Implementation
Chapter 10Setting Up Geography Reference Data for Territories and
Addresses
63
4. Select the country in the Search Results area.
5. Click the Go to Task button in the Validation Defined column.
The Manage Geography Validation page appears.
6. In the Address Style region, ensure that the No Styles Format address style is selected. You define validation forthe No Styles Format address style so that the validations are performed for all addresses in the country.
NoteThe setup of address styles for your application is done elsewhere, using the Manage Address Formatstask.
7. Select Enable List of Values in the Geography Mapping and Validation region to display the geography type as listof values during address entry in the classic and simplified user interfaces. For example, to have users select statesfrom a list, select Enable List of Values for State.
To prevent data entry errors, Oracle recommends that you enable lists of values at all levels including state, city, andpostal code.
8. Select Geography Validation for all the geography types that you plan to use in territories.

Oracle Sales CloudGetting Started with Your Implementation
Chapter 10Setting Up Geography Reference Data for Territories and
Addresses
64
In our example, Vision Corp. plans to use set up geographies by state, so it selects Geography Validation forState.
You must enable geography validation for all geography levels above the level you are planning to use for territories.If Vision Corp. decided to set up territories at the postal code level, it would have to select Geography Validation forstate, city, county, and postal code.
NoteIf you do not select the validation for an address element, the application still suggests values to the userduring address entry in the classic and simplified UIs, but does not validate the address element.
9. Specify if you want to permit addresses that are not considered valid by the application to be saved by making aselection from the Geography Validation Level for Country list.
◦ No validation, the default value, permits users to save incomplete or incorrect addresses.
◦ Error permits only valid addresses to be saved.
Vision Corp. wants to save all addresses including incomplete and invalid addresses, so keeps the No validationdefault value.
10. Click Save and Close.
Oracle Sales CloudGetting Started with Your Implementation
Chapter 11Creating Your Sales Catalog
65
11 Creating Your Sales Catalog
About Creating the Sales CatalogYou'll need to create the sales catalog so you can:
• Use product as a territory dimension.
• Let salespeople add product groups to leads.
• Let salespeople add product groups to opportunities, where they can also enter revenue amounts.
• Have product revenue available in forecasting.
In the setup area, you create the catalog as a hierarchy of product groups. You can create the product group hierarchymanually in the application, or you can import product groups using file-based import. If your product group hierarchy issmall, such as 50 groups, it's easier to create the catalog manually in the application. If you have a large number of productgroups, Oracle recommends that you import them. Even if you are importing, you still have to create a root catalog in the UIbefore you can import any product groups.
NoteWhile you can include individual products (versus product groups) in your catalog, stock keeping units (SKUs) arenot desirable for sales forecasting and not required unless you are integrating with an order management system,such as Oracle Configure, Price and Quote (CPQ) Cloud. In this guide, we'll start by creating the catalog with onlyproduct groups. You can always add individual products later, if required.
Use CaseIn our use case, Vision Corporation is selling a new line of green servers, the ElitePro Series. They will create the first fourhigh-level product groups in the application and import the rest.
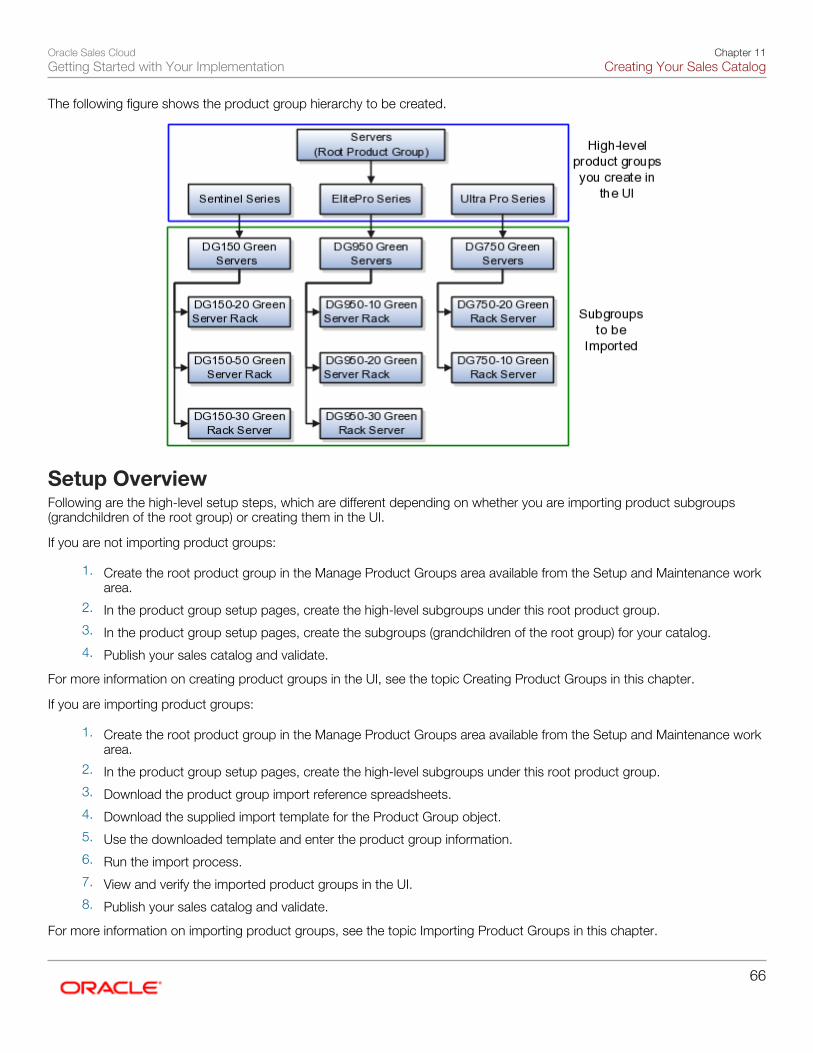
Oracle Sales CloudGetting Started with Your Implementation
Chapter 11Creating Your Sales Catalog
66
The following figure shows the product group hierarchy to be created.
Setup OverviewFollowing are the high-level setup steps, which are different depending on whether you are importing product subgroups(grandchildren of the root group) or creating them in the UI.
If you are not importing product groups:
1. Create the root product group in the Manage Product Groups area available from the Setup and Maintenance workarea.
2. In the product group setup pages, create the high-level subgroups under this root product group.
3. In the product group setup pages, create the subgroups (grandchildren of the root group) for your catalog.
4. Publish your sales catalog and validate.
For more information on creating product groups in the UI, see the topic Creating Product Groups in this chapter.
If you are importing product groups:
1. Create the root product group in the Manage Product Groups area available from the Setup and Maintenance workarea.
2. In the product group setup pages, create the high-level subgroups under this root product group.
3. Download the product group import reference spreadsheets.
4. Download the supplied import template for the Product Group object.
5. Use the downloaded template and enter the product group information.
6. Run the import process.
7. View and verify the imported product groups in the UI.
8. Publish your sales catalog and validate.
For more information on importing product groups, see the topic Importing Product Groups in this chapter.
Oracle Sales CloudGetting Started with Your Implementation
Chapter 11Creating Your Sales Catalog
67
Additional Setups for ProductsWhile our use case covers setting up a simple product hierarchy, you can set up additional product functionality, including:
• Product group descriptions and images: When you create product groups, you can include descriptions and images.Whether you should include this detail depends on your intended use. Different interfaces are optimized for differentuses:
◦ The simplified UI is optimized for quick entry. Salespeople pick the product group from a list in the opportunityproducts table. They do not browse a catalog, so no descriptions or images are required.
◦ The desktop UI includes the ability to browse through the catalog, in addition to directly picking the productgroup. If you are planning to use this interface, you may want to include more detail.
• Products: You may want to set up individual products, depending on your business requirements.
For more information on creating sales catalogs, see the rest of this chapter and the Oracle Sales Cloud ImplementingSales guide. For more information on the setup of individual products, search the online help using keywords "productioninformation management".
Creating Product GroupsThere are no prerequisites to creating your product groups. To begin, create your root product group and then create thenested subgroups to form your product hierarchy.
Creating the Root Product GroupUse this procedure to create the root product group for your sales catalog. In this example, we create a product group for anew product line of green servers that Vision Corporation has introduced.
1. In the Navigator, select Setup and Maintenance under the Tools heading.
2. Search for the Manage Product Groups task.
3. Click the Go to Task icon for the task. The Manage Product Groups page appears.

Oracle Sales CloudGetting Started with Your Implementation
Chapter 11Creating Your Sales Catalog
68
4. Click Create from the Manage Product Groups region. The Create Product Group page appears.
5. Enter an internal name without spaces in the Name field, for example VisionServers. This is not displayed in thecatalog.
6. Enter a name that you want displayed in the catalog in the Display field, for example Servers.7. Enter an optional description in the Description field.8. Optionally, enter start and end dates.9. Make sure the Active check box is checked.
10. Deselect the Allow Duplicate Children check box. This ensures that product groups do not appear multiple timesin the hierarchy.
11. Select the Root Catalog check box.12. Do not use the Revenue Role drop down list.13. Optionally, if you are using revenue categories, select a Revenue Category.14. Click Save and Close.
Creating Product SubgroupsUse the following procedure to create subgroups under the root product group:
1. In the Manage Product Groups page, select the root group in the product groups list.2. Click the Subgroups tab.3. Click the Lock button.4. Click Create. The Create Subgroup page appears.
Oracle Sales CloudGetting Started with Your Implementation
Chapter 11Creating Your Sales Catalog
69
5. In the Create Subgroup page, enter the details for the subgroup. Do not select the Root Catalog check box.
6. Click Save and Close.
7. Repeat the steps to create additional levels in your sales catalog hierarchy.
Importing Product GroupsIf you don't want to create product groups individually in the application, you can import them using file-based import.Product Group is one of the import objects recognized by Oracle Sales Cloud.
Overview of Importing Product GroupsFollowing is the high-level process for importing product groups:
1. Download the product group import reference spreadsheets.
2. Download the supplied product group import template.
3. Review the product group import template and understand what values the import process expects. In tandem,review the reference spreadsheets to determine which attributes are required, optional, or conditionally required.
4. Populate your import spreadsheet and save it as a .csv file.
5. Perform the import, during which you pick a mapping that maps attributes to UI fields.
6. Validate that the import was successful.
The sections that follow go through each of these steps in detail.
Downloading Reference SpreadsheetsReference spreadsheets list the product group import attributes and information about each attribute, such as when it'srequired or not for import, any default value, and any validation performed on the attribute during import.
Use the following procedure to download the spreadsheets:
1. Navigate to the Oracle Enterprise Repository at http://fusionappsoer.oracle.com.
2. In the Enter Search String box, enter QSC_IMP_PROD_GROUP.
3. For Type, pick File Based Data Import.
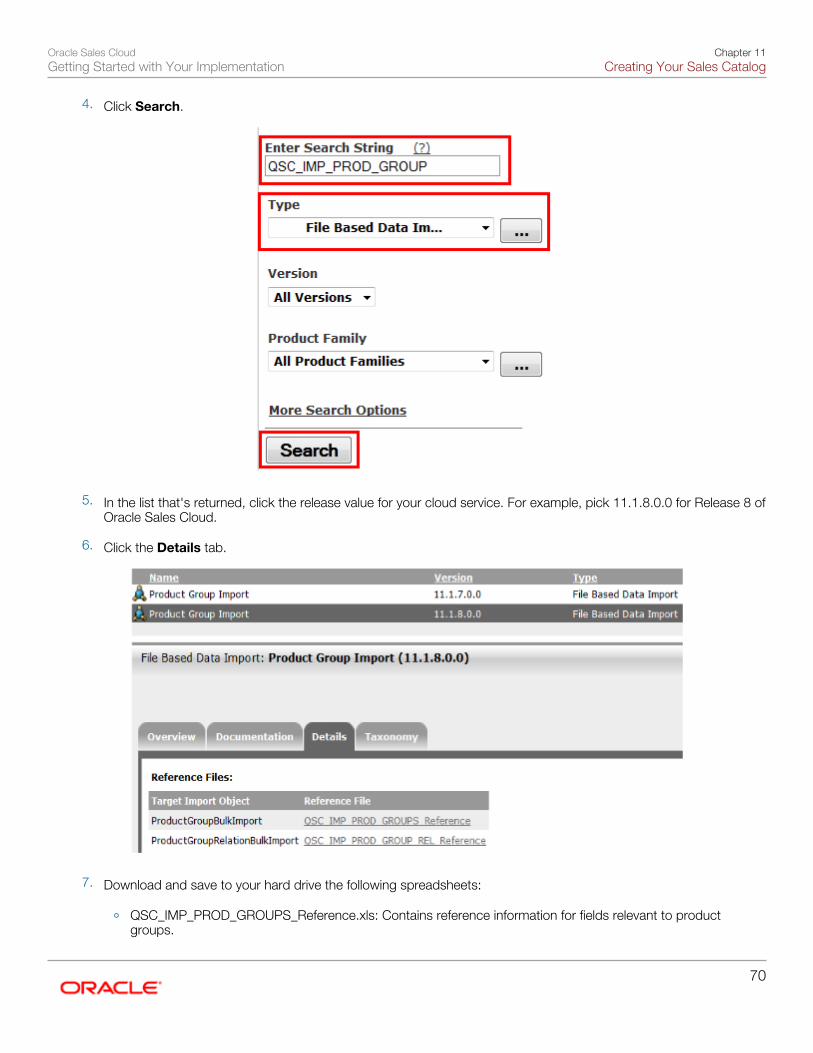
Oracle Sales CloudGetting Started with Your Implementation
Chapter 11Creating Your Sales Catalog
70
4. Click Search.
5. In the list that's returned, click the release value for your cloud service. For example, pick 11.1.8.0.0 for Release 8 ofOracle Sales Cloud.
6. Click the Details tab.
7. Download and save to your hard drive the following spreadsheets:
◦ QSC_IMP_PROD_GROUPS_Reference.xls: Contains reference information for fields relevant to productgroups.
Oracle Sales CloudGetting Started with Your Implementation
Chapter 11Creating Your Sales Catalog
71
◦ QSC_IMP_PROD_GROUP_REL_Reference.xls: Contains reference information for fields relevant to set thehierarchical relationship of product groups.
NoteAnother reference spreadsheet exists for item import, namedQSC_IMP_PROD_GROUP_ITEMS_Reference.xls. It's available for download by selecting the Release 7version option and then selecting the Details tab.
Downloading the Product Group Import Template
Download the product group import template using the file-based import tool.
1. Sign in as a setup or sales administrator user and click Setup and Maintenance in the Navigator.
2. Search for the Manage File Import Mappings task.
3. Click the Go to Task icon on the task. The Manage File Import Mappings page appears.
4. In the Manage File Import Mappings page Search region, select Product group from the Object list.
5. Click Search.
6. In the search results, click the Product Group Predefined Mapping - Product Group Header and ChildEntities mapping name link.
The Edit Import Mapping page appears.
7. Click Download Template.
8. Save the template to your hard drive.
Template Headers and Import AttributesThe product group import template spreadsheet includes a header row with import attributes. It includes all of the requiredfields, plus several that are optional. The header row names correspond to attribute names for the Product Group file-basedimport object. These attributes are listed in the reference spreadsheets that you downloaded from the enterprise repository.
The following table lists the column headings in the template; the corresponding, actual import attributes from the referencespreadsheets; and the value that the import process expects.
NoteOptional or unnecessary attributes from the import template are not described in the table. For more informationon these other attributes, consult the reference spreadsheets.
• Column Header in Import Template column: Lists the import template column headers. The column headers arearranged in the same order as the predefined import mapping that Oracle provides for you. So, be sure to keep theorder of the columns in your import file in exactly the same order as the template. If you need additional attributes,add them after the last column.
• Attribute Name in Reference Spreadsheet column: Lists the attributes that the template column headers map to inthe reference spreadsheets.

Oracle Sales CloudGetting Started with Your Implementation
Chapter 11Creating Your Sales Catalog
72
• Purpose and Expected Value column: Lists the purpose of the attribute and whether the attribute is required.
NoteThis document provides a brief summary of the value the import process expects. It does not list all of the detailsthat you can find in the reference spreadsheets. You'll want to consult the reference spreadsheets in addition tothis document.
Product group import has the concept of a product group ID (PROD_GROUP_ID), also known as the Oracle Fusion ID. This isthe unique ID assigned in the Oracle Fusion (Oracle Sales Cloud) database tables for the product group.
Column Header in ImportTemplate
Attribute Name in ReferenceSpreadsheet
Purpose and Expected Value
PGHeader Reference Number
PgRefNumber
Reference number of the parentproduct group, used to derive theproduct group ID. Required if creating a new productgroup or updating an existingproduct group record and you arenot providing the product group'sinternal name (PgInternalName). Limited to 50 characters. No default value.
PGHeader Internal Name
PgInternalName
Unique internal name of theproduct group. Required if you are creating anew product group or updatingan existing product group recordand you are not providing theproduct group's reference number(PgRefNumber). Limited to 150 characters. No default value.
PGHeader Language
Language
Code representing the language forthe translatable columns PROD_GROUP_NAME and PROD_GROUP_ DESC_TEXT. Required if you are creating a newproduct group or updating anexisting product group's name(ProdGroupName) or description(ProdGroupDescText). No default value.
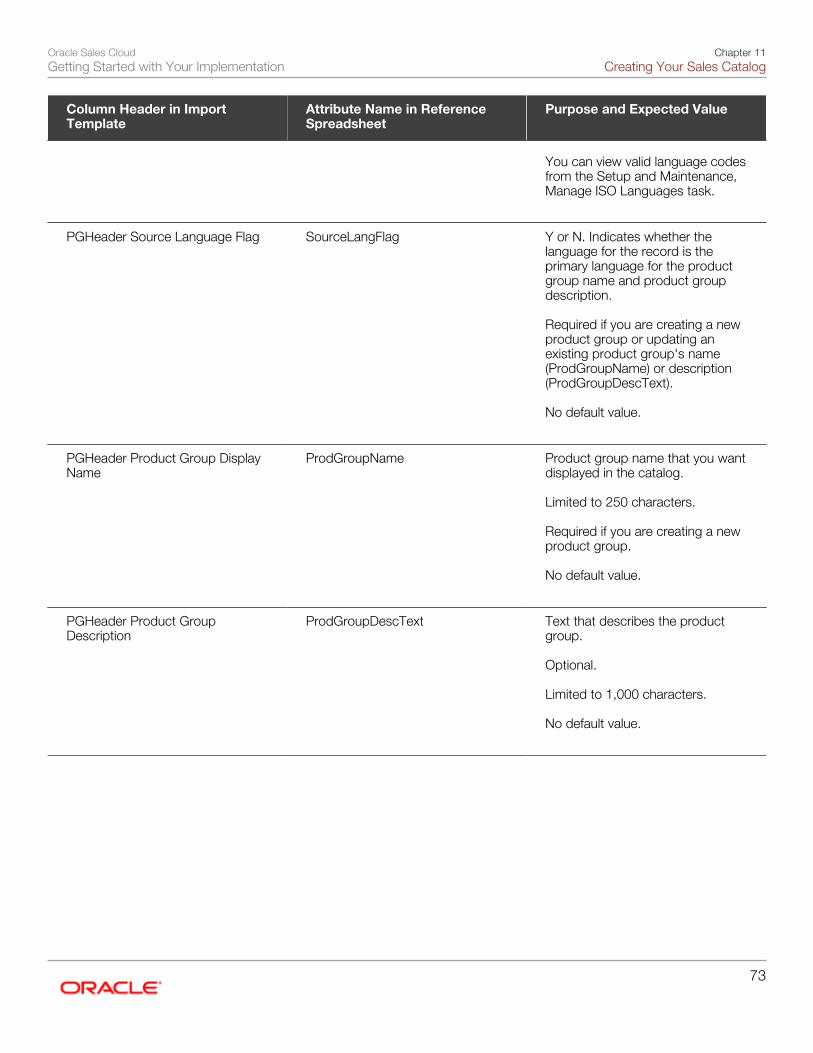
Oracle Sales CloudGetting Started with Your Implementation
Chapter 11Creating Your Sales Catalog
73
Column Header in ImportTemplate
Attribute Name in ReferenceSpreadsheet
Purpose and Expected Value
You can view valid language codesfrom the Setup and Maintenance,Manage ISO Languages task.
PGHeader Source Language Flag
SourceLangFlag
Y or N. Indicates whether thelanguage for the record is theprimary language for the productgroup name and product groupdescription. Required if you are creating a newproduct group or updating anexisting product group's name(ProdGroupName) or description(ProdGroupDescText). No default value.
PGHeader Product Group DisplayName
ProdGroupName
Product group name that you wantdisplayed in the catalog. Limited to 250 characters. Required if you are creating a newproduct group. No default value.
PGHeader Product GroupDescription
ProdGroupDescText
Text that describes the productgroup. Optional. Limited to 1,000 characters. No default value.
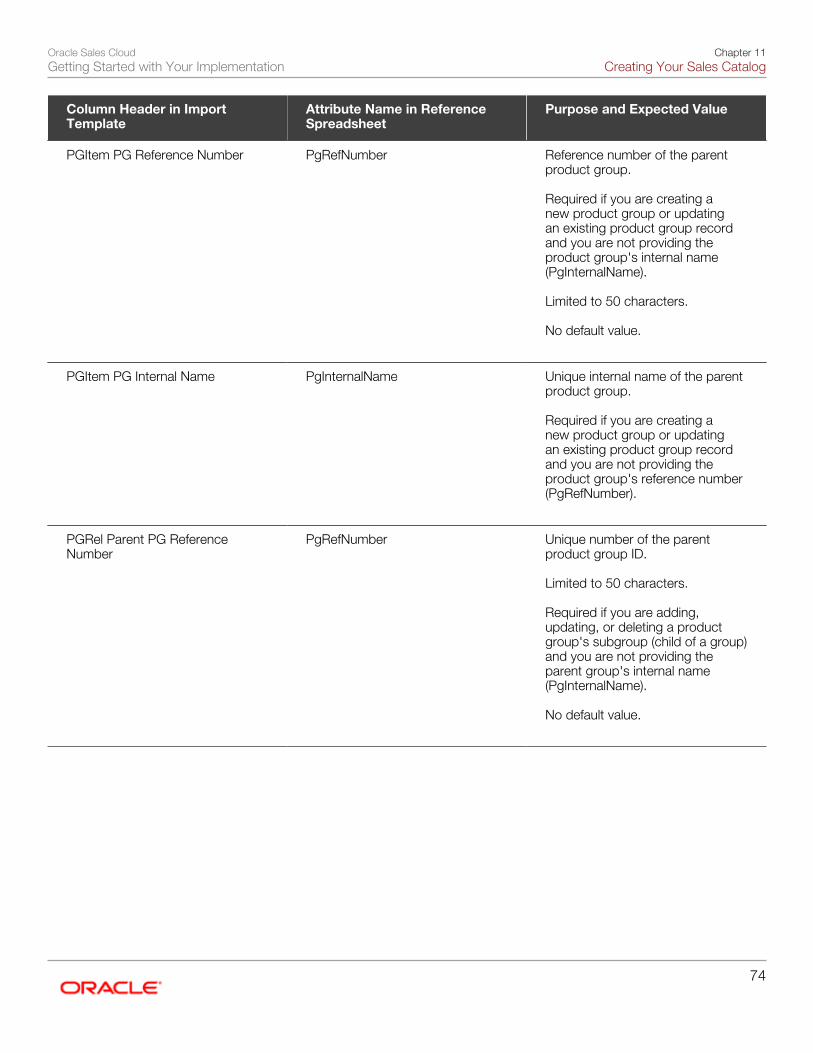
Oracle Sales CloudGetting Started with Your Implementation
Chapter 11Creating Your Sales Catalog
74
Column Header in ImportTemplate
Attribute Name in ReferenceSpreadsheet
Purpose and Expected Value
PGItem PG Reference Number
PgRefNumber
Reference number of the parentproduct group. Required if you are creating anew product group or updatingan existing product group recordand you are not providing theproduct group's internal name(PgInternalName). Limited to 50 characters. No default value.
PGItem PG Internal Name
PgInternalName
Unique internal name of the parentproduct group. Required if you are creating anew product group or updatingan existing product group recordand you are not providing theproduct group's reference number(PgRefNumber).
PGRel Parent PG ReferenceNumber
PgRefNumber
Unique number of the parentproduct group ID. Limited to 50 characters. Required if you are adding,updating, or deleting a productgroup's subgroup (child of a group)and you are not providing theparent group's internal name(PgInternalName). No default value.

Oracle Sales CloudGetting Started with Your Implementation
Chapter 11Creating Your Sales Catalog
75
Column Header in ImportTemplate
Attribute Name in ReferenceSpreadsheet
Purpose and Expected Value
PGRel Parent PG Internal Name
PgInternalName
Unique internal name of the parentproduct group. Limited to 50 characters. Required if you are adding,updating, or deleting a productgroup's subgroup and you arenot providing the parent group'sreference number (PgRefNumber). No default value.
PGRel Child PG Reference Number
PgRelChildRefNumber
Unique internal number of thesubgroup, used to derive theproduct group ID. Limited to 50 characters. Required if you are adding,updating, or deleting a productgroup's subgroup and you are notproviding the subgroup's internalname (PgRelChildInternalName). No default value.
PGRel Child PG Internal Name
PgRelChildInternalName
Unique internal name of thesubgroup, used to derive theproduct group ID. Limited to 50 characters. Required if you are adding,updating, or deleting a productgroup's subgroup and you are notproviding the subgroup's referencenumber (PgRelChildRefNumber). No default value.

Oracle Sales CloudGetting Started with Your Implementation
Chapter 11Creating Your Sales Catalog
76
Column Header in ImportTemplate
Attribute Name in ReferenceSpreadsheet
Purpose and Expected Value
PGRel Relation Type Code
RelationTypeCode
Lookup code that represents therelationship type between productgroups:
• PRODUCT_GROUP_HIERARCHY- indicates that the productgroups are arranged in ahierarchy.
• RELATED_REVENUE_GROUP- indicates that the productgroup of a specific revenuetype can be related to anotherproduct group.
• RELATED_SERVICE_GROUP- indicates that the productsin one service product groupcover products in anotherproduct group.
Required if you are adding aproduct group's subgroup.No default value.
Adding Data to the Product Group Import TemplateNext, add sample data to the import template, using the following procedure.
1. Open the import template spreadsheet you downloaded earlier. Create your own version of the spreadsheet. Forexample, save it as Product_Catalog_Import.xls to your hard drive.
2. In rows 2 through 12, enter the sample data shown in the following table.
NoteSince either Reference Number or Internal Name is required, but not both, you can omit one of them ifyou want to.
The following table shows the required column headings in the import template spreadsheet for rows 2 through 12.The second row of the table shows which column each heading aligns with.
PGHeaderReferenceNumber
PGHeaderInternalName
PGHeaderLanguage
PGHeaderSourceLanguageFlag
PGHeaderProductGroupDisplay
PGHeaderProductGroupDescription
Column A
Column B
Column C
Column D
Column E
Column F
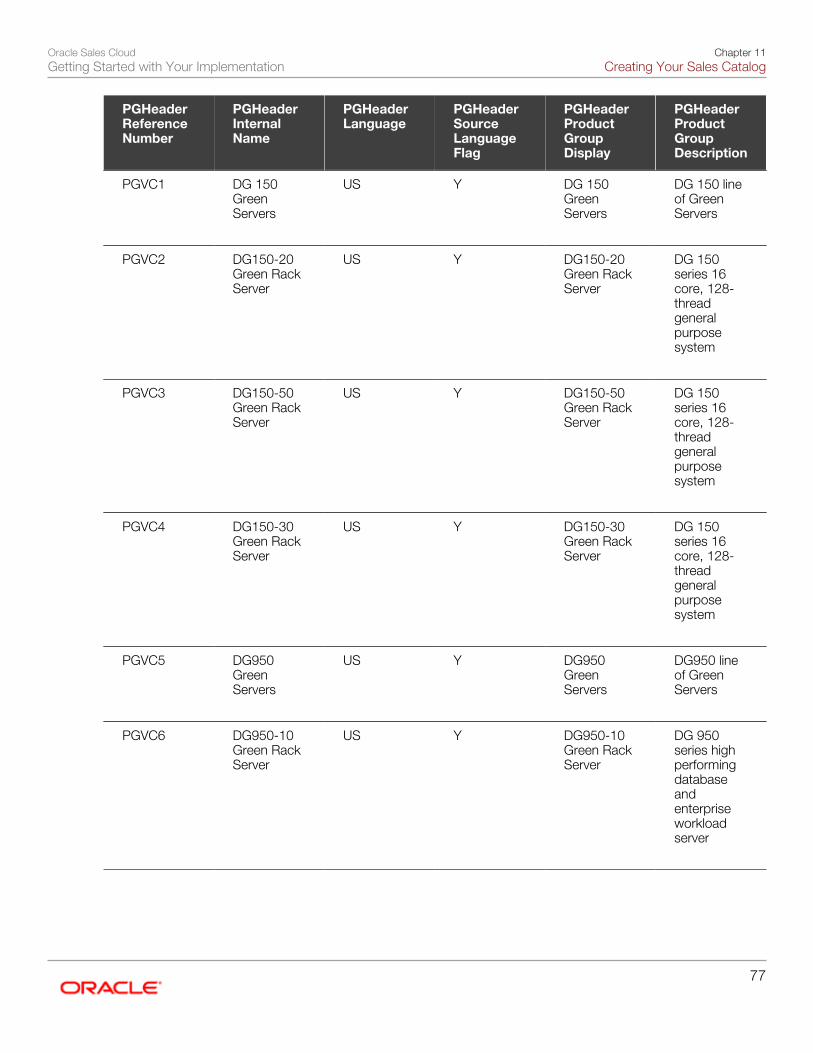
Oracle Sales CloudGetting Started with Your Implementation
Chapter 11Creating Your Sales Catalog
77
PGHeaderReferenceNumber
PGHeaderInternalName
PGHeaderLanguage
PGHeaderSourceLanguageFlag
PGHeaderProductGroupDisplay
PGHeaderProductGroupDescription
PGVC1
DG 150GreenServers
US
Y
DG 150GreenServers
DG 150 lineof GreenServers
PGVC2
DG150-20Green RackServer
US
Y
DG150-20Green RackServer
DG 150series 16core, 128-threadgeneralpurposesystem
PGVC3
DG150-50Green RackServer
US
Y
DG150-50Green RackServer
DG 150series 16core, 128-threadgeneralpurposesystem
PGVC4
DG150-30Green RackServer
US
Y
DG150-30Green RackServer
DG 150series 16core, 128-threadgeneralpurposesystem
PGVC5
DG950GreenServers
US
Y
DG950GreenServers
DG950 lineof GreenServers
PGVC6
DG950-10Green RackServer
US
Y
DG950-10Green RackServer
DG 950series highperformingdatabaseandenterpriseworkloadserver

Oracle Sales CloudGetting Started with Your Implementation
Chapter 11Creating Your Sales Catalog
78
PGHeaderReferenceNumber
PGHeaderInternalName
PGHeaderLanguage
PGHeaderSourceLanguageFlag
PGHeaderProductGroupDisplay
PGHeaderProductGroupDescription
PGVC7
DG950-20Green RackServer
US
Y
DG950-20Green RackServer
DG 950series highperformingdatabaseandenterpriseworkloadserver
PGVC8
DG950-30Green RackServer
US
Y
DG950-30Green RackServer
DG 950series highperformingdatabaseandenterpriseworkloadserver
PGVC9
DG750GreenServers
US
Y
DG750GreenServers
DG750 lineof GreenServers
PGVC10
DG750-20Green RackServer
US
Y
DG750-20Green RackServer
Greenrack serverbacked bythe Solaris10 OS
PGVC11
DG750-10Green RackServer
US
Y
DG750-10Green RackServer
Greenrack serverbacked bythe Solaris10 OS
Your spreadsheet should now look like the following images.

Oracle Sales CloudGetting Started with Your Implementation
Chapter 11Creating Your Sales Catalog
79
The following image shows the spreadsheet with rows 1-12 and columns A through E populated with the sample data.
The following image shows the spreadsheet with rows 1-12, column F populated. Columns G-V are not required attributes,so they are not included here.

Oracle Sales CloudGetting Started with Your Implementation
Chapter 11Creating Your Sales Catalog
80
3. In the remaining rows, 13 through 23, use the sample data to enter Reference Number values that establishhierarchical relationships between the product groups in your import file and the product groups that you created inthe UI.
For our use case, we have provided the sample data (see the following table) that will establish these relationships.However, in a scenario where you don't yet have the reference numbers needed to establish these relationships,you would need to find the reference number for the parent product group using the Setup and Maintenance workarea.
Here is the procedure you would use if you needed to find and copy the reference numbers:
a. In Setup and Maintenance, navigate to the Manage Product Groups task.
b. In the Manage Product Groups page, find the parent product group and select it. For example click on theSentinel Series.
c. The reference number is shown in the Reference Number column. You may have to add the column to theview by clicking View and selecting Reference Number under Columns.
d. Copy this reference number under the PGRel Parent PG Reference Number column in your spreadsheet.

Oracle Sales CloudGetting Started with Your Implementation
Chapter 11Creating Your Sales Catalog
81
The following image shows an example of how the product groups and the reference numbers might look.
Using the sample data, enter the values from the following table in rows 13 through 23, columns W, Y, and AA.Again, attributes for the headings in columns G through V are not required and are not mentioned here.
PGRel Parent PG ReferenceNumber
PGRel Child PG ReferenceNumber
PGRel Relation Type Code
Column W
Column Y
Column AA
300100062437404
PGVC1
PRODUCT_ GROUP_HIERARCHY
PGVC1
PGVC2
PRODUCT_ GROUP_HIERARCHY
PGVC1
PGVC3
PRODUCT_ GROUP_HIERARCHY
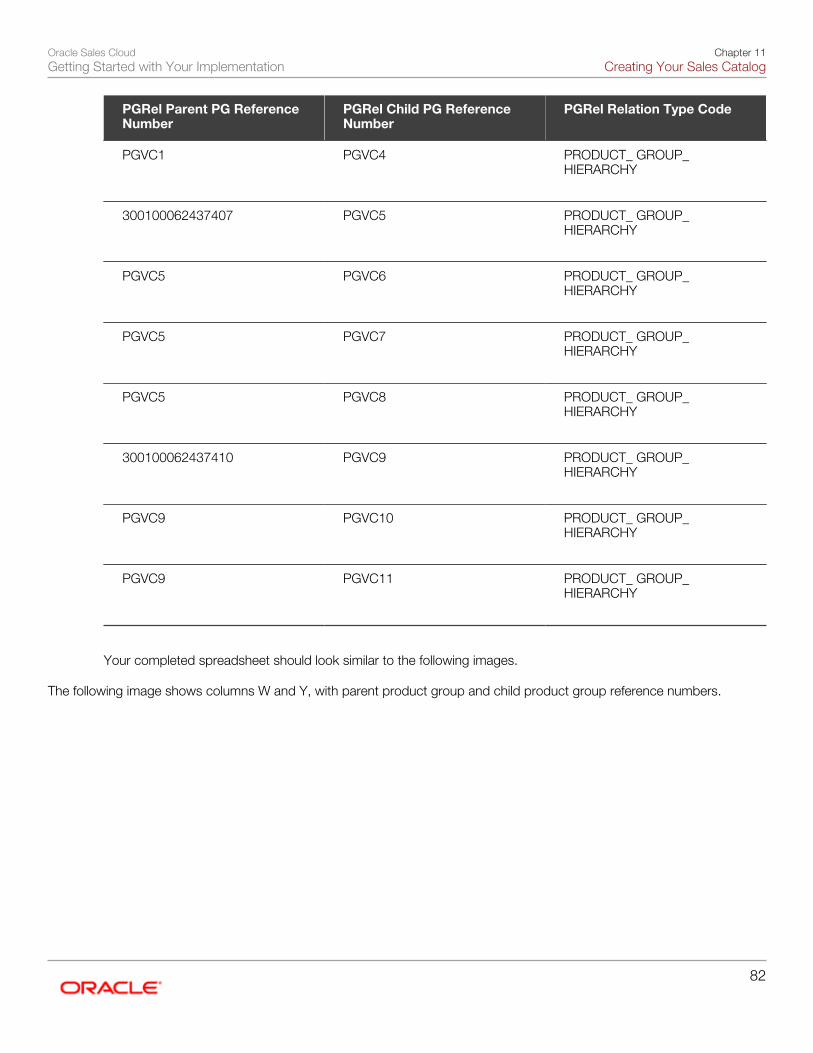
Oracle Sales CloudGetting Started with Your Implementation
Chapter 11Creating Your Sales Catalog
82
PGRel Parent PG ReferenceNumber
PGRel Child PG ReferenceNumber
PGRel Relation Type Code
PGVC1
PGVC4
PRODUCT_ GROUP_HIERARCHY
300100062437407
PGVC5
PRODUCT_ GROUP_HIERARCHY
PGVC5
PGVC6
PRODUCT_ GROUP_HIERARCHY
PGVC5
PGVC7
PRODUCT_ GROUP_HIERARCHY
PGVC5
PGVC8
PRODUCT_ GROUP_HIERARCHY
300100062437410
PGVC9
PRODUCT_ GROUP_HIERARCHY
PGVC9
PGVC10
PRODUCT_ GROUP_HIERARCHY
PGVC9
PGVC11
PRODUCT_ GROUP_HIERARCHY
Your completed spreadsheet should look similar to the following images.
The following image shows columns W and Y, with parent product group and child product group reference numbers.

Oracle Sales CloudGetting Started with Your Implementation
Chapter 11Creating Your Sales Catalog
83
The following image shows column AA.
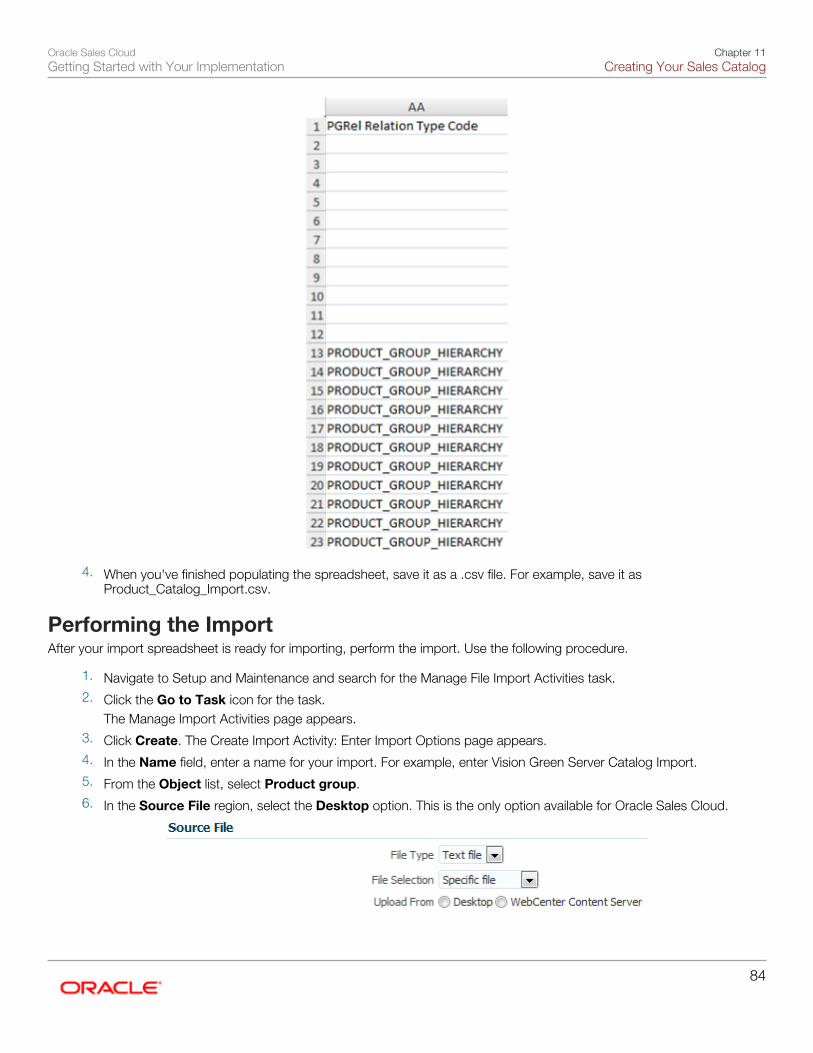
Oracle Sales CloudGetting Started with Your Implementation
Chapter 11Creating Your Sales Catalog
84
4. When you've finished populating the spreadsheet, save it as a .csv file. For example, save it asProduct_Catalog_Import.csv.
Performing the ImportAfter your import spreadsheet is ready for importing, perform the import. Use the following procedure.
1. Navigate to Setup and Maintenance and search for the Manage File Import Activities task.2. Click the Go to Task icon for the task.
The Manage Import Activities page appears.3. Click Create. The Create Import Activity: Enter Import Options page appears.4. In the Name field, enter a name for your import. For example, enter Vision Green Server Catalog Import.5. From the Object list, select Product group.6. In the Source File region, select the Desktop option. This is the only option available for Oracle Sales Cloud.

Oracle Sales CloudGetting Started with Your Implementation
Chapter 11Creating Your Sales Catalog
85
7. Click Browse and select the file.
8. Select the Header row included option because the file includes a header.
9. From the Import Mapping list, select the predefined mapping, since in this procedure you did not append anyattributes.
Click Next. The Create Import Activity: Map Fields page appears. The Map Fields region displays your mapping.
10. Click Next. The Create Import Activity: Schedule page appears.
11. Click Next. The Create Import Activity: Review and Activate page appears.
12. Click Activate.
13. You return to the Manage Import Activities page to view the status of your import. You may have to scroll tothe right to see the status and periodically refresh the page. An import activity with a status of Completedor Completed with Errors indicates that the import activity completed. Click the status link to see detailedinformation about the import, including any errors.
Viewing the Imported Product GroupsAfter you complete the import, verify that the imported product groups were imported correctly. Use the following procedure:
1. From the Navigator, select Setup and Maintenance under the Tools heading.
2. Search for the Manage Product Groups task.
3. Click the Go to Task icon for the task.
4. In the Manage Product Groups region, search for Servers.

Oracle Sales CloudGetting Started with Your Implementation
Chapter 11Creating Your Sales Catalog
86
5. Select the Servers product group and click the tree icon to view the product groups you imported as a hierarchy.Verify that the hierarchical relationships that you defined have been imported correctly.
For additional information on importing product groups, see the Importing Product Groups chapter of the Oracle Sales CloudFile-Based Data Import Guide (Doc ID: 1564536.1).
Publishing and Validating the Sales CatalogAfter you have created your product groups, either directly in the UI or through file-based import (or a combination of thetwo), you need to publish and enable your sales catalog, and then validate it in the opportunities UI.
Publishing the Sales CatalogNow that you have verified your imported product groups and their hierarchy, use the following steps to publish your salescatalog.
1. Sign in as a setup user or as the sales administrator user.
2. From the Navigator, select Setup and Maintenance, under the Tools menu.
3. Search for the Manage Product Groups task.
4. Click the Go to Task icon for the task.
5. In the Product Group page, select the top product group you want to publish, for example EliteProSeries. Mostlikely, you will not want to publish the root product group because it is too general.
6. Click Lock.
7. Click Publish.
8. Click Yes in the Confirm Publish dialog box.
Oracle Sales CloudGetting Started with Your Implementation
Chapter 11Creating Your Sales Catalog
87
9. Click OK on the confirmation message that is displayed.
10. Click Save and Close.
Enabling the Catalog for Use in Sales CloudFor sales catalogs to be visible in opportunities and leads, you must enable them by associating the root catalog you createdwith the Base usage. Use the following procedure:
1. Sign in as a setup user or as the sales administrator user.
2. From the Navigator, select Setup and Maintenance, under the Tools menu.
3. Search for the Manage Product Group Usage task.
4. Click the Go to Task icon for the task.
5. In the Manage Product Group Usage page, in the upper portion of the page, select the record named Base.
6. In the Details region in the lower portion of the screen, if a product group is already associated with the Base usage,then remove the product group by selecting it and clicking the clicking Delete icon.
7. In the Details section, click the Select and Add icon.
8. In the dialog box that appears, search for the root catalog that you created. For example, search for Servers as theDisplay name.
9. Select the record and click OK.
10. On the Manage Product Group Usage page, click Save and Close.
Validating the Sales Catalog
Use the following steps to validate the sales catalog:
1. Sign in as a sales manager or salesperson.
2. From the Navigator, select Opportunities.
3. In the Opportunities overview page, click Create Opportunity.
4. Enter a name for the opportunity, and click Save and Close.
5. Search for the opportunity you just created and edit it.
6. In the Revenue Items region, click Add.
7. For Type, pick Group.
8. Under Product, from the drop down list, click the product group or one of the product subgroups you have created.For example, select ElitePro Series.
Oracle Sales CloudGetting Started with Your Implementation
Chapter 11Creating Your Sales Catalog
88
9. Click Save and Close.

Oracle Sales CloudGetting Started with Your Implementation
Chapter 12Enabling and Configuring Search
89
12 Enabling and Configuring Search
About Enabling and Configuring SearchThis chapter describes how to enable and configure the two principal ways of searching in Oracle Sales Cloud.
• Global SearchThe global search, located at the top of the application page, makes it possible to search across different objectsin the application. When searching for a contact, for example, you retrieve not only information about the contactherself, but also all of the accounts, opportunities, activities, and other information that involve the contact.
• Work Area Search and ListsThe Find field available in the different work areas makes it possible to search for the record by name.
You can also search for records using other search criteria by creating a saved search. The results of your searchare displayed as a list in the work area landing page. For example, you can search for and display a list of all of theactive accounts in Canada.
For more information how to use these two types of search, see Using Sales guide (https://docs.oracle.com/cloud/latest/salescs_gs/docs.htm).
The two searches use different technology. This means that the setups you perform for one do not impact the other.
Setup OverviewHere is an overview of the setup steps.
1. Enable work area search by setting up the Synchronize Database Search Indexes for CRM Objects process to runperiodically. Oracle recommends that you set the process to run every five minutes.You can run the process by signing in as a setup user (or another user with the CRM Application Administrator Dutyrole) and navigating to the Scheduled Processes work area.See Running the Work Area Search Index Process in this chapter for details.

Oracle Sales CloudGetting Started with Your Implementation
Chapter 12Enabling and Configuring Search
90
2. Enable global search by setting the system profile option FUSION_APPS_SEARCH_ENABLED to Y at the Site level.This setup is accomplished using the Manage Profile Options task.
See Enabling the Global Search Profile Option in this chapter for details.
3. Configure global search using the tasks in the Define Global Search Configuration task group. You can search forthis task group from the All Tasks tab in the Setup and Maintenance work area.
a. Using the Manage Search View Objects task, activate the objects you want to search and set the indexingfrequency. Until a record is indexed, it does not appear in search results. Optionally, you can change whatinformation gets displayed in the search results and which fields are indexed for searching (adding customfields, for example).
See Activating and Configuring Application Objects for Global Search in this chapter for details.
b. Using the Manage User Interface task, select the objects you activated to display as filters in the globalsearch UI. Users can use the filters to specify which objects they want to search and to filter results.
See Enabling the Objects You Activated as Filters in the Global Search UI in this chapter for details.
c. Optionally, you can modify the default configuration of the automatic suggestions users receive as theyenter their search terms. For example, the application displays suggestions based on searches performedwithin the last 30 days by default, but you may want to extend or shorten this interval. These setups areaccomplished using the Manage Auto Suggest task.
See Changing the Behavior of Global Search Automatic Suggestions in this chapter for details.
Running the Work Area Search Index ProcessTo enable searches in Oracle Sales Cloud work areas, you must set up the Synchronize Database Search Indexes for CRMObjects process to run periodically. Oracle recommends that you set the process to run every five minutes. Until a newrecord is indexed, it remains unavailable for searching.
Setting Up the Indexing Process to Run Periodically
1. Sign in as a user with the CRM Application Administrator Duty role.
2. From the Navigator, select Scheduled Processes under the Tools heading.
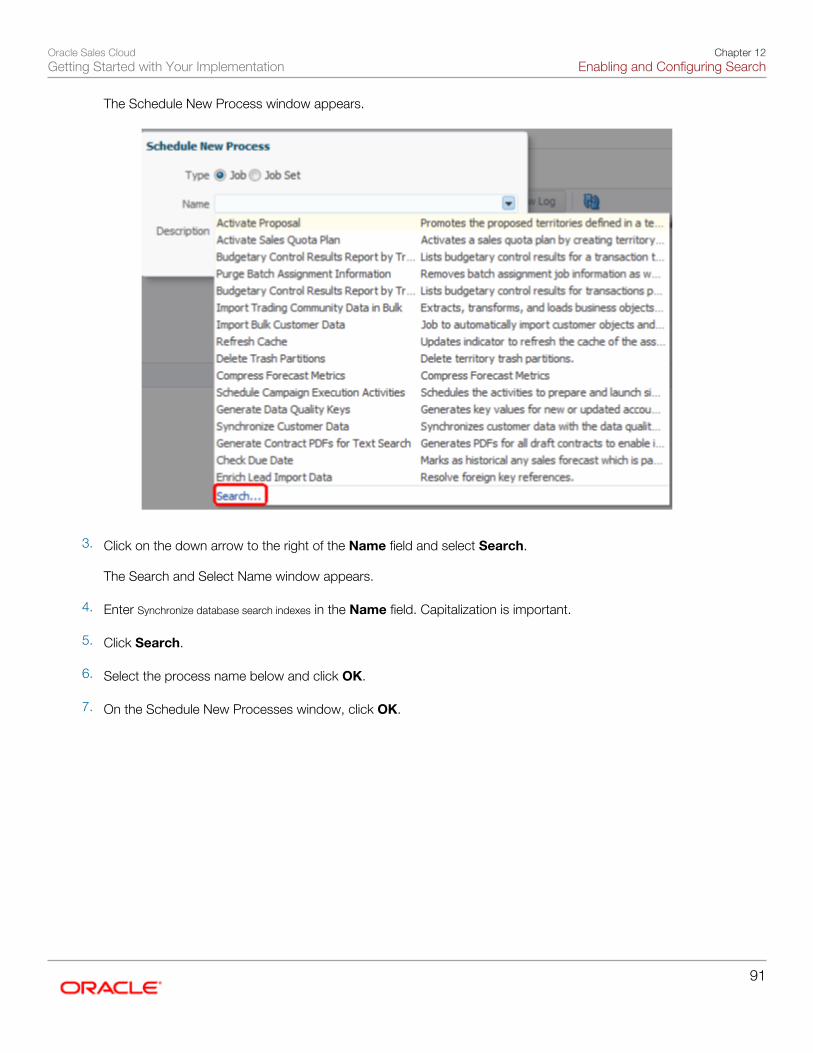
Oracle Sales CloudGetting Started with Your Implementation
Chapter 12Enabling and Configuring Search
91
The Schedule New Process window appears.
3. Click on the down arrow to the right of the Name field and select Search.
The Search and Select Name window appears.
4. Enter Synchronize database search indexes in the Name field. Capitalization is important.
5. Click Search.
6. Select the process name below and click OK.
7. On the Schedule New Processes window, click OK.

Oracle Sales CloudGetting Started with Your Implementation
Chapter 12Enabling and Configuring Search
92
The Process Details window appears.
8. Click Advanced.
Oracle Sales CloudGetting Started with Your Implementation
Chapter 12Enabling and Configuring Search
93
9. On the Schedule tab, select the Using a schedule option.
10. Select Hourly/Minute from the Frequency list.
11. Specify the index to run every five minutes and enter an end-date far in the future.
12. Click Submit.
Enabling the Global Search Profile OptionUse this procedure to enable global search by setting the FUSION_APPS_SEARCH_ENABLED profile option.
Setting the Profile Option
1. Sign in as a setup user and navigate to the Setup and Maintenance work area.

Oracle Sales CloudGetting Started with Your Implementation
Chapter 12Enabling and Configuring Search
94
2. Search for the Manage Profile Options task.
3. Click Go to Task.
The Manage Profile Options page appears.
4. In the Search region, Profile Option Code field, enter FUSION_APPS_SEARCH_ENABLED.
5. Click Search.
6. Select the Site option.
7. Click Save and Close.
Activating and Configuring Application Objects forGlobal SearchUse this procedure to activate and configure each of the objects you want to enable for searching using global search.
For each object:
1. Activate the object.
2. Specify the frequency with which the object will be indexed.
3. Optionally, you can modify the list and order of fields indexed in the search and displayed in the search results.
Activating an Object for Search
1. While signed in as a setup user or a sales administrator, navigate to the Setup and Maintenance work area.
2. In the All Tasks tab, search for the Manage Search View Objects task.
3. Click Go to Task.

Oracle Sales CloudGetting Started with Your Implementation
Chapter 12Enabling and Configuring Search
95
The Manage Search View Objects page appears.
4. Select the object you want to enable for search.
5. Click Activate.
The status for the object changes to Active.
Setting the Indexing Frequency and ScheduleAfter you have activated the object, you must specify how frequently you want the object records indexed.
Oracle recommends that you index objects daily during off-hours. You can stagger the indexing times for the different objectsto minimize performance impacts.
Specifying the fields to be indexed and displayed in the search results is optional because these are already set up for you.
1. Select the Display Name link of the object.
Oracle Sales CloudGetting Started with Your Implementation
Chapter 12Enabling and Configuring Search
96
The Edit Search View Object page appears.
2. In the Index Schedule region, select the Frequency Type and enter the number of days between index runs andthe time, if appropriate.
3. You can change which fields the application indexes and which fields display in search results as described in thefollowing section.
4. When you are done, click Save and Close
The application returns you to the Manage Search View Objects page where you can monitor the status of theindex generation for each object.
The first time your scheduled indexing process runs or any time you modify the list of fields in the object, theapplication generates a complete index of all the existing records. Subsequently, the process indexes only recordsthat have changed.
If you end up with many inactive records in your system over time, you can improve the efficiency of your searchesby periodically regenerating the full index. This can be accomplished by selecting the object and clicking FullReindex.
Modifying the List of Fields Used for Indexing and Displayed in SearchResultsIn the Edit Search View Object page, you can also change which fields the application indexes and which fields display insearch results. You will want to add any custom fields you want to enable for searching, for example.
• The Title and Fixed Content fields let you specify which fields are displayed in search results and in what order.
◦ Title is the linked heading of each search result.

Oracle Sales CloudGetting Started with Your Implementation
Chapter 12Enabling and Configuring Search
97
◦ Fixed Content is the text which appears under the heading.
In the following example, the titles starting with the word Opportunity: are links which permit users to drill down tothe record. The rest of the fields are the fixed content.
• The Body field lists the fields that are indexed by the application. The most relevant fields are displayed in the searchresults, space permitting. While the Body field includes all of the standard fields for indexing, you must add anycustom fields to the list if you want them available for searches.
To make changes, click Edit (the pencil icon) and make your changes in the Edit Search View Object window.
Enabling the Objects You Activated as Filters in theGlobal Search UIAfter you have activated the different objects for global search and set up their indexing, you will want to display these objectsas filters in the global search UI.
Enabling the Objects as Filters
1. While signed in as a setup user, navigate to the Setup and Maintenance work area.
2. Search for the Manage User Interface task.
3. Click Go to Task.

Oracle Sales CloudGetting Started with Your Implementation
Chapter 12Enabling and Configuring Search
98
The Manage User Interface page appears.
4. Use the arrows in the Search Categories region, to move each object to the Selected Categories list.
5. Optionally, select the Show Clear button option to display the Clear button on the search results page. Thisbutton permits users to clear all of the filter options they have previously selected in the search.
6. Click Save and Close.
Changing the Behavior of Global Search AutomaticSuggestionsUse this procedure to change the behavior of the automatic suggestions users receive for global search.
Changing the Automatic Suggestions Options
1. While signed in as a setup user, navigate to the Setup and Maintenance work area.
2. Search for the Manage Auto Suggest task.
3. Click Go to Task .

Oracle Sales CloudGetting Started with Your Implementation
Chapter 12Enabling and Configuring Search
99
The Manage Auto Suggest page appears.
4. On this page, you can:
◦ Select the type of suggestions users receive in the Suggestion Groups region. By default, only Recent Itemsand Recent Searches display.
• Last Search
Shows the very last search for the signed-in user, including any applied filters.
• Recent Items
Recent items the user accessed from the search results.
• Recent Searches
Recent searches by the user, including any applied filters.
• Saved Searches
Any saved searches, if this functionality has been implemented.
◦ Show or hide the headers for the suggestion groups by setting the Show Suggestion Group Headersoption. The headers are displayed by default.

Oracle Sales CloudGetting Started with Your Implementation
Chapter 12Enabling and Configuring Search
100
◦ Specify the minimum number of search characters users must enter before the suggestions appear, byselecting a value from the Minimum Characters for New Suggestions list.
The default is three characters.
◦ Specify the maximum number of suggestions users receive, by selecting a value from the Maximum Numberof Suggestions list.
The default is 15 suggestions.
◦ Specify the number of days the recent items are retained, by selecting a value from the Number of DaysRecent Items Retained list.
The default is 30 days.
5. Click Save and Close when you are done.

Oracle Sales CloudGetting Started with Your Implementation
Chapter 13Importing Accounts and Contacts
101
13 Importing Accounts and Contacts
About Importing Accounts and ContactsYou can import your accounts and contacts into Oracle Sale Cloud using a text file. Alternatively, you can also createaccounts and contacts in Customer Center. However, if you want to move a large number of accounts or contacts from othersystems into Oracle Sales Cloud then it is recommended you import them into Oracle Sales Cloud.
Oracle Sales Cloud refers to sales account and sales prospects collectively as an Account. Sales accounts are accounts witha sell-to address, and this allows you to assign territories to the sales account. In this scenario, Vision Corporation wants toimport accounts and assign territories to them. We will import accounts, with sell-to address, and then import contacts forrelated to the accounts.
Oracle Sales Cloud provides templates for importing accounts and contacts. These templates are:
• Account Create and Update Seeded Mapping: To import accounts with basic and additional entity information, suchas relationship, job information, and sales profile information.
• Contact Create and Update Seeded Mapping: To import contact with basic and additional entity information, suchas relationship, job information, and comprehensive contact information.
Before importing contacts, you must ensure that the accounts related to the contacts exist in Oracle Sales Cloud byimporting accounts before importing the related contacts.
Oracle Sales Cloud includes a reference attribute, for all import objects, that is used to store the source of a record. Youcan use this reference attribute to update an existing record in Oracle Sales Cloud with updated records from a source. Forexample, you must provide the reference attribute of an account when import contacts for the account.
Setup OverviewTo import accounts and contacts:
1. Use the Manage File Import Mappings task in the Setup and Maintenance work area to download the templates forthe Account and Contact objects. The templates include the most common attributes you use to import an accountor a contact. For more information, see Downloading Templates You Can Use for Import.
2. Register the source system in Oracle Sales Cloud. This helps you identify the source system of a record, and ishelpful when you are importing from multiple sources. For more information, see Registering the Source System ofYour Customer Data Import.
3. Create import files for accounts and contacts using their templates and save them as CSV files. For moreinformation, see Understanding the Import Templates.
4. Optionally, add additional attributes to the import file. For more information, see the Appending Additional Attributesfor Import topic in the respective section.
5. Import the file by creating an import activity using the Manage File Import Activity task available from the Setup andMaintenance work area. For more information, see Importing Accounts from a File or Importing Contacts from aFile.
Downloading Templates You Can Use for ImportOracle Sales Cloud provides templates to help you import data with the file-based import tool. The templates include thecommonly used fields, in addition to the required fields.

Oracle Sales CloudGetting Started with Your Implementation
Chapter 13Importing Accounts and Contacts
102
Downloading an Import TemplateTo download your import template:
1. Navigate to the Setup and Maintenance work area and search for the Manage File Import Mappings task.
2. Click the Go to Task icon.
3. In the Manage File Import Mappings page, select Account to download the account template, or Contact todownload the contact template.
4. Click Search.
5. Vision Corp. would like to import complete information for accounts and contacts, so we would select the templatethat supports comprehensive account and contact information. Select Account Create and Update SeededMapping to download the account template, or select Contact Create and Update Seeded Mapping todownload the contact template. The Edit Import Mapping page is displayed.
6. In the Edit Import Mapping page, click Download Template.
Registering the Source System of Your CustomerData ImportYou can set up source systems to identify the source of the data you are importing. You can specify whether the sourcesystem is a spoke system, such as a legacy system, or a purchased system, such as data from a third party provider. Theimport process uses the combination of source system and source system reference value to identify the existing record. Thesource system reference value is a unique identifier of the record in that source system.
You can either import source systems or configure them in the Manage Trading Community Source Systems page. In thistopic, we will create a source system to identify data you are importing from a legacy application in the in the Manage TradingCommunity Source Systems page.

Oracle Sales CloudGetting Started with Your Implementation
Chapter 13Importing Accounts and Contacts
103
To add a source system:
1. Navigate to the Setup and Maintenance work area and search for the Manage Trading Community Source Systemstask.
2. Click the Go to Task icon.
3. In the Manage Trading Community Source Systems page, click Add from Actions menu. The Create SourceSystem is displayed.
4. In the Code field, enter VISION.
5. In the Name field, enter Vision Applications.
6. In the Description field, enter a description for the spoke system such as Maintains cross reference between OracleSales Cloud database and Vision records.
7. Select Spoke from the Type list.
8. Select Enable for Trading Community Members.
9. Click Save and Close.
Importing Accounts
Understanding the Account Import TemplateYou must understand the columns in the account import template to populate the templates with the correct data.
The template file includes a header row with columns that map to the attributes for the account object. The columns arearranged in the same order as the mapping in Oracle Sales Cloud. You can add additional attributes to the file by appendingthem after the last column. In case you add additional attributes, you must copy and modify the seeded mapping to create acustom mapping that includes these additional attributes.
You must provide a unique identifier for an account when you use file-based data import to update the record or to associateanother record with it. For example, to associate a contact with an account you must uniquely identify the account record.You can identify an account record by providing the Party ID or by providing the record's original system and its originalsystem reference. If an account includes its original system and original system reference when it is imported, then they canuniquely identify the record when it is updated or when other records are associated with it.
Account Import TemplateThe following table lists the commonly used and required attributes of the account import template in the order they areincluded in the template. In this scenario, we import a sell-to address for each of the account, so that we can assignterritories to accounts.
Column Description Sample Value
Organization_ Origin_System
Enter the unique identifierrepresenting the source systemfor the account. You can managesource systems in the Setup andMaintenance, Manage TradingCommunity Source Systems task.
VISION

Oracle Sales CloudGetting Started with Your Implementation
Chapter 13Importing Accounts and Contacts
104
Column Description Sample Value
Organization_ Origin_ System_Reference
Enter the unique identifier of theaccount within the source system.For example, you can either usethe account ID from the sourcesystem, or generate a unique ID forthe party in Excel.
Vision_ Account1
Organization_ Name
Enter an organization name.Organization names within animport batch must be unique. Youmust provide an organization namewhen importing accounts.
PCM Tech Computer MaintenanceGlobal HQ
Party_ Usage_Code
Enter usage code for the accountsuch as organization or partner.
SALES_ACCOUNT
Classification_ Category
Enter the classification categoryfor the account from the list ofavailable categories. You canmanage classification categoriesin the Setup and Maintenance,Manage Classification Categoriestask.
1987 SIC
Classification_ Code
You must enter one of theclassification codes for theclassification category youspecified. You can obtain a listof the codes using the ManageClassification Categories, Setupand Maintenance task.
2752
Named_ Account_Flag
Enter Y if the account is a namedaccount.
Y
Account_ Owner_ Party_Id
Enter the party ID of the accountowner. You can identify theparty ID of the account owner byexporting the party object by usingthe Manage Bulk Data Export,Schedule Export Processes Setupand Maintenance task. If you do not enter an accountowner, the current user is assignedas the account owner.
Oracle Sales CloudGetting Started with Your Implementation
Chapter 13Importing Accounts and Contacts
105
Column Description Sample Value
Address_ Purpose
Enter the purpose of the address.You can have multiple addresseswith different purposes for anaccount. An account recordmust include at least one sell-toaddress to be a customer. You canassign only customer accounts toterritories.
SELL_TO
Address_Line_1
Enter the first line of the address.
600 4th Ave
City
Enter the city for the account'saddress.
IRVINE
State
Enter the state for the account'saddress.
CA
Postal_Code
Enter the postal code for theaccount's address.
19102
Address_ Country_Code
Enter the country code for theaccount's address. The countrycode should exist in OracleSales Cloud. You can managethe list of countries using theDefine Geographies, Setup andMaintenance task.
US
You can import additional attributes to an account by appending attributes to the import file. For more information aboutappending additional attributes for import, see the topic Appending Additional Attributes for Import in this chapter.
You can identify the party ID of the account owner by exporting the party object by using the Manage Bulk Data Export,Schedule Export Processes Setup and Maintenance task.
Appending Additional Account Attributes for ImportYou may want to add additional attributes to your files to import additional information for your accounts.
Appending Additional Attributes for Account ImportAll available attributes for an import object are included in a reference file located in Oracle Enterprise Repository. Reviewthe reference file to explore other account attributes that are available for import and the possible prerequisite steps forthose attributes. You must copy and modify the seeded mapping to create a custom mapping that includes these additionalattributes.

Oracle Sales CloudGetting Started with Your Implementation
Chapter 13Importing Accounts and Contacts
106
The reference file includes the following information:
• All organization profile attributes available for account import.• The attribute descriptions, including the user interface display name for the attribute if the attribute is displayed on
the user interface.• The data type, length, and validation logic, including the task or work area where you can view or define valid values
before importing data.• The logic for default values, if values are not provided in your source file.
To access the reference file for accounts, follow these steps.
1. Using your browser, enter http://fusionappsoer.oracle.com. Sign in as a user or a guest to Oracle EnterpriseRepository.
2. Search for assets, using the following value for your Search String: HZ_IMP_PARTIES_T.The results include a set of assets. The assets that apply to file-based import are typically titled <Object> NameImport, such as Contact Import.
3. Within the asset, click the link to the reference file in the Details tab. The file opens in Excel or in another applicationof your choice. Select the HZ_IMP_PARTIES_T_Reference file to view the attributes for the account object.
Importing Accounts from a FileAfter creating the import file and creating your import mapping, you create an import activity to import the account.
Importing accounts from a fileTo import accounts from a file:
1. In the Navigator menu, select the Setup and Maintenance link under the Tools heading.2. Search for the Manage File Import Activities task.3. Click Go to Task. The Manage Import Activities page appears.4. Click Create. The Create Import Activity: Enter Import Options page appears.5. In the Name field, enter a name for your import activity.6. In the Objects list, select Account .7. In the Source File region, select Desktop. This is the only option available for Oracle Sales Cloud.8. Click Browse and select your import file.9. Select the correct delimiter for your import file in the Data Type list. The default is Comma separated.
10. Select the Header row included option because the file includes a header.11. In the Import Mapping list, select Account Create and Update Seeded Mapping .
If you have added additional attributes into your file and created a custom mapping, select the custom mapping thatincludes these additional attributes.
12. Click Next. The Create Import Activity: Map Fields page appears.The Map Fields region of the page displays the attribute mapping based on the import mapping you select.Optionally, you can ignore blank columns from the import process by selecting the Ignore option for the column.
13. Click Next. The Create Import Activity: Schedule page appears.14. Click Next. The Create Import Activity: Review and Activate page appears.15. Click Activate.

Oracle Sales CloudGetting Started with Your Implementation
Chapter 13Importing Accounts and Contacts
107
You can monitor the progress of the import activity processing, and view completion reports for both successful records anderrors. To view the status of an import activity, select the import activity in the Manage File Import Activities page.
Importing Contacts
Understanding the Contact Import TemplateYou must understand the columns in the contact import template to populate the templates with the correct data.
The template file includes a header row with columns that map to the attributes for the objects. The columns are arranged inthe same order as the mapping in Oracle Sales Cloud. You can add additional attributes to the file by appending them afterthe last column. In case you add additional attributes, you must copy and modify the seeded mapping to create a custommapping that includes these additional attributes.
You must provide a unique identifier for a record when you use file-based data import to update the record or to associateanother record with it. If a record includes its original system and original system reference when it is imported, then that pairof attributes can uniquely identify the record when it is updated or when other records are associated with it. For example, toassociate a contact with the existing account you must uniquely identify the account record.
Contact Import TemplateYou must provide the first name and last name of the contact, as well as parent account information when importing acontact.
To import contacts, you must identify the existing account that you want to associate the contact with. You can identify anexisting account record either by providing the Party Id or by providing the origin system and origin system reference. Youcan get Party Id of an account by exporting the Party object using the Setup and Maintenance, Manage Bulk Data Export,Schedule Export Processes task.
When importing contacts or contact information for an account, you must provide relationship reference information inaddition to the parent reference. This information is required because a contact can have multiple relationships with anorganization, such as an employee or board member. When importing information about a contact you must refer to thespecific relationship that you want to import information for. For example, you might want to import information for JohnSmith the employee or John Smith the board member. If you do not include the reference information for an account-contactrelationship, then the import process creates a relationship. Vision Corporation does not have multiple account-contactrelationships, so we are not going to provide a specific contact relationship.
The following table lists the commonly used attributes of the contact import template in the order they are included in thetemplate.
Column Description Sample Value
Person_ Origin_System
Enter the unique identifierrepresenting the source systemfor the contact. You can managesource systems in the Setup andMaintenance, Manage TradingCommunity Source Systems task.
VISION
Person_ Origin_ System_Reference
Enter the unique identifier of thecontact within the source system.For example, you can either usethe party Id of the account from the
Vision_ Contact1

Oracle Sales CloudGetting Started with Your Implementation
Chapter 13Importing Accounts and Contacts
108
Column Description Sample Value
source system, or generate uniqueId for the party in Excel.
First_Name
Enter the first name of the contact.
Dennis
Last_Name
Enter the last name of the contact.
Peattie
Gender
Enter the gender of the contact.
MALE
Job_Title
Enter the job title of the contact.
President
Address_Line_1
Enter the first line of the contact'saddress.
212 Herrington Boulevard
Address_Line_2
Enter the second line of thecontact's address.
Suite 10
City
Enter the city of the contact'saddress.
Foster City
State
Enter the state of the contact'saddress.
CA
Postal_Code
Enter the postal code of thecontact's address.
94356
Address_ Country_Code
Enter the country code of thecontact's country.
US
Enter the e-mail of the contact.
Dennis. Peattie@usvisioncorp. com
Existing_ Account_ Party_Id
Enter the party ID of the accountassociated with the contact.
Existing_ Account_ Origin_System
Enter the code representing thesource system for the accountassociated with the contact.
VISION

Oracle Sales CloudGetting Started with Your Implementation
Chapter 13Importing Accounts and Contacts
109
Column Description Sample Value
Existing_ Account_ Origin_System_ Reference
Enter the reference number ortext representing the sourcesystem unique ID for the accountassociated with the contact.
Vision_ Account1
You can import additional attributes to a contact by appending attributes to the import file. For more information aboutappending additional attributes for import, see the topic Appending Additional Attributes for Import in this chapter.
Appending Additional Contact Attributes for ImportYou may want to add additional attributes to your files to import additional information for your contacts.
Appending Additional Attributes for Contact ImportAll available attributes for an import object are included in a reference file located in Oracle Enterprise Repository. Reviewthe reference file to explore other contact attributes that are available for import and the possible prerequisite steps for thoseattributes.
The reference file includes the following information:
• All organization profile attributes available for contact import.
• The attribute descriptions, including the user interface display name for the attribute if the attribute is displayed onthe user interface.
• The data type, length, and validation logic, including the task or work area where you can view or define valid valuesbefore importing data.
• The logic for default values, if values are not provided in your source file.
To access the reference file for contacts, follow these steps.
1. Using your browser, enter http://fusionappsoer.oracle.com. Sign in as a user or a guest to Oracle EnterpriseRepository.
2. Search for assets, use HZ_IMP_CONTACTS_T value for your Search String to view the contact-relatedspreadsheet.
The results include a set of assets. The assets that apply to file-based import are typically titled <Object> NameImport, such as Contact Import.
3. Within the asset, click the link to the HZ_IMP_CONTACTS_T_Reference file in the Details tab. The file opens in Excelor in another application of your choice.
Importing Contacts from a FileAfter creating the import file and creating your import mapping, you create an import activity to import the contact. Beforeimporting contacts, you must ensure that the accounts related to the contacts exist in Oracle Sales Cloud by importingaccounts before importing the related contacts.

Oracle Sales CloudGetting Started with Your Implementation
Chapter 13Importing Accounts and Contacts
110
Importing contacts from a fileTo import contacts from a file:
1. In the Navigator menu, select the Setup and Maintenance link under the Tools heading.
2. Search for the Manage File Import Activities task.
3. Click Go to Task. The Manage Import Activities page appears.
4. Click Create. The Create Import Activity: Enter Import Options page appears.
5. In the Name field, enter a name for your import activity.
6. In the Objects list, select Contact .
7. In the Source File region, select Desktop. This is the only option available for Oracle Sales Cloud.
8. Click Browse and select your import file.
9. Select the correct delimiter for your import file in the Data Type list. The default is Comma separated.
10. Select the Header row included option because the file includes a header.
11. In the Import Mapping list, select Contact Create and Update Seeded Mapping .
If you have added additional attributes into your file and created a custom mapping, select the custom mapping thatincludes these additional attributes.
12. Click Next. The Create Import Activity: Map Fields page appears.
The Map Fields region of the page displays the attribute mapping based on the import mapping you select.
Optionally, you can ignore blank columns from the import process by selecting the Ignore option for the column.
13. Click Next. The Create Import Activity: Schedule page appears.
14. Click Next. The Create Import Activity: Review and Activate page appears.
15. Click Activate.
Verifying Your Imported DataYou can view the list of import activities from the Manage Import Activities page. You can verify your imported data by clickingthe Status column for your import activity. After the import is complete, you can verify the imported contacts in the CustomerCenter. You can search for the account you have associated with the contact, and view the contacts for the account.
Oracle Sales CloudGetting Started with Your Implementation
Chapter 14Setting Up Sales Territories and Assignment
111
14 Setting Up Sales Territories and Assignment
About Setting Up Sales Territories and AssignmentIn Oracle Sales Cloud, you assign salespeople to both accounts and individual opportunities to ensure everyone focuses onthe most important tasks and shares the information they need to be efficient and effective in dealing with customers.
While all salespeople in your organization have access to basic account information, including customer names, contacts,and addresses, salespeople who are assigned to an account or an opportunity gain additional access:
• Accounts
Assignees get to share all the details they need to collaborate including, customer interactions, to-do lists, andappointments. Assignees participate in social discussions, share collateral, and collaborate on presentations.
• Opportunities
You must be assigned to an opportunity (or be in the management chain for someone who is), to view and updateopportunities and their revenue lines, and to submit forecasts.
While salespeople can always assign others manually while editing an account or opportunity, Vision Corporation decidesto take advantage of automatic assignment. In Oracle Sales Cloud, there are two methods of automatically assigning salespeople:
• By setting up sales territories
The primary method for assigning salespeople to both accounts and opportunities is using sales territories. Youcan set up the sales territory boundaries based on a wide variety of factors, called dimensions. The most commondimensions include geography, products, customer size, customer type, and industry.
One set of sales territories takes care of assigning both accounts and opportunities. Sales territories also form thebasis for forecasting setup described in a later chapter.
When you assign salespeople using territories, the territories themselves become associated with the account andopportunity. If you later realign your sales territories or there's turnover in your sales organization, the assignmentsreflect those changes automatically after you run the assignment process.
NoteIf you implement Outlook, only the accounts that are part of a salesperson's territory are downloadedwhen synchronizing.
• By creating assignment rules
For opportunities, you can assign additional salespeople based on factors that are not covered by territories, suchas deal size or product knowledge, by creating rules to supplement territory assignment. But because you cannotuse rules for account assignment and because rules are of secondary importance for opportunities, rule-basedassignment is not covered in this guide.
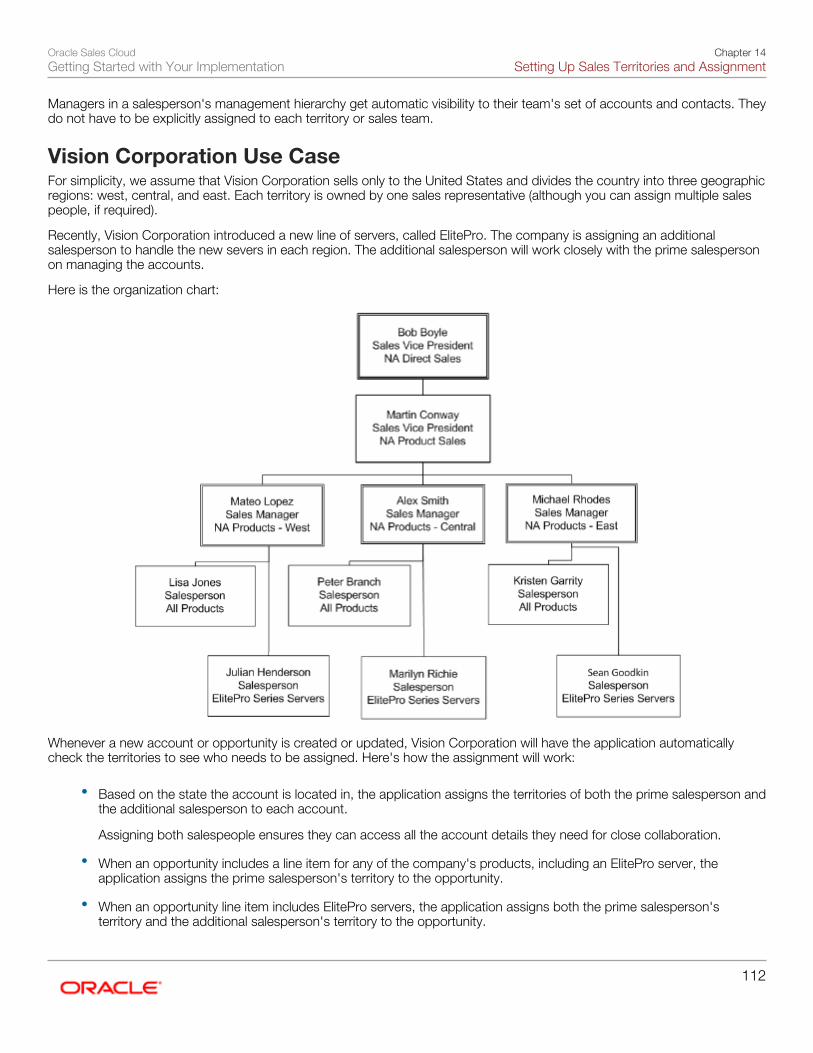
Oracle Sales CloudGetting Started with Your Implementation
Chapter 14Setting Up Sales Territories and Assignment
112
Managers in a salesperson's management hierarchy get automatic visibility to their team's set of accounts and contacts. Theydo not have to be explicitly assigned to each territory or sales team.
Vision Corporation Use CaseFor simplicity, we assume that Vision Corporation sells only to the United States and divides the country into three geographicregions: west, central, and east. Each territory is owned by one sales representative (although you can assign multiple salespeople, if required).
Recently, Vision Corporation introduced a new line of servers, called ElitePro. The company is assigning an additionalsalesperson to handle the new severs in each region. The additional salesperson will work closely with the prime salespersonon managing the accounts.
Here is the organization chart:
Whenever a new account or opportunity is created or updated, Vision Corporation will have the application automaticallycheck the territories to see who needs to be assigned. Here's how the assignment will work:
• Based on the state the account is located in, the application assigns the territories of both the prime salesperson andthe additional salesperson to each account.
Assigning both salespeople ensures they can access all the account details they need for close collaboration.
• When an opportunity includes a line item for any of the company's products, including an ElitePro server, theapplication assigns the prime salesperson's territory to the opportunity.
• When an opportunity line item includes ElitePro servers, the application assigns both the prime salesperson'sterritory and the additional salesperson's territory to the opportunity.
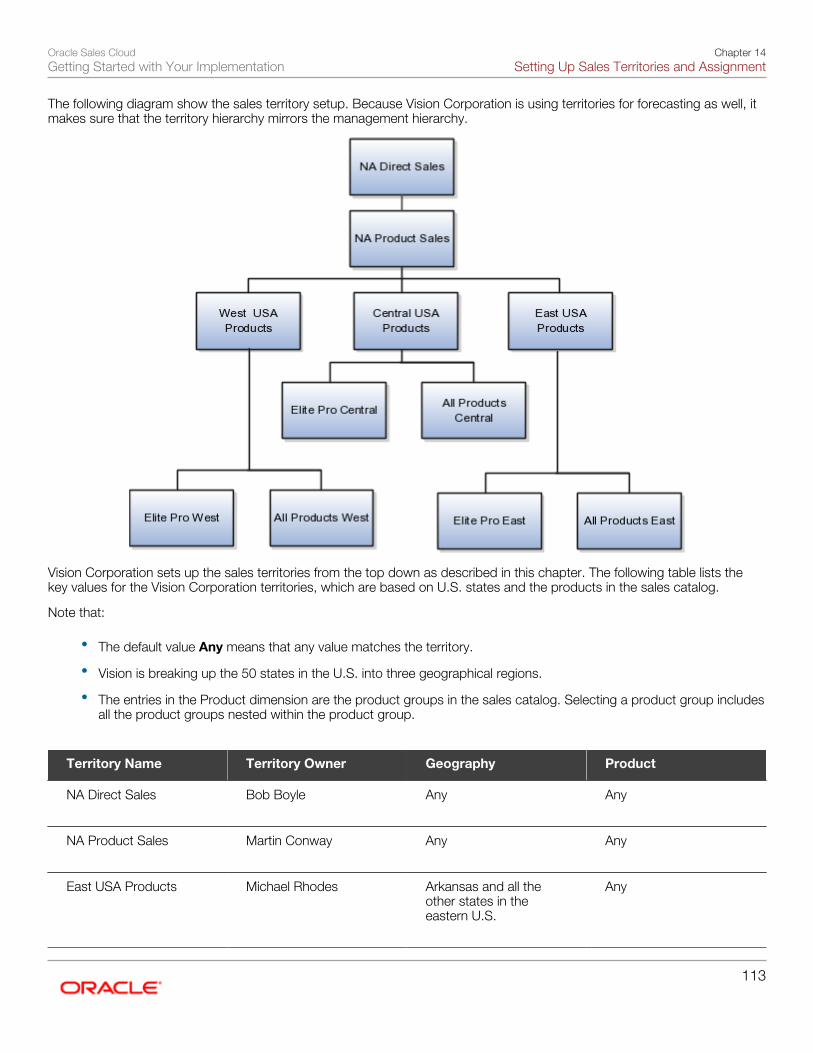
Oracle Sales CloudGetting Started with Your Implementation
Chapter 14Setting Up Sales Territories and Assignment
113
The following diagram show the sales territory setup. Because Vision Corporation is using territories for forecasting as well, itmakes sure that the territory hierarchy mirrors the management hierarchy.
Vision Corporation sets up the sales territories from the top down as described in this chapter. The following table lists thekey values for the Vision Corporation territories, which are based on U.S. states and the products in the sales catalog.
Note that:
• The default value Any means that any value matches the territory.
• Vision is breaking up the 50 states in the U.S. into three geographical regions.
• The entries in the Product dimension are the product groups in the sales catalog. Selecting a product group includesall the product groups nested within the product group.
Territory Name Territory Owner Geography Product
NA Direct Sales
Bob Boyle
Any
Any
NA Product Sales
Martin Conway
Any
Any
East USA Products
Michael Rhodes
Arkansas and all theother states in theeastern U.S.
Any

Oracle Sales CloudGetting Started with Your Implementation
Chapter 14Setting Up Sales Territories and Assignment
114
Territory Name Territory Owner Geography Product
ElitePro East
Seam Goodkin
Arkansas and all theother states in theeastern U.S.
ElitePro Series
All Products Central
Kristen Garrity
Arkansas and all theother states in theeastern U.S.
Any
Central USA Products
Alex Smith
Illinois and all the otherstates in the central U.S.
Any
ElitePro Central
Marilyn Richie
Illinois and all the otherstates in the central U.S.
ElitePro Series
All Products Central
Peter Branch
Illinois and all the otherstates in the central U.S.
Any
West USA Products
Mateo Lopez
Alaska and all the otherstates in the westernU.S.
Any
ElitePro West
Julian Henderson
Alaska and all the otherstates in the westernU.S.
ElitePro Series
All Products West
Lisa Jones
Alaska and all the otherstates in the westernU.S.
Any
The application matches territories to accounts and opportunities from the bottom of the hierarchy up. For example:
• An account in Illinois gets assigned the ElitePro Central and All Products Central territories• An opportunity for the Illinois account with an ElitePro server line item gets assigned the ElitePro Central territory.• An account from Mexico gets assigned the NA Product Sales territory.• An opportunity for a Mexican account with an ElitePro server line item gets assigned the NA Product Sales territory.
Setup Overview
1. You configure the application for the types of sales territories you plan to create.a. If you are setting up territories based on geography, like Vision Corporation, you must enable the
geographical elements you plan to use during territory setup for the countries for which you importedgeography reference information. Optionally, you can organize the geography elements into zones.

Oracle Sales CloudGetting Started with Your Implementation
Chapter 14Setting Up Sales Territories and Assignment
115
See Specifying Geography Elements for Territory Setup in this chapter for details.b. You must enable the territory dimensions you plan to use in your territories.
See Enabling Territory Dimensions for details.2. You set up the sales territories themselves. This involves:
a. Creating a territory proposal.A proposal is a sandbox that permits you to update territories without affecting any existing territory setup, soit becomes useful when you want to readjust your territories in the future.See Creating a Territory Proposal for details.
b. Create the hierarchy of sales territories in the proposal starting with the top territory and working your waydown.See Creating the Sales Territory Hierarchy
c. Activate the proposal.See Activating the Territory Proposal.
3. You set assignment options.Assignment behavior is controlled by a set of system profiles. By default, the application
◦ Automatically assigns sales territories to accounts whenever an account is created or updated.
◦ Assignment of opportunities is manual: salespeople can either trigger the assignment process while editing anindividual opportunity or the opportunities are assigned by the Sales Account Assignment Process which youset up to run periodically.
Oracle sets manual assignment for opportunities as the default behavior to prevent performance issues forcompanies with large number of opportunities (100,000 and up).If your organization, like Vision Corporation, does not have such a large volume, you can have the application assignthe opportunity automatically by setting the profile Assignment Submission at Save Enabled to Yes.See Making Opportunity Assignment Automatic for details.
4. Turn off deal protection for quoting and incentive compensation to permit immediate opportunity sales teamreassignment when you are configuring territories.When a territory is assigned to an opportunity, the application copies over the territory owners to the opportunitysales team. When you realign territories, the application automatically implements your territory changes but waits15 days to remove sales people from the opportunity sales teams. This delay permits the original salespeople toreceive credit for the deals they are working on.If you are not implementing quotas and incentive compensation or if you are in the process of setting up territories,you should turn off deal protection by setting the system profile Opportunity Resource Deal Protection Period to 0.By default this profile is set to 15 days. Making this change does not impact forecasting because the salesperson'sterritory has been removed from the opportunity and no longer is a forecast territory for any revenue line.See Disabling Deal Protection for details.

Oracle Sales CloudGetting Started with Your Implementation
Chapter 14Setting Up Sales Territories and Assignment
116
5. Run assignment processes:
◦ Request Sales Account Assignments
◦ Revenue Territory Territory Batch Assignment
You should run these processes immediately after you activate your territories and then set them to run on a regularbasis, perhaps once a day in off-peak periods, to handle ongoing assignments. Just how frequently you need to runthese processes depends on your business needs.
See Running the Account Assignment Process and Running the Opportunity Assignment Process topics for details.
Preparing to Create Territories
Specifying Geography Elements for Territory SetupThis step is required only if you are creating territories with geography as one of the dimensions. For example, if you arecreating territories based on states, you must enable the states for selection during territory creation.
In an earlier step, you imported the reference geography for the countries where you do business. Now you must specifywhich of those geography elements you want to use in your sales territories. Vision Corporation is creating territories bystates, so it will enable states.
Optionally, you can organize the geographies into zones to simplify territory creation. Vision Corporation, in our example, hasimported just one country, the US, and plans just three geographical territories: West, Central, and East.
Vision has two options:
• Enable states
List the states in each territory
• Enable the states and create zones to organize them
Organize the states in zones, and then select the zone in each territory rather than entering the individual states.
Vision Corporation decides to forego zones and enables states only. When building the territory hierarchy, you copy theexisting territories and modify them. The individual states you entered are copied as well.
Specifying Geography Elements for Selection During Territory Setup
1. Navigate to the Setup and Maintenance work area and search for the Manage Territory Geographies task.

Oracle Sales CloudGetting Started with Your Implementation
Chapter 14Setting Up Sales Territories and Assignment
117
2. Click Go to Task.
3. In the Manage Territory Geographies page, Zones Hierarchies region, select Add Geography from the Actionsmenu.
The Add Geography page appears.
4. From the Country list, select Search.

Oracle Sales CloudGetting Started with Your Implementation
Chapter 14Setting Up Sales Territories and Assignment
118
5. In the Search and Select Country window, search for the country, select it, and click OK.
6. Click Search. The geographies belonging to the country appear in the Add Geography page.
7. Select the country and click Submit.
8. In the confirmation box, select Add geography and include selected children.
9. Select the geography elements you want to use in territories. For Vision Corporations, this is State.

Oracle Sales CloudGetting Started with Your Implementation
Chapter 14Setting Up Sales Territories and Assignment
119
10. Click OK.
11. Click OK again in the batch process confirmation box.
12. Click OK.
Enabling Sales Territory DimensionsYou must enable the territory dimensions that you will use to create your sales territories.
Make sure you have all the source data available before you start. Vision Corporation plans to enable the Product andGeography dimensions, so it has completed sales catalog and territory geography setup.
Enabling Sales Territory Dimensions
1. Sign in as a setup user or sales administrator.
2. Navigate to Territories and Quotas.
3. In the Tasks list, select Enable Dimensions and Metrics.
The Enable Dimensions and Metrics page appears.
4. Click Edit.
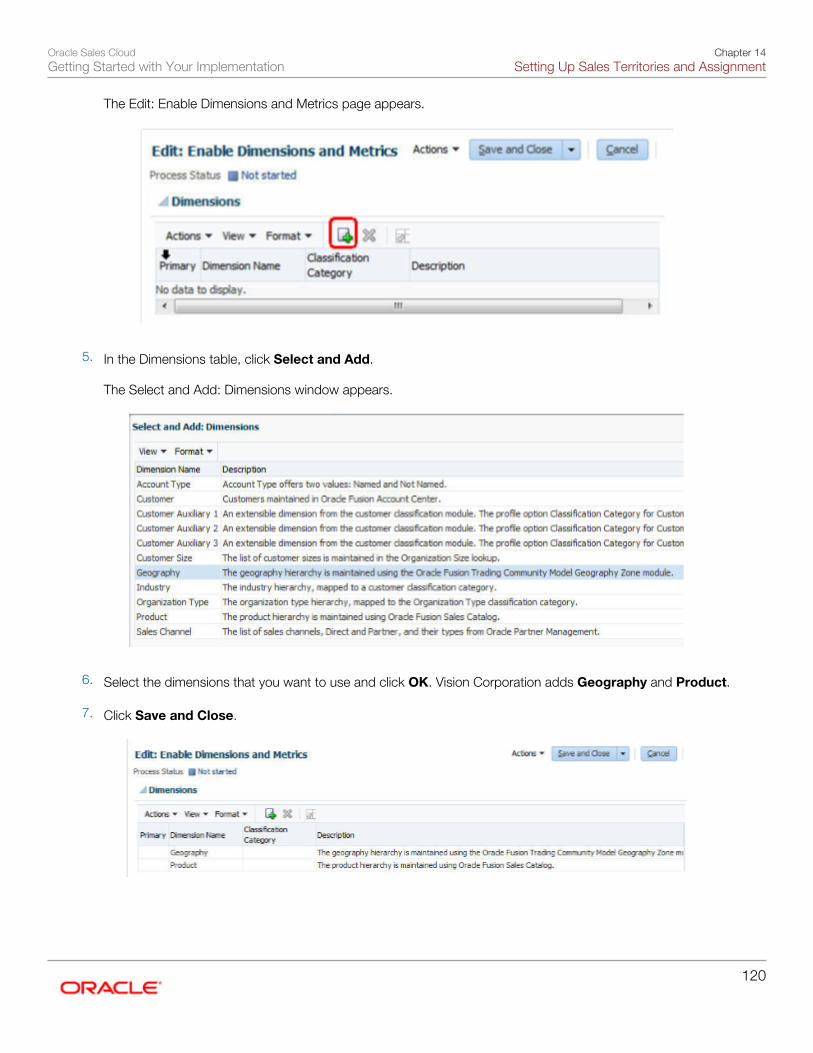
Oracle Sales CloudGetting Started with Your Implementation
Chapter 14Setting Up Sales Territories and Assignment
120
The Edit: Enable Dimensions and Metrics page appears.
5. In the Dimensions table, click Select and Add.
The Select and Add: Dimensions window appears.
6. Select the dimensions that you want to use and click OK. Vision Corporation adds Geography and Product.
7. Click Save and Close.
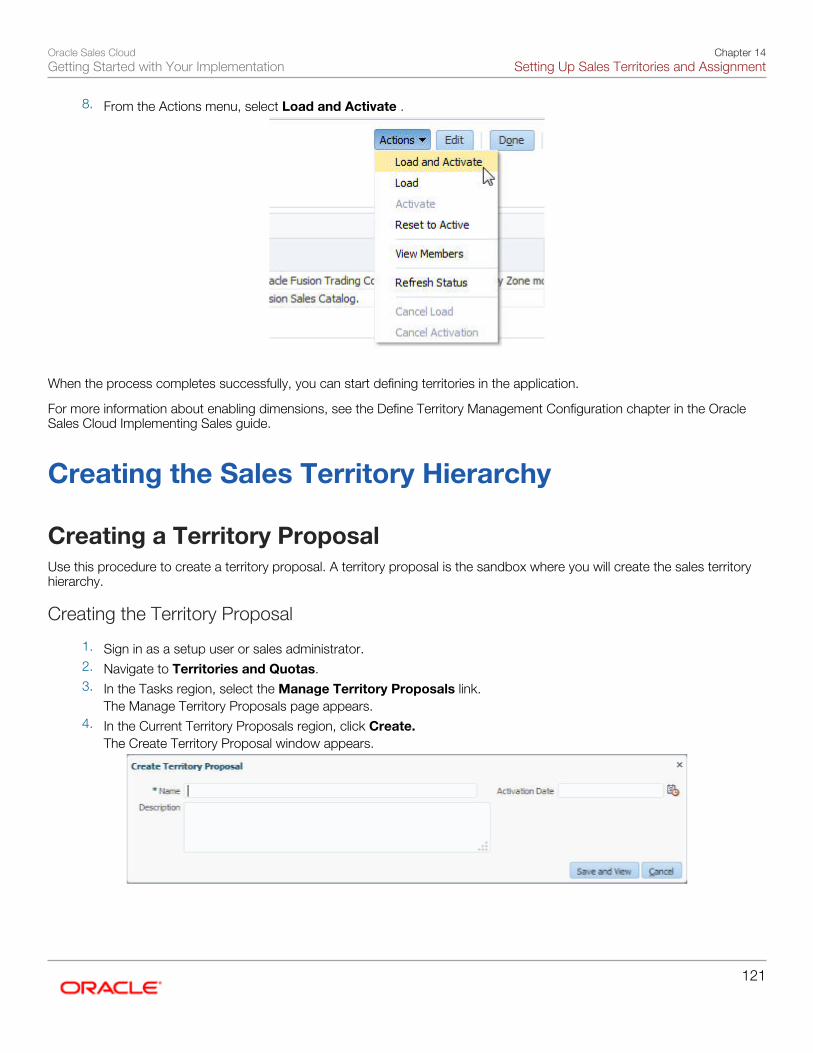
Oracle Sales CloudGetting Started with Your Implementation
Chapter 14Setting Up Sales Territories and Assignment
121
8. From the Actions menu, select Load and Activate .
When the process completes successfully, you can start defining territories in the application.
For more information about enabling dimensions, see the Define Territory Management Configuration chapter in the OracleSales Cloud Implementing Sales guide.
Creating the Sales Territory Hierarchy
Creating a Territory ProposalUse this procedure to create a territory proposal. A territory proposal is the sandbox where you will create the sales territoryhierarchy.
Creating the Territory Proposal
1. Sign in as a setup user or sales administrator.2. Navigate to Territories and Quotas.3. In the Tasks region, select the Manage Territory Proposals link.
The Manage Territory Proposals page appears.4. In the Current Territory Proposals region, click Create.
The Create Territory Proposal window appears.

Oracle Sales CloudGetting Started with Your Implementation
Chapter 14Setting Up Sales Territories and Assignment
122
5. Enter a name for the proposal.
6. Leave the Activation Datefield blank. This will cause the proposal to be activated immediately after you build yourterritories and activate it.
NoteEntering an activation date requires you to run the Run Territory Proposal Activation process, notcovered here.
7. Click Save and View.
Your territory proposal opens and you can start building your territory hierarchy.
Creating the Sales Territory HierarchyCreate the sales territory hierarchy starting with the top territory in the hierarchy.
For each territory you create, you enter the name of the salesperson or manager who owns the territory and the values forthe dimensions that form the territory boundaries. When you create the territories, the application automatically copies all thedimension values from the parent territories to the child territories to speed up entry.
Creating the Top of the Hierarchy
1. In the Territories region of your territory proposal, click Create.

Oracle Sales CloudGetting Started with Your Implementation
Chapter 14Setting Up Sales Territories and Assignment
123
The Create Territory page appears.
2. Enter the territory name, for example, NA Direct Sales.
3. Select an owner for the top territory, most likely the VP of Sales:
a. From the Owner list, select Search
b. Search for the resource name using any of the criteria.
c. Select the name and click OK.

Oracle Sales CloudGetting Started with Your Implementation
Chapter 14Setting Up Sales Territories and Assignment
124
The owner appears on the Territory Team tab. You can add additional members to the team, and the owner himselfcan add members later.
4. From the Forecast Participation list, select Revenue and nonrevenue. This setting enables the territory to beused for forecasting.
5. Click Save and Close.
Your new territory appears in the Territories table of your proposal.
6. Select the Coverages tab in the Details region at the bottom of the page.
NoteIf the Coverages tab is blank, then your territory configuration is incomplete. Navigate to ScheduledProcesses and check to see if the Synchronize Stage Environment process completed successfully. SeeEnabling Territory Dimensions topic for more information.
7. In the Dimensional Coverage table, click Add.
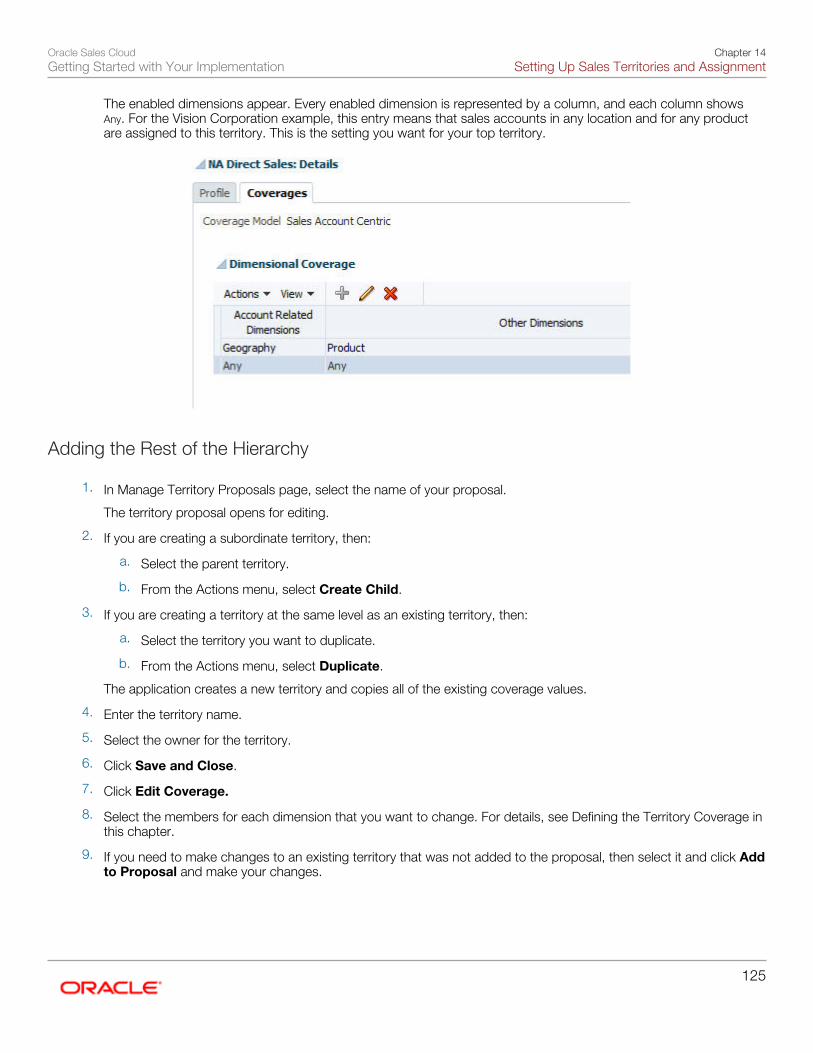
Oracle Sales CloudGetting Started with Your Implementation
Chapter 14Setting Up Sales Territories and Assignment
125
The enabled dimensions appear. Every enabled dimension is represented by a column, and each column showsAny. For the Vision Corporation example, this entry means that sales accounts in any location and for any productare assigned to this territory. This is the setting you want for your top territory.
Adding the Rest of the Hierarchy
1. In Manage Territory Proposals page, select the name of your proposal.
The territory proposal opens for editing.
2. If you are creating a subordinate territory, then:
a. Select the parent territory.
b. From the Actions menu, select Create Child.
3. If you are creating a territory at the same level as an existing territory, then:
a. Select the territory you want to duplicate.
b. From the Actions menu, select Duplicate.
The application creates a new territory and copies all of the existing coverage values.
4. Enter the territory name.
5. Select the owner for the territory.
6. Click Save and Close.
7. Click Edit Coverage.
8. Select the members for each dimension that you want to change. For details, see Defining the Territory Coverage inthis chapter.
9. If you need to make changes to an existing territory that was not added to the proposal, then select it and click Addto Proposal and make your changes.
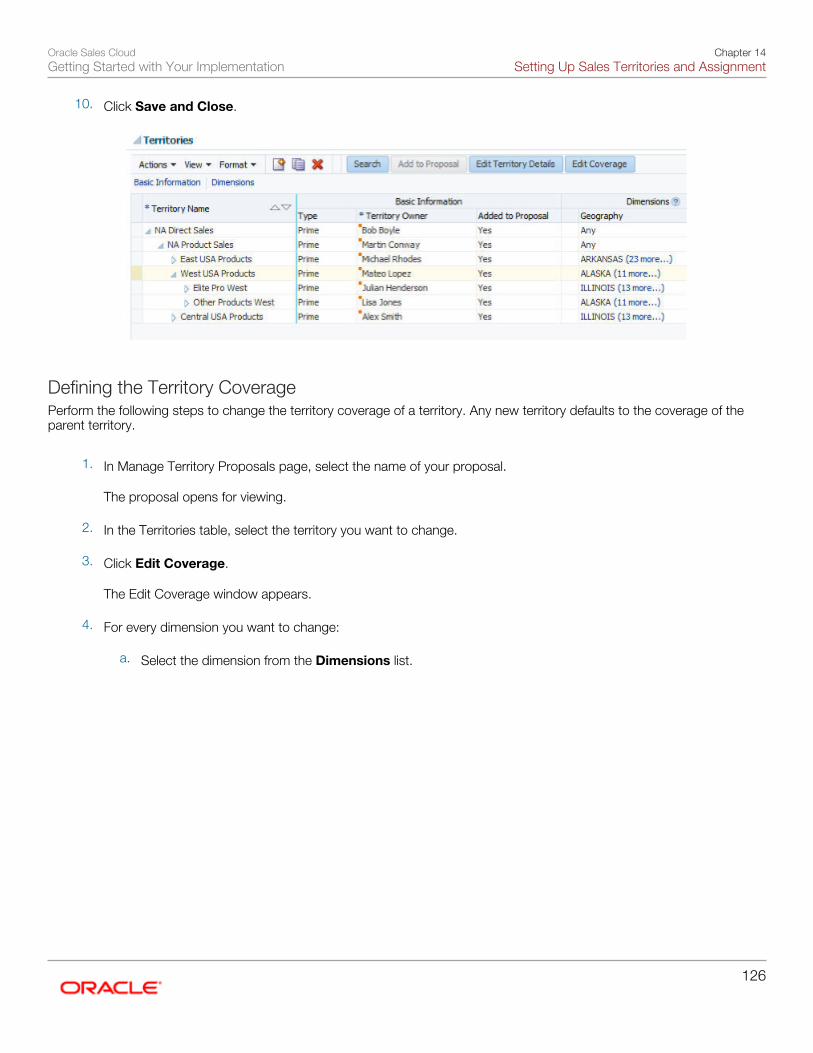
Oracle Sales CloudGetting Started with Your Implementation
Chapter 14Setting Up Sales Territories and Assignment
126
10. Click Save and Close.
Defining the Territory CoveragePerform the following steps to change the territory coverage of a territory. Any new territory defaults to the coverage of theparent territory.
1. In Manage Territory Proposals page, select the name of your proposal.
The proposal opens for viewing.
2. In the Territories table, select the territory you want to change.
3. Click Edit Coverage.
The Edit Coverage window appears.
4. For every dimension you want to change:
a. Select the dimension from the Dimensions list.
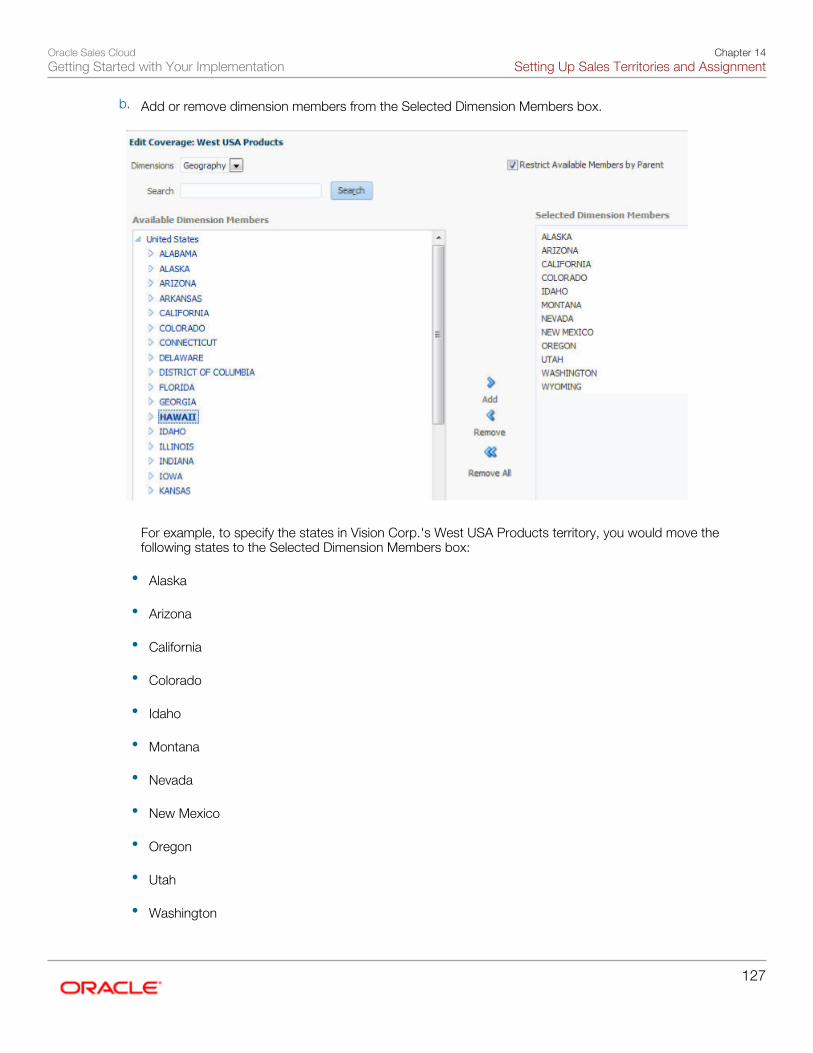
Oracle Sales CloudGetting Started with Your Implementation
Chapter 14Setting Up Sales Territories and Assignment
127
b. Add or remove dimension members from the Selected Dimension Members box.
For example, to specify the states in Vision Corp.'s West USA Products territory, you would move thefollowing states to the Selected Dimension Members box:
• Alaska
• Arizona
• California
• Colorado
• Idaho
• Montana
• Nevada
• New Mexico
• Oregon
• Utah
• Washington

Oracle Sales CloudGetting Started with Your Implementation
Chapter 14Setting Up Sales Territories and Assignment
128
• Wyoming
c. Click Save and Close.
Activating the Territory ProposalWhen you have completed building your territory hierarchy, use this procedure to activate the territory proposal and startusing the new territories for assignment.
Activating the Territory Proposal
1. Sign in as a setup user or sales administrator.
2. Navigate to Territories and Quotas.
3. In the Tasks region, click Manage Territory Proposals.
The Manage Territory Proposals page appears.
4. If the proposal you want to activate doesn't appear in the Current Territory Proposals table, select All Proposalsfrom the Proposals list.

Oracle Sales CloudGetting Started with Your Implementation
Chapter 14Setting Up Sales Territories and Assignment
129
5. Select the proposal and click Activate.
The application displays the new territories in the View Active Territories page.
Setting Assignment Options
Making Opportunity Assignment AutomaticBy default, sales users must assign opportunities manually when they edit each opportunity. You can make the assignment ofopportunities automatic by setting the system profile Assignment Submission at Save Enabled.
Making Opportunity Assignment Automatic
1. Sign in as a sales administrator or setup user.
2. Navigate to Setup and Maintenance and search for the Manage Opportunity Profile Options task.
3. Click the Go to Task.
The Manage Opportunity Profile Options page appears.
4. In the Search region, enter Assignment Submission at Save Enabled in the Profile Display Name field.
5. In the MOO-OPTY_ENABLE_AUTO_ASSIGN: Profile Values region, select Yes from the Profile Value list.
6. Click Save and Close.
Disabling Deal Protection on OpportunitiesWhen a sales territory is assigned to an opportunity, the application copies over the territory resources to the opportunitysales team. By default, the application retains the salespeople on the opportunity sales team for a period of 15 days after

Oracle Sales CloudGetting Started with Your Implementation
Chapter 14Setting Up Sales Territories and Assignment
130
territory realignment. Use this procedure to disable this feature by setting the system profile Opportunity Resource DealProtection Period to 0.
Disabling Deal Protection
1. Sign in as a sales administrator or setup user.
2. Navigate to Setup and Maintenance and search for the Manage Opportunity Profile Options task.
3. Click the Go to Task icon.
The Manage Opportunity Profile Options page appears.
4. In the Search region, enter Opportunity Resource in the Profile Display Name field.
5. In the MOO_DEAL_PROTECTION_PERIOD: Profile Values region, enter 0 in the Profile Value field.
6. Click Save and Close.
Running Assignment Processes
Running the Account Assignment ProcessYou must run the Request Sales Account Assignments process to assign territories to accounts after you activate a territoryproposal and then set it run on a regular basis to ensure that all territories are assigned properly.
Running the Request Sales Account Assignment Process
1. Navigate to the Scheduled Processes work area.
2. On the Overview page, click Schedule New Process.

Oracle Sales CloudGetting Started with Your Implementation
Chapter 14Setting Up Sales Territories and Assignment
131
The Schedule New Process window appears.
3. Click the down arrow to the right of the Name field and select the Search... link.

Oracle Sales CloudGetting Started with Your Implementation
Chapter 14Setting Up Sales Territories and Assignment
132
The Search and Select: Name window appears.
4. Enter Request Sales Account Assignments in the Name field and click Search.
5. Select the name below and click OK.
You are returned to the Schedule New Process window.
6. Click OK.

Oracle Sales CloudGetting Started with Your Implementation
Chapter 14Setting Up Sales Territories and Assignment
133
The Process Details page appears.
7. Make the following entries:
Field Entry
Work Object Code Enter SalesAccount_ Work_Object.
Candidate Object Code Enter SalesAccountTerritory_ Candidate_ Object.
Assignment Mode Select Territory from the list.
View Criteria Name Enter SalesAccountsUpdatedSinceVC.
View Criteria Bind Values Enter the date you started implementing theapplication to ensure you are assigning all therecords, in the format: BindLastUpdateDate=YYYY-MM-DD HH:MM:SS. For example:BindLastUpdateDate= 2012-01-01 00: 00:00

Oracle Sales CloudGetting Started with Your Implementation
Chapter 14Setting Up Sales Territories and Assignment
134
NoteYou can find additional information on the available process parameters in the Sales AccountAssignment Process Parameters (1507365.1) document on support.oracle.com.
8. If you want to run this process on a regular basis, then:
a. Click Advanced.
b. Select the Schedule tab.
c. Select the Using a schedule option.
d. Select the frequency and start date.
9. Click Submit.
10. Unless you specified a schedule, your process runs immediately. You can monitor its progress by searching for theprocess by name on the Overview page.

Oracle Sales CloudGetting Started with Your Implementation
Chapter 14Setting Up Sales Territories and Assignment
135
NoteFor information on troubleshooting see the CRM Assignment Troubleshooting Guide (1389342.1) onmy.oracle.support.com.
Running the Assignment Process for OpportunitiesYou must run the Revenue Territory Territory Based Assignment process to assign territories to opportunities after youactivate a territory proposal and then set it run on a regular basis to ensure that all territories are assigned properly.
Just how frequently and when you need to run this process depends on such factors as your opportunity volume and thesales cycle.
Running the Assignment Process
1. While signed in as a sales administrator, select Scheduled Processes in the Tools group in the Navigator.
2. In the Scheduled Processes page, click Schedule New Process.
3. In the Schedule New Process dialog, select the Name list and then select the Search link.
4. In the Search and Select dialog, enter the process name Revenue Territory Based Assignment, and click Search. You cansearch by a partial name, but note that the search is case sensitive.
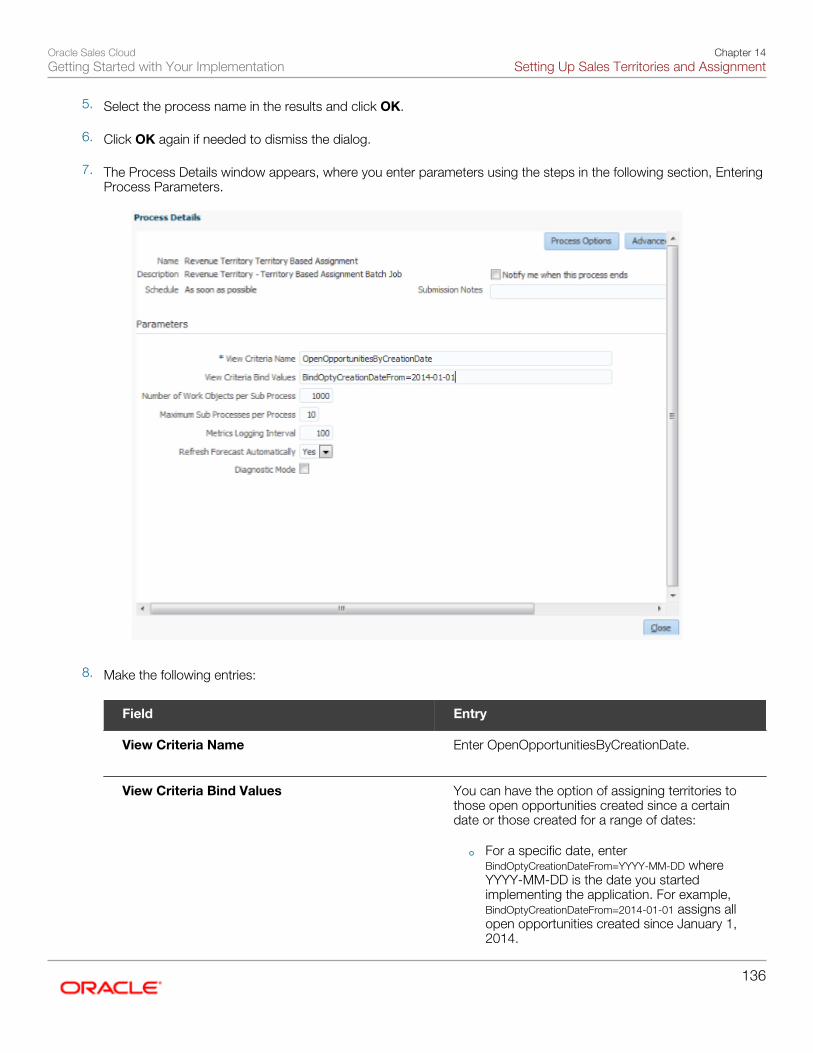
Oracle Sales CloudGetting Started with Your Implementation
Chapter 14Setting Up Sales Territories and Assignment
136
5. Select the process name in the results and click OK.
6. Click OK again if needed to dismiss the dialog.
7. The Process Details window appears, where you enter parameters using the steps in the following section, EnteringProcess Parameters.
8. Make the following entries:
Field Entry
View Criteria Name Enter OpenOpportunitiesByCreationDate.
View Criteria Bind Values You can have the option of assigning territories tothose open opportunities created since a certaindate or those created for a range of dates:
◦ For a specific date, enterBindOptyCreationDateFrom=YYYY-MM-DD whereYYYY-MM-DD is the date you startedimplementing the application. For example,BindOptyCreationDateFrom=2014-01-01 assigns allopen opportunities created since January 1,2014.
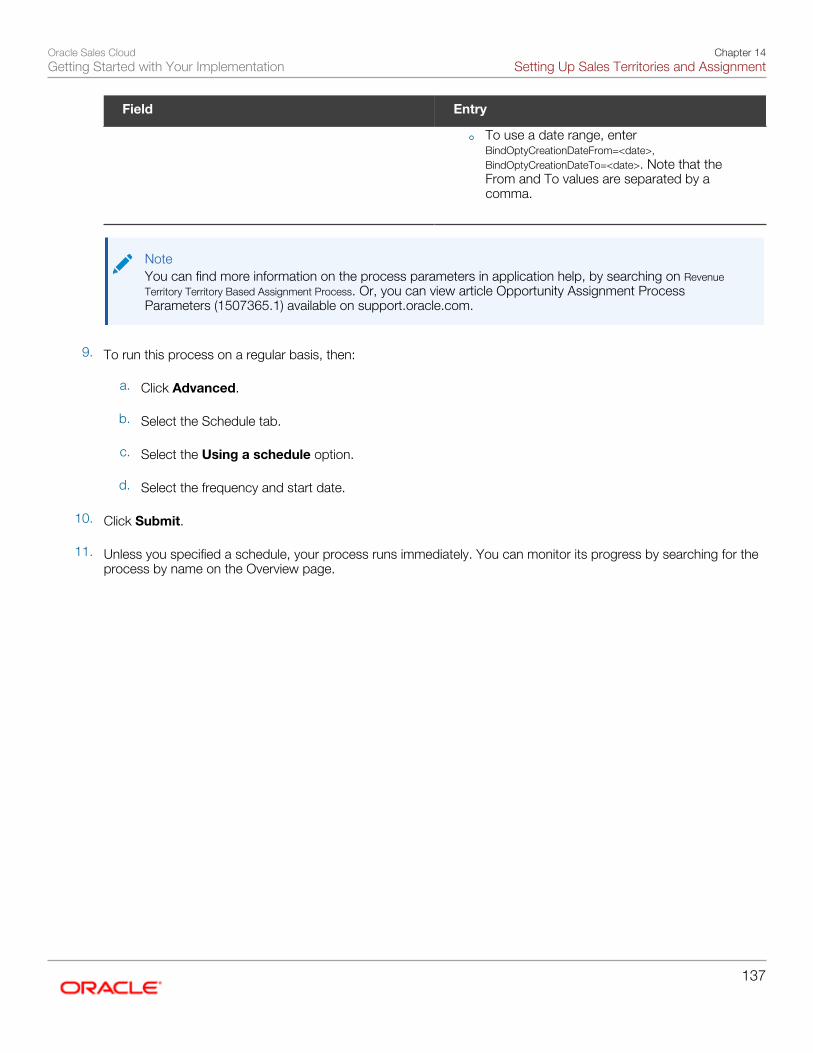
Oracle Sales CloudGetting Started with Your Implementation
Chapter 14Setting Up Sales Territories and Assignment
137
Field Entry
◦ To use a date range, enterBindOptyCreationDateFrom=<date>,BindOptyCreationDateTo=<date>. Note that theFrom and To values are separated by acomma.
NoteYou can find more information on the process parameters in application help, by searching on RevenueTerritory Territory Based Assignment Process. Or, you can view article Opportunity Assignment ProcessParameters (1507365.1) available on support.oracle.com.
9. To run this process on a regular basis, then:
a. Click Advanced.
b. Select the Schedule tab.
c. Select the Using a schedule option.
d. Select the frequency and start date.
10. Click Submit.
11. Unless you specified a schedule, your process runs immediately. You can monitor its progress by searching for theprocess by name on the Overview page.
Oracle Sales CloudGetting Started with Your Implementation
Chapter 15Configuring Opportunity Behavior
138
15 Configuring Opportunity Behavior
About Configuring Opportunity BehaviorAfter you set up the required functionality described prior to this chapter, the opportunity application is ready for use withdefault behavior. However, you might want to configure some functionality, including:
• Configuring sales methods and sales stages: Sales methods and sales stages mark the progress of an opportunityfrom start to close. A few sales methods, with supplied sales stages, are provided for use in opportunities. Thesupplied Standard Sales Process works without any additional setups required. However, you can customizesales methods. For example, you might want to add stages to a supplied sales method or even create new salesmethods. For more information, see the section in this chapter, Configuring Sales Methods.
• Configuring how opportunities are closed: The ability to close an opportunity using a dedicated close page andrequired fields is enabled by default. However, you can turn off the close page and control which fields are required.For more information, see the section in this chapter, Configuring Opportunity Close Behavior.
Configuring Sales Methods
About Opportunity Sales MethodsA company's sales methodology is its formalized approach toward achieving a sale. In opportunities, you can employ yourcompany's sales methodology using a sales method that is automatically associated with the opportunity when it is created.The sales method contains several sales stages that progress as the opportunity matures.
Several sales methods and stages are supplied with the application. You can use the supplied sales methods and stages asshipped, modify them to suit your business needs, or create new ones.
You can specify the default sales method using the profile option, Sales Method Default. Setting the profile option isdiscussed in the topic, Setting Default Sales Method Profile Option.
While editing an opportunity, salespeople can change the sales method and sales stage, if needed.
For information on creating new sales methods or editing existing ones, see the topic, Configuring Sales Methods.
Configuring Sales MethodsYou can create and edit sales methods and their stages by following the procedures in this topic.
Note: This topic does not cover setting up the elements of the Sales Coach. For information on setting up sales coach, seethe videos, Setting Up Sales Coach, parts 1 and 2, available in the online help.
You can find more information on sales methods and Sales Coach in the online help and in the guide, Oracle Sales Cloud -Using Sales.
Creating or Editing Sales MethodsUse the following procedure to create new or modify existing sales methods.
1. As a user with access to the sales methods pages, such as the sales administrator or a setup user, navigate toSetup and Maintenance.

Oracle Sales CloudGetting Started with Your Implementation
Chapter 15Configuring Opportunity Behavior
139
2. Search for the task, Manage Sales Methods and Sales Stages, and click the Go to Task icon on the task toretrieve the Manage Sales Methods page.
3. If you want to create a sales method: In the Manage Sales Methods page, click the Create icon.
4. If you want to edit a sales method: In the Manage Sales Methods page, drill down on the sales method, or selectthe row showing the sales method and click the Edit icon.
5. In the Create Sales Method or Edit Sales Method page, fill in the required information. The following are the morecomplex attributes of sales methods:
◦ Set: A set represents a group of business units. The Set field allows the sales method to be shared acrossmultiple business units. Select the Common Set, unless you are aware that a different set should be selected.
◦ Close Window: Set in days, the Close Window value is added to the current date to set the initial opportunityclose date. If not set, the application retrieves the default close window from the Opportunity Close DateDefault profile option.
◦ Disable: The Disable check box lets you disable the sales method. Only disable sales methods duringimplementation and not after the methods are in use in current opportunities.
6. Add new or modify existing sales stages as described in the following section, Creating or Editing Sales Stages.
7. Save your changes.
Creating or Editing Sales StagesUse the following procedure to create new or modify existing sales stages.
1. As a user with access to the sales methods pages, such as the sales administrator or as a setup user, navigate toSetup and Maintenance.
2. Search for the task, Manage Sales Methods and Sales Stages, and click the Go to Task icon on the task toretrieve the Manage Sales Methods page.
3. Drill into the sales method whose sales stages you want to customize. The Edit Sales Method page appears.
4. To add another sales stage to the sales method: In the Edit Sales Method page, click the Create icon and fill outthe required information in the Create Sales Stage page.
5. To edit a sales stage: In the Edit Sales Method page, drill down on the sales stage, or select the row and click theEdit icon. Fill out the required information in the Edit Sales Stage page.
6. Following are the more complex attributes of sales stages:
◦ Quota Factor: This field feeds the data in the sales Pipeline report. Quota factor is the number that asalesperson's quota must be multiplied by to meet his revenue targets at this sales stage. Enter a 3, forexample, to indicate that a salesperson needs three times the amount of deals to meet his revenue targets atthis sales stage.
◦ Disable: This check box lets you disable the sales stage. Only disable sales stages during implementation andnot after the stages are in use in current opportunities.
◦ Win Probability: This field represents the likelihood (in percent form) of winning the opportunity. This WinProbability field sets the default win probability at opportunity level for the sales stage. If you don't want yoursales stages to control opportunity win probability, make sure they are null by blanking out any value in thisfield.

Oracle Sales CloudGetting Started with Your Implementation
Chapter 15Configuring Opportunity Behavior
140
◦ Duration: This field signifies the average number of days that you expect this sales stage to last. For example,you would enter 30 if you think this sales stage will last about 30 days.
◦ Stalled Deal Limit: This field signifies the number of days after which an opportunity in this sales stage wouldbe considered stalled. This field drives metrics for the Stalled Opportunities report.
7. Save your changes.
Related Topics• Sales Stages: Explained
• Managing Sales Methods and Stages
• Setting Up Sales Coach, Part 1
• Setting Up Sales Coach, Part 2
Setting Default Sales Method Profile OptionYou can specify the sales method set on an opportunity when it is initially created by setting the profile option, Sales MethodDefault. Use the following procedure to set the default sales method profile option.
1. As a user with access to the profile option screens, such as the sales administrator or a setup user, navigate toSetup and Maintenance.
2. Search for the task, Manage Opportunity Profile Options, and click the Go to Task icon for the task. The ManageOpportunity Profile Options page appears.
3. In the search region, select Opportunity Management as the application, or just enter the profile option SalesMethod Default directly in the Profile Display Name field.
4. In the list that is returned, click on the profile option to retrieve the details about the profile option.
5. Set the profile option to the sales method that will be the default for newly created opportunities.
NoteOpportunity and revenue reports and analytics, such as the Pipeline report, are designed to work with thesupplied sales method Standard Sales Process. If you use a sales method other than this one as the default salesmethod, you 'll need to customize reports to uptake the other sales method.
Configuring Opportunity Close Behavior
About Setting Up Opportunity ClosingSalespeople close an opportunity when the deal is either won, lost, or abandoned for some reason. The ability to close anopportunity is always available. You have the following configuration options:
• Enable or disable the Close Opportunity action in the Edit Opportunity page and the subsequent Close Opportunitypage that appears after a user selects the Close Opportunity action in the Edit Opportunity page.

Oracle Sales CloudGetting Started with Your Implementation
Chapter 15Configuring Opportunity Behavior
141
• Make it required or optional to enter a win/loss reason in the Close Opportunity page or in the Edit Opportunity page.
• Make it required or optional to enter a competitor in the Close Opportunity page or in the Edit Opportunity page.
• Set the default number of days to the opportunity close date.
Each of these options is controlled by profile options described in the topic Setting Close Opportunity Profile Options.
NoteEven if you have not enabled the Close Opportunity action or Close Opportunity page, users can still close anopportunity by selecting a closed status and saving the opportunity. If you have set the profile options to requirea win/loss reason or a competitor, users will still be required to enter them, regardless whether you have enabledthe Close Opportunity page.
Related Topics• Closing an Opportunity: Explained
• Setting Initial Opportunity Assignment Profile Options
Setting Close Opportunity Profile OptionsUsing profile options discussed in this topic, you can configure close opportunity behavior. For more information on theconfiguration options, see the topic, About Closing Opportunities.
Close Opportunity Profile OptionsThe following table shows the profile options that control opportunity close behavior.
Profile Option Display Name Default Value Effect
Close Opportunity Flow Enabled
Yes
Determines whether the closeopportunity flow is enabled. AYes value enables the CloseOpportunity action in the editopportunity UI, as well as thesubsequent close opportunitysummary screen. A No valuestill allows the user to close anopportunity by setting the status toa closed status category.
Close Opportunity Win/LossReason Requirement
Yes
Determines whether, when closingan opportunity, the user is requiredto enter a win/loss reason. Appliesboth at the opportunity andrevenue item levels. Effectiveregardless of the setting of theClose Opportunity Flow Enabledprofile option.

Oracle Sales CloudGetting Started with Your Implementation
Chapter 15Configuring Opportunity Behavior
142
Profile Option Display Name Default Value Effect
Close Opportunity CompetitorRequirement
Yes
Determines whether, when closingan opportunity, the user is requiredto enter a competitor. Applies bothat the opportunity and revenue itemlevels. Effective regardless of thesetting of the Close OpportunityFlow Enabled profile option.
Opportunity Close Date Default
20
Determines the number of daysafter an opportunity is created forthe initial close date.
Setting Close Opportunity Profile OptionsUse the procedure below to find and set the close opportunity profile options.
1. As a user with access to the profile option screens, such as the sales administrator or the setup user you createdearlier in this guide, navigate to Setup and Maintenance.
2. Search for the task, Manage Opportunity Profile Options, and click the Go to Task icon. The Manage OpportunityProfile Options page appears.
3. In the search region, select Opportunity Management as the application, or just enter the profile option namedirectly in the Profile Display Name field.
4. In the list that is returned, click on the profile option to retrieve the details about the profile option.
5. Set the profile option value as needed.

Oracle Sales CloudGetting Started with Your Implementation
Chapter 16Setting Up Forecasting
143
16 Setting Up Forecasting
About Setting Up ForecastingSet forecast options to enable forecasts for all users. You must define the forecast periods and due dates for yourorganization. Forecast criteria determine the opportunity line items that get automatically added to a territory forecast.
PrerequisitesBefore you can set up the forecasting periods and due dates, you must complete the following steps:
• Your selected calendar and the period definition for that calendar determine the adjustment period for the forecast.For Vision, it is a calendar month. See Creating the Accounting Calendar in the Setting Up Calendar and Currencieschapter.
• You created your territory hierarchy as described in the Defining Sales Territories chapter. Forecasts are generatedby territory and roll up the territory hierarchy. The owner of a territory submits a forecast to the owner of the parentterritory.
Setup OverviewPerform the following tasks to set up forecasting:
1. Select forecast period parameters. See Creating a Forecast in this chapter.
2. Review the scheduled forecast dates and modify as needed.
3. Set the criteria for automatically adding opportunity line items to the forecast. See Creating a Forecast.
4. Schedule forecast processes to run daily. See Generating Your Forecasts in this chapter.
Creating a ForecastStart the forecasting process by creating your forecast for the year and defining forecasting periods.
PrerequisitesBefore you can begin forecasting, you must have a territory hierarchy. Forecasts accumulate by territory and then roll up theestablished territory hierarchy.
Your accounting calendar must be set up, and you need to be familiar with the period frequency defined in the calendar. Theperiod frequency is called Fiscal period in forecasting options. For a discussion of how time period frequency settings andtime period dates affect your forecast time periods, see Creating the Accounting Calendar in the Setting Up Calendar andCurrencies chapter.
Selecting Options to Create the ForecastPerform the following steps to select sales forecasting options:
1. Sign in as a setup user or sales administrator.
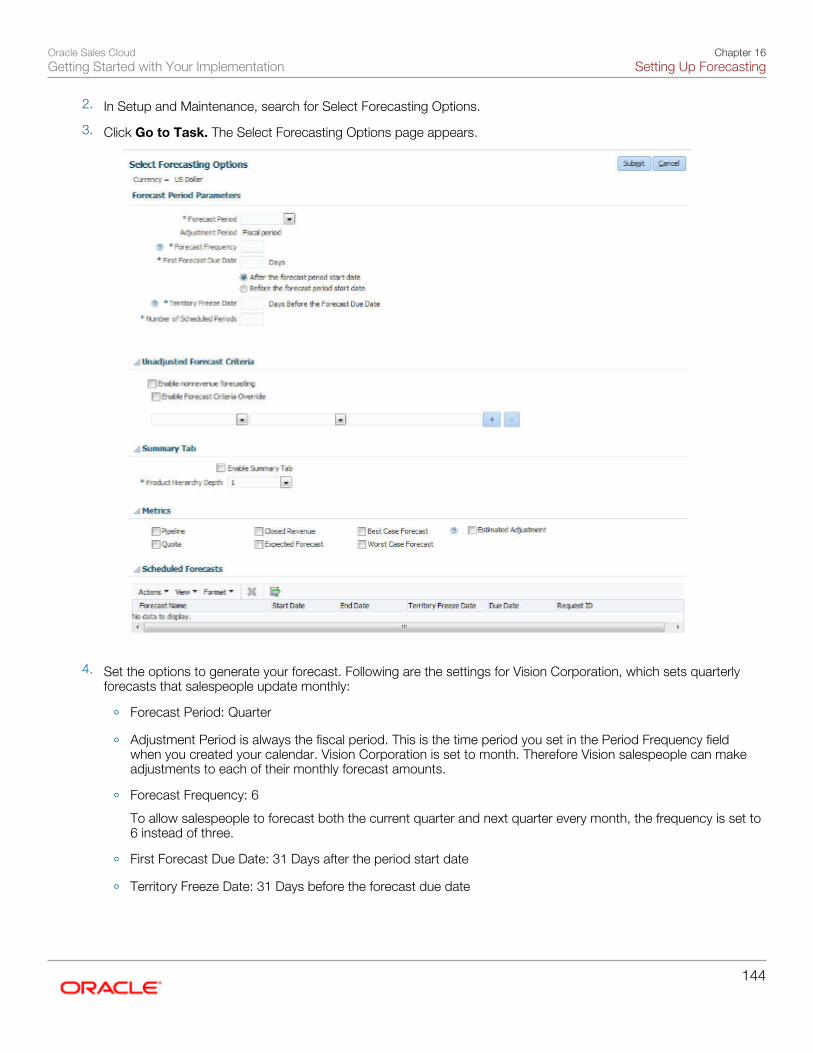
Oracle Sales CloudGetting Started with Your Implementation
Chapter 16Setting Up Forecasting
144
2. In Setup and Maintenance, search for Select Forecasting Options.
3. Click Go to Task. The Select Forecasting Options page appears.
4. Set the options to generate your forecast. Following are the settings for Vision Corporation, which sets quarterlyforecasts that salespeople update monthly:
◦ Forecast Period: Quarter
◦ Adjustment Period is always the fiscal period. This is the time period you set in the Period Frequency fieldwhen you created your calendar. Vision Corporation is set to month. Therefore Vision salespeople can makeadjustments to each of their monthly forecast amounts.
◦ Forecast Frequency: 6
To allow salespeople to forecast both the current quarter and next quarter every month, the frequency is set to6 instead of three.
◦ First Forecast Due Date: 31 Days after the period start date
◦ Territory Freeze Date: 31 Days before the forecast due date
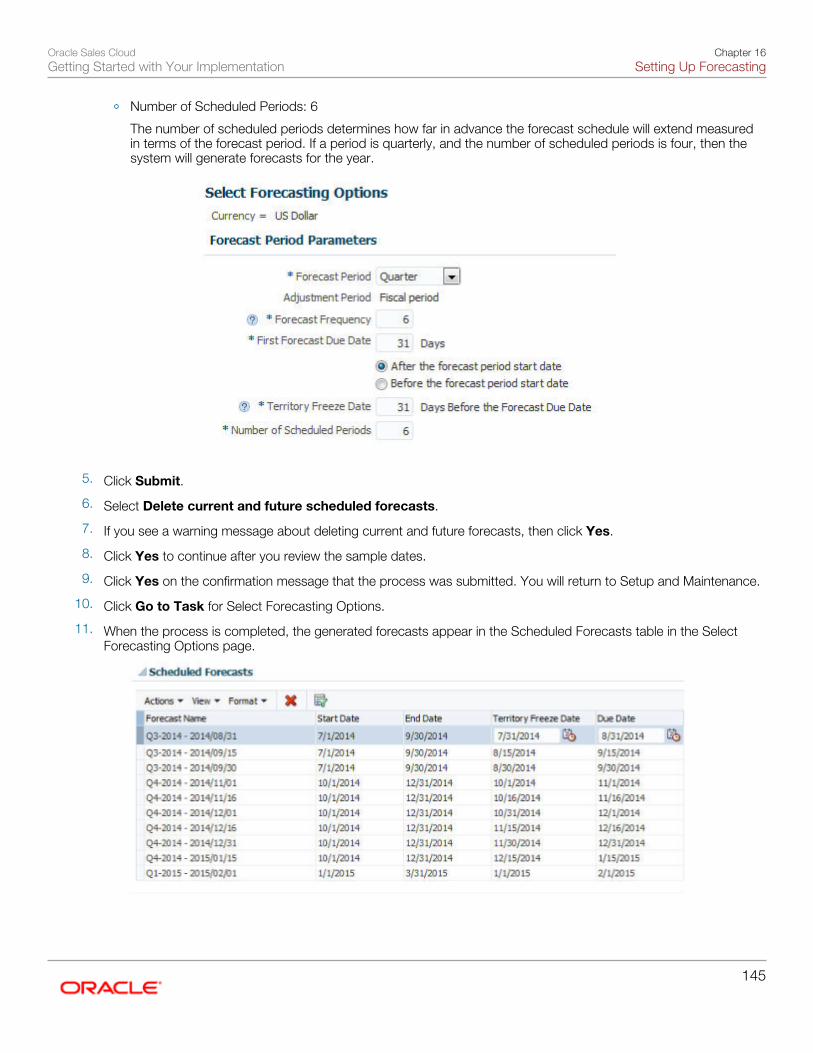
Oracle Sales CloudGetting Started with Your Implementation
Chapter 16Setting Up Forecasting
145
◦ Number of Scheduled Periods: 6
The number of scheduled periods determines how far in advance the forecast schedule will extend measuredin terms of the forecast period. If a period is quarterly, and the number of scheduled periods is four, then thesystem will generate forecasts for the year.
5. Click Submit.
6. Select Delete current and future scheduled forecasts.
7. If you see a warning message about deleting current and future forecasts, then click Yes.
8. Click Yes to continue after you review the sample dates.
9. Click Yes on the confirmation message that the process was submitted. You will return to Setup and Maintenance.
10. Click Go to Task for Select Forecasting Options.
11. When the process is completed, the generated forecasts appear in the Scheduled Forecasts table in the SelectForecasting Options page.

Oracle Sales CloudGetting Started with Your Implementation
Chapter 16Setting Up Forecasting
146
NoteWhen you schedule forecasts, the forecast quarter you are in will not have all six forecasts generated.The first quarter will have a prorated number of forecasts scheduled, depending on where you are in thatquarter.
12. Because with the forecast frequency of 6 salespeople can change the forecast for a quarter (for example quarter4) three times during quarter 3 and three times during quarter 4, you must manually change the generated territoryfreeze dates and due dates. The first date for July can't be July 1 because this example forecast was generated inJuly. Today is therefore the territory freeze date for July in quarter 3 and quarter 4, as shown in this image.
13. Make sure the due dates are the same as the dates that the VP of Sales typically requires all forecasts to besubmitted. For Vision Corporation, this is the first of each month. You can manually change dates wheneverneeded.
14. Also make sure the freeze date for the next forecast is at least one day after the due date of the current forecast.This allows time for processes to run that generate the next forecast before salespeople start making changes to it.
Setting Forecast CriteriaOpportunity revenue lines are automatically added to the forecast when they fit the unadjusted forecast criteria, and have aclose date within a forecasting period. Perform the following steps to set the criteria for this forecast:
1. In the Unadjusted Forecast Criteria region of the Select Forecasting Options page, select one criterion you want touse. Vision Corporation selects Probability.
2. Select the operator. Vision uses Greater Than.
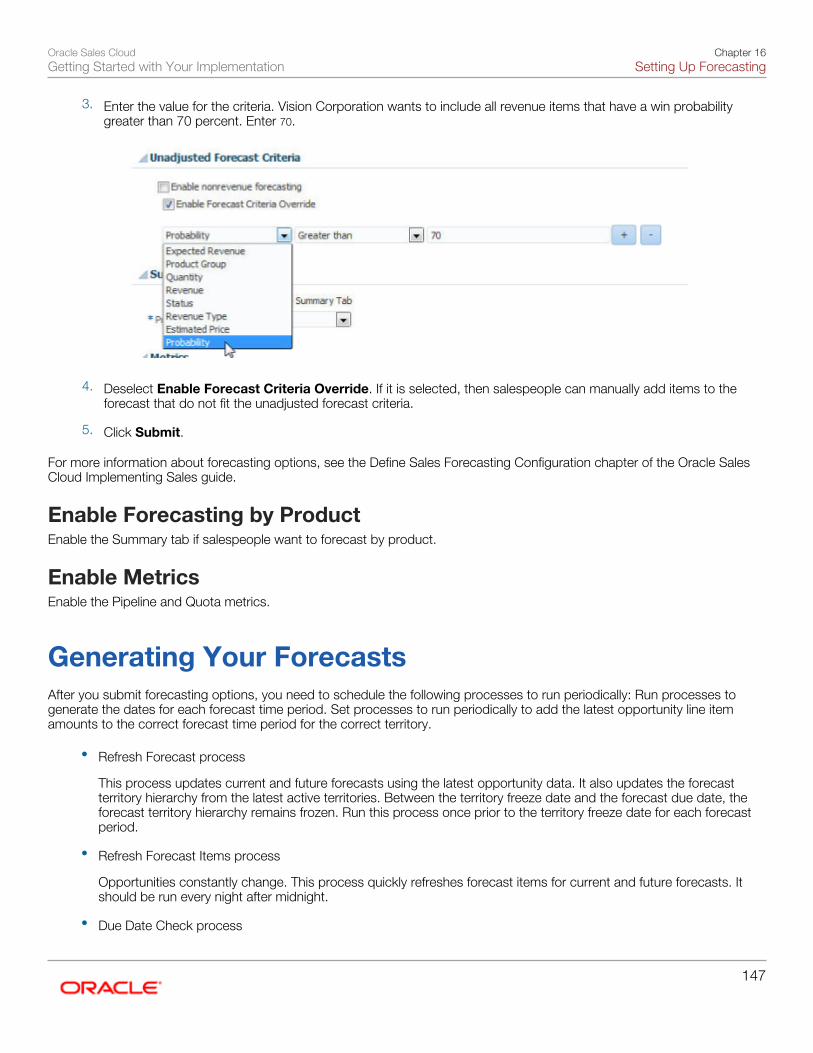
Oracle Sales CloudGetting Started with Your Implementation
Chapter 16Setting Up Forecasting
147
3. Enter the value for the criteria. Vision Corporation wants to include all revenue items that have a win probabilitygreater than 70 percent. Enter 70.
4. Deselect Enable Forecast Criteria Override. If it is selected, then salespeople can manually add items to theforecast that do not fit the unadjusted forecast criteria.
5. Click Submit.
For more information about forecasting options, see the Define Sales Forecasting Configuration chapter of the Oracle SalesCloud Implementing Sales guide.
Enable Forecasting by ProductEnable the Summary tab if salespeople want to forecast by product.
Enable MetricsEnable the Pipeline and Quota metrics.
Generating Your ForecastsAfter you submit forecasting options, you need to schedule the following processes to run periodically: Run processes togenerate the dates for each forecast time period. Set processes to run periodically to add the latest opportunity line itemamounts to the correct forecast time period for the correct territory.
• Refresh Forecast process
This process updates current and future forecasts using the latest opportunity data. It also updates the forecastterritory hierarchy from the latest active territories. Between the territory freeze date and the forecast due date, theforecast territory hierarchy remains frozen. Run this process once prior to the territory freeze date for each forecastperiod.
• Refresh Forecast Items process
Opportunities constantly change. This process quickly refreshes forecast items for current and future forecasts. Itshould be run every night after midnight.
• Due Date Check process
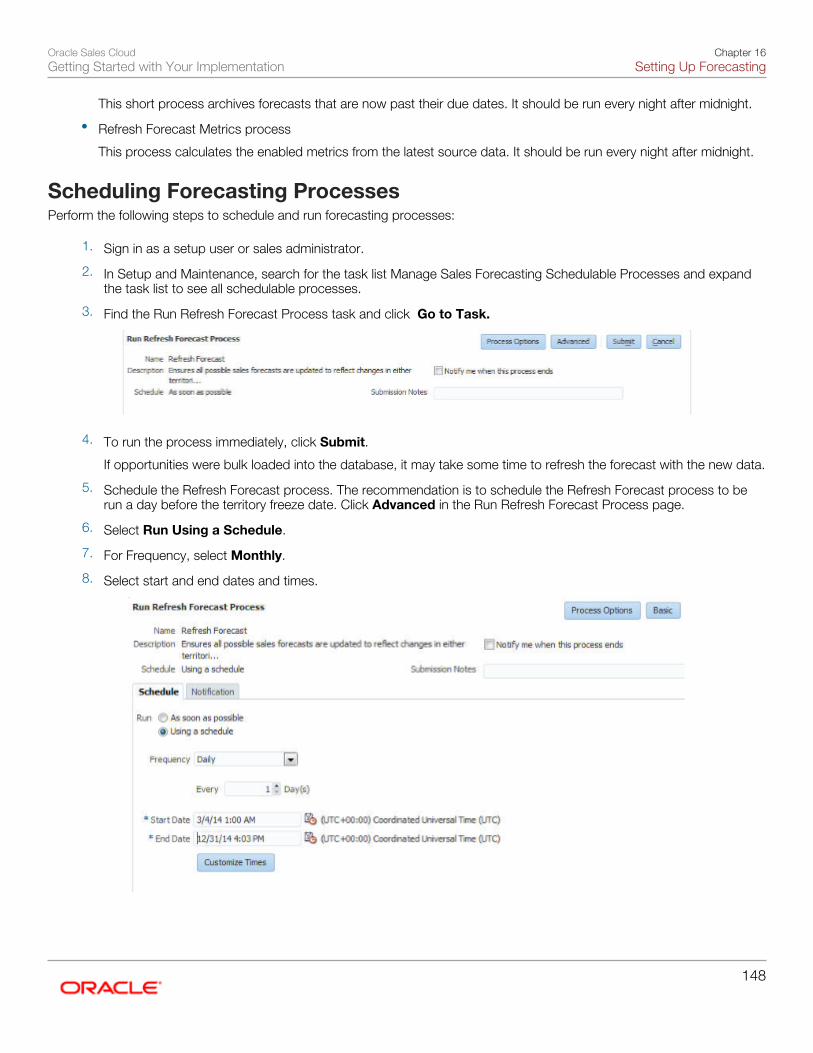
Oracle Sales CloudGetting Started with Your Implementation
Chapter 16Setting Up Forecasting
148
This short process archives forecasts that are now past their due dates. It should be run every night after midnight.
• Refresh Forecast Metrics process
This process calculates the enabled metrics from the latest source data. It should be run every night after midnight.
Scheduling Forecasting ProcessesPerform the following steps to schedule and run forecasting processes:
1. Sign in as a setup user or sales administrator.
2. In Setup and Maintenance, search for the task list Manage Sales Forecasting Schedulable Processes and expandthe task list to see all schedulable processes.
3. Find the Run Refresh Forecast Process task and click Go to Task.
4. To run the process immediately, click Submit.
If opportunities were bulk loaded into the database, it may take some time to refresh the forecast with the new data.
5. Schedule the Refresh Forecast process. The recommendation is to schedule the Refresh Forecast process to berun a day before the territory freeze date. Click Advanced in the Run Refresh Forecast Process page.
6. Select Run Using a Schedule.
7. For Frequency, select Monthly.
8. Select start and end dates and times.

Oracle Sales CloudGetting Started with Your Implementation
Chapter 16Setting Up Forecasting
149
9. Go to the Notification tab.
10. Click Create Notification.
11. Enter the e-mail address for the person who should receive notifications.
12. In the Condition field, you should select On Warning and On Error as a minimum.
13. Find the Run Due Date Check Process task and click Go to Task.
14. Repeat the steps to schedule this process to run after midnight each day. Create a notification for this process aswell.
15. Click Submit.
See the Define Sales Forecasting chapter of the Oracle Sales Cloud Implementing Sales guide for information about otherforecasting processes.
Timing for Forecast ProcessesAt the end of a scheduled forecast (the due date), you want to give the processes time to run before the territory freeze dateof the next forecast, which is the start of forecast activities. Salespeople will then have accurate information to work withwhen they update and submit their forecasts.
The recommendation in the Creating a Forecast topic is to provide a one day gap to run both the Refresh Forecast and theDue Date Check processes. The Refresh Forecast process should be scheduled to be run the night before the freeze dateThe Due Date Check process should be scheduled to be run daily after midnight, for example, at 12:05 a.m.

Oracle Sales CloudGetting Started with Your Implementation
Chapter 17Setting Up Oracle Social Network
150
17 Setting Up Oracle Social Network
About Setting Up Oracle Social Network with OracleSales CloudOracle Social Network is a secure, private social network that integrates with Oracle Sales Cloud and connects you with allyour colleagues.
You can use Oracle Social Network for:
• Discussing projects, plans, and issues in public forums, membership groups, or one-on-one.
• Reviewing and publishing files.
• Following the daily activities of the people you choose.
The real power of Oracle Social Network is how easily it integrates with common sales objects. For example, you can bringan Oracle Sales Cloud opportunity into a Conversation where you can discuss it, plan around it, and share it. You can takethe opportunity from possibility to realization without losing any of the casual and formal information that flows from all of thisactivity.
With Oracle Social Network, you and your teams have the tools you need to collaborate, capitalize on collective experience,and make informed business decisions.
Before you can use it to integrate with your Oracle Sales Cloud objects (such as leads or opportunities), both you as theadministrator and your end users must perform some setup tasks. These setup tasks include:
• As the administrator, you must enable Oracle Sales Cloud objects for Oracle Social Network.
• Your end users can then enable any Oracle Sales Cloud records that they want to include Oracle Social NetworkConversations on.
Enabling Oracle Sales Cloud Objects for Oracle Social NetworkBefore users can make individual Oracle Sales Cloud records available to include Oracle Social Network Conversations in,you must enable the objects. You can enable entire objects or only certain attributes of the objects. You can also decidewhether new objects are automatically shared in Oracle Social Network or whether they need to be manually shared.
Enabling Oracle Sales Cloud Records for Oracle Social NetworkAfter you have enabled an object, users must share the object records they wish to collaborate on with Oracle SocialNetwork.
Setting Up Oracle Sales Cloud for Oracle SocialNetworkWith Oracle Social Network, you can create Social Objects and Conversations that are associated with an Oracle SalesCloud object record, such as an opportunity. Social Objects are Oracle Sales Cloud object records that are mapped intoOracle Social Network. As the administrator, you can expose a record from an Oracle Sales Cloud application in Oracle SocialNetwork so selected people can see it.

Oracle Sales CloudGetting Started with Your Implementation
Chapter 17Setting Up Oracle Social Network
151
Enabling an Object for Oracle Social NetworkYou want to be able to share information about sales opportunities with colleagues in other teams. Before this can happen,you need to enable the Opportunity object. Once the object is enabled, team members can then enable individual opportunityrecords for discussion in Oracle Social Network.
However, the sales manager has decided not to allow the sharing of all the information in the opportunity object, sincesome of it is sensitive and he doesn't want everyone to be able to view it. Specifically, he doesn't want the Level of Risk andStrategic Value attributes shared. Further, he has instructed you to set up the Opportunity object so that each time someonecreates a new opportunity record, that record isn't shared automatically but must be manually marked for sharing.
Enabling the Opportunity Object for Manual SharingTo let users manually control which opportunity records are enabled for collaboration, follow these steps:
1. Sign in as a setup user or sales administrator.
2. In the Setup and Maintenance work area, find the Manage Oracle Social Network Objects task.
3. Click the Go to Task icon for the task.
4. Scroll down to Opportunity Management, open it and select Opportunity as the object you want to enable.
5. Click Enable Object.

Oracle Sales CloudGetting Started with Your Implementation
Chapter 17Setting Up Oracle Social Network
152
6. Since you want users to manually integrate each new opportunity record with Oracle Social Network, select Manualand click OK.
7. Click Save.
8. Notice that the Opportunity now includes a Warning icon in the Status column. You still need to enable attributes forthe object.

Oracle Sales CloudGetting Started with Your Implementation
Chapter 17Setting Up Oracle Social Network
153
Enabling the Opportunity Object AttributesTo enable the attributes you want to make available to share:
1. Under Attributes, click the New button.

Oracle Sales CloudGetting Started with Your Implementation
Chapter 17Setting Up Oracle Social Network
154
2. A list of attributes for Opportunity is displayed. The sales manager doesn't want the Level of Risk and StrategicValue attributes enabled, so select the Enabled check box at the top to enable all the attributes, then scroll downand deselect the Level of Risk and Strategic Value check boxes so they won't be enabled.
3. Click OK.
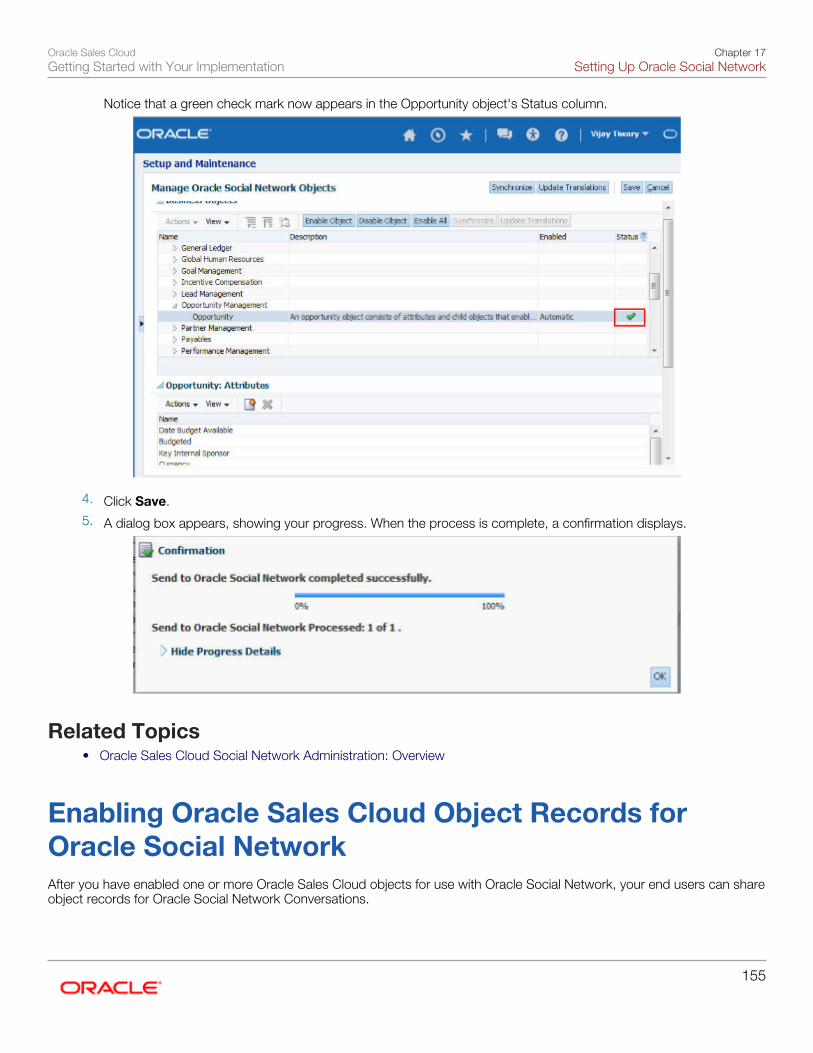
Oracle Sales CloudGetting Started with Your Implementation
Chapter 17Setting Up Oracle Social Network
155
Notice that a green check mark now appears in the Opportunity object's Status column.
4. Click Save.5. A dialog box appears, showing your progress. When the process is complete, a confirmation displays.
Related Topics• Oracle Sales Cloud Social Network Administration: Overview
Enabling Oracle Sales Cloud Object Records forOracle Social NetworkAfter you have enabled one or more Oracle Sales Cloud objects for use with Oracle Social Network, your end users can shareobject records for Oracle Social Network Conversations.
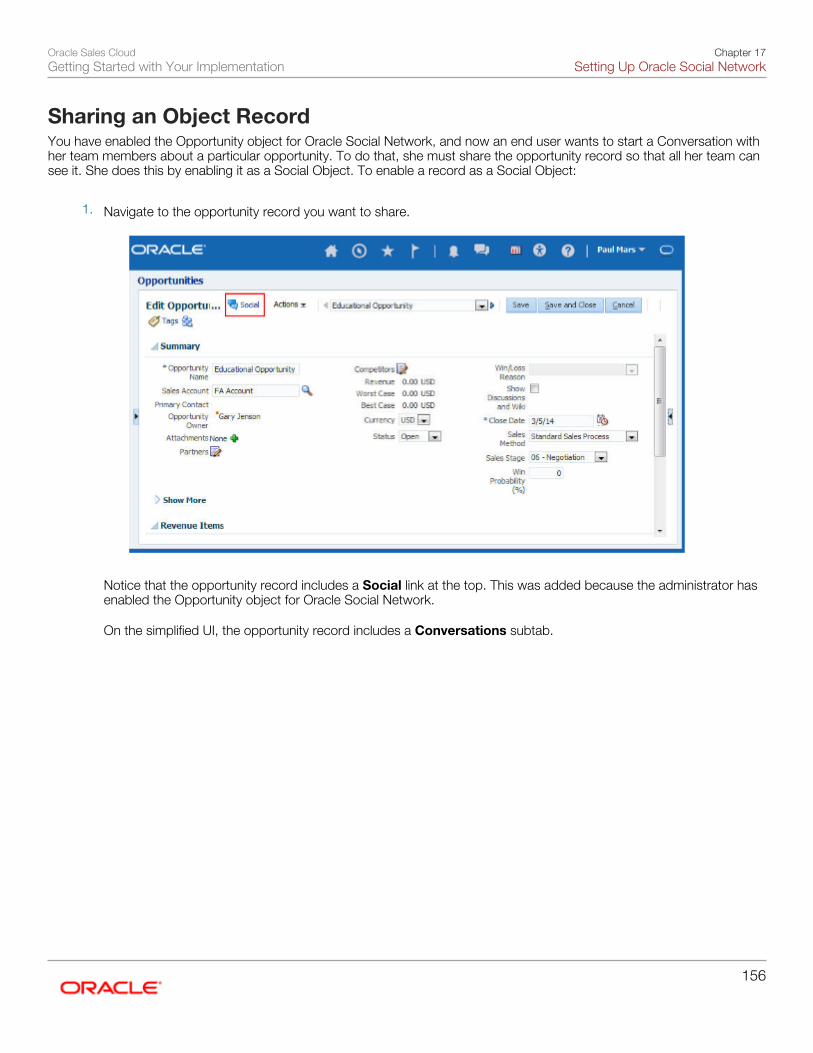
Oracle Sales CloudGetting Started with Your Implementation
Chapter 17Setting Up Oracle Social Network
156
Sharing an Object RecordYou have enabled the Opportunity object for Oracle Social Network, and now an end user wants to start a Conversation withher team members about a particular opportunity. To do that, she must share the opportunity record so that all her team cansee it. She does this by enabling it as a Social Object. To enable a record as a Social Object:
1. Navigate to the opportunity record you want to share.
Notice that the opportunity record includes a Social link at the top. This was added because the administrator hasenabled the Opportunity object for Oracle Social Network.
On the simplified UI, the opportunity record includes a Conversations subtab.

Oracle Sales CloudGetting Started with Your Implementation
Chapter 17Setting Up Oracle Social Network
157
2. Click the Social link, or the Conversations subtab when in the simplified UI.

Oracle Sales CloudGetting Started with Your Implementation
Chapter 17Setting Up Oracle Social Network
158
On the desktop UI, a panel appears on the right side of the record. Because no one has shared this opportunityrecord as a Social Object yet, a Share button appears.
NoteIf someone had already shared this record, you would see a Join button that would allow you to join theexisting Conversation.
3. Click the Share button
4. The opportunity record is now shared as a Social Object. Your team members can now join the Conversation.

Oracle Sales CloudGetting Started with Your Implementation
Chapter 17Setting Up Oracle Social Network
159

Oracle Sales CloudGetting Started with Your Implementation
Chapter 18Setting Up Microsoft Outlook
160
18 Setting Up Microsoft Outlook
Overview of Oracle Sales Cloud for OutlookThe Oracle Sales Cloud for Outlook application helps maximize sales productivity by providing Oracle Sales Cloud capabilitiesdirectly within Microsoft Outlook, thereby allowing sales professionals access to essential Sales Cloud data.
Summary of FeaturesThe key features of Oracle Sales Cloud for Outlook are:
• Sales Cloud capabilities within Microsoft Outlook: Using Oracle Sales Cloud for Outlook, all e-mails, calendar events,and tasks can be linked to the respective contact, customer, lead, or opportunity within Oracle Sales Cloud. Salesprofessionals can access and update customer and sales information within Microsoft Outlook.
• Single-click sharing between Microsoft Outlook and Oracle Sales Cloud: When sending a meeting invite or an e-mail,or when setting up a task, a single click on the Share with Fusion button captures the action and updates of OracleSales Cloud in the background.
• Synchronization of data between Oracle Sales Cloud and Microsoft Outlook: Two-way data synchronization allowssales professionals to have a continuously updated and accurate 360-degree view of Sales Cloud data changes.
• Synchronization Control Panel: Oracle Sales Cloud for Outlook provides synchronization filtering capabilities, enablingsales professionals to synchronize only the most critical data from Oracle Sales Cloud. Sales professionals cansynchronize high-priority accounts or opportunities closing this quarter, instead of synchronizing the entire data setfrom Oracle Sales Cloud.
• Offline access: The transition between online and offline modes of operation allows sales professionals in thefield to use the full functionality of the product in an offline mode, and then synchronize the sales data in the nextsynchronization cycle.
• Customize Oracle Sales Cloud for Outlook: Add to the standard Microsoft Outlook view, or rearrange how the pagelooks, using Oracle Sales Cloud for Outlook's customizable objects, fields, and UI layout options. For example,Custom objects, competitors or other objects that you rely on can be added to the application to cater to specificorganizational or user requirements.
Related Topics• Implement Oracle Sales Cloud for Outlook: Explained
Overview of Oracle Sales Cloud for OutlookInstallationThis topic describes how to install Oracle Sales Cloud for Outlook manually on each laptop or PC.
Before installing Oracle Sales Cloud for Outlook, ensure that:
• Microsoft Outlook is installed on the laptop or PC.

Oracle Sales CloudGetting Started with Your Implementation
Chapter 18Setting Up Microsoft Outlook
161
• An existing Microsoft Outlook profile is available for use with Oracle Sales Cloud for Outlook, or a new MicrosoftOutlook profile has been created.
• The user performing the installation is a sales application user provisioned with either the Sales Representative or theSales Manager job role, but not both. The user must not have the Sales Administrator job role assigned.
Use this procedure to install Oracle Sales Cloud for Outlook
1. Download the Oracle Sales Cloud for Outlook installer file.
2. Run the InstallShield Wizard.
3. Enter the Oracle Sales Cloud connection information, if the administrator has not already set it up.
The first synchronization begins. For details, see the Installing the Oracle Sales Cloud for Outlook Application topic.
Installing the Oracle Sales Cloud for OutlookApplicationThis topic explains how to install the Oracle Sales Cloud for Outlook application on a laptop or PC.
Download the Oracle Sales Cloud for Outlook installer file, run the InstallShield Wizard, and enter the Oracle Sales Cloudserver connection information, if required.
Downloading Oracle Sales Cloud for Microsoft Outlook InstallerFile
1. Sign in as either a sales manager or a salesperson, and select the Personalization menu, and then select the SetPreferences menu item.
2. Select CRM for Microsoft Outlook Installer under the Preferences pane.
3. Select the appropriate installer language, and then click Start Download to download the installer.
Running the InstallShield Wizard
1. Navigate to the installation file, and double-click the file to start the installation.
2. On the Welcome page of the InstallShield Wizard, click Next.
3. On the Customer Information page, check the defaulted User Name and Organization Name values, and changethem if necessary.
4. Click Next.
5. On the Destination Folder page, check the default folder that will be created in the installation. If you want to use adifferent folder, then click Change.
Oracle Sales CloudGetting Started with Your Implementation
Chapter 18Setting Up Microsoft Outlook
162
6. When you have confirmed or selected a folder on the Destination Folder page, click Next.
7. On the Ready to Install the Program page, click Install.
Entering the Oracle Sales Cloud Server Connection Information
1. After the InstallShield wizard completes, open Microsoft Outlook.
2. On the Choose Profile page, choose the Microsoft Outlook profile that you want to use with Oracle Sales Cloud forOutlook, then click OK.
3. On the message asking if you want to install the application using the profile you selected in step 2, click Yes.
4. When the Oracle Sales Cloud for Outlook First Run Assistant pane appears, click anywhere in the Assistant pane todisplay the Login page.
5. In the Login page, enter your user information and the Oracle Sales Cloud server information.
The server information may be set up by default based on your administrator settings.
6. Click Login to complete the installation.

Oracle Sales CloudGetting Started with Your Implementation
Chapter 19Setting Up Mobile
163
19 Setting Up Mobile
Oracle Sales Cloud Mobile Setup OverviewThe Setting Up Mobile chapter provides information to help you set up and roll out Oracle Sales Cloud Mobile (Sales CloudMobile) at your organization.
PrepareFirst of all, you need to prepare the device you are using to test your implementation of Sales Cloud Mobile application.Ensure that your company's mobile devices and their operating systems are supported by checking the topic, What are thesupported platforms for Oracle Sales Cloud Mobile? Then follow the steps outlined in the topics, Finding Your Company'sHost URL for Oracle Sales Cloud Mobile and Installing the Oracle Sales Cloud Mobile Application.
Try It OutBecome familiar with the application to understand the default settings and behavior, outlined in the topic, Reviewing OracleSales Cloud Mobile's Features.
CustomizeIf required, change the application to meet your business requirements by following the topics, Customizing Oracle SalesCloud, through to the Testing Your Customizations.
Roll Out to Your Sales TeamGet ready to roll out Sales Cloud Mobile to your sales force by using the suggestions provided in the topic, Rolling Out OracleSales Mobile to Your Sales Team.
What are the supported platforms for Oracle SalesCloud Mobile?See the System Requirements for Oracle Applications Cloud at: http://www.oracle.com/us/products/system-requirements/overview/index.html
Oracle Sales CloudGetting Started with Your Implementation
Chapter 19Setting Up Mobile
164
Determining Your Company's Host URL for OracleSales Cloud MobileYou must determine the host portion of the URL for entry in the Host field when signing into Sales Cloud Mobile on mobiledevices. Follow these steps to determine the two Host URLs that you'll require (one URL for for iPhones and Android devices,and one for BlackBerry devices).
Determining the Host URL for iPhone and Android Devices
1. Sign into Oracle Sales Cloud as a setup user.
2. Copy the URL in your browser's address bar to the Notepad.
Here is an example: : https://fap0655-crm.oracleads.com/crmCommon/faces/ ExtnConfiguratorHome?_afrLoop=1134989893797000&webApp=HomePage&fndHomePageViewId=%2FAtkHomePageWelcome&fnd=%3B%3B%3B%3Bfalse%3B256&_afrWindowMode=0&_adf.ctrl-state=m6wpw0vid_4
3. Now copy the host name portion of the URL only, which is the part between https:// and the next forward slash (/).This is your organization's host URL.
In our example, the host URL is: fap0655-crm.oracleads.com.
4. When you're rolling out Sales Cloud Mobile to your users, inform them of the Host URL value, so that they can enterthe URL when they're signing into the application.
Determining the Host URL for BlackBerry Devices
1. Start with this URL: https://host/sales/faces/MobileInstallerMain.
2. Replace host with the host URL value that you determined in the previous section, Determining the Host URL foriPhone and Android Devices.
Therefore, in our example, the URL for a BlackBerry installation would be: https:// fap0655-crm.oracleads.com /sales/faces/MobileInstallerMain.
3. Inform your users of the Host URL value when you roll out Sales Cloud Mobile to the sales team.
Installing the Oracle Sales Cloud Mobile iPhoneApplicationFollow these steps to install the Oracle Sales Cloud Mobile iPhone Application.
1. Using your iPhone, sign in to iTunes and access the App Store.

Oracle Sales CloudGetting Started with Your Implementation
Chapter 19Setting Up Mobile
165
2. Search for Oracle Sales Cloud Mobile and then tap Install.
3. Enter the host URL that you located in the previous topic called 'Determining Your Company's Host URL for OracleSales Cloud Mobile'.
4. Enter your user name and password.
5. Sign in to the Oracle Sales Cloud Mobile application.
Installing the Oracle Sales Cloud Mobile AndroidApplicationFollow these steps to install the Oracle Sales Cloud Mobile Android Application.
1. Using your Android device, sign in to Google Play, and browse the applications.
2. Search for Oracle Sales Cloud Mobile and then tap Install.
3. Enter the host URL that you located in the previous topic called 'Determining Your Company's Host URL for OracleSales Cloud Mobile'.
4. Open the Oracle Sales Cloud Mobile application, and enter your user name and password.
5. Sign in to the Oracle Sales Cloud Mobile application.
Installing the Oracle Sales Cloud Mobile BlackBerryApplicationFollow these steps to install the Oracle Sales Cloud Mobile BlackBerry Application.
1. Check that the BlackBerry's Wi-Fi is switched on.
2. Using the BlackBerry's browser, enter the host URL that you located in the previous topic called 'Determining YourCompany's Host URL for Oracle Sales Cloud Mobile'.
3. Enter the authentication credentials to sign in.
4. Click Start Download to start the download and installation.
Reviewing Oracle Sales Cloud Mobile's FeaturesBefore making Oracle Sales Cloud Mobile available to your sales team, it's best to familiarize yourself with the default featuresof the application so that you can decide whether you want to customize any aspects of the application.
Oracle Sales CloudGetting Started with Your Implementation
Chapter 19Setting Up Mobile
166
The following set of actions may help you to decide if the application needs to be customized to your requirements.
Explore Oracle Sales Cloud MobileIf you have data in your Oracle Sales Cloud application, sign in to the application following the steps outlined in the mobileinstallation topics. If you don't have any data, then you can use the demo data by tapping Demo Mode on the sign in page.
Familiarize Yourself with the Default Objects, Fields, and ReportsBecome familiar with the default objects, fields, and reports. While doing that, think about the following questions:
• What can you do with each object: Create, edit, or just view?
• What fields and related objects are displayed with each object?
• What reports are available?
Consider if You Need to Customize the ApplicationOnce you're familiar with the default objects, fields, related objects, and reports, consider if you need to change anything toaddress your organization's needs.
• Does Sales Cloud Mobile display the objects - standard and custom - that your sales team needs to work with?
• Are the correct fields displayed for each of those objects?
• Do you want to add or remove other fields, including custom fields?
• Do you need to add any related objects? Do you want to add, remove, or customize reports?
If you decide that you do need customize Sales Cloud Mobile, then the next section provides information about customizingSales Cloud Mobile, and how to test your changes.
Oracle Sales Cloud Mobile Extensibility OverviewUse Application Composer to customize the Oracle Sales Cloud Mobile Sales iPhone, Android and BlackBerry applications.Using Application Composer, you can manage which objects and fields are visible on the Oracle Sales Cloud Mobileapplication without having to carry out specific customizations for a particular device.
You can customize the following for the Oracle Sales Cloud Mobile application:
• Enable standard Oracle Sales Cloud Sales, Customer Center, Marketing, and Common objects that are not enabledby default for smartphones.
• Enable custom Sales, Customer Center, Marketing, and Common objects for smartphones.
• Change the fields (including custom fields) visible on Oracle Sales Cloud Mobile for mobile-enabled Sales, CustomerCenter, Marketing, and Common objects (standard or custom objects).
• Configure the Sales Cloud Mobile home page, and add Business Intelligence reports to the Sales Cloud Mobileapplication.
Oracle Sales CloudGetting Started with Your Implementation
Chapter 19Setting Up Mobile
167
Customizing Oracle Sales Cloud MobileThis procedure shows you how to customize Oracle Sales Cloud Mobile for a specified sales object using ApplicationComposer. For more information about Application Composer, see the Oracle Sales Cloud: Extending Sales Guide.
First you must open or create a sandbox, and then you customize Oracle Sales Cloud Mobile using Application Composer.
Opening or Creating a Sandbox
1. Sign in to Oracle Sales Cloud with a user that has a Sales Cloud Administrator job role.
2. In the global region, expand the Settings and Actions menu, then select Manage Sandboxes, under theAdministration subheading.
3. Select the sandbox that you want to use to make your customizations. You might need to make a sandbox active,or create a sandbox, if a suitable sandbox does not exist.
Customizing Oracle Sales Cloud Mobile Using ApplicationComposer
1. Open Application Composer by using the Navigator menu, and selecting Application Composer under the Tools,Customization category.
2. Select the application you want to customize within Application Composer.
3. Within the application you chose in step 1, select the custom or standard object you want to customize.
4. Select the Pages node in the navigation tree.
5. Select the Mobile Pages tab to see the mobile configuration options for the parent and its child objects.
6. Click either Create <object name>, or Edit <object name>, depending on whether the object is already enabledfor Sales Cloud Mobile. You can also create or edit the child objects that appear under the main object.
7. Navigate through the configuration wizard to customize your selected object.
Adding or Removing Object Icons From the SalesCloud Mobile Home PageYou can add or remove object icons from the Sales Cloud Mobile application, as follows:
1. Within Application Composer, open the Mobile Application Setup page, either by clicking the page link under theCommon Setup list, or by clicking the page link in the Overview section of the Application Composer page.
Oracle Sales CloudGetting Started with Your Implementation
Chapter 19Setting Up Mobile
168
2. Click Configure Springboard.
3. Select the object you want to add or remove, and click the arrows pointing toward the right or left, moving theobject to the Available list, or Selected list.
4. Click Save and Close.
Displaying a List of Products for Revenue ItemsYou can enable users to add products to a revenue item, by following these setup steps:
1. Within Setup and Maintenance, search for the Manage Product Group Usage task.
2. Click the Go to button for the Manage Product Group Usage task.
3. Under Product Group Usage, select the Base row.
4. Select the Miscellaneous tab and click on the Add icon.
5. Create a New Row with the following values:
◦ Name: Hide Products
◦ Value: No
◦ Mode: Oracle Fusion Mobile Sales
This displays a list of Products which enables users to attach a Product to a Revenue Item. If required, users will stillbe able to attach a Product Group to a Revenue Item, as well as a Product. If a Product list is not displayed then auser will only be able to attach a Product Group to a Revenue Item.
How can I set up the automatic password saving onsmartphones and tablets?Search for the Manage Administrator Profile Values task in the Setup and Maintenance work area. Set the Password Saveon Phone Enabled profile option to either Y (Yes) or N (no).
Setting Up RSS FeedsYou can set up RSS feed sources so that the RSS feeds will appear at the bottom of the Sales Cloud Mobile pages, togetherwith related objects, as follows:
1. Within Setup and Maintenance, search for the Manage Administrator Profile Values task.

Oracle Sales CloudGetting Started with Your Implementation
Chapter 19Setting Up Mobile
169
2. Find the Manage Administrator Profile Values task and click Go to Task.
3. Search for the RSS Feed Source Profile Display Name.
4. Add RSS feed URLs as required.
Testing Oracle Sales Cloud Mobile CustomizationsAfter customizing Oracle Sales Cloud Mobile, Oracle recommends that you test all of your changes using the sandbox thatcontains your customizations.
1. Sign in to Oracle Sales Cloud application as an Oracle Sales Cloud Mobile user that has a Sales Representative,Sales Manager, or Sales Vice President job role.
2. Select the sandbox that contains your customizations.
3. Keeping the Oracle Sales Cloud browser window open on your laptop or PC, open Oracle Sales Cloud Mobile onyour smartphone and sign in using the same user you used to sign in to Oracle Sales Cloud. Signing in as the sameuser as in step 1 enables you to view the sandbox you selected in step 2 on your smartphone's Oracle Sales CloudMobile application.
Note that only your user is accessing the sandbox on the Oracle Sales Cloud Mobile application (as long as theOracle Sales Cloud browser window is open). All other users will view only the published version of the application.
4. Check the pages you have customized to ensure that they are working as expected.
5. Distribute your customizations to all Oracle Sales Cloud Mobile users by publishing your sandbox. Refer to thePublishing Sandboxes chapter of the Oracle Sales Cloud: Customizing Sales Guide for more information aboutpublishing sandboxes.
Rolling Out Oracle Sales Mobile to Your Sales TeamAfter investigating the standard features of Oracle Sales Cloud Mobile, and configuring the application to meet yourcompany's requirements, you may want to think about how you're going to roll out the application to your sales team. Hereare some tips that might help you:
• Collect feedback from users in your company who have been testing the application, and fine tune materials toaddress any issues they might have raised.
• Capture screenshots on your mobile device to use in your training materials (several Internet sites exist with detailedinstructions about how to do this).
NoteNote that if you want to include a screenshot of the Host URL field on the initial sign-in page, then thefield only appears the first time you access the application. If you have already entered the Host URL,then you can uninstall and reinstall Sales Cloud Mobile and then the Host URL field will appear again.

Oracle Sales CloudGetting Started with Your Implementation
Chapter 19Setting Up Mobile
170
• Consider presenting live training, by using software that lets you mirror your mobile device onto your PC.
• Create an intranet page with information and links relating to the application. One piece of information that is oftenrequested is the company-specific Host URL.
• Make sure that your users have their mobile devices up and running.
Also refer to the article, Rollout Kit for Oracle Sales Cloud Mobile, available on My Oracle Support (https://support.oracle.com), Doc ID 1540393.1.

Oracle Sales CloudGetting Started with Your Implementation
Chapter 20Additional Learning Resources
171
20 Additional Learning Resources
Oracle Sales Cloud Additional ResourcesThis topic lists additional documentation, training, and other available resources.
Go to the following locations to find more information:
• Documentation, including videos and tutorials, is available at http://docs.oracle.com/cloud/latest/salescs_gs/index.html. Or navigate from cloud.oracle.com to Resources - Getting Started: Documentation - Oracle CloudApplication Services: Sales.
• Tutorials are available on the Oracle Sales Cloud Learning Library at http://www.oracle.com/oll. Navigate to Products- Applications - Fusion Applications - Oracle Sales Cloud.
• More information on client and browser settings for Oracle Sales Cloud is located at http://www.oracle.com/us/products/system-requirements/overview/index.html.
CommunityThe Oracle Applications Customer Connect (https://appsconnect.custhelp.com) offers a place where you can connectwith experts from Oracle, our partner community, and other users. Become part of this community to post tips, get answersto your questions, and find valuable information from the people using the application.
TrainingCourses are available through Oracle University. You can find a full list of available courses at http://education.oracle.com/fusionapps. The following courses are recommended:
• Oracle Sales Cloud Implementation
• Oracle Sales Cloud Extensibility
DocumentationSolutions and documentation are available in the help and in guides. The following guides are recommended:
• Getting Started with Oracle Sales Cloud Customizations
• Oracle Sales Cloud Using Sales
• Oracle Sales Cloud Implementing Sales
• Oracle Sales Cloud Using Campaigns
• Oracle Sales Cloud Using Leads
• Oracle Sales Cloud Implementing Marketing

Oracle Sales CloudGetting Started with Your Implementation
Chapter 20Additional Learning Resources
172
• Oracle Sales Cloud Using Marketing Segmentation
• Oracle Sales Cloud Using Customer Data Management
• Oracle Sales Cloud Customer Data Management Implementation Guide
• Oracle Sales Cloud Customizing Sales
These guides are available from http://docs.oracle.com.
Support ArticlesGo to My Oracle Support at https://support.oracle.com for the latest implementation articles.

Oracle Sales CloudGetting Started with Your Implementation
Glossary
173
Glossary
abstract role
A description of a person's function in the enterprise that is unrelated to the person's job (position), such as employee,contingent worker, or line manager. A type of enterprise role.
dimension
A data category used to define territory boundaries, such as geography. Dimensions contain related dimension membersusually organized in hierarchies. For example, a geography dimension often includes members, such as countries, and citiesthat belong to countries. Defined dimensions determine how to assign objects, such as customers, leads, and opportunities.
enterprise role
Enterprise roles provide users with access both to the application functions they need to perform their jobs as well as thepermissions to access the data where they need to perform those functions. There are two types of enterprise roles: job rolesand abstract roles. Job roles permit users to perform activities specific to their job. Abstract roles permit users to performfunctions that span the different jobs in the enterprise.
forecast due date
The date after which the forecast changes from current status to past status and no changes can be made to the forecast.
job role
Job roles provide users with access to both the application functions they need to perform specific jobs in you organizationas well as the permissions to access the data where they need to perform the job functions. Examples of job roles providedby Oracle include Sales Administrator, Sales Manager, and Sales Representative.
resource role
Resource roles indicate the role a resource plays as an individual, or within a resource team.
setup user
A user with permissions to perform implementation tasks, including the creating of other users and security modifications.Setup users are provisioned with the following enterprise roles: Application Implementation Consultant, IT Security Manager,Application Diagnostic Administrator, Customer Relationship Management Application Administrator, and Employee. A setupuser can be created by the initial user provided by Oracle or by another setup user.
territory
The jurisdiction of responsibility of a salesperson or sales manager over a set of customers. Territories serve as a basis forforecasting, quota, compensation, and analysis of sales performance.
territory coverage
A territory coverage is a set of boundaries that define what is included or excluded in the territory and what can be sold.Selected customers or partners can be selected to be included or excluded from the territory being defined. For example, sellall products in North America.
Oracle Sales CloudGetting Started with Your Implementation
Glossary
174
territory freeze date
The date after which forecasting stops accepting territory hierarchy changes for the scheduled forecast and forecastingactivities can begin.
territory owner
Resource assigned to manage a territory and is typically accountable for the work objects, such as opportunities, that arewithin the boundaries of the territory.
territory proposal
A sandbox container used to model territory changes. All valid territories within a proposal become active on the proposalactivation date.