imaging scan workstation - rjs software systems
TRANSCRIPT
Imaging Scan Workstation
© 2008 RJS Software Systems
Document Version 2.0.20.1
RJS Software Systems2970 Judicial Road, Suite 100
Burnsville, MN 55337
Phn: (952) 736-5800Fax: (952) 736-5801
Sales email: [email protected] email: [email protected]
Web Site: http://www.rjssoftware.com
User Guide

All rights reserved. No parts of this work may be reproduced in any form or by any means - graphic, electronic, ormechanical, including photocopying, recording, taping, or information storage and retrieval systems - without thewritten permission of RJS Software Systems.
RJS Imaging Scan Workstation is a trademark of RJS Software Systems. Products that are referred to in thisdocument may be either trademarks and/or registered trademarks of the respective owners. The publisher and theauthor make no claim to these trademarks.
While every precaution has been taken in the preparation of this document, RJS Software Systems assumes noresponsibility for errors or omissions, or for damages resulting from the use of information contained in this documentor from the use of programs and source code that may accompany it. The information contained in this document issubject to change without notice. In no event shall the publisher and the author be liable for any loss of profit or anyother commercial damage caused or alleged to have been caused directly or indirectly by this document.
Printed: August 2008
© 2008 RJS Software Systems
IContents
I
© 2008 RJS Software Systems
Table of Contents
Section 1 Introduction 2
................................................................................................................................... 2What is in this Guide
................................................................................................................................... 4About RJS Software Systems
................................................................................................................................... 4What is not in this Guide
................................................................................................................................... 5Document Conventions and Symbols
................................................................................................................................... 5Contacting RJS Softare Systems
Section 2 Overview of RJS Imaging Scan Workstation 8
................................................................................................................................... 8About RJS Imaging Scan Workstation
................................................................................................................................... 8Licensing Information
Section 3 System Requirements 10
Section 4 Installation 12
................................................................................................................................... 12Installing RJS Imaging Scan Workstation
................................................................................................................................... 12License Authorization Code
Section 5 Setup and Configuration 14
................................................................................................................................... 14Opening RJS Imaging Scan Workstation
................................................................................................................................... 15Settings
.......................................................................................................................................................... 16General Tab
.......................................................................................................................................................... 20WebDocs for iSeries Tab
.......................................................................................................................................................... 22WebDocs for Windows Tab
.......................................................................................................................................................... 25Enterprise Workflow Tab
.......................................................................................................................................................... 26Error Handling Tab
................................................................................................................................... 27Configuring RJS Imaging Scan Workstation
Section 6 Getting Started 31
................................................................................................................................... 31Exploring the Interface
.......................................................................................................................................................... 31Sections
.......................................................................................................................................................... 34Menus
.......................................................................................................................................................... 43Toolbars
.......................................................................................................................................................... 52Text Boxes
................................................................................................................................... 55Scanning a Document
................................................................................................................................... 57Appending a Page to a Document
................................................................................................................................... 58Capturing Batch Documents
.......................................................................................................................................................... 58Batch Scanning
.......................................................................................................................................................... 60Appending a Page to Batch-Scanned Documents
.......................................................................................................................................................... 61Moving Batch-Scanned Documents to the Main Viewing and Work Area
................................................................................................................................... 63Checking in a Document
RJS Imaging Scan Workstation User GuideII
© 2008 RJS Software Systems
................................................................................................................................... 64Saving a Document
Section 7 RJS OCR Zone Designer 69
................................................................................................................................... 69Opening RJS OCR Zone Designer
................................................................................................................................... 70Exploring Important Buttons on the Toolbar
................................................................................................................................... 71Opening an Image File
................................................................................................................................... 72Creating a Template
................................................................................................................................... 77Creating a Barcode Template
................................................................................................................................... 81Opening a Template
................................................................................................................................... 85Testing a Template
................................................................................................................................... 88Extracting Data from OCR Fields
Section 8 Full-Text OCR 93
Section 9 Searchable PDF Document 96
Section 10 Appendix A: Customizing the Interface 100
................................................................................................................................... 100Opening the Customize Dialog Box
................................................................................................................................... 100Displaying and Creating Toolbars
................................................................................................................................... 105Customizing the Interface Appearance
................................................................................................................................... 106Editing Custom and Default Toolbars
Section 11 Appendix B: 5250 Integrator Software 110
................................................................................................................................... 110Overview
................................................................................................................................... 110Installation
................................................................................................................................... 110Setup
................................................................................................................................... 111Using the Script Editor
Section 12 Appendix C: Scripting Functions 115
................................................................................................................................... 115Overview
.......................................................................................................................................................... 115Opening the RJS Script Editor
.......................................................................................................................................................... 116About Sax Basic Language
.......................................................................................................................................................... 117Accessing the Scripting Functions
.......................................................................................................................................................... 121Creating Custom Dialog Boxes
.......................................................................................................................................................... 122Bringing Windows Functions into your Scripts
................................................................................................................................... 123main
................................................................................................................................... 123AfterZoneAnalyze
................................................................................................................................... 125RJSADODatabaseLookup
................................................................................................................................... 128RJSADODBMultipleRecordLookup
................................................................................................................................... 129RJSADODBSingleRecordLookup
................................................................................................................................... 130RJSExtractWordfromSubstring
................................................................................................................................... 130RJSGet5250FieldFromCursor
................................................................................................................................... 130RJSGet5250ScreenField

IIIContents
III
© 2008 RJS Software Systems
................................................................................................................................... 130RJSPostProcessExitProgram
................................................................................................................................... 131RJSPreProcessExitProgram
................................................................................................................................... 133RunAfterOCR
................................................................................................................................... 134RunIndexFieldClick
................................................................................................................................... 136RunIndexFieldLookup
................................................................................................................................... 138RunNewDocument
................................................................................................................................... 139ShellExecute [Declare]
Section 13 Index 141

Section
1
Introduction
Introduction 2
© 2008 RJS Software Systems
Introduction
This section provides basic information about the following topics:
What is in this Guide
About RJS Software Systems
What is not in this Guide
Document Conventions and Symbols
Contacting RJS Software Systems
What is in this GuideThis user guide provides detailed information on how to install, configure, administer, and useRJS Imaging Scan Workstation.
Here is what this guide includes:
· Section 1 Introduction describes this user guide and how to use it effectively.
· Section 2 Overview of RJS Imaging Scan Workstation describes RJS Imaging ScanWorkstation, the benefits of using it, and how to license it.
· Section 3 System Requirements lays out the PC requirements to run RJS Imaging ScanWorkstation.
· Section 4 Installation provides step-by-step instructions on how to install and configure RJSImaging Scan Workstation.
· Section 5 Setup and Configuration describes how to set up and configure RJS Imaging ScanWorkstation
· Section 6 Getting Started provides a reference on how to get started using RJS Imaging ScanWorkstation.
· Section 7 RJS OCR Zone Designer shows how to create OCR zone templates to extract text orbarcode information from a document.
· Section 8 Full-Text OCR describes how to capture all the text on a document and search onthat text.
· Section 9 Searchable PDF Document shows how to create a PDF document on which you cansearch for any word within that document.
· Section 10 Appendix A: Customizing the Interface is a reference on how to customize RJSImaging Scan Workstation's interface.
· Section 11 Appendix B: 5250 Integrator Software is a reference for using 5250 IntegratorSoftware in conjunction with RJS Imaging Scan Workstation.
· Section 12 Appendix C: Scripting Functions is a reference for using RJS Imaging Scan
RJS Imaging Scan Workstation User Guide3
© 2008 RJS Software Systems
Workstation's scripting functions.
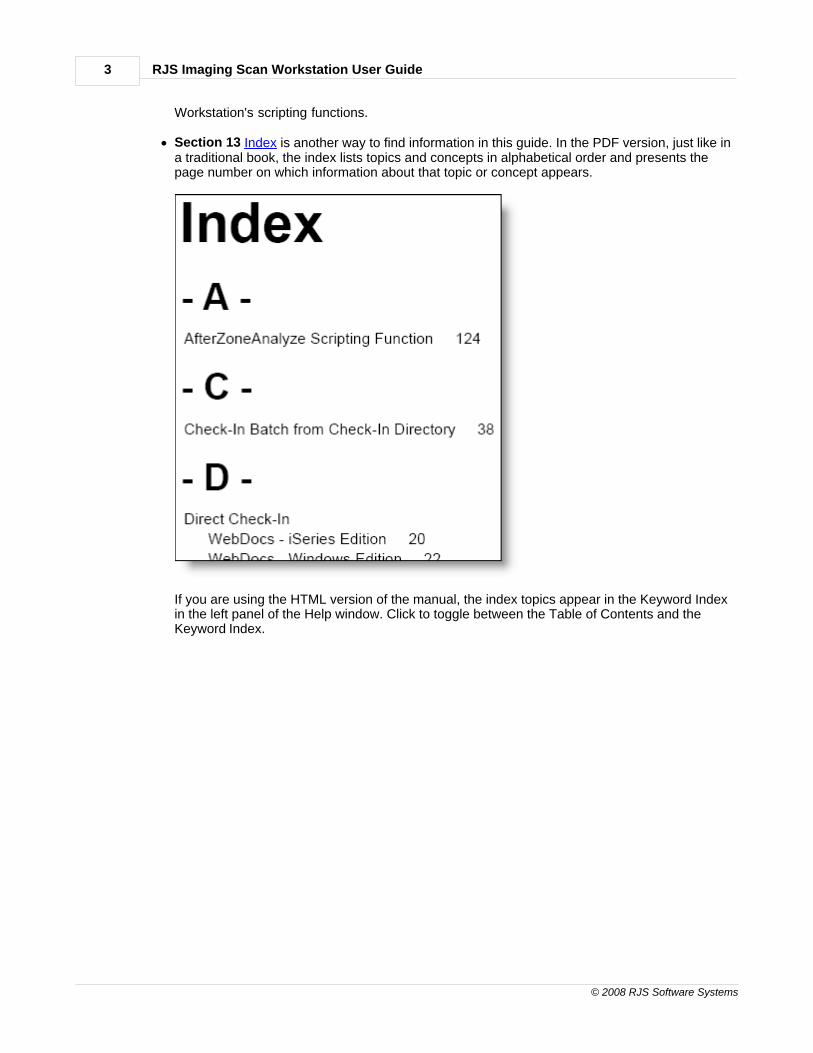
· Section 13 Index is another way to find information in this guide. In the PDF version, just like ina traditional book, the index lists topics and concepts in alphabetical order and presents thepage number on which information about that topic or concept appears.
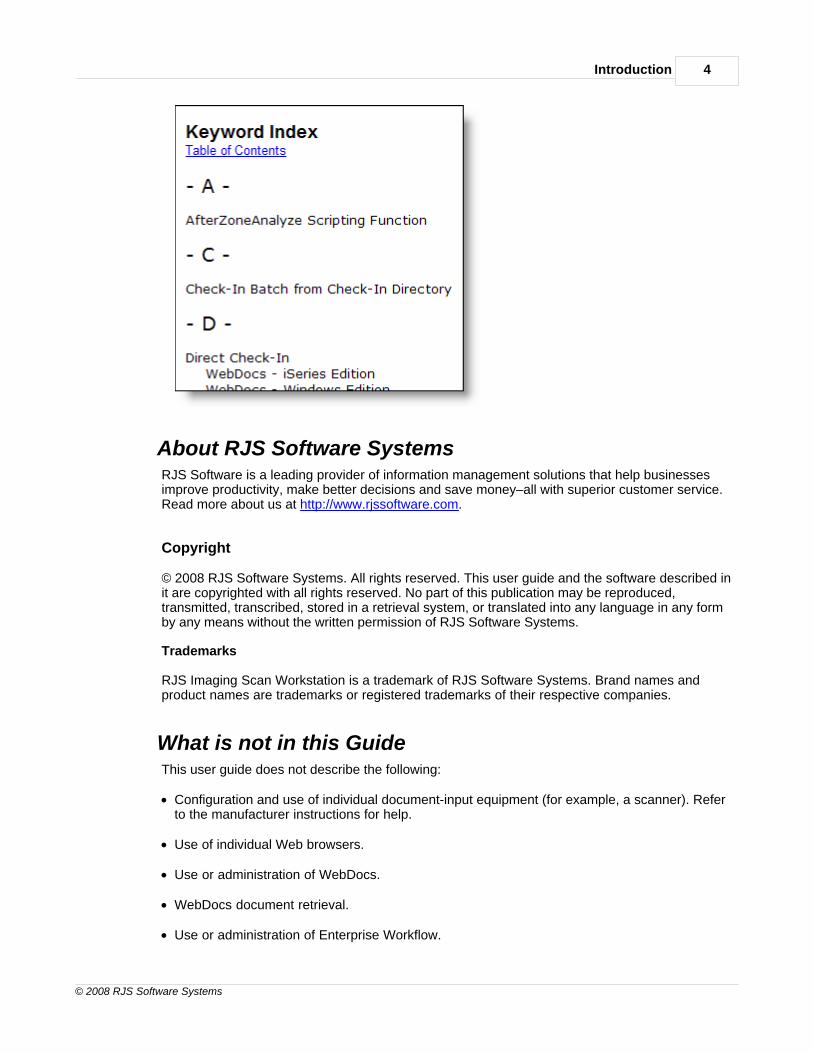
If you are using the HTML version of the manual, the index topics appear in the Keyword Indexin the left panel of the Help window. Click to toggle between the Table of Contents and theKeyword Index.
Introduction 4
© 2008 RJS Software Systems
About RJS Software SystemsRJS Software is a leading provider of information management solutions that help businessesimprove productivity, make better decisions and save money–all with superior customer service.Read more about us at http://www.rjssoftware.com.
Copyright
© 2008 RJS Software Systems. All rights reserved. This user guide and the software described init are copyrighted with all rights reserved. No part of this publication may be reproduced,transmitted, transcribed, stored in a retrieval system, or translated into any language in any formby any means without the written permission of RJS Software Systems.
Trademarks
RJS Imaging Scan Workstation is a trademark of RJS Software Systems. Brand names andproduct names are trademarks or registered trademarks of their respective companies.
What is not in this GuideThis user guide does not describe the following:
· Configuration and use of individual document-input equipment (for example, a scanner). Referto the manufacturer instructions for help.
· Use of individual Web browsers.
· Use or administration of WebDocs.
· WebDocs document retrieval.
· Use or administration of Enterprise Workflow.
RJS Imaging Scan Workstation User Guide5
© 2008 RJS Software Systems
· Enterprise Workflow document retrieval.
Document Conventions and SymbolsThis user guide conforms to the following conventions:
· Titles of documents appear in italics. Italic type also indicates information that varies bycircumstance.
· In step-by-step procedures, the following are in bold type: selections in lists, buttons that youclick, keys that you press, and information that you type.
· Acceptable hardware server names for RJS Imaging Scan Workstation could be noted asAS/400, iSeries, i5, or System i. For simplicity, all references to the server in this user guide willdefault to the term System i unless the notation is specific to a specific server model.
· The document version, shown on the first page of this user guide, denotes both the RJSImaging Scan Workstation software version this user guide represents and document draft forthe release. Document version will be in the format of X.YY.ZZ.N, where X.YY.ZZ representsthe RJS Imaging Scan Workstation software version and N represents the document draftnumber. For example, if the document version is noted as 2.0.12.2 then the information in thisuser guide is current as of RJS Imaging Scan Workstation version 2.0.12 and is the secondrelease of the guide for that software version.
· Typically, with RJS Imaging Scan Workstation as with most software applications, there areseveral ways to accomplish the same thing. This user guide shows one simple way to performan action: usually by clicking.
Contacting RJS Softare SystemsPlease review the following information before contacting RJS Software Systems for technicalsupport.
Before You Contact RJS
Gather and organize as much information as possible about the problem prior to contacting RJSSoftware Systems for support.
If you have not already done so, check this manual's table of contents and index for informationthat addresses your concern. Also refer to the troubleshooting page on the RJS Web site: http://wiki.rjssoftware.com/wiki/index.php/Category:Troubleshooting
Contact Information
Telephone support is available on business days from 8:00 a.m. to 5:00 p.m. Central StandardTime.
888-757-7638 Sales/Support
(952) 736-5800 General
(952) 736-5801 Fax

Introduction 6
© 2008 RJS Software Systems
E-mail support is available at [email protected].
For company information go to http://www.rjssoftware.com.
For More Information
To find code samples, user guides, installation and upgrade procedures, or troubleshootingassistance go to http://support.rjssoftware.com.
Section
2
Overview of RJSImaging ScanWorkstation
Overview of RJS Imaging Scan Workstation 8
© 2008 RJS Software Systems
Overview of RJS Imaging Scan Workstation
This section, which provides an overview of RJS Imaging Scan Workstation, includes thefollowing topics:
About RJS Imaging Scan Workstation
Licensing Information
About RJS Imaging Scan WorkstationYou can use RJS Imaging Scan Workstation software:
· To scan paper documents for storage in WebDocs software.
· In conjunction with RJS Software's business process management software, EnterpriseWorkflow.
· In conjunction with all other RJS Software imaging products.
Contact RJS Software for more details.
With RJS Imaging Scan Workstation you can scan:
· Individual documents.
· A batch of documents.
· Offline when access to the System i system or Windows server is not available.
RJS Imaging Scan Workstation highlights include:
· The ability to capture documents from any Twain or Kofax® compliant scanner.
· The ability to assign up to 10 user-defined search-key values for each document.
· The support of optical character recognition (OCR) so that important information on documents,such as Customer Number, can be captured from an image, converted to text, and stored inpre-defined Index fields.
· The support of barcode technology so that barcode symbols can be translated to text and thenstored in pre-defined Index fields.
Licensing InformationRJS Imaging Scan Workstation is licensed on a per workstation basis.
Section
3
System Requirements
System Requirements 10
© 2008 RJS Software Systems
System Requirements
RJS Imaging Scan Workstation is a flexible product with minimal system requirements. Youshould, however, still review the listed requirements for the PCs from which you will scan. You canhave an unlimited number of PCs that scan and upload paper documents as long as each of thecopies of RJS Imaging Scan Workstation on those PCs are licensed.
The system requirements for each PC that will be used for document scanning are:
· Windows 2000, XP, 2003, or Vista.
· 2 GHz processor.
· 1 GB memory.
· 10-20 GB free disk space for temporary storage of scanned images.
Additionally, each PC that will be used for document scanning must have the following installedand running:
· TCP/IP.
· RJS Imaging Scan Workstation software.
Note: Client Access/400 is not required.

Section
4
Installation
Installation 12
© 2008 RJS Software Systems
Installation
This section, which provides information on how to install RJS Imaging Scan Workstation,includes the following topics:
Installing Imaging Scan Workstation
License Authorization Code
Installing RJS Imaging Scan WorkstationFor the RJS Imaging Scan Workstation installation instructions, refer to the RJS Softwaresupport-site article at http://wiki.rjssoftware.com/wiki/index.php/RJS_Imaging_Scan_Workstation_Install.
License Authorization CodeTo complete the installation of RJS Imaging Scan Workstation, you need the license-authorizationcode. To get the license-authorization code:
1. Go to the support site article http://wiki.rjssoftware.com/wiki/index.php/RJS_Imaging_Scan_Workstation_License and scrolldown to "How do I find the Code Entry/Computer ID #?"
2. Find the Code Entry Number and Computer ID for your copy of RJS Imaging ScanWorkstation.
3. Either call RJS Support or send RJS an e-mail message with the Code Entry Number andComputer ID.
4. RJS Software support staff will then issue you the license-authorization code.
Note: Upon initial installation a 30-day temporary license is set automatically.
Section
5
Setup andConfiguration
Setup and Configuration 14
© 2008 RJS Software Systems
Setup and Configuration
This section, which provides setup and configuration information for RJS Imaging ScanWorkstation, includes the following topics:
Opening RJS Imaging Scan Workstation
Settings
Configuring RJS Imaging Scan Workstation
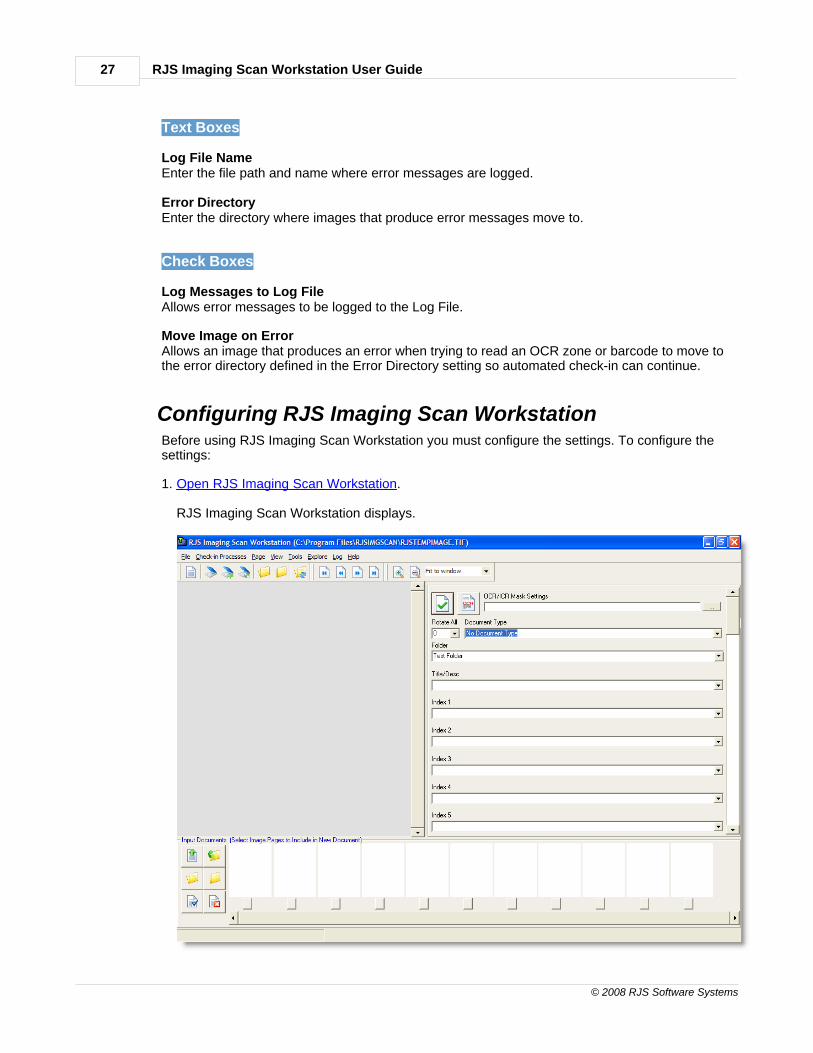
Opening RJS Imaging Scan WorkstationThe first step to setting up and configuring RJS Imaging Scan Workstation is to open theprogram.
To open RJS Imaging Scan Workstation:
1. Click the Start button.
2. Point to All Programs.
3. Point to RJS Software.
4. Point to RJS Imaging Scan Workstation.
5. Click RJS Imaging Scan Workstation.
RJS Imaging Scan Workstation opens.
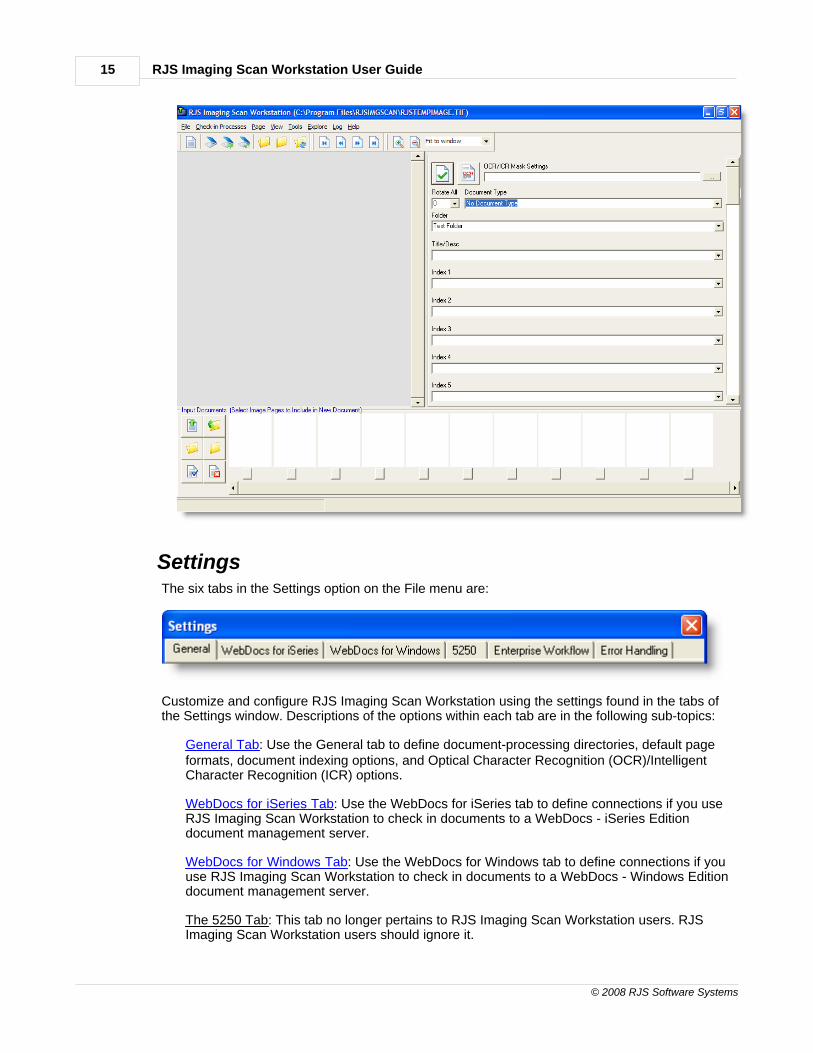
RJS Imaging Scan Workstation User Guide15
© 2008 RJS Software Systems
SettingsThe six tabs in the Settings option on the File menu are:
Customize and configure RJS Imaging Scan Workstation using the settings found in the tabs ofthe Settings window. Descriptions of the options within each tab are in the following sub-topics:
General Tab: Use the General tab to define document-processing directories, default pageformats, document indexing options, and Optical Character Recognition (OCR)/IntelligentCharacter Recognition (ICR) options.
WebDocs for iSeries Tab: Use the WebDocs for iSeries tab to define connections if you useRJS Imaging Scan Workstation to check in documents to a WebDocs - iSeries Editiondocument management server.
WebDocs for Windows Tab: Use the WebDocs for Windows tab to define connections if youuse RJS Imaging Scan Workstation to check in documents to a WebDocs - Windows Editiondocument management server.
The 5250 Tab: This tab no longer pertains to RJS Imaging Scan Workstation users. RJSImaging Scan Workstation users should ignore it.
Setup and Configuration 16
© 2008 RJS Software Systems
Enterprise Workflow Tab: Use the Enterprise Workflow tab to define connections if you useRJS Imaging Scan Workstation in conjunction with Enterprise Workflow.
Error Handling Tab: Use the Error Handling tab to define error-log and error-directoryconnections if you send messages to the log file.
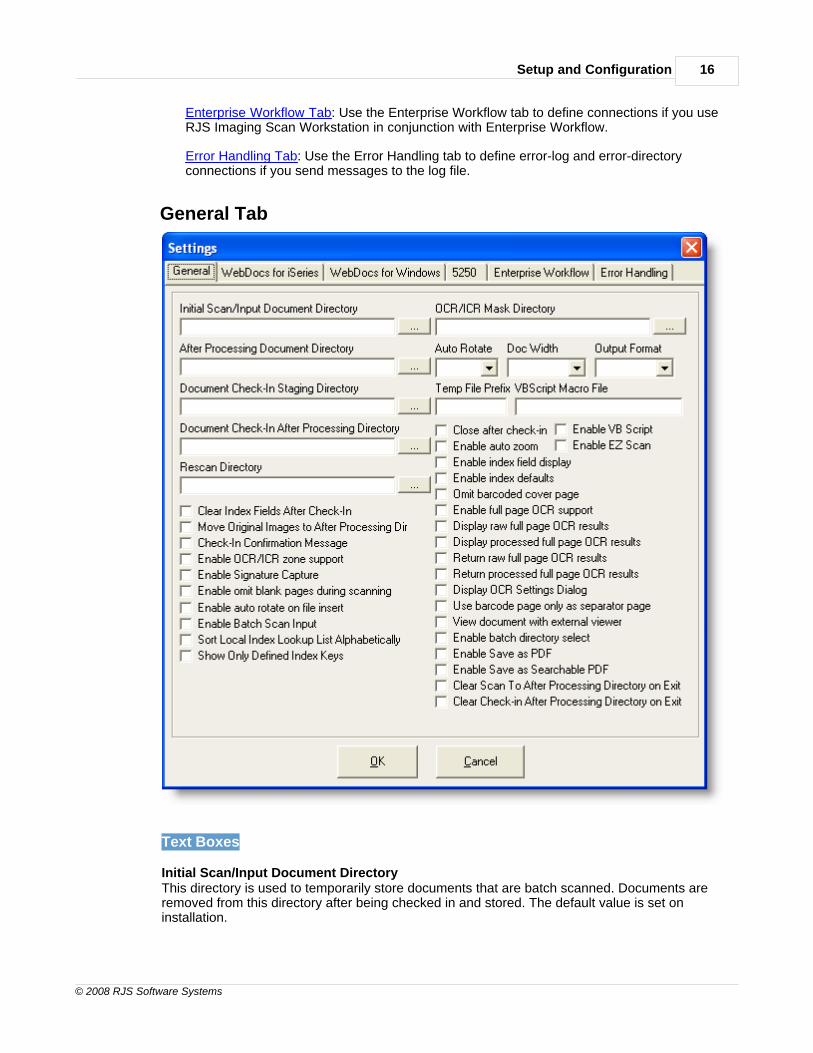
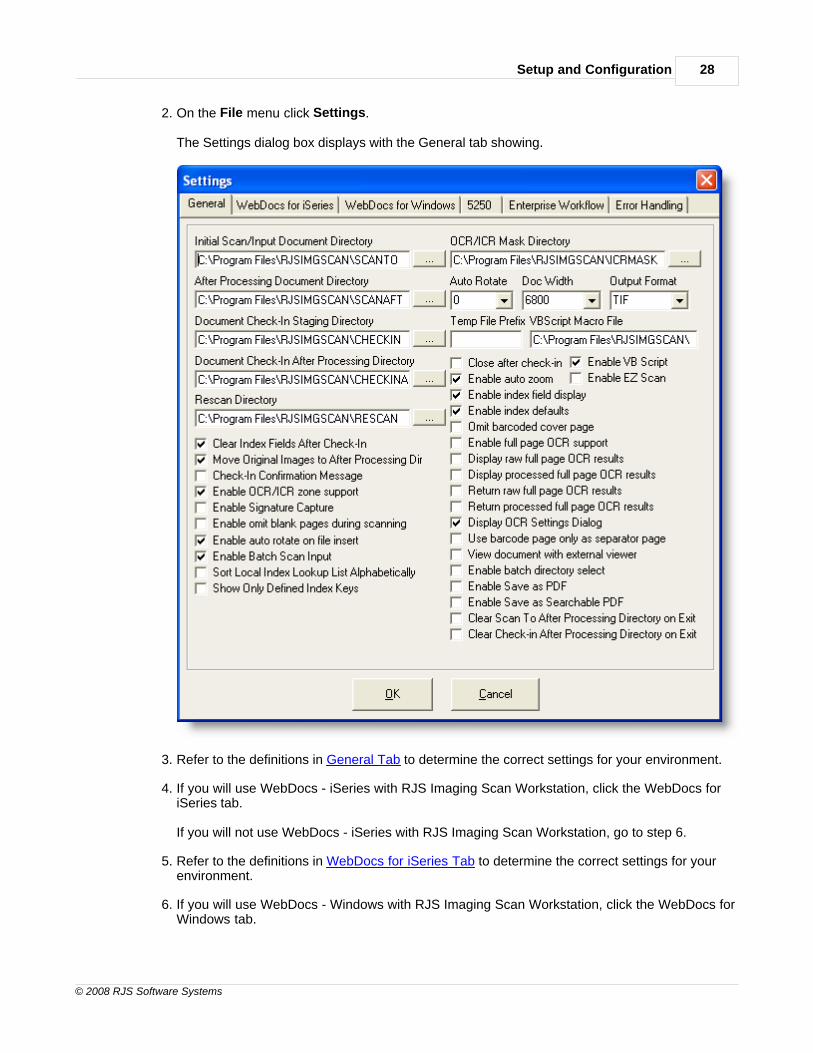
General Tab
Text Boxes
Initial Scan/Input Document DirectoryThis directory is used to temporarily store documents that are batch scanned. Documents areremoved from this directory after being checked in and stored. The default value is set oninstallation.

RJS Imaging Scan Workstation User Guide17
© 2008 RJS Software Systems
After Processing Document DirectoryDuring direct check-in documents are are moved to this directory. The default value is set oninstallation.
Document Check-In Staging DirectoryThis directory is used when you perform off-line scanning. The image document and theassociated index file (an RDX file) are stored here until they are checked in via the batch check-inprocess. The default value is set on installation.
Document Check-In After Processing DirectoryWhen you use the Check-In Batch from Check-In Directory on the Check-In Processes menu,documents are moved to this directory. The directory's default value is set on installation.
Rescan DirectoryWhen checking in documents from a batch scan, images that need to be rescanned can betemporarily stored in this directory. The default value is set on installation.
OCR/ICR Mask DirectoryThis directory holds OCR/ICR mask templates.
Auto RotateWhen using the Start Single Page Batch Check-in Process option, the auto rotate setting can beused to automatically rotate pages that are pulled from the Initial Scan/Input Document directory.Rotate values are degrees of a circle: 0, 90, 180, and 270.
Doc WidthThis entry determines the width of the Main Viewing and Work Area size and can maximize theviewing area on smaller screens.
Output FormatThis entry determines the output format that will be used when images are saved. By default,images will be saved as TIFF files. Additionally, images can be saved as GIF or JPG files.
Note: Changing this setting may change the size of the file.
Temp File PrefixIf specified, this prefix will be included at the beginning of every file name saved from this PC.
For example, you may want to apply the prefix SC (for scan) to the beginning of every image file.This SC prefix on the file name immediately tells you the file was converted from paper to digitalformat via the scanner.
For another example, you may want to apply a location number, like 001, as the file prefix ifmultiple sites are scanning to the same directory.
VB Script Macro FileThis setting determines the path to the script macro file. There are several script functions thatyou can use for Index look-up and retrieval. For more information, refer to Appendix C: ScriptingFunctions.
The path to the script macro file upon installing RJS Imaging Scan Workstation is C:\ProgramFiles\RJSIMGSCAN\RJSIMGSCAN.bas.
Check Boxes
Clear Index Fields After Check-In
Setup and Configuration 18
© 2008 RJS Software Systems
If enabled, the Index fields are cleared after each document is checked in.
Move Original Images to After Processing DirIf enabled, documents, when performing check-in of batch-scanned documents, are moved tothe After Processing Document directory after the selected pages are checked in.
Check-In Confirmation MessageIf enabled, a confirmation message is displayed before each document is checked in or beforeapplying an OCR mask to a document.
Enable OCR/ICR Zone SupportIf the RJS OCR/ICR support is loaded, you may enable this setting to use OCR support.
Enable Signature CaptureIf enabled, signatures can be captured as an image using a signature-capture device. Capturedsignatures can then be indexed and stored just like a scanned paper document. This settingcurrently support the WelchAllyn TT 1500 Signature Capture device.
Enable Omit Blank Pages During ScanningIf enabled, blank pages are included in the final-document scan results.
Enable Auto Rotate on File InsertIf enabled, documents are automatically rotated the selected number of degrees as files aremanually inserted into the Main Viewing and Work Area.
Enable Batch Scan InputIf you are not batch scanning documents, this setting hides the batch-input area at the bottom ofthe screen to allow more space in the Main Viewing and Work Area.
Sort Local Index Lookup List AlphabeticallyIf enabled, the entered Index-field values, which display after clicking the Index-field drop-downarrow, list alphabetically.
Show Only Defined Index KeysIf enabled, undefined Index fields do not display.
Close After Check-InIf enabled, the program closes after a document has been checked in. This is nice to do if theRJS scanning is integrated with other applications.
Enable Auto ZoomThis setting lets you perform an automatic zoom when using the Start Single Page BatchCheck-in Process option. Select the automatic-zoom area by drawing a box with the mousearound the selected image area. This process also works on most batch check-ins and mostmanual check-ins.
Enable Index Field DisplayWhen using the RJS Web check-in, this setting can be disabled to hide the Index-entry fields.During Web check-in, the Web browser is used to enter document Index information.
Enable Index DefaultsIf this setting and the Clear Index Fields After Check-In setting are enabled, document-Indexdefaults are honored. When scanning a new document or creating a new empty document adefault value is loaded if one has been set in the pull-down box settings for a particular Indexvalue. For more information on setting up a default Index-field value, refer to Text Boxes.
Omit Barcoded Cover Page
RJS Imaging Scan Workstation User Guide19
© 2008 RJS Software Systems
If enabled, the first page is removed from the document. Selecting this setting is useful withbarcode cover pages.
Enable Full Page OCR SupportIf enabled, allows for optical character recognition of the entire page. You can extract the text andsend it to WebDocs for use with the Text Search Engine.
Display Raw Full Page OCR ResultsIf enabled, RJS Imaging Scan Workstation displays character translations of the entire pagewithout special text-cleanup processing.
Display Processed Full Page OCR ResultsIf enabled, displays the final document based on full-page OCR and translation into individualwords. The words are alphabetized.
Note: No matter how many times any given word is captured, only one instance of that word isdisplayed.
Return Raw Full Page OCR ResultsIf enabled, raw OCR results are returned for viewing from the scan workstation. You can then editthese results before check-in.
Return Processed Full Page OCR ResultsIf enabled, processed–or edited–results are returned for viewing from the scan workstation. Youcan then edit these results before check-in.
Display OCR Settings DialogIf enabled, you are prompted with OCR settings prior to scan process.
Use Barcode Page only as Separator PageIf enabled, barcoded pages are used as separator pages. They are not included in the finaldocument before check-in.
View Document with External ViewerIf enabled, document images can be viewed using an application other than RJS Imaging ScanWorkstation.
Enable Batch Directory SelectIf enabled, you can select a directory to store documents before batch scanning and you canselect the directory of images to open when you click the Open Document button on the Menubartoolbar. If you enable this setting you can also select the Scan To directory when you click theOpen Input Document Directory button on the Input Document toolbar.
Enable Save as PDFIf enabled, images are saved as rasterized PDF documents. Rasterized means a document inwhich individual words within the document are not searchable by the PDF reader.
Enable Save as Searchable PDFIf enabled, images are saved as editable PDF documents. Editable means a document in whichindividual words within the document are searchable by the PDF reader.
Clear Scan To After Processing Directory on ExitIf enabled, the After Processing Document directory is cleared when you exit the program.
Clear Check-in After Processing Directory on ExitIf enabled, the Document Check-In After Processing directory is cleared when you exit RJSImaging Scan Workstation.
Setup and Configuration 20
© 2008 RJS Software Systems
Enable VB ScriptIf enabled, RJS Imaging Scan Workstation uses the script or scripts you have written to handleselected exit points. For more information on scripting in RJS Imaging Scan Workstation, refer to Appendix C: Scripting Functions.
Enabling this setting also adds browse buttons to the Document Type, Folder, Title/Desc, andIndex-field text boxes. For more information on the browse buttons, refer to the scripting function RunIndexFieldLookup in Appendix C: Scripting Functions.
Enable EZ ScanIf enabled, you can use the RJS EZ Scan Utility, which scans documents instead of RJS ImagingScan Workstation's built-in capabilities. The RJS EZ Scan Utility is helpful if you have highvolumes of documents to scan. For questions about using RJS EZ Scan Utility or your volume ofdocuments to scan, contact RJS Software.
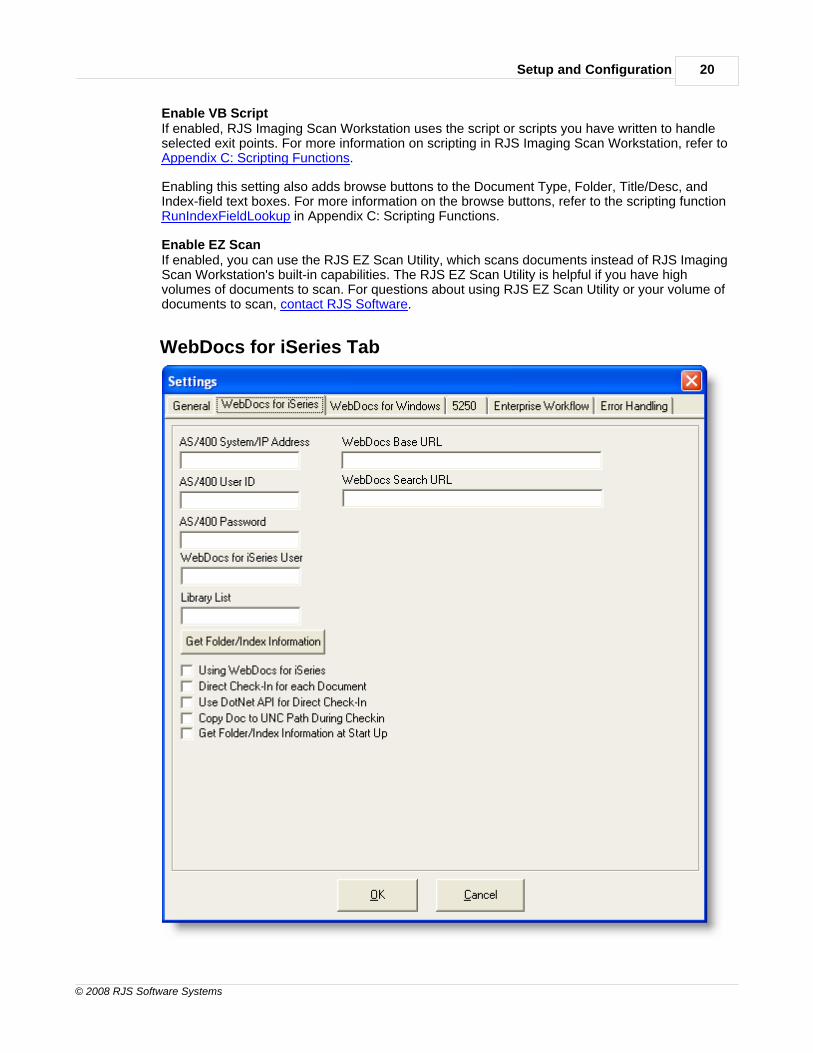
WebDocs for iSeries Tab
RJS Imaging Scan Workstation User Guide21
© 2008 RJS Software Systems
Note: You only need to configure these settings when using the WebDocs - iSeries Editiondocument management software.
Text Boxes
AS/400 System/IP AddressEnter a valid name or IP address for the System i system you are accessing.
AS/400 User IDEnter a valid System i user ID.
AS/400 PasswordEnter the valid System i password associated with the specified System i user ID.
WebDocs for iSeries UserEnter a valid WebDocs user ID that has access to all folders in which you will store documents.
Library ListEnter libraries, delimited by a semicolon, that you want to add to the library list of your current userID session.
WebDocs Base URLEnter the WebDocs base URL for the login page.
WebDocs Search URLEnter the WebDocs URL used when searching.
Button
GetFolder/Index InformationAfter enabling WebDocs by selecting the Using WebDocs for iSeries check box, exit RJS ImagingScan Workstation, re-start it, come back to this settings screen, and click this button to retrieve orupdate Folder and Index information from the WebDocs server.
Check Boxes
Using WebDocs for iSeriesEnable this setting if you are using the WebDocs - iSeries Edition document managementsoftware in conjunction with RJS Imaging Scan Workstation.
Direct Check-In for each DocumentIf enabled, documents are directly checked in to the WebDocs server. If not enabled, documentsare saved with a list of indices in the Document Check-In Staging directory.
Use DotNet API for Direct Check-InIf this setting is enabled along with the Direct Check-In for each Document setting, documents arechecked in to the WebDocs server using .NET API.
Note: RJS Software strongly recommends enabling the Use DotNet API for Direct Check-Insetting. Otherwise, documents are checked in to the WebDocs server using FTP, which will be aslower check-in process, and may not contain all functionality.
Copy Doc to UNC Path During Checkin
Setup and Configuration 22
© 2008 RJS Software Systems
This setting no longer pertains to RJS Imaging Scan Workstation users. RJS Imaging ScanWorkstation users should ignore it.
Get Folder/Index Information at Start UpIf enabled Folder and Index information is retrieved from the WebDocs server when you start RJSImaging Scan Workstation.
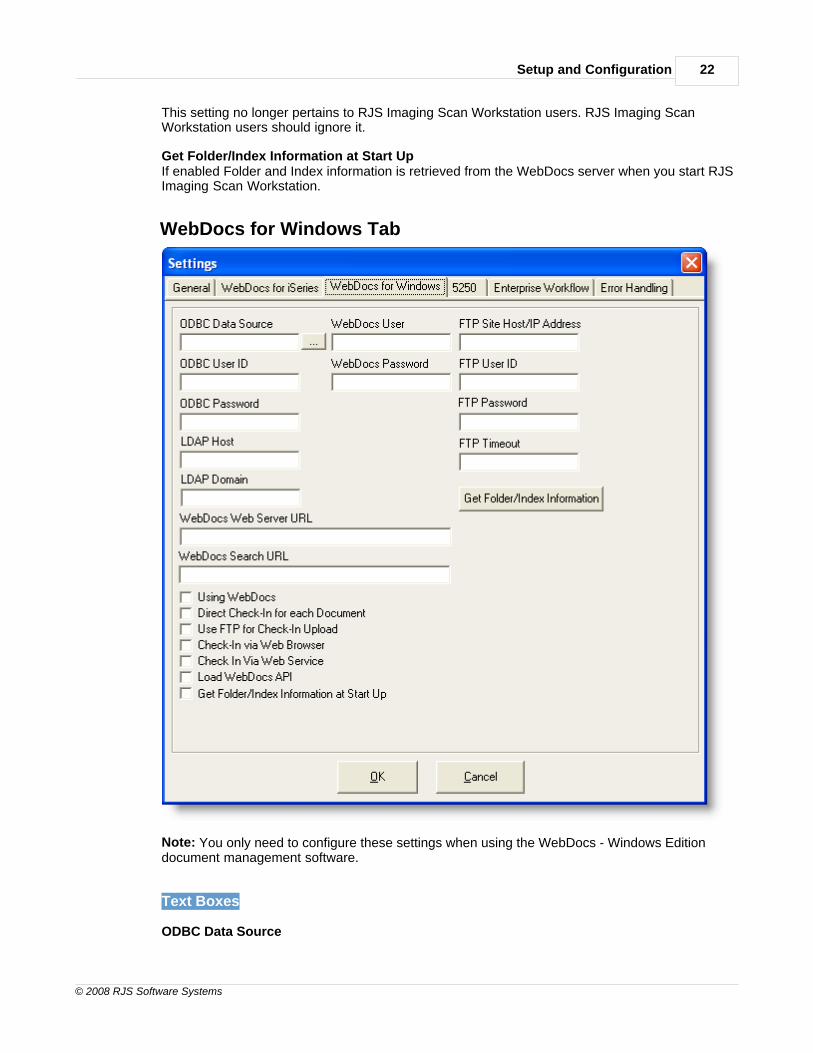
WebDocs for Windows Tab
Note: You only need to configure these settings when using the WebDocs - Windows Editiondocument management software.
Text Boxes
ODBC Data Source
RJS Imaging Scan Workstation User Guide23
© 2008 RJS Software Systems
Enter the ODBC data source pointing to the SQL Server where the WebDocs database resides.This ODBC data source is usually set to WebDocs.
ODBC User IDEnter a valid ODBC user ID for the selected ODBC data source.
ODBC PasswordEnter the valid ODBC password associated with the specified ODBC user ID.
LDAP HostEnter the system name or IP address for the LDAP server if using LDAP authentication forWebDocs - Windows Edition.
LDAP DomainEnter the domain that the LDAP server is on if using LDAP authentication for WebDocs -Windows Edition.
WebDocs Web Server URLEnter the correct URL for the WebDocs - Windows Edition server login.
WebDocs Search URLEnter the URL that, when you click on the link in Enterprise Workflow, takes you to the documentin WebDocs.
WebDocs UserEnter your valid WebDocs - Windows Edition user ID.
WebDocs PasswordEnter your valid password associated with your WebDocs - Windows Edition user ID.
FTP Site Host/IP AddressThis text box no longer pertains to RJS Imaging Scan Workstation users. RJS Imaging ScanWorkstation users should ignore it.
FTP User IDThis text box no longer pertains to RJS Imaging Scan Workstation users. RJS Imaging ScanWorkstation users should ignore it.
FTP PasswordThis text box no longer pertains to RJS Imaging Scan Workstation users. RJS Imaging ScanWorkstation users should ignore it.
FTP TimeoutThis text box no longer pertains to RJS Imaging Scan Workstation users. RJS Imaging ScanWorkstation users should ignore it.
Button
Get Folder/Index InformationAfter enabling WebDocs by selecting the Using WebDocs check box, exit RJS Imaging ScanWorkstation, re-start it, come back to this settings screen, and click this button to retrieve Folderand Index information from the WebDocs server.
Check Boxes
Setup and Configuration 24
© 2008 RJS Software Systems
Using WebDocsEnable this setting if using the WebDocs - Windows Edition document management software.
Direct Check-In for each DocumentIf enabled, documents are directly checked in to the WebDocs server. If not enabled, documentsare saved with a list of indices in the Document Check-In Staging directory.
Use FTP for Check-In UploadThis option no longer pertains to RJS Imaging Scan Workstation users. RJS Imaging ScanWorkstation users should ignore it.
Check-In via Web BrowserIf enabled, documents can be checked in via a Web browser.
Check In Via Web ServiceIf enabled, documents can be checked in via a WebDocs Web service.
Load WebDocs APIIf enabled, the WebDocs API is enabled and available for direct document check-in.
Get Folder/Index Information at Start UpIf enabled, this setting retrieves Folder and Index information from the WebDocs server when youstart RJS Imaging Scan Workstation.
RJS Imaging Scan Workstation User Guide25
© 2008 RJS Software Systems
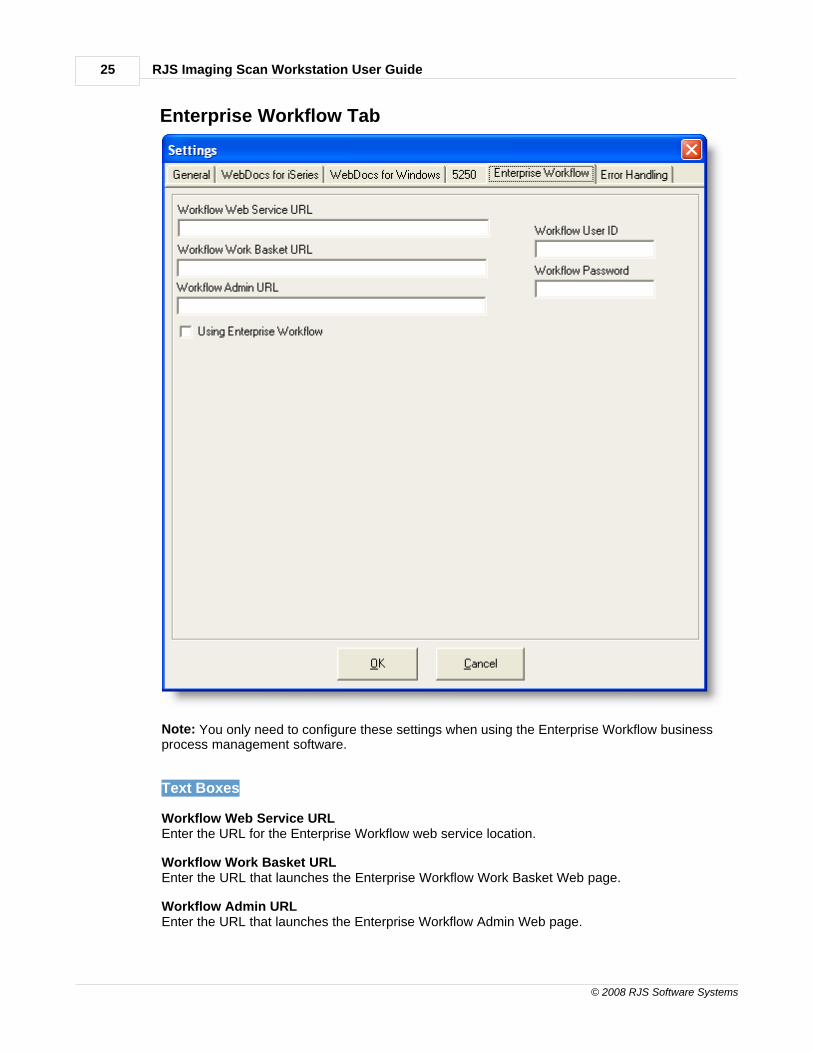
Enterprise Workflow Tab
Note: You only need to configure these settings when using the Enterprise Workflow businessprocess management software.
Text Boxes
Workflow Web Service URLEnter the URL for the Enterprise Workflow web service location.
Workflow Work Basket URLEnter the URL that launches the Enterprise Workflow Work Basket Web page.
Workflow Admin URLEnter the URL that launches the Enterprise Workflow Admin Web page.
Setup and Configuration 26
© 2008 RJS Software Systems
Workflow User IDEnter a valid Enterprise Workflow user ID.
Workflow PasswordEnter the valid password associated with the specified Enterprise Workflow user ID.
Check Box
Using Enterprise WorkflowEnable this setting if using the Enterprise Workflow business process management software.
Note: Selecting the Using Enterprise Workflow check box adds a Workflow toolbar to the MainViewing and Work Area.
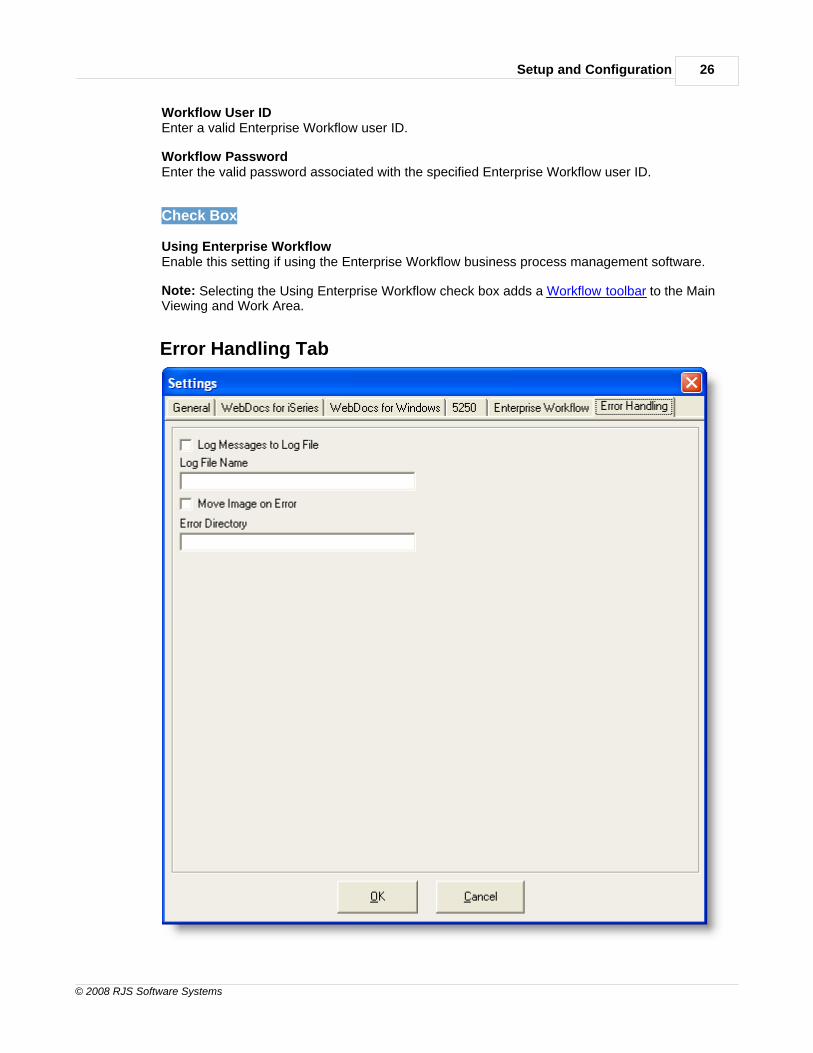
Error Handling Tab
RJS Imaging Scan Workstation User Guide27
© 2008 RJS Software Systems
Text Boxes
Log File NameEnter the file path and name where error messages are logged.
Error DirectoryEnter the directory where images that produce error messages move to.
Check Boxes
Log Messages to Log FileAllows error messages to be logged to the Log File.
Move Image on ErrorAllows an image that produces an error when trying to read an OCR zone or barcode to move tothe error directory defined in the Error Directory setting so automated check-in can continue.
Configuring RJS Imaging Scan WorkstationBefore using RJS Imaging Scan Workstation you must configure the settings. To configure thesettings:
1. Open RJS Imaging Scan Workstation.
RJS Imaging Scan Workstation displays.
Setup and Configuration 28
© 2008 RJS Software Systems
2. On the File menu click Settings.
The Settings dialog box displays with the General tab showing.
3. Refer to the definitions in General Tab to determine the correct settings for your environment.
4. If you will use WebDocs - iSeries with RJS Imaging Scan Workstation, click the WebDocs foriSeries tab.
If you will not use WebDocs - iSeries with RJS Imaging Scan Workstation, go to step 6.
5. Refer to the definitions in WebDocs for iSeries Tab to determine the correct settings for yourenvironment.
6. If you will use WebDocs - Windows with RJS Imaging Scan Workstation, click the WebDocs forWindows tab.
RJS Imaging Scan Workstation User Guide29
© 2008 RJS Software Systems
If you will not use WebDocs - Windows with RJS Imaging Scan Workstation, go to step 8.
7. Refer to the definitions in WebDocs for Windows Tab to determine the correct settings for yourenvironment.
8. If you will use Enterprise Workflow with RJS Imaging Scan Workstation, click the EnterpriseWorkflow tab.
9. Refer to the definitions in Enterprise Workflow Tab to determine the correct settings for yourenvironment.
10.Click OK to save the changes to the settings.
11.Exit and re-start RJS Imaging Scan Workstation to finalize the configuration changes.
Section
6
Getting Started
RJS Imaging Scan Workstation User Guide31
© 2008 RJS Software Systems
Getting Started
This section, which provides information on how to get started using RJS Imaging ScanWorkstation, includes the following topics:
Exploring the Interface
Scanning a Document
Appending a Page to a Document
Capturing Batch Documents
Checking in a Document
Saving a Document
Exploring the InterfaceThis topic, which provides information on RJS Imaging Scan Workstation's interface, includes thefollowing sub-topics:
Sections
Menus
Toolbars
Text Boxes
Sections
This sub-topic gives information about RJS Imaging Scan Workstation's three main sections:
Main Viewing and Work Area
Index Entry Area
Input Document Queue
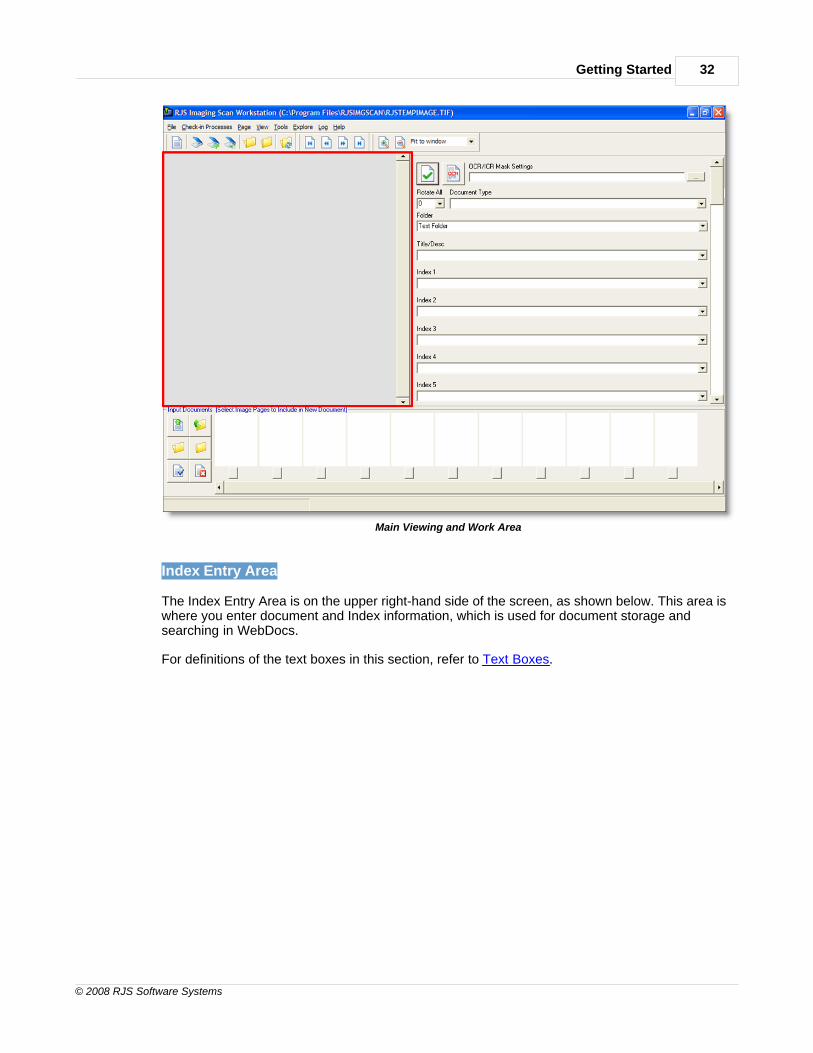
Main Viewing and Work Area
The Main Viewing and Work Area is on the upper left-hand side of the screen, as shown below.This area is where you build documents and view the different pages in those documents.
Getting Started 32
© 2008 RJS Software Systems
Main Viewing and Work Area
Index Entry Area
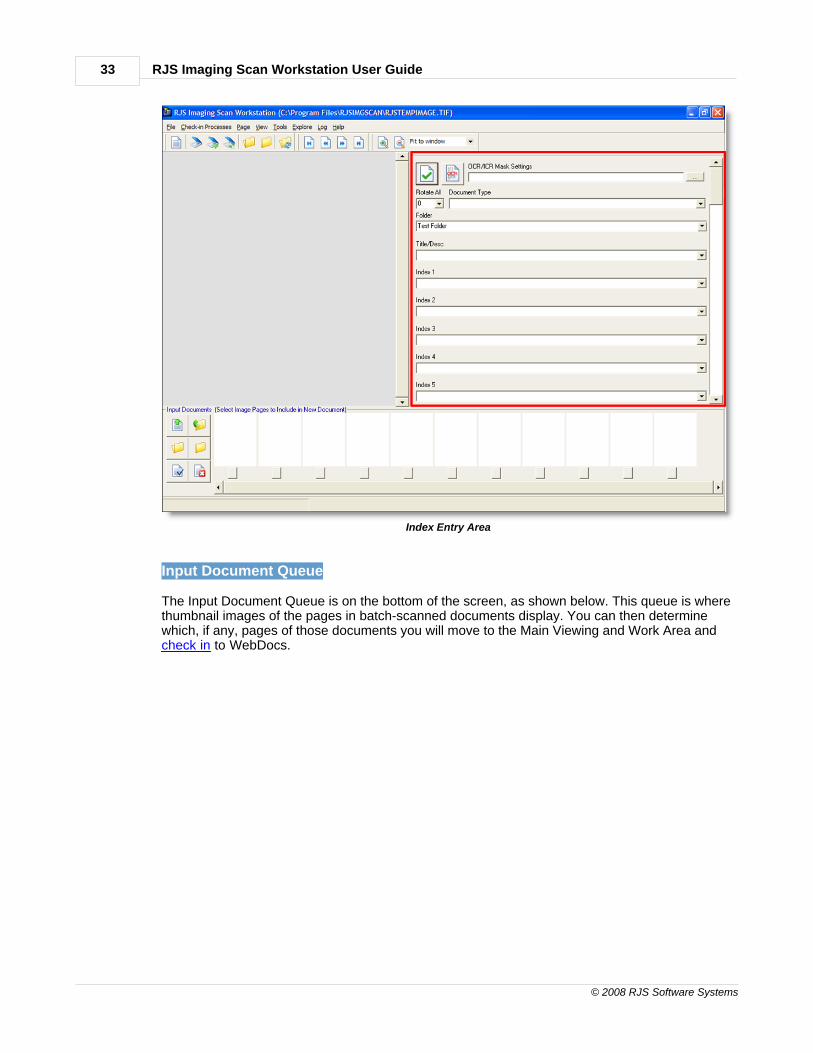
The Index Entry Area is on the upper right-hand side of the screen, as shown below. This area iswhere you enter document and Index information, which is used for document storage andsearching in WebDocs.
For definitions of the text boxes in this section, refer to Text Boxes.
RJS Imaging Scan Workstation User Guide33
© 2008 RJS Software Systems
Index Entry Area
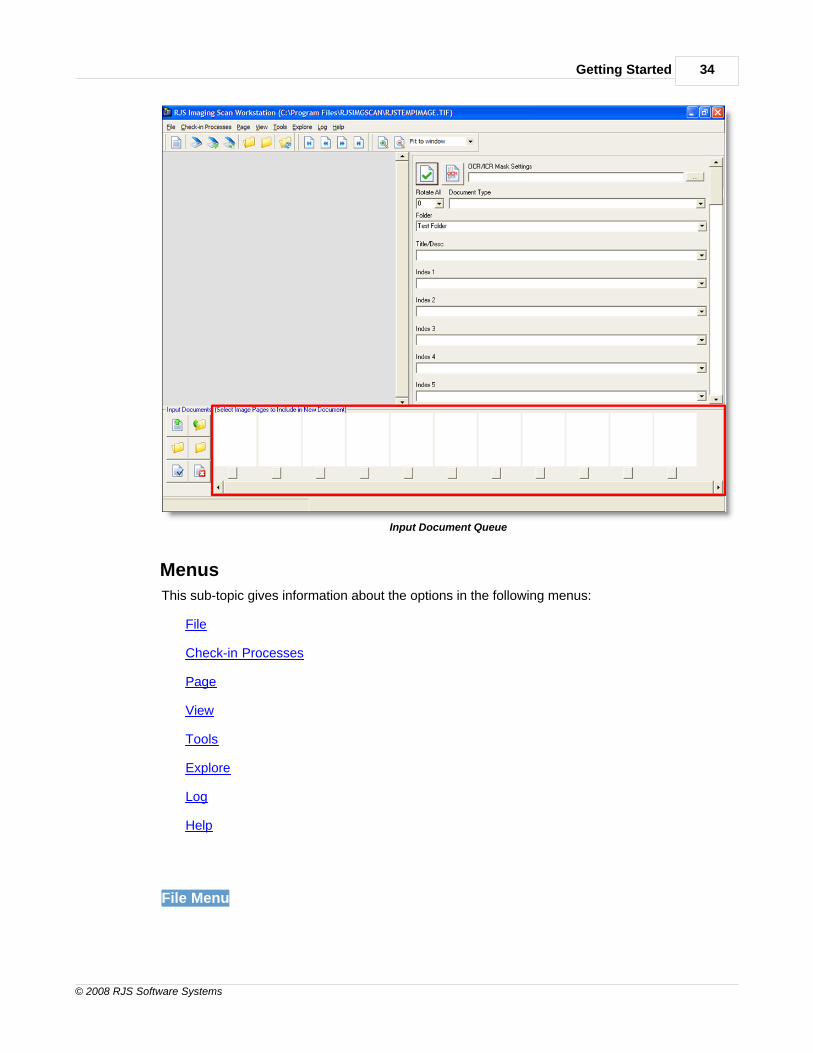
Input Document Queue
The Input Document Queue is on the bottom of the screen, as shown below. This queue is wherethumbnail images of the pages in batch-scanned documents display. You can then determinewhich, if any, pages of those documents you will move to the Main Viewing and Work Area and check in to WebDocs.
Getting Started 34
© 2008 RJS Software Systems
Input Document Queue
Menus
This sub-topic gives information about the options in the following menus:
File
Check-in Processes
Page
View
Tools
Explore
Log
Help
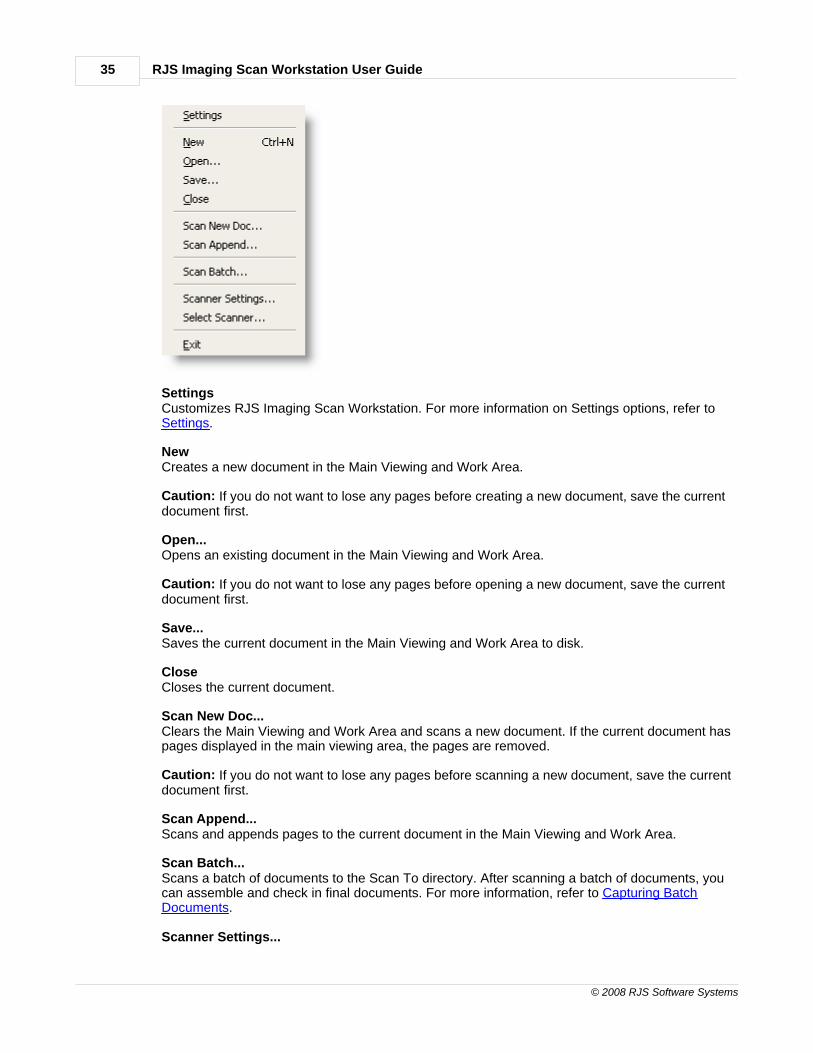
File Menu
RJS Imaging Scan Workstation User Guide35
© 2008 RJS Software Systems
SettingsCustomizes RJS Imaging Scan Workstation. For more information on Settings options, refer to Settings.
NewCreates a new document in the Main Viewing and Work Area.
Caution: If you do not want to lose any pages before creating a new document, save the currentdocument first.
Open...Opens an existing document in the Main Viewing and Work Area.
Caution: If you do not want to lose any pages before opening a new document, save the currentdocument first.
Save...Saves the current document in the Main Viewing and Work Area to disk.
CloseCloses the current document.
Scan New Doc...Clears the Main Viewing and Work Area and scans a new document. If the current document haspages displayed in the main viewing area, the pages are removed.
Caution: If you do not want to lose any pages before scanning a new document, save the currentdocument first.
Scan Append...Scans and appends pages to the current document in the Main Viewing and Work Area.
Scan Batch...Scans a batch of documents to the Scan To directory. After scanning a batch of documents, youcan assemble and check in final documents. For more information, refer to Capturing BatchDocuments.
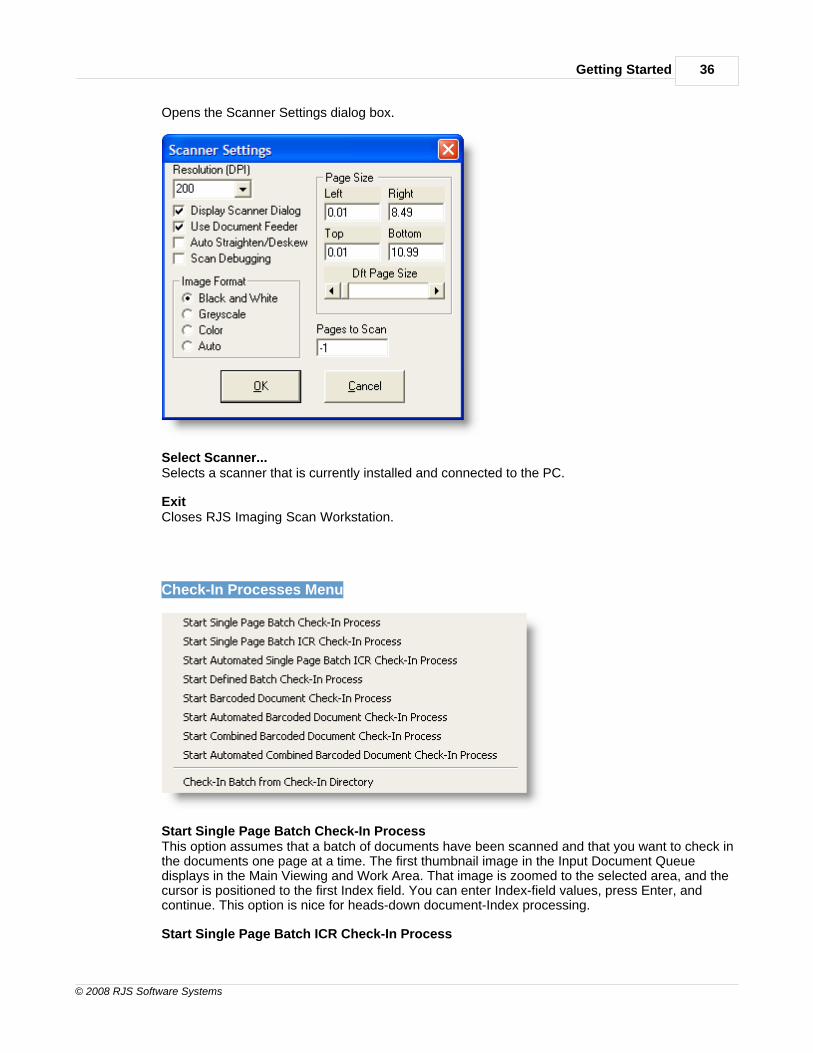
Scanner Settings...
Getting Started 36
© 2008 RJS Software Systems
Opens the Scanner Settings dialog box.
Select Scanner...Selects a scanner that is currently installed and connected to the PC.
ExitCloses RJS Imaging Scan Workstation.
Check-In Processes Menu
Start Single Page Batch Check-In ProcessThis option assumes that a batch of documents have been scanned and that you want to check inthe documents one page at a time. The first thumbnail image in the Input Document Queuedisplays in the Main Viewing and Work Area. That image is zoomed to the selected area, and thecursor is positioned to the first Index field. You can enter Index-field values, press Enter, andcontinue. This option is nice for heads-down document-Index processing.
Start Single Page Batch ICR Check-In Process
RJS Imaging Scan Workstation User Guide37
© 2008 RJS Software Systems
This option assumes that a batch of documents have been scanned and that you want to check inthe documents one page at a time using the OCR feature to capture text values from everydocument. The first thumbnail image in the Input Document Aueue displays in the Main Viewingand Work Area. That image is zoomed to the selected area, and the OCR-mapped field valuesare extracted and placed into the appropriate Index fields. The cursor is then positioned to the firstIndex field so you can enter additional Index-field values, press Enter, and continue. This option isnice for heads-down document-Index processing.
Start Automated Single Page Batch ICR Check-In ProcessThis option is similar to the Start Single Page Batch ICR Check-In Process option, but thedocument is automatically checked in. There is no opportunity to correct Index-field values unlessan error occurs. The process is entirely automated.
Note: Scan documents at 300 dots per inch (DPI) for the highest level of accuracy.
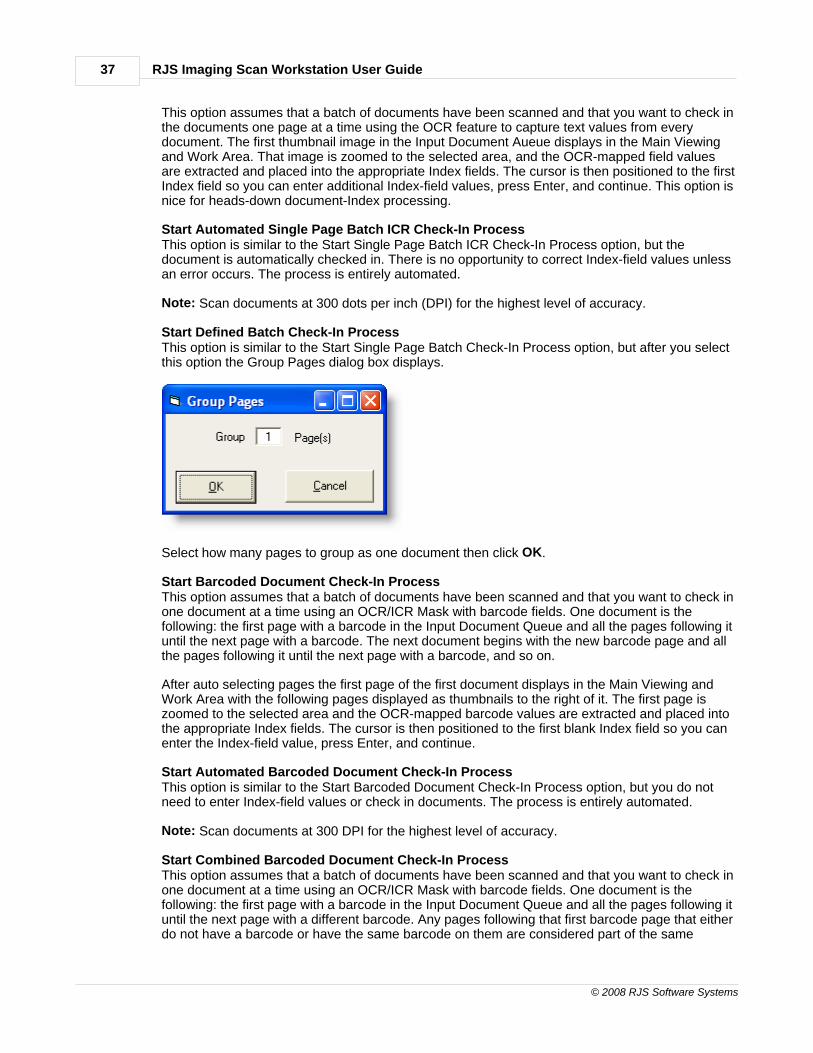
Start Defined Batch Check-In ProcessThis option is similar to the Start Single Page Batch Check-In Process option, but after you selectthis option the Group Pages dialog box displays.
Select how many pages to group as one document then click OK.
Start Barcoded Document Check-In ProcessThis option assumes that a batch of documents have been scanned and that you want to check inone document at a time using an OCR/ICR Mask with barcode fields. One document is thefollowing: the first page with a barcode in the Input Document Queue and all the pages following ituntil the next page with a barcode. The next document begins with the new barcode page and allthe pages following it until the next page with a barcode, and so on.
After auto selecting pages the first page of the first document displays in the Main Viewing andWork Area with the following pages displayed as thumbnails to the right of it. The first page iszoomed to the selected area and the OCR-mapped barcode values are extracted and placed intothe appropriate Index fields. The cursor is then positioned to the first blank Index field so you canenter the Index-field value, press Enter, and continue.
Start Automated Barcoded Document Check-In ProcessThis option is similar to the Start Barcoded Document Check-In Process option, but you do notneed to enter Index-field values or check in documents. The process is entirely automated.
Note: Scan documents at 300 DPI for the highest level of accuracy.
Start Combined Barcoded Document Check-In ProcessThis option assumes that a batch of documents have been scanned and that you want to check inone document at a time using an OCR/ICR Mask with barcode fields. One document is thefollowing: the first page with a barcode in the Input Document Queue and all the pages following ituntil the next page with a different barcode. Any pages following that first barcode page that eitherdo not have a barcode or have the same barcode on them are considered part of the same
Getting Started 38
© 2008 RJS Software Systems
document. The next document begins at the page containing the new barcode value and all thepages following it until the next page with a different barcode value, and so on.
The first page of the first document displays in the Main Viewing and Work Area with the followingpages displayed as thumbnails to the right of it. The first page is zoomed to the selected area andthe OCR-mapped barcode values are extracted and placed into the appropriate Index fields. Thecursor is then positioned to the first Index field so you can enter the Index-field value, press Enter,and continue.
Start Automated Combined Barcoded Document Check-In ProcessThis option is similar to the Start Combined Barcoded Document Check-In Process option, butyou do not need to enter Index-field values or check in documents. The process is entirelyautomated.
Note: Scan documents at 300 DPI for the highest level of accuracy.
Check-In Batch from Check-In DirectoryThis option assumes that you either already checked in documents to the Check-In directory,which is called indirect check-in, or that documents are coming from a different application. If yourdocuments come from a different application, you must have an image file and an RDX file.Selecting this option checks in the documents that are in the Check-In directory to WebDocs.
Note: Indirect check-in streamlines the process, eliminating the one-to-three second delaybetween each direct check-in to WebDocs.
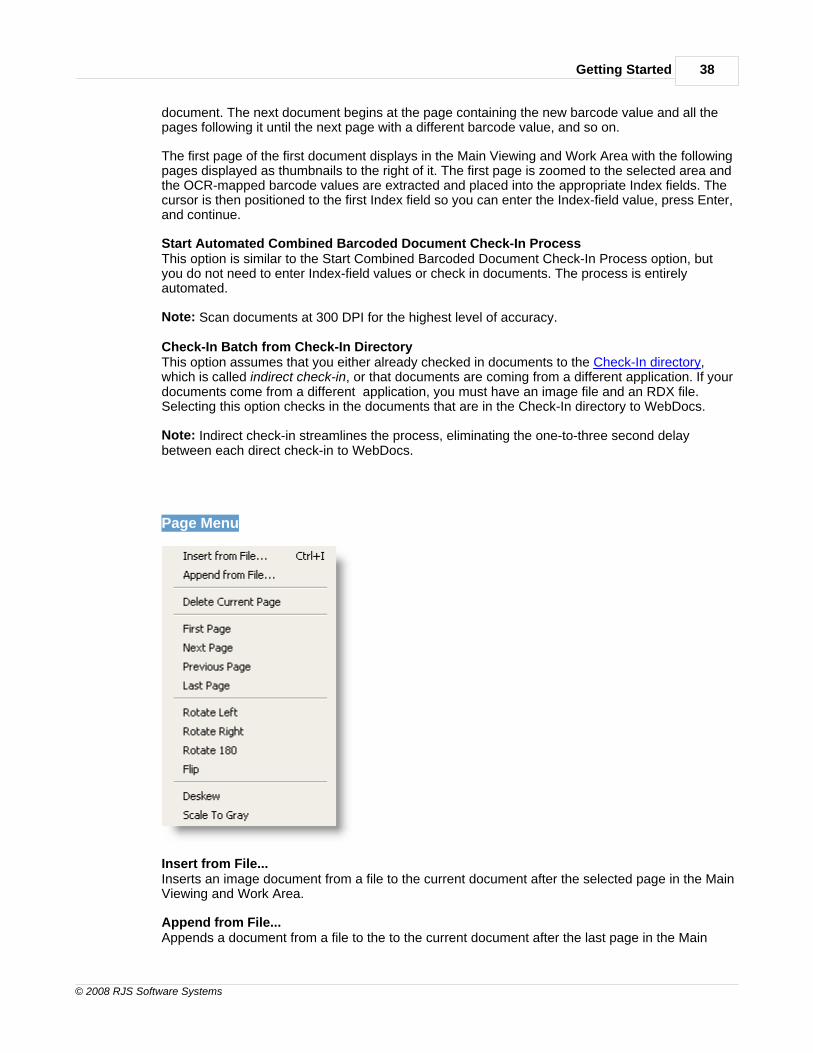
Page Menu
Insert from File...Inserts an image document from a file to the current document after the selected page in the MainViewing and Work Area.
Append from File...Appends a document from a file to the to the current document after the last page in the Main
RJS Imaging Scan Workstation User Guide39
© 2008 RJS Software Systems
Viewing and Work Area.
Delete Current PageDeletes the current document page from in the Main Viewing and Work Area.
First PageDisplays the first document page in the Main Viewing and Work Area.
Next PageDisplays the next document page in the Main Viewing and Work Area.
Previous PageDisplays the previous document page in the Main Viewing and Work Area.
Last PageDisplays the last document page in the Main Viewing and Work Area.
Rotate LeftRotates the current page in the Main Viewing and Work Area left 90 degrees.
Rotate RightRotates the current page in the Main Viewing and Work Area right 90 degrees.
Rotate 180Rotates the current page in the Main Viewing and Work Area 180 degrees.
FlipFlips the current page in the Main Viewing and Work Area on its horizontal axis.
DeskewAttempts to straighten a document image if it scanned slightly crooked.
Scale to GrayConverts images to grayscale.
View Menu
Getting Started 40
© 2008 RJS Software Systems
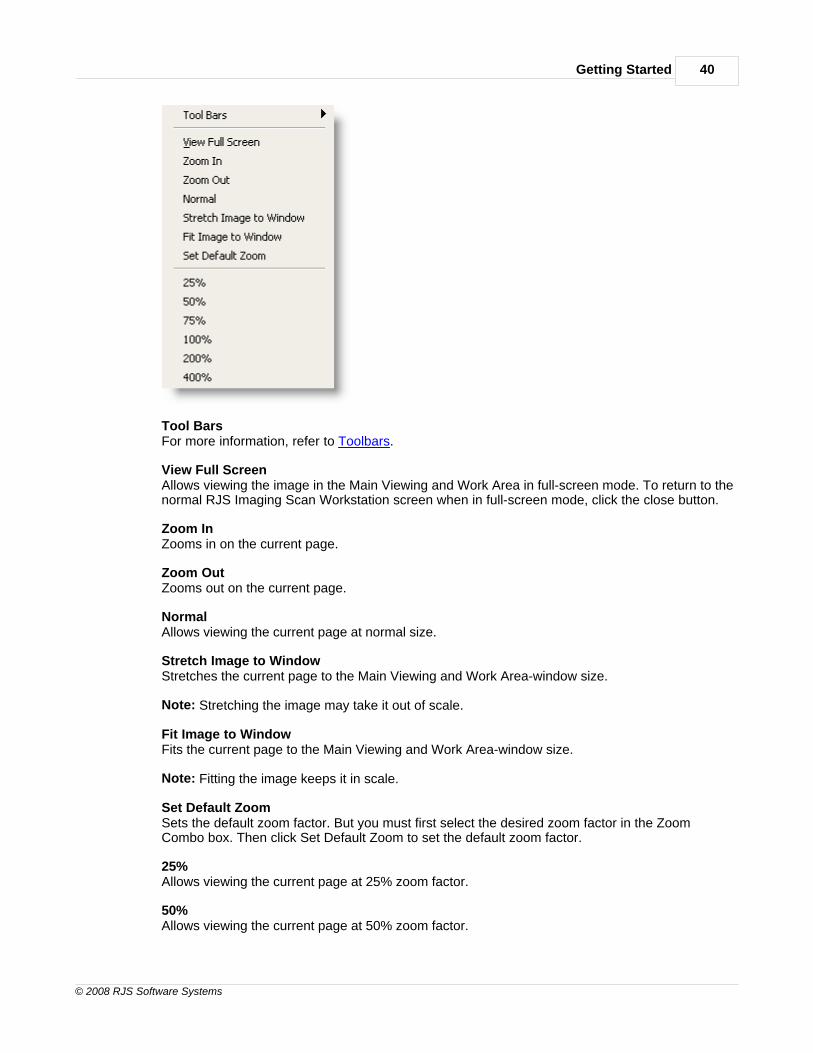
Tool BarsFor more information, refer to Toolbars.
View Full ScreenAllows viewing the image in the Main Viewing and Work Area in full-screen mode. To return to thenormal RJS Imaging Scan Workstation screen when in full-screen mode, click the close button.
Zoom InZooms in on the current page.
Zoom OutZooms out on the current page.
NormalAllows viewing the current page at normal size.
Stretch Image to WindowStretches the current page to the Main Viewing and Work Area-window size.
Note: Stretching the image may take it out of scale.
Fit Image to WindowFits the current page to the Main Viewing and Work Area-window size.
Note: Fitting the image keeps it in scale.
Set Default ZoomSets the default zoom factor. But you must first select the desired zoom factor in the ZoomCombo box. Then click Set Default Zoom to set the default zoom factor.
25%Allows viewing the current page at 25% zoom factor.
50%Allows viewing the current page at 50% zoom factor.
RJS Imaging Scan Workstation User Guide41
© 2008 RJS Software Systems
75%Allows viewing the current page at 75% zoom factor.
100%Allows viewing the current page at 100% zoom factor.
200%Allows viewing the current page at 200% zoom factor.
400%Allows viewing the current page at 400% zoom factor.
Tools Menu
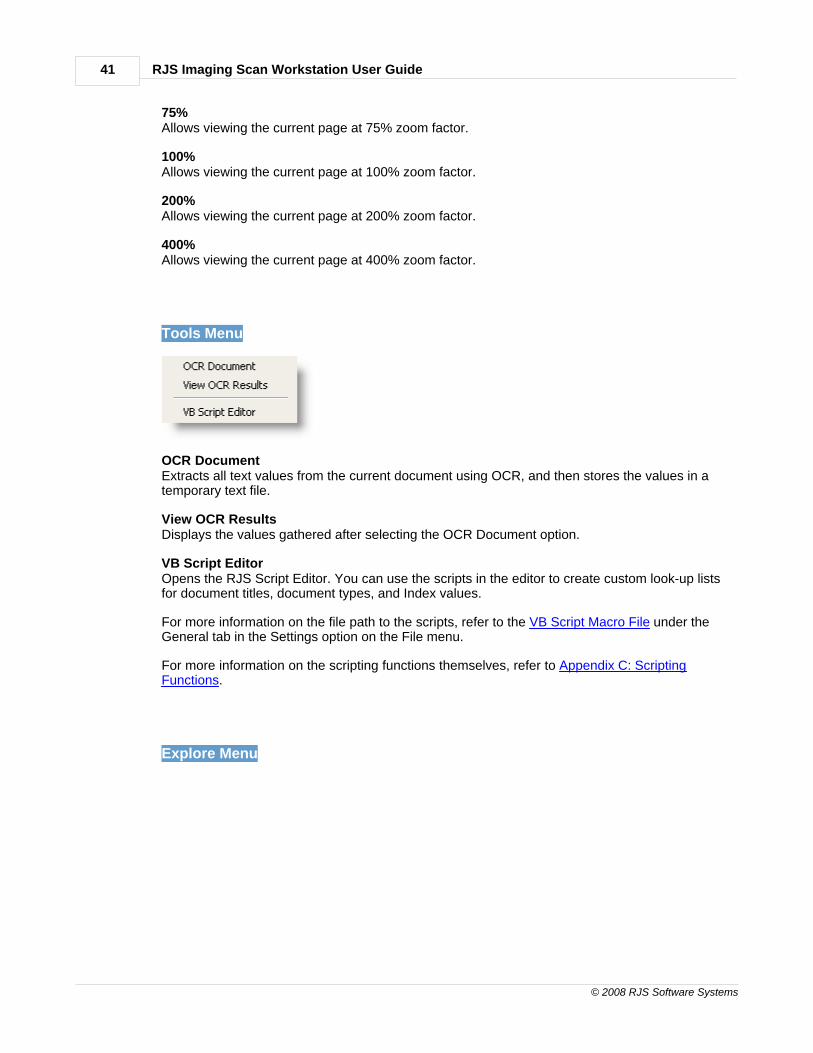
OCR DocumentExtracts all text values from the current document using OCR, and then stores the values in atemporary text file.
View OCR ResultsDisplays the values gathered after selecting the OCR Document option.
VB Script EditorOpens the RJS Script Editor. You can use the scripts in the editor to create custom look-up listsfor document titles, document types, and Index values.
For more information on the file path to the scripts, refer to the VB Script Macro File under theGeneral tab in the Settings option on the File menu.
For more information on the scripting functions themselves, refer to Appendix C: ScriptingFunctions.
Explore Menu
Getting Started 42
© 2008 RJS Software Systems
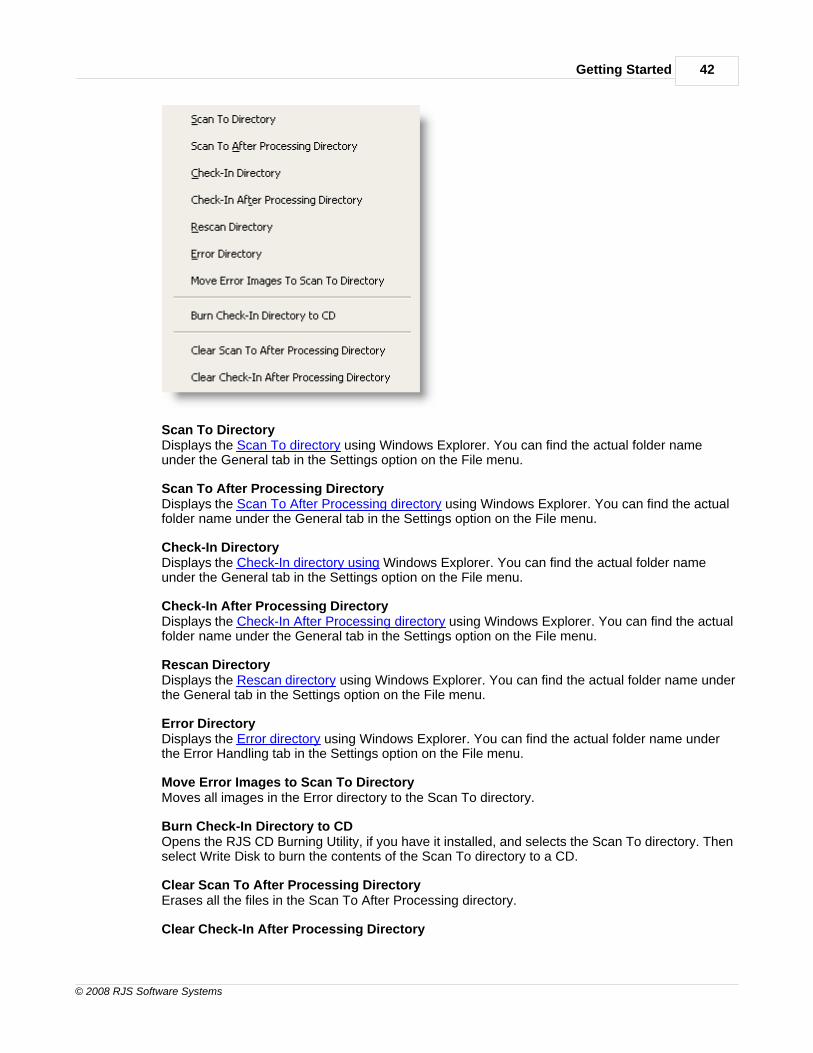
Scan To DirectoryDisplays the Scan To directory using Windows Explorer. You can find the actual folder nameunder the General tab in the Settings option on the File menu.
Scan To After Processing DirectoryDisplays the Scan To After Processing directory using Windows Explorer. You can find the actualfolder name under the General tab in the Settings option on the File menu.
Check-In DirectoryDisplays the Check-In directory using Windows Explorer. You can find the actual folder nameunder the General tab in the Settings option on the File menu.
Check-In After Processing DirectoryDisplays the Check-In After Processing directory using Windows Explorer. You can find the actualfolder name under the General tab in the Settings option on the File menu.
Rescan DirectoryDisplays the Rescan directory using Windows Explorer. You can find the actual folder name underthe General tab in the Settings option on the File menu.
Error DirectoryDisplays the Error directory using Windows Explorer. You can find the actual folder name underthe Error Handling tab in the Settings option on the File menu.
Move Error Images to Scan To DirectoryMoves all images in the Error directory to the Scan To directory.
Burn Check-In Directory to CDOpens the RJS CD Burning Utility, if you have it installed, and selects the Scan To directory. Thenselect Write Disk to burn the contents of the Scan To directory to a CD.
Clear Scan To After Processing DirectoryErases all the files in the Scan To After Processing directory.
Clear Check-In After Processing Directory
RJS Imaging Scan Workstation User Guide43
© 2008 RJS Software Systems
Erases all the files in the Check-In After Processing directory.
Log Menu
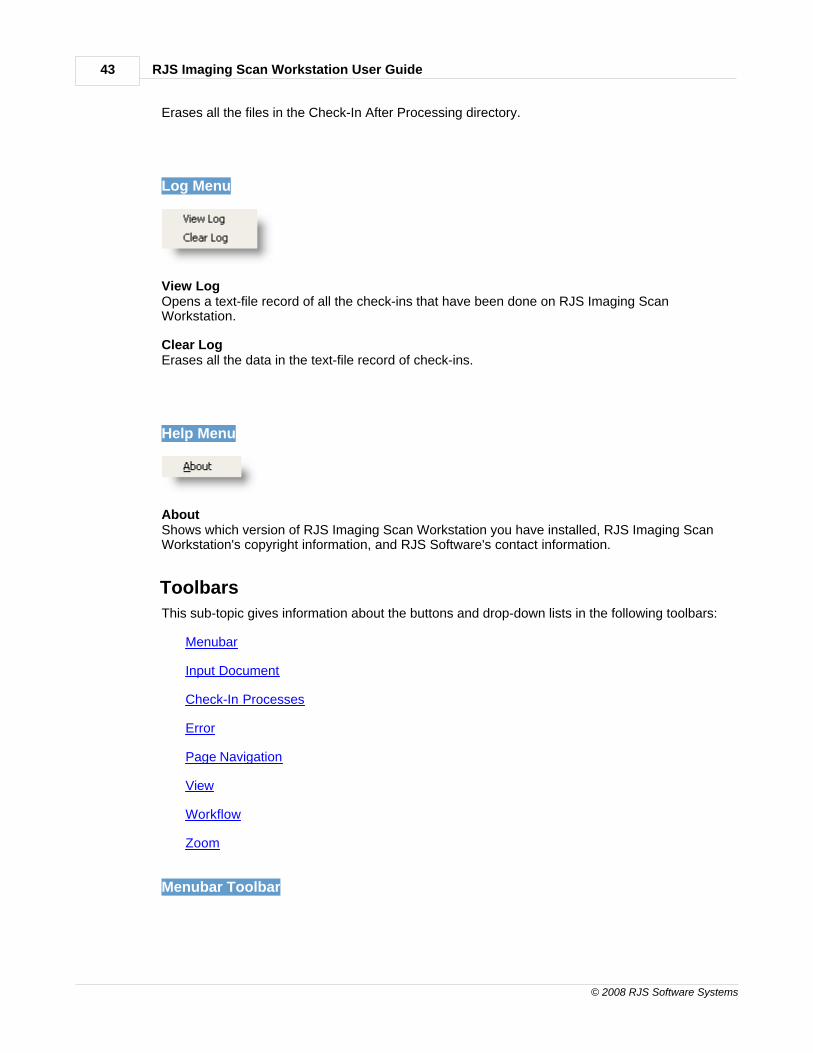
View LogOpens a text-file record of all the check-ins that have been done on RJS Imaging ScanWorkstation.
Clear LogErases all the data in the text-file record of check-ins.
Help Menu
AboutShows which version of RJS Imaging Scan Workstation you have installed, RJS Imaging ScanWorkstation's copyright information, and RJS Software's contact information.
Toolbars
This sub-topic gives information about the buttons and drop-down lists in the following toolbars:
Menubar
Input Document
Check-In Processes
Error
Page Navigation
View
Workflow
Zoom
Menubar Toolbar
Getting Started 44
© 2008 RJS Software Systems
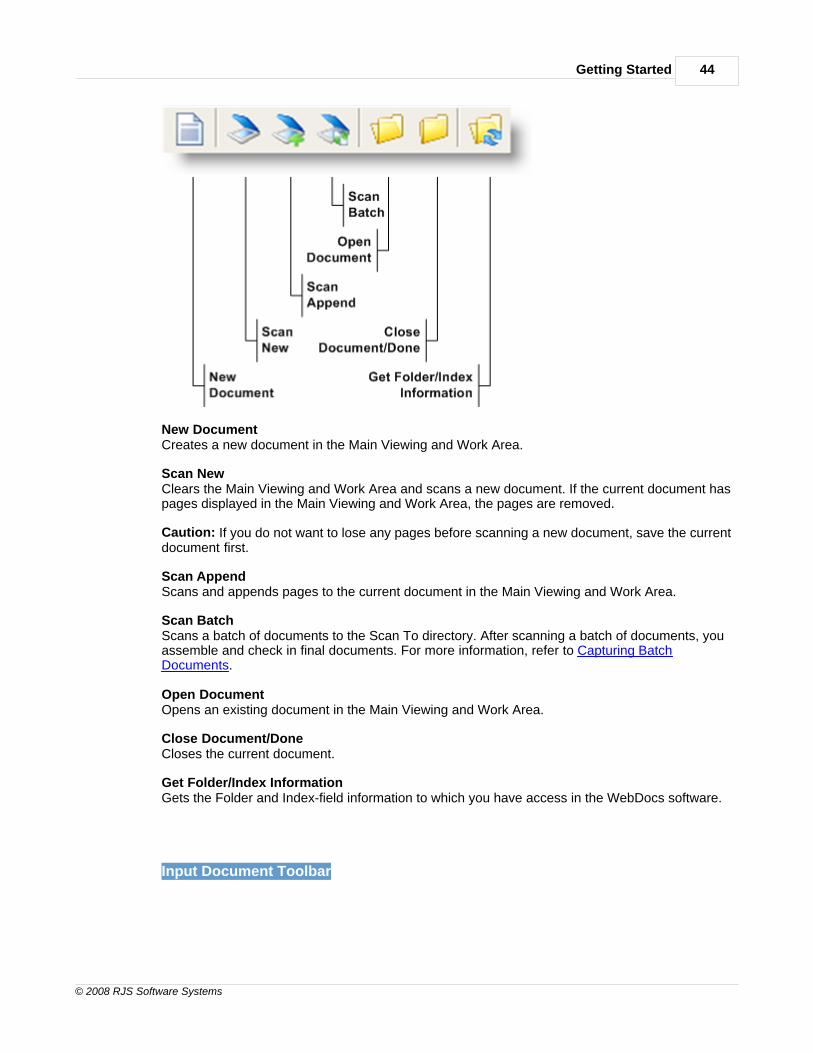
New DocumentCreates a new document in the Main Viewing and Work Area.
Scan NewClears the Main Viewing and Work Area and scans a new document. If the current document haspages displayed in the Main Viewing and Work Area, the pages are removed.
Caution: If you do not want to lose any pages before scanning a new document, save the currentdocument first.
Scan AppendScans and appends pages to the current document in the Main Viewing and Work Area.
Scan BatchScans a batch of documents to the Scan To directory. After scanning a batch of documents, youassemble and check in final documents. For more information, refer to Capturing BatchDocuments.
Open DocumentOpens an existing document in the Main Viewing and Work Area.
Close Document/DoneCloses the current document.
Get Folder/Index InformationGets the Folder and Index-field information to which you have access in the WebDocs software.
Input Document Toolbar
RJS Imaging Scan Workstation User Guide45
© 2008 RJS Software Systems
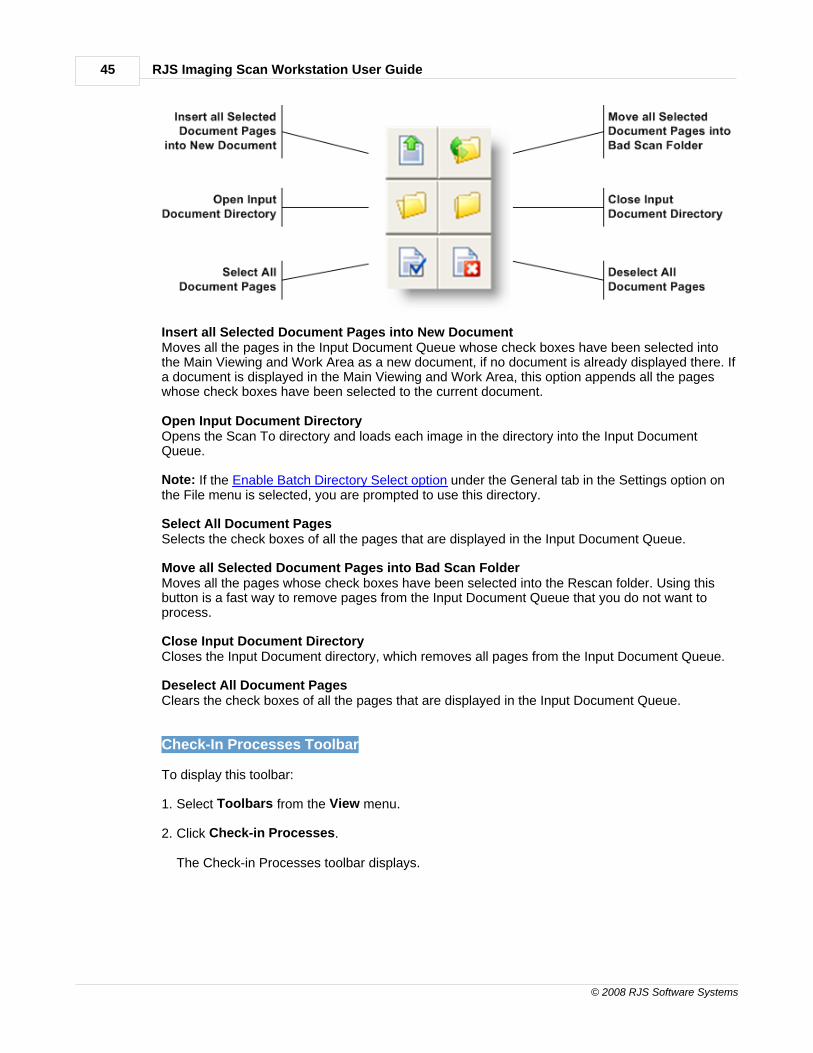
Insert all Selected Document Pages into New DocumentMoves all the pages in the Input Document Queue whose check boxes have been selected intothe Main Viewing and Work Area as a new document, if no document is already displayed there. Ifa document is displayed in the Main Viewing and Work Area, this option appends all the pageswhose check boxes have been selected to the current document.
Open Input Document DirectoryOpens the Scan To directory and loads each image in the directory into the Input DocumentQueue.
Note: If the Enable Batch Directory Select option under the General tab in the Settings option onthe File menu is selected, you are prompted to use this directory.
Select All Document PagesSelects the check boxes of all the pages that are displayed in the Input Document Queue.
Move all Selected Document Pages into Bad Scan FolderMoves all the pages whose check boxes have been selected into the Rescan folder. Using thisbutton is a fast way to remove pages from the Input Document Queue that you do not want toprocess.
Close Input Document DirectoryCloses the Input Document directory, which removes all pages from the Input Document Queue.
Deselect All Document PagesClears the check boxes of all the pages that are displayed in the Input Document Queue.
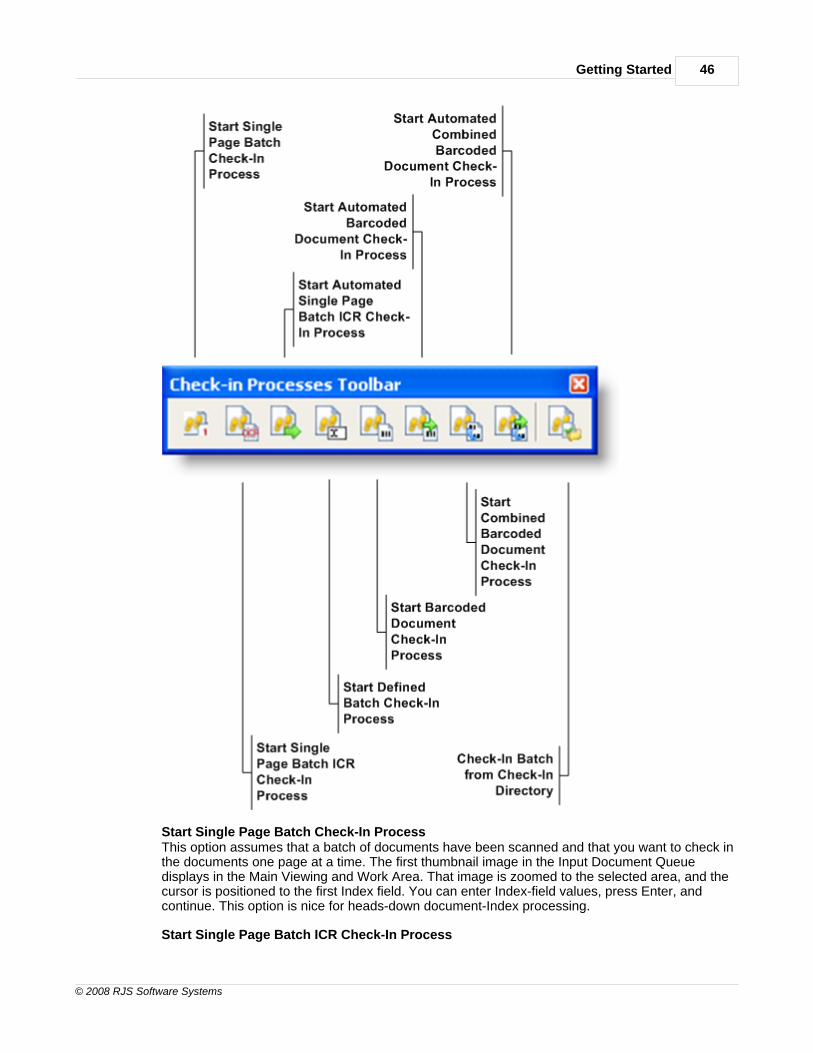
Check-In Processes Toolbar
To display this toolbar:
1. Select Toolbars from the View menu.
2. Click Check-in Processes.
The Check-in Processes toolbar displays.
Getting Started 46
© 2008 RJS Software Systems
Start Single Page Batch Check-In ProcessThis option assumes that a batch of documents have been scanned and that you want to check inthe documents one page at a time. The first thumbnail image in the Input Document Queuedisplays in the Main Viewing and Work Area. That image is zoomed to the selected area, and thecursor is positioned to the first Index field. You can enter Index-field values, press Enter, andcontinue. This option is nice for heads-down document-Index processing.
Start Single Page Batch ICR Check-In Process
RJS Imaging Scan Workstation User Guide47
© 2008 RJS Software Systems
This option assumes that a batch of documents have been scanned and that you want to check inthe documents one page at a time using the OCR feature to capture text values from everydocument. The first thumbnail image in the Input Document Queue displays in the Main Viewingand Work Area. That image is zoomed to the selected area, and the OCR-mapped field valuesare extracted and placed into the appropriate Index fields. The cursor is then positioned to the firstIndex field so you can enter additional Index-field values, press Enter, and continue. This option isnice for heads-down document-Index processing.
Start Automated Single Page Batch ICR Check-In ProcessThis option is similar to the Start Single Page Batch ICR Check-In Process option, but thedocument is automatically checked in. There is no opportunity to correct Index-field values unlessan error occurs. The process is entirely automated.
Note: Scan documents at 300 DPI for the highest level of accuracy.
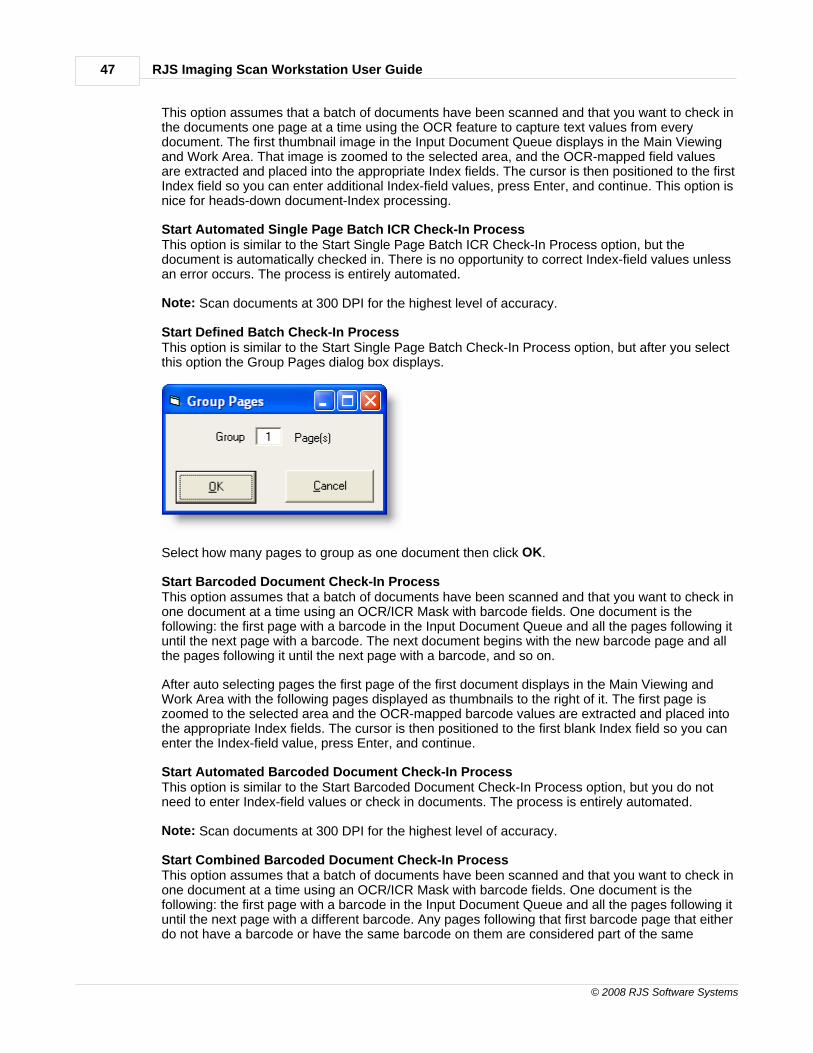
Start Defined Batch Check-In ProcessThis option is similar to the Start Single Page Batch Check-In Process option, but after you selectthis option the Group Pages dialog box displays.
Select how many pages to group as one document then click OK.
Start Barcoded Document Check-In ProcessThis option assumes that a batch of documents have been scanned and that you want to check inone document at a time using an OCR/ICR Mask with barcode fields. One document is thefollowing: the first page with a barcode in the Input Document Queue and all the pages following ituntil the next page with a barcode. The next document begins with the new barcode page and allthe pages following it until the next page with a barcode, and so on.
After auto selecting pages the first page of the first document displays in the Main Viewing andWork Area with the following pages displayed as thumbnails to the right of it. The first page iszoomed to the selected area and the OCR-mapped barcode values are extracted and placed intothe appropriate Index fields. The cursor is then positioned to the first blank Index field so you canenter the Index-field value, press Enter, and continue.
Start Automated Barcoded Document Check-In ProcessThis option is similar to the Start Barcoded Document Check-In Process option, but you do notneed to enter Index-field values or check in documents. The process is entirely automated.
Note: Scan documents at 300 DPI for the highest level of accuracy.
Start Combined Barcoded Document Check-In ProcessThis option assumes that a batch of documents have been scanned and that you want to check inone document at a time using an OCR/ICR Mask with barcode fields. One document is thefollowing: the first page with a barcode in the Input Document Queue and all the pages following ituntil the next page with a different barcode. Any pages following that first barcode page that eitherdo not have a barcode or have the same barcode on them are considered part of the same
Getting Started 48
© 2008 RJS Software Systems
document. The next document begins at the page containing the new barcode value and all thepages following it until the next page with a different barcode value, and so on.
The first page of the first document displays in the Main Viewing and Work Area with the followingpages displayed as thumbnails to the right of it. The first page is zoomed to the selected area andthe OCR-mapped barcode values are extracted and placed into the appropriate Index fields. Thecursor is then positioned to the first Index field so you can enter the Index-field value, press Enter,and continue.
Start Automated Combined Barcoded Document Check-In ProcessThis option is similar to the Start Combined Barcoded Document Check-In Process, but you donot need to enter Index-field values or check in documents. The process is entirely automated.
Note: Scan documents at 300 DPI for the highest level of accuracy.
Check-In Batch from Check-In DirectoryThis option assumes that you either already checked in documents to the Check-In directory,which is called indirect check-in, or that documents are coming from a different application. If yourdocuments come from a different application, you must have an image file and and RDX file.Selecting this option checks in the documents that are in the Check-In directory to WebDocs.
Note: Indirect check-in streamlines the process, eliminating the one-to-three second delaybetween each direct check-in to WebDocs.
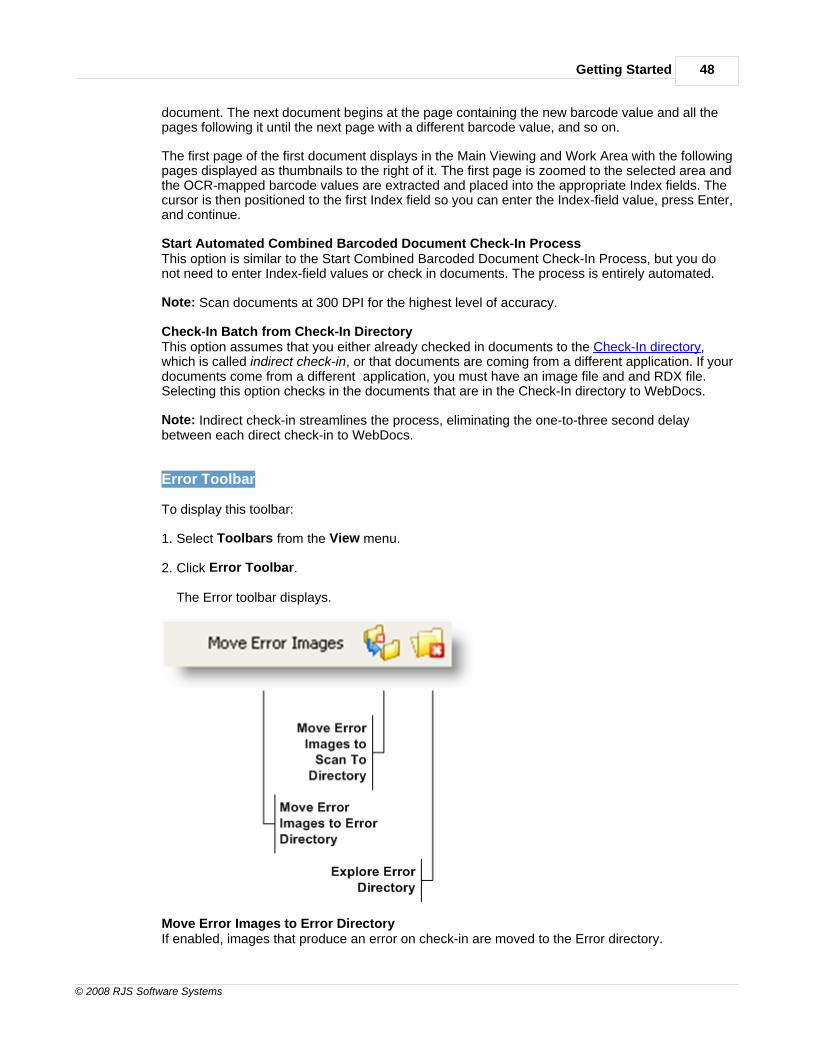
Error Toolbar
To display this toolbar:
1. Select Toolbars from the View menu.
2. Click Error Toolbar.
The Error toolbar displays.
Move Error Images to Error DirectoryIf enabled, images that produce an error on check-in are moved to the Error directory.
RJS Imaging Scan Workstation User Guide49
© 2008 RJS Software Systems
Move Error Images to Scan To DirectoryMoves images that produced an error on check-in back to the Scan To directory.
Explore Error DirectoryBrowse the Error directory using Windows Explorer. You can find the actual folder name underthe Error Handling tab in the Settings option on the File menu.
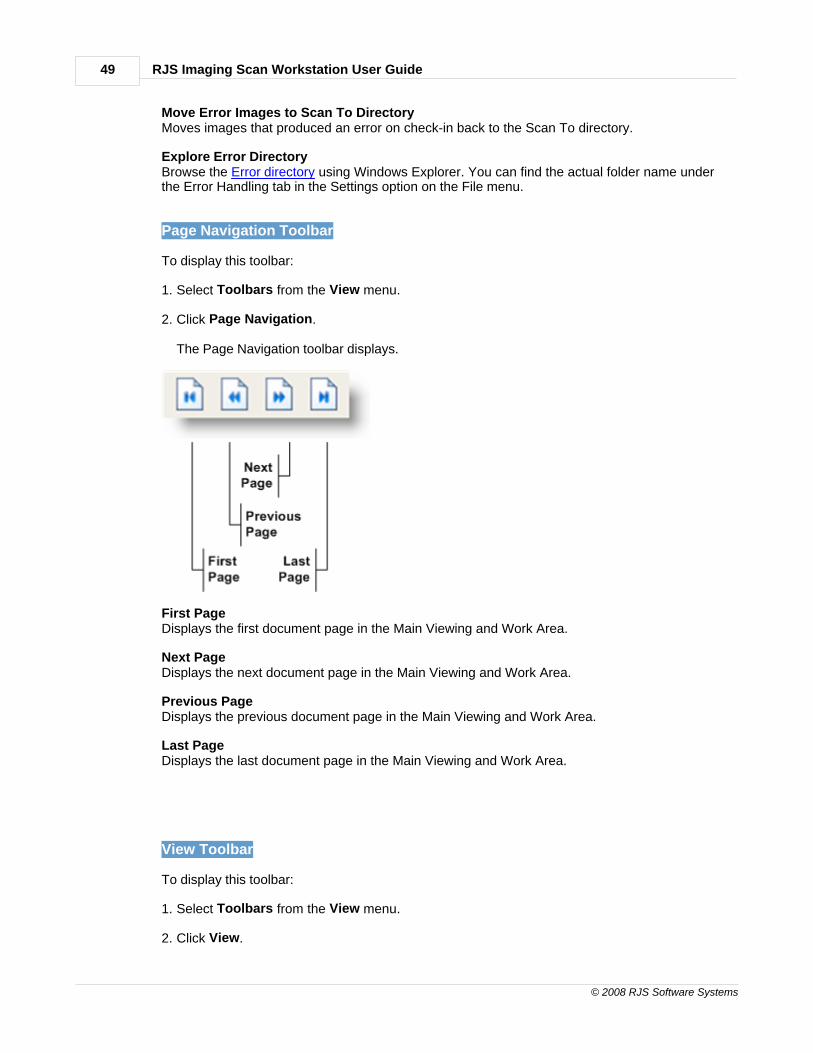
Page Navigation Toolbar
To display this toolbar:
1. Select Toolbars from the View menu.
2. Click Page Navigation.
The Page Navigation toolbar displays.
First PageDisplays the first document page in the Main Viewing and Work Area.
Next PageDisplays the next document page in the Main Viewing and Work Area.
Previous PageDisplays the previous document page in the Main Viewing and Work Area.
Last PageDisplays the last document page in the Main Viewing and Work Area.
View Toolbar
To display this toolbar:
1. Select Toolbars from the View menu.
2. Click View.
Getting Started 50
© 2008 RJS Software Systems
The View toolbar displays.
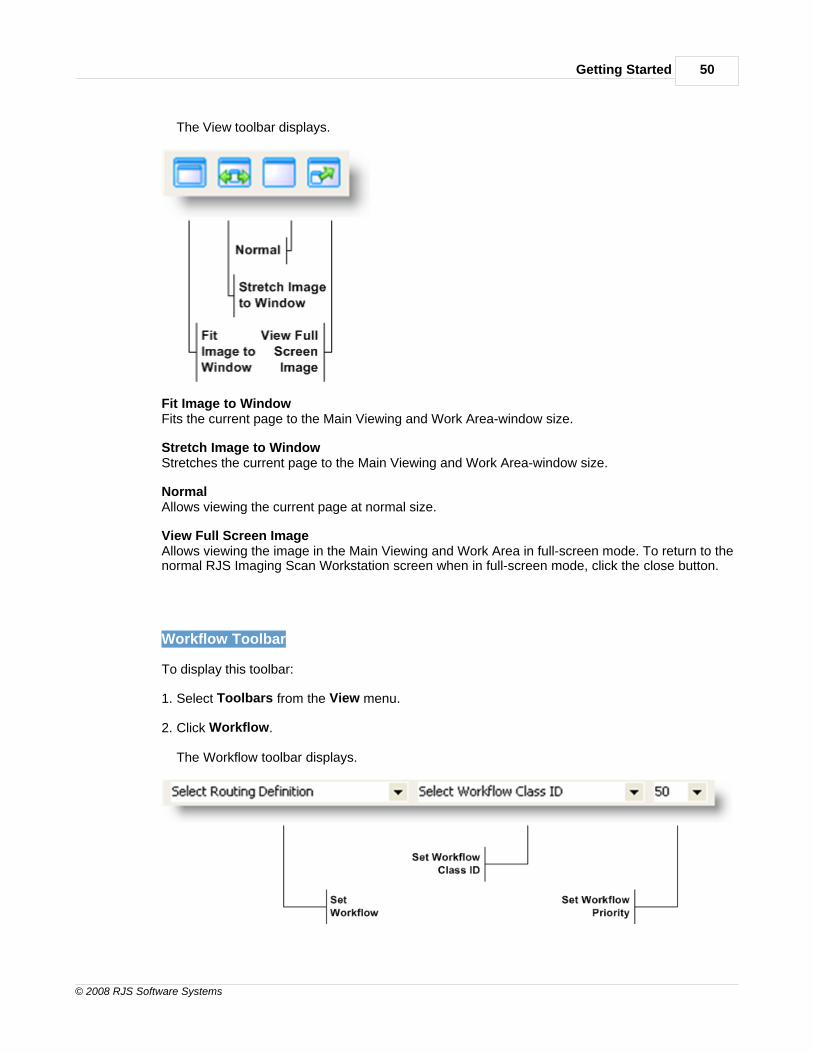
Fit Image to WindowFits the current page to the Main Viewing and Work Area-window size.
Stretch Image to WindowStretches the current page to the Main Viewing and Work Area-window size.
NormalAllows viewing the current page at normal size.
View Full Screen ImageAllows viewing the image in the Main Viewing and Work Area in full-screen mode. To return to thenormal RJS Imaging Scan Workstation screen when in full-screen mode, click the close button.
Workflow Toolbar
To display this toolbar:
1. Select Toolbars from the View menu.
2. Click Workflow.
The Workflow toolbar displays.
RJS Imaging Scan Workstation User Guide51
© 2008 RJS Software Systems
Note: You can only access this toolbar if:
· You have selected the Using Enterprise Workflow check box under the EnterpriseWorkflow tab in the Settings option on the File menu.
or
· You have selected the Using WebDocs for iSeries check box under the WebDocs foriSeries tab in the Settings option on the File menu.
or
· You have selected the Using WebDocs check box under the WebDocs for Windows tab inthe Settings option on the File menu.
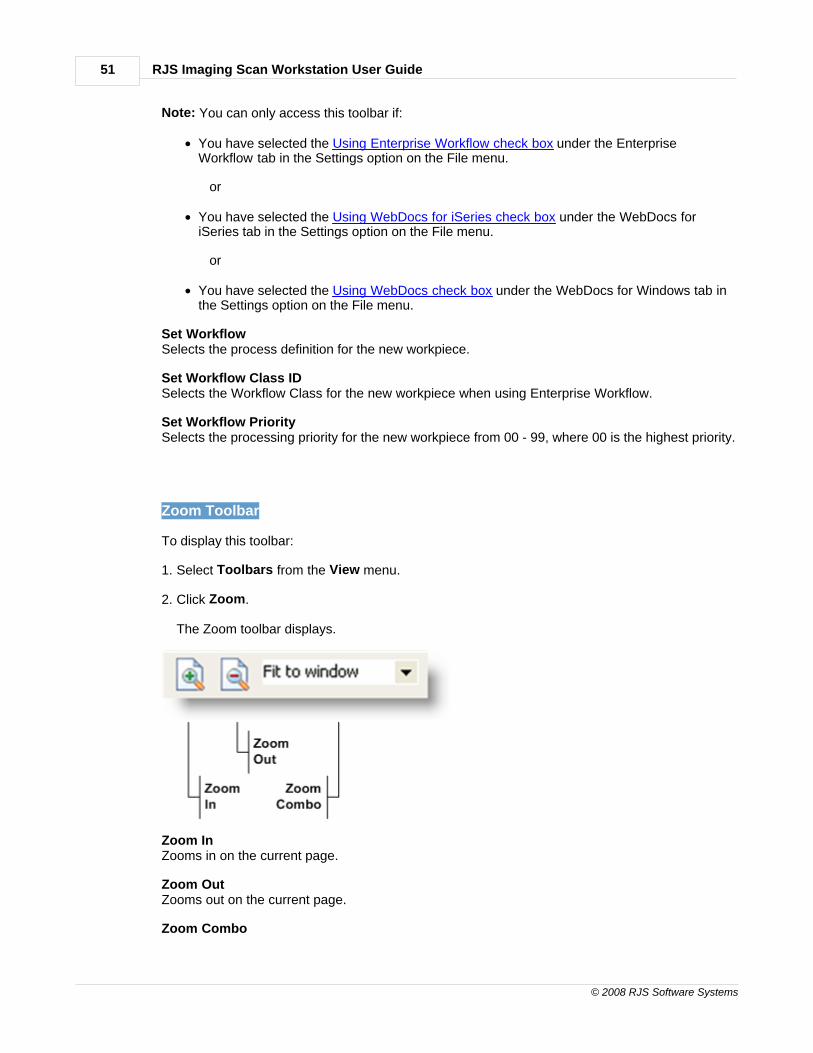
Set WorkflowSelects the process definition for the new workpiece.
Set Workflow Class IDSelects the Workflow Class for the new workpiece when using Enterprise Workflow.
Set Workflow PrioritySelects the processing priority for the new workpiece from 00 - 99, where 00 is the highest priority.
Zoom Toolbar
To display this toolbar:
1. Select Toolbars from the View menu.
2. Click Zoom.
The Zoom toolbar displays.
Zoom InZooms in on the current page.
Zoom OutZooms out on the current page.
Zoom Combo
Getting Started 52
© 2008 RJS Software Systems
Displays a drop-down menu with zoom-percentage options for document viewing.
Text Boxes
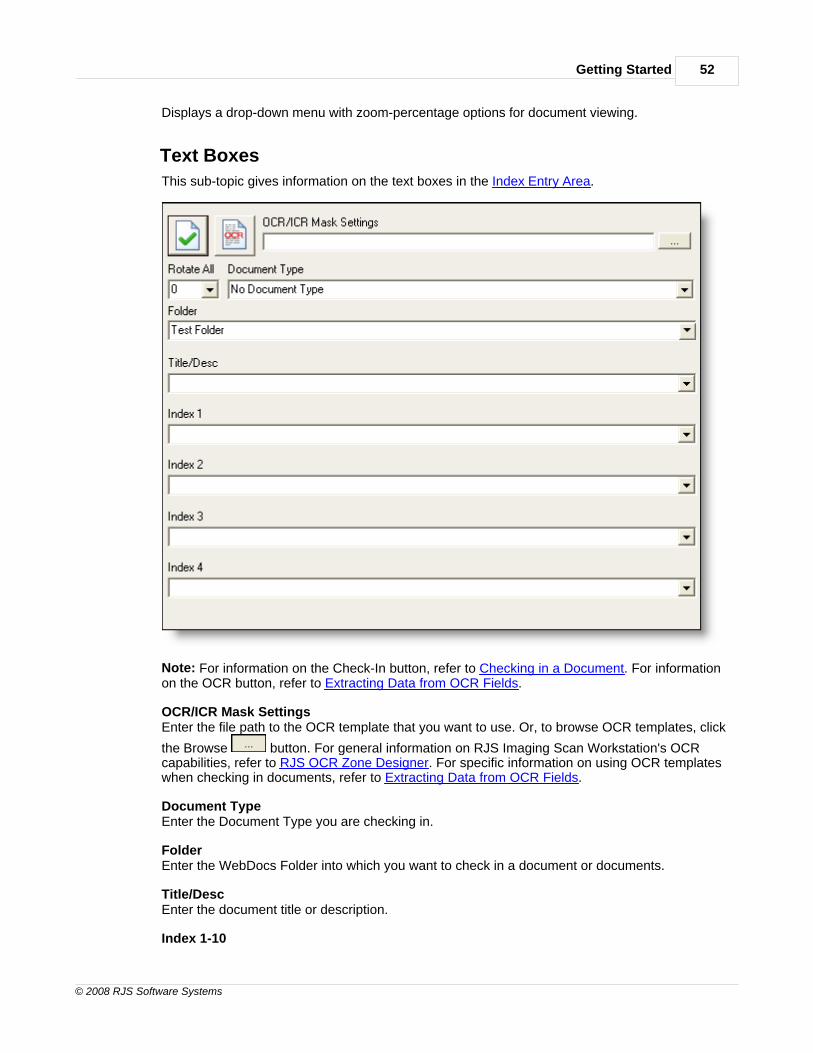
This sub-topic gives information on the text boxes in the Index Entry Area.
Note: For information on the Check-In button, refer to Checking in a Document. For informationon the OCR button, refer to Extracting Data from OCR Fields.
OCR/ICR Mask SettingsEnter the file path to the OCR template that you want to use. Or, to browse OCR templates, click
the Browse button. For general information on RJS Imaging Scan Workstation's OCRcapabilities, refer to RJS OCR Zone Designer. For specific information on using OCR templateswhen checking in documents, refer to Extracting Data from OCR Fields.
Document TypeEnter the Document Type you are checking in.
FolderEnter the WebDocs Folder into which you want to check in a document or documents.
Title/DescEnter the document title or description.
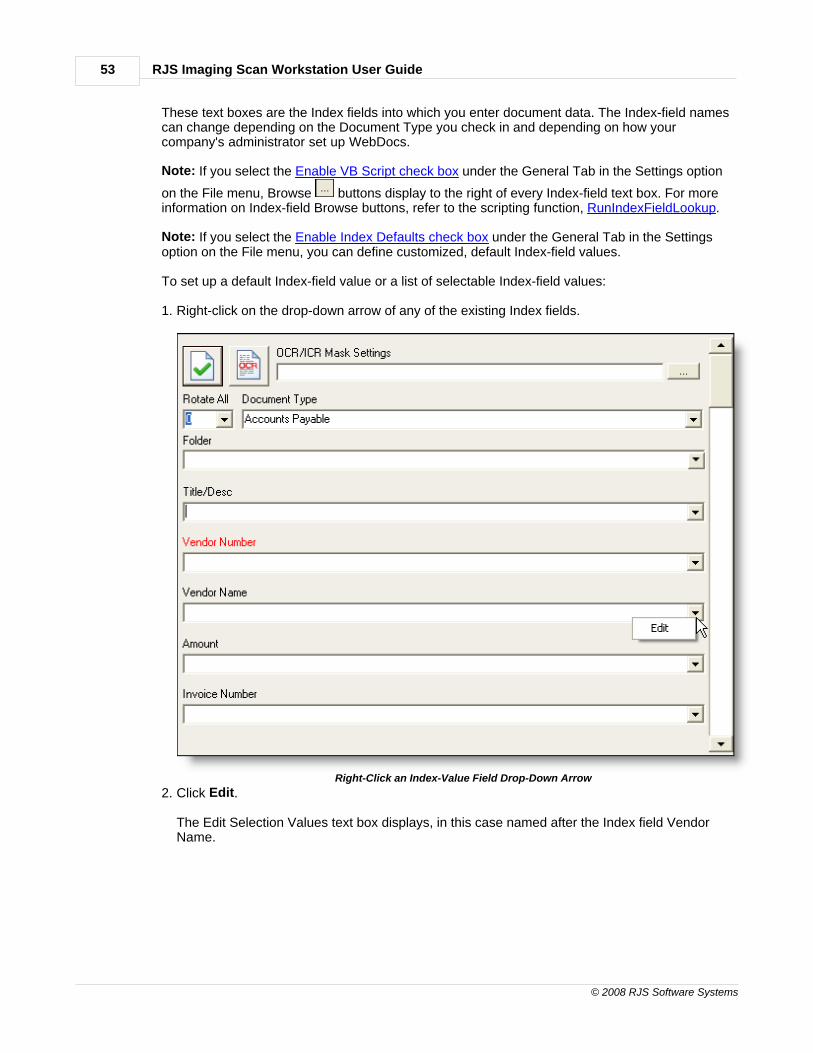
Index 1-10
RJS Imaging Scan Workstation User Guide53
© 2008 RJS Software Systems
These text boxes are the Index fields into which you enter document data. The Index-field namescan change depending on the Document Type you check in and depending on how yourcompany's administrator set up WebDocs.
Note: If you select the Enable VB Script check box under the General Tab in the Settings option
on the File menu, Browse buttons display to the right of every Index-field text box. For moreinformation on Index-field Browse buttons, refer to the scripting function, RunIndexFieldLookup.
Note: If you select the Enable Index Defaults check box under the General Tab in the Settingsoption on the File menu, you can define customized, default Index-field values.
To set up a default Index-field value or a list of selectable Index-field values:
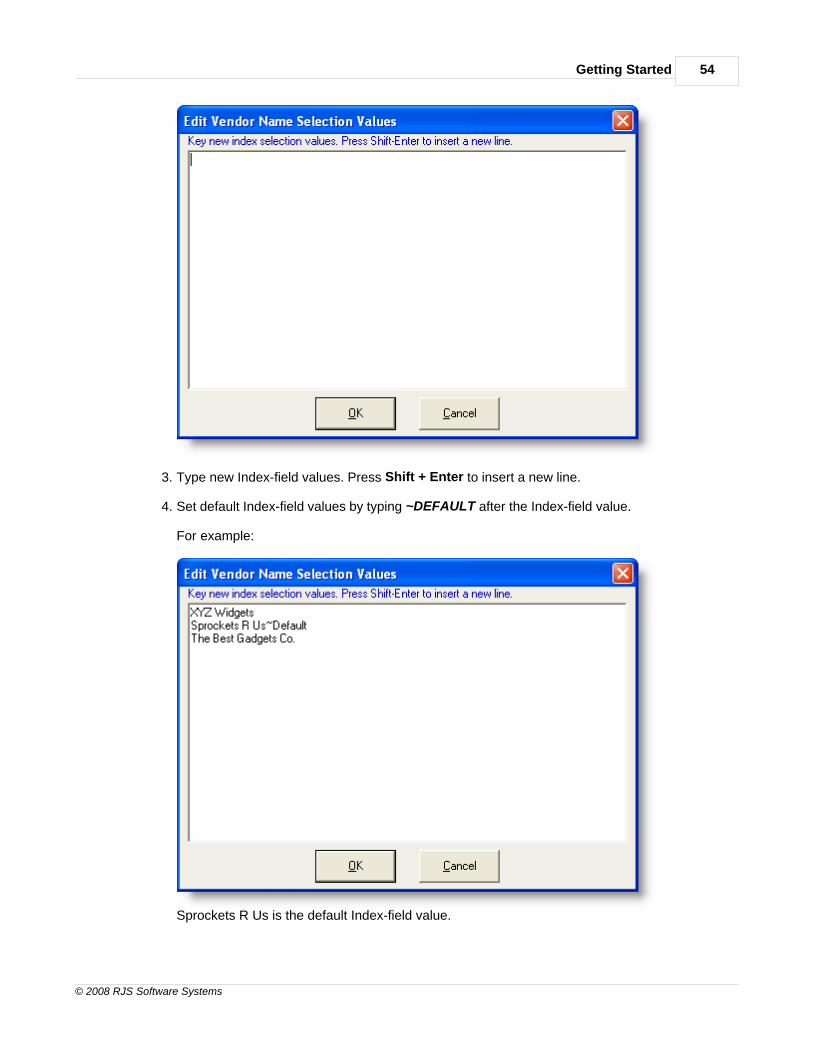
1. Right-click on the drop-down arrow of any of the existing Index fields.
Right-Click an Index-Value Field Drop-Down Arrow
2. Click Edit.
The Edit Selection Values text box displays, in this case named after the Index field VendorName.
Getting Started 54
© 2008 RJS Software Systems
3. Type new Index-field values. Press Shift + Enter to insert a new line.
4. Set default Index-field values by typing ~DEFAULT after the Index-field value.
For example:
Sprockets R Us is the default Index-field value.
RJS Imaging Scan Workstation User Guide55
© 2008 RJS Software Systems
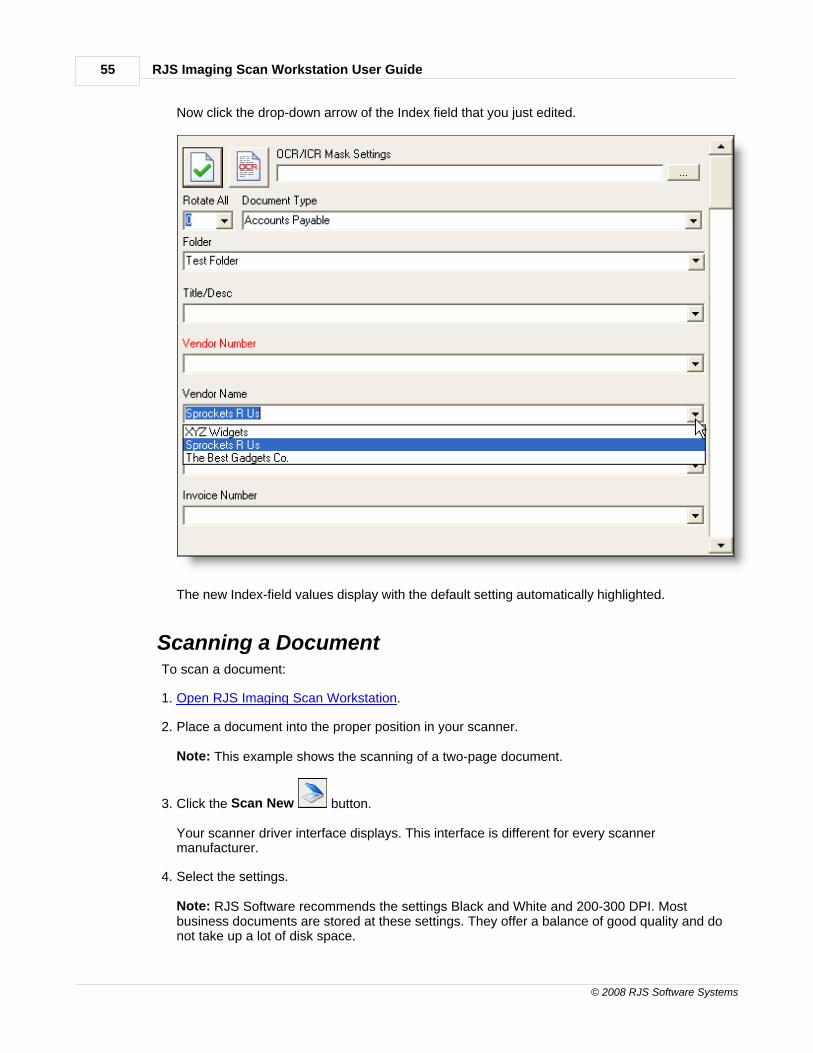
Now click the drop-down arrow of the Index field that you just edited.
The new Index-field values display with the default setting automatically highlighted.
Scanning a DocumentTo scan a document:
1. Open RJS Imaging Scan Workstation.
2. Place a document into the proper position in your scanner.
Note: This example shows the scanning of a two-page document.
3. Click the Scan New button.
Your scanner driver interface displays. This interface is different for every scannermanufacturer.
4. Select the settings.
Note: RJS Software recommends the settings Black and White and 200-300 DPI. Mostbusiness documents are stored at these settings. They offer a balance of good quality and donot take up a lot of disk space.
Getting Started 56
© 2008 RJS Software Systems
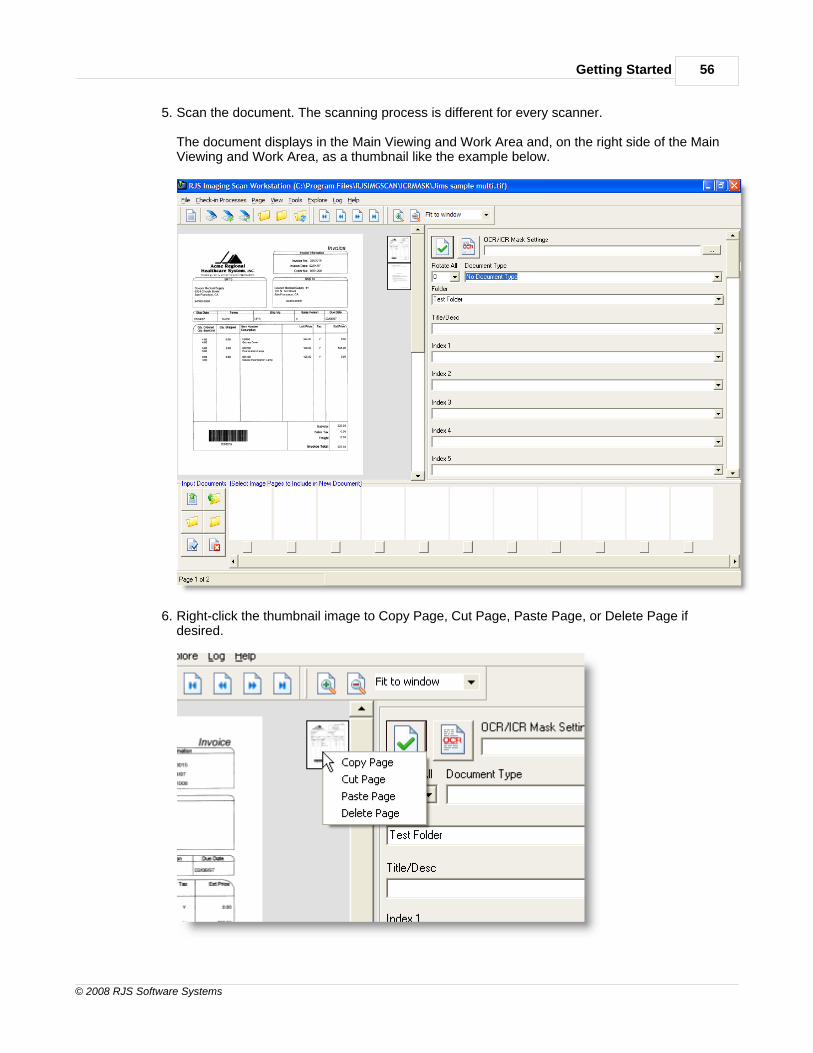
5. Scan the document. The scanning process is different for every scanner.
The document displays in the Main Viewing and Work Area and, on the right side of the MainViewing and Work Area, as a thumbnail like the example below.
6. Right-click the thumbnail image to Copy Page, Cut Page, Paste Page, or Delete Page ifdesired.
RJS Imaging Scan Workstation User Guide57
© 2008 RJS Software Systems
Appending a Page to a DocumentTo append a page to a document:
1. Open RJS Imaging Scan Workstation.
2. Scan a document.
3. Place a different document into the proper position in your scanner.
Note: This example shows appending a one-page document.
4. Click the Scan Append button.
Your scanner driver interface displays. This interface is different for every scannermanufacturer.
5. Select the settings.
Note: RJS Software recommends the settings Black and White and 200-300 DPI. Mostbusiness documents are stored at these settings. They offer a balance of good quality and nottaking up a lot of disk space.
6. Scan the document. The scanning process is different for every scanner.
The appended page displays as a thumbnail as the last page in the Main Viewing and WorkArea, like the example below.
Getting Started 58
© 2008 RJS Software Systems
Capturing Batch DocumentsThis topic, which provides information on scanning batch documents, includes the following sub-topics:
Batch Scanning
Appending a Page to Batch-Scanned Documents
Moving Batch-Scanned Documents to the Main Viewing and Work Area
Batch Scanning
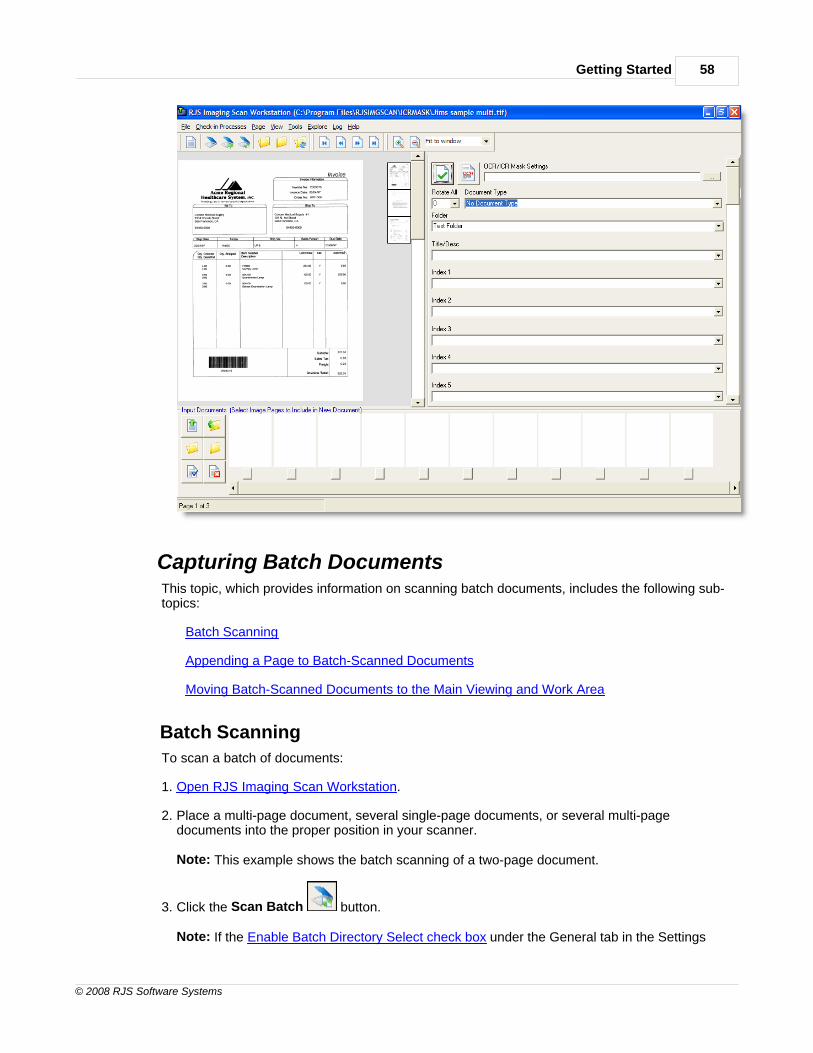
To scan a batch of documents:
1. Open RJS Imaging Scan Workstation.
2. Place a multi-page document, several single-page documents, or several multi-pagedocuments into the proper position in your scanner.
Note: This example shows the batch scanning of a two-page document.
3. Click the Scan Batch button.
Note: If the Enable Batch Directory Select check box under the General tab in the Settings
RJS Imaging Scan Workstation User Guide59
© 2008 RJS Software Systems
option on the File menu is selected, you are prompted to select a folder into which to batchscan these pages.
Your scanner driver interface displays. This interface is different for every scannermanufacturer.
4. Select the settings.
Note: RJS Software recommends the settings Black and White and 200-300 DPI. Mostbusiness documents are stored at these settings. They offer a balance of good quality and donot take up a lot of disk space.
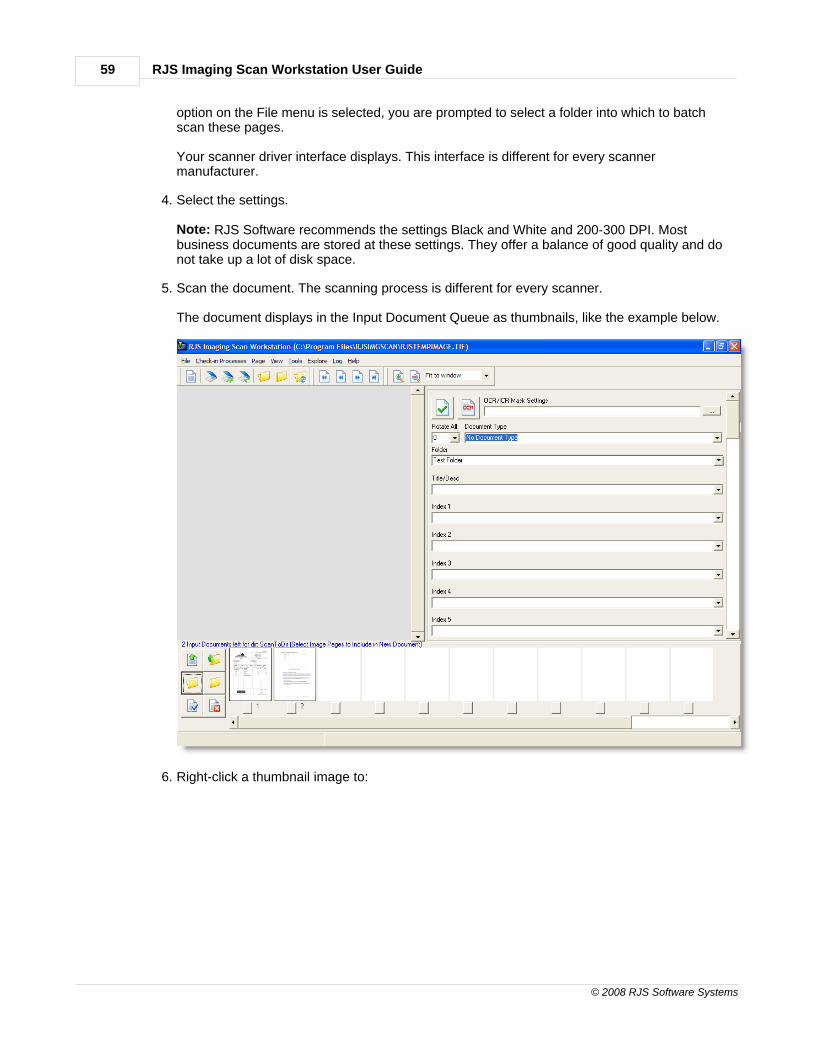
5. Scan the document. The scanning process is different for every scanner.
The document displays in the Input Document Queue as thumbnails, like the example below.
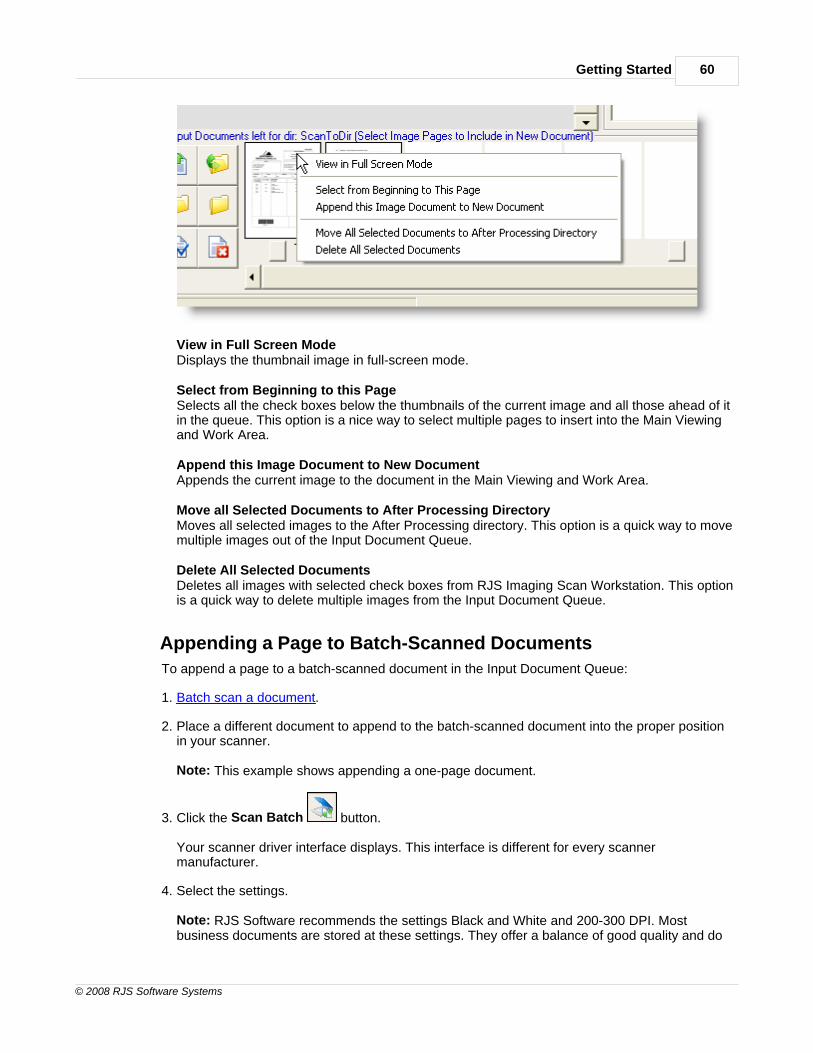
6. Right-click a thumbnail image to:
Getting Started 60
© 2008 RJS Software Systems
View in Full Screen ModeDisplays the thumbnail image in full-screen mode.
Select from Beginning to this PageSelects all the check boxes below the thumbnails of the current image and all those ahead of itin the queue. This option is a nice way to select multiple pages to insert into the Main Viewingand Work Area.
Append this Image Document to New DocumentAppends the current image to the document in the Main Viewing and Work Area.
Move all Selected Documents to After Processing DirectoryMoves all selected images to the After Processing directory. This option is a quick way to movemultiple images out of the Input Document Queue.
Delete All Selected DocumentsDeletes all images with selected check boxes from RJS Imaging Scan Workstation. This optionis a quick way to delete multiple images from the Input Document Queue.
Appending a Page to Batch-Scanned Documents
To append a page to a batch-scanned document in the Input Document Queue:
1. Batch scan a document.
2. Place a different document to append to the batch-scanned document into the proper positionin your scanner.
Note: This example shows appending a one-page document.
3. Click the Scan Batch button.
Your scanner driver interface displays. This interface is different for every scannermanufacturer.
4. Select the settings.
Note: RJS Software recommends the settings Black and White and 200-300 DPI. Mostbusiness documents are stored at these settings. They offer a balance of good quality and do
RJS Imaging Scan Workstation User Guide61
© 2008 RJS Software Systems
not take up a lot of disk space.
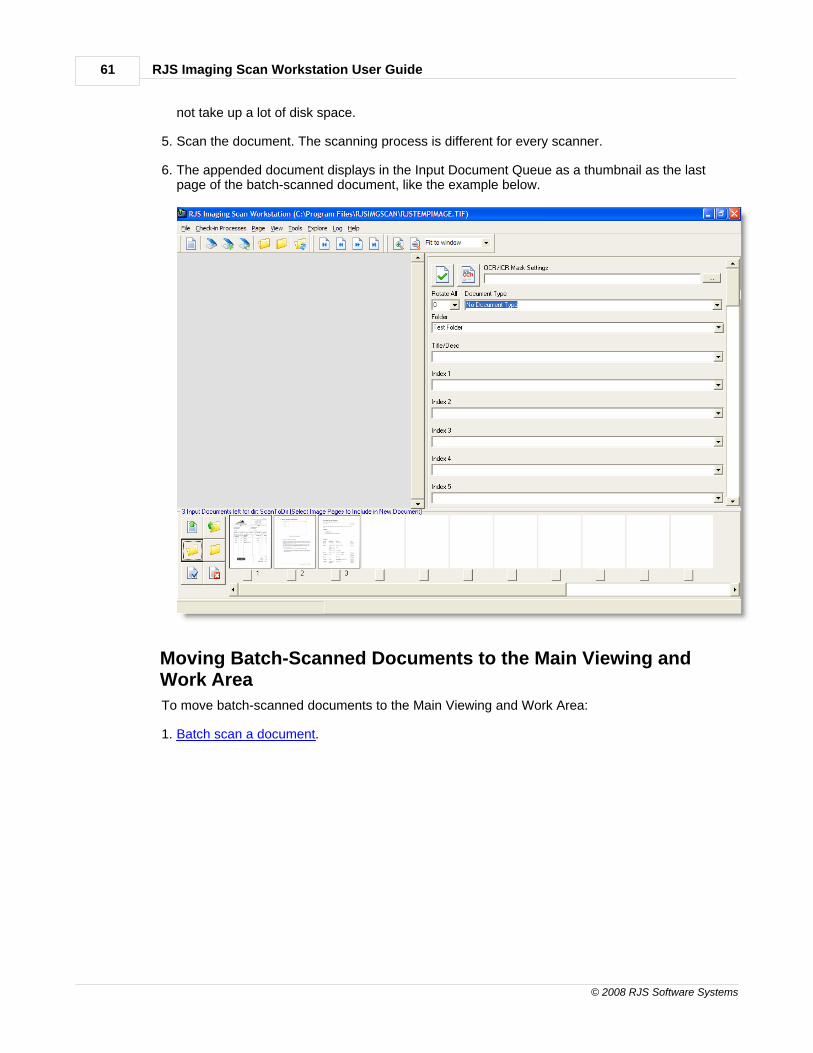
5. Scan the document. The scanning process is different for every scanner.
6. The appended document displays in the Input Document Queue as a thumbnail as the lastpage of the batch-scanned document, like the example below.
Moving Batch-Scanned Documents to the Main Viewing andWork Area
To move batch-scanned documents to the Main Viewing and Work Area:
1. Batch scan a document.
Getting Started 62
© 2008 RJS Software Systems
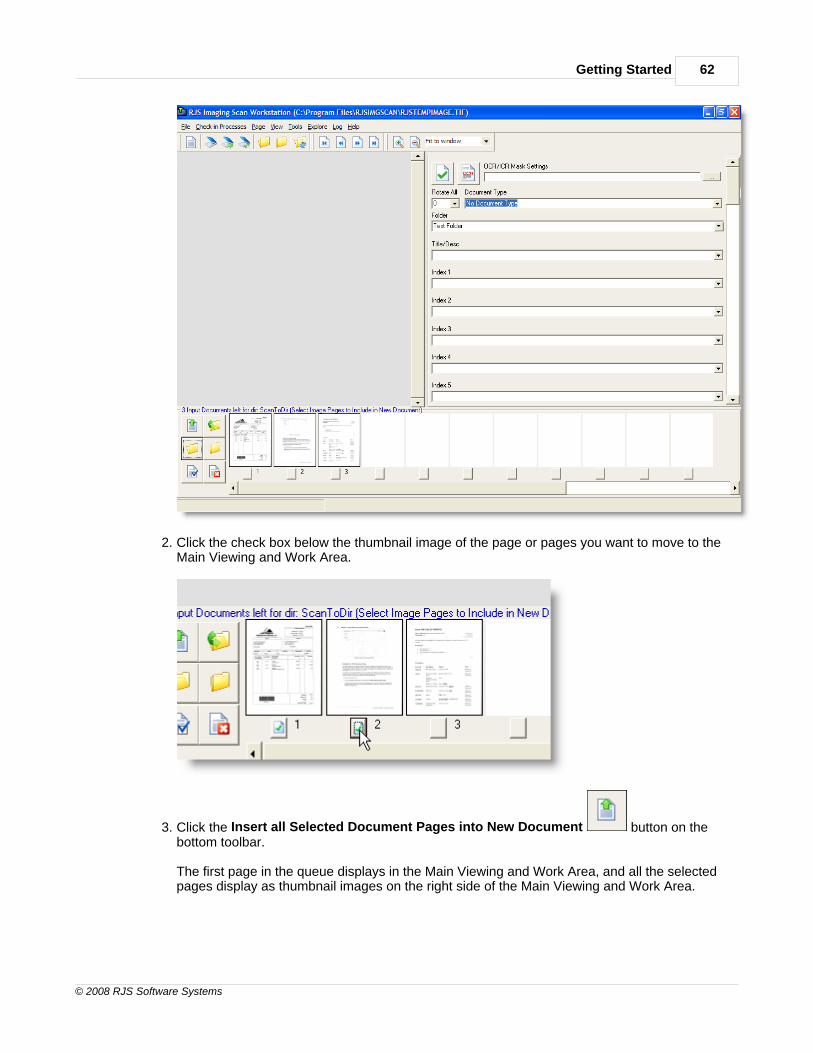
2. Click the check box below the thumbnail image of the page or pages you want to move to theMain Viewing and Work Area.
3. Click the Insert all Selected Document Pages into New Document button on thebottom toolbar.
The first page in the queue displays in the Main Viewing and Work Area, and all the selectedpages display as thumbnail images on the right side of the Main Viewing and Work Area.
RJS Imaging Scan Workstation User Guide63
© 2008 RJS Software Systems
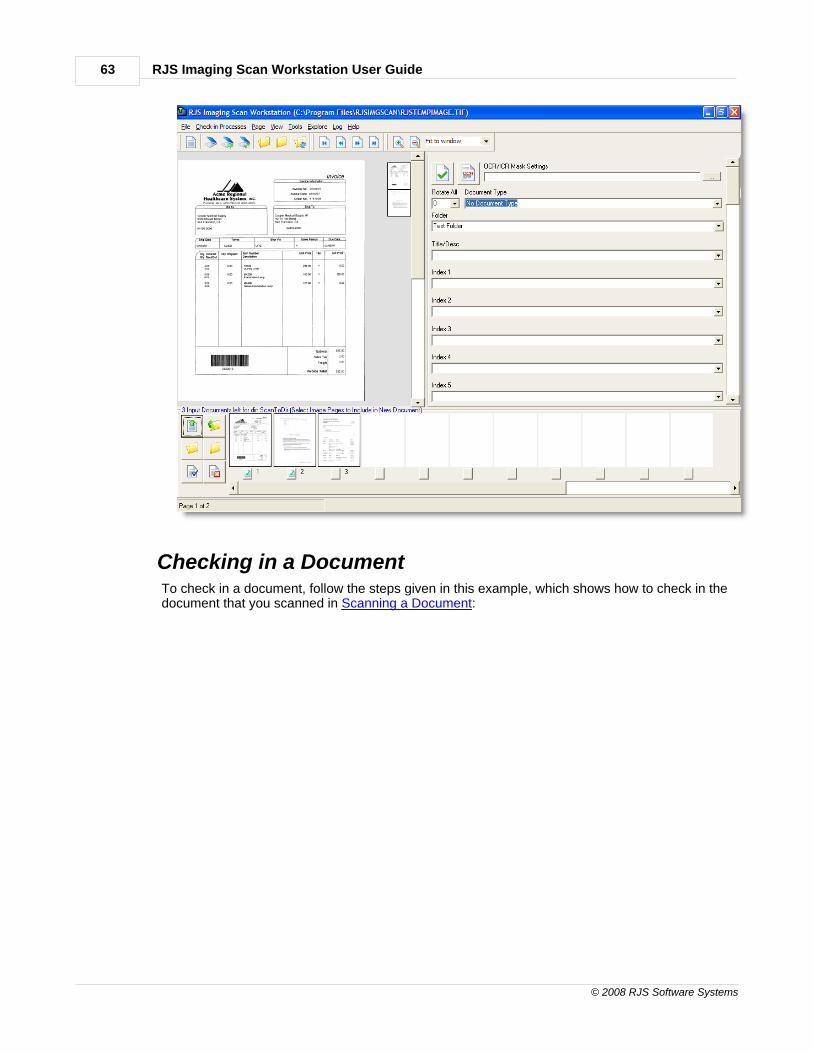
Checking in a DocumentTo check in a document, follow the steps given in this example, which shows how to check in thedocument that you scanned in Scanning a Document:
Getting Started 64
© 2008 RJS Software Systems
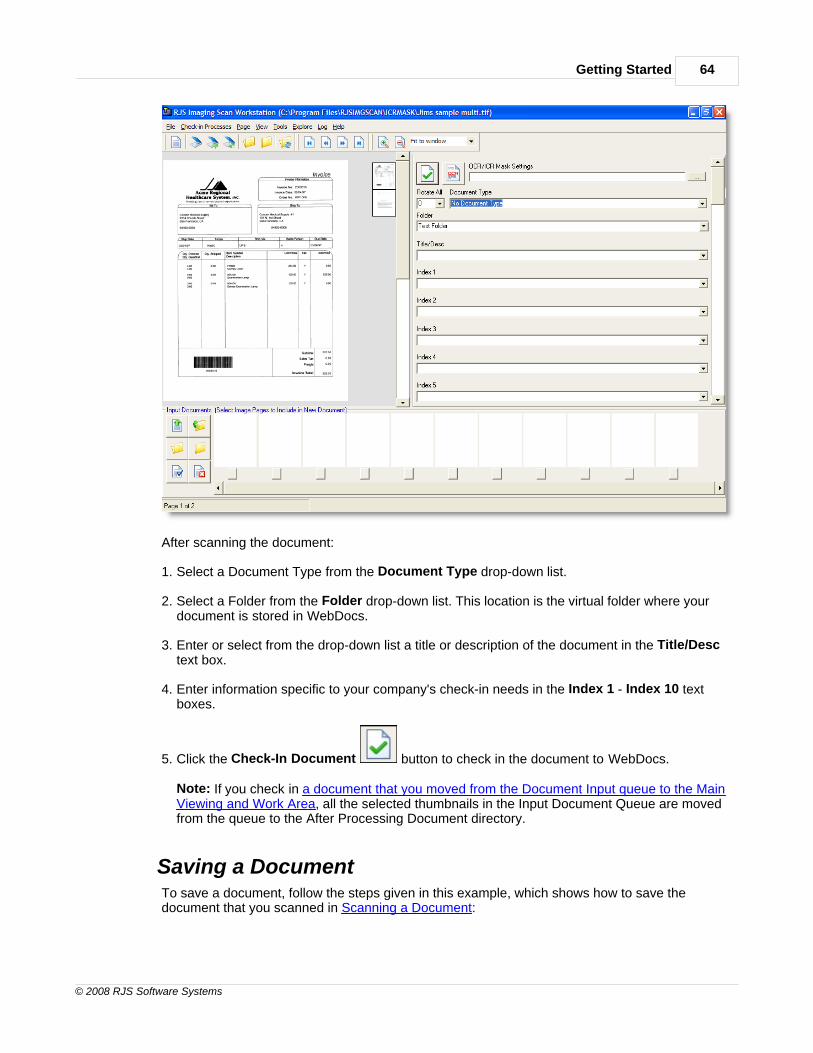
After scanning the document:
1. Select a Document Type from the Document Type drop-down list.
2. Select a Folder from the Folder drop-down list. This location is the virtual folder where yourdocument is stored in WebDocs.
3. Enter or select from the drop-down list a title or description of the document in the Title/Desctext box.
4. Enter information specific to your company's check-in needs in the Index 1 - Index 10 textboxes.
5. Click the Check-In Document button to check in the document to WebDocs.
Note: If you check in a document that you moved from the Document Input queue to the MainViewing and Work Area, all the selected thumbnails in the Input Document Queue are movedfrom the queue to the After Processing Document directory.
Saving a DocumentTo save a document, follow the steps given in this example, which shows how to save thedocument that you scanned in Scanning a Document:
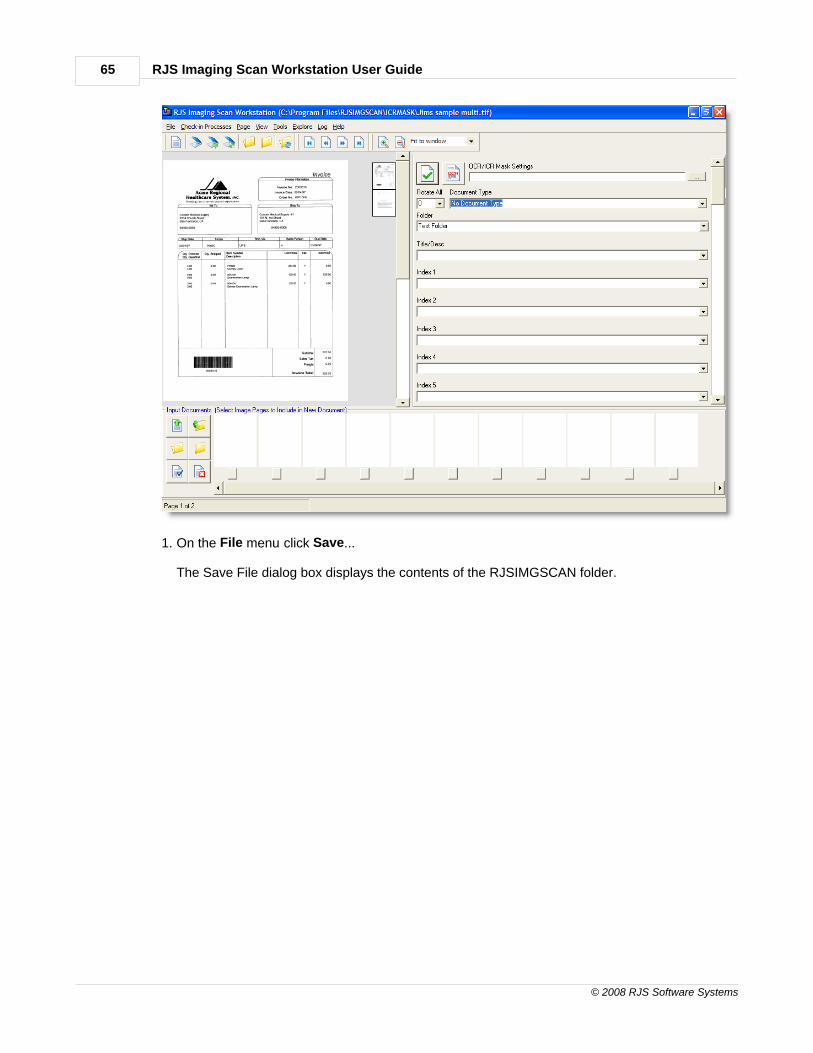
RJS Imaging Scan Workstation User Guide65
© 2008 RJS Software Systems
1. On the File menu click Save...
The Save File dialog box displays the contents of the RJSIMGSCAN folder.
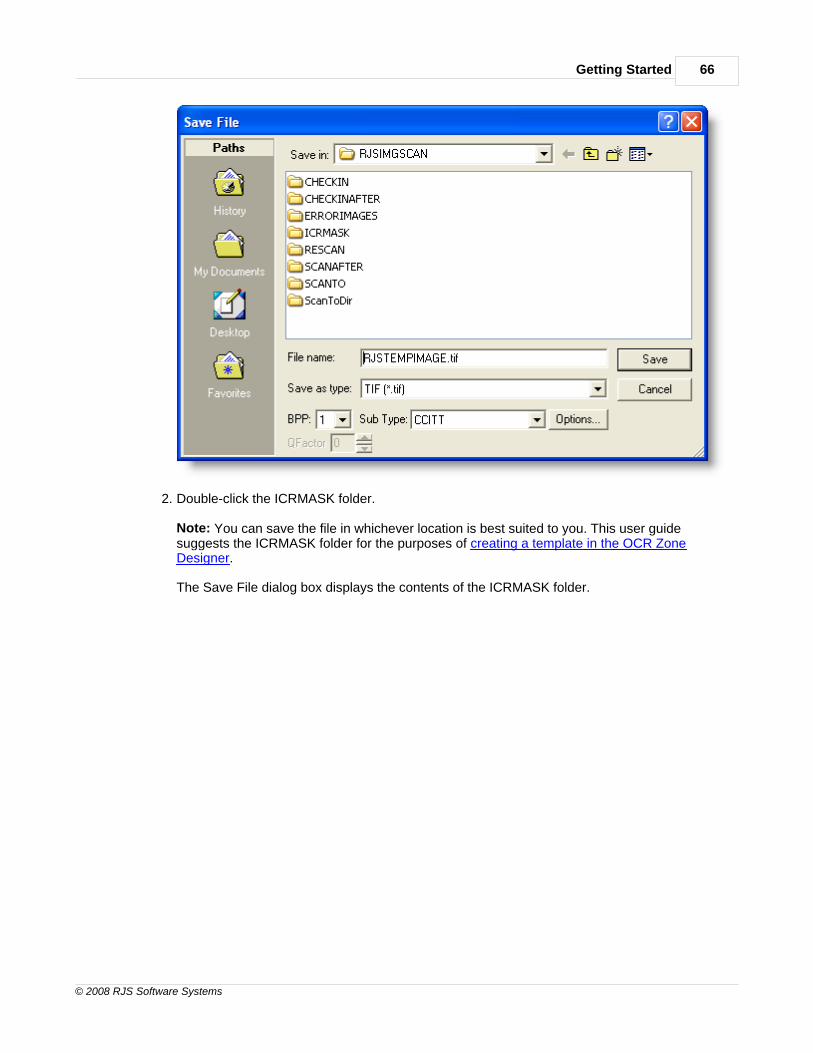
Getting Started 66
© 2008 RJS Software Systems
2. Double-click the ICRMASK folder.
Note: You can save the file in whichever location is best suited to you. This user guidesuggests the ICRMASK folder for the purposes of creating a template in the OCR ZoneDesigner.
The Save File dialog box displays the contents of the ICRMASK folder.
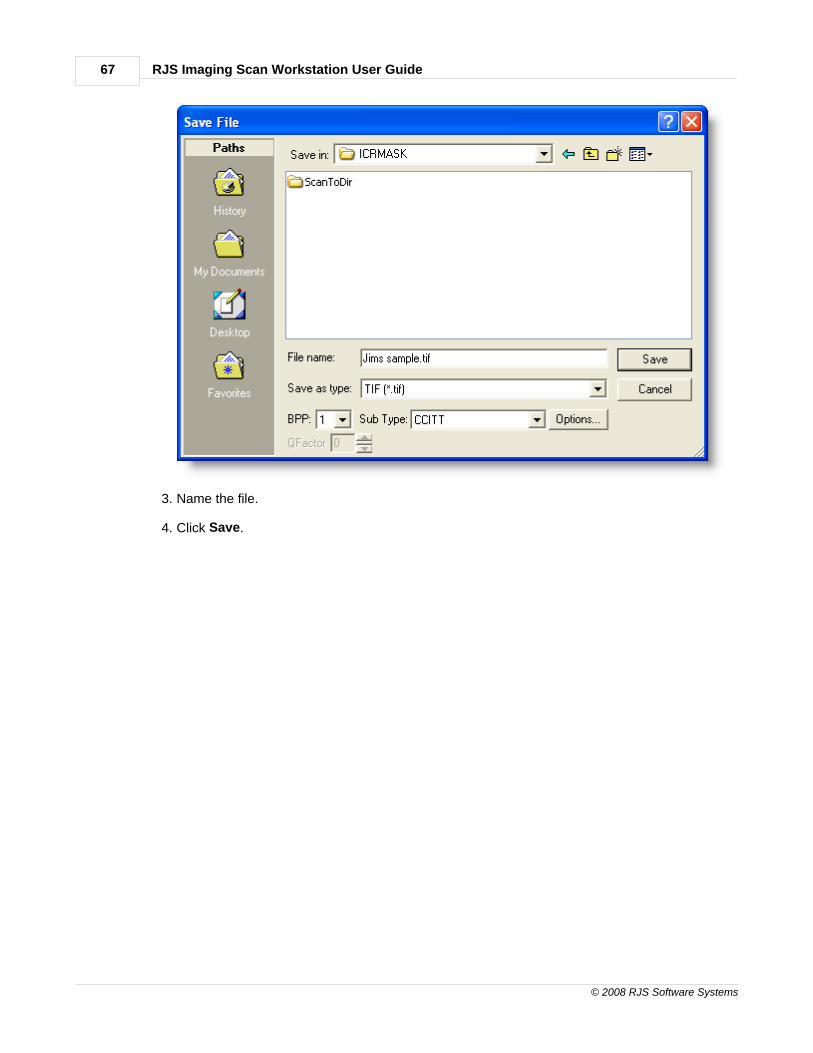
RJS Imaging Scan Workstation User Guide67
© 2008 RJS Software Systems
3. Name the file.
4. Click Save.

Section
7
RJS OCR ZoneDesigner
RJS Imaging Scan Workstation User Guide69
© 2008 RJS Software Systems
RJS OCR Zone Designer
Use the OCR Zone Designer to create templates for checking in various types of documents. Youcan then reference these templates in RJS Imaging Scan Workstation for fast, automatic entry ofIndex-field values. This section shows you the basic steps to design an OCR template, shows youhow to use that template in RJS Imaging Scan Workstation, and covers the following topics:
Opening the RJS OCR Zone Designer
Exploring Important Buttons on the Toolbar
Opening an Image File
Creating a Template
Creating a Barcode Template
Opening a Template
Testing a Template
Extracting Data From OCR Fields
Opening RJS OCR Zone DesignerTo open the RJS OCR Zone Designer:
1. Click the Start button.
2. Point to All Programs.
3. Point to RJS Software.
4. Point to RJS Imaging Scan Workstation.
5. Point to Scansoft OCR.
6. Click RJS OCR Zone Designer.
The RJS OCR Zone Designer opens.

RJS OCR Zone Designer 70
© 2008 RJS Software Systems
Exploring Important Buttons on the ToolbarThe RJS OCR Zone Designer toolbar looks like the one below.
The four buttons that RJS Imaging Scan Workstation users need to use the RJS OCR ZoneDesigner are labeled and described below.
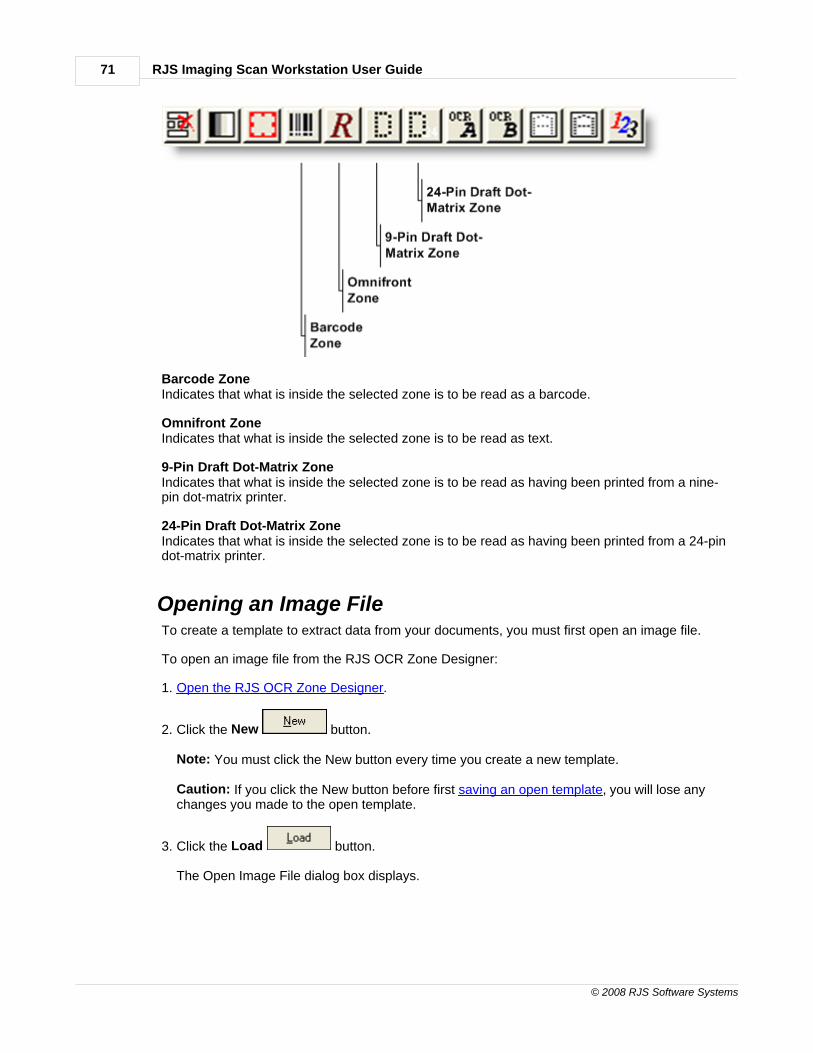
RJS Imaging Scan Workstation User Guide71
© 2008 RJS Software Systems
Barcode ZoneIndicates that what is inside the selected zone is to be read as a barcode.
Omnifront ZoneIndicates that what is inside the selected zone is to be read as text.
9-Pin Draft Dot-Matrix ZoneIndicates that what is inside the selected zone is to be read as having been printed from a nine-pin dot-matrix printer.
24-Pin Draft Dot-Matrix ZoneIndicates that what is inside the selected zone is to be read as having been printed from a 24-pindot-matrix printer.
Opening an Image FileTo create a template to extract data from your documents, you must first open an image file.
To open an image file from the RJS OCR Zone Designer:
1. Open the RJS OCR Zone Designer.
2. Click the New button.
Note: You must click the New button every time you create a new template.
Caution: If you click the New button before first saving an open template, you will lose anychanges you made to the open template.
3. Click the Load button.
The Open Image File dialog box displays.
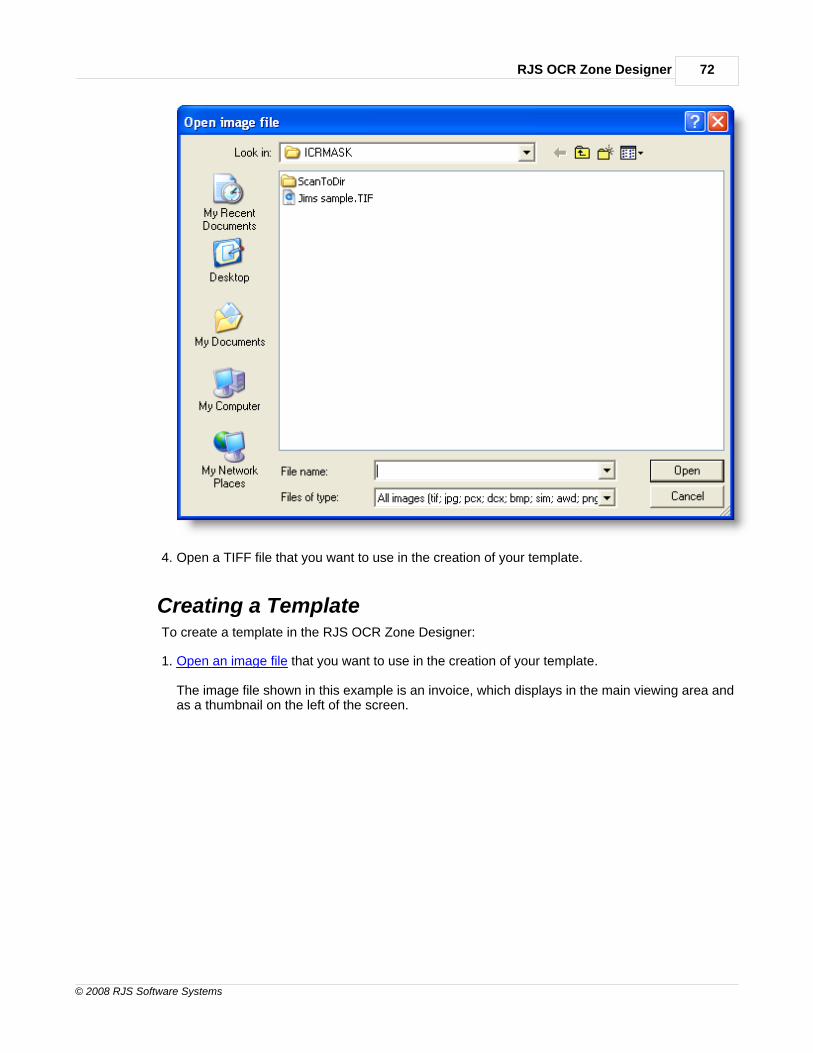
RJS OCR Zone Designer 72
© 2008 RJS Software Systems
4. Open a TIFF file that you want to use in the creation of your template.
Creating a TemplateTo create a template in the RJS OCR Zone Designer:
1. Open an image file that you want to use in the creation of your template.
The image file shown in this example is an invoice, which displays in the main viewing area andas a thumbnail on the left of the screen.
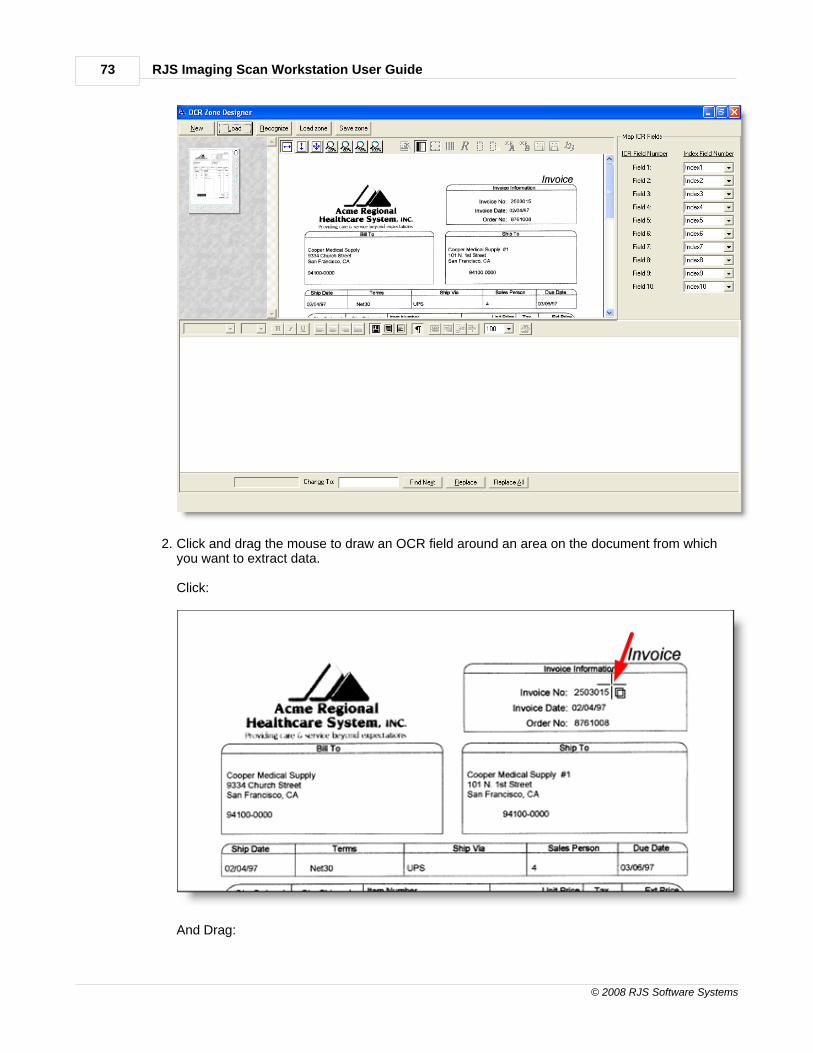
RJS Imaging Scan Workstation User Guide73
© 2008 RJS Software Systems
2. Click and drag the mouse to draw an OCR field around an area on the document from whichyou want to extract data.
Click:
And Drag:
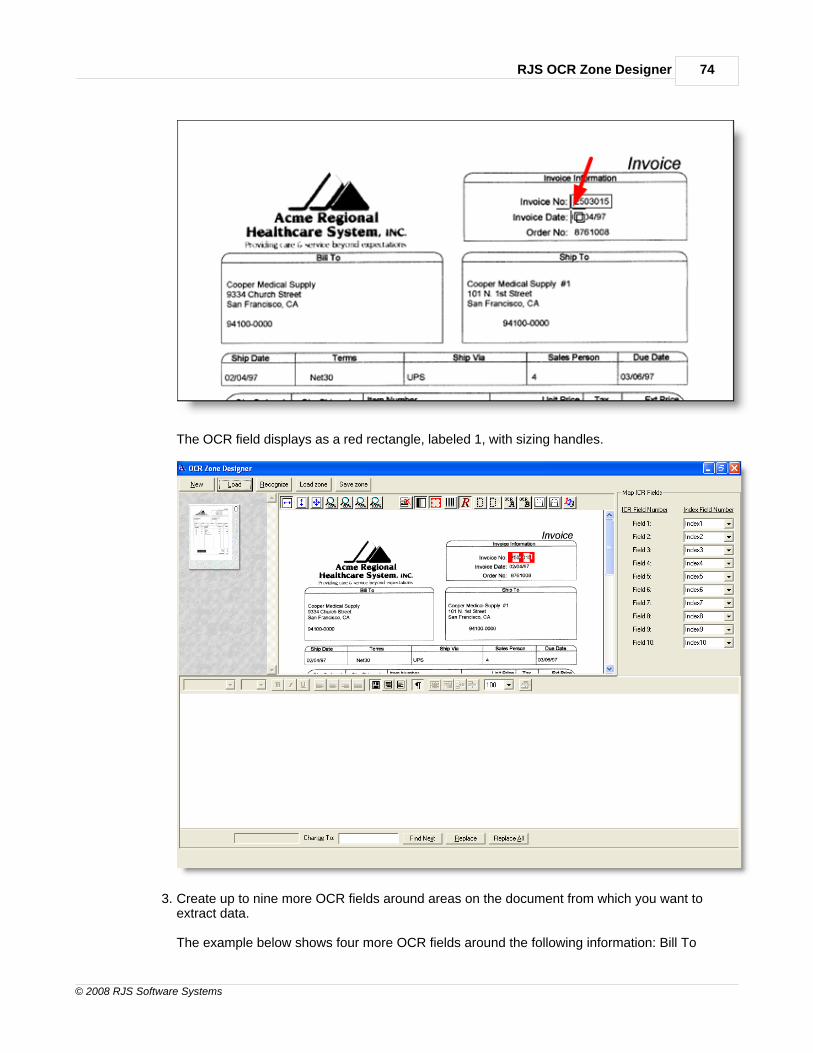
RJS OCR Zone Designer 74
© 2008 RJS Software Systems
The OCR field displays as a red rectangle, labeled 1, with sizing handles.
3. Create up to nine more OCR fields around areas on the document from which you want toextract data.
The example below shows four more OCR fields around the following information: Bill To
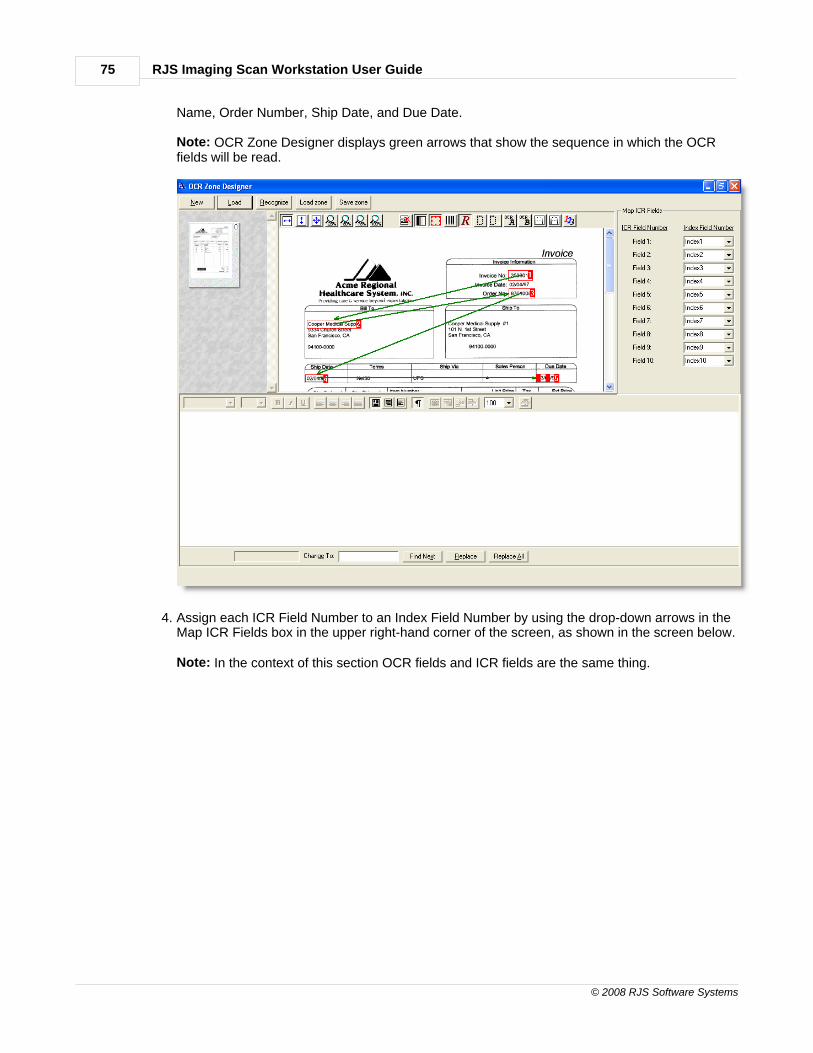
RJS Imaging Scan Workstation User Guide75
© 2008 RJS Software Systems
Name, Order Number, Ship Date, and Due Date.
Note: OCR Zone Designer displays green arrows that show the sequence in which the OCRfields will be read.
4. Assign each ICR Field Number to an Index Field Number by using the drop-down arrows in theMap ICR Fields box in the upper right-hand corner of the screen, as shown in the screen below.
Note: In the context of this section OCR fields and ICR fields are the same thing.
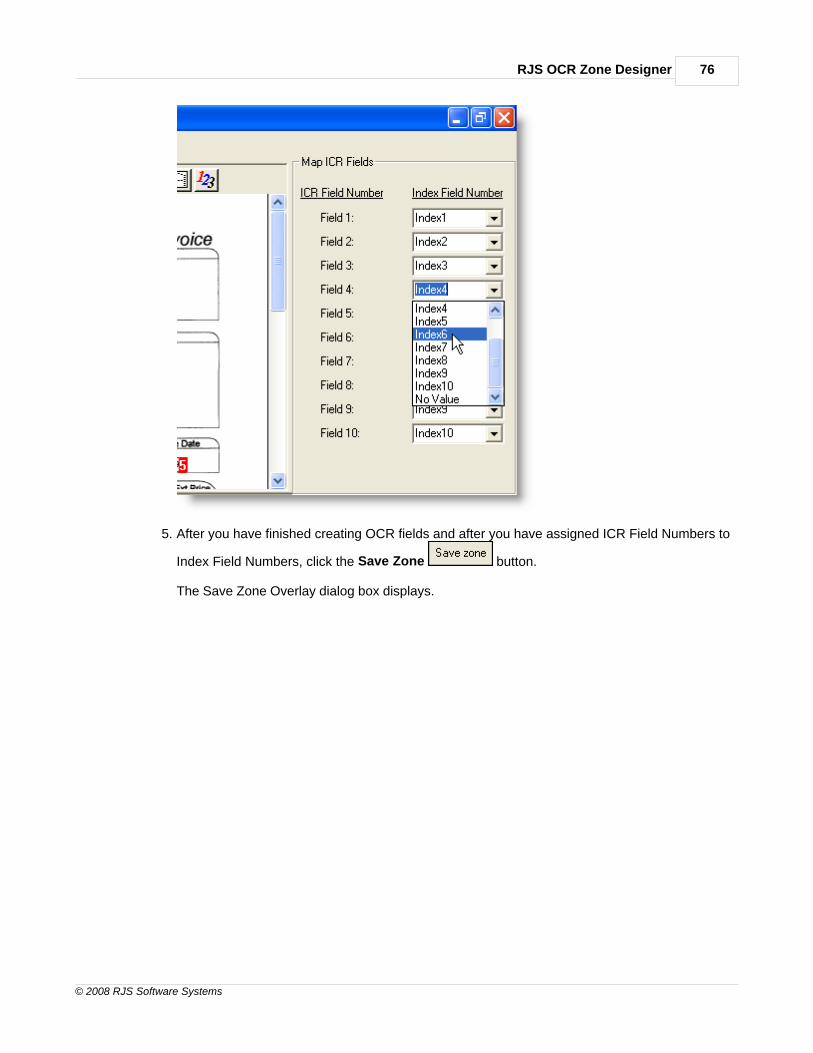
RJS OCR Zone Designer 76
© 2008 RJS Software Systems
5. After you have finished creating OCR fields and after you have assigned ICR Field Numbers to
Index Field Numbers, click the Save Zone button.
The Save Zone Overlay dialog box displays.
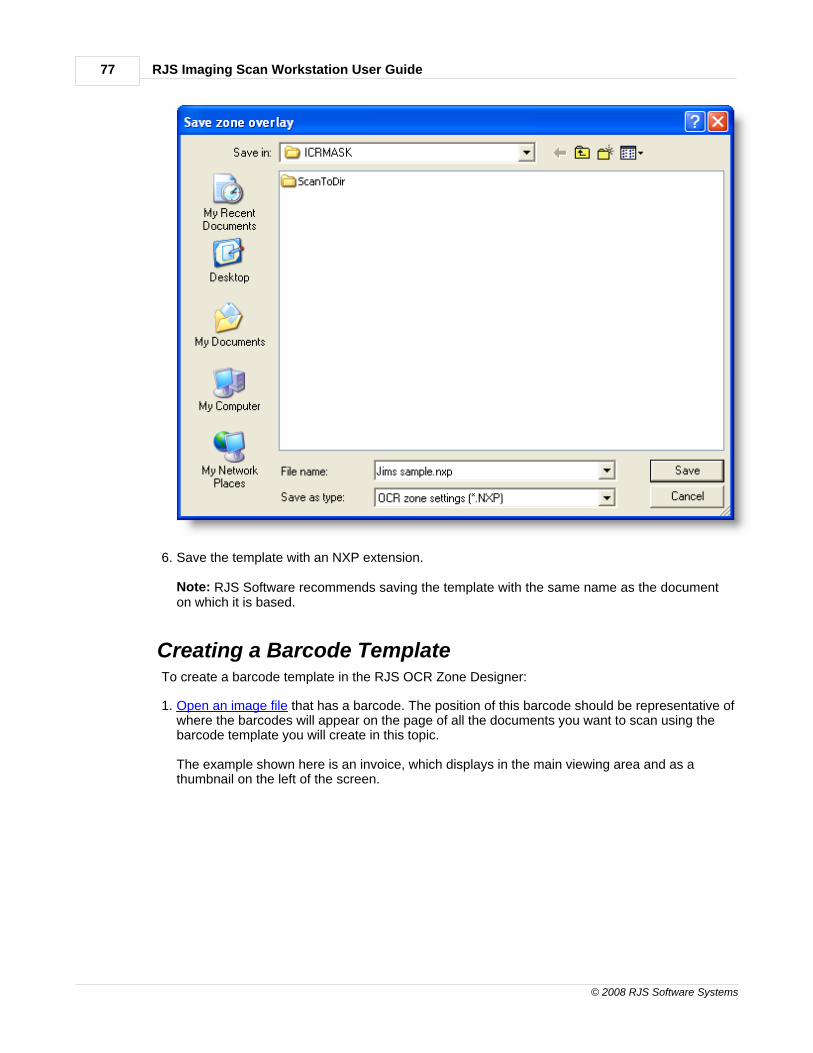
RJS Imaging Scan Workstation User Guide77
© 2008 RJS Software Systems
6. Save the template with an NXP extension.
Note: RJS Software recommends saving the template with the same name as the documenton which it is based.
Creating a Barcode TemplateTo create a barcode template in the RJS OCR Zone Designer:
1. Open an image file that has a barcode. The position of this barcode should be representative ofwhere the barcodes will appear on the page of all the documents you want to scan using thebarcode template you will create in this topic.
The example shown here is an invoice, which displays in the main viewing area and as athumbnail on the left of the screen.
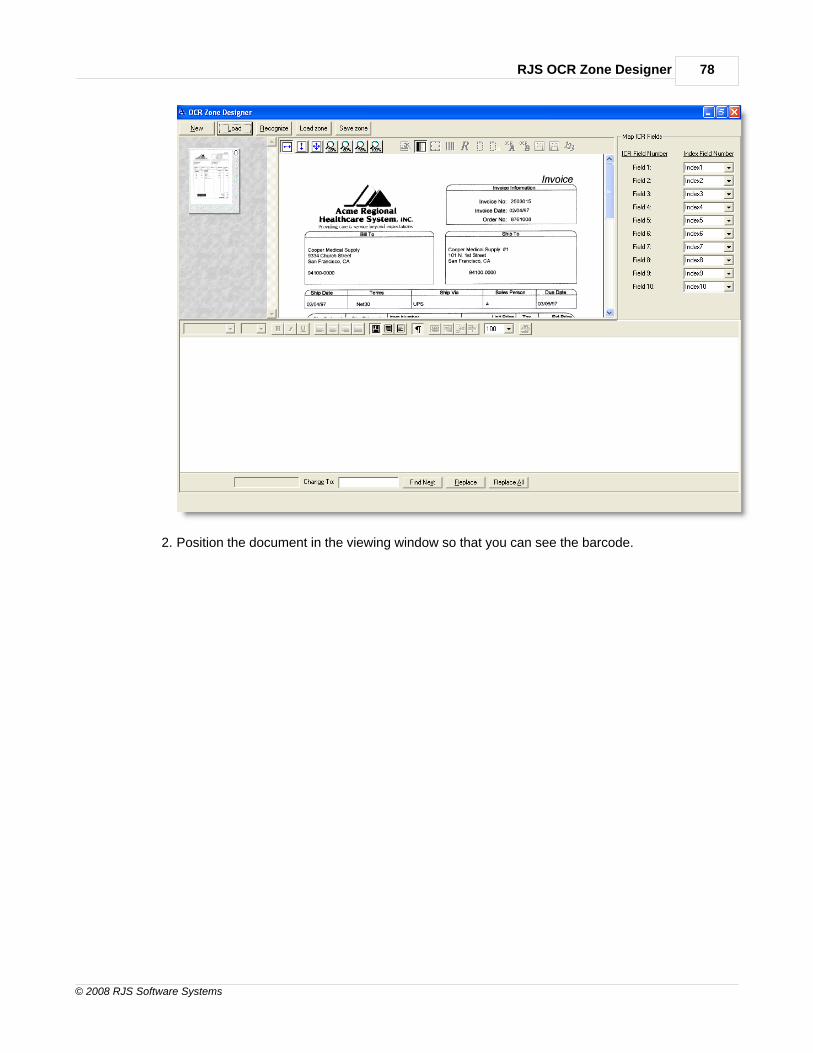
RJS OCR Zone Designer 78
© 2008 RJS Software Systems
2. Position the document in the viewing window so that you can see the barcode.
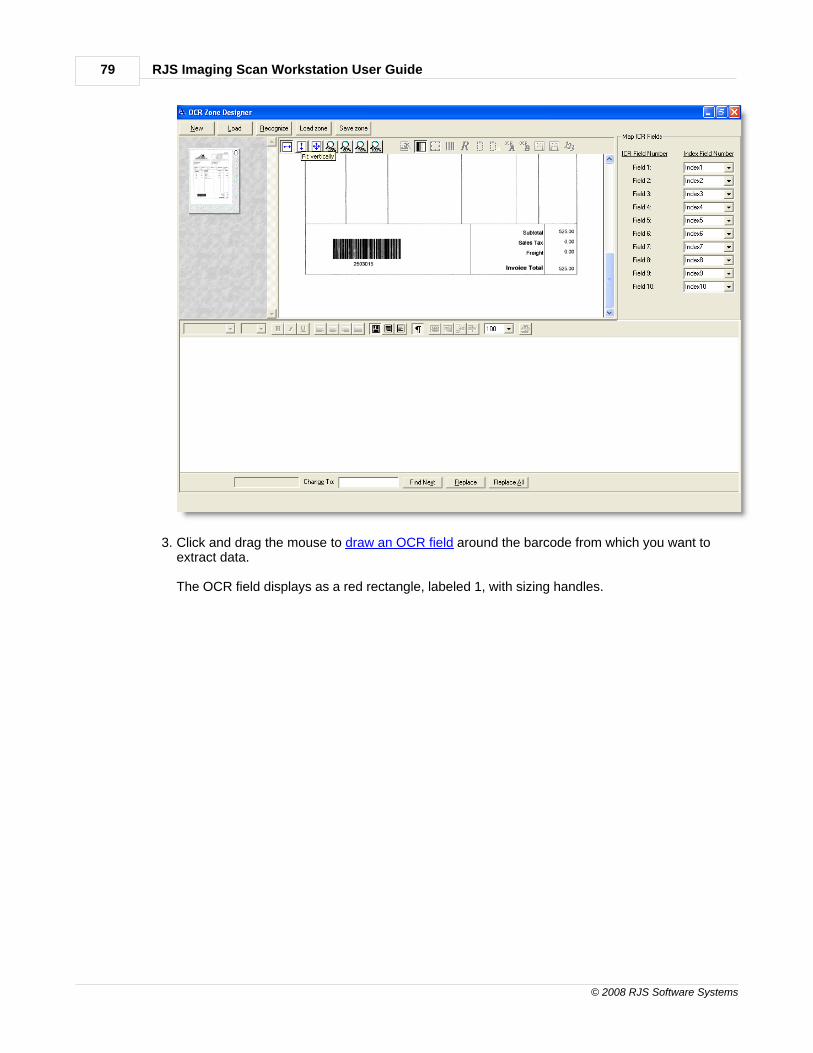
RJS Imaging Scan Workstation User Guide79
© 2008 RJS Software Systems
3. Click and drag the mouse to draw an OCR field around the barcode from which you want toextract data.
The OCR field displays as a red rectangle, labeled 1, with sizing handles.
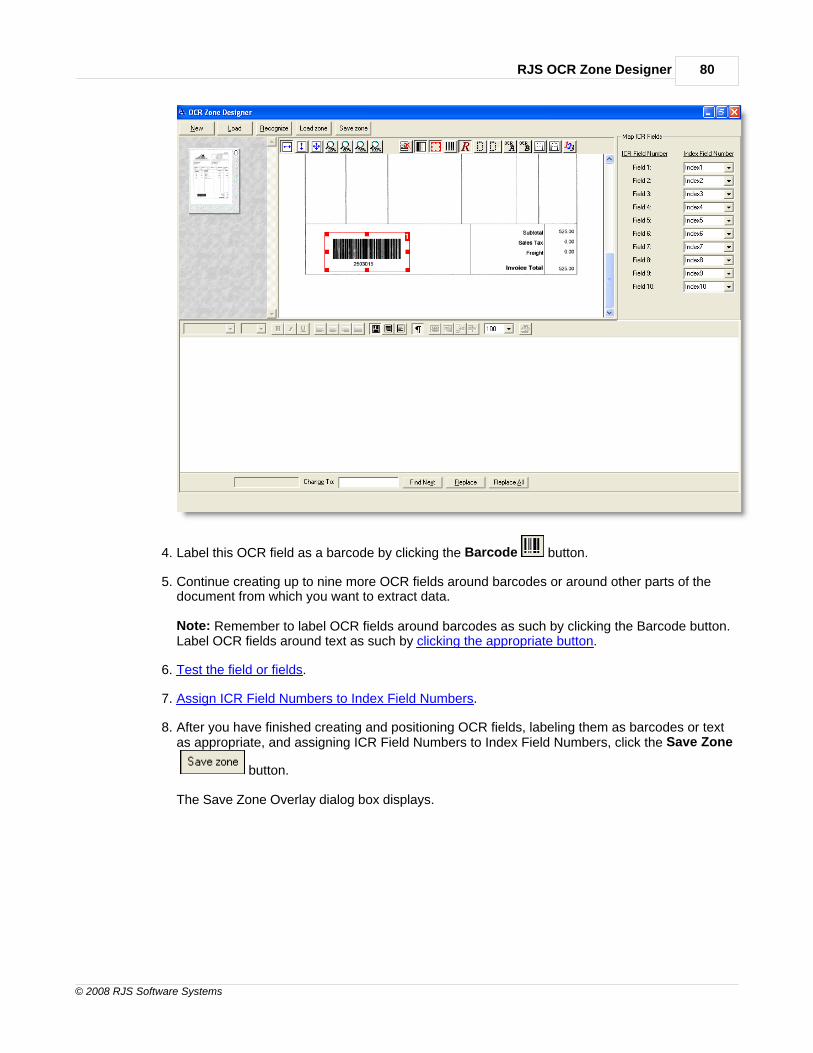
RJS OCR Zone Designer 80
© 2008 RJS Software Systems
4. Label this OCR field as a barcode by clicking the Barcode button.
5. Continue creating up to nine more OCR fields around barcodes or around other parts of thedocument from which you want to extract data.
Note: Remember to label OCR fields around barcodes as such by clicking the Barcode button.Label OCR fields around text as such by clicking the appropriate button.
6. Test the field or fields.
7. Assign ICR Field Numbers to Index Field Numbers.
8. After you have finished creating and positioning OCR fields, labeling them as barcodes or textas appropriate, and assigning ICR Field Numbers to Index Field Numbers, click the Save Zone
button.
The Save Zone Overlay dialog box displays.

RJS Imaging Scan Workstation User Guide81
© 2008 RJS Software Systems
9. Save the template with an NXP extension.
Note: RJS Software recommends saving the template with the same name as the documenton which it is based.
Opening a TemplateTo open an existing template:
1. Open the RJS OCR Zone Designer.
2. Click the New button.
Note: You must click the New button every time you open an existing template.
Caution: If you click the New button before first saving an open template, you will lose anychanges you made to the open template.
3. Click the Load button.
The Open Image File dialog box displays.
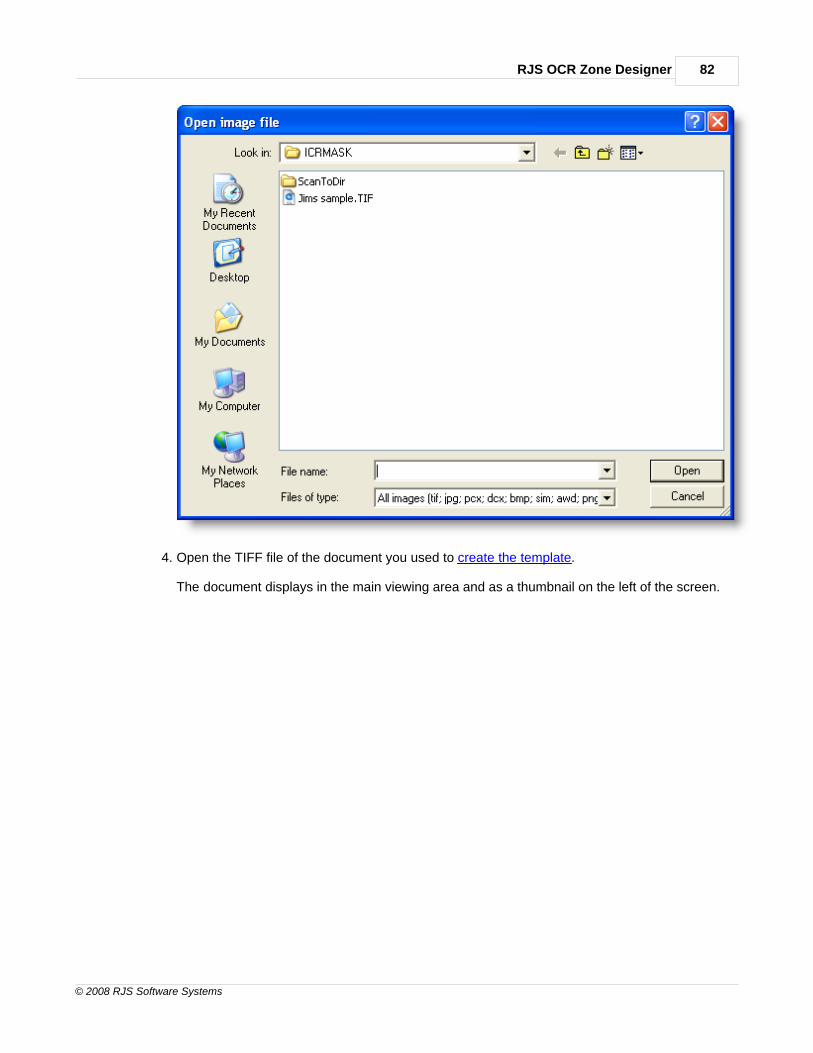
RJS OCR Zone Designer 82
© 2008 RJS Software Systems
4. Open the TIFF file of the document you used to create the template.
The document displays in the main viewing area and as a thumbnail on the left of the screen.
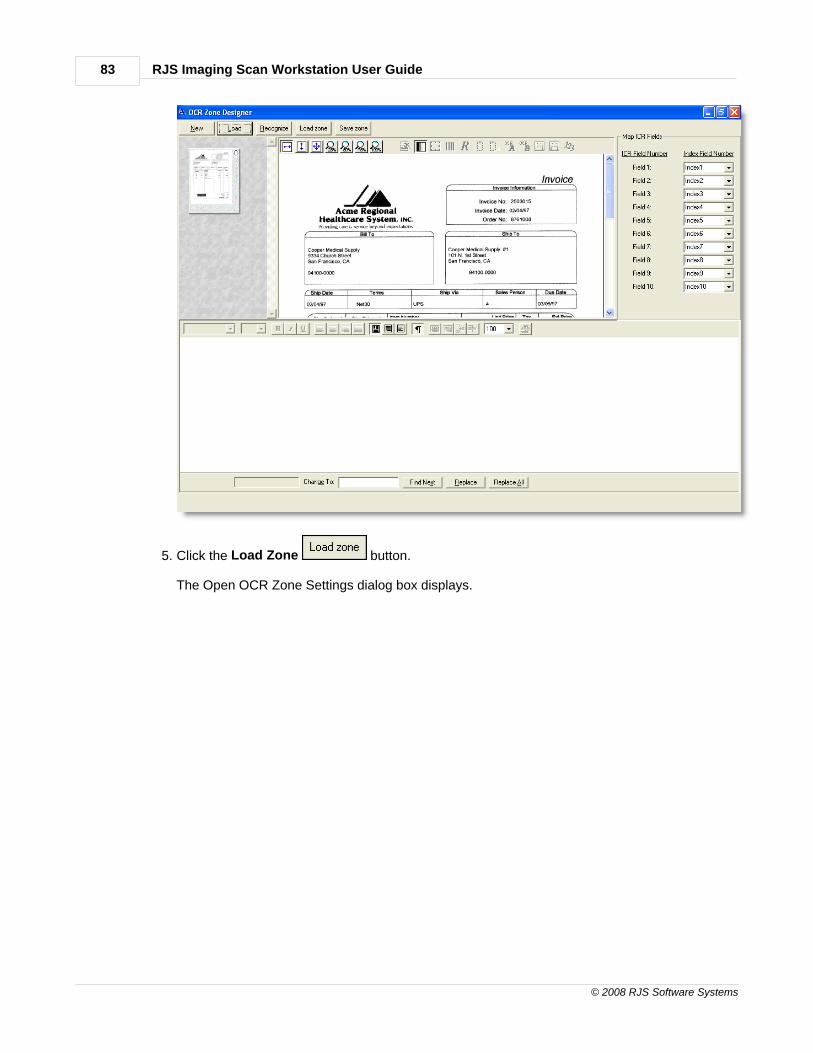
RJS Imaging Scan Workstation User Guide83
© 2008 RJS Software Systems
5. Click the Load Zone button.
The Open OCR Zone Settings dialog box displays.
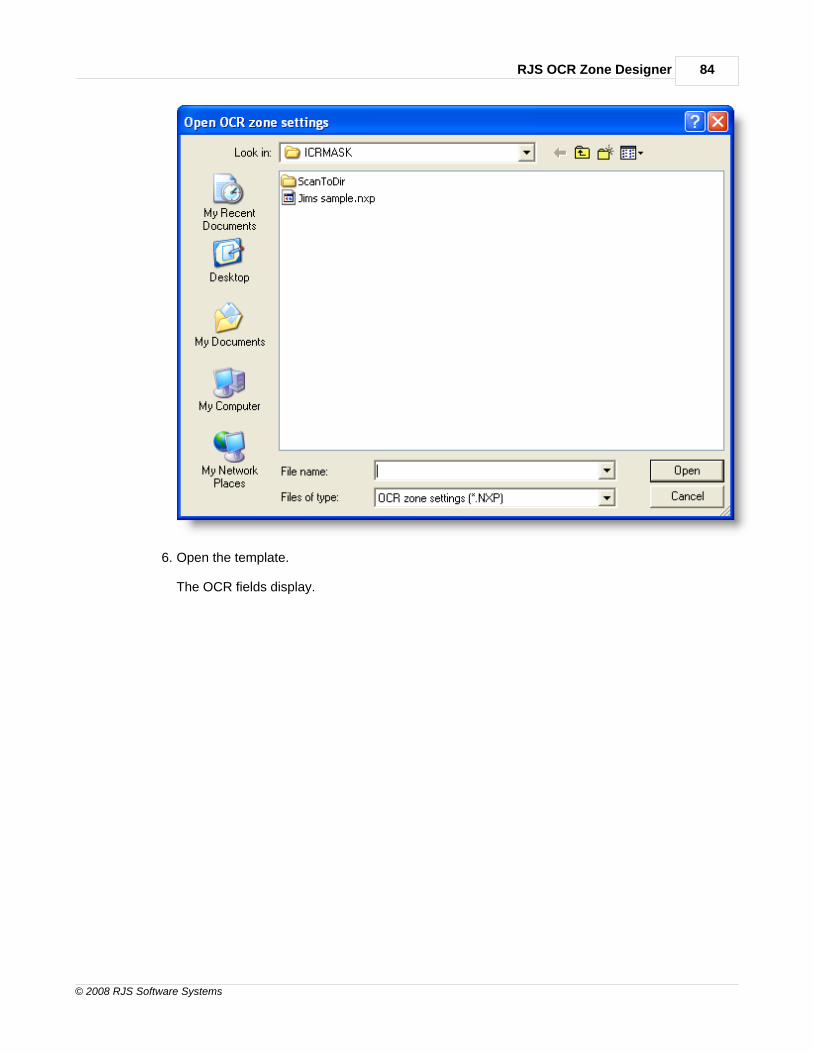
RJS OCR Zone Designer 84
© 2008 RJS Software Systems
6. Open the template.
The OCR fields display.
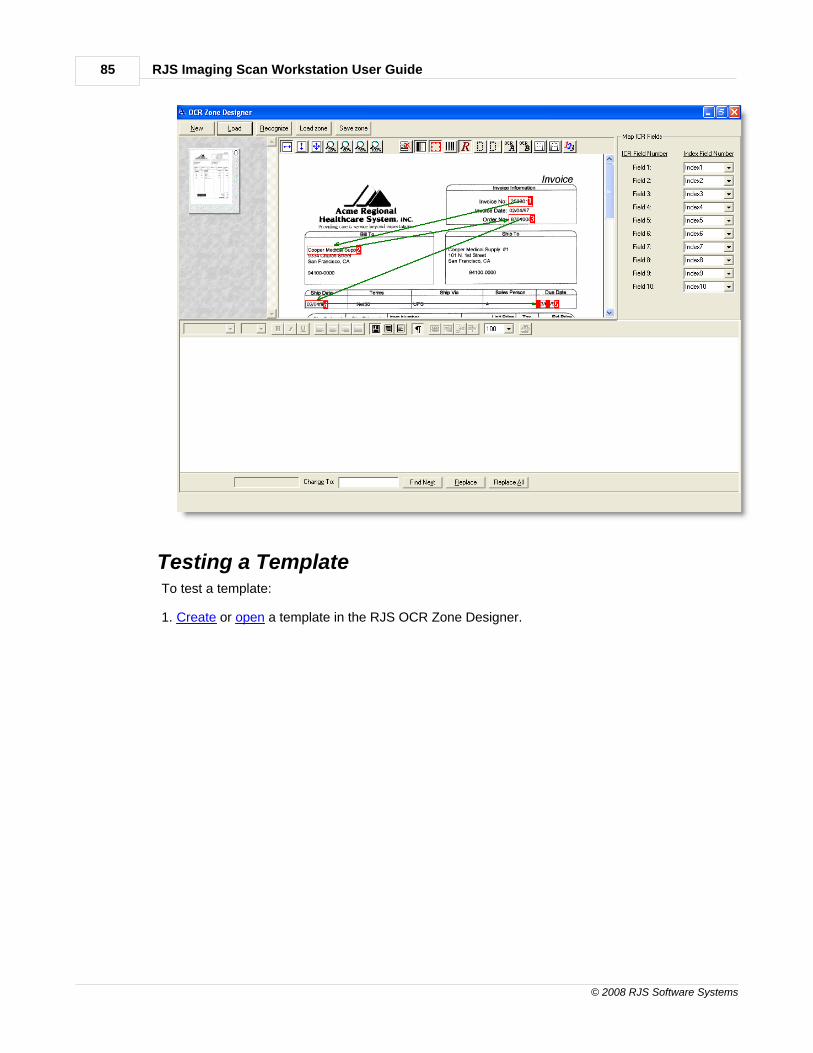
RJS Imaging Scan Workstation User Guide85
© 2008 RJS Software Systems
Testing a TemplateTo test a template:
1. Create or open a template in the RJS OCR Zone Designer.
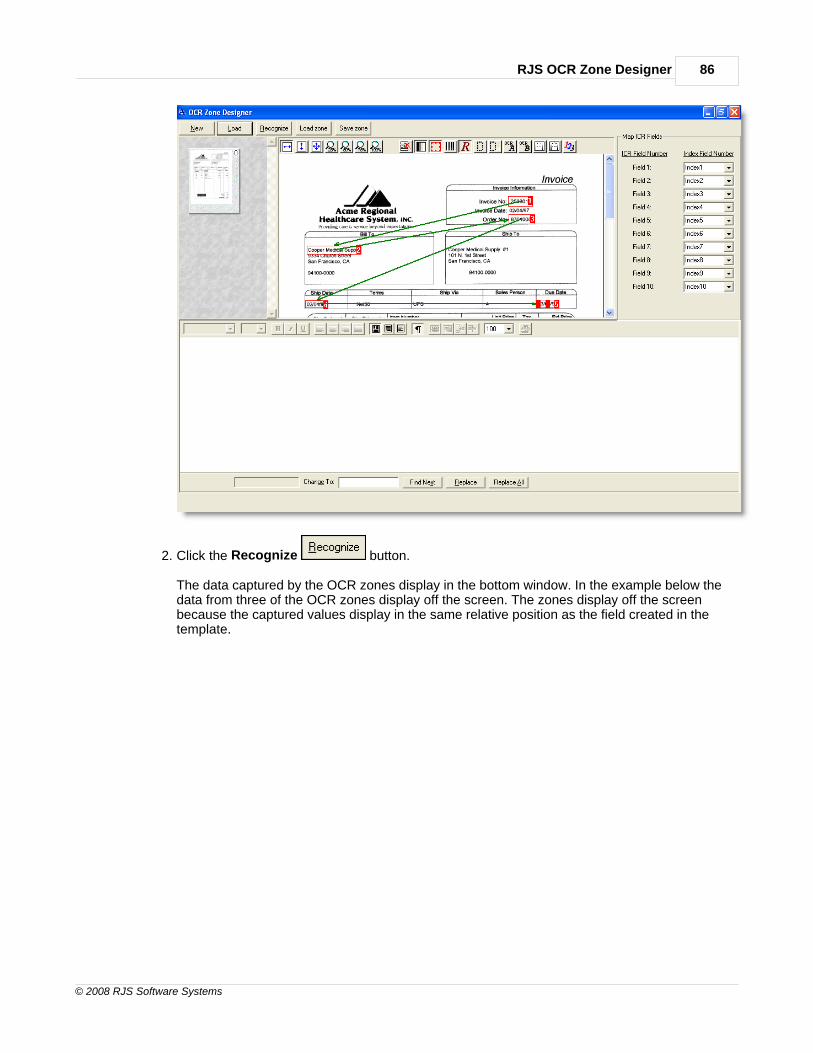
RJS OCR Zone Designer 86
© 2008 RJS Software Systems
2. Click the Recognize button.
The data captured by the OCR zones display in the bottom window. In the example below thedata from three of the OCR zones display off the screen. The zones display off the screenbecause the captured values display in the same relative position as the field created in thetemplate.
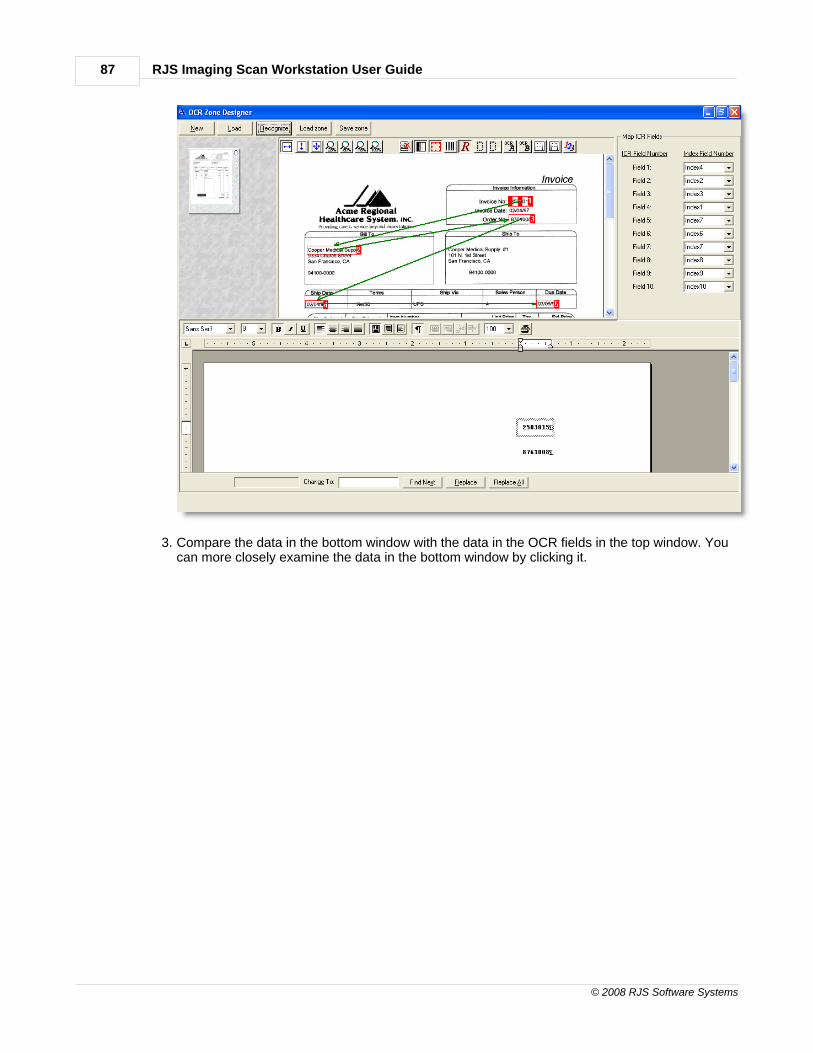
RJS Imaging Scan Workstation User Guide87
© 2008 RJS Software Systems
3. Compare the data in the bottom window with the data in the OCR fields in the top window. Youcan more closely examine the data in the bottom window by clicking it.
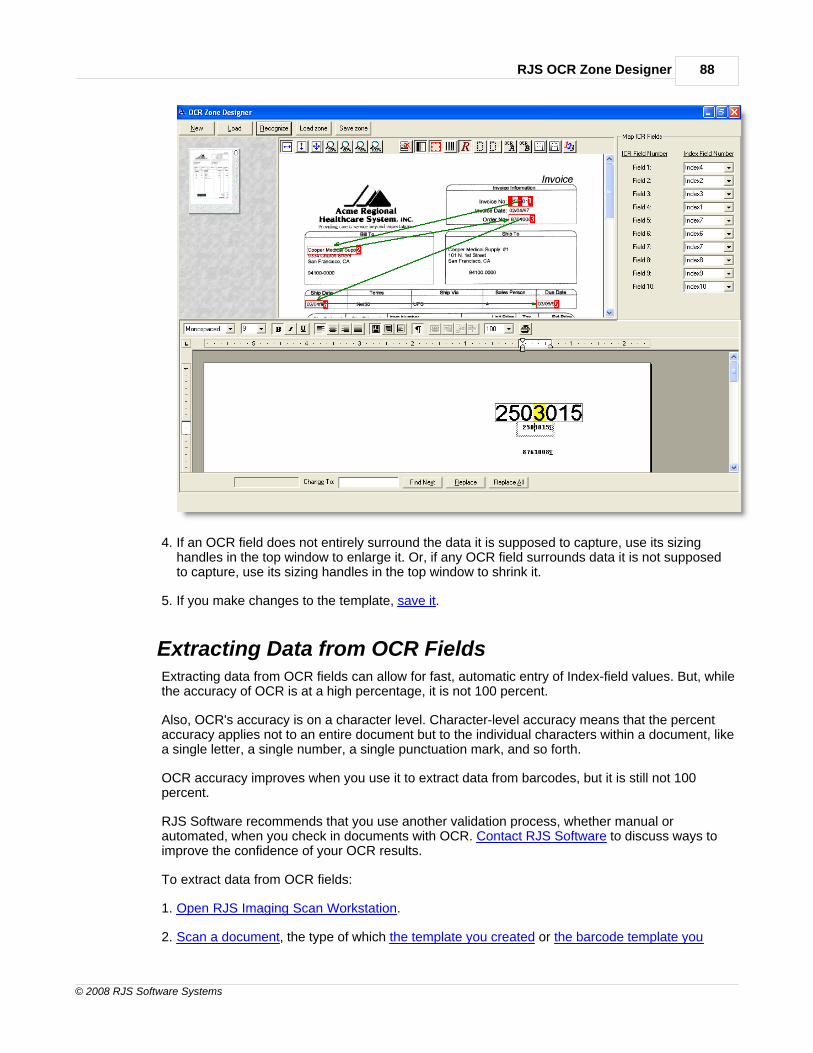
RJS OCR Zone Designer 88
© 2008 RJS Software Systems
4. If an OCR field does not entirely surround the data it is supposed to capture, use its sizinghandles in the top window to enlarge it. Or, if any OCR field surrounds data it is not supposedto capture, use its sizing handles in the top window to shrink it.
5. If you make changes to the template, save it.
Extracting Data from OCR FieldsExtracting data from OCR fields can allow for fast, automatic entry of Index-field values. But, whilethe accuracy of OCR is at a high percentage, it is not 100 percent.
Also, OCR's accuracy is on a character level. Character-level accuracy means that the percentaccuracy applies not to an entire document but to the individual characters within a document, likea single letter, a single number, a single punctuation mark, and so forth.
OCR accuracy improves when you use it to extract data from barcodes, but it is still not 100percent.
RJS Software recommends that you use another validation process, whether manual orautomated, when you check in documents with OCR. Contact RJS Software to discuss ways toimprove the confidence of your OCR results.
To extract data from OCR fields:
1. Open RJS Imaging Scan Workstation.
2. Scan a document, the type of which the template you created or the barcode template you
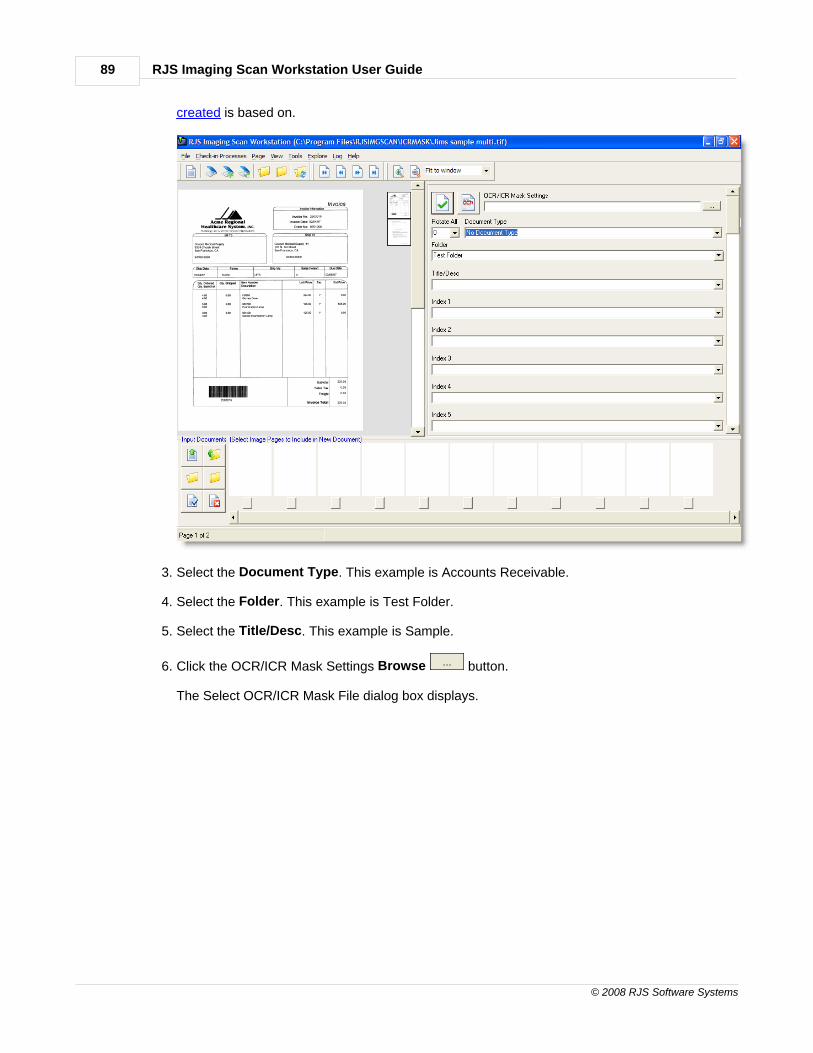
RJS Imaging Scan Workstation User Guide89
© 2008 RJS Software Systems
created is based on.
3. Select the Document Type. This example is Accounts Receivable.
4. Select the Folder. This example is Test Folder.
5. Select the Title/Desc. This example is Sample.
6. Click the OCR/ICR Mask Settings Browse button.
The Select OCR/ICR Mask File dialog box displays.
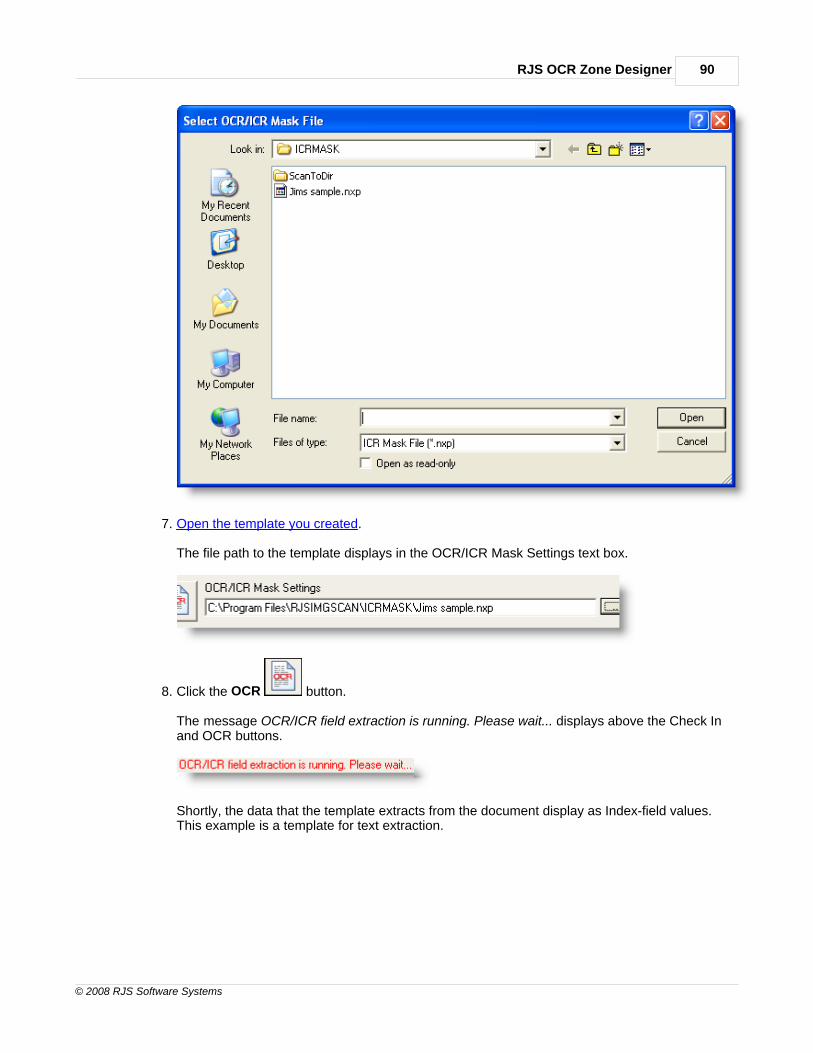
RJS OCR Zone Designer 90
© 2008 RJS Software Systems
7. Open the template you created.
The file path to the template displays in the OCR/ICR Mask Settings text box.
8. Click the OCR button.
The message OCR/ICR field extraction is running. Please wait... displays above the Check Inand OCR buttons.
Shortly, the data that the template extracts from the document display as Index-field values.This example is a template for text extraction.
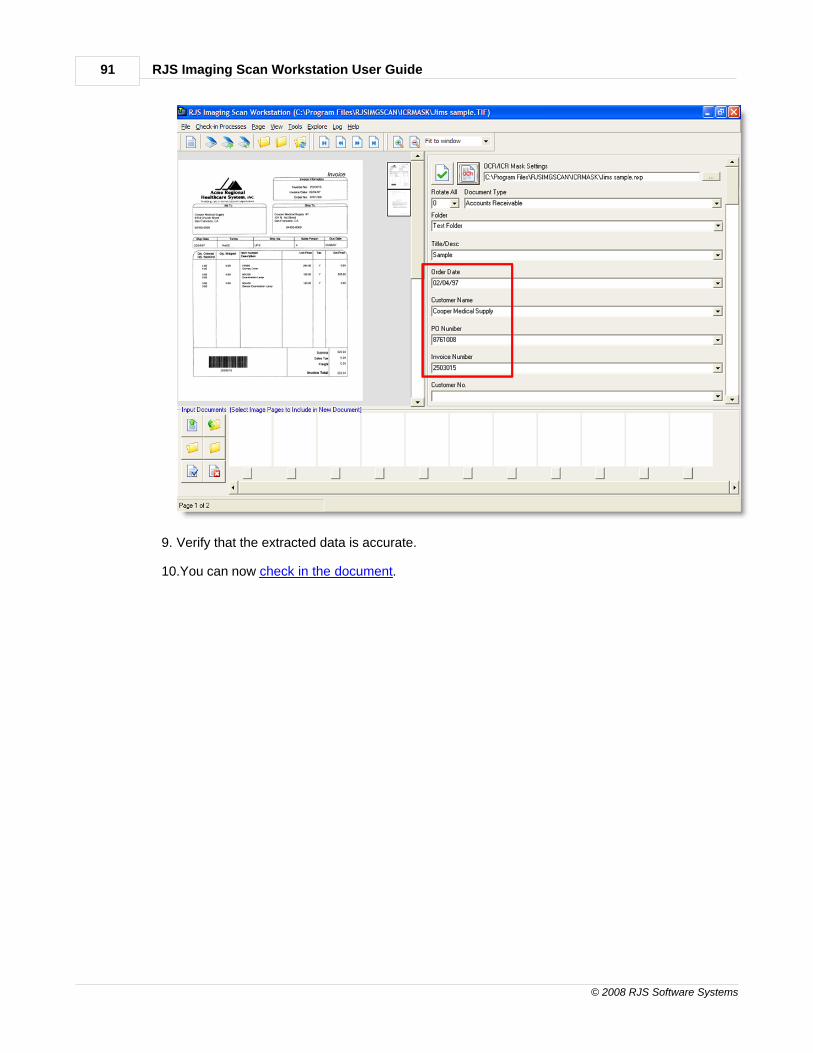
RJS Imaging Scan Workstation User Guide91
© 2008 RJS Software Systems
9. Verify that the extracted data is accurate.
10.You can now check in the document.
Section
8
Full-Text OCR
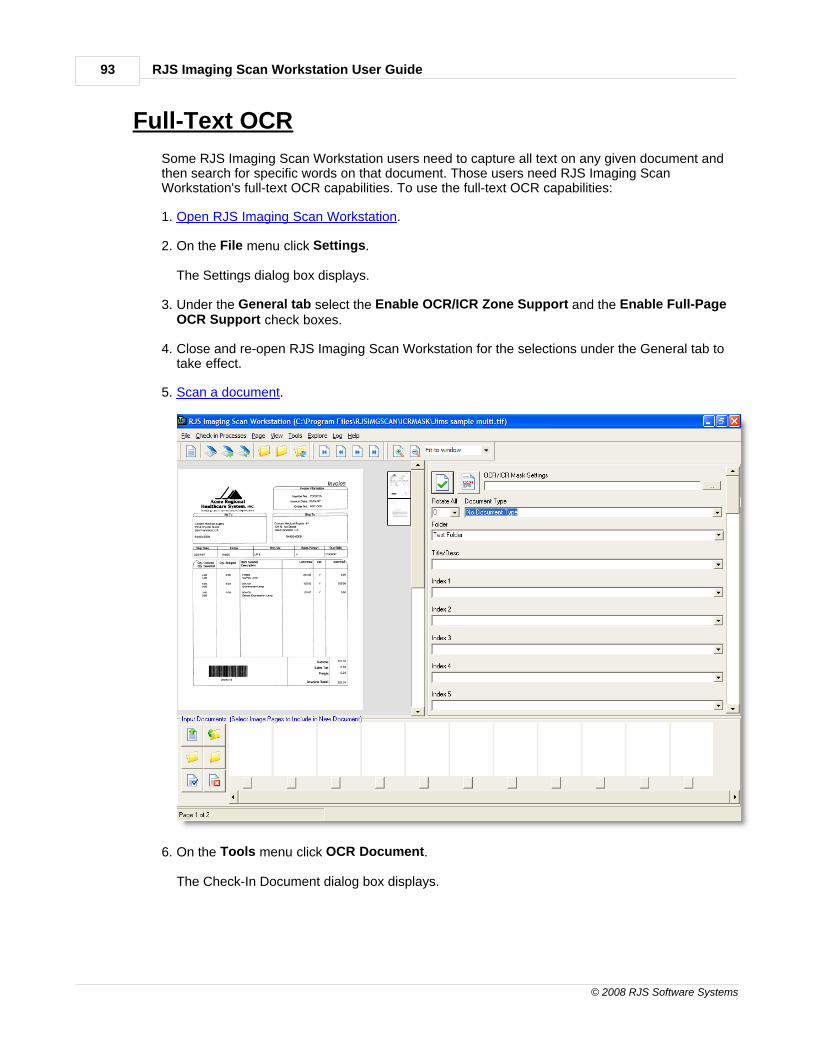
RJS Imaging Scan Workstation User Guide93
© 2008 RJS Software Systems
Full-Text OCR
Some RJS Imaging Scan Workstation users need to capture all text on any given document andthen search for specific words on that document. Those users need RJS Imaging ScanWorkstation's full-text OCR capabilities. To use the full-text OCR capabilities:
1. Open RJS Imaging Scan Workstation.
2. On the File menu click Settings.
The Settings dialog box displays.
3. Under the General tab select the Enable OCR/ICR Zone Support and the Enable Full-PageOCR Support check boxes.
4. Close and re-open RJS Imaging Scan Workstation for the selections under the General tab totake effect.
5. Scan a document.
6. On the Tools menu click OCR Document.
The Check-In Document dialog box displays.
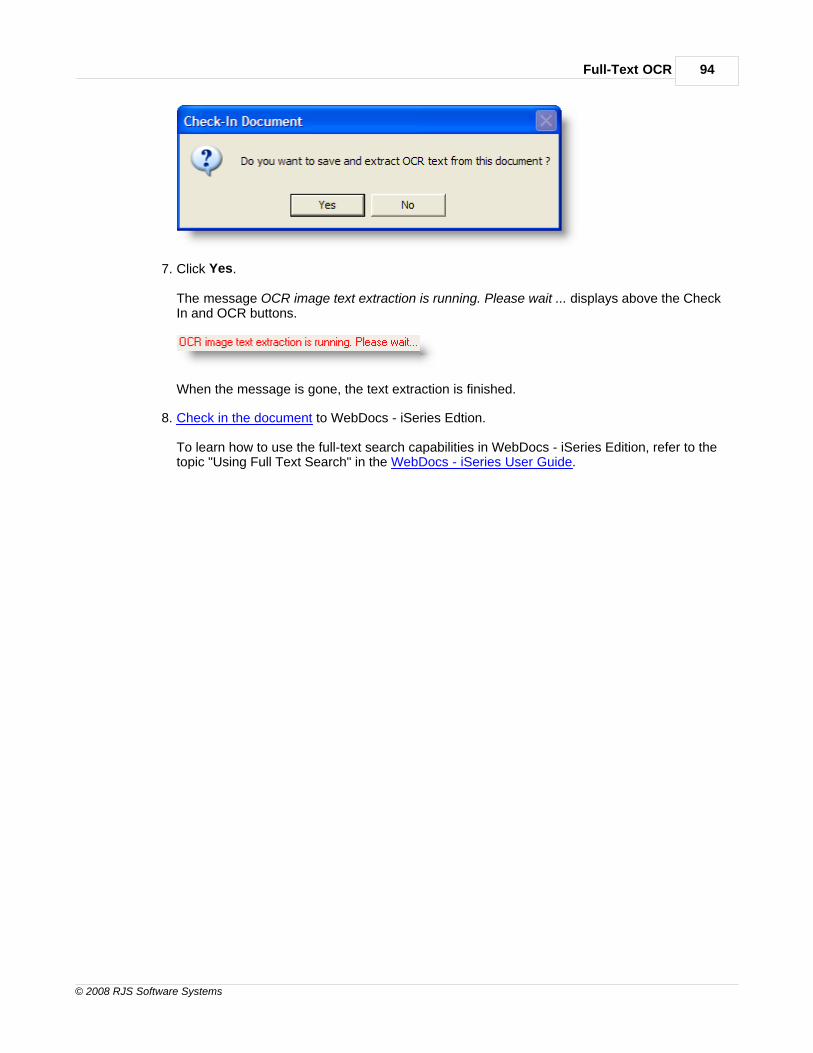
Full-Text OCR 94
© 2008 RJS Software Systems
7. Click Yes.
The message OCR image text extraction is running. Please wait ... displays above the CheckIn and OCR buttons.
When the message is gone, the text extraction is finished.
8. Check in the document to WebDocs - iSeries Edtion.
To learn how to use the full-text search capabilities in WebDocs - iSeries Edition, refer to thetopic "Using Full Text Search" in the WebDocs - iSeries User Guide.

Section
9
Searchable PDFDocument
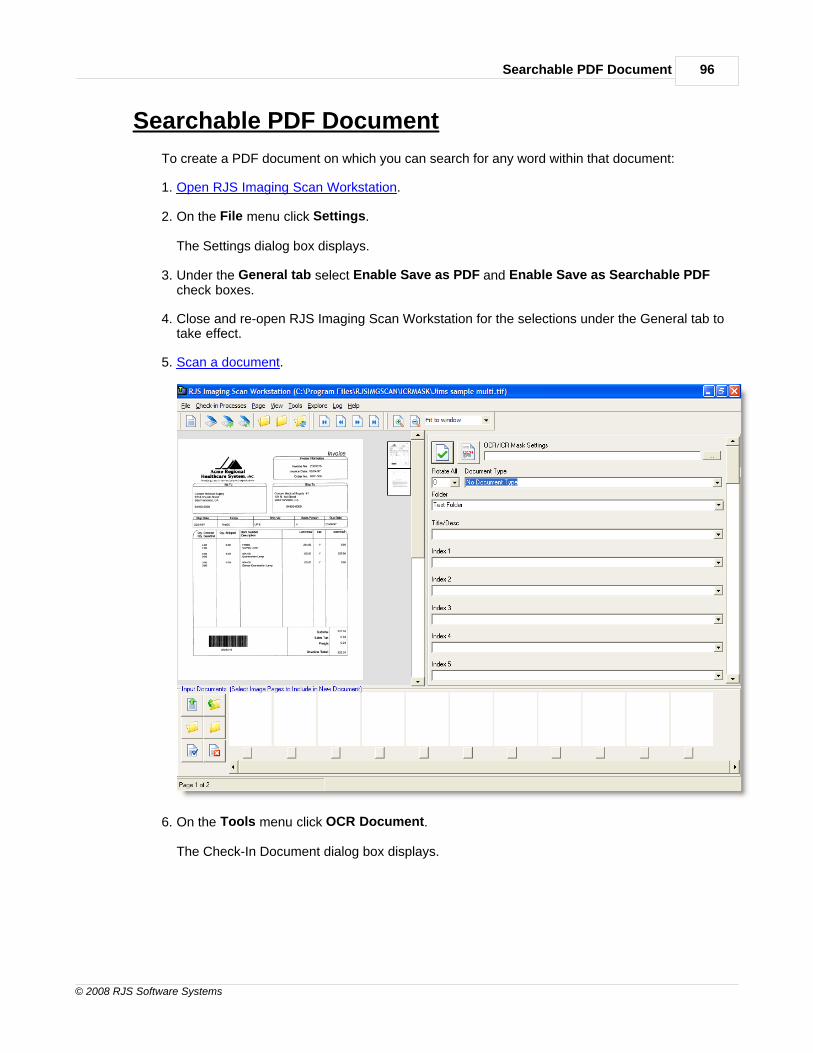
Searchable PDF Document 96
© 2008 RJS Software Systems
Searchable PDF Document
To create a PDF document on which you can search for any word within that document:
1. Open RJS Imaging Scan Workstation.
2. On the File menu click Settings.
The Settings dialog box displays.
3. Under the General tab select Enable Save as PDF and Enable Save as Searchable PDFcheck boxes.
4. Close and re-open RJS Imaging Scan Workstation for the selections under the General tab totake effect.
5. Scan a document.
6. On the Tools menu click OCR Document.
The Check-In Document dialog box displays.
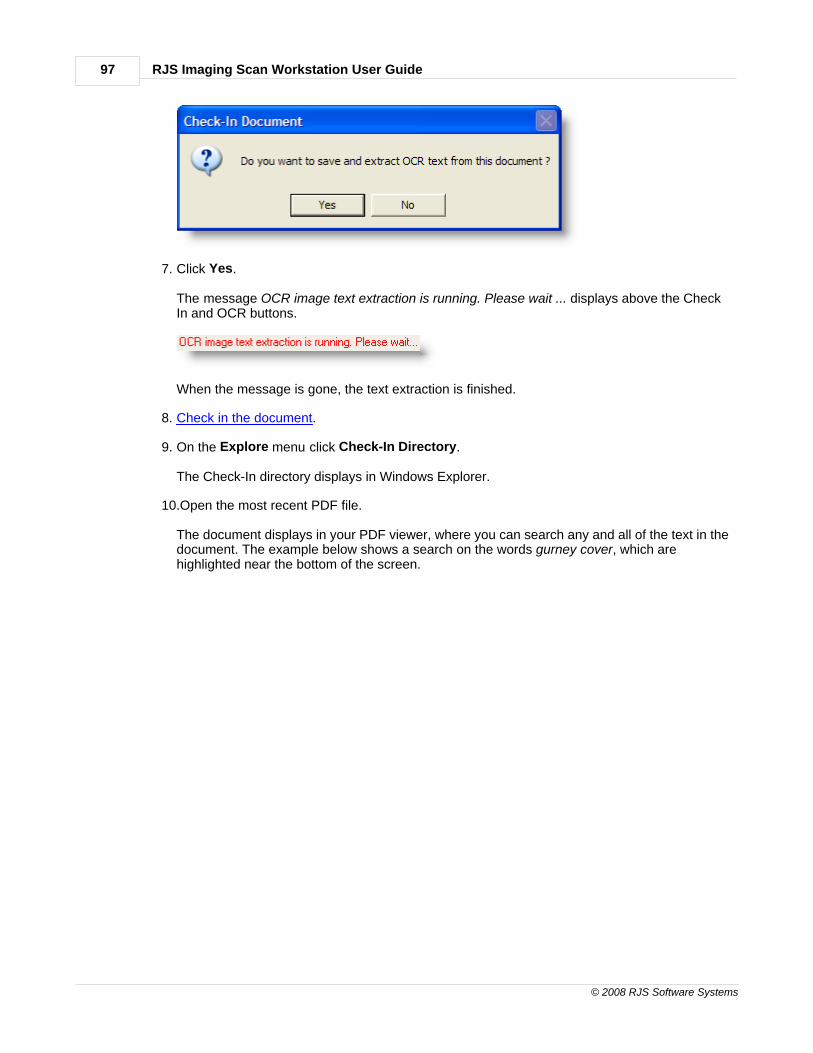
RJS Imaging Scan Workstation User Guide97
© 2008 RJS Software Systems
7. Click Yes.
The message OCR image text extraction is running. Please wait ... displays above the CheckIn and OCR buttons.
When the message is gone, the text extraction is finished.
8. Check in the document.
9. On the Explore menu click Check-In Directory.
The Check-In directory displays in Windows Explorer.
10.Open the most recent PDF file.
The document displays in your PDF viewer, where you can search any and all of the text in thedocument. The example below shows a search on the words gurney cover, which arehighlighted near the bottom of the screen.
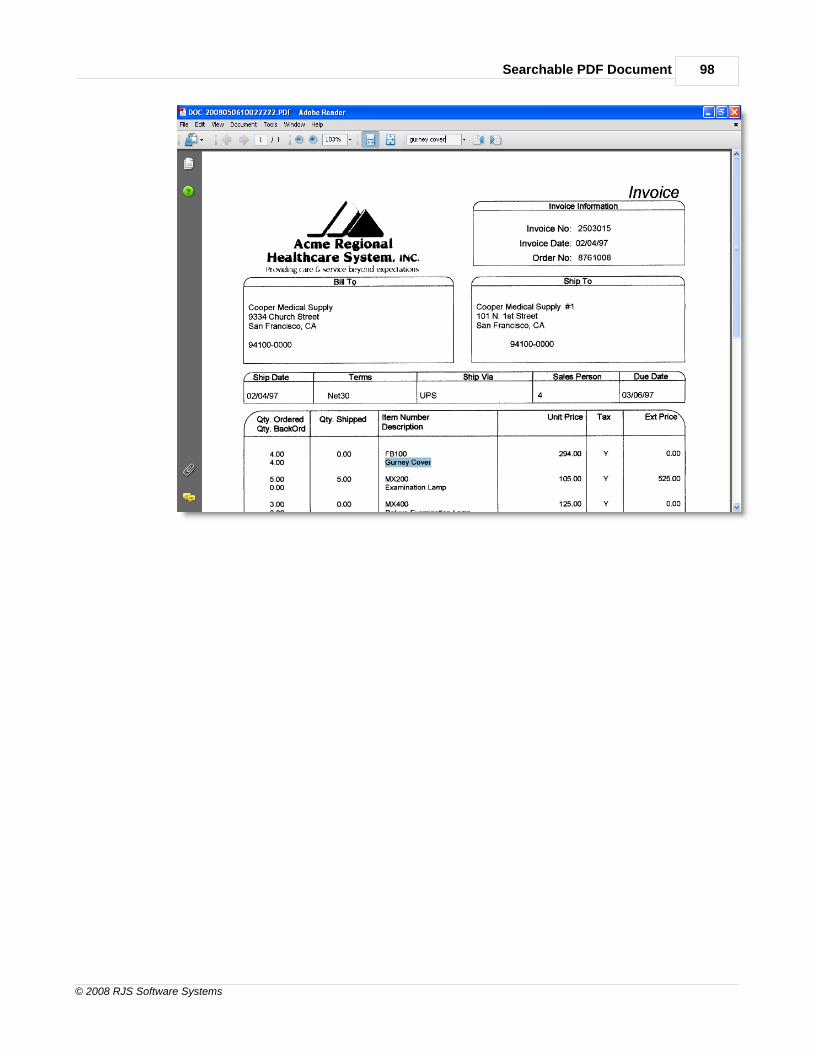
Searchable PDF Document 98
© 2008 RJS Software Systems
Section
10
Appendix A:Customizing theInterface
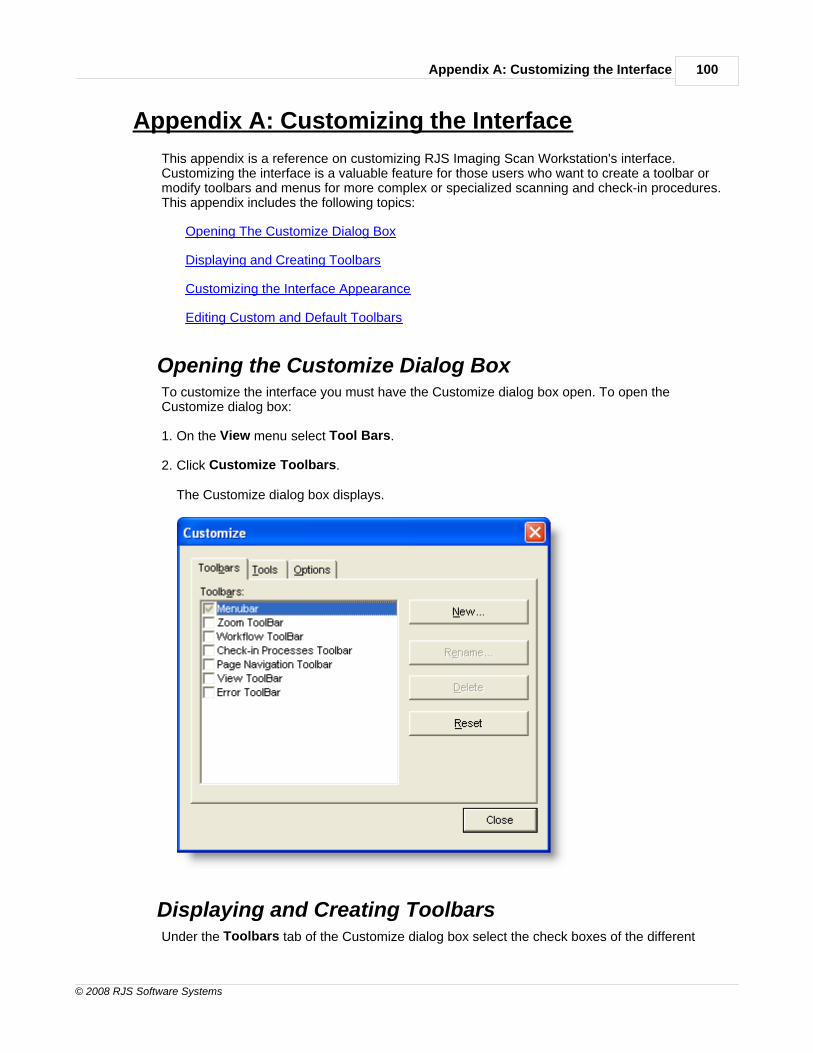
Appendix A: Customizing the Interface 100
© 2008 RJS Software Systems
Appendix A: Customizing the Interface
This appendix is a reference on customizing RJS Imaging Scan Workstation's interface.Customizing the interface is a valuable feature for those users who want to create a toolbar ormodify toolbars and menus for more complex or specialized scanning and check-in procedures.This appendix includes the following topics:
Opening The Customize Dialog Box
Displaying and Creating Toolbars
Customizing the Interface Appearance
Editing Custom and Default Toolbars
Opening the Customize Dialog BoxTo customize the interface you must have the Customize dialog box open. To open theCustomize dialog box:
1. On the View menu select Tool Bars.
2. Click Customize Toolbars.
The Customize dialog box displays.
Displaying and Creating ToolbarsUnder the Toolbars tab of the Customize dialog box select the check boxes of the different
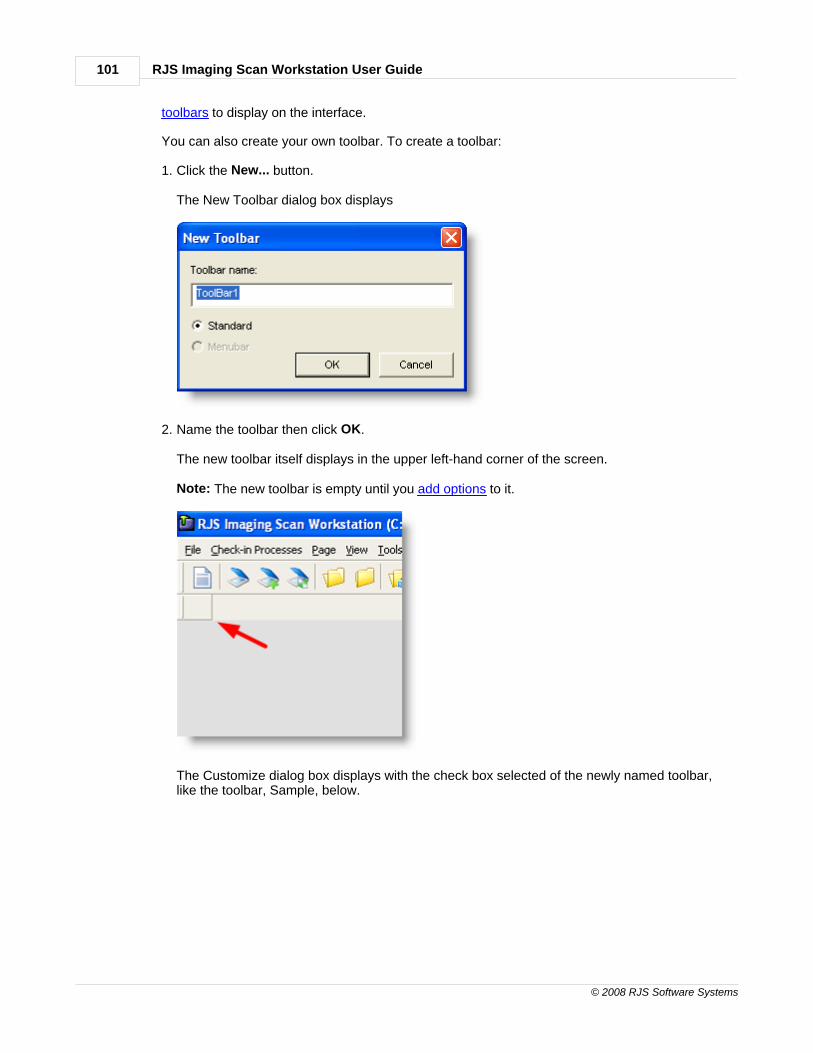
RJS Imaging Scan Workstation User Guide101
© 2008 RJS Software Systems
toolbars to display on the interface.
You can also create your own toolbar. To create a toolbar:
1. Click the New... button.
The New Toolbar dialog box displays
2. Name the toolbar then click OK.
The new toolbar itself displays in the upper left-hand corner of the screen.
Note: The new toolbar is empty until you add options to it.
The Customize dialog box displays with the check box selected of the newly named toolbar,like the toolbar, Sample, below.
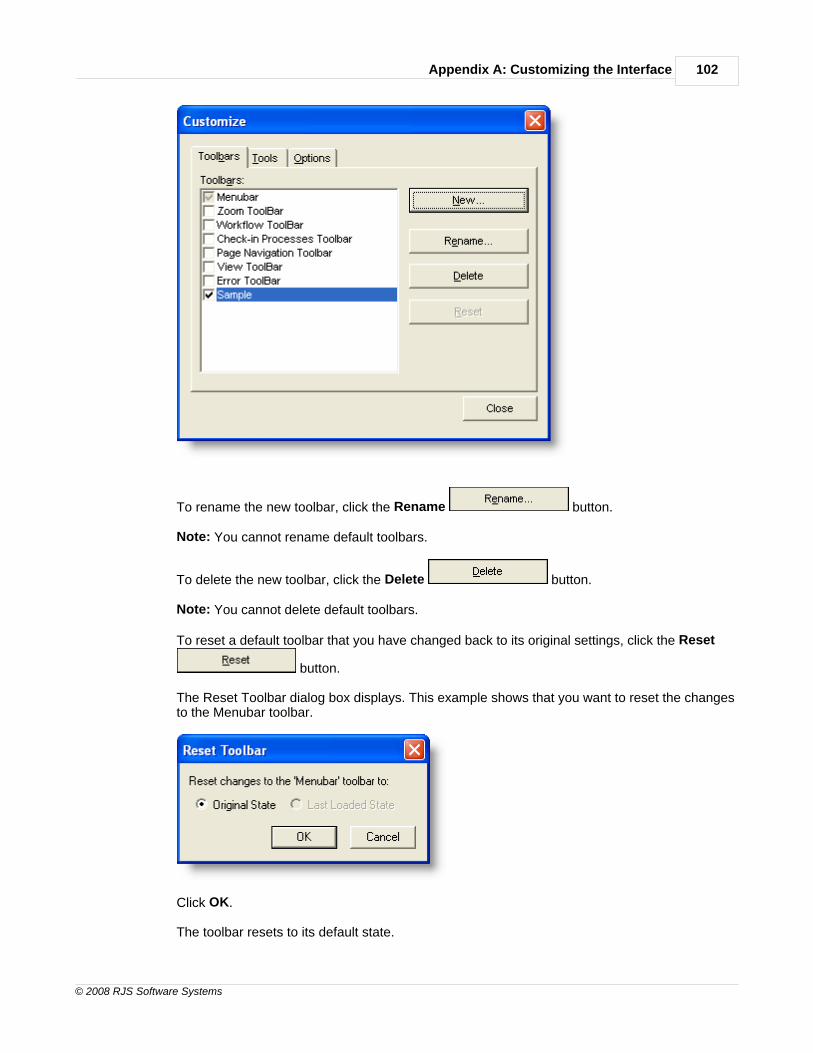
Appendix A: Customizing the Interface 102
© 2008 RJS Software Systems
To rename the new toolbar, click the Rename button.
Note: You cannot rename default toolbars.
To delete the new toolbar, click the Delete button.
Note: You cannot delete default toolbars.
To reset a default toolbar that you have changed back to its original settings, click the Reset
button.
The Reset Toolbar dialog box displays. This example shows that you want to reset the changesto the Menubar toolbar.
Click OK.
The toolbar resets to its default state.
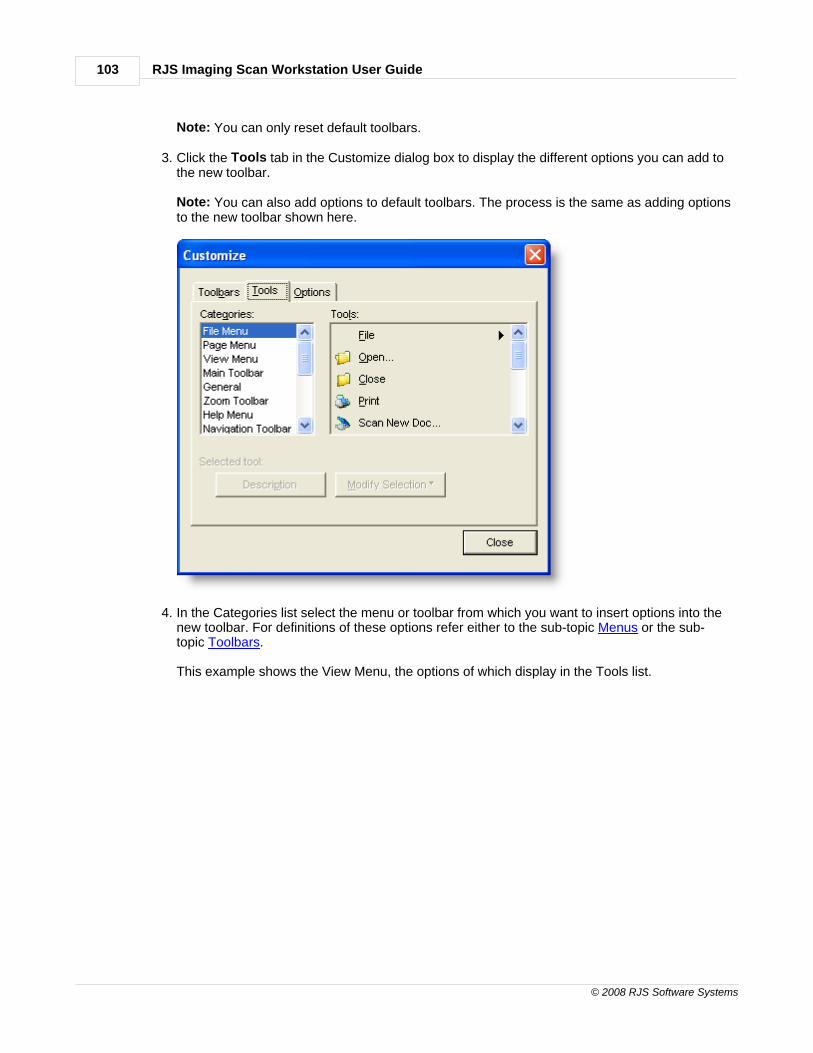
RJS Imaging Scan Workstation User Guide103
© 2008 RJS Software Systems
Note: You can only reset default toolbars.
3. Click the Tools tab in the Customize dialog box to display the different options you can add tothe new toolbar.
Note: You can also add options to default toolbars. The process is the same as adding optionsto the new toolbar shown here.
4. In the Categories list select the menu or toolbar from which you want to insert options into thenew toolbar. For definitions of these options refer either to the sub-topic Menus or the sub-topic Toolbars.
This example shows the View Menu, the options of which display in the Tools list.
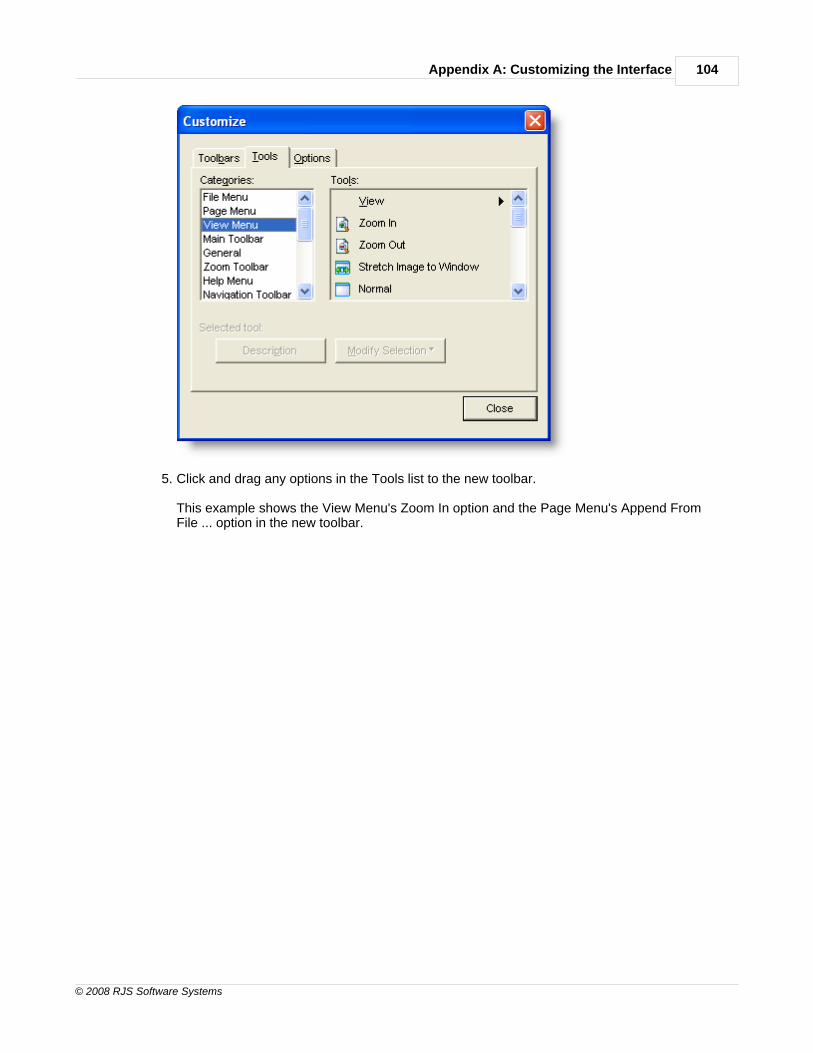
Appendix A: Customizing the Interface 104
© 2008 RJS Software Systems
5. Click and drag any options in the Tools list to the new toolbar.
This example shows the View Menu's Zoom In option and the Page Menu's Append FromFile ... option in the new toolbar.
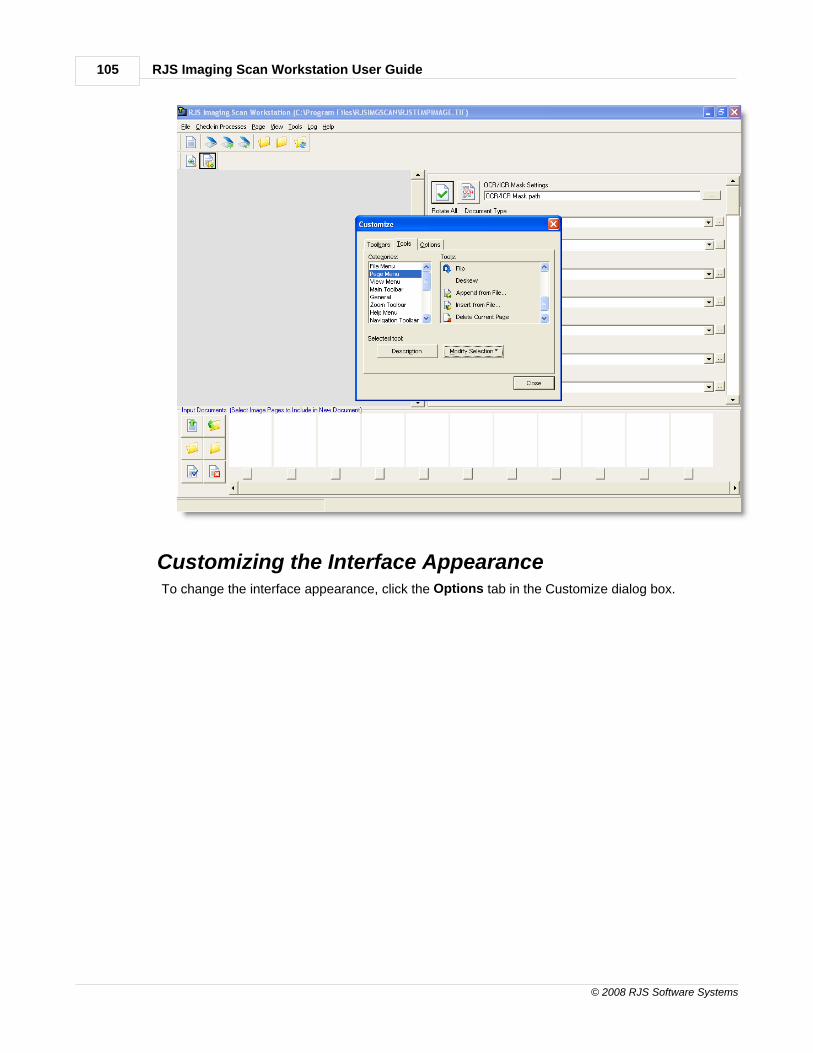
RJS Imaging Scan Workstation User Guide105
© 2008 RJS Software Systems
Customizing the Interface AppearanceTo change the interface appearance, click the Options tab in the Customize dialog box.
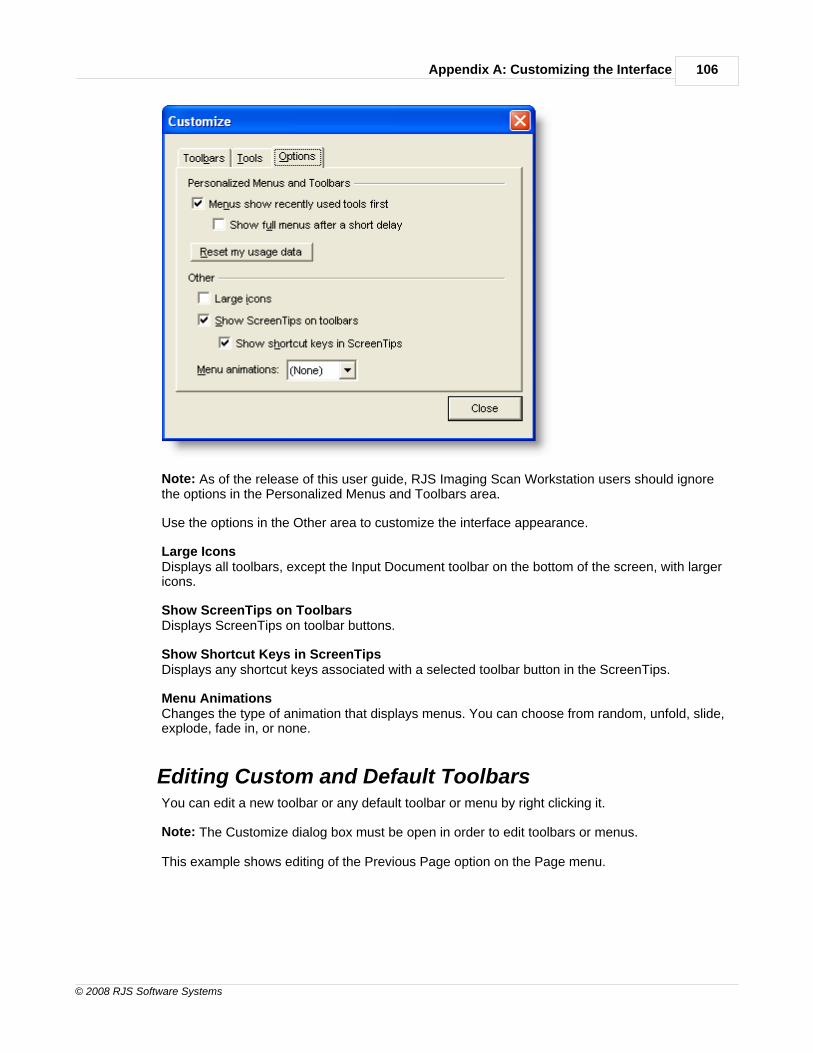
Appendix A: Customizing the Interface 106
© 2008 RJS Software Systems
Note: As of the release of this user guide, RJS Imaging Scan Workstation users should ignorethe options in the Personalized Menus and Toolbars area.
Use the options in the Other area to customize the interface appearance.
Large IconsDisplays all toolbars, except the Input Document toolbar on the bottom of the screen, with largericons.
Show ScreenTips on ToolbarsDisplays ScreenTips on toolbar buttons.
Show Shortcut Keys in ScreenTipsDisplays any shortcut keys associated with a selected toolbar button in the ScreenTips.
Menu AnimationsChanges the type of animation that displays menus. You can choose from random, unfold, slide,explode, fade in, or none.
Editing Custom and Default ToolbarsYou can edit a new toolbar or any default toolbar or menu by right clicking it.
Note: The Customize dialog box must be open in order to edit toolbars or menus.
This example shows editing of the Previous Page option on the Page menu.
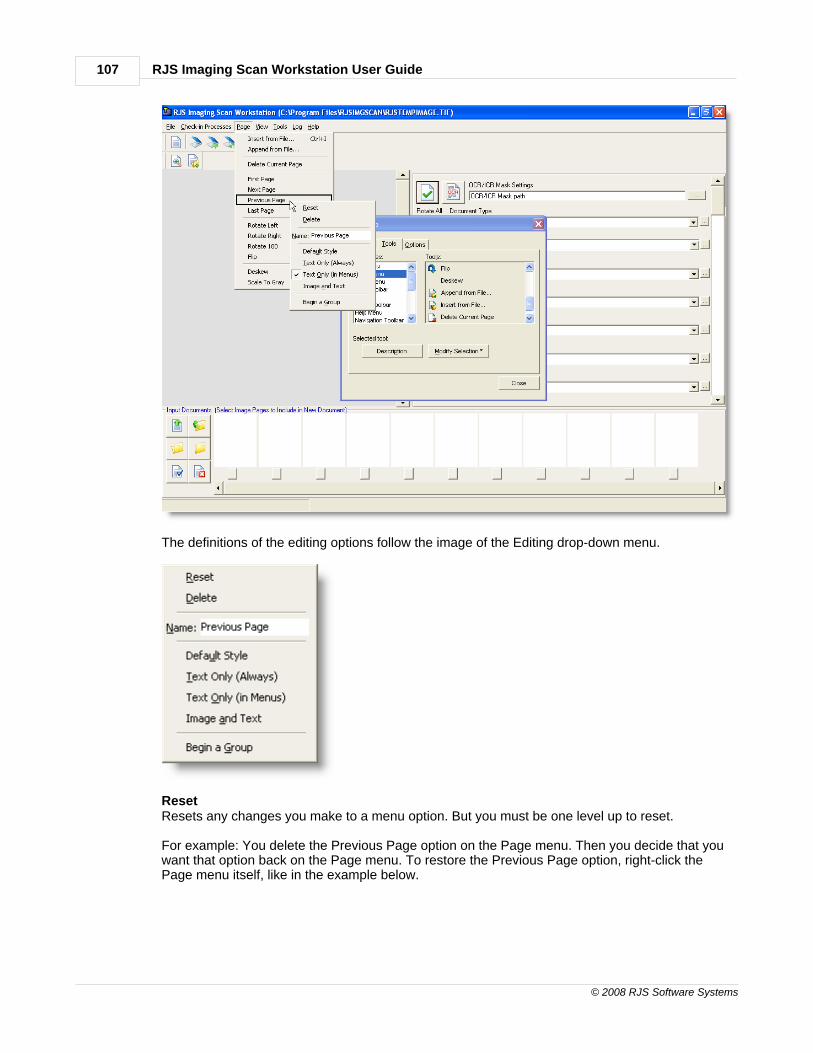
RJS Imaging Scan Workstation User Guide107
© 2008 RJS Software Systems
The definitions of the editing options follow the image of the Editing drop-down menu.
ResetResets any changes you make to a menu option. But you must be one level up to reset.
For example: You delete the Previous Page option on the Page menu. Then you decide that youwant that option back on the Page menu. To restore the Previous Page option, right-click thePage menu itself, like in the example below.
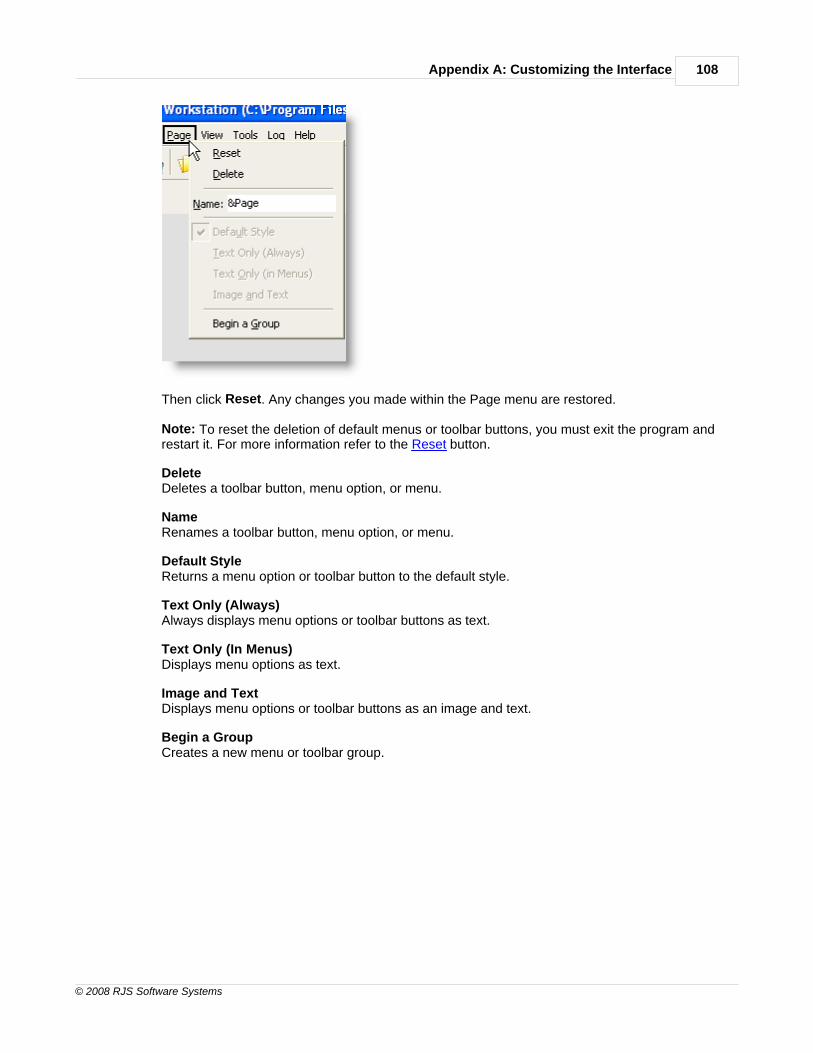
Appendix A: Customizing the Interface 108
© 2008 RJS Software Systems
Then click Reset. Any changes you made within the Page menu are restored.
Note: To reset the deletion of default menus or toolbar buttons, you must exit the program andrestart it. For more information refer to the Reset button.
DeleteDeletes a toolbar button, menu option, or menu.
NameRenames a toolbar button, menu option, or menu.
Default StyleReturns a menu option or toolbar button to the default style.
Text Only (Always)Always displays menu options or toolbar buttons as text.
Text Only (In Menus)Displays menu options as text.
Image and TextDisplays menu options or toolbar buttons as an image and text.
Begin a GroupCreates a new menu or toolbar group.

Section
11
Appendix B: 5250Integrator Software
Appendix B: 5250 Integrator Software 110
© 2008 RJS Software Systems
Appendix B: 5250 Integrator Software
This appendix is a reference for using 5250 Integrator Software in conjunction with RJS ImagingScan Workstation. It includes the following topics:
Overview
Installation
Setup
Using the Script Editor
OverviewYou can use the RJS 5250 Integrator software to integrate with Client Access/400 5250 sessionsto extract information from the 5250 screen. You can use this extracted information to performprogrammatic logic, such as passing values to RJS Imaging Scan Workstation.
Installation
Installation Instructions
For the 5250 Integrator installation instructions, refer to the RJS Software Support Site article at http://wiki.rjssoftware.com/wiki/index.php/5250_Integrator_Install.
Authorization Code
To complete the installation of 5250 Integrator, you need the license-authorization code.
To get the license-authorization code, either call RJS Support or send RJS Support an e-mailmessage with the product's Code Entry Number and Computer ID.
For instructions on how to find 5250 Integrator's Code Entry Number and Computer ID, refer tothe support site article http://wiki.rjssoftware.com/wiki/index.php/5250_Integrator_License andscroll down to "How do I find the Code Entry/Computer ID #?"
SetupThis section is a quick reference. If you have questions on setting up 5250 Integrator that are notaddressed here, contact RJS Software.
1. After installing the the software, click the Start button.
2. Point to All Programs.
3. Point to RJS 5250 Integrator.
4. Click RJS 5250 Integrator.
The following toolbar button displays:
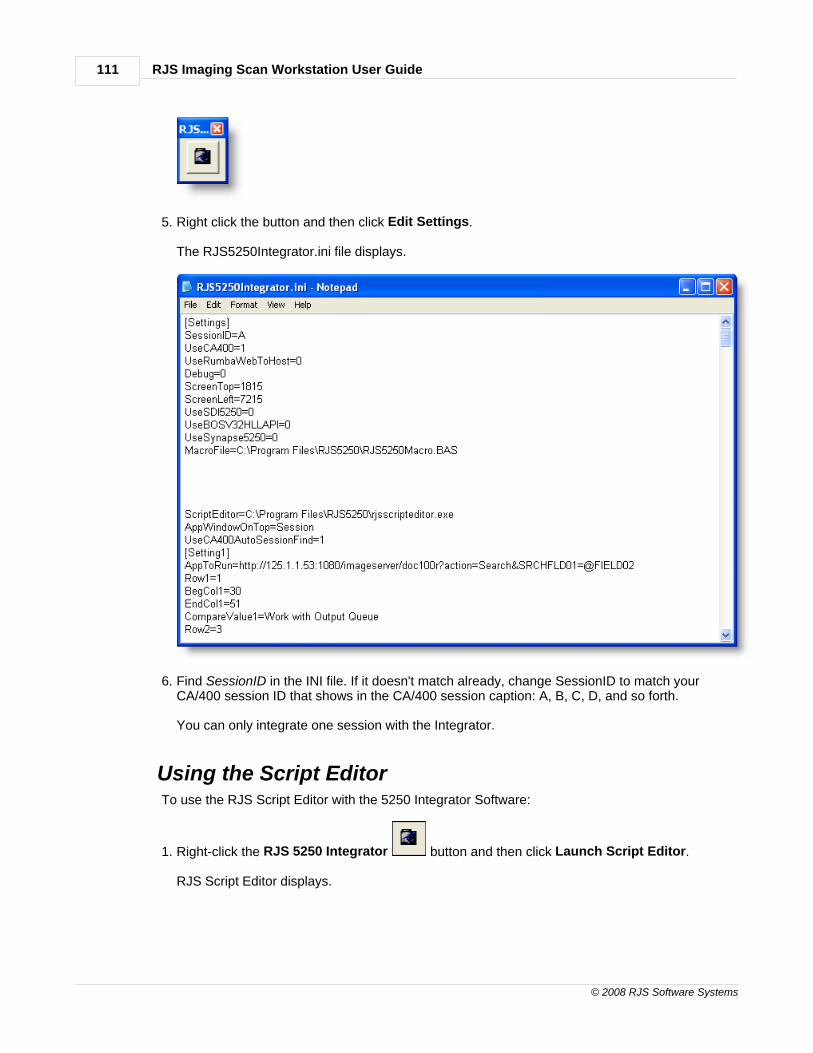
RJS Imaging Scan Workstation User Guide111
© 2008 RJS Software Systems
5. Right click the button and then click Edit Settings.
The RJS5250Integrator.ini file displays.
6. Find SessionID in the INI file. If it doesn't match already, change SessionID to match yourCA/400 session ID that shows in the CA/400 session caption: A, B, C, D, and so forth.
You can only integrate one session with the Integrator.
Using the Script EditorTo use the RJS Script Editor with the 5250 Integrator Software:
1. Right-click the RJS 5250 Integrator button and then click Launch Script Editor.
RJS Script Editor displays.
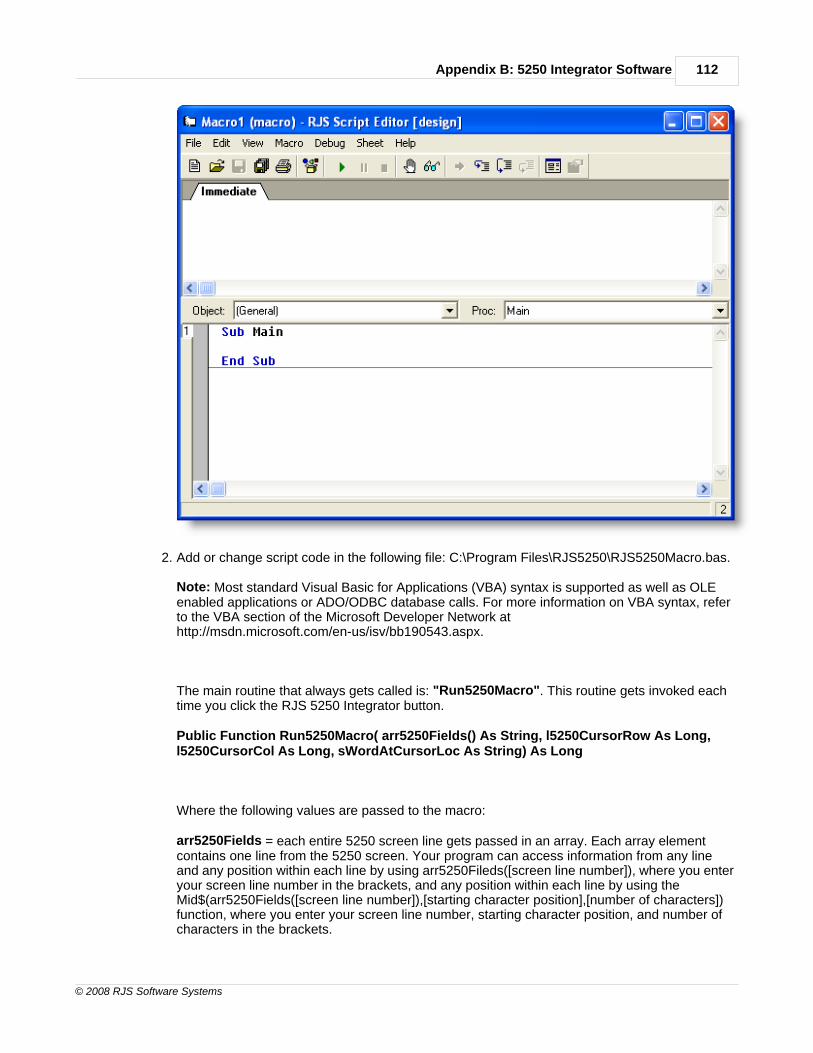
Appendix B: 5250 Integrator Software 112
© 2008 RJS Software Systems
2. Add or change script code in the following file: C:\Program Files\RJS5250\RJS5250Macro.bas.
Note: Most standard Visual Basic for Applications (VBA) syntax is supported as well as OLEenabled applications or ADO/ODBC database calls. For more information on VBA syntax, referto the VBA section of the Microsoft Developer Network at http://msdn.microsoft.com/en-us/isv/bb190543.aspx.
The main routine that always gets called is: "Run5250Macro". This routine gets invoked eachtime you click the RJS 5250 Integrator button.
Public Function Run5250Macro( arr5250Fields() As String, l5250CursorRow As Long,l5250CursorCol As Long, sWordAtCursorLoc As String) As Long
Where the following values are passed to the macro:
arr5250Fields = each entire 5250 screen line gets passed in an array. Each array elementcontains one line from the 5250 screen. Your program can access information from any lineand any position within each line by using arr5250Fileds([screen line number]), where you enteryour screen line number in the brackets, and any position within each line by using theMid$(arr5250Fields([screen line number]),[starting character position],[number of characters])function, where you enter your screen line number, starting character position, and number ofcharacters in the brackets.
RJS Imaging Scan Workstation User Guide113
© 2008 RJS Software Systems
Note: If your screen resolution is set to 24x80, each line will be 80 characters long. If yourscreen resolution is set to 27x132, each line will be 132 characters long.
l5250CursorRow = contains the current row where the cursor is positioned. This informationcan be useful when you want to create cursor-location-sensitive operations.
l5250CursorCol = contains the current column where the cursor is positioned. This informationcan be useful when you want to create cursor-location-sensitive operations.
sWordAtCursorLoc = contains the entire string that is highlighted by the cursor. Thisinformation can be useful when you want your scripts to simply act on a highlighted word on thescreen.
This is a quick getting started guide. Contact RJS Software if you have any questions.

Section
12
Appendix C: ScriptingFunctions
RJS Imaging Scan Workstation User Guide115
© 2008 RJS Software Systems
Appendix C: Scripting Functions
This appendix is a reference for using RJS Imaging Scan Workstation's scripting functions. Itincludes the following topics:
Overview
main
AfterZoneAnalyze
RJSADODatabaseLookup
RJSADODBMultipleRecordLookup
RJSADODBSingleRecordLookup
RJSExtractWordfromSubstring
RJSGet5250FieldFromCursor
RJSGet5250ScreenField
RJSPostProcessExitProgram
RJSPreProcessExitProgram
RunAfterOCR
RunIndexFieldClick
RunIndexFieldLookup
RunNewDocument
ShellExecute [Declare]
OverviewThis topic, which provides a brief overview of the RJS Script Editor and the scripting functions,includes the following sub-topics:
Opening the RJS Script Editor
About Sax Basic Language
Accessing the Basic Language
Creating Custom Dialog Boxes
Bringing Windows Functions into your Scripts
Opening the RJS Script Editor
To open the RJS Script Editor:

Appendix C: Scripting Functions 116
© 2008 RJS Software Systems
1. Open RJS Imaging Scan Workstation.
2. On the Tools menu click VB Script Editor.
The RJS Script Editor displays.
About Sax Basic Language
RJS Imaging Scan Workstation's scripting functions are in the Sax Basic Language. Sax Basic iscompatible with Visual Basic for Applications. For more information on Sax Basic:
1. Open the RJS Script Editor.
2. On the Help menu click Language Help.
The Sax Basic Help dialog box displays.
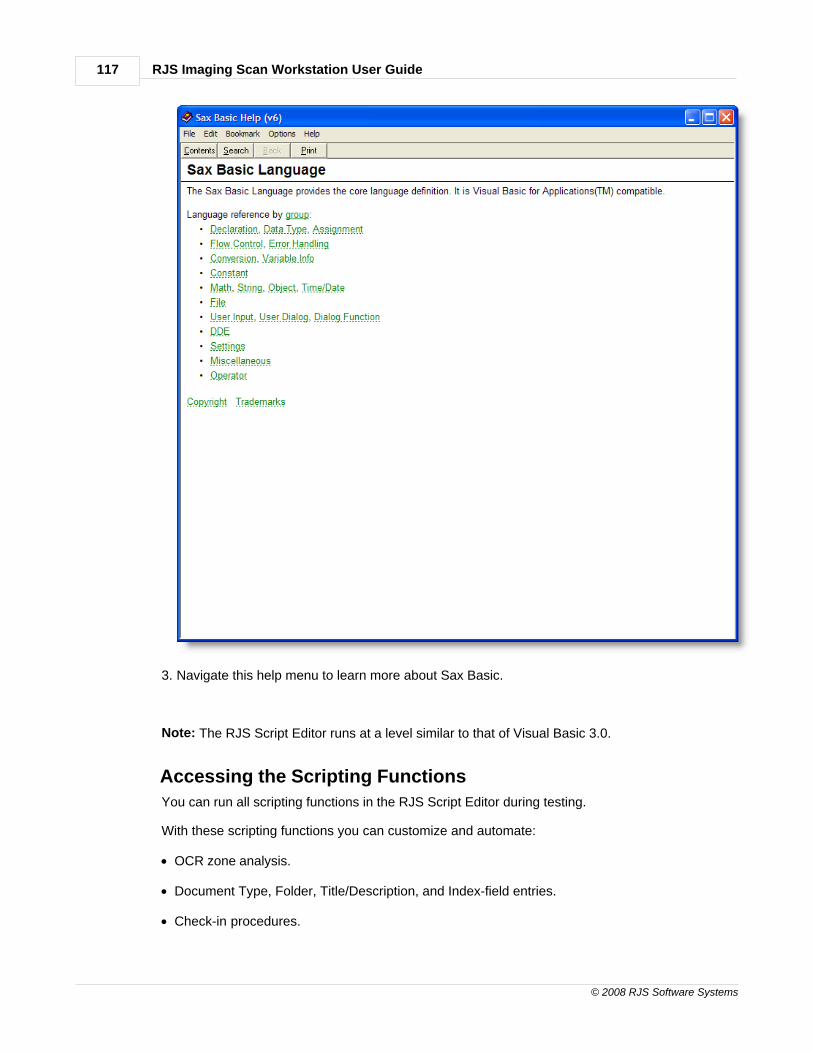
RJS Imaging Scan Workstation User Guide117
© 2008 RJS Software Systems
3. Navigate this help menu to learn more about Sax Basic.
Note: The RJS Script Editor runs at a level similar to that of Visual Basic 3.0.
Accessing the Scripting Functions
You can run all scripting functions in the RJS Script Editor during testing.
With these scripting functions you can customize and automate:
· OCR zone analysis.
· Document Type, Folder, Title/Description, and Index-field entries.
· Check-in procedures.
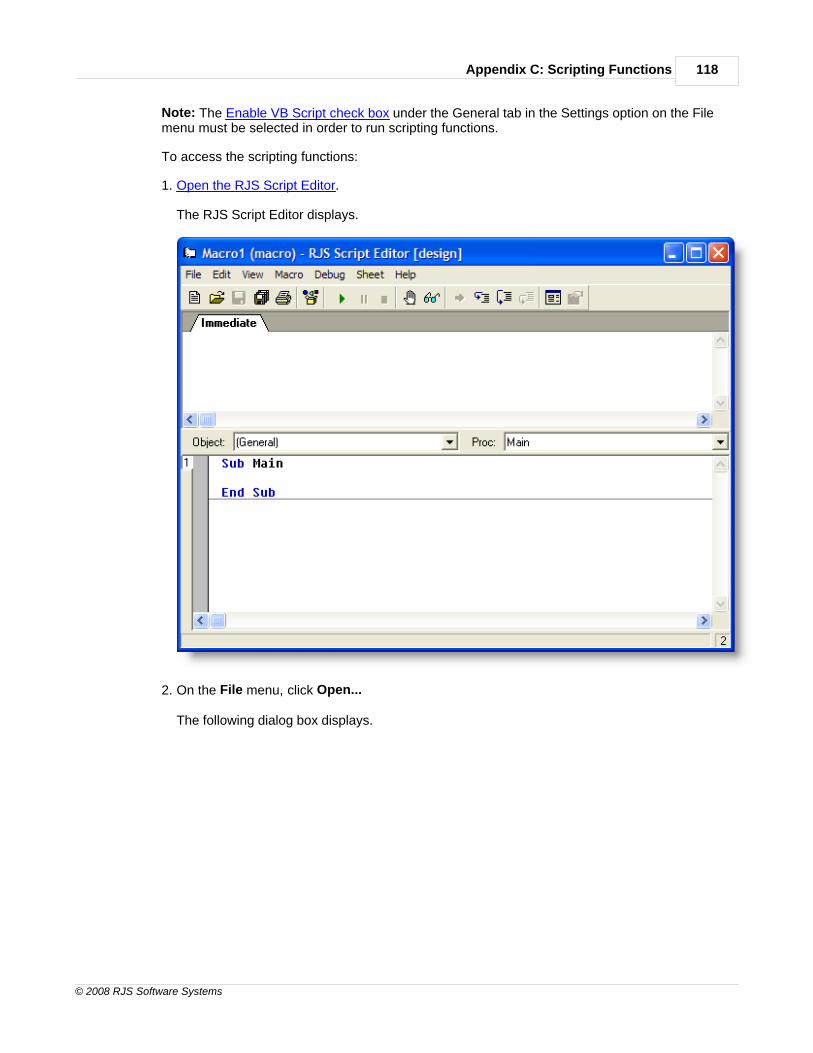
Appendix C: Scripting Functions 118
© 2008 RJS Software Systems
Note: The Enable VB Script check box under the General tab in the Settings option on the Filemenu must be selected in order to run scripting functions.
To access the scripting functions:
1. Open the RJS Script Editor.
The RJS Script Editor displays.
2. On the File menu, click Open...
The following dialog box displays.
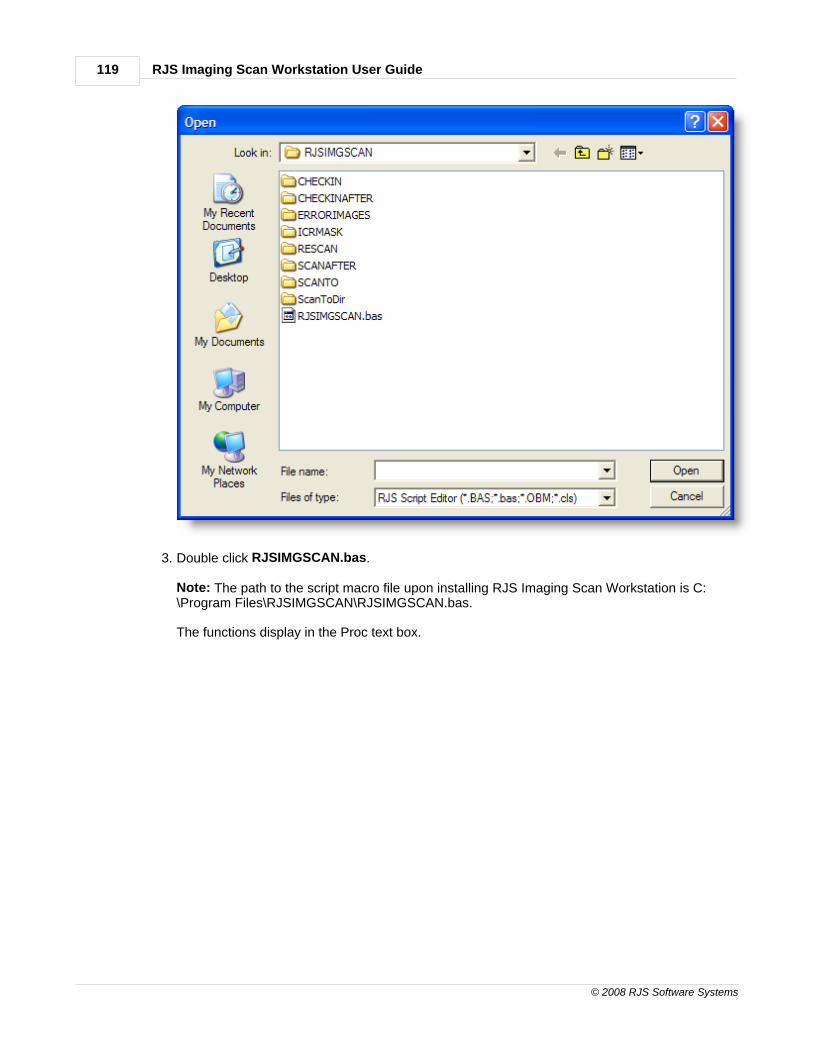
RJS Imaging Scan Workstation User Guide119
© 2008 RJS Software Systems
3. Double click RJSIMGSCAN.bas.
Note: The path to the script macro file upon installing RJS Imaging Scan Workstation is C:\Program Files\RJSIMGSCAN\RJSIMGSCAN.bas.
The functions display in the Proc text box.
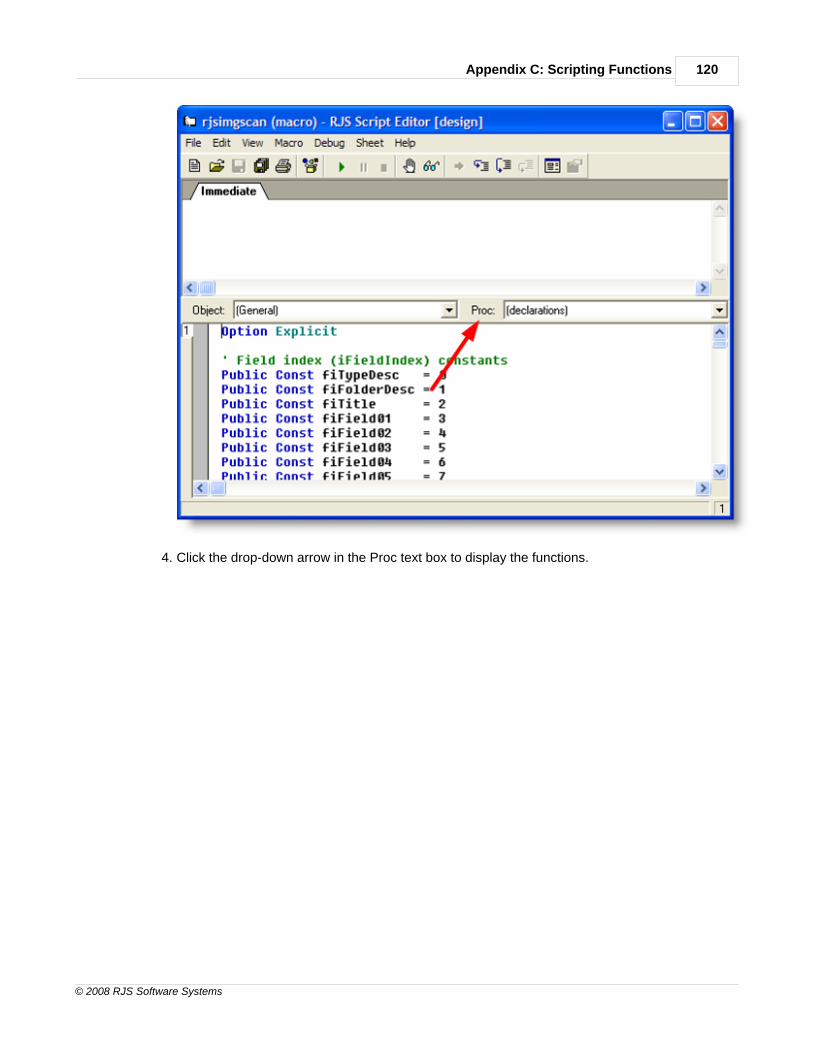
Appendix C: Scripting Functions 120
© 2008 RJS Software Systems
4. Click the drop-down arrow in the Proc text box to display the functions.
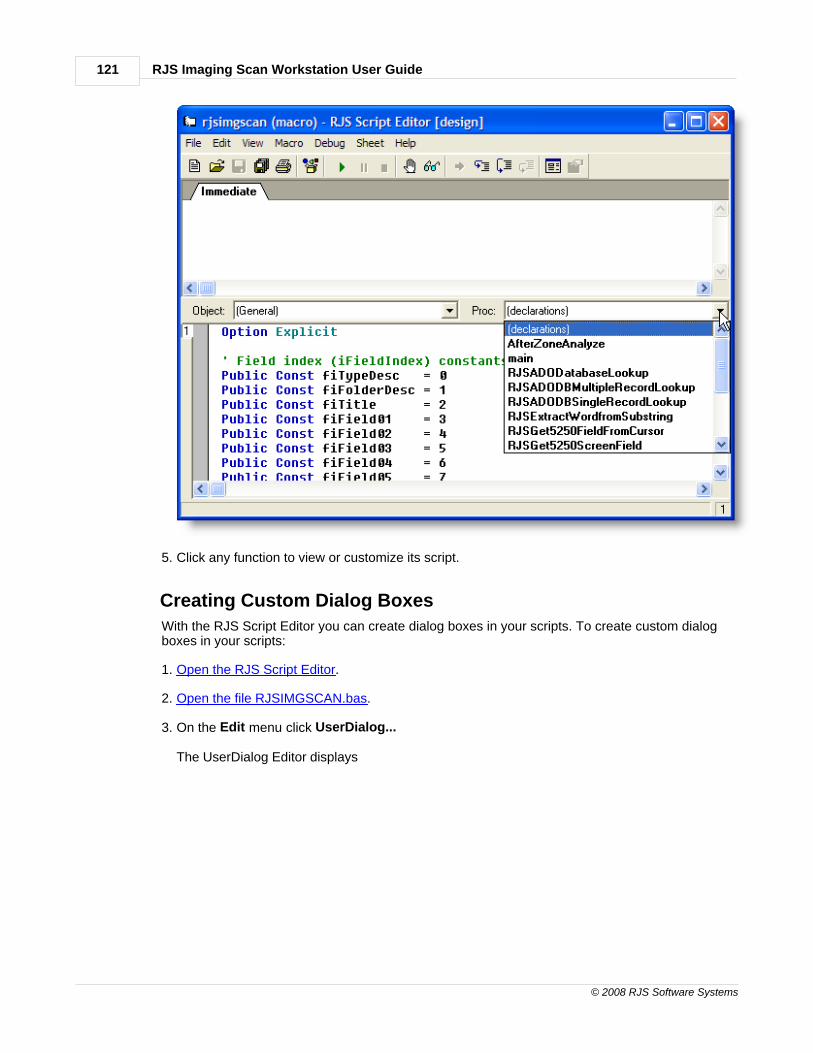
RJS Imaging Scan Workstation User Guide121
© 2008 RJS Software Systems
5. Click any function to view or customize its script.
Creating Custom Dialog Boxes
With the RJS Script Editor you can create dialog boxes in your scripts. To create custom dialogboxes in your scripts:
1. Open the RJS Script Editor.
2. Open the file RJSIMGSCAN.bas.
3. On the Edit menu click UserDialog...
The UserDialog Editor displays
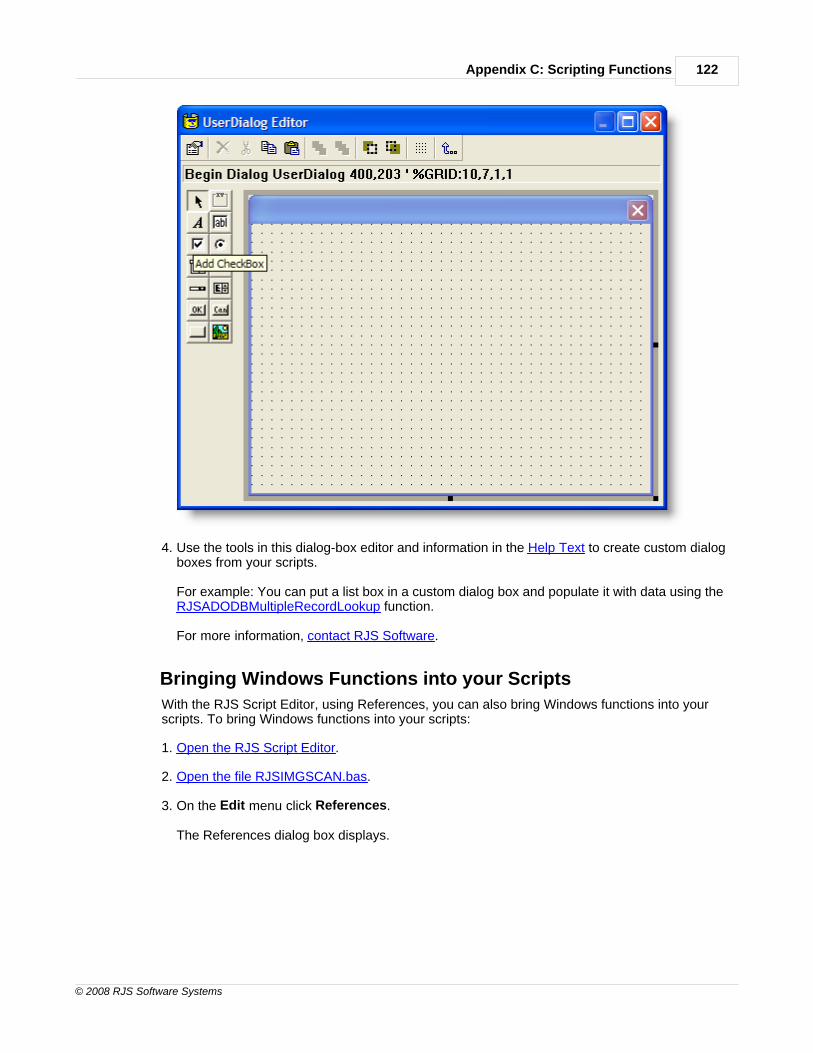
Appendix C: Scripting Functions 122
© 2008 RJS Software Systems
4. Use the tools in this dialog-box editor and information in the Help Text to create custom dialogboxes from your scripts.
For example: You can put a list box in a custom dialog box and populate it with data using the RJSADODBMultipleRecordLookup function.
For more information, contact RJS Software.
Bringing Windows Functions into your Scripts
With the RJS Script Editor, using References, you can also bring Windows functions into yourscripts. To bring Windows functions into your scripts:
1. Open the RJS Script Editor.
2. Open the file RJSIMGSCAN.bas.
3. On the Edit menu click References.
The References dialog box displays.
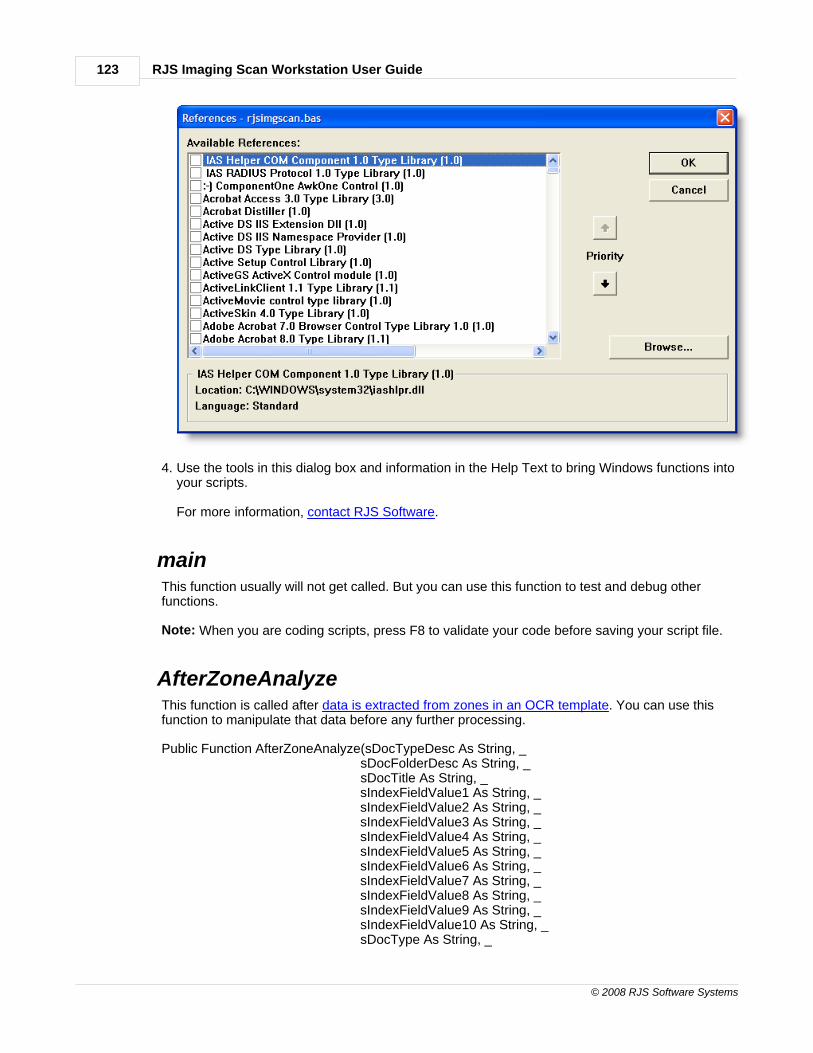
RJS Imaging Scan Workstation User Guide123
© 2008 RJS Software Systems
4. Use the tools in this dialog box and information in the Help Text to bring Windows functions intoyour scripts.
For more information, contact RJS Software.
mainThis function usually will not get called. But you can use this function to test and debug otherfunctions.
Note: When you are coding scripts, press F8 to validate your code before saving your script file.
AfterZoneAnalyzeThis function is called after data is extracted from zones in an OCR template. You can use thisfunction to manipulate that data before any further processing.
Public Function AfterZoneAnalyze(sDocTypeDesc As String, _ sDocFolderDesc As String, _ sDocTitle As String, _ sIndexFieldValue1 As String, _ sIndexFieldValue2 As String, _ sIndexFieldValue3 As String, _ sIndexFieldValue4 As String, _ sIndexFieldValue5 As String, _ sIndexFieldValue6 As String, _ sIndexFieldValue7 As String, _ sIndexFieldValue8 As String, _ sIndexFieldValue9 As String, _ sIndexFieldValue10 As String, _ sDocType As String, _
Appendix C: Scripting Functions 124
© 2008 RJS Software Systems
sFolder1 As String, _ sFolder2 As String, _ sFolder3 As String, _ sFolder4 As String, _ sFolder5 As String) As Variant
Incoming Parameters
1. Document Type description from RJS Imaging Scan Workstation.
2. Document Folder description from RJS Imaging Scan Workstation.
3. Document Title from RJS Imaging Scan Workstation.
4. Index-field text value 1 from RJS Imaging Scan Workstation.
5. Index-field text value 2 from RJS Imaging Scan Workstation.
6. Index-field text value 3 from RJS Imaging Scan Workstation.
7. Index-field text value 4 from RJS Imaging Scan Workstation.
8. Index-field text value 5 from RJS Imaging Scan Workstation.
9. Index-field text value 6 from RJS Imaging Scan Workstation.
10.Index-field text value 7 from RJS Imaging Scan Workstation.
11.Index-field text value 8 from RJS Imaging Scan Workstation.
12.Index-field text value 9 from RJS Imaging Scan Workstation.
13.Index-field text value 10 from RJS Imaging Scan Workstation.
14.Doc Type value (Input Only - Not returned).
15.Folder-level 1 from RJS Imaging Scan Workstation.
16.Folder-level 2 from RJS Imaging Scan Workstation.
17.Folder-level 3 from RJS Imaging Scan Workstation.
18.Folder-level 4 from RJS Imaging Scan Workstation.
19.Folder-level 5 from RJS Imaging Scan Workstation.
Returns
This function returns a variant array containing all Index-field values, whether they are modified ornot.
1. Index-field text value 1.
2. Index-field text value 2.
3. Index-field text value 3.
RJS Imaging Scan Workstation User Guide125
© 2008 RJS Software Systems
4. Index-field text value 4.
5. Index-field text value 5.
6. Index-field text value 6.
7. Index-field text value 7.
8. Index-field text value 8.
9. Index-field text value 9.
10.Index-field text value 10.
11.Document-Type description from RJS Imaging Scan Workstation.
12.Document-Folder description from RJS Imaging Scan Workstation.
13.Document Title from RJS Imaging Scan Workstation.
14.Folder-level 1 from RJS Imaging Scan Workstation.
15.Folder-level 2 from RJS Imaging Scan Workstation.
16.Folder-level 3 from RJS Imaging Scan Workstation.
17.Folder-level 4 from RJS Imaging Scan Workstation.
18.Folder-level 5 from RJS Imaging Scan Workstation.
RJSADODatabaseLookupThis function calls the RJS ADO Table Explorer program. The RJS ADO Table Explorer programis a general database-driven query tool for looking up, displaying, and selecting key values fromany ADO or ODBC database including Microsoft Access, SQL Server, Oracle, or the System i.This function returns a single string value that is set in code and is the value stored in the return-field name.
Note: If you require more complex queries than this function provides, look at theRJSADODBMultipleRecordLookup and the RJSADODBSingleRecordLookup functions. You canalso create your own dialog boxes with the UserDialog Editor in the RJS Script Editor.
Function RJSADODatabaseLookup(sDSNConnect As String, _sDialogTitle As String, _sSQLSelect As String, _sSQLOrderBy As String, _sFieldDescriptions As String, _sSearchField1 As String, _sFieldType1 As String, _sSearchCaption1 As String, _sSearchValue1 As String, _sCondition1 As String, _sConnect As String, _sSearchField2 As String, _sFieldType2 As String, _sSearchCaption2 As String, _sSearchValue2 As String, _sCondition2 As String, _
Appendix C: Scripting Functions 126
© 2008 RJS Software Systems
sReturnFieldName As String, _lRunQuery As Long, _lDisplayErrors As Long, _lUnboundData As Long) As String
Incoming Parameters
1. ADO/ODBC connection string or DSN (Data Source). You can use any valid ODBC data sourceor ADO connection string.
For example: A sample ODBC data-source name could be DSN=ISERIES.
2. Title to display at the top of ADO Table Browser. This setting shows a descriptive title for thequery window.
For example: Customer Lookup.
3. SQL SELECT Query Statement.
For example: SELECT * FROM QIWS.QCUSTCDT
For example: SELECT CUSNUM,LSTNAM FROM QIWS.QCUSTCDT
4. SQL ORDER BY for the SQL Query Statement. The statement can contain a simple field list.
For example: Enter CUSNUM, ORDDATE
Or the statement can contain the entire order by clause.
For example: Enter ORDER BY CUSNUM, ORDDATE
5. To name column titles, enter a name with a tilde (~) after the name. If you leave this parameterblank, the table field name displays. The list must be in the same ordinal position as the fieldsyou are querying.
For example: If the query is SELECT FLD1, FLD2 FROM TABLE and you specifyCustomer#~Name~ then Customer# would be the column heading for the grid for FLD1 andName would be the column heading for the grid for FLD2.
6. Search Field 1. Select a database-field name for filtering data in the lookup.
For example: CUSNUM
7. Search Field 1 Type. CHAR is a character field. NUMERIC is a numeric field.
8. Search Field Description 1. This parameter is descriptive text for Search Field 1 when it isdisplayed on the search screen.
For example: Customer Number
9. Search Field Starting Criteria 1. Enter a default search value when the search screen isdisplayed. If you leave the search value blank, the default is blank. A blank search returns allvalues.
For example: Jones%
RJS Imaging Scan Workstation User Guide127
© 2008 RJS Software Systems
10.Search Condition 1. This condition is applied to Search Field 1 when searching.
Search conditions: Corresponding values:
Starts with STARTS
Contains CONTAINS
Like query LIKE
Equal to =
Greater than or equalto
>=
Greater than >
Less than or equal to <=
Less than <
Not equal to <>
11.Use an AND/OR connector for Search Field 1 and Search Field 2.
12.Search Field 2. Select a database-field name for filtering data in the lookup.
13.Search Field 2 Type. CHAR is a character field. NUMERIC is a numeric field.
14.Search Field Description 2. This parameter is descriptive text for Search Field 1 when it isdisplayed on the search screen.
15.Search Field Starting Criteria 2. Enter a default search value when the search screen isdisplayed. If you leave the search value blank, everything is searched.
16.Search Condition 2.
Search conditions: Corresponding values:
Starts with STARTS
Contains CONTAINS
Like query LIKE
Equal to =
Greater than or equalto
>=
Greater than >
Less than or equal to <=
Less than <
Appendix C: Scripting Functions 128
© 2008 RJS Software Systems
Not equal to <>
17.Return Field Value. After a user clicks a row, the query function returns a value. Select thedatabase-field name that is the same as the returned value. Any field name specified in thequery is valid.
18.Run Query Before Displaying Screen. This parameter determines if the empty-query-resultsscreen is displayed before the query is run.
Enter 0 for the empty-query-results screen to be displayed before the query is run. The usermust then click Search before search results are displayed.
Enter 1 for the query to run before the empty-query-results screen is displayed.
19.Display Errors.
Enter 0 not to display errors.
Enter 1 to display Query errors. This setting can help debug SQL SELECT query statements.
20.Run Query Without Binding Grid to Database. This parameter returns the selected databasevalue to the calling VBScript subroutine.
Enter 0 to bind the grid directly to the record set generated from the SQL query.
Enter 1 to use an unbound record set.
Note: The Client Access/400 Express ODBC driver will not work unless this parameter is set to1.
RJSADODBMultipleRecordLookupThis function calls an SQL query to retrieve and return all of the selected database-field values forall of the matching records from any ADO or ODBC database, including SQL Server, Oracle, andMySQL. The database-field values are returned in a variant field array based on the the ordinalposition they were specified in the SQL query. No screen is displayed with this function, as it iswith the RJSADODatabaseLookup function. Use the UserDialog Editor in the RJS Script Editor tocreate a custom interface.
Function RJSADODBMultipleRecordLookup(sDSNConnect As String, _sSQLSelect As String, _lMaxRecords As Long, _lDisplayErrors As Long) As Variant
Parameters
1. ADO/ODBC connection string or DSN (Data Source). You can use any valid ODBC data sourceor ADO connection string.
2. SQL SELECT Query Statement.
3. The maximum number of records to return from the query.
4. Display Errors.
RJS Imaging Scan Workstation User Guide129
© 2008 RJS Software Systems
Enter 0 not to display errors.
Enter 1 to display query errors. This setting can help debug SQL SELECT query statements.
Returns
1. This function returns selected database-field values for all records in a multi-dimensionalvariant array.
2. A query-status message is returned in Element(0,0). The value of Element(0,0) is eitherNODATA or DATAFOUND.
If Element(0,0) returns NODATA, then enter an error-message text.
3. The record count is returned in Element(0,1).
4. The record data is returned starting in Element (1,0), in the format Element(Row/Record,Column).
For example: Element(1,0) returns the first column of the first actual data record.
RJSADODBSingleRecordLookupThis function calls an SQL query to retrieve and return all of the selected database-field values forthe first matching record from any ADO or ODBC database, including SQL Server, Oracle, andMySQL. The database-field values are returned in a variant field array based on the ordinalposition they were specified in the SQL query. No screen is displayed with this function, as it iswith the RJSADODatabaseLookup function. Use the UserDialog Editor in the RJS Script Editor tocreate a custom interface.
Function RJSADODBSingleRecordLookup(sDSNConnect As String, _sSQLSelect As String, _lDisplayErrors As Long) As Variant
Incoming Parameters
1. ADO/ODBC connection string or DSN (Data Source). You can use any valid ODBC data sourceor ADO connection string.
For example: DSN=ISERIES.
2. SQL SELECT Query Statement.
3. Display Errors.
Enter 0 not to display errors.
Enter 1 to display query errors. Displaying query errors can help debug SQL SELECT querystatements.
Returns
Appendix C: Scripting Functions 130
© 2008 RJS Software Systems
1. This function returns selected database values for a single record in a single-record variantarray.
2. A query-status message is returned in Element 0. The element value is either NODATA orDATAFOUND.
3. The record data is returned starting in Element(Column).
For example: Element(1) returns the first column of the single data record returned.
RJSExtractWordfromSubstringThis function no longer pertains to RJS Imaging Scan Workstation users. RJS Imaging ScanWorkstation users should ignore it.
RJSGet5250FieldFromCursorThis function no longer pertains to RJS Imaging Scan Workstation users. RJS Imaging ScanWorkstation users should ignore it.
RJSGet5250ScreenFieldThis function no longer pertains to RJS Imaging Scan Workstation users. RJS Imaging ScanWorkstation users should ignore it.
RJSPostProcessExitProgramThis function is called immediately after the document is checked in to WebDocs. With thisfunction you can update an SQL database, send an e-mail with the checked-in document, or doother actions.
Public Function RJSPostProcessExitProgram(sDocTitle As String, _sDocFlr1 As String, _sDocFlr2 As String, _sDocFlr3 As String, _sDocFlr4 As String, _sDocFlr5 As String, _sKey1 As String, _sKey2 As String, _sKey3 As String, _sKey4 As String, _sKey5 As String, _sKey6 As String, _sKey7 As String, _sKey8 As String, _sKey9 As String, _sKey10 As String, _sDocType As String, _sDocID As String) As String
Incoming Parameters
RJS Imaging Scan Workstation User Guide131
© 2008 RJS Software Systems
1. Document Title from RJS Imaging Scan Workstation. This parameter is input only. It is notreturned.
2. Folder-level 1 from RJS Imaging Scan Workstation. This parameter is input only. It is notreturned.
3. Folder-level 2 from RJS Imaging Scan Workstation. This parameter is input only. It is notreturned.
4. Folder-level 3 from RJS Imaging Scan Workstation. This parameter is input only. It is notreturned.
5. Folder-level 4 from RJS Imaging Scan Workstation. This parameter is input only. It is notreturned.
6. Folder-level 5 from RJS Imaging Scan Workstation. This parameter is input only. It is notreturned.
7. Index-field text value 1 from RJS Imaging Scan Workstation.
8. Index-field text value 2 from RJS Imaging Scan Workstation.
9. Index-field text value 3 from RJS Imaging Scan Workstation.
10.Index-field text value 4 from RJS Imaging Scan Workstation.
11.Index-field text value 5 from RJS Imaging Scan Workstation.
12.Index-field text value 6 from RJS Imaging Scan Workstation.
13.Index-field text value 7 from RJS Imaging Scan Workstation.
14.Index-field text value 8 from RJS Imaging Scan Workstation.
15.Index-field text value 9 from RJS Imaging Scan Workstation.
16.Index-field text value 10 from RJS Imaging Scan Workstation.
17.Document Type value. This parameter is input only. It is not returned.
18.Document ID. This parameter is input only. It is not returned.
Returns
This function returns a string containing any error messages. If there are no error messages, thenthe string will be blank.
RJSPreProcessExitProgramThis function is called after you click the Check-In button but before the document is actuallychecked in to WebDocs. With this function you can script a program to determine documentcharacteristics like the Title, Folder, Index-field value, Document Type, and Workflow processes.
Public Function RJSPreProcessExitProgram(sDocTitle As String, _sDocFlr1 As String, _sDocFlr2 As String, _
Appendix C: Scripting Functions 132
© 2008 RJS Software Systems
sDocFlr3 As String, _sDocFlr4 As String, _sDocFlr5 As String, _sKey1 As String, _sKey2 As String, _sKey3 As String, _sKey4 As String, _sKey5 As String, _sKey6 As String, _sKey7 As String, _sKey8 As String, _sKey9 As String, _sKey10 As String, _sDocType As String, _sSelectedWorkflowCode As String, _sSelectedWorkflowClassID As String, _sSelectedWorkflowPriorityID As String) As String
Parameters
1. Document Title from RJS Imaging Scan Workstation. This parameter is input only. It is notreturned.
2. Folder-level 1 from RJS Imaging Scan Workstation.
3. Folder-level 2 from RJS Imaging Scan Workstation.
4. Folder-level 3 from RJS Imaging Scan Workstation.
5. Folder-level 4 from RJS Imaging Scan Workstation.
6. Folder-level 5 from RJS Imaging Scan Workstation.
7. Index-field text value 1 from RJS Imaging Scan Workstation.
8. Index-field text value 2 from RJS Imaging Scan Workstation.
9. Index-field text value 3 from RJS Imaging Scan Workstation.
10.Index-field text value 4 from RJS Imaging Scan Workstation.
11.Index-field text value 5 from RJS Imaging Scan Workstation.
12.Index-field text value 6 from RJS Imaging Scan Workstation.
13.Index-field text value 7 from RJS Imaging Scan Workstation.
14.Index-field text value 8 from RJS Imaging Scan Workstation.
15.Index-field text value 9 from RJS Imaging Scan Workstation.
16.Index-field text value 10 from RJS Imaging Scan Workstation.
17.Document Type value. This parameter is input only. It is not returned.
18.Document Routing/Workflow process code.
RJS Imaging Scan Workstation User Guide133
© 2008 RJS Software Systems
19.Workflow Class ID. This parameter is only used with Enterprise Workflow.
20.Workflow Priority ID. This parameter is only used with Enterprise Workflow.
Returns
This function returns a string containing any error messages. If there are no error message, thenthe string will be blank.
RunAfterOCRNote: To run this procedure you must first open an OCR template.
This function is called after you click the OCR button. The data captured in the OCR zones thencall the AfterZoneAnalyze function. After AfterZoneAnalyze runs, you can manipulate the dataagain using this function.
Public Function RunAfterOCR(iFieldIndex As Integer, _sIndexFieldValue As String, _sDocTypeDesc As String, _sDocFolderDesc As String, _sDocTitle As String, _sIndexFieldValue1 As String, _sIndexFieldValue2 As String, _sIndexFieldValue3 As String, _sIndexFieldValue4 As String, _sIndexFieldValue5 As String, _sIndexFieldValue6 As String, _sIndexFieldValue7 As String, _sIndexFieldValue8 As String, _sIndexFieldValue9 As String, _sIndexFieldValue10 As String, _sDocType As String, _sFolder1 As String, _sFolder2 As String, _sFolder3 As String, _sFolder4 As String, _sFolder5 As String, _sArrGlobalVariables() As String) As Variant
Parameters
1. Index-field number from RJS Imaging Scan Workstation.
Note: This parameter will always contain 0.
2. Current Index-field value from RJS Imaging Scan Workstation.
Note: This parameter will always contain the Document Type description.
3. Document Type description from RJS Imaging Scan Workstation.
4. Folder description from RJS Imaging Scan Workstation.
Appendix C: Scripting Functions 134
© 2008 RJS Software Systems
5. Title/Desc from RJS Imaging Scan Workstation.
6. Index-field text value 1 from RJS Imaging Scan Workstation.
7. Index-field text value 2 from RJS Imaging Scan Workstation.
8. Index-field text value 3 from RJS Imaging Scan Workstation.
9. Index-field text value 4 from RJS Imaging Scan Workstation.
10.Index-field text value 5 from RJS Imaging Scan Workstation.
11.Index-field text value 6 from RJS Imaging Scan Workstation.
12.Index-field text value 7 from RJS Imaging Scan Workstation.
13.Index-field text value 8 from RJS Imaging Scan Workstation.
14.Index-field text value 9 from RJS Imaging Scan Workstation.
15.Index-field text value 10 from RJS Imaging Scan Workstation.
16.Document-Type value. This parameter is input only. It is not returned.
17.Folder-level 1 from RJS Imaging Scan Workstation.
18.Folder-level 2 from RJS Imaging Scan Workstation.
19.Folder-level 3 from RJS Imaging Scan Workstation.
20.Folder-level 4 from RJS Imaging Scan Workstation.
21.Folder-level 5 from RJS Imaging Scan Workstation.
22.An incoming array of global-work variables.
If this function uses these variables, refer to positions (20-120) as needed. RJS Softwaredesigned this parameter this way for consistency since any data returned is in the return variantarray in positions (20-120) of lcarrFieldValues.
Returns
This function returns a variant array containing all Index-field values, whether modified or not.Positions 20-120 will be saved as globals that get passed back into this function on each call.
RunIndexFieldClickThis function is called after you select a value for an Index field from the Index-field drop-downarrow.
Public Function RunIndexFieldClick(iFieldIndex As Integer, _sIndexFieldValue As String, _sDocTypeDesc As String, _sDocFolderDesc As String, _sDocTitle As String, _sIndexFieldValue1 As String, _
RJS Imaging Scan Workstation User Guide135
© 2008 RJS Software Systems
sIndexFieldValue2 As String, _sIndexFieldValue3 As String, _sIndexFieldValue4 As String, _sIndexFieldValue5 As String, _sIndexFieldValue6 As String, _sIndexFieldValue7 As String, _sIndexFieldValue8 As String, _sIndexFieldValue9 As String, _sIndexFieldValue10 As String, _sDocType As String, _sFolder1 As String, _sFolder2 As String, _sFolder3 As String, _sFolder4 As String, _sFolder5 As String) As Variant
Parameters
1. Index-field number from RJS Imaging Scan Workstation.
2. Current Index-field value from RJS Imaging Scan Workstation.
3. Document Type description from RJS Imaging Scan Workstation.
4. Folder description from RJS Imaging Scan Workstation.
5. Title/Desc from RJS Imaging Scan Workstation.
6. Index-field text value 1 from RJS Imaging Scan Workstation.
7. Index-field text value 2 from RJS Imaging Scan Workstation.
8. Index-field text value 3 from RJS Imaging Scan Workstation.
9. Index-field text value 4 from RJS Imaging Scan Workstation.
10.Index-field text value 5 from RJS Imaging Scan Workstation.
11.Index-field text value 6 from RJS Imaging Scan Workstation.
12.Index-field text value 7 from RJS Imaging Scan Workstation.
13.Index-field text value 8 from RJS Imaging Scan Workstation.
14.Index-field text value 9 from RJS Imaging Scan Workstation.
15.Index-field text value 10 from RJS Imaging Scan Workstation.
16.Document-Type value. This parameter is input only. It is not returned.
17.Folder-level 1 from RJS Imaging Scan Workstation.
18.Folder-level 2 from RJS Imaging Scan Workstation.
19.Folder-level 3 from RJS Imaging Scan Workstation.
20.Folder-level 4 from RJS Imaging Scan Workstation.
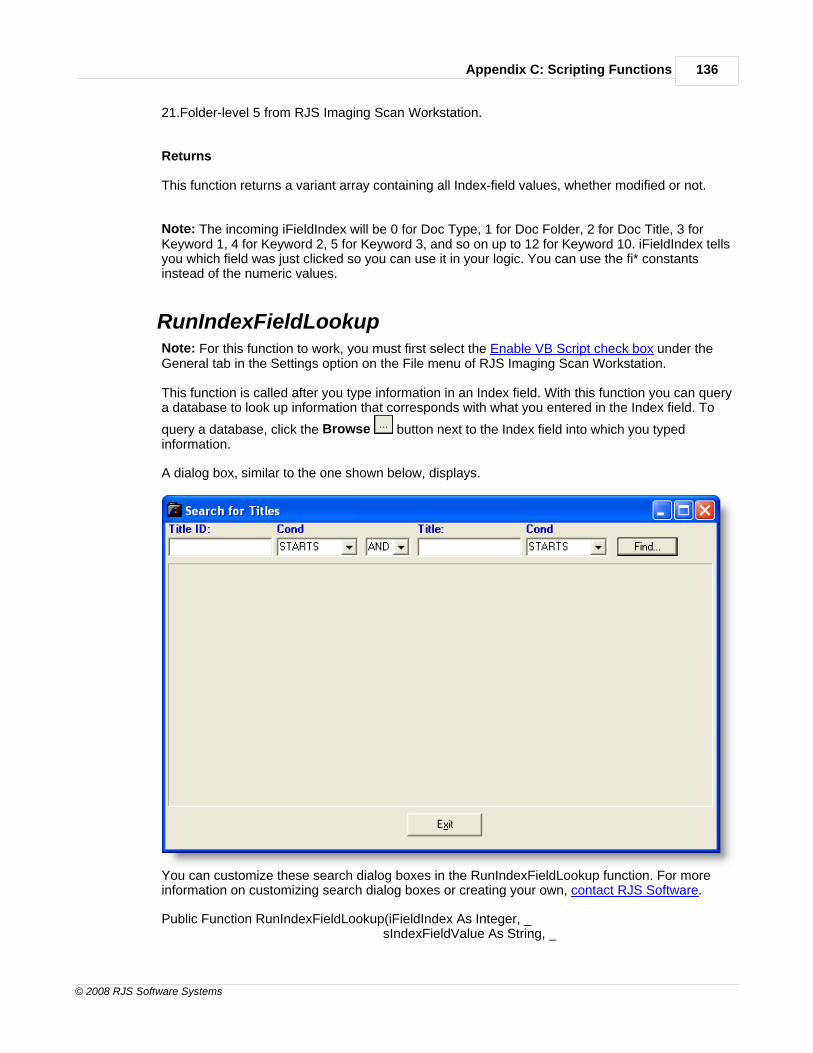
Appendix C: Scripting Functions 136
© 2008 RJS Software Systems
21.Folder-level 5 from RJS Imaging Scan Workstation.
Returns
This function returns a variant array containing all Index-field values, whether modified or not.
Note: The incoming iFieldIndex will be 0 for Doc Type, 1 for Doc Folder, 2 for Doc Title, 3 forKeyword 1, 4 for Keyword 2, 5 for Keyword 3, and so on up to 12 for Keyword 10. iFieldIndex tellsyou which field was just clicked so you can use it in your logic. You can use the fi* constantsinstead of the numeric values.
RunIndexFieldLookupNote: For this function to work, you must first select the Enable VB Script check box under theGeneral tab in the Settings option on the File menu of RJS Imaging Scan Workstation.
This function is called after you type information in an Index field. With this function you can querya database to look up information that corresponds with what you entered in the Index field. To
query a database, click the Browse button next to the Index field into which you typedinformation.
A dialog box, similar to the one shown below, displays.
You can customize these search dialog boxes in the RunIndexFieldLookup function. For moreinformation on customizing search dialog boxes or creating your own, contact RJS Software.
Public Function RunIndexFieldLookup(iFieldIndex As Integer, _sIndexFieldValue As String, _
RJS Imaging Scan Workstation User Guide137
© 2008 RJS Software Systems
sDocTypeDesc As String, _sDocFolderDesc As String, _sDocTitle As String, _sIndexFieldValue1 As String, _sIndexFieldValue2 As String, _sIndexFieldValue3 As String, _sIndexFieldValue4 As String, _sIndexFieldValue5 As String, _sIndexFieldValue6 As String, _sIndexFieldValue7 As String, _sIndexFieldValue8 As String, _sIndexFieldValue9 As String, _sIndexFieldValue10 As String, _sDocType As String, _sFolder1 As String, _sFolder2 As String, _sFolder3 As String, _sFolder4 As String, _sFolder5 As String) As Variant
Parameters
1. Index-field number from RJS Imaging Scan Workstation.
2. Current Index-field value from RJS Imaging Scan Workstation.
3. Document Type description from RJS Imaging Scan Workstation. Do not enter the actual foldername.
4. Folder description from RJS Imaging Scan Workstation. Do not enter the actual folder name.
5. Title/Desc from RJS Imaging Scan Workstation.
6. Index-field text value 1 from RJS Imaging Scan Workstation.
7. Index-field text value 2 from RJS Imaging Scan Workstation.
8. Index-field text value 3 from RJS Imaging Scan Workstation.
9. Index-field text value 4 from RJS Imaging Scan Workstation.
10.Index-field text value 5 from RJS Imaging Scan Workstation.
11.Index-field text value 6 from RJS Imaging Scan Workstation.
12.Index-field text value 7 from RJS Imaging Scan Workstation.
13.Index-field text value 8 from RJS Imaging Scan Workstation.
14.Index-field text value 9 from RJS Imaging Scan Workstation.
15.Index-field text value 10 from RJS Imaging Scan Workstation.
16.Document-Type value. This parameter is input only. It is not returned.
17.Folder-level 1 from RJS Imaging Scan Workstation.
Appendix C: Scripting Functions 138
© 2008 RJS Software Systems
18.Folder-level 2 from RJS Imaging Scan Workstation.
19.Folder-level 3 from RJS Imaging Scan Workstation.
20.Folder-level 4 from RJS Imaging Scan Workstation.
21.Folder-level 5 from RJS Imaging Scan Workstation.
Returns
This function returns a variant array containing all Index-field values, whether modified or not.
Note: The incoming iFieldIndex will be 0 for Doc Type, 1 for Doc Folder, 2 for Doc Title, 3 forKeyword 1, 4 for Keyword 2, 5 for Keyword 3, and so on up to 12 for Keyword 10. iFieldIndex tellsyou which field was just clicked so you can use it in your logic. You can use the fi* constantsinstead of the numeric values.
RunNewDocumentThis function is called when you click the New Document button. This functions clears the mainviewing area. Use it to set Folders, Document Types, or Index names.
Public Function RunNewDocument(iFieldIndex As Integer, _sIndexFieldValue As String, _sDocTypeDesc As String, _sDocFolderDesc As String, _sDocTitle As String, _sIndexFieldValue1 As String, _sIndexFieldValue2 As String, _sIndexFieldValue3 As String, _sIndexFieldValue4 As String, _sIndexFieldValue5 As String, _sIndexFieldValue6 As String, _sIndexFieldValue7 As String, _sIndexFieldValue8 As String, _sIndexFieldValue9 As String, _sIndexFieldValue10 As String, _sDocType As String, _sFolder1 As String, _sFolder2 As String, _sFolder3 As String, _sFolder4 As String, _sFolder5 As String, _sArrGlobalVariables() As String) As Variant
Parameters
1. Index-field number from RJS Imaging Scan Workstation.
2. Current Index-field value from RJS Imaging Scan Workstation.
3. Document Type description from RJS Imaging Scan Workstation.
RJS Imaging Scan Workstation User Guide139
© 2008 RJS Software Systems
4. Folder description from RJS Imaging Scan Workstation.
5. Title/Desc from RJS Imaging Scan Workstation.
6. Index-field text value 1 from RJS Imaging Scan Workstation.
7. Index-field text value 2 from RJS Imaging Scan Workstation.
8. Index-field text value 3 from RJS Imaging Scan Workstation.
9. Index-field text value 4 from RJS Imaging Scan Workstation.
10.Index-field text value 5 from RJS Imaging Scan Workstation.
11.Index-field text value 6 from RJS Imaging Scan Workstation.
12.Index-field text value 7 from RJS Imaging Scan Workstation.
13.Index-field text value 8 from RJS Imaging Scan Workstation.
14.Index-field text value 9 from RJS Imaging Scan Workstation.
15.Index-field text value 10 from RJS Imaging Scan Workstation.
16.Document-Type value. This parameter is input only. It is not returned.
17.Folder-level 1 from RJS Imaging Scan Workstation.
18.Folder-level 2 from RJS Imaging Scan Workstation.
19.Folder-level 3 from RJS Imaging Scan Workstation.
20.Folder-level 4 from RJS Imaging Scan Workstation.
21.Folder-level 5 from RJS Imaging Scan Workstation.
22.An incoming array of global-work variables.
If this function uses these variables, refer to positions (20-120) as needed. RJS Softwaredesigned this parameter this way for consistency since any data returned is in the return variantarray in positions (20-120) of lcarrFieldValues.
ShellExecute [Declare]This function does not pertain to RJS Imaging Scan Workstation users. RJS Imaging ScanWorkstation users should ignore it.
Section
13
Index
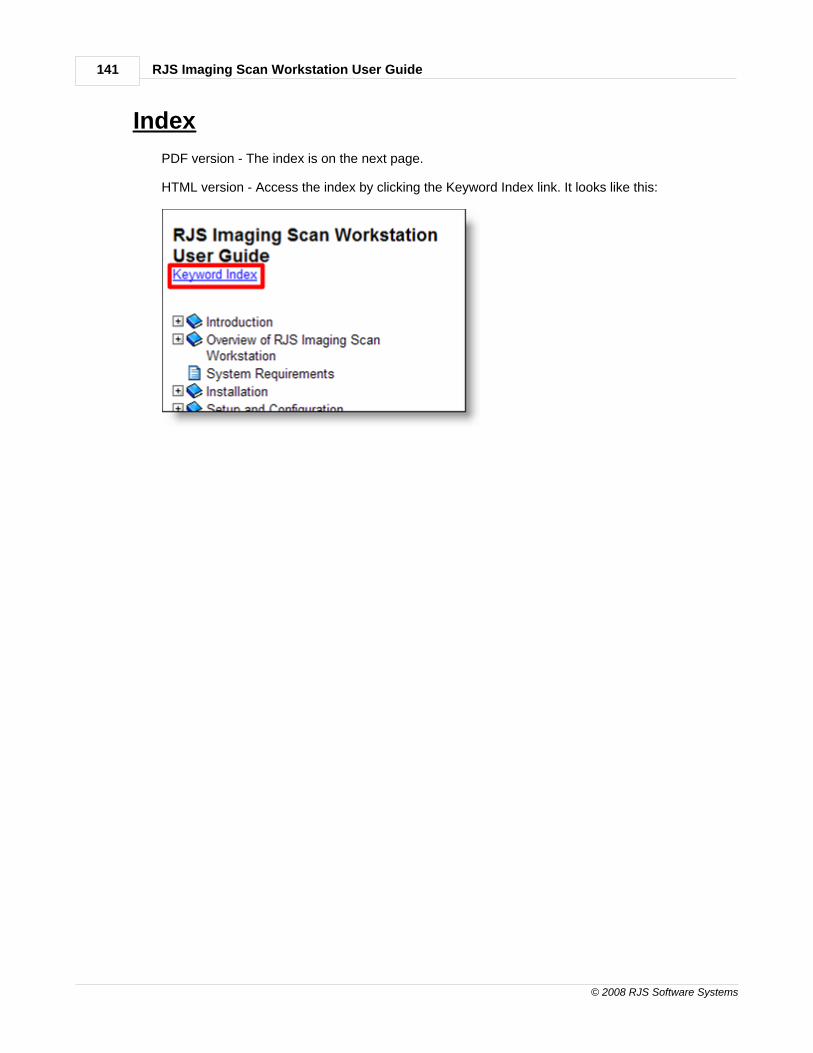
RJS Imaging Scan Workstation User Guide141
© 2008 RJS Software Systems
Index
PDF version - The index is on the next page.
HTML version - Access the index by clicking the Keyword Index link. It looks like this:
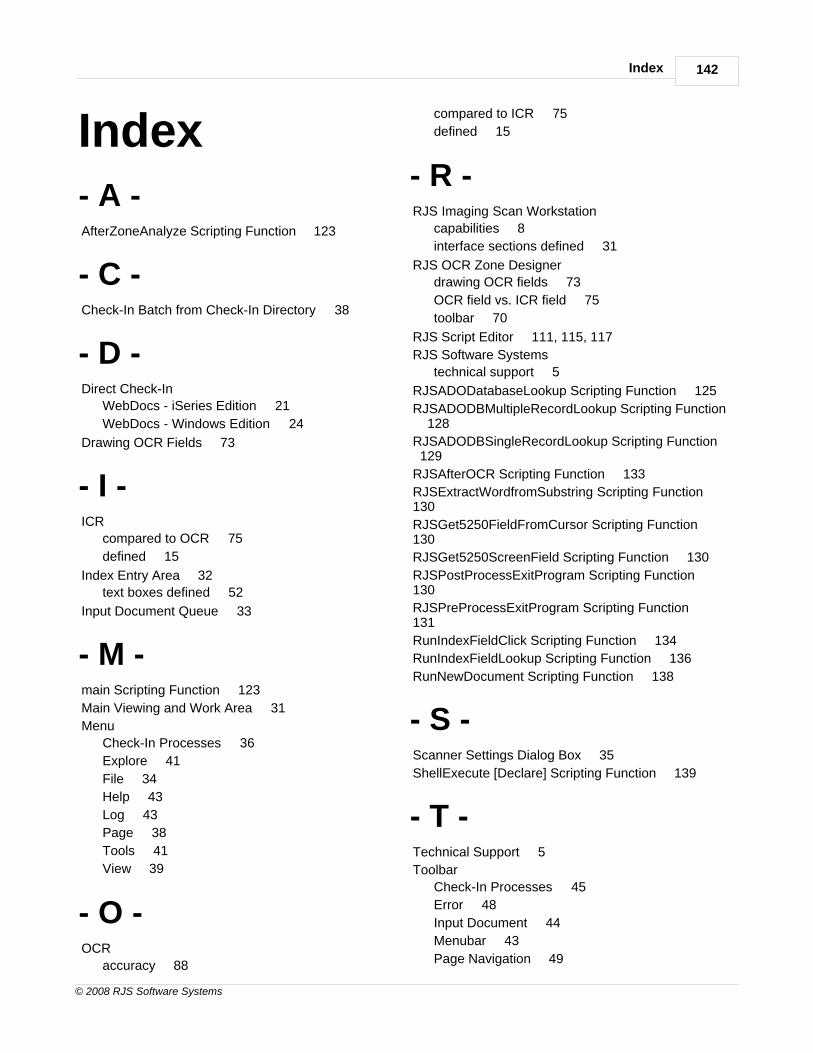
Index 142
© 2008 RJS Software Systems
Index- A -AfterZoneAnalyze Scripting Function 123
- C -Check-In Batch from Check-In Directory 38
- D -Direct Check-In
WebDocs - iSeries Edition 21
WebDocs - Windows Edition 24
Drawing OCR Fields 73
- I -ICR
compared to OCR 75
defined 15
Index Entry Area 32
text boxes defined 52
Input Document Queue 33
- M -main Scripting Function 123
Main Viewing and Work Area 31
Menu
Check-In Processes 36
Explore 41
File 34
Help 43
Log 43
Page 38
Tools 41
View 39
- O -OCR
accuracy 88
compared to ICR 75
defined 15
- R -RJS Imaging Scan Workstation
capabilities 8
interface sections defined 31
RJS OCR Zone Designer
drawing OCR fields 73
OCR field vs. ICR field 75
toolbar 70
RJS Script Editor 111, 115, 117
RJS Software Systems
technical support 5
RJSADODatabaseLookup Scripting Function 125
RJSADODBMultipleRecordLookup Scripting Function 128
RJSADODBSingleRecordLookup Scripting Function 129
RJSAfterOCR Scripting Function 133
RJSExtractWordfromSubstring Scripting Function 130
RJSGet5250FieldFromCursor Scripting Function 130
RJSGet5250ScreenField Scripting Function 130
RJSPostProcessExitProgram Scripting Function 130
RJSPreProcessExitProgram Scripting Function 131
RunIndexFieldClick Scripting Function 134
RunIndexFieldLookup Scripting Function 136
RunNewDocument Scripting Function 138
- S -Scanner Settings Dialog Box 35
ShellExecute [Declare] Scripting Function 139
- T -Technical Support 5
Toolbar
Check-In Processes 45
Error 48
Input Document 44
Menubar 43
Page Navigation 49

RJS Imaging Scan Workstation User Guide143
© 2008 RJS Software Systems
Toolbar
View 49
Workflow 50
Zoom 51