imaging a latitude 10 with configmgr 2012
TRANSCRIPT

Imaging a Latitude 10 on Windows 8 with System Center Configuration
Manager
Enterprise imaging steps required for provisioning a Latitude 10
with Windows 8
Dell
Chris Minaugh

Imaging a Latitude 10 in your Enterprise Environment
Page ii
THIS WHITE PAPER IS FOR INFORMATIONAL PURPOSES ONLY, AND MAY CONTAIN TYPOGRAPHICAL
ERRORS AND TECHNICAL INACCURACIES. THE CONTENT IS PROVIDED AS IS, WITHOUT EXPRESS OR
IMPLIED WARRANTIES OF ANY KIND.
© 2010 Dell Inc. All rights reserved. Reproduction of this material in any manner whatsoever without
the express written permission of Dell Inc. is strictly forbidden. For more information, contact Dell.
Dell, the DELL logo, and the DELL badge, PowerConnect, and PowerVault are trademarks of Dell Inc.
Symantec and the SYMANTEC logo are trademarks or registered trademarks of Symantec Corporation or
its affiliates in the US and other countries. Microsoft, Windows, Windows Server, and Active Directory
are either trademarks or registered trademarks of Microsoft Corporation in the United States and/or
other countries. Other trademarks and trade names may be used in this document to refer to either the
entities claiming the marks and names or their products. Dell Inc. disclaims any proprietary interest in
trademarks and trade names other than its own.

Imaging a Latitude 10 in your Enterprise Environment
Page 1
Table of Contents Introduction ............................................................................................................. 2
Let’s Get Started ....................................................................................................... 2
Creating your Task Sequence and\or Reference Image .......................................................... 4
Drivers for your Boot Image ........................................................................................... 8
Drivers for your Latitude 10 .......................................................................................... 8
Building your System .............................................................. Error! Bookmark not defined.
PXE and the Latitude 10 ............................................................................................. 10

Imaging a Latitude 10 in your Enterprise Environment
Page 2
Introduction With the introduction of the Latitude 10, there are several new technologies introduced that require
evaluating the strategy in which you image systems. These new technologies are industry standards
being adopted by many hardware vendors. The purpose of this whitepaper is to demystify some of
these and provide you with the information you will need to image a Latitude 10 in your enterprise
environment. In our environment, we use Configuration Manager 2012 (ConfigMgr) SP1, which is the
supported version of ConfigMgr for deploying Windows 8. This paper will outline how to create a
Windows 8 image in ConfigMgr for the Latitude 10, but keep in mind, these steps can be created in
almost any imaging solution and items regarding Unified Extensible Firmware Interface (UEFI) and
Secure Boot can be related to other models with these features.
Let’s Get Started First, let’s take a look at the hardware. The Latitude 10 is built on a 32 bit chipset, thus you will need
to select a 32 bit operating system. In our environment, given this is a touch enabled device, the
obvious choice for an operating system is Windows 8 x86. And currently, there are no supported drivers
for this platform on the legacy Windows 7 platform. You will also want to form a strategy what you will
use for a LAN NIC, since this model ships with a wireless NIC only. You will also want to form a
strategy what you will use for a LAN NIC. You may choose to a USB NIC, but that will occupy the one
USB port and won’t allow you to leverage other peripherals such as a keyboard or mouse. In our
scenario, we decided enforce a standard which includes ordering the Latitude 10 dock when one of
these devices is ordered.
Figure 1: Latitude 10
Next, let’s look at the differences in the preboot environment. The typical BIOS has now been replaced
by a new UEFI enabled boot environment. This provides great new functionality but requires some
changes in your boot images and how you partition your disks on this platform. We won’t go into detail
on the benefits and functionality, information can be found on www.uefi.org or from our BIOS team’s

Imaging a Latitude 10 in your Enterprise Environment
Page 3
Intro to UEFI found here, the intent of this whitepaper is to get you up and running on these devices.
Let’s get started!

Imaging a Latitude 10 in your Enterprise Environment
Page 4
Creating your Task Sequence and\or Reference Image We assume the reader of this paper is familiar with common imaging practices. You can create a
ConfigMgr task sequence that performs a scripted build of the OS or create a reference image. In our
environment, we use a reference image versus simply doing a scripted OS installation. If you already
manage a Windows 8 32 bit image, you can incorporate the settings below into your existing image.
You can use a reference task sequence much like you have on Windows 7 or a Windows 8, but you will
have to create a couple of steps to address the previously mentioned UEFI and Secure Boot
configurations.
How do I partition my drive to support UEFI
There are some changes you’ll want to make in your task sequence in ConfigMgr to diskpart your hard
drive. Below is a screen shot of how you can configure this in your ConfigMgr task sequence These steps
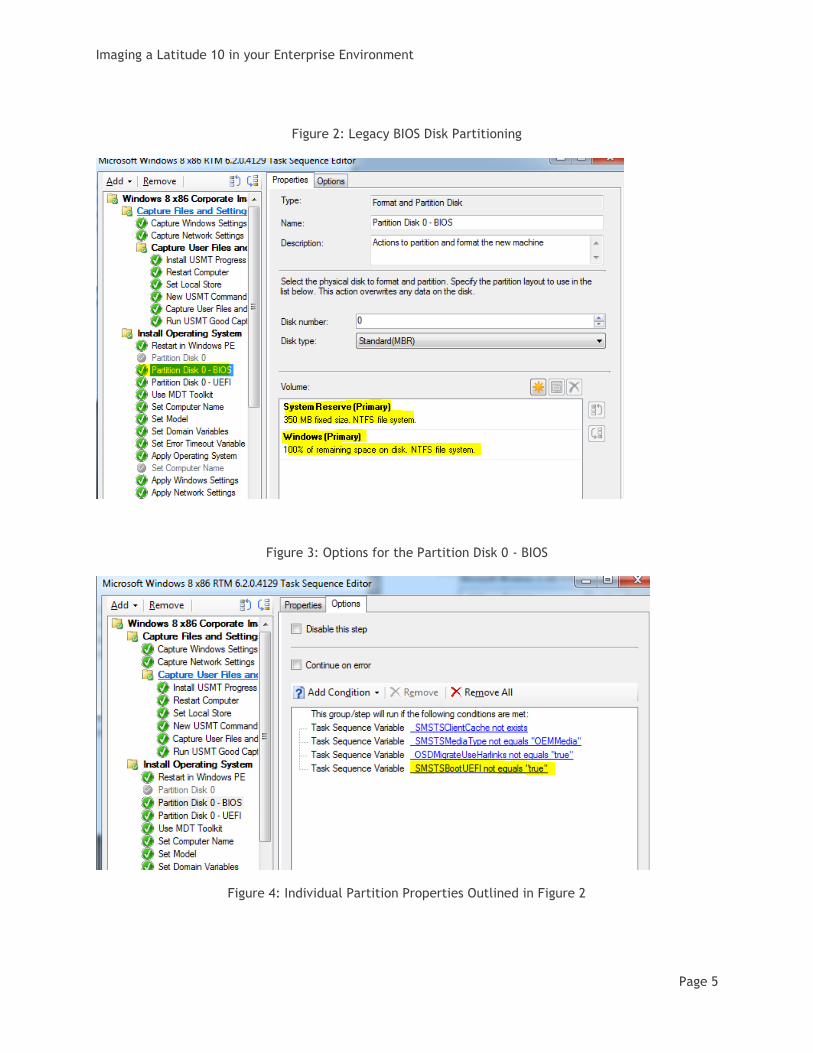
should correlate to an MDT task sequence as well or any custom image process. Figure 2 shows the two
steps for diskpart now required; Partition Disk 0 – BIOS is your legacy partitioning method and
Partition Disk 0 – UEFI is required for your new UEFI. If you are creating a task sequence specifically
for the Latitude 10, the UEFI partitioning step is all that is technically needed. But if you plan to
provide Windows 8 support for other models with legacy BIOS, you will want to include each step.
Partition Disk 0 – BIOS ConfigMgr has new built in task sequence variables you can leverage to
determine which partitioning step you need to run. This variable is created out of the box with
ConfigMgr 2012 SP1 release, so we will leverage that variable to determine which disk partitioning step
to run. Create a condition via the Options tab on your diskpart step or group to _SMSTSBootUEFI not
equal to “true” condition for legacy BIOS systems and the opposite for UEFI enabled systems. If your
plan is to limit this OS image only to Latitude 10 devices or will only support UEFI native systems, you
could omit this step, but I recommend that you create this step regardless for potential future use. If
the condition does not evaluate to be true, it is simply going to skip this step.
(see Figure 2-4 below as an example of these legacy BIOS disk partitioning steps).
Imaging a Latitude 10 in your Enterprise Environment
Page 5
Figure 2: Legacy BIOS Disk Partitioning
Figure 3: Options for the Partition Disk 0 - BIOS
Figure 4: Individual Partition Properties Outlined in Figure 2

Imaging a Latitude 10 in your Enterprise Environment
Page 6
Partition Disk 0 – UEFI is your second disk partitioning step which will be used for your Latitude 10. In
Figure 5, you can see we need to create three difference partitions on our Disk 0 for which we are
imaging. There is an EFI, MSR (Microsoft Recovery) and Windows Primary partition. In Figure 6 you
see where we create the opposite condition we leveraged in the classic BIOS step which executes the
step this if _SMSTSBootUEFI=True. Figure 7 shows the properties you can set for each of those
partitions.
Figure 5: UEFI Disk Partitioning Task Sequence Step

Imaging a Latitude 10 in your Enterprise Environment
Page 7
Figure 6: Conditional Options for the UEFI Disk Partition Step
Figure 7: Individual Partition Properties for the UEFI Partition Step

Imaging a Latitude 10 in your Enterprise Environment
Page 8
Drivers for your Boot Image In order to image these systems with you will need to include a mass storage and NIC driver into your
Windows Pre-installation Environment (WinPE). Dell provides these drivers on DellTechCenter. You will
find these on www.dell.com/configmgr. Scroll to the bottom and you will see a link for the driver
CABs. You will want to grab the driver WinPE 4.0 CAB and include the driver architecture for your
WinPE version, in our scenario the 32 bit drivers. Specifically you will want to make sure you include
the NIC driver for the dock (LAN 7500 NIC) or whatever USB NIC you plan to support and the mass
storage device driver (Intel 11.6 or newer). Import these into your ConfigMgr console and then add
them into your boot image. Just be sure to use the appropriate drivers for the OS architecture of the
WINPE environment, not necessarily the OS you are putting on the system. So if you are using a 64 bit
WINPE 5.0 you will want to include the Windows 8 x64 drivers.
Drivers for your Latitude 10 While you are on the DellTechCenter, also download the “10 Tablet” Windows 8 System CAB. This is
what you will need for creating your driver package for the OS you are installing on the device. Simply
import drivers and create a driver package as you normally would for other images and then reference
this driver package in your task sequence. You can also create a task sequence variable to install this
driver package if a WMI query for model (Figure 9). This can be done on the Apply Driver Package step
or if you have several steps create a group and create the condition there.
Figure 8: Adding an Apply Driver Package Step

Imaging a Latitude 10 in your Enterprise Environment
Page 9

Imaging a Latitude 10 in your Enterprise Environment
Page 10
PXE and the Latitude 10 While we do not use PXE boot internally, several customers have had questions regarding what those abilities are on the Latitude 10. Since this is a hot topic I wanted to share what our findings have been from other testing teams. This isn’t a formal support statement, rather some findings you may leverage if you do use PXE in your environment. We have received a number of questions regarding the ability to PXE boot the Latitude 10 tablet. This mail is designed to give you the information you need to help customers use this common feature on
our tablet.
Below are some common Q&A’s and attached are two setup guide’s that can be followed to enable and
carry out PXE booting on the Latitude 10.
Is the Latitude 10 PXE boot capable?
Latitude 10 is PXE boot capable, this must be enabled via the BIOS. (see setup guide)
What BIOS setting do I need ?
To allow for PXE boot, the Latitude 10 must have the latest BIOS, A03 or above. This can be
downloaded from the Latitude 10 support site. The dell.com link is as follows :
http://www.dell.com/support/drivers/us/en/04/Product/latitude-10-tablet
What additional accessories do I need to carry out PXE boot ?
We offer two accessory devices that will allow PXE boot on the Latitude 10 and also point out that a USB keyboard will be required.
a) Dell Productivity Dock. This has been tested and is PXE enabled. b) USB to Ethernet PXE enabled adapter. The details of this cable are as follows, (while we
work to add this to the Latitude 10 as an upsell option, it is available today as a kit solution
via XPS 12). Details are as follows :
USB to Ethernet Dongle (PXE) US EMEA APJ
Mod No TXXF8 N/A N/A
Kit Mod 49W1V 49W1V 49W1V
Kit SKU 331-9318 450-18874
c) USB Keyboard – A keyboard will be required to initiate PXE boot. This can either be connected to the dock or directly via a USB hub (along with the dongle).
Please note, that customers cannot use their legacy PXE as it will not work with Windows 8.
Building your System Now you are ready to deploy your task sequence to a collection that houses the Latitude 10 systems. If you plan to build via bare metal or full media build disks in order to receive the boot option screen you need to hold down the Windows button on the front of the device while powering on. Once you get the

Imaging a Latitude 10 in your Enterprise Environment
Page 11
Dell splash screen you will see an F12 Support message pop on the lower right side of the screen. When you see this, hit your F12 button to load the boot menu and select your applicable media.
Conclusion At this point you should have everything you need to create a new task sequence or modify your existing task sequence to support the new Latitude 10 on Windows 8. You can start your image process as you normally would other models. While the focus of this paper is building this specific model with Configuration Manager, these processes can be used as a reference to add support for other UEFI and Secure Boot enabled devices.