images needed for adobe connect events note the image sizes you will need for the email and web page...
TRANSCRIPT

Images Needed for Adobe Connect Events
Note the image sizes you will need for the email and web page presentation of
your event.

STEP 1: Paint - Create image template at pixel level
Why Start Here?Since it is can be a hassle to get and tweak pixel sizes in any Office product, we start with Paint to create, command and control the exact pixel sizes we need for each image.
Open Paint Using Start in Windows on the Windows menu and searching under Accessories (or type in “Paint” under Programs search in Windows 7 and beyond.
Note the default image size indicated on the status bar when you
open the Paint program.
Use this arrow to display the menu for the
Properties command.
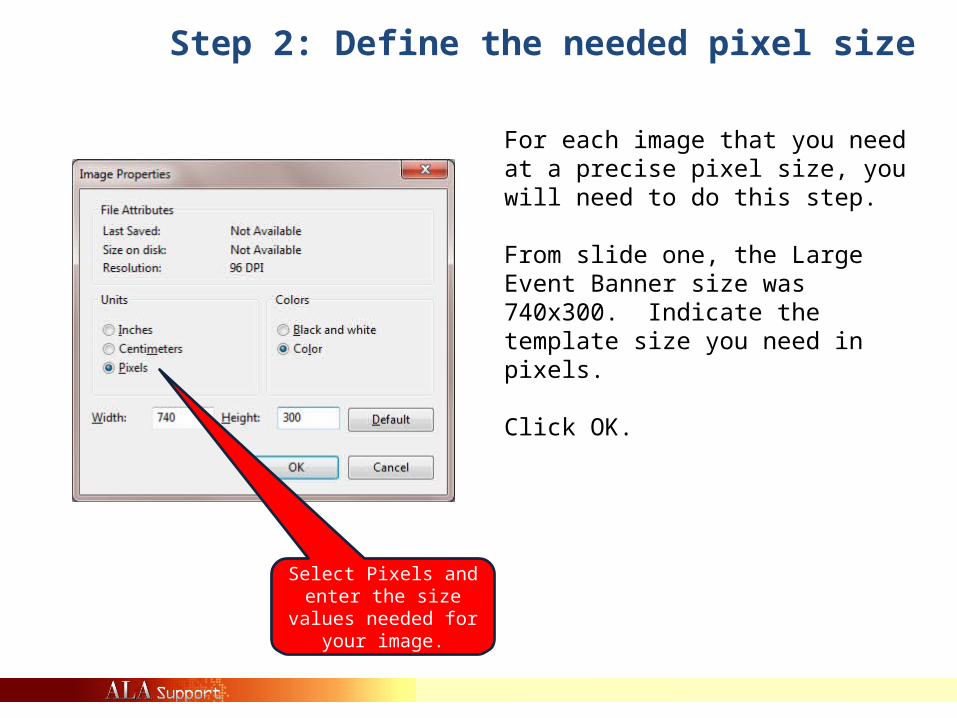
Step 2: Define the needed pixel size
For each image that you need at a precise pixel size, you will need to do this step.
From slide one, the Large Event Banner size was 740x300. Indicate the template size you need in pixels.
Click OK.
Select Pixels and enter the size values needed
for your image.

Step 3: Make it easy to work with
Choose a color from the palette and then the
bucket to fill your image background.
Use the Text tool to add a size note to
your template.
Use the Save command to save it as a *.png file.

Note the pixel size changes.
Step 4: Do the same for all the templates you need
Note the Color 1 selected and the background & text; this is solely for easy
reference when we close out of here.
Note how the pixel sizes match the image templates changes.

Step 5: Paste your new templates into PowerPointSave yourself the first five steps and just use mine here:

BYOBrown
Bag Learning
Session Topic:
Photo Editing Tips
BYO
Brown Bag Learning Session Topic:
Photo Editing Tips
Brown Bag Learning Session Topic:
Photo Editing TipsBYO
April 24, 2013
April 24, 2013
4-24-1312pm CST
12pm CST
12pm CST
Step 6: Use Shapes and Text boxes to buildJust lay your images, shapes and text on top of the
templates for sizing purposes

ALA StaffBrownbag
ALA Staff Brown Bag
Learning Session Topic:
How Not to be a Press ReleaseMarch 27, 201312pm CST
ALA Staff Brown Bag
Learning Session Topic:
How Not to be a Press Release
March 27, 201312pm CST
ALA StaffBrownbag
ALA Staff Brown Bag
Learning Session Topic:
How Not to be a Press Release
3-27-1312pm CST
ALA StaffBrownbag
Step 7: Add Logos and BrandingUse the Insert/Picture from file to add and resize logos.
Use the Group command to join it all together.

Step 8: Group your created imagesUse the Group command to join all the elements of your
new banner images together.

Save and UploadRight click to Save As Picture, so you can Upload it into Adobe Connect or Drupal
or ALA Connect or wherever

This title would change each time
This date would change each time
This blurb is what I would look for from
each presenter— please feel free to
edit for ours
Add to Adobe Connect EventGrab a screenshot (using Print Screen keyboard button) of your preview and paste
back in PowerPoint to add notes for committee approval if needed

Speaker Info

Speaker Info
Getting To Know
ALAPresented by
Maureen Sullivan
Audra Caplan
Keith Michael Fiels
Maureen Sullivan
Audra Caplan
Keith Michael
Fiels