imageprograf media configuration tool guidedownloads.canon.com/.../mediaconfigurationtool-e.pdfi...
TRANSCRIPT
i
imagePROGRAF
Media Configuration Tool Guide
For Macintosh
Contents
Before You Begin ...................................................................................................................ii■ Compatible Printers .......................................................................................................ii■ Drivers Applicable with Media Configuration Tool .........................................................ii
How to Use This Guide ..........................................................................................................ii■ Conventions...................................................................................................................ii■ Button Notations ............................................................................................................ii■ Trademarks ...................................................................................................................ii■ Request to Our Customers...........................................................................................iii
Chapter 1 Installing and Starting the Media Configuration Tool.............................. 1-1Operating Environment.......................................................................................................1-1Installation Procedures .......................................................................................................1-1Procedures for Uninstalling................................................................................................. 1-3Starting the Media Configuration Tool ................................................................................1-5
Chapter 2 Functions of the Media Configuration Tool............................................. 2-1The Functions of the Media Configuration Tool..................................................................2-1
■ Replacing all of the printer and printer driver media information at once ..................2-1■ Adding user defined media types to the printer and printer driver media menus ......2-1■ Detailed Settings of Media Properties .......................................................................2-2■ Customizing the printer and printer driver media type menu.....................................2-2
Outline of the Media Configuration Tool Functions.............................................................2-2■ The Media Configuration Tool Main Screen ..............................................................2-2■ Wizard Screen Content .............................................................................................2-4
Chapter 3 Updating Media Information File ............................................................ 3-1Select the Media Information File .......................................................................................3-1Select Printer to Update......................................................................................................3-3Check What Is to be Updated.............................................................................................3-4
Chapter 4 Adding Media Types............................................................................... 4-1Select Printer to be Added..................................................................................................4-1Input Media Name .............................................................................................................. 4-3Input Media Properties........................................................................................................4-4Check Addition....................................................................................................................4-9
Chapter 5 Editing Media Types............................................................................... 5-1Select Printer to be Edited ..................................................................................................5-1Edit Media Type..................................................................................................................5-2
Index ...................................................................................................................Index-1

ii
Media Configuration Tool Guide Before You Begin
Before You Begin
imagePROGRAF Media Configuration Tool (known below as the Media Configuration Tool) is software to store media information when media (media types) supported by the printer have been added. It offers functions for users familiar with media and printers.This document contains an outline and information on settings for the Media Configuration Tool version used in Macintosh.This document also explains how to use Media Configuration Tool in Mac OS. Refer to “imagePROGRAF Media Configuration Tool Guide For Windows”, for information on how to use Media Configuration Tool in a Windows environment.The printer types and range represented for this driver are as follows.
■ Compatible Printers Canon Large Format Printer W6400Canon Large Format Printer W8400
■ Drivers Applicable with Media Configuration ToolCanon imagePROGRAF Printer Driver 2005 (Mac OS 8.6/9.x/X 10.2 or Later)imagePROGRAF Print Plug-In for Photoshop (Mac OS 8.6/9.x/X 10.2 or Later)
How to Use This Guide
■ ConventionsThe following marks are used to alert you about safety, handling precautions and limitations, cautions, and other important information.
■ Button NotationsThe following names are used for buttons in this guide.
• Buttons on the computer screen appear in bold text.
Example: Click OK.Click the Set button.
■ TrademarksCanon, the Canon logo, and imagePROGRAF are trademarks or registered trademarks of CANON INC.Apple, Macintosh and Mac OS are registered trademarks or trademarks of Apple Computer, Inc.Microsoft® and Windows® are registered trademarks of the Microsoft Corporation in United States and other countries.Any other company name and product name are company trademarks or registered trademarks.
Describes important points and limitations you should follow during operation. Read and obey this information to avoid problems caused by incorrect procedures.
Provides helpful hints and tips for reference during operation. We recommend that you read and obey this information.
Important
Note

iii
Media Configuration Tool Guide Before You Begin
■ Request to Our Customers
• Unauthorized transfer or duplication of all or any part of this document is prohibited.
• The content of this document is subject to change without notice.
• Every effort has been made to ensure that the information contained in this guide is correct. If any error or omission is found, contact us directly or an authorized Canon representative.
• Canon is not responsible for any damages, direct or indirect, arising from or related to the use of this software.
Copyright© 2005 CANON INC. ALL RIGHTS RESERVED.
1-1
Media Configuration Tool Guide Chapter 1 Installing and Starting the Media Configuration Tool
Chapter 1 Installing and Starting the Media Configuration Tool
The explanation below is on the operating environment and installation procedures for the Media Configuration Tool.
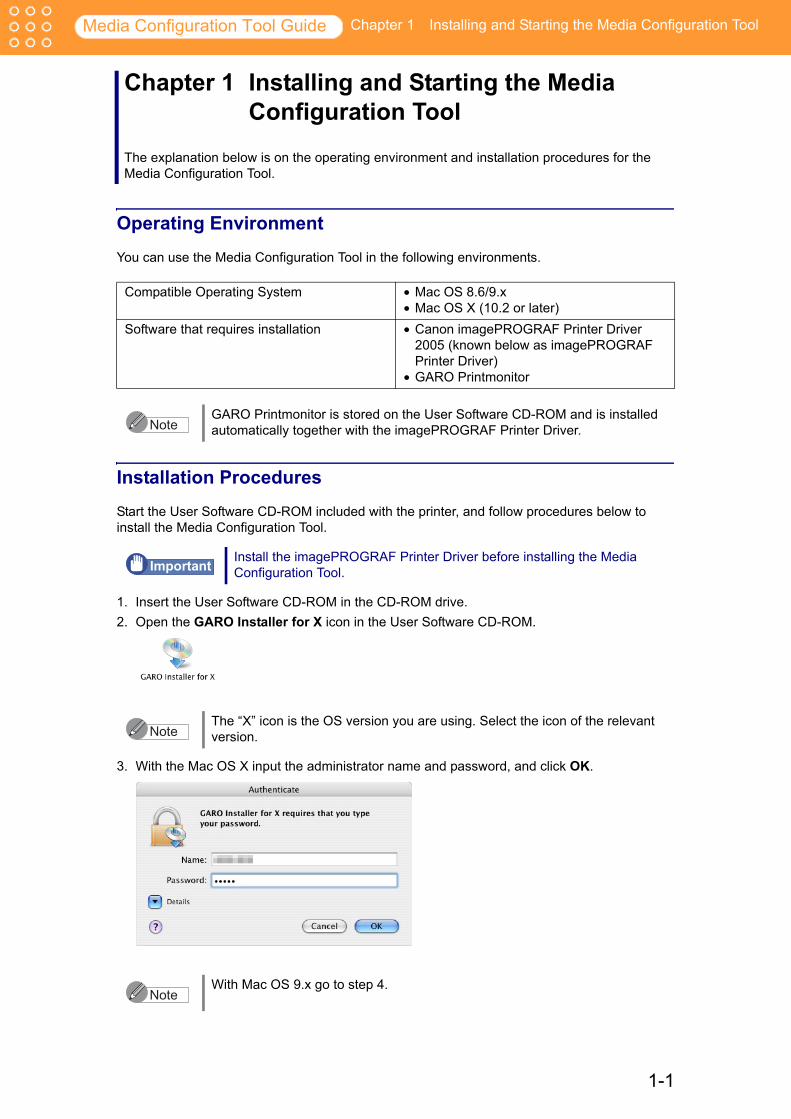
Operating Environment
You can use the Media Configuration Tool in the following environments.
Installation Procedures
Start the User Software CD-ROM included with the printer, and follow procedures below to install the Media Configuration Tool.
1. Insert the User Software CD-ROM in the CD-ROM drive.2. Open the GARO Installer for X icon in the User Software CD-ROM.
3. With the Mac OS X input the administrator name and password, and click OK.
Compatible Operating System • Mac OS 8.6/9.x• Mac OS X (10.2 or later)
Software that requires installation • Canon imagePROGRAF Printer Driver 2005 (known below as imagePROGRAF Printer Driver)
• GARO Printmonitor
GARO Printmonitor is stored on the User Software CD-ROM and is installed automatically together with the imagePROGRAF Printer Driver.
Install the imagePROGRAF Printer Driver before installing the Media Configuration Tool.
The “X” icon is the OS version you are using. Select the icon of the relevant version.
With Mac OS 9.x go to step 4.
Note
Important
Note
Note
1-2
Media Configuration Tool Guide Chapter 1 Installing and Starting the Media Configuration Tool
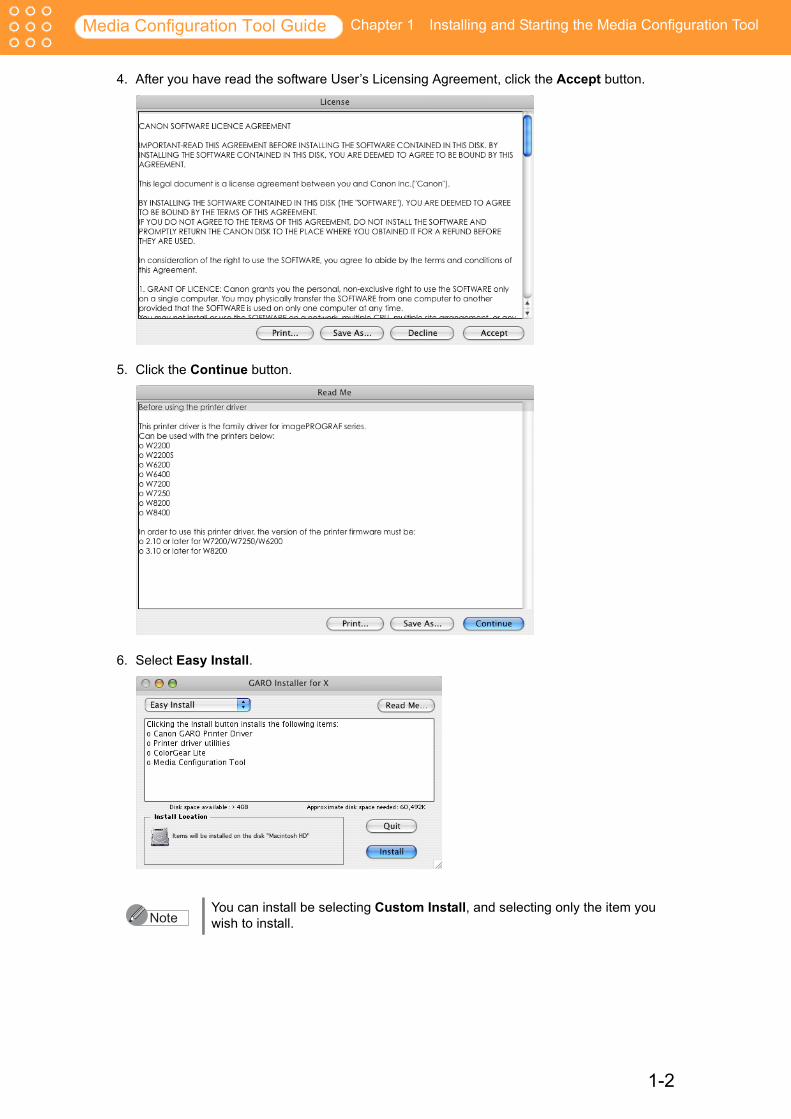
4. After you have read the software User’s Licensing Agreement, click the Accept button.
5. Click the Continue button.
6. Select Easy Install.
You can install be selecting Custom Install, and selecting only the item you wish to install.Note
1-3
Media Configuration Tool Guide Chapter 1 Installing and Starting the Media Configuration Tool
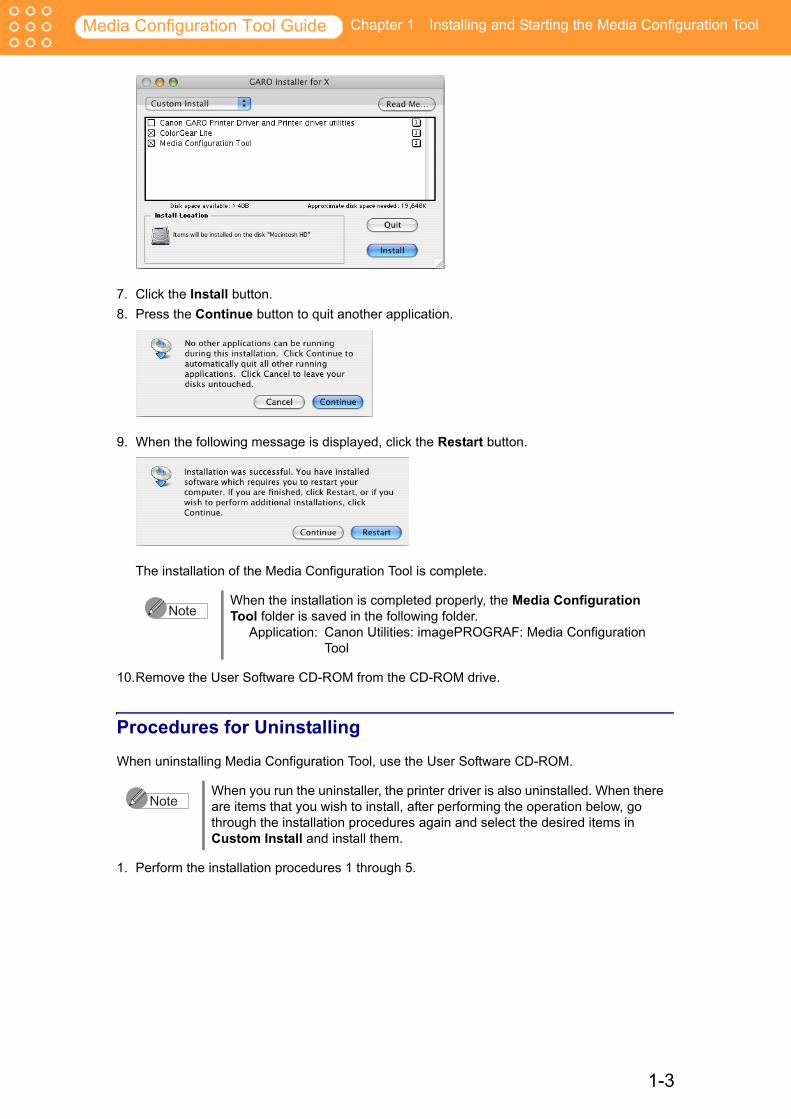
7. Click the Install button.8. Press the Continue button to quit another application.
9. When the following message is displayed, click the Restart button.
The installation of the Media Configuration Tool is complete.
10.Remove the User Software CD-ROM from the CD-ROM drive.
Procedures for Uninstalling
When uninstalling Media Configuration Tool, use the User Software CD-ROM.
1. Perform the installation procedures 1 through 5.
When the installation is completed properly, the Media Configuration Tool folder is saved in the following folder.
Application: Canon Utilities: imagePROGRAF: Media Configuration Tool
When you run the uninstaller, the printer driver is also uninstalled. When there are items that you wish to install, after performing the operation below, go through the installation procedures again and select the desired items in Custom Install and install them.
Note
Note
1-4
Media Configuration Tool Guide Chapter 1 Installing and Starting the Media Configuration Tool
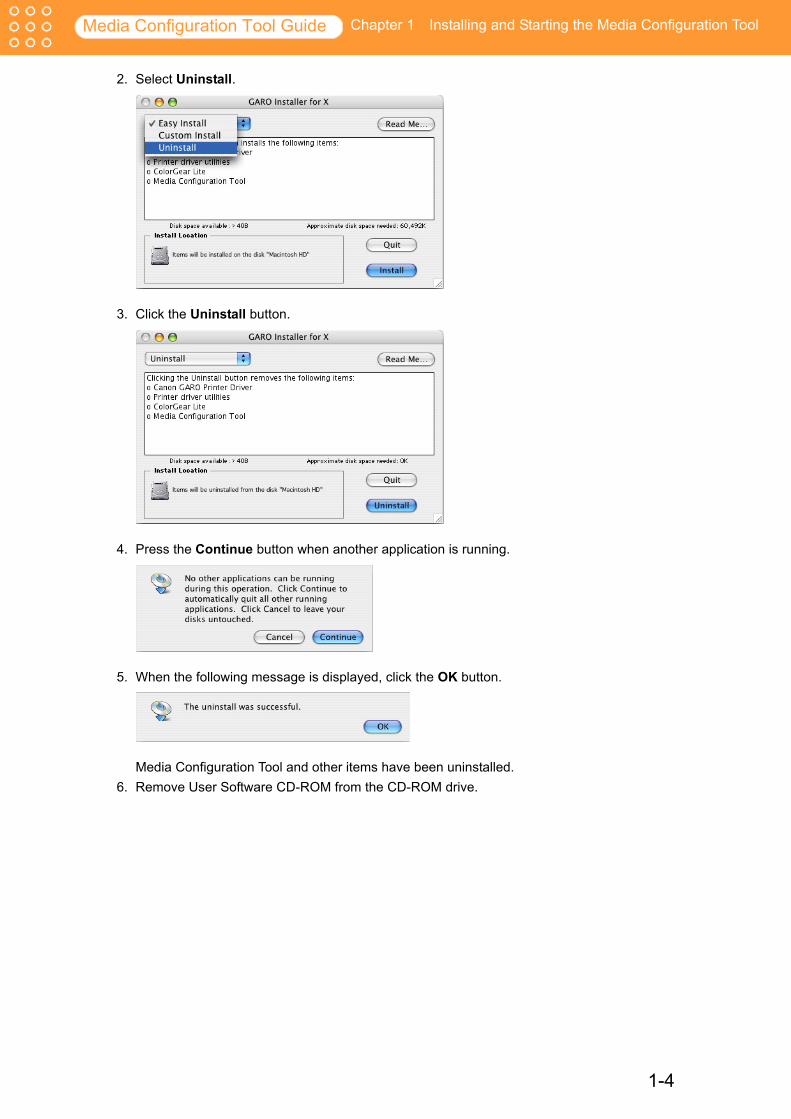
2. Select Uninstall.
3. Click the Uninstall button.
4. Press the Continue button when another application is running.
5. When the following message is displayed, click the OK button.
Media Configuration Tool and other items have been uninstalled.6. Remove User Software CD-ROM from the CD-ROM drive.
1-5
Media Configuration Tool Guide Chapter 1 Installing and Starting the Media Configuration Tool
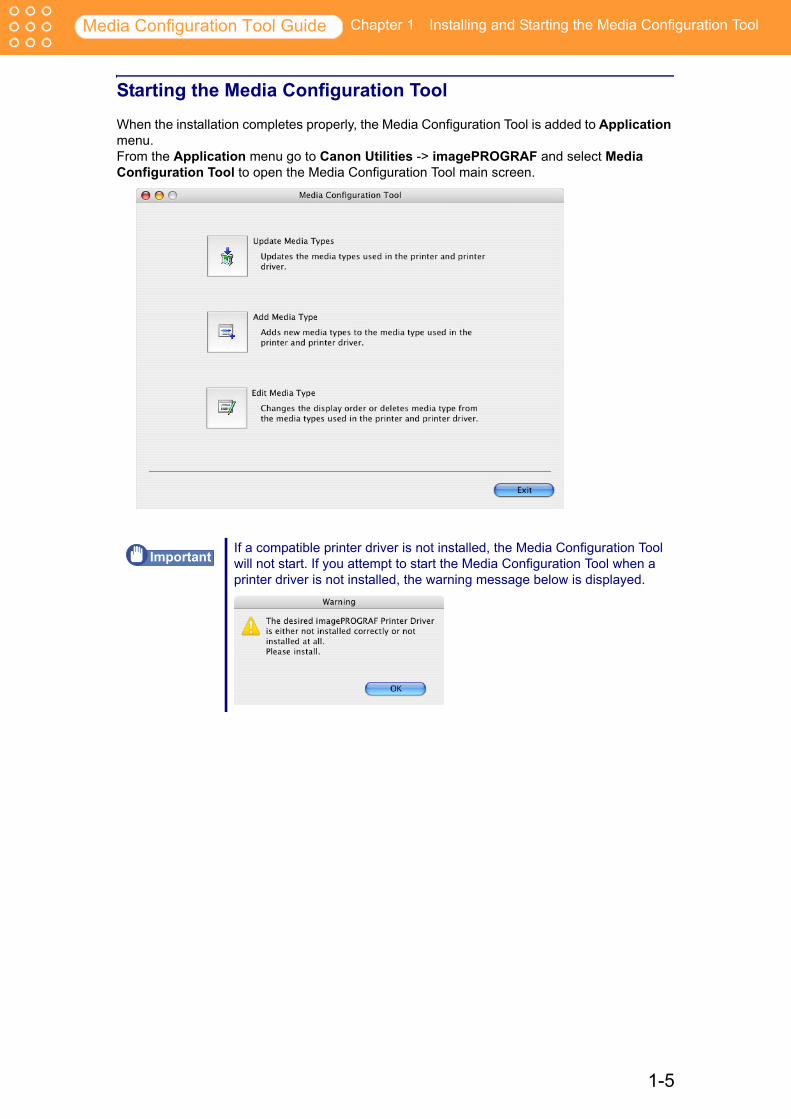
Starting the Media Configuration Tool
When the installation completes properly, the Media Configuration Tool is added to Application menu.From the Application menu go to Canon Utilities -> imagePROGRAF and select Media Configuration Tool to open the Media Configuration Tool main screen.
If a compatible printer driver is not installed, the Media Configuration Tool will not start. If you attempt to start the Media Configuration Tool when a printer driver is not installed, the warning message below is displayed.
Important

2-1
Media Configuration Tool Guide Chapter 2 Functions of the Media Configuration Tool
Chapter 2 Functions of the Media Configuration Tool
The Media Configuration Tool is software to store media information when media (media types) supported by the printer have been added. It offers functions for users familiar with media and printers.The explanation below outlines the functions and operations of the Media Configuration Tool.
The Functions of the Media Configuration Tool
The Media Configuration Tool can be used for the following objectives.
■ Replacing all of the printer and printer driver media information at onceIf any of the newly added media types or special media are deleted after the printer has been sold, you can replace the printer driver media information by downloading the latest media information files from the Canon Web site. This function allows you to replace printer or printer drive media information files.
Refer to Chapter 3 “Updating Media Information File” (p.3-1) for more information on this function.
■ Adding user defined media types to the printer and printer driver media menus
You can add your customer defined media types to the printer and printer driver media menus. Additionally, you can set the media name of your choice to the printer operating panel and the printer driver.
Refer to Chapter 4 “Adding Media Types” (p.4-1) for more information on this function.
2-2
Media Configuration Tool Guide Chapter 2 Functions of the Media Configuration Tool
■ Detailed Settings of Media PropertiesWhen adding media types you can perform detailed settings to match media type properties such as Media Thickness, Vacuum Strength, and Cut Speed. For instance, when adding media that does not dry quickly, you can increase the value for Drying Time.Refer to “Input Media Properties” in Chapter 4 “Adding Media Types” (p.4-4) for an explanation.
■ Customizing the printer and printer driver media type menu You can change the display order of the media types on the printer operating panel and printer driver, you can change the name of the media, and you can erase the user-defined media.
Refer to Chapter 5 “Editing Media Types” (p.5-1) for more information on this function.
Outline of the Media Configuration Tool Functions
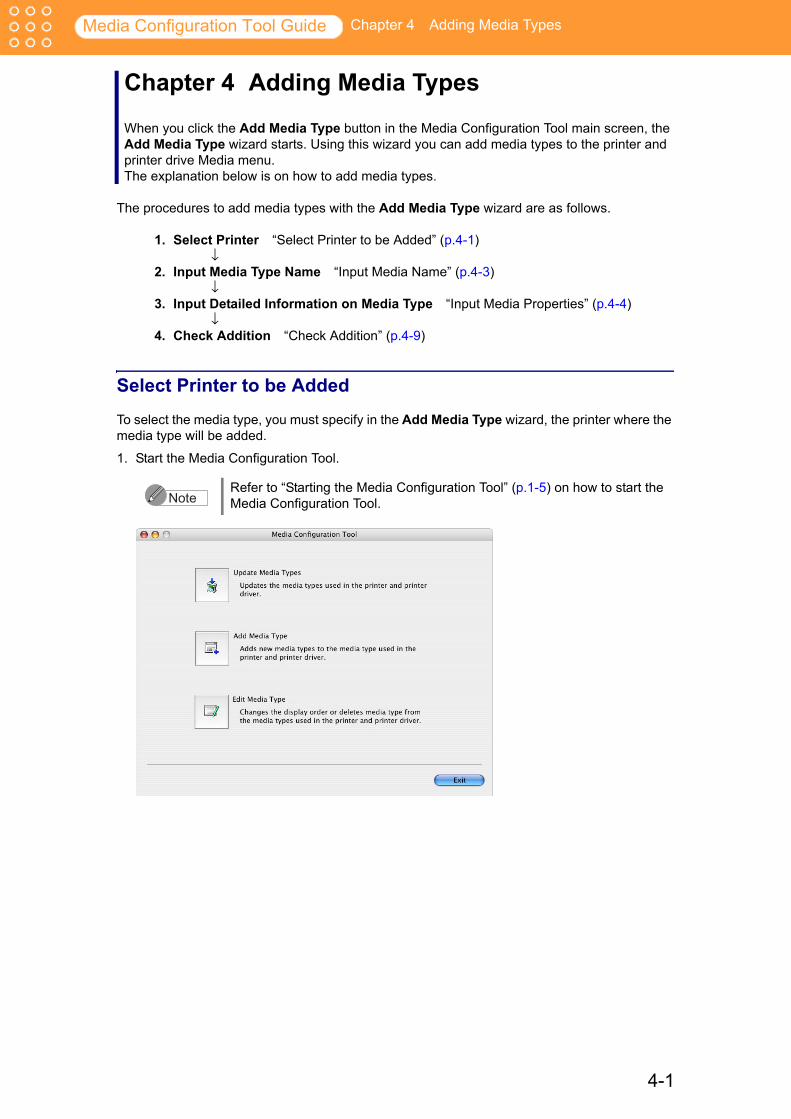
The explanation below is an outline of the Media Configuration Tool.
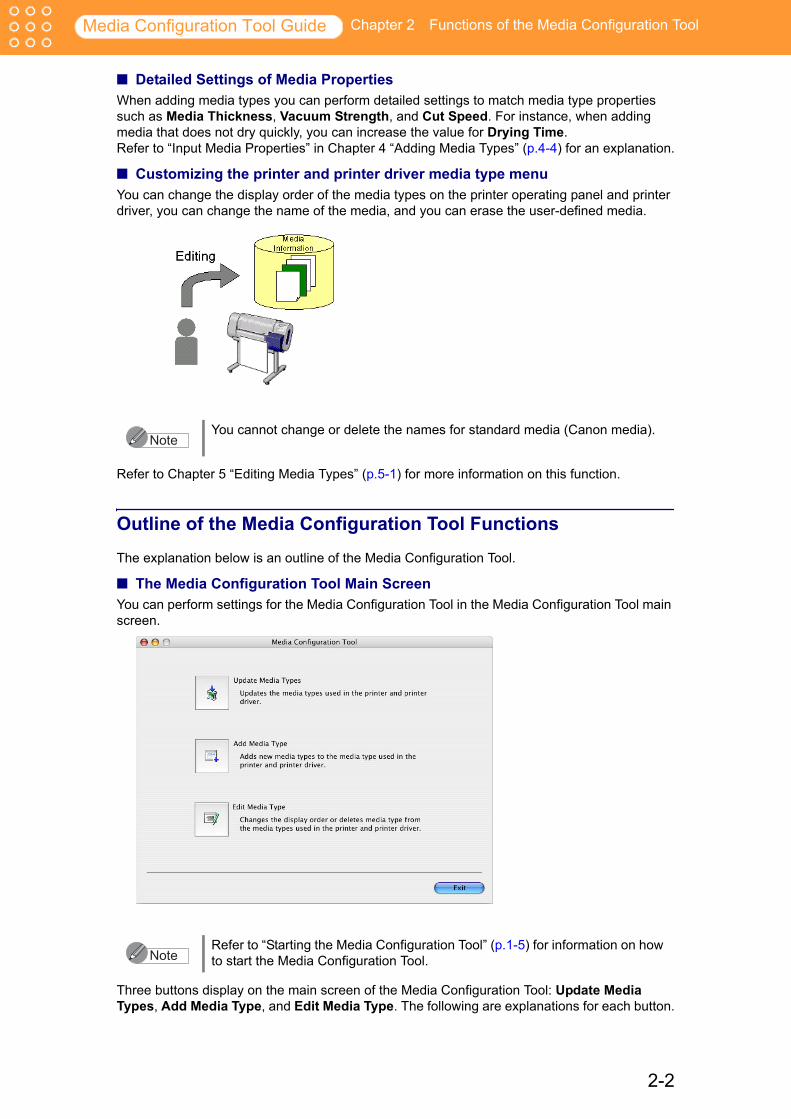
■ The Media Configuration Tool Main ScreenYou can perform settings for the Media Configuration Tool in the Media Configuration Tool main screen.
Three buttons display on the main screen of the Media Configuration Tool: Update Media Types, Add Media Type, and Edit Media Type. The following are explanations for each button.
You cannot change or delete the names for standard media (Canon media).
Refer to “Starting the Media Configuration Tool” (p.1-5) for information on how to start the Media Configuration Tool.
Note
Note

2-3
Media Configuration Tool Guide Chapter 2 Functions of the Media Configuration Tool
• The Update Media Types Button
When you click this button, the Update Media Types wizard starts. The wizard is used to replace printer and printer driver media information files with media information files that you have downloaded from the Canon Web site or another company’s Web site.
• The Add Media Type Button
When you click this button, the Add Media Type wizard starts. This wizard is used to add new media types to the media type information.

2-4
Media Configuration Tool Guide Chapter 2 Functions of the Media Configuration Tool
• The Edit Media Type Button
When you click this button, the Edit Media Types wizard starts. This wizard is used to change the display order of the media type on the printer operating panel and printer driver and to delete user-defined media.
What follows is an explanation on the wizard screen content.
■ Wizard Screen ContentWhen you click a button on the main screen of the Media Configuration Tool, the wizard associated with that button starts. An operation guide for each wizard displays. Perform settings for the Media Configuration Tool following the wizard operation guide display. Additionally, the operation steps display on the left side of every wizard. When one setting is complete, the wizard moves to display the next step.The wizard screen content is explained below using the Update Media Types wizard as an example.
Content Description
(a) Operation Guide Explains the operation details.(b) Operation Steps Displays the operation steps to be
carried out in the wizard. The current step is indicated in bold.
(c) Information Displays detailed information about the setting.
(a)
(b)
(c)
3-1
Media Configuration Tool Guide Chapter 3 Updating Media Information File
Chapter 3 Updating Media Information File
When you click the Update Media Types button on the main screen of the Media Configuration Tool the Update Media Types wizard starts. Using this wizard you can replace printer and printer driver Media Information File with Media Information File you have downloaded from the Canon Web site or another company’s Web site.The explanation below is on the update method for the Media Information File.
The procedures for updating the media type information with the Update Media Types wizard are as follows.
1. Select the file “Select the Media Information File” (p.3-1)↓
2. Select printer “Select Printer to Update” (p.3-3)↓
3. Check what is to be updated “Check What Is to be Updated” (p.3-4)
Select the Media Information File
To update the media information file you must specify the Media Information File you have downloaded from the Canon Web site in the Update Media Types wizard.
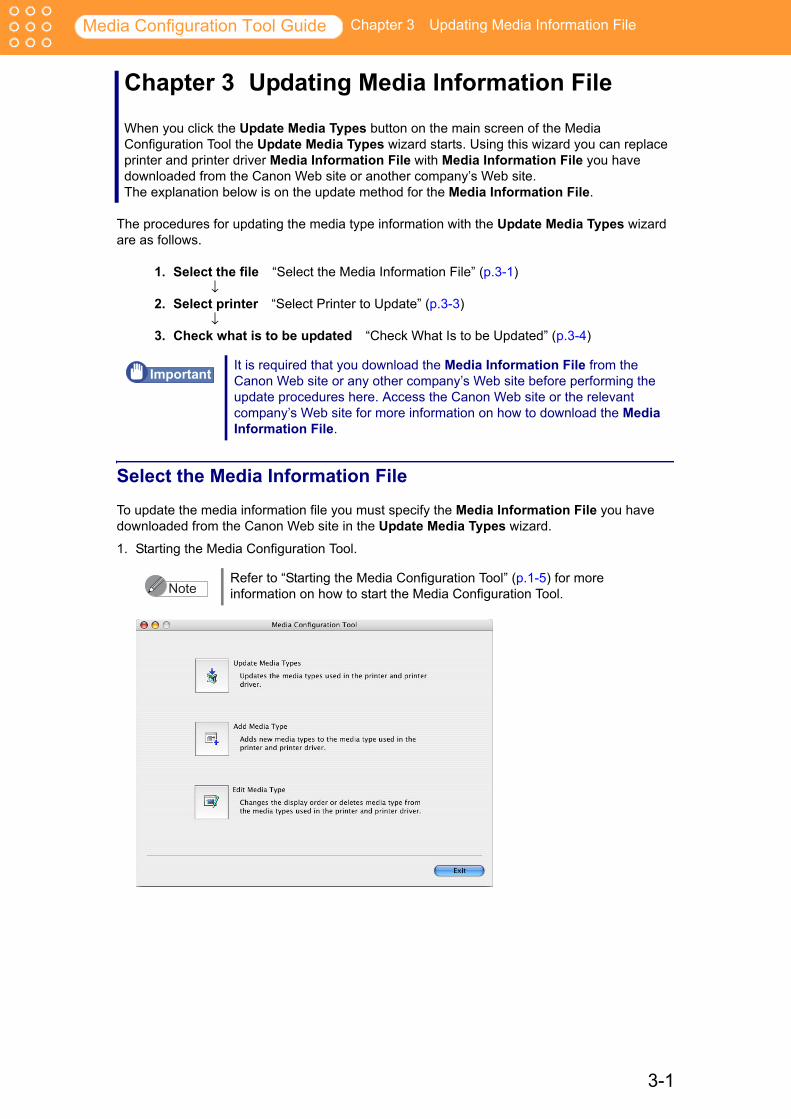
1. Starting the Media Configuration Tool.
It is required that you download the Media Information File from the Canon Web site or any other company’s Web site before performing the update procedures here. Access the Canon Web site or the relevant company’s Web site for more information on how to download the Media Information File.
Refer to “Starting the Media Configuration Tool” (p.1-5) for more information on how to start the Media Configuration Tool.
Important
Note

3-2
Media Configuration Tool Guide Chapter 3 Updating Media Information File
2. Click the Update Media Types button.The Update Media Types wizard starts.
3. Click the Browse button to open the Open dialog box.4. Move the file to a directory containing Media Information File (*.med).
5. Select the Media Information File and click the Open button.The name of the Media Information File you have selected in the Open dialog box is displayed in File Name in the Update Media Types wizard.
3-3
Media Configuration Tool Guide Chapter 3 Updating Media Information File
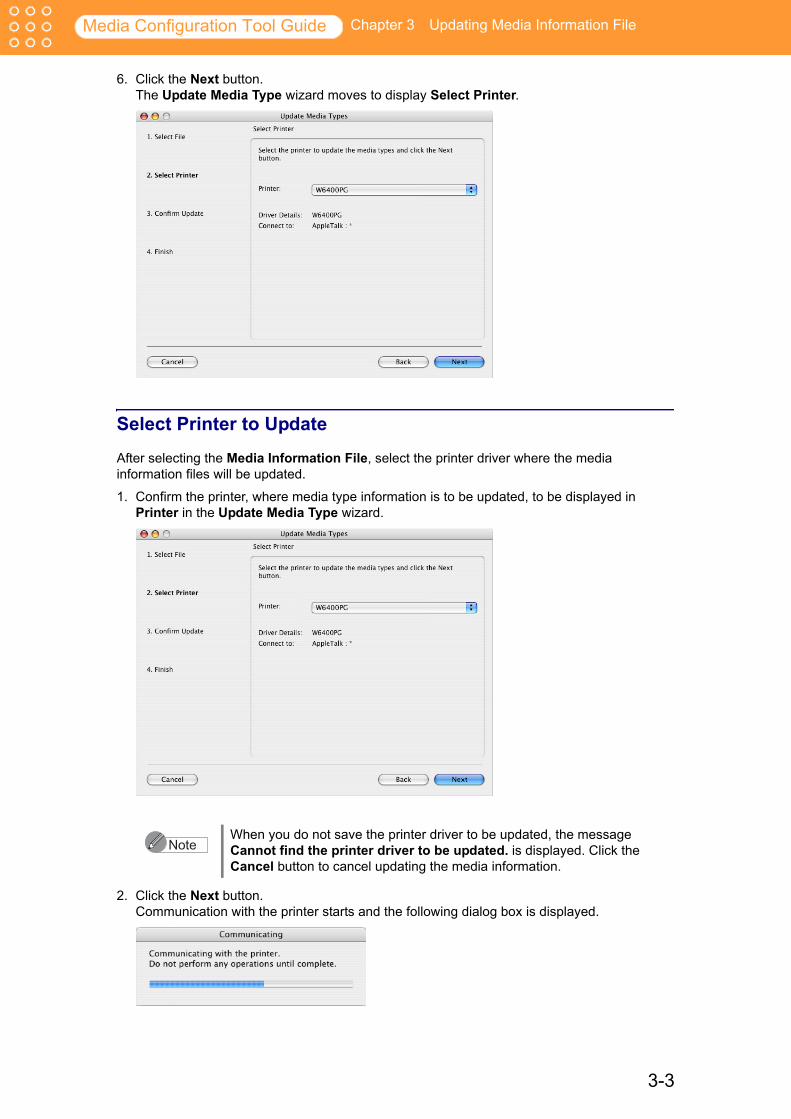
6. Click the Next button.The Update Media Type wizard moves to display Select Printer.
Select Printer to Update
After selecting the Media Information File, select the printer driver where the media information files will be updated.
1. Confirm the printer, where media type information is to be updated, to be displayed in Printer in the Update Media Type wizard.
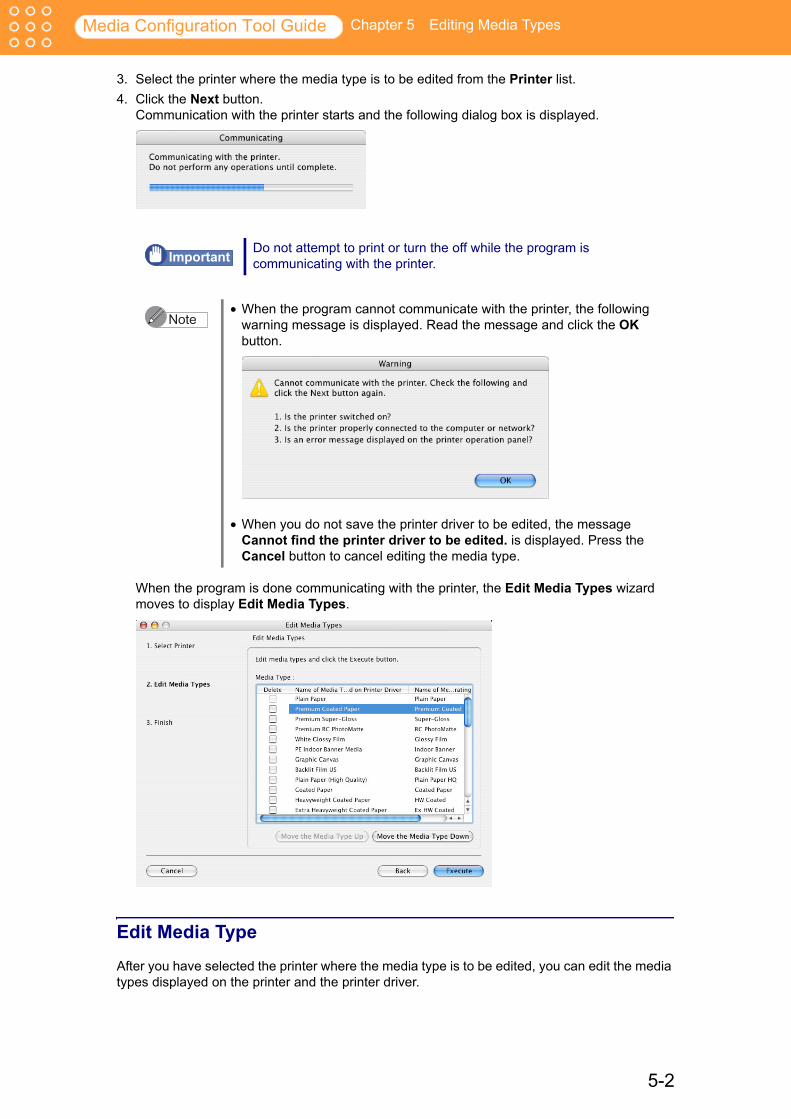
2. Click the Next button.Communication with the printer starts and the following dialog box is displayed.
When you do not save the printer driver to be updated, the message Cannot find the printer driver to be updated. is displayed. Click the Cancel button to cancel updating the media information.
Note

3-4
Media Configuration Tool Guide Chapter 3 Updating Media Information File
When the program has finished communicating with the printer, the Update Media Types wizard display moves to display Confirm Update.
Check What Is to be Updated
Select the printer to be updated. When the program has finished communicating with the printer, information acquired from the printer such as the printer name, the driver details, and the connection point is displayed in the Update Media Types wizard. You can make the final check of what is to be updated in this window.
1. Confirm the information acquired from the printer in the Update Media Types wizard.
Do not attempt to print or turn the off while the program is communicating with the printer.
• When the program cannot communicate with the printer, the following warning message is displayed. Read the message and click the Next button.
• When there is data set to the printer that is older than the data to be updated, the printer, printer driver and software media types are updated.
• When there is data set to the printer that is newer than the data to be updated, the media information files selected are updated. When you would like to let the data that is set to the printer remain, click the Cancel button.
• When the data set to the printer is the same as the data to be updated, only the software media types are updated.
Important
Note
Important
3-5
Media Configuration Tool Guide Chapter 3 Updating Media Information File
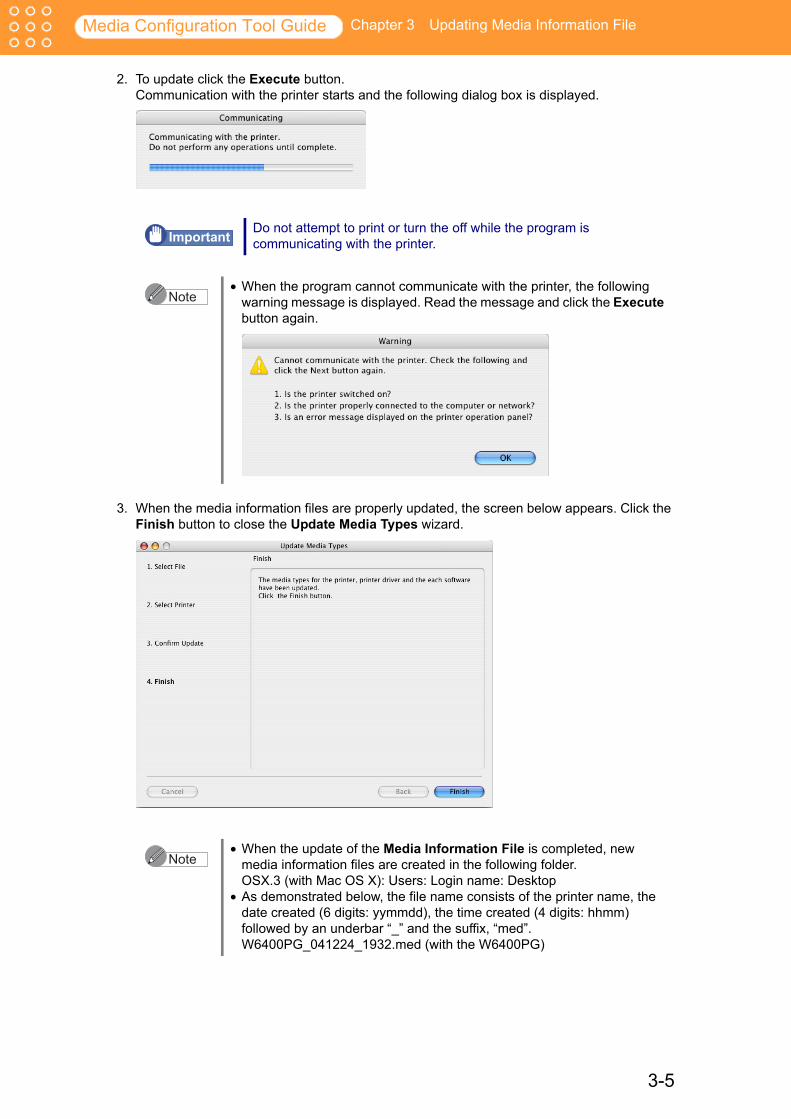
2. To update click the Execute button.Communication with the printer starts and the following dialog box is displayed.
3. When the media information files are properly updated, the screen below appears. Click the Finish button to close the Update Media Types wizard.
Do not attempt to print or turn the off while the program is communicating with the printer.
• When the program cannot communicate with the printer, the following warning message is displayed. Read the message and click the Execute button again.
• When the update of the Media Information File is completed, new media information files are created in the following folder.OSX.3 (with Mac OS X): Users: Login name: Desktop
• As demonstrated below, the file name consists of the printer name, the date created (6 digits: yymmdd), the time created (4 digits: hhmm) followed by an underbar “_” and the suffix, “med”.W6400PG_041224_1932.med (with the W6400PG)
Important
Note
Note
4-1
Media Configuration Tool Guide Chapter 4 Adding Media Types
Chapter 4 Adding Media Types
When you click the Add Media Type button in the Media Configuration Tool main screen, the Add Media Type wizard starts. Using this wizard you can add media types to the printer and printer drive Media menu.The explanation below is on how to add media types.
The procedures to add media types with the Add Media Type wizard are as follows.
1. Select Printer “Select Printer to be Added” (p.4-1)↓
2. Input Media Type Name “Input Media Name” (p.4-3) ↓
3. Input Detailed Information on Media Type “Input Media Properties” (p.4-4)↓
4. Check Addition “Check Addition” (p.4-9)
Select Printer to be Added
To select the media type, you must specify in the Add Media Type wizard, the printer where the media type will be added.
1. Start the Media Configuration Tool.
Refer to “Starting the Media Configuration Tool” (p.1-5) on how to start the Media Configuration Tool.Note
4-2
Media Configuration Tool Guide Chapter 4 Adding Media Types
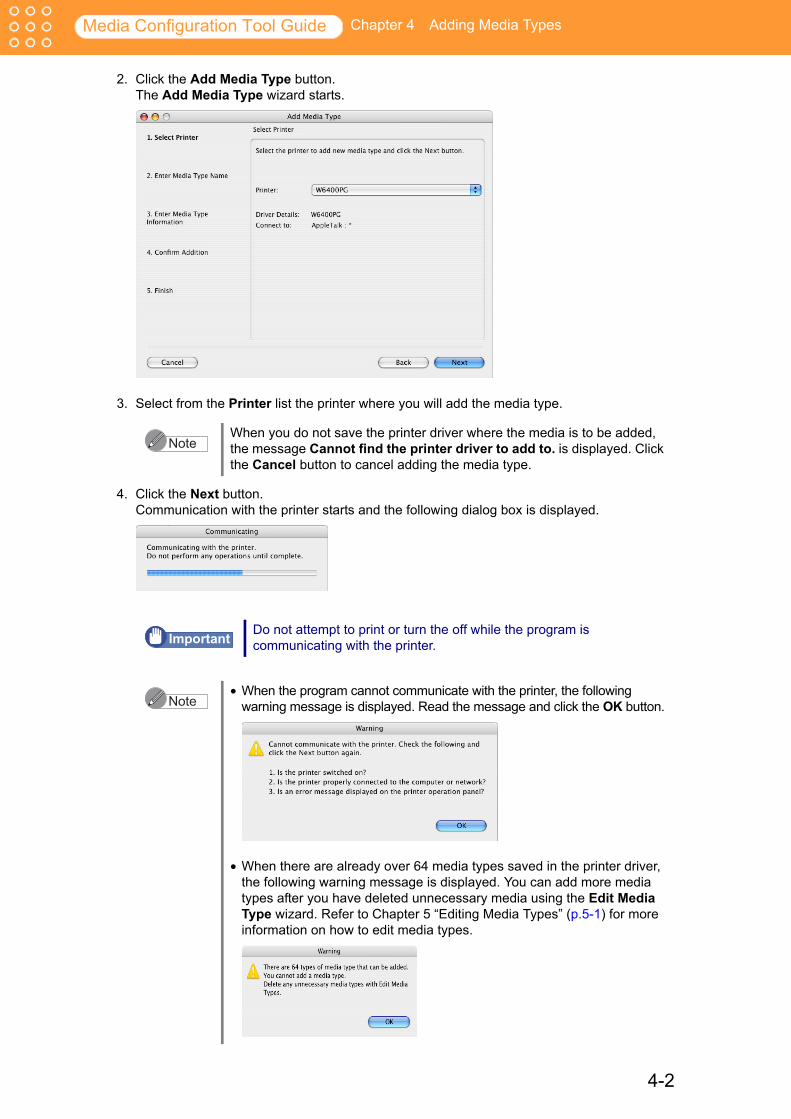
2. Click the Add Media Type button.The Add Media Type wizard starts.
3. Select from the Printer list the printer where you will add the media type.
4. Click the Next button.Communication with the printer starts and the following dialog box is displayed.
When you do not save the printer driver where the media is to be added, the message Cannot find the printer driver to add to. is displayed. Click the Cancel button to cancel adding the media type.
Do not attempt to print or turn the off while the program is communicating with the printer.
• When the program cannot communicate with the printer, the following warning message is displayed. Read the message and click the OK button.
• When there are already over 64 media types saved in the printer driver, the following warning message is displayed. You can add more media types after you have deleted unnecessary media using the Edit Media Type wizard. Refer to Chapter 5 “Editing Media Types” (p.5-1) for more information on how to edit media types.
Note
Important
Note

4-3
Media Configuration Tool Guide Chapter 4 Adding Media Types
When the program is done communicating with the printer, the screen moves to display Add Media Type: Enter Media Type Name.
Input Media Name
You can input the name of the media you have added here. The names you enter here display on the Printer driver, the Printer operating panel and the Remote UI.
Indicated below are the conditions for inputting media names.
1. Input the name of your choice into Name of Media Type Displayed on Printer Driver.2. Input the name of your choice into Name of Media Type Displayed on Printer Operating
Panel.3. Input the name of your choice into Name of Media Type Displayed on Remote UI.
Media Name Conditions
Name of Media Type Displayed on Printer Driver
You can input up to 32 characters.
Name of Media Type Displayed on Printer Operating Panel
You can input up to 15 alphabet or numerical characters.
Name of Media Type Displayed on Remote UI
You can input up to 31 alphabet or numerical characters.
• You cannot input “\” (back slash).• You cannot use “-” (hyphen) at the front of the media name.• Only spaces are prohibited from entry into names. • A warning message will be displayed in any of the following cases:
a. When the media name is not inputb. When the number of characters input exceeds the limitc. When a media type of the same name is already savedd. When characters input are not correct
Important

4-4
Media Configuration Tool Guide Chapter 4 Adding Media Types
4. Click the Next button. The screen moves to display Add Media Type: Enter Media Type Information.
Input Media Properties
You can set the properties of the media that is to be added.Select the item that has similar properties from standard media, and then set properties of the new media based on those setting values.
1. From the Media Type list in the Add Media Type: Enter Media Type Information select the media type that is to be the base for the media type to be added.A detailed settings list of the media type select in Media Type Detailed Settings List.
4-5
Media Configuration Tool Guide Chapter 4 Adding Media Types
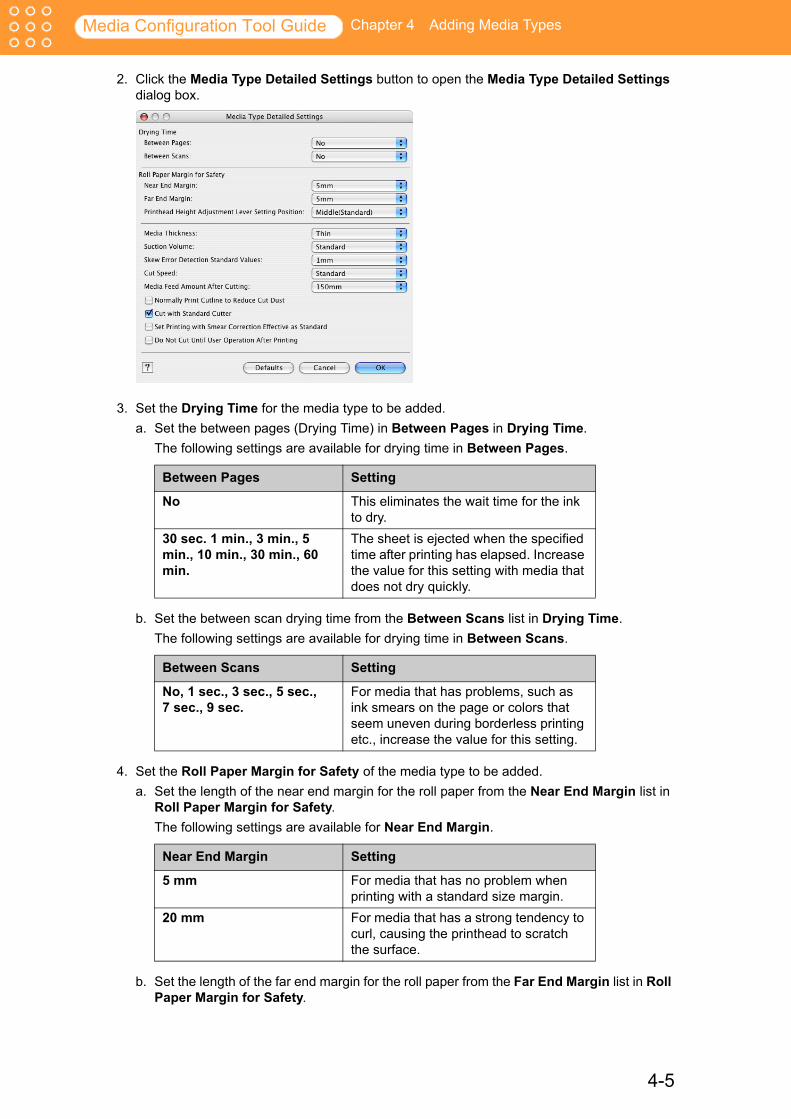
2. Click the Media Type Detailed Settings button to open the Media Type Detailed Settings dialog box.
3. Set the Drying Time for the media type to be added.a. Set the between pages (Drying Time) in Between Pages in Drying Time.
The following settings are available for drying time in Between Pages.
b. Set the between scan drying time from the Between Scans list in Drying Time.The following settings are available for drying time in Between Scans.
4. Set the Roll Paper Margin for Safety of the media type to be added.a. Set the length of the near end margin for the roll paper from the Near End Margin list in
Roll Paper Margin for Safety.The following settings are available for Near End Margin.
b. Set the length of the far end margin for the roll paper from the Far End Margin list in Roll Paper Margin for Safety.
Between Pages Setting
No This eliminates the wait time for the ink to dry.
30 sec. 1 min., 3 min., 5 min., 10 min., 30 min., 60 min.
The sheet is ejected when the specified time after printing has elapsed. Increase the value for this setting with media that does not dry quickly.
Between Scans Setting
No, 1 sec., 3 sec., 5 sec., 7 sec., 9 sec.
For media that has problems, such as ink smears on the page or colors that seem uneven during borderless printing etc., increase the value for this setting.
Near End Margin Setting
5 mm For media that has no problem when printing with a standard size margin.
20 mm For media that has a strong tendency to curl, causing the printhead to scratch the surface.
4-6
Media Configuration Tool Guide Chapter 4 Adding Media Types
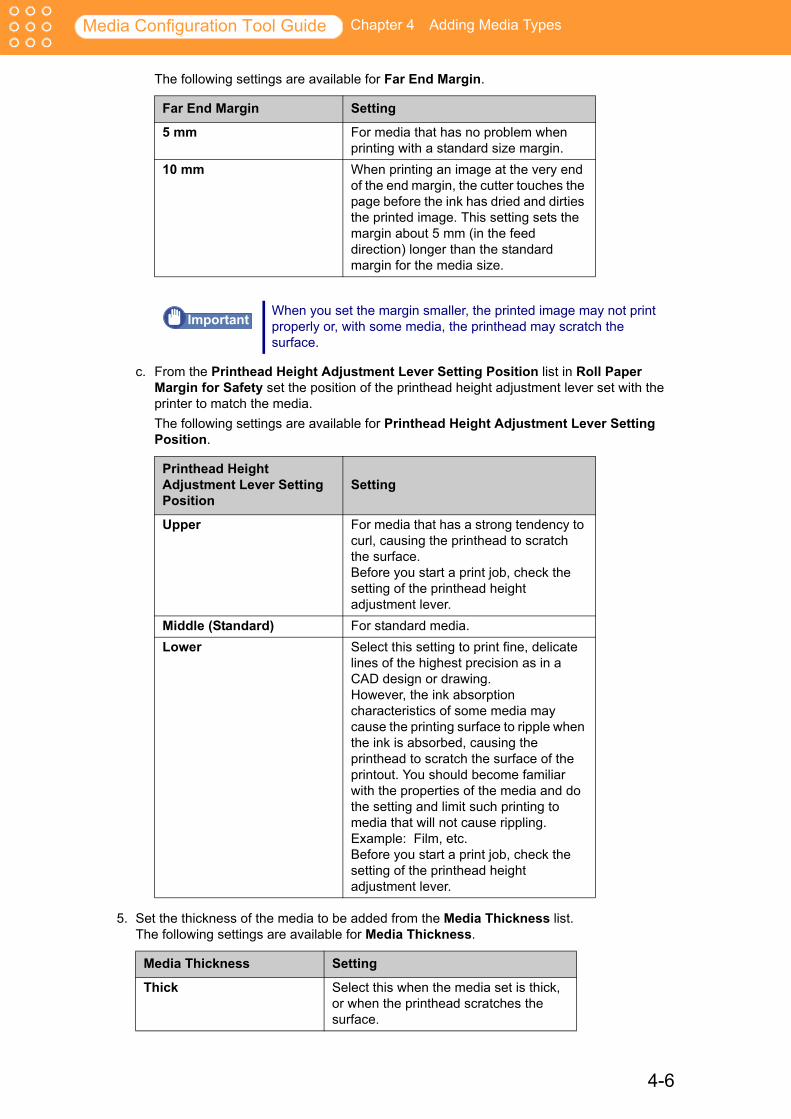
The following settings are available for Far End Margin.
c. From the Printhead Height Adjustment Lever Setting Position list in Roll Paper Margin for Safety set the position of the printhead height adjustment lever set with the printer to match the media.The following settings are available for Printhead Height Adjustment Lever Setting Position.
5. Set the thickness of the media to be added from the Media Thickness list.The following settings are available for Media Thickness.
Far End Margin Setting
5 mm For media that has no problem when printing with a standard size margin.
10 mm When printing an image at the very end of the end margin, the cutter touches the page before the ink has dried and dirties the printed image. This setting sets the margin about 5 mm (in the feed direction) longer than the standard margin for the media size.
When you set the margin smaller, the printed image may not print properly or, with some media, the printhead may scratch the surface.
Printhead Height Adjustment Lever Setting Position
Setting
Upper For media that has a strong tendency to curl, causing the printhead to scratch the surface.Before you start a print job, check the setting of the printhead height adjustment lever.
Middle (Standard) For standard media.Lower Select this setting to print fine, delicate
lines of the highest precision as in a CAD design or drawing. However, the ink absorption characteristics of some media may cause the printing surface to ripple when the ink is absorbed, causing the printhead to scratch the surface of the printout. You should become familiar with the properties of the media and do the setting and limit such printing to media that will not cause rippling. Example: Film, etc.Before you start a print job, check the setting of the printhead height adjustment lever.
Media Thickness Setting
Thick Select this when the media set is thick, or when the printhead scratches the surface.
Important

4-7
Media Configuration Tool Guide Chapter 4 Adding Media Types
6. From the Vacuum Strength list set the Vacuum Strength when printing a media type to be added.The following settings are available for Vacuum Strength.
7. From the Skew Error Detection Standard Values list set the standard which will cause a media slant detection error in the printer.The following settings are available for Skew Error Detection Standard Values.
8. Set the auto cut speed for media to be added from the Cut Speed list.The following settings are available for Cut Speed.
9. Set the amount of media to purge after cutting the media type to be added in the Media Feed Amount After Cutting list.The following setting are available for Media Feed Amount After Cutting.
Standard For media that is a standard thickness and has no problem printing.
Thin Select this when the media set is thin, or when the image is adversely affected.
Vacuum Strength Setting
Strongest For media that does not settle even when set to Strong.
Strong For media that does not settle properly because it curls.
Standard For media that has no problems when printed.
Weak For thin media, or when the image on the media is adversely affected.
Skew Error Detection Standard Values Setting
1 mm, 2 mm, 3 mm, 4 mm, 5 mm
Reduce the value for media used for documents where the precision rate is important and for media where strict detection of slants is required. Increase the value for media that does not slant much and for media that is used for documents that allow for a degree of slant.
Cut Speed Setting
Standard For media that has no problem with cutting.
Fast For media that has problems, such as inaccurate cutting with the Standard setting.
Media Feed Amount After Cutting Setting
No Does not purge media after cutting.
Media Thickness Setting

4-8
Media Configuration Tool Guide Chapter 4 Adding Media Types
10.Click the OK button to close the Media Type Detailed Settings dialog box.The Add Media Type wizard displays.
11.Click the Next button.The Add Media Type moves to display Confirm Addition.
150 mm, 390 mm Sets the media purge amount for media that does not easily fall into place after being auto cut. The purged media is returned to the original position during cutting and continues to print with no change in print starting position.
• Place a checkmark in Normally Print Cutline to Reduce Cut Dust for media that easily produces cut waste, such as backlight film. These settings can protect against a reduction in print quality and printhead malfunction. However, do not set this for media that curls easily, such as plain paper and thin media. The media will not be properly cut, and the media may become jammed.
• Place a checkmark in Cut with Standard Cutter to use the standard cutter for auto cut. Remove the checkmark with media that cannot be cut using the standard cutter.
• When you place a checkmark in Set Printing with Smear Correction Effective as Standard for media with unwanted yellow portions in images, or lines in the printing and changes in the image color balance, the lines may be improved.
• When you place a checkmark in Do Not Cut Until User Operation After Printing for media that you do not want to drop in the basket after printing, the media will not be auto cut after purging. Once the ink has dried, follow the printer operating panel to cut the media.
Media Feed Amount After Cutting Setting
Important

4-9
Media Configuration Tool Guide Chapter 4 Adding Media Types
Check Addition
When you input the detailed information on media types with the Add Media Type: Confirm Addition and click the Next button, the Printer, Driver Details, and the Update Software are displayed. You can make the final check of what is to be added in this window.
1. Check the items to be added that are displayed in the Add Media Type wizard.2. Select Add Media Type from Options.
3. Click the Execute button.Communication with the printer starts and the following dialog box is displayed.
• When adding new media types, select Continues to add new media type from Options.
• When editing the media type, select Continues to change the display order of media types or delete media type from Options.
Do not attempt to print or turn the off while the program is communicating with the printer.
• When the program cannot communicate with the printer, the following warning message is displayed. Read the message and click the OK button again.
• The following error message may be displayed with some data to be updated.When the printer media type has been changed by another user:
Note
Important
Note
4-10
Media Configuration Tool Guide Chapter 4 Adding Media Types
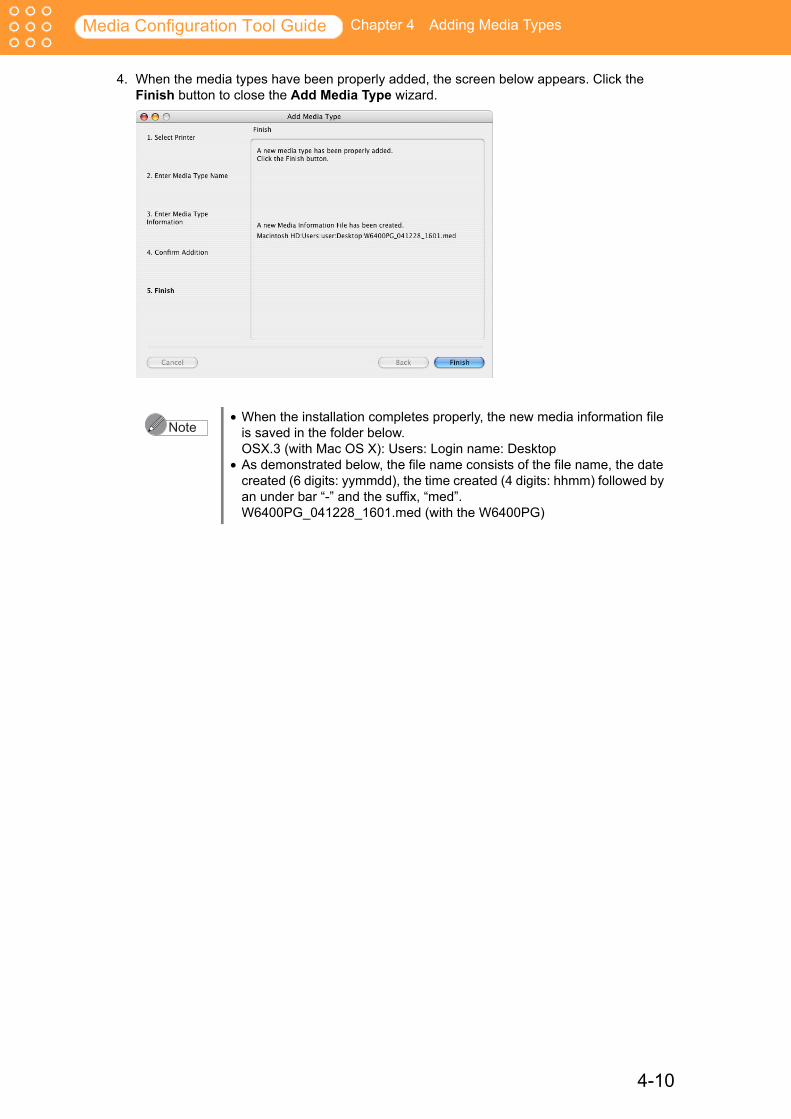
4. When the media types have been properly added, the screen below appears. Click the Finish button to close the Add Media Type wizard.
• When the installation completes properly, the new media information file is saved in the folder below.OSX.3 (with Mac OS X): Users: Login name: Desktop
• As demonstrated below, the file name consists of the file name, the date created (6 digits: yymmdd), the time created (4 digits: hhmm) followed by an under bar “-” and the suffix, “med”.W6400PG_041228_1601.med (with the W6400PG)
Note
5-1
Media Configuration Tool Guide Chapter 5 Editing Media Types
Chapter 5 Editing Media Types
When you click the Edit Media Type button in the Media Configuration Tool main screen, the Edit Media Types wizard starts. Using this wizard you can change the display order or delete media type from the media type used in the printer and printer driver.The explanation below is on how to edit media types.
The procedures to edit the media type in the Edit Media Type wizard are as follows.
1. Select Printer Select “Select Printer to be Edited” (p.5-1)↓
2. Edit Media Type “Edit Media Type” (p.5-2)
Select Printer to be Edited
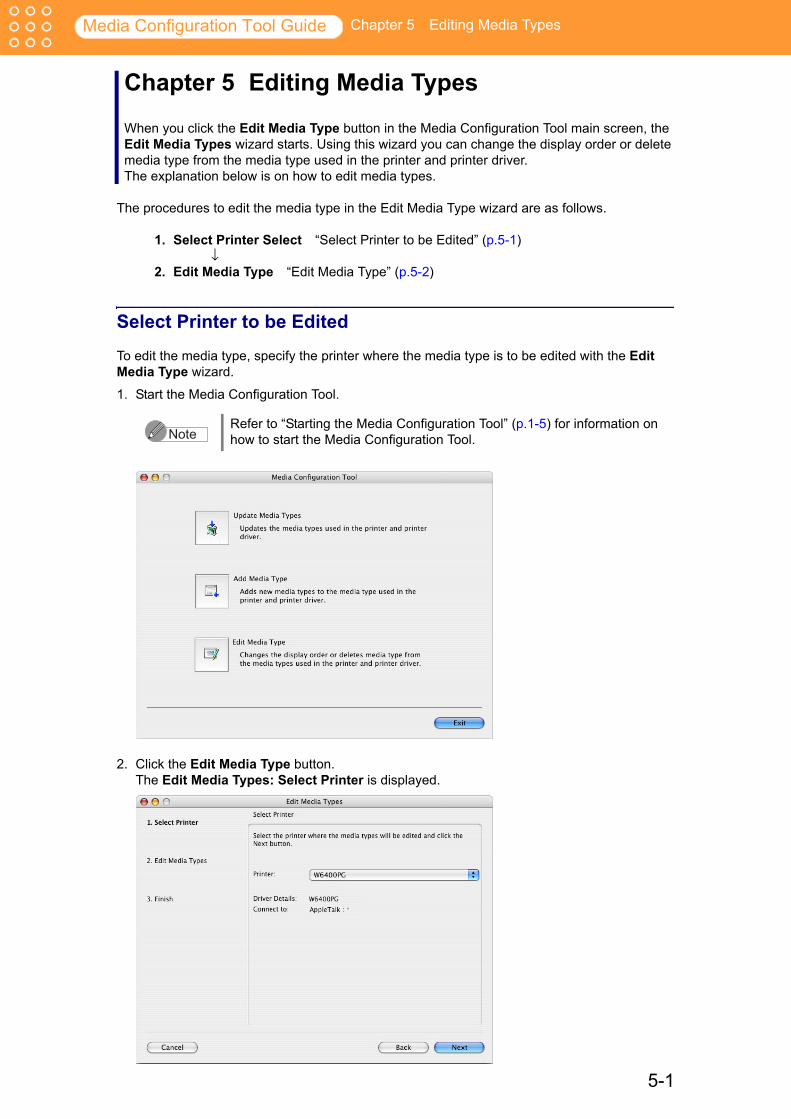
To edit the media type, specify the printer where the media type is to be edited with the Edit Media Type wizard.
1. Start the Media Configuration Tool.
2. Click the Edit Media Type button.The Edit Media Types: Select Printer is displayed.
Refer to “Starting the Media Configuration Tool” (p.1-5) for information on how to start the Media Configuration Tool.Note
5-2
Media Configuration Tool Guide Chapter 5 Editing Media Types
3. Select the printer where the media type is to be edited from the Printer list.4. Click the Next button.
Communication with the printer starts and the following dialog box is displayed.
When the program is done communicating with the printer, the Edit Media Types wizard moves to display Edit Media Types.
Edit Media Type
After you have selected the printer where the media type is to be edited, you can edit the media types displayed on the printer and the printer driver.
Do not attempt to print or turn the off while the program is communicating with the printer.
• When the program cannot communicate with the printer, the following warning message is displayed. Read the message and click the OK button.
• When you do not save the printer driver to be edited, the message Cannot find the printer driver to be edited. is displayed. Press the Cancel button to cancel editing the media type.
Important
Note
5-3
Media Configuration Tool Guide Chapter 5 Editing Media Types
1. Edit the media information in the Edit Media Type wizard.
Changing the Display Order of Media Typesa. From the Media Type list select the media that you would like to change the display order
of, and click the Move the Media Type Up button and Move the Media Type Down button.
Changing the Name of the Media Typesa. From the Media Types list select the media that you would like to change the name of,
and double click.The Enter Media Type Name dialog box is displayed.
b. Input the Name of Media Type Displayed on Printer Driver.c. Input the Name of Media Type Displayed on Printer Operation Panel.
Indicated below are the conditions for inputting media names.
When you edit the media type, the information about the media type overwrites the media type information file. It follows then that the information added for the media is lost. To add and register media, select Add Media Type, confirm the information in the media type details list, then make a memo.
• When you want to move the selected item up, click the Move the Media Type Up button. Each time you press the Move the Media Type Up button the selected item moves one slot up.
• When you want to move the selected item down, click the Move the Media Type Down button. Each time you press the Move the Media Type Down button the selected item moves one slot down.
• You can also Change Display Order by dragging and dropping items on the list.
• You cannot change the display position of Plain Paper.
Name of Media Type Conditions
Input the Name of Media Type Displayed on Printer Driver
You can input up to 32 characters.*You cannot change the standard media (Canon media).
Input the Name of Media Type Displayed on Printer Operation Panel
You can input up to 15 alphabet or numerical characters.*You cannot change the standard media (Canon media).
Important
Note
5-4
Media Configuration Tool Guide Chapter 5 Editing Media Types
Deleting a Media Typea. Place a checkmark in the checkbox of the media you wish to delete in the Media Type
list.
2. Press the Execute button.Communication with the printer starts and the following dialog box is displayed.
• You cannot input “\” (back slash).• You cannot use “-” (hyphen) at the front of the media name.• Only spaces are prohibited from entry into names.• A warning message will be displayed in any of the following
cases:a. When the media selected is the standard media (Canon
media)b. When the media name is not inputc. When the number of character input exceeds the limitd. When a media type of the same name is already savede. When characters input are not correct
• When you place a checkmark in standard media (Canon media), the media name will not be deleted just by turning gray. However, the media name will stop being displayed on the printer driver list.
• You cannot delete Plain Paper from Media Type.
Do not attempt to print or turn the off while the program is communicating with the printer.
• When the program cannot communicate with the printer, the following warning message is displayed. Read the message and click the OK button again.
• The following error message may be displayed with some data to be changed.When the printer media type has been changed by another user:
Important
Important
Important
Note
5-5
Media Configuration Tool Guide Chapter 5 Editing Media Types
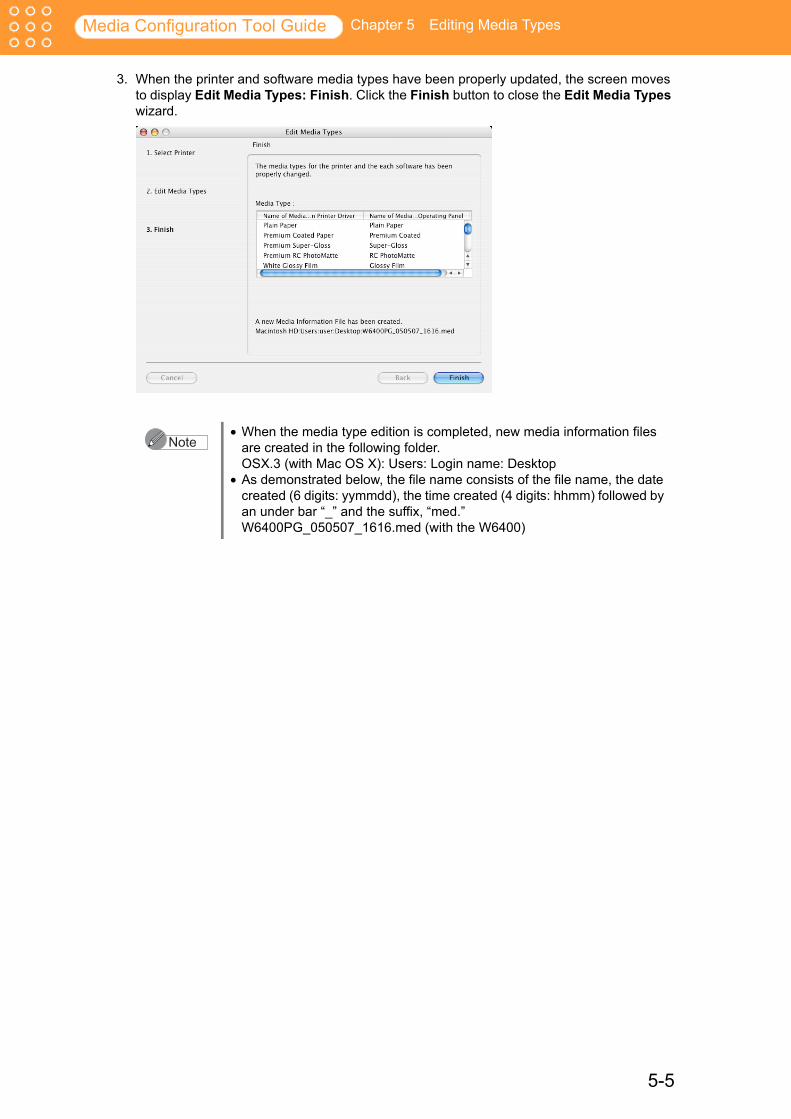
3. When the printer and software media types have been properly updated, the screen moves to display Edit Media Types: Finish. Click the Finish button to close the Edit Media Types wizard.
• When the media type edition is completed, new media information files are created in the following folder.OSX.3 (with Mac OS X): Users: Login name: Desktop
• As demonstrated below, the file name consists of the file name, the date created (6 digits: yymmdd), the time created (4 digits: hhmm) followed by an under bar “_” and the suffix, “med.”W6400PG_050507_1616.med (with the W6400)
Note
Index-1
Media Configuration Tool Guide Index
Index
AAdd Media Type, 2-2, 4-9Add Media Type Button, 2-3Adding Media Types, 4-1
Bbacklight film, 4-8Between Pages, 4-5Between Scans, 4-5
CCancel, 3-4Canon media, 2-2, 5-4CD-ROM drive, 1-1Confirm Addition, 4-8Confirm Update, 3-4Continues to add new media type, 4-9Continues to change the display order of
media types or delete media type, 4-9customer defined media, 2-1Cut Speed, 2-2, 4-7Cut with Standard Cutter, 4-8
DDo Not Cut Until User Operation After
Printing, 4-8download, 3-1Driver Details, 3-4, 4-9Drying Time, 2-2, 4-5
EEdit Media Type, 2-2, 5-2Edit Media Type button, 2-4, 5-1Edit Media Type wizard, 2-4, 4-2, 5-1Editing Media Types, 5-1Enter Media Type Information, 4-4Enter Media Type Name, 4-3Execute button, 3-5, 4-9, 5-4
FFar End Margin, 4-6Finish button, 3-5, 5-5Functions of the Media Configuration
Tool, 2-1
GGARO Printmonitor, 1-1
IInput Media Name, 4-3Installation Procedures, 1-1
Mmedia, 2-1Media Configuration Tool, 1-1, 2-2Media Configuration Tool main screen, 1-5,
2-2, 4-1, 5-1Media Feed Amount After Cutting, 4-7
media information, 2-1Media Information File, 2-1, 2-3, 3-1Media Properties, 2-2, 4-4Media Thickness, 2-2, 4-6Media Type, 4-4Media Type Detailed, 4-8Media Type Detailed dialog box, 4-5Media Type Detailed Settings button, 4-5Media Type Detailed Settings List, 4-4media types, 2-2
NName of Media Type Displayed on Printer
Driver, 4-3, 5-3Name of Media Type Displayed on Printer
Operating Panel, 4-3Name of Media Type Displayed on Printer
Operation Panel, 5-3Name of Media Type Displayed on Remote
UI, 4-3name of the media, 2-2Near End Margin, 4-5Normally Print Cutline to Reduce Cut
Dust, 4-8
OOpen dialog box, 3-2operating environment, 1-1operating panel, 2-1Options, 4-9
PPrinter, 4-9Printer driver, 1-5, 2-1, 4-3printer name, 3-4, 3-5Printer operating panel, 4-3Printhead Height Adjustment Lever Setting
Position, 4-6
RRemote UI, 4-3Roll Paper Margin for Safety, 4-5
SSelect Printer to be Edited, 5-1Select Printer to Update, 3-3Select the Media Information File, 3-1Set Printing with Smear Correction Effective
as Standard, 4-8setting values, 4-4Skew Error Detection Standard Values, 4-7software, 2-1standard cutter, 4-8standard media, 2-2, 4-4, 5-4Starting the Media Configuration Tool, 1-5
UUpdate Media Types, 2-2, 3-1, 3-3

Index-2
Media Configuration Tool Guide Index
Update Media Types Button, 2-3Update Media Types wizard, 2-3, 2-4, 3-1,
3-2, 3-4Updating Media Information Files, 3-1User Software CD-ROM, 1-1
VVacuum Strength, 2-2
Wwarning message, 1-5, 3-4, 3-5, 4-2, 4-9,
5-2, 5-4Web site, 2-1, 2-3Wizard Screen Content, 2-4