imagecast adjudication user guide
TRANSCRIPT

ImageCast® Adjudication User Guide
Version: 5.11-CO::4
May 31, 2019
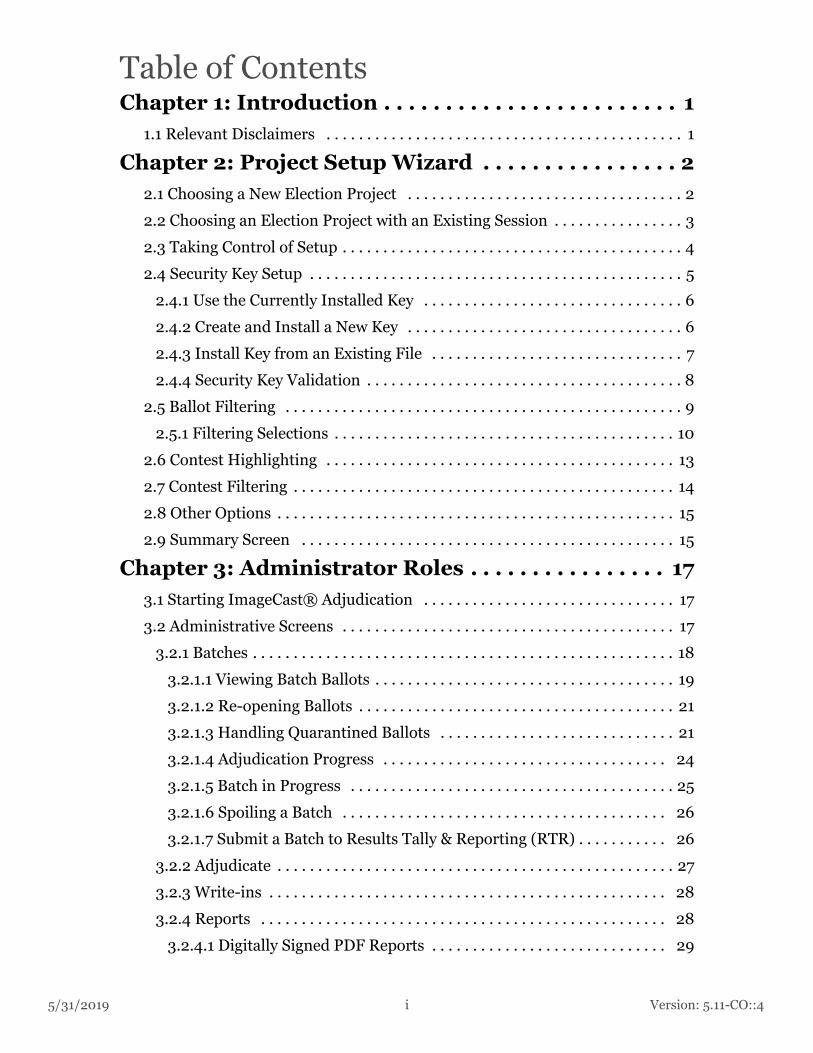
Table of Contents
5/31/2019
Chapter 1: Introduction . . . . . . . . . . . . . . . . . . . . . . . . 11.1 Relevant Disclaimers . . . . . . . . . . . . . . . . . . . . . . . . . . . . . . . . . . . . . . . . . . . . 1
Chapter 2: Project Setup Wizard . . . . . . . . . . . . . . . . 22.1 Choosing a New Election Project . . . . . . . . . . . . . . . . . . . . . . . . . . . . . . . . . . 2
2.2 Choosing an Election Project with an Existing Session . . . . . . . . . . . . . . . . 3
2.3 Taking Control of Setup . . . . . . . . . . . . . . . . . . . . . . . . . . . . . . . . . . . . . . . . . . 4
2.4 Security Key Setup . . . . . . . . . . . . . . . . . . . . . . . . . . . . . . . . . . . . . . . . . . . . . . 5
2.4.1 Use the Currently Installed Key . . . . . . . . . . . . . . . . . . . . . . . . . . . . . . . . 6
2.4.2 Create and Install a New Key . . . . . . . . . . . . . . . . . . . . . . . . . . . . . . . . . . 6
2.4.3 Install Key from an Existing File . . . . . . . . . . . . . . . . . . . . . . . . . . . . . . . 7
2.4.4 Security Key Validation . . . . . . . . . . . . . . . . . . . . . . . . . . . . . . . . . . . . . . . 8
2.5 Ballot Filtering . . . . . . . . . . . . . . . . . . . . . . . . . . . . . . . . . . . . . . . . . . . . . . . . . 9
2.5.1 Filtering Selections . . . . . . . . . . . . . . . . . . . . . . . . . . . . . . . . . . . . . . . . . . 10
2.6 Contest Highlighting . . . . . . . . . . . . . . . . . . . . . . . . . . . . . . . . . . . . . . . . . . . 13
2.7 Contest Filtering . . . . . . . . . . . . . . . . . . . . . . . . . . . . . . . . . . . . . . . . . . . . . . . 14
2.8 Other Options . . . . . . . . . . . . . . . . . . . . . . . . . . . . . . . . . . . . . . . . . . . . . . . . . 15
2.9 Summary Screen . . . . . . . . . . . . . . . . . . . . . . . . . . . . . . . . . . . . . . . . . . . . . . 15
Chapter 3: Administrator Roles . . . . . . . . . . . . . . . . 173.1 Starting ImageCast® Adjudication . . . . . . . . . . . . . . . . . . . . . . . . . . . . . . . 17
3.2 Administrative Screens . . . . . . . . . . . . . . . . . . . . . . . . . . . . . . . . . . . . . . . . . 17
3.2.1 Batches . . . . . . . . . . . . . . . . . . . . . . . . . . . . . . . . . . . . . . . . . . . . . . . . . . . . 18
3.2.1.1 Viewing Batch Ballots . . . . . . . . . . . . . . . . . . . . . . . . . . . . . . . . . . . . . 19
3.2.1.2 Re-opening Ballots . . . . . . . . . . . . . . . . . . . . . . . . . . . . . . . . . . . . . . . 21
3.2.1.3 Handling Quarantined Ballots . . . . . . . . . . . . . . . . . . . . . . . . . . . . . 21
3.2.1.4 Adjudication Progress . . . . . . . . . . . . . . . . . . . . . . . . . . . . . . . . . . . 24
3.2.1.5 Batch in Progress . . . . . . . . . . . . . . . . . . . . . . . . . . . . . . . . . . . . . . . . 25
3.2.1.6 Spoiling a Batch . . . . . . . . . . . . . . . . . . . . . . . . . . . . . . . . . . . . . . . . 26
3.2.1.7 Submit a Batch to Results Tally & Reporting (RTR) . . . . . . . . . . . 26
3.2.2 Adjudicate . . . . . . . . . . . . . . . . . . . . . . . . . . . . . . . . . . . . . . . . . . . . . . . . . 27
3.2.3 Write-ins . . . . . . . . . . . . . . . . . . . . . . . . . . . . . . . . . . . . . . . . . . . . . . . . . 28
3.2.4 Reports . . . . . . . . . . . . . . . . . . . . . . . . . . . . . . . . . . . . . . . . . . . . . . . . . . 28
3.2.4.1 Digitally Signed PDF Reports . . . . . . . . . . . . . . . . . . . . . . . . . . . . . 29
i Version: 5.11-CO::4
5/31/2019
Table of Contents
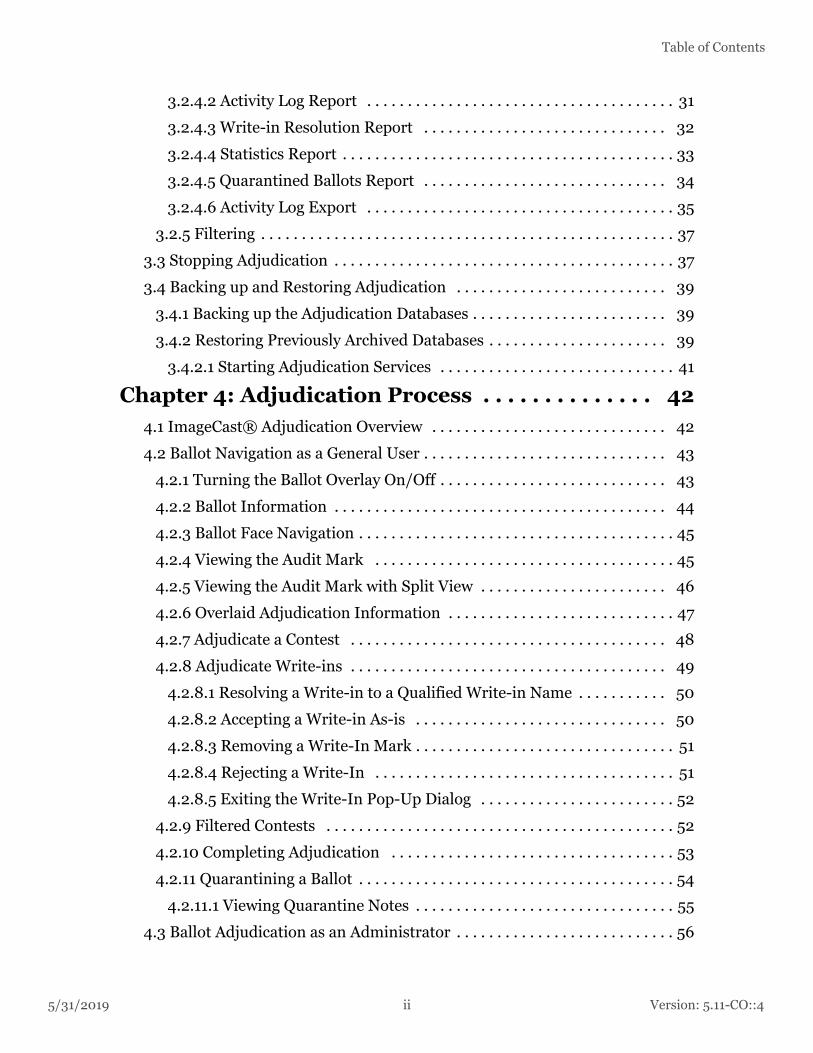
3.2.4.2 Activity Log Report . . . . . . . . . . . . . . . . . . . . . . . . . . . . . . . . . . . . . . 31
3.2.4.3 Write-in Resolution Report . . . . . . . . . . . . . . . . . . . . . . . . . . . . . . 32
3.2.4.4 Statistics Report . . . . . . . . . . . . . . . . . . . . . . . . . . . . . . . . . . . . . . . . . 33
3.2.4.5 Quarantined Ballots Report . . . . . . . . . . . . . . . . . . . . . . . . . . . . . . 34
3.2.4.6 Activity Log Export . . . . . . . . . . . . . . . . . . . . . . . . . . . . . . . . . . . . . . 35
3.2.5 Filtering . . . . . . . . . . . . . . . . . . . . . . . . . . . . . . . . . . . . . . . . . . . . . . . . . . . 37
3.3 Stopping Adjudication . . . . . . . . . . . . . . . . . . . . . . . . . . . . . . . . . . . . . . . . . . 37
3.4 Backing up and Restoring Adjudication . . . . . . . . . . . . . . . . . . . . . . . . . . 39
3.4.1 Backing up the Adjudication Databases . . . . . . . . . . . . . . . . . . . . . . . . 39
3.4.2 Restoring Previously Archived Databases . . . . . . . . . . . . . . . . . . . . . . 39
3.4.2.1 Starting Adjudication Services . . . . . . . . . . . . . . . . . . . . . . . . . . . . . 41
Chapter 4: Adjudication Process . . . . . . . . . . . . . . 424.1 ImageCast® Adjudication Overview . . . . . . . . . . . . . . . . . . . . . . . . . . . . . 42
4.2 Ballot Navigation as a General User . . . . . . . . . . . . . . . . . . . . . . . . . . . . . . 43
4.2.1 Turning the Ballot Overlay On/Off . . . . . . . . . . . . . . . . . . . . . . . . . . . . 43
4.2.2 Ballot Information . . . . . . . . . . . . . . . . . . . . . . . . . . . . . . . . . . . . . . . . . 44
4.2.3 Ballot Face Navigation . . . . . . . . . . . . . . . . . . . . . . . . . . . . . . . . . . . . . . . 45
4.2.4 Viewing the Audit Mark . . . . . . . . . . . . . . . . . . . . . . . . . . . . . . . . . . . . . 45
4.2.5 Viewing the Audit Mark with Split View . . . . . . . . . . . . . . . . . . . . . . . 46
4.2.6 Overlaid Adjudication Information . . . . . . . . . . . . . . . . . . . . . . . . . . . . 47
4.2.7 Adjudicate a Contest . . . . . . . . . . . . . . . . . . . . . . . . . . . . . . . . . . . . . . . 48
4.2.8 Adjudicate Write-ins . . . . . . . . . . . . . . . . . . . . . . . . . . . . . . . . . . . . . . . 49
4.2.8.1 Resolving a Write-in to a Qualified Write-in Name . . . . . . . . . . . 50
4.2.8.2 Accepting a Write-in As-is . . . . . . . . . . . . . . . . . . . . . . . . . . . . . . . 50
4.2.8.3 Removing a Write-In Mark . . . . . . . . . . . . . . . . . . . . . . . . . . . . . . . . 51
4.2.8.4 Rejecting a Write-In . . . . . . . . . . . . . . . . . . . . . . . . . . . . . . . . . . . . . 51
4.2.8.5 Exiting the Write-In Pop-Up Dialog . . . . . . . . . . . . . . . . . . . . . . . . 52
4.2.9 Filtered Contests . . . . . . . . . . . . . . . . . . . . . . . . . . . . . . . . . . . . . . . . . . . 52
4.2.10 Completing Adjudication . . . . . . . . . . . . . . . . . . . . . . . . . . . . . . . . . . . 53
4.2.11 Quarantining a Ballot . . . . . . . . . . . . . . . . . . . . . . . . . . . . . . . . . . . . . . . 54
4.2.11.1 Viewing Quarantine Notes . . . . . . . . . . . . . . . . . . . . . . . . . . . . . . . . 55
4.3 Ballot Adjudication as an Administrator . . . . . . . . . . . . . . . . . . . . . . . . . . . 56
ii Version: 5.11-CO::4
ImageCast® Adjudication User Guide
Version: 5.
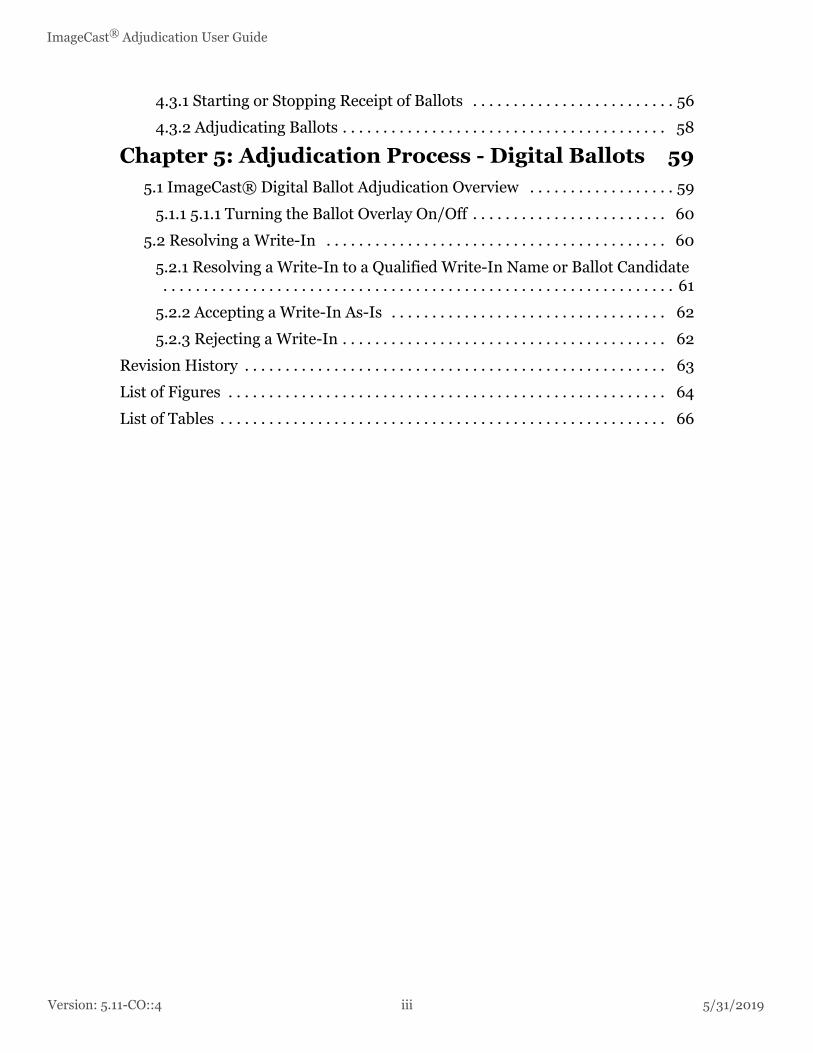
4.3.1 Starting or Stopping Receipt of Ballots . . . . . . . . . . . . . . . . . . . . . . . . . 56
4.3.2 Adjudicating Ballots . . . . . . . . . . . . . . . . . . . . . . . . . . . . . . . . . . . . . . . . 58
Chapter 5: Adjudication Process - Digital Ballots 595.1 ImageCast® Digital Ballot Adjudication Overview . . . . . . . . . . . . . . . . . . 59
5.1.1 5.1.1 Turning the Ballot Overlay On/Off . . . . . . . . . . . . . . . . . . . . . . . . 60
5.2 Resolving a Write-In . . . . . . . . . . . . . . . . . . . . . . . . . . . . . . . . . . . . . . . . . . 60
5.2.1 Resolving a Write-In to a Qualified Write-In Name or Ballot Candidate . . . . . . . . . . . . . . . . . . . . . . . . . . . . . . . . . . . . . . . . . . . . . . . . . . . . . . . . . . . . . . . 61
5.2.2 Accepting a Write-In As-Is . . . . . . . . . . . . . . . . . . . . . . . . . . . . . . . . . . 62
5.2.3 Rejecting a Write-In . . . . . . . . . . . . . . . . . . . . . . . . . . . . . . . . . . . . . . . . 62
Revision History . . . . . . . . . . . . . . . . . . . . . . . . . . . . . . . . . . . . . . . . . . . . . . . . . . . . 63
List of Figures . . . . . . . . . . . . . . . . . . . . . . . . . . . . . . . . . . . . . . . . . . . . . . . . . . . . . . 64
List of Tables . . . . . . . . . . . . . . . . . . . . . . . . . . . . . . . . . . . . . . . . . . . . . . . . . . . . . . . 66
11-CO::4 iii 5/31/2019
5/31/2019 1 Version: 5.11-CO::4
Chapter 1 - Introduction
CHAPTER 1: INTRODUCTION
ImageCast® Adjudication is a client and server application used to review and
adjudicate vote results from ImageCast® tabulators. The application uses tabulator result files and scanned images to allow election administrators to make adjudications to ballots with auditing and reporting capabilities.
ImageCast® Adjudication examines such voter exceptions as overvotes, undervotes, blank contests, blank ballots, write-in selections, and marginal marks.
The application works in two basic modes: election project setup and adjudication. Standard adjudication users only have the ability to adjudicate ballots; while adjudication administrator users have additional capabilities, such as viewing configuration settings and generating reports.
The application supports all ImageCast® tabulators and can be used in a multi-
client environment. ImageCast® Adjudication eliminates the need to physically rescan ballots, which can potentially damage the originals and cause chain-of-custody concerns.
1.1 Relevant Disclaimers
This document may make reference to certain Democracy Suite functionalities that are not part of the current 5.11 campaign and should be disregarded throughout the document.
For a full list of relevant disclaimers, please see the “Relevant Disclaimers” section
in the 2.02 - Democracy Suite® System Overview Document.
Version: 5.
ImageCast® Adjudication User Guide
CHAPTER 2: PROJECT SETUP WIZARD
The ImageCast® Adjudication Project Setup Wizard is the application’s default state once it is installed.
While in this state adjudication administrators can:
• Choose the election project to adjudicate.
• Configure adjudication options, such as ballot and contest filtering.
• Start adjudication on the selected election.
Note that regular, non-administrator users will not see the Setup Wizard. Instead, they are taken to the main adjudication screen, to wait for an administrator to start adjudication.
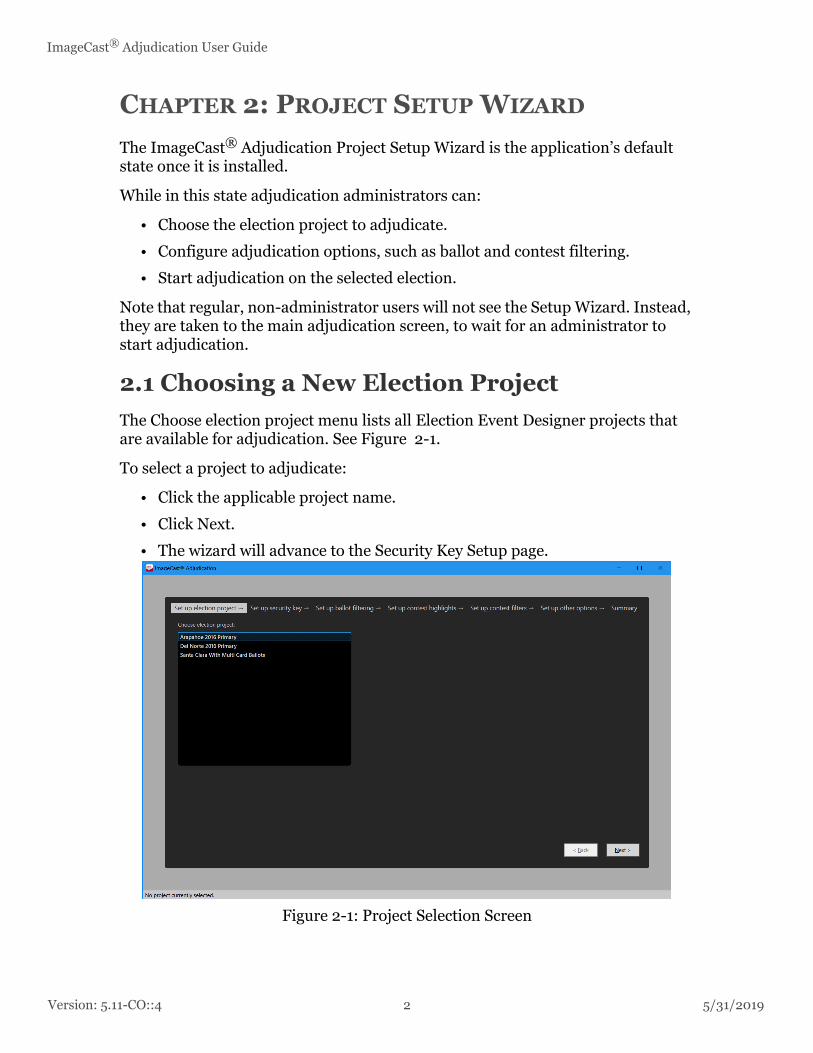
2.1 Choosing a New Election Project
The Choose election project menu lists all Election Event Designer projects that are available for adjudication. See Figure 2-1.
To select a project to adjudicate:
• Click the applicable project name.
• Click Next.
• The wizard will advance to the Security Key Setup page.
Figure 2-1: Project Selection Screen
11-CO::4 2 5/31/2019
5/31/2019
Chapter 2 - Project Setup Wizard
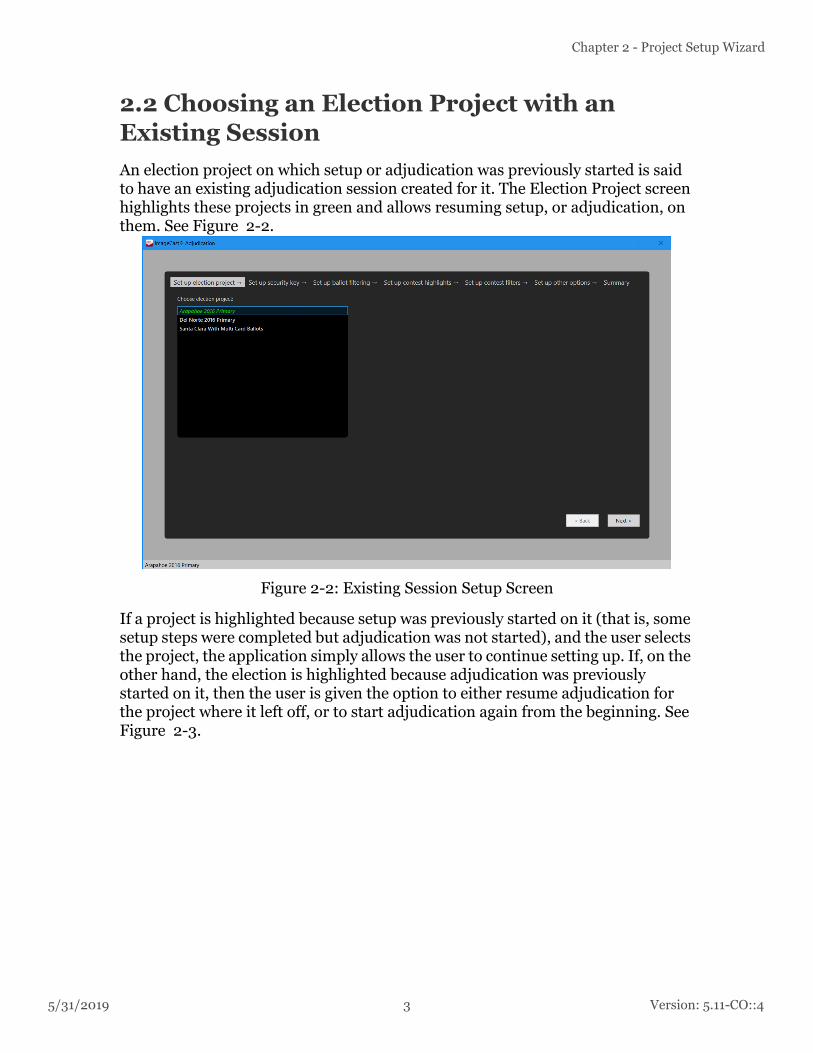
2.2 Choosing an Election Project with an Existing Session
An election project on which setup or adjudication was previously started is said to have an existing adjudication session created for it. The Election Project screen highlights these projects in green and allows resuming setup, or adjudication, on them. See Figure 2-2.
Figure 2-2: Existing Session Setup Screen
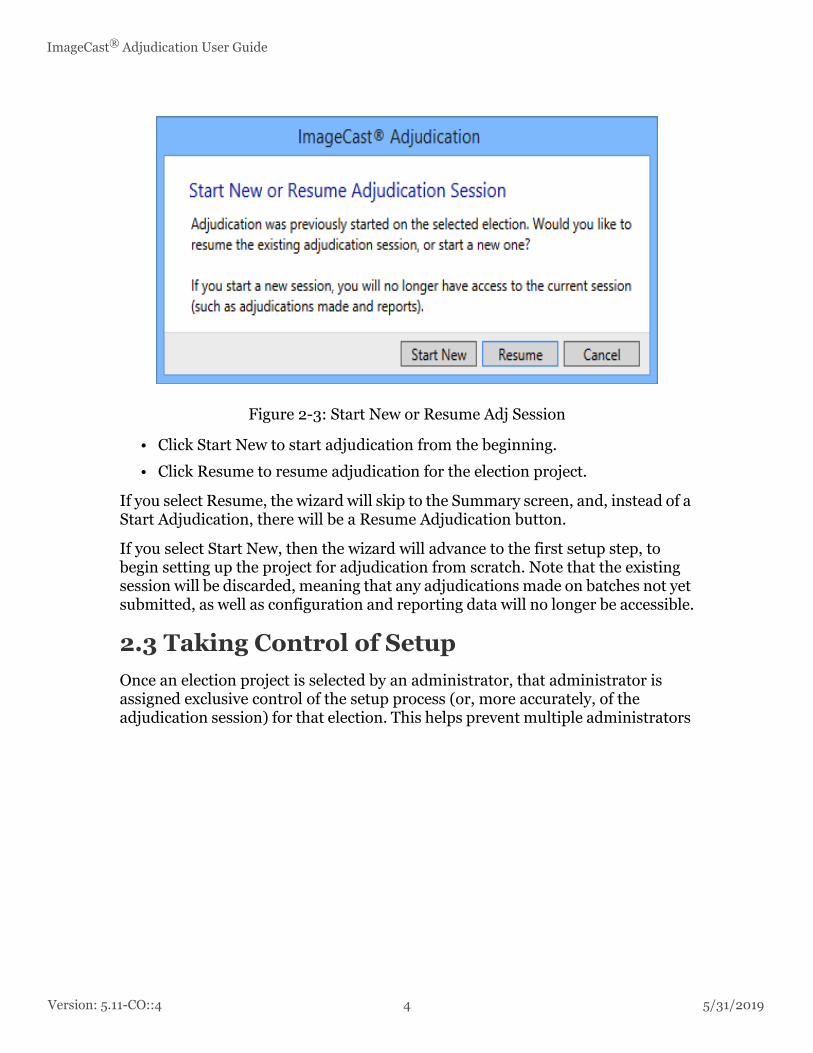
If a project is highlighted because setup was previously started on it (that is, some setup steps were completed but adjudication was not started), and the user selects the project, the application simply allows the user to continue setting up. If, on the other hand, the election is highlighted because adjudication was previously started on it, then the user is given the option to either resume adjudication for the project where it left off, or to start adjudication again from the beginning. See Figure 2-3.
3 Version: 5.11-CO::4
Version: 5.
ImageCast® Adjudication User Guide
Figure 2-3: Start New or Resume Adj Session
• Click Start New to start adjudication from the beginning.
• Click Resume to resume adjudication for the election project.
If you select Resume, the wizard will skip to the Summary screen, and, instead of a Start Adjudication, there will be a Resume Adjudication button.
If you select Start New, then the wizard will advance to the first setup step, to begin setting up the project for adjudication from scratch. Note that the existing session will be discarded, meaning that any adjudications made on batches not yet submitted, as well as configuration and reporting data will no longer be accessible.
2.3 Taking Control of Setup
Once an election project is selected by an administrator, that administrator is assigned exclusive control of the setup process (or, more accurately, of the adjudication session) for that election. This helps prevent multiple administrators
11-CO::4 4 5/31/2019
5/31/2019
Chapter 2 - Project Setup Wizard
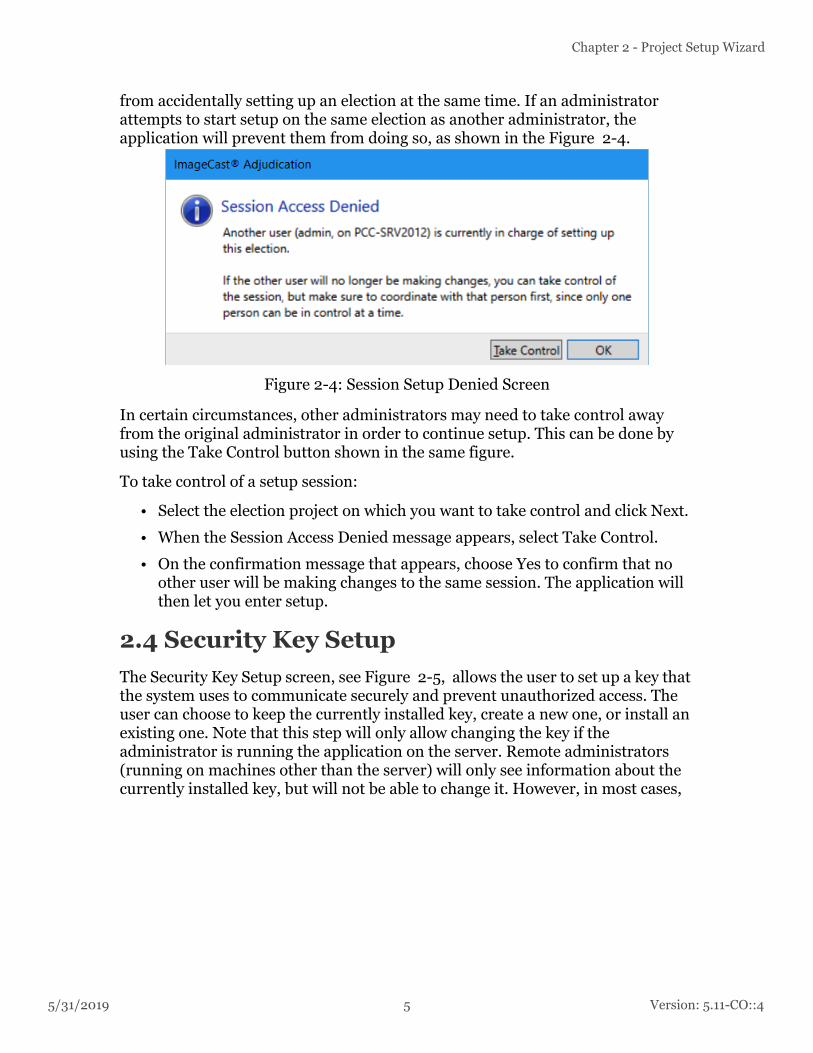
from accidentally setting up an election at the same time. If an administrator attempts to start setup on the same election as another administrator, the application will prevent them from doing so, as shown in the Figure 2-4.
Figure 2-4: Session Setup Denied Screen
In certain circumstances, other administrators may need to take control away from the original administrator in order to continue setup. This can be done by using the Take Control button shown in the same figure.
To take control of a setup session:
• Select the election project on which you want to take control and click Next.
• When the Session Access Denied message appears, select Take Control.
• On the confirmation message that appears, choose Yes to confirm that no other user will be making changes to the same session. The application will then let you enter setup.
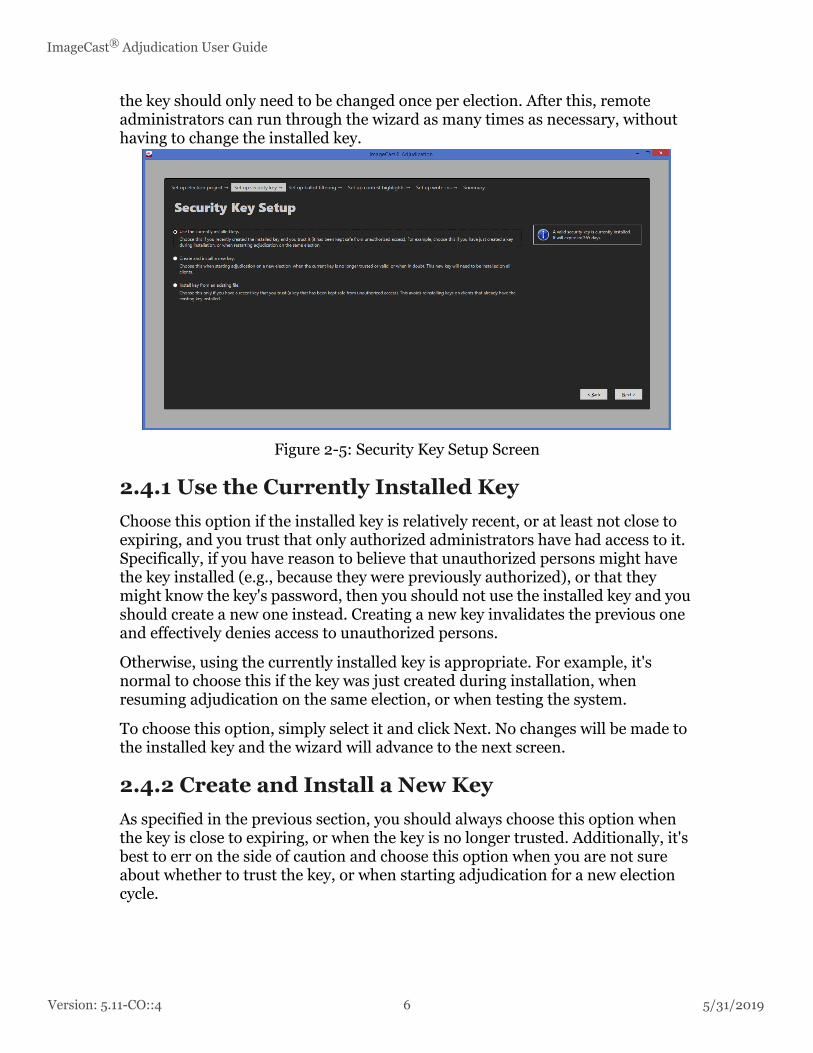
2.4 Security Key Setup
The Security Key Setup screen, see Figure 2-5, allows the user to set up a key that the system uses to communicate securely and prevent unauthorized access. The user can choose to keep the currently installed key, create a new one, or install an existing one. Note that this step will only allow changing the key if the administrator is running the application on the server. Remote administrators (running on machines other than the server) will only see information about the currently installed key, but will not be able to change it. However, in most cases,
5 Version: 5.11-CO::4
Version: 5.
ImageCast® Adjudication User Guide
the key should only need to be changed once per election. After this, remote administrators can run through the wizard as many times as necessary, without having to change the installed key.
Figure 2-5: Security Key Setup Screen
2.4.1 Use the Currently Installed Key
Choose this option if the installed key is relatively recent, or at least not close to expiring, and you trust that only authorized administrators have had access to it. Specifically, if you have reason to believe that unauthorized persons might have the key installed (e.g., because they were previously authorized), or that they might know the key's password, then you should not use the installed key and you should create a new one instead. Creating a new key invalidates the previous one and effectively denies access to unauthorized persons.
Otherwise, using the currently installed key is appropriate. For example, it's normal to choose this if the key was just created during installation, when resuming adjudication on the same election, or when testing the system.
To choose this option, simply select it and click Next. No changes will be made to the installed key and the wizard will advance to the next screen.
2.4.2 Create and Install a New Key
As specified in the previous section, you should always choose this option when the key is close to expiring, or when the key is no longer trusted. Additionally, it's best to err on the side of caution and choose this option when you are not sure about whether to trust the key, or when starting adjudication for a new election cycle.
11-CO::4 6 5/31/2019
5/31/2019
Chapter 2 - Project Setup Wizard
When a new key is created, it needs to be installed on all adjudication machines. After changing the key on the server, opening the application on other machines will automatically show the option to install the new key (see section Security Key Validation.
To create and install a new key:
1. Click Install Key after selecting Create and install a new key.
2. Click Yes in the User Account Control prompt that will be shown. The Security Key Installation window appears.
3. Specify where to save the new key by either clicking Save As or by manually entering a file path. It's recommended to save the key file to a removable USB drive that can then be used to install the key on remote client machines, as well as for subsequent safe keeping.
4. Enter a new password for the key and confirm it. Then click Install.
5. A confirmation message stating Key Installation Successful appears. After clicking OK, the application will shut down.
6. Restart the machine.
2.4.3 Install Key from an Existing File
This option is mainly intended for special cases where a previously created key may need to be installed. For example, you would choose this if a new key was mistakenly installed and you need to revert to the previous key (thus avoiding reinstalling the key on all clients that have the previous key installed).
Again, as specified in previous sections, this option should only be chosen if the key to be installed is recent and it's trusted.
1. Click Install Key after selecting Install key from an existing file.
2. Click Yes in the User Account Control prompt that will be shown. The Security Key Installation window appears.
3. Specify the location of the existing key file by either clicking Browse or by manually entering the file path.
4. Enter the key's password, then click Install.
5. A confirmation message stating Key Installation Successful appears. After clicking OK, the application will shut down.
6. Restart the machine.
7 Version: 5.11-CO::4
Version: 5.
ImageCast® Adjudication User Guide
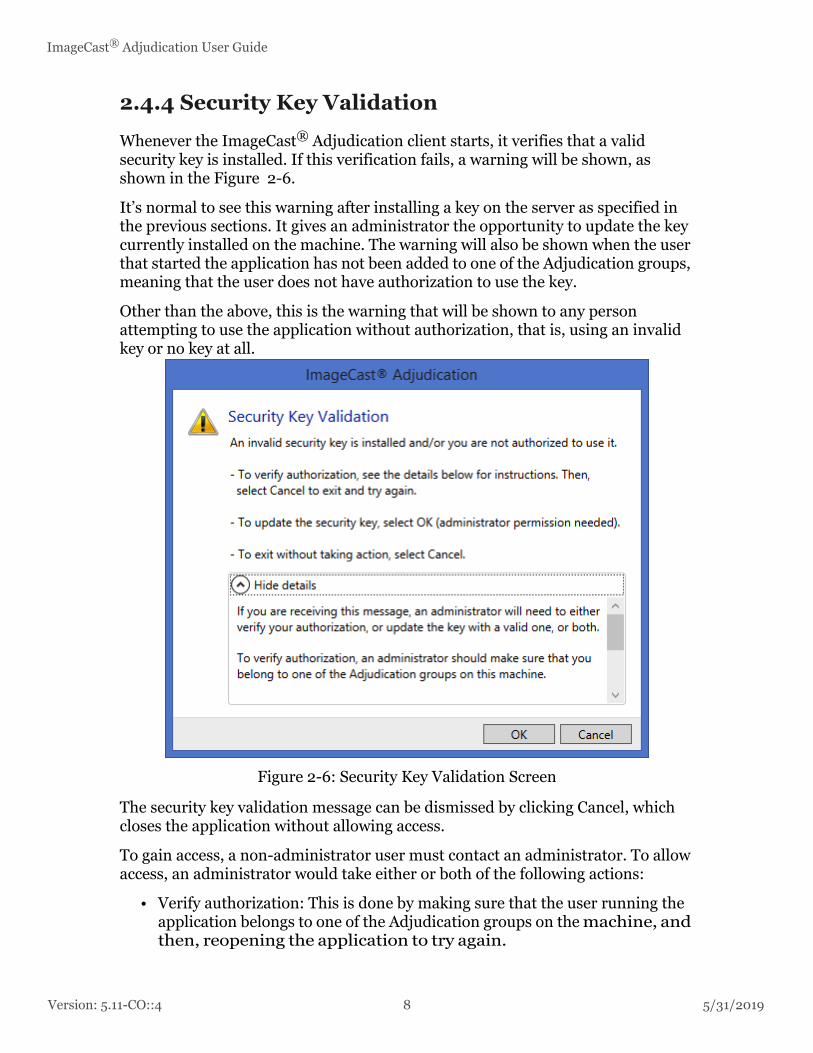
2.4.4 Security Key Validation
Whenever the ImageCast® Adjudication client starts, it verifies that a valid security key is installed. If this verification fails, a warning will be shown, as shown in the Figure 2-6.
It’s normal to see this warning after installing a key on the server as specified in the previous sections. It gives an administrator the opportunity to update the key currently installed on the machine. The warning will also be shown when the user that started the application has not been added to one of the Adjudication groups, meaning that the user does not have authorization to use the key.
Other than the above, this is the warning that will be shown to any person attempting to use the application without authorization, that is, using an invalid key or no key at all.
Figure 2-6: Security Key Validation Screen
The security key validation message can be dismissed by clicking Cancel, which closes the application without allowing access.
To gain access, a non-administrator user must contact an administrator. To allow access, an administrator would take either or both of the following actions:
• Verify authorization: This is done by making sure that the user running the application belongs to one of the Adjudication groups on the machine, and then, reopening the application to try again.
11-CO::4 8 5/31/2019
5/31/2019
Chapter 2 - Project Setup Wizard
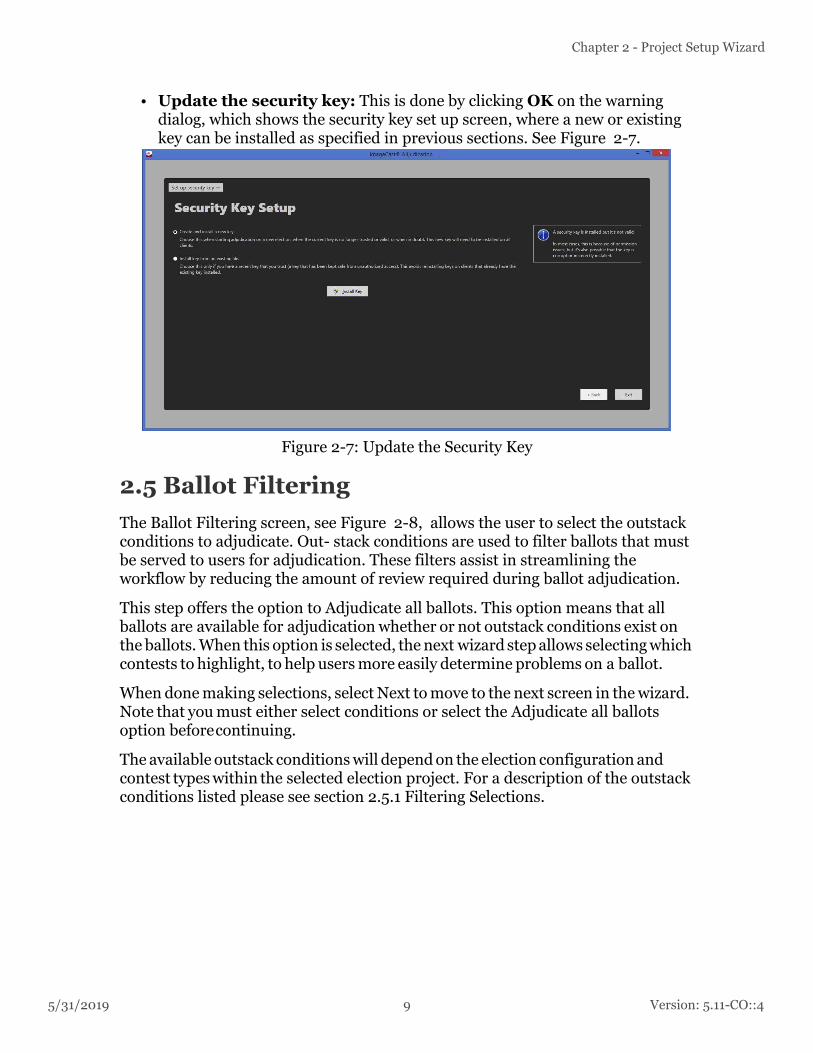
• Update the security key: This is done by clicking OK on the warning dialog, which shows the security key set up screen, where a new or existing key can be installed as specified in previous sections. See Figure 2-7.
Figure 2-7: Update the Security Key
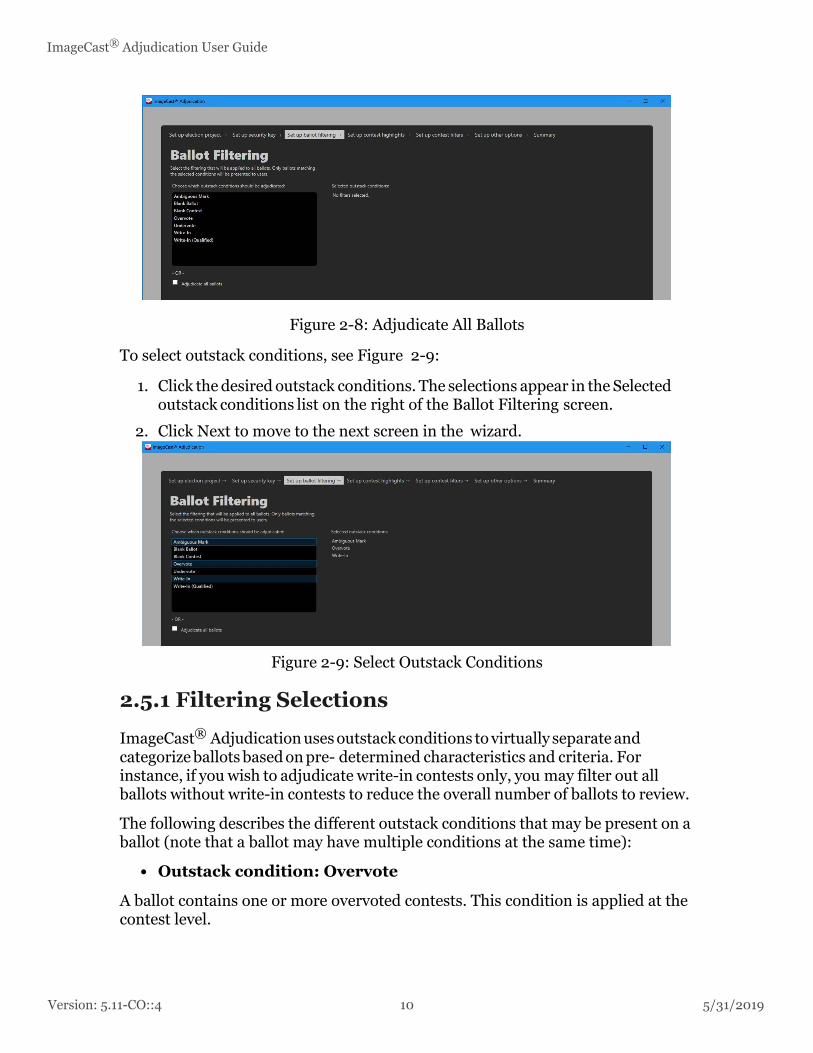
2.5 Ballot Filtering
The Ballot Filtering screen, see Figure 2-8, allows the user to select the outstack conditions to adjudicate. Out- stack conditions are used to filter ballots that must be served to users for adjudication. These filters assist in streamlining the workflow by reducing the amount of review required during ballot adjudication.
This step offers the option to Adjudicate all ballots. This option means that all ballots are available for adjudication whether or not outstack conditions exist on the ballots. When this option is selected, the next wizard step allows selecting which contests to highlight, to help users more easily determine problems on a ballot.
When done making selections, select Next to move to the next screen in the wizard. Note that you must either select conditions or select the Adjudicate all ballots option before continuing.
The available outstack conditions will depend on the election configuration and contest types within the selected election project. For a description of the outstack conditions listed please see section 2.5.1 Filtering Selections.
9 Version: 5.11-CO::4
Version: 5.
ImageCast® Adjudication User Guide
Figure 2-8: Adjudicate All Ballots
To select outstack conditions, see Figure 2-9:
1. Click the desired outstack conditions. The selections appear in the Selected outstack conditions list on the right of the Ballot Filtering screen.
2. Click Next to move to the next screen in the wizard.
Figure 2-9: Select Outstack Conditions
2.5.1 Filtering Selections
ImageCast® Adjudication uses outstack conditions to virtually separate and categorize ballots based on pre- determined characteristics and criteria. For instance, if you wish to adjudicate write-in contests only, you may filter out all ballots without write-in contests to reduce the overall number of ballots to review.
The following describes the different outstack conditions that may be present on a ballot (note that a ballot may have multiple conditions at the same time):
• Outstack condition: Overvote
A ballot contains one or more overvoted contests. This condition is applied at the contest level.
11-CO::4 10 5/31/2019

5/31/2019
Chapter 2 - Project Setup Wizard
• Outstack condition: Undervote
A ballot contains one or more undervoted contests. This condition is applied at the contest level.
• Outstack condition: Write-in
A ballot contains one or more contests with write-in marks. This condition is applied at the contest level.
• Outstack condition: Write-in (Qualified)
A ballot contains one or more contests with qualified write-ins and write-in marks. This condition is applied at the contest level.
• Outstack condition: Blank ballot
A ballot contains no valid votes. A ballot containing one or more marginal marks may qualify for this condition. This condition is applied at the ballot level.
• Outstack condition: Blank contest
A ballot contains one or more contests where no votes were detected. If a contest contains only marginal marks, this condition will exist. This condition is applied at the contest level.
• Outstack condition: Marginal mark
A ballot contains one or more choices that were detected as marginal marks. This condition is applied at the contest level.
The following outstack conditions may occur when a ranked-choice vote (RCV) contest is defined in the election project. Each is applied at the contest level.
• Outstack condition: Duplicate ranking
A ballot contains an RCV contest where a candidate is marked in more than one ranking.
• Outstack condition: Inconsistent ordering
A ballot contains an RCV contest where a candidate is ranked both above and below another candidate.
• Outstack condition: Overvoted rank
A ballot contains an RCV contest where a ranking has been overvoted.
• Outstack condition: Skipped ranking
A ballot contains an RCV contest where a ranking was skipped.
• Outstack condition: Unvoted contest
A ballot contains an RCV contest that is not voted.
11 Version: 5.11-CO::4
Version: 5.
ImageCast® Adjudication User Guide
• Outstack condition: Unused ranking
A ballot contains an RCV contest with an unused ranking at the end of the contest.
Additional outstack conditions may occur depending on the election project configuration and the types of contests defined in the election:
• Outstack condition: Crossover
A cross-over rule violation was detected on the ballot. This occurs when the voter votes in mutually- exclusive contests, for example, voting in different partisan contests on an open primary ballot. This condition is applied at the ballot level.
• Outstack condition: ’No Preference’ choice overridden
In jurisdictions that include a ’No Preference’ choice this condition indicates that a vote for ’No Preference’ was overridden because it would result in an overvote. This condition is applied at the contest level
• Outstack condition: Overridden by write-in
A vote for a regular candidate was overridden by a vote for a write-in candidate to prevent an overvote in jurisdictions where this rule applies. This condition is applied at the contest level.
• Outstack condition: Party preference
A party preference rule violation was detected on the ballot. This occurs when the voter votes for one party in a party preference contest and then votes for a candidate in a different party. This condition is applied at the ballot level.
• Outstack condition: Removed cross-endorsed mark
A ballot contains a contest where the voter voted twice for a candidate affiliated with multiple parties. Only the top mark is counted. This condition is applied at the contest level.
• Outstack condition: Strict Inclusive overvote
A ballot contains a contest where an overvote occurred through the combination of explicit votes and implicit votes from a straight-party contest. This condition is applied at the contest level.
• Outstack condition: Strict vote for
In jurisdictions with contests where the voter is required to vote for a particular number of candi- dates, this condition indicates a contest where the voter marked a number of candidates different than the contest ”vote for”. This condition is applied at the contest level.
11-CO::4 12 5/31/2019
5/31/2019
Chapter 2 - Project Setup Wizard
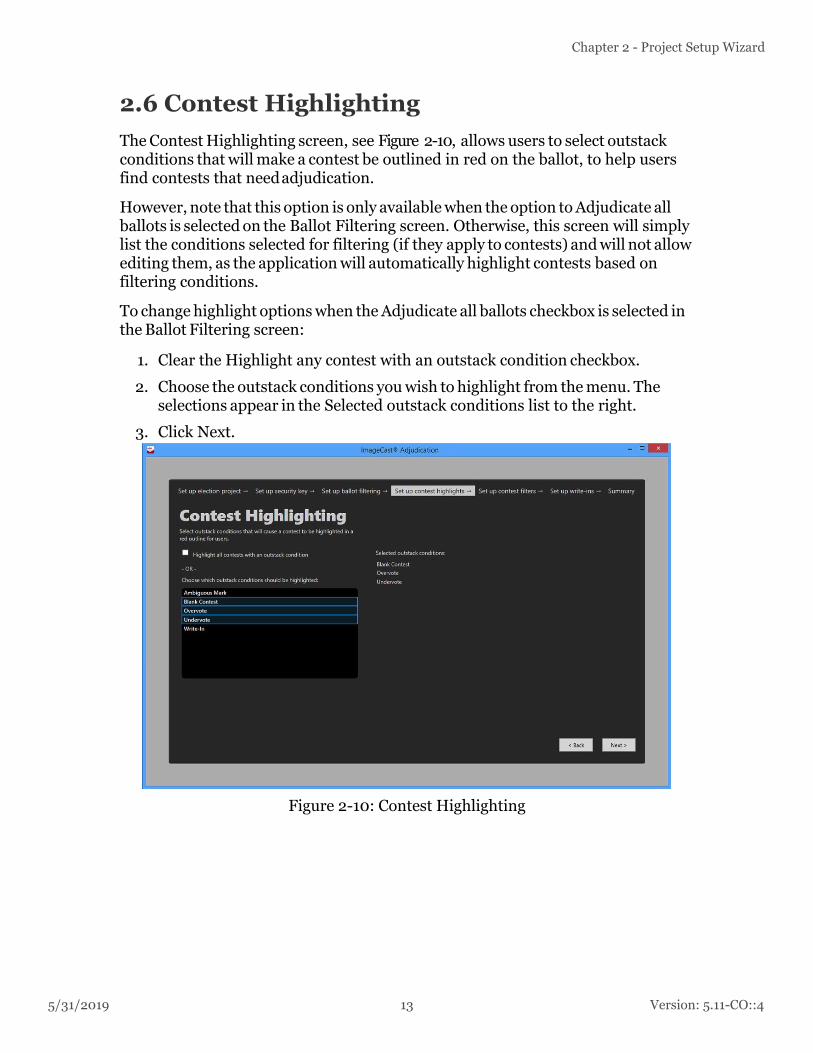
2.6 Contest Highlighting
The Contest Highlighting screen, see Figure 2-10, allows users to select outstack conditions that will make a contest be outlined in red on the ballot, to help users find contests that need adjudication.
However, note that this option is only available when the option to Adjudicate all ballots is selected on the Ballot Filtering screen. Otherwise, this screen will simply list the conditions selected for filtering (if they apply to contests) and will not allow editing them, as the application will automatically highlight contests based on filtering conditions.
To change highlight options when the Adjudicate all ballots checkbox is selected in the Ballot Filtering screen:
1. Clear the Highlight any contest with an outstack condition checkbox.
2. Choose the outstack conditions you wish to highlight from the menu. The selections appear in the Selected outstack conditions list to the right.
3. Click Next.
Figure 2-10: Contest Highlighting
13 Version: 5.11-CO::4

Version: 5.
ImageCast® Adjudication User Guide
2.7 Contest Filtering
The Contest Filtering screen, see Figure 2-11, allows users to select specific contests to be adjudicated. This option is specifically for recount situations where the focus is only on individual contests. Only ballots with the selected contest(s) will be shown in adjudication and only the selected contest(s) will be allowed to be adjudicated.
If the user chose to adjudicate all ballots in the Ballot Filtering step, all ballots that contain the selected contest(s) will be available. If the user selected one or more outstack conditions in that step, only ballots where the selected contest(s) have the selected outstack conditions will be available for adjudication.
By default, all contests are selected to be adjudicated. To select specific contests:
1. Clear the Adjudicate all contests check box.
2. Select one or more contests. Selected contests appear in the Selected contests list on the right of the Contest Filtering screen.
3. Click Next to move to the next screen in the wizard
Figure 2-11: Contest Filtering
Re-selecting the Adjudicate all contests check box will again select all contests to be adjudicated.
11-CO::4 14 5/31/2019
5/31/2019
Chapter 2 - Project Setup Wizard
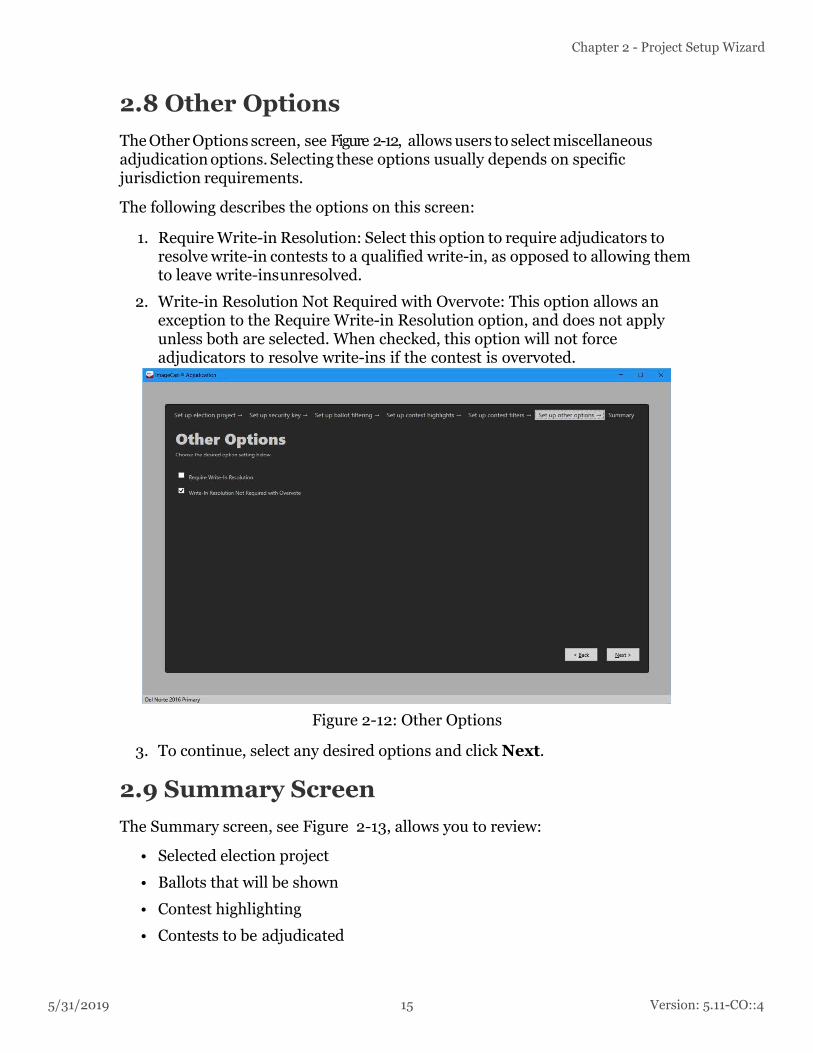
2.8 Other Options
The Other Options screen, see Figure 2-12, allows users to select miscellaneous adjudication options. Selecting these options usually depends on specific jurisdiction requirements.
The following describes the options on this screen:
1. Require Write-in Resolution: Select this option to require adjudicators to resolve write-in contests to a qualified write-in, as opposed to allowing them to leave write-ins unresolved.
2. Write-in Resolution Not Required with Overvote: This option allows an exception to the Require Write-in Resolution option, and does not apply unless both are selected. When checked, this option will not force adjudicators to resolve write-ins if the contest is overvoted.
Figure 2-12: Other Options
3. To continue, select any desired options and click Next.
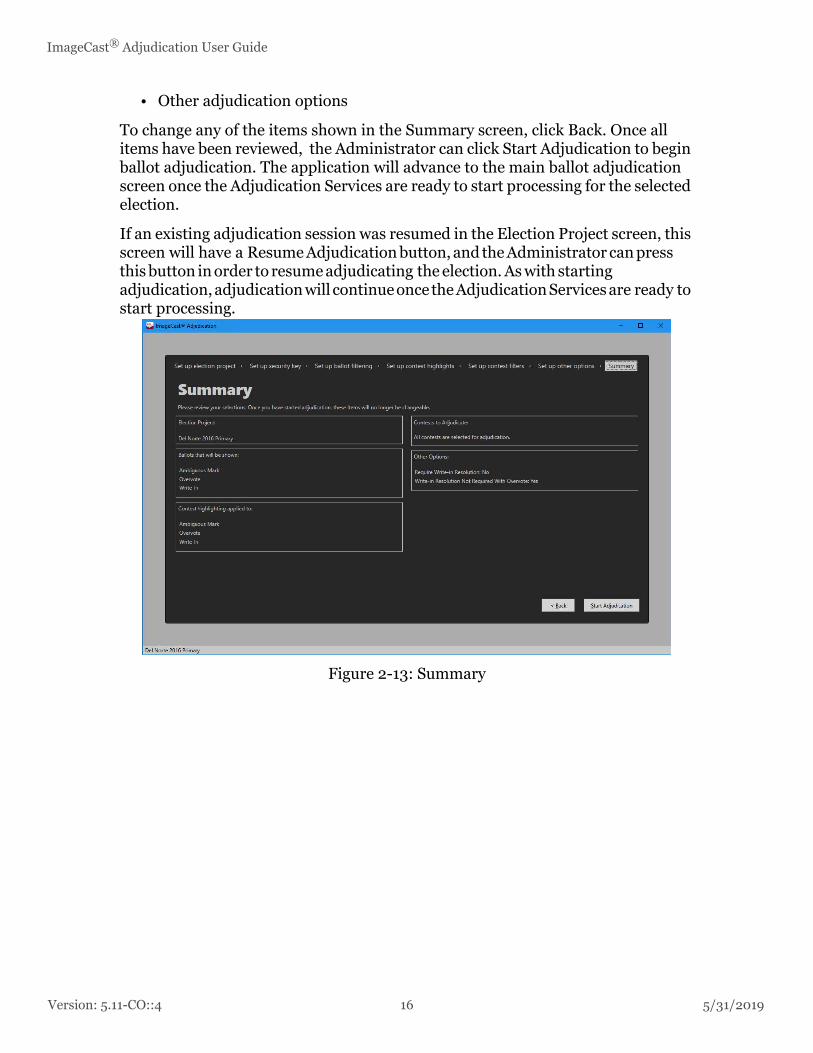
2.9 Summary Screen
The Summary screen, see Figure 2-13, allows you to review:
• Selected election project
• Ballots that will be shown
• Contest highlighting
• Contests to be adjudicated
15 Version: 5.11-CO::4
Version: 5.
ImageCast® Adjudication User Guide
• Other adjudication options
To change any of the items shown in the Summary screen, click Back. Once all items have been reviewed, the Administrator can click Start Adjudication to begin ballot adjudication. The application will advance to the main ballot adjudication screen once the Adjudication Services are ready to start processing for the selected election.
If an existing adjudication session was resumed in the Election Project screen, this screen will have a Resume Adjudication button, and the Administrator can press this button in order to resume adjudicating the election. As with starting adjudication, adjudication will continue once the Adjudication Services are ready to start processing.
Figure 2-13: Summary
11-CO::4 16 5/31/2019
5/31/2019
Chapter 3 - Administrator Roles
CHAPTER 3: ADMINISTRATOR ROLES
The Adjudication system distinguishes between general Adjudication Users, which can only adjudicate ballots, and Adjudication Administrators, which have access to the Project Setup Wizard, and to manage- ment operations, such as reporting, re-opening of ballots, and the ability to start and stop adjudication. This chapter will describe the administrative functions that are available after running through the setup wizard.
3.1 Starting ImageCast® Adjudication
To start Adjudication the administrator clicks Start Adjudication in the Summary screen of the Project Setup Wizard. For more information see section 2.9, Summary Screen.
Once adjudication is started, the Adjudication services request results from the Democracy Suite Election Management System (EMS), which are typically loaded through Results Tally and Reporting (RTR). The Adjudication services read cast vote records from tabulator batches and transfers them into the Adjudication system.
After starting adjudication the Administrator cannot make changes to what was selected in the setup wizard. If changes must be made adjudication needs to be stopped, which brings the administrator back to the setup wizard so they can setup the project again and start adjudication anew. Note that when doing this, any ballots that were adjudicated in the previous session will retain the appended audit mark.
Ballots will begin to be served to adjudicators soon after adjudication is started. If no ballots are served, use RTR to ensure that loaded batches are in an ’Initial’ or ’Validated’ state and check the DVS Adjudication and EMS System event logs for errors. For more information, see the Troubleshooting section in the Democracy Suite Adjudication System Operation Procedures document.
3.2 Administrative Screens
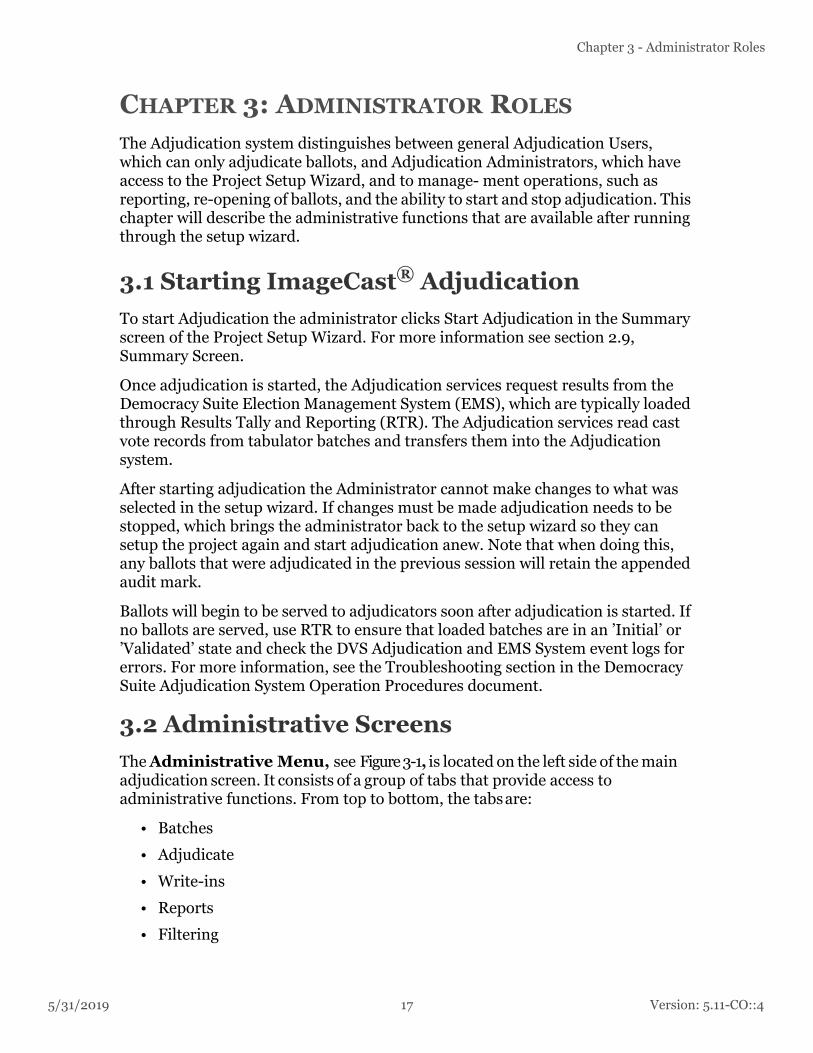
The Administrative Menu, see Figure3-1, is located on the left side of the main adjudication screen. It consists of a group of tabs that provide access to administrative functions. From top to bottom, the tabs are:
• Batches
• Adjudicate
• Write-ins
• Reports
• Filtering
17 Version: 5.11-CO::4
Version: 5.
ImageCast® Adjudication User Guide
Figure 3-1: Administrative Menu
These screens will be discussed in further detail next.
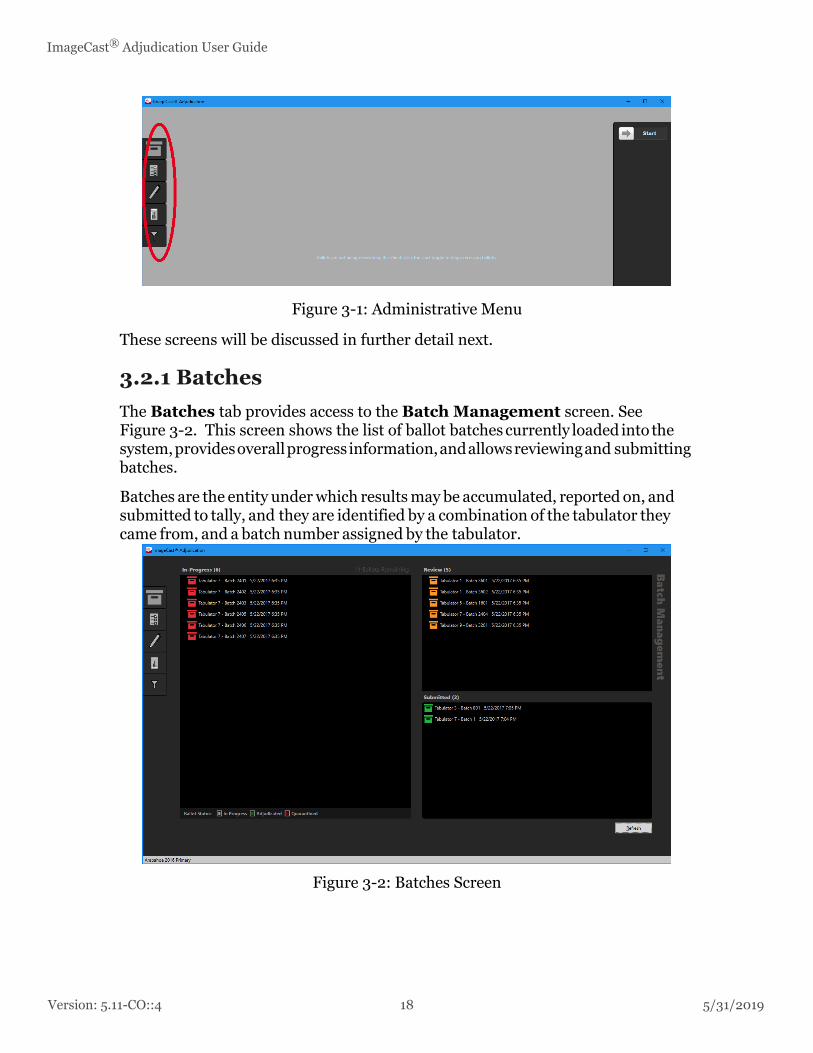
3.2.1 Batches
The Batches tab provides access to the Batch Management screen. See Figure 3-2. This screen shows the list of ballot batches currently loaded into the system, provides overall progress information, and allows reviewing and submitting batches.
Batches are the entity under which results may be accumulated, reported on, and submitted to tally, and they are identified by a combination of the tabulator they came from, and a batch number assigned by the tabulator.
Figure 3-2: Batches Screen
11-CO::4 18 5/31/2019
5/31/2019
Chapter 3 - Administrator Roles
Batches move through the panes in the Batch Management screen as they are processed. The following are the different states that a batch moves through in the Adjudication system:
• In-Progress
• Read Error
• Review
• Pending Submission
• Submitted
• Submission Error
In-Progress batches are batches that have been acquired by the system and have ballots being served to clients. If errors occur while loading ballots for a batch into the system, the batch will be marked as being in Read Error.
When a batch is completed, that is, all its ballots have been adjudicated, its status changes to Review. Additionally, if ballot filters were setup in a way that causes no ballots in a batch to require adjudication, the batch will automatically move over to Review as well. A batch in review is available to be re-opened and adjudicated, and for reporting and submission for tallying.
After a batch is submitted (see section 3.2.1.5), the batch status changes temporarily to Pending Submission while the system processes the submission. When the system confirms that a batch has been successfully sent to tally, its status changes to Submitted. However, if submission is unsuccessful, the status changes to Submission Error.
Batches that are in progress or in read error are shown in the In-Progress pane. The Review pane shows batches that are completed or that could not be submitted due to an error, while the Submitted pane shows batches pending submission and batches successfully submitted.
3.2.1.1 Viewing Batch Ballots
Batches in the In-Progress and Review panes can be expanded to show ballots in statuses of interest to an administrator. See Figure 3-3.
The In-Progress pane shows ballots that are currently being adjudicated (in progress), ballots already adjudicated, and ballots marked as quarantined, while the Review pane shows only ballots that are adjudicated (since batches in this pane are completed).
Hovering over a ballot displays a tool-tip with details about the ballot, such as the most recent modification. Except for in-progress ballots, double-clicking on a ballot opens it for review. See later sections for more on reviewing (reopening) ballots.
19 Version: 5.11-CO::4

Version: 5.
ImageCast® Adjudication User Guide
Ballots can be filtered on by using the status filter at the bottom of the In-Progress pane. Clicking on each box allows the user to hide or show the ballots with the corresponding status. This is helpful when an administrator needs to look for ballots in specific statuses, e.g., when reviewing quarantined ballots.
Figure 3-3: Expanded Batches with Ballots
The In-Progress and Review panes also include information about adjudicated ballots with unresolved write-ins. A ballot with unresolved write-ins is flagged with a 'w' in a red circle in the upper right corner of its green box icon. See Figure 3-4. Similarly, a batch that contains such ballots is also flagged with a 'w' in the upper right corner of its icon. If you hover over the icon for a batch that is flagged for unresolved write-ins, a tool-tip is displayed, giving the number of ballots in the batch with unresolved write-ins.
Figure 3-4: Ballots and Batches with Unresolved Write-Ins
11-CO::4 20 5/31/2019
5/31/2019
Chapter 3 - Administrator Roles
3.2.1.2 Re-opening Ballots
Re-opening a ballot consists of double-clicking an adjudicated or quarantined ballot in the Batch Management screen. When this is done, the ballot is displayed in the Adjudication screen, which allows working with the ballot in the same way as is done during normal adjudication.
Note that if another ballot was already displayed in the Adjudication screen, the administrator will be given the option to save or discard changes on that ballot, or to cancel reopening and keep the previous ballot.
After reopening a ballot, the administrator can re-adjudicate it if desired, or change its quarantine status (see subsequent sections for more on this). Additionally, the administrator may simply decide to view the ballot without changing anything. For example, the administrator can go back to the Batch Management screen and reopen a different ballot without having to do anything on the previously reopened ballot.
To reopen a ballot for review or for readjudication:
1. In the In-Progress pane or Review pane, click the arrow to the left of the batch.
2. Double-click the ballot that requires review or readjudication.
3. Review or readjudicate the ballot.
4. When done, click to Overwrite to save changes, or Revert to discard any changes made.
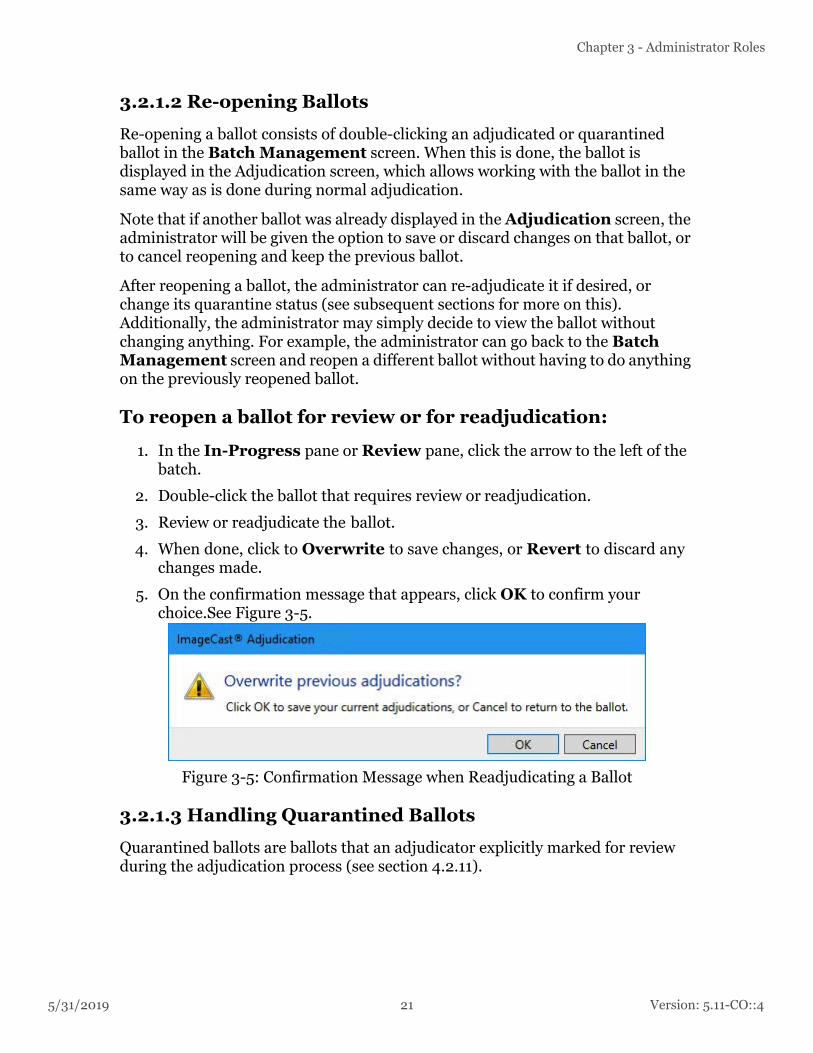
5. On the confirmation message that appears, click OK to confirm your choice.See Figure 3-5.
Figure 3-5: Confirmation Message when Readjudicating a Ballot
3.2.1.3 Handling Quarantined Ballots
Quarantined ballots are ballots that an adjudicator explicitly marked for review during the adjudication process (see section 4.2.11).
21 Version: 5.11-CO::4

Version: 5.
ImageCast® Adjudication User Guide
After reopening a quarantined ballot, an administrator should review the ballot and the quarantine notes added by the adjudicator. Then, the administrator should either adjudicate the ballot, or unquarantine it, so that an adjudicator can subsequently adjudicate it. See Figure 3-6.
Figure 3-6: Quarantined Ballot in Batch Management
To review a quarantined ballot:
1. In the In-Progress pane, click the arrow to the left of a batch.
2. Double-click a quarantined ballot to re-open it.
11-CO::4 22 5/31/2019
5/31/2019
Chapter 3 - Administrator Roles
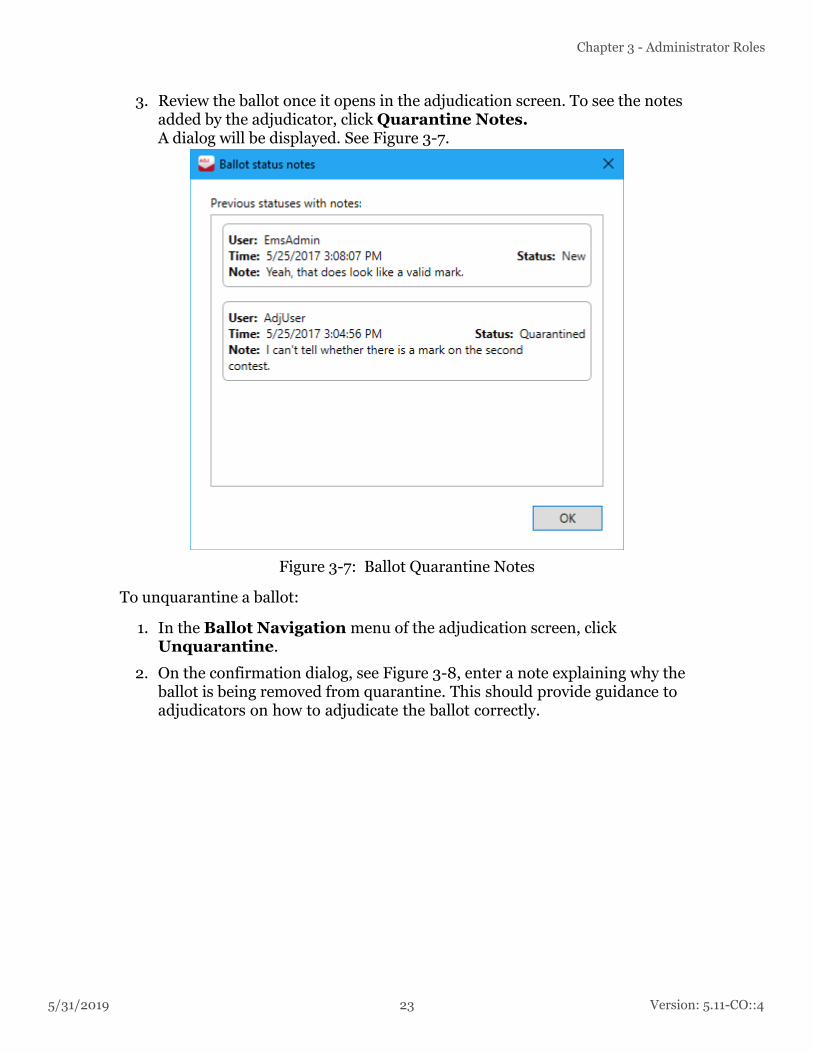
3. Review the ballot once it opens in the adjudication screen. To see the notes added by the adjudicator, click Quarantine Notes. A dialog will be displayed. See Figure 3-7.
Figure 3-7: Ballot Quarantine Notes
To unquarantine a ballot:
1. In the Ballot Navigation menu of the adjudication screen, click Unquarantine.
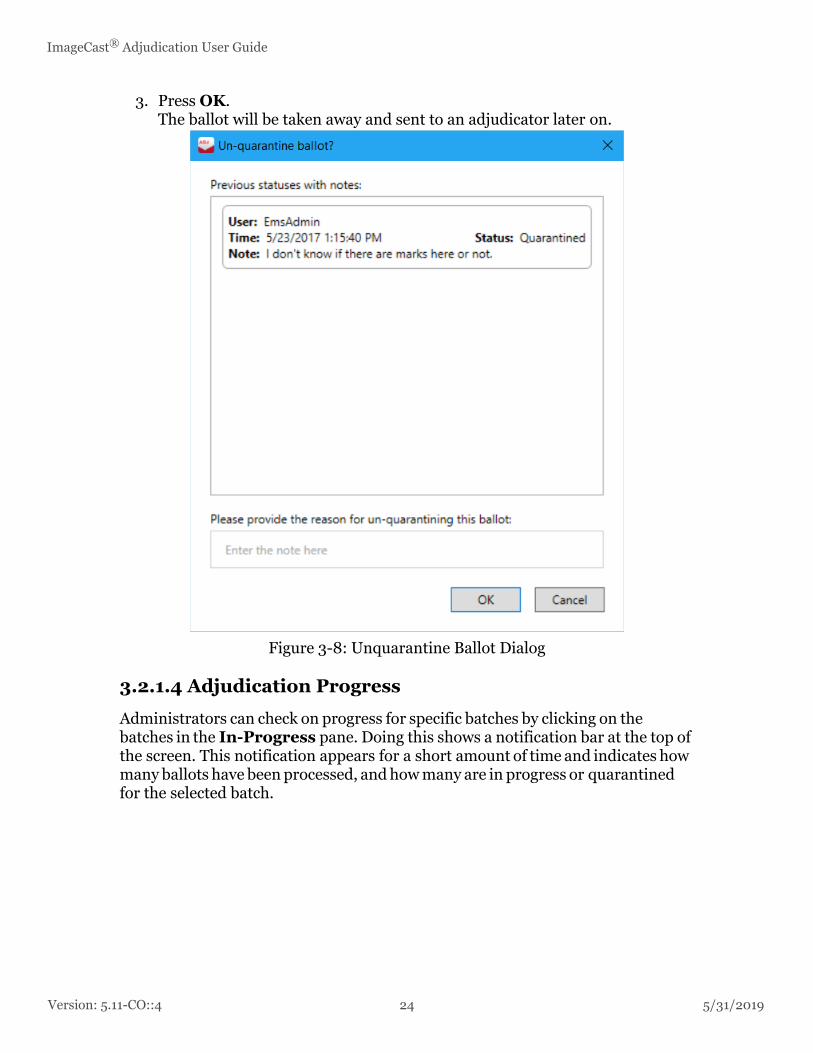
2. On the confirmation dialog, see Figure 3-8, enter a note explaining why the ballot is being removed from quarantine. This should provide guidance to adjudicators on how to adjudicate the ballot correctly.
23 Version: 5.11-CO::4
Version: 5.
ImageCast® Adjudication User Guide
3. Press OK. The ballot will be taken away and sent to an adjudicator later on.
Figure 3-8: Unquarantine Ballot Dialog
3.2.1.4 Adjudication Progress
Administrators can check on progress for specific batches by clicking on the batches in the In-Progress pane. Doing this shows a notification bar at the top of the screen. This notification appears for a short amount of time and indicates how many ballots have been processed, and how many are in progress or quarantined for the selected batch.
11-CO::4 24 5/31/2019

5/31/2019
Chapter 3 - Administrator Roles
At the top of the screen there is a Ballots Remaining counter. See Figure 3-9. This counter displays how many ballots are left to adjudicate based on the filtering options selected and batches loaded. This number will update as batches are loaded and ballots are adjudicated. The Refresh button in the lower right corner can be used to ensure that the current batch status and Ballots Remaining counter is current.
Figure 3-9: Batch Progress
3.2.1.5 Batch in Progress
In some instances, a batch may remain in the In-Progress state when it seems as if all ballots for the batch have been adjudicated. This indicates that one or more ballots within the batch have not been served.
To ensure all ballots in a batch are served to adjudicators:
1. Confirm that the ballot is not open in any clients, including administrator clients (it’s easy to miss an open ballot if the client is on an administrative screen such as Batch Management).
2. In the In-Progress pane, highlight the batch that has not processed.
25 Version: 5.11-CO::4
Version: 5.
ImageCast® Adjudication User Guide
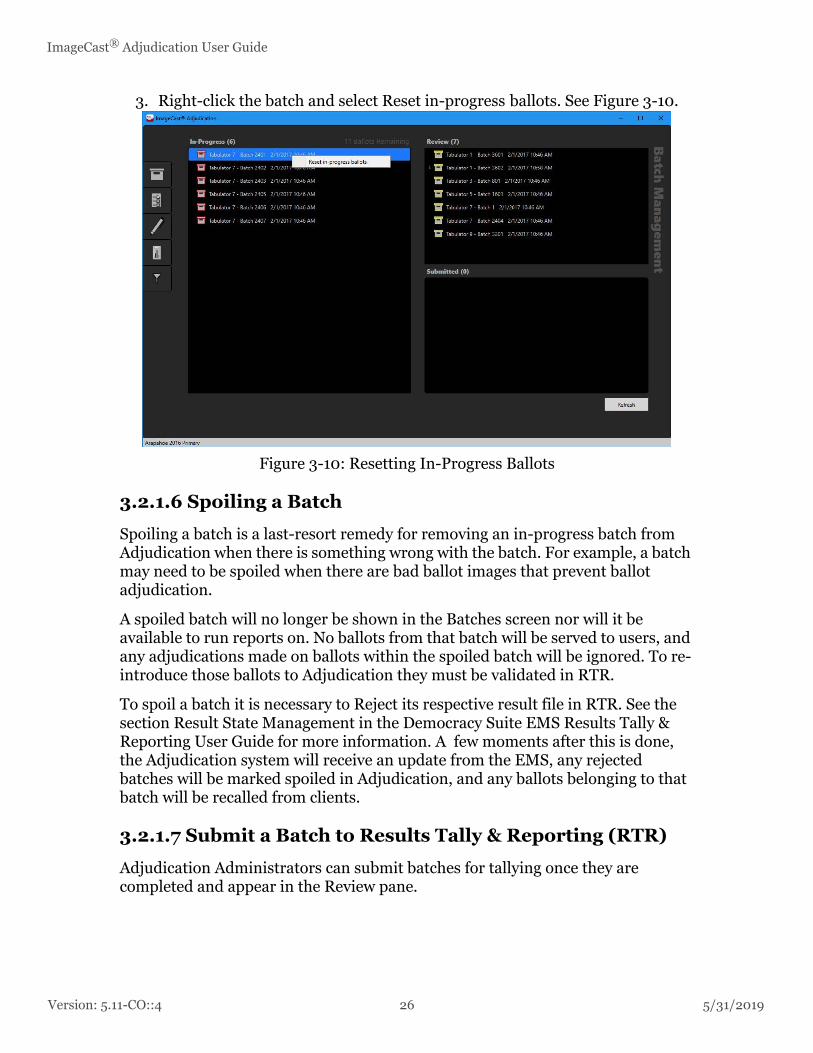
3. Right-click the batch and select Reset in-progress ballots. See Figure 3-10.
Figure 3-10: Resetting In-Progress Ballots
3.2.1.6 Spoiling a Batch
Spoiling a batch is a last-resort remedy for removing an in-progress batch from Adjudication when there is something wrong with the batch. For example, a batch may need to be spoiled when there are bad ballot images that prevent ballot adjudication.
A spoiled batch will no longer be shown in the Batches screen nor will it be available to run reports on. No ballots from that batch will be served to users, and any adjudications made on ballots within the spoiled batch will be ignored. To re-introduce those ballots to Adjudication they must be validated in RTR.
To spoil a batch it is necessary to Reject its respective result file in RTR. See the section Result State Management in the Democracy Suite EMS Results Tally & Reporting User Guide for more information. A few moments after this is done, the Adjudication system will receive an update from the EMS, any rejected batches will be marked spoiled in Adjudication, and any ballots belonging to that batch will be recalled from clients.
3.2.1.7 Submit a Batch to Results Tally & Reporting (RTR)
Adjudication Administrators can submit batches for tallying once they are completed and appear in the Review pane.
11-CO::4 26 5/31/2019
5/31/2019
Chapter 3 - Administrator Roles
NOTE: Before submitting batches, make sure other administrators know about, and agree on, the batches to submit. This ensures that no other administrators attempt to submit the same batches at the same time, preventing errors.
Additionally, you should make sure that no ballots from the batches to be submitted are being reviewed. Any work on ballots being reviewed will be lost if the batch they belong to is submitted before the ballot is saved (a warning will be logged by the services whenever this occurs).
To submit a batch to RTR:
1. In the Review pane, select one or more batches. You can use the Shift and Ctrl keys as you click to select multiple batches. Additionally, you can use Ctrl-A to select all batches.
2. Drag the selected batches to the Submitted pane.
3. The batches will appear as pending until the system confirms that they have been successfully submitted. Once this is done, cast vote records for all adjudicated ballots in the submitted batches will be updated and will appear as synchronized in RTR.
If an error occurs while the system processes a submitted batch, the batch will move back to the Review pane with an error status. In addition, there are circumstances where a batch may remain in the pending state indefinitely (in the Submitted pane).
In such cases, an administrator should check for errors on the server. After doing that and resolving any issues, batches may be resubmitted, as follows.
To resubmit a batch that is pending:
1. Make sure to Refresh beforehand to ensure the correct status is being shown for the batch.
2. In the Submitted pane, select the affected batch.
3. Right-click the batch and select Resubmit.
To resubmit a batch that has a submission error:
1. In the Review pane, select the affected batch.
2. Drag the selected batch to the Submitted pane.
3.2.2 Adjudicate
All clients will receive a set of ballots to adjudicate based on the filtering options set by the administrator during project setup. Ballots are automatically served to each client, including Adjudication Administrators (although they have the option to stop receiving ballots). To review the adjudication process, please see chapter 4, Adjudication Process.
27 Version: 5.11-CO::4
Version: 5.
ImageCast® Adjudication User Guide
3.2.3 Write-ins
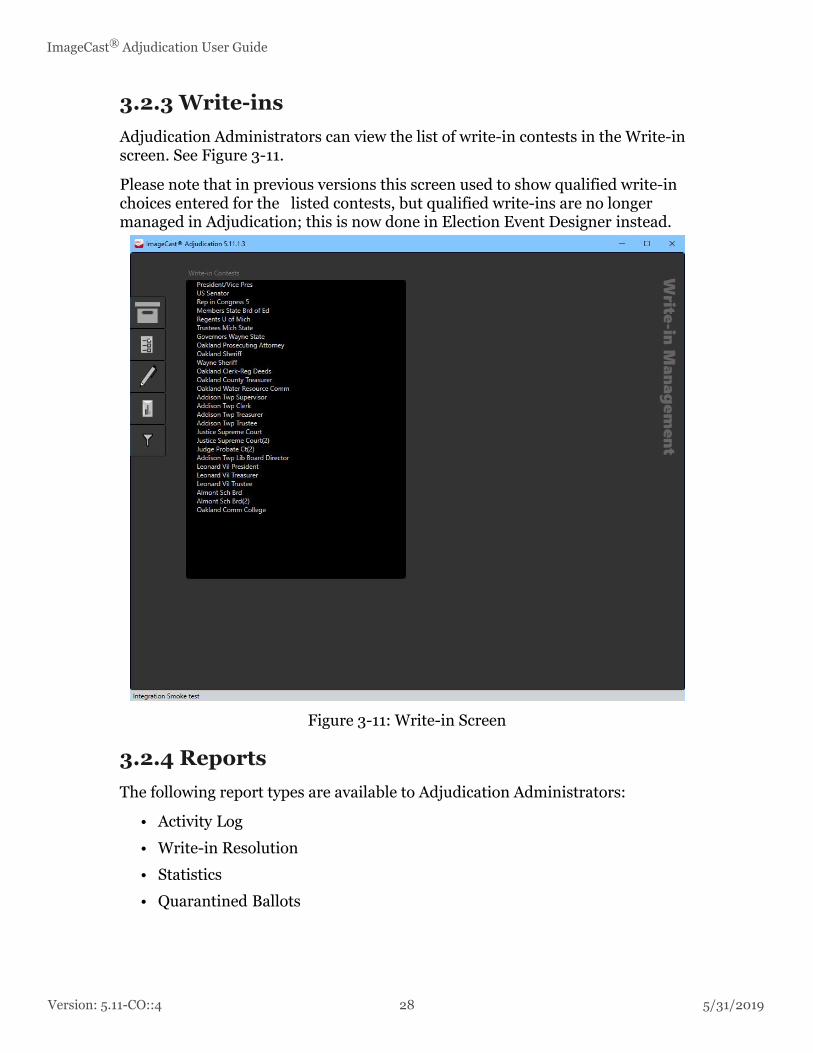
Adjudication Administrators can view the list of write-in contests in the Write-in screen. See Figure 3-11.
Please note that in previous versions this screen used to show qualified write-in choices entered for the listed contests, but qualified write-ins are no longer managed in Adjudication; this is now done in Election Event Designer instead.
Figure 3-11: Write-in Screen
3.2.4 Reports
The following report types are available to Adjudication Administrators:
• Activity Log
• Write-in Resolution
• Statistics
• Quarantined Ballots
11-CO::4 28 5/31/2019
5/31/2019
Chapter 3 - Administrator Roles
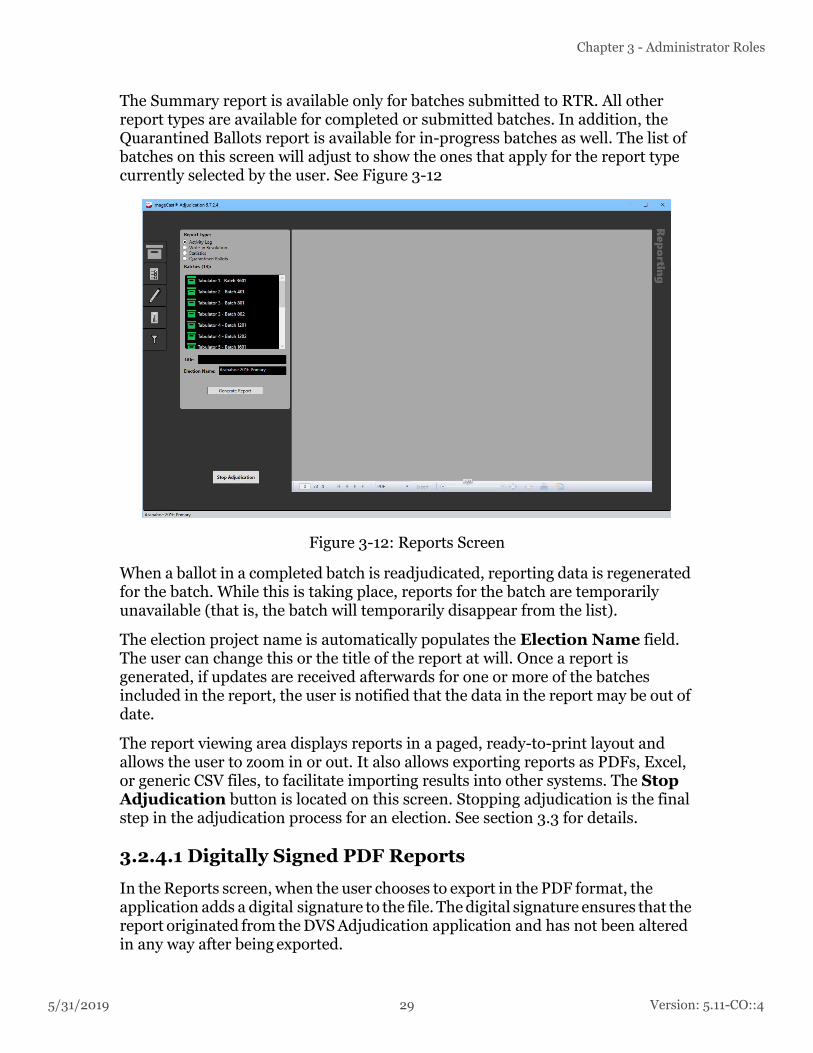
The Summary report is available only for batches submitted to RTR. All other report types are available for completed or submitted batches. In addition, the Quarantined Ballots report is available for in-progress batches as well. The list of batches on this screen will adjust to show the ones that apply for the report type currently selected by the user. See Figure 3-12
Figure 3-12: Reports Screen
When a ballot in a completed batch is readjudicated, reporting data is regenerated for the batch. While this is taking place, reports for the batch are temporarily unavailable (that is, the batch will temporarily disappear from the list).
The election project name is automatically populates the Election Name field. The user can change this or the title of the report at will. Once a report is generated, if updates are received afterwards for one or more of the batches included in the report, the user is notified that the data in the report may be out of date.
The report viewing area displays reports in a paged, ready-to-print layout and allows the user to zoom in or out. It also allows exporting reports as PDFs, Excel, or generic CSV files, to facilitate importing results into other systems. The Stop Adjudication button is located on this screen. Stopping adjudication is the final step in the adjudication process for an election. See section 3.3 for details.
3.2.4.1 Digitally Signed PDF Reports
In the Reports screen, when the user chooses to export in the PDF format, the application adds a digital signature to the file. The digital signature ensures that the report originated from the DVS Adjudication application and has not been altered in any way after being exported.
29 Version: 5.11-CO::4
Version: 5.
ImageCast® Adjudication User Guide
The application signs the document using the same key that is installed during the Project Setup Wizard (see section 2.4). Note that the key is associated to a digital certificate that identifies the Adjudication system as the owner of the key. This key and certificate are trusted by Windows on Adjudication machines because they’re installed by the administrator when setting up the election.
However, Adobe products, such as Adobe Reader or Acrobat, do not determine whether a certificate is trusted in the same way that Windows does (this is because they have their own “certificate store”).
Thus, when using Adobe products to view signed Adjudication reports for the first time on a machine, the user will need to manually trust the certificate in order to avoid a warning about the validity of the document signature. To do this:
1. Expand the certificate in the Signature pane in Adobe.
2. Expand Signature Details and select Certificate Details. The Certificate Viewer window will appear.
3. Click the Trust tab and highlight the root certificate in the left pane.
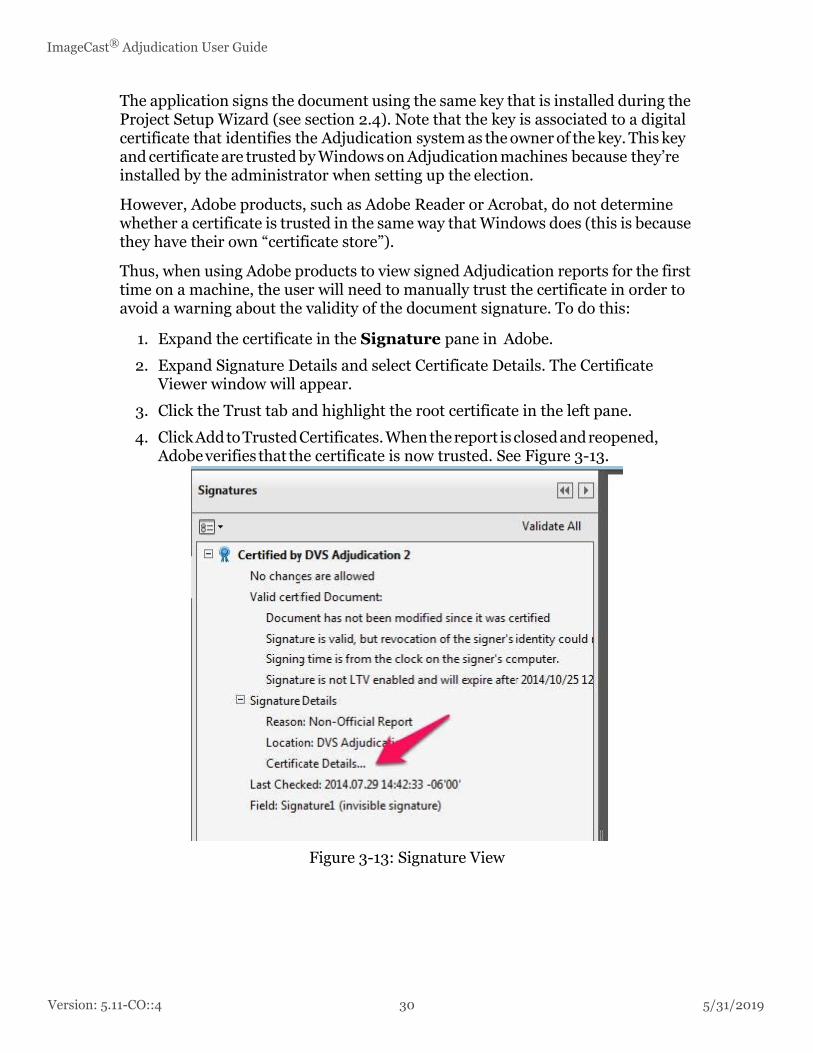
4. Click Add to Trusted Certificates. When the report is closed and reopened, Adobe verifies that the certificate is now trusted. See Figure 3-13.
Figure 3-13: Signature View
11-CO::4 30 5/31/2019
5/31/2019
Chapter 3 - Administrator Roles
The export process initially saves a version of the file that is unsigned, signs it, producing a second file, and then deletes the original file. The signed file is saved with a “signed.pdf” extension. For example, if the user chooses to save the file with the name SummaryReport, the exported file name will be SummaryReport.signed.pdf.
Note that in case the system cannot clean up the original, unsigned file (i.e., SummaryReport.pdf), the user will be informed and directed to manually remove the file.
3.2.4.2 Activity Log Report
Activity Log reports show adjudication actions taken against each ballot and are grouped by tabulator and batch. Each action shows the user name of the logged-in adjudication user along with the date/time of the action.
The following actions are listed:
• Mark added
• Mark removed
• Write-in accepted
• Write-in rejected (with reason).
Additionally, ballots that did not meet any outstack conditions, and were thus filtered out of adjudication, will be reported on in a "summary" section for each batch. See Figure 3-14.
1. Select the Activity Log report type.
2. Select one or more batches that you want to view.
3. In the Title field, enter a title or nothing as needed.
31 Version: 5.11-CO::4

Version: 5.
ImageCast® Adjudication User Guide
4. In the Election Name field, enter or modify the election name.
5. Select Generate Report.
Figure 3-14: Activity Report
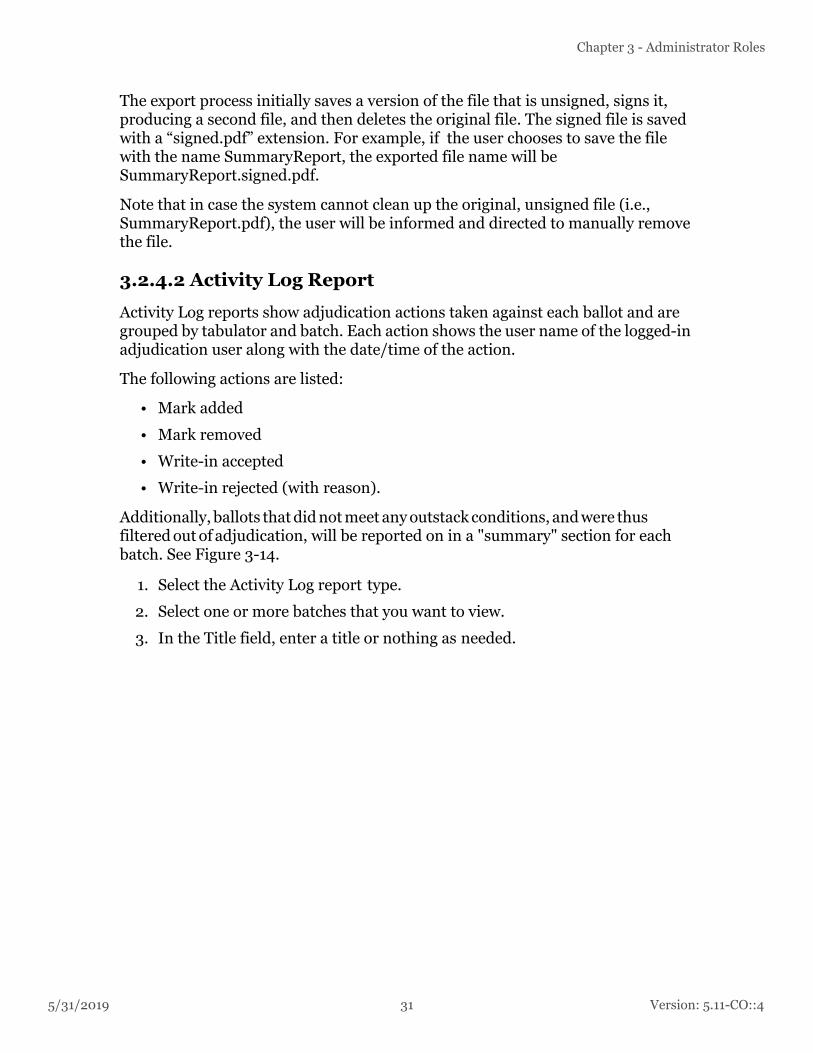
3.2.4.3 Write-in Resolution Report
The Write-In Resolution report shows a breakdown of adjudication actions made specifically to resolve write-in choices. The report breaks down the actions into the number of choices accepted as-is, the number of choices that were resolved to a qualified write-in candidate and what candidate they were resolved to, and the number of choices that were rejected and for what reason they were rejected.
To generate the write-in resolution report:
1. Select the Write-in Resolution report type. See Figure 3-15.
2. Select one or more batches that you want to view.
3. In the Title field, enter a title or nothing as needed.
4. In the Election Name field, enter or modify the election name
11-CO::4 32 5/31/2019
5/31/2019
Chapter 3 - Administrator Roles
5. Select Generate Report.
Figure 3-15: Write-in Resolution Report
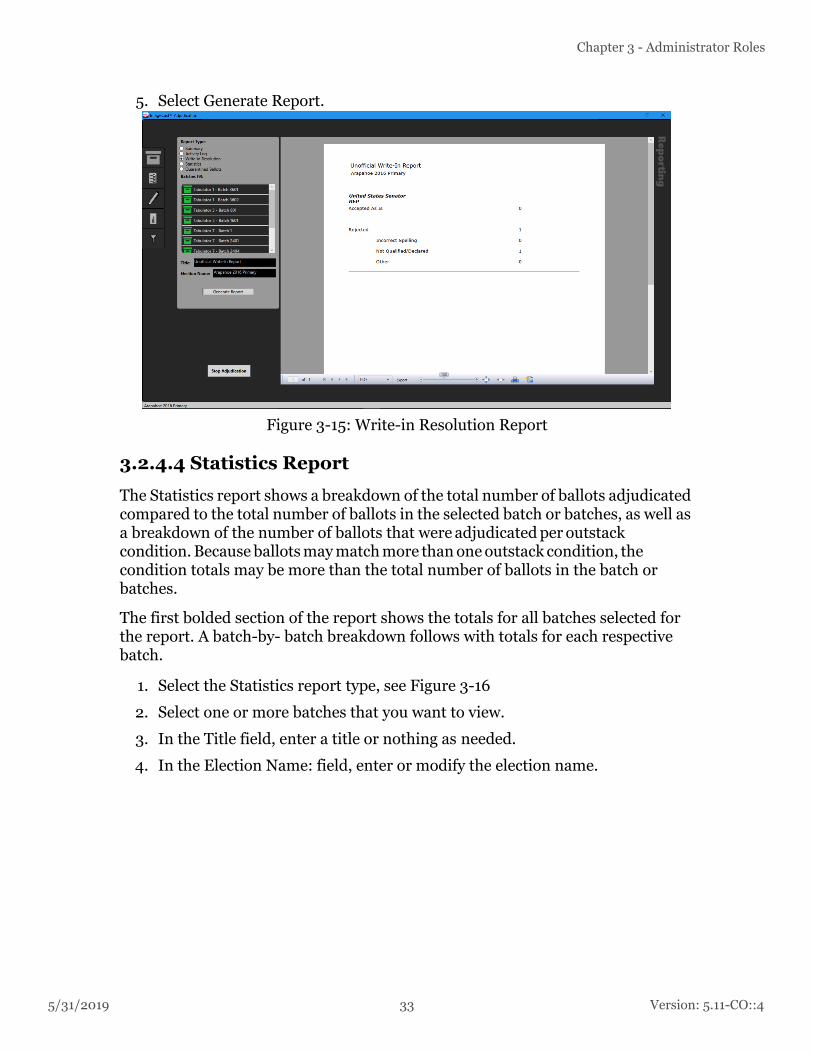
3.2.4.4 Statistics Report
The Statistics report shows a breakdown of the total number of ballots adjudicated compared to the total number of ballots in the selected batch or batches, as well as a breakdown of the number of ballots that were adjudicated per outstack condition. Because ballots may match more than one outstack condition, the condition totals may be more than the total number of ballots in the batch or batches.
The first bolded section of the report shows the totals for all batches selected for the report. A batch-by- batch breakdown follows with totals for each respective batch.
1. Select the Statistics report type, see Figure 3-16
2. Select one or more batches that you want to view.
3. In the Title field, enter a title or nothing as needed.
4. In the Election Name: field, enter or modify the election name.
33 Version: 5.11-CO::4
Version: 5.
ImageCast® Adjudication User Guide
5. Select Generate Report.
Figure 3-16: Statistics Report
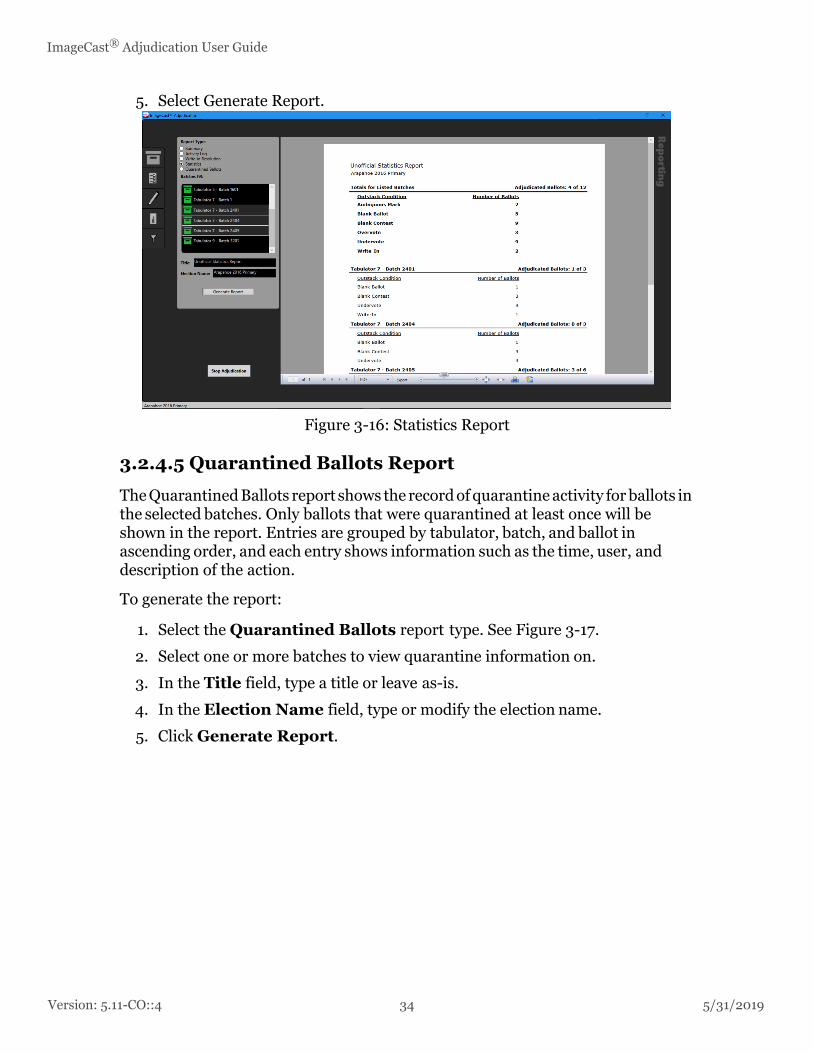
3.2.4.5 Quarantined Ballots Report
The Quarantined Ballots report shows the record of quarantine activity for ballots in the selected batches. Only ballots that were quarantined at least once will be shown in the report. Entries are grouped by tabulator, batch, and ballot in ascending order, and each entry shows information such as the time, user, and description of the action.
To generate the report:
1. Select the Quarantined Ballots report type. See Figure 3-17.
2. Select one or more batches to view quarantine information on.
3. In the Title field, type a title or leave as-is.
4. In the Election Name field, type or modify the election name.
5. Click Generate Report.
11-CO::4 34 5/31/2019
5/31/2019
Chapter 3 - Administrator Roles
Figure 3-17: Quarantined Ballots Report
3.2.4.6 Activity Log Export
Activity log data can also be exported to a CSV file in a flat format that facilitates manipulation in Excel. To do this, follow the steps below:
1. Select Activity Log in the Report Type radio button group, and select that batches for which you want to export data.
2. Click the Export Data button, instead of the Generate Report button. This brings up a File Save dialog.
3. Navigate to the desired output directory, and enter a file name.
4. Click Save to save the export file.
The CSV file generated by the export has the following columns:
• RowType: The rows in the CSV file give data at the level of individual adjudications, adjudication sessions as a whole, and batches as a whole. The row types are:
• Mark Adjudicated: An adjudication made to the voting target for choice.
• Session Summary: Summary of an adjudication session.
• Batch Summary: Summary of a batch.
• Ballot Quarantined: A ballot was quarantined, this happens outside of any adjudication session.
35 Version: 5.11-CO::4
Version: 5.
ImageCast® Adjudication User Guide
• Ballot Unquarantined: A ballot was released from quarantine, this happens outside of any adjudication session.
• AdjudicationType: For Mark Adjudicated Rows, this is the type of adjudication that was performed. For other row types, the value is "None". Adjudication types are None, Mark Removed, Mark Added, Write In Accepted As Is, Write In Resolved, and Write In Rejected.
• AdjudicationCount: This is 1 for a Mark Adjudicated row. For a Session Summary Row, it's the number of adjudications in the session. For a Batch Summary row, it's the number of adjudications in the batch. For other row types, it's zero.
• SkippedBallotCount: For a Batch Summary row, it's the number of ballots in the batch that were not served to users because they didn't meet the given outstack conditions. For other row types, it's zero.
• TabulatorId: The tabulator ID of the batch.
• BatchId: The ID of the batch.
• BallotNumber: A sequential ID of the ballot, zero for a batch summary row.
• SessionNumber: For Mark Adjudicated and Session Summary rows, this is a sequential session number. For other row types, it's zero.
• SessionEndTime: For Mark Adjudicated and Session Summary rows, this is the date and time when the user finished adjudicating the ballot. For other row types, this is blank.
• TimeToAdjudicate: For Session Summary rows, this gives the time span from when the ballot was first presented to the adjudication user and when adjudication was completed.
• ContestName: For Mark Adjudicated rows, this gives the name of the contest containing the adjudicated choice. For other row types, this is blank.
• ChoiceName: For Mark Adjudicated rows, this gives the name of the the adjudicated choice. For other row types, this is blank.
• ItemDescription: An activity description.
• UserName: The Windows user name of the user performing the action.
• OutstackConditions: For Mark Adjudicated rows, this gives the original outstack conditions for the contest containing the adjudicated choice. For SessionSummary rows, this gives the original outstack conditions for the ballot as a whole.
11-CO::4 36 5/31/2019
5/31/2019
Chapter 3 - Administrator Roles
3.2.5 Filtering
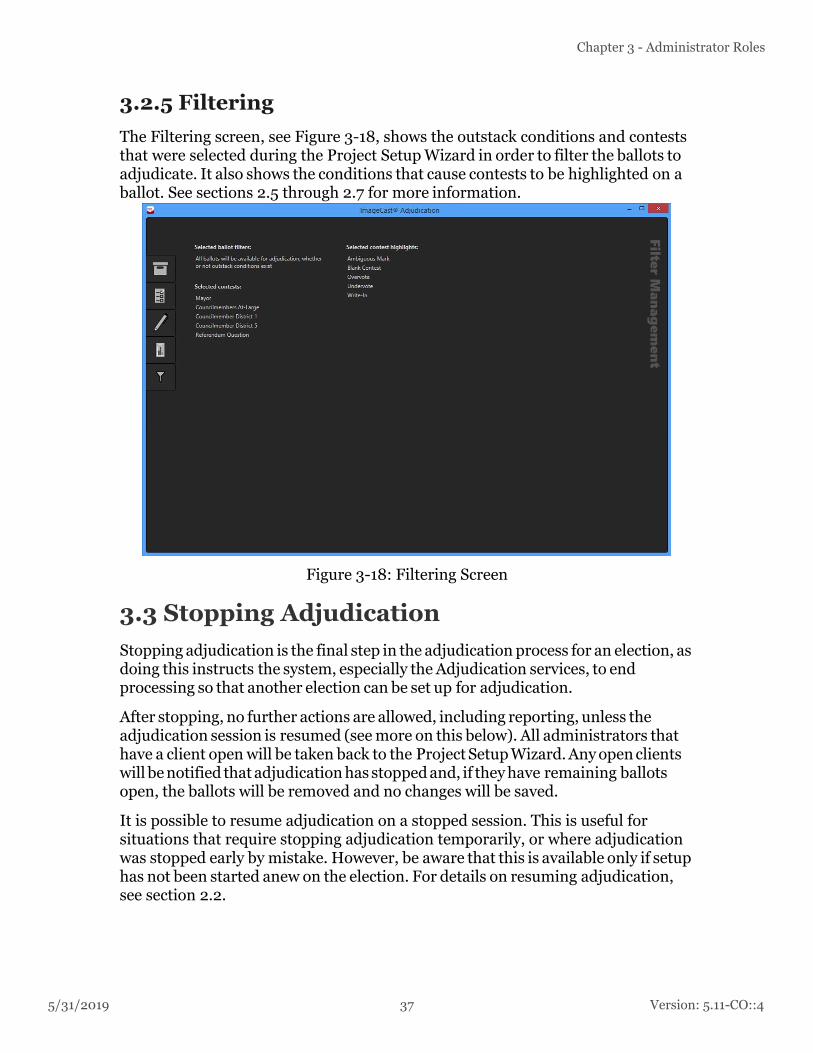
The Filtering screen, see Figure 3-18, shows the outstack conditions and contests that were selected during the Project Setup Wizard in order to filter the ballots to adjudicate. It also shows the conditions that cause contests to be highlighted on a ballot. See sections 2.5 through 2.7 for more information.
Figure 3-18: Filtering Screen
3.3 Stopping Adjudication
Stopping adjudication is the final step in the adjudication process for an election, as doing this instructs the system, especially the Adjudication services, to end processing so that another election can be set up for adjudication.
After stopping, no further actions are allowed, including reporting, unless the adjudication session is resumed (see more on this below). All administrators that have a client open will be taken back to the Project Setup Wizard. Any open clients will be notified that adjudication has stopped and, if they have remaining ballots open, the ballots will be removed and no changes will be saved.
It is possible to resume adjudication on a stopped session. This is useful for situations that require stopping adjudication temporarily, or where adjudication was stopped early by mistake. However, be aware that this is available only if setup has not been started anew on the election. For details on resuming adjudication, see section 2.2.
37 Version: 5.11-CO::4
Version: 5.
ImageCast® Adjudication User Guide
When adjudication is stopped, it may take a few minutes before adjudication can be started on a new project, or before an existing session can be resumed. It is recommended to wind down adjudication activities before stopping adjudication. That is, stop batch loading in RTR and stop adjudicating ballots. Check the Batches screen to ensure that all batches shown in RTR have been loaded by Adjudication, and that batches report the expected counts of processed ballots. Finally, if you notice any problems, check the logs for ongoing errors and correct them.
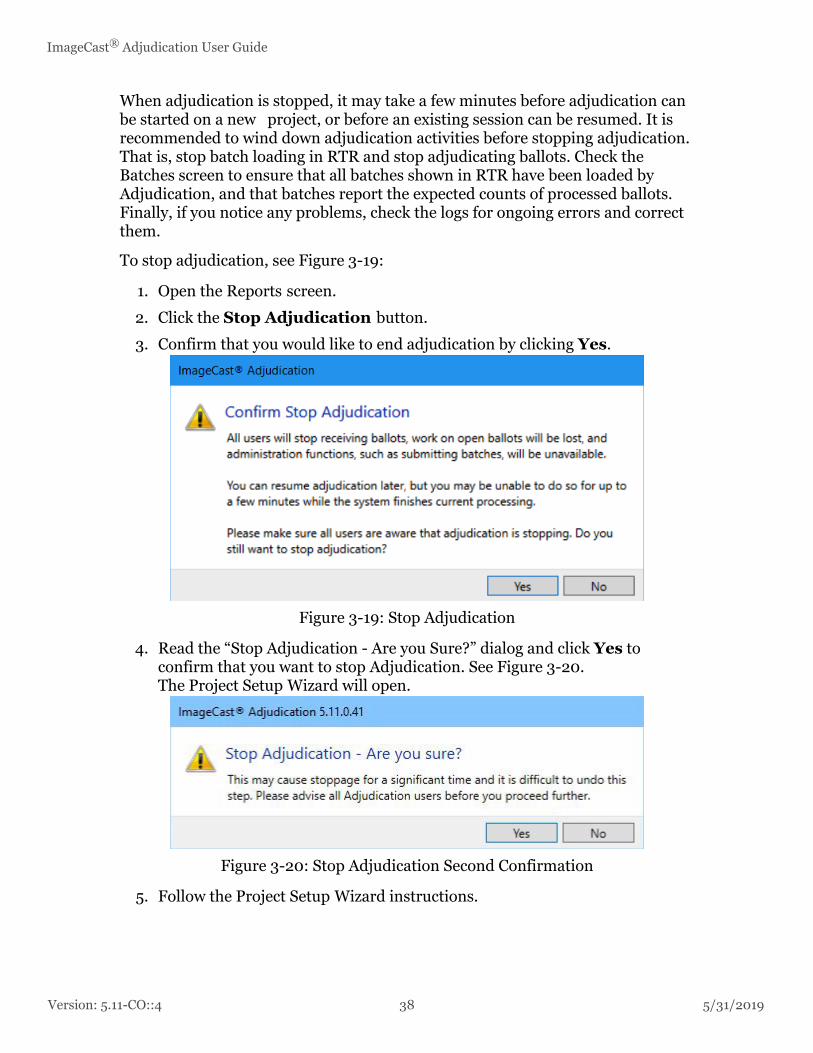
To stop adjudication, see Figure 3-19:
1. Open the Reports screen.
2. Click the Stop Adjudication button.
3. Confirm that you would like to end adjudication by clicking Yes.
Figure 3-19: Stop Adjudication
4. Read the “Stop Adjudication - Are you Sure?” dialog and click Yes to confirm that you want to stop Adjudication. See Figure 3-20.The Project Setup Wizard will open.
Figure 3-20: Stop Adjudication Second Confirmation
5. Follow the Project Setup Wizard instructions.
11-CO::4 38 5/31/2019

5/31/2019
Chapter 3 - Administrator Roles
3.4 Backing up and Restoring Adjudication
The adjudication application uses three SQL Server databases:
• Election store
• Tabulation store
• Adjudicable Ballot store
The Tabulation and Adjudicable Ballot stores are specific to the election being processed, which means that a new database is created for those stores each time an election is set up for adjudication. They will be named as follows:
• Tabulation store: TabulationStore Election name Date/time stamp
• Adjudicable Ballot store: AdjudicableBallotStore Election name Date/time stamp
To make a backup of the Adjudication application a backup must be made of the three databases. It is recommended that the backups of EED and RTR also be done, according to their respective User Guides.
3.4.1 Backing up the Adjudication Databases
1. As the Administrator, from the Start menu, open SQL Server Management Studio.
2. In the Connect to Server window, click Connect.
3. In the Object Explorer pane, click the Databases folder.
4. Right-click ElectionStore and click Tasks > Backup.
5. In the “Backup set” Name section enter additional details to the name as needed, change the backup destination as needed and click OK. A success message appears, click OK again.
6. Repeat the above instructions for the TabulationStore and the AdjudicableBallotStore databases.
7. Once complete, please exit out of the application.
3.4.2 Restoring Previously Archived Databases
1. From the Start menu, right-click Computer and click Manage. The Computer Management window appears.
2. Expand Services and Applications and click Services.In the Services pane, scroll down to the services whose names start with DVS. The application has 10 services:
• DVS Adjudicable Ballot Service
39 Version: 5.11-CO::4
Version: 5.
ImageCast® Adjudication User Guide
• DVS Adjudication Data Service
• DVS Ballot Completion Service
• DVS Ballot Preparation Service
• DVS Batch Completion Service
• DVS Election Data Service
• DVS Election File Manager
• DVS Report Builder Service
• DVS Report Service
• DVS Statistics Service.
3. Right-click each Service and click Stop.
4. Open SQL Server Management Studio.
5. In the Connect to Server window, click Connect.
6. In the Object Explorer pane, click the Databases folder.
7. Right-click ElectionStore and click Delete.
8. In the Delete Object window, click Close existing connections and click OK. You are returned to the Object Explorer pane.
9. Repeat this process for the TabulationStore and AdjudicableBallotStore databases.
10. After the process have been completed for all three databases, in Object Explorer pane, right-
11. click the Databases folder and click Restore Database
12. In the Restore Database window, click From device and browse to the backup location where ElectionStore.bak is found. Click OK.
13. In the Restore Database window, check Restore and in the To database field type in the name of the database being restored.
NOTE: Right-click and copy the database name from the Device field to ensure the database name is correct. Click OK.
14. Repeat this process for TabulationStore.bak.
15. To restore the AdjudicableBallotStore database ensure the Restore Database window is open. Click From device and browse to the Backup location where ElectionStore.bak is located. Click OK.
16. In the Restore Database window, check Restore and in the To database field, type in the name of the database being restored.
17. Click Options in the Select a page pane.
11-CO::4 40 5/31/2019
5/31/2019
Chapter 3 - Administrator Roles
18. Check the entire Restore As field names and remove any colons, if existing, in AdjudicableBallotStore.mdf and AdjudicableBallotStore.LDF. Click OK.
3.4.2.1 Starting Adjudication Services
From the Start menu, right-click Computer and click Manage. The Computer Management window appears.
1. Display the Services and Applications menu and click Services.
2. In the Services pane, scroll down to the list of services stopped in the previous section.
3. Right-click each service and click Start.
41 Version: 5.11-CO::4
Version: 5.
ImageCast® Adjudication User Guide
CHAPTER 4: ADJUDICATION PROCESS
ImageCast® Adjudication eliminates the need to physically rescan ballots, which can potentially dam- age the originals and cause of chain-of-custody concerns. While ballot adjudication is in progress, all clients receive ballots to adjudicate based on the filtering conditions set up by the administrator in the Project Setup Wizard. Ballots are automatically served to each client when available. Both Adjudication Administrators and general Adjudication Users may adjudicate ballots.
4.1 ImageCast® Adjudication Overview
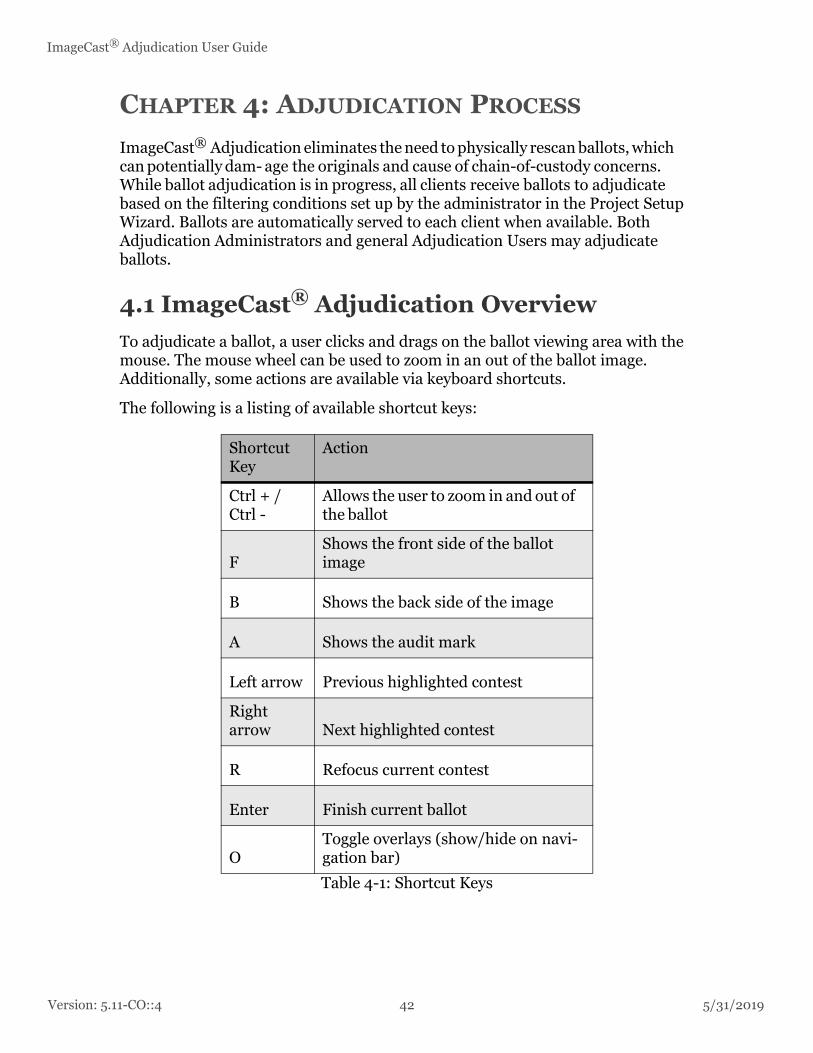
To adjudicate a ballot, a user clicks and drags on the ballot viewing area with the mouse. The mouse wheel can be used to zoom in an out of the ballot image. Additionally, some actions are available via keyboard shortcuts.
The following is a listing of available shortcut keys:
Shortcut Key
Action
Ctrl + / Ctrl -
Allows the user to zoom in and out of the ballot
FShows the front side of the ballot image
B Shows the back side of the image
A Shows the audit mark
Left arrow Previous highlighted contest
Right arrow Next highlighted contest
R Refocus current contest
Enter Finish current ballot
OToggle overlays (show/hide on navi-gation bar)
Table 4-1: Shortcut Keys
11-CO::4 42 5/31/2019

5/31/2019
Chapter 4 - Adjudication Process
4.2 Ballot Navigation as a General User
When opening the application, general users are presented with the ballot adjudication screen. If adjudication is started and a ballot is available for adjudication, the application will automatically load it and present it to the user.
The Ballot Navigation menu (see Figure 4-1) is located on the right side of the screen. From top to bottom, it provides:
• Toggle switch to hide or show target overlays and highlights
• Description of the ballot being adjudicated
• Thumbnails to switch between ballot faces
• Buttons to complete adjudication and perform other tasks
Figure 4-1: Ballot Navigation
4.2.1 Turning the Ballot Overlay On/Off
The toggle switch at the top of the Ballot Navigation menu controls the overlays shown over the ballot image, such as contest coloring and check-marks over the target areas (discussed in more detail later on, see section 4.2.6).
43 Version: 5.11-CO::4
Version: 5.
ImageCast® Adjudication User Guide
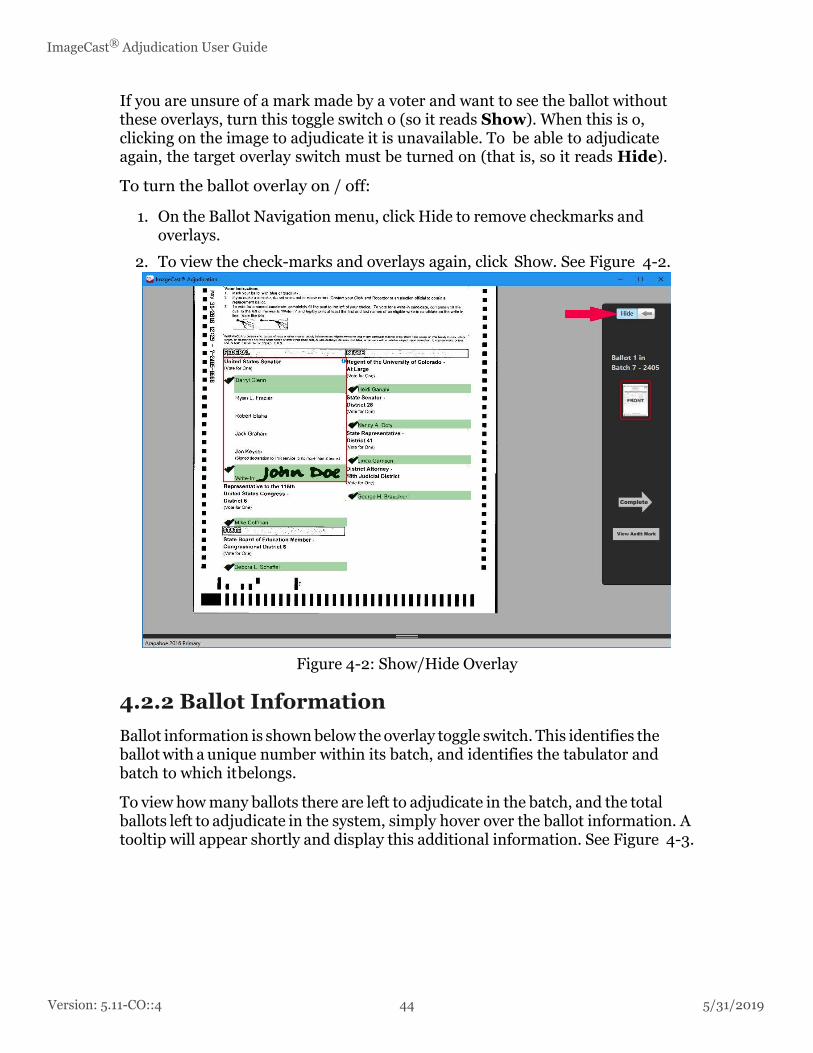
If you are unsure of a mark made by a voter and want to see the ballot without these overlays, turn this toggle switch o (so it reads Show). When this is o, clicking on the image to adjudicate it is unavailable. To be able to adjudicate again, the target overlay switch must be turned on (that is, so it reads Hide).
To turn the ballot overlay on / off:
1. On the Ballot Navigation menu, click Hide to remove checkmarks and overlays.
2. To view the check-marks and overlays again, click Show. See Figure 4-2.
Figure 4-2: Show/Hide Overlay
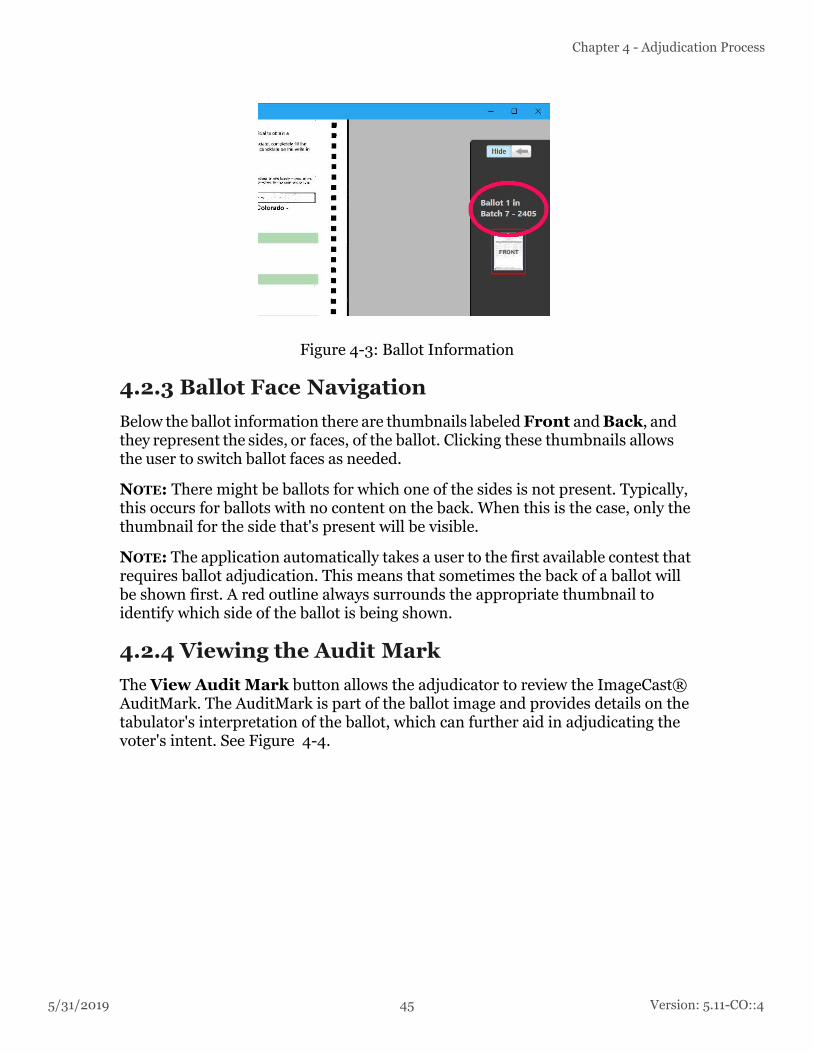
4.2.2 Ballot Information
Ballot information is shown below the overlay toggle switch. This identifies the ballot with a unique number within its batch, and identifies the tabulator and batch to which it belongs.
To view how many ballots there are left to adjudicate in the batch, and the total ballots left to adjudicate in the system, simply hover over the ballot information. A tooltip will appear shortly and display this additional information. See Figure 4-3.
11-CO::4 44 5/31/2019
5/31/2019
Chapter 4 - Adjudication Process
Figure 4-3: Ballot Information
4.2.3 Ballot Face Navigation
Below the ballot information there are thumbnails labeled Front and Back, and they represent the sides, or faces, of the ballot. Clicking these thumbnails allows the user to switch ballot faces as needed.
NOTE: There might be ballots for which one of the sides is not present. Typically, this occurs for ballots with no content on the back. When this is the case, only the thumbnail for the side that's present will be visible.
NOTE: The application automatically takes a user to the first available contest that requires ballot adjudication. This means that sometimes the back of a ballot will be shown first. A red outline always surrounds the appropriate thumbnail to identify which side of the ballot is being shown.
4.2.4 Viewing the Audit Mark
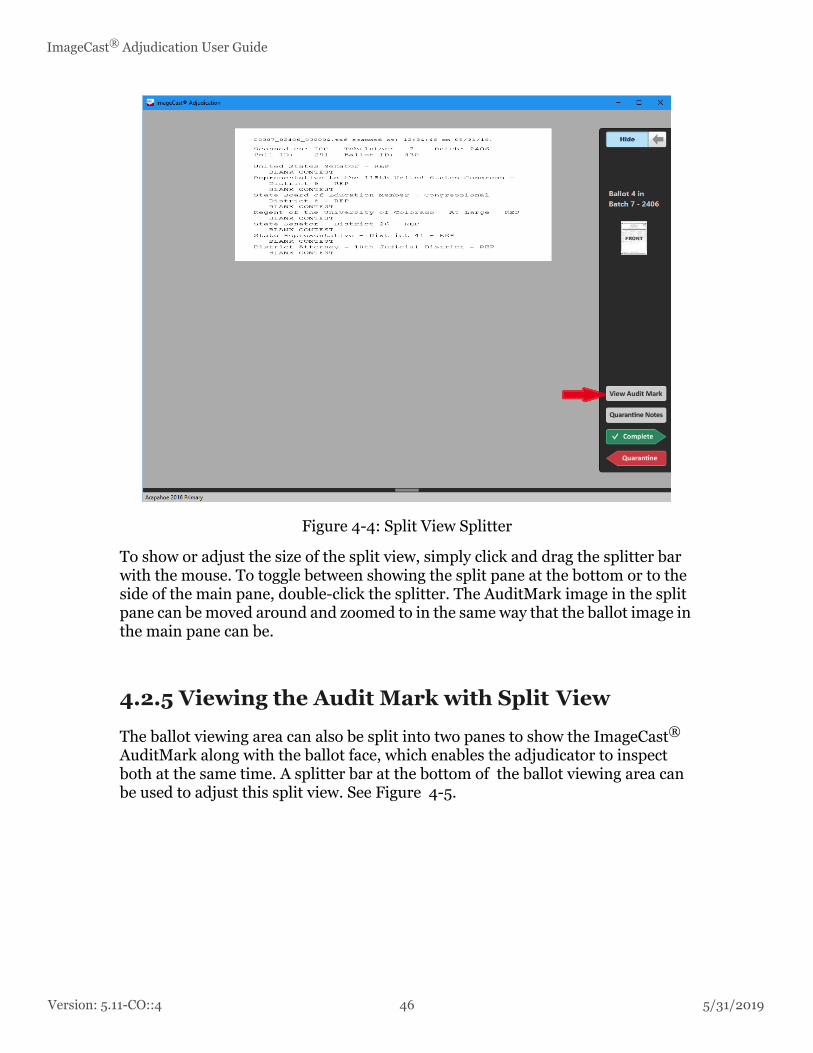
The View Audit Mark button allows the adjudicator to review the ImageCast® AuditMark. The AuditMark is part of the ballot image and provides details on the tabulator's interpretation of the ballot, which can further aid in adjudicating the voter's intent. See Figure 4-4.
45 Version: 5.11-CO::4
Version: 5.
ImageCast® Adjudication User Guide
Figure 4-4: Split View Splitter
To show or adjust the size of the split view, simply click and drag the splitter bar with the mouse. To toggle between showing the split pane at the bottom or to the side of the main pane, double-click the splitter. The AuditMark image in the split pane can be moved around and zoomed to in the same way that the ballot image in the main pane can be.
4.2.5 Viewing the Audit Mark with Split View
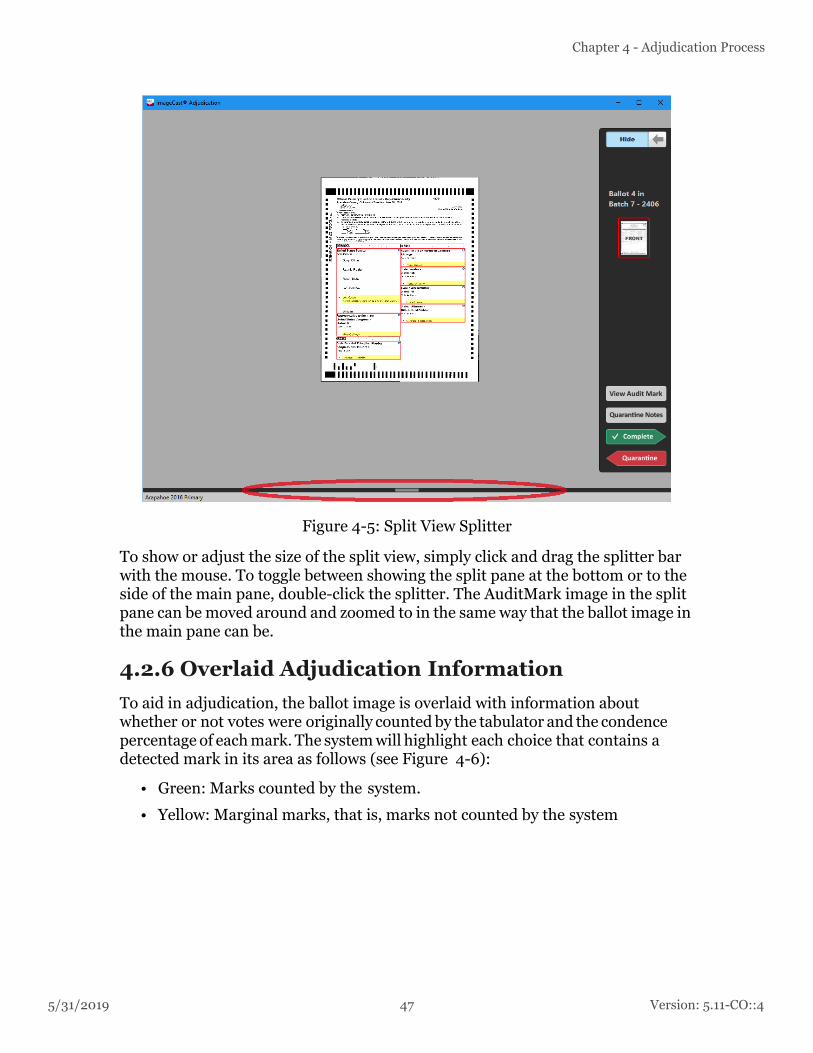
The ballot viewing area can also be split into two panes to show the ImageCast® AuditMark along with the ballot face, which enables the adjudicator to inspect both at the same time. A splitter bar at the bottom of the ballot viewing area can be used to adjust this split view. See Figure 4-5.
11-CO::4 46 5/31/2019
5/31/2019
Chapter 4 - Adjudication Process
Figure 4-5: Split View Splitter
To show or adjust the size of the split view, simply click and drag the splitter bar with the mouse. To toggle between showing the split pane at the bottom or to the side of the main pane, double-click the splitter. The AuditMark image in the split pane can be moved around and zoomed to in the same way that the ballot image in the main pane can be.
4.2.6 Overlaid Adjudication Information
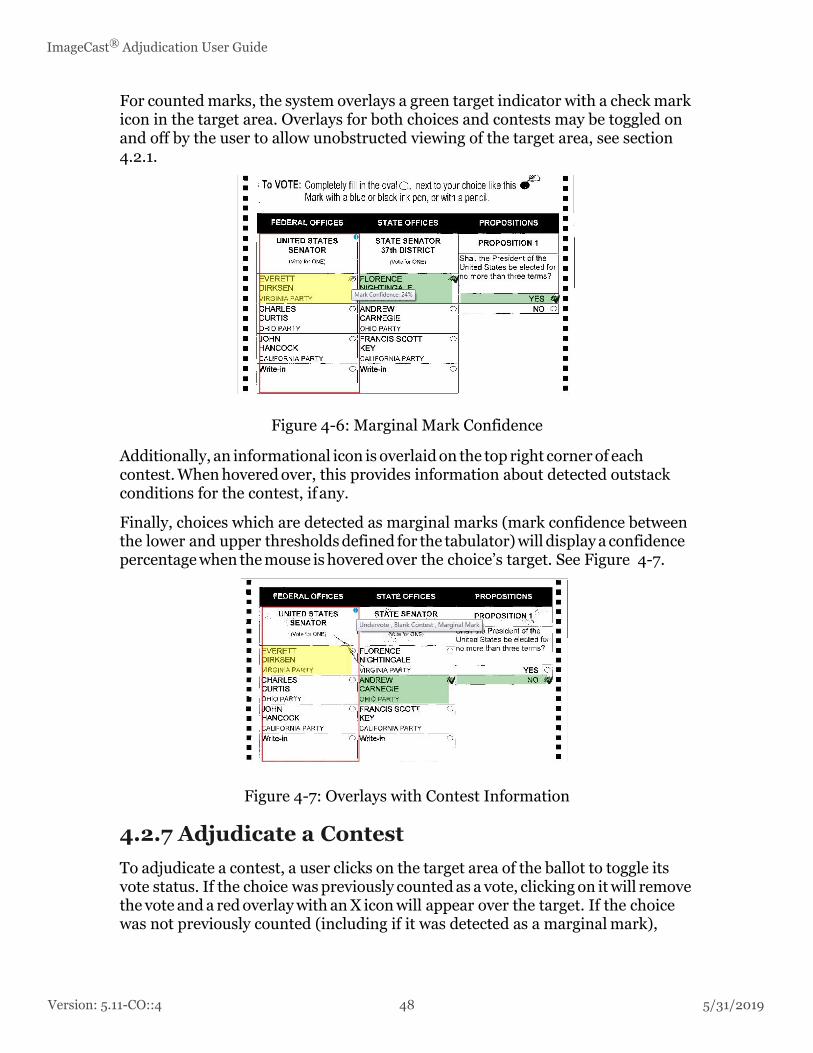
To aid in adjudication, the ballot image is overlaid with information about whether or not votes were originally counted by the tabulator and the condence percentage of each mark. The system will highlight each choice that contains a detected mark in its area as follows (see Figure 4-6):
• Green: Marks counted by the system.
• Yellow: Marginal marks, that is, marks not counted by the system
47 Version: 5.11-CO::4
Version: 5.
ImageCast® Adjudication User Guide
For counted marks, the system overlays a green target indicator with a check mark icon in the target area. Overlays for both choices and contests may be toggled on and off by the user to allow unobstructed viewing of the target area, see section 4.2.1.
Figure 4-6: Marginal Mark Confidence
Additionally, an informational icon is overlaid on the top right corner of each contest. When hovered over, this provides information about detected outstack conditions for the contest, if any.
Finally, choices which are detected as marginal marks (mark confidence between the lower and upper thresholds defined for the tabulator) will display a confidence percentage when the mouse is hovered over the choice’s target. See Figure 4-7.
Figure 4-7: Overlays with Contest Information
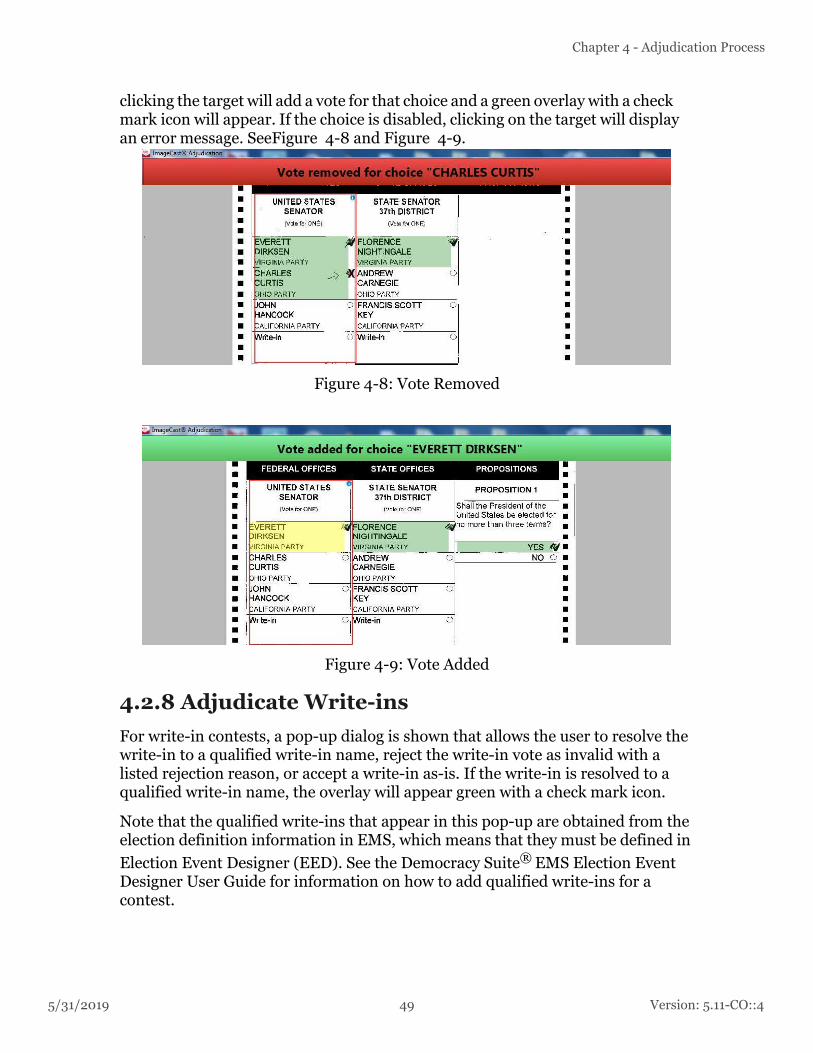
4.2.7 Adjudicate a Contest
To adjudicate a contest, a user clicks on the target area of the ballot to toggle its vote status. If the choice was previously counted as a vote, clicking on it will remove the vote and a red overlay with an X icon will appear over the target. If the choice was not previously counted (including if it was detected as a marginal mark),
11-CO::4 48 5/31/2019
5/31/2019
Chapter 4 - Adjudication Process
clicking the target will add a vote for that choice and a green overlay with a check mark icon will appear. If the choice is disabled, clicking on the target will display an error message. SeeFigure 4-8 and Figure 4-9.
Figure 4-8: Vote Removed
Figure 4-9: Vote Added
4.2.8 Adjudicate Write-ins
For write-in contests, a pop-up dialog is shown that allows the user to resolve the write-in to a qualified write-in name, reject the write-in vote as invalid with a listed rejection reason, or accept a write-in as-is. If the write-in is resolved to a qualified write-in name, the overlay will appear green with a check mark icon.
Note that the qualified write-ins that appear in this pop-up are obtained from the election definition information in EMS, which means that they must be defined in
Election Event Designer (EED). See the Democracy Suite® EMS Election Event Designer User Guide for information on how to add qualified write-ins for a contest.
49 Version: 5.11-CO::4

Version: 5.
ImageCast® Adjudication User Guide
Qualified write-in names may only be used once per contest. For example, in a vote for two contest, a single qualified write-in name may only be applied to one of each write-in choice. See Figure 4-10. Once a candidate name is selected and assigned to a choice, it is no longer available for subsequent name resolution within that ballot.
Figure 4-10: Write-In Pop-Up Dialog
4.2.8.1 Resolving a Write-in to a Qualified Write-in Name
1. Select the write-in target to open the pop-up.
2. Select the write-in from the list of qualified write-ins.
3. Click Accept.
4. A user notification appears and displays for whom a write-in was accepted.
Figure 4-11: Write-in Notification
4.2.8.2 Accepting a Write-in As-is
1. Select the write-in target to open the pop-up.
2. Select Accept As-Is. A user notification message appears stating that a write-in was accepted as-is.
In the case where a write-in was added by a voter who wrote a name in the write area, but did not fill in the write-in target, the adjudicator can still accept that mark as-is, which casts a vote for the general write-in option, or accept it to a qualified write-in if one exists. The other option is to leave the write-in as an undervote. To remove a write-in accepted as-is, click Remove Mark.
11-CO::4 50 5/31/2019
5/31/2019
Chapter 4 - Adjudication Process
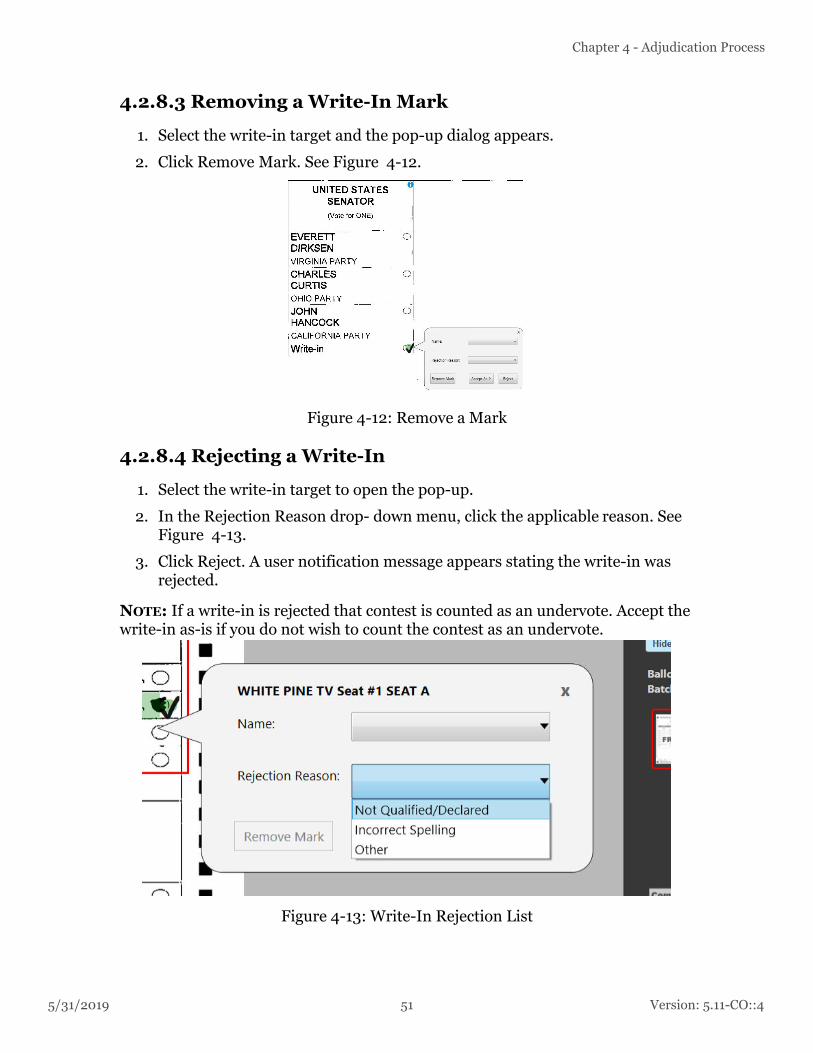
4.2.8.3 Removing a Write-In Mark
1. Select the write-in target and the pop-up dialog appears.
2. Click Remove Mark. See Figure 4-12.
Figure 4-12: Remove a Mark
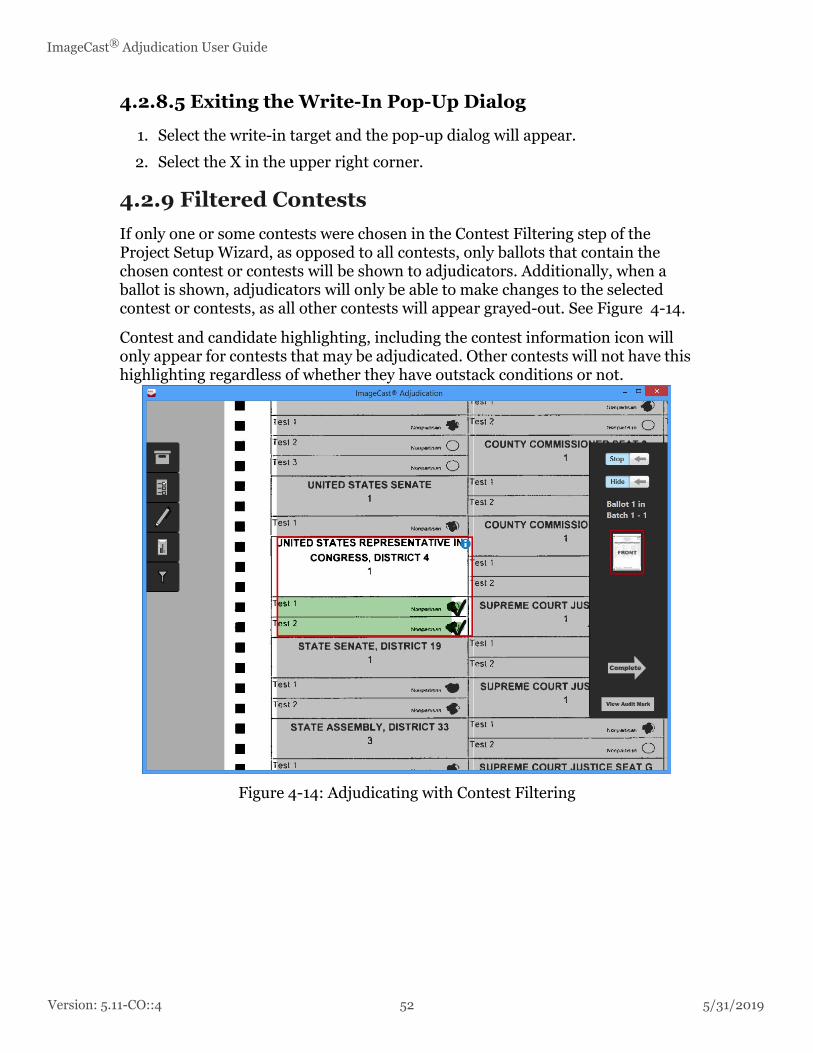
4.2.8.4 Rejecting a Write-In
1. Select the write-in target to open the pop-up.
2. In the Rejection Reason drop- down menu, click the applicable reason. See Figure 4-13.
3. Click Reject. A user notification message appears stating the write-in was rejected.
NOTE: If a write-in is rejected that contest is counted as an undervote. Accept the write-in as-is if you do not wish to count the contest as an undervote.
Figure 4-13: Write-In Rejection List
51 Version: 5.11-CO::4
Version: 5.
ImageCast® Adjudication User Guide
4.2.8.5 Exiting the Write-In Pop-Up Dialog
1. Select the write-in target and the pop-up dialog will appear.
2. Select the X in the upper right corner.
4.2.9 Filtered Contests
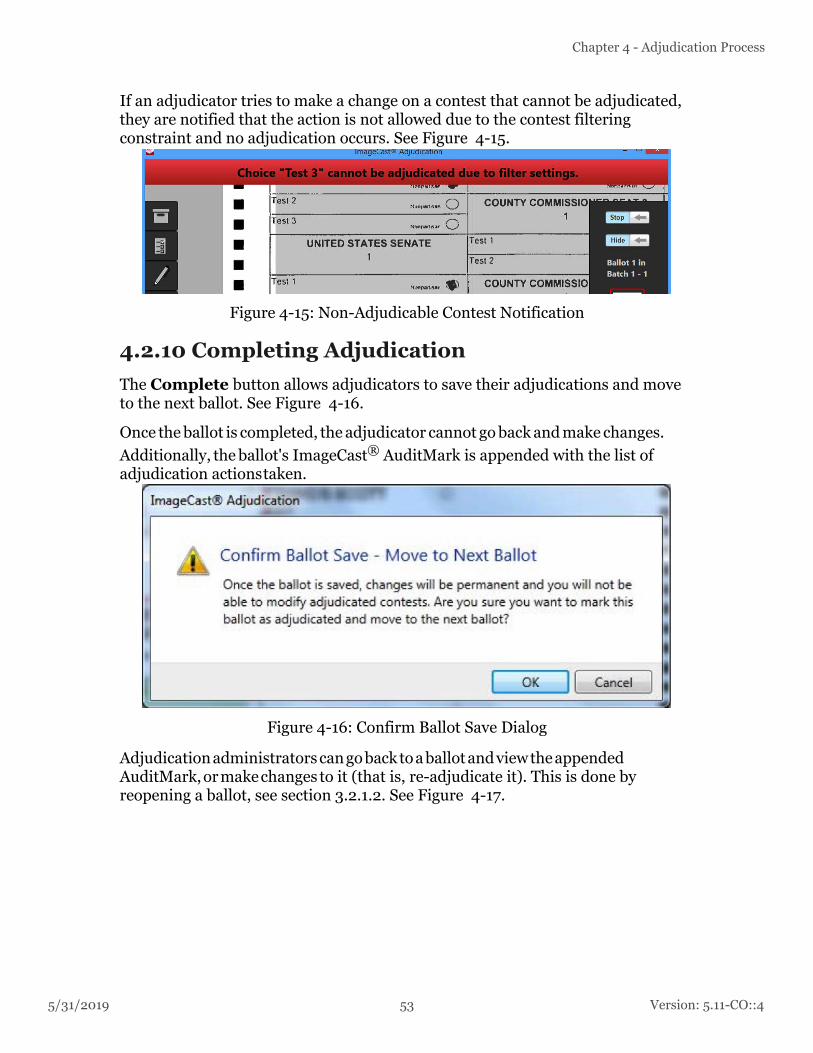
If only one or some contests were chosen in the Contest Filtering step of the Project Setup Wizard, as opposed to all contests, only ballots that contain the chosen contest or contests will be shown to adjudicators. Additionally, when a ballot is shown, adjudicators will only be able to make changes to the selected contest or contests, as all other contests will appear grayed-out. See Figure 4-14.
Contest and candidate highlighting, including the contest information icon will only appear for contests that may be adjudicated. Other contests will not have this highlighting regardless of whether they have outstack conditions or not.
Figure 4-14: Adjudicating with Contest Filtering
11-CO::4 52 5/31/2019
5/31/2019
Chapter 4 - Adjudication Process
If an adjudicator tries to make a change on a contest that cannot be adjudicated, they are notified that the action is not allowed due to the contest filtering constraint and no adjudication occurs. See Figure 4-15.
Figure 4-15: Non-Adjudicable Contest Notification
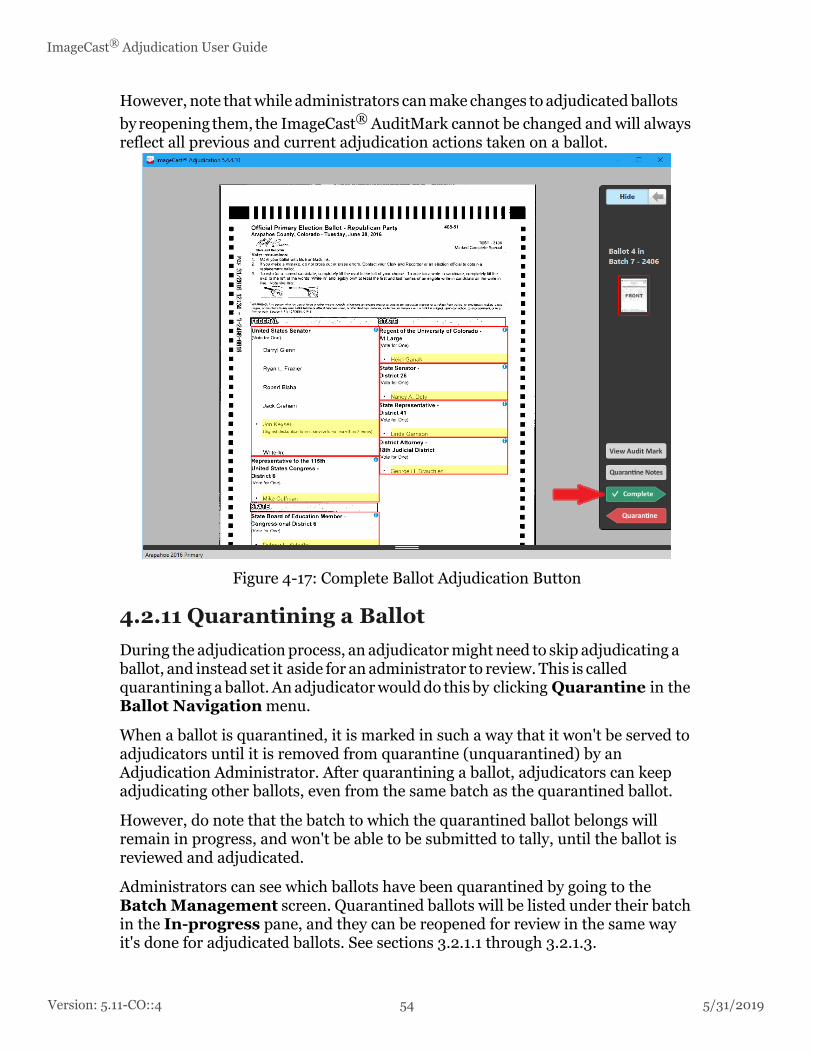
4.2.10 Completing Adjudication
The Complete button allows adjudicators to save their adjudications and move to the next ballot. See Figure 4-16.
Once the ballot is completed, the adjudicator cannot go back and make changes.
Additionally, the ballot's ImageCast® AuditMark is appended with the list of adjudication actions taken.
Figure 4-16: Confirm Ballot Save Dialog
Adjudication administrators can go back to a ballot and view the appended AuditMark, or make changes to it (that is, re-adjudicate it). This is done by reopening a ballot, see section 3.2.1.2. See Figure 4-17.
53 Version: 5.11-CO::4
Version: 5.
ImageCast® Adjudication User Guide
However, note that while administrators can make changes to adjudicated ballots
by reopening them, the ImageCast® AuditMark cannot be changed and will always reflect all previous and current adjudication actions taken on a ballot.
Figure 4-17: Complete Ballot Adjudication Button
4.2.11 Quarantining a Ballot
During the adjudication process, an adjudicator might need to skip adjudicating a ballot, and instead set it aside for an administrator to review. This is called quarantining a ballot. An adjudicator would do this by clicking Quarantine in the Ballot Navigation menu.
When a ballot is quarantined, it is marked in such a way that it won't be served to adjudicators until it is removed from quarantine (unquarantined) by an Adjudication Administrator. After quarantining a ballot, adjudicators can keep adjudicating other ballots, even from the same batch as the quarantined ballot.
However, do note that the batch to which the quarantined ballot belongs will remain in progress, and won't be able to be submitted to tally, until the ballot is reviewed and adjudicated.
Administrators can see which ballots have been quarantined by going to the Batch Management screen. Quarantined ballots will be listed under their batch in the In-progress pane, and they can be reopened for review in the same way it's done for adjudicated ballots. See sections 3.2.1.1 through 3.2.1.3.
11-CO::4 54 5/31/2019

5/31/2019
Chapter 4 - Adjudication Process
Once the ballot is reopened, the administrator can review the ballot and the quarantine notes added by the adjudicator, and then unquarantine or adjudicate the ballot so the batch can be completed.
Figure 4-18: Ballot Quarantine Button
To quarantine a ballot (see Figure 4-18):
1. Press Quarantine.
2. On the confirmation dialog, enter a note explaining why the ballot is being quarantined. This helps the administrator that will review the ballot to locate problems and decide how to handle them.
3. Press OK. The ballot will be taken away so you can adjudicate other ballots.
4.2.11.1 Viewing Quarantine Notes
If an administrator decides to unquarantine a ballot, the ballot will become available for adjudication and will be served to an adjudicator at some point later.
55 Version: 5.11-CO::4

Version: 5.
ImageCast® Adjudication User Guide
When the ballot is received again, the adjudicator may want to review the administrator's notes, or the original note added when the ballot was quarantined. See Figure 4-19. This can be done by clicking Quarantine Notes in the Ballot Navigation menu.
Figure 4-19: Quarantine Notes Dialog
4.3 Ballot Adjudication as an Administrator
When opening the application after adjudication is started, Administrators are presented with the ballot adjudication screen that all users are presented with, however, receiving of ballots is paused by default, so administrators will not see a ballot automatically like general users will.
4.3.1 Starting or Stopping Receipt of Ballots
To allow administrators to receive ballots, or to stop receiving ballots at any point, the Ballot Navigation
menu contains an extra toggle switch at the top. Initially, this is the only button available on the menu.
11-CO::4 56 5/31/2019
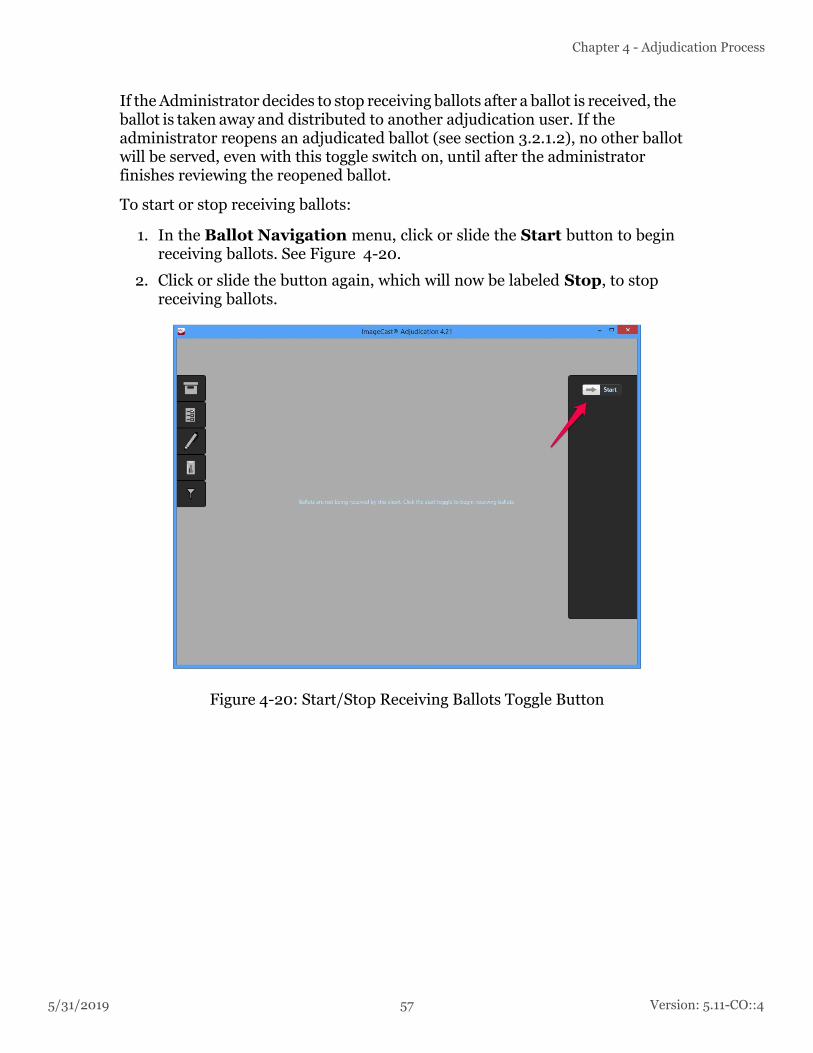
5/31/2019
Chapter 4 - Adjudication Process
If the Administrator decides to stop receiving ballots after a ballot is received, the ballot is taken away and distributed to another adjudication user. If the administrator reopens an adjudicated ballot (see section 3.2.1.2), no other ballot will be served, even with this toggle switch on, until after the administrator finishes reviewing the reopened ballot.
To start or stop receiving ballots:
1. In the Ballot Navigation menu, click or slide the Start button to begin receiving ballots. See Figure 4-20.
2. Click or slide the button again, which will now be labeled Stop, to stop receiving ballots.
Figure 4-20: Start/Stop Receiving Ballots Toggle Button
57 Version: 5.11-CO::4
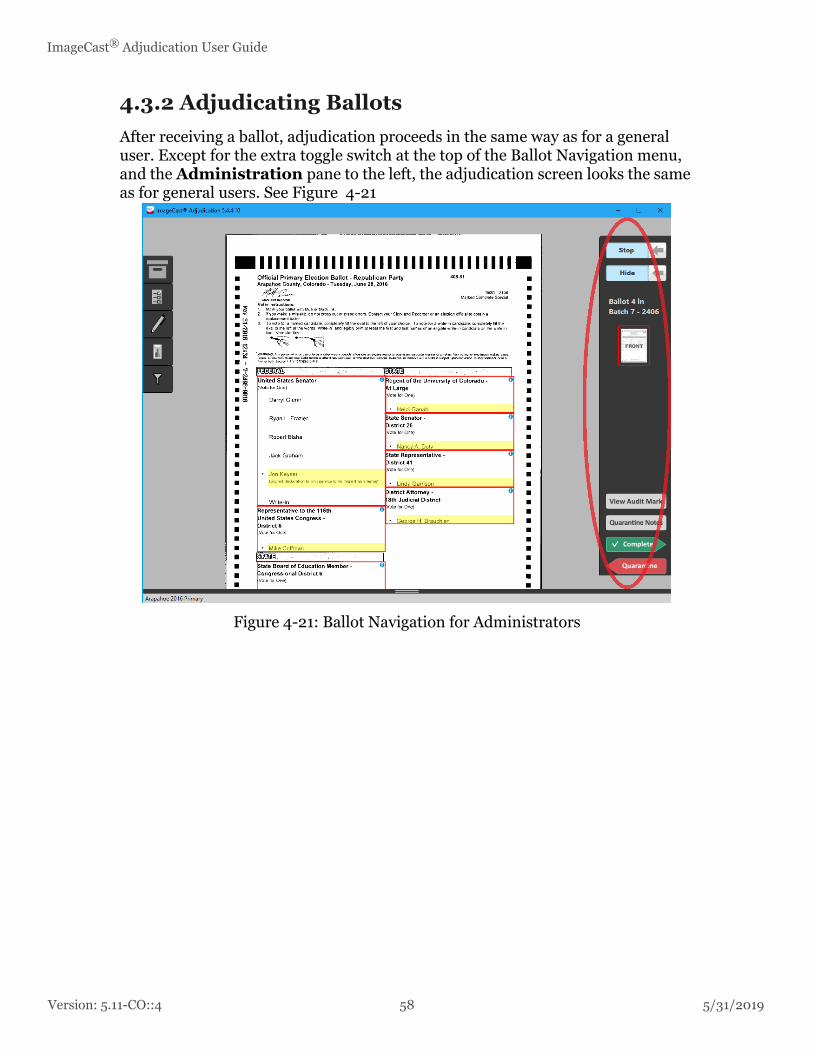
Version: 5.
ImageCast® Adjudication User Guide
4.3.2 Adjudicating Ballots
After receiving a ballot, adjudication proceeds in the same way as for a general user. Except for the extra toggle switch at the top of the Ballot Navigation menu, and the Administration pane to the left, the adjudication screen looks the same as for general users. See Figure 4-21
Figure 4-21: Ballot Navigation for Administrators
11-CO::4 58 5/31/2019
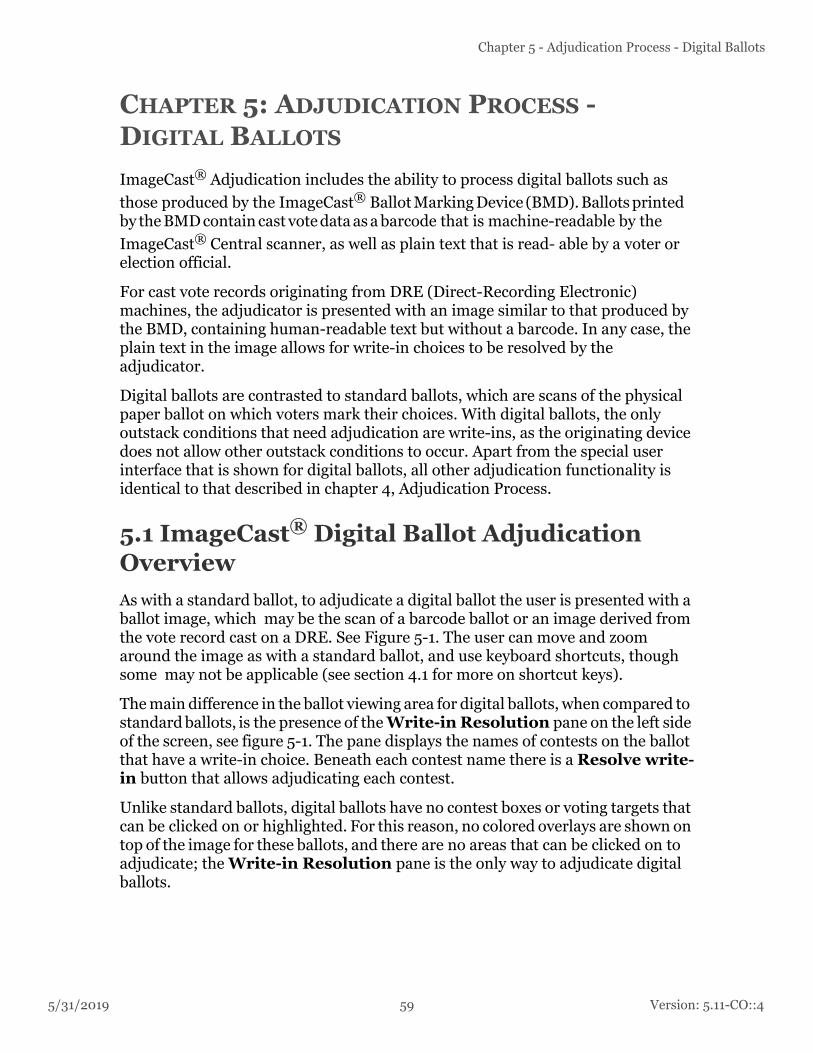
5/31/2019
Chapter 5 - Adjudication Process - Digital Ballots
CHAPTER 5: ADJUDICATION PROCESS - DIGITAL BALLOTS
ImageCast® Adjudication includes the ability to process digital ballots such as
those produced by the ImageCast® Ballot Marking Device (BMD). Ballots printed by the BMD contain cast vote data as a barcode that is machine-readable by the
ImageCast® Central scanner, as well as plain text that is read- able by a voter or election official.
For cast vote records originating from DRE (Direct-Recording Electronic) machines, the adjudicator is presented with an image similar to that produced by the BMD, containing human-readable text but without a barcode. In any case, the plain text in the image allows for write-in choices to be resolved by the adjudicator.
Digital ballots are contrasted to standard ballots, which are scans of the physical paper ballot on which voters mark their choices. With digital ballots, the only outstack conditions that need adjudication are write-ins, as the originating device does not allow other outstack conditions to occur. Apart from the special user interface that is shown for digital ballots, all other adjudication functionality is identical to that described in chapter 4, Adjudication Process.
5.1 ImageCast® Digital Ballot Adjudication Overview
As with a standard ballot, to adjudicate a digital ballot the user is presented with a ballot image, which may be the scan of a barcode ballot or an image derived from the vote record cast on a DRE. See Figure 5-1. The user can move and zoom around the image as with a standard ballot, and use keyboard shortcuts, though some may not be applicable (see section 4.1 for more on shortcut keys).
The main difference in the ballot viewing area for digital ballots, when compared to standard ballots, is the presence of the Write-in Resolution pane on the left side of the screen, see figure 5-1. The pane displays the names of contests on the ballot that have a write-in choice. Beneath each contest name there is a Resolve write-in button that allows adjudicating each contest.
Unlike standard ballots, digital ballots have no contest boxes or voting targets that can be clicked on or highlighted. For this reason, no colored overlays are shown on top of the image for these ballots, and there are no areas that can be clicked on to adjudicate; the Write-in Resolution pane is the only way to adjudicate digital ballots.
59 Version: 5.11-CO::4
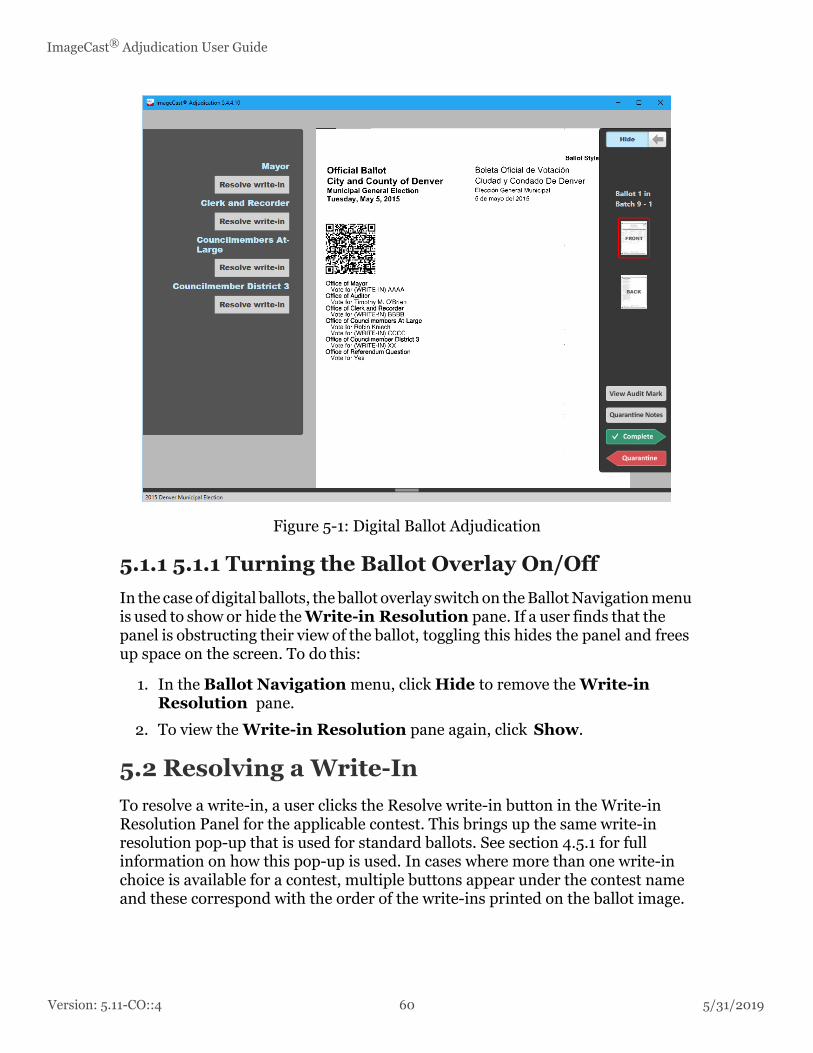
Version: 5.
ImageCast® Adjudication User Guide
Figure 5-1: Digital Ballot Adjudication
5.1.1 5.1.1 Turning the Ballot Overlay On/Off
In the case of digital ballots, the ballot overlay switch on the Ballot Navigation menu is used to show or hide the Write-in Resolution pane. If a user finds that the panel is obstructing their view of the ballot, toggling this hides the panel and frees up space on the screen. To do this:
1. In the Ballot Navigation menu, click Hide to remove the Write-in Resolution pane.
2. To view the Write-in Resolution pane again, click Show.
5.2 Resolving a Write-In
To resolve a write-in, a user clicks the Resolve write-in button in the Write-in Resolution Panel for the applicable contest. This brings up the same write-in resolution pop-up that is used for standard ballots. See section 4.5.1 for full information on how this pop-up is used. In cases where more than one write-in choice is available for a contest, multiple buttons appear under the contest name and these correspond with the order of the write-ins printed on the ballot image.
11-CO::4 60 5/31/2019
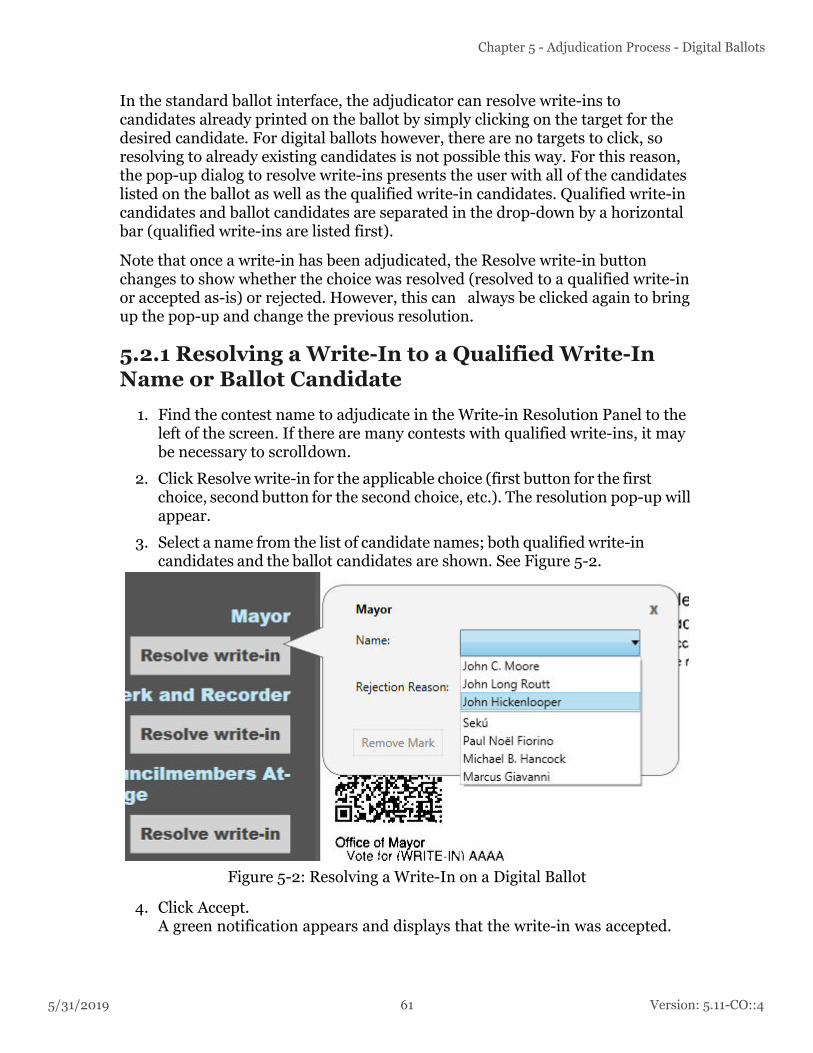
5/31/2019
Chapter 5 - Adjudication Process - Digital Ballots
In the standard ballot interface, the adjudicator can resolve write-ins to candidates already printed on the ballot by simply clicking on the target for the desired candidate. For digital ballots however, there are no targets to click, so resolving to already existing candidates is not possible this way. For this reason, the pop-up dialog to resolve write-ins presents the user with all of the candidates listed on the ballot as well as the qualified write-in candidates. Qualified write-in candidates and ballot candidates are separated in the drop-down by a horizontal bar (qualified write-ins are listed first).
Note that once a write-in has been adjudicated, the Resolve write-in button changes to show whether the choice was resolved (resolved to a qualified write-in or accepted as-is) or rejected. However, this can always be clicked again to bring up the pop-up and change the previous resolution.
5.2.1 Resolving a Write-In to a Qualified Write-In Name or Ballot Candidate
1. Find the contest name to adjudicate in the Write-in Resolution Panel to the left of the screen. If there are many contests with qualified write-ins, it may be necessary to scroll down.
2. Click Resolve write-in for the applicable choice (first button for the first choice, second button for the second choice, etc.). The resolution pop-up will appear.
3. Select a name from the list of candidate names; both qualified write-in candidates and the ballot candidates are shown. See Figure 5-2.
Figure 5-2: Resolving a Write-In on a Digital Ballot
4. Click Accept. A green notification appears and displays that the write-in was accepted.
61 Version: 5.11-CO::4
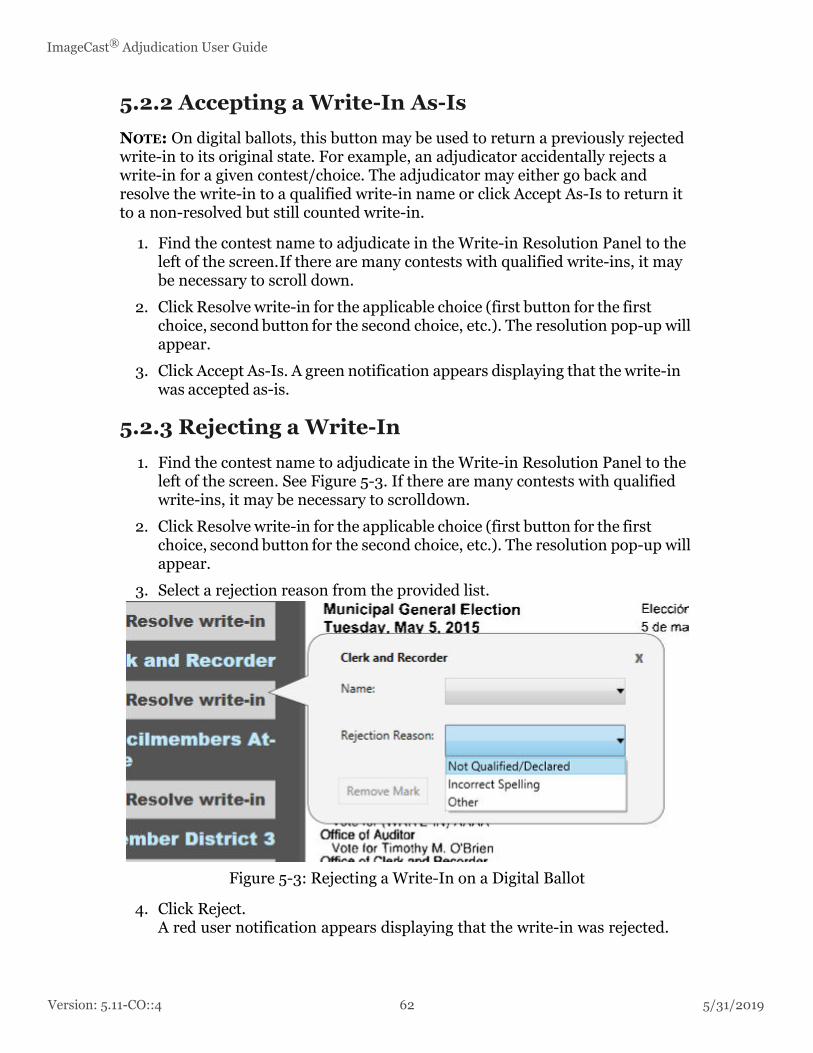
Version: 5.
ImageCast® Adjudication User Guide
5.2.2 Accepting a Write-In As-Is
NOTE: On digital ballots, this button may be used to return a previously rejected write-in to its original state. For example, an adjudicator accidentally rejects a write-in for a given contest/choice. The adjudicator may either go back and resolve the write-in to a qualified write-in name or click Accept As-Is to return it to a non-resolved but still counted write-in.
1. Find the contest name to adjudicate in the Write-in Resolution Panel to the left of the screen. If there are many contests with qualified write-ins, it may be necessary to scroll down.
2. Click Resolve write-in for the applicable choice (first button for the first choice, second button for the second choice, etc.). The resolution pop-up will appear.
3. Click Accept As-Is. A green notification appears displaying that the write-in was accepted as-is.
5.2.3 Rejecting a Write-In
1. Find the contest name to adjudicate in the Write-in Resolution Panel to the left of the screen. See Figure 5-3. If there are many contests with qualified write-ins, it may be necessary to scroll down.
2. Click Resolve write-in for the applicable choice (first button for the first choice, second button for the second choice, etc.). The resolution pop-up will appear.
3. Select a rejection reason from the provided list.
Figure 5-3: Rejecting a Write-In on a Digital Ballot
4. Click Reject.A red user notification appears displaying that the write-in was rejected.
11-CO::4 62 5/31/2019
ImageCast® Adjudication User Guide
5/31/2019 63 Version: 5.11-CO::4
REVISION HISTORY
Rev. Date Author Summary
4 05-28-2019 tijana.todorovic Resolving discrepancies for 5.11-CO.
3 04-16-2019 tijana.todorovic Resolving discrepancies for 5.11-CO.
2 03-22-2019 tijana.todorovic Updated sections 3.2.1.1 Viewing Batch Ballots and 3.2.3 Write-ins.
1 03-06-2019 blair.beauchesne Branched for 5.11.
ImageCast® Adjudication User Guide
5/31/2019
LIST OF FIGURES
Figure 2-1: Project Selection Screen . . . . . . . . . . . . . . . . . . . . . . . . . . . . . . . . . . . . . . . . . 2
Figure 2-2: Existing Session Setup Screen . . . . . . . . . . . . . . . . . . . . . . . . . . . . . . . . . . . . 3
Figure 2-3: Start New or Resume Adj Session . . . . . . . . . . . . . . . . . . . . . . . . . . . . . . . . . 4
Figure 2-4: Session Setup Denied Screen . . . . . . . . . . . . . . . . . . . . . . . . . . . . . . . . . . . . . 5
Figure 2-5: Security Key Setup Screen . . . . . . . . . . . . . . . . . . . . . . . . . . . . . . . . . . . . . . . 6
Figure 2-6: Security Key Validation Screen . . . . . . . . . . . . . . . . . . . . . . . . . . . . . . . . . . . 8
Figure 2-7: Update the Security Key . . . . . . . . . . . . . . . . . . . . . . . . . . . . . . . . . . . . . . . . . 9
Figure 2-8: Adjudicate All Ballots . . . . . . . . . . . . . . . . . . . . . . . . . . . . . . . . . . . . . . . . . . 10
Figure 2-9: Select Outstack Conditions . . . . . . . . . . . . . . . . . . . . . . . . . . . . . . . . . . . . . . 10
Figure 2-10: Contest Highlighting . . . . . . . . . . . . . . . . . . . . . . . . . . . . . . . . . . . . . . . . . . 13
Figure 2-11: Contest Filtering . . . . . . . . . . . . . . . . . . . . . . . . . . . . . . . . . . . . . . . . . . . . . 14
Figure 2-12: Other Options . . . . . . . . . . . . . . . . . . . . . . . . . . . . . . . . . . . . . . . . . . . . . . . 15
Figure 2-13: Summary . . . . . . . . . . . . . . . . . . . . . . . . . . . . . . . . . . . . . . . . . . . . . . . . . . . 16
Figure 3-1: Administrative Menu . . . . . . . . . . . . . . . . . . . . . . . . . . . . . . . . . . . . . . . . . . 18
Figure 3-2: Batches Screen . . . . . . . . . . . . . . . . . . . . . . . . . . . . . . . . . . . . . . . . . . . . . . . 18
Figure 3-3: Expanded Batches with Ballots . . . . . . . . . . . . . . . . . . . . . . . . . . . . . . . . . . 20
Figure 3-4: Ballots and Batches with Unresolved Write-Ins . . . . . . . . . . . . . . . . . . . . . . 20
Figure 3-5: Confirmation Message when Readjudicating a Ballot . . . . . . . . . . . . . . . . . 21
Figure 3-6: Quarantined Ballot in Batch Management . . . . . . . . . . . . . . . . . . . . . . . . . . 22
Figure 3-7: Ballot Quarantine Notes . . . . . . . . . . . . . . . . . . . . . . . . . . . . . . . . . . . . . . . . 23
Figure 3-8: Unquarantine Ballot Dialog . . . . . . . . . . . . . . . . . . . . . . . . . . . . . . . . . . . . . 24
Figure 3-9: Batch Progress . . . . . . . . . . . . . . . . . . . . . . . . . . . . . . . . . . . . . . . . . . . . . . . 25
Figure 3-10: Resetting In-Progress Ballots . . . . . . . . . . . . . . . . . . . . . . . . . . . . . . . . . . . 26
Figure 3-11: Write-in Screen . . . . . . . . . . . . . . . . . . . . . . . . . . . . . . . . . . . . . . . . . . . . . . 28
Figure 3-12: Reports Screen . . . . . . . . . . . . . . . . . . . . . . . . . . . . . . . . . . . . . . . . . . . . . . 29
Figure 3-13: Signature View . . . . . . . . . . . . . . . . . . . . . . . . . . . . . . . . . . . . . . . . . . . . . . 30
Figure 3-14: Activity Report . . . . . . . . . . . . . . . . . . . . . . . . . . . . . . . . . . . . . . . . . . . . . . 32
Figure 3-15: Write-in Resolution Report . . . . . . . . . . . . . . . . . . . . . . . . . . . . . . . . . . . . . 33
Figure 3-16: Statistics Report . . . . . . . . . . . . . . . . . . . . . . . . . . . . . . . . . . . . . . . . . . . . . 34
Figure 3-17: Quarantined Ballots Report . . . . . . . . . . . . . . . . . . . . . . . . . . . . . . . . . . . . . 35
Figure 3-18: Filtering Screen . . . . . . . . . . . . . . . . . . . . . . . . . . . . . . . . . . . . . . . . . . . . . . 37
64 Version: 5.11-CO::4
Version: 5.
List of Figures
Figure 3-19: Stop Adjudication . . . . . . . . . . . . . . . . . . . . . . . . . . . . . . . . . . . . . . . . . . . . 38
Figure 3-20: Stop Adjudication Second Confirmation . . . . . . . . . . . . . . . . . . . . . . . . . . 38
Figure 4-1: Ballot Navigation . . . . . . . . . . . . . . . . . . . . . . . . . . . . . . . . . . . . . . . . . . . . . 43
Figure 4-2: Show/Hide Overlay . . . . . . . . . . . . . . . . . . . . . . . . . . . . . . . . . . . . . . . . . . . . 44
Figure 4-3: Ballot Information . . . . . . . . . . . . . . . . . . . . . . . . . . . . . . . . . . . . . . . . . . . . . 45
Figure 4-4: Split View Splitter . . . . . . . . . . . . . . . . . . . . . . . . . . . . . . . . . . . . . . . . . . . . . 46
Figure 4-5: Split View Splitter . . . . . . . . . . . . . . . . . . . . . . . . . . . . . . . . . . . . . . . . . . . . . 47
Figure 4-6: Marginal Mark Confidence . . . . . . . . . . . . . . . . . . . . . . . . . . . . . . . . . . . . . . 48
Figure 4-7: Overlays with Contest Information . . . . . . . . . . . . . . . . . . . . . . . . . . . . . . . . 48
Figure 4-8: Vote Removed . . . . . . . . . . . . . . . . . . . . . . . . . . . . . . . . . . . . . . . . . . . . . . . 49
Figure 4-9: Vote Added . . . . . . . . . . . . . . . . . . . . . . . . . . . . . . . . . . . . . . . . . . . . . . . . . . 49
Figure 4-10: Write-In Pop-Up Dialog . . . . . . . . . . . . . . . . . . . . . . . . . . . . . . . . . . . . . . . 50
Figure 4-11: Write-in Notification . . . . . . . . . . . . . . . . . . . . . . . . . . . . . . . . . . . . . . . . . . 50
Figure 4-12: Remove a Mark . . . . . . . . . . . . . . . . . . . . . . . . . . . . . . . . . . . . . . . . . . . . . . 51
Figure 4-13: Write-In Rejection List . . . . . . . . . . . . . . . . . . . . . . . . . . . . . . . . . . . . . . . . 51
Figure 4-14: Adjudicating with Contest Filtering . . . . . . . . . . . . . . . . . . . . . . . . . . . . . . 52
Figure 4-15: Non-Adjudicable Contest Notification . . . . . . . . . . . . . . . . . . . . . . . . . . . . 53
Figure 4-16: Confirm Ballot Save Dialog . . . . . . . . . . . . . . . . . . . . . . . . . . . . . . . . . . . . 53
Figure 4-17: Complete Ballot Adjudication Button . . . . . . . . . . . . . . . . . . . . . . . . . . . . 54
Figure 4-18: Ballot Quarantine Button . . . . . . . . . . . . . . . . . . . . . . . . . . . . . . . . . . . . . . 55
Figure 4-19: Quarantine Notes Dialog . . . . . . . . . . . . . . . . . . . . . . . . . . . . . . . . . . . . . . . 56
Figure 4-20: Start/Stop Receiving Ballots Toggle Button . . . . . . . . . . . . . . . . . . . . . . . . 57
Figure 4-21: Ballot Navigation for Administrators . . . . . . . . . . . . . . . . . . . . . . . . . . . . . 58
Figure 5-1: Digital Ballot Adjudication . . . . . . . . . . . . . . . . . . . . . . . . . . . . . . . . . . . . . . 60
Figure 5-2: Resolving a Write-In on a Digital Ballot . . . . . . . . . . . . . . . . . . . . . . . . . . . 61
Figure 5-3: Rejecting a Write-In on a Digital Ballot . . . . . . . . . . . . . . . . . . . . . . . . . . . . 62
11-CO::4 65 5/31/2019

ImageCast® Adjudication User Guide
5/31/2019 66 Version: 5.11-CO::4
LIST OF TABLES
Table 4-1: Shortcut Keys . . . . . . . . . . . . . . . . . . . . . . . . . . . . . . . . . . . . . . . . . . . . . 42

ImageCast® Adjudication User Guide
5/31/2019 67 Version: 5.11-CO::4
End of DocumentEnd of Document