ilmt installation guide · “masthead.afxm” will be created after clicking ok. ilmt installation...
TRANSCRIPT
ILMT Installation Guide
Accounting Enterprise
IBM License Matric Tool 9.2
Installation and Configuration Guide

ILMT Installation Guide
Accounting Enterprise
Contents 1 Before Starting ........................................................................................................ 3
1 Step-by-step installation of ILMT 9.2.0.2 on Windows 2008 R2 Server ........ 4
2 Manual scan configuration .......................................................................... 62
Activating the analyses ............................................................................... 62
Installing the scanner .................................................................................. 63
Initiating software scans .............................................................................. 64
Uploading software scan results ................................................................. 65
Initiating the capacity scan on all endpoints ................................................ 65
IBM Software Classification ......................................................................... 66
1. ERROR : If Airgap tool returns Error: Error parsing LicenseServerResponse XML document. ............................................................. 69
2. ERROR : Authentication – cannot be blank and is invalid ........................... 72
3. ERROR : Specified Database was not found .............................................. 74

ILMT Installation Guide
Accounting Enterprise
3
Before Starting These are ports involved during the installation for ILMT.
• 52311
• 52312
• 8083
• 50000
• 9081
• 1433
• 80
• 443
• 21
Sites involve when downloading files during installations:
• http://www.bigfix.com
• https://gatherer.bigfix.com
• https://sync.bigfix.com
• https://software.bigfix.com
• https://esync.bigfix.com
• https://support.bigfix.com

ILMT Installation Guide
Accounting Enterprise
4
1 Step-by-step installation of ILMT 9.2.0.2 on Windows 2008 R2 Server
1. Double click the SQL Server installer.
2.

ILMT Installation Guide
Accounting Enterprise
5
3.
4.

ILMT Installation Guide
Accounting Enterprise
6
5.
6.

ILMT Installation Guide
Accounting Enterprise
7
7.
8.

ILMT Installation Guide
Accounting Enterprise
8
9.
10.

ILMT Installation Guide
Accounting Enterprise
9
11.
12.

ILMT Installation Guide
Accounting Enterprise
10
13.
14. Installation of SQL Server 2014 is completed!
Let's continue with the installation of IEM 9.2. After you copy and extract the content of the 2 packages I mentioned above, run the IEM setup.

ILMT Installation Guide
Accounting Enterprise
11
15. Find the BigFix-BES installer.
16.

ILMT Installation Guide
Accounting Enterprise
12
17.
18.
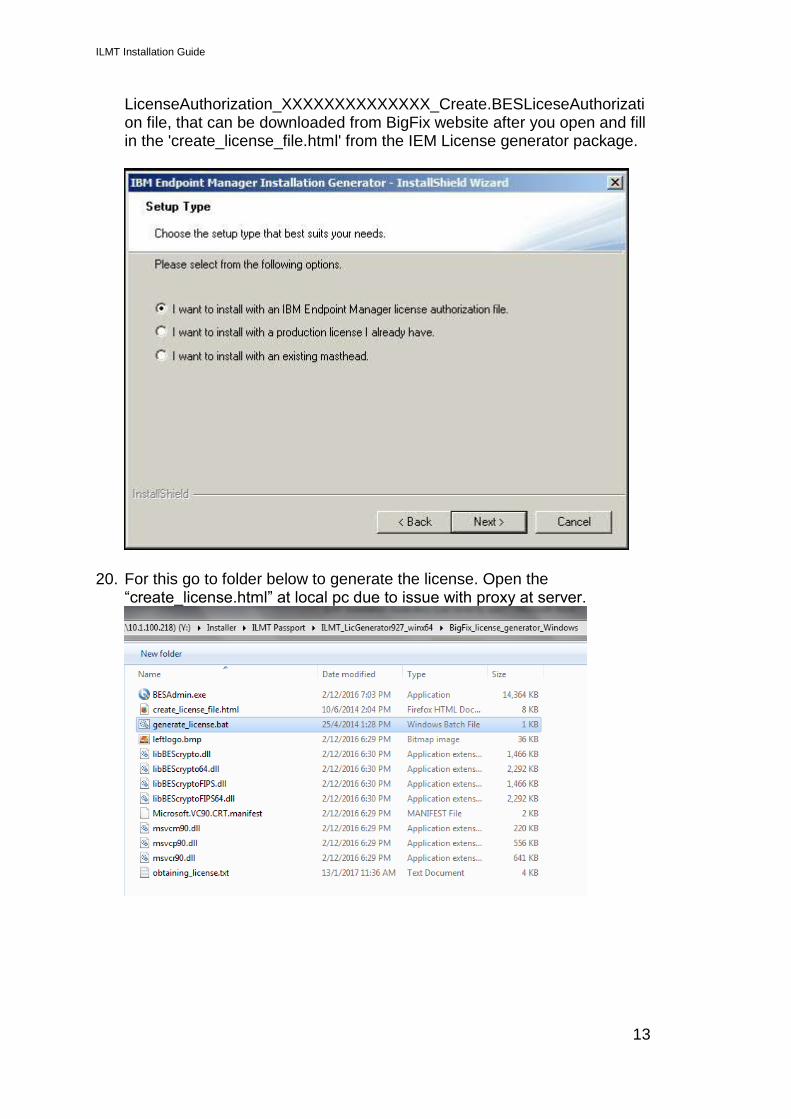
19. From this step, you have 2 possibilities. Either choose the first option and create the authorization file directly in the IEM installer or choose the second option (I want to install with a product license I already have) and in this case you need to use the license generator package (CN4HDML) and create the license separately, then add it to the installer. Either ways, you need to have the
ILMT Installation Guide
Accounting Enterprise
13
LicenseAuthorization_XXXXXXXXXXXXXX_Create.BESLiceseAuthorization file, that can be downloaded from BigFix website after you open and fill in the 'create_license_file.html' from the IEM License generator package.
20. For this go to folder below to generate the license. Open the “create_license.html” at local pc due to issue with proxy at server.

ILMT Installation Guide
Accounting Enterprise
14
21.
Copy the file generated and paste it at Server desktop
22. Double click “generate_license.bat”. Browse to the generated license authorization at Desktop.

ILMT Installation Guide
Accounting Enterprise
15
23.
24.
ILMT Installation Guide
Accounting Enterprise
16
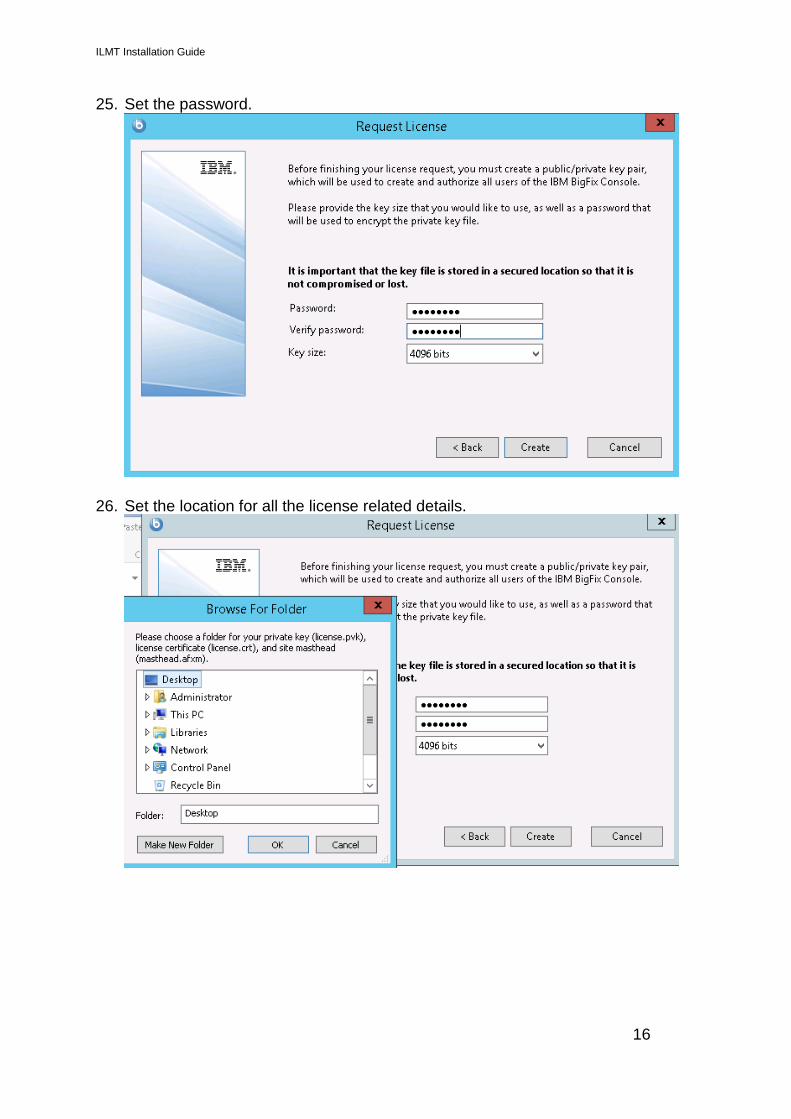
25. Set the password.
26. Set the location for all the license related details.

ILMT Installation Guide
Accounting Enterprise
17
27. Set the proxy.
28. Key in the proxy detail and test the connection.

ILMT Installation Guide
Accounting Enterprise
18
29. Select the 2nd option and click Request button. A
“request.BESLicenseRequest” will be generated. Copy the file to local PC.
30. Copy the URL and open it at local PC.

ILMT Installation Guide
Accounting Enterprise
19
31. Browse the “request.BESLicenseRequest” file. Submit.
32.

ILMT Installation Guide
Accounting Enterprise
20
33. Copy the “license.crt” to Server. Click Import. Browse to the cert file.
34.
“masthead.afxm” will be created after clicking OK.

ILMT Installation Guide
Accounting Enterprise
21
35.
36. *This is the option you use if you created the license authorization file separately.

ILMT Installation Guide
Accounting Enterprise
22
37. Just browse for the new created license.
38.

ILMT Installation Guide
Accounting Enterprise
23
39. If the license process completes successfully, you can continue the installation wizard.
40.

ILMT Installation Guide
Accounting Enterprise
24
41. Now the IEM install wizard is completed!
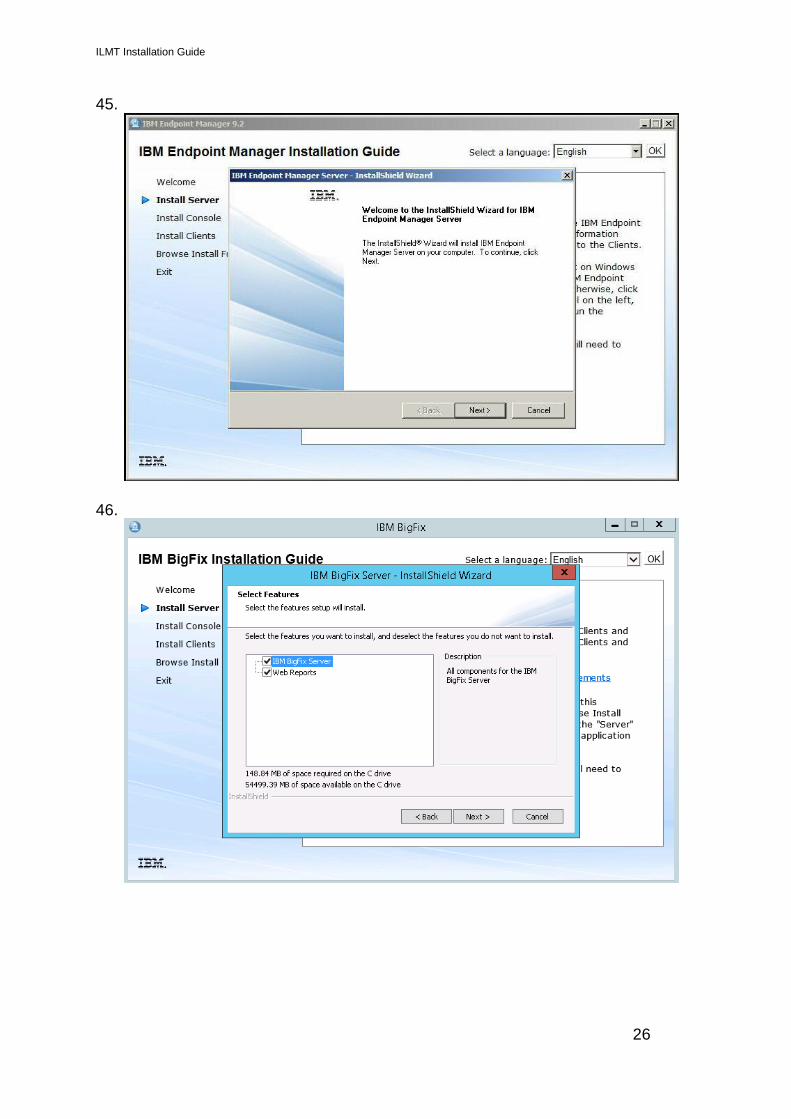
42. Let's deploy the IEM Server

ILMT Installation Guide
Accounting Enterprise
25
43.
44.
ILMT Installation Guide
Accounting Enterprise
26
45.
46.

ILMT Installation Guide
Accounting Enterprise
27
47.
48.

ILMT Installation Guide
Accounting Enterprise
28
49.
50.

ILMT Installation Guide
Accounting Enterprise
29
51.
52.

ILMT Installation Guide
Accounting Enterprise
30
53.
54.

ILMT Installation Guide
Accounting Enterprise
31
55.
56.

ILMT Installation Guide
Accounting Enterprise
32
57.

ILMT Installation Guide
Accounting Enterprise
33
58. IEM Server Installation is complete!
59. Installing the IEM Console
60.

ILMT Installation Guide
Accounting Enterprise
34
61.
62. Installing the BESClient

ILMT Installation Guide
Accounting Enterprise
35
63. Starting the IEM Console
64. IEM Server running for the first time

ILMT Installation Guide
Accounting Enterprise
36
65.

ILMT Installation Guide
Accounting Enterprise
37
66. Create a folder “Airgap” at Server Desktop
67. Run the “BESAirgapTool.exe” in Airgap folder.
68. After few minutes, the BigFix Management site appears

ILMT Installation Guide
Accounting Enterprise
38
69.
install-windowsfeature desktop-experience
Restart the server after complete.
70. Install windows update.

ILMT Installation Guide
Accounting Enterprise
39
71. Installation complete
72. From License Overview, we enable the ILMT site

ILMT Installation Guide
Accounting Enterprise
40
73. ILMT site appears in the console in a few minutes
74. Subscribe the computer to all. Save.

ILMT Installation Guide
Accounting Enterprise
41
75. Ensure there is subscribe computer in License Overview

ILMT Installation Guide
Accounting Enterprise
42
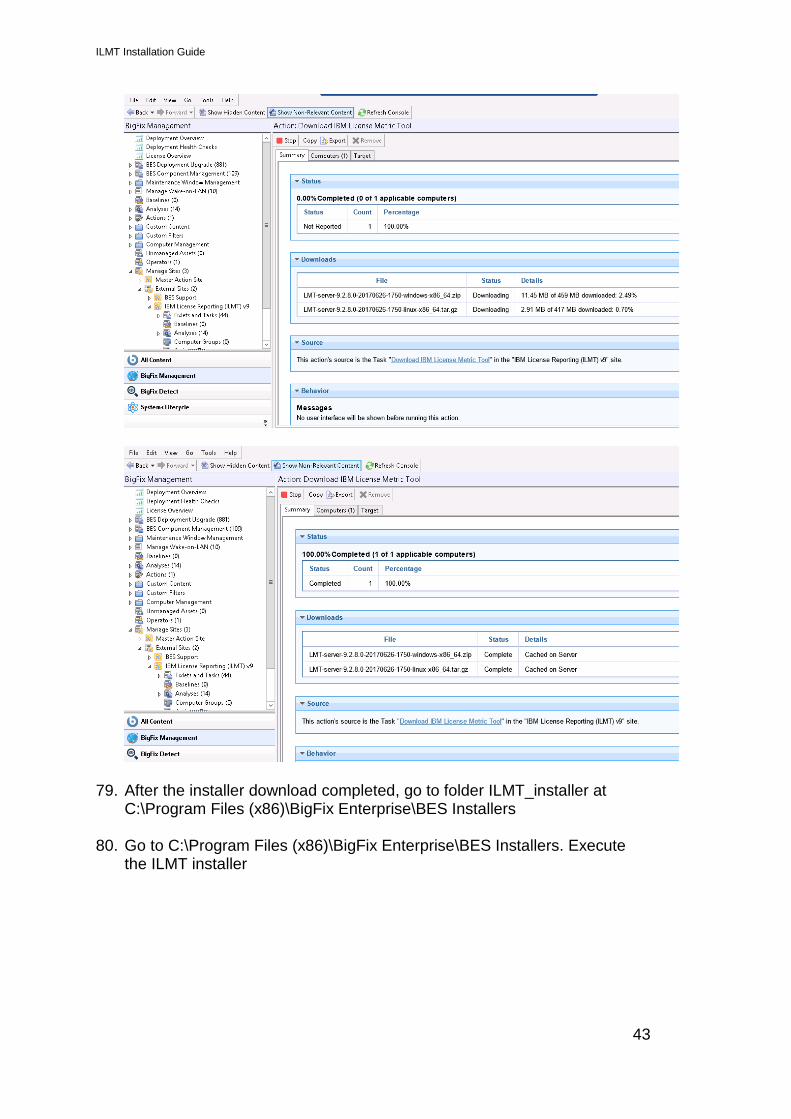
76. Go to Fixlets “Download IBM License Metric Tools and click ‘here’ to download the ILMT installer
77. Select the device. Click OK.
78. Wait till the installation is complete.
ILMT Installation Guide
Accounting Enterprise
43
79. After the installer download completed, go to folder ILMT_installer at C:\Program Files (x86)\BigFix Enterprise\BES Installers
80. Go to C:\Program Files (x86)\BigFix Enterprise\BES Installers. Execute the ILMT installer

ILMT Installation Guide
Accounting Enterprise
44

ILMT Installation Guide
Accounting Enterprise
45

ILMT Installation Guide
Accounting Enterprise
46
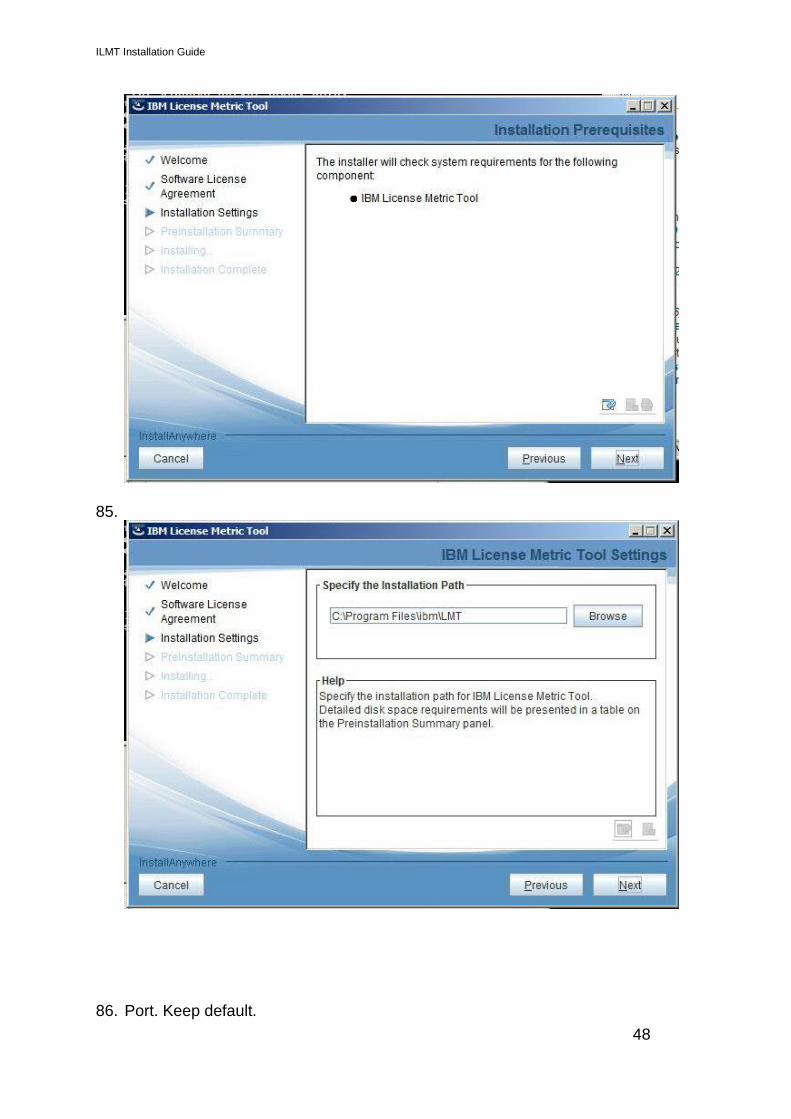
81. Install ILMT
82.

ILMT Installation Guide
Accounting Enterprise
47
83.
84.
ILMT Installation Guide
Accounting Enterprise
48
85.
86. Port. Keep default.

ILMT Installation Guide
Accounting Enterprise
49
87.
88.

ILMT Installation Guide
Accounting Enterprise
50
89.
90. ILMT Installation completed!

ILMT Installation Guide
Accounting Enterprise
51
91. Go to https://localhost:9081 / https://<servername>:9081/ Continue to this website.
92. Go to SQL Server Configuration Manager. Enable all TCP/IP listed.

ILMT Installation Guide
Accounting Enterprise
52
93. Stop and restart back the SQL Server(SQLEXPRESS)
94. Configuring ILMT UI
95. Open Microsoft SQL Server to configure the authentication.

ILMT Installation Guide
Accounting Enterprise
53
96. View Server properties

ILMT Installation Guide
Accounting Enterprise
54
97. Update the password for “sa” user.

ILMT Installation Guide
Accounting Enterprise
55
98. Ensure the setting as pic.

ILMT Installation Guide
Accounting Enterprise
56
99. Stop and restart back the SQL Server(SQLEXPRESS)
100. At ILMT webpage, select SQL Server Authentication. Key-in the authentication.
Host : Copy the name from SQL Management Studio. Right-click on server > Properties > Copy from the Name field.

ILMT Installation Guide
Accounting Enterprise
57
101.

ILMT Installation Guide
Accounting Enterprise
58
102. Confgure the Data Source
ILMT Installation Guide
Accounting Enterprise
59
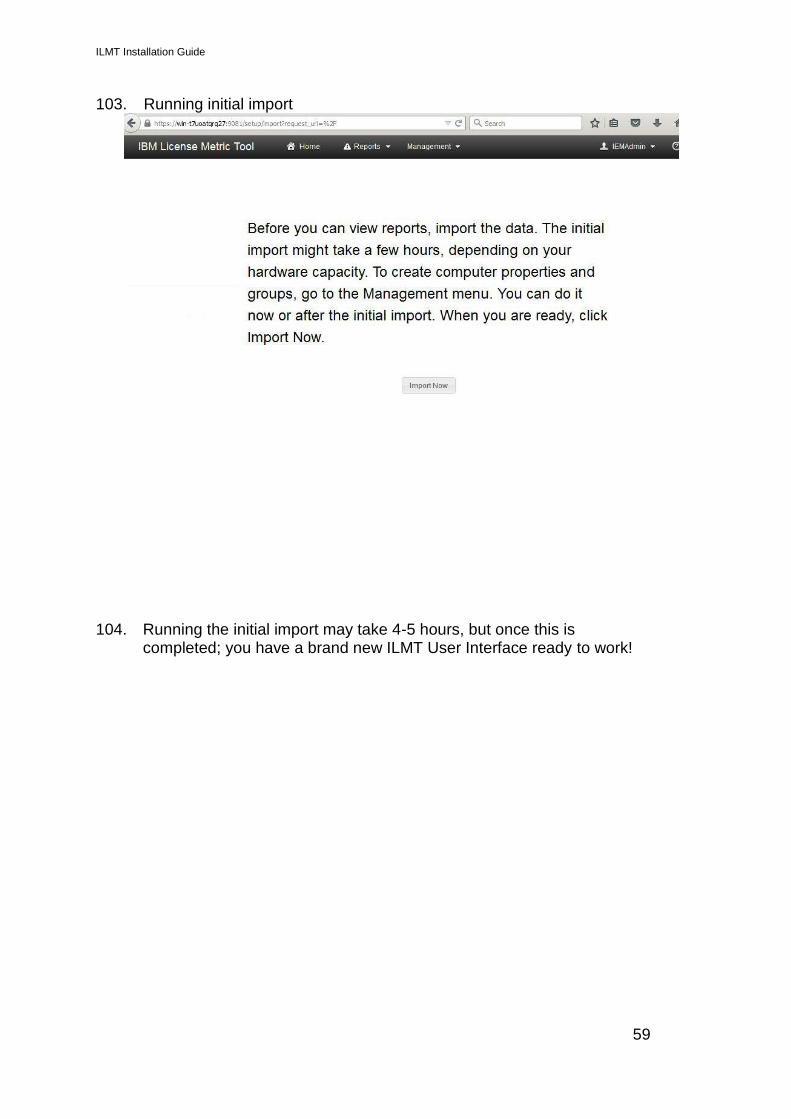
103. Running initial import
104. Running the initial import may take 4-5 hours, but once this is completed; you have a brand new ILMT User Interface ready to work!

ILMT Installation Guide
Accounting Enterprise
60
------------
105. If the import failed. Manually upload software catalog.
106. Log in to the BigFix console. In the navigation tree, click Sites > External Sites > IBM License Reporting (ILMT) > Fixlets and Tasks and select Software Catalog Update.

ILMT Installation Guide
Accounting Enterprise
61
107. Click Take Action. Wait until finish download. 108. Go to folder where the software catalog is downloaded. Check if the
files exist.
https://www.ibm.com/support/knowledgecenter/en/SS8JFY_9.0.0/com.ibm.lmt.doc_9.0/com.ibm.license.mgmt.doc/planinconf/t_download_sw_catalog_tem_conf.html
109. Upload the catalog to the IBM License Metric Tool server. Log in to IBM License Metric Tool and go to Management > Catalog Upload.
110. Click Browse and locate the catalog file that you downloaded. 111. To upload the file, click Upload. During the next import, the file is
processed and scanner catalogs that are used to discover software are created.
112. Start Import.

ILMT Installation Guide
Accounting Enterprise
62
2 Manual scan configuration Activating the analyses
1. Log in to the BigFix console. 2. In the navigation tree, click Sites > External Sites > IBM License
Reporting (ILMT) > Analyses. 3. To activate an analysis, right-click it, and click Activate.
To ensure that the installed software is properly detected, activate the following analyses on all computers in your infrastructure:
• Installed UNIX Packages • Installed Windows Applications • Software Scan Status

ILMT Installation Guide
Accounting Enterprise
63
Installing the scanner
4. Log in to the BigFix console. 5. In the navigation bar, click Sites > External Sites > IBM License
Reporting (ILMT) > Fixlets and Tasks. 6. In the upper right pane, select Install or Upgrade Scanner. 7. Select the installation directory. You can choose the default directory, or
an alternative one. In the latter case, the scanner is installed in the same path as the BigFix client.
8. Click Take Action.

ILMT Installation Guide
Accounting Enterprise
64
Tip: To ensure that the action is applied on all computers that are added in the future, select Dynamically target by property.
Initiating software scans 1. Log in to the BigFix console. 2. In the navigation tree, click Sites > External Sites > IBM License Reporting
(ILMT) > Fixlets and Tasks. 3. Select Initiate Software Scan. 4. In the lower pane, select the types of scans that you want to initiate.
Different types of scans search for different types of information to determine whether the software is installed. Generally, all types of scans should be run regularly. However, you can choose to run different types of scans at different times or distribute the scan schedule over the computers in your environment to improve the performance of the import.
5. Optional: To limit the amount of processor resources that the scanner consumes, select Initiate the software scan with CPU threshold. Specify the consumption limit that is in the range 5 - 100. The higher value you specify, the higher is the consumption limit. For example, if you specify 75, scanner processes use up to 75% of the processing power of the target computer.
6. Select the computers on which you want to initiate the scans. 7. If you want to specify the dates and frequency of the scans, open the
Execution tab. Specify the details, and click OK.

ILMT Installation Guide
Accounting Enterprise
65
Uploading software scan results
1. Log in to the BigFix console. 2. In the navigation tree, click Sites > External Sites > IBM License Reporting
(ILMT) > Fixlets and Tasks. 3. In the upper right pane, select Upload Software Scan Results, and then in
the lower pane, click Take Action.
4. Select computers from which you want to upload software scan results. 5. Open the Execution tab. Specify the details, and click OK.
Initiating the capacity scan on all endpoints
1. Log in to the BigFix console.

ILMT Installation Guide
Accounting Enterprise
66
2. In the navigation tree, click Sites > External Sites > IBM License Reporting (ILMT) > Fixlets and Tasks and select Run Capacity Scan and Upload Results.
3. In the lower pane, click Take Action, and choose Click here to schedule regular capacity scans and uploads of results.
4. Open the Target tab and select the computers that you want to scan. 5. When the scan completes successfully, scan results are automatically
uploaded to the BigFix server. https://www.ibm.com/support/knowledgecenter/SS8JFY_9.2.0/com.ibm.lmt.doc/Inventory/planinconf/c_manual_scan_configuration.html
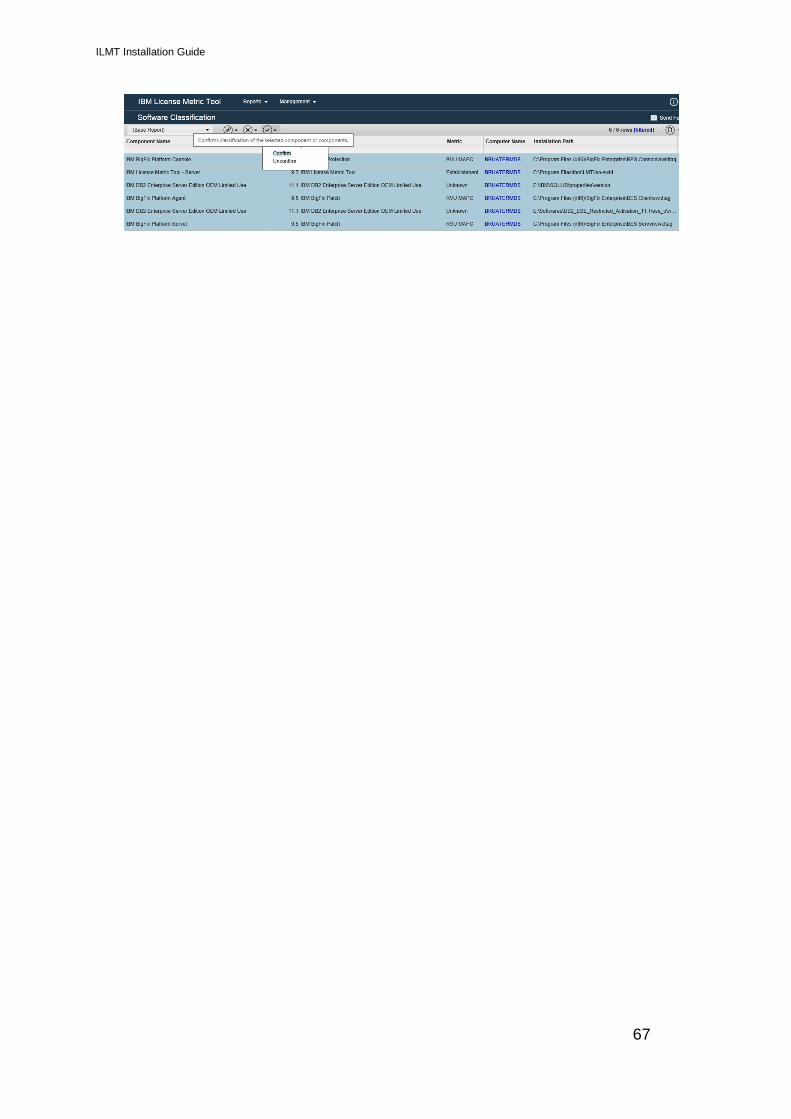
IBM Software Classification
1. Log in to the ILMT. Click Pending link. 2. Select all the component and confirm it.
ILMT Installation Guide
Accounting Enterprise
67

ILMT Installation Guide
Accounting Enterprise
68

ILMT Installation Guide
Accounting Enterprise
69
1. ERROR : If Airgap tool returns Error: Error parsing LicenseServerResponse XML document.
This will affect the BigFix management site from showing on BigFix console. Solution:
i) Open BES Admin at C:\Program Files (x86)\BigFix
Enterprise\BES Server > Security tab. Check whether the
license has been gathered. If there are warning as picture, try
clicking on the link Gather license now. If there is popup
indicating the error, it means the license and the files cannot be
downloaded. Check the proxy and ports opened for the server.
ii) If the BES Admin doesn’t shows such warnings and AirGap tool
still returns the same error. Check GatherDB at log C:\Program
Files (x86)\BigFix Enterprise\BES Server\GatherDBData . See
the log and check the problem. If the error shown as below, the
proxy is blocking the files to be downloaded. Check the proxy
and ports opened for the server.
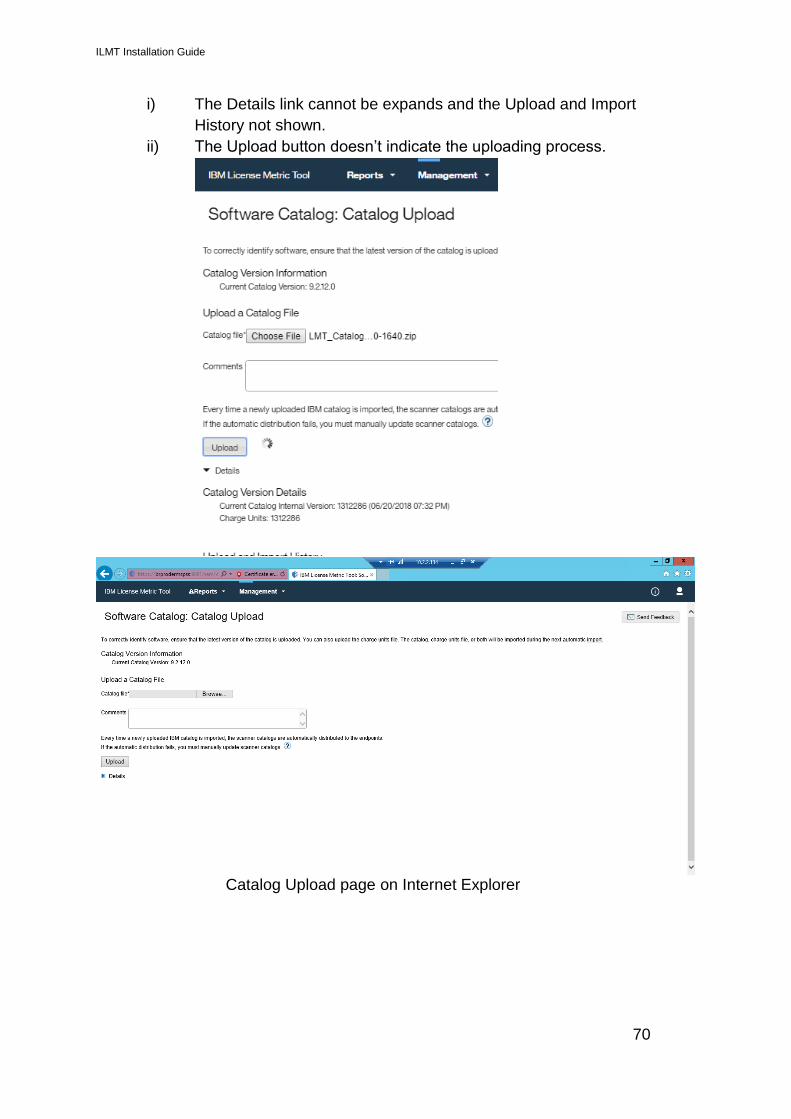
Note : IBM License Metric Tool is not compatible with Internet Explorer. There are some button and functions might not functioned properly. Thus, ensure to install Google Chrome and use Google Chrome as browser to run IBM License Metric Tool. Ie :
ILMT Installation Guide
Accounting Enterprise
70
i) The Details link cannot be expands and the Upload and Import
History not shown.
ii) The Upload button doesn’t indicate the uploading process.
Catalog Upload page on Internet Explorer

ILMT Installation Guide
Accounting Enterprise
71
Catalog Upload page on Google Chrome

ILMT Installation Guide
Accounting Enterprise
72
2. ERROR : Authentication – cannot be blank and is invalid
When filling the form to build the database, the Authentication doesn’t need to be filled as it is signing in as Windows Authentication. However, despite of choosing Windows Authentication, if the error is still coming out, check again the Security status of the database in SQL Management Studio. Solution: Right click on the server > Properties > Security > Follow the instruction #98 in ILMT Installation Guide 2.0

ILMT Installation Guide
Accounting Enterprise
73

ILMT Installation Guide
Accounting Enterprise
74
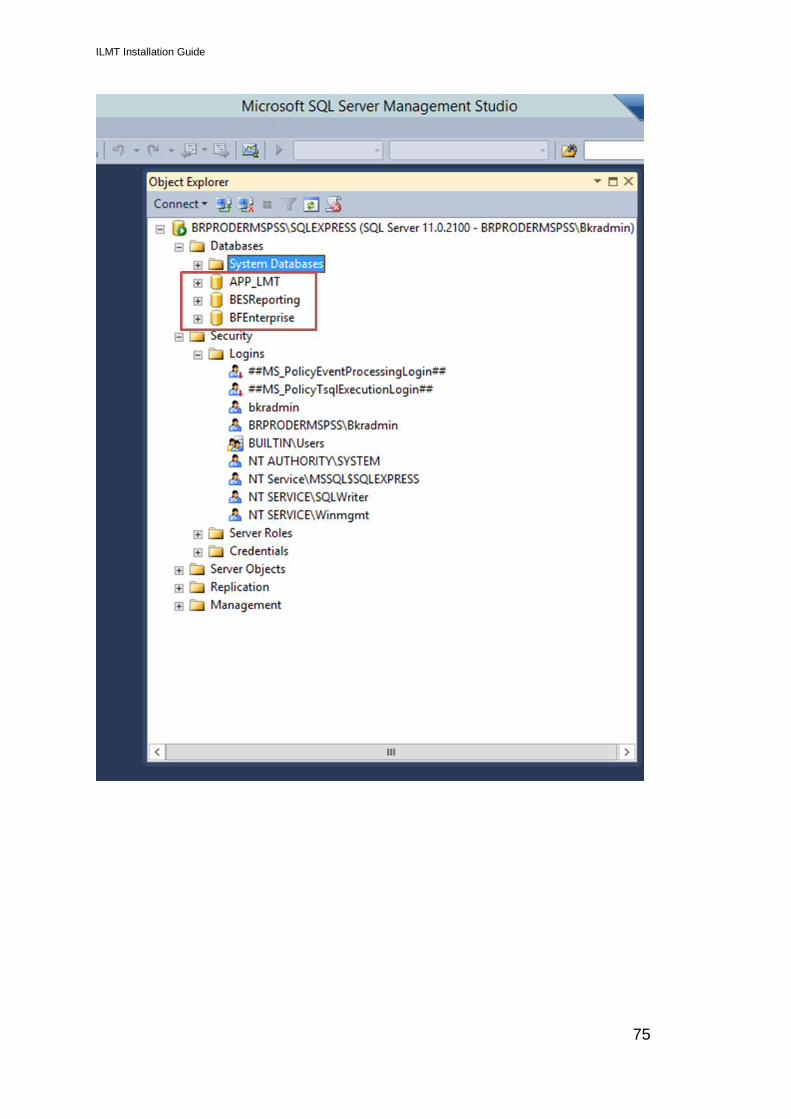
3. ERROR : Specified Database was not found
This error appears indicating there are errors during BigFix installation. The databases were already exists before the installation finished. This happens when the installed BigFix is re-installed but the databases were not deleted before the installation. Thus, when the reinstallation of BigFix is running, the database cannot be created (as there is database with the same name existed). As a result, the database cannot be detected by the server. Solution: Uninstall all BigFix > Delete all the databases > Re-install the BigFix Notes : Ensure all databases are deleted before re-install the BigFix. To delete, right click on the selected database, and click delete.
ILMT Installation Guide
Accounting Enterprise
75

ILMT Installation Guide
Accounting Enterprise
76
In a case of file cannot be downloaded, check whether the proxy or your internet connection has no restrictions to access to http://www.bigfix.com . To check, click the [+] Download error button, and copy the URL indicated. Paste on the browser and see if any file is downloading or not. If the file cannot be downloaded, this shows that there are restrictions on the proxy ports and internet connections.
Ensure all the files are successfully downloaded. Indicator : Cached on server. And the status will turn Status: Completed

ILMT Installation Guide
Accounting Enterprise
77
After enabling ILMT site, there are few minutes of waiting time before IBM License Metric tool fixlet can be downloaded. On Computer Subscriptions tab, all buttons for computer subscriptions is disabled by default. After the waiting time passed, the button will be enable for you to change the setting.

ILMT Installation Guide
Accounting Enterprise
78
This error would appear if the database of SQL Server is not in the same drive as BigFix server installation folders. Hence, always ensure both installation path are inside C:/ Drive. Installing both inside D: Drive might causing the database cannot be connected with BigFix server as some files on SQL Server installation would need to installed in C: drive for it to be working properly. Reference: https://www.mcbsys.com/blog/2017/07/install-sql-2016-with-data-on-a-separate-drive/

ILMT Installation Guide
Accounting Enterprise
79
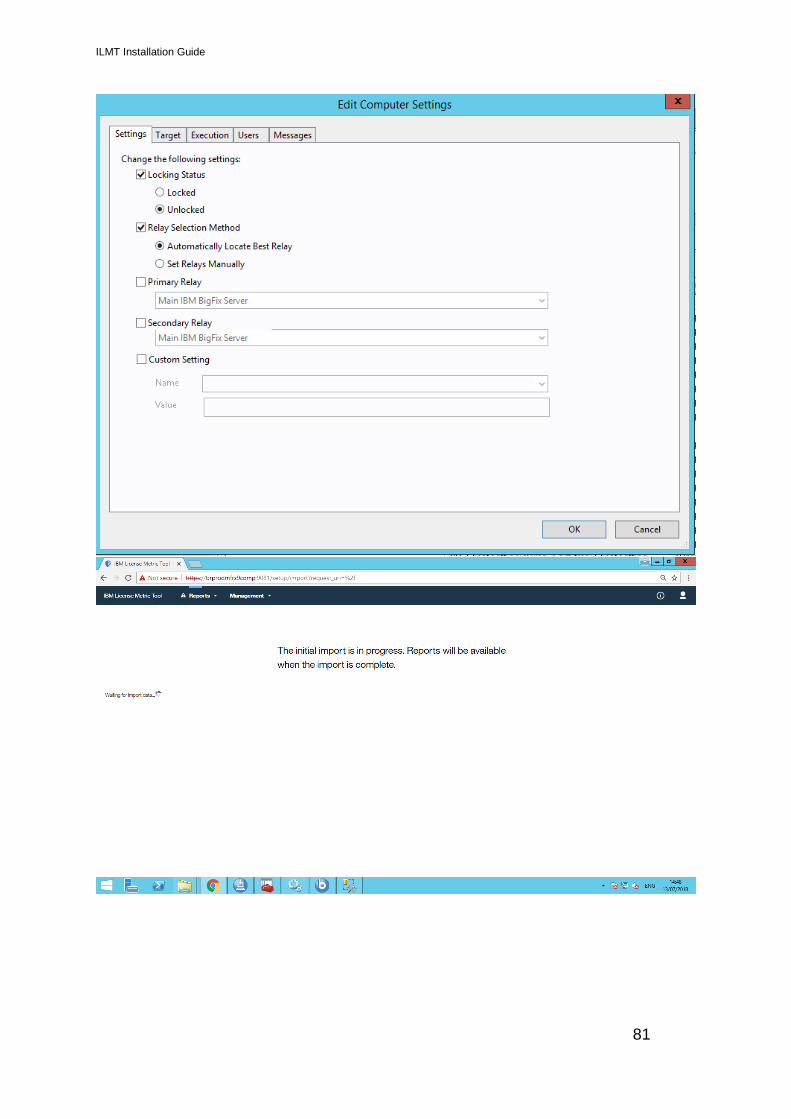
Subscribed computers should turns 1 for all fixlets are installed properly. Usually, it will turn 1 once the ILMT is finished installing. However, in a case when it doesn’t turn 1, a computer setting should be changed.

ILMT Installation Guide
Accounting Enterprise
80
On All content, click on Computers on navigation panel. Right-click on your current computer, choose Edit Computer Settings > More Options > Enable Locking Status > Unlocked > OK.
ILMT Installation Guide
Accounting Enterprise
81

ILMT Installation Guide
Accounting Enterprise
82

ILMT Installation Guide
Accounting Enterprise
83
Reference: Sites information: http://www-01.ibm.com/support/docview.wss?uid=swg22010333 Ports information: https://www.ibm.com/support/knowledgecenter/en/SS8JFY_9.2.0/com.ibm.lmt.doc/Inventory/planinconf/r_port_requirements.html https://www.ibm.com/developerworks/community/wikis/home?lang=en#!/wiki/Tivoli+Endpoint+Manager/page/Network+Traffic+Guide