il519010en define gyp/fsr 122-125 installation … · cut hole in gypsum board (or other substrate)...
TRANSCRIPT

INS #
Brand Logo reversed out of black
INS #IL519027EN
Installation Instructions – Define Gen 2 GYP/FSR S122-S125
WARNINGRISK OF ELECTRIC SHOCK—Disconnect power at fuse or circuit breaker before installing or servicing.
WARNINGRisk of fire/electric shock. If not qualified, consult an electrician.
WARNINGRisk of fire or electric shock. Fixture wiring, driver, or other electrical parts may be damaged during installation. Check enclosed wiring and components.
WARNINGRISK OF PERSONAL INJURY - Fixture may become damaged and/or unstable if not installed properly.
NOTE: This product must be installed in accordance with the applicable installation code by a certified electrician familiar with the construction and operation of the product and hazards involved.
NOTE: Only those open holes indicated in the photographs and/or drawings may be made or altered as a result of kit installation. Do not leave any other open holes in an enclosure of wiring or electrical components.
NOTE: To prevent wiring damage or abrasion, do not expose wiring to edges of sheet metal or any sharp objects.
NOTE: Disconnect all power before proceeding.
Neo-Ray
2 EATON IL519027EN Installation instructions
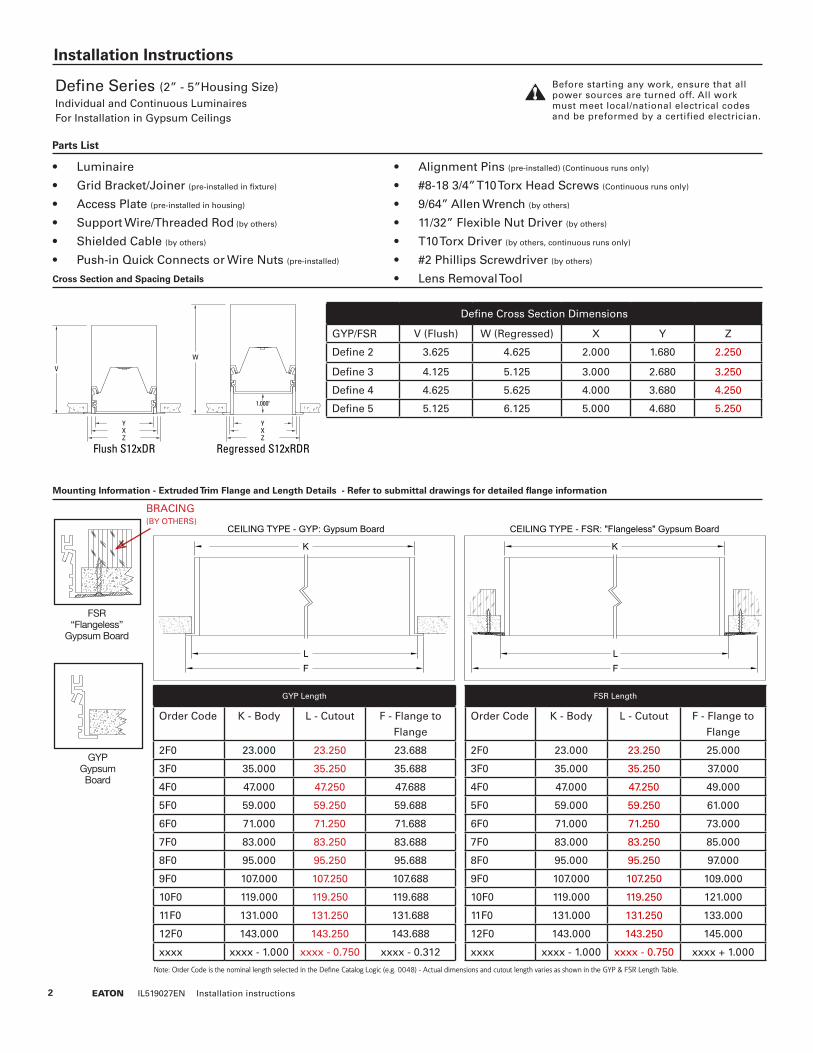
Before starting any work, ensure that all power sources are turned off. All work must meet local/national electrical codes and be preformed by a certified electrician.
Cross Section and Spacing Details
Parts List
• Luminaire
• Grid Bracket/Joiner (pre-installed in fixture)
• Access Plate (pre-installed in housing)
• Support Wire/Threaded Rod (by others)
• Shielded Cable (by others)
• Push-in Quick Connects or Wire Nuts (pre-installed)
• Alignment Pins (pre-installed) (Continuous runs only)
• #8-18 3/4” T10 Torx Head Screws (Continuous runs only)
• 9/64” Allen Wrench (by others)
• 11/32” Flexible Nut Driver (by others)
• T10 Torx Driver (by others, continuous runs only)
• #2 Phillips Screwdriver (by others)
• Lens Removal Tool
Mounting Information - Extruded Trim Flange and Length Details - Refer to submittal drawings for detailed flange information
Installation Instructions
Define Series (2” - 5”Housing Size)Individual and Continuous Luminaires For Installation in Gypsum Ceilings
Define Cross Section Dimensions
GYP/FSR V (Flush) W (Regressed) X Y Z
Define 2 3.625 4.625 2.000 1.680 2.250
Define 3 4.125 5.125 3.000 2.680 3.250
Define 4 4.625 5.625 4.000 3.680 4.250
Define 5 5.125 6.125 5.000 4.680 5.250
BRACING (BY OTHERS)
K
L
CEILING TYPE - GYP: Gypsum Board
F
K
LF
CEILING TYPE - FSR: "Flangeless" Gypsum Board
GYP Length
Order Code K - Body L - Cutout F - Flange to
Flange
2F0 23.000 23.250 23.688
3F0 35.000 35.250 35.688
4F0 47.000 47.250 47.688
5F0 59.000 59.250 59.688
6F0 71.000 71.250 71.688
7F0 83.000 83.250 83.688
8F0 95.000 95.250 95.688
9F0 107.000 107.250 107.688
10F0 119.000 119.250 119.688
11F0 131.000 131.250 131.688
12F0 143.000 143.250 143.688
xxxx xxxx - 1.000 xxxx - 0.750 xxxx - 0.312
FSR Length
Order Code K - Body L - Cutout F - Flange to
Flange
2F0 23.000 23.250 25.000
3F0 35.000 35.250 37.000
4F0 47.000 47.250 49.000
5F0 59.000 59.250 61.000
6F0 71.000 71.250 73.000
7F0 83.000 83.250 85.000
8F0 95.000 95.250 97.000
9F0 107.000 107.250 109.000
10F0 119.000 119.250 121.000
11F0 131.000 131.250 133.000
12F0 143.000 143.250 145.000
xxxx xxxx - 1.000 xxxx - 0.750 xxxx + 1.000
Note: Order Code is the nominal length selected in the Define Catalog Logic (e.g. 0048) - Actual dimensions and cutout length varies as shown in the GYP & FSR Length Table.
GYPGypsum Board
FSR“Flangeless”
Gypsum Board
Flush S12xDRZ
V
XY
Z
W
XY
Regressed S12xRDR
1.000"

3 EATON IL519027EN Installation instructions
3
Remove 1/4” knockouts to line up with threaded rods.FOR FSR ONLY: Using (2) 8-32 screws from the LED tray assembly, install aperture guide snugly to ensure housing opening does not open or close during installation. NOTE: This will be removed prior to reinstalling the lens.
Secure shielded cable to access plate. Reinstall access plate pulling wiring through housing and lift fixture into cutout.
5
Draw fixture tight to ceiling using 1/4” tie rods through the appropriate knockouts on fixture housing. Tighten nuts until flange is snug with ceiling. NOTE: FSR must be secured with tie-rod.
Hex Nut
1/4-20 All Thread
Power Feed
6
Wiring should enter fixture housing as shown. Tie rods extend into housing and are secured with nuts. Enure threaded rod does not interfere with LED tray assembly. Trim threaded rod if necessary.
4
Flexible Conduit1/4-20 Threaded Rod
Z
L1
Prior to drywall installation: Install shielded cable to accommodate electrical feed point on first fixture. Install 1/4-20 tie rods in specified locations as shown on factory submittal drawings. Cut hole in gypsum board (or other substrate) as specified on factory submittal drawing (dimensions “Z” & “L”). NOTE: FSR requires bracing around opening to secure flange. Follow local building code.
Remove Lens
Remove Pan Assembly
2
Prior to installing fixture: Remove top access plate. Turn fixture over and remove lens using lens removal tool per lens instruction provided. Remove screws and carefully lift LED tray assembly from housing frame. Disconnect wire-harness quick connects and store pan assembly in a safe place. Lens diffusers do not need to be removed from pan assembly. Repeat for each LED Tray.

4 EATON IL519027EN Installation instructions
Insert Torx Head Screwinto Joiner
Drive Torx Head Screw into Joiner to Hold Fixtures Together
Connect Wiring harness
9
FOR CONTINUOUS ROWS: Insert torx head into joiner and drive screw into housing to hold fixtures together. Ensure there are no gaps between fixtures and joint is secure.
Make appropriate wire connections between fixture housings using provided push in connectors.
11a
FOR FSR ONLY: Drill pilot holes along fixture(s) and through bracing shown above. One screw every 2 feet is recommended.
Structure(by Others)
FOR FSR ONLY: Drive screws (provided by others) through fixture flange into structure as shown. Size and length of screws deter-mined by local building code.
10
11b
Alignment Pin
Joiner
8
FOR CONTINUOUS ROWS: Repeat step 2 (and 3 for FSR) to prepare fixture. Slide fixtures together ensuring alignment pins are in the correct position.
Push Nuts
7
Connect feed wiring to fixture through wiring via push-in quick con-
nects or wire nuts.

5 EATON IL519027EN Installation instructions
Acrylic Diffuser
Reinstall acrylic diffuser by squeezing one end, inserting that end into the fixture opening and slowly pressing the diffuser into the housing along the length of the lens until it snaps into place. For continu-ous runs, ensure seams of adjacent lenses are touching to avoid light leak. Diffuser film should not require re-installation, however, if required, insert tabs into the slots of the LED tray assembly with the shiny side facing toward the LED array.
Installation is complete.
14
Replace Pan Assembly
With fixture securely secured in opening, reconnect the first tray assembly to the power feed. Carefully tuck all wiring back into fixture. Reinstall screws to secure tray assembly back into housing. Continue reinstalling additional LED tray assemblies in the same manner using the quick disconnects pre-installed on the LED tray.
Remove Apeture Bracketafter Joint Compound has cured
12”
FOR FSR ONLY: Apply a generous amount of joint compound to fixture flange and “feather” at least 12” from fixture aperture. Ensure compound has properly cured before removing aperture bracket.
12 13
Insert Lens Removal Tool as shown, biased towardone side of the lens. Lifting from center of lens maycause lens to crack.
Tilt Lens Removal Tool asshown and gently pry lensup. Complete lens removalby hand.
Lens Removal

Eaton1121 Highway 74 SouthPeachtree City, GA 30269P: 770-486-4800www.eaton.com/lighting
Canada Sales 5925 McLaughlin RoadMississauga, Ontario L5R 1B8P: 905-501-3000F: 905-501-3172
© 2018 EatonAll Rights ReservedPrinted in USAImprimé aux États-UnisImpreso en los EE. UU.Publication No. IL519027ENJune 25, 2018
Eaton is a registered trademark.All trademarks are property of their respective owners.
Eaton est une marque de commercedéposée. Toutes les autres marques de commerce sont la propriété de leur propriétaire respectif.
Eaton es una marca comercialregistrada. Todas las marcas comerciales son propiedad de sus respectivos propietarios.
Product availability, specifications, and compliances are subject to change without notice
La disponibilité du produit, les spécifications et les conformités peuvent être modifiées sans préavis
La disponibilidad de productos, las especificaciones y los cumplimientos están sujetos a cambio sin previo aviso
Warranties and Limitation of LiabilityPlease refer to www.eaton.com/LightingWarrantyTerms for our terms and conditions.
Garanties et limitation de responsabilitéVeuillez consulter le site www.eaton.com/LightingWarrantyTerms pour obtenir les conditions générales.
Garantías y Limitación de ResponsabilidadVisite www.eaton.com/LightingWarrantyTerms para conocer nuestros términos y condiciones.