ibm tivoli identity manager: server installation guide...
TRANSCRIPT
IBM Tivoli Identity Manager
Server Installation Guide on Windows2000 using WebSphereVersion 4.5.0
SC32-1148-01
���


IBM Tivoli Identity Manager
Server Installation Guide on Windows2000 using WebSphereVersion 4.5.0
SC32-1148-01
���

Note:Before using this information and the product it supports, read the information in Appendix H, “Notices”, on page 131.
Second Edition (September 2003)
This edition applies to version 4.5.0 of Tivoli Identity Manager and to all subsequent releases and modificationsuntil otherwise indicated in new editions.
© Copyright International Business Machines Corporation 2003. All rights reserved.US Government Users Restricted Rights – Use, duplication or disclosure restricted by GSA ADP Schedule Contractwith IBM Corp.

Contents
Preface . . . . . . . . . . . . . . viiWho Should Read This Book . . . . . . . . viiPublications . . . . . . . . . . . . . . vii
Tivoli Identity Manager Server Library . . . . viiPrerequisite Product Publications . . . . . . viiiRelated Publications . . . . . . . . . . viiiAccessing Publications Online . . . . . . . ix
Accessibility . . . . . . . . . . . . . . ixContacting Software Support. . . . . . . . . ixConventions Used in This Book . . . . . . . . ixInstallation Directory Conventions . . . . . . . x
Chapter 1. Introduction . . . . . . . . 1Hardware and Software Requirements . . . . . . 1Product Compact Discs . . . . . . . . . . . 1
Chapter 2. Configuration Overview . . . 3WebSphere Application Server Terminology . . . . 3Single-Server Configurations . . . . . . . . . 4Cluster Configurations for Tivoli Identity Manager . 6
Tivoli Identity Manager Server Tiers . . . . . 7Single-cluster Configuration . . . . . . . . 7Functional Cluster Configuration . . . . . . 8Java Message Service and Other Server Processes 10WebSphere Environment Limitations using TivoliIdentity Manager . . . . . . . . . . . 10
Chapter 3. Database Configuration. . . 11IBM DB2 Configuration . . . . . . . . . . 11
Ensuring Communication and Configuring theServer . . . . . . . . . . . . . . . 11Configuring the IBM DB2 JDBC Driver . . . . 14Configuring IBM DB2 Version 7.1 and 7.2 for aJDBC Type 2 Driver . . . . . . . . . . 15Example: Expanding Values for DB2 . . . . . 15
Oracle Installation and Configuration for TivoliIdentity Manager . . . . . . . . . . . . 16
Preparing to Install Oracle on AIX . . . . . . 16Preparing to Install Oracle on Solaris . . . . . 18Preparing to Install Oracle on Windows . . . . 19Configuring Oracle after Installation . . . . . 19
SQL Server 2000 Configuration . . . . . . . . 20Preparing to Install SQL Server 2000 . . . . . 20Configuring SQL Server 2000 after Installation. . 20
Chapter 4. Directory ServerConfiguration . . . . . . . . . . . . 23IBM Directory Server Configuration . . . . . . 23
Specify the Suffix for Tivoli Identity Manager . . 24Configure the Referential Integrity Plug-in forTivoli Identity Manager . . . . . . . . . 24Restart the Directory Server . . . . . . . . 25Create the LDAP Suffix Object . . . . . . . 26
Using Version 5.1 and WebSphere ApplicationServer on the Same Computer . . . . . . . . 27Sun ONE Directory Server Configuration . . . . 28
Chapter 5. Single-server Installation:Tivoli Identity Manager Server. . . . . 31Before You Begin . . . . . . . . . . . . 31Resolving Port Problems . . . . . . . . . . 33Information Worksheet for Single-Server Installation 34
Database Information . . . . . . . . . . 34Directory Server Information . . . . . . . 35WebSphere Application Server Information forSingle-Server Installation . . . . . . . . . 36WebSphere Embedded Messaging Server andClient . . . . . . . . . . . . . . . 37IBM HTTP Server Information . . . . . . . 38Tivoli Identity Manager Information . . . . . 38
Installing Tivoli Identity Manager Server . . . . 38Navigate Initial Welcome and LicensingWindows . . . . . . . . . . . . . . 40Select the Installation Type and InstallationDirectory . . . . . . . . . . . . . . 41Select the Database . . . . . . . . . . . 41Complete the Windows for a Single-serverInstallation . . . . . . . . . . . . . 41Specify WebSphere Global Security . . . . . 43Specify an Encryption Key and Read thePre-Installation Summary . . . . . . . . . 45Installation Progress and AdditionalConfiguration Activities . . . . . . . . . 46Logs and Directories for Single-Server Installation 52Complete Security Configuration . . . . . . 53Using runConfig after Installing Tivoli IdentityManager . . . . . . . . . . . . . . 53Optionally Installing a Language Pack . . . . 53
Testing Tivoli Identity Manager ServerCommunication . . . . . . . . . . . . . 54Server-Agent Communication . . . . . . . . 55
Chapter 6. Cluster Installation: TivoliIdentity Manager Server . . . . . . . 57Before You Begin . . . . . . . . . . . . 57
Resolving Port Problems . . . . . . . . . 58Creating Clusters Using Network DeploymentManager . . . . . . . . . . . . . . 59
Information Worksheet for Cluster Installation. . . 60Database Information . . . . . . . . . . 60Directory Server Information . . . . . . . 61WebSphere Application Server Information forCluster Installation . . . . . . . . . . . 62Tivoli Identity Manager Information . . . . . 63
Installing Tivoli Identity Manager Server . . . . 64Navigate Initial Welcome and LicensingWindows . . . . . . . . . . . . . . 65
© Copyright IBM Corp. 2003 iii

Select the Installation Type and DefaultInstallation Directory . . . . . . . . . . 66Select the Database . . . . . . . . . . . 67Complete the Sequence for Cluster Installation 67Specify WebSphere Global Security . . . . . 71Specify an Encryption Key and Read thePre-Installation Summary . . . . . . . . . 73Installation Progress and AdditionalConfiguration Activities . . . . . . . . . 74Logs and Directories for Cluster Installation . . 80Complete Security Configuration . . . . . . 81Using runConfig after Installing Tivoli IdentityManager . . . . . . . . . . . . . . 81Optionally Installing a Language Pack . . . . 81Optionally, Define HTTP Session Persistence . . 82Verify Transaction Service Settings . . . . . . 82
Update the Web Server Plug-in . . . . . . . . 82Start Clusters . . . . . . . . . . . . . . 82Testing Tivoli Identity Manager ServerCommunication . . . . . . . . . . . . . 82Server-Agent Communication . . . . . . . . 84Adding or Removing Cluster Members . . . . . 84
Expanding a Cluster Using a New Computer . . 84Expanding a Cluster Using the Same Computer 85Removing a Cluster Member . . . . . . . 85
Appendix A. Compact Discs . . . . . 87Recommended WebSphere Interim Fix PQ77521 Noton CDs . . . . . . . . . . . . . . . . 87Language Packs CD . . . . . . . . . . . 87Base Code Solaris CD for Tivoli Identity Managerusing WebSphere Application Server . . . . . . 87Base Code Solaris CD for Tivoli Identity Managerfor non-IBM Application Servers . . . . . . . 88Supplemental Solaris CD 1 . . . . . . . . . 88Supplemental Solaris CD 2 . . . . . . . . . 88Supplemental Solaris CD 3 . . . . . . . . . 89Supplemental Solaris CD 4 . . . . . . . . . 89Base Code AIX CD for Tivoli Identity Managerusing WebSphere Application Server . . . . . . 89Base Code AIX CD for Tivoli Identity Manager fornon-IBM Application Servers . . . . . . . . 89Supplemental AIX CD 1 . . . . . . . . . . 89Supplemental AIX CD 2 . . . . . . . . . . 90Supplemental AIX CD 3 . . . . . . . . . . 90Base Code HP-UX CD for Tivoli Identity Managerfor non-IBM Application Servers . . . . . . . 91Base Code Windows 2000 CD for Tivoli IdentityManager using WebSphere Application Server . . . 91Base Code Windows 2000 CD for Tivoli IdentityManager for non-IBM Application Servers . . . . 91Supplemental Windows 2000 CD 1 . . . . . . 91Supplemental Windows 2000 CD 2 . . . . . . 92Supplemental Windows 2000 CD 3 . . . . . . 92Supplemental Windows 2000 CD 4 . . . . . . 92
Appendix B. Software and HardwareRequirements on Windows . . . . . . 93
Minimum Windows Operating System andHardware Requirements for Tivoli Identity Managerusing WebSphere . . . . . . . . . . . . 93Databases for Tivoli Identity Manager Server usingWebSphere . . . . . . . . . . . . . . 93Directory Servers for Tivoli Identity Manager Serverusing WebSphere . . . . . . . . . . . . 94Tivoli Identity Manager Server Prerequisites forWebSphere and HTTP Servers . . . . . . . . 94Supported Web Browsers . . . . . . . . . . 95
Appendix C. Preparing the WebSphereEnvironment . . . . . . . . . . . . 97Preparing for WebSphere Application ServerInstallation . . . . . . . . . . . . . . 97
Ensuring Solaris Kernel Settings for WebSphereEmbedded Messaging Server and Client . . . . 97Using an Existing WebSphere MQ Version 5.3 . . 97Validating Availability of Port 9090 . . . . . 98
Configuring Tivoli Identity Manager Clusters . . . 98Installing WebSphere Application ServerNetwork Deployment . . . . . . . . . . 98Installing IBM HTTP Server and WebSphereWeb Server Plugin. . . . . . . . . . . 100Generating the WebSphere Web Server PluginConfiguration File . . . . . . . . . . . 100Installing Base on Each Node . . . . . . . 101Add Nodes to a Cell . . . . . . . . . . 101Create a Cluster . . . . . . . . . . . 102Ensure that Network Deployment Manager andNode Agents are Running . . . . . . . . 102
Configuring WebSphere Application ServerTransaction Service Settings . . . . . . . . 103
Appendix D. Security Considerations 105Security for WebSphere . . . . . . . . . . 105
Configuring Security for Single-NodeDeployment . . . . . . . . . . . . . 105Configuring Security for Multi-NodeDeployment . . . . . . . . . . . . . 108Disabling J2EE Security . . . . . . . . . 111
Alternatives in Configuring the HTTP Server . . . 111
Appendix E. Upgrading from TivoliIdentity Manager 4.3 to Tivoli IdentityManager 4.5 . . . . . . . . . . . . 115Before You Begin . . . . . . . . . . . . 115Upgrading from Tivoli Identity Manager 4.3 UsingWebLogic to Tivoli Identity Manager 4.5 UsingWebLogic. . . . . . . . . . . . . . . 116Installing Tivoli Identity Manager Version 4.5 usingWebSphere Application Server . . . . . . . . 116Configuring the New Installation . . . . . . . 117
Appendix F. Upgrading from TivoliIdentity Manager Version 4.4.x to 4.5 . 119Before You Begin . . . . . . . . . . . . 119Upgrading a Single-Server Configuration . . . . 120
Upgrading Tivoli Identity Manager 4.4.x to 4.5 120
iv IBM Tivoli Identity Manager: Server Installation Guide on Windows 2000 using WebSphere

Upgrading a Cluster Configuration . . . . . . 121Upgrading Tivoli Identity Manager 4.4.x to 4.5for the Network Deployment Manager System . 122Upgrading Tivoli Identity Manager 4.4.x to 4.5for the Member System . . . . . . . . . 123
Appendix G. Uninstalling TivoliIdentity Manager . . . . . . . . . . 127Before You Begin . . . . . . . . . . . . 127
Steps to Uninstall Tivoli Identity Manager . . . . 128
Appendix H. Notices . . . . . . . . 131Trademarks . . . . . . . . . . . . . . 132
Glossary . . . . . . . . . . . . . 135
Index . . . . . . . . . . . . . . . 139
Contents v

vi IBM Tivoli Identity Manager: Server Installation Guide on Windows 2000 using WebSphere

Preface
The IBM ® Tivoli ® Identity Manager Installation Guide on Windows 2000 usingWebSphere® describes how to install and configure the Tivoli Identity ManagerServer on a Windows 2000 Server to manage resources from a central location.
Who Should Read This BookThis manual is intended for system and security administrators who install,maintain, or administer software on their site’s computer systems. Readers areexpected to understand system and security administration concepts. Additionally,the reader should understand administration concepts for the following:v Directory serverv Database serverv WebSphere® embedded messaging supportv WebSphere Application Server or WebLogicv IBM HTTP Servers
PublicationsRead the descriptions of the Tivoli Identity Manager library, the prerequisitepublications, and the related publications to determine which publications youmight find helpful. After you determine the publications you need, refer to theinstructions for accessing publications online.
Tivoli Identity Manager Server LibraryThe publications in the Tivoli Identity Manager Server library are:v Online user assistance for Tivoli Identity Manager
Provides integrated online help topics for all Tivoli Identity Manageradministrative tasks.
v Separate versions of Tivoli Identity Manager Server Installation Guide on eitherUNIX or Windows, using either WebSphere or WebLogic. Use the versionappropriate for your site.Provides installation information for Tivoli Identity Manager.
v Tivoli Identity Manager Policy and Organization Administration Guide
Provides topics for Tivoli Identity Manager administrative tasks.v Tivoli Identity Manager Server Configuration Guide
Provides configuration information for single-server and cluster Tivoli IdentityManager configurations.
v Tivoli Identity Manager End User Guide
Provides beginning user information for Tivoli Identity Manager.v Tivoli Identity Manager Release Notes
Provides software and hardware requirements for Tivoli Identity Manager, andadditional fix, patch, and other support information.
v Tivoli Identity Manager Troubleshooting Guide
Provides additional problem solving information for the Tivoli Identity Managerproduct.
© Copyright IBM Corp. 2003 vii

Prerequisite Product PublicationsTo use the information in this book effectively, you must have knowledge of theproducts that are prerequisites for Tivoli Identity Manager. Publications areavailable from the following locations:v WebSphere Application Server
http://www.ibm.com/software/webservers/appserv/support.html
Note: The following brief list of Redbooks describes installing and configuringWebSphere Application Server and providing additional security.Although the list was current when this publication went to production,publications may become obsolete. Contact your customer representativefor a recommended list of resource information.– IBM WebSphere Application Server V5.0 System Management and
Configuration, an IBM Redbook– IBM WebSphere Application Server V5.0 Security, an IBM Redbook
v Database servers– IBM DB2
http://www.ibm.com/software/data/db2/udb/support.htmlhttp://www.ibm.com/software/data/db2
– Oraclehttp://technet.oracle.com/documentation/content.html
– Microsoft SQL Server 2000http://msdn.microsoft.com/library/
v Directory server applications– IBM Directory Server
http://www.ibm.com/software/network/directory– Sun ONE Directory Server
http://www.ibm.com/software/network/directoryv WebSphere embedded messaging support (or IBM MQSeries)
http://www.ibm.com/software/ts/mqseriesv Web Proxy Server
– IBM HTTP Serverhttp://www.ibm.com/software/webservers/httpservers/library.html
Related PublicationsInformation related to Tivoli Identity Manager Server is available in the followingpublications:v The Tivoli Software Library provides a variety of Tivoli publications such as
white papers, datasheets, demonstrations, redbooks, and announcement letters.The Tivoli Software Library is available on the Web at:http://www.ibm.com/software/tivoli/library/
v The Tivoli Software Glossary includes definitions for many of the technical termsrelated to Tivoli software. The Tivoli Software Glossary is available, in Englishonly from the Glossary link on the left side of the Tivoli Software Library Webpage:http://www.ibm.com/software/tivoli/library/
viii IBM Tivoli Identity Manager: Server Installation Guide on Windows 2000 using WebSphere

Accessing Publications OnlineThe IBM publications for this product are available online in Portable DocumentFormat (PDF) or Hypertext Markup Language (HTML) format, or both at theTivoli Software Library:
http://www.ibm.com/software/tivoli/library
To locate product publications in the library, click the Product manuals link on theleft side of the Library page. Then, locate and click the name of the product on theTivoli Software Information Center page.
Product publications include release notes, installation guides, user’s guides,administrator’s guides, and developer’s references.
Note: To ensure proper printing of PDF publications, select the Fit to page checkbox in the Adobe Acrobat Print window (which is available when you clickFile → Print).
AccessibilityThe product documentation includes the following features to aid accessibility:v Documentation is available in both HTML and PDF formats to give the
maximum opportunity for users to apply screen-reader software.v All images in the documentation are provided with alternative text so that users
with vision impairments can understand the contents of the images.
Contacting Software SupportBefore contacting IBM Tivoli Software support with a problem, refer to the IBMTivoli Software support Web site at:
http://www.ibm.com/software/sysmgmt/products/support/
If you need additional help, contact software support using the methods describedin the IBM Software Support Guide at the following Web site:
http://techsupport.services.ibm.com/guides/handbook.html
This guide provides the following information:v Registration and eligibility requirements for receiving supportv Telephone numbers, depending on the country in which you are locatedv A list of information you should gather before contacting customer support
Conventions Used in This BookThis reference uses several conventions for special terms and actions and foroperating system-dependent commands and paths.
The following typeface conventions are used in this book:
Bold Bold text indicates selectable window buttons, field entries, andcommands appearing in this manual except from within examplesor the contents of files.
Preface ix

Monospace Text in monospace type indicates the contents of files, file names orthe output from commands.
italic Italic text indicates context-specific values such as:v path namesv file namesv user namesv group namesv system parametersv environment variables
Installation Directory ConventionsThis publication uses the following conventions to specify default directories:
{ITIM_HOME}The default installation directory for Tivoli Identity Manager
{WAS_HOME}The default installation directory for WebSphere Application Server
{WAS_NDM_HOME}The default installation directory for WebSphere Application ServerNetwork Deployment
x IBM Tivoli Identity Manager: Server Installation Guide on Windows 2000 using WebSphere

Chapter 1. Introduction
This manual describes installing, initially configuring, and verifying the TivoliIdentity Manager Server on either a single-server or cluster configuration. Use theinstallation documentation that matches the operating system and Web applicationon your system. There is also a Tivoli Identity Manager Server Installation Guide forUNIX using WebSphere.
Major steps to install and begin to use the Tivoli Identity Manager Server varydepending on whether installation is for a single-server or cluster configuration,and whether a pre-existing WebSphere Application Server is used. An overview ofsteps includes the following:1. Determining whether your configuration should be a single server or requires a
more scalable cluster or functional cluster solution, described in Chapter 2,“Configuration Overview”, on page 3.
2. Installing and configuring a database described in Chapter 3, “DatabaseConfiguration”, on page 11.
3. Installing and configuring a directory server, described in Chapter 4, “DirectoryServer Configuration”, on page 23.
4. For a single-server configuration, installing Tivoli Identity Manager Server,described in Chapter 5, “Single-server Installation: Tivoli Identity ManagerServer”, on page 31.
5. For a cluster configuration, doing the following:v Installing and configuring prerequisite WebSphere Application Server
support described in Appendix C, “Preparing the WebSphere Environment”,on page 97.
v Creating clusters and installing Tivoli Identity Manager Server, described inChapter 6, “Cluster Installation: Tivoli Identity Manager Server”, on page 57.
Note: You must manually install the required fix packs for a clusterconfiguration.
Hardware and Software RequirementsFor a list of software and hardware requirements, see Appendix B, “Software andHardware Requirements on Windows”, on page 93.
Product Compact DiscsThe Tivoli Identity Manager Server product is provided on a series of compactdiscs (CDs). For help obtaining the CDs, contact IBM Support. For a list of the CDsand their contents, see Appendix A, “Compact Discs”, on page 87.
© Copyright IBM Corp. 2003 1

2 IBM Tivoli Identity Manager: Server Installation Guide on Windows 2000 using WebSphere

Chapter 2. Configuration Overview
Tivoli Identity Manager servers in a WebSphere Application Server environmentare organized in either a single-server configuration or a cluster configuration. Thissection provides a brief, high-level description of configuration options and anoverview of their implementation sequences. Subsequent chapters provide greaterimplementation detail.
Notes:
1. Sample configurations in this chapter require a number of prior planningactivities before taking the steps that install and configure this product. Foradditional documentation that describes planning to meet your business needs,contact your customer representative.
2. For additional information about the WebSphere Application Server products,refer to additional documentation cited in “Prerequisite Product Publications”on page viii.
3. Fix packs are required for most middleware that Tivoli Identity Manager uses.For more information, see Appendix B, “Software and Hardware Requirementson Windows”, on page 93.
WebSphere Application Server TerminologyThe following terms describe elements in WebSphere Application Serverconfigurations:
cell The administrative domain that a Deployment Manager manages. A cell isa logical grouping of nodes that enables common administative activities ina WebSphere Application Server distributed environment. A cell can haveone or many clusters.
node A node is a logical group of one or more application servers on a physicalcomputer. The node name is unique within the cell. A node name usuallyis identical to the host name for the computer. That is, a node usuallycorresponds to a physical computer system with a distinct IP address.
application serverThe application server is the primary component of WebSphere. The serverruns a Java virtual machine, providing the runtime environment for theapplication’s code. The application server provides containers thatspecialize in enabling the execution of specific Java applicationcomponents.
Network Deployment ManagerThe administrative process used to provide a centralized managementview and control for all elements in a WebSphere Application Serverdistributed cell, including the management of clusters. The NetworkDeployment Manager is responsible for the contents of the repositories oneach of the nodes. The Network Deployment Manager manages thisthrough communication with node agent processes on each node of thecell.
node agentA node agent manages all managed processes on a WebSphere ApplicationServer on a node by communicating with the Network DeploymentManager to coordinate and synchronize the configuration. A node agent
© Copyright IBM Corp. 2003 3

performs management operations on behalf of the Network DeploymentManager. The node agent represents the node in the management cell.Node agents are installed with WebSphere Application Server base, but arenot required until the node is added to a cell in a Network Deploymentenvironment.
clusterA logical grouping of one or more functionally identical application serverprocesses. A cluster provides ease of deployment, configuration, workloadbalancing, and fallback redundancy. A cluster is a collection of serversworking together as a single system to ensure that mission-criticalapplications and resources remain available to clients.
Clusters provide scalability. For more information, refer to additionaldocumentation that customer support may provide that describes verticaland horizontal clustering in the WebSphere Application Server distributedenvironment.
cluster memberAn instance of a WebSphere Application Server in a cluster.
WebSphere Web Server plug-inThe WebSphere Web Server plug-in is a component installed onto an HTTPserver to take incoming requests and transport them to the appropriateWeb container in a cluster. The behavior of the plug-in is governed by theplugin-cfg.xml file. The plug-in allows the Web server to communicaterequests for dynamic content, such as servlets, to the application server.
Single-Server ConfigurationsA single-server configuration might install WebSphere Application Server base andother required applications on one physical computer. The Tivoli Identity ManagerServer provides both user interface and workflow processing.
4 IBM Tivoli Identity Manager: Server Installation Guide on Windows 2000 using WebSphere

The configuration on one computer requires the following:v A database to store transactional informationv A directory serverv WebSphere Application Server basev Tivoli Identity Manager Serverv An HTTP server such as IBM HTTP Server and a WebSphere Web Server
plug-in. For a basic definition of WebSphere Web Server plug-in, see “WebSphereApplication Server Terminology” on page 3. For more information onconfiguring the WebSphere Web Server plug-in, see “Alternatives in Configuringthe HTTP Server” on page 111.
Optionally, you can install the instance of WebSphere Application Server base andTivoli Identity Manager Server on one physical computer and install all otherrequired applications on one or more additional computers.
Note: For additional manual configuration steps required if you install IBMDirectory Server version 5.1 on the same computer that has WebSphereApplication Server, see “Using Version 5.1 and WebSphere ApplicationServer on the Same Computer” on page 27.
WebSpherebase
Tivoli IdentityManager Server
HTTP Server
Web Serverplugin
DirectoryServer
TivoliIdentity
ManagerDatabase
Figure 1. Single-server configuration on one physical computer
Chapter 2. Configuration Overview 5

The computer that has the Tivoli Identity Manager Server requires the following:v WebSphere Application Server basev A JDBC driver (the database client)
The additional computers have the following:v A database to store transactional informationv A directory serverv An HTTP server such as IBM HTTP Server and the WebSphere Web Server
plug-in
For more information, see Chapter 5, “Single-server Installation: Tivoli IdentityManager Server”, on page 31.
Cluster Configurations for Tivoli Identity ManagerCluster configurations for Tivoli Identity Manager specify one of the following:v “Single-cluster Configuration” on page 7v “Functional Cluster Configuration” on page 8
For more information on configuring clusters, see “Creating Clusters UsingNetwork Deployment Manager” on page 59. For release levels and fix packspecifications, see Appendix B, “Software and Hardware Requirements onWindows”, on page 93.
Notes:
1. In the following illustrations, each box shape represents one WebSphere nodeon one physical computer. It is recommended that only one node be created onone computer.
2. If you install IBM Directory Server version 5.1 on the same computer that hasWebSphere Application Server, see “Using Version 5.1 and WebSphereApplication Server on the Same Computer” on page 27 for additional manualsteps that are required.
WebSpherebase
JDBC driver
Tivoli IdentityManager Server
DirectoryServer
HTTPServer
Web Serverplugin
TivoliIdentity
ManagerDatabase
Figure 2. Single-server configuration on multiple physical computers
6 IBM Tivoli Identity Manager: Server Installation Guide on Windows 2000 using WebSphere

Tivoli Identity Manager Server TiersAs provided by Tivoli Identity Manager Server, a tier is a subset of functions, suchas the functions that handle user interface activity or the functions that handleworkflow activity. Tivoli Identity Manager Server can be installed as a multi-tieredserver that enables you to allocate the function provided by each tier to separateclusters in a functional cluster configuration.
The Tivoli Identity Manager Server provides the following tiers:
User Interface (UI)Provides the user interface processing function, including the dialogs andforms that enable a variety of users to work with function that TivoliIdentity Manager Server provides. For information about the user interface,refer to the Tivoli Identity Manager Policy and Organization AdministrationGuide.
Workflow (WF)Provides workflow processing function.
A workflow is the process by which a request is approved, rejected, or sentfor completion. For information on workflow processing, refer to the TivoliIdentity Manager Policy and Organization Administration Guide.
Installation options include the following:v Single serverv Single cluster or functional cluster: In a single-cluster installation, both tiers are
installed on every application server in a cluster member. Each cluster memberfunctions as the equivalent of a Tivoli Identity Manager single server.In a functional cluster, the user interface (UI) tier is installed on a cluster and theworkflow (WF) tier is installed on another cluster. Combining the functionalitiesof the two clusters provides the full function of Tivoli Identity Manager.
Single-cluster ConfigurationA configuration for a single cluster specifies a group of WebSphere applicationservers. Both the Tivoli Identity Manager user interface tier and workflow tier runon the same WebSphere Application Server on every node in the cluster. Theconfiguration specifies the Network Deployment Manager on one computer. Theremaining applications are configured on additional computers.
Chapter 2. Configuration Overview 7

The following describes the configuration:v On the computer that has the Network Deployment Manager, install the
following:– WebSphere Network Deployment Manager– A JDBC driver (the database client)
v On each cluster member, install the following:– WebSphere Application Server– Tivoli Identity Manager Server. Installed in this configuration, the Tivoli
Identity Manager Server provides combined user interface and workflowtiers.
– A JDBC driver (the database client)v On one or more additional computers that are not in the cluster, install the
following:– A database to store transactional information– A directory server– An HTTP server such as IBM HTTP Server and a WebSphere Web Server
plug-in. For more information on this server, refer to documentation that IBMHTTP Server provides. For a basic definition of WebSphere Web Serverplug-in, see “WebSphere Application Server Terminology” on page 3. Formore information on configuring the WebSphere Web Server plug-in, see“Alternatives in Configuring the HTTP Server” on page 111.
Functional Cluster ConfigurationA configuration for a functional cluster places the Network Deployment Manageron one computer. The remaining applications are configured in separate clusters onadditional computers. The Tivoli Identity Manager Server UI tier is configured on
WebSphere NetworkDeployment Manager
JDBC driver
Tivoli IdentityManager Cell
DirectoryServerWebSphere
ApplicationServer (ITIM)
WebSpherebase
JDBC driver
WebSphereApplication
Server (ITIM)
WebSpherebase
JDBC driver
WebSphereApplication
Server (ITIM)
Tivoli IdentityManager Cluster
HTTPServer
Web Serverplugin
TivoliIdentity
ManagerDatabase
Figure 3. Single-cluster configuration on multiple physical computers
8 IBM Tivoli Identity Manager: Server Installation Guide on Windows 2000 using WebSphere

the nodes in one cluster and the WF tier is configured on the nodes in another,separate cluster.
The following describes the configuration:v On the computer that has the Network Deployment Manager, install the
following:– WebSphere Network Deployment Manager– A JDBC driver (the database client)
v On each member of the each cluster, install the following:– WebSphere Application Server– Tivoli Identity Manager Server
Within the user interface cluster, instances of the Tivoli Identity ManagerServer provide only user interface processing. Within the workflow cluster,instances of the Tivoli Identity Manager Server provide only workflowprocessing.
– A JDBC driver (the database client)v On one or more additional computers that are not in a cluster, install the
following:– A database to store transactional information– A directory server– IBM HTTP Server and a WebSphere Web Server plug-in
DirectoryServer
WebSphere NetworkDeployment Manager
JDBC driver
WebSphereApplication
Server( ITIM UI )
WebSphereApplication
Server( ITIM UI )
Tivoli IdentityManager Cell
WebSpherebase
JDBC driver
WebSphereApplication
Server( ITIM UI )
WebSphereApplication
Server( ITIM WF )
WebSphereApplication
Server( ITIM WF )
WF Cluster
UI Cluster
WebSpherebase
JDBC driver
HTTPServer
Web Serverplugin
TivoliIdentity
ManagerDatabase
Figure 4. Functional Cluster Configuration
Chapter 2. Configuration Overview 9

Java Message Service and Other Server ProcessesAdditional server processes run in a WebSphere Application Server environment,such as the Java Message Service (termed the jmsserver process, also the JMSserver) that provides the WebSphere embedded messaging support.
Note: WebSphere embedded messaging support is required to enable TivoliIdentity Manager to exchange information with other applications, sendingand receiving data as messages. For more information, refer to WebSphereApplication Server documentation that describes WebSphere embeddedmessaging support or WebSphere MQ.
WebSphere Environment Limitations using Tivoli IdentityManager
To use Tivoli Identity Manager most effectively in a WebSphere environment,observe the following limitations:v Tivoli Identity Manager assumes that a cluster is homogeneous with respect to
operating system. To avoid problems with secure communication and certificateconfiguration, it is recommended that you do not use more than one operatingsystem type within a Tivoli Identity Manager cluster.
v In a functional cluster, do not place cluster members from the User Interface andthe Workflow clusters on the same computer.
v If there are multiple instances of WebSphere Application Server on the samecomputer, only servers from one of these instances can be Tivoli IdentityManager cluster members.
v WebSphere Application Server permits you to install both the NetworkDeployment Manager and a cluster member on the same computer. Ensure thatthe computer has the required memory, speed, and available space to meet theadditional load.
10 IBM Tivoli Identity Manager: Server Installation Guide on Windows 2000 using WebSphere

Chapter 3. Database Configuration
This chapter describes configuring a database for use with Tivoli Identity ManagerServer. For more information on supported database releases and required patches,see Appendix B, “Software and Hardware Requirements on Windows”, on page 93.For more information on IBM DB2, refer to documentation available athttp://www.ibm.com/software/data/db2/udb/support.html.
Notes:
1. The IBM DB2 settings described in this chapter are initial settings that requireruntime adjustment.
2. This chapter refers to the IBM DB2 runtime client as a type 2 Java DatabaseConnectivity driver. In subsequent mention, the term used is the JDBC driver.
This section describes the following:v “IBM DB2 Configuration”v “Oracle Installation and Configuration for Tivoli Identity Manager” on page 16v “SQL Server 2000 Configuration” on page 20
IBM DB2 ConfigurationYou must log on to the IBM DB2 server as Administrator to complete the followingsteps:v “Ensuring Communication and Configuring the Server”v “Configuring the IBM DB2 JDBC Driver” on page 14
Ensuring Communication and Configuring the ServerTo prepare the IBM DB2 server, do the following:v “Ensure TCP/IP Communication”v “Configure the IBM DB2 Server” on page 12
Ensure TCP/IP CommunicationBefore you begin, confirm TCP/IP communication on the IBM DB2 server. Do thefollowing:
Note: These steps assume the configuration uses multiple computers, one of whichhas the IBM DB2 server. If the database is on the same computer as the IBMDB2 server, it is not necessary to configure TCP/IP communication.
1. Open an IBM DB2 command window by clicking Start –> Run and typingdb2cmd.
2. Run the following command in the DB2 command window:db2set -all DB2COMM
3. If a tcpip entry (indicating TCP/IP communication) is not in the list returnedby the db2set -all DB2COMM command, run the following command,including tcpip and any other values that were returned in the list that thecommand provided.db2set DB2COMM=tcpip,<values_from_db2set_command>
© Copyright IBM Corp. 2003 11

For example, if the db2set -all DB2COMM command returned values such asnpipe and ipxspx in the list, specify these values again when you run thedb2set command the second time:db2set DB2COMM=tcpip,npipe,ipxspx
Configure the IBM DB2 ServerTo configure the server, do the following:1. Create a database with a name such as itimdb for Tivoli Identity Manager and
a bufferpool named enrolebp.
Note: The database name is any name you specify. The bufferpool name mustbe enrolebp.
a. Open an IBM DB2 command window by clicking Start –> Run and typingdb2cmd.
b. In the command window, execute these commands to create the database:db2 create db itimdb using codeset UTF-8 territory USdb2 update db cfg for itimdb using applheapsz heapvaluedb2 update db cfg for itimdb using app_ctl_heap_sz 512
where heapvalue is an integer in kilobytes such as 1024 representing thenumber of 4K pages.
Note: Set applheapsz to a value that is approximately half the value of thereal memory in the computer that has the database, taking intoconsideration the demands other applications may make for memory.
c. Configure the service name for the instance for remote JDBC driver access.For example, enter the following:db2 update dbm cfg using svcename <service_name>
where <service_name> is a value such as DB2_db2inst1.d. Ensure the appropriate service name is added to following file:
v UNIX: /etc/servicesv Windows: %SYSTEMROOT%\system32\drivers\etc\services
For example, enter the following:db2 get dbm cfg
Values can be similar to the following:v DB2_db2inst1: 50000/tcpv DB2_db2inst1i: 50001/tcp
You are required to enter the port number that corresponds to the servicename.
e. Enter the following command to confirm the connection. If the connection issuccessful, database connection information will be returned:db2 connect to itimdb
f. Create the bufferpool:db2 create bufferpool enrolebp size -1 pagesize 32k
2. Ensure that the Repeatable Read attribute is turned on with the settingDB2_RR_TO_RS=YES. Do the following:a. Type the following:
db2set -all
12 IBM Tivoli Identity Manager: Server Installation Guide on Windows 2000 using WebSphere

b. Examine the response to ensure that DB2_RR_TO_RS=YES is present.c. If the entry is not found, type the following to set the value to YES:
db2set DB2_RR_TO_RS=YES
d. Retype the following to verify the setting now exists:db2set -all
3. Restart IBM DB2.db2stop# (Note: Do a "db2 force application all" if entering db2stop fails)db2start
Create a User Named enrole on the IBM DB2 ServerOn the IBM DB2 server, create a user named enrole. Do the following:v On AIX, do the following as root:
1. Start the System Management tool using smit or smitty.2. Select Security & Users –> Users –> Add a User.3. In the User Name field, type enrole.4. Press Enter to create the user and return to the Users screen.5. Select Change a User’s Password.6. At the prompt for the User’s Name, type a value that you define such as
enrole. You have now assigned the enrole user ID with a password of enrole.7. At the prompt to change the user’s password, type the password that you
defined earlier for the database user.8. Exit the System Management tool.9. Test the user access. Telnet to the computer on which the IBM DB2 server is
running. Ensure you can log on with the new user ID without encounteringa password reset.
v On Solaris, do the following as root:1. Start the admintool.2. Click Browse –> Users from the task bar.3. Click Edit –> Add.4. On the Add User dialog, type enrole in the User Name field. On the
Password Select menu, select Normal Password.5. On the Set User Password dialog, enter the password and verify. Click OK.6. Set the path in the Home Directory field to a path such as
/export/home/enrole. Click OK.7. Click File –> Exit from the task bar to exit.8. Test the user access. Telnet to the computer on which the IBM DB2 server is
running. Ensure that you can log on with the new user ID withoutencountering a password reset.
v On Windows 2000, do the following as Administrator:1. Access the Computer Management tool by clicking Start –> Settings –>
Control Panel –> Administrative Tools –> Computer Management.2. Click Local Users and Groups –> Users.
Note: The enrole user does not need to be added to any group.3. Select Action –> New User.4. In the username field, type enrole.5. In the password field, type a password for the database user.6. Clear the User must change password at next login option.
Chapter 3. Database Configuration 13
7. Check the Password never expires check box.8. Click Create.
Create a User Named enrole on each Computer in the ClusterOn each computer that will be part of the Tivoli Identity Manager cluster, create auser named enrole. No special privileges are required for this user. Ensure that apassword change is not required at the next logon and that the password neverexpires.
Configuring the IBM DB2 JDBC DriverIBM DB2 requires a type 2 Java Database Connectivity driver (JDBC driver) as thedatabase client. The JDBC driver is used to connect a Java-based application to anIBM DB2 database that is running on either the same machine or a remotemachine. In a clustered deployment of Tivoli Identity Manager, the JDBC driverenables all the Tivoli Identity Manager servers to communicate with the datasource and share information. For more information, refer to IBM DB2documentation.
Notes:
1. The JDBC driver that IBM DB2 product installs is called the IBM DB2 runtimeclient.
2. To ensure that database connections are correctly released on Intel platforms,use TCP sockets. Do not use named pipes as the connection method on theIBM DB2 client. The named pipes method has a limit of the number ofconnections that cause Tivoli Identity Manager database errors.
Assuming that IBM DB2 is not installed on the target computer, you must installand configure the JDBC driver and required fix pack on the following targets. Formore information, see Appendix B, “Software and Hardware Requirements onWindows”, on page 93.v The computer that has the Network Deployment Managerv Each cluster member on which you expect to install Tivoli Identity Manager
Serverv On the computer that has a single-server installation, where IBM DB2 is remote.
On each target, do the following:1. Install and configure the JDBC driver and the required fix pack.2. Catalog the database by taking the following steps:
a. Open an IBM DB2 command window.Click Start –> Run and type db2cmd.
b. In the command window on the client, execute this command on one line:db2 catalog tcpip node db2node_hostname remote db2server_hostnameserver service-name|portnumber
where:
node db2node_hostnameA local alias for the node to be cataloged. It is the host name of thecomputer on which the database resides. This user-defined valuerepresents the internal IBM DB2 node name.
remote db2server_hostnameHost name of the node on which IBM DB2 resides. The host nameis the name of the node that is known to the TCP/IP network. Forexample, the name is db2server2host.
14 IBM Tivoli Identity Manager: Server Installation Guide on Windows 2000 using WebSphere

server service-name|portnumberSpecifies the service name or the port number of the server databasemanager instance. The default value of the IBM DB2 port number is50000. Locate the current port number in the%SYSTEMROOT%\system32\drivers\etc\services file on the computeron which the IBM DB2 server resides. The port number on theclient and the server must match. If a port number is specified, noservice name needs to be specified in the local TCP/IP services file.
c. Enter the following command to catalog the database:db2 catalog database itimdb as itimdb at node db2node_hostname
3. To test that cataloging was successful, enter the following:db2 connect to itimdb
Configuring IBM DB2 Version 7.1 and 7.2 for a JDBC Type 2Driver
Note: IBM DB2 Fix Pack 3 will migrate IBM DB2 Version 7.1 to Version 7.2. Formore information on the currently required fix pack, refer to Appendix B,“Software and Hardware Requirements on Windows”, on page 93.
For IBM DB2 version 7.1 and version 7.2, you must manually configure the JDBCtype 2 driver. Do the following on the IBM DB2 server:1. Ensure that you are logged on as the IBM DB2 Administrator.2. Configure IBM DB2 to use the JDBC type 2 driver, as follows:
a. Stop all IBM DB2 services.b. Bring up a Windows command prompt and run <IBM DB2 install
directory>\java12\usejdbc2.bat
where <IBM DB2 install directory> is replaced by the directory into whichyou installed IBM DB2.
c. Restart all IBM DB2 services.
Example: Expanding Values for DB2An example of setting larger values for IBM DB2 is the following:db2 update database configuration for itimdb using dbheap 1200db2 update database configuration for itimdb using applheapsz 2048db2 update database configuration for itimdb using maxappls 60db2 update database configuration for itimdb using app_ctl_heap_sz 1024db2 alter bufferpool ibmdefaultbp size 14750db2 alter bufferpool enrolebp size 13240
If the value of applheapsz is too small, out of memory errors might occur when alarge number of users are loaded. For example, a log file might contain thestatement:Not enough storage available for processing the sql statements.
To provide additional storage space, change the IBM DB2 application heap size toa larger value.su - db2inst1db2 force applications alldb2stopdb2 terminatedb2 update db cfg for itimdb using applheapsz 2048db2start
Chapter 3. Database Configuration 15

Note: On Windows, open a db2cmd window to enter the commands.
Oracle Installation and Configuration for Tivoli Identity ManagerThis section describes pre-installation procedures and post-installationconfiguration steps for an installation of Oracle within a framework of TivoliIdentity Manager.
In all cases, refer to the Oracle 8i Installation Guide for complete information.
Note: When you install Oracle, you must include the JServer option as part of theinstall. If you choose a typical Oracle install, JServer is included. If youchoose to perform a custom Oracle install, ensure that JServer is selected asan option for installation.
Preparing to Install Oracle on AIXComplete the following procedures prior to installing Oracle on an AIX system:1. Log in to the AIX system as root.2. Ensure that the AIX system has the following filesets installed:
v bos.adt.base
v bos.adt.libm
The Oracle product installation links with local libraries to create Oracleexecutables. Without the filesets, the links will fail and Oracle will not installor run correctly. You can install these filesets from the AIX developer’s toolkitCD.
3. Verify that your system meets or exceeds the free disk space requirements forthe following directories:v /usr: 3 GBv /var: 300 MBv /tmp: 2 GB
For AIX, the default Oracle installation directory is /usr.
Notes:
a. To determine disk space availability, enter the following command:df - Ivk
Output values are in units of 1024 bytes.b. To change the size of /usr or /var directories using SMIT or SMITTY,
navigate the following windows: System Storage Management –> FileSystems –> Add/Change/Show/Delete File Systems –> Journaled FileSystems –> Change/Show Characteristics of a Journaled File System–>/usr –> SIZE of file system (in 512–byte blocks).
4. Create a CD-ROM filesystem, if not already present, using the SMITTY utility:a. Type $ mkdir /cdrom from the console or command line.b. Type $ smitty crcdrfs from the console or command line.
The following menu appears:
16 IBM Tivoli Identity Manager: Server Installation Guide on Windows 2000 using WebSphere

Add a CDROM File System
Type or select values in entry fields.Press Enter AFTER making all desired changes.
[Entry Fields]* DEVICE name +* MOUNT POINT []
Mount AUTOMATICALLY at system restart? no +
c. Select a CD-ROM drive by pressing F4, selecting a drive, and pressingEnter.
d. Hit Enter again to create the filesystem. Exit SMITTY with F10 when thecreation command completes.
e. Mount the cdrom directory with the following command:mount /cdrom
5. Create mount points to use with Oracle databases:$ mkdir /u01$ mkdir /u02
6. Set permissions for the mount points to allow the Oracle user account to writeto them during the installation:$ chmod 777 /u01$ chmod 777 /u02
7. Use SMIT to create two groups; a user group named dba and a user groupnamed oper.
8. Use SMIT to create a new user called oracle. Complete the following steps forthe new user account.a. Set the Primary GROUP of the account to the dba group you created.b. Set the HOME directory of the account to /home/oracle.c. Set the login shell (Initial PROGRAM) to /bin/sh.
The Oracle account will run the installer. This account must be used only forinstalling and maintaining Oracle.
9. Check that a file path of /usr/lbin exists and is included in the PATH for theOracle user account. This path can be set by editing /home/oracle/.profile.
10. Create the oratab file by executing the oratab.sh script located in the orainstdirectory of the CD.$ ./oratab.sh
11. Sign on to the system as the oracle user:$ su - oracle
12. View the umask settings for the oracle account.$ umask
The umask should be set to 022. If the account’s umask is not set to 022, set itwith the following command:$ umask 022
13. Edit .profile and add the following environment variable settings:ORACLE_BASE=/u01/app/oracle; export ORACLE_BASEORACLE_HOME=$ORACLE_BASE/product/8.1.7; export ORACLE_HOMELIBPATH=$ORACLE_HOME/lib; export LIBPATHLD_LIBRARY_PATH=$ORACLE_HOME/lib:$ORACLE_HOME/network/lib; export LD_LIBRARY_PATHORACLE_SID=or1; export ORACLE_SIDORACLE_TERM=vt100; export ORACLE_TERM
Make sure that the oracle user’s PATH includes $ORACLE_HOME/bin, /bin and/usr/bin. If it does not, add them to .profile.
Chapter 3. Database Configuration 17

14. Source the profile using the following command:$ . ./.profile
15. Run rootpre.sh to ready the machine for install from /cdrom:$ ./rootpre.sh
You are now ready to begin the Oracle installation.
Preparing to Install Oracle on SolarisComplete the following procedures prior to installing Oracle on a Solaris system:1. Log in to the Solaris system as root.2. Ensure that the kernel parameters set for the system meet or exceed values
required for the installation. Refer to the Oracle 8i Installation Guide for moreinformation.
3. Create mount points to use with Oracle databases:$ mkdir /u01$ mkdir /u02
4. Start the admintool utility from a console, using the following command:# admintool
5. In the Admintool window, click Browse –> Groups. The Admintool:Groupswindow opens.
6. In the Admintool:Groups window, click Edit –> Add. The Admintool:AddGroup window opens.
7. Create two groups; a user group named dba and a user group named oinstall.8. In the Admintool:Groups window, click Browse –> Users. The
Admintool:Users window opens.9. Use admintool to create a new user called oracle. Complete the following
steps for the new user account.a. Set the Primary Group of the account to the oinstall group you created.b. Set the Secondary Group of the account to the dba group you created.c. Ensure that the radio button beside the Create Home Directory field is
selected. In the Path field, enter /export/home/oracle as the homedirectory for the user oracle.
d. Set the Login Shell to /bin/sh.
The Oracle installer must be run under this account. This account will be usedonly for installing and maintaining Oracle.
10. Sign on to the system as the oracle user:# su - oracle
View the umask settings for the oracle account.$ umask
The umask should be set to 022. If the account’s umask is not set to 022, set itwith the following command:$ umask 022
Also modify .profile to reflect the change.11. Add the following to /export/home/oracle/.profile for the oracle account:
ORACLE_BASE=/u01/app/oracle; export ORACLE_BASEORACLE_HOME=$ORACLE_BASE/product/8.1.7; export ORACLE_HOMEORACLE_SID=or1; export ORACLE_SID
18 IBM Tivoli Identity Manager: Server Installation Guide on Windows 2000 using WebSphere

ORACLE_DOC=$ORACLE_HOME/doc; export ORACLE_DOCORA_NLS33=$ORACLE_HOME/ocommon/nls/admin/data; export ORA_NLS33PATH=$ORACLE_HOME/bin:/usr/bin:/usr/local/bin:/usr/ccs/bin:/usr/ucb:/usr/openwin/bin:.
If you require /usr/ucb in your search path make sure it is listed after/usr/ccs/bin in the PATH setting.
12. Source the profile using the following command:$ . ./.profile
You are now ready to begin the Oracle installation. Refer to the appropriate Oracledocumentation and install the software. After a successful installation, return to theconfiguration instructions contained in this section.
Preparing to Install Oracle on WindowsComplete the following procedures prior to installing Oracle on a Windowssystem:1. Verify that your system meets or exceeds the system requirements listed in the
Oracle 8i Installation Guide for the type of installation you intend to perform.2. Log in to the Windows system with the Administrator account that you will
use for the installation.
You are now ready to begin the Oracle installation.
Configuring Oracle after InstallationThere are several post-installation tasks that must be completed to configure Oraclefor use in a Tivoli Identity Manager framework.1. Verify that the following line exists in the init.ora file:
compatible=8.1.0
2. Create a database for use with Tivoli Identity Manager.The following is a sample SQL script that can be used to create your database.The values in the script should be changed to match your site’s requirements.-- Create databaseCREATE DATABASE sample
CONTROLFILE REUSELOGFILE ’/u01/oracle/sample/redo01.log’ SIZE 1M REUSE,
’/u01/oracle/sample/redo02.log’ SIZE 1M REUSE,’/u01/oracle/sample/redo03.log’ SIZE 1M REUSE,’/u01/oracle/sample/redo04.log’ SIZE 1M REUSE
DATAFILE ’/u01/oracle/sample/system01.dbf’ SIZE 10M REUSEAUTOEXTEND ONNEXT 10M MAXSIZE 200M
CHARACTER SET UTF8;
-- Create another (temporary) system tablespaceCREATE ROLLBACK SEGMENT rb_temp STORAGE (INITIAL 100 k NEXT 250 k);
-- Alter temporary system tablespace online before proceedingALTER ROLLBACK SEGMENT rb_temp ONLINE;
-- Create additional tablespaces ...-- RBS: For rollback segments-- USERs: Create user sets this as the default tablespace-- TEMP: Create user sets this as the temporary tablespaceCREATE TABLESPACE rbs
DATAFILE ’/u01/oracle/sample/sample.dbf’ SIZE 5M REUSE AUTOEXTEND ONNEXT 5M MAXSIZE 150M;
CREATE TABLESPACE usersDATAFILE ’/u01/oracle/sample/users01.dbf’ SIZE 3M REUSE AUTOEXTEND ONNEXT 5M MAXSIZE 150M;
CREATE TABLESPACE tempDATAFILE ’/u01/oracle/sample/temp01.dbf’ SIZE 2M REUSE AUTOEXTEND ONNEXT 5M MAXSIZE 150M;
-- Create rollback segments.
Chapter 3. Database Configuration 19

CREATE ROLLBACK SEGMENT rb1 STORAGE(INITIAL 50K NEXT 250K)tablespace rbs;
CREATE ROLLBACK SEGMENT rb2 STORAGE(INITIAL 50K NEXT 250K)tablespace rbs;
CREATE ROLLBACK SEGMENT rb3 STORAGE(INITIAL 50K NEXT 250K)tablespace rbs;
CREATE ROLLBACK SEGMENT rb4 STORAGE(INITIAL 50K NEXT 250K)tablespace rbs;
-- Bring new rollback segments online and drop the temporary system oneALTER ROLLBACK SEGMENT rb1 ONLINE;ALTER ROLLBACK SEGMENT rb2 ONLINE;ALTER ROLLBACK SEGMENT rb3 ONLINE;ALTER ROLLBACK SEGMENT rb4 ONLINE;
ALTER ROLLBACK SEGMENT rb_temp OFFLINE;DROP ROLLBACK SEGMENT rb_temp ;
3. Increase the value for Oracle connections from the default of 50 to a value of150 by editing the PROCESSES parameter of the $ORACLE_HOME/dbs/init.orafile.
Note: Oracle connection requirements will vary greatly between enterprises. Setyour connection value to a value appropriate for your environment.
4. Increase the Oracle tablespace from the default to the maximum amountavailable using the alter sql command.SQL> alter database datafile ’<location of DBF file>\ENROLE1_DATA_001.DBF’ resize 500mSQL> alter database datafile ’<Oracle db location of DBF file>\ENROLE1_IDX_001.DBF’resize 500m
SQL Server 2000 ConfigurationThis section describes pre-installation procedures and post-installationconfiguration steps for an installation of Microsoft SQL Server 2000 for use withTivoli Identity Manager.
In all cases, refer to SQL Server 2000 installation documentation for completeinformation.
Preparing to Install SQL Server 2000Complete the following procedures prior to installing SQL Server 2000 on aWindows system:1. Ensure that you have the latest SQL Server 2000 service packs installed.2. Log in to the Windows system with an Administrator account before launching
the SQL Server installation.
You are now ready to begin the SQL Server installation.
Configuring SQL Server 2000 after InstallationThere are several post-installation tasks that must be completed to configure SQLServer 2000 for use in a Tivoli Identity Manager framework.1. Launch the MS SQL Server Enterprise Manager.2. Ensure that the mixed-mod authentication is enabled.
a. Select Tools –> SQL Server Configuration Properties...
b. On the Security tab, ensure that SQL Server and Windows Authentication isselected.
3. Create a new database.a. Using the navigational tree, navigate to Microsoft SQL Servers –> SQL
Server group –> (local) Windows NT –> Databases.
20 IBM Tivoli Identity Manager: Server Installation Guide on Windows 2000 using WebSphere

b. Right-click the Databases node and select New Database.The Database Properties window appears.
c. On the General tab, supply itimdb as a value for the Name field.d. On the Data Files tab, supply the following information:
v Initial File Size (MB): 20v Check the check box for Automatically grow file.v Select the radio button for Unrestricted file growth.
e. On the Transaction Log tab, supply the following information:v Initial File Size (MB): 20v Check the check box for Automatically grow file.v Select the radio button for Unrestricted file growth.
f. Click OK.
Chapter 3. Database Configuration 21

22 IBM Tivoli Identity Manager: Server Installation Guide on Windows 2000 using WebSphere

Chapter 4. Directory Server Configuration
This chapter describes configuring the directory server. The steps assume that youpreviously installed the directory server and are ready to configure the directoryserver for Tivoli Identity Manager use.
Notes:
1. IBM Directory Server Version 5.1 can install an instance of IBM DB2. Ensurethat you do not install two instances of IBM DB2. For more information, referto documentation for IBM Directory Server athttp://www.ibm.com/software/network/directory. For more information onsupported directory servers, see Appendix B, “Software and HardwareRequirements on Windows”, on page 93.
2. If IBM Directory Server Version 5.1 was previously installed, there may be anunregistered instance of WebSphere – Express, causing potential port conflicts.For more information, see “Using Version 5.1 and WebSphere ApplicationServer on the Same Computer” on page 27.
Choose one of the following:v “IBM Directory Server Configuration”v “Sun ONE Directory Server Configuration” on page 28
IBM Directory Server ConfigurationThis section describes configuring the IBM Directory Server.
The following steps refer to these variables:
dirserver_installdirDirectory in which you installed IBM Directory Server. For example:v AIX: /usr/ldap/v Solaris:
– IBM Directory Server Version 4.1: /opt/IBMldapc/– IBM Directory Server Version 5.1: /opt/ldap/
v Windows: c:\Program Files\IBM\ldap
cd_installdirDirectory on the CD. To locate the correct CD for your environment, seethe CD1 description in Appendix A, “Compact Discs”, on page 87.
versionspecific_slapd
v IBM Directory Server Version 4.1 uses slapd as the command, andslapd32.conf as the file.
v IBM Directory Server Version 5.1 uses ibmslapd as the command, andibmslapd.conf as the file.
my_suffixAny value that you define for the Tivoli Identity Manager suffix, such ascom.
To configure the IBM Directory Server, do the following:1. “Specify the Suffix for Tivoli Identity Manager” on page 24
© Copyright IBM Corp. 2003 23

2. “Configure the Referential Integrity Plug-in for Tivoli Identity Manager”3. “Restart the Directory Server” on page 254. “Create the LDAP Suffix Object” on page 26
Specify the Suffix for Tivoli Identity ManagerTo specify the suffix for Tivoli Identity Manager, log on to the IBM DirectoryServer system and perform the following steps:1. Stop the IBM Directory Server before editing the versionspecific_slapd.conf file.
The IBM Directory Server reads that file during initialization and replaces thefile when IBM Directory Server terminates.
2. Edit the following file:v UNIX: <dirserver_installdir>/etc/versionspecific_slapd.confv Windows: <dirserver_installdir>\etc\versionspecific_slapd.conf
3. Locate the line that reads: ibm-slapdSuffix: cn=localhost
4. Add a line below it that reads: ibm-slapdSuffix: dc=my_suffix
where my_suffix is a value for the suffix that you define for Tivoli IdentityManager.
5. For the next step in the configuration, see “Configure the Referential IntegrityPlug-in for Tivoli Identity Manager”.
Configure the Referential Integrity Plug-in for Tivoli IdentityManager
You can configure the referential integrity plug-in before or after you install TivoliIdentity Manager.
To find the files appropriate for your environment, search CD 2 described inAppendix A, “Compact Discs”, on page 87. Locate the following directory:v AIX: DelRef/aix/v SUN: DelRef/sun/v Windows: DelRef\nt\
Locate the appropriate file:v libdelref
Referential integrity plug-in library file for Tivoli Identity Managerv timdelref
Tivoli Identity Manager configuration file
To configure the referential integrity plug-in, do the following:1. Copy the following plug-in library file for Tivoli Identity Manager from CD 2:
v AIX: libdelref.av Solaris: libdelref.sov Windows: libdelref.dll
to the following directory server directory:v UNIX: <dirserver_installdir>/libv Windows: <dirserver_installdir>\bin
2. Copy the Tivoli Identity Manager configuration file named timdelref.conffrom the appropriate CD directory to the following directory server directory:
24 IBM Tivoli Identity Manager: Server Installation Guide on Windows 2000 using WebSphere
v UNIX: <dirserver_installdir>/etcv Windows: <dirserver_installdir>\etc
3. Modify the following directory server file:v UNIX: <dirserver_installdir>/etc/versionspecific_slapd.confv Windows: <dirserver_installdir>\etc\versionspecific_slapd.conf
Follow these steps:a. Search for this line in the file:
ibm-slapdPlugin: database path_to_rdbmfilename rdbm_backend_init
where path_to_rdbmfilename has the value:v AIX: /lib/libback-rdbm.av Solaris: /lib/libback-rdbm.sov Windows: /bin/libback-rdbm.dll
b. Add the following on one line immediately below the previous line:v AIX:
ibm-slapdPlugin: preoperation<dirserver_installdir>/lib/libdelref.a DeleteReferenceInitfile=<dirserver_installdir>/etc/timdelref.conf dn=dc=my_suffix
v Solaris:ibm-slapdPlugin: preoperation<dirserver_installdir>/lib/libdelref.so DeleteReferenceInitfile=<dirserver_installdir>/etc/timdelref.conf dn=dc=my_suffix
v Windows:ibm-slapdPlugin: preoperation "<dirserver_installdir>/bin/libdelref.dll"DeleteReferenceInit file="<dirserver_installdir>\etc\timdelref.conf"dn=dc=my_suffix
Note: To specify the path to the timdelref.dll and the timdelref.conffiles on Windows, ensure that you enclose the value in doublequote marks. Additionally, specify the path to the timdelref.dllfile with a forward slash.
4. Restart the directory server. For more information, see “Restart the DirectoryServer”.
Restart the Directory ServerTo stop and restart the IBM Directory Server, do the following:v Windows: Enter the following commands:
net stop "IBM Directory Server version"net start "IBM Directory Server version"
where version is one of the following IBM Directory Server versions:– V4.1– V5.1
Alternatively, do the following:1. Click Start –> Settings –> Control Panel –> Administrative Tools –>
Services.2. Right-click ″IBM Directory Server version″.3. On the pop-up menu, click Stop and then click Start.
Chapter 4. Directory Server Configuration 25
4. Determine if the referential integrity plug-in is reconfigured. Examine thedirserver_installdir\var\versionspecific_slapd.log file for a messagesimilar to the following:Plugin of type PREOPERATION is successfully loadedfrom c:/Program Files/IBM/ldap/bin/libdelref.dll
v UNIX:1. Enter the following:
ps -ef | grep versionspecific_slapd
2. Note the process ID (PID) number returned in the results of the previouscommand.
3. Enter the following to end the process: kill <PID>
where <PID> is replaced by the PID value that was returned earlier.4. Ensure that the process has ended by repeating the ps -ef | grep
versionspecific_slapd command until the process is not listed in the resultsof the command.
5. Restart the directory server to ensure that the new settings take effect. Enterthe following command:versionspecific_slapd
6. Determine if the referential integrity plug-in is reconfigured. Examine thedirserver_installdir/var/ldap/versionspecific_slapd.log file for amessage similar to the following:Plugin of type PREOPERATION is successfully loadedfrom /usr/ldap/lib/libdelref.a
Create the LDAP Suffix ObjectYou must specify the suffix and restart the directory server before you create theLDAP suffix object for Tivoli Identity Manager.
To create the LDAP suffix object, do one of the following:v Command line: Create an LDIF file such as suffix.ldif that is similar to the
following:dn: dc=my_suffixdc: my_suffixobjectclass: topobjectclass: domain
Use the ldapadd command to add the suffix. For example, enter the followingon one line:<dirserver_installdir>/bin/ldapadd -i <full_path_to_suffix.ldif> -D <ldap_admin>-w <ldap_admin_password>
v LDAP administrative console: Create the suffix object with the value ofobjectClass set to domain. Use one of the following:– IBM Directory Server version 4.1: Directory Management tool– IBM Directory Server version 5.1: Administration console
For example, use the IBM Directory Server version 5.1 Web administrationconsole as follows:1. Click Directory Management –> Add an Entry.2. Select domain as the Structural Object Class. Click Next.3. Do not add Auxiliary Object Classes. Click Next.4. For Relative DN, add dc=my_suffix.5. For Required Attributes, add my_suffix.
26 IBM Tivoli Identity Manager: Server Installation Guide on Windows 2000 using WebSphere

6. Click Finish.7. Click Directory Management –> Manage Entries.
The suffix dc=my_suffix should be listed with an object class of domain.
Using Version 5.1 and WebSphere Application Server on the SameComputer
If IBM Directory Server version 5.1 previously exists, its installation might haveincluded WebSphere – Express, which might not be registered on the target system.
If you use Tivoli Identity Manager to install WebSphere Application Server on thesame computer, the installation does not detect the instance of WebSphere –Express. WebSphere – Express and WebSphere Application Server will compete forthe same set of ports. Before installing Tivoli Identity Manager and WebSphereApplication Server, you must eliminate any potential port conflicts with WebSphere– Express.
The WebSphere Application Server uses the following default port settings:v HTTP Transport (port 1): 9080v HTTP Transport (SSL, port 2): 9443v HTTP Transport (port 3): 9090v HTTP Transport (port 4): 9043v Bootstrap/rmi port: 2809v Simple Object Access Protocol (SOAP) connector port: 8880
Use a text editor to change each default port that WebSphere – Express uses to anunused port. For example, do the following:v Modify each of the HTTP Transport port numbers in the following files:
dirserver_installdir\appsrv\config\cells\DefaultNode\nodes\DefaultNode\servers\server1\server.xmldirserver_installdir\appsrv\config\cells\DefaultNode\virtualhosts.xml
Replace the following HTTP Transport port numbers with unused port numbers:– 9080– 9443– 9090– 9043
v Bootstrap/rmi port: 2809Locate the line containing the port number 2809 and replace it with an unusedport number. The line is in the following file:dirserver_installdir\appsrv\config\cells\DefaultNode\nodes\DefaultNode\serverindex.xml
v SOAP connector port: 8880Locate the line containing the port number 8880 and replace it with an unusedport number. The line is in the following file:dirserver_installdir\appsrv\config\cells\DefaultNode\nodes\DefaultNode\serverindex.xml
Chapter 4. Directory Server Configuration 27

Sun ONE Directory Server Configuration
Note: In the following statements, my_suffix is any value for the suffix that youdefine for Tivoli Identity Manager, such as com.
To configure the Sun ONE Directory Server, do the following:1. Start the iPlanet Console.
The iPlanet Console login dialog window appears.2. Verify the port number in the Administration URL, type in your password,
and click OK.3. Go to your Directory Server in the console tree and click Open.4. Select the Configuration tab.5. Right-click Data in the directory server tree on the Configuration tab, and
click New Root Suffix.The Create new root suffix dialog window appears.
6. Type dc=my_suffix in the New suffix text field on the Create new root suffixdialog window.
7. Type the desired database name in the Database name text field.For example, type the following:itimdb
8. Select the Create associated database automatically check box if it is notselected and click OK.The Confirmation Needed dialog window appears.
9. On the Confirmation Needed dialog window, click Yes.The Directory Server console reappears.
10. Select the Directory tab.11. Right-click the name of the directory server in the directory server tree.
A pop-up menu appears.12. Select dc=my_suffix under New Root Object in the pop-up menu.
The New Object dialog window appears.13. Select domain and click OK.
The Property Editor dialog window for dc=my_suffix appears.14. Click OK in the Property Editor dialog window.
The Directory Server console reappears.15. Select the Tasks tab and click Restart the Directory Server.
The Sun ONE Directory Server is now set up.16. Increase the memory cache available for the Tivoli Identity Manager Server by
completing the following procedures:a. Open the directory server console and click the Configuration tab.b. Expand the Data node in the directory tree and click the Database
Settings tab.c. Click the LDBM Plug-in Settings tab.d. Set the Maximum Cache Size setting to an appropriate value based on
your hardware’s physical memory.If Sun ONE Directory Server is installed on its own machine, it isrecommended that this value be set to 75% of the system’s availablememory.
28 IBM Tivoli Identity Manager: Server Installation Guide on Windows 2000 using WebSphere

e. Click Save.f. Expand the Tivoli Identity Manager application node.
For example, this could be dc=com.g. Select the database object in the Tivoli Identity Manager application node
and click the Database Settings tab.h. Set the ″Memory available for cache″ setting to an appropriate value based
on your hardware’s physical memory.If Tivoli Identity Manager is the only application using this directory, it isrecommended that this value be set to 60% of the ″Maximum Cache Size″set on the LDBM Plug-in Settings tab.
i. Click Save.j. Click the Tasks tab and restart the directory server.
Chapter 4. Directory Server Configuration 29

30 IBM Tivoli Identity Manager: Server Installation Guide on Windows 2000 using WebSphere

Chapter 5. Single-server Installation: Tivoli Identity ManagerServer
This chapter describes tasks that install and configure the Tivoli Identity ManagerServer in a single-server configuration.
On a computer on which WebSphere Application Server base is not previouslyinstalled, the single-server installation process will automatically install thefollowing applications and fix packs based on the following conditions:v WebSphere Application Server base
WebSphere Application Server, Fix Pack 2, and the APARS listed in Appendix B,“Software and Hardware Requirements on Windows”, on page 93 areautomatically installed if any of the following do not exist on the target system:– WebSphere Application Server Version 5.0 or lower– WebSphere Application Server Network Deployment
v IBM HTTP ServerIBM HTTP Server is installed if IBM HTTP Server does not exist, or if a versionlower than 1.3.26 exists.
v WebSphere embedded messaging supportv Tivoli Identity Manager Server
Note: If WebSphere Application Server 5.0 is already installed, the Tivoli IdentityManager installs only Tivoli Identity Manager Server.
For specific application versions and fix packs, see Appendix B, “Software andHardware Requirements on Windows”, on page 93.
Installation tasks include the following:v “Before You Begin”v “Installing Tivoli Identity Manager Server” on page 38
Before You BeginBefore you begin, do the following:v Ensure that the following Tivoli Identity Manager prerequisites are running:
Table 1. Prerequisite applications
Prerequisite For more information, see
Database Chapter 3, “Database Configuration”, on page 11
Directory server Chapter 4, “Directory Server Configuration”, on page 23
v Ensure free disk space, virtual memory, and other space requirements are met.For more information, see Appendix B, “Software and Hardware Requirementson Windows”, on page 93.
v If the Tivoli Identity Manager installation process installs the WebSphereApplication Server, the target system must meet the requirements described inAppendix B, “Software and Hardware Requirements on Windows”, on page 93and also in Appendix C, “Preparing the WebSphere Environment”, on page 97.
© Copyright IBM Corp. 2003 31

For additional information on WebSphere requirements, refer to documentationprovided by WebSphere Application Server.
v Ensure you have the correct administrative authority. If not, obtain the authorityand restart the system to activate the proper authorization.On Windows, the user must be in the Administrators Group (but not be theAdministrator user). The user in the Administrators Group should have thefollowing rights:– Act as part of the operating system– Log on as a service
To determine the user rights that are selected, do the following:1. Click Start –> Control Panel.2. On the Control Panel, click Administrative Tools –> Local Security Policy
–> Local Policies –> User Rights Assignment.3. Click the appropriate rights to select them.
v If WebSphere Application Server was previously installed and WebSphere GlobalSecurity is already turned on, complete the necessary manual steps afterinstalling Tivoli Identity Manager. For more information on thosepost-installation steps, see “Manual Steps on Single-node Deployments AfterInstalling Tivoli Identity Manager” on page 106. For more information on GlobalSecurity, refer to documentation provided by WebSphere Application Server.
v Determine whether instances of the following currently exist on the targetcomputer and take the necessary corrective actions:– Do WebSphere Application Server base and Fix Pack 2 already exist?
Notes:
1. You must apply the fix pack and interim fix requirements described inAppendix B, “Software and Hardware Requirements on Windows”, onpage 93 either before or after installing Tivoli Identity Manager.
2. The installer will detect the existence of the WebSphere Application Server5.0 and also Fix Pack 2. If WebSphere Application Server 5.0 exists but FixPack 2 does not exist, installation will prompt a warning message, but willnot install the Fix Pack 2. Installation will also detect the WebSphereApplication Server Network Deployment Fix Pack 2. For moreinformation, see Appendix B, “Software and Hardware Requirements onWindows”, on page 93.
– Does WebSphere embedded messaging support already exist? If WebSphereApplication Server already exists on the target system, the installation processdoes not check whether WebSphere embedded messaging support also exists.In this case, if WebSphere embedded messaging support does not exist, runthe WebSphere Application Server installation program again to installWebSphere embedded messaging support. If WebSphere Fix Pack 2 has beenapplied to WebSphere Application Server base, you must run the same FixPack to apply patches for the WebSphere embedded messaging support.
v Verify that the WebSphere Application Server transaction service settings arelarge enough to handle Tivoli Identity Manager loads for your businessprocesses. See “Configuring WebSphere Application Server Transaction ServiceSettings” on page 103 for detailed information on modifying these settings. Ifyou do not modify the settings to handle your business process loads, requestscan time out before completing.
v Ensure you have resolved any port problems, if you have more than one versionof WebSphere Application Server installed on the computer. For moreinformation, see “Resolving Port Problems” on page 33.
32 IBM Tivoli Identity Manager: Server Installation Guide on Windows 2000 using WebSphere
v On the computer on which Tivoli Identity Manager will be installed, set theappropriate value for your locale to ensure the language format is recognized.
v Ensure that the WebSphere Application Server Fix Pack 2 is also applied on thecomputer on which the Web server is installed. Stop the Web Server beforeinstalling the fix pack.
Note: There may be several WebSphere Web plug-ins in the configuration,including a WebSphere Web Server plug-in on the computer that hasWebSphere Application Server Network Deployment.
v Complete the information worksheet for your configuration.
Resolving Port ProblemsThe following port problems may occur:v Before installing Tivoli Identity Manager, ensure the same SOAP port for
WebSphere 5.0 is defined at the following locations:– com.ibm.ws.scripting.port in the following file:
{WAS_HOME}\properties\wsadmin.properties
– Port under SOAP_CONNECTOR_ADDRESS of server1 in the following file:{WAS_HOME}\config\cells\<cell_name>\nodes\<node_name>\serverindex.xml
If the values are different, correct the port number as follows:1. Open the wsadmin.properties file.2. Change the value of com.ibm.ws.scripting.port to the value you find in the
serverindex.xml file.
Note: If installation failed because the SOAP port number was incorrect, correctthe port specification and rerun the {ITIM_HOME}/bin/runConfig installcommand.
v After installation completes, the Tivoli Identity Manager logon process will fail ifvirtual host port values are different than the values that Tivoli Identity Managerrequires.Tivoli Identity Manager requires virtual host port values of 80 and 9443. Port9443 is used if secure communication is enabled.Installing one instance of a WebSphere server on a computer will specify thecorrect values for the virtual host port numbers that Tivoli Identity Managerexpects to use.However, installing a second instance of a WebSphere server such as NetworkDeployment Manager on the same computer will automatically advance the portnumbers specified for the Network Deployment Manager. For example, thevirtual host port numbers advance from 80 to 81, and from 9443 to 9444. Youmust reconfigure the port numbers to be the numbers that Tivoli IdentityManager requires.To correct the virtual host port numbers, access the WebSphere administrativeconsole and do the following:1. Click Environment –> Virtual Hosts –> Default Host –> Host Aliases.2. Change the virtual host port values to 80 and to 9443.3. Save the configuration to the master repository, selecting Synch Changes
with Nodes.4. Click Update Web Server Plugin and click OK.5. Restart the cluster.
Chapter 5. Single-server Installation: Tivoli Identity Manager Server 33

Information Worksheet for Single-Server InstallationCollect the following information before you begin the installation:
Database InformationCollect the following information for the relational database management system:
Admin ID ______________________________
The Administrator User ID (the db2InstanceName as database instanceowner) that you created when installing the database. For example, thedefault for IBM DB2 is the following:v UNIX: db2inst1v Windows: db2admin
For more information, see “IBM DB2 Configuration” on page 11.
Admin Password ______________________________
The password for the Administrator user ID.
Database Name ______________________________
Specifies how the Tivoli Identity Manager Server connects to the database.If the database is installed locally, the Database Name is the name of thedatabase. For example, the value of Database Name is itimdb. If thedatabase is installed remotely, the Database Name is the local alias name ofthe remote database. For more information on using the catalog commandto specify the remote database, see “Configuring the IBM DB2 JDBCDriver” on page 14.
Database Type ______________________________
Type of database used for your system. For example, the database is IBMDB2.
Credentials for the database:
Database User
The account that Tivoli Identity Manager Server uses to log in tothe database. The user ID is enrole.
Note: This user ID cannot be changed.
User Password
Password for the account that Tivoli Identity Manager Server usesto log in to the database.
IP Address ______________________________
IP address of the database server. Not required for IBM DB2. Required forOracle and SQL Server 2000.
Port Number ______________________________
Port number of the database server. Not required for IBM DB2. Requiredfor Oracle and SQL Server 2000.
Additionally, the installation process reports the following Database Poolinformation. The database pool information determines the number of JDBC
34 IBM Tivoli Identity Manager: Server Installation Guide on Windows 2000 using WebSphere

connections that Tivoli Identity Manager Server can open to the database. For moreinformation, refer to the Tivoli Identity Manager Server Configuration Guide.
Evaluate the following values in relation to your site needs:
Initial CapacityInitial number of JDBC connections that Tivoli Identity Manager Server canopen to the database
Maximum CapacityMaximum number of JDBC connections that Tivoli Identity ManagerServer can open to the database at any one time
Login Delay SecondsTime, in seconds, between connections
Directory Server InformationCollect the following information:
Host name ______________________________
Fully-qualified host name of the directory server. For example,identity1.mylab.mydomain.com.
Identity Manager DN Location ______________________________
The value such as dc=com that you enter in the Location field must matchthe suffix (for example, dc=com) that you created when you configuredLDAP. For more information, see Chapter 4, “Directory ServerConfiguration”, on page 23.
Name of your organization ______________________________
The value that you enter in the Name of Your Organization field will bedisplayed in the organization chart that is displayed on many of the TivoliIdentity Manager graphical user interface screens. This value is typicallythe more formal name of your company. For example, an organizationname is IBM Corporation.
Note: You may enter either single-byte character set (ASCII) characters ordouble-byte character set characters in this field.
Default Org Short Name ______________________________
The value that you enter in the Default Org Short Name field will be usedinternally in IBM Directory Server to represent your organization. Thisvalue is typically an abbreviation of your company name. For example, ashort name is ibmcorp.
Note: Enter only single-byte character set (ASCII) characters in the DefaultOrg Short Name field, such as an identifier in English.
Number of hash buckets ______________________________
A hash bucket is used to apportion data items for sorting or lookuppurposes. Evaluate the default value (1) in relation to your site needs.
Port ______________________________
Port on which the directory server is listening, such as 389.
Principal DN ______________________________
The Principal Distinguished Name user ID. For example, cn=root.
Chapter 5. Single-server Installation: Tivoli Identity Manager Server 35
Password ______________________________
The password of the Principal Distinguished Name user ID that youcreated when installing the directory server.
Additionally, the installation process reports the following LDAP Connection PoolInformation fields for a pool of LDAP connections accessible by Tivoli IdentityManager Server. For more information, refer to the Tivoli Identity Manager ServerConfiguration Guide.
Evaluate the following values in relation to your site needs:
Max. pool sizeMaximum number of connections the LDAP Connection Pool can have atany time
Initial pool sizeInitial number of connections created for the LDAP Connection Pool
Increment countNumber of connections added to the LDAP Connection Pool every time aconnection is requested once all connections are in use
WebSphere Application Server Information for Single-ServerInstallation
WebSphere Application Server installation for a single-server configuration has thefollowing fields. For more information, see Appendix C, “Preparing the WebSphereEnvironment”, on page 97.
Administrator user ID ______________________________
Required if WebSphere Application Server is to be installed. This is used tocreate WebSphere Application Server and IBM HTTP Server services. Theuser ID must have the following rights or Tivoli Identity Managerinstallation will fail:v Act as part of the operating systemv Log on as a service
Administrator password ______________________________
The Administrator user ID password
Host name of the workstation ______________________________
Displayed during single-server installation, the valid host name of thephysical computer on which WebSphere Application Server base isinstalled. This field does not appear if WebSphere Application Server baseis already installed.
Note: If Dynamic Host Configuration Protocol (DHCP) is used todetermine the IP address of the computer, do not use the fullyqualified host name of the computer. Use only the short name.
Installation directory ______________________________
Installation directory for WebSphere Application Server base. For example,the directory is drive:\Program Files\WebSphere\AppServer. This field hasthe following conditions:v Required if Tivoli Identity Manager installation installs WebSphere
Application Server base.
36 IBM Tivoli Identity Manager: Server Installation Guide on Windows 2000 using WebSphere

v For confirmation purposes, if WebSphere Application Server base isalready installed.
Node name ______________________________
The user-defined node name is usually specified to be identical to the hostname for a physical computer with a fixed IP host address.
Port ______________________________
Port on which the WebSphere Application Server is listening. The default is9090. You must ensure that this port is available. This field does not appearif WebSphere Application Server base is already installed.
Server Name ______________________________If WebSphere Application Server was previously installed, this fieldprompts for the WebSphere Application Server name. This is theWebSphere Application Server to which you deploy Tivoli IdentityManager during a single-server installation.
Security settingsThe following fields appear on the System Configuration Security tab.
Encryption (checkbox)Encrypts the password of the database, LDAP, and WebSphereApplication Server administrator user identifier in the TivoliIdentity Manager property files.
Application Server User ManagementEnables you to set and confirm the password for the followingusers:
System UserThe WebSphere Application Server user ID and password.Required only if WebSphere Global Security is on. This isthe user ID that has a value such as wasadmin, describedin the manual steps in “Security for WebSphere” onpage 105.
EJB UserA user and password that you must have defined prior tostarting installation. Required only if WebSphere GlobalSecurity is on. This is the user ID that has a value such asitimadmin, described in the manual steps in “Security forWebSphere” on page 105.
Note: If this field is pre-filled when it appears, the fieldmight contain the value of wasadmin. Change thefield to the value of itimadmin.
WebSphere Embedded Messaging Server and ClientCollect the following information:
Installation directory ______________________________
This is the directory in which WebSphere embedded messaging support isinstalled.
Chapter 5. Single-server Installation: Tivoli Identity Manager Server 37

IBM HTTP Server InformationCollect the following information:
Installation directory ______________________________
Displayed during single-server installation. This field appears only if bothWebSphere Application Server and IBM HTTP Server are not installed. Thisis the directory in which IBM HTTP Server is installed.
Tivoli Identity Manager InformationNote the following information for Tivoli Identity Manager:
Encryption keyThe key can be any word or phrase. The key is used to encrypt TivoliIdentity Manager passwords and other sensitive text. The value is stored inthe enRole.properties file as enrole.encryption.password.
Logging levelDisplays how verbose the logs are when tracing system errors. Systemadministrators can select how detailed the log file should be by setting theLogging Level field number between INFO and FATAL. The more severethe logging level, the better the performance of the system because lessinformation is written to the log file.
Mail server nameSMTP mail servers are supported. The SMTP host is the mail gateway.
User ID ____itim manager________
The Tivoli Identity Manager user ID. The default value after installation isitim manager. Use this user ID when you log on to Tivoli IdentityManager.
Password ____secret______________
Password for the Tivoli Identity Manager administrator user ID specifiedas itim manager. The default password immediately after installation issecret.
Note: You will be forced to change the administrator account passwordwhen you log on to Tivoli Identity Manager Server.
Installing Tivoli Identity Manager ServerThe following flowchart describes the basic sequence of events during installationof Tivoli Identity Manager Server in a single-server configuration:
38 IBM Tivoli Identity Manager: Server Installation Guide on Windows 2000 using WebSphere

To install the Tivoli Identity Manager Server in a single-server configuration,complete the following steps:1. “Navigate Initial Welcome and Licensing Windows” on page 40
Encryption key
Pre-installsummary
Configuredatabase
ConfigureLDAP
ConfigureSystem
No
No
Yes
Yes
WebSpheresecurity?
WebSpherealready
installed?
EnterCredential
Enternode name,server name
ConfirmWebSphere
directory
Enter installationdirectory
Selectdatabase type
WebSphere,HTTP serverdirectories
Host nameWebSphere node
name
SingleServer
Cluster/Functional
ClusterInstallType?
ClusterInstall
WebSphereMQ directory
WindowsAdministrator UserID and Password
Figure 5. Single-server installation flowchart (Windows)
Chapter 5. Single-server Installation: Tivoli Identity Manager Server 39
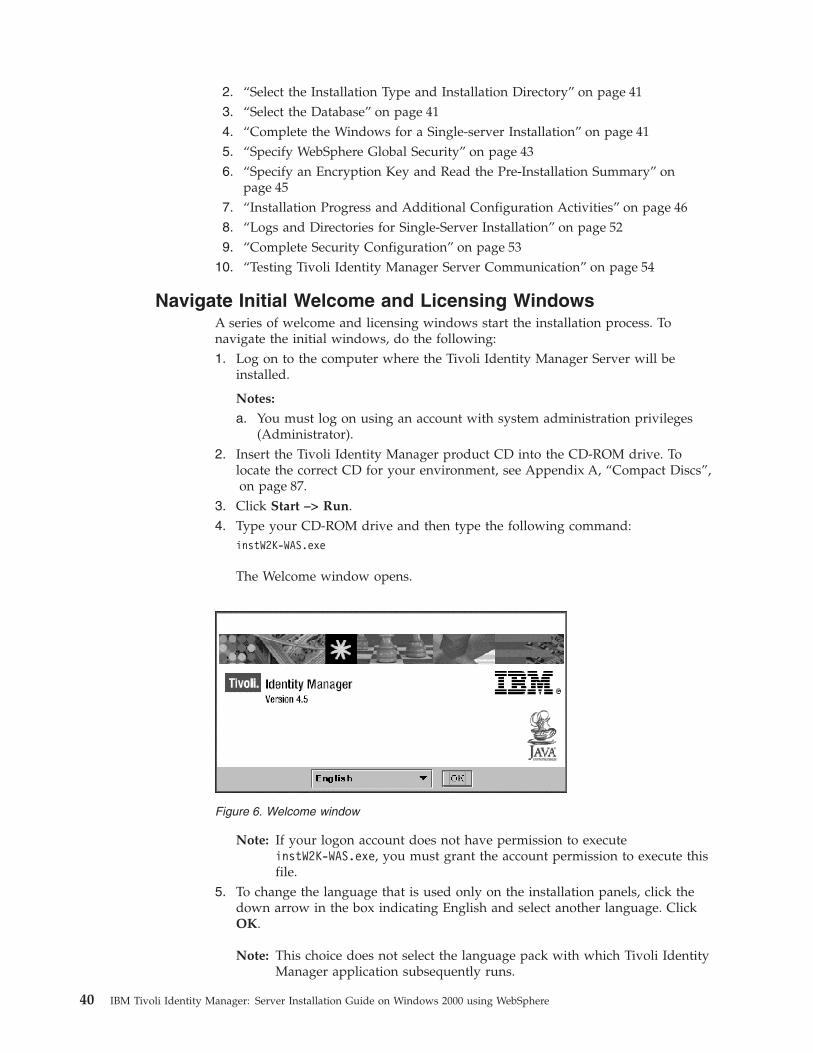
2. “Select the Installation Type and Installation Directory” on page 413. “Select the Database” on page 414. “Complete the Windows for a Single-server Installation” on page 415. “Specify WebSphere Global Security” on page 436. “Specify an Encryption Key and Read the Pre-Installation Summary” on
page 457. “Installation Progress and Additional Configuration Activities” on page 468. “Logs and Directories for Single-Server Installation” on page 529. “Complete Security Configuration” on page 53
10. “Testing Tivoli Identity Manager Server Communication” on page 54
Navigate Initial Welcome and Licensing WindowsA series of welcome and licensing windows start the installation process. Tonavigate the initial windows, do the following:1. Log on to the computer where the Tivoli Identity Manager Server will be
installed.
Notes:
a. You must log on using an account with system administration privileges(Administrator).
2. Insert the Tivoli Identity Manager product CD into the CD-ROM drive. Tolocate the correct CD for your environment, see Appendix A, “Compact Discs”,on page 87.
3. Click Start –> Run.4. Type your CD-ROM drive and then type the following command:
instW2K-WAS.exe
The Welcome window opens.
Note: If your logon account does not have permission to executeinstW2K-WAS.exe, you must grant the account permission to execute thisfile.
5. To change the language that is used only on the installation panels, click thedown arrow in the box indicating English and select another language. ClickOK.
Note: This choice does not select the language pack with which Tivoli IdentityManager application subsequently runs.
Figure 6. Welcome window
40 IBM Tivoli Identity Manager: Server Installation Guide on Windows 2000 using WebSphere

The License Agreement window opens.6. Read the license agreement and decide whether to accept its terms. If you do,
click Accept. Click Next.
Select the Installation Type and Installation DirectoryThe Choose Installation Type window opens.
Do the following:1. Select the Single Server option, and click Next.
The Choose Install Directory window opens.2. Accept the default installation directory c:\itim45 or select another directory
by clicking Choose.... Click Next.
Select the DatabaseThe Choose Database Type window opens.
Select one of the following database types and click Next:v IBM DB2 Universal Databasev Oracle. For more information, see “Oracle Installation and Configuration for
Tivoli Identity Manager” on page 16.v SQL Server 2000. For more information, see “SQL Server 2000 Configuration” on
page 20.
Complete the Windows for a Single-server InstallationThe following sequence occurs for a single-server installation if WebSphereApplication Server and IBM HTTP Server are not detected:
Note: If the installation detects existing applications, an altered sequence occurs.
Figure 7. Choose Installation Type window
Chapter 5. Single-server Installation: Tivoli Identity Manager Server 41

1. A window requests the installation directories used for WebSphere ApplicationServer, IBM HTTP Server, and the WebSphere embedded messaging server andclient.
Accept the default directories, or enter alternate directories in which you planto install WebSphere Application Server and IBM HTTP Server. On Windows,an additional window requests the directory for WebSphere embeddedmessaging support. Click Next.
Note: If a previously-existing WebSphere Application Server at the correctversion is detected, an alternate window appears. If a previously existingIBM HTTP Server at the correct version is detected, its field does notappear on this window.
2. A subsequent window prompts for the host name of the workstation, a nodename, and the port on which WebSphere Application Server listens.
Note: If WebSphere Application Server is already installed, a window willprompt you for the WebSphere node name and WebSphere ApplicationServer name. If DHCP is used to determine the IP address of thecomputer, do not use the fully qualified host name of the computer. Useonly the short name. For example, identity1 is the short name andidentity1.tivlab.raleigh.ibm.com is the fully qualified name.
Figure 8. Enter Following Data for Installing WebSphere Application Server window
42 IBM Tivoli Identity Manager: Server Installation Guide on Windows 2000 using WebSphere

Accept the defaults or modify them appropriately. Click Next.3. If Tivoli Identity Manager installs the WebSphere Application Server, additional
windows describe the prerequisites that WebSphere Application Server requires.Note the requirements. Click OK.
4. A window appears that requests a Windows 2000 Administrator user ID andpassword. Complete the fields and click OK. Ensure the user ID has thefollowing user rights:v Act as Part of the Operating Systemv Log on as Service
Specify WebSphere Global SecurityThe WebSphere Security window opens.
Note: The WebSphere Security and credential windows are displayed only whenWebSphere Application Server is already installed.
Figure 9. Data for Installing WebSphere Application Server Base window
Chapter 5. Single-server Installation: Tivoli Identity Manager Server 43

If WebSphere Global Security is on, click WebSphere Security Enabled.
An additional window requires you to specify the WebSphere Application Serveruser ID and password. This is the wasadmin user ID described in the manual stepsin “Security for WebSphere” on page 105.
Provide the user ID and password and click Next.
Figure 10. WebSphere Security window
Figure 11. WebSphere Administrator Credentials window
44 IBM Tivoli Identity Manager: Server Installation Guide on Windows 2000 using WebSphere

Specify an Encryption Key and Read the Pre-InstallationSummary
The Specify the Encryption Key window opens followed by an installationsummary window.
1. Provide an encryption key, which can be any word or phrase. The key is usedto encrypt Tivoli Identity Manager passwords and other sensitive text. Thevalue is stored in the enRole.properties file as enrole.encryption.password.Click Next.The Pre-install Summary window opens, listing components to be installed, therequired free disk space, and the installation directory such as c:\itim45.
2. Ensure that the required disk space is available before continuing, and clickInstall.If Tivoli Identity Manager installs the WebSphere Application Server, a windowappears after an interval of time, and requests the directory that contains theWebSphere Application Server installation binary.
3. Specify the location for the installation files on Windows as mount_point\nt andclick Next:A series of installation progress windows open during the interval thatinstallation requires. On a computer that has the minimum required resources,the interval can be significant.
Figure 12. Specify the Encryption Key window
Chapter 5. Single-server Installation: Tivoli Identity Manager Server 45
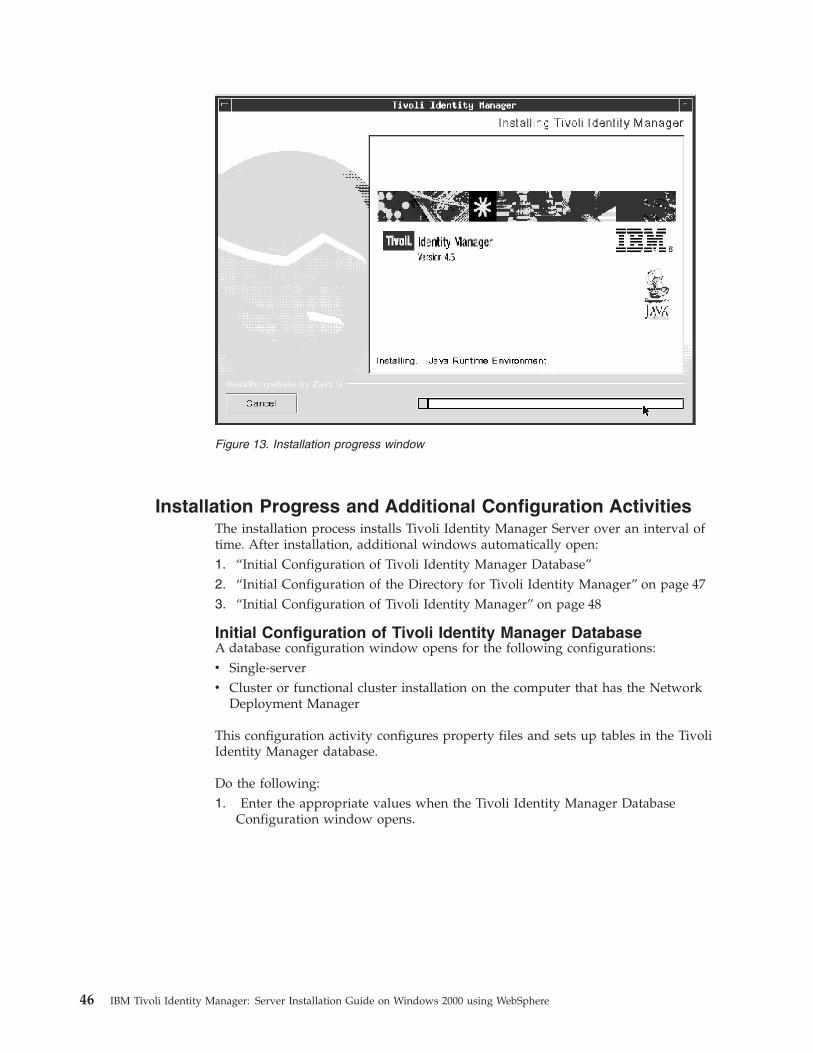
Installation Progress and Additional Configuration ActivitiesThe installation process installs Tivoli Identity Manager Server over an interval oftime. After installation, additional windows automatically open:1. “Initial Configuration of Tivoli Identity Manager Database”2. “Initial Configuration of the Directory for Tivoli Identity Manager” on page 473. “Initial Configuration of Tivoli Identity Manager” on page 48
Initial Configuration of Tivoli Identity Manager DatabaseA database configuration window opens for the following configurations:v Single-serverv Cluster or functional cluster installation on the computer that has the Network
Deployment Manager
This configuration activity configures property files and sets up tables in the TivoliIdentity Manager database.
Do the following:1. Enter the appropriate values when the Tivoli Identity Manager Database
Configuration window opens.
Figure 13. Installation progress window
46 IBM Tivoli Identity Manager: Server Installation Guide on Windows 2000 using WebSphere

Note: If you are using Oracle for your database, you must copy the OracleJDBC driver into the <ITIM_HOME>/lib directory and also into the{WAS_HOME}/installedApps/enrole.ear directory for WebSphereApplication Server before continuing with the IBM Tivoli IdentityManager Database Configuration window. A copy of the Oracle JDBCDriver (in the file named classes12.zip) is available on a supplementaryCD described in Appendix A, “Compact Discs”, on page 87.
2. Complete the database configuration fields for the database that Tivoli IdentityManager uses. If the database is IBM DB2, the IP Address and Port Numberfields are greyed out. These fields are required for other databases. Forexample, the value of the Database Name or Alias is an entry such as itimdb.The value of the Admin ID field is one of the following:v UNIX: db2inst1v Windows: db2admin
For more information, see “Configure the IBM DB2 Server” on page 123. Click Test. When the database test is successful, the User ID and User
Password fields on the Database Configuration window become active.4. Complete the fields with appropriate values and click Continue.
Initial Configuration of the Directory for Tivoli Identity ManagerA directory server configuration window opens for the following configurations:v Single-serverv Cluster or functional cluster installation on the computer that has the Network
Deployment Manager
Enter the appropriate values to initially configure the directory server to recognizeTivoli Identity Manager.
Do the following:
Figure 14. Database configuration window
Chapter 5. Single-server Installation: Tivoli Identity Manager Server 47
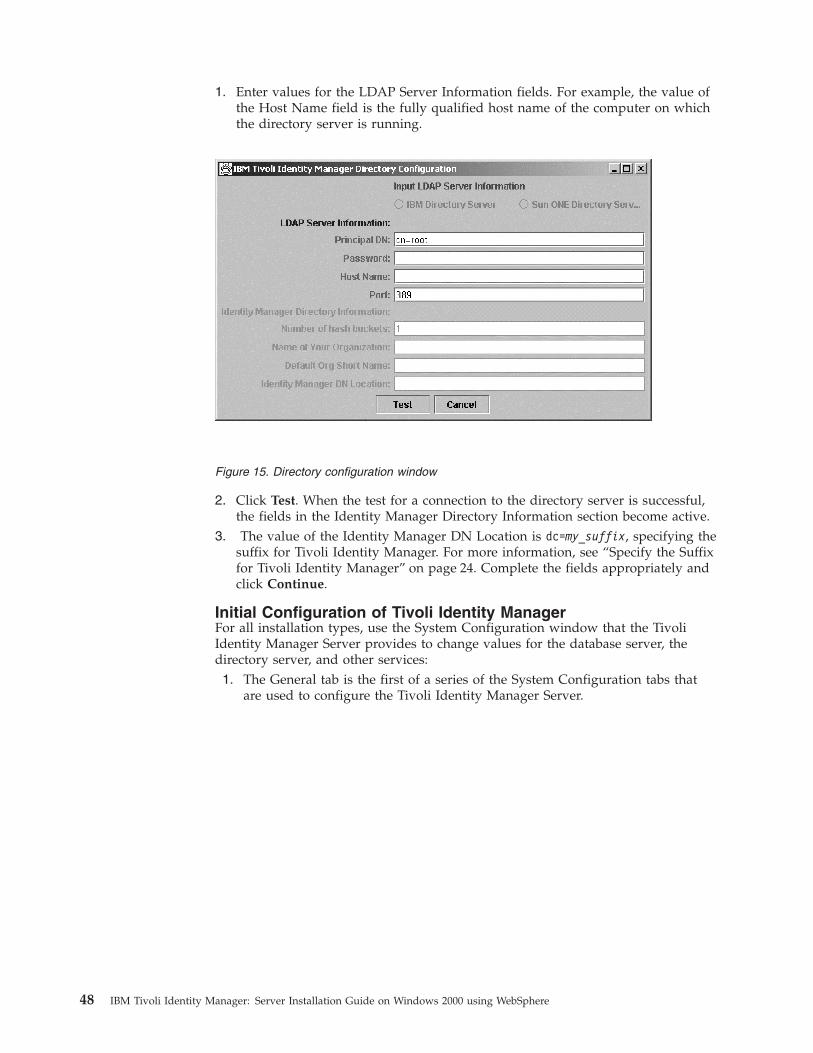
1. Enter values for the LDAP Server Information fields. For example, the value ofthe Host Name field is the fully qualified host name of the computer on whichthe directory server is running.
2. Click Test. When the test for a connection to the directory server is successful,the fields in the Identity Manager Directory Information section become active.
3. The value of the Identity Manager DN Location is dc=my_suffix, specifying thesuffix for Tivoli Identity Manager. For more information, see “Specify the Suffixfor Tivoli Identity Manager” on page 24. Complete the fields appropriately andclick Continue.
Initial Configuration of Tivoli Identity ManagerFor all installation types, use the System Configuration window that the TivoliIdentity Manager Server provides to change values for the database server, thedirectory server, and other services:1. The General tab is the first of a series of the System Configuration tabs that
are used to configure the Tivoli Identity Manager Server.
Figure 15. Directory configuration window
48 IBM Tivoli Identity Manager: Server Installation Guide on Windows 2000 using WebSphere

Field values on the General tab will be prefilled. For more information onthese fields, refer to system configuration information in the Tivoli IdentityManager Server Configuration Guide.
2. Click the Directory tab.The Directory tab window opens.
If necessary, modify the information for the directory server. If this installationis on a cluster member, the information must match the LDAP specificationpreviously made for the Network Deployment Manager.
3. Click the Database tab.The Database tab window opens.
Figure 16. General tab window
Figure 17. Directory tab window
Chapter 5. Single-server Installation: Tivoli Identity Manager Server 49

4. Provide the Database Name connection information for the Tivoli IdentityManager database. For example, the value of Database Name may be itimdb.The default user ID is enrole. If this installation is on a cluster member, theinformation must match the database specification previously made for theNetwork Deployment Manager.
5. Click Logging. The Logging tab window opens.
6. Either accept the default value of WARN or change the values to more or lessverbose, depending on site performance considerations.
7. Click the Mail tab.The Mail tab window opens.
Figure 18. Database tab window
Figure 19. Logging tab window
50 IBM Tivoli Identity Manager: Server Installation Guide on Windows 2000 using WebSphere

8. Enter required values on the Mail tab and click OK. For more information onthese fields, refer to the Tivoli Identity Manager Server Configuration Guide.
Notes:
a. The value of the Identity Manager Server URL field is the URL of theproxy server (for example, the IBM HTTP Server that is used to log onTivoli Identity Manager).
b. Change the Mail From address to the Tivoli Identity Manager systemadministrator e-mail address for your site. You must change this address,or you will send spam to the e-mail address listed.
9. Click UI.The UI tab window opens.
10. Either accept the defaults on the UI tab or modify the logo and addressinformation to specify your organization’s customized Welcome display andWeb address. The List Page Size specifies how many items will be displayed
Figure 20. Mail tab window
Figure 21. UI tab window
Chapter 5. Single-server Installation: Tivoli Identity Manager Server 51

on lists throughout the user interface. For more information, refer to the TivoliIdentity Manager Server Configuration Guide. Click OK.
11. Click Security.The Security tab window opens.
If WebSphere Global Security is on, and an administrator user ID andpassword have been entered, these fields are prefilled. The fields are blank ifWebSphere Global Security is not on.
Notes:
a. The initial values for the EJB User and Password fields are the values ofthe System User and Password fields. You might need to modify the EJBUser and Password fields. The length of the EJB user ID must be fewerthan 12 characters.
b. If you change the value of the EJB user ID or the EJB password on thissystem configuration Security window, then manual steps are requiredafter Tivoli Identity Manager installation to map the security role to theITIM user in order to start Tivoli Identity Manager. For more information,see Appendix D, “Security Considerations”, on page 105.
12. Click OK to complete the system configuration.13. Additionally, ensure that other values are appropriate to run the configuration
that Tivoli Identity Manager and related applications use.
Logs and Directories for Single-Server InstallationWhen the system configuration is complete, note the following log locations:
Table 2. Install log file names and directories
File names Directory
dbConfig.stdoutldapConfig.stdoutitim45_installer_debug.txtrunConfig.stdout (on cluster install)runConfigTmp.stdout (on single server
and Network Deployment Manager)
{ITIM_HOME}\install_logs
Figure 22. Security tab window
52 IBM Tivoli Identity Manager: Server Installation Guide on Windows 2000 using WebSphere

Table 2. Install log file names and directories (continued)
File names Directory
itim45_install.stdoutitim45_install.stderr
system root
Tivoli_Identity_Manager_InstallLog.log If installation completes successfully, thedirectory is {ITIM_HOME}. If installationfails, the log file will be on the Windowsdesktop.
log.txtihs_log.txtmq_install.logserver1/SystemOut.logitim.log
{WAS_HOME}\logs
For more information on WebSphere Application Server log files, refer toWebSphere Application Server documentation.
Complete Security ConfigurationIf you intend to enable J2EE security, do the following:v Complete the manual steps to complete the mapping and restart J2EE security
after installing Tivoli Identity Manager. For more information, see “Manual Stepson Single-node Deployments After Installing Tivoli Identity Manager” onpage 106.
v Ensure that the was.policy file exists. For more information, see “Configuringthe was.policy File” on page 106.
Using runConfig after Installing Tivoli Identity ManagerUse the runConfig command after installing Tivoli Identity Manager to completesystem configuration for activities such as the following:v Change the password of the enrole user.v Specify password encryption and update Tivoli Identity Manager EJB user IDs
and passwords. For more information, see descriptions of tabs on the SystemConfiguration window in “Initial Configuration of Tivoli Identity Manager” onpage 48.
For more information on using the runConfig command, see the Tivoli IdentityManager Server Configuration Guide.
Optionally Installing a Language PackAfter installing Tivoli Identity Manager, if the default language is not English,optionally obtain and mount the language pack CD for the Tivoli Identity ManagerServer. Use command line mode to install the language pack. For example, enterthe following:java –jar itimlp_setup.jar
The Tivoli Identity Manager language pack setup program will start. To completethe language pack installation, follow the instructions that appear in the setupprogram panels.
Chapter 5. Single-server Installation: Tivoli Identity Manager Server 53

Note: To run the Tivoli Identity Manager language pack setup program, Javaruntime environment 1.3.1 should be accessible from the command line.
Testing Tivoli Identity Manager Server CommunicationTo test whether the database, the directory server, and the Tivoli Identity ManagerServer are correctly configured and communicating with each other, do thefollowing:1. Test the JDBC driver to ensure that it is running:
a. Before you begin, ensure that the database server and the WebSphereApplication Server are running. For more information on starting theWebSphere Application Server, refer to documentation that the WebSphereApplication Server provides.
b. Access the WebSphere Application Server administrative console.c. Click Resources –> JDBC Providers. Select the target node.d. Select the scope as server, select a target server such as server1, and then
click Apply.e. Scroll to the list of JDBC providers and double-click ITIM JDBC Provider.f. Scroll the dialog that appears to view the Additional Properties. Click Data
Sources.g. In the Data Sources dialog that appears, click Test Connection. A message
appears that indicates the test result.If the test fails, ensure that you sourced the IBM DB2 profile correctly. Ifyou are using IBM DB2 Version 7.1 or 7.2 with the fix packs this productrequires, ensure that you ran the usejdbc2 shell script in the shell beforestarting WebSphere Application Server. Test the connection again. If theconnection does not work, verify that the enrole user ID and password areconfigured correctly. If the IBM DB2 server is remote, ensure that the sameIBM DB2 fix pack level is applied to both the database server and the client.
Note: Fix Pack 3 will migrate the IBM DB2 Version 7.1 environment to theIBM DB2 Version 7.2 general availability level. For more information,see Appendix B, “Software and Hardware Requirements onWindows”, on page 93.
2. The single-server installation automatically starts Tivoli Identity ManagerServer. If the server is not running, start Tivoli Identity Manager Server andany prerequisite applications. If IBM DB2 is used, ensure that you source theIBM DB2 profile prior to starting the WebSphere Application Server.Click Start –> Programs –> IBM WebSphere –> Application Server v5.0 –>Start Server. Alternatively, you can enter the following:{WAS_HOME}\bin\startServer.bat servername
For example:{WAS_HOME}\bin\startServer.bat server1
3. Log on to Tivoli Identity Manager. For example, at a browser window, type thefollowing:http://hostname/enrole
where hostname is the fully-qualified name or IP address of the computer onwhich Tivoli Identity Manager Server is running.
54 IBM Tivoli Identity Manager: Server Installation Guide on Windows 2000 using WebSphere

Notes:
a. Do not start two separate browser sessions from the same client computer.The two sessions are regarded as one session ID, resulting in problems withdata.
b. If you cannot log on after the Tivoli Identity Manager installation installsboth WebSphere Application Server and Tivoli Identity Manager, do thefollowing:1) Log off and log on the user to the system.2) Again attempt to log on to Tivoli Identity Manager.3) If you cannot log on to Tivoli Identity Manager, then reboot the system,
which might correct certain environment settings and WebSphereembedded messaging support queue problems.
c. If you log on using the single sign-on capability and need to select alanguage, append /language to the Web site address. For example, enter:https://mysite.myco.com/itim/enrole/language
For more information on configuring the language default for your Webbrowser, refer to the Tivoli Identity Manager Server Configuration Guide.
4. Enter the Tivoli Identity Manager administrator user ID (″itim manager″) andpassword (immediately after installation, the value is ″secret″).
5. Take the necessary steps to create a user (an ITIM user). For more information,refer to online help or to the Tivoli Identity Manager Policy and OrganizationAdministration Guide.
For more information on processes that should be running, refer to the TivoliIdentity Manager Server Configuration Guide.
Server-Agent CommunicationUsing the Tivoli Identity Manager system with a Tivoli Identity Manager agent willrequire production certificates to ensure that secure communication occurs betweenthe Tivoli Identity Manager server and the agent.
The Certificate Authority that corresponds to the Tivoli Identity Manager agent’scertificate must be located in the {ITIM_HOME}\cert directory. For supportedcertificate types, refer to the Tivoli Identity Manager Server Configuration Guide andto a specific agent’s installation guide for more information.
Notes:
1. Install one agent profile at a time, and complete the profile installation beforeinstalling another agent profile. Installing multiple profiles at the same timemight cause the Tivoli Identity Manager Server to force a reboot.
2. If the default language is not English, before installing the first Tivoli IdentityManager agent, optionally obtain and mount the language pack CD for theTivoli Identity Manager agents. Use command line mode to install the languagepack for the agents on the Tivoli Identity Manager Server:java –jar itimlp_agents_setup.jar
The Tivoli Identity Manager language pack setup program will start. Tocomplete the language pack installation, follow the instructions that appear inthe setup program panels.
Note: To run the Tivoli Identity Manager language pack setup program, Javaruntime environment 1.3.1 should be accessible from the command line.
Chapter 5. Single-server Installation: Tivoli Identity Manager Server 55

56 IBM Tivoli Identity Manager: Server Installation Guide on Windows 2000 using WebSphere

Chapter 6. Cluster Installation: Tivoli Identity Manager Server
This chapter describes installing and configuring the Tivoli Identity ManagerServer in either a cluster or functional cluster configuration. Before continuing,read “WebSphere Environment Limitations using Tivoli Identity Manager” onpage 10.
Notes:
1. In a cluster environment, Tivoli Identity Manager installation does notautomatically install WebSphere Application Server. Install and configure theWebSphere components before you install Tivoli Identity Manager on a cluster.
2. Installing Tivoli Identity Manager on clusters must be done sequentially, onecomputer at a time.
3. For required application versions and fix packs, see Appendix B, “Software andHardware Requirements on Windows”, on page 93.
Installation tasks include the following:v “Before You Begin”v “Installing Tivoli Identity Manager Server” on page 64
Before You BeginBefore you begin, do the following:v Determine whether a pre-existing WebSphere Application Server configuration at
your site is one of the configurations listed in “WebSphere EnvironmentLimitations using Tivoli Identity Manager” on page 10.
v Complete the steps to construct a WebSphere Application Server cell and one ormore clusters, described in “Creating Clusters Using Network DeploymentManager” on page 59 and also in “Configuring Tivoli Identity Manager Clusters”on page 98.
v Ensure that the following are running:
Table 3. Applications that must be running
Prerequisite For more information, see:
Database Chapter 3, “Database Configuration”, on page 11
Directory server Chapter 4, “Directory Server Configuration”, onpage 23
Network Deployment Manager “Ensure that Network Deployment Manager andNode Agents are Running” on page 102WebSphere Application Server node
agents
WebSphere Application Server JMSservers
This is WebSphere embedded messaging supportNote: If WebSphere MQ Version 5.3 previouslyexists, see “Using an Existing WebSphere MQVersion 5.3” on page 97.
v Ensure free disk space and virtual memory requirements are met. For moreinformation, see Appendix B, “Software and Hardware Requirements onWindows”, on page 93.
v Ensure you have the correct administrative authority (Administrator). If not,obtain the authority and restart the system to activate the proper authorization.
© Copyright IBM Corp. 2003 57

v Ensure you have resolved any port problems. For more information, see“Resolving Port Problems”.
v On the computer on which Tivoli Identity Manager will be installed, set theappropriate value for your locale to ensure the language format is recognized.
v Ensure that the WebSphere Application Server Fix Pack 2 is also applied on thecomputer on which the Web server is installed. Stop the Web Server beforeinstalling the fix pack.
Note: There may be several WebSphere Web plug-ins in the configuration,including a WebSphere Web Server plug-in on the computer that hasWebSphere Application Server Network Deployment.
v Complete the information worksheet for your configuration.
Resolving Port ProblemsThe following port problems may occur:v Before installing Tivoli Identity Manager, ensure the same SOAP port for
WebSphere 5.0 is defined at the following locations:– com.ibm.ws.scripting.port in the following file:
{WAS_NDM_HOME}\properties\wsadmin.properties
– Port under SOAP_CONNECTOR_ADDRESS of server1 in the following file:{WAS_NDM_HOME}\config\cells\<cell_name>\nodes\<node_name>\serverindex.xml
If the values are different, correct the port number as follows:1. Open the wsadmin.properties file.2. Change the value of com.ibm.ws.scripting.port to the value you find in the
serverindex.xml file.
Notes:
1. If installation failed because the SOAP port number was incorrect, correct theport specification and rerun the runConfig command.
2. If both WebSphere Application Server Network Deployment and WebSphereApplication Server are installed on the same system, use the port numberfrom the serverindex.xml file that applies to the WebSphere ApplicationServer Network Deployment Manager.
v After installation completes, the Tivoli Identity Manager logon process will fail ifvirtual host port values are different than the values that Tivoli Identity Managerrequires.Tivoli Identity Manager requires virtual host port values of 80 and 9443. Port9443 is used if secure communication is enabled.Installing one instance of a WebSphere server on a computer will specify thecorrect values for the virtual host port numbers that Tivoli Identity Managerexpects to use.However, installing a second instance of a WebSphere server such as NetworkDeployment Manager on the same computer will automatically advance the portnumbers specified for the Network Deployment Manager. For example, thevirtual host port numbers advance from 80 to 81, and from 9443 to 9444. Youmust reconfigure the port numbers to be the numbers that Tivoli IdentityManager requires.To correct the virtual host port numbers, access the WebSphere administrativeconsole and do the following:1. Click Environment –> Virtual Hosts –> Default Host –> Host Aliases.
58 IBM Tivoli Identity Manager: Server Installation Guide on Windows 2000 using WebSphere

2. Change the virtual host port values to 80 and to 9443.3. Save the configuration to the master repository, selecting Synch Changes
with Nodes.4. Click Update Web Server Plugin and click OK.5. Restart the cluster.
Creating Clusters Using Network Deployment Manager
Note: For more information on specifying a WebSphere cell, see “ConfiguringTivoli Identity Manager Clusters” on page 98.
To create a cluster and populate it with cluster members, do the following usingthe WebSphere administation console before you begin installing Tivoli IdentityManager:1. Log on to the Network Deployment Manager administrative console.2. In the left pane, click Servers –> Clusters.3. Click New.
The Create New Cluster dialog appears.4. Enter a new cluster name. For example, enter ITIM_CLUSTER.
Notes:
a. If you are creating a functional cluster with multiple clusters, repeat thisprocess and specify a cluster name such as ITIM_UI_CLUSTER for one clusterproviding the Tivoli Identity Manager user interface tier, andITIM_WF_CLUSTER for another cluster providing the Tivoli Identity Managerworkflow tier.
b. Cluster names are case sensitive.
Note:
5. Click Next.The Create New Clustered Servers dialog appears.
6. Assuming you have several cluster members to specify, enter the name of anew cluster member, select its node, and click Apply.A list of cluster members appears at the bottom of the Create New ClusteredServers dialog. Examine the list to ensure that the new cluster member isadded.
7. Add additional cluster members by entering the name of each new clustermember and selecting its node. When you are done adding all members, clickNext.A Summary dialog appears with a list of cluster members. Examine thesummary to ensure that the cluster member names and server names arecorrect.
8. Click Finish.9. Click Cluster Topology, expand the tree of the cluster you created, and
examine its members.10. If the cluster is correctly specified, click Clusters and then click Save to save
the new cluster to the Network Deployment Manager master repository. Formore information on repositories used in a cluster, refer to informationprovided by Redbooks for WebSphere Application Server. For moreinformation, see “Prerequisite Product Publications” on page viii.
Chapter 6. Cluster Installation: Tivoli Identity Manager Server 59

Note: Select Synch changes with Nodes when you save the configuration.11. Update the Web Server Plugin. To do so, click Environment –> Update Web
Server Plugin –> OK.
Information Worksheet for Cluster InstallationCollect the following information before you begin the installation:
Database InformationCollect the following information for the relational database management system:
Admin ID ______________________________
The Administrator User ID (the db2InstanceName as database instanceowner) that you created when installing the database. For example, thedefault for IBM DB2 is the following:v UNIX: db2inst1v Windows: db2admin
For more information, see “IBM DB2 Configuration” on page 11.
Admin Password ______________________________
The password for the Administrator user ID.
Database Name ______________________________
Specifies how the Tivoli Identity Manager Server connects to the database.If the database is installed locally, the Database Name is the name of thedatabase. For example, the value of Database Name is itimdb. If thedatabase is installed remotely, the Database Name is the local alias name ofthe remote database. For more information on using the catalog commandto specify the remote database, see “Configuring the IBM DB2 JDBCDriver” on page 14.
Database Type ______________________________
Type of database used for your system. For example, the database is IBMDB2.
Credentials for the database:
Database User
The account that Tivoli Identity Manager Server uses to log in tothe database. The user ID is enrole.
Note: This user ID cannot be changed.
User Password
Password for the account that Tivoli Identity Manager Server usesto log in to the database.
IP Address ______________________________
IP address of the database server. Not required for IBM DB2. Required forOracle and SQL Server 2000.
Port Number ______________________________
Port number of the database server. Not required for IBM DB2. Requiredfor Oracle and SQL Server 2000.
60 IBM Tivoli Identity Manager: Server Installation Guide on Windows 2000 using WebSphere
Additionally, the installation process reports the following Database Poolinformation. The database pool information determines the number of JDBCconnections that Tivoli Identity Manager Server can open to the database. For moreinformation, refer to the Tivoli Identity Manager Server Configuration Guide.
Evaluate the following values in relation to your site needs:
Initial CapacityInitial number of JDBC connections that Tivoli Identity Manager Server canopen to the database
Maximum CapacityMaximum number of JDBC connections that Tivoli Identity ManagerServer can open to the database at any one time
Login Delay SecondsTime, in seconds, between connections
Directory Server InformationCollect the following information:
Host name ______________________________
Fully-qualified host name of the directory server. For example,identity1.mylab.mydomain.com.
Identity Manager DN Location ______________________________
The value such as dc=com that you enter in the Location field must matchthe suffix (for example, dc=com) that you created when you configuredLDAP. For more information, see Chapter 4, “Directory ServerConfiguration”, on page 23.
Name of your organization ______________________________
The value that you enter in the Name of Your Organization field will bedisplayed in the organization chart that is displayed on many of the TivoliIdentity Manager graphical user interface screens. This value is typicallythe more formal name of your company. For example, an organizationname is IBM Corporation.
Note: You may enter either single-byte character set (ASCII) characters ordouble-byte character set characters in this field.
Default Org Short Name ______________________________
The value that you enter in the Default Org Short Name field will be usedinternally in IBM Directory Server to represent your organization. Thisvalue is typically an abbreviation of your company name. For example, ashort name is ibmcorp.
Note: Enter only single-byte character set (ASCII) characters in the DefaultOrg Short Name field, such as an identifier in English.
Number of hash buckets ______________________________
A hash bucket is used to apportion data items for sorting or lookuppurposes. Evaluate the default value (1) in relation to your site needs.
Port ______________________________
Port on which the directory server is listening, such as 389.
Chapter 6. Cluster Installation: Tivoli Identity Manager Server 61
Principal DN ______________________________
The Principal Distinguished Name user ID. For example, cn=root.
Password ______________________________
The password of the Principal Distinguished Name user ID that youcreated when installing the directory server.
Additionally, the installation process reports the following LDAP Connection PoolInformation fields for a pool of LDAP connections accessible by Tivoli IdentityManager Server. For more information, refer to the Tivoli Identity Manager ServerConfiguration Guide.
Evaluate the following values in relation to your site needs:
Max. pool sizeMaximum number of connections the LDAP Connection Pool can have atany time
Initial pool sizeInitial number of connections created for the LDAP Connection Pool
Increment countNumber of connections added to the LDAP Connection Pool every time aconnection is requested once all connections are in use
WebSphere Application Server Information for ClusterInstallation
WebSphere Application Server installation for a cluster configuration has thefollowing fields. For more information, see “Configuring Tivoli Identity ManagerClusters” on page 98.
Cluster name ______________________________The cluster name you created earlier when you constructed the WebSphereApplication Server cell. Use one name such as ITIM_CLUSTER for a singlecluster. In a functional cluster, use names such as ITIM_UI_CLUSTER andITIM_WF_CLUSTER. This field is not displayed during single-serverinstallation.
Note: Cluster names and other WebSphere identifiers you enter are casesensitive.
Installation directory ______________________________
Installation directory for WebSphere Application Server base. For example,the Solaris default directory is /opt/WebSphere/AppServer. This field is forinformation purposes, if WebSphere Application Server base is alreadyinstalled.
Logging levelDisplays how verbose the logs are when tracing system errors. Systemadministrators can select how detailed the log file should be by setting theLogging Level field number between INFO and FATAL. The more severethe logging level, the better the performance of the system because lessinformation is written to the log file.
Mail server nameSMTP mail servers are supported. The SMTP host is the mail gateway.
62 IBM Tivoli Identity Manager: Server Installation Guide on Windows 2000 using WebSphere

Security settingsThe following fields appear on the System Configuration Security tab.
Encryption (checkbox)Encrypts the password of the database, LDAP, and WebSphereApplication Server administrator user identifier in the TivoliIdentity Manager property files
Application Server User ManagementEnables you to set and confirm the password for the following:
System UserThe WebSphere Application Server user ID and password.Required only if WebSphere Global Security is on. This isthe wasadmin user ID described in the manual steps in“Security for WebSphere” on page 105.
EJB UserA user and password that you must have defined prior tostarting installation. Required only if WebSphere GlobalSecurity is on. This is the itimadmin user ID described inthe manual steps in “Security for WebSphere” on page 105.
Note: If this field is pre-filled when it appears, the fieldmight contain the value wasadmin. Change the fieldto the value itimadmin.
Tivoli Identity Manager InformationNote the following information for Tivoli Identity Manager:
Encryption keyThe key can be any word or phrase. The key is used to encrypt TivoliIdentity Manager passwords and other sensitive text. The value is stored inthe enRole.properties file as enrole.encryption.password.
Logging levelDisplays how verbose the logs are when tracing system errors. Systemadministrators can select how detailed the log file should be by setting theLogging Level field number between INFO and FATAL. The more severethe logging level, the better the performance of the system because lessinformation is written to the log file.
Mail server nameSMTP mail servers are supported. The SMTP host is the mail gateway.
User ID ____itim manager________
The Tivoli Identity Manager user ID. The default value after installation isitim manager. Use this user ID when you log on to Tivoli IdentityManager.
Password ____secret______________
Password for the Tivoli Identity Manager administrator user ID specifiedas itim manager. The default password immediately after installation issecret.
Note: You will be forced to change the administrator account passwordwhen you log on to Tivoli Identity Manager Server.
Chapter 6. Cluster Installation: Tivoli Identity Manager Server 63
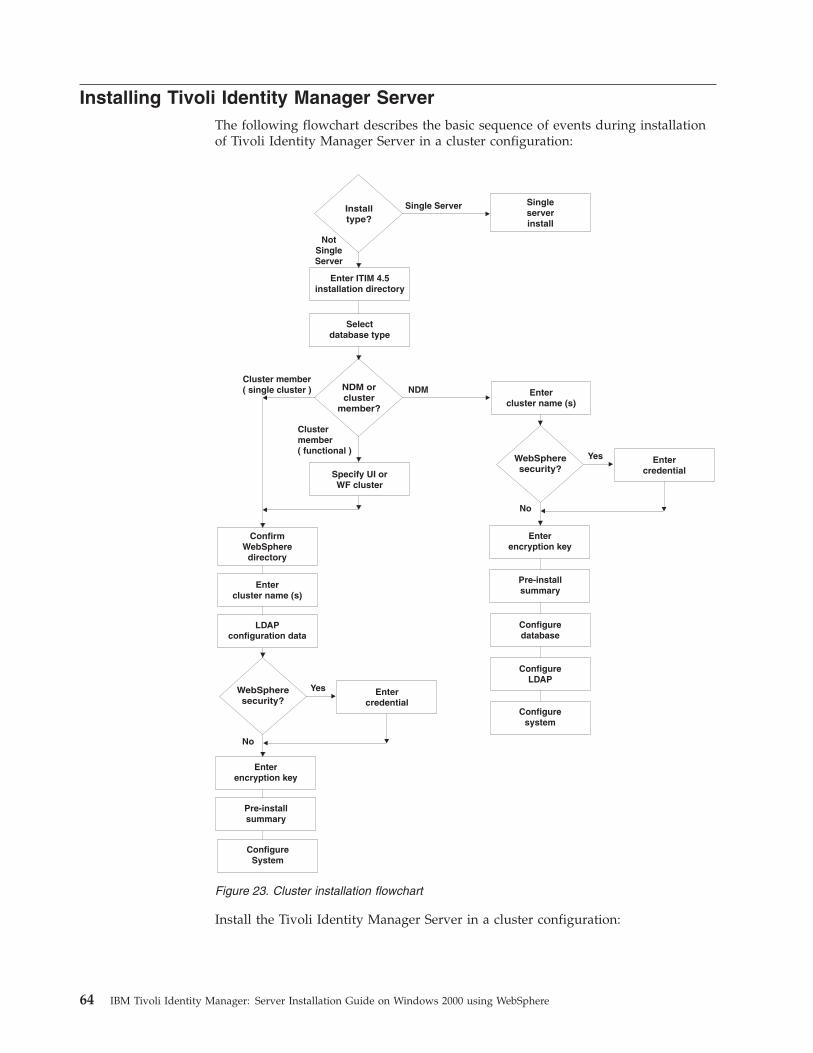
Installing Tivoli Identity Manager ServerThe following flowchart describes the basic sequence of events during installationof Tivoli Identity Manager Server in a cluster configuration:
Install the Tivoli Identity Manager Server in a cluster configuration:
Enterencryption key
Enterencryption key
Pre-installsummary
Pre-installsummary
Configuredatabase
ConfigureLDAP
ConfigureSystem
Configuresystem
No
Yes
NDMNDM orcluster
member?
Entercredential
Entercluster name (s)
Entercluster name (s)
LDAPconfiguration data
Enter ITIM 4.5installation directory
Selectdatabase type
WebSpheresecurity?
No
Yes Entercredential
WebSpheresecurity?
ConfirmWebSphere
directory
Cluster member( single cluster )
Installtype?
Single Server Singleserverinstall
NotSingleServer
Clustermember( functional )
Specify UI orWF cluster
Figure 23. Cluster installation flowchart
64 IBM Tivoli Identity Manager: Server Installation Guide on Windows 2000 using WebSphere

Note: To install Tivoli Identity Manager Server, obtain the correct CD for yourenvironment. For more information, see Appendix A, “Compact Discs”, onpage 87.
1. On the computer that has the Network Deployment Manager. The initialconfiguration of the database and the directory server for Tivoli IdentityManager occurs during this installation.
2. On each computer that has a cluster member or cluster members.
Note: Ensure that you previously completed the steps in “Before You Begin” onpage 57.
To install Tivoli Identity Manager Server, do the following:1. “Navigate Initial Welcome and Licensing Windows”2. “Select the Installation Type and Default Installation Directory” on page 663. “Select the Database” on page 674. “Complete the Sequence for Cluster Installation” on page 675. “Specify WebSphere Global Security” on page 716. “Specify an Encryption Key and Read the Pre-Installation Summary” on
page 737. “Installation Progress and Additional Configuration Activities” on page 748. “Logs and Directories for Cluster Installation” on page 809. “Complete Security Configuration” on page 81
10. “Testing Tivoli Identity Manager Server Communication” on page 82
Navigate Initial Welcome and Licensing WindowsA series of welcome and licensing windows start the installation process. Tonavigate the initial windows, do the following:1. Log on to the computer where the Tivoli Identity Manager Server will be
installed.
Notes:
a. You must log on using an account with system administration privileges(Administrator).
2. Insert the Tivoli Identity Manager product CD into the CD-ROM drive.3. Click Start –> Run.4. Type your CD-ROM drive and then type the following command:
instW2K-WAS.exe
The Welcome window opens.
Chapter 6. Cluster Installation: Tivoli Identity Manager Server 65

Note: If your logon account does not have permission to executeinstW2K-WAS.exe, you must grant the account permission to execute thisfile.
5. To change the language that is used only on the installation panels, click thedown arrow in the box indicating English and select another language. ClickOK.
Note: This choice does not select the language pack with which Tivoli IdentityManager application subsequently runs.
The License Agreement window opens.6. Read the license agreement and decide whether to accept its terms. If you do,
click Accept. Click Next.
Select the Installation Type and Default Installation DirectoryThe Choose Installation Type window opens.
Figure 24. Welcome window
Figure 25. Choose Installation Type window
66 IBM Tivoli Identity Manager: Server Installation Guide on Windows 2000 using WebSphere

1. Select either Cluster or Functional Cluster, and click Next.
Note: A subsequent window will appear, allowing you to specify whether thefunctional cluster is part of a UI or WF tier. The window does notappear if you select the installation type as Cluster.
The Important Information window opens.2. Verify that the WebSphere Network Deployment Manager, and all WebSphere
node agents are operational before continuing. For more information, see“Ensure that Network Deployment Manager and Node Agents are Running” onpage 102. Click Next.The Choose Install Directory window opens.
3. Accept the default c:\itim45 installation directory for Tivoli Identity Manageror specify another directory by clicking Choose... and completing its prompts.Click Next.
Select the DatabaseThe Choose Database Type window opens.
Select one of the following database types and click Next:v IBM DB2 Universal Databasev Oracle. For more information, see “Oracle Installation and Configuration for
Tivoli Identity Manager” on page 16.v SQL Server 2000. For more information, see “SQL Server 2000 Configuration” on
page 20.
Complete the Sequence for Cluster InstallationThe Choose Cluster Node Type window opens.1. Select a node type. You must install Tivoli Identity Manager first on the
computer that has the Network Deployment Manager, and then install TivoliIdentity Manager on cluster members.
Chapter 6. Cluster Installation: Tivoli Identity Manager Server 67

Note: You can also install both the Network Deployment Manager and acluster member on the same computer. Ensure that the computer has therequired memory, speed, and available space to meet the additional load.
The Choose Functional Cluster Membership window opens.
Note: The following window appears if you previously specified theinstallation type as functional cluster. The window does not appear ifyou previously selected the installation type as cluster.
Figure 26. Choose Cluster Node Type window
68 IBM Tivoli Identity Manager: Server Installation Guide on Windows 2000 using WebSphere

2. For a functional cluster, select whether this computer is a UI Cluster member ora Workflow Cluster member. Click Next.
Note: Do not assign a UI cluster member and a Workflow cluster member tothe same computer.
A data window appears to request one or more cluster names.3. For a single (regular) cluster, enter a cluster name such as itim_cluster.
Figure 27. Choose Functional Cluster Membership window
Chapter 6. Cluster Installation: Tivoli Identity Manager Server 69
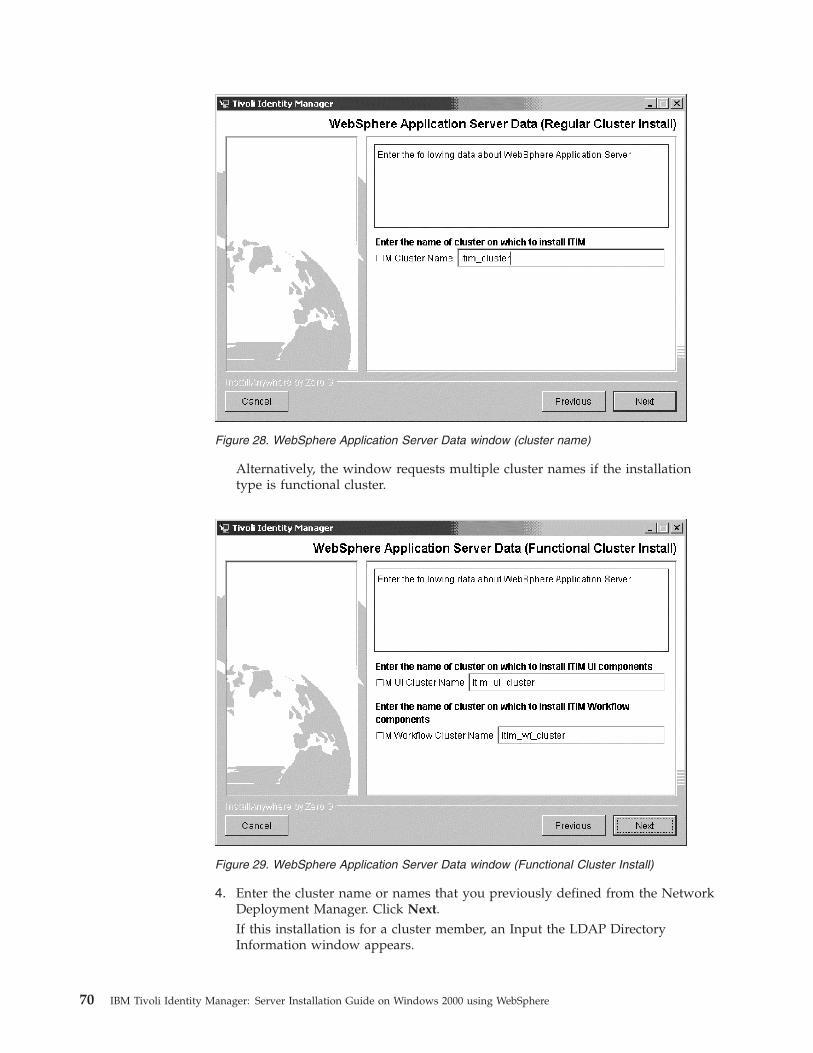
Alternatively, the window requests multiple cluster names if the installationtype is functional cluster.
4. Enter the cluster name or names that you previously defined from the NetworkDeployment Manager. Click Next.If this installation is for a cluster member, an Input the LDAP DirectoryInformation window appears.
Figure 28. WebSphere Application Server Data window (cluster name)
Figure 29. WebSphere Application Server Data window (Functional Cluster Install)
70 IBM Tivoli Identity Manager: Server Installation Guide on Windows 2000 using WebSphere

Note: This window does not appear if Tivoli Identity Manager installation isspecified for the Network Deployment Manager.
5. From the information worksheet you previously assembled, enter organizationdata in the fields in the LDAP Directory Information window.For every cluster member, the information must match the LDAP specificationthat was previously made during the primary Tivoli Identity Managerinstallation on the Network Deployment Manager. Each cluster member shouldhave the identical information. For more information, see “Directory ServerInformation” on page 61. Click Next.
Specify WebSphere Global SecurityThe WebSphere Security window opens.
Figure 30. LDAP Directory information window
Chapter 6. Cluster Installation: Tivoli Identity Manager Server 71
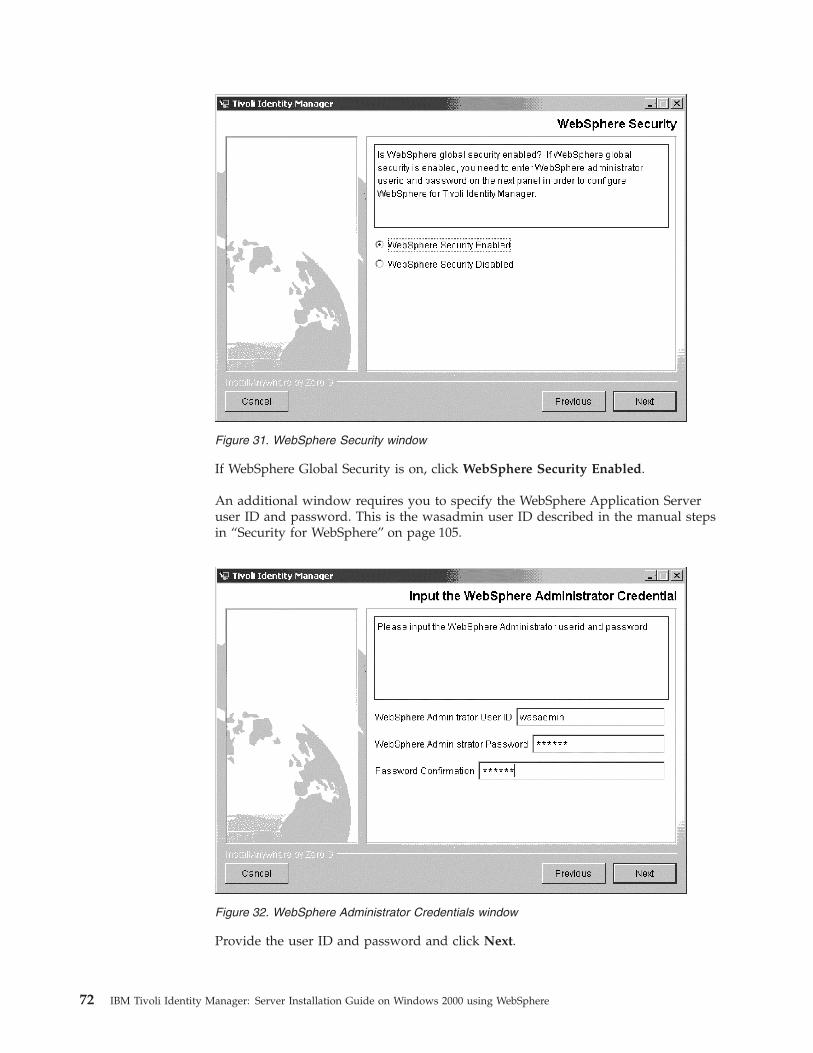
If WebSphere Global Security is on, click WebSphere Security Enabled.
An additional window requires you to specify the WebSphere Application Serveruser ID and password. This is the wasadmin user ID described in the manual stepsin “Security for WebSphere” on page 105.
Provide the user ID and password and click Next.
Figure 31. WebSphere Security window
Figure 32. WebSphere Administrator Credentials window
72 IBM Tivoli Identity Manager: Server Installation Guide on Windows 2000 using WebSphere
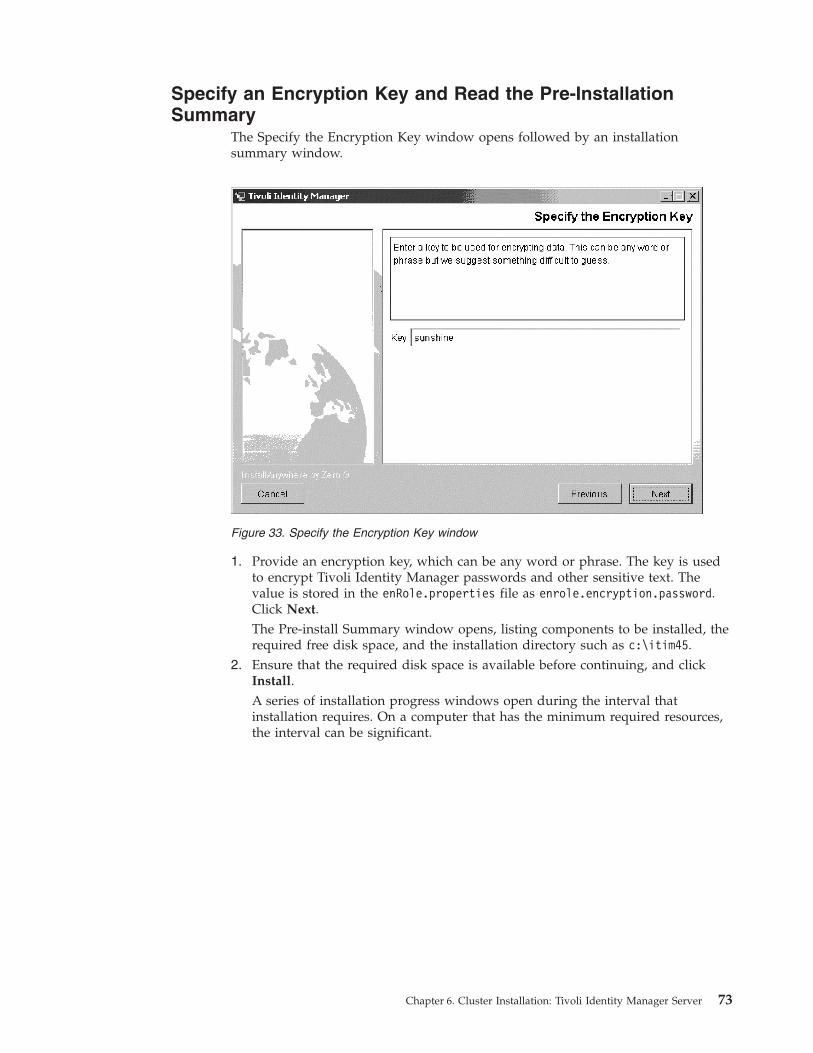
Specify an Encryption Key and Read the Pre-InstallationSummary
The Specify the Encryption Key window opens followed by an installationsummary window.
1. Provide an encryption key, which can be any word or phrase. The key is usedto encrypt Tivoli Identity Manager passwords and other sensitive text. Thevalue is stored in the enRole.properties file as enrole.encryption.password.Click Next.The Pre-install Summary window opens, listing components to be installed, therequired free disk space, and the installation directory such as c:\itim45.
2. Ensure that the required disk space is available before continuing, and clickInstall.A series of installation progress windows open during the interval thatinstallation requires. On a computer that has the minimum required resources,the interval can be significant.
Figure 33. Specify the Encryption Key window
Chapter 6. Cluster Installation: Tivoli Identity Manager Server 73

Installation Progress and Additional Configuration ActivitiesThe installation process installs Tivoli Identity Manager Server over an interval oftime. After installation, additional windows automatically open:1. Only during installation on the computer that has the WebSphere Network
Deployment Manager, the following windows appear:a. Database configuration. For more information, see “Initial Configuration of
Tivoli Identity Manager Database”.b. Directory server. For more information,see “Initial Configuration of the
Directory for Tivoli Identity Manager” on page 75.2. During installation on either the computer that has the WebSphere Network
Deployment Manager or on a computer that has a cluster member, a systemconfiguration window opens to configure Tivoli Identity Manager. For moreinformation, see “Initial Configuration of Tivoli Identity Manager” on page 76.
Initial Configuration of Tivoli Identity Manager DatabaseA database configuration window opens for the following configurations:v Single-serverv Cluster or functional cluster installation on the computer that has the Network
Deployment Manager
This configuration activity configures property files and sets up tables in the TivoliIdentity Manager database.
Do the following:1. Enter the appropriate values when the Tivoli Identity Manager Database
Configuration window opens.
Figure 34. Installation progress window
74 IBM Tivoli Identity Manager: Server Installation Guide on Windows 2000 using WebSphere

Note: If you are using Oracle for your database, you must copy the OracleJDBC driver into the <ITIM_HOME>/lib directory and also into the{WAS_HOME}/installedApps/enrole.ear directory for WebSphereApplication Server before continuing with the IBM Tivoli IdentityManager Database Configuration window. A copy of the Oracle JDBCDriver (in the file named classes12.zip) is available on a supplementaryCD described in Appendix A, “Compact Discs”, on page 87.
2. Complete the database configuration fields for the database that Tivoli IdentityManager uses. If the database is IBM DB2, the IP Address and Port Numberfields are greyed out. These fields are required for other databases. Forexample, the value of the Database Name or Alias is an entry such as itimdb.The value of the Admin ID field is one of the following:v UNIX: db2inst1v Windows: db2admin
For more information, see “Configure the IBM DB2 Server” on page 123. Click Test. When the database test is successful, the User ID and User
Password fields on the Database Configuration window become active.4. Complete the fields with appropriate values and click Continue.
Initial Configuration of the Directory for Tivoli Identity ManagerA directory server configuration window opens for the following configurations:v Single-serverv Cluster or functional cluster installation on the computer that has the Network
Deployment Manager
Enter the appropriate values to initially configure the directory server to recognizeTivoli Identity Manager.
Do the following:
Figure 35. Database configuration window
Chapter 6. Cluster Installation: Tivoli Identity Manager Server 75

1. Enter values for the LDAP Server Information fields. For example, the value ofthe Host Name field is the fully qualified host name of the computer on whichthe directory server is running.
2. Click Test. When the test for a connection to the directory server is successful,the fields in the Identity Manager Directory Information section become active.
3. The value of the Identity Manager DN Location is dc=my_suffix, specifying thesuffix for Tivoli Identity Manager. For more information, see “Specify the Suffixfor Tivoli Identity Manager” on page 24. Complete the fields appropriately andclick Continue.
Initial Configuration of Tivoli Identity ManagerFor all installation types, use the tabs on the System Configuration window thatthe Tivoli Identity Manager Server provides to change values for the databaseserver, the directory server, and other services:1. The General tab is the first of a series of System Configuration tabs that are
used to configure the Tivoli Identity Manager Server.
Figure 36. Directory configuration window
76 IBM Tivoli Identity Manager: Server Installation Guide on Windows 2000 using WebSphere

Field values on the General tab will be prefilled. For more information onthese fields, refer to system configuration information in the Tivoli IdentityManager Server Configuration Guide.
2. Click the Directory tab.The Directory tab window opens.
If necessary, modify the information for the directory server. If this installationis on a cluster member, the information must match the LDAP specificationpreviously made for the Network Deployment Manager.
If this installation is on a cluster member, a Test button is visible. Click Test.You should receive a successful connection response window. Click OK toclose the window.
3. Click the Database tab.The Database tab window opens.
Figure 37. General tab window
Figure 38. Directory tab window
Chapter 6. Cluster Installation: Tivoli Identity Manager Server 77

4. Provide the Database Name connection information for the Tivoli IdentityManager database. For example, the value of Database Name may be itimdb.The default user ID is enrole. If this installation is on a cluster member, theinformation must match the database specification previously made for theNetwork Deployment Manager.If this installation is on a cluster member, a Test button is visible. Click Test. Asuccessful test activates the remaining fields in the Database Pool Informationsection. Click OK to close the window.
5. Click Logging. The Logging tab window opens. Either accept the defaultvalue of WARN or change the values to more or less verbose, depending onsite performance considerations.
6. Click the Mail tab.The Mail tab window opens.
Figure 39. Database tab window
Figure 40. Logging tab window
78 IBM Tivoli Identity Manager: Server Installation Guide on Windows 2000 using WebSphere

7. Enter required values on the Mail tab and click OK. For more information onthese fields, refer to the Tivoli Identity Manager Server Configuration Guide.
Notes:
a. The value of the Identity Manager Server URL field is the URL of theproxy server (for example, the IBM HTTP Server that is used to log onTivoli Identity Manager).
b. Change the Mail From address to the Tivoli Identity Manager systemadministrator e-mail address for your site. You must change this address,or you will send spam to the e-mail address listed.
8. Click UI.The UI tab window opens.
9. Either accept the defaults on the UI tab or modify the logo and addressinformation to specify your organization’s customized Welcome display andWeb address. The List Page Size specifies how many items will be displayed
Figure 41. Mail tab window
Figure 42. UI tab window
Chapter 6. Cluster Installation: Tivoli Identity Manager Server 79

on lists throughout the user interface. For more information, refer to the TivoliIdentity Manager Server Configuration Guide. Click OK.
10. Click Security.The Security tab window opens.
If you optionally selected WebSphere Application Server security earlier, thesefields are prefilled. The fields are blank if you did not enable WebSphereApplication Server security.
Notes:
a. The initial values for the EJB User and Password fields are the values ofthe System User and Password fields. You might need to modify the EJBUser and Password fields. The length of the EJB user ID must be fewerthan 12 characters.
b. If you change the value of the EJB user ID or the EJB password on thissystem configuration Security window, then manual steps are requiredafter Tivoli Identity Manager installation to map the security role to theITIM user in order to start Tivoli Identity Manager.
11. Click OK to complete the system configuration.12. Additionally, ensure that other values are appropriate to run the configuration
that Tivoli Identity Manager and related applications use.
Logs and Directories for Cluster InstallationWhen the system configuration is complete, note the following installation loglocations:
Table 4. Install log file names and directories
File names Directory
dbConfig.stdoutldapConfig.stdoutitim45_installer_debug.txtrunConfig.stdout (on cluster install)runConfigTmp.stdout (on single server
and Network Deployment Manager)
{ITIM_HOME}/install_logs
Figure 43. Security tab window
80 IBM Tivoli Identity Manager: Server Installation Guide on Windows 2000 using WebSphere

Table 4. Install log file names and directories (continued)
File names Directory
itim45_install.stdoutitim45_install.stderr
system root
Tivoli_Identity_Manager_InstallLog.log If installation completes successfully, thedirectory is {ITIM_HOME}. If installationfails, the log file will be in the systemroot (UNIX) on the Windows desktop.
v UNIX: system root
v Windows: desktop
For more information on logs created by the WebSphere Application Serverinstallation, refer to the WebSphere Application Server documentation.
Complete Security ConfigurationIf you intend to enable J2EE security, complete the manual steps to complete themapping and restart J2EE security after installing Tivoli Identity Manager. Formore information, see one of the following:v “Manual Steps on Single-node Deployments After Installing Tivoli Identity
Manager” on page 106v “Manual Steps on a Multi-node Deployment after Installing Tivoli Identity
Manager” on page 110v Ensure that the was.policy file exists. For more information, see “Configuring
the was.policy File” on page 110.
Using runConfig after Installing Tivoli Identity ManagerUse the runConfig command after installing Tivoli Identity Manager to completesystem configuration for activities such as the following:v Change the password of the enrole user.v Specify password encryption and update Tivoli Identity Manager EJB user IDs
and passwords. For more information, see descriptions of tabs on the SystemConfiguration window in “Initial Configuration of Tivoli Identity Manager” onpage 76.
For more information on using the runConfig command, see the Tivoli IdentityManager Server Configuration Guide.
Optionally Installing a Language PackAfter installing Tivoli Identity Manager, if the default language is not English,optionally obtain and mount the language pack CD for the Tivoli Identity ManagerServer. Use command line mode to install the language pack. For example, enterthe following:java –jar itimlp_setup.jar
The Tivoli Identity Manager language pack setup program will start. To completethe language pack installation, follow the instructions that appear in the setupprogram panels.
Note: To run the Tivoli Identity Manager language pack setup program, Javaruntime environment 1.3.1 should be accessible from the command line.
Chapter 6. Cluster Installation: Tivoli Identity Manager Server 81

Optionally, Define HTTP Session PersistenceOptionally, define the HTTP session persistence for the WebSphere ApplicationServer. For more information, refer to HTTP session management documentation inthe WebSphere information center.
Note: If a WebSphere Application Server subsequently fails in a Tivoli IdentityManager cluster, session persistence makes the failure transparent to the enduser.
Verify Transaction Service SettingsVerify that the WebSphere Application Server transaction service settings are largeenough to handle Tivoli Identity Manager loads for your business processes. See“Configuring WebSphere Application Server Transaction Service Settings” onpage 103 for detailed information on modifying these settings. If you do notmodify the settings to handle your business process loads, requests can time outbefore completing.
Update the Web Server Plug-inWhen installation is complete, update the Web Server Plug-in. To do so, access theWebSphere Application Server administrative console and click Environment –>Update Web Server Plugin –> OK.
Start ClustersWhen installation completes and any required security modification is done, restartthe clusters. On the WebSphere administration console, do the following:1. Click Servers –> Clusters.2. Select the Tivoli Identity Manager cluster.3. Click Start. Tivoli Identity Manager should start when the cluster starts.
Optionally, start a cluster member by running the following at the commandprompt of any computer in the cluster:{ITIM_DIR}\bin\win\ssCluster start
Notes:
1. Running this command on the computer that has the Network DeploymentManager will start the entire cluster.
2. This command also starts the JMS servers.
Optionally, stop a cluster member by running the following at the commandprompt of any computer in the cluster:{ITIM_DIR}\bin\win\ssCluster stop
Note: Running this command on the computer that has the Network DeploymentManager will stop the entire cluster.
Testing Tivoli Identity Manager Server CommunicationTo test whether the database, the directory server, and the Tivoli Identity ManagerServer are correctly configured and communicating with each other, do thefollowing:
82 IBM Tivoli Identity Manager: Server Installation Guide on Windows 2000 using WebSphere

1. Test the JDBC driver to ensure that the driver is running on a specific clustermember:a. Before you begin, ensure that the database server and the WebSphere
Application Server are running. For more information on starting theWebSphere Application Server, refer to documentation that the WebSphereApplication Server provides.
b. Ensure that you sourced the IBM DB2 profile correctly. If you are using IBMDB2 Version 7.1 or version 7.2 with the fix packs this product requires,ensure that you ran the usejdbc2 shell script in the shell before startingWebSphere Application Server. Test the connection again. If the connectiondoes not work, verify that the enrole user ID and password are configuredcorrectly. If the IBM DB2 server is remote, ensure that the same IBM DB2 fixpack level is applied to both the database server and the client.
Note: Fix Pack 3 will migrate the IBM DB2 Version 7.1 environment to theIBM DB2 Version 7.2 general availability level. For more information,see Appendix B, “Software and Hardware Requirements onWindows”, on page 93.
c. Access the WebSphere Application Server administrative console.d. Click Resources –> JDBC Providers. Select the target node.e. Click Browse Servers. Select a target server and then click Apply.f. Scroll to the list of JDBC providers and double-click ITIM JDBC Provider.g. Scroll the dialog that appears to the Additional Properties pane. In the
Additional Properties pane, click Data Sources.h. In the Data Sources dialog that appears, click Test Connection. A message
appears that indicates the test result.2. Start Tivoli Identity Manager Server and any prerequisite applications.
Click Start –> Programs –> IBM WebSphere –> Application Server v5.0 –>Start Server.
3. Log on to Tivoli Identity Manager. For example, at a browser window, type thefollowing:http://hostname/enrole
where hostname is the fully qualified name or IP address of the computer onwhich Tivoli Identity Manager Server is running.
Notes:
a. Do not start two separate browser sessions from the same client computer.The two sessions are regarded as one session ID, resulting in problems withdata.
b. If you log on using the single sign-on capability and need to select alanguage, append /language to the Web site address. For example, enter:https://mysite.myco.com/itim/enrole/language
For more information on configuring the language default for your Webbrowser, refer to the Tivoli Identity Manager Server Configuration Guide.
4. Enter the Tivoli Identity Manager administrator user ID (itim manager) andpassword (immediately after installation, the value is ″secret″).
5. Take the necessary steps to create a user (an ITIM user). For more information,refer to online help or to the Tivoli Identity Manager Policy and OrganizationAdministration Guide.
Chapter 6. Cluster Installation: Tivoli Identity Manager Server 83

For more information on processes that should be running, refer to the TivoliIdentity Manager Server Configuration Guide.
Server-Agent CommunicationUsing the Tivoli Identity Manager system with a Tivoli Identity Manager agent willrequire production certificates to ensure that secure communication occurs betweenthe Tivoli Identity Manager server and the agent.
The Certificate Authority that corresponds to the Tivoli Identity Manager agent’scertificate must be located in the {ITIM_HOME}\cert directory. For supportedcertificate types, refer to the Tivoli Identity Manager Server Configuration Guide andto a specific agent’s installation guide for more information.
Notes:
1. Install one agent profile at a time, and complete the profile installation beforeinstalling another agent profile. Installing multiple profiles at the same timemight cause the Tivoli Identity Manager Server to force a reboot.
2. In a cluster configuration, install the agent profile once. For recommendationson where to install the agent profile in a cluster configuration, refer to the agentinstallation guide for your specific agent.
3. The WebSphere Application Server configuration requires that the drivelocation for a certificate for an agent be the same drive location under whichthe Tivoli Identity Manager Server is installed. For example, if you install anagent profile on a cluster member that has the Tivoli Identity Manager Serverinstalled on d:\itim45, then the certificate must reside on the d:\itim45\certdirectory. The WebSphere Application Server configuration must also specifythe d:\itim45\cert directory.
4. If the default language is not English, before installing the first Tivoli IdentityManager agent, optionally obtain and mount the language pack CD for theTivoli Identity Manager agents. Use command line mode to install the languagepack for the agents on the Tivoli Identity Manager Server:java –jar itimlp_agents_setup.jar
The Tivoli Identity Manager language pack setup program will start. Tocomplete the language pack installation, follow the instructions that appear inthe setup program panels.
Note: To run the Tivoli Identity Manager language pack setup program, Javaruntime environment 1.3.1 should be accessible from the command line.
Adding or Removing Cluster MembersThis section describes adding or removing cluster members.
Expanding a Cluster Using a New ComputerTo add a new cluster member to an existing Tivoli Identity Manager cluster, do thefollowing:
Note: These steps expand a cluster using a computer not previously in theWebSphere cell. This is an example of horizontal clustering.
1. Using the WebSphere Application Server administrative console, create the newcluster member. For more information, see “Add Nodes to a Cell” on page 101.
84 IBM Tivoli Identity Manager: Server Installation Guide on Windows 2000 using WebSphere

2. Using the WebSphere Application Server administrative console, add a newcluster member on the node. For more information, see “Create a Cluster” onpage 102.
3. Run the Tivoli Identity Manager installation process on the new computer,choosing cluster member installation.
4. Update the Web Server Plugin. To do so, access the WebSphere ApplicationServer administrative console and click Environment –> Update Web ServerPlugin –> OK.
5. Using the WebSphere Application Server administrative console, start the newcluster member.
Expanding a Cluster Using the Same ComputerYou can also expand a cluster by adding an additional cluster member on acomputer with an existing cluster member.
Do the following:1. On the WebSphere Application Server administrative console, create the new
cluster member on the computer that has a previously existing cluster member.
Note: This is an example of vertical clustering.2. Update the Web Server Plugin. To do so, access the WebSphere Application
Server administrative console and click Environment –> Update Web ServerPlugin –> OK.
3. Using the WebSphere Application Server administrative console, start the newcluster member.
Removing a Cluster MemberTo remove the only cluster member on a computer, do the following:v If only one cluster member exists on the computer:
1. Run the Tivoli Identity Manager uninstaller. For more information, seeAppendix G, “Uninstalling Tivoli Identity Manager”, on page 127.
2. On the WebSphere Application Server administrative console, delete thecluster member from the cluster.
3. Update the Web Server Plugin. To do so, access the WebSphere ApplicationServer administrative console and click Environment –> Update Web ServerPlugin –> OK.
v If there are multiple cluster members (a vertical cluster) on the computer:1. On the WebSphere Application Server administrative console, delete the
cluster member from the cluster.2. Update the Web Server Plugin. To do so, access the WebSphere Application
Server administrative console and click Environment –> Update Web ServerPlugin –> OK.
Chapter 6. Cluster Installation: Tivoli Identity Manager Server 85

86 IBM Tivoli Identity Manager: Server Installation Guide on Windows 2000 using WebSphere

Appendix A. Compact Discs
Tivoli Identity Manager Server installation provides the following compact discs(CDs). If you do not have all listed CDs, contact IBM Support.
Recommended WebSphere Interim Fix PQ77521 Not on CDsA recommended interim fix PQ77521 is not provided on the product CDs. Thecumulative Messaging Interim Fix for WebSphere Application Server 5.0.2. isrecommended to correct the MQJMS2013 XA recovery error with WebSphereembedded messaging support.
The first lines of the error message are similar to the following:[8/6/03 13:30:54:484 EDT] f341ce J2CXAResource W J2CA0061W: Error creatingXA Connection and Resource javax.resource.spi.ResourceAdapterInternalException:createQueueConnection failed atcom.ibm.ejs.jms.JMSCMUtils.mapToResourceException(JMSCMUtils.java:123)
For example, this error can occur when a workflow is running and the WebSphereApplication Server stops. The incomplete transactions cannot be recovered. If youapply the interim fix, the data is recovered.
To obtain this interim fix, enter the following to access the Web site:http://www.ibm.com/support/docview.wss?uid=swg24005451
Language Packs CDThe following table itemizes the contents of the language pack CD.
Table 5. Contents of Language Pack CD
Product File Name
language packs itimlp_setup.jar, itimlp_agents_setup.jar
Base Code Solaris CD for Tivoli Identity Manager using WebSphereApplication Server
The following table itemizes the contents of the base code Solaris CD for TivoliIdentity Manager using WebSphere Application Server:
Table 6. Contents of base code Solaris CD for Tivoli Identity Manager using WebSphereApplication Server
Product File Name
Tivoli Identity Manager Version 4.5 forWebSphere Application Server
instSOL-WAS.bin
Documentation ReadMeFirst Docs-ReadMeFirst.pdf
© Copyright IBM Corp. 2003 87

Base Code Solaris CD for Tivoli Identity Manager for non-IBMApplication Servers
The following table itemizes the contents of the base code Solaris CD for TivoliIdentity Manager using non-IBM Application Servers (WebLogic):
Table 7. Contents of base code Solaris CD for Tivoli Identity Manager using WebLogic
Product File Name
Tivoli Identity Manager Version 4.5 forWebLogic
instSOL-WL.bin
Documentation ReadMeFirst Docs-ReadMeFirst.pdf
Supplemental Solaris CD 1The following table itemizes the contents of supplemental Solaris CD 1:
Table 8. Contents of Supplemental Solaris CD 1
Product File Name
WebSphere Application Server base Version5.0 Fix Pack 2
was50_fp2_solaris.zip
WebSphere Application Server NetworkDeployment Version 5.0 Fix Pack 2
was50_nd_fp2_solaris.zip
WebSphere Application Server base Version5.0.2 interim fix (APAR PQ75794)
PQ75794.zip
WebSphere Application Server base andWebSphere Application Server NetworkDeployment Version 5.0.2 interim fix (APARSOV62778)
ibmorb.jar
WebSphere Application Server JSP Compileinterim fix (APAR PQ77263)
PQ77263.zip
Supplemental Solaris CD 2The following table itemizes the contents of supplemental Solaris CD 2:
Table 9. Contents of Supplemental Solaris CD 2
Product File Name
IBM Directory Server Version 5.1 ids510-solaris-ismp-us.tar
IBM Directory Server Version 5.1 Fix Pack 1 FP510S-01.tar.Z
IBM Directory Server referential integrityplug-in
DelRef/aix/libdelref.aDelRef/hpux/libdelref.slDelRef/nt/libdelref.dllDelRef/sun/libdelref.so
Tivoli Identity Manager Version 4.5configuration file
DelRef/timdelref.conf
88 IBM Tivoli Identity Manager: Server Installation Guide on Windows 2000 using WebSphere

Supplemental Solaris CD 3The following table itemizes the contents of supplemental Solaris CD 3:
Table 10. Contents of Supplemental Solaris CD 3
Product File Name
IBM DB2 Version 8.1 Fix Pack 2 (32 and 64Bit)
Sol-FP2_U486567.tar.Z
Supplemental Solaris CD 4The following table itemizes the contents of supplemental Solaris CD 4:
Table 11. Contents of Supplemental Solaris CD 4
Product File Name
Oracle Type 4 JDBC driver classes12.zip
Oracle Type 4 JDBC driver license file LI_en
Base Code AIX CD for Tivoli Identity Manager using WebSphereApplication Server
The following table itemizes the contents of the base code AIX CD for TivoliIdentity Manager using WebSphere Application Server:
Table 12. Contents of base code AIX CD for Tivoli Identity Manager using WebSphereApplication Server
Product File Name
Tivoli Identity Manager Version 4.5 usingWebSphere Application Server
instAIX-WAS.bin
Documentation ReadMeFirst Docs-ReadMeFirst.pdf
Base Code AIX CD for Tivoli Identity Manager for non-IBM ApplicationServers
The following table itemizes the contents of the base code AIX CD for TivoliIdentity Manager using non-IBM application servers (WebLogic):
Table 13. Contents of base code AIX CD for Tivoli Identity Manager using WebLogic
Product File Name
Tivoli Identity Manager Version 4.5 forWebLogic
instAIX-WL.bin
Documentation ReadMeFirst Docs-ReadMeFirst.pdf
Supplemental AIX CD 1
Note: Because of size constraints, the Fix Pack 2 for IBM DB2 on AIX is notprovided on a supplemental CD. To obtain Fix Pack 2 for IBM DB2 on AIX,access the following FTP site:ftp://ftp.software.ibm.com/ps/products/db2/fixes/english-us/db2aix5v8/fixpak/FP2_U486566/
Appendix A. Compact Discs 89
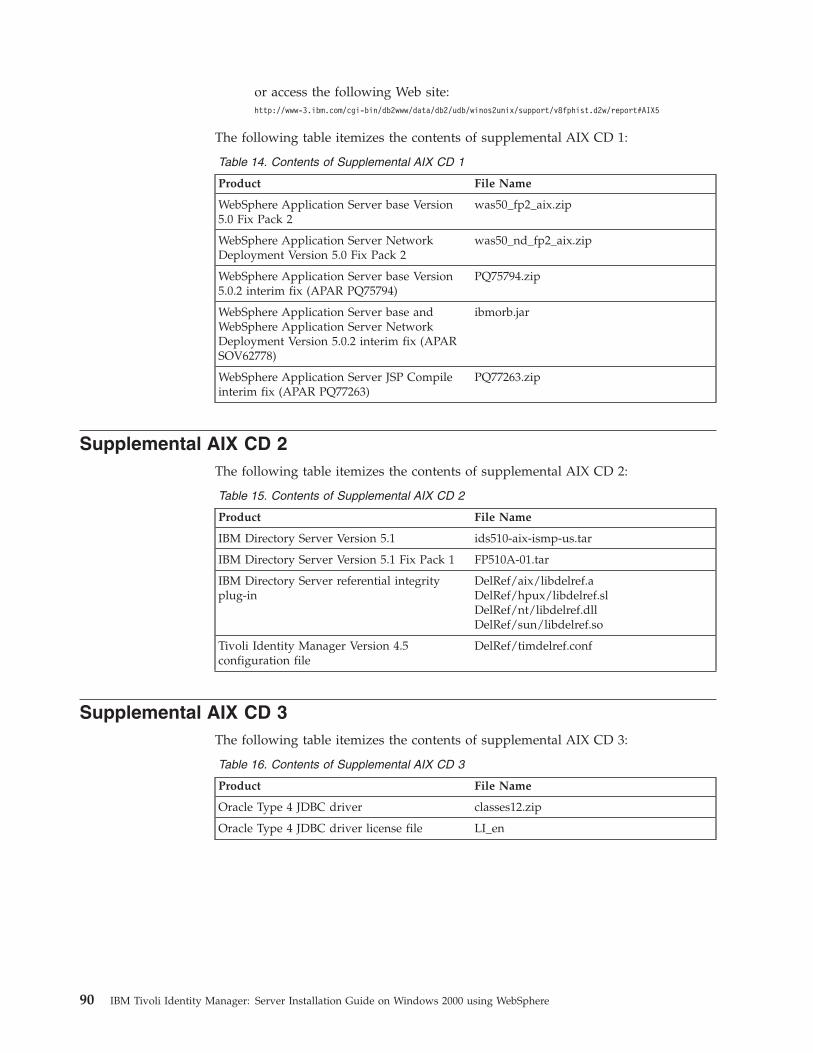
or access the following Web site:http://www-3.ibm.com/cgi-bin/db2www/data/db2/udb/winos2unix/support/v8fphist.d2w/report#AIX5
The following table itemizes the contents of supplemental AIX CD 1:
Table 14. Contents of Supplemental AIX CD 1
Product File Name
WebSphere Application Server base Version5.0 Fix Pack 2
was50_fp2_aix.zip
WebSphere Application Server NetworkDeployment Version 5.0 Fix Pack 2
was50_nd_fp2_aix.zip
WebSphere Application Server base Version5.0.2 interim fix (APAR PQ75794)
PQ75794.zip
WebSphere Application Server base andWebSphere Application Server NetworkDeployment Version 5.0.2 interim fix (APARSOV62778)
ibmorb.jar
WebSphere Application Server JSP Compileinterim fix (APAR PQ77263)
PQ77263.zip
Supplemental AIX CD 2The following table itemizes the contents of supplemental AIX CD 2:
Table 15. Contents of Supplemental AIX CD 2
Product File Name
IBM Directory Server Version 5.1 ids510-aix-ismp-us.tar
IBM Directory Server Version 5.1 Fix Pack 1 FP510A-01.tar
IBM Directory Server referential integrityplug-in
DelRef/aix/libdelref.aDelRef/hpux/libdelref.slDelRef/nt/libdelref.dllDelRef/sun/libdelref.so
Tivoli Identity Manager Version 4.5configuration file
DelRef/timdelref.conf
Supplemental AIX CD 3The following table itemizes the contents of supplemental AIX CD 3:
Table 16. Contents of Supplemental AIX CD 3
Product File Name
Oracle Type 4 JDBC driver classes12.zip
Oracle Type 4 JDBC driver license file LI_en
90 IBM Tivoli Identity Manager: Server Installation Guide on Windows 2000 using WebSphere

Base Code HP-UX CD for Tivoli Identity Manager for non-IBMApplication Servers
The following table itemizes the contents of the base code HP-UX CD for TivoliIdentity Manager for non-IBM application servers (WebLogic):
Table 17. Contents of base code HP-UX CD for Tivoli Identity Manager using WebLogic
Product File Name
Tivoli Identity Manager Version 4.5 usingWebLogic
instHPUX-WL.bin
Documentation ReadMeFirst Docs-ReadMeFirst.pdf
Base Code Windows 2000 CD for Tivoli Identity Manager usingWebSphere Application Server
The following table itemizes the contents of the base code Windows 2000 CD forTivoli Identity Manager using WebSphere Application Server:
Table 18. Contents of base code Windows 2000 CD for Tivoli Identity Manager usingWebSphere Application Server
Product File Name
Tivoli Identity Manager Version 4.5 usingWebSphere Application Server
instW2K-WAS.exe
Documentation ReadMeFirst Docs-ReadMeFirst.pdf
Base Code Windows 2000 CD for Tivoli Identity Manager for non-IBMApplication Servers
The following table itemizes the contents of the base code Windows 2000 CD forTivoli Identity Manager for non-IBM application servers (WebLogic):
Table 19. Contents of base code Windows 2000 CD for Tivoli Identity Manager usingWebLogic
Product File Name
Tivoli Identity Manager Version 4.5 forWebLogic
instW2K-WL.exe
Documentation ReadMeFirst Docs-ReadMeFirst.pdf
Supplemental Windows 2000 CD 1The following table itemizes the contents of supplemental Windows 2000 CD 1:
Table 20. Contents of supplemental Windows 2000 CD 1
Product File Name
WebSphere Application Server base Version5.0 Fix Pack 2
was50_fp2_win.zip
WebSphere Application Server NetworkDeployment Version 5.0 Fix Pack 2
was50_nd_fp2_win.zip
Appendix A. Compact Discs 91

Table 20. Contents of supplemental Windows 2000 CD 1 (continued)
Product File Name
WebSphere Application Server base Version5.0.2 interim fix (APAR PQ75794)
PQ75794.zip
WebSphere Application Server base andWebSphere Application Server NetworkDeployment Version 5.0.2 interim fix (APARSOV62778)
ibmorb.jar
WebSphere Application Server JSP Compileinterim fix (APAR PQ77263)
PQ77263.zip
Supplemental Windows 2000 CD 2The following table itemizes the contents of supplemental Windows 2000 CD 2:
Table 21. Contents of supplemental Windows 2000 CD 2
Product File Name
IBM Directory Server Version 5.1 ids510-windows-us.zip
IBM Directory Server Version 5.1 Fix Pack 1 FP510W-01.zip
IBM Directory Server referential integrityplug-in
DelRef\aix\libdelref.aDelRef\hpux\libdelref.slDelRef\nt\libdelref.dllDelRef\sun\libdelref.so
Tivoli Identity Manager Version 4.5configuration file
DelRef\timdelref.conf
Supplemental Windows 2000 CD 3The following table itemizes the contents of supplemental Windows 2000 CD 3:
Table 22. Contents of supplemental Windows 2000 CD 3
Product File Name
IBM DB2 Version 8.1 Fix Pack 2 W2K-FP2.zip
Supplemental Windows 2000 CD 4The following table itemizes the contents of supplemental Windows 2000 CD 4:
Table 23. Contents of supplemental Windows 2000 CD 4
Product File Name
Oracle Type 4 JDBC driver classes12.zip
Oracle Type 4 JDBC driver license file LI_en
92 IBM Tivoli Identity Manager: Server Installation Guide on Windows 2000 using WebSphere

Appendix B. Software and Hardware Requirements onWindows
This appendix specifies software and hardware requirements for Tivoli IdentityManager Server on Windows using WebSphere Application Server.
Minimum Windows Operating System and Hardware Requirements forTivoli Identity Manager using WebSphere
The following table identifies the Windows operating system, patches, andminimum hardware requirements for installation. These values do not includeadditional runtime requirements. Running more than one server type, such as anapplication server and database server on a single computer, will requireadditional hardware resources (more RAM) for that computer.
Table 24. Minimum operating system and hardware requirements for Tivoli Identity Manager
Operating System Patch Minimum memory, free disk space, andother hardware requirements
Windows 2000Advanced Server
Service Pack 3 or later v RAM: 1 GB of memory
v Processor: Intel Pentium with a clock speedof 1 GHz or faster
v Free disk space: The temp directory musthave at least 1.5 GB of free disk space.Additionally, provide 1.1 GB of free diskspace for the following:
– \itim45 directory for Tivoli IdentityManager Server 500 MB
– WebSphere Application Server 600 MB
Databases for Tivoli Identity Manager Server using WebSphereThe following table lists databases available for Tivoli Identity Manager Serverusing WebSphere:
Table 25. Databases available for Tivoli Identity Manager Server using WebSphere
Database Version and Fix Packor patch
AIX 5.1 Solaris 8 Windows 2000Advanced Server
IBM DB2 Universal DatabaseEnterprise Edition server¹and IBM DB2 runtime client
v 8.1 with Fix Pack 2
v 7.2 with Fix Pack 9
U U U
Oracle 8.1.7 U U U
Microsoft SQL server SQL Server 2000 U
Notes:
1. IBM DB2 requires the following minimum free disk space:
v Installation requires 1 GB in the directory in which you create the database for Tivoli Identity Manager, suchas /home/db2inst1.
© Copyright IBM Corp. 2003 93

Directory Servers for Tivoli Identity Manager Server using WebSphereThe following table lists Directory servers available for Tivoli Identity ManagerServer using WebSphere:
Table 26. Directory servers available for Tivoli Identity Manager Server using WebSphere
Directory server Version and Fix Pack or patch AIX Solaris 8 Windows 2000Advanced Server
IBM Directory Server v 5.1 with Fix Pack 1
v 4.1 with Fix Pack 2 (Version4.1.1 on Windows NT )
U
on AIX 5.1
U U
Sun ONE DirectoryServer¹
5.1 U
on AIX 4.3.3 noton 5.1
U U
1. Also check the following website:
http://wwws.sun.com/software/download/inter_ecom.html#dirserv
Tivoli Identity Manager Server Prerequisites for WebSphere and HTTPServers
The following table lists the WebSphere and HTTP servers for Tivoli IdentityManager Server:
Table 27. Tivoli Identity Manager Server prerequisites for WebSphere and HTTP servers
Prerequisite Version Fix Pack Interim fix
IBM HTTP Server¹ 1.3.26 WebSphere Fix Pack 2
Notes:
1. You must bring down theHTTP server before youapply WebSphere Fix Packs.
2. In a cluster environment,ensure that you load theWebSphere Fix Pack on allcomputers that have theIBM HTTP Server, whichmight include the computerwith WebSphere ApplicationServer NetworkDeployment.
—
WebSphere Application Serverbase²
5.0 WebSphere Fix Pack 2 Apply the following fixes in theorder listed:
v APAR SOV62778 (See note 3below.)
v APAR PQ75794
v APAR PQ77263
WebSphere Application ServerNetwork Deployment²
5.0 WebSphere Fix Pack 2 Apply the following fix:
v APAR SOV62778 (See note 3below.)
94 IBM Tivoli Identity Manager: Server Installation Guide on Windows 2000 using WebSphere

Table 27. Tivoli Identity Manager Server prerequisites for WebSphere and HTTP servers (continued)
Prerequisite Version Fix Pack Interim fix
1. IBM HTTP Server is included in WebSphere Application Server installation process.
2. The JDK distributed with WebSphere Application Server is the supported JDK. Use of an independently installedJDK, from IBM or other vendors, is not supported.
3. If you manually install Fix Pack 2 for WebSphere Application Server base, copy the ibmorb.jar file that is on thesupplemental CD to the {WAS_HOME}/java/jre/lib/ext directory. On the computer that has WebSphereApplication Server Network Deployment, copy the ibmorb.jar file that is on the supplemental CD to the{WAS_NDM_HOME}/java/jre/lib/ext directory.You must contact WebSphere support before copying the fileibmorb.jar if you installed any WebSphere JDK fixes after installing WebSphere 5.0 Fix Pack 2.
Supported Web BrowsersThe following Web browsers are supported on Windows only:v Internet Explorer 5.5 with Service Pack 2v Internet Explorer 6.0 with Service Pack 1v Netscape 4.75
Notes:
1. Cookies must be enabled.2. Do not start two separate browser sessions from the same client computer. The
two sessions are regarded as one session ID, resulting in problems with data.3. For Internet Explorer, ensure that the Java runtime environment (JRE) is
specified. Open the browser and click Tools –> Internet Options. Click theAdvanced tab. Scroll the list of features. Select the check box for an item similarto Use Java 2 V1.3.1_04. Restart the computer.
Appendix B. Software and Hardware Requirements on Windows 95

96 IBM Tivoli Identity Manager: Server Installation Guide on Windows 2000 using WebSphere

Appendix C. Preparing the WebSphere Environment
This chapter describes generic steps to create a WebSphere Application Serverenvironment before you install the Tivoli Identity Manager Server on eithersingle-server or cluster configurations. For cluster configurations, the chapterprovides steps to install and configure WebSphere Application Server NetworkDeployment and WebSphere Application Server base.
Note: For more information, refer to the WebSphere Application Server installationdocumentation.
Preparing for WebSphere Application Server InstallationBefore you install WebSphere Application Server, ensure that there is adequate freedisk space to unpack the files. For more information, see Appendix B, “Softwareand Hardware Requirements on Windows”, on page 93.
Ensuring Solaris Kernel Settings for WebSphere EmbeddedMessaging Server and Client
On Solaris, ensure that the following additional kernel settings are specified for theEmbedded Messaging server and client:v set shmsys:shminfo_shmmax = 4294967295v set shmsys:shminfo_shmseg = 1024v set shmsys:shminfo_shmmni = 1024v set semsys:seminfo_semaem = 16384v set semsys:seminfo_semmni = 1024v set semsys:seminfo_semmap = 1026v set semsys:seminfo_semmns = 16384v set msgsys:msginfo_msgmap = 1026v set semsys:seminfo_semopm = 100v set semsys:seminfo_semmnu = 2048v set semsys:seminfo_semume = 256v set msgsys:msginfo_msgmax = 65535v set rlim_fd_cur=1024
Using an Existing WebSphere MQ Version 5.3WebSphere embedded messaging server and client (WebSphere embeddedmessaging support) are WebSphere 5.0 components that are required by TivoliIdentity Manager. To install these WebSphere components successfully, you mustremove IBM MQSeries Version 5.2 if it already exists on the target computer.
If WebSphere MQ Version 5.3 exists on the computer, ensure the followingWebSphere MQ components are installed before installing the WebSphereembedded messaging support client and server:v WebSphere MQ Version 5.3 with the CSD03 updatev The WebSphere MQ features for Server and for Java Messaging
© Copyright IBM Corp. 2003 97

To determine the existing version, run the mqvr utility that WebSphere MQprovides.
For more information, refer to WebSphere Application Server installationdocumentation.
Validating Availability of Port 9090WebSphere Application Server uses port 9090 for its adminstrative console. If theport is being used on the system, you must choose a different and available portfor the WebSphere application console. You can test whether the port is being usedby entering the following command:netstat -an
Configuring Tivoli Identity Manager ClustersThe cluster installation and configuration process has the following sequence:1. “Installing WebSphere Application Server Network Deployment”2. “Installing IBM HTTP Server and WebSphere Web Server Plugin” on page 1003. “Installing Base on Each Node” on page 1014. “Add Nodes to a Cell” on page 1015. “Ensure that Network Deployment Manager and Node Agents are Running” on
page 102
Subsequently, you create one or more clusters, described in “Creating ClustersUsing Network Deployment Manager” on page 59.
Installing WebSphere Application Server Network Deployment
Note: If this is an upgrade, WebSphere Application Server Network Deployment5.0 can be loaded on the Tivoli Identity Manager 4.4.x primary or secondaryserver.
To install WebSphere Application Server Network Deployment, do the following:1. Determine whether the computer has adequate memory and free disk space.2. In advance, obtain the required Fix Pack or APAR, if any. For more
information, see Appendix B, “Software and Hardware Requirements onWindows”, on page 93.
3. Mount the initial product CD. For more information on the product CDs andtheir contents, see Appendix A, “Compact Discs”, on page 87.
4. Open the WebSphere Application Server Network Deployment installationprogram by typing the following:drive:\nt\LaunchPad.bat .\nt
5. In the initial dialog, accept the license requirements.The installation program checks for prerequisites. For example, it might detecta missing patch such as a font required to display Japanese characters. Referto documentation provided by the WebSphere Application Server NetworkDeployment and remedy any missing patch that you determine to beessential.
Note: During the prerequisite check, the installation program will detect anypreviously installed versions of WebSphere Application Server NetworkDeployment and display a migration and coexistence dialog. If you
98 IBM Tivoli Identity Manager: Server Installation Guide on Windows 2000 using WebSphere

would like the two versions of WebSphere Application Server NetworkDeployment to coexist, select Modify ports for coexistence and thenmodify the port numbers from the coexistence dialog. At the conclusionof the installation, you must change the port value for the SOAPconnection in the wsadmin.properties file located under{WAS_ND_HOME}\properties to match the new port value.
6. Click Next.A dialog appears that allows you to select features for the NetworkDeployment.
7. Accept the defaults and click Next.A dialog appears that lists the installation destination directory, the requiredspace, and the available space.
8. Accept or modify the default directory, ensure that there is adequate diskspace for installation, and click Next.A dialog appears that requests values for node name, host name, and cellname.
9. Accept the defaults, or provide the requested field values. For example:
Node NameAccept the default string, or provide a meaningful string thatidentifies the node. For example: hostname
Host Name or IP AddressEnter the fully qualified host name or IP address of the targetcomputer.
Cell NameEnter a value that identifies the cell. For example, enter:ITIM_CELL_A1
10. Repeatedly click Next to navigate the following dialogs:v Installation summaryv Installation progressv Product registrationv Completionv Finish
11. Respond to the First Steps dialog, which prompts you to start the server andto run an installation verification test. Use the following Web address to accessthe Administration console:http://networkdeploymenthost:9090/admin
where networkdeploymenthost is the fully qualified host name of the computeron which you installed WebSphere Application Server Network Deployment.
Note: If two versions of WebSphere Application Server Network Deploymentcoexist, replace the default port number with the port numberconfigured during the installation.
12. Install the required Fix Pack or APAR.
Note: Stop the WebSphere Application Server Network Deployment systembefore you install a Fix Pack or APAR. For more information, seeAppendix B, “Software and Hardware Requirements on Windows”, onpage 93.
Appendix C. Preparing the WebSphere Environment 99
Installing IBM HTTP Server and WebSphere Web Server PluginTo install the IBM HTTP Server and the WebSphere Web Server plug-in, do thefollowing:1. Mount the initial product CD. For more information on the product CDs and
their contents, see Appendix A, “Compact Discs”, on page 87.2. Start installation using the WebSphere Application Server base product.3. Navigate the following installation dialogs, accepting the default settings.4. Click the check box to accept reconfiguration when an installation dialog
provides the following choice:Reconfigure the product to coexist with other versions of itself
5. Navigate through Operating System Level Check and any other dialogs thatcheck prerequisites.
6. Select Custom when a dialog appears that provides the choice.7. Click Next.
A features selection dialog appears.8. On the features selection dialog, select only the following items:
v IBM HTTP Serverv WebSphere Web Server plug-in for IBM HTTP Server
9. Click Next.A dialog appears that displays default target directories and values foravailable and required space.
Note: If this installation is intended to coexist with a previous installation, thedefault installation directory can be used for IBM HTTP Server 5.0because it differs from the default directory included as part of the IBMHTTP Server 4.0 installation.
10. Accept the default target directories, or modify the target or modify yourcomputer’s free disk space. Click Next.A dialog appears that summarizes the features to install and their locations.
11. Repeatedly click Next to navigate through subsequent dialogs that include thefollowing:v Progress reportingv Product registrationv Completion
12. Obtain and install the required WebSphere Application Server base Fix Packthat also includes the fix for IBM HTTP Server. For more information, seeAppendix B, “Software and Hardware Requirements on Windows”, onpage 93.
Generating the WebSphere Web Server Plugin ConfigurationFile
Generate the configuration file for the WebSphere Web Server plug-in. You muststop the IBM HTTP Server before installing the patch. Do the following:1. Log on to the Network Deployment Manager administrative console.2. From the left pane of the console, click Environment –> Update Web Server
Plugin –> OK to update the Web Server Plugin. This will generate the WebServer Plugin configuration file plugin-cfg.xml in {NDM_HOME}\config\cells.
3. After the Plugin update completes, click Save to save your configuration to themaster repository.
100 IBM Tivoli Identity Manager: Server Installation Guide on Windows 2000 using WebSphere

Note: Select Synch changes with Nodes when you save the configuration.4. If the IBM HTTP Server is installed on the computer that has the Network
Deployment Manager, verify that the following line exists in thehttp_server_installdir\conf\httpd.conf configuration file:
Note: This step is not required if the IBM HTTP Server and NetworkDeployment Manager are installed on different computers.
WebSpherePluginConfig drive:"\Program Files\WebSphere\DeploymentManager\config\cells\plugin-cfg.xml"
Installing Base on Each NodeInstall WebSphere Application Server base, repeating the following steps on eachnode that is a member of the cell:1. Start the WebSphere Application Server base installation program.2. Navigate through the dialogs until you reach a dialog that lists the features to
install.
Notes:
a. During the prerequisite check, the installation program will detect anypreviously installed versions of WebSphere Application Server base anddisplay a migration and coexistence dialog. If you would like the twoversions of WebSphere Application Server base to coexist, select Modifyports for coexistence and then modify the port numbers from thecoexistence dialog. At the conclusion of the installation, you must changethe port value for the SOAP connection in the wsadmin.properties filelocated under {WAS_HOME}\AppServer\properties to match the new portvalue.
b. To improve performance and to avoid any potential problems with theoperation of the Web console, it is recommended that you do not install thesample applications, the application assembly and deployment tools, andthe ant utilities that are included with the WebSphere Application Server.
3. Click Next.A dialog appears that summarizes the features to install. Select what you needfrom the list.
4. Repeatedly click Next to navigate through subsequent dialogs that include thefollowing:v Progress reportingv Product registrationv Completion
5. Install the required Fix Pack. For more information, see Appendix B, “Softwareand Hardware Requirements on Windows”, on page 93.
6. Prepare the new node for inclusion into the cell by doing the following:a. Change to the WebSphere bin subdirectory.b. Start the server using the following command:
startServer server1
Add Nodes to a CellBefore you begin, ensure that the WebSphere Application Server (server1) isrunning on the node that you intend to add to a cell.
On the Network Deployment Manager administrative console, do the following toadd a node to a cell:
Appendix C. Preparing the WebSphere Environment 101

1. Click System Administration –> Cell.2. On the dialog that appears, click Nodes.3. Scroll the next dialog and click Nodes at the bottom of the Configuration tab.4. On the Nodes dialog that appears, click Add Node. Specify the node host name
and ports and click OK.A progress dialog appears that reports the node addition.
Alternatively, you can add a node to a cell by running the addNode.bat script andthen run the startNode.bat script. For example, enter the following on thecomputer that you want added as a node:drive:"\Program Files\WebSphere\AppServer\bin\addNode.bat serverNodeName 8879"drive:"\Program Files\WebSphere\AppServer\bin\startNode.bat"
Create a ClusterOn the Network Deployment Manager administrative console, do the following tocreate a cluster:1. Click Servers –> Cluster.2. On the subsequent dialog, click New.3. Enter the name of the cluster, select the appropriate server, and click Next.4. Complete the New Clustered Servers dialog, specifying a cluster member, and
click Apply. Repeat the specification for additional cluster members. When thelist is complete, click Next.
5. Examine the cluster member summary to ensure that the list of clustermembers is correct. Click Finish.
6. Save the configuration to the master repository.
Note: Select Synch changes with Nodes when you save the configuration.
Ensure that Network Deployment Manager and Node Agentsare Running
To ensure that the Network Deployment Manager and all WebSphere ApplicationServer node agents are running, do the following:1. Access the Administration Console on the computer on which Network
Deployment Manager is installed by typing the following:http://NDM_host:9090/admin
To determine the status of the Network Deployment Manager, you can run thefollowing on the computer on which Network Deployment Manager isinstalled:drive:"\Program Files\WebSphere\DeploymentManager\bin\serverStatus.bat"
To determine the status of the JMS server, appserver, and node agent, run thefollowing on the computer on which WebSphere Application Server base isinstalled:drive:"\Program Files\WebSphere\AppServer\bin\serverStatus.bat"
2. For each node, determine whether the environment variables for the JDBCdriver path and {ITIM_HOME} are defined and correctly specified. On theNetwork Deployment Manager administration console, click Environment –>Manage WebSphere Variables. For example, examine the list of variables todetermine if the value of {ITIM_HOME) is correct.
102 IBM Tivoli Identity Manager: Server Installation Guide on Windows 2000 using WebSphere

3. Start the node agents, the JMS servers, and the application servers for eachcluster member. For example, click Servers –> Application Servers. Click thecheck box for a server such as server1 and click Start.
4. After starting node agents, to ensure that node agents are running, clickSystem Administration –> Node Agents. A window opens that displays thenode agents and their status.
5. On a browser, enter the Web address for the computer on which the IBM HTTPServer is running. For example, enter:http://myhost.mylab.mycity.mycompany.com/enrole
The Tivoli Identity Manager logon panel appears. Log on to the Tivoli IdentityManager application.
Configuring WebSphere Application Server Transaction ServiceSettings
Default WebSphere Application Server transaction service settings are too low tohandle most standard business process loads. Therefore, these transaction servicesettings must be modified to prevent transaction time-outs.
The default WebSphere Application Server transaction service settings are:v Total transaction lifetime timeout = 120v Client Inactivity timeout = 60
These values must be increased to a minimum of 1200 and 600, respectively. If youare planning large provisioning tasks, these numbers may have to be set higher.The values can be modified using the WebSphere Application Serveradministrative console.
The following procedures describe how to change the transaction service settings.If you will implement a cluster configuration of Tivoli Identity Manager, you willneed to repeat these procedures on each member of the cluster.1. Log on to the WebSphere Application Server and open the WebSphere
Application Server administrative console.2. Open the Applications Servers branch in the tree on the left side of the console
and select the name of your server.3. Select Transaction Service in the Additional Properties properties section.4. Modify the values for the Total Transaction Lifetime Timeout and Client
Inactivity Timeout settings to match your expected business process load.5. Click OK to save the changes.
Appendix C. Preparing the WebSphere Environment 103

104 IBM Tivoli Identity Manager: Server Installation Guide on Windows 2000 using WebSphere

Appendix D. Security Considerations
This section describes additional security you can provide for the environment inwhich Tivoli Identity Manager runs. Topics include the following:v “Security for WebSphere”v “Alternatives in Configuring the HTTP Server” on page 111
Security for WebSphereWhen enabled, J2EE security ensures that authenticated users have the necessarypermissions to access Tivoli Identity Manager Enterprise Java Bean (EJB)components. Configuring this security component involves configuring anauthentication mechanism and a user registry. The manual steps differ, dependingon whether the deployment is for a single-node or multi-node configuration.
Steps include the following:1. Manually configure the authentication mechanism and user registry before
installing Tivoli Identity Manager.2. Specifying security user IDs and passwords during Tivoli Identity Manager
installation.3. Manually mapping an administrative user to a Tivoli Identity Manager role
after installation.
Configuring Security for Single-Node DeploymentThis section describes manual steps to take to configure J2EE security for asingle-node deployment.
Manual Steps on Single-Node Deployments before InstallingTivoli Identity ManagerTo configure the J2EE security component, do the following before Installing TivoliIdentity Manager:
Specifying an Administrative User: Do the following to specify an administrativeuser:1. Create or select an administrative user in your operating system’s user registry.
In subsequent examples, the user is called the System User or wasadmin.2. Create or select another administrative user in your operating system’s user
registry. In subsequent examples, the user is called the EJB user or itimadmin.
Specifying the Authentication Mechanism and User Registry: To specify theauthentication mechanism and user registry, do the following:1. Start the WebSphere administrative server and log in at the console.2. Click Security –> Global Security.3. Select the following options:
v Active Authentication Mechanism: SWAM (Simple WebSphere AuthenticationMechanism)
v Active User Registry: Local OS4. Save the configuration changes.
© Copyright IBM Corp. 2003 105

Configuring the Local OS User Registry: To configure the local OS user registry,do the following:1. Click Security –> User Registries–> Local OS.2. Enter the System User user ID (wasadmin) and password.3. Save the configuration changes.
Enabling Security: Enable security. Do the following:1. Click Security –> Global Security.2. Click Enabled.3. Optionally, click Enforce Java 2 Security if you want to enable Java 2 security.
All applications must support Java 2 security when this option is selected.4. Save the configuration changes.
Running with Security Enabled on Single-node Deployment: To run withsecurity enabled on a single-node deployment, restart the WebSphereadministrative server. When starting the administrative server, you might berequired to specify the WebSphere administrative user ID and password. Forexample:{WAS_HOME}\bin\stopServer server1 [-username wasadmin -password wasadminpassword]{WAS_HOME}\bin\startServer server1 [-username wasadmin -password wasadminpassword]
Manual Steps on Single-node Deployments After Installing TivoliIdentity ManagerTo complete configuration of the J2EE security component, do the following afterinstalling Tivoli Identity Manager:
Mapping an Administrative User to a Tivoli Identity Manager Role: To map anadministrative user to a Tivoli Identity Manager role, do the following:1. On the WebSphere Application Server administrative console, click
Applications –> Enterprise Applications.2. Click enRole.3. Scroll down and click Map security roles to users/groups from Additional
Properties.4. Select the check box for ITIM_SYSTEM.5. Click Lookup users.6. Click Search.7. Select the EJB User user (itimadmin) from the list.8. Click OK.9. Ensure that the Everyone? or All Authenticated? check boxes are NOT
selected.
Note: To prevent unauthorized access, it is important to disable these checkboxes.
10. Save the configuration changes.
Configuring the was.policy File: Ensure that the was.policy file exists in thefollowing directory on the node:{WAS_HOME}\config\cells\<cellname>\applications\enRole.ear\deployements\enrole\META-INF
This policy file grants to Tivoli Identity Manager the permissions it needs toexecute. Although this policy does not impose any restrictions on Tivoli IdentityManager, the enablement of Java 2 security allows security to be enforced in other
106 IBM Tivoli Identity Manager: Server Installation Guide on Windows 2000 using WebSphere
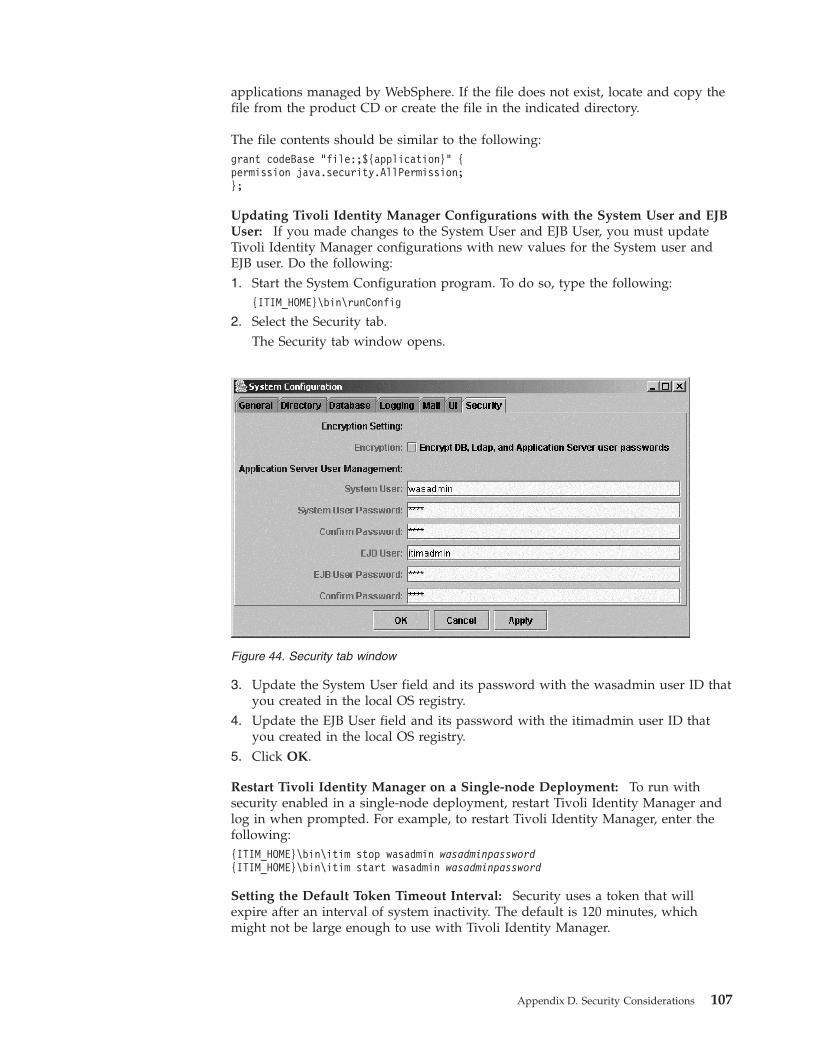
applications managed by WebSphere. If the file does not exist, locate and copy thefile from the product CD or create the file in the indicated directory.
The file contents should be similar to the following:grant codeBase "file:;${application}" {permission java.security.AllPermission;};
Updating Tivoli Identity Manager Configurations with the System User and EJBUser: If you made changes to the System User and EJB User, you must updateTivoli Identity Manager configurations with new values for the System user andEJB user. Do the following:1. Start the System Configuration program. To do so, type the following:
{ITIM_HOME}\bin\runConfig
2. Select the Security tab.The Security tab window opens.
3. Update the System User field and its password with the wasadmin user ID thatyou created in the local OS registry.
4. Update the EJB User field and its password with the itimadmin user ID thatyou created in the local OS registry.
5. Click OK.
Restart Tivoli Identity Manager on a Single-node Deployment: To run withsecurity enabled in a single-node deployment, restart Tivoli Identity Manager andlog in when prompted. For example, to restart Tivoli Identity Manager, enter thefollowing:{ITIM_HOME}\bin\itim stop wasadmin wasadminpassword{ITIM_HOME}\bin\itim start wasadmin wasadminpassword
Setting the Default Token Timeout Interval: Security uses a token that willexpire after an interval of system inactivity. The default is 120 minutes, whichmight not be large enough to use with Tivoli Identity Manager.
Figure 44. Security tab window
Appendix D. Security Considerations 107

Note: On some systems, the actual timeout interval might be shorter than thevalue that is specified. A timeout might prevent you from logging on. Whena timeout occurs, you must recycle the Network Deployment Manager, thecluster, and all node agents.
To ensure that the token expiration value is large enough to prevent accidentaltimeouts, do the following:1. Access the WebSphere Application Server administrative console.2. Click Security –> Authentication –> LTPA –> Timeout.3. Set the token expiration interval to a value that exceeds your site’s longest
anticipated interval of system inactivity.
Configuring Security for Multi-Node DeploymentThis section describes manual steps to take to configure J2EE security for amulti-node deployment.
Manual Steps on a Multi-Node Deployment Before InstallingTivoli Identity ManagerTo configure the J2EE security component, do the following before installing TivoliIdentity Manager:
Setting up the LDAP for Multi-node Security: To set up LDAP for multi-nodesecurity, do the following:1. Using the directory server’s management tool, create the organization unit
ou=wasSecurity,dc=com, where com might be your organization’s suffix.2. Create the user, cn=wasadmin,ou=wasSecurity,dc=com. In this example, the
WebSphere Application Server admin user is specified as the System User(wasadmin). Set the following fields:v sn=wasadminv uid=wasadminv userPassword=wasadminpassword
3. Additionally, create the user, cn=itimadmin,ou=wasSecurity,dc=com. In thisexample, the Tivoli Identity Manager admin user is specified as the EJB user(itimadmin). Set the following fields:v sn=itimadminv uid=itimadminv userPassword=itimadminpassword
Setting up the Authentication Mechanism and User Registry: To set up theauthentication mechanism and user registry, do the following:1. Start the WebSphere administrative server and log in at the console.2. Click Security –> Global Security.3. Select the following options:
v Active Authentication Mechanism: LTPA (Lightweight Third PartyAuthentication)
v Active User Registry: LDAP4. Save the configuration changes.
Configuring the Authentication Mechanism: To configure the authenticationmechanism, do the following:1. Click Security –> Authentication Mechanisms –> LTPA.
108 IBM Tivoli Identity Manager: Server Installation Guide on Windows 2000 using WebSphere

2. Create and confirm a password for the LTPA authentication mechanism.3. Save the configuration changes.
Configuring the LDAP User Registry: To configure the LDAP user registry, dothe following:1. Click Security –> User Registries–> LDAP.2. Select the following options:
v Server User ID=wasadminv Server User Password=wasadminpassword
v Type=directoryservertype
where directoryservertype identifies the directory server such asIBM_Directory_Server.
v Host=ITIM LDAP server hostname
v Base Distinguished Name (DN): ou=wasSecurity,dc=comv Bind Distinguished Name (DN): Enter the bind distinguished name such as
cn=root.v Bind Password: Enter the password for the bind distinguished name.v Ignore Case: Check this option
3. Save the configuration changes.
Enabling Security: To enable security, do the following:1. Click Security –> Global Security.2. Click Enabled.3. Optionally, click Enforce Java 2 Security if you want to enable Java 2 security.
All applications must support Java 2 security when this option is selected.4. Save the configuration changes.
Running with Security Enabled in a Multi-node Environment: To run withsecurity enabled, do the following:1. On the computer with the Network Deployment Manager, enter:
{WAS_NDM_HOME}\bin\stopManager [-username wasadmin -password wasadminpassword]{WAS_NDM_HOME}\bin\startManager [-username wasadmin -password wasadminpassword]
2. On other computers with the node agent:{WAS_HOME}\bin\stopNode [-username wasadmin -password wasadminpassword]{WAS_HOME}\bin\startNode [-username wasadmin -password wasadminpassword]
3. Restart the cluster. Do the following:a. Log in to the WebSphere administrative server using the wasadmin user ID
and password at the console.b. Click Servers –> Clusters.c. Select the cluster.d. Click Stop and then click Start.
4. Restart the JMS server. Do the following:a. Log on to the WebSphere administrative server.b. Click Servers –> JMS Servers.c. Select the server.d. Click Stop and then click Start.
Appendix D. Security Considerations 109

Manual Steps on a Multi-node Deployment after Installing TivoliIdentity ManagerTo complete configuration of the J2EE security component, do the following afterinstalling Tivoli Identity Manager:
Mapping an Administrative User to a Tivoli Identity Manager Role: To map anadministrative user to a Tivoli Identity Manager role, do the following:1. On the WebSphere Application Server administrative console, click
Applications –> Enterprise Applications.2. Click enRole.3. Scroll down and click Map security roles to users/groups from Additional
Properties.4. Select the check box for ITIM_SYSTEM.5. Click Lookup users.6. Click Search.7. Select the EJB user (itimadmin) from the list.8. Click OK.9. Ensure that the Everyone? or All Authenticated? check boxes are NOT
selected.
Note: To prevent unauthorized access, it is important to disable these checkboxes.
10. Save the configuration changes.
Configuring the was.policy File: Ensure that the was.policy file exists in thefollowing directory on the Network Deployment Manager node:{WAS_NDM_HOME}\config\cells\<cellname>\applications\enRole.ear\deployements\enrole\META-INF
This policy file grants to Tivoli Identity Manager the permissions it needs toexecute. Although this policy does not impose any restrictions on Tivoli IdentityManager, the enablement of Java 2 security allows security to be enforced in otherapplications managed by WebSphere. If the file does not exist, locate and copy thefile from the product CD or create the file in the indicated directory.
The file contents should be similar to the following:grant codeBase "file:;${application}" {permission java.security.AllPermission;};
Synchronize the WebSphere Application Server Network Deployment configurationwith the nodes in the cell. Restart the Tivoli Identity Manager cluster.
Restarting Tivoli Identity Manager in a Multi-node Environment: To restartTivoli Identity Manager, do the following:1. Click Server –> Clusters.2. Select the check box next to the cluster name.3. Click Stop. Wait for the cluster to stop and then click Start.
Setting the Default Token Timeout Interval: Security uses a token that willexpire after an interval of system inactivity. The default is 120 minutes, whichmight not be large enough to use with Tivoli Identity Manager.
110 IBM Tivoli Identity Manager: Server Installation Guide on Windows 2000 using WebSphere

Note: On some systems, the actual timeout interval might be shorter than thevalue that is specified. A timeout might prevent you from logging on. Whena timeout occurs, you must recycle the Network Deployment Manager, thecluster, and all node agents.
To ensure that the token expiration value is large enough to prevent accidentaltimeouts, do the following:1. Access the WebSphere Application Server administrative console.2. Click Security –> Authentication –> LTPA –> Timeout.3. Set the token expiration interval to a value that exceeds your site’s longest
anticipated interval of system inactivity.
Disabling J2EE SecurityTo disable J2EE security using the WebSphere administrative console, do thefollowing:1. Click Security –> Global Security.2. Uncheck (disable) Security and Java Security.3. Stop and then start all node agents, JMS servers, and application servers.
Alternatives in Configuring the HTTP ServerTo provide additional security, configure an HTTP server such as the IBM HTTPServer to reside on a computer that is external to the cell once Tivoli IdentityManager is fully installed. This process includes installing the web server, copyingseveral files from the Network Deployment Manager, and configuring the webserver to load and configure a WebSphere module at server startup.
Appendix D. Security Considerations 111

The following is an example on a Solaris platform for IBM HTTP Server orApache. Adapt the following steps for your platform:1. On the external computer, install and configure the HTTP server.2. Create a directory under the http_server_dir/conf directory called WebSphere.3. Copy the following files from the Network Deployment Manager computer to
the http_server_dir/conf/WebSphere directory:v was_deployment_mgr/bin/mod_ibm_app_server_http.sov was_deployment_mgr/config/cells/plugin-cfg.xmlv was_deployment_mgr/etc/plugin-key.kdbv was_deployment_mgr/etc/plugin-key.sth
4. On the computer external to the cell, open the plugin-cfg.xml file in the texteditor and make the following changes:v Change each instance of the was_deployment_mgr/etc/ directory to the
http_server/conf/WebSphere directory. That is, replace/opt/WebSphere/DeploymentManager/etc with/opt/IBMHttpServer/conf/WebSphere.
v Change the directory of the http_plugin.log file to http_server/logs. Thatis, replace /opt/WebSphere/AppServer/logs/http_plugin.log with/opt/IBMHttpServer/logs/http_plugin.log.
5. Use a text editor to open the http_server_home/conf/httpd.conf file directoryand add the following lines at the bottom of the file:# WebSphere plugin settingsLoadModule ibm_app_server_http_module http_server/conf/WebSphere/mod_ibm_app_server_http.soWebSpherePluginConfig http_server/conf/WebSphere/plugin-cfg.xml
DirectoryServer
WebSphere NetworkDeployment Manager
JDBC driver
WebSphereApplication
Server( ITIM UI )
WebSphereApplication
Server( ITIM UI )
Tivoli IdentityManager Cell
WebSpherebase
JDBC driver
WebSphereApplication
Server( ITIM UI )
WebSphereApplication
Server( ITIM WF )
WebSphereApplication
Server( ITIM WF )
WF Cluster
UI Cluster
WebSpherebase
JDBC driver
HTTPServer
Web Serverplugin
TivoliIdentity
ManagerDatabase
Figure 45. HTTP Server Configuration for Increased Security
112 IBM Tivoli Identity Manager: Server Installation Guide on Windows 2000 using WebSphere

For example, enter the following:# WebSphere plugin settingsLoadModule ibm_app_server_http_module /opt/IBMHttpServer/conf/WebSphere/mod_ibm_app_server_http.soWebSpherePluginConfig /opt/IBMHttpServer/conf/WebSphere /plugin-cfg.xml
Note: Ensure that the WebSphere Application Server Fix Pack 2 is also installed onthe computer on which the WebSphere Web Server plug-in is installed.
Appendix D. Security Considerations 113

114 IBM Tivoli Identity Manager: Server Installation Guide on Windows 2000 using WebSphere

Appendix E. Upgrading from Tivoli Identity Manager 4.3 toTivoli Identity Manager 4.5
This section describes upgrading previous data and schema from Tivoli IdentityManager Version 4.3 using WebLogic to Tivoli Identity Manager Version 4.5 usingWebSphere Application Server.
To complete the migration, an installation of Tivoli Identity Manager Version 4.3using WebLogic will first have to be upgraded to Tivoli Identity Manager Version4.5 using WebLogic. This process will upgrade the Tivoli Identity Manager Version4.3 database and LDAP directory to be compatible with Tivoli Identity ManagerVersion 4.5. After the initial upgrade, a new installation of Tivoli Identity ManagerVersion 4.5 using WebSphere Application Server will be installed to a separateinstallation folder and then configured.
Before You BeginBefore upgrading from Tivoli Identity Manager version 4.3 to Tivoli IdentityManager version 4.5, do the following:1. Upgrade and configure any software that is part of the existing Tivoli Identity
Manager environment to meet the requirements for the new Tivoli IdentityManager version. This includes migrating or patching databases and directoryservers.
2. During upgrade of the directory server, entries within the Tivoli IdentityManager sub-tree are scanned for the string enrole (case-insensitive). If anattribute’s value contains the string enrole, that string is changed to itim. Thisstring replacement is done for all attributes except those listed in{ITIM_HOME}\data\enRoleUnchangedAttributes.properties file.Before beginning the upgrade process, export the contents of the Tivoli IdentityManager 4.3 LDAP sub-tree to an LDIF file. Search the LDIF file for the stringenrole. If you find attributes that contain values that should not be changedduring upgrade, do the following:a. Select No for LDAP Directory Upgrade during the Tivoli Identity Manager
4.5 installation.b. Edit {ITIM_HOME}\data\enRoleUnchangedAttributes.properties file to add
the attribute names.c. Invoke the LDAP Directory Upgrade manually.
3. Ensure your directory server is up and running.4. Back up all current Tivoli Identity Manager information, which includes
properties files and configuration settings. These files are located in{ITIM_HOME}\data.
5. Ensure all items in the pending queue are clear and that all recurring scheduledevents, such as existing reconciliations, are deleted. Workflow preservation isnot supported when upgrading from Tivoli Identity Manager Version 4.3 toTivoli Identity Manager Version 4.5. Failing to complete this task prior to theupgrade may result in exceptions being thrown as Tivoli Identity ManagerVersion 4.5 attempts to read recurring or pending events that were created inthe previous installation.
6. If you are using Oracle, ensure Oracle and the Oracle listener services arestarted.
© Copyright IBM Corp. 2003 115
Upgrading from Tivoli Identity Manager 4.3 Using WebLogic to TivoliIdentity Manager 4.5 Using WebLogic
This section describes the steps necessary to upgrade a Tivoli Identity Manager 4.3installation using WebLogic to a Tivoli Identity Manager 4.5 installation usingWebLogic. This upgrade must be accomplished before an installation of TivoliIdentity Manager 4.5 using WebSphere Application Server can be performed.1. Invoke the Tivoli Identity Manager 4.5 WebLogic installer and proceed
normally through the installation wizard until the Have you installed BEAWeblogic Server 7.0? dialog appears.
2. Click No.The Do you want to continue the installation? dialog appears.
3. Click Yes.The Where do you plan to install Weblogic Server? dialog appears.
4. Click Next to accept the default WebLogic Server directory.The Choose Install Folder dialog appears.
5. Input the home directory for Tivoli Identity Manager 4.3.The Do you want to upgrade? dialog appears.
6. Click Yes.The Do you want to upgrade the LDAP directory during installation? dialogappears.
7. Click Yes. This will initiate an LDAP directory upgrade.
Note: You can choose to upgrade the LDAP directory after the installation byselecting No. After the installation, invoke the ldapUpgrade utilitylocated in the bin directory.
After the schema update is complete, the Database schema upgrade is completedialog appears.
8. Click OK.At the conclusion of the LDAP upgrade, the Successfully upgraded directoryserver’s schema and data dialog appears.
The Tivoli Identity Manager 4.3 using WebLogic to Tivoli Identity Manager 4.5using WebLogic upgrade is complete.
Installing Tivoli Identity Manager Version 4.5 using WebSphereApplication Server
This section describes the steps necessary to install Tivoli Identity Manager Version4.5 using WebSphere Application Server in the specific context of an upgrade fromTivoli Identity Manager Version 4.3 using WebLogic.1. Invoke the Tivoli Identity Manager 4.5 WebSphere installer and proceed as
you normally would through the installation wizard until the Choose InstallDirectory dialog appears.
2. Select a folder to install Tivoli Identity Manager 4.5 that is different from theoriginal Tivoli Identity Manager 4.3 installation. For example, itim45.The Choose Database Type dialog appears.
3. Select the existing database type that was used for the original Tivoli IdentityManager 4.3 installation.
116 IBM Tivoli Identity Manager: Server Installation Guide on Windows 2000 using WebSphere

4. Continue with a typical installation until the Database Configuration Programdialog appears.
5. Click Cancel.The Directory Configuration dialog appears.
6. Click Cancel.The System Configuration Tool dialog appears.
7. Select the Directory tab and enter connection information for your existingdirectory server.
8. Click Test to verify that the connection information you entered is correct.9. Select the Database tab and enter connection information for your existing
database.10. Click Test to verify that the connection information you entered is correct.11. Click the Mail tab.
The Mail tab window opens.12. Change the value for the Identity Manager Server URL field to that of your
server and click Apply.13. Click OK and complete the installation.
The Tivoli Identity Manager 4.5 using WebSphere Application Server installation iscomplete.
Configuring the New InstallationThis section describes the configuration steps necessary to complete the migrationof Tivoli Identity Manager 4.3 using WebLogic to Tivoli Identity Manager 4.5 usingWebSphere Application Server. Complete the steps in this section only after youhave upgraded a Tivoli Identity Manager 4.3 installation using WebLogic to aTivoli Identity Manager 4.5 installation using WebLogic and have completed aninstallation of Tivoli Identity Manager 4.5 using WebSphere Application Server.1. Copy CustomLabels.properties from Tivoli Identity Manager 4.3 data subfolder
to the Tivoli Identity Manager 4.5 data subfolder.2. Modify the following properties in the Tivoli Identity Manager 4.5
enRole.properties file to match the ones stored in Tivoli Identity Manager 4.3enRole.properties:v enrole.defaulttenant.idv enrole.organization.name
Appendix E. Upgrading from Tivoli Identity Manager 4.3 to Tivoli Identity Manager 4.5 117

118 IBM Tivoli Identity Manager: Server Installation Guide on Windows 2000 using WebSphere

Appendix F. Upgrading from Tivoli Identity Manager Version4.4.x to 4.5
This section describes upgrading from Tivoli Identity Manager Version 4.4.x toTivoli Identity Manager Version 4.5. This section details upgrading bothsingle-server and cluster Tivoli Identity Manager configurations.
The Tivoli Identity Manager upgrade process is grouped into two efforts:v Upgrading prerequisite software. You will have to upgrade and configure any
software that is part of the existing Tivoli Identity Manager environment to meetthe requirements for the new Tivoli Identity Manager version. This includesmigrating or patching databases and directory servers.
v Installing the new version of Tivoli Identity Manager using the Tivoli IdentityManager installation program. The Tivoli Identity Manager installation programupgrades database tables, directory server schema, and properties files for usewith the new version of Tivoli Identity Manager.
Notes:
1. The upgrade instructions provided in this section assume that you will installand configure a new installation of WebSphere Application Server version 5.0to coexist with WebSphere Application Server version 4.0.In an environment where two WebSphere Application Server installationscoexist, you need to ensure that the value for the com.ibm.ws.scripting.port in{WAS_HOME}\properties\wsadmin.properties matches the port underSOAP_CONNECTOR_ADDRESS of server1 in the following:{WAS_HOME}\config\cells\<cell_name>\nodes\<node_name>\serverindex.xml
Without the matching value, Tivoli Identity Manager deployment and TivoliIdentity Manager/WebSphere Application Server configuration will fail.
If you do not want to retain the installation of WebSphere Application Serverversion 4.0, you must uninstall it manually using the WebSphere ApplicationServer version 4.0 uninstaller.
2. If you intend to install WebSphere Application Server version 5.0 using theTivoli Identity Manager version 4.5 installer you must uninstall the followingproducts:v WebSphere Application Server 4.0v IBM MQSeriesv IBM MQSeries support pack MA88
3. After the upgrade, previous audit and log data may not be relevant to the newdata.
Before You BeginBefore upgrading from Tivoli Identity Manager version 4.4.x to Tivoli IdentityManager version 4.5, do the following:1. Back up all current WebSphere Application Server configuration settings, which
includes the settings for Tivoli Identity Manager 4.4.x. These files are located in{WAS_HOME}\config.
© Copyright IBM Corp. 2003 119

2. Back up all current Tivoli Identity Manager information, which includesproperties files and configuration settings. These files are located in{ITIM_HOME}\data.
3. Back up the directory server. Refer to the appropriate documentation for yourproduct.
4. Back up the database. Refer to the appropriate documentation for your product.5. Ensure your installation environment meets or exceeds Tivoli Identity Manager
version 4.5 requirements. Refer to Appendix B, “Software and HardwareRequirements on Windows”, on page 93.
6. Upgrade the directory server and database software to meet Tivoli IdentityManager version 4.5 installation requirements. Refer to Appendix B, “Softwareand Hardware Requirements on Windows”, on page 93.
7. Ensure all items in the pending queue are clear and that all recurring scheduledevents, such as existing reconciliations, are deleted. Workflow preservation isnot supported when upgrading from Tivoli Identity Manager Version 4.4 toTivoli Identity Manager Version 4.5. Failing to complete this task prior to theupgrade may result in exceptions being thrown as Tivoli Identity ManagerVersion 4.5 attempts to read recurring or pending events that were created inthe previous installation.
8. Prepare your WebSphere Application Server environment. Refer to “Preparingfor WebSphere Application Server Installation” on page 97.
9. Shut down the cluster, if applicable.
Upgrading a Single-Server ConfigurationThis section includes procedures for upgrading a Tivoli Identity Managersingle-server configuration. Complete the following procedures which are dividedinto the following groups of tasks:1. Installing WebSphere Application Server base 5.0. Refer to “Installing Base on
Each Node” on page 101 for procedures. Disregard any Network DeploymentManager or cluster-specific information.
2. Upgrading Tivoli Identity Manager 4.4.x to 4.5. Refer to “Upgrading TivoliIdentity Manager 4.4.x to 4.5” for procedures.
Upgrading Tivoli Identity Manager 4.4.x to 4.5This section includes procedures for upgrading Tivoli Identity Manager 4.4.x to 4.5.1. Start the Tivoli Identity Manager installer:
instW2K-WAS.exe
The Welcome window opens.2. Select the appropriate language and click OK.
The License Agreement window opens.3. Read the license agreement and decide whether to accept its terms. If you do,
select Accept and click Next.The Choose Installation Type window opens.
4. Select Single Server and click Next.The Choose Install Directory window opens.
5. Click Choose.... and select the Tivoli Identity Manager 4.4.x home directory.6. Click Next.
The Do You Want to Upgrade from 4.4 to 4.5? dialog appears.
120 IBM Tivoli Identity Manager: Server Installation Guide on Windows 2000 using WebSphere

7. Select Yes.The WebSphere Location Confirmation dialog appears.
8. Confirm the location of the WebSphere home directory and click Next.The Choose WebSphere Security dialog appears.
9. Determine if WebSphere Global Security is active on your system. IfWebSphere Global Security is on, click WebSphere Security Enabled,otherwise, select WebSphere Security Disabled. If you choose WebSphereSecurity Enabled and click Next, an additional window appears that requiresyou to specify the WebSphere Application Server user ID and password. Formore information, refer to Appendix D, “Security Considerations”, onpage 105.The Specify the Encryption Key dialog appears.
10. Provide an encryption key and click Next.The Pre-Install Summary dialog appears.
11. Click Install.The System Configuration Tool dialog appears.
12. Click the Mail tab.The Mail tab window opens.
13. Change the value for the Identity Manager Server URL field to that of yourserver and click Apply.
14. Click OK and complete the installation.
Notes:
1. The upgrade process should pick up previously configured database and LDAPserver pointer information. If you experience difficulty connecting to theseresources, you can use the System Configuration Tool to reconfigure theconnection properties for these systems. Refer to the Tivoli Identity ManagerServer Configuration Guide for System Configuration Tool information.
2. If you receive an error message during the install regarding the enrole.ear file,the Network Deployment Manager may not be able to connect to the SOAPport. Ensure the port configured for SOAP is the one configured during theWebSphere 5.0 installation.In an environment where two WebSphere Application Server installationscoexist, you need to ensure that the value for the com.ibm.ws.scripting.port in{WAS_HOME}\properties\wsadmin.properties matches the port underSOAP_CONNECTOR_ADDRESS of server1 in the following:{WAS_HOME}\config\cells\<cell_name>\nodes\<node_name>\serverindex.xml
Without the matching value, Tivoli Identity Manager deployment and TivoliIdentity Manager/WebSphere Application Server configuration will fail.
Upgrading a Cluster ConfigurationThis section includes procedures for upgrading a Tivoli Identity Manager clusterconfiguration. These procedures are divided into the following groups of tasks:1. Installing and configuring WebSphere components for cluster configuration:
a. Installing WebSphere Application Server Network Deployment. Refer to“Installing WebSphere Application Server Network Deployment” on page 98for procedures.
b. Installing IBM HTTP Server and Web plug-in components. Refer to“Installing IBM HTTP Server and WebSphere Web Server Plugin” onpage 100 for procedures.
Appendix F. Upgrading from Tivoli Identity Manager Version 4.4.x to 4.5 121

c. Installing WebSphere Application Server base 5.0 on a secondary server.Refer to “Installing Base on Each Node” on page 101 for procedures.
d. Configuring the cluster environment. Refer to “Configuring Tivoli IdentityManager Clusters” on page 98 for more information.
2. Upgrading Tivoli Identity Manager 4.4.x to 4.5 for the Network DeploymentManager System. Refer to “Upgrading Tivoli Identity Manager 4.4.x to 4.5 forthe Network Deployment Manager System” for procedures.
3. Upgrading Tivoli Identity Manager 4.4.x to 4.5 for the member node system.Refer to “Upgrading Tivoli Identity Manager 4.4.x to 4.5 for the MemberSystem” on page 123 for procedures.
Upgrading Tivoli Identity Manager 4.4.x to 4.5 for the NetworkDeployment Manager System
This section includes procedures for upgrading Tivoli Identity Manager 4.4.x to 4.5on the system hosting the Network Deployment Manager system.
Note: WebSphere Application Server Network Deployment 5.0 can be loaded onthe Tivoli Identity Manager 4.4.x primary or secondary server.
1. Start the Tivoli Identity Manager installer on the Network DeploymentManager computer:instW2K-WAS.exe
The Welcome window opens.2. Select the appropriate language and click OK.
The License Agreement window opens.3. Read the license agreement and decide whether to accept its terms. If you do,
select Accept and click Next.The Choose Installation Type window opens.
4. Select Cluster and click Next.The Important Information window opens.
5. Click Next.The Choose Install Directory window opens.
6. Click Choose.... and select the Tivoli Identity Manager 4.4.x home directory.7. Click Next.
The Do You Want to Upgrade from 4.4 to 4.5? dialog appears.8. Select Yes.
The Choose Cluster Node Type window opens.9. Select Network Deployment Manager for the node type and click Next.
The WebSphere Location Confirmation dialog appears.10. Confirm the location of the WebSphere home directory and click Next.
The Choose Cluster Name dialog appears.11. Provide the name of the cluster created within Network Deployment Manager.12. Click Next.
The Choose WebSphere Security dialog appears.13. Determine if WebSphere Global Security is active on your system. If
WebSphere Global Security is on, click WebSphere Security Enabled,otherwise, select WebSphere Security Disabled. If you choose WebSphereSecurity Enabled and click Next, an additional window appears that requires
122 IBM Tivoli Identity Manager: Server Installation Guide on Windows 2000 using WebSphere

you to specify the WebSphere Application Server user ID and password. Formore information, refer to Appendix D, “Security Considerations”, onpage 105.The Specify the Encryption Key dialog appears.
14. Provide an encryption key and click Next.The Pre-Install Summary dialog appears.
15. Click Install.
Note: If you receive an error message during the install regarding theenrole.ear file, the Network Deployment Manager may not be able toconnect to the SOAP port. Ensure the port configured for SOAP is theone configured during the WebSphere 5.0 installation.
In an environment where two WebSphere Application Serverinstallations coexist, you need to ensure that the value for thecom.ibm.ws.scripting.port in{WAS_HOME}\properties\wsadmin.properties matches the port underSOAP_CONNECTOR_ADDRESS of server1 in the following:{WAS_HOME}\config\cells\<cell_name>\nodes\<node_name>\serverindex.xml
Without the matching value, Tivoli Identity Manager deployment andTivoli Identity Manager/WebSphere Application Server configurationwill fail.
The System Configuration Tool dialog appears.16. Click the Mail tab.
The Mail tab window opens.17. Change the value for the Identity Manager Server URL field to that of your
server and click Apply.
Note: The Identity Manager Server URL field is the only value that you arerequired to change. You may provide additional information for otherSystem Configuration Tool tabs at this time.
18. Click OK and complete the installation.
Note: The upgrade process should pick up previously configured database andLDAP server pointer information. If you experience difficulty connecting tothese resources, you can use the System Configuration Tool to reconfigurethe connection properties for these systems. Refer to the Tivoli IdentityManager Server Configuration Guide for System Configuration Toolinformation.
Upgrading Tivoli Identity Manager 4.4.x to 4.5 for the MemberSystem
This section includes procedures for upgrading Tivoli Identity Manager 4.4.x to 4.5on the cluster member system.
Note: WebSphere Application Server Network Deployment 5.0 can be loaded onthe Tivoli Identity Manager 4.4.x primary or secondary server.
1. Start the Tivoli Identity Manager installer on the member node machine:instW2K-WAS.exe
The Welcome window opens.
Appendix F. Upgrading from Tivoli Identity Manager Version 4.4.x to 4.5 123

2. Select the appropriate language and click OK.The License Agreement window opens.
3. Read the license agreement and decide whether to accept its terms. If you do,select Accept and click Next.
4. Click Next.The Choose Installation Type window opens.
5. Select Cluster and click Next.The Important Information window opens.
6. Click Next.The Choose Install Directory window opens.
7. Click Choose.... and select the Tivoli Identity Manager 4.4.x home directory.8. Click Next.
The Do You Want to Upgrade from 4.4 to 4.5? dialog appears.9. Select Yes.
The Choose Cluster Node Type window opens.10. Select Cluster Member for the node type and click Next.
The WebSphere Location Confirmation dialog appears.11. Confirm the location of the WebSphere home directory and click Next.
The Choose Cluster Name dialog appears.12. Provide the name of the cluster created within Network Deployment Manager.13. Click Next.
The Choose WebSphere Security dialog appears.14. Determine if WebSphere Global Security is active on your system. If
WebSphere Global Security is on, click WebSphere Security Enabled,otherwise, select WebSphere Security Disabled. If you choose WebSphereSecurity Enabled and click Next, an additional window appears that requiresyou to specify the WebSphere Application Server user ID and password. Formore information, refer to Appendix D, “Security Considerations”, onpage 105.The Specify the Encryption Key dialog appears.
15. Provide an encryption key and click Next.The Pre-Install Summary dialog appears.
16. Click Install.
Note: If you receive an error message during the install regarding theenrole.ear file, the Network Deployment Manager may not be able toconnect to the SOAP port. Ensure the port configured for SOAP is theone configured during the WebSphere 5.0 installation.
In an environment where two WebSphere Application Serverinstallations coexist, you need to ensure that the value for thecom.ibm.ws.scripting.port in{WAS_HOME}\properties\wsadmin.properties matches the port underSOAP_CONNECTOR_ADDRESS of server1 in the following:{WAS_HOME}\config\cells\<cell_name>\nodes\<node_name>\serverindex.xml
Without the matching value, Tivoli Identity Manager deployment andTivoli Identity Manager/WebSphere Application Server configurationwill fail.
124 IBM Tivoli Identity Manager: Server Installation Guide on Windows 2000 using WebSphere
The System Configuration Tool dialog appears.17. Click the Mail tab.
The Mail tab window opens.18. Change the value for the Identity Manager Server URL field to that of your
server and click Apply.
Note: The Identity Manager Server URL field is the only value that you arerequired to change. You may provide additional information for otherSystem Configuration Tool tabs at this time.
19. Click OK and complete the installation.
Note: The upgrade process should pick up previously configured database andLDAP server pointer information. If you experience difficulty connecting tothese resources, you can use the System Configuration Tool to reconfigurethe connection properties for these systems. Refer to the Tivoli IdentityManager Server Configuration Guide for System Configuration Toolinformation.
Appendix F. Upgrading from Tivoli Identity Manager Version 4.4.x to 4.5 125

126 IBM Tivoli Identity Manager: Server Installation Guide on Windows 2000 using WebSphere

Appendix G. Uninstalling Tivoli Identity Manager
The Tivoli Identity Manager uninstall process uninstalls the following:v Tivoli Identity Manager, including all {ITIM_HOME} files copied to a target
system during the Tivoli Identity Manager installationv Tivoli Identity Manager application and configuration settings created for Tivoli
Identity Manager on WebSphere Application Server
Uninstalling Tivoli Identity Manager does not modify existing database tables orthe Directory server schema. The Tivoli Identity Manager uninstaller removes theTivoli Identity Manager application from within WebSphere Application Server.
To uninstall additional products that might have been installed during the TivoliIdentity Manager installation, such as WebSphere Application Server or IBM HTTPServer, refer to the appropriate documentation for the product.
Note: If you uninstall Tivoli Identity Manager from a cluster configuration, removeTivoli Identity Manager from all cluster members first, and then removeTivoli Identity Manager from the computer on which the NetworkDeployment Manager is installed.
Before You BeginIf you intend to save Tivoli Identity Manager configuration information inWebSphere, prior to uninstalling Tivoli Identity Manager, perform a backup of theWebSphere configuration files.1. Start the WebSphere Application Server. For more information on starting this
server, refer to documentation provided by WebSphere Application Server.2. Run the following command on the computer that hosts the WebSphere
Application Server to make a backup file:{WAS_HOME}\bin\backupConfig.bat
The command creates a zip file such as WebSphereConfig_2003–07–10.zip thatcontains all current Tivoli Identity Manager configuration settings. The file iscreated in the directory from which you run the backupConfig command.
Note: To restore the configuration settings, run the following command:{WAS_HOME}\bin\restoreConfig.bat WebSphereConfig_datevalue.zip
Notes:
1. If you uninstall Tivoli Identity Manager from a cluster configuration, ensure theNetwork Deployment Manager is running. In addition, you should also verifythat the node agent is running on the system prior to performing an uninstallprocess to maintain communication between the application server and theNetwork Deployment Manager.
2. You may encounter problems if you uninstall Tivoli Identity Manager from aNetwork Deployment Manager system if there is not a local copy of JVM 1.3 ora local installation of WebSphere Application Server base resident on thesystem. In this case, you can either install a local copy of JVM 1.3 or update theJVM definition of the <ITIM_HOME>/itimUninstallerData/Uninstall ITIM.laxLAX file.
© Copyright IBM Corp. 2003 127

Change the following line:lax.nl.current.vm=\java\bin\javaw.exe
tolax.nl.current.vm=<was_ndm_home>\java\bin\javaw.exe
Steps to Uninstall Tivoli Identity ManagerTo uninstall Tivoli Identity Manager, do the following:1. Uninstall the Tivoli Identity Manager application by running the following
command on the computer on which Tivoli Identity Manager is installed:{ITIM_HOME}\itimUninstallerData\Uninstall_ITIM
2. Proceed through the uninstall wizard panels to confirm you want to uninstallTivoli Identity Manager.
3. After the uninstall completes successfully, remove any residual directories,configuration files, and log files for Tivoli Identity Manager from your filesystem.
The Tivoli Identity Manager uninstaller also removes the Tivoli Identity Managerapplication deployed in the WebSphere Application Server.
To verify that Tivoli Identity Manager has been uninstalled and removed as anapplication from WebSphere Application Server, do the following:1. Launch the WebSphere Application Server administrative console and log in.2. From the navigation tree, navigate through the target node and click the
Enterprise Applications link located beneath it.A list of the enterprise applications installed on the application server appears.If you see an application named enRole listed, the Tivoli Identity Manageruninstaller was unable to automatically remove the Tivoli Identity Managerapplication from WebSphere Application Server. You can remove theapplication manually. If you do not find the enRole application listed, the TivoliIdentity Manager uninstaller successfully removed the Tivoli Identity Manageruninstaller application from within WebSphere Application Server.
To manually remove Tivoli Identity Manager as an application from WebSphereApplication Server, do the following:1. Launch the WebSphere Application Server administrative console and log in.2. From the navigation tree, navigate through the target node and click the
Enterprise Applications link located beneath it.A list of the enterprise applications installed on the application server appears.
3. Select the check box next to the enRole application.4. Click the Stop button.5. When the enRole application has successfully been stopped, select the check
box next to the enRole application.6. Click the Uninstall button.7. Check that the enrole.ear directory is completely removed from
{WAS_HOME}\AppServer\config\cells\servername\applications
8. Remove itim.log in {WAS_HOME}\AppServer\logs
Note: In a cluster environment, once you remove Tivoli Identity Manager from theNetwork Deployment Manager system, Tivoli Identity Manager will nolonger be available to the cluster. You can remove Tivoli Identity Manager
128 IBM Tivoli Identity Manager: Server Installation Guide on Windows 2000 using WebSphere

from an individual cluster member by following the instructions listedabove for a manual uninstall of the application.
Appendix G. Uninstalling Tivoli Identity Manager 129

130 IBM Tivoli Identity Manager: Server Installation Guide on Windows 2000 using WebSphere

Appendix H. Notices
This information was developed for products and services offered in the U.S.A.IBM may not offer the products, services, or features discussed in this document inother countries. Consult your local IBM representative for information on theproducts and services currently available in your area. Any reference to an IBMproduct, program, or service is not intended to state or imply that only that IBMproduct, program, or service may be used. Any functionally equivalent product,program, or service that does not infringe any IBM intellectual property right maybe used instead. However, it is the user’s responsibility to evaluate and verify theoperation of any non-IBM product, program, or service.
IBM may have patents or pending patent applications covering subject matterdescribed in this document. The furnishing of this document does not give youany license to these patents. You can send license inquiries, in writing, to:
IBM Director of LicensingIBM CorporationNorth Castle DriveArmonk, NY 10504-1785U.S.A.
For license inquiries regarding double-byte (DBCS) information, contact the IBMIntellectual Property Department in your country or send inquiries, in writing, to:
IBM World Trade Asia CorporationLicensing2-31 Roppongi 3-chome, Minato-kuTokyo 106-0032, Japan
The following paragraph does not apply to the United Kingdom or any othercountry where such provisions are inconsistent with local law:INTERNATIONAL BUSINESS MACHINES CORPORATION PROVIDES THISPUBLICATION “AS IS” WITHOUT WARRANTY OF ANY KIND, EITHEREXPRESS OR IMPLIED, INCLUDING, BUT NOT LIMITED TO, THE IMPLIEDWARRANTIES OF NON-INFRINGEMENT, MERCHANTABILITY OR FITNESSFOR A PARTICULAR PURPOSE. Some states do not allow disclaimer of express orimplied warranties in certain transactions, therefore, this statement may not applyto you.
This information could include technical inaccuracies or typographical errors.Changes are periodically made to the information herein; these changes will beincorporated in new editions of the publication. IBM may make improvementsand/or changes in the product(s) and/or the program(s) described in thispublication at any time without notice.
Any references in this information to non-IBM Web sites are provided forconvenience only and do not in any manner serve as an endorsement of those Websites. The materials at those Web sites are not part of the materials for this IBMproduct and use of those Web sites is at your own risk.
IBM may use or distribute any of the information you supply in any way itbelieves appropriate without incurring any obligation to you.
© Copyright IBM Corp. 2003 131

Licensees of this program who wish to have information about it for the purposeof enabling: (i) the exchange of information between independently createdprograms and other programs (including this one) and (ii) the mutual use of theinformation which has been exchanged should contact:
IBM Corporation2ZA4/10111400 Burnet RoadAustin, TX 78758U.S.A.
Such information may be available, subject to appropriate terms and conditions,including in some cases, payment of a fee.
The licensed program described in this information and all licensed materialavailable for it are provided by IBM under terms of the IBM Customer Agreement,IBM International Program License Agreement, or any equivalent agreementbetween us.
Any performance data contained herein was determined in a controlledenvironment. Therefore, the results obtained in other operating environments mayvary significantly. Some measurements may have been made on development-levelsystems and there is no guarantee that these measurements will be the same ongenerally available systems. Furthermore, some measurements may have beenestimated through extrapolation. Actual results may vary. Users of this documentshould verify the applicable data for their specific environment.
Information concerning non-IBM products was obtained from the suppliers ofthose products, their published announcements or other publicly available sources.IBM has not tested those products and cannot confirm the accuracy ofperformance, compatibility or any other claims related to non-IBM products.Questions on the capabilities of non-IBM products should be addressed to thesuppliers of those products.
TrademarksThe following terms are trademarks or registered trademarks of InternationalBusiness Machines Corporation in the United States, other countries, or both:
AIXDB2IBMIBM logoSecureWayTivoliTivoli logoUniversal DatabaseWebSphere
Lotus is a registered trademark of Lotus Development Corporation and/or IBMCorporation.
Domino is a trademark of International Business Machines Corporation and LotusDevelopment Corporation in the United States, other countries, or both.
Microsoft, Windows, Windows NT, and the Windows logo are trademarks ofMicrosoft Corporation in the United States, other countries, or both.
132 IBM Tivoli Identity Manager: Server Installation Guide on Windows 2000 using WebSphere

UNIX is a registered trademark of The Open Group in the United States and othercountries.
Java™ and all Java-based trademarks and logos aretrademarks or registered trademarks of Sun Microsystems,Inc. in the United States and other countries.
Other company, product, and service names may be trademarks or service marksof others.
Appendix H. Notices 133

134 IBM Tivoli Identity Manager: Server Installation Guide on Windows 2000 using WebSphere
Glossary
Aaccess. The privilege to use information or data storedon computer systems.
account. The set of parameters that define the logininformation and access control information for a user.
account report. A report that lists people and theirassociated accounts and whether or not the account isin compliance with current policies.
access control information (ACI). Data that identifiesthe access rights of a group or principal. See also accesscontrol.
ACI origin. The branch in the organization tree wherethe ACI is created.
ACI target. The set of entities that are controlled bythe ACI.
active account. An account that exists and that is inuse by the owner to access a resource.
admin domain. A division of an organization withinthe Tivoli Identity Manager system that contains itsown policies, services, ACIs, and so on. Each admindomain can have administrators that cannot administeror view the policies, services, ACIs of other admindomains.
alias. An identity for a user, usually referred to as theuser ID. A person can have several aliases, for example:GSmith and GWSmith.
attribute enforcement. The process in which systemadministrators define the attributes that are requiredfor an account and the values that are valid for thoseattributes.
audit trail. The record of transactions for a computersystem during a given time period.
authentication. The process of identifying anindividual, usually based on a user name andpassword. In security systems, authentication is distinctfrom authorization, which is the process of givingindividuals access to system objects based on theiridentity. Authentication merely ensures that theindividual is who he or she claims to be, but saysnothing about the access rights of the individual.
authorization. In computer security, the right grantedto a user to communicate with or make use of a
computer system. The process of granting a user eithercomplete or restricted access to an object, resource, orfunction.
Most computer security systems are based on atwo-step process. The first stage is authentication,which ensures that a user is who he or she claims tobe. The second stage is authorization, which allows theuser access to various resources based on the user’sidentity.
authorization owner. A group of users who can defineaccess control information (ACI) within the context ofthe organizational unit to which they belong.
Bbranch. Each level within the organization tree iscalled a branch. Each type of branch in the tree isindicated by a different icon. The contents of a branchwith sub-units can be viewed by clicking the plus (+)sign next to it.
business partner organization. One of the types ofsubsidiary entities that can be added to anorganization. Typically, a business partner organizationis used to identify a contractor, supplier, or othergroups of individuals who are not direct employees butmay need access to a company’s resources.
business partner person. A person in a businesspartner organization.
business unit. A subsidiary entity of an organization.
Ccentral data repository. The database used to recordand store user and access privilege data for allregistered users, including transaction and maintenancerecords.
Certificate Authority (CA). An organization thatissues certificates. The certificate authority authenticatesthe certificate owner’s identity and the services that theowner is authorized to use, issues new certificates,renews existing certificates, and revokes certificatesbelonging to users who are no longer authorized to usethem.
challenge response. An authentication method thatrequires users to respond to a prompt by providingprivate information to verify their identity whenlogging in to the network.
completed requests. Requests that were submitted tothe system and that are completed.
© Copyright IBM Corp. 2003 135
constraint. A limitation on a parameter or policy.
control type. An instance of the Java Type class thatrepresents the type of field on a user interface.
credential. The User ID and password information fora user, which allows access to an account.
Ddelegate. An individual who is designated as theresponsible party to approve requests or provideinformation for requests for another user.
de-provision. To remove a service or component. Forexample, to de-provision an account means to delete anaccount from a resource.
digital certificate. An attachment to an electronicmessage used for security purposes.
Directory Services Markup Language (DSML). AnXML implementation that provides a common formatfor describing and sharing directory servicesinformation among different directory systems.
disallowed action. A parameter set for reconciliationsthat defines action to take if the Tivoli IdentityManager Server finds accounts for persons who are notallowed to have an account for the selected service.This parameter is only valid if the Check Policy checkbox is selected.
domain administrator. An administrator that candefine and manage provisioning entities, policies,services, workflow definitions, roles, and users withintheir admin domain, but only in his or her own admindomain.
DSML identity feed. One of Tivoli Identity Manager’sthree default service types.
A DSML identity feed service imports user data from ahuman resources database or file and feeds theinformation into the Tivoli Identity Manager directory.The service can receive the information in one of twoways: a reconciliation or an unsolicited notification.
Eelectronic forms. An electronic form serves as atemplate to define the parameters of the access beingrequested.
entitlement. In security management, a data structure,service, or list of attributes that represents policyinformation.
entity. 1) A person or object for which information isstored.
2) One of the following classes, as referred to by theTivoli Identity Manager system:
v Person
v BPPerson
v Organization
v BPOrganization
escalation participant. In identity management, aperson that has the authority to respond to requeststhat participants do not respond to within a specifiedescalation time. An escalation participant can beidentified as an individual, as a roles, or by using acustom JavaScript script.
escalation limit. The amount of time, in days, hours,minutes or seconds, that a participant has to respond toa request, before an escalation occurs.
HHR feed. An automated process in which the TivoliIdentity Manager system imports user data from ahuman resources database or file. Refer to DSMLidentity feed.
Iidentity policy. The rules by which the Tivoli IdentityManager system defines how a user’s ID is created.
inactive account. An account that exists in the system,but that is not in use by the account owner.
ITIM group. A user group within the Tivoli IdentityManager Server.
System access and administration can be structuredaround ITIM groups. However, before a person can beassigned to an ITIM group, the user must beprovisioned with an ITIM account. Once the person isprovisioned with an ITIM account, the person is anITIM user and can be added to an ITIM group.
Jjoin directive. The set of rules that define how tohandle attributes when two or more provisioningpolicies conflict.
Kkeyword. An index entry that identifies the policy in asearch.
Llocation. One of the types of subsidiary entities thatcan be added to an organization. Typically, locations areused to logically separate geographic locations fororganizational management purposes.
136 IBM Tivoli Identity Manager: Server Installation Guide on Windows 2000 using WebSphere

Ooperation report. A report that lists Tivoli IdentityManager operation requests by type of operation, date,who requested the operation, and who the operation isrequested for.
organization. In identity management, a body of usersand resources which is fairly independent. Althoughthe sharing of resources between organizations ispossible, the level of integration between theorganizations is relatively low. Generally, anorganization represents a company.
organization tree. A hierarchical structure of theorganization that provides a logical place to create,access, and store organizational information.
organizational role. In identity management, anattribute that is used to determine membership topolicies that grant access to various managed resources.
organizational unit. A body of users and resourceswithin an organization defined to sub-divide anorganization into more manageable groups. Users areassigned to only one organizational unit. Resources arealso assigned to only one organizational unit unlessthey are defined as global to an organization.
orphan (orphan accounts). Accounts on a remoteresource whose owner in the Tivoli Identity Managersystem cannot be determined.
owner. A person in the Tivoli Identity Managersystem that owns an account or a service.
Pparticipant. In identity management, a person that hasthe authority to respond to a request that is submittedthrough the workflow engine. A participant can beidentified as an individual, as a roles, or by using acustom JavaScript script.
password. In computer and network security, aspecific string of characters entered by a user andauthenticated by the system, which allows the user togain access to the system and to the information storedwithin it.
password expiration period. The amount of time apassword can be used before the user is forced tochange it.
password policy. The rules that define the setparameters that all passwords must meet, such aslength, and the type of characters allowed anddisallowed.
pending requests. Requests that have been submittedto the system but that have not yet been completed.
personal information. A user’s personal information.This information can include last name, first name,home address, phone number, e-mail address, officenumber, supervisor, etc.
policy. In Tivoli, a set of rules that are applied tomanaged resources. For example, a policy can apply topasswords or to resources that a user attempts toaccess.
policy enforcement. The manner in which the TivoliIdentity Manager system allows or disallows accountsthat violate provisioning policies.
provision. To set up and maintain a user’s access to asystem in the organization.
provisioning policy. A policy that defines the accessto various types of managed services, such as TivoliIdentity Manager or operating systems. Access isgranted to all persons or based on a person’sorganizational role. Access can also be grantedspecifically to persons who are not members of anyorganizational role.
Qquery. A way in which to limit a reconciliation toreturn smaller packets.
Rreconciliation. The process of comparing theinformation the central data repository to the managedagent system and identifying the discrepancies betweenthe two.
reconciliation report. A report that lists the orphanaccounts found since the last reconciliation wasperformed.
rejected report. A report that lists requests denied bydate, who requested the operation, and who theoperation is requested for.
request. An action item in the Tivoli Identity Managersystem asking for approval or information.
requestee. The person for whom a request issubmitted.
requestor. A person who submits a request.
resource. A hardware, software, or data entity that ismanaged by Tivoli software. See also managedresource.
resource provisioning management (rpm). Themanagement principle that combines three keyelements - business logic, workflow management, and
Glossary 137

distribution agents - which together centrally managethe provisioning of users with access to informationand business resources.
restore. To reactivate an account that was suspended.
request for information (RFI). In identitymanagement, an action item that requests additionalinformation from the specified participant and that is arequired step in the workflow.
Sscope. The range that a policy can affect.
Typically, the scope is defined as single or subtree. Whenthe scope is defined as single, the policy only affectsentities in the same branch in which the policy isdefined. When the scope is defined as sub-tree, thepolicy affects the branch in which it is defined and allother branches that are subordinate to the policy’sbranch of origin.
service. A program that performs a primary functionwithin a server or related software.
service selection policy. A JavaScript filter thatdetermines which service to use in a provisioningpolicy.
shared secret. An encrypted value used to retrieve auser’s initial password to access the Tivoli IdentityManager system. This value is defined when the user’spersonal information is initially loaded into the system.
signature authority. The right to approve or deny arequest that is submitted to the workflow engine. Auser or group of users is granted signature authoritywhen they are designated as the participant orescalation participant in a workflow design.
secure socket layer (SSL). A protocol for transmittingprivate documents through the Internet. SSL works byusing a private key to encrypt data that is transferredover the SSL connection.
static organizational role. An organizational role thatcan only be assigned manually.
subprocess. A workflow design that is started as partof another workflow design.
supervisor. A person in the Tivoli Identity Managersystem that is designated as the owner of a businessunit.
suspend. The act of deactivating an account so theaccount owner cannot log into the resource.
system administrator. Individuals with access to allareas in the system.
A pre-configured ITIM Group is provided in the TivoliIdentity Manager system. This ITIM Group is designed
to grant members maximum access to the system.Users who are members of the administrator ITIMGroup have access to all system functions and data.
TTivoli Identity Manager Agent. An intelligentinterface between the targeted managed system and theTivoli Identity Manager Server. It acts as a trustedvirtual administrator and is a critical component thattranslates user requests and provides secureconfigurations access to various targeted systems.
Tivoli Identity Manager Server. A software andservices package designed to deploy policy-basedprovisioning solutions.
to do list. The list of actions items assigned to a userfor completion.
Uuser. Any person who interacts with the system.
user class. An LDAP class such as inetorgperson orBPPerson.
user interface (UI). The display used by the user tointeract with the system.
user name. The ID used by the user to access thesystem. This ID also identifies the user to the systemand allows the system to determine the user’s accessrights based on the user’s membership in variousorganizational roles and ITIM groups.
user report. A report that lists all Tivoli IdentityManager operations by date, who requested theoperation, and who the operation is requested for.
Wworkflow. The sequence of activities performed inaccordance with the business processes of an enterprise.
138 IBM Tivoli Identity Manager: Server Installation Guide on Windows 2000 using WebSphere

Index
Special characters″secret″, as initial password after Tivoli Identity Manager
installation 38, 64{ITIM_HOME} 107{ITIM_HOME}/cert directory, for CA certificate 55, 84{WAS_HOME} 106
Numerics2809
file location 27port 27
8880file location 28port 27
9043port 27
9080port 27
9090port 27, 37port conflict with wsmserver, solving 98
9091port 37
9443port 27
Aaccessibility, documentation ixAdmin ID, database field 34, 60Admin Password, database field 34, 60administrative authority, ensure before installation 32, 57administrative authority, Windows 32Administrator password,WebSphere Application Server
field 36Administrator user ID,WebSphere Application Server field 36applheapsz
example, update itimdb 12out of memory errors, correcting 15
application server, WebSphere Application Server 3audience viiautomatic, installing single-server prerequisites 31
Bbold text ixBootstrap/rmi port 27bufferpool, create for IBM DB2 12bufferpool, IBM DB2 12
CCA certificate
${ITIM_HOME}/cert directory 55, 84requirements 55, 84
catalog IBM DB2 database 14CDs 87
celladding nodes 101WebSphere Application Server 3
certificate authorityserver-agent communication 55, 84supported certificate types 55, 84
clustercreating
before Tivoli Identity Manager installation 59creating on Network Deployment Manager administrative
console 102installation
additional configuration 74logs 80restart after 82sequence 65sequential requirement 57Tivoli Identity Manager Server 57
installation flowchart 64member
additional configuration 74installation sequence after Network Deployment
Manager 65populate in cluster 59WebSphere Application Server 4
prerequisitesdatabase 57directory server 57HTTP session persistence 82JMS servers 57Network Deployment Manager 57node agents 57WebSphere Application Server base 57WebSphere Global Security 105
WebSphere Application Server 4worksheet 60
Cluster name, WebSphere Application Server field 62command
db2 catalog 14db2 connect 12db2 create 12db2 create bufferpool 12db2 force application all 13db2 update 12db2cmd 12db2set 11db2start 13db2stop 13usejdbc2 15
configurationdatabase 46, 74
IBM DB2 11directory server 47, 75IBM DB2
applheapsz 15bufferpool 12create user on cluster computer 14create user on server 13JDBC driver 14server 12
© Copyright IBM Corp. 2003 139

configuration (continued)IBM Directory Server
referential integrity 24version 4.1 24
overview 3planning 3terminology 3Tivoli Identity Manager
Database tab 49, 77Directory tab 49, 77General tab 48, 76Logging tab 50, 78Mail tab 50, 78Security tab 52, 80UI tab 51, 79
WebSphere Application Serverfunctional cluster 9single-cluster 7single-server 4used with Tivoli Identity Manager 10
configuringOracle 19SQL Server 2000 20Sun ONE Directory Server 28
contacting support ixconventions, in publications ix
Ddatabase
configurationIBM DB2 11initial 46, 74
fieldAdmin ID 34, 60Admin Password 34, 60Database Name 34, 60Database Type 34, 60Database User 34, 60IP Address 34, 60Port Number 34, 60User Password 34, 60
select during installation 41, 67database client, JDBC driver 14Database Name, database field 34, 60database pool
Initial Capacity 35, 61Login Delay Seconds 35, 61Maximum Capacity 35, 61
Database tab 49, 77Database Type, database field 34, 60Database User, database field 34, 60db2 catalog, command 14db2 connect, command 12db2 create bufferpool, command 12db2 create, command 12db2 force application all, command 13db2 update, command 12db2cmd, command 12db2set, command 11db2start, command 13db2stop, command 13Default Org Short Name, directory server field 35, 61detecting prerequisites
IBM HTTP Server 31WebSphere Application Server 31WebSphere embedded messaging support 31
directory serverconfiguration, initial 47, 75field
Default Org Short Name 35, 61Host name 35, 61Identity Manager DN Location 35, 61Increment count 36, 62Initial pool size 36, 62Max. pool size 36, 62Name of your organization 35, 61Number of hash buckets 35, 61Password 36, 62Port 35, 61Principal DN 35, 62
Directory tab 49, 77disable, J2EE security configuration 111documents
accessibility ixaccessing online ixIBM DB2 viiiIBM Directory Server viiiIBM HTTP Server viiiOracle viiirelated vii, viiiSQL Server 2000 viiiSun ONE Directory Server viiiWeb proxy server viiiWebSphere Application Server viiiWebSphere embedded messaging support viii
EEJB User field, WebSphere Application Server 37, 63encryption
key 45, 73WebSphere Application Server 37, 63
enroledefault user ID, database 50, 78user
create on cluster computer 14create on IBM DB2 server 13
ensuring running processesusing runConfig (System Configuration) 53, 81
Fflowchart
cluster installation 64single-server installation 38
functional cluster configurationnaming cluster by tier (UI, WF) 7, 59WebSphere Application Server 9
GGeneral tab 48, 76Global Security
configuration 105determining state before installation 32itimadmin 107wasadmin 107WebSphere Application Server
EJB User field 37, 63settings 37, 43, 63, 71System User field 37, 63
140 IBM Tivoli Identity Manager: Server Installation Guide on Windows 2000 using WebSphere

HHost name of the workstation, WebSphere Application Server
field 36Host name, directory server field 35, 61HTTP server
configuring outside cell 111HTTP session persistence, for cluster 82
IIBM DB2
commandcatalog 14db2 connect 12db2 create 12db2 create bufferpool 12db2 force application all 13db2 update 12db2cmd 12db2set 11db2start 13db2stop 13usejdbc2 15
configuration 11applheapsz 15bufferpool 12create user on cluster computer 14create user on server 13JDBC driver 14server 12TCP/IP communication 11
out of memory error, using applheapsz 15with WebSphere Application Server 93
IBM DB2 documents viiiIBM Directory Server
configurationport conflicts with WebSphere – Express 27referential integrity 24version 4.1 24
documents viiiIBM HTTP Server
automatic installation, single-server 31detecting before installing Tivoli Identity Manager 31documents viiiHTTP session persistence 82Installation directory, field 38installing 100prerequisite 94upgrading 121
Identity Manager DN Location, directory server field 35, 61Increment count, directory server field 36, 62Initial Capacity, database pool field 35, 61Initial pool size, directory server field 36, 62installation
logscluster 80single-server 52
restarting clusters 82select database 41, 67sequence
additional configuration 46, 74cluster 65single-server 39
Installation directoryIBM HTTP Server field 38WebSphere Application Server base field 62
Installation directory (continued)WebSphere Application Server field 37WebSphere embedded messaging support 37
installingIBM HTTP Server 100Oracle
AIX 16Solaris 18Windows 19
SQL Server 2000 20Tivoli Identity Manager Server
automatic 31cluster 57flowchart, cluster 64flowchart, single-server 38single-server 31
WebSphere Application Server base 101WebSphere Application Server Network Deployment 98
IP Address, database field 34, 60italic text xitimadmin
EJB User 105, 106, 107User 37, 108User ID, WebSphere Application Server 63
JJ2EE security
configurationmulti-node 108, 110single-node 105
disabling 111manual steps 53, 81
JDBCaconnections, Maximum Capacity of database pool 35, 61driver as IBM DB2 database client 14
JDK, distributed with WebSphere Application Server 95JMS server
WebSphere embedded messaging support 10
Llibdelref
referential integrity 24success message 26
limitationhomogeneous operating system 10multiple instances of WebSphere Application Server, same
computer 10UI, WF cluster members on same computer 10WebSphere embedded messaging support 98
logging level 38, 62, 63Logging tab 50, 78Login Delay Seconds, database pool field 35, 61logs
cluster installation 80single-server installation 52
Mmail server name 38, 62, 63Mail tab 50, 78Max. pool size, directory server field 36, 62Maximum Capacity, database pool field 35, 61Microsoft SQL server
with WebSphere Application Server 93
Index 141

monospace text xmqver utility, WebSphere MQ 98multi-node, J2EE security configuration 108, 110
NName of your organization, directory server field 35, 61Network Deployment Manager
ensuring up and running 102WebSphere Application Server 3
nodeadding to cell 101WebSphere Application Server 3
node agentensuring up and running 102WebSphere Application Server 4
Node name, WebSphere Application Server field 37Number of hash buckets, directory server field 35, 61
Ooperating system
Windows 2000 Advanced Server supported 93Oracle
configuring 19installing
AIX 16Solaris 18Windows 19
with WebSphere Application Server 93Oracle documents viiiout of memory error, using applheapsz 15
PPassword
″secret″ as initial value after installation 38, 64directory server field 36, 62Tivoli Identity Manager field 38, 64
port2809 278880 279043 279080 279090 27, 379090, solving conflict with wsmserver 989091 379443 27Bootstrap/rmi 27conflicts, resolving 27SOAP connector 28
Portdirectory server field 35, 61WebSphere Application Server field 37
Port Number, database field 34, 60prerequisite
authority as root 57automatic installation, single server 31cluster
database 57directory server 57HTTP session persistence 82JMS servers 57Network Deployment Manager 57node agents 57WebSphere Application Server base 57
prerequisite (continued)creating
clusters 59detecting
IBM HTTP Server 31WebSphere Application Server 31WebSphere embedded messaging support 31
documents viiIBM HTTP Server
automatic installation, single-server 31root user 57servers
IBM HTTP Server 94WebSphere Application Server base 94WebSphere Application Server Network
Deployment 94single-server
administrative authority 57database 31directory server 31WebSphere Global Security on? 32
WebSphere Application Server baseautomatic installation, single-server 31
WebSphere embedded messaging supportautomatic installation, single-server 31
worksheetcluster 58, 60single-server 34
prerequisitesadministrative authority on Windows 32single-server
administrative authority 32Principal DN, directory server field 35, 62publications
accessibility ixaccessing online ixconventions used in ixIBM DB2 viiiIBM Directory Server viiiIBM HTTP Server viiiOracle viiiprerequisite viirelated viiiSQL Server 2000 viiiSun ONE Directory Server viiiTivoli Identity Manager viiWeb proxy server viiiWebSphere Application Server viiiWebSphere embedded messaging support viii
Rreferential integrity
IBM Directory Server 24timdelref.conf 24
related documents vii, viiirequirements
browsers, Windows only 95CA certificate 55, 84IBM DB2 93IBM Directory Server 94IBM HTTP Server 94Microsoft SQL server 93Oracle 93Sun ONE Directory Server 94WebSphere Application Server base 94WebSphere Application Server Network Deployment 94
142 IBM Tivoli Identity Manager: Server Installation Guide on Windows 2000 using WebSphere

requirements (continued)Windows 2000 Advanced Server 93
rootauthority 57user 57
runConfig, using for system configuration 53, 81
SSecurity tab 52, 80sequence
additional configuration 46, 74installation, cluster 65installation, single-server 39requirement, cluster installation 57
Server Name, WebSphere Application Server field 37servers
automatically installed, single-server 31manually installed, cluster 97prerequisite
IBM HTTP Server 94WebSphere Application Server base 94WebSphere Application Server Network
Deployment 94single-cluster configuration
installing 65WebSphere Application Server 7
single-node, J2EE security configuration 105single-server
configurationinstalling 31WebSphere Application Server 4
installationadditional configuration 46logs 52sequence 39Tivoli Identity Manager Server 31
installation flowchart 38prerequisites
administrative authority 32, 57database 31directory server 31WebSphere Global Security on? 32
worksheet 34SOAP connector port 28SQL Server 2000
configuring 20installing 20
SQL Server 2000 documents viiiSun ONE Directory Server
configuring 28documents viiiwith IBM Directory Server 94with WebSphere Application Server 94
support, contacting ixSystem User field, WebSphere Application Server 37, 63
Ttab
Database 49, 77Directory 49, 77General 48, 76Logging 50, 78Mail 50, 78Security 52, 53, 80, 81
tab (continued)UI 51, 79
TCP/IP configuration, IBM DB2 11terminology
application server 3cell 3cluster 4cluster member 4jmsserver 10Network Deployment Manager 3node 3node agent 4user interface (UI) 7WebSphere Application Server 3WebSphere embedded messaging support 10WebSphere Web Server plug-in 4workflow (WF) 7
tierdefinition as subset of function 7user interface (UI) 7, 59workflow (WF) 7, 59
timdelref.conf 24Tivoli Identity Manager
configurationDatabase tab 49, 77Directory tab 49, 77General tab 48, 76limits using WebSphere Application Server 10Logging tab 50, 78Mail tab 50, 78Security tab 52, 80UI tab 51, 79
fieldPassword 38, 64User ID 38, 63
terminologyuser interface (UI) 7workflow (WF) 7
uninstalling 127additional products 127database tables 127directory server schema 127saving configuration information in WebSphere 127steps 128
Tivoli Identity Manager ServerCA certificate 55, 84installing
automatic 31cluster 57flowchart, cluster 64flowchart, single-server 38single-server 31
test communication 54, 82
UUI tab 51, 79uninstalling
Tivoli Identity Manager 127additional products 127database tables 127directory server schema 127saving configuration information in WebSphere 127steps 128
upgradingbefore upgrading 115, 119cluster configuration 121
Index 143

upgrading (continued)configuring 117IBM HTTP Server 121single server configuration 120Tivoli Identity Manager 115, 119
usejdbc2, command 15User ID, Tivoli Identity Manager field 38, 63user interface tier, Tivoli Identity Manager 7User Password, database field 34, 60
Wwasadmin
System User 105, 107User 108User ID, WebSphere Application Server 37
wasadmin User ID, WebSphere Application Server 63web browsers, supported on Windows only 95Web proxy server
documents viiiWebSphere Application Server
configurationfunctional cluster 9limits using Tivoli Identity Manager 10port conflicts with WebSphere – Express 27single-cluster 7single-server 4
detecting before installing Tivoli Identity Manager 31encryption 37, 63field
Administrator password 36Administrator user ID 36Cluster name 62Host name of the workstation 36Installation directory 37, 62logging level 38, 62, 63mail server name 38, 62, 63Node name 37Port 37Server Name 37
Global SecurityEJB User field 37, 63itimadmin 107settings 37, 43, 63, 71System User field 37, 63wasadmin 107
prerequisitesupported JDK 95
supported level of IBM DB2 93supported level of IBM Directory Server 94supported level of Microsoft SQL server 93supported level of Oracle 93supported level of Sun ONE Directory Server 94terminology
application server 3cell 3cluster 4cluster member 4jmsserver 10Network Deployment Manager 3node 3node agent 4WebSphere embedded messaging support 10WebSphere Web Server plug-in 4
WebSphere Application Server baseautomatic installation, single-server 31installing 101
WebSphere Application Server base (continued)manual installation, cluster 102prerequisite 94
WebSphere Application Server documents viiiWebSphere Application Server Network Deployment
installing 98prerequisite 94
WebSphere embedded messaging supportand WebSphere MQ 10as process 10automatic installation, single-server 31detecting before installing Tivoli Identity Manager 31documents viiiInstallation directory, field 37pre-existing WebSphere MQ 97
WebSphere MQand WebSphere embedded messaging support 10CSD update required 97features required 97mqvr utility 98
Windows 2000 Advanced Server supported 93workflow tier, Tivoli Identity Manager 7worksheet
cluster 60single-server 34
144 IBM Tivoli Identity Manager: Server Installation Guide on Windows 2000 using WebSphere


����
Program Number: 5724–C34
Printed in U.S.A.
SC32-1148-01