ibm operational decision manager: tutorial: getting ... · the decision table of the miniloan-rules...
TRANSCRIPT

IBM Operational Decision ManagerVersion 8 Release 5
Tutorial: Getting started with theDecision Center Enterprise console
���

NoteBefore using this information and the product it supports, read the information in “Notices” on page 25.
This edition applies to version 8, release 5, modification 1 of Operational Decision Manager and to all subsequentreleases and modifications until otherwise indicated in new editions.
© Copyright IBM Corporation 2008, 2013.US Government Users Restricted Rights – Use, duplication or disclosure restricted by GSA ADP Schedule Contractwith IBM Corp.

Contents
Tutorial: Getting started with theDecision Center Enterprise console. . . 1Introduction: Getting started with business rules . . 1Task 1: Starting the Enterprise console . . . . . . 3
Step 1: Start the sample server . . . . . . . 4Step 2: View the rule project in the Enterpriseconsole . . . . . . . . . . . . . . . 4
Task 2: Exploring . . . . . . . . . . . . . 5Step 1: View a rule . . . . . . . . . . . 5Step 2: View a decision table . . . . . . . . 5Step 3: Generate a project report . . . . . . . 6Step 4: Create a query . . . . . . . . . . 7
Task 3: Authoring. . . . . . . . . . . . . 8Step 1: Modify an action rule . . . . . . . . 8Step 2: Modify a decision table . . . . . . . 9Step 3: Create a rule . . . . . . . . . . 10
Task 4: Managing . . . . . . . . . . . . 11Step 1: Compare versions of a decision table . . 11Step 2: Create a smart folder. . . . . . . . 12
Task 5: Validating . . . . . . . . . . . . 13Step 1: Create and run a test suite . . . . . . 13Step 2: Modify the Excel scenario file . . . . . 14
Step 3: Edit and run the test suite . . . . . . 15Task 6: Creating a simulation . . . . . . . . 15
Step 1: Generate the Excel file . . . . . . . 16Step 2: Run the simulation . . . . . . . . 16
Task 7: Deploying . . . . . . . . . . . . 17Step 1: Start the miniloan web application . . . 17Step 2: Create the RuleApp . . . . . . . . 18Step 3: Deploy the RuleApp . . . . . . . . 19Step 4: See the effects in the Miniloan application 19
Task 8: Authoring in Rule Solutions for Office . . . 20Step 1: Enable direct edit in Rule Solutions forOffice . . . . . . . . . . . . . . . 20Step 2: Edit directly from the Enterprise console 21Step 3: Modify a decision table in Rule Solutionsfor Office . . . . . . . . . . . . . . 21Step 4: Check the changes in the Enterpriseconsole . . . . . . . . . . . . . . . 22
Summary . . . . . . . . . . . . . . . 22
Notices . . . . . . . . . . . . . . 25Trademarks . . . . . . . . . . . . . . 27
© Copyright IBM Corp. 2008, 2013 iii

iv IBM Operational Decision Manager: Tutorial: Getting started with the Decision Center Enterprise console

Tutorial: Getting started with the Decision Center Enterpriseconsole
This tutorial helps you to take your first steps with IBM® Decision Center V8.5.1.You learn how to create and manage business rules in the Decision CenterEnterprise console and Rule Solutions for Office.
Learning objectives
In this tutorial, you learn how to:v Start the sample server and sign in to Decision Center.v Explore the artifacts already available in the miniloan-rules project.v Modify existing rules and write a new rule in Decision Center.v Create a smart folder, and compare two versions of a decision table.v Create a test suite and a simulation that contains scenarios to run tests on the
rules.v Deploy the rules to the execution environment.v (Optional) Update a decision table in Excel by using Rule Solutions for Office.
Time required
This tutorial takes approximately 3 hours to complete.
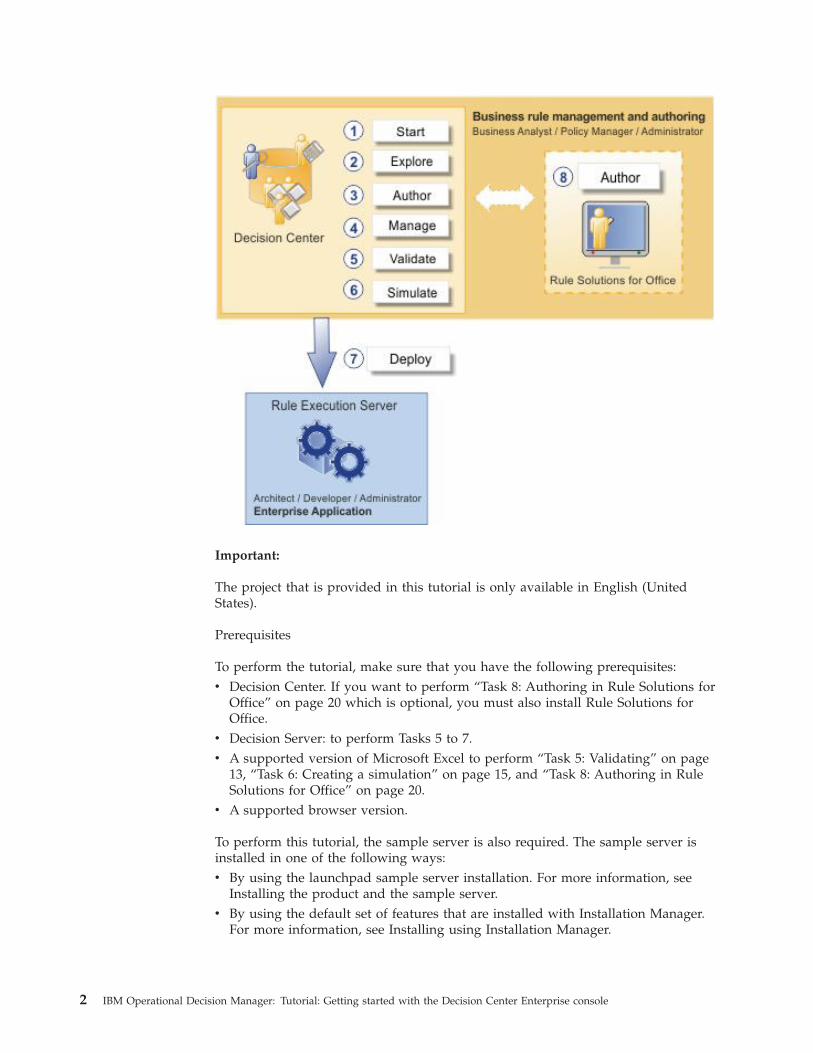
Introduction: Getting started with business rulesThe scenario of the tutorial is based on the fictitious web-based application of anonline lender. The application is called Miniloan. The Miniloan application aims atdefining whether a customer is eligible for a loan according to several criteria suchas the amount of the loan, the yearly income of the borrower, and the duration ofthe loan.
In Decision Center, you explore the rules in a project, and you check the executionflow. Then, you create action rules and decision tables. You manage changes byusing queries, you compare different versions of your rules, and create customviews to display only the artifacts that you are interested in.
By using Rule Solutions for Office, you can edit rules in Microsoft Officedocuments. You use the editors that are integrated with Microsoft Word or Excel toedit business rules, ruleflows, and decision tables with a natural language syntax.
The following figure shows the workflow and the interaction between DecisionCenter, Rule Execution Server, and Rule Solutions for Office.
© Copyright IBM Corp. 2008, 2013 1
Important:
The project that is provided in this tutorial is only available in English (UnitedStates).
Prerequisites
To perform the tutorial, make sure that you have the following prerequisites:v Decision Center. If you want to perform “Task 8: Authoring in Rule Solutions for
Office” on page 20 which is optional, you must also install Rule Solutions forOffice.
v Decision Server: to perform Tasks 5 to 7.v A supported version of Microsoft Excel to perform “Task 5: Validating” on page
13, “Task 6: Creating a simulation” on page 15, and “Task 8: Authoring in RuleSolutions for Office” on page 20.
v A supported browser version.
To perform this tutorial, the sample server is also required. The sample server isinstalled in one of the following ways:v By using the launchpad sample server installation. For more information, see
Installing the product and the sample server.v By using the default set of features that are installed with Installation Manager.
For more information, see Installing using Installation Manager.
2 IBM Operational Decision Manager: Tutorial: Getting started with the Decision Center Enterprise console

To check that the required products, getting started projects, and the sample serverare installed, see Checking your installation.
For more information about the required products and their modules, and how toinstall them, see Installing Operational Decision Manager.
To perform this tutorial, you must first start the sample server and sign in toDecision Center.
Note:
In this tutorial, when a URL contains the PORT placeholder, you must replace<PORT> with the port number. The default port number for WebSphere® ApplicationServer is 9080 but it can be different depending on your installation.
A was.properties file is created when you start the server for the first time. Toknow the port number to use, open <WAS_InstallDir>/profiles/ODMSample<version>/data/was.properties, and check the value of the server.portproperty.
Audience
This tutorial is aimed at business users (rule authors, policy managers, businessanalysts).
Learning objectives
In this tutorial, you learn how to:v Start the sample server and sign in to Decision Center.v Explore the artifacts already available in the miniloan-rules project.v Modify existing rules and write a new rule in Decision Center.v Create a smart folder, and compare two versions of a decision table.v Create a test suite and a simulation that contains scenarios to run tests on the
rules.v Deploy the rules to the execution environment.v (Optional) Update a decision table in Excel by using Rule Solutions for Office.
Time required
This tutorial takes approximately 3 hours to complete.
Task 1: Starting the Enterprise consoleIn this task, you start the sample server, and you login to the Enterprise console.
Operational Decision Manager provides a sample server to run the tutorials andsamples and to demonstrate Decision Center. Before signing in to the Enterpriseconsole, you must start the sample server.
This tutorial is based on the miniloan-rules rule project that is already deployedto Decision Center.
Tutorial: Getting started with the Decision Center Enterprise console 3

This task should take you about 10 minutes to complete.
Step 1: Start the sample serverBefore starting the Enterprise console, you must start the sample server.
To start the sample server:1. Click Start > All Programs > IBM > package_group > Sample Server > Start
server.package_group refers to the package group specified in IBM Installation Managerduring installation. The default package group is Operational Decision ManagerV8.5.1.
Note: On Windows 7, if you have installed the product in the Program Filesor Program Files (x86) directories, you must be an administrator to start thesample server. You can run the sample server as an administrator, or obtain thewrite permissions on the Operational Decision Manager installation directory.
2. Wait until the server has started.It can take a while for the server startup procedure to complete. The commandwindow displays server trace messages as the server starts. A feedback messageindicates when the server has started successfully:[samples.echo] GBRPS0029I: start.server is completed.
BUILD SUCCESSFULTotal time: 20 minutes 3 secondsPress any key to continue . . .
Step 2: View the rule project in the Enterprise consoleNow that you have started the sample server, you can open the Enterprise consoleto view the rule project.
To view the rule project in Decision Center:1. Click Start > All Programs > IBM > package_group > Sample Server >
Decision Center Enterprise Console.
Tip: You can also enter the following URL with the correct port number in abrowser: http://localhost:<PORT>/teamserver/. For more information on theport number to use, see Prerequisites.
2. Sign in to Decision Center using the following details:Username: rtsUser1Password: rtsUser1Decision Center can handle different user profiles. Here you sign in as a regularbusiness user.
3. On the Decision Center Home tab, in the Project in use field, selectminiloan-rules.
In the next task, you navigate in the Enterprise console and explore the rules andthe decision table of the miniloan-rules rule project.
4 IBM Operational Decision Manager: Tutorial: Getting started with the Decision Center Enterprise console

Task 2: ExploringIn this task, you explore business rules of the miniloan rule project in theEnterprise console.
You use the Explore tab to navigate through your folders and select what youwant to work on. The default smart folders display most of the project elements.
In this task, you discover the business rules that make up the business policy, forexample an action rule and a decision table, and you generate a report on all therule artifacts in the rule project. Then, you write a query that returns the rules thatmatch your search criteria.
This task should take you about 10 minutes to complete.
Step 1: View a ruleAn action rule is a business rule that you edit in a rule editor and that usesnatural-language. An action rule is made of a condition part and of an action part.The first part of the rule defines the condition in which the rule applies. Thesecond part of the rule defines the action to take if the condition of the rule is true.
To view the rules in your rule project:1. Make sure you are signed in to the Enterprise console as rtsUser1 and that the
Project in use is set to miniloan-rules, as described in “Task 1: Starting theEnterprise console” on page 3.
2. Click the Explore tab.3. Under Business Rules, click the eligibility folder.
The eligibility folder contains two action rules and a decision table. Theserules compose the business policy that defines whether a borrower is eligiblefor a loan.
4. In the table, click the minimum income rule to open it.The following action rule is displayed in the Content section:if
the yearly repayment of ’the loan’ is more than the yearly income of’the borrower’ * 0.3then
add "Too big Debt-To-Income ratio" to the messages of ’the loan’ ;reject ’the loan’ ;
In this rule, the loan is rejected if the yearly repayment of the loan is more than30% of the yearly income of the borrower.
Step 2: View a decision tableDecision tables provide an alternative way of viewing and managing large sets ofsymmetric business rules. A decision table contains condition columns and actioncolumns.
To view a decision table:1. Click the Explore tab to go back to the list of project elements.2. In the table displaying the business rules of the eligibility folder, click
repayment and score.In this decision table, the debt to income and credit score columns define theconditions, and the message and rejected columns define the actions. The
Tutorial: Getting started with the Decision Center Enterprise console 5

condition and action columns are displayed in a different color, as shown in thefollowing figure:
In this table, the conditions are based on the repayment capacity of theborrower: debt-to-income ratio and credit score. The actions define the messageto display when the loan is rejected, and the reasons for the rejection of theloan. The Disable action icon defines the action cells that do not requireany action. For example, if the debt-to-income ratio and the credit score aresufficient, the loan is accepted and no action is required.The debt-to-income ratio is the percentage of the borrower’s monthly grossincome that is used to pay debts. It is used to compare the debt payments tothe income.The credit score is a number to determine the likelihood that the borrowerswill pay their debts.
Step 3: Generate a project reportNow, you generate a report to get a view of the business rules in the rule project.
To generate a project report:1. Click the Analyze tab.2. Under Project Report, click Generate Project Report.
On the Queries page, <none> is selected because there are no queries yet.Therefore, the report returns all the rule artifacts in the project.
3. Click Generate Report.4. On the Project Report page, click miniloan-rules to view the report.
The Business Rule Report opens in a new window, and provides details on theproject elements:
Parameters
The values of the parameters, here borrower and loan, are the base ofthe decision. Ruleset parameters define the data that is sent to theapplication and the type of information that can be retrieved.
Rule Artifacts
The Rule Artifacts section displays the packages, the action rules andthe decision table, and lists the properties for each artifact.
Ruleflows
A ruleflow defines the flow of execution of the rules. The rules areorganized into tasks and the ruleflow specifies how tasks are chainedtogether: how, when, and under what conditions they are executed.
5. Close the HTML report.
6 IBM Operational Decision Manager: Tutorial: Getting started with the Decision Center Enterprise console
Step 4: Create a queryIn your business user role, you are asked to change the allowable debt-to-incomeratio for people who earn less than 500,000 from 30% to 50%.
Your starting point is to find all the rules in your project that use the yearlyincome on which the debt-to-income ratio is based.
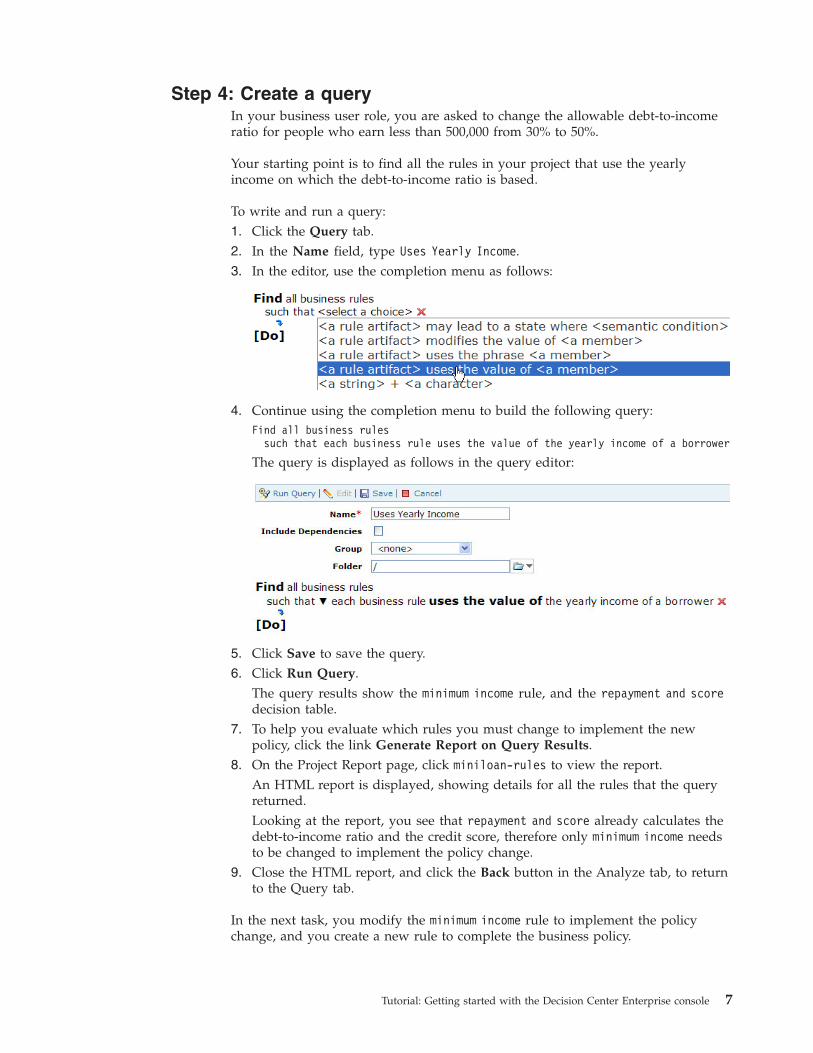
To write and run a query:1. Click the Query tab.2. In the Name field, type Uses Yearly Income.3. In the editor, use the completion menu as follows:
4. Continue using the completion menu to build the following query:Find all business rules
such that each business rule uses the value of the yearly income of a borrower
The query is displayed as follows in the query editor:
5. Click Save to save the query.6. Click Run Query.
The query results show the minimum income rule, and the repayment and scoredecision table.
7. To help you evaluate which rules you must change to implement the newpolicy, click the link Generate Report on Query Results.
8. On the Project Report page, click miniloan-rules to view the report.An HTML report is displayed, showing details for all the rules that the queryreturned.Looking at the report, you see that repayment and score already calculates thedebt-to-income ratio and the credit score, therefore only minimum income needsto be changed to implement the policy change.
9. Close the HTML report, and click the Back button in the Analyze tab, to returnto the Query tab.
In the next task, you modify the minimum income rule to implement the policychange, and you create a new rule to complete the business policy.
Tutorial: Getting started with the Decision Center Enterprise console 7

Task 3: AuthoringIn this task, you learn how to modify a rule and a decision table, and how to writea rule in the Enterprise console.
Changes in the business policy occur regularly. As a business user you can beasked to edit business rules to reflect the changes in the business policy. In thistask, you use the editors in the Enterprise console to modify and create businessrules.
This task should take you about 20 to 30 minutes to complete.
Step 1: Modify an action ruleYou have been asked to change the allowable debt-to-income ratio for people whoearn less than 500,000 from 30% to 50%.
In the previous task, you ran a query on the rules that use the yearly income of theborrower. The query returned the minimum income rule, and the repayment andscore decision table.
Now, you can change the allowable debt-to-income ratio in the minimum incomerule, and add a condition on the yearly income of the borrower.
Note:
If you have closed the query results, you can run the query again by clicking theQuery tab, and click Run Query.
To change the allowable debt-to-income ratio:
1. In the query results table, click Quick Edit next to the minimum incomerule.
The rule opens in editing mode at the bottom of the page:
Note:
If you have difficulties using the Quick Edit, make sure that you have asupported browser version.
2. In the if part of the rule, click the value 0.3 to activate the field, and changethe value to 0.5, then press Enter to incorporate the change.
8 IBM Operational Decision Manager: Tutorial: Getting started with the Decision Center Enterprise console

3. Click the blue arrow just above the then keyword and add the followingcondition using the completion menu:and the yearly income of the borrower is less than 500000
Tip:
Click is to select is less than:
4. In the text box at the bottom, type the following comment to the new versionof the rule:Reject loans for low to mid-range income with debt-to-income ratio above 50%
Compliant with corporate policy v1.5
Tip:
You can also copy and paste the comment.
5. Click Save to save the policy change.
Step 2: Modify a decision tableIn this step, you change the policy to make the lending criteria more restrictive.You modify the repayment and score decision table so that the application rejects aloan for someone whose debt-to-income ratio is between 0% and 30% if theapplicant’s credit score is less than 300.
To modify the repayment and score decision table:
1. Click Quick Edit next to the repayment and score decision table.The decision table opens in editing mode.
Note:
If you have difficulties using the Quick Edit, make sure that you have asupported browser version.
2. Under credit score, click the first cell in the max column, replace 200 with 300,and then press Enter.The decision table displays a warning indicating an overlap with the secondrow:
Tutorial: Getting started with the Decision Center Enterprise console 9

3. To solve this problem, in the second row of the min column, replace 200 with300, and press Enter.The warning is no longer displayed.
4. Click Save to save the policy changes.
Step 3: Create a ruleThe maximum loan amount that a borrower can request is 1,000,000. You are askedto create a new rule that rejects the loan if the requested amount is greater than1,000,000.
In this step, you create the maximum amount rule using the completion menuavailable in the editor:if
the amount of ’the loan’ is more than 1,000,000then
add "The loan cannot exceed 1,000,000" to the messages of ’the loan’;reject ’the loan’ ;
To create the maximum amount rule:1. Click the Compose tab.2. Make sure that Action Rule is selected and click OK to create an action rule.3. In the Name field, enter maximum amount.4. In the Folder field, select the validation folder.
5. Click Next to start writing the content of the rule.6. Click <select a condition>, and build the following statement using the
completion menu:if
the amount of the loan is more than 1,000,000
7. Click <select an action>, select add a <string> to the messages of <aloan>, and then click the placeholder to enter the message to display, andselect terms and phrases from the completion menu to build the followingexpression:then
add The loan cannot exceed 1,000,000 to the messages of the loan
8. Click the blue arrow to create a new action line.9. Click <select an action>, select reject <a loan>, and click the placeholder to
build the following action:reject the loan
The maximum amount rule appears as follows in the editor:
10 IBM Operational Decision Manager: Tutorial: Getting started with the Decision Center Enterprise console

10. Click Finish to save the rule.The maximum amount rule is now complete:if
the amount of ’the loan’ is more than 1000000then
add "The loan cannot exceed 1,000,000" to the messages of ’the loan’;reject ’the loan’ ;
You have discovered how to modify and write rules in the Enterprise console. Inthe next task, you manage project elements by creating a smart folder, andcomparing two versions of a decision table.
Task 4: ManagingIn this task, you create a smart folder to display the rules that you have modifiedby day, and you compare two versions of a decision table.
Business users create and edit business rules in the Enterprise console. Their workis saved in a database that handles versioning, history, and multi-user access.
This task should take you about 15 minutes to complete.
Step 1: Compare versions of a decision tableNow, you check the history of the decision table that you modified in “Task 3:Authoring” on page 8, and compare the differences between the two versions.
To compare versions of a decision table:1. Click the Explore tab.2. Click the eligibility folder, and select the check box next to the repayment
and score decision table.
3. Click History in the toolbar.On the History page, you can see the versions of the decision table since itscreation.
4. Select versions 1.0 and 1.1, and click Compare 2 Versions to see the changes inthe decision table between these two versions.
5. Click the Content link to display the differences between the old and newvalues of the decision table content.The values that you have modified in the previous task are displayed in red.
Note:
Tutorial: Getting started with the Decision Center Enterprise console 11

You can proceed the same way to view the changes in the minimum income rule.The action statement that you added to the minimum income rule in “Task 3:Authoring” on page 8 is displayed in green.
Step 2: Create a smart folderYou want to get a quick view of the rules that you have modified today, and youwant the rules to be listed according to the day that you have modified them. Todo so, you create a smart folder based on a query and on the modification date ofthe rules.
To create a smart folder:1. Click the Compose tab.2. Select Smart Folder, and click OK.3. In the Name field, enter Last Changed On.4. Click Next.5. Use the completion menu to build the following query:
Find all business rulessuch that the last modifier name of each business rule is me
6. Click Next.7. In the Available Properties, select Last Changed On, and then click the arrow
to move the property to the Displayed Properties window:
8. Click Finish.The new smart folder is displayed in the Explore tab, and displays the rulesthat you have modified today:
You have modified the minimum income rule, the repayment and score decisiontable, and you have created the maximum amount rule. The minimum credit scorerule is not displayed because you have not modified it today.
Tip:
If the rules are not automatically displayed, click Refresh.
12 IBM Operational Decision Manager: Tutorial: Getting started with the Decision Center Enterprise console

In the next task, you test your rules using scenarios to make sure that they behaveas expected.
Task 5: ValidatingIn the Enterprise console, you can test a ruleset against typical execution scenariosto check that the rules operate as expected.
The scenarios are stored in an Excel file called “scenario file”. When you create atest suite, you must specify the set of rules to test and the file containing thescenarios. After running the test suite, a report compares the results that youexpected to have with the actual results obtained when applying rules on yourscenarios.
In this tutorial, you run test suites and simulations on a configured server calledSample. Rule Execution Server provides a runtime execution environment onwhich test suites and simulations are run.
Previously, you modified the debt-to-income ratio in the minimum income rule. Inthis task, create and run a test suite to check that the modified rule behaves asexpected.
This task should take you about 15 to 20 minutes to complete.
Step 1: Create and run a test suiteTo run a scenario in the Enterprise console, you must create a test suite. For thepurpose of this tutorial, the scenario file for the test suite is already created foryou. The miniloan-test.xls scenario file is located in <InstallDir>/gettingstarted/EnterpriseConsole/, where <InstallDir> refers to your installationdirectory. The scenario file is available in Excel 2003 format. You can open it andtake a look at it to view the scenarios that you are about to execute.
The scenario file contains two scenarios with their corresponding expected results.The scenarios are listed in the Scenarios tab, and the anticipated results in theExpected Results tab.
To create and run a test suite:1. Make sure that you are still signed in to the Enterprise console as rtsUser1 and
that the Project in use is set to miniloan-rules.2. Click the Compose tab.3. In the Compose tab, select Test Suite, and then click OK.4. In Step 1: Properties, enter Miniloan Test as name for the test suite, and click
Next.5. In Step 2: Rules Tested, click Next to test all the rules in the project.6. In Step 3: Scenarios, select Excel 2003 as the format for the scenario file.7. Click Browse, and select <InstallDir>/gettingstarted/EnterpriseConsole/
miniloan-test.xls to upload the scenario file.The miniloan-test.xls file is now shown as uploaded.
Tutorial: Getting started with the Decision Center Enterprise console 13

8. Click Finish and Run.9. On the Run page, make sure that the Sample server is selected, and click Run.
Decision Center may take a few seconds to complete this action.The report opens and shows the results of the tests:
Scenario 1 fails because it expects the loan to be rejected. However, the loan isnow approved because you have increased the allowable debt-to-income ratioin the minimum income rule.
Step 2: Modify the Excel scenario fileTo correct the problem in Scenario 1, you edit miniloan-test.xls and modify theexpected results for Scenario 1. You also add a new scenario to verify that the loanis rejected if the debt-to-income ratio is too high.
To edit the scenario file:1. Open the miniloan-test.xls scenario file from <InstallDir>/gettingstarted/
EnterpriseConsole/.
Tip:
Make a copy of this file to use as a back up.2. Click the Expected Results tab, and change the expected result for Scenario 1
to TRUE.
14 IBM Operational Decision Manager: Tutorial: Getting started with the Decision Center Enterprise console
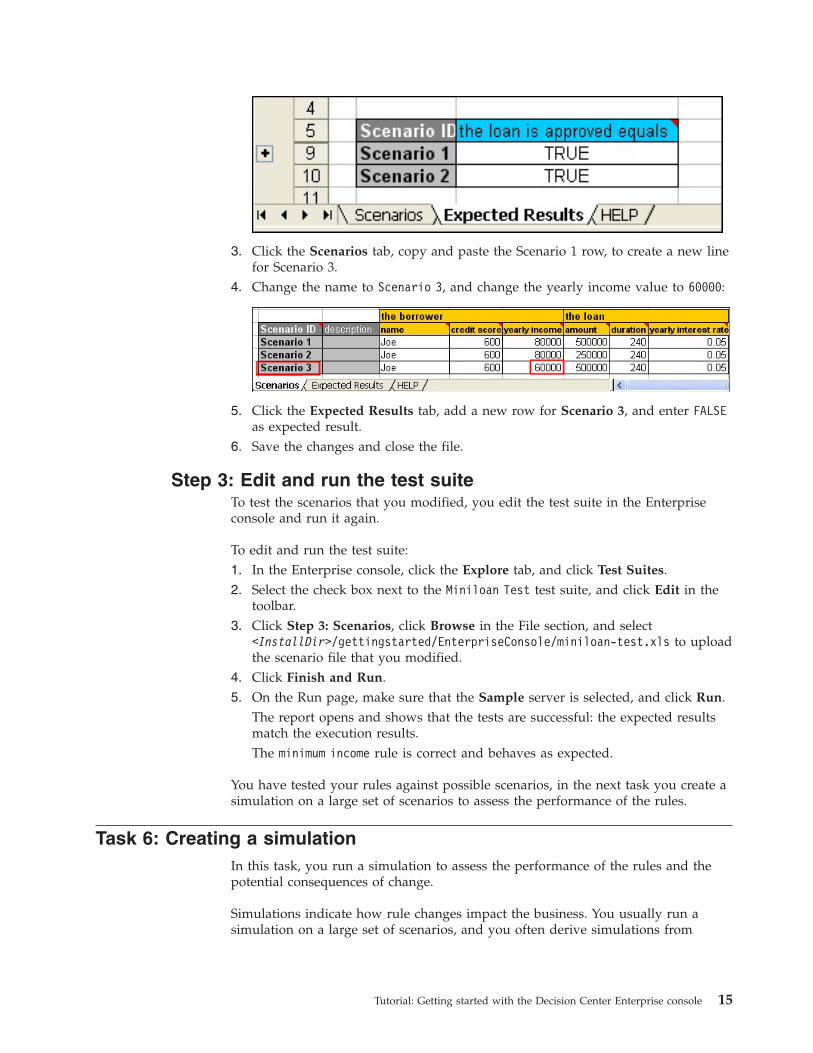
3. Click the Scenarios tab, copy and paste the Scenario 1 row, to create a new linefor Scenario 3.
4. Change the name to Scenario 3, and change the yearly income value to 60000:
5. Click the Expected Results tab, add a new row for Scenario 3, and enter FALSEas expected result.
6. Save the changes and close the file.
Step 3: Edit and run the test suiteTo test the scenarios that you modified, you edit the test suite in the Enterpriseconsole and run it again.
To edit and run the test suite:1. In the Enterprise console, click the Explore tab, and click Test Suites.2. Select the check box next to the Miniloan Test test suite, and click Edit in the
toolbar.3. Click Step 3: Scenarios, click Browse in the File section, and select
<InstallDir>/gettingstarted/EnterpriseConsole/miniloan-test.xls to uploadthe scenario file that you modified.
4. Click Finish and Run.5. On the Run page, make sure that the Sample server is selected, and click Run.
The report opens and shows that the tests are successful: the expected resultsmatch the execution results.The minimum income rule is correct and behaves as expected.
You have tested your rules against possible scenarios, in the next task you create asimulation on a large set of scenarios to assess the performance of the rules.
Task 6: Creating a simulationIn this task, you run a simulation to assess the performance of the rules and thepotential consequences of change.
Simulations indicate how rule changes impact the business. You usually run asimulation on a large set of scenarios, and you often derive simulations from
Tutorial: Getting started with the Decision Center Enterprise console 15

historical data. The results produce a report that you can use to assess theperformance of a set of rules without impacting the rules or the applications onwhich they act.
In the previous task, you created a test suite to compare the actual results with theexpected results. In this task, you generate an Excel file template in the Enterpriseconsole, and create a simulation based on data stored in the Excel file.
This task should take you about 10 to 15 minutes to complete.
Step 1: Generate the Excel fileTo create a simulation, you first generate an Excel file template based on theMiniloan project.
To generate the Excel file:1. Make sure that you are still signed in to the Enterprise console as rtsUser1 and
that the Project in use is set to miniloan-rules.2. Click the Compose tab.3. Select Simulation, and click OK.4. In the Name field, enter Miniloan Simulation, and then click Next.5. Keep the default option to test all the rules in the current project, and click
Next.6. In the Format list, select Excel 2003 as the format of Excel file.7. Click the Generate template link.8. On the Generate Scenario File Template page, select the English (United States)
locale for the template, and click Generate.The generation of the Excel file might take a few seconds to complete.
9. Click the template.xls link, and save the Excel file to your local drive.
Step 2: Run the simulationTo complete the simulation, you must upload the Excel file containing thescenarios. For the purpose of this tutorial, the scenario file containing test data forthe simulation is already created for you (miniloan-simu.xls).
Note:
You can also use the Excel file that you just generated, edit it offline and populateit with the scenarios contained in <InstallDir>/gettingstarted/EnterpriseConsole/miniloan-simu.csv.
You can now finish creating the simulation in the Enterprise console and run it.Then, you take a look at the report to view the results of the simulation.
To finish and run the simulation:1. If you are still on the Template Download page, click Back to return to the
simulation.2. On the Scenarios page (Step 3: Scenarios), click the Browse button and select
<InstallDir>/gettingstarted/EnterpriseConsole/miniloan-simu.xls.This scenario file is already populated with the scenarios.
3. Click Finish and Run to save the simulation and run it.
16 IBM Operational Decision Manager: Tutorial: Getting started with the Decision Center Enterprise console

4. Make sure that the Sample server is selected, and then click Run.Wait until the simulation is complete.The report opens and shows that 100 scenarios were executed, and that theexecution was successful.
5. Sign out of the Enterprise console.
After testing the ruleset in the Enterprise console, users with the appropriate rolecan deploy the changes to Rule Execution Server.
Task 7: DeployingUsers with the correct access rights can deploy a set of rules directly from theEnterprise console to Rule Execution Server, which is the runtime executionenvironment that integrates the rule engine.
Typically, Rule Execution Server is deployed to a test platform. The IT departmentis then responsible for the deployment to a production platform.
You can create the following deployment artifacts in the Enterprise console:v A ruleset is a set of rules and rule artifacts that can be executed by the engine.v A RuleApp is a deployable management unit that contains one or more rulesets.
In this task, you deploy a RuleApp from the Enterprise console to execute it inRule Execution Server. Then, you see how the new rules affect the Miniloan webapplication.
This task should take you about 15 to 20 minutes to complete.
Step 1: Start the miniloan web application
Note: Before starting the Miniloan application, make sure that the sample serveris still running.
In this tutorial, the scenario is based on the web application of an online lender.The application is called Miniloan.
At this point, the Miniloan application uses a ruleset that was deployed to RuleExecution Server and that contains the initial state of the rules.
To start the Miniloan web application:1. Enter the following URL with the correct port number in a browser:
http://localhost:<PORT>/miniloan-center
Tip: To find out the port number to use, see the information on port numbersin Prerequisites.The Miniloan application is displayed:
Tutorial: Getting started with the Decision Center Enterprise console 17

2. Click Validate Loan.The results of the validation show that the loan is rejected because theborrower’s debt-to-income ratio is too big:The loan is rejectedMessages:Too big Debt-To-Income ratio
Step 2: Create the RuleAppYou take the role of configuration manager in Decision Center to create and deploya RuleApp containing the rules of the miniloan-rules project. Because the changesthat you made to the rule were small, you keep the version of the RuleApp as 1.0but increase its ruleset version to 1.1. Then you see how Rule Execution Serverhandles these changes.
To create the RuleApp:1. Sign in to the Enterprise console as a user having configuration privileges:
Username: rtsConfigPassword: rtsConfig
2. In the Home page, change the Project in use to miniloan-rules.3. Click the Configure tab, and then click Manage RuleApps.
4. Under Available RuleApps, click New.5. In the Name field, type miniloanruleapp.6. Under Rulesets, click the New button.
You will add a ruleset into the RuleApp, and specify that this ruleset comesfrom the miniloan-rules project.
7. In the Name field, type miniloanrules.8. In the Project field, select miniloan-rules.9. Keep main as the branch in use.
10. Click Save to save the ruleset.A warning indicates that some changes have been made to the RuleApp.
11. Click Save again on the New RuleApp page to save the RuleApp.Your RuleApp is ready to be deployed.
18 IBM Operational Decision Manager: Tutorial: Getting started with the Decision Center Enterprise console

Step 3: Deploy the RuleAppYou can now deploy the RuleApp directly to Rule Execution Server.
To deploy the RuleApp:1. Under Available RuleApps, select the check box next to miniloanruleapp.
2. Click Deploy in the toolbar.3. On the Deployment Baseline page, type V1.0, and then click Next.
This creates a deployment baseline called V1.0, that is, a snapshot of theversion of each element about to be deployed. A baseline captures the changesthat occur in a project over time. If required, you can revert back to a certainset of rules.
4. On the RuleApp target page, select Deploy on a Rule Execution Server, andthen click Next.
5. On the Versioning Policy page, select Increment ruleset(s) minor version.This keeps the RuleApp version as 1.0 but increases the ruleset version to 1.1.
6. Click Next.7. On the Select Server page, select the Sample server as the server where you
want to deploy the RuleApp.8. Click Deploy.
When processing is completed, you see that the deployment succeeded, andthat the ruleset minor version was incremented.
Step 4: See the effects in the Miniloan applicationFinally, you see how the business policy changes that you made are reflected backinto the Miniloan application.
To see the effects in Miniloan:1. Switch back to the Miniloan application.
Tip: If you have closed the Miniloan application, enter the following URL in abrowser: http://localhost:<PORT>/miniloan-center. Remember to enter thecorrect port number.
2. Click Validate Loan with the default values.This time, the loan is approved because the policy change for borrowers withan income of 500,000 has been implemented.
3. Under Ruleset Information, change the ruleset version from Latest to 1.0, sothat the 1.0 version is called by the Miniloan application:
Tutorial: Getting started with the Decision Center Enterprise console 19

4. Click Validate Loan again.This time the loan request is rejected as before, because it refers to the olderversion of the policy.
You have now deployed your ruleset to Rule Execution Server. You can stop thetutorial here or continue to the next task which is optional and requires theinstallation of Rule Solutions for Office.
Task 8: Authoring in Rule Solutions for OfficeYou can edit business rules directly in the Enterprise console, but you can also useRule Solutions for Office to edit rules offline with the Microsoft Office tools thatyou are already familiar with.
This task is optional. To do this task, you must have Rule Solutions for Officeinstalled. For installation instructions, see Installing Rule Solutions for Office.
In this task, you edit a decision table in the Enterprise console and make changesin Rule Solutions for Office, and then you update the changes in the Enterpriseconsole.
This task should take you about 15 to 30 minutes to complete.
Step 1: Enable direct edit in Rule Solutions for OfficeIn this step, you set some parameters to enable direct edit in Rule Solutions forOffice from the Enterprise Console.
To enable the direct edit mode:1. After signing out of the Enterprise console, sign in again as an administrator
user:v Username: rtsAdminv Password: rtsAdmin
2. Make sure that the project in use is miniloan-rules.3. Click the Configure tab.4. Under Administration, click Installation Settings Wizard.5. Click Step 5: Set configuration parameters.6. Check that the parameter teamserver.rsoediting.enable is set to true:
a. Click New to add a new configuration parameter.b. In the Name list, select teamserver.rsoediting.enable.c. In the Value field, enter true.d. Click Apply.
The teamserver.rsoediting.enable is added to the list of configurationparameters.
e. Click Apply again to save the changes.
20 IBM Operational Decision Manager: Tutorial: Getting started with the Decision Center Enterprise console

The following message is displayed Step execution successful.f. Sign out of the Enterprise console.
Step 2: Edit directly from the Enterprise consoleIn this step, you open a decision table from the Enterprise console to edit it usingRule Solutions for Office. This generates a Microsoft Excel .xlsx file that containsthe decision table.
To edit directly from the Enterprise console:1. Sign in to the Enterprise console as a regular user (rtsUser1/rtsUser1), and
make sure that miniloan-rules is the project in use.2. Click the Explore tab, and navigate to Business Rules > eligibility.
3. Click the Edit in Rule Solutions for Office icon next to the repayment andscore decision table. The decision table is now locked.
4. Click OK to open the decision table in Excel. A dialog opens to inform you thata local copy of the document has been saved to a drafts folder. This copy willbe deleted after publishing the changes to Decision Center.
5. Click OK.
Step 3: Modify a decision table in Rule Solutions for OfficeYou are asked to make your lending criteria less restrictive, so that you reject aloan for someone whose debt-to-income ratio is between 45 and 50 only if theapplicant’s credit score is less than 500. To do this, you modify the repayment andscore decision table in the Excel file.
To modify a decision table and correct any resulting errors:1. If the RuleDoc pane is not visible, on the Decision Table tab, in the View
group, click RuleDoc Pane to display it.2. Under credit score, click the cell in the max column that contains 600. Replace
600 with 500, and then press Enter.
Notice how some cells have a yellow background. This indicates that there isan error. In the Problem List in the RuleDoc pane, you can see exactly what theerror is: Rows have gaps.
3. To solve this problem, click the cell in the min column under credit scorecontaining 600, and replace 600 with 500, and then press Enter.
Tutorial: Getting started with the Decision Center Enterprise console 21

The problem is no longer displayed in the Problem List in the RuleDoc pane.4. Save your changes and close the file.5. A dialog prompts you to check-in your changes, click Yes.6. You are prompted to enter your password to connect to Decision Center, enter
rtsUser1 for the password, and then click OK.7. Add a comment for this version, for example Changed credit score to 500
for applicants whose debt-to-income ratio is between 45 and 50, and clickOK. Your changes are ckecked in, and the local copy of your file will bedeleted.
8. Click OK.
Step 4: Check the changes in the Enterprise consoleIn this step, you return to the Enterprise console to verify that the changes thatyou made in your Excel file have been taken into account.
To check the changes:1. Make sure that you are still signed in to the Enterprise console as a regular
user (rtsUser1/rtsUser1).2. Click the Explore tab to refresh.3. Navigate to Business Rules > eligibility, click the Preview icon next to the
repayment and score decision table. The decision table in the Enterprise consoleis now up to date with the modifications you made in Rule Solutions for Office,and a new version of the decision table was created.
4. Sign out of the Enterprise console.
You have completed the getting started tutorial to discover business rules in theEnterprise console. To find out more information on the tasks that you haveperformed, see “Summary.”
SummaryYou have completed the Getting started tutorial for the Enterprise console. Findout more information on the different tasks that you have performed.
During this tutorial you became familiar with the following modules:v The Decision Center Enterprise console to author, edit, organize, and search for
business rules in a collaborative environment.v Rule Solutions for Office to author and edit rules in Word or Excel.
If you want to learn more about the tasks that you performed in this tutorial, youcan find useful pointers in the following table. For each task in this tutorial, thefollowing table provides links to related information in the rest of thedocumentation.
Tasks Related information Related tutorials
“Task 1: Starting theEnterprise console” on page3
Introducing Decision Center
“Task 2: Exploring” on page5
Explore: Navigate yourprojects
Tutorial: Using smart foldersand queries
22 IBM Operational Decision Manager: Tutorial: Getting started with the Decision Center Enterprise console

Tasks Related information Related tutorials
“Task 3: Authoring” on page8
Creating business rules
Compose: Create projectelements
Decision Center basics
Tutorial: Editing action rulesand decision tables
“Task 4: Managing” on page11
Creating a test suite
Creating a smart folder
Decision Center basics
Tutorial: Using smart foldersand queries
“Task 5: Validating” on page13
Testing and simulation
Creating a simulation
Working with test suites andsimulations
Tutorial: Testing a set of rules
“Task 6: Creating asimulation” on page 15
Testing and simulation
Working with test suites andsimulations
Tutorial: Testing a set of rules
“Task 7: Deploying” on page17
Deploying RuleApps
“Task 8: Authoring in RuleSolutions for Office” on page20
Working with decision tablesin Excel
Tutorial: SynchronizingDecision Center with RuleSolutions for Office
Tutorial: Editing decisiontables in Excel
Restarting the tutorial
To do this tutorial again, you can restore the sample server to its initial state. Torestore the sample server, ask someone from the IT department to check theDecision Server documentation on the sample server and on the samples console.
Stopping the sample server
To stop the sample server, click All Programs > IBM > package_group > SampleServer > Stop server.
package_group is the package group specified in IBM Installation Manager duringinstallation. The default package group is Operational Decision Manager.
Tutorial: Getting started with the Decision Center Enterprise console 23

24 IBM Operational Decision Manager: Tutorial: Getting started with the Decision Center Enterprise console

Notices
This information was developed for products and services offered in the U.S.A.
IBM may not offer the products, services, or features discussed in this document inother countries. Consult your local IBM representative for information on theproducts and services currently available in your area. Any reference to an IBMproduct, program, or service is not intended to state or imply that only that IBMproduct, program, or service may be used. Any functionally equivalent product,program, or service that does not infringe any IBM intellectual property right maybe used instead. However, it is the user's responsibility to evaluate and verify theoperation of any non-IBM product, program, or service.
IBM may have patents or pending patent applications covering subject matterdescribed in this document. The furnishing of this document does not grant youany license to these patents. You can send license inquiries, in writing, to:
IBM United Kingdom Laboratories,Mail Point 151,Hursley Park,Winchester,Hampshire,England SO21 2JN
For license inquiries regarding double-byte character set (DBCS) information,contact the IBM Intellectual Property Department in your country or sendinquiries, in writing, to:
Intellectual Property LicensingLegal and Intellectual Property LawIBM Japan, Ltd.19-21, Nihonbashi-Hakozakicho, Chuo-kuTokyo 103-8510, Japan
The following paragraph does not apply to the United Kingdom or any othercountry where such provisions are inconsistent with local law:INTERNATIONAL BUSINESS MACHINES CORPORATION PROVIDES THISPUBLICATION "AS IS" WITHOUT WARRANTY OF ANY KIND, EITHEREXPRESS OR IMPLIED, INCLUDING, BUT NOT LIMITED TO, THE IMPLIEDWARRANTIES OF NON-INFRINGEMENT, MERCHANTABILITY OR FITNESSFOR A PARTICULAR PURPOSE. Some states do not allow disclaimer of express orimplied warranties in certain transactions, therefore, this statement may not applyto you.
This information could include technical inaccuracies or typographical errors.Changes are periodically made to the information herein; these changes will beincorporated in new editions of the publication. IBM may make improvementsand/or changes in the product(s) and/or the program(s) described in thispublication at any time without notice.
Any references in this information to non-IBM Web sites are provided forconvenience only and do not in any manner serve as an endorsement of those
© Copyright IBM Corp. 2008, 2013 25

websites. The materials at those websites are not part of the materials for this IBMproduct and use of those websites is at your own risk.
IBM may use or distribute any of the information you supply in any way itbelieves appropriate without incurring any obligation to you.
Licensees of this program who wish to have information about it for the purposeof enabling: (i) the exchange of information between independently createdprograms and other programs (including this one) and (ii) the mutual use of theinformation which has been exchanged, should contact:
IBM United Kingdom Laboratories,Mail Point 151,Hursley Park,Winchester,Hampshire,England SO21 2JN
Such information may be available, subject to appropriate terms and conditions,including in some cases, payment of a fee.
The licensed program described in this document and all licensed materialavailable for it are provided by IBM under terms of the IBM Customer Agreement,IBM International Program License Agreement or any equivalent agreementbetween us.
Any performance data contained herein was determined in a controlledenvironment. Therefore, the results obtained in other operating environments mayvary significantly. Some measurements may have been made on development-levelsystems and there is no guarantee that these measurements will be the same ongenerally available systems. Furthermore, some measurements may have beenestimated through extrapolation. Actual results may vary. Users of this documentshould verify the applicable data for their specific environment.
Information concerning non-IBM products was obtained from the suppliers ofthose products, their published announcements or other publicly available sources.IBM has not tested those products and cannot confirm the accuracy ofperformance, compatibility or any other claims related to non-IBM products.Questions on the capabilities of non-IBM products should be addressed to thesuppliers of those products.
This information contains examples of data and reports used in daily businessoperations. To illustrate them as completely as possible, the examples include thenames of individuals, companies, brands, and products. All of these names arefictitious and any similarity to the names and addresses used by an actual businessenterprise is entirely coincidental.
COPYRIGHT LICENSE:
This information contains sample application programs in source language, whichillustrate programming techniques on various operating platforms. You may copy,modify, and distribute these sample programs in any form without payment toIBM, for the purposes of developing, using, marketing or distributing applicationprograms conforming to the application programming interface for the operatingplatform for which the sample programs are written. These examples have notbeen thoroughly tested under all conditions. IBM, therefore, cannot guarantee or
26 IBM Operational Decision Manager: Tutorial: Getting started with the Decision Center Enterprise console

imply reliability, serviceability, or function of these programs. The sampleprograms are provided "AS IS", without warranty of any kind. IBM shall not beliable for any damages arising out of your use of the sample programs.
Each copy or any portion of these sample programs or any derivative work, mustinclude a copyright notice as follows:
© (your company name) (year). Portions of this code are derived from IBM Corp.Sample Programs. © Copyright IBM Corp. _enter the year or years_.
TrademarksIBM, the IBM logo, and ibm.com are trademarks or registered trademarks ofInternational Business Machines Corp., registered in many jurisdictions worldwide.Other product and service names might be trademarks of IBM or other companies.A current list of IBM trademarks is available on the Web at “Copyright andtrademark information” at www.ibm.com/legal/copytrade.shtml.
Linux is a registered trademark of Linus Torvalds in the United States, othercountries, or both.
Microsoft, Windows, and the Windows logo are trademarks of MicrosoftCorporation in the United States, other countries, or both.
UNIX is a registered trademark of The Open Group in the United States and othercountries.
Java and all Java-based trademarks and logos are trademarks or registeredtrademarks of Oracle and/or its affiliates.
Notices 27

28 IBM Operational Decision Manager: Tutorial: Getting started with the Decision Center Enterprise console


����
Printed in USA