ibm bluemix tutorial - connecting a device using internet of things
TRANSCRIPT

IBM Bluemix Tutorial
Connecting a Device using Internet of Things of Bluemix v1.0
1
IBM Bluemix – http://ibm.biz/bluemixph
A platform where developers can act like kids in a sandbox —except this box is enterprise-grade.
IBM Bluemix Tutorial
Connecting a Device using Internet of Things of Bluemix v1.0
This laboratory exercise demonstrates how to connect a device to an Internet of Things service in
Bluemix.
Prerequisite
Item Comment
Bluemix Account do the “Creating a Bluemix Account” laboratory exercise if you do not
have a Bluemix account
cf tool do the “Setting-up Laboratory Environment” (section: Installing the cf
tool) laboratory exercise to install the cf tool
JDK do the “Setting-up Laboratory Environment” (section: Installing Java
JDK) laboratory exercise to install JDK
Creating an Internet of Things Service
1. Go to the IBM Bluemix website and login using your Bluemix account (http://ibm.biz/bluemixph).
2. In the menu, click the CATALOG link.
3. In the Internet of Things area, click the Internet of Things icon.

IBM Bluemix Tutorial
Connecting a Device using Internet of Things of Bluemix v1.0
2
4. Fill-up the "Add service" form. In the “App” field, select “Leave Unbound”. In the “Service name”
field, type “Internet of Things-demo”. Click “CREATE”.
5. In the Internet of Things-demo page, click “Launch dashboard”.

IBM Bluemix Tutorial
Connecting a Device using Internet of Things of Bluemix v1.0
3
6. Another page will open showing the dashboard of the Internet of Things-demo service you created.
Take note of the Organization name assigned to your service. In the screenshot below, the
organization is 9cf3j2. The organization name varies for every Internet of Things service you create.

IBM Bluemix Tutorial
Connecting a Device using Internet of Things of Bluemix v1.0
4
Connecting a Device to Your Internet of Things Service
7. In your Internet of Things dashboard, click “Devices”.
8. Click “Add Device”.

IBM Bluemix Tutorial
Connecting a Device using Internet of Things of Bluemix v1.0
5
9. Since you do not have an actual device, you will use an emulator that represents an actual device.
Although only an emulator is used, this emulator will communicate with the Internet of Things
service in the same way an actual device will communicate with the service. The emulator you will
be using have the following characteristics:
• Device Type: Arduino
• Device ID : 080028572C3f
In an actual device the device ID is usually the MAC address of the device. In the emulator, you are
using a hypothetical MAC address 080028572C3f. You may use a different device ID but it is
recommended in this experiment that you use 080028572C3f.
Fill-up the "Register Device" form. In the “Device Type” field, select “Create a device type…” and
below it type “Arduino”. In the “Device ID” field, type “080028572C3f”. Click “Continue”.

IBM Bluemix Tutorial
Connecting a Device using Internet of Things of Bluemix v1.0
6
10. In the “Connect Your Device” page, copy the values from org to auth-token. Since the auth-token
contains special characters, it is suggested that you copy and save the information in a text file and
not just copy the contents on a piece of paper. Take note that the screenshot below is just an
example. The value of auth-token changes every time you register a new device.
IMPORTANT:
• It is important that you copy ACCURATELY the information especially auth-token. Once you
click “Done” you cannot anymore recover the auth-token value.
• In an actual deployment, you should keep the auth-token a secret otherwise other people
who knows the auth-token of your device can easily use this credential to connect to your
Internet of Things service.
After you copied the information, click “Done”.

IBM Bluemix Tutorial
Connecting a Device using Internet of Things of Bluemix v1.0
7
11. Your device is now shown in your dashboard. Notice that the “Last Event” column is “Unavailable”.
This means that your device has not sent a single message to your Internet of Things service. This
column will be updated once your device is running.
12. Download device-emulator.zip. Extract the folder found inside the zip file to the folder
c:\bluemixtemp. Make sure that the following folder structure is followed:
• c:\bluemixtemp
• device-emulator
• Arduino.java
• Emulator.java
• :
• run.bat

IBM Bluemix Tutorial
Connecting a Device using Internet of Things of Bluemix v1.0
8
13. Download the Paho Java Client is an MQTT client library. This library allows Arduino.java to
communicate with your Internet of Things service. To download, go to
https://repo.eclipse.org/content/repositories/paho-releases/org/eclipse/paho/

IBM Bluemix Tutorial
Connecting a Device using Internet of Things of Bluemix v1.0
9
14. Click the folder of the latest version (e.g., org.eclipse.paho.client.mqttv3/). Take note that in future
releases, the library’s version might get updated (e.g, v4 or higher). Access the latest version.

IBM Bluemix Tutorial
Connecting a Device using Internet of Things of Bluemix v1.0
10
15. Select the folder indicating the latest version (e.g., 1.0.2).

IBM Bluemix Tutorial
Connecting a Device using Internet of Things of Bluemix v1.0
11
16. Download the jar file (e.g., org.eclipse.paho.client.mqttv3-1.0.2.jar) and save it in the same folder
where Arduino.java is located. Rename the jar file to mqtt.jar.
17. Open the Arduino.java file in a text editor. Change the following values:
• ORGANIZATION
• PASSWORD
DO NOT use the values in the screenshot below. Use the org and auth-token values for the
ORGANIZATION and PASSWORD, respectively. These are the values you copied in the Connect Your
Device step.
IMPORTANT: It is important that you use the correct ORGANIZATION and PASSWORD values,
otherwise your device will not be able to send and receive messages from your Internet of Things
service.

IBM Bluemix Tutorial
Connecting a Device using Internet of Things of Bluemix v1.0
12
18. You may examine the Arduino.java file to have an idea on how an actual device connects to the
Internet of Things service.
Notice the values of PUBLISH_TOPIC and SUBSCRIBE_TOPIC:
PUBLISH_TOPIC = "iot-2/evt/devicestatus/fmt/json";
SUBSCRIBE_TOPIC = "iot-2/cmd/+/fmt/json";
You will understand later the purpose of these values.
You do not need to examine the other Java files since these are only created as part of the emulator.
Once you are done examining Arduino.java, save and close the file.
19. In the device-emulator folder, double click compile.bat. Make sure that there are no errors.
Press any key to close the compile.bat console.

IBM Bluemix Tutorial
Connecting a Device using Internet of Things of Bluemix v1.0
13
20. In the device-emulator folder, double click run.bat. The emulator should run. The emulator has
two windows: a console and a GUI.
The console provides a text-based notification on the status of the device. For example, it shows the
notification “Setting LED to off” to indicate that the LED is turned off. A notification “Message
Sent: { "d": { "temp": 25.0, "led": 0 } }” means that the device is sending the
message to the Internet of Things Service. The temp value 25.0 means that the virtual temperature
sensor of the device is sensing a temperature of 25.0 degrees Celsius. In addition, a led value of 0
means that the LED is turned off.
You can drag the fire towards or away the device in order to adjust the temperature sensed by the
virtual temperature sensor.

IBM Bluemix Tutorial
Connecting a Device using Internet of Things of Bluemix v1.0
14
21. Go back to the Internet of Things dashboard. In the “Last Event” column, there should be a “Just
now” text. If you do not see “Just now”, you may need to refresh the browser. Take note that the
text is originally “Unavailable”. Since your device is already running and sending messages to your
Internet of Things service, the text changed to “Just now”.
22. Click the “+” icon at the right side of the “Just now” text to see the details of the messages the
Internet of Things service is receiving. Take note that will keep on updating as long as your device is
running. The dashboard of your Internet of Things service is a good tool to verify if your device is
successfully connected to your service.
23. Do not close your device.

IBM Bluemix Tutorial
Connecting a Device using Internet of Things of Bluemix v1.0
15
Creating a Simple Remote Control Application to Interact
with the same Internet of Things Service
24. Go back to your Bluemix account. Click “CATALOG”.
25. In the Boilerplate area, click the Node-RED Starter icon.

IBM Bluemix Tutorial
Connecting a Device using Internet of Things of Bluemix v1.0
16
26. Fill-up the "Create an app" form. Use the same value for the “Name” and “Host” field. Click
“CREATE”. As a convention, use the name “simpleremotecontrol-<your name>” in the “Name” and
“Host” field.

IBM Bluemix Tutorial
Connecting a Device using Internet of Things of Bluemix v1.0
17
27. In “Getting Started with…” click “VIEW APP OVERVIEW”.
:
28. Wait for your application to start.
29. Click “BIND A SERVICE OR API”.

IBM Bluemix Tutorial
Connecting a Device using Internet of Things of Bluemix v1.0
18
30. Select the “Internet of Things-demo” service created earlier. Click “ADD”.
31. When asked to restage the application, click “CANCEL” since you will add another service.
32. Click “ADD A SERVICE OR API”.

IBM Bluemix Tutorial
Connecting a Device using Internet of Things of Bluemix v1.0
19
33. In the Web Application area, click the mongodb icon. Note that mongodb is different from
MongoLab.

IBM Bluemix Tutorial
Connecting a Device using Internet of Things of Bluemix v1.0
20
34. Click “CREATE”.
35. When asked to restage the application, click “RESTAGE”.
36. Wait for your application to start.

IBM Bluemix Tutorial
Connecting a Device using Internet of Things of Bluemix v1.0
21
37. You will be redirected to the Node-Red in Bluemix page. Click the “Go to your Node-RED flow
editor” button.
38. In the Node palette (left pane), look for the ibmiot input node. Take note that there are two ibmiot
nodes, one is an input and the other one is an output. You may move your mouse over the node to
know if it is an input or output node.

IBM Bluemix Tutorial
Connecting a Device using Internet of Things of Bluemix v1.0
22
39. Drag and drop an ibmiot input node to the work area.

IBM Bluemix Tutorial
Connecting a Device using Internet of Things of Bluemix v1.0
23
40. Double-click the ibmiot input node in the work area. Change the values of the form to the following:
• Authentication : Bluemix Service
• Input Type : Device Event
• Device Type : Arduino
• Device Id : 080028572C3f
• Event : devicestatus
• Format : json
• Name : <no need to update this>
Recall that the value of PUBLISH_TOPIC in Arduino.java is
PUBLISH_TOPIC = "iot-2/evt/devicestatus/fmt/json";
This PUBLISH_TOPIC value is consistent with the values set in the “ibmiot” input node.
Click “Ok”.

IBM Bluemix Tutorial
Connecting a Device using Internet of Things of Bluemix v1.0
24
41. In the Node palette, look for the “debug” node.
42. Drag and drop a debug node to the work area to the right of the ibmiot input node.
43. Connect the ibmiot input node to the debug node. To do this, click (and hold) over the rounded-
square symbol of the ibmiot input node. Move the mouse until you reach the rounded-square
symbol of the debug node. Release the mouse button.
44. Click the “Deploy” button.
45. Make sure that you see a “Successfully deployed” message.

IBM Bluemix Tutorial
Connecting a Device using Internet of Things of Bluemix v1.0
25
46. In the right pane, click the “debug” tab and wait for messages to appear. These messages are the
messages sent by the device. The device is sending messages to the Internet of Things service. On
the other hand, the simpleremotecontrol app receives the messages from the same service.
47. Go back to the device and drag the fire to change its value. Check the “debug” tab and see if the
message changes.

IBM Bluemix Tutorial
Connecting a Device using Internet of Things of Bluemix v1.0
26
48. In the Node palette, look for the ibmiot output node. Take note that this time an output node is
needed as oppose to the previous steps that used an input node.
49. Drag and drop an ibmiot output node to the work area at the bottom of the debug node.

IBM Bluemix Tutorial
Connecting a Device using Internet of Things of Bluemix v1.0
27
50. Double-click the ibmiot output node in the work area. Change the values of the form to the
following:
• Authentication : Bluemix Service
• Output Type : Device Command
• Device Type : Arduino
• Device Id : 080028572C3f
• Command Type : led-on
• Format : json
• Data : {}
• Name : <no need to update this>
Recall that the value of SUBSCRIBE_TOPIC in Arduino.java is
SUBSCRIBE_TOPIC = "iot-2/cmd/+/fmt/json";
In thes SUBSCRIBE_TOPIC, the value after cmd is + which stands for ALL. This means that any
message with any command type is accepted by device. Since the ibmiot output node’s command
type is set to “led-on”, the node will be sending a message with a “led-on” command type. This
message is received by the device. If you will review further Arduino.java, if this message with a
“led-on” command type is received, it will turn on the LED.
The ibmiot output node will not automatically send a message. It needs to be triggered. The next
few steps will handle this.

IBM Bluemix Tutorial
Connecting a Device using Internet of Things of Bluemix v1.0
28
51. Click “Ok”.
52. In the Node palette, look for the inject node.

IBM Bluemix Tutorial
Connecting a Device using Internet of Things of Bluemix v1.0
29
53. Drag and drop an inject node to the work area to the left of the ibmiot output node.
54. Double-click the inject node in the work area. Change the values of the form to the following:
• Payload : blank
• Topic : <leave this blank>
• Repeat : none
• Fire once at start : <do not select>
• Name : Turn On LED
• Format : json
• Data : {}
• Name : <no need to update this>
Cllick “Ok”.

IBM Bluemix Tutorial
Connecting a Device using Internet of Things of Bluemix v1.0
30
55. Connect the inject node to the ibmiot output node.
56. Click the “Deploy” button.
57. Make sure that you see a “Successfully deployed” message.
58. Go back to your device and take note that the LED is off.
59. Go back to the simpleremotecontrol app. Click the trigger button of the inject node. This will
trigger the ibmiot output node to send a message with a command type “led-on”.
60. Go back to your device and verify that the LED is now on.

IBM Bluemix Tutorial
Connecting a Device using Internet of Things of Bluemix v1.0
31
61. In the Node palette, look for the http node.
62. Drag and drop an http node to the work area on top of the inject node.

IBM Bluemix Tutorial
Connecting a Device using Internet of Things of Bluemix v1.0
32
63. Double-click the http node in the work area. Change the values of the form to the following:
• Method : GET
• url : /led-on
• Name : <no need to update this>
Cllick “Ok”.
64. In the Node palette, look for the function node.

IBM Bluemix Tutorial
Connecting a Device using Internet of Things of Bluemix v1.0
33
65. Drag and drop a function node to the work area to the right of the http node.
66. Double-click the function node in the work area. Set the function to:
msg.payload = "{}" return msg;
Cllick “Ok”.

IBM Bluemix Tutorial
Connecting a Device using Internet of Things of Bluemix v1.0
34
67. In the Node palette, look for the http response node.
68. Drag and drop an http response node to the work area to the right of the function node.
69. Connect the following nodes:
• http node to function node
• function node to http response node
• function node to ibmiot output node
The purpose of adding the http node, function node, and http response node to the work area will
be seen later.
70. Click at the left-top area near the http node. Do not release the mouse button. Drag until the
following nodes are selected:

IBM Bluemix Tutorial
Connecting a Device using Internet of Things of Bluemix v1.0
35
• http node
• function node
• http response node
• inject node
• ibmiot output node
Release the mouse button. The five (5) node are now selected.
71. Press Ctrl+C to copy the selected nodes.
72. Press Ctrl+V to paste a new set of the five nodes. Move the mouse to adjust the position of the new
set of five nodes. Place them just below the original set.

IBM Bluemix Tutorial
Connecting a Device using Internet of Things of Bluemix v1.0
36
73. Double-click the new http node in the work area. Change the values of the form to the following:
• Method : GET
• url : /led-off
• Name : <no need to update this>
Cllick “Ok”.

IBM Bluemix Tutorial
Connecting a Device using Internet of Things of Bluemix v1.0
37
74. Double-click the new inject node in the work area. Change the values of the form to the following:
• Payload : blank
• Topic : <leave this blank>
• Repeat : none
• Fire once at start : <do not select>
• Name : Turn Off LED
• Format : json
• Data : {}
• Name : <no need to update this>
Cllick “Ok”.

IBM Bluemix Tutorial
Connecting a Device using Internet of Things of Bluemix v1.0
38
75. Double-click the new ibmiot output node in the work area. Change the values of the form to the
following:
• Authentication : Bluemix Service
• Output Type : Device Command
• Device Type : Arduino
• Device Id : 080028572C3f
• Command Type : led-off
• Format : json
• Data : {}
• Name : <no need to update this>
Click “Ok”.
76. Click the “Deploy” button.

IBM Bluemix Tutorial
Connecting a Device using Internet of Things of Bluemix v1.0
39
77. Make sure that you see a “Successfully deployed” message.
78. Go back to your device and take note that the LED is on.
79. Go back to the simpleremotecontrol app. Click the trigger button of the new inject node. This will
trigger the ibmiot output node to send a message with a command type “led-off”.
80. Go back to your device and verify that the LED is now off.
81. The following steps will now demonstrate the purpose of the http node, function node, and http
response node.
Open another tab on the browser. Type the following URL on the browser and press enter:
http://simpleremotecontrol-<name>.mybluemix.net/led-on
82. Go back to your device and verify that the LED is now on.

IBM Bluemix Tutorial
Connecting a Device using Internet of Things of Bluemix v1.0
40
83. Go back to the browser. Change the URL of the browser to the following and press enter:
http://simpleremotecontrol-<name>.mybluemix.net/led-off
84. Go back to your device and verify that the LED is now off.
85. Go back to the simpleremotecontrol app.
86. Drag and drop a function node to the work area to the right-top of the ibmiot input node.

IBM Bluemix Tutorial
Connecting a Device using Internet of Things of Bluemix v1.0
41
87. Double-click the function node in the work area. Set the function to:
var d = new Date(); // convert to msec // subtract local time zone offset // get UTC time in msec var utc = d.getTime() - (d.getTimezoneOffset() * 60000); // create new Date object for different city // using supplied offset var nd = new Date(utc + (3600000*+8)); msg.payload._id = "1234"; msg.payload.timestamp= nd.toISOString();//.toLocaleString(); return msg;
Click “Ok”.

IBM Bluemix Tutorial
Connecting a Device using Internet of Things of Bluemix v1.0
42
88. In the Node palette, look for the mongodb output node. Take note that there are two mongodb
nodes in the palette, an input-output node and an output node.
89. Drag and drop a mongodb output node to the work area to the right of the function node that was
added in the previous steps.
IBM Bluemix Tutorial
Connecting a Device using Internet of Things of Bluemix v1.0
43
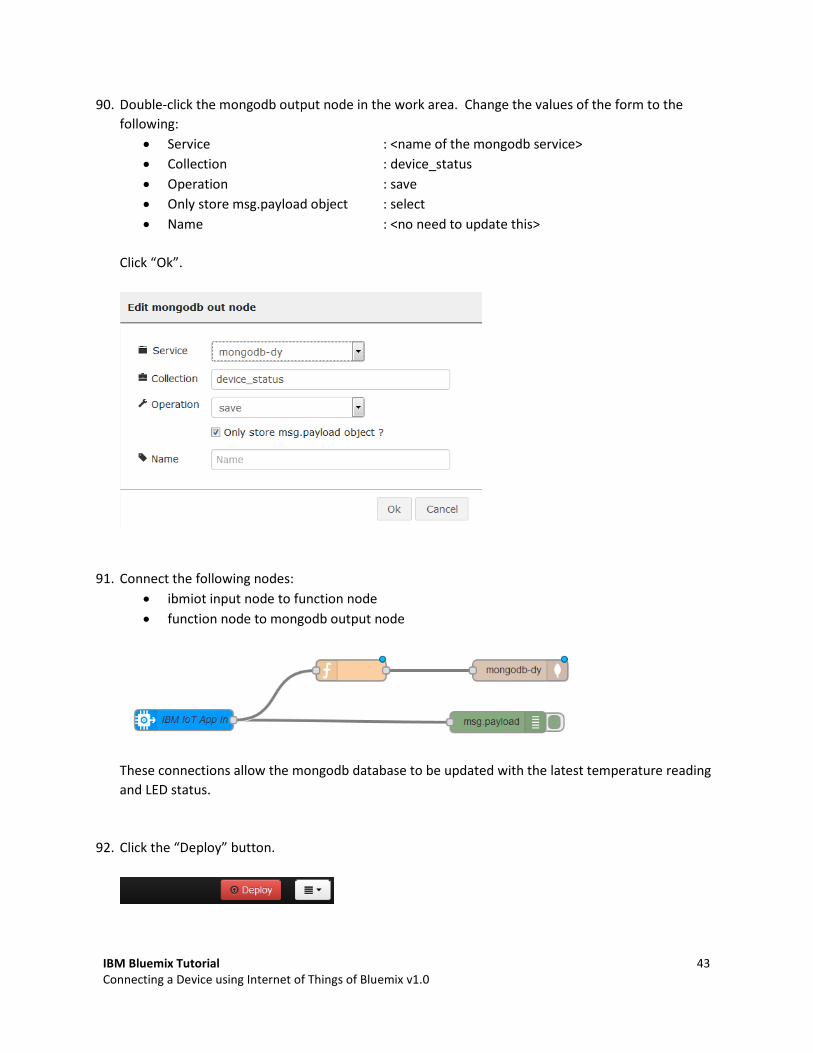
90. Double-click the mongodb output node in the work area. Change the values of the form to the
following:
• Service : <name of the mongodb service>
• Collection : device_status
• Operation : save
• Only store msg.payload object : select
• Name : <no need to update this>
Click “Ok”.
91. Connect the following nodes:
• ibmiot input node to function node
• function node to mongodb output node
These connections allow the mongodb database to be updated with the latest temperature reading
and LED status.
92. Click the “Deploy” button.

IBM Bluemix Tutorial
Connecting a Device using Internet of Things of Bluemix v1.0
44
93. Make sure that you see a “Successfully deployed” message.

IBM Bluemix Tutorial
Connecting a Device using Internet of Things of Bluemix v1.0
45
Creating another Remote Control Application that Provides
an improved UI of the Simple Remote Control Application
94. Download remote-control.zip. Extract the folder found inside the zip file to the folder
c:\bluemixtemp. Make sure that the following folder structure is followed:
• c:\bluemixtemp
• remote-control
• .bp-config
• index.html
• status.php
95. Open index.html using a text editor. Look for the text “NOTE”. Change the URL to
http://simpleremotecontrol-<your name>.mybluemix.net/. Take note that this is the URL of the
Node-Red project created earlier.

IBM Bluemix Tutorial
Connecting a Device using Internet of Things of Bluemix v1.0
46
96. Open a Windows command prompt. Enter the following command to go to the directory of the
sample application.
Windows Command Prompt
CMD>cd c:\bluemixtemp\remote-control CMD>dir
97. Enter the following command to login to Bluemix. Enter your Bluemix username and password
when prompted.
Windows Command Prompt
CMD>cf login -a https://api.ng.bluemix.net

IBM Bluemix Tutorial
Connecting a Device using Internet of Things of Bluemix v1.0
47
98. Enter the following command to upload the sample web application to Bluemix.
Windows Command Prompt
CMD> cf push remotecontrol-<your name> --no-start -m 64M -b https://github.com/dmikusa-pivotal/cf-php-build-pack
99. If you encounter the error “The host is taken”, modify the name of the application and try to upload
the application again.
100. Go back to your Bluemix account and click the DASHBOARD link.
101. In the dashboard, click your newly uploaded application.

IBM Bluemix Tutorial
Connecting a Device using Internet of Things of Bluemix v1.0
48
IBM Bluemix Tutorial
Connecting a Device using Internet of Things of Bluemix v1.0
49
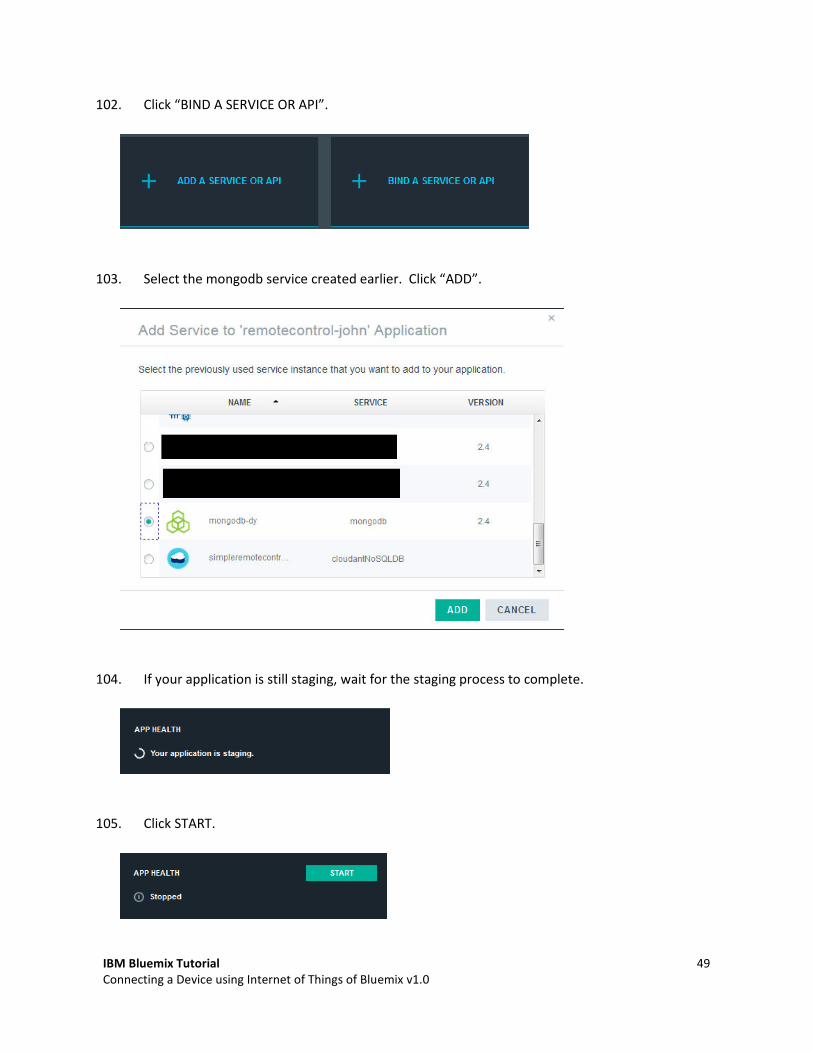
102. Click “BIND A SERVICE OR API”.
103. Select the mongodb service created earlier. Click “ADD”.
104. If your application is still staging, wait for the staging process to complete.
105. Click START.

IBM Bluemix Tutorial
Connecting a Device using Internet of Things of Bluemix v1.0
50
106. Wait for your application to start.
107. Click the route top open the remotecontrol app.
108. The remotecontrol app shows the temperature reading and the current status of the LED. These
information are taken from mongodb. Recall that the mongodb is periodically updated in the
simpleremotecontrol app.
109. Go back to the device and drag the fire to change its value. Check the remotecontrol app and
see if the temperature reading changed.
110. Press the “Turn ON LED” and “Turn OFF LED” buttons. Check the LED in the device if its status
changes based on the button that was pressed. Take note that the Turn ON LED and Turn OFF LED
buttons can control the status of the LED because in the index.html file the two buttons are tied to
the URLs that will allow the LED to turn on and off.