ibike newtontm power meter operating instructions os … · ibike® newtontm power meter operating...
TRANSCRIPT

iBike® NewtonTM Power Meter Operating Instructions
OS 4.13 and higher
December 2013
PROTECTED BY ONE OR MORE OF THE FOLLOWING US PATENTS 7,387,029; 7,377,180; D528,451
Copyright Velocomp LLP 2005-2013
1
These instructions are divided into two parts:
• PART ONE provides Easy Start instructions for
all users—quick setup and Newton calibration • PART TWO describes basic features of interest
to all Newton users • PART THREE describes advanced features
To learn how to install your iBike Newton mount and sensors, please refer to the instructions included separately. Other resources: Enjoy the large community of iBike owners participating in the iBike Forum: www.ibikeforum.com OR, please email us at [email protected] Also, check out our blog: www.ibikeblog.com Make sure to visit our website frequently to get the very latest in iBike product, software, and information updates: www.ibikesports.com

Copyright Velocomp LLP 2005-2013
2
PART ONE—Easy Start 3-6 PART TWO BASIC OPERATION TOPIC PAGES • Newton Hard Reset Procedure 7 • Fine-tuning calibration, and sensor pairing 7-8 • Setting and using the Newton Profile 8-11 • Newton features and buttons 12-15 • Newton Trip Information and Ride Files 16 • Starting your Newton on each day’s ride 17 • Setting/Updating starting elevation 17-18 • Setting Display Filtering time 18
PART THREE ADVANCED FEATURES TOPIC PAGES • Introduction to USER and RACR sequences 19 • USER sequence 20 • Coast downs (optional) 21-23 • Setting wind speed display, temperature 24 • Fitness Test (FTP Test) 25-29 • RACR sequence 30-33 • Day-to-day Setup screens 34-35 • Indoor Trainer feature (Optional) 36 • Special Newton Features 37-41 • PowerStrokeTM Data Recording 42 • Troubleshooting 43-44 • About FTP, NP, TSS, and IF measurements 45-47 • Frequently Asked Questions 48-51

Copyright Velocomp LLP 2005-2013
3
PART ONE: Easy Start Getting your Newton going is faster and easier than ever. Here’s what you will do:
1) Charge your Newton’s battery 2) Attach the Newton mount to your bicycle 3) Attach the speed-cadence sensor to your bike 4) Calibrate your Newton with an easy 10-15 minute ride
THAT’S IT!!! Details on each step follow.
1. Charge your Newton’s battery Your Newton includes a rechargeable battery. The battery is permanently installed in the case and cannot be removed. Before using your Newton for the first time, make sure to fully charge your battery. Attach the USB cable to the connector located on the bottom of the Newton case, then plug in the USB connector to your computer port, or to any USB power source. While charging, the middle window will show “batt%” and the bottom window will flash “chrg” (charging), followed by the percentage charge of your battery. When your Newton is fully charged the bottom window will show “100” (100%). Your Newton battery will charge fully in about 2 hours.
A note on Newton battery life Your Newton battery will provide you about 20 hours of continuous ride time between recharges, in cold weather or warm. Of course, each time you plug your Newton into your computer, or any USB charger device, the Newton battery will recharge very quickly. You can check the percentage of battery energy remaining in your Newton by clicking the left arrow one time to find “Batt %”. The amount of battery charge in your Newton is shown in %. Wait a few seconds for the battery charge indication to stabilize. TIP: While in the battery screen you can turn your Newton off by press-holding the center button. TIP: During the winter months and the “off” season, recharge your Newton once every two weeks. This will extend battery life. You can return your Newton to the main screen by clicking the center button.

Copyright Velocomp LLP 2005-2013
4
2. Attach the mount to your bicycle You’ll need to attach your Newton mount to your stem, handlebars, or steer tube (depending on which kind of mount you purchased). Follow the printed instructions included separately. Make sure to locate your mount so that your Newton, when attached, has an unobstructed view of the wind. Make sure to remove the double-sticky tape from the mount top and bottom. This tape helps keep the mount solidly attached to the handlebars and stem.
3. Attach the Speed/Cadence sensor to your bike Attach your iBike speed/cadence sensor, and speed and cadence magnets, to your bike, using the printed instructions included separately. TIP: MAKE SURE THE MAGNETS PASS BY THEIR RESPECTIVE SENSORS WITH A SEPARATION OF ABOUT 1-2 COIN WIDTHS. THIS SMALL GAP ASSURES THAT THE SENSORS WILL DETECT THE PRESENCE OF THE MAGNETS. TIP: IBIKE SENSORS SHIPPED WITH YOUR NEWTON HAVE BEEN PRE-PAIRED AT THE FACTORY AND ARE READY TO USE. THERE’S NO NEED TO DO A “SCAN”
ANT+ SENSOR PAIRING NOTE: YOUR NEWTON HAS ALREADY BEEN PAIRED WITH ITS SPEED/CADENCE SENSOR. Your Newton will work with any wireless ANT+ sensor. If you’re using any ANT+ sensor other than the speed/cadence sensor shipped with your Newton, you will need to do sensor pairing. Install your speed/cadence sensor on your bike, following the instructions included separately. If you use an HR strap, fasten it to your body. To pair your Newton to your ANT+ sensors, press-hold the TOP AND BOTTOM arrows simultaneously, until a “Scan” message appears. After a few moments the pairing process will be completed and your Newton will remember permanently the wireless IDs of your sensors. ANT+ speed, cadence, speed/cadence, HR, and DFPM sensors can be read.

Copyright Velocomp LLP 2005-2013
5
4. Calibrate your Newton with a “Cal Ride” To calibrate your Newton you need about 10 minutes to perform a Cal Ride. The Cal Ride customizes your Newton to your bike, and gets it ready for power measurements. This is an easy, leisurely ride; there’s no need to race, and no reason to worry! Here’s how to do the Cal Ride:
1. Pick a quiet, low-traffic place to do a solo (no drafting allowed) Cal Ride. 2. Wake up the Newton. Speed is shown in the top window. You’ll see “----W” in
the center window, indicating that your Newton requires a Cal Ride, and that it can’t report power numbers until after the Cal Ride has been completed.
3. Start riding. After 8 seconds the Newton screen changes. “Cal” appears in the
middle window, and “Start” flashes in the bottom window.
4. When you’re ready to start the Cal ride, click the center button to start the
Cal Ride. 5. The top window shows bike speed, the center window alternates between “Cal”
and distance traveled, and the progress bar fills as you ride.
6. During the Cal Ride you can bike at a leisurely pace, and it’s OK to stop if
needed. Your Cal Ride will be unaffected. 7. Ride for five minutes, until “go back, turn 180 degrees” flashes.
8. If you still need to keep going a ways before turning safely, it’s OK. When safe,
slow to a stop, turn around, and ride back to the starting point. 9. The progress bar empties as you ride back. Keep riding until the progress
bar is completely empty, and “Cal Done” flashes.

Copyright Velocomp LLP 2005-2013
6
NOTICE: ONCE BEGINNING YOUR CAL RIDE, IF YOU WISH TO TERMINATE IT, PRESS-HOLD THE CENTER BUTTON FOR TWO SECONDS. THIS ABORTS THE CAL RIDE AND LEAVES ANY PRIOR RESULTS UNCHANGED.
IMPORTANT: UNTIL YOU COMPLETE THE CAL RIDE, YOU WILL SEE “---W” IN THE MAIN SCREENS, INDICATING THAT YOUR CAL RIDE HAS NOT BEEN COMPLETED AND THAT YOUR NEWTON IS NOT SET UP PROPERLY. YOU MUST COMPLETE THE CAL RIDE BEFORE USING YOUR NEWTON FOR ANY BIKE RIDE MEASUREMENTS.
BASIC SETUP OF YOUR NEWTON IS NOW COMPLETE AND YOU’LL GET CONSISTENT RESULTS. TO FINE-TUNE YOUR NEWTON’S ACCURACY WITH ISAAC SOFTWARE, SEE INSTRUCTIONS IN THE NEXT SECTION
NOTE: IF YOU USE YOUR NEWTON WITH A DIRECT FORCE POWER METER (DFPM), CONSULT PAGES 12-13 OF THE “CdA INSTRUCTIONS”, LOCATED IN THE “HELP” MENU OF ISAAC SOFTWARE, TO LEARN HOW TO PAIR AND CALIBRATE YOUR NEWTON WITH A DFPM, AND HOW TO USE SOME OF THE SPECIAL FEATURES AVAILABLE WHEN YOU HAVE BOTH A NEWTON AND A DFPM.

Copyright Velocomp LLP 2005-2013
7
PART 2: BASIC OPERATION PERFORMING A “HARD RESET” WITH THE NEWTON A Hard Reset reboots your Newton’s computer. In the Newton, you do a “Hard Reset” by doing the following: Simultaneously press-hold the left, bottom, right, and center buttons. The screen will go blank. Then, release the button and the Newton will restart. All of your stored information will be retained, with the exception of date and time.
FINE-TUNING NEWTON CALIBRATION WITH ISAAC SOFTWARE You can fine-tune your Newton’s calibration even more by entering Basic Information with Isaac software. It’s simple to do, and we strongly recommend you take a few minutes to do so. The Isaac software, included with your iBike Newton, provides an extremely simple way to enter your basic information. Install the Isaac software on your computer, then connect your Newton to your computer and launch the Isaac software. “Dial-In Wizard” The “Dial-In” wizard increases the accuracy of your calibration. Each time Isaac detects that you’ve done a Cal Ride that started from a factory-default profile, you’ll be prompted to enter information using the “Dial-In Wizard”. Just answer a few questions regarding your weight, height, ride position, and FTP (if you don’t know what FTP is, don’t worry—leave the number at “81”, the default value. To learn more about FTP, please refer to pgs 45-47 of these instructions). “Set-Up Device Wizard” If you prefer, you can use the “Device/Device Setup…” wizard to enter your basic information BEFORE you perform the Cal Ride. If you use the Setup Device wizard prior to the cal ride, then your Newton will be fully dialed-in immediately after the cal ride is completed. TIP: If you use the Setup Device wizard prior to a Cal Ride, the Dial-In wizard won’t appear after your Cal Ride is completed.
Copyright Velocomp LLP 2005-2013
8
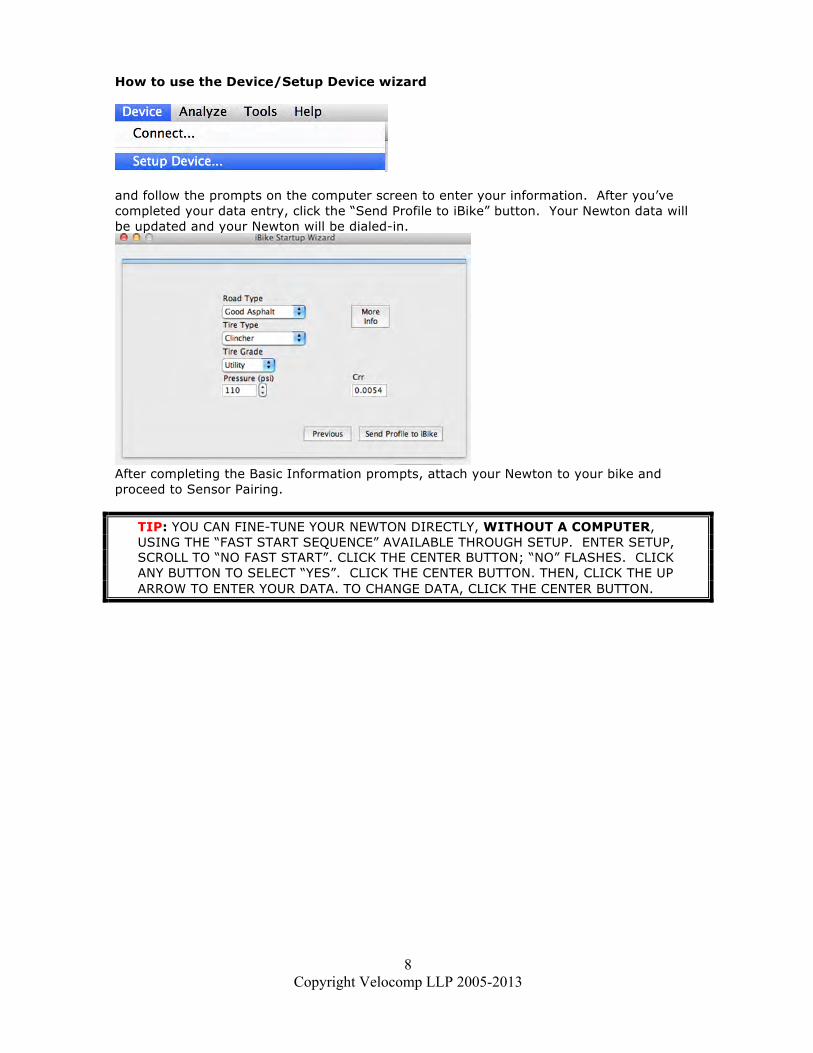
How to use the Device/Setup Device wizard
and follow the prompts on the computer screen to enter your information. After you’ve completed your data entry, click the “Send Profile to iBike” button. Your Newton data will be updated and your Newton will be dialed-in.
After completing the Basic Information prompts, attach your Newton to your bike and proceed to Sensor Pairing.
TIP: YOU CAN FINE-TUNE YOUR NEWTON DIRECTLY, WITHOUT A COMPUTER, USING THE “FAST START SEQUENCE” AVAILABLE THROUGH SETUP. ENTER SETUP, SCROLL TO “NO FAST START”. CLICK THE CENTER BUTTON; “NO” FLASHES. CLICK ANY BUTTON TO SELECT “YES”. CLICK THE CENTER BUTTON. THEN, CLICK THE UP ARROW TO ENTER YOUR DATA. TO CHANGE DATA, CLICK THE CENTER BUTTON.
Copyright Velocomp LLP 2005-2013
9
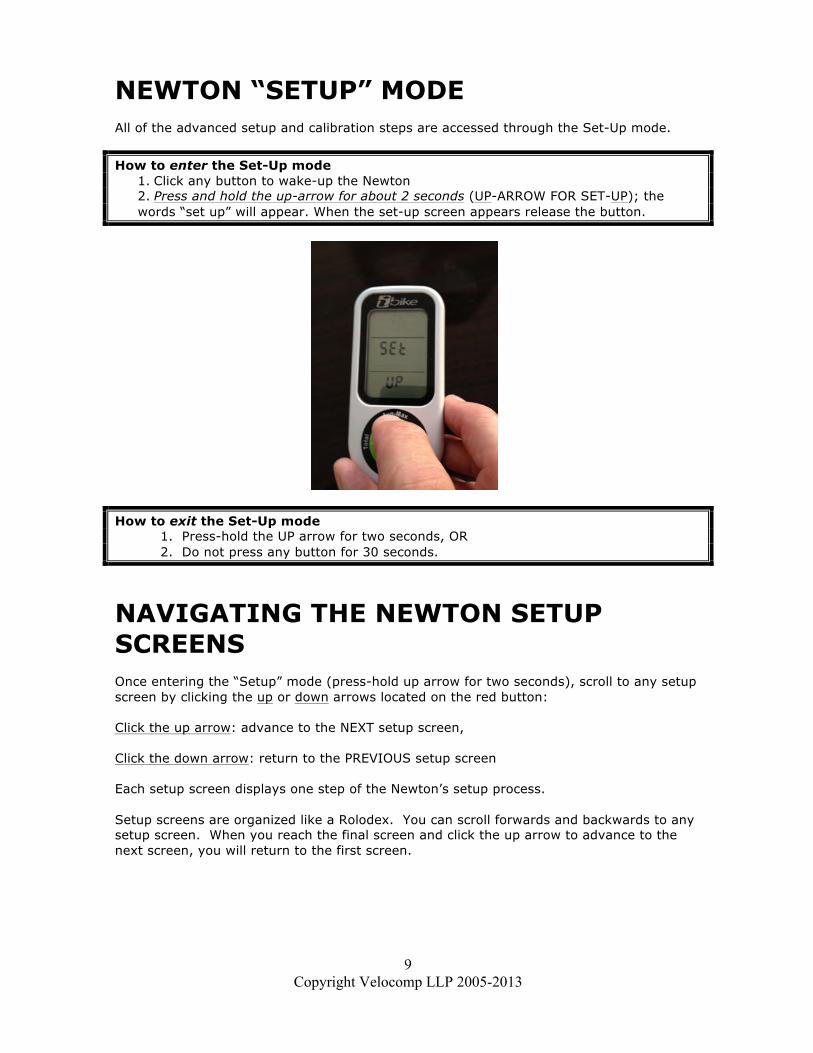
NEWTON “SETUP” MODE All of the advanced setup and calibration steps are accessed through the Set-Up mode.
How to enter the Set-Up mode 1. Click any button to wake-up the Newton 2. Press and hold the up-arrow for about 2 seconds (UP-ARROW FOR SET-UP); the
words “set up” will appear. When the set-up screen appears release the button.
How to exit the Set-Up mode 1. Press-hold the UP arrow for two seconds, OR 2. Do not press any button for 30 seconds.
NAVIGATING THE NEWTON SETUP SCREENS
Once entering the “Setup” mode (press-hold up arrow for two seconds), scroll to any setup screen by clicking the up or down arrows located on the red button: Click the up arrow: advance to the NEXT setup screen, Click the down arrow: return to the PREVIOUS setup screen Each setup screen displays one step of the Newton’s setup process. Setup screens are organized like a Rolodex. You can scroll forwards and backwards to any setup screen. When you reach the final screen and click the up arrow to advance to the next screen, you will return to the first screen.

Copyright Velocomp LLP 2005-2013
10
THE NEWTON PROFILE The Basic Information you entered with the Isaac software, in combination wireless sensor Pairing and Cal Ride, together form a “Profile”, a description of all the things that make your Newton work properly with you and your particular bike. Your Newton can store up to four Profiles in its memory, and your Isaac software can store as many profiles as you like. Any four of the profiles stored on your Isaac software can be uploaded into your Newton.
IMPORTANT: TO LEARN HOW TO STORE A PROFILE ON YOUR COMPUTER AND TO LOAD A PROFILE INTO YOUR NEWTON, REFER TO THE “ISAAC SOFTWARE INSTRUCTIONS”.
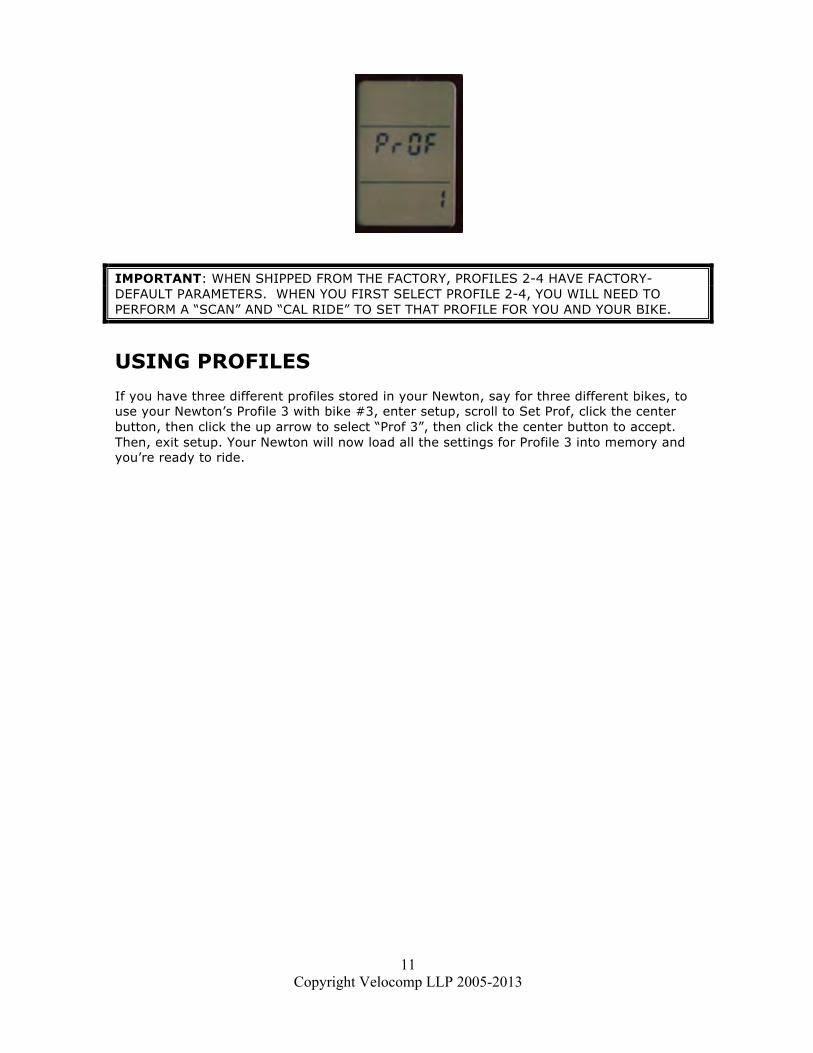
By default, your Newton is set to Profile 1. So, all of the information you gathered as part of your original Newton setup is stored in profile 1. You can create up to four different profiles and store them in your Newton’s memory. This is useful if you own two bikes or have two different riding positions (for example, hoods and TT). Here is how to select a different profile: Enter Setup and click the up arrow repeatedly to find the Set Prof (Set Profile) screen. The number in the top window shows the profile currently selected for your Newton. In the screen below all Setup data you have entered and any calibrations you have performed are stored in “Profile 1”.
To select a different profile click the center button. Then, click the up arrow to change the profile number you wish to select (1-4). To accept your choice, click the center button.
Copyright Velocomp LLP 2005-2013
11
IMPORTANT: WHEN SHIPPED FROM THE FACTORY, PROFILES 2-4 HAVE FACTORY-DEFAULT PARAMETERS. WHEN YOU FIRST SELECT PROFILE 2-4, YOU WILL NEED TO PERFORM A “SCAN” AND “CAL RIDE” TO SET THAT PROFILE FOR YOU AND YOUR BIKE.
USING PROFILES If you have three different profiles stored in your Newton, say for three different bikes, to use your Newton’s Profile 3 with bike #3, enter setup, scroll to Set Prof, click the center button, then click the up arrow to select “Prof 3”, then click the center button to accept. Then, exit setup. Your Newton will now load all the settings for Profile 3 into memory and you’re ready to ride.
Copyright Velocomp LLP 2005-2013
12
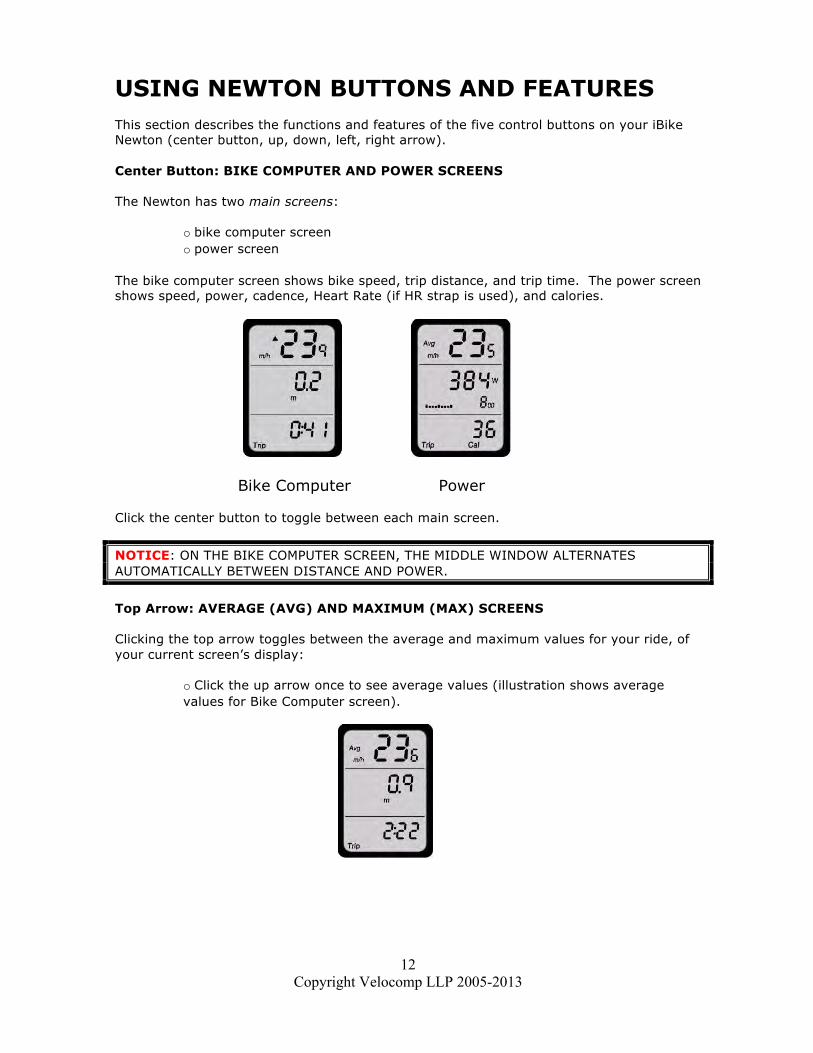
USING NEWTON BUTTONS AND FEATURES This section describes the functions and features of the five control buttons on your iBike Newton (center button, up, down, left, right arrow). Center Button: BIKE COMPUTER AND POWER SCREENS The Newton has two main screens:
o bike computer screen o power screen
The bike computer screen shows bike speed, trip distance, and trip time. The power screen shows speed, power, cadence, Heart Rate (if HR strap is used), and calories.
Bike Computer Power Click the center button to toggle between each main screen.
NOTICE: ON THE BIKE COMPUTER SCREEN, THE MIDDLE WINDOW ALTERNATES AUTOMATICALLY BETWEEN DISTANCE AND POWER.
Top Arrow: AVERAGE (AVG) AND MAXIMUM (MAX) SCREENS Clicking the top arrow toggles between the average and maximum values for your ride, of your current screen’s display:
o Click the up arrow once to see average values (illustration shows average values for Bike Computer screen).

Copyright Velocomp LLP 2005-2013
13
o Click top arrow again to see max values.
IMPORTANT: To return to the main screen, click the center button.
Bottom Arrow: HILL SLOPE AND WIND SPEED DISPLAY No matter which main screen you are using, at any point in your ride you can find out the slope of the hill you’re climbing, or the amount of head wind or tail wind.
o Click the down arrow once to see hill slope in the top window.
o Click the down arrow again to see opposing wind speed in the top window.
To return to the main screen click the center button.
TIP: PRESS-HOLD THE BOTTOM ARROW FOR TWO SECONDS TO TURN “AUTO-HILL SLOPE DISPLAY” ON OR OFF. SEE BELOW FOR MORE DETAILS ABOUT AUTO-HILL FUNCTION.

Copyright Velocomp LLP 2005-2013
14
Right Arrow: ENVIRO (Environment) SCREENS/FIT TRAIN MODE You can learn useful information about your ride by clicking the Enviro button (right arrow).
o Click the right arrow: Temperature and current time are displayed.
o Click the right arrow again (enviro screen 2): current hill slope, wind speed, and current elevation are displayed
o Click the right arrow again (enviro screen 3): main screen is shown.
SPECIAL FEATURE: AFTER ENABLING THE “FIT TRAIN” FEATURE IN THE RACR SEQUENCE, YOU CAN START PRE-PROGRAMMED WORKOUTS BY PRESS-HOLDING THE RIGHT ARROW FOR TWO SECONDS. SEE BELOW FOR MORE DETAILS ABOUT FITNESS TRAINING SCREENS, AND HOW TO ENABLE THE FEATURE.
Left Arrow: TOTAL SCREENS/LAP SCREEN You can get summary statistics for the entire ride with the “Total” screens. Total screens are shown by clicking the left arrow.
• Click left arrow once: Battery charge % is shown. TIP: When battery charge % screen is shown, you can press-hold center button to turn Newton off
• Click left arrow again: Total energy expended (in kilojoules or KJ) and calories (Kcal) are displayed.
• Click left arrow again, ride distance traveled and elevation gained are displayed.
SPECIAL FEATURE: IF YOU HAVE SELECTED “TSS ON” IN THE RACR SEQUENCE, THE NEXT THREE SCREENS SHOW NORMALIZED POWER (NP), INTENSITY FACTOR (IF) AND TRAINING STRESS SCORE (TSS).
• Click the left arrow again and “x% Full” shown (“x” is a number between 0 and 99).
This screen indicates the amount of memory used (logged) by your ride files. When the screen says 0% full your ride memory is empty; when it says 99% full your ride memory is full.
TIP: THE NEWTON RECORDS AT ONE SECOND INTERVALS (155 HOURS OF DATA RECORDING) OR FIVE SECOND INTERVALS (768 HOURS OF DATA RECORDING). YOU CAN SELECT THE RECORD INTERVAL IN THE SETUP SCREEN. THE NEWTON HAS 4x AS MUCH RECORDING CAPACITY AS THE NEWTON.

Copyright Velocomp LLP 2005-2013
15
TIP: YOU WILL GET WARNING MESSAGES WHEN YOUR RIDE MEMORY IS 80% FULL AND 90% FULL. DOWNLOAD YOUR RIDES AS SOON AS POSSIBLE OR YOU MAY LOSE YOUR MOST RECENT RIDE FILE!
TIP: YOU CAN ERASE YOUR MEMORY WITH A NEWTON COMMAND THAT LOCATED IN THE SETUP MENU. THE “ERAS DATA” COMMAND CLEARS ALL YOUR MEMORY AND ERASE ALL RIDES STORED IN YOUR NEWTON.
• Click the left arrow again: Total odometer and total ride time are shown. • Click the left arrow again: return to main screen
SPECIAL FEATURE: PRESS-HOLD THE LEFT ARROW FOR TWO SECONDS TO MARK YOUR LAP TIME INFORMATION. SEE PAGE 37 FOR MORE DETAILS ABOUT LAP TIMER.
SPECIAL FEATURE: PRESS-HOLD THE LEFT ARROW FOR FIVE SECONDS TO ENTER LAP REVIEW SCREENS. SEE PAGE 37 FOR MORE DETAILS ABOUT LAP REVIEW.

Copyright Velocomp LLP 2005-2013
16
NEWTON TRIP DATA AND RIDE FILES iBike Newton “Trips” The Newton gathers, stores, analyzes, and displays data as “trips”. Information from each trip is recorded in a “Ride File”. Generally, each time you start a new day’s ride you’ll want to start a new trip. A simple and fast “Trip-Reset” (described below) closes the previous ride file, creates a new Newton Trip, and opens a new ride file. Also, if your Newton sleeps for more than 4 hours it will automatically begin a new Trip and ride file. A “Trip Reset” starts a new ride file and resets the Newton screens with zero readings of:
• Trip odometer • Trip time • Lap Timer and lap stats • Instantaneous, average and maximum:
Power kilojoules
speed hill slope wind speed elevation gain Starting a New Trip (Trip-Reset): You can start a new trip and new ride file at any time. Here is how:
1. Click and hold the center button for two seconds. 2. The screen says “trip reset”. The word “trip” does not flash and the word “reset” does flash.
3. To confirm your trip-reset, click the center button again. Both words (“trip”, “reset”) will flash, then the main screen will return. 4. If you decide you DON’T want to complete the trip-reset, cancel the trip reset by waiting for four seconds (NOT RESET” WILL APPEAR), or by clicking any button EXCEPT the center button.
IMPORTANT: UNLESS YOU CONFIRM THE TRIP RESET BY CLICKING THE CENTER BUTTON A SECOND TIME, YOU WILL NOT COMPLETE THE TRIP RESET AND YOU WON’T START A NEW RIDE FILE!
TIP: You can do a trip reset any time, even while riding.

Copyright Velocomp LLP 2005-2013
17
HOW TO START YOUR NEWTON PRIOR TO A RIDE Each time you ride with the Newton, follow these simple steps:
1) Attach your Newton to your mount 2) Click the center button of your Newton to awaken it. 3) Start riding.
SPECIAL FEATURE: setting starting elevation Your Newton determines altitude (elevation) from barometric pressure measurements. For correct elevation measurements, the Newton has to be “told” the reference elevation that corresponds to the currently measured value of barometric pressure. To set the reference elevation, go into Setup and click the top arrow until you see the “Alt” screen. Click the center button and set the number to the correct elevation (in this example, 15 feet).
Then, click the center button to accept. The elevation number you set in this step is memorized, and can be easily recalled later, whenever your rides begin from the same location. Recalling Starting Elevation Many people start their rides from the same place, so the starting elevation is the same. However, because weather and barometric pressure vary from day to day, the elevation shown on the Newton screen can change considerably. For example, in the Enviro screen shown below, the reported elevation has drifted to -71 feet due to weather changes, even though at this particular location the actual elevation is 15 feet.
To set the correct elevation, while in the Enviro/Tilt-Wind-elevation screen, press-hold the center button for a few seconds. The current elevation will be updated to the reference

Copyright Velocomp LLP 2005-2013
18
elevation memorized earlier in the Set Alt step.
SPECIAL FEATURE: Setting Display Filtering Time Power measurement is extremely sensitive, so much so that your watts can vary considerably even within a pedal stroke. Thus, wattage measurements can be jumpy. The Newton includes a “filter” that smooths out wattage numbers displayed on your screen. To access the filter, go to Setup/”Set Filt” (Set Filter). The number in the top of the screen shows your current filter setting, in seconds. Available choices are 0 (no filtering), 2 (2 second), 3, 5, 10, and 30 second filtering. For example, when set to “5”, the wattage number currently displayed on your Newton screen is averaged over a 5 second period. If you’re a racer who does a lot of sprinting, then a 0 or 2 second filtering will give you very fast response; however, your wattage display will be a bit jumpy. For normal training and riding, a 3 or 5 second filtering is a good choice. For long endurance and TT rides at a constant pace, 10 or 30 second filtering will give you very smooth readings. To change the filtering number click the center button, then select your choice with the top arrow. Click the center button to save.
NOTE: NO MATTER WHICH DISPLAY FILTER SELECTION YOU MAKE, YOUR RIDE FILE DATA WILL BE RECORDED WITHOUT ANY FILTERING, AND WITH HIGHEST SENSITIVITY. CONTROLS IN THE ISAAC SOFTWARE WILL ALLOW YOU TO APPLY SMOOTHING FILTERING TO YOUR RIDE FILE INFORMATION DISPLAYED IN THE ISAAC WINDOWS.

Copyright Velocomp LLP 2005-2013
19
PART THREE: ADVANCED FEATURES GETTING MORE FROM YOUR NEWTON: “USER” AND “RACR” SEQUENCES For most cyclists it is not necessary to use the USER and RACR sequences; however, there are some extra features available that can be accessed from these sequences. The USER sequence contains features and settings of value to many iBike Newton users. The RACR (racer) sequence contains features and settings of interest to advanced users and racers.
Copyright Velocomp LLP 2005-2013
20
USER SEQUENCE To access the USER sequence, enter Setup then click the up arrow to find the USER screen. If the screen says “USER YES” then click the up arrow to enter the USER sequence; if the screen says USER NO, then click the center button, select YES with the up arrow, then click the center button to accept USER YES. Then, click the up arrow to enter the USER sequence. Here are the steps included in the USER sequence: “USER YES”, click the up arrow successively to perform:
• Set trainer mode (standard with Newton and PowerStroke): “TRNR”: See page 36 for details
• Turn Fitness Training Feature On/Off: “Fit Trn Off/On” • Turn Auto Display On/Off: “Off/On Auto Disp” • Set Year: “YEAR” • Set Date: “DATE” • Set Time: “CLOC”
TIP: YEAR, DATE AND TIME CAN BE ENTERED INSTANTLY USING THE ISAAC SOFTWARE.
• Set Display Contrast: “LCD” Also, there are four other selections you can make in the User Sequence:
• Perform Coast Down calibration: “COAST” (see page 21-23 for instructions) • Display ambient wind speed: “ABS WIND” • Set current temperature: “Temp Set” • Perform Fitness Test: “FIT TEST” (see pages 25-29 for instructions)

Copyright Velocomp LLP 2005-2013
21
“COAST DOWN” PROCEDURE When you ride at high speed the effects of wind, bike aerodynamics, and riding position become very significant. These effects are measured by aerodynamic drag, commonly called CdA. Using Isaac, or using the Fast Start sequence in your Newton, provides accurate estimates your CdA. The estimates of CdA made by the Newton are the result of considerable testing and experience. For 99.5% of riders, Estimated CdA and Crr provide both consistent and very accurate results under nearly all cycling conditions. If you do solo rides on the flats at speeds consistently above 23 mph, or you want to measure your CdA (and, optionally, Crr), then the coast down procedure is an advanced feature that is available. The coast down calibration found in the User sequence measures the aerodynamic (and optionally, friction) drag coefficients that are particular to each cyclist, riding position, bike type, tires, and road type. These drag coefficients are stored in the Newton’s memory (in a Profile) and are used in power calculations. The coast down procedure is this: accelerate to 20 mph (32 kph), then stop pedaling. Your bike will slow due to aerodynamic and frictional drag (your bike may also slow due to the effect of hill slope, but the Newton factors hill slope effects into its calculations). Once you slow to 8 mph (13 kph) the coast down is complete. For good accuracy, repeat the coast down 5-8 times, then analyze your results in the Isaac software to get the best composite measurements.
The Coast Down measurement works very well when the procedure is followed. However, if the procedure is not followed EXACTLY, then it is likely that your Newton will be more poorly calibrated than it was prior to the Coast Downs! So, if you decide to do coast downs, please read these instructions carefully and follow them exactly.
Here is the Coast Down procedure:
1. Before doing Coast Downs you MUST use Isaac, or the Fast Start Sequence in the Newton, to provide rider information. AND, you must perform the Calibration Ride.
2. Wear the clothing, bike helmet, and shoes you’re going to use during your rides. 3. Find a fairly level to uphill road, with few cars, where you can coast on the road
for about 1/4 mile, without stopping, hitting big bumps in the road, making sharp turns, or being subjected to wind gusts caused by passing traffic, other cyclists or gusty wind conditions. DO COAST DOWNS ONLY WHEN WINDS ARE CALM.
NOTE: THE ROAD MUST BE MOSTLY LEVEL TO SLIGHTLY UPHILL. IF THE ROAD HAS TOO MUCH DOWNHILL YOU WON’T SLOW TO 8 MPH!
4. Just before starting your Coast Down, enter Setup, then scroll to USER. If “USER
YES” is shown, click the up arrow to enter the user sequence. If “USER NO” is shown, click the center button (to make the word “NO” flash), then select YES with the up arrow, then click the center button to accept (“USER YES”). Then, click the up arrow to enter the User sequence.
5. In the User sequence, click the up arrow button until you find the “Coast” menu. You will see the word “Coast” in the bottom window.

Copyright Velocomp LLP 2005-2013
22
6. To begin the Coast Down procedure, click the center button. 7. Before going to the coast down screen your Newton will check to see how
recently you performed the “Tilt” and “Cal Wind” steps. If these steps were performed more than 30 minutes prior to the start of your Coast Downs, you will be required to do them again. This assures maximum accuracy of your Coast Downs. The word “Start” will flash after performing Tilt and Cal Wind calibrations.
8. After completing the above steps, click the center button to start the Coast Down ride.
9. The Coast Down screen shows the word “Fast”, and your current bike speed appears in the display.
10. When this screen is shown, pedal your bike faster BUT INCREASE SPEED IN A LEISURELY MANNER, making sure you remain in your usual ride position.
11. As you go faster the horizontal bar in the screen will start to fill. Your goal is to get to 20 mph (32KPH).
12. Once you’ve reached full speed, the word “coast” will appear. Stop pedaling IMMEDIATELY; you will begin to slow down due to aerodynamic and frictional drag.
13. Make sure you remain in your usual riding position during the coast down. 14. As you coast the bike will slow down and the Newton will measure your drag
coefficients (aerodynamic and frictional).
TIP: COAST DOWN DATA IS COLLECTED BETWEEN THE SPEEDS OF 18 MPH AND 8 MPH.
15. Do not pedal your bike, apply the brakes, or make abrupt moves with the front
wheel during the coast down.
16. As the bike slows the horizontal bar will empty and your bike speed will drop.

Copyright Velocomp LLP 2005-2013
23
17. Once you get to a speed of about 8 mph, the words “DONE COAST” will flash for a few seconds, then the screen “CALC COAST” (calculating coast) will appear, then main coast down screen will appear, indicating that the measurement is complete.
CRITICAL: FOR BEST RESULTS PERFORM 5 TO 8 COAST DOWNS, BACK-TO-BACK. RETURN TO THE PLACE WHERE YOU STARTED YOUR FIRST COAST DOWN AND DO MORE COAST DOWNS BY REPEATING STEPS 6-15.
CRITICAL: DO COAST DOWNS ONLY IN CALM WIND CONDITIONS, AND ON ROADS THAT ARE LEVEL TO UPHILL.
TIP: IF YOU ACCIDENTALLY INITIATE THE COAST-DOWN CALIBRATION PROCESS YOU MAY STOP IT BY CLICKING THE CENTER BUTTON. THE SCREEN WILL SAY “Abrt COASt” (abort coast). THE COAST-DOWN READINGS CURRENTLY STORED WILL BE UNCHANGED.
RACER TIP: BY DEFAULT, THE COAST DOWN USES A FIXED VALUE OF ROLLING RESISTANCE (CRR = 0.0054) IN THE COAST DOWN MEASUREMENT.
IMPORTANT: YOUR COAST DOWN AND CAL RIDE DATA MUST BE DOWNLOADED AND ANALYZED IN THE ISAAC SOFTWARE TO PROVIDE YOU THE BEST RESULTS. SEE THE “ISAAC SOFTWARE INSTRUCTIONS” FOR DETAILS.

Copyright Velocomp LLP 2005-2013
24
SETTING WIND SPEED DISPLAY (“ABS WIND YES/NO”) Your Newton measures opposing wind speed. Opposing wind includes both the absolute ground wind that comes from nature, and the wind caused because you are riding your bike. You can display opposing wind speed in one of two ways:
1) ABS WIND NO shows the TOTAL amount of wind opposing you. So, if you’re riding 20 mph and there is a headwind of 5 mph, your Newton will display the opposing wind as 25 mph.
2) “ABS WIND YES” shows only the ground wind force opposing you. In the same example as above, the Newton would show a wind speed of 5 mph. NOTE: if you have a tail wind the Newton will show the magnitude of the tail wind.
In the Newton the default setting is ABS WIND YES. The “ABS WIND NO/YES” setting is in the “USER” sequence. Make your selection with the center button and up arrow, then click the center button again to accept.
SETTING TEMPERATURE If the temperature shown on the Set Temperature screen is different from what you believe it should be, click the center button, then use the up/down arrows to adjust the number to the correct temperature, then click the center button to accept.
Copyright Velocomp LLP 2005-2013
25
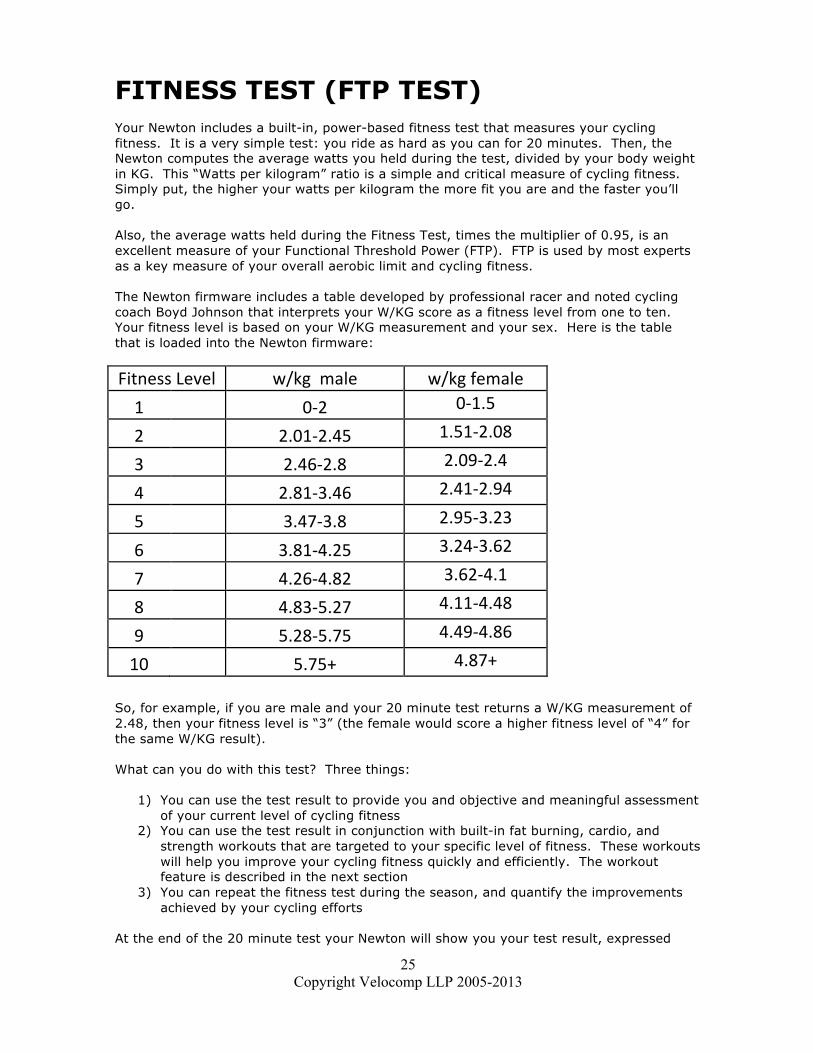
FITNESS TEST (FTP TEST) Your Newton includes a built-in, power-based fitness test that measures your cycling fitness. It is a very simple test: you ride as hard as you can for 20 minutes. Then, the Newton computes the average watts you held during the test, divided by your body weight in KG. This “Watts per kilogram” ratio is a simple and critical measure of cycling fitness. Simply put, the higher your watts per kilogram the more fit you are and the faster you’ll go. Also, the average watts held during the Fitness Test, times the multiplier of 0.95, is an excellent measure of your Functional Threshold Power (FTP). FTP is used by most experts as a key measure of your overall aerobic limit and cycling fitness. The Newton firmware includes a table developed by professional racer and noted cycling coach Boyd Johnson that interprets your W/KG score as a fitness level from one to ten. Your fitness level is based on your W/KG measurement and your sex. Here is the table that is loaded into the Newton firmware:
Fitness Level w/kg male w/kg female 1 0-‐2 0-‐1.5
2 2.01-‐2.45 1.51-‐2.08
3 2.46-‐2.8 2.09-‐2.4
4 2.81-‐3.46 2.41-‐2.94
5 3.47-‐3.8 2.95-‐3.23
6 3.81-‐4.25 3.24-‐3.62
7 4.26-‐4.82 3.62-‐4.1
8 4.83-‐5.27 4.11-‐4.48
9 5.28-‐5.75 4.49-‐4.86
10 5.75+ 4.87+ So, for example, if you are male and your 20 minute test returns a W/KG measurement of 2.48, then your fitness level is “3” (the female would score a higher fitness level of “4” for the same W/KG result). What can you do with this test? Three things:
1) You can use the test result to provide you and objective and meaningful assessment of your current level of cycling fitness
2) You can use the test result in conjunction with built-in fat burning, cardio, and strength workouts that are targeted to your specific level of fitness. These workouts will help you improve your cycling fitness quickly and efficiently. The workout feature is described in the next section
3) You can repeat the fitness test during the season, and quantify the improvements achieved by your cycling efforts
At the end of the 20 minute test your Newton will show you your test result, expressed

Copyright Velocomp LLP 2005-2013
26
both as your W/KG ratio and as your fitness level. Here is how to do the fitness test: Enter Setup and click the up arrow to find the User sequence. Using the center button and up arrow, set “USER YES”. Then, click the up arrow to find the Fit Test screen in the User sequence:
Click the center button of your Newton to start the test sequence. The first screen you’ll see is the result from your previous Fitness Test.
Your watts-per-kilogram (W/KG) number will be shown in the center window. It will read x_yz, where x,y and z are numbers, and the underscore indicates a decimal point. For example, 3_54 indicates a watts/kg result of 3.54. The bottom window shows your fitness level associated with your W/KG test result.
Click the center button to continue. You will be asked to enter your body weight only; DO NOT INCLUDE THE WEIGHT OF YOUR BIKE, EQUIPMENT, AND CLOTHING. If you’re sure of your body weight then enter it; if you haven’t weighed yourself recently take the time to get on a scale so you’ll have the right weight working in the calculations.
Click the center button to continue; you’ll be asked to tell the Newton if you are female or male. If you are male select the screen that says “FE NO” (not female); if you are female click the up arrow to select “FE YES” (female yes). Then, click the center button to continue

Copyright Velocomp LLP 2005-2013
27
Now, your Newton is set up for the test. Find a place where you can cycle at a very aggressive pace for 20 minutes. You need to be pedaling during the entire test, so a hilly course is not a good idea (on the downhills you’ll likely be coasting and this will reduce your fitness score). A flat course without stoplights and traffic is best; depending on how fast you can pedal you should try to find a course that is 5 to 8 miles long. Before beginning the test ride around for a few minutes to warm up. When you are ready click the center button to start the fitness test. The (flashing) screen will look like this:
Click the center button to start the test. You will see this screen, indicating that the test will start after a 10 second countdown:
The instant you start pedaling the bottom window clock will start counting down to zero. When the clock reaches 0:00 the test will begin and the timer will reset to 20 minutes, zero seconds, and count down towards zero. Pedal as hard as you can for the 20 minute testing period. As you do the test your body will adjust naturally: if you start out too hard your performance will fall-off later in the test. If you have energy to spare in the last few minutes you can “pour it on”.

Copyright Velocomp LLP 2005-2013
28
During the test you will see your average watts in the top screen, your instantaneous watts in the middle window, and the elapsed time of your test in the bottom window. Here is an example of how the screen might look:
This screen shows that this rider has 18 minutes, 32 seconds remaining on the test (bottom window), and that, up to this point of the test, the rider has sustained an average of 218W (top window). The middle screen shows the watts output at the instant of the photo: 191W. So, the rider’s wattage output AT THAT INSTANT is below the average. The down arrow to the left of the reading 191W indicates that the instantaneous wattage output is below the average watts output. During the 20 minute test pedal your bike as aggressively as you can and try to keep those watts up.
TIP: 20 minutes is a long time! You’ll see that both average and current watts are displayed on the Newton. Both of these numbers will help you keep a good pace. For example, if you start off way too hard your current watts will be huge for a few minutes and your average watts will be high too. However, you will be unable to maintain the pace for 20 minutes and will fade: your current watts will diminish because you are tired. Your Newton screen will report that your current watts are below your average watts, indicating that you “blew up” too soon. If you blow up prior to the end of the test then you won’t have a W/KG measurement that reflects your potential. Work hard, but try to keep an even pace throughout the ride.
During the test a situation may arise where you need to stop (say, at a traffic light). If that happens you can pause the test by clicking the center button. The screen will say “hold test”:

Copyright Velocomp LLP 2005-2013
29
To resume the test, click the center button.
Finally, if for some reason you don’t like how your test is going you can abort the test at any time by pressing and holding the center button for about 5 seconds. The screen will say “Test Abrt” (test abort) and the test will end. The W/KG and fitness score result from your earlier test will be remain in memory.
At the end of the ride your Newton will compute your watts per kilogram and show you your fitness level. TIP: THE NEWTON MEASURES YOUR “FUNCTIONAL THRESHOLD POWER” (FTP) AS A TRAINING AID. AT THE END OF YOUR FITNESS TEST THE NEWTON WILL AUTOMATICALLY UPDATE YOUR FTP NUMBER, LOCATED IN THE “RACR/FTP CFG” SCREEN. OR, IF YOU KNOW AND ENTER YOUR FTP NUMBER IN THE FTP CFG SCREEN, THE NEWTON WILL AUTOMATICALLY COMPUTE YOUR 20 MINUTE W/KG AND FITNESS RATING.
Copyright Velocomp LLP 2005-2013
30
RACR SEQUENCE The Racr (racer) sequence contains settings of interest to advanced power meter users and bike racers. To access the RACR sequence, enter Setup then scroll to RACR. If the screen says RACR YES then click up arrow button to enter the sequence; if the screen says RACR NO, then click the center button, select YES with the up arrow, then click the center button to accept. Then, click the up arrow to enter the RACR sequence. Here are the steps included in the RACR sequence: “RACR YES”, then click up/left arrow successively to perform:
• Tilt Calibration: “Tilt Cal” • Estimate frictional drag: “EST FRIC” • Display TSS/IF/NP measurements in the Totals screen: “TSS” • Configure Functional Threshold Power: “FTP CFG” • Display CdA data on screen (NOTE: iAero feature ONLY): “CdA” • Set total hours logged: “TOTAL HRS LOG” • Turn PowerBar display On/Off: “Pbar” • Display coast friction number: “Cst Fric” • Display coast aero number: “Cst Aero” • Turn cadence display On/Off: “Cad On” • Set total distance logged: “TOTAL ODO”
Each of these settings is explained below:
• Tilt Calibration: “Tilt Cal” The tilt calibration is performed automatically during the calibration ride, and under almost all circumstances, there is no reason to perform another Tilt Cal. However, if you move your handlebars, or otherwise affect the angle of the Newton on your bike, you may perform a tilt calibration. To perform the Tilt calibration, do the following:
1. Enter Setup mode (press-hold up arrow). Enter the Racr Sequence. Click the up arrow; you’ll see the tilt angle in the top window, and the word “Tilt” in the bottom.
2. Set your bike on reasonably level ground. Mark the spots where the wheels touch
the pavement.
TIP: DO NOT PERFORM A TILT CALIBRATION ON A ROAD WITH LOOSE STONES OR JAGGED PAVEMENT. YOU WILL GET POOR RESULTS.
3. Hold the bike still and upright, with the front wheel pointed straight ahead. 4. Click the center button to start the tilt calibration process.
IMPORTANT: YOU MUST HOLD THE BIKE STILL DURING THIS STEP. AN EASY WAY TO KEEP YOUR BIKE FROM MOVING IS TO WEDGE YOUR FOOT IN FRONT OF THE BACK TIRE.
5. The screen says “HOLD STILL” and the horizontal bar moves from right to left,
towards zero. Do not move the bike. Once the bar disappears, the screen flashes “turn 180 degrees”. 6. Turn the bike around 180 degrees; the bike now points in exactly the opposite
direction with the tires resting on the same two spots.

Copyright Velocomp LLP 2005-2013
31
7. Hold the bike still and upright, with the front wheel pointed straight ahead. Click the center button. The horizontal bar counts down to zero. Do not move the bike.
8. Once the bar disappears, the words “turn 180” flashes again. Turn the bike 180 degrees; the bike now points in the original direction with the tires resting on the same two spots.
9. Hold the bike still and upright, with the front wheel pointed straight ahead. Click the center button. The horizontal bar counts down to zero. Do not move the bike.
10. Once the bar disappears, if the calibration is good the words “GOOD TILT” flash a few times and the iBike advances to the CAL WIND screen.
11. If you moved the bike during any of the three “countdowns” you may get the message “BAD TILT”. If so, repeat steps 2-10, making sure you point the bike straight ahead and hold it as still as possible during the calibrations.
The “Tilt Calibration” process is performed only one time; you do not need to repeat it.
• “EST FRIC” (estimate Frictional drag) Bikes have an intrinsic level of rolling resistance (frictional drag) that is dependent on tire type, tire pressure, and road surface. This factor is called “Crr” (coefficient of rolling resistance) and Crr is a number generally between 0.003 and 0.008. The higher the Crr the higher the rolling resistance. For example, with normal bike tires a very smooth velodrome track will have a Crr of about 0.003; asphalt will have a Crr around 0.0055, and dirt roads have a Crr of 0.008 or higher. The Newton’s coast down process can measure Crr (in addition to CdA, the aerodynamic resistance) but in many cases it’s easier and faster just to assume a value for Crr. Assuming a value of Crr can improve the accuracy of the CdA measurement. The default setting for EST FRIC is YES; that is, in the EST FRIC YES setting the Newton will assume a fixed, user-set value of Crr, even when coast downs are performed. The default value of Crr has been set at the factory to 0.0055; on the Newton, this reads as “55” in the screen. The value of Crr can be set by the user. To use the estimated Crr feature do the following:
1) Go to Setup/RACR YES/EST FRIC. 2) Click the center button; the bottom screen flashes. Use the up arrow to select YES,
then click the center button to accept. “done” flashes 3) The screen FRIC appears; the number at the bottom is the value of Crr currently
stored in the Newton. 4) To change the value of Crr (fric) click the center button. Adjust the digits to the
value you want. Fric = 30 corresponds to a very smooth velodrome; 55 is an average asphalt road; 80 is rough concrete; 100 or higher is dirt roads. These values are approximate; you can get more exact values from the web.
5) When you’ve entered the value you want, click the center button to accept. Done flashes and the Newton proceeds to the next RACR screen, TSS
REMEMBER: IF YOU SET EST FRIC TO “YES” THE VALUE SHOWN WILL BE USED BOTH IN ESTIMATED DRAG COEFFICIENTS AND AS THE ASSUMED VALUE IN COAST DOWNS.
If you do NOT want to use the estimated Crr feature do the following:
1) Go to Setup/RACR YES/EST FRIC. 2) Click the center button; the bottom screen flashes. Use the up arrow to select NO,
Copyright Velocomp LLP 2005-2013
32
then click the center button to accept. “done” flashes and the Newton proceeds to the next RACR screen, TSS
IMPORTANT: WHEN EST FRIC IS “OFF”, COAST DOWNS WILL MEASURE BOTH AERO AND FRICTIONAL DRAG.
TIP: WHEN COAST DOWNS ARE DONE WITH EST FRIC “OFF”, THE CRR CORRESPONDING TO THE MEASURED FRICTIONAL DRAG WILL APPEAR IN THE EST FRIC WINDOW.
• TSS ON/OFF
The Newton incorporates special measurements to help serious cyclists improve their training. These three measurements, called Training Stress score (TSSTM), Intensity Factor (IFTM), and Normalized Power (NPTM) are described on pages 45-47. Normally, TSS, IF and NP measurements are not visible in the Newton’s Totals screen (“TSS OFF”). If you’d like to see them, then do the following:
1) Go to Setup/RACR YES/TSS. 2) Click the center button; the bottom screen flashes. Use the up arrow to select YES,
then click the center button to accept. “done” flashes and the Newton proceeds to the next RACR screen, “FTP CFG”
• FTP CFG (Functional Threshold Power Configuration)
Functional Threshold Power is another specialized measurement of interest to advanced cyclists. FTP is described on pages 45-47. There are two ways your functional threshold power can be determined:
1) By direct measurement in a 1 hour test 2) By estimate, based on the 20 minute Newton Fitness Test
If a Newton Fitness Test is performed then FTP = avg. watts from 20 minute test * 0.95
IMPORTANT: WHENEVER YOU DO A NEWTON FITNESS TEST, YOUR ESTIMATED FTP WILL BE AUTOMATICALLY COMPUTED AND STORED.
If you have measured your FTP by some other means, you can override the results of the Newton Fitness Test and enter your FTP directly
IMPORTANT: IF YOU ENTER YOUR FTP DIRECTLY, YOUR NEWTON FITNESS TEST WILL BE UPDATED. YOUR W/KG SCORE AND YOUR FITNESS LEVEL WILL CORRESPOND TO YOUR FTP RESULT
You can see, and change, your FTP number as follows:
1) Go to Setup/RACR YES/FTP CFG. 2) Click the center button; the bottom screen flashes and shows your current value of
FTP. If you’ve done a Fitness Test, the FTP is based on the Fitness Test. If you haven’t done a fitness test, a default value o 0001 (1Watt) will be shown
3) If you wish to change the FTP number do so 4) To accept your choice or exit the item, click the center button to accept. “done”
flashes and the Newton proceeds to the next RACR screen, “CDA”

Copyright Velocomp LLP 2005-2013
33
• CDA ON/OFF
CdA is an important aerodynamic measurement. You can read about CdA measurements in the “CdA Instructions”, available separately through the Help menu of Isaac. To see CdA measurement on the bottom window of your Newton power screen, do the following:
1) Go to Setup/RACR YES/CDA ON-OFF. 2) Click the center button; the bottom screen flashes. To turn CDA on select “ON” with
the up arrow. 3) If you don’t want to see CdA measurements on your Newton click the up arrow to
select “OFF”. 4) To accept your choice click the center button; the screen flashes “done” and the
Newton advances to the next menu item, “TOTAL HRS LOG”
• TOTAL HRS LOG
You can set the Newton’s hours-on-bike log to start at a number other than the default number of zero. This is a handy feature if you want to copy this value from your old bike computer. Click the center button to set the log; when finished, click the center button to accept. “done” will flash and the Newton will move to the next screen, “TOTAL ODO”
• Pbar On/Off (PowerBar On/Off)
PowerBar is in the center window of the Power Screen, and shows instantaneous watts as a bar graph with power scale. By default this feature is Off; this setup screen can turn it On.
• Fric number (Cst Fric)
This number is the value of friction used in the Newton. It is related to, but not the same as, Crr. It is displayed in Racr as a convenience.
• Aero number (Cst Aero)
This number is the value of aero used in the Newton. It is related to, but not the same as, CdA. It is displayed in Racr as a convenience.
• CAD ON/OFF (cadence display on/off)
The display of the cadence measurement is turned on or off in this setting. The default value is On; cadence (and HR if available) alternate back and forth in the bottom window of the Power Screen. if Cad is set to “off”, then cadence will not be shown in the bottom window of the power screen. If you are using an HR strap and Cad is “Off”, then HR will be alternate with calorie readings.
• TOTAL ODO (total Odometer)
You can set the Newton’s odometer to start at a number other than the default number of zero. This is a handy feature if you want to copy your odometer setting from your old bike computer. Click the center button to set the log; when finished, click the center button to accept. “done” will flash and the Newton will move to the next screen, “RACR NO” IMPORTANT: UPON COMPLETION OF THE “TOTAL ODO” SETTING YOU WILL EXIT THE RACR SEQUENCE AND THE NEWTON WILL AUTOMATICALLY CHANGE THE SETTING TO “RACR NO”.
Copyright Velocomp LLP 2005-2013
34
DAY-TO-DAY SETUP SCREENS Your Newton setup is designed around one-time setup sequences. Once these sequences are performed, you’ll rarely need to access them to make changes. So, unless you choose to reveal the sequence steps, they’ll remain hidden from view. Some Newton setup and calibration steps are very common, so much so that you’ll want easy access to them. We’ve gathered the most common setup items together as “day-to-day” screens that you’ll find whenever you enter setup. All of the day-to-day setup screens are listed below. Many of them have been described so we won’t repeat their function here. The new screens not described previously will be in BOLD:
1) CAL WIND This optional calibration is the first screen you’ll see when entering Setup. Once you click the center button to perform the wind calibration, your Newton will automatically exit setup after a few seconds, OR you can click the up arrow to move to the next screen:
2) ON FAST REC (POWERSTROKE MODELS ONLY) 3) CAL RIDE 4) BATT % (battery voltage percentage). Use this screen to find out the percentage of
battery energy remains in your Newton 5) ALT (altitude)
Use this screen to enter the starting elevation for your ride.
TIP: THE STARTING ELEVATION IS OPTIONAL AND NOT REQUIRED FOR ANY NEWTON CALCULATIONS
IMPORTANT: EVEN IF YOUR NEWTON HASN’T MOVED, THE STARTING ELEVATION WILL CHANGE WHEN WEATHER CONDITIONS CHANGE. THIS IS NORMAL.
6) TOTAL WGHT
This number is the total weight of your bike and you with clothing and gear 7) SCAN (Wireless Setup) 8) SET FILT 9) SET PROF 10) REC INT (RECORD INTERVAL)
Your Newton’s memory fills with information as you ride. You can select in this screen how often to record your ride information: Click the center button, then select 1 sec (one second recording interval) to record about 155 ride hours of data, OR Click the up arrow to select 5 sec (five second recording interval) to record about 768 hours of data.
TIP: YOU CAN HAVE AS MANY RIDE FILES AS YOU WANT. THEIR TOTAL TIME LENGTH IS DETERMINED BY YOUR RECORDING INTERVAL
TIP: YOU’LL GET WARNING MESSAGES WHEN YOUR RIDE MEMORY IS NEAR CAPACITY. IF YOUR RIDE MEMORY FILLS TO 100% DURING A RIDE YOUR NEWTON WILL CONTINUE TO FUNCTION BUT YOU’LL LOSE THE RIDE DATA FOR THAT RIDE.

Copyright Velocomp LLP 2005-2013
35
RACER TIP: WHEN 5 SECOND RECORDING INTERVALS ARE CHOSEN, YOUR NEWTON WILL AVERAGE THE WATTS DATA FOR 5 SECONDS, THEN RECORD THE AVERAGED DATA FOR THE PREVIOUS 5 SECONDS
11) ERAS DATA (ERASE RIDE DATA FROM NEWTON)
After downloading your rides to your Isaac software (see the Isaac software instructions) you can erase your ride data with the Isaac software. Alternatively, you can erase your ride data directly on your Newton:
• Click the center button. The word “NO” flashes. If you do NOT want to erase your data, click the center button
• If you DO want to erase the data, click the up arrow. The word YES flashes. Click the center button to confirm your choice and erase the data. The word “done” flashes for a few seconds.
12) REL (firmware release number) This screen shows the firmware version installed in your unit. You can update can your firmware to the latest version using the Isaac software. See the Isaac Software instructions for details.

Copyright Velocomp LLP 2005-2013
36
USING THE INDOOR TRAINER FEATURE The Indoor Trainer feature allows you to measure power with your Newton when using many models of indoor trainers and rollers. Consult the Isaac software, “Device/Edit Trainer Settings…” for a complete list of supported trainers and rollers. When using the indoor trainer function your Newton measures the speed of the rear wheel and, using the trainer profile you select for your particular model of indoor trainer, estimate the power required to produce the measured rear wheel speed. The Indoor Trainer function is standard on the PowerStroke+ and Newton, and is an optional upgrade for the Newton. Here’s how turn the Indoor Trainer function “On”:
1) Make sure your speed sensor is mounted on the rear wheel of your bike 2) Use the Isaac software to install the select and install the profile for your indoor
trainer, “Device/Edit Trainer Settings…” 3) To turn the trainer function ON, enter Setup and click the bottom arrow repeatedly
to find “User”. If “User/No” is on the screen, click the center button to make the word “Yes” flash. Then, click the center button so that “User/Yes” is displayed without any flashing.
4) With “User/Yes” shown, click the up arrow one time. “Trnr” is shown. If “Trnr/Off” is shown, click the center button so that Off flashes. Click the up arrow so that “Trnr/On” flashes. Click the center button to accept. “Trnr/On” is shown.
5) Exit Setup. Your Newton is ready to use with your indoor trainer. 6) When downloading ride files recorded with the Indoor Trainer function On, the
status window of your Newton software will read “Indoor Trainer”. How to turn the Indoor Trainer function “Off”: When riding outdoors you need to turn your Indoor Trainer function off so that the Newton’s power measurement sensors will function normally:
1) To turn the trainer function Off, enter Setup and click the bottom arrow repeatedly to find “User”. If “User/No” is on the screen, click the center button to make the word “Yes” flash. Then, click the center button so that “User/Yes” is displayed without any flashing.
2) With “User/Yes” shown, click the up arrow one time. “Trnr” is shown. If “Trnr/On” is shown, click the center button so that “On” flashes. Click the up arrow so that “Trnr/Off” flashes. Click the center button to accept. “Trnr/Off” is shown.
3) Exit Setup. Your Newton is ready to use on your outdoor rides.
NOTE: YOUR NEWTON WILL NOT PROVIDE ACCURATE WATTS READINGS IF “TRNR/ON” IS SET DURING OUTDOOR RIDES. NOTE: WHEN AWAKENING YOUR NEWTON FROM SLEEP, IF TRNR IS “ON” A MESSAGE WILL APPEAR. TO CONTINUE, CLICK ANY BUTTON. TO TURN TRAINER “OFF”, PRESS-HOLD THE CENTER BUTTON UNTIL “ON” FLASHES, THEN CLICK ANY ARROW TO SELECT “OFF”, THEN CLICK CENTER BUTTON TO ACCEPT.

Copyright Velocomp LLP 2005-2013
37
OTHER SPECIAL FEATURES There are some other very useful features available with your Newton. SPECIAL FEATURE #1: “AUTO HILL” You’re riding along on the flats but you see a steep hill ahead. Once you start climbing you’ll want to know: how tough is the climb? Your Newton can tell you AUTOMATICALLY. Anytime you ride on a hill slope higher than two percent, the top window of your main screen will AUTOMATICALLY alternate between your bike speed and the hill slope. Once the hill slope drops below 2%, the Auto Hill feature will automatically cancel.
TIP: BY DEFAULT AUTO HILL IS TURNED “OFF”. PRESS-HOLD THE BOTTOM ARROW FOR TWO SECONDS TO TURN AUTO HILL ON (“Hill Auto”). DO THIS AGAIN TO TURN AUTO-HILL OFF (“Hill OFF”).
SPECIAL FEATURE #2: “LAP TIMER” AND “LAP REVIEW” Your Newton screens display information about each Newton Trip, while simultaneously storing all your trip ride data in memory. But if you’re racing in a crit or training on a route where you’re doing multiple laps you will likely want to compare your performance from lap to lap. The Newton has a lap timer that lets you see your important lap stats (lap number, average speed, average watts, and lap time) while on the bike and that marks those laps in your ride file for later analysis. Each time you press-hold the left arrow for two seconds, four things happen:
1) The previous lap ends, and the screen flashes the lap number that has just ended 2) Stats from the previous lap are flashed on the screen for about 10 seconds (average
speed, average watts, lap time) 3) A new lap is started and stats are gathered in the background for the new lap 4) Your Newton automatically returns to the main screen
The lap timer automatically resets to lap 1 whenever you perform a “trip reset” command. So, if you’re racing, perform a trip-reset while waiting at the starting line; your first lap will start recording lap one. When you’ve finished your ride you can download your ride, then perform a trip-reset to reset your lap timer. You can also review your lap stats on your Newton. To do so, press-hold the left arrow for five seconds. The “Lap Data” screen appears; the lap number is in the top window. Select the lap number you wish to review with the top/bottom arrows. Wait 2 seconds; the screen changes and shows the average lap speed, average lap power, and lap time. Continue to use the up/down arrows to select other laps. If no button is touched for 4 seconds, “Lap End” flashes and the Lap Review screens are exited automatically.

Copyright Velocomp LLP 2005-2013
38
SPECIAL FEATURE #3: “TIME-TRIAL INTERVAL WORKOUTS” Suppose you’re going to do a time trial; the time trial can be thought of as one huge interval. The Newton gives you a way to manage your time trial so you can see average watts, actual watts, and elapsed time, all on the same screen. Here’s how: 1: Enable the Fit Train feature in the User Sequence (Setup/User/Yes/Fit Trn On) 2:While in the main screen, press-hold the right arrow to enter FIT TRAIN.
Use the left/right arrow to select “USER”:
2. Click the center button to enter the User Interval. 3. To start the first User Interval, click the center button or just start pedaling; when you start moving the User Interval will start automatically. 3. You’ll see average watts in the top window, actual watts in the middle screen, and elapsed time in the bottom window.
NOTE: IN THE TOP WINDOW THE LEAST SIGNIFICANT DIGIT OF THE AVERAGE WATTS NUMBER WILL BE SUBSCRIPTED. FOR EXAMPLE, AN AVERAGE WATTAGE OF 198W WILL SHOW IN THE TOP WINDOW AS 198
4. To end an interval, click the center button. The prior user interval will stop and a new user interval will begin immediately.

Copyright Velocomp LLP 2005-2013
39
5. During any user interval you may pause the interval by clicking the left arrow. To resume the interval, click the left arrow again. 6. At any time, you may review the results of all prior user intervals by clicking the up arrow. You’ll see the interval number in the top window, average watts for the interval in the center window, and elapsed time for the interval in the bottom window. Click any button to return to the current interval being recorded. 7. To exit the user interval, press-hold the right arrow. The message “End Train” will appear:
SPECIAL FEATURE #4: “PRE-PROGRAMMED FITNESS WORKOUTS” Your Newton is equipped with pre-programmed workouts that are linked to your fitness score. There are three types of pre-programmed workouts: fat burning, cardio, and strength. You can select any of these different workouts to help improve your cycling, quickly and efficiently. Also, the workout intensity is controlled by your fitness score, so you won’t work either too hard or too little. Here’s a summary of how to use your Newton for fitness workouts. 1) Perform the fitness test. 2) Decide what kind of workout you want to do. There are three pre-programmed workouts: fat burning, cardio and strength. 3) Enable the Fit Train feature in the User Sequence (Setup/User/Yes/Fit Trn On) 4) Press-hold the right arrow. You will enter “FIT TRAIN”. 5) Use the left or right arrow to select the kind of workout you want. 6) For the workout you’ve selected, you can choose from three levels of difficulty: 0, 1, (and sometimes 2. 2 is the most difficult and is available only with some workouts). Use the up/down arrows to select workout intensity. 7) When you’re ready to do you workout, click the center button. You’ll see your target watts in the top window, your actual watts and number of remaining intervals in the center window, and the time remaining for the interval in the bottom window. 8) As each interval ends, the interval counter will decrement by one and the target watts and time for the next interval will appear. Continue with the workout until the set is finished. 9) To exit the interval workout, press-hold the right arrow.

Copyright Velocomp LLP 2005-2013
40
SPECIAL FEATURE #5: “USER-PROGRAMMED INTERVAL WORKOUTS” Not only is it possible to use the Newton with the pre-programmed workouts described in Special Feature #3, it is also possible to create your own power-based interval set. How to Create a Custom Interval Set Interval programs are created in the Isaac software. Consult the Isaac software instructions to learn how to create interval sets. Here is an example interval set, created in the Isaac software. In this example interval set there are five intervals: the first interval is 150W for 4 minutes, followed by 5 minutes of rest, followed by a second interval of 200W for 3 minutes, with a 5 minute rest thereafter, and a third interval of 250W for 2 minutes, followed by a 5 minute rest period, a fourth interval of 200W for 3 minutes with a 5 minute rest, and a final 150W interval for 4 minutes with a final 10 minute rest/cool-down.
Uploading a Custom Interval Set into your Newton After you’ve created your custom interval set, simply click the “Send to iBike” button, located on the Edit Intervals window. Your interval set will be transferred to your Newton.
TIP: YOUR COACH CAN CREATE INTERVAL SETS FOR YOU WITH HIS COPY OF Isaac SOFTWARE. HE WILL SEND YOU THE INTERVAL SET FILE, WHICH YOU’LL IMPORT INTO YOUR EDIT INTERVALS WINDOW WITH THE “IMPORT” BUTTON. ONCE YOU HAVE IMPORTED THE SET, HIGHLIGHT IT TO SELECT IT, THEN CLICK THE “SEND TO NEWTON” BUTTON.
Selecting and Using the Customized Interval Workout on your Newton Once you have uploaded your customized workout, you’ll need to tell your Newton that you want to perform the customized workout (instead of the pre-programmed workout). This is extremely easy to do:
Copyright Velocomp LLP 2005-2013
41
1) Press-hold the right arrow to enter FIT TRAIN. 2) With the left/right arrow, select iB3 (Isaac software). 3) To start the workout, click the center button. 4) To end the workout, press-hold the right arrow.
TIP: INTERVAL PAUSE You’re in the middle of your interval training session and you have to stop because of a traffic light. What to do? Click the center button (of course!). Your interval timer pauses. When you’re ready to resume interval training click the center button. Your interval training continues at the point where you left off.
TIP: INTERVAL SETS You can repeat interval sets as many times as you like (or your body can stand). How? At the end of your first set click the center button (what else?) and hold for 3 seconds. The word “Set” will flash in the center window, and the word “no:” and a number will flash in the bottom window. For example, the second set will be “Set No: 2”. Of course, the set counter will increment each time you do a new set.
TIP: USING THE INTERVAL TRAINER WITH YOUR BIKE COACH Your bike coach can create and email to you interval training files for your Newton. Your Isaac Ride Analysis software is used to upload the training interval into your Newton. And, after you’ve downloaded your ride data to your PC/Mac, you can send your coach the actual ride data from your interval training session. That data will include hill slope, wind speed, altitude gained, and temperature, in addition to the usual time/distance/speed data. See the Isaac Ride Analysis software instructions for more details. Make sure to tell your coach that the Isaac software is free and available on our website www.ibikesports.com/downloads/html . This software can be used both to view your ride files and to create Intervals.

Copyright Velocomp LLP 2005-2013
42
SPECIAL FEATURE #6: “POWERSTROKE DATA RECORDING” PowerStrokeTM is a optional feature. PowerStroke data provides cyclists the ability to understand their dynamic motion on the bike, helping to minimize the amount of watts/time/motion wasted because of pedal stroke style. PowerStroke is an optional upgrade key that can be purchased for any iBike Newton or Newton. The Newton PowerStroke+ comes with PowerStroke feature pre-installed. The PowerStroke key enables very high data recording rates in the Newton—16 data records per second, vs. 1 data record per second without PowerStroke. PowerStroke data is analyzed in Isaac software to provide Wasted Motion, Wasted Time, and Wasted Power measurements. See the Isaac Software Instructions for more details. Enabling PowerStroke Feature You must purchase and install the PowerStroke upgrade key, available from the iBike Store at www.ibikesports.com. Recording PowerStroke Ride Files Once the PowerStroke key is installed, your Newton settings will be changed so that PowerStroke recording (Fast Recording) is normally ON. NOTICE: The fast recording used by PowerStroke consumes a LOT of memory! Depending on model, you’ll get about 26 hours of ride time with PowerStroke TIP: When using PowerStroke, download your ride file after each ride, and then erase your ride memory before starting your next PowerStroke ride. When PowerStroke recording is enabled, each time your Newton awakens from sleep, a message will be shown on your screen, reminding you that Fast Recording is being used:
When you see the screen above, you will have two options:
1) Click any button to accept. Your ride will be recorded in PowerStroke mode 2) Press-hold the center button. The word “On” will start to flash. Click the up arrow,
and the word will change to flashing “Off”. Click the center button to accept. PowerStroke recording will be turned off.
TIP: YOU CAN TURN ON POWERSTROKE RECORDING AT ANY TIME. ENTER SETUP, THEN USE UP ARROW TO SELECT THE “FAST REC” SCREEN. CLICK THE CENTER BUTTON, THEN SELECT “On” WITH THE UP ARROW. CLICK THE CENTER BUTTON TO ACCEPT.

Copyright Velocomp LLP 2005-2013
43
TROUBLESHOOTING Problem: The Newton screen is blank even when I click the buttons Possible causes:
1) The Newton battery is dead. Recharge your battery 2) The Newton requires rebooting. Simultaneously press left/down/right/center
buttons 3) A firmware update has been interrupted during loading and has “frozen” the
Newton. Contact us at [email protected] to diagnose. Problem: The Newton screen doesn’t show bike speed Possible causes:
1) The spoke magnet is not properly positioned. The spoke magnet must pass by the vertical notch of the sensor, no more than 1-2 coin widths from the sensor.
2) The wireless speed sensor battery is dead or is not installed. Replace the battery in the sensor.
3) Sensor is defective. Email or call iBike technical support for assistance. 4) Tire circumference has been set to zero in the Setup screen. Set tire circumference properly.
Problem: Power readings seem to be “off” for the entire ride Possible causes:
1) Basic information was not entered. See pages 7-8 to correct. 2) Calibration ride was not performed. See pages 5-6 to correct. 3) Newton handlebar mount rotates on handlebars. Make sure to use double-sided stickies when installing the mount! If needed, tighten mount: see instructions to correct, then recalibrate. 4) Wind sensor has obstructed access to wind (hands, aero bars.). See instructions to correct. 5) Coast Downs were done improperly. Go to the USER sequence and perform the “EST AERO” procedure.
Problem: Power readings seem to be “off” for first five minutes only, then become “normal” Possible causes:
1) Mount has been rotated. Ride for five minutes, after which watts will become normal. Then do a trip reset and the problem will self-correct.
Problem: I get very low watts readings or zero watts readings. Possible causes:
1) Your cadence sensor has been bumped away from the cadence magnet. Make sure the cadence magnet passes within two coin thicknesses of the cadence sensor. When cadence is zero, watts are zero.
2) CAL RIDE was done improperly. Perform a Cal Ride. 3) Drag coefficients have been set to zero. You can check this going to Setup/Racr/Yes, and scrolling to read the aero coefficient (“CSt Aero”). Click again to read the frictional coefficient. If either is zero, do a new EST Aero. 4) Tire circumference has accidentally been set to zero. Check this by going to Setup/Tire Circ (tire circumference). If zero, set to correct value.

Copyright Velocomp LLP 2005-2013
44
Problem: Unit locks-up (screen displays numbers but buttons don’t work) To correct this condition, perform a “Hard Reset” by press-holding the left, bottom,
right, and center buttons simultaneously. Release the buttons when the screen goes blank. Problem: I can’t download data to my computer and/or upload data to my Newton Possible causes:
1) Newton is sleeping (nothing is visible on the display screen). Click the center button to turn on the Newton and make its display visible.
2) USB cable isn’t plugged into your computer. 3) USB cable isn’t plugged in to your Newton 4) Isaac software and/or USB drivers are installed improperly. Contact Technical
Support for assistance, [email protected]

Copyright Velocomp LLP 2005-2013
45
APPENDIX 1 FTP, NP, TSS, AND IF: WHAT ARE THEY, AND HOW DO I BENEFIT FROM THEM? Your Newton includes Normalized PowerTM(NP), Training Stress ScoreTM (TSS), and Intensity FactorTM (IF) measurements. If you are a seasoned veteran of power training, you realize how important this information can be, and how great it is that the Newton can display this information on the road. TSS, IF, and NP were developed by well-known exercise physiologist Dr. Andrew R. Coggan. These three measurements use the “raw” power data from your Newton, along with sophisticated mathematical formulas, to provide more detailed information about the intensity and quality of your workouts. If you have never heard of these three useful factors, then keep reading to find out what they are and how they can help you get the most out of your workouts and your fitness improvement goals. Getting Started: Determining Your Functional Threshold Power (FTP) Before you can obtain TSS, IF and NP measurements you need to have a “baseline” that characterizes your current level of fitness. This reference point is called your “Functional Threshold Power”, or FTP. One way to determine your FTP is to do a one hour Time Trial; your average watts for that one hour period is your FTP. Another way to estimate your FTP is by using the Newton’s 20 minute fitness test. The Newton 20 minute fitness test is similar to a time trial, just shorter in time. To estimate your FTP from the Newton fitness test, take the watts per kilogram number shown in your “FIT TEST” screen, multiply that number by your weight (in kilograms), then multiply that number by 0.95. For example, if your W/KG measurement is 3.02 and your weight is 81KG, then your estimated FTP is 3.02 *81 *.95 = 233W. Once you have determined your FTP number from either method, you must enter that value into the Newton. Go to Setup/FTP CFG (FTP Configuration). Click the center button, then use the arrows to enter your FTP in watts. Click the center button to Accept. If you’re training regularly you’ll want to check your FTP about once a month. Normalized Power (NP) Have you ever participated in a group ride where your watts are never steady? Group rides can be very difficult, but afterwards you might suspect that your average watts don’t accurately reflect how difficult the ride was. The disparity between measured and perceived effort is due to coasting, surging, using brakes, and soft pedaling. In fact, your average watts will be lower than your perceived effort suggests. This is where Normalized Power (NP) comes in. NP takes your “raw” power data and gives you a related power measurement number (reported in watts) that better represents the “tax” on your body for the ride, especially when you’re varying your power output considerably from moment to moment. For example, in a criterium, the NP number will be much higher than the average power because the NP measurement does a better job of accounting for the effects of coasting and large power surges. The NP number will be more representative your effort for the

Copyright Velocomp LLP 2005-2013
46
ride. In events such as a time trial or climbing hills where the wattage holds very steady, NP and average power will be very close to each other because you pedal almost all the time. Using Intensity Factor (IF) to gauge the difficulty of your Workout If you do cycling workouts regularly you know that some of your workouts are more intense than others. Average power and NP alone won’t quantify the intensity of your workout, because the intensity of a workout is not based on power output alone but also the time length of your workout and how hard you work during each moment of your workout. Normalized Power (NP) and Functional Threshold Power (FTP) can be used together to quantify the overall intensity of each of your workouts. The Intensity Factor (IF) is very simple to calculate: divide your NP by your FTP. The number IF represents the intensity of your workout as compared to the effort you expend in a one hour Time Trial. So, an IF of 1.0 represents a time trial effort and in theory can only be maintained for an hour. One of the great things about an IF measurement is that you can manage your training schedule to make sure you’re training hard, but not training too hard. Here are some values for IF and the kind of rides they represent:
• Less than 0.75 - recovery rides • 0.75-0.85 - endurance-paced training rides • 0.85-0.95 - tempo rides, aerobic and anaerobic interval workouts (work and rest periods combined), longer (>2.5 h) road races • 0.95-1.05 - lactate threshold intervals (work period only), shorter (<2.5 h) road races, criteriums, circuit races, longer (e.g., 40 km) TTs • 1.05-1.15 - shorter (e.g., 15 km) TTs, 10 minute hill climb • Greater than 1.15 - prologue TT, track pursuit, 5 minute hill climb
One more way to gauge your workouts: Training Stress Score We now know the true tax on our body (NP), and how intense each workout is (IF) compared to a reference one hour TT, but there is still one more thing to think about. For example, what is the comparative stress on the body from riding at 50% of our FTP for two hours, compared to a 100% FTP effort for one hour? A simple number called Training Stress Score (TSS) allows you to quantify and compare your different workouts, even when they are considerably different in time length and power intensity. TSS is designed to give you a numeric value for each ride that tells you how much training load was on your body for that day’s ride. A TSS of 100 equals an hour at an IF of 1.0. So, if you were out for a fairly easy four hour ride, and accumulated 200 TSS points, it’s the same training load as doing two hours at time trial pace. Importantly, TSS also quantifies how tired you can expect to be after a workout and how long the residual fatigue might last.
• Less than 150 - low (recovery generally complete by following day) • 150-300 - medium (some residual fatigue may be present the next day, but gone by 2nd day) • 300-450 - high (some residual fatigue may be present even after 2 days) • Greater than 450 - very high (residual fatigue lasting several days likely)

Copyright Velocomp LLP 2005-2013
47
Where to find your TSS, IF and NP factors in your Newton screen After each ride you’ll find your TSS, IF and NP measurements in the Totals screens (left arrow). Click the left arrow to find your scores. Whenever you do a Trip Reset (press-hold center button, then click to confirm) these three measurements will be reset to zero. Summary By looking at your TSS, IF and NP numbers after each ride you can track your workouts based on data from your own personal FTP number. Furthermore, these three metrics can be used to diagnose workouts and even prescribe rest days. If you can normally ride two hours at an IF of .9, but today you really struggled, it might be time for a couple of easy recovery rides (IF of under .7). Using this information can make your Newton power data even more personalized to you, and help you maximize the effectiveness of your training. For more detailed explanations of NP, IF, and TSS, see the Trainingpeaks article at: http://home.trainingpeaks.com/articles/cycling/normalized-power-intensity-factor- training-stress-score.aspx TSS™ is a trademark of Peaksware, LLC Training Stress Score™ is a trademark of Peaksware, LLC IF™ is a trademark of Peaksware, LLC Intensity Factor™ is a trademark of Peaksware, LLC NP™ is a trademark of Peaksware, LLC Normalized Power is a trademark of Peaksware, LLC
Copyright Velocomp LLP 2005-2013
48
APPENDIX 2: FREQUENTLY ASKED QUESTIONS WHERE DO I FIND THE SERIAL NUMBER FOR MY NEWTON? The serial number is stored in your Newton’s internal memory. You obtain the serial number using the Isaac software. Consult your Isaac software manual for serial number downloading instructions. HOW DOES THE NEWTON® POWER METER WORK? The iBike Newton power meter uses a revolutionary approach to power measurement that is based on Newton’s third law:
“For every action there is an equal and opposite reaction” In bicycling terms, this means that the factors causing the cyclist to expend power during a bike ride (hill climbing; opposing wind; tire, bearing and other losses; bike acceleration) are equaled by the power applied through the pedals by the rider. With the exception of the Newton, all other high performance power meters determine power by measuring the forces applied by the rider to the pedal. Directly measuring applied pedal force is an accurate way to derive power, provided the cyclist is willing to accept the weight, cost, installation, inflexibility, and operational penalties that are characteristic of a direct-force power meter (DFPM). In radical contrast, the Newton uses state-of-the-art sensors, along with new and patented technology, to measure the opposing forces that cause the cyclist to expend power: opposing wind, hill climbs, bike acceleration, and rolling friction of the bike and tires. A powerful microprocessor, programmed with proprietary DSP filters and real-time solutions to the dynamic power equation, processes the output from the Newton sensors many times per second, computing the total power demands created by hill slope, wind, etc. And thanks to Newton’s third law, measuring the power consumed by hill climbing, overcoming wind resistance, etc. provides a comprehensive and accurate measurement of the power generated by the cyclist. The Newton uses four sensors:
o an accelerometer to measure hill slope and bike acceleration/deceleration forces,
o a differential pressure sensor to measure wind speed forces, o an absolute pressure sensor to measure elevation gain, and o a wheel pickup to measure bike speed.
All sensors except the wheel pickup are located within the Newton housing, making it possible to use the Newton, quickly and easily, on all of your bicycles. HOW IS HILL SLOPE CALCULATED? When you climb a hill your bike’s movement has two components of motion: the total distance traveled forward on the road, and the vertical distance traveled up the hill. The “Hill Slope” is the ratio of vertical movement to forward movement, expressed as a percentage.
Example: You travel 1000 feet forward and climb 100 feet vertically. Your hill slope is 100/1000 x 100% = 10%

Copyright Velocomp LLP 2005-2013
49
The accelerometer in the Newton measures hill slope instantaneously, much faster and more accurately than GPS or barometric pressure methods. HOW ACCURATE IS THE HILL SLOPE MEASUREMENT? Your Newton uses an accelerometer that measures hill slope and bike acceleration simultaneously. When your bike is at rest or you ride at a constant speed (in either case there is no bike acceleration) the hill slope displayed on your screen is very accurate (within 0.1% of the actual slope). When you are accelerating on your bike (going faster, coasting on a downhill, or braking) the hill slope may jump around a bit because the accelerometer not only senses hill slope but bike acceleration as well. In this circumstance the hill slope displayed on the screen will be only approximately correct (generally within 1% of actual slope). NOTE, HOWEVER, THAT WATTS ARE CALCULATED WITH HIGH PRECISION UNDER THESE RIDING CONDITIONS, including those where the hill slope displayed is “off”. WHAT IS THE RELATIONSHIP BETWEEN THE AERODYNAMIC AND FRICTIONAL DRAG COEFFICIENTS THE Newton MEASURES, AND CdA AND Crr? The Newton measures aerodynamic and frictional drag coefficients in the coast down calibration. The numbers measured and reported on the Newton screens (“aero” and “fric”) are related to, but not the same as, CdA and Crr. The value of aero can vary from 0.2 to 1.5, depending on the location of the Newton on the handlebars. The value of fric can vary from 5.00 to 25.00, depending on the weight of the rider.
NOTE: The Isaac software will report drag coefficients in CdA and Crr format. See the Newton software instructions for more details.
WHAT ARE TYPICAL VALUES OF CDA AND CRR? CdA (coefficient of aerodynamic drag) is dependent mostly on ride position, rider height, and rider weight. Lower CdA means less effort is required to overcome opposing wind. The time trial position results in the lowest values of CdA: numbers between 0.22 and 0.28 are typical. The specific value will depend considerably on the details of bike type, rider position, and rider size. The “drops” position is not as aerodynamically efficient. Values between 0.32 and 0.38 are typical. The “hoods” position (hands grasping the brake levers) is the most typical riding position. CdA values of 0.34 to 0.43 are typical. The CdA of a cyclist riding a comfort bike can be 0.45 or higher. Crr (coefficient of rolling resistance) measures the amount of opposing friction caused by road surface, tire type, and bearing friction. A low value of Crr means low rolling resistance. On a very smooth surface, such as those found at an indoor track, Crr can be 0.003. Asphalt roads have a typical Crr of 0.0055, and dirt roads can have Crr values of 0.008 or higher. Values of CdA and Crr are accurately estimated by Isaac Dial-in Wizards, or they can be measured by the Coast Down procedure.
Copyright Velocomp LLP 2005-2013
50
WHAT DOES “HEADWIND” MEAN? The headwind speed that is displayed by your Newton is the TOTAL magnitude of wind blowing directly in your face as you pedal. A few examples make this easy to understand:
• You ride at 15mph directly into a 12 mph headwind. The Newton will read 27 mph headwind.
• You’re going 18 mph and there is a cross wind of 10 mph. The Newton will display
18 mph as the headwind (remember, you’re riding perpendicular to the wind’s direction.)
• You’re going 20mph and there is a tailwind of 10mph. Your Newton reads
10mph as the headwind (it knows you’re getting a bit of a free ride from mother nature!)
NOTE: WITH “ABS WIND/YES” YOUR NEWTON WILL REPORT THE ACTUAL WIND SPEED.
UNDER WHAT CONDITIONS CAN THE NEWTON BE “LESS ACCURATE”? There are two extreme riding situations where it is difficult for the Newton to measure watts with highest accuracy:
1) Sharp turns such as hair-pin turns. During sharp turns, where your handlebars are pointed into the turn, your watts may read low. As soon as the turn ends your watt readings will return to full accuracy.
2) When pedaling at high speed in a tuck. While pedaling on downhills, any minor variation in ride position from your normal ride position (such as going into a tuck to pick up more speed), or any error in your drag coefficient measurement, can cause a false watts reading. The reason is simple: wind resistance varies as the cube of your speed, so high speeds “amplify” enormously the watts errors caused by ride position changes. As a practical matter, most riders DON’T pedal on downhills (it’s a very poor use of rider energy) and when not pedaling, any Newton with a cadence mount will report zero watts. WHAT CAN I DO TO GET THE MOST ACCURATE RESULTS FROM MY NEWTON? Your Newton will work extremely well when it is properly calibrated:
1) Perform the Fast Start sequence AND the Cal Ride. For the highest level of accuracy, you may also perform multiple Coast Downs after completing the Cal Ride. Make sure to use the Newton software to analyze your Cal Ride/Coast Down data.
2) If you don’t pedal on down hills, the cadence sensor will force watts to zero whenever zero cadence is detected.
HOW DOES THE NEWTON MEASURE TEMPERATURE? The Newton measures the temperature at the wind port. If you’ve been riding and air is moving around your Newton, the temperature displayed will be close to the outdoor temperature. However, if your Newton has been sitting in the hot sun, without airflow over it, the display could show a significantly higher temperature.
NOTE: if you own a BLACK Newton, it will tend to over-report temperature by about 10F-15F, particularly in sunny weather.
Copyright Velocomp LLP 2005-2013
51
I PURCHASED A FIRMWARE KEY FOR MY NEWTON. WHAT HAPPENS NEXT? You will receive an email asking you to send us the serial number of your Newton. After we receive your serial number we will email your firmware key to load into your Newton with Isaac software. WHAT IS “TOTAL VERTICAL CLIMBED”? Any time you climb, the Newton will accumulate the amount of elevation gain.
Example: You climb a 100 foot hill, then descend 50 feet downhill, then slowly climb another 25 feet, and then ride back to your starting spot, descending 75 feet along the way. The Newton will show your Total Vertical as 100 + 25 = 125 feet.
DOES “TRIP RESET” ZERO-OUT SETUP, CALIBRATION, AND PREVIOUS RIDE DATA? No! Your total odometer, tilt and coast down calibrations, wireless IDs, and other profile information are unaffected by trip reset. Also, any ride files recorded from prior rides is unaffected. IS THE NEWTON SUITABLE FOR RAINY RIDES? Yes! Your Newton was designed to be water resistant so don’t worry if you get it wet. If the front port becomes filled with water your power readings may be wrong. To correct this problem, remove your Newton, blow the water out of the front port, and dry your mount and underside of the Newton with a dry cloth. Replace and continue on your ride.
TIP: IF YOU RIDE OFTEN IN RAINY CONDITIONS, CONSIDER PURCHASING THE OPTIONAL REMOTE WIND SENSOR (RWS). THE RWS WILL KEEP RAIN FROM FILLING THE NEWTON’S WIND PORT AND WILL IMPROVE WATTS ACCURACY DURING RAINY RIDES.
HOW DO I HARD RESET THE NEWTON? Your Newton contains a microprocessor. It is possible, though extremely unlikely, that your Newton might “freeze”. Symptoms of a freeze include: the buttons do not function properly, the screens are frozen, or you can’t download rides. A Hard Reset will fix this problem. To do a “hard reset” press-hold the left, bottom, right, and center buttons simultaneously. The screen will go blank. Release the buttons to restart.
NOTICE: AFTER YOU DO A HARD RESET YOU WILL NEED TO RESET THE DATE AND TIME IN YOUR NEWTON. HOWEVER, YOU WILL NOT NEED TO RE-ENTER WEIGHT, TIRE CIRCUMFERENCE, AND CALIBRATION DATA. THAT DATA IS STORED PERMANENTLY IN THE NEWTON’S NON-VOLATILE MEMORY. ALSO, ALL OF YOUR STORED RIDE FILES WILL REMAIN IN YOUR NEWTON AFTER A HARD RESET.
OTHER QUESTIONS? Please contact us anytime with your questions: [email protected]