i. software installation. software installation ... the screen, it will guide you through the whole...
TRANSCRIPT

I. Software Installation
To start Mylocksmith PC version installation from CD ROM, you can simply click on the link “Install MylockSmith PC 2.01” in the main menu, or go to D:\Appsetup (Where D:\ is your CD/DVD ROM drive) and run the setup.exe file. Once the installation starts you can just follow the instructions on the screen, it will guide you through the whole process.
Step 1: Before you start the program, you need to connect the connectivity kit to the serial port of the PC which the Mylocksmith 2.01 has been installed on. Step 2: To run Mylocksmith program from the Start\Program menu. First window you will see is the “1-wire interface” window. This window is to configure or detect which COM port on your computer is being used for the blue dot receptor (connectivity kit). If this is your first time using the program, click on the “Auto Detect” button to let the program find 1-wire connection port. After this process is 100% done, click ok to exit “1-wire interface” window.
For first time users, please start with the “Instruction for First Time User” before doing the mission script.
If you need to know the details of how to use one of the mission scripts, see details in “Mission Scripts” section.
II. Instruction For First time user
1. Add user key and SiB key to the key management table.
?? Click on the Key Management tag. ?? Insert ibutton key to the blue dot receptor, a
ROM ID number appears in the key ID field. Assign the user profile to this ID. Repeat this step until all assigned keys have been added to the key list.
?? Owner Name is required field. No duplicate names are allowed in the database. (Any alphabetical and numerical characters and symbols can be used, and it's not case sensitive.)
2. Add lock to the lock management table. ?? Click on the Lock Management tag. ?? You can manually enter the lock ID to the
table, the lock ID can be found on the inside of
the lock, or you can use the "Get lock configuration mission" to retrieve it from the lock. Please follow the instruction in the "Mission Script" section.
3. Apply local real time to the lock. ?? The real time is PC time, and can be edited
during the mission. ?? This is a necessary step for running audit trail
mission in the future. For detail please see "Set time of lock mission script".
4. Set the timetable and load it to the lock. Go to "Set Timetable Mission".
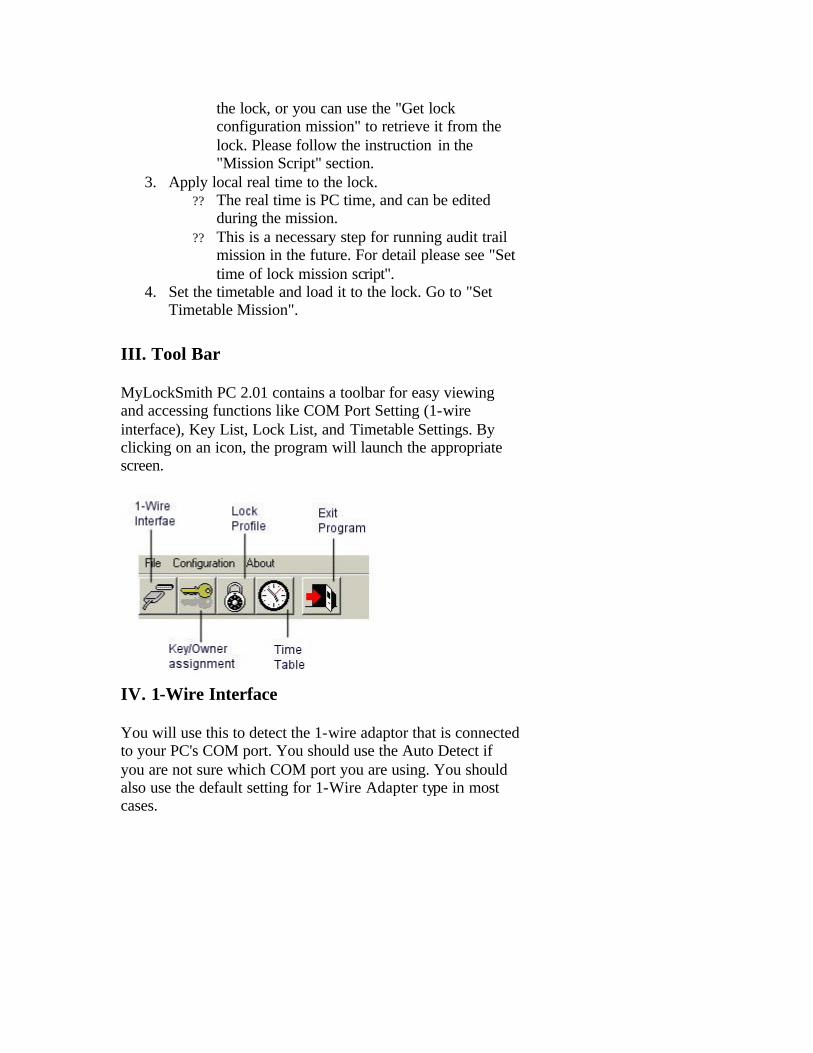
III. Tool Bar
MyLockSmith PC 2.01 contains a toolbar for easy viewing and accessing functions like COM Port Setting (1-wire interface), Key List, Lock List, and Timetable Settings. By clicking on an icon, the program will launch the appropriate screen.
IV. 1-Wire Interface
You will use this to detect the 1-wire adaptor that is connected to your PC's COM port. You should use the Auto Detect if you are not sure which COM port you are using. You should also use the default setting for 1-Wire Adapter type in most cases.

V. Key Owner Assignment
This window shows a list of the key owners. You can edit the user information here, but you cannot add new user in this screen.
VI. Lock Profile
Edit Lock Location. Depending on the license you buy, there is restriction of the lock amount you can store in the database. Contact the sales person for the detail if you need upgrade the license number.

VII. Timetable
There are total 16 groups of time shift and 8 groups of Activation/Expiration for each lock. Timetable needs to be preset and upload to each lock before you assign the key to the time- limited key. Every time when you need to change group information, reload the timetable to the lock before the assignment.
VIII. Key Owner Registration
Enter the information to each field following the field definitions and instructions below.

iButton Key ID: Attach the iButton Key to the blue dot receiver, the ID number will appear automatically. This field is mandatory. Login User Name / Password: If this key is allowed to manage this database, assign the user name and password here. Otherwise, leave these two fields blank. Owner First Name / Last Name: These two fields are mandatory. The combination of first & last name has to be unique. If you need to assign two keys to one owner, use different owner name. (e.g. John, John1) Address: This field is part of the user profile, it's an optional field. Contact Information: This field is part of the user profile, it's an optional field. Title: This field is part of the user profile, it's an optional field. Status: Either active or inactive. This field is part of user profile, it's an optional field.
FYI: If the iButton key has been previously assigned, no duplicate assignments are allowed. However, you can re-assign it by modifying the owner information. Program is ready to scan a new iButton key when the blinking green light is observed at the bottom left corner of this window. If the green light turns still, no new iButton is accepted until the light starts flashing again.

IX. Lock Registration
1. Manual Registration: Lock ID can be located in the package of the lock box, or at the inside of the lock. It is a 16 digital ID ending with 95. (e.g. 019 DD0010B000558795) Lock Location: This is a description of the physical location of an installed lock, such as building or room / door number or name.

2. Mission Registration: Please follow the Lock Mission instructions accordingly. Step 1: Initialize the Sync iButton (SiB). Step 2: Go to the lock to do the "Get lock configuration" script. Step 3: Upload the Sync to the PC. Step 4: Assign the Lock Location.
FYI: The total number of locks each database will hold is solely based upon the license level purchased. If this is a 5 locks license, only 5 locks can be stored in the database. If you need an upgrade to a higher license level, please contact UCA sales department for detail information.
X. Mission Scripts
1. Step One: Select a lock from the lock list. ?? Select one of locks from the lock list, click on the Add Lock button to add it
to the right window for mission script. OR ?? Universal Default: If the SiB has been registered as legal SiB to the lock, a
serial click sound will be heard when touching it onto the Blue Dot receptor. This indicates that the lock is searching for its missions in the SiB. If no associated mission for the lock is found by comparing the mission ID with

lock's ROM ID, Universal Default Mission will be run at the end of the search. OR
?? Universal Initialization: Universal means it will run in any Blue Dot Locks. ?? When the Reset Button is pressed, bright blinking light is seen along with
THREE loud tones and Five click tones. Before the five click tones end, touch your SiB which contains the Universal Initialization Mission to the Blue Dot. The mission script associated with the Universal Initialization* Mission will now be run by the Lock.

2. Step Two: Select Mission from list. ?? Add key list - There are 4 attributions that can be assigned to key.
o Sync Key: only 1996 iButton can be assigned as Sync Key. o Standard Key: User key. All iButton serial can be assigned as a user
key. o Lock Down Key: This key acts like a master key. It locks all other
keys from accessing the lock, until the lock sees another Lockdown Key.
o Keypad digital 1-4: The combination of 4 different keys can be used as an emergency key for the lock. It is used when all the other keys are not available for the lock.
o Time limited key: This key can be used only in the assigned time zone. It is associated with the timetable.

?? Adjust lock memory size o Without any expand-chip (EC) 1996, this stand-alone lock can hold
up to 15 keys. Its Audit trail size is 570. With an extra EC1996, the key list amounts to 256. The Audit trail memory, however, is reduced to 410. With more EC1996 applied, more keys can be assigned to the lock, but less Audit trail records can be held. Thus, download the audit records more often if you have 2-4 expand chips added.
o Audit records run from space1 thru #(depending on the setting in this mission). Once it reaches the last space, it will go back to rewrite at #1 space, erasing all previous data. BE SURE to download records often to prevent losing the audit records.
?? Delete key list o Select the key from the key list. (similar step as Add Key List)

?? Disable/Enable beacon blinking o Disable the beacon blinking is to save energy of the battery. o Enable the beacon blinking is very useful for in-the-dark entrance.
?? Erase all keys o All keys will be erased from lock memory.
?? Get audit trail records o You can set the number of records to download. o Audit trail events: "Invalid Key, ......" o Options to view the records: 1. Select time frame. 2. View by lock or
key or User.

?? Get lock configuration o This is the same mission as the Mission Lock Registration. o Select Universal Initialization to do the lock configuration. One
mission can scan all the locks at the same time. For example, you have 5 locks that need configuration, only one mission script run is needed. Collect information from each lock, then upload all information to the PC. Information for all 5 locks will be uploaded during the same mission.
?? Load time table to the lock o Set timetable by selecting the clock icon from the top menu bar: How
to set time. o For any changes made to the timetable setting, all information needs
to be re-uploaded to the lock. ?? Relock lock
o Lock the lock set when no keys available. ?? Set actuator pause time
o For storehouse lock mode, the pause time between unlock & relock can be set. For example, Setting of 50 resolution of 0.1sec will be 5 sec pause time.

?? Set classroom mode o A lock that will lock or unlock for each valid user key touch.
?? Set daylight saving time o Adjust the real clock at the inside of the lock to Daylight saving time.
?? Set lock actuator mode o Select Motor type or Solenoid Type. o Select Storehouse Mode or Classroom Mode.
?? Set storehouse mode o Lock will automatically relock itself in "N" second after unlocking.
"N" can be set from this mission. ?? Set time of lock

o Set lock real time to the lock clock. It is very important to do this mission in order to get accurate audit trail records, and set time limited key.
o Time is PC time, can be modified from the mission.
?? Test lock o Test current lock mode.
?? Unlock lock o Unlock the lock when no valid keys are available.
3. Step Three: Initialize the Sync iButton. 4. Step Four: Go to the lock to give order. 5. Step Five: Come back to PC to upload if needed. (For "get lock configuration" and
"audit trail" missions only.)
XI. User Access List
View the key / lock relation by selecting View by Lock, View by Key or View by User.

XII. Register the software
Go to the pull down menu "About", select "Register", the following window will appear.

Click on the "Modify Information" button, fill in the User Full Name, License Number, the Software ID number will automatically show up in the window. Email all three information to: [email protected], or go to Online Register. We will email you a registration number once we receive your request. After you have received the registration number, repeat the step above if you have closed the program and fill in the registration part, and click "Register to this PC".
Click Yes, if you see a successful message, the registration is done. Note: All the fields are case sensitive.
