i n t e g r a t i o n 7 . s a l e s f o r c e a n d a p p ... fileinformation, see the s a l e s f o...
TRANSCRIPT

Informatica® Cloud Application IntegrationWinter 2019
7. Salesforce and Application Integration

Informatica Cloud Application Integration 7. Salesforce and Application IntegrationWinter 2019March 2019
© Copyright Informatica LLC 1993, 2019
Publication Date: 2019-03-07

Table of Contents
Preface . . . . . . . . . . . . . . . . . . . . . . . . . . . . . . . . . . . . . . . . . . . . . . . . . . . . . . . . . . . . . . . . . . . . . . 4
Chapter 1: Salesforce Managed Package. . . . . . . . . . . . . . . . . . . . . . . . . . . . . . . . . . . . . . 5Salesforce Managed Package Overview. . . . . . . . . . . . . . . . . . . . . . . . . . . . . . . . . . . . . . . . 5
Salesforce Managed Package URLs. . . . . . . . . . . . . . . . . . . . . . . . . . . . . . . . . . . . . . . . . . . 5
Installing the Managed Package. . . . . . . . . . . . . . . . . . . . . . . . . . . . . . . . . . . . . . . . . . . . . 6
Uninstalling and Deleting the Managed Package. . . . . . . . . . . . . . . . . . . . . . . . . . . . . . . . . . . 9
More Information. . . . . . . . . . . . . . . . . . . . . . . . . . . . . . . . . . . . . . . . . . . . . . . . . . . . . . 10
Chapter 2: Running a Guide Within a Salesforce Organization. . . . . . . . . . . . . . . . 11Running a Guide Within a Salesforce Organization Overview. . . . . . . . . . . . . . . . . . . . . . . . . . 11
Step 1: Install the Salesforce Managed Package. . . . . . . . . . . . . . . . . . . . . . . . . . . . . . . . . . 11
Step 2: Synchronize Salesforce with Application Integration Assets. . . . . . . . . . . . . . . . . . . . . 12
Step 3: Create a Salesforce Connection. . . . . . . . . . . . . . . . . . . . . . . . . . . . . . . . . . . . . . . 12
Step 4: Create and Publish the Guide. . . . . . . . . . . . . . . . . . . . . . . . . . . . . . . . . . . . . . . . . 12
Step 5: Set Up Salesforce to View Guides. . . . . . . . . . . . . . . . . . . . . . . . . . . . . . . . . . . . . . 13
Chapter 3: Techniques. . . . . . . . . . . . . . . . . . . . . . . . . . . . . . . . . . . . . . . . . . . . . . . . . . . . . . 16Techniques Overview. . . . . . . . . . . . . . . . . . . . . . . . . . . . . . . . . . . . . . . . . . . . . . . . . . . 16
Checking for Duplicate Leads and Contacts. . . . . . . . . . . . . . . . . . . . . . . . . . . . . . . . . . . . . 16
Email Actions (Salesforce). . . . . . . . . . . . . . . . . . . . . . . . . . . . . . . . . . . . . . . . . . . . . . . . 20
Chapter 4: Customizing Salesforce. . . . . . . . . . . . . . . . . . . . . . . . . . . . . . . . . . . . . . . . . . 25Customizing Salesforce Overview. . . . . . . . . . . . . . . . . . . . . . . . . . . . . . . . . . . . . . . . . . . 25
Creating a Button or Link to Launch a Guide. . . . . . . . . . . . . . . . . . . . . . . . . . . . . . . . . . . . . 25
Creating a Visualforce Page. . . . . . . . . . . . . . . . . . . . . . . . . . . . . . . . . . . . . . . . . . . . 26
Update the Security for the Visualforce Page. . . . . . . . . . . . . . . . . . . . . . . . . . . . . . . . . 27
Update the Page Layout. . . . . . . . . . . . . . . . . . . . . . . . . . . . . . . . . . . . . . . . . . . . . . 29
Create a Button on the Salesforce Page. . . . . . . . . . . . . . . . . . . . . . . . . . . . . . . . . . . . 29
Launch the Guide. . . . . . . . . . . . . . . . . . . . . . . . . . . . . . . . . . . . . . . . . . . . . . . . . . . 31
Running a Guide When the User Clicks New. . . . . . . . . . . . . . . . . . . . . . . . . . . . . . . . . . . . . 31
Implementing Service Steps and Search Services. . . . . . . . . . . . . . . . . . . . . . . . . . . . . . . . . 32
Creating an Apex-based Service Call Step. . . . . . . . . . . . . . . . . . . . . . . . . . . . . . . . . . . 32
Custom Search Services. . . . . . . . . . . . . . . . . . . . . . . . . . . . . . . . . . . . . . . . . . . . . . 34
Synchronization. . . . . . . . . . . . . . . . . . . . . . . . . . . . . . . . . . . . . . . . . . . . . . . . . . . . 35
Table of Contents 3

PrefaceThe Salesforce and Application Integration guide provides information about the Salesforce Managed Package for Application Integration.
The guide contains the following information on the following topics:
• Installing the managed package
• Running a guides within Salesforce
• Tips on creating Salesforce guides
The Salesforce Managed Package for Informatica Cloud Real Time version 1.20 uses version 40.0 of the Salesforce API.
4

C h a p t e r 1
Salesforce Managed PackageThis chapter includes the following topics:
• Salesforce Managed Package Overview, 5
• Salesforce Managed Package URLs, 5
• Installing the Managed Package, 6
• Uninstalling and Deleting the Managed Package, 9
• More Information, 10
Salesforce Managed Package OverviewYou need the Informatica Cloud Real Time for Salesforce package (the 'managed package') to create the following artifacts:
• A Salesforce connection in Application Integration.
• A Salesforce outbound message (OBM) that triggers an Application Integration process. For more information, see the Salesforce Outbound Messages topic in the System Services, Listeners and Connectors section of the Design guide.
Salesforce Managed Package URLsThe Salesforce Managed Package for Informatica Cloud Real Time version 1.24 uses version 40.0 of the Salesforce API.
You can install or upgrade to the latest managed package, version 1.24.
Use the following URLs to install or upgrade to the latest managed package:
• To install the latest version, 1.24 use the following URL: https://login.salesforce.com/packaging/installPackage.apexp?p0=04t1J000000gOtF
• To install the latest sandbox version, use the following URL: http://test.salesforce.com/packaging/installPackage.apexp?p0=04t1J000000gOtF
5

Installing the Managed PackageBefore you install the managed package, make sure that your organization meets the following prerequisites:
• Your organization uses the Unlimited, Enterprise, or Professional edition of Salesforce.
• Salesforce APIs are enabled.
• You have administrative rights in the Salesforce organization where you want to install the managed package.
1. Depending on your business need, log in to your production or sandbox Salesforce developer account.
• Production: https://login.salesforce.com/packaging/installPackage.apexp?p0=04t1J000000gOtF
• Sandbox: http://test.salesforce.com/packaging/installPackage.apexp?p0=04t1J000000gOtF
2. Enter your Salesforce developer account user credentials.The install page appears where can choose to install the managed package for all users, for administrators only, or for selected users.
3. Select the option you want and click Install.
Note: Click View Components to see the detailed components of the managed package.
6 Chapter 1: Salesforce Managed Package
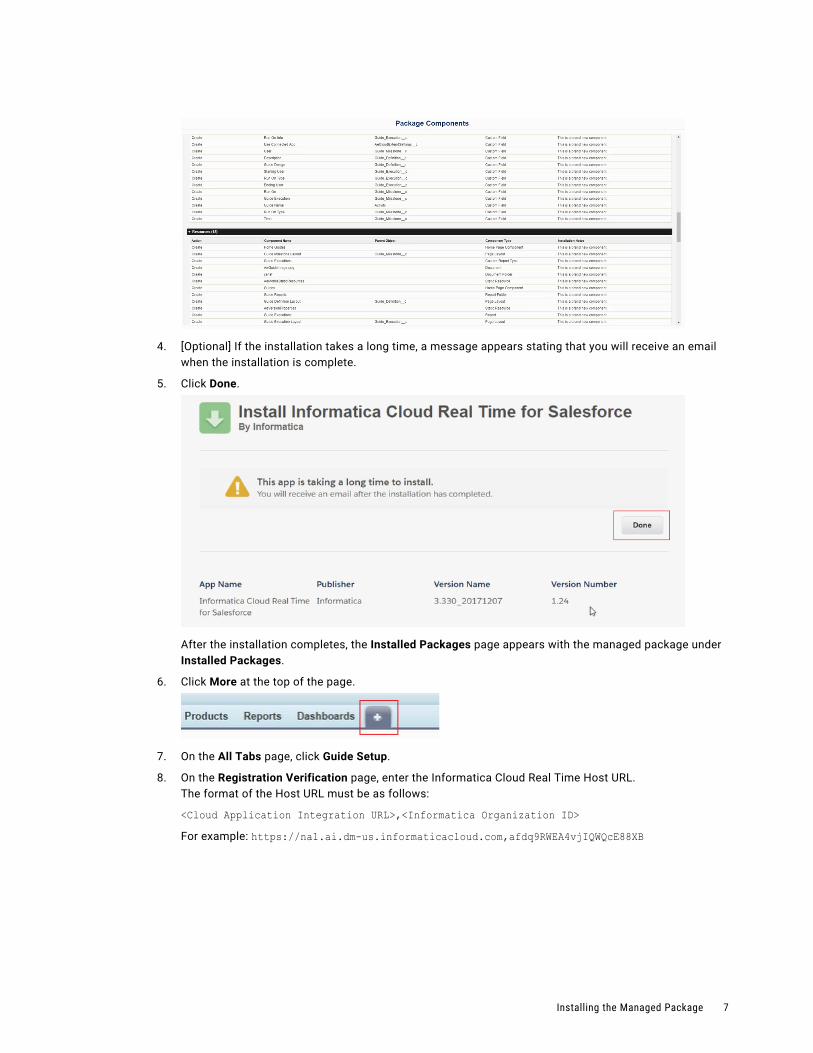
4. [Optional] If the installation takes a long time, a message appears stating that you will receive an email when the installation is complete.
5. Click Done.
After the installation completes, the Installed Packages page appears with the managed package under Installed Packages.
6. Click More at the top of the page.
7. On the All Tabs page, click Guide Setup.
8. On the Registration Verification page, enter the Informatica Cloud Real Time Host URL.The format of the Host URL must be as follows:
<Cloud Application Integration URL>,<Informatica Organization ID>For example: https://na1.ai.dm-us.informaticacloud.com,afdq9RWEA4vjIQWQcE88XB
Installing the Managed Package 7

To view your Cloud Application Integration URL, log in to Informatica Intelligent Cloud Services and select the Application Integration service. From the browser address bar, copy the URL from https till .com as shown in the following image:
To view your Informatica Organization ID, log in to Informatica Intelligent Cloud Services, select the Administrator service and then click Organization. Copy the Informatica Organization ID displayed in the ID field as shown in the following image:
9. Click Verify.You see the Informatica Cloud Services Authorization page.
8 Chapter 1: Salesforce Managed Package

10. Enter your Informatica Intelligent Cloud Services credentials and then click Log In.
Note: If your Informatica Intelligent Cloud Services organization was previously linked to another Salesforce organization, you might change the linked Salesforce organization when you install a managed package. For example, You have done steps 1 through 8 to install the managed package in Salesforce organization A. However, your Informatica Intelligent Cloud Services organization B is already linked to a Salesforce organization C. If you click confirm on the warning message that might appear in step 9, you link Informatica Intelligent Cloud Services organization B to Salesforce organisation A.
You have installed the Informatica Cloud Real Time for Salesforce package.
Uninstalling and Deleting the Managed PackageThe following steps detail the procedure to uninstall and delete the managed package:
1. Log in to your Salesforce developer account.
2. Under Quick Links > App, click Manage apps.
3. In the Apps list, click Informatica Cloud Real Time for Salesforce
4. Click Uninstall at the top of the page.
Uninstalling and Deleting the Managed Package 9

The Uninstalling a Package page appears with a list of all package components.
You have the option to save package data for 48 hours after you uninstall the package.
5. Click Uninstall.
A dialog box prompts you to confirm if you want to delete the package.
6. Click OK.The Informatica Cloud Real Time for Salesforce package appears in the Uninstalled section of the Installed Packages page.
7. If you did not delete the managed package in step 5, click Del under Action.
8. In the dialog box that prompts you to confirm if you want to delete the managed package, click OK.
More InformationTo learn more, see the Using Salesforce System Services, Listeners and Connectors section under Design.
10 Chapter 1: Salesforce Managed Package

C h a p t e r 2
Running a Guide Within a Salesforce Organization
This chapter includes the following topics:
• Running a Guide Within a Salesforce Organization Overview, 11
• Step 1: Install the Salesforce Managed Package, 11
• Step 2: Synchronize Salesforce with Application Integration Assets, 12
• Step 3: Create a Salesforce Connection, 12
• Step 4: Create and Publish the Guide, 12
• Step 5: Set Up Salesforce to View Guides, 13
Running a Guide Within a Salesforce Organization Overview
To run a guide from within your Salesforce organization, create a guide in Application Integration and select a Salesforce object in the Start > Applies To property.
Before you run a guide in Salesforce, you need to perform some tasks to prepare your organization.
Note: If you have migrated to the Informatica Intelligent Cloud Services, log in to Salesforce and verify that your guides are visible on the relevant Salesforce object pages. If you do not see your guides, log out of Salesforce, clear the browser cache, and then log in to Salesforce.
Step 1: Install the Salesforce Managed PackageLog in to Salesforce and install the Informatica Cloud Real Time for Salesforce package. The managed package connects your Informatica Intelligent Cloud Services and Salesforce accounts.
For information on how to install the managed package, see the Installing the Managed Package topic in the Salesforce Managed Package section of the online help.
11

Step 2: Synchronize Salesforce with Application Integration Assets
Before you set up your Salesforce account to run guides, synchronize Salesforce with Application Integration assets.
1. On the Salesforce Home page, click All Tabs.
2. Click Guide Setup and follow the instructions in the wizard.
Step 3: Create a Salesforce ConnectionLog in to Application Integration and create a Salesforce connection to the organization in which you installed the managed package. You must name the connection Salesforce.
For details on how to create a Salesforce connection, See the Salesforce Connector Guide in the Connectors section of the online help.
If you have an existing Salesforce connection, verify that the name of the connection is Salesforce and that the connection is published.
Step 4: Create and Publish the GuideLog in to Application Integration and create a new guide. In the properties section of the Start step, set the Start > Applies to property to a Salesforce object.
Note: If you set the property to Home, the guide appears on your Salesforce Home page.
Save and publish the guide.
The following image shows a guide that applies to the Salesforce Contact object:
12 Chapter 2: Running a Guide Within a Salesforce Organization
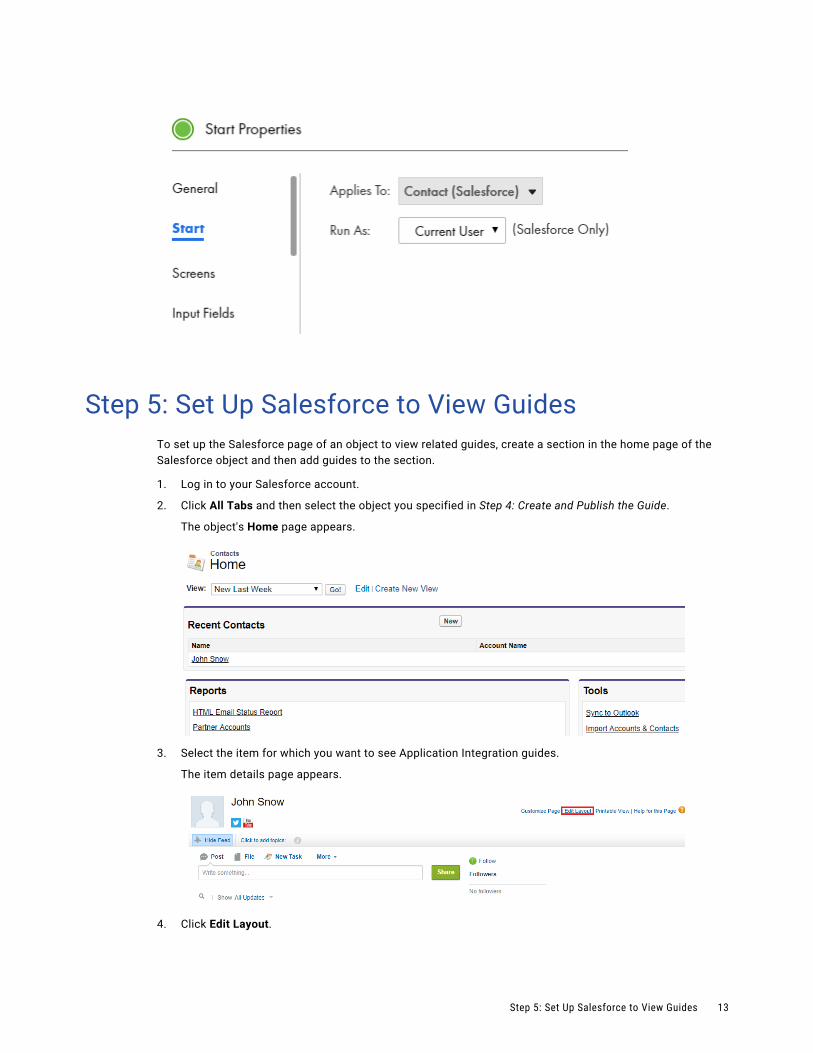
Step 5: Set Up Salesforce to View GuidesTo set up the Salesforce page of an object to view related guides, create a section in the home page of the Salesforce object and then add guides to the section.
1. Log in to your Salesforce account.
2. Click All Tabs and then select the object you specified in Step 4: Create and Publish the Guide.
The object's Home page appears.
3. Select the item for which you want to see Application Integration guides.
The item details page appears.
4. Click Edit Layout.
Step 5: Set Up Salesforce to View Guides 13

The Layout page appears.
5. Drag a Fields > Section onto the page layout area below.
The Section Properties dialog box appears.
.
6. In the Section Name field, enter Guides and then click OK.
A section called Guides appears in the page layout of the object.
7. From the top of the page, select Visualforce Pages and then select a guide.
14 Chapter 2: Running a Guide Within a Salesforce Organization

8. Drag the guide on to the Guides section of the page.
All published guides that apply to this Salesforce object appear as links here. Click a link to run the guide.
Step 5: Set Up Salesforce to View Guides 15

C h a p t e r 3
TechniquesThis chapter includes the following topics:
• Techniques Overview, 16
• Checking for Duplicate Leads and Contacts, 16
• Email Actions (Salesforce), 20
Techniques OverviewThis section explains some common techniques to design Salesforce guides.
Checking for Duplicate Leads and ContactsWhen entering a new lead or contact, you may want to check if it already exists. This topic demonstrates how to do this.
Here's what the completed guide looks like:
You can also download this guide. Be sure to right-click on "download" so that your browser does not try to read the file.
Step 1: Set Guide Properties
This is really the crucial step. The guide must access data of some kind but the fields do not exist into which they can be entered as the guide will not be associated with an object. You can create the fields that Guide Designer will use to store this data by using the Guide Fields tab.
16

Now that these fields exist, you can insert them in steps and the data that users enter can be used in searches.
The three fields created are:
• Search First Name
• Search Last Name
• Search Lead List
Notice that the type of the first two is Text and the last is Object ID. Guide Designer searches for the name. If it is found, it also has the object ID associated with the name. This means that the person was found.
You will want also want to set to create a guide that is not directly associated with a Salesforce object. Also, you should place it on the Home page so that users will have a place from which they can launch it.
Step 2: Create a Screen Step for entering a name
Create a Screen Step into which a user can type a first and last name.
Checking for Duplicate Leads and Contacts 17

Insert two updateable fields using the picklist. Notice that the three fields defined in the Guide Fields tab are there.
Step 3: Create a screen step for selecting a lead
In this step, you will need to set an inserted field's properties, as is shown in the next figure.
18 Chapter 3: Techniques

The step will display a list whose contents come from an object query. This query uses the contents of the fields that were filled in within the previous step as part of the query's Where clause.
Don't be concerned about the information within the curly braces "{}". If you use the Add Condition dialog, Guide Designer adds them for you.
After Guide Designer executes this step, it will show a four-column table. It will have the three columns entered within the Display Columns area and a fourth column containing radio buttons. If the lead is within the table, the user will select one of them.
Checking for Duplicate Leads and Contacts 19
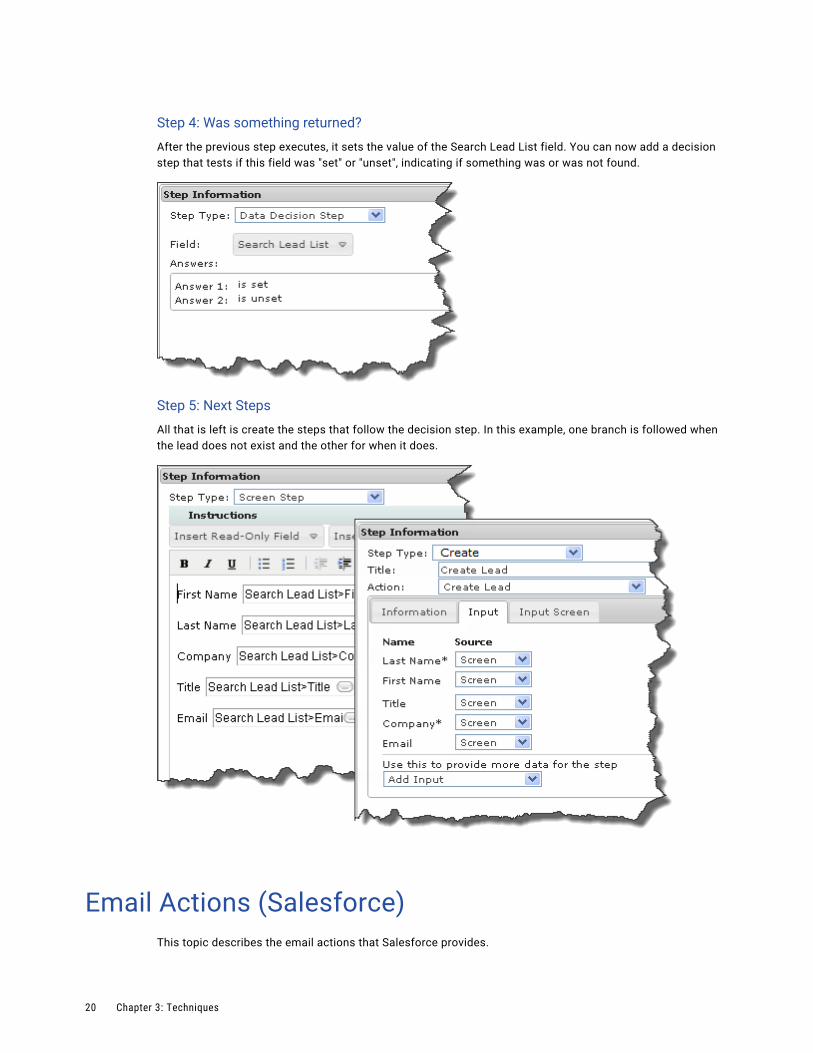
Step 4: Was something returned?
After the previous step executes, it sets the value of the Search Lead List field. You can now add a decision step that tests if this field was "set" or "unset", indicating if something was or was not found.
Step 5: Next Steps
All that is left is create the steps that follow the decision step. In this example, one branch is followed when the lead does not exist and the other for when it does.
Email Actions (Salesforce)This topic describes the email actions that Salesforce provides.
20 Chapter 3: Techniques

Send Email Using Template and Send Free-Form Email
The Send Email Using Template and Send Free-Form Email actions are very similar as they both send email. The difference between them is that a template contains the subject and body of the email while the free form requires you to add them.
• When using a template, you will need to specify either the object to take information from or the email address, but not both. If neither is specified, the email is sent to the address within the current object.
• If there is no template, you will need to add a subject and the email's body. Specify either the object or the email address, but not both. If neither is specified, the email is sent the current person.
Note: Unlike other steps, email steps cannot be rolled back either by selecting a step in the History or by you backing up to it. This is because the email is already sent. Also, if you do step back to this step or one executed prior to it, the email will again be sent.
Using Send Free-Form Email is often better than Send Email Using Template even when there's a template that meets your needs because using a template doesn't give your users any flexibility. However, there's a way to use a template and allow users to modify things. Do this by using the Send Free-Form Email Service Call step, and setting the source of email's body to Screen. Next, double click on the body's input field and then insert the email template so that it is the default value of the field. This default value can include fields of any object that is available from the guide. Your users will see the template shown in an HTML editor inside the step with its data inserted for field values used by the template.
You can add attachments to an email. While all attachments are files, Salesforce differentiates attachments by where they exist and how they are used:
• Attachment Attachment: The files named in Salesforce attachment lists. These lists appear in the detail pages of some objects. These attachments can include feed attachments.
• Content Attachments: Shared and published corporate files. These files are typically shared with co-workers or sent to customers. For example, they could be Google Docs.
• Document Attachments: Web resources that others from your site have placed on the Web. Some of the kinds of information that are contained within documents attachments are logos, graphics, and template files.
• File Attachments: Files that you upload. While these are initially private files, they can be shared with co-workers.
Email iCal for Event Action
This action sends a calendar invitation by email (in iCalendar format) for the meeting created as a Salesforce Event. The dates and times are the same as the dates and times of the event. The email recipients who can log in to your Salesforce site receive an iCalendar file that contains a link to the Event within Salesforce. The Salesforce user to which the event is assigned receives a link that when clicked starts the guide for the event.
Email Actions (Salesforce) 21
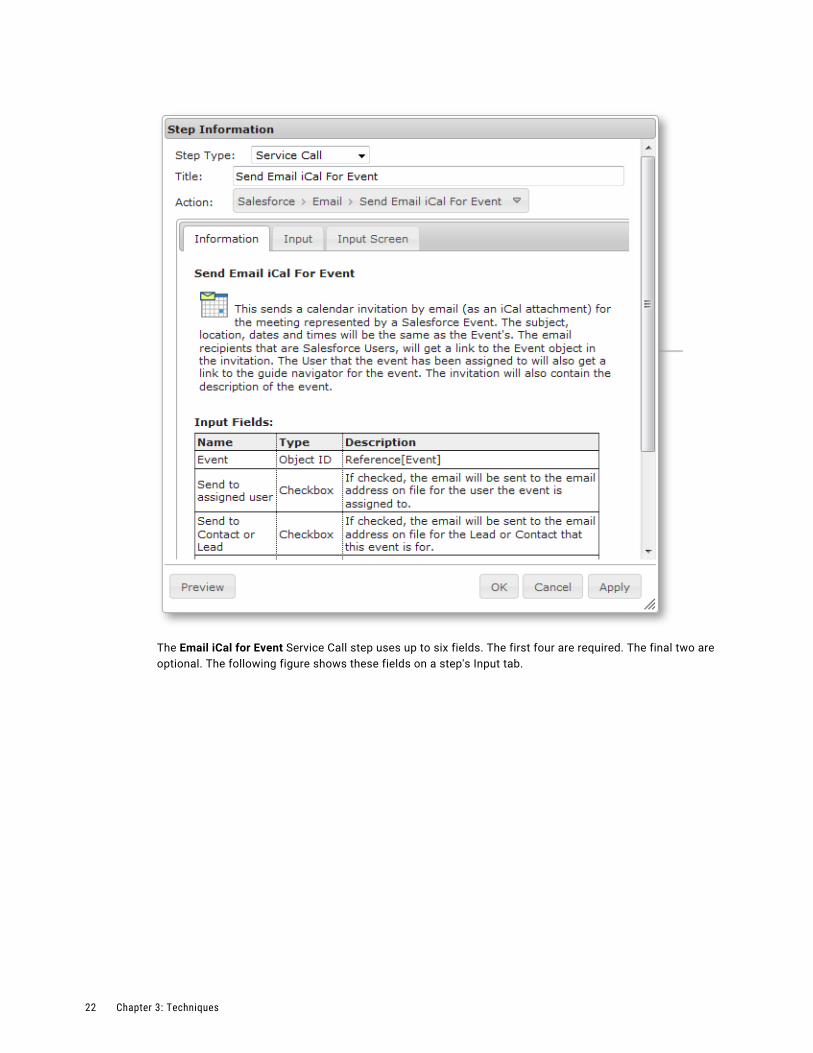
The Email iCal for Event Service Call step uses up to six fields. The first four are required. The final two are optional. The following figure shows these fields on a step's Input tab.
22 Chapter 3: Techniques

Email Actions (Salesforce) 23

These fields are:
• Event: The object ID that is a reference to an event. Process Designer will provide this ID. In this figure, the ID is that of the current Activity ID. You can, of course, select another field; for example, you can also select the ID for other events.
You can also use a query to select the event.
• Send to assigned user: If checked, the email is sent to the email address stored within Salesforce for the user to which the event is assigned.
• Send to Contact or Lead: If checked, the email is sent to the email address stored within Salesforce for the lead or contact that this event is for.
• Send to Other Invitees: If checked, the email is sent to the email addresses stored within Salesforce for the users, leads or contacts that are listed for this event.
• Other Recipients: A semicolon separated list of email addresses of other people you would like to attend the event.
• Body: Optional text that is inserted into the email after any links that are sent.
24 Chapter 3: Techniques

C h a p t e r 4
Customizing SalesforceThis chapter includes the following topics:
• Customizing Salesforce Overview, 25
• Creating a Button or Link to Launch a Guide, 25
• Running a Guide When the User Clicks New, 31
• Implementing Service Steps and Search Services, 32
Customizing Salesforce OverviewThis set of topics describes how you can better integrate Process Designer with Salesforce.
Creating a Button or Link to Launch a GuideThis topic describes how to create a button or a link that launches a guide from a Salesforce object. The steps for doing this are:
1. Create a Visualforce page.
2. Update the Visualforce page's security settings.
3. Create a button (or link) for the desired Salesforce object.
4. Add the button (or link) the object's page layout.
An example is used to show these steps. In this example, a button is added that launches the Handle Case guide. Here is the General tab of the Guide Properties dialog for this guide:
25

Creating a Visualforce PageSet the Visualforce Markup to:
<apex:page standardController="Case"> <icrt:AeSalesGuides guideName="Handle Case" objectType="Case" objectId="{!Case.Id}" height="600px"/></apex:page>
Note: Make sure that the guide's Name value here matches the name set in the Guide Properties dialog.
26 Chapter 4: Customizing Salesforce

Update the Security for the Visualforce PageClick the Security link for the page you just created:
Creating a Button or Link to Launch a Guide 27

Add one or more profiles displayed within the Available Profiles list to the Enabled Profiles list.
Save your changes.
28 Chapter 4: Customizing Salesforce

Update the Page LayoutSelect Cases | Page Layouts on the left. On the Case Page Layout page, click edit to display the page onto which you will be placing the button (or link).
Note: To add custom links to the page layout, select the Custom Links category on the palette and drag one or more custom links from the palette to the Custom Links section on the page layout.
Notice that Buttons is selected on the left, not Visualforce Pages, which is the entry after this one.
Save your changes.
Create a Button on the Salesforce PageWithin the Custom Buttons and Links area, press New to create a new button.
Creating a Button or Link to Launch a Guide 29

Set the button's details similar to the following. Notice how Detail Page Button, Behavior, and Content Source are set. Content Source must be set to the Visualforce page that you created earlier.
30 Chapter 4: Customizing Salesforce

Note: The way in which you create a link is similar; just select Detail Page Link instead of Detail Page Button and then use link in place of the button in the instructions that follow.
Launch the GuideOpen a case to see the newly added Handle Case button.
Running a Guide When the User Clicks NewSalesforce users can create new objects using the Create New picklist, a button, or a link.
Running a Guide When the User Clicks New 31

After users select one of these, Salesforce displays a page into which the user can enter information. If you would prefer that they run a guide, you can override these actions for standard objects. Here's how:
1. Go to that object's Buttons and Links setup page; for example, App Setup Customize > Opportunities > Buttons and Links.
2. Within the displayed table, find the New row, and then click Edit.
3. Select the Visualforce page on which you are going to override the New action.
4. Create the Visualforce page that runs the guide. For example, if you wish to run the Create Opportunity guide, you might create a page that runs it such as:
<apex:page sidebar="false" showHeader="false"> <icrt:AeSalesGuides objectType="_any" objectId="{!$User.Id}" guideName="Create Opportunity"/></apex:page>
Implementing Service Steps and Search ServicesThis topic describes how to create service steps and search services from Salesforce Apex classes.
Note: You can download an archive file that contains a sample automated step and a sample search service.
Creating an Apex-based Service Call StepYou can create new Service Call step services using an Apex Class that implements the IAeAutomatedStepService interface.
IAeAutomatedStepService Interface
To create the new services, you first implement two interface methods:
• describe()
• invoke()
describe()
Returns AeServiceDescription, which contains metadata for services.xml.
32 Chapter 4: Customizing Salesforce

invoke()
Invoked at runtime.
For example:
global class icrtStep_EchoService implements IAeAutomatedStepService { global AeServiceDescription describe() { // called during synchronization }
global AeServiceResponse invoke(AeServiceRequest aRequest) { // called at runtime }}
Service Discovery with Apex Automated Steps
When you synchronize your Salesforce organization, Apex services are discovered based on their class name. If a class name starts with "icrtStep", it is recognized as a Service step (an "Apex automated step"). For example, the Apex class named "icrtStep_EchoService" is a service.
Process objects or object lists are serialized to a JSON payload format, similar to the process object input or output in other processes. They are sent to Apex where the System.JSON class in Apex can parse the JSON.
To return a process object, define the outputs as either 'reference' or 'objectlist' and serialize the objects to JSON so Process Designer converts them back to a process object.
For example, for output parameters:
global AeServiceDescription.AeServiceParameterDesc output = sDescription.addOutputParameterDesc('objOutput', 'reference'); output.addParameterOption('referenceTo','Account');
Service Interface
Apex services must implement two methods:
• describe()
• invoke()
describe()
Provides information discovered for use by the cloud service.
Returns an instance of AeServiceDescription, which has the following fields:
Field Description
serviceType Type of service , either a service step or a search.
namespaceQualifier Organization-specific namespace.
name Service class name.
displayName Name displayed to the user.
description Text describing the service.
Implementing Service Steps and Search Services 33

Field Description
inputParameter (0..n) List of input parameter descriptions.(AeServiceDescription.AeParameterDesc)
outputParameter (0..n) List of output parameter descriptions.(AeServiceDescription.AeParameterDesc)
invoke()
Implements the runtime behavior of the service.
Parameter Description
objectId ID of the Applies To object from the host's context.
objectType Type of the Applies To object from the host's context.
parameter (0..n) List of AeServiceParameter name/value pairs.
Takes an instance of AeServiceRequest as input.
Returns AeServiceResponse, which has the following fields:
Field Description
parameter (0..n) List of AeServiceParameter name/value pairs.
errorInfo.AeErrorInfo Conveys error information. Use this to relay error information instead of throwing an uncaught fault within your service
errorInfo.errorMessage Error message.
errorInfo.invalidData Field-level error details.
Custom Search ServicesYou can implement search services as Apex classes. Search services use the same interface and discovery mechanisms as step services, with the following differences:
• Set the service type to search in AeServiceDescription:AeServiceDescription.serviceType = 'search';
• There should be one output parameter, Search Results, that returns the data.
• To return a valuelist, the invoke() method should return name/value pairs representing the name/id of the objects returned.
The following example returns a valuelist of account references filtered by OwnerId:
List<Account> accountList = [SELECT Name, id FROM Account WHERE OwnerId =:userRef LIMIT 20]; for (Account account: accountList) { // For a search service, return name/id as parameters response.addParameter(account.Name, account.Id); }
34 Chapter 4: Customizing Salesforce

SynchronizationTo make custom automated step and search services visible, you need to synchronize your Salesforce organization with Cloud Application Integration. For more information, see Synchronize Salesforce with Application Integration Assetson page 12.
Note: You need to re-synchronize only when you make a change to the class interface, not when you make a change to the class.
Implementing Service Steps and Search Services 35