i. introduction to seeco motor operators · i. introduction to seeco motor operators thank you for...
TRANSCRIPT

Southern Electrical Equipment CompanySouthern Electrical Equipment CompanySouthern Electrical Equipment CompanySouthern Electrical Equipment CompanySouthern Electrical Equipment Company MNM Motor Operator MNM Motor Operator MNM Motor Operator MNM Motor Operator MNM Motor Operator4045 Hargr4045 Hargr4045 Hargr4045 Hargr4045 Hargrove ove ove ove ove AAAAAve., Charlotte, NC 28208 (704)-392-1396 Installation Instructionsve., Charlotte, NC 28208 (704)-392-1396 Installation Instructionsve., Charlotte, NC 28208 (704)-392-1396 Installation Instructionsve., Charlotte, NC 28208 (704)-392-1396 Installation Instructionsve., Charlotte, NC 28208 (704)-392-1396 Installation Instructions
1
I. INTRODUCTION TO SEECO MOTOR OPERATORS Thank you for purchasing a SEECO motor operator. We are excited to be able to provide this product to you and we are certain that it will fulfill your performance expectations. The SEECO motor operator is designed and fabricated with the philosophy of quality, functionality and reliability, as well as installation (application) simplicity in mind. We appreciate all comments with regard to our product and welcome any suggested modifications to the design, which would better suit your future application needs. We are particularly interested in hearing any suggestions related to field installation which may help you perform a more timely and efficient installation. Following are the installation instructions for the SEECO motor operator. The purpose of these instructions is to outline a step-by-step, descriptive procedure for the field installation of SEECO motor operators.
If you need assistance please contact our factory:
(704)-392-1396 (phone) (704)-392-7033 (fax)
II. MOTOR OPERATOR INSTALLATION INSTRUCTIONS
A. SWITCH ADJUSTMENT 1) The switch must be properly adjusted before beginning the installation
of the motor operator.
B. MOTOR ATTACHMENT 1) Remove the existing switch lever handle, lock segment assembly and
ground strap (If applicable). 2) Determine the motor mounting position as outlined on the mounting
drawing provided trying to use as many existing holes on the structure or pole as possible.
3) Determine the switch control pipe cutting point; pipe is to extend down into the coupling or universal joint far enough to allow the self-piercing setscrews to grasp the pipe.
4) Cut pipe. 5) Attach the motor with the mounting bracket to the structure or pole
inserting the switch control pipe into the coupling or universal joint. 6) Do not pierce the set screws

Southern Electrical Equipment CompanySouthern Electrical Equipment CompanySouthern Electrical Equipment CompanySouthern Electrical Equipment CompanySouthern Electrical Equipment Company MNM Motor Operator MNM Motor Operator MNM Motor Operator MNM Motor Operator MNM Motor Operator4045 Hargr4045 Hargr4045 Hargr4045 Hargr4045 Hargrove ove ove ove ove AAAAAve., Charlotte, NC 28208 (704)-392-1396 Installation Instructionsve., Charlotte, NC 28208 (704)-392-1396 Installation Instructionsve., Charlotte, NC 28208 (704)-392-1396 Installation Instructionsve., Charlotte, NC 28208 (704)-392-1396 Installation Instructionsve., Charlotte, NC 28208 (704)-392-1396 Installation Instructions
2
C. FIELD WIRING CONNECTIONS
D. POSITIONING OF COUPLING COMPONENTS
1) Press the open push-button and make certain that the motor rotation matches the rotation required to open the switch.
2) If rotation is not correct, reposition connector exiting motor to adjacent unoccupied connector. Connector is located behind the hinged panel on units with battery and charger. Open panel by pulling on black plastic knob located at lower left corner of LAB tester plate.
MOTOR ROTATION CONNECTOR, REVERSE TO CHANGE FROM CW TO CCW
TEMPORARY ADJUSTMENT BLOCKS, REMOVE AFTER PIERCING PIPE SETSCREWS
DECOUPLING MECHANISM SHOULD BE CENTERED AT FRONT OF MOTOR FOR FULL RANGE
PULL KNOB TO OPEN HINGED PANEL, PRESS KNOB TO LOCK CLOSED
1) Connect field wiring, (AC voltage, and DC voltage). See connection diagram oninterior cabinet wall or wiring diagram for the connection points at the terminalblocks.
2) Connect main power connector, close knife switches and circuit breakers. Ob-serve lights on charger, yellow light should be on, green light will be on whencharge reaches 90% or flashing when battery is fully charged
POWER CONNECTIONS
CONTROL AND STATUS CONNECTIONS
MOTOR AUXILIARY SWITCH CONNECTIONS

Southern Electrical Equipment CompanySouthern Electrical Equipment CompanySouthern Electrical Equipment CompanySouthern Electrical Equipment CompanySouthern Electrical Equipment Company MNM Motor Operator MNM Motor Operator MNM Motor Operator MNM Motor Operator MNM Motor Operator4045 Hargr4045 Hargr4045 Hargr4045 Hargr4045 Hargrove ove ove ove ove AAAAAve., Charlotte, NC 28208 (704)-392-1396 Installation Instructionsve., Charlotte, NC 28208 (704)-392-1396 Installation Instructionsve., Charlotte, NC 28208 (704)-392-1396 Installation Instructionsve., Charlotte, NC 28208 (704)-392-1396 Installation Instructionsve., Charlotte, NC 28208 (704)-392-1396 Installation Instructions
3
1) Place the overhead switch in the closed position. Press the closed pushbutton. Adjust the closed limit switch using the hex key wrench provided until the closed to open range of travel is centered at the front of the motor operator enclosure. This allows easy access to the coupling and swing handle in both the open and closed positions.
2) Pierce the setscrews on the coupling or universal joint. Remove the
temporary coupling adjustment blocks and padlock the movable portion of the coupling in the uncoupled position.
E. ADJUSTING LIMIT SWITCHES
1) At this time the limit switch should be correctly positioned for the closed switch position.
2) Move the switch to the open position using the manual operation swing handle. Leave the switch in the decoupled position.
3) Press the Open pushbutton on the motor operator. 4) Using the hex key wrench, loosen the setscrew on the open switch
collar. 5) Rotate the collar in the opposite direction of the desired rotation.
Lightly tighten the setscrew. Press the related pushbutton. 6) Repeat step 6 to allow the motor to incrementally step forward until
the arrow on the switch position of the coupling matches the arrow on the motor portion of the coupling.
OPEN PUSH BUTTON
LOCAL/ REMOTE SWITCH
CLOSE PUSH BUTTON
OPEN/CLOSE INDICATING LIGHTS
CLOSE LIMIT SWITCH COLLAR
OPEN LIMIT SWITCH COLLAR
HEX KEY WRENCH PROVIDED
POLE OR STRUCTURE
OPERATING PIPE
ROTATION OF COUPLING AND HANDLE AT FRONT OF MOTOR OPERATOR

Southern Electrical Equipment CompanySouthern Electrical Equipment CompanySouthern Electrical Equipment CompanySouthern Electrical Equipment CompanySouthern Electrical Equipment Company MNM Motor Operator MNM Motor Operator MNM Motor Operator MNM Motor Operator MNM Motor Operator4045 Hargr4045 Hargr4045 Hargr4045 Hargr4045 Hargrove ove ove ove ove AAAAAve., Charlotte, NC 28208 (704)-392-1396 Installation Instructionsve., Charlotte, NC 28208 (704)-392-1396 Installation Instructionsve., Charlotte, NC 28208 (704)-392-1396 Installation Instructionsve., Charlotte, NC 28208 (704)-392-1396 Installation Instructionsve., Charlotte, NC 28208 (704)-392-1396 Installation Instructions
4
1) Padlock the movable coupling into the coupled position and operate the switch with the motor operator.
2) Fine-tune the adjustment of the limit switches in both the open and closed positions to compensate for the twist in the control pipe by repeating step six.
F. HANDLE, LOCK SEGMENT ADJUSTMENT
1) Make certain the swing handle is correctly positioned for the open and closed positions. Tighten the swing handle bolt and piercing setscrews.
2) Adjust and tighten the lock stops for the switch open and closed positions.
G. FINAL ADJUSTMENTS AND INSPECTION
1) Adjust any required Auxiliary switches in the same manner as the switch limit switches. A shunt is provided to convert the Auxiliary switches from NO as set at the factory to NC in the field as required.
LOCK STOPS FOR PADLOCKING THE SWITH OPEN OR CLOSED IN THE DECOUPLED POSITION
MOVE SHUNTS FROM NO POSITION TO NC POSITION TO CHANGE FROM NO TO NC IN THE FIELD

Southern Electrical Equipment CompanySouthern Electrical Equipment CompanySouthern Electrical Equipment CompanySouthern Electrical Equipment CompanySouthern Electrical Equipment Company MNM Motor Operator MNM Motor Operator MNM Motor Operator MNM Motor Operator MNM Motor Operator4045 Hargr4045 Hargr4045 Hargr4045 Hargr4045 Hargrove ove ove ove ove AAAAAve., Charlotte, NC 28208 (704)-392-1396 Installation Instructionsve., Charlotte, NC 28208 (704)-392-1396 Installation Instructionsve., Charlotte, NC 28208 (704)-392-1396 Installation Instructionsve., Charlotte, NC 28208 (704)-392-1396 Installation Instructionsve., Charlotte, NC 28208 (704)-392-1396 Installation Instructions
5
1) Change LAB Tester settings for load and check tests if desired (factory preset at 14 days for the check test and 30 days for the load test). Consult the LAB instructions for information on how to change and view settings.
2) Change Heater/ Fan settings if desired (factory preset at 25 degrees C for the upper limit and 15 degrees C for the lower limit). Consult the heater instructions for information on how to view and change settings.
3) Make certain all sliding links on the terminal blocks (if ordered) are in the closed positions.
4) Make certain ground wires are connected to the ground connection points supplied.
5) Leave the AC and DC knife switches and circuit breakers in the closed and on positions.
6) Leave the Local/ Remote switch in the Remote position 7) Make certain all bolts and setscrews have been tightened. 8) Operate the switch multiple times to ensure a reliable accurate
installation. 9) Make Certain the ground strap has been reconnected to the operating
pipe.
MOTOR BREAKER, HEATER BREAKER, MAIN DC BREAKER, MAIN AC BREAKER, DC KNIFE SWITCH AND AC KNIFE SWITCH ARE LOCATED AT LOWER LEFT CORNER OF MOTOR OPERATOR AC/DC BREAKERS AND AC KNIFE SWITCH ARE OPTIONAL

Southern Electrical Equipment CompanySouthern Electrical Equipment CompanySouthern Electrical Equipment CompanySouthern Electrical Equipment CompanySouthern Electrical Equipment Company MNM Motor Operator MNM Motor Operator MNM Motor Operator MNM Motor Operator MNM Motor Operator4045 Hargr4045 Hargr4045 Hargr4045 Hargr4045 Hargrove ove ove ove ove AAAAAve., Charlotte, NC 28208 (704)-392-1396 Installation Instructionsve., Charlotte, NC 28208 (704)-392-1396 Installation Instructionsve., Charlotte, NC 28208 (704)-392-1396 Installation Instructionsve., Charlotte, NC 28208 (704)-392-1396 Installation Instructionsve., Charlotte, NC 28208 (704)-392-1396 Installation Instructions
6
COUPLING OR UNIVERSAL JOINT NOT SHOWN
MANUAL OPERATION SWING HANDLE SOCKET
SWITCH OPEN/CLOSE LOCK STOPS FOR PADLOCKING SWITCH OPEN OR CLOSED WHEN DECOUPLED
LOCK POINT FOR PADLOCKING MOTOR OPERATOR IN THE COUPLED POSITION OR HOLDING THE DECOUPLER UP FOR MANUAL OPERATION
REMOVABLE DOOR HOLDBACK AND LIFT OFF HINGES
“LAB” BATTERY TESTER ON HINGED PANEL, CHARGER IS LOCATED BEHIND LAB TESTER WHEN PROVIDED
TORQUE RELIEF KNOB, TURN TO REDUCE PRESSURE ON SWITCH COUPLING FOR EASE OF DECOUPLING
DUST FILTER
BREAKERS, RECEPTICLE AND KNIFE SWITCHES
A C P R E S E N T L IG H T A N D S U R G E S U P P R E S S IO N
POWER TERMINAL BLOCK
REMOVABLE CONDUIT PLATE GROUND
CONNECTION POINT NOT SHOWN
MOTOR AUXILIARY SWITCH TERMINAL BLOCK
(2) 12 VDC BATTERIES IF PROVIDED
EXPANDABLE MANUAL OPERATION SWING HANDLE
HEATER/ FAN AND CONTROL UNIT
HANDLE POSITION STATUS INDICATOR AND REMOTE DISABLE SWITCHES
DOOR OPERATED LIGHT/ HEATER SHUTOFF SWITCH AND STATUS INDICATOR
DOOR OPERATED CABINET ILLUMINATION LIGHT
SCREENED AND FILTERED CABINET INTAKE
OPERATION COUNTER
MAIN BATTERY CONNECTOR, UNPLUGGED WHEN SHIPPED FROM THE FACTORY

Southern Electrical Equipment CompanySouthern Electrical Equipment CompanySouthern Electrical Equipment CompanySouthern Electrical Equipment CompanySouthern Electrical Equipment Company MNM Motor Operator MNM Motor Operator MNM Motor Operator MNM Motor Operator MNM Motor Operator4045 Hargr4045 Hargr4045 Hargr4045 Hargr4045 Hargrove ove ove ove ove AAAAAve., Charlotte, NC 28208 (704)-392-1396 Installation Instructionsve., Charlotte, NC 28208 (704)-392-1396 Installation Instructionsve., Charlotte, NC 28208 (704)-392-1396 Installation Instructionsve., Charlotte, NC 28208 (704)-392-1396 Installation Instructionsve., Charlotte, NC 28208 (704)-392-1396 Installation Instructions
7
H. LAB24 OPERATION INSTRUCTIONS The SEECO Lead Acid Battery (LAB) Tester is standard equipment on “MNM2” series operators. It is shipped from the factory fully functional. You may adjust the settings per the following instructions:
Figure 1 Figure 2 Null Modem Cable LAB Tester
Figure 3 Hyper-terminal Setup disk
Step 1: Confirm all above listed and shown components are present. One cable and setup disk is provided per customer. Step 2: Insert Disk provided (Figure 3) into Computer, drag contents to desktop within Windows.
Optional Operations Counter
Southern Electrical Equipment CompanySouthern Electrical Equipment CompanySouthern Electrical Equipment CompanySouthern Electrical Equipment CompanySouthern Electrical Equipment Company MNM Motor Operator MNM Motor Operator MNM Motor Operator MNM Motor Operator MNM Motor Operator4045 Hargr4045 Hargr4045 Hargr4045 Hargr4045 Hargrove ove ove ove ove AAAAAve., Charlotte, NC 28208 (704)-392-1396 Installation Instructionsve., Charlotte, NC 28208 (704)-392-1396 Installation Instructionsve., Charlotte, NC 28208 (704)-392-1396 Installation Instructionsve., Charlotte, NC 28208 (704)-392-1396 Installation Instructionsve., Charlotte, NC 28208 (704)-392-1396 Installation Instructions
8
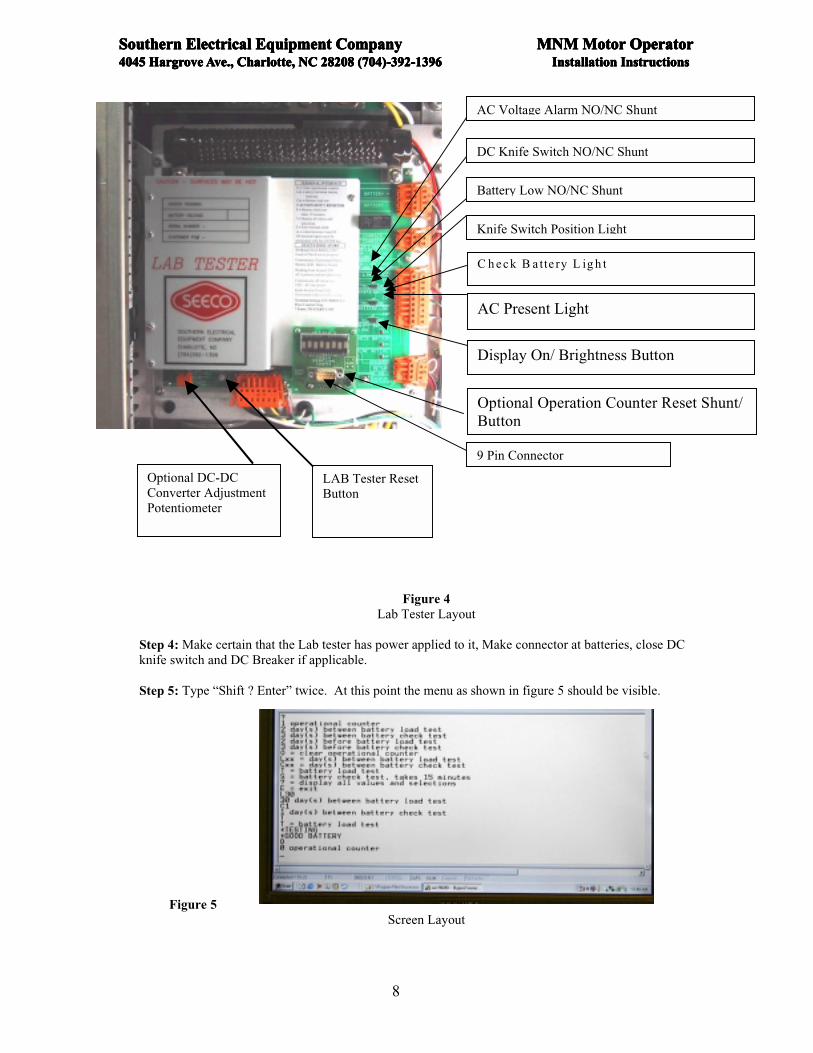
AC Voltage Alarm NO/NC Shunt
DC Knife Switch NO/NC Shunt
Battery Low NO/NC Shunt
Knife Switch Position Light
9 Pin Connector
LAB Tester Reset Button
Optional DC-DC Converter Adjustment Potentiometer
Optional Operation Counter Reset Shunt/ Button
C h eck B a tte ry L ig h t
AC Present Light
Display On/ Brightness Button
Figure 4
Lab Tester Layout Step 4: Make certain that the Lab tester has power applied to it, Make connector at batteries, close DC knife switch and DC Breaker if applicable. Step 5: Type “Shift ? Enter” twice. At this point the menu as shown in figure 5 should be visible.
Figure 5 Screen Layout

Southern Electrical Equipment CompanySouthern Electrical Equipment CompanySouthern Electrical Equipment CompanySouthern Electrical Equipment CompanySouthern Electrical Equipment Company MNM Motor Operator MNM Motor Operator MNM Motor Operator MNM Motor Operator MNM Motor Operator4045 Hargr4045 Hargr4045 Hargr4045 Hargr4045 Hargrove ove ove ove ove AAAAAve., Charlotte, NC 28208 (704)-392-1396 Installation Instructionsve., Charlotte, NC 28208 (704)-392-1396 Installation Instructionsve., Charlotte, NC 28208 (704)-392-1396 Installation Instructionsve., Charlotte, NC 28208 (704)-392-1396 Installation Instructionsve., Charlotte, NC 28208 (704)-392-1396 Installation Instructions
9
Step 6: Modify and/or view desired parameters, a typical screen print is shown below displaying the default settings. a------- 0 operation counter b------- 30 day(s) between battery load test c------- 14 day(s) between battery check test d------- O = clear operational counter e------- Lxx = day (s) between battery load test f------- Cxx = day (s) between battery check test g------- T = battery load test h------- S = battery check test, takes 15 minutes i-------- Zxx = Count on time 16.66ms steps j-------- 20 count on time 16.66ms steps k------- Yxx = Count off time 1 second steps l-------- 1 Count off time 1 second steps m------ ? = Display all values and selections n------- E = exit a------- Displays the current number of motor operator operations, open and close since the last reset. This
is available even if the operational counter display option is not ordered. b------- Displays the number of days between the battery load tests. This test automatically disconnects
the charger and places a load resistor across the battery for 15 seconds. If the battery voltage drops below 20 volts during the test duration, a contact and indicating light alarm are provided.
c------- Displays the number of days between the battery check tests. This test automatically disconnects the charger and lets the normal motor operator load run off the battery for 15 minutes. If the battery voltage drops below 20 volts during the test duration, a contact and indicating light alarm are provided.
d------- Type “O” to clear the operational counter. e------- Type “Lxx”, where xx is the number of days between the load test. For example L20 would set
the load test interval to 20 days between the tests. f------- Type “Cxx”, where xx is the number of days between the check test. For example C20 would set
the check test interval to 20 days between the tests. g------- Type “T” to initiate a battery Load test immediately. h------- Type “S” to initiate a battery Check test immediately. Please keep in mind that this test will
continue for 15 minutes. i,j,k,l-- These are for SEECO Internal use only, no need to alter these settings. m------ Type “?” to refresh the screen and display all values and selections. n------- Type “E” to exit from the menu and store all updated values. Step 7: Confirm that the AC Voltage, DC Knife Switch, and Battery Low dry contact status alarms are as desired (Normally Open or Normally Closed). If a change is needed, reposition the related shunt to the opposite pins. The location of each of these shunts is shown in Figure 4. Step 8: Press the Display Brightness pushbutton to turn on and increase the intensity of the optional operational counter display. The location of this pushbutton is shown in figure 4. Step 9: To reset the optional counter display without accessing the LAB tester through Hyper-terminal. Move the shunt shown in figure 4 to the reset position and press the button located on the backside of the board directly above the shunt. Return the shunt to the normal position upon reset. Step 10: To adjust the output voltage on the DC to DC converter. Turn the Adjustment Potentiometer shown in figure 4 until the desired voltage is obtained.

Southern Electrical Equipment CompanySouthern Electrical Equipment CompanySouthern Electrical Equipment CompanySouthern Electrical Equipment CompanySouthern Electrical Equipment Company MNM Motor Operator MNM Motor Operator MNM Motor Operator MNM Motor Operator MNM Motor Operator4045 Hargr4045 Hargr4045 Hargr4045 Hargr4045 Hargrove ove ove ove ove AAAAAve., Charlotte, NC 28208 (704)-392-1396 Installation Instructionsve., Charlotte, NC 28208 (704)-392-1396 Installation Instructionsve., Charlotte, NC 28208 (704)-392-1396 Installation Instructionsve., Charlotte, NC 28208 (704)-392-1396 Installation Instructionsve., Charlotte, NC 28208 (704)-392-1396 Installation Instructions
10
I. BATTERY CHARGER SPECIFICATIONS AND INSTRUCTIONS. (Provided as standard with the Lab Tester)
Figure 1 SEECO Battery Charger Specifications:
1) 130 Watt constant output power 2) Designed to charge two 12 Volt, 33 Amp-hour sealed lead acid batteries wired in series. 3) Three stage charging: Bulk charge, Over charge, and Float charge. 4) AC Input voltage surge suppression. 5) Short circuit protection across output. 6) Reverse polarity protection on output. 7) Over temperature protection. 8) Temperature Compensation. 9) Constant voltage, not pulsed output.

Southern Electrical Equipment CompanySouthern Electrical Equipment CompanySouthern Electrical Equipment CompanySouthern Electrical Equipment CompanySouthern Electrical Equipment Company MNM Motor Operator MNM Motor Operator MNM Motor Operator MNM Motor Operator MNM Motor Operator4045 Hargr4045 Hargr4045 Hargr4045 Hargr4045 Hargrove ove ove ove ove AAAAAve., Charlotte, NC 28208 (704)-392-1396 Installation Instructionsve., Charlotte, NC 28208 (704)-392-1396 Installation Instructionsve., Charlotte, NC 28208 (704)-392-1396 Installation Instructionsve., Charlotte, NC 28208 (704)-392-1396 Installation Instructionsve., Charlotte, NC 28208 (704)-392-1396 Installation Instructions
11
1) Cooling fan. 2) LED status indication light.
Figure 2 SEECO Battery Charger Indicating lights (visible w/lab tester in secured position) Yellow Light ON =Power is on Flashing =Fault error codes Short Flash =Charger is not connected properly Green Light ON =The Batteries are 90% Charged Flash =The Batteries have reached full Charge
Yellow Indicating
Green Indicating

Southern Electrical Equipment CompanySouthern Electrical Equipment CompanySouthern Electrical Equipment CompanySouthern Electrical Equipment CompanySouthern Electrical Equipment Company MNM Motor Operator MNM Motor Operator MNM Motor Operator MNM Motor Operator MNM Motor Operator4045 Hargr4045 Hargr4045 Hargr4045 Hargr4045 Hargrove ove ove ove ove AAAAAve., Charlotte, NC 28208 (704)-392-1396 Installation Instructionsve., Charlotte, NC 28208 (704)-392-1396 Installation Instructionsve., Charlotte, NC 28208 (704)-392-1396 Installation Instructionsve., Charlotte, NC 28208 (704)-392-1396 Installation Instructionsve., Charlotte, NC 28208 (704)-392-1396 Installation Instructions
12
J. SPEED ADJUSTMENTS (Optional Equipment Provided on 2-Speed versions, suffix ‘T’ in part number) Motor Operators used on certain switches require a variable open and close speed. The right hand resistor is used to control the open speed. The left hand resistor is used to control the close speed. Loosening the clamp and increasing the distance between the upper terminal connection and the clamp will slow the motor operator. Decreasing the clamp to upper terminal distance will increase the motor operator speed. Generally a fast close and slow open is desired. CLOSE D CYCLE OPERATING SPEED ADJUSTMENT RESISTOR
OPENING CYCLE OPERATING SPEED ADJUSTMENT RESISTOR
MOVING EITHER OF THESE TWO CLAMPS UPWARD INCREASES THE SPEED OF THE CLOSED AND OPEN CYCLES RESPECTIVELY.

Southern Electrical Equipment CompanySouthern Electrical Equipment CompanySouthern Electrical Equipment CompanySouthern Electrical Equipment CompanySouthern Electrical Equipment Company MNM Motor Operator MNM Motor Operator MNM Motor Operator MNM Motor Operator MNM Motor Operator4045 Hargr4045 Hargr4045 Hargr4045 Hargr4045 Hargrove ove ove ove ove AAAAAve., Charlotte, NC 28208 (704)-392-1396 Installation Instructionsve., Charlotte, NC 28208 (704)-392-1396 Installation Instructionsve., Charlotte, NC 28208 (704)-392-1396 Installation Instructionsve., Charlotte, NC 28208 (704)-392-1396 Installation Instructionsve., Charlotte, NC 28208 (704)-392-1396 Installation Instructions
13
K. MSM - Motor / Switch Monitor (Optional equipment, provided when suffix G is present in part number) The MSM is utilized when switch true position and motor operator coupler status is desired. An additional function is the monitoring of the power required to operate the switch via the motor operator. Status contacts are provided, reference applicable wiring diagram.
Figure 1 Figure 2 Null Modem Cable MSM Board
Figure 3 Hyper-terminal Setup disk
Step 1: Confirm all above listed and shown components are present. One cable and setup disk is provided per customer.

Southern Electrical Equipment CompanySouthern Electrical Equipment CompanySouthern Electrical Equipment CompanySouthern Electrical Equipment CompanySouthern Electrical Equipment Company MNM Motor Operator MNM Motor Operator MNM Motor Operator MNM Motor Operator MNM Motor Operator4045 Hargr4045 Hargr4045 Hargr4045 Hargr4045 Hargrove ove ove ove ove AAAAAve., Charlotte, NC 28208 (704)-392-1396 Installation Instructionsve., Charlotte, NC 28208 (704)-392-1396 Installation Instructionsve., Charlotte, NC 28208 (704)-392-1396 Installation Instructionsve., Charlotte, NC 28208 (704)-392-1396 Installation Instructionsve., Charlotte, NC 28208 (704)-392-1396 Installation Instructions
14
Step 3: Connect Null Modem Cable (Figure 1) into Computer and 9 pin connector at front of MSM (See Figure 4).
Figure 4 MSM Board Layout (Located in upper left hand corner of motor cabinet)
Step 4: Make certain that the motor operator cabinet has power applied to it. Make connector at batteries, close DC knife switch and DC Breaker if applicable. Step 5: Type “Shift ? Enter” twice. At this point the menu as shown in figure 5 should be visible.
Figure 5 Screen Layout
9 Pin Connector
Auxiliary switch designator shunt
Close set pushbutton and indicating light
Open set pushbutton and indicating light
Record set pushbutton
MSM Series Failure Indication Light (Motor is not open or closed, coupled or decoupled)
Motor Over Power shunt NO/NC & Ind. Light
Coupled/ Decoup shunt NO/NC & Ind. Light
Switch Open shunt NO/NC & Ind. Light
MSM Reset
Switch Closed shunt NO/NC & Ind. Light

Southern Electrical Equipment CompanySouthern Electrical Equipment CompanySouthern Electrical Equipment CompanySouthern Electrical Equipment CompanySouthern Electrical Equipment Company MNM Motor Operator MNM Motor Operator MNM Motor Operator MNM Motor Operator MNM Motor Operator4045 Hargr4045 Hargr4045 Hargr4045 Hargr4045 Hargrove ove ove ove ove AAAAAve., Charlotte, NC 28208 (704)-392-1396 Installation Instructionsve., Charlotte, NC 28208 (704)-392-1396 Installation Instructionsve., Charlotte, NC 28208 (704)-392-1396 Installation Instructionsve., Charlotte, NC 28208 (704)-392-1396 Installation Instructionsve., Charlotte, NC 28208 (704)-392-1396 Installation Instructions
15
Step 6: Modify and/or view desired parameters, a typical screen print is shown below displaying the default settings. a--------C = Close Status Relay On/Off b--------O = Open Status Relay On/Off c--------U = Coupled Status Relay On/Off d--------M = Motor Status Relay On/Off e-------- F = Failure Status Relay On/Off f-------- D = Data Log g--------R = Clear Data Log h--------Yxx = Open power percentage, input range (0 to 90). i-------- 30 Open power percentage j-------- 0000 Open power threshold k------- 0000 Open average power l-------- Zxx = Close power percentage, input range (0 to 90). m------ 30 Close power percentage n------- 0000 Close power threshold o------- 0000 Close average power p------- ?=Display all values and selections. q------- Software Number = W818-0276 Rev. A r------- E = exit, automatic mode a------- Type “C” to toggle the Sw. closed relay on or off in order to perform function tests. b------- Type “O” to toggle the Sw. open relay on or off in order to perform function tests. c------- Type “U” to toggle the Coupled Status relay on or off in order to perform function tests. d------- Type “M” to toggle the Motor Status relay on or off in order to perform function tests. e------- Type “F” to toggle the Failure Status relay on or off in order to perform function tests. f------- Type “D” to view the switch operation data g------- Type “R” to delete the contents of the switch operation data log. h------- Type “Yxx” where xx is the percentage (0 to 90) above the initial set open power value
that an alarm contact indication is desired (factory preset to 30). i-------- Indicates the currently set open power percentage j-------- Calculated open power threshold value as it relates to h k--------Calculated average open power. l-------- Type “Zxx” where xx is the percentage (0 to 90) above the initial set close power value
that an alarm contact indication is desired (factory preset to 30). m-------Indicates the currently set close power percentage n--------Calculated close power threshold value as it relates to h o--------Calculated average close power. p--------Type ? to redisplay all current values & selections (refresh screen) q------- Current software number and release in use. r------- Type “E” to exit and allow system to return to automatic mode.

Southern Electrical Equipment CompanySouthern Electrical Equipment CompanySouthern Electrical Equipment CompanySouthern Electrical Equipment CompanySouthern Electrical Equipment Company MNM Motor Operator MNM Motor Operator MNM Motor Operator MNM Motor Operator MNM Motor Operator4045 Hargr4045 Hargr4045 Hargr4045 Hargr4045 Hargrove ove ove ove ove AAAAAve., Charlotte, NC 28208 (704)-392-1396 Installation Instructionsve., Charlotte, NC 28208 (704)-392-1396 Installation Instructionsve., Charlotte, NC 28208 (704)-392-1396 Installation Instructionsve., Charlotte, NC 28208 (704)-392-1396 Installation Instructionsve., Charlotte, NC 28208 (704)-392-1396 Installation Instructions
16
Step 7: With the motor operator coupled to the switch and the overhead switch in the fully open or closed position, ensure that the correct indicating light is illuminated (i.e. ‘OPEN’ or ‘CLOSE’). If a change is required, position the “Auxiliary switch designator shunt” in the alternate position. Step 8: Confirm that the Close, Open, Coupled and Motor contact status alarms are as desired (NO or NC). If a change is needed, reposition the related shunt located to the right of the indicating light to the opposite pins. Step 9: Once the switch is operating properly with the motor operator and any necessary adjustments have been performed on the switch. Couple the motor operator to the switch and while in the closed position, press and hold the record and open buttons simultaneously. Release the buttons and press the motor open pushbutton. Once, the motor operator and switch open. Press and hold the record and close buttons simultaneously. Release the buttons and press the motor close pushbutton. This procedure stores in memory the power required to perform each operation.