human anatomy drawing for artists
DESCRIPTION
Anatomy Drawing introductionTRANSCRIPT

presents
An Art Lesson on Studying &
Drawing Anatomy
Human anatomy drawing for artists
2 www.artistdaily.com
Human anatomy drawing for artists
How to Study anatomy
This content has been abridged from an original article written by Dan Gheno. This premium has been published by Interweave Press, 201 E. Fourth St., Loveland, CO 80537-5655; (970) 669-7672. Copyright © 2011 by Interweave Press, a division of Aspire Media, all rights reserved. The contents of this publication may not be reproduced either in whole or in part without consent of the copyright owner.
KnOwLEDGE OF ThE huMAn bODy CAn bE An InvALuAbLE TOOL FOr ArTISTS—AS LOnG AS ThE STuDy OF AnATOMy IS APPrOAChED In ThE rIGhT wAy.
by Dan Gheno
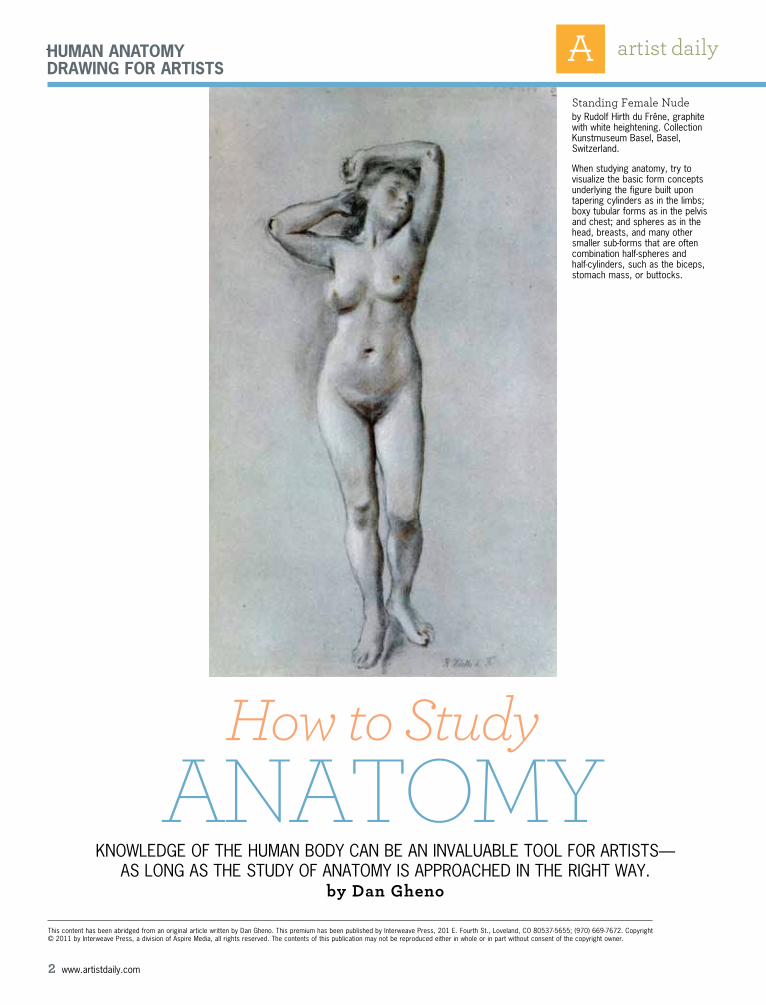
Standing Female Nudeby rudolf hirth du Frêne, graphite with white heightening. Collection Kunstmuseum basel, basel, Switzerland.
when studying anatomy, try to visualize the basic form concepts underlying the figure built upon tapering cylinders as in the limbs; boxy tubular forms as in the pelvis and chest; and spheres as in the head, breasts, and many other smaller sub-forms that are often combination half-spheres and half-cylinders, such as the biceps, stomach mass, or buttocks.
3 www.artistdaily.com
any artists debate the question, “Why should you study anatomy?” But it’s less often that you hear an equally impor-tant question: “How do you study anatomy?”
For me, answering the question “why” is easy. When I was 10 years old, I could see that my draw-ings of people were f lat and formless, with arms and legs that looked like rubber. I realized I need-ed to study anatomy if I wanted to give my drawings any kind of structure and volume. But when I took my first look at the anatomical charts, I stared incredulously at the complex mass of muscles that comprised the human body, and I nearly gave up. None of the muscles were easily definable or confined to an individual body part. Instead, they seemed to incoherently criss-cross bones, with muscle masses
diving in and out of one another. Determined to persevere, I began the only way I then knew how: learning one muscle at a time, starting with a neck muscle called the sternocleidomastoid.
It was only years later that I realized there was an easier and better way to study anatomy. This article will explain in-depth how you can streamline your studies into a more rewarding and manageable pro-cess by utilizing the right resources and by first con-centrating on the bones rather than spending hours memorizing the names and shapes of muscles.
Many art teachers evangelize against the study of anatomy. I can certainly understand their fear; quite a few stu-dents who have studied anatomy end up putting the cart before the horse by drawing their preconceptions of the
m
Human anatomy drawing for artists
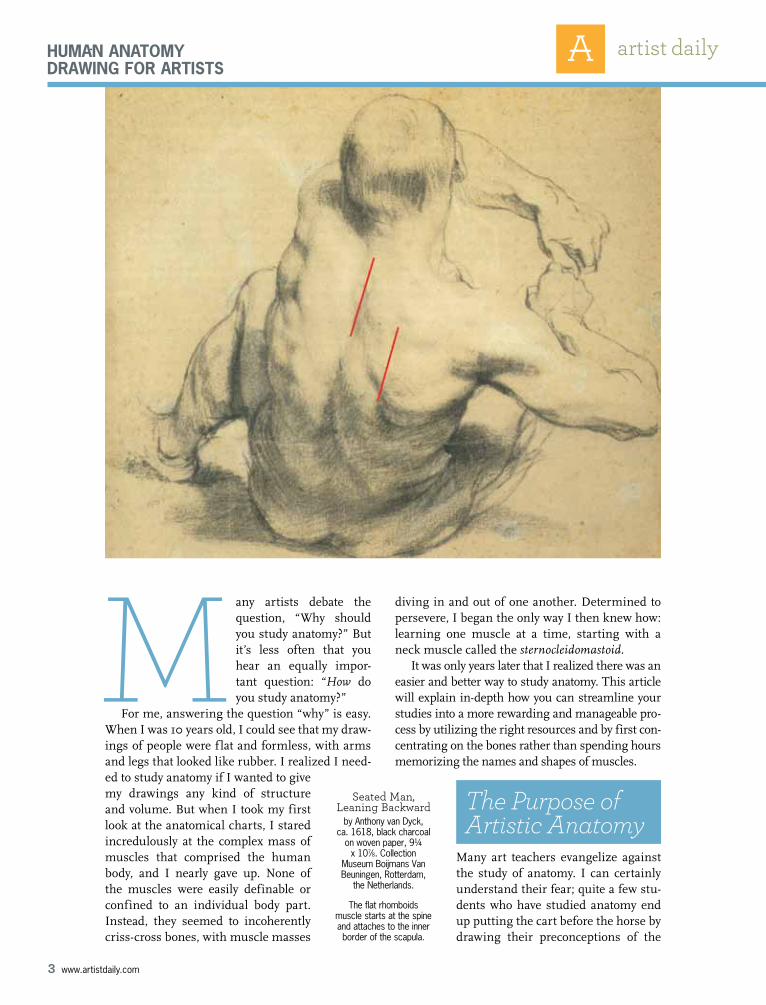
Seated Man, Leaning Backward
by Anthony van Dyck, ca. 1618, black charcoal
on woven paper, 9¼ x 107⁄8. Collection
Museum boijmans van beuningen, rotterdam,
the netherlands.
The flat rhomboids muscle starts at the spine and attaches to the inner border of the scapula.
The Purpose of Artistic Anatomy

4 www.artistdaily.com
Human anatomy drawing for artists
Stasisby Dan Gheno, 2003, colored
pencil and white charcoal on toned
paper, 24 x 18. Collection the artist.
5 www.artistdaily.com
figure’s anatomy instead of the visual reality in front of them. But this is a limitation of the student who hasn’t studied enough, not an inevitable result of the study of anatomy itself.
As the great anatomy teacher Robert Beverly Hale often noted, the study of anatomy is the “sci-entific” side of art, meant as a tool to help you understand the model’s volumetric nature and find subtle visual details you might otherwise miss. This means you should dedicate a certain amount of time solely for your anatomical inves-tigations so that your “scientific” endeavors don’t pollute your artistic efforts. Your anatomical ef-forts, though, should always include drawing the human figure from life, which gives you some-thing compellingly real to keep you motivated and to judge your studies against.
A brief study of form concepts will help sim-plify your initial efforts to understand anatomy. Unsophisticated as it may sound, all your knowl-edge of anatomy will do you no good if you don’t understand how each limb and digit can be visu-alized as a tapering cylinder; the head as a type of cornered sphere; and the torso as a blocky, tubular form. With this basic understanding as a founda-tion, you can then proceed into a more intensive study of the bones and their joint systems, fol-lowed by the individual muscles along with their origins and insertions. Your studies can then grow to encompass superficial structures such as f lesh, wrinkles, and veins.
Ultimately, the idea is to learn anatomy so well that it becomes part of your subconscious so that you don’t have to think about it while you draw the model. In the preface to his book, A Handbook of Anatomy for Art Students, Arthur Thompson proudly quotes one of his pupils who said, “The first thing I did after passing my exam was to burn your book.” Incorporating anatomical knowledge into your art should become a f luid, intuitive act, rather than a focal point that detracts from your creative process.
As we shall see, there are many resources available to help you pursue your studies, including books, videos, lectures, and sculp-tural approaches. And of course, there’s also the way many Old Masters learned anato-my—through dissections.
BookS For many artists studying on their own, their only anatomy resource may be a single book. But anatomy is a complex subject—one book can’t cover it all. Therefore, read all the books you can lay your hands on, whether you buy them, borrow them from the library, or download them free off the in-
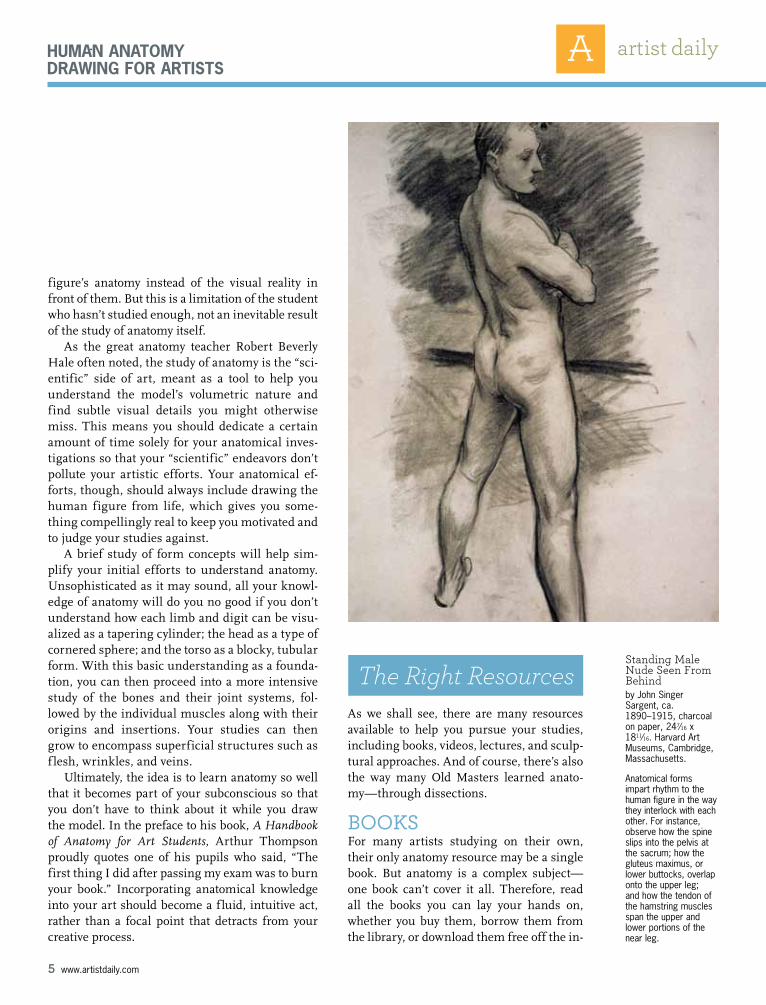
Standing Male Nude Seen From Behindby John Singer Sargent, ca. 1890–1915, charcoal on paper, 247⁄16 x 1811⁄16. harvard Art Museums, Cambridge, Massachusetts.
Anatomical forms impart rhythm to the human figure in the way they interlock with each other. For instance, observe how the spine slips into the pelvis at the sacrum; how the gluteus maximus, or lower buttocks, overlap onto the upper leg; and how the tendon of the hamstring muscles span the upper and lower portions of the near leg.
Human anatomy drawing for artists
The Right Resources
6 www.artistdaily.com
ternet. The list of useful books is almost endless, but for some of my favorites, see the sidebar on page 57. Once you ex-amine different texts, you’ll often find that many books that seem poorly il-lustrated—such as Richard G. Hatton’s Figure Drawing or Jack Hamm’s Draw-ing the Head and Figure—are fountain-heads of information. Conversely, some well-known guides can actually be mis-leading to someone just beginning to study the subject. However, every book has at least some useful information not found in the others.
You may also find that many anat-omy books contradict one another. Because of this, it’s important to have
at least one book that you rely upon as your ultimate reference—the book you go to for the final answer. Two anatomy books serve this purpose for me: Artis-tic Anatomy by Dr. Paul Richer and Hu-man Anatomy for Artists: The Elements of Form by Eliot Goldfinger. My copies are now tattered and worn, with tape and post-it notes sticking over the sides so that I can quickly find the pages I use most often.
Whether you are an advanced artist or a beginner, I think you’ll find that most anatomy books are not inviting to read word by word—especially books that are heavy on detailed diagrams. When you first open an anatomy book,
it’s a good idea to do some rough sketch-es of the muscles from the diagrams to acquire a taste for their shape and get ac-quainted with the subject. Then, look at the diagrams again, and loosely sketch the areas of the skeleton concerned with the movements of these muscles in an abbreviated manner. Finally, using trac-ing paper, try layering the muscles on top of the bones, paying special atten-tion to their origins and insertions.
When studying individual muscles this way, you usually need to draw at least two bones to support the muscle. A muscle’s sole purpose is to contract and move the body part, and a muscle that starts on one bone can only cause an ac-tion if it reaches past a joint to another bone. For instance, the biceps muscle starts within the torso on the shoulder blade, passes over the shoulder joint, crosses the elbow joint system, and inserts into the lower arm. When this muscle contracts, it can help lift the up-per arm, bend the lower arm, and even twist the wrist inward under certain conditions. Consequently, to better un-derstand the full function of the biceps
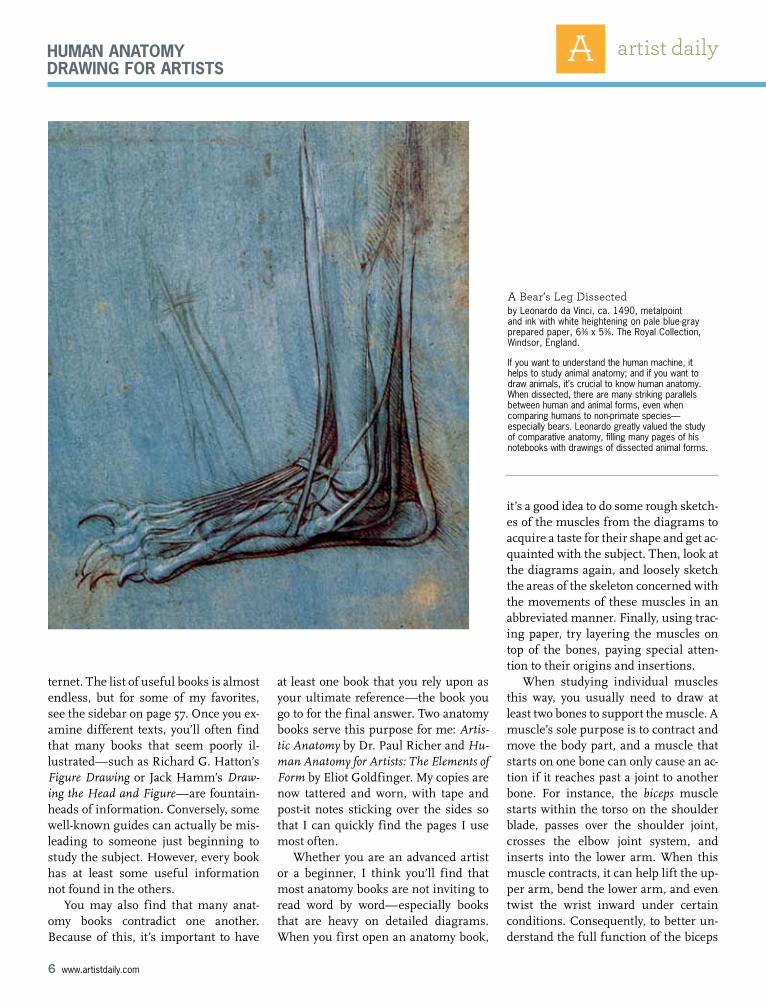
A Bear’s Leg Dissectedby Leonardo da vinci, ca. 1490, metalpoint and ink with white heightening on pale blue-gray prepared paper, 63⁄8 x 53⁄8. The royal Collection, windsor, England.
If you want to understand the human machine, it helps to study animal anatomy; and if you want to draw animals, it’s crucial to know human anatomy. when dissected, there are many striking parallels between human and animal forms, even when comparing humans to non-primate species —especially bears. Leonardo greatly valued the study of comparative anatomy, filling many pages of his notebooks with drawings of dissected animal forms.
Human anatomy drawing for artists

7 www.artistdaily.com
Human anatomy drawing for artists
In Actionby Dan Gheno, 2007, colored pencil and white charcoal on toned paper, 24 x 18. Collection the artist.

8 www.artistdaily.com
muscle, you will need to draw not only the bone it primarily covers (the humerus, in the upper arm) but also the other bones that participate in its ac-tion: the shoulder blade, the collarbone, and the bones of the lower arm, called the ulna and radius.
Even though it’s nearly impossible for most artists to read an anatomy book sequentially from cover to cover, you shouldn’t ignore the words completely. As an artist trying to understand the structure of the human body’s forms, you are more likely to retain and absorb the information if you refer to the text as you draw from the diagrams, consciously asking yourself what function each muscle or muscle group serves, where it begins, and where it ends.
I don’t advocate memorizing all the muscle names, but knowing them can help retention, as many of the names refer to the muscles’ shapes, functions, origins, and insertions. Knowing this nomenclature will help you remember the essen-tial characteristics for each muscle. Even as a child, I couldn’t forget the importance or complicated visual shape of the sternocleidomastoid, because its equally complicated name refers to the position
Human anatomy drawing for artists
above
Male Nude From the Backby Egon Schiele, 1910, watercolor and charcoal, 18 x 12. Private collection.
with an anatomy book by your side, you will see that Schiele depicts several key anatomical landmarks in this expressive drawing, including the vertebral column, the surrounding postlike spinal muscles, the trapezius, the rhomboids, the triangular sacrum in the pelvis, and the iliac crest, among many other visually important details.
top left
Self-Portrait With Arm Twisting Above Headby Egon Schiele, 1910, watercolor and charcoal, 17¾ x 12½. Private collection.
There are many ways to put the knowledge of anatomy to artistic use. Some artists use it to help them find subtlety of form and value shapes, and other artists, such as Schiele, use their understanding of muscles and bones for expressive purposes.

of its origins at the sternum (sterno) and clavicle (cleido) and to its distant insertion behind the ear at the mastoid process.
Life Sketching If you’re like most people, you may reach your frustration level rather quickly when drawing from anatomical charts, and you might find that there is a limit to how much information you can absorb in this way. To extend your motivation and energy lev-els, attend a sketch group or figure-drawing class as often as possible. Buy a lightweight, portable anatomy book, such as Edmond J. Farris’ Art Stu-dents’ Anatomy, so that you can bring it with you for reference while you sketch from life.
It’s extremely important to trust your eye in-stead of imposing your knowledge of anatomy on the model. But turn to your anatomy book as soon as you see a shape or lump on the model that defies the limits of your anatomical knowledge, and try to find the muscle or bone causing that shape. Al-though studying anatomy through books alone can become tedious and seem like an artificial process, using the model in front of you in this way will help you to build a list of compelling questions that an anatomy book can help answer.It’s not all about bones and muscles. Skin, fat, veins, the model’s age, and the influences of the environ-ment all have an effect on the muscles underneath and are an essential element of your studies. Use life drawing sessions to drill yourself. Look at the model for superficial anatomy, and question yourself on the boney and muscular landmarks below the skin.
9 www.artistdaily.com
Human anatomy drawing for artists
Transparent Front and Back Viewby Jean-baptiste Leveille, 1849, lithograph. From The Anatomy of the External Forms of Man by Dr. Julien Fau.when analyzing anatomy on the living figure, try visualizing the bones underneath as if the superficial forms were transparent. A helpful exercise is to first draw the figure in a simple, flat silhouette form. Then, try to superimpose your understanding of the bones within. Follow this with a layer of muscles, noting where their origins and insertions occur on the underlying bones.

10 www.artistdaily.com
Human anatomy drawing for artists
above
Protruding Elbowby Dan Gheno, 2010, carbon pencil, 24 x 18. Collection the artist.
AnAtomy cLASSeS Most people wouldn’t try to learn a complex subject such algebra, physics, or psychology from books alone. The same is true for the subject of artistic anat-omy. After drawing from anatomy books for a couple of months, you may find it very helpful to take a class from someone who can demonstrate the structure of human anatomy in person and who is available to an-swer questions as you go along. It’s especially helpful if the lecture class is combined with drawing from the model, as the teacher can then look at your work and double-check your anatomical accuracy.
ScuLpturAL ÉcorchÉSThere is a limit to how far two-dimensional diagrams can take you on your journey to un-derstand the human form. To help combine the tactile feeling of muscles with the abstract knowledge of your mind and eyes, try incorpo-rating sculpture as one of your research tools. Many artists create their own small, three- dimensional écorchés, or f layed figures. You can create these by laying strips of non-hardening clay called plasteline over a small plastic skeleton or rigid skeleton-like armature in order to simulate muscles. With a detailed anatomical diagram at your side, this exercise can give you hands-on ex-perience as you place each “muscle” strap at its origin and then string it to its insertion, paying at-tention to how it interweaves with other muscles.
DiSSectionS Ultimately, there’s no substitute for doing your own original research. Pre-Renaissance doctors and their patients found this out the hard way. For centuries, many doctors relied on the writings of the 2nd-century Roman anatomist Claudius Ga-len to guide them in their surgeries, despite the fact that Galen never dissected an actual human cadaver. Most of his observations were based on the dissections of pigs, which he thought were close enough to human forms. Many patients died because doctors didn’t trust their own eyes and followed Galen’s f lawed dictums instead. It was thanks in part to artists such as Leonardo da Vinci, who did his own anatomical dissections in an effort to advance his art, that doctors such as Andreas Vesalius had the courage to challenge Galen’s false writings and begin a new age of
medical research based on direct observation.Unlike during the Renaissance, when artists
were at the forefront of dissections, it is very dif-ficult for today’s artists to participate in these ana-tomical demonstrations still held in most medical schools. However, thanks to modern technology, there are virtual ways to study the f layed human figure. One of your best substitute resources is Color Atlas of Anatomy: A Photographic Study of the Human Body by Johannes W. Rohen, Chihiro Yokochi, and Elke Lütjen-Drecoll. Even better is Acland’s DVD Atlas of Human Anatomy, a six-part series of videos narrated by Dr. Robert Acland.
11 www.artistdaily.com
Human anatomy drawing for artists
Using actual cadavers and real hu-man bones, Dr. Acland systematically examines all parts of the human form, starting with the bones and finishing with the muscles and superficial skin structures. And don’t forget the inter-net: There are many virtual body and muscle programs available to down-load, and YouTube is loaded with short films on the subject.
The nearest proxy to studying cadav-ers firsthand is “Bodies…The Exhibi-tion.” These touring shows contain more than 200 examples of f layed human bodies that have been injected with silicone rubber that permanently hardens their forms and prevents them from decaying or smelling. The circus atmosphere of the shows may annoy you, with many cadavers placed in silly poses, but bring a sketchbook and con-centrate your energy on studying and drawing the subjects and body parts most interesting to you.
oLD mASter DrAwingS I have saved the best for last—draw-ings by the Old Masters. Think of these works as your answer book. Before the invention of photography and fancy art books, many academies built their reputations and acquired their student following by the amount of master drawings in their archives. For generations, students have done copies from these drawings, analyz-ing their lines and forms to learn how the Old Masters perceived human structure.
Today, all you need to do is open up a book of reproductions. Don’t try to imitate the style of these masters in your own creative work—there are al-ready enough artists trying in vain to be the next Michelangelo or Rubens—but use them as a resource to guide and inspire.
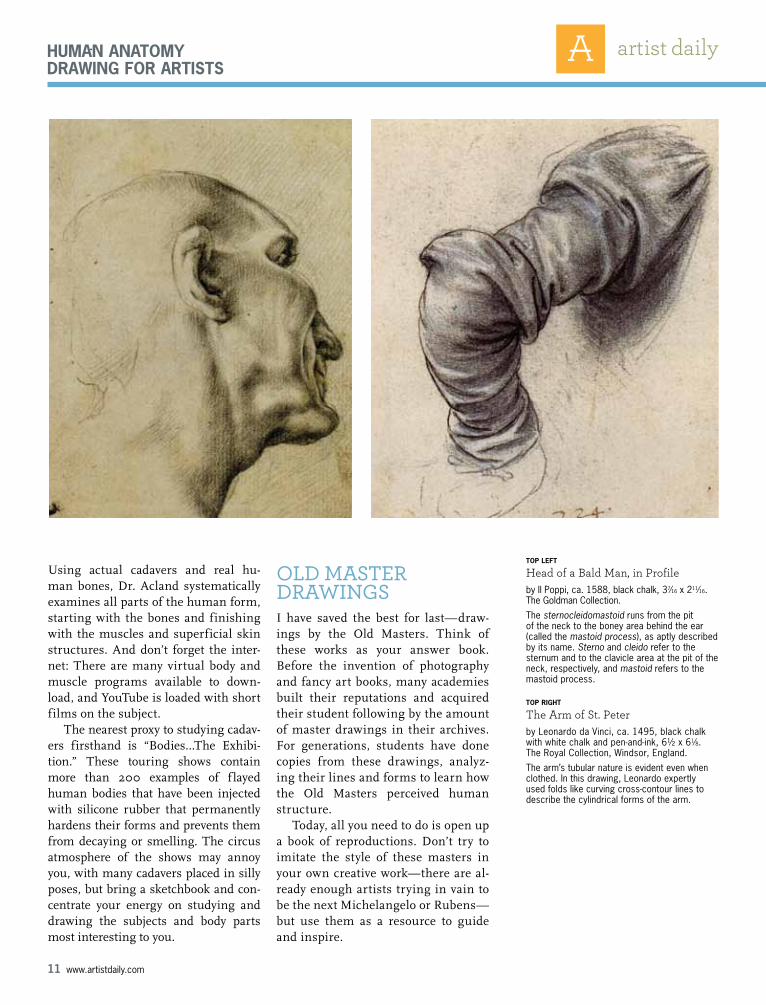
top left
Head of a Bald Man, in Profileby Il Poppi, ca. 1588, black chalk, 37⁄16 x 211⁄16. The Goldman Collection.
The sternocleidomastoid runs from the pit of the neck to the boney area behind the ear (called the mastoid process), as aptly described by its name. Sterno and cleido refer to the sternum and to the clavicle area at the pit of the neck, respectively, and mastoid refers to the mastoid process.
top rigHt
The Arm of St. Peterby Leonardo da vinci, ca. 1495, black chalk with white chalk and pen-and-ink, 6½ x 61⁄8. The royal Collection, windsor, England.
The arm’s tubular nature is evident even when clothed. In this drawing, Leonardo expertly used folds like curving cross-contour lines to describe the cylindrical forms of the arm.

A
F GT
S
T
J
1
23
12 www.artistdaily.com
Human anatomy drawing for artists
The Anatomy of the Throat and of the Legby Leonardo da vinci, ca. 1510–1511, ink, wash, and black chalk on paper, 113⁄8 x 7¾. The royal Collection, windsor, England.
The hamstring muscles on the back of the leg flex the limb, and the vastus group on the front (1, 2, and 3) extend the leg. Important land-marks on the front of the leg include the anterior superior iliac spine where the sar-torius (S) begins; the tibia (T); and the great trochanter (GT) at the top of the femur bone (F). notice how the shaft of the femur angles inward from top to bottom. It’s often useful to place a construction line across the knee joint where the femur and the tibia meet (J). The patella, or kneecap, usually floats above this joint line.

13 www.artistdaily.com
Human anatomy drawing for artists
H
B
G
left
Rear Muscles of the Legby Jean-baptiste Leveille, 1849, lithograph. From The Anatomy of thwe External Forms of Man, by Dr. Julien Fau.when first studying anatomy, it’s important to keep it as simple as you can. Simplify the many muscles into groups that perform similar functions or look visually fused, as in the hamstring muscle group in the upper leg (h) and the combined mass of the gastrocnemius (G) and soleus (b) muscles in the lower leg. The soleus sits underneath the gastrocnemius, poking out on either side of the top muscle.
above
The Myology of the Male Torso, From the Sideby Leonardo da vinci, ca. 1506–1508, pen-and-ink with black chalk underdrawing, 79 ⁄16 x 5½. Collection royal Library, windsor, England.Often mistaken for bone by novices, the flat serratus anterior and the external oblique muscles meet along a knotty, rhythmic line—which, if extended, points in the general direction of the nipple (not depicted in Leonardo’s drawing).
14 www.artistdaily.com
Human anatomy drawing for artists
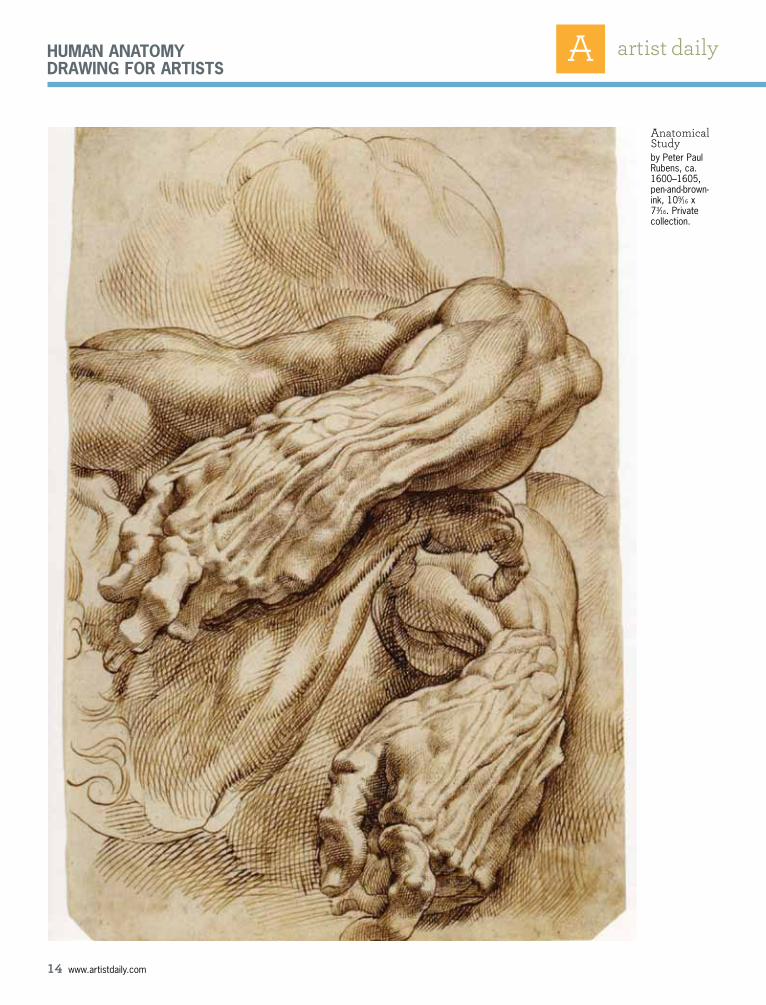
Anatomical Studyby Peter Paul rubens, ca. 1600–1605, pen-and-brown-ink, 109⁄16 x 73⁄16. Private collection.
15 www.artistdaily.com
Human anatomy drawing for artists
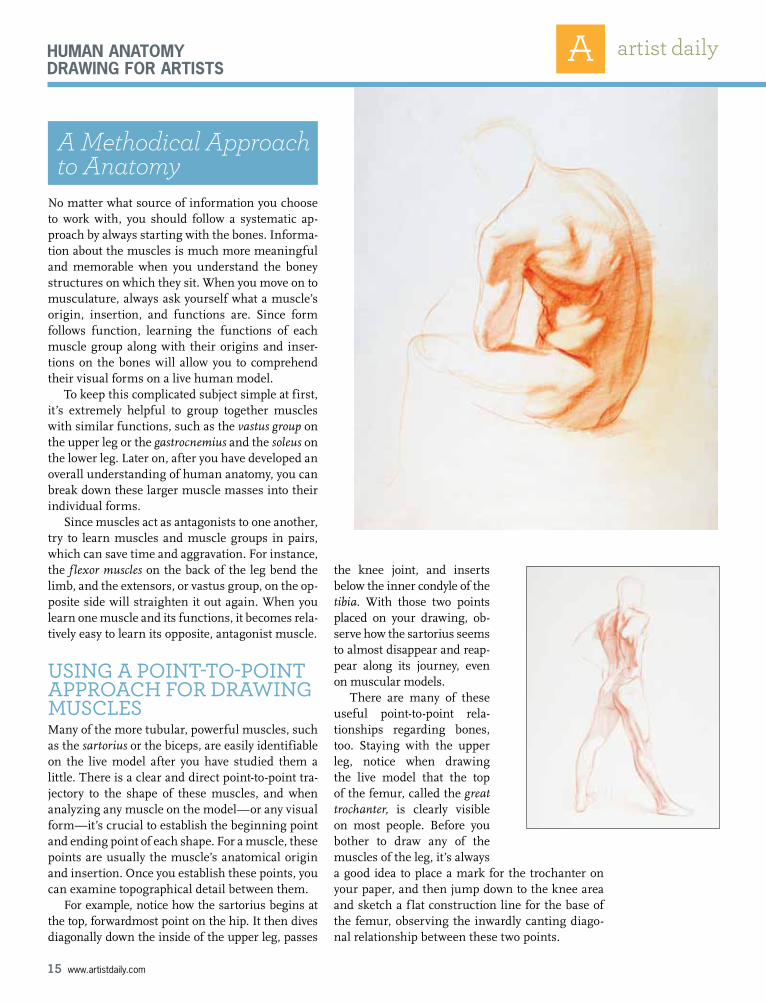
No matter what source of information you choose to work with, you should follow a systematic ap-proach by always starting with the bones. Informa-tion about the muscles is much more meaningful and memorable when you understand the boney structures on which they sit. When you move on to musculature, always ask yourself what a muscle’s origin, insertion, and functions are. Since form follows function, learning the functions of each muscle group along with their origins and inser-tions on the bones will allow you to comprehend their visual forms on a live human model.
To keep this complicated subject simple at first, it’s extremely helpful to group together muscles with similar functions, such as the vastus group on the upper leg or the gastrocnemius and the soleus on the lower leg. Later on, after you have developed an overall understanding of human anatomy, you can break down these larger muscle masses into their individual forms.
Since muscles act as antagonists to one another, try to learn muscles and muscle groups in pairs, which can save time and aggravation. For instance, the f lexor muscles on the back of the leg bend the limb, and the extensors, or vastus group, on the op-posite side will straighten it out again. When you learn one muscle and its functions, it becomes rela-tively easy to learn its opposite, antagonist muscle.
uSing A point-to-point ApproAch for DrAwing muScLeSMany of the more tubular, powerful muscles, such as the sartorius or the biceps, are easily identifiable on the live model after you have studied them a little. There is a clear and direct point-to-point tra-jectory to the shape of these muscles, and when analyzing any muscle on the model—or any visual form—it’s crucial to establish the beginning point and ending point of each shape. For a muscle, these points are usually the muscle’s anatomical origin and insertion. Once you establish these points, you can examine topographical detail between them.
For example, notice how the sartorius begins at the top, forwardmost point on the hip. It then dives diagonally down the inside of the upper leg, passes
the knee joint, and inserts below the inner condyle of the tibia. With those two points placed on your drawing, ob-serve how the sartorius seems to almost disappear and reap-pear along its journey, even on muscular models.
There are many of these useful point-to-point rela-tionships regarding bones, too. Staying with the upper leg, notice when drawing the live model that the top of the femur, called the great trochanter, is clearly visible on most people. Before you bother to draw any of the muscles of the leg, it’s always a good idea to place a mark for the trochanter on your paper, and then jump down to the knee area and sketch a f lat construction line for the base of the femur, observing the inwardly canting diago-nal relationship between these two points.
A Methodical Approach to Anatomy

There are many reasons why small bits of anatomical knowledge like this are so important. For example, most artists don’t have a hard time find-ing the collarbone where it appears prominently at the pit of the neck. But the clavicle twists backward and then outward toward the tip of the shoulder, disappearing under a mass of muscle as it moves. With-out knowing the clavicle’s endpoint, many artists put the observable part of the curving collar-bone too high, point-ing to empty space above the model’s shoulder. Alternate-ly, they might place it too low, making the shoulder look bulky and stiff. To become more aware of the effects bones and muscles have on the surface of the live model, try this exercise. Start with a simple outline drawing of the form you are trying to study—nothing more than an empty silhouette. Then, on a layer of tracing paper, draw the bones, and follow that by sketching the individual muscles on another layer of tracing pa-per. This will help you understand the body’s structure and keep you attuned to the shapes you see when drawing from life.
Artistic anatomy is a never-ending subject. The more you know, the more you’ll discover what you don’t know, and the more you will want to know. But,
When drawing from life, it may seem difficult to identify some of the shallower, broader muscles, such as the serratus anterior, external oblique, and the rhomboids. However, as with the other more pronounced, tubular muscles, you merely need to determine their important point-to-point origins and insertions. As just one example, when looking at Anthony van Dyck’s drawing Seated Man, Leaning Backward, you may have a hard time finding the rhomboids muscle until you determine its origin along the spine and its inser-tion along the edge of the scapula.
Besides their f latness, these muscles can seem complicated because of the way they often interweave with one another. Nevertheless, you can usu-ally find some sort of rhythmic rela-tionship between the muscles to help you accurately place their complicated forms. Once again, the key to finding these subtle rhythms is to know each muscle’s origins and insertions. In the case of the interconnected serratus and oblique, their joined boundary runs along a curving line on the front of the rib cage that points toward the nipple. The rhythmic boundary line between these two f lat muscles also happens to be the same point on the rib cage where one inserts and the other originates.
the finer pointS As you become more adept and in-formed about anatomy, it can be dan-gerously easy to think you already know everything. So, when drawing from life, make it a point to actively question your presumed knowledge with each new pose. Don’t just assume you know what causes all of those bumps and shapes in front of you. For instance, many students look at the shoulder—espe-cially when viewing the figure from behind—and presume that bump at the top is the arm bone or the tip of the shoulder blade. But usually, this lump is the end of the collarbone or clavicle.
16 www.artistdaily.com
Human anatomy drawing for artists
unless you are investigating anatomy as an end in itself, remember why you are studying the subject. It’s a tool to en-hance your awareness of visual subtlety and structure on the human form.
When you first begin your studies of anatomy, you will need to do many “workman” drawings from the live hu-man model that emphasize anatomical landmarks or render the model as a f layed figure, a la Ruben’s Anatomical Study. But be sure to do some artistic renderings along the way to exercise your creative side as well. You don’t want to spend years studying anatomy only to find you can no longer see the living, f lesh-and-blood human figure in front of you. n
Académie d’hommeby Pierre-Paul Prud’hon, ca. 1800, black chalk heightened with white, 235⁄8 x 181⁄8. Collection Musée des beaux-Arts André-Malraux, Le havre, France.
Continuous Process