hr online - staff.mq.edu.au · letter to hr or email it to your payroll advisor. 9. 6 | my...
TRANSCRIPT

HUMA N RESOURCES
HR Online USER GUIDE

2
1 | Logging On:
1. Log on to the following website: https://hronline.mq.edu.au
2. When prompted, enter your OneID username and password.
Can’t remember your password? Phone the Help Desk on 9850 4357. .
3. Click the Login button.
Contents
All staff members: Page
1 | Logging On How to log on and access HR Online 2
2 | Screen Layout Where to find the key features of HR Online 3
3 | My HR 3.1 - Update personal details (incl. emergency contacts, equity data, qualifications)
3.2 - Check and project leave balances
3.3 - Apply for leave
3.4 - Delete a pending (unapproved) leave request
3.5 - Reverse (cancel) an approved leave request
3.6 - Create a statement of service (casual appointments only)
3.7 - Apply for a training course
33
4
4
4
5
5
4 | My Pay 4.1 - View current and past payslips
4.2 - View payment summaries
4.3 - Edit bank account details
4.4 - Add a charitable deduction (Workplace Giving)
4.5 - Submit a timesheet (casual academic and MUIC teaching staff only)
5
6
6
6
7
For managers: Page
5 | My Team 5.1 - View summary of team appointments (and team probation dates, increment
dates, length of service, training and development, birthdays, qualifications)
5.2 - View team leave balances
5.3 - View team leave bookings (via team leave matrix)
5.4 - View team leave bookings (via report)
5.5 - Process an online termination request
7
7
8
8
8
6 | My Approvals 6.1 - Approve timesheets (for casual academic staff only)
6.2 - Approve leave requests
6.3 - Defer a leave request
6.4 - Set up an approval delegation
9
9
10
10

3
2 | Screen Layout:
3 | My HR:
3.1 Update personal details
1. Click on My HR2. Personal Details menu3. Personal Contacts4. Click Contact Details link5. Edit Address/Phone Number6. Click Update button
The same process applies to Emergency Contacts, Equity Data and Qualifications.
3.2 Check and project leave balances
1. Click on My HR2. Leave menu3. Leave Balances
Current leave balances will now be displayed. To project leave balances to a future date:
4. Click Enquiry Date Calendar5. Click on a Future Date6. Click Calculate Balances
button
Menu bar:
Click here to access all key functions of HR Online.
My Unapproved Requests: Click here to view or delete any pending leave requests.
My Favourites: Quick access to the most commonly used HR Online functions.
Print button: To print any screen in HR Online.

4
3.3 Apply for leave
1. Click on My HR2. Leave menu3. Leave Bookings Request4. Click Whole Day or Part
Day Leave Booking link
5. Select the Leave Code6. Enter Start/End Dates7. Select Hours as the Unit8. Pay in Advance: Yes or No9. For Personal Leave, click
Browse to upload medicalcertificate if required
10. Other Document: Yes or No11. Select Reason (if required)12. Enter Comment (optional)13. Click Submit button
Leave Request is now sent to your manager for approval.
3.4 Delete a pending (unapproved) leave request
1. Click on My UnapprovedRequests
A list of all pending (unapproved) leave requests will now be displayed.
2. Tick the Delete box next to therequest(s) you wish to delete
3. Click Delete button
3.5 Reverse (cancel) an approved leave request
1. Click on My HR2. Leave menu3. Leave History4. Clear the Start and End Dates5. Click Find button
6. Click the Reverse link next tothe booking to be deleted
7. Click Reverse button8. A final pop-up window will
appear - click the OK buttonto confirm the reversal
The reversal request is now sent to your manager. NOTE: You cannot book new leave requests (containing the same dates) until reversal has been approved.

5
3.6 Create a statement of service
For casual appointments only
1. Click on My HR2. Employment menu3. Statement of Service4. Enter Start/End Dates5. Select Job (or leave blank for
all jobs)6. Click Find button7. Click the link under
Employment Status to createa Professional or Academicstatement of service
3.7 Apply for a training course
1. Click on My HR2. Training & Development menu3. Training Requests4. Click Register for a Course
link
5. Select Course Category
6. Select Course
7. Select Register (or WaitingList) for the course
8. Complete Course Registrationpage
9. Click Submit button
You will be advised by email of the outcome of your training course request.
4 | My Pay:
4.1 View current and past payslips
To view a current payslip:
1. Click on My Pay2. Payroll Details menu3. Current Payslip
To view a past payslip:
1. Click on My Pay2. Payroll Details menu3. Payslip History4. To view your Summary
Payslip with totals per transaction, click Period End Date of the payslip you wish to view. To view your Detailed payslip with all transactions listed, click Detail.

6
4.2 View payment summaries
1. Click on My Pay2. Payroll Details menu3. Payment Summary4. Click on the Serial # link for
the tax year you wish to view5. A final screen will appear –
click the PAYG PaymentSummary link at the bottom ofthe page
4.3 Edit bank account details
1. Click on My Pay2. Payroll Details menu3. Maintain Bank Accounts
NOTE – Your main account cannot be deleted, only edited.
To edit an existing account:
4. Select account5. Click Details tab6. Edit 6 digit BSB7. Edit Account Number8. Edit Account Name9. Edit % OR Fixed Amount
(multiple accounts only)10. Click Save button
To add a new (second) account:
4. Click Add button5. Enter ‘Bank’ as Pay Method6. Enter 6 digit BSB7. Enter Account Number8. Enter Account Name9. Enter % OR Fixed Amount10. Click Save button
To delete a second account:
4. Select account5. Click Delete button
4.4 Add a charitable deduction (Workplace Giving)
1. Click on My Pay2. Payroll Details menu3. Deductions4. Click link: ‘Add new deduction
record’5. Select Deduction6. Enter Deduction Amount
(numerals only, no $ sign)7. OPTIONAL: Enter Total
Amount (at which thededuction expires)
8. Enter Start Date of deduction9. OPTIONAL: Enter End Date of
Deduction10. Click Add button
7
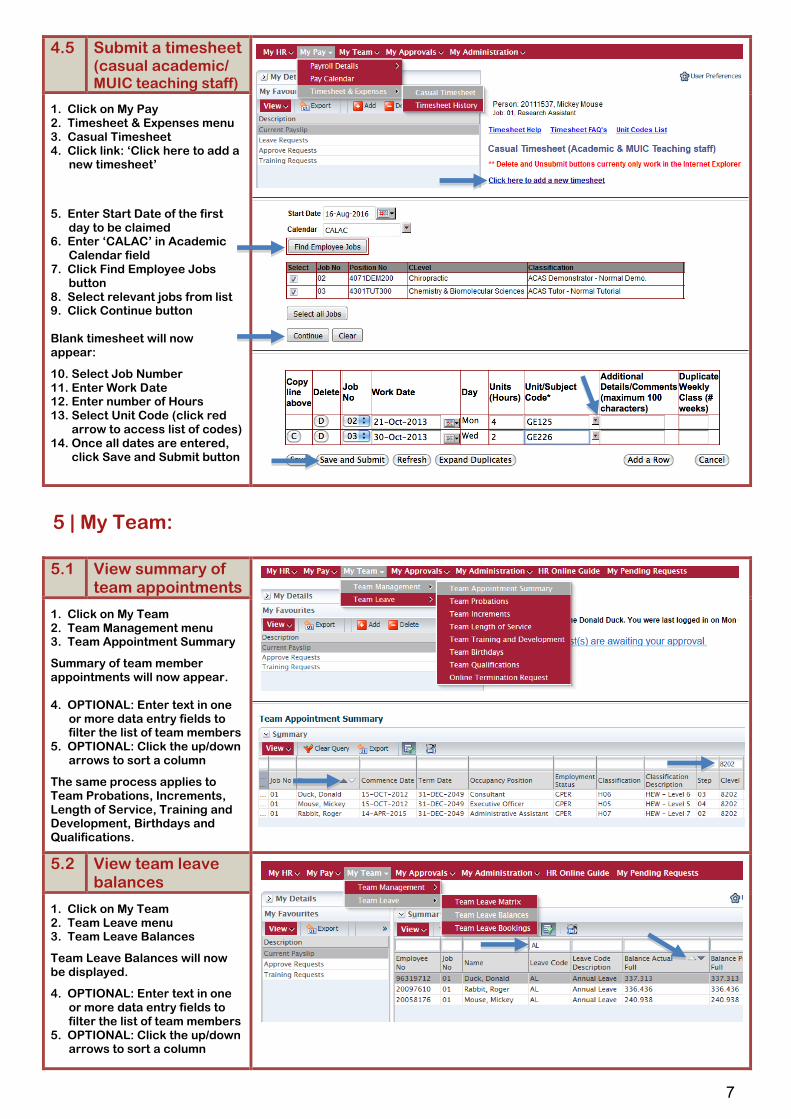
4.5 Submit a timesheet (casual academic/ MUIC teaching staff)
1. Click on My Pay2. Timesheet & Expenses menu3. Casual Timesheet4. Click link: ‘Click here to add a
new timesheet’
5. Enter Start Date of the firstday to be claimed
6. Enter ‘CALAC’ in AcademicCalendar field
7. Click Find Employee Jobsbutton
8. Select relevant jobs from list9. Click Continue button
Blank timesheet will now appear:
10. Select Job Number11. Enter Work Date12. Enter number of Hours13. Select Unit Code (click red
arrow to access list of codes)14. Once all dates are entered,
click Save and Submit button
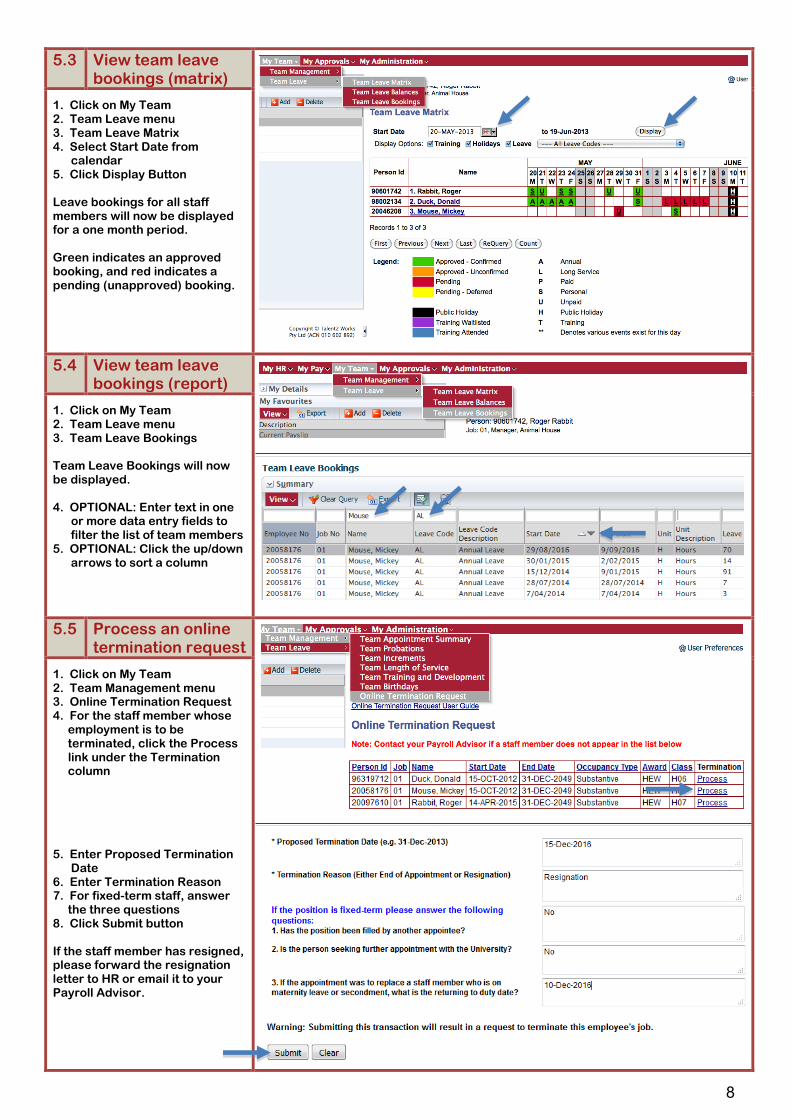
5 | My Team:
5.1 View summary of team appointments
1. Click on My Team2. Team Management menu3. Team Appointment Summary
Summary of team member appointments will now appear.
4. OPTIONAL: Enter text in oneor more data entry fields tofilter the list of team members
5. OPTIONAL: Click the up/downarrows to sort a column
The same process applies to Team Probations, Increments, Length of Service, Training and Development, Birthdays and Qualifications.
5.2 View team leave balances
1. Click on My Team2. Team Leave menu3. Team Leave Balances
Team Leave Balances will now be displayed.
4. OPTIONAL: Enter text in oneor more data entry fields tofilter the list of team members
5. OPTIONAL: Click the up/downarrows to sort a column
8
5.3 View team leave bookings (matrix)
1. Click on My Team2. Team Leave menu3. Team Leave Matrix4. Select Start Date from
calendar5. Click Display Button
Leave bookings for all staff members will now be displayed for a one month period.
Green indicates an approved booking, and red indicates a pending (unapproved) booking.
5.4 View team leave bookings (report)
1. Click on My Team2. Team Leave menu3. Team Leave Bookings
Team Leave Bookings will now be displayed.
4. OPTIONAL: Enter text in oneor more data entry fields tofilter the list of team members
5. OPTIONAL: Click the up/downarrows to sort a column
5.5 Process an online termination request
1. Click on My Team2. Team Management menu3. Online Termination Request4. For the staff member whose
employment is to beterminated, click the Processlink under the Terminationcolumn
5. Enter Proposed TerminationDate
6. Enter Termination Reason7. For fixed-term staff, answer
the three questions8. Click Submit button
If the staff member has resigned, please forward the resignation letter to HR or email it to your Payroll Advisor.

9
6 | My Approvals:
6.1 Approve timesheets (casual academic/ MUIC teaching staff)
1. Click on My Approvals2. Approve Transactions
A list of submitted casual academic timesheets will now be displayed.
For each timesheet entry:
3. Check the total hours claimed4. OPTIONAL: Click the Details
link to check the exact datesthat the staff member worked(pop-up window will open)
5. Click the Approve or Rejectradio button
6. Click Update button
6.2 Approve leave requests
1. Click on My Approvals2. Approve Transactions
A list of submitted leave requests will now be displayed.
To approve, reject or escalate the leave request:
3. Click the Approve, Reject orEscalate radio button
4. Click Update button
To sight a medical certificate prior to approving request:
3. Click the Details link (pop-upwindow will open)
4. Click on the Attachment link5. View the certificate6. Select ‘Yes’ in Medical
Certificate Sighted field7. Change Approval Status field
from Submitted toApproved/Rejected/Escalated
8. Click Update button
The staff member will be sent an email advising them that their leave request has been actioned.

10
6.3 Defer a leave request
1. Click on My Approvals2. Approve Transactions
A list of submitted leave requests will now be displayed.
To defer a leave request:
3. Click the Details link (pop-upwindow will open)
4. Change Approval Status fieldfrom Submitted to Deferred
5. Enter a Reactivated Date (thedate which you want toreassess the leave request)
6. Click Update button
Deferring the leave request will prevent the leave request from being escalated to your manager. You will be emailed on the reactivation date to advise you to now process the request.
6.4 Set up an approval delegation
To allow a delegate to approvetimesheets and/or leaverequests during an absence:
1. Click on My Approvals2. Approval Delegation3. Click Add New Approval
Delegation record link4. Select the Transaction Type
you wish to delegate (LeaveBookings, Timesheets or ALL)
5. Click small red arrow at endof Delegated Position No. field(pop-up window will open)
6. Enter the occupant’s surnamefollowed by % (e.g. mouse%)
7. Click Find button8. Select the delegate’s Position
Number (under Position Title)9. Enter Start Date of delegation10. Enter End Date of delegation11. Click Add button