hp10294 kit - pacbrake.com · it is necessary to have a proper and professional wheel alignment...
TRANSCRIPT

HP10294 KIT2011-2017 Ford F250 / F350 Super Duty 4WD
2.5" Leveling Kit

Pacbrake is a registered trademark of Pacbrake Co. 1
HP10294 PacPro Ford F250 / F350 Leveling Kit L6418
KIT CONTENT
KIT CONTENTS
A Coil Spring Spacer (2)B Shock Extension (2) C Sway Bar Drop Bracket (2) D M10 x 1.25 Flange Nut (4)E M14 x 2 x 80 mm Hex Head Cap Screw (2)F M14 Flat Washer (4)G M14 x 2 Nylon Lock Nut (2)H Brake Line Drop Bracket (2)I M8 x 1.25 x 16 mm Hex Head Cap Screw (2)J M8 Flat Washer (2)K M8 x 1.25 Nyloc Nut (2)
AB
C KI
EH
DJ F G
Make sure all the items shown in the photo are provided in your kit before starting the installation.

Pacbrake is a registered trademark of Pacbrake Co. 2
HP10294 PacPro Ford F250 / F350 Leveling Kit L6418
Thank you and congratulations on the purchase of a Pacbrake leveling kit. Please read the entire manual prior to starting the installation to ensure you can complete it once started.
SAFETY WARNINGAltering the suspension system of your vehicle may cause it to handle differently than it did from the factory. Larger wheel and tire combinations may increase the leverage on the suspension, and steering components. This changes the way your vehicle handles and responds to abrupt maneuvers. Operate your vehicle at reduced speeds in all conditions to prevent loss of control. Failure to do so may result in serious injury. Pacbrake does not recommend the combined use of suspension lifts, body lifts, or other lifting methods.
INSTALLATION WARNINGUse caution when disassembling, and reassembling the vehicle. The proceeding instructions are guidelines only, the installer is responsible for ensuring that the vehicle is safe for use after performing the installation. Pacbrake recommends the use of an OE service manual for the model/year of the vehicle when disassembling and assembling factory related components.
Suspension components that use rubber or urethane bushings should be tightened with the vehicle at normal ride height. This will prevent premature wear or failure of the bushing. Prevent the suspension components from overextension by supporting them with a jack.
Due to the suspension geometry and vehicle tolerances, the amount of lift is a base figure. Spacer thickness does not equate to the amount of lift due to the suspension geometry. For example, a 1" thick spacer may provide a 2" lift. Always measure the vehicle ride height at all 4 corners before and after installation to ensure the results are as expected.
WHEEL ALIGNMENT AND HEADLIGHT ADJUSTMENTIt is necessary to have a proper and professional wheel alignment performed by a certified alignment technician to align the vehicle to factory specifications. After the installation is complete, check to ensure that the vehicles head lamps are aimed properly. If not, a head light alignment is required.
1 MEASURE THE STOCK RIDE HEIGHT
• Park the vehicle on a level surface.
• Using a measuring tape, measure the distance between the center of the wheel hub and the bottom of the fender well (this will give you your ride height).
• Note the ride height for all four corners.
2 RAISE THE FRONT AXLE
• Place wheel chocks in front of and behind both rear wheels.
• Raise the front of the truck high enough to remove both wheels and attain a comfortable working height.
• Place two jack stands under the vehicles frame.
• Lower the vehicle until the frame is supported by the jack stands.
• Use a floor jack to support underneath the front axle at a suitable lifting point such as the front differential.
• Remove the front wheels.

Pacbrake is a registered trademark of Pacbrake Co. 3
HP10294 PacPro Ford F250 / F350 Leveling Kit L6418
3
4A 4B
5
3 DISCONNECT THE TRACK BAR
• Disconnect the track bar from the track bar mount that is connected to the frame. Refer to figure 3.
4 INSTALL THE BRAKE LINE DROP BRACKET
• Remove the factory OE brake line support bracket from both the driver and passenger side.
• Use the supplied fasteners to install the brake line drop brackets as shown in figure 4A & 4B.
NOTE: Perform a steering sweep and inspect the front brake lines for adequate slack. Failure to perform this check may result in performance failure.
5 DISCONNECT THE SWAY BAR
• Disconnect the sway bar from the frame on both the driver and passenger side.
• Install the provided sway bar drop brackets to the frame using the OE fasteners. Torque the hardware to the manufacturer’s specifications.
• Raise the sway bar and attach it to the drop bracket using the M10 nuts that are provided. Torque the M10 nuts to 45 ft-lbs (61 N.m)
Pacbrake is a registered trademark of Pacbrake Co. 4
HP10294 PacPro Ford F250 / F350 Leveling Kit L6418
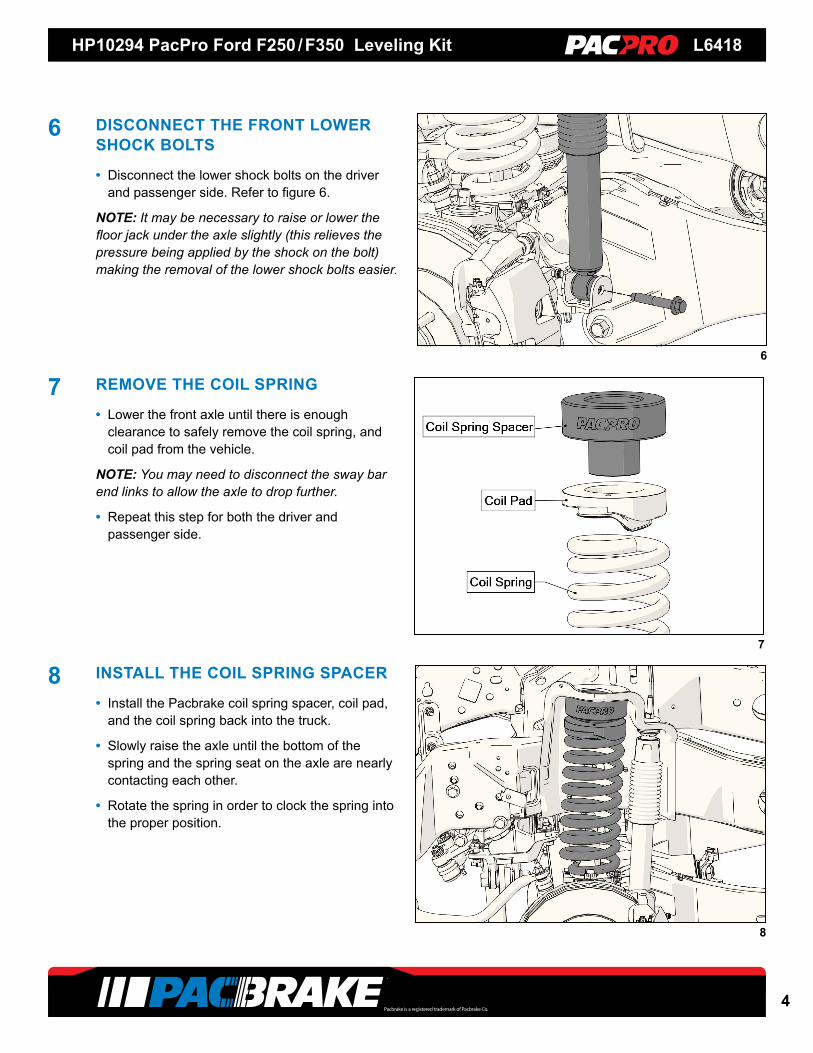
6 DISCONNECT THE FRONT LOWER SHOCK BOLTS
• Disconnect the lower shock bolts on the driver and passenger side. Refer to figure 6.
NOTE: It may be necessary to raise or lower the floor jack under the axle slightly (this relieves the pressure being applied by the shock on the bolt) making the removal of the lower shock bolts easier.
7 REMOVE THE COIL SPRING
• Lower the front axle until there is enough clearance to safely remove the coil spring, and coil pad from the vehicle.
NOTE: You may need to disconnect the sway bar end links to allow the axle to drop further.
• Repeat this step for both the driver and passenger side.
8 INSTALL THE COIL SPRING SPACER
• Install the Pacbrake coil spring spacer, coil pad, and the coil spring back into the truck.
• Slowly raise the axle until the bottom of the spring and the spring seat on the axle are nearly contacting each other.
• Rotate the spring in order to clock the spring into the proper position.
6
8
7

Pacbrake is a registered trademark of Pacbrake Co. 5
HP10294 PacPro Ford F250 / F350 Leveling Kit L6418
9 REINSTALL THE SHOCK
• Install the provided shock extension bracket onto the factory OE mounting bracket and use the factory OE fasteners to attach the new bracket. Refer to figure 9. Torque the fasteners to the manufacturer’s specification.
• Raise the axle such that the hole in the shock extension lines up with the hole located at the bottom of the shock absorber.
• Install the provided M14 hardware and torque to the manufacturer’s specifications.
10 REINSTALL THE TRACK BAR
• Reconnect the track bar to the frame track mount using the OE hardware as shown in figure 3.
• Torque the hardware to the manufacturer’s specifications.
11 REINSTALL THE WHEELS
• Install the wheels and torque them to factory specification.
• Raise the vehicle in order to remove the jack stands from under the frame and then carefully lower the vehicle back to the ground.
• Using a measuring tape, measure the distance between the center of the wheel hub and the bottom of the fender well for all four corners.
• Note the distance between the wheel hub and the fender well, this is your new ride height. Ensure the results are as expected.
9

Pacbrake is a registered trademark of Pacbrake Co. 6
HP10294 PacPro Ford F250 / F350 Leveling Kit L6418
POST INSTALLATION WARNINGOnce the installation is complete and the vehicle is lowered to the ground, check all parts which have rubber or urethane components to ensure proper torque. Move the vehicle backwards and forwards a short distance to allow suspension components to adjust. Turn the front wheels completely left then right and verify adequate tire, wheel, brake line, and ABS wire clearance. Test and inspect steering, brake and suspension components. Inspect brake/ABS lines for adequate slack at full extension. Failure to perform the post installation checks may result in vehicle damage.
VEHICLE HANDLING WARNINGLarger wheel and tire combinations may increase the leverage on the suspension, and steering components. Increasing the height of your vehicle increases the likelihood of rollover or loss of control during abrupt manoeuvres, especially at high speeds. Operate your vehicle at reduced speeds in all conditions to prevent loss of control. Failure to do so may result in serious injury.
WHEEL ALIGNMENT AND HEADLIGHT ADJUSTMENTIt is necessary to have a proper and professional wheel alignment performed by a certified alignment technician to align the vehicle to factory specifications. After the installation is complete, check to ensure that the vehicles head lamps are aimed properly. If not, a head light alignment is required as well.
VEHICLE RE-TORQUE AND SAFETY INSPECTIONUpon completion of all services and adjustments performed on your vehicle, and within 50 miles of driving, check to ensure all fasteners and hardware are properly torqued to specification as noted in the vehicles factory service manual.
WARRANTYTo be eligible for warranty, the owner must submit their warranty card or register online within 30 days of the purchase date.
L6418 Rev1 14.06.2017