hp systems insight manager user guide
TRANSCRIPT

Systems Insight Manager 7.1 User Guide
HP Part Number: 601823-006Published: August 2012Edition: Edition 2

© Copyright 2010, 2012 Hewlett-Packard Development Company, L.P.
Legal Notices
Confidential computer software. Valid license from HP required for possession, use or copying. Consistent with FAR 12.211 and 12.212, CommercialComputer Software, Computer Software Documentation, and Technical Data for Commercial Items are licensed to the U.S. Government undervendor's standard commercial license.
The information contained herein is subject to change without notice. The only warranties for HP products and services are set forth in the expresswarranty statements accompanying such products and services. Nothing herein should be construed as constituting an additional warranty. HP shallnot be liable for technical or editorial errors or omissions contained herein.
Acknowledgments
Microsoft, Windows, Windows Server, Windows Vista, Windows NT, and Windows XP are U.S. registered trademarks of Microsoft Corporation.Linux is a U.S. registered trademark of Linus Torvalds.
Publication history
The manual publication date and part number indicate its current edition. The publication date will change when a new edition is released. Themanual part number will change when extensive changes are made.
To ensure that you receive the latest edition, you should subscribe to the appropriate product support service. See your HP sales representative fordetails.
Please direct comments regarding this guide to:
Hewlett-Packard CompanyHP Systems Insight Manager Learning Products20555 Tomball ParkwayHouston, Texas 77070
Or, use this web form to send us feedback:
http://docs.hp.com/assistance/feedback.html
Typographic conventions
find(1) HP-UX manpage. In this example, “find” is the manpage name and “1” is the manpage section.
Book Title Title of a book or other document.
Linked Title Title that is a hyperlink to a book or other document.
http://www.hp.com A Web site address that is a hyperlink to the site.
Command Command name or qualified command phrase.
user input Commands and other text that you type.
computer output Text displayed by the computer.
Enter The name of a keyboard key. Note that Return and Enter both refer to the same key. A sequence such as Ctrl+A indicatesthat you must hold down the key labeled Ctrl while pressing the A key.
term Defined use of an important word or phrase.
variable The name of an environment variable, for example PATH or errno.
value A value that you may replace in a command or function, or information in a display that represents several possiblevalues.
<element> An element used in a markup language.
attrib An attribute used in a markup language.

ContentsI Introduction...............................................................................................12
1 About this document.............................................................................13User Guide.......................................................................................................................13HP SIM User Guide layout..................................................................................................13
2 Product overview..................................................................................14HP SIM features.................................................................................................................14Basic concepts..................................................................................................................14
Discovery and identification............................................................................................14Inventory......................................................................................................................15Status info....................................................................................................................15Reports........................................................................................................................15Automatic event handling...............................................................................................15Tools and tasks.............................................................................................................16Collections...................................................................................................................16Users and Authorizations................................................................................................16
Nested user groups...................................................................................................16Signing in and using the graphical user interface...................................................................16
Security Alerts in Internet Explorer and Firefox...................................................................17Automatically signing in.................................................................................................17
Configuring the CMS................................................................................................17Configuring the browser............................................................................................18Behavior.................................................................................................................18
Guided tour of the HP SIM user interface..........................................................................19Customizing views.........................................................................................................20
II Setting up HP SIM.....................................................................................213 Setting up managed systems..................................................................22
Configure or Repair Agents.................................................................................................22Setting up Windows servers to be managed by HP SIM..........................................................22Setting up HP-UX servers to be managed by HP SIM...............................................................29
Manually setting up an HP-UX managed system................................................................30Configuring SNMP to send traps to the CMS................................................................30Configuring SSH access............................................................................................30Subscribing to WBEM indications/events:...................................................................30
Setting up Linux servers to be managed by HP SIM................................................................31Configuring agents remotely using Configure or Repair Agents:...........................................31Manually setting up Linux managed systems.....................................................................31
Installing and configuring SSH...................................................................................32Configuring a Linux system to send SNMP traps............................................................32
4 Credentials..........................................................................................34Example XML file to add more than 10 WBEM username and password pairs...........................34
5 WMI Mapper Proxy .............................................................................366 Discovery............................................................................................37
Recommended discovery tasks.............................................................................................37Options on the Discovery page............................................................................................38Discovery credentials..........................................................................................................39Configuring Configure or Repair Agents through a discovery task.............................................39Viewing discovery task results..............................................................................................39Discovery filters.................................................................................................................39
Contents 3
Discovery of Gen8 servers..................................................................................................407 Manage Communications......................................................................41
Configuring the managed system software using the Configure or Repair Agents feature from theCMS................................................................................................................................41Sending test traps and indications........................................................................................42
8 Automatic event handling......................................................................43Example automatic event handling tasks...............................................................................44
9 Users and Authorizations.......................................................................45Users................................................................................................................................45
User groups..................................................................................................................45Toolboxes.........................................................................................................................45
10 Managed environment.........................................................................46III HP SIM basic features...............................................................................47
11 Basic and advanced searches...............................................................48Basic search......................................................................................................................48Advanced search...............................................................................................................48
Hierarchical displays.....................................................................................................48Save as.......................................................................................................................48View...........................................................................................................................49
Searching for tools.............................................................................................................4912 Monitoring systems..............................................................................50
Viewing system collections...................................................................................................50Pages displaying system status........................................................................................50Viewing health status from the table or icon view...............................................................51Viewing health status in the tree view...............................................................................51System status types........................................................................................................51Software status types.....................................................................................................52WBEM operational status types.......................................................................................53
Monitoring clusters.............................................................................................................53System properties...............................................................................................................54Example of setting system properties.....................................................................................55
Setting customer company and contact information individually...........................................55Example of setting system properties for multiple systems.........................................................55
13 Event management..............................................................................56Event management configuration.........................................................................................56Example - Creating a paging task based on e-mail notification................................................57Examples of e-mail pages...................................................................................................58
Example of a standard e-mail page.................................................................................58Example of a Pager/SMS page......................................................................................59Example of an HTML page.............................................................................................59
Example - Creating a task to send an e-mail when a system reaches a critical state.....................60Example - Creating a task to delete all cleared events.............................................................61
14 Reporting in HP SIM............................................................................63Standard reports................................................................................................................63
New Reports................................................................................................................63Managing reports.........................................................................................................63Snapshot Comparison....................................................................................................64Enhanced Reports.........................................................................................................64
Predefined reports....................................................................................................65Run Enhanced reports...............................................................................................65New Enhanced reports.............................................................................................66
4 Contents

Editing Enhanced reports...........................................................................................66E-mailing reports......................................................................................................66Deleting reports........................................................................................................66
15 HP SIM tools.......................................................................................68Target selection..................................................................................................................68Scheduling tools................................................................................................................68Managing with tasks..........................................................................................................68Viewing results..................................................................................................................69Example - Device ping........................................................................................................69
IV HP SIM advanced features........................................................................7016 Collections in HP SIM..........................................................................71
Collections in HP SIM.........................................................................................................71Types of collections........................................................................................................72Other customization features...........................................................................................73
17 HP SIM custom tools............................................................................78General concepts..............................................................................................................78
Tool types....................................................................................................................78Environment variables for custom tools.............................................................................79Custom tool menu placement..........................................................................................81Custom tool URL format..................................................................................................81
Creating custom tools through the GUI..................................................................................82New............................................................................................................................82Edit.............................................................................................................................82View tool definition.......................................................................................................82Run Now/Schedule.......................................................................................................83Delete..........................................................................................................................83
Creating custom tools through the HP SIM CLI........................................................................83Creating a custom SSA tool............................................................................................83Example Web launch tool..............................................................................................85Example MSA tool........................................................................................................86Example Enabling Remote Desktop tool............................................................................87Adding a TDEF to HP SIM..............................................................................................88Removing a TDEF from HP SIM.......................................................................................88Modifying a TDEF.........................................................................................................89
18 Federated Search................................................................................90Federated CMS Configuration.............................................................................................90
19 CMS Reconfigure Tool.........................................................................92Operational Commands, Options and Parameters..................................................................92Reconfiguring the CMS password.........................................................................................92
Dependencies...............................................................................................................93Warnings.....................................................................................................................93Changing the CMS password.........................................................................................93
Reconfiguring the CMS host and IP attributes.........................................................................94Dependencies...............................................................................................................94Warning......................................................................................................................95Reconfiguring the CMS host name and primary IP address.................................................95
Reconfiguring the CMS database credentials.........................................................................95Dependencies...............................................................................................................95Warning......................................................................................................................95Changing the HP SIM and HP Insight Control database credentials.....................................95
Changing the database authorizations for Matrix OE and HP Operations Orchestration....95Reconfiguring the CMS to use a different database................................................................96
Contents 5

Dependencies...............................................................................................................97Warning......................................................................................................................97Changing the database associated with the CMS..............................................................97
20 Understanding HP SIM security.............................................................98Securing communication.....................................................................................................98
Secure Sockets Layer (SSL)..............................................................................................98Secure Shell (SSH).........................................................................................................98Hyper Text Transfer Protocol Secure (HTTPS)......................................................................98Secure Task Execution (STE) and Single Sign-On (SSO)......................................................98Distributed Task Facility (DTF)..........................................................................................98WBEM........................................................................................................................99LDAP...........................................................................................................................99RMI.............................................................................................................................99
Credentials management....................................................................................................99SSL certificates..............................................................................................................99
HP SIM main certificate.............................................................................................99WBEM certificate.....................................................................................................99Upgrading to HP SIM 7.0..........................................................................................99
Certificate expiration and Certificate Revocation Check (CLR Check)..................................100Source of client and server certificates.......................................................................100Enabling or disabling certificate revocation check.......................................................100Offline and online mode of certificate revocation check...............................................100
Offline mode....................................................................................................100Online mode....................................................................................................100
CRL distribution points.............................................................................................101Warning or error....................................................................................................101Conditions for warning............................................................................................101Customizable properties..........................................................................................101
Certificate sharing.......................................................................................................102SSH keys....................................................................................................................102Passwords..................................................................................................................102
Browser..........................................................................................................................102SSL............................................................................................................................102Cookies.....................................................................................................................102Passwords..................................................................................................................103Password warnings......................................................................................................103Browser session...........................................................................................................103Internet Explorer zones.................................................................................................103System link format.......................................................................................................104
Operating-system dependencies.........................................................................................104User accounts and authentication..................................................................................104File system..................................................................................................................104Background processes.................................................................................................104Windows Cygwin.......................................................................................................105HP-UX and Linux.........................................................................................................105
HP SIM database.............................................................................................................105SQL Server and MSDE.................................................................................................105Remote SQL Server......................................................................................................105PostgreSQL.................................................................................................................105Oracle.......................................................................................................................105
Command-line interface....................................................................................................105How to: configuration checklist..........................................................................................106
General.....................................................................................................................106Configuring the CMS...................................................................................................106
6 Contents

Strong security............................................................................................................106Configuring managed systems......................................................................................106
How to: lockdown versus ease of use on Windows systems....................................................107Moderate...................................................................................................................107Strong.......................................................................................................................108
21 Privilege elevation.............................................................................110Two-factor authentication..................................................................................................110
Enabling and disabling two-factor authentication............................................................110Enable secure communication..................................................................................111Microsoft Active Directory users................................................................................111Users Distinguished Name.......................................................................................111Subject Alternative Name........................................................................................111Authentication phase..............................................................................................111Authorization phase................................................................................................111Certificate revocation check.....................................................................................111Pre-requisites to enable two-factor authentication technique..........................................111Smart cards and Cryptographic Service Provider (CSP)...............................................112Security measures to follow......................................................................................112
22 Contract and warranty.......................................................................113Viewing contract and warranty information.........................................................................113Collecting contract and warranty data................................................................................114Viewing contract and warranty status..................................................................................114
Overview...................................................................................................................114System Information......................................................................................................114Contract.....................................................................................................................114Warranty...................................................................................................................115Monitoring contract and warranty status.........................................................................117
23 License Manager..............................................................................118CLI mxlmkeyconfig...........................................................................................................119License types...................................................................................................................119Licensed System(s)............................................................................................................121Add Licenses...................................................................................................................121Collect Remote License Info...............................................................................................121
License Collection Results table......................................................................................121Assigning and Unassigning licenses...................................................................................123Apply Licenses.................................................................................................................123Add License page............................................................................................................124Key details page..............................................................................................................124Assigning or Applying Licenses page.................................................................................125License unlicensed systems (optional) page..........................................................................126
24 Storage integration using SMI-S..........................................................127About storage systems......................................................................................................127Storage integration using SNMP........................................................................................127Storage events.................................................................................................................128Storage inventory details...................................................................................................128Introduction to SMI-S for HP SIM........................................................................................129
About SMI-S...............................................................................................................129Key components..........................................................................................................129
CIM......................................................................................................................129WBEM..................................................................................................................130SLP.......................................................................................................................130
Profiles.......................................................................................................................130SMI-S implementation..................................................................................................130
Contents 7

About storage security using SNMP....................................................................................130Discovery and identification..........................................................................................130
Prerequisites for managing storage systems.........................................................................131Using storage solutions.....................................................................................................131
Event collection and launch..........................................................................................131For Command View SDM........................................................................................131Configuring the SNMP trap destination on Windows 2000..........................................132Configuring the SNMP trap destination on HP-UX.......................................................132Loading the HSV MIB on the CMS for EVA.................................................................132
Receiving WBEM protocol events from XP arrays..................................................................132Discovery........................................................................................................................133Configuring HP SIM with storage systems............................................................................133
Subscribe to WBEM indication events............................................................................133Viewing storage system collections.................................................................................134Viewing individual storage systems................................................................................134
Viewing storage system reports..........................................................................................134Existing storage system reports......................................................................................134
Viewing storage array capacity.........................................................................................135Viewing storage capacity for all arrays..........................................................................135Viewing storage capacity for a single array....................................................................135
25 Managing MSCS clusters...................................................................136MSCS status....................................................................................................................136
Cluster fields...............................................................................................................137Node fields................................................................................................................137Network fields............................................................................................................137Resource fields............................................................................................................138
Cluster Monitor resource thresholds....................................................................................138Disk capacity thresholds...............................................................................................138CPU utilization thresholds.............................................................................................138Cluster resources supported by HP SIM..........................................................................139
Cluster Monitor states.......................................................................................................139Cluster Monitor polling rate...............................................................................................139
CPU polling rate.........................................................................................................139Disk polling rate..........................................................................................................140MSCS status polling rate..............................................................................................140System status polling rate.............................................................................................140
26 HP SIM Audit log..............................................................................141Configuring the HP SIM audit log.......................................................................................141Configuring the tool definition files.....................................................................................141Configuring the log.properties file .....................................................................................141Viewing the audit log.......................................................................................................141Example audit log............................................................................................................141Log content.....................................................................................................................142
27 HP Version Control and HP SIM..........................................................143About the Version Control Agent........................................................................................143
Additional resources....................................................................................................143About the Version Control Repository Manager...............................................................144About integration........................................................................................................144About software repositories..........................................................................................145About multiple system management...............................................................................145
28 Compiling and customizing MIBs........................................................146MIB management tools.....................................................................................................146
mcompile...................................................................................................................146
8 Contents

mxmib.......................................................................................................................148mxmib MIB keyword customization...........................................................................149
SNMP Trap Settings page............................................................................................152A Important Notes.....................................................................................154
System and object names must be unique................................................................................154Setting the Primary DNS Suffix for the CMS.............................................................................154Distributed Systems Administration Utilities menu options not available.........................................154Virtual machine guest memory reservation size.........................................................................154Insight Remote Support Advanced compatibility........................................................................154Database firewall settings......................................................................................................155Annotating the portal UI........................................................................................................155Security bulletins...................................................................................................................155Validating RPM signatures.....................................................................................................156
Checking which public keys are installed............................................................................156Validate the signature on an RPM......................................................................................156How to check RPM signatures within the sysmgmt.bin............................................................156
Central Management Server..................................................................................................157Complex systems displaying inconsistency with the number of nPars within the complex.................157Configure or Repair Agents....................................................................................................158Data collection reports..........................................................................................................158
B Troubleshooting......................................................................................159Adobe................................................................................................................................159Agentless Management Service..............................................................................................159Authentication......................................................................................................................159Blade insertion.....................................................................................................................159Browser...............................................................................................................................160Central Management Server..................................................................................................161Complex.............................................................................................................................162Configure or Repair Agents....................................................................................................162Container View....................................................................................................................162Credentials..........................................................................................................................163Data Collection....................................................................................................................164Database............................................................................................................................165Discovery............................................................................................................................166iLO.....................................................................................................................................168Linux servers........................................................................................................................168Event...................................................................................................................................168Health status........................................................................................................................169Host name...........................................................................................................................169HP Insight Control power management....................................................................................169Insight Control virtual machine management............................................................................170HP Smart Update Manager...................................................................................................171HP ProLiant Support Pack.......................................................................................................173HP Systems Insight Manager..................................................................................................173Identification........................................................................................................................173Installation...........................................................................................................................175License Manager..................................................................................................................175Locale.................................................................................................................................176Managed Environment..........................................................................................................176HP MIBs..............................................................................................................................176Onboard Administrator.........................................................................................................177OpenSSH............................................................................................................................177Performance.........................................................................................................................177Ping....................................................................................................................................177
Contents 9

Ports used by HP SIM............................................................................................................177Privilege elevation.................................................................................................................178Property pages.....................................................................................................................178Reporting............................................................................................................................179Security...............................................................................................................................179Sign-in................................................................................................................................179SNMP settings......................................................................................................................179SNMP traps.........................................................................................................................179SSH communication..............................................................................................................180Software/Firmware...............................................................................................................180System Page........................................................................................................................180System status........................................................................................................................180Target selection wizard..........................................................................................................180Tasks..................................................................................................................................180Tools...................................................................................................................................181Upgrade.............................................................................................................................181UUID..................................................................................................................................181Virtual Connect Enterprise Manager........................................................................................182Virtual identifiers..................................................................................................................182Virtual machines...................................................................................................................183VMware..............................................................................................................................183WBEM................................................................................................................................183WBEM indications................................................................................................................183WMI Mapper......................................................................................................................183
C Protocols used by HP SIM........................................................................185SNMP.................................................................................................................................185HTTP...................................................................................................................................186WBEM................................................................................................................................186Remote Method Invocation (RMI)............................................................................................187Remote Wake-Up.................................................................................................................187Internet Control Message Protocol (ICMP)................................................................................187Lightweight Directory Access Protocol (LDAP)............................................................................187Simple Object Access Protocol (SOAP)....................................................................................187Protocol functionality.............................................................................................................187Configuring protocol settings in HP SIM...................................................................................189
D Data Collection......................................................................................190Append new data set (for historical trend analysis)....................................................................190Overwrite existing data set (for detailed analysis).....................................................................190Initial data collection.............................................................................................................190Bi-weekly data collection.......................................................................................................191
E Default system tasks................................................................................192Biweekly Data Collection.......................................................................................................193System Identification..............................................................................................................193Old Noisy Events..................................................................................................................194Events Older Than 90 Days....................................................................................................194Status Polling for Non Servers.................................................................................................194Status Polling for Servers........................................................................................................194Status Polling for Systems No Longer Disabled..........................................................................194Hardware Status Polling for Superdome 2 Onboard Administrator..............................................194Data Collection....................................................................................................................194Hardware Status Polling.........................................................................................................194Version Status Polling............................................................................................................194Version Status Polling for Systems no Longer Disabled................................................................195
10 Contents
Check Event Configuration.....................................................................................................195Status polling.......................................................................................................................195
F Host file extensions.................................................................................196Default values......................................................................................................................198
G System Type Manager rules.....................................................................200Adding new SNMP rules.......................................................................................................200
H Custom tool definition files.......................................................................201Tool type-specific requirements...............................................................................................201
SSA-specific attributes.......................................................................................................201MSA-specific attributes......................................................................................................201WLA-specific attributes.....................................................................................................202
mxtool command parameters.................................................................................................203Parameterized strings............................................................................................................203Common tool attributes.........................................................................................................205Tool Filtering attributes...........................................................................................................207Environment Variables...........................................................................................................208Tool parameter guidelines......................................................................................................209
I Out-of-the-box MIB support in HP SIM........................................................211J Support and other resources.....................................................................216
Related documents................................................................................................................216Documentation and support..............................................................................................216HP SIM documentation.....................................................................................................216
Glossary..................................................................................................217Index.......................................................................................................227
Contents 11

Part I Introduction
1 About this documentUser Guide
HP Systems Insight Manager provides this user guide to help you understand management features.
HP SIM User Guide layout• Introduction
Describes the features, basic concepts, and using the graphical user interface (GUI) in HPSIM.
• Setting up HP SIMDescribes how to set up HP SIM by explaining requirements for systems to be managed byHP SIM, credentials, discovery, automatic event handling, and users and authorizations.
• HP SIM basic featuresDescribes HP SIM basic features, including monitoring systems, clusters, and events, performingbasic and advanced searches, editing system properties, and basic reporting.
• HP SIM advanced featuresDescribes HP SIM advanced features, including managing with collections, advanced reporting,and creating custom tools.
For information on HP SIM support and how to access related documentation, see “Support andother resources” (page 216).
User Guide 13

2 Product overviewHP SIM features
• Automatic discoveryAutomatically discovers and identifies systems attached to the network. Use discovery filtersto prevent discovery of unwanted system types.
• Health monitoringColored status icons enable you to see at a glance the operational health of your systems,and quickly drill down to find the failing component if any are not ok.
• Fault management and event handlingHP SIM provides proactive notification of actual or impending component failure alerts.Automatic Event Handling enables you to configure actions to notify appropriate users offailures through e-mail or pager, , and enables automatic execution of scripts or eventforwarding to enterprise platforms such as HP Operations Orchestration or HP Network NodeManager.
NOTE: Pager support is only for Windows-based Central Management Server (CMS).
• InventoryPerforms comprehensive system data collection and enables users to quickly produce detailedinventory reports for managed systems. Save reports in multiple formats for easy incorporationinto popular reporting packages.
• Consistent multisystem managementHP SIM initiates a task on multiple systems or nodes from a single command on the CMS. Thisfunctionality eliminates the need for tedious, one-at-a-time operations performed on eachsystem.
• Role-based securityAllows effective delegation of management responsibilities by giving systems administratorsgranular control over which management operations users can perform on selected systems.
• Two user interfacesHP SIM provides the option of a browser-based GUI or a command line interface (CLI) thatenables you to incorporate HP SIM into your existing management processes.
• Customized toolsSimple Extensible Markup Language (XML) documents that enable you to integrate off-the-shelfor custom command line and web-based applications or scripts into the HP SIM user interface.
Basic concepts
Discovery and identificationHP SIM can automatically discover and identify systems attached to the network using informationfrom management protocols such as Simple Network Management Protocol (SNMP), WindowsManagement Instrumentation (WMI), WBEM, Secure Shell (SSH), Secure Sockets Layer (SSL),HTTP/HTTPs, and WS-MAN. Create discovery tasks to limit discovery to specific network segmentsor IP address ranges, or to control the frequency that each task runs. Use discovery filters to preventdiscovery of unwanted system types.
14 Product overview

NOTE: HP SIM uses several management protocols to communicate to managed systems. Theprotocols used, include WBEM/WMI, SNMP, HTTP/HTTPS, SSH and WS-MAN. All of theseprotocols can be configured to access data from non-root/non-administrator users. For Linux systems,one of the protocols used during discovery, is SSH. During discovery, HP SIM executes thecommand, /usr/sbin/dmidecode, on the remote Linux system to fetch certain information.Since this command requires super user privileges, HP SIM needs the root credentials. Therefore,to discover a Linux system using SSH protocol, be sure root credentials are entered as part discovery,system or global credentials
InventoryData collection gathers data that can be used for reporting and to populate various fields in theuser interface. HP SIM collects various information such as system type and sub-type, supportedprotocols, and available memory. You can choose to maintain only the most recent data, enablingyou to run reports or compare different systems using Snapshot Comparison. Or, you can store alldata collected over time, which enables use of Snapshot Comparison to view trends on a singlesystem.
Status infoThe following status icons are used in the status list columns to show status on different aspects ofthe managed systems. For example, the MP column displays the status icon of the managementprocessor if the system has a management processor board installed.
Table 1 Status types
Status typeStatus icon
Critical
Major
Minor
Warning
Normal
Disabled
Unknown
Informational
ReportsHP SIM performs comprehensive system data collection and enables you to quickly produce detailedinventory reports for managed systems. Reports can be generated in Hyper Text Markup Language(HTML), XML, or Comma Separated Value (CSV) format. Enhanced reports can be automaticallygenerated and e-mailed on a scheduled basis. The type of data collected depends on themanagement software (SNMP agents or WBEM/WMI providers) that is installed.
Automatic event handlingAutomatic event handling enables you to define an action that HP SIM performs when an event isreceived. These actions can include running a program or script, forwarding the event to anothermanagement system, clearing the event, or notifying a user through e-mail or pager.
Basic concepts 15
Tools and tasksTools are actions you perform on the managed systems from within HP SIM's GUI or CLI. Manytools ship with HP SIM, but you can also add your own custom tools. Tasks are instances of runningtools. To create a task, select target systems (systems or events that the task will work on) and thenselect the tool from the HP SIM menu. Tasks can be run immediately or scheduled, and you canview task results by selecting Tasks & Logs→View Task Results .Tools can be run from the HP SIM menus and can be added to a Quick Launch list that is availablefrom many pages within HP SIM.
CollectionsCollections are groups of systems and events that can be used for viewing information, or as away to specify the targets for a tool. They can be created through the Customize link in the Systemand Event Collections panel either by selecting specific systems to be included, or by specifyingattributes to be matched. Once created, they are displayed in the System and Event Collectionspanel for quick access. Shared collections can be seen by everyone logging into HP SIM. Privatecollections can only be seen by the user who created them.You can bind event collections and system collections together and use them either separately ortogether. For example, after you define a collection of Security Events, you can easy look at thoseevents on any system collection, such as Security Events on All Servers or Security Events on MyFinancialServers.Conversely, you can choose a system collection, and view any set of events on those systems. Forexample, you can easily select My FinancialServers and look at All Events, Sign-in Events, SecurityEvents, or any other event collection as it applies to that collection of systems.
Users and AuthorizationsHP SIM enables effective delegation of management responsibilities by giving system administratorsgranular control over which users can perform specific management operations on specific systems.
Nested user groupsA nested user group is a concept on Windows Active Directory. A user/user group might belongto one or many user groups. Therefore, it makes a hierarchical relationship between users anduser groups.For Windows to support nested group security; CMS, user and user groups must exist in ActiveDirectory. Members of user groups (user and user group) inherit the behavior (authentication andauthorization privilege) from its parent groups. So, if a user is a member of two different usergroups with different privileges and one group is a member of another user group, then the userwill inherit rights as a result of the union of all the three user groups.If a user is a member of more than one user group, then the IP login restrictions of all the usergroups are combined and applied to the user. To override IP login restrictions of all user groupswith the user's current group IP login restrictions, select Override IP Login Inclusion/Exclusion Rangefrom the user's authorizations page.
Signing in and using the graphical user interfaceHP SIM provides a browser-based GUI. Supported browsers include:
• For Windows:
Microsoft Internet Explorer 7 or later◦◦ Firefox 3 (3.0.13) or later
• For HP-UX:Firefox 2(2.0.0.19.020 or later
16 Product overview

To download, go to http://www.hp.com/go/firefox.
• For Linux:Firefox 3.0.10 or later
NOTE: Browser settings:• For all Windows Internet Explorer browsers, you must have the SSL 3.0 or Transport Layer
Security (TLS) 1.0 browser security options enabled for HP SIM to work properly, which allowsonly stronger ciphers for the SSL connection.
• To use automatic sign-in with Firefox, you must configure Firefox with a list of sites withautomatic sign-in. For more information, see Initial setup section of the HP SIM online help.
Security Alerts in Internet Explorer and FirefoxBecause the HP SIM web server uses a self-signed SSL certificate (unless otherwise configured),you will encounter a browser warning when browsing to the CMS. Firefox warns of an UntrustedConnection. Internet Explorer warns of a Certificate Error. Both browsers let you continue, but youcan take measures to avoid repeatedly encountering those warnings. This applies to HP SIM, HPSMH, Integrated Lights-Out (iLO), Onboard Administrator, and all web servers you browse to.Each time you receive an Untrusted Connection warning in Firefox, you must add a permanentsecurity exception to avoid seeing the warning again for that host. Note that if you browse to asingle system using its short host name, fully qualified Domain Name Service (FQDN), and IPaddress (for example, three different ways), you must add three security exceptions.With Internet Explorer, you must install the SSL certificate into the Trusted Root CertificationAuthorities certificate store, but the browser will continue to warn you (by default) when details inthe certificate do not match (for example, browsing by short host name when the full host name isin the certificate). To avoid certificate errors when names do not match, the following setting mustbe turned off: Internet Explorer→Advanced→Security→Warn about certificate address mismatch.If you do not install the SSL certificate in Internet Explorer 8, these warnings appear for each pop-upwindow that appears in HP SIM.
Automatically signing inYou can sign in to HP SIM using the same account with which you are logged in on your desktop,bypassing the HP SIM sign-in page. If user groups are configured for HP SIM, membership in thesegroups is accepted and treated the same as if you manually signed in.
Configuring the CMS
• HP SIM must be running on a Windows CMS that is a member of a Windows domain. Thebrowsing system must be a member of the same domain.
• The HP SIM service account must be a domain account; local accounts can not be used.
• The CMS must be registered with an SPN in the domain, which requires a domain administratorto configure. From any system that is a member of the domain, the domain administrator canrun the setspn.exe utility from the Windows Support Tools. For example:setspn -a HTTP/<cms_fqdn> <sim_service_account>
Where HTTP is in all capital letters, <cms_fqdn> is the FQDN of the CMS, and<sim_service_account> is the domain account under which HP SIM service runs.
Signing in and using the graphical user interface 17

IMPORTANT: Automatic sign-in fails if the SPN registered more than once. If you changethe name of the HP SIM service account, you must first delete the SPN associated with the oldservice account name, and then register the new service account name:setspn -d HTTP/<cms_fqdn> <old_sim_service_account>
setspn -a HTTP/<cms_fqdn> <new_sim_service_account>
NOTE: Local accounts cannot be used for HP SIM service account if automatic sign-in isdesired.
• The automatic sign-in feature must be enabled in HP SIM in the globalsettings.propsfile. You can use the mxglobalsettings command, or directly modify the file. Set the valuefor the AutomaticSignIn property to 1. Restarting HP SIM is not necessary.
Configuring the browser
• Supported in Internet Explorer 7 and Firefox. Internet Explorer 6 is not supported.
• The browsing system must be remote; browsing locally from the CMS does not performautomatic sign-in.
• The browsing system and the CMS must be members of the same Windows domain.
• You must be logged in to the browsing system with a domain account that is configured as auser account in HP SIM, or is a member of a user group configured in HP SIM.
• There must be no proxy servers between the browser and the CMS. Use the proxy bypass listin the browser, or use no proxy at all.
• The browser must be configured to support automatic sign-in.
• The remote browsing machine must use Adobe 10. Adobe 11 is not supported.Procedure 1 Configuring the browser in Internet Explorer1. In Internet Explorer, enable Integrated Windows Authentication under Tools→Internet
Options→Advanced tab.2. The CMS must be in the Local Intranet or Trusted Sites zone, which can be configured under
the Tools→Internet Options→Security tab.3. (Optional) If the CMS is in the Internet Explorer Local Intranet zone, select Automatic Logon
only in Intranet zone.4. (Optional) If the CMS is in the Internet Explorer Trusted Sites zone, select Automatic logon
with current user name and password.Configuring the browser in Firefox:Firefox must be configured with a list of sites (for example, the CMS) where automatic sign-in canbe performed, and should be restricted to local intranet sites. This list can be configured by enteringabout:config in the Firefox address bar. From the list of Preference Names, selectnetwork.negotiate-auth.trusted-uris and either double-click or right-click, and select Modify. Here,you can specify a comma-separated list of URLs or domains, enter the list of URLs used to accessHP SIM. For example: https://cms_fqdn, where cms_fqdn is the FQDN of the CMS.
BehaviorWhen automatic sign-in occurs, an intermediate sign-in page appears. If you click Cancel from thispage, the manual sign-in page appears. You might want to cancel automatic sign-in if anyunexpected network or domain errors occur. If any browser configuration errors are detected,automatic sign-in is cancelled and the manual sign-in page appears along with the configurationerror.
18 Product overview

Failures encountered during automatic sign-in are logged as normal sign-in failures in both theaudit log and the event log. If automatic sign-in is not attempted, no failure is detected or loggedby HP SIM.If automatic sign-in is configured, you can manually sign in to HP SIM.
• If automatic sign-in fails, the manual sign-in page appearsThis might occur if you are logged in to the operating system using an account that is not anHP SIM account.
• If automatic sign-in is not attemptedThis might occur if the browser is not properly configured for automatic sign-in, or the featureis disabled in HP SIM.
• If you click Sign Out from HP SIMThis enables you to specify another user account to use if you are signed in to the operatingsystem with a different account.
Guided tour of the HP SIM user interface
The GUI includes the following six regions:1. Banner area
The banner provides a link to the Home page, a link to Sign Out of HP SIM, and displays theuser that is currently signed in. Click the minimize icon in the top right corner to minimize thebanner. To maximize the banner, click the maximize icon.
2. System Status panelThis panel provides uncleared event status, system health status information, and an alarm tonotify you about certain events or statuses. You can customize the System Status panel foryour environment. If you do not need to view this panel at all times, you can collapse it byclicking the minus sign ( ) in the top right corner of the panel. To expand the panel, click theplus sign ( ). If the System Status panel is collapsed and an alarm is received, the panelexpands to show the alarm. You can enlarge the panel by clicking the Open in new windowicon ( ) to display a separate large window that you can resize and view from across a roomwithout sitting at the HP SIM terminal.
3. Search panelThe search feature enables you to search for matches by system name and common systemattributes. You can also perform an advanced search for matches based on selected criteria.
Signing in and using the graphical user interface 19

To speed the search process, as you enter system information in the search box, a dropdownlist appears listing systems that begin with the text you are entering. You can select from thedropdown list or continue to enter the information. If you do not need to view this panel at alltimes, you can collapse it by clicking the minus sign ( ) in the top right corner of the panel.To expand the panel, click the plus sign ( ).
4. System and Event Collections panelSystem and event collections enable you to view all known systems and events in a specificmanagement environment. A collection can be private, visible only to its creator, or shared,visible to all users. All default collections are shared. You can add additional collections byclicking the Customize link. Collections can optionally be configured to show health statusicons in this area.
5. HP SIM menusThe HP SIM menus provide access to tools, logs, software options, and online help. The Optionsmenu is primarily for users who administer the HP SIM software. If you lack authorization touse these tools, you might not be able to view certain menus.
6. HP SIM workspaceThe workspace displays the results of your latest request. It can contain a collection, tool, orreport. Some tools launch a separate browser window or X Window terminal instead ofdisplaying in the workspace. This area contains the Home page when you sign in to HP SIM.By default, the introductory page is the Home page. The introductory page provides informationand tips about HP SIM and links to frequently used features. You can customize HP SIM todisplay a different page as the Home page.
NOTE: To maximize the workspace, click the Maximize link next to the Help icon ( ). Torestore the workspace to its original size, click Restore Size.
Customizing viewsA Customize link is available in the upper right of many pages in HP SIM. Use this link to customizethe way the page is presented.
20 Product overview

Part II Setting up HP SIM

3 Setting up managed systemsSetting up managed systems involves installing the required Management Agents software andconfiguring the supported protocols to communicate with the HP SIM software.
Configure or Repair AgentsManaged systems must be able to communicate status to the HP Systems Insight Manager CMSin order to launch commands to the managed systems. To configure the managed systems tocommunicate with the CMS, you must configure common configurations and trust relationships.The Configure or Repair Agents feature enables you to configure or repair agents in Windows,Linux, and HP-UX.The Configure or Repair Agents tool enables you to repair Simple Network Management Protocolsettings and trust relationships that exist between HP Systems Insight Manager and target systemsif you have 7.2 agents or later installed. If you have 7.1 agents or earlier installed, you can updateWeb Agent passwords on target systems.This tool adds the security and trap community strings and trust settings to the target systems, butit does not replace existing settings. To replace existing settings on target systems, use the ReplicateAgent Settings feature in HP SIM.You can use Configure or Repair Agents tool to send test SNMP traps from Windows systems withInsight Management Advisors and send test Web-Based Enterprise Management indications fromWindows and HP-UX systems with HP WBEM provider installed.You can also configure WBEM certificates for HP-UX systems and WBEM/WMI users for Windowssystems with HP Insight Management WBEM Providers for Windows Server 2003 or WindowsServer 2008.The Configure or Repair Agents feature on a Windows CMS also enables you to install variousagents and providers on a ProLiant or Itanium-based system with Windows operating system. Afew features that can be installed include:
• Agentless Management Service (AMS)
• HP Insight Management WBEM Providers for Windows Server 2003 or Windows Server2008
• OpenSSH
• HP Version Control Agent for Windows
• Insight Management Advisors for WindowsFor detailed information on running Configure or Repair Agents, see the HP SIM online help.
Setting up Windows servers to be managed by HP SIMTo be fully managed by HP SIM, HP ProLiant servers running Windows should have the InsightManagement Agents or HP WBEM Providers installed. These agents are part of the ProLiant SupportPack. See the HP SIM online help for instructions on how to do this through the HP SIM UI. Youcan also configure these agents to be installed as part of your normal operating system deploymentprocedures. For third party servers, enable WMI and/or SNMP in the operating system. HP SIMattempts to retrieve information that is instrumented in an industry-standard way. After setting upthe management agents on the managed systems, the remaining configuration can be done fromthe HP SIM user interface. Continue to Chapter 4 “Credentials” (page 34) for further information.Procedure 2 Configuring or repairing the agents for Windows1. Select Configure→Configure or Repair Agents.2. Select Install Agentless Management Service (AMS) on HP ProLiant Gen8 servers running
Windows, Linux, or ESX to send all host operating system-specific data to the iLO4 firmware.
22 Setting up managed systems

3. Select Install Linux PSP or ESX Agents to install Linux PSP and ESX Agents which are a collectionof SNMP agents used by HP SIM to gather information from managed systems and send trapsto HP SIM.
4. Select Install WBEM / WMI Provider (HP Insight Management WBEM Provider) for Windowsto install WBEM or WMI providers on Windows managed systems.
5. Select Install SNMP Agent (Insight Management Advisor) for Windows to install the SNMPagent on Windows managed systems. This Insight Management Agent allows networkmonitoring and control.
6. Select Install OpenSSH to install OpenSSH on Windows managed systems.7. Select Install the Version Control Agent for Windows (VCA) to install the HP VCA on Windows
managed systems. The HP VCA enables you to view the HP software installed on a systemand whether updates for the software are available in the repository.Installs the HP VCA in conjunction with the Version Control Repository Manager and enablesmanagement of the HP ProLiant software and firmware on the managed systems.
8. Select Register VM Host for VMware ESX, Citrix XenServer, Microsoft Hyper-V, and Xen onSLES and RHEL.
9. For selected installs, perform the following steps:a. If you are installing software that is earlier than or the same version currently installed,
select Force install the agents. This option is disabled by default.b. If you want to reboot after the installation, select Reboot systems if necessary after
successful install option.HP SIM determines the type of agent or provider to install based on the system type,subtype, and operating system description of the system.If you want to install a 64-bit agent or provider, be sure the target system is identified asa 64-bit system in HP SIM.If your system is not correctly identified, go to System Page→Tools & Links→Edit SystemProperties. Select the correct system type, or subtype and enter the operating systemdescription manually.Example: Installing Insight Management Agents on a ProLiant Windows 64-bit system:a. Select System type: server.b. Select System subtype 1: HP ProLiant.c. Enter operating system description as Microsoft Windows Server 2003, x64 Enterprise
Edition Service Pack 1 or the correct operating system description of your system.If you want to configure the agents after installation, select the force reboot option. Thisallows the newly installed component to be completely initialized before you configureit.
NOTE: Installation with reboot typically takes about 8 minutes.
10. Click Next. The Step 3: Configure or Repair Agents Settings page appears.
NOTE: The Step 3: Configure or Repair Settings page changes to show the configurationoptions available with the installed plug-ins.
11. Configure the target systems by selecting one of the following options:• Configure WBEM /WMI. This section enables you to configure the target Linux, Windows,
or HP-UX system to send WBEM indications or events to HP SIM.For this section, consider the following:
◦ Create subscription to WBEM events so that WBEM events will be sent to the CMS
Setting up Windows servers to be managed by HP SIM 23

◦ Send a sample WBEM / WMI indication to this instance of HP SIM to test that eventsappear in HP SIM in the Event List or All Event User Interface for the selected system
NOTE: This indication will appear as an Informational Event in the Event List of HPSIM.
NOTE: This indication is supported only on HP-UX and Windows targets withWBEM provider installed.
◦ Use an HP SIM WBEM certificate (good for 10 years) rather thanusername/password to manage the systemThis option deploys a WBEM certificate to the managed system and is only valid forHP-UX systems.
◦ Configure a non-administrative account for HP SIM to access WMI dataThis option applies to Windows systems with HP WBEM providers. The configurationof the managed system updates to allow the specified user to access WMI informationover the network. HP SIM uses this user to read inventory and configurationinformation from the system and is configured as the WBEM user in the SystemCredentials. If HP SIM is configured with a user with administration rights, thisconfiguration step is not necessary. HP SIM does not create this user. The user alreadyexists as either a domain user or one local to the managed system.The user is added to the DCOM Users group on the managed system and hasread-only access to WMI information, and read-write permissions to the HPQ namespace. This user does not need to be an administrator of the managed system orhave sign-in rights. The domain administrator should create a special domain account.To enter the credentials for HP SIM to use to access the managed systems:1. In the User name field, enter a user name.2. In the Password field, enter the password.3. In the Password (Verify) field, re-enter the password exactly as it was entered
in the Password field.4. In the Domain (Optional) field, if the target belongs to a Domain, enter the
Windows domain.If configuration of a nonadministrative user is successful, then these credentialsare saved as the System Credentials for WBEM access in HP SIM.
• Configure SNMPThis section enables you to configure SNMP settings.a. Select Set SNMP cmmunity strings to specify the Read Community string and the Trap
Community string. By default, the first HP SIM read community string that is not publicappears. If no community string exists in HP SIM, you must enter one.
24 Setting up managed systems

NOTE: If you configure only HP-UX systems with default SNMP installations, youdo not need to set this option. HP-UX enables read by default (get-community-nameis set to public by default on HP-UX systems).
NOTE: If you select this option, the Read Only community string is added to thetarget systems. If the target system is SuSE Linux or Microsoft Windows 2003, themanaged systems do not always enable SNMP communication between themselvesand a remote host. This setting is modified to enable the instance of the HP SIMsystem to communicate using SNMP with these target systems.
NOTE: You can enter a community string up to 255 characters.
NOTE: Repairing the SNMP settings adds a Read Write community string to thetarget system only if one does not currently exist. This community string is unique foreach system, is composed of over 30 characters to include letters and numbers, andis visible only to the user with administrator privileges for that system. This Read Writecommunity string is required by the Web Agent to perform certain threshold settingcapabilities. This community string is used locally only on the target system and isnot used by HP SIM over the network. Linux and HP-UX systems do not require aReadWrite community string. The ReadWrite community string is added on Windowssystems only.
b. Select Set traps to refer to this instance of HP Systems Insight Manager in the targetsystems SNMP Trap Destination List. This setting enables the target systems to sendSNMP traps to this instance of HP SIM.Select Set additional list of SNMP Trap Destinations for an iLO Management Engineo set additional SNMP trap destinations. Enter the trap destination information inthe fields provided.
c. Select Send a sample SNMP trap to this instance of the HP SIM to test that eventsappear in HP SIM event lists to verify that SNMP events appear in the HP SIM eventslist.To successfully send a test trap, you must configure target systems to send a trap tothis instance.
NOTE: You can send a test trap only from a managed system with an InsightManagement Advisor installed.
NOTE: The trap from Windows appears as a Generic Trap from the system andis listed as a Major Event in the Event List of HP SIM. The trap received from Linuxand HP-UX targets appears as a Cold Trap and is listed as Informational Events inthe Event List of HP SIM.
1) In the Configure SNMP for iLO Management Engine dropdown list, select eitherAgentless Management or SNMP Pass-thru.
2) In the Forward Insight Management Agent SNMP Alerts dropdown list, selecteither Enable or Disable.
3) In the iLO SNMP Alerts dropdown list, select either Enable or Disable.
• Configure secure shell (SSH) accessSelect this option to configure SSH access on managed systems.If you select this option, you must select one of the following options:◦ Host based authentication for SSH
Setting up Windows servers to be managed by HP SIM 25

NOTE: For this option to work, the user name and password provided in Step 4:Enter credentials must be an administrative level account. For Linux or HP-UX targets,it must be the root account and password.
◦ Each user has to be authenticated on the managed system
NOTE: If you do not want all users that have sign-in access to HP SIM to run thetool and you would like to control which users need to have access, this option ismore secure.
NOTE: You can configure SSH only if the OpenSSH service is running on themanaged systems. You can install OpenSSH on Windows systems by running theInstall Open SSH or by selecting the tool under Deploy→Deploy Drivers, Firmwareand Agents→Install Open SSH.
• Set Trust relationship to "Trust by Certificate"Select this option to configure systems to use the Trust by Certificate trust relationship withthe HP SIM.For HP SIM on the target systems, this option sets the trust mode to Trust by Certificateand copies the HP SIM system certificate to the target system trusted certificate directory.This option enables HP SIM users to connect to the HP SMH using the certificate forauthentication.You can configure SSO to management processors for Onboard Administrator and forremote management. To configure SSO, select Set Trust Relationship. After you configureSSO, you are not continually prompted to supply the login credentials for the managementprocessor.
NOTE: For systems with Management HTTP Server 5.x and earlier, the Configure orRepair Agents setting adds the Administrator password in the Management HTTP Serverstore and modifies the SNMP settings, but it cannot change trust relationship information.
Select the checkbox beside Import Secure Sockets Layer (SSL) certificate for HP SIM totrust the HP SMH of the managed system. This option is only valid for HP-UX and Linuxoperating systems.
• Configure HP Version Control AgentSelect this option to configure the HP VCA to point to the Version Control RepositoryManager, where the repository of software and firmware is located, enabling versioncomparison and software updates. This option is available for Windows and Linux systems.To configure HP VCA:1. In the Select the system where the HP VCRM is installed field, select a server from the
dropdown list.2. In the User Name field, enter the user name to access the HP VCRM. This user cannot
be the default administrator user, and must have administrative privileges.3. In the Password field, enter the password to access the HP VCRM.4. In the Password (verify) field, re-enter the password for the HP VCRM.
• Set administrator password for Insight Management Agents version 7.1 or earlierSelect this option to repair the administrator password on all Insight Management Agentsinstalled on the target systems as applicable for Windows and Linux systems.
26 Setting up managed systems

NOTE: Do not set this option if you have Insight Management Agents 7.2 or laterinstalled.
NOTE: If the remote system is running HP-UX, this option is not executed on the remotesystem because it is not applicable on HP-UX systems. If you are configuring only HP-UXtarget systems, you do not need to set this option.If you select this option, you must complete the following steps:a. In the Password field, enter the new administrator password.b. In the Password (verify) field, re-enter the new administrator password.
• Select Configure Insight Remote Support Advanced Settings for iLO Management Engineto configure Insight Remote Support Advanced settings. Select one of the following options:1. Select Connect this server to an Insight Remote Suppport hosting server and enter
the Remote Support URL and port.2. Select Disable the Insight Remote Support Advanced connection.
12. Click Next. The Step 4: Enter credentials page appears.13. Enter the following credentials.
The credentials used in this step must work for all selected target systems. HP recommendsusing domain administrator credentials. Credentials entered here are not saved by HP SIMexcept to run a scheduled task later.If you select Configure secure shell (SSH) access for a Windows target system, the account youspecify must be a member of the local Administrators group. For Windows targets using adomain account, the account is automatically added to this group.a. Select one of the following options:
• Use sign-in credentials These credentials must be a privileged account on the managedsystem. The sign-in credentials option is available if the following options are selected:
◦ Install WBEM/WMI Provider (HP Insight Management WBEM Provider) forWindows
◦ Install Simple Network Management Protocol Agent (HP Insight ManagementAgents) for Windows
◦ Install Linux PSP or ESX Agents
◦ Install the HP Version Control Agent for Windows
NOTE: This option is not available if you selected Install Open SSH or Register VMHost on the â�Step 2: Install Providers and Agents (Optional)â�page.
• Use the following credentials for all systems.b. In the User name field, enter the system administrator name.c. In the Password field, enter the system administrator password.d. In the Password (Verify) field, re-enter the system administrator password.e. In the Domain (Optional) field, if you are using a domain account, enter the Windows
domain.
Setting up Windows servers to be managed by HP SIM 27

14. Click Run Now or click Schedule to run this task at a later time. The Task Results page appears.If the Management HTTP Server is installed on target systems, the login credentials are updatedin the Management HTTP Server password file. As with other HP SIM tools, you can configurethe Configure or Repair Agents tool to run on a schedule or manually. Only one instance ofConfigure or Repair Agents tool can run at a time.The Configure or Repair Agents tool can update multiple target systems. The log results indicatewhether the repair attempt was successful. For Configure or Repair Agents, the Task Resultspage displays the following information.
Table 2 CRA Task Results information
DescriptionField Name
This field displays the details for each target systemwithin a task instance.
Status
This field represents the success or failure of anexecutable program. If the return value is zero or apositive value, the executable ran successfully. If anegative value is returned, the executable failed. Thisexit code does not indicate that all configurationattempts were successful. It is possible for some tosucceed but some to fail.
Exit Code
This field displays the name/IP address of the target.Target Name
This tab displays the output text information.The stdout tab
This tab displays information if the executableexperienced an error.
The stderr tab
You can print reports for the selected target system orfor all target systems associated with the task instance.To print a report:
View Printable Report
a. Click View Printable Report.An Options Message box appears.
b. Select a report.c. Click OK to display the report, or click Cancel to
return to the View Task Results page.
.
28 Setting up managed systems

Setting up HP-UX servers to be managed by HP SIMProcedure 3 Setting up HP-UX managed systems1. Understand the basic managed system software for HP-UX.
For HP-UX, the following software, shown with minimum recommended versions, is requiredfor essential HP SIM functionality to operate. This software is installed by default as part ofthe latest HP-UX 11i v2 and 11i V3 operating environments, but it might need to be installedor updated on HP-UX 11i v1 or older HP-UX 11i v2 environments.
• T1471AA HP-UX Secure Shell
• B8465BA HP WBEM Services for HP-UX
• OpenSSLThis WBEM Services bundle contains basic system instrumentation displayed in the HP SIMProperty pages, supporting collection and reporting by HP SIM inventory functionality. Tomaximize the value of HP SIM for properties, inventory, and events, see http://www.hp.com/go/hpsim/providers for the latest WBEM Services bundle.If iCap information is desired, also install:
• B9073BA version 08.01.01 iCAP for HP-UX2. Ensure the managed system software is installed.
To verify that the minimum required software is installed, log in to the remote system, and runthe following command:$ swlist –l bundle T1471AA B8465BA OpenSSL
To verify that the optional providers and System Management Homepage are installed, runcommands such as:$ swlist –l bundle LVMProvider WBEMP-LAN-00 SysMgmtWeb SysFaultMgmtOnlineDiag
3. Acquire and install the managed system software if not previously installed.The SSH and WBEM bundles are included on the HP-UX Operating Environment andApplication Release media, as well as part of the HP SIM HP-UX depot downloaded fromhttp://h18013.www1.hp.com/products/servers/management/hpsim/dl_hpux.html.For the WBEM providers, see http://h18013.www1.hp.com/products/servers/management/hpsim/dl_hpux.html .After you have obtained the depots containing the software, you can install then from themanaged system:$ swinstall –s <depot_location> OpenSSL
NOTE: B8465BA and B9073BA version 08.01.01 depends on OpenSSL, so you must installOpenSSL first.
$ swinstall –s <depot_location> T1471AA
$ swinstall –s <depot_location> B8465BA
$ swinstall –s <depot_location> <names of WBEM providers beinginstalled>
After you have verified that the correct management software is installed on your managed systems,continue to Chapter 4 “Credentials” (page 34) to finish the configuration from the HP SIM userinterface.
Setting up HP-UX servers to be managed by HP SIM 29

Manually setting up an HP-UX managed systemAlthough chapters 4-7 explain how to finish configuring managed systems from the HP SIM GUI,this section describes how to perform some of these same steps from the command line for HP-UXsystems. You do need to first supply credentials and discover the systems, as described in Chapter4 “Credentials” (page 34) and Chapter 6 “Discovery” (page 37). Then you can do the followingactions from the command line, if desired.You can use the HP SIM Configure or Repair Agents tool to configure HP-UX managed systemssimultaneously, or you can configure each managed system manually.
Configuring SNMP to send traps to the CMS
• On the managed system, add the full host name or IP address of the CMS as a trapdest inthe following file:/etc/SnmpAgent.d/snmpd.conf
trap-dest: hostname_or_ip_address
• Stop the SNMP Master agent and all subagents with the command:/sbin/init.d/SnmpMaster stop
• Restart the SNMP Master agent and all subagents with the command:/usr/sbin/snmpd
Configuring SSH accessOn the CMS, copy the SSH-generated public key from the CMS to the managed system using themxagentconfig:Use one of the following commands:
• mxagentconfig -a -n <hostname> -u root -f <file_with_root_password>
• mxagentconfig -a -n <hostname> -u root -p <root_password>
NOTE: Using the -p option exposes the password through ps output, so using the -f option(with a file only readable by root, and containing only the managed system root password)is highly recommended when using mxagentconfig -a. If you use the -p option, enclosethe password in single quotes if the password has any special characters, such as & or $. Formore information and options, see the mxagentconfig manpage with manmxagentconfig.
Subscribing to WBEM indications/events:
NOTE: For more information about HP-UX WBEM events, see the HP SIM online help.
Procedure 4 Subscribing to WBEM indications/events1. From the managed system, be sure WBEM is installed.
swlist -l bundle B8465BA
30 Setting up managed systems
2. Verify that SysFaultMgmt provider is installed.Depending on the System Fault Manager configuration, run the following:cimprovider –lm SFMProviderModule
The EMSWrapperProvider appears.orcimprovider –ls
The EMSWrapperProvider appears.
NOTE: For more information regarding System Fault Manager, see HP System FaultManagement Diagnostics.
3. From the CMS:To subscribe to WBEM Events, you must have root access. You can verify what credentialsare used for WBEM access by running the following command line:mxnodesecurity –l –p wbem –n <systemname>
If the managed system does not have a root level user credential configured, you can add itfor the individual system.
NOTE: You can use the Configure or Repair Agents tool in the HP SIM UI to perform thisstep without permanently recording a root password.
• To change the individual system:mxnodesecurity -a -p WBEM -c \
<username:password> -n <systemname>
4. From the CMS, run the WBEM Indications/Events command line:mxwbemsub -l -n <systemname>
For more information on subscribing and unsubscribing to WBEM indications, see the HP SIMonline help.
Setting up Linux servers to be managed by HP SIMTo be fully managed by HP SIM, HP ProLiant servers running Linux should have the InsightManagement Advisor installed. These agents are part of the ProLiant Support Pack. You can installthe ProLiant Support Pack manually, or configure it to be installed as part of your normal operatingsystem deployment procedures.After setting up the management agents on the managed systems, the rest of the configuration canbe done from the HP SIM UI. Continue to Chapter 4 “Credentials” (page 34) for further information.
Configuring agents remotely using Configure or Repair Agents:1. For Linux systems, select Install Linux PSP or ESX Agents.2. Click Next. The Step 3: Configure or Repair Agents page appears.
Manually setting up Linux managed systemsAlthough chapters 4-7 explain how to finish configuring managed systems from the HP SIM GUI,this section describes how to perform some of these same steps from the command line for Linuxsystems. You do need to first supply credentials and discover the systems, as described in chapters4 and 6. Then you can do the following actions from the command line, if desired.
Setting up Linux servers to be managed by HP SIM 31

Installing and configuring SSHProcedure 5 Installing and configuring SSH on a Linux system1. Verify that SSH is installed on the managed system:
rpm -qa | grep ssh
If SSH is not installed, see your Linux provider for information about installing SSH.2. On the CMS, copy the SSH-generated public key from the CMS to the managed system, and
place it in the authorized keys file of the execute-as user (root or administrator).
IMPORTANT: On a non-English CMS, ensure that an administrator account exists on theCMS, and that mxagentconfig has run on the CMS for the created administrator account.
• Launch the Manage SSH Keys dialog box from the CMS command prompt:mxagentconfig -a -n hostname -u username -p Password
Configuring a Linux system to send SNMP traps
NOTE: These steps might vary slightly, depending on your version of Linux. See your Linuxprovider for details if these file paths and file names do not exist on your system.
Procedure 6 Configuring a Linux system to send SNMP traps1. Verify that SNMP is installed:
rpm -qa | grep snmp
If it is not installed, see your Linux provider for information about installing SNMP.2. If the HP Server and Management Drivers and Agents daemons are installed on your system,
stop them:/etc/init.d/hpasm stop
3. Stop the SNMP daemon:/etc/init.d/snmpd stop
4. Edit the snmpd.conf file.For Red Hat Linux, open the following file in the vi editor:vi /etc/snmp/snmpd.conf
For SuSE SLES 8, open the following file in the vi editor:vi /usr/share/snmp/snmpd.conf
a. Remove the comment symbol (#) from the trapsink line, and add the IP address of theCMS:trapsink IPaddress
where IPaddress is the IP address of the CMS.
b. Add the CMS to the read only community by adding the line:rocommunity CommunityName IPaddress
where CommunityName is the SNMP community string used by the CMS and IPaddressis the IP address of the CMS.
c. Save the changes to the file. To save and close this file using the vi editor, press the Esckey, enter :wq!, and then press the Enter key.
5. Start the SNMP daemon:/etc/init.d/snmpd start
32 Setting up managed systems

6. If the HP Server Management Drivers and Agents daemons are installed on your system, startthem:/etc/init.d/hpasm start
Setting up Linux servers to be managed by HP SIM 33

4 CredentialsIn HP SIM, credentials are used to enable the CMS to communicate with managed systems, throughWBEM, WS-MAN, SSH, and SNMP. However, the Sign-in credential is used unless you configurethe other protocols. The Sign-in credential is protocol independent and can be tied to systemsthrough the discovery credential. In HP SIM, there are three different types of credentials:
• System credentialsCredentials used by identification to access managed systems. These credentials includeWBEM, WS-MAN, and SSH credentials, Sign-in, SNMP community string, and Single Sign-On(SSO) credentials.
• Discovery task credentialsCredentials used by a discovery task that apply to all systems discovered by that task.
• Global CredentialsGlobal credentials are system credentials that apply to all systems.
During the identification process (done automatically during discovery), credentials are tried,starting with System Credentials. If they do not work, and the Try Others setting is chosen for them,then Discovery credentials are used. Similarly, if those do not work and the Try Others setting ischosen, then Global Credentials are tried. As soon as a credential is found that works, HP SIMnotes that credential as working and continues to use it for regular communications with themanaged system as long as it continues to work. If it should fail, then the process is repeated thenext time identification is run. To see the working credentials for any managed system, go to theSystem Credentials page (Options→Security→Credentials→System Credentials). These workingcredentials appear in the Credentials that are in use table.When a discovery credential is used to successfully communicate with a system, a credentialreference is created for that system. If the credential is later changed on that same discovery task,the credential that is used on all systems referencing it changes. This enables credentials to bechanged in one place (usually passwords for an account) and immediately be available for usein HP SIM. The same is true for global credentials.Because of this, if a global or discovery credential is deleted, you are asked if all references tothat credential should be removed or if copies should be made as system credentials for eachsystem that is referencing the current credential.However, when a credential is overwritten, instead of deleted and then re-added, the credentialis changed and each system referencing it uses the new username/password values.If the intent is not to change what is currently in use, you must add a new credential. For discoverytasks, a new discovery task must be created with its own credentials, instead of editing an existingdiscovery task, if the systems require different credentials than contained in the existing discoverytask.
Example XML file to add more than 10 WBEM username and passwordpairs
To save time and effort, create an XML file that defines your system authorizations before runningdiscovery. For example:
<?xml version="1.0" encoding="UTF-8"?> <!-- 15.43.215.47 15.43.212.150
34 Credentials

15.3.110.117 15.3.105.51 15.3.110.113 --> <nodelist> <node name="system1"> <credential protocol="wbem" username="root" password="pswd" /> </node> <node name="system2"> <credential protocol="wbem" username="root" password="pswd" /> </node> <node name="system3"> <credential protocol="wbem" username="root" password="pswd" /> </node> <node name="system4"> <credential protocol="wbem" username="root" password="pswd" /> </node> <node name="system5"> <credential protocol="wbem" username="euploid\administrator" password="pswd" /> </node> </nodelist>
You can include the IP addresses of the systems to be discovered in an XML comment so that youcan maintain the IP addresses with the XML file and can copy and paste into the Ping inclusionranges, system (hosts) names, templates, and/or hosts files field when creating or editing a discoverytask.After you create the XML file import it into HP SIM before running discovery using the followingCLI command:mxnodesecurity -a -f <path-to-xml-file>
HP recommends limiting the WBEM user name and password pairs to 10 to reduce the overalldiscovery run time.
Example XML file to add more than 10 WBEM username and password pairs 35

5 WMI Mapper ProxyWindows systems use a variation on the WBEM management protocol called WMI. For HP SIMto communicate with Windows systems, the WBEM protocol it uses must be converted to the WMIprotocol and vice versa. This is the function of the WMI Mapper Proxy. This proxy is typicallyinstalled on the same system as HP SIM when HP SIM is installed on a Windows system. For Linuxor HP-UX installations where Windows systems will be managed, it can be installed on a separateWindows system, with its location configured in the Options→Protocol Settings→WMI MapperProxy menu.You can configure the WMI Mapper Proxy from the First Time Wizard. You can also add, edit,and delete WMI Mapper Proxies by selecting Options→Protocol Settings→WMI Mapper Proxy.
36 WMI Mapper Proxy

6 DiscoveryDiscovery is the process of finding systems in the management domain so that they can be managedfrom the CMS by HP SIM. HP SIM can automatically discover and identify systems attached to thenetwork using information from management protocols such as SNMP, WMI, WBEM, SSH, andSSL. Create discovery tasks to limit discovery to specific network segments or IP address ranges,or to control the frequency that each task runs. Use discovery filters to prevent discovery of unwantedsystem types.When you access the Discovery page, a table displays a list of all available discovery tasks. Youcan configure multiple instances of discovery with each instance having its own schedule and setof inclusion ranges. When a discovery task is executed, the Last Run column is updated to displayits progress, including the percentage of completion.Automatic discovery and completion percentages are calculated by weighting two factors: theping sweep (performed on each host) is 10% of the process; the system identification is 90% ofthe process. If no host is found on an IP address, the system identification is considered complete.For example, you have 100 hosts in your discovery range. If 50 hosts have been pinged, but only10 identified, you have: 50/100 * .10 = 0.05 (ping sweep) 10/100 * .90 = 0.09 (identification)0.05 + 0.09 = 0.14 * 100 = 14% (total completed percentage).
NOTE: You can run only one discovery task at a time. If you select to run more than one discoverytask, the percentage in the Last Run column remains at 0% until the currently running task is complete.
When multiple Command View (CV) consoles are discovered in HP SIM, with each activelymanaging its own EVAs, the managed system section of the CVEVA listing in HP SIM displays allof the Storage Arrays (both actively managed and passively managed).When another CVEVA server is discovered in HP SIM, which is managing the same set of StorageArrays, the managed system section of both CVEVA servers display only arrays managed actively.
Recommended discovery tasksFor best results, HP recommends creating the following discovery tasks, and running themsequentially in the suggested order. You might want to create multiple tasks for certain types, suchas servers, grouping them so that systems with the same credentials are in the same discoverytasks, with up to three sets of credentials supplied in each discovery task. This reduces the chanceof account lockout when an invalid credential is tried too many times.1. Central Management Server (CMS)
This discovery task is for discovery of the HP SIM CMS and its management processor, if ithas one.
2. Onboard AdministratorThis discovery task is for discovery of the Onboard Administrators for every enclosure to bemanaged. When specifying credentials for this task, include the iLO credentials for everyblade in the enclosures associated with the Onboard Administrators.
3. Management ProcessorsThis discovery task is for discovery of all management processors not discovered in the previoustasks. This includes iLOs and management processors for all non-blade systems.
Recommended discovery tasks 37

4. Physical ServersThis discovery task is for discovery of physical servers (blade servers and standalone servers).The management processors for these servers must be discovered prior to this discovery taskbeing run.
5. Virtual MachinesThis discovery task is for discovery of virtual machines associated with servers discovered inthe previous category.
NOTE: If discovery tasks are run out of order, errors are likely. Typical errors due to runningdiscovery tasks in an improper order include:• Association errors
For example, a server not associated with a management processor or virtual machine notassociated with a virtual machine host.
• Credentials errorsBecause discovery of systems can trigger additional discovery of associated systems ormanagement processors, if the correct credentials are not supplied for the associated systems,their discoveries are likely to show errors. If you discover these associated systems with asubsequent discovery task containing the proper credentials, they should then completesuccessfully.
NOTE: Citrix Xen VMs discovered in category 5 will always return a discovery error unless theCitrix Xen Host has been registered through Configure→Virtual Machine→Register Virtual MachineHost.
If you have a small network, an alternate way of setting up your discovery tasks is to create asingle task with one IP address range and all of the required credentials for the systems in thatrange. However, doing this can make it difficult to troubleshoot and diagnose errors if one or moresystems are not configured correctly.
Options on the Discovery pageUnder the For all automatic discoveries section, the following options are available:
• Configure general settingsSelect this option to configure general settings that apply to all discovery tasks.
• Manage hosts filesSelect this option to manage hosts files
• Configure global protocol settingsSelect this option to configure global protocol settings.
NOTE: To discover clusters correctly, you must enable SNMP with the correct security settingson HP SIM on the target systems.
From the Discovery page, you can:
• Create a new discovery taskClick New and the New Discovery section appears.
• Edit an existing discovery taskSelect a task from the table,and click Edit. The Edit Discovery section appears.
38 Discovery
• Enable or disable a discovery taskSelect a task and click Disable to disable the schedule of an enabled task. If a task is disabled,the button changes to Enable. To resume automatic execution of the task, click Enable.
• Delete an existing discovery taskSelect a task from the table and click Delete.
• View Task ResultsThis button displays the task results for the current discovery task.
• Run a discovery taskSelect the task you want to run and click Run Now. When a task is running, the Run Nowbutton changes to a Stop button.
• Stop a discovery task from runningSelect the running task and click Stop.
See the Systems Insight Manager online help for more information on each of these options.
Discovery credentialsOne of the best ways to configure credentials for your managed systems is to do so as part of adiscovery task. You can enter one or more sets of credentials. As each system is discovered, thecredentials listed in the discovery task will be tried on it, in order, until one set is found to work.This set will be saved as the working credentials for that system. You can configure more than oneset of credentials for each discovery task, but it is suggested that you keep it to a small number(less than 5) for best performance. If possible, group systems with similar credentials into the samediscovery task.
Configuring Configure or Repair Agents through a discovery taskYou can choose to have additional configuration done on the managed systems, as they arediscovered, by configuring the settings using the Configure or Repair Agents button. For additionalinformation, see the HP SIM online help.
Viewing discovery task resultsTo display the task results for discovery task, select the task on the Discovery page, and then clickView Task Results. You can also view discovery task results, by selecting Tasks & Logs→View TaskResults.
Discovery filtersDiscovery filters prevent or enable certain system types from being added to the database throughautomatic discovery. When you want to discover systems of a certain type, using filters is mucheasier than specifying the IP addresses of each individual system. Discovery filters do not apply toindividually added systems.You can access discovery filters from the Discovery page by selecting Enable discovery filters inthe Configure general settings, section.To disable filters, clear the Enable discovery filters checkbox. To enable filters, select the Enablediscovery filters checkbox, and then select the system types that you want to discover.To access and modify discovery filters, you must have administrative rights. If discovery filters areenabled, only systems of the selected types are added to the database through automatic discovery.Because all tasks operate on systems that exist in the database, tasks do not run on any systemuntil the filter criteria has been met and that system has been added to the database. Filters donot affect any systems already discovered, even if the systems change to a type that no longer
Discovery credentials 39

matches the current filter. If discovery filters are disabled, automatic discovery discovers systemsaccording to the General Settings for All Discoveries section on the Discovery page.If you do not discover the HP systems that you expect to find, ensure that the Insight ManagementAgent are installed and running correctly on the target systems. In addition, verify that the SNMPCommunity Strings settings and WBEM user name and passwords in HP SIM and on the agentsfor systems that are not discovered are configured correctly.
Discovery of Gen8 serversDiscovery for a Gen8 server must happen through the IP address of the host server’s ILO4 IPaddress. If it is a blade server, you can discover the server through the Onboard Administrator IPaddress. If the host IP address is used, it will be discovered, but will not include all the HPManagement Instrumentation, as this now all comes from the iLO4. It is the iLO4 which makes allthe proper associations (along with Onboard Administrator if it's a blade). The host is fully offloaded from the system management tasks.Discovery for the Gen8 with host-based agents fully installed, properly configured, and agentlessmode disabled, can be discovered through a number of ways. This host IP is the correct place tofind all you would need. Additionally, an Onboard Administrator IP if the host is a blade, is alsoallowed here. Since this is using host-based agents, the iLO4 can be viewed as a pass through tothe host, and could be used as well, but is treated as a management processor, not a host NIC.
40 Discovery

7 Manage CommunicationsUse the Manage Communications feature to troubleshoot communication problems between theCMS and targeted systems. For each failed communication function, troubleshooting informationis available. You can reconfigure communication settings, launch agents, and push certificates totarget systems. This feature is available by selecting Configure→Manage Communications menuand includes the following tabs:
• Identification tabIncludes status information on the state of an identification process . Identification attempts todetermine what the system type is, what management protocol a system supports, and attemptsto determine the operating system and version loaded, along with other basic attributes aboutthe system. Finally, it determines if the system is associated with another system.
• Events tabIndicates if the CMS can receive events from the target systems. This status considers the settingof SNMP traps and WBEM indications.
• Run Tools tabIndicates if the CMS can run tools locally on target systems. Communication issues in thiscolumn usually relate to security and trust relationships.
• Version Control tabIndicates the availability of software and firmware inventory data for target systems. The statusis collected and stored during data collection.
The following information is available:
• Advising and repairing managed system settingsIncludes a tabbed interface with a tab for each functional column (Identification, Events, RunTools, and Version Control). Each tab displays the diagnostic results and includestroubleshooting tips and advice for fixing communication problems.
• Repairing managed system settingsLaunches the Configure or Repair Agents tool. Configure or Repair Agents enables you toquickly and optimally configure systems for manageability.
• Updating communication statusesRuns to get an updated communication status.
• Printing Manage Communications tableCreates a printer-friendly version of the list in a new window.
NOTE: Experienced users who do not need the troubleshooting advice might be able to repairtheir systems faster with the Configure or Repair Agents feature. To access Configure or RepairAgents, select Configure→Configure or Repair Agents.
Configuring the managed system software using the Configure or RepairAgents feature from the CMS
The HP SIM Configure or Repair Agents tool is a quick and easy way to configure Linux, HP-UXand Windows managed systems to communicate with HP SIM.To run Configure or Repair Agents remotely against multiple systems simultaneously, you must haveauthorizations to run the Configure or Repair Agents tool.In addition, you must enter administrator level user credentials for the target system.
Configuring the managed system software using the Configure or Repair Agents feature from the CMS 41

Sending test traps and indicationsTo verify that SNMP traps and WBEM indications can be sent, send test traps and indications.You can send test traps and indications from Configure or Repair Agents on Windows and HP-UXsystems, with the WBEM provider installed, from the Step 4: Configure or Repair Agents page,under Configure WBEM / WMI.. Select Send a sample WBEM / WMI indication to this instance ofHP SIM to test that events appear in HP SIM in the Event list or All Event User Interface for theselected system..You can also send test WBEM indications from some HP-UX version by running the followingprocedure:Procedure 7 Sending WBEM indications From an HP-UX system1. From the HP-UX managed system, run /ect/opt/resmon/lbin/send_test_event
monitor name . For example, /etc/opt/resmon/lbin/send_test_event disk_em.Possible monitor names:
• dm_memory
• lpmc_em
• disk_em
• dm_chassis
• dm_core_hw
• ia64_corehw
• fpl_em2. Confirm that the test indication is shown in the HP SIM event table view after you trigger it.Procedure 8 Sending WBEM indications from a Windows system1. Login to the target Windows system.2. Go to Start→Programs→HP Insight WBEM Providers→Test WMI events.3. Click any one of the severities (Informational, Warning, or Error).4. Click OK to send the test events to the CMS.Procedure 9 Sending SNMP traps from Windows or HP-UX system1. Run Configure or Repair Agents and on Step 4: Configure or Repair Agents under Configure,
select Send a sample SNMP trap to this instance of HP SIM to test that events appear in HPSIM in the Event list or All Event User Interface for the selected system.
2. Confirm that the test trap is shown in the HP SIM event table view after you trigger it.
42 Manage Communications

8 Automatic event handlingAutomatic event handling enables you to define an action that HP SIM performs when an event isreceived. Users who want to access this feature must have administrative rights.
NOTE: Automatic Event Handling events older than 24 hours are filtered out from AEH tasks.
• Managing TasksEnables you to view definitions, copy tasks, edit tasks, view task results, disable or enabletasks, or delete existing Automatic Event Handling tasks.
• Creating a New TaskEnables you to create a new Automatic Event Handling task. Select Options→Events→AutomaticEvent Handling→New Task.
• E-mail SettingsEnables you to set up the various e-mail settings needed because of an event action. You canaccess the E-mail Settings page using one of the following methods:
◦ Select Options→Events→Automatic Event Handling→E-mail Settings.
◦ From the HP SIM introductory page, click e-mail in the Do this now to finish the installationsection.
E-mails are sent to alert users about problems. Ask your e-mail administrator to verify whetheryou need the following information:
◦ SMTP host name of the outgoing mail server, such as mail.company.com. This serverreceives the mail messages from HP SIM and begins routing them to the recipient.
◦ The name of the management server e-mail address. This address appears in the Fromfield of any e-mail sent from HP SIM. The user can be a system name. Enter the full domainaddress in the form [email protected], as the sender.
NOTE: Some e-mail systems require a valid From user before they accept the message. HPsuggests that a valid e-mail account be used for this purpose.
• Modem SettingsEnables you to set up a modem to use for alphanumeric paging. Before you send a page fromthe HP SIM server, set up the modem on the server. Be sure you know the COM port used bythe modem to send the page.This feature is available to users with administrative rights only and is available only whenthe HP SIM CMS is installed on Windows.You can access the Modem Settings for Paging page using one of the following methods:
◦ Select Options→Events→Automatic Event Handling→Modem Settings.
◦ From the HP SIM introductory page, click paging in the Do this now to finish the installationsection.
Access the Automatic Event Handling page to edit or delete an existing rule by clicking AutomaticEvent Handling in the Do this now to finish the installation section of the HP SIM introductory page.
43

Example automatic event handling tasksHP SIM ships with three example automatic event handling tasks that are disabled by default.When the Automatic Event Handling - Manage Tasks page appears, you can select one of theexample tasks and click View Definition.
• example - all desktop information eventsThis task is triggered when an informational event is received from the discovered desktopsystems, and this task clears the event. The same task can be edited to change the action ofthe system criteria .
• example - all linux MIB updatesThis task is triggered when a MIB update events request is received from all managed Linuxtarget systems that are discovered and identified in HP SIM. The same task can be edited andsaved as new task.
• example - all server failed sign-in eventsThis task is triggered when a failed sign-in attempt is made. Sign-in failure might be causedby an invalid user account, sign-in attempt from an excluded IP address, or failed sign-inauthentication.
44 Automatic event handling
9 Users and AuthorizationsHP SIM enables you to configure authorizations for specific users or user groups. Authorizationsgive the user access to view and manage systems. Each authorization specifies a user or usergroup, a toolbox, and a system or system group. The specific set of tools that can be run on asystem is specified in the assigned toolbox.You must plan which systems each user will manage and which specific set of tools each user isauthorized to execute on managed systems. A user with no toolbox authorizations on a particularsystem cannot view or manage that system.Authorizations are cumulative. If a user is authorized for Toolbox1 and Toolbox2 on the samesystem, the user is authorized for all tools in both Toolbox1 and Toolbox2 on that system. Similarly,a user authorized for the All Tools toolbox on a system requires no other toolbox authorizationson that system because the All Tools toolbox always includes all tools. See the Systems InsightManager online help for more information on setting up users and authorizations.
UsersCreate user accounts to sign-in to HP SIM. The account must be valid on the operating system(including Active Directory on Windows) on the CMS and is authenticated by the CMS. You mustknow the operating system user account name of the user you are adding, but it is not necessaryto know the password.
User groupsUser groups must exist in the operating system. For Windows, they must also exist in Active Directory.Members of user groups in the operating system can sign-in to HP SIM and inherit the group'sattributes for configuration rights, sign-in IP address restrictions, and authorizations. When a group'sconfiguration rights, sign-in IP address restrictions, or authorizations are changed, this change isimmediately reflected for all current members of the group.With configuration rights, the user inherits the highest setting. With sign-in IP address restrictions,the user inherits all entries. With authorizations, the user inherits all authorizations.
NOTE: A user's group membership is determined at sign-in. If a user's group membership changesin the operating system, it is not reflected in HP SIM until the next time the user signs in to HP SIM.
ToolboxesToolboxes are used to configure a group of tools for each user that has access. Toolboxes are setup so that some users can use the group of tools to which each user has access but not others. Forexample, an administrator has access to more tools than a user.
NOTE: For users with operator rights and user rights to clear, delete, assign events, and addcomments to events, you must select Configuration Tool from the Show tools in category dropdownlist. Then, select Clear Events, Delete Events, Assign Events, and Comment Events as necessary,and then click to add them to the Toolbox contents.
Users 45
10 Managed environmentThe Managed Environment feature enables you to select the operating systems that you will manage.There are four options: Windows, Linux, HP-UX, and Other. The selections made here configureHP SIM to hide collections, tools, and reports for operating systems you do not manage.
NOTE: These settings can be changed at any time, and the hidden collections, tools, and reportscan be made visible again.
If you select Linux or HP-UX, you can select to have GlancePlus or Ignite-UX and Software Distributormenu items appear in HP SIM. The HP-UX menu items are for handling Integrity Extensions on aWindows or Linux CMS and are not available on an HP-UX CMS.If both Linux and HP-UX are selected, the same user name must be specified for GlancePlus inboth the places. Root user is used if no user name is specified.If you select HP-UX, select Ignite UX and Software Distributor, and then enter the IP address of theignite server and the SSH credentials (Host based or User based).
NOTE: The password field is populated with a dump value, not with the actual password suppliedby user. Dump value is used as a security measure. All selections are retained when you movearound in the UI. The same selections are retained in Options→Managed Environment page.
46 Managed environment

Part III HP SIM basic features

11 Basic and advanced searchesBasic search
The Search feature enables you to quickly retrieve details about a system using its name or commonsystem attributes. For example, you could search for a system name, IP address, or a word suchas server, HP-UX, or storage.The search field only allows the following characters: letters, numbers, tilde (~), dash (-), period(.), underscore (_), apostrophe ('), and space.As you type, a dropdown list appears and lists systems with names that begin with the text entered.The list includes up to 12 systems, and shows the icon for the system health status. If more than 12systems are found, an ellipsis (...) appears at the bottom of the list. Continue typing to narrow thelist further. You can use the mouse or arrow keys to select a system to view, or do not select asystem and press Enter or click Search to search for the indicated criteria.If you selected a system in the dropdown list, the System Page for that system appears.If you did not select a system, and you pressed Enter or clicked Search, the Search Results pagedisplays a list of systems that match your criteria. Clicking a name in the list displays the SystemPage for that system. If no system in the database resembles the target system, the Search Resultspage indicates that no entries meet the criteria, and gives you the option to search again or performan advanced search.
Advanced searchTo access the Advanced Search page, click the Advanced Search link in the Search panel.You can create a system, event, or cluster search by selecting systems, events, or clusters in theSearch for box at the top of the Advanced Search page. Then you can specify the criteria to beused in the search. The result of running a search is a collection. The criteria selected can also besaved as a collection definition, so that search can be run again at a later date. The savedcollections are stored in the System and Event Collections panel as Systems or Events. Thesecollections can be saved as private or shared.
Hierarchical displaysSome search criteria require hierarchical displays. Examples of hierarchical criteria are: OperatingSystem, Event Type, and Software/Firmware.In these cases, the comparison selection box is replaced by a selection box containing theappropriate syntax for that particular tree level. The most complex of these cases is theSoftware/Firmware criteria. When Software/Firmware is selected, a series of search criteria areadded below in a tree format:• component type is
• and operating system is
• and category type is
• and name is
• and version isIn this case, as selections are made in the higher-level selection boxes, the available selections inlower-level boxes are updated.
Save asWhen you click Save As Collection, the Save As Collection section displays. Enter a name for thesearch in the Name field, and then select where to save it.
48 Basic and advanced searches

ViewWhen you click View, the results of the search appear below the search frame. This functionalityenables you to preview the results of the search before saving it, or to run a search without savingit.
Searching for toolsThe Tool Search feature provides a quick way to search and filter textually, based on tool names,tool locations in the HP SIM cascading menu structure, and tool descriptions.
For additional information, see the HP SIM online help.
Searching for tools 49

12 Monitoring systemsViewing system collections
In HP SIM monitoring systems involves HP SIM polling Insight Management Advisor or firmwareon the managed systems to retrieve status information, and then displays this information as statusicons. There are several types of status that can be displayed, such as Health Status (HW), SoftwareVersioning Status (SW), or Management Processor status (MP). Other status icons might be addedby plug-ins to HP SIM. These icons enable you to see, at a glance, the state of your systems.
Pages displaying system status• System lists
There are four system lists page views; table view, icon view, tree view, and picture view (forracks and enclosures). Common in each view is the system name and system status. To accessthe system list pages, select a collection or system from the System and Event Collections panel.The type of collection or system that you select determines the view that appears.
◦ Table viewThe HS column on the system list page displays the overall system health status, which isdetermined by the default Hardware Status Polling task and is a roll up of all the statussources, which can be SNMP, WBEM, HTTP, and cluster status. The legend shows howmany systems in the view are Critical, Major, Minor, Normal, Disabled, and Unknown.
◦ Icon viewThe icon view lists the system name of all discovered systems, as well as the system healthstatus for each system. The legend shows how many systems in the view are Critical,Major, Minor, Normal, Disabled, and Unknown.
◦ Tree viewThe tree view displays the health status icon and the system name for each system in atree format.
◦ Picture viewThe picture view page for racks and enclosures contains a picture view of the discoveredsystems in the rack or enclosure if available. While signed in to HP SIM, placing yourcursor over a server shown in the view displays information on that particular server,including server blade name, slot number, and the enclosure in which the server is located.You can also click a component name to display detailed information about thecomponent.
In all views, you can select the checkbox next to the system name to select a system. You canselect more than one system, or to select an entire collection, select the checkbox, Select"collection name" itself.
• System pagesOn the System Page, System tab, a status icon indicates the overall health status stored in thedatabase. If system monitoring is suspended, a disabled icon appears in place of the hardwarestatus icon and software status icon. The System Status section contains more information onthe system status.You can access the System Page one of the following ways:
◦ Select Tools→System Information→System Page, and then select a target system.
◦ Click the system name in the System Name column on the system table view page.
50 Monitoring systems

• Property pagesThe Property page Status tab displays WBEM properties that help determine the status of thetarget system, such as determining memory status and process status. Computer system statusis determined by information collected live through the WBEM protocol and the informationprovided by the WMI provider.You can access Property pages in the following ways:
◦ From the System Page on the System tab, click Properties. The Property pages appearfor the target system.
◦ Select Tools→System Information→Properties, select the target system, and click Runnow. The Property pages display for the target system.
• System Status PanelThis panel provides uncleared event status, system health status information, and an alarm tonotify you about certain events or statuses. The System Status panel is in the upper left cornerof the HP SIM GUI and can be customized by clicking the Customize link within the panel.
Viewing health status from the table or icon viewTo display the next level of status detail from any page in HP SIM that shows a health status icon,place your cursor over the icon and additional status detail information appears. The status valuesthat appear depend on the agents installed on the target system.In some cases, the system is a container, such as a rack, enclosure, complex, or cluster. In thetable and icon views, the status value is the status of the container and does not include status ofsubsystems. If the status is Unknown, only the system name and Unknown status icon appears.
Viewing health status in the tree viewThe tree view displays status data for each system, as well as rollup status for container systems.The status icon is located on the left side of the tree view next to the selection checkbox. For systemsthat are containers, the status to the left of the container name indicates the most critical status ofthe systems in the container, including the container status itself. The status of the container itself,if there is one, appears to the right of the system name, inside parentheses, alongside the systemtype label. Placing your cursor over the status icons will reveal additional status details.
System status typesThe following table describes the HP SIM, system health status types, which appear in the HScolumn on the system list page.
Table 3 Health status types
DescriptionStatus typeStatus icon
HP SIM can no longer communicate with the system. The system waspreviously discovered but cannot be pinged. The system might be
Critical
down, powered off, or no longer accessible on the network becauseof network problems.
A major problem exists with this system that should be addressedimmediately. For systems running Insight Management Agent, a
Major
component has failed. The system might no longer be properlyfunctioning and data loss can occur. In Insight Manager (WIN32),this status was identified as Failed.
A minor problem exists with this system. For systems running InsightManagement Agent, a component has failed, but the system is still
Minor
functioning. In Insight Manager (WIN32), this status was identifiedas Degraded.
Viewing system collections 51
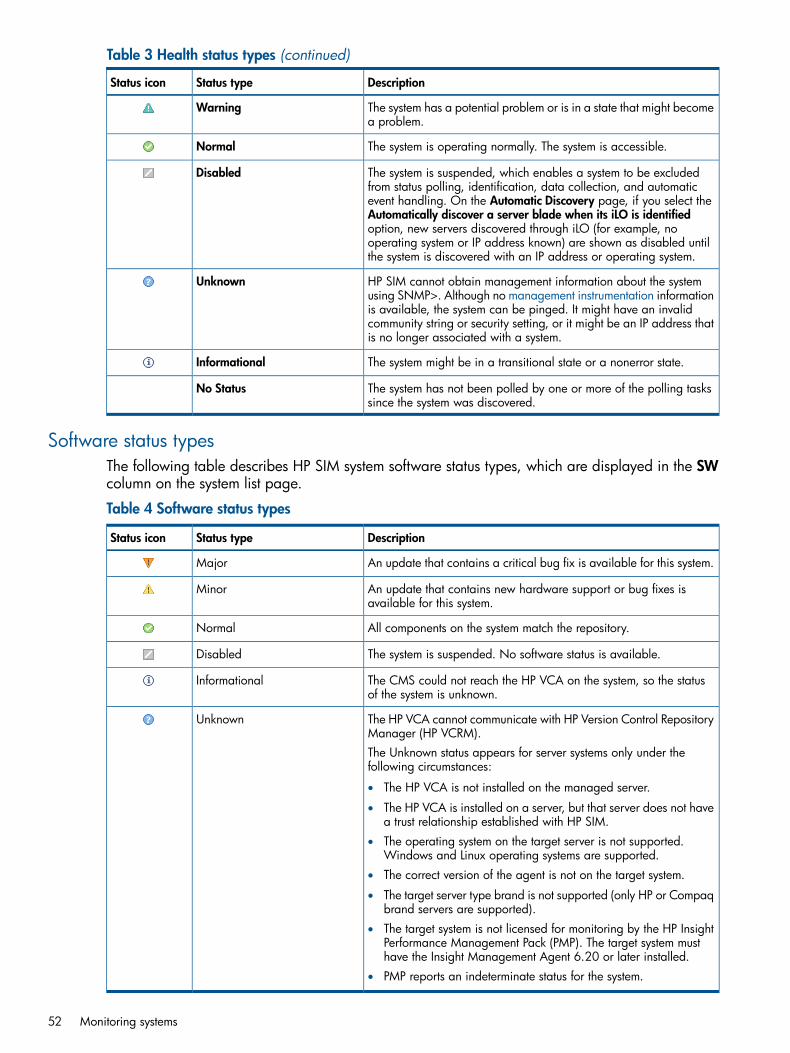
Table 3 Health status types (continued)
DescriptionStatus typeStatus icon
The system has a potential problem or is in a state that might becomea problem.
Warning
The system is operating normally. The system is accessible.Normal
The system is suspended, which enables a system to be excludedfrom status polling, identification, data collection, and automatic
Disabled
event handling. On the Automatic Discovery page, if you select theAutomatically discover a server blade when its iLO is identifiedoption, new servers discovered through iLO (for example, nooperating system or IP address known) are shown as disabled untilthe system is discovered with an IP address or operating system.
HP SIM cannot obtain management information about the systemusing SNMP>. Although no management instrumentation information
Unknown
is available, the system can be pinged. It might have an invalidcommunity string or security setting, or it might be an IP address thatis no longer associated with a system.
The system might be in a transitional state or a nonerror state.Informational
The system has not been polled by one or more of the polling taskssince the system was discovered.
No Status
Software status typesThe following table describes HP SIM system software status types, which are displayed in the SWcolumn on the system list page.
Table 4 Software status types
DescriptionStatus typeStatus icon
An update that contains a critical bug fix is available for this system.Major
An update that contains new hardware support or bug fixes isavailable for this system.
Minor
All components on the system match the repository.Normal
The system is suspended. No software status is available.Disabled
The CMS could not reach the HP VCA on the system, so the statusof the system is unknown.
Informational
The HP VCA cannot communicate with HP Version Control RepositoryManager (HP VCRM).
Unknown
The Unknown status appears for server systems only under thefollowing circumstances:
• The HP VCA is not installed on the managed server.
• The HP VCA is installed on a server, but that server does not havea trust relationship established with HP SIM.
• The operating system on the target server is not supported.Windows and Linux operating systems are supported.
• The correct version of the agent is not on the target system.
• The target server type brand is not supported (only HP or Compaqbrand servers are supported).
• The target system is not licensed for monitoring by the HP InsightPerformance Management Pack (PMP). The target system musthave the Insight Management Agent 6.20 or later installed.
• PMP reports an indeterminate status for the system.
52 Monitoring systems
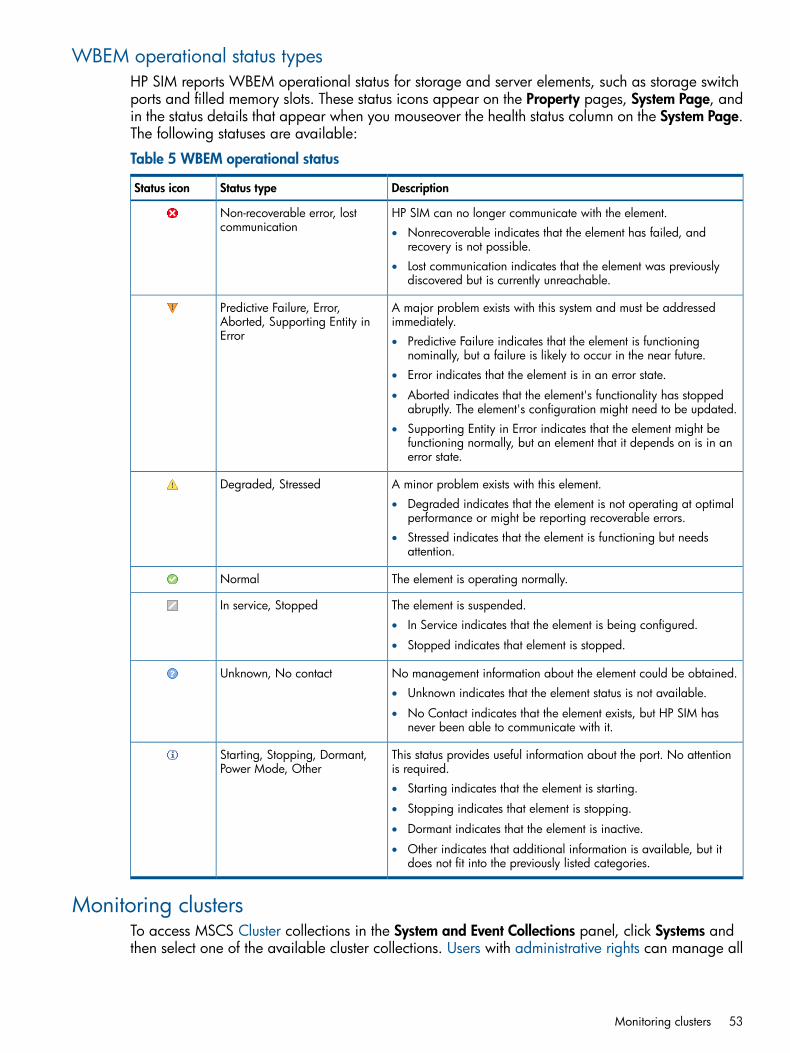
WBEM operational status typesHP SIM reports WBEM operational status for storage and server elements, such as storage switchports and filled memory slots. These status icons appear on the Property pages, System Page, andin the status details that appear when you mouseover the health status column on the System Page.The following statuses are available:
Table 5 WBEM operational status
DescriptionStatus typeStatus icon
HP SIM can no longer communicate with the element.Non-recoverable error, lostcommunication • Nonrecoverable indicates that the element has failed, and
recovery is not possible.• Lost communication indicates that the element was previously
discovered but is currently unreachable.
A major problem exists with this system and must be addressedimmediately.
Predictive Failure, Error,Aborted, Supporting Entity inError • Predictive Failure indicates that the element is functioning
nominally, but a failure is likely to occur in the near future.• Error indicates that the element is in an error state.
• Aborted indicates that the element's functionality has stoppedabruptly. The element's configuration might need to be updated.
• Supporting Entity in Error indicates that the element might befunctioning normally, but an element that it depends on is in anerror state.
A minor problem exists with this element.Degraded, Stressed• Degraded indicates that the element is not operating at optimal
performance or might be reporting recoverable errors.• Stressed indicates that the element is functioning but needs
attention.
The element is operating normally.Normal
The element is suspended.In service, Stopped• In Service indicates that the element is being configured.
• Stopped indicates that element is stopped.
No management information about the element could be obtained.Unknown, No contact• Unknown indicates that the element status is not available.
• No Contact indicates that the element exists, but HP SIM hasnever been able to communicate with it.
This status provides useful information about the port. No attentionis required.
Starting, Stopping, Dormant,Power Mode, Other
• Starting indicates that the element is starting.
• Stopping indicates that element is stopping.
• Dormant indicates that the element is inactive.
• Other indicates that additional information is available, but itdoes not fit into the previously listed categories.
Monitoring clustersTo access MSCS Cluster collections in the System and Event Collections panel, click Systems andthen select one of the available cluster collections. Users with administrative rights can manage all
Monitoring clusters 53

shared cluster collections from the cluster collection view. Users can manage their own privatecollections, as well as:• Save collections
Click Save As Collection from the cluster table view page.
• Delete clustersClick Delete from the cluster table view page. A confirmation box appears. To delete thecluster, click OK, or to cancel the deletion, click Cancel.
NOTE: Clusters that contain cluster members cannot be deleted. To delete a cluster with itscluster members, select the All Systems collection in the System and Event Collections panel.Then, select the cluster and all of its members, and then click Delete.
• Print cluster collection viewClick Print to print the collection results.
• Customize the viewClick Customize to customize which columns display and in what order.
System propertiesThe Set System Properties tool enables you to set system properties for a single system or for multiplesystems.You have two options for setting system properties:
• Edit system properties for a single systemSelect the Tools & Links tab on the System Page, and then click the Edit System Properties link.
• Set system properties for one or more systemsSelect Options→System Properties→Set System Properties.
The Suspend or Resume Monitoring tool enables you to suspend monitoring of a single system ormultiple systems, which enables systems to be excluded from status polling, identification, datacollection, and the automatic event handling features of HP SIM. The available suspend lengthsinclude the predetermined increments of 5 minutes, 15 minutes, 1 hour, 2 hours, 4 hours, 8 hours,1 day, 2 days, 3 days, 4 days, 5 days, 6 days, and 7 days. You can turn on the suspend toolindefinitely. Configuration changes take effect immediately. To view the new settings for a system,click the System tab on the System Page. Changes made with this tool override previous settings.A system that is suspended appears with a disabled icon throughout HP SIM.You can suspend or resume monitoring using one of the following methods:
• Suspend or resume monitoring for a single systemClick the Tools & Links tab on the System Page, and then click the Suspend/Resume Monitoringlink.
• Suspend or resume monitoring for one or more systemsSelect Options→System Properties→Suspend or Resume Monitoring.
NOTE: You must have administrative rights to access these tools.
For ESXi system, the WBEM Health Inclusion Status link takes you to the WBEM Health InclusionStatus page in HP SIM. From this page, you can disable all or part of the sub-component statusfor an ESXi system so that they do not affect the overall status of the ESXi system. This is useful todisable disconnected NICs from reporting an error status on the ESXi overall health.
54 Monitoring systems

After setting the Ignore status on the components, the change will not be reflected until after thenext status polling task runs.
Example of setting system properties
Setting customer company and contact information individuallyIf the customer company or contact information is different between multiple systems, the preferredconfiguration method is through the Set System Properties or Edit System Properties page usingthe procedures outlined below.HP SIM provides two sections on the Set System Properties page under Contract and WarrantyInformation, called System Site Information and Customer Contact. Each section is treated by HPSIM as a unique database record with the first field of each section representing the record'sheader.The System Site Information section uses Site name as the header, and Customer Contact usesContact's first name and Contact's last name as the header. You must be aware, when enteringinformation in these sections, that certain properties are tied to the Site name and Contact's firstname / last name fields. If information is meant to be unique for a particular system or systemlocation, you must ensure that the Site name and/or Contact's first name/last name are also unique.Under Customer Contact, changing any of the fields Contact job title through Contact other changesthe corresponding properties for all of the systems that use the same Contact's first name/last name.For example, if the Site name was set globally to Widgets Inc. and you require a unique addressfor an individual system located in Brussels. You can create a Site name of Widgets Inc. — Brusselsto ensure that the unique address information for this system does not overwrite the other system'sSystem Site Information, nor will it be overwritten if changes are made to those systems.
IMPORTANT: Although HP SIM currently does not require you to complete both System SiteInformation and Customer Contact sections, the Remote Support Pack requires both sections arefilled out, especially the fields designated by *.
Example of setting system properties for multiple systemsThis tool enables you to edit system properties for multiple systems at one time. The Set SystemProperties page for multiple systems is similar to the Edit System Properties page for a single system,except that a checkbox appears next to each property. The checkboxes enable you to select theproperties you want to configure when the tool executes. Only the selected properties are savedas a property for the target systems. If the value of the selected property is blank, that property isnot set for the systems All properties are optional.
NOTE: This tool can be used for a single system. However, some of the properties that areavailable from the System Page are not available when selecting this option. For example, theserial number is not available here, whereas it is available from the System Page.
NOTE: To complete this procedure, you must be authorized to use the EDIT_SYSTEM_PROPERTIEStool on the systems you want to update.
See the HP SIM online help for information on editing system properties.
Example of setting system properties 55
13 Event managementEvents are typically sent to the CMS from agents running on the managed systems. However, someevents are generated directly from the CMS itself. Managed systems must be configured to sendevents to the CMS. After the CMS receives the event, if it passes the filters, any actions configuredto happen upon its receipt are run, and the event is stored in the HP SIM database for later viewing.The event list page is the view for an event collection and lists of events that meet common criteria.From this page, you can clear, delete, and assign events, enter comments on the event, and viewprintable reports. To access the event list page, select an event collection from the System andEvent Collections panel.Monitoring events in HP SIM includes the following tasks:
• Automatic Event HandlingEnables you to manage automatic event handling tasks, create new automatic event handlingtasks, and configure e-mail and modem settings.
• Clearing EventsEnables you to clear events. Select Options→Events→Clear Events. Select the target events toclear and click Clear.Cleared events remain in the HP SIM database, but no longer contribute to the status iconreported in the System Status panel.
• Deleting EventsEnables you to delete events from the database.Select Options→Events→Delete Events. Select the events to delete and click Delete. The eventsare deleted from the database This tool can be scheduled to run on a regular basis. For moreinformation, see “Default system tasks” (page 192).
NOTE: You can also delete events from the event view page.
Event management configurationThe following menu options are used to configure event management:
• Event Filter SettingsEnables you to filter SNMP traps you receive from discovered systems. The default setting isto accept all registered SNMP traps from all discovered systems. You can specify the severityof the traps you want to see and use the IP address ranges to create a subset of systems whosetraps you can receive or ignore. For example, you can use event filtering to ignore informationaltraps. This feature is available to users with administrative rights.To access Event Filter Settings, select Options→Events→Event Filter Settings.
• SNMP Trap SettingsEnables you to tailor trap messages to your specific network needs. Trap messages can becryptic, poorly written, and incomprehensible. You can modify the Management InformationBase (MIB) information in the database representation. You can also modify a .cfg file ofthe MIB. HP recommends that you never modify an actual MIB. To access SNMP trap settings,select Options→Events→SNMP Trap Settings.SNMP trap settings are available to users with administrative rights and are used to view oredit trap details for a registered MIB.
56 Event management

• Status Change Event SettingsEnables you to control if a status change event is generated when health status changes. Toaccess, select Options→Events→Status Change Event Settings.
• Subscribing to WBEM EventsEnables you to subscribe to WBEM events. Select Options→Events→Subscribe to WBEM Events.
• Unsubscribing to WBEM EventsEnables you to unsubscribe to WBEM events. Select Options→Events→Unsubscribe to WBEMEvents.
Example - Creating a paging task based on e-mail notificationYou can set up a notification task to forward an e-mail to a cell phone (for example, Short MessageService (SMS)) or other paging interface applications, whenever the CMS receives a Critical,Major, or Minor event.
IMPORTANT: When using time filters, you can use on-call style e-mails or pages. If you want oneperson to be notified during business hours and another at night, create two different tasks andset the time filter appropriately.
NOTE: This same type of task configuration can be applied to a Paging Task to use a modemin the HP SIM server to page through a cell phone or alphanumeric pager.
NOTE: Paging is only supported on a CMS running Windows.
Procedure 10 Setting notification task to forward e-mail to cell phone1. Select Options→Events→Automatic Event Handling→New Task. The Automatic Event Handling
- New Task page appears.2. In the Task name field, enter a name for the task, such as Important Events for
e-mail-Pager Task.
3. Click Next. The Select event collection page appears.4. Select use event attributes that I will specify.5. From the second selection box (comparison selection), click the dropdown list, and then select
is.6. From the third selection box (value selection), the available values for a given criteria or
comparison combination are given. Select Informational.7. Click Add.8. From the third selection box (value selection), the available values for a given criteria or
comparison combination are given. Select Critical.9. Repeat steps 5-8, and in the third selection box, select Major and then Minor.10. Click Next. The Select system collection page appears.11. Select Use system attributes that I will specify.12. Click Next. The Select systems page appears.
a. In the first selection box (criteria selection), select system name.b. In the second selection box (comparison selection), select is.c. In the third selection box (value selection), select (any).d. Click Next. The Select actions page appears.
Example - Creating a paging task based on e-mail notification 57

13. Select Send e-mail.a. In the To address field, enter the e-mail address to which you want the notification sent
(multiple addresses can be added so that a group is notified). A CC address can also beadded so that a manager or supervisor is also notified.
b. In the Subject field, enter your subject. For example, HP Systems Insight ManagerEvents.
c. In the Message Format section, change the option to Pager/SMS. This option sends acondensed e-mail format that is similar to a paging task in HP SIM, which is the idealway to send alerts to a cell phone type of hardware (or when Telephony ApplicationProgramming Interface (TAPI) is not available and an e-mail-to-paging provider is beingused).
14. Click Next. The Select time filter section appears.15. Select Use time filter and select Nights and Weekends, unless you want to receive the e-mail
24 hours per day. If so, clear Use time filter.16. Click Next. The Review summary page appears.17. Click Finish to create the new task.
Examples of e-mail pagesAutomatic Event Handling enables you to send a system's home page URL in an e-mail address ifthat system has a home page. If the system does not have a home page, then Automatic EventHandling sends a URL that points to the HP SIM System Page of the system on the current CMS.
NOTE: The URL specified in an e-mail message appears only if the format is set to standard.
You can send the following e-mail pages from HP SIM:• Standard
• Pager/SMS
• HTML
Example of a standard e-mail page
From: Doe, JohnSent: Wednesday, April 28, 2004 5:04 PMTo: Doe, JaneCc: Smith, Jim; Jones, BethSubject: System A: Storage System side panel is removed (Ver. 3):Standard E-mail format
Event Name: Storage System side panel is removed (Ver. 3)URL: https://systemname:2381Event originator: System AEvent Severity: MajorEvent received: 28-Apr-2004, 17:03:47
Event description: Storage System side panel is removed. The side panel status has been set to removed. The storage system`s side panel is not in a properly installed state. This situation may resultin improper cooling of the drives in the storage system due to air flow changes caused by the missing side panel.
58 Event management

User Action: Replace the storage system side panel.
Status: sidePanelRemoved
Example of a Pager/SMS page
From: Doe, JohnSent: Wednesday, April 28, 2004 5:04 PMTo: Doe, JaneCc: Smith, Jim; Jones, BethSubject: System A: Storage System side panel is removed (Ver. 3): PagerSMS Format E-mail testing
System A, Storage System side panel is removed (Ver. 3),Status: sidePanelRemoved
Example of an HTML page
From: Doe, JohnSent: Wednesday, April 28, 2004 5:04 PMTo: Doe, JaneCc: Smith, Jim; Jones, BethSubject: qaunit1: Storage System side panel is removed (Ver. 3): HTML Format E-mail testing
Examples of e-mail pages 59
Where quanit1 is the system name.
Example - Creating a task to send an e-mail when a system reaches acritical state
The following instructions set up an automatic event handling task to be run when a discoveredsystem goes to a Critical status.Procedure 11 Creating a task to send an e-mail when a system reaches a critical state1. In the Search panel, click Advanced Search. The Advanced Search page appears.2. Select events from the Search for dropdown list.3. From the first selection box (criteria selection), select severity from the dropdown list.4. From the second selection box (comparison selection), select is from the dropdown list.5. In the third selection box (value selection), the available values for a given criteria or
comparison combination are given. Select Critical.6. (Optional) Click View to view the search results.7. Click Save As Collection to save the event collection.8. In the Name field, enter a name for the collection, such as Critical Events.9. Under Place in Folder, select to save the collection in Events by Severity to have it available
to other users.10. Click OK to save the collection, or click Cancel to cancel the save operation.11. To configure HP SIM to send an e-mail, select Options→Events→Automatic Event
Handling→E-mail Settings. The E-mail Settings page appears.12. Specify the SMTP host in the SMTP Host box.13. Specify the e-mail address that the management server uses when sending e-mail notifications
in the Sender's Email Address box.14. To authenticate your SMTP server, select the Server Requires Authentication checkbox.15. Specify the account name in Account name box.16. Specify the password in the Password box.17. Click OK to save changes.18. To configure status change events, select Options→Events→Status Change Event Settings. The
Status Change Event Settings page appears.19. Select Enable creation of system status change events. This option sends a system unreachable
event whenever a system cannot be reached by a ping through the Hardware Status Pollingtask. Enabling this option creates a system reachable event whenever the system is reachableagain.
20. Click OK to apply changes.21. To create the task, select Options→Events→Automatic Event Handling→New Task. The
Automatic Event Handling - New Task page appears.22. On the Step 1, Select name page, enter a name for the task in the Task name box, such as
Send E-mail for Critical Status.23. Click Next. The Step 2, Select event collection page appears.24. Select the Critical Events collection from the dropdown list.25. Click Next. The Select system collection page appears. Do not select a system collection.26. Click Next. The Select action page appears.27. Select Send e-mail.
a. In the To field, enter the list of e-mail addresses that should receive the notification.b. In the CC field, enter any e-mail address that should receive a copy of the e-mail,
separating each with a comma.c. In the Subject field, enter a note describing the subject of the e-mail.
60 Event management
d. In the Message Format field, select from the following formats based on the encodingpreference of the recipient:• Standard. This default message format sends a text e-mail message to the recipients.
• Pager/SMS. An e-mail message formatted with the same information and format asa pager message is sent to the recipients.
• HTML. An e-mail message that looks like the HTML Event Details page is sent to therecipients.
e. In the Encoding field, select from the following formats:• Western European (ISO-8859-1)
• Unicode (UTF-8)
• Japanese (ISO-2022-JP)
• Japanese (Shift_JIS)
• Japanese (EUC-JP)
• S-Chinese (GB18030)
• T-Chinese (Big5)
• Korean (EUC-KR)
28. Click Next. The Step 4, Select time filter page appears.29. Select the Use time filter box if you want to use time filters, and then select an option from the
dropdown list.Click Manage Filters if you want to set user defined filters.
30. Click Next. The Step 5, Review summary page appears. The Task name, the selected eventcollection, the events, system criteria, and Action(s) information appear.
31. If you want to edit the e-mail selections, click Edit e-mail Settings to edit the SMTP settings.32. Click Finish to create the new task.
Example - Creating a task to delete all cleared eventsThe following example describes how to create a task to delete all cleared server events from theHP SIM database. This task is useful to include in your management portfolio because deletingcleared events on a regular basis empties the database of unnecessary entries and improves systemperformance.The following task has the following segments:
• Creating an event collection that contains the events you want to delete
• Creating and scheduling the task to delete all cleared server events and run the taskProcedure 12 Creating a task to delete all cleared events1. In the Search panel, click Advanced Search. The Advanced Search page appears.2. Select events from the Search for dropdown list.3. From the first selection box (criteria selection), select cleared state from the dropdown list.4. From the second selection box (comparison selection), select is from the dropdown list.5. In the third selection box (value selection), select cleared.6. (Optional) Click View to view the search results.7. Click Save As Collection to save the event collection.8. In the Name field, enter a name for the collection, such as Delete Cleared Server
Events.9. Under Place in Folder, select to save the collection in Events by Severity to have it available
to other users.
Example - Creating a task to delete all cleared events 61
10. Click OK to save the collection.11. Then select systems from the Search dropdown list.12. From the first selection box (criteria selection), select system type from the dropdown list.13. From the second selection box (comparison selection), select is from the dropdown list.14. In the third selection box (value selection), the available values for a given criteria or
comparison combination are given. Select server.15. (Optional) Click View to view the search results.16. Click Save As Collection to save the system collection.17. In the Name field, enter a name for the system collection, such as Delete Cleared Server
Events_system.18. To create and schedule the task, select Options→Events→Delete Events. The Delete Events
page appears.19. Select the Delete Cleared Server Events collection from the dropdown list20. Click Apply.21. Now click Add system filter to add the system collection.22. Select the system collection created in step 17, select "Delete Cleared Server Events_system"
itself.23. Click Apply.24. Click Schedule.25. In the Task name box, give the task a name, such as Delete Cleared Server Events
task.26. In the Refine schedule section, select the scheduling option that you prefer.
In this example, if you select When new systems or events are added to the collection, thenHP SIM automatically deletes server events whenever they become cleared.
27. Click Done. The task is scheduled and the All Scheduled Tasks page appears.To run this task at any time, select Tasks & Logs→View All Scheduled Tasks . Then selectDelete Cleared Server Events from the table and click Run Now.
62 Event management

14 Reporting in HP SIMStandard reports
Standard reports are shipped with HP SIM. The reports are based on common user scenarios anddo not need any additional configuration or enablement. These reports are installed, configured,and available for use as soon as HP SIM is installed and configured. Standard reports are tied toexisting systems collections in HP SIM, for instance, All Systems or All Servers. Report results appearbased on logged in user authorization of systems.Standard reports are available by navigating to the Manage Reports page .
New ReportsA report configuration is a customer-defined set of preferences that pulls specified criteria from thedatabase tables and places it in a report in the specified format. The report configurations can besaved and used to run a report at a later date with live data.You must have administrative or operator rights to create, save, edit, copy, or delete reportconfigurations. Users with user rights can run the authorized report configurations only.If User 1 with administrative rights generates a report and a private collection, then User 2 withadministrative rights is allowed to generate a report using the report configuration and privatecollection that User 1 created. User 2 is allowed to edit, save, and delete the report configurationbut cannot delete the private collection created by User 1.The create new report wizard helps you to create a new report and add it to HP SIM reports. Thisoption is only available for HP SIM.You can save the report configuration for future use or generate a one-time report.Select Reports→New Report..., the Step 1: Select Target Systems page appears.
Managing reportsThe Manage Reports feature provides you with the following options:
• Run ReportA generated report provides you with the following information:
◦ Report name
◦ Associated system collection
NOTE: The Associated system collection information does not appear if there is nocollection selected to run the report.
◦ Report run date and time
Standard reports 63

Format for generated report:
◦ HTML (Recommended for viewing)Enables viewing an existing report in HTML format.
◦ XMLEnables viewing an existing report in XML format.
◦ CSVEnables viewing an existing report in CSV format.
• CopyHP SIM enables you to copy report configurations from an existing report configuration. Youcan edit the newly copied configurations to create a new report.
NOTE: You must be signed in to HP SIM with administrative rights or operator rights to copyreport configurations. If you are not signed in with administrative or operator rights, the copyoption is not available.
• NewEnables you to create a new report and add it to HP SIM reports. This option is only availablefor HP SIM.You can save the report configuration for future use or generate a one-time report.
• EditHP SIM enables you to edit existing report configurations. You can save these updated reportconfigurations over the existing report configuration, or you can save it as a new reportconfiguration.
NOTE: You must have administrative rights or operator rights to create, save, edit, copy, ordelete report configurations. Users with user rights cannot edit the report configurations.
• DeleteYou can permanently delete a report configuration from the Manage Reports page.
• Showing SQL Queries.Enables viewing SQL queries.Select Reports→Manage Reports.... The Manage Reports page appears. Select the report forwhich you want to view the SQL details, select Run Report, and then on the report itself, clickShow SQL queries.
Snapshot ComparisonSnapshot comparisons enable you to compare up to four systems (with the same operating system)to each other or to compare a single system to itself and observe changes over time.To view a snapshot comparison, select Reports→Snapshot Comparison.... The Snapshot Comparisonpage appears. Select target systems, and then click Next.
Enhanced ReportsEnhanced reports contain the Reports by Product table that displays the products registered withHP SIM along with the available reports. There are 18 predefined reports under HP SIM enhancedreports.
64 Reporting in HP SIM

The reporting engine main page contains the Reports by Product table that displays the productsregistered with HP SIM along with the available reports.The Reports by Product table displays reports for HP SIM by default. Only products that have beenregistered with HP SIM have Predefined reports displayed.
Table 6 Reports by Product columns
DescriptionName
Displays the name of the products along with the totalnumber of reports in parenthesis registered with HP SIM
Product/Report Name
for reports. When the product item is expanded by clickingthe expand icon, the available reports are displayed underthe product section along with report details Description,Target Systems and Report Type.
Displays the type of report such as; Table, Bar, Pie, Bar-Pie,or Line.
Report Type
Displays the target selection in which the report is executed.Target Systems
Displays a short description of the report.Report Description
Table 7 Reports by Product buttons
DescriptionName
Creates a new report.New
Edits a selected report. Only enabled for usercreated/defined reports under HP SIM. Remains disabledfor Predefined reports.
Edit
Executes a report.Run Report
Enables users to email a report.Email Report
Deletes a selected report. Only user created/definedreports can be deleted.
Delete
Predefined reportsPredefined Reports are shipped with HP SIM. The reports are based on common user scenarios.Predefined Reports are tied to existing system collections in HP SIM, for instance, "All Systems" or"All Servers". Report results appear based on logged in user authorization of systems.Select Reports→Enhanced Reports. The Enhanced Reports, Reports by Product page appears.
Run Enhanced reportsRunning reports executes an available report in the reporting engine. The generated report isdisplayed in a new page when Run Report is clicked.A generated report provides you with the report name, associated system collection, and reportrun date and time in the following formats. You select the format before you run the report.
• HTML (Recommended for viewing)
• CSV
• PDFSelect Reports→Enhanced Reports. The Enhanced Reports page appears. Select the report that youwant to run. Click Run Report.
Standard reports 65

New Enhanced reportsA report configuration is a customer-defined set of preferences that pulls specified criteria from thedatabase tables and places it in a report in the specified format. The report configurations can besaved and used to run a report at a later date with live data.An additional create new report option is to select the type of report to use. You can select thefollowing options in any combination.
• Include Chart
• Include TableThe report type graph supports three sub types.
• Bar
• Pie
• Line (Trend)The Include Chart section dynamically changes to display the selection items that are required tocreate the corresponding report. Depending on the type of chart selected, additional details arepresented as follows.
• Graph TitleThe graph title is available for all chart types.
• FooterThe footer is available for all chart types.
• X-axisThe X-axis is available for a bar or line chart.
• Y-axisThe Y-axis is available for a bar or line chart.
The Include Table option allows the selection of the column fields and order to be displayed in thetable of the generated report.You can save the report configuration for future use or generate a one-time report.
Editing Enhanced reportsOnly custom reports can be edited.The details from the opened report are pre-populated in the text fields. The Edit button is onlyenabled for custom reports under HP SIM
E-mailing reportsE-mailing reports enables you to schedule a report to be run at a specified time and sent throughe-mail. You can schedule a report to be run periodically or once. Select from the following optionsto run the report.
• Select Run when the central management server is started if you want the report to run whenthe central management server is started.
• Select Run now if you want to run the report immediately.
• Select Disable this task if you want to disable the report at any time.
Deleting reportsUser-created reports located in the Reports by Product section can be deleted. Before the report isdeleted, a popup message displays asking if you are sure you want to delete the selected report.
66 Reporting in HP SIM

If you click OK, the report is deleted and the product and report page is refreshed to show thecorrect status of the reports.
Standard reports 67

15 HP SIM toolsTarget selection
Targets are systems that a tool acts upon. Targets can be single systems, collections, or groups ofsystems that are chosen just for the task at hand. You can select the targets either before or afterselecting the tool. You can verify and modify the selection using the task wizard.After the targets are verified, they appear in the title area of the tool.
NOTE: Some tools cannot work on multiple systems. In this case, a warning is displayed thatstates you can select only an individual system.
See the Systems Insight Manager online help for more information on the task wizard.
Scheduling toolsThe following options are available when scheduling tools to run:
• PeriodicallySelect from intervals of minutes, hours, days, weeks, or months. With periodic scheduling,you can configure the task to run until a certain date and time or to execute only a set numberof times. Periodic scheduling allows time filters to be applied. These filters specify the hoursof the day when a scheduled task can operate.
NOTE: If you want to schedule a task to run once a month on the 31st of the month and themonth has only 30 days, the task will run on the 1st day of the following month.
• OnceSpecify the date and time the task is to run.
• When new systems or events are added to the collectionThis option is only available if you select a Collection of Systems or Events as your target. Thetask runs only when new systems or events meet the collection criteria. You can also apply atime filter to this type of scheduling.
• When systems or events are removed form the collectionThis option is almost identical to the previous option, except that the task runs only whensystems contained in the Collection of Systems or Events no longer meet the collection criteria.A time filter can be applied to this type of scheduling.
• Not ScheduledThis option specifies that the task runs only when manually executed by a user with appropriateprivileges. This task never runs automatically. Tasks can be manually run from the All ScheduledTasks page or the CLI.
Managing with tasksHP SIM enables you to manage systems and events by scheduling and executing tasks. Tasks areactions performed using an HP SIM tool. Task instances are an executed single instance of a task.Users can:
• Create a variation of a task
• Schedule a task
• Modify a task
68 HP SIM tools

• Delete a task
• Stop an executing task
• Track task statusTask information is available by selecting one of the following:
• Tasks & Logs→View All Scheduled Tasks
• Tasks & Logs→View Task ResultsHP SIM provides system-delivered (default) tasks. These tasks can be disabled or have their schedulesmodified but they cannot be removed or reassigned to another user. HP SIM requires these tasks(for example, Data Collection) to provide a complete picture of the systems being monitored.
Viewing resultsAfter a task runs, you can view the task results by selecting Tasks & Logs→View Task Results. TheTask Results page appears and includes a table displaying all tasks that are complete or currentlyrunning. The table includes information on the launching task, the tool used, status of the task, whoran the task, and the start and end time of the task.
Example - Device pingUse the Ping tool to ping an individual system or multiple systems. To ping systems, selectDiagnose→Ping. The Ping window appears. Select the target systems and click Run Now to runthe task.If a system does not resolve to an IP address, the request cannot be performed. For systems withmultiple IP addresses, the result of each IP address occupies one row in the result page. The statuson the upper-right corner is: Pinging selected systems. After all the systems on the list arepinged, the status is: Ping completed with a time stamp of the completion time.The ping results appear in a separate window. You might receive the following replies:
• Replied. The request has been executed successfully, and the pinged system has responded.
• Request timed out. The request has been executed, but the pinged system failed torespond.
• System does not have an IP address and cannot be pinged. There is no IPaddress associated with the system. Unable to perform ping.
If the ping is successful, there is no retry. You can retry only when the ping fails. The ping resultshave no effect on the system status on the Task Results or system view pages.
Viewing results 69

Part IV HP SIM advanced features

16 Collections in HP SIMCollections in HP SIM
Systems and events are grouped into collections based on information from the HP SIM database.After a collection is defined, you can display the results or associate the collection with a task. Youcan also save an edited or unedited collection as a collection with another name.You can use collections to organize large numbers of systems into smaller, more meaningfulgroupings. For example, your organization might have five system administrators who areresponsible for 100 different systems in 6 different buildings. You can create a collection for eachadministrator that includes only his or her systems, or you can create a collection for each buildingthat includes only the systems located in that building. You must have administrative rights tocustomize shared collections.
NOTE: Use English text for naming collections. If you do not use English text, you might seenamed collections generated by HP SIM. For example, collection-<number>
You can create a collection several ways:
• Create a collection from the Customize Collections page.Click the Customize link on the System and Event Collections panel. The Customize Collectionspage appears. Select Events or Systems and click New. The New Collection section is displayed.Customize Collections page
NOTE: Both systems and event collections can be created.
• Create a collection from the system view page.Click Save As Collection at the bottom of any system view page. This command enables youto save the currently selected systems (or collections) as a new collection.Saving from the table view page
Collections in HP SIM 71

• Run a system search and save the search criteria as the attributes defining a collection.Saving a collection from the Advanced Search page
For more information on saving collections, see the Systems Insight Manager online help.
Types of collections• By member
When you create a collection, you can select exactly which specific systems or collectionsyou want to include. From the, Customize Collections page, click New. The New Collectionsection appears. Select Choose members individually.
NOTE: When you create event collections, you cannot select individual events. However,you can select event collections, which enables you to create a convenient hierarchy.
• By attributeWhen you create a collection, you can describe the contents of the collection by the attributesof its members. Collections defined by attributes are dynamic because each time they areinvoked, the contents are determined again.You can use many system attributes for creating collections, for example, system name (fullor partial), operating system, or system type. For event collections, some of the attributes youcan select are cleared status, type, severity, and time. You can combine multiple attributes tocreate the exact group of systems or events that you need.To create collections by attribute, click Save As Collection from the Advanced Search page orclick New from the Customize Collections page. Then, in the New Collection section, selectChoose members by attributes. Select the attributes and click Save As Collection
72 Collections in HP SIM

Because collections by attribute use a database query, collections that are complex take moresystem resources every time they are accessed. Keeping collections simple minimizesperformance impact.
• Combination collectionsCombination collections enable you to bind together a system collection and an event collectionand to reuse and recombine system and event collections that you have created.
NOTE: There are two kinds of combination collections. If you are creating a system collection,then the combination collection returns a system list. If you are creating an event collection,then the combination collection returns an event list. For example, the two collections AllServers and All Login and Logout Events could be combined in two ways. One way yields allservers that have login and logout events. The other way yields all login and logout eventsthat occurred on servers.
Other customization featuresThe Customize Collections page enables you to create and organize your collections in a way thatworks for you.Customize Collections page
On the Customize Collections page, some collections show their contents and others do not. Forexample, in the above image, All Systems, HP BladeSystems, and Storage Systems are not collectionsby member because the expansion icon ( ) is located beside the collection name, and when youclick the icon, the contents of the collection are displayed.Because collections by attribute are dynamic, determining their content and displaying it in thisinterface would be very time consuming. Therefore, their content is not displayed and you cannot
Collections in HP SIM 73

set properties on members of these collections. Setting properties on systems that might not be partof the collection in the future would be of very limited value.
• EditAny collection can be edited. However, collections cannot change type. For example, youcan change the criteria for a collection that is defined by attribute, but you cannot change thecollection type so the collection is a collection by member or a combination collection.
• CopyCopy enables you to copy a collection from one place in the collection hierarchy to another.It is important to note that what is copied is independent of the original collection; anycollections that are within the copied collection are themselves copied by reference.For example, consider the following hierarchy (contents of the collections not relevant to theexample are not shown):
If CollectionB is copied to CollectionF, the hierarchy would look like the following:
The new instance of CollectionB receives a new name, but its contents are copied directly.The contents, CollectionC and CollectionD, are copied by reference. Both CollectionB andCopy of CollectionB refer to the exact same instances of CollectionC and CollectionD.Later, if SystemC is added to CollectionC, and SystemD is added to the original CollectionB,the result would be that SystemC appears in both places, and SystemD appears only in oneplace, as follows:
74 Collections in HP SIM

There are two instances of SystemC in the view of the hierarchy because CollectionC is thesame throughout the application. Any place that CollectionC is referenced, it will alwayscontain the same systems. However, SystemD appears only under CollectionB. CollectionBand Copy of CollectionB are distinct and independent collections.
• MoveMove enables you to easily move a collection exactly where you want it in the hierarchy.
NOTE: Collections can be moved from Private to Shared, but not from Shared to Private.
• DeleteMost collections can be deleted. However, there are some restrictions.
◦ Collections cannot be deleted if they are not empty.
◦ Collections cannot be deleted if they are in use. That is, if the collection is the target fora scheduled task, if it is used for the System Status panel, or if it is used in some othercollection, then it cannot be deleted.
◦ The All Systems and All Events collections cannot be deleted.
◦ After a collection is deleted, it cannot be recovered.
• Set PropertiesCollections have properties, and these properties define the way collections behave in theSystem and Event Collections panel and elsewhere in HP SIM.◦ Visible property
It might be the case that there are system or event collections, that are either shipped withHP SIM or are user-defined, that you do not use, but at the same time, do not want todelete. If you do not use these collections, but you do not want to delete them, you canremove them from the user interface by using the Visible setting in the collection properties.When you select No, do not show collection and its members in the user interface for acollection, that collection no longer appears in the System and Event Collections panel,in the Task Wizard, or any place in the user interface (except the customization panelitself) where collections are shown.Making collections invisible can make the System and Event Collections panel less cluttered,but note that once you make collections invisible, they are excluded everywhere in HPSIM including being removed from tasks. For example, if a task is scheduled to run with
Collections in HP SIM 75

a certain collection, and that collection is made not visible, then the task will not run onthat collection. You can change the visibility setting at any time.
◦ Status Displayed propertyYou can set the Status Displayed property to enable you to easily view the aggregatestatus of a particular collection in the System and Event Collections panel. You can setthis property only on individual systems or on collections by attribute, for example, thelowest displaying collection aggregate status.
level of the hierarchy (the leaves of the tree).In the System and Event Collections panel, where the status is displayed, the status will"bubble up"� to the higher levels of the hierarchy (the root of the tree) so that the mosturgent statuses are always visible at any level.Statuses are merged so that the most significant is always displayed.
NOTE: Statuses at the top of the following list take priority over those at the bottom.
– Critical
– Major
– Minor
– Warning
– Normal
– Disabled
76 Collections in HP SIM

– Unknown
– Informational
• Default View propertyWhen you select a collection in the System and Event Collections panel, the contents of thatcollection are displayed in the workspace. By default, different types of collections are displayedin different ways. Collections by attribute and combination collections default to a table view,but they can also be displayed as icons or a tree. Collections by members default to a treeview, but they can also be displayed as icons or a table. Special types of system collectionsdefault to picture views or special consoles. You can change the default view using thisproperty.
Collections in HP SIM 77

17 HP SIM custom toolsGeneral concepts
Custom tools are tools that can be created by the user to run on the CMS or on target systems. Forexample:
• Remote toolA tool that runs on selected target systems. It might copy files to the target systems or runspecific X-Window applications on the target systems. You can schedule this tool.
• CMS toolA tool that runs on the CMS. It is usually a script or batch file and can pass in environmentvariables. Using Automatic Event Handling, you can configure this tool to run when eventsare received. You can schedule this tool.
• Web page toolA tool that launches a web URL. The URL is launched in a separate browser window on theCMS. You cannot schedule this tool.
To add custom tools, you can either use the Tools→Custom Tools→New Custom Tools menu in theGUI, or edit the tool definition files (tdefs) in a text editor and register them with the CLI mxtool.Both procedures are explained in this chapter.
Tool typesAs delivered, HP SIM provides an administrator with unified management control of any numberof servers and storage devices from a single console in the data center or in a remote location.When customized with specialized tools or Insight Essentials Value Added Software plug-ins, HPSIM becomes a comprehensive, easy-to-use platform for controlling Microsoft Windows, Linux, orHP-UX enterprise environments.A key method of administering multiple systems is through scripting. HP SIM features a modulararchitecture that uses tool definition files (TDEFs) written in the XML data file format. A TDEF containsthe definitions of one or more tools used by HP SIM and define how a tool launches and executes.A tool can be a script or an executable file. Creating custom tools enables you to extend the useof HP SIM to your specific business environment.
Table 8 Tool types
DescriptionName
An SSA tool executes on a selected target and is onlyaware of the target system environment. In executing an
Single-system-aware command tool OR Remote Tool in theGUI
SSA tool, the HP SIM Distributed Task Facility (DTF) of the
78 HP SIM custom tools

Table 8 Tool types (continued)
DescriptionName
CMS uses SSH to send one or more files to the targetsystem, which then executes the tool. An example of anSSA tool would be a tool that wraps a common Unixcommand such as ls. cat, or cp.
An MSA tool executes typically on the CMS and can workwith multiple target systems. When launched, the MSA
Multiple-system-aware command tool
process is created once and then passed to all targets onthe list. An XWindows tool is an example of an MSA tool.
A WLA tool typically launches in a separate browser (bydefault) or in the same frame as HP SIM and is specified
Web launch tool or Web page tool in the GUI
by a universal resource locator (URL). Web-launchapplications that do not share HP SIM certificates shouldbe executed in a separate frame.
An application launch tool is a batch file, script, orexecutable that runs on the CMS and can reference
Application launch tool or CMS Tool in the GUI
environment variables specified by the tool to access deviceor event information. An example of an application launchtool would be one that performs a task that is tied to thecontents of an Exchange Servers�list which returns threedevices (A, B, and C). The tool will run three times (in thecontext of A, B, and C).
Environment variables for custom tools
NOTE: If your user-defined variables have the same names as the HP SIM environment variables,the HP SIM environment variables override the user-defined variables.
DOS environment variables are supported in custom tool parameters and work as parameters onthe New Custom Tool page or the Manage Custom Tools page. Unless you use DOS environmentvariables in a batch or script file, you must surround them with double percent (%) signs. Forexample, to pass in the NOTICELABEL environment variable as a parameter on the parameter line,enter %%NOTICELABEL%%. If you use DOS environment variables in a batch file or script file, useonly a single percent (%) sign before and after the environment variable name.NOTICELABEL. Type of notice. A small string that contains discovered system, other HP SIMserver-level notices, or the type of trap that caused the notice.NOTICESTATE. An internal value used by HP SIM, indicating whether the notice is cleared.NOTICEPLAINTEXT. A text description of the notice that contains details about the notice (InProgress, Cleared, or Not Cleared).NOTICERAWDATA. The raw data from the notice is passed as a string. This is a small pipe (|)delimited set of variables and might be useful for some simple parsing rules.NOTICESEVERITYSTR. A verbose description of the notice severity, which can be Critical,Informational, Major, Minor, Unknown, Warning, or Normal.NOTICESEVERITY. The integer value of the NOTICESEVERITYSTR which can be one of the following:• 0, Unknown
• 1, Normal
• 2, Warning
• 3, Minor
• 4, Major
General concepts 79
• 5, Critical
• 100, InformationalNOTICEQUERYNAME. The collection name based on how the notice was generated. This valuecan say one of the following:
• This system or event meets the following search criteria: +QueryName;
• This system or event now meets the following search criteria:+QueryName;
• This system or event no longer meets the following search criteria:+QueryName;
DEVICENAME. The name of the system that caused the notice.DEVICEIPADDRESSCOUNT. The number of IP addresses that are mapped to this system.DEVICEIPADDRESS%d . Based on the count, %d is an integer that shows the actual IP address.For example:
IF, DEVICEIPADDRESSCOUNT = 2 Then, DEVICEIPADDRESS0 = 111.111.111.111 DEVICEIPADDRESS1 = 222.222.222.222
DEVICEMACADDRESSCOUNT. The number of MAC addresses collected for the system. Beforethis information is available, you must run a Data Collection task.DEVICEMACADDRESS%d. Based on the MAC address count, %d is an integer that references theactual MAC address environment variable. For example:
IF, DEVICEMACADDRESSCOUNT = 2 Then, DEVICEMACADDRESS0=00:80:5F:7F:B0:81 DEVICEMACADDRESS1=00:80:C7:29:EF:B6
GENERICTRAPID. The SNMP Generic Trap ID of the trap received, if this is an event-based list andoriginated from an SNMP trap.SPECIFICTRAPID. The SNMP Specific Trap ID of the trap received, if this is an event-based list andoriginated from an SNMP trap.Path. The Path environment variable value from the context where the service is runningSystemRoot. The SystemRoot environment variable value, from the context where the service isrunning.Windir. The Windir environment variable value, from the context where the service is running.COMPUTERNAME. The COMPUTERNAME environment variable value, where the context in whichthe service is running.MPIP. The IP address of the associated management processor.MPNAME. The name of the associated management processor.RELATEDDEVICECOUNT. The number of associated systems.RELATEDDEVICENAME%d. The name of the associated system, where %d is the iteration number.For example:
IF, RELATEDDEVICECOUNT = 2 Then, RELATEDDEVICENAME0=DeviceName0 RELATEDDEVICENAME1=DeviceName1
RELATEDDEVICEIP%d. The IP address of the associated system, where %d is the iteration number.For example:
80 HP SIM custom tools

IF, RELATEDDEVICECOUNT = 2 Then, RELATEDDEVICEIP0=111.111.111.111 RELATEDDEVICEIP1=222.222.222.222
RELATIONSHIP%d. The relationship string with the associated system, and %d is the iterationnumber. For example:
IF, RELATEDDEVICECOUNT = 2 Then, RELATIONSHIP0=ServerToEnclosure RELATIONSHIP1=VMGuestToVMHost
Custom tool menu placementTo place custom tools in the following menu locations, use a string in the formbase|submenu|subsubmenu.
ExampleMenu level
Toolstop-level-menu
Tools|Custom Toolstop-level-menu|first-level-cascade
Tools|Custom Tools|My Toolstop-level-menu|first-level-cascade|second-level-cascade
For example, place a tool under Tools→Custom Tools, place an entry in the Menu placement fieldsuch as Tools|CustomTools.By default, if the Menu placement field is left blank, the tools are placed in Tools→Custom Tools.
Custom tool URL formatThe URL strings for web-aware tools and command line tools must be provided as absolute URLsbeginning with http:// or https://. For example,https://%n:1188/kcweb/ https://%l:2381/
Web-launch aware tools and command line tools that always run on the CMS must be relativeURLs beginning with /. For example,/propertypages/Identify.jsp?device=%n
Multiple selections can be substituted into the URL. A selection index is used during the substitutionprocess to track the current selection. The selection index is initially set to 1, and the first selectionof the list of selected target systems remains current until a %z parameter is encountered in theURL. (An exception to this exists in the repeat block.) When the %z parameter is encountered, thenext selection becomes current, the selection index is incremented by 1, and so on. For example,http://server/app/doit.jsp?name=%n%z&addr=%a
where the doit.jsp page is invoked with the network name of the first selected system assignedto the name parameter and with the IP address of the second selected target assigned to the addrparameter.You can substitute any number of selected targets by using the repeat block construct, %( ... %).Anything inside the repeat block delimiters is repeated until the selection list is exhausted, startingwith the current selection and selection index. For example,https://%{deploy.server%}/deploy/deployimage.jsp?device1=%n%z%(&device%i=%n%z%)
General concepts 81

NOTE: When using the %i parameter, the current selection index (1, 2, 3, and so on) is substitutedfor this parameter during the substitution process.If the end of the repetition clause is reached and no %z parameter is encountered, the selectionindex and current election are automatically incremented to avoid an infinite loop during thesubstitution phase.
In the above example, if there were two selected target systems, the expanded URL string wouldlook like this:https://deploy.hp.com:280/deploy/deployimage.jsp?device1=nodea.hp.com&device2=nodeb.hp.com
If there was only one selected target system, the expanded URL string would look like:https://deploy.hp.com:280/deploy/deployimage.jsp? device1=nodea.hp.com
Because there is no current selection when the string gets to the repeat block, the repeat block issuppressed during the substitution process.
Creating custom tools through the GUIIMPORTANT: Use of a single quote, ', inside a tool parameter field is not supported in the HPSIM GUI. However, you can use a double quote, ", instead.
Use the Manage Custom Tools page to view and manage custom tools created through the NewCustom Tool feature. The Manage Custom Tools page displays a table listing the custom tools andinformation on each tool. The table includes:
• Selection column
• Name
• Description
• Command
• Run as user
• Automatic Event HandlingThe following options are available for managing custom tools:
• “New” (page 82)
• “Edit” (page 82)
• “View tool definition” (page 82)
• “Run Now/Schedule” (page 83)
• “Delete” (page 83)
NewUse to create a custom tool and open the Select the tool to create page.
EditUse to edit an existing custom tool. Select the tool, and then click Edit. The Edit Custom Tool Detailssection appears. You can edit all fields and add or delete environment variables.
View tool definitionUse to display the XML code for the tool. This tool is not enabled if you select more than one tool.
82 HP SIM custom tools
Run Now/ScheduleUse to run the tool immediately or to schedule the tool to run (if the tool can be scheduled). If thetool can be run, the schedule a task page appears. You can schedule when and how often thetool runs.
DeleteUse to delete a tool. Deleting a tool removes it from the Manage Custom Tools page and from thesystem. If a tool is dependent on a task, an alert appears with the list of tasks associated with thetool.For information custom tool definition files details, see “Custom tool definition files” (page 201).
Creating custom tools through the HP SIM CLIHP SIM includes a CLI that allows manual control of HP SIM functions. This manual control enablesyou to create your own customized tools. The CLI is accessible directly on the CMS or from anynetwork client using SSH client software. Creating custom tools manually offers a betterunderstanding of the XML file format and allows greater flexibility in exercising the options availablewhen creating TDEFs. For more information on custom tool definition file syntax, see “Custom tooldefinition files” (page 201).
Creating a custom SSA toolThis procedure uses the CLI to create a custom SSA tool for copying any executable file to amanaged system (target system) and having it execute (install) there.This example illustrates the creation of a custom tool that installs a security patch on every Windowsserver managed by HP SIM. If done manually, the administrator would have to locate each Windowsserver and perform the following commands in that server:
• Log on as Administrator
• Access a network drive or portable media containing a copy of the file to be used for the tool(we will use hpsecurity_patch.exe in this example) and copy that file to the local drive.
• Use Start/Run or a command line prompt to enter the command:<install_path>\hpsecurity_patch.exe
• Log off of the systemFor this example, it is assumed that the administrator will want to execute this procedure againand be able to quickly locate it in the HP SIM menus, so an entry in the Deploy menu is made andcalled Software Distributor, which when invoked allows the administrator to execute this customtool.Procedure 13 Creating the Software Distributor tool1. Log into the CMS using a valid user name and password. HP SIM grants authorization based
on the operating system login.
NOTE: Only administrators have command line access to HP SIM on a Windows CMS.Administrators on a HP-UX/Linux CMS must have root capability.
2. Open a terminal window or a command prompt window to execute HP SIM commands.3. Open a text editor and create a new file by typing the XML version text and tool list tags as
follows:
Creating custom tools through the HP SIM CLI 83

NOTE: Your text editor must be able create a text-only file with no embedded formatting.
4. Following the leading XML version and tool-list tags, type the tool name tag of<ssa-command-tool name=<Deploy HP Security Patch> to define the type andname of the tool. The revision string is used to keep track of different versions of the tool aswill be seen later. Enter the subsequent category, description, and comment elements to furtherdefine the tool for HP SIM and the user (the description and comments will be displayed inthe GUI window for that particular tool).
5. Enter the execute-as-user element with the value of Administrator to define the user whosepermissions are allowed on the target node. After entering the execute-as-user element, theTDEF should display as follows:
6. The include-filter element specifies which hardware and/or operating system filters will beapplied. For this example, enter the include-filter data as shown below.
7. Following the include-filter element is a block element that is the heart of the tool and includesthe command(s) to be executed. Enter the ssa block element as shown below. It will copy thefile to the specified destination and execute it there. In the example, the HP Security Patch v.1executable is given the filename hpsecurity_patch.exe.
NOTE: The <destination> must be a directory that exists on the Managed Node. The defaultfile permission value used by DTF for a file copy operation is 755. If another permission is tobe used, an explicit file permission command such as chmod should be included in the copyblock element for security reasons.
8. Type the following attribute element code, which states where the tool will be located in theHP SIM menu.
84 HP SIM custom tools
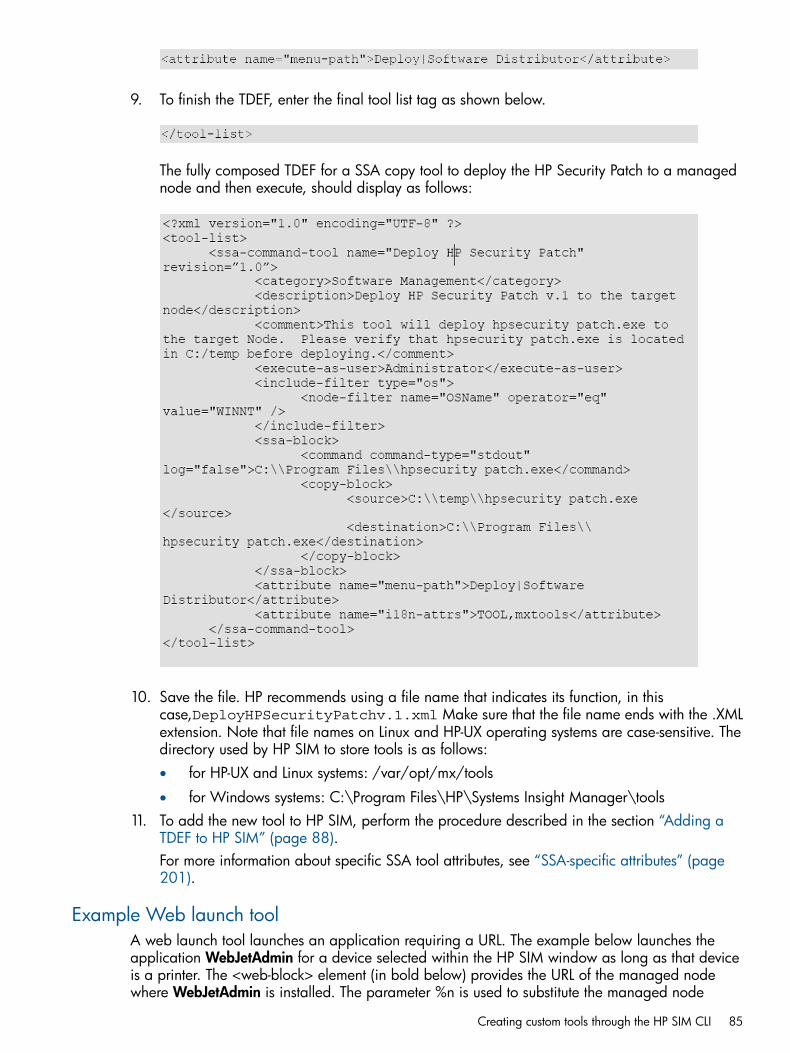
9. To finish the TDEF, enter the final tool list tag as shown below.
The fully composed TDEF for a SSA copy tool to deploy the HP Security Patch to a managednode and then execute, should display as follows:
10. Save the file. HP recommends using a file name that indicates its function, in thiscase,DeployHPSecurityPatchv.1.xml Make sure that the file name ends with the .XMLextension. Note that file names on Linux and HP-UX operating systems are case-sensitive. Thedirectory used by HP SIM to store tools is as follows:• for HP-UX and Linux systems: /var/opt/mx/tools
• for Windows systems: C:\Program Files\HP\Systems Insight Manager\tools11. To add the new tool to HP SIM, perform the procedure described in the section “Adding a
TDEF to HP SIM” (page 88).For more information about specific SSA tool attributes, see “SSA-specific attributes” (page201).
Example Web launch toolA web launch tool launches an application requiring a URL. The example below launches theapplication WebJetAdmin for a device selected within the HP SIM window as long as that deviceis a printer. The <web-block> element (in bold below) provides the URL of the managed nodewhere WebJetAdmin is installed. The parameter %n is used to substitute the managed node
Creating custom tools through the HP SIM CLI 85

hostname. The <toolbox-enabled> element can have a value of true or false. If the <toolbox-enabled>element is true, it will be associated with the Toolboxes under HP SIM User and Authorization. Thisallows a trusted user to disable the tool in the Toolbox if the value is false. This tool launches in aseparate browser window using the "target-frame" of WJAFrame. For additional parameters, see“mxtool command parameters” (page 203).
NOTE: In the previous example, hostname.domain should be replaced with the FQDN ofwhere the WebJetAdmin tool is running.
For more information about specific web launch tool requirements and attributes, see “WLA-specificattributes” (page 202). For more information about parameterized strings, see “Parameterizedstrings” (page 203).
Example MSA toolThe MSA tool executes on the CMS and is functional with multiple targets. The process executesonce, and then is passed to all targets selected. The example below shows an MSA tool thatdeploys the SSH public key to the selected managed target nodes as long as those nodes arerecognized as iLO devices on an HP single partition server. To do this manually, the administratorwould:
• Log on as Administrator on the CMS
• Use Start/Run or a command line prompt to enter the command.
• mxagentconfig –a- n nodename –u username –p password
• Repeat the command for each managed system
• Log off the systemThe <msa-block> element (in bold below) initiates mxagentconfig and requires the user nameand password parameters.
NOTE: When the XWindows tool is launched, the system running the browser must be runningan XWindows server for the tool's GUI to be visible.
86 HP SIM custom tools
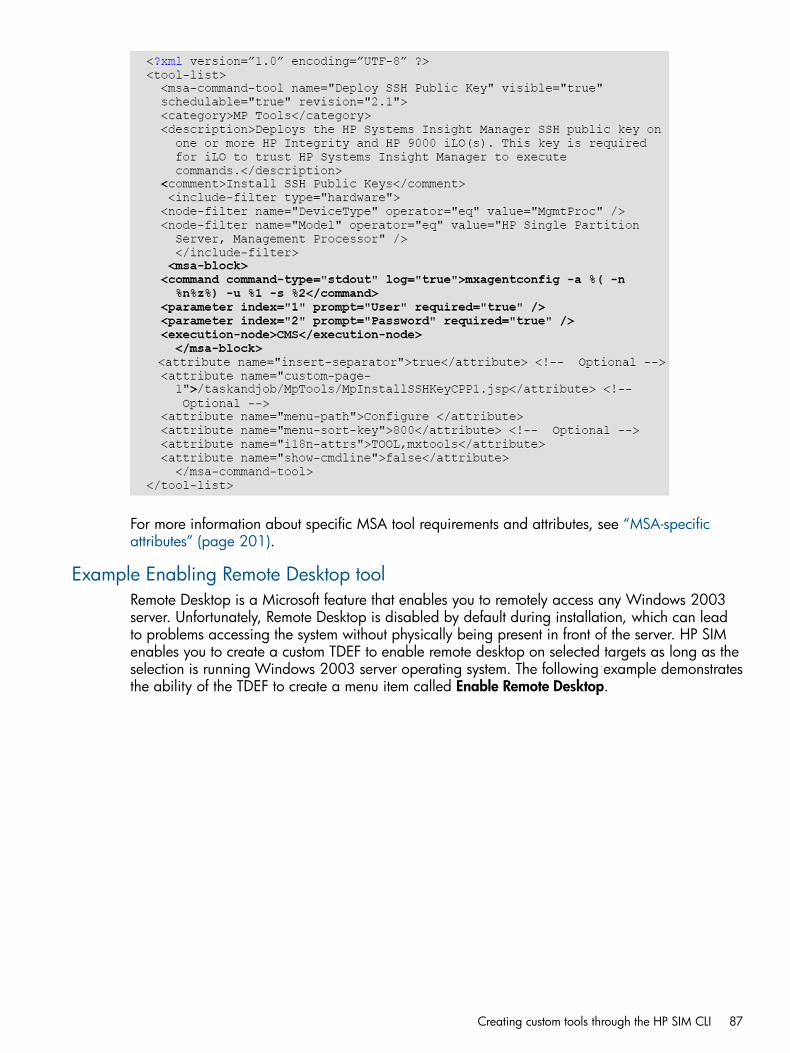
For more information about specific MSA tool requirements and attributes, see “MSA-specificattributes” (page 201).
Example Enabling Remote Desktop toolRemote Desktop is a Microsoft feature that enables you to remotely access any Windows 2003server. Unfortunately, Remote Desktop is disabled by default during installation, which can leadto problems accessing the system without physically being present in front of the server. HP SIMenables you to create a custom TDEF to enable remote desktop on selected targets as long as theselection is running Windows 2003 server operating system. The following example demonstratesthe ability of the TDEF to create a menu item called Enable Remote Desktop.
Creating custom tools through the HP SIM CLI 87
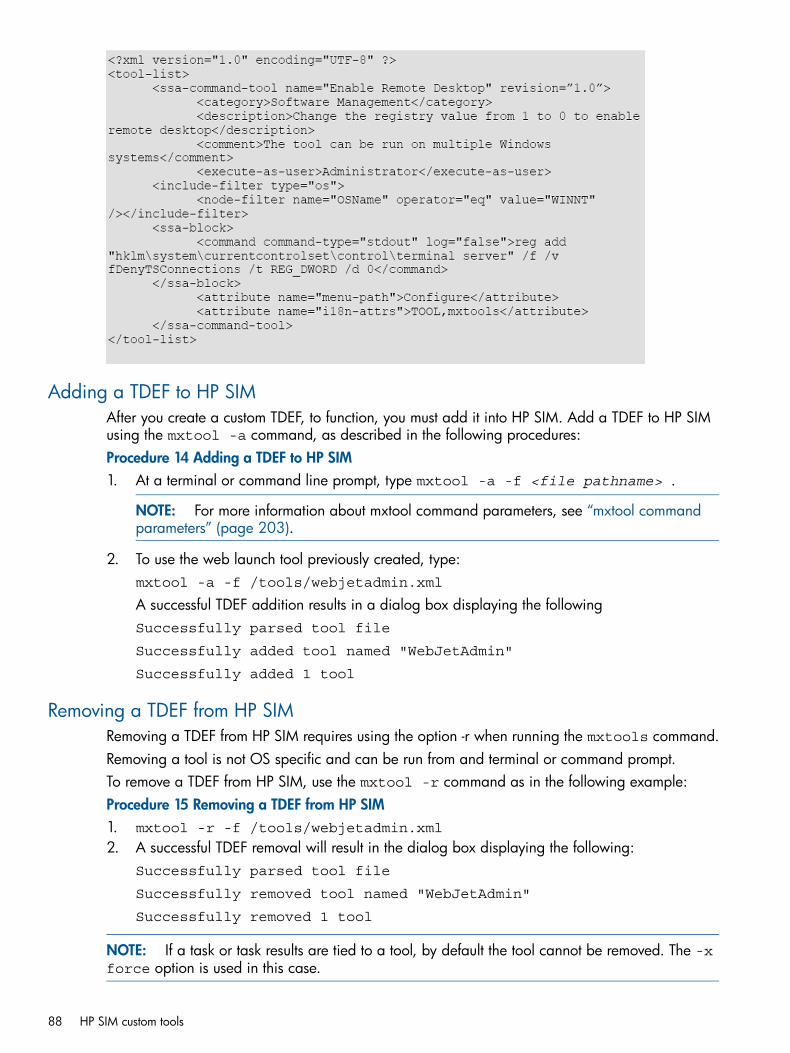
Adding a TDEF to HP SIMAfter you create a custom TDEF, to function, you must add it into HP SIM. Add a TDEF to HP SIMusing the mxtool -a command, as described in the following procedures:Procedure 14 Adding a TDEF to HP SIM1. At a terminal or command line prompt, type mxtool -a -f <file pathname> .
NOTE: For more information about mxtool command parameters, see “mxtool commandparameters” (page 203).
2. To use the web launch tool previously created, type:mxtool -a -f /tools/webjetadmin.xml
A successful TDEF addition results in a dialog box displaying the followingSuccessfully parsed tool file
Successfully added tool named "WebJetAdmin"
Successfully added 1 tool
Removing a TDEF from HP SIMRemoving a TDEF from HP SIM requires using the option -r when running the mxtools command.Removing a tool is not OS specific and can be run from and terminal or command prompt.To remove a TDEF from HP SIM, use the mxtool -r command as in the following example:Procedure 15 Removing a TDEF from HP SIM1. mxtool -r -f /tools/webjetadmin.xml
2. A successful TDEF removal will result in the dialog box displaying the following:Successfully parsed tool file
Successfully removed tool named "WebJetAdmin"
Successfully removed 1 tool
NOTE: If a task or task results are tied to a tool, by default the tool cannot be removed. The -xforce option is used in this case.
88 HP SIM custom tools

Modifying a TDEFModifying a TDEF allows users to customize the XML to align with their business. Each TDEF includedcan be modified to fit with each customers business needs.To modify a TDEF to execute as a different user, perform the following steps:Procedure 16 Modifying a TDEF1. Modify the Windows HP SIM tools to use the new user account as follows:
a. Navigate to the tools directory.Example: C:\Program Files\HP\HP SIM\tools
b. Search the tools directory for the tool to modify. Alternatively, you may create a tooldefinition file from an existing tool using the mxtool command.Example: mxtool - lf -t netstat > netstat.xml
c. Edit netstat.xml using a text editor. Find each execute-as-user line in the XML file.Example: <execute-as-user>Administrator</execute-as-user>
d. (Optional) Change the revision attribute value for the tool type and name element or usethe -x force option on the mxtool command line:Example: In the SSA command tool sample code in the previous example, changerevision="1.0" to revision="1.1".
e. Run mxtool to update the tool definition:Example: mxtool -m -f netstat.xml -x force.
2. Configure each managed system that is to run tools with the user account. If the current useraccount was used to install OpenSSH, then the managed node should be correctly configured.If a different account is used, then the administrator should either run the Configure or RepairAgents tool on the systems (specifying the administrator or other account to be used by theSSH), or perform the following steps:a. Add the administrator user to the passwd file using the "sshuser" utility on the managed
system. Example: sshuser -u MyUser -d MyDomain -f "C:\Program Files\OpenSSH\etc\passwd"
b. Run mxagentconfig on the CMS to configure public key authentication for theadministrator user. Example: mxagentconfig -a -n <managed system> -uMyDomain\MyUser
NOTE: For more information about mxtool command parameters, see “mxtool commandparameters” (page 203).
To view changes to TDEFs, refresh the HP SIM GUI by selecting the system list. A software restartis not necessary.
Creating custom tools through the HP SIM CLI 89

18 Federated SearchSelect Reports→Federated Search....Federated Search is a web-based HP SIM plug-in that enables you to search quickly across anumber of Systems Insight Manager CMS systems. Federated Search finds systems using basicsystem criteria such as name, system type, subtype, and operating system. The search tool canalso search software inventory information to find, for example, firmware versions across allWindows systems. From the search results, you can drill down into specific systems on specificCMSs, accessing all features on those CMSs and you can have the results exported to CSV, acomma-separated value, format.How it works
• System administrators log into the host CMS running the Federated Search tool and launchthe tool from the HP SIM Reports menu.
• A list of searchable CMSs appears with their respective connection status, version information,and system counts.
NOTE: Federated Search must be configured before a search can be performed.
• Submit search criteria (name, status, system type/subtype, product, operating system) and theFederated Search UI searches other CMSs through their respective HP SIM web service APIs.
• Other CMSs in the organization returns the individual search results in a single table.
Federated CMS ConfigurationThe Federated CMS Configuration feature provides you with the following options:
• Adding a CMSA wizard guides you through the process of adding a CMS.
• Deleting a CMSA selected CMS can be removed from the list of CMSs. When the CMS is deleted, the trustrelationship that was set up between the main CMS and secondary CMS is also removed.
• Refreshing the listRefreshing the list re-checks the configurations from the CMS.
• Fixing the configuration of a CMSAfter the initial configuration of a CMS, changes in the CMS could break the Federated CMSconfiguration. The CMS table displays the current configuration status since the last refresh.If the configuration is broken, you must use Fix CMS Configuration to repair the configuration.
Procedure 17 Adding a CMS1. Click Add CMS. The Add CMS wizard appears.2. Enter the name of the remote CMS using the host name or IP address.3. Verify the SSL certificate from the remote CMS.
This step gets the SSL certificate from the secondary CMS and allows you to install it on themain CMS. If the certificate is retrieved successfully, it is displayed. After viewing the certificate,you can click Continue or Cancel the wizard. If you finish the wizard, the certificate is installed.
NOTE: Any time communication with a secondary CMS is initiated, the certificate returnedmust already be installed.
90 Federated Search

4. Configure the remote CMS.The main CMSs SSL certificate is exported to the secondary CMS, and the secondary CMSis configured to trust the main CMS. To have this configuration performed, you must providecredentials for a full-rights HP Systems Insight Manager user on the secondary CMS. Thecredentials supplied are used for this one transaction and are not permanently stored.
NOTE: To avoid remote CMS connection errors, make sure a firewall is not blocking ports 50001and 50002 on the remote CMS.
See the HP Systems Insight Manager online help for additional information.
Federated CMS Configuration 91

19 CMS Reconfigure ToolThe CMS Reconfigure Tool feature provides a set of commands that enable you to quickly makecommon reconfiguration changes to HP SIM, HP Insight Control, HP Virtual Connect EnterpriseManager, and HP Matrix OE.The challenge in attempting to make operating system or CMS configuration changes is the difficultyin knowing exactly what steps need to be performed on a particular operating system/CMS installedenvironment. The mxreconfig command fills the need for an automated application tool toperform these tasks for the Insight Management software components.The CMS Reconfigure Tool is supported through HP SIM and only on systems running MicrosoftWindows with SQL server.Prior to executing any CMS Reconfigure Tool command, ensure the CMS and associated databaseare backed up. For information about backing up the CMS, see the Backing up and restoring HPInsight Software Central Management System (Windows) white paper at: www.hp.com/go/insightsoftware/docs.
Operational Commands, Options and ParametersOperational command type options for mxreconfig are those designated single-char options thatmust be the first option placed on the entered command line string. These type options may or maynot require an additional argument string. For example, the operational command option ‘-m’(mode) option requires an argument. This operational option is used to specify a particularreconfiguration mode. The required associated argument string identifies which specificreconfiguration task mode needs to be performed in the specified mode, such as ‘host’ (to changehost name) or ‘password’ (to change password).An example of an mxreconfig command is shown below. This command is a request to changethe CMS host name (additional command line options and arguments would be required for thisparticular reconfiguration command and are described later).>mxreconfig –m host
An example of an operational command option that does not require an argument is the ‘-h’ (help)option. This operational option is used to show brief online help usage text in the console. Noassociated argument string is required.>mxreconfig –h
Parameter type options are those single-char options that follow the operational command optionon the entered command line string. These type options may be required or may be optional forthe specified operational command option being given, and the parameter option itself might notrequire an additional argument string. An example of using a parameter type option is the ‘-a’option which is used to specify the database user name. This particular type parameter optiondoes require an additional string argument, which is the actual specified database username.>mxreconfig –m dbauth –a db-username-here
The usage of the available commands depends on the products you have installed. See the HPSystems Insight Manager Command Line Guide for information on the command options, arguments,and parameters.
Reconfiguring the CMS passwordThe mxreconfig —m password command prompts you for a new password and changes thecredentials configured. The mxreconfig –m password command realigns the InsightManagement software services account credentials with the operating system password (after thishas been changed). If the user that installed Insight Management software changes the Windowslogon password, then that user must also run this command to make Insight Management softwarematch the new operating system password.
92 CMS Reconfigure Tool

When this command is run, and the new password is typed and confirmed, all services are stopped.The password entered is then updated on services that are configured to run using the installinguser's credentials. Services running as local system will not be changed.
NOTE: This command does not work with HP Insight Control server deployment. See the HPInsight Control Server Deployment User Guide for more information.
Dependencies• HP SIM, HP Insight Control, HP Virtual Connect Enterprise Manager, or HP Matrix OE are
installed and configured on a Windows operating system, using Microsoft SQL.• The user changed their password in the operating system using standard Windows password
change tools.
NOTE: If you have HP Insight Control server deployment installed, you must update the credentialsit uses by following the Changing deployment server/solution username or password (after initialinstallation) section in the HP Insight Control Server Deployment User Guide.
WarningsVerify that all jobs related to HP SIM, HP Insight Control, HP Virtual Connect Enterprise Manager,and HP Matrix OE are complete before running this command. If HP System ManagementHomepage is open, close it.
Changing the CMS passwordProcedure 18 Changing the CMS password for HP SIM and Insight Control1. Open a command prompt on the CMS.2. Enter the following and then press Enter:
mxreconfig -m password
3. Enter the new password (characters are hidden), and then press Enter.4. When prompted to confirm the password, enter the new password again, and then press
Enter.5. You must authorize the new password with the old password. Enter the old password, and
then press Enter.6. The utility stops the HP SIM, HP Insight Control, HP Virtual Connect Enterprise Manager, and
HP Matrix OE services, changes the password, and then restarts the services.7. If the CMS is associated with a locally installed SQL database, and the SQL database services
are running with the same user authentication, then update the SQL services login credentialwith the new password.
8. If the associated SQL database is remote, then you must also follow “Reconfiguring the CMSdatabase credentials” (page 95) to run the mxreconfig -m dbauth command.
Procedure 19 Changing CMS password for Matrix OE and Operations Orchestration1. Execute the following commands from the command prompt:
mxpassword -m -x MxDBUserPassword=<New Password>
mxpassword -m -x io.db.password=<New Password>
mxpassword -m -x oo.admin.password=<New Password>
2. Update the gwlmdb.properties file by executing the following command from the commandprompt:vseinitconfig -a
Reconfiguring the CMS password 93

3. Open the Windows command prompt and navigate to ..\Program Files\HP\Operations Orchestration\Central\tools .
4. Execute change-db-props.bat to change the Operations Orchestration database password.Enter the following and press Enter:C:\Program Files\HP\OperationsOrchestration\Central\tools>change-db-props.bat <db-user-name><Newpassword>
The command, change-db-props must be executed passing only the user name and notdomain, even if this is a domain account.
5. Restart the RSCentral Windows service.The RSCentral service must be updated to use the user and password for changed account(not the local account). Service must run with credentials that has access to the database.
6. Open Operations Orchestration Central (Web portal) at https://localhost:16443/PAS/ and log in using the old (unchanged) credentials.
NOTE: If the Web portal does not open after Step 5, verify that the RSCentral service isrunning under the new credentials; if not, update the service logon credential with the newpassword and repeat from Step 4.
7. Select the Administration tab and change the password for the admin user. The new adminpassword must match the oo.admin.password specified in Step 1.
Reconfiguring the CMS host and IP attributesThe mxreconfig —m host command enables you to realign the CMS host name and/or IPaddress with the operating system after the operating system host name and/or IP address haschanged. For example, this command could be used after renaming the server on which HP SIMis installed.The host command does the following:• Stops all installed HP SIM and Insight Control services.
• Updates references to the CMS host name.
• Updates CMS primary IP address.
• Creates a new CMS certificate.
• Starts all installed HP SIM and Insight Control services.
NOTE: This command is only supported on HP SIM and HP Insight Control. It is not currentlysupported on HP Virtual Connect Enterprise Manager or HP Matrix OE.
NOTE: If the SQL database associated with the CMS is installed locally (on the same server),and you have changed the host name and/or IP address, you must run mxreconfig -msqlredirect before running mxreconfig -m host -c <OldCmsName>.Where:
• -c <OldCmsName>Old name of the CMS.
Dependencies• HP SIM or HP Insight Control is installed and configured on a Windows operating system
host, using Microsoft SQL.• The host name for the operating system was changed using standard Windows configuration
tools.
94 CMS Reconfigure Tool

• The host is still in the same domain.
• All credentials are known.
• The new host name can be resolved by the DNS server.
• The new IP address is valid (assigned through DHCP if enabled on the CMS) and is the IPaddress assigned to the CMS.
• If the SQL database is a local database running on the CMS server, reconfigure the CMSdatabase information using the sqlredirect command.
WarningVerify that all HP SIM or HP Insight Control operations are complete before running this command.
Reconfiguring the CMS host name and primary IP addressTo reconfigure the CMS host name and primary IP address, complete the following:Procedure 20 Reconfiguring the CMS host name and primary IP address1. Open a command prompt on the CMS and navigate to the install directory of HP SIM.2. Type the following, and then press Enter:
mxreconfig -m host
3. Follow the prompts that appear to complete the host name and IP address change.
Reconfiguring the CMS database credentialsThe mxreconfig —m dbauth —a <dbuserDomain\dbuser> command enables you tochange the credentials used by Insight Management to access the CMS database. If the user nameused to logon to the database associated with Insight Management software must be changed,then this command must be used.
Dependencies• CMS is installed and configured on a Windows operating system host, using Microsoft SQL.
• All credentials are known.
• The database credentials provided by the user during this command are valid for the CMSdatabase.
WarningVerify that all Insight Management software operations are complete before running this command.
Changing the HP SIM and HP Insight Control database credentialsAdditional steps are required to change the database authorizations for Matrix OE and OperationsOrchestration:Procedure 21 Changing the HP SIM and HP Insight Control database credentials1. Open a command prompt on the CMS and navigate to the install directory of HP SIM.2. Type the following, and then press Enter.
mxreconfig -m dbauth -a <db-user-name>
3. Enter the new password when prompted, and then press Enter.
Changing the database authorizations for Matrix OE and HP Operations OrchestrationAdditional steps are required to change the CMS password for Matrix OE and OperationsOrchestration:
Reconfiguring the CMS database credentials 95
Procedure 22 Changing the database authorizations for Matrix OE and HP Operations Orchestration1. Update the gwlmdb.properties file by executing the following command from the command
line:vseinitconfig -a
2. Open a Windows command prompt and navigate to ..\Program Files\HP\OperationsOrchestration\Central\tools.
3. Execute the following commands from the command prompt:mxpassword -m -x MxDBUserPassword=<New Password>
mxpassword -m -x io.db.password=<New Password>
4. Execute change-db-props.bat to change the Operations Orchestration database password.Type the following and press Enter:For example:C:\Program Files\HP\Operations Orchestration\Central\tools>change-db-props.bat <dbuser> <New password>
The command, change-db-props must be executed passing only the user name and notdomain, even if this is a domain account.
5. Update jdbc.properties file located under IO_install_directory\conf. Updatethe following line:jdbc.username = <new_user>
6. Update chargeback service jdbc.properties file located underIO_install_directory\chargeback\conf. Update the following line:jdbc.username = <new_user>
NOTE: If HP Capacity Advisor Data Service is not running after executing dbauth, you mustupdate the hosts file under Windows\System32\drivers\etc and add <cms_name>, where<cms_name> is the hostname of CMS. Be sure to save the file and restart HP Capacity AdvisorData Service if it was stopped.
Reconfiguring the CMS to use a different databaseUse the mxreconfig —m sqlredirect -s <dbserver> -b <dbname> -a<dbuserDomain\dbuser> [-p <dbport>] command to reconfigure the CMS to use a differentdatabase.Where:
• -a <dbuser>Name of the database user with administrative privileges, must include domain name.
• <-b dbname>Name of the new database.
• -s <dbserver>Name of the new database server
• -p <dbport>Port number to access the new database server
This command updates the CMS to associate itself with a new Microsoft SQL database residingon a different server. If the database previously associated with HP SIM or HP Insight Control mustbe changed, use this command to specify the new database server and database name. You canoptionally specify the database port number on which HP SIM or HP Insight Control communicates
96 CMS Reconfigure Tool

with the new database, and the username credential that HP SIM or HP Insight Control uses toaccess the new database.
NOTE: This is not supported on VCEM or Matrix Operating Environment.
NOTE: The parameters —s,—a and —b and their arguments are required. The parameter —p andits argument is optional.
This command does the following:• Stops all installed HP SIM or HP Insight Control services.
• Redirects the CMS to use the new SQL database.
• Modifies the CMS configuration files to reflect the new SQL server name.
• Restarts all installed HP SIM or HP Insight Control services.
Dependencies• The database to be associated with HP SIM or HP Insight Control has been copied and setup
on a different SQL server.• HP SIM or HP Insight Control is installed and configured on a Windows operating system,
using Microsoft SQL.
WarningVerify that all HP SIM or HP Insight Control operations are complete before running this command.
Changing the database associated with the CMSTo change the database associated with the CMS, perform the following:Procedure 23 Changing the database associated with the CMS1. Open a command prompt on the CMS and navigate to the install directory of HP SIM.2. Type the following and then press Enter.
mxreconfig —m sqlredirect -s <dbserver> -b <dbname> -a<dbuserDomain\dbuser>
Where:
• -a <dbuser>Name of the database user with administrative privileges, must include domain name.
• -b <dbname>Name of the new database.
• -s <dbserver>Name of the new database server
3. Enter the database password when prompted, and then press Enter.
Reconfiguring the CMS to use a different database 97

20 Understanding HP SIM securityThis chapter provides an overview of the security features available in the HP SIM framework. HPSIM runs on a CMS and communicates with managed systems using various protocols. You canbrowse to the CMS or directly to the managed system.
Securing communication
Secure Sockets Layer (SSL)SSL is an industry-standard protocol for securing communications across the Internet. It providesfor encryption to prevent eavesdropping as well as data integrity to prevent modification, and itcan also authenticate both the client and the server, leveraging public-key technology. Allcommunications between the browser and the CMS are protected by SSL. HP SIM supports bothSSL 3 and TLS 1.0 and enforces stronger cipher suites for the HP SIM SSL web server and thepartner application SOAP servers. HP SIM does not enforce stronger cipher suites for the WBEMindication receiver..
Secure Shell (SSH)SSH is an industry-standard protocol for securing communications. It provides for encryption toprevent eavesdropping plus data integrity to prevent modification, and it can also authenticateboth the client and the server utilizing several mechanisms, including key-based authentication. HPSIM supports SSH 2.
Hyper Text Transfer Protocol Secure (HTTPS)HTTPS refers to HTTP communications over SSL. All communications between the browser and HPSIM are carried out over HTTPS. HTTPS is also used for much of the communication between theCMS and the managed system.
Secure Task Execution (STE) and Single Sign-On (SSO)STE is a mechanism for securely executing a command against a managed system using the Webagents. It provides authentication, authorization, privacy, and integrity in a single request. SSOprovides the same features but is performed when browsing a system. STE and SSO are implementedin very similar ways. SSL is used for all communication during the STE and SSO exchange. Asingle-use value is requested from the system prior to issuing the STE or SSO request to help preventagainst replay or delay intercept attacks. Afterwards, HP SIM issues the digitally signed STE orSSO request. The managed system uses the digital signature to authenticate the HP SIM server.Note that the managed system must have a copy of the CMS SSL certificate imported into the Webagent and be configured to trust by certificate to validate the digital signature. SSL can optionallyauthenticate the system to HP SIM, using the system's certificate, to prevent HP SIM from inadvertentlyproviding sensitive data to an unknown system.
NOTE: For SSO to web agents, the Replicate Agent Settings and Install Software and Firmwaretools each provide administrator-level access to the web agents. HP System Management HomepageAs Administrator, System Management Homepage As Operator, and System ManagementHomepage As User each provide SSO access at the described level.
Distributed Task Facility (DTF)DTF is used for custom command tools and multiple- and single-system aware tools. Commandsare issued securely to the managed system using SSH. Each managed system must have the CMSSSH public key in its trusted key store so that it can authenticate the CMS. Managed systems arealso authenticated to the CMS by their SSH public key.
98 Understanding HP SIM security

In HP SIM, the Privilege Elevation feature enables tools to be run against HP-UX, Linux, and ESXmanaged systems by first signing in as a non-root user, and then requesting privilege elevation torun root-level tools. This can be configured under Options→Security→Privilege Elevation.
WBEMAll WBEM access is over HTTPS for security. HP SIM is configured with a user name and passwordfor WBEM agent access. Using SSL, HP SIM can optionally authenticate the managed system usingits SSL certificate.For HP-UX, certificates can be used instead of username and password for WBEM authentication.You can configure WBEM authentication from the System Credentials→WBEM tab by selectingOptions→Security→Credentials→System Credentials. For more information, see the HP SIM onlinehelp.
LDAPWhen configured to use a directory service, HP SIM can be configured to use LDAP with SSL(default) or without SSL, which would transmit credentials in clear-text. To enable LDAP over SSLin Microsoft Active Directory, refer to http://support.microsoft.com/default.aspx?scid=kb;en-us;321051. Additionally, the directory server can be authenticated using the TrustedCertificate list in HP SIM.
RMIJava RMI is secured by requiring digitally signed requests using the CMS private key, which shouldonly be available to the local system. All communications use localhost to prevent the communicationfrom being visible on the network.
Credentials management
SSL certificatesThere are several certificates used by HP SIM.
HP SIM main certificateThe HP SIM main certificate is used by the HP SIM SSL web server, the partner application SOAPinterface, and the WBEM indications receiver. This certificate is used to authenticate HP SIM inthe browser, in partner applications that communicate with HP SIM through SOAP, and in WBEMagents that deliver indications to HP SIM.By default the SIM main certificate is self-signed. Public Key Infrastructure (PKI) support is providedso that the main certificate may be signed by an internal certificate server or by a third-partyCertificate Authority (CA).
WBEM certificateIn HP SIM 7.0, the WBEM certificate uses the 2,048-bit key length. A new HP SIM 7.0 installationcreates a WBEM certificate with the 2,048-bit key length. The WBEM certificate can be regeneratedif required with the following commands:mxcert -w(Distinguished Name)
mxcert -W
Upgrading to HP SIM 7.0Upgrading from a previous version of HP SIM to 7.0 does not overwrite the main or WBEMcertificates. The existing certificates are maintained to preserve the trust relationships between theCMS and managed systems. After the upgrade HP recommends you upgrade the HP SIM mainand WBEM certificates to use 2,048-bit keys.
Credentials management 99

The SSO certificate is created during the upgrade. To reestablish the trust relationships with themanaged systems you might need to import the newly generated main certificate into the managedsystems. Also, you might need to import the trusted certificates back into HP SIM's trust store.
Certificate expiration and Certificate Revocation Check (CLR Check)HP SIM provides the support for certificate revocation check. By default, the revocation check isenabled for both client and server certificates. However, server certificates are checked forrevocation only if you have enabled Require Trusted Certificate(Options→Security→Credentials→Trusted Systems→Trusted Certificates).The Certificate revocation check can be configured from the GUI by selectingOptions→Security→Configure Certificate Revocation Check.You can also configure certificate revocation check by entering: mxcert -L from the commandline.
Source of client and server certificatesThe client certificates are sent to HP SIM by the Web portal, partner requests, and the WBEMservices.The server certificates are sent to HP SIM by the managed systems.
Enabling or disabling certificate revocation checkHP SIM enables you to disable certificate revocation check for both server and client certificates.Disabling revocation check for client certificate does not affect Two-Factor authentication, wherethe client certificate (called as user certificate) is always checked for revocation.Enabling certification revocation check might affect the performance of the system as it downloadsthe Certificate Revocation List (CRL) file from the certificate server during the processing of revocationcheck. The downloading of the CRL file happens only if a CRL file associated with the certificateis not already cached in the server, or CRL file that is cached is expired.Enabling or disabling certificate revocation check does not require restart of HP SIM.
Offline and online mode of certificate revocation checkThe certificate revocation check is performed offline and/or online.
Offline modeThe offline mode is set as the default mode of checking the revocation. The offline mode expectsthe CRL files to be cached in the system. You must regularly populate the CRL files associated withthe certificates in a directory maintained by HP SIM. In Windows, the directory is \data\crl,and in Linux/HPUX, this directory is /var/opt/mx/data/crl.
Alert on CRL file expiration
If any of the CRL files present in this directory are expired, then HP SIM will send an alert to theSystem. These alerts could be seen in "All Events" page.The intent of this alert is to inform User to update the CRL directory with the latest CRL files.Please see below to configure few of the CRL alert related settings.
Online modeThe online mode can optionally be enabled. Enabling online mode does not bypass the offlinemode of CRL check.If the CRL file associated with a certificate is not present in the above directory, or if the cachedCRL file is expired, then HP SIM checks if online mode has been enabled. If online mode is enabled,HP SIM tries to download the CRL file from the certificate server. After downloading the CRL file,HP SIM caches the file in the above directory.
100 Understanding HP SIM security
Ways of enabling online mode
There are two ways of enabling online mode. One is through Proxy settings, and the other isdirectly.In the former method, you must save the host address and the port of the proxy server.The latter method assumes that the certificate server is reachable from the CMS server without theneed for the proxy settings. Example, the certificate server is located in the same intranet as theCMS server.In the future, the proxy settings will be configured in a common location in HP SIM.
CRL distribution pointsHP SIM expects the CRL distribution points to be present in the certificate and the CRL distributionpoint URLs are valid. There is a possibility that revocation check might fail if any of the distributionpoints contains an invalid URL.HP SIM processes only HTTP distribution point URLs. If a certificate does not contain a HTTPdistribution point URL, then the CRL check for the certificate will fail.
Warning or errorIf the certificate revocation check cannot be performed successfully, then HP SIM logs that as awarning, but it does not cease the connection with the peer system. The connection will be ceasedonly if HP SIM identifies the certificate as revoked.In Two-Factor authentication, if the revocation check did not succeed or if the certificate is revoked,then the user is not allowed to log-in to the CMS.
Conditions for warning
• If the CRL distribution point is not available in the certificate
• If the CRL distribution point does not contain HTTP URL
• If the CRL file is not available in the CRL directory (or expired), and if the file cannot bedownloaded from the CRL distribution point URL
Customizable propertiesThere are few CRL properties that can be configured through the globalsettings.propertiesfile present under HP SIM’s \config directory. The CRL GUI or the command line might not supportall these settings.
• Download timeout of CRL file:Property name: CRL_FETCH_TIMEOUTThe default value is 10000 (10s)
• The expiring delay is 1 day by default. This can be customized using:Property name: CRLExpirationStartThe default value is 1
• If you do not want to receive alerts on CRL expiration:Property name: CRLAlert1 — Enable
Credentials management 101

0 — Disable
• Proxy settings:The proxy host and port can be configured using the below properties. The proxy settings canbe cleared off or removed if both these properties are removed, or set as empty in theglobalsettings.properties file.Property name: PROXYHOSTProperty name: PROXYPORT
Certificate sharingHP SIM supports a mechanism whereby other components installed on the system can use the samecertificate and private key, facilitating authentication of the system as a whole instead of eachindividual component. This is currently used by the Web Agents and the WBEM components onthe CMS.
SSH keysAn SSH key-pair is generated during initial configuration. The CMS public key is copied to themanaged system using the mxagentconfig tool. This key-pair is not the same as for SSL and requiresa manual process to regenerate a new pair. See the manpages or online documentation formxagentconfig for more details. See the Secure Shell (SSH) in HP SIM white paper located athttp://h18013.www1.hp.com/products/servers/management/hpsim/infolibrary.html.The SSH keys of the trusted systems do not expire. These keys can be removed manually from thetrust store.
PasswordsPasswords configured on the HP SIM System Credentials and Global Credentials pages are storedin the database encrypted using 128-bit Blowfish. These passwords can be further managed usingthe CLI command mxnodesecurity. A few passwords might be stored in a file on the CMS thatare also encrypted using the same 128-bit Blowfish key. These passwords can be managed usingthe mxpassword command. The password file and the Blowfish key file are restricted with operatingsystem file permissions to administrators or root.Prior to HP SIM 5.3, passwords configured on the HP SIM protocol settings pages are stored in alocal file on the CMS, restricted with operating system file permissions to administrators or root.These passwords can be further managed using the mxnodesecurity command.For User accounts, HP SIM relies on the customer environment (for example, Windows OperatingSystem) to govern credential policy (expiration, lockout, and so on).
Browser
SSLAll communication between the browser and the CMS or any managed server occurs using HTTPSover SSL. Any navigation using HTTP (not using SSL) is automatically redirected to HTTPS.
CookiesAlthough cookies are required to maintain a logged in session, only a session identifier is maintainedin the cookie. No confidential information is in the cookie. The cookie is marked as secure, so itis only transmitted over SSL.A strict separation between the content provided by unrelated sites must be maintained on theclient side to prevent the loss of data confidentiality or integrity. HP recommends you avoid linksor resources that have arrived from unauthorized sites when a valid HP SIM session is running onbrowsers.
102 Understanding HP SIM security
PasswordsPassword fields displayed by HP SIM do not display the password. Passwords between the browserand the CMS are transmitted over SSL.
Password warningsThere are several types of warnings that can be displayed by the browser or by the Java plug-inon the browser, most having to do with the SSL server certificate.
• Untrusted system
This warning indicates the certificate was issued by an untrusted system. Since certificates areby default self-signed, this is likely if you have not already imported the certificate into yourbrowser. In the case of CA-signed certificates, the signing root certificate must be imported.The certificate can be imported before browsing if you have obtained the certificate by someother secure method. The certificate can also be imported when you get the warning, but issusceptible to spoofing since the host system is not authenticated. Do this if you canindependently confirm the authenticity of the certificate or you are comfortable that the systemhas not been compromised.
• Invalid certificate>
If the certificate is invalid because it is not yet valid or it has expired, it could be a date ortime problem, which could be resolved by correcting the system's date and time. If the certificateis invalid for some other reason, it might need to be regenerated.
• Host name mismatch>
If the name in the certificate does not match the name in the browser, you might get thiswarning. This can be resolved by browsing using the system's name as it appears in thecertificate, for example, marketing1.ca.hp.com or marketing1. The HP SIM certificate supportsmultiple names to help alleviate this problem. See the “System link format” (page 104) sectionbelow for information on changing the format of names created in links by HP SIM.
• Signed appletPrevious versions of HP SIM use a Java plug-in that can additionally display a warning abouttrusting a signed applet. Those previous versions of HP SIM use an applet signed byHewlett-Packard Company, whose certificate is signed by Verisign.
Browser sessionBy default, HP SIM does not time-out a user session while the browser is displaying the HP SIMbanner. This is known as monitor mode, and allows a continuous monitoring of the managedsystems without any user interaction. The session times-out after 20 minutes if the browser is closedor navigates to another site.An active mode is also supported where the session times out after 20 minutes if the user does notinteract with HP SIM, by clicking a menu item, link or button. You can enable active mode byediting the globalsettings.props file and change the EnableSessionKeepAlive setting tofalse.Best security practices include care when visiting other websites. You should use a new browserwindow when accessing other sites; when you are finished using HP SIM you should both sign outand close the browser window.
Internet Explorer zonesInternet Explorer supports several zones that can each be configured with different security settings.The name used to browse to HP SIM or managed systems can affect which browser zone InternetExplorer places the system. For example, browsing by IP address or full Domain Name System(DNS) (for example, hpsim.mycorp.com) can place the system into the browser's more restrictive
Browser 103

Internet zone, causing improper operation. Ensure systems are being placed into the correct Internetzone when browsing. You might need to configure Internet Explorer, or use a different name formatwhen browsing.
System link formatTo facilitate navigation to managed systems, HP SIM provides the System Link Configuration optionto configure how links to managed systems are formed. Go to Options→Security→System LinkConfiguration.The following options are available:
• Use the system name
• Use the system IP address
• Use the system full DNS nameIf you need full DNS names to resolve the system on your network, keep in mind that the browsermight display a warning if the name in the system's certificate does not match the name in thebrowser.
Operating-system dependencies
User accounts and authenticationHP SIM accounts are authenticated against the CMS host operating system. Any operating systemfeatures that affect user authentication affect signing into HP SIM. The operating system of the CMScan implement a lock-out policy to disable an account after a specified number of invalid sign inattempts. Additionally, an account can be manually disabled in the Microsoft Windows domain.Any account that cannot authenticate against the operating system prevents signing into HP SIMusing that account. For automatic sign-in to HP SIM, user accounts must be domain accounts.
NOTE: A user who is already signed into HP SIM is not re-authenticated against the operatingsystem until the next sign in attempt and continues to remain signed into HP SIM, retaining all rightsand privileges therein, until signing out of HP SIM.
IMPORTANT: If creating operating system accounts exclusively for HP SIM accounts, give usersthe most limited set of operating system privileges required. Any root or administrator accountsshould be properly guarded. Configure any password restrictions, lock-out policies, and so on, inthe operating system.
File systemAccess to the file system should be restricted to protect the object code of HP SIM. Inadvertentmodifications to the object code can adversely affect the operation of HP SIM. Maliciousmodification can allow for covert attacks, such as capturing sign in credentials or modifyingcommands to managed systems. Read-level access to the file system should also be controlled toprotect sensitive data such as private keys and passwords, which are stored in a recoverableformat on the file system. HP SIM does not store user account passwords for users signing into HPSIM.
IMPORTANT: HP SIM sets appropriate restrictions on the application files. These restrictionsshould not be changed because this could affect the operation of HP SIM or allow unintendedaccess to the files.
Background processesOn Windows, HP SIM is installed and runs as a Windows service. The service account requiresadministrator privileges on the CMS and the database, and can be either a local or a domain
104 Understanding HP SIM security

account. For automatic sign-in to HP SIM, a domain account must be used. On UNIX, HP SIM isinstalled and runs as daemons running as root.
Windows CygwinThe version of Cygwin provided with the SSH server for Windows, for CMS and the managedsystems, has been modified with security enhancements to restrict access to the shared memorysegment. As a result, it does not interoperate with the generally available version of Cygwin. Onlyadministrative users can connect to a system running the modified SSH server.
HP-UX and LinuxThe device /dev/random command is used, if available on the CMS, as a source for randomnumbers within HP SIM.
HP SIM databaseAccess to the database server should be restricted to protect HP SIM data. Specify appropriatenon-blank passwords for all database accounts, including the system administrator (sa) accountfor SQL Server. Changes to the operating data, such as authorizations, tasks, and collectioninformation, can affect the operation of HP SIM. System data contains detailed information aboutthe managed systems, some of which might be considered restricted including asset information,configuration, and so on. Task data might contain extremely sensitive data, such as user namesand passwords.
SQL Server and MSDEHP SIM uses only Windows authentication with SQL Server and MSDE. The installation of MSDEwith previous versions of HP SIM creates a random password for the sa account, though it is notused for HP SIM.
Remote SQL ServerSQL Server supports advanced security features, including SSL encryption during sign in and datacommunication. More information can be found in SQL Server documentation and the Microsoftwebsite.
PostgreSQLPostgreSQL uses a password that is randomly generated when HP SIM is installed. This passwordcan be changed through the command line. See the mxpassword manpage for more information.
OracleThe Oracle database administrator must create a user (preferably with a non-blank password) forHP SIM to use when connecting to Oracle. The Oracle user must have, at the minimum, the Connectand DBA roles, which allow HP SIM to have the correct privileges to create and delete HP SIMtables and views, along with read/write access to the HP SIM tables. Changes to the operatingdata, such as authorizations, tasks, and collection information, can affect the operation of HP SIM.System data contains detailed information about the managed systems, some of which might beconsidered restricted, including asset information, configuration, and so on. Task data can containextremely sensitive data, such as user names and passwords.
Command-line interfaceMuch of HP SIM's functionality can be accessed through the command line. To access thecommand-line interface, you must be logged on to the CMS using an operating system accountthat is a valid HP SIM user account. That account's authorizations and privileges within HP SIMapply to the command line interface as well.
HP SIM database 105

NOTE: On a Windows system, the operating system account must have administrator-level accesson the CMS for all of the commands to work properly.
How to: configuration checklist
General• Access to the CMS must be restricted, both at the network operating system-level and at the
physical-level.• A strict separation between the contents provided by unrelated sites must be maintained on
the client side to prevent the loss of data confidentiality or integrity. HP recommends you avoidlinks or resources that have arrived from unauthorized sites when a valid HP SIM session isrunning on browsers.
• Configure firewalls to allow desired ports and protocols
• Review lockdown versus ease of use
• After configuring the CMS and managed systems, run discovery on the CMS
• User account policies (password, lockout, and so on) must be configured and enforced byyour environment.
• CMS must be configured on the local intranet.
Configuring the CMS• Inspect SSL server certificate and update if desired
• Configure passwords and SNMP community strings (See the “Configuring managed systems”(page 106) section below)
• Configure user accounts, based on operating system accounts that will access HP SIM
• Review and configure toolboxes if defaults are not appropriate
• Review and configure authorizations for users
• Configure system link configuration format
• Review audit log
Strong security
NOTE: How-to: lockdown versus ease of use for more details.
• Enable Require Trusted Certificates, inspect and import desired system SSL certificates or rootsigning certificates
• Require only known SSH keys, inspect and import desired system SSH public keys
Configuring managed systems• Configure SNMP community strings, which are required at the CMS.
• For WBEM on HP-UX and Linux, configure the WBEM password. This password is requiredat the CMS. For the highest level of security, a different user name and password can be usedfor each managed system; each user name and password pair must be entered into the CMSto enable access.For HP-UX, certificates can be used instead of username and password for WBEMauthentication. For more information, see the HP SIM online help.
106 Understanding HP SIM security

• The CMS requires a user name and password to access WMI data on Windows systems. Bydefault, a domain administrator account can be used for this, but you should use an accountwith limited privileges for WMI access. You can configure the accounts accepted by eachWindows managed system by using the Computer Management tool:1. Select the WMI Control item.2. Right-click WMI Control, and then select Security.3. Select the Security tab, select Root namespace, and then click Security>4. Add a user to access WMI data along with their access rights. The enable account and
remote enable permissions options must be enabled for correct operation of HP SIM.5. The user name and password specified here must be configured in the CMS.
• Set up user accounts for Insight Web Agents
• Add the CMS SSH public key to the system's trusted key store by running mxagentconfigon the CMS.
• Configure trust relationship option for Insight Web Agents; import the CMS SSL certificate ifset to trust by certificate.
CAUTION: Establishing the trust by certificate for HP SMH enables any HP SIM user to gainadministrative access to the HP SMH hosts. This enables the HP SIM user to execute any commandremotely on the HP SMH host.
How to: lockdown versus ease of use on Windows systems
ModerateThe HP Insight Management Agent should be configured to trust by certificate. This requiresdistributing the HP SIM certificate, which includes the public key, to all the managed systems. Afterthe systems have been configured to trust the HP SIM system, they will accept secure commandsfrom that particular system only.This certificate can be distributed in a number of different ways, including:
• Use the Configure or Repair Agents Set Trust Relationship option in HP SIM to deploy the HPSIM certificate to the managed systems. Depending on the managed system, this might useSSL or Windows network connections to copy files and configure the managed systems.
• Use the Web-based interface in an individual Insight Management Agent to specify the HPSIM system to trust. This causes the agents to pull the digital certificate from the HP SIM systemimmediately, enables you to verify it, and then sets up the trust relationship. While this optiondoes have some limited vulnerability, it would be possible to spoof the HP SIM system at thetime the certificate is pulled and thus set up an unexpected trust relationship. However, it isreasonably secure for most networks.
• Import the HP SIM certificate during initial installation of the Insight Management Agent. Thiscan be done manually during an attended installation or through the configuration file in anunattended one. This method is more secure because there is little opportunity for the spoofingattack described above.
• If you have already deployed the Insight Management Agent, you can distribute the securitysettings file and the HP SIM certificate directly to the managed systems using operating systemsecurity.
How to: lockdown versus ease of use on Windows systems 107

IMPORTANT: When using the Trust by certificate option, the HP SIM SSL certificate must beredistributed if a new SSL certificate is generated for HP SIM. SSH on the managed system normallyoperates in a mode similar to trust by certificate in that it requires the SSH public key from theCMS. Note that the SSH public key is not the same as the SSL certificate. The commandmxagentconfig is used on the CMS to copy the key to the managed system. This must be donefor each user account that is to be used on the managed system since the root or Administratoraccount is used by default.
The HP SIM SSH public key must be redistributed if the SSH key-pair is regenerated.
StrongThe strong security option lets you take advantage of every security feature. This option providesthe highest level of security available within the HP SIM security framework, but there are someadditional procedural steps you must make in your server operations. Also, this option is facilitatedby using your own PKI that includes a certificate authority and certificate server.Procedure 24 Setting security to strong1. Generate certificates from your certificate server for each managed system and the HP SIM
system. To do this, first generate a certificate signing request (CSR) from the various systems.This generates a PKCS#7 file. This file should then be taken to the certificate server and signed,and then the resulting file (generally a PKCS#10 response) should be imported into the eachmanaged system and the HP SIM system.To maximize security, it is important that none of these steps be done over a network unlessall communications are already protected by some other mechanism.Thus, in the case of the Insight Management Agent, a removable media (for example, USBthumb drive, floppy disk) should be taken directly to the managed system, have the PKCS#7file placed on it, and hand-carried to a secure system with access to the certificate server. ThePKCS#10 response file should similarly be placed on the removable media and returned tothe managed system to be imported into the Insight Management Agent.
2. Take the root certificate (just the certificate, not the private key) of your certificate server andimport that into the HP SIM trusted certificate list. This allows HP SIM to trust all the managedsystems because they were signed with this root certificate.
3. Take the certificate from the HP SIM system and import it into the Insight Management Agentof each system. This allows the managed systems to trust the HP SIM system. This certificatecan be distributed using any of the methods available to distribute the HP SIM certificate.However, the option to pull the certificate directly from the HP SIM system over the networkmust be avoided due to the potential man-in-the-middle attack.As in the Moderate option, you must redistribute the HP SIM SSL certificate to the managedsystems whenever a new HP SIM SSL certificate is generated.
4. Once these steps have been completed, you can turn on the option in HP SIM to enableRequire Trusted Certificates. Select Options→Security→Trusted Systems, and then click TrustedCertificates. The warnings presented around this option make it clear that any managed systemthat does not have a certificate signed by your certificate server will not be sent securecommands from the HP SIM system, although it will be monitored for hardware status.
108 Understanding HP SIM security
5. For SSH, turn on the option to accept SSH connections only from specified systems. SelectOptions→Security→Trusted Systems, click SSH Host Keys, and then enable the The centralmanagement server will accept an SSH connection only if the host key is in list below.Afterwards, you must manually import each managed system's public SSH key into the list ofkeys in HP SIM.To configure this in previous versions of HP SIM, add or modify the following line in theHmx.properties file:MX_SSH_ADD_UNKNOWN_HOSTS=false
and then restart HP SIM.Afterwards, you must manually import each managed system's public SSH key into the list ofkeys in HP SIM.
How to: lockdown versus ease of use on Windows systems 109
21 Privilege elevationPrivilege elevation enables users without root privileges to run tools requiring root privileges onHP-UX, Linux, and VMware ESX managed systems. To use this feature with HP SIM, a privilegeelevation utility such as su, sudo, or Powerbroker must be installed on the managed system. Typically,these utilities are used to sign in as a normal user, then when you want to run a program requiringroot, prefix the command line for that program with the privilege elevation utility's executable. Forexample sudo rm /private/var/db/.setupFile. Some of these utilities can be configuredto prompt the user for a password before allowing root access.For HP SIM to run tools on managed systems using privilege elevation, HP SIM must be configuredto know which user to use to sign in to the managed systems, how to prefix the command line thatit will run, and whether or not the privilege elevation utility will prompt for a password. This isconfigured either from the First Time Wizard, or from the Options menu by selectingOptions→Security→Privilege Elevation. You can configure different values of these settings for Unixand Linux systems versus VMware ESX systems.
IMPORTANT: Whenever privilege elevation is enabled, the other tools, which make use ofprivilege elevation, must provide the privilege elevation password.
Once you have configured HP SIM to use privilege elevation, it determines if a tool needs privilegeelevation by looking at the tool's execute-as parameter. This is the user the tool should be run ason the managed system. If this parameter is specified as root in the tool's tool definition file (tdef),then HP SIM will invoke privilege elevation. If this parameter is not specified in the tdef, then HPSIM defaults the value of execute-as to be the identity of the user invoking the tool within HPSIM. If this user is logged in as root, then privilege elevation will also be used.When HP SIM determines that privilege elevation should be used, it uses SSH to sign in to theremote system with the user that was configured in the privilege elevation settings page (a specificuser, the user who is currently signed into HP SIM, or a user specified at runtime). If the user mustbe specified at runtime, or if a password is required for privilege elevation, these prompts appearon the Task Wizard page that collects any parameters necessary to run a tool. After HP SIM issigned into the remote system through SSH, it invokes the command for the tool, prefixed by theprivilege elevation utility executable, and supplies the password if required.
Two-factor authenticationThe two-factor authentication is an alternative technique that an full rights user can configure as alogging mechanism for HP SIM. This signin technique offers a more secure communication thanthe user name and password technique, as it requires two factors to sign in to the system. The twofactors are:
• Smartcard
• Personal Identification Number (PIN)Two-factor authentication is applicable to HP SIM's web interface and is applicable to port 50000.
Enabling and disabling two-factor authenticationHP SIM uses user name and password mode of signin by default. The two-factor authenticationtechnique can be enabled or disabled from the GUI by selecting Options→Security→Two-factorAuthentication→Change Authentication Mechanism. The same can be configured through thecommand line interface:mxauthnconfig –m 0|1
After enabling or disabling two-factor authentication, the HP SIM service must be restarted for thechanges to take effect. Only one authentication technique will be enabled at a time. All users willbe authenticated based on the currently enabled authentication technique.
110 Privilege elevation

Enable secure communicationHP SIM ensures that the user certificate contained in the smart card is trusted by a valid and knownCertificate Authority (CA). It allows users to login to the CMS only if the certificate is trusted, andis not expired or revoked by the CA issuer, and also it ensures that the user is a valid SIM user.
Microsoft Active Directory usersTwo-factor authentication is not supported for local CMS users. It is supported only for domainusers which are configured in Microsoft Active Directory. HP SIM expects one user account to besaved in HP SIM This account can be configured from the GUI by selectingOptions→Security→Two-factor Authentication Configuration, or by using the command line interfacemxauthnconfig -a. Refer to HP SIM Command Line Guide for more information.
Users Distinguished NameIt is important to save the Users distinguished name (DN) in HP SIM where all the certificate basedusers are configured. HP SIM does not support multiple users distinguished names.
Subject Alternative NameHP SIM expects all certificates to possess the Subject Alternative Name->Other name field whichcontains the User Principal Name. This User Principal Name will map user's account in HP SIM.
Authentication phaseThis phase involves validating the certificate for the following requirements:
• If the certificate is trusted by a valid or known Certificate Authority (CA)
• If the certificate is not expired and is still valid.
• If the certificate is not revoked by the CA.If any of these validations fail, an error will be reported to the user by the CMS.
Authorization phaseThe authentication phase is followed by the authorization phase.This phase involves authorizing the user to execute tasks in the CMS. This step verifies that theauthenticated user has a valid HP SIM user account.
Certificate revocation checkThis is one of the pre-requisites to enable two-factor authentication.
Pre-requisites to enable two-factor authentication technique
• A domain server account must be configured in HP SIM.
• The users distinguished name must be configured in HP SIM.
• The certificate revocation check must be configured in HP SIM. Please see section Certificateexpiration and Certificate Revocation Check (CLR Check) for more information.
• The root and intermediate CA certificates associated with the user certificates must be importedinto HP SIM. This can be done by selecting Options→Security→Credentials→TrustedSystems→Trusted Certificates.
• Switch to two-factor authentication mode and restart CMS.All users must possess certificates to login to HP SIM.Administrators can still be able to access all CLIs (such as mxuser, mxnode, and so on) when HPSIM runs on two-factor authentication mode.
Two-factor authentication 111

Smart cards and Cryptographic Service Provider (CSP)HP SIM does not directly communicate with the Cryptographic Service provider rather it leveragesthe capabilities from the browser. It is expected that browsers need to be configured manually tocommunicate with the Smart card's CSP. Browsers must be able to recognize smart cards andprompt for PIN when user connects to HP SIM.For instance, if Active Client is installed and running on a client workstation, and if user connectsto HP SIM through Internet Explorer, then Internet Explorer will start communicating with the ActiveClient CSP and will prompt the user to insert the Smart card.
Security measures to follow
• You are advised to close the browser and remove the smart card immediately after you havelogged out of HP SIM. This will clean up any certificate cached by the browser, or by thesoftware CSP.
• It is recommended to use a fresh browser window to login to HP SIM.
• Always insert Smart card before connecting to HP SIM. Few browsers might not recognize orcommunicate with the CSP until you insert the smart card.
• Whenever you get any error during the course of authentication, close the browser and retry.This is because the browser will treat the current session as failed and will not allow you tore-handshake with the server.
• Do not store your certificates in the browser. This might enable others to use your certificate.Login steps:
• Type https://<CMS>:50000 from the browser (IE or firefox).
• If the browser is configured properly, you will be prompted to pass the PIN
• User is authenticated and authorized successfully.
112 Privilege elevation

22 Contract and warrantyThe Contract andWarranty Status is available when you have a Windows CMS, and the HP InsightRemote Support Pack is installed. You can view Contract and Warranty status updates for HPsystems that have contract and warranty data collection enabled. Click the Contract and WarrantyStatus icon to view the Contract and Warranty Details page for the system.The following requirements must be met in order to view contract and warranty data in HP SIM:
• The HP SIM CMS must have connectivity to http://www.hp.com.
• The Remote Support Pack software must be installed and properly configured. The RemoteSupport Software Manager is installed on the CMS during the HP SIM installation. After theHP SIM installation is complete, you must configure the Remote Support Software Managerto fit your enterprise specifications. Once configured, the Remote Support Software Managerwill download and install the Remote Support tool. The Remote Support tool must be installed,configured, and registered before you can retrieve contract and warranty data.
• To collect contract and warranty data for a system, the system's serial number, product ID,and country code must be present in the system properties. In most cases, the serial numberand product ID are obtained during HP SIM's identification process. You can enter a serialnumber and product ID if needed. It is important to specify the correct country code to ensureaccurate information. If HP SIM cannot obtain a country code, it defaults to US. If you havea support contract, enter an entitlement or obligation identifier and entitlement type if youwant to view contract data.
NOTE: Collecting Contract and Warranty information is limited to once a day.
Viewing contract and warranty informationYou can view contract and warranty information by:
• Clicking the CW icon in the system table view page.
• Clicking the Contract and Warranty status link on the system page.
• Viewing a Warranty-Contract report.
• Searching for systems with contracts or warranties that expire in a specified number of days.
• Configuring alerts for systems with expiring contracts or warranties.
• Viewing the initial and monthly contract and warranty data collection tasks.
• Viewing the Remote Support Eligible collection, which lists systems the Remote Support Packsupports if you choose to enable them for support and are entitled to support. If a system isenabled without proper entitlement, events are submitted to the Remote Support tool, but theyare not monitored and will not trigger a response.
NOTE: If you receive an incorrect response for a particular HP brand system after clicking theCW icon on the system table view page, there might be an entitlement issue with the system. Thisis not a Remote Support or an HP SIM issue. Please contact HP support. You must have a validserial number, product ID, and any contract or Care Pack numbers that are applicable.
Viewing contract and warranty information 113

Collecting contract and warranty dataThe following tasks are used to collect contract and warranty data:
• Initial contract and warranty collection.This task collects contract and warranty data from newly discovered systems. If the requiredsystem properties are not entered for a new system or automatically collected by HP SIMduring identification, contract and warranty data will not be collected.
• Monthly contract and warranty collectionThis task collects contract and warranty data every month. If the required system propertiesare not entered for a system or automatically collected by HP SIM during identification, contractand warranty data will not be collected.
If you want to run the Contract and Warranty Collection task immediately for an updated system,select Options→Contract and Warranty Data Collection. Collecting Contract and Warrantyinformation is limited to once a day.
IMPORTANT: Running the contract and warranty collection task more than once a month is notrecommended or needed since the data does not often change.
Viewing contract and warranty status
OverviewThe Contract and Warranty Status page is available when you click the CW icon on the systemtable view page or the Contract and Warranty Status link on the system page. This page listsSystem Information and contract and warranty details.
NOTE: A system can have multiple contracts and warranties.
System Information• System Name
The system name or IP address.
• Serial NumberThe system serial number. This can be the serial number discovered by HP SIM or the numberyou entered in the Customer-Entered serial number field on the Edit System Properties page.
• Registered Product NumberThe product number. Typically, the product number is the number used to order a system.
• Product LineDetails about the product line.
Contract• CCRN (Customer Contract Reference Number).
The reference used for the contract as renewed over time.
• Active ContractThis value is true if an active contract exists.
• Start DateThe start date of an active contract.
114 Contract and warranty
• End DateThe end date of an active contract. If no end date is available, this field is blank.
• Contract StatusThe possible values are:
◦ A: Active
◦ F: The start date is in the future
◦ X: Expired
◦ E: There is no end date
◦ I: The agreement is informal. This status might mean that the agreement is not finalized.
◦ B: Delivery blocked
◦ C: Cancelled
• Active ObligationThis value is true if there is an active support contract for a system.
The contract start and end date is listed for each contract item along with the following information:
• StatusThe possible values are:
◦ A: Active
◦ F: The start date is in the future
◦ X: Expired
◦ E: There is no end date
◦ I: The agreement is informal. This status might mean that the agreement is not finalized.
◦ B: Delivery blocked
◦ C: Cancelled
• Service LevelThe level of service specified in the offer. This includes the amount of time HP has to react toan issue, the time to resolution for a set of issues, and the type of response HP will use to reactto an issue.
• DeliverablesA description of services offered with this contract, for example, onsite support or parts andmaterials.
Warranty• Warranty Type
The type of warranty, for example, Base Warranty, Bundled Warranty, or HP Care Pack.
• Start DateThe start date of an active warranty.
Viewing contract and warranty status 115

• ExtensionThe number of days that this warranty has been extended.
• Wty: HP HW Maintenance Onsite SupportThe warranty start and end date is listed for each warranty item along with the followinginformation:
◦ StatusThe possible values are:
– A: Active
– F: The start date is in the future
– X: Expired
– E: There is no end date
– I: The agreement is informal. This status might mean that the agreement is notfinalized.
– B: Delivery blocked
– C: Cancelled
◦ Service LevelThe level of service specified in the warranty. This includes the amount of time HP has toreact to an issue, the time to resolution for a set of issues, and the type of response HPwill use to react to an issue.
◦ DeliverablesA description of services offered with this warranty, for example, onsite support or partsand materials.
• Wty: HP Support for Initial Setup
◦ StatusThe possible values are:
– A: Active
– F: The start date is in the future
– X: Expired
– E: There is no end date
– I: The agreement is informal. This status might mean that the agreement is notfinalized.
– B: Delivery blocked
– C: Cancelled
◦ Service LevelThe level of service specified in the warranty. This includes the amount of time HP has toreact to an issue, the time to resolution for a set of issues, and the type of response HPwill use to react to an issue.
◦ DeliverablesA description of services offered with this warranty, for example, onsite support or partsand materials.
116 Contract and warranty

Monitoring contract and warranty statusContract and warranty status is shown by the following status types:
Table 9 Contract and Warranty status
DescriptionIcon MeaningStatus Icon
The contract or warranty is expiredMajor
Minor • Contract information is temporarilyunavailable.
• The contract expires in 30 days.
The contract expires in 90 days.Warning
The system has a valid contract orwarranty.
Normal
No contract information was found. Thesystem might not have a serial numberor product ID.
Unknown
The Do not collect contract andwarranty data for this system option isset for the system.
Disabled
Viewing contract and warranty status 117

23 License ManagerLicense Manager enables you to view and manage product licenses within the HP SIM user interface.To access additional information about Updates, Upgrades, and Technical support, contact yourHP services or HP partner representative or access the HP Support Center at www.hp.com/go/hpsc.
NOTE: To run License Manager, you must have administrative rights on the CMS (to set, selectOptions→Security→Users and Authorizations→User) and choose the Configure CMS Securityoption, and the All Tools toolbox (to set, select Options→Security→Users andAuthorizations→Authorizations) on the managed systems that you want to license.
You can view and associate licenses to specified target systems discovered by HP SIM. A productmay use artificial systems to contain licenses. Therefore, you may see names of non-existent systems.System licenses can be reviewed by product. Licenses can be associated with specific systems.Licenses can be collected and deployed to management processors. New licenses can be addedindividually or in bulk from a file. License Manager database tables are updated and synchronizeddaily at midnight or at HP SIM startup, and expired license information is sent to registered plug-ins.For some products, License Manager only permits users to review system licenses, available licenses,and add licenses. For other products, License Manager allows association of licenses with systemsselected by the user. The association of the license is dependent on the particular product. Forsome products, licenses can be freely associated with selected systems and those associations canbe changed. However, in most cases the license is locked to the system once it is used with theproduct. Once locked, associations can no longer be changed. For other products, the productassociation is permanent once made in License Manager. Finally, some products allow LicenseManager to manage their licenses entirely such that selection and licensing systems is final. Thedistinction between these latter modes is that associations may be changed if the user optionsinclude Assign / Un assign and are final if there is one option, Apply.License Manager includes functionality to collect and deploy licenses with most managementprocessors. The License Manager core establishes and maintains a secure communication channelfor license deployment with the management processor through two options provided by HP SIM,SSL and Secure Shell (SSH). Both, SSL and SSH meet the requirements for a secure channel. If thetarget systems are management processors, the management processor must support SSH and youmust provide the required credentials. An SSH based solution uses CLO. All management processorfirmware releases include support for SSH/CLP. ProLiant SSH/CLP support is included in v1.70 orlater of the management processor firmware. Integrity SSH/CLP support is included in managementprocessor firmware. All management processors can be updated to this version or later. The licensecollection uses an HTTP based mechanism and operates without credentials. Management processorfirmware in many instances allows the user to define if license information is available on demandusing this mechanism.
Table 10 Supported hardware for Integrity management processor license collections
Firmware supportServer typeProduct nameHardware
F.02.19 or greaterRackMerlinrx2660
F.02.19 or greaterRackRubyrx3600
F.02.19 or greaterRackSapphirerx6600
T.03.07 or greaterBladeTahitiBL860c
T.03.07 or greaterBladeBarbaraBL870c
118 License Manager

NOTE: The new management processor license collection is supported on management processorand management processor devices. Deployment is supported on management processor andmanagement processors with newer firmware versions.
In some instances, licenses are managed and controlled by the licensed system (remote licensing).In this case, License Manager provides the facility to collect and deploy licenses to those systems.For non-management processor systems, communication used is a Microsoft COM mechanism.For some products, the license is stored in a licensing structure in the Windows registry on thelicensed system. License Manager employs Microsoft's remote registry API over the COM protocolto assign licenses to and collect license information from those remote systems. License informationis duplicated in the HP SIM database, but licenses are managed remotely and must be periodicallycollected to keep this information current. Authentication credentials for the specified systems areneeded when licenses are sent to the specified system. If WBEM authentication credentials havebeen provided for a specific target, these credentials are used. If specific credentials have notbeen provided, each set of WBEM credentials provided as global credentials are used in turn. Ifno credentials are provided, the connection is attempted using the default credentials of the HPSIM server. The remote registry service must be started and run on candidate target systems forkey collection or assignment. This mechanism of license management is rare. Those instances whereused, will be clearly stated in product documentation.
NOTE: Automatic collection of management processor licenses is not supported.
NOTE: You do not have support or upgrade options by default. After July 9, 2007, all licensekeys are included in one year of 24 x 7 Software Technical Support and Update Service. TheLicense Manager informs you which license keys are "support and update enabled" and whichlicense keys require the purchase of future updates and upgrades.
CLI mxlmkeyconfigThe CLI mxlmkeyconfig enables you to combine all the License Manager key files into one fileinstead of having to execute multiple files. Combining these files into a single file makes it easierwhen adding keys from a file through the License Manager graphical user interface.The mxlmkeyconfig command takes all the keys and related information and places it in theresulting key file. The CLI program will not allow duplicates. If there are duplicate <key string>values, a warning message appears and only the first value is placed in the resulting key file. Ifbadly formatted files are encountered, warning messages appear.The key file is created when the CLI mxlmkeyconfig is command is executed. If the resulting keyfile already exists, then the previous keys remain and the information from the source key files areadded to the resulting key file.
License typesLicense Manager displays licenses by product. If a license authorizes multiple products, the numberof seats permitted by the license is applied in full to each authorized product. For example, alicense authorizing five seats and two products authorize five seats for each product.
Table 11 License types
DescriptionLicense Type
Offers full, unlimited functionality for an unlimited time andfor a specific number of seats purchased, up to 50,000.
Flexible Quantity
Offers full, unlimited functionality for an unlimited time.This license represents an expected upper limit on thenumber of seats, up to 50,000.
Activation Key Agreement
CLI mxlmkeyconfig 119

Table 11 License types (continued)
DescriptionLicense Type
Offers full, unlimited functionality for a limited time and aspecific number of seats. The license determines the number
Demo (seats and time)
of days the key enables the product to function. The daysbegin counting from the day of first use. The key can permitmore than one instance of the product to run. Demo keyscan authorize up to 255 seats for up to 255 days.
Offers full, unlimited functionality for a limited time. Thelicense determines the number of days the key allows the
Demo (time)
product to function. The days begin counting from the dayof first use. The key can permit more than one instance ofthe product to run. Demo keys can authorize use for up to65,535 days.
Offers full, unlimited functionality for a limited time. Thelicense determines the number of days the key enables the
Beta
product to function. The days begin counting from the daythe key is created. The key can permit more than oneinstance of the product to run. Demo keys can authorizeuse for up to 65,535 days.
Offers time limited, full functionality license. A Durationlicense (DLL) can be assigned to a system multiple times.
Duration
When the licensed product consumes a license and thatlicense subsequently expires, a new license will beconsumed and removed from the stack of assigned licenses(if there are any and using the same license key). Forexample, if seven product licenses from the same DLL keyare assigned the license remains valid for seven times theinterval specified in the corresponding DLL license. Anynumber of the assigned licenses still assigned can beunassigned at any time.. The basic time unit encoded inthe key is one month. A DLL can authorize up to 255 seatsfor up to 255 months.
Offers time limited, full functionality license. The basic timeunit encoded in the key is one month. A Subscription license
Subscription
can authorize up to 255 seats for up to 255 months. Allsubscriptions licenses based on a specific subscriptionlicense key will all expire when the first license used fromthis key expires. All time representations in LicenseManager displays are in days
NOTE: HP SIM considers one month equal to 30 days.
Table 12 License types reported by management processor products
DescriptionLicense Type
Offers full, unlimited functionality and represents asingle-use key for the product. This license type is specificto management processors.
Intrinsic
Offers full, unlimited functionality and represents asingle-use key for the product. This license type is specificto management processors.
Individual
Offers full, unlimited functionality.Permanent
Offers full, unlimited functionality for a limited time. Thelicense determines the number of days the key allows the
Demo (time)
product to function. The days begin counting from the dayof first use. The key can permit more than one instance of
120 License Manager

Table 12 License types reported by management processor products (continued)
DescriptionLicense Type
the product to run. Demo keys can authorize use for up to65,535 days.
Licensed System(s)License Systems in License Manager enables you to list the systems licensed for the selected product.Products can elect to not display all or some licensing details.Some products provide licenses to enable other products. The license keys generated by theseproducts can be manually added. In many instances, these generated licenses are not visible tothe user. Therefore, the only way to determine if a system is licensed for a product is to check thelicense status of the enabling product and noting this relationship.
Add LicensesHP SIM enables you to add individual license keys to the License Manager database.HP iLO product license keys can be added into the database because they can be deployed directlyto management processors.
Collect Remote License InfoCollect Remote License Info (for management processors) collects licenses using an HTTP basedprotocol which does not require credentials.When collecting remote licenses, be aware of the following:
• Automatic collection of management processor licenses is not supported.
• You do not have support or upgrade options by default. After July 9, 2007, all license keysare included in one year of 24 x 7 Software Technical Support and Update Service. TheLicense Manager informs you which license keys are "support and update enabled" and whichlicense keys require the purchase of future updates and upgrades.
Collect Remote License Info (for servers) collects license details from selected targets. If licenses arestored on the selected system (for details, see the specific product information), the selected machinemust be running a variant of Microsoft Windows.This collection process will do the correct behavior when a product has been selected in ProductLicense Information table above. When no product has been selected, the behavior is determinedby the type of system selected. When no product has been selected, select the managementprocessor and NOT the server hosting the desired management processor.
License Collection Results table
1 System Name. The names of the systems where the task was executed.
Licensed System(s) 121

2 Key. The license keys received from the target systems. Each key retrieved from a system ison a separate line. Some products have more than one license key. License details arecontained in the key, and each key might enable more than one product.
3 Product. The name of the product associated with the use of this key.4 Response Status. The status of the request for license data for the selected system.
• Successful taskLicensing information from the remote system.A.
B. Licensing information from the target system.
NOTE: This response status displays for systems running Windows variant OS and haslicense stored in the registry.
• Unsuccessful taskConnection to device failed. Possible reasons could be devicenot reachable or device is an older firmware version of managementprocessor.
This happens due to the following reasons:
A.
a. Network error - Connection Refused.b. Network error - Connection timed out.c. The system you are trying to connect has firmware version that is older or not
supported.B. Device not found.
Failure in pinging the system.C. License Key overused. Please refer to the license agreement to
avoid any violations.
D. No valid licensing information found on the remote system.
E. No licensing information on the remote system.
F. Problem collecting licensing information.
G. Failed to contact this system. Network path not found or similarerror.
H. Specified system is no longer in the database.
I. Target system is not running Microsoft Windows as required.
J. Keys cannot be collected from a system of this type.
NOTE: This displays if the system is of a different type such as; a switch, a printer, acluster, a complex, or a system not running a Windows OS.
K. Cannot collect keys stored on this node. HP SIM host and specifiedsystem must be running Microsoft Windows.
NOTE: This happens when, for example CMS or a remote system is not running aWindows variant operating system.
L. License Manager does not know how to assign licenses for thisproduct. License Manager has no information about this product.Install the HP Systems Insight Manager plug-in that uses thislicense or collect license information from a system running thisproduct first.
122 License Manager
Assigning and Unassigning licensesHP SIM enables you to assign and Un assign product licenses for plug-ins, if applicable for thatplug-in, and to assign licenses to remote target systems when licenses are managed remotely.Remember that management processor licenses must be applied directly to the managementprocessor and NOT its host server. For plug-ins, when assigning licenses, note the following fornon-management processor targets:
• When a license is assigned to a system, it is not locked or consumed until the product operateson that system.
• A system can be licensed with a demo key just once. If the license expires, the only option tocontinue to use the system with that product is to purchase a license. A system licensed by ademo key can be relicensed at any time with a paid license.
• An assigned license can be unassigned from one system and assigned to another system, aslong as the product enabled by the license has not consumed the license. When a producthas been used on a system, the license is locked to that system permanently. Licenses delivereddirectly to a target system that manages its own licenses cannot be unassigned (product willprovide details on when a license must be sent to a remote server). There is no penalty forhaving these licenses remain on those systems because they are consumed on an as-neededbasis. The remaining licenses can be used elsewhere.
• A DLL can be assigned to a system a multiple number of times. When the licensed productconsumes a license and that license subsequently expires, a new license will be consumedand removed from the stack of assigned licenses (if there are any and using the same licensekey). For example, if seven product licenses based on the same DLL key are assigned, thelicense remains valid for seven times the time interval specified in the corresponding DLLlicense. Any number of the assigned licenses still assigned may be unassigned at any time.
Some products limit the use of the License Manager interface. Consequently, Manage Licenses maybe selected, however Apply or Assign/Un-assign might be disabled.
Apply LicensesA license applied to a system is irreversible. Licenses applied to management processors aremanaged by each management processor and so the policy is set by the management processor.The license is locked to the specified system.For management processor targets:
• When a license is assigned to a management processor, a license record is created andstored in the License Manager database.
• If the selected management processor is already licensed, you cannot replace that licensewith a new license from License Manager. You must first delete the existing license at themanagement processor console and then insert the new license (directly or using LicenseManger). However, Integrity MP does replace a demo key with a permanent license. If apermanent key is already present, Integrity MP displays a message such as License alreadyInstalled.
• An assigned license cannot be unassigned from one management processor and assigned toanother management processor. Licenses delivered directly to the actual target system cannotbe unassigned because the behavior of the product operating with that license is outside thescope of License Manager.
When assigning licenses to management processor targets, the SSH credentials for each targetmust be known. When deploying licenses to remote servers, the access credentials must be known.Remember that management processor licenses must be applied directly to the managementprocessor and not its host server.
Assigning and Unassigning licenses 123

Add License page
1 Select the complete key string and press Carl + C to copy it.Position the cursor in any of the five fields forming the input box and press Carl + V, or right-clickyour mouse to paste the license key. If the Add License function was selected after you copiedthe key, press Carl + V to paste the key.The license key displays with five characters in each field.
2 Enter the full path and file name in the Specify a file name and path field.3 Click Browse.
a. The Choose file dialog box appears.b. Navigate to the file that contains the licenses to be added.c. When a file has been located, click Process.
NOTE: When pasting in the complete key, the key can be in the normal format of five groupsof five characters, with each separated by a hyphen (-), (for example,12345-67890-54321-09876-12345). There are no spaces between the characters and thehyphens.
Key details pageClick Process to display the license details.
1 ProductThe name of the product.
2 License VersionThe license version of the product.
3 Licenses TypeThe type of license for example, Demo, Beta, Duration, Site, and Maintenance.
4 Licenses PurchasedThe number of licenses purchased for a product.
5 Days MaxThe maximum number of days the licenses can be used.
6 BackReturns to the Add License page.
7 Add Licenses NowAdds the keys to the database.
124 License Manager

Assigning or Applying Licenses page
1 System NameThe name of the system where the task was executed.
2 Serial NumberA number the licensing product chooses to identify remote systems. (Check product informationfor specific details).
3 Unique IdentifierA unique string that further identifies a system. Systems can be licensed by any combinationof system name, serial number, or unique identifier.
4 StatusThe status of the use of the license on the named system.
5 Operating SystemThe name and edition of the operating system installed on the product.
6 System TypeThe type of system licensed, for example, server, storage, or unmanaged.
7 System IP AddressThe IP Address of the licensed system.
8 All Features SupportedA 'Yes' or 'No' value. Systems can be licensed with a bundle license. The Yes in this columnimplies that all products licensed by bundle license fully support the system indicated. No,indicates that some licenses do not support this system. You must determine which productsdo not support the selected system.
9 License advisories and warnings resulting from last licensing activity:Table that indicates other licenses which are required to be in place on indicated system tofully comply with the selected product license.
Assigning or Applying Licenses page 125

License unlicensed systems (optional) page
1 System license statusDisplays the status of system licenses, such as Not licensed, or assigned duration license.
2 System selected to be licensedSystem Name 15.146.233.1 is selected to have a license assigned to it.
3 Licenses currently availableDisplays all of the currently available licenses to be assigned.
4 License selectedA license is selected to be assigned to system 15.148.233.1.
5 Apply licenseApplies the selected license to the selected system.
Online license page displaying the change to both the System license status table and the Licensescurrently available table after a node is licensed with DLL license.
1 System license statusSystem 15.146.233.1 displays the status as having a assigned duration license.
2 Licenses currently availableDisplays that the Duration license has been reduced by the number of licenses assigned tosystem 15.146.233.1.
126 License Manager
24 Storage integration using SMI-SAbout storage systems
Storage systems are SAN-attached Fibre Channel disk arrays, switches, tape libraries, or hosts(with Fibre Channel host bus adapters). HP SIM uses WBEM SMI-S providers to discover and collectdata from storage systems. To view the latest information about HP SIM device support and forinformation about obtaining and installing SMI-S providers, see http://www.hp.com/go/hpsim/providers .The default collection Storage Systems is listed under Systems by Type in the tree in the Systemand Event Collections panel. The following collections are available under Storage Systems:• All Storage Systems This category includes all devices that were discovered through an SMI-S
provider.• All Storage Hosts A storage host is a server, desktop, or workstation that is connected by a
HBA to a SAN Storage hosts are also included in the All Servers and All Systems collections.• All Storage Switches A storage switch is a Fibre Channel switch that is connected to a SAN.
Storage switches are also included in the All Systems and All Network Devices collections.• All Storage Arrays A storage array is a disk array that uses a Fibre Channel controller to
connect to a SAN. Storage arrays are also included in the All Systems collection.• All Tape Libraries A tape library is a tape drive that is connected to SAN. Tape libraries are
also included in the All Systems collection.
NOTE: HP SIM cannot manage ESLG3, MSL, and VLS with WBEM because there is noactive CVTL management on these libraries. Only SNMP is supported on these.
• Scalable Storage Solutions
Storage integration using SNMPStorage devices can be broken down into real-time access and backup systems. Real-time accesssystems can be subdivided into internal disks, RAIDs, tape libraries, SANs, and NAS.Most data centers have combinations of these systems including:
• Small BusinessAlmost entirely internal disk drives
• Medium BusinessVarying combination of internal disks and RAID systems
• Large BusinessVarying combination of internal disks, RAID, and some SAN or NAS
• Enterprise BusinessMostly large SAN or NAS, but some RAID and internal disks might be present
HP SIM can retrieve the information for the internal disk drives for monitored systems. This doesnot mean that HP SIM actively manages and configures each system previously indicated.HP SIM can:
• Discover and identify storage systems that are directly attached to a server.
• Discover and identify storage systems that are on the network, including tape libraries.
About storage systems 127

• Receive storage system events and associate them with the system that generated the event(through Command View) running on a system, or from a tape library management card.
• Context launch appropriate management application from the context of the event or thecontext of the system running the Command View that generated the event.
IMPORTANT: To discover an XP P9500 array, you can either discover it with a CVAE server ordiscover it with embedded SMI-S. Do not use both methods of discovery together because thereare chances for Data collection and WBEM subscriptions to fail.
Storage eventsWith HP SIM, administrators can monitor inventory and configure and manage hardware resourcesand the system software that affects the systems.HP SIM provides the administrator with a complete overview of the hardware status. Storage eventsprovide notification that a problem exists that might affect the availability of storage resources,which can affect system and application availability. HP SIM receives detailed event messagesthrough WBEM events or SNMP traps. These events identify the system and the affected disk andprovide an error number for looking up details and a description of the problem. The event detailsalso contain links to the Command View server that generated the event. HP SIM associates a diskor RAID subsystem with the controller managing these drives for internal storage.
Storage inventory detailsHP SIM inventory retrieves and stores the following information from internal disk drives:
• Disk
Total number of disk slots◦◦ Number of used slots
◦ Slot ID
◦ The type of disk in slot
◦ Disk manufacturer
◦ Disk model
◦ Disk part number
◦ Disk characteristics
◦ Firmware version
◦ Controller ID that is managing this disk
• Controller details
Total number of controllers◦◦ Controller type
◦ Controller manufacturer
◦ Model number
◦ Part number
◦ Slot ID that this card is installed in
128 Storage integration using SMI-S
◦ Firmware version
◦ Controller characteristics
• RAID details
RAID type◦◦ RAID configuration
• SAN and NAS
Network addresses◦◦ Manufacturer
◦ Model
• IS and MNHA
Part number◦◦ Total number of disks
◦ Disk details
◦ Servers being serviced by this system
Introduction to SMI-S for HP SIMThe Storage Management Initiative Specification (SMI-S) is a Storage Networking IndustryAssociation (SNIA) standard that enables interoperable management for storage networks andstorage devices. HP SIM uses this standard to discover and manage the storage systems it supports.
About SMI-SSMI-S replaces multiple disparate managed object models, protocols, and transports with a singleobject-oriented model for each type of component in a storage network. The specification wascreated by SNIA to standardize storage management solutions. SMI-S enables managementapplications (such as HP SIM) to support storage devices from multiple vendors quickly and reliablybecause they are no longer proprietary. SMI-S detects and manages storage elements by type,not by vendor.
Key componentsThe key SMI-S components include:
• Common Information Model (CIM)
• Web-based Enterprise Management (WBEM)
• Service Location Protocol (SLP)
CIMCIM, the data model for WBEM, provides a common definition of management information forsystems, networks, applications, and services, and allows vendor extensions. SMI-S is theinterpretation of CIM for storage. It provides a consistent definition and structure of data, usingobject-oriented techniques. The standard language used to define elements of CIM is Meta-ObjectFacility (MOF). Unified Modeling Language (UML) creates a graphical representation (using boxesand lines) of objects and relationships.
Introduction to SMI-S for HP SIM 129
WBEMWBEM is a set of management and Internet standard technologies developed to unify themanagement of enterprise computing environments. WBEM includes the following specifications:
• xmlCIM: Defines XML elements, conforming to DTD, which can represent CIM classes andinstances
• CIM Operations over HTTP: Defines a mapping of CIM operations onto HTTP; used as atransport mechanism
SLPSLP enables computers and other devices to find services in a LAN without prior configuration. SLPis designed to scale from small, unmanaged networks to large enterprise networks.
ProfilesSMI-S is organized around profiles, which describe objects relevant for a class of storage subsystem.SMI-S includes profiles for arrays, Fibre Channel HBAs, Fibre Channel switches, and tape libraries.Other storage devices (for example, NAS heads) are expected to be added in the future. Profilesare registered with the CIM server and advertised to clients using SLP. HP SIM determines whichprofiles it intends to manage, and then uses the CIM model to discover the actual configurationsand capabilities.
SMI-S implementationSMI-S is implemented with the following components:
• CIM server (called a CIMOM), that monitors WBEM requests (CIM operations over HTTP)from a CIM client, and responds to those requests.
• CIM provider, that communicates to a particular type of managed resource (for example, HPMSA arrays), provides the CIMOM with information about the managed resource. In theory,providers for multiple types of devices (for example, HP MSA arrays and Brocade switches)can be plugged into the same CIMOM. However, in practice, all storage vendors providethe CIMOM and a single provider together, and they do not co-exist well with solutions fromother vendors.
The following components can be provided in several different ways:
• Embedded agentThe hardware device has an embedded SMI-S agent. No other installation of software isrequired to manage the device.
• SMI solutionThe hardware or software ships with an agent installed on a host. The agent must connect tothe device and obtain unique identifying information. This is the method used by all HP storagedevices and most SAN devices.
About storage security using SNMP
Discovery and identificationHP SIM discovers storage systems on the LAN and Command View storage device managersrunning on managed systems or devices. For internal disks, the HP SIM inventory component canidentify all drives installed, disk manufacturer, models, disk types, firmware revision, internallocation of the drive in the system, and details about the controllers that manage the systems. ForRAID drives, the RAID type (1 to 5) and manufacturer are discovered in addition to the detailsgathered for the internal drives. For SAN systems, HP SIM discovers the Command View serversthat manage the SAN devices.
130 Storage integration using SMI-S

HP SIM displays storage systems as follows:
• Internal drivesThese systems must appear in the Properties pages and the inventory database as componentsof their respective systems.
• Tape librariesThese devices are identified and included in the All Systems, All Storage Systems, and AllTape Libraries collections.
• SANThe Command View systems for these devices are identified and available from the Tools &Links tab of the System Page for the systems serving the Command View systems.
NOTE: HP SIM discovers SAN and NAS management applications and provides user access tosystem information when those applications are started.
Prerequisites for managing storage systemsThe WEBES provider must be installed on the CVEVA server to receive WBEM protocol events inHP SIM.Procedure 25 Configuring WEBES on CVEVA proxy server1. In WEBES, create a new protocol named CV_EVA of type Command View EVA under the
Managed Protocol tab.2. Enter the CVEVA credentials for the new protocol.3. Set the ELMC protocol with the newly created CV_EVA protocol under Managed Entity property.4. Set the SNMP notifications (HP SIM, OVO) under WEBES Notification settings.5. Set WEBES SNMP settings by turning on SNMP notifications and setting the SNMP node name
to CVEVA proxy server IP, and set Service trap type to type3. Apply changes.6. Create default site in WEBES.
Using storage solutions
Event collection and launchTo receive events, the Command View software must be configured to send SNMP events to theHP SIM CMS.
For Command View SDMProcedure 26 Configuring SNMP trap destination onWindows NT 4.0 on the Command View server1. Select Start→Settings→Control Panel→Network→Services→SNMP Service.
The SNMP Service Properties dialog box appears.2. Click Traps.3. Enter a community name, such as public.4. Click Add.5. At the bottom of the dialog box, click Add.
The SNMP Service Configuration dialog box appears.6. Enter the host name or IP address of the enterprise management station, and then click Add.
The SNMP trap destination is added.7. Click OK to save the changes and close the dialog box.
Prerequisites for managing storage systems 131

Configuring the SNMP trap destination on Windows 2000Procedure 27 Configuring the SNMP trap destination on Windows 20001. Select Start→Settings→Control Panel→Network→Services→SNMP Service.
The SNMP Service Properties dialog box appears.2. Click Traps.3. Enter a community name, such as public.4. Click Add to list.5. At the bottom of the dialog box, click Add.
The SNMP Service Configuration dialog box appears.6. Enter the host name or IP address of the enterprise management station, and then click Add.
The SNMP trap destination is added.7. Click OK to save the changes and close the dialog box.
Configuring the SNMP trap destination on HP-UXProcedure 28 Configuring SNMP trap destination on HP-UX1. Using a text editor, open the following file:
/etc/snmpd.conf
2. Insert the following information at the end of the snmpd.conf file:trap-dest: X.X.X.XWhere X.X.X.X is the IP address of the enterprise management station.
3. Save and close the snmpd.conf file.4. Stop the SNMP daemon by entering the following at a shell command prompt:
ps -ef | grep snmpd
kill -9 PIDWhere PID is the process ID returned by the previous command.
5. Restart the SNMP daemon by entering the following at a shell command prompt:snmpd
Loading the HSV MIB on the CMS for EVAProcedure 29 Loading the HSV MIB on the CMS for EVA1. On a Windows operating system, go to a command prompt.2. Navigate to \Program Files\HP\System Insight manager\mibs directory.3. Run mxmib -a cpqhsv110v3.cfg.
Receiving WBEM protocol events from XP arraysCVAE must trust the HP SIM certificate. Importing and exporting the SMI-S certificates is performedby using the HiKeytool.bat command. This command is located at <server install dir>\DeviceManager\Server\HiKeytool.ba.1. Open a shell window and execute the HiKeytool and select (2) for SIM-S configuration.2. Export the management server's SMI-S certificate for indications. Refer to your management
station's documentation.
132 Storage integration using SMI-S
3. Select (4) to import the management server's certificate into the CVAE provider's truststore forevent indications. Enter the following:• Enter alias: Use the management server's DNS name (for example: hostname.hp.com).
• Enter truststore-password: indtrust
• Enter authenication-filename (absolute path): Enter path to management server's certificatefile.
For additional information, refer to the HP Storageworks P9000 and XP Event Notificationwhitepaper.
DiscoveryTo discover an XP P9500 array, you can either discover it with a CVAE server or discover it withembedded SMI-S. Do not use both methods of discovery together because there are chances forData collection and WBEM subscriptions to fail.The HP SIM discovery process for systems running Command View includes the following:
• CV XP on port 80 (http)
• CV VA/SDM on port 4096 (http)
• CV TL on port 4095 (http)
• Discovery of Command View EVA is encapsulated within the discovery of the HP StorageWorksStorage Management Appliance on ports 2301 or 2381
HP SIM must be permitted to access the web server.
NOTE: To access the links to Command View, select Tools→System Information→SystemPage→Links.
To configure Command View and SDM:Procedure 30 Configuring Command VIEW and SDM1. Verify that the HP SIM CMS is within a secure IP range in the Command View server
configuration.• Host based
CMS IP address included in .../sanmgr/hostagent/config/access.dat.
• Storage Area Manager management server (if applicable)CMS station IP address included in /sanmgr/managementserver/config/authorizedClients.dat.
2. Run discovery to discover or re-identify the Command View systems.3. When discovery is complete, you can group systems in HP SIM and launch Command View
from the System Page.To load the EVA MIB, enter mxmib -a cpqhsv110v3.cfg.
NOTE: Loading the MIB could take several minutes to complete.
Configuring HP SIM with storage systemsFor optimal interaction between HP SIM and storage systems, complete the following procedures.
Subscribe to WBEM indication eventsIf a storage systems SMI-S provider supports WBEM indication events and you want to view WBEMindication events on the event table view page, you must subscribe to WBEM events for the storagesystem.
Discovery 133

Viewing storage system collectionsHP SIM enables you to view storage system information for collections and individual storagesystems.Procedure 31 Viewing storage system collections1. In the System and Event Collections panel, expand Systems, Shared, Systems by Type, and
Storage Systems.2. Select one of the following:
• All Storage Systems
• All Storage Hosts
• All Storage Switches
• All Storage Arrays
• All Tape Libraries
The system table view page for that collection appears.
Viewing individual storage systemsProcedure 32 Viewing individual storage systems1. In the System and Event Collections panel, expand Systems, Shared, Systems by Type, and
Storage Systems.2. Expand the storage system collection that contains the system you want to view.3. Click the name of the storage system you want to view.The System Page for that system appears.
Viewing storage system reportsHP SIM provides predefined and customized storage system reports.
Existing storage system reportsThe following predefined storage system reports are available:
• Storage Device Capacity—All Storage ArraysLists capacity usage details for all storage arrays.
• Storage Device Controllers—All Storage ArraysLists the status, port count, and number of ports utilized for each storage array controller.
• Storage Device Inventory—All Storage ArraysLists vendor, status, and port information for each storage array.
• Storage Device Inventory—All Storage SwitchesLists vendor, status, and port information for each storage switch.
• Storage HBAs—All Storage HostsLists vendor, status, and port information for each host bus adapter (HBA) that is installed ona storage host.
• Storage Logical Units—All Storage ArraysLists LUN information and status for all LUNs on all storage arrays.
• Storage Ports—All Storage ArraysLists port information for all storage arrays.
134 Storage integration using SMI-S

• Storage Ports—All Storage HostsLists port information for all storage host HBAs.
• Storage Ports—All Storage SwitchesLists port information for all storage switches.
• Changer Devices—All Tape LibrariesLists the name, firmware version, and status for all tape libraries.
• Media Access Devices—All Tape LibrariesLists the name, firmware version, and status for all tape libraries.
Viewing storage array capacityHP SIM enables you to view capacity details for either a single storage array or all arrays.
Viewing storage capacity for all arraysTo view storage capacity for all arrays, run the Storage Device Capacity-All Storage Arrays report.
Viewing storage capacity for a single array
NOTE: Capacity information is not available for passively managed storage arrays.
Procedure 33 Viewing storage capacity for a single array1. In the System and Event Collections panel, expand Systems, Shared, Systems by Type, Storage
Systems, and All Storage Arrays.2. Select a storage array.
3. Click the icon next to Capacity Information.
Viewing storage array capacity 135

25 Managing MSCS clustersCluster Monitor is a core component of HP SIM, and adds the ability to monitor and managemulti-node clusters. Cluster Monitor also manages multiple cluster platforms in a heterogeneousenvironment.Procedure 34 Managing clusters1. Access the Cluster Monitor page by using one of the following methods:
• Method 1:1. Select Tools→System Information→Cluster Monitor.
Note: If no MSCS clusters are discovered, Cluster Monitor is not listed in the menu.2. Select a target MSCS cluster, and then click Run Now.
• Method 2:1. Locate a cluster by expanding Systems under the System and Event Collections panel
and selecting a cluster collection.The appropriate cluster collection table appears in the workspace.Note: Only MSCS clusters you are authorized to access appear on the cluster tableview page.
2. Choose one of the following:
◦ In the Cluster Name column, click the name of the MSCS cluster.
◦ In the CS column on the cluster table view page, click the MSCS cluster statusicon.
The Cluster Monitor page appears for that cluster.
2. Select from the following tabs available on the Cluster Monitor page. Every tab includes aProblem Info section that provides details about problems reported on the tab. For example,on the Cluster tab, this section includes status information if the cluster has a status of anythingother than Normal.Each tab also includes a Last Update field that displays the last time the information on thetab was updated.
• ClusterUse to view cluster information such as the cluster status, name, IP address, and quorum.
• NodesUse to view node information such as the node status, name, and IP address.
• NetworkUse to view network information such as the network status, name, mask, state, role, anddescription.
• ResourcesUse to view MSCS Resource information for the cluster, including the status, name, IPaddress, state, group, owner node, type, and drive of the resources.
MSCS statusThe Cluster Monitor page summarizes cluster status as defined by MSCS and lists the status andvalues of MSCS-defined cluster attributes.
136 Managing MSCS clusters

Cluster fieldsTable 13 Cluster fields
DescriptionName
Name or alias for the clusterName
Status of the cluster: Normal (the cluster condition is functioning normally, everynode condition and resource condition is normal), Degraded (the cluster
Status
condition is degraded if at least one node condition is failed or degraded orat least one resource condition is degraded), Failed (the cluster condition isfailed if every node condition is failed or at least one resource condition isfailed), and Other (the cluster condition cannot be determined and every nodecondition and resource condition is undetermined)
IP address of the cluster aliasIP
Resource that maintains essential cluster data and guarantees that all nodeshave access to the most recent database changes
Quorum
Node fieldsTable 14 Node fields
DescriptionName
Name or alias for the nodeName
Status of the node: Normal (the node status is an active cluster member),Degraded (the node status is down, trying to form or rejoin a cluster, is operating
Status
as an active member of a cluster but cannot host any resources or resourcegroups, or is up but cluster activity is paused), Failed (the node status is downor trying to form or rejoin a cluster), and Other (the node status is unavailableor could not be determined)
IP addresses associated with the nodeIP
NOTE: No information appears in the IP field of a particular node if an Insight ManagementAgent 4.22 or earlier is installed on that node in the cluster.Cluster Monitor shows the condition of Other when all the nodes of a cluster are down.
Network fieldsTable 15 Network fields
DescriptionName
Server cluster object that carries internal communication between nodes andprovides client access to cluster resources
Name
Status of the network: Normal (the network state is online or available),Degraded (the network is partitioned), Failed (the network state is offline), and
Status
Other (the network state indicates that an error has occurred and the exactstate of the network could not be determined or the network state is unavailable)
The subnet mask associated with the network within the clusterMask
State of a particular network in the cluster: Offline (not operational), Partitioned(operational, but two or more nodes on the network cannot communicate),Online (operational), or Unavailable (information is not available)
State
Role the network name plays in the cluster: network name for the cluster, networkname for computer systems in the cluster, or network name for groups in thecluster
Role
Description of the networkDescription
MSCS status 137

Resource fieldsTable 16 Resource fields
DescriptionName
Physical or logical entity that is capable of being owned by a node, broughtonline and taken offline, moved between nodes, and managed as a servercluster object
Name
Status of the resource: Normal (the resource state is online), Degraded (theresource state is Unavailable, Offline, Online Pending, or Offline Pending),
Status
Failed (the resource state is failed), and Other (unable to determine the resourcecondition)
Collection of resources managed as a single server cluster objectGroup
Node on which a resource residesOwnerNode
Server cluster object used to categorize and manage resources that have similarcharacteristics
Type
Disk or drive on which the resource residesDrive
NOTE: A group must have a network name and an IP address associated with it for you to accessgroup resources. A group can be owned by any node in the cluster and can be moved by userswith administrative rights for load balancing and other administrative purposes. When a failuretakes place, the entire group fails over, which prompts the cluster software to transfer all groupresources and data to a different node in the cluster. The resources and data in a transferred (failedover) group are still accessible under the same network name and IP address, even after they havebeen moved to a different node.
Cluster Monitor resource thresholdsCluster resources use thresholds to trigger HP SIM events. The Disk resource sets thresholds for diskcapacity, and the CPU resource sets thresholds for CPU utilization.
Disk capacity thresholdsUse the Disk resource to collect disk capacity data. To access the Cluster Monitor - Node ResourceSettings page where the thresholds are set, select Options→Cluster Monitor→Node ResourceSettings.The threshold values you enter in the Settings for the Selected Resource section define the Minor,and Major ranges for disk utilization on monitored nodes.For each disk, there are four thresholds in pairs. The Minor and Major thresholds are associatedwith a corresponding reset threshold. Utilization enters the Major range when it equals or exceedsthe Major threshold value. It remains in the Major range until it falls to or below the Major resetvalue. Minor and Major reset thresholds behave similarly.You can specify different thresholds for each disk in each node of a cluster.
CPU utilization thresholdsUse the CPU resource to collect utilization data for CPUs in a cluster. To access the Cluster Monitor- Node Resource Settings page where the thresholds are set, select Options→Cluster Monitor→NodeResource Settings.The threshold values you enter in the Settings for the Selected Resource section define the Normal,Minor, and Major ranges for CPU utilization on the selected node.For each CPU, there are four thresholds in pairs. The Minor and Major thresholds are associatedwith a corresponding reset threshold. Utilization enters the Major range when it equals or exceeds
138 Managing MSCS clusters

the Major threshold value. It remains in the Major range until it falls to or below the Major resetvalue. The Minor and Major reset thresholds behave similarly.You can specify different thresholds for each CPU in each node of a cluster.
Cluster resources supported by HP SIMHP SIM supports the following Cluster Monitor resources:
• Disk and CPU resourcesMonitor disk capacity and CPU utilization, respectively. You can set minor and major thresholdsfor nodes in a cluster. When those thresholds are reached, Cluster Monitor creates an HP SIMevent. The event triggers associated e-mail and paging notification as configured in HP SIMoptions.
• SystemMonitors the system health of the cluster member.
Cluster Monitor statesNOTE: The cluster condition is Other when all nodes of a cluster are down.
OtherFailedDegradedNormalList
The node status isUnavailable or could notbe determined.
The node status is downor is trying to form orrejoin a cluster.
The node status is down,is trying to reform orrejoin a cluster, is
The node status is anactive cluster member.
Node
operating as an activemember of a cluster butcannot host resources orresource groups, or is upbut cluster activity ispaused.
The network stateindicates that an error
The network state isOffline.
The network state isPartitioned.
The network state isOnline or Available.
Network
occurred and the state ofthe network could not bedetermined, or thenetwork state isunavailable.
The resource state isUnknown.
The resource state isFailed.
The resource state isUnavailable, Offline,
The resource state isOnline.
Resources
Online Pending, orOffline Pending.
NOTE: For additional information about the MSCS, see Microsoft documentation.
Cluster Monitor polling rateNOTE: You can specify only one polling rate (interval) for all nodes in all clusters. You cannotspecify different rates for different nodes, so the polling fields appear on the configuration pageonly when you select All in both Cluster and Node dropdown lists.
CPU polling rateThe CPU polling rate determines how often Cluster Monitor checks CPU utilization as reported bythe appropriate Insight Management Agent on monitored nodes.Adjust the CPU polling rate by configuring the Cluster Monitor node resource settings.
Cluster Monitor states 139
Disk polling rateThe Disk polling rate determines how often Cluster Monitor checks the free disk space as reportedby the appropriate Insight Management Agent on monitored nodes.Adjust the polling rate by configuring the Cluster Monitor node resource settings.
MSCS status polling rateThe polling rate you enter determines how often Cluster Monitor checks the MSCS status of monitoredclusters.Adjust the status polling rate by configuring the Cluster Monitor's cluster resource settings.
System status polling rateThe system polling rate determines how often Cluster Monitor checks node status as reported bythe appropriate Insight Management Agent running on the nodes.System is a node-level attribute. You can adjust the polling rate by configuring Cluster Monitornode resource settings. The polling rate is a global attribute of the resource, so you can specifyonly one polling interval for all nodes in all clusters. The polling fields appear on the configurationpage only when you select All in both the Cluster and Node dropdown lists.
140 Managing MSCS clusters

26 HP SIM Audit logHP SIM logs all tasks performed by all HP SIM users on all systems. The information is stored inthe Audit Log file on the CMS. Several features of the HP SIM Audit Log are configurable. Forexample, you can specify which tools log data and the maximum Audit Log file size. The HP SIMAudit Log is configured through the log.properties file, and tool logging is enabled or disabledthrough the XML tool definition files.On Windows, the audit log can be found at the <SIM installdir>/logs/mx.log . OnLinux and HP-UX, the audit log can be found at /var/opt/mx/logs/mx.log. These are rolledover to mx.log.old when the file reaches the maximum default size of 20 MB.
Configuring the HP SIM audit logConfiguring the HP SIM Audit log is performed from the CLI, and you must be signed-in as root oradministrator.
Configuring the tool definition filesThe XML tool definition file provides an option to disable logging of SSA and MSA command tools.The log attribute for the command element specifies whether the results of the command are outputto the HP SIM log file. Command output is logged by default.
Configuring the log.properties fileYou might need to create the file and name it log.properties if one does not exist in thedirectory. HP SIM uses default values when the file does not exist or when a variable is not definedin the file.For Windows, the file is located in <SIM installdir>/logs/mx.log.For Linux and HP-UX, the file is located in /var/opt/mx/logs/mx.log. This is rolled over tothe mx.log.old file when it reaches the maximum configured size of 20MB.The file is rolled over to the mx.log.old file when it reaches the maximum configured size of20MB.
Viewing the audit logHP SIM logs all tasks performed by all HP SIM users on all systems. The information is stored inthe Audit Log file on the CMS.
NOTE: You must be signed-in as root or administrator (or any user with administrative rights) toread the audit log file directly.
Procedure 35 Viewing the HP SIM audit log1. Select Tasks & Logs→View Systems Insight Manager Audit Log. The Audit Log page appears.2. Select the log entries you want to view by selecting one of the following options:
• most recent 40 entries. Select this to view a selectable number of the most recent logentries. The default is set to view the 40 most recent log entries.
• from entry " " to entry " ". Select this option to view an indexed range of log entries.3. Click View Now. The requested log entries appear.
Example audit log
Example Audit Log: User "partner" runs tool "ls" on cup11.hp.com from cup12.hp.com from CMS cup12.hp.com
Configuring the HP SIM audit log 141
104611: 2008-04-24 11:17:45 PDT,JOB,PROGRESS,START,JOB,44641_cup12.hp.com,VERBOSE,partner,,, Running Tool:ls Expanded Command Line:ls Targets: cup11.hp.com
104612: 2008-04-24 11:17:45 PDT,JOB,PROGRESS,START,JOB,44641_cup12.hp.com:cup11.hp.com, DETAIL,partner,,, Running Tool:ls
104613: 2008-04-24 11:17:45 PDT,JOB,SUCCESS,DONE,JOB,44641_cup12.hp.com:cup11.hp.com, DETAIL,partner,,, Running Tool:ls Exit Code:0
Log contentThe HP SIM Audit Log contains the following information in the order listed, and the log entry key@!@ precedes all other fields in an audit log entry.
• Time stamp date, time, and time zone
• Category
• Result
• Action
• Object type
• Object type descriptor
• Level
• Session user login string
• (Optional) Session ID
• (Optional) Transaction ID
• (Optional) Session user full user nameThese fields appear in one line. If messages or additional information about a log entry is present,it appears in the next line.
142 HP SIM Audit log
27 HP Version Control and HP SIMAbout the Version Control Agent
The HP VCA is an Insight Management Agent installed on a system that enables you to view HPsoftware and firmware installed on the system. You can configure: HP VCA to point to a repositorymanaged by HP VCRM, enabling easy version comparison and software updates from the repositoryto the system where HP VCA is installed.HP VCA provides version control and system update capabilities for a single HP system. HP VCAdetermines system software status by comparing each component installed on the local system withthe set of individual components or a specified ProLiant and Integrity Support Packs listed in HPVCRM. While browsing to HP VCA, you can update individual components or an entire ProLiantand Integrity Support Packs by clicking the install icon located next to the system software statusicon.HP VCRM and HP VCA are integrated with HP SMH, which is the standard single-servermanagement tool in the HP Foundation Pack. HP SIM, also part of the HP Foundation Pack, usesHP VCRM and HP VCA to facilitate software versioning, update, and tasks related to it.HP VCA is available for Windows and Linux operating systems. HP VCA is an integrated part ofHP SMH and displays the available software inventory of the system it is installed on. HP VCAalso allows the installation, comparison, and update of system software from a repository managedby HP VCRM.Users with administrator or operator privileges can access the HP VCA to maintain the softwareinventory of the system. The installation of components and configuration activities are logged toa log file on the system. HP VCA logs activities, such as software installations. However, installationsdone outside HP VCA do not appear in this log.HP VCA enables you to view software installed on selected HP equipment, available updates, andwhether the installed software complies with the latest updates in the selected repository. In addition,you can add or update HP software on the system remotely, using the browser interface of HPVCA.You can use the Replicate Agent Settings feature in HP SIM to update multiple servers with HP VCAsettings.HP VCA enables the following tasks:
• Viewing installed software• Selecting an HP VCRM as a reference point for obtaining software updates• Selecting a ProLiant and Integrity Support Packs as a managed baseline• Viewing details of a ProLiant and Integrity Support Packs or software component that is in the
HP Version Control repository• Installing a ProLiant and Integrity Support Packs or software component from the HP Version
Control repository• Printing the installed software inventory and software status• Managing the HP VCA logIn addition to maintaining the software inventory of the system, the HP VCA integrates with HPSIM, enabling administrators to take advantage of the Software Update capabilities of the agent.
Additional resourcesFor additional resources, go to http://www.hp.com/servers/manage.
About the Version Control Agent 143

About the Version Control Repository ManagerHP VCRM is an HP Insight Management Agent that manages a directory of HP software andfirmware components. You can use HP VCRM without HP VCA to provide a listing of availablesoftware and firmware to load on the local machine. HP VCRM is part of the HP Foundation Pack.HP VCRM is designed to be used in a one-to-many configuration with a HP VCA installed on eachmanaged HP system to manage installed HP software and firmware. In conjunction with HP SIM,HP VCRM, and HP VCA provides enterprise management of HP software and firmware on HPProLiant and Integrity systems. Alone, HP VCRM can catalog and manage a repository of ProLiantand Integrity Support Packs and software and firmware for HP ProLiant and Integrity systems.
NOTE: Although you can install ProLiant and Integrity Support Packs or component to the localmachine using HP VCRM, you cannot install the software on remote servers unless HP VCA isinstalled on the remote server and using HP VCA.
HP VCRM permits the following tasks:
• Viewing the contents of the repository• Configuring Automatic Update to deliver ProLiant software from HP as it becomes available• Uploading a support pack to the repository from a CD or other accessible media using the
Upload a Support Pack feature• Creating ProLiant and Integrity Support Packs• Deleting ProLiant and Integrity Support Packs and components• Copying ProLiant and Integrity Support Packs and components to another repository• Configuring components in the repository that are flagged as requiring configuration• Updating from HP.com now• Rescanning the repository and rebuilding the catalog• Managing the log• Installing selected components at the local (browser client) system
About integrationFor software versioning and updating, HP SIM relies on HP VCRM and HP VCA. By using theseapplications, HP SIM provides a single view of the software status for managed ProLiant or Integrityservers, and it can update software and firmware on those servers through its powerful query andtask features. Updates can be scheduled and applied to specific sets of servers based onpredetermined criteria, including applying updates only to systems that require an update.
NOTE: HP SIM no longer requires the VCA to be installed on target systems. The new SW/FWBaselines feature performs this task.
To take full advantage of the software update capabilities of HP SIM, verify that the followingconditions are met:
• Every managed target server on the network has the HP VCA installed and is configured touse a repository.
• Every repository that is to be used has the HP VCRM installed.
• You can optionally use the automatic update feature of the HP VCRM to automatically updateall repositories with the latest software from HP.
144 HP Version Control and HP SIM

About software repositoriesUpdating ProLiant Support Packs and components using HP VCRM from a single or multiplerepositories saves time and is key to standardizing software maintenance and update procedureson distributed systems.For maximum manageability and flexibility across operating system platforms, each repository youcreate must conform to the following conditions:
• It must be located on a local drive with write access.
• It must be updated automatically by the HP VCRM.
• It must be managed by HP VCRM.After a repository is created, it must be populated with ProLiant Support Packs and componentsbefore being updated on target HP systems. Although it is optional, the easiest and most efficientway to update a repository is by using the Automatic Update feature of HP VCRM. This featureenables you to schedule an automatic population of the repository. However, the repository canbe updated in one or more of the following ways:
• By using the Automatic Update feature of HP VCRM
• By using the Upload ProLiant Support Pack feature of HP VCRM, which enables users to easilycopy ProLiant Support Packs from a SmartStart CD or other accessible media
• By manually downloading the software into the repository from http://www.hp.com/go/softwaredepot
About multiple system managementThe Software Update capabilities of HP SIM includes the following features:
• Install Software and Firmware. Use to automatically update ProLiant Support Packs andcomponents on HP systems managed by HP SIM. The target systems must have HP VCAinstalled.
• Searching by systems with Software/Firmware. Use to create and display a list of systemswith specific software or firmware versions. For example, a user with administrative rightsmight want to locate and display HP systems with Insight Management Agent earlier than adefined version. The search can then be used with the Install Software and Firmware Task toupdate the systems to the current version of Insight Management Agent.The Install Software and Firmware task can be executed in two modes:
◦ Offline modeOffline task is executed on a baremetal sever (server with no operating system installed)and only supported firmware components are installed on the server. The target systemfor this task is the iLO of the server.
◦ Online modeThis task installs all supported software and firmware components on the server.
• Software Version Status Polling. Use to retrieve software and firmware upgrade statuses fromHP VCA on target systems. Software and firmware inventories are also retrieved from thosesystems during this task.
• Replicate Agent Settings. Use to have HP SIM to retrieve Web Agent configuration settingsfrom a source device and distribute that configuration to target systems through their WebAgents.
These capabilities rely on the integration of HP SIM with HP VCRM and HP VCA.
About the Version Control Agent 145

28 Compiling and customizing MIBsHP SIM; provides the capability of managing systems through SNMP and by receiving incomingSNMP trap events. HP SIM ships with many MIBs pre-configured. For a complete list, see“Out-of-the-box MIB support in HP SIM” (page 211).You can use tools provided by HP SIM tointegrate third-party (non-HP) SNMP v1/v2 MIBs into HP SIM and to provide support for processingand displaying traps from other systems. The MIB syntax extensions supported by HP SIM provideadditional value in customizing specific trap information. Finally, the set of MIBs included with HPSIM to provide out-of-the-box support for many HP systems.Integration of third-party MIBs is a topic for advanced users of HP SIM. Most vendors tend to looselyfollow industry standards for the development of MIBs and MIB compilers. Therefore, it is often thecase that MIBs require some changes and customization on the part of the end-user to properlyintegrate the MIBs with a management application such as HP SIM.This chapter frequently references directories and tool locations throughout the HP SIM directorystructure. This directory structure varies depending upon your installation choices and on theoperating system under which you have installed HP SIM. Typical installation paths are as follows:Windows
• C:\Program Files\HP\Systems Insight Manager\ as the <BASE> installationdirectory
• C:\Program Files\HP\Systems Insight Manager\mibs for all MIB and CFG files
• C:\Program Files\HP\Systems Insight Manager\lbin for mcompile
• C:\Program Files\HP\Systems Insight Manager\bin for mxmibHP-UX and Linux
• /opt/mx as the <BASE> installation directory
• /opt/mx/mibs for all MIB and CFG files
• /opt/mx/bin for mcompile and mxmib
NOTE: Compiling MIBs into HP SIM only enables the console to receive SNMP traps from systems.This does NOT extend the data collection mechanism to collect data points from the compiled MIBsinto the database. This type of functionality is currently not available in HP SIM.
MIB management toolsHP SIM provides three tools for use with MIB integration and trap customization. MIBs are registeredwith HP SIM using two command-line tools. These tools are only accessible to the administrator orroot user of the operating system. They are:
• mcompile
• mxmibIn addition, HP SIM provides a GUI tool to display and edit the trap settings for MIBs alreadycompiled using the command-line tools listed above. This tool is the SNMP Trap Settings page. Theremainder of this section discusses each of the tools provided and elaborates on their specificusage.
mcompileThe mcompile tool verifies the syntax of all MIBs to be loaded into the system. mcompile resolvesall MIB dependencies and, where necessary, converts SNMP v2 MIBs into v1 format for loadinginto the HP SIM database. mcompile is located in the <BASE>\lbin directory and should berun from the <BASE>\mibs directory. mcompile looks for all MIB files in the <BASE>\mibs
146 Compiling and customizing MIBs
directory by default so any MIB that you intend to register should be copied to the <BASE>\mibsdirectory. While mcompile does provide some capability to specify a different directory to searchfor MIBs, as a best practice HP strongly recommends you place all MIBs in the <BASE>\mibsdirectory. Usage for mcompile is as follows:mcompile [-d <dirspec>] <mibfile></
Use of the -d switch is not necessary when you have copied all MIBs, including dependency MIBs,to the <BASE>\mibs directory and execute mcompile from the <BASE>\mibs directory. The -dswitch specifies which directory contains the MIB files to be compiled into HP SIM. The directorypath must be specified as relative to the full path or relative to the <BASE> directory.As output, mcompile produces a CFG file and save it to the <BASE>\mibs directory. This file hasthe same name as the source MIB except it has the .cfg suffix. In the typical usage mentionedabove, the resulting output file would be test.cfg. Running mcompile several times againstthe same source MIB produces multiple revisions of the CFG with the latest version retaining the.cfg extension. CFG files are stripped-down versions of the original source MIBs where allcomments have been removed, all imports from other MIBs have been resolved and substituted asneeded, and the compiler has converted v2 syntax to v1 where appropriate.When compiling MIBs with dependencies, the dependent MIB must be located in the same directoryas the target MIB and must follow a certain naming convention, typically MIBMODULE.MIB. Anexample follows using excerpts from the CPQFCA MIB:
CPQFCA-MIB DEFINITIONS ::= BEGINIMPORTScompaqFROM CPQHOST-MIBenterprisesFROM RFC1155-SMIDisplayStringFROM RFC1213-MIBOBJECT-TYPEFROM RFC-1212TRAP-TYPEFROM RFC-1215cpqSsChassisNameFROM CPQSTSYS-MIB
mcompile searched for compaq by opening the file CPQHOST.MIB and mcompile looks forcpqSsChassisName in CPQSTSYS.MIB. The other imports are resolved automatically whenmcompile runs from the <BASE>\mibs directory. HP provides versions of the RFC 1212, 1213,and 1215 MIBs for automatic import during compilation. mcompile automatically resolves andimports internally from RFC1155.Another example of imports during compilation comes from the BLADETYPE2-TRAP.MIB usedby the HP ProLiant BL p-Class GbE2 Interconnect Switch:
BLADETYPE2-TRAP-MIB DEFINITIONS ::= BEGINIMPORTSTRAP-TYPEFROM RFC-1215sysNameFROM RFC1213-MIBhpSwitchBladeType2-MgmtFROM HP-SWITCH-PL-MIBagSlotNumberFROM BLADETYPE2-SWITCH-MIBipCurCfgGwIndexFROM BLADETYPE2-NETWORK-MIB
MIB management tools 147

In this example, TRAP-TYPE and sysName are readily resolved as in the example above.hpSwitchBladeType2-Mgmt is resolved by mcompile checking HP-SWITCH-PL.MIB. agSlotNumberis resolved from BLADETYPE2-SWITCH.MIB and ipCurCfgGwIndex is resolved fromBLADETYPE2-NETWORK.MIB.To illustrate further how imports are resolved — the following procedure is how mcompile wouldattempt to resolve the import for hpSwitchBladeType2-Mgmt:Procedure 36 How MIB imports are resolved1. Search for a file named HP-SWITCH-PL-MIB.mib (module name, uppercase).2. Search for a file named HP-SWITCH-PL.mib (module name without -MIB, uppercase).3. Search for hp-switch-pl.mib (convert name to lowercase for case sensitivity in
Linux/HP-UX).4. Search for hp-switch-pl.mib.mib (convert name to lowercase for case sensitivity in
Linux/HPUX).5. Report an error indicating that the imported MIB could not be found.A major consideration when importing MIBs is locating variables from other third-party MIBs. Inmany cases, MIBs are named to match module names. However, in some circumstances it mightbe necessary to rename MIB files to match the module names prior to compilation. For example,some vendors might provide MIB files with different extensions such as .my. In this case, beforeusing mcompile, the mibfile.my file must be renamed to mibfile.mib.
mxmibThe mxmib tools registers MIBs into the HP SIM database by using their corresponding CFG files.This tool has the capability to list all registered MIBs, to display a list of traps contained in eachindividually registered MIB, and to unregister MIBs that you or the system have previously registered.
IMPORTANT: While it is possible to unregister MIBs currently registered in the HP SIM database,HP strongly advises you do not unregister any files that have been registered by default. Doing socan impair HP SIM's ability to correctly process traps from other HP systems on the network.If you unregister a MIB from HP SIM, the corresponding received events in HP SIM are automaticallydeleted.
mxmib expects to find all files located in the <BASE>\mibs directory. Usage for mxmib is asfollows:
mxmib -a <myfile.cfg>mxmib -f <mylist.list> mxmib -l mxmib -t <myfile.mib> mxmib -d <myfile.mib>
The switches work as follows:
• -a registers a new CFG, <myfile.cfg>, or replaces the data of a previously registered MIB.
• -f reads and processes a list of CFGs from a file, <mylist.list (one mibname per line)>, toregister with HP SIM. This file must reside in the <BASE>\mibs directory and the full CFGfilename must be listed on individual lines. Each line in the file is processed as it would be byrunning the mxmib -a command individually on each individual MIB file.
• -l lists all the MIBs registered in HP SIM. Supplying no arguments to mxmib defaults to runningmxmib -l.
• -t lists the traps in the specified MIB <myfile.cfg>.
• -d unregisters a MIB, <myfile.cfg>, from the HP SIM database.
148 Compiling and customizing MIBs

The initial command to register the file uses the .cfg extension, but all subsequent commandsrefer to the file by its .mib extension.
IMPORTANT: mxmib is order sensitive. While the command enables you to compile MIBs whosedependencies have not been compiled, for optimal results, HP recommends that you register MIBswith HP SIM in order of dependency. If you do not compile MIBs in order of dependency, HP SIMmight not properly resolve varbind data for incoming traps from MIB X when a varbind has beenimported from MIB Y that was not registered prior to registering MIB X. MIB dependencies aretypically identified at the top of MIB files in the IMPORTS section ad are discussed in the mcompilesection. Note that failing to compile imported MIBs properly does not block reception of traps; itonly limits the data captured for some traps.
mxmib MIB keyword customizationAfter using mcompile to parse and validate the source MIB, you can customize the resulting CFGfile for support in HP SIM. Specifically, there are special keywords that can be defined on a per-trapbasis. At the conclusion of this section, there is a full example. The keywords and their usage areas follows.--#TYPEThe TYPE keyword provides a way to add a short description of the trap to HP SIM. This shortdescription can be used when sending a paging message. This enhances the ability to transmitinformation without being verbose. This keyword does not provide any functional purpose; however,it does represent the primary display string for the trap when it is displayed in HP SIM. Note thatwhile the TYPE field does not need to be unique, but HP recommends that the combination of TYPEand CATEGORY fields form a unique pair so that this event can be effectively searched for usingthe Event by Category/Type search criteria.--#SEVERITYThe SEVERITY keyword can be used to alter the severity of a trap. The vendor who created theMIB might have decided that the trap, under most circumstances, only warrants a severity level ofinformational. However, you might need to escalate the trap's severity based on operationalimportance. Therefore, this keyword overrides default severity. The allowable severity levels areshown below. Many vendors have different severities specified in their MIBs such as Normal,Warning, Degraded, Broken, and so on. These severities must be changed in the base MIB orCFG to one that matches HP SIM. For example, Degraded can be mapped to Minor or Major,depending on the degradation. Editing the MIB or CFG and doing a search/replace on theseverities is the easiest way to tweak the MIB. HP SIM also provides a GUI to change the SEVERITYafter MIB compilation.
• INFORMATIONALEvents of this type require no attention. They are provided as useful information.
• MINOREvents of this type indicate a warning condition that can escalate into a more serious problem.
• MAJOREvents of this type indicate an impending failure.
• CRITICALEvents of this type indicate a failure and signal the need for immediate attention.
--#ENABLEThe ENABLE flag can be set to TRUE or FALSE and can effectively enable or disable a trap frombeing processed by HP SIM. The usage for the keyword is either TRUE to indicate that the trapshould be processed or FALSE to indicate that this trap should not be processed. By default, thiskeyword is TRUE and should only be explicitly overwritten on an exception basis.
MIB management tools 149

--#CATEGORYThis provides a categorization of the trap for ease of viewing and use in forming HP SIM lists. Youcan use predefined categories or, if none of these fit your need, you can create a category befittingyour circumstances. The HP SIM SNMP Trap Settings page provides a GUI to change the CATEGORYafter MIB compilation. The predefined categories in HP SIM are shown below.
• APPLICATION
• ARCserve Events
• CommandView Events
• Common Cluster Events
• Cpqdscs
• Data Protector Events
• General Backup
• Giga Switch Events
• HP Open View Internet Services Events
• HP OVSAM Events
• HP Service Events
• HP-UX EMS Events
• Integrity Server Events
• IO Drive Events
• NetServer Events
• PATROL Events
• PowerDevice
• ProLiant Application Events
• ProLiant BL p-Class GbE Interconnect Switch Events
• ProLiant BL p-Class GbE2 Interconnect Switch Events
• ProLiant Cluster Events
• ProLiant Miscellaneous Events
• ProLiant NIC Events
• ProLiant Operating System Events
• ProLiant Rack Events
• ProLiant Remote Management Events
• ProLiant Storage Events
• ProLiant System and Environmental Events
• ProLiant UPS Events
• RFC 1215 SNMP Trap Events
• SAN Appliance Events
• Server Net Events
• ServiceGuard Events
• STORAGE
• SWCC Events
150 Compiling and customizing MIBs

• SYSTEM AND ENVIRONMENTAL
• Tandem EMS Events
• TruCluster Events
• Unassigned
• Unisys Configuration Agent Events
• UNKNOWN
• WYSE Events
• ZESA
• ZHRM--#MSG_FORMATTERThis keyword has a number of HP SIM specific commands. These commands are parsed andexecuted when a paging or e-mail Automatic Action on Event rule is created and exercised withinHP SIM. You might view these commands as a paging or e-mail command language. The generallayout of each command contains an operand and descriptive text associated with the operand.The descriptive text must be delimited by a # pair. If the parser within HP SIM does not recognizea command, it will disregard that command without providing any additional feedback.
IMPORTANT: Changing the MSG_FORMATTER string is only recommended for extremelyadvanced users. Always back up any files that are modified so that they can easily be restored.Also, for HP ProLiant traps, HP has already generated intelligent messages that are registered bydefault with HP SIM.
Referring to the following tables, the V keyword represents varbind information specific to individualtraps. Numerically, all V definitions match the varbinds as they appear in the trap.
Table 17 Varbind keywords and descriptions
CommentsDescriptionKeyword
Label will reflect the value selected. Thiswill vary on a trap-to-trap basis.
Includes value for varbind anddescriptive text (in this case, Sometext#)
$VnV#Some text#
Label will reflect the valve selected. Thiswill vary on a trap-to-trap basis.
Includes the varbind description thatis only available within HP SIM
$VnD#Some text#
Text that could be added to add clarityto output data. Used to form varbinddata into text sentences.
Used to add text or formatting toheaders
$Hdr#Some text#
Also, if the beginning keyword in the trap definition file is a $!, that tells the HP SIM parser todisregard the global settings and to use only the trap definition file keywords. See example below.
cpqDa5PhyDrvStatusChange TRAP-TYPEENTERPRISE compaqVARIABLES { sysName, cpqHoTrapFlags, cpqDaPhyDrvStatus,cpqDaPhyDrvCntlrIndex, cpqDaPhyDrvBusNumber,cpqDaPhyDrvBay, cpqDaPhyDrvModel, cpqDaPhyDrvFWRev,cpqDaPhyDrvSerialNum, cpqDaPhyDrvFailureCode }DESCRIPTION "Physical Drive Status Change. This trap signifies that the agent has detected a change in the status of an HP Drive Array physical drive. The variable cpaDaPhyDrvStatus indicates the current physical drive status. User Action: If the physical drive status is failed(3) or predictiveFailure(4), replace the drive."
--#TYPE "Physical Drive Status Change" --#SUMMARY "Physical Drive Status is now %d." --#ARGUMENTS {2}
MIB management tools 151
--#SEVERITY CRITICAL--#TIMEINDEX 99--#MSG_FORMATTER "$V1V#Computer: # $V3V#Drive Status: # $V9V#Serial Number: #"::= 3029
The e-mail or pager output would appear as:
Event Notice ID: 3029Computer: CRONUSDrive Status: FAILEDSerial Number: WS7000134715Event Description: Physical Drive Status Change. This trap signifies that the agent has detected a change in the status of an HP Drive Array physical drive. The variable cpaDaPhyDrvStatus indicates the current physical drive status. User Action: If the physical drive status is failed(3) or predictiveFailure(4), replace the drive.Event Time: 01/09/2003 15:46: PM
Event Notice ID, Event Description and Event Time are inserted by HP SIM into all event notificationsand that Computer (V1, sysName), Drive Status (V3, cpqDaPhyDrvStatus) and Serial Number (V9,cpaDaPhySerialNum) are customized to this specific trap.Using the preceding example and adding the $!--#MSG_FORMATTER "$! $V1V#System Name: # $V3V#Drive Status: # $V9V#SerialNumber: #"
The e-mail or pager output would be:
System Name: CRONUS Drive Status: FAILED Serial Number: WS7000134715
Using the $Hdr keyword in conjunction with $! to further customize the display could be as follows:--#MSG_FORMATTER "$! $Hdr#The # $V1V#system # $Hdr#had the following #$V3V#Drive Status:# $Hdr#. The system Serial Number # $V9V#is #$Hdr#.#"
The e-mail or pager output would be:The system Cronus had the following Drive Status: failed. The systemSerial Number is WS7000134715
IMPORTANT: For the TYPE, CATEGORY, and MSG_FORMATTER keywords described above,the value for these keywords must be encapsulated in quotes, such as xxx for the mxmib tosuccessfully register the MIB in question. Other keywords such as SEVERITY and ENABLE do notrequire quoted values.
SNMP Trap Settings pageThe SNMP Trap Settings page has the capability to modify the attributes of any trap that has beenregistered with the HP SIM database. The attributes that are available for modification include theshort and long descriptions, severity, category, and the trap enable/disable flag. Use the interfaceon this page to first select the registered MIB containing the trap in which you are interested, andthen select the specific trap you wish to modify.
152 Compiling and customizing MIBs
Fields can be modified as follows:
• The Description field is the long description stating the nature of the trap. The Description fieldis used on the Event detail page and can be included in paging and e-mail notifications. Thisfield corresponds to the DESCRIPTION keyword in the CFG files.
• The Event Type field is the short description and is used as the display string when viewing alist of events. The event type can also be used as part of a paging or e-mail notification. Eventtype fields have been custom-created for all of the HP ProLiant hardware events. However,for many other MIBs they have not been customized. Tailoring this field to present a clearmessage is crucial for presenting meaningful event data in HP SIM. This field corresponds tothe #TYPE keyword in the CFG files.
• The Severity field can be set to CRITICAL, MAJOR, MINOR, or INFORMATIONAL. The defaultis INFORMATIONAL when no other severity has been set by the base MIB. Many vendorshave different severities specified in their MIBs such as Normal, Warning, Degraded, Broken,etc. These severities need to be changed in the base MIB or CFG to one that matches HP SIM.For example, Degraded can be mapped to Minor or Major, depending on the degradation.Editing the MIB or CFG and doing a search/replace on the severities is the easiest way totweak the MIB. This field corresponds to the #SEVERITY keyword in the CFG files.
• The Category field is used to logically group similar events for display purposes in HP SIM.These groups are shown when you create event lists and when configuring Automatic EventHandling. This is extremely helpful when wanting to group specific networking, storage, andother traps to be easily found in the user interface. This field corresponds to the #CATEGORYkeyword in the CFG files.
• The Enable Trap Handling field can be toggled to support or suppress events on a per-trapbasis. HP recommends that all traps remain Enabled and are only disabled when they arewell-understood and can be ignored without any impact. By disabling a specific trap, youare telling HP SIM to ignore that trap once received. If a trap is disabled, then the trap isdropped and not logged in the database. This field corresponds to the #ENABLE keyword inthe CFG files.
MIB management tools 153

A Important NotesSystem and object names must be unique
System and object names must be unique in HP SIM.For example, the name of a Virtual Connect Domain must not be identical to the name of a VirtualConnect Switch, or they can be confused in HP SIM. The Virtual Connect Domain is a virtual systemwith no physical network address. The Virtual Connect Switch is a physical system that is networkaddressable.
Setting the Primary DNS Suffix for the CMSIMPORTANT: If the Windows server you are installing HP SIM onto is a multi-homed systemserving up multiple IP addresses across multiple domains, then it is important that the server hasthe primary DNS suffix defined for the system. The primary DNS suffix must be displayed in theSystem Properties as part of the Full computer name for the server.
In Windows:Procedure 37 Setting the Primary DNS suffix of the CMS BEFORE installation1. From the Windows Control Panel, click System. The System Properties window appears.2. Select the Computer Name tab. The Computer Name window appears.3. Click More. The DNS Suffix and NetBIOS Computer Name window appears.4. Enter the primary DNS suffix name in the Primary DNS suffix of this computer field.5. Continue clicking OK until you return to the Control Panel.To fix the issue AFTER HP SIM installation, complete the following:Procedure 38 Deleting duplicate CMS AFTER installation1. From the command line, run ipconfig/flushdns.2. In the HP SIM UI, on the system view page, select the duplicate CMS system you want to
remove.3. Click Delete. If the system cannot be deleted, select the other CMS system and delete it.4. Select the remaining CMS system, and then select Options→Identify Systems.5. Select target systems, and then click Run Now.
Distributed Systems Administration Utilities menu options not availableThe Distributed Systems Administration Utilities (DSAU) menu items do not work on a HP SIM 6.0HP-UX CMS. A new version of DSAU will be released to the web in the future.
Virtual machine guest memory reservation sizeIf HP SIM is installed on a virtual machine guest, but does not start and an emptymxdomainmgr.0.log file is observed in the installation/logs directory, then use the virtualmachine configuration tools to set the guest's memory reservation size to be a minimum of 4GB.
Insight Remote Support Advanced compatibilityIMPORTANT:If a version prior to A.05.40 of Insight Remote Support Advanced is installed, you must update itto version A.05.40 or higher to preserve configuration information and avoid some manualconfiguration steps. The latest version of Insight Remote Support Advanced is available at: https://h20392.www2.hp.com/portal/swdepot/displayProductInfo.do? productNumber=RSADVANCED
154 Important Notes

Database firewall settingsWhen using MSDE (or Microsoft SQL Server 2005 Express Edition), Microsoft SQL, or Oracledatabase server located on a remote Windows XP SP2 server, the firewall settings on the remoteserver must be turned off. To do this:1. Select Start→Control Panel→Windows Firewall.2. Select Off.
Annotating the portal UIAnnotation refers to adding a small amount of textual information, such as the name of the CentralManagement Server (CMS), near the product name when browsing to the CMS. Areas that canbe annotated are the browser's title bar, the sign-in page, and the banner. Annotation is supportedby adding values to globalsettings.props entries whose names are:
ANNOTATION_SIGN_IN_PAGE_HTMLANNOTATION_BANNER_HTMLANNOTATION_BROWSER_TITLE_TEXT
The names all begin with ANNOTATION_ so that they sort together and are easy to find. They endwith _HTML or _TEXT to indicate how the value is treated as HTML or text. Note that simple textis valid HTML.Browser title annotation uses ANNOTATION_BROWSER_TITLE_TEXT:
• The annotation is appended to the product name in the browser title.• The annotation is treated as text.• The annotation is prepended with a space.Sign-in page annotation uses ANNOTATION_SIGN_IN_PAGE_HTML:
• The annotation is put below the product name.• The annotation is treated as HTML.• The annotation uses the same style (font, font size, and so on) as the product name but can
be modified by using HTML in the annotation.Banner annotation uses ANNOTATION_BANNER_HTML:
• The annotation is appended to the product name in the banner of the portal.• The annotation is prepended with a space, for both maximized and normal portal states.• The annotation uses the same style (font, font size, etc.) as the product name but can be
modified by using HTML in the annotation.The globalsettings.props file is a text file that can be manually edited. It is located at:
• On Windows: It is typically located at C:\Program Files\HP\Systems InsightManager\config\globalsettings.props.
• On HP-UX and Linux: It is located at /etc/opt/mx/config/globalsettings.props.Alternatively, when setting simple values, the mxglobalsettings command line utility can beused. The following is an example of setting simple values from the command line:
mxglobalsettings -s ANNOTATION_SIGN_IN_PAGE_HTML=alwayson.company.com mxglobalsettings -s "ANNOTATION_BANNER_HTML=- alwayson.company.com" mxglobalsettings -s "ANNOTATION_BROWSER_TITLE_TEXT=- alwayson.company.com"
Security bulletinsHP software products contain multiple third-party components, such as OpenSSL. HP discloses thatthe non-HP owned software components listed in the Systems Insight Manager end user licenseagreement (EULA) are included with Systems Insight Manager.
Database firewall settings 155

To view the EULA, use a text editor to open the eula_license.xml file, and search forthird-party software .HP addresses security bulletins for the software components listed in the EULA with the same levelof support afforded HP products. HP is committed to reducing security defects and helping youmitigate the risks associated with security defects when they do occur.HP has a well defined process when a security defect is found that culminates with the publicationof a security bulletin. The security bulletin provides you with a high level description of the problemand explains how to mitigate the security defect.Procedure 39 Subscribing to security bulletins1. Open a browser to the HP home page:
http://www.hp.com2. Click the Support & Drivers tab.3. Click Sign up: driver, support, & security alerts, which appears under Additional Resources
in the right navigation pane.4. Select Business & IT Professionals to open the Subscriber's Choice web page.5. Do one of the following:
• Sign in if you are a registered customer.• Enter your email address to sign-up now. Select Driver and Support alerts and click
Continue.
Validating RPM signaturesThe RPMs for HP SIM for Linux are digitally signed with HP's official private key. You can use therpm-hpPublicKey.pub provided with the HP SIM's Linux distribution or go to the official HPwebsite to download HP's public code signing key.
Checking which public keys are installedCheck which public keys are installed on your system with the following command:# rpm -q grep-pubkey
Where grep-pubkey finds all the public keys installed on the system.Alternatively, you can use the rpm -qi command to show more details about the certificates.The following procedure installs HP's code signing public key.# rpm --import rpm-hpPublicKey.pub
Validate the signature on an RPMUse the rpm -checksig" command to validate and verify the digital signature of an RPM. Theoutput from the command indicates whether or not the RPM is correctly signed, as shown in theexample below:# rpm --checksig <hpsimrpm>
How to check RPM signatures within the sysmgmt.binTo check RPM signatures in the sysmgmt.bin before installing HP SIM, complete the followingprocedure:
chmod +x sysmgmt.bin ./sysmgmt.bin --keep --confirm (and type y to extract the archive and n to execute ./mxbundle.server.postinstall)
156 Important Notes

This creates a temporary directory. For example, makeself-32350-20091024210345, is wherethe HP SIM RPMs will be located. You can use the rpm --checksig command to verify the HPsignature of the RPMs. After verifying the RPM, enter ./sysmgmt.bin to install HP SIM.If you install HP SIM sysmgmt.bin without installing the HP public key, you will receive thefollowing warning:
Installing hpsim* ... warning: hpsim-C.06.00.00.00.%20091027-1.i386.rpm: V3 DSA signature: NOKEY, key ID 2689b887
Central Management ServerResource-intensive applications such as HP Insight Control performance management have sometimesencountered problems working with large numbers of systems. In an effort to improve the stabilityof the CMS, HP SIM imposes a limit of 2000 systems on the information that is provided to theseapplications. This limit can be changed, if necessary, by adding a new property namedMaxNodesViaSOAP to globalsettings.props and setting it to the desired number of systems.Setting MaxNodesViaSOAP to a negative number disables the limit checking. In some cases,setting this limit to a number greater than 2,000, or disabling the limit, can results in errors, includingthe possibility of HP SIM hanging or crashing.-------------------------------------------------------------Installing the CMS on Windows uses the user desktop locale to determine the CMS locale. Forexample, if you install the CMS on a German Windows system and the user desktop locale happensto be English, then the CMS installed becomes an English CMS.The language of mxlog.txt (a log file) currently depends on the CMS locale. If the installer userdesktop locale is German, mxlog.txt is logged in German, even though the CMS is installedon an English Windows system and the browser locale is also English.This happens because the Log On As property of the HP SIM service is configured as the installuser name, instead of Local System, which specifies system environment. Running the service withthe credentials of the user that installed the application is necessary for the service to have thenecessary credentials for database access and other CMS settings.If you want the logs to be in a different language (German or English), you have three options:• Stop HP SIM service. Change the default locale of the user account specified in the Log On
As property of the HP SIM service (the user that performed the install) to the desired language,and restart the service.
• Stop HP SIM service. Change the Log On As user for the HP SIM service to the localadministrator account, and be sure its locale is set to the desired language. Restart the service.
• If you do not want to change the default locale of either of the previous accounts to the desiredlanguage for the logs, create a new administrator-level account with the desired default locale.Then uninstall HP SIM and reinstall HP SIM specifying the new administrator-level account.
-------------------------------------------------------------On a Windows NT 4.0 system running Internet Explorer 6 Service Pack 1, remotely browsing intoa CMS causes a DLL failure after being connected for hours. This issue occurs on a Windows CMSand on an HP-UX CMS.
Complex systems displaying inconsistency with the number of nPars withinthe complex
When viewing the complex through the System Page or Report, the number of nPars represent thetotal number of nPars that can potentially be in the complex, regardless of the state of the individualnPars. Alternatively, when viewing nPars within a complex under a system collection, the numberof nPars associated with a complex is equal to what HP SIM has determined through a WBEMprovider. Therefore, the number of nPars shown in the system collection might be less than or equalto the number displayed in the System Page or Report.
Central Management Server 157

Configure or Repair AgentsConfigure or Repair Agents tasks that combine Critical, Unknown, and Unmanaged targetedsystems appear to hang at 0% but will eventually complete.
Data collection reportsData Collection reports might report the network interface for HP-UX systems incorrectly. This isdue to an issue with SNMP agents on HP-UX. In the future, the HP-UX WBEM provider will includea Link Aggregate Provider to report the network interface on HP-UX systems, and HP SIM can thenprovide the correct data from the WBEM provider.
158 Important Notes
B TroubleshootingAdobe
HP SIM requires Adobe 10 plugin on remote browsing machines. Adobe 11 is not compatiblewith HP SIM and might produce errors.
Agentless Management ServiceAMS re-installation through Configure or Repair Agents on an RHEL 6.2 target might fail, eventhough the force install option is selected. Uninstall AMS from target and then install throughConfigure or Repair Agents, it will install it successful.
AuthenticationSSH key authentication is not configured when a system is discovered for the first time.SSH configuration for Linux and HP-UX systems:Procedure 40 SSH configuration for Linux and HP-UX systems1. On the HP-UX system being managed, edit the following file:
/opt/ssh/etc/sshd_config
On the Linux system being managed, edit the following file:/etc/ssh/sshd_config~
2. Search for the following line:KerberosAuthentication yes
3. Edit the line as follows:KerberosAuthentication no
4. Restart the sshd process.-------------------------------------------------------------On a Linux or ESX system, you might receive the following error when running the mxagentconfigcommand or through Configure or Repair Agents:Configuration failed to complete due to the following exception: Couldnot access the file or directory sshd_config.orig on the target systemesxhost1. Remote system reported following error message: Permissiondenied. Check whether the directory or file exists or whether the userhas the operating system permission to access it.
Solution:You must manually change the permissions in the file to 644.
Blade insertionWhen a Blade is inserted in to an enclosure, Onboard Administrator will notify HP SIM about thisevent through a Blade Insertion Trap. In order to synchronize the topology of the Enclosure withinHP SIM, upon reception of Blade Insertion trap HP SIM triggers reidentification on the OnboardAdministrator. Since this operation is triggered immediately upon trap reception, it was observedthat at times the Onboard Administrator is still not ready with the latest updated information. Thisresults in an error message in HP SIM that the Onboard Administrator XML is incomplete which israised as an event and can be seen from All Events in HP SIM.To work around this issue, reinitiate identification on the Onboard Administrator after waiting fora moment. Live lab tests have shown that, after waiting for 60 seconds (one minute), the informationin Onboard Administrator is refreshed. The time taken could be lesser than this at times, but 60seconds is a conservative time interval which could be relied upon.In HP SIM 7.1, upon reception of Blade insertion trap from Onboard Administrator, rather thanimmediately kicking off reidentification HP SIM waits for a configurable interval of time and theninitiates re identification. The configurable parameter is bladeInsertDiscoveryWaitTime
Adobe 159

This parameter is a global setting and is currently configured to 60 seconds. For all practicalpurposes this interval is sufficient. However if there is a case due to slow responding systems, ifthis interval is found to be insufficient, then you can change the default value through the commandline interface: go to <sim_install_dir> and execute the following command: mxglobalsettings-s bladeInsertDiscoveryWaitTime=120, where 120 represents the new value in seconds.
BrowserIf you are using a Firefox browser, you should avoid remaining on the Task Results page for anextended period of time. If you notice the browser becoming sluggish while viewing the TaskResults page, you should sign out of HP SIM to allow the browser to release memory. You canthen sign back in.-------------------------------------------------------------My Browser is displaying an error message Communication with the HP SIM serverhas been lost.Solution: The HP SIM portal relies on the CMS to respond quickly to all requests.• If the CMS is slow to respond to one request, browser performance can fall significantly during
that time.• If the CMS is slow to respond to two requests, the browser appears to lock up completely
during subsequent interaction; the browser does not send additional requests until there arefewer than two outstanding requests.
• If four sequential ping-like requests takes more than 30 seconds each to complete, due eitherto request queuing or slow CMS response, the browser displays the message, Communicationwith the HP SIM server has been lost, even though the CMS might still beresponsive to other browser sessions.
By default, web browsers are limited to two simultaneous connections to a single web server. Iftwo requests are outstanding, any additional requests wait until one of the current connectionscompletes. This is by design and is in agreement with the HTTP 1.1 specification. The HP SIM UIgenerates many requests, many of them simultaneously. The HP SIM portal relies on the CMS torespond quickly to all requests. On a LAN, the browser receives a CMS response to most requestswithin 10 to 100 milliseconds, which is nearly instantaneous. Requests that involve databasequeries or secondary network communication might take a few seconds to respond. The followingsituations might result in particularly slow response times:• Viewing large collections of systems or events.• Specific or custom database queries taking an unexpectedly long time.• Many users simultaneously accessing a shared resource, such as the database.• Pages (for example, System Properties) that retrieve data using WBEM or SNMP and display
the results, especially when the requests are destined to time out.Solution: The maximum number of server connections can be increased in both Internet Explorerand Firefox. The default number of connections is two. Though you can increase this number intothe hundreds, it's recommended not to exceed ten. For more information, see:• Internet Explorer: http://support.microsoft.com/kb/282402/• Firefox: http://kb.mozillazine.org/Network.http.max-persistent-connections-per-server-------------------------------------------------------------When browsing to HP SIM using Microsoft Internet Explorer 6.0.3790.0 on Windows 2003, thebillboard in lower corner of the Home page is blank.Solution: Enable Play Animations in Web Pages in Internet Explorer. To access this, selectTools→Internet Options→Advanced, and then select Play Animations in Web Pages under theMultimedia section.-------------------------------------------------------------
160 Troubleshooting

If you receive a Page Not Found browser error when launching HP Insight Control performancemanagement tools from within HP SIM, the CMS name link might not have resolved correctly onthe network.Solution: Note the name being used in the browser window, verify that the name resolves on thenetwork, and that it is not being affected by any proxy settings in the browser.-------------------------------------------------------------When you try to browse to the HP SMH on the same Linux system that HP SIM is installed, youmight receive multiple browser warning messages.Solution: Complete the following:1. Open a terminal window.2. At the command prompt, enter: /etc/opt/hp/hpsmh/certs /opt/hp/hpsmh/certs3. Press the Enter key.4. At the command prompt, enter: service hashed restart5. Press the Enter key.
Central Management ServerResource-intensive applications such as HP Insight Control performance management have sometimesencountered problems working with large numbers of systems. In an effort to improve the stabilityof the CMS, HP SIM now imposes a limit of 2000 systems on the information that is provided tothese applications. This limit can be changed, if necessary, by adding a new property namedMaxNodesViaSOAP to globalsettings.props and setting it to the desired number of systems.Setting MaxNodesViaSOAP to a negative number disables the limit checking. In some cases,setting this limit to a number greater than 2,000, or disabling the limit, can results in errors, includingthe possibility of HP SIM hanging or crashing.-------------------------------------------------------------When you cannot access HP SIM on a Windows system using a full DNS host name, your WindowsDNS; configuration is not set properly.Solution: There are several reasons and workarounds for this:• The TCP/IP Settings for your Network Connection are not configured properly.
HP recommends the following workaround:1. On the CMS, open the Control Panel, and select Network Connections→Local Area
Connection Settings→Internet Protocol (TCP/IP)→Properties→Advanced.2. Select the DNS tab.3. Be sure that DNS suffix for this connection contains the full DNS suffix for the system.4. Be sure both the Register this connection's address in DNS and the Use this connection's
DNS suffix in DNS registration checkboxes are selected.
• The System name for the CMS is not configured properly.HP recommends the following workaround:1. On the CMS, open the Control Panel and select System.2. Click Network Identification.3. Click Properties or Change next to the Rename this computer or Join a domain field.4. In the dialog box, click More.5. Be sure the primary DNS suffix is set correctly. If not, set it, and click OK until all dialog
boxes are closed.
• The proxy settings on the client browser is configured to proxy local systems.HP recommends the following workaround:1. In Internet Explorer, select Tools→Internet Options→Connections→LAN Settings and then
select Use a proxy server for your LAN.2. Click Advanced.3. Add the DNS suffix for the CMS to the Exceptions list.
Central Management Server 161

4. Click OK until all dialog boxes are closed.
• The company DNS servers could be having problems.HP recommends that you contact your company's network support group.
ComplexYou cannot delete a complex and all associated systems when you first select either the system orcomplex alone and then try to delete.Solution: You must select all associated systems from the list for the deletion to work correctly.
Configure or Repair AgentsThe Remote Registry service is not started by default on the workstations like windows7 andWindows Vista. If this service is not started, then Configure or Repair Agents on these target systemswill fail.To start the service, follow the steps below:Procedure 41 Starting Remote Registry service1. Enter services.msc in run. This displays the list of services.2. Select the Remote Registry Service and start it and also change the startup type to Automatic.-------------------------------------------------------------Configure or Repair Agents cannot be used to install the WBEM Providers to Integrity Windowssystems.You must manually install the WBEM provider by copying cp010621.exe (can be found in thesmartcomponents directory under the HP SIM install) to the target system and then running it.-------------------------------------------------------------HP-UX 11.31 does not ship with smbclient, therefore, any Configure or Repair Agents task froman HP-UX 11.31 CMS to a Windows target fails until smbclient is installed on the CMS.Solution: A back up smbclient is located under /opt/mx/bin/smbclient. Copy this to theopt/samba/bin/smbclient folder to execute the Configure or Repair Agents task.-------------------------------------------------------------How do I push an SSH key using mxagentconfig to a target system running Windows Vista?Solution: HP recommends turning off the Windows Vista User Account Control.How do I push an SSH key through Configure or Repair Agents on Windows 2008?Solution: HP recommends disabling User Account Control on Windows 2008 systems.
NOTE: Configure or Repair Agents is not supported on Windows Vista.
-------------------------------------------------------------I received a connection failed error in Configure or Repair Agents on Windows XP.Solution: You might have Windows XP SP2 or later installed. Windows XP SP2 disables adminshare. You must enable admin share by using the command net share admin$.
Container ViewWhen the SNMP protocol is disabled and the WBEM protocol is enabled, the HP IntegratedLights-Out (iLO) firmware version is displayed as Not Available in tool tip of the Picture View.Solution: To view the iLO firmware version, enable the SNMP protocol. To do so, selectOptions→Protocol Settings→Global Protocol Settings.Solution: This can happen when the enclosure contains at least one double dense blade (BL2x220cor ProLiant xw2x220c Blade Workstation) and all the slots in the enclosure are populated with theservers. A double dense blade contains 2 servers per blade: an A and a B server. Some of thecases where the number of servers exceeds the available slots in the enclosure are:
162 Troubleshooting

C7000 containing 15 BL servers (single sided) and 1 Double dense server = 17 serversC7000 containing 10 Double dense servers = 20 serversTherefore with number of servers exceeding the number of available slots, the B side of each bladebeyond the 8th double dense blade or beyond the 16th blade will be missing from HP SIM. Theservers can still be discovered, but they will not be associated with the enclosure or will not beshown in enclosure container view-------------------------------------------------------------The table view of a rack appears empty but the container view has a rack diagram.Solution: This error can happen if you unplug the power supply and then plug it back in. Therefore,you must re-run discovery.-------------------------------------------------------------HP ProLiant BL e-Class blade servers or the HP bc1000 blade PC container view is empty but thetable view displays all blades correctly.Solution: This happens when the Integrated Administrator is discovered before blades arediscovered. Therefore, run identification on the Integrated Administrator management processor.1. Select Options→Identify Systems.2. Select the ProLiant BL e-Class Integrated Administrator.3. Click Run Now.
CredentialsIf you have problems where credentials are not being saved in Systems Insight Manager on aFirefox system, HP recommends you use latest version available of Firefox. Reference:http://support.mozilla.org/en-US/questions/919779http://support.mozilla.org/en-US/questions/922291-------------------------------------------------------------When more than one credential is not specified on the Edit System Credentials page, ESXi 5.0 willbe discovered with multiple WBEM credentials.• If an ESX system is in lock down mode enabled, Sign-In and WBEM credentials will be masked
on the System Credentials page.• If an ESX system is in lock down mode enabled, Sign-In and WBEM credentials will be masked
under view all System Credentials page.• If an ESX system is in lock down mode enabled, Sign-In and WBEM credentials will be disabled
for editing on the System Credentials page..-------------------------------------------------------------For HP SIM to set the sign-in credentials for a system after successful discovery, be sure the followingsettings are made:• If the system that is being discovered only supports WBEM/WMI protocols apart from SNMP;
for example, Windows systems, then for HP SIM to set Sign-in credentials, enter theWBEM/WMI credentials under the Sign-in credentials tab. Do not enter the credentials underthe WBEM/WMI credentials tab in the discovery task.
• If the system that is being discovered supports multiple protocols apart from SNMP, like WBEMand SSH, be sure either the SSH or WBEM credentials are entered under the Sign-in credentialstab in the discovery task.
-------------------------------------------------------------If you delete a credential (system credential, global credential, or one configured with a discoverytask) while discovery or identification is running, and that credential is found to work with a system,the attempt to write the working credential to the database fails because the original credentialhas been removed. If you try to view System Credentials for such a system, the system will not belisted in the Credentials that are in use table, or the table includes No data available. Normally,
Credentials 163
a system is listed in this table; even one with no working credentials is listed with an Access Typeof None.To resolve this issue, restart HP SIM to remove any extraneous database records, and re-run thediscovery or identification task.
Data CollectionCapacity information is not available from providers for passively managed storage arrays.-------------------------------------------------------------If you have more than 2000 objects in an array, you must increase the default data collection timeto 32400, by modifying the Storage_DC_Timeout field in the globalsettings.props file.When the number of objects to be collected on any given storage array exceeds 1000, it is possiblethat data collection will fail for the array with a default timeout value of 10800 seconds.-------------------------------------------------------------After a HP SIM upgrade, the Data Collection task might fail when executed.Solution: Following upgrade procedures, you must run either the Identification Task or SystemDiscovery Task against the systems for them to be reconciled following the completed upgradeprocedure. The Daily Identification task is available by default and can be ran be any time byselecting Run Now. In a future release, the upgrade process will incorporate the automatic launchingof the Identification task against discovered systems.-------------------------------------------------------------The Data Collection task for an Onboard Administrator times out on non-Windows CMS.Solution: This affects the individual task only and does not affect other tasks in the batch.-------------------------------------------------------------HP SIM might report duplicate entries for array controllers if the data is collected using both WBEMand SNMP protocols on a HP Insight Management WBEM Providers for Windows Server2003/2008 target.Solution: To see the correct data in report, you can perform data collection by disabling one ofthe protocols. You can also access HP SMH to see the correct number of array controllers.-------------------------------------------------------------You see a problem with more than two mxinventory processes starting on the CMS.Solution: Complete the following:Procedure 42 Issue with two mxinventory processes starting1. Verify that your HP-UX CMS has the latest HP-UX kernel patches required for Java 1.5 execution.
If the CMS is HP-UX 11.23 IA/PA, then verify that the PHKL_35029 Kernel patch (or itssuperseding patch) is installed. See http://www.hp.com/go/java.
2. Verify that all your HP-UX managed systems have HP WBEM Services for HP-UX A.02.00.11or newer and for managed systems running HP-UX 11.23 IA/PA, verify the PHSS_33349Kernel path (or its superseding patch) is installed.
-------------------------------------------------------------If you cancel a running task, by clicking Stop or Delete, and immediately try to start another taskof the same type, the second task does not run until the previously canceled task fully completesthe cancellation. Systems in the cancelled task that are currently being processed are allowed torun to completion. For some long-running tasks like data collection or software deployment, it cantake some time to allow the systems in progress to reach completion and finally cancel the task.Solution: If data collection runs for an unusually long time you might want to stop or delete thetask, and wait 5 to 10 minutes after the cancellation has completed before running another datacollection task.If the data collection task is allowed to run to full completion without canceling, another datacollection task cannot be run for at least 15 minutes or the task will fail because it is skipped (thiswould be shown in the STDOUT of the task instance).
164 Troubleshooting

-------------------------------------------------------------If you see that data collection failed because of a WBEM connection, it might be caused by afailed WMI Mapper proxy.Solution: Complete the following steps:Procedure 43 Issue with data collection failing because of WBEM connection1. Physically verify all of the configured Pegasus WMI Mapper proxies. From the Administrative
tools→Services menu on the server hosting the Pegasus WMI Mapper proxy, be sure thePegasus WMI Mapper is running.
2. If not, restart the Pegasus WMI Mapper if possible.3. If you are unable to restart the proxy or if the Pegasus WMI Mapper was uninstalled, delete
it from the CMS WMI Mapper Proxy settings found in the Options→Protocol Settings→WMIMapper Proxy page.
4. Be sure you have at least one running Pegasus WMI Mapper Proxy configured in HP SIM.5. Verify credentials for the systems.6. Run identification on all systems.-------------------------------------------------------------If data collection of a system fails with the STDOUT error, stating An error occurredconnecting to this system with the WBEM protocol. Check the systemconfiguration
Solution: This might be caused by any of the following conditions:• You failed to make appropriate port number entries in the wbemportlist.xml file:
/etc/opt/mx/config/identificationOn Linux and HP-UX:On Windows: C:\program files\hp\systems insight manager\
config\identification
The folders listed above are the default folders and should be used unless you have changedthe installation folder location.
• You might have failed to set up and specify appropriate WMI Mapper proxy servers.• You might have failed to specify appropriate WBEM credentials.-------------------------------------------------------------If you run a data collection task on a storage host and select the Append new data set (for historicaltrend analysis) option instead of the default option, Overwrite existing data set (for detailedanalysis), the data collection task will fail and the data for that storage host is erased.Solution: To restore the missing data, do one of the following:Procedure 44 Issue with data collection failing and data for the storage host being erased1. Delete the storage host from the HP SIM database, and then discover it again.2. Wait fifteen minutes, and run the data collection task again with Overwrite existing data set
(for detailed analysis) selected.
DatabaseDatabase creation under SuSE 10 PostgreSQL reports warning messages at various stages as thedatabase is created.Solution: A warning message states that the view which provides license reporting has caused anexception and has not been inserted. Subsequently, there are warnings indicating that the licenseview cannot be dropped as it does not exist (creation failed earlier). However, the final step forupdating the database in HP SIM 5.1 or later correctly inserts the license view for SuSE 10.Therefore, the view is present when database creation is complete and license reporting shouldfunction correctly.
Database 165

DiscoveryA managed system must not have Hyper-V host, SMI-S Storage CIMOM proxy, and SCVMMinstalled together. If they are all installed, HP SIM will not be able to set all the subtypes.-------------------------------------------------------------To discover an XP P9500 array, you can either discover it with a CVAE server or discover it withembedded SMI-S. Do not use both methods of discovery together because there are chances forData collection and WBEM subscriptions to fail. However, if you use both methods of discoveryand observe that Data Collection or WBEM subscription is failing please delete the system andrun discovery again.-------------------------------------------------------------Discovery of a Microsoft Windows 2008 MSCS cluster in HP SIM fails to illustrate the second IPaddress on the Cluster Monitor page even though HP SIM discovers the cluster correctly.Solution: If the first IP address of the MSCS cluster is not in the same subnet as the HP SIM server,a pop-up window appears when browsing to the Cluster Monitor page. See the Microsoft link forsetting up MSCS cluster with two-subnet Failover Cluster at http://technet.microsoft.com/en-us/library/bb676403.aspx.-------------------------------------------------------------For Windows 2008 MSCS clusters (including Hyper-V clusters), DHCP addresses are now allowedfor the cluster alias. In some circumstances the reverse lookup for the cluster alias IP resolves backto one of the cluster nodes instead of the cluster alias name.Solution: If this occurs, HP SIM will not add the cluster and the cluster nodes will not be associatedin HP SIM with the cluster. To work around this, add an entry to the hosts file on the HP SIM serverfor the cluster alias name and IP. On Windows, the host file is located in the %windir%/system32/drivers/etc directory. The standard hosts file entry should be of the following form:IP Hostname alias (for example: 15.2.9.1 hypcl1.vse.adapps.hp.com hypvcl1).-------------------------------------------------------------Discovery of an MSCS cluster service name or IP address (for example. a Fileserver service, andso on) overwrites MSCS system information, making management of the cluster nodes through HPSIM, HP Insight Control virtual machine management, or HP Insight Dynamics impossible.Solution: Remove all systems associated with the MSCS cluster (this includes the cluster alias, thecluster nodes, and any VMs that might be running on the cluster), and then re-discover the cluster(and any VMs) without discovering the service. For example, add the IP address of the clusterservice to the ping exclusion range on the general discovery settings page.-------------------------------------------------------------When the number of objects to be collected on any given storage array exceeds the value of~2500, it is possible that data collection will fail for the array.Solution: This is due to a default timeout value of three hours for this operation. There are two waysto resolve the issue:• Configure the array to have a maximum of 2500 collectible objects (volumes, disks, ports,
and so on).• Increase the timeout value, depending on the configuration, to an optimal value by modifying
the configurable parameter Storage_DC_Timeout which is set to a default value of 10800(equals 3 hours), with the mxglobalsettings command.
◦ Example to retrieve the current value:mxglobalsettings -ld Storage_DC_Timeout
◦ Example to modify the value to 4 hours (14,400 seconds):mxglobalsettings -s Storage_DC_Timeout=14400
It has been observed that data collection can take 3 hours and 37 minutes on an XP24000 arraythat has ~3200 lives, 40n network ports, and ~150 disks.
166 Troubleshooting

-------------------------------------------------------------If an HP Logical Server that is created in Insight Dynamics is given the same name as the operatingsystem host name of the blade on which it is applied, then the logical server is deleted when theblade is rediscovered.Solution: To avoid this, be sure the logical server name is different from the host name of the blade.-------------------------------------------------------------If you:• Configure an HP Serviceguard package as an HP virtual machine which is hosted by two
different HP virtual machine hosts,AND
• Complete a failover of the package from one HP virtual machine host to the other one,AND
• Re-identify the package in HP SIM,you might find that the package is not associated with the correct HP virtual machine host.Solution After a Serviceguard package fails over from one host to a different host, you mustre-identify the HP virtual machine host system in HP SIM to see the correct association.-------------------------------------------------------------Orphan systems are appearing after I run discovery.Solution: To prevent orphans from appearing in the future, review events and remove the systemthat you have migrated to a new system type before rediscovering the new system after it is booted.This is true of systems moving in or out of a virtual system environment.-------------------------------------------------------------If you see the preferred system name is different than the host name of the full DNS name for anHP virtual machine guest, it is because the preferred system name is specified in the virtual machinepackage.Solution: If you want HP SIM to display the same name as the host name of the full DNS name,you must use the modify command to modify it.-------------------------------------------------------------If an iLO or Onboard Administrator was discovered prior to enabling/configuring Single Sign-on(SSO), re-identification is required for SSO communication to work between HP SIM and theiLO/OA.-------------------------------------------------------------If an Onboard Administrator is discovered with Discover systems in an enclosure when OnboardAdministrator is discovered option enabled, then the percentage completion of the discovery taskin which the Onboard Administrator IP address is part of, fluctuates. Initially, the percentagecompletion is higher, but as the discovery of iLOs are triggered, the overall percentage completioncomes down. As the iLO discovery completes, the percentage completion moves higher and finallybecomes 100% and task status becomes complete.-------------------------------------------------------------Some systems, such as Cisco Fibre Channel switches, that support both SNMP and SMI-S protocolscan appear as two separate systems within HP SIM.-------------------------------------------------------------HP SIM currently does not support an association of management processor to server if the systemis based on PA-RISC because a management processor is only supported on HP Integrity systems.This will not be supported until a new release of firmware for the PA-RISC systems.-------------------------------------------------------------If the partition has a vPar already created and been discovered by HP SIM but the IP address usedby the vPar has been moved to a stand-alone server, HP SIM will not delete the association to the
Discovery 167
complex or the management processor; the reason is the partition still has vPar defined within thepartition.
iLODeployment to an iLO with Trust Platform Module (TPM) enabled on the server will fail. You canonly deploy iLO firmware if TPM is disabled.
Linux serversWhen a Linux server is discovered as an unmanaged system:1. Be sure to make the changes similar to the following in the /etc/hosts file on the discovered
system before installing agents:#Do not remove the following line, or various programs #that require network functionality will fail. 127.0.0.1 localhost 172.24.30.34 HPSIM.wbemqa.com HPSIM
Note: Replace the IP address, host name, and alias previously listed with your localhost IPaddress, DNS name, and host name.
2. Install agents.3. Verify that the following lines are entered in the /etc/snmp/snmpd.conf file. If not, stop
the SNMP service, enter them manually, and restart the SNMP service.rwcommunity private rocommunity public
Note: The community strings used should match those community strings on the CMS.
After completing these steps, the system is discovered properly.-------------------------------------------------------------To discover detailed information for Linux running on ProLiant systems, you can do one of thefollowing:• Install the Linux ProLiant agents on the system.• Update the snmpd.conf file. If you choose this option and do not update the snmpd.conf
file, LINUX appears in the Operating system name column on the system table view page,instead of the true operating system name, such as Red Hat Advanced Server.
To solve this issue:1. Stop the SNMP daemon.2. Add the following line to the /etc/snmp/snmpd.conf file:
rocommunity public
3. Restart SNMP.
EventWhen you subscribe for WBEM events from either the command line (mxwbemsub) or the GUI(Options→Events→Subscribe to WBEM Events), you might receive the error message Stringindex out of range.Solution: Verify if the name of the local host resolves to a fully qualified name through DNS. Thecommand needs the FQDN name to work properly.-------------------------------------------------------------To enable non-administrative users to delete or clear events, you can create a toolbox with theClear Events and Delete Events tools.1. Select Options→Security→Users and Authorizations.2. Click the Toolboxes tab and click New3. In the Name field, enter a name for the new toolbox.4. In the Description field, enter a description for the new toolbox.
168 Troubleshooting
5. Select Toolbox is enabled.6. Under Show Tools in Category, select Configuration Tool from the dropdown list.7. Select Delete Events and Clear Events, and move them to the Toolbox contents window.8. Click OKNext, create an authorization on the systems that you want to enable the user to clear or deleteevents.1. Select Options→Security→Users and Authorizations.2. Select the Authorizations tab, and click New.3. In the Select field, select the users or user groups to which to assign the toolbox.4. In the Select Toolbox(es) section, select the toolbox you created in step 2.5. In the Select Systems section, select the systems that you want this toolbox to apply.6. Click OK.Create an event collection, and run the tool through the menus.-------------------------------------------------------------When event types are dynamically added, you must manually refresh any event collections thatare currently displayed
Health statusWhile viewing MSA G3 health status on system page.1. When any of the array’s sub-component is in non-ok status, the status of the
TopComputerSystem will also be set to non-ok status. It is not necessary that both thesestatuses have same value. For example, when a Vdisk is in Offline status, the operationalstatus property of this vdisk is set to “15”, and the TopComputerSystem’s operationalproperty value is set to “3” (Degraded).
2. Currently HP has implemented the GroupSystemSpecificCollection class for somecomponents like Controllers, Vdisk, Temp.Sensors, Fan and Power Supply. When the Overallhealth status is non-ok and none of these GroupCollection instances is in non-ok status,this means the faulty component is not covered by these collection instances.
Host nameWhen installing HP SIM, CMS host names that exceed 15 characters are truncated, and thetruncated name must be used to complete the installation. After the install, two administrator accountsare created. One account includes the original hostname\administrator and the otheraccount includes the truncated hostname\administrator.Solution: To sign in, you must use the original host name in the Domain field on the Sign in page.
HP Insight Control power managementTo manage ProLiant blades running ESX 3.0.x or 3.5 with the virtual ID option turned on, the HPProLiant SNMP Agent for ESX package must be installed. You can use the Configure or RepairAgents feature in HP SIM to install the package. If you have already discovered ESX classic serversbefore the ProLiant SNMP Agent is installed, you must delete these systems, install the ProLiantSNMP agent on them, and re-discover them.-------------------------------------------------------------While restoring the Onboard Administrator configuration, initially the following message appearsif the network communication to Onboard Administrator is slow. Save/Restore operationis taking more than the expected time. Please wait while the save/restoreoperation completes. If the restore operation exceeds 4 minutes on Onboard Administrator,a message appears stating that the save/restore operation could not be completed, however, theoperation does complete.-------------------------------------------------------------When an Onboard Administrator is discovered, the enclosure that it resides in is created. If thisenclosure is daisy chained to other c-class enclosures, then these enclosures are also created. By
Health status 169

default, daisy chained enclosures are displayed as c7000 enclosure models. As a result, whenc7000 and c3000 enclosures are daisy chained, and the Onboard Administrator is discovered,the c3000 Tower Model enclosure is displayed as a c7000 enclosure. To ensure that the daisychained enclosures are displayed accurately, you must discover the Onboard Administrator oneach of these enclosures.-------------------------------------------------------------To correctly identify the xw25p Blade Workstation, you must install Insight Management Agent7.4.-------------------------------------------------------------To associate the Cisco Gigabit Ethernet Switch Module with the HP BladeSystem enclosure it isinserted in, you must update the HP Insight Management Agent to 7.3 or later on at least oneblade in the enclosure.-------------------------------------------------------------If you have licensed a system for HP Insight Control power management and receive the followingerror message while attempting to view the last data collection status on the System Page for thesystem, Unable to communicate with Management Processor <mpname> in server<servername> because the Management Processor does not have a serialnumber and(or) network address. Please re-identify the ManagementProcessor and try again., then there might be a problem with duplicate iLOs associatedwith the system. Use the All Management Processors view and identify the iLOs associated withthe server. There is one iLO with its name being the IP address of the iLO and another iLO withthe serial number of the iLO as its system name. Deleting the iLO with no IP address recordedresolves the issue.-------------------------------------------------------------After discovering new servers and their iLO 2 management processors using Reports→InsightPower Manager, the task wizard indicates the server is not compatible with Insight Power Manager.Solution: Insight Power Manager requires an association to exist between the iLO managementprocessor and the server before compatibility can be determined. If you attempt to use the InsightPower Manager tool before this has been determined, you encounter this issue.• Select the iLO 2 from the system list and execute Options→Identify Systems to re-execute the
Insight Power Manager compatibility check.or
• Wait for 15 minutes for Insight Power Manager's periodic system management to re-determinecompatibility. After compatibility has been verified, this problem should not reoccur.
-------------------------------------------------------------After applying an iLO Select or Advanced license to the iLO 2 using its user interface, Refresh Datais clicked in Insight Power Manager to collect new power history data and a message appearsindicating the iLO 2 has no license.Solution: HP SIM must re-identify the iLO 2 to detect the presence of the new license. SelectOptions→Identify Systems to re-identify the iLO 2 or wait for HP SIM's periodic identification cycleto complete. You can check the status of HP SIM's awareness of iLO 2 license assignment selectingDeploy→License Manager.
Insight Control virtual machine managementvirt fails to update the change in VM name when performed from Virtual Connect. It is observedthat when a VM name is updated from vCenter that is registered on the hosts, the updated namedoes not reflect on the 'All Systems Page". However, the change is updated in the host systempage after few minutes.For the VM name to be updated and reflected in the All Systems system list page, initiate anidentification task on the host System Page.-------------------------------------------------------------
170 Troubleshooting
After you have selected the Install Linux PSP or ESX agents and Register VM host options in aConfigure or Repair Agents task for ESX 3.5 U4 or later, the VM-host registration task fails becausethe system shows as Not Responding in Vcenter. Vcenter takes about five minutes for a system toreach a Normal status and therefore fails when HP SIM tries to register the VM host. Re-run theVM-host registration task at a later time when the server is in a Normal state in Vcenter.
HP Smart Update ManagerOnline deployment through HP SUM is not supported for Itanium based systems.-------------------------------------------------------------To install HP SUM, you must select the following additional libraries on the system running HPSUM:• Compatibility libraries• Under Hardware Monitoring Utilities, the following must be selected:
lm_sensor-3.1.1-10.e16◦◦ Under Systems Management:
Select SNMP Support.
◦ Under Desktops.– Select X Windows System.– Select Legacy X Windows System Compatibility.– Select either the Gnome or KDE Desktop.– Under Development Tools, the following must be selected:
– expect-5.44.1.15-2.el6.
The prerequisites for Red Hat Enterprise Linux 6 servers - RHEL6 Console Mode:
NOTE: No X console in either x86 or x86_64 - User installs base server with defaults and thefollowing RPMs to run HP SUM in silent mode.
NOTE: The versions below are needed as a minimum. Later versions of these can most likely beused as well.• lm-sensors-libs-3.1.1-10.el6.<arch>.rpm• net-snmp-libs-5.5-27.el6.<arch>.rpm• net-snmp-5.5.27.el6.<arch>.rpm• kernel-headers-2.6.32-71.el6.<arch>.rpm• redhat-rpm-config-9.0.3-25.el6.noarch.rpm• kernel-devel-2.6.32-71.el6.<arch>.rpm• rpm-build-4.8.0-12.el6.<arch>.rpm• gcc-4.4.4-13.el6.<arch>.rpm
For Red Hat Enterprise Linux 6 servers - RHEL6 Graphical Mode:
HP Smart Update Manager 171
NOTE: This applies to both x86 and x86_64 if the user elects to install the XWindows support.
NOTE: These must be the 32-bit version even under x86_64 architecture as HP SUM and severalof the RPMs require 32-bit libraries installed.
NOTE: The versions below are needed as a minimum. Later versions of these can most likely beused as well.• libuuid-2.17.2-6.el6.i686.rpm• freetype-2.3.11-5.el6.i686.rpm• libSM-1.1.0-7.1.el6.i686.rpm• libICE-1.0.6-1.el6.i686.rpm• libXi-1.3-3.el6.i686.rpm• libX11-1.3-2.el6.i686.rpm• libXext-1.1-3.el6.i686.rpm• libXcb-1.5-1.el6.i686.rpm• libXau-1.0.5-1.el6.i686.rpm• libXrender-0.9.5-1.el6.i686.rpm• libXrandr-1.3.0-4.el6.i686.rpm• libXfixes-4.0.4-1.el6.i686.rpm• libXcursor-1.1.10-2.el6.i686.rpm• fontconfig-2.8.0-3.el6.i686.rpm• expat-2.0.1-9.1.el6.i686.rpm• expect-5.44.1.15-2.el6.<arch>.rpm• zlib-1.2.3-25.el6.i686.rpm• libstdc++-4.4.4-13.el6.i686.rpm• net-snmp-5.5-27.el6.<arch>.rpmIn addition, the build directory for RPMs built from source has changed depending on the nameof the user building them. Up through RHEL5, the directory had been /usr/src/redhat/RPMS/<architecture>. Under RHEL6, the directory is /root/rpmbuild/RPMS/<architecture>if the user is logged in as root and /$USER/home/rpmbuild/RPMS/<architecture> forusers other than root.
-------------------------------------------------------------If you are receiving an HP Smart Update Manager Connection Error or Discovery Failed messagein the StdOut Task Results for Initial ProLiant Support Pack Install, SSH Install, or Configure or RepairAgents, follow the following troubleshooting tips:• Ensure your workstation does not have an existing connection to the admin/administrator
share on the target IP address. If it does, it prevents HP Smart Update Manager from connectingto the remote server's share because Windows only allows one connection from a client to aserver's share. This can be checked by entering net use at a command prompt. If there isan existing share to the target IP address, \admin share, delete it and try the installationagain.
• Ensure that the target IP address server's admin share is accessible. Validate the target servercan be accessed by entering net use x: \\<ip_address_or_dns_name>\admin forthe target server's IP address or DNS name. When the connection is validated, ensure that itis deleted by entering net use x: /d at command prompt.
• Ensure the user ID being used to connect to the target IP address server is part of theadministrator's group. If it is not, HP Smart Update Manager blocks installation to the target.
172 Troubleshooting

• Ensure WMI is enabled and running on all Windows target servers.• For Linux, ensure the SSH port is not blocked.• In some rare cases, external storage enclosures can cause HP Smart Update Manager to
report a discovery failure. To resolve this problem, disconnect the external storage until thefirmware updates are completed.
• For Linux, ensure that the target server can be contacted through SSH and that the scpcommand is available to securely send files to the target server.
• Ensure the firewall ports on any routers in the network as documented in the Enabling portsin the HP Smart Update Manager documentation.
• The Symantec End Point Protection product (SEP) blocks HP Smart Update Manager ability tocommunicate with remote targets if the Network Threat Analysis feature is enabled. Disablethis feature while HP Smart Update Manager is in use on the workstation.
HP ProLiant Support PackWhen the HP ProLiant Support Pack is uploaded using the Upload Support Pack option, HP VCRMas invalid. This occurs because HP VCRM Upload Control fails to process the component with asize of more than 100 MB.As a workaround, for VCRM to display the HP Service Pack for ProLiant correctly, perform eitherof the following:Procedure 45 Displaying HP ProLiant Support Pack correctly through HP VCRM1. Click on the invalid SPP link on the VCRM homepage and make a note of the missing
component filenames that are marked in red.2. Extract the missing component manually from the SPP and copy it to the repository.ORPlace the "Service Pack for ProLiant" ISO file directly into the repository folder.
HP Systems Insight ManagerText in UI is not translated into other languages and appears in English. This happens when thetext is obtained from a system.-------------------------------------------------------------Page in HP SIM appears with no content due to a truncated JSP deployment.Solution: The cause of the error is lack of disk space. HP recommends you delete the .class and.java files related to the JSP causing the issue ({HPSIM}\jbosss\server\hpsim\work\jboss.web\localhost\). Deleting the entire localhost directory will impact performancebecause a restart would be required for all JSP pages to be recompiled by JBOSS.-------------------------------------------------------------When shutting down HP-UX, sometimes a message indicating HP SIM is being stopped will bemissing from the rc.log.
IdentificationThe new SSH identification method cannot be used to form associations between DL100 seriessystems; such as the DL160 G5 and DL180 G5 and their management processors. There is anincompatibility between the system UUID presented by the system and the UUID presented by theBMC (management processor) firmware.-------------------------------------------------------------To get basic hardware data, such as model, serial number, and UUID, from non-HP x86 serversrunning VMware ESX Server or Linux, you must configure the root user as the Sign-in credential inHP SIM. This is because the Privilege Elevation feature is not used for identification of servers andrunning dmidecode requires the root privilege. In addition, to identify the VMware ESX server as
HP ProLiant Support Pack 173

the VMware ESX Host subtype, the WBEM cimserver on the ESX host must be up and workingcorrectly. There are many ways to set these credentials:• Global sign-in credentials (Options→Security→Credentials→Global Credentials)• System Sign-in credentials (Options→Security→Credentials→System Credentials)• Discovery task Sign-in credentials (Options→Discovery→Edit→Credentials)-------------------------------------------------------------For ProLiant iLO2's to be properly identified with WS-MAN functionality, the iLO2 credentials mustbe the first credentials specified in either the discovery credential list or the global credential listwhen discovery is run. Otherwise, system credentials can be set directly for the system after it isdiscovered.-------------------------------------------------------------Unable to identify ESX 3.x classic servers to have the appropriate system types and subtypes, orno virtual machines can be discovered from the ESX 3.x hosts.Symptoms:• The host is not identified correctly in HP SIM with the type Server and subtype as VMware
ESX Host, Virtual Machine Host• The host is discovered correctly in HP SIM with the appropriate types and subtypes. However,
no guests are discovered. The Vman page shows the host, but no guests. The virt propertypage is the one place on the CMS that does show the guests.
• On the ESX host, when attempting to start the WBEM server, the following error is given:
# service pegasus start Processing /var/pegasus/vmware/install_queue/1 [FAILED]
ERROR: See log - /var/pegasus/vmware/install_queue/1.log
• When running HP SIM discovery, the following information appears:
Running WBEM rules based identification.Cannot get ComputerSystem WBEM/WMI data from the system
[WBEM] System identified as WBEM instrumented but no usable WBEM credentials available. Check configuration and rerun Identification. Root Cause: Identification failed to generate relevant WBEM credentials for target system.Corrective Action: Check network and configuration of target system. Check the following pages to ensure appropriate WBEM credentials and port number data are provided: Global Protocol Settings, System Protocol Settings. Rerun Identification and Data Collection..
Solution: Go to http://communities.vmware.com/message/914939#914939. Note that the fixabove references /var/pegasus/vmware/install_queue/1 in the install queue. However,the number might vary by installation.-------------------------------------------------------------I am unable to identify Windows XP targets through WBEM if Simple File Sharing is enabled.Solution: Uncheck Simple File Sharing by navigating to Tools→Folder Options→View or set thesecurity policy Network access: Sharing and security model for local accounts to Classic: Local usersauthenticate as themselves.
174 Troubleshooting

InstallationHP-UX install/execution of partner plug-ins (for example, HP Insight Dynamics - VSE for Integrity)might fail due to failed communication with HP SIM. Reviewing the install logs, daemon servicelogs and command line command output of partner commands may show long execution time withfailed results describing a failure to connect to HP SIM or the messagejava.net.NoRouteToHostException: No route to host (errno:242). Local partnercommunication to HP SIM occurs using the ‘localhost’ hostname. This should be set to the loopbackIP address (usually 127.0.0.1). This is normally defined in the /etc/hosts file on the CMS.However, by default HP-UX systems will resolve hostnames through DNS before looking at this file.If nslookup localhost does NOT resolve to the loopback IP address, then you must changethe lookup configuration. HP-UX or Linux systems use /etc/nsswitch.conf to resolve hostnames,and having dns resolve before files (/etc/hosts) will give the wrong IP Address for localhost.The default for HP-UX is set as:hosts: dns [NOTFOUND=return] nis [NOTFOUND=return] files
To resolve this issue, change the configuration to:hosts: files dns [NOTFOUND=return] nis NOTFOUND=return] files
Also, be sure the /etc/hosts file contains the loopback entry: 127.0.0.1 localhostloopback.-------------------------------------------------------------When HP SIM 6.1 is installed on HP-UX, you should consider monitoring the pgsql logs under/var/opt/hpsmdb/pgsql and clear them if they become too large.-------------------------------------------------------------HP SIM requires the DBA Role privilege for the user during HP SIM installation or upgrade only.However you can select to revoke the DBA Role privilege from the user after installation or upgradeis complete.1. HP SIM installation
• Create a database user with DBA Role privilege on the Oracle database server.• Install HP SIM with the database user created for the database.
2. Post installationAfter successful installation, stop the HP SIM service.
3. Configure the database user.a. Remove the DBA Role privilege from the database user.b. Grant Unlimited Tablespace for the database user.c. Grant the following Object Privilege to all tables and views:
• INSERT• UPDATE• DELETE• SELECT
d. Grant CREATE SESSION privilege for database user.e. Grant truncate privilege for:
• associated_device_data• consolidatedNodeAuths
4. Restart the HP SIM service.
License ManagerCollection of Lights-out 100 licenses from Lights-out 100 targets are supported beginning with inHP SIM 6.1 and deployment on LO100 targets on G6 servers with latest firmware versions.-------------------------------------------------------------
Installation 175

When a subscription license for a particular product has expired, license manager's opening tablewill still show that product has no system limit. The true disposition of licenses for the correspondingproduct can be determined by opening Manage Licenses. If an expected subscription license isnot listed, it has expired and is no longer available.
LocaleCertain parts of CLI output might contain system-generated text that always appears in the languageindicated by the default CMS locale, not the locale of the user's CLI terminal. This condition canoccur following two problems:• This text might provide a localized property key of the TDef file, which is not allowed for TDef
input.• This text might be identified by one or more question mark (?) character strings appearing in
the CLI output.Solution: The CMS locale is determined by the globalsettings.props file. To change theCMS locale and possibly allow the CLI to generate proper locale text, edit theglobalsettings.props file by running the following command:To set CMS Locale to Japanese:mxglobalsettings -s -f CMSLocale=ja_JP
To set CMS Locale to English:mxglobalsettings -s -f CMSLocale=en_US
After you run this command, restart HP SIM.
Managed EnvironmentWhen you set the Ignite server on the Managed Environment page and then access the pageagain, you cannot change and save the address again.Solution: To bypass this problem, modify the Ignite tools from the CLI using the tools' original tdefs,as follows:Procedure 46 Issue with changing and saving the address of an Ignite server1. From the CLI, go to the Tools directory under the HP SIM install directory on Windows and
under /var/opt/mx/tools on Linux and HP-UX.2. Run mxtool -mf <tool XML> -x force' where <tool XML> for each TDef is as follows:
iux_tools.xml
swm-msa-tools.xml
swm-ssa-tools-up.xml
swm-ssa-tools.xml
hpux\iux_tools.xml
hpux\swm-msa-tools.xml
HP MIBsThe LinkUp and LinkDown traps in IF-MIB.mib are redundant traps; these are also present inrfc1215.mib. As per the current framework, the redundant traps are not allowed in HP SIMTraps with same name.Change the loading of MIBs. The IF-MIB.mib is loaded first and then the RFC1215.mib. TheIF-MIB.mib will be listed in mibcore.list and RFC1215 in preload.list. By doing thisthe LinkUp and linkDown traps from IF-MIB.mib will only be registered with HP SIM. The RFC1215file will only show four traps Cold Start, Warm Start, Authentication Failure, egp....-------------------------------------------------------------Do not rename, move, or delete MIB files from the MIBs directory after they are registered.Solution: For a MIB file to be listed as registered, the MIB file must reside in the MIBs directory.
176 Troubleshooting

Onboard AdministratorWhen an Onboard Administrator system is deleted, health status of the bare metal server systemsremain stale. ProLiant OA must be rediscovered to obtain updated health status of the bare metalserver systems.
OpenSSHOpenSSH installation fails on a Windows XP SP3 system.Solution: Verify that the Network access: Sharing and security model for local accounts under LocalPolicies→Security Options is set to Classic - local users are authenticate as themselves.
PerformanceWhen running HP SIM in an environment that contains a large number of ProLiant systems runningthe WMI-based Insight Agents, the completed job output in Tasks & Logs→View Task Results mightexceed several thousand files.Solution: This can result in HP SIM consuming large amounts of memory, task page interfaceslowdown, or out of memory errors.If this behavior is noted, the following workaround can be implemented to alleviate the consumptionof memory and disk space. The workaround adjusts the retention values for completed tasks andcan be altered as desired to reduce resource consumption.
NOTE: This fix only applies to HP SIM instances which are managing a large number of servers(maximum 5000) using WMI.
Add the following script to the MX.PROPERTIES file located in the Microsoft Windows directory\Program Files\HP\Systems Insight Manager\config or in the Linux and HP-UXdirectory /etc/opt/mx/config:MX_JOB_MAX_COMPLETED_JOBS_PER_TASK=3Recommended value is 3 for greater than 1500 systemsMX_JOB_MAX_COMPLETED_JOB_AGE=7Recommended value is 7 for greater than 1500 systemsMX_JOB_KEEP_RUN_NOW_HOURS=8Recommended value is 8 for greater than 1500 systemsAfter the MX.PROPERTIES file has been modified, restart the HP SIM service to initiate the changes.
PingHP recommends you do not disable ping in hardware status polling tasks. If the ping protocol fromhardware status polling task is disabled, then other polling protocol statuses like SNMP, WBEM,OOB, WSMAN, and so on will be affected. There will be no polling done for these protocols andthe status shown in the UI for these protocols will be that of the previously collected data beforedisabling ping protocol.
Ports used by HP SIM.By default, HP SIM uses port 5989 to communicate with the WBEM server of the systems it monitors.To use a different port for this purpose, complete the following:
Onboard Administrator 177

1. The wbemportlist.xml file used by HP SIM must be altered to add the additional oralternate WBEM port to be used. The file is located in C:\Program Files\HP\SystemsInsight Manager\Config\Identification. This example shows where the new lines(in red) must be added to the <wbemportlist> tag in the xml file:
<?xml version='1.0' encoding='UTF-8'><wbemportlist> <port id='5989' protocol='https'> <cimnamespacelist> <cimnamespace name='root/cimv2'/> <cimnamespace name='vmware/esxv2'/> <cimnamespace name='root/hpq'/> </cimnamespacelist> <interopnamespacelist> <interopnamespace name='interop'/> <interopnamespace name='root/pg_interop'/> <interopnamespace name='root'/> <interopnamespace name='root/emulex'/> <interopnamespace name='root/qlogic'/> <interopnamespace name='root/ibm'/> <interopnamespace name='root/emc'/> <interopnamespace name='root/smis/current'/> <interopnamespace name='root/hitachi/dm51'/> <interopnamespace name='root/interop'/> <interopnamespace name='root/switc'/> <interopnamespace name='root/cimv2'/> </interopnamespacelist> </port> <port id='2718' protocol='https'> <cimnamespacelist> <cimnamespace name='root/cimv2'/> </cimnamespacelist> </port></wbemportlist>
2. Restart the HP SIM service.3. Right-click the Systems Insight Manager service in Windows Services API, and click restart
from the dropdown menu.
Privilege elevationWhen “DISPLAY_LAST_LOGIN” = 1 in HP-UX, even non-interactive logins, such as used bysudo, emit the Last login string. This extraneous data in stderr/stdout can affect tools.This value can be changed using HP SMH in the Auditing and Security Attributes Configurationsection of the HP SMH home page. This can be done for the user whose rights have been elevated(typically “root”) or set as the system-wide default for all users.To make these changes, run the following commands:For an individual user:/usr/sbin/userdbset –u <user> DISPLAY_LAST_LOGIN=0
For the system-wide default:/usr/sbin/ch_rc –a –p DISPLAY_LAST_LOGIN=”0” /etc/default/security
Property pagesI am receiving an error when clicking the Fans link on the Property pages Configuration tab.Solution: Upgrade to HP ProLiant WBEM Providers 2.3.
178 Troubleshooting
-------------------------------------------------------------The Property pages for the VMWare ESX (Non-Embedded) operating system are not availabledue to limitations in the WBEM agents.
ReportingIt has been observed that when HP SIM is upgraded from 6.2 to any later version, EnhancedReports cease to work. If you encounter this issue, you must perform the following steps to solvethe problem.Procedure 47 Correcting issue with Enhanced Reports not working after an upgrade from HP SIM6.21. On Linux or HP-UX:
Navigate to <SIM Installation Directory>\jboss\server\hpsim\work\jboss.web\localhost\_\org\apache\jsp\mxportal\NewReport
On Windows:Navigate to: \opt\mx\jboss\server\hpsim\work\jboss.web\localhost\_\org\apache\jsp\mxportal\NewReport
2. Delete all files in these folders.3. Go to your browser and refresh the Enhanced Reports page and run any report.
NOTE: This does not require the HP SIM service to restart. The changes are automatically detectedby HP SIM and Enhanced Reports will work correctly.
-------------------------------------------------------------In advanced reporting, graph labels may not be displayed properly in the report output.This can be caused by not having the right Asian fonts installed on the CMS and client system.Ensure that Asian fonts for the desired locale are installed on both the CMS and client system wherethe browser is installed. In addition the font can be configured to an alternate font in the <HP SIMInstalldir>/config/globalsettings.props file or by running the CLI command:mxglobalsettings --a EnhancedReportsLogicalFonts=<font name> where fontname can be Dialog or SansSerif. The default value is Dialog.
SecurityIf HP SIM is installed after HP SMH is installed, the HP SMH 2048-bit key pair is replaced withthe HP SIM 1,024-bit key pair.
Sign-inUser is not able to sign-in to HP SIM when HP SIM is installed on RHEL6.1 64-bit operating system.For HP SIM to work on RHEL6.1 64-bit operating system, the 32-bit library (32-bit(i686) versionof PAM-level Red Hat Packager Manager (RPM)) must be installed as part of the operating systeminstallation. This is a prerequisite for HP SIM installation.
SNMP settingsConfiguring SNMP settings through Configure or Repair Agents displays corrupt message in taskresults.The reported problem will occur if the target system is configured with any localized languageexcept in English. The /etc/init.d/snmpd script does not follow localization standards andthe error is provided as part of Linux operating system SNMP service.
SNMP trapsAfter applying Hotfixes or an upgrade, if there is an issue recieving SNMP traps, complete thefollowing:1. Stop the HP SIM service.
Reporting 179

2. Restart Windows SNMP service.3. Start the HP SIM service.
SSH communicationDomain support for SSH communication:• Hyper-V systems
SSH communication between a CMS and a managed system works propertly only when themanaged system is in a workgroup. If the managed system is in a domain, then thecommunication between the managed system and the CMS fails over SSH.
• Windows systemsSSH communication between a CMS and a managed system fails if both are in a domain.
Software/FirmwareThe Software and Firmware revision section under system page of an MSA displays details of boththe controllers.
System PageWhen WBEM protocol is enabled, incorrect drive information is displayed in the Logical Volumesection in the Performance tab for a blade server.Solution: To view the accurate drive information, disable the WBEM protocol and enable SNMPprotocol. To do so, select Options→Protocol Settings→Global Protocol Settings.
System statusHP SIM shows system with health status OK, although the power status is Major. When Powersupplies are grouped, the overall status of the Power Supply group is determined by the PowerSupply Redundancy group. This is expected behavior.
Target selection wizardCannot launch target selection wizard in Firefox (3.x and above) if HP SIM is upgraded to 7.0.When you upgrade to HP SIM 7.0 and the same Firefox browser is being used for launching olderversions of HP SIM, then the target selection wizard will cease to work. Target selection stepsappear to be blank, with no control, or the controls might be present, but do not work correctly.When HP SIM is upgraded, you must clear the Firefox browser cache to avoid issues with thetarget selection wizard. Perform the following procedure to clear the cache:1. In the Firefox browser, select Tools→Options. The Options window appears.2. Select Advanced, and then select the Network tab.3. Under Offline Storage, click Clearn Now.4. Click OK to close the Options window.
TasksThe Initial ProLiant Support Pack Install task does not work on Windows 2000 target systems.Likewise, the install portion of the Configure or Repair Agents tool does not work on Windows2000 systems.Solution: If the HP Version Control Agent is present on these target systems, then the Install Softwareand Firmware tool can be used to distribute agents, Support Packs and other components toWindows 2000 systems.
180 Troubleshooting

ToolsThe message /tmp/Acmd42947.bat[26]: /usr/dt/bin/dtterm: not found mightappear when running the following tools on HP-UX 11.31:• Retrieve Bastille Configuration file• Deploy Bastille Configuration• Consolidated Logging Wizard• Configuration Synchronization WizardTo eliminate this problem:1. Remove the above tools using the CLI command mxtool -r -t <tool name>.2. Edit the tool definition XML files, replacing instances of dtterm and hpterm with xterm.
The above-mentioned tools can be found in the following TDef files:security_patch_check.xml
clog_windows.xml
3. Add the tools again using mxtool -a -f <TDef file name>4. Run the tool.-------------------------------------------------------------If a user is created with the operator template, then the user is automatically given authorizationsto run any CMS tool created with the Run as option set to root/Administrator.Solution: To avoid granting users access to CMS tools, when creating new users, the operatortemplate must not be used and authorization must be configured separately. Note that only HPSIM administrators can create CMS tools.
UpgradeWhen upgrading an HP SIM 6.3 Simplified Chinese system to an HP SIM 7.0 Simplified Chinesesystem running W2k8-x64 R2, some of the dialog boxes might be garbled. To resolve this issue,update the browser languages preference to Simplified Chinese.-------------------------------------------------------------If you are upgrading to HP SIM 5.3 or later on Windows 2008 64-bit, first verify that OpenSSH3.7.1 is not stuck in a starting state. If it is, select End Process for the cygrunsrv.exe process andany sshd.exe processes using the Windows Task Manager.-------------------------------------------------------------If HP SIM is installed on a Windows XP system with MSDE as the database, you must manuallyupgrade MSDE to SQL Server 2005 to upgrade the Windows XP system to Windows Vista.-------------------------------------------------------------If you upgrade to Windows Vista on a HP SIM server running Windows XP, you might no longerbe able to browse into HP SIM. HP recommends turning off the Windows Vista User AccountControl features, and you might/ need to change the privileges of the SIMinstalldir\configdirectory to get HP SIM running again.
UUIDAll server hardware has what is called a UUID available to the operating system through the ROMBIOS. This UUID is use to uniquely identify the hardware regardless of the operating system runningon it. While there is a standard way to decode and format/display this value, not all operatingsystem vendors have complied with that standard. For software that did not follow the standard,HP SIM converts this value and displays it in the standard way. This can result in some differencesif the UUID is viewed through a given operating system tool such as dmidecode.The SMBIOS stores the 16 bytes of System UUID as:00 01 02 03 04 05 06 07 08 09 10 11 12 13 14 15
Dmidecode displays:
Tools 181
00010203-0405-0607-0809-101112131415
UniqueIdentifier in SIM03020100-0504-0706-0809-101112131415
Virtual Connect Enterprise ManagerUnable to browse to VCEM menu when logged in as read only user. To resolve this issue, installVCEM and other dependent components from Integrated installer component>selection screen. Tomake the menu visible in HP SIM, configure following settings in browser: Tools→InternectOptions→Security→Custom level, and then under Miscellaneous, select Allow Script initiatedwindows without size or position constraints.Same settings are applied when the browser security has been set to medium-low.
Virtual identifiersA new feature of virtual connect is to enable server profiles to have virtual identifiers, such as serialnumbers and unique identifiers. These identifiers then move with the profile across server hardware.There are a number of management tools that currently rely on these identifiers to remain stablefor any given hardware platform, if not some serious issues, such as loss of software licenses willoccur.When setting up an environment for virtual identifier support the following steps must be taken forproper operations of the management tools.1. Upgrade HP SIM to version 5.2 Update 2 or later.2. For any server that will have a profile with a virtual identifier, upgrade the ROM BIOS to the
latest version to ensure it contains virtual identifier support.Note The server hardware must be listed in the virtual ID support matrix.
3. Upgrade the agents and WMI providers on the servers that will be used for virtual identifiers.(See the version table below for proper versions).
4. Upgrade the firmware for the Onboard Administrator to version 2.25 or later.5. On the virtual connect Ethernet module, upgrade the virtual connect firmware to version 1.3
or later. Do not enable virtual identifiers at this time.6. On the virtual connect Ethernet module, enable virtual identifiers.7. You may now create and assign profiles with virtual identifiers.
WARNING! If you do not follow the specific instructions for enabling Virtual Identifiers in yourenvironment and you enable the feature without the proper agent revisions, iLO firmware,infrastructure orchestration firmware, System ROM revisions, and HP SIM version, then systemsmight appear multiple times and systems might not properly be associated with systems. If thathappens, upgrade to all of the latest software prescribed in the c-Class chassis. You might alsoneed to delete discovered systems in the chassis and rediscover them.
Supported Software and FirmwareNote: Failure to meet the minimal revision of any of the listed components can result in virtualidentifiers not working properly resulting in the loss of licenses in HP SIM, in issues obtaining properwarranty information, or result in orphaned systems showing in the system list.The table below outlines the minimal versions required by management tools such as HP SIM andRemote Support Pack to properly operate.
Table 18 Minimal versions
VersionProduct
2.0x, 2.1x, and 2.3xVirtual Connect Manager
2.30Onboard Administrator
1.6Integrated Lights-Out
182 Troubleshooting

Table 18 Minimal versions (continued)
VersionProduct
(see supported server matrix for Virtual Connect)Server ROM
8.1ProLiant Support Pack / SNMP agents
2.2ProLiant Support Pack / WMI providers
5.3 or laterSystems Insight Manager
Virtual machinesHP Insight Management WBEM Providers and SNMP agents must not be installed on a virtualmachine guest operating system. Installing the providers or agents on a guest operating systemcauses HP SIM to have excessive timeouts when data is requested or WBEM Indication Subscriptionsare created.The installer for HP Insight Management WBEM Providers 2.2.x and earlier does not preventinstallation on a guest operating system. The installer for version 2.3 and beyond automaticallyprevents the installation of the providers on a guest operating system.If the WBEM providers or SNMP agents have been installed on a guest operating system, uninstalland re-identify the managed system in HP SIM.
VMwareThe name of the temperature sensors might be incorrect. This is a known issue in the VMWareprovider and will be addressed in a future release of VMWare providers.
WBEMWBEM is no longer supported on HP servers. The last servers to support WBEM were the G6servers. Therefore, HP SIM will not identify the operating system details properly for RHEL 5.7 Xenand KVM servers.
WBEM indicationsCurrent P9500 embedded SMI-S does not support WBEM indications. WBEM indication will besupported from V05 firmware version.-------------------------------------------------------------For a CVAE 7.2 server to receive WBEM indications from XP arrays in HP SIM 7.1, the belowconfiguration changes need to be performed on CVAE 7.2 server.Procedure 48 Configuration for a CVAE 7.2 server to receive WBEM indications from XP arrays1. Create the .ind.keystore file be executing:
keytool.exe -genkey -keystore .ind.keystore -storepass indssl-validity 365 -keyalg RSA -keysize 2048
2. After importing HP SIM certificate in CVAE 7.2, the truststore file is creating asindtruststore instead of .ind.truststore. You must rename indtruststore fileto .ind.truststore.
-------------------------------------------------------------HP SIM doesn't support WBEM Indications on ESL G3 tape library with embedded SMI-S(withoutCVTL)
WMI MapperIf you have created subscriptions on a Windows managed system and then elect to change theWMI Mapper proxy or install a WMI Mapper on the managed system, you must first unsubscribefor WBEM events, change the proxy, re-identify the systems, and then resubscribe for WBEM
Virtual machines 183

events. If you do not unsubscribe for the WBEM events, HP SIM will no longer receive indicationsfrom the managed system.
184 Troubleshooting

C Protocols used by HP SIMHP SIM uses many different management protocol standards. This capability enables HP SIM toprovide management support for a wide array of manageable systems.
SNMPThe Internet Engineering Task Force (IETF), the standards-rating body for the worldwide Internet,has defined a management protocol, SNMP, which has accumulated a major share of the marketand has the support of over 20,000 different products. SNMP has its roots in the Internet community.The complexity of large international TCP/IP networks has provided the necessary incentive todevelop a standard method of managing devices on the network.Within the SNMP framework, manageable network systems (routers, bridges, servers, and so on)contain a software component called a management agent. The agent monitors the varioussubsystems of the network element and stores this information in a MIB. The agents enable thedevice to generate traps, which can be sent to a trap destination server that is running HP SIM.Conceptually, the MIB is a database that can be written to and read by a management applicationusing the SNMP protocol. The following MIB types include:• Internet Management MIBs.
These MIBs include MIB-II, RMON, and others and represent the core objects that are commonacross the widest range of network devices implementing the Internet protocols. Examples ofthese objects include network protocols such as TCP/IP and network systems such as Ethernetnetwork interfaces.
• Vendor MIBs.These MIBs represent objects that are unique to an individual vendor's product or productline. Over 500 vendors and organizations have created their own vendor MIBs. HP was thefirst personal computer company to develop a MIB-enabled SNMP management of systemhardware.
SNMP supports both read and write (GET and SET) commands on attributes. Some vendors donot support the SET command because of the potential to allow an unauthorized person to altercritical parameters on a network element. HP SIM primarily only uses the SNMP GET command.SNMP is associated with TCP/IP and used for monitoring systems on Ethernet networks becauseof its long association with the Internet.Since its inception, SNMP itself has undergone several updates, including SNMP V2c and SNMPV3. HP SIM supports the original V1-compliant agents and the compilation of V1 and V2 MIBs.SNMP uses UDP port 161 for monitoring systems, while traps are received on port 162.If your CMS is an HP-UX or Linux system, HP SIM might need to co-exist with other applicationsusing port 162. Use the following procedure to assign HP SIM to use a different port.Procedure 49 Assigning HP SIM to use a different port1. Open the globalsettings.props file located at /etc/opt/mx/config/
globalsettings.props.2. Locate the SnmpTrapPortAddress property: SnmpTrapPortAddress=162 .3. Modify this property by changing the port value to a different port number.4. Restart HP SIM.
NOTE: HP SIM does not receive traps from the application using port 162 unless the applicationis configured to forward traps to the port assigned to HP SIM.
NOTE: If the SnmpTrapPortAddress entry is deleted, HP SIM defaults to port 162.
HP SIM attempts SNMP communications based on the number of SNMP retries you specify andonly stops when the communication is successful or the number of retries is exceeded. HP SIM alsowaits for SNMP responses between retries based on the timeout period. Finally, HP SIM cancommunicate only through SNMP when the community string specified on the system and the
SNMP 185

community string specified for that system in HP SIM match. The community string, "public," is acommonly used default. However, you can specify any community string needed for your securityrequirements.
NOTE: Community strings on the managed system and the HP SIM community strings for thesystem must match to manage the system through SNMP. Some SNMP management agents alsoprovide IP address filtering. Be sure the HP SIM IP address is in the allow list for any given SNMPagents.
The operating system of the managed system can provide additional security capabilities for SNMPsuch as IP address restrictions for valid requests.
HTTPHP SIM also takes advantage of the industry standard HTTP protocol (used to transfer informationover the World Wide Web) for transportation of management information. Many systems supportsome kind of configuration "home page" that is supported over HTTP or the secure HTTPS protocol.HP SIM attempts to find HTTPS servers running on systems if the Global Protocol Settings page hasthis enabled.If you have changed the http or https port number on a managed system, then perform the followingsteps to enable HP SIM to identify the port correctly. For management processors, data fromhttp/https is used for identification.Procedure 50 Enabling HP SIM to identify ports correctly1. Open the additionalWsDisc.properties file located under <SIM_INSTALL_DIR>\
config\identification on Windows systems, and /etc/opt/mx/config/identification on Linux and HP-UX systems.
2. Add the following entries for systems other than management processors (managementprocessors include iLO and Onboard Administrator):<PORT_NO>=Secure Web Server Interface, ,true,false, ,https<PORT_NO>=Web Server Interface, ,true,false, ,http
Where <PORT_NO> is the http/https port number that is configured on the managed system.For example: If the http port number is configured to 83, then following entry will be added83=Web Server Interface, ,true,false, ,http
3. If the managed system is a management processor, like iLO or Onboard Administrator, thenadd the following entry:<ORT_NO>=Web Server Interface,,true,false,com.hp.mx.core.tools.identification.mgmtproc.MgmtProcessorParser,http
For example: If the http port number of the iLO is changed to 83, then following entry will beadded 83= Web Server Interface,,true,false,com.hp.mx.core.tools.identification.mgmtproc.MgmtProcessorParser,http
WBEMWBEM is one of the newest management protocols. This protocol leverages the industry-standardCIM as defined by the DMTF. HP SIM can communicate to systems directly using the WBEMprotocol or to the Windows WMI systems using the WMI Mapper Proxy. HP SIM uses WBEM tocommunicate with storage system SMI-S WBEM providers and HP-UX providers. HP has beenleading this effort through its association with the Distributed Management Task Force (DMTF).WBEM is an initiative supported by HP, Microsoft, Intel, BMC, Cisco, and 120 other platform,operating system, and application software suppliers.When WBEM is enabled, the management console can obtain information from any system thatsupports WBEM. For WBEM to work, you must provide the correct user name and password forthe given system. WBEM enables a larger set of server and storage manageability data to becollected and displayed on the System Page and in reports. The presence of WBEM enables theProperties pages and enables WBEM indications (events) to be displayed in event collections.
186 Protocols used by HP SIM

Without HTTPS enabled, HP SIM does not discover any WBEM-based features on a system. Supportfor non-HP systems has been expanded starting with HP SIM 6.0.
NOTE: HP SIM supports WBEM over HTTPS to ensure user supplied WBEM name and passwordpairs are protected.
NOTE: OpenWBEM is not supported.
Remote Method Invocation (RMI)Java RMI is used within the CMS only for inter-process communication.
Remote Wake-UpRemote Wake-Up refers to the ability to remotely turn on a system that is in a soft-off power state.Systems that support the Advanced Configuration and Power Interface (ACPI) should be awakenedtransparently by any network activity to the system. Alternatively, a system might support the MagicPacket technology. When a system is turned off, the Magic Packet — capable network interfacecard (NIC) is still powered on and monitoring traffic. The system will be powered on, if it receivesthe Magic Packet targeting it.
Internet Control Message Protocol (ICMP)ICMP is used during automatic system discovery and prior to other requests to a system to ensurethe system is responding. An ICMP echo request, also known as a ping, is sent to the system's IPaddress. Receipt of a proper reply indicates the system is up and responding.
NOTE: HP SIM can be configured to use TCP as a ping, instead of ICMP, from the Global ProtocolSettings page.
Lightweight Directory Access Protocol (LDAP)LDAP 3 is used during execution of a Directory Group tool to communicate with the configureddirectory server to collect information about systems configured in the directory.
Simple Object Access Protocol (SOAP)SOAP is used by partner applications to communicate with HP SIM. It is primarily XML over HTTPS.
Protocol functionalityThe following table displays descriptions of management protocols displayed under ManagementProtocols on the System Page which displays protocols that have responded when attempting toidentify the system.
NOTE: The CMS initiates the requests for all protocols except events.
Functionality when enabledDescriptionManagement standard
System identification, inventory, eventsA common definition of managementinformation for systems, networks,applications, and services.
CIM
System identificationA protocol using XML over HTTP toexchange CIM information; part of theWBEM suite of standards.
CIM-XML
System identification, management toollaunch, agent configuration
HTTP is another primary protocol usedto acquire data about managed
HTTP and HTTPS
systems during identification. HTTP isnot a secure protocol and can beeasily viewed on the network. Thesecure version of HTTP is called HTTPSand is described later.
Remote Method Invocation (RMI) 187
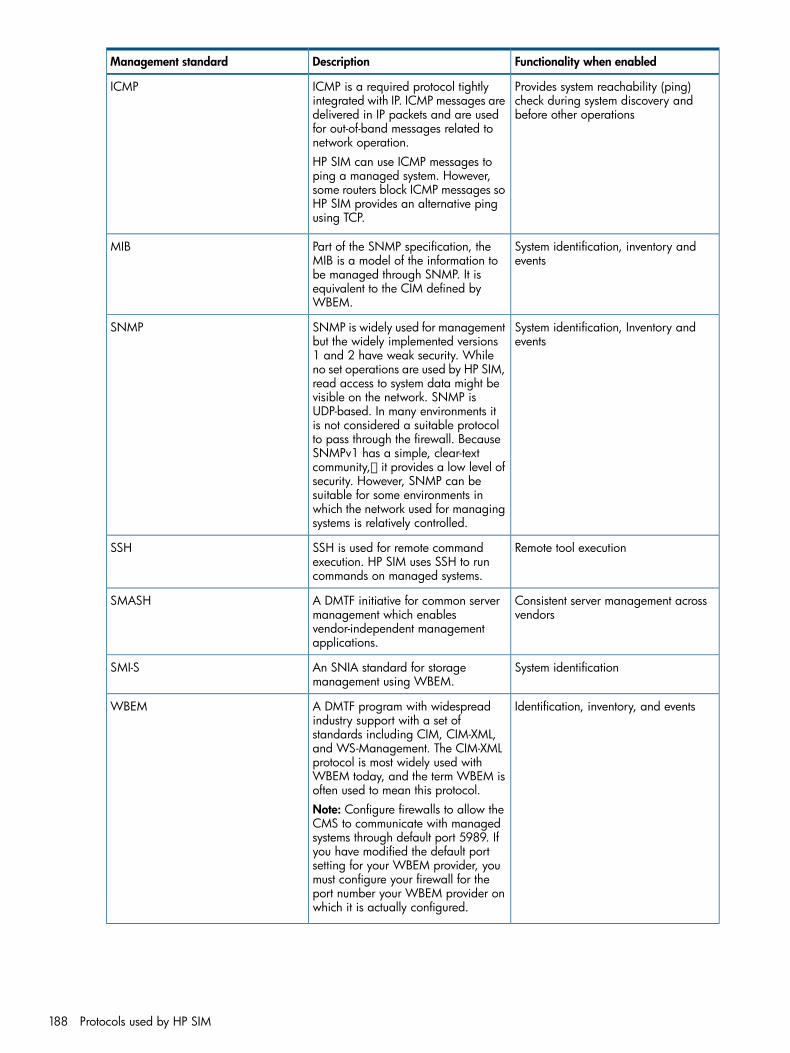
Functionality when enabledDescriptionManagement standard
Provides system reachability (ping)check during system discovery andbefore other operations
ICMP is a required protocol tightlyintegrated with IP. ICMP messages aredelivered in IP packets and are used
ICMP
for out-of-band messages related tonetwork operation.HP SIM can use ICMP messages toping a managed system. However,some routers block ICMP messages soHP SIM provides an alternative pingusing TCP.
System identification, inventory andevents
Part of the SNMP specification, theMIB is a model of the information to
MIB
be managed through SNMP. It isequivalent to the CIM defined byWBEM.
System identification, Inventory andevents
SNMP is widely used for managementbut the widely implemented versions
SNMP
1 and 2 have weak security. Whileno set operations are used by HP SIM,read access to system data might bevisible on the network. SNMP isUDP-based. In many environments itis not considered a suitable protocolto pass through the firewall. BecauseSNMPv1 has a simple, clear-textcommunity, it provides a low level ofsecurity. However, SNMP can besuitable for some environments inwhich the network used for managingsystems is relatively controlled.
Remote tool executionSSH is used for remote commandexecution. HP SIM uses SSH to runcommands on managed systems.
SSH
Consistent server management acrossvendors
A DMTF initiative for common servermanagement which enables
SMASH
vendor-independent managementapplications.
System identificationAn SNIA standard for storagemanagement using WBEM.
SMI-S
Identification, inventory, and eventsA DMTF program with widespreadindustry support with a set of
WBEM
standards including CIM, CIM-XML,and WS-Management. The CIM-XMLprotocol is most widely used withWBEM today, and the term WBEM isoften used to mean this protocol.Note: Configure firewalls to allow theCMS to communicate with managedsystems through default port 5989. Ifyou have modified the default portsetting for your WBEM provider, youmust configure your firewall for theport number your WBEM provider onwhich it is actually configured.
188 Protocols used by HP SIM

Functionality when enabledDescriptionManagement standard
Identification, inventory, and eventsA DMTF standard for exchangingmanagement information using web
WS-Management
services. You can useWS-Management to transport CIM asan alternative to CIM-XML.
Identification, inventory, and eventsWMI is Microsoft's implementation ofWBEM. WMI runs over Distributed
WMI
Component Object Model (DCOM),which in turn, uses RPC. For Windowssystems behind a firewall, HPrecommends installing the WMIMapper on a managed system in thesecure network. This mapper allowsstandard CIM-XML requests throughthe firewall, and they are mapped toWMI requests on the managed system.
Configuring protocol settings in HP SIMYou can use HP SIM to set protocol settings for all systems, for a group of systems, or for anindividual system. You can control the way HP SIM uses these protocols, such as configuring defaulttimeouts and retries, or disabling HP SIM's use of the protocol entirely.To set protocol settings for all systems, access the Global Protocol Settings page in one of thefollowing ways:• Select Options→Protocol Settings→Global Protocol Settings.• From the Discovery page, click Configure global protocol settings in the Discovery configuration
section.Setting protocol settings for a single system or group of systems, access the System Protocol Settingspage in one of the following ways:• From the All Systems page, click the System Name link of the system to go to the System Page
for that system, and then click the System Protocol Settings link on the Tools & Links tab page.• From the HP SIM menu, select Options→Protocol Settings→System Protocol Settings, and then
select the single system to set its protocol settings.Procedure 51 Setting protocol settings for a single system1. Access the System Protocol Settings page by selecting Tools→System Information→System
Page.2. Select the target system.3. Click Run Now.4. Select Links→System Protocol Settings.
Configuring protocol settings in HP SIM 189

D Data CollectionAfter HP SIM collects data initially during the identification process, you can schedule a DataCollection task to specify systems and run the task with different schedules. In addition to the defaultInitial and Bi-Weekly Data Collection tasks built in to HP SIM, you can set new data collectiontasks targeting specific managed systems. If you are scheduling to Overwrite existing data set (fordetailed analysis), formerly known as Single Instance Data Collection task in Insight Manager 7,having it run once per week (smaller networks) to once per month (larger networks) should beadequate. If you are scheduling to Append new data set (for historical trend analysis), it might bebeneficial to run data collection more frequently, perhaps once per hour for your most importantsystems, realizing it consumes database storage space.To create a Data Collection task from the toolbar, select Options→Data Collection.
NOTE: To enable data collection to collect data from any of the protocols used by HP SIM, thecorresponding protocol must be enabled, and the appropriate protocol settings and credentialsmust be specified, globally or for the specific target system.
NOTE: To enable collection of WMI data from WMI-instrumented systems, a WMI Mapper Proxymust have been set and specified through Options→Protocol Settings→WMI Mapper Proxy.
Append new data set (for historical trend analysis)The Append new data set (for historical trend analysis) option maintains trend information inseparate historical entries. You can use the historical perspective for trend and usage analysisbecause records change over time. Information gathered by data collection is used in SnapshotComparison and reports and can be used as criteria in system collections. With Append new dataset (for historical trend analysis), data detailing the system history is collected. Use Append newdata set (for historical trend analysis) sparingly to track problem systems or problem usage times.Do not overuse this task because it can create a considerable amount of data to be stored.
CAUTION: Do not delete the standard data collection task without replacing it with a substitutetask that achieves a similar result. For example, removing the Data Collection task removes thecapability for historical analysis and updating any information shown in reporting tables. You mustrefresh the page to see new data in reports.
Overwrite existing data set (for detailed analysis)The Overwrite existing data set (for detailed analysis) option overwrites any previous informationcollected.You can view the current Data Collection report from the Tools & Links tab of the System Page,which you can reach by selecting a system in a collection.Running data collection consumes noticeable network resources. Proper scheduling might beappropriate.
IMPORTANT: Multiple instances of the same Status Polling or Data Collection tasks do not runsimultaneously.
Initial data collectionThe Initial Data Collection task is used to collect information from many systems that have SNMPor WBEM running (for example, serial numbers and model numbers). This task is set to run bydefault when a new system or event meets the search criteria. You can view the Data CollectionReport for a system after data has been collected by selecting it from the system table view page.This action displays the System Page, where you can select the Data Collection Report link fromthe Tools & Links tab. Other report formats are available from the Reporting tool.
190 Data Collection

Bi-weekly data collectionThe Bi-Weekly Data Collection task runs the Overwrite existing data set (for detailed analysis)option on all systems in the system default collection. The default schedule is to run every two weekson Saturday at 12:00 a.m. You can view the Data Collection Report for a system after data hasbeen collected by selecting it from the system table view page. This action displays the SystemPage, where you can select the Tools & Links tab and then click Data Collection Report.
Bi-weekly data collection 191

E Default system tasksPolling tasks track the health status of systems in associated collections. Hardware status pollingmust occur periodically to determine when systems go offline or when hardware degrades. Youcan customize polling tasks for specific systems to run at scheduled times. You can also createpolling tasks with different collections to meet your needs.You can configure polling tasks to take place based on the receipt of an event. Event polling tasksare associated with event collections. For example, you might set up a hardware status pollingtask for when traps are received from a system.When a polling task is set up to run as the result of a change in an event collection, the pollingtask is applied to all systems generating events that match the given collection.
NOTE: HP does not recommend scheduling a polling task based on periodic event collection.The task would run on the set of systems for each event in the associated collection.
NOTE: If you remove a hardware status polling task, systems continue to be discovered, but thestatus on them is not updated. If you remove the Daily System Identification task, you would nolonger detect changes in management on systems.
The following default tasks are available on the View All Scheduled Tasks page:• Use this task to collect data. This task runs on all systems in the Data Collection List collection.
The default schedule sets the task to run every other Saturday at noon.
• Use this task to gather information about systems such as networking systems. By default, thistask runs once a day. The information is identified and stored in the database.• Single Sign On and STE support on a managed system• Type of management protocol on the system (HTTP, SNMP, and WBEM)• Type and subtype of system (server, storage, switch, router, and so on)• Product name of the system• Operating system name and version• Web Agents running on the system• Web-based software running on the system (for example, printer management software)• System associations with management processors (for example, a system and its Remove
Insight board)• Storage proxies and related storage systems• Wake-on-LAN information
• Includes events that are transient and happen frequently, but do not generally indicate hardwarefailures. For example, link up, link down, and authentication events. These events fill the eventdatabase tables, but do not add value to the hardware event history.
• This task deletes events older than 90 days and can help maintain HP SIM by limiting the totalnumber of events. By default, this task is disabled. To enable the task:On the All Scheduled Taskspage, click Enable.In some installations there might be high volumes of events. If so, consider using this task andevent collections as models and creating an event collection for events older than 30 days(for example), and then creating a task to delete events older than 30 days.
• This task collects status information through management protocols (SNMP, WBEM, and soon) for systems that are not Server, Cluster, or Management Processor type. By default, thistask polls every 10 minutes and at start-up.
192 Default system tasks
NOTE: If you discover more than 500 systems, HP suggests you change the interval tosomething greater than 10 minutes (for example, 15 minutes for every 1,000 systems).
• This task collects status information for SNMP, or WBEM systems that are Server, Cluster, orManagement Processor types. By default, this task polls every 5 minutes and at start-up.
NOTE: If you discover more than 500 systems, HP suggests you change the interval tosomething greater than 5 minutes (for example, 10 minutes for every 1,000 systems).
• This task runs when a system goes from a disabled state to an enabled state. You could usethis task to get the latest status after a planned maintenance window on a system that was setto disabled. This should reflect the entire category (inventory, software baseline, and so on)in the Data Collection report.
• Hardware status polling should reflect the proper status of the Onboard Administrator andthis status must m atch with the XML reply data.
• This task collects static information from a number of systems that have WBEM, or SNMPrunning (for example, serial numbers and model numbers).
• This task runs hardware status polling on systems that are newly discovered. Therefore, youdo not need to wait for the periodic tasks to run before the system has a valid status.
• This task determines software version update status and is set to run every seven days bydefault at midnight. You can edit this task or manually run it at any time.
• This task runs the software version tool when a system changes from a disabled state to anenabled state so that the status of the software loaded on the system is kept current in HP SIM.
• This task checks event configuration on all systems and is scheduled to run every day. TheWeekly Check Event Configuration task can be edited.
Biweekly Data CollectionUse this task to collect data. This task runs on all systems in the Data Collection List collection. Thedefault schedule sets the task to run every other Saturday at noon.
System IdentificationUse this task to gather information about systems such as networking systems. By default, this taskruns once a day. The information is identified and stored in the database.• Single Sign On and STE support on a managed system• Type of management protocol on the system (HTTP, SNMP, and WBEM)• Type and subtype of system (server, storage, switch, router, and so on)• Product name of the system• Operating system name and version• Web Agents running on the system• Web-based software running on the system (for example, printer management software)• System associations with management processors (for example, a system and its Remove
Insight board)• Storage proxies and related storage systems• Wake-on-LAN information
Biweekly Data Collection 193

Old Noisy EventsIncludes events that are transient and happen frequently, but do not generally indicate hardwarefailures. For example, link up, link down, and authentication events. These events fill the eventdatabase tables, but do not add value to the hardware event history.
Events Older Than 90 DaysThis task deletes events older than 90 days and can help maintain HP SIM by limiting the totalnumber of events. By default, this task is disabled. To enable the task:On the All Scheduled Taskspage, click Enable.In some installations there might be high volumes of events. If so, consider using this task and eventcollections as models and creating an event collection for events older than 30 days (for example),and then creating a task to delete events older than 30 days.
Status Polling for Non ServersThis task collects status information through management protocols (SNMP, WBEM, and so on)for systems that are not Server, Cluster, or Management Processor type. By default, this task pollsevery 10 minutes and at start-up.
NOTE: If you discover more than 500 systems, HP suggests you change the interval to somethinggreater than 10 minutes (for example, 15 minutes for every 1,000 systems).
Status Polling for ServersThis task collects status information for SNMP, or WBEM systems that are Server, Cluster, orManagement Processor types. By default, this task polls every 5 minutes and at start-up.
NOTE: If you discover more than 500 systems, HP suggests you change the interval to somethinggreater than 5 minutes (for example, 10 minutes for every 1,000 systems).
Status Polling for Systems No Longer DisabledThis task runs when a system goes from a disabled state to an enabled state. You could use thistask to get the latest status after a planned maintenance window on a system that was set todisabled. This should reflect the entire category (inventory, software baseline, and so on) in theData Collection report.
Hardware Status Polling for Superdome 2 Onboard AdministratorHardware status polling should reflect the proper status of the Onboard Administrator and thisstatus must m atch with the XML reply data.
Data CollectionThis task collects static information from a number of systems that have WBEM, or SNMP running(for example, serial numbers and model numbers).
Hardware Status PollingThis task runs hardware status polling on systems that are newly discovered. Therefore, you do notneed to wait for the periodic tasks to run before the system has a valid status.
Version Status PollingThis task determines software version update status and is set to run every seven days by defaultat midnight. You can edit this task or manually run it at any time.
194 Default system tasks
Version Status Polling for Systems no Longer DisabledThis task runs the software version tool when a system changes from a disabled state to an enabledstate so that the status of the software loaded on the system is kept current in HP SIM.
Check Event ConfigurationThis task checks event configuration on all systems and is scheduled to run every day. The WeeklyCheck Event Configuration task can be edited.
Status pollingPolling tasks track system health status for systems in the system list. They provide a simple meansof assessing system health in the event that an SNMP trap or other event was not properly deliveredto the management console. Hardware status polling must occur continuously to determine whensystems go offline or performance degrades. You can customize polling tasks for specific systemsto run at scheduled times. You can also create new polling tasks with different system or event liststo match your specific requirements.The following default polling tasks exist:• Software Status Polling.
Used to determine software version update status. This task is set to run every seven days, onWednesday at midnight, by default. You can edit the task and run it at any time. This taskperforms the following functions:
◦ Retrieves software and firmware inventory from systems.
◦ Determines the software and firmware update status.
◦ Sorts versions in the database.To access Software Status Polling, select Options→Status Polling→Software Status Polling.
• Hardware Status Polling.Used to track system status:
◦ Hardware Status Polling for Non servers. Used to collect status information for targetsystems that are not of a server, cluster, or management processor type. This task isconfigured to poll every 10 minutes and at startup by default. It does not send statuschange events.
◦ Hardware Status Polling for Servers . Used to collect status information for SNMP systemsof type server, cluster, or management processor. This task is configured to poll every 5minutes and at startup by default. It sends status change events that can be used set upa notification task based on the event.
To access Hardware Status Polling, select Options→Status Polling→Hardware Status Polling.
Version Status Polling for Systems no Longer Disabled 195

F Host file extensionsHosts files are used during discovery to manually add multiple systems to the HP SIM database.Hosts files typically contain IP addresses, system names, system name aliases, and user comments.The hosts file that you create can contain additional information about systems. The informationappears as one or more comments that precede the hosts file entry for the system. Unless othervalues are specified, the default values are used.
Table 19 Hosts file system information
KeywordParameter
TYPEsystem type
SNMP_TIMSNMP timeouts
SNMP_RETSNMP retries
SNMP_MONSNMP read community
SNMP_CONSNMP write community
You can modify the hosts file to substitute a value for the defaults for one entry or change the defaultfor all subsequent entries. To change values for a single-system entry in a hosts file, add a statementto the hosts file as a comment on the line before the host entry, as shown in the following example.The statement applies only to the system it precedes. In the following example, the default TYPE ischanged to "server" for the system EngProliant.
Table 20 Changing default hosts file parameters
Hosts file entriesKeyword statement
#$IMXE: TYPE=server#$IMXE:< Keyword=value >
16.26.176.92 EngProliant.compaq.com EngProliant #usercomments
For example: #$IMXE: TYPE=server
To change the default globally so that it affects the next file entry and all subsequent entries, usea statement similar to the following example. The default is changed to "router" for the next entry.Router remains the default for all entries until another #$IMXE_DEFAULT statement changes thatvalue. If a single instance of TYPE is changed by a #$IMXE statement, the default is not used onlyfor the next entry and then reverts to back "router".
Table 21 Globally changing hosts file parameters
Hosts file entriesKeyword statement
#$IMXE_DEFAULT: TYPE=router#$IMXE_DEFAULT: < Keyword=value>
16.26.176.92 BldRtr6.compaq.com BldRtr6 #usercomments
For example: #$IMXE_DEFAULT: TYPE=router
NOTE: If a keyword parameter is omitted on a commented entry, the current default value isused. The current default is always the standard default unless a new default value was set usingthe #$IMXE_DEFAULT statement. Enclose keywords containing more than one word, such as"management processor." Enclose the full keyword in double quotation marks. Quotation marksare optional for single keywords like "server."
The following text quoted from a hosts file illustrates several statements. The explanations, whichbegin with the pound sign (#), are not displayed in the hosts file.
# Title: Systems in database
196 Host file extensions

# Sorted by: IP address# Date: 28-Mar-00 2:29:31 PM# Author: administrator
The system EngProliant uses all current defaults. There are no additional comments.
16.26.176.92 EngProliant.compaq.com EngProliant #user comments
The system testServer in the following example defaults for TYPE.The defaults for SNMP Timeouts and Retries were restored for this system but only apply to testServer. The SNMP write community string default was changed and only applies to testServer.
#$IMXE: TYPE=Server #$IMXE: SNMP_TIM=0 SNMP_RET=0 SNMP_MON=publicSNMP_CON=private16.26.160.20 testServer.compaq.com testServer
All defaults in the following example for the system BldRtr1 are the same as for testServer, but had to be specified because they are not the global defaults. These changes apply only to BldRtr1.
#$IMXE: TYPE=Router #$IMXE: SNMP_TIM=0 SNMP_RET=0 SNMP_MON=public SNMP_CON=private16.26.160.23 BldRtr1.compaq.com BldRtr1
For the system BldRtr5, the TYPE and protocols used for discovery were changed from the current defaults. Because the remaining keyword entries are missing, the standard defaults are applied for the SNMP timeouts, retries, and community strings.
#$IMXE: TYPE=Router 16.26.160.24 BldRtr5.compaq.com BldRtr5
For the system AcctServer, only the TYPE was changed from the current defaults.
#$IMXE: TYPE=Server16.26.176.36 AcctServer.compaq.com AcctServer #user comments
The global default for TYPE was changed from Unknown to Router. All subsequent entries will be identified as routers until a TYPE statement is used to specify another type or restore the default.
#$IMXE_DEFAULT: TYPE=Router16.25.176.38 FloorRtr2a.compaq.com FloorRtr2a #user comments
The default for the next host entry was changed to management processor, which is enclosed in quotes. #$IMXE: TYPE="Management Processor" AcctSvriLo.compaq.com 16.25.176.37 AcctSvriLo #user comments
...
197

Default valuesIf a parameter is missing in the hosts file, the default is applied. The following lists the parametersthat can be used in hosts files:
Table 22 Hosts file default parameters
DescriptionValueKeyword
Unknown (Default)TYPE • Application
• Cluster
• Complex
• Desktop
• Enclosure
• Environmental Monitor
• Handheld
• Hub
• KVM Switch
• Management Processor
• Notebook
• Partition
• Power Distribution Unit
• Power Supply
• Printer
• Rack
• Resource Partition
• Remote Access Device
• Router
• Server
• Shared Resource Domain
• Storage Device
• Switch
• Tape Library
• Thin Client
• UPS
• Unknown
• Unmanaged
• Workstation
Disabled (Default)0SNMPEnabled1
Disabled (Default)0HTTPEnabled1
System default (Default)0SNMP_TIMGreater than 0
System default (Default)0SNMP_RETGreater than 0
198 Host file extensions

Table 22 Hosts file default parameters (continued)
DescriptionValueKeyword
Read only (Default)PublicSNMP_MON<Community String >
No default<Community String>SNMP_CON
To use a hosts file to specify systems for an automatic discovery, add the hosts file name to thePing inclusion ranges, system (hosts) names, templates, and/or hosts files section of the Discoverypage under the Configure general settings section. Enter the following statement: $Hosts_filenamewhere Hosts_filename is the name of the hosts file that you want to use.
Default values 199

G System Type Manager rulesSystem Type Manager enables you to extend HP SIM's SNMP-based discovery so that it is ableto identify new types of systems. You do this by creating a System Type Manager rule that mapsa System Object ID (OID), and optionally an additional MIB variable, to the desired type.Manufacturers assign unique System OIDs to their SNMP-instrumented products.Systems supply information about themselves using variables described in files called MIBs. Thesevalues are enumerated using an industry-standard structure. MIBs are provided by vendors for theirsystems and must be registered with HP SIM to be accessible and usable from System Type Manager.HP preregisters all HP MIBs and many third-party MIBs. You can register the remaining MIBs usingthe MIB compiler, if you have the related systems on your network. If you examine a MIB, you willfind modules, or groups of variables. Some variables have multiple values. Each of these valueshas an OID as well. You can use these OIDs to determine which system you have and its currentbehavior by querying these OIDs. For a list of default MIBs supplied by HP SIM, see “Out-of-the-boxMIB support in HP SIM” (page 211).You might need to enter a MIB variable OID if you have systems that return the same System OIDthat you would like to classify as different products based on an SNMP variable that returns adifferent value for each class. For example, if you have Windows NT servers from different vendorsthat return the same Windows NT System OID, you can specify rules using the Windows NT OIDas the OID and a vendor-specific MIB variable and value combination to create separate rules foreach vendor.
Adding new SNMP rulesYou can create a new SNMP-based rule using the command line utility (mxstm) or by selectingOptions→Manage System Types from the HP SIM user interface. Within the SNMP framework,manageable network systems (routers, bridges, servers, and so on) contain a software componentcalled a management agent. The agent monitors the various subsystems of the network elementand stores this information in a MIB. The agents enable the system to generate traps, which canbe configured to be sent to a trap destination server that is running HP SIM.
200 System Type Manager rules
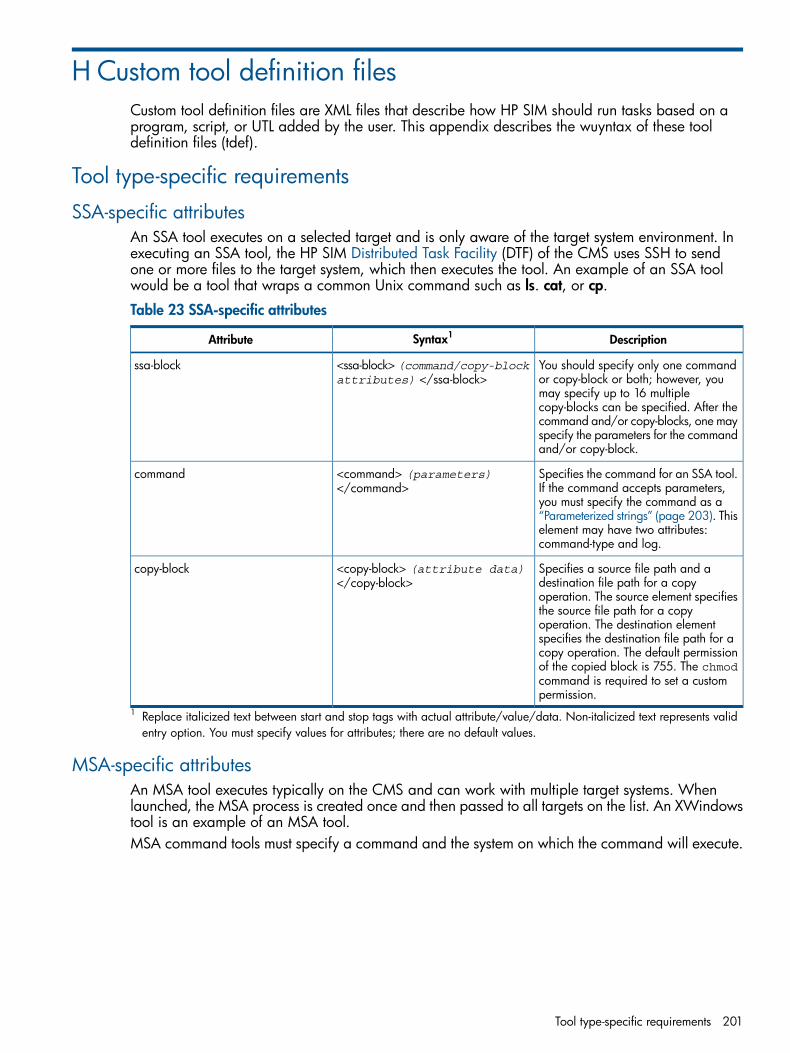
H Custom tool definition filesCustom tool definition files are XML files that describe how HP SIM should run tasks based on aprogram, script, or UTL added by the user. This appendix describes the wuyntax of these tooldefinition files (tdef).
Tool type-specific requirements
SSA-specific attributesAn SSA tool executes on a selected target and is only aware of the target system environment. Inexecuting an SSA tool, the HP SIM Distributed Task Facility (DTF) of the CMS uses SSH to sendone or more files to the target system, which then executes the tool. An example of an SSA toolwould be a tool that wraps a common Unix command such as ls. cat, or cp.
Table 23 SSA-specific attributes
DescriptionSyntax1Attribute
You should specify only one commandor copy-block or both; however, youmay specify up to 16 multiplecopy-blocks can be specified. After thecommand and/or copy-blocks, one mayspecify the parameters for the commandand/or copy-block.
<ssa-block> (command/copy-blockattributes) </ssa-block>
ssa-block
Specifies the command for an SSA tool.If the command accepts parameters,you must specify the command as a“Parameterized strings” (page 203). Thiselement may have two attributes:command-type and log.
<command> (parameters)</command>
command
Specifies a source file path and adestination file path for a copyoperation. The source element specifiesthe source file path for a copyoperation. The destination elementspecifies the destination file path for acopy operation. The default permissionof the copied block is 755. The chmodcommand is required to set a custompermission.
<copy-block> (attribute data)</copy-block>
copy-block
1 Replace italicized text between start and stop tags with actual attribute/value/data. Non-italicized text represents validentry option. You must specify values for attributes; there are no default values.
MSA-specific attributesAn MSA tool executes typically on the CMS and can work with multiple target systems. Whenlaunched, the MSA process is created once and then passed to all targets on the list. An XWindowstool is an example of an MSA tool.MSA command tools must specify a command and the system on which the command will execute.
Tool type-specific requirements 201
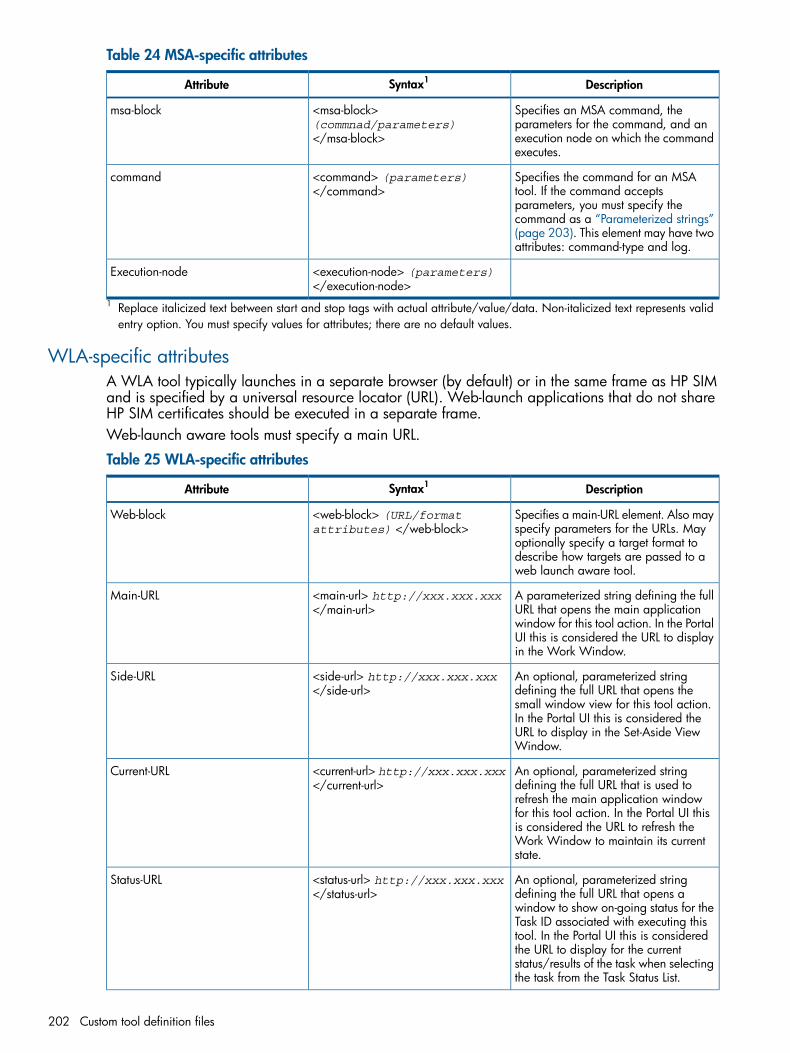
Table 24 MSA-specific attributes
DescriptionSyntax1Attribute
Specifies an MSA command, theparameters for the command, and anexecution node on which the commandexecutes.
<msa-block>(commnad/parameters)</msa-block>
msa-block
Specifies the command for an MSAtool. If the command acceptsparameters, you must specify thecommand as a “Parameterized strings”(page 203). This element may have twoattributes: command-type and log.
<command> (parameters)</command>
command
<execution-node> (parameters)</execution-node>
Execution-node
1 Replace italicized text between start and stop tags with actual attribute/value/data. Non-italicized text represents validentry option. You must specify values for attributes; there are no default values.
WLA-specific attributesA WLA tool typically launches in a separate browser (by default) or in the same frame as HP SIMand is specified by a universal resource locator (URL). Web-launch applications that do not shareHP SIM certificates should be executed in a separate frame.Web-launch aware tools must specify a main URL.
Table 25 WLA-specific attributes
DescriptionSyntax1Attribute
Specifies a main-URL element. Also mayspecify parameters for the URLs. May
<web-block> (URL/formatattributes) </web-block>
Web-block
optionally specify a target format todescribe how targets are passed to aweb launch aware tool.
A parameterized string defining the fullURL that opens the main application
<main-url> http://xxx.xxx.xxx</main-url>
Main-URL
window for this tool action. In the PortalUI this is considered the URL to displayin the Work Window.
An optional, parameterized stringdefining the full URL that opens the
<side-url> http://xxx.xxx.xxx</side-url>
Side-URL
small window view for this tool action.In the Portal UI this is considered theURL to display in the Set-Aside ViewWindow.
An optional, parameterized stringdefining the full URL that is used to
<current-url> http://xxx.xxx.xxx</current-url>
Current-URL
refresh the main application windowfor this tool action. In the Portal UI thisis considered the URL to refresh theWork Window to maintain its currentstate.
An optional, parameterized stringdefining the full URL that opens a
<status-url> http://xxx.xxx.xxx</status-url>
Status-URL
window to show on-going status for theTask ID associated with executing thistool. In the Portal UI this is consideredthe URL to display for the currentstatus/results of the task when selectingthe task from the Task Status List.
202 Custom tool definition files

Table 25 WLA-specific attributes (continued)
DescriptionSyntax1Attribute
An optional parameterized string thatprovides a way for web-launch
<target-format> (parameters)</target-format>
Target-format
applications to pass long lists of targets.The <target-format> gets expanded inexactly the same manner as the URLsdefined for the tool (for example,<main-url>).
Indicates the title of a section in theSystem Page Tools/Links tab. The
<system-page-link-group-title>(parameters)</system-page-link-group-title>
System-page-link-group-title
content of this attribute is the displayingtitle for a section of links. For example,"Systems Insight Manager Pages" isa section title.
1 Replace italicized text between start and stop tags with actual attribute/value/data. Non-italicized text represents validentry option. You must specify values for attributes; there are no default values.
mxtool command parametersThe HP SIM mxtool command enables you to perform specific actions as defined by theparameter(s) that follow it. The following table is a partial list of common parameters used withthe mxtool command.
Table 26 Command mxtool parameters
FunctionParameter
Specify a file/tool to add-a
Specify a directory-d
Specify a file-f
Modify/change-m
Specify a file/tool to be removed-r
Specify a tool name-t
Force a tool to be removed or modified even if the versionis the same or tasks are tied to the tool
-x force
NOTE: For more information about mxtool parameters, refer to the mxtool man page in the HPSIM information library at the following URL: http://h18013.www1.hp.com/products/servers/management/hpsim/info-library5/mxtool.1m.html or in the HP Systems Insight Manager CommandLine User Guide.
Parameterized stringsParameterized strings allow tool developers to greatly enhance the options available in creatingTDEFs. Parameterized strings contain replacement fields (similar to the format strings used in thepopular printf() function in the standard C library). These fields can be replaced by values enteredby the user at runtime (as defined by the tool parameters attribute), by some standard task propertiessupplied by the Task Controller by values related to the selected target systems or system groups,or by property values retrieved from a global tool properties file.Parameterized string substitution descriptions
mxtool command parameters 203

Table 27 Global attribute parameters
DescriptionParameter
Job ID for the task being executed%t
Name of the user running this task%u
Name of the user this task will execute as%e
Management server hostname of the core CMS runningthe tool (the HP SIM server name)
%s
Substitute the value input by the user for the parameterreferenced by the number (#) provided, as a list index
%#
position (one-based positive whole integer... %1, %2, %3,and so on). Up to 10 parameters are allowed, %A is usedfor the 10th.
SOAP logon token, for use with SOAP SSO Webapplications
%y
Table 28 Current selected target parameters
DescriptionParameter
The system name of the target system.%f
Network name (hostname, IP address, IPX address, orsystem name in that order).
%n
Network address (IP address, or IPX address, in that order).%a
Link name in format specified by System Link Configurationsecurity setting (name, IP address, or full DNS name).
%l
IP address of WMI proxy, if any, for this target, in the form<ip address>:<port#></port#></ip>.
%p
HP SIM identifier or GUID of the target system.%g
System type of the target system.%b
System sub-type of the target system%c
Substitutes the related system that has the relationship typeas specified in the parameter rt. Valid relationship type
%r% {rt[.attribute]%}
strings are those that are stored in theassociationTypeNumber column in the device_associationstable. If the [.attribute] is specified, then one of the namedsystem attributes would be returned for the related system.In addition, the common attributes such as Network name(.a) also work. For example, to get the IP address of theserver's management processor, use%r%{MgmtProcToServer.a%}; to get the contact use%r%{MgmtProcToServer.Contact%}. If the related systemsattribute is omitted, then for each system, the network nameand IP address are returned in the form "network name|ipaddress." If more than one system is returned, then theyare comma-delimited. Note that the relationship type"MgmtProcToServer" can be used to return related systeminformation for all management processor relationshiptypes.
The value of the named attribute of the target system.%{attribute]%}
204 Custom tool definition files
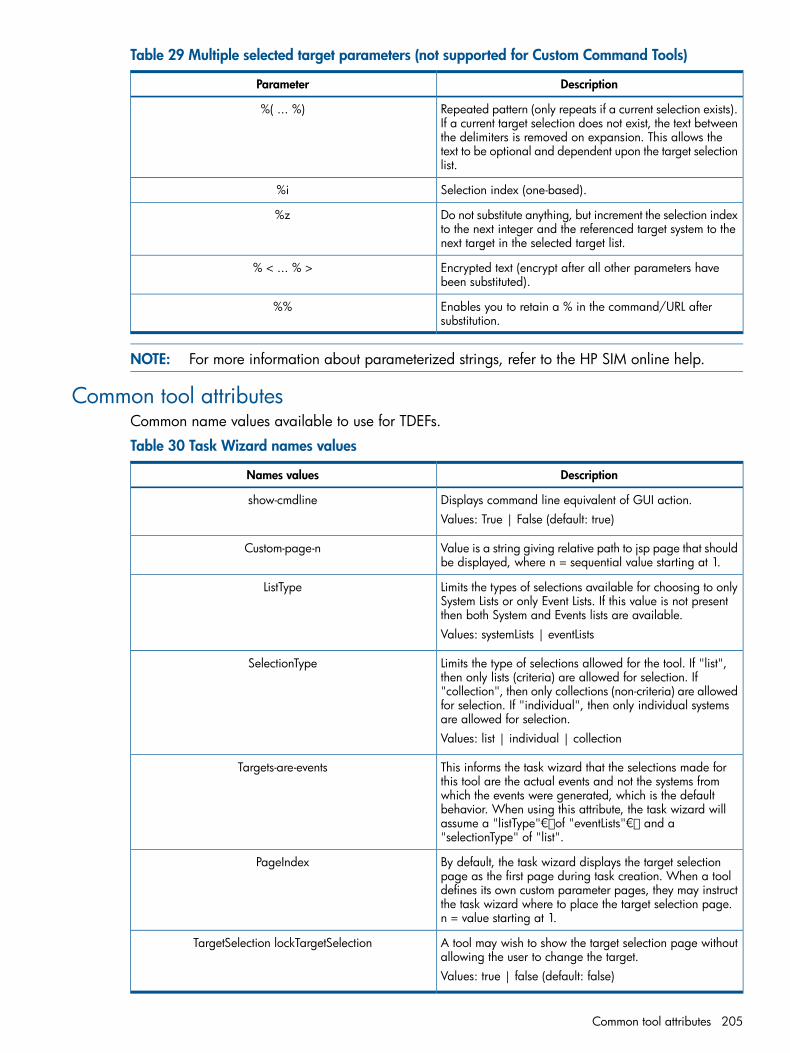
Table 29 Multiple selected target parameters (not supported for Custom Command Tools)
DescriptionParameter
Repeated pattern (only repeats if a current selection exists).If a current target selection does not exist, the text between
%( ... %)
the delimiters is removed on expansion. This allows thetext to be optional and dependent upon the target selectionlist.
Selection index (one-based).%i
Do not substitute anything, but increment the selection indexto the next integer and the referenced target system to thenext target in the selected target list.
%z
Encrypted text (encrypt after all other parameters havebeen substituted).
% < ... % >
Enables you to retain a % in the command/URL aftersubstitution.
%%
NOTE: For more information about parameterized strings, refer to the HP SIM online help.
Common tool attributesCommon name values available to use for TDEFs.
Table 30 Task Wizard names values
DescriptionNames values
Displays command line equivalent of GUI action.show-cmdlineValues: True | False (default: true)
Value is a string giving relative path to jsp page that shouldbe displayed, where n = sequential value starting at 1.
Custom-page-n
Limits the types of selections available for choosing to onlySystem Lists or only Event Lists. If this value is not presentthen both System and Events lists are available.
ListType
Values: systemLists | eventLists
Limits the type of selections allowed for the tool. If "list",then only lists (criteria) are allowed for selection. If
SelectionType
"collection", then only collections (non-criteria) are allowedfor selection. If "individual", then only individual systemsare allowed for selection.Values: list | individual | collection
This informs the task wizard that the selections made forthis tool are the actual events and not the systems from
Targets-are-events
which the events were generated, which is the defaultbehavior. When using this attribute, the task wizard willassume a "listType"� of "eventLists"� and a"selectionType" of "list".
By default, the task wizard displays the target selectionpage as the first page during task creation. When a tool
PageIndex
defines its own custom parameter pages, they may instructthe task wizard where to place the target selection page.n = value starting at 1.
A tool may wish to show the target selection page withoutallowing the user to change the target.
TargetSelection lockTargetSelection
Values: true | false (default: false)
Common tool attributes 205

Table 31 Defined name values
DescriptionNames values
32 character stringproduct-name
24 character numberProduct-version
Insert a separator line in the menu structure before ("true")or after ("after") this tool.
Insert-separator
Values: true | after | false (default: false)
String. Name of a resource bundle for storing localizedtool parameters. See the section on toolinternationalization.
I18n-attrs
String. Normally, the portal will refer internally to the toolusing its database GUID. If a tool needs a well-known IDthat will not change, this attribute can be used.
Tool-id
Have the portal show —in the workspace— the number ofselected nodes, linked to a popup window that displays alist of selected nodes.
Show-selections
Values: true | false (default: false)
String. Set this URL as the portal's current help URL whenthis tool loads. The help URL will be loaded into a separate
help-url
browser window, and the name of the browser frame willbe "helpWindow".
Table 32 All tools values
DescriptionNames values
Have the portal provide a hyperlink for tool's workspaceto be snapped off into a separate browser window.
show-snap-off
Values: true | false (default: false)
A string in the form "base|submenu|subsubmenu".Overrides the tool's category.
menu-path
String. Display the supplied string in the tool's window titlearea. By default, the name of the tool (used in the Managemenu) will be used as the title of the tool.
title
Values: true | false. (default: true)show-titleIf false, the portal will not display a title bar for the tool.
String. Integer sort key used to sort among the other menuitems in the group. The lower the number, the earlier the
Menu-sort-key
item appears in the menu. If a group of menus consists ofmenus without sort keys, then those without keys are sortedalphabetically and put at the end
A trailblazer is a definition used only to establish thepresence of cascades in the menu system and to apply asorting order to them.
Trail-blazer
Values: true | false (default: false)
Table 33 Web-launch tools
DescriptionNames values
String.Indicates
Target-frame
not to load
206 Custom tool definition files
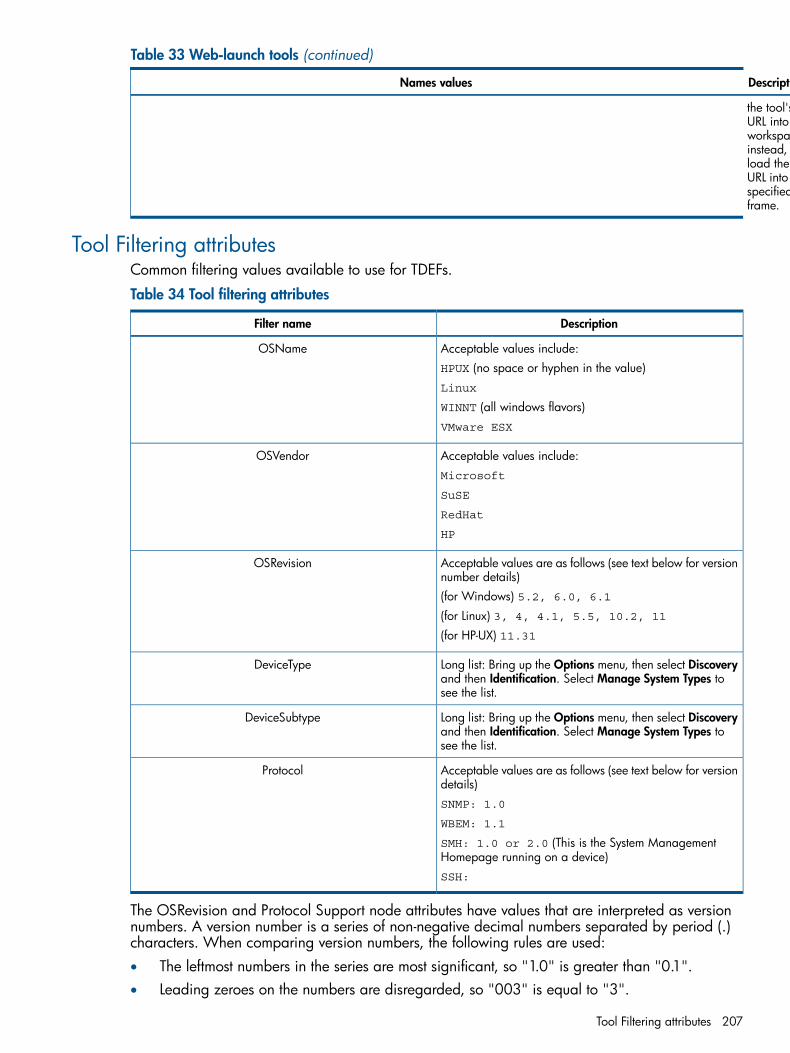
Table 33 Web-launch tools (continued)
DescriptionNames values
the tool'sURL into aworkspace;instead,load theURL into thespecifiedframe.
Tool Filtering attributesCommon filtering values available to use for TDEFs.
Table 34 Tool filtering attributes
DescriptionFilter name
Acceptable values include:OSNameHPUX (no space or hyphen in the value)Linux
WINNT (all windows flavors)VMware ESX
Acceptable values include:OSVendorMicrosoft
SuSE
RedHat
HP
Acceptable values are as follows (see text below for versionnumber details)
OSRevision
(for Windows) 5.2, 6.0, 6.1(for Linux) 3, 4, 4.1, 5.5, 10.2, 11(for HP-UX) 11.31
Long list: Bring up the Options menu, then select Discoveryand then Identification. Select Manage System Types tosee the list.
DeviceType
Long list: Bring up the Options menu, then select Discoveryand then Identification. Select Manage System Types tosee the list.
DeviceSubtype
Acceptable values are as follows (see text below for versiondetails)
Protocol
SNMP: 1.0
WBEM: 1.1
SMH: 1.0 or 2.0 (This is the System ManagementHomepage running on a device)SSH:
The OSRevision and Protocol Support node attributes have values that are interpreted as versionnumbers. A version number is a series of non-negative decimal numbers separated by period (.)characters. When comparing version numbers, the following rules are used:• The leftmost numbers in the series are most significant, so "1.0" is greater than "0.1".• Leading zeroes on the numbers are disregarded, so "003" is equal to "3".
Tool Filtering attributes 207

• Two adjacent period characters are interpreted as if they delimited the number zero, so"1.0.3" is equal to "1..3".
• A beginning period character is interpreted as if preceded by a zero, so ".9" is equal to"0.9".
• Trailing zero numbers are disregarded, so "1.0.0" is equal to "1"
Environment VariablesSpecific environment variables (EVs) available to use for TDEFs. In addition to this list, operatingsystem environment variables are also available (for Windows systems) to be passed into TDEFs.In addition to these "automatic" EV's, user-defined environment variables may be set as part ofscripting in the TDEFs.
Table 35 Environment Variables
DescriptionNames values
The short string type of event (like Discovered Device)NoticeLabel
Shows whether the event has been clearedNoticeState
Plain text description of the event and also includes whetherit is set to In Progress, Cleared, or Not Cleared
NoticePlainText
The raw data of the event that was sent and in a stringformat. It is in a pipe (|) delimited format that can be usedfor simple parsing
NoticeRawData
Can be Critical, Major, Minor, Unknown, Normal,Warning, or Informational
NoticeSeverityStr
An integer format of the severityNoticeSeverity1 — noormal2 - Warning3 - Minor4 - Major5 - Critical6 - Informational
Displays the event list that generated the event. In the formatof:
NoticeQueryName
• This device or event meets the following query criteria:+QueryName;
• This device or event now meets the following querycriteria:+QueryName;
• This device or event no longer meets the following querycriteria:QueryName
Name of the device that generated the eventDeviceName
Number of IPX addresses that are mapped to this deviceDeviceIpxAddressCount
Number of IP addresses that are mapped to this deviceDeviceIPAddressCount
Based on the count of IP addresses, %d is an integer thatshows the actual IP address. For example, if
DeviceIPAddress%d
DeviceIPAddressCount=2 thenDeviceIPAddress0=111.111.111.111 andDeviceIPAddress1=222.222.222.222.
208 Custom tool definition files

Table 35 Environment Variables (continued)
DescriptionNames values
Based on the MAC address count, %d is an integer thatreferences the actual MAC address variable. If
DeviceMACAddress%d
DeviceMACAddressCount=2 then,DeviceMACAddress0=00:80:5E:7F:B0:81 andDeviceMACAddress1=00:80:C7:29:EF:B6
If tied to an event list and the event was a SNMP trap, thenthis is set to the SNMP generic trap ID of the trap received
GenericTrapID
If tied to an event list and the event was a SNMP trap, thenit is set to the SNMP specific trap ID
SpecificTrapID
Path variable received from the operating system (receivedin context of the windows service account)
Path
Variable received from the operating system (received incontext of the windows service account)
SystemRoot
Variable received from the operating system (received incontext of the windows service account)
WinDIR
Variable received from the operating system (received incontext of the windows service account)
ComputerName
Tool parameter guidelinesGuidelines for entering parameter field data when creating new command line tools.
Table 36 New Command Line Tool parameter entry guidelines
Entry guidelinesParameter string assignmentData entry required?Parameter field
As when using the CLI, thename of the new tool should
%1YesTool name
be descriptive of the tool'sfunction.
This is the new commandused to call the tool, and itmay include parameters.
%2YesTool command
If the Tool command includesthe %1 parameter, then this
%3NoPrompt
field entry is required tospecify the destinationprompt.
Use this entry to specify thelocation of the tool in the
%4NoTool menu category
menu. If left blank, the newtool will be added to theTools→Command Line Toolsmenu.
Description of what the newtool does.
%5NoTool description
Description of how to use(invoke) the new tool.
%6NoTool help comment
If left blank, the new tool willrun as the HP SIM user
%7NoEnter root execute as root
whose SSH public key mustbe configured on themanaged system using themxagentconfig
Tool parameter guidelines 209
Table 36 New Command Line Tool parameter entry guidelines (continued)
Entry guidelinesParameter string assignmentData entry required?Parameter field
command. Refer to the HPSIM Installation and UserGuide for more information.CAUTION!If root is specified, any userauthorized to run this toolmay gain full access to themanaged system dependingon the definition of thecommand and itscapabilities.
Path name of new tool.%8NoFile path to save toolExample: /var/opt/mx/tools/mytool.xml
210 Custom tool definition files

I Out-of-the-box MIB support in HP SIMThe following table represents the key MIBs that ship with HP SIM. Those MIBs that are marked aspreloaded are registered as part of every HP SIM installation. The remaining MIBs are in the MIBdirectory for you to compile, if necessary, for managing those types of systems in your environment.
Table 37 MIBs supported in HP SIM
Pre-loadedSupportsMIB name
XARC Serveasmib.mib
XATM deviceatmf.mib
XAvailant Manageravsnmpv1.mib
XGeneral Backupbkupexec.mib
XHP ProLiant BL p-Class GbE2Interconnect Switch
bladetype2-network.mib
XHP ProLiant BL p-Class GbE2Interconnect Switch
bladetype2-physical.mib
XHP ProLiant BL p-Class GbE2Interconnect Switch
bladetype2-switch.mib
XProliant BL P-class GbE2 InterconnectSwitch
bladetype2-trap.mib
hpSwitchProliantbladetype4-switch.mib
XCisco bridgebridge.mib
Xcisco productscisco-cdp.mib
Xcisco productscisco-cluster.mib
Xcisco productscisco-config-copy.mib
Xcisco productscisco-config-man.mib
Xcisco productscisco-entity-fru-control.mib
Xcisco productscisco-entity-vendortype-oid.mib
Xcisco productscisco-envmon.mib
Xcisco productscisco-flash.mib
Xcisco productscisco-ftp-client.mib
Xcisco productscisco-igmp-filter.mib
Xcisco productscisco-image.mib
Xcisco productscisco-ip-stat.mib
Xcisco productscisco-l2l3-interface-config.mib
Xcisco productscisco-lag.mib
Xcisco productscisco-mac-notification.mib
Xcisco productscisco-memory-pool.mib
Xcisco productscisco-pae.mib
Xcisco productscisco-pagp.mib
Xcisco productscisco-ping.mib
211

Table 37 MIBs supported in HP SIM (continued)
Pre-loadedSupportsMIB name
Xcisco productscisco-port-security-mib.mib
Xcisco productscisco-process.mib
Xcisco productscisco-products.mib
Xcisco productscisco-rttmon.mib
Xcisco productscisco-stack-mib.mib
Xcisco productscisco-stackmaker.mib
Xcisco productscisco-stp-extensions.mib
Xcisco productscisco-syslog.mib
Xcisco productscisco-tc.mib
Xcisco productscisco-tcp.mib
Xcisco productscisco-udldp.mib
Xcisco productscisco-vlan-iftable-relationship.mib
Xcisco productscisco-vlan-membership.mib
Xcisco productscisco-vtp.mib
XHP Rack and Enclosurecompaq-agent.mib
XHP ProLiantBLpClassGbE seriesProduct
compaq-id-rec.mib
XHP Proliant BL P-class GbE InterconnectSwitch
cpq-traps.mib
XGiga Switchcpq54nn.mib
XHP Proliant Clustercpqclus.mib
XHP Proliant remote managementcpqcmc.mib
XHP Proliant Clustercpqcr.mib
XCpqdsccscpqdsccs.mib
XHP Proliant Storagecpqfca.mib
XHP Proliant Miscellaneouscpqgen.mib
XHP Proliant System and Environmentalcpqhlth.mib
XHP Proliant Applicationcpqhost.mib
XHP Proliant Storagecpqida.mib
XHP Proliant Storagecpqide.mib
XHP proLiant BL pClass GbE Devicecpqidrec.mib
XGiga Switchcpqn5226a.mib
XHP Proliant NICcpqnic.mib
XDevicecpqpower.mib Power
XHP ProLiant Rackcpqrack.mib
XHP Proliant Clustercpqrecov.mib
XHP Proliant UPScpqrpm.mib
212 Out-of-the-box MIB support in HP SIM
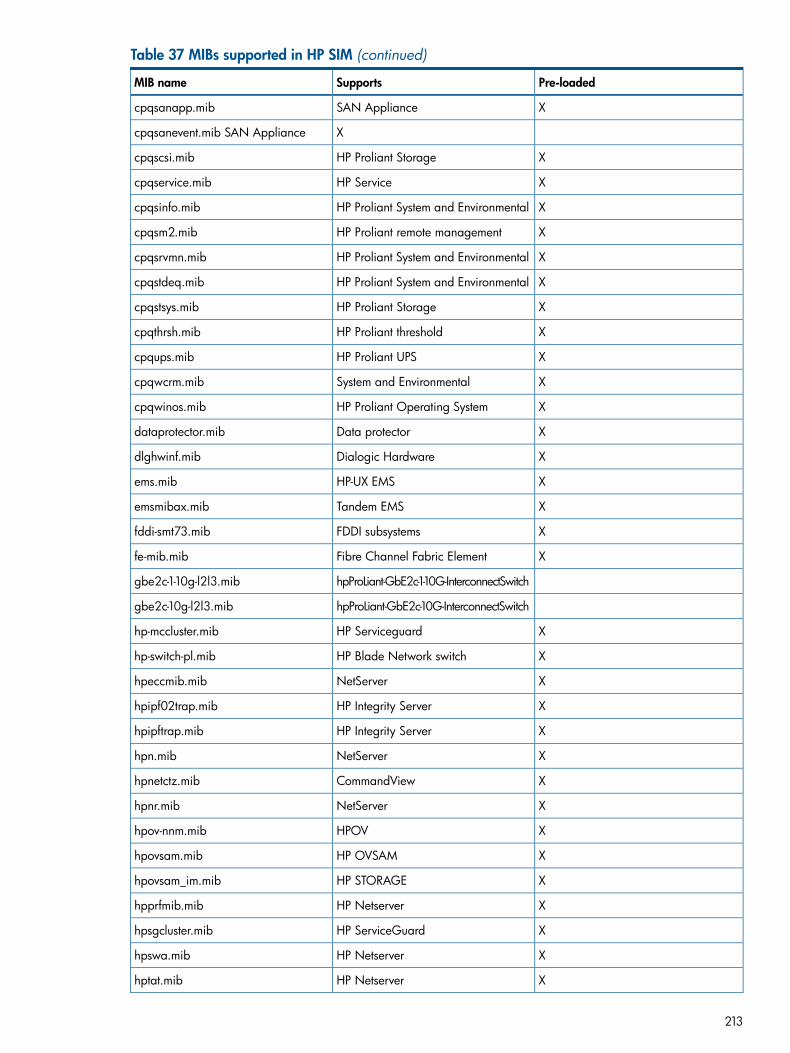
Table 37 MIBs supported in HP SIM (continued)
Pre-loadedSupportsMIB name
XSAN Appliancecpqsanapp.mib
Xcpqsanevent.mib SAN Appliance
XHP Proliant Storagecpqscsi.mib
XHP Servicecpqservice.mib
XHP Proliant System and Environmentalcpqsinfo.mib
XHP Proliant remote managementcpqsm2.mib
XHP Proliant System and Environmentalcpqsrvmn.mib
XHP Proliant System and Environmentalcpqstdeq.mib
XHP Proliant Storagecpqstsys.mib
XHP Proliant thresholdcpqthrsh.mib
XHP Proliant UPScpqups.mib
XSystem and Environmentalcpqwcrm.mib
XHP Proliant Operating Systemcpqwinos.mib
XData protectordataprotector.mib
XDialogic Hardwaredlghwinf.mib
XHP-UX EMSems.mib
XTandem EMSemsmibax.mib
XFDDI subsystemsfddi-smt73.mib
XFibre Channel Fabric Elementfe-mib.mib
hpProLiant-GbE2c-1-10G-InterconnectSwitchgbe2c-1-10g-l2l3.mib
hpProLiant-GbE2c-10G-InterconnectSwitchgbe2c-10g-l2l3.mib
XHP Serviceguardhp-mccluster.mib
XHP Blade Network switchhp-switch-pl.mib
XNetServerhpeccmib.mib
XHP Integrity Serverhpipf02trap.mib
XHP Integrity Serverhpipftrap.mib
XNetServerhpn.mib
XCommandViewhpnetctz.mib
XNetServerhpnr.mib
XHPOVhpov-nnm.mib
XHP OVSAMhpovsam.mib
XHP STORAGEhpovsam_im.mib
XHP Netserverhpprfmib.mib
XHP ServiceGuardhpsgcluster.mib
XHP Netserverhpswa.mib
XHP Netserverhptat.mib
213

Table 37 MIBs supported in HP SIM (continued)
Pre-loadedSupportsMIB name
XSWCChs_agent.mib
XLSF productlsf001.mib
XMSA2000 Array(HPMSA)msa2000traps.mib
XHP Netservernsadimm.mib
XHP Netservernsaevent.mib
XHP Netservernsainfo.mib
XHP Netservernsapci.mib
XHP Netservernsascsi.mib
XHP Netservernsavolcp.mib
Xcisco productsold-cisco-chassis.mib
Xcisco productsold-cisco-flash.mib
Xcisco productsold-cisco-interfaces.mib
Xcisco productsold-cisco-ip.mib
Xcisco productsold-cisco-sys.mib
Xcisco productsold-cisco-tcp.mib
Xcisco productsold-cisco-ts.mib
XHP Open View Internet Servicesovis-v2.mib
XServerNetpcisnet.mib
XPATROLpfc.mib
XRFC MIBrfc1213.mib
XRFC MIBrfc1215.mib
XRFC MIBrfc1514.mib
XRFC MIBrmon-mib.mib
XUnisys Configuration Agentsmsagent.mib
XCommon Clustersvrclu.mib
XServerNetswitch.mib
XIntegrity Serversymtrap.mib
XTruClustertruclu.mib
XNumerical Managementucd-snmp-mib.mib
XFICON in Fabosv5_0ficon.mib
XBrocade Communications Systemsv5_1ha.mib
XFibre Channel Switchv5_3sw.mib
XWYSE Eventswbt3mib.mib
XHitachi RAID450 SNMP Agentxp1024trapmib.mib
XZESAzesa.mib
XZHRMzhrm.mib
214 Out-of-the-box MIB support in HP SIM

Table 37 MIBs supported in HP SIM (continued)
Pre-loadedSupportsMIB name
XTandem's Subsystem Control Facility(SCF)
zsmp.mib
XTandem SNMP Trap Multiplexerztmx.mib
XTandem TCP/IP Subagentztsa.mib
215

J Support and other resourcesRelated documents
Documentation and supportFor support, software updates, and additional information on HP SIM and other products usedwith HP SIM, see the following websites:• HP SIM website at http://www.hp.com/go/hpsim/ for general product information and links
to software downloads, documentation, and troubleshooting information• HP Software Depot website at http://www.software.hp.com/ for access to HP SIM software
downloads• HP Business Support Center website at http://www.hp.com/bizsupport/ for support information
about HP SIM and HP Commercial products• HP Support Center website at http://www.hp.com/go/hpsc for support information about
HP SIM and HP Enterprise products• HP SIM SMI-S Providers website at http://www.hp.com/go/hpsim/providers for information
about device support and SMI-S providers• Videos that showcase HP SIM and the Essentials at http://h18013.www1.hp.com/products/
servers/management/hpsim/infolibrary.html• HP SIM forum at http://forums1.itrc.hp.com/service/forums/categoryhome.do?categoryId=455
for discussions about HP SIM
HP SIM documentationFor more information regarding HP SIM, see the HP HP SIM Information library at http://h18013.www1.hp.com/products/servers/management/hpsim/infolibrary.html for access to HPSIM manuals and release notes.
216 Support and other resources

GlossaryA
administrativerights user
A user who is authorized for the All Tools toolbox on all systems, including the CMS. This typeof user has been given special privileges to administer the HP SIM software.
administrator A user who manages users, resource pools, and self-service requests through HP InsightOrchestration console.
agent A program that regularly gathers information or performs some other service without the user'simmediate presence. HP SIM agents provide in-depth hardware and software information andsubsystem status to HP SIM and numerous third-party management applications.See also management agent.
alarm A user-configurable notification displayed in the System Status panel of HP SIM when certainevents occur. For instance, if a monitored item changes, an alarm notifies the user that a changehas occurred.See also trap, event.
all events collection Displays all events that have occurred for all systems.All Tools toolbox A default toolbox that provides complete access to all tools for the authorized system or system
group.authentication The process of identifying an individual, based on a user name and password. Authentication is
distinct from authorizations and ensures that the individual is who they claim to be.authorizations A mapping of a relationship between a user, a toolbox, and a system or system group.automaticdiscovery
The process that HP SIM uses to find and identify systems on your network and populate thedatabase with that information. A system must first be discovered to collect data and track systemhealth status. The primary source for automatic discovery is ping sweeps configured in theautomatic discovery tasks page. Other sources might include receiving events from unknownsystems or from a management processor that has information about a server. Identificationautomatically runs on discovered systems.
available software A listing of the software components available in the repository to which the Version ControlAgent (HP VCA) has been configured to point. When browsing directly into a HP VCA, theseadditional components can be selected for installation.
B
banner The section of the GUI at the top of the screen that includes the user name and links to the Homepage and sign out functions.
C
caution A note to indicate that failure to follow directions could result in damage to equipment or loss ofinformation.
central processingunit polling rate
The rate for how often the Cluster Monitor CPU Resource checks CPU utilization as reported byInsight Management Agent on monitored systems.
certificate An electronic document that contains a subject's public key and identifying information aboutthe subject. The certificate is signed by a certificate authority (CA) to bind the key and subjectidentification together.See also certificate authority.
certificate authority A trusted third-party organization or company that issues digital certificates used to create digitalsignatures and public-private key pairs. The role of the CA in this process is to guarantee that theindividual who has been granted the unique certificate is the individual they claim to be.
cleared status A status condition that indicates an event is cleared.clients HP desktop, portable, and workstation systems.
217

cluster A parallel or distributed computing system made up of many discrete systems that form a single,unified computing resource. Clusters vary in their features, complexity, and the purposes for whichthey are best suited.
cluster monitorresource
A program that provides a monitoring or management function for clustered nodes in a cluster.
CMS A system in the management domain that executes the HP SIM software. All central operationswithin HP SIM are initiated from this system.
collections The method for grouping system or event.command lineinterface
A text-based application that can be executed from a command shell such as sh, csh, ksh or theMicrosoft Windows CMD shell.
commoninformation model
An object-oriented schema defined by the Desktop Management Task Force (DMTF). CIM is aninformation model guide that describes and shares management information enterprise-wide.CIM is designed for extending each management environment in which it is used.
commoninformation modelobject manager
A CIMOM acts as the interface for communication between web-based enterprise management(WBEM) providers and management applications such as HP Systems Insight Manager. A CIMOMthat provides an interface for an SMI-S provider is called an SMI CIMOM.
communicationsprotocol
See management protocol.
complex Computer systems that support multiple hardware partitions are referred to as a complex. Forexample, the HP Integrity Superdome systems support multiple hardware partitions within a singlecomplex.
component A component is a single, self-describing, installable (interactive or silent) binary file containing asingle piece of software, such as firmware image, driver, agent, or utility, that is supported bythe management and update tools.
Configure orRepair Agents
An HP SIM feature that enables you to repair credentials for SNMP settings and trust relationshipsthat exist between HP SIM and target systems. You can also update Web Agent passwords ontarget systems that have 7.1 agents or earlier installed.
critical status A state generated when HP SIM can no longer communicate with a managed system.Cygwin A UNIX compatibility layer that is used to port some UNIX utilities to Windows.
D
data collectiontasks
Procedure that involves gathering information from a group of managed systems and storing thatinformation in the database. HP SIM uses Hardware Status Polling and Data Collection Tasks toimplement data collection.
digital signatures A technology used to validate the sender of a transaction. This technology uses private keys todigitally sign the data and public keys to verify the sender.
discovery A feature within a management application that finds and identifies network objects. In HPmanagement applications, discovery finds and identifies all the HP systems within a specifiednetwork range.
discovery filters Enables users with to prevent or allow certain system types from ever being added to the database.DistributedComponent ObjectModel
An extension of the Component Object Model (COM) that enables COM components tocommunicate between clients and servers on the same network.
Distributed TaskFacility
A management application that manages the remote execution of tasks on managed systems.
Domain NameService
A service that translates domain names into IP addresses.
E
enclosure A physical container for a set of server blades. It consists of a backplane that routes power andcommunication signals and additional hardware for cabling and thermal issues. It also hosts theCPU or server power supplies.
218 Glossary

event Information sent to certain users that something in the managed environment has changed. Eventsare generated from SNMP traps. HP SIM receives a trap when an important event occurs. Eventsare defined as:
• Warning.Events of this type indicate a state that might become a problem.
• Informational.Events of this type require no attention and are provided as useful information.
• Normal.Events of this type indicate that this event is not a problem.
• Minor.Events of this type indicate a warning condition that can escalate into a more serious problem.
• Major.Events of this type indicate an impending failure.
• Critical.Events of this type indicate a failure and signal the need for immediate attention.
G
graphical userinterface
A program interface that takes advantage of the graphics capabilities of the computer to makethe program easier to use. The HP SIM GUI runs in a web browser.
H
health status Health status is an aggregate status all of the status sources (which can be SNMP, WBEM, andHTTP) with the most critical status being displayed.See also system health status.
host key The public key that proves the identity of a particular host.hosts files A file that follows the UNIX, Linux, or Windows host file format, which is an IP address followed
by a name and each system is listed on a separate line in this file. This file is used by discoveryto manually add multiple systems to the HP SIM database,
HP Version ControlAgent
The all-in-one vulnerability assessment and patch management tool integrated into HP SIM,simplifying and consolidating the proactive identification and resolution of issues that can impactserver availability into one central console.
HyperText TransferProtocol
The underlying protocol used by the World Wide Web.
Insight Controlpowermanagement
An integrated power monitoring and management application that provides centralized controlof server power consumption and thermal output at the datacenter level. It extends the capacityof datacenters by enabling the user to control the amount of power and cooling required forProLiant servers. Built on ProLiant Power Regulator Technology, it extends new server energyinstrumentation levers into HP SIM for greater Unified Infrastructure Management.
Insight Controlvirtual machinemanagement
Provides central management and control of Virtual Machines on Microsoft Virtual server, Vmware’sGSX and ESX. Integrated with HP SIM, virt provides unified management of HP ProLiant hostservers and virtual machines.
InsightManagementAdvisor
A program that regularly gathers information or performs some other service without the user'simmediate presence.
Systems InsightManager
System management software that is capable of managing a wide variety of systems, includingHP systems, clusters, desktops, workstations, and portables.HP SIM combines the strengths of Insight Manager 7, HP Toptools, and HP Servicecontrol Managerto deliver a single tool for managing HP ProLiant, Integrity, and HP 9000 systems runningWindows, Linux, and HP-UX. The core HP SIM software delivers the essential capabilities required
219

to manage all HP server platforms. HP SIM can also be extended to deliver unparalleled breadthof system management with plug-ins for HP storage, power, client, and printer products. Plug-insfor rapid deployment, performance management, and workload management enable systemsadministrators to pick the value added software required to deliver complete lifecycle managementof their hardware assets.
Systems InsightManager database
The database that stores vital information about HP SIM, including users, systems, and toolboxes.
Version ControlAgent
An agent that is installed on a server to enable you to see the HP software installed on that server.The HP VCA can be configured to point to Version Control Repository Manager, enabling easyversion comparison and software update from the repository.
Version ControlRepositoryManager
An HP agent that enables a customer to manage HP provided software stored in a user-definedrepository.
I
identification While discovery finds systems, identification attempts to determine what the system type is. Inaddition, it determines what management protocol a system supports, using credentials from theGlobal Protocol Settings page, and attempts to determine the operating system and version loaded,along with other basic attributes about the system. Finally, it determines if the system is associatedwith another system. For example, a management processor in a server.
installed version A particular HP software component that is installed on the server.InternetEngineering TaskForce
From the IETF Web page: "The Internet Engineering Task Force (IETF) is a large open internationalcommunity of network designers, operators, vendors, and researchers concerned with the evolutionof the Internet architecture and the smooth operation of the Internet."�
Internet Protocol Specifies the format of datagrams (packets) and the addressing scheme on a network. Mostnetworks combine IP with Transmission Control Protocol (TCP), which establishes a virtualconnection between a destination and a source.
IP range Systems with an IP address that falls in the specified range.
J
Java RemoteMethod Invocation
A set of protocols that enable Java objects to communicate remotely with other Java objects.
M
Major status Status information collected from the system that indicates one or more of the monitored subsystemsare not operating properly which is impacting the system. Action should be taken immediately.
managed systems Any system managed by HP SIM, such as servers, desktops, storage systems, and Remote InsightBoards (RIBs).
managementagent
A daemon or process running on a managed system. It receives and executes requests from theCMS on the managed system.
managementdomain
A collection of resources called managed systems that have been placed under the control of HPSIM. Each CMS is responsible for a management domain. The managed systems can belong tomore than one management domain.
Management HTTPServer
An integrated piece of software used by the HP suite of HP Web-enabled System ManagementSoftware to communicate over HTTP and HTTPS. It provides a uniform set of functionality andsecurity to HP Web-enabled System Management Software. This version is available in the ProLiantSupport Pack.10 or earlier.
ManagementInformation Base
The data specification for passing information using the SNMP protocol. An MIB is also a databaseof managed objects accessed by network management protocols.
managementinstrumentation
Agents running on systems that provide management information for HTTP, or SNMP protocols.
220 Glossary

managementprotocol
A set of protocols, such as WBEM, HTTP, or SNMP, used to establish communication withdiscovered systems.
Minor status Status information collected from the system that indicates one or more of the monitored subsystemsare not operating properly which is impacting the system. Action should be taken as soon aspossible to prevent further failure.
Monitor Toolstoolbox
A default toolbox that contains tools that display the state of managed systems but not tools thatchange the state of managed systems.
multiple-systemaware tool
A run type that supports multi-system operations. Tools with this run type operate on the targetsystems using their own internal mechanisms instead of using the Distributed Task Facility. TheMSA run type uses the Distributed Task Facility to launch the tool on a single system before thetool interacting with the other managed systems.
O
OnboardAdministrator
The Onboard Administrator is the central point for controlling an entire c-Class enclosure. It offersconfiguration, power, and administrative control over the rack, and its associated blades (ComputeServers), blade management processors (iLOs), network switches (depending on the models ofswitches used) and storage components (such as SAN or SATA). The Onboard Administrator isa single management processor, with shared resources to an optional backup twin processor forfailover.
OpenSSH A set of network connectivity tools providing encrypted communication sessions over a computernetwork using SSH. It was created as an open source alternative to the proprietary SSH softwaresuite offered by SSH Communications Security.
operator rightsuser
A user who has limited capability to configure the CMS. operator rights users have permissionto create, modify, and delete all reports and their own tools.
overall softwarestatus
This section indicates whether the software on the server that the HP VCA is installed on has anyupdates available within the repository in which it has been configured to monitor.
P
HP Insight Controlperformancemanagement
A software solution that detects, analyzes, and explains hardware bottlenecks on HP ProLiantservers. performance management tools consist of Online Analysis, Offline Analysis, CommaSeparated Value (CSV) File Generator Report, System Summary Report, Status Analysis Report,Configuration, Licensing, and Manual Log Purge.
Predefined Reports that have been defined and installed with HP SIM.private key the private half of a public and private key pair. The private key is stored in and owner read-only
file (for example, only the owner can view it) on a particular system. The private key is nevertransmitted to another system.
ProLiant andIntegrity SupportPacks
An ProLiant and Integrity Support Packs is a set of HP software components that have been bundledtogether by HP, and verified to work with a particular operating system. An ProLiant and IntegritySupport Packs contains driver components, agent components, and application and utilitycomponents. All of these are verified to install together.
ProLiant Essentialslicense key
The contractual permissions granted by HP to the customer in the form of a coded embodimentof a license that represents a specific instance of a license. A single license can be representedby a single key or by a collection of keys.
ProLiant SupportPack
A set of HP software components that have been bundled together by HP and verified to workwith a particular operating system. A ProLiant Support Pack contains driver components, agentcomponents, and application and utility components. All of these are verified to install together.
public key the public half of a public and private key pair. The public key can be freely distributed withoutfear that it can be used to impersonate the user. It can only be used for authentication inconjunction with a private key.
R
HP Insight Controlserver deployment
The HP Insight Control server deployment is a multiserver deployment tool that enables ITadministrators to easily deploy large numbers of servers in an unattended, automated fashion.
221

The server deployment is installed separately from HP SIM. It requires a license for each servermanaged. You must register your server deployment product to purchase licenses or obtain a10-node 30-day license before installing server deployment (a 10-node 7-day evaluation licenseis built into the software). The server deployment is installed from its own DVD. See http://www.hp.com/servers/rdp for information about server deployment including a link to obtainevaluation licenses or register your product. See the server deployment documentation for networkenvironment setup, prerequisites for the deployment server, and installation instructions.
HP Insight RemoteSupport Pack
The HP Insight Remote Support Pack provides proactive remote monitoring, diagnostics, andtroubleshooting to help improve the availability of HP-supported servers and storage devices inyour data center. The Remote Support Pack reduces cost and complexity in support of systemsand devices. The Remote Support Pack securely communicates incident information through yourfirewall and/or Web proxy to the HP Support Center for reactive support. Additionally, basedon your support agreement, system information can be collected for proactive analysis andservices.
rack A set of components cabled together to communicate between themselves. A rack is a containerfor an enclosure.
Red Hat PackageManager
The Red Hat Package Manager is a powerful package manager that can be used to build, install,query, verify, update, and uninstall individual software packages. A package consists of anarchive of files and package information, including name, version, and description.
Replicate AgentSettings
A tool that can be used to copy web-based agent settings to a group of systems.
repository A directory containing ProLiant and Integrity Support Packs and Smart Components.Resource Partition A subset of the resources owned by an operating system instance. The use of those resources is
controlled through technologies such as the Fair Share Scheduler, pSets, and Memory ResourceGroups.A resource partition also has a set of processes associated with it, and only those processes canuse the resources within the resource partition. Policies established by tools such as ProcessResource Manager (PRM), Workload Manager (WLM), or Global Workload Manager (gWLM)control how resources are allocated to the set of resource partitions within an operating systeminstance.
role See toolbox.
S
SAN A storage area network (SAN) is a network (or subnetwork) that connects data storage deviceswith associated data servers. A storage area network is typically part of an overall network ofcomputing resources.
search criteria A set of variables (information) used to define a requested subset of information from the HP SIMdatabase.
Secure HTTP An extension to the HTTP protocol that supports sending data securely over the web.Secure Shell A program to log in to another system over a network and execute commands on that system. It
also enables you to move files from one system to another, and it provides authentication andsecure communications over insecure channels.
Secure SocketsLayer
A standard protocol layer that lies between HTTP and TCP and provides privacy and messageintegrity between a client and server. A common usage of SSL is to provide authentication of theserver, so clients can be assured they are communicating with the server it claims to be. It isapplication protocol independent.
Secure TaskExecution
A feature of HP SIM that securely executes a task from a managed system. STE ensures that theuser requesting the task has the appropriate rights to perform the task, and encrypts the requestto protect data from snooping.
server blade Typically a very dense server system containing microprocessors, memory, and network connectionsthat can be easily inserted into a rack-mountable enclosure to share power supplies, fans, switches,and other components with other server blades. Server blades tend to be more cost-efficient,faster to deploy, and easier to adapt to growth and change than traditional rack-mounted ortower servers.
222 Glossary
See also enclosure.Shared ResourceDomain
A collection of compartments—all of the same type—that share system resources. The compartmentscan be nPartitions, virtual partitions, processor sets (pSets), or Fair Share Scheduler (FSS) groups.A server containing nPartitions can be an SRD—as long as nPartition requirements are met. Aserver or an nPartition divided into virtual partitions can be an SRD for its virtual partitioncompartments. Similarly, a server, an nPartition, or a virtual partition containing pSets can be anSRD for its pset compartments. Lastly, a Server, an nPartition, or a virtual partition containing FSSgroups can be an SRD for its FSS group compartments.A complex with nPartitions can hold multiple SRDs. For example, if the complex is divided intonPartitions, named Par1 and Par2, Par1's compartments could be virtual partitions, while Par2'scompartments are pSets.Each compartment holds a workload. gWLM manages the workload by adjusting thecompartment's resource allocation.
Short MessageService
A convenient way to send brief text messages directly to a wireless phone. There is a maximummessage length of 140 characters.
Simple NetworkManagementProtocol
One management protocol supported by HP SIM. Traditional management protocol usedextensively by networking systems and most servers. Management Information Base for NetworkManagement of TCP/IP-based internets (MIB-II) is the standard information available consistentlyacross all vendors.
Simple ObjectAccess Protocol
A lightweight protocol for exchange of information in a decentralized, distributed environment.
Single Sign-On Permission granted to an authenticated user browsing to HP SIM to browse to any of the managedsystems from within HP SIM without re-authenticating to the managed system. HP SIM is the initialpoint of authentication, and browsing to another managed system must be from within HP SIM.
single-systemaware
A run type that does not support multi-system operations. Tools with this run type are only awareof the system on which they are running.
single-systemaware tool
This type of tool is executed by way of SSH on the target system.
SMI CIMOM See common information model object manager.SMI-S provider An industry-standard WBEM provider that implements a well defined interface for storage
management. The manufacturers of host bus adapters (HBAs), switches, tape libraries, and storagearrays can integrate SMI-S providers with their systems, or provide them as separate softwarepackages.See also Web-Based Enterprise Management.
SNMP trap Asynchronous event generated by an SNMP agent that the system uses to communicate a fault.SoftwareDistributor
The HP-UX administration tool set used to deliver and maintain HP-UX operating systems andlayered software applications.
software inventory A listing of the HP software installed on the system where the HP VCA is installed.software update A task to remotely update software and firmware.spoofing The act of a website posing as another site to gather confidential or sensitive information, alter
data transactions, or present false or misleading data.SSH client Connects to SSH servers to perform remote task execution and file copy.SSH server Listens for and services requests coming in on the proper TCP/IP port, usually port 22.status type The classification of status messages (for example, Critical, Major, Minor, Normal, Warning,
and Unknown).StorageManagementInitiativeSpecification
A standard management interface developed by the Storage Networking Industry Association(SNIA). SMI-S provides a common interface and facilitates the management of storage devicesfrom multiple vendors. SMI-S uses industry-standard common information model and Web-BasedEnterprise Management technology.
storage systems SAN-attached Fibre Channel disk arrays, switches, tape libraries, or hosts (with Fibre Channelhost bus adapters).
223

subnet On TCP/IP networks, subnets are all systems whose IP addresses have the same prefix. Forexample, all systems with IP addresses that start with 10.10.10. would be part of the same subnet.
system Systems on the network that communicate through TCP/IP. To manage a system, some type ofmanagement protocol (for example, SNMP, or WBEM) must be present on the system. Examplesof systems include servers, workstations, desktops, portables, routers, switches, hubs, andgateways.
system group A group of systems based on a system collection; a static snapshot of the source collection at thetime the system group was created. Used for authorizations.
system healthstatus
This is aggregate status all of the status sources (which can be SNMP, WBEM, and HTTP) thatare supported on a target system, with the most critical status being displayed. The following arethe different system health statuses that can be displayed:
• CriticalHP SIM can no longer communicate with the system. The system was previously discoveredbut cannot be pinged. The system might be down, powered off, or no longer accessible onthe network because of network problems.
• MajorA major problem exists with this system. It should be addressed immediately. For systemsrunning an Insight Management Agent, some component has failed. The system might nolonger be properly functioning, and data loss can occur.
• MinorA minor problem exists with this system. For systems running Insight Management Agent,some component has failed but the system is still functioning.
• WarningThe system has a potential problem or is in a state that might become a problem.
• NormalThe system is functioning correctly.
• DisabledThe system is disabled from monitoring but is not necessarily turned off.
• UnknownHP SIM cannot obtain management information about the system.
• InformationalThe system might be in a transitional or non-error state.
systemidentification
Identifying information about systems. This information is stored in the database. The followinginformation is identified:
• Type of management protocol on the system (SNMP, WBEM, HTTP, and SSH)
• Type of HP system (server, client, switch, router, and so on)
• Network name of system
SystemManagementHomepage
An integrated piece of software used by the HP suite of HP Web-enabled System ManagementSoftware to communicate over HTTP and HTTPS. It provides a uniform set of functionality andsecurity to HP Web-enabled System Management Software.
system properties Properties can be set for a single system or for multiple systems at the same time and includeoptions such as system name, system type, system sub-type, operating system version, assetnumber, contact information, and whether or not the system properties can be changed or updatedby the discovery process.
system search Logical grouping of systems into a collection based on information in the HP SIM database. Aftera search is defined, you can display the results from the system view page or associate it with amanagement task.
224 Glossary

system statuspanel
The section of the GUI on the left of the screen that displays status information and system orevent alarms.
system type One of 12 supplied types. You can add your own based on one of these types. For example,use Server type to create MyServer type. It is still a server and is reported on in the same way,but it has your designation.
System TypeManager
A utility that enables you to modify the default behavior of the discovery and identification ofobjects classified as Unknown or as another category of systems are discovered and identifiedprecisely as you require. HP SIM discovers and identifies the system and applies the newinformation when an Unknown system matches a rule set that you specify as the primary rule set.Furthermore, creating the new system type provides a System Link page for viewing the informationreturned from the system agent or from the communication protocol of SNMP .
T
target system The system selected for a tool to run on.task An executed instance of an HP SIM tool, on one or more systems, with a specific set of arguments.threshold A preset limit that produces an event when the limit is reached or exceeded.tool An application, command, or script that can be executed by HP SIM on one or more systems to
perform a task.Tool definition file The TDEF defines parameters of a tool, its execution user, toolbox, and so on in XML format.toolbox A defined set of tools that a user might need for a particular task, such as database administration
or software management. Each HP SIM toolbox is associated with a set of tools and authorizations.trap An unsolicited message generated by a management agent that indicates that an event has
occurred. For example, a monitored item has exceeded a set threshold or changed status.Previously called alarm.See also event.
type The classification of a system, which identifies it as a standard system type. The system types areclient, cluster, portable, printer, remote access device, repeater, router, server, switch, unknown,workstation, and other.
U
uncleared eventstatus
Events that have a Critical, Major, Minor, Normal, or Informational severity and have not beencleared or deleted from the database. Events can be cleared without being deleted from thedatabase by using the Clear events menu option.
• Critical.A failure has occurred, and immediate attention is required.
• Major.A failure is impending.
• Minor.A warning condition exists that can escalate into a more serious problem.
• Normal.These events are not a problem.
• Informational.No attention required. This status is provided as useful information
unknown status HP SIM cannot obtain management information about the system using SNMP. Although nomanagement instrumentation information is available, the system can be pinged. It might havean invalid community string or security setting.
user A network user with a valid login on the CMS that has been added to HP SIM.user accounts Accounts used to sign-in to HP SIM. These accounts associate a local Windows user account or
a domain account with privilege levels and paging attributes inside HP SIM.
225
user group A group of users defined on the CMS operating system that has been added to HP SIM. Membersof the user group in the operating system can sign-in to HP SIM.
user rights user A user who cannot configure the CMS. However, the user can view and run predefined reportson the CMS and all managed systems.
V
HP VCA log A listing of all the software maintenance tasks completed by the HP VCA and reports resultingfrom those tasks.
version control Referred to as the Version Control Repository Manager installed on a Windows system forWindows and Linux ProLiant systems, and Software Distributor on HP-UX operating systems.Provides an overview of the software status for all managed ProLiant or Integrity systems and canupdate system software and firmware on those systems programmatically using predeterminedcriteria. Version control identifies systems that are running out-of-date system software, indicatesif an upgrade is available, and provides reasons for upgrading. For HP-UX systems, SoftwareDistributor can be launched from an HP SIM CMS against one or more installed HP-UX systems.
Virtual ServerEnvironment
An integrated server virtualization offering for HP-UX, Linux, and Windows servers that providesa flexible computing environment maximizing usage of server resources. VSE consists of a poolof dynamically sizeable virtual servers; each can grow and shrink based on service level objectivesand business priorities. For more information, see http://hp.com/go/vse.
W
WBEM Services HP WBEM Services for HP-UX is an HP product that uses WBEM and DMTF standards to manageHP-UX system resources.
Web-BasedEnterpriseManagement
This industry initiative provides management of systems, networks, users, and applications acrossmultiple vendor environments. WBEM simplifies system management, providing better access tosoftware and hardware data that is readable by WBEM client applications.
Web-launch awaretool
A run type for tools that are launched in a web browser using a web server. WLA tools can bedesigned to deal with multiple systems.
WindowsManagementInstrumentation
An API in the Windows operating system that enables you to manage and control systems in anetwork.
workspace The section of the GUI where tools appear.
X
X server A local application that accepts X client requests and acts on them.X Window System A cross-platform windowing system that uses the client/server model to distribute services across
a network. It enables applications or tools to run on a remote computer.XML document A collection of data represented in XML.
226 Glossary
Index
Aabout, 144, 145
default polling tasks, 192searches, 48storage solutions (SNMP), 127, 130version control agent, 143
accessingautomatic event handling, 56discovery filters, 39
accessing the GUI, 16adding
SNMP rules, 200agents, 22All c-Class Racks collection
discontinued, 169All p-Class Racks collection
discontinued, 169all scheduled tasks
task results list, 68applying
time filters, 57, 60array controllers
duplicate entries, 164attributes
cluster monitor, 139audit log, 141authentication
errors, 159ESX system, 159Linux system, 159
automatic discovery, 14, 37, 39, 51, 166, 185automatic event handling, 14
accessing, 56creating new task, 56e-mail settings, 56managing tasks, 56modem settings, 56
automatic event handling taskcreating, 60with specific event, 60
Bbanner, 19BC1000 blades
identification, 173biweekly data collection, 190blade
double dense, 162Brocade 4GbSAN Switch for HP BladeSystem, 169
Ccanceling
data collection, 164capacity
storage arrays, 135
Cisco Fibre Channel switches, 166Cisco Gigabit Ethernet Switch Module
associating with enclosure, 169clearing
events, 61CLI
collections, 71cluster
identification, 195cluster collections, 136
customizing, 53managing, 53printing, 53
Cluster Monitor, 166cluster monitor, 136
attributes, 139CPU polling rate, 139Disk polling rate, 139MSCS polling rate, 139polling rates, 139resources, 139status data fields, 136system status polling rate, 139
cluster monitor resourceoverview, 139thresholds, 138
cluster nodesmanagement, 166
cluster table view page, 136overview, 53
clusters, 37deleting, 53Hyper-V, 166MSCS, 136
CMScommunications, 41setting locale, 176system limit, 161
collectinglicense information, 118
collectionsCLI, 71customizing, 71discontinued, 169event, 61events, 71saving, 61storage systems, 127, 129Systems Insight Manager, 71tasks, 71
command line toolsparameters, 81
Command Viewdiscovery, 133
communicatingwith systems, 34
227

communicationerrors, 160
community strings, 51complex
deleting, 162discovering, 162System Page, 162
Configure or Repair Agents, 14not starting, 162Windows Vista, 162
Configure or Repair Agents task, 162configuring, 162fails, 162
configuringaudit log, 141Configure or Repair Agents task, 162storage system discovery, 133tool definition files, 141
contract and warrantydefault tasks, 192status, 113, 114system properties, 55
CPU resource, 138, 139CPU utilization, 138creating
automatic event handling tasks, 56, 60custom tools, 201discovery task, 37event collections, 61tasks, 68
credentialsdeleting, 163discovery, 163discovery sign-in, 173discovery task, 34fail, 163global, 34, 37global sign-in, 173Sign-in, 163system, 34system sign-in>, 173
custom tools, 181creating, 201deleting, 78editing, 78environment variables, 79managing, 78, 201menu placement, 81MSA, 201multiple-system-aware, 201running, 78scheduling, 78single-system-aware, 201SSA, 201TDEF, 201web-launch tool, 201
customizingcluster table view, 53collections, 71
Ddata collection, 190
append new data set, 190biweekly, 190canceling, 164detailed analysis, 190duplicate entries, 164fails, 164initial, 190Onboard Administrator, 164overwrite existing data set, 190search criteria, 190STDOUT error, 164storage systems, 133task, 164upgrade issues, 164
data collection taskscheduling, 190
default tasksbi weekly data collection, 192daily device identification, 192delete events older than 90 days, 192hardware status polling for non servers, 192hardware status polling for servers, 192hardware status polling for systems no longer disabled,
192Initial contract and warranty collection, 192initial data collection, 192initial hardware status polling, 192Monthly contract and warranty collection , 192software version status polling, 192software version status polling for systems no longer
disabled, 192weekly check event configuration, 192
deletingclusters, 53complexes, 162custom tools, 78discovery task, 37events, 61tasks, 68
disablingdiscovery filters, 39discovery task, 37
discoveringcomplexes, 162, 166IO, 169Linux servers, 168
discovery, 14, 22automatic, 37, 39, 51, 185Command View, 133filters, 14MSCS cluster services, 166storage array, 166storage solutions (SNMP), 130storage systems, 133XP P9500, 166
discovery filtersaccessing, 39
228 Index

disabling, 39editing, 39
discovery taskscreating, 37deleting, 37disabling, 37editing, 37enabling, 37general settings, 37running, 37stopping, 37
disk capacity, 138disk resource, 138, 139DL100 series systems
identifying, 173DL160 G5, 173DL180 G5, 173DMI, 185DTMF, 185
Ee-mail paging
examples, 58e-mail settings, 56editing
custom tools, 78discovery filters, 39discovery task, 37tasks, 68
Emulex 1050C HBA cardidentified as two single port HBAs, 173
Emulex Host Bus Adapteridentifying, 173
enablingdiscovery task, 37
enclosuremissing servers, 162
enclosure view, 162Enhanced reports, 179environment variables
custom tools, 79errors
database initialization failed, 175discovery failed, 171HP Smart Update Manager connection, 171HTTP status 505, 181installssh.bat, 180invalid credentials, 175
ESC 3i server, 183ESL G3 tape library, 183ESX 3.x hosts, 173ESX 3.x servers, 173event collections
creating, 61event types
dynamically added, 168events
clearing, 61, 168collections, 71
deleting, 56, 61, 168management, 56rules, 56server, clearing, 61storage (SNMP), 127storage solutions (SNMP), 131
events taskrunning, 61scheduling, 61
examples, 22clearing server events, 61command line tool parameters, 81e-mail paging, 58system properties, 55web launch tool parameters, 81
execute-as user, 22
Ffailover, 166fault management, 14Firefox, 16, 180
Gglobal credentials, 37global protocol settings, 37, 185
setting, 190storage systems, 133
globalsettings.propsSnmpTrapPortAddress, 185
graphical user interface see GUIGUI
banner, 19features, 16Home page, 19requirements, 16signing in, 16
Hhardware status polling for non servers, 195hardware status polling for servers, 195Hardware Status Polling task
no longer works, 180health monitoring, 14health status, 192, 195
MSA G3, 169types, 51
Home page, 19host names
long, 169truncated, 169
hosts file, 168hosts files
extensions, 196managing, 37
HP Insight Control performance management, 118HP Insight Control power management
24-hour graph, 169incompatible server, 169license, 169
229

temperature graph, 169HP Insight Control virtual machine management, 166HP Insight Dynamics, 166HP Insight Remote Support, 175HP Insight Remote Support Pack
contract and warranty status, 113, 114default tasks, 192system properties, 55
HP Logical Server, 166HP Network-attached Storage systems
discovering, 173HP ProLiant SNMP Agent, 169HP ProLiant Support Pack, 173HP ProLiant WBEM Providers, 178HP Serviceguard package, 166HP SIM
installation errors, 175upgrading, 181
HP Smart Update Manager, 171HP SMH, 164HP Version Control, 143, 144, 145HP-UX, 190
empty, 164managed systems, 22
HTTP, 185
Iidentification, 173
cluster, 195management processor, 195SNMP, 200storage solutions (SNMP), 130
identifyingBC1000 blades, 173complex, 173DL100 series systems, 173Emulex 1050C HBA card, 173Emulex Host Bus Adapter, 173management processors, 173xw25p Blade Workstation, 169
Ignite servers, 176iLO, 51, 166, 168
firmware version, 169iLO2, 169incorrect drive information, 169indications, 14initial data collection, 190Initial ProLiant Support Pack Install task, 180Insight Control virtual machine management, 170Insight Dynamics - USE, 166Insight Management Advisor, 169Insight Manager 7, 190Install OpenSSH task, 180Install Software and Firmware task, 180installation
Oracle database, 175typical, 175
installingHP SIM errors, 175
MSDE errors, 175Integrated Lights-Out see iLOintegration, 144Internet Explorer, 16, 175
maximum URL length, 175response time, 160
IP address, 69IPX address, 69
JJava 1.5, 164Java Virtual Machine, 169
KKernal Configuration (kcweb), 181
Llegend, 19license management, 118license manager, 175
subscription expiration, 175licensing
assigning licenses, 118collecting license information, 118iLO, 118managing licenses, 118ProLiant Essentials, 118
Linux, 190HP VCA, 143
Linux ProLiant agentsinstalling, 168
Linux serversdiscovering, 168
log.properties, 141
MManaged Environment, 46managed environment, 176managed systems
communications, 41HP-UX, 22overview, 22performance, 177setting up, 22Windows, 22
management, 145management agents, 22management processor, 169
identification, 195management processors
identifying, 173PA-RISC, 168
management protocols, 22managing
automatic event handling tasks, 56cluster collections, 53CMS communications, 41custom tools, 78, 201discovery task, 37
230 Index

events, 56hosts files, 37licenses, 118SSH keys, 14
Matrix infrastructure orchestrationdiscovering, 169
McDATA 4Gb SAN Switch for HP BladeSystemassociating with enclosure, 169
MIB, 200internet management, 185rules, 200vendor, 185
mib, 176Microsoft Windows 2008 MSCS cluster, 166ML370 G5 server, 169modem settings, 56monitoring
health, 14Mozilla, 175, 181
response time, 160MSA
custom tools, 201MSA G3
health status, 169MSCS
clusters, 136MSCS cluster services
discovery, 166MSCS resource, 139MSDE, 181
installing, 175multiple-system-aware
custom tools, 201mxagentconfig, 159, 162, 181mxauthenticationexception, 181mxinventory processes, 164mxnodesecurity, 34, 181mxstm, 200
Nname mismatches, 166naming restrictions, 166National Language Support, 175navigating
Home page, 19nPars, 162
OOnboard Administrator, 166, 177
data collection, 164OpenSSH, 177, 181
typical install, 175operating system
inconsistent version, 173Oracle, 175orphans
preventing, 166overview, 118
managed systems, 22
reporting, 63storage solutions (SNMP), 127storage systems, 127, 129
Pparameters
examples, 81Pegasus WMI Mapper, 164performance
managed systems, 177performance management, 161Peripheral Device (pdweb), 181ping, 69, 177polling tasks
customizing, 195default, 192
port 162, 185printing
cluster collections, 53privilege elevation
login issues, 178ProLiant iLO Advanced
licensing, 175ProLiant Support Pack, 22ProLiant xw2x220c Blade Workstation, 162Property pages, 178protocol settings
global, 169protocols, 22, 187
DMI, 185global, 185HTTP, 185setting, 185setting global, 133single system, 185SNMP, 185, 190, 195WBEM, 34, 185, 190WMI Mapper Proxy, 36
Rrelated documents, 216Remote Registry service, 162Replicate Agent Settings task, 180reporting, 14
graph labels, 179overview, 63snapshot comparison, 179snapshot comparisons, 14storage array capacity, 135storage systems, 134views, 63
reports, 63data collection, 14inventory, 14storage systems, 134
requirementsGUI, 16
resourcescluster monitor, 138, 139
231

thresholds, 138response time, 160ROM BIOS, 181RPM Package Manager tools
no longer work, 180rules
SNMP, 200System Type Manager, 200
runningcustom tools, 78discovery task, 37events task, 61
Ssaving
collections, 61scheduling
clear events task, 61custom tools, 78event tasks, 61tasks, 68
search, 19search criteria, 190searching
advanced, 48basic, 48hierarchical displays, 48
security, 14, 179role-based, 14
security alerts, 16server
protocols, 187server connections
increase size, 160setting up
managed systems, 22managed systems - HP-UX, 22managed systems - Linux, 22managed systems - Windows, 22
settingsbrowser, 16
sign-in, 179signing in
GUI, 16Simple File Sharing, 173, 175Single Sign-On, 166single system protocol settings, 185
setting, 190single-system-aware
custom tools, 201SMBIOS, 181SMI-S, 166SMI-S providers
storage systems, 133SNMP, 22, 185, 190, 195
adding rules, 200port 162, 185SnmpTrapPortAddress, 185trap, 56
traps, 195SNMP Agents, 166SNMP agents, 183SNMP settings, 179SNMP traps, 179software
status, 52SQL Express 2005 SP2, 181SQL Server
ports, 175SSA
custom tools, 201SSH, 22
domain support, 180SSH key, 162SSH keys
managing, 14SSL, 14status
software, 52system, 51WBEM status, 53
status pollinghardware status polling, 195software status polling, 195
STDOUT errordata collection, 164
stoppingdiscovery task, 37tasks, 68
storage arraydiscovery, 166
storage hostdata collection fails, 164
storage solutions (SNMP)about, 127configuring event collection, 131discovery, 130, 133overview, 127, 131searching for, 131
storage systems (SMI-S)discovery, 133overview, 127, 129SMI-S providers, 133storage systems, 134viewing, 127viewing array capacity, 135WBEM event indications, 133
subscribingWBEM indication events, 133
support, 216system
status, 51WBEM status, 53
system collectionscustomizing, 50managing, 50printing, 50
system key, 19
232 Index

system monitoringresume, 54suspend, 54
system page, 131, 185, 190protocols, 187
system propertiesexamples, 55set for multiple systems, 55
system resource, 139system status, 180system status panel, 19system tab
protocols, 187system table view page, 48, 69, 131, 190
overview, 50System Type Manager
SNMP rules, 200systems
deleting, 50Systems Insight Manager
collections, 71
Ttarget selection
troubleshooting, 180task instance, 68task results
viewing, 61, 69tasks, 14
collections, 71command line, 180creating, 68Daily Identification, 164data collection, 190default, 192deleting, 68editing, 68instance, 68invalid characters, 180paging, 57polling, 192scheduling, 68stopping, 68track status, 68user privileges, 68
TDEF see tool definition filescustom tools, 201
temperature sensors, 183thresholds
cluster monitor, 138time filters
applying, 57, 60tool definition files, 141tools, 14, 181
authorization, 181customized, 14Kernal Configuration (kcweb), 181launching, 181Peripheral Device (pdweb), 181
ping, 69Trust Platform Module, 168trust relationships, 180
Uunsupported characters
database user names and passwords, 175operating system, 175
upgradingdata collection, 173HP SIM, 181identification, 173Oracle JDBC driver, 181running Daily Device Identification task, 173
UUID, 181
Vv0 keys, 175VCEM
menus, 182viewing
task results, 61, 69virtual machine hosts, 166virtual machines, 183VMware
subscriptions, 183VMWare ESX
property pages, 178VMware ESX Server, 173
WWBEM, 22, 173, 185, 190
events, 183status, 53
WBEM connections, 164WBEM events
subscribing, 168WBEM indications, 183web browsers
communication errors, 160requirements, 16
web launch toolsparameters, 81
web-launch toolcustom tools, 201
Windowsmanaged systems, 22
Windows 2000, 180Windows 2008, 162Windows 2008 64-bit, 181Windows Vista
Configure or Repair Agents, 162User Account Control features, 181
Windows XP, 181Windows XP SP2, 162Windows XP SP3, 177WMI Mapper proxy, 183
233

XXP P500
WBEM indications, 183xw25p Blade Workstation
identifying, 169
234 Index