hp storeonce vtl, cifs share and ost/catalyst...
TRANSCRIPT

Technical white paper
HP StoreOnce VTL, CIFS share and OST/Catalyst
integration guide with Symantec NetBackup 7.5
“Getting the best out of HP StoreOnce technology and Symantec NetBackup 7.x”
Contents
Executive Summary 3 Key learnings 3
Introduction to HP StoreOnce Emulations and Features 4 Comparison table of emulations; showing key features and when to use 4
Introduction to Symantec NetBackup and OST 5 NetBackup Terminology 5 Introduction to OST/StoreOnce Catalyst 6 Introduction to HP StoreOnce B6200 Backup System architecture 7
Multiple stream considerations 10 Recommended streaming schematic 10
Not recommended 11 Configuring multiple streams in NetBackup 12
Set concurrency values for storage units 12 Configure backup policies appropriately 13
Integration environment 16
Licensing considerations 17 Symantec licensing 17
Licensing modes 17 VTL licensing 18 How this relates to our integration example 18
HP StoreOnce B6200 licensing 18
Integrating StoreOnce VTL emulation with NetBackup 7.x 20 An overview of integration steps 20 Fibre Channel VTL creation process on the StoreOnce Backup System 20 Configuring the StoreOnce VTL Library devices as NetBackup Storage Units 21 Configuring the VTL device for best performance 27
Block size and number of buffers configuration files 29 To create the configuration files 29
Configuring and testing backups 30 Other VTL Configuration parameters to consider 31
Setting up HP StoreOnce VTL replication 31 Disaster recovery 32
Integrating StoreOnce NAS CIFS emulation with NetBackup 7.x 33 An overview of integration steps 33 Configuring Active Directory authentication (optional) 33
To join an AD domain 34 Creating NAS (CIFS) shares 36

To grant AD access permissions to StoreOnce shares (optional) 36 To test data access 38
Configuring the StoreOnce NAS Share devices as NetBackup Storage Units 39 To configure storage devices 39 Configurable options and when to use them 40 Incorporating StorageNAS into the backup policy 41
Setting up NAS (CIFS) replication 42 Blackout windows 43
NAS NFS Shares 44
Integrating StoreOnce Catalyst emulation with Symantec OST in NetBackup 7.x 45 What are low bandwidth backups? 45
Low Bandwidth backup – usage models 46 An overview of integration steps 47
Terminology 47 Installing the HP StoreOnce Catalyst OST 2.0 plugin 47 Setting up a Catalyst Store in the HP StoreOnce Backup System 50
Setting Catalyst Store Access permissions 52 Configuring Catalyst Stores into the NetBackup Storage Server/Disk Pool/Storage Unit architecture 54
To configure the connection to the HP StoreOnce Backup System 55 Configurable options and when to use them 60 Image Cleanup 64
Configuring backups to OST/Catalyst Store 64 Symantec Lifecycle Policies and Catalyst Store Copies (low bandwidth replication) 67
Creating the Catalyst Store and user on the StoreOnce GUI for replication (low bandwidth copies) 67 Setting up OST Duplication/Catalyst Store low bandwidth replication via NetBackup Storage Lifecycle Policies. 68
Checking Duplication Job Status from a Command Prompt 73 Monitoring outbound and inbound copy jobs on the StoreOnce GUI 74 Multi-hop replication (duplication) 75 Faster DR recoveries 76 Manipulating and controlling Catalyst copies 76 Promoting a secondary copy to a primary copy 77 Promoting the secondary copy using the Storage Lifecycle policy 78
Using HP StoreOnce VTL autonomic restart scripts with NetBackup 7.x 82
Backup applications and Autonomic Restart 84 Job status in NetBackup 84 Device up scripts 84
Checkpoints 84 Autonomic Restart Script for Windows 84
Installation 84 Configuration 85 Logging 85
Autonomic Restart Script for Linux 85 Installation 85 Configuration 85 Logging 85
Checkpoints 85

3
3
Executive Summary
The following implementation guide provides readers with a comprehensive overview of how to integrate various HP StoreOnce Backup System
emulation types with Symantec NetBackup 7.x enterprise backup software. As well as showing “How to”, the guide also explains the
configuration options that are available and provides recommendations for getting the best functionality and performance out of the
hardware/software combination. The examples in this integration guide were all performed on the HP StoreOnce B6200 Enterprise Backup
System with Symantec NetBackup V7.5.
Key learnings
For all emulation types HP StoreOnce throughput performance is directly related to the number of parallel backup streams that are run
concurrently – this sometimes requires a “new approach” to specifying backup jobs. A maximum of 16 concurrent backup streams to a device
(the backup target on the HP StoreOnce appliance) is recommended. Configuring NetBackup parameters and device configurations to
support multiple stream backups is the key to successful integration.
For all emulations HP recommends the creation of specific devices for specific “data types” in order to ensure that similar data is stored in
the same device – hence improving the deduplication ratio. For example: VTL1 for File/Print data, VTL2 for SQL databases, and so on.
For VTL emulations HP recommends using the D2DBS emulation type because it offers flexible emulations (almost unlimited drive counts
and slot counts), and can easily be distinguished as an HP StoreOnce product. It is important to note that Symantec requires the D2DBS
emulation type to be used in order to properly support and license the device. Failure to comply with this could result in an “unsupported”
configuration.
For VTL emulation a block size of 256K is recommended because this provides the highest throughput (measured on the HP StoreOnce
appliance) – See how to implement this parameter in Integrating StoreOnce VTL emulation with NetBackup 7.x.
For VTL emulations do not use multiplexing because this technique is intended for slow clients and physical tape drives. Using multiplexing
on HP StoreOnce systems will reduce deduplication ratios and reduce restore speed.
For NAS (CIFS) emulations there is a file limit of 25000 files per share. To maximize the storage capacity per share, a fragment size of 500GB
is recommended with Symantec NetBackup.
For VTL and NAS low bandwidth replication, the replication process is controlled by the StoreOnce device itself and, NetBackup has no
inherent knowledge of multiple copies of the data. This means in a disaster recovery scenario, NetBackup data import techniques must be
used to update the NetBackup Master Server so that it is aware of the data’s existence. This is not required for Catalyst/OST implementations
where the Master Media Servers are aware of the data locations that reside within the same domain as the original backup Media Servers*.
Configuring StoreOnce Catalyst devices into OST for source-side deduplication or target-side deduplication requires the Catalyst stores to be
configured in different ways.
o Source-side deduplication on the NetBackup Media Servers is generally used for remote site backups into Catalyst stores or
within data centers where network bandwidth usage is to be minimized.
o Target-side deduplication on the StoreOnce appliance is typically deployed when deduplication load processing impedes on
the Media Server performance during a running backup.
When implementing Catalyst stores into Symantec OST, the NetBackup Storage Lifecycle Policy (SLP) is used to create multiple copies of the
Catalyst stores. This is all controlled from within NetBackup’s management console.
The HP StoreOnce B6200 Backup System supports autonomic failover in the event of a node in a couplet failing. This feature allows backup
jobs to restart and continue on the remaining node in the couplet. By utilizing the "checkpoint" capability in the backup policies, the backup
job can restart from the last known good checkpoint instead of having to restart from the very beginning of the job. This ensures that backup
jobs will complete as quickly as possible even in the event of failover.
To take full advantage of the “Autonomic restart” High Availability feature of the HP StoreOnce B6200/NetBackup implementation with VTL
emulation some additional NetBackup scripts are required. These are described in NBU Autonomic restart scripts. The scripts are only
required for VTL emulations; NAS and StoreOnce Catalyst restart automatically without any additional scripting.
Overall the integration of HP StoreOnce products with Symantec NetBackup is very robust, with both companies doing significant “In-house”
testing and certification in extensive configurations.
* A second technical whitepaper in this series will cover StoreOnce/NetBackup DR recovery scenarios in more detail.

4
Introduction to HP StoreOnce Emulations and Features
HP StoreOnce Backup Systems are a range of disk-based backup systems supporting in-line deduplication and deduplication enabled
replication that offer users the following business benefits:
Data growth is managed more effectively by implementing deduplication technology (developed by HP Labs) to store more backups
on the same physical hardware for longer periods of time.
Implementing a disaster recovery solution is more cost effective. An additional benefit of deduplication is that it enables low
bandwidth replication. Data can be replicated offsite over low bandwidth (cost-effective) links - making disaster recovery more
affordable than ever before.
Three types of emulation are available – VTL, NAS shares and StoreOnce Catalyst stores. This provides the widest range of
functionality and capabilities in a single appliance. See Table 1 below.
Comparison table of emulations; showing key features and when to use
Emulation Key Features Best used in Comments
Virtual Tape
Uses virtual tape drives and
virtual slots to emulate
physical tape libraries
Enterprise FC SAN environment
(B6200 and 4xxx series).
HP StoreOnce also supports iSCSI
VTL (4xxx and 2xxx series)
Tried and tested, well understood but
lacks sophistication.
Uses NetBackup Robot and Drives
device type
NAS (CIFS/NFS shares)
NAS shares can be easily
configured and viewed by the
operating system
Specific environments that do not
support tape emulation backup or
prefer to backup directly to disk.
In some cases the licensing may
be lower cost for NAS shares as a
backup target.
This is a NAS target for backup - not
recommended for random NAS file
type access.
Uses NetBackup Basic Disk device
type
OST with StoreOnce
Catalyst
NetBackup has total control
over the HP StoreOnce
appliance, providing source
based deduplication,
replication control, improved
DR etc.
Environments that require a
single management console for
all backup and replication
activities and the ability to
implement federated
deduplication*
Requires HP OST 2.0 plugins to be
installed on NetBackup Media servers
Uses NetBackup OpenStorage device
type
Table 1: HP StoreOnce Emulations
* Federated deduplication is an HP term referring to the ability to distribute the deduplication load across NetBackup Ss. This feature is
sometimes known as source-based deduplication or low bandwidth backup.

5
5
Introduction to Symantec NetBackup and OST
Symantec NetBackup is an Enterprise class data protection application. Its architecture is designed for a large and complex distributed
computing environment. NetBackup provides scalable storage servers that can be configured for a variety of tasks such as backup, recovery,
rchiving and file migration. NetBackup provides a variety of client agents for different operating systems and applications. There is a variety of
additional functions such as Advanced Disk and the implementation of the Symantec Open Storage Technology (OST) Application Programming
Interface (API). NetBackup Media Servers can use disk or tape for storage targets.
NetBackup Terminology
NetBackup Master Server: Manages backups, archives and restores. A Master Server manages all policies for a NetBackup domain and is
required for all backup and restore operations. It is responsible for all media (can be tape or disk) selection and maintains an internal database
called a Catalog. The catalog tracks backups and media and is used to quickly locate the correct media and backup items. There is one Master
Server per NetBackup domain, but can be clustered for redundancy.
NetBackup Media Server: Distributes the backup load across large deployment configurations. Storage devices are attached to Media Servers
via SCSI, SAN or network connection. It is possible for a Media Server to be present on the same physical server as the master. A Master Server
can control many Media Servers and also function as a Media Server. It is possible in large enterprise scale operations to have multiple Master
Servers.
Storage Server: When disks are connected directly to the Media Server I/O. In this configuration, disks can be configured in an OpenStorage
Disk Pool.
Storage Units: The logical unit that is used as the target device for policies and Storage Lifecycle Policies.
Disk Pool: A collection of disk volumes presented to multiple Media Servers.
Clients: Servers or workstations that have the NetBackup client software loaded and will back up over the network to their designated Media
Server.
Policy: Backup job
Storage Lifecycle Policy (SLP): This is a policy that can be overlaid onto a standard policy. It controls creation, and duplication (multiple
copies) of backup data and maintains where backups are stored and their retention period.
Figure 1 shows how the NetBackup components are interconnected. NetBackup is extremely scalable and can support a large, complex backup
solution. Symantec provides multiple guides on how to configure performance and these must be considered when planning a robust solution.
NetBackup Master and Media Server software is available for Windows, Linux, HP-UX and Solaris platforms.
Figure 1: NetBackup architecture
(NAS)

6
HP StoreOnce emulations roughly translate into the following Symantec device terminology:
StoreOnce VTL = NetBackup Robots and Drives Device
StoreOnce NAS CIFS shares = Basic Disk. Locally attached disk storage or network attached disk storage are presented as file systems to the
Media Server. The directory structure is specified when the storage unit is created. This is the standard configuration for StoreOnce NAS. Basic
Disk cannot be used in a Storage Lifecycle Policy.
StoreOnce Catalyst Stores = OpenStorage (HP StoreOnce Catalyst). This is used for intelligent storage devices that are OST protocol aware.
This option is vendor specific and requires the creation of a Symantec Storage server and disk pool.
Introduction to OST/StoreOnce Catalyst
OST stands for Open Storage Technology – it is a Symantec specific interface to enable tighter integration with backup appliances of all types.
The OST API allows the features of individual hardware vendors with backup appliances to be supported through a common interface within
NetBackup and Symantec Backup Exec. The appliance vendors contribute by writing what are called “OST-plugins”, which are installed on
NetBackup Media Servers and Master Servers to complete the integration.
In HP StoreOnce terminology, a “Catalyst Store” along with the HP OST2.0 plugin is HP’s methodology for providing a tight integration with
Symantec NetBackup OST. This provides customers with the following benefits:
Backup and restores are performed to specific NetBackup Open Storage devices providing improved reporting capabilities
(deduplication ratios, etc).
Part of the deduplication process can be offloaded onto Media Servers, so less network bandwidth is consumed within a Data
Center or over a Wide Area Network (WAN) link when backup data is sent to an HP StoreOnce B6200 appliance. This is only
achievable when using the OST API with Catalyst API integration. Offloading the deduplication workload to a NetBackup Media
Servers will improve the overall throughput that the B6200 StoreOnce Backup System can deliver.
Replication of OpenStorage devices (in NetBackup terminology this is called Duplication) is controlled by NetBackup – rather than
the appliance itself – leading to the backup catalog having true visibility of all copies of the backup data that exist (if required). In
addition different retention periods can be specified for different copies of the data – for example, copies stored at the Data Center
can have longer retention periods than those stored at remote sites.
Reduced disaster recovery times from replicated copies because the backup catalog has visibility to all copies of the data.
All in all, OST with Catalyst provides the customer with a comprehensive and intelligent backup solution tightly managed from the NetBackup
Management Console.
Figure 2: StoreOnce Catalyst and OST integration

7
7
The specific HP implementation is shown in Figure 2, note the following:
The StoreOnce Catalyst plugin to the OST API provides the “bridge” between Symantec standard OST commands and Catalyst store
commands.
A Catalyst store created on the StoreOnce B6200 Backup System can be configured as either “high bandwidth” or “low bandwidth”. If
configured as high bandwidth, all data is passed from the NetBackup Media Server (using either a 1Gbe or 10GbE interface) to the
B6200 high bandwidth catalyst store; and all processor intensive deduplication is performed on the B6200 Backup System and not
the Media Server.
If the Catalyst store on the B6200 is configured as low bandwidth, the OST/catalyst API integration ensures that the processor
intensive part of deduplication (called hashing, chunking and compression) is performed on the Media Server. Low bandwidth has the
advantage of transferring only a fractional amount of data over the network to the Catalyst store on the B6200 Backup System. This
technique can be used to reduce network backup traffic in the Data Center or can be used to allow remote sites to backup over WAN
links to a low bandwidth Catalyst store at a centralized Data Center.
Catalyst stores can be “copied” (replicated (HP), duplicated (Symantec)) using OST commands and defined NetBackup Storage
Lifecycle Polices using low bandwidth techniques. This copy is done without having to “rehydrate” the data as it is sent from one
location to another. Significant savings on time and bandwidth provide a very cost-effective Disaster Recovery solution for
customers.
Introduction to HP StoreOnce B6200 Backup System architecture
This section provides an overview of the B6200 architecture, see also Figure 3. The scalability is provided by a series of couplets, with each
couplet consisting of two nodes. There is a maximum of 8 nodes (4 couplets) and each couplet can have up to 128TB of usable storage capacity
attached to it. On each node (or service set as it is called), various devices such as VTL, NAS and Catalyst stores can be created, and the service
set can also be configured as a replication source or target. For Catalysts stores and replication, a license is required for each couplet using
these services.
The couplet concept is used to provide various HP unique features such as autonomic failover and restart (covered in Using HP StoreOnce VTL
autonomic restart scripts with NetBackup 7.x). In the event of failure of one of the nodes, access to all devices is maintained. This section will
provide an overview of the Fibre Channel and network connections that provide the customer with access to the VTL, NAS shares and Catalyst
stores on the HP StoreOnce B6200 Backup System.
Figure 3: StoreOnce B6200 Backup system

8
Each node has two 8Gb FC connections (used for VTL only), two 10GbE and four 1GbE Ethernet connections (used for NAS shares or Catalyst
stores). Figure 4 illustrates these physical connections.
Figure 4: StoreOnce B6200 Fibre Channel and Ethernet network architecture
The network must be configured using one of four different templates depending on the customer’s environment. This is important because
the network template used will affect the way certain emulations are configured, such as NAS (CIFS shares) and replication, and the way
authentication works with Active Directories.

9
9
The most popular template is Template 1 (figure 5), which uses the 1GbE network for device management and the 10GbE network for data
(backup and replication). Only one Gateway is supported and that may be on either the Management Network or the Data Network. For more
details on template configurations see the B6200 Backup System Recommended Configuration Guidelines.
Figure 5: StoreOnce B6200 Network connections – template 1 showing two options where the Gateway can be connected.

10
Multiple stream considerations
Before we cover VTL, NAS (CIFS) and OST/Catalyst emulation integrations we need to understand a fundamental rule for getting the best
performance out of an HP StoreOnce deduplication appliance. This rule is that the backup throughput of the appliance emulation is directly
proportional to the number of concurrent backup streams supplied. For example, a single backup stream may achieve 150 MB/sec, but 16
streams concurrently could achieve 1000 MB/sec throughput. So from an ISV backup policy perspective and device configuration perspective,
there are many parameters that have to be configured to allow this to happen.
The following factors determine the number of streams that can run concurrently for a policy or client:
Number of drives or concurrent jobs configured to the Storage Unit (NAS and Catalyst stores)
The number of concurrent write drives enabled in the VTL properties.
Multiple data streams enabled in both the backup policy and the client attributes
Number of jobs per policy setting
Number of jobs per client setting
Streams created as a result of the NEW STREAM directive in the backup policy
Whether the multiple data streams option is enabled in the policy definition
Recommended streaming schematic
Try to identify the streams that are uncontended, such as those shown in the diagram below, as this will ensure best backup throughput to
StoreOnce device
The StoreOnce architecture provides maximum throughput for a VTL/NAS share or Catalyst store at about 16 streams assuming the hosts are
not the bottleneck to the supply of data. If host data delivery is constrained in some way then more than 16 streams can be configured into the
StoreOnce device to improve throughput. HP Characterize StoreOnce performance by testing with unconstrained data supply
Figure 6: Recommended multiple stream configuration
11
11
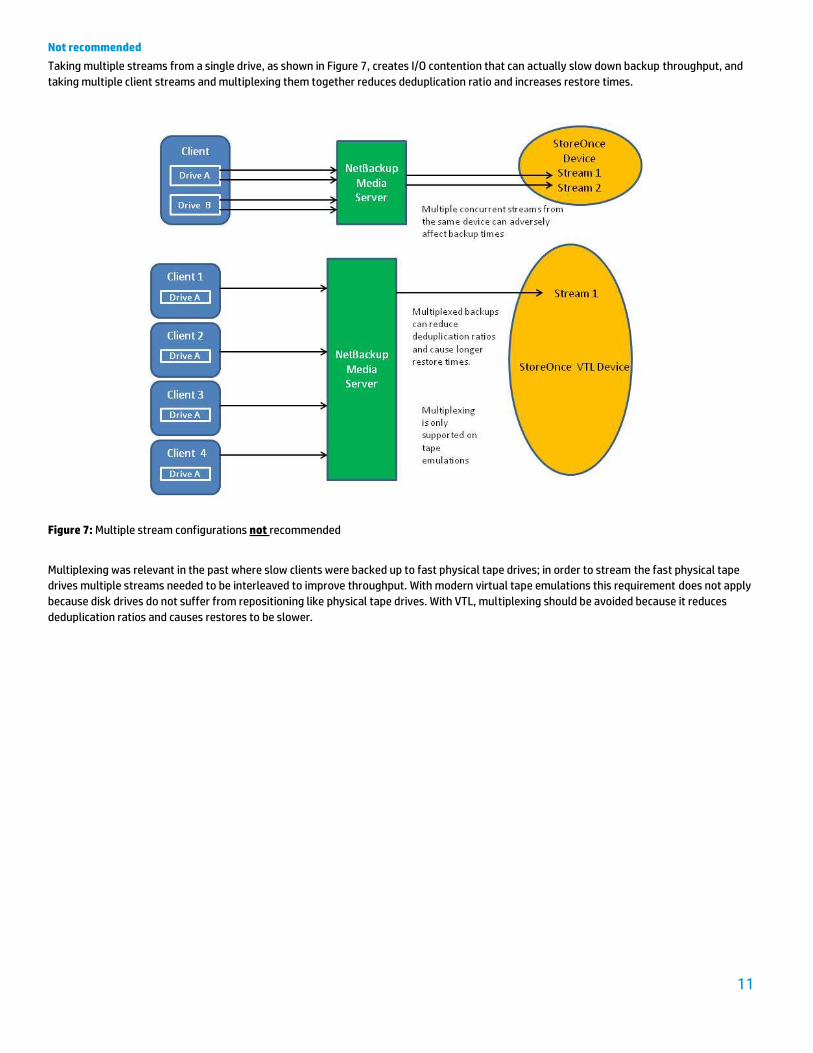
Not recommended
Taking multiple streams from a single drive, as shown in Figure 7, creates I/O contention that can actually slow down backup throughput, and
taking multiple client streams and multiplexing them together reduces deduplication ratio and increases restore times.
Figure 7: Multiple stream configurations not recommended
Multiplexing was relevant in the past where slow clients were backed up to fast physical tape drives; in order to stream the fast physical tape
drives multiple streams needed to be interleaved to improve throughput. With modern virtual tape emulations this requirement does not apply
because disk drives do not suffer from repositioning like physical tape drives. With VTL, multiplexing should be avoided because it reduces
deduplication ratios and causes restores to be slower.

12
Configuring multiple streams in NetBackup
Multiple streams are configured in several different areas in NetBackup as follows.
Set concurrency values for storage units
The storage units for each different emulation type offer the ability to change the number of drives or concurrent jobs.
Figure 8: VTL emulation (Storage unit type = Media Manager)
Figure 9: NAS emulation (Storage unit type = Disk/Basic Disk)
Figure 10: OST/Catalyst emulation

13
13
Configure backup policies appropriately
Certain backup policy types have the option to enable multiple data streams. Check the box and apply as shown below.
Figure 11 - Enable multiple streams in the backup policy
The Limit jobs per policy attribute (which can apply to many clients) limits the number of jobs that NetBackup performs
concurrently when the policy is run. By default, the box is unchecked, and NetBackup performs an unlimited number of backup jobs
concurrently. Other resource settings can limit the number of jobs.
So, for example, if we had a policy that backed up 64 clients, 8 virtual tape drives with no multiplexing, and the limit jobs per policy
value set to 8, as each client finished backups and one of the 8 devices became free the next client would take that device. Of course,
one of the benefits of virtualization is the fact that adding extra tape drives is easy – so why not increase the number of VTL drives to
16 and jobs per policy to 16 and then we are running at the sweetspot for the HP StoreOnce VTL appliance.
Figure 12: Limit jobs per policy

14
Maximum Jobs per client is a property of the “host” and applies to all clients in all policies. This is the Tier 1 setting to enable multiple
streams at an individual client level.
Figure 13: Set jobs per client
To accommodate weaker clients (ones that can handle only a small number of jobs concurrently), consider using one of the following
approaches:
Set the Maximum Data Streams property to a low value for weaker client(s) and Media Servers appropriately. Note how a list of
clients can be created with different maximum data streams settings.
Figure 14: Set maximum data streams per client
15
15
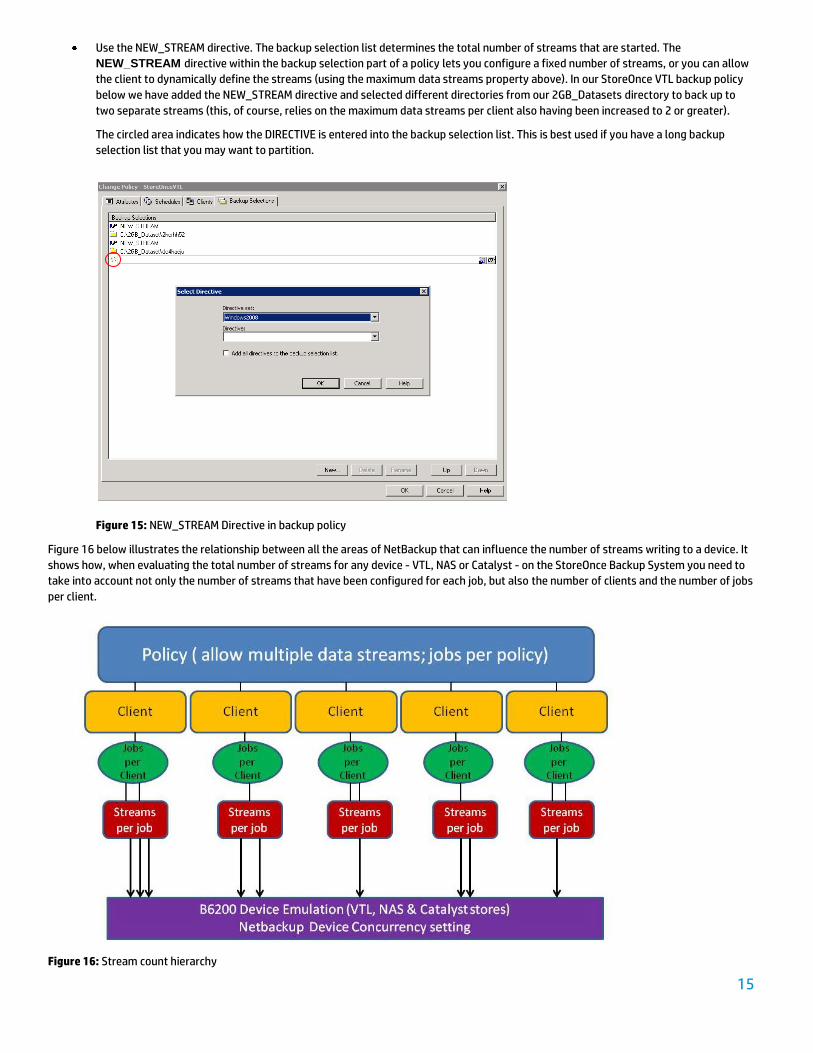
Use the NEW_STREAM directive. The backup selection list determines the total number of streams that are started. The
NEW_STREAM directive within the backup selection part of a policy lets you configure a fixed number of streams, or you can allow
the client to dynamically define the streams (using the maximum data streams property above). In our StoreOnce VTL backup policy
below we have added the NEW_STREAM directive and selected different directories from our 2GB_Datasets directory to back up to
two separate streams (this, of course, relies on the maximum data streams per client also having been increased to 2 or greater).
The circled area indicates how the DIRECTIVE is entered into the backup selection list. This is best used if you have a long backup
selection list that you may want to partition.
Figure 15: NEW_STREAM Directive in backup policy
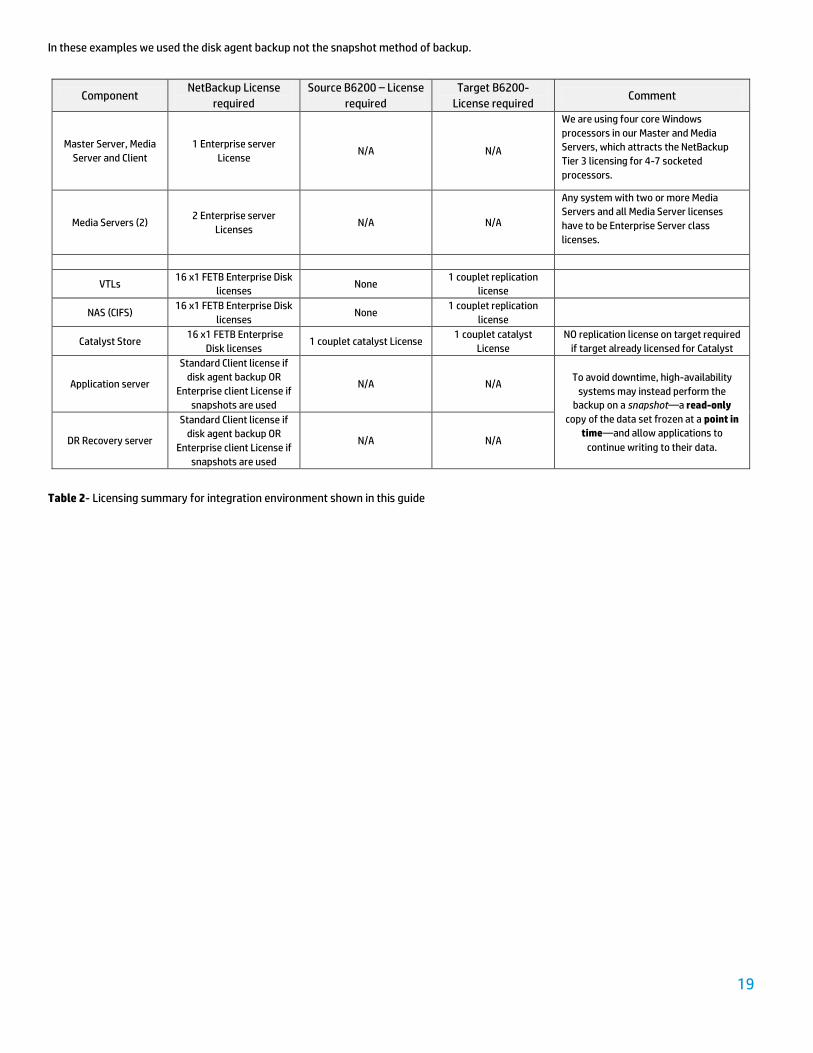
Figure 16 below illustrates the relationship between all the areas of NetBackup that can influence the number of streams writing to a device. It
shows how, when evaluating the total number of streams for any device - VTL, NAS or Catalyst - on the StoreOnce Backup System you need to
take into account not only the number of streams that have been configured for each job, but also the number of clients and the number of jobs
per client.
Figure 16: Stream count hierarchy

16
Integration environment
The environment that was used to produce this integration guide (and a subsequent guide on Disaster Recovery) is shown below. It aims to
reproduce a typical NetBackup environment:
NetBackup Master server (Saratoga) and two Media Servers (Heartofgold) and (Deathstar) in different data centers. Another server
(Valiant) will be used for disaster recovery in a future guide.
Devices were configured and performance parameters set for VTL, NAS (CIFS) and Catalyst stores at the Primary Data Center.
Backups were run to each device to prove connectivity; the backup policy configuration is not shown explicitly in this implementation
guide because most NetBackup administrators are familiar with creating policies and selecting the correct storage device for the
policy. In these examples we use a randomly generated 2GB_Dataset to backup. The main focus of this integration guide is to show
how to configure and connect the various device emulations to NetBackup. Three backup policies were created StoreOnceVTL,
StoreOnceNAS and StoreOnceCatalyst to represent the different device types created.
The content of each device was then replicated to the Secondary Data Center by the appropriate method (StoreOnce mappings for
VTL and NAS shares) and NetBackup Storage Lifecycle policy for Catalyst stores.
Figure 17: Integration environment for this guide

17
17
Licensing considerations
Symantec licensing
Licensing modes
Symantec operates two licensing models:
a) Standard Licensing (Traditional): This is based around the number of clients being protected. This approach is component-based on
processor tiers, and separate licenses are required for each server running in the Backup Domain. Integrating a StoreOnce product
into a NetBackup traditional licensing environment requires no additional NetBackup licenses.
b) Platform Base Licensing (Capacity): This is based on a concept of Front-End Terabytes (FETB). A Front- End Terabyte (FETB) is one
terabyte of protected data. The data can either be on clients or devices where the software is installed or where the software is used
to provide backup functionality. The total amount of protected data is calculated based on the backup image header information in
the NetBackup catalog. The good news is that this capacity licensing is not related to the efficiency of the backup devices – so there is
no “extra” cost for using deduplication appliances such as HP StoreOnce B6200 – unless special features like OST are involved.
In both licensing models Symantec provide a utility (nbdeployutil) that scans the environment, analyses the set up and produces either a
report or an xls spreadsheet which shows the licensing configured and required.
For more information on nbdeployutil go to http://www.symantec.com/docs/TECH145972
Figure 18: NetBackup licensing overview
The table above shows the main NetBackup Licensing components based around architectures and advanced features. The Enterprise Disk
license is particularly relevant in this whitepaper and is delivered in units of 1 FETB.

18
VTL licensing
In September 2008, NetBackup licensing of VTLs (and all disk-based backup options such as OpenStorage and AdvancedDisk) changed. There
are now two options available for licensing VTLs. Both of these are based on the amount of primary storage (Front- End Terabytes) that are
backed up to the VTL. This capacity is the total sum of data, from a NetBackup perspective, included in the largest set of full backups to the
VTL.
If the VTL can perform deduplication and/or replication, the Enterprise Disk Option license is required.
If the VTL cannot perform deduplication or replication, the Basic Disk license is included at no extra charge and the Shared Storage
option license (per drive) is only required for sharing physical tape drives in a FC SAN.
These licenses allow a customer to configure as many virtual tape drives as desired and allows sharing of these virtual tape drives among
Media Servers. Sharing of virtual tape drives is typically not necessary or wise when using a VTL. This was useful when VTLs were first
introduced and some of them supported only four to six drives, but support for configuring hundreds of virtual drives has alleviated the need
for sharing the drives.
NOTE: The Library Based Tape Drive Option for NetBackup is ONLY for licensing physical tape drives with NetBackup, not virtual tape drives.
How this relates to our integration example
For the integration environment in this guide let us adopt the NetBackup Platform Base capacity licensing model and assume we are protecting
16 FETB. Let us also assume that the Master Servers and Media Servers are four core processer servers.
We will show the licensing requirements for backing up the 16 FETB to different device emulations on the HP StoreOnce B6200 Backup System.
Additional licenses may also be required depending on the backup technique used to backup the flat files in our Integration environment.
Simple disk agent backup
VSS snapshot backup
To keep things simple we are ignoring additional licenses that would be required for special agent based backups for SQL, Oracle etc. and other
special options like bare metal restore or open file backup options, we simply want to explain how to license the HP StoreOnce emulations.
HP StoreOnce B6200 licensing
The StoreOnce B6200 licensing system is fairly straightforward:
Each storage shelf arrives with a license that must be loaded, further capacity upgrades also arrive with a license included.
There is no licensing required for VTL or NAS emulations
VTL and NAS replication requires a license (per couplet) on the target site, but only if VTL/NAS replication is used on that couplet
OST/Catalyst devices require a license to be used at both source and target – but DO NOT require an additional replication license as
well. Catalyst licensing is per couplet; if a couplet is not using Catalyst stores – you do not need the license.
A summary of licensing for the integration environment (illustrated in Figure 17) is shown in Table 2.
This example assumes the user is going to use VTL or NAS or Catalyst stores. The 16 FETB licences are common to all the emulations. Only if we
use Catalyst stores do we need to purchase the Enterprise Disk license to obtain open storage support and Storage Lifecycle Policy support.
19
19
In these examples we used the disk agent backup not the snapshot method of backup.
Component NetBackup License
required
Source B6200 – License
required
Target B6200-
License required Comment
Master Server, Media
Server and Client
1 Enterprise server
License N/A N/A
We are using four core Windows
processors in our Master and Media
Servers, which attracts the NetBackup
Tier 3 licensing for 4-7 socketed
processors.
Media Servers (2) 2 Enterprise server
Licenses N/A N/A
Any system with two or more Media
Servers and all Media Server licenses
have to be Enterprise Server class
licenses.
VTLs 16 x1 FETB Enterprise Disk
licenses None
1 couplet replication
license
NAS (CIFS) 16 x1 FETB Enterprise Disk
licenses None
1 couplet replication
license
Catalyst Store 16 x1 FETB Enterprise
Disk licenses 1 couplet catalyst License
1 couplet catalyst
License
NO replication license on target required
if target already licensed for Catalyst
Application server
Standard Client license if
disk agent backup OR
Enterprise client License if
snapshots are used
N/A N/A To avoid downtime, high-availability
systems may instead perform the
backup on a snapshot—a read-only
copy of the data set frozen at a point in
time—and allow applications to
continue writing to their data. DR Recovery server
Standard Client license if
disk agent backup OR
Enterprise client License if
snapshots are used
N/A N/A
Table 2- Licensing summary for integration environment shown in this guide

20
Integrating StoreOnce VTL emulation with NetBackup 7.x
This section will focus on integrating HP StoreOnce VTLs into Symantec NetBackup 7.5. The VTL creation process within the HP StoreOnce
Backup System is straightforward. No licensing is required for VTL devices in HP StoreOnce appliances.
An overview of integration steps
To integrate HP StoreOnce VTL with NetBackup you must:
1. Set up and configure a VTL Library on the HP StoreOnce Backup System
2. Configure the VTL Library into the NetBackup Storage Device architecture
3. Configure the VTL library for best performance
4. Configure and check backups to the VTL Library
5. Configure HP StoreOnce VTL replication
All these stages are discussed in detail in the following sections.
Fibre Channel VTL creation process on the StoreOnce Backup System
1. From the Navigator in the StoreOnce GUI select VTL-> Libraries.
2. Click Create and select the service set on which you wish to create the VTL; in our example we have chosen Service Set 1.
3. Choose the required library emulation – D2DBS is recommended for use with NetBackup. Specify the number of slots required and the
number of drives required – a sizing exercise is required to determine the correct values.
4. Select which FC port you wish the VTL to be presented on. For high availability SANs the VTL medium changer can be presented to
both Port 1 and Port 2, if required, to allow Fabric failover. We have called the VTL library device NetBackup75.
5. The device is created and put online as shown below.
6. Click on the Interface information tab to see the FC WW Names of the medium changer and drives you have created so that these can
be configured into your Fibre Channel zoning configurations.

21
21
7. Finally click on the Cartridges tab to see the virtual barcodes of the virtual media you have created. In this example we have created a
single-drive LTO5 virtual tape library with 8 x 1600GB cartridges. The information on this tab will be useful when performing an
inventory on the virtual tape library.
The barcodes that are currently created are a random number format; however a template barcode format will be available in a
release planned for late 2012.
In terms of cartridge size a best practice is to make the cartridge size no bigger than the physical tape that the virtual cartridges
might be copied to. For example, here we have configured Virtual 1600GB tapes but if we wish to off load these to LTO4 physical
tapes at some point, we should re-configure the cartridge size (using Edit) to a capacity of 800GB.
Configuring the StoreOnce VTL Library devices as NetBackup Storage Units
TIP: Use your operating system device management utilities to ensure the operating system can see the FC VTL devices you have configured
BEFORE you start to present the devices to Symantec NetBackup. For example, in Windows use scan hardware in the Storage Management
section of Server Manager.

22
1. From the Media and Device Management label in the NetBackup navigation pane, launch the Configure Storage Devices wizard.
2. Select the Media Server on which you wish to discover the device(s) in this case “heartofgold” and click Next >.

23
23
3. Scanning takes place and, in our example, one tape drive and one robot have been discovered on Media Server “heartofgold”. Click
Next>
4. In this example the only SAN client is the "heartofgold" Media Server itself which automatically includes the SAN client functionality.

24
5. Click Next > and review the FC VTL devices that NetBackup has found.
Click Next > to see the NetBackup Drag and Drop configuration screen. This may be used to reconfigure drive location, if the robot and
drive assignments are not aligned as they should be.

25
25
6. Click Next and the configuration is committed.
7. Click Next > to move on to the Storage Unit Configuration. The name of the storage unit is defined as a combination of the Media
Server it is attached to, the drive type and the robot number. A storage unit is the target for backup data that is configured in
NetBackup policies.

26
8. Click Properties… to configure the tuning parameters for the library.
Maximum concurrent write drives: In our example we only have one tape drive; but if 20 drives were configured this dictates how
many of those 20 drives are allowed to run concurrently, depending on Media Server performance capability or the number of SAN
clients configured to write directly to the tape library drives. NetBackup also recommend that if “duplication” (copy” jobs are also
being run that the total drive count is split 50:50, with 50% of the drives allocated to backup jobs and 50% of the drives allocated to
Duplication jobs
Enable Multiplexing: Do NOT check this box. This feature is for physical tape drives (not virtual) where several data streams are
supplied from different sources to enable streaming of the physical tape drive. Multiplexing, if set, will reduce restore performance.
Multiplexing also reduces deduplication ratios because the backup streams may not be multiplexed in the same way each time the
backup is run.
Maximum streams per drive: This equates to the limit for the number of streams the physical tape drives would be allowed to
multiplex.
Fragment size/reduce fragment size: For a media manager device type, such as VTL, the default maximum fragment size is 1000 GB.
This is the way the backup is “split” into transfers to the virtual tape devices. There is no real reason to change this default.

27
27
9. This completes the HP StoreOnce VTL discovery process with NetBackup 7.5. Click Finish before configuring the VTL for best performance.
Configuring the VTL device for best performance
After configuring the VTL as a Storage Device in NetBackup the next step is to perform an inventory of the device to ensure that the virtual
barcodes allocated earlier when the VTL was created on the HP StoreOnce Backup System are all entered into the NetBackup database. This will
allow us to track which backups are on which virtual media.
1. Right click on the tld(0) robot in the left hand navigation page and select Inventory Robot…

28
2. In this example we want to inventory the VTL that we created on the “heartofgold” Media Server, so make sure you select the correct
Media Server in the drop down list. The inventory takes place.
3. Click Yes to update the volume configuration.
All the virtual barcodes are now incorporated into the Symantec NetBackup database.
4. We now need to set the tape format block size and the number of buffers so that they are the optimal size for throughput
performance and deduplication. This is done by editing two configuration files as described in the next section.

29
29
Block size and number of buffers configuration files
NetBackup settings for block size and number of buffers are controlled by two configuration files:
SIZE_DATA_BUFFERS, which defines the size. For best performance with HP StoreOnce VTLs HP recommends a tape block size of
256K
NUMBER_DATA_BUFFERS, which controls how many buffers are reserved for each stream. This is per stream (assuming no
multiplexing) and should be set to reflect the number of data streams (drives) you are using simultaneously. HP recommends this
value be set to 128.
The configuration files must be created on all Media Servers. You do not need to stop and start any daemons; the very next backup will use the
new settings. But be careful to set the SIZE_DATA_BUFFERS value right. A misconfigured value will impact performance in a negative way.
Always verify the settings by looking at the bptm log.
To create the configuration files
In Unix create the configuration files as follows:
touch /usr/open/netbackup/db/config/SIZE_DATA_BUFFERS
touch /usr/open/netbackup/db/config/NUMBER_DATA_BUFFERS
echo 262144 >> /usr/open/netbackup/db/config/SIZE_DATA_BUFFERS
echo 128 >> /usr/open/netbackup/db/config/NUMBER_DATA_BUFFERS
Always verify the settings by looking at the bptm logs in /usr/openv/netbackup/logs/bptm. Look for the io_init messages in the
BPTM log.
In Windows use a text editor to create the files in C:\Program Files\Veritas\NetBackup\db\config.
Create the files SIZE_DATA_BUFFERS and NUMBER_DATA_BUFFERS and insert the correct values. Note for 256K buffer the entry in the Config
file is 252144, and for 128 buffers the entry in the Config file is 128
In Windows, look for the correct adoption of the values in C:\Program Files\Veritas\NetBackup\logs\bptm. If not created
already, you must create the bptm folder for the logs to be stored in.

30
Configuring and testing backups
Creating backup policies will be familiar to most NetBackup administrators, so we will not show all the details here.
1. Using the Create a Policy wizard in the Main window, create a policy called StoreOnceVTL, which will back up fulls and incrementals of
a directory called 2GB_Dataset (a dataset residing on "heartofgold"), with a retention period of two weeks, to the TLD(0) robot we
have just configured.
2. Right click the StoreOnceVTL policy and click Manual Backup. Tthe backup to VTL job will run immediately.
3. Check the following areas:
The correct SIZE_DATA_BUFFERS has been set (256K) and NUMBER_DATA_BUFFERS (128) by looking at the bptm log on
‘heartofgold’ Media Server as detailed above.
The backup job completes successfully in the activity monitor (shown below). The “Detailed status” in the activity monitor will
also show the block size and number of buffers being used.

31
31
Other VTL Configuration parameters to consider
Symantec NetBackup offers a wealth of configuration options. These are some of the more useful ones you may wish to consider for use with
StoreOnce VTL Libraries
Enabling Automatic path correction in Windows. When Windows re-boots the paths are sometimes re-enumerated making some
devices inaccessible. (Highly recommended)
NUMBER_DATA_BUFFERS_RESTORE. This is similar to the NUMBER_DATA_BUFFERS parameter. HP recommends a value of 256 or
larger.
TAPE_RESOURCE_MULTIPLIER. This only applies to Duplication Manager and Duplication operations. This parameter makes sure that
there is enough queued work to prevent the devices becoming idle. The TAPE_RESOURCE_MULTIPLIER entry lets administrators tune
the amount of work that the Resource Broker can evaluate for a particular storage unit.
For example, a particular storage unit contains three write drives. If the TAPE_RESOURCE_MULTIPLIER parameter is set to two, the
limit on concurrently active jobs is six. Other duplication jobs requiring the storage unit remain queued.
Syntax: TAPE_RESOURCE_MULTIPLIER = n
Default: 2 (multiplier of two).
More documentation on these options is available in the NetBackup 7.5 User Guide
Setting up HP StoreOnce VTL replication
One of the benefits of HP StoreOnce Deduplication is that it also enables low bandwidth replication. This allows data to be replicated to another
site over low bandwidth WAN links, thereby creating a cost-effective Disaster Recovery solution. In the case of StoreOnce VTLs and NAS (CIFs
shares) the replication happens WITHOUT the knowledge of NetBackup and is managed entirely by the StoreOnce Appliance.
Note: In the case of OST/Catalyst stores there is tight integration between the HP StoreOnce appliance and NetBackup and replication is
controlled directly by NetBackup using the “Duplicate” functionality within Symantec NetBackup Storage Lifecycle policies. This is described in
more detail in Symantec Lifecycle Policies and Catalyst Store Copies (low bandwidth replication).
For StoreOnce VTL emulations the unit of replication is a cartridge and up to 16 remote VTLs can be “fanned-in” to a larger VTL at a central Data
Center, if required. Replication is configured using mappings that map slots in a source VTL device to slots in a target VTL device. A StoreOnce
replication license is required on the target site to support VTL and NAS replication.
An example of how VTL mappings are set up in the HP StoreOnce Backup System is shown below; it assumes a VTL source device exists on the
current system and a VTL target device has been created on another system. The sequence is controlled by a wizard, which is started from
Replication – VT Mappings.

32
Step 3 of the wizard below is where the actual mapping is created – in this simple case slot 1 on the source is mapped to slot 1 on the target,
and so forth for all 8 slots in the VTL that we created.
Once the replication mapping wizard is complete replication will start immediately unless a replication blackout window is set (see the HP
StoreOnce Backup System user guide or online help for details).
Data is then replicated from source to target. The first replication is called “seeding” where all the data is replicated – thereafter only the
changed data is replicated. As can be seen below source and target are said to be synchronized when the data on the source is identical to the
data on the target. The user can configure replication blackout windows on the HP StoreOnce appliance to determine when replication actually
takes place.
Disaster recovery
In a Disaster Recovery scenario the VTL replicated data at the DR site has to be “imported” via a NetBackup Media Server into the NetBackup
catalog before Disaster recovery can start. The NetBackup catalog is unaware that a duplicate copy of the data exists because it was replicated
under HP StoreOnce appliance control.
For more details on how to do this refer to a separate whitepaper HP StoreOnce – Disaster Recovery scenarios with Symantec NetBackup 7.x

33
33
Integrating StoreOnce NAS CIFS emulation with NetBackup 7.x
Integrating HP StoreOnce NAS (CIFS) shares emulation into Symantec NetBackup 7.x is likely to occur on the following occasions:
a) The customer has no real experience of VTL type backup, barcode management, tape media pools, and so on, and thinks VTL
emulation to be overly complex. The customer wants to keep it simple and backup to “disk”.
b) Certain integrations like the Vstorage API in VMWare only support disk targets not tape targets, so VTL is not an option.
The StoreOnce B6200 Backup System uses a series of Virtual IP addresses (VIF) on which to present the NAS (CIFS) shares. The use of Virtual IP
addresses supports the autonomic restart feature of the HP StoreOnce B6200 Backup System . NFS shares can also be used but with some
restrictions (see the HP StoreOnce Backup System user guide for instructions on creating NFS shares). It is particularly important with NFS
shares that the "forcedirectio" mount option is used to ensure data is always delivered in order to the NFS share on the HP StoreOnce appliance.
An overview of integration steps
To integrate HP StoreOnce NAS CIFS emulation with NetBackup you must:
1. If required, configure Active Directory authentication.
2. Set up and configure a NAS CIFS share on the HP StoreOnce Backup System. If using AD authentication, assign users and group
permissions, as required.
3. Configure the StoreOnce NAS Share as a NetBackup Disk device and test backup access
4. Configure HP StoreOnce NAS replication
All these stages are discussed in detail in the following sections.
Configuring Active Directory authentication (optional)
Each service set within an HP StoreOnce B6200 Backup System can be configured for the following NAS CIFS server authentication methods:
a) None. No authentication is required to access the shares on the service set and any user on the network can access the shares. This
level is only recommended if the StoreOnce systems are connected to a dedicated network within the Data Center. For example, this
could be a 10GbE switch used between Media Servers and StoreOnce systems only.
b) User level. In this case a user name and password is required to access the StoreOnce share. This will not work with NetBackup as
there is no way to supply the password from the software.
c) Active Directory. This selection allows the access and permissions to be controlled by Microsoft Active Directory. If this is used the
NetBackup services are changed so they run as a domain logon which allows access to the share(s).
(NFS assigns access by IP address and essentially maintains an access control list.)
For the purposes of this example, we will configure Active Directory authentication. Let’s assume that we are using Network Template 1 to
configure the networking on the HP StoreOnce B6200 system. This means management traffic is on the 1GbE network and the data traffic
(NAS/Catalyst backup data and replication) is on the 10GbE network.
IMPORTANT: It is the MANAGEMENT network and NOT the DATA network that the StoreOnce Backup System uses to register with Active
Directory.

34
To join an AD domain
1. Select NAS in the StoreOnce Navigator, select the Service Set on which you widh to create the share and on the CIFS Server tab choose
AD from the Authentication drop down list. Click Update.
2. If the domain controller is found, a pop-up box will request credentials of a user with permission to join the domain. (Note that joining
or leaving the domain will result in failure of any backup or restore operations that are currently running.) Provide credentials
(username and password) of a domain user that has permission to add computers to the domain and click Register.
3. If successful, a message is displayed and the CIFS Server screen is displayed. All access to the shares on this CIFS Server is now
administered from one place.

35
35
4. The CIFS Server tab on the StoreOnce GUI now shows the Domain and the Status. The DNS entry will be the Current Node name of the
Service Set and all shares created on that service set will be connected to the Domain.
5. Normally joining the Active Directory Domain updates the DNS entries automatically. DNS is an essential component of Active
Directory. You can confirm that the Service Set that you are using for NAS shares has joined the Active Directory by checking that it
has an entry in the DNS server.
On the Active Directory Users and Computers screen, it should be listed under Computers. Note that the name of the computer is the
Main Node name.

36
6. On the DNS Managers screen it should be listed under Forward Lookup Zones. Note that the IP address is the VIF of the service set on
the 10 GbE network.
NOTE: If an “A” record has not been created corresponding to the node ID of the StoreOnce service set that contains the share (e.g.
hp49273bd8c-1), it will be necessary to add the entry to the DNS server manually.
Creating NAS (CIFS) shares
1. Select NAS - Shares in the Navigator. Click Create. Select a service set on which to create your share and give your share a name, such
as NetBackup75.
2. The share is created and comes on line with a Virtual IP address (VIF) and name associated with it.
3. If required, you can now set the access permissions for the share you have created. The options available on the Permissions tab
associated with the share depend upon overall authentication settings that are configured for the CIFS server running on the
StoreOnce service set. (If the default of None is acceptable, you have finished creating the share.)
To grant AD access permissions to StoreOnce shares (optional)
Once the StoreOnce Backup System is part of a domain and can be managed, it is possible to grant access permission to domain account users
or groups to shares created on any service set that has AD authentication enabled on its CIFS Server tab.

37
37
Use the MMC snap-in (Microsoft management console). This is standard procedure for authenticating access to shares in a Windows Active
Directory Domain.
IMPORTANT: The IP address that you provide during this process must be the MANAGEMENT VIF (192.168.60.10 in our example).
Login to the Domain Controller in your environment and execute the following command sequence:
1. Use the command line to execute Run>mmc and then select Add/Remove snap-in.
2. From the File menu, select Shared Folders and select Another computer. Enter the Management VIF of the HP StoreOnce B6200
Backup System.
3. Click on shared folders to show any shares configured on the StoreOnce Backup System.
4. Locate the required share and display its Properties dialog.
5. Select the Share Permission tab, as shown below. Click Add to include domain users or groups. Here we have set the Domain
administrator as the object name. We could have created a new user such as NetBackup Admin also.
6. Once users or groups have been added, click in the Allow boxes to enable Full Control permissions.
7. Click Apply to complete the process.

38
To test data access
Having set up the management parameters from the Domain Controller, we can now test data access (on the 10GbE network) from the
NetBackup Media Server that will be writing to this share, in this case “heartofgold”
Check you have access through Windows Explorer with the appropriate login you have created. This time you will use the IP address of the
actual service set that the share is created on, in this case 172.16.60.2, or the hostname, as shown below. The CIFS share below on Service set
1, when viewed by Windows Explorer, shows some entries after backups have taken place.
Any host with the appropriate NetBackup Admin login and password can now access the NetBackup75 share we have created on the HP B6200
Backup System.
If AD is used to control access to the CIFS file shares, the NetBackup Services must be changed from local account to domain administrator
logon. Each service must be stopped and restarted for each account change. The logon is changed from the Windows Services in Windows
Server Manager. In our example, we will change the logon of all the NetBackup services on “heartofgold” to be the Logon Account of the
Domain with the Domain password.

39
39
Configuring the StoreOnce NAS Share devices as NetBackup Storage Units
Disk-based storage in NetBackup 7 can be one of the following categories:
1. Basic Disk. This is locally attached disk storage or network attached disk storage presented as a file system to the Media Server. The
directory structure is specified when the storage unit is created. This is the standard configuration for StoreOnce CIFs shares. Basic
disk cannot be used in a storage lifecycle policy.
2. NearStore. This is a special configuration for NetApps NAS only. This is also on OpenStorage option.
3. SnapVault. This option is only usable if the NetBackup snapshot client is licensed. (NetApps NAS devices only).
4. OpenStorage (vendor name). This is used for intelligent storage devices which are OST protocol aware. This option is vendor specific.
5. Advanced Disk. This option allows NetBackup to use dedicated disk storage (can be network attached from NetBackup 7 onwards).
This allows disks to be part of a storage ‘pool’. Advanced disk is licensed normally under the ‘Enterprise Disk License’. Storage
Lifecycle Policies can be used with Advanced disk.
6. PureDisk - This provides software based deduplication wither via a NetBackup 7.5 Media Server Dedupe Pool (MSDP) or through the
PureDisk storage pool.
To use the StoreOnce CIFS NAS configuration for NetBackup Storage the Basic Disk category is used.
To configure storage devices
1. In the NetBackup Administration Console, select NetBackup Management> Storage > Storage Units.
2. Click Actions > New > New Storage Unit.
3. In the New Storage Unit dialog box, name the storage unit.
4. Select Basic Disk as the Storage unit type.
5. Select the Disk type of disk storage unit that is to be a disk staging storage unit, in this case BasicDisk.
6. Select a Media Server – in this case “Heartofgold”
7. Enter the absolute path to the directory to be used for storage. This is the VIF of the service set + Share name
8. This directory is on a StoreOnce unit so it cannot reside on the root file system or system disk – leave unticked.
9. Enter the Maximum concurrent jobs that are allowed to write to this storage unit at one time – 16 is the recommended value.
10. Enter a High water mark value. The high water mark works differently for the Basic Disk disk type. NetBackup assigns new jobs
to a Basic Disk disk staging storage unit, even if it is over the indicated high water mark. For Basic Disk, the high water mark is
used to trigger the deletion of images that have been relocated or expired. NetBackup continues to delete images until the disk
reaches the low water mark. Note: The Low water mark setting does not apply to disk staging storage units.
11. Do not check the Enable temporary staging area option.
12. Click OK. The following screenshot illustrates the options we have selected.

40
Configurable options and when to use them
Symantec does not recommend configuring multiple storage units to the same share. This is because the individual storage units will assume
that they have exclusive access.
The On demand only checkbox, if set, means that only backup policies which are specifically assigned to this storage unit can use it. If this
option is set and policies do not specify a storage unit they will not run, so take care.
In order to increase the number of streams to optimize HP StoreOnce performance, increase the maximum number of concurrent jobs for the
storage unit. (This equates to number of tape drives in a real tape library) up to a recommended maximum of 16. It is good practice to group
servers together by application. For example, arrange that file and print servers are backed up to the same share if they are likely to contain
some degree of duplicate data because this will improve deduplication ratios for the share.
The maximum fragment size is set at default to 524288. The data is stored on disk in fragments to ensure that the backups do not exceed the
maximum size file allowed by the file system. The space is not pre-allocated so there is no concern about lost disk space. NetBackup will
automatically create new fragments as required. This parameter can be left at default. HP NAS shares have a limit of 25000 files per share –
with each fragment at 524288 it means the 25000 file limit should rarely be exceeded.
The high and low water mark are parameters used by NetBackup to determine when to release disk space occupied by expired backup policies.
Once the high water mark is reached expired policies will be deleted until none remain or the low water mark is reached. Deleting expired
backup will cause housekeeping* overhead on the HP StoreOnce systems. This needs to be monitored (HP StoreOnce has inbuilt housekeeping
reporting) to ensure it is within sensible limits. Housekeeping should normally not be increasing week on week.
* Housekeeping is the space reclamation process used on HP StoreOnce and can be “scheduled” to occur up to two periods in 24 hours. It is
triggered when tapes are overwritten or files deleted.
The enable temporary staging area option is used when backups are staged to disk before reaching their final destination. In the case of the
HP StoreOnce the appliance is the final destination (other than possible archiving to tape) – so this box does not need to be checked.

41
41
Incorporating StorageNAS into the backup policy
Once configured, StoreOnceNAS appears as a Storage Unit in the NetBackup Administration Console.
It can now be selected in backup policies to test backup integration.
Run a test backup using policy StoreOnceNAS to confirm the integration is successful. Check in Activity monitor/Detailed status that the backup
completes successfully.

42
Setting up NAS (CIFS) replication
Replication of NAS CIFS shares is similar to VTL replication. It is configured using mappings and is controlled by the HP StoreOnce appliance
itself; the user has the ability to select blackout windows to prevent replication happening in peak backup or housekeeping periods. The only
difference being that NAS shares have a 1 to 1 correlation; a NAS share on a source is replicated to a NAS share on a target. Fan-in of NAS
shares from several sources to a single NAS share at a target is not possible.
An example of how NAS mappings are set up in the HP StoreOnce Backup System is shown below. We are replicating between service sets on
the same B6200 to simulate replication across sites. The sequence is controlled by a wizard, which is started from Replication – NAS Mappings.
1. At Step 1 of the wizard select the target appliance. In this case we are selecting Service Set 3 of the B6200 on IP address 172.16.60.6
but in reality this would be a separate B6200 Backup System on another site.
2. The wizard will automatically create a NAS share on the target system. Provide the name and description and click Create New Target
Share.

43
43
3. Just like with VTLs we must set up a mapping to establish the relationship between source and target
4. Once the mapping is complete, the first step is to synchronize the source and target devices – this is known as “seeding” and is
displayed as "synchronizing" in the screenshot below.
5. Click on the File Details tab shows the files that have been backed up to the source and replicated to the target.
Blackout windows
In our example no replication blackout window is set, which means as soon as a NAS file on the source is closed it will replicate, If you want to
control more accurately when replication takes place, you can configure blackout windows for each service set as follows.

44
Select Replication in the StoreOnce Navigator. Select the Local Settings and the Blackout Windows tab. The blackout windows can be set to
occur over two durations in a 24 hour period. Note that these blackout windows will apply to all replication activity for both VTL libraries and
NAS shares within the same service set.
NAS NFS Shares
NAS (NFS) is also supported on StoreOnce appliances again using the Virtual IP addresses which are delivered from the HP StoreOnce appliance
but special care is required because NFS packets can be delivered with wide scale out of order. The reason this occurs is that, by default, writes
from the client are stored within the client operating system memory and only later written due to background purging/flushing of stored
pages from client virtual memory.
The following solutions are currently available:
Solaris and AIX have an NFS mount option ‘forcedirectio’, and HPUX has similar with 11iv3
Linux has no such current NFS mount option. So HP is working on a patch that adds a ‘-o direct’ mount option for NFS shares under Linux.
This ensures that NFS reads and writes are directly put on the wire to the server rather than being stored and then issued out of order from
the client; the result is that the HP StoreOnce stack when using NFS sees a drastically lower incidence of out of order data.
This patch is against the kernel source and one file in the nfs-utils to provide an updated mount.nfs command. The patch can be utilized on a
per mountpoint basis – i.e. solely against StoreOnce mounts, rather than affecting all NFS mounts. The patch will need to be re-compiled into
the Linux of each client which might not appeal to all customers.

45
45
Integrating StoreOnce Catalyst emulation with Symantec OST in NetBackup
7.x
Symantec provides an OpenStorage API (OST) in order to allow vendor-specific integrations with NetBackup that make full use of the intelligent
features available in today’s backup appliances. See Introduction to OST/StoreOnce Catalyst.
In summary the HP StoreOnce Catalyst integration with Symantec OST provides a backup device that:
• Has no unnecessary geometry limitations
• Makes ISV applications aware of HP StoreOnce capabilities
• Allows ISV applications to report deduplication efficiency
• Uses bandwidth-efficient transport protocols
• Increases backup performance
• Enables Backups over WAN or uses low levels of networking loading in the Data Center
• Provides optimized copies (low bandwidth)
• Provides ISV applications with full control of their data
• Lets the ISV application control when and to where one or more backup copies are made
What are low bandwidth backups?
The OST/Catalyst integration allows for the processor-intensive deduplication tasks of chunking, hashing and compression to be “offloaded”
onto NetBackup Media Servers. We call this low bandwidth backup and it has two main benefits:
a) It increases the overall throughput available on the HP StoreOnce appliance when receiving data streams that have already been
chunked, hashed and compressed.
b) Low bandwidth backups make the process much more bandwidth efficient. If the backups are from remote sites they can be
performed over a WAN or, if the Media Servers are in the Data Center, a much reduced network bandwidth from Media Server to HP
StoreOnce B6200 appliance is required. (See examples below)
The following figure illustrates the operations associated with deduplication and where they can occur. If deduplication takes place on the
target, all data is sent to the Catalyst Store and chunking, hashing, matching, compressing and storing occur on the B6200 Backup System. If
deduplication takes place on the source, the only operations that occur on the B6200 Backup System are matching of hashes (created by the
Catalyst client) and storing of unique chunks (compressed on the Catalyst client).
Figure 19: Deduplication pre-processing; the operations involved and where they can occur

46
Low Bandwidth backup – usage models
The following example illustrates a remote office where several clients are connected to a Media Server. Deduplication occurs on the Media
Server, enabling low bandwidth backup across the WAN to the Catalyst Store on the HP StoreOnce Backup System.
Figure 20: Low bandwidth backup from remote sites – over a WAN
In the following example there are multiple Media Servers in a Data Center. Deduplication occurs on the Media Servers reducing the network
bandwidth required to backup to the Catalyst Store on the HP StoreOnce Backup System. This saves on bandwidth costs and improves
application responsiveness within the Data Center during the backup window.
Figure 21: Low bandwidth backup – in the Data Center
Data CenterRemote Office
Media Server
(Dedupe)
HP StoreOnce
Catalyst
Store
Client
Client
Client
Client
Client
Low Bandwidth
Backup
Media Server Based Deduplication for Low Bandwidth Backups
Data Center
Media Server
#1
Media Server
#2
Media Server
#3
Media Server
#4
HP StoreOnce
Catalyst
Store
Client
Client
Client
Client
Client
Multiple Media Servers Connecting to a Single Catalyst Store

47
47
An overview of integration steps
The HP StoreOnce Catalyst emulation fully utilizes the Open Storage API device support with NetBackup. To integrate HP StoreOnce Catalyst
with NetBackup you must:
1. Install the HP StoreOnce Catalyst OST 2.0 plug-in on any Media Server that is required to write to HP Catalyst Stores
2. Set up and configure a Catalyst Store on the HP StoreOnce Backup System
3. Configure the Catalyst Store into the NetBackup Storage Server/Disk Pool/Storage Unit architecture
4. Configure backups to the Catalyst Store
5. Set up low bandwidth replication via NetBackup Storage Lifecycle Policies (optimized copies)
All these stages are discussed in detail in the following sections.
Terminology
StoreOnce Catalyst Store: a backup device with specific NetBackup integration provided via HP OST plug-in 2.0.
StoreOnce Catalyst High Bandwidth: Backup data that is sent directly to the HP StoreOnce Backup System where it is deduplicated; this
requires a high bandwidth network.
StoreOnce Catalyst Low Bandwidth: Backup data that is deduplicated on the Media Server before sending only the unique data to the HP
StoreOnce Backup System, making a low bandwidth network link adequate. HP has a rule of thumb for the sizing of the deduplication process
running on the Media Server – 1GHz of core processing power can sustain a deduplication rate of 50MB/sec. This additional processing
requirement is in addition to the standard NetBackup Media Server sizing guidelines.
Installing the HP StoreOnce Catalyst OST 2.0 plugin
Install the HP StoreOnce Catalyst OST 2.0 plugin, as shown below, on every Media Server that is required to write to HP Catalyst Stores.
1. Download the HP StoreOnce OST 2.0 plugin from OST2.0 Plugin download
2. Run the HP OST 2.0 plugin setup and click Continue>

48
3. A warning is displayed.
4. Open the Command Prompt and check the path is C:\Program Files\Veritas\NetBackup\bin.
5. Input bpdown, then press <Return>, to shut down the Netbackup services..
6. Input y, press <Return> and wait for NetBackup services to stop.

49
49
7. Once the command has completed successfully. Go back to the OST Plugin wizard.
8. Click < Back followed by Continue >. Then click Install.
9. Click Finish and restart the Media Server.

50
10. The OST2.0 plugin now appears as an executable program.
Setting up a Catalyst Store in the HP StoreOnce Backup System
In this example we will configure a Low Bandwidth Catalyst Store for use with NetBackup.
Note: High Bandwidth Catalyst Stores can also be configured, if the extra deduplication load required of the Media Server is not available, either
because processing power is limited or because the application is so critical that no processing power can be sacrificed.
1. From the Navigator select StoreOnce Catalyst - Stores, then click Create. Select a service set to create it on; we have chosen Service
Set 1.

51
51
2. Give the Catalyst Store a name (NetBackup75 in our example) and a description and set the primary and secondary transfer policies as
Low Bandwidth (this will ensure part of the deduplication process is offloaded to the Media Server). Click the lower Create button.
Note: Differing Primary and Secondary transfer policies are not supported by all ISVs – for Symantec NetBackup primary and
secondary transfer policies must BOTH be set to low bandwidth or high bandwidth.
3. Display details for the newly created NetBackup75 Catalyst Store by selecting it in the main list of Stores.
There are several tabs associated with each store. See the StoreOnce B6000 User Guide or online help for more information about
using these tabs.
Store Details: shows Catalyst Store name, description and the retention period of the logs (up to 1 year)
Permissions: determines who can access this store – these permissions will be set shortly, as described below
Item Summary: Data stored in a Catalyst Store is referred to as an Item – you can search for items. In the case of NetBackup a backup
file consists of a header item and a data item.
Data Jobs: There are three types of activities associated with a catalyst store – Data jobs, Inbound and Outbound copy (replication)
jobs. In this context Data jobs are backup jobs.
Outbound Copy Jobs: Outbound jobs are when this Catalyst Store is replicated out to another Catalyst store at another site
Inbound Copy jobs: Inbound copy jobs are when this Catalyst Store is receiving data that is being replicated in from another Catalyst
Store

52
Setting Catalyst Store Access permissions
Before you can assign client permissions to an individual store, you must first enable client access checking and configure clients on the
StoreOnce Catalyst configuration tabs.
1. From the Navigator select StoreOnce Catalyst.
There are several configuration tabs. See the StoreOnce B6000 User Guide or online help for more information about using these tabs.
Status: A summary view of catalyst store performance per service set.
Settings: Enables access permissions, outbound and inbound concurrency, and port numbers for Catalyst control and Catalyst data
commands.
Clients: Determines which clients have access to which stores.
Blackout Windows: This can be used to create two blackout windows within a 24-hour period when catalyst copy process will not
occur. Best practice is not to replicate (Catalyst Store copy) whilst backups or housekeeping are taking place. Catalyst store copies
always take place using low bandwidth replication (optimized copies).
Bandwidth Limiting Windows: This can be used to “throttle” the amount of WAN bandwidth used with catalyst store replication – this
is to prevent “hogging” of all the available replication bandwidth.
2. Select the Settings tab and check the tick box to enable Client access permission checking.

53
53
3. Create a new client using the Add button and enter a name and description, such as NetBackup75user or NBU media server.
NetBackup does not support the ability to automatically create a Catalyst store, so leave that box unticked.
4. Return to the NetBackup75 catalyst store that you created and select the Permissions tab. It will now contain the NetBackup75 user
client that you have just configured. Check the Access box next to this client and click Update.
We will use the same client name, NetBackup75user, when we configure this catalyst store into NetBackup.
5. Finally before we start configuration into NetBackup we must get the name (or Virtual IP address) of Service Set 1 on which the
NetBackup75 Catalyst store resides, because this will be required to configure the Storage Server in NetBackup. From the Navigator
select B6000 StoreOnce and look for the VIF IP.

54
Configuring Catalyst Stores into the NetBackup Storage Server/Disk Pool/Storage Unit
architecture
More sophisticated type of backup devices, such as HP StoreOnce Catalyst Stores, are configured as Storage Servers within NetBackup. A
Storage Server is NetBackup terminology for an entity that writes data to and reads data from the disk storage. Separate disk pools can be
created under the same storage server and separate storage units can be created within the disk pools, allowing maximum flexibility, as can be
seen in the figure below.
Figure 22: NetBackup storage architecture
The following diagram illustrates the different ways Catalyst High Bandwidth and Low Bandwidth stores can be accommodated within the
Symantec Storage Server architecture.
The storage server is configured with three disk pools; the first is configured with a single storage unit for low bandwidth backup; the second
has a single storage unit for high bandwidth backup; while the third is configured with two storage units. Each storage unit relates to a Catalyst
Store on the HP StoreOnce Backup System.
Figure 23: Incorporating Catalyst stores into the NetBackup storage architecture

55
55
To configure the connection to the HP StoreOnce Backup System
A NetBackup Storage Server is required to create a connection to the StoreOnce service set containing the StoreOnce Catalyst Stores.
1. From the NetBackup Administration console expand Credentials and select Storage Servers.
2. Right click Storage Servers and select New; the storage server wizard will start.

56
3. Click Next> and select OpenStorage from the drop down list. (This means it is an OST supported device). Click Next>
4. Provide the storage server details as described below and click Next >
Storage server name: This is the name of the virtual IP address (or equivalent server name) that represents where the Catalyst Store
(NetBackup75 in our example) resides
Storage server type: This is always hp-StoreOnceCatalyst because this is the unique identifier that utilizes the OST2.0 plugins HP
has developed.
Media server: This is the Media Server where the OST2.0 plugin is installed. In this case we will connect it to our “Heartofgold” Media
Server (where part of the deduplication process will now be performed because we have set up a low bandwidth catalyst store).
User name: This is the user you previously created and the password can be of your choosing.
The Use Symantec OpenStorage plug-in for network controlled storage server should not be ticked as this is a Symantec special
device type.

57
57
5. There is an option to allow other Media Servers (in the same backup domain) to access the Storage Server, for this example we will
not select any additional Media Servers. Additional Media servers can be added dynamically later if required; for example in a Disaster
Recovery scenario. Click Next >.
6. Review the summary and click “Next >again,

58
7. The storage server is created, click Next >.
8. The task asks if a disk pool is required, click “Next >.

59
59
9. Select the storage server on which the disk pool is to be created and click Next>
10. This starts the Disk Pool Configuration Wizard.
11. The wizard has detected two Catalyst Stores on the Storage Server that we named B6200SS1.nearline.local. Select Netbackup75 and
click Next >
Note: dpstore 1 had permissions set to “All users” on the StoreOnce Backup System, which is why the NetBackup75user can see this
Catalyst Store as well.

60
25TB is the total raw size of the storage connected to the Storage Server B6200SS1.nearline.local. Replication source and
Replication target are attributes used with disk pools associated with Symantec snapshot technology – for StoreOnce Catalyst these
should not be ticked.
Configurable options and when to use them
12. The next step allows us to name our Disk Pool, to set high and low water marks and to define the number of concurrent I/O streams
(write and read combined). Give the disk pool a name such as NetBackup75Lowbandwidth
The High water mark for the disk pool applies to both the individual disk volumes in the pool and the individual disk pool itself:
When all volumes are at the high water mark, the disk pool is full. When a disk pool approaches the high water mark, NetBackup
reduces the number of jobs that are allowed to write to the pool. NetBackup does not assign new jobs to a storage unit in which the
disk pool is full. The default setting is 99%. Once a disk volume fills to its high water mark, NetBackup attempts to delete enough
relocated images to reduce the used capacity of the disk volume down to the low water mark. The low water mark setting cannot be
greater than the high water mark setting.

61
61
The Low water mark setting has no effect unless backups are written through a storage lifecycle policy, using the capacity-
managed retention type. These watermarks are more relevant when using traditional disk devices with multiple volumes.
As stated before the maximum concurrent streams recommended for any device configured on the StoreOnce Backup System is 16,
so we will enable Limit I/O streams and configure 16 as the Maximum I/O streams per volume for the disk pool containing the
catalyst store.
13. Click Next > to display a Summary screen.
14. Click Next > to enable disk pool creation.

62
15. Click Next > to create a Storage Unit that will use the disk pool.
16. Configure the Maximum concurrent jobs and Maximum fragment size for the storage unit. HP recommends 16 jobs and the
fragment size of 524288 Mbytes (0.5TB as the maximum Catalyst item size). Provide a Storage unit name such as
netbackup75LowbandwidthStore.

63
63
17. Click Next> to finish the disk pool configuration process.
18. The Storage Server b6200ss1.nearline .local is now set up with access from the Media Server “heartofgold”
The Storage units for use in creating backup policies now contain the low bandwidth Catalyst store we created and are visible in the
NetBackup Administration Console, along with our previously created VTL and NAS Storage units.

64
The disk pool can also be seen and monitored.
Image Cleanup
In terms of Catalyst stores there is a frequent NetBackup automated job that runs called Image Cleanup. This checks in the NetBackup catalog
to see if an image has expired and, if it has expired, it deletes the data from the Catalyst Store. This intelligence helps prevents the Catalyst
Store from becoming clogged with expired images and, so, is self regulating. The image cleanup runs by default every 12 hours but is
configurable. Deleting catalyst items creates a housekeeping process, and housekeeping run time is configurable via blackout windows. The
best practice is to ensure the Image Cleanup job runs just before the housekeeping window on the HP StoreOnce Backup System opens.
Configuring backups to OST/Catalyst Store
1. We can now set up a backup policy using the Create a Policy wizard and assign the storage unit for this particular policy, similar to
what we have done previously for StoreOnce VTL and StoreOnce NAS policies, again backing up a sample 2GB dataset..

65
65
2. Select the NetBackup75LowbandwidthStore as the target Policy Storage device for the backup. We will also check Allow multiple
data streams.
3. Right click on the StoreOnceCatalyst policy and click Manual Backup. Monitor the backup in the Activity monitor as we did previously
with StoreOnceVTL and StoreOnceNAS policy backups.

66
4. Because this is the first time the backup job has run and the deduplication is being done on the “Heartofgold” Media Server, all the
data will be transmitted to our Catalyst Store, but on subsequent backups there will be only small amounts of data transmitted from
the Media Server – saving lots of bandwidth.
If we inspect the Data Jobs tab of the Catalyst Store we created on the StoreOnce Backup System after the first backup we find.
Note how the backup has created two item entries in the NetBackup75 low bandwidth Catalyst Store, that 2.1 GB of data have been
transferred in that backup and the bandwidth saving was 23.1%.
If we now change some of the data set (using an HP utility), this will illustrate the effect of daily changes. Let us change 10% of the
data in 10% of the files and add 10% new data as well. Re-run the Low Bandwidth backup and see how the network efficiency
improves.
This time you can see the network saving is 98.6% for a backup where data has changed and increased. This represents a great saving
on bandwidth usage either in the Data Center or for remote office backups over a WAN to an HP StoreOnce Catalyst Store located in a
Data Center.
The second low bandwidth backup has 98.6% bandwidth savings!
Also note – even with just two backups to this Catalyst Store we have already achieved a deduplication ratio of 2.5:1

67
67
Symantec Lifecycle Policies and Catalyst Store Copies (low bandwidth replication)
A Storage Lifecycle Policy (SLP) is a storage plan for a set of backups. An SLP is configured within the Storage Lifecycle Policies utility. An SLP
contains instructions in the form of storage operations, to be applied to the data that is backed up by a backup policy. Operations are added to
the SLP that determine how the data is stored, copied, replicated, and retained. NetBackup retries the copies as necessary to ensure that all
copies are created.
SLPs offer the opportunity for users to assign a classification to the data at the policy level. A data classification represents a set of backup
requirements, which makes it easier to configure backups for data with different requirements. For example, email data and financial data.
SLPs can be set up to provide staging behavior. They simplify data management by applying a prescribed behavior to all the backup images
that are included in the SLP. This process allows the NetBackup administrator to leverage the advantages of disk-based backups in the near
term. It also preserves the advantages of tape-based backups for long-term storage.
The beauty of OST is that the “duplicate” feature of storage lifecycle policies can be used to enable Catalyst Stores to be replicated (using low
bandwidth replication), all under the control of the backup software. Furthermore, multiple copies (or duplicates) can be created at multiple
sites to ensure even better DR capabilities. All copies are logged in the NetBackup catalog.
We shall now show how to configure catalyst store replication and multi-hop replication from within NetBackup7.5.
To do this we first need to set up another Catalyst Store on the StoreOnce GUI as a target for replication. The actual replication is then
configured from within the Storage lifecycle policy within NetBackup – not via the actual HP StoreOnce appliance itself.
This is a different approach to VTL and NAS emulations, where we use “mappings” to set up replication and configure them from the Navigator
menu options on the StoreOnce GUI, as shown in the following screenshot.
Creating the Catalyst Store and user on the StoreOnce GUI for replication (low bandwidth copies)
For our example, we will create the second Catalyst Store on Service Set 3 of the HP StoreOnce Backup System to simulate it actually being on a
different site (NetBackup75 Catalyst store is on Service Set 1). Let us call the new Catalyst Store NetBackup75reptarget.
1. Create the Catalyst Store as previously but with the new name and on Service Set 3. Although the duplicate (low bandwidth
replication) is triggered by the storage policy the actual data is NOT passed through the NetBackup Media Server but replicated across
the 10GbE data network configured on the HP StoreOnce Backup System (in this case) or the WAN link between separate HP
StoreOnce Backup Systems units in a real world scenario.

68
2. Because this is on a different Service Set the user we set up to access NetBackup75 (NetBackup75user) is not present, so we have to
create a new NetBackup75user for Service Set 3 on the Clients tab and click Update.
3. Now select the NetBackup75reptarget and give the NetBackup75user access to the store on the Permissions tab.
Setting up OST Duplication/Catalyst Store low bandwidth replication via NetBackup Storage
Lifecycle Policies.
There are two stages to this process:
First we need to establish the NetBackup75reptarget on Service Set 3 as a new Storage Server and create the associated Disk Pool
and Storage Unit.
This is the same process as described for the Catalyst Store on Service Set 1, but be sure to establish the Storage Server Name (VIF IP)
of Service Set 3 from the StoreOnce GUI before you start. In a real world scenario both StoreOnce units would be in the same Backup
Domain.
Once the NetBackup75reptarget is established, we create a Storage Lifecycle Policy to incorporate the existing StoreOnce Catalyst
backup policy along with one or more “duplicate” commands.

69
69
1. Right click on storage servers and click New to start the storage server wizard, as described previously.
2. Set up the Service Set 3 Storage Server. After creating the storage server we are automatically led into the disk pool creation wizard
and asked to choose which storage server we want to create the new disk pool on, and the new NetBackup75reptarget is displayed.

70
3. Select NetBackup75reptarget as the disk pool to be created and this in turn leads onto the storage unit being created after clicking
Next>.
4. Complete the configuration as previously. Click Next> to Finish.

71
71
5. To create a storage lifecycle policy in the NetBackup Administration Console, right click Storage Lifecycle Policies in the left-hand
navigation pane and select New Storage Lifecycle Policy.
6. Enter the name of the policy, such as StoreOnceCatalystLCP, and the data classification (priority) and then click Add. We shall now
assign two storage operations to the policy (backup followed by duplicate).
First select Backup as the Operation and the Storage Unit involved – in this case NetBackup75LowbandwidthStore and click OK to add
it to the storage lifecycle policy. Note the retention period (2 weeks).

72
7. Click Add to add another storage operation to the Storage Lifecycle policy – this time select Duplication from the Operation drop
down list. Note the source of the data is already specified (NetBackup75LowbandwidthStore).
8. Select the new Storage unit to be used for the duplication operation (NetBackup75reptarget). Also note in this example we have
increased the retention of the duplicate copy to 3 months. Typically, at a central location data is held for longer periods than at the
“local” level to make optimum use of the higher levels of storage available at the Data Center.
9. Click OK and the Storage Lifecycle policy is saved.
10. Now we must apply this Storage Life cycle policy to our existing StoreOnce Catalyst backup policy. Double click StoreOnceCatalyst
under the policies in the Left -hand Navigation pane. Under Policy Storage click the drop down list and change the storage policy from
NetBackupLowBandwidthStore to StoreOnceCatalyst LCP (the storage lifecycle policy we have just created). Click OK.

73
73
11. Now run a backup and see the Storage Lifecycle Policy take effect (and replicate data from NetBackup75LowbandwidthStore to
NetBackup75reptarget). Right click StoreOnceCatalyst in the policies and run Manual backup, as we have done previously. The
backup job runs successfully.
The duplicate job will run approximately 30 minutes after the backup job( this is configurable). The duplicate job will run as long as there is no
replication blackout window set on the StoreOnce Backup System, if there is, it will keep trying until the replication blackout window is over.
Checking Duplication Job Status from a Command Prompt
1. Open a Command Prompt window.
2. Go to the C:\ProgramFiles\Veritas\NetBackup\bin\admincmd (default) directory.
3. Input the command nbstlutil report and press <Return>.
4. As you can see our StoreOnceCatalystLCP is active but incomplete – waiting for the duplication to take place.

74
After 30 minutes the Duplication process runs and is reported in the NetBackup Administration Console.
Monitoring outbound and inbound copy jobs on the StoreOnce GUI
There are two tabs on the StoreOnce GUI that show what has happened from a StoreOnce Catalyst Store “Item” perspective. We need to look at
the Outbound Copy jobs tab of the NetBackup75 Store on Service Set 1 and the Inbound Copy Jobs tab on the NetBackup75reptarget Store on
Service Set 3.
Outbound copy jobs from B6200ss1
Note that because this is the first time the Catalyst store has been replicated a “seeding” process to B6200ss3 has to take place and hence the
bandwidth saving is not up at 98%. Subsequent “Duplicates” would be much more bandwidth efficient because the seeding process would have
already taken place.

75
75
Inbound copy jobs to B6200ss3
The screenshot below shows the NetBackup controlled (but B6200 implemented) copies being created on the B6200SS3 Storage Server in the
Storage Unit Netbackup75reptarget.
Multi-hop replication (duplication)
The above example demonstrates the power of the HP StoreOnce catalyst store integration with Symantec OST and Storage Lifecycle Policies.
The technique can be extended further to allow multiple duplicates to be produced. This technique is sometimes called multi-hop replication.
The multiple copies are not produced in parallel but serially one after the other. It now becomes easy to implement this feature because we
simply “add“ another storage operation to the Storage Lifecycle Policy (see below).

76
For example: in the SLP we created we could select Backup again and “add” a second Duplication entry, the second duplicate copy could then be
written to either:-
a) Our Virtual Tape unit (or even a real physical tape) – with an even longer extended retention period (such as 1 year)
b) Another B6200 catalyst store (not shown) on a third site perhaps called NetBackupreptarget2
Faster DR recoveries
A further important feature of the OST/Catalyst integration is the ability to provide very fast disaster recovery SLAs. This is because, unlike VTL
and NAS replication, Symantec NetBackup is fully aware of every copy of a Catalyst Store (because it created them!) and entries are made
automatically in the NetBackup Catalog.
The following diagram illustrates an Integration Environment with a NetBackup Master Server connected to a primary and secondary data
center. Should we lose the primary Data Center StoreOnce Backup System, B6200A, (but not the NetBackup Master server) we can recover the
data directly from a copy on the StoreOnce Backup System, B6200B, that is at the secondary Data Center. This is possible because we can use
NetBackup copy entries in the NetBackup catalog.
Figure 24: Catalyst improves DR recovery times because all copies of data are already registered in the NetBackup catalog
Manipulating and controlling Catalyst copies
We can show the duplicate copy (Copy 2) exists in the catalog by selecting the Catalog in the Left -hand navigation pane of the NetBackup
Administration Console and then performing specific search criteria as shown below. This shows a duplicate copy of the files we backed up from
“heartofgold”. Note Copy 2 is not the primary copy (yet).

77
77
Promoting a secondary copy to a primary copy
Occasions may arise where we want to make a secondary copy the primary copy. Proceed as follows.
Select the Copy 2 (illustrated in the previous screenshot) in the Catalog search, right click and select Set Primary Copy. The status will change,
as shown below and the backup will appear in the restore options with the same timestamp as the original backup.

78
Promoting the secondary copy using the Storage Lifecycle policy
As an alternative, in the Storage Lifecycle Policy for Backup there is the Retention type option to expire the backup after copy. If you select this
option, it automatically makes the “Copy” the primary copy. This is one way of saving space on the primary data center site but only after the
data is safely replicated to the DR site.
Let us do a restore from Copy 2.
1. Select The Symantec Client utility to perform restores. NetBackup has a specific Client utility that can be invoked from the NetBackup
Administration console, as illustrated below.

79
79
2. Click the Select for restore tab and Restore from Normal Backup.
3. A display of all possible restore points is shown but unfortunately the display does not indicate we are restoring from Copy2. (We are
restoring from the “Primary Copy” of the latest full backup from July 4th , which now happens to be the Copy 2 we described earlier
since we changed it to be the primary copy). Tick the box to restore all the files from the backup or click “ + “ and select the individual
files you want to restore. Click the restore icon (highlighted).

80
4. Specify the options for restore as shown below
5. Click Start Restore.
6. The restore can be monitored on the Activity monitor.

81
81
7. You can also use the StoreOnce GUI to monitor restore performance and check we are restoring from “Copy2” of the Catalyst backup.
Select Activity from the Navigator to show the reporting from Service Set 3 where the Catalyst Store NetBackup75reptarget is
located. As you can see below the StoreOnce Catalyst read (restore) peaks at about 35 MB/sec during the restore period.

82
Using HP StoreOnce VTL autonomic restart scripts with NetBackup 7.x
The HP StoreOnce B6200 Backup System architecture is unique because, if a node within a couplet fails, backups will restart and continue on
the other node in the couplet. HP calls this Autonomic Restart because no manual intervention is required. The architecture allowing this extra
high availability feature is shown below.
Figure 25 illustrates this high availability architecture in a StoreOnce Backup System that has four couplets and all nodes are functioning
correctly.
Figure 25: High availability architecture, all nodes functioning correctly

83
83
In Figure 26 Node 2 on Couplet 1 has failed. Autonomic restart transfers all the services that were running for the failed node to Node 1 without
any manual intervention. (All other couplets are unaffected.)
Figure 26: High availability architecture, autonomic restart on couplet 1

84
Backup applications and Autonomic Restart
Job status in NetBackup
In the event of node failover occurring on an HP B6200 Series Backup System, all NetBackup jobs that are running to virtual tape libraries on
the failing node will lose their connectivity to the libraries and the jobs will be reported as failed within the NetBackup Administration Console.
In addition, the target libraries presented within NetBackup will be marked with a status of down, denoting that they are unavailable to run
further NetBackup jobs.
NetBackup will automatically attempt to retry the failed jobs to any other available target devices defined in the backup policy. However, if all
target devices defined in the backup policy were running on the failed node, the jobs will continue to fail to run until the target libraries are
available again with a status of up.
The transition of the target libraries from the primary B6200 node to the secondary node is an automatic process requiring no user interaction.
However, the process of marking the device as up within NetBackup is not an automated process and, following a failover event, NetBackup
jobs may continue to fail until the libraries are re-enabled within the NetBackup Administration Console.
With typically limited backup windows, lengthy outages are not easy to tolerate and it is essential that the target libraries are available again
within NetBackup as soon as possible after the failover of the libraries has completed. The simplest method of providing the functionality is to
create a background process that will monitor NetBackup, identifying target libraries marked as down and then re-enable them again using the
NetBackup vmoprcmd command.
Device up scripts
There are numerous ways in which this monitoring process can be written and in complex backup environments additional logic may be
required, for example, to prioritize which libraries and backups are re-enabled first. The following scripts have been provided as examples and
may be modified as required. The scripts must be installed and configured on each NetBackup Media Server that has B6200 virtual tape
libraries configured.
Theses scripts are ONLY required for VTL devices, NAS (CIFS) and Catalysts stores restart automatically.
Checkpoints
With all backup policies to backup devices, if “Checkpoints” have been enabled in the backup policy and the backup fails because of B6200 node
failure, when B6200 failover is complete the backups will restart from the last checkpoint NOT from the beginning of the backup job. B6200
failover takes around 15 minutes – so the backups continue almost uninterrupted and will complete within the required backup window.
The VTL “device up” script is downloadable from here
Autonomic Restart Script for Windows
These installation and configuration steps must be performed on each NetBackup Media Server that is configured with a B6000 library as a
target device.
Installation
The script for windows has been written for PowerShell v2.x and you should verify PowerShell v2.x is installed:
powershell -command $HOST.Version Major Minor Build Revision ----- ----- ----- -------- 2 0 -1 -1
If PowerShell v2.x is not installed, it can be downloaded from www.microsoft.com
Copy the Autonomic Restart script to the NetBackup folder:
copy AutonomicRestartNBU.ps1 %ProgramFiles%\Veritas\Volmgr\bin\

85
85
Configuration
Schedule the script to run every 15 minutes:
schtasks /create /ru system /tn "HP B6000 Autonomic Restart for NetBackup" /sc minute /mo 15 /tr "powershell -version 2.0 -file \"%ProgramFiles%\Veritas\Volmgr\bin\AutonomicRestartNBU.ps1\""
Logging
The Autonomic Restart script will log any attempts to re-enable library devices within NetBackup in the Windows Event Log. Using Windows
Event Viewer, see Windows Logs > Application.
Autonomic Restart Script for Linux
These installation and configuration steps must be performed on each NetBackup Media Server that is configured with a B6000 library as a
target device.
Installation
Copy the Autonomic Restart script to the NetBackup folder:
cp AutonomicRestartNBU.sh /usr/openv/volmgr/bin/
Ensure the script is executable:
chmod a+x /usr/openv/volmgr/bin/AutonomicRestartNBU.sh
Configuration
Schedule the script to run every 15 minutes:
crontab AutonomicRestartNBU.cron
Logging
The Autonomic Restart script will log any attempts to re-enable library devices within NetBackup in /var/log/AutonomicRestartNBU.log.
Checkpoints
The disruption caused by node failover can be further minimized by ensuring the highest priority policies are all checkpoint enabled, so that
when the VTL, NAS or Catalyst stores fail over the backup jobs continue from the last good checkpoint. They do not have to start again from the
very beginning of the job, which saves considerable time.

86
For more information
To read more about HP StoreOnce, go to: hp.com/go/storeonce
StoreOnce and NetBackup DR Scenarios – will be published under the part number EJ022-90954
Get connected hp.com/go/getconnected
Current HP driver, support, and security alerts
delivered directly to your desktop
© Copyright 2012 Hewlett-Packard Development Company, L.P. The information contained herein is subject to change without notice. The only
warranties for HP products and services are set forth in the express warranty statements accompanying such products and services. Nothing herein
should be construed as constituting an additional warranty. HP shall not be liable for technical or editorial errors or omissions contained herein.
Symantec and NetBackup are trademarks or registered trademarks of Symantec Corporation or its affiliates in the U.S. and other countries. Other
names may be trademarks of their respective owners.
EJ022-90953, Created August 2012