hp storageworks cluster extension xp: installation …h10032. · 4 hp storageworks cluster...
TRANSCRIPT

HP StorageWorks Cluster Extension XP
installation guide
XP48 XP128 XP512
XP1024XP10000 XP12000
Product Version: 2.06.00
seventh edition (October 2005)
part number T1609-96005
This guide explains how to install the HP StorageWorks Cluster Extension XP software.

2 HP StorageWorks Cluster Extension XP Installation Guide
© Copyright 2003-2005 Hewlett-Packard Development Company, L.P., all rights reserved
Hewlett-Packard Company makes no warranty of any kind with regard to this material, including, but not limited to, the implied warranties of merchantability and fitness for a particular purpose. Hewlett-Packard shall not be liable for errors contained herein or for incidental or consequential damages in connection with the furnishing, performance, or use of this material.
This document contains proprietary information, which is protected by copyright. No part of this document may be photocopied, reproduced, or translated into another language without the prior written consent of Hewlett-Packard. The information contained in this document is subject to change without notice.
All product names mentioned herein may be trademarks of their respective companies.
Hewlett-Packard Company shall not be liable for technical or editorial errors or omissions contained herein. The information is provided “as is” without warranty of any kind and is subject to change without notice. The warranties for Hewlett-Packard Company products are set forth in the express limited warranty statements accompanying such products. Nothing herein should be construed as constituting an additional warranty.
Printed in the U.S.A.
HP StorageWorks Cluster Extension XP Installation Guide
product version: 2.06.00
seventh edition (October 2005)
part number: T1609-96005

Contents 3
About this guide 9Intended audience 10Supported arrays 10Related documentation 11Other resources 11Getting help 12HP technical support 12HP storage website 13HP authorized reseller 13Document conventions 14Terminology conventions 15Revision history 16
Warranty statement 18
1 Introduction 21Introducing Cluster Extension XP 22
Cluster Extension XP configurations 22One-to-one configurations 23Consolidated disaster recovery site configuration 25Supported Continuous Access XP configurations and fence levels 26
Installation prerequisites 27Software versions and supported Cluster Extension XP features 29
Disk array firmware and software dependencies 29Pair/resync monitor 30Fast failback feature of Continuous Access XP (Extension) 30Quorum service (Microsoft Cluster Service only) 31Rolling disaster protection 31
Contents
4 HP StorageWorks Cluster Extension XP Installation Guide
2 Cluster Extension XP licensing 33Product licensing 34
About your Entitlement Certificate 34Overview of retrieving license keys 35
Getting an evaluation license extension 35Using AutoPass to retrieve permanent license keys 35
Retrieving license keys over the Internet 37Requesting license keys by e-mail or fax 46Importing a license key into AutoPass 53Getting a 60-day trial extension 59License options 60
Report license key 60Backup license file 61Remove license key 64Recover license key 66
clxautopass command line utility 67Installing the Instant-on license 67Importing a license key from a file 67
3 Installing Cluster Extension XP in IBM HACMP environments 69Prerequisites 70
Supported versions 70HP StorageWorks Auto Path XP for AIX 70RAID Manager XP instances 71RAID Manager XP device groups 71RAID Manager XP startup 71RAID Manager XP configuration 72LVM configuration 74HACMP 74
Installing Cluster Extension XP 75Pair/resync monitor configuration 77
Remote access hosts file 77Configuring the port for the pair/resync monitor remote
communications 77Configuring Cluster Extension XP resources 78Removing Cluster Extension XP 79Upgrading Cluster Extension XP 80

Contents 5
4 Installing Cluster Extension XP in Microsoft Cluster Service environments 81Installation Overview 83
The Cluster Extension XP quorum service 83Disk configuration for Microsoft Cluster Service with quorum
service 84Partitioning RAID Manager XP command devices and quorum service
control disks 86Pairing all disks in the cluster environment 87
Prerequisites 88Supported versions 89Custom Volume Size (CVS) Configuration on XP disk arrays 89Secure Path/MPIO 89RAID Manager XP instances 90RAID Manager XP device groups 90RAID Manager XP command devices 91
Installation Roadmap 92Preparing data centers for quorum service installation 93
Create CVS volumes in the disk arrays and map them to servers 93Partition physical disks on the first server 94Create RAID Manager configuration file and pair disk pairs 96Reboot and check for GUIDs on all nodes 97Install Microsoft Cluster Service on all nodes in the second data
center 99Install Cluster Extension XP 100Installing the quorum service 102Installing Cluster Extension XP Command Line Interface 107Installing the Cluster Extension XP external arbitrator 108
Procedure 108Problems during Cluster Extension XP external arbitrator
installation 110Identifying the external arbitrator in the Active Directory 111
Troubleshooting 112Log files 112
Resolving quorum service problems 114Installing Cluster Extension XP resource types 116Configuring Cluster Extension XP resources 118RAID Manager XP startup at system boot 119

6 HP StorageWorks Cluster Extension XP Installation Guide
Pair/resync monitor configuration 120Remote access hosts file 120Configuring the port for the pair/resync monitor remote
communications 120Registering the Cluster Extension XP resource manually 121Maintenance and repair of Cluster Extension XP 122
Modify function 122Repair function 122Remove function 123
Removing your Cluster Extension XP installation 124Removing the Cluster Extension XP resource type 124Disabling the Cluster Extension XP resource DLL 124Removing the quorum service 125
Removing the Cluster Extension XP external arbitrator 127Upgrading Cluster Extension XP 128
Upgrading Cluster Extension XP: offline upgrade 128Upgrading from Cluster Extension XP version 2.03.00 and later only:
online upgrade 129
5 Installing Cluster Extension XP in VCS environments 135Prerequisites 136
Supported versions 136RAID Manager XP instances 136RAID Manager XP device groups 137RAID Manager XP startup 138VERITAS Volume Manager configuration 138
Installing Cluster Extension XP 139Pair/resync monitor configuration 140
Remote access hosts file 140Configuring the port for the pair/resync monitor remote
communications 140Log level reporting 141
Including the Cluster Extension resource type 142Changing the default agent configuration 144Disabling the Cluster Extension XP agent 145Removing Cluster Extension XP 146
Removing the HP AutoPass License Components 146Upgrading Cluster Extension XP 147

Contents 7
6 Installing Cluster Extension XP in Serviceguard for Linux environments 149Prerequisites 150
Supported versions 150HP StorageWorks Secure Path 150RAID Manager XP instances 151RAID Manager XP device groups 151RAID Manager XP startup 152Logical Volume Manager configuration 152
Installing Cluster Extension XP 154Pair/resync monitor configuration 155
Remote access hosts file 155Configuring the port for the pair/resync monitor remote
communications 155Including Cluster Extension XP in a Serviceguard package 156Removing Cluster Extension XP 157Upgrading Cluster Extension XP for Serviceguard for Linux 158
Glossary 159
Index 163

8 HP StorageWorks Cluster Extension XP Installation Guide

About this guide 9
About this guide
Cluster Extension XP software is used to create a disaster-tolerant environment using two or more data centers. Cluster Extension XP enables cluster software to provide automatic failover for applications whose data is continuously mirrored from a local XP disk array to a remote XP disk array.
This guide explains how to install Cluster Extension XP. It assumes clustered systems are connected to a disaster recovery, array-based mirroring system where mirroring is provided by HP StorageWorks Continuous Access XP.
This guide applies to the following versions of Cluster Extension XP:
• Microsoft Windows: Cluster Extension XP version 2.06.00 • Linux Red Hat: Cluster Extension XP version 2.06.00• SuSE Linux: Cluster Extension XP version 2.06.00• Solaris: Cluster Extension XP version 2.05.01 • IBM AIX: Cluster Extension XP version 2.02.00
Please contact your HP representative for the latest information on supported configurations and versions.

10 HP StorageWorks Cluster Extension XP Installation Guide
Intended audience
This guide is written for those responsible for maintaining the cluster environment and managing the storage subsystems.
This guide is intended for system administrators who have an understanding of:
• disk arrays and RAID technology• cluster software configuration• operating systems, including commands and utilities• related software: HP StorageWorks Continuous Access XP, HP
StorageWorks Business Copy XP and HP StorageWorks RAID Manager XP
Supported arrays
Unless otherwise noted, the term disk array refers to these disk arrays:• HP StorageWorks Disk Array XP48• HP StorageWorks Disk Array XP128• HP StorageWorks Disk Array XP512• HP StorageWorks Disk Array XP1024• HP StorageWorks XP10000 Disk Array• HP StorageWorks XP12000 Disk Array
About this guide 11
Related documentation
For information about disk arrays, please refer to the owner’s manuals.
For related product documentation, see the HP web site www.hp.com):• HP StorageWorks Cluster Extension XP: User’s Guide• HP StorageWorks RAID Manager: User’s Guide• HP StorageWorks Continuous Access XP: User’s Guide• HP StorageWorks Business Copy XP: User’s Guide• HP StorageWorks Command View XP: User’s Guide • HP StorageWorks Command View XP Advanced Edition Device
Manager Web Client User's Guide• HP StorageWorks XP Remote Web Console User Guide• HP StorageWorks Disk Array XP Operating System Configuration
Guide: AIX• HP StorageWorks Disk Array XP Operating System Configuration
Guide: Sun Solaris• HP StorageWorks Disk Array XP Operating System Configuration
Guide: Windows 2000/2003• HP StorageWorks Disk Array XP Operating System Configuration
Guide: Linux
Other resources
The following websites contain related information:• Serviceguard for Linux. See the HP High Availability web site:
http://docs.hp.com/en/ha.html • RS/6000 and HACMP. See the IBM web site:
www-1.ibm.com/servers/aix/library• VERITAS Cluster Server. See the VERITAS web site:
support.veritas.com• Microsoft Cluster Service. See these Microsoft web sites:
www.microsoft.com/windows2000/technologies/clustering www.microsoft.com/windowsserver2003/technologies/clustering

12 HP StorageWorks Cluster Extension XP Installation Guide
Getting help
If you still have a question after reading this guide, contact an HP authorized service provider or access our web site:
www.hp.com
For the most current information about this product, visit the following support web site:
www.hp.com/support/clxxp
HP technical support
In North America, call technical support at 1-800-633-3600, available 24 hours a day, 7 days a week.
Outside North America, call technical support at the location nearest you. The HP web site lists telephone numbers for worldwide technical support at: http://www.hp.com/support. From this web site, select your country.
Be sure to have the following information available before calling:• technical support registration number (if applicable)• product serial numbers• product model names and numbers• applicable error messages• operating system type and revision level• detailed, specific questions
For continuous quality improvement, calls may be recorded or monitored.

About this guide 13
HP storage website
For the most current information about HP StorageWorks XP products, visit: http://h18006.www1.hp.com/storage/arraysystems.html.
For information about product availability, configuration, and connectivity, contact your HP support representative.
HP authorized reseller
To reach HP sales or find a local authorized reseller of HP products, call 1-800-282-6672 or visit the HP How To Buy web site:
http://welcome.hp.com/country/us/en/howtobuy.html
You can also find HP sales and resellers at http://www.hp.com. Click Contact HP.

14 HP StorageWorks Cluster Extension XP Installation Guide
Document conventions
Convention Element
Blue text (Figure 1) Blue text represents a cross-reference. In the online version of this guide, the reference is linked to the target.
Bold Bold text represents application names, file names, menu items, dialog box titles, buttons, key names, field names, and literal values that you type exactly as shown.
Italics Italic type indicates that you must supply a value. Italic type is also used for manual titles.
Blue underlined sans serif font (www.hp.com)
Underlined, blue text represents a website on the Internet. In the online version of this guide, the reference is linked to the target.
monospace font Monospace font denotes user input and system responses, such as output and messages.
Example The word “example” in italics denotes an example of input or output.
[ ] Square brackets indicate an optional parameter.
{ } Braces indicate that you must specify at least one of the listed options.
| A vertical bar separates alternatives in a list of options.

About this guide 15
Terminology conventions
Cluster software vendors use different terms for clustering and disaster recovery processes and for their cluster software components. Because of these variations in terminology, it is important to clarify the terms used in this guide. This guide uses the following terminology conventions:
application service This is the unit of granularity for a failover or failback operation. It includes all necessary resources that must be present for the application. For example, a file share must have a disk, a mount point (or drive letter) and an IP address to be considered an application service. A disk is a necessary resource for the application service. Depending on the cluster software, application services can depend on each other and run in parallel on the same system or on different systems. Vendor equivalent terms: HACMP: resource group Microsoft Cluster Service: resource group SG-LX (Serviceguard): package VCS: service group
resource The smallest unit in an application service. It describes the necessary parts to build an application service. The implementation of such resources in cluster software is vendor-specific. Some vendors (such as IBM or HP) do not allow accessing the chains between dependent resources. Vendor equivalent terms HACMP: resource Microsoft Cluster Service: resource SG-LX (Serviceguard): package VCS: resource
startup/shutdown This refers to starting and stopping application services or resources. Only Microsoft and Veritas allow the starting and stopping of a single resource.

16 HP StorageWorks Cluster Extension XP Installation Guide
Revision history
February 2001 First release.
March 2001 General corrections.
July 2001 Added MSCS support.
November 2001 Added quorum filter-service for MSCS on XP512/XP48.
May 2002 Updated content for version 1.03 of all Cluster Extension products. Updated content for version 1.04.00 of Cluster Extension for MSCS. Added support for Serviceguard on Linux. Updated content for version 1.1 of Cluster Extension XP quorum service with external arbitrator.
September 2002 Updated content for version 2.00. Changed product terminology from MSCS to Microsoft Cluster Service. Revised the quorum service installation procedure for Microsoft Cluster Service.
December 2002 Updated content for version 2.01 for VCS and Serviceguard. Added graphical user interface installation procedure.
January 2003 Updated content for version 2.01 for Windows GUI.
April 2003 Updated content for version 2.02.
November 2003 Updated content for versions 2.02 and 2.03. Added support for SUSE Linux and Windows 2003. Removed support for XP256.
March 2004 Modified document for version 2.04.

About this guide 17
August 2004 Updated for version 2.05.00 and AutoPass.
October 2005 Updated for version 2.06.00.

18 HP StorageWorks Cluster Extension XP Installation Guide
Warranty statementHP warrants that for a period of ninety calendar days from the date of purchase, as evidenced by a copy of the invoice, the media on which the Software is furnished (if any) will be free of defects in materials and workmanship under normal use.
DISCLAIMER. EXCEPT FOR THE FOREGOING AND TO THE EXTENT ALLOWED BY LOCAL LAW, THIS SOFTWARE IS PROVIDED TO YOU “AS IS” WITHOUT WARRANTIES OF ANY KIND, WHETHER ORAL OR WRITTEN, EXPRESS OR IMPLIED. HP SPECIFICALLY DISCLAIMS ANY IMPLIED WARRANTIES OR CONDITIONS OF MERCHANTABILITY, SATISFACTORY QUALITY, NON-INFRINGEMENT, TITLE, ACCURACY OF INFORMATIONAL CONTENT, AND FITNESS FOR A PARTICULAR PURPOSE. Some jurisdictions do not allow exclusions of implied warranties or conditions, so the above exclusion may not apply to you to the extent prohibited by such local laws. You may have other rights that vary from country to country, state to state, or province to province.
WARNING! YOU EXPRESSLY ACKNOWLEDGE AND AGREE THAT USE OF THE SOFTWARE IS AT YOUR SOLE RISK. HP DOES NOT WARRANT THAT THE FUNCTIONS CONTAINED IN THE SOFTWARE WILL MEET YOUR REQUIREMENTS, OR THAT THE OPERATION OF THE SOFTWARE WILL BE UNINTERRUPTED, VIRUS-FREE OR ERROR-FREE, OR THAT DEFECTS IN THE SOFTWARE WILL BE CORRECTED. THE ENTIRE RISK AS TO THE RESULTS AND PERFORMANCE OF THE SOFTWARE IS ASSUMED BY YOU. HP DOES NOT WARRANT OR MAKE ANY REPRESENTATIONS REGARDING THE USE OR THE RESULTS OF THE USE OF THE SOFTWARE OR RELATED DOCUMENTATION IN TERMS OF THEIR CORRECTNESS, ACCURACY, RELIABILITY, CURRENTNESS, OR OTHERWISE. NO ORAL OR WRITTEN INFORMATION OR ADVICE GIVEN BY HP OR HP’S AUTHORIZED REPRESENTATIVES SHALL CREATE A WARRANTY.

About this guide 19
LIMITATION OF LIABILITY. EXCEPT TO THE EXTENT PROHIBITED BY LOCAL LAW, IN NO EVENT INCLUDING NEGLIGENCE WILL HP OR ITS SUBSIDIARIES, AFFILIATES, DIRECTORS, OFFICERS, EMPLOYEES, AGENTS OR SUPPLIERS BE LIABLE FOR DIRECT, INDIRECT, SPECIAL, INCIDENTAL, CONSEQUENTIAL, PUNITIVE OR OTHER DAMAGES (INCLUDING LOST PROFIT, LOST DATA, OR DOWNTIME COSTS), ARISING OUT OF THE USE, INABILITY TO USE, OR THE RESULTS OF USE OF THE SOFTWARE, WHETHER BASED IN WARRANTY, CONTRACT, TORT OR OTHER LEGAL THEORY, AND WHETHER OR NOT ADVISED OF THE POSSIBILITY OF SUCH DAMAGES. Your use of the Software is entirely at your own risk. Should the Software prove defective, you assume the entire cost of all service, repair or correction. Some jurisdictions do not allow the exclusion or limitation of liability for incidental or consequential damages, so the above limitation may not apply to you to the extent prohibited by such local laws.
NOTE. EXCEPT TO THE EXTENT ALLOWED BY LOCAL LAW, THESE WARRANTY TERMS DO NOT EXCLUDE, RESTRICT OR MODIFY, AND ARE IN ADDITION TO, THE MANDATORY STATUTORY RIGHTS APPLICABLE TO THE LICENSE OF THE SOFTWARE TO YOU; PROVIDED, HOWEVER, THAT THE CONVENTION ON CONTRACTS FOR THE INTERNATIONAL SALE OF GOODS IS SPECIFICALLY DISCLAIMED AND SHALL NOT GOVERN OR APPLY TO THE SOFTWARE PROVIDED IN CONNECTION WITH THIS WARRANTY STATEMENT.

20 HP StorageWorks Cluster Extension XP Installation Guide

Introduction 21
1Introduction
This chapter provides instructions for installing HP StorageWorks Cluster Extension XP for Linux, Microsoft Windows 2000 and Windows 2003, Sun Solaris, or IBM AIX servers connected to XP disk arrays in a Continuous Access XP configuration.

22 HP StorageWorks Cluster Extension XP Installation Guide
Introducing Cluster Extension XP
Cluster Extension XP improves the performance and safety of your disk array by:
• enabling write-protected XP disk array disk sets• checking disk status information in case of a server or complete site
failure, which allows application service recovery even in the worst disaster.
Cluster Extension XP is fully integrated with Serviceguard for Linux, Microsoft Cluster Service, VERITAS Cluster Server (VCS) and IBM HACMP, allowing the cluster administrator to easily integrate XP storage subsystems.
The guide will explain the options available to make your disaster tolerant environment as robust as possible and to keep your data always available.
Cluster Extension XP configurations
Cluster configurations typically consist of two or more server systems connected to a shared storage subsystem.
Cluster Extension XP allows dispersion of data center resources by enabling cluster systems to take advantage of XP disk arrays configured for Continuous Access XP operations. Cluster Extension XP connects the XP software to control XP disk arrays (and Continuous Access XP) with the cluster software and uses the ability of cluster software to react to system hardware and application failures.
Cluster Extension XP’s behavior is based on four major considerations:• Cluster software failover behaviors• Cluster Extension XP user settings• The fence level configuration (in Continuous Access XP)• XP disk status information

Introduction 23
Therefore, and because of consistency and concurrency considerations, Cluster Extension XP supports the configurations described below. The fence level of Continuous Access XP is used to configure the remote replication feature of an XP disk array environment based on your needs regarding application service availability, data concurrency and replication performance.
One-to-one configurations
Cluster host nodes are split between two geographically separate data center sites and use redundant, diversely routed network connections for intracluster communications. Those links must be as reliable as possible to prevent false failover operations or “split-brain” situations.
Each cluster host node connected to an XP disk array should have redundant I/O paths (FC or SCSI) to the XP disk array. Connections to both the primary (P-VOL) and the secondary (S-VOL) copy of the application disk set are not allowed from the same host.
HP recommends a minimum of two cluster host nodes per site. This allows for a preferred local failover in case of a system failure. Local failover operations are faster than a remote failover between XP disk arrays because the mirroring direction of the XP disks does not need to be changed.
Cluster Extension XP can be deployed in environments where several clusters use the same XP disk array pair.
Currently, Cluster Extension XP works with Continuous Access XP in the following configurations:
• Fibre Channel direct connections, using either short wave (550 meters) or long wave (10 km) transceivers.
• Fibre Channel with switches, short wave, long wave, or extra long wave transceivers can be used up to 200 km, depending on the transceiver type.
• Fibre Channel over WDM (wave division multiplexing) can be used up to 200 km, depending on the WDM vendor specifications. This includes DWDM (Dense wave division multiplexing) and CWDM (coarse wave division multiplexing) technologies.

24 HP StorageWorks Cluster Extension XP Installation Guide
• Fibre Channel over IP networks using FC to IP converters. This includes ATM networks using an FC to ATM converter. The IP/ATM network can be public or private, such as T3/E3 lines. The distance supported by FC over IP/ATM implementation is limited only by the acceptable latency (time delay) of the link.
• ESCON direct connections or extended connections using extender/director hardware for distances up to 43 km. (ESCON is not supported on all array types.)
• ESCON over WDM is only supported up to 50 km. (This is an ESCON limitation and not a WDM limitation.)
• ESCON or IP/ATM using ESCON to IP/ATM converters. The distance supported is limited only by the acceptable latency of the link.
One-to-one configuration
data centerin
Manhattan
data centerin
Brooklyn
MAN(ESCON,IP
ATM,DWDM)
User LAN (carrying heartbeats)Data LAN (carrying heartbeats)
Heartbeat LAN
Client Systems
Cluster Systems

Introduction 25
Consolidated disaster recovery site configuration
Configurations that have a single XP disk array in the disaster recovery (DR) data center and up to four other primary XP disk arrays are supported with Cluster Extension XP (the logical configuration must be a one-to-one configuration). The restrictions outlined earlier apply also to consolidated configurations.
Cluster Extension XP does not support NxM configurations, where the application service’s data disk set is spread over two or more XP disk arrays.
Consolidated Disaster Recovery site configuration

26 HP StorageWorks Cluster Extension XP Installation Guide
Supported Continuous Access XP configurations and fence levels
One-to-one and consolidated configurations support all Continuous Access XP fence levels: NEVER, DATA, and ASYNC. Fence levels DATA and NEVER implement synchronous replication and are therefore directly impacted by the distance of the link. HP recommends not implementing these fences on links exceeding 100 km. However, each customer should determine the acceptable impact to their host application I/O.
Fence level ASYNC can be implemented on any configuration, but is typically implemented for longer distances.
Notes:• The Continuous Access XP links must be configured for bidirectional
mirroring and must have redundant, separately routed links for each direction.
• Heartbeat network over DWDM or IP: The cluster heartbeat communications could be routed over the same DWDM or IP links as the Continuous Access XP data traffic. However, the network links should be diversely routed to minimize link congestion and reduce the potential of “split-brain” syndrome attributed to network component failures or link failures.
• Dynamic routing in the wide area network must be transparent to the Continuous Access XP links. Otherwise, dynamic switched network connections could lead to suspended XP disk pairs.

Introduction 27
Installation prerequisites
Ensure that the following conditions are met before installing your Cluster Extension XP software:
• Internal LDEVs are mapped to redundant XP Client Host Interface Ports (CHIPs) and host modes and Fibre Channel port settings have been customized.
• Continuous Access XP links (including all extender hardware) are set up in a redundant, bidirectional configuration.
• Alternate I/O paths between server system and the XP disk array are set up.
• The cluster and client networks are set up in a redundant configuration.
• The cluster software is installed on all systems (not required for Windows 2000 and Windows 2003).
• The cluster is set up and cluster systems can communicate with each other (not required for Windows 2000 and Windows 2003).
• HP StorageWorks RAID Manager XP command devices are configured.
• HP StorageWorks RAID Manager XP horcmX.conf files have been created and tested.
• HP StorageWorks RAID Manager XP instances can communicate using the most reliable network (heartbeat network) and at least one alternate network.
• RAID Manager versions are the same on all nodes in a cluster.• The pair/resync monitor port is set up in the /etc/services file (not
required for Windows 2000 and Windows 2003). See the HP StorageWorks Cluster Extension XP: User’s Guide.
• A failover test proved bidirectional communications in the CA XP setup for all configured XP Control Units (CUs).

28 HP StorageWorks Cluster Extension XP Installation Guide
• The following minimum disk space is available:
Linux/UNIX 2 MB for /opt/hpclx
1 MB for /etc/opt/hpclx
100 MB for /var/opt/hpclx
Windows 100 MB in %ProgramFiles%\Hewlett-Packard\Cluster Extension XP
• At least 25 MB of system memory is available for Cluster Extension XP installation. 50 MB in %SYSTEMROOT%\ (typically c:\WINNT or c:\WINDOWS) for the Cluster Extension XP quorum service log file and components.

Introduction 29
Software versions and supported Cluster Extension XP features
Failover operations depend on the XP firmware and HP StorageWorks RAID Manager XP versions.
Cluster Extension XP supports Continuous Access XP (Extension) configurations between XP512/XP48/XP128/XP1024/XP12000/XP10000 disk arrays.
Host mode and Fibre Channel port settings for XP CHIPs vary depending on the operating system and XP firmware version.
Disk array firmware and software dependencies
Use the most recently available combination of Cluster Extension XP and RAID Manager XP firmware.
XP48, XP512 Firmware revision: 01.19.86.00/00 or later
XP128, XP1024 Firmware revision: 21.13.02.00/00 or later
XP10000 Firmware revision: 50.04.28.00/00 or later
XP12000 Firmware revision: 50.04.28.00/00 or later
HP StorageWorks RAID Manager XP version 1.17.04 or later

30 HP StorageWorks Cluster Extension XP Installation Guide
Pair/resync monitor
The pair/resync monitor is used to monitor the XP disk pair status of the local and remote volume based on the HP StorageWorks RAID Manager XP device group configured for the application service.
The automatic resynchronization feature will reinstate suspended mirroring activities for RAID Manager device groups if the disk pair status is maintained. That is, the primary disk reports P-VOL state and the secondary disk reports S-VOL state.
Linux UNIX
The pair/resync monitor will report any different state from the above-mentioned to the system by using the syslog( ) call only.
Windows
The pair/resync monitor will report any different state from the above-mentioned to the system by using the Event Log facility.
Fast failback feature of Continuous Access XP (Extension)
Cluster Extension XP is optimized to support the Fast Failback feature of RAID Manager. This feature allows Continuous Access XP (Extension) to automatically redirect the mirroring direction of the XP disk pair even if the remote RAID Manager XP instance is not available (fence level DATA and ASYNC). This ensures the fastest possible recovery to the original site in case of an application service failover to the alternate site.
To ensure this, the disk arrays keep track of changed disk cylinders/tracks. Updates are based on changed cylinders/tracks if the link between the XP disk pair cannot be maintained (for example, in the case of Continuous Access XP link failures).
Once activated, the secondary site becomes the dominant site and the former primary site acts as the secondary copy site.

Introduction 31
Quorum service (Microsoft Cluster Service only)
For XP disk arrays, the quorum service provides the disaster recovery solution for Microsoft Cluster Service quorum disk resources to allow creation of a true dispersed Microsoft Cluster Service environment. The quorum service control mechanism uses three additional noncluster XP disks for each cluster and utilizes the Continuous Access XP pair control feature. You can also deploy an external arbitrator that guards against split-brain situations. The quorum service is fully integrated with the external arbitrator. The quorum service operates independently from the Cluster Extension XP resource type DLL in Microsoft Cluster Service environments.
Rolling disaster protection
Rolling disaster protection features are automatically installed with Cluster Extension XP. You must preconfigure features that are dependent on Business Copy XP in order to use these features. Additional disk space is also required.
Related information See HP StorageWorks Cluster Extension XP: User’s Guide for information about how to implement rolling disaster protection.

32 HP StorageWorks Cluster Extension XP Installation Guide

Cluster Extension XP licensing 33
2Cluster Extension XP licensing
This chapter explains how to obtain and install HP StorageWorks Cluster Extension XP product license keys.

34 HP StorageWorks Cluster Extension XP Installation Guide
Product licensing
When you first install a Cluster Extension XP product, you receive a 60-day Instant On license which allows you to use the product for 60 days without entering a permanent license key. The product logs messages to the product log file and the system log every 24 hours to notify you of how many days remain on the 60-day license.
Cluster Extension XP requires a permanent license key to use the product for more than 60 days. Sometime during the initial 60 day period, you must obtain a license key from HP and enter the key. This chapter gives you instructions for getting and entering a license key.
About your Entitlement Certificate
When you purchase a Cluster Extension XP product, you receive an Entitlement Certificate. You will need information from this certificate in order to retrieve and enter your license keys.
An example of the information included in an Entitlement Certificate is shown below:
HP Order Number: XXXXXXXXX
The Entitlement Certificate also includes instructions for using AutoPass in Cluster Extension XP to retrieve and enter license keys and explains how to contact the Hewlett-Packard Password Center in your region for help. If you need more licenses than the License to Use (LTU) quantity you have purchased, please contact your HP Sales Representative.
Product Name Product Number Quantity
HP Cluster Extension XP for Windows/Linux LTU
T1607A 1
HP Cluster Extension XP for AIX/Solaris LTU
T1608A 1

Cluster Extension XP licensing 35
Overview of retrieving license keys
There are two different types of license keys:
• Permanent license keys
• One time 60-day trial (evaluation) license key extension
Getting an evaluation license extension
Only one 60-day trial license extension will be issued for a total of 120 days of evaluation use. If you want to request an extension to your 60-day trial license key, contact the Hewlett-Packard Password Center. When you receive your license key, use AutoPass to import it. See “Importing a license key into AutoPass” on page 53.
Using AutoPass to retrieve permanent license keys
Have the information from your Entitlement Certificate available. You will need it to retrieve permanent license keys.
1. Start the AutoPass licensing GUI (clxautopass) located in the Cluster Extension XP product bin directory:
clxautopass -ovlicensemgr
AutoPass requires JAVA:
• 32-bit JRE (Java Runtime Environment) version 1.3.1 or later for 32-bit and 64-bit extended system (x64) platforms.
• IA64 JAVA SDK 1.4.2-04 or later for 64-bit Itanium (IA64) platforms.
2. If you have an Internet connection, go to “Retrieving license keys over the Internet” on page 37.
3. If you do not have an Internet connection, go to “Requesting license keys by e-mail or fax” on page 46 for instructions about retrieving license keys by e-mail or fax.

36 HP StorageWorks Cluster Extension XP Installation Guide
4. After installing the permanent license keys, restart Cluster Extension XP so the license will be recognized. You can restart Cluster Extension XP by restarting the Microsoft Cluster Service (MSCS environment) or the Cluster Extension XP agent (VCS environment).

Cluster Extension XP licensing 37
Retrieving license keys over the Internet
After starting clxautopass in the Cluster Extension XP product bin directory, use AutoPass to retrieve a permanent license key through the Internet as explained in the following steps:
1. The AutoPass Retrieve/Install License Key window opens when the application starts.
If you require a web proxy to access the Internet, click the Tools menu and click Configure Proxy.

38 HP StorageWorks Cluster Extension XP Installation Guide
The Proxy Settings window opens.
2. In the Proxy Settings window, either disable proxy or enter the host name (or IP address) and port number for your proxy server and click Save.
Cluster Extension XP licensing 39
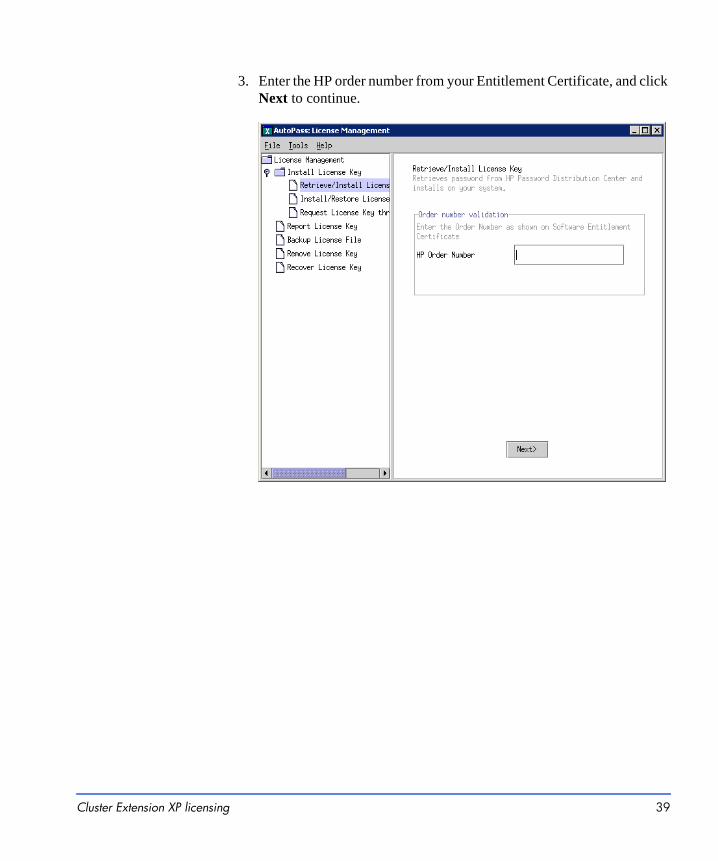
3. Enter the HP order number from your Entitlement Certificate, and click Next to continue.
40 HP StorageWorks Cluster Extension XP Installation Guide
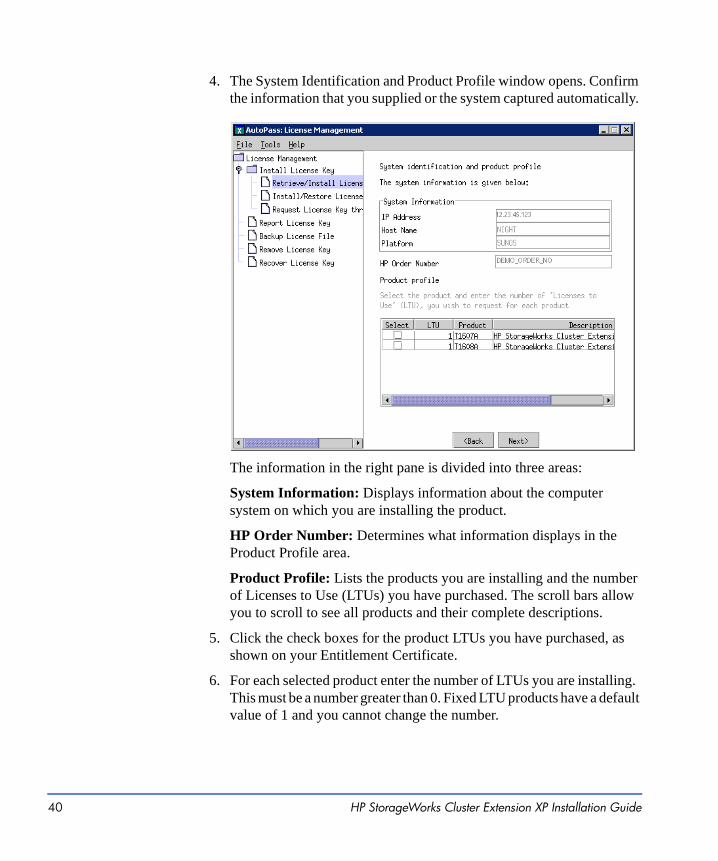
4. The System Identification and Product Profile window opens. Confirm the information that you supplied or the system captured automatically.
The information in the right pane is divided into three areas:
System Information: Displays information about the computer system on which you are installing the product.
HP Order Number: Determines what information displays in the Product Profile area.
Product Profile: Lists the products you are installing and the number of Licenses to Use (LTUs) you have purchased. The scroll bars allow you to scroll to see all products and their complete descriptions.
5. Click the check boxes for the product LTUs you have purchased, as shown on your Entitlement Certificate.
6. For each selected product enter the number of LTUs you are installing. This must be a number greater than 0. Fixed LTU products have a default value of 1 and you cannot change the number.

Cluster Extension XP licensing 41
7. Click Next. AutoPass uses an online database to verify the number of LTUs requested. If you have not purchased enough LTUs to fulfill your request, AutoPass lists the products with insufficient LTUs. Change the number of LTUs requested and continue.
The Member Login window opens.
8. Enter your e-mail address. This will be your Member ID for AutoPass licensing.
9. Select “Member” or “First-time user.”
10. Enter your AutoPass password.
If you don’t have a password, create one: Verify you selected “First-time user” and then enter a new password in the Password and Confirm Password fields. The two entries must match and must contain between 4 and 15 characters.
If you are an existing AutoPass user, verify you selected “Member” and then enter your existing password. If you can’t remember your password, click Forgot. HP will e-mail you your password.

42 HP StorageWorks Cluster Extension XP Installation Guide
If you are an existing AutoPass user, but have selected “First-time user,” AutoPass will check to see if the password you entered is already valid for your Member ID (e-mail address). If so, a message displays telling you that you are already registered and you should select “Member” or create a new password.
11. Click Next.
The License Requestor Information window opens. If you are an existing user and you have an active Internet connection, the window displays your current information. If you are a first-time user, or there is no Internet connection, the fields are blank.
12. Enter any new or changed information.
Required fields are marked with an asterisk (*).
You must enter a state only if you select USA as the country. Select a state from the drop-down list. For other countries, type in the state.
13. Under “Privacy Policy,” select how HP may contact you.

Cluster Extension XP licensing 43
14. Click Next. The License Owner window opens.
15. Click or unclick “Is License Requestor same as License Owner?”
When you select this checkbox, the information entered for the License Requestor populates the fields in the License Owner window.
If the License Owner is not the same as the License Requestor, enter the requested information for the License Owner.

44 HP StorageWorks Cluster Extension XP Installation Guide
16. Click Next. The Information Summary window opens.
17. Check the Information Summary carefully, and use the Back button to go to the previous window to change incorrect details.
AutoPass displays a message for each product for which there is an insufficient number of LTUs. If an “insufficient LTU” message appears, you must go back to the System Identification and Product Profile window and change the number of LTUs requested.
18. Click Next. AutoPass generates passwords for the selected products.
If the passwords are successfully installed, the Password Delivery System updates your member profile and machine information.

Cluster Extension XP licensing 45
19. The Confirmation window displays a table showing the products that have had license keys/passwords successfully installed.
20. Click Next if you want to retrieve and install the license key for another order number, or click Close in the File menu to close the application.

46 HP StorageWorks Cluster Extension XP Installation Guide
Requesting license keys by e-mail or fax
If you install Cluster Extension XP on a system that does not have an Internet connection, you can request a license key by e-mail or fax. Use AutoPass as explained below to send your request to the HP Password Center. When you receive the license key in your e-mail, use AutoPass to import it. See “Importing a license key into AutoPass” on page 53.
1. Open AutoPass by running the clxautopass utility:
clxautopass -ovlicensemgr
2. Click Request License Key through Email/Fax in the left panel.
3. Enter the HP Order Number for your product.
4. Click Next.

Cluster Extension XP licensing 47
5. The System Identification and Product Profile window opens. Confirm the information you have supplied or that the system has gathered automatically.
The information is divided into three areas:
System Information: Displays information about the computer system on which you are installing the product.
HP Order Number: Determines what information displays in the Product Profile area.
Product Profile: Lists the products you are installing and the number of Licenses to Use (LTUs) you have purchased. The scroll bars allow you to scroll to see all products and their complete descriptions.
6. Enter the Product and Description for each product you are installing.
7. Click the check boxes for your Product and Description entries.
8. Enter the number of Licenses to Use (LTU) for each product, as shown on your Entitlement Certificate.

48 HP StorageWorks Cluster Extension XP Installation Guide
9. Click Next. The License Requestor Information window opens.
10. Enter the requested information in the blanks.
Required fields are marked with an asterisk (*).
You must enter a state only if you choose USA as the country. Select a state from the drop-down list. For other countries, type in the state.
11. Under “Privacy Policy,” select how HP may contact you.
12. Click Next.

Cluster Extension XP licensing 49
13. The License Owner window opens.
14. Click or unclick “Is License Requestor same as License Owner?”
When you select this check box, the information entered for the License Requestor populates the fields in the License Owner window.
15. If the License Owner is not the same as the License Requestor, enter the requested information for the License Owner.

50 HP StorageWorks Cluster Extension XP Installation Guide
16. Click Next. The Information Summary window opens.
17. Check the Information Summary carefully, and use the Back button to go to the previous window to change incorrect details.
18. Click Next. The Password center information window opens.

Cluster Extension XP licensing 51

52 HP StorageWorks Cluster Extension XP Installation Guide
19. Follow the instructions in the Password center information window for faxing or e-mailing your license key request to the HP Password Center. Click Save and use the window that opens to save the information you have entered.

Cluster Extension XP licensing 53
Importing a license key into AutoPass
You may request license keys by contacting the HP Password Center by phone, email, or fax, or from the web at www.webware.hp.com. When you receive a license key by e-mail, use the AutoPass program as describe below to import the license key from a saved file into Cluster Extension XP.
1. To request a license key by phone, fax, or email, contact the nearest Password Center using the contact information in the table below. You will need your Entitlement Certificate information, such as HP order number, and product LTUs, and quantities you purchased.
2. The Password Center e-mails a License Key Password Certificate to you as an attachment.
3. Save the attachment file in a location accessible by the system where you run AutoPass. When saving the file, do not use the file name LicFile.txt because that name is used by AutoPass as the destination file name for installed license keys.
4. Open the saved license key file using a text editor. Follow the instructions in the license key file to perform required editing of the license password.
5. Open AutoPass by running the clxautopass utility:
clxautopass -ovlicensemgr
Location Phone Number Fax Number Email
USA (801) 431-1597 or (800) 326-0411
(801) 431-3654 [email protected]
Europe/ Africa
(+31-55-543-4642) (+31-55-543-4645) [email protected]
Asia Pacific Outside Japan (+81-3-3227-5672)
In Japan (03-3227-5264)
(+81-3-3227-5238) [email protected]

54 HP StorageWorks Cluster Extension XP Installation Guide
6. Click Install/Restore License Key in the left panel.
7. Click Browse.

Cluster Extension XP licensing 55
8. The Open window displays.
9. Browse to the license key file. Find the file, highlight it, and click Open.
You return to the Install/Restore License Key from file window.
10. Click View file contents to display the details for the selected license key file.

56 HP StorageWorks Cluster Extension XP Installation Guide
11. Click the check boxes for passwords (license keys) you want to import into AutoPass, then click Install.

Cluster Extension XP licensing 57
Passwords for the selected products are imported into the AutoPass License file (LicFile.txt) on your local system.
Those products that had licenses successfully installed are indicated by a different color font as designated by the “Installed licenses” legend at the bottom of the screen.

58 HP StorageWorks Cluster Extension XP Installation Guide

Cluster Extension XP licensing 59
Getting a 60-day trial extension
If you want to request a 60-day trial (evaluation) license key extension, you can do so directly with the Hewlett-Packard Password Center. Go to the web site www.webware.hp.com for contact information for evaluation software passwords. Contact the Password Center to request a Trial (evaluation) License Extension. The trial license code for your HP StorageWorks Cluster Extension XP product trial software is TRIAL-CLX_XP. The trial license extension will give you a one-time 60-day extension.
You will receive your trial license key by email. Import the license key using the process described in “Importing a license key into AutoPass” on page 53.

60 HP StorageWorks Cluster Extension XP Installation Guide
License options
Report license key
To view a report of the license keys installed on the system:
1. Run clxautopass -ovlicensemgr.
2. When AutoPass opens, click Report License Key in the left panel.

Cluster Extension XP licensing 61
Backup license file
To back up the AutoPass license file (LicFile.txt):
1. Run clxautopass -ovlicensemgr.
2. When AutoPass opens, click Backup License File in the left panel.
3. In the Backup License File window, click Browse to specify the location and file name where you want to save the backup copy of the AutoPass license file.

62 HP StorageWorks Cluster Extension XP Installation Guide
4. The Choose option window opens.
5. Browse to the directory you want to use. Enter a file name in the “File Name” field.
6. Click Choose option to return to the Backup License File window.

Cluster Extension XP licensing 63
7. The Backup License File window opens.
8. Click Backup License File to save the AutoPass license file to the specified backup file location.

64 HP StorageWorks Cluster Extension XP Installation Guide
Remove license key
To remove license keys from your system for products that are no longer being used or have been uninstalled:
1. Run clxautopass -ovlicensemgr.
2. When AutoPass opens, click Remove License Key in the left panel.
3. In the Remove License Key window, select the license keys you want to remove.
You can permanently remove licenses by selecting the Remove Licenses permanently check box.
Note: Licenses that are permanently removed cannot be recovered using the Recover License Key option. They must be reinstalled.

Cluster Extension XP licensing 65
4. Click Remove to remove the license from the AutoPass license file. The list of installed licenses updates after you click Remove.

66 HP StorageWorks Cluster Extension XP Installation Guide
Recover license key
To recover a license key that was previously removed:
1. Run clxautopass -ovlicensemgr.
2. When AutoPass opens, click Recover License Key in the left panel.
3. Select the licenses you want to add back to the AutoPass license file and click Recover.
The list of removed licenses updates after you select Recover.

Cluster Extension XP licensing 67
clxautopass command line utility
In addition to using clxautopass to start the AutoPass GUI, you can use clxautopass to install the Instant-on license and import a password from the license key file.
Installing the Instant-on license
In cases where the Cluster Extension XP installation process failed to install the 60-day Instant-on license, use clxautopass to install it. Repair any conditions that may have caused the Instant-on license installation to fail. Then run the following command to install the Instant-on license:
clxautopass -installinstanton
Importing a license key from a file
Once you receive the license key file by e-mail, you can import the license key using the command line instead of using the AutoPass GUI. To import the license key, run the following command:
clxautopass -addpasswords <license file path>
where <license file path> is the full (absolute) path name to the license key file.
The clxautopass -addpasswords command is equivalent to using the Install/Restore License Key from file option in the AutoPass GUI.

68 HP StorageWorks Cluster Extension XP Installation Guide

Installing Cluster Extension XP in IBM HACMP environments 69
3Installing Cluster Extension XP in IBM
HACMP environments
Cluster Extension XP provides a standard installation package for IBM AIX. This package can be installed with the System Manager Information Tool (SMIT) or the installp command line utility.

70 HP StorageWorks Cluster Extension XP Installation Guide
Prerequisites
The following tasks must be done prior to the installation and configuration of your Cluster Extension XP for the HACMP environment:
• Check “Installation prerequisites” on page 27.
• Check supported software versions, fixes, Fibre Channel adapter firmware and driver versions.
Optional • Install and configure Auto Path XP for AIX to enable Alternative Pathing and Load balancing for AIX.
• Install and configure RAID Manager XP.
• Configure LVM.
• Install and configure HACMP.
Supported versions
Cluster Extension XP supports HACMP 4.4.1 and 4.5 with AIX 5.1, and HACMP 5.1 and 5.2 with AIX 5.1, AIX 5.2, and AIX 5.3.
Related information Please see the latest documentation and release notes for these products.
HP StorageWorks Auto Path XP for AIX
Auto Path XP is available for IBM AIX with HACMP and can be installed using SMIT or installp.
Auto Path XP creates virtual device files for redundant hdisk devices.
Auto Path XP provides utility programs to convert hdisk devices into Auto Path devices.
Auto Path XP must be installed on all cluster systems.

Installing Cluster Extension XP in IBM HACMP environments 71
RAID Manager XP instances
RAID Manager XP is available as a cpio archive and must be installed on each clustered system.
Application services using Cluster Extension XP must use the same RAID Manager XP instances among all configured systems.
Several RAID Manager XP instances can be configured. If specified, Cluster Extension XP will use the alternative instance when an instance becomes unavailable.
The RAID Manager XP instances should be running at all times to provide the fastest failover capability. Refer to the paragraph “RAID Manager XP startup” on page 71 for an example on how to integrate automatic RAID Manager XP startup at boot time.
Recommendation For rolling disaster protection, use the same RAID Manager XP instances to manage the BC pairs.
RAID Manager XP device groups
One device group must be configured for each resource group’s disk set. This disk set must include all disks of the volume groups used for the entire highly available application. A device group can contain several volume groups.
Rolling disaster protection
For rolling disaster protection, create the BC disk pair with the no_read option to hide it from the disk management layer.
RAID Manager XP startup
To enable RAID Manager XP instances (for example, instance 11 and 22) to be started at system boot time, the following changes must be applied to the system configuration:

72 HP StorageWorks Cluster Extension XP Installation Guide
1. Add a local entry to the /etc/inittab file.
Example logsymp:2:once:/usr/lib/ras/logsymptom # for system dumps
httpdlite:2:once:/usr/IMNSearch/httpdlite/httpdlite -r /etc/IMNSearch/httpdlite/
httpdlite.conf & >/dev/console 2>&1 local:2:wait:/etc/rc.local > /dev/console 2>&1 # Start raid manager
cons:0123456789:respawn:/usr/sbin/getty /dev/console
2. Edit the /etc/rc.local file and add the following entries:
Example echo “Starting local application”
HORCMBIN=/opt/HORCM/usr/bin
PATH=/bin:/usr/bin:$HORCMBIN
export PATH
# Start RAID Manager XP instances
RAIDMGR_INSTANCES=”11 22”
if [ ! –z “$RAIDMGR_INSTANCES” ]
then echo “Starting RAID Manager XP instances: $RAIDMGR_INSTANCES” $HORCMBIN/horcmstart.sh $RAIDMGR_INSTANCES fi
echo “Completed local application”
RAID Manager XP configuration
In a disaster tolerant environment, it is highly recommended to have redundant networks available between the two data center sites. This will protect the environment against a total network failure, and protect against a “split-brain” syndrome since it is not possible to implement a serial heartbeat connection (RS232) between the two geographically dispersed sites. You can use this additional network as a dedicated heartbeat network.
Each clustered system needs at least one RAID Manager XP instance running in order to control the shared disks. The shared disks are mirrored between both sites using Continuous Access XP. The following rules must be considered when configuring the RAID Manager XP instances:
• Local binding (HORCM_MON) must be set to NONE. This enables RAID Manager XP to listen on all possible HACMP IP addresses: boot, service and standby. In addition to this, the RAID Manager XP instance can communicate over the heartbeat network mentioned above.

Installing Cluster Extension XP in IBM HACMP environments 73
• The RAID Manager XP instances should communicate over both networks. The Remote binding (HORCM_INST) must be set to “heartbeat-address,” service, standby, and boot IP addresses of the public network. Review HP StorageWorks Cluster Extension XP: User’s Guide for more information on timing constraints when setting up several alternative remote instances.
• The service ports of each RAID Manager XP instance, configurable in the /etc/services file, must be different. This prevents the RAID Manager XP instance from communicating with itself in case of a takeover situation. If the service ports of the local and remote system were the same and the service IP address of the remote system had been taken over by the local system, the RAID Manager XP instance running on the local system would communicate with itself instead of the RAID Manager XP instance on the remote system. This would lead to wrong XP disk pair status information being processed by Cluster Extension XP.
Example #/************************* For HORCM_MON **************************/HORCM_MON#ip_address service poll(10ms) timeout(10ms)NONE horcm0_aix1 1000 1000
#/************************* For HORCM_CMD **************************/HORCM_CMD#dev_name dev_name dev_name/dev/rhdisk2 /dev/rhdisk15
#/************************* For HORCM_DEV **************************/HORCM_DEV#dev_group dev_name port# TargetID LU#oracle dev01 CL1-C 0 8oracle dev02 CL1-C 0 9
sap dev05 CL1-C 0 12sap dev06 CL1-C 0 13
#/************************* For HORCM_INST ************************/HORCM_INST#dev_group ip_address serviceoracle aix2h horcm0_aix2oracle aix2s horcm0_aix2oracle aix2b horcm0_aix2oracle aix2 horcm0_aix2sap aix2h horcm0_aix2sap aix2s horcm0_aix2sap aix2b horcm0_aix2sap aix2 horcm0_aix2

74 HP StorageWorks Cluster Extension XP Installation Guide
LVM configuration
The shared data disks reside on the XP disk array, which are mirrored to the remote data center using Continuous Access XP. In order to be able to access the mirrored disks in read/write mode, the primary disk (P-VOL) of the mirrored disk pair must be in the local data center. To make the disk (S-VOL) accessible to the remote system, you must switch the personalities of the disks:
• Create volume groups, logical volumes, and file systems on the first system for all resource groups.
• Use the RAID Manager XP horctakeover command to switch the RAID Manager XP device groups from site A to site B to make the shared disks accessible.
• Import volume groups, logical volumes, and file systems on the system on the remote site.
• Make sure that the volume groups are not automatically activated at system boot time.
HACMP
Set up the HACMP cluster configuration as described in IBM’s HACMP documentation.
The cluster system of the primary data center must have access to the XP disk array of the local data center, while the cluster system of the remote data center must have access to the remote XP disk array.

Installing Cluster Extension XP in IBM HACMP environments 75
Installing Cluster Extension XP1. Log in as root.
2. Download the installation package to a temporary directory on your system.
3. Uncompress and extract the install package into the hpclxxp sub-directory (created during extraction).
4. Use SMIT or the installp utility to install Cluster Extension XP.#smitty install_update
5. Select “Install and Update from LATEST Available Software.”
6. Specify the path to hcclxxp as the target directory for the update.
7. Press Enter to start installation right away, or press F4 to list the contents of the installation package.

76 HP StorageWorks Cluster Extension XP Installation Guide
8. Select either “HP Cluster Extension XP For HACMP” or “HP Cluster Extension XP Generic Interface” to install the command line interface for AIX.
9. When the installation is finished, press F10 to exit from SMIT. Remove the CD-ROM.
The Cluster Extension XP software is installed into three directory locations:
/etc/opt/hpclx
/var/opt/hpclx
/opt/hpclx
Repeat these steps on each system that will run Cluster Extension XP in the cluster.
Samples of user configuration files (UCF.cfg) can be found in /opt/hpclx/sample.

Installing Cluster Extension XP in IBM HACMP environments 77
Pair/resync monitor configuration
The pair/resync monitor checks whether the requesting server is allowed to have access to the pair/resync monitor.
Remote access hosts file
The names of the remote systems must be configured in a remote access hosts file:
clxhosts
By default this file is located in the following directory:
/etc/opt/hpclx/conf
The access file is formatted with one host name per line. Blank or empty lines are ignored. Comments in the file are not supported.
Configuring the port for the pair/resync monitor remote communications
The services file must contain the port entries for the pair/resync monitor.
The services file is located in the following directory:
/etc/services
The user must choose a port and add the following entry:
clxmonitor nnnnn/tcp
where nnnnn is the chosen port number.

78 HP StorageWorks Cluster Extension XP Installation Guide
Configuring Cluster Extension XP resources
The default configuration can be modified to fit your HACMP and disk array environment. Before configuring the Cluster Extension XP resource, review the Cluster Extension XP objects in the UCF.cfg file.
Related information For information about how to configure Cluster Extension XP for integration with HACMP, see HP StorageWorks Cluster Extension XP: User’s Guide.
Installing Cluster Extension XP in IBM HACMP environments 79
Removing Cluster Extension XP
Caution Before you can remove Cluster Extension XP from the system, you must first stop the resource group or switch the resource group to another system. Then remove the pre-event entry for Cluster Extension XP from the get_disk_vg_fs event and from the release_vg_fs event.
The following command removes Cluster Extension XP for HACMP from the system.
#smitty deinstall
1. Select software.
2. Press F4.
3. Select the Cluster Extension XP component you want to deinstall from the system, then press Enter.
4. When the deinstallation process is complete, press F10 to exit from SMIT.

80 HP StorageWorks Cluster Extension XP Installation Guide
Upgrading Cluster Extension XP
The Cluster Extension XP software for HACMP can be upgraded while the cluster is running.
If you are installing Cluster Extension XP for the first time, this section is not applicable.
Recommendation Stop the cluster on the node to be upgraded before starting the upgrade process.
To upgrade Cluster Extension XP:
1. Move the resource groups that use Cluster Extension XP to another cluster system, or stop the resource groups, including Cluster Extension XP.
2. Deinstall Cluster Extension XP and install the new version of Cluster Extension XP.
If the Cluster Extension XP command line interface (clxrun) is used, make sure that all associated resources that were previously online are offline after clxrun has run.
Then, deinstall Cluster Extension XP Generic Interface and install the new version of Cluster Extension XP.

Installing Cluster Extension XP in Microsoft Cluster Service environments 81
4Installing Cluster Extension XP in Microsoft
Cluster Service environments
This chapter describes additional requirements and provides installation procedures for installing Cluster Extension in a Microsoft Cluster Service environment.
Cluster Extension XP provides a standard InstallShield wizard for Windows. The setup program includes the Cluster Extension XP integration with Microsoft Cluster Service and the generic interface of Cluster Extension XP.
The Cluster Extension XP Arbitrator service can be installed from a separate setup program. For your convenience, the installation CD includes an autostart feature that permits you to choose the operating system and other options before you start the installation.

82 HP StorageWorks Cluster Extension XP Installation Guide
Supported Cluster Extension XP configuration with Microsoft Cluster Service
data centerin
Manhattan
data centerin
Brooklyn
User LAN (carrying heartbeats)Data LAN (carrying heartbeats)
Heartbeat LAN
Client Systems
Cluster Systems
MAN(ESCON,IP
ATM,DWDM)
Fiber Channel
Infrastructure ExtenderInfrastructure

Installing Cluster Extension XP in Microsoft Cluster Service environments 83
Installation Overview
This section describes features and requirements for using Cluster Extension XP in Microsoft Cluster Service environments with the XP512/XP48/XP128/XP1024/XP10000/XP12000 disk arrays.
The XP256 is not supported in Cluster Extension XP environments.
The Cluster Extension XP quorum service
The quorum service removes the limitation of Microsoft Cluster Service that requires each clustered server to access a single, shared quorum disk to maintain a persistent log of cluster events and provide a “tie-breaker” for events that could otherwise lead to a split-brain condition. Cluster nodes connected to the quorum disk pair behave as if they were connected to a single, shared quorum disk. As with any cluster disk resource, only the server node that owns the quorum disk resource can access that drive. The quorum disk resource is synchronously mirrored over Continuous Access XP, allowing the cluster to remain online even when a site experiences a disruption.
When the quorum disk resource is moved (failed over) to a new server, the quorum service handles any necessary swapping of the secondary-to-primary disk of the mirror set. This ensures that the proper low-level SCSI drive reserve/release semantics are preserved. The quorum service detects the disruption of service via Microsoft Cluster Service and assigns the quorum resource to either the local or the remote site. The decision is based on the challenger/defender protocol built into Microsoft Cluster Service.

84 HP StorageWorks Cluster Extension XP Installation Guide
The quorum service enables a cluster to recover after most types of site failures, for example:
• server unable to access the local quorum disk
• failure of one or all servers in either data center
• failure of a disk array
• total communication failure between data centers (if the arbitrator service is deployed)
In rare circumstances, communications failures between the cluster nodes in the dispersed data centers and the arbitrator can prevent the quorum service from ascertaining the correct failover behavior. If this occurs, the cluster stops completely to prevent data from being corrupted by a split-brain condition. It can be quickly restarted from any host node using a documented procedure, once the system administrator has confirmed that a split-brain situation has not occurred and will not occur when the system is restarted.
As long as one site can communicate with the arbitrator service, the cluster will restart or continue to operate. The Continuous Access XP link failure could leave the PVOL site of the quorum disk pair and the status disk pair in a failure state (PSUE or PDUB). It may be necessary to manually recover after site service has been restored. The required pair split and pair creation operations can be performed while the cluster is running.
Disk configuration for Microsoft Cluster Service with quorum service
To configure the quorum service, you must provide a quorum disk sized as required by Microsoft, usually 100 Mbytes or larger. User data must not be stored on this volume.
In addition, two RAID Manager XP command devices per cluster node must be configured, as well as three small XP disks (LDEVs) per cluster on each array for quorum service metadata. These control disks must be CVS volumes made as small as possible (36-50 Mbytes).
The control disks must be mapped to all local cluster nodes. The control disks are shared raw devices.

Installing Cluster Extension XP in Microsoft Cluster Service environments 85
The command device and control disks must be partitioned, but must not be assigned Windows drive letters; nor must they have file systems created on them. They must be accessed only by RAID Manager XP software and Cluster Extension XP quorum service software.
The application/data disks can be any size supported by the XP disk array. However, for replication and recovery performance reasons, you should configure several smaller disks or create LUSE disks to take advantage of parallel processing in the XP disk array.
The quorum disk, application/data disk(s) and the control disks will be paired with disks in the remote disk array.
Disk configuration for the quorum service (RAID Manager XP Command device not shown)

86 HP StorageWorks Cluster Extension XP Installation Guide
Partitioning RAID Manager XP command devices and quorum service control disks
Cluster Extension XP quorum service uses the GUID to resolve the physical drive number. In order to use GUIDs to access the command devices and the control devices, each disk used by the Cluster Extension XP quorum service must have a partition created, in order to create a GUID for the disk.
Do not assign drive letters for disks used by the Cluster Extension XP quorum service.
Do not format partitions.
GUIDs are much more reliable disk identifiers in a SAN than physical drive numbers or drive letters. The Cluster Extension XP quorum service fully supports GUIDs and discovers them automatically if they were created before the Cluster Extension XP installation.
In order to acquire the GUID for a disk, the drive must be accessible by the host system. To check this, open Disk Management and check the property values for the target disk.
There are two different, but complementary, property sheets for a given disk. In the lower, right pane of Disk Management, the graphical table of disks shows a text description of each disk (stating whether it is in Basic or Dynamic mode). It also shows a graphical representation of partition information (partition display). The property sheet for the text description provides Port-Target ID-LUN data, in addition to the capacity of the disk (should be non-zero). The property sheet for the partition display breaks down the partition capacity into used and free space. Again, capacity should be a nonzero value, confirming that a disk or partition displays the correct capacity. This indicates that the host system has access to the volume, and the installation program would therefore be able to retrieve its assigned GUID.
If you have version 1.09.04 (or later) of RAID Manager XP installed, you can optionally use a RAID Manager XP utility to verify that a disk's GUID is visible to the local system.

Installing Cluster Extension XP in Microsoft Cluster Service environments 87
Close the Computer Management window and run the inqraid.exe program from a command prompt.
Example (Windows2000)
C:\>inqraid $Volume -fv -fx
Caution Windows 2000: GUIDs are generated on the local node when creating a new partition. This means that whenever you create a new partition, you change the GUID of the disk. If the disk is shared between several nodes you must open Disk Management and close it in order to update the other systems GUID information. This is also true if you create a new partition while disks in a Continuous Access XP disk pair are suspended or split.
Caution Windows 2003: GUIDs are not automatically created for partitions that have been created on another node. In order to create a GUID for a shared partition you must delete and re-create the partition on the node that doesn't show a GUID.
Pairing all disks in the cluster environment
Microsoft Cluster Service uses the disk signature to recognize a shared disk as a common resource in the cluster. In order to allow geographically dispersed cluster environments, Continuous Access XP needs to replicate the disk signature to the remote disk. This means all disk resources in the Cluster Extension XP cluster must be copied to the remote side prior to failover operations in the cluster.
To initialize the quorum service control disks correctly, they must be replicated to the remote disk array as well.
After the disks have been paired, the servers on the remote disk array (S-VOL side) must be rebooted. This will allow them to recognize the correct disk signature.
Once the servers are rebooted, the disk pairs can be suspended until Cluster Extension XP is installed.

88 HP StorageWorks Cluster Extension XP Installation Guide
Prerequisites
Prior to installing Cluster Extension XP, perform the following tasks:
1. Check “Installation prerequisites” on page 27.
2. Check for the latest supported software versions, fixes, Fibre Channel adapter firmware and driver versions.
Optional 3. Install and configure HP StorageWorks Secure Path XP or HP MPIO DSM for Windows for XP Disk Arrays to enable alternative pathing for Windows.
4. Install and configure HP StorageWorks RAID Manager XP.
Optional 5. Install the applicable JAVA package for your system:
• 32-bit JRE (Java Runtime Environment) version 1.3.1 or later for 32-bit and 64-bit extended system (x64) platforms
• IA64 JAVA SDK 1.4.2-04 or later for 64-bit Itanium (IA64) platforms.
6. Install and configure Microsoft Cluster Service on all nodes.
7. Install Microsoft hotfixes:
(Windows 2000 only) • Install Service Pack 4 to obtain the latest hotfixes.
• If you cannot install Service Pack 4, install Service Pack 3, which includes:
Q297219 Q307939 Q321793
These hotfixes include the minimum supported version of the Cluster Service clusdisk.sys driver.
Installing Cluster Extension XP in Microsoft Cluster Service environments 89
Supported versions
Cluster Extension XP supports
• Windows 2000 Advanced Server and Datacenter Server with the hotfixes mentioned above plus Service Pack 3 or later.
• Windows 2003 Enterprise Edition and Datacenter Edition plus Sevice Pack 1.
HP supports XP disk arrays connected to a broad range of Intel-based servers with FC HBAs (direct connected or switched) running Windows 2000 and Windows 2003.
Secure Path for Windows 2000 and Windows 2003 are available from Hewlett-Packard.
Related information See the documentation and release notes for each of the above products.
Custom Volume Size (CVS) Configuration on XP disk arrays
The volume size configuration feature allows you to create custom size volumes (CVS) that are smaller than a single LDEV (logical device). CVS volumes as small as 36 Mbytes are suitable for supporting the required quorum service control functions. The quorum disk pair must be sized as required by Microsoft. The sizes of the quorum disk and the control disks affect the recovery time required for the quorum disk pair.
Related information For information about custom size volumes, see HP StorageWorks LUN Configuration Manager XP: User’s Guide.
Secure Path/MPIO
HP StorageWorks Secure Path XP and HP MPIO DSM for XP Disk Arrays are available for Windows 2000 and Windows 2003. Secure Path or MPIO DSM must be used to take advantage of I/O-path failover, a feature not available with Windows operating systems.

90 HP StorageWorks Cluster Extension XP Installation Guide
Secure Path or MPIO DSM must be installed on the cluster systems prior to connecting the system to the second I/O path.
RAID Manager XP instances
HP StorageWorks RAID Manager XP must be installed on each clustered system.
The RAID Manager XP instance numbers used for the Cluster Extension XP resource must be identical among all systems on which the resource is configured to run.
Multiple RAID Manager XP instances can be configured. If specified, the Cluster Extension XP resource uses an alternative instance when an instance becomes unavailable.
The RAID Manager XP instances must be running at all times to provide the fastest failover capability. Cluster Extension XP provides a RAID Manager XP Service to include the RAID Manager XP instance startup in the system boot process.
Recommendation For rolling disaster protection, use the same RAID Manager XP instances to manage the BC pairs.
RAID Manager XP device groups
One RAID Manager device group must be configured for each resource group’s disk set. This disk set must include all physical disks associated with the resource group. A RAID Manager XP device group can contain multiple physical disks.
The quorum disk pair and quorum service control disk pairs must be configured as a separate device group. This group is for maintenance purposes only.

Installing Cluster Extension XP in Microsoft Cluster Service environments 91
Rolling disaster protection
For rolling disaster protection, create the BC disk pair with the no_read option to hide it from the disk management layer.
RAID Manager XP command devices
Recommendation Configure a minimum of two command devices per cluster node.
One of the command devices must be dedicated to the quorum service and not be used for any other purpose. The second command device should be used for the above-mentioned RAID Manager XP instance(s). You can set up additional command devices to provide for additional redundancy or other HP integration products such as HP Open View Data Protector Zero Downtime Backup Integration.

92 HP StorageWorks Cluster Extension XP Installation Guide
Installation Roadmap
The installation roadmap below shows the steps for installing Cluster Extension XP in a Microsoft Cluster Service environment. The steps are described in detail on the pages that follow.
1. Prepare the installation:
• Create CVS volumes in the disk arrays and map them to servers.
• Partition physical disks on the first server
• Create Raid Manager configuration file and pair disk pairs
• Install Microsoft Cluster Service on all nodes in the first data center
• Reboot and check for GUIDs on all nodes for the command device and the control disks.
• Install Microsoft Cluster Service on all nodes in the second data center
2. Install Cluster Extension XP:
• Install the Cluster Extension XP resource type DLL
• Install the quorum service
• Install the arbitrator service on the arbitrator system
3. Troubleshoot your Cluster Extension XP installation
4. Repair your Cluster Extension XP installation
5. Remove your Cluster Extension XP installation
6. Upgrade Cluster Extension XP

Installing Cluster Extension XP in Microsoft Cluster Service environments 93
Preparing data centers for quorum service installation
This section describes disk array configuration procedures for the local, primary site and the remote, secondary site prior to installation of the quorum service for environments with XP512/XP48/XP128/XP1024/ XP10000/XP12000 disk arrays.
Consult your HP service representative for assistance in configuring the disk array.
Create CVS volumes in the disk arrays and map them to servers
At the local, primary site:
HP service representative only
1. Configure the disk array with the following disk drives (LDEVs):
• 4 x CVS volumes per cluster:
— 1 x 100 Mbyte volume for the quorum disk
— 3 x 36 Mbyte volumes for the three quorum service control disks. These disks must be visible to all nodes on the local site.
• 2 additional CVS volumes per node in the cluster:
— 1 x 36 Mbyte volume as command device for the RAID Manager XP instance used by the Cluster Extension XP resource in the resource group.
— 1 x 36 Mbyte volume as command device for the quorum service
These volumes can usually be created from available free space on a disk parity group.
Any additional application/data disks can be of any size supported in the disk array.
HP service representative only
2. Configure two of the CVS volumes as a command device.

94 HP StorageWorks Cluster Extension XP Installation Guide
HP service representative only
3. Assign the new CVS volumes to the FC ports to be connected to the local cluster nodes.
HP service representative only
4. Coordinate with remote, secondary site to configure the disk array at that site in the same manner (steps 1 to 3).
HP service representative only
5. Establish bidirectional links between the disk arrays at the two sites.
For greater fault tolerance, use two or more diversely routed links in each direction between the two data centers.
HP service representative only
6. Identify the array volumes that will be part of the cluster.
These volumes will be the data disks that will support your applications and shares. Assign the same FC client host interface ports to the servers as were assigned to the CVS volumes.
7. With the array attached to the local cluster node, configure the array volumes so that they are assigned to equivalent physical disks on the respective servers.
Partition physical disks on the first server1. Open Microsoft Management Console (MMC) on the first server and
select Device Manager.
2. Scan the Device Manager for new hardware. (Select Scan for new hardware.)
3. Select Disk drives.
Look for the six CVS volumes created in step 1. These are designated by an OPEN-n-CVS label, where n is the emulation type.
4. Select Disk Management and ensure that signatures are written to each disk.

Installing Cluster Extension XP in Microsoft Cluster Service environments 95
5. Verify that each of the OPEN CVS volumes is listed with a disk and that each disk is in Basic mode.
If the new CVS volumes are marked as RAW devices, partition each one. Do not reformat them.
If a volume has been partitioned and formatted but is unreadable, you can disable and then enable the volume in Device Manager–Disk drives.
Of the six CVS volumes, only the intended Microsoft Cluster Service quorum disk should have a drive letter assignment. Record these assignments for future reference.
Adding drive letters or formatting the control disks and command devices causes unnecessary file system checks and even log entries.
6. Close Disk Management.
Windows 2000 only If you use Terminal Services, you must reset the Terminal Service session and create a new Terminal Services session in order to update all windows.
7. If applicable, open MMC on all cluster nodes on the local side and confirm that you can see the previously created partitions in the Disk Manager.
The drive letters may vary because you do not have the cluster software installed yet. This can be changed later.
Windows 2003 only If you see a partition on a command device or control disk as an unknown partition, you can delete and re-create the partition on the server.
If you use Terminal Services, you need to reset the Terminal Service session and create a new Terminal Services session in order to update all windows or to see the latest changes.

96 HP StorageWorks Cluster Extension XP Installation Guide
At the remote, secondary site:
8. Configure the disk array at the remote, secondary site to match the configuration at the primary site.
Match the CVS volumes and drive letter assignments.
Record the volume assignment details for the next step.
Create RAID Manager configuration file and pair disk pairs
On all servers:
1. Make sure that the HP StorageWorks RAID Manager XP software has been installed on all nodes at both sites.
The RAID Manager XP configuration files describe the array configurations that were created using the data recorded in the previous steps. This includes a description of the volume pair that will make up the Microsoft Cluster Service quorum disk pair, the quorum service control disk pairs, and the application/data disk pairs. Please refer to the "RAID Manager XP dependencies" section in the HP StorageWorks Cluster Extension XP: User’s Guide and to the HP StorageWorks RAID Manager: User’s Guide.
At the local, primary site:
2. Use RAID Manager XP to create synchronous mirrored pairs for the quorum disk, the three drives used by the quorum service, and the data disk pairs.
Syntax paircreate –g disk_pair_name –f never –vl –c 15
where disk_pair_name is the disk pair used for the quorum disk or any of the control disks as specified in a previously created RAID Manager configuration file.
3. Install Microsoft Cluster Service on all nodes in the first data center.
Windows 2000 On the first server, install Cluster service in the Add/Remove Windows Components pane of Add/Remove Programs.

Installing Cluster Extension XP in Microsoft Cluster Service environments 97
Windows 2003 On the first server, open the Cluster Administrator GUI by selecting Start -> Programs -> Administrative Programs -> Cluster Administrator. Create a new cluster in the Cluster Administrator GUI and add the local node.
When designating disk resources, none of the non-quorum CVS volumes should be included. If they do appear in the selection list, go back to Disk Management and remove the drive letter assignment. Only the quorum disk and the application/data disks should be visible to the cluster software.
When designating the quorum disk, select the one CVS volume that was assigned a drive letter.
4. If applicable, after the cluster is running on the first server and has been configured for your application, install cluster service on all cluster nodes in the local data center.
Windows 2000 Install Cluster service in the Add/Remove Windows Components pane of Add/Remove Programs. Make all local cluster nodes join the existing cluster, consecutively.
Windows 2003 Open the Cluster Administrator GUI by selecting Start -> Programs -> Administrative Programs -> Cluster Administrator. Add all local cluster nodes to the existing cluster in the Cluster Administrator GUI.
Reboot and check for GUIDs on all nodes
On all servers:
1. Reboot all local and remote systems.
2. Check the GUIDs for the command devices and the quorum service control disks.
C:\>inqraid $Volume -fvx

98 HP StorageWorks Cluster Extension XP Installation Guide
Windows 2000 If you cannot find the GUID for any of the three quorum service control devices, delete and re-create the partition of the specific disk on one server at the P-VOL site.
If you use Terminal Services, you must reset the Terminal Service session and create a new Terminal Services session in order to update all windows.
Windows 2003 If you cannot find the GUID for any of the three quorum service control devices, delete and recreate the partition of the specific disk on the server that doesn't have the GUID.
If you use Terminal Services, you must reset the Terminal Service session and create a new Terminal Services session in order to update all windows.
If the GUID of any command device is missing, re-create the partition on the command device on the server where the GUID is missing.
If you use Terminal Services, you must reset the Terminal Service session and create a new Terminal Services session in order to update all windows.
At the remote, secondary site:
3. If there is no user/application data on the application/data disks, suspend all disk pairs.
Syntax pairsplit -g disk_pair_name
where disk_pair_name is the disk pair used for the quorum disk or any of the control disks or application/data disks, as specified in a previously created RAID Manager configuration file.
If there already is user/application data on the application/data disks, suspend only the quorum disk pair and all quorum service control disks.
This means your application/data disk might not be shown as an available disk during installation of the remote cluster nodes (below), until Cluster Extension XP is installed and configured.

Installing Cluster Extension XP in Microsoft Cluster Service environments 99
Install Microsoft Cluster Service on all nodes in the second data center1. Add all remaining nodes on the remote site to the existing cluster.
Windows 2000 Install Cluster service in the Add/Remove Windows Components pane of Add/Remove Programs. Make all remaining cluster nodes join the existing cluster, consecutively.
Windows 2003 Open the Cluster Administrator GUI by selecting Start -> Programs -> Administrative Programs -> Cluster Administrator. Add all local cluster nodes to the existing cluster in the Cluster Administrator GUI.

100 HP StorageWorks Cluster Extension XP Installation Guide
Install Cluster Extension XP
The Cluster Extension XP setup program consists of three components:
• the Cluster Extension XP resource type (resource type DLL)
• the quorum service
• the documentation
The installation was separated in this way to allow you to repair the individual components if necessary. However, we recommend that you install all the above-mentioned components at the same time.
The installation requires that the quorum disk (cluster group) be located on the local server.
1. Log in with your administrator account.
2. After both sites have been prepared, open Cluster Administrator and move the cluster group to the first server where Cluster Extension XP will be installed.
3. From Windows Explorer, confirm that the server can detect the quorum disk.
A Microsoft Cluster Service directory should be visible in the root directory of the drive.
Tip If you are remotely setting up Cluster Extension XP using Microsoft Terminal Services, the quorum disk may not appear properly in Disk Manager after moving the cluster group to that host node. To correct the problem, reset the Terminal Services session and then log on to a new session.
4. Make sure that the cluster service is running and that the RAID Manager instances are configured.
5. Before continuing to install Cluster Extension XP, stop all Cluster Administrator programs.
6. Download the installation package into a temporary folder on the first cluster sytem.

Installing Cluster Extension XP in Microsoft Cluster Service environments 101
7. Extract the install package to folders hpclxxp and hpclxextarb (created during extraction).
8. Open the hpclxxp folder and run setup.exe.
9. Select the "quorum service" and "Cluster resource type" to install the necessary Cluster Extension XP components.
10. Follow the on-screen instructions to enter your identification and select the program installation location.
11. Select “Yes” when the installation asks if you want to install the permanent license. Follow the instructions in Chapter 2 “Cluster Extension XP licensing” on page 33 to retrieve and install licenses.
102 HP StorageWorks Cluster Extension XP Installation Guide
Installing the quorum service
This procedure installs the following Cluster Extension XP components:
• quorum disk filter driver clxqflt.sys
Windows 2003 only • quorum SCSI port/storport filter driver clxspflt.sys
• quorum service clxqsvc.exe
• additional components
Caution Cluster Extension XP adds a dependency to the Microsoft Cluster Service that is lost during de-installation or eviction of a cluster node. Every new installation, removal, or reinstallation of the Microsoft Cluster Service requires running Repair for the Cluster Extension XP quorum service installation.
1. Before installing the quorum service, prepare the local and remote sites. See “Preparing data centers for quorum service installation” on page 93.
2. The installation program writes the setup data into a text file for quick reference. The default file name is %SystemRoot%\clxcfg.txt.
Document the settings under the registry key at this location:
HK_LM\SYSTEM\CurrentControlSet\Services\ClxQSvc\Parameters
3. In the next dialog box, select the command device and the three control devices.
The installation program displays all resources that it determines to be suitable for supporting the quorum service.
If sufficient resources are not detected, carefully review “Preparing data centers for quorum service installation” on page 93, then restart Setup.

Installing Cluster Extension XP in Microsoft Cluster Service environments 103
Example Setup detected a number of suitable control devices. A command device is selected by default. A different disk must be selected for each of the three control devices.
4. After the control devices are selected, decide whether Active Directory will be used to store data about an external arbitrator. External arbitrator is a service that supports the quorum service but resides outside the cluster.
For more information about the external arbitrator, see “Installing the Cluster Extension XP external arbitrator” (page 108).

104 HP StorageWorks Cluster Extension XP Installation Guide
Example 5. If Active Directory services are to be used, check the box and complete the information for the fully qualified network name of the Active Directory server and its IP address.
6. If there is more than one cluster member on any site (such as in a 3-node or 4-node cluster), move the cluster group to the next server at the same site and install Cluster Extension XP on that node. (During setup on the second and subsequent servers, it is important that the servers can communicate via the network with the servers that already have Cluster Extension XP installed.)
Caution When installation is complete, do not reboot the system.
7. Split the quorum disk pair and the three quorum service control disk pairs, if not already done.
Use the RAID Manager utilities pairsplit command:

Installing Cluster Extension XP in Microsoft Cluster Service environments 105
Syntax pairsplit -S -g disk_pair_name
where disk_pair_name is the disk pair used for the quorum disk or any of the quorum service control disks, as specified in a previously created RAID Manager configuration file.
The disk pairs must be placed into simplex mode.
8. If not already done, install the Microsoft Cluster Service software on all servers at the secondary site and make them join the cluster.
9. If there is more than one cluster member at each site, move the cluster group to one of the servers at the secondary site and confirm that the server detects the quorum disk.
Each server at the second site must be able to own the cluster group and see the simplex (SMPL) copy of the quorum disk in order to complete the Cluster Extension XP installation on the remaining cluster nodes.
10. While the server at the secondary site owns the quorum disk, run the installation as explained above.
During setup, this server (secondary site) must communicate with the servers at the distant site where Cluster Extension XP has already been installed.
The pairs for the quorum service control disks can now be created.
11. When prompted to create the disk pair for the quorum service, click Yes.
Caution When installation is complete, do not reboot the system.
12. If there is more than one cluster member at each site, move the cluster group to the next server of the cluster and install Cluster Extension XP there. During setup, this server must communicate with the servers at the distant site where Cluster Extension XP was previously installed.

106 HP StorageWorks Cluster Extension XP Installation Guide
Caution When installation is complete, do not reboot the system.
All cluster nodes should now have Cluster Extension XP installed.
13. Reboot each server that does not own the cluster group, one at a time.
14. Move the cluster group to the newly rebooted server node at the same site
15. Reboot the final server.
16. Open Cluster Administrator and verify that the cluster group can be successfully moved to each server node.
17. Verify that the disk pairs for the quorum disk and the first of the three control disks have been created. If not, create the pairs from the Cluster Extension XP directory:
cd \Program Files\Hewlett-Packard\Cluster Extension XP
clxqr -createpair
18. Document all configuration data for later upgrades. You can review the configuration data in the %WINDIR%\clxcfg.txt file.

Installing Cluster Extension XP in Microsoft Cluster Service environments 107
Installing Cluster Extension XP Command Line Interface
The Cluster Extension XP Command Line Interface can be used for custom cluster software integration. For example, you could write your own online and offline scripts using the advanced disk pair status checking options of Cluster Extension XP.
It is not necessary to install this component if Cluster Extension XP is used with Microsoft Cluster Service.
Please refer to the HP StorageWorks Cluster Extension XP: User’s Guide for more information on the command line interface.

108 HP StorageWorks Cluster Extension XP Installation Guide
Installing the Cluster Extension XP external arbitrator
During communications disruptions, the quorum service on each cluster node uses the external arbitrator to determine the following:
• whether the cluster is operational on other nodes, and
• whether the inquiring node can communicate with the network at large.
It assists in determining whether that node can restart the cluster without the risk of creating a split-brain condition.
Before installing the external arbitrator, you must determine the most suitable host system. The external arbitrator service places little load on the host system, but it does need to be responsive and available to the network at all times. Therefore the server should not be running many other service functions or encumbered with a very heavy workload.
The host system is best located on a server that uses the services provided by the cluster and not co-located with either part of the cluster itself. The cluster nodes that receive arbitration services are not suitable hosts, because disruption of a cluster site that hosts the external arbitrator would defeat its purpose.
Consequently, installation of the external arbitrator on one of the cluster nodes for which it provides arbitration is not supported.
Procedure1. Download the installation package into a temporary folder on the
system.
2. Extract the install package to folders hpclxxp and hpclxextarb (created during extraction).
3. Launch setup.exe from the hpclxextarb folder.
4. Follow the on-screen instructions until the External Arbtitrator dialog box appears.

Installing Cluster Extension XP in Microsoft Cluster Service environments 109
5. In the external arbitrator dialog box, enter the IP address for the external arbitrator. This is usually the node's public IP address.
Example
If you change the default name and port address, you must ensure that all cluster host nodes that use the arbitrator and Active Directory services are updated.

110 HP StorageWorks Cluster Extension XP Installation Guide
6. Enter a domain user account name and password with sufficient privileges to access the domain that contains the dispersed cluster.
7. Choose Next to start the arbitrator service. When finished, and if Active Directory was selected earlier, proceed to the next section to record information about the external arbitrator with the Active Directory services.
8. Document all configuration data for later upgrades. You can review the configuration data in the %WINDIR%\system32\clxqarbs.ini file.
Problems during Cluster Extension XP external arbitrator installation
If you provide an incorrect domain or user for the arbitrator service during installation, the installation procedures will not be able to register the ClxQArb service. The installation procedure will instruct you to re-enter the correct domain or user.
Caution During the deinstallation, do not use the Modify or Repair functions of the Setup program. Select Remove to deinstall the arbitrator.

Installing Cluster Extension XP in Microsoft Cluster Service environments 111
Identifying the external arbitrator in the Active Directory
The Active Directory can be used to store information about the external arbitrator. This ensures that the address lookup for the arbitrator is not solely dependent on a local domain controller that may be co-located with one of the data centers. To edit Active Directory services, you must install the Active Directory Service Interfaces (ADSI) Edit snap-in, which is included as part of Windows 2000 or Windows 2003 Administrator Tools.
1. Open an MMC session by launching mmc.exe.
2. Click Console in the main menu, and then click Add/Remove Snap-In.
3. In the Add/Remove Snap-In dialog box, click [Add], and then select to add ADSI Edit. Close the dialog box.
4. Right-click the ADSI Edit object and connect to the Active Directory domain controller for your domain using the Domain NC naming.
Contact your domain administrator for help in obtaining credentials with permissions to make changes to Active Directory.
5. Right-click on the domain, select New, and then Object.
6. Create a container object for external arbitrator.
7. Right-click the new external arbitrator container, select New, and then Object.
8. Create a computer object with the value set to External_Arbiter. Enter ClxqArbiter for the sAMAccountName.
9. Click [More] to set the value of the location attribute.
10. Enter the value of the location attribute for the computer object to equal the IP address and arbitrator listening port (for example, www.xxx.yyy.zzz 5306 where www.xxx.yyy.zzz represents the IP address of the system where you installed the external arbitrator and 5306 is the default port).
11. Click [Set] to register the value, then click [OK].
12. Save the change and exit ADSI Edit.
13. Set up the domain trust properties. The account the installer specifies for the external arbitrator must be a domain account, and that domain must be trusted by the Active Directory domain.

112 HP StorageWorks Cluster Extension XP Installation Guide
Troubleshooting
Log files
Log files are shown below to assist you in locating and identifying problems. Timestamps, component IDs, and message IDs are not shown in the log file examples.
The %WINDIR%\clxq.log file shows the correct initialization of the quorum service as follows.
[INFO] Current GMT/UTC [Thu Oct 02 21:25:59 2003 ][INFO] [DebugLevel=1][INFO] [LogFile=L:\WINDOWS\clxq.log][INFO] External Arbitration is enabled[INFO] [CommandDevice=Volume{563a9aac-e945-11d7-bde8-505054503030}][INFO] [ControlDevice1(S)=Volume{563a9aae-e945-11d7-bde8-505054503030}][INFO] [ControlDevice2(X)=Volume{563a9aaf-e945-11d7-bde8-505054503030}][INFO] [ControlDevice3(Y)=Volume{563a9ab0-e945-11d7-bde8-505054503030}][INFO] [CommandDevice=PhysicalDrive2][INFO] [ControlDevice1(S)=PhysicalDrive30][INFO] [ControlDevice2(X)=PhysicalDrive31][INFO] [ControlDevice3(Y)=PhysicalDrive32][INFO] [QuorumPortTidLunSerialSSIDLDEVNUMLDEV]
[INFO] [LocalCL1-C(2 0x2)15(0xf)46(0x2e)20030(0x4e3e)4(0x4)168(0xa8)1]
[INFO] [RemoteCL2-K(25 0x19)15(0xf)84(0x54)20035(0x4e43)4(0x4)218(0xda)1]
[INFO] [Control1PortTidLunSerialSSIDLDEVNUMLDEV]
[INFO] [LocalCL1-C(2 0x2)15(0xf)47(0x2f)20030(0x4e3e)4(0x4)169(0xa9)1]
[INFO] [RemoteCL2-K(25 0x19)15(0xf)85(0x55)20035(0x4e43)4(0x4)219(0xdb)1]
[INFO] [Control3PortTidLunSerialSSIDLDEVNUMLDEV]
[INFO] [LocalCL1-C(2 0x2)15(0xf)49(0x31)20030(0x4e3e)4(0x4)171(0xab)1]
[INFO] [RemoteCL2-K(25 0x19)15(0xf)87(0x57)20035(0x4e43)4(0x4)221(0xdd)1]
[INFO] Init check succeeded[INFO] The wait time for cluster service startup is [10] seconds[INFO] Cluster service attempts to start[INFO] Detected cluster service status: [SERVICE_START_PENDING][INFO] HP CLX Quorum Filter Driver found, version [1.1][INFO] Filter Timeout value is set to 8 seconds[INFO] Set Filter Passthrough value to KLICKITAT_FORWARD_3R_ONCLEANUP succeeded[INFO] Detected cluster service status: [SERVICE_START_PENDING][INFO] Waiting for requests to time out. Retrying ...[INFO] Detected cluster service status: [SERVICE_START_PENDING][INFO] Waiting for requests to time out. Retrying ...[INFO] Detected cluster service status: [SERVICE_RUNNING]
If the clxq.log file shows errors referring to *_RPort initialization error or a convert GUID error, then the initialization was not successful.
[ERR] Function DeviceIoControl() to device [\\?\Volume{6735536f-da7f-11d7-8e14-806e6f6e6963}] failed. Error code [1167]

Installing Cluster Extension XP in Microsoft Cluster Service environments 113
[ERR] Failed to convert GUID[6735536f-da7f-11d7-8e14-806e6f6e6963] to physical drive number
These errors can occur when using Terminal Service sessions during the installation of Cluster Extension XP.
In such a case, the installation on a node that shows these or similar symptoms must be repaired. Use the Repair option of Cluster Extension XP in Add/Remove Programs and reboot the node afterwards.
In rare cases where the GUIDs were not available during installation of Cluster Extension XP, a rerun of the above installation procedure is necessary.
• In those cases you must re-create the GUIDs while all quorum service control disk pairs are paired (in PAIR state) and then split all quorum service control disk pairs.
• After this, reboot all nodes and repair the Cluster Extension XP installation using the Repair feature on each node in the cluster.
• If the clxq.log shows a “mismatch error.” You can use the clxqr utility to repair and reinitialize the quorum service disk pairs. See “Quorum service recovery” in HP StorageWorks Cluster Extension XP: User’s Guide.
114 HP StorageWorks Cluster Extension XP Installation Guide
Resolving quorum service problems
Problem During setup, the installation program is unable to detect the quorum disk and fails.
Solution Verify that the quorum disk is accessible from Windows Explorer, and then try again.
If the quorum is not visible in Windows Explorer, make sure that the cluster service is running. Move the cluster group to the node where the installation is being done and refresh Windows Explorer before starting Setup again. (Disable and re-enable the quorum disk in Disk Manager; then, if using Remote Desktop in Windows 2000, reset the Terminal Services session from the Terminal Service Manager. Upon the next connection, the disk should be visible.)
Problem The Setup command cannot find the Command Device, sufficient control devices, or other resources, and is terminated.
Solution The installation program examines your system to look for the requisite disk resources. If resources are not found, it terminates installation after identifying the type of resource it could not find. If Setup fails a second time for the same reason, contact your HP service representative to ensure that the storage array is properly configured for Continuous Access operation, to include designation of a Command Device.
The service representative must check the array for three CVS or single LDEV volumes configured to the Fibre Channel port for the local host node. The CVS or single LDEV volumes must not be included as part of the cluster disk resources. Additionally, the volumes must not be assigned drive letters. If the installation program reports it is unable to locate a supported Fibre Channel host bus adapter or disk array, ensure that those required devices are properly installed, and drivers are loaded and visible to the Windows device manager. Then restart the installation process.

Installing Cluster Extension XP in Microsoft Cluster Service environments 115
Problem The server cannot detect the quorum disk, although the cluster node owns the cluster group.
Solution If the server is accessed from Terminal Services, Windows Explorer is not always properly refreshed. From Disk Management in MMC, the disk is visible and includes the volume label and drive letter; however, the disk Properties indicates a disk capacity of 0 bytes. Resetting the Terminal Services session and re-establishing the connection sometimes resolves this problem. If not, use the primary console to continue administration of the node.
Problem The installation program reports that it is unable to locate a supported Fibre Channel host bus adapter or disk array.
Solution (HP service
representative only)
Check the disk array for three CVS or single LDEV volumes configured to the Fibre Channel port for the local host node. The CVS or single LDEV volumes must not be included as part of the cluster disk resources. Additionally, the volumes must not be assigned drive letters. Ensure that these required devices are properly installed and that drivers are loaded and visible to the Windows device manager. Then restart the installation process.

116 HP StorageWorks Cluster Extension XP Installation Guide
Installing Cluster Extension XP resource types
This procedure installs the following Cluster Extension XP components:• resource DLL clxmscs.dll• cluster administrator extension DLL clxmscsex.dll• pair/resync monitor components clxchkd and clxchkmon• RAID Manager XP service clxraidmgr• clxrun command line interface • additional components
Caution Cluster Extension XP adds a resource type DLL to the Microsoft Cluster Service. The association with this resource type DLL is lost during deinstallation of the cluster software. Every new installation, removal, or reinstallation of the Microsoft Cluster Service requires running Repair for the Cluster Extension XP "Cluster resource type" setup program.
1. Specify the RAID Manager XP instances used for Cluster Extension XP resources that will be started and monitored by the RAID Manager XP Service.

Installing Cluster Extension XP in Microsoft Cluster Service environments 117
Example
2. Enter the password for the user name used to run this service. Use the same password as for the Cluster administrator user.
3. Verify that the RAID Manager XP instances are started. If there is a problem starting the RAID Manager service, you will be instructed to manually start it from the Services panel in the MMC.
If problems persist, examine the horcmX.conf file in the system root directory, or reconfigure existing instances by selecting New in the RAID Manager XP Instance dialog box (see step 1 above) and enter an existing instance number.
4. Check whether your Microsoft cluster offers the new resource type “Cluster Extension XP.”
You can register the resource DLL and cluster extension (GUI) DLL manually if the resource type “Cluster Extension XP” is not available. For instructions, see “Registering the Cluster Extension XP resource manually” (page 121).

118 HP StorageWorks Cluster Extension XP Installation Guide
Configuring Cluster Extension XP resources
The default configuration can be modified to fit your Microsoft Cluster Service and disk array environment. Before configuring the Cluster Extension XP resource, review the Microsoft Cluster Service resource properties of the Cluster Extension XP resource type.
Related information For information about resources and to change the default settings, see HP StorageWorks Cluster Extension XP: User’s Guide.

Installing Cluster Extension XP in Microsoft Cluster Service environments 119
RAID Manager XP startup at system boot
To enable RAID Manager XP instances to be started at system boot, specify the instance numbers during the Cluster Extension XP installation process.
If you need to change the instance number later, run Repair from the setup Maintenance window, or edit the RaidManager Instances value in the Windows Registry:
1. Click Start.2. Click Run.3. Enter regedit in the “Open:” box.4. Open the Parameter folder in the following path:
HKEY_LOCAL_MACHINE\SYSTEM\CurrentControlSet\Services\RdMgrXPSvc
5. Click on the RaidManager Instances parameter and select “Modify” from the Edit menu.
6. Enter/change the instance numbers in the “Value data” box.
Several instances can be entered, separated by spaces.
Example
7. Click OK.
8. Restart the RAID Manager XP Service.

120 HP StorageWorks Cluster Extension XP Installation Guide
Pair/resync monitor configuration
The pair/resync monitor verifies whether the requesting server is allowed to access information in the pair/resync monitor.
Remote access hosts file
The names of the remote systems must be configured in a remote access hosts file:
clxhosts.txt
By default this file is located in the following directory:
C:\Program Files\Hewlett-Packard\Cluster Extension XP\conf\
This file is automatically generated. The access file is formatted with one host name per line. Blank or empty lines are ignored. Comments in the file are not supported.
Configuring the port for the pair/resync monitor remote communications
The services file must contain the port entries for the pair/resync monitor.
The services file is located in the following directory:
%SystemRoot%\system32\drivers\etc
The user must choose a port and add the following entry:
clxmonitor nnnnn/tcp
where nnnnn is the chosen port number.

Installing Cluster Extension XP in Microsoft Cluster Service environments 121
Registering the Cluster Extension XP resource manually
The following commands can be executed from the Microsoft Cluster Service command line to register the Cluster Extension XP resource manually when a problem has occurred during installation.
1. Check whether the Cluster Extension XP resource type is registered with Microsoft Cluster Service:
\cd %SystemRoot%\system32 cluster resourcetype
2. Register the Cluster Extension XP resource type with Microsoft Cluster Service:
cluster resourcetype "Cluster Extension XP" /CREATE /DLLNAME:clxmscs.dll /TYPE:"Cluster Extension XP"
3. Check whether the Cluster Extension XP cluster extension DLL is registered with Microsoft Cluster Service to provide the Microsoft Cluster Service Cluster Administrator GUI functionality:
cluster resourcetype "Cluster Extension XP" /PROPERTIES
4. Register the Cluster Extension XP cluster extension DLL with Microsoft Cluster Service:
cluster /REGADMINEXT: "clxmscsex.dll"

122 HP StorageWorks Cluster Extension XP Installation Guide
Maintenance and repair of Cluster Extension XP
Any time the installation program is run after one or more product components are installed, it starts up in a Maintenance mode. In this mode, the user can optionally add or remove individual components, repair or update installed components, or remove all components of Cluster Extension XP. Use the Setup Maintenance screen to make installation changes.
Modify function
Selecting Modify from the Maintenance dialog box allows you to add or remove Cluster Extension XP components by checking or clearing the check box associated with each component. Only those components with a checked box will be installed; all other components will be removed.
If Cluster Extension XP resource type is already installed and there are no changes to the list of selected components, the Modify mode provides the opportunity to change the RAID Manager XP settings. However, the preferred method of updating RAID Manager XP is to use the Repair function. The Repair function is more complete and ensures that all requisite files and registry settings are in place.
Repair function
Selecting Repair from the Maintenance dialog box initiates a search for installed components, and then reinstalls them without having to uninstall them first. The Repair function enables changes to component configurations to be made easily, in most instances, without disrupting the cluster service.
For the Cluster Extension XP resource type, Repair allows the user to select instances of RAID Manager XP from a list of detected configurations. The user can also create new instance configurations and then add the newly created instances to the list of instances to be installed. This feature also allows the user to overwrite an existing configuration by choosing to create

Installing Cluster Extension XP in Microsoft Cluster Service environments 123
a new instance and then entering the instance number of the configuration to be replaced.
For the Cluster Extension XP quorum service, Repair allows the user to select a different command device and different control devices. Selecting the same devices used in a previous installation or repair refreshes the configuration settings on the local system and on the dispersed data center. Repair also provides the opportunity to add, modify, or remove Active Directory features for the quorum service.
Recommendation When making changes to the quorum or moving the quorum to a new disk, uninstall the quorum service, assign the quorum to a new disk, and then reinstall the quorum service.
After user-definable options are set, component files are recopied and the registry is refreshed with the new data. When making changes to the quorum service (especially when changing the quorum disk), the server must be rebooted afterwards. Otherwise, key components started at boot time will not be able to register or invoke the new configuration.
Tip Although you can change the logon password for Cluster Extension XP services during a Repair, it will not update the password for other services that use that same logon account, such as the cluster service. The preferred method is to change the password in the Logon Properties tab of the target service in the Services pane where all services affected by a password change can be easily accessed.
Remove function
Selecting Remove from the Maintenance dialog box will remove all Cluster Extension XP components. Before proceeding with any deinstallation, see “Removing the Cluster Extension XP resource type” (page 124) and “Removing the quorum service” (page 125).

124 HP StorageWorks Cluster Extension XP Installation Guide
Removing your Cluster Extension XP installation
Removing the Cluster Extension XP resource type
To remove the Cluster Extension XP resource type from the system, you must first remove the individual Cluster Extension XP resources. Refer to the Microsoft Cluster documentation for instructions about how to remove resources.
1. Before you can remove the Cluster Extension XP resource type from the system, first either stop the application groups or switch the applications groups that contain a Cluster Extension XP resource to another system.
2. Remove the node from the list of possible owners and from the node name list of the Cluster Extension XP resource.
3. Open the Add/Remove Programs utility from the Control Panel. Select HP StorageWorks Cluster Extension XP in the Change or Remove Programs pane. In the setup maintenance Welcome dialog, select Modify to remove only the resource type while leaving other components installed
4. Ensure that Cluster Resource Type is not checked, then click [Next]. Select Remove to remove all Cluster Extension XP components. For more information, see “Maintenance and repair of Cluster Extension XP” (page 122).
Disabling the Cluster Extension XP resource DLL
Before you can disable the resource DLL, you must first stop the resource group or switch the resource group to another system.
To remove the Cluster Extension XP resource from the cluster group:
1. Confirm whether the resource group is online or offline.

Installing Cluster Extension XP in Microsoft Cluster Service environments 125
2. If the resource group has been taken offline, you can remove the Cluster Extension XP resource from the resource group.
If the resource group is online, take the resource group offline or switch the resource group with the following command from the Microsoft Cluster Service command line:
cluster group resource_group
cluster group resource_group /moveto: system_name
cluster group resource_group
or:
cluster group resource_group /offline
cluster group resource_group
Related information For information about how to remove a resource, see HP StorageWorks Cluster Extension XP: User’s Guide.
Removing the quorum service
To remove the quorum service on one or more host nodes, first move the cluster group to another host node. If deactivating the cluster at one site, begin the uninstall on servers at that site.
1. Open the Add/Remove Programs utility from the Control Panel.
2. Select HP StorageWorks Cluster Extension XP in the Change or Remove Programs panel.
3. In the setup maintenance Welcome dialog, select Modify to remove only the quorum service while leaving other components installed
4. Ensure that Quorum Service is not checked, then click [Next].
5. Select Remove to remove all Cluster Extension XP components.
For more information, see “Maintenance and repair of Cluster Extension XP” (page 122).
Recommendation Remove the Cluster service or set the Cluster service's Startup type to Manual in the Services panel of the MMC. If this is not done and

126 HP StorageWorks Cluster Extension XP Installation Guide
Cluster service attempts to restart before the uninstall is completed, the Cluster service will fail with unpredictable results.
6. Reboot the server.
7. If removing the quorum service on all four host nodes, be sure that the site where you want to maintain the cluster is the same site that is the last to own the cluster group.

Installing Cluster Extension XP in Microsoft Cluster Service environments 127
Removing the Cluster Extension XP external arbitrator
Before removing the Cluster Extension XP external arbitrator from the system, you must
1. Stop the ClxQArb service in the Services window on the system hosting the arbitrator.
2. Open the Add/Remove Programs utility from the Control Panel. Select cluster extension xp external arbitrator in the Change or Remove Programs pane.
3. Select Remove to remove the external arbitrator.
4. For more information, see “Maintenance and repair of Cluster Extension XP” (page 122).
Caution During deinstallation, do not use the Modify or Repair functions of the Setup program. Always use Remove to deinstall the arbitrator.

128 HP StorageWorks Cluster Extension XP Installation Guide
Upgrading Cluster Extension XP
Upgrading Cluster Extension XP: offline upgrade
This is the recommended procedure for upgrading Cluster Extension XP. However, this procedure requires application downtime as it involves a complete uninstall and re-install of Cluster Extension XP. If this downtime is not acceptable, perform the procedure outlined in “Upgrading from Cluster Extension XP version 2.03.00 and later only: online upgrade” on page 129.
Note When upgrading from versions 2.02.00 and earlier, use only this procedure (offline upgrade).
Upgrading from Version 2.01.00 only
1. Cluster Extension XP 2.01.00 did not create a service dependency between ClxQSvc and Microsoft Cluster Service ClusSvc during installation. The dependency had to be added manually. When de-installing CLX 2.01.00, this dependency must be removed manually; otherwise the Cluster service will not start and the latest version of CLX will not be able to be installed. Additionally, the following error message displays:
Could not start the Cluster service on Local Computer. Error 1075: The dependency service does not exist or has been marked for deletion.
To manually remove the service dependency use the following command:
sc.exe config ClusSvc depend= ClusNet/RpcSs/W32Time/netman/WMI
The sc.exe program is provided with the Windows 2000/2003 Server Resource Kit.
2. Completely uninstall the previous version of Cluster Extension XP on all nodes. Refer to “Removing your Cluster Extension XP installation” on page 124 (or follow the uninstall procedures for your current Cluster Extension XP version.)

Installing Cluster Extension XP in Microsoft Cluster Service environments 129
Upgrading from version 2.02.00 and
earlier only
3. Using Disk Management, delete the partitions on the three Cluster Extension XP quorum service control devices and the RAID Manager Command devices. Do this on every node.
4. Install the new Cluster Extension XP version on all nodes. Refer to “Install Cluster Extension XP” on page 100.
Upgrading from Cluster Extension XP version 2.03.00 and later only: online upgrade
Use this upgrade procedure when minimal application downtime is necessary. If you are installing Cluster Extension XP for the first time, do not use this procedure. Refer to “Install Cluster Extension XP” on page 100.
The following steps assume that the quorum disk resource (Cluster Group) is online on the first node in the primary data center DC_A, which is the primary volume (PVOL) of the quorum disk pair. These steps also assume that the cluster group containing the quorum disk resource is called “Cluster Group”.
These assumptions simplify the upgrade procedure. However, the quorum disk resource can be online in either of the two data centers.
1. Open the Services window on all nodes in the cluster and pause the ClxQSvc service by right-clicking on the service name and selecting Pause.
2. Split the quorum disk pair and the S disk (status disk or control disk 1) pair using the pairsplit –S command.
3. Move the Cluster Group to the first node in DC_B.
This makes the Cluster Group temporarily unavailable.
Note: If the quorum disk resource (Cluster Group) is online on any node in the secondary data center (DC_B), ignore this step.
The next step may require application downtime.
4. Move all applications to any node(s) in DC_A. If applications are already running on node(s) in DC_A proceed to the next step.

130 HP StorageWorks Cluster Extension XP Installation Guide
5. Remove Cluster Extension XP’s cluster service resource type and quorum service from the first node in DC_B (the node that currently owns the Cluster Group) using the Change/Remove button of the Cluster Extension XP installation in the Add/Remove Programs window.
You do not need to remove the Cluster Extension XP resources from the cluster configuration in the Cluster Administrator window. Removing them may cause error messages when moving groups between the nodes later.
For any additional nodes in DC_B:
a. Move the Cluster Group to the current node.
b. Uninstall Cluster Extension XP’s cluster service resource type and quorum service.
This makes the cluster group temporarily unavailable.
6. Move the Cluster Group to the first node in DC_A.
This makes the Cluster Group temporarily unavailable.
7. Reboot the first node in DC_B.
If there are additional nodes in DC_B, reboot each node.
Note: At this point Cluster Extension XP has been uninstalled on all nodes in DC_B and each node in DC_B has been rebooted.
8. Move the Cluster Group to the first node in DC_B.
This makes the Cluster Group temporarily unavailable.
9. Install Cluster Extension XP’s cluster service resource type and quorum service.
For any additional nodes in DC_B:
a. Move the Cluster Group to the current node.
b. Install Cluster Extension XP’s cluster service resource type and quorum service.
(Windows 2000 only) If you use Terminal Services, in order to update all windows you must reset the Terminal Service session and create a new Terminal Services session before you can install Cluster Extension XP.

Installing Cluster Extension XP in Microsoft Cluster Service environments 131
Caution Do not create disk pairs during the installation of Cluster Extension XP. If disk pairs have been created, split the quorum disk and control disk 1 again with the pairsplit -S command.
10. Move the Cluster Group to the first node in DC_A.
This makes the Cluster Group temporarily unavailable.
11. Open the Services window on the first node in DC_A and resume the ClxQSvc service by right-clicking the service name and selecting Resume.
Cluster Extension XP quorum service recognizes that the quorum disk pair and the status disk pair are split and recovers the PAIR state.
Check the %WINDIR%\clxq.log file for quorum service self-recovery completion. You can also use the pairdisplay –fc command to check resynchronization progress.
12. Reboot the first node in DC_B.
If there are additional nodes in DC_B, reboot each node.
Note: At this point the latest version of Cluster Extension XP has been installed on all nodes in DC_B and each node in DC_B has been rebooted.
The next step requires application downtime.
13. Move all applications to any node in DC_B.
14. Remove Cluster Extension XP’s cluster service resource type and quorum service from the first node (node that owns the Cluster Group) in DC_A using the Change/Remove button of the Cluster Extension XP installation in the Add/Remove Programs window.
You do not need to remove the Cluster Extension XP resources from the cluster configuration in the Cluster Administrator window. Removing them may cause error messages when moving groups between the nodes later.
For any additional nodes in DC_A:
a. Move the Cluster Group to the current node.
b. Remove Cluster Extension XP’s cluster service resource type and quorum service.

132 HP StorageWorks Cluster Extension XP Installation Guide
15. Move the Cluster Group to the first node in DC_B.
This makes the Cluster Group temporarily unavailable
16. Reboot the first node in DC_A.
If there are additional nodes in DC_A, reboot each node.
Note: At this point Cluster Extension XP has been uninstalled on all of the nodes in DC_A and each node in DC_A has been rebooted.
17. Open the Services window on all nodes in DC_B and pause the ClxQSvc service by right-clicking the service name and selecting Pause.
18. Split the quorum disk pair and the S (status disk or control disk 1) pair using the pairsplit -S command.
19. Move the Cluster Group to the first node in DC_A.
This makes the Cluster Group temporarily unavailable.
20. Install Cluster Extension XP’s cluster service resource type and quorum service.
For any additional nodes in DC_A:
a. Move the Cluster Group to the current node.
b. Install Cluster Extension XP’s cluster service resource type and quorum service.
(Windows 2000 only) If you use Terminal Services, in order to update all windows you must reset the Terminal Service session and create a new Terminal Services session before you can install Cluster Extension XP.
Caution Do not create disk pairs during the installation of Cluster Extension XP. If disk pairs have been created, split the quorum disk and control disk 1 again with the pairsplit -S command.
21. Move the Cluster Group to the first node in DC_B.
This makes the Cluster Group temporarily unavailable

Installing Cluster Extension XP in Microsoft Cluster Service environments 133
22. Resume the ClxQSvc service on each node in DC_B by opening the Services window and right-clicking the service name and selecting Resume.
Cluster Extension XP quorum service recognizes that the quorum disk pair and the status disk pair are split and recovers the PAIR state.
Check the %WINDIR%\clxq.log file for quorum service self-recovery completion. You can also use the pairdisplay –fc command to check resynchronization progress.
23. Reboot the first node in DC_A.
If there are additional nodes in DC_A, reboot each node.
Note: At this point the latest version Cluster Extension XP has been installed on all nodes in DC_A and DC_B and each node has been rebooted.
24. Check the status of the disk pairs.
The quorum disk pair and the first Cluster Extension XP quorum service control disk pair (status) should be the primary volume (PVOL) in the data center where the Cluster Group is online.
The second and third quorum service control disk pairs should be in SMPL state.
25. To take advantage of the continuous availability provided by Cluster Extension XP, install the external arbitrator component on a system that is external to both data centers.
To test the quorum service, move the cluster group from one cluster node to the next. The data center where the cluster group is online should show the quorum disk pair and the first quorum service control disk pair as the primary volume (PVOL). If not, contact your HP representative for assistance.

134 HP StorageWorks Cluster Extension XP Installation Guide

Installing Cluster Extension XP in VCS environments 135
5Installing Cluster Extension XP in VCS
environments
Cluster Extension XP provides three standard installation packages for Sun Solaris. The HWPclxvcs package includes the Cluster Extension XP integration with VERITAS Cluster Server (VCS). The HWPclxgen package includes the Cluster Extension XP generic interface. The HPOvLic package includes the HP AutoPass licensing components. All three packages are bundled into a single data stream format package named HWPclxXP.pkg.

136 HP StorageWorks Cluster Extension XP Installation Guide
Prerequisites
The following tasks must be done prior to the installation and configuration of your Cluster Extension XP for VCS environment:
• Check “Installation prerequisites” on page 27
• Check supported software versions, patches, Fibre Channel HBA firmware, and driver versions.
• Install and configure RAID Manager XP for the desired operating system.
• Install and configure VERITAS Volume Manager (VxVM).
• Install and configure VERITAS Cluster Server.
• Install and configure JRE (Java Runtime Environment) 1.3 or later.
Supported versions
Cluster Extension XP supports
• VCS 3.5 on Solaris 7 and Solaris 8 and Solaris 9
• VCS 4.0 on Solaris 9
Recommendation Review the latest documentation and release notes for each of the above products.
RAID Manager XP instances
RAID Manager XP is available as a cpio archive and must be installed on each clustered system.
The RAID Manager XP instance numbers used for the Cluster Extension XP resource must be the same among all systems for which the resource is configured.

Installing Cluster Extension XP in VCS environments 137
Several RAID Manager XP instances can be configured. If specified, the Cluster Extension XP resource will use the alternative instance when an instance becomes unavailable.
The RAID Manager XP instances should be running at all times to provide the fastest failover capability. Cluster Extension XP provides a script to include the RAID Manager XP instance startup in the system boot process.
Recommendation For rolling disaster protection, use the same RAID Manager XP instances to manage the BC pairs.
RAID Manager XP device groups
One device group must be configured for each service group’s disk set. This disk set must include all disks of the disk groups used for the entire highly available application. A device group can contain several disk groups.
Rolling disaster protection
For rolling disaster protection, create the BC disk pair with the no_read option to hide it from the disk management layer.

138 HP StorageWorks Cluster Extension XP Installation Guide
RAID Manager XP startup
To enable RAID Manager XP instances to be started at system boot time, configure the /etc/init.d/raidmgr file.
Example The following example enables instances 11 and 22.#! /usr/bin/ksh # Copyright 2000 Hewlett-Packard, All Rights Reserved. # Generic init script for RAID Manager XP provided with Cluster # Extension XP #
# Note that there are two methods by which we can start # RAID Manager XP at boot time. # The default method is to look for files of the form # /etc/horcm<instance number>.conf # and thus determine the instance numbers. # # However, we recommend to statically define the instances which need # to be started, then uncomment and edit the following line: # RAIDMGR_INSTANCES="11 22"
VERITAS Volume Manager configurationThe shared data disks residing on the XP disk array, are mirrored to the remote data center using Continuous Access XP. To access the mirrored disks in read/write mode, the primary disk (P-VOL) of the mirrored disk pair must be in the local (currently active) data center. To make the disk (S-VOL) accessible to the remote system, switch the personalities of the disks:
• Create disk groups, logical volumes and file systems on the primary system for all service groups.
• Use the RAID Manager XP horctakeover command to switch the RAID Manager XP device groups from site A to site B in order to make the shared disks accessible.
• Import disk groups, and logical volumes and file systems on the remote systems after creating the mount points on each system.
• Make sure that the volume groups are not automatically activated at system boot time.
• Do not configure the VxVM rootdg on Continuous Access XP disk pairs.
• Configure Dynamic Multi Pathing.

Installing Cluster Extension XP in VCS environments 139
Installing Cluster Extension XP
On a UNIX system:
1. Log in as root.
2. Download the installation package to a temporary directory on your system.
3. Uncompress and extract the install package to the hpclxxp sub-directory (created during extraction).
4. Change directory to the hpclxxp directory.
5. Type the following command to install the Cluster Extension XP agent:
Sun Solaris #pkgadd –d HWPclxXP.pkg
The pkgadd program displays the packages available in the HWPclxXP.pkg bundle and prompts you to select the package(s) you wish to install. Type “all” to install all packages or select individual packages.
If you choose to install individual packages, the HPOvLic package is a prerequisite for the Cluster Extension XP packages and must be installed before you install the Cluster Extension XP packages.
6. After the installation is complete, follow the instructions in Chapter 2 “Cluster Extension XP licensing” on page 33 to retrieve and install the necessary licenses for Cluster Extension XP packages.
Repeat the preceding steps on each system that will run the Cluster Extension XP resource in the cluster.

140 HP StorageWorks Cluster Extension XP Installation Guide
Pair/resync monitor configuration
The pair/resync monitor checks whether the requesting server is allowed to have access to the pair/resync monitor.
Remote access hosts file
The names of the remote systems must be configured in a remote access hosts file:
clxhosts
By default this file is located in the following directory:
/etc/opt/hpclx/conf
The access file is formatted with one host name per line. Blank or empty lines are ignored. Comments in the file are not supported.
Configuring the port for the pair/resync monitor remote communications
The services file must contain the port entries for the pair/resync monitor.
The services file is located in the following directory:
/etc/services
The user must choose a port and add the following entry:
clxmonitor nnnnn/tcp
where nnnnn is the chosen port number.

Installing Cluster Extension XP in VCS environments 141
Log level reporting
The default setting for the pair/resync monitor's log facility is log level WARNING in the syslog. Solaris does not log warning messages to syslog by default.
To be able to receive messages from the pair/resync monitor in case of Continuous Access XP link failures, you must add the following line to the /etc/syslog.conf file:
user.warning /var/adm/messages
This line ensures that you will be notified of Continuous Access XP link failures if you use the pair/resync monitor.

142 HP StorageWorks Cluster Extension XP Installation Guide
Including the Cluster Extension resource type
To include the Cluster Extension XP agent in the VCS cluster:
1. Log in to the system as root.
2. Copy the Cluster Extension XP types configuration file.
VCS 1.3.0 and later offers the convenient feature to import resource types from the VCS Cluster Manager GUI.
$VCS_CONF/sample_hpclx/ClusterExtensionXPTypes.cf
to:
$VCS_CONF/config/ClusterExtensionXPTypes.cf

Installing Cluster Extension XP in VCS environments 143
To import the Cluster Extension XP types configuration file from the VCS Cluster Manager GUI while the cluster is running:
1. Using Cluster Explorer, choose File from the menu.
2. Choose Import from the File menu.
3. Enter the path to the Cluster Extension XP types configuration file (/etc/VRTSvcs/conf/sample_hpclx) in the Look In box.
4. Select ClusterExtensionXPTypes.cf and click Import.
5. Edit the configuration file $VCS_CONF/config/main.cf to include the following line:
include ClusterExtensionXPTypes.cf

144 HP StorageWorks Cluster Extension XP Installation Guide
Changing the default agent configuration
To change Cluster Extension XP resource attributes, take the resource offline. Changing an attribute of the Cluster Extension XP resource while the resource is running is not supported.
Related information To change the default attribute setting, and to enable the pair/resync monitor, see HP StorageWorks Cluster Extension XP: User’s Guide.

Installing Cluster Extension XP in VCS environments 145
Disabling the Cluster Extension XP agent
Before you can disable the agent, you must first stop the service group or switch the service group to another system.
To remove the Cluster Extension XP resource from the service group, you must confirm whether the service group is online.
• If the service group is online, take the service group offline or switch the service group with the following command from the VCS command line:#hagrp –state service_group –sys system_name
#hagrp –switch service_group –to system_name
or#hagrp –offline service_group –sys system_name
• If the service group is offline, you can remove the Cluster Extension XP resource from the service group.
Related information To remove the resource, see HP StorageWorks Cluster Extension XP: User’s Guide.

146 HP StorageWorks Cluster Extension XP Installation Guide
Removing Cluster Extension XP
The following command will remove Cluster Extension XP from the system.
Sun Solaris (for VCS)
#pkgrm HWPclxvcs
(for generic interface)
#pkgrm HWPclxgen
Removing the HP AutoPass License Components
If there are no other package dependencies on the HPOvLic package, the HPOvLic package can be removed from the system with the following command:
Sun Solaris #pkgrm HPOvLic

Installing Cluster Extension XP in VCS environments 147
Upgrading Cluster Extension XP
The ClusterExtensionXP agent for VCS can be upgraded while the cluster is running.
If you are installing Cluster Extension XP for the first time, this section is not applicable.
Recommendation Stop the cluster on the node to be upgraded before starting the upgrade process.
To upgrade Cluster Extension XP:
1. Move the ClusterExtensionXP resources to another cluster system, or stop the ClusterExtensionXP resources.
2. Stop the ClusterExtensionXP agent with the following command:
haagent –stop ClusterExtensionXP
3. Check the engine_A.log for details.
4. Deinstall Cluster Extension XP and install the new version of Cluster Extension XP.
If the Cluster Extension XP command line interface (clxrun) is used, make sure that all associated resources that were previously online are offline after clxrun has run.
Then, deinstall Cluster Extension XP Generic Interface and install the new version of Cluster Extension XP.

148 HP StorageWorks Cluster Extension XP Installation Guide

Installing Cluster Extension XP in Serviceguard for Linux environments 149
6Installing Cluster Extension XP in
Serviceguard for Linux environments
Cluster Extension XP provides a standard RPM installation package for Linux. The package includes the Cluster Extension XP integration with Serviceguard for Linux (SG-LX) as well as the Cluster Extension XP command line interface (CLI).

150 HP StorageWorks Cluster Extension XP Installation Guide
Prerequisites
The following tasks must be done prior to the installation and configuration of your Cluster Extension XP for SG-LX environment:
• Check “Installation prerequisites” (page 27)
• Check supported software versions, patches, Fibre Channel HBA firmware, and SCSI/FC HBA driver versions.
• (Optional) Install and configure Auto Path XP to enable Alternative Pathing and Load balancing for Linux.
• Install and configure HP StorageWorks RAID Manager XP for the desired operating system.
• Install and configure Logical Volume Manager.
• Install and configure Serviceguard on Linux.
For the latest version, see the HP software depot:
www.software.hp.com → High availability
Supported versions
Cluster Extension XP supports these product versions:
• Serviceguard for Linux 11.16A (B9903BA or T1521A) with Linux Disaster Recovery Data Replication Enabler (T1858AA)
• Serviceguard for Linux 11.16A includes the Linux Disaster Recovery Data Replication Enabler by default. (Installation of T1858AA is not required.)
• Cluster Extension XP supports the same Linux distributions supported by Serviceguard.
HP StorageWorks Secure Path
Secure Path is available for Linux.

Installing Cluster Extension XP in Serviceguard for Linux environments 151
Secure Path creates virtual device files (/dev/APx) for redundant /dev/sdx devices. Those /dev/APx devices must be used when creating volume groups to take advantage of the load balancing and path failover feature.
Secure Path provides the discovery option to create /dev/APx devices. To create volume groups with virtual devices you must install the LVM version provided with Secure Path.
Secure Path must be installed on all cluster systems.
RAID Manager XP instances
HP StorageWorks RAID Manager XP is available as a cpio archive and must be installed on each clustered system.
The RAID Manager XP instance numbers used for the Cluster Extension XP resource must be the same among all systems for which the SG-LX package is configured.
Several RAID Manager XP instances can be configured. If specified, the Cluster Extension XP resource uses the alternative instance when an instance becomes unavailable.
The RAID Manager XP instances should be running at all times to provide the fastest failover capability. Cluster Extension XP provides a script to include the RAID Manager XP instance startup in the system boot process.
Recommendation For rolling disaster protection, use the same RAID Manager XP instances to manage the BC pairs.
RAID Manager XP device groups
One device group must be configured for each SG-LX package’s disk set. This disk set must include all disks of the volume groups used for the entire highly available application. A device group can contain several volume groups.

152 HP StorageWorks Cluster Extension XP Installation Guide
Rolling disaster protection
For rolling disaster protection, create the BC disk pair with the no_read option to hide it from the disk management layer.
RAID Manager XP startup
To enable RAID Manager XP instances to be started at system boot time, configure the /etc/init.d/raidmgr file.
Example The following example enables instances 11 and 22.
# Generic init script for RAID Manager XP provided with Cluster Extension XP # # Note that there are two methods by which we can start # RAID Manager XP at boot time. # The default method is to look for files of the form # /etc/horcm<instance number>.conf # and thus determine the instance numbers. # # However, we recommend to statically define the instances which need to be # started, then uncomment and edit the following line: # RAIDMGR_INSTANCES="11 22" ...
Logical Volume Manager configuration
The shared data disks reside on the disk array, which are mirrored to the remote data center using Continuous Access XP. To access the mirrored disks in read/write mode, the primary disk (P-VOL) of the mirrored disk pair must be in the local (currently active) data center. To make the disk

Installing Cluster Extension XP in Serviceguard for Linux environments 153
(S-VOL) accessible to the remote system, switch the personalities of the disks:
• Create volume groups, logical volumes and file systems on the primary system for all packages.
• Use the RAID Manager XP horctakeover command to switch the RAID Manager XP device groups from site A to site B in order to make the shared disks accessible.
• Import volume groups and logical volumes on the remote systems after creating the mount points on each system. (vgscan).
• Make sure that the volume groups are not automatically activated at system boot time.
• Configure Alternative Pathing and Load Balancing for redundant FC HBAs provided with Auto Path XP (requires LVM provided with Auto Path XP).

154 HP StorageWorks Cluster Extension XP Installation Guide
Installing Cluster Extension XP
On a Linux system:
1. Log in as root.
2. Download the installation program to a temporary directory on your system.
3. Uncompress and extract the install program to the hpclxxp directory (created during extraction).
4. Change directory to the hpclxxp directory.
5. If a prior version of Cluster Extension XP for SG-LX is not installed, type:
#rpm –ivh clx-2.06.00-0.i386.rpm
If an older version of Cluster Extension for SG-LX is currently present on the system, type:
#rpm –Uvh clx-2.06.00-0.i386.rpm
6. Add the following line to your root profile:
PATH=$PATH:/opt/hpclx/bin
7. After installation read the /opt/hpclx/README file.
Repeat steps 1 to 7 on each system that will run a SG-LX package with Cluster Extension XP.

Installing Cluster Extension XP in Serviceguard for Linux environments 155
Pair/resync monitor configuration
The pair/resync monitor checks whether the requesting server is allowed to have access to the pair/resync monitor.
Remote access hosts file
The names of the remote systems must be configured in a remote access hosts file:
clxhosts
By default this file is located in the following directory:
/etc/opt/hpclx/conf
The access file is formatted with one host name per line. Blank or empty lines are ignored. Comments in the file are not supported.
Configuring the port for the pair/resync monitor remote communications
The services file must contain the port entries for the pair/resync monitor.
The services file is located in the following directory:
/etc/services
The user must choose a port and add the following entry:
clxmonitor nnnnn/tcp
where nnnnn is the chosen port number.

156 HP StorageWorks Cluster Extension XP Installation Guide
Including Cluster Extension XP in a Serviceguard package
The default Serviceguard configuration can be modified to fit your cluster and disk array environment. Before configuring the Cluster Extension XP integration, review the Cluster Extension XP objects in the user configuration file package_name_clx.env file.
Then, set the DATA_REP parameter in the package control script from none to clx.
Related information For detailed information about how to configure Cluster Extension XP for integration with Serviceguard, see HP StorageWorks Cluster Extension XP: User’s Guide.

Installing Cluster Extension XP in Serviceguard for Linux environments 157
Removing Cluster Extension XP
Before you remove Cluster Extension XP from the system, ensure that no package has the DATA_REP set parameter set to CLX. Change this parameter to NONE. Also ensure that the package is configured to run only on nodes in one data center with the primary volumes (PVOLs).
The following command removes Cluster Extension XP from the system.
#rpm –ev clx

158 HP StorageWorks Cluster Extension XP Installation Guide
Upgrading Cluster Extension XP for Serviceguard for Linux
The Cluster Extension XP software for Serviceguard can be upgraded while the cluster is running. However, it is recommended that the cluster on the node to be upgraded is stopped before starting the upgrade process.
If you are installing Cluster Extension XP for the first time, this section is not applicable.
In order to upgrade Cluster Extension XP, follow these steps:
1. Move all the Serviceguard packages using Cluster Extension XP to another cluster system or stop the packages that use Cluster Extension XP.
2. Deinstall Cluster Extension XP and install the new version of Cluster Extension XP.
If the Cluster Extension XP command line interface (clxrun) is used, make sure that all associated resources are offline which were previously onlined, after clxrun has run.
Then, deinstall Cluster Extension XP Generic Interface and install the new version of Cluster Extension XP as described in “Installing Cluster Extension XP” (page 154).

Glossary 159
Glossary
BC HP StorageWorks Business Copy XP. BC lets you maintain up to nine local copies of logical volumes on the disk array.
CA HP StorageWorks Continuous Access XP. CA lets you create and maintain duplicate copies of local logical volumes on a remote disk array.
CLI Command line interface.
Command View (CVXP)
HP StorageWorks Command View XP, a software product for managing XP arrays. Command View runs on a Windows-based management workstation.
Command View XP Advanced Edition (CVXP AE)
HP StorageWorks Command View XP Advanced Edition, installs on the user-provided Device Manager server and provides a browser-based platform from which you can manage the XP family of disk arrays—even globally distributed arrays.
command device A volume on the disk array that accepts Continuous Access or Business Copy control operations which are then executed by the disk array.
CU Control Unit. Contains LDEVs and is approximately equivalent to SCSI Target ID.
CVS Custom volume size. CVS devices (OPEN-x CVS) are custom volumes configured using array management software to be smaller than normal fixed-size OPEN system volumes. Synonymous with volume size customization (VSC).
DWDM Dense wavelength division multiplexing.

160 HP StorageWorks Cluster Extension XP Installation Guide
emulation modes The logical devices (LDEVs) associated with each RAID group are assigned an emulation mode that makes them operate like OPEN system disk drives. The emulation mode determines the size of an LDEV:
OPEN-3: 2.46 GB OPEN-8: 7.38 GB OPEN-9: 7.42 GB OPEN-E: 13.56 GB OPEN-L: 36 GBOPEN-V: User-defined custom size
failover Disconnecting a failed unit or path and replacing it with an alternative unit or path in order to continue functioning.
FC Fibre Channel.
fence level A level for selecting rejection of a write I/O request from the host according to the condition of mirroring consistency.
GUID Globally Unique Identifier.
HACMP IBM High Availability Cluster Multi-Processing for AIX software.
HBA Host bus adapter.
heartbeat A periodic synchronization signal issued by cluster software or hardware to indicate that a node is an active member of the cluster.
LDEV Logical device. An LDEV is created when a RAID group is carved into pieces according to the selected host emulation mode (that is, OPEN-3, OPEN-8, OPEN-L). The number of resulting LDEVs depends on the selected emulation mode. The term LDEV is often used synonymously with the term volume.
LUN Logical unit number. A LUN results from mapping a SCSI logical unit number, port ID, and LDEV ID to a RAID group. The size of the LUN is determined by the emulation mode of the LDEV and the number of LDEVs associated with the LUN. For example, a LUN associated with two OPEN-3 LDEVs has a size of 4,693 MB.
LUSE A LUN is normally associated with only a single LDEV. The LUSE feature allows a LUN to be associated with 1 to 36 LDEVs. Essentially, LUSE makes

Glossary 161
it possible for applications to access a single large pool of storage. The LUSE feature is available when the HP StorageWorks LUN Configuration Manager product is installed.
MMC Microsoft Management Console.
OPEN-x A general term describing any one of the supported OPEN emulation modes (for example, OPEN-L).
OV-SAM HP OpenView Storage Area Manager.
port A physical connection that allows data to pass between a host and the disk array. The number of ports on an XP disk array depends on the number of supported I/O slots and the number of ports available per I/O adapter. The XP family of disk arrays supports Fibre Channel (FC) ports as well as other port types. Ports are named by port group and port letter, such as CL1-A. CL1 is the group, and A is the port letter.
primary site Data center location that owns the Cluster Group (quorum resource).
quorum In Microsoft Cluster Service, a cluster resource that has been configured to control the cluster, maintaining essential cluster data and recovery information. In the event of a node failure, the quorum acts as a tie-breaker and is transferred to a surviving node to ensure that data remains consistent within the cluster.
RAID Redundant array of independent disks.
Remote Web Console (RWC)
HP StorageWorks XP Remote Web Console. A browser-based program installed on the SVP that allows you to configure and manage the disk array.
RPM Red Hat package manager.
SCSI Small computer system interface.
secondary site Data center location with the mirror copy of the quorum disk pair.
SG-LX Serviceguard for Linux.
SIM Service information message.
SMS System managed storage.
SNMP Simple Network Management Protocol.

162 HP StorageWorks Cluster Extension XP Installation Guide
“split-brain” syndrome
A state of data corruption can occur if a cluster is reformed as subclusters of nodes at each site, and each subcluster assumes authority, starting the same set of applications and modifying the same data.
SVP Service processor. A notebook computer built into the disk array. The SVP provides a direct interface to the disk array and is used only by the HP service representative.
TB Terabytes.
TID Target ID.
VCS VERITAS Cluster Server.
Volume On the XP array, a volume is a uniquely identified virtual storage device composed of a control unit (CU) component and a logical device (LDEV) component separated by a colon. For example 00:00 and 01:00 are two uniquely identified volumes; one is identified as CU = 00 and LDEV = 00, and the other as CU = 01 and LDEV = 00; they are two unique separate virtual storage devices within the XP array.
VSC Volume size customization. Synonymous with CVS.
WWN World Wide Name. A unique identifier assigned to a Fibre Channel device.

Index 163
Index
Aagent
default 144default configuration 144disabling 145
authorized resellers 13autopass command line utility 67AutoPass license program 35
Bbackup license file 61
Ccautions
disk pairs 131, 132installing quorum service 102removing Cluster Extension XP 79
clxautopass command line utility 67configuration
consolidated site 25one to one 23
Ddocumentation
related products 11
EEntitlement Certificate 34evaluation license 59
evaluation license extension 35
Ffiles
clxhosts 77services 77
firmware requirementsXP disk arrays 29
HHP
storage website 13technical support 12
HP StorageWorks Auto Path XPIBM AIX with HACMP 70MC/SG environment 150
HP StorageWorks Cluster Extension XPconfigurations 22HACMP environments 75installation prerequisites 27installing 21removing (HACMP) 79removing (MC/SG) 157removing (VCS) 146supported features 29UNIX installations 139

164 HP StorageWorks Cluster Extension XP Installation Guide
HP StorageWorks RAID Manager XPconfiguring (HACMP environment) 72device group configuration (HACMP) 71device groups (MC/SG environment) 151device groups (VCS) 137installing (HACMP environment) 71instances (MC/SG environment) 151instances (VCS) 136Microsoft Cluster Service requirements 90startup (HACMP) 71
HP StorageWorks Secure Path 89
IIBM HACMP
installation of Cluster Extension XP 69setting up 74
installationHACMP environment 69MC/SG environment 154Microsoft Cluster Service environment 81VCS environment 135
Instant On license 34
Llicense
60-day Instant On 34backup 61evaluation extension 35, 59importing a key 53key recovery 66key removal 64keys by e-mail or fax 46keys over the Internet 37permanent key 34report 60retrieving key 35
licensing 33Linux environment
Cluster Extension XP for MC/SG 149
LVMconfiguration (HACMP) 74configuration (MC/SG) 152
MMC/Serviceguard (MC/SG)
integration of Cluster Extension XP 156integration with Cluster Extension XP 149
Microsoft Cluster Serviceintegration with Cluster Extension XP 81
Ppair/resync monitor 30
configuration 120configuring for HACMP 77configuring for MC/Serviceguard 155configuring for Microsoft Cluster
Service 120configuring for VCS 140
permanent license key 34prerequisites
HACMP 70MC/SG 150Microsoft Cluster Service 88VCS 136
Qquorum disk
Microsoft Cluster Service configuration 83quorum service
data center preparation 93MSCS environment 31

Index 165
Rrecommendations
changing the quorum 123rolling disaster protection (HACMP) 71rolling disaster protection (MC/SG) 151rolling disaster protection (MSCS) 90rolling disaster protection (VCS) 137stopping the cluster before upgrading 80
recover license key 66related information 11remove license key 64report license key 60resellers, authorized 13resource
configuring Cluster Extension XP 118disabling Cluster Extension XP DLL 124
retrieving license keys 35rolling disaster protection
BC disk pair creation (HACMP) 71BC disk pair creation (MC/SG) 152BC disk pair creation (MSCS) 91BC disk pair creation (VCS) 137installation 31recommendation (HACMP) 71recommendation (MC/SG) 151recommendation (MSCS) 90recommendation (VCS) 137
Ssystem administrator, required knowledge 10
Ttechnical support 12terminology
cluster software 15tips
changing the logon password 123
Uupgrading
HACMP environment 80MC/Serviceguard environment 158Microsoft Cluster Service environment 128VCS environment 147
VVERITAS Cluster Server (VCS)
integration of Cluster Extension XP 135
Wwarranty 18websites
HP storage 13
XXP disk arrays
firmware requirements 29

166 HP StorageWorks Cluster Extension XP Installation Guide