hp notebook formatting guide
DESCRIPTION
HP Notebook guideTRANSCRIPT
Author's Notes
I would like to take this opportunity to apologise on my behalf for taking so long in releasing this guide.
I know there is no reason for me to do it and I won’t get paid for releasing it but I have broken a
promise I made some time ago to others on this site. I have been besotted by problems that not only
hinder me physically but also mentally as well. I know it is not much of an excuse so again I apologise
for this.
The last six months have been a blur to me where I was just a shell of my former self, a person who
has lost his sense of direction and dedication. Only now, am I slowly beginning to return to where I was
before and my life has come to some semblance that resembles normality. Hopefully, by posting this
guide, it is the beginning of a small spark that will help me finish a journey long delayed in my life.
Again, I apologise for the delay and hope that in time this guide will benefit you in the long run, just as
it has benefitted me by putting me on the right path again.
Version 1.0: First guide posted
Introduction
As of the year 2006, HP does not provide any OS CD's with every purchase of a new notebook. Instead,
they provide a recovery partition that restores your notebook to a factory state if you wish to have a
problem removed. Unfortunately, this will also restore all the unnecessary programs that will practically
slow down your computer to a point where it becomes unusable. Now you must be wondering, what's
so hard about it when you could just use your own copy of Windows and format the notebook with it?
This is not an issue when using a different Windows XP CD to format and install the OS on an AMD
powered notebook. However, with an Intel powered notebook, installation using a Windows XP CD
which is not certified by HP will be met with an error during the installation process. This is due to the
Intel SATA AHCI Controller Driver as the driver does not exist in the Windows XP installation CD.
Windows Vista, which is the latest operating system from Microsoft, has the driver in its database but
considering that Windows Vista hasn't been released yet, this is a moot point.
HP does provide the necessary OS CD that does not bring up the driver errors and will ship it to you if
requested. Unfortunately, this will incur additional charges of at least $10. Considering that it should
already be included with your new purchase, this is hardly something that can be tolerated. This is very
much a pity considering that HP is now the number 1 manufacturer in the world and their notebooks
have a very aesthetic and pleasing design that is not too far behind Apple.
I am however going to try and change all that by providing this guide on how you could format your
notebook by using your own copy of Windows and the necessary steps needed to ensure a successful
reinstallation. I will also provide the necessary steps on how to reinstall HP QuickPlay onto its respective
partition. For those of you who do not know, HP QuickPlay is a media front-end that allows you to play
music, videos and DVD's without booting into Windows.
The guide will be based on the HP Pavilion dv5000t but will also work with the HP Pavilion dv2000t,

dv6000t, dv8000t and dv9000t with only a few differences otherwise. The only Compaq notebook that
is applicable with this guide is the Compaq Presario v3000t and only covers the reinstallation part, not
HP QuickPlay. For AMD powered notebooks, the relevant points applicable with this guide are the HP
QuickPlay partition and installation process. If you however find otherwise, please contact me so I can
make the necessary changes to the guide.
Methods Available
Before we begin, you will need to ensure that you have everything you need to make your installation
successful and back up all the necessary files. If you haven't done so, burn the Recovery Disks and
place them in a safe place. BACK UP your SWSETUP folder which includes all the necessary drivers for
your notebook plus a few extras (such as wallpapers located in the Brandit folder).
There are 3 methods available to install the Intel SATA AHCI Controller Driver that is necessary for the
installation of Windows to be successful. I will however only show you two as the third method is much
harder to understand and would require a lot of experience and knowledge for it to be successful. Here
is a list of what we need for both methods:
First Method
• Windows XP Installation CD
• USB External Floppy Drive
• Empty floppy disk
• Installation drivers (SWSETUP folder and/or HP Online Downloads)
Second Method
• Windows XP Installation CD
• nLite (to integrate SATA driver into Windows installation CD)
• Microsoft .NET Framework 2.0 (for nLite to run)
• Empty CD-R
• Installation drivers (SWSETUP folder and/or HP Online Downloads)
Necessary Drivers & Patches
Although there are many drivers and applications listed in the SWSETUP folder, only a few are essential
to your installation. Here are most of the basic drivers needed for your notebook to run smoothly, which
is according to my notebook, the HP Pavilion dv5000t:
• 1UAA: Microsoft Universal Audio Architecture (UAA) Bus Driver for High Definition Audio
• Audio: Conexant High Definition Audio Drive
• BTOOTH: Support Software for HP Integrated Module with Bluetooth Wireless Technology
• Chipset: Intel Chipset Installation Utility for ICH7
• Default: System Default Settings
• HPQPDP: HP QuickPlay DirectPlay
• Misc3: Texas Instruments Media Card Driver
• Modem: Conexant HDAUDIO Soft Data Fax Modem with SmartCP
• Network: Intel PRO Network Adapter Driver
• QLB: HP Quick Launch Buttons
• QPW: HP QuickPlay
• VIDEO: NVIDIA GeForce Go 7400 and 7600 Graphics Driver
• WLAN2: Intel PRO/Wireless Drivers
• WLASST: HP Wireless Assistant
If you wish to use the online SoftPaq drivers, here are the most up-to-date drivers available for
download, according to my notebook:
• SP32646: Microsoft Universal Audio Architecture (UAA) Bus Driver for High Definition Audio
• SP33442: Conexant HDAUDIO Soft Data Fax Modem with SmartCP
• SP33443: Conexant High Definition Audio Drive
• SP32017: High-Speed Secure Digital (SD) Card Driver
• SP32144: Intel PRO Network Adapter Driver
• SP32203: HP Wireless Assistant
• SP32299: HP Battery Check
• SP32327: System Default Settings
• SP32478: Intel SATA AHCI Controller Driver
• SP32492: Intel Matrix Storage Manager
• SP32555: Intel Chipset Installation Utility for ICH7
• SP32597: HP Quick Launch Buttons
• SP32598: Support Software for HP Integrated Module with Bluetooth Wireless Technology
• SP32899: NVIDIA GeForce Go 7400 and 7600 Graphics Driver
• SP33347: Fix for Issue with WMDRM Protected Content
• SP33416: Texas Instruments Media Card Driver
• SP33649: Help and Support Center
• SP33713: *WinFlash Utility for HP Notebook System BIOS - Windows-Based
• SP33862: Intel PRO/Wireless Drivers
• SP29813: Diagnostics for Windows
*The SP33713 flashes your notebook to support Merom processors. If you have a Core 2 Duo notebook,
chances are you don't need it.
To access the SoftPaq drivers, navigate to the HP main page, click on Software & Drivers Downloads
and insert the product number of your notebook. If it is a custom-to-order notebook, insert CTO at the
end of your entry. Example: HP Pavilion dv5000t CTO.
Listed here are a few drivers that will enhance you HP QuickPlay installation, including the necessary HP
QuickPlay 2.3 updates and skin packs, which can be accessed through the HP QuickPlay Updates and
Enhancements tab.
• HP DVD Audio Pack 3015
• HP QuickPlay 2.3 Update
• HP QuickPlay Skinpack 2.1 To 2.3
• HP QuickPlay Update 3514

• HP QuickPlay Update Patch
Although there will be variations concerning drivers on different notebook models such as display and
media card drivers, most of it will generally be the same and/or placed in the same locations. Most of
the SoftPaq definitions also generally apply to most of the notebooks covered in this guide.
As for me, I use the online SoftPaq drivers as they are the latest and generally offer fixes to problems in
some drivers. The only installation drivers that I use are QPW and HPQPDP.
REMINDER: BACK UP SWSETUP Folder
Please BACK UP your SWSETUP folder located in the C:\ drive of your computer. It includes the HP
QuickPlay installation folder (QPW) and the HP QuickPlay DirectPlay (HPQPDP). If you lose the
SWSETUP folder, you will have a hard time recovering these two files as HP does not upload it online on
their Support site and it is very hard to get it elsewhere.
Let me relate to you from my experience what had happened when I accidently formatted my external
hard disk, which unfortunately had the SWSETUP folder on it. When I realised what had happened, I
quickly contacted HP to see if I could recover those files. However, HP did not have the same model
with them at that time so they could not help me. I tried asking at the shops that have the same model
on offer if I can get the files. Unfortunately, I needed to pay between RM10-20 to get the files burned
onto a DVD, even when I said I could just copy it with my external hard disk.
Thankfully, I managed to find a sympathetic shopkeeper who allowed me to copy the files for free. And
even then he was worried because some of the files inside the SWSETUP folder are unique to each
notebook. But as most of those files are bloatware, I reassured him that his fears are unnecessary.
So again I remind you, please BACK UP your SWSETUP folder, preferably on DVD and keep it
somewhere safe so you don’t have to go through what I had to go through.
Installing Windows XP
First Method
The first method involves using an external floppy drive for the SATA driver to be installed in Windows
XP. Although in some ways this method is easier, don’t be fooled. HP has actually made it harder by
limiting the number of external floppy drives that are supported for SATA installation. So far, I have
learned that HP and Imation Floppy Drives are one the few that is fully compatible with this process.
My external drive, which is a Mitsumi Floppy Drive though branded by IBM, would sometimes works but
at other times fail during the installation process. However, for others who have external floppy drives
and would like to see if this method is applicable for you, then please proceed. If it does, please inform
me of the results such as the brand of your floppy drive used so I can add it into my guide for the
benefit of everyone involved.

Before we insert the Windows XP CD, we must first install the SATA driver onto an empty floppy disk.
There are 2 ways of doing it, either using the SATA driver in X:\SWSETUP\HDD\F6flpy32.exe or
using the SoftPaq driver SP32478, which launches the installation process. Once this is done, we can
then insert the Windows XP CD and reboot the computer.
Make sure the floppy disk is not yet inserted when your notebook is rebooting as there is a high
probability that the disk could be corrupted. Once the notebook has rebooted and you have press
ENTER to boot the CD in your drive, get ready to press F6 when it asks you if you wish to install a
third party SCSI/RAID driver. Doing so would allow you to install the SATA driver.
Upon accessing all the necessary files, it will ask you to insert your floppy disk and press s. Do so now
and press ENTER and a menu should show up with 4 drivers available on the disk. The driver that you
need to select is named Intel® 82801GBM SATA AHCI Controller (Mobile ICH7M). Select it and
press ENTER. An installation process would appear and when it is finished, you will return to the first
menu. Continue your installation and you should reach the Windows XP installation splash page with no
problems.
Proceed to the Partitions for Windows & HP QuickPlay for the next step in your reinstallation
process.
Second Method
The second method requires a bit more effort on your part for your Windows installation to be
successful. But it is also much more foolproof in a sense that if you do it properly, you will have a
problem free installation. This method requires you to slipstream the SATA driver into your Windows XP
installation CD by using nLite.
NLite is a wonderful program that allows you to enhance your Windows installation by allowing you to
add drivers, patches and software. It also allows you to remove programs that you have no wish to
install such as Windows Messenger. If you wish to learn more, here is an excellent guide provided by
rado354 who also lists out software that can be integrated into your Windows XP installation CD.
I, however, will only concentrate on the process to integrate the SATA driver into your Windows XP
installation CD. I would recommend for those who are using nLite for the first time to just integrate the
SATA driver first before trying anything else. Make sure you have nLite installed along with
Microsoft.NET Framework 2.0.
Let us begin the process.
Step-by-step Analogy
Before we begin, make sure that you have everything you need for the process to go smoothly. Copy
the contents of your Windows XP CD to a folder on your desktop. You may rename it if you wish to but
I prefer to follow the CD drive name given by the Windows XP CD. In this guide, I’m using my Windows

XP Home Service Pack 1 as the test CD for this process.
• Launch nLite and you will be greeted with the nLite splash page. Select your language and
click Next.
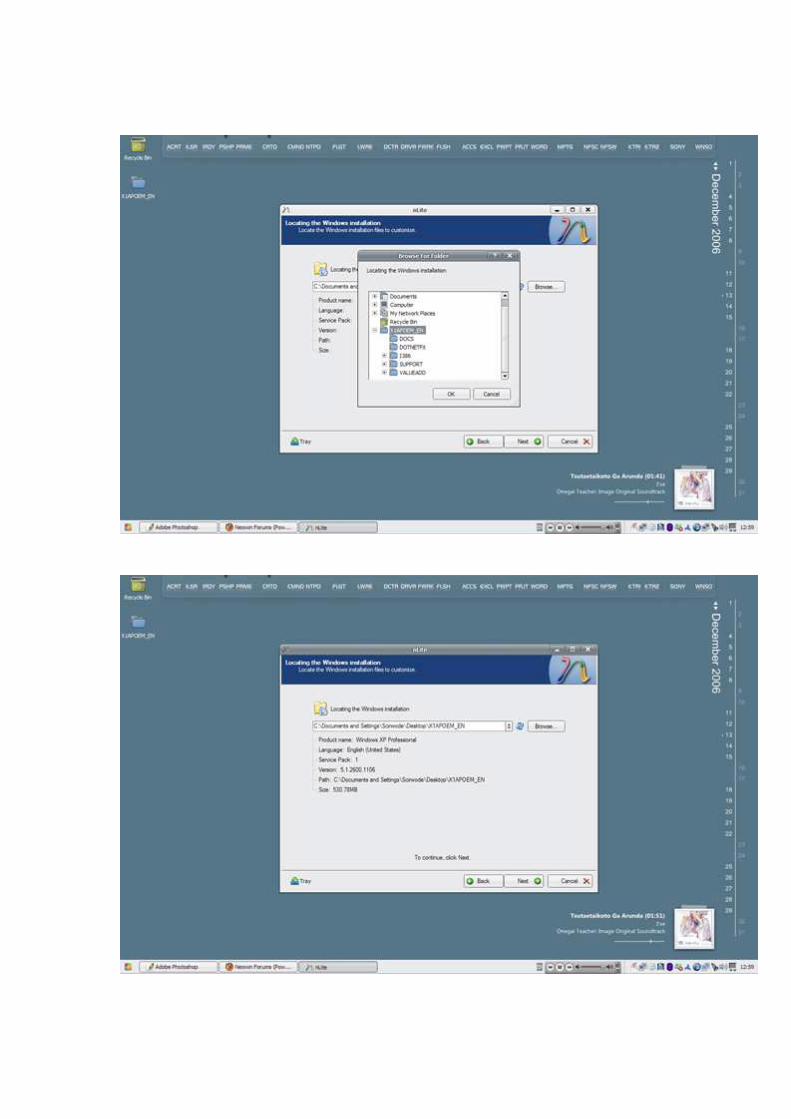
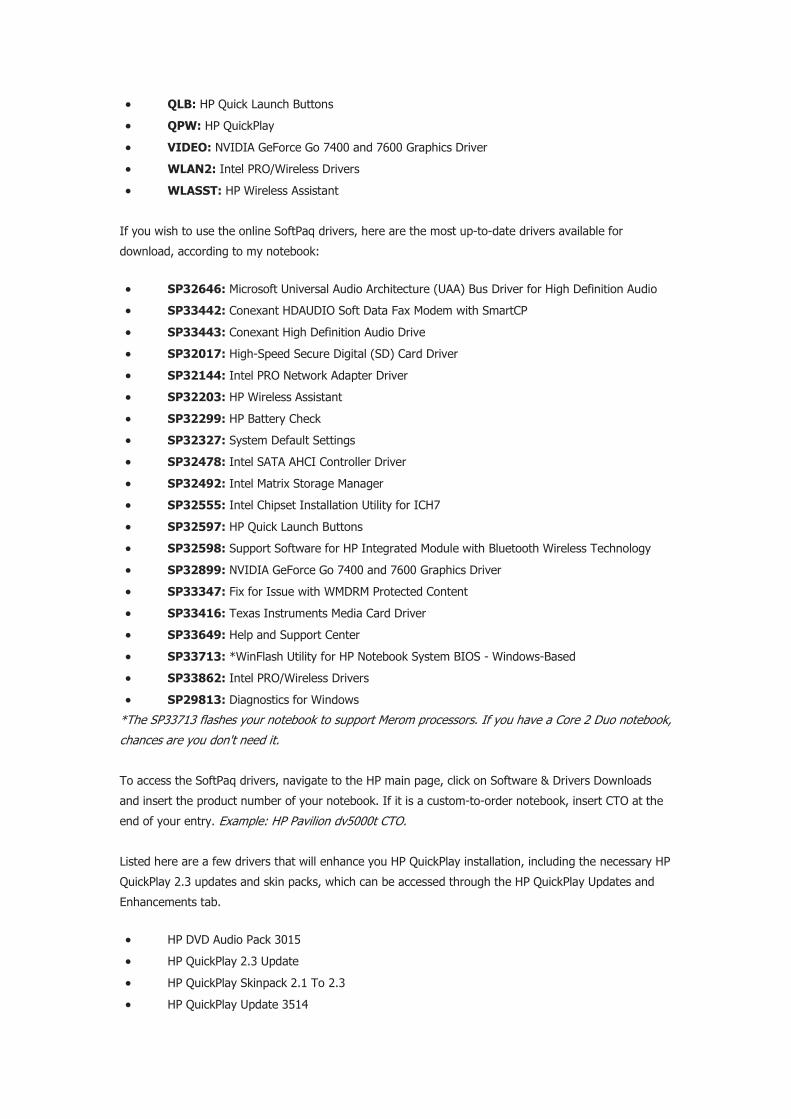
• You will be greeted with a menu that asks for the location of your Windows XP installation
folder. Locate the folder and once you have selected it, click Next.
• You will encounter a preset page which stores your previous nLite sessions. If you do not wish
to load any presets or if this is your first time with nLite, ignore this menu and click Next.


• You will arrive at the Task Selection menu, which lists the many tasks that you may wish to
conduct on your Windows XP installation CD. For this part, we will select only Integrate Drivers
and Create Bootable ISO. Once this is done, click Next.

• In the Drivers menu, click on Insert and browse for the SATA driver, which is located in the
iastor.inf file. You may use either your floppy disk drive if you have created a SATA disk or
select the file in the X:SWSETUP\HDD\iastor.inf.

• In the Storage Device Textmode Driver, select the Intel® 82801GBM SATA AHCI
Controller (Mobile ICH7M). Once you have done so, select OK and click Next.

• It will ask if you wish to start the process in the next menu. Click Yes and wait for the driver
to be slipstreamed into your Windows XP installation. Once it is done, click Next.

• Upon reaching the Bootable ISO menu, label the ISO and click on the Make ISO option. It will
then proceed with making a Bootable ISO that can be burned onto a CD.
• An ISO file should be created once the process is done. If so, you may now close nLite and
proceed with the next step.
You may now burn the newly created Windows XP installation onto a CD. Use any CD burning software
that you are familiar with but for this guide, I will show you how to burn the ISO onto a CD using Nero
6.
• Launch Nero 6, select the Recorder drop down menu and click on Burn Image
• Select the ISO that you have just created and click Open.
• A Burn Compilation menu will appear. If you wish to adjust anything, you may do so but if not
just click Burn. It will burn the ISO onto the CD and when it is done, your new Windows XP
installation CD, complete with the necessary SATA driver is complete.
You may now restart your notebook and use your newly created installation disk to install Windows XP.
Proceed with the normal process in starting up the Windows XP installation process. With this method,
there is no need for you to press F6 to install a third party SCSI/RAID driver. You should now be on the
Windows XP installation splash page and are ready to proceed with the next step.
Partitions for Windows & HP QuickPlay
Proceed with the normal steps in installing Windows XP by pressing ENTER and agreeing to the terms
by pressing F8. After arriving at the Create Partitions menu, you should notice 3 partitions on your main

hard drive. The first is the C:\ partition which is your Windows installation while the second is the HP
QuickPlay partition. The third should be the HP_RECOVERY partition, which numbers around a few GB’s
or so.
If you wish, you may leave the HP_RECOVERY partition as it is but it has no further use considering that
all it does is just take up needed space on your hard drive. You may also leave the HP QuickPlay
partition if you’re afraid of making any mistakes. If you do leave the HP QuickPlay partition alone, there
is no need to install the HPQPDP process later in this guide.
However, since the purpose of this guide is to format and reinstall Windows XP, I prefer removing all
three partitions, leaving me with an empty hard drive devoid of anything that is HP related in it. Now
this is where you must pay careful attention as the success of the HP QuickPlay installation
depends on it. You must now create a partition by pressing c and listing the amount of space you
wish to allocate for your Windows installation.
This part of the guide is a bit tedious. You must ensure that you have at least 1028 MB of
unpartitioned space for HP QuickPlay DirectPlay. Any less and you will be met with an error if you try to
install DirectPlay once your Windows installation is finished.
To do this, you must adjust your windows partition so that it would leave 1028 MB of unpartitioned
space. For example, my notebook has a 100GB hard drive which translates to about 95394 MB in
theory. To leave 1028 MB of unpartitioned space, 94366 must be entered to ensure the correct amount
is left behind. Once this is done, you may proceed with the normal Windows installation.
Installing HP QuickPlay & DirectPlay
Once, you have finished installing Windows, it is advisable to install HP QuickPlay before setting up all
the other necessary drivers. Here, I must remind you to not touch the QuickPlay or DVD button
above your keyboard until you have successfully installed HP QuickPlay and DirectPlay.
You may start by installing HP QuickPlay (QPW) from your SWSETUP folder. Once that is done, launch
the DirectPlay (HPQPDP). The system should restart a number of times if it deems necessary. Once
done, you may now press the QuickPlay button to see if there are any problems or not. I would also
advise to shut down your notebook and launch the QuickPlay application to see if the installation is
successful.
Note concerning Windows Vista: I have found that there is a possibility to install HPQPDP on
Windows Vista. What I have learned is that HPQPDP cannot convert the unformatted partition due to
Windows Vista’s newer boot options. The solution to this problem is to format the partition by
navigating to Storage\Disk Management using the Computer Management application in
Administrative Tools and label it as X:\ drive. The installation should then encounter no problems. I
have not tested this method so if there is someone who would kindly do so and tell me the results, I
would be grateful.

Installing Microsoft & Conexant Audio Drivers
The next part, which involves installing the Conexant High Definition Audio Drive and Microsoft
Universal Audio Architecture (UAA) Bus Driver for High Definition Audio, requires a little
finesse for it to be installed on your notebook. Here are the necessary steps to install the audio drivers
on your notebook:
• First run the installer for Microsoft Universal Audio Architecture (UAA) Bus Driver for
High Definition Audio, either from X:\SWSETUP\1UAA\Disk1\setup.exe or using the
SoftPaq driver SP32646.
• Once that is done, launch the Device Manager by right clicking on the My Computer icon,
select Properties in the drop down menu and select the Hardware tab. You may also launch
Device Manager by clicking on the System icon in the Control Panel and navigating to the
Hardware tab.
• Navigate down the Device Manager window until you see an exclamation mark beside a
device named “PCI Device”.


• Double click on the device and click on Reinstall Driver. A new window should appear asking
you if you wish to connect to Windows Update. Select the “No, Not This Time” option and click
Next.
• Select the “Install from a list or specific location (Advanced)” in the next menu and click Next.

• In the next menu, select the “Search for the best driver in these locations” and tick the
“Include this location in the search”. You may now browse for the Conexant High Definition
Audio Drive either through the X:\SWSETUP\AUDIO or by first launch the SoftPaq driver
SP33443, cancelling it when it has finished extracting the relevant files and selecting
X:\SWSETUP\SP33443. If you try to install the audio driver by launching the setup you will be
met with an error.
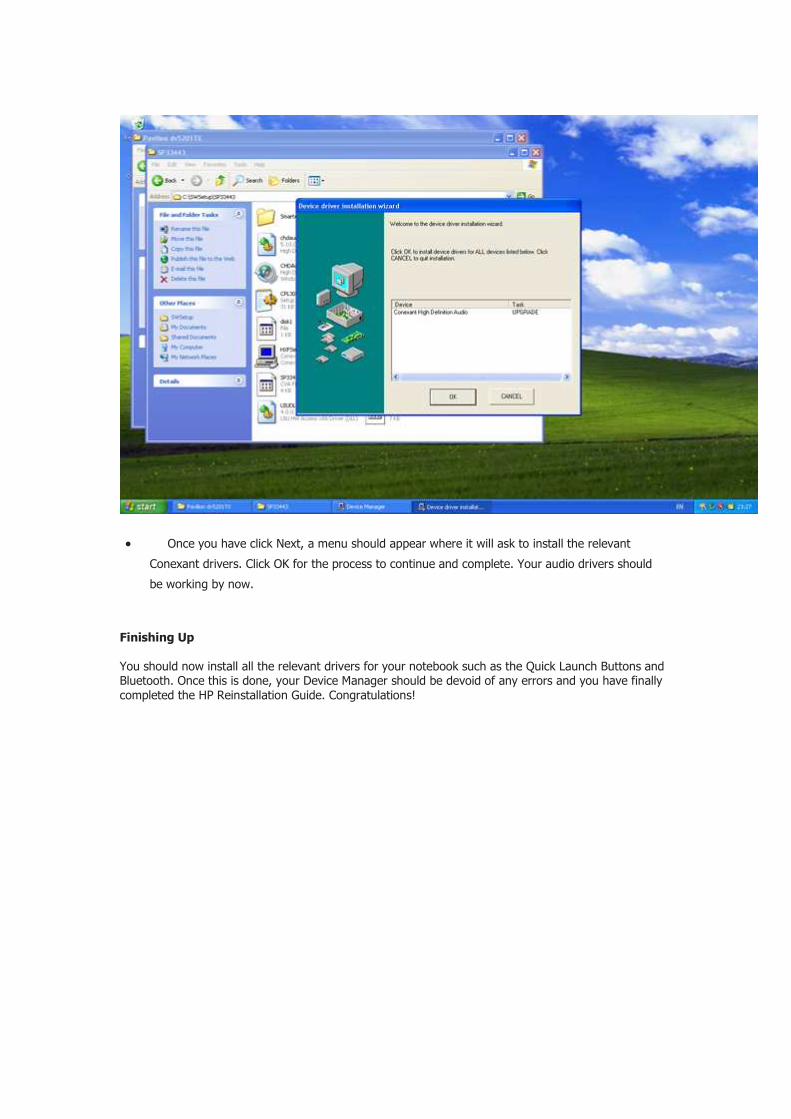
• Once you have click Next, a menu should appear where it will ask to install the relevant
Conexant drivers. Click OK for the process to continue and complete. Your audio drivers should
be working by now.
Finishing Up You should now install all the relevant drivers for your notebook such as the Quick Launch Buttons and Bluetooth. Once this is done, your Device Manager should be devoid of any errors and you have finally completed the HP Reinstallation Guide. Congratulations!

Final Words I have reviewed this guide numerous times to ensure the quality of the release. If there are any problems or if you wish to post feedback, please do so that other may benefit from the insight you have shared. I would like to apologise if I have made any mistakes in my guide or offended you in some way.

Thank you for taking your time to read this guide and I wish you a pleasant day. Scirwode