how to use the adventure book - wizkids · 3 special adventure rules track bandits: this adventure...
TRANSCRIPT
ADVENTURE BOOK

2
is designed to handle. This number usually corresponds to the number of players (one Hero for each player). You can play any of the adventures as a solo experience, where you run all the Heroes yourself.
Adventure Setup: This section provides details about any special setup needs of the adventure, including notes related to Dungeon tiles, Monsters, tokens, and other game elements.
Special Adventure Rules: This section contains any new rules or rules changes to be incorporated into the adventure. It also describes any special Victory or Defeat conditions for the Heroes, as well as an Aftermath section to describe what happens between adventures.
Making Adventures More or Less ChallengingEach time the Heroes complete an adventure without losing any Healing Surges, they begin the next adventure with 1 less Healing Surge (to a minimum of 1).
Each time the Heroes are defeated, they receive 1 extra Healing Surge the next time they attempt that adventure (to a maximum of 4).
Canceling EncountersIn the Waterdeep: Dungeon of the Mad Mage™ Board Game, the Heroes will adventure from different starting points in Undermountain. Each new adventure point is more difficult than the last and thus requires more Experience to cancel Encounters.
The Heroes begin in the Yawning Portal, using it as a base of operations for the first four adventures. It will cost the normal 5 XP to cancel an Encounter in these adventures. However, each new location increases the expenditure of Experience Points by two. See chart below:
HOW TO USE THE ADVENTURE BOOKThe Dungeons & Dragons®: Waterdeep: Dungeon of the Mad Mage™ Board Game is a cooperative adventure game. You and your fellow Heroes work as a team to explore Undermountain and rid yourselves of its supernatural call.
For most of the adventures, you win together or lose together. Play through “Adventure 1: Mopping Up” (page 3) to get a feel for how the game plays, then either continue in order, playing it as a campaign or, as with previous Adventure System games, you can still feel free to play any one of these adventures as a stand-alone experience.
Dungeon setting: (Used in adventures 1-8)
Cavern setting: (Used in adventures 9-13)
DUNGEON TILES NEVER MIX WITH CAVERN TILES.
How the Adventures WorkEach adventure contains the following sections:
Start the Adventure: Read the first boxed text aloud to set the scene of the adventure for the players. Some adventures also feature a read-aloud section when a significant scene takes place in the adventure. Objective: What the Heroes need to accomplish to win the adventure.Number of Heroes: How many Heroes the adventure
Upgrading Between AdventuresThe Heroes are in a specific location after each adventure, and what town actions they can do depends on that location. Heroes can always swap out their powers and trade treasure and/or gold pieces in between adventures no matter what location they are in.
Yawning Portal (After Adventures 1–4) The Marketplace: The Heroes collectively draw 4 Treasure cards after each adventure, purchasing any or all Item cards drawn that they can afford for the buy price listed on the card. Unpurchased Items are returned to the Treasure Deck before the next adventure. Additionally, Heroes may sell any Items they found during a previous adventure for the sell price listed on the card.
Advancements: Any of the 6 Yawning Portal Advancement tokens may be purchased for the cost listed on the token. Each Hero may not have more Advancements than their level.
Level UP: For 2,000 gold pieces, a Hero may upgrade to level 2.
Skullport (After Adventures 4–6)The Marketplace: The Heroes collectively draw Treasure cards after each adventure, purchasing any or all Item cards drawn that they can afford for the buy price listed on the card. Unpurchased Items are returned to the Treasure Deck before the next adventure. Additionally, Heroes may sell any Items they found during a previous adventure for the sell price listed on the card.
Advancements: Any of the unpurchased Yawning Portal Advancement tokens, as well as any of the 8 Skullport
ADVENTURES LOCATIONS XP TO CANCEL
1–4 Yawning Portal 5 XP
5-8 Skullport 7 XP
9-13 The Depths 9 XP
Advancement tokens may be purchased for the cost listed on the token. Again, each Hero may not have more Advancements than their level.
Level UP: For 2,000 gold pieces, a level 1 Hero may upgrade to level 2.
For 3,000 gold pieces, a level 2 Hero may upgrade to level 3.
The Depths (After Adventures 9-13) Advancements: Any of the unpurchased Yawning Portal and Skullport Advancement tokens, as well as any of the 6 The Depths Advancements tokens may be purchased for the cost listed on the token.
Level UP: For 1000 gold x their new level, a Hero may upgrade to level 2 (2,000 gold), level 3, (3,000 gold), or level 4 (4,000 gold).

3
Special Adventure RulesTrack Bandits: This adventure features a new action that a Hero can take. When a Hero takes the Track Bandits action, he or she may spend 5 Experience Points to track the bandits. You cannot use Human Monsters in your Experience pile for this action nor can you use them to cancel Encounter cards.When the Experience is spent, draw cards from the Monster Deck until a Human Monster is drawn. Place that Monster figure onto the Ambush symbol nearest to the Hero that tracked the bandit (the card goes to the Hero as a normal Monster draw):
Afterwards, shuffle the other cards you drew back into the Monster deck.
When there are 4 Humans in the Experience pile, read:
That’s cleared the bandits out, at least for now. Time to head back to the Yawning Portal and get your reward.
Victory: The Heroes win the adventure when they have 4 Humans in their Experience pile.
Defeat: The heroes lose the adventure if any hero has 0 Hit Points remaining at the start of his or her turn and there are no Healing Surges remaining.
Aftermath: If the Heroes complete the scenario without using any Healing Surges, they each receive 200 gold pieces.
If the Heroes complete the scenario, but use at least 1 Healing Surge, they each receive 100 gold pieces.
In either event, make the changes listed below, then the Heroes may purchase any upgrades they wish at the Yawning Portal.
Make the following changes to the decks:
ADVENTURE 1Mopping UpFollowing the mysterious pull that has led you here, you have arrived at the infamous tavern that serves as the entrance to the Undermountain, the Yawning Portal. Asking around, you hear that the barkeep, Durnan, is offering a reward for anyone who will clear out a bandit gang known as the Undertakers, who have taken up residence in the dungeon. Recently, they dared to rob several of his patrons, and now he wants them gone.
Objective: Defeat 4 Humans.
Number of Heroes: 2-5 (group adventure).
Adventure SetupTile Set: Dungeon tiles.
Special Components in this Adventure: Entry Well tile.
Place the Entry Well tile on the table. Place each Hero on any square of the tile.
Shuffle the rest of the Dungeon tile stack.
REMOVE ADD
TREASURE 1 Pouch of Copper 1 Bag of Silver
MONSTERS 1 Mad Laughter None
ENCOUNTERS 1 Brief Respite None

4
Special Adventure RulesUnderground River: When the Underground River tile is revealed, read:
The first hint that you’ve come to the right place is the incredible stench. You smell the foul creatures long before laying eyes on them! With a sickly groan, the beasts float towards you.
Then:
Instead of drawing Monster cards for the tile, the active player takes the two Zombie Beholder Monster cards from the Advanced Monster deck, place one card in front of you, and the second in front of the next player in turn order (these cards are returned to the Advanced Monster deck if the Heroes are defeated). Then place the figures on the Underground River tile. For this Adventure, the Zombie Beholders are considered Villains. As Villains, the Zombie Beholders act at step 2 of each player’s Villain Phase.
If the Zombie Beholders are defeated, read:
With a squelch, the creatures collapse into a pile of rot that, incredibly, smells even worse than before! On the bright side, your path forward is clear now (at least after you return to the Yawning Portal for a nice hot bath).
Victory: The Heroes win the adventure when they defeat both Zombie Beholders.
Defeat: The heroes lose the adventure if any hero has 0 Hit Points remaining at the start of his or her turn and there are no Healing Surges remaining.
Aftermath: If the Heroes complete the scenario without using any Healing Surges, they each receive 200 gold pieces.
If the Heroes complete the scenario, but use at least 1 Healing Surge, they each receive 100 gold pieces.
In either event, make the card changes listed on the campaign roadmap, then the Heroes may purchase any upgrades they wish at the Yawning Portal.
Make the following changes to the decks:
ADVENTURE 2Toll BridgeHaving returned to the dungeon once again, you are tracking a pair of deadly zombie beholders that have moved into the area you need to journey through next. You’ll have to get rid of them to continue your quest deeper into the mountain.
Objective: Defeat the 2 Zombie Beholders.
Number of Heroes: 2–5 (group adventure).
Adventure SetupTile Set: Dungeon tiles.
Special Components in this Adventure: Entry Well tile, Underground River tile, 2 Zombie Beholder Monster cards and figures.
Place the Entry Well tile on the table. Place each Hero on any square of the tile.
Take the Underground River tile from the Dungeon tile stack and set it aside. Shuffle the rest of the Dungeon tile stack. Take 3 tiles from it, and shuffle the Underground River tile into those tiles. Then, without looking at any of the tiles, put the shuffled Underground River tile and 3 tiles into the Dungeon tile stack after the 8th tile. (This way, the Underground River tile will appear between the 9th and 12th tile drawn.)
A. Tiles 1–8
B. Tiles 9–12: Underground River tile and 3 random Dungeon tiles, shuffled together.
C. All other Dungeon tiles.
A
B
C
REMOVE ADD
TREASURE 1 Pouch of Copper 1 Chest of Gold
MONSTERS None 2 Zombie Beholders
ENCOUNTERS 1 Brief Respite None

5
Special Adventure RulesAbandoned Study: When the Abandoned Study tile is revealed, read:
There’s the crystal crown! All you have to do is get it back to the Entry Well now.
Then:
The active player places the Crystal Crown token on one of the Treasure spaces of the Abandoned Study tile.
Instead of attacking, any Hero in the same space as the Crystal Crown token may pick it up. When the Crown is first picked up, roll a die for every empty ambush site on the map. On a 13 or higher, a Monster spawns in that ambush site. In addition, the Hero carrying the Crown is now always considered the closest Hero to every Monster. Once a Hero has picked up the Crown, they cannot drop it and must carry it all the way to the exit.
Victory: The Heroes win the adventure when one of them occupies a square on the Entry Well tile while carrying the Crystal Crown.
Defeat: The heroes lose the adventure if any hero has 0 Hit Points remaining at the start of his or her turn and there are no Healing Surges remaining.
Aftermath: If the Heroes complete the scenario without using any Healing Surges, they each receive 200 gold pieces.
If the Heroes complete the scenario, but use at least 1 Healing Surge, they each receive 100 gold pieces.
In either event, make the card changes listed on the campaign roadmap, then the Heroes may purchase any upgrades they wish at the Yawning Portal.
Afterwards, read:
A harrowing adventure, to be sure, but now you have your key to the rest of Undermountain!
Make the following changes to the decks:
ADVENTURE 3The Crystal CrownStill feeling drawn deeper into the mountain, you learn there are various magical keys required to allow greater access to the dungeon. Fortunately, the adventurer you bought a drink for knew where there was a crystal crown that you could use to keep delving deeper. You just have to get in, grab it, and return.
Objective: Return to the Entry Well tile with the Crystal Crown.
Number of Heroes: 2–5 (group adventure).
Adventure SetupTile Set: Dungeon tiles.
Special Components in this Adventure: Entry Well tile, Abandoned Study tile, and Crystal Crown token.
Place the Entry Well tile on the table. Place each Hero on any square of the tile.
Take the Abandoned Study tile from the Dungeon tile stack and set it aside. Shuffle the rest of the Dungeon tile stack. Take 3 tiles from it, and shuffle the Abandoned Study tile into those tiles. Then, without looking at any of the tiles, put the shuffled Abandoned Study tile and 3 tiles into the Dungeon tile stack after the 10th tile. (This way, the Abandoned Study tile will appear between the 11th and 13th tile drawn.)
REMOVE ADD
MONSTERS3 Thugs
3 Intellect Devourers3 Infested Thugs
ENCOUNTERS 1 Heavy Traffic 1 Ill Omens
A. Tiles 1–10
B. Tiles 11–13: Abandoned Study tile and 3 random Dungeon tiles, shuffled together.
C. All other Dungeon tiles.
A
B
C

6
Special Adventure RulesHidden Outpost: When the Hidden Outpost tile is revealed, read:
An old man in a tattered cloak covered in eyes stands before you, giggling and mumbling to himself. Could this be the Mad Mage himself?
Then:
Instead of drawing Monster cards for the tile, the active player takes the False Halaster Villain card and places the False Halaster figure on the Hidden Outpost tile. As a Villain, False Halaster acts at step 2 of each player’s Villain Phase.
Victory: The Heroes win the adventure when they defeat False Halaster.
Defeat: The heroes lose the adventure if any hero has 0 Hit Points remaining at the start of his or her turn and there are no Healing Surges remaining.
Aftermath: If the Heroes complete the scenario without using any Healing Surges, they each receive 200 gold pieces.
If the Heroes complete the scenario, but use at least 1 Healing Surge, they each receive 100 gold pieces.
In either event, make the card changes listed on the campaign roadmap, then the Heroes may purchase any upgrades they wish at the Yawning Portal.
Afterwards, read:
Just when you thought you had Halaster at your mercy, he began to laugh at you and faded away like a ghost. Oh well, you didn’t really think he was that easy to defeat.
In any event, you follow your map to the city of Skullport, deep within the mountain. The town is shady and dilapidated, but you manage to secure a room at a rundown inn called the Guts and Garters. The mysterious call is stronger here, and in your dreams, you hear a few whispered words of warning, “Be careful, his eyes are upon you now.”
Make the following changes to the decks:
REMOVE ADD
TREASURE None1 Superior Healing
Potion
MONSTERS1 Ghostly
Procession1 Halaster Attacks!
ENCOUNTERS None 1 Healing Energies
TRAPS None 1 Choking Smoke
ADVENTURE 4Blackcloak?After your last journey into the mountain, Durnan approached you with another offer. He’d heard rumors that Halaster himself had been seen in the upper levels lately, and he offers you a map leading to a city within the mountain if you’ll investigate those rumors.
Objective: Defeat Halaster Blackcloak.
Number of Heroes: 2–5 (group adventure).
Adventure SetupTile Set: Dungeon tiles.
Special Components in this Adventure: Entry Well tile, Hidden Outpost tile, False Halaster Villain card, and Halaster Blackcloak figure.
Place the Entry Well tile on the table. Place each Hero on any square of the tile.
Take the Hidden Outpost tile from the Dungeon tile stack and set it aside. Shuffle the rest of the Dungeon tile stack. Take 3 tiles from it, and shuffle the Hidden Outpost tile into those tiles. Then, without looking at any of the tiles, put the shuffled Hidden Outpost tile and 3 tiles into the Dungeon tile stack after the 8th tile. (This way, the Hidden Outpost tile will appear between the 9th and 12th tile drawn.)
A. Tiles 1–8
B. Tiles 9–12: Hidden Outpost tile and 3 random Dungeon tiles.
C. All other Dungeon tiles.
A
B
C

7
Special Adventure RulesGauntlet: When The Gauntlet tile is revealed, read:
With clicking, chattering footsteps, a large figure moves out of the shadows and into the light. Half man, half scorpion, this must clearly be Muiral, the first of Halaster’s apprentices! Uninterested in conversation, he moves to attack you immediately!
Then:
Instead of populating that tile with Trap and Treasure tokens, the active player takes the Muiral Villain card and places the figure on The Gauntlet tile. As a Villain, Muiral acts at step 2 of each player’s Villain Phase.
If Muiral is defeated, read:
With one final blow, Muiral is defeated and collapses to the ground. Hopefully, after a rest back in Skullport, you can now push forward on your quest.
Victory: The Heroes win the adventure when they defeat Muiral.
Defeat: The heroes lose the adventure if any hero has 0 Hit Points remaining at the start of his or her turn and there are no Healing Surges remaining.
Aftermath: If the Heroes complete the scenario without using any Healing Surges, they each receive 300 gold pieces.
If the Heroes complete the scenario, but use at least 1 Healing Surge, they each receive 200 gold pieces.
In either event, make the card changes listed on the campaign roadmap, then the Heroes may purchase any upgrades they wish at Skullport.
Afterwards, read:
Quietude is impressed that you defeated one of the apprentices but warns you that the next leg of your journey will take you through the Graveyard of Trobriand, the Metal Mage. He is the next of Halaster’s apprentices and is much more dangerous than Muiral
Make the following changes to the decks:
ADVENTURE 5Muiral's GauntletThe innkeeper of the Guts and Garters, a tiefling named Quietude, warns you that the first of Halaster’s apprentices dwells nearby, Muiral the misshapen. If you wish to keep journeying into the Undermountain, you’ll have to pass through Muiral’s Gauntlet.
Objective: Defeat Halaster’s apprentice, Muiral.
Number of Heroes: 2–5 (group adventure).
Adventure SetupTile Set: Dungeon tiles.
Special Components in this Adventure: Mirror Gate tile, The Gauntlet tile, Muiral Villain card and figure.
Place the Mirror Gate tile on the table. Place each Hero on any square of the tile.
Take The Gauntlet tile from the Dungeon tile stack and set it aside. Shuffle the rest of the Dungeon tile stack. Take 3 tiles from it, and shuffle The Gauntlet tile into those tiles. Then, without looking at any of the tiles, put the shuffled The Gauntlet tile and 3 tiles into the Dungeon tile stack after the 8th tile. (This way, The Gauntlet tile will appear between the 9th and 12th tile drawn.)
REMOVE ADD
MONSTERS 3 Flying Swords3 Flaming Flying
Swords
ENCOUNTERS 1 Picked Over 1 Mystical Energies
A. Tiles 1–8
B. Tiles 9–12: The Gauntlet tile and 3 random Dungeon tiles.
C. All other Dungeon tiles.
A
B
C
8
Special Adventure RulesGraves: When the Graves tile are revealed, read:
With a heavy clanking, Trobriand comes stepping out from behind one of the graves in the graveyard. A giant man forged from metal, he sneers down at you before twisting a ring on his finger. After a moment of tense silence, an enormous metal scorpion emerges to stand at his side. Clearly, you’ll be facing both of them this battle.
Then:
Instead of drawing Monster cards for the tile, the active player takes the Trobriand Villain card and places the figure on the Graves tile. Then, the player next in turn order takes the Scaladar Monster card and places the figure on the Graves tile as well. As a Villain, Trobriand acts at step 2 of each player’s Villain Phase.
If both Trobriand and the Scaladar are defeated, read:
Having managed to defeat both Trobriand and his metal monstrosity, you pause for a moment to take the ring that Trobriand wore, as it seemed to control the creature somehow. Battered and bruised, you decide that a retreat to Skullport is in order.
Victory: The Heroes win the adventure when they defeat Trobriand and his Scaladar.
Defeat: The heroes lose the adventure if any hero has 0 Hit Points remaining at the start of his or her turn and there are no Healing Surges remaining.
Aftermath: If the Heroes complete the scenario without using any Healing Surges, they each receive 300 gold pieces.
If the Heroes complete the scenario, but use at least 1 Healing Surge, they each receive 200 gold pieces.
In addition, the Hero who struck the final blow to Trobriand receives the Scaladar Control Ring Treasure card. The Hero may either keep it or give it to a different Hero.
In either event, make the card changes listed on the campaign roadmap, then the Heroes may purchase any upgrades they wish at Skullport.
Afterwards, read:
As you return, Quietude takes you aside. “A friend of mine has given me some information you’ll be interested in if you wish to get past Halaster’s next apprentice. Make sure to talk to me before setting out once again.”
Make the following changes to the decks:
ADVENTURE 6Trobriand's GraveyardYou know that you are approaching Trobriand’s territory due to the increasing frequency of ruined metal devices you see laying abandoned here and there. Strange buzzings and whirrings off in the distance cause you to shiver, but nothing unusual approaches you yet.
Objective: Defeat Halaster’s apprentice, Trobriand, and his Scaladar minion.
Number of Heroes: 2–5 (group adventure).
Adventure SetupTile Set: Dungeon tiles.
Special Components in this Adventure: Mirror Gate tile, Graves tile, Trobriand Villain card and figure, Scaladar Monster card and figure.
Place the Mirror Gate tile on the table. Place each Hero on any square of the tile.
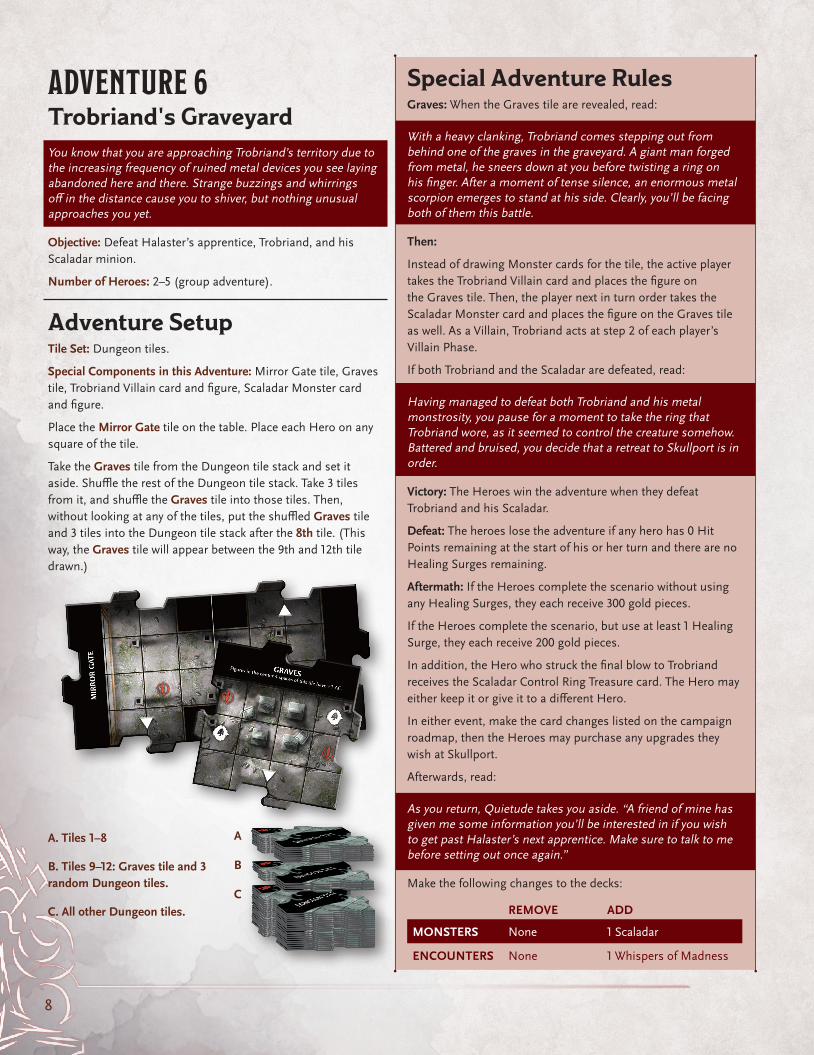
Take the Graves tile from the Dungeon tile stack and set it aside. Shuffle the rest of the Dungeon tile stack. Take 3 tiles from it, and shuffle the Graves tile into those tiles. Then, without looking at any of the tiles, put the shuffled Graves tile and 3 tiles into the Dungeon tile stack after the 8th tile. (This way, the Graves tile will appear between the 9th and 12th tile drawn.)
REMOVE ADD
MONSTERS None 1 Scaladar
ENCOUNTERS None 1 Whispers of Madness
A. Tiles 1–8
B. Tiles 9–12: Graves tile and 3 random Dungeon tiles.
C. All other Dungeon tiles.
A
B
C

9
Special Adventure RulesFind the Phylactery: This adventure features a new action that a Hero can take. When a Hero takes the Find the Phylactery action, he or she may spend 20 Experience points to find the phylactery and destroy it.
The Hero must be alone on a named tile other than the Mirror Gate in order to perform this action.
In addition, cards in the Experience pile cannot be spent for any other purpose except to find the phylactery.
When the Experience is spent, the Heroes immediately win the adventure.
When the phylactery is found, read:
This must be the lich’s phylactery! With a hearty smash, it is no more. Now it’s possible for you to defeat Arcturia, one of Halaster’s more senior apprentices. However, there was a cost for this information – Quietude’s mysterious “friend” has asked you to dispose of a death tyrant in the area before you move on.
Victory: The Heroes win the adventure when they find the Phylactery.
Defeat: The heroes lose the adventure if any hero has 0 Hit Points remaining at the start of his or her turn and there are no Healing Surges remaining.
Aftermath: If the Heroes complete the scenario without using any Healing Surges, they each receive 300 gold pieces.
If the Heroes complete the scenario, but use at least 1 Healing Surge, they each receive 200 gold pieces.
In either event, make the card changes listed on the campaign roadmap, then the Heroes may purchase any upgrades they wish at Skullport.
Make the following changes to the decks:
ADVENTURE 7The PhylacteryGrimly, you make your way towards the area Quietude directed you to. Thanks to him, you’ve received an incredibly valuable piece of info about one of Halaster’s apprentices. Specifically, you now know that she’s a lich, and you have a good idea where her phylactery is. If you’re smart, you have a chance to destroy it before she catches wind of you and hides it somewhere else.
Objective: Find and Destroy the Phylactery.
Number of Heroes: 2–5 (group adventure).
Adventure SetupTile Set: Dungeon tiles.
Special Components in this Adventure: Mirror Gate tile.
Place the Mirror Gate tile on the table. Place each Hero on any square of the tile.
Shuffle the rest of the Dungeon tile stack.
REMOVE ADD
TREASURE None1 Ioun Stone of
Regeneration
MONSTERS 3 Veterans 3 Gnarled Veterans
ENCOUNTERS 1 Overcrowding 1 Terrible Urgency
TRAPS None 1 Dizzying Ray

10
Special Adventure RulesThe Ossuary: When The Ossuary tile is revealed, read:
At first, all you see here are the niches full of bones. But then, with a flicker of red light, the death tyrant slowly rises from a pile of skulls into the air, and its zombie servants move to flank you. Looks like you’ve got quite a battle on your hands.
Then:
Instead of drawing Monster cards for the tile, the active player takes the two Zombie Beholder Monster cards (no matter where they are) and the Death Tyrant Monster card, then places the figures on The Ossuary tile. For this Adventure, the Zombie Beholders and the Death Tyrant are considered Villains. As Villains, the Zombie Beholders and Death Tyrant act at step 2 of each player’s Villain Phase.
If the Zombie Beholders and the Death Tyrant are defeated, read:
Dispatching of the death tyrant and its minions, you return to Skullport, hopefully for the last time. Quietude seems somewhat surprised to see you again, but then he smiles. “My friend will be grateful to you. He doesn’t like…competition.”
Victory: The Heroes win the adventure when they defeat both Zombie Beholders as well as the Death Tyrant.
Defeat: The heroes lose the adventure if any hero has 0 Hit Points remaining at the start of his or her turn and there are no Healing Surges remaining.
Aftermath: If the Heroes complete the scenario without using any Healing Surges, they each receive 300 gold pieces.
If the Heroes complete the scenario, but use at least 1 Healing Surge, they each receive 200 gold pieces.
In either event, make the card changes listed on the campaign roadmap, then the Heroes may purchase any upgrades they wish at Skullport.
Afterwards, read:
That night in your dreams, a faint voice whispers, “If you can defeat him, even for a moment, then there’s a chance.” The next morning, you prepare to leave Skullport for good to journey into the depths of the mountain, where there will be no one to aid you further.
Make the following changes to the decks:
ADVENTURE 8Behold!Following Quietude’s information one last time, you draw near to where he said the death tyrant would be. Hopefully, after this you can resume your quest deeper into Undermountain, as the pull grows stronger every day you delay.
Objective: Defeat the 2 Zombie Beholders and the Death Tyrant.
Number of Heroes: 2–5 (group adventure).
Adventure SetupTile Set: Dungeon tiles.
Special Components in this Adventure: Mirror Gate tile, The Ossuary tile, Death Tyrant Villain card and figure, both Zombie Beholder Monster cards and figures.
Place the Mirror Gate tile on the table. Place each Hero on any square of the tile.
Take The Ossuary tile from the Dungeon tile stack and set it aside. Shuffle the rest of the Dungeon tile stack. Take 3 tiles from it, and shuffle The Ossuary tile into those tiles. Then, without looking at any of the tiles, put the shuffled The Ossuary tile and 3 tiles into the Dungeon tile stack after the 8th tile. (This way, The Ossuary tile will appear between the 9th and 12th tile drawn.)
REMOVE ADD
TREASURE None1 Superior Healing
Potion
MONSTERS None 1 Death Tyrant
ENCOUNTERS None 1 Inexplicable Theft
A. Tiles 1–8
B. Tiles 9–12: The Ossuary tile and 3 random Dungeon tiles.
C. All other Dungeon tiles.
A
B
C

11
Special Adventure RulesCavern of Ooze: When the Cavern of Ooze tile is revealed, read:
With a burble, the ground begins to roil all around you as a massive gray ooze rises up from the muck to bar your path!
Then:
Instead of drawing Monster cards for the tile, the active player takes the Great Gray Ooze Villain card and places the Gray Ooze figure on the Cavern of Ooze tile. As a Villain, the Great Gray Ooze acts at step 2 of each player’s Villain Phase.
If the Great Gray Ooze is defeated, read:
Finally finishing off the horrid abomination, you are relieved to see dryer land up ahead. Finding a defensible spot, you bed down for the night, exhausted. Again, your dreams are disturbed by a faint whisper, “Destroy the crystal.”
Victory: The Heroes win the adventure when they defeat the Great Gray Ooze.
Defeat: The heroes lose the adventure if any hero has 0 Hit Points remaining at the start of his or her turn and there are no Healing Surges remaining.
Aftermath: If the Heroes complete the scenario without using any Healing Surges, they each receive 400 gold pieces.
If the Heroes complete the scenario, but use at least 1 Healing Surge, they each receive 300 gold pieces.
In either event, make the card changes listed on the campaign roadmap, then the Heroes may purchase any upgrades they wish in the Depths.
Make the following changes to the decks:
ADVENTURE 9The Great Gray OozeForewarned one last time by your clever innkeeper, you know that the next area in your path is a portion of Undermountain known as the Cavern of Ooze. It’s rumored that a particularly huge and powerful ooze dwells within.
Objective: Defeat the Great Gray Ooze.
Number of Heroes: 2–5 (group adventure).
Adventure SetupTile Set: Cavern tiles.
Special Components in this Adventure: Arch Gate tile, Cavern of Ooze tile, Great Gray Ooze Villain card and figure.
Place the Arch Gate tile on the table. Place each Hero on any square of the tile.
Take the Cavern of Ooze tile from the Dungeon tile stack and set it aside. Shuffle the rest of the Dungeon tile stack. Take 3 tiles from it, and shuffle the Cavern of Ooze tile into those tiles. Then, without looking at any of the tiles, put the shuffled Cavern of Ooze tile and 3 tiles into the Dungeon tile stack after the 8th tile. (This way, the Cavern of Ooze tile will appear between the 9th and 12th tile drawn.)
REMOVE ADD
MONSTERS None 1 Gray Ooze
ENCOUNTERS None 1 Healing Energies
A. Tiles 1–8
B. Tiles 9–12: Cavern of Ooze tile and 3 random Dungeon tiles.
C. All other Dungeon tiles.
A
B
C

12
Special Adventure RulesRunestone tile: When The Runestone tile is revealed, read:
The Runestone has revealed itself to you. It is a large, circular lozenge of translucent white crystal in the center of the room, but now you must find a way to destroy it!
Then:
The active player places The Runestone token in the middle of this tile. Any Hero on this tile may attack The Runestone as though it were a Monster with an AC of 8. It does not move or attack. The Heroes must do a total of 20 damage to The Runestone in order to destroy it completely.
Victory: The Heroes win the adventure when one of them manages to destroy The Runestone once and for all, depriving Halaster of its power.
Defeat: The heroes lose the adventure if any hero has 0 Hit Points remaining at the start of his or her turn and there are no Healing Surges remaining.
Aftermath: If the Heroes complete the scenario without using any Healing Surges, they each receive 400 gold pieces.
If the Heroes complete the scenario, but use at least 1 Healing Surge, they each receive 300 gold pieces.
In either event, make the card changes listed on the campaign roadmap, then the Heroes may purchase any upgrades they wish in the Depths.
Afterwards, read:
A solid blow against Blackcloak’s power! Without the Runestone, you’ve got a much better chance to defeat him. But for now, you better get what rest you can, for your dreams echo with warnings of “The siblings who stand at dusk.”
Make the following changes to the decks:
ADVENTURE 10Cutting a RuneYou awaken with strange knowledge in your mind. Ahead is a magical crystal called the Runestone that Halaster has created. If you can destroy it, you’ll set his plans back some and force him to split his attention away from you as well.
Objective: Destroy the Runestone.
Number of Heroes: 2–5 (group adventure).
Adventure SetupTile Set: Cavern tiles.
Special Components in this Adventure: Arch Gate tile, and The Runestone tile, Runestone token.
Place the Arch Gate tile on the table. Place each Hero on any square of the tile.
Take The Runestone tile from the Dungeon tile stack and set it aside. Shuffle the rest of the Dungeon tile stack. Take 3 tiles from it, and shuffle The Runestone tile into those tiles. Then, without looking at any of the tiles, put the shuffled The Runestone tile and 3 tiles into the Dungeon tile stack after the 10th tile. (This way, The Runestone tile will appear between the 11th and 13th tile drawn.)
REMOVE ADD
TREASURE None1 Armor of
Invulnerability
MONSTERS 3 Grung1 Grung Elite Warrior
3 Grung Assassin
ENCOUNTERS None 1 Sneak Attacked
TRAPS None 1 Life Draining Field
A. Tiles 1–10
B. Tiles 11–13: The Runestone tile and 3 random Dungeon tiles.
C. All other Dungeon tiles.
A
B
C

13
Special Adventure RulesRunestone: When The Runestone tile is revealed, set it aside and replace it with the Shadowdusk Hold tile, then read:
Standing here are an armored man and a woman, though judging by their withered skin, it seems clear that they are undead. The male speaks as he draws his sword, “As you foretold, dear Dezmyr, they have come.”
The woman smiles, “The watcher in the walls has sent them, dear Zalthar. Let us dispose of them.”
Then:
Instead of drawing Monster cards for the tile, the active player takes the Zalthar Shadowdusk and Dezmyr Shadowdusk Villain cards and places the figures on the Shadowdusk Hold tile. As Villains, Zalthar and Dezmyr act at step 2 of each player’s Villain Phase.
If both Zalthar and Dezmyr are defeated, read:
As the siblings are struck down at last, they reach out for each other, even as the false life fades from their eyes. You pick up Zalthar’s blade – it is apt to serve you well in the future.
Victory: The Heroes win the adventure when they defeat Zalthar and Dezmyr Shadowdusk.
Defeat: The heroes lose the adventure if any hero has 0 Hit Points remaining at the start of his or her turn and there are no Healing Surges remaining.
Aftermath: If the Heroes complete the scenario without using any Healing Surges, they each receive 400 gold pieces.
If the Heroes complete the scenario, but use at least 1 Healing Surge, they each receive 300 gold pieces.
In addition, the Hero who struck the final blow to Zalthar Shadowdusk receives the Zalthar’s Nine Lives Stealer Treasure card. The Hero may either keep it or give it to a different Hero.
In either event, make the card changes listed on the campaign roadmap, then the Heroes may purchase any upgrades they wish in the Depths.
Afterwards, read:
That night as you dream, you hear only a single word, as if the speaker were afraid of being overheard, “Arcturia.”
Make the following changes to the decks:
ADVENTURE 11Brother and Sister
You grow closer to the bottom of Undermountain, but have reached a notoriously dangerous site known as – Shadowdusk Hold. Set on edge by your dreams last night, filled with warnings and strange shadows, you approach cautiously.
Objective: Defeat Zalthar and Dezmyr Shadowdusk.
Number of Heroes: 3–5 (group adventure).
Adventure SetupTile Set: Cavern tiles.
Special Components in this Adventure: Arch Gate tile, The Runestone tile, Shadowdusk Hold tile, Zalthar Villain card and figure, Dezmyr Shadowdusk Villain card and figure.
Place the Arch Gate tile on the table. Place each Hero on any square of the tile.
Take The Runestone tile from the Dungeon tile stack and set it aside. Shuffle the rest of the Dungeon tile stack. Take 3 tiles from it, and shuffle The Runestone tile into those tiles. Then, without looking at any of the tiles, put the shuffled The Runestone tile and 3 tiles into the Dungeon tile stack after the 8th tile. (This way, The Runestone tile will appear between the 9th and 12th tile drawn.)
Set aside the Shadowdusk Hold tile.
REMOVE ADD
MONSTERS3 Flaming Flying
Swords3 Spectral Flying
Swords
ENCOUNTERS None 1 Distraction
A. Tiles 1–8
B. Tiles 9–12: The Runestone tile and 3 random Dungeon tiles.
C. All other Dungeon tiles.
A
B
C

14
Special Adventure RulesRunestone: When The Runestone tile is revealed, set it aside and replace it with the Arch Gate tile, then read:
A bizarre sight greets you here. A gaunt woman in a flowing gown with gossamer wings on her shoulders and bone spurs on her forearms and elbows flits about. When she sees you, her face is filled first with recognition, and then with rage. Wasting no time, she screams as she rushes into combat with you.
Then:
Instead of drawing Monster cards for the tile, the active player takes the Arcturia Villain card and places the figure on the Arch Gate tile. As a Villain, Arcturia acts at step 2 of each player’s Villain Phase.
If Arcturia is defeated, read:
As you raise your weapon to strike her down, the strange woman suddenly disperses into a cloud of butterflies and vanishes. Although you may not have seen the last of her, hopefully she’ll stay away long enough for you to complete this strange quest you find yourself compelled upon.
Victory: The Heroes win the adventure when they defeat Arcturia.
Defeat: The heroes lose the adventure if any hero has 0 Hit Points remaining at the start of his or her turn and there are no Healing Surges remaining.
Aftermath: If the Heroes complete the scenario without using any Healing Surges, they each receive 400 gold pieces.
If the Heroes complete the scenario, but use at least 1 Healing Surge, they each receive 300 gold pieces.
In either event, make the card changes listed on the campaign roadmap, then the Heroes may purchase any upgrades they wish in The Depths.
Afterwards, read:
That night, you dream of a soft voice once more, “Good luck. Halaster awaits. Thank you for this chance.”
Make the following changes to the decks:
ADVENTURE 12The Lich's RevengeYou find yourself nearly at the heart of Undermountain, but you must deal with one final apprentice, Arcturia. Although you destroyed her phylactery, it’s possible that she has been able to construct another in the meantime. All you can hope is that either she hasn’t had time to replace it, or that you can defeat her for long enough to pass through to Halaster’s chambers.
Objective: Defeat Halaster’s apprentice, Arcturia.
Number of Heroes: 2–5 (group adventure).
Adventure SetupTile Set: Cavern tiles.
Special Components in this Adventure: Shadowdusk Hold tile, The Runestone tile, Arch Gate tile, Arcturia Villain card and figure.
Place the Shadowdusk Hold tile on the table. Place each Hero on any square of the tile.
Take The Runestone tile from the Dungeon tile stack and set it aside. Shuffle the rest of the Dungeon tile stack. Take 3 tiles from it, and shuffle The Runestone tile into those tiles. Then, without looking at any of the tiles, put the shuffled The Runestone tile and 3 tiles into the Dungeon tile stack after the 8th tile. (This way, The Runestone tile will appear between the 9th and 12th tile drawn.)
Set aside the Arch Gate tile.
REMOVE ADD
MONSTERS None 2 Bheur Hags
A. Tiles 1–8
B. Tiles 9–12: The Runestone tile and 3 random Dungeon tiles.
C. All other Dungeon tiles.
A
B
C

15
Special Adventure RulesHalaster’s Rune: When Halaster’s Rune tile is revealed, read:
A ragged old man stands before you in the center of a large rune, muttering to himself. “They have come here. She sent them, I bet. Jhesiyra. She’s in the walls. First, I take care of them, then I take care of her.” At that, the rune at Halaster’s feet begins to glow, and the battle is joined in earnest.
Then:
Instead of drawing Monster cards for the tile, the active player takes the Halaster Blackcloak Villain card and places the figure on the Halaster’s Rune tile. As a Villain, Halaster Blackcloak acts at step 2 of each player’s Villain Phase.
Adventure EndVictory: The Heroes win the adventure when they defeat Halaster Blackcloak.
Defeat: The heroes lose the adventure if any hero has 0 Hit Points remaining at the start of his or her turn and there are no Healing Surges remaining.
If the Heroes won the adventure, read:
As Halaster falls in battle, the area begins to distort and warp around you. A woman’s voice echoes in your head, “Thank you! I am Jhesiyra Kestellharp. I was apprenticed to Halaster, but when his insanity became obvious, I fled, only for him to imprison me. I concealed myself within the walls of Undermountain. But now, there is a chance to remake this realm in my own image.” She hesitates for a moment, “But no. First, I must see you clear of this place. You are free of its grip – do not return. No one gets a second chance to walk away from Undermountain. Not Halaster, not his mad apprentices, and not me. Get away while you can!”
Abruptly, the air twists around you, and you find yourself back at the Yawning Portal, where this all began. The drunken patrons around you barely notice your appearance. But unlike the last time you were here, you feel no burning hunger to explore the Undermountain. You are free.
If the Heroes lost the adventure, read:
As you fall in battle, the Mad Mage mutters to himself, “Naughty Jhesyra. Naughty apprentice. Halaster sees you now, yes he does. Time for your lessons to resume.”
ADVENTURE 13Halaster's HomeAt last, you’ve fought your way to the very bottom of Undermountain for your chance to battle its master face-to-face. But remember, the Mad Mage is a terrible opponent – you’ll need all your wits about you today if you hope to succeed.
Objective: Defeat Halaster Blackcloak.
Number of Heroes: 2–5 (group adventure).
Adventure SetupTile Set: Cavern tiles.
Special Components in this Adventure: Arch Gate tile, Halaster’s Rune tile, Halaster Blackcloak Villain card and figure.
Place the Arch Gate tile on the table. Place each Hero on any square of the tile.
Take the Halaster’s Rune tile from the Dungeon tile stack and set it aside. Shuffle the rest of the Dungeon tile stack. Take 3 tiles from it, and shuffle the Halaster’s Rune tile into those tiles. Then, without looking at any of the tiles, put the shuffled Halaster’s Rune tile and 3 tiles into the Dungeon tile stack after the 8th tile. (This way, the Halaster’s Rune tile will appear between the 9th and 12th tile drawn.)
A. Tiles 1–8
B. Tiles 9–12: Halaster's Rune tile and 3 random Dungeon tiles.
C. All other Dungeon tiles.
A
B
C

16
Your First GameIf this is your first game, use the Power cards suggested below for your Hero. Once you’re more familiar with the game, you can choose your own Power cards.
Atka, Tiefling Fighter: AT–WILL (Pressing Attack), DAILY POWER (Hellish Rebuke), UTILITY POWER (Challenging Shout, Royal Envoy)
Cormac, Half-Elf Cleric: AT–WILL (Probe Defenses), DAILY POWER (Path to the Grave), UTILITY POWER (Bane, False Life)
Nayeli Goldflower, Human Paladin: AT–WILL (Whirlwind Slash), DAILY POWER (Juggernaut), UTILITY POWER (Champion Challenge, Divine Health)
Marcon, Human Sorcerer: AT–WILL (Shocking Grasp), DAILY POWER (Thunder Step), UTILITY POWER (Distant Metamagic, Heart of the Storm)
Trosper, Gnome Rogue AT–WILL (Mopping Up), DAILY POWER (Nice Try!), UTILITY POWER (Slippery Mind, Unerring Eye)
AD&D® ADVENTURE SYSTEM
COOPERATIVE GAME
WIZKIDS/NECA, LLC603 Sweetland Ave.Hillside, NJ 07205 USAwww.wizkids.com
Wizards of the Coast, Dungeons & Dragons, Waterdeep Dungeon of the Mad Mage, D&D, and their respective logos are trademarks of Wizards of the Coast LLC in the USA and other countries. Used with permission. ©2019 Wizards. All Rights Reserved.
© 2019 WizKids. WizKids and the WizKids logo are trademarks of WizKids. All Rights Reserved.