how to setup pogamut 3 with mavenpogamut.cuni.cz/pogamut_files/doc/setup-pogamut3-with-maven.pdf ·...
TRANSCRIPT

How to setup Pogamut 3 with Maven
Assumptions You’re using Windows-based system and you want to harness the power of ultimate Pogamut 3! If you’re using Linux-based system and want Pogamut 3 as well, all the steps more-or-less apply to you as well, but you’ll have to supply different URLs / use rpm / yum / etc…
Step 1 – Install SVN Install Subversion (SVN) console client
o http://sourceforge.net/projects/win32svn/
o Download the .ZIP file and unzip it to some folder (e.g. C:\)
Set $PATH to point to the ‘bin’ directory of the Subversion installation
o E.g. C:\Program files\Subversion\bin
Starting from Windows Vista:
o Click Start -> type “Environment” -> Windows will search up link “Edit the system
variables”, click on it.
For Windows systems before Windows Vista:
o Click Start -> Run
o type “sysdm.cpl” -> Choose Advanced
o Following dialog will show up, click on the “Environment Variables…” button
o Find “Path” variable (scroll down), click on the row and click “Edit” button.

o Now insert additional “;” to the end of the long line and then path to the directory
…\svn\bin\ where you have unpacked SVN client as can be seen on the next image.
o Click on the OK and OK and OK to confirm changes and close all dialogs.
Step 2- Install graphical SVN client Go to: http://tortoisesvn.tigris.org/ download the installer and install it.
Step 3 – Install Maven Install Maven 3.0.2
o Note that Maven is very SENSITIVE about versions, e.g., Maven 3.0.4 should not do the same
as Maven 3.0.2, therefore … be sure to download Maven 3.0.2
o See: http://archive.apache.org/dist/maven/binaries/ o Look up “apache-maven-3.0.2-bin.zip”
o Download it.
o Unzip it to some folder (e.g. C:\)
As in Step 1 add the maven\bin directory to the “Path” system variable (e.g. appending something like
;C:\apache-maven-3.0.2\bin to the value
Do not leave the system variables yet, you will need to add another variable there
o Click on the “New” button

o Fill in values “MAVEN_OPTS” and “-Xmx1g –Xms512m” (both without quotes) … note that
everything is CASE-SENSITIVE! Do not change upper-lower case symbols. See next image.
Step 4 – Install UT2004 Install UT2004
Patch it with 3369 version
o http://www.beyondunreal.com/main/ut2004/ut2004essential.php
Step 5 – Install NetBeans (preferably v6.9.1) Install NetBeans v6.9.1
Download it from: http://netbeans.org/downloads/6.9.1/
Step 6 – Install Pogamut 3 platform Install Pogamut 3
o Downloads section of http://pogamut.cuni.cz/
Step 7 [Optional] – Install newest GameBots2004 If you wish to stay on the bleeding edge of development (you should if using Pogamut 3 as we’re
constantly fixing our platform), you have to manually install newest GameBots2004 from SVN
Go to UT2004, right-click System folder, choose ‘SVN Checkout’

Type correct address / directory and click OK.
Confirm any overwrites you might have.
Step 8 – How to run UT2004 dedicated server with GameBots2004 Note that Pogamut 3 platform requires you to start up UT2004 as dedicated server running
GameBots2004 mod.
To do that, just locate file UT2004/System/startGamebotsDMServer.bat and double-click
it.
To connect to the game with UT2004 GUI (the game itself) just double-click another file
UT2004/System/startUT2004low.bat
Step 9 – Import your first example project using Maven First you have to configure NetBeans properly.
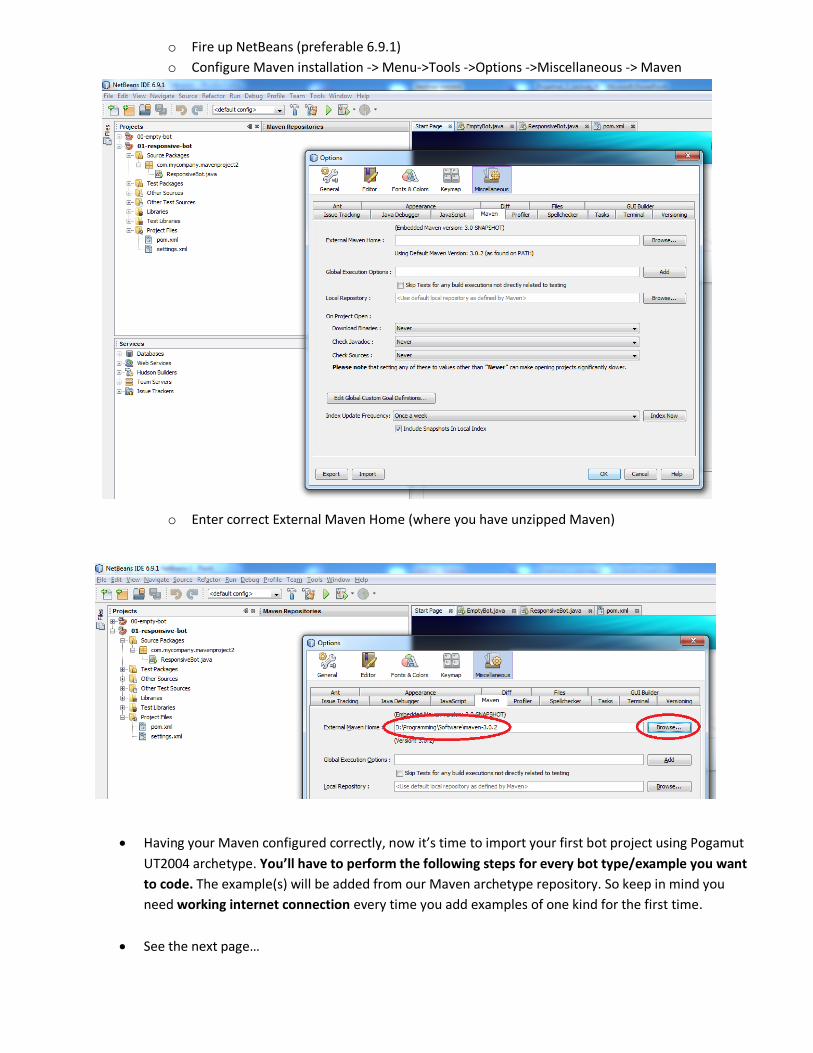
o Fire up NetBeans (preferable 6.9.1)
o Configure Maven installation -> Menu->Tools ->Options ->Miscellaneous -> Maven
o Enter correct External Maven Home (where you have unzipped Maven)
Having your Maven configured correctly, now it’s time to import your first bot project using Pogamut
UT2004 archetype. You’ll have to perform the following steps for every bot type/example you want
to code. The example(s) will be added from our Maven archetype repository. So keep in mind you
need working internet connection every time you add examples of one kind for the first time.
See the next page…

o Create new Maven project…
o Click in the following order…
o See the next page…

o Click in the following order…
o Now you have to correctly fill archetype details:
groupid
artifactid
version
repository (WHICH IS NOT OPTIONAL AS THE NETBEANS DISPLAYS!)
o See the following list of all existing archetypes:
http://diana.ms.mff.cuni.cz:8081/artifactory/libs-snapshot-local/archetype-catalog.xml
There you’ll find updated archetype information for every example we offer.
At the moment we support only manual addition of archetypes. So you’ll need to copy these
data from the .xml list. Blue rectangle on the screenshot below shows the portion of .xml file
containing one archetype data.
Be sure to use the most recent version of every example.

o Data required for the form in Netbeans are enclosed betweed the following tags:
<groupid> … </groupid>
<artifactid> … </artifactid>
<version> … </version>
<repository> … </repository>
o For example (written in bold): <archetype> <groupId>cz.cuni.amis.pogamut.ut2004.examples</groupId> <artifactId>00-empty-bot-archetype</artifactId> <version>3.2.4 </version> <repository>http://diana.ms.mff.cuni.cz:8081/artifactory/libs-release-local</repository> <description>
First PogamutUT2004 example. It features fully-runnable bot with no logic expalining the structure of the bot class. See: http://pogamut.cuni.cz/pogamut_files/latest/doc/tutorials/EmptyBotTutorial.html
</description> </archetype>
Fill in the values, click ok, select the name of archetype you have added and you’re good to go!
Sometimes Maven plugin fails to download correct POM file. Which results in Netbeans reporting newly added project as an <Badly-formed Maven project>.
Such situation can be easily solved by right-clicking the name of the project in Project Explorer and choosing Clean and Build.
If you are in trouble, visit our forums at http://pogamut.cuni.cz.