how to register for loweslink® · revised march 2018 1 how to register for loweslink® go to >...
TRANSCRIPT

Revised March 2018 1
How to Register for LowesLink®
Go to www.loweslink.com > LowesLink® Getting Started > Click Here to Register
Click on LowesLink® Getting Started
BEFORE you attempt to register please read our LowesLink® Requirements carefully, make the
necessary changes to your computer and make sure you have read the How does LowesLink® Login
Work? document. NOTE: If you do not have the correct computer settings, the system will not allow
you to submit your registration!

Revised March 2018 2
Next, click on the link Click Here to Register. This will begin the online registration process.
or
You can also Click on Click Here to Register from the link under Getting Started. Either option will begin
the registration process.

Revised March 2018 3
The screen will look like:
Click CONTINUE HERE for Lowe’s USA or Lowe’s Canada
Read and Agree to the Lowe’s Subscriber Agreement and click Next

Revised March 2018 4
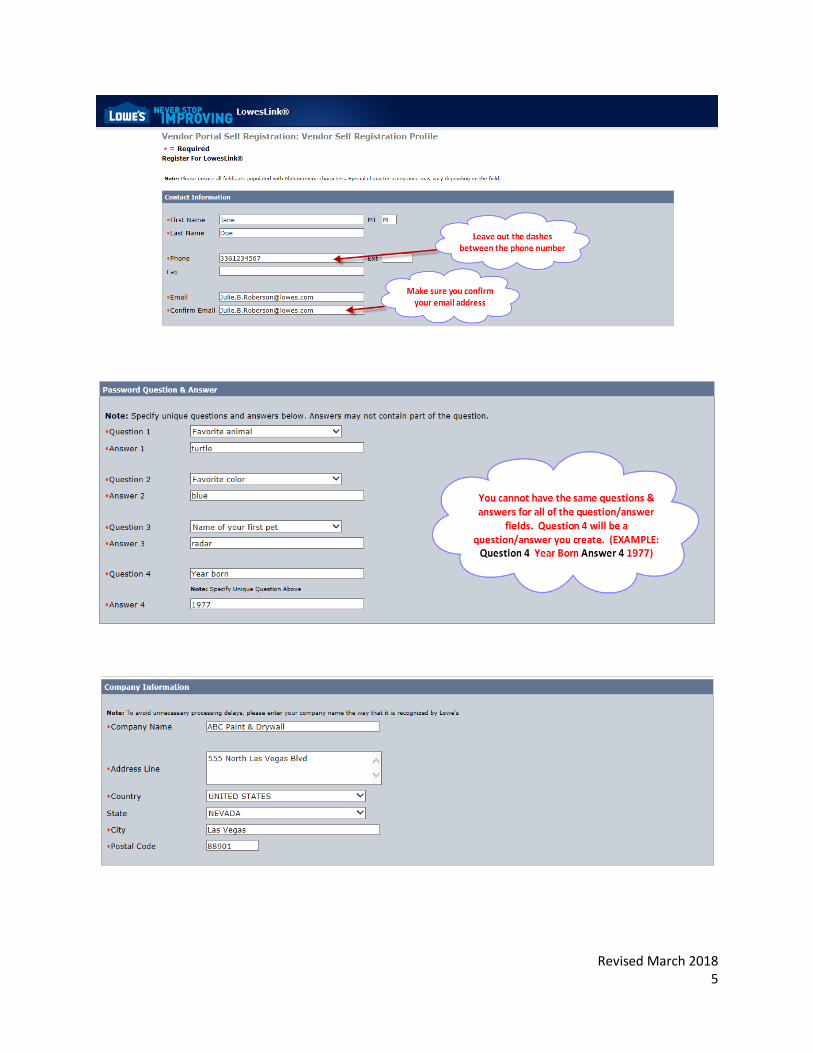
The screen will look like the example below. You must complete the *REQUIRED fields. Please
complete the form and click Submit
Revised March 2018 5

Revised March 2018 6
Read the description, select the Vendor Type that represents your company and then enter your Lowe’s
Vendor Number(s) in the small box. You must click on the UP arrow button to add your vendor number.
NOTE: If your company has more than one Lowe’s vendor number, you must enter the vendor numbers
one at a time.
Vendor number has now been added

Revised March 2018 7
Click Submit to submit your LowesLink® Registration to Lowe’s.
Revised March 2018 8
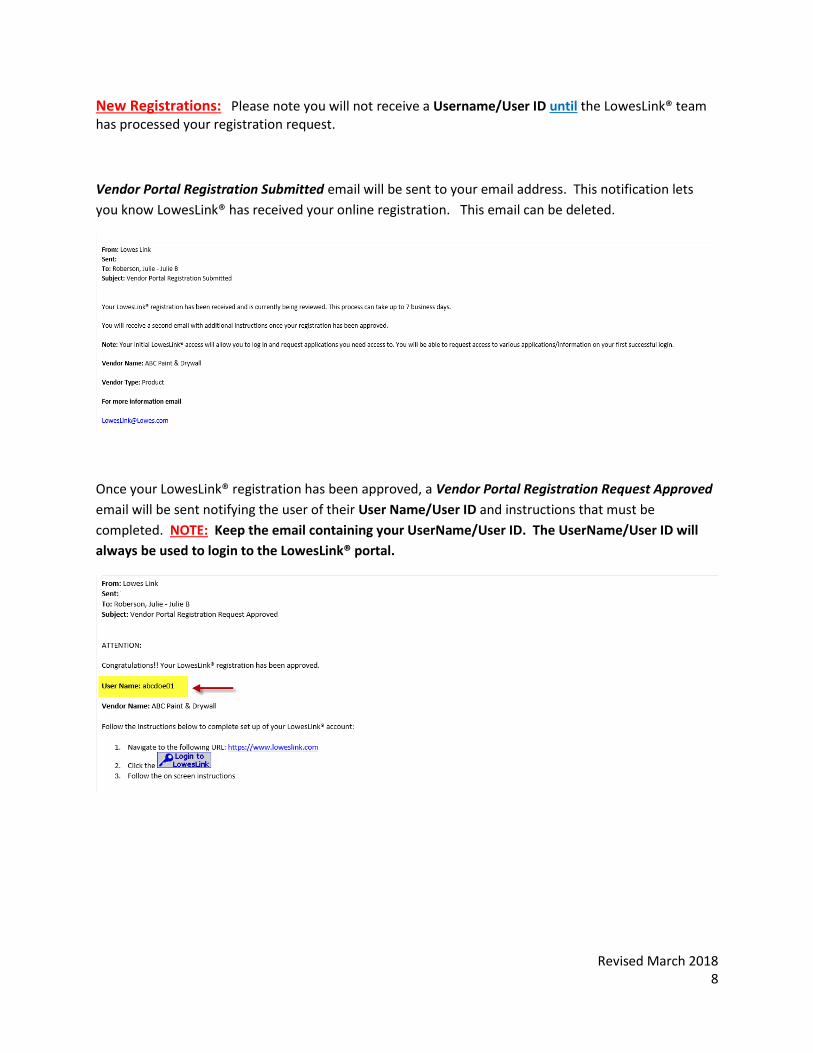
New Registrations: Please note you will not receive a Username/User ID until the LowesLink® team has processed your registration request.
Vendor Portal Registration Submitted email will be sent to your email address. This notification lets
you know LowesLink® has received your online registration. This email can be deleted.
Once your LowesLink® registration has been approved, a Vendor Portal Registration Request Approved
email will be sent notifying the user of their User Name/User ID and instructions that must be
completed. NOTE: Keep the email containing your UserName/User ID. The UserName/User ID will
always be used to login to the LowesLink® portal.

Revised March 2018 9
Login screen: Enter your Username/User ID and click Continue
The following screen prompt will appear:
NOTE: The browser window CANNOT be closed. Entering your User ID again in a new browser will prompt another email to be sent with another new code.

Revised March 2018 10
An Enrollment Activation Code for LowesLink® email will be sent to your email address containing the
Activation Code that must be used. Activation Codes are time sensitive and for one-time use only. If
you do not use the Activation Code within 10 minutes it becomes invalid. After this code has been used,
this email can be deleted.
Copy/paste the Activation Code and then click Submit

Revised March 2018 11
Next, create a New Password. As you meet the password requirements, the screen will change from
RED to GREEN. Both the Username/User Id and the password you created will be used to login to
LowesLink®.
Create a password using the requirements on the screen. NOTE: You can only use the special characters
listed on the screen (!@#$%^?_~). Click Submit

Revised March 2018 12
On the LowesLink® Security screen, read and determine which choice best describes your computer.
NOTE: If you select Public computer you will receive a code each time you login to LowesLink®. Select
Private Computer and then click Submit

Revised March 2018 13
The screen will look like: (Example – Product vendor)
NOTE: All new Product, Expense and Carrier LowesLink® users are automatically given access to Lowe’s
Store Lookup, Supply Chain Information and Vendor Information on their LowesLink® profile. Product
vendors are also given Quality Assurance. Installers are only given Lowe’s Store Lookup.
Click Change My Access to request additional LowesLink® applications needed. NOTE – Not all
applications will apply to each company. ONLY select the applications truly needed.

Revised March 2018 14
Carefully read the requirements before selecting the applications needed and click Submit. Do NOT
request applications multiple times. This could result in both requests being deleted.
An Application Access Request Submitted email will be sent letting you know your LowesLink®
application request has been received and is being reviewed. This email can be deleted.

Revised March 2018 15
A Requested Application Access Approved email will be sent once applications have been approved and
added to your LowesLink® profile. You will receive a notification for each application approved. These
emails can be deleted.

Revised March 2018 16
Applications added to your LowesLink® profile will be displayed on the LowesLink® landing page. You
will see these applications once you login to LowesLink® with your Username/User Id. Click on the
hyperlink to select/open the application.
To log off LowesLink® you will click Logout.

Revised March 2018 17
Note To Remember:
The following conditions will cause you to be sent an Identification Code EACH TIME YOU LOGIN.
1. You log in from a different computer 2. Your temporary internet folders/cookies have been deleted 3. Internet Options setting is to delete browsing history on exit 4. Your company deletes temporary internet folders each night 5. You chose Public instead of Private Computer
When the screen prompts for an Identification Code you MUST wait for the email and enter that code as
soon as you receive it. After entering that 8 digit code you will be ask for the following:
• Answer 2 of your security questions correctly
• Enter the password you set up in the system
Referenced below are the action steps that will be taken.
Login screen: Enter your User ID and click Continue

Revised March 2018 18
The following screen prompt will appear:
NOTE: The browser window CANNOT be closed. Entering your User ID again in a new browser will prompt another email to be sent with another new code.
An Identification Code for LowesLink® Roaming Authentication email will be sent to your email address
containing the Identification Code that must be used. Identification Codes are time sensitive and for
one-time use only. If you do not use the Identification Code within 10 minutes it becomes invalid. After
this code has been used, this email can be deleted.

Revised March 2018 19
Copy/paste the Identification Code and then click Submit
Next, you will be prompted to answer two of your security questions. Click Submit

Revised March 2018 20
On the LowesLink® Security screen, read and determine which choice best describes your computer.
NOTE: If you select Public computer you will receive a code each time you login to LowesLink®. Select
Private Computer and then click Submit
Now that you have successfully answered your security questions, you will be prompted to key in the actual password you created when you retrieved your login id (Username/User ID).

Revised March 2018 21
The following screen will appear showing your application list once you have successfully entered in your original password.
You will receive a LowesLink® Roaming email once you have completed the steps listed above. This email notification can be deleted.