how to raise a requisition - connect group · 2019-10-30 · raising a requisition user guide how...
TRANSCRIPT
USER GUIDE
How to Raise a Requisition Raising a requisition is the first step in the CS2 cycle and triggers the chain of events that leads to receiving and paying for goods or services. This guide will show you how to:
• Raise a requisition by searching for Products and Services
• Build a Requisition Basket
• Code a Requisition with Delivery Details
• View the Status of Submitted Requisitions

Raising a Requisition User Guide
How to Raise a Requisition To raise a requisition, use the following steps:
Click on the Raise Requisition quick link.
1
2 Select the Company which you are buying for.
Additional step ONLY if you have access to raise requisitions for more than one Legal Entity (i.e. both Smiths News and Tuffnells)

Raising a Requisition User Guide
Build Requisition Options You now have the following options:
1 Search and select Add items from the catalogue to the requisition
2 Templates Select items from a choice of templates, each containing multiple goods
3 NCI / Service Add items from outside the catalogue of approved products and services
4 Punch Out Link to supplier’s own website and bring back items from there into your basket
5 Upload Electronically upload a basket using an excel template
6 Basket A list of all items added to the requisition

Raising a Requisition User Guide
How to Search and Select Items The search and select functionality allows for free text searches for products and services that are in your organisation’s catalogue. To use the text search functionality, use the following instructions:
Click the Search button. All results that match your search criteria will now appear. Click Clear Search Results to begin a completely new search
1 Select whether you wish to search for a Product or Category. Category example - stationery
2 Enter the Text you wish to search
3 Use Wildcard You can search for everything containing the word you have typed by
4

Raising a Requisition User Guide
5 Use the icons to switch between either a List view or Image view of the results as shown below
8 Enter the Quantity needed into the text box (note any minimum order values)
9 Click Add to Basket to add the required items to your requisition
Repeat this process until you have all the items in your basket that you wish to select using the Search and Select process
You can use the free text box to search within the results and the dropdown to filter by supplier, by clicking Apply Filter 6
7
Filter Results • Search Within Results You can use the free text box to
search within the shown results followed by clicking Go. • Price select a price range, or enter a price range using the
from and to boxes followed by Go • Suppliers Click on the supplier you wish to filter by Any combination of these filters can be used
Raising a Requisition User Guide
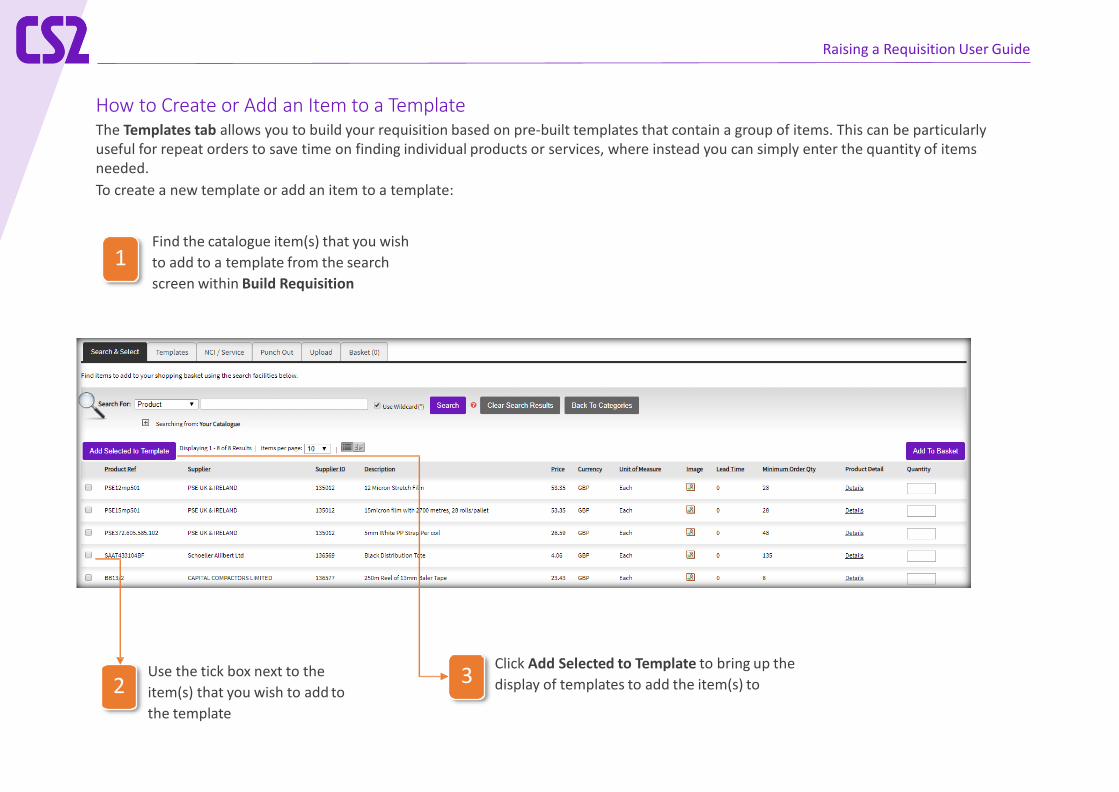
How to Create or Add an Item to a Template The Templates tab allows you to build your requisition based on pre-built templates that contain a group of items. This can be particularly useful for repeat orders to save time on finding individual products or services, where instead you can simply enter the quantity of items needed. To create a new template or add an item to a template:
1 Find the catalogue item(s) that you wish to add to a template from the search screen within Build Requisition
2 Use the tick box next to the item(s) that you wish to add to the template
3 Click Add Selected to Template to bring up the display of templates to add the item(s) to

Raising a Requisition User Guide
Create a New Template Enter the Name, Description, select Visible to, click OK.
4a To add an item to an existing template, click Select
Click Finish. The item(s) will now 5 appear in the template and can
be added to a requisition by using the template in the future
4b

Raising a Requisition User Guide
1 Use the search bar to search for a specific template
2 Click View on the template you wish to use
How to Use a Template

Raising a Requisition User Guide
3 Enter a Quantity for each item required 4
Click Add to Basket
Raising a Requisition User Guide
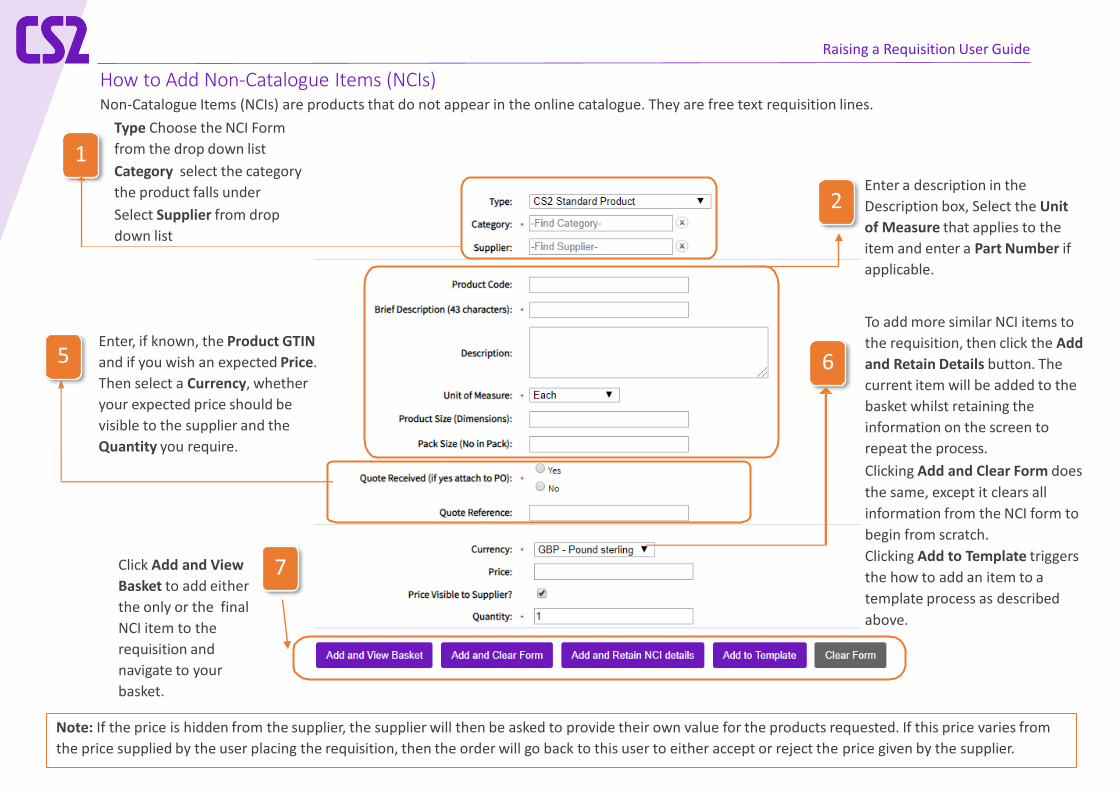
1 Type Choose the NCI Form from the drop down list Category select the category the product falls under Select Supplier from drop down list
2 Enter a description in the Description box, Select the Unit of Measure that applies to the item and enter a Part Number if applicable.
5 Enter, if known, the Product GTIN and if you wish an expected Price. Then select a Currency, whether your expected price should be visible to the supplier and the Quantity you require.
Note: If the price is hidden from the supplier, the supplier will then be asked to provide their own value for the products requested. If this price varies from the price supplied by the user placing the requisition, then the order will go back to this user to either accept or reject the price given by the supplier.
6
To add more similar NCI items to the requisition, then click the Add and Retain Details button. The current item will be added to the basket whilst retaining the information on the screen to repeat the process. Clicking Add and Clear Form does the same, except it clears all information from the NCI form to begin from scratch. Clicking Add to Template triggers the how to add an item to a template process as described above.
7 Click Add and View Basket to add either the only or the final NCI item to the requisition and navigate to your basket.
How to Add Non-Catalogue Items (NCIs) Non-Catalogue Items (NCIs) are products that do not appear in the online catalogue. They are free text requisition lines.
Raising a Requisition User Guide
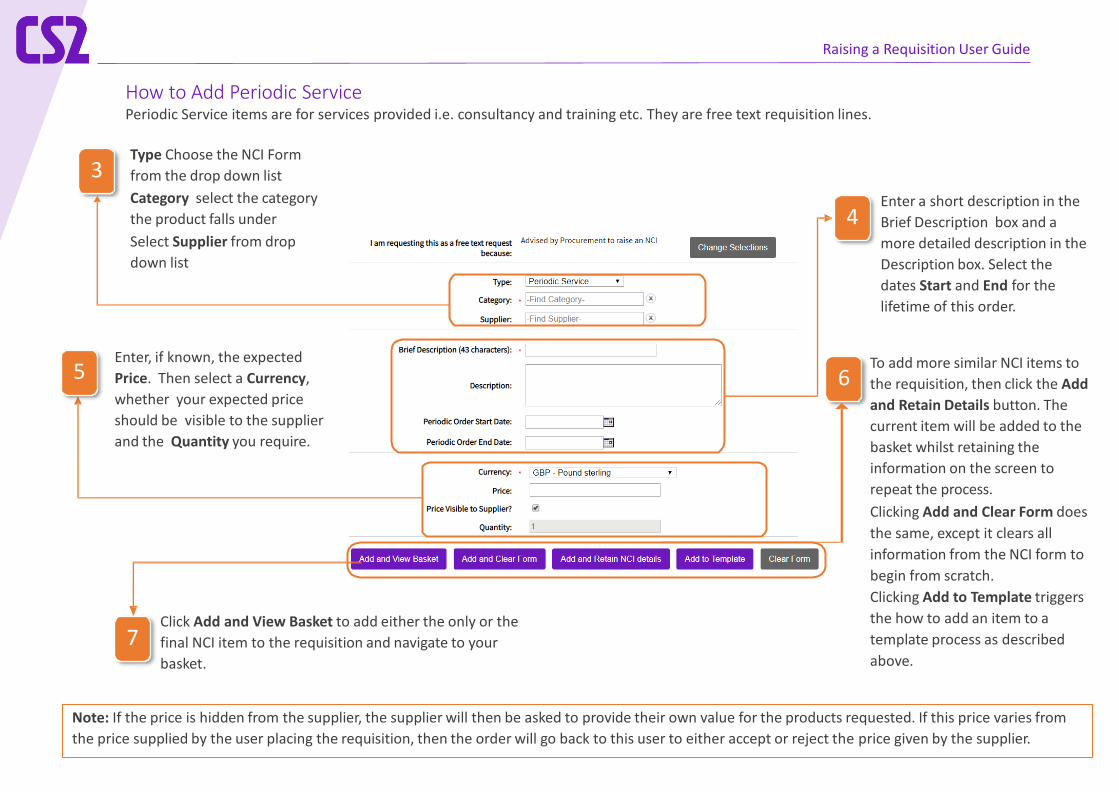
How to Add Periodic Service Periodic Service items are for services provided i.e. consultancy and training etc. They are free text requisition lines.
3 Type Choose the NCI Form from the drop down list Category select the category the product falls under Select Supplier from drop down list
4 Enter a short description in the Brief Description box and a more detailed description in the Description box. Select the dates Start and End for the lifetime of this order.
5 Enter, if known, the expected Price. Then select a Currency, whether your expected price should be visible to the supplier and the Quantity you require.
Note: If the price is hidden from the supplier, the supplier will then be asked to provide their own value for the products requested. If this price varies from the price supplied by the user placing the requisition, then the order will go back to this user to either accept or reject the price given by the supplier.
6 To add more similar NCI items to the requisition, then click the Add and Retain Details button. The current item will be added to the basket whilst retaining the information on the screen to repeat the process. Clicking Add and Clear Form does the same, except it clears all information from the NCI form to begin from scratch. Clicking Add to Template triggers the how to add an item to a template process as described above.
7 Click Add and View Basket to add either the only or the final NCI item to the requisition and navigate to your basket.

Raising a Requisition User Guide
How to Punch-out to a Supplier Site CS2 allows you to ‘Punch-Out’ to a supplier’s own website if they have been set up in this way. This allows you to select products from the supplier’s own website, before completing the purchasing process within CS2. To add items to your requisition from a punch-out supplier, use the following instructions:
1 On the Punch-Out tab, click the Supplier you wish to order from.
2 Build your basket in the supplier’s site. Click the Return Requisition button to bring the basket back to CS2.

Raising a Requisition User Guide
3 If required, select the Category that relates to each item
4 Click Add to Basket to complete the process of adding the item(s) to your requisition

Raising a Requisition User Guide
How to Upload a Basket This function is for uploading multi line requisitions instead of manually building a basket by uploading a .csv file.
1 On the Upload tab, select the Download Template complete before saving the file.
2 Select the Choose File button, find the file you have previously saved and select it
3 Click the Upload button. The items will now appear in the Basket tab and the system will automatically navigate you
Raising a Requisition User Guide
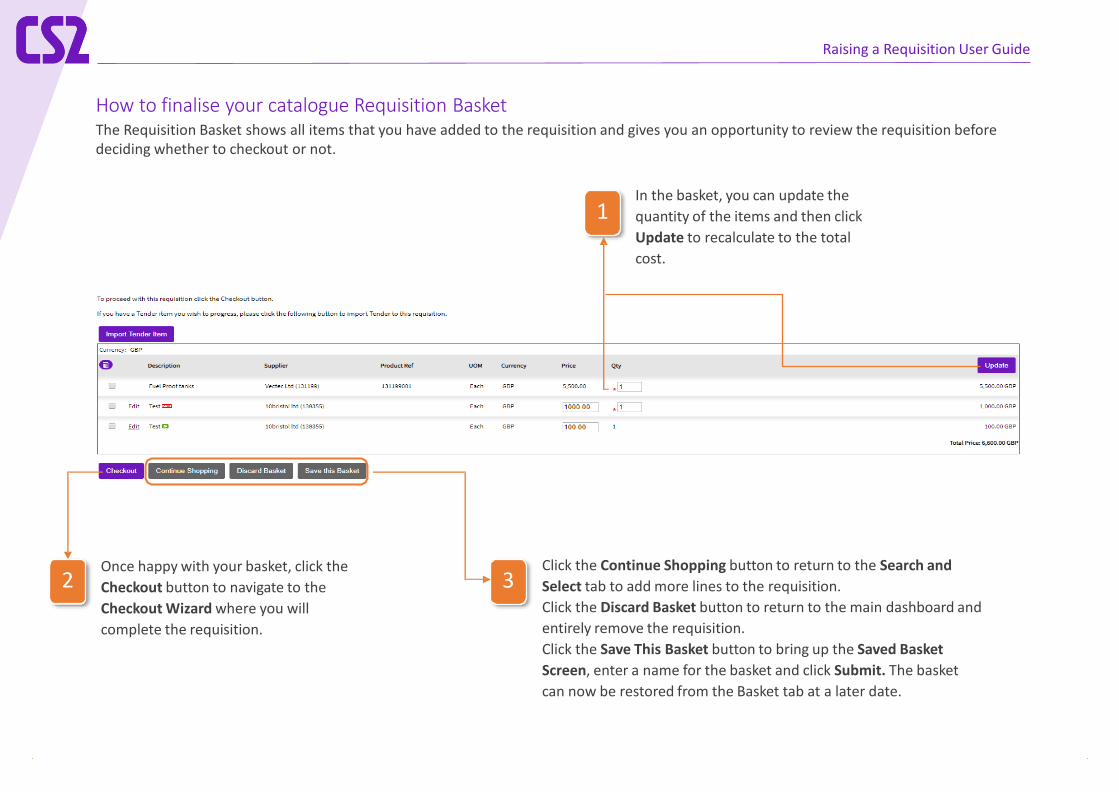
How to finalise your catalogue Requisition Basket The Requisition Basket shows all items that you have added to the requisition and gives you an opportunity to review the requisition before deciding whether to checkout or not.
1 In the basket, you can update the quantity of the items and then click Update to recalculate to the total cost.
3 Click the Continue Shopping button to return to the Search and Select tab to add more lines to the requisition. Click the Discard Basket button to return to the main dashboard and entirely remove the requisition. Click the Save This Basket button to bring up the Saved Basket Screen, enter a name for the basket and click Submit. The basket can now be restored from the Basket tab at a later date.
2 Once happy with your basket, click the Checkout button to navigate to the Checkout Wizard where you will complete the requisition.

Raising a Requisition User Guide
How to Checkout Once you have built your requisition basket and clicked to check out, you will need to follow these steps:
1 The Header tab is where the key top-level information for the requisition is entered
2 The Coding tab is used to attribute expenditure to your requisition line, such as cost centres, account codes and activities
3 The Delivery tab is used to allocate delivery addresses for line-items
4 The Notes and Attachments tab allows for either text comments or attachments to either the whole requisition or to individual items within the requisition
5 The Confirmation Tab is the final stage of the Checkout process. It summarises the requisition and is where you submit for approval

Raising a Requisition User Guide
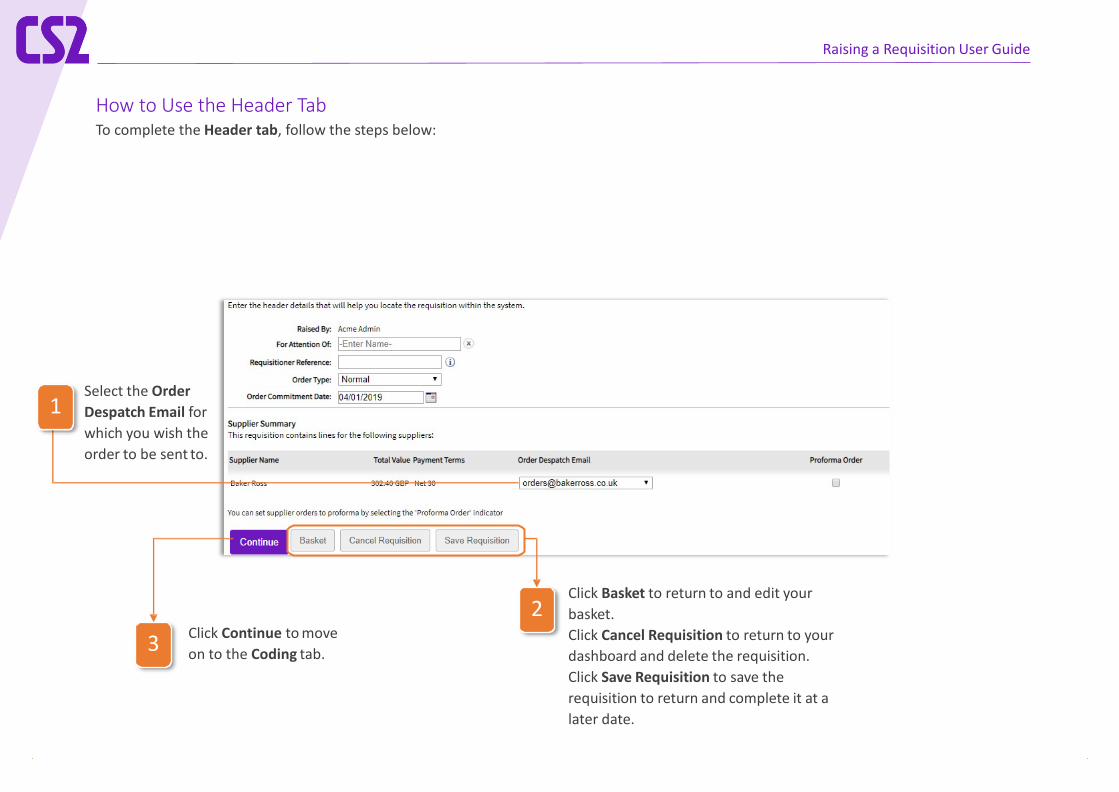
How to Use the Header Tab To complete the Header tab, follow the steps below:
1 Enter a user of the system in the For Attention Of box if you wish them to see this requisition.
2
Choose the Order Type Normal – Simple one-off order of items Scheduled – The order repeats at given time intervals Confirmation – The order has already been placed outside the system but needs recording in the system NOTE: your permissions will determine which order types you can raise

Raising a Requisition User Guide
Scheduled Orders Scheduled orders are a great way to place repeat orders without the need to manually create new purchase orders every time you wish the order to repeat
Scheduled orders should be used when you need to create a repeat purchase order for the same product or service over a period of time. The schedule will be set up with standardised values however these can be amended for individual purchase orders throughout the schedule period. Any increase in value will require additional approval
Select the start and end date of the whole schedule i.e. 6months/full financial year. Choose the Schedule Frequency: If daily, choose run days. If weekly, which day of the week? If monthly, which date each month (1-28) Choose the Time you want the PO released to the supplier. You have up to this time to make any amendments Calculate will automatically show run count (how many POs you are creating)
2
1
Raising a Requisition User Guide
How to Use the Header Tab To complete the Header tab, follow the steps below:
1 Select the Order Despatch Email for which you wish the order to be sent to.
2 Click Basket to return to and edit your basket. Click Cancel Requisition to return to your dashboard and delete the requisition. Click Save Requisition to save the requisition to return and complete it at a later date.
3 Click Continue to move on to the Coding tab.
Raising a Requisition User Guide
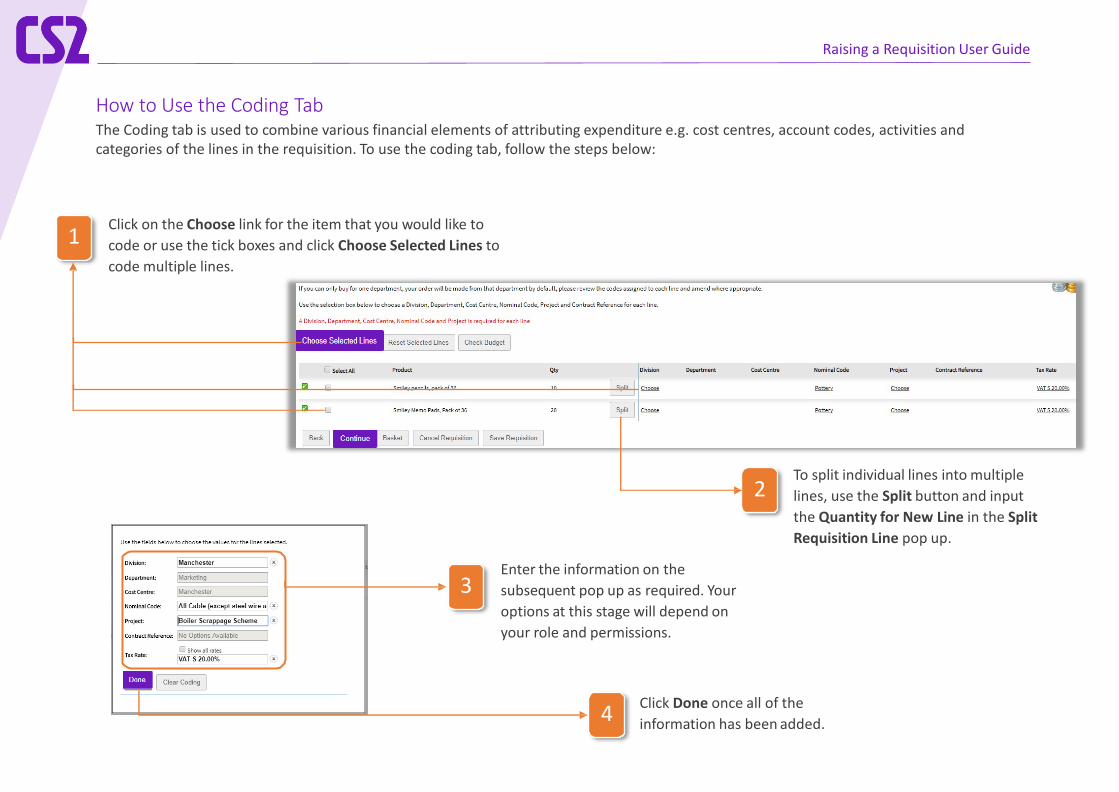
How to Use the Coding Tab The Coding tab is used to combine various financial elements of attributing expenditure e.g. cost centres, account codes, activities and categories of the lines in the requisition. To use the coding tab, follow the steps below:
1 Click on the Choose link for the item that you would like to code or use the tick boxes and click Choose Selected Lines to code multiple lines.
3 Enter the information on the subsequent pop up as required. Your options at this stage will depend on your role and permissions.
4 Click Done once all of the information has been added.
2 To split individual lines into multiple lines, use the Split button and input the Quantity for New Line in the Split Requisition Line pop up.
Raising a Requisition User Guide
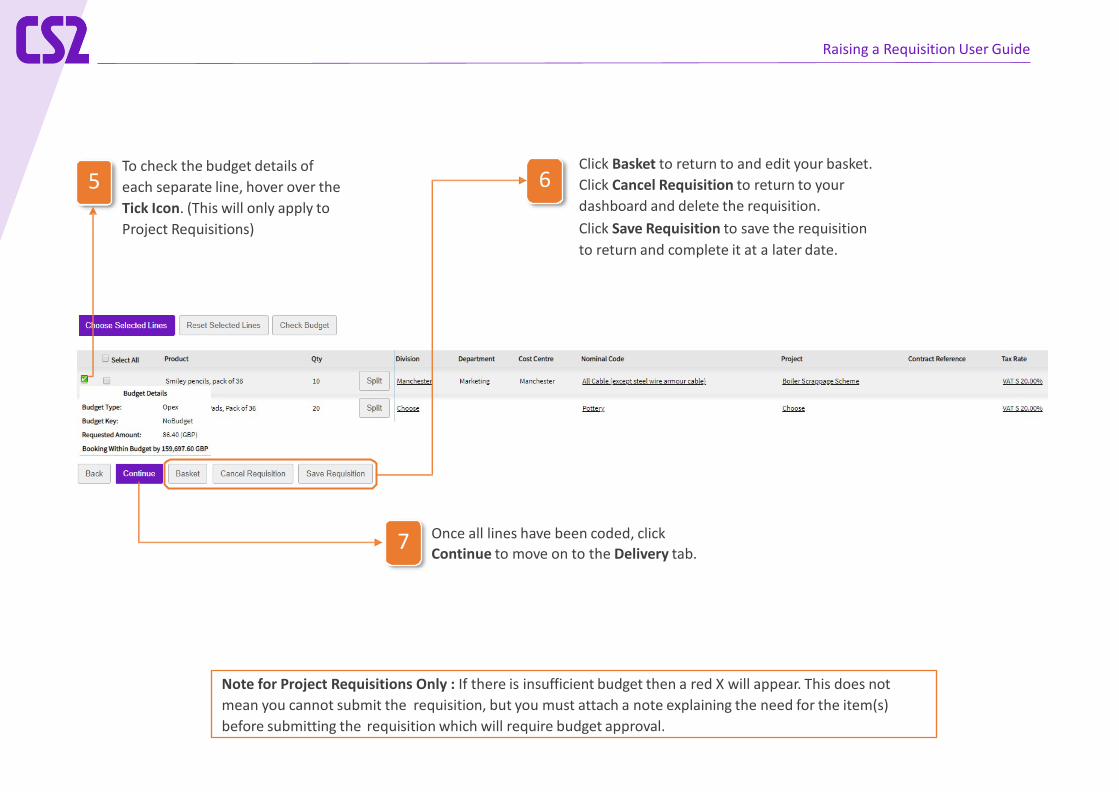
5 To check the budget details of each separate line, hover over the Tick Icon. (This will only apply to Project Requisitions)
6 Click Basket to return to and edit your basket. Click Cancel Requisition to return to your dashboard and delete the requisition. Click Save Requisition to save the requisition to return and complete it at a later date.
7 Once all lines have been coded, click Continue to move on to the Delivery tab.
Note for Project Requisitions Only : If there is insufficient budget then a red X will appear. This does not mean you cannot submit the requisition, but you must attach a note explaining the need for the item(s) before submitting the requisition which will require budget approval.
Raising a Requisition User Guide
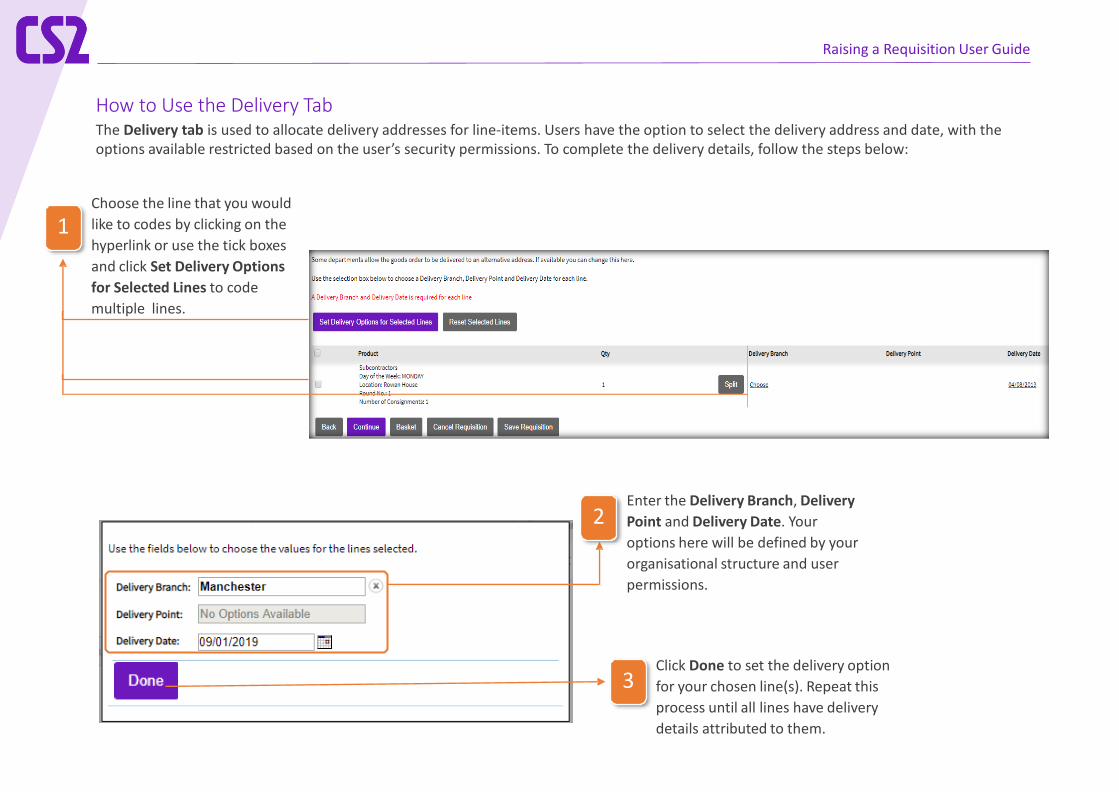
How to Use the Delivery Tab The Delivery tab is used to allocate delivery addresses for line-items. Users have the option to select the delivery address and date, with the options available restricted based on the user’s security permissions. To complete the delivery details, follow the steps below:
1 Choose the line that you would like to codes by clicking on the hyperlink or use the tick boxes and click Set Delivery Options for Selected Lines to code multiple lines.
2 Enter the Delivery Branch, Delivery Point and Delivery Date. Your options here will be defined by your organisational structure and user permissions.
3 Click Done to set the delivery option for your chosen line(s). Repeat this process until all lines have delivery details attributed to them.

Raising a Requisition User Guide
4 Click Basket to return to and edit your basket. Click Cancel Requisition to return to your dashboard and delete the requisition. Click Save Requisition to save the requisition to return and complete it at a later date.
5 Click Continue to move on to the Notes and Attachments tab.

Raising a Requisition User Guide
How to Add Notes and Attachments The Notes and Attachments tab allows for either text comments or attachments to be attributed to the whole requisition or to individual items within the requisition. To add a note or attachment, follow the steps below:
1 Click Add a Header Level Note to add a note or attachment relating to the entire requisition OR click the icon on any given line to add a note or attachment relating just to that line.
2 Choose who the note or attachment should be visible to: Internal, External or BuyerNote. Input your Message.
3 Click the Add Files for Upload button to add an attachment.
4 Click OK. The note and / or attachment will now appear either on the line or header level.
Raising a Requisition User Guide
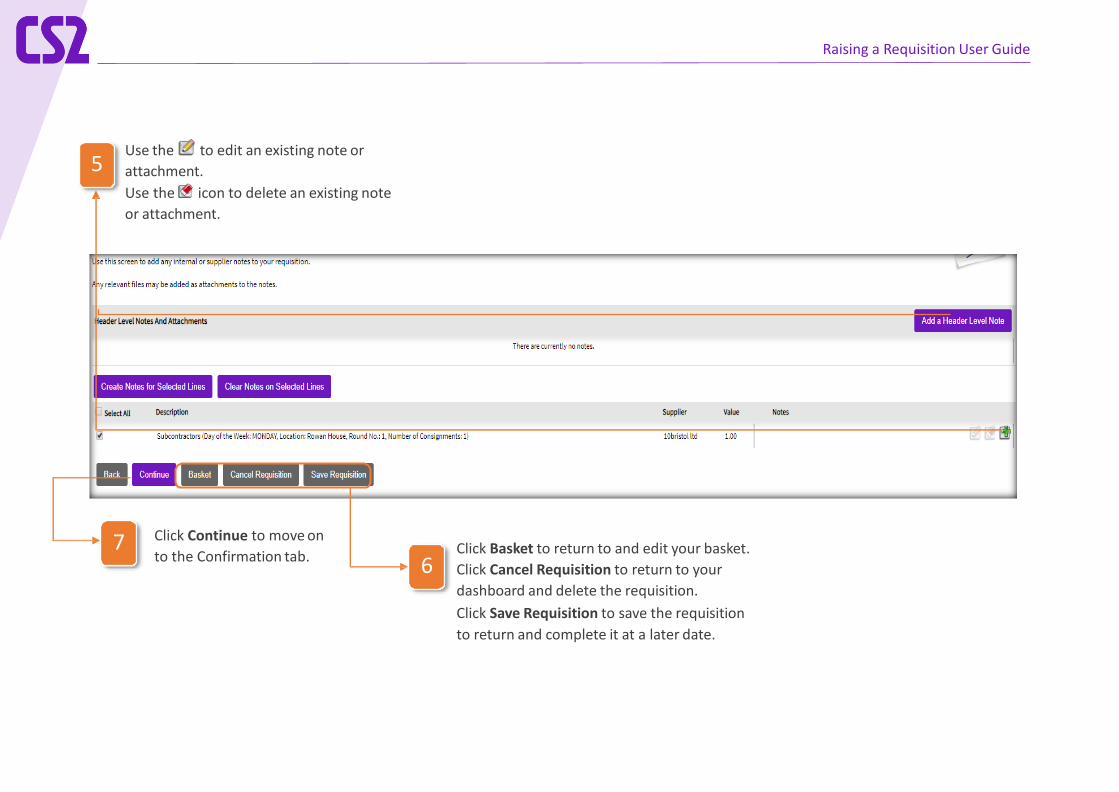
5 Use the to edit an existing note or attachment. Use the icon to delete an existing note or attachment.
6 Click Basket to return to and edit your basket. Click Cancel Requisition to return to your dashboard and delete the requisition. Click Save Requisition to save the requisition to return and complete it at a later date.
7 Click Continue to move on to the Confirmation tab.
Raising a Requisition User Guide
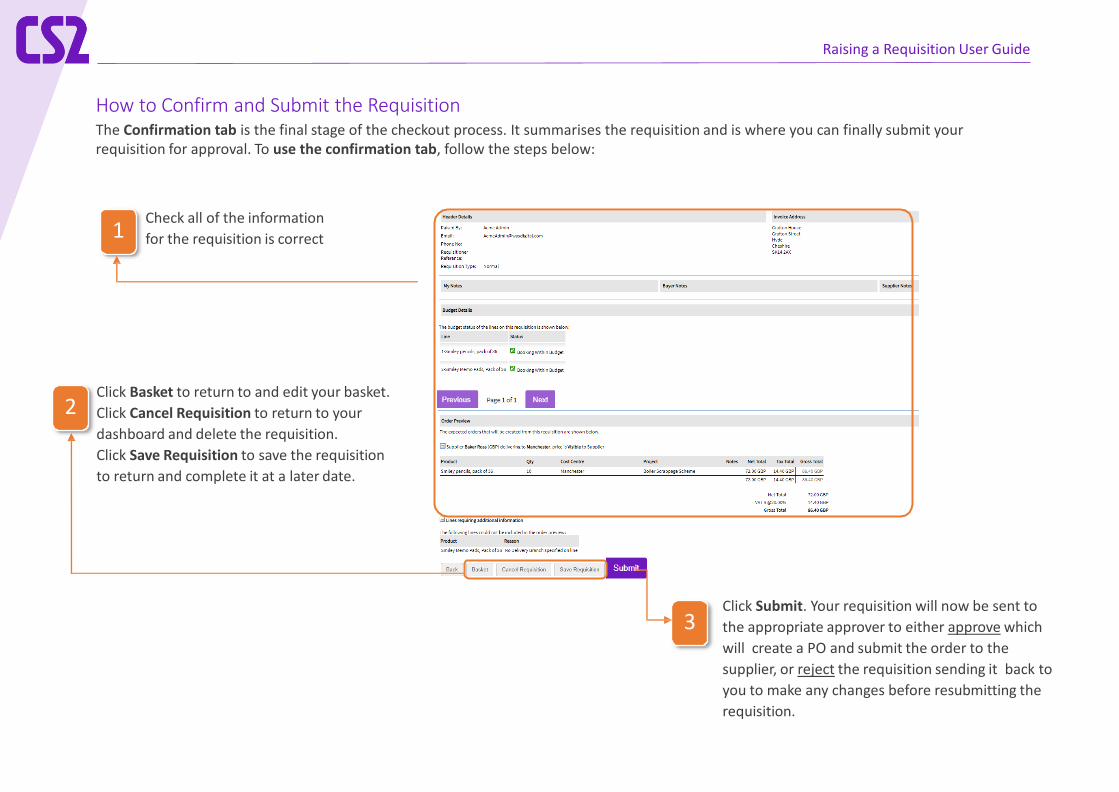
How to Confirm and Submit the Requisition The Confirmation tab is the final stage of the checkout process. It summarises the requisition and is where you can finally submit your requisition for approval. To use the confirmation tab, follow the steps below:
1 Check all of the information for the requisition is correct
Click Basket to return to and edit your basket. Click Cancel Requisition to return to your dashboard and delete the requisition. Click Save Requisition to save the requisition to return and complete it at a later date.
2
3 Click Submit. Your requisition will now be sent to the appropriate approver to either approve which will create a PO and submit the order to the supplier, or reject the requisition sending it back to you to make any changes before resubmitting the requisition.

Raising a Requisition User Guide
Once you have clicked the submit button, you will be shown the requisition reference screen giving you the following options:
4 Email a copy of the requisition to yourself (this is not a requirement) 5
See the approvals path that your requisition will now follow having been submitted
6 Navigate to Build Requisition to build a new requisition 7 Return to the dashboard