how to paint a car and save your money
TRANSCRIPT

airbrushdoc.com http://airbrushdoc.com/tipstricks/how-to-paint-a-car/
How to Paint a Car And Save Your Money
How to paint a car? If you need any advice then you should read this tutorial by my brother Alex. This “Howto” has been posted on some blogs already (for example: Slavka Kerdova website) but it was in Slovaklanguage. My intention was to share this guide with readers of airbrushdoc.com, so I translated it and gave itsome more description.
Ones I’ve decided to renew the look of my old car and finish it with some airbrush painting. After I started toprepare everything I wanted to share the process, step by step with other people. So I captured it all andstarted to write this article. When car got painted, I started to prepare the airbrush design for it. Unfortunatelysomething happened and I could not finish it. What exactly went wrong I revile at the end. This tutorial haswaited a long time to be posted and I didn’t want to wait any longer. I think that this guide for painting a carcan be useful for many airbrushists who do automotive airbrush, especially the airbrush beginners.
In this guide I’m painting Ford Scorpio 2.0I Ghia. The car is a bit old (1990) and has been driven more thanhalf a million kilometers. It has been crashed in the front some time ago but then it was fixed. Just before Iwas going to do the painting it got hit (easily) from behind, so there is a crack on rear bumper. Despite allthese facts it was more like experimental project as it was my own car and I got it cheap. Even thought, thecar has mark GHIA (Who doesn’t know German Ford with Ghia is high-class car – it has all the features aselectric windows and mirrors, air-conditioner, etc. At least it was “high-class” in 1990). For me it was kind ofcomfort provided inside the car, so I wanted to make it special from the outside.
The finish coat was in very bad condition. Dark blue color looked almost like it was black (that’s nice) butbecause of the Sun, roof, boot and engine hood became gray over time and it looked almost as it wassanded.
Dents all over the car body. Rear fender bead are practically gone, rust destroyed them (weakness ofthese cars).
Just to point out: the thing was more like learning and experimental process run on very tight budget as Ihave invested most of my money into underbody. This is actually my first car I’ve ever painted, so I wanteda good finish for very small money.
Process of painting the car.
Preparation
Before painting
Painting
After painting

PreparationFind out the amount and cost of paint and clear coat
Get all the equipment and materials (grinder, air compressor, spray gun, sand-paper, masking tape,foil …)
Find the proper premises (for the job)
A huge help for me was that there was a car welder in the premises where I was renting a garage (Laci,your advises are priceless).
I estimated the amount of paint to 2L and the same amount of clear coat, plus recommended amount ofthinner and hardener.
Now when I visited the closest store of automobile colors (in Slovakia) I almost lost all the motivation to doanything. I live very close to Ukraine border, so I decided to try it there. 2 Liters of dark blue enamel(Mobihel) + 1L of thinner + 2L of clear coat + 1L of thinner and half a liter of hardener cost me all together€90. I could buy 1L of urethane color at home for this money, so that’s great saving. Anyway I neededprimer coat as well (about 2L) + one can of black spray. 1L of primer coat is about €8.5.
Another materials needed: Sand paper with #80, #120, #240, #800 grit or even higher if you want betterfinish. Some fiberglass to fix the bumper, paper masking tape, covering foil and old newspapers. BodyFiller to fix all the dents. All the spraying tools I had at home so no worries there.
There was no special plan what has to be done step by step, most of the time there was a good friendhelping me out and we’ve planned what to do next during the smoke breaks.
Before The PaintingAll that’s left of rear fender bead was cut off and my friend (welder Laci) has made new fenders out of metalplate. I could buy new ones, but I tried to save everywhere I could. The car has been stripped of all theplastic details, bumpers, door handles, locks …
With masking tape we covered all the parts that could not be taken off and are not supposed to be sandedor painted. This is very important step and if you are afraid that one layer of tape is not enough, give it twolayers.

Then we started fixing all the dents and mistakes that this car collected during its life.
The Body Filler we used came with aluminum addition, it sticks very well to the body and when it dries outit’s hard as rock and it’s very good for sanding.

First sand paper we used to grind dried body filler is #80 next #120. Then we sanded the whole body with#120 and after #240. The parts with rust #80 – #120 – #240. Then body filler again to fill any gaps thatwere made during previous sanding. Wait till it dries and sand again.
The whole process of roughly sanding took about 4 evenings. While waiting for body filler to dry out I fixedthe bumper with fiberglass (I bought a fiberglass fixing kit in paint shop for €7).
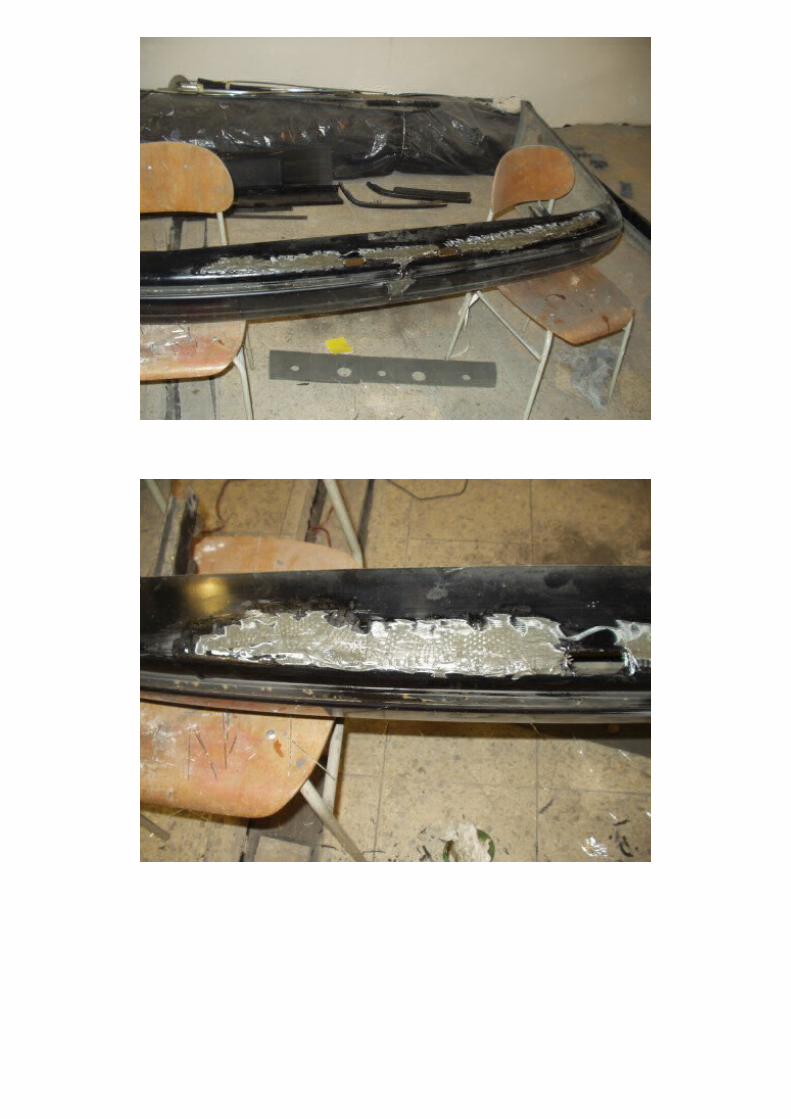

The bumper was cracked through the length, so I sanded it around the crack and made some chases withgrinder to make better connection of fiberglass and plastic bumper. When fiberglass dried I put some BodyFiller on it and after all I sanded it exactly the same way as I did the car body. Fiberglass has been used forinside of the bumper too just to make it more firm.
Then we started the process of detailed body filling. It means that we fill, sand, find more to fill and sandagain, fill and sand until the body is spotless. Before you even use body filler, the body has to be almostdent free so the layer of filler will be as thin as possible. If you use more body filler to hide deeper dent it willcrack one day or fall off (check the instructions on the body filler can – it has to be around 2 to 5 mm).

Now this car is ready for primer coat. Make sure you masked everything you don’t want to paint. The car isactually sanded only to #240 grit. Wash it to get rid of any dirt and dust. Then make it oil-free using benzineor painting prep solvent (can buy in any paint shop very cheap).
Painting The Car
On the picture above you can still see the mist after primer coat. After the mist is gone, we have to check thebody for other mistakes we may have forgotten or missed. As you can see on the picture below we foundsome. How to proceed then? This is where we use black spray can. It is called a checkout spray. We useblack because it’s best for check after sanding. Then the process is the same as before: sanding – filling –sanding – primer coat.

After this we start wet-sanding using sand-paper #800 until black color is gone and the surface is glossy(especially important for enamel). Don’t be afraid to sand it to the original coat, it’s better than leave any pits.When you fix all the mistakes, wet-sand the whole body with sand-paper #800.

Masking is gone because of water, so we have to mask it again. After complete masking, the car and plasticbumper are ready for enamel.
When we prepared the car for enamel we decided to move it to my friend’s garage (proper ventilation – lessdust – very important). When spraying hold the spray gun 15 – 25cm from surface and spray it in smoothlevel strokes. Overlap strokes by 50%. Snaps below were made with my phone right after we sprayed thecar, so the quality of these snaps is not the best.

The pause between enamel coat and clear coat is really short. Enamel is glossy right after spraying. But itgets matt after a while when it dries out (in my case I barely cleaned my spray gun after enamel coating –anyway it should be no more than 90 minutes). Then you can start applying clear coat.
When you have diluted the clear coat, do not wait as hardener does its role. I did two heavy layers of clearcoat, but you can make more. If you do light layers make more than 4. Give it about 15 minutes beforeapplying next layer.

I finished at about 11pm and I was very tired so I left everything as it is and went home to get some sleep.Next day I started with cleaning. Take all the masking off and mount all the parts back (be very careful not toscratch anything). It’s good to mark unmounted parts. I didn’t and I had some troubles to find where theybelong. Do not make the same mistake. Here is the final product (wheels are different as I had to changethem for set with winter tires).

I wanted to write something about polishing but I didn’t polish because I wanted to airbrush some stuff on it,then give it another clear coat and then polish it. I even had prepared airbrush designs.


ConclusionEven though I crashed the car and had to deal with it all over again I don’t regret I painted it, as I did it myselfwith some help and if I’m going to do it again I’ll be more confident of what I’m doing and I will know if I’mdoing it right. I learned a lot, I got some practice and got some bit of a skills for almost no cost. Next time I’lldo it better.
If you like this tutorial then share it, like it, tweet it, or if you have anything you want to point out or you don’tagree with something or have some better advice, please leave a comment bellow.