how to make pin stories? - sentinel hub
TRANSCRIPT

0
HOW TO MAKE PIN STORIES?
Submit your pin story to our Custom Script Contest and compete for a prize!

1
Prepared by: Sinergise laboratory for geographical information systems, Ltd.
Cvetkova ulica 29, 1000 Ljubljana
30.4.2021, Ljubljana

2
Contents
1 Introduction ............................................................................................................................... 3
2 Register for the Contest and Get More Data ................................................................................. 3
2.1 Access Open EO Data Collections ................................................................................................ 3
2.2 Access Non-Open EO Data Collections ........................................................................................ 3
3 Create and Export Your Pins ........................................................................................................ 5
4 Create a Pin Story ....................................................................................................................... 6
5 Submit Your Pin Story ................................................................................................................. 8

3
1 Introduction
This year’s Custom Script Contest theme is urban growth in Africa. We are hoping to learn more about how remote sensing can help us understand and monitor changes in urban growth. New solutions can come a long way in starting positive change.
One of the submission possibilities, especially suitable for beginners and students, is to submit a pin story, where you tell a story with EO Browser pins and descriptions. You don't need to do any scripting for that - you may use the pre-prepared visualizations and scripts from our custom script repository, while focusing only on the story. Pin stories should ideally focus on urban development in Africa, but other cool ideas are also welcome.
In this tutorial you will learn how to create pin stories in EO Browser and all you need to know to submit them to the Contest. If you win, you will receive a nice prize, but even if you don't, creating pin stories is fun, and you can share them with friends, on social media or even write a blog post on them. We can't wait to see your submissions!
Note: To create a pin story, you will need to be familiar with EO Browser. Check out our EO Browser website and watch the EO Browser webinar, where you will learn all about its features.
2 Register for the Contest and Get More Data
You must register for the Contest by completing this registration form. Completion of the form is mandatory for all entrants who wish to submit their pin stories. The registration form will ask you for an email address associated with your EO Browser account or Sentinel Hub account. The choice of account depends on which data collections you wish to access.
2.1 Access Open EO Data Collections With the EO Browser account, you can create and save your pins from the available open collections. You can simply create a free EO Browser account here and proceed to create your pins.
2.2 Access Non-Open EO Data Collections If you would like to gain access to additional layers and non-open EO data collections with higher resolution images, create a free Sentinel Hub trial account here (unless of course, you have an account already1). You will be given a special configuration, that contains carefully prepared layers for urban exploration from the following data collections:
• Sentinel-1 GRD - CARD4L compliant Sentinel-1 data.
• Sentinel-2 L2A with specially selected layers for urban exploration
• Layers visualising high-resolution commercial data collections, such as Airbus Pleiades and SPOT, PlanetScope, and Maxar’s WorldView/GeoEye provided by European Space Imaging. Only available over the Dakar area.
1 If you have had a trial account in the past but it has expired, contact us and we will extent its validity for the duration of the Contest.

4
Within two working days after your registration, our team will prepare a new configuration for you that includes the layers for Sentinel-2 L2A, Sentinel-1 GRD CARD4L data, SPOT, Pleiades, WorldView/GeoEye and PlanetScope, so you won't have to configure anything yourself. You will receive an email informing you when your account is properly configured so that you can find the collection in EO Browser.
Figure 1: With your Sentinel Hub trial account, you can also view and configure your configurations directly in the Sentinel Hub Dashboard.
In EO Browser, you must be logged in to find your configuration by name by expanding the drop-down menu under Theme at the top of the Discover tab. In the list you will see several collections to choose from. Click on the Africa Custom Script Contest configuration (Figure 2). Select one “Data source” and navigate to the area you want to explore (note that to see the data from SPOT, Pleiades, WorldView/GeoEye and PlanetScope, you must view the Dakar area). Increase the time range (for Pleiades and SPOT the data goes back to 2012-03-13 and 2012-10-17 respectively), and click "Search". When you do this, you can select and visualise the tiles.
Figure 2: Listed configurations in EO Browser (left) and available collections in Africa Custom Script Contest configuration (right)
5
If you would like to add new layers to your configuration or create your own configurations from scratch, check this FAQ and the section on configurations in one of our webinars.
Note: Commercial data given to you for the Urban Growth in Africa Contest can only be used for the Contest itself. If you need commercial data for any other use, use our third party data import service to purchase and order commercial data.
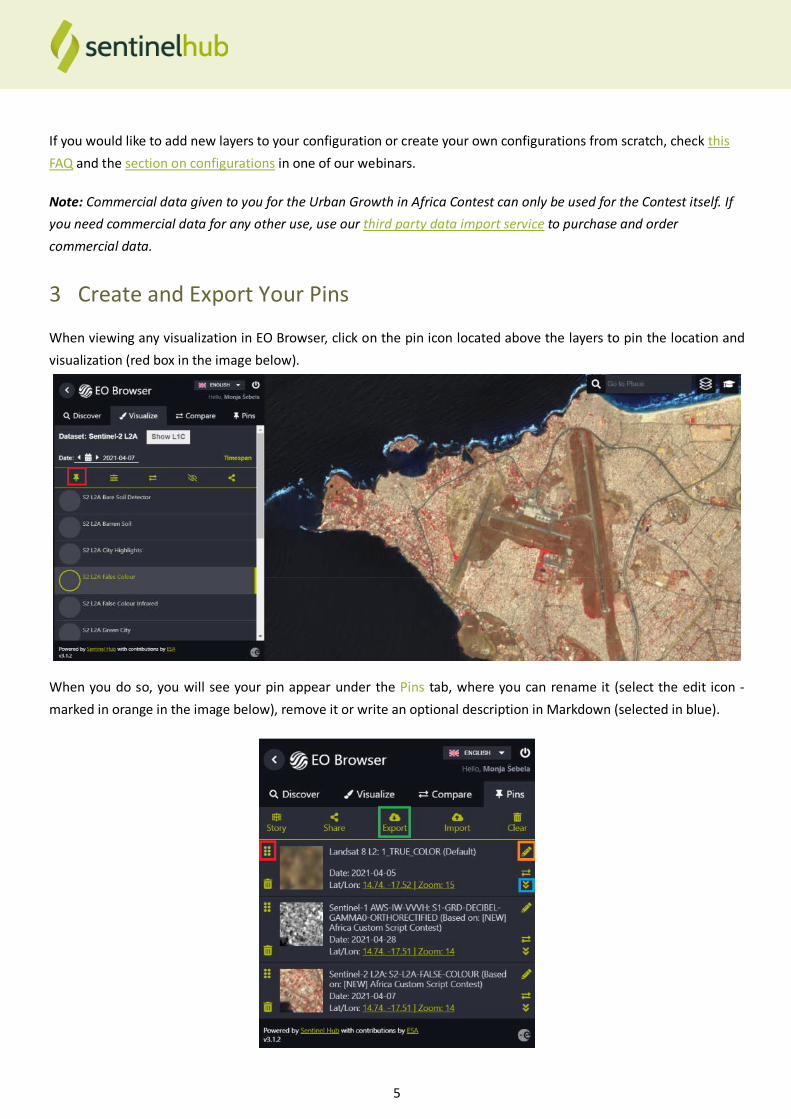
3 Create and Export Your Pins
When viewing any visualization in EO Browser, click on the pin icon located above the layers to pin the location and visualization (red box in the image below).
When you do so, you will see your pin appear under the Pins tab, where you can rename it (select the edit icon - marked in orange in the image below), remove it or write an optional description in Markdown (selected in blue).

6
You can create as many pins as you like by going back to the Visualize tab and pinning different visualizations. If you have saved multiple pins, you can rearrange them by dragging the dots icon on the left (highlighted in red in the image above).
If you want to add a pin from another data collection, go back to the Discover tab, select another collection, and search for data again. If you only see a few collections available, choose the "Default" option or a different theme from the Theme drop-down menu on the Discover tab.
When you're happy with your pin selection and arrangement, export them by clicking the Export button at the top of the Pins tab (highlighted in green in the image above). This will download a JSON file to your computer, which you shouldn't change - you'll upload it as is to the submission form.
Note: Make sure you are logged in to EO Browser to ensure your pins are saved to your account. Otherwise, you could lose all your pins as soon as you close the browser window.
Note: If you have used the pins from a custom configuration, such as the one we prepared (using either commercial data, CARD4L, or a custom Sentinel-2 configuration), when you send someone the JSON file of the pins and they import them, they will not be able to see your pins from that configuration. However, this is not a problem for the Contest.
4 Create a Pin Story
To create a pin story, first rearrange the pins in the Pins tab by clicking on the dots icon to the left of each pin (as highlighted in blue in the image to the right) and dragging it so that the pin you want to be first in your story is on top. You can't rearrange your pins in the Pin Story Builder - they will appear in the same order as they are set in the Pins tab.
Next, click the Story button in the Pins tab, highlighted in red in the image to the right. This will open a Pin Story Builder window, as shown in the Figure 3.
Note: Only the pins that cover your current viewing area in EO Browser will be included in the Story Builder. For example, if you have 10 pins in the Dakar area and 2 pins in the Alps and your EO Browser window is zoomed to Dakar, only the Dakar pins will be included in the pin story. If you are in the Alps, only the 2 Alps-related pins will be included in your Pin Story. If you are not in either area, none of the pins will be displayed.
In addition to the instructions above, check out the section on Pins in our EO Browser webinar to learn more.

7
Figure 3: Pin Story Builder window
The Pin Story Builder allows the following options, as higlighted in colors in Figure 3:
• You can rename your pins by clicking on the pencil icon to the right of each pin, as higlighted in orange.
• You can select the speed of your animation, as highlighted in blue. You can stop your animation and scroll through it using a bar highlighted in green to inspect each pin individually.
• You can choose what information to display on your pins by enabling or disabling the options on the right (highlighted in red):
o You can choose whether to display the title of your pins at the top for each pin by enabling Show slide title.
o You can choose to display labels and borders over all your pins by enabling Show overlays.
o You can show the logo, scale, and information about the collection and date it was taken by enabling Show captions.
o You can add legends to pins that use layers with preconfigured legends by enabling Show legend.
Note: If you close the Pin Storey Builder window, all your changes (changed titles, enabled options) will be lost and you will have to make them again.
When you are satisfied with your setup, click Download to download a GIF animation to your computer.
Finally, prepare the actual story - write about it, describe all your pins and let us know what changes and interesting features you discovered in your urban area in Africa!
In addition to the above, check out the section on how to make pin stories in our EO Browser webinar.

8
5 Submit Your Pin Story
After you have registered for the contest and prepared your story, you will need to submit the following files to the Pin story submission form:
• Pins JSON file (as exported from EO Browser, see Chapter 3).
• Pin story GIF (as exported from EO Browser Pin Story Builder, see Chapter 4)
• Additional file with a description of your pin story - what you are highlighting with your pins and descriptions of all pins. The file can be either .txt, .md, .pptx, .pdf or .docx.
Note: For uploading, it is best to zip your file(s) to avoid file upload issues - zip it even if you are only submitting one file under each requested question in the form.
If you want to submit multiple pin stories (there are no limits), you can zip two to three JSON files and upload the zip file to the JSON file slot, and do the same for the GIF and text files. Make sure that the JSON, GIF, and text files are named the same for each story. Alternatively, you can submit separate pin stories in separate submission forms.
Also, fill out the other requested information and submit your pin story for review.
We look forward to receiving your great pin stories!

9