how to make and install an a-frame barn owl nestboxd)new how to make and install a barn owl nest box...
TRANSCRIPT

Materials 8x4 sheet of 18mm exterior plywood, preferably from sustainable sources (Scandinavia)* 20.5” x 2x2 softwood (cut to 60º angle) & 18” x 1.5” x 0.5” battens for hatch etc 40 mm screws (and glue by choice) Woodstain, water-based such as Cuprinol “Ducksback” Woodchips *Scraps of ply can be used, but if the thickness is less than 18mm, battens will be needed and the dimensions will have to be adjusted Tools Electric saw, capable of 60º cut 5” hole-saw and/or Jig-saw Sandpaper Screwdriver, preferably electric or battery Paintbrush Cutting and Assembly Follow the instructions on Diagrams A, B and C on subsequent pages. Installation - Boxes should generally be installed outside of the bird breeding season (unless an internal or pole box), ideally between September and February, to avoid the risk of an offence regarding the damage or destruction of birds
nests that are in use. The months of August and March may be acceptable, providing the tree surgeon proceeds with care
checking for late or early nesting birds. Due caution is recommended throughout the year because other bird species, such as
blackbirds and barn owls, have been know to nest throughout the year. - An inch or two layer of wood chippings or shavings should be sprinkled on the inside of the box floor – this encourages nesting and stops eggs from rolling around. It often helps to add a few barn owl pellets if they are available, to give the “lived in feel”. - The box should be installed 3-5 metres up in the tree, no higher. - Tree branches should be trimmed so that owls can fly in and out directly. - The nest box will normally be mounted on a level platform of 2 bearers (2X4” wooden batons), with the help of a bough or two. The box should be screwed to the bearers and, if possible, to nearby branches so as to provide a firm and permanent fixing, and avoiding bolts being drilled directly into the trunk. In the absence of supporting branches 2 bearers may be fixed to the tree trunk, creating a level triangular platform for the nest box to rest on. Use a third bearer to support the weight of the box and keep the platform level, by fixing to the centre of the tree trunk underneath and the frontal point of the platform. - Nails used to secure the bearers should be galvanized iron coated, so will not subsequently affect the commercial value of the tree through staining. - Do not be disappointed if barn owls do not adopt the nest box in the first season. If they are around and
How to make and install an A-frame barn owl nestbox
Suffolk Wildlife Trust Brooke House, Ashbocking, Ipswich IP6 9JY Tel: 01473 890089 Fax: 01473 890165 Email us at [email protected] or visit our website at www.suffolkwildlifetrust.org
Registered Charity No 262777 Living Landscapes, Living Gardens, Living Seas
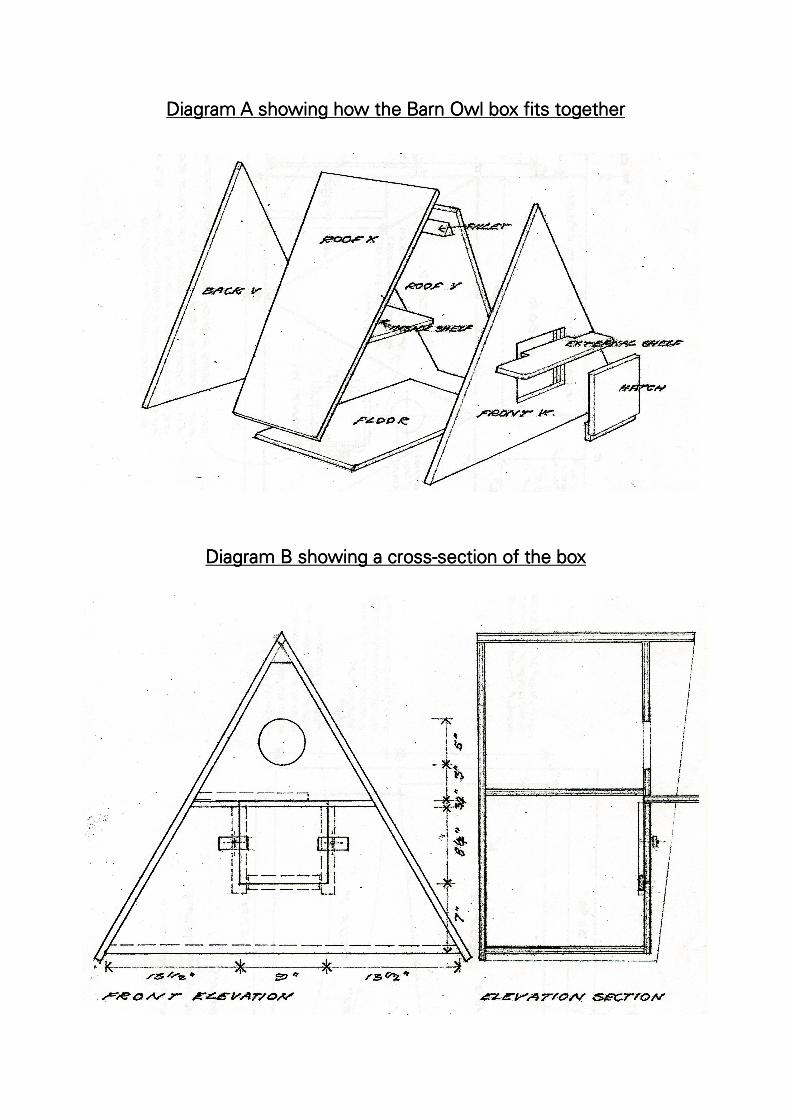
Diagram A showing how the Barn Owl box fits togetherDiagram A showing how the Barn Owl box fits togetherDiagram A showing how the Barn Owl box fits togetherDiagram A showing how the Barn Owl box fits together
Diagram B showing a crossDiagram B showing a crossDiagram B showing a crossDiagram B showing a cross----section of the boxsection of the boxsection of the boxsection of the box
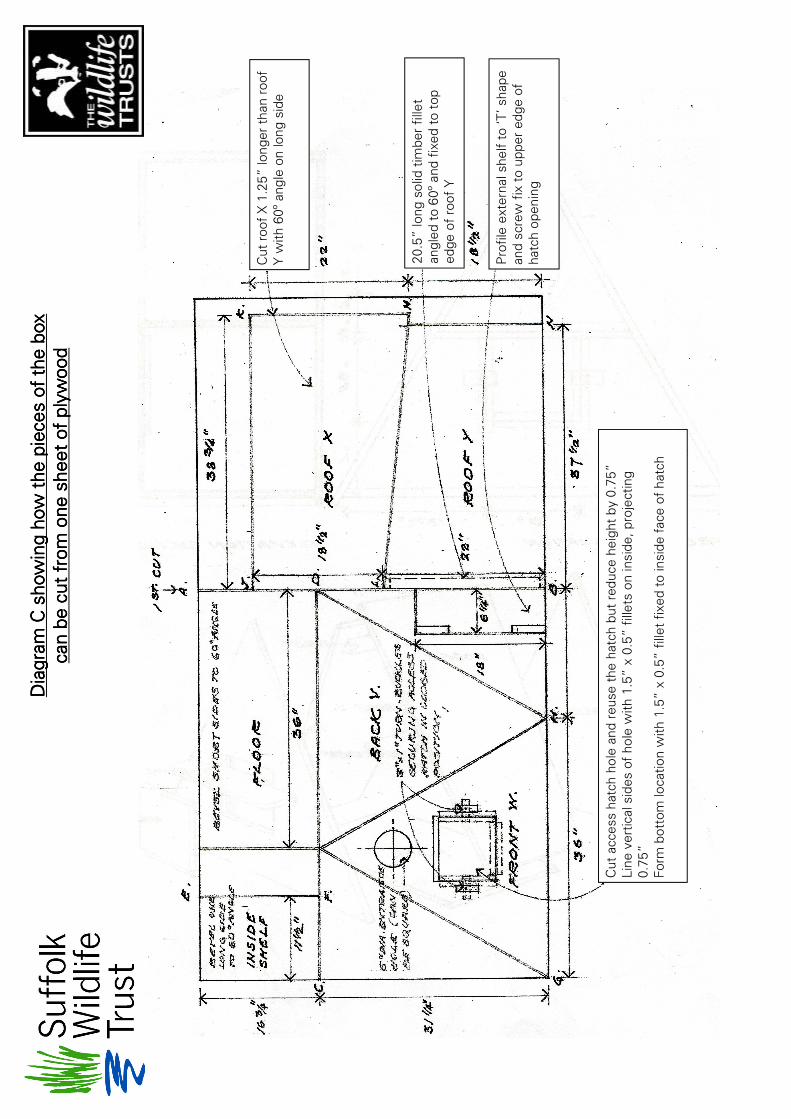
Diagram
C showing how the pieces of the box
Diagram
C showing how the pieces of the box
Diagram
C showing how the pieces of the box
Diagram
C showing how the pieces of the box
can be cut from one sheet of plyw
ood
can be cut from one sheet of plyw
ood
can be cut from one sheet of plyw
ood
can be cut from one sheet of plyw
ood
Cut roof X 1.25”
long
er than roof
Y with 60º ang
le on long
side
20.5” long solid tim
ber fillet
angled
to 60
º and fixed
to top
edge
of roof Y
Profile external she
lf to ‘T
’ shape
and screw fix to up
per edge
of
hatch op
ening
Cut access hatch ho
le and
reuse the hatch but red
uce height by 0.75
” Line
vertical sides of ho
le w
ith 1.5” x 0.5”
fillets on
inside, p
rojecting
0.75
” Form
bottom locatio
n with 1.5” x 0.5”
fillet fixed
to inside face of hatch
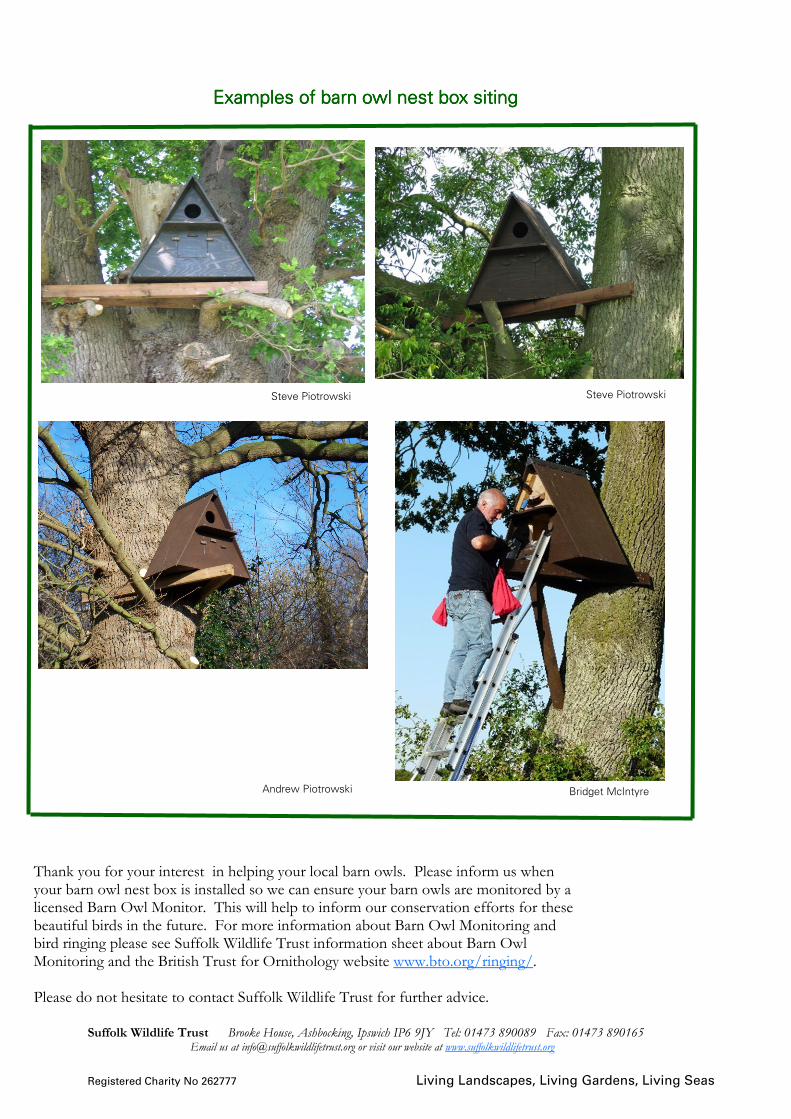
Thank you for your interest in helping your local barn owls. Please inform us when your barn owl nest box is installed so we can ensure your barn owls are monitored by a licensed Barn Owl Monitor. This will help to inform our conservation efforts for these beautiful birds in the future. For more information about Barn Owl Monitoring and bird ringing please see Suffolk Wildlife Trust information sheet about Barn Owl Monitoring and the British Trust for Ornithology website www.bto.org/ringing/. Please do not hesitate to contact Suffolk Wildlife Trust for further advice.
Steve Piotrowski
Examples of barn owl nest box sitingExamples of barn owl nest box sitingExamples of barn owl nest box sitingExamples of barn owl nest box siting
Andrew Piotrowski Bridget McIntyre
Steve Piotrowski
Suffolk Wildlife Trust Brooke House, Ashbocking, Ipswich IP6 9JY Tel: 01473 890089 Fax: 01473 890165 Email us at [email protected] or visit our website at www.suffolkwildlifetrust.org
Registered Charity No 262777 Living Landscapes, Living Gardens, Living Seas