how to make a history notebook - living history …livinghistory-books.com/historynotebook.pdfhow to...
TRANSCRIPT

Living History: Dan and Jan Hunter, 754 East 50 North, Heber City, UT 84032
(435) 654-4092 www.livinghistory-books.com e-mail: [email protected]
How To Make a History Notebook by Jan Hunter
(To use with books from Living History: The World Before Christ, The World After Christ, or
United States History curriculum; or you can use it with other history curriculum.)
A history notebook is a place for you to organize the things you are learning in history and watch
it grow as you add to it each year the things you study. Everyone should have their own history
notebook, including mom. As you have probably already heard the saying, “If you want your
children to learn it, you learn it, too.” A history notebook can be as big or little as you want to
make it. The following are some ideas for making your very own notebook and you will have
some of your own ideas to add to the list. Surprisingly once you start learning about the people
and events in history, ideas will come to you of resources you have in your own home that you
can use for your notebook, or you can find things at the thrift stores for an inexpensive price. The
main thing to remember about a notebook is to make it yours.
Materials: 1. 3 ring binder. You can start with a 2 inch 3-ring binder (you can add binders as your notebook
grows). If you use a “viewbinder” with a clear plastic slip cover you can slide a paper in the
front cover, back cover, and/or spine of the binder for your cover page and title of your history
book. Decide how you are going to divide history. If you use the Living History curriculum you
can use a binder for The World Before Christ, another binder for The World After Christ, one for
United States History, and one for Native American History.
2. Dividers. One for each “epoch” or time period. (An epoch is the term used in the Living
History books for a time period that is being studied about. If you use other history curriculum
you may want to divide the history into time periods you want to study and use dividers to
organize maps, time lines, biographies, etc. into corresponding periods of history.)
3. Paper (lined and copy paper), pictures, copies of person and event pages, copies of maps and
other materials listed below.
4. Box and file folders: I have found that once I started collecting pictures and magazine articles
I needed some way to organize them to see if I wanted to use them for history, or even put it in
my notebook. I labeled my file folders the same way the Living History books are titled, and I
have a folder for each Epoch. When I find something I file it away in its time period. Then
when I prepare for the epoch we are studying, I pull out my folder and see if there is a picture or
article that will add to what we are studying. An example is when we studied WWII I found an
article I had on Heinrich Harrer. After reading it I found out his story was told in the movie
“Seven Years in Tibet.” We watched the movie with our WWII studies and found it to be quite
interesting. It opened up our studies to other happenings during the war, yet the war had an
effect on people far from the fighting.

Cover: 1. Give your history notebook a title. This is your history book, so give some thought to your
title. Add your name to the cover - you are the author. (See sample cover page.)If you are
having a hard time thinking of a title for your notebook, put the cover page aside for now. It may
take working on the contents of the notebook to help you come up with a title that has some
meaning to you.
2. Draw a picture for your title page or paste on pictures (look under “pictures” section to get
some ideas). If you would like add a scripture or thought to the cover - make it yours.
3. If you have a viewbinder you can slip the page in the outside front cover to be seen on the
outside, otherwise this is your first page inside the binder.
Time Line: The sample time line was done in black ink for copying purposes. I suggest you use colored
pens to make it colorful. On my time line I use red for the year, blue for the person, and green
for the event. Make it colorful.
1. Each person who is old enough can make a time line to go in their notebook. Make a time line
on the time period or “epoch” you are covering that will show important people and events that
happened all over the world during that time period. If you are using the history books by Living
History then you would make one time line covering an epoch (see sample time line). The
Living History books also have a time line in each epoch to look at. To make a time line use a
blank
8-1/2" x 11" paper. (Some people have used a long strip of paper and put the whole time line on
it and folded it accordion style and put it in the front or back of the book instead of in each
divided section.)
2. You can also make a chronological time line on just one person or event you have been
studying. (See sample chronological time line on Martin Luther.)
3. Some people like to put a time line up on the wall of their classroom. (Even if your
classroom is in the kitchen - this makes a wonderful conversation piece as the family gathers
around the dinner table, or when company comes.) One suggestion is to buy colored butcher
paper (it comes on a roll and you can get the length you want). It can be found at copy stores
and places where they sell school supplies or educational materials). It comes 36 inches wide so
you can cut it into 12 inch strips or wider if you want. Put the dates of people and events you
study on the paper - and add pictures (see picture ideas below).
Person Page: As you can see in the Living History books there are no tests. I feel using a test means I have to
teach to the test and am not free to teach what I feel my children and I need to learn about
history. Instead of a test they write about a person and event that we have learned about.
Sometimes this takes individual study on their part depending on how much detail they want to
write. They will understand and remember history better this way than by answering questions.

1. You can make copies of the person page to fill out or make one of your own. For younger
children who are not writing yet you can use the page with the larger writing and have them tell
you what to write. For all other children you can decide whether to use the larger or smaller
printed page depending on how large they write and how much they can write about the person.
If you need more room use the back of the page or add lined paper.
2. Use this page to write about a person you are studying in history. For Living History
curriculum write at least one person page for each epoch. Sometimes you may want to write
about two people (or even more) that were studied about. In another year when you again study
the same time period you will study different people and events. You will then write up a new
person page and add it to your binder with the other people you studied about in previous years.
3. Write about someone you studied but let each person choose who they want to write about.
You can write about how this person followed the Lord, or didn’t follow the Lord. Write about
their characteristic traits that can be someone you would want to follow, or that made them weak
and gave us lessons to learn from so we don’t make the same mistakes. What are some choices
you would have made (or hope to make if you’re in the same kind of situation)? Or you can
write about events in this persons life or a brief biography about them.
4. Add a picture of the person who is being written about in the space provided. Read about the
ideas under Pictures.
5. Each person who wants to can give an oral presentation on who they wrote about. They can
share their whole paper or just some highlights.
Pictures: Pictures really help make your notebook fun to look at over and over again. One of my children
disliked writing but the pictures motivated her to write the person and event pages. The
following are some ideas on where you can find pictures for the notebook and how to make it fit.
If you need more than one of the same picture many copy stores can make the same picture in
duplicate copies on one page. You can also get colored pictures in duplicate. If the picture is too
large or too small to fit in the area provided on the person or event page, the pictures can be sized
down or enlarged and copied in duplicate for more than one child.
Sources for pictures:
Encyclopedia’s have some good pictures. I like to get real old ones that don’t cost much at the
thrift stores so I can cut out the pictures and make copies.
Old history text books (again at the thrift stores, or homeschool bookstores that sell used
curriculum).
Your own photographs are fun to use if you have visited a historical place.
Gospel Art Prints (from LDS Church Distribution). This comes in a packet of pictures from the
scriptures and church history. These pictures are copyrighted. I called the Church Offices
to get permission to copy them and to pass this information on to others. They gave
permission for these pictures to be copied for your own personal use except for the
following picture #’s which are restricted and you are not allowed to make copies:
116, 124, 125, 226, 321, 400, 417, 504, 600-on

You can also draw your own pictures about the person or event.
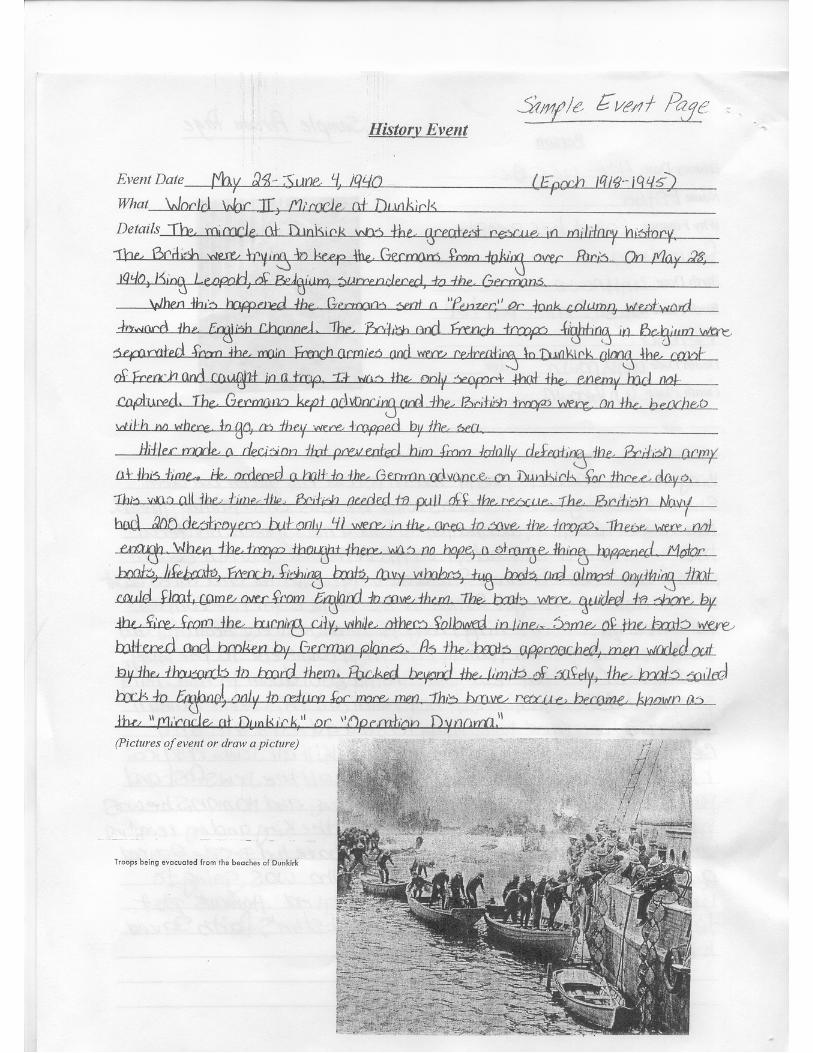
Event Page: 1. You can make copies of the event page to fill out or make one of your own. For younger
children who are not writing yet you can use the page with the larger writing and have them tell
you what to write. For all other children you can decide whether to use the larger or smaller
printed page depending on how large they write and how much they can write about the person.
If you need more room use the back of the page or add lined paper.
2. Use this page to write about an event you are studying in history. For Living History
curriculum write at least one event page for each epoch. Sometimes you may want to write
about two events (or even more) that were studied about. In another year when you again study
the same time period you will study different people and events. You will then write up a new
event page and add it to your binder with the other events you studied about in previous years.
3. Write about an event you studied but let each person choose what they want to write about.
You can write about how this event is fulfillment of prophecy because people obeyed or
disobeyed the Lord. Write about choices you would have made. What are some lessons in this
event that you can learn from so history can, or won’t, repeat itself? Write about something from
the event that helps you understand a gospel principle.
4. Add a picture of the event that is being written about in the space provided. Read about the
ideas under Pictures.
5. Each person who wants to can give an oral presentation on what they wrote about. They can
share their whole paper or just some highlights.
Maps: You can get pictures of maps from old encyclopedias and history books if you want to use
something already printed up. We like to use map outlines - where it is just an outline of the
land and larger water areas being studied - and we fill in the cities, countries, oceans, etc. On the
sample map the water is shaded in so you can tell where the countries are. On our outline maps
we like to use colored pencils to color in the water. This gives us more skills in geography in
figuring out where the water is and where the countries are. Make your map colorful by using
colored pencils or pens to write the names of cities, countries, boundaries of different
civilizations, etc. Draw in rivers or mountains if they are applicable to what you are studying.
Articles: These are just a few articles listed to give you an idea of what you can find. Some magazine
articles I list on a reference page that I put in my notebook and put it behind the divider for the
time period it goes to so I can refer to it when we study that epoch. Other articles I take the
pages out of the magazine and put it in sheet protectors and place it in my notebook for that
epoch.
National Geographic

January 1995 - Age of Pyramids
November 1993 - New Light on the Olmec, pp. 88-115 (for Ancient American History)
February 1987 - Caesarea Maritima (Herod’s City on the Sea), pp. 260-279
December 1983 - The Byzantine Empire (Rome of the East), pp. 709-767
Relief Society Course of Study
1978-79: Cultural Roots from the Bible - Arts Among the Hebrews, pp. 209-212 (also Art
Selection)
Cultural Roots from China, pp. 213-216 (also Art Selection)
Cultural Roots from Egypt, pp. 217-220 (also Art Selection)
1979-80: Ancient Persia, pp.231-236 (also Art Selection)
1980-81: Cultural Arts of Aztecs and Mixtecs, pp. 211-216 (also Art Selection)
Light in Medieval Times, pp. 217-223 (also Art Selection)
The Gothic Cathedral, pp. 224-227 (also Art Selection)
1982: Renaissance Literature, pp. 164-168
Renaissance Music, pp. 169-173
Renaissance Art, pp. 174-178
Ensign
January 1998 - In The Beginning (pre-existence)
January 1998 - What Modern Revelation Teaches About Adam (and many other articles in
this one Ensign)
November 1999 - Lessons From Laman and Lemuel, pp. 6-8
June 1999 - Preparing for the Restoration (on the Reformation), pp. 34-45
October 1992 - Columbus and the Hand of God, pp. 6-13
August 1987 - articles on the Constitution
Friend
November 1992 - Reverence For Heavenly Father’s Creations
February 1998 - Josiah, Believer in the Scriptures, pp. 10-11 (has pictures for flannel board
story)
March 1998 - Isaiah Prophesies of the Savior, pp. 34-35
- Railroad to Zion, pp. 47-49
October 1986 - Symbol of Liberty and Friendship, pp. 26-27 (on the Statue of Liberty)
If you kept handouts in your file drawer from Seminary and other classes and you don’t
know what to do with them, put them in your notebook or file box.
Church’s Student Manual for Religion Classes - Old Testament, Life of Christ, Book of
Mormon, Doctrine and Covenants. (You can get these from LDS bookstores or LDS Church
Distribution.)
Highlights Magazine
March 1997 - The Tomb of the King, pp. 16-17
March 1999 - Great-Grandma’s Nickel, pp. 10-12 (about the Jewish Purim celebration)
November 1996 - Sarah’s Pen and Thanksgiving Day

Visitor Centers that deal with American History, and historical museums have pamphlets with
some information, such as places along the Oregon and Mormon trails, Fort Vancouver,
Washington D.C. sites, Gettysburg, etc.
Notes: Children should take notes on history what you discuss and talk about in history. These notes
can go in their notebooks and can be used to write up their person and event page. A child can
also do extra research on their own and include in their notebook anything they have studied
about that time period.
For my notes I include questions I have that I would like to study on my own in more depth, or
questions to bring up in our class discussions. I also keep my own list of videos we have seen or
would like to see with a description about it, a list of literature books to read and resources or
activities that go along with the time period being studied.
Music: Music has played a big part in history as well as the present. Try to incorporate music in your
history whether it was written in a time period you study or it tells the story about something
from that time period. Again, on my notes page I list music to listen to and music for us to learn
to sing. The following are some ideas of music to use in history.
Songs of Valor
Many beautiful songs have come about during war time. Songs of valor have been written in
almost every century and every country. The Battle Hymn of the Republic came from the Civil
War. Hatikvah (which means “The Hope”) is Israel’s National Anthem. It became popular as
the anthem of the Zionist movement in 1897. Another song from Israel is Jerusalem of Gold
which came from the Six Day War in 1967 (it can be found on the Tabernacle Choir CD or tape -
“Live in Jerusalem”, and they also have a video of their trip to Israel which also shows many
sites from the time of Christ). Another song is Finlandia written by Jean Sibelius written in
1900 when Russia ruled Finland. Finlandia expressed so much national pride and patriotism of
the Finns that for many years the Russians refused to permit its performance. It became the
anthem of the Finnish independence movement and Russian troops left Finland in 1918. We are
familiar with the tune as it is in the LDS Hymn book as Be Still My Soul. It is also found on the
Tabernacle Choir tape This is My Country along with some National Anthems and other patriotic
songs from other countries. Tabernacle Choir tapes of U.S. history songs are God Bless
America, and Songs of the Civil War.
Classical Music
People and music you can study are Johann Sebastian Bach, George Frederick Handel, Franz
Joseph Haydn, Wolfgang Amadeus Mozart, and Ludwig van Beethoven just to name a few.
Hymnals
Before the Reformation in England and in Europe, church music was sung in Latin by the priests
or attendant monks, not the congregation. During the Reformation, Martin Luther and others
wrote hymns to be sung in the church by the congregation in their native language. Some are in

our hymn book. These songs include A Mighty Fortress is Our God; Guide Me, O Thou Great
Jehovah; Jesus, Savior, Pilot Me and many others.
Negro Spirituals are another group of songs that came from American slaves who sung and
produced these simple, moving scriptural songs. These songs include Now Let Me Fly, Nobody
Knows de Trouble I See, Joshua Fit de Battle ob Jerico, One More River, and Swing Low Sweet
Chariot.
Literature: Read a book written during the time period you study, historical fiction about that time period, or
autobiographies and biographies.
Family History: Look into your own ancestors. What countries do your ancestors come from and what time
period were they there. Were they in France during the French Revolution? How about during
the Reformation? Were they persecuted for religious beliefs? Do you have Mormon Pioneers in
your family tree? Get out your pedigree charts and start finding out. Are there any family
stories you can bring into your history class. Add pedigree charts, family group sheets, pictures,
and even write up some person pages on your own ancestors. This is a good time to get your
children interested in genealogy and especially get to know the neat heritage they come from.


Martin Luther Chronological Time Line
— 1483 - Nov. 10 - Born in Eisleben, Saxony.
— 1501 - Entered the University of Erfurt (to become a lawyer).
— 1505 - Entered a monastery.
— 1507 - Ordained a priest.
— 1512 - Received doctor’s degree in theology (appointed a professor of theology at Wittenberg)
— 1517 - October 31 - Posted his 95 Theses on the door of the Castle church.
— 1518 - Met Philipp Melanchthon.
— 1519 - Debate in Leipzig with Johann Eck.
— 1520 - Wrote “The Babylonian Captivity of the Church” and “The Freedom of the Christian
Man.”
— 1521 - Excommunicated from the church by Pope Leo X. Charles V ordered Luther to appear
before diet in Worms, Germany. Sentenced as an outlaw. Rumors spread that he had been
killed.
— 1522 - Published the New Testament in the German language.
Some time after 1522 Luther married Katharina von Bora and they had six children.
(Haven’t been able to find a date.)
— 1524 - Luther, with others, produced the first Protestant hymnals (himself writing many of the
hymns, including “A Mighty Fortress Is Our God”).
— 1525 - Wrote “The Bondage of the Will.”
— 1534 - Completed translation of Old Testament and published it in the German language.
(Taught that the Bible should be studied in the schools as part of the curriculum.)
— 1535 - Wrote “Lectures on Galatians..”
— 1546 - February 18 - Died in Eisleben.