how to install eclipse in windows
DESCRIPTION
How to Install Eclipse in WindowsTRANSCRIPT
7/7/2014 How to Install Eclipse in Windows
http://www.tekdigest.com/how-to-install-eclipse-in-windows.html 1/15
This tutorial explains you ‘How to Install Eclipse in Windows’ or ‘How to Install Eclipse in Windows 7’ for Writing,
Compiling and Testing your code.
Tools & Technologies Used:
1. Java SE 7 – JDK/JRE
2. Eclipse Juno – Version 4.2 as of this tutorial writing
Step 1: Install Java JDK/JRE:
Install the JRE, in order to use the Eclipse IDE.
You can check the Java installation instructions at – ‘How to Install Java on Windows’.
Step 2: Download Eclipse:
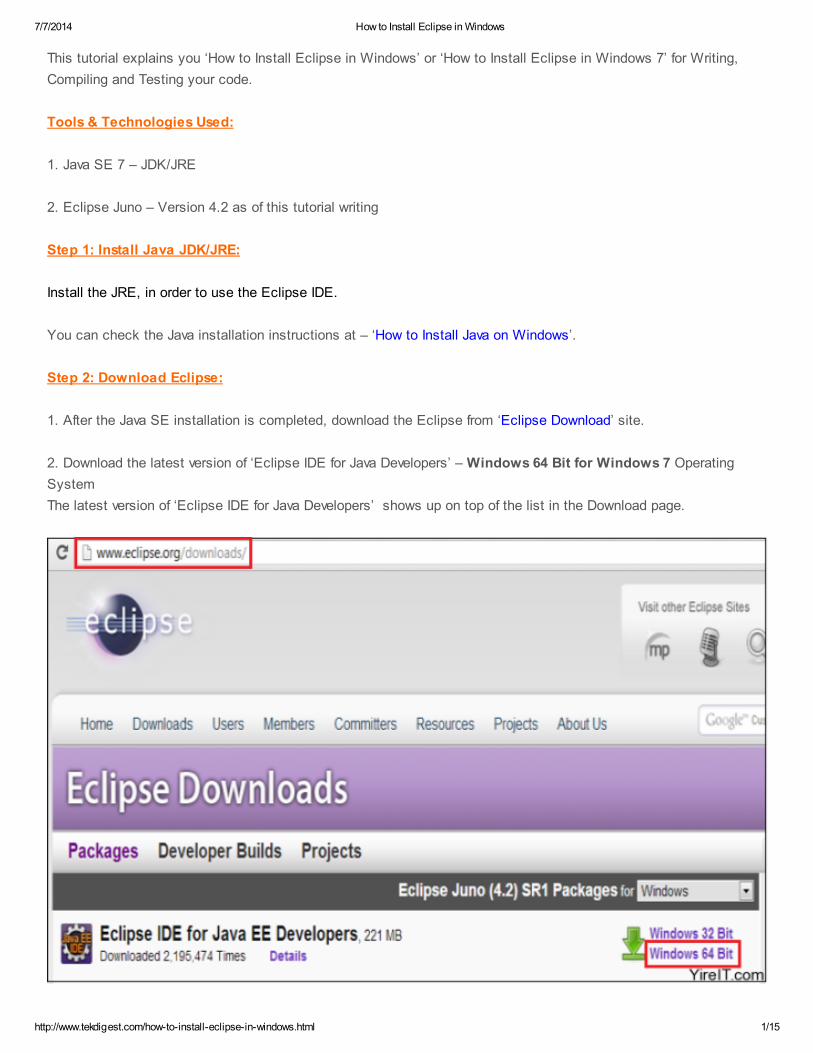
1. After the Java SE installation is completed, download the Eclipse from ‘Eclipse Download’ site.
2. Download the latest version of ‘Eclipse IDE for Java Developers’ – Windows 64 Bit for Windows 7 Operating
System
The latest version of ‘Eclipse IDE for Java Developers’ shows up on top of the list in the Download page.
7/7/2014 How to Install Eclipse in Windows
http://www.tekdigest.com/how-to-install-eclipse-in-windows.html 2/15
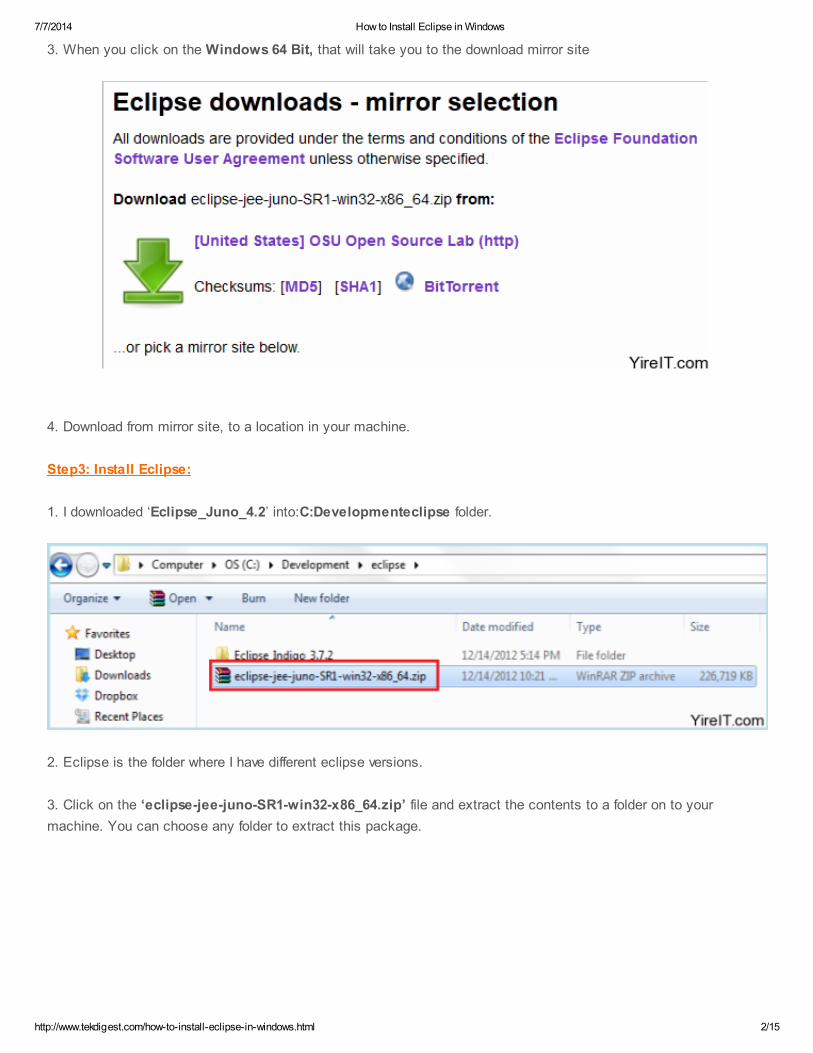
3. When you click on the Windows 64 Bit, that will take you to the download mirror site
4. Download from mirror site, to a location in your machine.
Step3: Install Eclipse:
1. I downloaded ‘Eclipse_Juno_4.2’ into:C:Developmenteclipse folder.
2. Eclipse is the folder where I have different eclipse versions.
3. Click on the ‘eclipse-jee-juno-SR1-win32-x86_64.zip’ file and extract the contents to a folder on to your
machine. You can choose any folder to extract this package.

7/7/2014 How to Install Eclipse in Windows
http://www.tekdigest.com/how-to-install-eclipse-in-windows.html 3/15
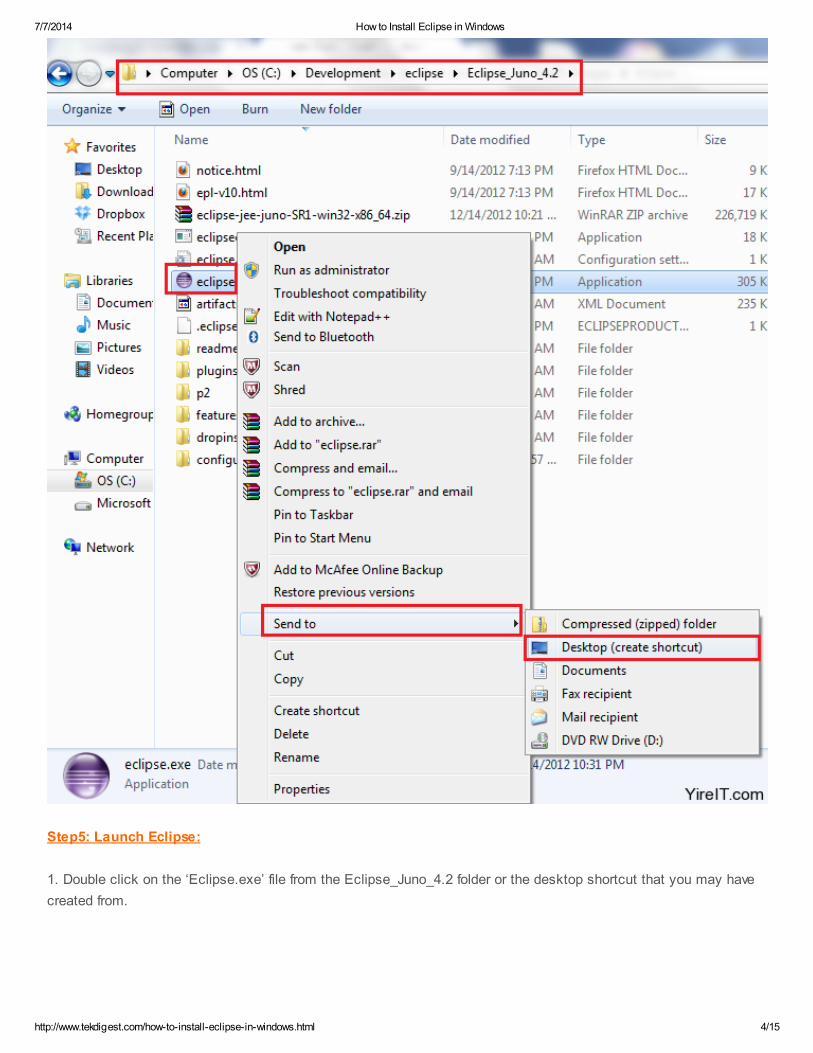
4. So I named the folder as Eclipse_Juno_4.2.
Note: You can have older version of eclipse and a newer version of eclipse on the same machine by placing the
eclipse in different folders. See image above.
5. Your extracted eclipse folder looks like this.
Step4: Eclipse Desktop Shortcut:
1. Now go to your Eclipse folder and create ‘Eclipse Desktop Shortcut’ icon for the ease of access.
2. Right mouse click on ‘Eclipse.exe’ -> Send to -> Desktop (create shortcut)
7/7/2014 How to Install Eclipse in Windows
http://www.tekdigest.com/how-to-install-eclipse-in-windows.html 4/15
Step5: Launch Eclipse:
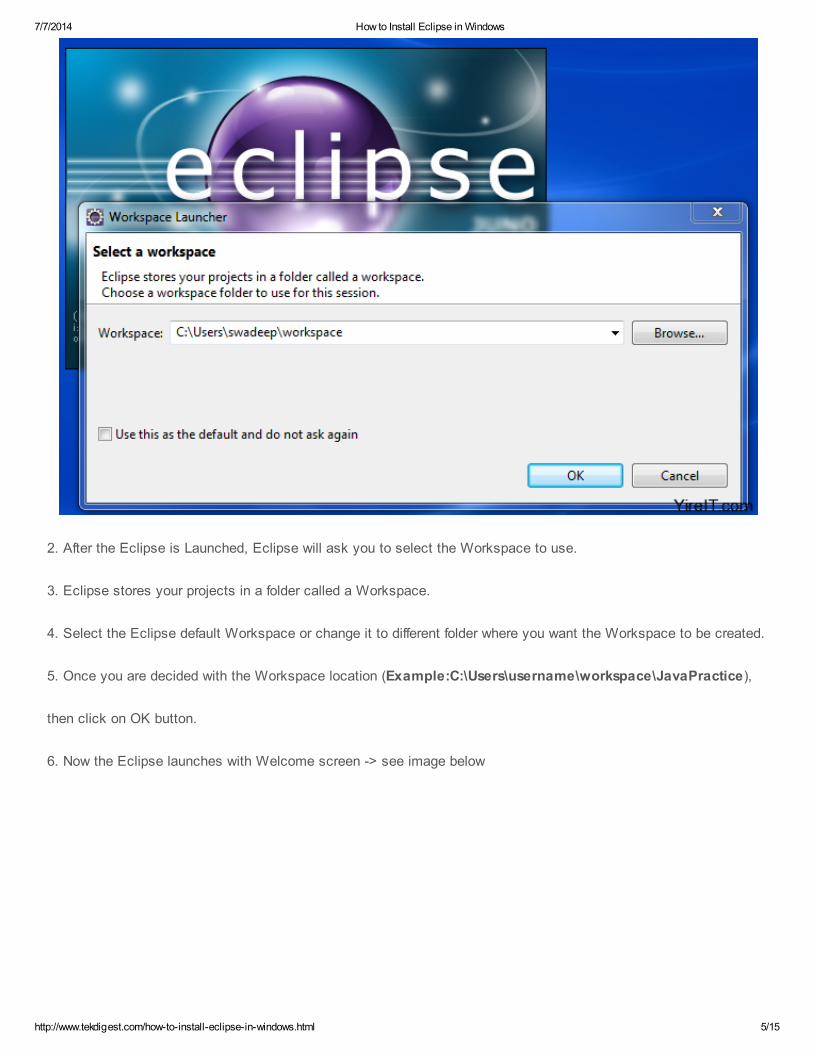
1. Double click on the ‘Eclipse.exe’ file from the Eclipse_Juno_4.2 folder or the desktop shortcut that you may have
created from.
7/7/2014 How to Install Eclipse in Windows
http://www.tekdigest.com/how-to-install-eclipse-in-windows.html 5/15
2. After the Eclipse is Launched, Eclipse will ask you to select the Workspace to use.
3. Eclipse stores your projects in a folder called a Workspace.
4. Select the Eclipse default Workspace or change it to different folder where you want the Workspace to be created.
5. Once you are decided with the Workspace location (Example:C:\Users\username\workspace\JavaPractice),
then click on OK button.
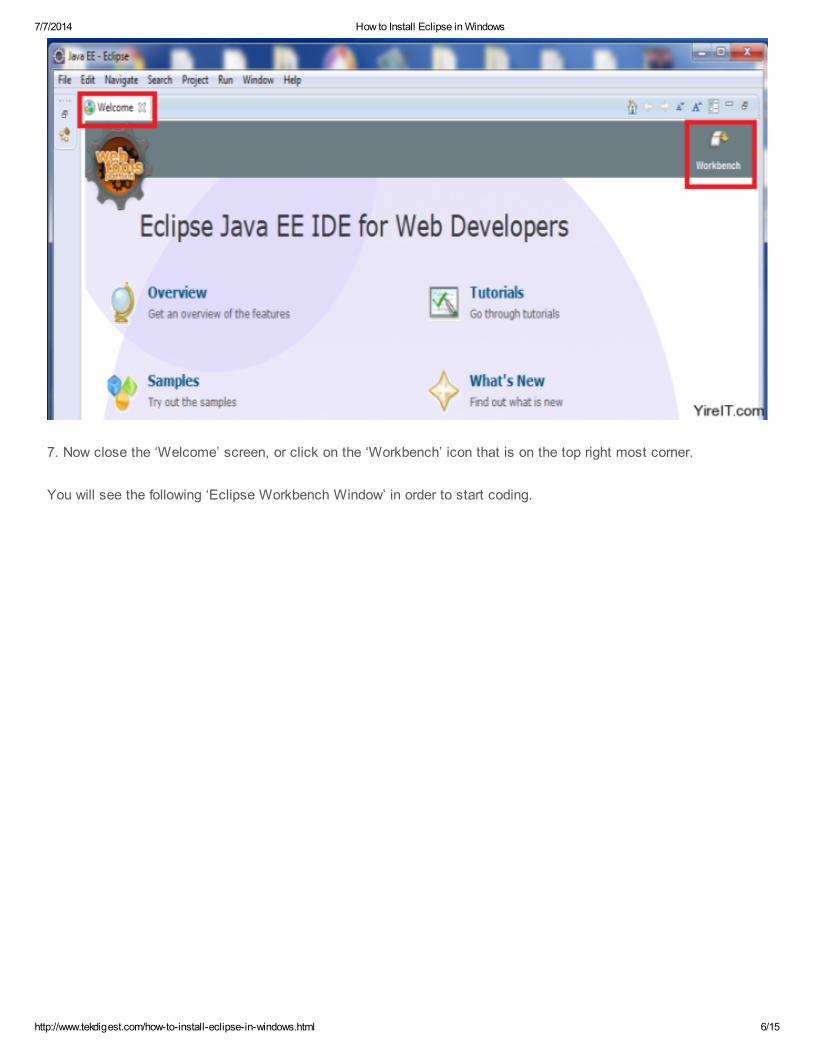
6. Now the Eclipse launches with Welcome screen -> see image below
7/7/2014 How to Install Eclipse in Windows
http://www.tekdigest.com/how-to-install-eclipse-in-windows.html 6/15
7. Now close the ‘Welcome’ screen, or click on the ‘Workbench’ icon that is on the top right most corner.
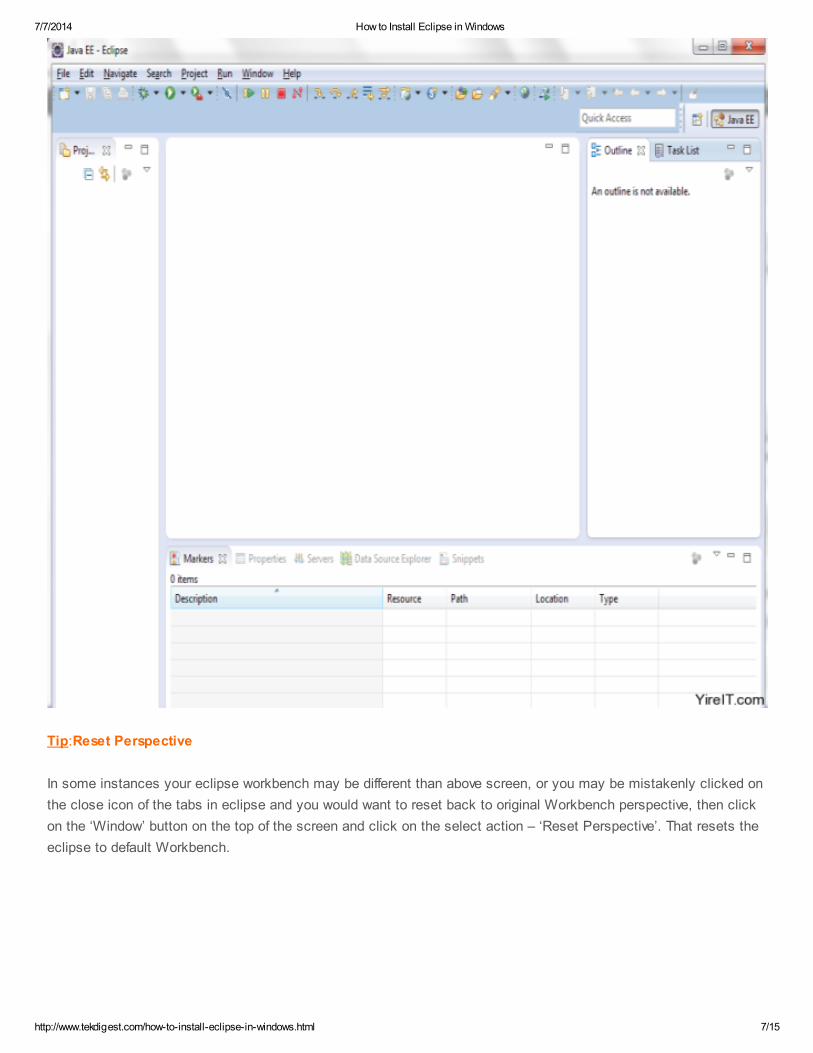
You will see the following ‘Eclipse Workbench Window’ in order to start coding.
7/7/2014 How to Install Eclipse in Windows
http://www.tekdigest.com/how-to-install-eclipse-in-windows.html 7/15
Tip:Reset Perspective
In some instances your eclipse workbench may be different than above screen, or you may be mistakenly clicked on
the close icon of the tabs in eclipse and you would want to reset back to original Workbench perspective, then click
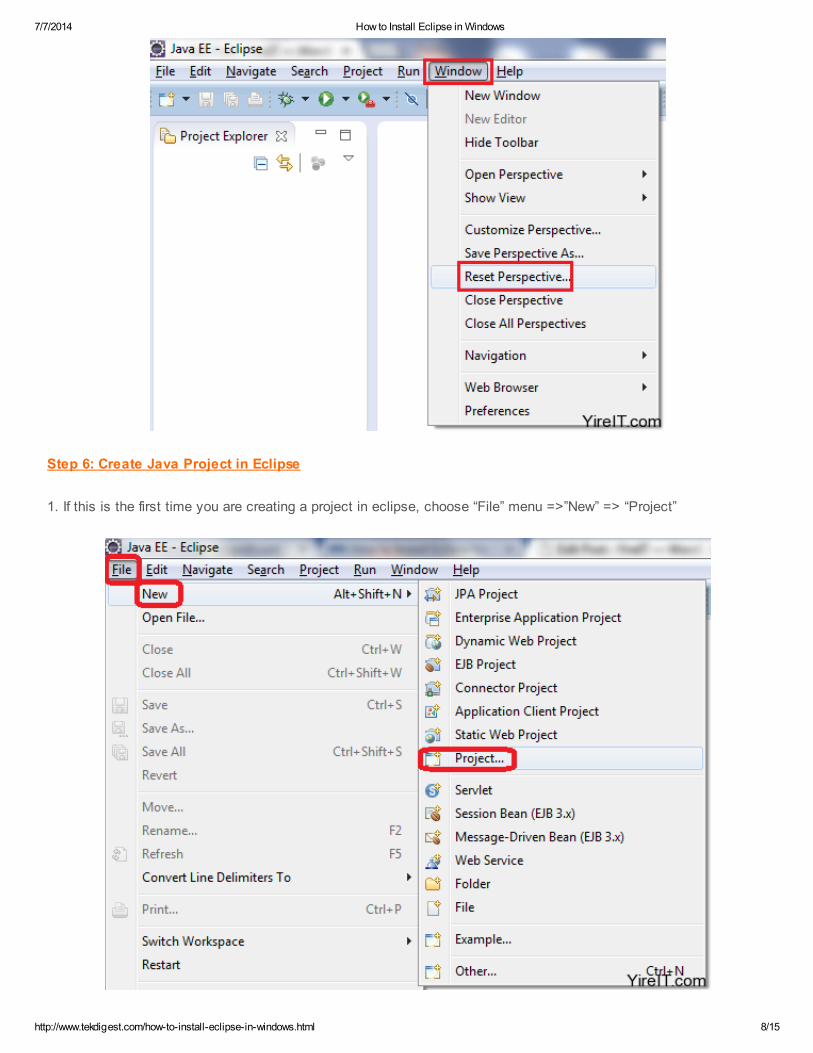
on the ‘Window’ button on the top of the screen and click on the select action – ‘Reset Perspective’. That resets the
eclipse to default Workbench.
7/7/2014 How to Install Eclipse in Windows
http://www.tekdigest.com/how-to-install-eclipse-in-windows.html 8/15
Step 6: Create Java Project in Eclipse
1. If this is the first time you are creating a project in eclipse, choose “File” menu =>”New” => “Project”
7/7/2014 How to Install Eclipse in Windows
http://www.tekdigest.com/how-to-install-eclipse-in-windows.html 9/15
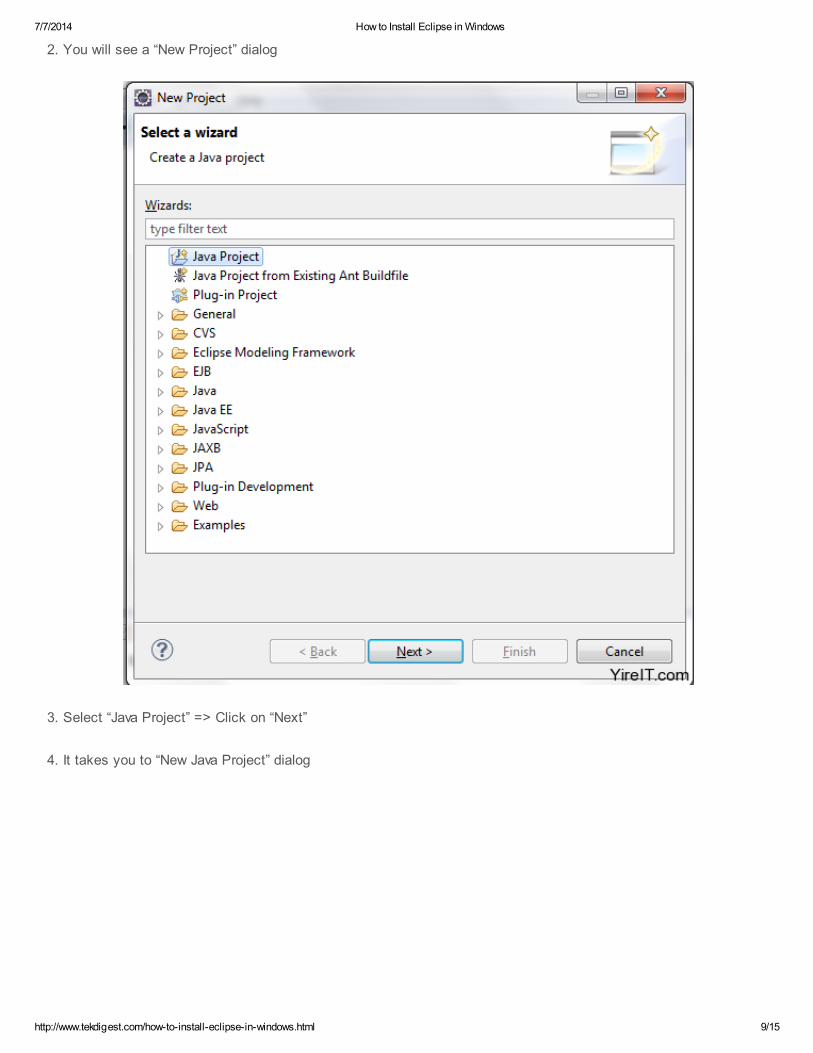
2. You will see a “New Project” dialog
3. Select “Java Project” => Click on “Next”
4. It takes you to “New Java Project” dialog
7/7/2014 How to Install Eclipse in Windows
http://www.tekdigest.com/how-to-install-eclipse-in-windows.html 10/15
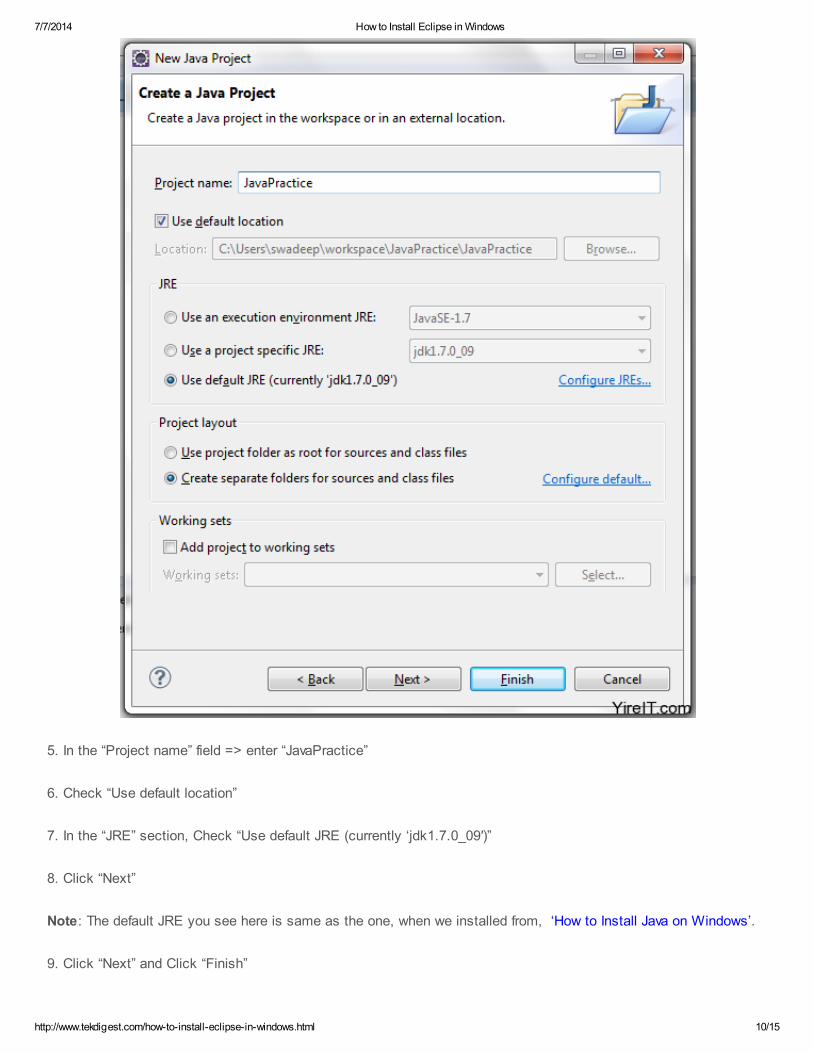
5. In the “Project name” field => enter “JavaPractice”
6. Check “Use default location”
7. In the “JRE” section, Check “Use default JRE (currently ‘jdk1.7.0_09′)”
8. Click “Next”
Note: The default JRE you see here is same as the one, when we installed from, ‘How to Install Java on Windows’.
9. Click “Next” and Click “Finish”
7/7/2014 How to Install Eclipse in Windows
http://www.tekdigest.com/how-to-install-eclipse-in-windows.html 11/15
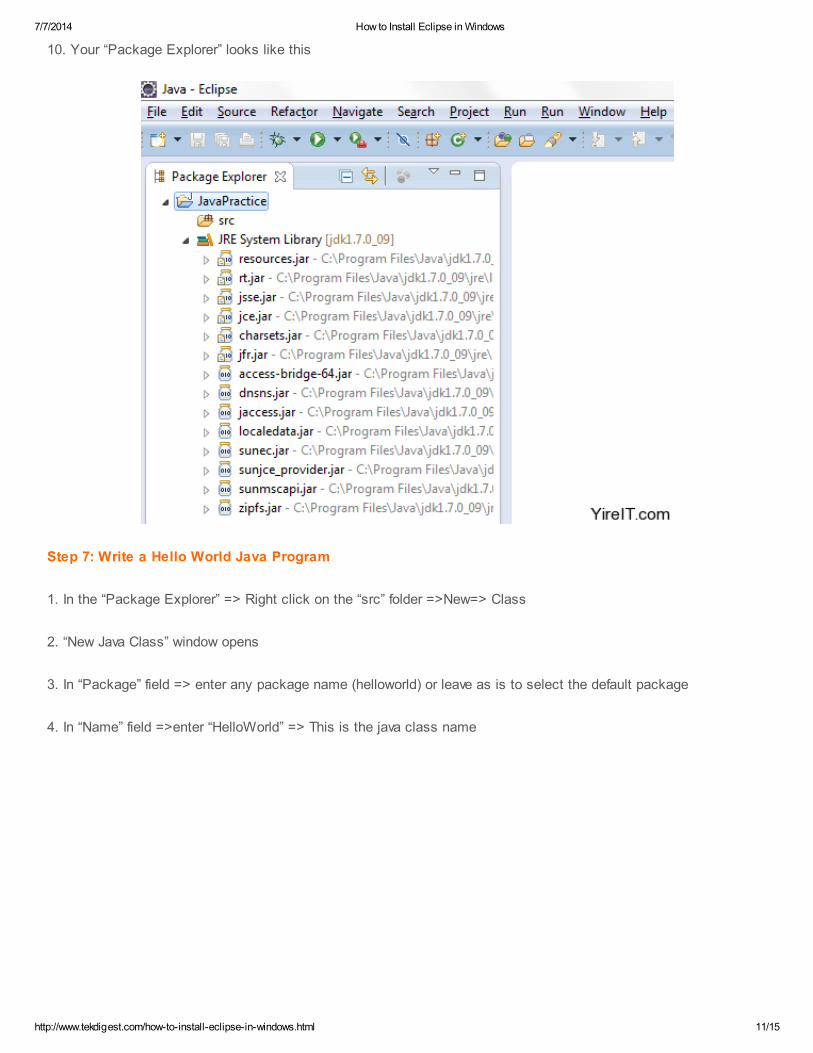
10. Your “Package Explorer” looks like this
Step 7: Write a Hello World Java Program
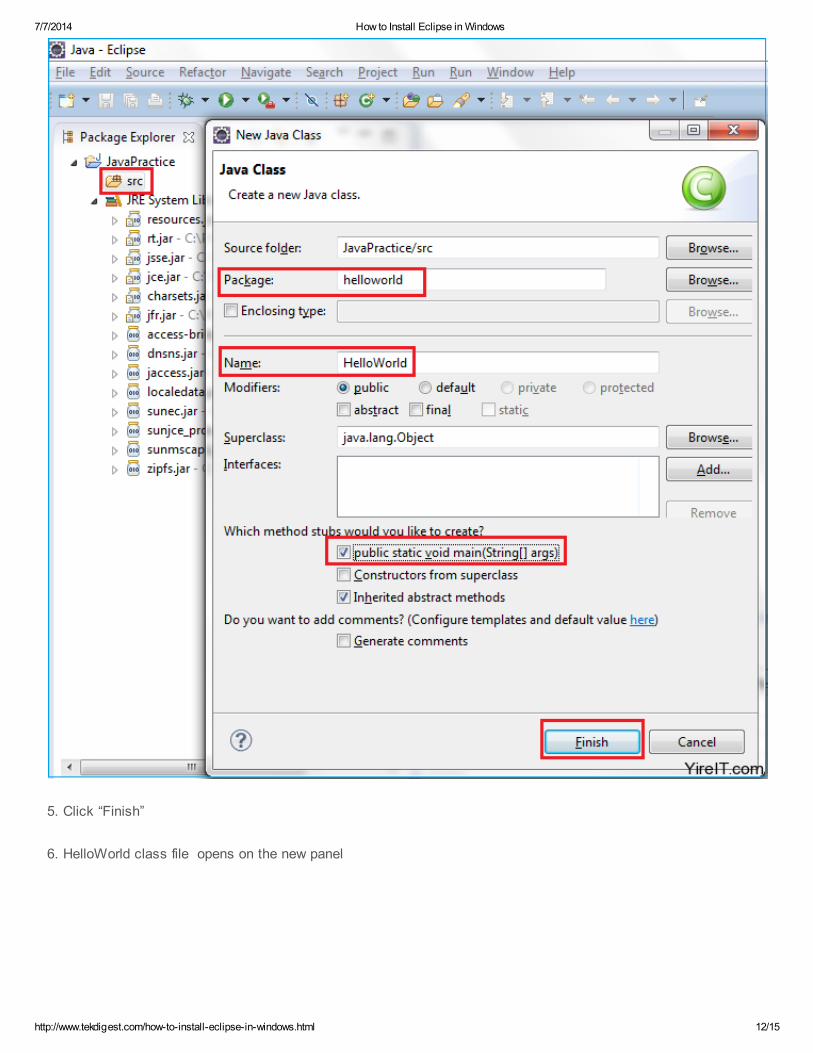
1. In the “Package Explorer” => Right click on the “src” folder =>New=> Class
2. “New Java Class” window opens
3. In “Package” field => enter any package name (helloworld) or leave as is to select the default package
4. In “Name” field =>enter “HelloWorld” => This is the java class name
7/7/2014 How to Install Eclipse in Windows
http://www.tekdigest.com/how-to-install-eclipse-in-windows.html 12/15
5. Click “Finish”
6. HelloWorld class file opens on the new panel
7/7/2014 How to Install Eclipse in Windows
http://www.tekdigest.com/how-to-install-eclipse-in-windows.html 13/15
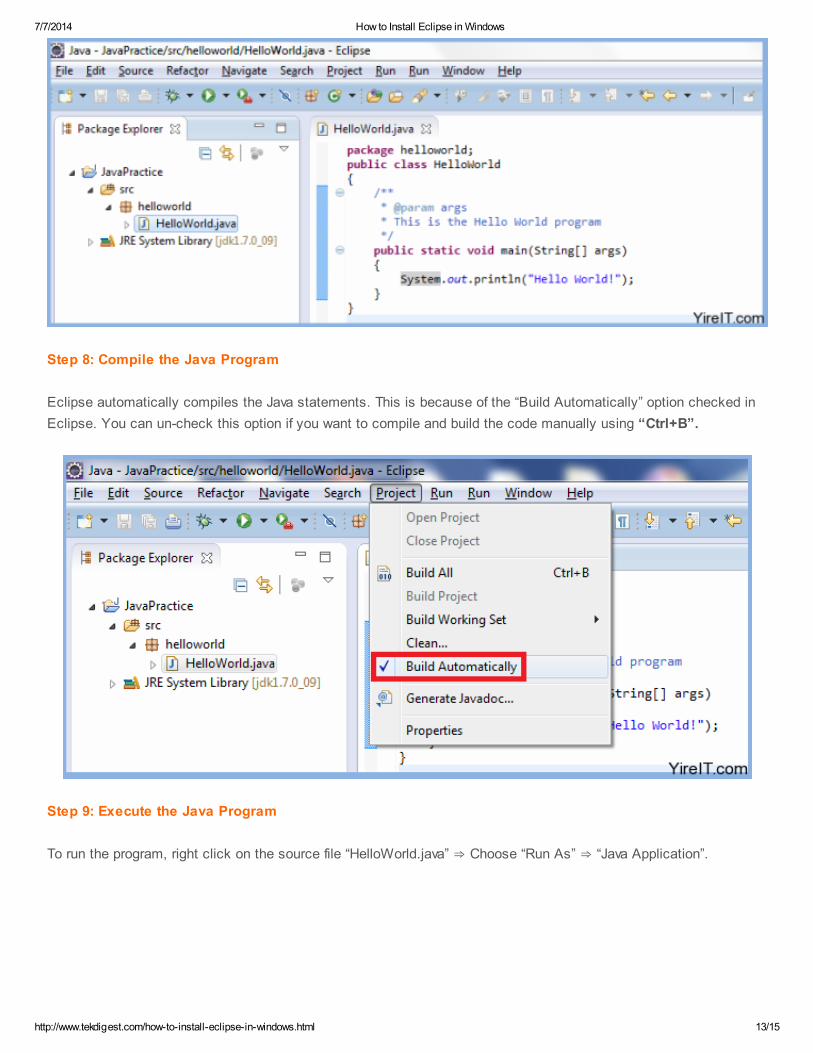
Step 8: Compile the Java Program
Eclipse automatically compiles the Java statements. This is because of the “Build Automatically” option checked in
Eclipse. You can un-check this option if you want to compile and build the code manually using “Ctrl+B”.
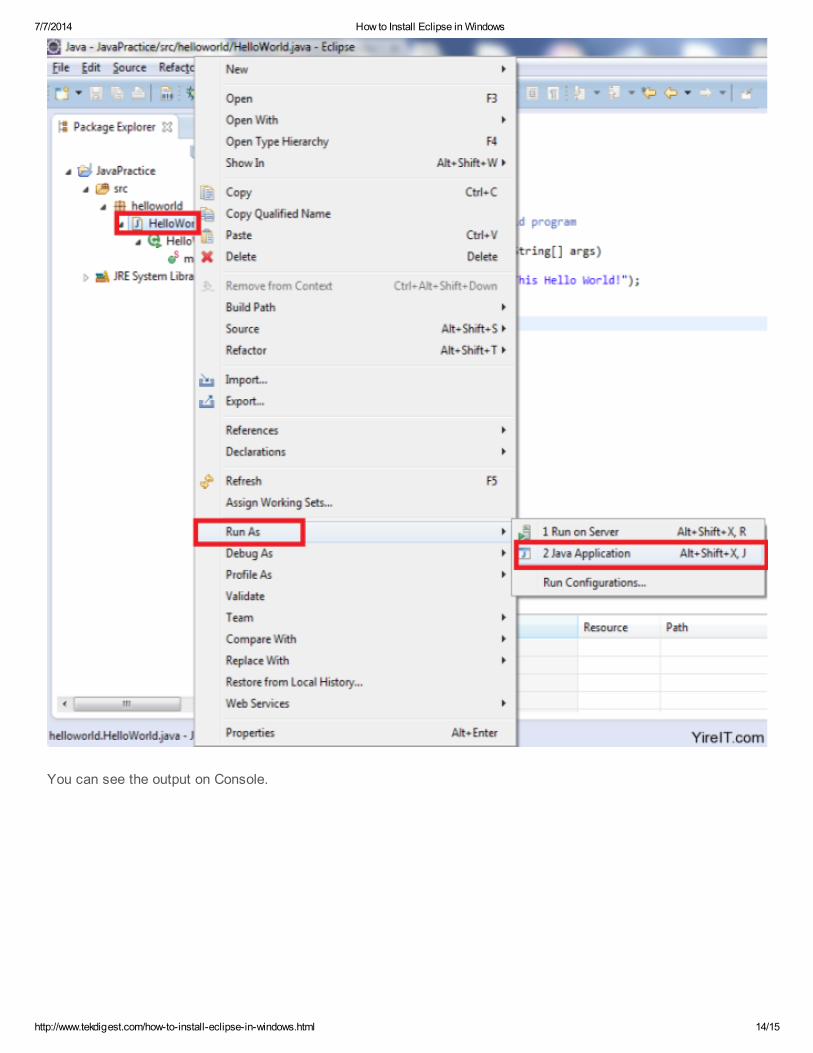
Step 9: Execute the Java Program
To run the program, right click on the source file “HelloWorld.java” ⇒ Choose “Run As” ⇒ “Java Application”.
7/7/2014 How to Install Eclipse in Windows
http://www.tekdigest.com/how-to-install-eclipse-in-windows.html 14/15
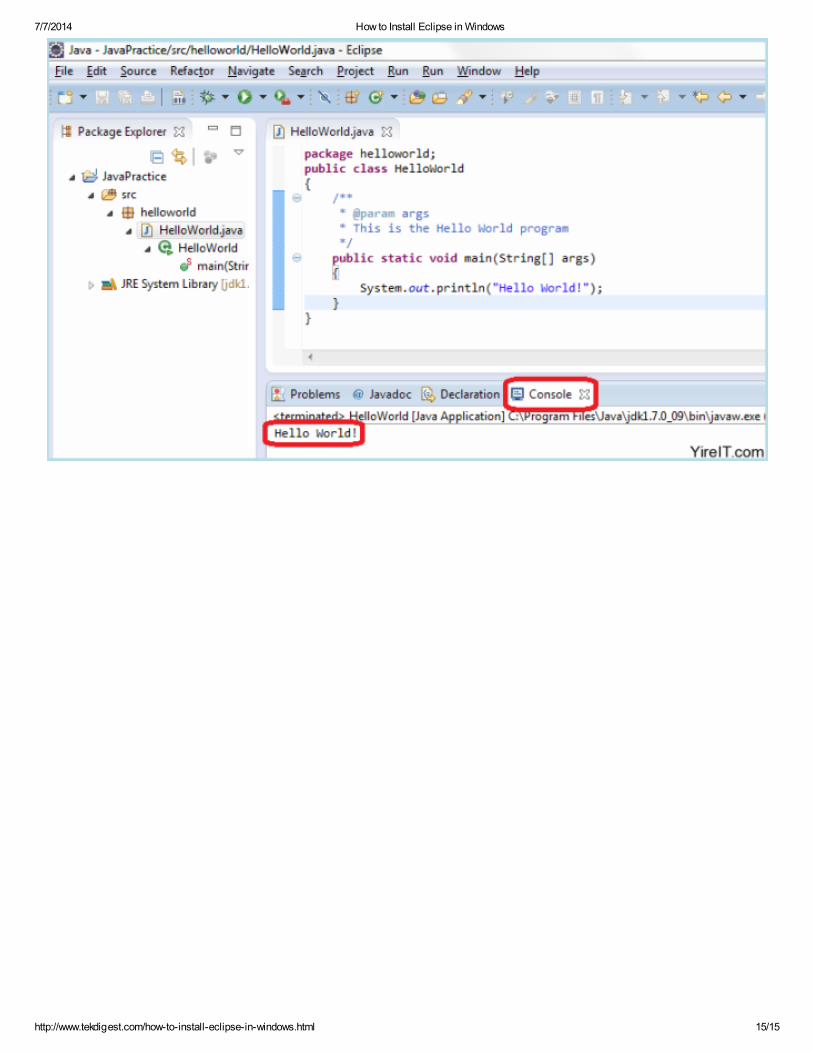
You can see the output on Console.
7/7/2014 How to Install Eclipse in Windows
http://www.tekdigest.com/how-to-install-eclipse-in-windows.html 15/15