how to create a countdown timer
TRANSCRIPT

How to Create a Countdown Timer
In this tutorial, we will look at how to create a countdown timer in Storyline that willtrigger a change inside the course when the time runs out.

Have you ever wanted to add a countdown timer to your eLearning course,
but weren't sure how to set one up?
Perhaps you're building a scenario where the learner would normally need to
make a quick decision, so you want to make sure the scenario reflects that
time pressure?
In this tutorial, we will look at how to use some JavaScript to add a
countdown timer to a course and trigger a change in the course when the
timer runs out.
Before We Begin
We are going to start by writing a little bit of JavaScript and then we will set
up our Storyline course to work with this code.
So, open your text editor. If you don't already have a preferred text editor,
then grab yourself a copy of Sublime Text.
Why do you need a proper text editor? So your code doesn't get all messed up.
If you try and write JavaScript in Microsoft Word, you'll have a bad time.
And I don't want you to have a bad time!
Zeros Matter
The first thing that we need to set up is a function that can check the minutes
and seconds of our timer to make sure they display correctly.
Why?

Because 1:2 is not a time. But that's exactly how our timer wants to display
1 minute and 2 seconds.
So let's set up some code that will add the necessary zeros:
function zeros(i) {
if (i < 10) {
i = "0" + i;
}
return i;
}
This function will take the number that we feed it (which we'll look at in a
minute) and check if it is less than 10 .
If it is, it will add a 0 to the front of the number. That's all we need to make
sure that out timer looks like 01:02 rather than 1:2 .
Setting Up Our JavaScript Variables
Next, we need to create a few JavaScript variables so they are ready for when
we need them later:
var minutes, seconds, timer, totalTime;

Then we are going to create another JavaScript variable, this one will be
called counter . We will use this to specify how often the countdown timer
should update. Let's set the interval to 1000 (which is 1000 milliseconds, or
one second):
var counter = setInterval(timer, 1000);
Then we'll create another variable that holds the value we want to send to
Storyline once the timer has finished. Because abbreviating stuff is fun, let's
call this variable fin :
var fin="Done";
Because finished is a long word. And I'm a bit of a goose.
We need to know how many seconds the countdown timer should run for,
which we can find out from Storyline. So let's establish communication with
the player:
var player = GetPlayer();
Then we will kindly ask Storyline for the value that is stored in the
Countdown_Duration variable:

var count = player.GetVar("Countdown_Duration");
The Main Event
Now that we have all of that initial preparation done, we just need to add our
timer function.
Here's the code:
function timer() {
count = count - 1;
minutes = zeros(Math.floor(count / 60));
seconds = zeros(count % 60);
if (count == 0){
player.SetVar("Countdown_Finished",fin);
}
if (count < 0) {
clearInterval(counter);
return;
}
totalTime = minutes + ':' + seconds;
player.SetVar("Countdown_Display",totalTime);
}
So let's quickly talk through what this block of code does.

count = count - 1; means that when the timer begins, we will take the
value of the count variable (which you'll remember from earlier tells us
how long the timer runs for) and take 1 from it. This is the what makes the
seconds in the timer go down by one.
Now, we don't want to just show seconds in our timer, so let's split this up into
minutes and seconds:
minutes = zeros(Math.floor(count / 60));
seconds = zeros(count % 60);
So here we are saying, let's take the number of seconds that we have and see
how many times 60 fits into that number. This will tell us how many
minutes are left. If that number is less than 10 , the zeros function we set up
earlier will add a 0 to the front of it.
Then, to see how many seconds are left over, we can use our good friend the
modulus % to tell us what is left over. Once again, if the number is less than
10 , then a 0 will be added.
Then we are going to make sure that our fin message is sent to Storyline
when the timer finishes. This is done by:
if (count == 0){
player.SetVar("Countdown_Finished",fin);
}

This means that when there are no more seconds left, our fin message
(which is Done ) will be pushed to a Storyline variable called
Countdown_Finished .
Storyline will like that.
Now, JavaScript gets carried away sometimes. Because we told it to subtract
1 from our count variable every second, it'll just keep doing that forever.
And that would be silly. So let's tell it to stop:
if (count < 0) {
clearInterval(counter);
return;
}
This means that when the value of count is less than 0 , the interval we set
earlier will be cleared (this interval is what made the timer change every
second).
Then all we need to do is take our minutes and seconds and store them in
a single variable that we can pass back to Storyline so that we can actually
see this timer countdown:
totalTime = minutes + ':' + seconds;
player.SetVar("Countdown_Display",totalTime);

And that's it!
Here is the complete code that we'll need to add to Storyline:
function zeros(i) {
if (i < 10) {
i = "0" + i;
}
return i;
}
function timer() {
count = count - 1;
minutes = zeros(Math.floor(count / 60));
seconds = zeros(count - minutes * 60);
if (count == 0){
player.SetVar("Countdown_Finished",fin);
}
if (count < 0) {
clearInterval(counter);
return;
}
totalTime = minutes + ':' + seconds;
player.SetVar("Countdown_Display",totalTime);
}
Setting up Storyline
Now we need to make sure that we have the right variables in Storyline.

As you can see above, we need three Storyline variables:
Countdown_Display , which is used to display the timer.
Countdown_Duration which is the duration of the timer in seconds.
Countdown_Finished which is used to catch the finished message.
You'll notice that the default value of the Countdown_Display variable is set
to display the total time in minutes and seconds. This is because otherwise
the start time wouldn't be shown, only the value after the first second has
been removed would appear. And that's not pretty.
The Countdown_Duration variable is what we use to set the duration of the
timer. For example, if you enter 300 here, the timer would go for 5 minutes.
If you put anything other than a whole number in here, strange things will
happen.
Once these variables are set up, we'll need to add a variable reference so the
Countdown_Display can, well, display the countdown!

To add a variable reference, simply pop a text box in Storyline and type
%Countdown_Duration% in it, as shown below:
While that looks a bit big for the space available, remember that this will only
show the value of the timer, which is limited to five characters.
The Start Timer button you can see above has an Execute JavaScript trigger
attached to it, which is set to fire when the user clicks the button.
This is where our JavaScript that we prepared earlier goes:

Then we just need to specify what we want to happen with the countdown
timer finishes:
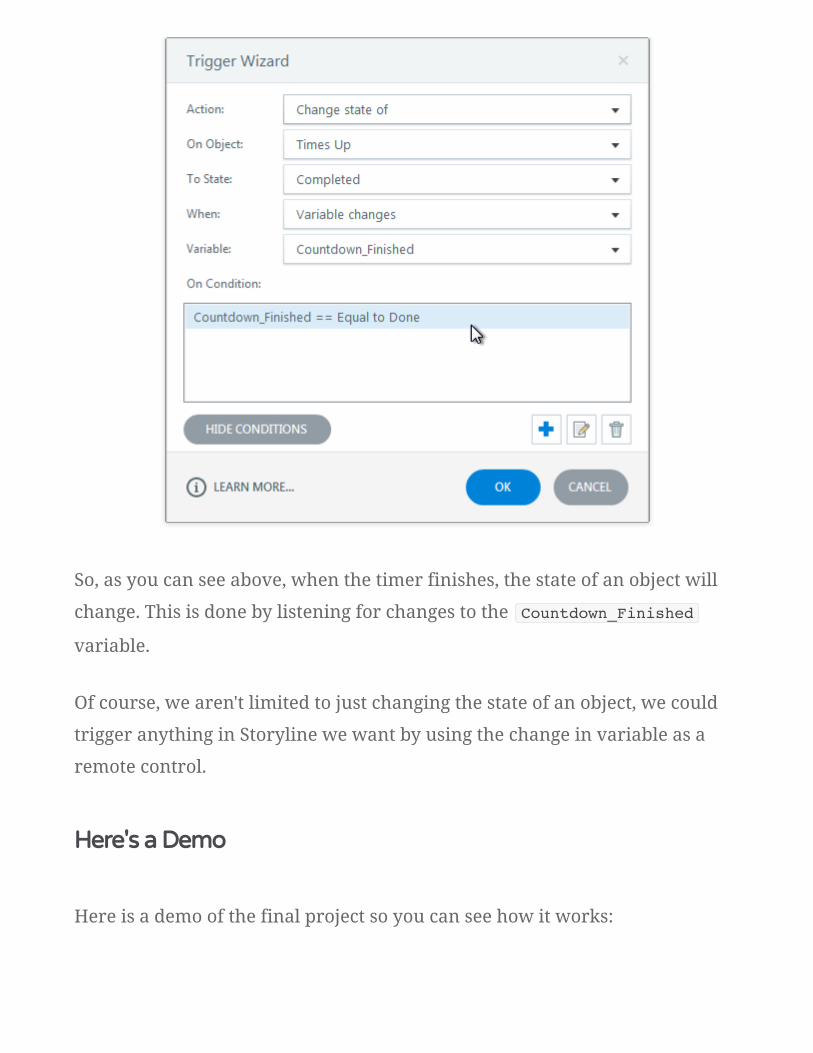
So, as you can see above, when the timer finishes, the state of an object will
change. This is done by listening for changes to the Countdown_Finished
variable.
Of course, we aren't limited to just changing the state of an object, we could
trigger anything in Storyline we want by using the change in variable as a
remote control.
Here's a Demo
Here is a demo of the final project so you can see how it works:
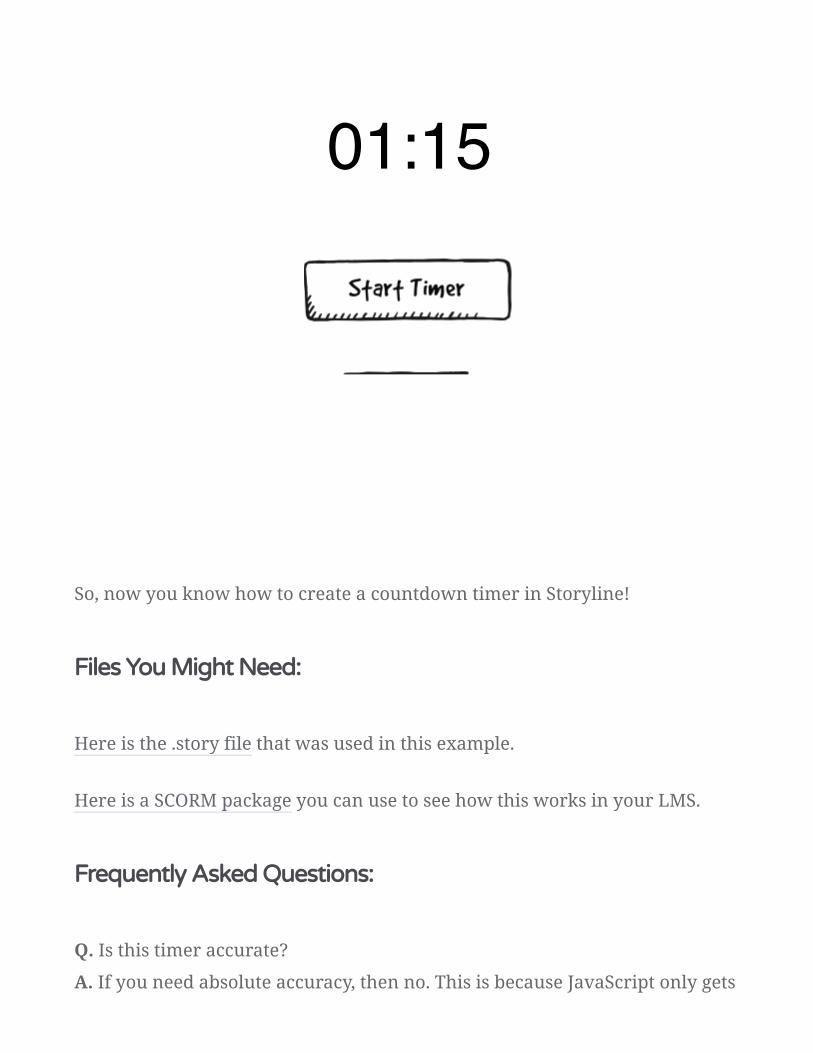
So, now you know how to create a countdown timer in Storyline!
Files You Might Need:
Here is the .story file that was used in this example.
Here is a SCORM package you can use to see how this works in your LMS.
Frequently Asked Questions:
Q. Is this timer accurate?
A. If you need absolute accuracy, then no. This is because JavaScript only gets
01:15

to play in a single thread and other JavaScript that is doing stuff in the
browser may interfere with our timer. For an in-depth explanation, see this
article on how JavaScript timers work.
Q. Should I add a timer to my course?
A. I don't know, it depends on the course. Please don't just add a timer
because you can. You need to use this responsibly. If you aren't sure, see what
Zsolt has to say on this topic.
Q. Why didn't you use that silly font you like so much to display the
countdown timer?
A. Because fonts can't be embedded in the published output as noted here.
Q. Could this be changed to show hours as well?
A. Yes, it could. However, given the note above about accuracy, this timer
would drift a bit over long periods of time. Maybe a couple of seconds, maybe
more. So I'd avoid using it to count down for hours. There are other solutions
that would be more suitable for that.
Q. Can this countdown be stopped by disabling JavaScript?
A. Yes, I imagine so. In the same way that your computer could be stopped by
pulling out the power cord. So if you are using this code as part of a very
important project and are concerned that someone may cheat, then you
should consider hiring someone to stand behind them with a stopwatch...
Q. Does this work in HTML5? (i.e. will it work on my phone and tablet?)
A. Yes, it will.
Q. Will this work in Articulate Mobile Player?
A. No, it won't. The Articulate Mobile Player and JavaScript aren't friends.

Q. Will this work in an LMS?
A. Yes, it will, I've tested it in SCORM Cloud and it worked perfectly. If you'd
like to test it in your LMS, you can grab the SCORM package above and use
that for a quick test.
Q. Do Articulate support this method?
A. No, they are not able to offer assistance with JavaScript stuff. So if you run
into issues when using this approach, their support team won't be able to
assist. However, I may be able to help, so reach out if you're stuck.
Q. My question isn't listed here, what should I do?
A. Jump back to the demo, hit start and then ponder your question for a
minute and fifteen seconds. If you haven't figured it out by the end of that
time, then you can leave a comment below or contact me.
Update
The demo and source files for this tutorial have been updated to include a
disabled state on the Start Timer button.
The only changes made were to add the disabled state to the Start Timer
button and pop in a new trigger to change the state of the button to Disabled
after the Execute JavaScript trigger had fired.
This prevents the learner from pressing 'Start Timer' multiple times, which
quickly gets confusing as demonstrated below:

Thanks for bringing this to my attention Miriam.
If you found this tutorial helpful and think others in your network will also,
please share using the share buttons below. Thanks!
STORYLINE TUTORIALS
JAVASCRIPT
SHARE:
AUTHOR

Matthew Bibby
I'm Matt. I'm an eLearning Consultant. I help people like you develop memorable,
engaging and pro�table training programs. What do you need a hand with?
VIEW COMMENTS