how to build a paver patio or walkway - stone...
TRANSCRIPT

How To BuildA Paver PatioOr Walkway
Copyright © 2013 Stone Plus, Inc.
Complete step by step “How-to” guide forbuilding a concrete paver patio or walkway.

Tools&MaterialsRequired
• Landscape Fabric & Securing pins (if overlapping fabric)• Shovel (Garden Spade and Flat-Bladed)• Garden Rake• Wheelbarrow• Masons String & Stakes• Level (ideally 4’ to 6’) and a line level• Tape Measure• Hammer• Joint Sand (sweep sand)• Course sub-base material such as concrete roadbase (crushed concrete)• Paver Base such as 919 screenings (crushed limerock) or concrete screenings• 1” outside diameter PVC or Iron pipe• 2”x4” or screed long enough to reach both 1” pipes that are laid as guides• Diamond Blade Wet Saw (rental tool)• Vibrating Plate Compactor (rental tool)• Vinyl Brick Edge & Spikes (optional, though recommended) or stone edging• Work Gloves• Safety Glasses• Optional polymeric joint sand or joint stabilizing sealer• Pavers
1”screed is a flat board, or a purpose made aluminium tool, used to smooth concrete after it has been placed on a surface”Source:http://en.wikipedia.org/wiki/Screed
HowToBuildAPaverPatioorWalkway
There are different ways of installing concrete pavers. We have found the following to be a solidtechnique of installing concrete pavers.
ChoosingYourPaversChoosing the right paver for the job is very important. For walkways, patios and driveways you need to
use a paver at least 2” thick. Standard pavers are 2-3/8” thick and are perfect for the job. You should alsoconsider a color that will compliment the surroundings, such as your house, trees and shrubs.
It is not recommended to use thin 1” pavers on top of concrete driveways, as the weight of vehicleswill break them, even when set in mortar. Thin pavers can be used on concrete patios and walkways, pro-vided nothing heavy will be placed on them.
After choosing a color, decide what style and pattern you would like to have. The 3 piece system is themost popular. It includes 6”x9”, 6”x6” and 6”x4” pavers which allow creating a nice staggered look. The 3pc pavers are available in 2-3/8” or 1” thick. For heavy traffic areas, such as parking lots and commercialapplications, thicker pavers should be used, which are 3-3/8” thick. They can handle heavy vehicles, such asdump trucks or busses. See the pattern diagrams for layout ideas (inside back cover).
Also available are brick 4”x8”x2-3/8” Pavers. Using the 4”x8” pavers, you can create many differentpatterns. They also make a nice border. See the pattern diagrams for layout ideas (inside back cover).
WhereToBeginThe first step is to check with local/county building codes and determine if you need a permit. Make
sure you comply with any building codes or other legal requirements. The next step is to prepare the loca-tion where your patio or walkway will be installed. First, mark out the area where the patio will be installed.Make sure you know where any utility pipes or cables are located so you do not dig them up. Place yourpatio away from them, if possible, to leave them accessible.
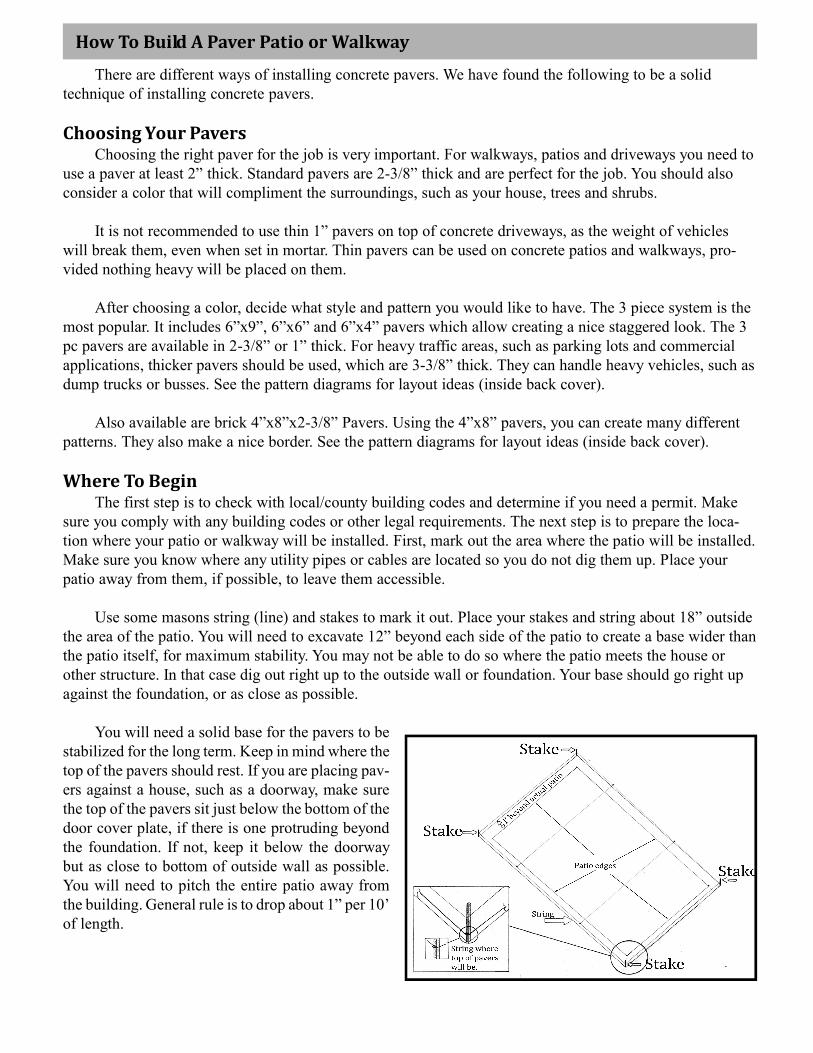
Use some masons string (line) and stakes to mark it out. Place your stakes and string about 18” outsidethe area of the patio. You will need to excavate 12” beyond each side of the patio to create a base wider thanthe patio itself, for maximum stability. You may not be able to do so where the patio meets the house orother structure. In that case dig out right up to the outside wall or foundation. Your base should go right upagainst the foundation, or as close as possible.
You will need a solid base for the pavers to bestabilized for the long term. Keep in mind where thetop of the pavers should rest. If you are placing pav-ers against a house, such as a doorway, make surethe top of the pavers sit just below the bottom of thedoor cover plate, if there is one protruding beyondthe foundation. If not, keep it below the doorwaybut as close to bottom of outside wall as possible.You will need to pitch the entire patio away fromthe building. General rule is to drop about 1” per 10’of length.
HowToBuildAPaverPatioorWalkway(cont’d)
You should place stakes with string running along the building with the string exactly where the top of thepavers should be. Make it level along the outside wall. You will add stakes inside your hole at the far end of thepatio to match the top of the pavers, with a slight grade from the building side. (It may be necessary to extendthe string beyond the end of the building in order to be able to place the string almost against the building. Thisis because the hole you dig will be against the building. Or use extra long stakes to set below the portion to bedug out. A 2’ to 3’ stake should suffice.) (See Fig.1 inside back cover).
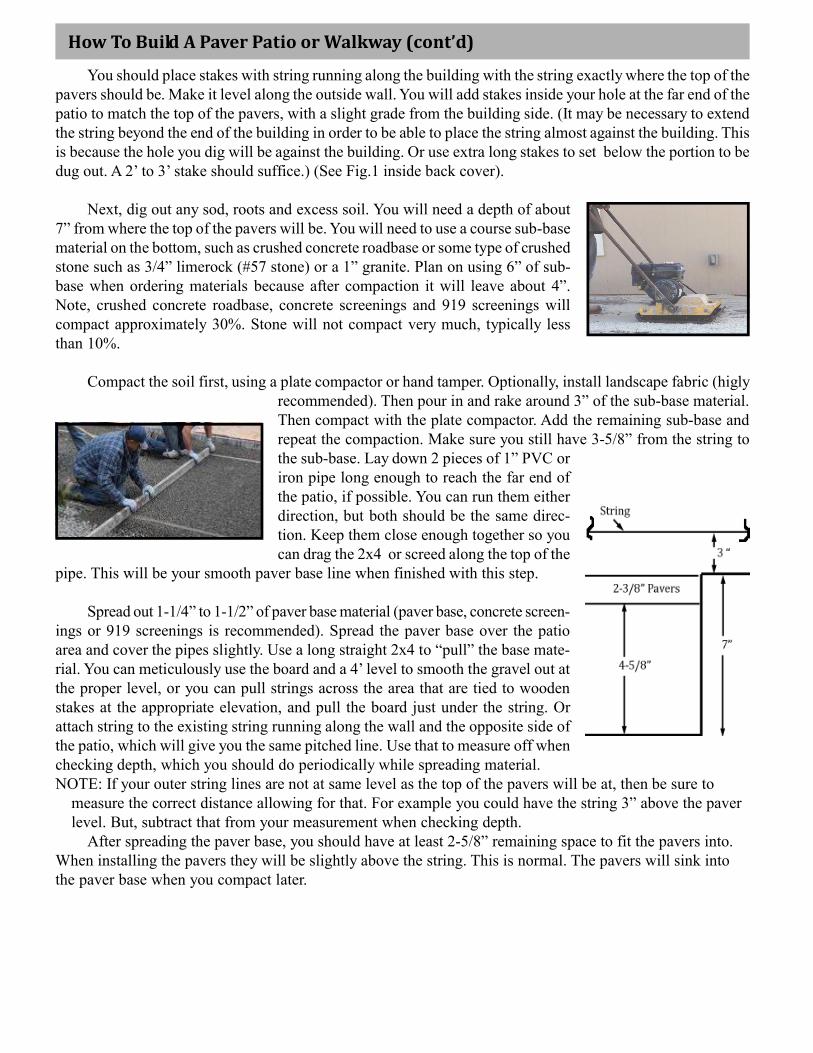
Next, dig out any sod, roots and excess soil. You will need a depth of about7” from where the top of the pavers will be. You will need to use a course sub-basematerial on the bottom, such as crushed concrete roadbase or some type of crushedstone such as 3/4” limerock (#57 stone) or a 1” granite. Plan on using 6” of sub-base when ordering materials because after compaction it will leave about 4”.Note, crushed concrete roadbase, concrete screenings and 919 screenings willcompact approximately 30%. Stone will not compact very much, typically lessthan 10%.
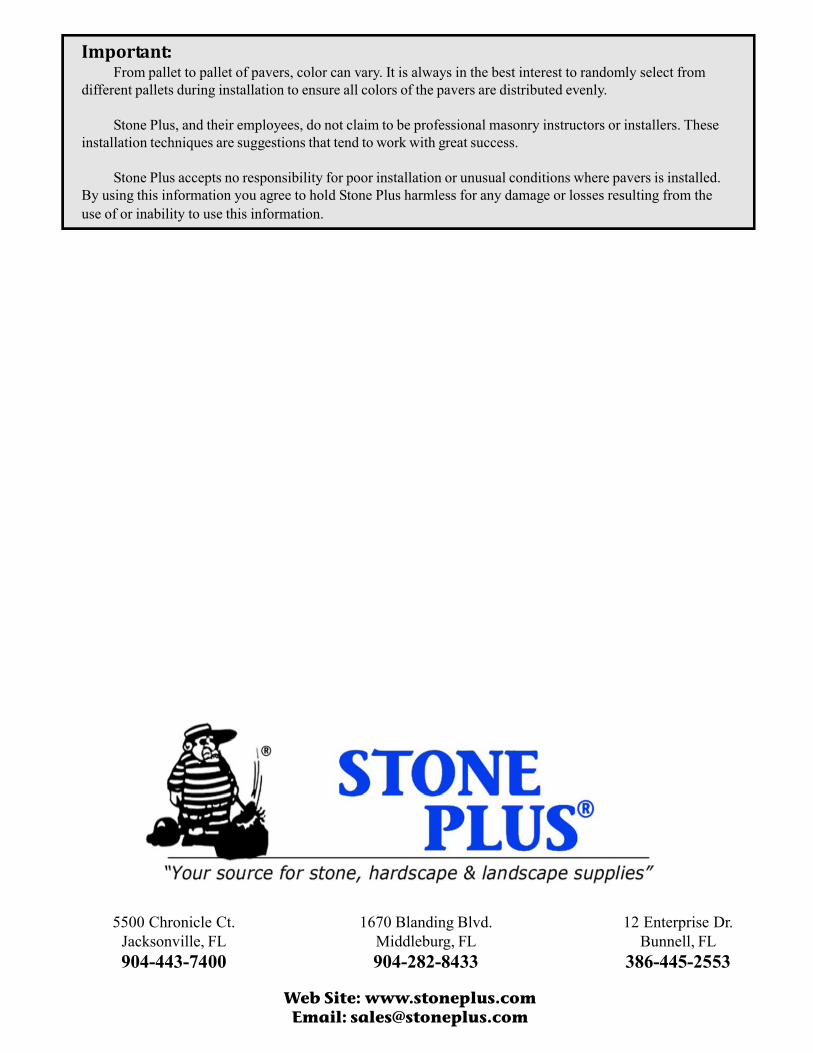
Compact the soil first, using a plate compactor or hand tamper. Optionally, install landscape fabric (higlyrecommended). Then pour in and rake around 3” of the sub-base material.Then compact with the plate compactor. Add the remaining sub-base andrepeat the compaction. Make sure you still have 3-5/8” from the string tothe sub-base. Lay down 2 pieces of 1” PVC oriron pipe long enough to reach the far end ofthe patio, if possible. You can run them eitherdirection, but both should be the same direc-tion. Keep them close enough together so youcan drag the 2x4 or screed along the top of the
pipe. This will be your smooth paver base line when finished with this step.
Spread out 1-1/4” to 1-1/2” of paver base material (paver base, concrete screen-ings or 919 screenings is recommended). Spread the paver base over the patioarea and cover the pipes slightly. Use a long straight 2x4 to “pull” the base mate-rial. You can meticulously use the board and a 4’ level to smooth the gravel out atthe proper level, or you can pull strings across the area that are tied to woodenstakes at the appropriate elevation, and pull the board just under the string. Orattach string to the existing string running along the wall and the opposite side ofthe patio, which will give you the same pitched line. Use that to measure off whenchecking depth, which you should do periodically while spreading material.NOTE: If your outer string lines are not at same level as the top of the pavers will be at, then be sure to
measure the correct distance allowing for that. For example you could have the string 3” above the paverlevel. But, subtract that from your measurement when checking depth.
After spreading the paver base, you should have at least 2-5/8” remaining space to fit the pavers into.When installing the pavers they will be slightly above the string. This is normal. The pavers will sink intothe paver base when you compact later.

HowToBuildAPaverPatioorWalkway(cont’d)
After laying the pavers you will run the compactor over the pavers with jointing sand, and that willeven out the pavers and push them into the base, leaving the top of the pavers where they should be.
After pulling the paver base level at 1” deep, remove the pipe and gently fill in the space with morepaver base keeping it level with the rest of the paver base. Using a trowel will make it easier. Pick a 90degree corner, if available, to start laying pavers from. If building off a house or door, you might want tostart there and work your way outward. Note when you get to the end of the patio or walkway, you may needto make cuts to finish the line. Or you can stop where a solid edge is obtained without cutting. If you need tocut, run pavers beyond the end, snap a chalk line and do one long cut to keep cuts even.
Lay pavers without draggingthem in the paver base, which woulddisturb the level surface. Place pav-ers by holding tight against each otherthen pushing down gently. You canuse a rubber mallet to tighten thejoints as you go along. Lay one entirerow in each direction, if possible, andmake sure you have your 90 degree
corner intact, if any. Work your way outward and continue to tightenwith rubber mallet to ensure there’s no space between pavers, other thanthe preset joint width, usually about 1/8” or less. Note, walking on pavers will push them into the uncompactedbase. You will level them out later with the plate compactor. Try not to step on corners which can shift thepaver angle.
After laying all of the pavers you will need to tamp the pavers into the paver base. It is recommendedthat you use the plate compactor on a low setting. Run the compactor over the entire patio 2 or 3 times. Thepavers should even themselves out very nicely and set into the paver base at the correct height.

HowToBuildAPaverPatioorWalkway(cont’d)
After tamping the pavers, install optional brick-edge edging aroundthe perimter to hold the pavers tight. If not using brick-edge edging,you should use something to secure the outside edges, such aslandscape timber, mortar, stone blocks such as belgian blocks workgood. The purpose of the border is to prevent “paver walking” (Seeimage on right). Pavers tend to drift apart over time widening thejoints which will make the pavers unstable.
At this point you can either fill the joints with jointing sand,such as a fine washed mason sand, or use a polymeric sand. If usingpolymeric sand, follow the instructions exactly. It is critical that youuse a leaf blower to blow off excess dust before applying water.
If you are using mason sand to fill joints, spread a good 1/2”layer over the entire patio area. Use the plate compactor on a lowsetting and go over the entire area several times. This will shake thesand down into the joints. Sweep off excess sand.
If you wish to lock the sand in the joints, you can use a jointstabilizing sealer such as the Surebond SB-1300 or SB-7700 GlossJoint Stabilizing Sealer. The SB-1300 & SB-7700 are water-based,breathable sealers that will allow efflorescence1 to filter through it tothe surface. Once efflorescence is on the surface it can be cleanedwithout damaging the sealer. If using the sealer, make sure the paversare clean and use a leaf blower to blow off any sand that might be on the surface. Follow instructions on thesealer jug. Pavers need to be completely dry before starting and make sure there’s no rain forecast for atleast 24 hours before, during and 24 hours after sealing.
Note, using a sealer will change the paver color slightly, usually making the color stand out more. Followinstructions exactly for any sealer or polymeric sand you use.
1 “Primary efflorescence is named such, as it typically occurs during the initial cure of a cementitious product. It often occurs onmasonry construction, particularly brick, as well as some firestop mortars, when water moving through a wall or other structure,or water being driven out as a result of the heat of hydration as cement stone is being formed, brings salts to the surface that arenot commonly bound as part of the cement stone. As the water evaporates, it leaves the salt behind, which forms a white, fluffydeposit, that can normally be brushed off. The resulting white deposits are referred to as "efflorescence" in this instance. In thiscontext efflorescence is sometimes referred to as "saltpetering." Since primary efflorescence brings out salts that are notordinarily part of the cement stone, it is not a structural, but, rather, an aesthetic concern.”
Source: http://en.wikipedia.org/wiki/Efflorescence

Some Photos courtesy: Legacy Landscaping, L.L.C.
Fig. 1
Important:From pallet to pallet of pavers, color can vary. It is always in the best interest to randomly select from
different pallets during installation to ensure all colors of the pavers are distributed evenly.
Stone Plus, and their employees, do not claim to be professional masonry instructors or installers. Theseinstallation techniques are suggestions that tend to work with great success.
Stone Plus accepts no responsibility for poor installation or unusual conditions where pavers is installed.By using this information you agree to hold Stone Plus harmless for any damage or losses resulting from theuse of or inability to use this information.
5500 Chronicle Ct.Jacksonville, FL904-443-7400
1670 Blanding Blvd.Middleburg, FL904-282-8433
12 Enterprise Dr.Bunnell, FL
386-445-2553
Web Site: www.stoneplus.comEmail: [email protected]