hotfuzzhotfuzz.sourceforge.net/files/usermanual.pdf · 1.4 hotfuzz ... fuzzing is the approach of...
TRANSCRIPT

HotFuzzUser manual
Authors: Dusan Domany, Stepan Henek, Peter Kmet, Jan Stanek, Martin Zember

HotFuzz User manual
Special ThanksWe would like to thank our project leader Daniel Toropila for his invaluable comments and
leadership skills that lead this project to a successful finish. We would also like to express our never-ending gratitude to Pavel Kankovsky for his ideas, hints and advices during the whole project development phase.
2

HotFuzz User manual
Table of Contents1 Introduction: Computer Security, Peach and Hotfuzz......................................................................5
1.1 Computer Security – a Brief Overview....................................................................................51.2 Basic Concepts..........................................................................................................................7
Fuzzing........................................................................................................................................7Dissection....................................................................................................................................7Network Proxy............................................................................................................................8
1.3 Peach.........................................................................................................................................81.4 HotFuzz...................................................................................................................................101.5 What Are the Benefits of HotFuzz?........................................................................................12
2 Installation......................................................................................................................................132.1 Hardware and Software Requirements...................................................................................132.2 Installation Instructions...........................................................................................................15
Pre-installation Check ..............................................................................................................15Installation Step-by-step...........................................................................................................16Installation – Non-default paths................................................................................................22Installation – Troubleshooting..................................................................................................22
Install Log.............................................................................................................................22How to Keep Wireshark Installed........................................................................................22How to Keep Other Versions of Python Installed................................................................23
3 Tutorial...........................................................................................................................................243.1 Getting Started........................................................................................................................243.2 FTP Server Test.......................................................................................................................25
How to Open a Project..............................................................................................................26Main Window............................................................................................................................29
Recording Tab......................................................................................................................29 How to Set up Client and Server for Recording ...........................................................30 How to Adjust Recording Settings................................................................................32 How to Start Recording.................................................................................................33
Fuzzing Settings Tab............................................................................................................35 How to Mark an Element for Fuzzing...........................................................................36 How to Set Mutators for Fuzzing..................................................................................38
Fuzzing Tab..........................................................................................................................39 How to Adjust Peach Settings.......................................................................................39 How to Start Fuzzing.....................................................................................................40
Dump Viewer Tab.................................................................................................................42 How to Investigate a Crash Report................................................................................42
Conclusion................................................................................................................................433.3 Basic Test................................................................................................................................443.4 BIND Test...............................................................................................................................453.5 ICQ Test..................................................................................................................................473.6 BadBlue Clear Test.................................................................................................................493.7 BadBlue Crash Test.................................................................................................................543.8 BadBlue Picture Test...............................................................................................................563.9 How to Prepare a New Test....................................................................................................573.10 How to Control Programs.....................................................................................................583.11 How to Set up a Test Project.................................................................................................59
3

HotFuzz User manual
4 Use Cases........................................................................................................................................605 Advanced Topics.............................................................................................................................67
5.1 Supported Protocols................................................................................................................675.2 Options....................................................................................................................................675.3 Mutators..................................................................................................................................685.4 Mutation Strategies.................................................................................................................68
6 Troubleshooting..............................................................................................................................706.1 Agent Refuses to Start.............................................................................................................706.2 GUI Does Not Write any Errors to Console, but Is Not Working Properly............................706.3 Windows Debugger Is Not Starting........................................................................................70
7 Resources........................................................................................................................................72
4

HotFuzz User manual
1 Introduction: Computer Security, Peach and Hotfuzz
1.1 Computer Security – a Brief OverviewThe aim of the HotFuzz project is to provide a tool for discovering security vulnerabilities in
network applications. It is based upon a software testing method named fuzzing, which we will describe later in this chapter.
Security of network applications plays a significant role in today's world, where everything is connected with everything and a single flaw in this system can affect many lives. To point out how serious can such a security-related flaw be, we mention the release of Code Red worm in July 2001. Code Red infected nearly 360,000 servers in only 14 hours. In addition to the havoc it caused at government server, which was its main target, Code Red consumed also an enormous amount of Internet capacity. It was able to create such big problems by exploiting a security hole in the Microsoft Internet Information Server.
Many computer security vulnerabilities result from poor programming practices. Most critical security flaws occur as a consequence of insufficient checking and validation of data and error codes in programs.
When writing a program, programmers typically focus on what is essential to solve for the right functionality of the program. Their attention is put on the normal flow of execution of the program rather than considering every potential point of failure. They often make assumptions about the type of inputs the program will receive and the environment it executes in instead of incorporating checks of these conditions into the program.
The usual approach to improve software quality is to use some form of structured design and testing to identify and eliminate as many bugs as reasonably possible. The testing usually involves variations of likely inputs and common errors, with the indent of minimizing the number of bugs that would be seen in general use. The concern is not the total number of bugs in a program, but how often they are triggered, resulting in program failure.
Software security differs in that the attacker chooses the probability distribution, targeting specific bugs that result in a failure, which can be exploited by the attacker. These bugs may often be triggered by inputs that differ dramatically from what is usually expected and hence are unlikely to be identified by common testing approaches. Writing secure and safe code requires attention to all aspects of how a program executes, the environment it executes in, and the type of data it processes. Nothing can be assumed, no input can be trusted, all potential errors must be checked.
To give an example of how such potentially dangerous input can look like, we will describe two security-related flaws that can be commonly found in software products:
Integer Overflow
In 32-bit operating system, an integer can range from −2,147,483,648 to +2,147,483,647. Adding 1 to 2,147,483,647 will not give 2,147,483,648, but will instead give −2,147,483,648. If programmer assumes that a variable contains only positive integers, but its type is actually a signed integer, arithmetic operations might cause the overwrite of the leftmost bit and make the result negative. If the variable for example stores a size of buffer to be allocated, this might cause serious issues.
Buffer Overflow
Most of the vulnerabilities discovered by security researchers are buffer overflows. These overflows are caused by bugs that allow the code to write past the end of a buffer. If one of the input
5

HotFuzz User manual
parameters is, for example, a large string, which then application tries to store inside a buffer allocated on stack, that is not big enough to hold its content. Thus, other values stored on stack might be overwritten, including the return address of the running function. Such stack corruption usually leads to a crash of the running application. If appropriate security measures are not implemented, this vulnerability can be then further exploited by a skilled attacker, to get access to the machine with the privileges of the running application. This is especially unpleasant if the application is running with administrator privileges.
Unless software security is a design goal, addressed from the start of program development, a secure program is unlikely to result. However the first priority during the development is often functionality of the product and not its security. The only way how to provide at least some level of security assurance is to test the software before it is publicly released.
Commonly used software testing techniques include:
Source Code Review
An effective way to find vulnerabilities in software for which the source code is available is manual code review. While this approach has yielded a lot of vulnerabilities in the past, its results are predicated on looking for instances of a known language problem or for instances of commonly used statements that are known to exist and cause problems.
Black Box Testing
Black box testing does not take into account the internal structure of the application, but rather the input and output specification of the program. From the security perspective, in black box testing it is important to provide the program with an input it would not expect normally. Variation of this technique, in which tester has a limited knowledge about the target application, is sometimes referred to as Gray box testing. Black box testing can be done manually, or its input generation and output analysis can be automated.
White Box Testing
White box testing is performed in a similar manner to black box testing, but the testers have a view of the program structure and data flow requirements. With white box testing, it is possible to craft set of inputs that allows every line of code to be executed and tested.
How much needs to be invested into software testing is usually based on how accessible the particular software components are and what level of security assurance is required. This goes hand in hand with the choice of suitable methods.
One of the methods used in software testing is called fuzz testing, also known as fuzzing. Fuzzing is often described as black-box testing technique. By providing a program with malformed input, it attempts to reach an error indicating a potential vulnerability. Fuzzing does not require previous knowledge about the program tested such as its design or source code, although it can make use of them. For detailed information about fuzzing, please refer to the following chapter “Basic concepts”.
6

HotFuzz User manual
1.2 Basic ConceptsThis chapter explains some basic terms and concepts necessary to understand the documentation. If you are already familiar with fuzzing of network applications and its principles, you can skip this chapter.
FuzzingFuzzing is the approach of searching for errors in programs, used by Quality Assurance
engineers and security researchers. It is a black-box testing technique in which the program under test is stressed with unexpected inputs and data structures through external interfaces. The purpose of fuzzing is to find security-related defects, or any critical flaws leading to denial of service, degradation of service, or other undesired behaviour.
The idea of fuzzing is the automation of the process where the data is provided for the program. The program is monitored for faults (mostly by attaching a debugger that is watching for crashes, exceptions and other faults). When the input is processed, a new test case starts using different input data.
The most straightforward approach to fuzzing is to use completely random input to eliminate any assumptions. While this method can theoretically reveal completely unexpected weak spots, it can also be very time-consuming. Many generated inputs will probably be refused by the target application right away. This method of fuzzing is not used very often because of the already mentioned disadvantages.
There are two basic commonly used types of fuzzing ‒ mutation based and generation based. Mutation based fuzzing is the simpler one. It does not need any information about the fuzzed protocol and just adds anomalies to the valid inputs, either randomly or using some heuristics. Mutation based fuzzing usually works with an infinite number of variations creating an infinite number of test cases. Generation based fuzzing creates test cases using the knowledge of the fuzzed protocol. It adds anomalies to each possible spot in the input and using a predefined set of variations it usually creates a finite set of test cases. It is also able to handle dependencies in the inputs like checksums, size relations etc. Because of its characteristics, mutation based fuzzing is sometimes also called “dumb” and generation based fuzzing is called “smart”.
These two types of fuzzing led to the development of fuzzers which combine both described principles. One of these fuzzers is SPIKE, released in 2002. SPIKE uses templates to target critical aspects of network protocols. It offers a framework by which new data-set templates could be added in order to allow fuzzing of different protocols.
In 2004, a new open source fuzzing tool named Peach was released. The tool was conceptually very similar to SPIKE, but it was written in Python and much more extensible.
DissectionDissection is a term usually used in anatomy for the well known process of examination of a
dead body, often using invasive methods like cutting, chopping, slicing and so on. In terms of our project, however, we will not be so severe. The general term dissection is quite well described in Wikipedia: “Dissection (also called an atomization) is usually the process of disassembling and observing something to determine its internal structure and as an aid to discerning the functions and relationships of its components.”
Leaving anatomy aside, the previous description fits well also for the dissection in computer
7

HotFuzz User manual
science. Dissection (often called more precisely packet dissection) is a process of disassembling a packet into parts with specific meaning. The dissection process is usually automatic and is a part of work of traffic analysers (like Wireshark). The analyser acquires the packet, determines to which protocol it belongs (using heuristics) and uses appropriate protocol dissector.
A dissector is basically a description of the structure of all types of packets belonging to the protocol. The analyser uses the dissector to divide the packet into parts with individual meaning (for example first eight bytes in a HTTP response packet specifies the HTTP version, usually HTTP/1.1 etc.).
Network ProxyNetwork proxy is a computer system or an application program that acts as an intermediary
between hosts communicating via network. Clients connect to proxy and send requests, which are then forwarded in some form to the desired target (usually a server). Replies from the target are then forwarded back to clients. A proxy that passes requests and replies unmodified is usually called a gateway.
Network proxy can be used for various purposes:• Speed up access to resources (web server caches)• Block undesired network communication• Bypass security controls (like IP blacklists)• Maintain anonymity of clients• Log network communication• Scan communication for malicious content• etc.
In case of our application we have implemented the idea of network proxy to alter the real requests and responses into form, which is still understandable and acceptable by both client and server, but might introduce security issues due to an unexpected content.
1.3 PeachPeach became a base ground for our project as it is still under active development of its author
and we decided to enhance an existing tool rather than build a new one from scratch. Though there is therefore a strong connection between Peach and Hotfuzz, there are also some significant conceptual differences. Before we can talk about these differences we first need to describe what Peach actually is and how it works.
Peach is a fuzzing tool capable of performing both mutation based and generation based fuzzing. It uses objects called mutators to smartly generate inputs. Choice of mutators has often direct influence on code coverage of fuzzing test performed by Peach. For more information about mutators, please refer to the chapter Mutators.
Although Peach does not try to exploit specific vulnerabilities, it is important to be aware that it might provide the target application with an input that will cause its instability, or even crash. If it finds such input, there is clearly something about the application that needs to be fixed. One of the advanced Peach features is the ability to monitor the target application and eventually provide additional information in case of its crash.
Peach is capable of (but not limited to) network protocol fuzzing. As it is the scope of the HotFuzz project, we will focus specifically on this area. A typical Peach network fuzzing scenario looks as follows:
8

HotFuzz User manual
In a usual scenario Peach acts as a client and communicates with a single remote application. It alters requests specified in the configuration and tries to generate an input for the remote application, which would cause a crash or other kind of undesired behaviour. It uses a so called Peach Agent to maintain control over the target application.
Peach Agent is a specific instance of Peach started on the host, where the target application is located. Agent is started without any configuration, it just listens on a specified port and waits for instructions. As the matter of fact, agent itself is quite simple, it handles communication with Peach and most of the functionality is hidden in so called monitors.
Monitor is basically a class that implements specific methods, which are called by the agent during the fuzzing process. Its main purpose is to monitor and control behaviour of the target application. One of Peach Monitors is called WindowsDebugEngine, which attaches Windows Debugger to the target application and reports debug information when a crash occurs.
Mutation strategy controls which data are being fuzzed, when and how. Values are provided by a chosen set of mutators.
Peach State Model is a deterministic finite state machine, which defines how Peach should behave while acting as a client. In each state it performs one or more actions. There are several actions supported, but most important ones are Output and Input. Output action represents sending
9
Figure 1: Peach fuzzing scenario

HotFuzz User manual
data from Peach to the target application and Input action represents receiving data from the target application. Each Output action has its own Data Model, which represents structure of message sent during the action. Data Model is basically a list of elements, where each element should have its type, default value and attribute, which tells whether the element is allowed to be altered during the fuzzing process or not. Some of the Input actions might also require specification of a Data Model.
Finally, the Pit file is a configuration file written by the Peach user, which describes the whole fuzzing scenario. It has a form of an XML file, where the user needs to specify all necessary addresses and ports, monitor and mutators that are supposed to be used and the whole Peach State Model including all the Data Models that are required for the test.
After writing a Pit file for the desired test, the user can launch the test at any time. The test then runs fully automatically and requires minimum of the users attention.
Now to put this into perspective we will describe the major conceptual differences between HotFuzz and Peach.
1.4 HotFuzzWhen one wants to use Peach for testing, he has to write his own Pit file. Writing a Pit file can be
a very tedious task. State model needs to reflect every single aspect of communication with the target application including deviations that might occur as a result of the fuzzing process. Therefore a good knowledge about the underlying network protocol and about the target application reactions to various types of input is also required.
To avoid the need of manual Pit file creation, Michael Eddington, author of Peach, came up with an idea, which he called “Peach in the middle”, shortly referred as Pitm. The idea was based on situating Peach between client and server and performing a sort of man-in-the-middle attack. It had not been implemented and so when we were thinking about what to program as our school project, we decided that it would be an interesting extension.
The current version of HotFuzz brings this idea a bit further. It does not rely on determinism in behaviour of client and server application and requires only little knowledge about the data being sent.
HotFuzz operates as a network proxy between client and server application and performs real-time data analysis and fuzzing.
Typical HotFuzz network fuzzing scenario can be seen in figure 2 on the next page.The user interacts with the application using the Graphical User Interface. The interface can be used for starting Peach agents as well as for starting the HotFuzz process, which can run in recording or in fuzzing mode. The interface interacts with the running HotFuzz process using a specified network port.
The whole process has four phases• configuration of the applications and the HotFuzz proxy part• recording• configuration of the fuzzing process• fuzzing
The two configuration phases are described in detail in the “Tutorial” chapter.
10

HotFuzz User manual
Recording phase
During each iteration of this phase (number of iterations is specified by the user) full communication between the communicating applications is performed. The data are being analysed, transformed into Peach structures and stored as a list of Peach Actions with Data Models. After the last iteration all collected data are aggregated and exported into the HotFuzz configuration file, which is similar to the Peach Pit file.
The results are presented to the user via Graphical User Interface and he can then select elements of the Data Models that are supposed to be altered during the fuzzing process. Additionally he can also choose mutators and the mutation strategy, which controls the overall mutation process. The user can then save his configuration. Saved or not, the configuration will be used in the next phase.
Fuzzing phase
Live data flowing through HotFuzz are being analysed and transformed into Peach structures. These structures are then compared with the set of Actions collected during the recording phase in a Data Models Comparison process. The system cannot rely on complete compliance as certain elements like timestamps may vary. If an action is identified to be equivalent to one of actions in the
11
Figure 2: Hotfuzz fuzzing scenario

HotFuzz User manual
known set, configuration that was done by the user for this action is copied, mutations based on this configuration is performed and the altered data are sent instead of the original ones. If no equivalent action is identified, then the data are forwarded as is. The fuzzing process itself is infinite, but the user can stop it at any time. Stopping may sometimes take a while, depending on the current state of Peach Agents. The user can then view information about the crashes (if any) and analyse what happened to the tested applications.
1.5 What Are the Benefits of HotFuzz?Using HotFuzz, fuzzing can be done without manually specifying the data model. All the user
needs is to configure the applications to use HotFuzz as a proxy and it can perform fuzzing on the data that the applications send. It does not perform only random fuzzing without the awareness of the underlying protocol, but it parses the communication into a data model and applies more sophisticated fuzzing. It also finds relations between these blocks.
The user does not need to specify the state model of the program, because real applications are used on both sides of the communication and HotFuzz uses the real states of these applications.
Because fuzzing needs to be an automated process, this would not make much sense without a way to control the applications to produce communication without users interaction. Although it was not in the scope of this project, we have added some tools for interacting with the applications to the HotFuzz distribution and the examples show the ways how these tools can be used.
12

HotFuzz User manual
2 Installation
2.1 Hardware and Software RequirementsHardware recommendations were obtained during an intensive testing by the HotFuzz team
members. Running HotFuzz with minimum hardware configuration is considered to be still possible, but will probably cause the application to run slowly.
Minimum hardware requirements:• 450 MB HD space• 512 MB RAM• CPU: Pentium M 1,6 GHz
Recommended hardware configuration:• 600 MB HD space• 2 GB RAM• CPU: Intel Core2 Duo 2,16 GHz.
HotFuzz was developed and tested for Windows XP Service Pack 3. The application runs also on other versions of Windows, but might provide less stability based on compatibility of its dependencies. It is therefore advised to use Win XP SP3 as a platform.
The deployment diagram describes software and components needed for full functionality of the product. All required software, its configuration, dependencies and libraries are included in the installation package of HotFuzz. However, if the user has some of the software already installed on his machine, certain difficulties might happen in specific situations (this is further described in the following chapter).
13

HotFuzz User manual
14
Figure 3: Deployment diagram

HotFuzz User manual
2.2 Installation InstructionsTo make the installation as easy as possible we have created an installation wizard that will lead
you through the whole installation process. However there are some things that we were not able to automatize as much as we would like to, so we highly recommend you to read these installation instructions before the installation process. It might help you avoid some otherwise crucial problems.
Pre-installation Check For HotFuzz to work properly there are some programs that must not be installed on the system
where you want to run HotFuzz. These programs are• Wireshark• Python in version different from 2.5
If you have these programs installed, uninstall them before installing HotFuzz. There is also an automatic check in the HotFuzz installer itself that will remind you to uninstall them. However there is a way to keep them, if you really need to. For more information see the troubleshooting section.
There are also some programs that must not be installed for some of the prepared example projects to work properly. These programs together with the conflicting example projects are listed below
• BadBlueTest• Mozilla Firefox
• IcqTest• Miranda IM
• BindTest• Bind 9
The reason why these programs must not be installed is that the installer installs these programs when you choose to install the corresponding example projects and there might be version conflicts preventing the example projects from running properly.
15

HotFuzz User manual
Installation Step-by-step1. Re-check the pre-installation instructions.2. Run HF_install.exe.3. Read the license agreement, click I agree to continue or Cancel if you do not agree with the
license conditions (we will be glad if you send us an e-mail with the reason why you did not accept the license since we tried to make it as open as possible).
4. Choose the components to be installed and click the Next button.• Note that all the dependencies are necessary to run HotFuzz and if you uncheck
them, you will not be able to run HotFuzz. The possibility to uncheck them is present only for the situation where you have some of these already installed and do not want to reinstall them.
• Note that the installer has some predefined paths for its components. These hard-coded paths are
• “C:\python25” for Active Python 2.5 and consecutively for all of python extension libraries (all dependencies excluding Windows Debugging Tools and WinPcap)
• “C:\Program Files\Debugging Tools for Windows“ for Windows Debugging Tools
• “C:\Program Files\WinPcap” for WinPcap• “C:\WINDOWS\system32\dns” for DNS-BIND fuzzing example
• If you need to change these default paths, consult the “Installation – non-default paths” section. Note that this will complicate the installation process a bit.
16
Figure 4: License agreement window
HotFuzz User manual
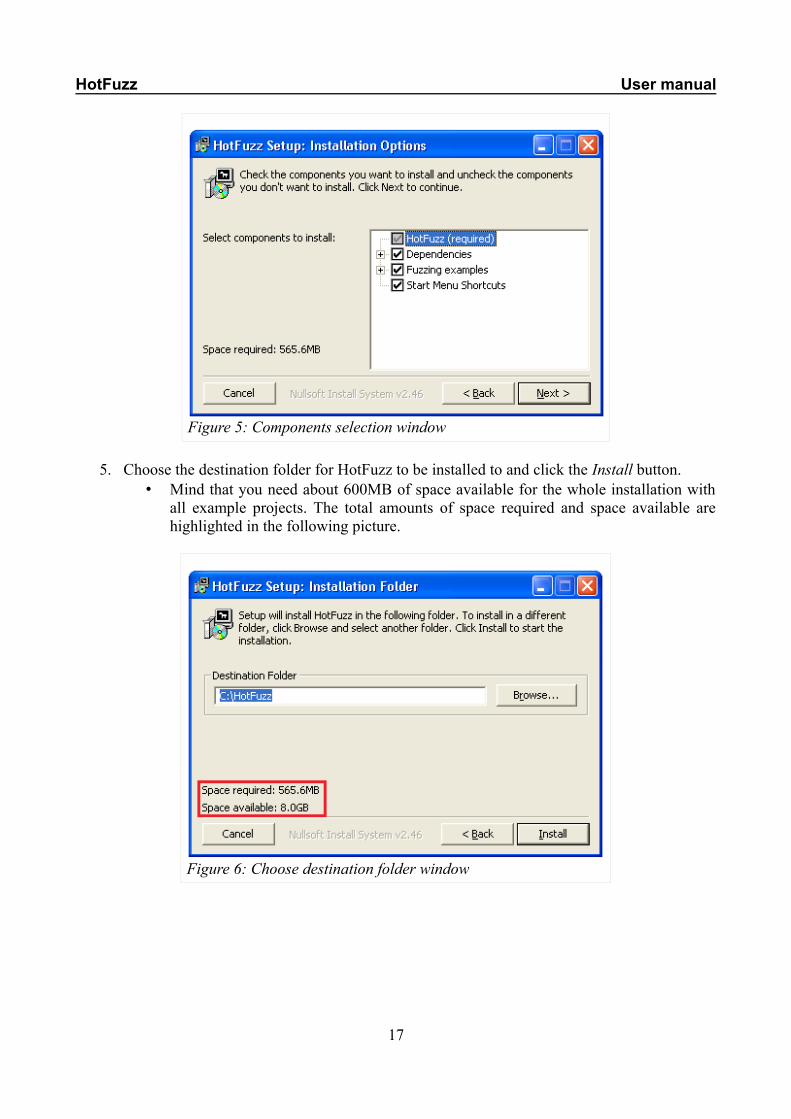
5. Choose the destination folder for HotFuzz to be installed to and click the Install button.• Mind that you need about 600MB of space available for the whole installation with
all example projects. The total amounts of space required and space available are highlighted in the following picture.
17
Figure 5: Components selection window
Figure 6: Choose destination folder window

HotFuzz User manual
6. If everything goes well, you should not see any of the two screens below.
If you see any of these, re-read the “Pre-installation check” part and follow the instructions written there.The screen you should see looks like the following one.
Unfortunately we were not able to force the installers of some of the components to run in silent mode so you will have to go through their wizards. It is usually very easy, just clicking the Next button, leaving everything to default. But to make sure everything goes well, we will describe briefly these wizards too.
18
Figure 7: Installed python warning message
Figure 8: Installed Wireshark warning message
Figure 9: Multiprocessing installation wizard

HotFuzz User manual
This multiprocessing installation wizard requires you to click the Next button four times and then click the Finish button.
7. Now you should see the WinPcap installation wizard.
The simple sequence of button clicking Next, Next, I agree, Finish should lead to the desired result.
19
Figure 10: WinPcap installation wizard

HotFuzz User manual
8. Depending on whether you chose to install the DNS-BIND example or not you might see the successful ending screen or Bind installation screen. If you see the Bind installation screen
then you have to fill something in the Service Account Password, anything will be OK for the testing purposes (we, for example, used simple 'a'). Fill the same password in the Confirm Service Account Password. Then click the Install button. After the wizard shows the window that installation was completed, close it and click the Exit button.
20
Figure 11: Bind installation wizard

HotFuzz User manual
9. Now you should see the ending screen
and HotFuzz should be correctly installed. You can proceed to the “Using HotFuzz” section and start your work with our program. If you encountered any problems during the installation (some windows did not appear, there were some error or warning windows), consult the “Troubleshooting” section.
21
Figure 12: Installation completed window

HotFuzz User manual
Installation – Non-default pathsIf you need to install the dependencies into folders different from the default ones, there is a way
to do it but we must warn you that it might lead to problems. If you still intend to do it, then you should download the dependencies.rar archive from our web site http://hotfuzz.atteq.com/ section Support, unpack it and then follow the instructions below depending on what programs you intend to install to different locations.
At first you have to install the dependencies you intend to move to non-default directories. When you run their installers in interactive mode (just double-click the provided MSI) there are common installation wizards that will let you choose the destination folder. Afterwards you should run the HotFuzz installer and on the components page (step 4 in the “Step-by-step installation manual”) uncheck all the dependencies you have already installed manually.
Note that when you install Active Python 2.5 into non-default folder, then the python extensions might not find the correct python path (happened once when we tested it, usually it finds it well). Therefore it is recommended that you check the install log (see “Troubleshooting – Install log”) whether these python-dependent programs installed correctly.
Also note that if you install Debugging Tools for Windows into non-default folder, you must manually update the path to it after you run HotFuzz. That can be done in the HotFuzz menu “Edit → Preferences → PathToWinDbg” which should point to the Debugging Tools for Windows installation directory.
We have not encountered problems with relocated WinPcap but if you encounter a message saying “NFP service not running” or something similar, it is very probably that there is something wrong with WinPcap.
We strongly recommend not to change the path to the Bind program since it will break the configuration prepared for the testing purposes. If you need to do it, you can, but you will have to create your own configuration files for Bind. For this refer to the Bind manual at http://www.isc.org/software/bind.
Installation – Troubleshooting
Install LogThe installer generates the log file with information about the installation process. If anything
went wrong during the installation, you should open this log and see if there is any information concerning your problem. The log file is available in HOTFUZZDIR\dependencies\install_log.txt where HOTFUZZDIR is the destination folder you have chosen in step 5 of the installation process. The log is very detailed and might be confusing for inexperienced users, but you are interested in the lines saying something like “MSI (s) (24:F8) [16:35:59:167]: Product: Debugging Tools for Windows -- Installation operation completed successfully”. There will most likely be a line saying that installation of some of the dependencies failed. In that case, just go to HOTFUZZDIR\dependencies and try to install that dependency manually using the provided MSI installer.
How to Keep Wireshark InstalledIf you want to keep Wireshark installed and use HotFuzz at the same time, there is a solution.
You just need to go to your Wireshark directory (usually C:\Wireshark) and rename the plugins
22

HotFuzz User manual
subdirectory to something else. This will disable the plugins that might be incompatible with the HotFuzz adapted version of Wireshark dissection libraries and everything should be fine. Mind that with renamed plugins directory you will not be able to use plugins in Wireshark.When you finish working with HotFuzz, you can simply rename the directory back and your original plugins will work again.
How to Keep Other Versions of Python InstalledIf you have other version of Python than Python 2.5 and you want to keep it, you can, but you
must take care of some settings. HotFuzz comes with a lot of Python-specific dependencies that install automatically during the installation of HotFuzz. These dependencies might not install correctly if they find another version of Python already installed. Therefore you have to check the installation log file (see “Troubleshooting/Install log” section) whether all dependencies installed correctly and if not, you must run their individual installers by yourself (all these can be found in the dependencies directory). You also need to check that python.exe for the Python version 2.5 is listed first in the Windows Path. This can be found (and changed) in “This Computer → Preferences → Advanced → Environment Variables”.
You also have to manually patch the comtypes python module. Instructions for installation of the patch can be found in “HOTFUZZDIR\dependencies\comptypes_fix\ readme.txt” together with the necessary file which needs to be replaced.
23

HotFuzz User manual
3 Tutorial
3.1 Getting StartedHotFuzz, as a smart network fuzzing system, can be considered a system for experienced users.
That suggests it can be less intuitive and more challenging to use and it can require more patience to produce expected results than simpler applications. Yet, we hope that with this tutorial you will overcome most problems and difficulties related to this complexity and you will be able to start using HotFuzz as quickly as possible. This is also the main purpose of the tutorial, it focuses mostly on the basics needed to perform testing. If you are interested in more advanced topics such as expert configuration and implementation details, please refer to the developers guide.
The first step when you want to use HotFuzz is to prepare your testing scenario. You will need to have installed the network applications you wish to test and configure communication between them. Typical example of such setup is a client-server pair which implements some service, for example FTP, and is instructed to exchange series of requests and responses, like “log in with username” or “create directory”. Communication exchange shall trigger operations that you have chosen to be tested for unexpected input, for example creation of a directory with invalid names or processing of damaged acknowledgements from the server. When deciding about exact content of communication, you should keep practical considerations in mind. For performance reasons it is good idea to keep it as simple as possible and create separate test projects for different functions or small sets of functions. It should also reflect expected pattern – if login fails because the username string was altered by the fuzzer, it will not be possible to perform further operations available only for logged users etc. It might be useful to experiment with tested programs for a while in order to find inputs and settings which fit intended test the best.
When you have your scenario ready, you need to provide information about the programs to be tested – how to run and monitor them and how communication will proceed between them – to HotFuzz so it can keep the track of the tested environment. This is done typically by setting up a configuration file for the scenario, structure and content of such files are described in detail in the Developers guide. Fuzzing is for the most part an automated process, thus to use its advantages you will need to come up with means of automating communication of chosen applications as well, either by scripts or external tools. Some of the options of how this could be achieved are discussed in the Developers guide. However, to turn your scenario to working HotFuzz test project when you start from scratch is non-trivial and can be quite challenging, especially for beginner users. That is the reason why we provide a few pre-made examples in order to help users to become familiar with HotFuzz and give them an idea how it can be used with different applications and protocols. We have also developed a GUI tool to make it easier to control configuration and run the tests.
In next parts of the tutorial we will explain one of the examples, FTP server test, in detail to introduce the basic ideas and general proceedings which testing with HotFuzz is based upon. Then we will briefly describe other examples to comment on differences that might arise when fuzzing another types of applications. We will use the GUI tool in the tutorial, as the easiest and most comfortable way to run HotFuzz, nevertheless note that the principles demonstrated here also hold when you create configuration files and run HotFuzz manually from a commandline.
24

HotFuzz User manual
3.2 FTP Server Test
From this first example you will learn how to start using HotFuzz, how to open and set up a test project and, finally, how to run fuzzing of server application and view its results. For this purpose we will use implementation of FTP server CesarFTP in version which is known to suffer from security vulnerabilities. The server, as well as all the programs in other examples, is part of the standard HotFuzz installation so if you went through the installation process successfully, you should have it ready to use. Commands to the server are sent via standard FTP client which is part of the Windows operating system.
The GUI tool organizes the test you develop into projects. Basically, a test project is a group of information and settings that wholly describes how your test should be performed in individual case of communication between tested applications. For instance, if you want to test operation of logging into a server, you create a new test project for this case and GUI lets you set which programs shall be run, how they will communicate, how communication shall be fuzzed etc. Then you can save these data as a project, which is in fact an XML file with settings and associated configuration files, and later open it again which will automatically load your test configuration. What exactly is included in the information and how you can set it is discussed later in this tutorial.
25

HotFuzz User manual
How to Open a Project
First we need to open a project within which we will work with the example test. To do this, go to the directory where you have HotFuzz installed and run GUI tool represented by file hotfuzzGUI.pyw (program should run automatically via Python interpreter after proper HotFuzz installation). Alternatively you can also run HotFuzz from within the “Start menu → Programs → HotFuzz”. Wait until the welcome screen (Figure 13) loads. The welcome screen has been designed to speed up the opening and creation of projects. In bottom part of the screen you can choose from three tabs that indicate project operations: Recent Project, New Project and Open Project.
Recent Project is a default tab for quick access to the projects you have opened recently. When
you save project and next time you want to load it again, you do not have to complicatedly browse for its XML file in Open file dialog. Instead, in the left panel of Recent Project tab you can choose name of your project among other recently opened ones, while in the right panel you can see its identification details. The chosen project is then opened by double clicking on its name or by clicking the Open button.
26
Figure 13: HotFuzz GUI tool – Welcome screen with Recent Project tab selected.

HotFuzz User manual
The New Project tab lets you create a new test project from scratch. In the left panel you have to choose two templates for the project, a recording template and a fuzzing template. Names of the templates refer to two phases of fuzzing process that are controlled from GUI tool main window and you will learn about them later. Templates are HotFuzz configuration files and contain structure (i.e. number and order of requests and responses) of communication performed in the test. There are templates available for every pre-made example which can be modified if communication pattern of the project remains the same. In the right panel of the tab you should fill in the meta-information about your new project. After that you can create a new project by clicking the Create button, which will open the Pick Directory dialog. There, navigate to the folder which will contain the project files in the dialog.
27
Figure 14: Welcome screen with the New Project tab selected. In the picture, empty templates are picked for both recording and fuzzing and short description information is filled in.

HotFuzz User manual
Open Project tab is used to load previously saved projects. If you have files of the project you want to work with saved in a directory, click the Browse button in the left panel and browse to the project XML file in the Open file dialog. You can see the description of the project in the right tab after it is successfully loaded. To finish loading of the project, click the Open button in the bottom part of the screen. As we are following one of the pre-made examples which come with prepared test projects, we will use this tab to open the CesarTest project. The XML file for this project is located in a subdirectory of HotFuzz installation directory. In the Open file dialog browse to the subdirectory examples, then projects, and then CesarTest. Pick project.xml file and click the Open button.
28
Figure 15: Welcome screen with the Open Project tab selected. CesarTest project is already set to open. Description information is visible in the left side of the screen.
HotFuzz User manual
Main Window
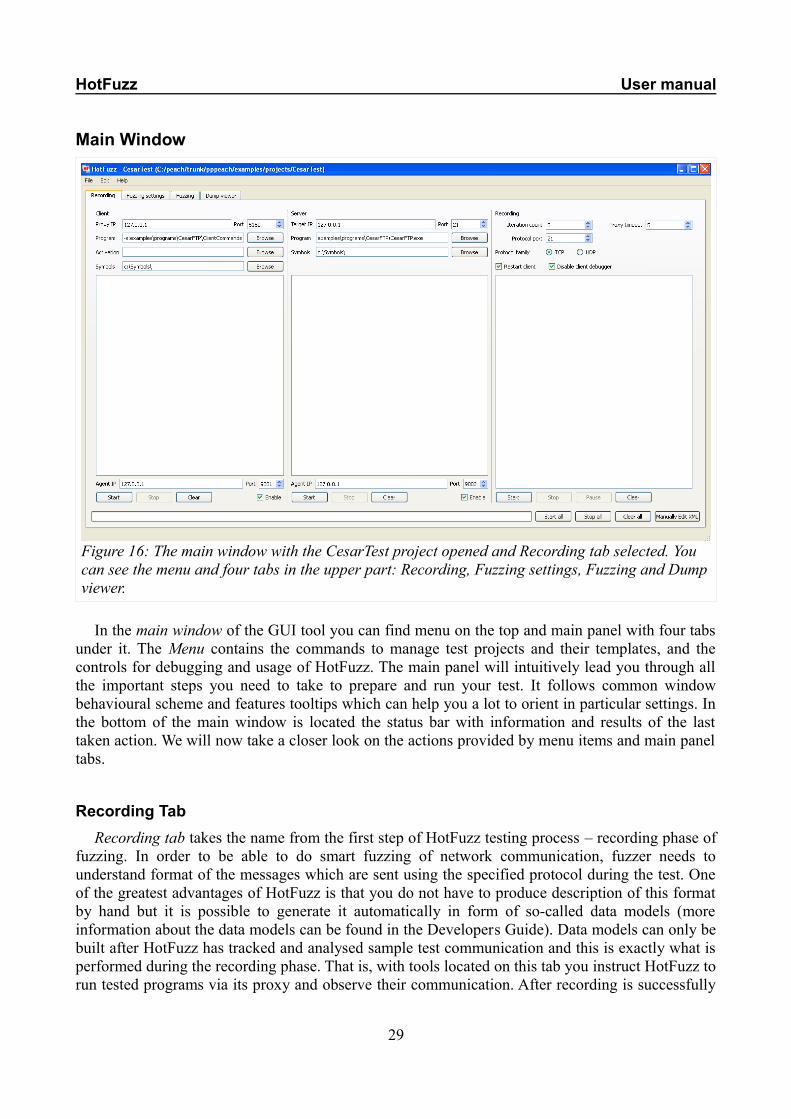
In the main window of the GUI tool you can find menu on the top and main panel with four tabs under it. The Menu contains the commands to manage test projects and their templates, and the controls for debugging and usage of HotFuzz. The main panel will intuitively lead you through all the important steps you need to take to prepare and run your test. It follows common window behavioural scheme and features tooltips which can help you a lot to orient in particular settings. In the bottom of the main window is located the status bar with information and results of the last taken action. We will now take a closer look on the actions provided by menu items and main panel tabs.
Recording TabRecording tab takes the name from the first step of HotFuzz testing process – recording phase of
fuzzing. In order to be able to do smart fuzzing of network communication, fuzzer needs to understand format of the messages which are sent using the specified protocol during the test. One of the greatest advantages of HotFuzz is that you do not have to produce description of this format by hand but it is possible to generate it automatically in form of so-called data models (more information about the data models can be found in the Developers Guide). Data models can only be built after HotFuzz has tracked and analysed sample test communication and this is exactly what is performed during the recording phase. That is, with tools located on this tab you instruct HotFuzz to run tested programs via its proxy and observe their communication. After recording is successfully
29
Figure 16: The main window with the CesarTest project opened and Recording tab selected. You can see the menu and four tabs in the upper part: Recording, Fuzzing settings, Fuzzing and Dump viewer.

HotFuzz User manual
finished, HotFuzz produces data models as a part of fuzzing template. The data models are then edited according to test scenario on Fuzzing settings tab and used to fuzz communication matching the recorded one on Fuzzing tab.
The tab is logically divided into three panels (see Figure 16), each representing one of the programs involved in the recording. The rightmost and the central ones are associated with the communicating applications under test (client and server in typical scenario) and provide applications run options. Leftmost panel displays the output of HotFuzz proxy between the applications and includes additional settings needed for correct communication processing. In the bottom of the tab you will find several control buttons and a progress bar which indicates the current test case of recording (explained later).
How to Set up Client and Server for Recording
In the client panel you subsequently provide information about: IP address and port client shall connect to – this is expected to be the socket of HotFuzz proxy, a command to start the client program, optional command to run at the start of each test case – typically used to perform communication on the client side without restarting the client and the path to the symbol table that
30
Figure 17: Closer view of client and server panels on the Recording tab as they appear when CesarTest is opened

HotFuzz User manual
can be useful to analyse debugging data of detected crashes. You can set up the server in similar way, in this case IP address and port point to the socket the server listens on and HotFuzz proxy will forward data to. Option for activating command is unnecessary on the server side.
All values for the test have been pre-set in our FTP example project but you might want to examine them anyway to learn how a real configuration looks like. IP address and port on the client panel are set to localhost and the port number where HotFuzz should be started by default. Client program command starts standard ftp client and instructs it to execute commands from prepared script ClientCommands. The script follows a simple scenario – client will try to log in to the server as an anonymous user, create a directory and disconnect from the server and close itself. If you are interested in details, you can read through the script file in the FTP application directory – examples\programs\CesarFTP subdirectory of HotFuzz installation directory. Since we are able to load communication instructions for the client from the script and since it is not very demanding to restart ftp client with every test case, you can leave the Activation command field blank (usage will be explained in other examples). We will show how to configure activation command when these conditions are not met in following examples. If you have debugging symbols installed in a directory different than C:\Symbols, change the Symbols field accordingly, otherwise you can leave it unchanged.
Server IP address and port are pointed to where our chosen FTP server will be running. As program command we use server executable CesarFTP.exe of previously mentioned CesarFTP version 0.99g located in FTP application directory. Symbols field should be set the same way as for the client.
31
Figure 18: Applicable settings for client and server programs involved in recording process. Values are already set for CesarTest project.

HotFuzz User manual
How to Adjust Recording SettingsThe group of settings in the upper part of Recording panel can influence the resulting data
models of the recording phase. They are meant to help HotFuzz to adapt to variations in communication protocols and run configurations.
Iteration count indicates how many times should be the test communication between client and server repeated, an iteration is also referred to as a test case. The reason for repetition is to cover diversity in communication content that manifests itself in multiple runs. The content can be different even if the programs are run with the same sequence of commands, depending on the programs' states, current data they work with, time etc. When HotFuzz detects such differences in repeated executions, it will include them in the data models, and as communication in fuzzing phase is naturally executed a number of times, the model will then fit it better. This implies that if your scenario varies a lot, you should set the iteration count to a higher number. However note that very varied communication leads to extremely complicated data models and will slow down the whole application significantly.
Proxy timeout value determines how long will HotFuzz proxy wait for communication between the client and the server before it finishes the test case. After this period expires, HotFuzz will assume that the scenario is finished and will start a new test case. You should set the timeout according to the maximum time you expect it will take to send any message from the scenario.
Protocol family radio button switches the mode of the proxy to the communication type of the tested programs. Protocol port is a hint for HotFuzz packet dissector, it should help to recognize particular used protocol and process its packets properly. You should insert the port number which the service typically uses into this field.
Restart client option is connected with the use of activation command for the client program. If you do not activate the client in each test case with a command (e.g. refresh a webpage in the browser), you probably want to run client program command instead. You can set such behaviour with this check box. Yet, be aware the client program will not be closed automatically at the end of the test case, you should instruct it yourself as needed.
Disable client debugger setting can be turned on if you are not interested in client debugging information in further steps of testing, it will speed up restarting of the client if set.
Communication scenario and protocol messages are not very diverse in FTP example which means you can keep iteration count on the default value. You can also keep the default proxy timeout as every message should be sent in 5 seconds period. Port number for FTP service is 21 so this value is filled in protocol port field. TCP connections are used for communication, therefore protocol family is switched to TCP. As mentioned earlier, we will not use activating command and we want to restart client in every test case so the respective box is checked. We will focus on the
32
Figure 19: Setting affecting recording process, values are already set for CesarTest project.

HotFuzz User manual
server in fuzzing phase and thus we can disable debugger for the client.
How to Start Recording
Before you proceed with recording process you can explore how the configuration file of recording template looks like. To do this, you need to have the path to preferred text editor properly set in Preferences panel which you can open from upper menu. For experienced users with knowledge of the file format, this is a good option how to quickly adjust advanced settings which are not accessible from GUI tool and make a final check of the file.
Then you can initiate recording itself, the easiest way (see limitations below) by clicking the Start all button in bottom part of Recording tab which will start all three programs – the client, the server and HotFuzz proxy. The client and the server are actually not running directly but inside a special HotFuzz component called Agent. This component is able to monitor behaviour of a program and report unexpected events like crashes. Therefore in big output boxes in the client and server panels you will not only see the output of the particular program but also additional information tracked by its Agent. In the proxy output box you can follow messages concerning actual test case and actions taken by HotFuzz. If you do not need to keep the output in the boxes any more, you can clear all of them by clicking Clear all button.
General progress of recording is visualized using the progress bar at the bottom of the panel. Short information about current events can be learned from the status bar below it. In case you will notice problems during recording or you wish to interrupt recording for another reasons, you can click the Stop all button to terminate the running programs.
In some situations, it might be more convenient or even necessary to start and stop the programs one by one – start in the order: first the agents then the proxy. For this purpose there are extra Start and Stop buttons associated with each program (and Clear button to clear single output box). You can also leave out server and client Agent from Start all initialization by unchecking their Enable checkbox. Additionally, you can pause whole recording process by clicking the Pause button in the Recording panel to examine the output of the programs and proxy to that point. Yet, keep in mind this of course might disrupt communication and derail test from set scenario. Finally, it is possible to set the IP address and ports where agents will be running in respective fields in their panels.
Please take into consideration the limits of control that GUI has over independent applications and processes. Under some critical conditions test run can become desynchronized or disrupted because system is overloaded by applications with high demand for resources or it takes too long to react on events from outside of a process. When you use the Start all function, it might happen that the recording will not start at all because agents will not run. The most probable reason is that when agents are being initialized, a lot of data needs to be loaded into the memory, and so the start up time exceeds the Start all Timeout limit. This can be adjusted in the Preferences panel accessible from upper menu. Similarly, if you click on Stop all button, it can take some time until the termination is finished and you will not be able to interact with GUI by then. We suggest to be patient when some action, especially a start up of an application, takes more time and not to interrupt HotFuzz when it performs an action. If you experience problems with start all or stop all
33
Figure 20: Control buttons and additional elements located in the bottom part of Recording tab.

HotFuzz User manual
functions, try to start and stop the programs one by one. In exceptional situations it might be necessary to start or stop the programs manually.
For our example it works well to just start all the programs at once with the Start all button. Proxy timeout is set high enough and so the test should start without problems. Click the Start all button and watch output boxes. You should be able to see: the FTP client performing commands from the script (log in, create directory, log out) along its Agent messages, CesarFTP server main window popping up and down as it runs, the server Agent printing monitoring messages and the proxy indicating when a test case is entered. When all five scheduled test cases are finished you should obtain a success message in the status bar. If this is not the case, search output boxes and status bar for any error messages. If you are not able to resolve the problem based on the message, please check that your recording settings are consistent with those previously described in the tutorial and try different method to start the recording. If this does not help, you can refer to the “Troubleshooting” section of the documentation for examples of the most common problems and their solutions.
34
Figure 21: Example of programs and proxy output during the recording phase of CesarTest project.

HotFuzz User manual
Fuzzing Settings TabFuzzing settings tab will let you to edit the data models that have been successfully recorded
during the recording phase. The goal is to implement the idea of smart fuzzing. If the entire messages was randomly altered in fuzzing phase, it could happen that server would not understand it. Thus, on this tab you can instruct HotFuzz to only alter certain parts of the messages for which it makes sense. The default setting is not to alter anything and you have to explicitly mark the elements for fuzzing.
The tab is logically divided into two panels and a sliding side bar on the right side. The left panel is mainly for navigation purposes and will help you to browse complicated data models. The right panel displays the content of the data models, that represent the record of communication preformed in the recording phase, structured and analysed by HotFuzz. The side bar contains list of mutators to be used to alter chosen elements of the data model. Mutator is an object that describes how exactly should be the element changed. The details are described in chapter “Advanced Topics, Mutators”.
35
Figure 22: Fuzzing settings tab selected after data models were recorded successfully.

HotFuzz User manual
How to Mark an Element for Fuzzing
In the Actions panel you can see the tree representation of recorded communication. For the internal use, HotFuzz organizes it in various structures like States and Actions which you do not need to be familiar with. But it still can be useful to use these structures to navigate within the data models. An action, one element inside the State in the first column, represents one message transferred between the client and the server. Action type in the second column indicates the direction of communication – output is from the client to the server, input is from the server to the client. There is also an artificial action associated with a connection closure (it is not present in the State if the end of communication can be determined other way). The third column provides the name as a reference to the data model for respective action. That is, if you are interested in the second client request for example, you browse to the second action of the type output in the Actions tree. Then you click on the reference in DataModel column and you will see the content of this request in Data Models panel. You might notice that not all messages from all test cases from recording phase are present in the tree. This is because HotFuzz automatically merges similar messages in single data model and creates new models only for significant variations. These models are then appended to the original ones and therefore their order in the tree might not correspond with the order in communication (the same holds for messages merged from different tree positions). Also, note that you can browse data models independently, the Actions panel just makes it easier to find the right message.
36
Figure 23: Closer view of Action panel. Data model references for the whole communication scenario are visible.

HotFuzz User manual
The Element column in the Data Models panel contains structure of messages as it was processed by HotFuzz dissector and tokenizer. This means that packets of the used protocol were divided into parts and marked like “request code” or “request argument” (depending on the protocol). Also, long strings in the messages were broken down to shorter pieces in order to give you more options for smart fuzzing. In the Value column you can see what is the actual content of these pieces. Some of the elements can be types other than string, for example numbers, and contain human unreadable values, for example certain binary objects. You can learn about the type of the element from the Type column. The only changeable setting in the panel is the Mutable column, which is exactly the flag used for smart fuzzing. If you wish to let particular element be altered during the fuzzing phase, click on the check box located in the Mutable field. Background color of the element will change from red to green and text in the field will change to true. Buttons in the bottom of the panel are shortcuts to set all fields mutable, immutable or revert to last saved setting.
Since our CesarFTP server is known to have security problem with processing command argument for creating a directory, we are interested in the message in which this command is sent. As you can check in the Data Models panel, the first two messages in “client to server” direction contain login information – user name and password for user anonymous. The request with XMKD command is sent in the third message from the client. Thus, to set XMKD argument as a mutable element, click on the third Action of type output in the Actions panel. The content of the message will appear in the Data Models tab under the element HotFuzzDataModel_5. Find the element
37
Figure 24: Closer view of Data Models panel. The content of messages with additional information is shown in the picture. Notice the element ftp_request_arg marked as mutable.
HotFuzz User manual
marked as ftp_request_arg with value egdir. Check the box in the Mutable column. This will make HotFuzz to alter egdir part of XMKD egdir message in the fuzzing phase.
How to Set Mutators for Fuzzing
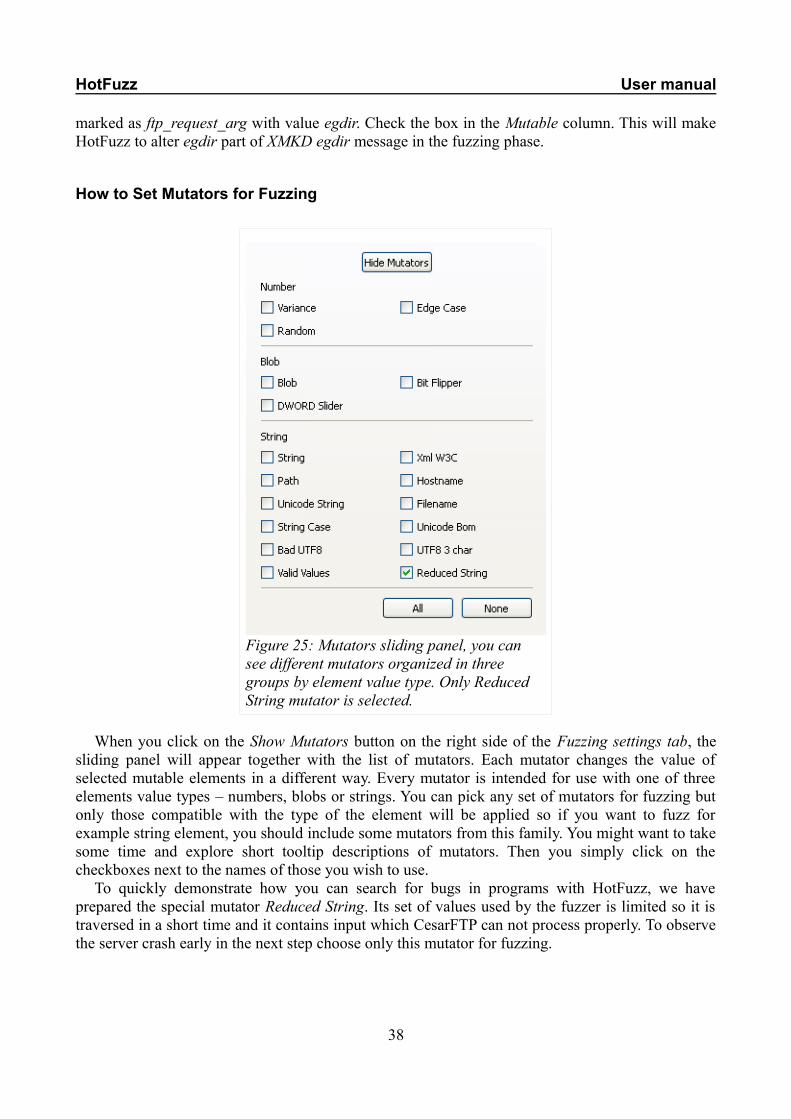
When you click on the Show Mutators button on the right side of the Fuzzing settings tab, the sliding panel will appear together with the list of mutators. Each mutator changes the value of selected mutable elements in a different way. Every mutator is intended for use with one of three elements value types – numbers, blobs or strings. You can pick any set of mutators for fuzzing but only those compatible with the type of the element will be applied so if you want to fuzz for example string element, you should include some mutators from this family. You might want to take some time and explore short tooltip descriptions of mutators. Then you simply click on the checkboxes next to the names of those you wish to use.
To quickly demonstrate how you can search for bugs in programs with HotFuzz, we have prepared the special mutator Reduced String. Its set of values used by the fuzzer is limited so it is traversed in a short time and it contains input which CesarFTP can not process properly. To observe the server crash early in the next step choose only this mutator for fuzzing.
38
Figure 25: Mutators sliding panel, you can see different mutators organized in three groups by element value type. Only Reduced String mutator is selected.

HotFuzz User manual
Fuzzing Tab
The Fuzzing tab is very similar to the Recording tab. Most of the components are the same and they also have the same function although some of the fields you will not be able to change as in recording tab (particularly IP addresses and ports). Because of this, we will only describe differences between both tabs and a few details about fuzzing process. For explanation of other components, please read “Recording tab” section of the tutorial.
How to Adjust Peach Settings
There are some extra settings which you can use to control fuzzing in the Peach panel (Peach is the underlying fuzzing technology used by HotFuzz). The Strategy radio button lets you to choose how many mutable elements will actually be altered in one test case. Single random strategy
39
Figure 26: Fuzzing tab selected at the beginning of fuzzing phase.
Figure 27: Detailed view of Peach settings that can be used to configure fuzzing. Values are already set for the CesarTest project.

HotFuzz User manual
chooses one and Random strategy chooses multiple elements (in a pseudorandom way as apparent from the name). Seed option is a way to replicate fuzzing session and come back to a particular test case in this session, typically to investigate suspicious behaviour of tested application which happened at that point. Fuzzing is a pseudorandom process so when you run it two times, you usually get different results in each case. However, if you set a number in Seed field, pseudorandom choices will be based on this value. When you turn on the Seed option by checking the box, you will be able to produce choices leading to any test case that occurs during fuzzing identified by this seed. You can set the number of the test case you want to look into in the Iteration field. The test will then start with the specified iteration. Finally, under the output box there is the Parameters panel where you can specify additional parameters for HotFuzz (list and description of the parameters can be found in chapter “Advanced topics”).
There is only one mutable element involved in the FTP test, therefore it does not make sense to try to fuzz more elements – switch Strategy to Single random. We also already know what kind of fault we are looking for so you do not have to take care about the Seed option.
How to Start FuzzingAs this tab itself, fuzzing works much like recording when it comes to interface and most of the
instructions stated in “How to start recording” section of the tutorial are valid for starting fuzzing as well, including discussion of limitations when you control programs from GUI. You can start fuzzing process by clicking on Start all button or start agents and proxy one by one. At first sight it might seem to you that messages roll down in output boxes in the same way as during recording too but if you take a closer look, you will notice important differences. In Peach output box you will find new information for every test case – which element has been altered, with which mutator and what is the resulting value. The element to fuzz is identified in proxy by matching current communication with recorded data models that have been set up for fuzzing in the previous steps. Then, when significant event happens, you should be able to see an agent message like DetectedFault() followed by handling log. Number of the current test case is displayed next to the progress bar, but the bar itself is always full because there is no limit on iteration count in fuzzing phase. In fact, fuzzing can run for very long, typically days or months, to test enough inputs. In the status bar you can read a brief report about crashes and the most recent affected test case. When a crash occurs, you might want to stop or pause fuzzing to get more information about the crash on the Dump viewer tab.
40
Figure 28: Picture of the progress bar during the fuzzing phase and a report message displayed in the status bar after fault has been detected.

HotFuzz User manual
You can again start the process for our example by clicking the Start all button. In the Peach output box you can observe how our chosen element, ftp_request_arg, is being changed during fuzzing. Actually, in the output box of FTP client you are able to see the altered values in the error messages coming back from the server. After a few iterations you should encounter a crash of CesarFTP caused by XMKD argument with value of 671 newline characters. This will be also indicated by the agent in the server output box, watch for messages DetectedFault() and RETURNING FAULT. After the crash is processed, you can stop fuzzing by clicking the Stop all button and switch to the Dump viewer tab.
41
Figure 29: Example of programs and proxy output after fault has been detected during fuzzing phase of CesarTest project. Note Detected fault, getting data message in the proxy output and DetectedFault() message in the server agent output.

HotFuzz User manual
Dump Viewer Tab
Dump viewer tab is a simple interface to view and access debugging information about crashes
of tested programs. It consists of one big panel that displays crash records and a few buttons that let you update and clean up the records and run tools to investigate them in details.
How to Investigate a Crash ReportThe Iteration column of the tab shows the number of the test cases in which a crash has been
detected. These are organized by fuzzing sessions with information about the date and time when the tests were performed. Based on this timestamp you can easily identify the test case you are interested in. If the fresh records from the currently held session are missing in the list, click on the Refresh button to update it. In the remaining columns you will find description of the crash including explanation and program that has been involved. You can click on the View communication button to see a brief summary of the communication which caused the crash. That can give you first ideas where the problem might be. If you wish to view further details like the content of registers or the stack trace, click the Open In WinDebugger button to load the crash dump in Windows Debugging Tools application. After you are finished and you do not wish to keep a record in the list any more, mark it and click the Delete button.
42
Figure 30: Dump viewer tab selected after performing fuzzing phase. One of the crash records is marked.

HotFuzz User manual
The crash of CesarFTP in the example when you are using the Reduced String mutator is most probably caused by read access violation at the instruction pointer. To see if this holds, browse to the latest crash record and check if Description is ReadAVonIP. Then click on View communication, a new window will pop up with a summary of the communication where you should find a message with XMKD command listed as the last message before the crash. When you click on the View in editor button you should be able to verify that argument consists of very long sequence of newline characters (providing you have the Path to Editor field in the Preferences panel properly set to your installed editor program).
ConclusionNow at the end of the guided tour for FTP example you should have a decent overview of how to
prepare, set up and perform a test of some network application or service using HotFuzz. You should be able to record communication, edit recorded data models, run fuzzing according to edited data models and explore debugging information of detected crashes. In final parts of the tutorial we will focus on differences of the settings you can find in another example test projects. Every project comes with a basic description you can read in the right part of the Open project welcome screen, we advise you to read it before you start experimenting with the example. And if you are not be sure how to adjust some setting or perform some action, you can always come back to this part of the tutorial to check again.
43
Figure 31: Summary view of communication that caused a crash in fuzzing phase of the CesarTest project. The problematic message, XCMD command with long sequence of newline characters as argument, is highlighted.

HotFuzz User manual
3.3 Basic TestBasic example using artificial client and server applications that were created by the HotFuzz
team. Client application runs persistently. It opens port 8150 and starts a loop, in which it first waits for a UDP packet that would cause its activation. When the activation packet is received, the application connects to localhost on port 5150, sends a simple fixed http request, receives the response, displays it and closes the connection. The loop is then repeated. Activation command is used to send activating UDP packet at the beginning of each iteration. Server application continually accepts connections on port 8080, receives requests, displays them to output and sends back fixed http responses. This example can be used to test basic functionality of the HotFuzz. Received requests and responses are displayed to the agents outputs and the user can watch how they are being altered by the fuzzing process. It is also possible to test relationships identification by fuzzing html part in http response and using Blob mutator. The mutator will occasionally change the length of the html part which will cause the change of the value of Content-length header
Open the test project which is located in examples\projects\BasicTest subdirectory of HotFuzz installation directory. Switch to Recording tab.
Notice that client and server commands are set to simple testing applications. In this example we use activating command. This command will send a packet to the port on which the client is listening. After receiving the packet, the client will automatically perform communication in one test case. It is a simple example how activating command can be used, you will see a bit more sophisticated setup in BadBlue examples.
Since the protocol used for communication is HTTP, the Protocol port field is set to number 80. The client will be activated at the start of each test case by activating command, therefore we do not want to have it restarted – the Restart client box is unchecked. Messages are pre-defined, it does not make sense to do more than a couple of test cases.
44
Figure 32: Recording settings values for BasicTest project.

HotFuzz User manual
Start recording and after the data models are created, switch to the Fuzzing settings tab. Explore the models, you will find that besides string elements they also contain blob elements this time. This is why both String and Blob mutators are checked in the project by default. Mark one string and one blob element as mutable, for example DataModelElement_10 from http_request_uri from the first message and hf_4 from data_text_lines from the second message.
Switch to the fuzzing tab and start the fuzzing process. We do not think it is possible to cause a crash of provided testing applications, but you might pause proxy while performing test cases and check the output boxes for the performed alterations.
3.4 BIND TestExample test of the DNS server application Bind. Requests are sent using a simple dns client
called dig, which is a part of Bind installation. Communication between client and server is handled by UDP. Dig is started at each iteration and sends two requests. Second request is used to identify the end of iteration during fuzzing process and its elements should be left immutable.
Open the test project which is located in examples\projects\BindTest subdirectory of the HotFuzz installation directory. Switch to the Recording tab.
45
Figure 33: Compact view of the elements set as mutable in the Basic test communication and the mutators that will be used to alter these elements.
Figure 34: Recording settings values for BindTest project.

HotFuzz User manual
Client and server commands are set to the DNS client called dig and the DNS server called BIND, respectively. The service uses port 53, thus the Protocol port is set accordingly. The scenario is similar to FTP example, it is straightforward to instruct dig to send necessary information (from command line) and it takes little time to restart it. Because of this we do not use an activation command and we set proxy to restart the client in every test case without monitoring it by debugger. DNS messages are very simple and it is sufficient to record just one test case. The most interesting feature of this example is that it uses UDP protocol. Note that Protocol family radio button is properly switched.
Start recording and after the data models are created switch to the Fuzzing settings tab. As you can see from the content of the models, many of the element values are not human readable (represented by ? signs). Part of the first message is supposed to be fuzzed, mark elements dns_count_queries, dns_count_answers, dns_count_auth_rr and dns_count_add_rr as mutable. Note that all the mutators are chosen by default. But since only the number type elements will be fuzzed, only the mutators from the “number family” will be applied automatically.
Switch to to the Fuzzing tab and start the fuzzing process. You will probably not be able to find any vulnerability in the well tested software like BIND easily, yet you can still observe communication and behaviour of the client and the server.
46
Figure 35: Part of the data models structure that was recorded. You can see chosen mutable elements.

HotFuzz User manual
3.5 ICQ TestThis test demonstrates fuzzing with HotFuzz by using MirandaPortable as a client application
and an official ICQ server as a server application. You can record communication between Miranda and ICQ server and you can of course also fuzz the communication, but it is advised to mutate only server responses (input actions) so that no harm is done to the ICQ server. The client is configured to turn offline and online (this behaviour is achieved by a script compiled by AutoHotKey into an .exe file). Peach Popupwatcher monitor is used to close pop-up windows (Note that this monitor cannot be set up using the GUI. If you want to use it you should use the button Manually edit XML and add the monitor in the same way it is done in this tests configuration file).
Open the test project which is located in examples\projects\ICQ subdirectory of the HotFuzz installation directory. Switch to the Recording tab.
Take a look on the client and the server configuration. On the client side we use portable version of the popular ICQ client Miranda. It is not completely straightforward to start the client as it can not be easily controlled by a script. A lot of network communication happens during the start up as well which takes time. For this reasons we will use an activation command to initiate communication from the client (that is, to activate the client) at the beginning of every test case. The activation command is in fact a compiled script produced by the AutoHotKey macro program. AutoHotKey makes it possible to control GUI applications to some extent, in our case it simulates clicking on a button in the client program (AutoHotKey is further mentioned in the section “How to create a new test”).
ICQ communicates via proprietary official servers so it is not possible to run own installed server for the example. This means the address and port of one of the official ICQ servers should be set in the Server IP and port field, the Program field shall be left blank. It also implies apparent limitations for fuzzing, you have to be careful about which parts of communication you alter to always comply with the terms of use of ICQ service. We strongly recommend to only alter communication in the direction from server to client.
Since the network communication is more demanding than the one on localhost, we will keep the iteration count low. Client should not be restarted in each test case because it will be activated. And we cannot monitor the server, the only option is to monitor the client so the Disable client debugger box should be unchecked.
47
Figure 36: Recording settings values for the ICQTest project.
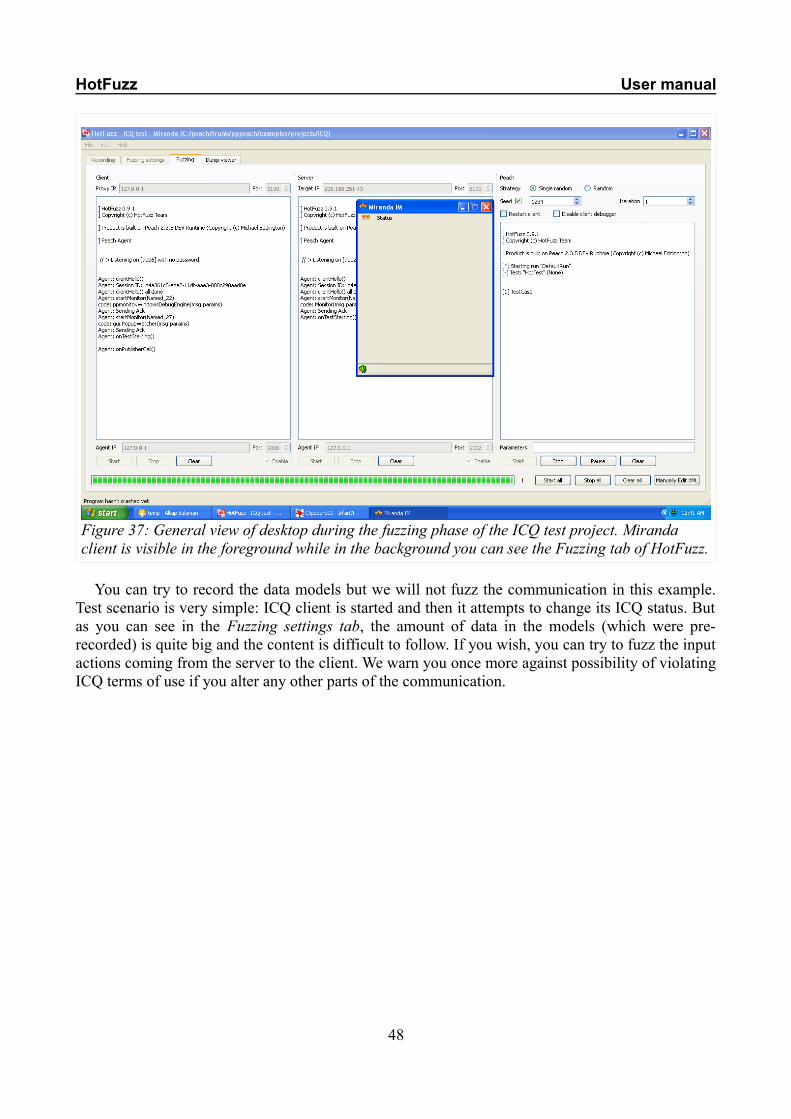
HotFuzz User manual
You can try to record the data models but we will not fuzz the communication in this example. Test scenario is very simple: ICQ client is started and then it attempts to change its ICQ status. But as you can see in the Fuzzing settings tab, the amount of data in the models (which were pre-recorded) is quite big and the content is difficult to follow. If you wish, you can try to fuzz the input actions coming from the server to the client. We warn you once more against possibility of violating ICQ terms of use if you alter any other parts of the communication.
48
Figure 37: General view of desktop during the fuzzing phase of the ICQ test project. Miranda client is visible in the foreground while in the background you can see the Fuzzing tab of HotFuzz.

HotFuzz User manual
3.6 BadBlue Clear TestExample test of HTTP server application BadBlue. Mozilla Firefox Portable is used as a web
client. The browser runs persistently and Selenium IDE plugin together with AutoHotKey are used to automate its behaviour. The cache of the browser needs to be disabled, so that full communication takes place at each iteration. Test comes with prepared Selenium script, which causes Firefox to make two HTTP requests to localhost on port 5150. The first request is on administration web page. The second request is on prepared “termination” web page and is used to identify the end of iteration during the fuzzing process. AutoHotKey are used as an activation command to interact with the Selenium window. The test comes without predefined fuzzing configuration. It is advised to first try recording and fuzzing without selecting any mutable elements. However, it is also possible to specify fuzzing configuration and use this example for real fuzzing.
This is the first test in the series of examples that are fuzzing HTTP server implementation called BadBlue. They are built on the same test scenario which is the most sophisticated of all pre-made examples. Complexity is caused by the difficulties with controlling the client (Mozilla Firefox has a relatively complicated interface) and by the amount and variability of real life web communication, containing such elements as timestamps or cookies. This might make it difficult to set up and execute the scenario in a proper way. Please, read the description of the project carefully, especially the Notes section, which addresses most common peculiarities, before you start using it.
Open the test project which is located in examples\projects\ClearBadBlueTest subdirectory of the HotFuzz installation directory. Switch to Recording tab.
As for applications settings, the client is started by a batch command and is activated at the start of every test case by the designed executable. It may surprise you that none of these commands mention the client program, Mozilla Firefox. In fact, the batch command runs Firefox in a special mode provided by web testing environment called Selenium. We use Selenium to access information from the browser (e.g. whether requested web page was already loaded) and to send commands to the browser (e.g. request to reload the page). This would too complicated and unreliable to achieve by a tool like AutoHotKey mentioned in the ICQ test (more details can be found in “How to create a new test” section). However, Selenium running in Firefox is instructed via GUI itself so we use a compiled script produced by AutoHotKey to activate Selenium. Even if it was possible to control Selenium from command line or a script file, it would be very impractical to restart Firefox in every test case since this is time consuming process.
49
Figure 38: Recording settings values for a series of BadBlue tests.

HotFuzz User manual
50
Figure 39: Example of desktop when running the BadBlue clear test. Selenium window is visible in the foreground and HotFuzz window in the background.

HotFuzz User manual
As the server command we simply run the BadBlue executable. This will open a small informative dialog. You can imagine that in the time you start recording or fuzzing a lot of processes will start up at once and there will be lots of windows and icons in your desktop and tray bar (HotFuzz, Firefox with Selenium, AutoHotKey, BadBlue). One consequence is that the orientation in the desktop can become a bit confusing, the other is that in special cases (mostly the first test case), start-up dependencies can be violated (for example it might happen that the Selenium clicks on the Execute Test button while the test page is not yet fully loaded which results in a situation that the click is not detected and the test does not start). If this happens, open the Selenium Functional Test Runner window (if not already opened) and click on the first icon in the Execute Tests panel. The recording or fuzzing should then continue normally.
51
Figure 40: Part of the Selenium window in the recording process, showing the icon which you should click on if the test doesn't start to run by itself. Note the mouse cursor in the form of a hand over the icon.

HotFuzz User manual
52
Figure 41: Close view of the Selenium window. In the central part there is a list of commands to control Firefox, below is the BadBlue welcome page in process of loading from the server.
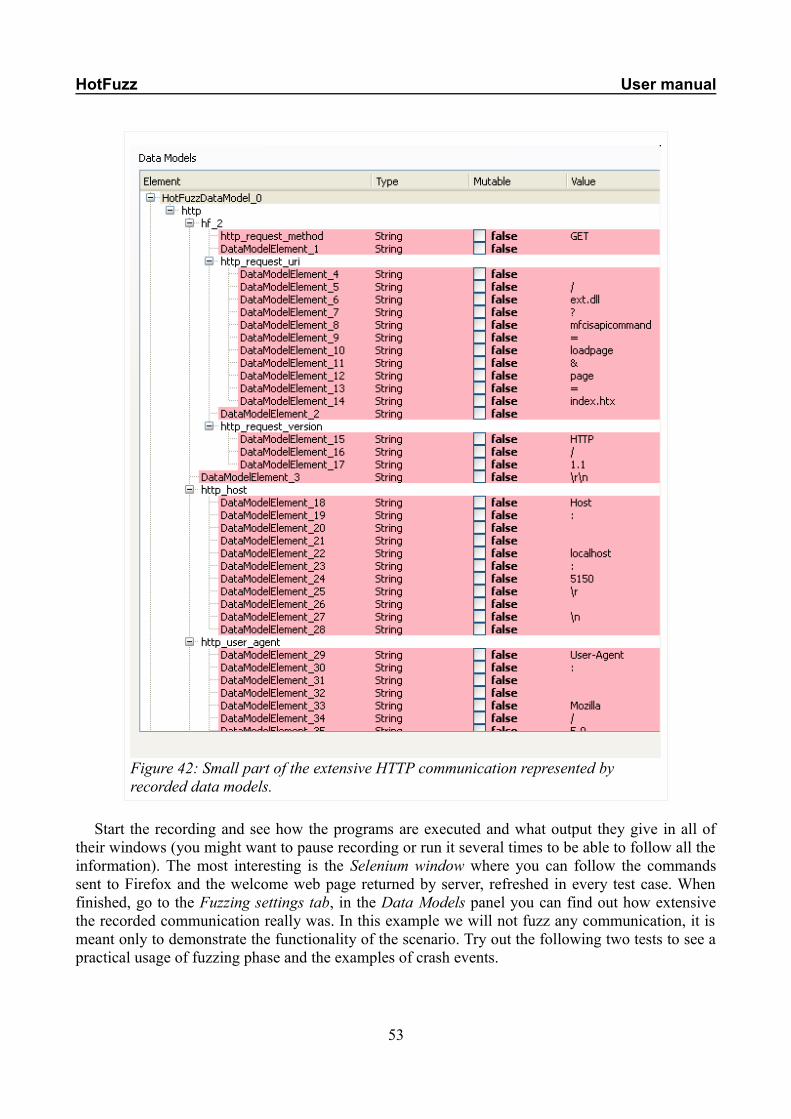
HotFuzz User manual
Start the recording and see how the programs are executed and what output they give in all of their windows (you might want to pause recording or run it several times to be able to follow all the information). The most interesting is the Selenium window where you can follow the commands sent to Firefox and the welcome web page returned by server, refreshed in every test case. When finished, go to the Fuzzing settings tab, in the Data Models panel you can find out how extensive the recorded communication really was. In this example we will not fuzz any communication, it is meant only to demonstrate the functionality of the scenario. Try out the following two tests to see a practical usage of fuzzing phase and the examples of crash events.
53
Figure 42: Small part of the extensive HTTP communication represented by recorded data models.

HotFuzz User manual
3.7 BadBlue Crash Test
This test works almost the same way as the BadBlue clear test except this time certain part of communication will be fuzzed to show the vulnerability of BadBlue server. You do not need to run recording phase if you do not wish to, you can use pre-recorded data models which are included in the test project.
Open the test project which is located in examples\projects\CrashBadBlueTest subdirectory of the HotFuzz installation directory. Switch to the Recording tab. In the Fuzzing settings tab you can see the one element marked as mutable, DataModelElement_10 in http_request_uri superelement in the first data model, and it will be fuzzed using the Reduced String mutator.
54
Figure 43: Part of data models settings where marking of DataModelElement_10 from GET request as mutable is visible.

HotFuzz User manual
The mutator will generate values in HTTP GET request that will exploit security defects of processing such values by BadBlue. This will lead to a crash of the server. Notice that because the requests are altered by the fuzzer, there is a modified server welcome page with Bad Request message displayed in the browser panel of the Selenium window (you can pause fuzzing to have a better look on the messages in proxy output box too). After you encounter a crash, you can switch to the Dump viewer tab and examine a record of Possible Stack corruption fault.
55
Figure 44: View of communication for one of the crash records produced by the BadBlue crash test

HotFuzz User manual
3.8 BadBlue Picture Test
This test works almost the same way as the BadBlue clear test except this time certain part of communication will be fuzzed as an experiment to visualize the process of fuzzing. We will be altering header picture of the server welcome page before it is returned to the client.
Open the test project which is located in examples\projects\PictureBadBlueTest subdirectory of the HotFuzz installation directory. Switch to the Recording tab.
In the Fuzzing settings tab in the Actions panel choose the third action of type input and browse to the data model HotFuzzDataModel_5. Then in the Data Models panel find the image represented by the element image-gif_image. We will fuzz the hf_11 subelement of this element using the Bit Flipper mutator.
56
Figure 45: Part of data models settings where marking the hf_11 image element as mutable is visible.

HotFuzz User manual
Bit Flipper mutator flips a number of bits in the content of the header image, you can see how is the image changing in the Selenium window. This view can give you a better idea of how fuzzing influences the input for the tested program. In this case, if there was a problem with the way how Firefox handles distorted images, we could be able to detect them by running this test. Of course, this is unlikely to happen, given the software and its version we are using as the client, so you will probably not be able to experience any crashes.
3.9 How to Prepare a New TestCreation of HotFuzz configuration files which could be used for a new test scenario is not very
complicated – they can be easily generated in the Create New Project tab of the welcome screen using prepared empty templates. The difficult part is to automate programs so they would do what is expected from them in the scenario and then set up the test project so it would carry on automation properly. In this chapter, we will make a few remarks on these issues. We assume that the user already has some knowledge of the HotFuzz GUI and functions it provides. If that is not the case, please read the previous parts of this chapter first. Also, please note that program automation is out of the scope of this project and project team does not have detailed expertise in this field. Therefore we will provide only brief summary of the topic.
First you need to install the applications to be tested, decide what will the test case focus on and choose parts of the communication which will be fuzzed. Then you have to consider whether the client should be restarted in every test case, whether the client can be controlled from the command line or a script file, if you have to use the activation command etc. Basically, you need to instruct the programs to produce the exact communication of the test case every time they run and it should be done in a reasonably effective way. Some of the choices are connected. For example when you will restart the client program, you apparently don't need to use the activating command. Other
57
Figure 46: Example of distorted header picture at BadBlue welcome page as it appears during the fuzzing phase in the lower part of the Selenium window.

HotFuzz User manual
connections might not be so obvious. For example if the client is caching data returned from the server, it might produce different communication in later test cases and HotFuzz will not be able to fuzz it. The safest way is to check the content of the communication and try to make it always fit the scenario.
3.10 How to Control ProgramsA good way to get basic knowledge of how the programs can be controlled is to try out the
example test projects prepared for HotFuzz. When we were creating the projects, we had to do all the mentioned decisions (FTP client is restarted every test case because it is fast enough and it can read input from a script and Mozilla Firefox has caching turned off and is activated by an external tool because it needs interaction with GUI and it would be too slow to restart it every test case anyway etc.) so you can get some inspiration out of them. However, we remind you that the examples are intended mainly for demonstration purposes and created using the simplest working solutions. There might be other solutions, better suited for your needs.
The easiest case is when the tested client can be controlled either by parameters given on the command line or by commands specified in a script file which is passed to the client on the startup. Example projects including this setup are BindTest and CesarTest, using DNS client dig (instructed from the command line) and standard Windows system FTP client (instructed from a script file) respectively. Dig sends DNS request for specified domain and displays response from the server. FTP client performs a bit longer conversation with the server – first it opens a connection to the server, then it sends login information, then it requests to create a directory on the server and eventually closes the connection and shuts itself down. Remember to ensure that the client is terminated at the end of the conversation if you want to restart it in every test case – otherwise inactive processes will be kept in the system. Commands representing all these operations are loaded from the script file. Consult the documentation for your client to see if it would be possible to run your test scenario in a similar way.
The second case, when it is necessary to interact with the client during communication, is covered by the BadBlue examples. It is based on the Mozilla Firefox browser which relies mostly on its graphical interface and performs sequences of operations like “enter website address”, “wait for the index page to load”, “click on the link” etc. These cannot be automated in a simple way. Generally, there are two approaches how to handle such applications – either you will try to use a general tool for interaction with the Windows GUI applications or, if available, you will use a dedicated system designed especially for your application. BadBlue examples combine both options in the following way. We were not able to find any general tool which supports all the functions we needed to use with our tested web browser like “wait for a page to load”. Therefore, we are using a specialized web testing system called Selenium (which provides command “openAndWait” for the previously mentioned needed functionality) that lets us implement HTTP test scenarios easily. Since it was the easiest way, we access Selenium via a web interface called TestRunner. However it is not possible to control the TestRunner from the command line or from a script, so we use general GUI control tool called AutoHotKey to control the TestRunner (again, with AutoHotKey commands).
The whole situation looks like this: instructions for both AutoHotKey and Selenium are written in each tool's particular set of commands and saved in separate files. AutoHotKey file is then compiled into a standalone executable file and Selenium file is interpreted by the TestRunner component. First, AutoHotKey is started (by the executable) and it waits until the Selenium TestRunner window opens. When it happens, it clicks on the icon inside the TestRunner web interface. This will cause the TestRunner to run operations in Firefox, more precisely to open a web page and wait until it is loaded.
58

HotFuzz User manual
This setup is working and can be adapted for other similar situations, but not to the full extent. There are some catches to mention. For instance, AutoHotKey takes control of the mouse cursor and it is difficult to do anything else than observe the window AutoHotKey works with at the moment. When you want to click on an icon with AutoHotKey, you need to specify its coordinates on the screen and coordinates depend on size of the fonts and other settings of the environment. Thus, this command is not 100 percent portable to another system. There could be some time-related issues as well. AutoHotKey only waits for the TestRunner window to appear but sometimes the TestRunner is not ready to receive commands yet even when the window is already opened and then the click produced by AutoHotKey is missed. So, in summary, when you will be using this setup, some customization might be necessary to make it working in different situations. Some more specialized solutions exist – in this case you might use the Selenium server or the HtmlUnit, in which your scenario could be implemented much easier. We encourage you to search for such solutions and share your knowledge about them since it might make everyone's life easier.
Another little complication is how to inform the HotFuzz that the communication in a test case has finished. This state can be detected automatically if the client closes connection to the server, like in the FTP example, but otherwise you need to signalize this to the proxy “manually”. To do that, client has to send a termination request at the very end of the communication. The message should be as simple as possible and it should not trigger any further requests, only an acknowledgement from the server. HotFuzz marks such acknowledgement and whenever it is recognized in the communication, HotFuzz terminates a test case immediately after the acknowledgement from the server is forwarded to the client. If you watch the Selenium window during any of the BadBlue tests carefully, you should see in the bottom part that the welcome page of the BadBlue server is exchanged by a white page with the text “Termination test page” at the end of a test case. The page is HTML representation of the termination acknowledgement. When Firefox is finished with communication in the current iteration, it sends a request for this page. BadBlue server returns the content of the page, which is displayed in the Selenium window. HotFuzz detects that this page request is a termination request and once the page is forwarded to the client HotFuzz terminates the actual iteration.
Additionally, some issues specific for the client or the server might arise when you start testing. In our BadBlue examples it turned out that Firefox is causing a caching problem mentioned earlier (cached parts of communication are derailing testing scenario) in default configuration and we had to turn caching off to be able to fuzz the communication properly. There is no general rule how to proceed with this kind of complications, you should consult the documentation of the programs and make sure about what can affect their behaviour before you start fuzzing.
3.11 How to Set up a Test ProjectOnce you have applications ready and scenario implemented, you can set up a project in
HotFuzz. Go to the New Project panel either from the welcome screen or from the File menu, select (EmptyTemplate) as a recording and a fuzzing template and fill in the description information. After the project is created, you will find empty fields in the Client and Server panels in the Recording tab. Specify commands to start the client, the server and to activate the client, if applicable. When the activation command is set, it will be automatically executed at the beginning of every iteration. If the option Restart client is turned on, the client command will also be executed at the beginning of every iteration. Next adjust all other settings in the Recording panel according to the information stated in the “Tutorial” chapter. Then you can proceed with recording, data model setting and fuzzing as usually. When you save the project in the File menu, all your settings will be saved into configuration files inside the project's directory.
59
HotFuzz User manual
4 Use CasesUse cases describe all the actions which the user can do with HotFuzz. The use cases are divided
into four different groups, each covering one specific area of usage. Use cases might help you quickly and easily understand the exact functionality of individual control elements available in HotFuzz.
• Project management• Create new project. The user can create new project based on provided templates.
These templates provide examples of the initial configuration, which can be then modified by the user. Both recording and fuzzing template need to be specified. The user can create clean project by using EmptyTemplate. Shortcut Ctrl+N can be used for quick access.
• Open project. The user can open previously created project. Shortcut Ctrl+O can be used for quick access.
• Save project. The user can save project changes. Shortcut Ctrl+S can be used for quick access.
• Save project as. The user can save current project to different location. Shortcut Ctrl+A can be used for quick access.
• Open recent project. The user can view the list of recently opened projects. The user can select a project from list, view its description and open the project. Shortcut Ctrl+R can be used for quick access.
• Import recording configuration file. The user can replace the current general and recording configuration with the configuration from an external recording template.
• Import fuzzing configuration file. The user can replace the current fuzzing configuration with the configuration from an external fuzzing template.
• Export recording configuration file. The user can save the current general and recording configuration as an external recording template.
• Export fuzzing XML. The user can save the current fuzzing configuration as an external fuzzing template.
• View and edit project information. The user can view information about the current project and edit some details. Shortcut Ctrl+I can be used for quick access.
60

HotFuzz User manual
ud Project management
Project m anagement
HotFuzz user
Create new project
Open projectSave project
Save project as Open recent project
View and edit project information
Import fuzzing configuration file
Import recording configuration file
Export recording configuration file
Export fuzzing configuration file
61
HotFuzz User manual
• Scenario configuration• General configuration
• Specify proxy listening address and port. The user can specify address and port on which proxy accepts connections from client.
• Specify client agent address and port. The user can specify address and port, on which proxy can contact client agent.
• Specify commands to run client application. The user can specify command that runs client application on client agent machine. The user can additionally choose whether the application starts at each iteration or runs persistently. For persistently running applications the user can specify an activation command, which causes the client application to generate a request.
• Specify target address and port. The user can specify target address and port, where proxy can connect to server application.
• Specify server agent address and port. The user can specify address and port, on which can proxy contact server agent.
• Specify command to run server application. The user can specify command that runs server application on the server agent machine.
• Recording configuration• Specify network protocol. The user can specify which network protocol is
used for communication between tested applications by specifying protocol family (TCP/UDP) and standard port
• Specify number of recording iterations. The user can specify how many times should be the whole communication between client and server recorded during the recording process.
• Specify communication timeout. The user can specify the number of seconds that is proxy supposed to wait for packets from client and server before it finishes the iteration.
• Disable WinDbg for client application. The user can choose to run client application without Windows debugger to increase startup speed.
• Manually edit recording configuration file. Experienced user can view general and recording configuration in a plain form and make manual adjustments.
• Fuzzing configuration• View recorded communication. The user can view recorded communication
in already analysed form. • Select mutable elements. The user can select mutable elements of recorded
communication. • Choose mutators. The user can select mutators for the fuzzing phase.• Choose mutation strategy. The user can select mutation strategy for fuzzing
phase.• Choose seed for pseudorandom mutation strategy. The user can specify seed,
which will cause random strategy to run as pseudorandom with specified seed. The user can additionally specify number of starting iteration, which will simulate start of the process from the specified iteration.
• Disable WinDbg for client application. The user can choose to run client application without Windows debugger to increase startup speed.
62

HotFuzz User manual
• Specify additional parameters. The user can specify additional command line options that are not covered by the graphical user interface.
• Manually edit fuzzing XML. Experienced user can view fuzzing configuration in a plain form and make manual adjustments.
ud Scenario configuration
Scenario configura tion
HotFuzz user
Specify general configuration
Specify recording configuration
Manually edit recording
configuration file
Specify fuzzing configuration
Manually edit fuzzing
configuration file
Specify commands to run client application
Configuration for client application
that runs persistently
Configuration for client application that starts at each
iteration
Specify proxy listening address
and port
Specify network protocol
View recorded communication
Select mutable elements Choose mutators
Choose mutation strategy
Choose seed for pseudorandom
mutation strategy
Disable WinDbg for client
application
Specify number of recording iterations
Specify additional parameters
Choose number of starting iteration
Specify communication
timeout
Specify client configuration
Specify client agent address and
port
Specify target address and port
Specify server configuration
Specify server agent address and
port
Specify command to run server
application
« include»
«include»
«include» «include» « include»
« include»
«include»
«include»
«include»
«include» «extend»
«extend»
«include»
«extend»
«include»
«extend»
«extend»
«include»
« include»
«include»
« include»
«include»
63

HotFuzz User manual
• Running application• Start agents. The user can locally start one or both agent processes.• Stop agents. The user can stop locally running agent process.• Run recording process. The user can start communication recording, which will run
based on the specified general and recording configuration. Full communication between client and server is recorded in each iteration. Process ends with aggregation of recorded data.
• Prematurely stop recording process. The user can choose to cancel the process of recording.
• Run fuzzing process. The user can start fuzzing process, which will run based on the specified fuzzing configuration and general configuration stored from the recording phase.
• Stop fuzzing process. The user can stop fuzzing including all the processes that were started during the process.
• Start all – recording. The user can start local agents and recording process at once.• Stop all – recording. The user can cancel recording process and locally running
agents at once.• Start all – fuzzing. The user can start local agents and fuzzing process at once.• Stop all – fuzzing. The user can stop fuzzing process and locally running agents at
once.• Pause/Unpause process. The user can pause recording or fuzzing process while it is
running. The process pauses at the beginning of the next iteration. The user can then unpause the paused process.
• Clear output. The user can clear the outputs of process windows.• Watch progress. The user can watch progress of recording or fuzzing process on
progress bar. Additional status information about current events are displayed on status bar.
• View crash details. The user can view the detailed information about the encountered crashes caused by fuzzing. A brief information is displayed together with each crash. The user can view the details about communication that led to the crash. The user can also open the crash dump in Windows debugger. The user can delete information about no more interesting crash.
64

HotFuzz User manual
ud Running application
Running appl ica tion
HotFuzz user
Start agents
Run recording process
Start all - recording
Run fuzzing process
Start all - fuzzing Stop all - fuzzing
Stop all - recording
Prematurely stop recording process
Stop agents
Stop fuzzing process
Watch progress
Status information about current
ev ents
View crash details
View communication that led to crash
View WinDbg dump
Clear output
Pause/Unpause process
Delete crash information
«include»
« include»
«include»
« include»
«extend»
«extend»
« include»
«include»
«include»
«extend»
«extend»
« include»
65

HotFuzz User manual
• General settings• Set path to Peach. The user can specify the path to peach.py file, which is used to
start agents and recording/fuzzing process.• Set path to WinDbg. The user can specify the path to Windows debugger, which is
used to view crash dumps .• Set path to text editor. The user can specify the path to a text editor, which is then
used for manual edit of configuration files.• Set timeout for start all. The user can specify the time to wait for agents to start when
Start all is pressed.• Set count of recent projects. The user can specify the maximum number of recent
projects displayed.• Set default author name. The user can specify the name of author used for new
projects.• Set GUI communication port. The user can specify port to use for communication
with recording/fuzzing process.• Enable debug output. The user can enable various debug outputs, which might help
when reporting bugs, but may also cause recording/fuzzing process to run slower.• Log outputs. The user can choose to log outputs from agents and recording/fuzzing
into the files on disk.
ud General settings
Gene ra l se ttings
HotFuzz user
Enable debug output
Log output into files
Set path to Peach
Set path to WinDbg
Set path to text editor
Set timeout for start all
Set count of recent projects
Set default author name
Set GUI communication
port
66

HotFuzz User manual
5 Advanced Topics
5.1 Supported ProtocolsThe data analysis part of the HotFuzz project is based mainly upon the Wireshark network
protocol analyser libraries and therefore HotFuzz supports the majority of protocols that Wireshark does. In general we can say that HotFuzz supports every well-known and often-used protocol. For the sake of space saving we will not provide the full list of supported protocols. If you are interested in it, you can find it at http://wiki.wireshark.org/ProtocolReference.
Note that there are some protocols that are supported by Wireshark but not supported by HotFuzz. These are the protocols whose dissectors are written as plug-ins for Wireshark and do not belong to the standard set of dissectors. There is no stable list of plug-in dissectors since the set is changing all the time but we hope that it will not make many problems since the set of standard dissectors (which means also protocols supported by HotFuzz) is quite big by itself. We will definitely try to add support for these nowadays unsupported protocols to HotFuzz in one of future revisions.
5.2 OptionsThe following options should be used by the user only when running application from command
line using the file peach.py. For example:
“python peach.py --hotfuzz --strategy=ppstrategies.SingleRandomMutationStrategy my_configuration_file.xml”
All these options can be set from HotFuzz graphical user interface by using appropriate controllers.
-a PORT_NUMBER: runs instance of a Peach Agent on local machine, which is listening on port PORT_NUMBER.
--debuglevel=DEBUG_LEVEL: enables debug output.Verbosity is specified by DEBUG_LEVEL.
--debugdissect: enables debug output from Wireshark dissection.
--strategy=STRATEGY: sets mutation strategy.Currently available HotFuzz strategies are “ppstrategies.RecordingStrategy”, “ppstrategies.↵ RandomMutationStrategy” and “ppstrategies.SingleRandomMutationStrategy”.
--hotfuzz: runs HotFuzz fuzzing phase. When using this option, strategy should be set to “ppstrategies.SingleRandomMutationStrategy” or “ppstrategies.RandomMutationStrategy”.
--hotrec=ITERATION_COUNT: runs HotFuzz recording phase. Number of iterations for
67

HotFuzz User manual
recording phase is specified by ITERATION_COUNT. When using this option, strategy should be set to “ppstrategies.RecordingStrategy”
--hotout=FILE_NAME: sets name of file to be used for configuration file generated at the end of recording phase. If this option is not specified for recording phase, name output.xml is used as default.
--hotseed=SEED: sets seed for random mutation strategy. If not set, strategy behaves randomly without any specific seed. SEED has format “S:N”, where S is an alphanumeric string and N is number of starting iteration. N simulates behaviour of the used strategy like that it was started from iteration N.
--hotGuiPort=PORT_NUMBER: sets port used for communication with graphical user interface. If not set, port 12559 is used as default. This option is used by GUI and currently there is no reason to use it when running application from command line.
5.3 MutatorsMutators perform changes of the state or data values in Peach. In HotFuzz, only data mutators
are used (like substituting strings with longer strings to trigger buffer overflows).
Each Mutator has a set of supported data elements (e.g. StringMutator supports only the elements described by the tag String) and does not perform anything on data with unsupported type. Therefore the simplest (and recommended) approach is to turn on all Mutators and they will modify the data only when they are applicable.
HotFuzz currently dissects data only into Strings, Numbers and Blobs. Thus, the list of Mutators in the GUI is shorter than it is in Peach (though the code contains all Mutators that are in Peach). Some of the string mutators need the configuration to be adjusted, e.g. the FilenameMutator applies only on the Strings that contain <Hint name=“type” value=“filename”>. The GUI allows the user to manually edit the configuration file, so these specific cases can be set up if needed.
5.4 Mutation StrategiesTwo major mutation strategies are supported by Peach: sequential and random. Both these
strategies have strong connection to Peach deterministic finite state model and require persistent data models.
As one of the ideas in HotFuzz is that it does not rely too much on determinism, new data models need to be created from a live communication in each iteration, which are then compared with stored templates.
Strategies needed to be therefore significantly rewritten to meet the HotFuzz requirements. Current stable version contains only random mutation strategy, which has been additionally enhanced by possibility to specify seed and use the strategy as pseudorandom. The user has two alternatives of this strategy at his disposal:
• Single random mutation strategy: selects one mutable element from the data model to be mutated
68

HotFuzz User manual
• Random mutation strategy: selects up to five mutable elements from the data model to be mutated
The strategy works as follows:• Strategy creates new random generator G
• In each iteration:• If the user specified seed S:
• number of current iteration is added to number of starting iteration and result R is concatenated with S into string “S:R”. Hash of this string is then used as a seed for G.
• For each output/input action (request/response):• Selects (pseudo)randomly n mutable elements from action data model.
If number of mutable elements in the data model is smaller than n, then all of the mutable elements are selected. If there are no mutable elements, then data are forwarded without any modification.
• For each selected element:• From set of mutators M select subset N, which is the set of the
applicable mutators based on elements type.• (Pseudo)randomly select one mutator m from set N.• (Pseudo)randomly generate seed s for general random
generator.• Mutator m is requested to randomly generate new value V.• Value V is stored in the element and is later used instead of
elements default value.A generation of a seed is important, because the Peach mutators do not naturally contain their own random generators. We chose this approach to prevent unnecessary changes to all existing mutators and maintain compatibility with the future versions of Peach.
69

HotFuzz User manual
6 Troubleshooting
6.1 Agent Refuses to StartIt may happen that one or both agents will not start and instead the following message appears in
the agent output window: raise CannotListenError, (self.interface, self.port, le) twisted.internet.error.CannotListenError: Couldn't listen on any:9001: (10048, 'Address already in use').
This means that some other Agent is listening on the port that the new Agent tries to use. Sometimes, even after the window is closed, an Agent is hanging in the background and blocking the address. Under Windows, run Task manager and end processes with the name python.exe.
Sometimes a port is not free even when the Agent process python.exe is not running. This happens when it has executed another processes (e.g. AutoHotKey for GUI control) and these have not exited. Solution is to terminate them, too. Useful sample commands are:
Display protocol statistics and current TCP/IP network connectionsnetstat -aoTerminate processtaskkill /im port_blocking_process.exe
6.2 GUI Does Not Write any Errors to Console, but Is Not Working Properly
Even though we tried to find and fix all unexpected behaviour that might happen during the HotFuzz execution, there is always a chance that something will go wrong. If the GUI starts working unexpectedly in any situation and the restart of HotFuzz does not help then probably there is a bug we missed. In order to see the error output from the GUI on the commandline, run HotFuzz using the following command using the commandline from the HotFuzz installation directory
python hotfuzzGUI.pyw
instead of running it from Start menu or directly using the application icon in the HotFuzz directory.
6.3 Windows Debugger Is Not StartingOccasionally you might encounter the following message when trying to start agents.
Warning: Windows debugger failed to load: (<type 'exceptions.AttributeError'>,AttributeError(“'module' object has no attribute 'DEBUG_ANY_ID'”,), <traceback object at 0x023D20D0>)
This happens when the comptypes module in python does not generate its object files properly. The
70

HotFuzz User manual
solution is to delete all .pyc files in C:\Python25\Lib\site-packages\comtypes and also delete the whole gen/ subdirectory in the comptypes directory. After you do this, run HotFuzz and start only one agent using the Start button (it is important not to use Start All in this case or the object files might then collide again). After this, the object files will be generated correctly and the problem should not occur again.
71

HotFuzz User manual
7 Resources[ 1 ] Ari Takanen, Jared DeMott, Charlie Miller: Fuzzing for Software Security Testing and
Quality Assurance, Syngress Publishing, 2008.
[ 2 ] Noam Rathaus, Gadi Evron: Open Source Fuzzing Tools, Artech House, 2007.
[ 3 ] William Stallings, Lawrie Brown: Computer Security - Principles and Practice, Pearson Education Inc., 2008
[ 4 ] Wireshark Developer's Guide – http://www.wireshark.org/docs/wsdg_html_chunked/[ 5 ] Wireshark mailing lists – http://www.wireshark.org/lists/[ 6 ] Peach documentation – http://peachfuzzer.com/HelpContents[ 7 ] Peach mailing list – http://groups-beta.google.com/group/peachfuzz[ 8 ] Wikipedia article about the dissection – http://en.wikipedia.org/wiki/Dissection[ 9 ] Wikipedia article about the network proxy – http://en.wikipedia.org/wiki/Proxy_server[10] DailyDave mailing list – http://lists.immunitysec.com/mailman/listinfo/dailydave[11] Tal Garfinkel: (semi)Automatic Methods for Security Bug Detection, Powerpoint
presentation, 2008.
72