hotdocs developer 11help.hotdocs.com/developer/desktop/hotdocs_developer_11_tutoria… · iii table...
TRANSCRIPT

HotDocs Developer 11.2TUTORIAL GUIDE
ii
Copyright© 2016 HotDocs Limited.All rights reserved. No part of this product may be reproduced, transmitted, transcribed, stored in a retrieval system, or translated into any language in any form by any means without the express written permission of HotDocs Limited. (“HotDocs”)
Warranty InformationHotDocs makes no representations or warranties with respect to the contents or use of this product and specifically disclaims any express or implied warranties of merchantability or fitness for any particular purpose. Information in this document is subject to change without notice and does not represent a commitment on the part of HotDocs.
Government UseUse, duplication, or disclosure by the Federal Government is subject to restrictions as set forth in FAR clauses 52.227--14, “Rights in Data--General”; 52.227--19, “Commercial Computer Software--Restricted Rights”; and subdivision (c)(1)(ii) of the Rights in Technical Data and Computer Software clause DFAR 252.227--7013; and the limitations set forth in the standard commercial license agreement for this soft-ware. Unpublished rights are reserved under the copyright laws of the United States.
Trademark InformationHotDocs is a registered trademark of HotDocs Limited. Other product names may be trademarks or regis-tered trademarks of their respective companies.
Sample Templates and FormsThis product includes sample templates and forms only. Using them may have significant legal implications in some situations, and these implications vary by state and depending on the subject matter. Before using these templates and forms or adapting them for your business, you should consult with a lawyer and finan-cial advisor.
Contact InformationFor customer inquiries, contact:HotDocs Limited 14 South Charlotte StreetEdinburgh, EH2 4AXScotland [email protected]
For technical support inquiries, call:(800) 828-8328 (US) or 0870 0100 676 (UK).

iii
Table of Contents
Chapter Guide . . . . . . . . . . . . . . . . . . . . . . . . . . . . . . . . . . . . . . . . . . . . . . . . . . . . . . . . . . . . . . . . . . . . . . 1
Chapter 1: HotDocs Developer Tutorial 3
Overview . . . . . . . . . . . . . . . . . . . . . . . . . . . . . . . . . . . . . . . . . . . . . . . . . . . . . . . . . . . . . . . . . . . . . . . . . . 3
What is HotDocs? . . . . . . . . . . . . . . . . . . . . . . . . . . . . . . . . . . . . . . . . . . . . . . . . . . . . . . . . . . . . . . . . . . . 3
Lesson 1: Assemble a Document . . . . . . . . . . . . . . . . . . . . . . . . . . . . . . . . . . . . . . . . . . . . . . . . . . . . . . . . . . 5
Overview . . . . . . . . . . . . . . . . . . . . . . . . . . . . . . . . . . . . . . . . . . . . . . . . . . . . . . . . . . . . . . . . . . . . . . . . . . 5
Start HotDocs and View a Template Library . . . . . . . . . . . . . . . . . . . . . . . . . . . . . . . . . . . . . . . . . . . . . . . 6
Assemble a Custom Document . . . . . . . . . . . . . . . . . . . . . . . . . . . . . . . . . . . . . . . . . . . . . . . . . . . . . . . . . 8
Preview the Assembled Document . . . . . . . . . . . . . . . . . . . . . . . . . . . . . . . . . . . . . . . . . . . . . . . . . . . . . 12
Edit Answers at the Document Preview Tab (Word Users) . . . . . . . . . . . . . . . . . . . . . . . . . . . . . . . . . . .13
Conclusion . . . . . . . . . . . . . . . . . . . . . . . . . . . . . . . . . . . . . . . . . . . . . . . . . . . . . . . . . . . . . . . . . . . . . . . . 15
Send the Assembled Document to the Word Processor . . . . . . . . . . . . . . . . . . . . . . . . . . . . . . . . . . . . . 16
Lesson 2: Create a New Template Library . . . . . . . . . . . . . . . . . . . . . . . . . . . . . . . . . . . . . . . . . . . . . . . . . .17
Overview . . . . . . . . . . . . . . . . . . . . . . . . . . . . . . . . . . . . . . . . . . . . . . . . . . . . . . . . . . . . . . . . . . . . . . . . . 17
Start the Tutorial . . . . . . . . . . . . . . . . . . . . . . . . . . . . . . . . . . . . . . . . . . . . . . . . . . . . . . . . . . . . . . . . . . .17
Create a New Template Library . . . . . . . . . . . . . . . . . . . . . . . . . . . . . . . . . . . . . . . . . . . . . . . . . . . . . . . .17
Add Existing Templates to the Template Library . . . . . . . . . . . . . . . . . . . . . . . . . . . . . . . . . . . . . . . . . . .18
On Your Own . . . . . . . . . . . . . . . . . . . . . . . . . . . . . . . . . . . . . . . . . . . . . . . . . . . . . . . . . . . . . . . . . . . . . .20
Conclusion . . . . . . . . . . . . . . . . . . . . . . . . . . . . . . . . . . . . . . . . . . . . . . . . . . . . . . . . . . . . . . . . . . . . . . . . 20
Lesson 3: Create a New Template . . . . . . . . . . . . . . . . . . . . . . . . . . . . . . . . . . . . . . . . . . . . . . . . . . . . . . . . 21
Overview . . . . . . . . . . . . . . . . . . . . . . . . . . . . . . . . . . . . . . . . . . . . . . . . . . . . . . . . . . . . . . . . . . . . . . . . . 21
Start the Tutorial . . . . . . . . . . . . . . . . . . . . . . . . . . . . . . . . . . . . . . . . . . . . . . . . . . . . . . . . . . . . . . . . . . .21
Create the Template . . . . . . . . . . . . . . . . . . . . . . . . . . . . . . . . . . . . . . . . . . . . . . . . . . . . . . . . . . . . . . . . 21
Familiarize Yourself with the HotDocs Toolbar . . . . . . . . . . . . . . . . . . . . . . . . . . . . . . . . . . . . . . . . . . . . 25
Conclusion . . . . . . . . . . . . . . . . . . . . . . . . . . . . . . . . . . . . . . . . . . . . . . . . . . . . . . . . . . . . . . . . . . . . . . . . 26
Lesson 4: Replace Text and Dates with Variables . . . . . . . . . . . . . . . . . . . . . . . . . . . . . . . . . . . . . . . . . . . . 27
Overview . . . . . . . . . . . . . . . . . . . . . . . . . . . . . . . . . . . . . . . . . . . . . . . . . . . . . . . . . . . . . . . . . . . . . . . . . 27
Start the Tutorial . . . . . . . . . . . . . . . . . . . . . . . . . . . . . . . . . . . . . . . . . . . . . . . . . . . . . . . . . . . . . . . . . . .27
Replace the EmployeeÊs Name with a Text Variable . . . . . . . . . . . . . . . . . . . . . . . . . . . . . . . . . . . . . . . .27
Replace the Job Title with a Text Variable . . . . . . . . . . . . . . . . . . . . . . . . . . . . . . . . . . . . . . . . . . . . . . .29
Create Prompts and Adjust the Height of the Answer Field . . . . . . . . . . . . . . . . . . . . . . . . . . . . . . . . . . 30
Replace Dates with Date Variables . . . . . . . . . . . . . . . . . . . . . . . . . . . . . . . . . . . . . . . . . . . . . . . . . . . . .33
On Your Own . . . . . . . . . . . . . . . . . . . . . . . . . . . . . . . . . . . . . . . . . . . . . . . . . . . . . . . . . . . . . . . . . . . . . .33
Use an Unanswered Variable Placeholder . . . . . . . . . . . . . . . . . . . . . . . . . . . . . . . . . . . . . . . . . . . . . . .33
Conclusion . . . . . . . . . . . . . . . . . . . . . . . . . . . . . . . . . . . . . . . . . . . . . . . . . . . . . . . . . . . . . . . . . . . . . . . . 36
Lesson 5: Replace Numbers . . . . . . . . . . . . . . . . . . . . . . . . . . . . . . . . . . . . . . . . . . . . . . . . . . . . . . . . . . . . . 37
Overview . . . . . . . . . . . . . . . . . . . . . . . . . . . . . . . . . . . . . . . . . . . . . . . . . . . . . . . . . . . . . . . . . . . . . . . . . 37

iv
Start the Tutorial . . . . . . . . . . . . . . . . . . . . . . . . . . . . . . . . . . . . . . . . . . . . . . . . . . . . . . . . . . . . . . . . . . .37
Replace Simple Numbers . . . . . . . . . . . . . . . . . . . . . . . . . . . . . . . . . . . . . . . . . . . . . . . . . . . . . . . . . . . .37
Replace the Hourly Wage . . . . . . . . . . . . . . . . . . . . . . . . . . . . . . . . . . . . . . . . . . . . . . . . . . . . . . . . . . . .38
Calculate Annual Salary for Hourly Employees . . . . . . . . . . . . . . . . . . . . . . . . . . . . . . . . . . . . . . . . . . . .40
On Your Own . . . . . . . . . . . . . . . . . . . . . . . . . . . . . . . . . . . . . . . . . . . . . . . . . . . . . . . . . . . . . . . . . . . . . .44
Insert the Number of Vacation Days Variable . . . . . . . . . . . . . . . . . . . . . . . . . . . . . . . . . . . . . . . . . . . . .44
Use an Existing Variable . . . . . . . . . . . . . . . . . . . . . . . . . . . . . . . . . . . . . . . . . . . . . . . . . . . . . . . . . . . . .45
Set Minimum and Maximum Limits . . . . . . . . . . . . . . . . . . . . . . . . . . . . . . . . . . . . . . . . . . . . . . . . . . . . .45
Conclusion . . . . . . . . . . . . . . . . . . . . . . . . . . . . . . . . . . . . . . . . . . . . . . . . . . . . . . . . . . . . . . . . . . . . . . . .46
Lesson 6: Replace Multiple Choice Text . . . . . . . . . . . . . . . . . . . . . . . . . . . . . . . . . . . . . . . . . . . . . . . . . . . .47
Overview . . . . . . . . . . . . . . . . . . . . . . . . . . . . . . . . . . . . . . . . . . . . . . . . . . . . . . . . . . . . . . . . . . . . . . . . .47
Start the Tutorial . . . . . . . . . . . . . . . . . . . . . . . . . . . . . . . . . . . . . . . . . . . . . . . . . . . . . . . . . . . . . . . . . . .47
Replace Pronouns with a Multiple Choice Variable . . . . . . . . . . . . . . . . . . . . . . . . . . . . . . . . . . . . . . . . .48
Assign Merge Text to a Multiple Choice Variable . . . . . . . . . . . . . . . . . . . . . . . . . . . . . . . . . . . . . . . . . .49
Choose Different Multiple Choice Merge Text . . . . . . . . . . . . . . . . . . . . . . . . . . . . . . . . . . . . . . . . . . . . .51
On Your Own . . . . . . . . . . . . . . . . . . . . . . . . . . . . . . . . . . . . . . . . . . . . . . . . . . . . . . . . . . . . . . . . . . . . . .53
Create Another Multiple Choice Variable and Add Resource Text to It . . . . . . . . . . . . . . . . . . . . . . . . . .53
Conclusion . . . . . . . . . . . . . . . . . . . . . . . . . . . . . . . . . . . . . . . . . . . . . . . . . . . . . . . . . . . . . . . . . . . . . . . .56
Lesson 7: Create Computation Variables . . . . . . . . . . . . . . . . . . . . . . . . . . . . . . . . . . . . . . . . . . . . . . . . . . .57
Overview . . . . . . . . . . . . . . . . . . . . . . . . . . . . . . . . . . . . . . . . . . . . . . . . . . . . . . . . . . . . . . . . . . . . . . . . .57
Start the Tutorial . . . . . . . . . . . . . . . . . . . . . . . . . . . . . . . . . . . . . . . . . . . . . . . . . . . . . . . . . . . . . . . . . . .58
Insert an Expression Model in a Computation Script . . . . . . . . . . . . . . . . . . . . . . . . . . . . . . . . . . . . . . . .58
Replace a Script Placeholder with a Value . . . . . . . . . . . . . . . . . . . . . . . . . . . . . . . . . . . . . . . . . . . . . . .60
Replace Placeholders with Other Expressions . . . . . . . . . . . . . . . . . . . . . . . . . . . . . . . . . . . . . . . . . . . .62
Replace a Placeholder with a Variable . . . . . . . . . . . . . . . . . . . . . . . . . . . . . . . . . . . . . . . . . . . . . . . . . .63
On Your Own . . . . . . . . . . . . . . . . . . . . . . . . . . . . . . . . . . . . . . . . . . . . . . . . . . . . . . . . . . . . . . . . . . . . . .64
Test the Computation . . . . . . . . . . . . . . . . . . . . . . . . . . . . . . . . . . . . . . . . . . . . . . . . . . . . . . . . . . . . . . . .65
Conclusion . . . . . . . . . . . . . . . . . . . . . . . . . . . . . . . . . . . . . . . . . . . . . . . . . . . . . . . . . . . . . . . . . . . . . . . .67
Lesson 8: Make Paragraphs Conditional . . . . . . . . . . . . . . . . . . . . . . . . . . . . . . . . . . . . . . . . . . . . . . . . . . . .68
Overview . . . . . . . . . . . . . . . . . . . . . . . . . . . . . . . . . . . . . . . . . . . . . . . . . . . . . . . . . . . . . . . . . . . . . . . . .68
Start the Tutorial . . . . . . . . . . . . . . . . . . . . . . . . . . . . . . . . . . . . . . . . . . . . . . . . . . . . . . . . . . . . . . . . . . .68
Conditionally Insert a Single Paragraph of Text . . . . . . . . . . . . . . . . . . . . . . . . . . . . . . . . . . . . . . . . . . . .68
On Your Own . . . . . . . . . . . . . . . . . . . . . . . . . . . . . . . . . . . . . . . . . . . . . . . . . . . . . . . . . . . . . . . . . . . . . .70
Conditionally Insert Alternate Paragraphs of Text . . . . . . . . . . . . . . . . . . . . . . . . . . . . . . . . . . . . . . . . . .70
Create the Variable Used in the Conditional Test . . . . . . . . . . . . . . . . . . . . . . . . . . . . . . . . . . . . . . . . . .71
Create the First Expression . . . . . . . . . . . . . . . . . . . . . . . . . . . . . . . . . . . . . . . . . . . . . . . . . . . . . . . . . . .74
Create an ELSE IF Instruction . . . . . . . . . . . . . . . . . . . . . . . . . . . . . . . . . . . . . . . . . . . . . . . . . . . . . . . . .77
On Your Own . . . . . . . . . . . . . . . . . . . . . . . . . . . . . . . . . . . . . . . . . . . . . . . . . . . . . . . . . . . . . . . . . . . . . .78
Conclusion . . . . . . . . . . . . . . . . . . . . . . . . . . . . . . . . . . . . . . . . . . . . . . . . . . . . . . . . . . . . . . . . . . . . . . . .78
Lesson 9: Test Assemble the Document . . . . . . . . . . . . . . . . . . . . . . . . . . . . . . . . . . . . . . . . . . . . . . . . . . . .79
Overview . . . . . . . . . . . . . . . . . . . . . . . . . . . . . . . . . . . . . . . . . . . . . . . . . . . . . . . . . . . . . . . . . . . . . . . . .79
Start the Tutorial . . . . . . . . . . . . . . . . . . . . . . . . . . . . . . . . . . . . . . . . . . . . . . . . . . . . . . . . . . . . . . . . . . .79
Test Assemble the Document . . . . . . . . . . . . . . . . . . . . . . . . . . . . . . . . . . . . . . . . . . . . . . . . . . . . . . . . .79

v
Conclusion . . . . . . . . . . . . . . . . . . . . . . . . . . . . . . . . . . . . . . . . . . . . . . . . . . . . . . . . . . . . . . . . . . . . . . . . 80
Lesson 10: Group Variables Into Dialogs . . . . . . . . . . . . . . . . . . . . . . . . . . . . . . . . . . . . . . . . . . . . . . . . . . . 81
Overview . . . . . . . . . . . . . . . . . . . . . . . . . . . . . . . . . . . . . . . . . . . . . . . . . . . . . . . . . . . . . . . . . . . . . . . . . 81
Start the Tutorial . . . . . . . . . . . . . . . . . . . . . . . . . . . . . . . . . . . . . . . . . . . . . . . . . . . . . . . . . . . . . . . . . . .81
Create the First Custom Dialog . . . . . . . . . . . . . . . . . . . . . . . . . . . . . . . . . . . . . . . . . . . . . . . . . . . . . . . .82
Add Variables to the Dialog . . . . . . . . . . . . . . . . . . . . . . . . . . . . . . . . . . . . . . . . . . . . . . . . . . . . . . . . . . . 84
Create the Second Dialog . . . . . . . . . . . . . . . . . . . . . . . . . . . . . . . . . . . . . . . . . . . . . . . . . . . . . . . . . . . .85
On Your Own . . . . . . . . . . . . . . . . . . . . . . . . . . . . . . . . . . . . . . . . . . . . . . . . . . . . . . . . . . . . . . . . . . . . . .86
Group True/False Variables in a Dialog . . . . . . . . . . . . . . . . . . . . . . . . . . . . . . . . . . . . . . . . . . . . . . . . . .87
Visually Separate Items in a Dialog . . . . . . . . . . . . . . . . . . . . . . . . . . . . . . . . . . . . . . . . . . . . . . . . . . . . .89
On Your Own . . . . . . . . . . . . . . . . . . . . . . . . . . . . . . . . . . . . . . . . . . . . . . . . . . . . . . . . . . . . . . . . . . . . . .91
Conclusion . . . . . . . . . . . . . . . . . . . . . . . . . . . . . . . . . . . . . . . . . . . . . . . . . . . . . . . . . . . . . . . . . . . . . . . . 91
Lesson 11: Create Scripts for Dialogs . . . . . . . . . . . . . . . . . . . . . . . . . . . . . . . . . . . . . . . . . . . . . . . . . . . . . . 92
Overview . . . . . . . . . . . . . . . . . . . . . . . . . . . . . . . . . . . . . . . . . . . . . . . . . . . . . . . . . . . . . . . . . . . . . . . . . 92
Start the Tutorial . . . . . . . . . . . . . . . . . . . . . . . . . . . . . . . . . . . . . . . . . . . . . . . . . . . . . . . . . . . . . . . . . . .92
Gray and Ungray Variables in a Script . . . . . . . . . . . . . . . . . . . . . . . . . . . . . . . . . . . . . . . . . . . . . . . . . .92
Test the Dialog . . . . . . . . . . . . . . . . . . . . . . . . . . . . . . . . . . . . . . . . . . . . . . . . . . . . . . . . . . . . . . . . . . . . . 96
Hide and Show Variables in a Dialog . . . . . . . . . . . . . . . . . . . . . . . . . . . . . . . . . . . . . . . . . . . . . . . . . . . 97
On Your Own . . . . . . . . . . . . . . . . . . . . . . . . . . . . . . . . . . . . . . . . . . . . . . . . . . . . . . . . . . . . . . . . . . . . . .98
Test Assemble the Template Again . . . . . . . . . . . . . . . . . . . . . . . . . . . . . . . . . . . . . . . . . . . . . . . . . . . . .98
Conclusion . . . . . . . . . . . . . . . . . . . . . . . . . . . . . . . . . . . . . . . . . . . . . . . . . . . . . . . . . . . . . . . . . . . . . . . . 99
Lesson 12: Use a Computation to Combine Multiple Answers into a Single Answer . . . . . . . . . . . . . . . . . 100
Overview . . . . . . . . . . . . . . . . . . . . . . . . . . . . . . . . . . . . . . . . . . . . . . . . . . . . . . . . . . . . . . . . . . . . . . . . 100
Start the Tutorial . . . . . . . . . . . . . . . . . . . . . . . . . . . . . . . . . . . . . . . . . . . . . . . . . . . . . . . . . . . . . . . . . . 100
Create Variables for the EmployeeÊs Name . . . . . . . . . . . . . . . . . . . . . . . . . . . . . . . . . . . . . . . . . . . . . . 101
On Your Own . . . . . . . . . . . . . . . . . . . . . . . . . . . . . . . . . . . . . . . . . . . . . . . . . . . . . . . . . . . . . . . . . . . . . 102
Make the Middle Initial Variable Optional . . . . . . . . . . . . . . . . . . . . . . . . . . . . . . . . . . . . . . . . . . . . . . . 102
Create a Computation That Combines the Employee Name Variables . . . . . . . . . . . . . . . . . . . . . . . . . 104
Insert the Variable Later in the Template . . . . . . . . . . . . . . . . . . . . . . . . . . . . . . . . . . . . . . . . . . . . . . . . 105
Conclusion . . . . . . . . . . . . . . . . . . . . . . . . . . . . . . . . . . . . . . . . . . . . . . . . . . . . . . . . . . . . . . . . . . . . . . . 106
Lesson 13: Copy Components Between Component Files . . . . . . . . . . . . . . . . . . . . . . . . . . . . . . . . . . . . . 107
Overview . . . . . . . . . . . . . . . . . . . . . . . . . . . . . . . . . . . . . . . . . . . . . . . . . . . . . . . . . . . . . . . . . . . . . . . . 107
Start the Tutorial . . . . . . . . . . . . . . . . . . . . . . . . . . . . . . . . . . . . . . . . . . . . . . . . . . . . . . . . . . . . . . . . . . 107
Copy Components . . . . . . . . . . . . . . . . . . . . . . . . . . . . . . . . . . . . . . . . . . . . . . . . . . . . . . . . . . . . . . . . . 107
Insert the Employee State Variable in the Template . . . . . . . . . . . . . . . . . . . . . . . . . . . . . . . . . . . . . . . 109
Create the Personal Data Dialog . . . . . . . . . . . . . . . . . . . . . . . . . . . . . . . . . . . . . . . . . . . . . . . . . . . . . . 110
Conclusion . . . . . . . . . . . . . . . . . . . . . . . . . . . . . . . . . . . . . . . . . . . . . . . . . . . . . . . . . . . . . . . . . . . . . . . 111
Lesson 14: Change the Placement of Variables in the Dialog . . . . . . . . . . . . . . . . . . . . . . . . . . . . . . . . . . 112
Overview . . . . . . . . . . . . . . . . . . . . . . . . . . . . . . . . . . . . . . . . . . . . . . . . . . . . . . . . . . . . . . . . . . . . . . . . 112
Start the Tutorial . . . . . . . . . . . . . . . . . . . . . . . . . . . . . . . . . . . . . . . . . . . . . . . . . . . . . . . . . . . . . . . . . . 112
Test the Dialog to See How Variables Are Arranged . . . . . . . . . . . . . . . . . . . . . . . . . . . . . . . . . . . . . . . 112
Place Answer Fields on the Same Line in a Dialog . . . . . . . . . . . . . . . . . . . . . . . . . . . . . . . . . . . . . . . . 113
On Your Own . . . . . . . . . . . . . . . . . . . . . . . . . . . . . . . . . . . . . . . . . . . . . . . . . . . . . . . . . . . . . . . . . . . . . 115

vi
Change a VariableÊs Width . . . . . . . . . . . . . . . . . . . . . . . . . . . . . . . . . . . . . . . . . . . . . . . . . . . . . . . . . .117
On Your Own . . . . . . . . . . . . . . . . . . . . . . . . . . . . . . . . . . . . . . . . . . . . . . . . . . . . . . . . . . . . . . . . . . . . .118
Conclusion . . . . . . . . . . . . . . . . . . . . . . . . . . . . . . . . . . . . . . . . . . . . . . . . . . . . . . . . . . . . . . . . . . . . . . .118
Lesson 15: Create Lists of Answers . . . . . . . . . . . . . . . . . . . . . . . . . . . . . . . . . . . . . . . . . . . . . . . . . . . . . .119
Overview . . . . . . . . . . . . . . . . . . . . . . . . . . . . . . . . . . . . . . . . . . . . . . . . . . . . . . . . . . . . . . . . . . . . . . . .119
Start the Tutorial . . . . . . . . . . . . . . . . . . . . . . . . . . . . . . . . . . . . . . . . . . . . . . . . . . . . . . . . . . . . . . . . . .119
Repeat a Paragraph . . . . . . . . . . . . . . . . . . . . . . . . . . . . . . . . . . . . . . . . . . . . . . . . . . . . . . . . . . . . . . . .119
Sort the List of Answers . . . . . . . . . . . . . . . . . . . . . . . . . . . . . . . . . . . . . . . . . . . . . . . . . . . . . . . . . . . . .122
Test a Portion of the Template . . . . . . . . . . . . . . . . . . . . . . . . . . . . . . . . . . . . . . . . . . . . . . . . . . . . . . . .123
Create a Sentence-Style List . . . . . . . . . . . . . . . . . . . . . . . . . . . . . . . . . . . . . . . . . . . . . . . . . . . . . . . . .125
Create a Filter . . . . . . . . . . . . . . . . . . . . . . . . . . . . . . . . . . . . . . . . . . . . . . . . . . . . . . . . . . . . . . . . . . . .125
Conclusion . . . . . . . . . . . . . . . . . . . . . . . . . . . . . . . . . . . . . . . . . . . . . . . . . . . . . . . . . . . . . . . . . . . . . . .127
Lesson 16: Use a Table to Display a List of Answers . . . . . . . . . . . . . . . . . . . . . . . . . . . . . . . . . . . . . . . . .128
Overview . . . . . . . . . . . . . . . . . . . . . . . . . . . . . . . . . . . . . . . . . . . . . . . . . . . . . . . . . . . . . . . . . . . . . . . .128
Start the Tutorial . . . . . . . . . . . . . . . . . . . . . . . . . . . . . . . . . . . . . . . . . . . . . . . . . . . . . . . . . . . . . . . . . .128
Insert Variables in a Table . . . . . . . . . . . . . . . . . . . . . . . . . . . . . . . . . . . . . . . . . . . . . . . . . . . . . . . . . . .128
Repeat a Table Row . . . . . . . . . . . . . . . . . . . . . . . . . . . . . . . . . . . . . . . . . . . . . . . . . . . . . . . . . . . . . . .129
Test the Table . . . . . . . . . . . . . . . . . . . . . . . . . . . . . . . . . . . . . . . . . . . . . . . . . . . . . . . . . . . . . . . . . . . .130
Conclusion . . . . . . . . . . . . . . . . . . . . . . . . . . . . . . . . . . . . . . . . . . . . . . . . . . . . . . . . . . . . . . . . . . . . . . .132
Lesson 17: Create Lists Within a List . . . . . . . . . . . . . . . . . . . . . . . . . . . . . . . . . . . . . . . . . . . . . . . . . . . . .133
Overview . . . . . . . . . . . . . . . . . . . . . . . . . . . . . . . . . . . . . . . . . . . . . . . . . . . . . . . . . . . . . . . . . . . . . . . .133
Start the Tutorial . . . . . . . . . . . . . . . . . . . . . . . . . . . . . . . . . . . . . . . . . . . . . . . . . . . . . . . . . . . . . . . . . .133
Insert REPEAT Instructions . . . . . . . . . . . . . . . . . . . . . . . . . . . . . . . . . . . . . . . . . . . . . . . . . . . . . . . . . .134
On Your Own . . . . . . . . . . . . . . . . . . . . . . . . . . . . . . . . . . . . . . . . . . . . . . . . . . . . . . . . . . . . . . . . . . . . .136
Insert the Author Information Dialog into the Editor Information Dialog . . . . . . . . . . . . . . . . . . . . . . . . .137
Insert the Book Information Dialog into the Author Information Dialog . . . . . . . . . . . . . . . . . . . . . . . . .139
Test the Nested Repeat Instructions . . . . . . . . . . . . . . . . . . . . . . . . . . . . . . . . . . . . . . . . . . . . . . . . . . .141
Conclusion . . . . . . . . . . . . . . . . . . . . . . . . . . . . . . . . . . . . . . . . . . . . . . . . . . . . . . . . . . . . . . . . . . . . . . .144
Chapter 2: HotDocs Automator Tutorial 143
Overview . . . . . . . . . . . . . . . . . . . . . . . . . . . . . . . . . . . . . . . . . . . . . . . . . . . . . . . . . . . . . . . . . . . . . . . .143
What is HotDocs Automator? . . . . . . . . . . . . . . . . . . . . . . . . . . . . . . . . . . . . . . . . . . . . . . . . . . . . . . . . .143
Lesson 1: Assemble a Form Document . . . . . . . . . . . . . . . . . . . . . . . . . . . . . . . . . . . . . . . . . . . . . . . . . . . .145
Overview . . . . . . . . . . . . . . . . . . . . . . . . . . . . . . . . . . . . . . . . . . . . . . . . . . . . . . . . . . . . . . . . . . . . . . . .145
Open the Tutorial Templates Library . . . . . . . . . . . . . . . . . . . . . . . . . . . . . . . . . . . . . . . . . . . . . . . . . . .145
Assemble a Form Document . . . . . . . . . . . . . . . . . . . . . . . . . . . . . . . . . . . . . . . . . . . . . . . . . . . . . . . . .146
Preview the Assembled Form Document . . . . . . . . . . . . . . . . . . . . . . . . . . . . . . . . . . . . . . . . . . . . . . . .147
Enter Answers at the Form Document Tab . . . . . . . . . . . . . . . . . . . . . . . . . . . . . . . . . . . . . . . . . . . . . .148
Save Your Answers in an Answer File . . . . . . . . . . . . . . . . . . . . . . . . . . . . . . . . . . . . . . . . . . . . . . . . . .149
Save or Print the Assembled Document . . . . . . . . . . . . . . . . . . . . . . . . . . . . . . . . . . . . . . . . . . . . . . . .150
Send the Assembled Document to HotDocs Filler . . . . . . . . . . . . . . . . . . . . . . . . . . . . . . . . . . . . . . . . .151
Conclusion . . . . . . . . . . . . . . . . . . . . . . . . . . . . . . . . . . . . . . . . . . . . . . . . . . . . . . . . . . . . . . . . . . . . . . .152
Lesson 2: Create a New Form Template . . . . . . . . . . . . . . . . . . . . . . . . . . . . . . . . . . . . . . . . . . . . . . . . . . .153

vii
Overview . . . . . . . . . . . . . . . . . . . . . . . . . . . . . . . . . . . . . . . . . . . . . . . . . . . . . . . . . . . . . . . . . . . . . . . . 153
Start the Tutorial . . . . . . . . . . . . . . . . . . . . . . . . . . . . . . . . . . . . . . . . . . . . . . . . . . . . . . . . . . . . . . . . . . 153
Create a New Form Template . . . . . . . . . . . . . . . . . . . . . . . . . . . . . . . . . . . . . . . . . . . . . . . . . . . . . . . . 153
Familiarize Yourself with the HotDocs Automator Window . . . . . . . . . . . . . . . . . . . . . . . . . . . . . . . . . . 157
Conclusion . . . . . . . . . . . . . . . . . . . . . . . . . . . . . . . . . . . . . . . . . . . . . . . . . . . . . . . . . . . . . . . . . . . . . . . 157
Lesson 3: Create Answer Fields . . . . . . . . . . . . . . . . . . . . . . . . . . . . . . . . . . . . . . . . . . . . . . . . . . . . . . . . .158
Overview . . . . . . . . . . . . . . . . . . . . . . . . . . . . . . . . . . . . . . . . . . . . . . . . . . . . . . . . . . . . . . . . . . . . . . . . 158
Start the Tutorial . . . . . . . . . . . . . . . . . . . . . . . . . . . . . . . . . . . . . . . . . . . . . . . . . . . . . . . . . . . . . . . . . . 158
Create Simple Text Fields . . . . . . . . . . . . . . . . . . . . . . . . . . . . . . . . . . . . . . . . . . . . . . . . . . . . . . . . . . . 158
On Your Own . . . . . . . . . . . . . . . . . . . . . . . . . . . . . . . . . . . . . . . . . . . . . . . . . . . . . . . . . . . . . . . . . . . . . 159
Auto-Detect Fields . . . . . . . . . . . . . . . . . . . . . . . . . . . . . . . . . . . . . . . . . . . . . . . . . . . . . . . . . . . . . . . . . 159
On Your Own . . . . . . . . . . . . . . . . . . . . . . . . . . . . . . . . . . . . . . . . . . . . . . . . . . . . . . . . . . . . . . . . . . . . . 160
Create Single-Character Fields . . . . . . . . . . . . . . . . . . . . . . . . . . . . . . . . . . . . . . . . . . . . . . . . . . . . . . .160
Create Check Box Fields . . . . . . . . . . . . . . . . . . . . . . . . . . . . . . . . . . . . . . . . . . . . . . . . . . . . . . . . . . . . 162
Change Properties for Multiple Fields . . . . . . . . . . . . . . . . . . . . . . . . . . . . . . . . . . . . . . . . . . . . . . . . . . 163
Create Circled Fields . . . . . . . . . . . . . . . . . . . . . . . . . . . . . . . . . . . . . . . . . . . . . . . . . . . . . . . . . . . . . . . 165
On Your Own . . . . . . . . . . . . . . . . . . . . . . . . . . . . . . . . . . . . . . . . . . . . . . . . . . . . . . . . . . . . . . . . . . . . . 168
Conclusion . . . . . . . . . . . . . . . . . . . . . . . . . . . . . . . . . . . . . . . . . . . . . . . . . . . . . . . . . . . . . . . . . . . . . . . 168
Lesson 4: Attach Text Variables to Fields . . . . . . . . . . . . . . . . . . . . . . . . . . . . . . . . . . . . . . . . . . . . . . . . . .169
Overview . . . . . . . . . . . . . . . . . . . . . . . . . . . . . . . . . . . . . . . . . . . . . . . . . . . . . . . . . . . . . . . . . . . . . . . . 169
Start the Tutorial . . . . . . . . . . . . . . . . . . . . . . . . . . . . . . . . . . . . . . . . . . . . . . . . . . . . . . . . . . . . . . . . . . 169
Attach Text Variables to Fields . . . . . . . . . . . . . . . . . . . . . . . . . . . . . . . . . . . . . . . . . . . . . . . . . . . . . . . 169
On Your Own . . . . . . . . . . . . . . . . . . . . . . . . . . . . . . . . . . . . . . . . . . . . . . . . . . . . . . . . . . . . . . . . . . . . . 170
Format Text Answers . . . . . . . . . . . . . . . . . . . . . . . . . . . . . . . . . . . . . . . . . . . . . . . . . . . . . . . . . . . . . . . 171
On Your Own . . . . . . . . . . . . . . . . . . . . . . . . . . . . . . . . . . . . . . . . . . . . . . . . . . . . . . . . . . . . . . . . . . . . . 174
Allow Multi-Line Text Answers . . . . . . . . . . . . . . . . . . . . . . . . . . . . . . . . . . . . . . . . . . . . . . . . . . . . . . . . 175
On Your Own . . . . . . . . . . . . . . . . . . . . . . . . . . . . . . . . . . . . . . . . . . . . . . . . . . . . . . . . . . . . . . . . . . . . . 176
Assign a Text Variable to a Group of Fields . . . . . . . . . . . . . . . . . . . . . . . . . . . . . . . . . . . . . . . . . . . . . 176
Group Lines of Text . . . . . . . . . . . . . . . . . . . . . . . . . . . . . . . . . . . . . . . . . . . . . . . . . . . . . . . . . . . . . . . . 179
Conclusion . . . . . . . . . . . . . . . . . . . . . . . . . . . . . . . . . . . . . . . . . . . . . . . . . . . . . . . . . . . . . . . . . . . . . . . 181
Lesson 5: Attach Date, Number, and Multiple Choice Variables to Fields . . . . . . . . . . . . . . . . . . . . . . . . . 182
Overview . . . . . . . . . . . . . . . . . . . . . . . . . . . . . . . . . . . . . . . . . . . . . . . . . . . . . . . . . . . . . . . . . . . . . . . . 182
Start the Tutorial . . . . . . . . . . . . . . . . . . . . . . . . . . . . . . . . . . . . . . . . . . . . . . . . . . . . . . . . . . . . . . . . . . 182
Attach Date Variables to Fields . . . . . . . . . . . . . . . . . . . . . . . . . . . . . . . . . . . . . . . . . . . . . . . . . . . . . . .182
Attach Number Variables to Fields . . . . . . . . . . . . . . . . . . . . . . . . . . . . . . . . . . . . . . . . . . . . . . . . . . . . 183
On Your Own . . . . . . . . . . . . . . . . . . . . . . . . . . . . . . . . . . . . . . . . . . . . . . . . . . . . . . . . . . . . . . . . . . . . . 185
Set Minimum and Maximum Limits . . . . . . . . . . . . . . . . . . . . . . . . . . . . . . . . . . . . . . . . . . . . . . . . . . . . 185
Attach Multiple Choice Variables to Fields . . . . . . . . . . . . . . . . . . . . . . . . . . . . . . . . . . . . . . . . . . . . . . 187
Attach Multiple Choice Variables to Check Boxes . . . . . . . . . . . . . . . . . . . . . . . . . . . . . . . . . . . . . . . . . 191
Conclusion . . . . . . . . . . . . . . . . . . . . . . . . . . . . . . . . . . . . . . . . . . . . . . . . . . . . . . . . . . . . . . . . . . . . . . . 193
Lesson 6: Attach True/False and Computation Variables to Fields . . . . . . . . . . . . . . . . . . . . . . . . . . . . . . . 194
Overview . . . . . . . . . . . . . . . . . . . . . . . . . . . . . . . . . . . . . . . . . . . . . . . . . . . . . . . . . . . . . . . . . . . . . . . . 194
Start the Tutorial . . . . . . . . . . . . . . . . . . . . . . . . . . . . . . . . . . . . . . . . . . . . . . . . . . . . . . . . . . . . . . . . . . 194

viii
Attach True/False Variables to Circled Fields . . . . . . . . . . . . . . . . . . . . . . . . . . . . . . . . . . . . . . . . . . . .194
On Your Own . . . . . . . . . . . . . . . . . . . . . . . . . . . . . . . . . . . . . . . . . . . . . . . . . . . . . . . . . . . . . . . . . . . . .195
Attach a True/False Variable to a Check Box . . . . . . . . . . . . . . . . . . . . . . . . . . . . . . . . . . . . . . . . . . . .195
Compute Numbers . . . . . . . . . . . . . . . . . . . . . . . . . . . . . . . . . . . . . . . . . . . . . . . . . . . . . . . . . . . . . . . . .196
Test the Computation . . . . . . . . . . . . . . . . . . . . . . . . . . . . . . . . . . . . . . . . . . . . . . . . . . . . . . . . . . . . . . .197
Use a Computation to Combine Text Answers . . . . . . . . . . . . . . . . . . . . . . . . . . . . . . . . . . . . . . . . . . .199
Conclusion . . . . . . . . . . . . . . . . . . . . . . . . . . . . . . . . . . . . . . . . . . . . . . . . . . . . . . . . . . . . . . . . . . . . . . .200
Lesson 7: Make Answer Fields Conditional . . . . . . . . . . . . . . . . . . . . . . . . . . . . . . . . . . . . . . . . . . . . . . . . .202
Overview . . . . . . . . . . . . . . . . . . . . . . . . . . . . . . . . . . . . . . . . . . . . . . . . . . . . . . . . . . . . . . . . . . . . . . . .202
Start the Tutorial . . . . . . . . . . . . . . . . . . . . . . . . . . . . . . . . . . . . . . . . . . . . . . . . . . . . . . . . . . . . . . . . . .202
Make Fields Conditional . . . . . . . . . . . . . . . . . . . . . . . . . . . . . . . . . . . . . . . . . . . . . . . . . . . . . . . . . . . . .202
On Your Own . . . . . . . . . . . . . . . . . . . . . . . . . . . . . . . . . . . . . . . . . . . . . . . . . . . . . . . . . . . . . . . . . . . . .205
Conclusion . . . . . . . . . . . . . . . . . . . . . . . . . . . . . . . . . . . . . . . . . . . . . . . . . . . . . . . . . . . . . . . . . . . . . . .205
Lesson 8: Create a List Using a Table . . . . . . . . . . . . . . . . . . . . . . . . . . . . . . . . . . . . . . . . . . . . . . . . . . . . .206
Overview . . . . . . . . . . . . . . . . . . . . . . . . . . . . . . . . . . . . . . . . . . . . . . . . . . . . . . . . . . . . . . . . . . . . . . . .206
Start the Tutorial . . . . . . . . . . . . . . . . . . . . . . . . . . . . . . . . . . . . . . . . . . . . . . . . . . . . . . . . . . . . . . . . . .206
Group Fields as a Table . . . . . . . . . . . . . . . . . . . . . . . . . . . . . . . . . . . . . . . . . . . . . . . . . . . . . . . . . . . . .206
Create a Repeated Dialog . . . . . . . . . . . . . . . . . . . . . . . . . . . . . . . . . . . . . . . . . . . . . . . . . . . . . . . . . . .208
Automate the Beneficiary Designation Continuation Table . . . . . . . . . . . . . . . . . . . . . . . . . . . . . . . . . .209
Filter Answers in a Table . . . . . . . . . . . . . . . . . . . . . . . . . . . . . . . . . . . . . . . . . . . . . . . . . . . . . . . . . . . .211
Conclusion . . . . . . . . . . . . . . . . . . . . . . . . . . . . . . . . . . . . . . . . . . . . . . . . . . . . . . . . . . . . . . . . . . . . . . .214
Lesson 9: Create Answer-Gathering Dialogs . . . . . . . . . . . . . . . . . . . . . . . . . . . . . . . . . . . . . . . . . . . . . . .215
Overview . . . . . . . . . . . . . . . . . . . . . . . . . . . . . . . . . . . . . . . . . . . . . . . . . . . . . . . . . . . . . . . . . . . . . . . .215
Start the Tutorial . . . . . . . . . . . . . . . . . . . . . . . . . . . . . . . . . . . . . . . . . . . . . . . . . . . . . . . . . . . . . . . . . .215
Gather Variables into Dialogs . . . . . . . . . . . . . . . . . . . . . . . . . . . . . . . . . . . . . . . . . . . . . . . . . . . . . . . .215
On Your Own . . . . . . . . . . . . . . . . . . . . . . . . . . . . . . . . . . . . . . . . . . . . . . . . . . . . . . . . . . . . . . . . . . . . .219
Create the Medical History Dialog . . . . . . . . . . . . . . . . . . . . . . . . . . . . . . . . . . . . . . . . . . . . . . . . . . . . .219
Create Custom Prompts for Variables . . . . . . . . . . . . . . . . . . . . . . . . . . . . . . . . . . . . . . . . . . . . . . . . . .222
Make Variables in a Dialog Conditional . . . . . . . . . . . . . . . . . . . . . . . . . . . . . . . . . . . . . . . . . . . . . . . . .226
On Your Own . . . . . . . . . . . . . . . . . . . . . . . . . . . . . . . . . . . . . . . . . . . . . . . . . . . . . . . . . . . . . . . . . . . . .227
Create Default Dialogs . . . . . . . . . . . . . . . . . . . . . . . . . . . . . . . . . . . . . . . . . . . . . . . . . . . . . . . . . . . . . .228
On Your Own . . . . . . . . . . . . . . . . . . . . . . . . . . . . . . . . . . . . . . . . . . . . . . . . . . . . . . . . . . . . . . . . . . . . .229
Attach an Answer Wizard to a Computed Field . . . . . . . . . . . . . . . . . . . . . . . . . . . . . . . . . . . . . . . . . . .230
Assign DEFAULT Answer Wizards to Fields . . . . . . . . . . . . . . . . . . . . . . . . . . . . . . . . . . . . . . . . . . . . .231
Assemble a Form Document Using Direct-Fill . . . . . . . . . . . . . . . . . . . . . . . . . . . . . . . . . . . . . . . . . . . .233
Conclusion . . . . . . . . . . . . . . . . . . . . . . . . . . . . . . . . . . . . . . . . . . . . . . . . . . . . . . . . . . . . . . . . . . . . . . .234
Lesson 10: Create a Default Interview . . . . . . . . . . . . . . . . . . . . . . . . . . . . . . . . . . . . . . . . . . . . . . . . . . . . .235
Overview . . . . . . . . . . . . . . . . . . . . . . . . . . . . . . . . . . . . . . . . . . . . . . . . . . . . . . . . . . . . . . . . . . . . . . . .235
Start the Tutorial . . . . . . . . . . . . . . . . . . . . . . . . . . . . . . . . . . . . . . . . . . . . . . . . . . . . . . . . . . . . . . . . . .235
Have HotDocs Generate a Default Interview . . . . . . . . . . . . . . . . . . . . . . . . . . . . . . . . . . . . . . . . . . . . .235
Assemble a Form Document Using an Interview . . . . . . . . . . . . . . . . . . . . . . . . . . . . . . . . . . . . . . . . . .238
Conclusion . . . . . . . . . . . . . . . . . . . . . . . . . . . . . . . . . . . . . . . . . . . . . . . . . . . . . . . . . . . . . . . . . . . . . . .242
ix
Chapter 3: HotDocs Database Connectivity Tutorial 243
Overview . . . . . . . . . . . . . . . . . . . . . . . . . . . . . . . . . . . . . . . . . . . . . . . . . . . . . . . . . . . . . . . . . . . . . . . . 243
Lesson 1: Create an ADO Connection String . . . . . . . . . . . . . . . . . . . . . . . . . . . . . . . . . . . . . . . . . . . . . . . 244
Overview . . . . . . . . . . . . . . . . . . . . . . . . . . . . . . . . . . . . . . . . . . . . . . . . . . . . . . . . . . . . . . . . . . . . . . . . 244
Create a Database Component . . . . . . . . . . . . . . . . . . . . . . . . . . . . . . . . . . . . . . . . . . . . . . . . . . . . . . .245
Define the ADO Connection String . . . . . . . . . . . . . . . . . . . . . . . . . . . . . . . . . . . . . . . . . . . . . . . . . . . . 247
On Your Own . . . . . . . . . . . . . . . . . . . . . . . . . . . . . . . . . . . . . . . . . . . . . . . . . . . . . . . . . . . . . . . . . . . . . 250
Conclusion . . . . . . . . . . . . . . . . . . . . . . . . . . . . . . . . . . . . . . . . . . . . . . . . . . . . . . . . . . . . . . . . . . . . . . . 250
Lesson 2: Link Variables to Fields in a Database Table . . . . . . . . . . . . . . . . . . . . . . . . . . . . . . . . . . . . . . . 251
Overview . . . . . . . . . . . . . . . . . . . . . . . . . . . . . . . . . . . . . . . . . . . . . . . . . . . . . . . . . . . . . . . . . . . . . . . . 251
Start the Tutorial . . . . . . . . . . . . . . . . . . . . . . . . . . . . . . . . . . . . . . . . . . . . . . . . . . . . . . . . . . . . . . . . . . 251
Link Variables to Fields . . . . . . . . . . . . . . . . . . . . . . . . . . . . . . . . . . . . . . . . . . . . . . . . . . . . . . . . . . . . . 251
Designate a Specific Field as the Key Field . . . . . . . . . . . . . . . . . . . . . . . . . . . . . . . . . . . . . . . . . . . . . 253
Test the Database . . . . . . . . . . . . . . . . . . . . . . . . . . . . . . . . . . . . . . . . . . . . . . . . . . . . . . . . . . . . . . . . . 254
On Your Own . . . . . . . . . . . . . . . . . . . . . . . . . . . . . . . . . . . . . . . . . . . . . . . . . . . . . . . . . . . . . . . . . . . . . 259
Conclusion . . . . . . . . . . . . . . . . . . . . . . . . . . . . . . . . . . . . . . . . . . . . . . . . . . . . . . . . . . . . . . . . . . . . . . . 260
Lesson 3: Select Fields and Records for Display . . . . . . . . . . . . . . . . . . . . . . . . . . . . . . . . . . . . . . . . . . . . 261
Overview . . . . . . . . . . . . . . . . . . . . . . . . . . . . . . . . . . . . . . . . . . . . . . . . . . . . . . . . . . . . . . . . . . . . . . . . 261
Start the Tutorial . . . . . . . . . . . . . . . . . . . . . . . . . . . . . . . . . . . . . . . . . . . . . . . . . . . . . . . . . . . . . . . . . . 261
Choose Which Fields Will be Presented During Assembly . . . . . . . . . . . . . . . . . . . . . . . . . . . . . . . . . . 261
On Your Own . . . . . . . . . . . . . . . . . . . . . . . . . . . . . . . . . . . . . . . . . . . . . . . . . . . . . . . . . . . . . . . . . . . . . 263
Conclusion . . . . . . . . . . . . . . . . . . . . . . . . . . . . . . . . . . . . . . . . . . . . . . . . . . . . . . . . . . . . . . . . . . . . . . . 263
Lesson 4: Filter the List of Records . . . . . . . . . . . . . . . . . . . . . . . . . . . . . . . . . . . . . . . . . . . . . . . . . . . . . . .264
Overview . . . . . . . . . . . . . . . . . . . . . . . . . . . . . . . . . . . . . . . . . . . . . . . . . . . . . . . . . . . . . . . . . . . . . . . . 264
Start the Tutorial . . . . . . . . . . . . . . . . . . . . . . . . . . . . . . . . . . . . . . . . . . . . . . . . . . . . . . . . . . . . . . . . . . 264
Create the Database Filter . . . . . . . . . . . . . . . . . . . . . . . . . . . . . . . . . . . . . . . . . . . . . . . . . . . . . . . . . . . 264
Conclusion . . . . . . . . . . . . . . . . . . . . . . . . . . . . . . . . . . . . . . . . . . . . . . . . . . . . . . . . . . . . . . . . . . . . . . . 267
Lesson 5: Select Related Database Records . . . . . . . . . . . . . . . . . . . . . . . . . . . . . . . . . . . . . . . . . . . . . . . 268
Overview . . . . . . . . . . . . . . . . . . . . . . . . . . . . . . . . . . . . . . . . . . . . . . . . . . . . . . . . . . . . . . . . . . . . . . . . 268
Start the Tutorial . . . . . . . . . . . . . . . . . . . . . . . . . . . . . . . . . . . . . . . . . . . . . . . . . . . . . . . . . . . . . . . . . . 268
Link the Common Field to a Variable . . . . . . . . . . . . . . . . . . . . . . . . . . . . . . . . . . . . . . . . . . . . . . . . . . . 268
Use the Linked Variable as a Filter . . . . . . . . . . . . . . . . . . . . . . . . . . . . . . . . . . . . . . . . . . . . . . . . . . . . 270
Conclusion . . . . . . . . . . . . . . . . . . . . . . . . . . . . . . . . . . . . . . . . . . . . . . . . . . . . . . . . . . . . . . . . . . . . . . . 271
Lesson 6: Test the Template . . . . . . . . . . . . . . . . . . . . . . . . . . . . . . . . . . . . . . . . . . . . . . . . . . . . . . . . . . . . 272
Overview . . . . . . . . . . . . . . . . . . . . . . . . . . . . . . . . . . . . . . . . . . . . . . . . . . . . . . . . . . . . . . . . . . . . . . . . 272
Start the Tutorial . . . . . . . . . . . . . . . . . . . . . . . . . . . . . . . . . . . . . . . . . . . . . . . . . . . . . . . . . . . . . . . . . . 272
Test the Template . . . . . . . . . . . . . . . . . . . . . . . . . . . . . . . . . . . . . . . . . . . . . . . . . . . . . . . . . . . . . . . . . 272
Conclusion . . . . . . . . . . . . . . . . . . . . . . . . . . . . . . . . . . . . . . . . . . . . . . . . . . . . . . . . . . . . . . . . . . . . . . . 275

1
Chapter Guide
This manual is divided into three chapters:
Chapter 1: HotDocs Developer Tutorial Lessons
This chapter contains lessons for creating text-based templates, or templates you automate in your word processor. Each lesson is self-contained and can be completed in short blocks of time.
Chapter 2: HotDocs Automator Tutorial Lessons
This chapter contains lessons for creating form-based templates, or templates you automate using HotDocs Automator. Like the tutorials in Chapter 1, these lessons are self-contained and can be completed in short blocks of time.
Chapter 3: HotDocs Database Connection Tutorial Lessons
This chapter contains six short lessons that teach you how to integrate your templates with a database.
For further documentation on HotDocs, see the Quick Start Guide at help.hotdocs.com and the HotDocs Help, which you can access from any HotDocs Help menu.

3
Chapter 1: HotDocs Developer Tutorial
Overview
The lessons in this chapter introduce you to important concepts and features avail-able in HotDocs. Because of the work you do in these lessons the procedure should be familiar when you begin automating your own documents, allowing you to focus on your documents, not HotDocs.
These lessons are short and are structured so you can complete each one in separate sessions. This allows you to learn HotDocs in the spare minutes you have during the day. You do not need to dedicate a large block of time to using the tutorial.
You should complete all of these lessons in order. In these lessons:
You will learn how to create template libraries and add templates to them. You will learn how to create a new template and replace text in it with answer
field tags, called variables. You will then learn how to group related variables into dialogs so that questions can be presented to users in logical groups.
You will also learn how to create variables that perform simple as well as complex calculations.
You will learn how to make sections of text in a template conditional so the text will be merged in the assembled document only when it is needed.
Finally, you will learn how to repeat variable fields so a user can enter lists of answers.
In Chapter 2, you will complete a tutorial that teaches you how to automate form templates using HotDocs Automator.
CautionCautionCautionCautionCautionCautionCautionCautionCautionCautionCautionCautionCautionCautionCautionThe documents used in these tutorials were drafted to suit the purposes of the tutorial. They are not provided as valid legal documents.
What is HotDocs?
In your day-to-day routine, you may need to create custom documents for clients or customers. Without HotDocs, you must manually search through the document and replace the text that needs to be changed with the new information. This process can be time-consuming and error-prone.
Using HotDocs, however, you can transform any document into an interactive template by marking changeable text with HotDocs variables. Then, the next time you want to create a custom document, you can assemble the interactive template you’ve created. As you do this, you will be prompted for the information needed in the document and that information will be merged into the document.

Chapter 1: HotDocs Developer Tutorial
4
Virtually any document in your workflow can be converted to a HotDocs template, including lengthy and complex documents. Using HotDocs, you can compile an invaluable repository of special language, unique clauses or terms, correspondence, and more.
The following diagram shows the HotDocs process, from template development to document assembly:
By completing the various tutorials in this guide, you will learn how to use HotDocs to transform documents you regularly customize for clients into HotDocs templates.

Lesson 1: Assemble a Document
5
Lesson 1: Assemble a Document
Overview
Before you learn how to automate a template, it is a good idea to see how an already-automated template is used to assemble a custom document.
There are two types of templates with which you work in HotDocs—text templates and form templates:
Text templates are automated in a word processor, such as Microsoft Word or WordPerfect. As you automate a text template, you indicate in the text where users’ answers should be merged. When you assemble a text document, you save the document as a regular word processor file. You have all of the editing capabilities that are included with word pro-cessor files.
Form templates use a Windows program (such as a form design program) to create a static form, or one in which the user will not be able to change or modify the underlying text. Once designed, you then use HotDocs to create a PDF version of the form. Finally, you use HotDocs Automator to place fill-in fields on the form where users’ answers will be inserted. (An IRS form is a good example of a form.) When you assemble a form document, you can view the assembled document in either HotDocs Filler or a PDF viewer. You will assemble and automate a form template in Chapter 2.
When you use HotDocs to assemble a document, HotDocs presents a series of ques-tions you must answer in an interview. Your answers are then merged into the assembled document. Once all of the answers are provided and you have verified that the document is correct, you can print the document or save it to disk. You also can save the answers you’ve provided in an answer file, which you can reuse to assemble other documents.

Chapter 1: HotDocs Developer Tutorial
6
The following diagram shows the assembly process:
Start HotDocs and View a Template Library
To start the tutorial, you must first open the HotDocs template library.
A template library allows you to manage a collection of template files associated with a specific project or area of business. Using the tools available in the library, you can edit templates, assemble documents, and access other HotDocs tools, such as Answer File Manager, HotDocs Options, and Component Manager. Items refer-enced in a template library act as shortcuts to the actual files on disk.
To start HotDocs Choose Start > Programs > HotDocs 11 > HotDocs Developer. The Tutorial
Templates library appears.

Lesson 1: Assemble a Document
7
NoteIf the Tutorial Templates library does not appear, choose Open Library (File menu), select the library for your word processor in the default Librar-ies folder (for example, DOCX Tutorial Templates.hdl), and click Open.
Tip: The items you see in the left pane are not the actual HotDocs files on your local disk or network. Instead, they are references to the files, operating similar to Windows-type shortcuts. When you select an item for assembly, HotDocs follows the assigned file path to locate the actual template and then opens it.
This Tutorial Templates library you are viewing includes fully automated versions of the templates you will automate throughout this tutorial. You may refer to these templates for help as you complete the different lessons in the tutorial.
The template library is divided into two main panes. The left pane shows a list of the items referenced in the library. These items can include folders, templates, clause libraries, or other files.
Chapter 1: HotDocs Developer Tutorial
8
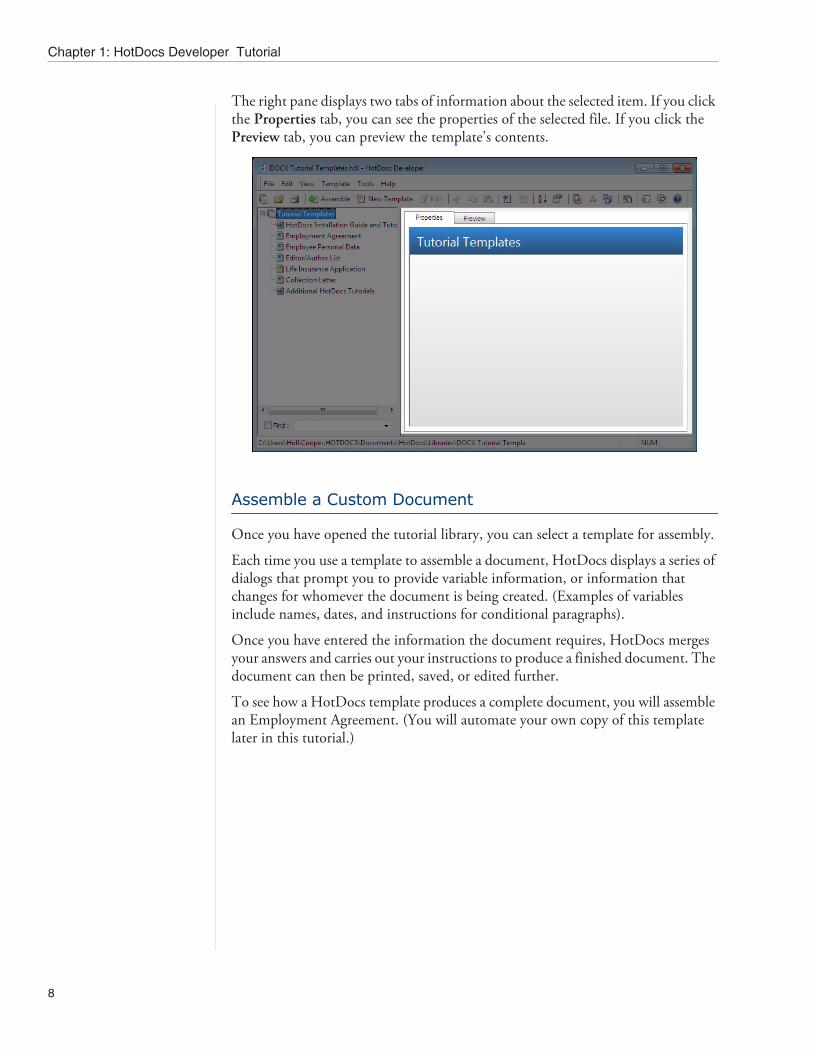
The right pane displays two tabs of information about the selected item. If you click the Properties tab, you can see the properties of the selected file. If you click the Preview tab, you can preview the template’s contents.
Assemble a Custom Document
Once you have opened the tutorial library, you can select a template for assembly.
Each time you use a template to assemble a document, HotDocs displays a series of dialogs that prompt you to provide variable information, or information that changes for whomever the document is being created. (Examples of variables include names, dates, and instructions for conditional paragraphs).
Once you have entered the information the document requires, HotDocs merges your answers and carries out your instructions to produce a finished document. The document can then be printed, saved, or edited further.
To see how a HotDocs template produces a complete document, you will assemble an Employment Agreement. (You will automate your own copy of this template later in this tutorial.)
Lesson 1: Assemble a Document
9
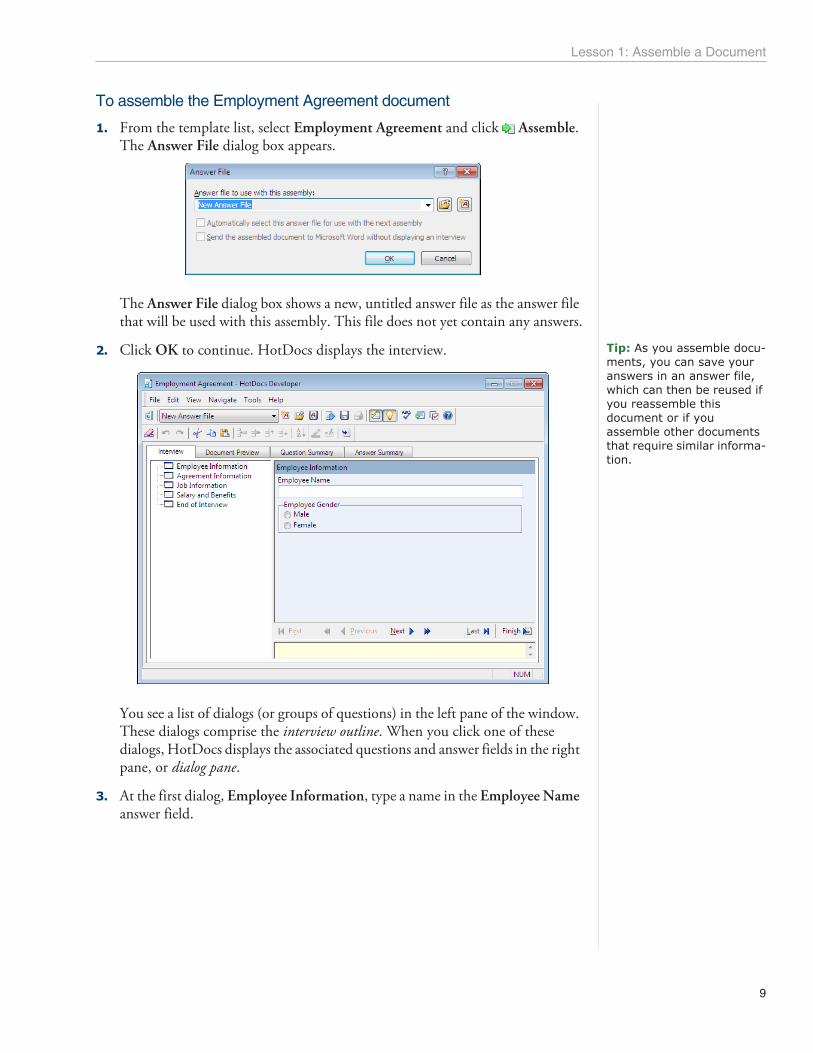
To assemble the Employment Agreement document
1. From the template list, select Employment Agreement and click Assemble. The Answer File dialog box appears.
The Answer File dialog box shows a new, untitled answer file as the answer file that will be used with this assembly. This file does not yet contain any answers.
Tip: As you assemble docu-ments, you can save your answers in an answer file, which can then be reused if you reassemble this document or if you assemble other documents that require similar informa-tion.
2. Click OK to continue. HotDocs displays the interview.
You see a list of dialogs (or groups of questions) in the left pane of the window. These dialogs comprise the interview outline. When you click one of these dialogs, HotDocs displays the associated questions and answer fields in the right pane, or dialog pane.
3. At the first dialog, Employee Information, type a name in the Employee Name answer field.

Chapter 1: HotDocs Developer Tutorial
10
4. Answer the Employee Gender question.
Tip: To enter dates, you can type the date directly in the answer field, or you can click the Calendar icon to the right of the answer field and choose a date there.
5. Click Next (or press Page Down) to advance to the next dialog, Agreement Information.
6. Answer questions in the dialog and click Next to move to the next dialog in the interview outline.
As you proceed through the interview, dialog icons in the interview outline change appearance, indicating whether the questions in the dialog are unan-swered ( ), partially answered ( ), or completely answered ( ).

Lesson 1: Assemble a Document
11
7. Continue answering questions in the interview, clicking Next to move to new dialogs.
8. After the last dialog, the End of Interview dialog appears.
The End of Interview dialog gives you options for working with the assembled document. For example, you can send a copy of the assembled document to the word processor.
Preview the Assembled Document
Once an assembled text document is sent to the word processor, the document is no longer associated with HotDocs. This means that if you change any text in the document, including any text that was merged because of answers you entered during the interview, the changes are only reflected in that document—not the template or the answer file. Because of this, you should always review assembled documents for accuracy before sending them to the word processor.
You can review a copy of the assembled employment agreement at the Document Preview tab of the HotDocs assembly window.

Chapter 1: HotDocs Developer Tutorial
12
To preview the assembled document At the assembly window, click the Document Preview tab. The assembled
document appears.
The Document Preview tab shows all of the answers you entered during the inter-view merged into the document.
NoteBecause of technical restrictions, HotDocs cannot display the actual word processor document. Instead, it uses a third-party application to render the text of the template or document in RTF format. This means that Word templates or documents are pre-viewed fairly accurately because they are in a format that can be displayed in RTF. Some of the formatting may be different, but, for the most part, it is a good represen-tation. However, because WordPerfect text can't be converted to RTF at the time the document is displayed, the application is only able to display the text in plain format. In either case, however, the actual text in the template or document is correct. And, once you send the assembled document to the word processor, the document will appear exactly as designed.
Edit Answers at the Document Preview Tab (Word Users)
If you are using Microsoft Word, you can change answers while viewing the Document Preview tab. When you edit an answer, any other questions affected by the answer are likewise updated.
If you are using WordPerfect, skip to Send the Assembled Document to the Word Processor (page 16).
Lesson 1: Assemble a Document
13
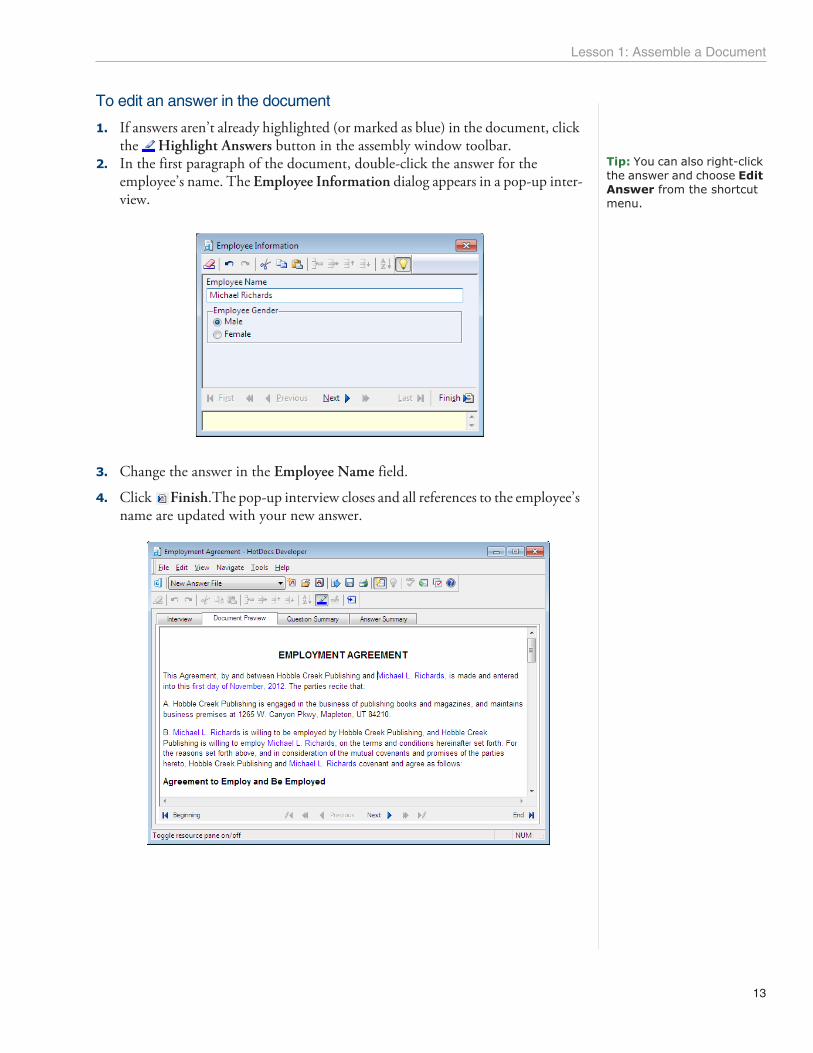
To edit an answer in the document
1. If answers aren’t already highlighted (or marked as blue) in the document, click the Highlight Answers button in the assembly window toolbar.
Tip: You can also right-click the answer and choose Edit Answer from the shortcut menu.
2. In the first paragraph of the document, double-click the answer for the employee’s name. The Employee Information dialog appears in a pop-up inter-view.
3. Change the answer in the Employee Name field.
4. Click Finish.The pop-up interview closes and all references to the employee’s name are updated with your new answer.

Chapter 1: HotDocs Developer Tutorial
14
Conclusion
You are now finished with this lesson. In it, you learned how to assemble a document from a HotDocs template.
In Lesson 2, you will create a new library.
If you are not continuing on to Lesson 2 at this time, close HotDocs by choosing Exit from the template library File menu.

Lesson 1: Assemble a Document
15
Send the Assembled Document to the Word Processor
Now that you have completed the interview and previewed the assembled docu-ment, you can send a copy of it to your word processor.
To send the document to the word processor
1. At the assembly window toolbar, click the Send Document to Word Proces-sor button. HotDocs opens the word processor and displays the complete doc-ument.
Tip: Windows Vista users may need to click the docu-ment’s icon on the Windows taskbar in order to view the document.
When the document is in the word processor, you can print, save, or edit it. For the purposes of this tutorial, however, you will simply view the document and then close the word processor without saving the document.
2. Close the word processor document. Do not save it.
3. At the HotDocs assembly window, choose Close (File menu). When HotDocs prompts you, don’t save your answers or a copy of the assembled document.
You are now finished with this lesson. In it, you learned how to assemble a text document. You also learned how to preview the assembled document before sending it to the word processor.
In the next lesson, you will begin automating your own version of the employment agreement.
If you are not continuing on to Lesson 2, close HotDocs by choosing Exit from the template library File menu.

Chapter 1: HotDocs Developer Tutorial
16
Lesson 2: Create a New Template Library
Overview
When you start HotDocs, the template library appears. It is from this window that you begin most tasks in HotDocs, such as creating templates, choosing templates for assembly, and so forth.
Tip: By default, template libraries are created and saved in the Docu-ments\HotDocs\Libraries folder. You can change the default folder at HotDocs Options.
The template library itself represents a collection of files you use to create custom documents for your clients. This collection can include text templates, form templates, clause libraries, word processor documents, HTML pages, and PDF documents.
When working with a template library, you should understand that files listed in a library act like shortcuts to the actual files on disk. This “virtual” organization of files provides an easy way to organize and manage the files you use in your practice or business. For example, even though template files can all be saved to the same common folder on disk, within the library, you can organize them into unique folders. Say you are creating an estate planning library. You can create three separate folders in the library, like Wills, Trusts, and Other Documents.
NoteTemplate libraries have an .HDL file name extension.
Start the Tutorial
If you are continuing immediately from Lesson 1, skip the instructions for starting HotDocs and proceed to “Create a New Template Library.”
If you closed HotDocs at the end of Lesson 1, complete the following steps.
To start HotDocs Choose Start > Programs > HotDocs 11 > HotDocs Developer. The Tutorial
Templates library appears.
NoteIf the Tutorial Templates library does not appear, choose Open Library (File menu), select the library for your word processor in the default Librar-ies folder (for example, DOCX Tutorial Templates.hdl), and click Open.
Create a New Template Library
You will create a new template library to organize the templates you will automate throughout this tutorial. (If you ever need to refer back to this tutorial library, simply open it using the Open Library command.)

Lesson 2: Create a New Template Library
17
To create a new library
1. At the existing template library, click the New Library button. The New Library dialog box appears.
2. In the File name box, enter My Test Templates. This is the name of the file that will be saved on disk.
3. Click in the Title box. HotDocs suggests My Test Templates as the title. This is correct.
The title is a required property that is used to identify the library. It is assigned to the top folder in the library.
4. In the Description box, type These are the templates I automated while learning how to use HotDocs.
The Description is an optional property that can provide additional informa-tion about the library. It appears in the Properties tab of the library.
5. Click OK. The Tutorial Templates library is closed and the new library is created.
In the next part of this lesson, you will add templates to the library list.
Add Existing Templates to the Template Library
During this tutorial, you will use three different templates. You will add two of these templates, which have already been created for you, to the test library now. (The third template you will create in the next lesson.)
Chapter 1: HotDocs Developer Tutorial
18
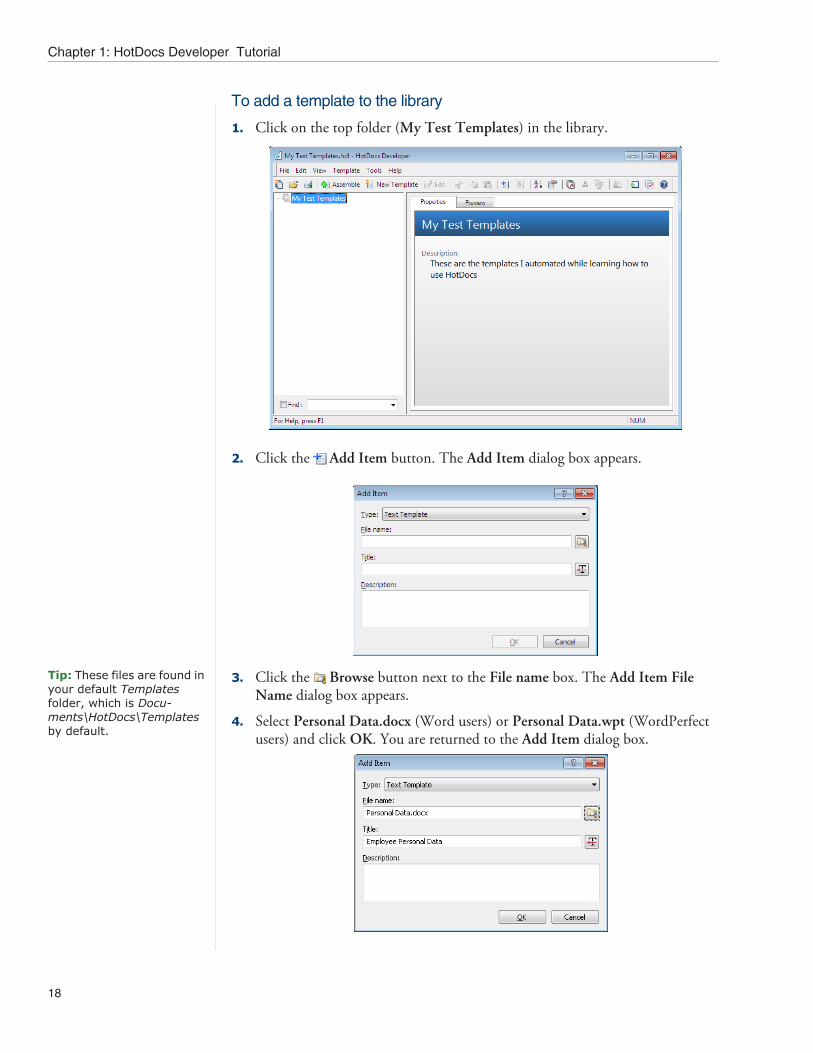
To add a template to the library
1. Click on the top folder (My Test Templates) in the library.
2. Click the Add Item button. The Add Item dialog box appears.
Tip: These files are found in your default Templates folder, which is Docu-ments\HotDocs\Templates by default.
3. Click the Browse button next to the File name box. The Add Item File Name dialog box appears.
4. Select Personal Data.docx (Word users) or Personal Data.wpt (WordPerfect users) and click OK. You are returned to the Add Item dialog box.

Lesson 2: Create a New Template Library
19
5. Click OK. The file is added to the library.
Tip: If you need to move a file in the list to a different location, you can click it and drag it up or down in the list. The horizontal bar that appears indicates where the file will be placed when you release the mouse button.
You will automate this template later in this tutorial.
On Your Own
Add the template Editor List.docx or Editor List.wpt to the library. Follow the instructions in the previous section if you do not remember how to do this.
In the next lesson, you will create a new template and add it to the library.
Conclusion
You are now finished with this lesson. In it, you learned how to create a new template library. You also learned how to add existing templates to a library.
In Lesson 3, you will create a new template.
If you are not continuing on to Lesson 3 at this time, close HotDocs by choosing Exit from the template library File menu.

Chapter 1: HotDocs Developer Tutorial
20
Lesson 3: Create a New Template
Overview
When you create a template, you must specify what text will be used in the template. For example, you can either use text from an existing document as the basis for the template, or you can create a new, empty template and just add the text as you automate it. For this lesson, you will use text from an existing employment agree-ment.
When the template is created, special HotDocs toolbars are added to the word processor window. Automating a template in the word processor lets you use all of the functionality of the word processor, while also providing full HotDocs function-ality through these custom HotDocs toolbars.
Once you have created a template, you can use HotDocs template-building features to automate the template.
The next several lessons teach you how to create and automate an Employment Agreement template like the one you assembled in Lesson 1.
Start the Tutorial
If you are continuing immediately from Lesson 2, skip the instructions for starting HotDocs and proceed to “Create the Template.”
If you closed HotDocs at the end of Lesson 2, complete the following steps.
To start HotDocs Choose Start > Programs > HotDocs 11 > HotDocs Developer. The Test
Templates library appears.
NoteIf the My Test Templates library does not appear, choose Open Library (File menu), select the library in the default Libraries folder (for example, My Test Templates.hdl), and click Open.
Create the Template
You will now create the Employment Agreement template. You will use an existing document as the basis for the template.

Lesson 3: Create a New Template
21
To create a template
1. In the My Test Templates library, click on the My Test Templates folder.
2. Click New Template. The New Template dialog box appears.
Chapter 1: HotDocs Developer Tutorial
22
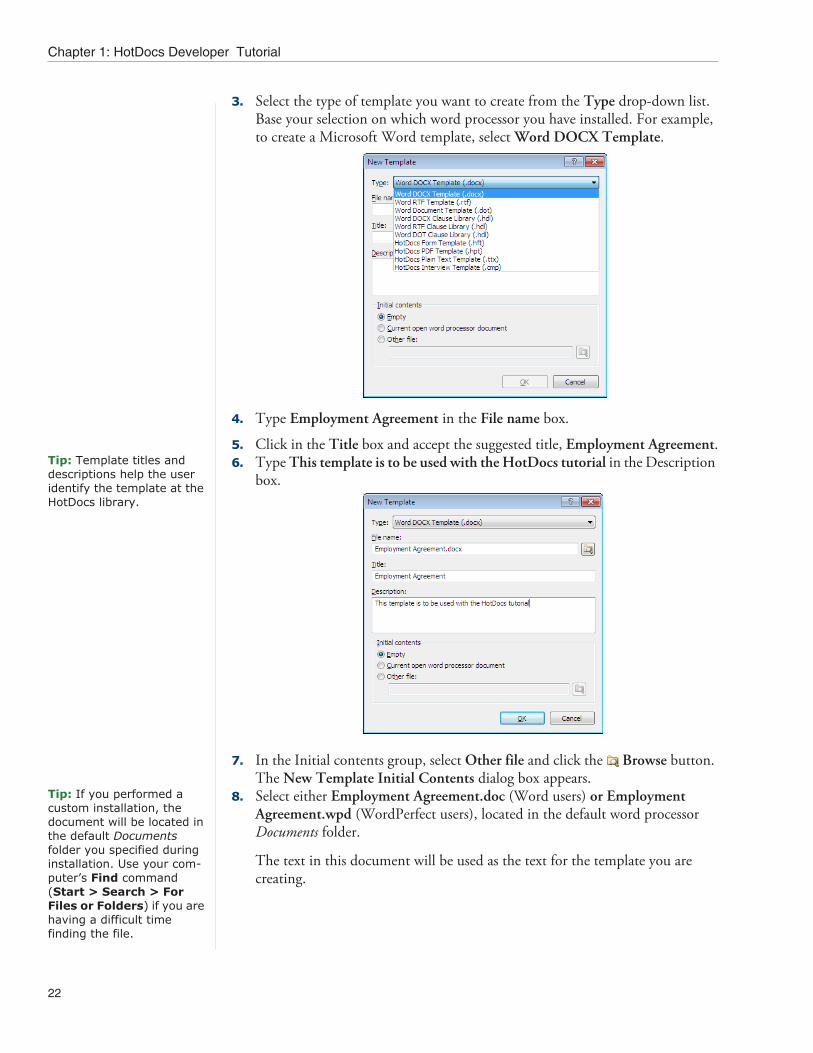
3. Select the type of template you want to create from the Type drop-down list. Base your selection on which word processor you have installed. For example, to create a Microsoft Word template, select Word DOCX Template.
4. Type Employment Agreement in the File name box.
5. Click in the Title box and accept the suggested title, Employment Agreement.Tip: Template titles and descriptions help the user identify the template at the HotDocs library.
6. Type This template is to be used with the HotDocs tutorial in the Description box.
7. In the Initial contents group, select Other file and click the Browse button. The New Template Initial Contents dialog box appears.
Tip: If you performed a custom installation, the document will be located in the default Documents folder you specified during installation. Use your com-puter’s Find command (Start > Search > For Files or Folders) if you are having a difficult time finding the file.
8. Select either Employment Agreement.doc (Word users) or Employment Agreement.wpd (WordPerfect users), located in the default word processor Documents folder.
The text in this document will be used as the text for the template you are creating.

Lesson 3: Create a New Template
23
9. Click OK to return to the New Template dialog box.
The document’s folder path and file name appear in the Other file box.
10. Click OK. The new template file is created and opened in the word processor. The template is also added to the template library.
When you create a template, HotDocs automatically creates a companion file for the template called a component file. This component file is necessary for a template to work, since it stores all of the information about the template’s automation (such as component names, template properties, and so forth).

Chapter 1: HotDocs Developer Tutorial
24
The component file works automatically in the background—as you create variables and other components in the template, they are automatically stored in the compo-nent file.
HotDocs gives the component file the same name as the template file. In this instance, HotDocs has created a component file named Employment Agreement.cmp (since your template file is named Employment Agreement.docx or Employment Agree-ment.wpt).
NoteComponents are elements in a HotDocs template that display or store information about the answers that are merged. Examples of components include variables, dialogs, dialog elements, merge text groups, and formats.
Familiarize Yourself with the HotDocs ToolbarTip: At any time during these lessons, you can click the HotDocs Help button to display the HotDocs Help file. You can then search for more infor-mation about anything in the tutorial you don’t under-stand or about which you would like to learn more.
When you create a new template, HotDocs adds custom toolbars to the template. These toolbars appear below the word processor toolbars. You use these toolbars to edit the HotDocs template. (The appearance and location of the buttons vary slightly, depending on the word processor you are using.)
NoteIn Word 2007, 2010 and 2013, all HotDocs editing and navigation buttons can be found on the HotDocs tab of the Word ribbon.
The buttons are:
Save Save and Close Test Assemble Variable Field IF Field REPEAT Field INSERT Field ASK Field Other Fields Edit Component Component Manager Create Model Clause Library HotDocs Help Apply Colors Label Fields Match Fields Go to Field Previous Field Next Field
Lesson 3: Create a New Template
25
In addition to these buttons, you can use the HotDocs button to display the HotDocs library. Click on the arrow below it to display a list of further options.
NoteYou should always use the Save button to save your work, or the Save and Close button to save and close a template, rather than your word processor’s Save and Close commands. Using these buttons ensures the template and component file are both properly saved and closed.
Conclusion
You are now finished with this lesson. In it, you learned how to create a text template and add it to the template library. Additionally, you learned about the buttons on the HotDocs toolbar.
If you do not want to go on to Lesson 4 at this time, click the HotDocs Save and Close button to close the template. Then exit HotDocs.
Chapter 1: HotDocs Developer Tutorial
26
Lesson 4: Replace Text and Dates with Variables
Overview
Once you have created a template, the next step in the automation process is to replace text that changes, depending on the user, with variables. Variable fields represent where the user’s information (or answers) will be inserted in the docu-ment. Examples of text you’d replace with variables include names, dates, descrip-tions, numbers, and calculations.
This lesson teaches you how to create and insert Text and Date variables. It also teaches you how to create prompts for variables. Prompts are the questions the user sees when assembling the document.
Start the Tutorial
If you are continuing immediately from Lesson 3, skip the instructions for opening the template and proceed to “Replace the Employee’s Name with a Text Variable.”
If you closed the template at the end of Lesson 3, complete the following steps.
To open the tutorial template
1. Open your word processor and click the HotDocs button, located on your word processor’s toolbar. The Test Templates library appears.
NoteIf the My Test Templates library does not appear, choose Open Library (File menu), select the library in the default Libraries folder (for example, My Test Templates.hdl), and click Open.
2. Select Employment Agreement and click Edit. The template appears, ready for you to edit.
Replace the Employee’s Name with a Text Variable
The first instance of text that needs to be replaced in the template is the name of the employee, Tyson Jones, in the first paragraph. You will replace it with a Text variable.

Lesson 4: Replace Text and Dates with Variables
27
To insert a Text variable
1. Select (highlight) the text Tyson Jones, located in the first paragraph.
Tip: If you are using Word 2007, 2010, and 2013, remember to click the HotDocs tab of the Word ribbon in order to see the HotDocs toolbar.
2. Click the Variable Field button on the HotDocs toolbar. The Variable Field dialog box appears.
3. In the Variable type group, make sure Text is selected.
4. In the Variable box, type Employee Name.
5. Because there are multiple instances of Tyson Jones in the template, click Replace Multiple. A variable component named Employee Name is created and the Find and Replace dialog box appears.

Chapter 1: HotDocs Developer Tutorial
28
6. Make sure the check box labeled Find whole words only is cleared. (Clearing this option allows HotDocs to replace all instances of Tyson Jones with the variable Employee Name, even if a specific instance ends with ’s.)
7. Click Replace All. HotDocs replaces all instances of Tyson Jones with «Employee Name».
Replace the Job Title with a Text Variable
The next variable you will replace is the job title (Marketing Manager), which is in the Agreement to Employ and Be Employed section.
To replace the text with a Text variable
1. Select the text Marketing Manager.
2. Click the Variable Field button. The Variable Field dialog box appears.

Lesson 4: Replace Text and Dates with Variables
29
3. Make sure Text is selected in the Variable type group, and type Job Title in the Variable box.
4. Since there is only one instance of this variable in the template, click Replace Once. The text is replaced with the variable.
Create Prompts and Adjust the Height of the Answer Field
The next item of text that needs to be replaced is the list of job duties in the Descrip-tion of Employee’s Duties section.
To replace the list of job duties with a HotDocs variableTip: An easy way to select or highlight text using the keyboard is to press and hold the Shift key as you press the right or left arrow keys. To select full words at a time, press and hold both Shift and Ctrl as you press the arrow keys.
1. Select (highlight) the text overseeing all marketing initiatives for the company and managing a team of writers and designers. (Do not select the period.)
2. Click the Variable Field button. The Variable Field dialog box appears.
3. Select Text and type Job Description in the Variable box. (Do not click Replace yet.)
Before you insert the variable into the template, you can test the variable to see how it will look to the user during the interview.

Chapter 1: HotDocs Developer Tutorial
30
To test the variable
1. With the Variable Field dialog box still open, click the Edit Component button, next to the variable name. The Text Variable Editor appears.
Tip: You can have HotDocs arrange the template and the test assembly window so that you can view both simultaneously. To do this, resize the test assembly window to the height you want and click the
Arrange button in the test assembly window toolbar.
2. Click Test. A test assembly window appears, with the question and answer field showing in the dialog pane.
Note that the variable name is used to ask the question the user must answer. In this case, the name does not make a good prompt because it doesn’t help the user’s answer fit into the rest of the sentence. Also, the answer field shows only a single line, which could be a problem for an employee who must list many different job responsibilities.
3. With the test assembly window still displayed, place your cursor in the answer field and click the Edit Component button in the assembly window toolbar. The Text Variable Editor comes to the front.
4. In the Prompt box, type the following text:Complete the following sentence: Job duties shall include

Lesson 4: Replace Text and Dates with Variables
31
5. At the Field height box, click the up arrow until the number 4 appears. This will make the answer field four lines high.
Tip: Clicking Update allows HotDocs to re-display the test assembly window with your changes. However, your changes aren’t saved to the component file until you click OK or Save at the Variable Editor.
6. Click Update to view the test assembly window again.
The new prompt appears and the answer field is large enough to hold a longer answer.
7. Choose Close (File menu) to close the test assembly window.
8. Click OK at the Text Variable Editor, and click Replace Once at the Variable Field dialog box.

Chapter 1: HotDocs Developer Tutorial
32
Replace Dates with Date Variables
The Employment Agreement template includes several dates that need to be replaced with Date variables. The first date is the agreement date, located in the first para-graph.
To replace the agreement date with a Date variable
1. Select the text sixth day of January, 2009 and click the Variable Field button. The Variable Field dialog box appears.
2. In the Variable type group, select Date.
Tip: The format you assign here will be used for this instance of the variable only. In other words, if you insert this same variable later in the template, it will not have this format assigned. If you want to assign a format that will be used every place the variable is merged, click the
Edit Component button at the Variable Field dialog box and select an example format from the Default format drop-down list.
Notice that when you select Date, the Format box in the Merge field properties group shows an example format. This controls the format of an answer when it is merged into a document. It is suggested based on the format of the template text you selected.
3. In the Variable box, type Agreement Date and click Replace Once, since the agreement date appears only once in the document.
In addition to the variable name, the format, third day of June, 1990, is merged into the field as well.
On Your Own
The next variable you will replace is the date the employee will start work (February 1, 2009), located at the end of the Agreement to Employ and Be Employed section. Replace the text now with a Date variable named Start Date.
See the previous section for a description of how to do this if you need help.
Use an Unanswered Variable Placeholder
The template includes a date the document will be signed by Hobble Creek Publishing representatives and the employee. Sometimes, however, this information may not be known when the document is assembled.

Lesson 4: Replace Text and Dates with Variables
33
By default, when users leave questions unanswered, HotDocs displays a warning and then merges a placeholder in the assembled document that indicates the answer is missing. To keep this from happening, you can specify a variable property that instead inserts a blank line so that the date can be entered by hand later. You can also suppress the warning that the variable is unanswered.
You will replace the signature date near the end of the template.
To use an answered variable placeholder
1. Scroll to the end of the template.
2. Select January 6, 2009 and click the Variable Field button. The Variable Field dialog box appears.
3. Select Date and type Signature Date in the Variable box.
4. Click the Edit Component button next to the Variable box. The Date Variable Editor appears.
5. In the Prompt box, type Signature Date (Leave blank if unknown).
6. Click the Advanced tab. The view changes to show advanced properties of the variable.

Chapter 1: HotDocs Developer Tutorial
34
7. Clear Warn when unanswered. This keeps HotDocs from displaying an unan-swered warning if the user leaves the answer blank. (This warning would other-wise appear at the end of the interview.)
8. Click OK at the Date Variable Editor. You are returned to the Variable Field dialog box.
9. Click Show Advanced. The dialog box expands to show advanced options.
10. In the Unanswered text box, enter several underline characters, like this: __________.
11. Click Hide Advanced to hide the properties again.
12. Click Replace Once. The text is replaced with a variable field.

Lesson 4: Replace Text and Dates with Variables
35
Conclusion
You are now finished with this lesson. In it, you learned how to create Text and Date variables. You also learned how to add a prompt to a variable and change how it looks in the interview. Finally, you learned how to insert a blank line in the document if the user doesn’t answer the question during the interview.
If you do not want to go on to Lesson 5 at this time, click the HotDocs Save and Close button to close the template. Then exit HotDocs.
If you are continuing on to Lesson 5, click the Save button to save your work.

Chapter 1: HotDocs Developer Tutorial
36
Lesson 5: Replace Numbers
Overview
This lesson teaches you how to replace numbers—both simple and computed. It also teaches you how to insert the same variable twice, but change how the answer will look each place it is merged in the assembled document.
Tip: Even though Social Security numbers, tele-phone numbers, and times of day are numbers, you must use a Text variable with the appropriate pattern to merge one of these numbers into your docu-ment.
You use Number variables to represent text in your template that can be calcu-lated—for example, dollar amounts or other sums.
Start the Tutorial
If you are continuing immediately from Lesson 4, skip the instructions for opening the template and proceed to “Replace Simple Numbers.”
If you closed the template at the end of Lesson 4, complete the following steps.
To open the tutorial template
1. Open your word processor and click the HotDocs button, located on your word processor’s toolbar. The My Test Templates library appears.
NoteIf the My Test Templates library does not appear, choose Open Library (File menu), select the library in the default Libraries folder (for example, My Test Templates.hdl), and click Open.
2. Select Employment Agreement and click Edit. The template appears, ready for you to edit.
Replace Simple Numbers
Hobble Creek Publishing classifies employees into three categories—exempt employees; full-time, non-exempt employees; and part-time, non-exempt employees. The salary for each type of employee is calculated differently.
The first amount you will replace is the 65,000.00 annual salary in the first para-graph of the Compensation and Reimbursement section.
To replace the annual salary with a Number variable
1. Select 65,000.00 (do not select the $ character) and click the Variable Field button. The Variable Field dialog box appears.

Lesson 5: Replace Numbers
37
2. Select Number and type Exempt Annual Salary in the Variable box.
Note that when you select Number, HotDocs clears the Use default check box and lists 9,999.00 in the Format drop-down box. This forces HotDocs to include the cents in an answer. (If a user doesn’t enter cents, zeros will be merged.)
To help the user know what type of answer to enter during the interview, you can specify a currency symbol as well as decimal places for cents.
3. Click the Edit Component button. The Number Variable Editor appears.
4. In the Prompt box, enter the text Annual Salary.Tip: Currency symbols appear next to the prompt when the variable appears during the interview—they are not actually merged into the assembled document.
5. At the Decimal places box, click the up arrow until the number 2 appears.
6. Click the Currency symbol drop-down button and select $.
7. Click OK at the Number Variable Editor, and click Replace Once at the Variable Field dialog box. The variable is inserted into the template.
Replace the Hourly Wage
The next amount you need to replace is the hourly wage, located in the second and third paragraphs of the Compensation and Reimbursement section. One paragraph describes the hourly salary for a full-time, non-exempt employee, while the other paragraph defines the hourly salary for a part-time employee. In both cases, you will create a single variable, but insert it in both paragraphs.

Chapter 1: HotDocs Developer Tutorial
38
To replace the hourly wage
1. In the second paragraph, select 30.00 (do not select the $ character).
2. Click the Variable Field button. The Variable Field dialog box appears.
3. Select Number as the Variable type and enter Hourly Salary in the Variable box.
4. Click the Edit Component button. The Number Variable Editor appears.
5. At the Decimal places box, click the up arrow until the number 2 appears.
6. Click the Currency symbol drop-down button and select $.
7. Click OK at the Number Variable Editor, and click Replace Multiple at the Variable Field dialog box. The Find and Replace dialog box appears.
8. Click Replace All. HotDocs replaces this instance of the text, as well as the text in the next paragraph with the variable.

Lesson 5: Replace Numbers
39
Calculate Annual Salary for Hourly EmployeesTip: Computation variables are discussed in greater detail in Lesson 7: Create Computation Variables (page 57).
Next, you will replace the non-exempt employee’s annual salary. You could replace these figures with Number variables; however, this would require users to calculate the salary themselves. To save users time and reduce the chance of a mistake, you will create a Computation variable, which will perform the calculation for the user.
To replace the yearly salary with a Computation variable
1. Select 62,400.00 (do not select the $ character) and click the Variable Field button. The Variable Field dialog box appears.
2. Select Computation and type Annual Salary Full-Time in the Variable box.
3. Click the Edit Component button. The Computation Editor appears.
To calculate the annual salary, you must multiply the hourly salary by the number of hours worked in a year. Since you don’t know what the hourly salary is at this point, you will use the Hourly Salary variable in the calculation instead.

Chapter 1: HotDocs Developer Tutorial
40
Then, when the user completes the interview, whatever amount the user enters will be substituted and the yearly salary can be calculated.
4. In the Components list, select Hourly Salary and drag it to the Script box. (You may need to scroll through the list of components until you see it.)
Tip: The different elements in a script must be sepa-rated by spaces.
5. Press the spacebar to add a space and then drag the multiplication sign (the asterisk *) from the Operators list into the Script box following Hourly Salary.

Lesson 5: Replace Numbers
41
6. Press the spacebar again and type 2080. (The number 2080 represents how many work hours there are in a given year. It is based on a 40-hour work week.)
Now that you have created the calculation, you can test it to make sure it produces the correct result.
To test the calculation
1. Click Test. A test assembly window appears.
HotDocs prompts you to enter the amount of the hourly salary.

Chapter 1: HotDocs Developer Tutorial
42
2. Type 15.75 for the hourly salary and click the Result tab. The computation result, 32,760, is displayed.
3. Choose Close (File menu) to close the test assembly window. HotDocs asks if you want to save your answers.
4. Choose whether to save your answers, based on the following information:Tip: For more information on using test answer files, see HotDocs Help.
If you click Save or Save As, you will be prompted to specify an answer file name and title. Type Test Answer File in the File name box and accept the suggested Title. From this point on, this answer file will be used each time you test a variable or test assemble the template, and you will no longer be prompted to save your answers after each test. (You can, of course, choose a different answer file when you are at the assembly window.)
If you click Don’t Save, each time you test a variable or test assemble the template, you will use an empty, untitled answer file. You will also be prompted to save your answers each time you finish a test.
5. Click OK at the Computation Editor.
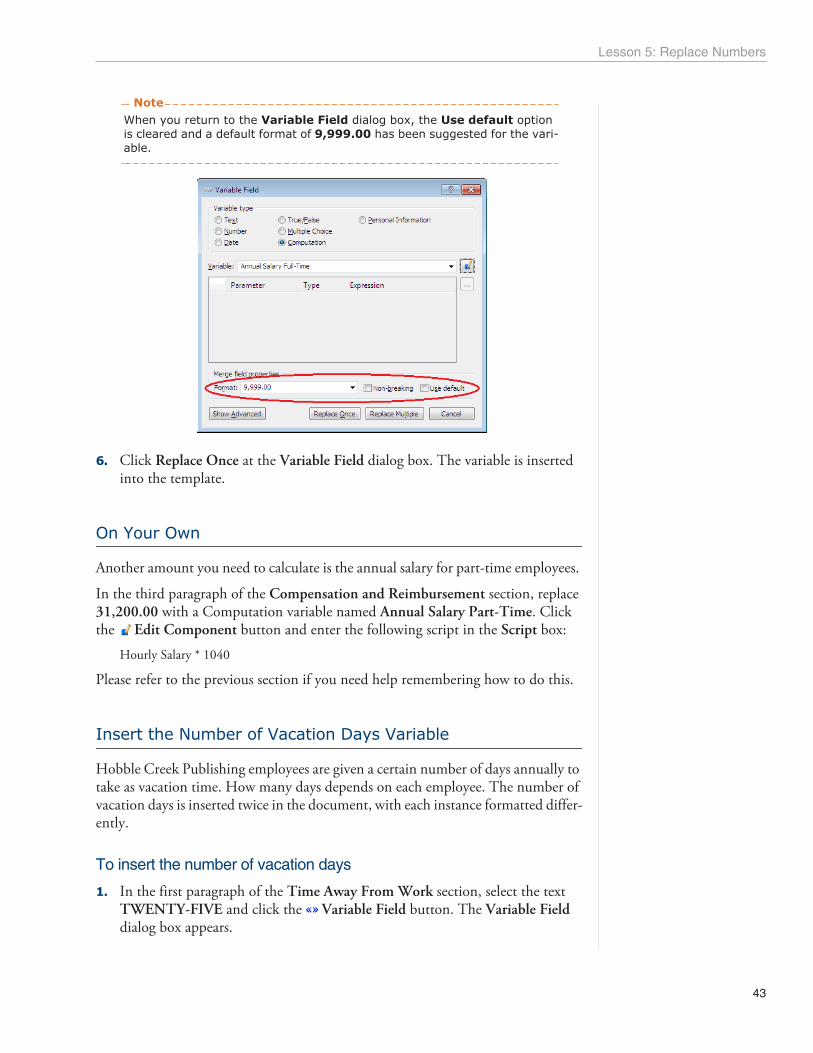
Lesson 5: Replace Numbers
43
NoteWhen you return to the Variable Field dialog box, the Use default option is cleared and a default format of 9,999.00 has been suggested for the vari-able.
6. Click Replace Once at the Variable Field dialog box. The variable is inserted into the template.
On Your Own
Another amount you need to calculate is the annual salary for part-time employees.
In the third paragraph of the Compensation and Reimbursement section, replace 31,200.00 with a Computation variable named Annual Salary Part-Time. Click the Edit Component button and enter the following script in the Script box:
Hourly Salary * 1040
Please refer to the previous section if you need help remembering how to do this.
Insert the Number of Vacation Days Variable
Hobble Creek Publishing employees are given a certain number of days annually to take as vacation time. How many days depends on each employee. The number of vacation days is inserted twice in the document, with each instance formatted differ-ently.
To insert the number of vacation days
1. In the first paragraph of the Time Away From Work section, select the text TWENTY-FIVE and click the Variable Field button. The Variable Field dialog box appears.

Chapter 1: HotDocs Developer Tutorial
44
2. Select Number and enter Number of Vacation Days in the Variable box.
3. Note that NINE is suggested as an example format. This is correct.
4. Click Replace Once. The variable is inserted into the template.
Use an Existing Variable
The number of vacation days is inserted a second time, in numeric format. Instead of creating a new variable, you can use the variable you just created. Remember, the same variable can be merged several different places in a template, and the variable’s format can be different for each field.
To replace the number with the variable you just created
1. Select 25 and click the Variable Field button.
2. Select Number and click the Variable drop-down button to see the list of vari-ables.
3. Select Number of Vacation Days from the list. The variable Number of Vacation Days appears in the Variable box.
4. Click Replace Once at the Variable Field dialog box. The variable is inserted.
Set Minimum and Maximum Limits
The final number that needs to be replaced with a variable is the number of seminar days allowed each employee. Employees may take no more than five seminar days per year. You can assign a maximum value to keep users from entering more than five days.
To set limits for a Number variable
1. In the last paragraph of the Time Away From Work section, select the number 3 and click the Variable Field button. The Variable Field dialog box appears.
2. Select Number and type Number of Seminar Days in the Variable box.
3. Click the Edit Component button. The Number Variable Editor appears.
4. Type 5 in the Maximum box.
5. Click Test. A test assembly window appears.
6. Type 6 in the answer field and click the Result tab.
The warning, Please enter a number between 0 and 5, appears.
7. Click OK to return to the test assembly window.
Lesson 5: Replace Numbers
45
Tip: You can use the Erase Answer button in
the test assembly window toolbar to clear answers.
8. Erase the answer and close the test assembly window.
9. Click OK at the Number Variable Editor and click Replace Once at the Variable Field dialog box. The variable is inserted into the template.
Conclusion
You are now finished with this lesson. In it, you learned how to create simple Number variables. You then learned how to create Computation variables to calcu-late amounts. Finally, you learned how to assign minimum and maximum values to a Number variable.
If you do not want to go on to Lesson 6 at this time, click the HotDocs Save and Close button to close the template. Then exit HotDocs.
If you are continuing on to Lesson 6, click the Save button to save your work.

Chapter 1: HotDocs Developer Tutorial
46
Lesson 6: Replace Multiple Choice Text
Overview
Sometimes in your templates, you need to present a list of already-known options from which the user can choose. For example, you may need to prompt the user for the county where a filing must be made. Or, maybe you need to identify whether the party in a court case is the petitioner or the respondent. When you know ahead of time what the options are, you can present these lists of options using a Multiple Choice variable.
There are two important “parts” to a Multiple Choice variable—the options and the merge text. The options are what are presented to the user (and represent the answer that can be saved in the answer file), while the merge text is the actual text that is merged in the document. While these can often be one and the same, being able to distinguish between the two allows you to present a set of possible answers to the user, but merge something slightly different in the completed document.
In this lesson, you will create a Multiple Choice variable that asks the employee’s gender, but then merges different pronouns, based on this gender, throughout the template. You will also create a variable that merges the name of the company repre-sentative who signs the agreement.
Start the Tutorial
If you are continuing immediately from Lesson 5, skip the instructions for opening the template and proceed to Replace Pronouns with a Multiple Choice Variable (page 48).
If you closed the template at the end of Lesson 5, complete the following steps.
To open the tutorial template
1. Open your word processor and click the HotDocs button, located on your word processor’s toolbar. The My Test Templates library appears.
NoteIf the My Test Templates library does not appear, choose Open Library (File menu), select the library in the default Libraries folder (for example, My Test Templates.hdl), and click Open.
2. Select Employment Agreement and click Edit. The template appears, ready for you to edit.

Lesson 6: Replace Multiple Choice Text
47
Replace Pronouns with a Multiple Choice Variable
The employment agreement template contains several pronoun references. To replace these references, you can create a single Multiple Choice variable that asks the employee’s gender. You can then insert the variable each place in the template a pronoun is used. You will assign specific merge text for each instance.
To replace the first pronoun
1. In the Description of Employee’s Duties section, select the text him, located near the end of the paragraph.
2. Click the Variable Field button. The Variable Field dialog box appears.
3. Select Multiple Choice in the Variable type group and then enter Employee Gender in the Variable box.
4. Click the Edit Component button. The Multiple Choice Variable Editor appears.

Chapter 1: HotDocs Developer Tutorial
48
5. Type Male in the first row of the Option column and Female in the second row.
These are the options that will be presented to the user in the interview, but specific pronouns should be merged into the assembled document. To do this, you must enter merge text.
Assign Merge Text to a Multiple Choice Variable
When you assign merge text to a Multiple Choice variable, you can assign it in one of two places: at the Multiple Choice Variable Editor (the dialog box you are now viewing), or at the Variable Field dialog box. When assigned at the Multiple Choice Variable Editor, the merge text is used every place the variable is used in the docu-ment. When assigned at the Variable Field dialog box, the merge text is used for that specific instance of the variable only.
Since you will use Employee Gender to merge different pronouns later in the template, you will assign the merge text at the Variable Field dialog box.
To assign default merge text
1. At the Multiple Choice Variable Editor, click OK to return to the Variable Field dialog box.

Lesson 6: Replace Multiple Choice Text
49
2. Clear Use default. The Merge Text column becomes active, allowing you to assign specific merge text for the field.
Normally when entering merge text, you would type each merge text option in the appropriate rows of the Merge Text column. However, HotDocs includes a list of common pronoun sets from which you can choose predefined options. When selected, these options are automatically merged in the column.
Tip: You can also create merge text of your own by typing the text in the Merge Text column.
3. Click the Merge Text column heading. A list of pronoun sets appears. HotDocs provides these lists of pronoun sets by default.

Chapter 1: HotDocs Developer Tutorial
50
4. Select him/her.
The pronoun him appears in the first row of the Merge Text column and her appears in the second row.
5. Click Replace Multiple. The Find and Replace dialog box appears. Tip: Choosing Replace Multiple allows you to search the entire template for instances and replace those instances.
6. Select Find whole words only. (Selecting this option prevents instances of him that are part of other words from being replaced with the variable.)
7. Click Replace All. The pronoun is replaced with the variable.
Choose Different Multiple Choice Merge Text
The first paragraph of the Duration of Employment section contains a different pronoun (“determined whether he will continue”) for the same person (the employee). Instead of creating a new variable to replace this pronoun, you can use the Multiple Choice variable you just created, but assign different merge text.
To replace another pronoun and change the merge text
1. In the Duration of Employment section, select he and click the Variable Field button. The Variable Field dialog box appears.

Lesson 6: Replace Multiple Choice Text
51
2. Select Multiple Choice.
3. Click the Variable drop-down button and select Employee Gender from the list.
4. Clear Use default.
5. Click the Merge Text column heading and select he/she from the list.
6. Click Replace Multiple.
7. Select Find whole words only and click Replace All. The variable is inserted into the template.

Chapter 1: HotDocs Developer Tutorial
52
On Your Own
The last pronoun you need to replace in the template is the pronoun his.
In the Duration of Employment section, select his, located near the end of the para-graph (“and upon his performance”), and replace it with the Employee Gender vari-able. Select his/her as the merge text. Replace all instances throughout the template, making sure you find whole words only.
Refer to the previous two sections if you do not remember how to do this.
Create Another Multiple Choice Variable and Add Resource Text to It
Another item of text that needs to be replaced in the template is the name of the company representative who signs the agreement. There are only three Hobble Creek Publishing employees who sign employment agreements: Stephanie Hanson, Ed Walters, and Kim Schuster. You can present these options using a Multiple Choice variable.
When creating variables, you can present additional information along with the variable to help the user know how best to answer the question. These helps are called resources.
When completing the agreement, users might not know which name to select for each agreement. You will add resource text to help them select the correct name.
To create a Multiple Choice variable and assign it a resource
1. Scroll to the end of the template.
2. In the signature block, select Stephanie Hanson and click the Variable Field button. The Variable Field dialog box appears.

Lesson 6: Replace Multiple Choice Text
53
3. Select Multiple Choice and type Company Representative in the Variable box.
4. Click the Edit Component button. The Multiple Choice Variable Editor appears.
Tip: If the rows in the Default Merge Text column are empty, the text from the Option column will be merged into the assem-bled document. Since you want the name you select to be merged into the docu-ment, do not enter any Default Merge Text for the options.
5. On separate rows in the Option column, type Stephanie Hanson, Ed Walters, and Kim Schuster.

Chapter 1: HotDocs Developer Tutorial
54
6. Click the Resource tab. The window changes to show resource options.
7. Make sure Entire Multiple Choice Variable is selected at the Resource for drop-down list.
8. Make sure Plain Text is selected at the Resource type drop-down list.

Lesson 6: Replace Multiple Choice Text
55
Tip: To assign resources to each individual option (or company representative), select each option at the Resource for drop-down list and then enter the text.
9. In the Text box, type Stephanie Hanson signs for editorial employees, Ed Walters for marketing, and Kim Schuster for production.
10. Click Test. A test assembly window appears and the information you just typed appears in the resource pane.
NoteIf the resource pane isn’t showing, click the Resource Pane button in the assembly window toolbar.
11. Close the test assembly window and click OK at the Multiple Choice Variable Editor.
12. Click Replace Once at the Variable Field dialog box. The variable is inserted into the template.
Conclusion
You are now finished with this lesson. In it, you learned how to use a Multiple Choice variable to merge correct pronouns—based on the employee’s gender—in the document. You also learned how to assign resource text to a variable to help a user know how to answer a particular question.
If you do not want to go on to Lesson 7 at this time, click the HotDocs Save and Close button to close the template. Then exit HotDocs.
If you are continuing on to Lesson 7, click the Save button to save your work.

Chapter 1: HotDocs Developer Tutorial
56
Lesson 7: Create Computation Variables
Overview
Some new Hobble Creek Publishing employees may need to complete a six-month probation period. When this probation period ends, however, depends on the employee’s first day of work.
In this lesson, you will use the HotDocs scripting language to calculate the date the probation period ends for new employees.
Like any language you speak or write, the HotDocs scripting language includes words, constructs, and rules you must follow in order to effectively execute a script. This syntax ensures that HotDocs will know how to process your script accurately. Failure to follow these rules may result in syntax errors when HotDocs attempts to process it. Fortunately, HotDocs includes several tools to help you learn how to use this language. You will learn about these tools in this and subsequent lessons.
There are certain words that represent certain things or tasks in the HotDocs scripting language. These words can be broken down into the following groups, or types:
Instruction keywords tell HotDocs to perform some sort of function or opera-tion. For example, the INSERT instruction keyword tells HotDocs to insert another template in the current template.
Expression keywords are used to generate an answer or retrieve a value. For example, the expression DATE + NUM MONTHS returns a date some number of months in the future.
Operators are symbols or words that cause an operation such as addition or a comparison to be performed in a script. Most operators are common mathemat-ical signs, but there are also Boolean operators such as AND and OR that allow you to compare different values.
Most instructions and expressions require values. A value is a user’s answer to a variable or other data which is needed to complete the expression or instruction so it can be processed or executed. Values are typically represented by variables, but they can also be literal text strings, numbers, file names, or even other expressions.
Using these different parts of the scripting language, you can begin creating scripts. To assist you with this, HotDocs provides instruction and expression models. A model is a pattern that shows exactly how the instruction or expression must be used. A model consists of the instruction or expression keyword(s) and placeholders, which you replace with variables, predefined answers, or other models.
There are two methods for writing a computation script:

Lesson 7: Create Computation Variables
57
Using the instruction, expression, and component lists at the bottom of the Computation Editor, you can drag models and components from these lists and drop them into the script. This is useful if you are learning the scripting lan-guage, since it provides accuracy and helps you learn the syntax for using instructions and expressions. (You will use this method in this lesson.)
You can type the script directly in the Script box. While doing this, you can access auto-complete lists that let you type a partial keyword or component name, then press a combination of keys to have HotDocs display a list of keywords or components it thinks you’re trying to enter. You can then select the keyword you want and HotDocs will merge it into the script. This method is useful for those more familiar with the scripting language. (You will use this method in later lessons.)
Start the Tutorial
If you are continuing immediately from Lesson 6, skip the instructions for opening the template and proceed to “Insert an Expression Model in a Computation Script.”
If you closed the template at the end of Lesson 6, complete the following steps.
To open the tutorial template
1. Open your word processor and click the HotDocs button, located on your word processor’s toolbar. The My Test Templates library appears.
NoteIf the My Test Templates library does not appear, choose Open Library (File menu), select the library in the default Libraries folder (for example, My Test Templates.hdl), and click Open.
2. Select Employment Agreement and click Edit. The template appears, ready for you to edit.
Insert an Expression Model in a Computation Script
In the first paragraph of the Duration of Employment section, there is a date, August 1, 2009. This date falls on the first day of the sixth month of employment. You will create a Computation variable that calculates this date for the user. You will use several expression models to create the script.
To insert a Computation variable that produces a date
1. Select the text August 1, 2009.
2. Click the Variable Field button. The Variable Field dialog box appears.

Chapter 1: HotDocs Developer Tutorial
58
3. Select Computation and type Probation End Date in the Variable box.
Tip: To make your work in this part of the tutorial easier, you can click and drag the lower-right corner of the Computation Editor to make it larger.
4. Click the Edit Component button. The Computation Editor appears.
In this script, you will use the DATE OF ( NUM, NUM, NUM ) model, which lets you examine the different portions of a date (day, month, and year) and assign specific values to each portion. The resulting date value can be merged into the assembled document.
5. Scroll through the Expression models list until you see DATE OF( NUM, NUM, NUM ). (Expression models are arranged alphabetically.)

Lesson 7: Create Computation Variables
59
6. Click the model, drag it into the Script box, and release the mouse button. The expression is inserted in the Script box.
Replace a Script Placeholder with a Value
To help you identify which portion of the script you must replace with values, HotDocs assigns a different color to the placeholders. As you see, the DATE OF expression has three placeholders for required number values, which represent the day, month, and year, respectively.
You know the probation period ends on the first day of the month, so you want the first NUM placeholder to be replaced with 1. One way to enter a number in a computation is to use the Enter a Number expression model.
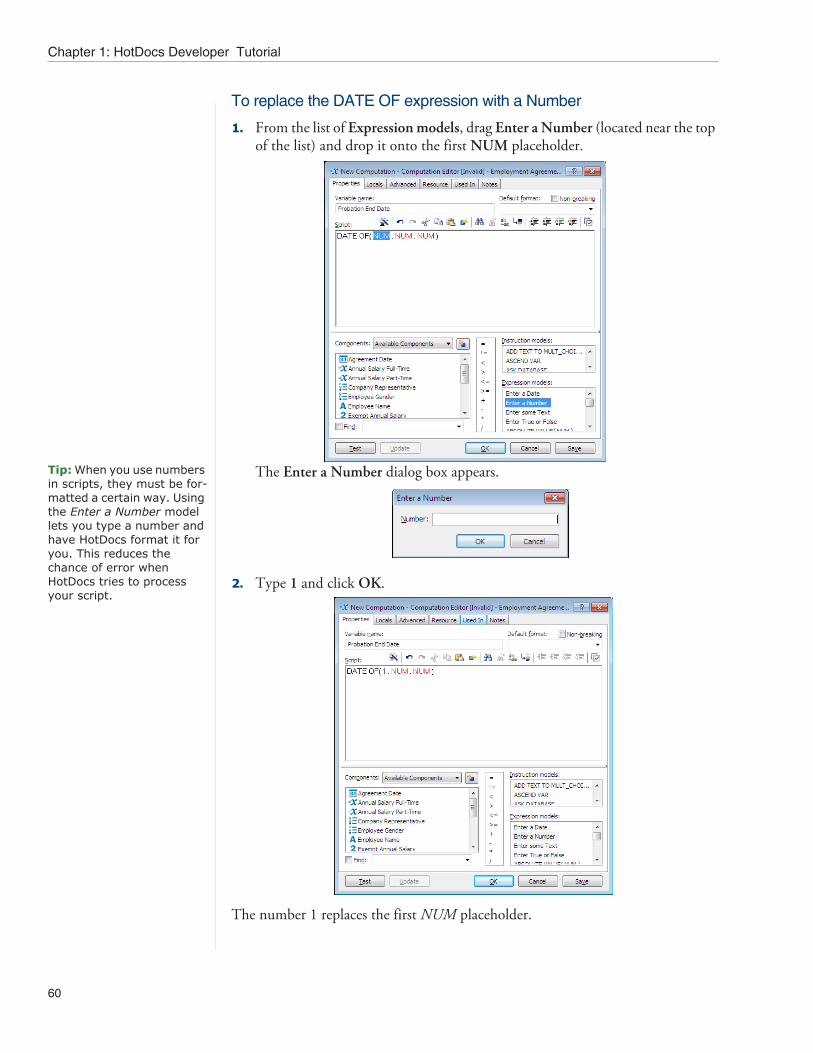
Chapter 1: HotDocs Developer Tutorial
60
To replace the DATE OF expression with a Number
1. From the list of Expression models, drag Enter a Number (located near the top of the list) and drop it onto the first NUM placeholder.
Tip: When you use numbers in scripts, they must be for-matted a certain way. Using the Enter a Number model lets you type a number and have HotDocs format it for you. This reduces the chance of error when HotDocs tries to process your script.
The Enter a Number dialog box appears.
2. Type 1 and click OK.
The number 1 replaces the first NUM placeholder.

Lesson 7: Create Computation Variables
61
Replace Placeholders with Other Expressions
You can also replace placeholders with other expressions.
The second NUM placeholder represents the numeric equivalent of a month. You cannot simply enter a number like you did for the day, because the month you want depends on the date the employee starts working. Instead, you should use the MONTH OF( DATE ) expression, which examines a date and returns the numeric equivalent of the month.
The MONTH OF ( DATE ) model returns a number value that corresponds with the month portion of the date the user enters. For example, if a user types July 1, 2007, this expression returns a value of 7, since July is the 7th month of the year.
To replace the placeholders in a computation with other expression mod-els
1. Drag MONTH OF( DATE ) from the Expression models list onto the second NUM placeholder.
Tip: The DATE + NUM MONTHS model takes a date and adds a specified number of months to it. For example, if a user’s answer to a date question is March 17, 2007 and six months needs to be added to it, then this expression returns the result of September 17, 2007.
You want the MONTH OF expression to return the number for the month six months after the employee starts working. In other words, you want to add six months to the employee’s start date. The DATE + NUM MONTHS expression helps you do this.
2. Drag DATE + NUM MONTHS onto the DATE placeholder that is in the parentheses following MONTH OF.

Chapter 1: HotDocs Developer Tutorial
62
Your script should look like this:
Replace a Placeholder with a Variable
Placeholders are often replaced with HotDocs variables. The DATE + NUM MONTHS expression has two placeholders—DATE and NUM. (MONTHS is a keyword that remains in the finished script.) The DATE placeholder needs to be replaced with the date the employee started working.
To replace a placeholder in a computation with a variable
1. Drag Start Date from the Components list onto the DATE placeholder.

Lesson 7: Create Computation Variables
63
2. Using the Enter a Number expression model, replace the NUM placeholder in the DATE + NUM MONTHS expression with the number 6. HotDocs will add six months to the Start Date. Your script should now look like this:
On Your Own
The YEAR OF ( DATE ) model operates similar to MONTH OF ( DATE ) model. Here it is used to make sure the correct year is returned for the new date.
Replace the remaining NUM placeholder in the script with YEAR OF( Start Date + 6 MONTHS ). (Follow all of the instructions for replacing the second NUM placeholder in the expression given earlier.)
When you are finished, the script should look like this:

Chapter 1: HotDocs Developer Tutorial
64
To summarize, this script produces a date that falls on the first day of the month, six months after the employee started work. The first value in this script, 1, specifies the first day of the month. The second value, MONTH OF( Start Date + 6 MONTHS ), determines the month of the start date and adds six months to it. The third value, YEAR OF (Start Date + 6 MONTHS ), determines the year of the start date (plus six months).
Test the Computation
Because some computation scripts can be quite complex, it is often helpful to test a computation script to make sure it calculates the correct result.
To test the Computation variable
1. At the Computation Editor, click Test. HotDocs opens a test assembly window showing the Start Date variable.
2. Type 5/12/2010 in the Start Date answer field and click the Result tab. HotDocs keeps you in the dialog to show you it has reformatted the answer you entered.

Lesson 7: Create Computation Variables
65
3. Click the Result tab again. HotDocs displays the answer November 1, 2010. This is the date the new employee’s probationary period ends. This is correct.
4. Click the Interview tab and change the date to 7/12/2010.

Chapter 1: HotDocs Developer Tutorial
66
5. Click the Result tab twice. HotDocs displays the updated answer January 1, 2011.
HotDocs correctly calculates the date here as well, because the script uses the Start Date + 6 MONTHS expression for both the month and the year.
6. Close the test assembly window to return to the Computation Editor, and then click OK.
7. At the Variable Field dialog box, click Replace Once. The variable is inserted in the template.
Now when users assemble this document, HotDocs is able to calculate the day the probation period ends.
Conclusion
You are now finished with this lesson. In it, you learned how to create a Computa-tion variable that uses expression and instruction models to calculate a date in the future.
If you do not want to go on to Lesson 8 at this time, click the HotDocs Save and Close button to close the template. Then exit HotDocs.
If you are continuing on to Lesson 8, click the Save button to save your work.

Lesson 8: Make Paragraphs Conditional
67
Lesson 8: Make Paragraphs Conditional
Overview
Sometimes your templates contain optional text, or text that should be included only when certain conditions are met. To include or exclude optional text, you can create an IF instruction. An IF instruction uses a True/False variable or some other test that produces a true/false value to include or exclude text in the assembled docu-ment.
The employment agreement template contains several paragraphs that are optional. You will learn how to include or exclude single paragraphs of text using simple True/False variables. You will also learn how to include or exclude alternate versions of a single paragraph by creating a series of IF/ELSE IF expressions.
Start the Tutorial
If you are continuing immediately from Lesson 7, skip the instructions for opening the template and proceed to “Conditionally Insert a Single Paragraph of Text.”
If you closed the template at the end of Lesson 7, complete the following steps.
To open the tutorial template
1. Open your word processor and click the HotDocs button, located on your word processor’s toolbar. The My Test Templates library appears.
NoteIf the My Test Templates library does not appear, choose Open Library (File menu), select the library in the default Libraries folder (for example, My Test Templates.hdl), and click Open.
2. Select Employment Agreement and click Edit. The template appears, ready for you to edit.
Conditionally Insert a Single Paragraph of Text
The employment agreement template contains a paragraph describing a probation period an employee must complete before being officially hired. It also contains a paragraph about the new employee’s privilege of attending training seminars throughout the year. However, not all Hobble Creek Publishing employees receive paid seminar days, nor are all new employees required to complete a trial period. In this template, you can make these paragraphs conditional, meaning they will be included in the finished document only when this information applies to the new employee.

Chapter 1: HotDocs Developer Tutorial
68
To make text conditional, you use an IF instruction, which works by testing to see if one or more conditions are true. If so, the IF instruction merges the conditional text into the document.
The simplest way to create an IF instruction is to use a True/False variable, which asks a yes/no question. In this case, if the answer to the question is yes, the text will be merged into the document.
To create an IF instruction
1. Select the first paragraph in the Duration of Employment section:If you are using Word, make sure you select the paragraph mark. (You may
need to click the Show/Hide ¶ button in Word if you need help identifying the paragraph mark.) The selected text should look like this:
If you are using WordPerfect, select the blank line after the paragraph, too. The selected text should look like this:
2. Click the IF Field button. The IF Field dialog box appears.
3. Make sure IF True/False Variable is selected and type Employee to Complete Trial Period in the True/False variable box.
4. Click OK. The paragraph is now surrounded by an IF instruction.

Lesson 8: Make Paragraphs Conditional
69
NoteBy default, when inserting instructions in a template, HotDocs inserts a return after the instruction. Then, during assembly, as the instruction is processed and removed from the assembled document, HotDocs removes the return it inserted as well.
On Your Own
In the Time Away From Work section of the template, make the last paragraph (starting with “Additionally, «Employee Name» shall be allowed...”) conditional. Name the True/False variable Employee to Receive Paid Seminar Days. Remember to select the entire paragraph (including the paragraph mark) before creating the instruction.
Please refer to the previous section if you do not remember how to do this.
NoteWhen the instruction is merged in the template, the END IF instruction takes on the formatting properties of the heading immediately following it. This is OK.
Conditionally Insert Alternate Paragraphs of Text
In addition to using an instruction or expression to merge or remove a single block of text, there may be times when you have multiple versions of a paragraph, only one version of which should be merged into the assembled document. To accom-plish this, you can use a series of ELSE IF instructions or expressions. If you have a paragraph that should be merged when no conditions are met, you can use an ELSE instruction.
In the Compensation and Reimbursement section of the Employment Agreement, the first three paragraphs describe the compensation rate for the employee. Which compensation rate the employee receives depends on the employee’s work status—full-time, non-exempt; full-time, exempt; or part-time.

Chapter 1: HotDocs Developer Tutorial
70
Tip: HotDocs processes IF instructions by starting at the top of the IF instruction and looking for the first con-dition that is true. Once it finds a true condition, it inserts the correct text and continues processing any additional instructions. But if all the conditions are false, HotDocs doesn’t insert anything at all (unless there is an ELSE instruc-tion.) If the condition that controls the IF instruction is not answered, none of the instructions are processed and no text is merged in the document.
In this part of the lesson, you will make each of these paragraphs conditional. You will base the condition on the user’s answer to a Multiple Choice variable that defines the work status.
Create the Variable Used in the Conditional Test
In this template, you want the first of these alternate paragraphs merged into the document only when the employee’s status is full-time, exempt. To determine this, you must first create a Multiple Choice variable, which will be used in the condi-tional test.
To create the Multiple Choice variable
1. Select the first paragraph in the Compensation and Reimbursement section.
This is how it should look in Word. (Make sure you select the entire paragraph, including the paragraph mark.)
In WordPerfect, select the blank line after the paragraph as well. This is how it should look:
2. Click the IF Field button. The IF Field dialog box appears.

Lesson 8: Make Paragraphs Conditional
71
3. Select IF Expression. The view changes to show a scripting box.
4. Click the New Component button. The New Component dialog box appears.
5. Select Multiple Choice Variable and click OK. The Multiple Choice Variable Editor appears.
6. Type Employment Status in the Variable name box.
7. Type Exempt in the first row of the Option column.

Chapter 1: HotDocs Developer Tutorial
72
8. Type Non-exempt and Part-time, respectively, in the second and third rows.
Tip: The options available in the Style drop-down control how the options are pre-sented in the dialog.
9. Click the Style drop-down button and choose Button Grid.
10. Click OK. You are returned to the IF Field dialog box.

Lesson 8: Make Paragraphs Conditional
73
Create the First Expression
Now that you have created the variable on which you will base the condition, you can create the expression script that determines whether the paragraph you have selected will be included in the document.
In Lesson 7, you learned how you can drag expression and instruction models to the scripting box to create a script. Another way you can write a script is by typing it directly in the script box. When doing this, you can press certain keystroke combi-nations that display auto-complete lists of expression and instruction keywords as well as components. You can then choose an option and it will be inserted in the script.
To create the IF expression
1. Place your cursor in the Expression box and press both the Ctrl key and the Spacebar simultaneously. HotDocs displays the auto-complete list.

Chapter 1: HotDocs Developer Tutorial
74
2. Type the letters empl. HotDocs begins limiting the list of options to include only those components that contain these characters.
3. Press the DOWN ARROW key to select Employment Status and press Enter. The component name is merged in the Expression box.
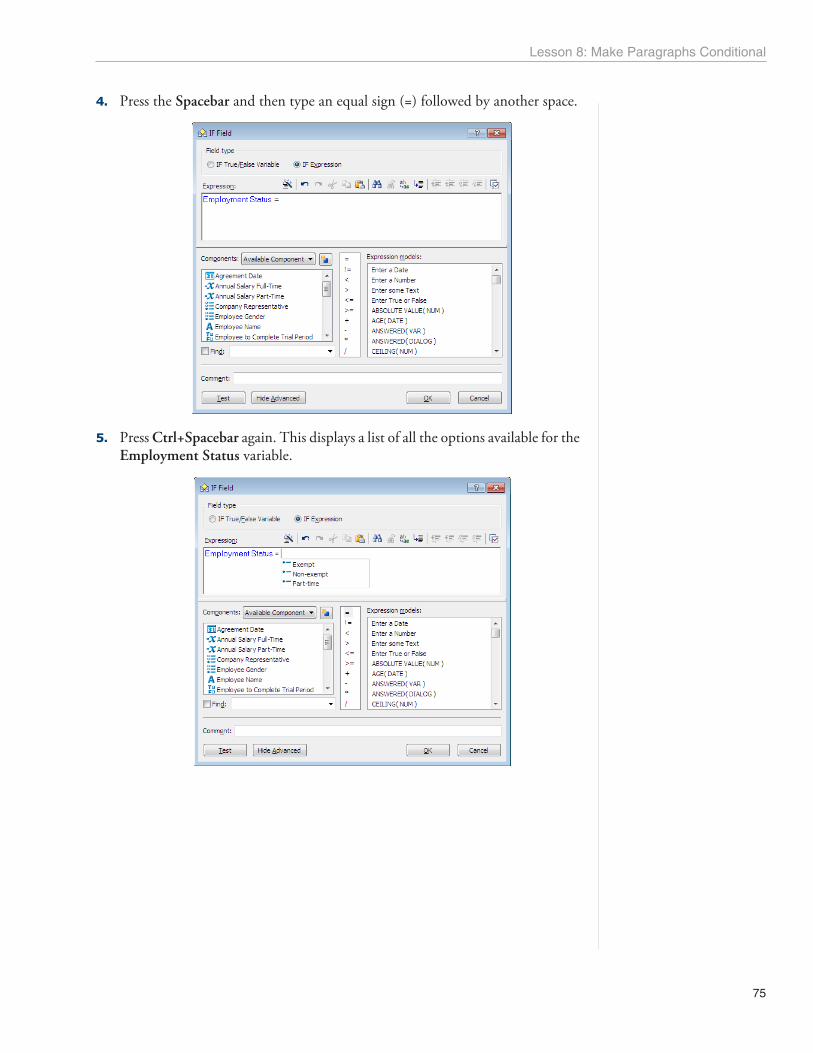
Lesson 8: Make Paragraphs Conditional
75
4. Press the Spacebar and then type an equal sign (=) followed by another space.
5. Press Ctrl+Spacebar again. This displays a list of all the options available for the Employment Status variable.

Chapter 1: HotDocs Developer Tutorial
76
6. Using the DOWN ARROW key, select Exempt and press Enter. The option, which is enclosed in quotation marks, is merged in the script.
7. Click OK. The paragraph is surrounded by the instruction.
To review, this expression merges the paragraph in the assembled document only if the user selects Exempt as his or her employment status.
Create an ELSE IF Instruction
You will now create the condition that will merge the paragraph for non-exempt employees.
To create the ELSE IF instruction
1. Select (highlight) the END IF instruction at the end of the first condition as well as the entire second paragraph, like this:

Lesson 8: Make Paragraphs Conditional
77
In WordPerfect, it should look like this:
2. Click the IF Field button. The ELSE Field dialog box appears.
3. Select ELSE IF Expression. The view changes to show the scripting box again.
4. Enter the following script. (Remember, you can press Ctrl+Spacebar to access the list of scripting options.)Employment Status = "Non-exempt"
5. When you are finished, click OK. The ELSE IF instruction is merged in the template.
If the employee’s employment status is non-exempt, this paragraph will be merged in the assembled document.
On Your Own
Make the paragraph for part-time employees conditional. Remember to select the END IF instruction from the previous paragraph as you select the paragraph. The ELSE IF expression should contain the following script:
Employment Status = "Part-time"
In this final IF expression, if the employee’s status is part-time, the paragraph describing the part-time salary will be merged in the assembled document.
Conclusion
You are now finished with this lesson. In it, you learned how to make single para-graphs conditional using a True/False variable. You then learned how to make alter-nate paragraphs conditional using ELSE IF expressions.
At this point in the tutorial, you have added all of the variables and instructions to the template that are required to produce an assembled document. In the next lesson, you will test your work.

Chapter 1: HotDocs Developer Tutorial
78
If you do not want to go on to Lesson 9 at this time, click the HotDocs Save and Close button to close the template. Then exit HotDocs.
If you are continuing on to Lesson 9, click the Save button to save your work.

Lesson 9: Test Assemble the Document
79
Lesson 9: Test Assemble the Document
Overview
This lesson teaches you how to test assemble a document while you are automating a template.
At any point during template development, you can test all or part of the template to make sure it is assembling correctly. Test assembling a document can help you pinpoint trouble spots in the template without requiring you to close the template and assemble it from the library.
When you test assemble a document, HotDocs displays the same HotDocs assembly window users will see. At any time during test assembly, you can return to the template, make the desired changes, and test assemble the document again. The test assembly window will adjust to show your changes.
Start the Tutorial
If you are continuing immediately from Lesson 8, skip the instructions for opening the template and proceed to “Test Assemble the Document.”
If you closed the template at the end of Lesson 8, complete the following steps.
To open the tutorial template
1. Open your word processor and click the HotDocs button, located on your word processor’s toolbar. The My Test Templates library appears.
NoteIf the My Test Templates library does not appear, choose Open Library (File menu), select the library in the default Libraries folder (for example, My Test Templates.hdl), and click Open.
2. Select Employment Agreement and click Edit. The template appears, ready for you to edit.
Test Assemble the Document
You will now test assemble the template.
To test the Employment Agreement template
1. At the template window, click the Test Assemble button in the HotDocs toolbar.

Chapter 1: HotDocs Developer Tutorial
80
A test assembly window appears, showing a list of variables in the left pane. These questions appear in what are called default dialogs. Each question appears by itself in the right pane.
Tip: If you saved your answers in a test answer file in Lesson 5, you will notice that answers you have entered are now merged into the answer fields. If you want to use a new answer file for this portion of the tutorial, click the New Answers button.
2. At each dialog, enter an answer and click the Next button to go to the next dialog.
Notice that each default dialog contains a single variable, or question. In the next lesson, you will group multiple variables together in a custom dialog. Presenting questions in groups (rather than individually) makes it easier for users to complete the interview.
3. After you have provided all of the answers, click the Document Preview tab. A preview of the assembled document appears, allowing you to make sure answers were merged correctly.
4. Choose Close (File menu) to close the test assembly window. You are returned to the template.
Conclusion
You are now finished with this lesson where you learned how to test assemble a document.
If you do not want to go on to Lesson 10 at this time, click the HotDocs Save and Close button to close the template. Then exit HotDocs.
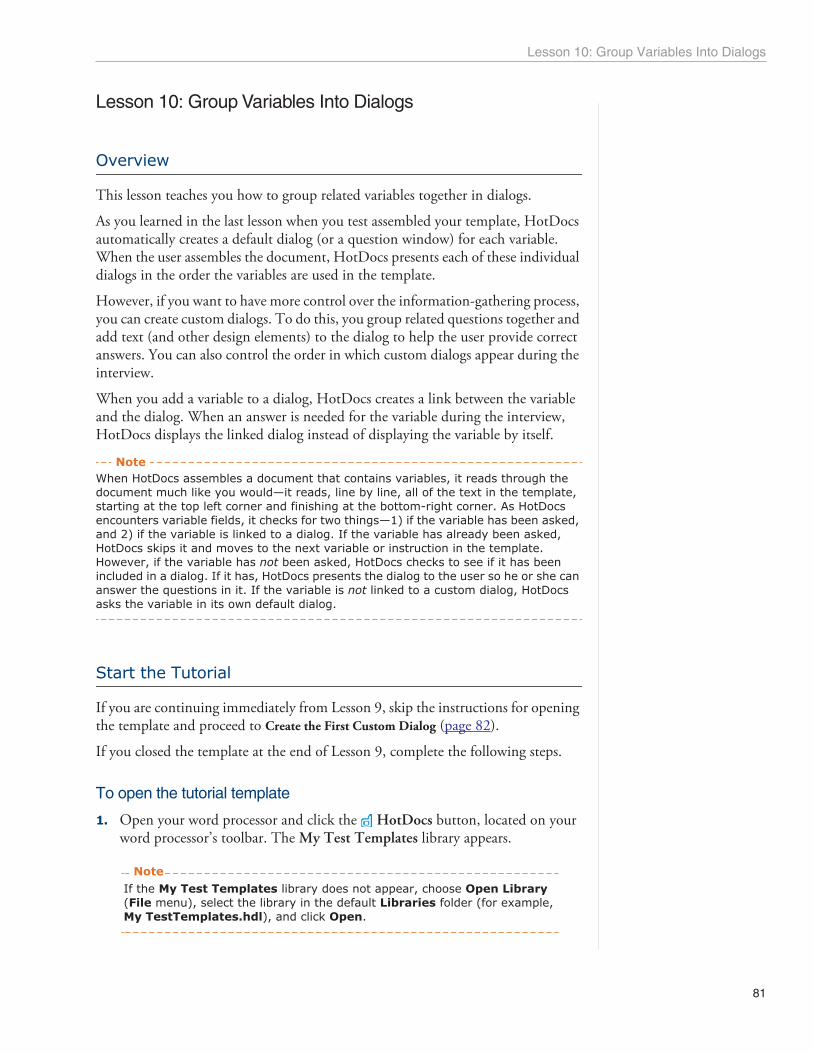
Lesson 10: Group Variables Into Dialogs
81
Lesson 10: Group Variables Into Dialogs
Overview
This lesson teaches you how to group related variables together in dialogs.
As you learned in the last lesson when you test assembled your template, HotDocs automatically creates a default dialog (or a question window) for each variable. When the user assembles the document, HotDocs presents each of these individual dialogs in the order the variables are used in the template.
However, if you want to have more control over the information-gathering process, you can create custom dialogs. To do this, you group related questions together and add text (and other design elements) to the dialog to help the user provide correct answers. You can also control the order in which custom dialogs appear during the interview.
When you add a variable to a dialog, HotDocs creates a link between the variable and the dialog. When an answer is needed for the variable during the interview, HotDocs displays the linked dialog instead of displaying the variable by itself.
NoteWhen HotDocs assembles a document that contains variables, it reads through the document much like you would—it reads, line by line, all of the text in the template, starting at the top left corner and finishing at the bottom-right corner. As HotDocs encounters variable fields, it checks for two things—1) if the variable has been asked, and 2) if the variable is linked to a dialog. If the variable has already been asked, HotDocs skips it and moves to the next variable or instruction in the template. However, if the variable has not been asked, HotDocs checks to see if it has been included in a dialog. If it has, HotDocs presents the dialog to the user so he or she can answer the questions in it. If the variable is not linked to a custom dialog, HotDocs asks the variable in its own default dialog.
Start the Tutorial
If you are continuing immediately from Lesson 9, skip the instructions for opening the template and proceed to Create the First Custom Dialog (page 82).
If you closed the template at the end of Lesson 9, complete the following steps.
To open the tutorial template
1. Open your word processor and click the HotDocs button, located on your word processor’s toolbar. The My Test Templates library appears.
NoteIf the My Test Templates library does not appear, choose Open Library (File menu), select the library in the default Libraries folder (for example, My TestTemplates.hdl), and click Open.

Chapter 1: HotDocs Developer Tutorial
82
2. Select Employment Agreement and click Edit. The template appears, ready for you to edit.
Create the First Custom Dialog
How you group variables into dialogs depends on the template and your own pref-erences. Generally, you begin with the most basic information. In the Employment Agreement, the most basic information pertains to the employee.
To create a custom dialog, you use Component Manager. Component Manager is a tool that lets you work with the different components and properties you use in your template. (These are stored in the component file, which you learned about when you created the new template in Lesson 3.)
To create a dialog
1. At the template, click the Component Manager button. Component Manager appears.
Tip: You can arrange both the Component Manager and word processor window so that you can view both windows simultaneously. To do this, adjust Component Manager to the desired width and click the
Arrange Windows button.
Component Manager lists all of the components associated with the template. It also provides several tools for working with the components. Using Compo-nent Manager you can create new components—specifically dialogs.

Lesson 10: Group Variables Into Dialogs
83
2. Click the Components drop-down button and select Dialogs from the list. The component list is filtered to show only dialogs. (You have not yet created any dialogs, so this list is empty.)
3. Click the New Component button. The Dialog Editor appears.

Chapter 1: HotDocs Developer Tutorial
84
4. Type Employee Information in the Dialog name box.
Add Variables to the Dialog
The next step is adding the employee variables to the dialog.
To add variables to a dialog
1. In the Components list, click on Employee Name and drag it to the Contents box.

Lesson 10: Group Variables Into Dialogs
85
2. Drag Employee Gender from the Components list to the Contents box.
3. Click Test. A test assembly window appears.
The dialog looks the way it will when it is displayed during the interview.
4. Close the test assembly window, and then click OK at the Dialog Editor. The dialog Employee Information is now complete.
Create the Second Dialog
The second dialog you will create will ask the questions about the agreement.

Chapter 1: HotDocs Developer Tutorial
86
To create the dialog
1. At Component Manager, click the New Component button. The Dialog Editor appears.
2. Enter Agreement Information in the Dialog name box.Tip: Components you have already added to a dialog are sorted to the bottom of the Components list and appear grayed. This helps you know they have already been included in a dialog.
3. Drag the following variables from the Components list to the Contents list, in this order: Agreement DateCompany RepresentativeSignature Date
4. Click OK. The Dialog Editor is closed.
On Your Own
Create the next two dialogs, based on the following information:
Dialog Name Components
Job Information Job Title
Job Description
Start Date
Employee to Complete Trial Period
Employee to Receive Paid Seminar Days
Number of Seminar Days
Salary and Benefits Employment Status
Exempt Annual Salary
Hourly Salary
Number of Vacation Days

Lesson 10: Group Variables Into Dialogs
87
Make sure you add the variables in the order they are listed in the table.
Group True/False Variables in a Dialog
When you view a dialog that contains True/False variables, they appear as Yes/No questions, like this:
You can select an option that makes these variables appear as check boxes (allowing the user to select multiple answers) or as option buttons (allowing the user to select just one answer). You do this by assigning a selection grouping to the dialog.
To group True/False variables
1. At Component Manager, select the Job Information dialog and click the Edit Component button. The Dialog Editor appears.

Chapter 1: HotDocs Developer Tutorial
88
2. Click Test. The test assembly window appears.
Notice the two True/False variables in the dialog appear as Yes/No questions.
3. In the interview outline, click on the Job Information dialog icon and click the Edit Component button. The Dialog Editor comes to the front.
4. Click the Options tab.

Lesson 10: Group Variables Into Dialogs
89
5. Click the Selection grouping drop-down button and choose Select All That Apply.
6. Click Update. The test assembly window appears again and shows the updated dialog. Note how the two True/False variables now appear as check boxes.
Visually Separate Items in a Dialog
As you review the Job Information dialog, you may notice that you’d like to separate the seminar attendance questions from the rest of the variables in the dialog. You

Chapter 1: HotDocs Developer Tutorial
90
can do this by creating a dialog space element. You can create a single dialog element and use it in any number of dialogs.
To create a dialog element
1. Bring the Dialog Editor to the front. (To do this, click on the dialog icon in the interview outline and then click the Edit Component button.)
2. Click the Properties tab.Tip: You can use dialog elements to include other items in a dialog, such as additional text, horizontal lines, or buttons that calcu-late values or launch the Web browser, just to name a few.
3. Click the Create New Dialog Element button and drag it to the Contents list, dropping it between the two True/False variables.

Lesson 10: Group Variables Into Dialogs
91
The Dialog Element Editor appears.
4. In the Dialog element name box, enter the text White Space.
5. In the Style group, select Vertical spacing.
6. Click OK. You are returned to the Dialog Editor.
7. Click Update. The test assembly window appears again, showing the updated dialog. Note the extra space between the Trial Period and Paid Seminar Days questions.
8. Close the test assembly window and click OK at the Dialog Editor.
On Your OwnTip: Although you already added the White Space dialog element to the previous dialog, it is not grayed in the Components list. This is because dialog elements can appear on multiple dialogs, or even multiple times on the same dialog.
Edit the Salary and Benefits dialog, and add the White Space dialog element you created in the previous section to it. To do this, drag the element from the Compo-nents list and drop it between the variables Hourly Salary and Number of Vacation Days. Close the Dialog Editor when you are finished.
Conclusion
You are now finished with this lesson. In it, you learned how to group variables into dialogs. You also learned how to group True/False variables in a dialog so they appear as option buttons or check boxes.
If you do not want to go on to Lesson 11 at this time, close Component Manager by clicking the X in the upper-right corner of Component Manager. Then click the HotDocs Save and Close button to close the template. Then exit HotDocs.
If you are continuing on to Lesson 11, click the Save button to save your work.

Chapter 1: HotDocs Developer Tutorial
92
Lesson 11: Create Scripts for Dialogs
Overview
Some variables you add to a dialog may not need to be asked unless other questions in the dialog are answered a certain way. For example, in the Job Information dialog, you don’t want the employee to enter the number of seminar days unless he or she actually qualifies for them. For situations like this, you can create a dialog script.
To do this, you use a series of instructions that disable certain questions in a dialog based on how other questions are answered. You can either gray or hide variables. Then you use an IF instruction to determine if the variables are relevant to the current user. If they are, you then show or ungray the variables for the user. (In Lesson 8, you learned how to use IF instructions to make text in the template condi-tional. In this lesson, you will use IF instructions to conditionally enable or disable variables in a dialog.)
Start the Tutorial
If you are continuing immediately from Lesson 10, skip the instructions for opening the template and proceed to “Gray and Ungray Variables in a Script.”
If you closed the template at the end of Lesson 10, complete the following steps.
To open the tutorial template
1. Open your word processor and click the HotDocs button, located on your word processor’s toolbar. The My Test Templates library appears.
NoteIf the My Test Templates library does not appear, choose Open Library (File menu), select the library in the default Libraries folder (for example, My Test Templates.hdl), and click Open.
2. Select Employment Agreement and click Edit. The template appears, ready for you to edit.
3. Click the Component Manager button to open Component Manager.
Gray and Ungray Variables in a Script
You will use the GRAY instruction to disable irrelevant variables in a dialog.

Lesson 11: Create Scripts for Dialogs
93
To GRAY the Number variableTip: You can also edit com-ponents by double-clicking them in Component Manager.
1. At Component Manager, select the Job Information dialog and click Edit Component. The Dialog Editor appears.
2. Click the Script tab.
Notice that the Components list shows the variables used in the dialog. This can help you remember the variables with which you are working. The Instruc-tion models list shows you which instructions you can use.
You want to gray the Number of Seminar Days until the user indicates that the employee should receive them.
3. Click in the Script box and press Ctrl+Spacebar. The auto-complete list appears.
4. Type the letters GR. The GRAY instruction is highlighted.

Chapter 1: HotDocs Developer Tutorial
94
5. Press Enter. The GRAY instruction is inserted.
6. Enter a space and then press the F5 key. HotDocs displays a list of just compo-nents.

Lesson 11: Create Scripts for Dialogs
95
7. Select Number of Seminar Days (either press the Down Arrow key to select the component, or start typing the component name) and then press Enter. The variable is inserted in the script.
In the next part of the script, you will define the condition under which the variable will be ungrayed.
To create the instruction to UNGRAY the variable
1. Press Enter to start a new line in the script.
2. Enter the IF instruction, followed by the variable name Employee to Receive Paid Seminar Days.
3. Press Enter.
4. On the new line, enter UNGRAY Number of Seminar Days.

Chapter 1: HotDocs Developer Tutorial
96
5. On the next line, enter END IF. Your script should look like this:
Test the Dialog
You can now test your work.
To test the dialog
1. At the Dialog Editor, click Test. The test assembly window appears.

Lesson 11: Create Scripts for Dialogs
97
2. Select Employee to Receive Paid Seminar Days. The Number of Seminar Days answer field becomes enabled.
3. Choose Close (File menu) to close the test assembly window.
4. Click OK at the Dialog Editor.
Hide and Show Variables in a Dialog
The Salary and Benefits dialog contains two variables—Annual Salary and Hourly Salary. Only one of these variables should be asked during the interview, depending on the employee’s work status. You can use a dialog script to hide these variables and then show only the correct one once the user specifies the status.
To hide variables
1. At Component Manager, edit the Salary and Benefits dialog.
2. Click the Script tab.
3. In the Script box, enter the following script:HIDE Exempt Annual SalaryHIDE Hourly Salary
Next, you will create the expression that determines which variable is shown.
4. Press Enter to start a new line.
5. Enter the following lines of script:

Chapter 1: HotDocs Developer Tutorial
98
IF Employment Status = “Exempt”SHOW Exempt Annual Salary
Next, you will create the rest of the expression.
6. On the next line of the script, enter the following:ELSE IF Employment Status = "Non-exempt" OR Employment Status = "Part-time"SHOW Hourly SalaryEND IF
To review, in this script, HotDocs first hides the variables Annual Salary and Hourly Salary. It then determines how the user answered the Employment Status question. If the employee is exempt, the Exempt Annual Salary variable is shown. Or, if the employee is non-exempt or part-time, the Hourly Salary variable is shown.
On Your Own
Once you have added the script to the dialog, you can test it. To do this, click the Test button at the Dialog Editor. Select an employee status and note which variable is asked. Change your answer to see the script update which variable is asked.
When you are finished, close the test assembly window.
Then, close the Dialog Editor.
Finally, close Component Manager by clicking the X in the upper-right corner of Component Manager.
Test Assemble the Template Again
You are now ready to test assemble the template again. You will see how grouping variables into dialogs makes the interview process easier for users.
To test assemble the template
1. At the template, click the Test Assemble button. The test assembly window appears.
2. Answer the questions in the interview, pressing Tab to move between answer fields and clicking Next (or Page Down) to move between dialogs.
3. Continue answering questions as dialogs appear.
4. After you reach the End of Interview dialog, click the Document Preview tab to preview the assembled document.
5. Close the test assembly window.
6. At the template, click the Save and Close button. The template is saved and closed.
Lesson 11: Create Scripts for Dialogs
99
Congratulations! You have completed automation work on the Employment Agree-ment template. In the next few lessons, you will continue to learn new automation concepts as you work in different templates.
Conclusion
You are now finished with this lesson. In it, you learned how to use dialog scripts to dynamically ask or disable variables in a dialog, based on how the user answers other questions in the dialog.
If you do not want to go on to Lesson 12 at this time, exit HotDocs.

Chapter 1: HotDocs Developer Tutorial
100
Lesson 12: Use a Computation to Combine Multiple Answers into a Single Answer
Overview
When new employees start working at Hobble Creek Publishing, they must complete a Personal Data document that can be filed with the human resources department. It contains basic information about the employee, including contact information and emergency information.
In this lesson, you will learn how to create three separate variables to represent the different parts of the employee’s name (first, middle, and last). You will then learn how to use a single Computation variable to join these three separate answers together.
Start the Tutorial
In this lesson, you will use the Employee Personal Data template you added to the My Test Templates library in Lesson 2. Some of the automation in this template has already been completed for you.
To open the tutorial template
1. Open your word processor and click the HotDocs button, located on your word processor’s toolbar. The My Test Templates library appears.
NoteIf the My Test Templates library does not appear, choose Open Library (File menu), select the library in the default Libraries folder (for example, My Test Templates.hdl), and click Open.

Lesson 12: Use a Computation to Combine Multiple Answers into a Single Answer
101
2. Select Employee Personal Data and click Edit. The template appears, ready for you to edit.
Create Variables for the Employee’s Name
In the Employment Agreement template, you learned how to create a single Text variable to represent the employee’s full name. Another option, and the preferred option, is to create three variables to represent a person’s name—First Name, Middle Initial, and Last Name. While this means you have three variables with which you must now work, keeping parts of the name separated like this makes other HotDocs tasks easier. For example, letters you write often include a salutation, followed by a title (Mr., Mrs., and so forth) and a last name. By keeping the name separated into its various parts, it’s easy to use just the client’s last name in the letter’s greeting. If you’ve used a single variable, however, you would have to either insert the client’s full name, or write a very complicated script to extract just the last name.
One negative aspect of using three variables is that using three separate fields for a single name can take up a lot of space in a template. One way around this is to create these three variables, but at places in the template where you need to merge the full name, create a single Computation variable that strings together these different vari-ables.
The first thing you will do in this template is create three separate variables for the employee’s first name, middle initial, and last name. Because some employees do not have a middle name, you will condition the middle initial variable so that it is removed from the assembled document when it’s not applicable.

Chapter 1: HotDocs Developer Tutorial
102
To insert the variables
1. In the PERSONAL DATA section of the template, click after Employee Name, at the 2-inch tab stop (Word users) or 3-inch tab stop (WordPerfect users), like this:
2. Click the Variable Field button. The Variable Field dialog box appears.
3. Make sure Text is selected and enter Employee First Name in the Variable box.
4. Click OK. The variable is inserted in the template.
On Your Own
Following Employee First Name, create two more variables named Employee Middle Initial and Employee Last Name.
When creating the Employee Middle Initial variable, edit the properties of the component and click the Advanced tab at the Text Variable Editor. Then clear Warn when unanswered. This will keep HotDocs from displaying a warning message when the user leaves the answer blank.
Make sure there is a space character separating each of the three variables.
Make the Middle Initial Variable Optional
Not all employees have a middle name, so you will use an IF expression to make this variable’s insertion conditional.

Lesson 12: Use a Computation to Combine Multiple Answers into a Single Answer
103
To create an IF expression
1. Select (highlight) the Employee Middle Initial variable field, including the opening and closing chevrons and the space immediately following the closing chevron.
2. Click the IF Field button. The IF Field dialog box appears.
3. In the Field type group, select IF Expression. The view changes to show a scripting box.
4. In the Expression box, enter the following expression:ANSWERED( Employee Middle Initial )
With this expression, the user’s middle initial will be merged in the document if the user answers the question during the interview. If the user doesn’t answer the question, nothing will be merged.
5. Click OK. The condition is inserted around the variable.

Chapter 1: HotDocs Developer Tutorial
104
When HotDocs inserts instruction fields in a template, it adds a paragraph mark at the end of each instruction—including both the opening and closing instructions. Then, when the template is assembled, HotDocs removes these instructions, along with the paragraph marks it inserted. So, even though the template text now looks like it is formatted incorrectly, it will appear correctly in the assembled document.
NoteIf you want to keep HotDocs from inserting these paragraph breaks when making text within a paragraph conditional, at the template library, choose Options (Tools menu) and then navigate to the Template Development folder. Then, click the Insert returns after instructions in text templates drop-down button and choose Smart. (See the HotDocs Help for more information on this option.)
Create a Computation That Combines the Employee Name Variables
As you can see with the variables you just inserted in the template, sometimes using several variable fields (first, middle, and last names) to represent a single thing (a full name) can take up considerable space in the template.
In this part of the lesson, you will create a Computation variable to join all of the Text variables together. (As with numbers, you can add text values together using the Add (+) operator.) If the middle initial is answered, it is merged in the docu-ment. If it is unanswered, nothing is merged.
To create a Computation variable that merges all parts of the name
1. At the beginning of the template, click after Employee Full Name and click the Variable Field button. The Variable Field dialog box appears.

Lesson 12: Use a Computation to Combine Multiple Answers into a Single Answer
105
2. Select Computation from the Variable type group and type Employee Full Name in the Variable box.
3. Click the Edit Component button. The Computation Editor appears.
4. Click in the Script box and enter the following script:Employee First Name + " " + SPACE ( Employee Middle Initial ) + Employee Last Name
In this script, HotDocs inserts the value for Employee First Name, followed by a space character (which is represented by the blank space between the quota-tion marks). It then tests whether Employee Middle Initial is answered. If it is, the answer is merged, along with a space character. If it is not, nothing is merged. The Employee Last Name is then merged.
5. Click OK at both the Computation Editor and the Variable Field dialog box. The variable is inserted into the template.
Insert the Variable Later in the Template
The Employee Full Name variable is also used later in the template. You can insert it now.
To insert the Full Name variable
1. In the SECTION 3: EDUCATION DATA section, place your cursor at the beginning of the sentence under Degrees Earned.
2. Click the Variable Field button. The Variable Field dialog box appears.
3. Choose Computation and click the Variable drop-down button.

Chapter 1: HotDocs Developer Tutorial
106
4. Choose Employee Full Name from the list.
5. Click OK. The variable is inserted in the template.
6. Add a space character after the closing chevron, so words in the sentence are properly spaced.
Conclusion
You are now finished with this lesson. In it, you learned how to keep variables that may not be answered from being merged in an assembled document. You also learned how to write a computation script that joins together three separate answers to create a single answer.
If you do not want to go on to Lesson 13 at this time, click the HotDocs Save and Close button to close the template. Then exit HotDocs.
If you are continuing on to Lesson 13, click the Save button to save your work.
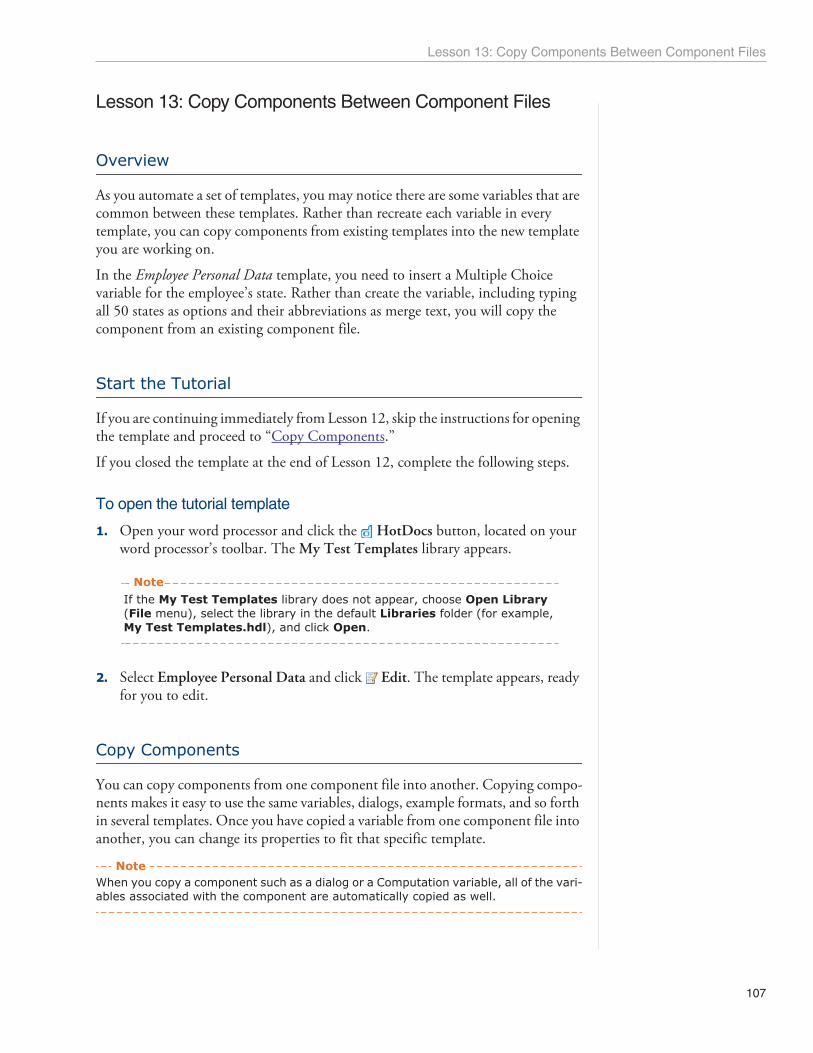
Lesson 13: Copy Components Between Component Files
107
Lesson 13: Copy Components Between Component Files
Overview
As you automate a set of templates, you may notice there are some variables that are common between these templates. Rather than recreate each variable in every template, you can copy components from existing templates into the new template you are working on.
In the Employee Personal Data template, you need to insert a Multiple Choice variable for the employee’s state. Rather than create the variable, including typing all 50 states as options and their abbreviations as merge text, you will copy the component from an existing component file.
Start the Tutorial
If you are continuing immediately from Lesson 12, skip the instructions for opening the template and proceed to “Copy Components.”
If you closed the template at the end of Lesson 12, complete the following steps.
To open the tutorial template
1. Open your word processor and click the HotDocs button, located on your word processor’s toolbar. The My Test Templates library appears.
NoteIf the My Test Templates library does not appear, choose Open Library (File menu), select the library in the default Libraries folder (for example, My Test Templates.hdl), and click Open.
2. Select Employee Personal Data and click Edit. The template appears, ready for you to edit.
Copy Components
You can copy components from one component file into another. Copying compo-nents makes it easy to use the same variables, dialogs, example formats, and so forth in several templates. Once you have copied a variable from one component file into another, you can change its properties to fit that specific template.
NoteWhen you copy a component such as a dialog or a Computation variable, all of the vari-ables associated with the component are automatically copied as well.

Chapter 1: HotDocs Developer Tutorial
108
To copy a Multiple Choice variable to the template
1. At the template, click the Component Manager button. The Component Manager window appears.
2. Click the Expand button in the upper-right corner of Component Manager. The window changes to show a second list of components.
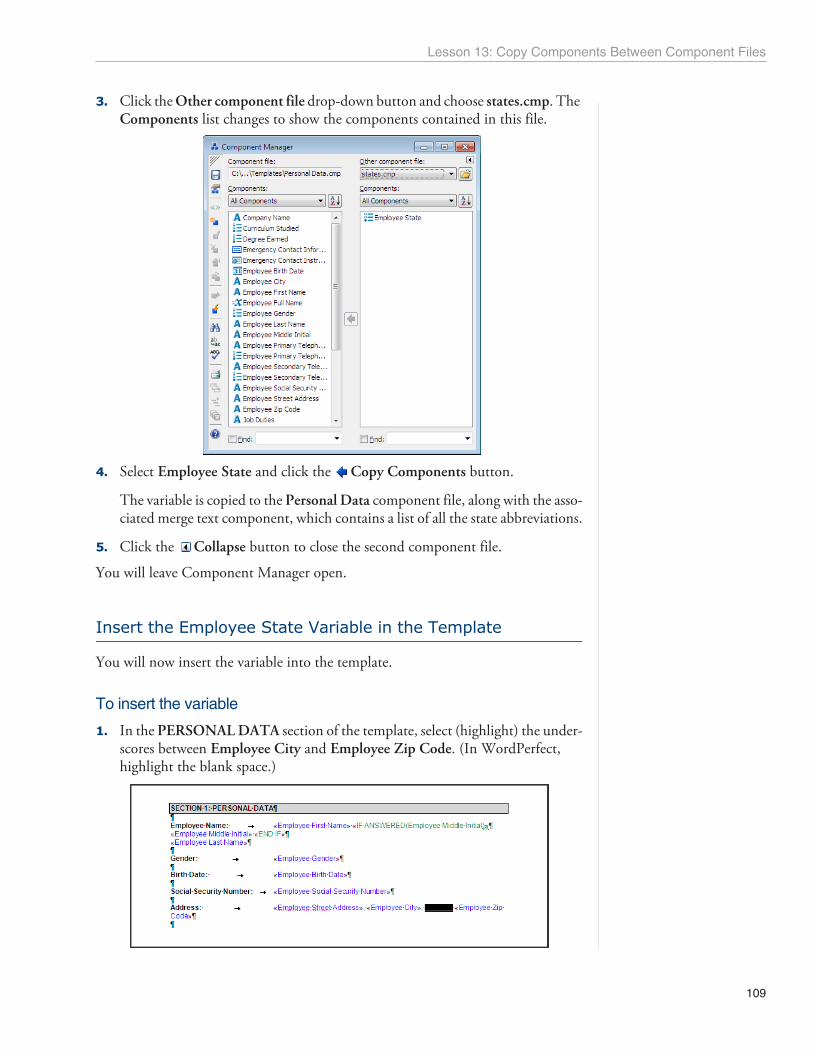
Lesson 13: Copy Components Between Component Files
109
3. Click the Other component file drop-down button and choose states.cmp. The Components list changes to show the components contained in this file.
4. Select Employee State and click the Copy Components button.
The variable is copied to the Personal Data component file, along with the asso-ciated merge text component, which contains a list of all the state abbreviations.
5. Click the Collapse button to close the second component file.
You will leave Component Manager open.
Insert the Employee State Variable in the Template
You will now insert the variable into the template.
To insert the variable
1. In the PERSONAL DATA section of the template, select (highlight) the under-scores between Employee City and Employee Zip Code. (In WordPerfect, highlight the blank space.)

Chapter 1: HotDocs Developer Tutorial
110
2. Click the Variable Field button. The Variable Field dialog box appears.
3. In the Variable type group, select Multiple Choice.
4. Click the Variable drop-down button and choose Employee State.
Note the Option column and the Merge Text column already include the list of states along with their abbreviations.
5. Clear Use default. (This will allow the merge text options to appear for just this instance of the variable only.)
6. Click Replace Once. The variable is inserted. (If you are using WordPerfect, click OK to close the Variable Field dialog box.)
Create the Personal Data Dialog
You can now group all of the variables associated with the employee’s personal information in a dialog.
To create a dialog
1. Bring Component Manager to the front. (You can click its icon on the Windows task bar.)
2. Click the New Component button. The New Component dialog box appears.
3. Select Dialog and click OK. The Dialog Editor appears.
4. In the Dialog name box, enter the text Personal Data.

Lesson 13: Copy Components Between Component Files
111
5. Add the following variables to the dialog, in this order:Employee First NameEmployee Middle InitialEmployee Last NameEmployee GenderEmployee Birth DateEmployee Social Security NumberEmployee Street AddressEmployee CityEmployee StateEmployee Zip CodeEmployee Primary Telephone NumberEmployee Primary Telephone TypeEmployee Secondary Telephone NumberEmployee Secondary Telephone Type
6. When you are finished, click Save at the Dialog Editor.
Conclusion
If you do not want to go on to Lesson 14 at this time, click OK to close the Dialog Editor, and then close Component Manager and click the HotDocs Save and Close button to close the template. Finally, exit HotDocs.
If you are continuing on to Lesson 14, leave the Dialog Editor open.

Chapter 1: HotDocs Developer Tutorial
112
Lesson 14: Change the Placement of Variables in the Dialog
Overview
When you create a custom dialog, each variable you add to the dialog is placed on its own line in the dialog. Sometimes, however, it makes more sense to place two or three variables, side by side, on the same line.
In this lesson, you will visually arrange variables in a dialog that is used in the Employee Personal Data template.
Start the Tutorial
If you are continuing immediately from Lesson 13, skip the instructions for opening the template and proceed to “Test the Dialog to See How Variables Are Arranged.”
If you closed the template at the end of Lesson 13, complete the following steps.
To open the tutorial template
1. Open your word processor and click the HotDocs button, located on your word processor’s toolbar. The My Test Templates library appears
NoteIf the My Test Templates library does not appear, choose Open Library (File menu), select the library in the default Libraries folder (for example, My Test Templates.hdl), and click Open.
2. Select Employee Personal Data and click Edit. The template appears, ready for you to edit.
3. Open Component Manager and edit the Personal Data dialog.
Test the Dialog to See How Variables Are Arranged
By default, HotDocs places each variable in a dialog on its own line.

Lesson 14: Change the Placement of Variables in the Dialog
113
To test the dialog At the Dialog Editor, click Test. A test assembly window appears.
Each answer field appears on its own line. However, to better organize the variables, you want Employee First Name, Employee Middle Initial, and Employee Last Name to be side by side on the same line.
Place Answer Fields on the Same Line in a Dialog
You can use the Dialog Editor to change the layout of a dialog.
To change the layout of a dialog
1. In the interview outline of the test assembly window, click the Personal Data dialog icon and click the Edit Component button. The Dialog Editor comes to the front.

Chapter 1: HotDocs Developer Tutorial
114
2. Click the Layout tab. The window changes to show icons for each variable in the dialog.
3. Click on the Employee Middle Initial icon and drag it to the right of the Employee First Name icon.
As you are dragging the variable to its new location, you see horizontal and vertical lines, indicating where the variable will be placed when you release the mouse button.

Lesson 14: Change the Placement of Variables in the Dialog
115
4. When you see a vertical line to the right of the Employee First Name icon, release the mouse button. HotDocs places the two variable icons on the same line.
When you do this, you will notice that the test assembly window automatically updates to show the new placement of the variable.
On Your Own
At the Dialog Editor, drag Employee Last Name to the same line as Employee First Name and Employee Middle Initial. (It should appear after the Employee Middle Initial.) Follow the instructions for moving Employee Middle Initial.
Repeat this process for two more groups of variables:
Place Employee Gender, Employee Birth Date, and Employee Social Security Number on the same line.

Chapter 1: HotDocs Developer Tutorial
116
Place Employee City, Employee State, and Employee Zip Code on the same line.
When you are finished, click Update to view the test assembly window again. The variables are arranged in the dialog.

Lesson 14: Change the Placement of Variables in the Dialog
117
Change a Variable’s Width
You can place two variables on the same line and make one of the variables wider than the other.
To change the width of a variable field
1. Bring the Dialog Editor to the front. (Select the dialog in the interview outline and click the Edit Component button.)
2. At the Layout tab, drag Employee Primary Telephone Type to the right of Employee Primary Telephone Number.
3. Right-click on Employee Primary Telephone Number. A shortcut menu appears.
4. Select Wide.
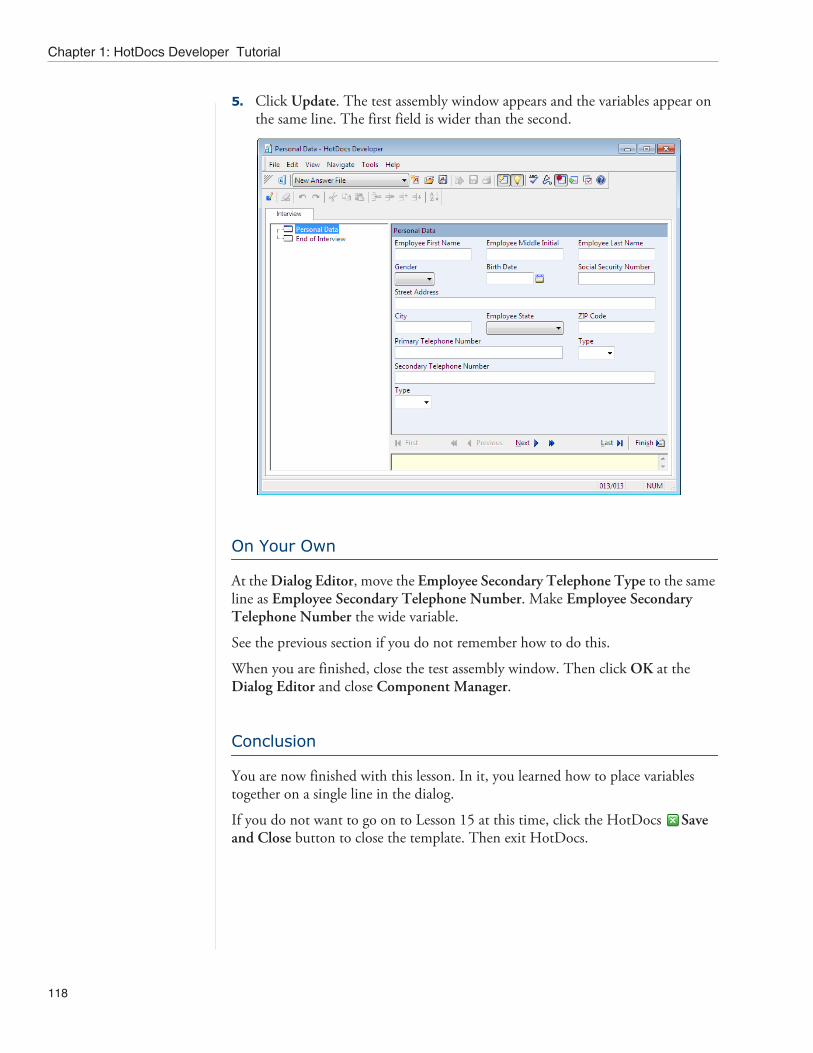
Chapter 1: HotDocs Developer Tutorial
118
5. Click Update. The test assembly window appears and the variables appear on the same line. The first field is wider than the second.
On Your Own
At the Dialog Editor, move the Employee Secondary Telephone Type to the same line as Employee Secondary Telephone Number. Make Employee Secondary Telephone Number the wide variable.
See the previous section if you do not remember how to do this.
When you are finished, close the test assembly window. Then click OK at the Dialog Editor and close Component Manager.
Conclusion
You are now finished with this lesson. In it, you learned how to place variables together on a single line in the dialog.
If you do not want to go on to Lesson 15 at this time, click the HotDocs Save and Close button to close the template. Then exit HotDocs.

Lesson 15: Create Lists of Answers
119
Lesson 15: Create Lists of Answers
Overview
Sometimes when completing an interview, you need to enter two or more answers for a given question. These answers generate a list within the document. For example, perhaps you need to include the names of several customers, rather than just a single customer. To accomplish this, you can repeat the Customer Name vari-able. This allows the user to enter as many answers as necessary and each name will be merged.
In this lesson, you will use a REPEAT instruction to create a list of colleges the employee has attended. You will repeat an entire paragraph of text as well as just a portion of an existing paragraph. In a later lesson, you will also learn how to repeat rows in a word processor table.
Start the Tutorial
If you are continuing immediately from Lesson 14, skip the instructions for opening the template and proceed to “Repeat a Paragraph.”
If you closed the template at the end of Lesson 14, complete the following steps.
To open the tutorial template
1. Open your word processor and click the HotDocs button, located on your word processor’s toolbar. The My Test Templates library appears.
NoteIf the My Test Templates library does not appear, choose Open Library (File menu), select the library in the default Libraries folder (for example, My TestTemplates.hdl), and click Open.
2. Select Employee Personal Data and click Edit. The template appears, ready for you to edit.
Repeat a Paragraph
You can include lists of answers in your documents by repeating variables and allowing the user to enter as many answers as necessary. You repeat variables by surrounding the variables with a REPEAT instruction. Instead of collecting and merging a single answer, as variables normally do, the repeated variable can merge an entire list of answers into the assembled document.

Chapter 1: HotDocs Developer Tutorial
120
In the Employee Personal Data template, employees must list each college they’ve attended, as well as degrees earned and the curriculum studied. Each college is listed in its own paragraph.
To insert the REPEAT instruction
1. In the EDUCATION DATA section, highlight the indented paragraph under Colleges or Universities Attended. (Make sure you include the paragraph mark.)
This is how it should look in Word:
This is how it should look in WordPerfect:
2. Click the REPEAT Field button. The REPEAT Field dialog box appears.
You must create the dialog you will use in the REPEAT instruction. (The variables you will add to the dialog have already been created for you.)

Lesson 15: Create Lists of Answers
121
To create the dialog
1. In the Dialog box, type Educational Information and click the Edit Com-ponent button. The Dialog Editor appears.
2. Drag the following variables, in this order, from the Components list to the Contents list:University or College NameYears AttendedCurriculum StudiedDegree Earned
Next you must specify the style for the repeated dialog. You can either present the list as a series of dialogs or as a single spreadsheet with multiple entry points.
To choose a presentation style for the list
1. At the Style drop-down list, make sure Repeated Series is selected.

Chapter 1: HotDocs Developer Tutorial
122
2. Click OK at the Dialog Editor. (Do not close the REPEAT Field dialog box yet.)
Sort the List of Answers
When creating a list of colleges, not all users will enter the schools in the order they attended them. You can organize the list by sorting its answers.
To sort the list based on dates attended
1. At the REPEAT Field dialog box, click Show Advanced. The dialog box expands to show advanced options.
2. Click the Sort by drop-down button. HotDocs displays a list of variables used in the dialog.
3. Select Years Attended.

Lesson 15: Create Lists of Answers
123
4. Click the Ascending drop-down button and choose Descending. This will list colleges in order, starting with the most recent.
5. Click OK to close the REPEAT Field dialog box. The REPEAT instruction is merged in the template.
6. If you are using Word, position your cursor before the «REPEAT Educational Information» instruction and press the Backspace key so the REPEAT instruc-tion is aligned with the left margin. (Doing this ensures the list is properly tabbed in the assembled document.) If you are using WordPerfect, do nothing.
Test a Portion of the Template
Just as you can test assemble the entire template, you can select just a portion of the template text and test it.

Chapter 1: HotDocs Developer Tutorial
124
To test the REPEAT instruction
1. At the template, select the text starting with the opening REPEAT instruction and ending after the closing REPEAT instruction, like this:
2. Click the Test Assemble button. The test assembly window appears.
3. Answer the questions in the first dialog.
4. Click the Add Another. A new, empty repetition of the dialog, Educational Information, appears again.
Notice that as you provide answers at each dialog, HotDocs adds repeated dialog icons to the interview outline. If you later decide to add more informa-tion, you can click the last dialog and then click the Add Another button again.
5. Enter answers for as many colleges as you want, clicking Add Another for each new college. When you are finished, click Next.
6. Click the Document Preview tab to see the generated list. Notice how the list is sorted in order, starting with the most recent school.
7. Close the test assembly window. HotDocs returns you to the template.

Lesson 15: Create Lists of Answers
125
Create a Sentence-Style List
You can also use REPEAT instructions to create lists within a sentence. When repeating a part of a sentence, you can specify the punctuation that will be used to separate the items in the list.
Next, you will insert a list of the degrees the employee has earned. You can use the dialog you created for the previous REPEAT instruction.
To create a sentence-style list
1. Under the Degrees Earned heading, select the text after the colon, «Degree Earned» («University or College Name»). (Do not select the closing period.)
2. Click the REPEAT Field button. The REPEAT Field dialog box appears.
3. Click the Dialog drop-down button and choose Educational Information.
4. Click the Format drop-down button and choose a, b, and c from the list.
You will now create a filter to show only those schools where the employee has received a degree.
Create a Filter
In the previous paragraph in the template, you created a list of all colleges or univer-sities the employee attended, regardless of whether he or she earned a degree from the school. In this paragraph, you will filter the list to show only those colleges where the employee received a degree.
A filter must result in a true/false (or yes/no) value. In this instance, the filter will list only the colleges where the employee earned a degree.

Chapter 1: HotDocs Developer Tutorial
126
To create the REPEAT instruction
1. At the REPEAT Field dialog box, click Show Advanced.
2. Click the Edit Component button next to the Filter by drop-down list. The Computation Editor appears.
3. In the Variable Name box, enter the name Graduated.
4. In the Script box of the Computation Editor, enter this script:Tip: The operator != means “does not equal.”
Degree Earned != "No Degree"
This expression looks at the answer for the Multiple Choice variable, Degree Earned. For each repetition, if the user selects any answer but No Degree, the school (along with the degree achieved) is merged in the document.
5. Click OK at the Computation Editor.
6. Click OK at the REPEAT Field dialog box. The REPEAT instruction is merged in the template.

Lesson 15: Create Lists of Answers
127
If you’d like, you can test your work to see how the list is repeated, as well as filtered. To do this, highlight the portion of the template you want to test, click the Test Assemble button, and answer the questions in the interview. Review the document at the Document Preview tab. Close the test assembly window when you are finished.
Conclusion
You are now finished with this lesson. In it, you learned how to repeat the text of an entire paragraph to create a list of answers. You also learned how to repeat a portion of text within a paragraph. Finally, you learned how to punctuate, sort, and filter answers in a list to customize how the list appears.
If you do not want to go on to Lesson 16 at this time, click the HotDocs Save and Close button to close the template. Then exit HotDocs.
If you are continuing on to Lesson 16, click the Save button to save your work.

Chapter 1: HotDocs Developer Tutorial
128
Lesson 16: Use a Table to Display a List of Answers
Overview
Sometimes you must insert a list of information using a word processor table, with each row in the table representing an entry in the list. You can insert variables in a table row and then repeat that row using a REPEAT instruction.
Start the Tutorial
If you are continuing immediately from Lesson 15, skip the instructions for opening the template and proceed to “Insert Variables in a Table.”
If you closed the template at the end of Lesson 15, complete the following steps.
To open the tutorial template
1. Open your word processor and click the HotDocs button, located on your word processor’s toolbar. The My Test Templates library appears.
NoteIf the My Test Templates library does not appear, choose Open Library (File menu), select the library in the default Libraries folder (for example, My Test Templates.hdl), and click Open.
2. Select Employee Personal Data and click Edit. The template appears, ready for you to edit.
Insert Variables in a Table
You can place HotDocs variables into the Professional Experience table cells. (These variables have already been created for you.)
To insert variables in word processor table cells
1. Scroll to the end of the template.
2. In the PROFESSIONAL EXPERIENCE table, position your cursor in the first empty row of the Company Name column and click the Variable Field button. The Variable Field dialog box appears.
3. Select Text and choose Company Name from the Variable drop-down list.

Lesson 16: Use a Table to Display a List of Answers
129
4. Click OK. The variable is inserted in the table cell.
5. In the remaining cells in this row, insert the following Text and Number vari-ables, in this order:Job Title (Text)Number of Years Employed (Number)Job Duties (Text)
When you are finished, your table should look like this:
Repeat a Table Row
Once you have inserted your variables into the table, you need to tell HotDocs to repeat the table row containing the variables. As you learned in the previous lesson, REPEAT instructions are always linked to a HotDocs dialog that contains the repeated variables.
To repeat the second table row
1. Position the cursor before the variable «Company Name», in the second row of the table.

Chapter 1: HotDocs Developer Tutorial
130
2. Click the REPEAT Field button. The REPEAT Field dialog box appears.
3. Type Professional Experience in the Dialog box and click the Edit Compo-nent button. The Dialog Editor appears.
4. Drag the following variables from the Components list into the Contents box:Company NameJob TitleNumber of Years EmployedJob Duties
5. Make sure the Style drop-down menu shows Repeated Series.
6. Click OK at the Dialog Editor, and click OK again at the REPEAT Field dialog box. The REPEAT instruction is inserted in the table.
7. Remove the END REPEAT instruction in the first cell.
This causes the REPEAT instruction to be valid for the entire row. This is because HotDocs sees the end of the row as the end of the REPEAT. This means you cannot repeat text on more than one row in the table.
Test the Table
You can test the table by test assembling a part of the document.

Lesson 16: Use a Table to Display a List of Answers
131
To test your work with the table
1. At the template, select all of Section 4, including the table, and click the Test Assemble button. A test assembly window appears, showing the Professional Experience dialog.
2. Enter information and click the Add Another button to add another repeti-tion. You are taken to a new repetition of the dialog.
3. Continue answering questions for as many jobs as you choose.

Chapter 1: HotDocs Developer Tutorial
132
4. When you are finished, click Next. The End of Interview dialog appears.
5. Click the Send the assembled document to the word processor button. HotDocs opens your word processor and displays the assembled document in it.
The table row appears once for each job entered.
6. Close the word processor document as well as the test assembly window. (You don’t need to save the document.)
Automation on the Personal Data template is now complete.
7. Click the HotDocs Save and Close button to close the template.
Conclusion
You are now finished with this lesson. In it, you learned how to repeat rows in a word processor table.

Lesson 17: Create Lists Within a List
133
If you do not want to go on to Lesson 17 at this time, exit HotDocs.
Lesson 17: Create Lists Within a List
Overview
In this lesson, you will make it possible for users to enter sublists within a list by placing REPEAT instructions inside each other. You will use a template called Editor/Author List, which keeps a record of the authors each editor has worked with at Hobble Creek Publishing. The list will also include a list of each author’s books that each editor has edited.
You will create this three-level list by nesting REPEAT instructions inside each other. There are two parts to nesting REPEAT instructions:
Insert REPEAT instructions in the template. Insert repeated dialogs into each other.
Start the Tutorial
You will work with the Editor/Author List template for this part of the tutorial.
To open the tutorial template
1. Open your word processor and click the HotDocs button, located on your word processor’s toolbar. The My Test Templates library appears
NoteIf the My Test Templates library does not appear, in the HotDocs Library, from the File menu, choose Open Library; then select the library in the default Libraries folder (for example, My Test Templates.hdl), and click Open.
2. From the My Test Templates folder, select Editor/Author List.

Chapter 1: HotDocs Developer Tutorial
134
3. Click Edit. The template appears, ready for you to edit.
Insert REPEAT Instructions
As the template is now, you can enter only one answer for each variable. However, you may want to enter multiple answers for each variable. For example, you may want to include a list of editors and under each editor, list several authors who have worked with each editor. Likewise, each author may have written more than one book. To create such a list, you must first insert the necessary REPEAT instructions into the template.
To insert the REPEAT instructions into the template
1. Select the three lines of text that begin with Editor, Author, and Title Edited/Date Completed, followed by the blank line below the last line of text. (Select-ing the blank line will separate editors’ information with an additional line.)
If you are using Word, the selected text should look like this:

Lesson 17: Create Lists Within a List
135
If you’re using WordPerfect, the selected text should look like this:
2. Click the REPEAT Field button. The REPEAT Field dialog box appears.
The Editor Information dialog, which has already been created, contains the variable for the first level of the list, Editor Full Name.
3. Click the Dialog drop-down button, select Editor Information, and then click OK. The Editor Information REPEAT instruction appears around all three levels of the list.
4. Starting with the line containing the second level of the list, Author, select the text and variables up to the «END REPEAT».
If you’re using Word, the selected text should look like this:

Chapter 1: HotDocs Developer Tutorial
136
If you’re using WordPerfect, select the entire first line, starting at the left margin. The selected text should look like this:
5. Click the REPEAT Field button. The REPEAT Field dialog box appears.
The Author Information dialog contains the variable for the second level of the list, Author Full Name.
6. Select Author Information from the Dialog drop-down list and click OK.
The REPEAT Author Information instruction appears around the text and vari-ables starting with the sublist Author.
7. If you are using Word, position your cursor before the «REPEAT Author Infor-mation» instruction and press the Backspace key so the REPEAT instruction is aligned with the left margin. (Doing this ensures the sublists are properly tabbed in the assembled document.) If you are using WordPerfect, do nothing.
On Your Own
The Book Information dialog contains the variables for the third level of the list, Book Title and Date Completed.
Insert a REPEAT instruction for the sublist Title Edited / Date Completed. Use Book Information as the repeated dialog, and, if you’re using Word, make sure the

Lesson 17: Create Lists Within a List
137
REPEAT instruction is also aligned with the left margin—just like Author Infor-mation.
This is how the template should look after you’ve inserted all three REPEAT instructions. Note how the REPEAT instructions are nested three levels deep.
Insert the Author Information Dialog into the Editor Information Dialog
Now that you have created nested REPEAT instructions in the template, you must nest the actual dialog components so they represent the nesting shown in the template.
During an interview, an inserted dialog appears on its parent dialog as an icon. Users click the icon and the inserted dialog appears. When they finish answering questions in the inserted dialog, they are returned to the parent dialog.
You can do this by inserting the second and third-level dialog components into the dialogs that precede them. In other words, you must insert the Book Information dialog into the Author Information dialog, and the Author Information dialog into the Editor Information dialog.

Chapter 1: HotDocs Developer Tutorial
138
To insert the Author Information dialog into the Editor Information dialog
1. Click the Component Manager button. The Component Manager window appears.
2. Select the dialog, Editor Information, from the list and click the Edit Com-ponent button. The Dialog Editor appears.
Tip: Repeated Series and Spreadsheet are two style options for repeated dialogs. One of these two options must be selected in order for repeated dialogs to work.
3. Click the Style drop-down button and select Repeated Series. This will cause the dialog to repeat as a series of questions.

Lesson 17: Create Lists Within a List
139
4. Drag Author Information from the Components list to the bottom of the Contents list.
Insert the Book Information Dialog into the Author Information Dialog
Finally, you must insert the last dialog, Book Information, into the Author Informa-tion dialog.
To add Book Information dialog to Author Information
1. At the Dialog Editor for Editor Information, double-click the Author Infor-mation icon in the Contents list. The Dialog Editor appears, showing the Author Information dialog.
2. Click the Style drop-down button and select Repeated Series.

Chapter 1: HotDocs Developer Tutorial
140
3. Drag Book Information from the Components list into the Contents box.
4. Double-click Book Information. The Dialog Editor for Book Information appears.
5. Click the Style drop-down button and select Spreadsheet on Parent. (Selecting Spreadsheet on Parent displays the dialog—in spreadsheet format—directly on the Author Information dialog, thus eliminating an extra mouse click for the user.)
6. Click OK.
7. At both the Author Information and the Editor Information dialog boxes, click OK. Then close Component Manager.

Lesson 17: Create Lists Within a List
141
Test the Nested Repeat Instructions
As you already know, it is always useful to test any complex work you do when auto-mating a template to make sure your template works correctly.
To test a nested repeat instruction
1. At the template, click the Test Assemble button. A test assembly window appears.
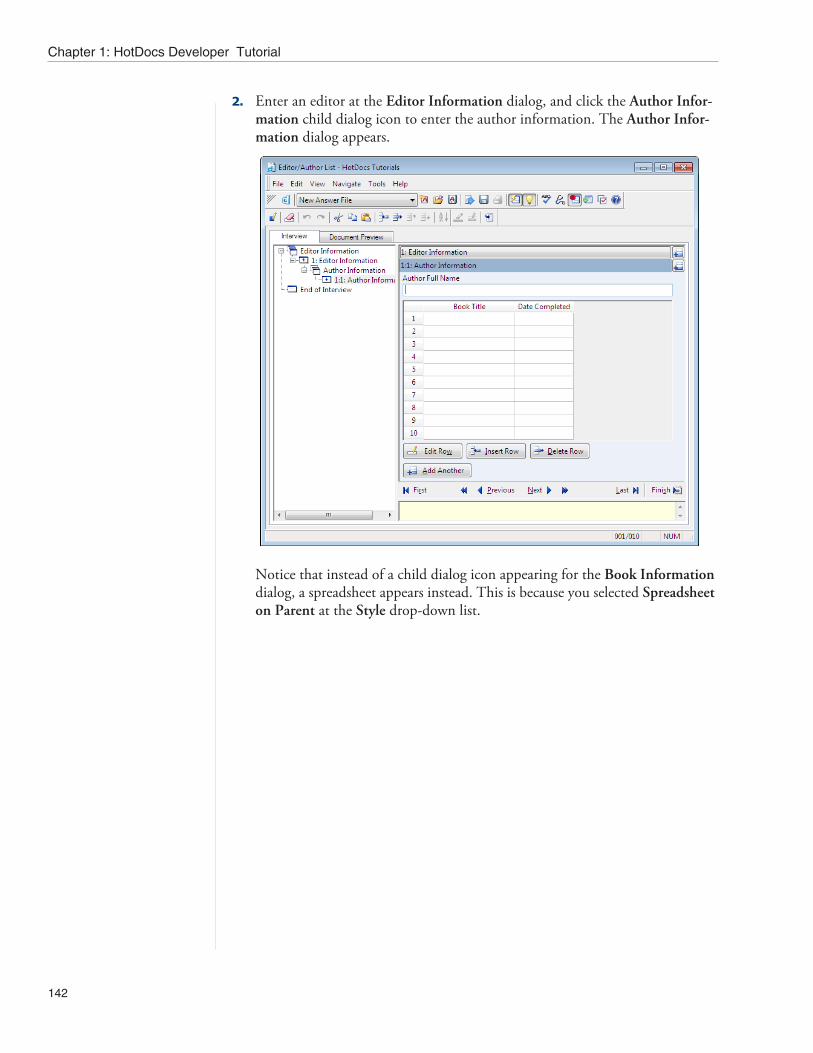
Chapter 1: HotDocs Developer Tutorial
142
2. Enter an editor at the Editor Information dialog, and click the Author Infor-mation child dialog icon to enter the author information. The Author Infor-mation dialog appears.
Notice that instead of a child dialog icon appearing for the Book Information dialog, a spreadsheet appears instead. This is because you selected Spreadsheet on Parent at the Style drop-down list.

Lesson 17: Create Lists Within a List
143
3. Enter the author information, along with a list of book titles and their comple-tion dates.
4. Click Add Another to enter information for a second author along with that author’s book information.
Tip: You can also press Alt+Left Arrow to move to the parent dialog, where you can then press Alt+A to add another repetition for Editor Information.
5. After you’ve entered the information for the second author’s books, click the Add Another button in the Editor Information title bar. You are taken to an
empty repetition of the Editor Information dialog.
6. Enter information for a second editor, along with that editor’s author and book information.
7. Continue this process for as many editors (and corresponding authors and books) as you want. Eventually, you will see several levels of answered dialogs in the interview outline.

Chapter 1: HotDocs Developer Tutorial
144
8. Click the Document Preview tab when you’re finished entering author and book information for the last editor in your list. A preview of the assembled document appears, with a three-level list.
9. Choose Close (File menu) to close the test assembly window. You don’t need to save your answers.
10. Click the Save and Close button to close the template.
Conclusion
You are finished with the HotDocs tutorial. You can now complete the HotDocs Automator tutorial, where you will learn how to automate form templates.
For additional information on using HotDocs, please refer to the HotDocs Help.

Lesson 17: Create Lists Within a List
145

143
Chapter 2: HotDocs Automator Tutorial
Overview
The lessons in this chapter introduce you to important concepts and features avail-able in HotDocs Automator. Before completing these lessons, you should complete the lessons in Chapter 1, since many of the ideas and concepts you see in the following lessons build upon the things you learned in that chapter.
These lessons are short and are structured so you can complete each one in separate sessions. This allows you to learn HotDocs Automator in the spare minutes you have during the day. You do not need to dedicate a large block of time to using the tutorial.
You should complete all of these lessons in order. In these lessons:
You will learn how to create a form template and add it to a HotDocs library. You will learn how to create fields in a form template, where HotDocs will
merge answers during assembly. You will learn how to attach variables to the fields in the template, which allows
you to save and reuse answers in other templates. Finally, you will learn how to create an interview for a form template.
In Chapter 3, you will complete a tutorial that teaches you how to link your templates to a database.
NoteThe document used in this tutorial was drafted to suit the purposes of the tutorial. It is not provided as a valid legal document.
What is HotDocs Automator?
HotDocs Automator is an application, included with HotDocs Developer, which allows you to create templates based on graphical forms—or forms that contain static text and graphics that cannot be changed or modified by users. These kinds of forms include loan applications, tax forms, or pre-printed court forms.
Using HotDocs Automator, you can take an existing graphical form (typically a PDF file) and convert it into a form template in much the same way as you create a text template in the word processor. For example, you must 1) identify each place on the form template where changeable information must be entered, 2) create fields, and then 3) attach variables to these fields.
Users assemble form documents from the form templates you develop. After answering the interview questions or entering answers directly in the form fields,
Chapter 2: HotDocs Automator Tutorial
144
they can print the assembled document, or save it to disk in one of several formats, such as PDF.
Types of HotDocs Form Templates
You can create two types of form templates using HotDocs Automator, each based on a different file format:
HotDocs PDF (.hpt) templates are based on the standard PDF file format. HotDocs includes the HotDocs PDF Driver, which you can use to create PDF files for use as the basis for new form templates—simply create your document in any Windows application and print it using the PDF driver to create a new PDF file.
HotDocs Form (.hft) templates are based on the Envoy file format, which was an early alternative to PDF. If you have an existing Envoy-based (.HFT, .HFD, .EVY) template or document, you can automate or assemble it with HotDocs. However, HotDocs does not include a driver or any other method for creating new Envoy documents to use as the basis for a new template. (Earlier versions of HotDocs did include a driver to create new Envoy-based documents, but that driver is not compatible with Windows XP and higher, which is required by current versions of HotDocs.)
HotDocs Filler
HotDocs Filler is an application, included in all desktop editions of HotDocs, for viewing and editing assembled form documents. After a form document is assem-bled and saved, it can be opened and its answers edited using HotDocs Filler. However, once the document is saved and then viewed in HotDocs Filler, much of the template functionality is lost. For example, the form fields no longer process computations; they simply act as placeholders for the user’s information. Likewise, answers changed in HotDocs Filler are not saved in an answer file for use in assem-bling other documents.
CautionCautionCautionCautionCautionCautionCautionCautionCautionCautionCautionCautionCautionCautionCautionIf the form document is saved as a static PDF document (.PDF) instead of a PDF-based form document (.HPD) or Fillable PDF Form (.PDF), its form fields cannot be modified.

Lesson 1: Assemble a Form Document
145
Lesson 1: Assemble a Form Document
Overview
Before you learn how to automate a form template, it is a good idea to see how a form template is used to assemble a custom form document. Because the assembly process for form documents is similar to that of text documents, this lesson will focus on the areas that are different. (Refer to Lesson 1: Assemble a Document (page 5) to see how to assemble a text document.)
Open the Tutorial Templates Library
You will first open the Tutorial Templates library, which you used at the beginning of the HotDocs Developer tutorial. This library includes automated versions of the templates you will look at throughout the HotDocs Automator tutorials. You may refer to these templates for help as you complete the different lessons in the tutorial.
Tip: The Tutorial Templates library file is located in the My Documents\Hot-Docs\Libraries folder.
To open the Tutorial Templates library
1. Open HotDocs Developer (choose Start > Programs > HotDocs 11 > HotDocs Developer). The HotDocs library window appears.
2. If the Tutorial Templates library is not open, choose Open Library (File menu), select the library for your word processor in the default Libraries folder (for example, DOCX Tutorial Templates.hdl), and click Open. The library appears.

Chapter 2: HotDocs Automator Tutorial
146
Assemble a Form Document
To see how a HotDocs form template produces a complete document, you will assemble the Life Insurance Application. (You will automate your own copy of this form later in this tutorial.)
To assemble the Life Insurance Application
1. From the template list, select Life Insurance Application and click Assemble. The Answer File dialog box appears.
The Answer File dialog box shows a new, untitled answer file as the answer file that will be used with this assembly. This file does not yet contain any answers.
Tip: If you select an answer file you used while assem-bling documents in the HotDocs tutorial, you may notice that some of those answers appear in this interview. This happens because the templates have some variable names in common.
2. Click OK to continue. HotDocs displays the interview.
You see a list of dialogs (or groups of questions) in the left pane of the window. These dialogs create the interview outline. When you click one of these dialogs, HotDocs displays the associated questions and answer fields in the right pane, or dialog pane.

Lesson 1: Assemble a Form Document
147
3. Answer each of the questions in the interview, clicking Next to move between each dialog.
The End of Interview dialog appears as the last dialog in the interview. It indicates how many questions were left unanswered, and shows you some common tasks you can complete after finishing the interview. (If you left questions unanswered, click
Go to the first unanswered question in the interview to return to the interview and answer them.)
Preview the Assembled Form Document
You can preview the assembled life insurance application while at the HotDocs assembly window.
You should always review your assembled documents for accuracy before sending them to HotDocs Filler or saving them to disk. This is because once an assembled form document is saved or sent to HotDocs Filler, the answer fields are no longer associated with HotDocs variables or an answer file. This means that if you change any answers in the form, the changes are only reflected in that document—not the template or the answer file.
To preview the assembled document At the assembly window, click the Form Document tab. The assembled
document appears.

Chapter 2: HotDocs Automator Tutorial
148
The Form Document tab shows all of the answers you entered during the interview merged into answer fields in the document. It is similar to the Document Preview tab for text documents.
Enter Answers at the Form Document Tab
You can enter or change answers at the Form Document tab, and the answers you enter are saved in the answer file just as they are when you enter the answers in the interview.
NoteSome users prefer entering answers at the Form Document tab to entering answers in the Interview dialogs. Also, some form documents do not even have an interview, thus requiring direct-fill assembly where all answers are entered at the Form Document tab.
To directly fill or change answers at the Form Document tab
1. Click the Street Address field. HotDocs places a cursor in the field, which allows you to type or change the employee’s street address.
Tip: To move to a previous field using the keyboard, press Shift+Tab.
2. Press the Tab key to move to the City field, where you can enter the employee’s city.
3. Continue tabbing through each field, entering or changing answers as desired.
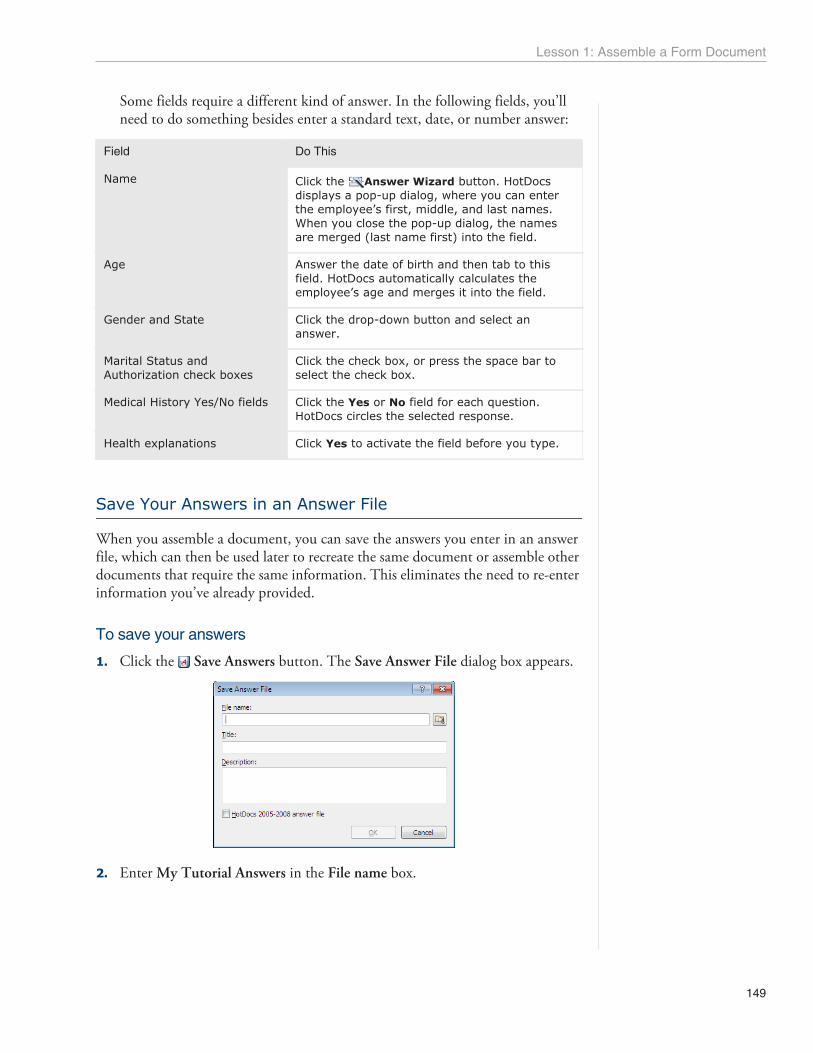
Lesson 1: Assemble a Form Document
149
Some fields require a different kind of answer. In the following fields, you’ll need to do something besides enter a standard text, date, or number answer:
Field Do This
Name Click the Answer Wizard button. HotDocs displays a pop-up dialog, where you can enter the employee’s first, middle, and last names. When you close the pop-up dialog, the names are merged (last name first) into the field.
Age Answer the date of birth and then tab to this field. HotDocs automatically calculates the employee’s age and merges it into the field.
Gender and State Click the drop-down button and select an answer.
Marital Status and Authorization check boxes
Click the check box, or press the space bar to select the check box.
Medical History Yes/No fields Click the Yes or No field for each question. HotDocs circles the selected response.
Health explanations Click Yes to activate the field before you type.
Save Your Answers in an Answer File
When you assemble a document, you can save the answers you enter in an answer file, which can then be used later to recreate the same document or assemble other documents that require the same information. This eliminates the need to re-enter information you’ve already provided.
To save your answers
1. Click the Save Answers button. The Save Answer File dialog box appears.
2. Enter My Tutorial Answers in the File name box.

Chapter 2: HotDocs Automator Tutorial
150
3. Click in the Title box and accept the suggested title, My Tutorial Answers.
4. Click OK. The answers are saved in the answer file.
Save or Print the Assembled Document
Now that you have completed the interview and previewed the assembled docu-ment, you can save or print it.
Tip: You will not print the document in this tutorial. However, if you want to print it, click the Print Document button and follow the prompts.
When you save an assembled form document, you have several options. If you want to edit the saved document at a later time using HotDocs Filler, you can save it as a HotDocs PDF (.hpd) document or a HotDocs Form (.hfd) document. Otherwise, if you want the assembled document to be static—where the answer fields cannot be modified—you can save it as a PDF (.pdf) form.
CautionCautionCautionCautionCautionCautionCautionCautionCautionCautionCautionCautionCautionCautionCautionYou can only save documents in one of the PDF formats (.pdf, .hpd). Also, only Envoy-based (.hft) templates can be saved as HotDocs Form (.hfd) documents.

Lesson 1: Assemble a Form Document
151
To save the assembled document
1. Click the Save Document button. The Save As dialog box appears.
The Save As dialog box displays the folder where you will save the document, which is your My Documents folder by default. If you want to save the document in a different location, use the dialog’s navigation buttons to open the desired folder.
2. From the Save as type drop-down list, select HotDocs Form Document (*.hpd).
3. Enter My Assembled Form Document in the File name box, and then click Save. The document is saved.
Send the Assembled Document to HotDocs Filler
In addition to saving and printing the assembled document, you can also send it to HotDocs Filler for viewing, saving, or printing.

Chapter 2: HotDocs Automator Tutorial
152
To send the document to HotDocs Filler
1. Click the Send Document to HotDocs Filler button in the assembly window toolbar. HotDocs opens the form document in HotDocs Filler.
When the document is opened in HotDocs Filler, you can print, save, or edit it. For the purposes of this tutorial, however, you will simply view the document and then exit HotDocs Filler without saving the document.
2. Choose Exit (File menu). When HotDocs prompts you, don’t save the docu-ment.
NoteWhen assembling a PDF-based form, you can choose to view the assembled document in HotDocs Filler or Adobe Acrobat. You can specify your preference at HotDocs Options. (See HotDocs Options > Form Documents > Send assembled PDF-based forms to.) By default, PDF-based forms are sent to Adobe Acrobat.
Conclusion
You are now finished with this lesson. In it, you learned how to assemble a form document. You also learned how to answer questions in the interview, enter or modify answers using direct-fill at the Form Document tab, as well as how to save and print the assembled form document.
Choose Close (File menu) to close the assembly window. You are returned to the HotDocs library. If you do not want to go on to Lesson 2 at this time, choose Exit (File menu) to close HotDocs.
Lesson 2: Create a New Form Template
153
Lesson 2: Create a New Form Template
Overview
The remaining lessons in this tutorial will teach you how to create and automate a Life Insurance Application form template like the one you assembled in Lesson 1.
When you create a form template, you must first create or find a document file, such as a PDF, to use as the basis for the template. For this lesson, you will use a sample life insurance application, which was installed with HotDocs for use in this tutorial. You will learn how to create a new form template based on that document and add it to your template library.
After creating the template, you will also learn about the HotDocs Automator window, where you will automate the form template in subsequent lessons.
Start the Tutorial
If you closed HotDocs at the end of Lesson 1, complete the following steps to start HotDocs.
To start HotDocs Open HotDocs Developer (choose Start > Programs > HotDocs 11 >
HotDocs Developer). The HotDocs library window appears, showing the last library you had open.
Before you can create a form template, you must open the library in which you want it to appear. In this tutorial, you will create a form template in the same library you created in the previous HotDocs tutorial. If you did not complete that tutorial, refer to Create a New Template Library (page 17) to create the library.
To open your test templates library Choose Open Library (File menu), select the My Test Templates library in the
default Libraries folder, and click Open.
Create a New Form Template
You will now create the Life Insurance Application template. You will use an existing form document as the basis for the template.
To create a new life insurance application form template
1. Click on the My Test Templates folder.

Chapter 2: HotDocs Automator Tutorial
154
2. Click New Template. The New Template dialog box appears.
3. From the Type drop-down list, select HotDocs PDF Template (.hpt).
4. Type Life Insurance Application in the File name box.
5. Click in the Title box and accept the suggested title, Life Insurance Applica-tion.

Lesson 2: Create a New Form Template
155
Tip: Template titles and descriptions help the user identify the template at the HotDocs library.
6. Type This template is to be used with the HotDocs Automator tutorial in the Description box.
7. In the Initial contents group, select Other file and click the Browse button. The New Template Initial Contents dialog box appears.
The file you need is located in your default Templates folder. If that folder is not displayed in the New Template Initial Contents dialog box, click the Templates button in the left-hand navigation pane.
8. Select HCP-1187.pdf.

Chapter 2: HotDocs Automator Tutorial
156
9. Click OK to return to the New Template dialog box. The document’s folder path and file name appear in the Other file box.
10. Click OK. The new form template is created and opened in HotDocs Automa-tor. The template is also added to the template library.
When you create a form template, HotDocs automatically creates a component file, just like it does when you create a text template. HotDocs gives the component file the same name as the template file. In this instance, HotDocs has created a compo-nent file named Life Insurance Application.cmp (since your template file is named Life Insurance Application.hpt or Life Insurance Application.hft).

Lesson 2: Create a New Form Template
157
Familiarize Yourself with the HotDocs Automator Window
When you open a form template in HotDocs Automator, you can use the buttons on the toolbar to edit the template. The buttons on this toolbar are, from left to right:
HotDocs Library New Template Open Form Save Form Print Form Field Properties Answer Font Detect Field Align Fields Undo Redo Variable Field Edit Component Component Manager Test Assemble Fill Tool Select Tool Select Text and Fields Tool Scroll Tool Zoom Tool Page Width Full Page Show Fields Show Variables Show Thumbnails Previous Page Next Page HotDocs Options Help
Conclusion
You are now finished with this lesson. In it, you learned how to create a form template based on an existing document file, and how to add the template to your template library. Additionally, you learned about the buttons on the HotDocs Automator toolbar.
Tip: To save your template, you can also press Ctrl+S.
Click the Save Form button to save the template. If you do not want to go on to Lesson 3 at this time, choose Exit (File menu) to close HotDocs Automator. Then exit HotDocs.

Chapter 2: HotDocs Automator Tutorial
158
Lesson 3: Create Answer Fields
Overview
The underlying text of a form template is static, meaning the text and graphics cannot be changed, and nothing can be entered or changed on the form. In order to enter information on the form, you must create fields that overlay the template. These fields are dynamic and information (answers) entered in them can be modified as needed.
In this lesson, you will learn how to create answer fields. In subsequent lessons, you will learn how to create variables and attach them to these fields.
NoteSince fields don’t have names, the tutorial refers to fields by the label of the corre-sponding blank on the form. For example, the field in the Name blank will be called the Name field.
Start the Tutorial
If you are continuing immediately from Lesson 2, skip the instructions for opening the template and proceed to “Create Simple Text Fields.”
If you closed the template at the end of Lesson 2, complete the following steps.
To open the tutorial template
1. Open HotDocs Developer (choose Start > Programs > HotDocs 11 > HotDocs Developer). The My Test Templates library appears.
NoteIf the My Test Templates library does not appear, choose Open Library (File menu), select the library in the default Libraries folder (for example, My Test Templates.hdl), and click Open.
2. Select Life Insurance Application and click Edit. The template appears in HotDocs Automator, ready for you to edit.
Create Simple Text Fields
The first place where information needs to be added to the form is the Name blank.

Lesson 3: Create Answer Fields
159
To create an answer field in the Name blank
1. Make sure the Select Tool button is selected in the HotDocs Automator toolbar, and then place the cursor directly below the word Name.
2. Press and hold down the left mouse button and move the cursor to the lower-right corner of the blank. Field borders will appear as you drag the cursor.
3. Release the mouse button. The new field is created and the field is automatically selected, as indicated by the handles on the field borders.
Tip: You can use the Page Up/Page Down keys or the Home/End keys to adjust the height and width of a field, respectively. To move a field up, down, left, or right, use the arrow keys on your keyboard.
If you want to adjust the size of the field, click one of the handles and drag. (Or, to move the whole field, click inside the field and drag.)
On Your Own
The second blank that needs a field is the Gender blank. Create a field in this blank. Refer to the instructions in the previous section if you need help doing this.
Auto-Detect Fields
You can create a field by manually drawing the field with your mouse cursor (like you did for the Name and Gender blanks), or you can have HotDocs create a field
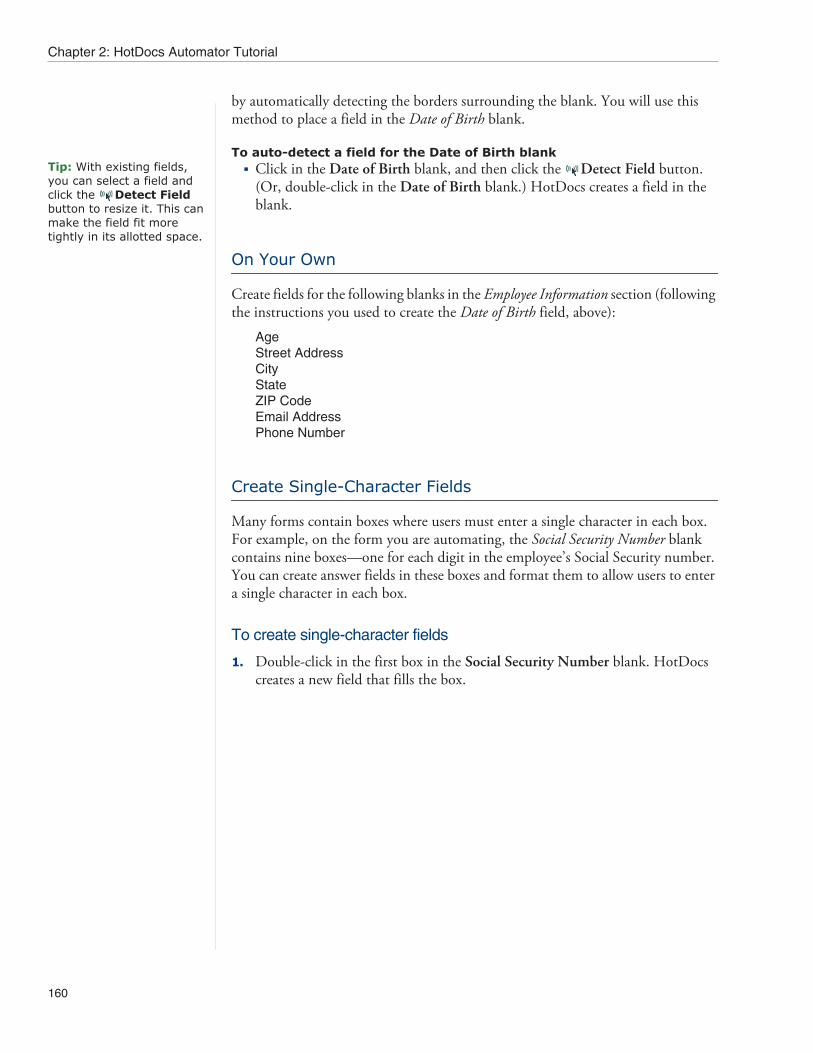
Chapter 2: HotDocs Automator Tutorial
160
by automatically detecting the borders surrounding the blank. You will use this method to place a field in the Date of Birth blank.
To auto-detect a field for the Date of Birth blankTip: With existing fields, you can select a field and click the Detect Field button to resize it. This can make the field fit more tightly in its allotted space.
Click in the Date of Birth blank, and then click the Detect Field button. (Or, double-click in the Date of Birth blank.) HotDocs creates a field in the blank.
On Your Own
Create fields for the following blanks in the Employee Information section (following the instructions you used to create the Date of Birth field, above):
AgeStreet AddressCityStateZIP CodeEmail AddressPhone Number
Create Single-Character Fields
Many forms contain boxes where users must enter a single character in each box. For example, on the form you are automating, the Social Security Number blank contains nine boxes—one for each digit in the employee’s Social Security number. You can create answer fields in these boxes and format them to allow users to enter a single character in each box.
To create single-character fields
1. Double-click in the first box in the Social Security Number blank. HotDocs creates a new field that fills the box.

Lesson 3: Create Answer Fields
161
Tip: The Field Properties dialog box can be left open at all times. The properties displayed in it will change depending on which field(s) is selected. Throughout this tutorial, if the Field Prop-erties dialog box is already visible, you do not need to click the Field Proper-ties button again to display it.
2. Click the Field Properties button. The Field Properties dialog box appears.
For the most part, the properties you specify at the Field Properties dialog box control how answers entered during assembly are processed and displayed in the assembled form document.
3. Click the Layout tab. The view changes to show layout options of the selected field.

Chapter 2: HotDocs Automator Tutorial
162
4. Change the Max chars/line setting to 1.
5. Repeat steps 1–4 for each of the remaining boxes in the Social Security Number blank.
Create Check Box Fields
Check box fields are similar to single-character fields, but rather than allowing a user to type in the field, HotDocs simply inserts a check box character (typically an X) when the user clicks the box. This form uses five check boxes to specify the employee’s marital status, and another check box to indicate the employee’s authorization to have life insurance contributions deducted from his or her wages.
To create check-box fields
1. Double-click in the first Marital Status box. HotDocs creates a new check box field that fills the box.
2. Repeat step 1 for the remaining check boxes in the Marital Status blank, as well as the check box in the Authorization and Signature section at the end of the second page.
NoteThe color of the check box fields is different than that of other fields you have created so far. When HotDocs creates a new field, it automatically creates a check box field if the size is less than the check-box detection threshold. (You can change this threshold, which is 0.19” by default, in HotDocs Options > Form Documents > Properties for New Fields.)

Lesson 3: Create Answer Fields
163
Change Properties for Multiple Fields
Sometimes, you may need to change field properties for multiple fields. For example, when you created fields for the Social Security Number blank, you set the maximum characters per line for each field. If you want multiple fields to have the same value for a particular field property, you can set this property for all of those fields at once.
You can specify the horizontal and vertical position of answers in a field. Depending on the height of the field when you first create it, HotDocs may default the vertical alignment to Top or Bottom. To give your form a more uniform appearance, you may wish to make them all one or the other. For most of the fields in the Employee Information section, you can make the answers all bottom-aligned. For the Social Security Number blanks, the numbers will look better if they are centered both verti-cally and horizontally in the fields. You can set these layout options for multiple fields at the same time.
To change properties of the Employee Information fields
1. Click the Employee Name field. Handles appear on the field borders, indicat-ing that the field is selected.
2. Press and hold the Shift key while clicking on each of the fields in the first three rows of the Employee Information section. (Do not select the Social Security Number and Marital Status fields.) All 10 fields are selected.
3. If the Field Properties dialog box is not visible, click the Field Properties button. The Field Properties [Multiple] dialog box appears.

Chapter 2: HotDocs Automator Tutorial
164
Tip: If the fields did not all begin with the same align-ment, you may see multiple options selected in the Hor-izontal or Vertical group.
4. At the Layout tab, select Left from the Horizontal group box and Bottom from the Vertical group box. Those properties are set for all 10 fields at once.
5. Click the first Social Security Number field. Handles appear on the field borders, indicating that the field is selected.
6. Press and hold the Shift key while clicking on each of the remaining fields in the Social Security Number blank. All nine fields are selected.

Lesson 3: Create Answer Fields
165
7. At the Layout tab of the Field Properties [Multiple] dialog box, select Center from both the Horizontal and Vertical group boxes. Those properties are set for all nine fields at once.
Create Circled Fields
The Medical History section of this form contains five questions where the user must circle Yes or No. You can create special check box fields that circle text on your form, rather than inserting the default check-box character.
To create circled fields
1. In the Medical History section, create a field that covers the Yes response in the first question. (You must manually “draw” this field like you did for the Name field above because auto-detection cannot create fields that overlap static text on the form.)

Chapter 2: HotDocs Automator Tutorial
166
2. Click the Field Properties button. The Field Properties dialog box appears.
3. At the Type tab, select Check box from the Field type group. The field color changes to indicate it is now a check box. (Circled fields are actually a special kind of check box.)

Lesson 3: Create Answer Fields
167
4. Select Circled from the Display type group. The field changes to show only the outer border, which indicates that it is a circled field.
5. Repeat steps 1–4 to create a field for the corresponding No response.
6. When you are finished creating the fields, close the Field Properties dialog box.
You must also create circled fields for the remaining questions in the Medical History section. You can do this in the same way as you created the first two circled fields, or you can copy and paste those two fields to save time.
To copy and paste the circled fieldsTip: If you want all of your circled fields to be the same size, you can select all of the fields (press and hold the Shift key while clicking each field) and then click the Align Fields button.
1. Press and hold the Shift key while clicking on the Yes and No fields you created for the first question.
2. Select Copy from the Edit menu (or press Ctrl+C). The fields are copied.
3. Click on the form where you want the lower left corner of the copied fields to appear. (Click below and to the left of the word Yes in the second question.)
4. Select Paste from the Edit menu (or press Ctrl+V). The copied fields are pasted at the specified location. (If they are not exactly where you would like them to

Chapter 2: HotDocs Automator Tutorial
168
appear, use the arrow keys on your keyboard to move the fields to the correct location.)
5. Repeat steps 3–4 for the remaining questions in the Medical History section.
On Your Own
You can now create fields for the rest of the blanks in the template:
In the Coverage Information section, create fields for the Amount of Coverage and Monthly Contribution to Cash Account blanks.
NoteAutomatically detecting the fields in the Coverage Information section will not work because the dollar signs ($) in each blank keep HotDocs from detecting the underlying field borders properly. Instead, you must manually create the fields.
In the Medical History section, create five fields where the user can type an explanation for any responses marked yes. These fields should be tall enough to accommodate multiple lines of text.
In the Beneficiary Designation section, create fields in each cell of the table on the first page, as well as its continuation at the top of the second page.
In the Other Remarks section, create a field on each line. You will group these fields together in a subsequent lesson to make them behave like a single, multiple-line field.
In the Authorization and Signature section, create a field in the Date Signed blank. Do not create a field for the employee’s signature, however.
Conclusion
You are now finished with this lesson. In it, you learned how to create various types of answer fields. With these fields in place, you could use this template to assemble a document using direct-fill assembly at the Form Document tab. However, because the fields do not have variables attached to them, answers you enter could not be saved in an answer file. You will address this limitation in the next lessons as you learn how to attach variables to the answer fields in your template.
Click the Save Form button to save the template. If you do not want to go on to Lesson 4 at this time, choose Exit (File menu). Then exit HotDocs.

Lesson 4: Attach Text Variables to Fields
169
Lesson 4: Attach Text Variables to Fields
Overview
Once you have created answer fields in your template, you can attach variables to each field. A variable determines the kind of answer that can be merged into a field, and it also allows that answer to be saved in an answer file.
This lesson will teach you how to create Text variables and attach them to answer fields in your template. You will also learn how to allow multiple-line answers in a Text variable, assign a pattern to a Text variable, and how to group multiple fields so they can act as a single field.
NoteYou may also attach any of the other types of HotDocs variables (Number, Date, True/False, Multiple Choice, Computation, and Personal Information) to answer fields. You will create other types of variables and attach them to fields in subsequent lessons.
Start the Tutorial
If you are continuing immediately from Lesson 3, skip the instructions for opening the template and proceed to “Attach Text Variables to Fields.”
If you closed the template at the end of Lesson 3, complete the following steps.
To open the tutorial template
1. Open HotDocs Developer (choose Start > Programs > HotDocs 11 > HotDocs Developer). The My Test Templates library appears.
NoteIf the My Test Templates library does not appear, choose Open Library (File menu), select the library in the default Libraries folder (for example, My Test Templates.hdl), and click Open.
2. Select Life Insurance Application and click Edit. The template appears in HotDocs Automator, ready for you to edit.
Attach Text Variables to Fields
You will first learn how to attach simple Text variables to answer fields. In this template, the first simple Text variable belongs to the Street Address field.

Chapter 2: HotDocs Automator Tutorial
170
Tip: If you have completed the tutorials for automating a text template, you will notice that variable and other component-editing dialog boxes are the same in both HotDocs Automator and in the word processor.
To attach a Text variable to the Street Address field
1. Click the Street Address field to select it and then click the Variable Field button. (Or, double-click the field.) The Variable Field dialog box appears.
The dialog box lists several types of variables. The Street Address field should contain text, so you will attach a Text variable to it.
2. Make sure Text is selected in the Variable type group.
3. Type Employee Street Address in the Variable box.
4. Click OK. The variable Employee Street Address is created and attached to the Street Address field.
During assembly, the variable prompts the user for an answer, which is then merged into that field. Other fields that use the same variable would also use that answer.
On Your OwnTip: To attach a variable to a field, you can also select a field and press Enter.
You will now create 12 more Text variables and attach them to fields in the template. (If you need help creating these fields, follow the instructions for creating

Lesson 4: Attach Text Variables to Fields
171
the Employee Street Address variable, above.) In the Employee Information section, create and attach the following Text variables to the corresponding fields:
Employee CityEmployee Zip CodeEmployee Email AddressEmployee Primary Telephone Number
In the Medical History section, create and attach the following Text variables to the explanation fields:
Explain SmokingExplain Heart TroubleExplain High Blood PressureExplain DiabetesExplain Immune Disorder
In the Beneficiary Designation section, create and attach the following Text vari-ables to the corresponding cells in the first row of the table (you will learn more about how this table works in a subsequent lesson):
Beneficiary NameBeneficiary Telephone NumberBeneficiary Relationship
Format Text Answers
You might think that the Phone Number fields should have Number variables attached to them. However, Number variables are usually reserved for numbers that can be added, multiplied, divided, etc. In the case of telephone numbers, Social Security numbers, and other non-calculated numbers, you should use Text vari-ables.
You could create basic Text variables for the Phone Number fields and rely on users to type the hyphen and parentheses in the appropriate places. However, you can specify a pattern that controls what users can type, how the answer looks as they type it, and how the answer will be merged into the assembled document.

Chapter 2: HotDocs Automator Tutorial
172
To assign a pattern to the employee’s phone number variable
1. Select the Phone Number field in the Employee Information section, and click the Edit Component button (found in the Automator toolbar). The Text Variable Editor appears.
Tip: You can create your own pattern by typing it in the Pattern box. (See the HotDocs Help for specific information on creating custom patterns.)
2. Click the Pattern drop-down button to display a list of patterns.
3. Select (999) 999-9999.

Lesson 4: Attach Text Variables to Fields
173
4. Click Test. A test assembly window appears, showing the phone number ques-tion. The parentheses and hyphen appear in the answer field, just as they will appear in the field on the form during direct-fill assembly.
5. Enter 8005005555.
HotDocs automatically puts the first three characters within the parentheses, the next three characters before the hyphen, and the last four characters after the hyphen.

Chapter 2: HotDocs Automator Tutorial
174
6. Click the Result tab. HotDocs shows you how the answer will be merged into the assembled document.
7. Choose Close (File menu) to close the test assembly window. Unless you were already using a test answer file, HotDocs asks if you want to save your answers.
8. Decide whether to save your answers, based on the following information:Tip: For more information on using test answer files, see the HotDocs Help.
If you click Save or Save As, you will be prompted to specify an answer file name and title. Type Test Answer File in the File name box and accept the suggested Title. From this point on, this answer file will be used each time you test a variable or test assemble the template, and you will no longer be prompted to save your answers after each test. (You can, of course, choose a different answer file when you are at the test assembly window.)
If you click Don’t Save, each time you test a variable or test assemble the template, you will use an empty, untitled answer file. You will also be prompted to save your answers each time you finish a test.
9. Click OK at the Text Variable Editor.
Now HotDocs will use this telephone number pattern when users answer the Employee Primary Telephone Number variable.
On Your Own
Assign the telephone number pattern to the Beneficiary Telephone Number vari-able, which you created and attached to a field in the Beneficiary Designation table. Refer to the previous section if you need help assigning this pattern to the variable.

Lesson 4: Attach Text Variables to Fields
175
Allow Multi-Line Text Answers
When you create a multi-line field in the form and attach a Text variable to it, you often need to adjust the height of the answer field in the interview so that users can more easily enter a longer answer. In the Medical History section, you will attach Text variable fields to each of the explanations. You will also increase the answer field height for each variable so users can enter a lengthy answer during the inter-view, if they need to.
To allow multiple lines of text in an answer fieldTip: You can also right-click on any field and select Edit Component from the shortcut menu.
1. Select the Explain Smoking answer field and click the Edit Component button (or press Ctrl+E). The Text Variable Editor appears.
Tip: The Field height setting only affects how tall the answer field is in the interview. To limit the actual number of characters a user can enter, change the Maximum characters setting.
2. At the Field height box, click the up arrow until the number 3 appears.
3. Click OK at the Text Variable Editor.
Now, users can enter hard returns or long sentences that wrap from one line to the next in the answer.

Chapter 2: HotDocs Automator Tutorial
176
On Your Own
Edit the remaining Text variables in the Medical History section to allow multiple lines of text. Refer to the instructions in the previous section if you need help doing this.
Assign a Text Variable to a Group of Fields
Sometimes an answer for a Text variable must span two or more fields, meaning an answer must wrap from one field to the next. To allow for this, you must group the separate fields as a run-on group. When two or more fields are grouped, HotDocs treats the grouping as if it were one field. Once the fields are grouped, you can attach a Text variable to the group.
In the Social Security Number blank, you created nine fields—one for each digit of the employee’s Social Security number. You can group these boxes together, which will allow you to place each digit of the user’s answer in the correct box.
To group the fields in the Social Security Number blank
1. Make sure no existing fields are selected by clicking on any white space in the template.
2. Press and hold the Shift key while clicking on each of the fields in the Social Security Number blank. All fields in the blank should now be selected.
Tip: You can also right-click on the selected fields and choose Group from the shortcut menu.
3. Click the Field menu and select Group. A bounding box appears around the fields, indicating that they are now grouped.
Now that you have grouped the fields, you can assign a Text variable to the group as if it were a single field. You will also assign a Social Security number pattern to the variable, similar to the pattern you used for telephone numbers earlier.

Lesson 4: Attach Text Variables to Fields
177
To create a Text variable for the Social Security Number fields
1. Double-click the grouped fields in the Social Security Number blank. The Variable Field dialog box appears.
2. Select Text from the Variable type group, and type Employee Social Security Number in the Variable box.
3. Click the Edit Component button. The Text Variable Editor appears.
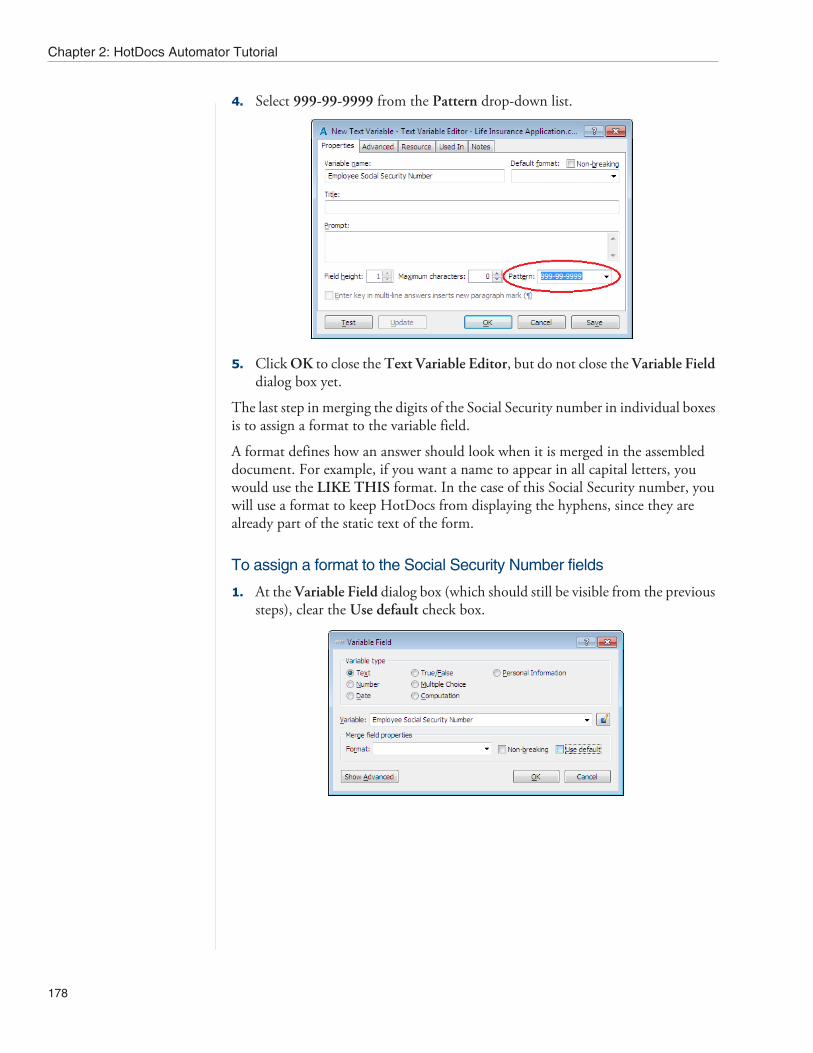
Chapter 2: HotDocs Automator Tutorial
178
4. Select 999-99-9999 from the Pattern drop-down list.
5. Click OK to close the Text Variable Editor, but do not close the Variable Field dialog box yet.
The last step in merging the digits of the Social Security number in individual boxes is to assign a format to the variable field.
A format defines how an answer should look when it is merged in the assembled document. For example, if you want a name to appear in all capital letters, you would use the LIKE THIS format. In the case of this Social Security number, you will use a format to keep HotDocs from displaying the hyphens, since they are already part of the static text of the form.
To assign a format to the Social Security Number fields
1. At the Variable Field dialog box (which should still be visible from the previous steps), clear the Use default check box.

Lesson 4: Attach Text Variables to Fields
179
2. Type XXX_XX_XXXX in the Format box. The underscores in this format tell HotDocs not to print the 4th and 7th characters in the answer, which corre-spond to the positions of the two hyphens.
3. Click OK. The variable is attached to the grouped fields.
Group Lines of Text
In the previous section, you learned how to assign a Text variable to a group of single-character fields. Another place in the form where you can assign a single variable to a group of fields is in the Other Remarks section. In that section, there are 10 fields that should act as one—when the user types an answer, it should flow from one line to the next. You will group these fields and attach a Text variable to the group.
To group the fields in the Other Remarks section
1. Press and hold the Shift key while drawing a box around all of the fields in the Other Remarks section. All fields in the section should now be selected.

Chapter 2: HotDocs Automator Tutorial
180
2. Click the Field menu and select Group. A bounding box appears around the fields, indicating that they are now grouped.
3. Click the Variable Field button. The Variable Field dialog box appears.
4. Select Text from the Variable type group and type Other Remarks in the Variable box.
5. Click the Edit Component button. The Text Variable Editor appears.
6. Change the Field height to 6.
7. Click OK to close the Text Variable Editor, and then click OK to close the Variable Field dialog box. The Text variable is attached to the grouped fields.

Lesson 4: Attach Text Variables to Fields
181
Conclusion
You are now finished with this lesson. In it, you learned how to create Text variables and attach them to answer fields in your template. You also learned how to assign patterns to Text variables, create run-on groups of multiple fields, and allow multiple-line answers for Text variables.
Click the Save Form button to save the template. If you do not want to go on to Lesson 5 at this time, choose Exit (File menu). Then exit HotDocs.

Chapter 2: HotDocs Automator Tutorial
182
Lesson 5: Attach Date, Number, and Multiple Choice Variables to Fields
Overview
Once you have mastered the steps necessary to create Text variables and attach them to answer fields in your form template, you can move on to other variable types.
In this lesson, you will learn how to create Date, Number, and Multiple Choice variables, and then attach them to fields in your template. You will also learn how to change some properties of Number variables, as well as how to assign a single Multiple Choice variable to a group of check-box fields.
Start the Tutorial
If you are continuing immediately from Lesson 4, skip the instructions for opening the template and proceed to “Attach Date Variables to Fields.”
If you closed the template at the end of Lesson 4, complete the following steps.
To open the tutorial template
1. Open HotDocs Developer (choose Start > Programs > HotDocs 11 > HotDocs Developer). The My Test Templates library appears.
NoteIf the My Test Templates library does not appear, choose Open Library (File menu), select the library in the default Libraries folder (for example, My Test Templates.hdl), and click Open.
2. Select Life Insurance Application and click Edit. The template appears in HotDocs Automator, ready for you to edit.
Attach Date Variables to Fields
The sample life insurance application you are automating contains two blanks for dates: the employee’s birth date in the Employee Information section, and the signa-ture date at the end of the form. You can create and attach Date variables to these fields the same way you created Text variables in the previous lesson.
To attach a Date variable to the Date of Birth field
1. Select the Date of Birth field, and then click the Variable Field button. (Or, double-click the field.) The Variable Field dialog box appears.

Lesson 5: Attach Date, Number, and Multiple Choice Variables to Fields
183
2. Select Date in the Variable type group, and type Employee Birth Date in the Variable box.
3. Click OK. The variable is attached to the Date of Birth field.
For the signature date, you will use the built-in HotDocs TODAY variable, which automatically inserts the current date when the template is assembled.
To attach the TODAY variable to the Date Signed field
1. Select the Date Signed field (in the Authorization and Signature section at the end of the form), and then click the Variable Field button. The Variable Field dialog box appears.
2. Select Date in the Variable type group.
3. Click the Variable drop-down button and select TODAY from the list.
4. Click OK. The variable is attached to the Date Signed field.
Attach Number Variables to Fields
You will now attach Number variables to the two fields in the Coverage Information section. By default, HotDocs only allows the user to enter whole numbers in a Number variable, which, in this case, would be whole dollar amounts. To allow the user to enter cents, you can specify decimal places. You can also specify a currency symbol that HotDocs will display in the interview for these variables.

Chapter 2: HotDocs Automator Tutorial
184
To attach a Number variable to the Amount of Coverage field
1. Select the Amount of Coverage field, and then click the Variable Field button. The Variable Field dialog box appears.
2. Select Number in the Variable type group, and type Amount of Coverage in the Variable box.
3. Click the Edit Component button. The Number Variable Editor appears.
4. Enter 2 in the Decimal places box.
You want two decimal places to appear in the answer field even if the answer is a whole number. (By default, HotDocs merges only the decimal places if they have a value.) You can use a format to merge the entire dollar amount, even if the user doesn’t enter any cents.

Lesson 5: Attach Date, Number, and Multiple Choice Variables to Fields
185
5. Click the Default format drop-down button and select 9,999.00.
Tip: Currency symbols are not merged into the assem-bled document. They are only used to prompt the user for the correct type of information.
6. Select $ from the Currency symbol drop-down list.
7. Click OK to close the Number Variable Editor, and then click OK to close the Variable Field dialog box.
On Your Own
The other field in the Coverage Information section also needs a Number variable attached to it. Create a variable named Monthly Contribution to Cash Account, and format it the same way you formatted the Amount of Coverage variable. Refer to the instructions in the previous section if you need help doing this.
Set Minimum and Maximum Limits
Each applicant must contribute no less than $10 but no more than $50 a month to a special cash account. You can help the user enter the correct number by setting minimum and maximum limits for a Number variable. When completing an inter-view, users cannot move to the next answer field or dialog if their answers are not within the limits.

Chapter 2: HotDocs Automator Tutorial
186
To specify limits for the monthly contribution
1. Select the Monthly Contribution to Cash Account field, and then click the Edit Component button. The Number Variable Editor appears.
2. Type 10 in the Minimum box and 50 in the Maximum box.
3. Click Test. The test assembly window appears.
4. Type 60 and click the Result tab.
The warning, Please enter a number between 10 and 50, appears.
Tip: You can use the Erase Answer button in
the toolbar to clear the answer field.
5. Click OK to return to the test assembly window.
6. Erase your answer from the answer field, and then choose Close (File menu) to close the test assembly window.
7. Click OK to close the Number Variable Editor.

Lesson 5: Attach Date, Number, and Multiple Choice Variables to Fields
187
Attach Multiple Choice Variables to Fields
You will now learn how to attach Multiple Choice variables to fields. A Multiple Choice variable lets the user choose an answer from a list of options. Specifically, in this lesson, you will create two Multiple Choice variables that merge a selected option into their associated answer fields. You will also create a Multiple Choice variable that allows the user to select one of a group of check boxes.
Multiple Choice variables are useful when the user’s answer has to be one of a limited number of answers. You will use a Multiple Choice variable to specify the gender of the employee.
To create the Gender Multiple Choice variable
1. Select the Gender field, and then click the Variable Field button. The Variable Field dialog box appears.
2. Select Multiple Choice in the Variable type group, and then type Employee Gender in the Variable box.

Chapter 2: HotDocs Automator Tutorial
188
3. Click the Edit Component button. The Multiple Choice Variable Editor appears.
4. Type Male in the first row of the Option column and Female in the second row. These are the options from which the user will choose.
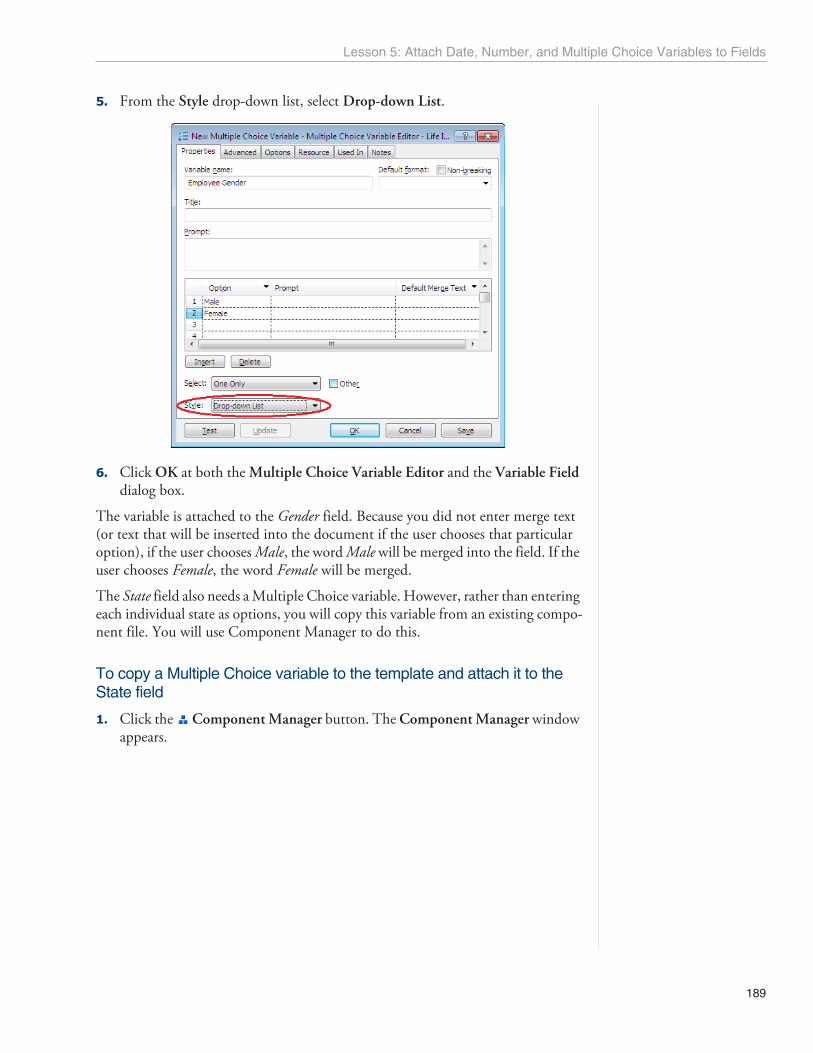
Lesson 5: Attach Date, Number, and Multiple Choice Variables to Fields
189
5. From the Style drop-down list, select Drop-down List.
6. Click OK at both the Multiple Choice Variable Editor and the Variable Field dialog box.
The variable is attached to the Gender field. Because you did not enter merge text (or text that will be inserted into the document if the user chooses that particular option), if the user chooses Male, the word Male will be merged into the field. If the user chooses Female, the word Female will be merged.
The State field also needs a Multiple Choice variable. However, rather than entering each individual state as options, you will copy this variable from an existing compo-nent file. You will use Component Manager to do this.
To copy a Multiple Choice variable to the template and attach it to the State field
1. Click the Component Manager button. The Component Manager window appears.

Chapter 2: HotDocs Automator Tutorial
190
2. Click the Expand button in the upper-right corner of Component Manager. The window changes to show a second list of components.
3. Click the Other component file drop-down button and choose states.cmp. The Components drop-down list changes to show the variables contained in this file.
4. Select Employee State and click the Copy Components button. The vari-able, along with its associated merge text, is copied to your template’s compo-nent file.
5. Click the Collapse button to close the second component file, and then close Component Manager.
6. In the template, double-click the State field. The Variable Field dialog box appears.
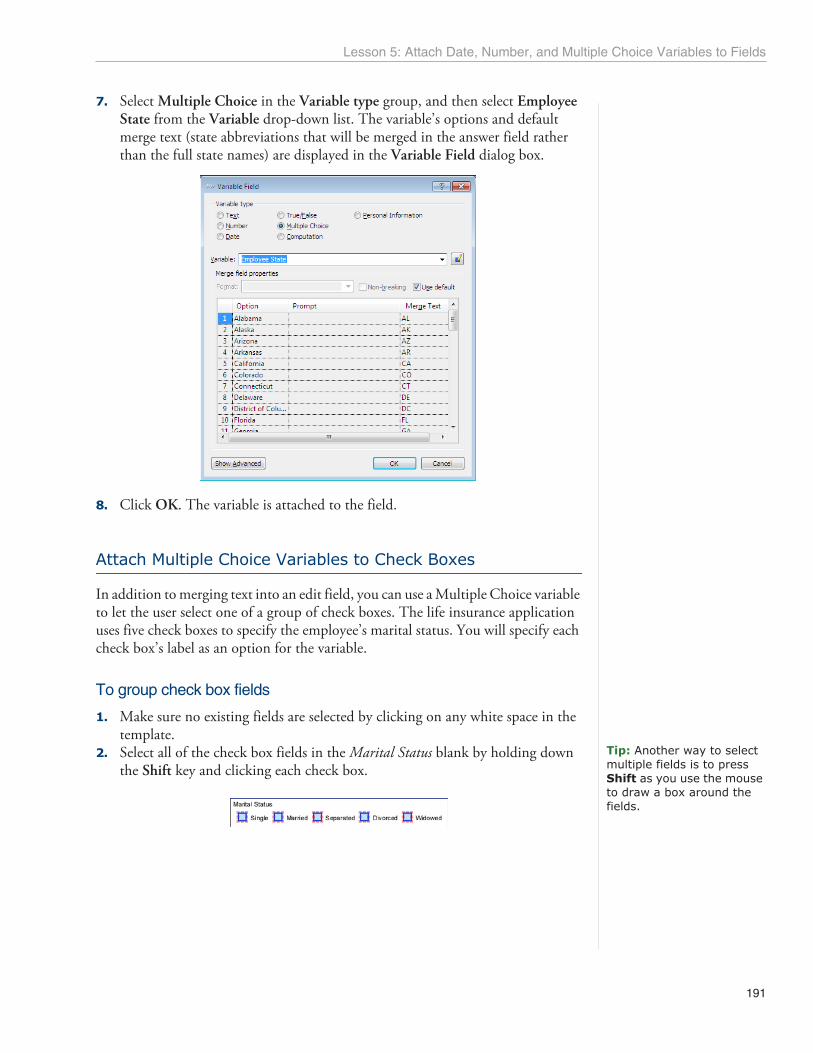
Lesson 5: Attach Date, Number, and Multiple Choice Variables to Fields
191
7. Select Multiple Choice in the Variable type group, and then select Employee State from the Variable drop-down list. The variable’s options and default merge text (state abbreviations that will be merged in the answer field rather than the full state names) are displayed in the Variable Field dialog box.
8. Click OK. The variable is attached to the field.
Attach Multiple Choice Variables to Check Boxes
In addition to merging text into an edit field, you can use a Multiple Choice variable to let the user select one of a group of check boxes. The life insurance application uses five check boxes to specify the employee’s marital status. You will specify each check box’s label as an option for the variable.
To group check box fields
1. Make sure no existing fields are selected by clicking on any white space in the template.
Tip: Another way to select multiple fields is to press Shift as you use the mouse to draw a box around the fields.
2. Select all of the check box fields in the Marital Status blank by holding down the Shift key and clicking each check box.

Chapter 2: HotDocs Automator Tutorial
192
3. With the fields selected, click Group (Field menu). A bounding box appears around the five fields, indicating that they will now be treated as one field and can have only one variable attached to them.
4. Click the Variable Field button. The Variable Field dialog box appears.
5. Select Multiple Choice and type Employee Marital Status in the Variable box.
6. Click the Edit Component button. The Multiple Choice Variable Editor appears.

Lesson 5: Attach Date, Number, and Multiple Choice Variables to Fields
193
7. Type the following options (in order, one per row) in the Option column: Single, Married, Separated, Divorced, Widowed.
8. Click OK at both the Multiple Choice Variable Editor and the Variable Field dialog box.
The Multiple Choice variable is now attached to the group of five Marital Status check boxes. When a user chooses one of the options, an X will be merged into the corresponding check-box field.
Conclusion
You are now finished with this lesson. In it, you learned how to attach Date, Number, and Multiple Choice variables to answer fields in your form template. Additionally, you learned how to specify minimum and maximum limits for Number variables, and how to attach a Multiple Choice variable to a group of check-box fields.
Click the Save Form button to save the template. If you do not want to go on to Lesson 6 at this time, choose Exit (File menu). Then exit HotDocs.

Chapter 2: HotDocs Automator Tutorial
194
Lesson 6: Attach True/False and Computation Variables to Fields
Overview
In this lesson, you will learn how to attach True/False and Computation variables to answer fields. A True/False variable lets you ask the user a yes/no question, and then customize the assembled document based on the user's answer. For example, you can use a True/False variable to place an X in a check box field or circle some text on the form.
A Computation variable calculates number, date, true/false, and text values based on answers a user enters. For example, you can use a Computation variable to calcu-late a person’s age based on his or her birth date, or to combine the answers for multiple Text variables to be merged into a single answer field.
Start the Tutorial
If you are continuing immediately from Lesson 5, skip the instructions for opening the template and proceed to “Attach True/False Variables to Circled Fields.”
If you closed the template at the end of Lesson 5, complete the following steps.
To open the tutorial template
1. Open HotDocs Developer (choose Start > Programs > HotDocs 11 > HotDocs Developer). The My Test Templates library appears.
NoteIf the My Test Templates library does not appear, choose Open Library (File menu), select the library in the default Libraries folder (for example, My Test Templates.hdl), and click Open.
2. Select Life Insurance Application and click Edit. The template appears in HotDocs Automator, ready for you to edit.
Attach True/False Variables to Circled Fields
In the Medical History section, you created fields where users can circle Yes or No for each question. You will now group each set of responses and attach a True/False variable to each group.

Lesson 6: Attach True/False and Computation Variables to Fields
195
To attach a True/False variable to circled fieldsTip: To select multiple fields, press and hold the Shift key while clicking the fields.
1. Select both circled fields for the first question in the Medical History section, and then select Group (Field menu). A bounding box appears around the fields, indicating that they are grouped.
2. Double-click the grouped fields. The Variable Field dialog box appears.
3. Select True/False from the Variable type group, and type Smoker in the Variable box.
4. Click OK. The variable is created and attached to the grouped fields.
On Your Own
Group the remaining four sets of Yes/No responses in the Medical History section, and attach a True/False variable to each group using the following variable names:
Heart TroubleHigh Blood PressureDiabetesImmune Disorder
If you need help doing this, follow the instructions for creating the Smoker variable, earlier.
Attach a True/False Variable to a Check Box
Another place where you will use a True/False variable in your template is in the Authorization and Signature section. Employees must check a box to indicate their authorization to have contributions deducted from their wages. You will attach a True/False variable to that check-box field, which will place an X in that field if the employee consents.

Chapter 2: HotDocs Automator Tutorial
196
To attach a True/False variable to the authorization check box
1. In the Authorization and Signature section, double-click the check-box field. The Variable Field dialog box appears.
2. Select True/False in the Variable type group, and type Authorization in the Variable box.
3. Click OK. The variable is created and attached to the check-box field.
Compute Numbers
One of the most useful features of HotDocs is its ability to compute values using Computation variables. In this form, you will use a Computation variable to calcu-late the age of the employee.
NoteIn Chapter 2, you learned about instruction and expression models, as well as other features available when writing computation scripts. As such, that information will not be repeated here. If you need to refresh your memory on how to write a computation script, please see Lesson 7: Create Computation Variables (page 57).
To create a Computation that computes the employee’s age
1. Select the field in the Age blank, and then click the Variable Field button. (Or, double-click the field.) The Variable Field dialog box appears.
2. Select Computation in the Variable type group, and type Employee Age in the Variable box.

Lesson 6: Attach True/False and Computation Variables to Fields
197
3. Click the Edit Component button. The Computation Editor appears.
Tip: Another expression that could calculate a person’s age is the YEARS FROM( DATE, DATE ) expression. You could use it if you want to calculate the age as of a specific date rather than today.
To calculate the employee’s age, you will use the AGE( DATE ) expression, which computes the number of years between a given date and today.
4. In the Script box, enter the following script:AGE( Employee Birth Date )
Now, when a user provides a date for the Employee Birth Date, HotDocs will use this script to determine how many years there are between that date and the current date (today).
Test the Computation
You can test the computation script to make sure it works correctly.

Chapter 2: HotDocs Automator Tutorial
198
To test the computation script
1. At the Computation Editor, click Test. A test assembly window appears, dis-playing the Employee Birth Date answer field.
2. Click the Calendar button. The Calendar dialog box appears.Tip: You can also enter the date directly in the answer field. Then, when you press the Tab key or otherwise leave the field, HotDocs reformats the answer (if necessary) to match the HotDocs date format.
3. Select your own birth date, and then click OK. The date is merged into the answer field.
4. Click the Result tab. You should see your age displayed.
5. Choose Close (File menu) to close the test assembly window.
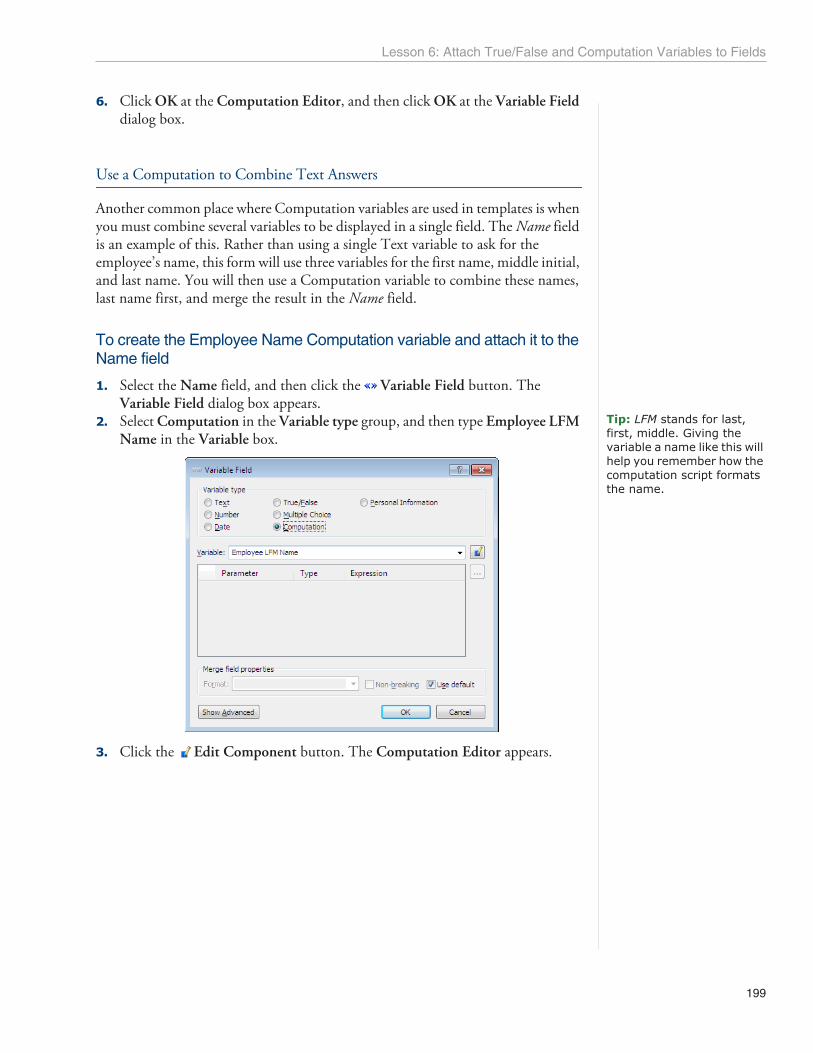
Lesson 6: Attach True/False and Computation Variables to Fields
199
6. Click OK at the Computation Editor, and then click OK at the Variable Field dialog box.
Use a Computation to Combine Text Answers
Another common place where Computation variables are used in templates is when you must combine several variables to be displayed in a single field. The Name field is an example of this. Rather than using a single Text variable to ask for the employee’s name, this form will use three variables for the first name, middle initial, and last name. You will then use a Computation variable to combine these names, last name first, and merge the result in the Name field.
To create the Employee Name Computation variable and attach it to the Name field
1. Select the Name field, and then click the Variable Field button. The Variable Field dialog box appears.
Tip: LFM stands for last, first, middle. Giving the variable a name like this will help you remember how the computation script formats the name.
2. Select Computation in the Variable type group, and then type Employee LFM Name in the Variable box.
3. Click the Edit Component button. The Computation Editor appears.

Chapter 2: HotDocs Automator Tutorial
200
4. Select Text Variables from the Components drop-down list. The list of com-ponents changes to show only Text variables.
5. Click the New Component button. The Text Variable Editor appears.
6. Enter Employee First Name in the Variable name box, and then click OK. The variable is created and you are returned to the Computation Editor.
7. Repeat steps 5–6 to create two more Text variables: Employee Middle Initial and Employee Last Name.
Tip: You can enter the script by 1) dragging components and models to the Script box and then replacing placeholders with values, 2) pressing Ctrl+Spacebar to access a shortcut list of components, expressions, and instructions, or 3) typing the script directly in the Script box.
8. Enter the following script in the Script box:Employee Last NameRESULT + ", " + Employee First NameIF ANSWERED( Employee Middle Initial )
RESULT + " " + Employee Middle InitialEND IF
The result of this script combines the three names, last name first, with appro-priate punctuation and spaces between each name. Specifically, the first line initializes the script’s result to include the employee’s last name. On the second line, a comma is added to the result, followed by the employee’s first name. Finally, the IF instruction adds a space and the employee’s middle initial if the user has answered that variable.
9. Click OK at both the Computation Editor and the Variable Field dialog box. The Computation variable is saved and attached to the variable field.
Conclusion
You are now finished with this lesson. In it, you learned how to group circled check-box fields and attach True/False variables to them. This allows you to circle either yes or no, depending on your answer to the True/False variables. You also learned

Lesson 6: Attach True/False and Computation Variables to Fields
201
how to attach a True/False variable to a single check-box field, and how to attach Computation variables to answer fields.
Click the Save Form button to save the template. If you do not want to go on to Lesson 7 at this time, choose Exit (File menu). Then exit HotDocs.
Chapter 2: HotDocs Automator Tutorial
202
Lesson 7: Make Answer Fields Conditional
Overview
Sometimes your templates contain optional fields, which should only be answered when certain conditions are met. In Lesson 8: Make Paragraphs Conditional (page 68), you learned how to create IF instructions to include or exclude text in an assembled text document. In a form template, you can also use IF instructions to enable or disable a field, which allows a user to enter an answer only if the conditions are met.
The Medical History section of the life insurance application template contains explanation fields, which only apply if the corresponding True/False variables indicate that the user has those particular health conditions. You can make these fields conditional, meaning that the user cannot enter an answer unless the corre-sponding True/False variable is true.
Start the Tutorial
If you are continuing immediately from Lesson 6, skip the instructions for opening the template and proceed to “Make Fields Conditional.”
If you closed the template at the end of Lesson 6, complete the following steps.
To open the tutorial template
1. Open HotDocs Developer (choose Start > Programs > HotDocs 11 > HotDocs Developer). The My Test Templates library appears.
NoteIf the My Test Templates library does not appear, choose Open Library (File menu), select the library in the default Libraries folder (for example, My Test Templates.hdl), and click Open.
2. Select Life Insurance Application and click Edit. The template appears in HotDocs Automator, ready for you to edit.
Make Fields Conditional
You can make a field conditional at the Field Properties dialog box. The simplest conditions are based on True/False variables, but you can also make fields condi-tional on the answers to several variables using an IF expression. In the life insurance application, you will make the explanation fields in the Medical History section conditioned on single True/False variables.

Lesson 7: Make Answer Fields Conditional
203
To make the Explain Smoking field conditional
1. Select the Explain Smoking field, and then click the Field Properties button. The Field Properties dialog box appears.
2. Click the IF Field button next to the Condition box. The IF Field dialog box appears.
You want the user to enter an explanation of smoking only if the applicant has smoked within the past 12 months—in other words, only if the True/False variable Smoker is true.
Tip: The IF True/False Variable option is used when the conditions are a simple either/or choice. The IF Expression option is used when the conditions require more complicated logic.
3. With IF True/False Variable selected in the Field type group, select Smoker from the True/False variable drop-down list.
4. Click OK at the IF Field dialog box. An IF instruction is inserted in the Con-dition box.

Chapter 2: HotDocs Automator Tutorial
204
The next field you will make conditional is the Explain Heart Trouble field.
To make the Explain Heart Trouble field conditional
1. Select the Explain Heart Trouble field. The Field Properties dialog box changes to show properties of the selected field.
Tip: You can also enter an IF instruction directly in the Condition box, rather than using the IF Field dialog box.
2. Click the IF Field button next to the Condition box. The IF Field dialog box appears.
3. With IF True/False Variable selected in the Field type group, select Heart Trouble from the True/False variable drop-down list.
4. Click OK at the IF Field dialog box. The IF instruction is inserted in the Condition box.

Lesson 7: Make Answer Fields Conditional
205
On Your Own
You can leave the Field Properties dialog box open as you modify the field proper-ties for the remaining fields in the Medical History section. Follow the instructions in the previous section, and condition each remaining text field upon its corre-sponding True/False variable. Specifically:
The Explain High Blood Pressure field should be conditioned upon the High Blood Pressure variable.
The Explain Diabetes field should be conditioned upon the Diabetes variable. The Explain Immune Disorder field should be conditioned upon the Immune
Disorder variable.
When you are finished making these fields conditional, close the Field Properties dialog box.
Conclusion
You are now finished with this lesson. In it, you learned how to make answer fields conditional based on the answers to corresponding True/False variables. This prevents a user from entering answers in fields that are not applicable based on the user’s other answers.
Click the Save Form button to save the template. If you do not want to go on to Lesson 8 at this time, choose Exit (File menu). Then exit HotDocs.
Chapter 2: HotDocs Automator Tutorial
206
Lesson 8: Create a List Using a Table
Overview
In this lesson, you will learn how to automate tables in form templates so they can gather and display lists of answers. To do this, you must first add the variables that appear in the table to a repeated dialog. Then you must group the fields in the table and attach the repeated dialog to the group of fields.
You will also learn how to filter the list of answers that appear in the table. For example, if a repeated dialog contains five sets of answers, you can use a filter to only display those answer sets that meet a certain condition.
Start the Tutorial
If you are continuing immediately from Lesson 7, skip the instructions for opening the template and proceed to “Group Fields as a Table.”
If you closed the template at the end of Lesson 7, complete the following steps.
To open the tutorial template
1. Open HotDocs Developer (choose Start > Programs > HotDocs 11 > HotDocs Developer). The My Test Templates library appears.
NoteIf the My Test Templates library does not appear, choose Open Library (File menu), select the library in the default Libraries folder (for example, My Test Templates.hdl), and click Open.
2. Select Life Insurance Application and click Edit. The template appears in HotDocs Automator, ready for you to edit.
Group Fields as a Table
When you created Text variables and attached them to fields in the form, you created variables in the first row of the Beneficiary Designation table. With those variables in place, you can now group all of the fields in this section as a table. When fields are grouped as a table, you can assign a REPEAT instruction to the group, which instructs HotDocs to merge each set of answers in a repeated dialog in a new row of the table.

Lesson 8: Create a List Using a Table
207
To group the table fields
1. Press and hold the Shift key. Notice that the mouse cursor changes to show a pointer with a bounding box.
2. While still pressing Shift, click and hold the mouse button, dragging it from the top-left corner of the Beneficiary Designation table to the bottom-right corner.
As you do this, HotDocs displays a bounding box around the group of fields.
3. Release the mouse button first, and then release the Shift key. Every field in the table is selected.
Tip: When grouping table fields, you can also right-click and select Group as Table from the shortcut menu.
4. With the fields selected, choose Group as Table (Field menu). A group box appears around the fields.
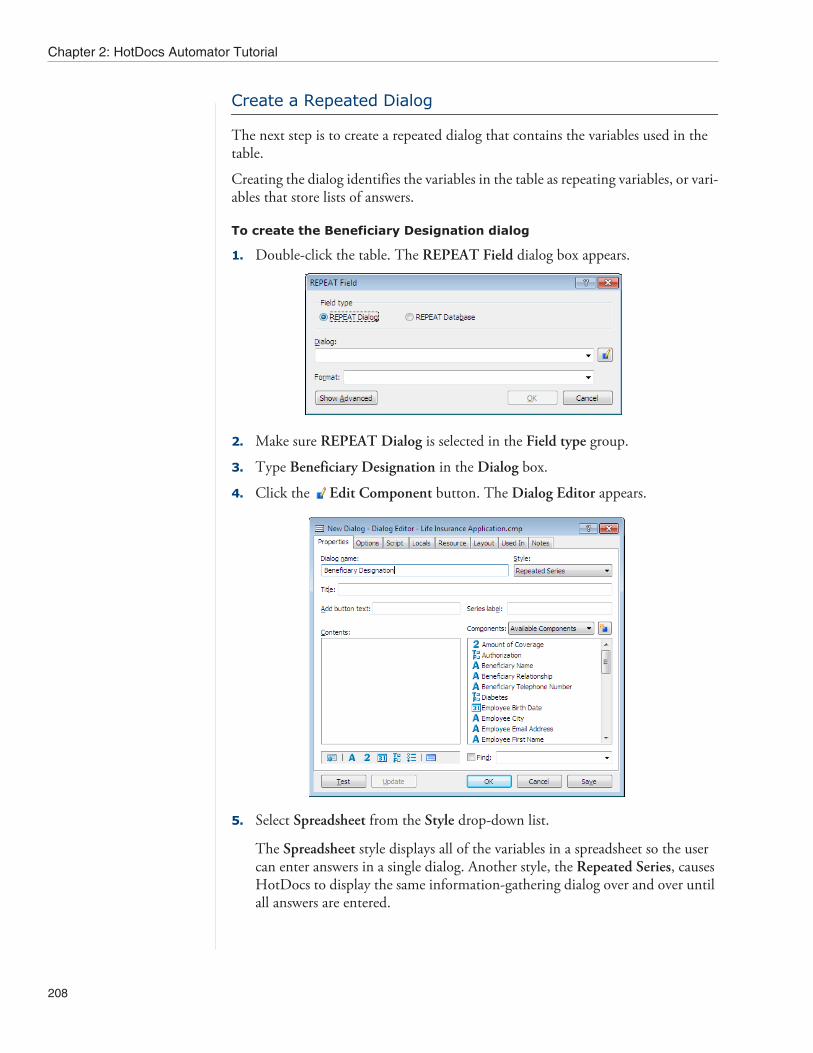
Chapter 2: HotDocs Automator Tutorial
208
Create a Repeated Dialog
The next step is to create a repeated dialog that contains the variables used in the table.
Creating the dialog identifies the variables in the table as repeating variables, or vari-ables that store lists of answers.
To create the Beneficiary Designation dialog
1. Double-click the table. The REPEAT Field dialog box appears.
2. Make sure REPEAT Dialog is selected in the Field type group.
3. Type Beneficiary Designation in the Dialog box.
4. Click the Edit Component button. The Dialog Editor appears.
5. Select Spreadsheet from the Style drop-down list.
The Spreadsheet style displays all of the variables in a spreadsheet so the user can enter answers in a single dialog. Another style, the Repeated Series, causes HotDocs to display the same information-gathering dialog over and over until all answers are entered.

Lesson 8: Create a List Using a Table
209
6. From the Components list, drag the following variables into the Contents box (you may have to scroll through the list to see the variable):Beneficiary NameBeneficiary Telephone NumberBeneficiary Relationship
7. Click OK at both the Dialog Editor and the REPEAT Field dialog box.
Automate the Beneficiary Designation Continuation Table
The Beneficiary Designation table is split between two pages of the form. So far, you have only grouped the fields on the first page. Because HotDocs Automator does not allow you to group fields across page boundaries, you must group the fields in the continuation table separately from the initial table on the first page.
Before grouping the fields, you must attach variables to the fields in the first row. One way you have learned to do this is by selecting the field and clicking the
Variable Field button. Another way you can do this is by dragging variables from Component Manager and dropping them on fields in your template.
To attach variables to the first row of the continuation table
1. Scroll to the top of the second page so you can see the continuation table.Tip: To display Component Manager next to the Automator window, adjust the width of Component Manager and click the
Arrange Windows button. HotDocs arranges the windows so you can work in both simultane-ously.
2. Click the Component Manager button. The Component Manager window appears.
3. In the Components list, select Beneficiary Name and, while holding the mouse button down, drag the variable from Component Manager to the first field in

Chapter 2: HotDocs Automator Tutorial
210
the Name column, then release the mouse button. The variable name appears in the Name field.
4. Repeat step 3 to drag the Beneficiary Telephone Number and Beneficiary Relationship variables to the corresponding fields in the first row of the contin-uation table.
5. Close the Component Manager window.
Now that you have attached variables to the first row of the continuation table, you must group the fields as a table and attach the repeated dialog to the table, just as you did on the first page.
To automate the continuation of the Beneficiary Designation table
1. While pressing Shift, click and hold the mouse button, dragging it from the top-left corner of the continuation table to the bottom-right corner.
2. Release the mouse button. Every field in the table is selected.

Lesson 8: Create a List Using a Table
211
Tip: You can also select Group as Table from the shortcut menu.
3. With the fields selected, choose Group as Table (Field menu). HotDocs places a group box around the fields.
4. Double-click the grouped fields. The REPEAT Field dialog box appears.
5. Select Beneficiary Designation from the Dialog drop-down list, and then click OK. The repeated dialog is assigned to the grouped fields.
Filter Answers in a Table
If you were to assemble the document now, HotDocs would treat both tables iden-tically—if you entered answers for three beneficiaries, HotDocs would insert the same answers on both pages. Instead, you want to insert the first three beneficiaries on the first page, and the remaining beneficiaries on the second page. You will use two filters (one for each table) to achieve this result.
To assign a filter to the first table
1. Double-click the Beneficiary Designation table on the first page. The REPEAT Field dialog box appears.
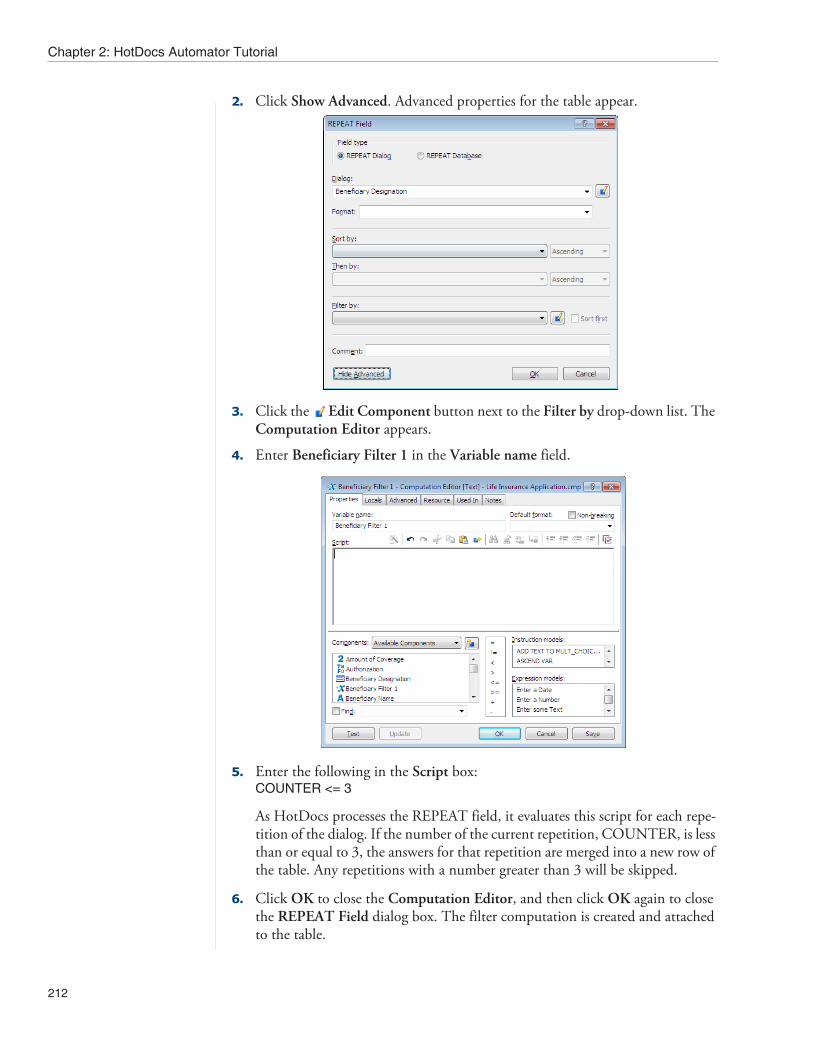
Chapter 2: HotDocs Automator Tutorial
212
2. Click Show Advanced. Advanced properties for the table appear.
3. Click the Edit Component button next to the Filter by drop-down list. The Computation Editor appears.
4. Enter Beneficiary Filter 1 in the Variable name field.
5. Enter the following in the Script box:COUNTER <= 3
As HotDocs processes the REPEAT field, it evaluates this script for each repe-tition of the dialog. If the number of the current repetition, COUNTER, is less than or equal to 3, the answers for that repetition are merged into a new row of the table. Any repetitions with a number greater than 3 will be skipped.
6. Click OK to close the Computation Editor, and then click OK again to close the REPEAT Field dialog box. The filter computation is created and attached to the table.

Lesson 8: Create a List Using a Table
213
Now you must assign a filter to the Beneficiary Designation table on the second page. While the filter for the first table limited repetitions to those less than or equal to 3, the filter for the second table must limit repetitions to those greater than 3.
To assign a filter to the second table
1. Double-click the Beneficiary Designation (Continued) table on the second page. The REPEAT Field dialog box appears.
2. Click Show Advanced. Advanced properties for the table appear.
3. Click the Edit Component button next to the Filter by drop-down list. The Computation Editor appears.
4. Enter Beneficiary Filter 2 in the Variable name field.
5. Enter the following in the Script box:COUNTER > 3
If the number of a repetition is greater than 3, this script will evaluate to TRUE and HotDocs will merge that repetition’s answers into a new row of the table.
6. Click OK to close the Computation Editor, and then click OK again to close the REPEAT Field dialog box. The filter computation is created and attached to the table.

Chapter 2: HotDocs Automator Tutorial
214
Conclusion
You are now finished with this lesson. In it, you learned how to group fields into tables and assign repeated dialogs to those tables. You also learned how to filter which sets of answers from those dialogs are merged into the table fields.
Click the Save Form button to save the template. If you do not want to go on to Lesson 9 at this time, choose Exit (File menu). Then exit HotDocs.

Lesson 9: Create Answer-Gathering Dialogs
215
Lesson 9: Create Answer-Gathering Dialogs
Overview
In this lesson, you will learn how to group the variables in your template into dialogs. You will also learn how to change variable prompts and add additional explanatory text (dialog elements) to your dialogs.
After creating dialogs, you will then learn how to display those dialogs in answer wizards, which help users enter answers during direct-fill assembly. You will test these answer wizards as you assemble the template using direct-fill at the end of the lesson.
In lesson 10, you will then learn how to add an interview and complete your form template.
Start the Tutorial
If you are continuing immediately from Lesson 8, skip the instructions for opening the template and proceed to “Gather Variables into Dialogs.”
If you closed the template at the end of Lesson 8, complete the following steps.
To open the tutorial template
1. Open HotDocs Developer (choose Start > Programs > HotDocs 11 > HotDocs Developer). The My Test Templates library appears.
NoteIf the My Test Templates library does not appear, choose Open Library (File menu), select the library in the default Libraries folder (for example, My Test Templates.hdl), and click Open.
2. Select Life Insurance Application and click Edit. The template appears in HotDocs Automator, ready for you to edit.
Gather Variables into Dialogs
How you divide variables into dialogs depends on the template and your own pref-erences. Generally, you begin with the most basic information, which, in this template, is the employee’s personal information. In templates that contain logical sections, such as the life insurance application you are automating, it also makes sense to group variables as they are grouped on the form itself. In this template, you will create a dialog for each section of the form, beginning with the Employee Infor-mation section.

Chapter 2: HotDocs Automator Tutorial
216
To create the Employee Information dialog
1. At the template, click the Component Manager button. The Component Manager window appears.
2. Click the Components drop-down button and select Dialogs. The list shows the Beneficiary Designation dialog that you already created in the previous lesson.
3. Click the New Component button. The Dialog Editor appears.
Tip: You can assign a dialog title to a dialog by typing it in the Title box. The title replaces the dialog name when the dialog is pre-sented during the interview.
4. Type Employee Information in the Dialog name box.
5. Drag the following variables into the Contents box, in this order:

Lesson 9: Create Answer-Gathering Dialogs
217
Employee First NameEmployee Middle InitialEmployee Last NameEmployee Social Security NumberEmployee Birth DateEmployee GenderEmployee Marital StatusEmployee Street AddressEmployee CityEmployee StateEmployee Zip CodeEmployee Primary Telephone NumberEmployee Email Address
6. Click Test. A test assembly window appears.
The dialog looks exactly the way it will during the interview. To make it look nicer, you can place up to three variables side by side on each line.

Chapter 2: HotDocs Automator Tutorial
218
7. Select Employee Information in the interview outline, and click the Edit Component button. The Dialog Editor is brought to the front.
Tip: Please see Lesson 14: Change the Placement of Variables in the Dialog (page 112) if you need help arranging variables side by side in the dialog.
8. At the Layout tab, drag and arrange the following groups of variables to appear on the same line:Employee First Name, Employee Middle Initial, Employee Last NameEmployee Social Security Number, Employee Birth Date, Employee
GenderEmployee Marital StatusEmployee Street AddressEmployee City, Employee State, Employee Zip CodeEmployee Personal Telephone NumberEmployee Email Address

Lesson 9: Create Answer-Gathering Dialogs
219
9. Click OK to close the Dialog Editor. The test assembly window shows the updated dialog layout.
10. Choose Close (File menu) to close the assembly window. The Employee Infor-mation dialog is now complete.
On Your Own
The next dialog you will create is for the Coverage Information section. Create a dialog named Coverage Information, which contains the following two variables:
Amount of CoverageMonthly Contribution to Cash Account
Please refer to the previous section if you need help creating this dialog.
Create the Medical History Dialog
The dialog for the Medical History section will contain five True/False variables, along with five corresponding Text variables to explain any health conditions.
To create the Medical History dialog
1. In Component Manager, click the New Component button. The Dialog Editor appears.

Chapter 2: HotDocs Automator Tutorial
220
2. Enter Medical History in the Dialog name box.
3. Drag the following variables from the Components list to the Contents list, in this order:SmokerExplain SmokingHeart TroubleExplain Heart TroubleHigh Blood PressureExplain High Blood PressureDiabetesExplain DiabetesImmune DisorderExplain Immune Disorder
If you were to test the dialog at this point, you would see all of your variables in the order in which you added them to the Contents list, and each True/False variable would contain yes/no options. To simplify the dialog, you can change these True/False variables to use check boxes instead. Not only do check boxes make the dialog appear more compact, they also help reduce the number of mouse clicks required to answer the dialog.
4. Click the Options tab of the Dialog Editor. The window changes to show several custom options.

Lesson 9: Create Answer-Gathering Dialogs
221
Tip: The Select All That Apply grouping causes True/False variables in the dialog to appear as check boxes. This is more efficient than showing yes/no options for each question.
5. Click the Selection grouping drop-down button and choose Select All That Apply.
6. Click Test. The test assembly window appears, showing your dialog. A check box appears for each True/False variable, allowing you to check the health con-ditions that apply.

Chapter 2: HotDocs Automator Tutorial
222
Create Custom Prompts for Variables
As you can see in the assembly window, the prompt displayed for each variable is the name of the variable by default. Sometimes, you may want the prompt, or question that appears in the interview, to be different than the variable’s name. Other times, you may not want a prompt at all.
In the Medical History dialog, you will change the prompts for the True/False vari-ables to assist the user in answering the questions appropriately.
To change the prompts for the Medical History check boxes
1. Go back to the Properties tab.
2. Right-click on the Smoker check box, and select Edit Component from the shortcut menu. The True/False Variable Editor appears.
3. In the Prompt box, enter the following text:
I have smoked within the past 12 months.
4. Click OK to close the True/False Variable Editor. The dialog is updated to show the new prompt.
5. Repeat steps 1–3 to create prompts for the remaining True/False variables in the dialog, using the following text:In the past 10 years, I have had or been told that I have chest pains, heart
trouble, heart attack, or heart murmur.In the past 10 years, I have had or been told that I have high blood pres-
sure, cancer, or tumors.In the past 10 years, I have had or been told that I have diabetes, pneu-
monia, or a disorder of the lymph system. In the past 10 years, I have had or been told that I have AIDS, AIDS-
related complex, or an immune system disorder.
Just as you can add prompts to variables, you can add text to the dialog to guide users in answering the questions. In this dialog, you will add text to instruct users what to enter in the text boxes.

Lesson 9: Create Answer-Gathering Dialogs
223
To add explanatory text to the dialog
1. At the assembly window, select the Medical History dialog in the interview outline and click the Edit Component button. The Dialog Editor is brought to the front.
2. At the Properties tab, click the Create New Dialog Element button and drag it to the top of the Contents box, above the Smoker variable.
3. Release the mouse button. The Dialog Element Editor appears.

Chapter 2: HotDocs Automator Tutorial
224
4. Enter Medical History Explanation in the Dialog element name box.
5. In the Display text box, type the following:Check each statement below that applies to you. For each checked statement, explain your answer in the space provided.
6. Click OK. The dialog element is created and added to the dialog.

Lesson 9: Create Answer-Gathering Dialogs
225
7. Click Update. The dialog element appears at the top of the dialog, providing the user with information about how to answer the questions.
The final change you will make to the prompts in this dialog is to hide the prompts for each of the explanation fields. Since the dialog element you added to the top of the dialog already explains how to answer the questions, the default prompts for these text fields are unnecessary.
To hide the prompts for the text fields
1. Click in the Explain Smoking field, and then click the Edit Component button (or press Ctrl+E). The Text Variable Editor appears.

Chapter 2: HotDocs Automator Tutorial
226
2. In the Prompt box, type NONE. (This is a special keyword that tells HotDocs not to display a prompt for the variable.)
3. Click OK to close the Text Variable Editor. The test assembly window is updated to show the variable without a prompt.
4. Repeat steps 1–3 to remove the prompts for the remaining explanation fields.
Make Variables in a Dialog Conditional
In Lesson 7, you made the text fields in the Medical History section of the template conditional upon their corresponding yes/no questions—if a user circles yes, he or she can tab to the text field and enter an explanation for the health condition. You can also use conditional logic to make answer fields in a dialog conditional upon other questions being answered.
In this lesson, you will create a dialog script that grays the answer fields for the health explanations if the user doesn’t select the preceding check boxes.
To create a dialog script
1. At the assembly window, select the Medical History dialog in the interview outline and click the Edit Component button. The Dialog Editor is brought to the front.

Lesson 9: Create Answer-Gathering Dialogs
227
2. Click the Script tab. The window changes to show a scripting box.
Notice that the Components list contains a list of all of the components used in this particular dialog. They are listed in the same order as they were added to the dialog.
Tip: You can quickly access the list of components by pressing the F5 key or Ctrl+Spacebar.
3. Click in the Script box, and enter the following script:GRAY Explain SmokingGRAY Explain Heart TroubleGRAY Explain High Blood PressureGRAY Explain DiabetesGRAY Explain Immune Disorder
These instructions gray the explanation fields so the user can’t enter any answers.
4. After the last GRAY instruction, press Enter and enter the following script:IF SmokerUNGRAY Explain SmokingEND IF
This tells HotDocs that if the user selects the Smoker True/False variable, it should ungray the corresponding Text variable so the user can answer it.
On Your OwnTip: Drag the bottom border of the Script box to make the script-writing area bigger. This allows you to see more of your script.
Using the condition for Smoker as an example, ungray the four remaining Text vari-ables (Explain Heart Trouble, Explain High Blood Pressure, Explain Diabetes, and Explain Immune Disorder) based on their corresponding True/False variables being TRUE.

Chapter 2: HotDocs Automator Tutorial
228
When you are finished, the dialog script should look like this:
Tip: To format the script so that any instructions or vari-ables within an IF instruc-tion are indented, click the
Auto Format button.
You can now test the dialog to see how the script works. Click Update to preview the dialog in the test assembly window. The explanation fields are grayed until you select the corresponding check boxes. When you are finished testing, choose Close (File menu) to close the test assembly window, and then click OK at the Dialog Editor.
Create Default Dialogs
Your component file now contains four dialogs—three dialogs you have created in this lesson and the Beneficiary Designation dialog you created in the previous lesson. Because the last two sections of the form contain only one variable each, you have several options for creating the dialogs:
You could create a separate dialog for each section, as you have done previously. Each dialog would contain only one variable.
You could create a dialog for both sections combined, and include both vari-ables in the same dialog.
You could use default dialogs, where HotDocs displays each variable in the interview individually as if it were a dialog.
For this template, you will use the third option, which saves you the time of creating dialogs that contain only one variable each.

Lesson 9: Create Answer-Gathering Dialogs
229
When HotDocs displays a default dialog for a variable, it uses the variable’s prompt as the title in the interview outline. To make the default dialog more consistent with the other dialogs you created, you can specify your own title instead.
To specify a title and prompt for the Other Remarks default dialog
1. In Component Manager, select All Variables from the Components drop-down list. The list changes to show all variables in the component file.
2. Double-click the Other Remarks variable. (You may have to scroll through the list to see the variable.) The Text Variable Editor appears.
3. In the Title box, type Other Remarks.
4. In the Prompt box, type the following text:Please use the space below to provide additional details, explanations, or other information necessary to establish your insurance eligibility claim:
5. Click Test. The test assembly window appears, showing the default dialog for your variable.
6. Choose Close (File menu) to close the test assembly window, and then click OK to close the Text Variable Editor.
On Your Own
The Authorization variable also needs a custom title and prompt for its default dialog. Use Authorization and Signature as its title and the following text as its prompt:
I hereby authorize Hobble Creek Publishing, the employer, to deduct from my wages amounts equal to the contributions required of me for Group Insurance under the policy issued to the employer by Hobble Creek Life Insurance Com-pany.
Please refer to the previous section if you need help setting the title and prompt for this variable. When you are finished, close Component Manager.

Chapter 2: HotDocs Automator Tutorial
230
Attach an Answer Wizard to a Computed Field
When a user direct-fills a form document, he or she answers questions by clicking on a field and entering the answer in the field. Sometimes, however, the user may not be able to enter an answer in the field, either because the field requires other variables be answered to calculate its answer, or because it’s conditioned on another field’s answer in the document. To help users answer the questions necessary to fill in the field, you can assign an answer wizard to the field. An answer wizard attaches an Answer Wizard button to the field that, when clicked, displays a pop-up inter-view asking the required questions.
Because the Name field contains a computed value, you will attach an answer wizard so users can enter answers for the employee’s first, middle, and last names. The computation attached to that field will then combine the names and merge them into the field. Without an answer wizard, clicking that field during assembly would reveal a grayed, or disabled, field that would not allow users to enter an answer.
To attach an answer wizard to the Name field
1. Select the Employee LFM Name field.Tip: To access the Field Properties dialog box, you can also select a field and press Alt+Enter.
2. Click the Field Properties button. The Field Properties dialog box appears.
3. At the Type tab, click the Wizard button. The Answer Wizard Field dialog box appears.
4. Select ASK Dialog.
5. Click the Dialog drop-down button and select Employee Information.

Lesson 9: Create Answer-Gathering Dialogs
231
6. Click OK at the Answer Wizard Field dialog box. An ASK instruction is inserted in the Wizard box.
7. Close the Field Properties dialog box.
Assign DEFAULT Answer Wizards to Fields
In the previous section, you attached an answer wizard to the Name field. There are a number of other fields in your template where answer wizards are recommended. For example, conditioned fields like those in the Medical History section typically use answer wizards to aid users in answering all of the required conditions for the field. The Beneficiary Designation tables could also use an answer wizard, which would allow the user to enter as many beneficiaries as needed, even if they do not all fit in the allotted space on the form. (Additional answers would be sent to an addendum.)
Instead of using a specific dialog as the answer wizard for these fields as you did with the Name field, you can use the DEFAULT answer wizard. HotDocs will then auto-matically ask any dialogs necessary for those fields.
To assign the DEFAULT answer wizard to multiple fields
1. On the first page of your template, make sure no existing fields are selected by clicking on any white space.
2. Press and hold the Shift key while clicking each of the following fields:

Chapter 2: HotDocs Automator Tutorial
232
Employee AgeExplain SmokingExplain Heart TroubleExplain High Blood PressureExplain DiabetesExplain Immune Disorder
A selection box appears around each of the six selected fields.
3. Click the Field Properties button. The Field Properties [Multiple] dialog box appears.
4. Click the Answer Wizard button next to the Wizard field. The Answer Wizard Field dialog box appears.
5. Select DEFAULT from the Contents group, and then click OK. The default answer wizard is inserted in the Wizard box.
To assign a DEFAULT answer wizard to the beneficiary tables
1. Select the Beneficiary Designation table at the bottom of the first page.
2. In the Field Properties dialog box, click the Answer Wizard button next to the Wizard field. The Answer Wizard Field dialog box appears.
3. Select DEFAULT from the Contents group, and then click OK. The default answer wizard is inserted in the Wizard box.
4. Repeat steps 1–3 for the Beneficiary Designation table at the top of the second page.

Lesson 9: Create Answer-Gathering Dialogs
233
5. Close the Field Properties dialog box.
Assemble a Form Document Using Direct-Fill
Your form template is now nearly complete. You can check your progress by test assembling it using direct-fill assembly, where you enter answers directly in the form fields instead of a separate interview. (You will learn how to create an interview in the next lesson.)
Tip: Even if you decide to provide an interview for your template, users still have the option of using direct-fill assembly, so you should test your templates using direct-fill to ensure that they work as expected.
As you develop your own form templates, you may decide that direct-fill assembly meets your needs for some templates, while other more complex templates may require an interview to help guide the person filling out the form.
To test assemble a document using direct-fill
1. Click the Test Assemble button. A test assembly window appears, displaying the Form Document tab.
2. In each field, enter an answer. To move to the next field, press the Tab key (or click the desired field with the mouse).

Chapter 2: HotDocs Automator Tutorial
234
NoteIf a field is grayed (disabled), its answer is either the result of a computation, or it is conditioned upon the answer for another variable. To enter answers in these fields, click the Answer Wizard button (or press F5) and answer questions in the pop-up dialogs.
3. When you are finished, choose Close (File menu) to close the test assembly window.
Conclusion
You are now finished with this lesson. In it, you learned how to group variables to create custom dialogs, and how to customize the titles and prompts displayed in those dialogs. You also learned how to customize the appearance of default dialogs—dialogs created during assembly for variables that are not included in a custom dialog. Finally, you learned how to create answer wizards for fields and test assemble the template using direct-fill assembly.
Click the Save Form button to save the template. If you do not want to go on to Lesson 10 at this time, choose Exit (File menu). Then exit HotDocs.

Lesson 10: Create a Default Interview
235
Lesson 10: Create a Default Interview
Overview
In Lesson 9, you grouped variables in your template into custom answer-gathering dialogs and created answer wizards that used those dialogs. In this lesson, you will learn how to create a default interview, which displays your dialogs in the Interview tab during assembly. After creating this interview, your form template will be complete and ready for a final test assembly.
Start the Tutorial
If you are continuing immediately from Lesson 9, skip the instructions for opening the template and proceed to “Have HotDocs Generate a Default Interview.”
If you closed the template at the end of Lesson 9, complete the following steps.
To open the tutorial template
1. Open HotDocs Developer (choose Start > Programs > HotDocs 11 > HotDocs Developer). The My Test Templates library appears.
NoteIf the My Test Templates library does not appear, choose Open Library (File menu), select the library in the default Libraries folder (for example, My Test Templates.hdl), and click Open.
2. Select Life Insurance Application and click Edit. The template appears in HotDocs Automator, ready for you to edit.
Have HotDocs Generate a Default Interview
When you assemble a form document, you can enter your answers directly at the Form Document tab of the assembly window as you did at the end of the previous lesson, or you can enter answers at the Interview tab where questions are grouped into dialogs. To display the Interview tab during assembly, you must create an interview for your template.
You can have HotDocs generate a default interview, which it creates by reading through the fields in the template and asking variables in the order they appear. If the variables are linked to a dialog, it asks the dialog instead. These variables and dialogs then appear in the Interview tab of the assembly window.

Chapter 2: HotDocs Automator Tutorial
236
NoteFor most templates, the default interview is sufficient. However, if you need control over the order questions are asked in the interview, you can create a custom interview instead. See the HotDocs Help to learn how to define a custom interview.
You can have HotDocs generate a default interview by specifying a property in your template’s component file.
To select the property that specifies a default interview
1. Click the Component Manager button. The Component Manager window appears.
2. At Component Manager, click the Component File Properties button. The Component File Properties dialog box appears.

Lesson 10: Create a Default Interview
237
3. Click the Interview tab. The view changes to show interview options.
Tip: If you select Use custom interview, you can create a computation that asks the dialogs in the order you choose, rather than the default order determined by HotDocs. (See the HotDocs Help for specific information on creating a custom inter-view.)
4. Select Generate default interview.
5. Click OK.
6. Close Component Manager by clicking the X in the upper-right corner.
7. Click the Save Form button to save your template.
Now when users assemble the document, they will, by default, enter answers using an interview. Also, any fields that require an answer wizard for which you have not explicitly created one will have default answer wizards during assembly.

Chapter 2: HotDocs Automator Tutorial
238
Assemble a Form Document Using an Interview
Once you have specified a default interview, HotDocs adds an Interview tab to the assembly window. (Direct-fill assembly shows only the Form Document tab.) The Interview tab shows an interview outline and the dialog pane. The interview outline displays icons for the dialogs you have created. You can click any dialog icon and view the corresponding variable or variables in the dialog pane, where you enter answers.
To test assemble a document using an interview
1. Click the Test Assemble button. A test assembly window appears, displaying the Employee Information dialog in the right pane of the window. The left pane shows the interview outline.

Lesson 10: Create a Default Interview
239
2. Enter the information in the answer fields and click Next to see the next dialog.
3. When you are finished, click the Form Document tab. The assembled form document appears, showing the answers you entered.

Chapter 2: HotDocs Automator Tutorial
240
4. Click in one of the explanation fields in the Medical History section. HotDocs displays an Answer Wizard button next to the field. (If you click this button, HotDocs displays the Medical History dialog as a pop-up, where you can answer any questions in the Medical History section.)
5. Click in one of the cells of the Beneficiary Designation table. HotDocs displays a Table Wizard button next to the cell.
6. Click the Table Wizard button. The Beneficiary Designation pop-up dialog box appears.
7. Enter at least seven beneficiaries in the list (one more beneficiary than will fit in the allotted space on the form), and then click Finish. The first six answers are merged into the appropriate spaces on the form.
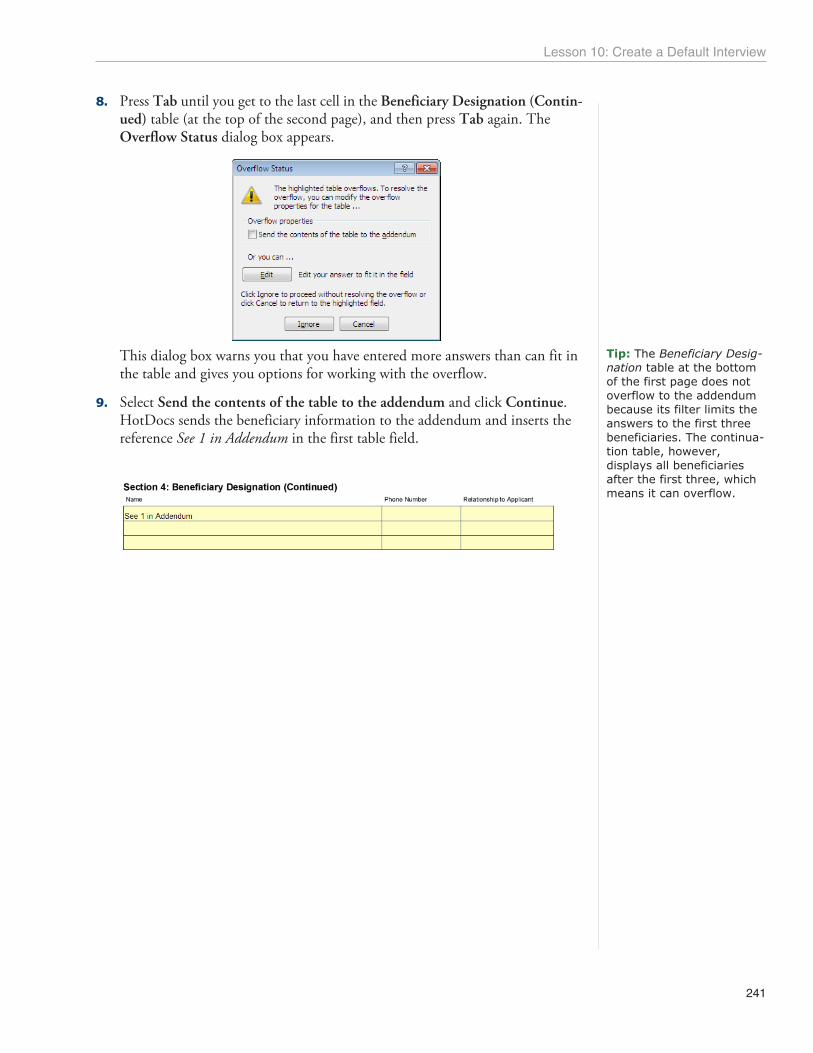
Lesson 10: Create a Default Interview
241
8. Press Tab until you get to the last cell in the Beneficiary Designation (Contin-ued) table (at the top of the second page), and then press Tab again. The Overflow Status dialog box appears.
Tip: The Beneficiary Desig-nation table at the bottom of the first page does not overflow to the addendum because its filter limits the answers to the first three beneficiaries. The continua-tion table, however, displays all beneficiaries after the first three, which means it can overflow.
This dialog box warns you that you have entered more answers than can fit in the table and gives you options for working with the overflow.
9. Select Send the contents of the table to the addendum and click Continue. HotDocs sends the beneficiary information to the addendum and inserts the reference See 1 in Addendum in the first table field.

Chapter 2: HotDocs Automator Tutorial
242
Tip: You can customize the layout of the addendum page, as well as the label inserted in the template when a field overflows. (For more information about customizing the addendum and overflow options, see the HotDocs Help.)
10. Click the scroll bar on the right side of the assembly window and scroll down to the addendum page. The answers from the continuation table are listed.
11. Choose Close (File menu) to close the test assembly window and return to the template, and then choose Exit (File menu) to close the template and HotDocs Automator.
Conclusion
You are now finished with this lesson. In it, you learned how to create a default interview. Then you test assembled your template and learned about answer overflow—what happens when answers do not fit in the answer fields.
Your life insurance application template is now complete, and you are finished with the HotDocs Automator tutorial. For additional information on using HotDocs Automator, please refer to the HotDocs Help.

243
Chapter 3: HotDocs Database Connectivity Tutorial
Overview
This tutorial teaches you how to connect your templates to a database file so you can retrieve answers from it during the interview.
As you know, each time you assemble a document, HotDocs prompts you for the information required by the document. Typically, to answer the questions in an interview, you either enter them during the interview, or you use a HotDocs answer file that already contains the answers you need. Another way you can provide the answers is by retrieving them from a database file.
In this tutorial, you will automate a Collection Letter that will be sent to clients who are delinquent in paying Hobble Creek Publishing for services it provides. To deter-mine which clients are late on payments, you will query a database file that stores information about the clients, including a list of all invoices associated with a given client.
To do this, you will create an ADO connection string that will link variables in the template to records in the database. You will then create a filter to retrieve only those records where invoices are unpaid.
The tutorial is divided into six lessons, which you must complete in order. However, you can complete each lesson in separate sessions.
In these lessons, you will:
Create database components using an ADO connection string. Link variables in the template to fields in a database table. Filter the list of records that are returned on the database query. Retrieve related records based on the filter you create.
NoteBefore completing these lessons, you should complete the lessons in Chapter 1, since many of the ideas and concepts you see in the following lessons build upon the things you learned in that chapter. The template and database files used in the tutorial were drafted for instructional purposes only.
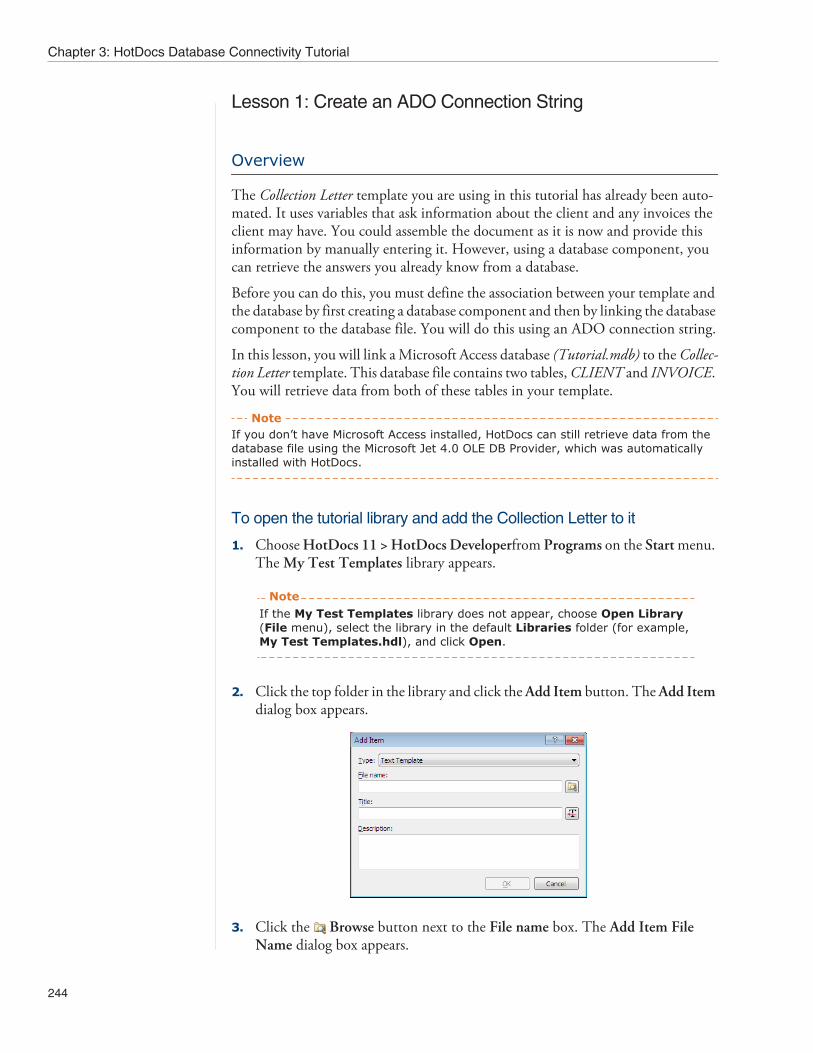
Chapter 3: HotDocs Database Connectivity Tutorial
244
Lesson 1: Create an ADO Connection String
Overview
The Collection Letter template you are using in this tutorial has already been auto-mated. It uses variables that ask information about the client and any invoices the client may have. You could assemble the document as it is now and provide this information by manually entering it. However, using a database component, you can retrieve the answers you already know from a database.
Before you can do this, you must define the association between your template and the database by first creating a database component and then by linking the database component to the database file. You will do this using an ADO connection string.
In this lesson, you will link a Microsoft Access database (Tutorial.mdb) to the Collec-tion Letter template. This database file contains two tables, CLIENT and INVOICE. You will retrieve data from both of these tables in your template.
NoteIf you don’t have Microsoft Access installed, HotDocs can still retrieve data from the database file using the Microsoft Jet 4.0 OLE DB Provider, which was automatically installed with HotDocs.
To open the tutorial library and add the Collection Letter to it
1. Choose HotDocs 11 > HotDocs Developerfrom Programs on the Start menu. The My Test Templates library appears.
NoteIf the My Test Templates library does not appear, choose Open Library (File menu), select the library in the default Libraries folder (for example, My Test Templates.hdl), and click Open.
2. Click the top folder in the library and click the Add Item button. The Add Item dialog box appears.
3. Click the Browse button next to the File name box. The Add Item File Name dialog box appears.

Lesson 1: Create an ADO Connection String
245
4. In the list of templates, select Collection Letter.docx or Collection Letter.wpt, depending on which word processor you are using.
5. Click OK. You are returned to the Add Item dialog box.
6. Click OK. The template is added.
Create a Database Component
In order to create the connection, you must first create the database component that will store the connection information.
To create a database component
1. At the template library, select Collection Letter and click Edit. The template appears, ready for you to edit.

Chapter 3: HotDocs Database Connectivity Tutorial
246
Tip: You can have HotDocs arrange the template and Component Manager windows so you can view both simultaneously. To do this, adjust Component Manager to the width you want and click the
Arrange Windows button in the Component Manager toolbar.
2. Click the Component Manager button in the HotDocs toolbar of the word processor. The Component Manager window appears.
3. Click the Components drop-down button and select Databases from the list. The list changes to show only database components. (Because you have not yet created any database components, this list is empty.)
4. Click the New Component button. The Database Editor appears.

Lesson 1: Create an ADO Connection String
247
5. Type Client Data in the Component name box.
Now that you have created the database component and assigned a name to it, you must define a connection string, which contains the information HotDocs needs to connect to the database.
Define the ADO Connection StringTip: ADO stands for ActiveX Data Objects. It is a data presentation layer that lets HotDocs communicate with a database so HotDocs can retrieve data from it and use it to assemble a document.
An ADO connection string defines the relationship HotDocs has to the database. It contains information about the OLE DB provider, the location of the actual database file, the name of the table from which you will be retrieving data, and any other information about the connection HotDocs needs to know to maintain its relationship with the database.
You can use a simple wizard to help you define the connection string.

Chapter 3: HotDocs Database Connectivity Tutorial
248
To build the ADO connection string
1. With the Database Editor displayed, make sure an ADO connection string is selected at the Connection properties are defined by drop-down list.
2. Click the Edit button next to the Connection string box. The Data Link Properties dialog box appears.

Lesson 1: Create an ADO Connection String
249
3. Select Microsoft Jet 4.0 OLE DB Provider from the list of providers and click Next. HotDocs displays the Connection tab of the Data Link Properties dialog box.
4. Click the Browse button next to the Database name box and locate the database file, TUTORIAL.mdb. (This file should be located in the default Templates folder, for example, C:\Documents and Settings\UserName\My Docu-ments\HotDocs\Templates.)
5. Click Open. The Data Link Properties dialog box appears again.
6. Click OK. The Database Editor appears again, showing the ADO connection string that will link your template to the database.
7. Click the Field Map tab.

Chapter 3: HotDocs Database Connectivity Tutorial
250
8. Click the Table name drop-down button and select CLIENT. The fields from the CLIENT table appear in the Field Name column.
9. Click OK.
HotDocs creates an association between the template file and the database, partic-ularly the CLIENT database table.
In Lesson 2 you will link fields in this table to variables in the template.
On Your Own
Create a second database component using an ADO connection string. Follow the instructions in both Create a Database Component (page 245) and Define the ADO Connection String (page 247). Name this component Invoice Data, and use the same database file, TUTORIAL.mdb. When selecting the database table at the Field Map tab, choose INVOICE.
Once you have created the second database component and defined its connection string, you are now ready to link variables in your template to fields in these two database tables. You will do this in Lesson 2.
Conclusion
You are now finished with this lesson. In it, you learned how to create a database component and link it to a specific table in a database file.
If you do not want to go on to Lesson 2 at this time, close Component Manager (by clicking the X in the upper-right corner of the Component Manager window), and then click the Save and Close button to close the template. Then exit HotDocs.
If you are continuing on to Lesson 2, click the Save button in the template to save your work.

Lesson 2: Link Variables to Fields in a Database Table
251
Lesson 2: Link Variables to Fields in a Database Table
Overview
As you already know, to create an interview, HotDocs reads through the template and displays the variables (or dialogs, if the variables are linked to the dialogs) in the order it reads them. When variables are linked to a database table (rather than a dialog), HotDocs displays the database table in the interview so you can choose a record. The selected data is then retrieved from the database file and merged into the assembled document.
In this lesson, you will link variables in the template to fields in both the CLIENT and INVOICE tables. You will also designate key fields in each table. Key fields help HotDocs remember which records have been selected during an interview.
Start the Tutorial
If you are continuing immediately from Lesson 1, skip the instructions for opening the template and proceed to “Link Variables to Fields.”
If you closed the template at the end of Lesson 1, complete the following steps.
To open the Collection Letter template
1. Open your word processor and click the HotDocs button. The My Test Templates library appears.
NoteIf the My Test Templates library does not appear, choose Open Library (File menu), select the library in the default Libraries folder (for example, My Test Templates.hdl), and click Open.
2. Select Collection Letter and click Edit. The template appears, ready for you to edit.
3. Click the Component Manager button. The Component Manager window appears.
Link Variables to Fields
Once the connection to your database has been defined, you can link fields in the database table to variables in your template. These links allow HotDocs to retrieve information from the database table each time the template is used to assemble a document.

Chapter 3: HotDocs Database Connectivity Tutorial
252
Tip: When linking variables to fields, data types must match. For example, if the field type is text, you must link to either a Text variable or a Multiple Choice variable (since Multiple Choice vari-ables are text values).
To link variables in the template to fields in the database
1. With Component Manager displayed, select Client Data from the list of com-ponents and click the Edit Components button. The Database Editor appears.
2. Click the Field Map tab. The CLIENT table appears, with a list of all the fields in the table.
3. In the Linked Variable column, click the drop-down button that corresponds to the COMPANY field and select Company Name.
The HotDocs variable Company Name is now linked to the COMPANY field in the CLIENT database table.

Lesson 2: Link Variables to Fields in a Database Table
253
Tip: By default, once you link a variable to a field, HotDocs removes the variable from the list. You can view the entire list of variables—linked and unlinked—by clearing Show unlinked variables only. When you do this, variables that are already linked are surrounded by brackets and are sorted to the bottom of the variable list.
4. Repeat step 3 to link the following variables to fields in the database table:Field Variable
Help Me!
CONTACT
Client Name
ADDRESS1 Address Line 1
ADDRESS2 Address Line 2
CITY City
STATE State
POSTALCODE Zip Code
The fields in the database table are now linked to variables in the template. Now that you have done this, you must make sure one of the fields is designated as the key field.
Designate a Specific Field as the Key Field
During the interview, when HotDocs connects to a database, it displays a table of records. When you select a record and move to another dialog, HotDocs can remember from where in the database table the record was selected so that if you later review the table, your record will still appear selected.
For HotDocs to operate this way, you must make one of the fields in the database component the key field. A key field contains information that is unique to a record—for example, an invoice number or a customer identification number. Without a key field, HotDocs has no way to remember from where in the table the record was retrieved and, therefore, cannot retain this information once you navigate to a new dialog. This may be confusing to some users since even though answers may appear in the assembled document, the table in the interview shows that no record has been selected.
Selecting a key field also makes it easier to reuse an answer file that contains selected database records, for the reasons explained above.
If you are connecting to a database table using a native OLE DB provider, HotDocs recognizes the key field that was designated when the database table was first created and automatically assigns it as the key field for the database component. Even so, it is always a good idea to make sure the correct key field is specified.

Chapter 3: HotDocs Database Connectivity Tutorial
254
Tip: HotDocs does not rec-ognize existing key fields when you connect to the database using the OLE DB provider for ODBC, or when your database component is connected to a database view. You must manually identify the key using the Database Editor.
Because a client’s identification number will always be unique, you must make sure the CLIENTID field is designated as the key field.
To ensure CLIENTID is designated as the key field In the Key column, make sure the box next to the CLIENTID field is selected.
Now that you have linked fields in the CLIENT table to corresponding variables in the template, you can test how the database component will appear during assembly.
Test the Database
Just as you can test variables and dialogs as you create them, you can test database components.

Lesson 2: Link Variables to Fields in a Database Table
255
To test the database component
1. At the Database Editor, click Test. A test assembly window appears, displaying the Client Data table.

Chapter 3: HotDocs Database Connectivity Tutorial
256
2. Click a record in the table and click Select, located below the database spreadsheet. HotDocs adds the record to the Selected Item list, at the bottom of the dialog pane.

Lesson 2: Link Variables to Fields in a Database Table
257
Tip: If you click the Show command string link, HotDocs displays the database command string it used to retrieve this data.
3. Click the Result tab. The window changes to show the information the database component retrieved.
The first row in the table shows the names of the fields in the actual database table, while the second row shows the names of the HotDocs variables to which these fields are linked. The third row shows the particular answers that were retrieved from the database table.

Chapter 3: HotDocs Database Connectivity Tutorial
258
4. Click the Interview tab again. Notice that the record is still listed in the Selected Items list. This is because the database component has a key field. If no key field had been assigned, no records would appear selected.
5. Close the test assembly window by choosing Close from the File menu. HotDocs asks you to save your answers.
6. Decide whether to save your answers, based on the following information:Tip: For more information on using test answer files, see the HotDocs Help.
If you click Save or Save As, you will be prompted to specify an answer file name and title. Type Test Answer File in the File name box and accept the suggested Title. From this point on, this answer file will be used each time you test a component or test assemble the template, and you will no longer be prompted to save your answers after each test. (You can, of course. choose a different answer file when you are at the assembly window.)
If you click Don’t Save, each time you test a component or test assemble the template, you will use an empty, untitled answer file. You will also be prompted to save your answers each time you finish a test.
7. Click OK at the Database Editor.

Lesson 2: Link Variables to Fields in a Database Table
259
On Your Own
Open the Invoice Data database component, click the Field Map tab, and link the following variables to their corresponding fields in the INVOICE table. Follow the instructions given in Link Variables to Fields (page 251).
Field Variable
INV_NUMBER Invoice Number
INV_DATE Invoice Date
INV_TOTAL Invoice Total
After linking the variables, make sure INV_NUMBER is designated as the key field. (Follow the instructions given in Designate a Specific Field as the Key Field (page 253).) Then, when you are finished, click OK to close the Database Editor.

Chapter 3: HotDocs Database Connectivity Tutorial
260
Conclusion
You are now finished with this lesson. In it, you learned how to map variables in the template to fields in a database table. You also learned how to assign key fields, which helps HotDocs remember which record was selected.
If you do not want to go on to Lesson 3 at this time, close Component Manager (by clicking the X in the upper-right corner of the Component Manager window), and then click the Save and Close button to close the template. Then exit HotDocs.
If you are continuing on to Lesson 3, click the Save button to save your work.

Lesson 3: Select Fields and Records for Display
261
Lesson 3: Select Fields and Records for Display
Overview
Sometimes a database table contains fields that have no corresponding variables in the template. Even if the fields contain information, you may not want them to appear during assembly—especially if there are already a large number of fields in a record. Also, perhaps a user assembling a document needs to see only the informa-tion in one or two fields, such as the company name and company contact, in order to select a record. In such situations, it makes sense to display only those fields, rather than all the fields.
In this lesson, you will hide fields that have little or no meaning to the user. You do this at the Database Editor.
Start the Tutorial
If you are continuing immediately from Lesson 2, skip the instructions for opening the template and proceed to “Choose Which Fields Will be Presented During Assembly.”
If you closed the template at the end of Lesson 2, complete the following steps.
To open the Collection Letter template
1. Open your word processor and click the HotDocs button. The My Test Templates library appears.
NoteIf the My Test Templates library does not appear, choose Open Library (File menu), select the library in the default Libraries folder (for example, My Test Templates.hdl), and click Open.
2. Select Collection Letter and click Edit. The template appears, ready for you to edit.
3. Click the Component Manager button. The Component Manager window appears.
Choose Which Fields Will be Presented During Assembly
You can customize the database component to show only the required fields during the interview.

Chapter 3: HotDocs Database Connectivity Tutorial
262
To select which fields will be shown in the table during assembly
1. With Component Manager displayed, select Client Data from the list of com-ponents and click the Edit Component button. The Database Editor appears.
2. Click the Field Map tab. The window changes to show all the fields in the CLIENT table.
Notice that in the Display column, each field has a check mark. This means that HotDocs will display each of these fields during the interview. However, some fields are unnecessary for the user to see.
Tip: Notice that as you “remove” fields, the field name is also removed from the Field display order box. The order of fields in this box indicates the order of columns in the spread-sheet when it’s displayed during the interview.
3. In the Display column, clear the check marks for the following database fields: CLIENTID and COUNTRY
4. Click Test. HotDocs displays the test assembly window and shows the seven remaining fields in the table.
5. Close the test assembly window by choosing Close from the File menu. HotDocs displays the Database Editor again.
Lesson 3: Select Fields and Records for Display
263
6. Click OK to close the Database Editor.
On Your Own
Edit the Invoice Data database component so that the following fields are not displayed during assembly:
CLIENTIDSHIP_DATEDATE_PAID
Follow the instructions given in Choose Which Fields Will be Presented During Assembly (page 261). When you are finished, click OK to close the Database Editor.
Conclusion
You are now finished with this lesson. In it, you learned how to select fields so they can be displayed during the interview.
If you do not want to go on to Lesson 4 at this time, close Component Manager and then click the Save and Close button to close the template. Then exit HotDocs.
If you are continuing on to Lesson 4, click the Save button to save your work.

Chapter 3: HotDocs Database Connectivity Tutorial
264
Lesson 4: Filter the List of Records
Overview
By default, when HotDocs presents a table of records during the interview, every record in the table is displayed. Depending on the size of the table, this may mean the table with which you are working could make retrieving data from it sluggish.
You can limit the number of records retrieved from a database by creating a filter. A filter compares the value in a database field with another value or with a variable in the template. Only the records that meet the comparison are displayed.
In this template, the INVOICE table contains many records, but you want to generate letters for only those invoices that have not been paid. You can create a filter that displays only the records whose DATE_PAID field is empty.
Start the Tutorial
If you are continuing immediately from Lesson 3, skip the instructions for opening the template and proceed to “Create the Database Filter.”
If you closed the template at the end of Lesson 3, complete the following steps.
To open the Collection Letter template
1. Open your word processor and click the HotDocs button. The My Test Templates library appears.
NoteIf the My Test Templates library does not appear, choose Open Library (File menu), select the library in the default Libraries folder (for example, My Test Templates.hdl), and click Open.
2. Select Collection Letter and click Edit. The template appears, ready for you to edit.
3. Click the Component Manager button. The Component Manager window appears.
Create the Database Filter
You must create a filter that displays only the records whose DATE_PAID field is empty. Then, during the interview, users can choose from only unpaid accounts.

Lesson 4: Filter the List of Records
265
To filter the records
1. With Component Manager displayed, edit the Invoice Data component. The Database Editor appears.
2. Click the Sort & Filter tab. The window changes to show sorting and filtering options.
3. Click the Filter by Field drop-down button and select DATE_PAID. The Comparison field becomes active.
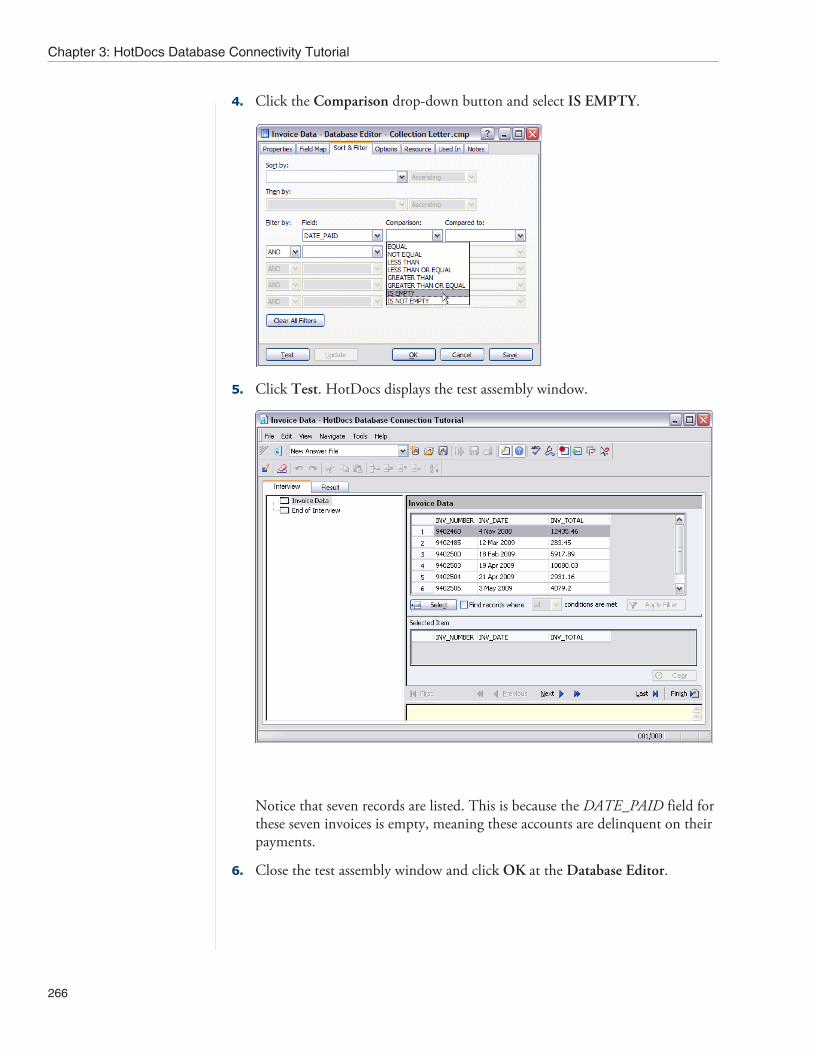
Chapter 3: HotDocs Database Connectivity Tutorial
266
4. Click the Comparison drop-down button and select IS EMPTY.
5. Click Test. HotDocs displays the test assembly window.
Notice that seven records are listed. This is because the DATE_PAID field for these seven invoices is empty, meaning these accounts are delinquent on their payments.
6. Close the test assembly window and click OK at the Database Editor.

Lesson 4: Filter the List of Records
267
Conclusion
You are now finished with this lesson. In it, you learned how to filter a list of records.
If you do not want to go on to Lesson 5 at this time, close Component Manager, and then click the Save and Close button to close the template. Then exit HotDocs.
If you are continuing on to Lesson 5, click the Save button to save your work.
Chapter 3: HotDocs Database Connectivity Tutorial
268
Lesson 5: Select Related Database Records
Overview
Sometimes your template may link to more than one database table. If so, and if both tables have at least one field in common, you can create a filter based on this association so that, during assembly, you can select a record from one table and have the corresponding records from the other table automatically selected.
For example, both the INVOICE and CLIENT tables used in the Collection Letter template have a field named CLIENTID. Using this commonality, you can set up a filter so that when the user selects an unpaid invoice from the INVOICE table, HotDocs automatically retrieves, from the CLIENT table, the client whose name is on the unpaid account.
Start the Tutorial
If you are continuing immediately from Lesson 4, skip the instructions for opening the template and proceed to “Link the Common Field to a Variable.”
If you closed the template at the end of Lesson 4, complete the following steps.
To open the Collection Letter template
1. Open your word processor and click the HotDocs button. The My Test Templates library appears.
NoteIf the My TestTemplates library does not appear, choose Open Library (File menu), select the library in the default Libraries folder (for example, My Test Templates.hdl), and click Open.
2. Select Collection Letter and click Edit. The template appears, ready for you to edit.
3. Click the Component Manager button. The Component Manager window appears.
Link the Common Field to a Variable
In order to associate the CLIENT and INVOICE tables, you must first link the common field, CLIENTID, to a variable in the component file. However, since this variable does not yet exist, you must create it. Once created, you can filter records based on the answer to this variable.

Lesson 5: Select Related Database Records
269
To create a variable and link your common field to it
1. From Component Manager, edit the Invoice Data database component. The Database Editor appears.
2. Click the Field Map tab. The window changes to show which variables in the template are linked to which fields in the table.
3. In the Linked Variable column, click the empty cell next to the CLIENTID field and click the New Component button. The Number Variable Editor appears.
Because CLIENTID is a number field, HotDocs automatically creates a Number variable and assigns a name to it, based on the name of the table field.
4. Click OK. HotDocs creates the variable (Clientid) and links it to the field in the table.
5. Click OK to close the Database Editor.
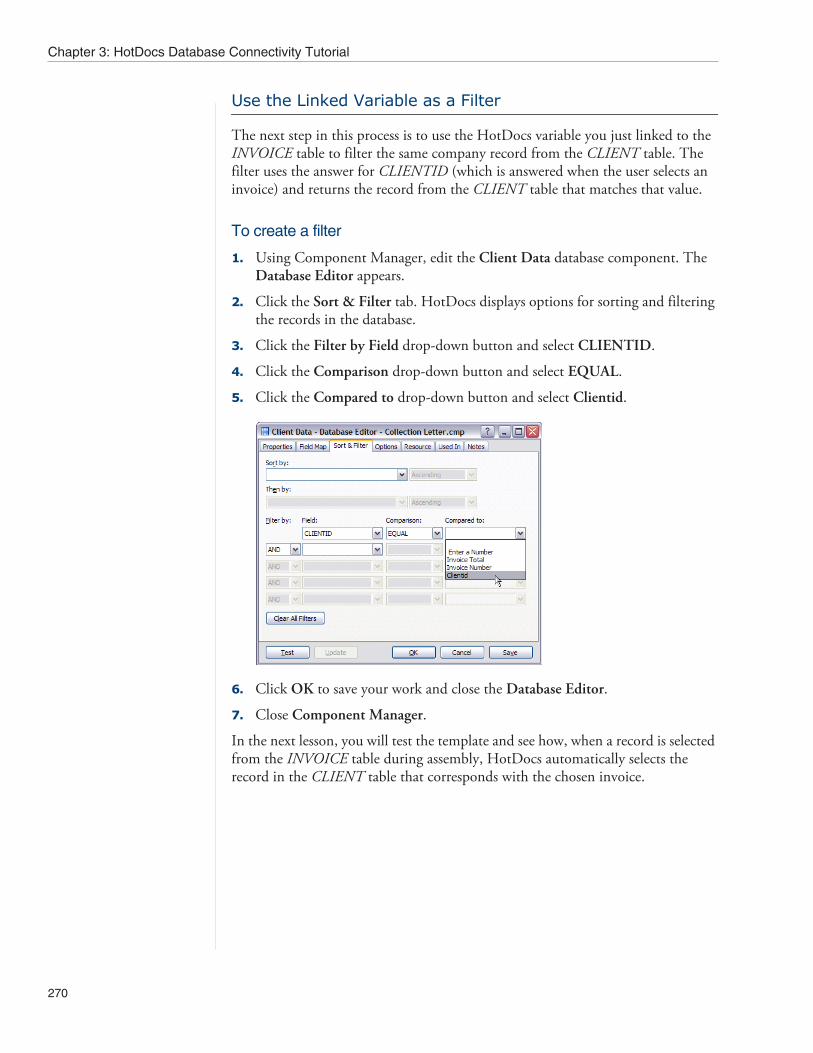
Chapter 3: HotDocs Database Connectivity Tutorial
270
Use the Linked Variable as a Filter
The next step in this process is to use the HotDocs variable you just linked to the INVOICE table to filter the same company record from the CLIENT table. The filter uses the answer for CLIENTID (which is answered when the user selects an invoice) and returns the record from the CLIENT table that matches that value.
To create a filter
1. Using Component Manager, edit the Client Data database component. The Database Editor appears.
2. Click the Sort & Filter tab. HotDocs displays options for sorting and filtering the records in the database.
3. Click the Filter by Field drop-down button and select CLIENTID.
4. Click the Comparison drop-down button and select EQUAL.
5. Click the Compared to drop-down button and select Clientid.
6. Click OK to save your work and close the Database Editor.
7. Close Component Manager.
In the next lesson, you will test the template and see how, when a record is selected from the INVOICE table during assembly, HotDocs automatically selects the record in the CLIENT table that corresponds with the chosen invoice.

Lesson 5: Select Related Database Records
271
Conclusion
You are now finished with this lesson. In it, you learned how to link common fields between the two database components. You then learned to create a filter that will retrieve related records from both database tables.
If you do not want to go on to Lesson 6 at this time, click the Save and Close button to close the template. Then exit HotDocs.
If you are continuing on to Lesson 6, click the Save button to save your work.

Chapter 3: HotDocs Database Connectivity Tutorial
272
Lesson 6: Test the Template
Overview
As with any template you are automating, it is always a good idea to test assemble it to make sure it assembles the way you expect. In this lesson, you will test assemble the Collection Letter template you have automated.
Start the Tutorial
If you are continuing immediately from Lesson 5, skip the instructions for opening the template and proceed to “Test the Template.”
If you closed the template at the end of Lesson 5, complete the following steps.
To open the Collection Letter template
1. Open your word processor and click the HotDocs button. The My Test Templates library appears.
NoteIf the My Test Templates library does not appear, choose Open Library (File menu), select the library in the default Libraries folder (for example, My Test Templates.hdl), and click Open.
2. Select Collection Letter and click Edit. The template appears, ready for you to edit.
Test the Template
Based on the automation you have done in the template, when you test the Collec-tion Letter template, HotDocs should present a list of unpaid invoices. When you select a specific invoice, it should automatically select and merge the information about the client whose name is on the invoice.

Lesson 6: Test the Template
273
To test the template
1. At the template, click the Test Assemble button. A test assembly window appears, showing the list of unpaid invoices.
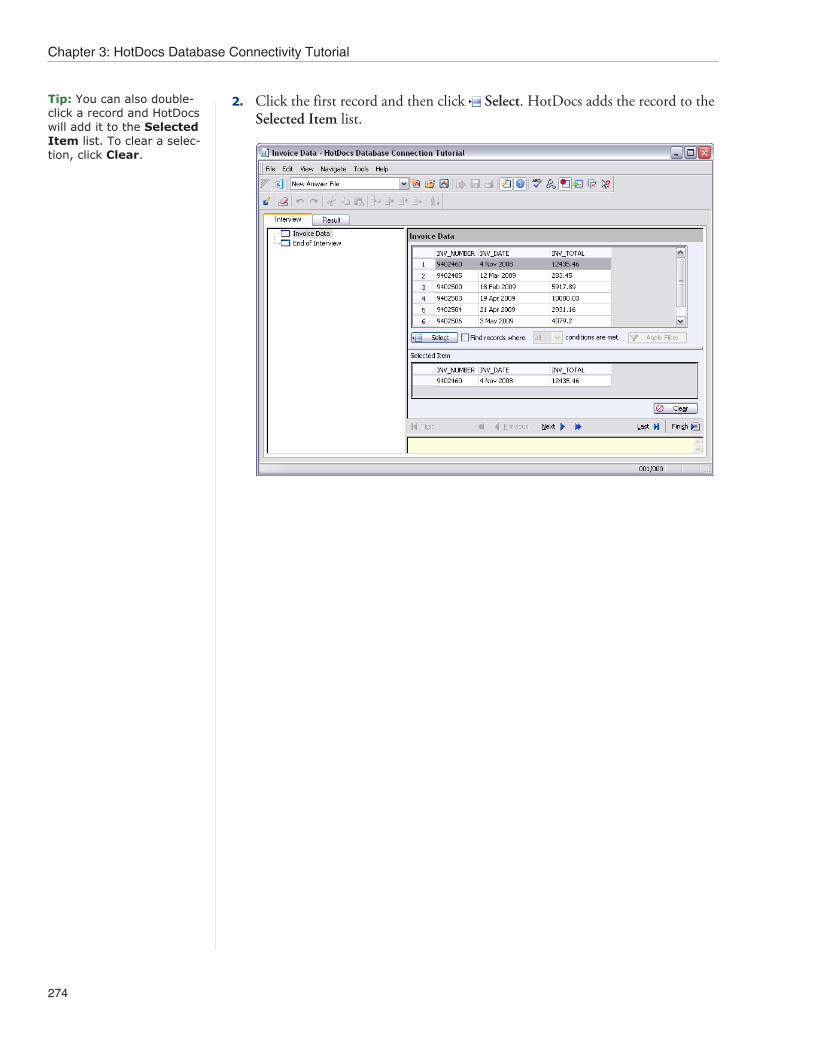
Chapter 3: HotDocs Database Connectivity Tutorial
274
Tip: You can also double-click a record and HotDocs will add it to the Selected Item list. To clear a selec-tion, click Clear.
2. Click the first record and then click Select. HotDocs adds the record to the Selected Item list.
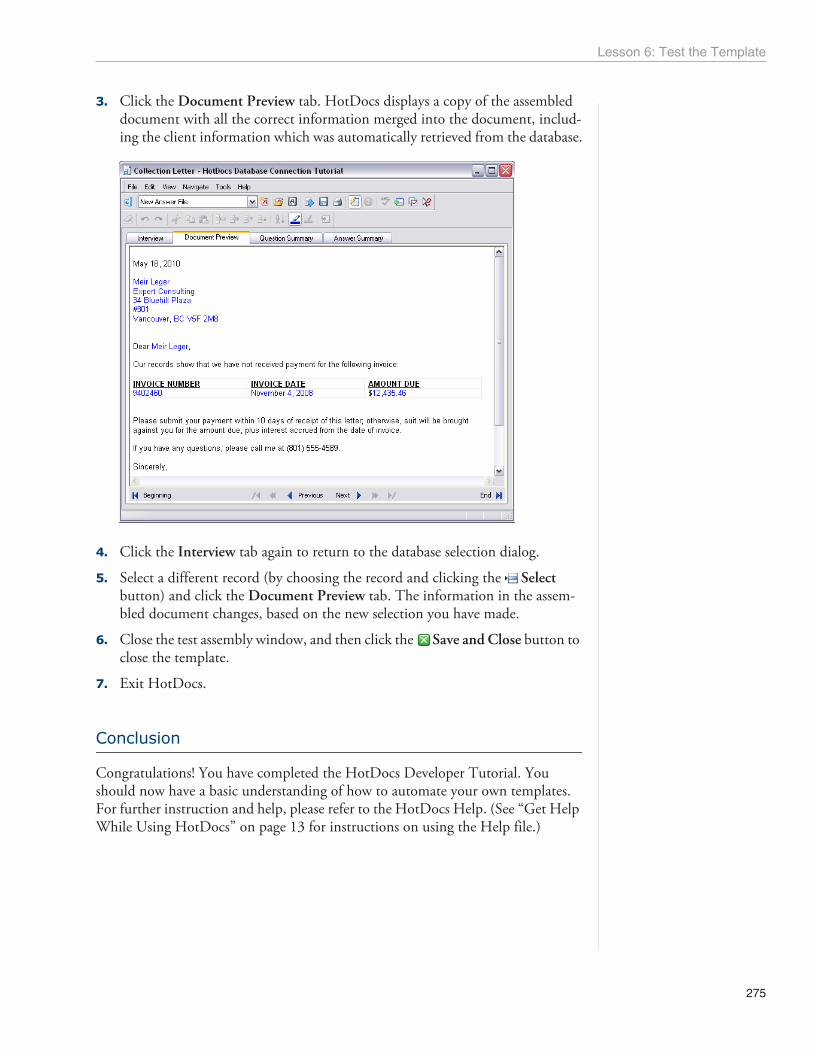
Lesson 6: Test the Template
275
3. Click the Document Preview tab. HotDocs displays a copy of the assembled document with all the correct information merged into the document, includ-ing the client information which was automatically retrieved from the database.
4. Click the Interview tab again to return to the database selection dialog.
5. Select a different record (by choosing the record and clicking the Select button) and click the Document Preview tab. The information in the assem-bled document changes, based on the new selection you have made.
6. Close the test assembly window, and then click the Save and Close button to close the template.
7. Exit HotDocs.
Conclusion
Congratulations! You have completed the HotDocs Developer Tutorial. You should now have a basic understanding of how to automate your own templates. For further instruction and help, please refer to the HotDocs Help. (See “Get Help While Using HotDocs” on page 13 for instructions on using the Help file.)