hot coat™ plus 7 manual - glue machinery corp
TRANSCRIPT

HOT COAT™ Plus 7 MANUAL
Hot Coat™ Plus 7
(#HCP7 – Rev. Jan 07)
Glue Machinery CorporationTM 4234 Boston Street, Baltimore, MD 21224
888-202-2468 · Fax: 410-761-5127 · E-mail: [email protected] www.gluemachinery.com

TABLE OF CONTENTS
CHAPTER 1 SAFETY SUMMARY
1.1 Introduction 1.2 Safety During Installation 1.3 Safety During Operation 1.4 Safety During Maintenance 1.5 Safety When Using Adhesive and Solvents
CHAPTER 2 EQUIPMENT
2.1 Introduction 2.2 Specifications 2.3 Characteristics 2.4 Functional Description
2.4.1 Heating System 2.4.2 Driving System
CHAPTER 3 INSTALLATION
3.1 Environmental Requirements and Installation 3.2 Power Installation
CHAPTER 4 OPERATION INSTRUCTIONS
4.1 Parts/Function 4.2 Before Operation 4.3 Machine Startup 4.4 Machine Adjustments 4.5 Shut-Off Procedures
CHAPTER 5 TROUBLESHOOTING
5.1 Troubleshooting CHAPTER 6 MAINTENANCE & SERVICING
6.1 Machine Maintenance 6.2 Cleaning the Upper Roller
CHAPTER 7 DRAWING/PARTS
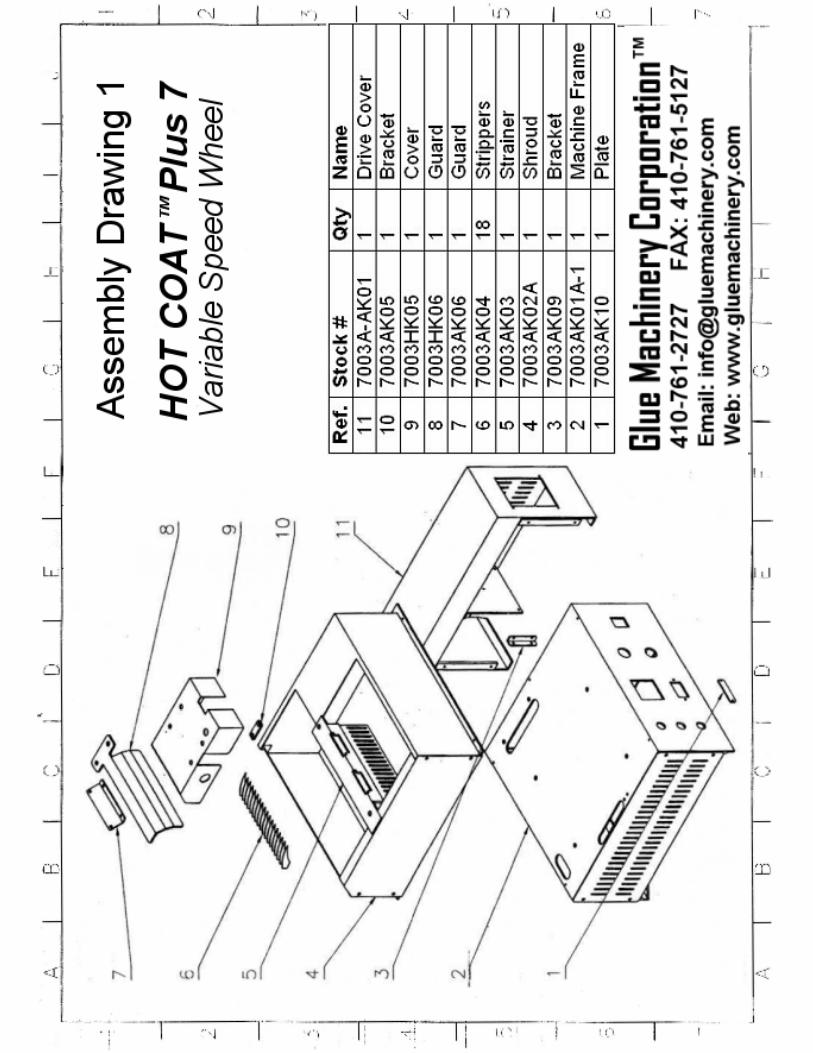
7.1 Assembly Drawings and Parts List, Speed Control (Inverter) Keypad Operations 7.2 Recommended Spare Parts List

1
Chapter 1 - Safety Summary
1.1 Introduction This chapter is intended as an introduction to the installation, operation and maintenance of the Roll Coater and sets out the safety rules to be observed for preventing risk both to personnel and to the equipment. 1.2 Safety During Installation 1. Establish correct and effective ground connection for entire apparatus. Without such
connection, every element of the apparatus even those apparently insulated become a potential conductor and pose a risk of electrical shock.
2. Check that the power cords and their insulation are correctly dimensioned for the load constituted by the apparatus complete with all its accessories.
3. Always operate the apparatus in accordance with the recommended current and voltage. If the apparatus is operated at voltages and currents other than recommended this may create potential fire risk.
1.3 Safety During Operation 1. Do not operate the equipment near volatile or otherwise explosive gases or materials. 2. Do not operate the equipment without the covers, panels and safety guards properly installed. 3. Do not operate the equipment at a temperature above 50ºC or below 0ºC (122ºF/32ºF). 4. Do not use the equipment as a ladder or stepping stool. 5. Only the base of the Roller Coater can be used while moving or lifting the machine. Do not use
outstretched parts or components on control panel as supporting parts for lifting. 6. Never put your fingers into the middle of two rollers when running or servicing the machine. 1.4 Safety During Maintenance The main precautions to be adopted when carrying out maintenance are:
1. Disconnect the electrical power supply before performing maintenance on the equipment. 2. Do not wear rings, watches, bracelets, etc. when carrying out the maintenance. 3. Do not in any way inspect or adjust any component unless another person is present and able to
ensure immediate assistance in event of an accident. 4. Employ only qualified personnel for maintenance work on the equipment. 5. Never touch bared connection or components while power is on without disconnecting the
electrical power supply. Dangerous voltage exists at several points in the equipment. 6. Disconnect the electrical supply before removing any protection case or changing any electrical
component. 7. If possible, stand on a rubber-insulating mat when carrying out maintenance on the hot melt
applicator. Do not work on wet floors or in very damp surroundings.

2
8. Always use protective gloves and clothing which gives the maximum protection to parts of the body liable to be splashed by hot melt or that may come in contact with the hot surface of components. Note: Do not wear gloves when feeding pieces into the roller.
9. To avoid injury in the internal surface of the equipment, do not use any tools with open flames or sharp tips to clean a hot melt applicator.
10. Never operate the equipment with air or adhesive leaks (air or hot melt) in the system. 1.5 Safety When Using Adhesive and Solvents A. Adhesive 1. Use extreme care when working with molten materials as they solidify rapidly and present a
hazard. Severe burns can occur if the molten materials first solidify; they are still hot. 2. Always wear protective clothing and eye protection when handling molten materials or
working near equipment containing hot melt adhesive under pressure. B. Heating Solvents 1. Do not use an open flame or uncontrolled heating device to heat solvents. 2. Do not use paint-type solvents under any circumstances. These solvents are volatile and may
be a fire and/or toxic-vapor hazard even at room temperature. 3. Always be sure that the work area is adequately ventilated. 4. Avoid prolonged or repeated breathing of solvent vapors. Following are the major applicable cleaning solvents: 1. Fluoride solvent:
Dichlorofluoromethane Trichlorofluorometyane
2. Chloride solvent:
Carbon tetrachloride Chloroform Dichloromethane Ethylene dichloride Methylene chloride Monochloro-benzene Monochlorotoluene Perchloroethylene Trichloroethylene
3. Trichloroethylene:
Ethylene dibromide Methylbromide Methlene chlorobromide
4. Lodide solvent:
Ethyliodide Methyliodide N-butyliodide Propyliodide

3
Kerosene and white mineral oil are also recommended cleaning solvents. IF MOLTEN MATERIAL COMES IN CONTACT WITH THE SKIN: • Do not try to remove molten material from the skin. • Immediately immerse the affected area in cold, clean water. Keep the affected area immersed
until the material has cooled. • Do not try to remove the cooled material from the skin. • Cover the affected area with a clean, wet compress. • In case of severe burns, look for signs of shock. If shock is suspected, have the patient lie
down, use blankets to preserve body heat and elevate the feet several inches. • Call a physician immediately.

4
Chapter 2 – Equipment
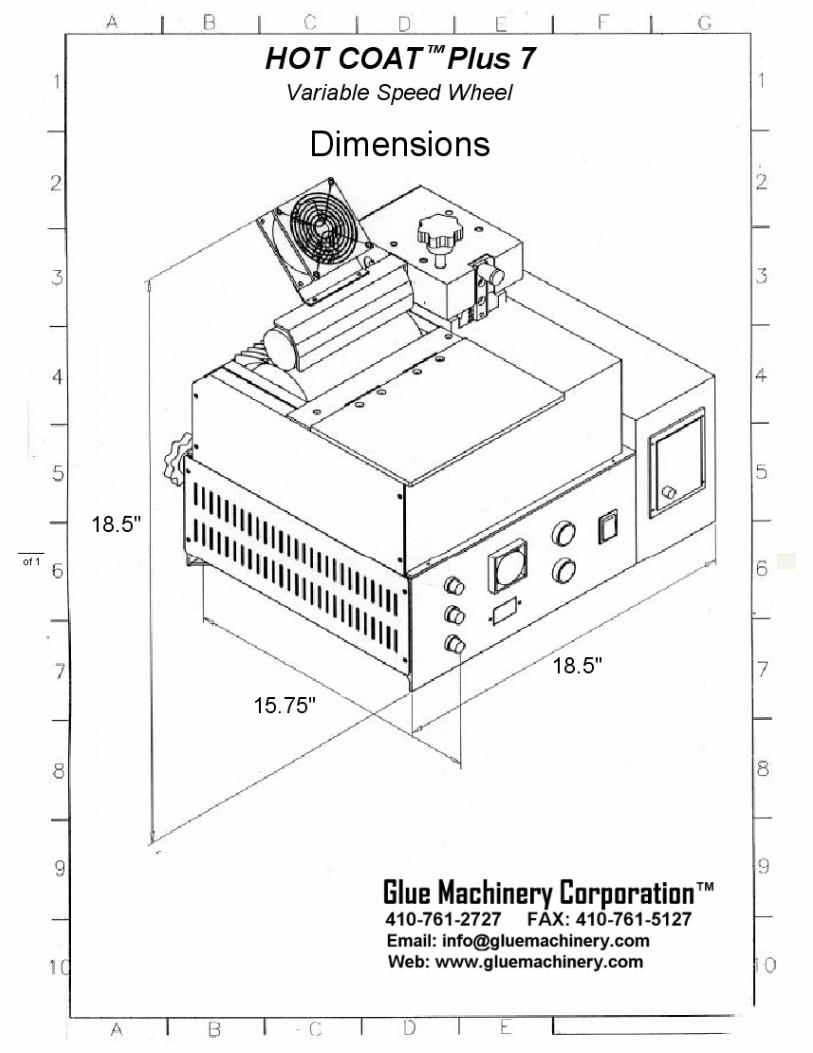
Fig 2.1 2.1 Introduction This Chapter provides the general overview (Fig 2.1), Dimensions (Fig. 2.2), Simple Working Procedure (Fig. 2.3), Specifications, Characteristics, and Functions of the Hot Coat Plus 7 roll coater.
Fig. 2.2

5
Fig 2.3 Simple Working Procedure 2.2 Specifications
Item HCP7 Power Supply Demand 220VAC/50HZ
Power 2KW Net weight 106 lb.
Size (L x W x H: inches) 18.5 x 15.75 x 18.5 Tank Capacity: pounds 4.2 lb.
Max Apply Width: Inches 7.086” Max. Substrate Thickness .75”
Max. Viscosity 20,000CPS Max. Melt Rate 5.5 Lb/Hr
2.3 Characteristics - The coating speed, coating thickness and material thickness can be regulated. - The adoption of a tank cover, insulation board, peel-off plate, emergency stop button and roller reverse button prevent injury to the operator. WARNING: DO NOT TOUCH THE HOT AND/OR RUNNING ROLLER. The driving system is indirectly under the control of the heating system. If the pre-set temperature of the tank is not reached, the roller will not run.

6
2.4 Functional Description 2.4.1 Heating System Heaters are built into the bottom of the tank and inside the lower roller heating the adhesive to the desired temperature. The mechanic temperature controller (TI3) controls the tank temperature, and the electronic proportional temperature controller controls the roller temperature. It will take approximately 40 minutes to melt the adhesive completely. 2.4.2 Driving System When the pre-set temperature of the tank has been reached, motor drives Gear A of the lower roller via a chain, Gear B of the upper roller works with Gear A allowing both rollers to run. A portion of the lower roller is dipped into the tank and the lower roller then brings the adhesive to the center of the two rollers. When a work piece goes between them, adhesive will coat the surface. The roller speed is controlled with the inverter.
Picture 2.4 Drive Chain Specification of Motor:

7
Chapter 3 - Installation
3.1 Environmental Requirements and Installation 1. Allow enough space for operators to walk around the machine.
2. Place the machine on a flat surface near the assembly line. Secure the machine tightly.
3. Avoid installing the machine where the temperature is below 0ºC or above 50ºC
(32ºF/122ºF)
4. The surroundings must be dust free and vibration free.
5. Avoid air flowing on the surface, as this will affect the coating.
6. Avoid opening the tank cover when unnecessary.
7. Try to avoid foreign matter from entering the driving mechanism as this will damage the machine. And try to avoid impurities from entering the center of both rollers to prevent damage to the rollers.
8. Use only the base when attempting to lift or move the machine. Do not use the rollers, fan, knobs or grips. To prevent burns, DO NOT move the machine when it is melting adhesive.
3.2 Power Installation
1. Check the main power value. The rated voltage of these Roller Coaters is 220VAC, 50~60HZ and single phase. Do not alter the machine to work at another voltage, as it will damage the machine.
2. Disconnect the power supply before opening the shield of the Electric Control Cabinet.
3. Ensure that the main power breaker is off.
4. Ensure that the machine is grounded. When installing the power cords be sure to connect a safe and reliable ground line to the clip to prevent a shock.
5. Assure that the cords to the outer power supply are connected to the internal terminals of the machine.
NOTE: After the above steps are completed, DO NOT switch on the machine at once. Before operation please carefully read the following chapter.

8
Chapter 4 - Operating Instructions
4.1 Function of the Control Panel The controls include the PID temperature control, main power switch, motor start button, emergency stop button, and fuse base. Detailed instructions are given as follows. Ensure that you carefully read the operation instructions before running the machine. Improper operation will lead machine and personal injury. (Fig4.1 Control Panel)
Fig. 4.1 HCP7 Control Panel

9
PID Temperature Controller
10
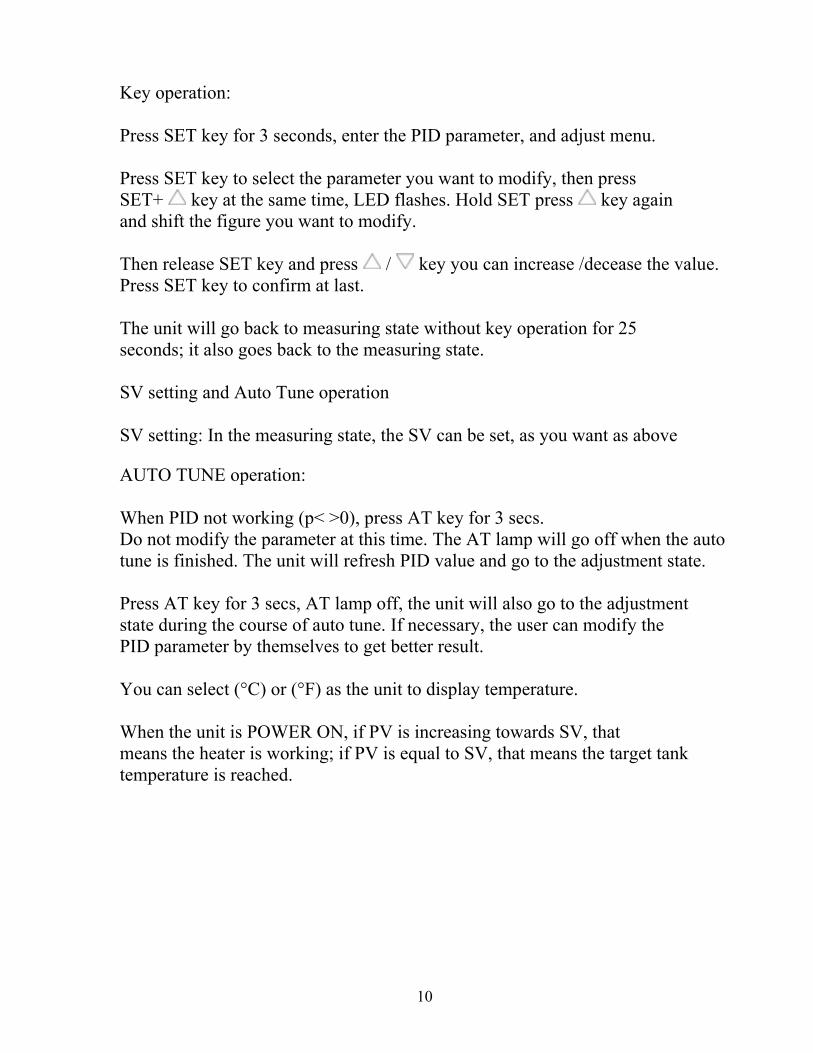
Key operation: Press SET key for 3 seconds, enter the PID parameter, and adjust menu. Press SET key to select the parameter you want to modify, then press SET+ key at the same time, LED flashes. Hold SET press key again and shift the figure you want to modify. Then release SET key and press / key you can increase /decease the value. Press SET key to confirm at last. The unit will go back to measuring state without key operation for 25 seconds; it also goes back to the measuring state. SV setting and Auto Tune operation SV setting: In the measuring state, the SV can be set, as you want as above AUTO TUNE operation: When PID not working (p< >0), press AT key for 3 secs. Do not modify the parameter at this time. The AT lamp will go off when the auto tune is finished. The unit will refresh PID value and go to the adjustment state. Press AT key for 3 secs, AT lamp off, the unit will also go to the adjustment state during the course of auto tune. If necessary, the user can modify the PID parameter by themselves to get better result. You can select (°C) or (°F) as the unit to display temperature. When the unit is POWER ON, if PV is increasing towards SV, that means the heater is working; if PV is equal to SV, that means the target tank temperature is reached.

11
2.Main Power Switch
Put the switch at ON, it gives off light from inside. This means the roll coater is POWERED ON. 3. Motor Start Button
Until tank temperature is reached (PV=SV), you can not start the motor by depressing the green button.

12
4. Motor Stop Button
Stop the motor by depressing the red button. 5. Voltage Meter
The meter indicates the working voltage of the heater inside the melting tank. High volts for high viscosity adhesive, low volts for low viscosity adhesive. Resistant for voltage adjustment is inside the right section of the machine. Before adjustment you will have to remove the chain cover.

13
6. Roller Rate:
With the small knob on the panel of the inverter, you can adjust the roller rate. Clockwise direction to increase roller rate while the opposite direction rotation will decrease the roller rate. See “Keypad Operations” diagram in back of manual for more detail. 4.3 Before Operation Load clean and dry hot melt adhesive into the tank.
NOTE: Before loading adhesive into the tank, put the main power switch in OFF position. Get the outer power source disconnected. 1. Cover the tank to avoid foreign matters falling into the tank. 2. Connect power source. 3. Switch on the main power. As introduced in 4.1, set or modify proper SV value if
necessary. To modify roller’s heater resistance depending on the adhesive viscosity. (Please refer to the introduction about voltage meter in this chapter).
4. Prepare materials for trial coating.

14
5. When PV=SV on the PID unit (the preset temperature of the tank is reached) and adhesive is completely melted: Depress the motor START button (green).
6. Test coating with materials. Adjust roller gap and coating thickness depending on the test result.
When these steps are done, the roll coater is ready to run. Machine Start-up 1. Connect the power source. 2. Switch on the machine with the main power switch on the control panel. 3. Check the hot melt adhesive inside the tank. The normal level is at 30% to 80% of the
tank capacity. Do not put too much adhesive into the tank.
4. Check if the temperature controller is properly set. If not, modify it. 5. Check if hot melt adhesive is completely melted when PV reaches SV on the PID unit.
If both are OK, follow the next step. 6. Star the motor by depressing the START button. You can now coat. 7. You can stop the motor by depressing the STOP button. (Both buttons are on the
control panel) 4.4.2 How to Shut Down the Machine Switch off the machine with the main power switch. Disconnect power source

15
Machine Adjustments 4.5.1 Roller Gap
When coating; different materials need different amounts of roller gap. Good roller gap can compensate for different thickness of material and ensure smooth coating. Turn the knob on the right of the rollers to make adjustments. Seen from above, clockwise rotation will enlarge the gap, counter-clockwise rotation will decrease the roller gap. 4.5.2 Coating Thickness
Turn the knob behind the machine to adjust the adhesive coating thickness. Seen from back, clockwise rotation will increase the coating thickness, counter-clockwise rotation will decrease the coating thickness.

16
Chapter 5 - Trouble Shooting
5.1 Trouble Shooting Procedures
Problem Possible Cause Solution Hot melt adhesive clinging to the upper roller.
1. Material too thin resulting in hot melt adhesive clinging to the upper roller.
2. The surface of the roller is not clean. Cloth fiber or foreign particles are attached.
1. If the material is too thin, place more material together to increase the roller gap.
2. Clean the upper roller with mineral oil to prevent adhesion.
Coating Uneven 1. Upper roller is set too high or not parallel to the lower roller. 2. Foreign matter between the blade and the roller is affecting the coating. 3. Not enough hot melt adhesive in the tank.
1. Re-adjust the upper roller. 2. Clean the roller. 3. Check if there is enough hot melt adhesive in the tank.
Material produces “silk” between the rollers.
1. Roller temperature too low. 2. Incorrect hot melt adhesive.
1. Raise the roller temperature until no “silk” forms. 2. Change to a more suitable hot melt adhesive to avoid smoking.
Hot melt adhesive is yellowish or charred.
1. Roller temperature may be too high.
2. Coating length is too long. Roll coater brings too much air for oxidization. 3. Hot melt adhesive has poor anti-oxidization ability or has aged.
1. Lower the roller temperature to prevent “silk”. 2. Stop the roller from running when coating has paused for some time. 3. Change the hot melt adhesive for better anti-oxidization character.
Material drawn into the melting tank.
1. The gap between the drawn proof blade and the roller is too big. 2. Roller temperature is too low. 3. The material is either too thin or too thick. It is not suitable for roll coating.
1. Adjust the gap between the blade and the roller with screwdriver. Make it as tight as possible. 2. Raise the roller temperature. 3. Use another kind of applicator for material.
The work piece will twist around the upper roller when coating.
1. The upper roller has hot melt adhesive on it making it sticky.
2. The work piece has been
treated with hot melt adhesive or another type of adhesive.
1. Once slight twist occurs, stop the machine and clean it with kerosene. Clean the machine routinely with mineral oil. 2. The material cannot be coated twice.

17
Problem Possible Cause Solution 1. Heater is damaged. 1. Replace it with new heater.
2. Temperature controller is damaged.
2. Replace it with a new temperature controller.
3. Main fuse blown. 3. Replace the fuse with a new one.
4. RTD is damaged. 4. Replace it with a new RTD. 5. Power cord is damaged or disconnected.
5. Replace cord or connect to the power.
Roller or tank cannot warm up
6. The mechanic temp. controller which limits the maximum temperature of the tank is broken.
6. Replace the temperature controller.
The motor power indicator is on but the motor fails to run.
1. Blown fuse. 2. The inverter is not set correctly, or the inverter
is bad. 3. Coating roller gear is damaged. 4. Power cords are damaged or broken or not connected to the power.
1. Replace the fuse with a new one. 2. Refer to the inverter manual. 3. Replace the gear with a new one. 4. Replace the cords or connect to the power.

18
Chapter 6 - Maintenance & Servicing 6.1 Machine Maintenance
1. Always keep the machine surface clean. Clean with kerosene. Do not use gasoline, toluene or any other solvent.
2. Always keep the upper roller clean, if adhesive is adhered to the roller stop the machine and clean with kerosene. Use white mineral oil for regular maintenance.
3. To get good coating quality, regularly clear yellowish or aged hot melt adhesive in the in tank.
4. Do not run the motor when clearing or performing regular maintenance. Hands can be drawn into the center of the rollers.
5. During operation cloth or paper scarps will possibly fall into the tank. They will be stuck between the roller and the blade as rollers run. This will affect the coating effect. It must be cleaned when needed.
6. Always wear safety gloves and long sleeved shirts when performing maintenance to prevent burns.
7. Always keep the exhaust fan clean. Clean it with kerosene.
8. Regularly open the side metal plate. Clean and lubricate the gears and chains. 6.2 Cleaning the Upper Roller
1. The roller is Teflon coated for easy cleaning.
2. To prevent scratching the Teflon coating, do not use sharp metal tools to clean the tank.

19
Chapter 7. Drawings 7.1 Assembly Drawings, List of Parts, Speed Control (Inverter) Keypad Operations 7.2 Recommended Spare Part List* *PLEASE CONTACT GLUE MACHINERY CORPORATION FOR RECOMMENDED SPARE PARTS Toll Free: 888-202-2468 Phone: 410-761-2727 Email: [email protected]


21
Keypad Operations: Keypad Illustration Freq. ref. controlled by TM2 or VR Forward run (Fn_11=1/2/3) RUN/STOP signal is on Ο Ο Ο Ο Reverse run (Fn_10 =1) SEQ FRQ FWD REV DISPLAY Hz OR Ο Ο Display voltage value RPM Hz/RPM VOLT Light on: program mode Ο Ο Display current value FUN AMP RUN/STOP Mode selection key COMMAND KEY Scroll Arrow keys Forward /Reverse Command key Digit selection key Speed Pot Adjustment Read/Write key FREQ. SET
Keypad Function:
RUN STOP
DSP FUN
FWD REV
< RESET
READ ENTER
READ ENTER
< RESET
FWD REV
RUN STOP
DSP FUN
Run / Stop Button Used for Start / Stop commands from the Keypad
DSP / FUN Button Used for Displaying Functions and Meters
FWD / REV Button Used for Foreword / Reverse commands from the Keypad
< / Reset Button Used for moving Diagonally and Resetting the Drive
READ / ENTER Used for Reading and Entering Functions
Arrows are used for moving through and Changing Parameters