hostopia e-mail help - integra telecom e-mail help. 2 ... description of the message summary ... use...
TRANSCRIPT

Hostopia E-mail Help

2
Table of Contents
SENDING EMAIL ............................................................................................................................................................. 5
CONFIGURING YOUR EMAIL CLIENT ...................................................................................................................... 5
Introduction to email clients ........................................................................................................................................ 5
Configuring Agent........................................................................................................................................................ 6
Configuring Claris Emailer (Mac)............................................................................................................................... 6
Configuring Email Connection................................................................................................................................... 6
Configuring Eudora...................................................................................................................................................... 7
Configuring Microsoft Exchange................................................................................................................................ 8
Configuring Microsoft Internet Mail ........................................................................................................................... 8
Configuring Microsoft Outlook.................................................................................................................................... 9
Configuring Netscape Mail .......................................................................................................................................13
Configuring Pegasus Mail.........................................................................................................................................15
Configuring Pine.........................................................................................................................................................16
ADMINISTERING YOUR EMAIL WITH EASYMAIL ...............................................................................................17
Introduction to EasyMail............................................................................................................................................17
Administering email accounts with EasyMail.........................................................................................................17
ADMINISTERING YOUR EMAIL WITH WEBMAIL .................................................................................................18
Getting started with WebMail...................................................................................................................................18
Introduction to WebMail........................................................................................................................................18 Cookies and WebMail...........................................................................................................................................18 Optimizing WebMail performance.......................................................................................................................18 Logging in to your account...................................................................................................................................18 Connection time limit.............................................................................................................................................19 Logging out of WebMail........................................................................................................................................19
Sending and receiving messages ...........................................................................................................................20
Introduction to the Mail function..........................................................................................................................20 Organizing messages using folders ...................................................................................................................20 Description of the message summary................................................................................................................20 Managing folders ...................................................................................................................................................21
Managing folders...............................................................................................................................................21 Deleting a folder................................................................................................................................................21 Adding a folder..................................................................................................................................................21 Renaming a folder.............................................................................................................................................21 Viewing folder statistics....................................................................................................................................21 Folder naming convention...............................................................................................................................22
Viewing and responding to messages ...............................................................................................................23 Viewing a message...........................................................................................................................................23 Understanding the message header..............................................................................................................23 Adding the sender to your contact list ...........................................................................................................23

3
Using addresses and URLs in a message....................................................................................................23 Deleting a message while viewing it..............................................................................................................24 Replying to a message.....................................................................................................................................24 Replying to all recipients of a message.........................................................................................................24 Forwarding a message.....................................................................................................................................24 Recomposing a message ................................................................................................................................24 Printing a message...........................................................................................................................................25
Selecting or deselecting a message..................................................................................................................25 Deleting or undeleting a message......................................................................................................................25 Copying and moving messages..........................................................................................................................25 Creating a new message.....................................................................................................................................26
Creating a new message.................................................................................................................................26 Addressing message with or without contacts .............................................................................................26 Entering a message subject............................................................................................................................26 Creating attachments .......................................................................................................................................26 Entering the message body.............................................................................................................................26 Spell checking....................................................................................................................................................28 Sending a message..........................................................................................................................................28 Saving a message draft ...................................................................................................................................28
Saving a message externally...............................................................................................................................28 Refreshing the message list................................................................................................................................28
Organizing your daily schedule................................................................................................................................29
Introduction to the Schedule function.................................................................................................................29 Date viewing methods ..........................................................................................................................................29 Display of schedule entries ..................................................................................................................................29 Selecting daily or monthly view...........................................................................................................................29 Adding a schedule item ........................................................................................................................................30 Deleting a schedule item ......................................................................................................................................30 Updating a schedule item.....................................................................................................................................30 Using groups to organize schedule items .........................................................................................................30 Moving schedule items.........................................................................................................................................30 Range of dates supported....................................................................................................................................31 Performing schedule maintenance.....................................................................................................................31
The main page - your account overview ................................................................................................................31
Introduction to the main page..............................................................................................................................31
Grouping users and items.........................................................................................................................................32
Introduction to groups ...........................................................................................................................................32 Adding a group.......................................................................................................................................................32 Group naming convention....................................................................................................................................32 Viewing group information...................................................................................................................................32 Placing an object in a group................................................................................................................................32 Adding a member to a group...............................................................................................................................33 Editing a group.......................................................................................................................................................33 Deleting a group....................................................................................................................................................33
Configuring your WebMail account.........................................................................................................................34
Setting preferences ...............................................................................................................................................34 Preference settings by function...........................................................................................................................34

4
Bookmarks .........................................................................................................................................................34 Contacts..............................................................................................................................................................34 Global preferences............................................................................................................................................35 Mail......................................................................................................................................................................35 Main page...........................................................................................................................................................36 Notes ...................................................................................................................................................................37 Schedule.............................................................................................................................................................37 ToDo....................................................................................................................................................................37
Managing your contact list........................................................................................................................................38
Introduction to the Contacts function..................................................................................................................38 Description of the contact summary...................................................................................................................38 Creating a contact.................................................................................................................................................38 Using groups to organize contacts.....................................................................................................................39 Selecting or deselecting a contact......................................................................................................................39 Deleting a contact..................................................................................................................................................39 Copying and moving contacts.............................................................................................................................39 Importing contacts from Outlook and Netscape...............................................................................................40
ToDo list management..............................................................................................................................................41
Introduction to the ToDo function........................................................................................................................41 Description of the ToDo display..........................................................................................................................41 Adding a ToDo item ..............................................................................................................................................41 Deleting a ToDo item ............................................................................................................................................41 Updating a ToDo item...........................................................................................................................................42 Using groups to organize ToDo items................................................................................................................42 Moving ToDo items ...............................................................................................................................................42
Writing notes ...............................................................................................................................................................43
Introduction to the Notes function.......................................................................................................................43 Writing a note.........................................................................................................................................................43 Updating a note .....................................................................................................................................................43 Deleting a note.......................................................................................................................................................43 Viewing a note .......................................................................................................................................................43 Using groups to share notes................................................................................................................................44
Keeping track of Internet bookmarks ......................................................................................................................45
Introduction to the Bookmark function...............................................................................................................45 Description of the bookmark display..................................................................................................................45 Adding a bookmark...............................................................................................................................................45 Deleting a bookmark.............................................................................................................................................45 Updating a bookmark............................................................................................................................................46 Using a bookmark.................................................................................................................................................46 Using groups to organize bookmarks ................................................................................................................46 Moving a bookmark...............................................................................................................................................46
SPAM POLICY...............................................................................................................................................................46
Index.............................................................................................................................................................................47

5
Sending email
You must check for new mail before you can send mail on our system. This ensures that only authenticated users can send email, which prevents the sending of spam through our servers.
Checking for new email
If you get the following error message when you try to send email, "Relaying denied: You must check for new mail before sending mail," you should check for new mail before you attempt to send again. Email clients differ, but in most cases you should move the sent items from your "Outbox" to another folder, click the “Send/Receive” button, wait for any new messages to appear in your “Inbox” and send your email again. Composing email offline
You may receive the same error message because you have composed email offline. If you put the email in your “Outbox” before you go online, some email clients will try to send the message before checking for new ones. This will cause an error. To compose email offline without an error, save the email in a place other than the “Outbox.” Check your account for new email when you go online, and then send the email after you have checked your account for new mail.
Configuring your email client
Introduction to email clients
An email client is an application that runs on your computer or workstation and allows you to send, receive and organize email. The email client sends email to a central server, which re-routes the mail to its intended destination. In order to use an email client to check your EasyMail account, you need to configure the client correctly.

6
Configuring Agent Use these settings to configure Agent to check your email. Remember to replace "username" with your actual username, and replace "yourname.com" with your actual domain name. Email address: [email protected] Reply To: [email protected] Send email messages with SMTP: Checked Email server: mail.yourname.com Receive email with POP: Checked POP server: mail.yourname.com Login with a user name and password: Checked Use APOP if supported by the server: Not Checked User Name: username.yourname.com
Configuring Claris Emailer (Mac) Use these settings to configure Claris Emailer to check your email. Remember to replace "username" with your actual username, and replace "yourname.com" with your actual domain name. Account name: Irrelevant User name: username.yourname.com Email account: [email protected] SMTP: mail.yourname.com Email address: [email protected]
Configuring Email Connection
Use these settings to configure Email Connection to check your email. Remember to replace "username" with your actual username, and replace "yourname.com" with your actual domain name. Mail host name: mail.yourname.com SMTP relay name: mail.yourname.com User ID: username.yourdname.com Return address: [email protected]

7
Configuring Eudora
Use these settings to configure Eudora to check your email. Remember to replace "username" with your actual username, and replace "yourname.com" with your actual domain name. POP account: [email protected] Return address: [email protected] SMTP server: mail.yourname.com
Eudora Setup Tutorial 1. Start Eudora. Select "Options" from the "Tools" menu. The Getting Started option will open.
2. Enter your real name in the "Real name" text box. The example uses the name "Bob Smith". 3. Enter your email address (in the form of [email protected]) in the "Return address" text box. 4. Enter the incoming mail server name (in the form of mail.yourname.com) in the "Mail Server (Incoming)" text box.

8
5. Enter your mail server user name (in the form of username.yourname.com) in the "Login Name" text box. 6. Enter the outgoing mail server name (in the form of mail.yourname.com) in the "SMTP Server (Outgoing)" text box. 7. Click the "OK" button and your email account will be set up. 8. The Checking Mail, Incoming Mail and Sending Mail options will be automatically filled in according to the information you entered in the Getting Started option.
Configuring Microsoft Exchange
Use these settings to configure Microsoft Exchange to check your email. Remember to replace "username" with your actual username, and replace "yourname.com" with your actual domain name. Email Address: [email protected] Internet Mail server (POP): mail.yourname.com Account name: username.yourname.com
Configuring Microsoft Internet Mail Use these settings to configure Microsoft Internet to check your email. Remember to replace "username" with your actual username, and replace "yourname.com" with your actual domain name. Email Address: [email protected] Outgoing Mail (SMTP) Server: mail.yourname.com Incoming Mail (POP) Server: mail.yourname.com POP3 Account: username.yourname.com

9
Configuring Microsoft Outlook
Use these settings to configure Microsoft Outlook to check your email. Remember to replace "username" with your actual username, and replace "yourname.com" with your actual domain name. Mail Account (can be any label): [email protected] Email Address: [email protected] Reply Address: [email protected] Outgoing Mail (SMTP) Server: mail.yourname.com Incoming Mail (POP) Server: mail.yourname.com Logon using Account Name: username.yourname.com
MS Outlook Setup Tutorial
1. Start Outlook. Select "Accounts" from the Tool menu.
2. Select the "Add" button and choose "Mail".
3. Enter your real name in the "Display name" text box.
4. Click the "Next" button to continue.
5. Enter your email address (in the form of [email protected]) in the "E-
mail address" text box. Click the "Next" button to continue.
10
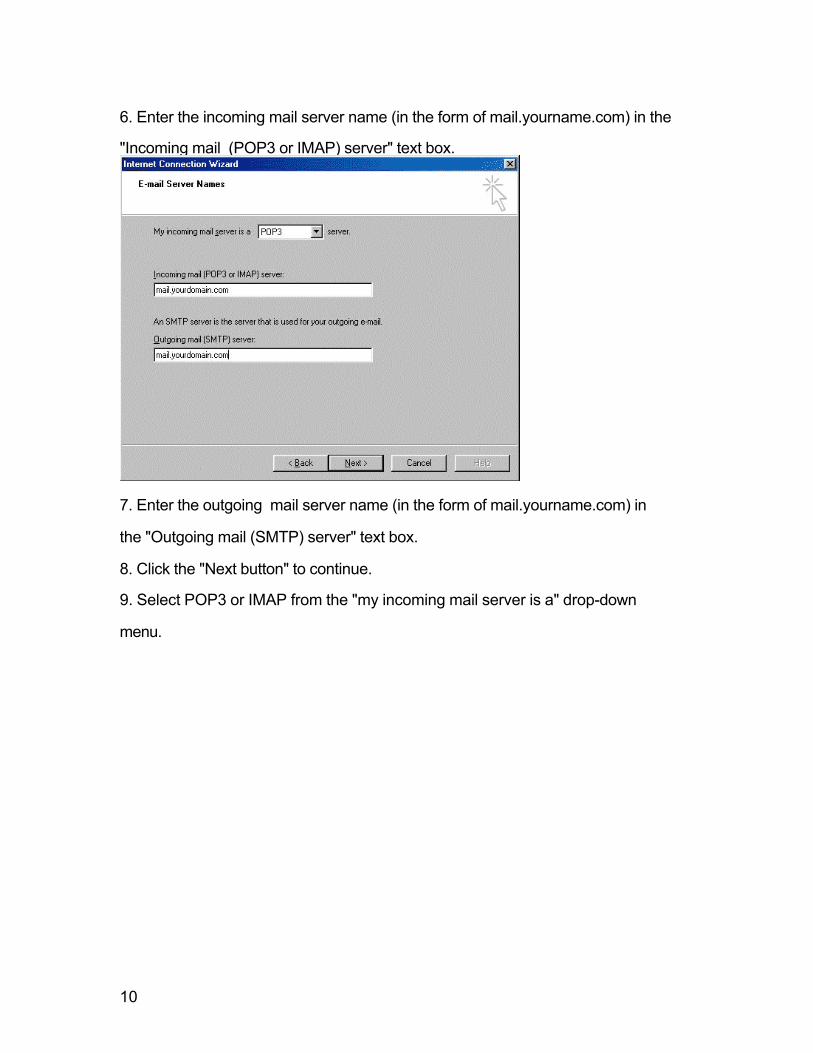
6. Enter the incoming mail server name (in the form of mail.yourname.com) in the
"Incoming mail (POP3 or IMAP) server" text box.
7. Enter the outgoing mail server name (in the form of mail.yourname.com) in
the "Outgoing mail (SMTP) server" text box.
8. Click the "Next button" to continue.
9. Select POP3 or IMAP from the "my incoming mail server is a" drop-down
menu.

11
10. Enter your email username and password.
11. Enter your account name (in the form of: username.yourname.com) in the
"Account name" text box.
12. Enter your account password in the "Password" text box. Your passwords
hidden for security reasons.

12
13. Click the "Next" button to continue.
14. Enter your connection type and click the "Next" button to continue.
15. Click the "Finish" button.

13
Configuring Netscape Mail Use these settings to configure Netscape to check your email. Remember to replace "username" with your actual username, and replace "yourname.com" with your actual domain name. Outgoing Mail (SMTP) Server: mail.yourname.com Incoming Mail (POP) Server: mail.yourname.com Mail Server User Name: username.yourname.com Your Email: [email protected] Reply-to Address: [email protected]
Netscape Navigator Setup Tutorial 1. Start Navigator. Select "Preferences" from the Edit menu. 2. Select "Mail and Newsgroups" from the Category list. Choose the "Identity" subtopic. 3. In the "Identity" window, enter your real name in the "Your name" text box. 4. Enter your email address (in the form of [email protected]) in the
"Email address" text box. 5. If applicable, enter your reply-to address (in the form of [email protected]) in the "Reply-to address" text box. 6. Select "Mail servers" from the Category list.

14
7. Enter your outgoing mail server name (in the form of mail.yourname.com) in the "Outgoing mail (SMTP) server" text box. 8. Enter your outgoing mail server username (in the form of username.yourname.com) in the "Outgoing mail server user name" text box. 9. Edit your existing incoming mail server or create a new by selecting either the "Add" or "Edit" button.

15
10. Select IMAP or POP3 from the "Server Type" drop-down menu. 11. Enter your incoming mail server name (in the form of mail.yourname.com) in the Server Name text box. 12. Enter your mail server name (in the form of username.yourname.com) in the "User Name" text box. 13. When you have entered your information, click the "Mail Servers Properties" OK button. Then click the Preferences "OK" button.
Configuring Pegasus Mail Use these settings to configure Pegasus Mail to check your email. Remember to replace "username" with your actual username, and replace "yourname.com" with your actual domain name. POP3 host: mail.yourname.com User name: username.yourname.com SMTP host: mail.yourname.com Default reply address: [email protected]

16
Configuring Pine
Use these settings to configure Pine to check your email using IMAP. There is no POP option for Pine. Mail Server : mail.megamailservers.com inbox-path: {mail.megamailservers.com/user=username}inbox personal-name: username user-domain: yourname.com Pine Setup Tutorial 1. Open Pine and choose the "SETUP" option. 2. Choose "C" (Config) from the setup menu. 3. Set the "inbox-path" configuration to read: {mailservername/user=mailusername}inbox Example: If your email address is [email protected] inbox-path = {mail.megamailservers.com/user=joesmith.yourname.com}inbox 4. Make sure the personal-name configuration is set to your "From:" name and the user-domain configuration is set to your email address domain. Example: If you email address is [email protected] personal-name = Joe Smith user-domain = yourname.com 5. The other fields are not necessary. Accept the changes by pressing "Enter" and exit the setup menu by pressing "e".

17
Administering your email with EasyMail
Introduction to EasyMail EasyMail is an application within the WebsiteOS control panel. It removes 100% of the hassle and frustration associated with administering local mail services. It completely eliminates the need for specialized hardware on your premises. We administer it from our network and give you access to our innovative EasyMail Wizard and remote email administration tools. These tools will assist you with all aspects of running a corporate email network. You can change your employees' Internet email addresses, delete old accounts and create new ones, all from one simple interface. All EasyMail accounts are POP3 accounts. This means that your mail sits on our servers until you download it to your email software. Additional email accounts are available in bundles of 5. Please contact us for current pricing. You can forward your EasyMail accounts to any existing email accounts, whether they reside on our servers or not.
Administering email accounts with EasyMail Please refer to our WebsiteOS help for information about administering your email accounts with EasyMail.

18
Administering your email with WebMail
Getting started with WebMail
Introduction to WebMail WebMail is a multi-featured, customisable, browser independent email system. Some of WebMail's many features include: contact list, daily schedule, to do list, spell checker and web bookmarks. WebMail can be accessed from any location with access to the Internet and a web browser.
Cookies and WebMail WebMail uses cookies to keep track of user information, and therefore cookies must be enabled before logging onto WebMail. Most modern browsers support cookies and include an option to enable and disable them. To find out more about cookies and how to control them, consult your browser's documentation.
Optimizing WebMail performance
You can significantly increase the loading speed of your WebMail account by limiting the size of your INBOX. Creating additional folders for messages that you would like to save will ensure that your access is as fast as possible.
Logging in to your account
To access your WebMail account, connect your browser to the WebMail URL. If you do not know the URL, please contact support. Your WebMail username is your email address. In other words, your username is your mail account username plus your domain name in the form of: [email protected]. For example, if your mail account username is "bob" and your domain name is "carsales.com," your WebMail username is: [email protected]. To log in to WebMail, enter your WebMail username in the username field of the login page. Enter your email password in the password field. Click the "Log in" button to start the authentication process. Your password is not displayed for security purposes. If your user information is incorrect, the login page will be re-displayed.
19
Connection time limit
No limits are placed on how long you can be logged into your account. WebMail will not time you out of your session regardless of inactivity. Your session ends when you log out or close your browser.
Logging out of WebMail To log out of WebMail, click the "Logout" link on any page. Logging out of a WebMail session ensures the security of your account. After you log out, another user cannot use your browser's back or history functions to access your account.

20
Sending and receiving messages
Introduction to the Mail function
The Mail function allows you to view and manage your messages. This page expands on the simple mail reading capabilities of the main page. While the main page shows recently received messages, the Mail function allows access to all messages. If you accessed this topic via a context sensitive help page, more information is available in the Contents tab at:
Sending and receiving messages
Organizing messages using folders
WebMail allows you to place messages into user defined folders. The folder being viewed is displayed in the folder drop-down menu. To change folders, select a folder name from the drop-down menu and click the "Go" button. By default, there are two folders: INBOX and sent-mail. When you log in to WebMail, the INBOX folder is automatically opened. The INBOX folder stores all incoming messages. The sent-mail folder stores a copy of all outgoing messages. To create new folders or to manage existing ones, click the "Folder management" link.
Description of the message summary
Each message is divided into five sections, of which three can be used as sorting criteria: Status A message is either read or unread. An unread message is designated with an unopened envelope while a read message is designated with an opened envelope. If a message has been marked for deletion, a trash can is displayed. Date The date is a sort criteria. By clicking the "Date" link at the top of the message list, the messages will be displayed in order by date. From The sender of a message is a sort criteria. By clicking the "Sender" link at the top of the message list, the messages will be displayed in order by sender. Subject By clicking on the subject of a message, the message view page is displayed. The subject is a sort criteria. By clicking the "Subject" link at the top of the message list, the messages will be displayed in order by subject. Size The size of a message is displayed in bytes if under 1000 bytes or in kilobytes if over 1000 bytes.

21
Managing folders
Managing folders
WebMail gives you complete control over folders. To manage your folders, click the "Folder Management" link on the main mail page. A folder management page will be displayed. If you accessed this topic via a context sensitive help page, more information is available in the Contents tab at:
Sending and receiving messages/Managing folders
Deleting a folder
To delete a folder, go to the main Mail page and click on the "Folder Management" link. Choose an existing folder from the drop-down menu beside the "Delete Folder" button. Clicking on the "Delete Folder" button will delete the selected folder, along with all of its contents. The deleted folder cannot be recovered.
Adding a folder
To add a folder, go to the main Mail page and click on the "Folder Management" link. Enter the name of the new folder into the text box beside the "Add Folder" button. Click the "Add Folder" button to finish adding the folder.
Renaming a folder
To rename an existing folder, go to the main Mail page and click on the "Folder Management" link. Select the folder to be renamed from the drop-down menu beside the "Rename Folder" button. Enter the new name for the folder in the text box beside the drop-down menu and click the "Rename Folder" button.
Viewing folder statistics
Go to the main Mail page and click on the "Folder Management" link. Click the "Folder Overview" link. The folder overview displays your folder names, the number of new messages, the total messages per folder and the size in bytes of the folders. To view the contents of a listed folder, click the folder name.

22
Folder naming convention
Group names follow standard UNIX filename conventions. Most characters are valid, but avoid spaces, tabs and characters that have a special meaning to the shell, such as:
& ; ( ) | ? \ ' " ` [ ] { } < > $ - ! /.

23
Viewing and responding to messages
Viewing a message
To view a message, click the message's subject and the message viewing page will be displayed. The message viewing page displays the selected message and several options relating to the message. If you accessed this topic via a context sensitive help page, more information is available in the Contents tab at:
Sending and receiving messages/Viewing and responding to messages
Understanding the message header
The message header is composed of several sections. Some of the sections are informational only, while others are links that provide extra functionality. The sections are: Date: The date the message was received by the system. From: The sender of the message. To: The recipient of the message. Subject: The subject of the message. Full Headers: A link, if clicked which will show all the header details. The default setting is a brief display.
Adding the sender to your contact list
To add the sender of a message to your Contacts list, first view the message by clicking on the subject. Then click the index card image that appears to the right of the sender's email address. The contacts page will open with the sender's information automatically filled in.
Using addresses and URLs in a message
Email addresses and URLs included in a message are displayed as links. To use an email address in a message, click the address. A message editing page will be displayed and will automatically be addressed with the selected address. To view a URL in a message, click the URL. A new browser window will open and the contents of the selected URL will be displayed.

24
Deleting a message while viewing it
To delete a message from the viewing page, click the "Delete" link. The page will refresh, and the next message (as ordered in the message list) will be displayed. The deleted message will be designated with a trash can in the status section of the main mail page.
Replying to a message
To reply to a message, click the "Reply" link from the message viewing page. A message editing page will be displayed with the sender's address in the "To" field. The subject of the reply is automatically entered in the form of "Re: original message subject". The body of the original message is included in the reply with each line preceded by a ">" symbol. Text can be added to the body of the message if desired. To finish the reply, spell check it if necessary and click a "Send Now" button.
Replying to all recipients of a message
To reply to all the recipients of a message, click the "Reply to all" link on the message viewing page. The message editing page that opens is similar to the one opened by the "Reply to" link, except all the recipients are included in the relevant address fields. Text can be added to the body of the message as desired. To finish the reply, spell check it if necessary and click a "Send Now" button.
Forwarding a message
To forward a message, click the "Forward" link from the message viewing page. A message editing page will open with the subject field in the form of "Fwd: original message subject". The body of the original message is included in the reply with each line preceded by a ">" symbol. Text can be added to the body of the message if desired. To complete forwarding the message, fill in the appropriate address fields, spell check if necessary and click a "Send Now" button.
Recomposing a message
The recomposing option allows you to view a message in an editing page. The normal message viewing page does not allow direct editing of the message. The recompose option allows full editing control over a received message. To recompose a message, click the "Recompose" link on the message viewing page. A message editing page will open with the original message's fields and body text entered in the appropriate fields.

25
Printing a message
Messages can be printed using the browser's print function or can be cut and pasted to a word processor. The "Print View" link on the message viewing page allows just the message to be viewed. The viewing page's links and buttons are suppressed by "Print View" to allow for a clean print out. Once the "Print View" link has been clicked and the message is re-displayed, use the browser's built in print functions to print the message.
Selecting or deselecting a message
To select a message, click the check box that appears beside the message's size display. To deselect a message, click the message's check box and the check mark will disappear. The "Select None" button deselects all selected messages and the "Select All" button selects all the displayed messages.
Deleting or undeleting a message
To delete a message, select it and click the "Delete Selected" button. Multiple messages can be deleted with multiple selections. A deleted message is designated with a trash can in the status section. Once a message has been marked for deletion, it can be permanently deleted by clicking the "Empty Trash" link. There is no way to recover a permanently deleted message. A message marked for deletion can be undeleted by selecting it and clicking the "Undelete Selected" button.
Copying and moving messages
Messages can be copied or moved to a specified folder. Copying a message leaves the original in the source folder and an exact copy in the target folder. Moving a message transfers the original to the target folder. To copy or move a message from the main mail page:
1. Select the desired message or messages. 2. Click either the "Copy" or "Move" radio button. 3. Select the target folder from the target folder drop-down menu located at
the bottom right of the page. 4. Click the "Go" button located beside the target folder drop-down menu.
You can also move a message from within a message viewing page by clicking on the "Move" link. A message moving page will be displayed. Choose the target folder from the "Folders" drop-down menu and click the "Move" button. The main mail page will then be displayed. After moving a message, the original message remains in the source folder and is marked for deletion with a trash can.
26
Confusing the folder viewing drop-down menu at the top left of the page with the target folder drop-down menu will make the operation fail.
Creating a new message
Creating a new message
To create a new message, go to the mail feature and click the "New Message" link. A message editing page will be displayed, which gives you full control over your message from addressing to creating attachments.
Addressing message with or without contacts
WebMail allows you to directly access your contacts from within the editing window. To address your message using your contact list, select the required contacts from the "Contacts" list and click the appropriate "Add to" button. Email addresses can also be manually entered directly into the appropriate "To", "CC" and "Bcc" fields. Multiple entries must be separated with commas. Addresses entered into the "To" and "CC" fields are visible to all recipients of the message. Addresses entered into the "Bcc" field are not visible to any recipient.
Entering a message subject
The "Subject" field is a one line description of the message. If a subject is not entered into the field, the line "[no subject]" will be automatically be entered for you.
Creating attachments
Files of any kind can be sent via email as an attachment. The attachment can then be downloaded by the recipient onto a local machine. To create an attachment, enter the complete path of the file to be attached in the "Attachment" field. If the desired file's path is unknown, click the "Browse" button and locate the file via the file chooser dialog box. Select the file, and click the chooser's "Open" button. The file's complete path will be entered in the "Attachment" field. Multiple attachments can be sent by entering the number of attachments in the "Attachments" text box. Click the "Change" button to display the selected number of attachment text boxes. Presently, the maximum size of an attachment is 25 Megabytes.
Entering the message body
In the mail function, enter the body of the message into the large text area on the message composition page. Line wrapping is automatic, and the vertical scroll

27
bars are enabled when the text reaches the bottom of the window.

28
Spell checking
WebMail includes a spell checker for the message body. To spell check the text of the message body, click one of the "Spell Check" buttons. The edit page will refresh and the message will be re-displayed. The spell checked message will be labelled "Spell Checked Version". Only those words not found in the spell checker's dictionary will be editable. The editable words are displayed in drop-down menus. To edit a word in a drop-down menu, either erase the relevant part of the word or choose one of the words offered in the drop-down menu's list. When you are satisfied with the spelling of the message, click the "Recompose" button. The page will refresh and will return to the regular editing mode.
Sending a message
To send a message, click the "Send Now" button.
Saving a message draft
To save a draft of a message for future editing, click the "Save draft" button. A copy of the message will be stored in the designated draft folder. To view or change the folder used to store drafts, change the "Save draft items in" setting in your mail preferences. To go view your preferences, click the "Prefs" link on any mail page or the "Preferences" link on the Main page.
Saving a message externally
To save a message to a floppy disk or hard drive, you must use the browser's save function. The message will be saved as HTML and can be viewed later in a browser. There is no direct way to save a plain text version of a message from WebMail. If you want to save a plain text version of a message, you can cut and paste the text of the message into a word processor. Another option is to use an HTML editor's "strip tags" function to remove the HTML tags of a message saved by the browser.
Refreshing the message list
Refreshing the message list will show any new messages that have been received since the page was last refreshed. To refresh the message list, click the "Refresh" link on the main mail page.

29
Organizing your daily schedule
Introduction to the Schedule function
WebMail provides a personal organiser called "Schedule." A summary of the day's scheduled items appears on the main page while a more detailed display can be obtained from the Schedule function. To view dates and add schedule items, click the "Schedule" link on any WebMail page.
Date viewing methods
WebMail provides several ways to navigate and view dates. You can view different months, days and the present day. Month From the main schedule page, months can be viewed by clicking the calendar's forward and reverse arrows. The reverse arrow displays the previous month, and the forward arrow displays the next month. Day You can view a specific day by clicking the desired day on the calendar. You can also choose a day by using the fields at the bottom of the main schedule page. To use the field method, select the desired month, day and year. Click the "Go" button at the bottom right of the page to view the selected day. Current day To view the current day, click one of the "Go to today" links on the main schedule page. The current date is controlled by the server and cannot be set by the user. You can toggle between daily, weekly and monthly views by clicking on the "Daily View", "Weekly View", and "Monthly View" links.
Display of schedule entries
Schedule items for the day are displayed beside the calendar on the main schedule page and at the bottom of the main WebMail page. An item's time, group and description are displayed. To view the complete details of an item, click its description.
Selecting daily or monthly view
The schedule page has two viewing modes: monthly and daily. The monthly mode displays a calendar while the daily mode displays a single day divided into hours. To switch between modes, click either the "Daily view" or "Monthly view" link.

30
Adding a schedule item
To add an item to the schedule, go to the main schedule page. Select the desired date, and click the "Add item" link. The item editing page will be displayed. Once the item editing page is displayed, fill in the appropriate fields and click the "Add" button. The text entered in the "Subject" field will appear as the "Description" text when the item is displayed.
Deleting a schedule item
To delete a schedule item, go to the main schedule page. Click the item's description. An item editing window will be displayed. To delete the item, click the "Delete" button at the bottom of the page. Once an item is deleted, it cannot be recovered.
Updating a schedule item
To update a schedule item go to the main schedule page. Click the item's description. The item editing window will be displayed. Edit the item as desired and click the "Update" button at the bottom of the page.
Using groups to organize schedule items
Schedule items can be assigned to groups. An item can be assigned to a group at the time of creation or afterwards. An item can only be assigned to an existing group. Until assigned a group, an item is listed as "Unfiled." Unfiled is not literally a group but a statement about the item's group status. To assign an item to a group at creation, select the desired group from the "Group" drop-down menu as you are filling in the fields on the item editing page. To assign an existing item to a group, please see "Moving Schedule Items."
Moving schedule items
You can move a schedule item from one group to another. To move an item, click its description and an item editing page will be displayed. Select the target group from the "Group" drop-down menu and click the "Update" button at the bottom of the page. To move a schedule item from one time to another, click its description to display the editing page. Select a new Date, Start time or End time.

31
Range of dates supported
Dates are based on a UNIX time function. The schedule presently supports years in the range of 1970 to 2035.
Performing schedule maintenance
The schedule maintenance function allows you to delete a range of schedule items. To perform schedule maintenance, click the "Maintenance" link from the schedule page. Choose the range of dates to delete from the "Delete records older than" drop-down menus. To preview the items that will be deleted, click the "Preview" button. To permanently delete the selected items, click the "Delete" button. Once an item or range of items are deleted, they cannot be recovered. You can also view a specific day's schedule items by filling out the "GoTo" drop-down menus and clicking the "Go" button.
The main page - your account overview
Introduction to the main page
WebMail's main page allows access to WebMail's features as well as displaying your five most recent messages and the daily schedule. Links to the Mail, Contacts, Schedule, ToDo, Bookmarks and Logout pages are available from the main page. Group and Preferences options are also accessible. To access any of the above features, click the appropriate link. To read a message, click the message's subject and a view message page will be displayed.

32
Grouping users and items
Introduction to groups
Objects such as contacts, schedule items, ToDo items and bookmarks can be placed into groups enabling them to be shared between group members. The Groups page allows you to view groups, create groups, edit groups, and add group members. To begin working with a group, click the "Groups" link on the WebMail main page.
Adding a group
To add a group, click the "Groups" link on the WebMail main page. Click the "Add group" link and an add group page will be displayed. Enter the name of the new group in the text box and click the "Add" button.
Group naming convention
Group names follow standard UNIX filename conventions. Most characters are valid, but avoid spaces, tabs and characters that have a special meaning to the shell, such as:
& ; ( ) | ? \ ' " ` [ ] { } < > $ - ! /.
Viewing group information
To view the members of a group, click the "Groups" link on the WebMail main page. From the main group page, click the group's name.
Placing an object in a group
Please refer to the help information about contact lists, daily schedules, ToDo lists, notes, and Internet bookmarks for more information about using groups with these objects.

33
Adding a member to a group
You can place other WebMail users (members) in a group to facilitate sharing common items and events. To add a member to a group, click the "Groups" link on the WebMail main page. Click the name of the group from the main group page, and then click the "Add member" link. The add member page will be displayed. Enter the WebMail email address of the member in the text box, and click the "Add" button. Once a user has been added to a group, that group appears in the user's group list. Any object that is placed in this group is accessible by all members of the group. A list of a group's members can be displayed by clicking the group name from the main group page.
Editing a group
The group editing function allows you to update or delete a group's name. To update the name of a group, click the "Groups" link on the WebMail main page. Select a group and click the "Edit group" link. The group editing page will be displayed. Enter the new name for the group in the text box and click the "Update" button. To delete a group, select a group and click the "Edit group" link. Once the group editing page is displayed, click the "Delete" button to permanently delete the group. The deleted group cannot be recovered.
Deleting a group
WebMail gives you two methods to delete groups. The first method is to use the edit groups function. The second method is to use the "Delete" link on the group viewing page. To use this method, click the "Groups" link on the WebMail main page. Select a group by clicking its name. When the group viewing page is displayed, click the "Delete group" link to permanently delete the group. Once deleted, a group cannot be recovered.

34
Configuring your WebMail account
Setting preferences
Many WebMail functions can be customised from the preferences page. To access the preferences page, click the "Preferences" link on the WebMail main page. A drop-down menu on the preferences page contains a list of customisable functions. The currently selected function's options are displayed. To view a function's options, choose a function from the "Feature" drop-down menu and click the "Go" button. To change your preferences, edit the settings and click the "Update preferences" button. Page specific preferences are available by clicking the "Prefs" link located on appropriate pages.
Preference settings by function
Bookmarks
The preference settings for the Bookmarks function are: Default group for new items - The group that new bookmarks are placed into. The default is "Unfiled". Default sort order for contacts list - The default order in which to sort the bookmarks. Choices are: item, group and url. Invert sort order - Invert the sorting order. The two sort orders are ascending and descending.
Contacts
The preference settings for the Contacts function are: Default group for new items - The group that new contacts are placed into. The default is "Unfiled". Default sort order for contacts list - The default order in which to sort the bookmarks. Choices are nickname, name, company, group and email. Invert sort order - Invert the sorting order. The two sort orders are ascending and descending. Number of Messages to index on one screen - The number of messages that can be viewed on one screen. The default number is 20. As the number of messages displayed on a screen increases, the time to load the page increases.

35
Global preferences
Global preferences are options that affect the entire WebMail application. The options are: Menu style 1 - This option controls the appearance of the WebMail top level menu. This menu contains the options to navigate to the main WebMail features including Main, Mail and contacts. Some of the available options are: HTML style links, drop-down menus and lists. Menu style 2 - This option controls the appearance of the WebMail secondary menu. This menu contains the options to navigate secondary, page specific WebMail features including (from the main Mail page) New Message and Folder Management. Some of the available options are: HTML style links, drop-down menus and lists. Language - The language option allows you to choose the language in which to view your messages. Your browser will have to be properly configured before you can take advantage of this option. The default language is English. Disable new message indicator in footer - When a new message arrives, you have the option of a message being displayed at the bottom of the page you are presently viewing. This option allows you to turn this message on and off. To disable the message, check the option's checkbox. To enable the message, ensure that the option is unchecked. Prev/Next style - When a page contains more than one page of information, this option controls the form of the page navigation tool. An example is the main Mail page. If you have many messages, they will be divided into pages. To move from page to page, you click the navigation tool. The tool comes in many forms including: tabbed lists and drop-down menus.
Mail The preference settings for the Mail function are: Your Real Name - This field holds your name. This is not your email address or your user name, but your real name. Reply-To - Fill in this field with an email address if you need to have replies to your messages sent to an address other than the one your messages are sent from. Automatic Signature when composing new mail - An automatic signature is a block of text that is appended to the end of your messages. Do not confuse an automatic signature with a written signature. The automatic signature is always in text form. Use it to personalise your messages with your name, place of work, a favourite quote, etc. Wrap Lines at this many characters - This option controls how many characters are entered before wrapping to the next line. Alter this option if your display is too large or too small for the present setting. The default setting is 80 characters.

36
Number of Messages to index on one screen - The number of messages that can be viewed on one screen. The default number is 20. As the number of messages displayed on a screen increases, the time to load the page increases. Default sort order for mail list - This option controls the default order in which to sort messages. Choices are date, from and subject. Invert sort order - Invert the sorting order. The two sort orders are ascending and descending. Delete and Expunge simultaneously - By default, when you delete a message, it remains in its folder and is marked with a trash can. To permanently delete the message, you click the "Empty Trash" link. This option allows you to skip the empty trash process. By checking this option, the delete command permanently deletes the message without warning. Set this option with care because once a message is deleted, it cannot be recovered. Save sent items - If this option is checked, a copy of each sent message will be stored in the "sent-mail" folder. Save sent items in - If the "Save sent items" option is checked, this option allows you to choose the folder in which the sent mail copy is stored. The default is "sent-mail". Save draft items in - This option allows you to choose the folder in which draft messages are stored. The default is "INBOX". Display second command bar at bottom - The second command bar holds the "New Message", "Prefs" and other links. This option will allow this command bar to be displayed at the bottom of the page as well as its default top position. Display messages in separate window - This option allows you to view your messages in a separate browser window. The default setting displays messages in the same window as the main Mail window. Show contacts list when composing new messages - The contacts list by default is displayed at the top of the message editing page. If you prefer that the contacts list not be displayed on this page, ensure that this option is not checked. If this option is disabled, you will have to add your contacts one by one by continuously loading your "Contacts" page.
Main page
The preference settings for the Main page are: Disable display of recent mail - The five most recent messages are by default displayed on the main page. This display can be disabled by checking this option. Disable display of today's schedule - The day's schedule is by default displayed on the main page. This display can be disabled by checking this option.

37
Notes
The preference settings for the Notes function are: Default group for new items - The group that new notes are placed into. The default is "Unfiled". Default sort order for notes list - The default order in which to sort the notes. Choices are: item and group. Invert sort order - Invert the sorting order. The two sort orders are ascending and descending. Width of text field - Width of the note body. Units are in characters. Height of text field - Height of the note body. Units are in characters.
Schedule
The preference settings for the Schedule function are: Default group for new items - The group that new schedule items are placed into. The default is "Unfiled".
ToDo
The preference settings for the Schedule function are: Default group for new items - The group that new ToDo list items are placed into. The default is "Unfiled". Default sort order for ToDo list - The default order in which to sort the ToDo list. Choices are item, group and priority. Invert sort order - Invert the sorting order. The two sort orders are ascending and decending. Default priority for new items - ToDo list items are assigned a priority from zero to ten. This option sets the default priority.

38
Managing your contact list
Introduction to the Contacts function
WebMail uses the Contacts function to store and manage email addresses. You can create your own contacts or import them from Microsoft Outlook 2000/98/Express or Netscape 4.6. To access the Contacts function, click the "Contacts" link found on any WebMail page.
Description of the contact summary
Each contact is divided into five sections, all of which can be used as sorting criteria: Nickname A nickname is a short (usually one word) field which identifies the contact. Clicking the nickname displays the contact editing page. Click on the "nickname" link at the top of the contact list to display the contents alphabetically by nickname. Name The name is a combination of the contact's last and first name. Click on the "name" link at the top of the contact list to display the contents alphabetically by name. Company Click the "company" link at the top of the contact list to display the contacts alphabetically by company. Group Click the "group" link at the top of the contact list to display the contacts alphabetically by group. Email Click the "email" link at the top of the contact list to display the contacts alphabetically by email address.
Creating a contact
To create a contact, go to the main contacts page and click the "Add item" link. The contact editing page will be displayed. This page holds information regarding the contact. None of the fields are required, however to be useful, at least an email address should be entered. Only some of the information will be visible from the main contacts page. To view all of a contact's information, click the desired "nickname" link from the main contacts page.

39
Using groups to organize contacts
Contacts can be assigned to groups. A contact can be assigned to a group at the time of creation or afterwards. A contact can only be assigned to an existing group. If no group is specified, the contact is listed as "Unfiled." Unfiled is not literally a group but a statement about the contact's group status. To assign a contact to a group at creation, select the desired group from the "Group" drop-down menu as you are filling in the fields on the contact editing page. To assign an existing contact to a group, please see "Copying and moving contacts."
Selecting or deselecting a contact
To select a contact, click the check box that appears beside the contact's email address. To deselect a contact, click the contact's check box and the check mark will disappear. The "Select None" button deselects all contacts and the "Select All" button selects all the contacts.
Deleting a contact
To delete a contact from the main contacts page, select it and click the "Delete Selected" button, or click its trash can image. Multiple contacts can be deleted with multiple selections. There is no way to recover a deleted contact. A contact can also be deleted from the contact editing page by clicking on the "Delete" button.
Copying and moving contacts
Contacts can be copied or moved to a specified group. Copying a contact leaves the original in the source group and an exact copy in the target group. Moving a contact transfers the original contact to the target group. To copy or move a contact from the main mail page or the main contacts page:
1. Select the desired contact or contacts. 2. Click either the "Copy" or "Move" radio button 3. Select the target group from the target group drop-down menu located at
the bottom right of the page. 4. Click the "Go" button located beside the target group drop-down menu.
You can also move a contact from within the contact editing page by selecting the target group from the "Group" drop-down menu and clicking the "Update" button.

40
Importing contacts from Outlook and Netscape
Contacts can be imported from Microsoft Outlook 2000/98/Express and from Netscape 4.6/4.7x in CSV (comma separated values) format. To import contacts into WebMail, click the "Import" link on the main contacts page and the import contacts page will be displayed. Export your address book/contact list from either Netscape or Outlook in CSV format. Check your browser's documentation if you are unsure of how to complete the export process. Use the "Import from" drop-down menu to select the application from where the contacts will be imported. Enter the complete path of the CSV file containing the contacts into the "From file" text box or use the "Browse" button to locate the file. Complete the import process by selecting a group in which to store the imported contacts and click the "Go" button. If the process is successful, the contacts will be imported and will appear in the selected group.

41
ToDo list management
Introduction to the ToDo function
WebMail provides a dateless ToDo list. The ToDo list allows you to add items and check them off as they are completed. The list can be sorted in a variety of ways and items can be grouped like schedule or contact items.
Description of the ToDo display
The ToDo function displays the group that is being viewed as well as a list of ToDo items. Each list item is broken into five sections, some of which can be used as sorting criteria: Item The item is the name of the item and a sort criteria. By clicking the "item" link at the top of the ToDo list, the list will be displayed in order by item. Group The group is a sort criteria. By clicking on the "group" link at the top of the ToDo list, the list will be displayed in order by group. Priority The priority is a numerical rating (from zero to ten) given to a list item indicating its level of importance. Priority is a sort criteria. By clicking on the "priority" link at the top of the ToDo list, the list will be displayed in order by priority. Status An item's status has two states: "not completed" and "completed". Not completed is designated by a red dot in the status section while completed is designated with a green check mark.
Adding a ToDo item
To add an item to the ToDo list, click the "Add item" link on the main ToDo page. When the ToDo item editing page is displayed, fill in the appropriate fields and click the "Add" button.
Deleting a ToDo item
To delete a ToDo item, click the item's description from the main ToDo page. A ToDo item editing window will be displayed. To delete the item, click the "Delete" button at the bottom of the page. Once an item is deleted, it cannot be recovered.

42
Updating a ToDo item
To update a ToDo item, click the desired item from the main ToDo page. A ToDo item editing window will be displayed. Edit the item as desired, and click the "Update" button at the bottom of the page.
Using groups to organize ToDo items
ToDo items can be assigned to groups. An item can be assigned to a group at the time of creation or afterwards. An item can only be assigned to an existing group. Until assigned a group, an item is listed as "Unfiled". Unfiled is not literally a group but a statement about the item's group status. To assign a ToDo item to a group at creation, select the desired group from the "Group" drop-down menu as you are filling in the fields on the ToDo item editing page. To assign an existing ToDo item to a group, please see "Moving ToDo Items."
Moving ToDo items
You can move a ToDo item from one group to another from the main ToDo pate. To move an item, click its name, and the ToDo item editing page will be displayed. Select the target group from the "Group" drop-down menu and click the "Update" button at the bottom of the page.

43
Writing notes
Introduction to the Notes function
WebMail's notes function allows you to write notes to yourself as well as make them available to group members. A note is similar to an email message as it has a topic and body.
Writing a note
To write a note, click the "Add New Item" link on the main notes page. After the note editing page is displayed, enter the note's name, group and description and click the "Add" button. Once created, the note will be displayed on the main notes page.
Updating a note
To update the information in a note, click the note's item name in the main notes page. The note editing page will be displayed. Update the note information as necessary and click the "Update" button at the bottom of the note editing page.
Deleting a note
To delete a note, click the note's item name in the main notes page. The note editing page will be displayed. Click the "Delete" button at the bottom of the note editing page to permanently delete the note. Once a note is deleted, it cannot be recovered.
Viewing a note
To view a note, click the note's item name in the main notes page. The note editing page will be displayed. After reading the note, you have the option of updating or deleting it. If you do not want to do anything to the note, click on one of the WebMail option links to leave the note editing page.

44
Using groups to share notes
You can shared notes with other WebMail users by placing them in groups. Notes are placed in groups on the notes editing page. To place a note in a group, click on the name of the note in the main notes page. When the notes editing page opens, select a group from the "Group" drop-down menu and click the "Update" button. The note will appear when you view the contents of the selected group. When a note is created, it can also be assigned to a group using the above procedure.

45
Keeping track of Internet bookmarks
Introduction to the Bookmark function
WebMail allows you to store bookmarks just like a web browser. A bookmark is a URL along with some descriptive information. When the bookmark is activated, a new browser window is opened and the content of the URL is displayed.
Description of the bookmark display
The Bookmark function displays the group that is being viewed as well as the list of bookmarks. Each list item is broken into three sections which can be used as sorting criteria: Item The item is the name of the bookmark and is a sort criteria. By clicking the "item" link at the top of the bookmark list, the list will be displayed in order by item. Group The group is a sort criteria. By clicking the "group" link at the top of the bookmark list, the list will be displayed in order by group. URL URL is an acronym for Uniform Resource Locator. A URL in the context of a web browser represents the location of a web page. See the glossary for more details. The URL is a sort criteria. By clicking the "url" link at the top of the bookmark list, the list will be displayed in order by URL.
Adding a bookmark
To add a bookmark, click the "Add item" link on the main bookmark page. When the bookmark editing page is displayed, fill in the appropriate fields and click the "Add" button. When entering the URL, you have the option of not adding the prefix "http://". Most modern browsers will add the prefix automatically. To be certain that the bookmark works with all browsers, add the prefix manually.
Deleting a bookmark
To delete a bookmark, click the desired bookmark's item name from the main bookmark page and the bookmark editing window will be displayed. To delete the bookmark, click the "Delete" button at the bottom of the page. Once a bookmark is deleted, it cannot be recovered.

46
Updating a bookmark
To update a bookmark, click the desired bookmark from the main bookmark page. A bookmark editing window will be displayed. Edit the bookmark as desired and click the "Update" button at the bottom of the page.
Using a bookmark
To activate a bookmark, click the desired bookmark's URL from the main bookmark page. A new browser window will open, and the content of the bookmark's URL will be loaded.
Using groups to organize bookmarks
Bookmarks can be assigned to groups. A bookmark can be assigned to a group at the time of creation or afterwards. A bookmark can only be assigned to an existing group. Until assigned a group, a bookmark is listed as "Unfiled." Unfiled is not literally a group but a statement about the bookmark's group status. To assign a bookmark to a group at creation, select the desired group from the "Group" drop-down menu as you are filling in the fields on the bookmark editing page. To assign an existing bookmark to a group, please see "Moving a bookmark."
Moving a bookmark
You can move a bookmark from one group to another. To move a bookmark, click its item name and the bookmark editing page will be displayed. Select the target group from the "Group" drop-down menu and click the "Update" button at the bottom of the page.
Spam Policy Spam is unsolicited email or newsgroup postings, usually advertising products or services. Spamming (sending junk email) generates a very negative response from most recipients. Since it is best to avoid this, we enforce a strict Anti-Spamming Policy. According to our policy, if you send spam from your domain, your account will be terminated. To ensure that you do not unintentionally generate spam, please obtain permission from your intended recipients before you add them to your distribution list.

47
Index
A
activate a bookmark............................................................................................................44 add a bookmark ..................................................................................................................43 add a group................................................................................................................... 30, 31 add folder...................................................................................................................... 20, 21 add group page............................................................................................................. 30, 31 add member page ...............................................................................................................31 add note..............................................................................................................................41 add schedule items....................................................................................................... 27, 28 add todo item......................................................................................................................39 address ...............................................................................................................................25 address message ................................................................................................................25 Agent ....................................................................................................................................5 ascending order.......................................................................................................32, 33, 35 attachment limit..................................................................................................................25 attachments........................................................................................................................25 automatic signature ............................................................................................................33
B Bcc......................................................................................................................................25 bookmark display ...............................................................................................................43 bookmark editing page .......................................................................................................44 bookmark editing window............................................................................................. 43, 44 bookmarks.............................................................................................. 17, 29, 30, 32, 43, 44 browser print functions ......................................................................................................24 browser save function ........................................................................................................26
C calendar..............................................................................................................................27 CC .......................................................................................................................................25 Claris Emailer .......................................................................................................................5 comma separated values....................................................................................................38 Company ............................................................................................................................36 composing new messages .................................................................................................33 connection time limit ..........................................................................................................18 contact editing page ...........................................................................................................36 contact list .............................................................................................. 17, 22, 25, 36, 37, 38 contact summary ................................................................................................................36 contacts ....................................................................................... 22, 25, 29, 30, 32, 36, 37, 38 contacts list ..................................................................................................22, 33, 36, 37, 38 cookies...............................................................................................................................17 copy a contact ....................................................................................................................37 copy message .....................................................................................................................24 create a contact ..................................................................................................................36 create a note .......................................................................................................................41 creating a new message .....................................................................................................25 creating attachments ..........................................................................................................25 CSV .....................................................................................................................................38 current date ........................................................................................................................27 customisable functions ...........................................................................................32, 34, 35

48
D daily schedule..........................................................................................................17, 34, 35 Date .............................................................................................................................. 19, 22 Day......................................................................................................................................27 default group ......................................................................................................................32 delete a bookmark ..............................................................................................................43 delete a contact ..................................................................................................................37 delete folder........................................................................................................................20 delete group........................................................................................................................31 delete messages......................................................................................................23, 24, 33 delete multiple messages...................................................................................................24 delete note ..........................................................................................................................41 delete schedule item..................................................................................................... 28, 29 delete todo item ..................................................................................................................39 descending order.....................................................................................................32, 33, 35 deselect a message ...................................................................................................... 24, 37 dictionary ............................................................................................................................26 disable cookies...................................................................................................................17 display of recent mail..........................................................................................................34 display of today's schedule .......................................................................................... 27, 34 draft items..................................................................................................................... 26, 33
E edit......................................................................................................................................23 edit groups .........................................................................................................................31 editing a message ...............................................................................................................23 email .................................................................................................................. 17, 22, 34, 36 email addresses..................................................................................................................22 email client ...................................................................................................5, 6, 8, 12, 14, 15 Email Connection .................................................................................................................6 Empty Trash .......................................................................................................................24 enable cookies....................................................................................................................17 Eudora ..................................................................................................................................6 expunge messages.............................................................................................................33
F floppy disk ..........................................................................................................................26 folder management....................................................................................................... 20, 24 folder statistics ...................................................................................................................20 folders...........................................................................................................17, 19, 20, 21, 24 forwarding a message ........................................................................................................23 From ............................................................................................................................. 19, 22 Full Headers........................................................................................................................22 Fwd: ....................................................................................................................................23
G
global preferences..............................................................................................................33 Group..................................................................... 28, 29, 30, 31, 34, 36, 37, 40, 41, 42, 43, 44 group viewing page ...................................................................................................... 31, 34
H hard drive............................................................................................................................26 header.................................................................................................................................22 header details .....................................................................................................................22

49
HTML editor ........................................................................................................................26
I
importing contacts..............................................................................................................38 inactivity .............................................................................................................................18 INBOX ................................................................................................................ 17, 19, 20, 33 index card ...........................................................................................................................22 index card image ................................................................................................................22 invert sort order .......................................................................................................32, 33, 35 item............................................................................................................................... 30, 43 item editing window ............................................................................................................28
L
language .............................................................................................................................33 line wrapping ................................................................................................................ 25, 33 logging in............................................................................................................................17 Logout .......................................................................................................................... 18, 29
M
Mail .................................................................................................................... 19, 20, 29, 33 main bookmark page ..........................................................................................................44 main page .......................................................................................................... 29, 32, 33, 34 main schedule page............................................................................................................27 manage messages........................................................................................................ 19, 20 maximum attachment size ..................................................................................................25 member...............................................................................................................................31 menu style ..........................................................................................................................33 message body .............................................................................................................. 25, 26 message draft .....................................................................................................................26 message editing page ................................................................................................... 23, 25 message header .................................................................................................................22 message summary..............................................................................................................19 message viewing page ................................................................................................. 23, 24 messages ............................................................................................... 19, 20, 22, 23, 24, 25 messages in separate window ............................................................................................33 Microsoft Exchange ..............................................................................................................8 Microsoft Internet Mail ..........................................................................................................8 Microsoft Outlook .................................................................................................................8 month .................................................................................................................................27 move a bookmark ...............................................................................................................44 move a contact ...................................................................................................................37 move message ....................................................................................................................24 move schedule item............................................................................................................28 move todo item ...................................................................................................................40 multiple attachments ..........................................................................................................25 multiple messages..............................................................................................................24
N
Name...................................................................................................................................36 naming convention .............................................................................................................30 Netscape .............................................................................................................................38 Netscape Mail .....................................................................................................................12 new items...................................................................................................................... 32, 35 new message ................................................................................................................ 25, 26 new message indicator .......................................................................................................33

50
new schedule items............................................................................................................35 Nickname ............................................................................................................................36 no subject ...........................................................................................................................25 notes............................................................................................................................. 35, 41 number of messages ..........................................................................................................33 number of new messages...................................................................................................20
O object ..................................................................................................................................30 Outlook ...............................................................................................................................38
P password ............................................................................................................................17 Pegasus Mail ......................................................................................................................14 plain text.............................................................................................................................26 Preferences............................................................................................. 26, 29, 32, 33, 34, 35 prev-next page style ...........................................................................................................33 print ....................................................................................................................................24 print functions ....................................................................................................................24 print message .....................................................................................................................24 Print View............................................................................................................................24 priority for new items..........................................................................................................35
R range of dates supported....................................................................................................29 Re: ......................................................................................................................................23 real name ............................................................................................................................33 received messages .............................................................................................................19 recompose .................................................................................................................... 23, 26 recompose a message .................................................................................................. 23, 26 refresh the message list .....................................................................................................26 rename folder................................................................................................................ 20, 21 reply to a message..............................................................................................................23 reply to all recipients ..........................................................................................................23 Reply-To ....................................................................................................................... 23, 33
S save draft items..................................................................................................................33 save message .....................................................................................................................26 save sent items...................................................................................................................33 Schedule.......................................................................................................27, 28, 29, 30, 35 schedule maintenance ........................................................................................................29 second command bar .........................................................................................................33 select a contact...................................................................................................................37 select a message ................................................................................................................24 Select All....................................................................................................................... 24, 37 Select None................................................................................................................... 24, 37 send a message ..................................................................................................................26 Send Now...................................................................................................................... 23, 26 sender.................................................................................................................................22 sent-mail ..................................................................................................................19, 20, 33 share notes.........................................................................................................................42 signature.............................................................................................................................33 Size.....................................................................................................................................19 sort order .................................................................................................................32, 33, 35

51
sorting criteria .............................................................................................................. 19, 36 special characters...............................................................................................................30 Spell Checked Version ........................................................................................................26 spell checker ......................................................................................................................17 spell checking.....................................................................................................................26 statistics .............................................................................................................................20 Status .................................................................................................................................19 strip tags.............................................................................................................................26 Subject............................................................................................................... 19, 22, 23, 25
T target folder ........................................................................................................................24 time limit.............................................................................................................................18 To.............................................................................................................................22, 23, 25 ToDo .............................................................................................................29, 30, 35, 39, 40 todo display ........................................................................................................................39 todo list.............................................................................................................. 17, 35, 39, 40 total messages....................................................................................................................20 trash can....................................................................................................................... 23, 24
U undelete message ...............................................................................................................24 Unfiled .....................................................................................................................28, 37, 44 UNIX.........................................................................................................................21, 29, 30 UNIX filenames ...................................................................................................................21 UNIX time function ..............................................................................................................29 update a bookmark .............................................................................................................44 update note .........................................................................................................................41 update preferences............................................................................................ 32, 33, 34, 35 update schedule item..........................................................................................................28 update todo item.................................................................................................................40 URL ..........................................................................................................................22, 43, 44 user defined folders...................................................................................................... 19, 20 username............................................................................................................................17 using a bookmark ...............................................................................................................44
V view a URL ..........................................................................................................................22 view dates...........................................................................................................................27 view messages ........................................................................................................19, 22, 23 view months .......................................................................................................................27 viewing group information............................................................................................ 30, 31 viewing notes......................................................................................................................41
W
WebMail ..............................................................................................................................17 wrap lines ...........................................................................................................................33 writing a note ......................................................................................................................41