hornetq user manual mesnil, howard gao (red hat, inc ... · hornetq user manual putting the buzz in...
TRANSCRIPT

HornetQ User Manual
Putting the buzz in messaging
by Clebert Suconic (Red Hat, Inc.), Andy Taylor (Red Hat, Inc.), Tim Fox, Jeff
Mesnil, Howard Gao (Red Hat, Inc.), and Francisco Borges (Red Hat, Inc.)


iii
1. Legal Notice ................................................................................................................ 1
2. Preface ......................................................................................................................... 3
3. Project Information ...................................................................................................... 5
3.1. Software Download ............................................................................................. 5
3.2. Project Information .............................................................................................. 5
4. Messaging Concepts ................................................................................................... 7
4.1. Messaging Concepts ........................................................................................... 7
4.2. Messaging styles ................................................................................................ 7
4.2.1. The Message Queue Pattern .................................................................... 8
4.2.2. The Publish-Subscribe Pattern .................................................................. 8
4.3. Delivery guarantees ............................................................................................ 9
4.4. Transactions ....................................................................................................... 9
4.5. Durability ............................................................................................................ 9
4.6. Messaging APIs and protocols ............................................................................ 9
4.6.1. Java Message Service (JMS) .................................................................. 10
4.6.2. System specific APIs .............................................................................. 10
4.6.3. RESTful API .......................................................................................... 10
4.6.4. STOMP ................................................................................................. 10
4.6.5. AMQP ................................................................................................... 11
4.7. High Availability ................................................................................................ 11
4.8. Clusters ............................................................................................................ 11
4.9. Bridges and routing ........................................................................................... 11
5. Architecture ............................................................................................................... 13
5.1. Core Architecture .............................................................................................. 13
5.2. HornetQ embedded in your own application ....................................................... 15
5.3. HornetQ integrated with a JEE application server ................................................ 15
5.4. HornetQ stand-alone server ............................................................................... 16
6. Using the Server ........................................................................................................ 19
6.1. Starting and Stopping the standalone server ....................................................... 19
6.2. Server JVM settings .......................................................................................... 19
6.3. Server classpath ............................................................................................... 20
6.4. Library Path ...................................................................................................... 20
6.5. System properties ............................................................................................. 20
6.6. Configuration files ............................................................................................. 20
6.7. JBoss Microcontainer Beans File ....................................................................... 22
6.8. JBoss AS4 MBean Service. ............................................................................... 24
6.9. The main configuration file. ............................................................................... 26
7. Using JMS ................................................................................................................. 27
7.1. A simple ordering system .................................................................................. 27
7.2. JMS Server Configuration .................................................................................. 27
7.3. Connection Factory Types ................................................................................. 28
7.4. JNDI configuration ............................................................................................ 29
7.5. The code .......................................................................................................... 30
7.6. Directly instantiating JMS Resources without using JNDI ..................................... 32

HornetQ User Manual
iv
7.7. Setting The Client ID ........................................................................................ 33
7.8. Setting The Batch Size for DUPS_OK ................................................................ 34
7.9. Setting The Transaction Batch Size ................................................................... 34
8. Using Core ................................................................................................................. 35
8.1. Core Messaging Concepts ................................................................................ 35
8.1.1. Message ................................................................................................ 35
8.1.2. Address ................................................................................................. 36
8.1.3. Queue ................................................................................................... 36
8.1.4. ServerLocator ........................................................................................ 36
8.1.5. ClientSessionFactory .............................................................................. 37
8.1.6. ClientSession ......................................................................................... 37
8.1.7. ClientConsumer ...................................................................................... 37
8.1.8. ClientProducer ....................................................................................... 37
8.2. A simple example of using Core ........................................................................ 38
9. Mapping JMS Concepts to the Core API ................................................................... 39
10. The Client Classpath ............................................................................................... 41
10.1. HornetQ Core Client ........................................................................................ 41
10.2. JMS Client ...................................................................................................... 41
10.3. JMS Client with JNDI ...................................................................................... 41
11. Examples ................................................................................................................. 43
11.1. JMS Examples ................................................................................................ 43
11.1.1. Applet .................................................................................................. 43
11.1.2. Application-Layer Failover ..................................................................... 43
11.1.3. Core Bridge Example ........................................................................... 43
11.1.4. Browser ............................................................................................... 44
11.1.5. Client Kickoff ........................................................................................ 44
11.1.6. Client-Side Load-Balancing ................................................................... 44
11.1.7. Clustered Durable Subscription ............................................................. 44
11.1.8. Clustered Grouping .............................................................................. 44
11.1.9. Clustered Queue .................................................................................. 44
11.1.10. Clustering with JGroups ...................................................................... 44
11.1.11. Clustered Standalone .......................................................................... 44
11.1.12. Clustered Static Discovery .................................................................. 45
11.1.13. Clustered Static Cluster One Way ....................................................... 45
11.1.14. Clustered Topic .................................................................................. 45
11.1.15. Message Consumer Rate Limiting ....................................................... 45
11.1.16. Dead Letter ........................................................................................ 45
11.1.17. Delayed Redelivery ............................................................................. 45
11.1.18. Divert ................................................................................................. 46
11.1.19. Durable Subscription ........................................................................... 46
11.1.20. Embedded .......................................................................................... 46
11.1.21. Embedded Simple .............................................................................. 46
11.1.22. Message Expiration ............................................................................ 46
11.1.23. Failover Manual Stop .......................................................................... 46

v
11.1.24. HTTP Transport .................................................................................. 46
11.1.25. Instantiate JMS Objects Directly .......................................................... 47
11.1.26. Interceptor .......................................................................................... 47
11.1.27. JAAS ................................................................................................. 47
11.1.28. JMS Bridge ........................................................................................ 47
11.1.29. JMX Management .............................................................................. 47
11.1.30. Large Message .................................................................................. 47
11.1.31. Last-Value Queue ............................................................................... 47
11.1.32. Management ...................................................................................... 48
11.1.33. Management Notification ..................................................................... 48
11.1.34. Message Counter ............................................................................... 48
11.1.35. Message Group .................................................................................. 48
11.1.36. Message Group .................................................................................. 48
11.1.37. Message Priority ................................................................................. 48
11.1.38. Multiple Failover ................................................................................. 49
11.1.39. Multiple Failover Failback .................................................................... 49
11.1.40. No Consumer Buffering ....................................................................... 49
11.1.41. Non-Transaction Failover With Server Data Replication ......................... 49
11.1.42. Paging ............................................................................................... 49
11.1.43. Pre-Acknowledge ................................................................................ 49
11.1.44. Message Producer Rate Limiting ......................................................... 50
11.1.45. Queue ................................................................................................ 50
11.1.46. Message Redistribution ....................................................................... 50
11.1.47. Queue Requestor ............................................................................... 50
11.1.48. Queue with Message Selector ............................................................. 50
11.1.49. Reattach Node example ...................................................................... 50
11.1.50. Request-Reply example ...................................................................... 50
11.1.51. Scheduled Message ........................................................................... 50
11.1.52. Security .............................................................................................. 50
11.1.53. Send Acknowledgements .................................................................... 51
11.1.54. Spring Integration ............................................................................... 51
11.1.55. SSL Transport .................................................................................... 51
11.1.56. Static Message Selector ..................................................................... 51
11.1.57. Static Message Selector Using JMS .................................................... 51
11.1.58. Stomp ................................................................................................ 51
11.1.59. Stomp1.1 ........................................................................................... 51
11.1.60. Stomp Over Web Sockets ................................................................... 51
11.1.61. Symmetric Cluster .............................................................................. 51
11.1.62. Temporary Queue .............................................................................. 52
11.1.63. Topic ................................................................................................. 52
11.1.64. Topic Hierarchy .................................................................................. 52
11.1.65. Topic Selector 1 ................................................................................. 52
11.1.66. Topic Selector 2 ................................................................................. 52
11.1.67. Transaction Failover ........................................................................... 52

HornetQ User Manual
vi
11.1.68. Transactional Session ......................................................................... 52
11.1.69. XA Heuristic ....................................................................................... 52
11.1.70. XA Receive ........................................................................................ 53
11.1.71. XA Send ............................................................................................ 53
11.1.72. XA with Transaction Manager .............................................................. 53
11.2. Core API Examples ......................................................................................... 53
11.2.1. Embedded ........................................................................................... 53
11.3. Java EE Examples .......................................................................................... 53
11.3.1. EJB/JMS Transaction ........................................................................... 53
11.3.2. HAJNDI (High Availability) ..................................................................... 53
11.3.3. Resource Adapter Configuration ............................................................ 53
11.3.4. Resource Adapter Remote Server Configuration ..................................... 53
11.3.5. JMS Bridge .......................................................................................... 54
11.3.6. MDB (Message Driven Bean) ................................................................ 54
11.3.7. Servlet Transport .................................................................................. 54
11.3.8. Servlet SSL Transport .......................................................................... 54
11.3.9. XA Recovery ........................................................................................ 54
12. Routing Messages With Wild Cards ........................................................................ 55
13. Understanding the HornetQ Wildcard Syntax .......................................................... 57
14. Filter Expressions .................................................................................................... 59
15. Persistence .............................................................................................................. 61
15.1. Configuring the bindings journal ....................................................................... 63
15.2. Configuring the jms journal .............................................................................. 63
15.3. Configuring the message journal ...................................................................... 63
15.4. An important note on disabling disk write cache. ............................................... 65
15.5. Installing AIO .................................................................................................. 66
15.6. Configuring HornetQ for Zero Persistence ........................................................ 66
15.7. Import/Export the Journal Data ........................................................................ 67
16. Configuring the Transport ....................................................................................... 69
16.1. Understanding Acceptors ................................................................................. 69
16.2. Understanding Connectors ............................................................................... 70
16.3. Configuring the transport directly from the client side. ........................................ 71
16.4. Configuring the Netty transport ........................................................................ 72
16.4.1. Configuring Netty TCP .......................................................................... 72
16.4.2. Configuring Netty SSL .......................................................................... 74
16.4.3. Configuring Netty HTTP ........................................................................ 74
16.4.4. Configuring Netty Servlet ...................................................................... 75
17. Detecting Dead Connections ................................................................................... 79
17.1. Cleaning up Dead Connection Resources on the Server .................................... 79
17.1.1. Closing core sessions or JMS connections that you have failed to close .... 81
17.2. Detecting failure from the client side. ................................................................ 81
17.3. Configuring Asynchronous Connection Execution .............................................. 82
18. Resource Manager Configuration ............................................................................ 83
19. Flow Control ............................................................................................................ 85

vii
19.1. Consumer Flow Control ................................................................................... 85
19.1.1. Window-Based Flow Control ................................................................. 85
19.1.2. Rate limited flow control ........................................................................ 87
19.2. Producer flow control ...................................................................................... 88
19.2.1. Window based flow control ................................................................... 88
19.2.2. Rate limited flow control ........................................................................ 90
20. Guarantees of sends and commits .......................................................................... 93
20.1. Guarantees of Transaction Completion ............................................................. 93
20.2. Guarantees of Non Transactional Message Sends ............................................ 93
20.3. Guarantees of Non Transactional Acknowledgements ....................................... 94
20.4. Asynchronous Send Acknowledgements ........................................................... 94
20.4.1. Asynchronous Send Acknowledgements ................................................ 95
21. Message Redelivery and Undelivered Messages ..................................................... 97
21.1. Delayed Redelivery ......................................................................................... 97
21.1.1. Configuring Delayed Redelivery ............................................................. 97
21.1.2. Example .............................................................................................. 98
21.2. Dead Letter Addresses .................................................................................... 98
21.2.1. Configuring Dead Letter Addresses ....................................................... 98
21.2.2. Dead Letter Properties .......................................................................... 99
21.2.3. Example .............................................................................................. 99
21.3. Delivery Count Persistence .............................................................................. 99
22. Message Expiry ...................................................................................................... 101
22.1. Message Expiry ............................................................................................ 101
22.2. Configuring Expiry Addresses ........................................................................ 101
22.3. Configuring The Expiry Reaper Thread ........................................................... 102
22.4. Example ....................................................................................................... 102
23. Large Messages ..................................................................................................... 103
23.1. Configuring the server ................................................................................... 103
23.2. Configuring Parameters ................................................................................. 103
23.2.1. Using Core API .................................................................................. 104
23.2.2. Using JMS ......................................................................................... 104
23.2.3. Compressed Large Messages ............................................................. 104
23.3. Streaming large messages ............................................................................ 105
23.3.1. Streaming over Core API .................................................................... 105
23.3.2. Streaming over JMS ........................................................................... 106
23.4. Streaming Alternative .................................................................................... 107
23.5. Large message example ................................................................................ 108
24. Paging .................................................................................................................... 109
24.1. Page Files .................................................................................................... 109
24.2. Configuration ................................................................................................. 109
24.3. Paging Mode ................................................................................................ 110
24.3.1. Configuration ...................................................................................... 110
24.4. Dropping messages ....................................................................................... 111
24.5. Dropping messages and throwing an exception to producers ............................ 111

HornetQ User Manual
viii
24.6. Blocking producers ........................................................................................ 111
24.7. Caution with Addresses with Multiple Queues ................................................. 112
24.8. Example ....................................................................................................... 112
25. Queue Attributes .................................................................................................... 113
25.1. Predefined Queues ....................................................................................... 113
25.2. Using the API ............................................................................................... 114
25.3. Configuring Queues Via Address Settings ....................................................... 114
26. Scheduled Messages ............................................................................................. 117
26.1. Scheduled Delivery Property .......................................................................... 117
26.2. Example ....................................................................................................... 117
27. Last-Value Queues ................................................................................................. 119
27.1. Configuring Last-Value Queues ...................................................................... 119
27.2. Using Last-Value Property ............................................................................. 119
27.3. Example ....................................................................................................... 120
28. Message Grouping ................................................................................................. 121
28.1. Using Core API ............................................................................................. 121
28.2. Using JMS .................................................................................................... 121
28.3. Example ....................................................................................................... 122
28.4. Example ....................................................................................................... 122
28.5. Clustered Grouping ....................................................................................... 122
28.5.1. Clustered Grouping Best Practices ...................................................... 124
28.5.2. Clustered Grouping Example ............................................................... 124
29. Extra Acknowledge Modes ..................................................................................... 125
29.1. Using PRE_ACKNOWLEDGE ........................................................................ 125
29.2. Individual Acknowledge ................................................................................. 126
29.3. Example ....................................................................................................... 126
30. Management ........................................................................................................... 127
30.1. The Management API .................................................................................... 127
30.1.1. Core Management API ....................................................................... 128
30.1.2. JMS Management API ........................................................................ 132
30.2. Using Management Via JMX .......................................................................... 135
30.2.1. Configuring JMX ................................................................................. 136
30.2.2. Example ............................................................................................. 137
30.3. Using Management Via Core API ................................................................... 137
30.3.1. Configuring Core Management ............................................................ 138
30.4. Using Management Via JMS .......................................................................... 139
30.4.1. Configuring JMS Management ............................................................. 140
30.4.2. Example ............................................................................................. 140
30.5. Management Notifications .............................................................................. 140
30.5.1. JMX Notifications ................................................................................ 140
30.5.2. Core Messages Notifications ............................................................... 140
30.5.3. JMS Messages Notifications ................................................................ 141
30.5.4. Example ............................................................................................. 142
30.6. Message Counters ........................................................................................ 142

ix
30.6.1. Configuring Message Counters ............................................................ 143
30.6.2. Example ............................................................................................. 144
30.7. Administering HornetQ Resources Using The JBoss AS Admin Console ............ 144
30.7.1. JMS Queues ...................................................................................... 144
30.7.2. JMS Topics ........................................................................................ 145
30.7.3. JMS Connection Factories .................................................................. 146
31. Security .................................................................................................................. 147
31.1. Role based security for addresses ................................................................. 147
31.2. Secure Sockets Layer (SSL) Transport ........................................................... 149
31.3. Basic user credentials ................................................................................... 149
31.4. Changing the security manager ...................................................................... 150
31.5. JAAS Security Manager ................................................................................. 151
31.5.1. Example ............................................................................................. 151
31.6. JBoss AS Security Manager .......................................................................... 151
31.6.1. Configuring Client Login ...................................................................... 152
31.6.2. Changing the Security Domain ............................................................ 152
31.7. Changing the username/password for clustering .............................................. 152
32. Application Server Integration and Java EE ........................................................... 153
32.1. Configuring Message-Driven Beans ................................................................ 153
32.1.1. Using Container-Managed Transactions ............................................... 154
32.1.2. Using Bean-Managed Transactions ..................................................... 156
32.1.3. Using Message Selectors with Message-Driven Beans .......................... 157
32.2. Sending Messages from within JEE components ............................................. 157
32.3. MDB and Consumer pool size ....................................................................... 159
32.4. Configuring the JCA Adaptor ......................................................................... 160
32.4.1. Global Properties ................................................................................ 162
32.4.2. Adapter Outbound Configuration .......................................................... 165
32.4.3. Adapter Inbound Configuration ............................................................ 167
32.4.4. Configuring the adapter to use a standalone HornetQ Server ................. 168
32.5. Configuring the JBoss Application Server to connect to Remote HornetQ Server .. 171
32.5.1. Configuring Jboss 5 ............................................................................ 171
32.5.2. Configuring Jboss 5 ............................................................................ 175
32.6. High Availability JNDI (HA-JNDI) .................................................................... 175
32.7. XA Recovery ................................................................................................. 176
32.7.1. XA Recovery Configuration ................................................................. 176
32.7.2. Example ............................................................................................. 178
33. The JMS Bridge ..................................................................................................... 179
33.1. JMS Bridge Parameters ................................................................................. 182
33.2. Source and Target Connection Factories ........................................................ 185
33.3. Source and Target Destination Factories ........................................................ 185
33.4. Quality Of Service ......................................................................................... 185
33.4.1. AT_MOST_ONCE ............................................................................... 185
33.4.2. DUPLICATES_OK .............................................................................. 186
33.4.3. ONCE_AND_ONLY_ONCE ................................................................. 186

HornetQ User Manual
x
33.4.4. Time outs and the JMS bridge ............................................................ 186
33.4.5. Examples ........................................................................................... 187
34. Client Reconnection and Session Reattachment ................................................... 189
34.1. 100% Transparent session re-attachment ....................................................... 189
34.2. Session reconnection .................................................................................... 190
34.3. Configuring reconnection/reattachment attributes ............................................. 190
34.4. ExceptionListeners and SessionFailureListeners .............................................. 191
35. Diverting and Splitting Message Flows .................................................................. 193
35.1. Exclusive Divert ............................................................................................ 193
35.2. Non-exclusive Divert ...................................................................................... 194
36. Core Bridges .......................................................................................................... 197
36.1. Configuring Bridges ....................................................................................... 197
37. Duplicate Message Detection ................................................................................. 201
37.1. Using Duplicate Detection for Message Sending ............................................. 201
37.2. Configuring the Duplicate ID Cache ................................................................ 202
37.3. Duplicate Detection and Bridges .................................................................... 203
37.4. Duplicate Detection and Cluster Connections .................................................. 203
38. Clusters .................................................................................................................. 205
38.1. Clusters Overview ......................................................................................... 205
38.2. Server discovery ........................................................................................... 206
38.2.1. Dynamic Discovery ............................................................................. 206
38.2.2. Discovery using static Connectors ....................................................... 213
38.3. Server-Side Message Load Balancing ............................................................ 215
38.3.1. Configuring Cluster Connections .......................................................... 216
38.3.2. Cluster User Credentials ..................................................................... 219
38.4. Client-Side Load balancing ............................................................................ 219
38.5. Specifying Members of a Cluster Explicitly ...................................................... 221
38.6. Message Redistribution ................................................................................. 222
38.7. Cluster topologies ......................................................................................... 223
38.7.1. Symmetric cluster ............................................................................... 223
38.7.2. Chain cluster ...................................................................................... 223
39. High Availability and Failover ................................................................................ 225
39.1. Live - Backup Groups .................................................................................... 225
39.1.1. HA modes .......................................................................................... 225
39.1.2. Data Replication ................................................................................. 225
39.1.3. Shared Store ...................................................................................... 227
39.1.4. Failing Back to live Server .................................................................. 229
39.2. Failover Modes ............................................................................................. 230
39.2.1. Automatic Client Failover .................................................................... 230
39.2.2. Getting Notified of Connection Failure .................................................. 233
39.2.3. Application-Level Failover ................................................................... 234
40. Libaio Native Libraries ........................................................................................... 235
40.1. Compiling the native libraries ......................................................................... 235
40.1.1. Install requirements ............................................................................ 235

xi
40.1.2. Invoking the compilation ...................................................................... 236
41. Thread management .............................................................................................. 239
41.1. Server-Side Thread Management ................................................................... 239
41.1.1. Server Scheduled Thread Pool ............................................................ 239
41.1.2. General Purpose Server Thread Pool .................................................. 239
41.1.3. Expiry Reaper Thread ......................................................................... 240
41.1.4. Asynchronous IO ................................................................................ 240
41.2. Client-Side Thread Management .................................................................... 240
42. Logging .................................................................................................................. 243
42.1. Logging in a client or with an Embedded server .............................................. 243
42.2. Logging With The JBoss Application Server .................................................... 245
43. REST Interface ....................................................................................................... 247
43.1. Goals of REST Interface ................................................................................ 247
43.2. Installation and Configuration ......................................................................... 248
43.2.1. Installing Within Pre-configured Environment ........................................ 248
43.2.2. Bootstrapping HornetQ Along with REST ............................................. 250
43.2.3. REST Configuration ............................................................................ 252
43.3. HornetQ REST Interface Basics ..................................................................... 254
43.3.1. Queue and Topic Resources ............................................................... 254
43.3.2. Queue Resource Response Headers ................................................... 255
43.3.3. Topic Resource Respones Headers ..................................................... 255
43.4. Posting Messages ......................................................................................... 255
43.4.1. Duplicate Detection ............................................................................. 257
43.4.2. Persistent Messages ........................................................................... 259
43.4.3. TTL, Expiration and Priority ................................................................. 260
43.5. Consuming Messages via Pull ....................................................................... 260
43.5.1. Auto-Acknowledge .............................................................................. 261
43.5.2. Manual Acknowledgement ................................................................... 265
43.5.3. Blocking Pulls with Accept-Wait ........................................................... 269
43.5.4. Clean Up Your Consumers! ................................................................ 270
43.6. Pushing Messages ........................................................................................ 270
43.6.1. The Queue Push Subscription XML ..................................................... 270
43.6.2. The Topic Push Subscription XML ....................................................... 272
43.6.3. Creating a Push Subscription at Runtime ............................................. 272
43.6.4. Creating a Push Subscription by Hand ................................................. 274
43.6.5. Pushing to Authenticated Servers ........................................................ 275
43.7. Creating Destinations .................................................................................... 275
43.8. Securing the HornetQ REST Interface ............................................................ 276
43.8.1. Within JBoss Application server ........................................................... 276
43.8.2. Security in other environments ............................................................ 276
43.9. Mixing JMS and REST .................................................................................. 277
43.9.1. JMS Producers - REST Consumers ..................................................... 277
43.9.2. REST Producers - JMS Consumers ..................................................... 278
44. Embedding HornetQ ............................................................................................... 279
HornetQ User Manual
xii
44.1. Simple Config File Embedding ....................................................................... 279
44.1.1. Core API Only .................................................................................... 279
44.1.2. JMS API ............................................................................................ 280
44.2. POJO instantiation - Embedding Programmatically .......................................... 281
44.3. Dependency Frameworks .............................................................................. 283
45. Spring Integration .................................................................................................. 285
46. Intercepting Operations ......................................................................................... 287
46.1. Implementing The Interceptors ....................................................................... 287
46.2. Configuring The Interceptors .......................................................................... 287
46.3. Interceptors on the Client Side ....................................................................... 288
46.4. Example ....................................................................................................... 288
47. Interoperability ....................................................................................................... 289
47.1. Stomp ........................................................................................................... 289
47.1.1. Native Stomp support ......................................................................... 289
47.1.2. Mapping Stomp destinations to HornetQ addresses and queues ............ 290
47.1.3. STOMP and connection-ttl .................................................................. 290
47.1.4. Stomp and JMS interoperabilty ............................................................ 291
47.1.5. Stomp Over Web Sockets ................................................................... 292
47.1.6. StompConnect .................................................................................... 293
47.2. REST ........................................................................................................... 293
47.3. AMQP .......................................................................................................... 293
48. Performance Tuning ............................................................................................... 295
48.1. Tuning persistence ........................................................................................ 295
48.2. Tuning JMS .................................................................................................. 295
48.3. Other Tunings ............................................................................................... 296
48.4. Tuning Transport Settings .............................................................................. 297
48.5. Tuning the VM .............................................................................................. 298
48.6. Avoiding Anti-Patterns ................................................................................... 298
49. Configuration Reference ........................................................................................ 301
49.1. Server Configuration ...................................................................................... 301
49.1.1. hornetq-configuration.xml .................................................................... 301
49.1.2. hornetq-jms.xml .................................................................................. 312
49.1.3. Using Masked Passwords in Configuration Files ................................... 316

Chapter 1.
1
Legal NoticeCopyright © 2010 Red Hat, Inc. and others.
The text of and illustrations in this document are licensed by Red Hat under a Creative Commons
Attribution–Share Alike 3.0 Unported license ("CC-BY-SA").
An explanation of CC-BY-SA is available at http://creativecommons.org/licenses/by-sa/3.0/. In
accordance with CC-BY-SA, if you distribute this document or an adaptation of it, you must provide
the URL for the original version.
Red Hat, as the licensor of this document, waives the right to enforce, and agrees not to assert,
Section 4d of CC-BY-SA to the fullest extent permitted by applicable law.

2

Chapter 2.
3
PrefaceWhat is HornetQ?
• HornetQ is an open source project to build a multi-protocol, embeddable, very high performance,
clustered, asynchronous messaging system.
• HornetQ is an example of Message Oriented Middleware (MoM) For a description of MoMs and
other messaging concepts please see the Chapter 4, Messaging Concepts.
• For answers to more questions about what HornetQ is and what it isn't please visit the FAQs
wiki page [http://www.jboss.org/community/wiki/HornetQGeneralFAQs].
Why use HornetQ? Here are just a few of the reasons:
• 100% open source software. HornetQ is licenced using the Apache Software License v 2.0 to
minimise barriers to adoption.
• HornetQ is designed with usability in mind.
• Written in Java. Runs on any platform with a Java 6+ runtime, that's everything from Windows
desktops to IBM mainframes.
• Amazing performance. Our ground-breaking high performance journal provides persistent
messaging performance at rates normally seen for non-persistent messaging, our non-
persistent messaging performance rocks the boat too.
• Full feature set. All the features you'd expect in any serious messaging system, and others you
won't find anywhere else.
• Elegant, clean-cut design with minimal third party dependencies. Run HornetQ stand-alone,
run it in integrated in your favourite JEE application server, or run it embedded inside your own
product. It's up to you.
• Seamless high availability. We provide a HA solution with automatic client failover so you can
guarantee zero message loss or duplication in event of server failure.
• Hugely flexible clustering. Create clusters of servers that know how to load balance messages.
Link geographically distributed clusters over unreliable connections to form a global network.
Configure routing of messages in a highly flexible way.
• For a full list of features, please see the features wiki page [http://www.jboss.org/community/
wiki/HornetQFeatures] .

4

Chapter 3.
5
Project InformationThe official HornetQ project page is http://hornetq.org/.
3.1. Software Download
The software can be download from the Download page:http://hornetq.org/downloads.html
3.2. Project Information
• Please take a look at our project wiki [http://www.jboss.org/community/wiki/HornetQ]
• If you have any user questions please use our user forum [http://www.jboss.org/index.html?
module=bb&op=viewforum&f=312]
• If you have development related questions, please use our developer forum [http://
www.jboss.org/index.html?module=bb&op=viewforum&f=313]
• Pop in and chat to us in our IRC channel [irc://irc.freenode.net:6667/hornetq]
• Our project blog [http://hornetq.blogspot.com/]
• Follow us on twitter [http://twitter.com/hornetq]
• HornetQ Git repository is https://github.com/hornetq/hornetq
• All release tags are availble from https://github.com/hornetq/hornetq/tags
Red Hat kindly employs developers to work full time on HornetQ, they are:
• Clebert Suconic (project lead)
• Andy Taylor
• Howard Gao
• Francisco Borges
And many thanks to all our contributors, both old and new who helped create HornetQ, for a full
list of the people who made it happen, take a look at our team page [http://jboss.org/hornetq/
community/team.html].

6

Chapter 4.
7
Messaging ConceptsHornetQ is an asynchronous messaging system, an example of Message Oriented Middleware
[http://en.wikipedia.org/wiki/Message_oriented_middleware] , we'll just call them messaging
systems in the remainder of this book.
We'll first present a brief overview of what kind of things messaging systems do, where they're
useful and the kind of concepts you'll hear about in the messaging world.
If you're already familiar with what a messaging system is and what it's capable of, then you can
skip this chapter.
4.1. Messaging Concepts
Messaging systems allow you to loosely couple heteregenous systems together, whilst typically
providing reliability, transactions and many other features.
Unlike systems based on a Remote Procedure Call [http://en.wikipedia.org/wiki/
Remote_procedure_call] (RPC) pattern, messaging systems primarily use an asynchronous
message passing pattern with no tight relationship between requests and responses. Most
messaging systems also support a request-response mode but this is not a primary feature of
messaging systems.
Designing systems to be asynchronous from end-to-end allows you to really take advantage of
your hardware resources, minimizing the amount of threads blocking on IO operations, and to use
your network bandwidth to its full capacity. With an RPC approach you have to wait for a response
for each request you make so are limited by the network round trip time, or latency of your network.
With an asynchronous system you can pipeline flows of messages in different directions, so are
limited by the network bandwidth not the latency. This typically allows you to create much higher
performance applications.
Messaging systems decouple the senders of messages from the consumers of messages. The
senders and consumers of messages are completely independent and know nothing of each other.
This allows you to create flexible, loosely coupled systems.
Often, large enterprises use a messaging system to implement a message bus which loosely
couples heterogeneous systems together. Message buses often form the core of an Enterprise
Service Bus [http://en.wikipedia.org/wiki/Enterprise_service_bus]. (ESB). Using a message bus
to de-couple disparate systems can allow the system to grow and adapt more easily. It also allows
more flexibility to add new systems or retire old ones since they don't have brittle dependencies
on each other.
4.2. Messaging styles
Messaging systems normally support two main styles of asynchronous messaging: message
queue [http://en.wikipedia.org/wiki/Message_queue] messaging (also known as point-to-point

Chapter 4. Messaging Concepts
8
messaging) and publish subscribe [http://en.wikipedia.org/wiki/Publish_subscribe] messaging.
We'll summarise them briefly here:
4.2.1. The Message Queue Pattern
With this type of messaging you send a message to a queue. The message is then typically
persisted to provide a guarantee of delivery, then some time later the messaging system delivers
the message to a consumer. The consumer then processes the message and when it is done, it
acknowledges the message. Once the message is acknowledged it disappears from the queue
and is not available to be delivered again. If the system crashes before the messaging server
receives an acknowledgement from the consumer, then on recovery, the message will be available
to be delivered to a consumer again.
With point-to-point messaging, there can be many consumers on the queue but a particular
message will only ever be consumed by a maximum of one of them. Senders (also known as
producers) to the queue are completely decoupled from receivers (also known as consumers) of
the queue - they do not know of each others existence.
A classic example of point to point messaging would be an order queue in a company's book
ordering system. Each order is represented as a message which is sent to the order queue. Let's
imagine there are many front end ordering systems which send orders to the order queue. When
a message arrives on the queue it is persisted - this ensures that if the server crashes the order
is not lost. Let's also imagine there are many consumers on the order queue - each representing
an instance of an order processing component - these can be on different physical machines but
consuming from the same queue. The messaging system delivers each message to one and only
one of the ordering processing components. Different messages can be processed by different
order processors, but a single order is only processed by one order processor - this ensures orders
aren't processed twice.
As an order processor receives a message, it fulfills the order, sends order information to
the warehouse system and then updates the order database with the order details. Once it's
done that it acknowledges the message to tell the server that the order has been processed
and can be forgotten about. Often the send to the warehouse system, update in database
and acknowledgement will be completed in a single transaction to ensure ACID [http://
en.wikipedia.org/wiki/ACID] properties.
4.2.2. The Publish-Subscribe Pattern
With publish-subscribe messaging many senders can send messages to an entity on the server,
often called a topic (e.g. in the JMS world).
There can be many subscriptions on a topic, a subscription is just another word for a consumer
of a topic. Each subscription receives a copy of each message sent to the topic. This differs from
the message queue pattern where each message is only consumed by a single consumer.
Subscriptions can optionally be durable which means they retain a copy of each message sent to
the topic until the subscriber consumes them - even if the server crashes or is restarted in between.
Non-durable subscriptions only last a maximum of the lifetime of the connection that created them.

Delivery guarantees
9
An example of publish-subscribe messaging would be a news feed. As news articles are created
by different editors around the world they are sent to a news feed topic. There are many
subscribers around the world who are interested in receiving news items - each one creates a
subscription and the messaging system ensures that a copy of each news message is delivered
to each subscription.
4.3. Delivery guarantees
A key feature of most messaging systems is reliable messaging. With reliable messaging the
server gives a guarantee that the message will be delivered once and only once to each consumer
of a queue or each durable subscription of a topic, even in the event of system failure. This is
crucial for many businesses; e.g. you don't want your orders fulfilled more than once or any of
your orders to be lost.
In other cases you may not care about a once and only once delivery guarantee and are happy to
cope with duplicate deliveries or lost messages - an example of this might be transient stock price
updates - which are quickly superseded by the next update on the same stock. The messaging
system allows you to configure which delivery guarantees you require.
4.4. Transactions
Messaging systems typically support the sending and acknowledgement of multiple messages in
a single local transaction. HornetQ also supports the sending and acknowledgement of message
as part of a large global transaction - using the Java mapping of XA; JTA.
4.5. Durability
Messages are either durable or non durable. Durable messages will be persisted in permanent
storage and will survive server failure or restart. Non durable messages will not survive server
failure or restart. Examples of durable messages might be orders or trades, where they cannot
be lost. An example of a non durable message might be a stock price update which is transitory
and doesn't need to survive a restart.
4.6. Messaging APIs and protocols
How do client applications interact with messaging systems in order to send and consume
messages?
Several messaging systems provide their own proprietary APIs with which the client
communicates with the messaging system.
There are also some standard ways of operating with messaging systems and some emerging
standards in this space.
Let's take a brief look at these:

Chapter 4. Messaging Concepts
10
4.6.1. Java Message Service (JMS)
JMS [http://en.wikipedia.org/wiki/Java_Message_Service] is part of Sun's JEE specification. It's
a Java API that encapsulates both message queue and publish-subscribe messaging patterns.
JMS is a lowest common denominator specification - i.e. it was created to encapsulate common
functionality of the already existing messaging systems that were available at the time of its
creation.
JMS is a very popular API and is implemented by most, messaging systems. JMS is only available
to clients running Java.
JMS does not define a standard wire format - it only defines a programmatic API so JMS clients
and servers from different vendors cannot directly interoperate since each will use the vendor's
own internal wire protocol.
HornetQ provides a fully compliant JMS 1.1 API.
4.6.2. System specific APIs
Many systems provide their own programmatic API for which to interact with the messaging
system. The advantage of this it allows the full set of system functionality to be exposed to the
client application. API's like JMS are not normally rich enough to expose all the extra features that
most messaging systems provide.
HornetQ provides its own core client API for clients to use if they wish to have access to
functionality over and above that accessible via the JMS API.
4.6.3. RESTful API
REST [http://en.wikipedia.org/wiki/Representational_State_Transfer] approaches to messaging
are showing a lot interest recently.
It seems plausible that API standards for cloud computing may converge on a REST style set of
interfaces and consequently a REST messaging approach is a very strong contender for becoming
the defacto method for messaging interoperability.
With a REST approach messaging resources are manipulated as resources defined by a URI and
typically using a simple set of operations on those resources, e.g. PUT, POST, GET etc. REST
approaches to messaging often use HTTP as their underlying protocol.
The advantage of a REST approach with HTTP is in its simplicity and the fact the internet is already
tuned to deal with HTTP optimally.
Please see Chapter 43, REST Interface for using HornetQ's RESTful interface.
4.6.4. STOMP
Stomp [http://stomp.codehaus.org/] is a very simple text protocol for interoperating with messaging
systems. It defines a wire format, so theoretically any Stomp client can work with any messaging

AMQP
11
system that supports Stomp. Stomp clients are available in many different programming
languages.
Please see Section 47.1, “Stomp” for using STOMP with HornetQ.
4.6.5. AMQP
AMQP [http://en.wikipedia.org/wiki/AMQP] is a specification for interoperable messaging. It also
defines a wire format, so any AMQP client can work with any messaging system that supports
AMQP. AMQP clients are available in many different programming languages.
HornetQ will shortly be implementing AMQP.
4.7. High Availability
High Availability (HA) means that the system should remain operational after failure of one or more
of the servers. The degree of support for HA varies between various messaging systems.
HornetQ provides automatic failover where your sessions are automatically reconnected to the
backup server on event of live server failure.
For more information on HA, please see Chapter 39, High Availability and Failover.
4.8. Clusters
Many messaging systems allow you to create groups of messaging servers called clusters.
Clusters allow the load of sending and consuming messages to be spread over many servers.
This allows your system to scale horizontally by adding new servers to the cluster.
Degrees of support for clusters varies between messaging systems, with some systems having
fairly basic clusters with the cluster members being hardly aware of each other.
HornetQ provides very configurable state-of-the-art clustering model where messages can be
intelligently load balanced between the servers in the cluster, according to the number of
consumers on each node, and whether they are ready for messages.
HornetQ also has the ability to automatically redistribute messages between nodes of a cluster
to prevent starvation on any particular node.
For full details on clustering, please see Chapter 38, Clusters.
4.9. Bridges and routing
Some messaging systems allow isolated clusters or single nodes to be bridged together, typically
over unreliable connections like a wide area network (WAN), or the internet.
A bridge normally consumes from a queue on one server and forwards messages to another
queue on a different server. Bridges cope with unreliable connections, automatically reconnecting
when the connections becomes available again.

Chapter 4. Messaging Concepts
12
HornetQ bridges can be configured with filter expressions to only forward certain messages, and
transformation can also be hooked in.
HornetQ also allows routing between queues to be configured in server side configuration.
This allows complex routing networks to be set up forwarding or copying messages from one
destination to another, forming a global network of interconnected brokers.
For more information please see Chapter 36, Core Bridges and Chapter 35, Diverting and Splitting
Message Flows.

Chapter 5.
13
ArchitectureIn this section we will give an overview of the HornetQ high level architecture.
5.1. Core Architecture
HornetQ core is designed simply as set of Plain Old Java Objects (POJOs) - we hope you like
it's clean-cut design.
We've also designed it to have as few dependencies on external jars as possible. In fact, HornetQ
core has only one jar dependency, netty.jar, other than the standard JDK classes! This is because
we use some of the netty buffer classes internally.
This allows HornetQ to be easily embedded in your own project, or instantiated in any dependency
injection framework such as JBoss Microcontainer, Spring or Google Guice.
Each HornetQ server has its own ultra high performance persistent journal, which it uses for
message and other persistence.
Using a high performance journal allows outrageous persistence message performance,
something not achievable when using a relational database for persistence.
HornetQ clients, potentially on different physical machines interact with the HornetQ server.
HornetQ currently provides two APIs for messaging at the client side:
1. Core client API. This is a simple intuitive Java API that allows the full set of messaging
functionality without some of the complexities of JMS.
2. JMS client API. The standard JMS API is available at the client side.
JMS semantics are implemented by a thin JMS facade layer on the client side.
The HornetQ server does not speak JMS and in fact does not know anything about JMS, it's a
protocol agnostic messaging server designed to be used with multiple different protocols.
When a user uses the JMS API on the client side, all JMS interactions are translated into
operations on the HornetQ core client API before being transferred over the wire using the HornetQ
wire format.
The server always just deals with core API interactions.
A schematic illustrating this relationship is shown in figure 3.1 below:

Chapter 5. Architecture
14
Figure 3.1 shows two user applications interacting with a HornetQ server. User Application 1 is
using the JMS API, while User Application 2 is using the core client API directly.

HornetQ embedded in your own application
15
You can see from the diagram that the JMS API is implemented by a thin facade layer on the
client side.
5.2. HornetQ embedded in your own application
HornetQ core is designed as a set of simple POJOs so if you have an application that requires
messaging functionality internally but you don't want to expose that as a HornetQ server you can
directly instantiate and embed HornetQ servers in your own application.
For more information on embedding HornetQ, see Chapter 44, Embedding HornetQ.
5.3. HornetQ integrated with a JEE application server
HornetQ provides its own fully functional Java Connector Architecture (JCA) adaptor which
enables it to be integrated easily into any JEE compliant application server or servlet engine.
JEE application servers provide Message Driven Beans (MDBs), which are a special type of
Enterprise Java Beans (EJBs) that can process messages from sources such as JMS systems
or mail systems.
Probably the most common use of an MDB is to consume messages from a JMS messaging
system.
According to the JEE specification, a JEE application server uses a JCA adapter to integrate with
a JMS messaging system so it can consume messages for MDBs.
However, the JCA adapter is not only used by the JEE application server for consuming messages
via MDBs, it is also used when sending message to the JMS messaging system e.g. from inside
an EJB or servlet.
When integrating with a JMS messaging system from inside a JEE application server it is always
recommended that this is done via a JCA adaptor. In fact, communicating with a JMS messaging
system directly, without using JCA would be illegal according to the JEE specification.
The application server's JCA service provides extra functionality such as connection pooling and
automatic transaction enlistment, which are desirable when using messaging, say, from inside
an EJB. It is possible to talk to a JMS messaging system directly from an EJB, MDB or servlet
without going through a JCA adapter, but this is not recommended since you will not be able to
take advantage of the JCA features, such as caching of JMS sessions, which can result in poor
performance.
Figure 3.2 below shows a JEE application server integrating with a HornetQ server via the HornetQ
JCA adaptor. Note that all communication between EJB sessions or entity beans and Message
Driven beans go through the adaptor and not directly to HornetQ.
The large arrow with the prohibited sign shows an EJB session bean talking directly to the HornetQ
server. This is not recommended as you'll most likely end up creating a new connection and
session every time you want to interact from the EJB, which is an anti-pattern.

Chapter 5. Architecture
16
For more information on using the JCA adaptor, please see Chapter 32, Application Server
Integration and Java EE.
5.4. HornetQ stand-alone server
HornetQ can also be deployed as a stand-alone server. This means a fully independent messaging
server not dependent on a JEE application server.
The standard stand-alone messaging server configuration comprises a core messaging server,
a JMS service and a JNDI service.

HornetQ stand-alone server
17
The role of the JMS Service is to deploy any JMS Queue, Topic and ConnectionFactory instances
from any server side hornetq-jms.xml configuration files. It also provides a simple management
API for creating and destroying Queues, Topics and ConnectionFactory instances which can
be accessed via JMX or the connection. It is a separate service to the HornetQ core server,
since the core server is JMS agnostic. If you don't want to deploy any JMS Queue, Topic
or ConnectionFactory instances via server side XML configuration and don't require a JMS
management API on the server side then you can disable this service.
We also include a JNDI server since JNDI is a common requirement when using JMS to lookup
Queues, Topics and ConnectionFactory instances. If you do not require JNDI then this service can
also be disabled. HornetQ allows you to programmatically create JMS and core objects directly
on the client side as opposed to looking them up from JNDI, so a JNDI server is not always a
requirement.
The stand-alone server configuration uses JBoss Microcontainer to instantiate and enforce
dependencies between the components. JBoss Microcontainer is a very lightweight POJO
bootstrapper.
The stand-alone server architecture is shown in figure 3.3 below:
For more information on server configuration files see Section 49.1, “Server Configuration”. $

18

Chapter 6.
19
Using the ServerThis chapter will familiarise you with how to use the HornetQ server.
We'll show where it is, how to start and stop it, and we'll describe the directory layout and what
all the files are and what they do.
For the remainder of this chapter when we talk about the HornetQ server we mean the HornetQ
standalone server, in its default configuration with a JMS Service and JNDI service enabled.
When running embedded in JBoss Application Server the layout may be slightly different but by-
and-large will be the same.
6.1. Starting and Stopping the standalone server
In the distribution you will find a directory called bin.
cd into that directory and you'll find a unix/linux script called run.sh and a windows batch file
called run.bat
To run on Unix/Linux type ./run.sh
To run on Windows type run.bat
These scripts are very simple and basically just set-up the classpath and some JVM parameters
and start the JBoss Microcontainer. The Microcontainer is a light weight container used to deploy
the HornetQ POJO's
To stop the server you'll also find a unix/linux script stop.sh and a windows batch file stop.bat
To run on Unix/Linux type ./stop.sh
To run on Windows type stop.bat
Please note that HornetQ requires a Java 6 or later runtime to run.
Both the run and the stop scripts use the config under config/stand-alone/non-clustered
by default. The configuration can be changed by running ./run.sh ../config/stand-alone/
clustered or another config of your choosing. This is the same for the stop script and the windows
bat files.
6.2. Server JVM settings
The run scripts run.sh and run.bat set some JVM settings for tuning running on Java 6
and choosing the garbage collection policy. We recommend using a parallel garbage collection
algorithm to smooth out latency and minimise large GC pauses.
By default HornetQ runs in a maximum of 1GiB of RAM. To increase the memory settings change
the -Xms and -Xmx memory settings as you would for any Java program.

Chapter 6. Using the Server
20
If you wish to add any more JVM arguments or tune the existing ones, the run scripts are the
place to do it.
6.3. Server classpath
HornetQ looks for its configuration files on the Java classpath.
The scripts run.sh and run.bat specify the classpath when calling Java to run the server.
In the distribution, the run scripts will add the non clustered configuration directory to the classpath.
This is a directory which contains a set of configuration files for running the HornetQ server in a
basic non-clustered configuration. In the distribution this directory is config/stand-alone/non-
clustered/ from the root of the distribution.
The distribution contains several standard configuration sets for running:
• Non clustered stand-alone.
• Clustered stand-alone
• Non clustered in JBoss Application Server
• Clustered in JBoss Application Server
You can of course create your own configuration and specify any configuration directory when
running the run script.
Just make sure the directory is on the classpath and HornetQ will search there when starting up.
6.4. Library Path
If you're using the Asynchronous IO Journal on Linux, you need to specify java.library.path
as a property on your Java options. This is done automatically in the run.sh script.
If you don't specify java.library.path at your Java options then the JVM will use the
environment variable LD_LIBRARY_PATH.
6.5. System properties
HornetQ can take a system property on the command line for configuring logging.
For more information on configuring logging, please see Chapter 42, Logging.
6.6. Configuration files
The configuration directory is specified on the classpath in the run scripts run.sh and run.bat
This directory can contain the following files.
• hornetq-beans.xml (or hornetq-jboss-beans.xml if you're running inside JBoss Application
Server). This is the JBoss Microcontainer beans file which defines what beans the

Configuration files
21
Microcontainer should create and what dependencies to enforce between them. Remember
that HornetQ is just a set of POJOs. In the stand-alone server, it's the JBoss Microcontainer
which instantiates these POJOs and enforces dependencies between them and other beans.
• hornetq-configuration.xml. This is the main HornetQ configuration file. All the parameters
in this file are described in Chapter 49, Configuration Reference. Please see Section 6.9, “The
main configuration file.” for more information on this file.
• hornetq-queues.xml. This file contains predefined queues, queue settings and security
settings. The file is optional - all this configuration can also live in hornetq-configuration.xml.
In fact, the default configuration sets do not have a hornetq-queues.xml file. The purpose
of allowing queues to be configured in these files is to allow you to manage your queue
configuration over many files instead of being forced to maintain it in a single file. There can be
many hornetq-queues.xml files on the classpath. All will be loaded if found.
• hornetq-users.xml HornetQ ships with a basic security manager implementation which
obtains user credentials from the hornetq-users.xml file. This file contains user, password
and role information. For more information on security, please see Chapter 31, Security.
• hornetq-jms.xml The distro configuration by default includes a server side JMS service which
mainly deploys JMS Queues, Topics and ConnectionFactorys from this file into JNDI. If you're
not using JMS, or you don't need to deploy JMS objects on the server side, then you don't need
this file. For more information on using JMS, please see Chapter 7, Using JMS.
• logging.properties This is used to configure the logging handlers used by the Java logger.
For more information on configuring logging, please see Chapter 42, Logging.
• log4j.xml This is the Log4j configuration if the Log4j handler is configured.
Note
The property file-deployment-enabled in the hornetq-configuration.xml
configuration when set to false means that the other configuration files are not
loaded. This is true by default.
It is also possible to use system property substitution in all the configuration files. by replacing
a value with the name of a system property. Here is an example of this with a connector
configuration:
<connector name="netty">
<factory-class>org.hornetq.core.remoting.impl.netty.NettyConnectorFactory</
factory-class>
<param key="host" value="${hornetq.remoting.netty.host:localhost}"
type="String"/>

Chapter 6. Using the Server
22
<param key="port" value="${hornetq.remoting.netty.port:5445}" type="Integer"/
>
</connector>
Here you can see we have replaced 2 values with system properties
hornetq.remoting.netty.host and hornetq.remoting.netty.port. These values will be
replaced by the value found in the system property if there is one, if not they default
back to localhost or 5445 respectively. It is also possible to not supply a default. i.e.
${hornetq.remoting.netty.host}, however the system property must be supplied in that case.
6.7. JBoss Microcontainer Beans File
The stand-alone server is basically a set of POJOs which are instantiated by the light weight JBoss
Microcontainer [http://www.jboss.org/jbossmc/]engine.
Note
A beans file is also needed when the server is deployed in the JBoss Application
Server but this will deploy a slightly different set of objects since the Application
Server will already have things like security etc deployed.
Let's take a look at an example beans file from the stand-alone server:
<?xml version="1.0" encoding="UTF-8"?>
<deployment xmlns="urn:jboss:bean-deployer:2.0">
<bean name="Naming" class="org.jnp.server.NamingBeanImpl"/>
<!-- JNDI server. Disable this if you don't want JNDI -->
<bean name="JNDIServer" class="org.jnp.server.Main">
<property name="namingInfo">
<inject bean="Naming"/>
</property>
<property name="port">1099</property>
<property name="bindAddress">localhost</property>
<property name="rmiPort">1098</property>
<property name="rmiBindAddress">localhost</property>
</bean>
<!-- MBean server -->
<bean name="MBeanServer" class="javax.management.MBeanServer">
<constructor factoryClass="java.lang.management.ManagementFactory"
factoryMethod="getPlatformMBeanServer"/>
</bean>
<!-- The core configuration -->
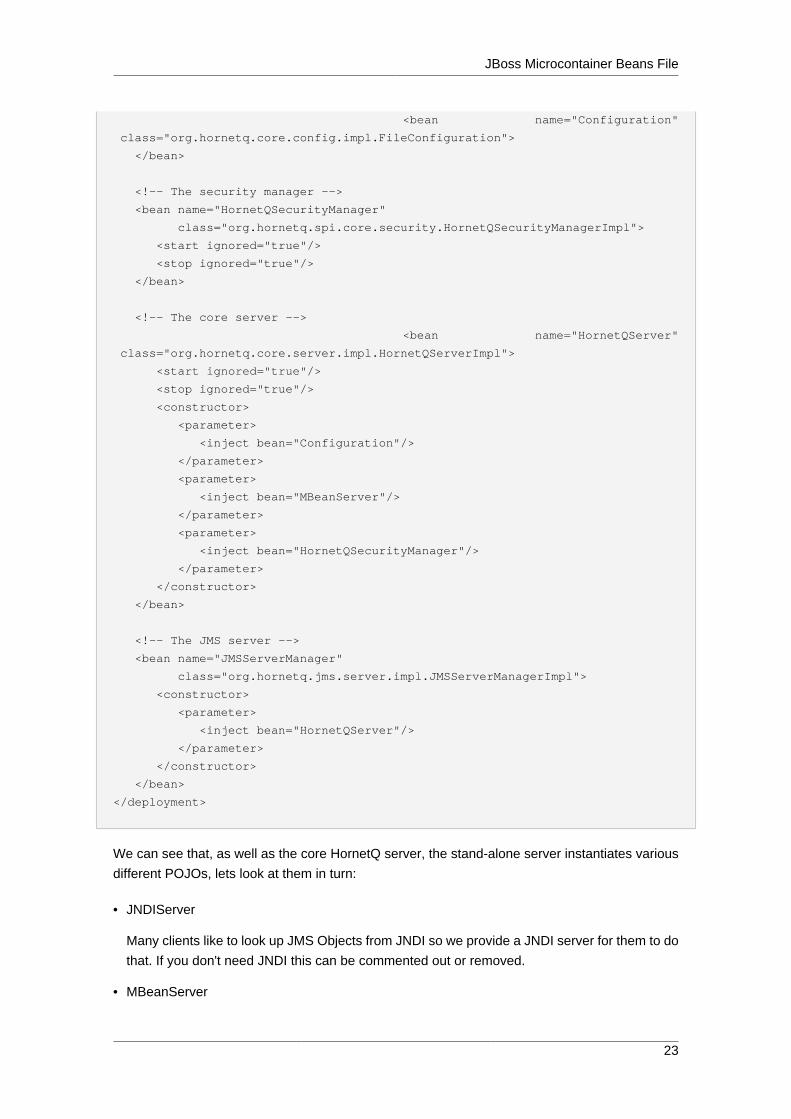
JBoss Microcontainer Beans File
23
<bean name="Configuration"
class="org.hornetq.core.config.impl.FileConfiguration">
</bean>
<!-- The security manager -->
<bean name="HornetQSecurityManager"
class="org.hornetq.spi.core.security.HornetQSecurityManagerImpl">
<start ignored="true"/>
<stop ignored="true"/>
</bean>
<!-- The core server -->
<bean name="HornetQServer"
class="org.hornetq.core.server.impl.HornetQServerImpl">
<start ignored="true"/>
<stop ignored="true"/>
<constructor>
<parameter>
<inject bean="Configuration"/>
</parameter>
<parameter>
<inject bean="MBeanServer"/>
</parameter>
<parameter>
<inject bean="HornetQSecurityManager"/>
</parameter>
</constructor>
</bean>
<!-- The JMS server -->
<bean name="JMSServerManager"
class="org.hornetq.jms.server.impl.JMSServerManagerImpl">
<constructor>
<parameter>
<inject bean="HornetQServer"/>
</parameter>
</constructor>
</bean>
</deployment>
We can see that, as well as the core HornetQ server, the stand-alone server instantiates various
different POJOs, lets look at them in turn:
• JNDIServer
Many clients like to look up JMS Objects from JNDI so we provide a JNDI server for them to do
that. If you don't need JNDI this can be commented out or removed.
• MBeanServer

Chapter 6. Using the Server
24
In order to provide a JMX management interface a JMS MBean server is necessary in which
to register the management objects. Normally this is just the default platform MBean server
available in the JVM instance. If you don't want to provide a JMX management interface this
can be commented out or removed.
• Configuration
The HornetQ server is configured with a Configuration object. In the default stand-alone set-
up it uses a FileConfiguration object which knows to read configuration information from the file
system. In different configurations such as embedded you might want to provide configuration
information from somewhere else.
• Security Manager. The security manager used by the messaging server is pluggable. The
default one used just reads user-role information from the hornetq-users.xml file on disk.
However it can be replaced by a JAAS security manager, or when running inside JBoss
Application Server it can be configured to use the JBoss AS security manager for tight
integration with JBoss AS security. If you've disabled security altogether you can remove this
too.
• HornetQServer
This is the core server. It's where 99% of the magic happens
• JMSServerManager
This deploys any JMS Objects such as JMS Queues, Topics and ConnectionFactory instances
from hornetq-jms.xml files on the disk. It also provides a simple management API for
manipulating JMS Objects. On the whole it just translates and delegates its work to the core
server. If you don't need to deploy JMS Queues, Topics and ConnectionFactorys from server
side configuration and don't require the JMS management interface this can be disabled.
6.8. JBoss AS4 MBean Service.
Note
The section is only to configure HornetQ on JBoss AS4. The service funtionality
is similar to Microcontainer Beans
<?xml version="1.0" encoding="UTF-8"?>
<server>
<mbean code="org.hornetq.service.HornetQFileConfigurationService"
name="org.hornetq:service=HornetQFileConfigurationService">
</mbean>

JBoss AS4 MBean Service.
25
<mbean code="org.hornetq.service.JBossASSecurityManagerService"
name="org.hornetq:service=JBossASSecurityManagerService">
</mbean>
<mbean code="org.hornetq.service.HornetQStarterService"
name="org.hornetq:service=HornetQStarterService">
<!--lets let the JMS Server start us-->
<attribute name="Start">false</attribute>
<depends optional-attribute-name="SecurityManagerService"
proxy-
type="attribute">org.hornetq:service=JBossASSecurityManagerService</depends>
<depends optional-attribute-name="ConfigurationService"
proxy-
type="attribute">org.hornetq:service=HornetQFileConfigurationService</depends>
</mbean>
<mbean code="org.hornetq.service.HornetQJMSStarterService"
name="org.hornetq:service=HornetQJMSStarterService">
<depends optional-attribute-name="HornetQServer"
proxy-type="attribute">org.hornetq:service=HornetQStarterService</
depends>
</mbean>
</server>
This jboss-service.xml configuration file is included inside the hornetq-service.sar on AS4 with
embebbed HornetQ. As you can see, on this configuration file we are starting various services:
• HornetQFileConfigurationService
This is an MBean Service that takes care of the life cycle of the FileConfiguration POJO
• JBossASSecurityManagerService
This is an MBean Service that takes care of the lifecycle of the JBossASSecurityManager POJO
• HornetQStarterService
This is an MBean Service that controls the main HornetQServer POJO. this has a dependency
on JBossASSecurityManagerService and HornetQFileConfigurationService MBeans
• HornetQJMSStarterService
This is an MBean Service that controls the JMSServerManagerImpl POJO. If you aren't using
jms this can be removed.
• JMSServerManager
Has the responsibility to start the JMSServerManager and the same behaviour that
JMSServerManager Bean

Chapter 6. Using the Server
26
6.9. The main configuration file.
The configuration for the HornetQ core server is contained in hornetq-configuration.xml. This
is what the FileConfiguration bean uses to configure the messaging server.
There are many attributes which you can configure HornetQ. In most cases the defaults will do
fine, in fact every attribute can be defaulted which means a file with a single empty configuration
element is a valid configuration file. The different configuration will be explained throughout the
manual or you can refer to the configuration reference here.

Chapter 7.
27
Using JMSAlthough HornetQ provides a JMS agnostic messaging API, many users will be more comfortable
using JMS.
JMS is a very popular API standard for messaging, and most messaging systems provide a
JMS API. If you are completely new to JMS we suggest you follow the Sun JMS tutorial [http://
java.sun.com/products/jms/tutorial/1_3_1-fcs/doc/jms_tutorialTOC.html] - a full JMS tutorial is out
of scope for this guide.
HornetQ also ships with a wide range of examples, many of which demonstrate JMS API usage.
A good place to start would be to play around with the simple JMS Queue and Topic example, but
we also provide examples for many other parts of the JMS API. A full description of the examples
is available in Chapter 11, Examples.
In this section we'll go through the main steps in configuring the server for JMS and creating a
simple JMS program. We'll also show how to configure and use JNDI, and also how to use JMS
with HornetQ without using any JNDI.
7.1. A simple ordering system
For this chapter we're going to use a very simple ordering system as our example. It's a somewhat
contrived example because of its extreme simplicity, but it serves to demonstrate the very basics
of setting up and using JMS.
We will have a single JMS Queue called OrderQueue, and we will have a single MessageProducer
sending an order message to the queue and a single MessageConsumer consuming the order
message from the queue.
The queue will be a durable queue, i.e. it will survive a server restart or crash. We also want
to predeploy the queue, i.e. specify the queue in the server JMS configuration so it's created
automatically without us having to explicitly create it from the client.
7.2. JMS Server Configuration
The file hornetq-jms.xml on the server classpath contains any JMS Queue, Topic and
ConnectionFactory instances that we wish to create and make available to lookup via the JNDI.
A JMS ConnectionFactory object is used by the client to make connections to the server. It knows
the location of the server it is connecting to, as well as many other configuration parameters. In
most cases the defaults will be acceptable.
We'll deploy a single JMS Queue and a single JMS Connection Factory instance on the server
for this example but there are no limits to the number of Queues, Topics and Connection Factory
instances you can deploy from the file. Here's our configuration:

Chapter 7. Using JMS
28
<configuration xmlns="urn:hornetq"
xmlns:xsi="http://www.w3.org/2001/XMLSchema-instance"
xsi:schemaLocation="urn:hornetq ../schemas/hornetq-jms.xsd ">
<connection-factory name="ConnectionFactory">
<connectors>
<connector-ref connector-name="netty"/>
</connectors>
<entries>
<entry name="ConnectionFactory"/>
</entries>
</connection-factory>
<queue name="OrderQueue">
<entry name="queues/OrderQueue"/>
</queue>
</configuration>
We deploy one ConnectionFactory called ConnectionFactory and bind it in just one place in
JNDI as given by the entry element. ConnectionFactory instances can be bound in many places
in JNDI if you require.
Note
The JMS connection factory references a connector called netty. This is a
reference to a connector object deployed in the main core configuration file
hornetq-configuration.xml which defines the transport and parameters used
to actually connect to the server.
7.3. Connection Factory Types
The JMS API doc provides several connection factories for applications. HornetQ JMS users
can choose to configure the types for their connection factories. Each connection factory has a
signature attribute and a xa parameter, the combination of which determines the type of the
factory. Attribute signature has three possible string values, i.e. generic, queue and topic; xa
is a boolean type parameter. The following table gives their configuration values for different
connection factory interfaces.
Table 7.1. Configuration for Connection Factory Types
signature xa Connection Factory Type
generic (default) false (default) javax.jms.ConnectionFactory
generic true javax.jms.XAConnectionFactory
queue false javax.jms.QueueConnectionFactory

JNDI configuration
29
signature xa Connection Factory Type
queue true javax.jms.XAQueueConnectionFactory
topic false javax.jms.TopicConnectionFactory
topic true javax.jms.XATopicConnectionFactory
As an example, the following configures an XAQueueConnectionFactory:
<configuration xmlns="urn:hornetq"
xmlns:xsi="http://www.w3.org/2001/XMLSchema-instance"
xsi:schemaLocation="urn:hornetq ../schemas/hornetq-jms.xsd ">
<connection-factory name="ConnectionFactory" signature="queue">
<xa>true</xa>
<connectors>
<connector-ref connector-name="netty"/>
</connectors>
<entries>
<entry name="ConnectionFactory"/>
</entries>
</connection-factory>
</configuration>
7.4. JNDI configuration
When using JNDI from the client side you need to specify a set of JNDI properties which tell the
JNDI client where to locate the JNDI server, amongst other things. These are often specified in a
file called jndi.properties on the client classpath, or you can specify them directly when creating
the JNDI initial context. A full JNDI tutorial is outside the scope of this document, please see
the Sun JNDI tutorial [http://java.sun.com/products/jndi/tutorial/TOC.html] for more information on
how to use JNDI.
For talking to the JBoss JNDI Server, the jndi properties will look something like this:
java.naming.factory.initial=org.jnp.interfaces.NamingContextFactory
java.naming.provider.url=jnp://myhost:1099
java.naming.factory.url.pkgs=org.jboss.naming:org.jnp.interfaces
Where myhost is the hostname or IP address of the JNDI server. 1099 is the port used by the
JNDI server and may vary depending on how you have configured your JNDI server.
In the default standalone configuration, JNDI server ports are configured in the file hornetq-
beans.xml by setting properties on the JNDIServer bean:

Chapter 7. Using JMS
30
<bean name="JNDIServer" class="org.jnp.server.Main">
<property name="namingInfo">
<inject bean="Naming"/>
</property>
<property name="port">1099</property>
<property name="bindAddress">localhost</property>
<property name="rmiPort">1098</property>
<property name="rmiBindAddress">localhost</property>
</bean>
Note
If you want your JNDI server to be available to non local clients make sure you
change it's bind address to something other than localhost!
Note
The JNDIServer bean must be defined only when HornetQ is running in stand-
alone mode. When HornetQ is integrated to JBoss Application Server, JBoss AS
will provide a ready-to-use JNDI server without any additional configuration.
7.5. The code
Here's the code for the example:
First we'll create a JNDI initial context from which to lookup our JMS objects:
InitialContect ic = new InitialContext();
Now we'll look up the connection factory:
ConnectionFactory cf = (ConnectionFactory)ic.lookup("/ConnectionFactory");
And look up the Queue:
Queue orderQueue = (Queue)ic.lookup("/queues/OrderQueue");

The code
31
Next we create a JMS connection using the connection factory:
Connection connection = cf.createConnection();
And we create a non transacted JMS Session, with AUTO_ACKNOWLEDGE acknowledge mode:
Session session = connection.createSession(false, Session.AUTO_ACKNOWLEDGE);
We create a MessageProducer that will send orders to the queue:
MessageProducer producer = session.createProducer(orderQueue);
And we create a MessageConsumer which will consume orders from the queue:
MessageConsumer consumer = session.createConsumer(orderQueue);
We make sure we start the connection, or delivery won't occur on it:
connection.start();
We create a simple TextMessage and send it:
TextMessage message = session.createTextMessage("This is an order");
producer.send(message);
And we consume the message:
TextMessage receivedMessage = (TextMessage)consumer.receive();
System.out.println("Got order: " + receivedMessage.getText());
It's as simple as that. For a wide range of working JMS examples please see the examples
directory in the distribution.

Chapter 7. Using JMS
32
Warning
Please note that JMS connections, sessions, producers and consumers are
designed to be re-used.
It's an anti-pattern to create new connections, sessions, producers and consumers
for each message you produce or consume. If you do this, your application will
perform very poorly. This is discussed further in the section on performance tuning
Chapter 48, Performance Tuning.
7.6. Directly instantiating JMS Resources without using
JNDI
Although it's a very common JMS usage pattern to lookup JMS Administered Objects (that's JMS
Queue, Topic and ConnectionFactory instances) from JNDI, in some cases a JNDI server is not
available and you still want to use JMS, or you just think "Why do I need JNDI? Why can't I just
instantiate these objects directly?"
With HornetQ you can do exactly that. HornetQ supports the direct instantiation of JMS Queue,
Topic and ConnectionFactory instances, so you don't have to use JNDI at all.
For a full working example of direct instantiation please see the JMS examples in Chapter 11,
Examples.
Here's our simple example, rewritten to not use JNDI at all:
We create the JMS ConnectionFactory object via the HornetQJMSClient Utility class, note we
need to provide connection parameters and specify which transport we are using, for more
information on connectors please see Chapter 16, Configuring the Transport.
TransportConfiguration transportConfiguration = new
TransportConfiguration(NettyConnectorFactory.class.getName());
ConnectionFactory cf =
HornetQJMSClient.createConnectionFactoryWithoutHA(JMSFactoryType.CF,transportConfiguration);
We also create the JMS Queue object via the HornetQJMSClient Utility class:
Queue orderQueue = HornetQJMSClient.createQueue("OrderQueue");
Next we create a JMS connection using the connection factory:

Setting The Client ID
33
Connection connection = cf.createConnection();
And we create a non transacted JMS Session, with AUTO_ACKNOWLEDGE acknowledge mode:
Session session = connection.createSession(false, Session.AUTO_ACKNOWLEDGE);
We create a MessageProducer that will send orders to the queue:
MessageProducer producer = session.createProducer(orderQueue);
And we create a MessageConsumer which will consume orders from the queue:
MessageConsumer consumer = session.createConsumer(orderQueue);
We make sure we start the connection, or delivery won't occur on it:
connection.start();
We create a simple TextMessage and send it:
TextMessage message = session.createTextMessage("This is an order");
producer.send(message);
And we consume the message:
TextMessage receivedMessage = (TextMessage)consumer.receive();
System.out.println("Got order: " + receivedMessage.getText());
7.7. Setting The Client ID
This represents the client id for a JMS client and is needed for creating durable subscriptions. It
is possible to configure this on the connection factory and can be set via the client-id element.
Any connection created by this connection factory will have this set as its client id.

Chapter 7. Using JMS
34
7.8. Setting The Batch Size for DUPS_OK
When the JMS acknowledge mode is set to DUPS_OK it is possible to configure the consumer so
that it sends acknowledgements in batches rather that one at a time, saving valuable bandwidth.
This can be configured via the connection factory via the dups-ok-batch-size element and is
set in bytes. The default is 1024 * 1024 bytes = 1 MiB.
7.9. Setting The Transaction Batch Size
When receiving messages in a transaction it is possible to configure the consumer to send
acknowledgements in batches rather than individually saving valuable bandwidth. This can be
configured on the connection factory via the transaction-batch-size element and is set in
bytes. The default is 1024 * 1024.

Chapter 8.
35
Using CoreHornetQ core is a completely JMS-agnostic messaging system with its own non-JMS API. We
call this the core API.
If you don't want to use JMS you can use the core API directly. The core API provides all the
functionality of JMS but without much of the complexity. It also provides features that are not
available using JMS.
8.1. Core Messaging Concepts
Some of the core messaging concepts are similar to JMS concepts, but core messaging concepts
differ in some ways. In general the core messaging API is simpler than the JMS API, since we
remove distinctions between queues, topics and subscriptions. We'll discuss each of the major
core messaging concepts in turn, but to see the API in detail, please consult the Javadoc.
8.1.1. Message
• A message is the unit of data which is sent between clients and servers.
• A message has a body which is a buffer containing convenient methods for reading and writing
data into it.
• A message has a set of properties which are key-value pairs. Each property key is a string and
property values can be of type integer, long, short, byte, byte[], String, double, float or boolean.
• A message has an address it is being sent to. When the message arrives on the server it is
routed to any queues that are bound to the address - if the queues are bound with any filter,
the message will only be routed to that queue if the filter matches. An address may have many
queues bound to it or even none. There may also be entities other than queues, like diverts
bound to addresses.
• Messages can be either durable or non durable. Durable messages in a durable queue will
survive a server crash or restart. Non durable messages will never survive a server crash or
restart.
• Messages can be specified with a priority value between 0 and 9. 0 represents the lowest priority
and 9 represents the highest. HornetQ will attempt to deliver higher priority messages before
lower priority ones.
• Messages can be specified with an optional expiry time. HornetQ will not deliver messages after
its expiry time has been exceeded.
• Messages also have an optional timestamp which represents the time the message was sent.
• HornetQ also supports the sending/consuming of very large messages - much larger than can
fit in available RAM at any one time.

Chapter 8. Using Core
36
8.1.2. Address
A server maintains a mapping between an address and a set of queues. Zero or more queues can
be bound to a single address. Each queue can be bound with an optional message filter. When
a message is routed, it is routed to the set of queues bound to the message's address. If any of
the queues are bound with a filter expression, then the message will only be routed to the subset
of bound queues which match that filter expression.
Other entities, such as diverts can also be bound to an address and messages will also be routed
there.
Note
In core, there is no concept of a Topic, Topic is a JMS only term. Instead, in core,
we just deal with addresses and queues.
For example, a JMS topic would be implemented by a single address to which
many queues are bound. Each queue represents a subscription of the topic. A JMS
Queue would be implemented as a single address to which one queue is bound -
that queue represents the JMS queue.
8.1.3. Queue
Queues can be durable, meaning the messages they contain survive a server crash or restart, as
long as the messages in them are durable. Non durable queues do not survive a server restart or
crash even if the messages they contain are durable.
Queues can also be temporary, meaning they are automatically deleted when the client connection
is closed, if they are not explicitly deleted before that.
Queues can be bound with an optional filter expression. If a filter expression is supplied then
the server will only route messages that match that filter expression to any queues bound to the
address.
Many queues can be bound to a single address. A particular queue is only bound to a maximum
of one address.
8.1.4. ServerLocator
Clients use ServerLocator instances to create ClientSessionFactory instances.
ServerLocator instances are used to locate servers and create connections to them.
In JMS terms think of a ServerLocator in the same way you would a JMS Connection Factory
ServerLocator instances are created using the HornetQClient factory class.

ClientSessionFactory
37
8.1.5. ClientSessionFactory
Clients use ClientSessionFactory instances to create ClientSession instances.
ClientSessionFactory instances are basically the connection to a server
In JMS terms think of them as JMS Connections
ClientSessionFactory instances are created using the ServerLocator class.
8.1.6. ClientSession
A client uses a ClientSession for consuming and producing messages and for grouping them
in transactions. ClientSession instances can support both transactional and non transactional
semantics and also provide an XAResource interface so messaging operations can be performed
as part of a JTA [http://java.sun.com/javaee/technologies/jta/index.jsp] transaction.
ClientSession instances group ClientConsumers and ClientProducers.
ClientSession instances can be registered with an optional SendAcknowledgementHandler. This
allows your client code to be notified asynchronously when sent messages have successfully
reached the server. This unique HornetQ feature, allows you to have full guarantees that sent
messages have reached the server without having to block on each message sent until a response
is received. Blocking on each messages sent is costly since it requires a network round trip for each
message sent. By not blocking and receiving send acknowledgements asynchronously you can
create true end to end asynchronous systems which is not possible using the standard JMS API.
For more information on this advanced feature please see the section Chapter 20, Guarantees
of sends and commits.
8.1.7. ClientConsumer
Clients use ClientConsumer instances to consume messages from a queue. Core
Messaging supports both synchronous and asynchronous message consumption semantics.
ClientConsumer instances can be configured with an optional filter expression and will only
consume messages which match that expression.
8.1.8. ClientProducer
Clients create ClientProducer instances on ClientSession instances so they can send
messages. ClientProducer instances can specify an address to which all sent messages are
routed, or they can have no specified address, and the address is specified at send time for the
message.
Warning
Please note that ClientSession, ClientProducer and ClientConsumer instances are
designed to be re-used.

Chapter 8. Using Core
38
It's an anti-pattern to create new ClientSession, ClientProducer and
ClientConsumer instances for each message you produce or consume. If you
do this, your application will perform very poorly. This is discussed further in the
section on performance tuning Chapter 48, Performance Tuning.
8.2. A simple example of using Core
Here's a very simple program using the core messaging API to send and receive a message:
ServerLocator locator = HornetQClient.createServerLocatorWithoutHA(new
TransportConfiguration(
InVMConnectorFactory.class.getName()));
ClientSessionFactory factory = locator.createClientSessionFactory();
ClientSession session = factory.createSession();
session.createQueue("example", "example", true);
ClientProducer producer = session.createProducer("example");
ClientMessage message = session.createMessage(true);
message.getBodyBuffer().writeString("Hello");
producer.send(message);
session.start();
ClientConsumer consumer = session.createConsumer("example");
ClientMessage msgReceived = consumer.receive();
System.out.println("message = " + msgReceived.getBodyBuffer().readString());
session.close();

Chapter 9.
39
Mapping JMS Concepts to the Core
APIThis chapter describes how JMS destinations are mapped to HornetQ addresses.
HornetQ core is JMS-agnostic. It does not have any concept of a JMS topic. A JMS topic is
implemented in core as an address (the topic name) with zero or more queues bound to it.
Each queue bound to that address represents a topic subscription. Likewise, a JMS queue is
implemented as an address (the JMS queue name) with one single queue bound to it which
represents the JMS queue.
By convention, all JMS queues map to core queues where the core queue name has the string
jms.queue. prepended to it. E.g. the JMS queue with the name "orders.europe" would map to
the core queue with the name "jms.queue.orders.europe". The address at which the core queue
is bound is also given by the core queue name.
For JMS topics the address at which the queues that represent the subscriptions are bound is
given by prepending the string "jms.topic." to the name of the JMS topic. E.g. the JMS topic with
name "news.europe" would map to the core address "jms.topic.news.europe"
In other words if you send a JMS message to a JMS queue with name "orders.europe" it will get
routed on the server to any core queues bound to the address "jms.queue.orders.europe". If you
send a JMS message to a JMS topic with name "news.europe" it will get routed on the server to
any core queues bound to the address "jms.topic.news.europe".
If you want to configure settings for a JMS Queue with the name "orders.europe", you need to
configure the corresponding core queue "jms.queue.orders.europe":
<!-- expired messages in JMS Queue "orders.europe" will be sent to the JMS Queue
"expiry.europe" -->
<address-setting match="jms.queue.orders.europe">
<expiry-address>jms.queue.expiry.europe</expiry-address>
...
</address-setting>

40

Chapter 10.
41
The Client ClasspathHornetQ requires several jars on the Client Classpath depending on whether the client uses
HornetQ Core API, JMS, and JNDI.
Warning
All the jars mentioned here can be found in the lib directory of the HornetQ
distribution. Be sure you only use the jars from the correct version of the release,
you must not mix and match versions of jars from different HornetQ versions.
Mixing and matching different jar versions may cause subtle errors and failures
to occur.
10.1. HornetQ Core Client
If you are using just a pure HornetQ Core client (i.e. no JMS) then you need hornetq-core-
client.jar and netty.jar on your client classpath.
If the client runs inside a Java 5 virtual machine, use instead hornetq-core-client-java5.jar.
10.2. JMS Client
If you are using JMS on the client side, then you will also need to include hornetq-jms-
client.jar and jboss-jms-api.jar.
If the client runs inside a Java 5 virtual machine, include instead hornetq-jms-client-
java5.jar.
Note
jboss-jms-api.jar just contains Java EE API interface classes needed for the
javax.jms.* classes. If you already have a jar with these interface classes on
your classpath, you will not need it.
10.3. JMS Client with JNDI
If you are looking up JMS resources from the JNDI server co-located with the HornetQ standalone
server, you wil also need the jar jnp-client.jar jar on your client classpath as well as any other
jars mentioned previously.

42

Chapter 11.
43
ExamplesThe HornetQ distribution comes with over 70 run out-of-the-box examples demonstrating many
of the features.
The examples are available in the distribution, in the examples directory. Examples are split into
JMS and core examples. JMS examples show how a particular feature can be used by a normal
JMS client. Core examples show how the equivalent feature can be used by a core messaging
client.
A set of Java EE examples are also provided which need the JBoss Application Server installed
to be able to run.
11.1. JMS Examples
To run a JMS example, simply cd into the appropriate example directory and type ./build.sh
(or build.bat if you are on Windows).
Here's a listing of the examples with a brief description.
11.1.1. Applet
This example shows you how to send and receive JMS messages from an Applet.
11.1.2. Application-Layer Failover
HornetQ also supports Application-Layer failover, useful in the case that replication is not enabled
on the server side.
With Application-Layer failover, it's up to the application to register a JMS ExceptionListener
with HornetQ which will be called by HornetQ in the event that connection failure is detected.
The code in the ExceptionListener then recreates the JMS connection, session, etc on another
node and the application can continue.
Application-layer failover is an alternative approach to High Availability (HA). Application-layer
failover differs from automatic failover in that some client side coding is required in order to
implement this. Also, with Application-layer failover, since the old session object dies and a new
one is created, any uncommitted work in the old session will be lost, and any unacknowledged
messages might be redelivered.
11.1.3. Core Bridge Example
The bridge example demonstrates a core bridge deployed on one server, which consumes
messages from a local queue and forwards them to an address on a second server.
Core bridges are used to create message flows between any two HornetQ servers which are
remotely separated. Core bridges are resilient and will cope with temporary connection failure
allowing them to be an ideal choice for forwarding over unreliable connections, e.g. a WAN.

Chapter 11. Examples
44
11.1.4. Browser
The browser example shows you how to use a JMS QueueBrowser with HornetQ.
Queues are a standard part of JMS, please consult the JMS 1.1 specification for full details.
A QueueBrowser is used to look at messages on the queue without removing them. It can scan
the entire content of a queue or only messages matching a message selector.
11.1.5. Client Kickoff
The client-kickoff example shows how to terminate client connections given an IP address
using the JMX management API.
11.1.6. Client-Side Load-Balancing
The client-side-load-balancing example demonstrates how sessions created from a single
JMS Connection can be created to different nodes of the cluster. In other words it demonstrates
how HornetQ does client-side load-balancing of sessions across the cluster.
11.1.7. Clustered Durable Subscription
This example demonstrates a clustered JMS durable subscription
11.1.8. Clustered Grouping
This is similar to the message grouping example except that it demonstrates it working over a
cluster. Messages sent to different nodes with the same group id will be sent to the same node
and the same consumer.
11.1.9. Clustered Queue
The clustered-queue example demonstrates a JMS queue deployed on two different nodes.
The two nodes are configured to form a cluster. We then create a consumer for the queue on each
node, and we create a producer on only one of the nodes. We then send some messages via the
producer, and we verify that both consumers receive the sent messages in a round-robin fashion.
11.1.10. Clustering with JGroups
The clustered-jgroups example demonstrates how to form a two node cluster using JGroups
as its underlying topology discovery technique, rather than the default UDP broadcasting. We
then create a consumer for the queue on each node, and we create a producer on only one of
the nodes. We then send some messages via the producer, and we verify that both consumers
receive the sent messages in a round-robin fashion.
11.1.11. Clustered Standalone
The clustered-standalone example demonstrates how to configure and starts 3 cluster nodes
on the same machine to form a cluster. A subscriber for a JMS topic is created on each node, and

Clustered Static Discovery
45
we create a producer on only one of the nodes. We then send some messages via the producer,
and we verify that the 3 subscribers receive all the sent messages.
11.1.12. Clustered Static Discovery
This example demonstrates how to configure a cluster using a list of connectors rather than UDP
for discovery
11.1.13. Clustered Static Cluster One Way
This example demonstrates how to set up a cluster where cluster connections are one way, i.e.
server A -> Server B -> Server C
11.1.14. Clustered Topic
The clustered-topic example demonstrates a JMS topic deployed on two different nodes. The
two nodes are configured to form a cluster. We then create a subscriber on the topic on each
node, and we create a producer on only one of the nodes. We then send some messages via the
producer, and we verify that both subscribers receive all the sent messages.
11.1.15. Message Consumer Rate Limiting
With HornetQ you can specify a maximum consume rate at which a JMS MessageConsumer will
consume messages. This can be specified when creating or deploying the connection factory.
If this value is specified then HornetQ will ensure that messages are never consumed at a rate
higher than the specified rate. This is a form of consumer throttling.
11.1.16. Dead Letter
The dead-letter example shows you how to define and deal with dead letter messages.
Messages can be delivered unsuccessfully (e.g. if the transacted session used to consume them
is rolled back).
Such a message goes back to the JMS destination ready to be redelivered. However, this means
it is possible for a message to be delivered again and again without any success and remain in
the destination, clogging the system.
To prevent this, messaging systems define dead letter messages: after a specified unsuccessful
delivery attempts, the message is removed from the destination and put instead in a dead letter
destination where they can be consumed for further investigation.
11.1.17. Delayed Redelivery
The delayed-redelivery example demonstrates how HornetQ can be configured to provide a
delayed redelivery in the case a message needs to be redelivered.
Delaying redelivery can often be useful in the case that clients regularly fail or roll-back. Without a
delayed redelivery, the system can get into a "thrashing" state, with delivery being attempted, the

Chapter 11. Examples
46
client rolling back, and delivery being re-attempted in quick succession, using up valuable CPU
and network resources.
11.1.18. Divert
HornetQ diverts allow messages to be transparently "diverted" or copied from one address to
another with just some simple configuration defined on the server side.
11.1.19. Durable Subscription
The durable-subscription example shows you how to use a durable subscription with HornetQ.
Durable subscriptions are a standard part of JMS, please consult the JMS 1.1 specification for
full details.
Unlike non-durable subscriptions, the key function of durable subscriptions is that the messages
contained in them persist longer than the lifetime of the subscriber - i.e. they will accumulate
messages sent to the topic even if there is no active subscriber on them. They will also survive
server restarts or crashes. Note that for the messages to be persisted, the messages sent to them
must be marked as durable messages.
11.1.20. Embedded
The embedded example shows how to embed JMS within your own code using POJO instantiation
and no config files.
11.1.21. Embedded Simple
The embedded example shows how to embed JMS within your own code using regular HornetQ
XML files.
11.1.22. Message Expiration
The expiry example shows you how to define and deal with message expiration. Messages can
be retained in the messaging system for a limited period of time before being removed. JMS
specification states that clients should not receive messages that have been expired (but it does
not guarantee this will not happen).
HornetQ can assign an expiry address to a given queue so that when messages are expired, they
are removed from the queue and sent to the expiry address. These "expired" messages can later
be consumed from the expiry address for further inspection.
11.1.23. Failover Manual Stop
This examples shows how to stop the server manually and cause failover
11.1.24. HTTP Transport
The http-transport example shows you how to configure HornetQ to use the HTTP protocol
as its transport layer.

Instantiate JMS Objects Directly
47
11.1.25. Instantiate JMS Objects Directly
Usually, JMS Objects such as ConnectionFactory, Queue and Topic instances are looked up
from JNDI before being used by the client code. This objects are called "administered objects"
in JMS terminology.
However, in some cases a JNDI server may not be available or desired. To come to the rescue
HornetQ also supports the direct instantiation of these administered objects on the client side so
you don't have to use JNDI for JMS.
11.1.26. Interceptor
HornetQ allows an application to use an interceptor to hook into the messaging system.
Interceptors allow you to handle various message events in HornetQ.
11.1.27. JAAS
The jaas example shows you how to configure HornetQ to use JAAS for security. HornetQ can
leverage JAAS to delegate user authentication and authorization to existing security infrastructure.
11.1.28. JMS Bridge
The jms-brige example shows how to setup a bridge between two standalone HornetQ servers.
11.1.29. JMX Management
The jmx example shows how to manage HornetQ using JMX.
11.1.30. Large Message
The large-message example shows you how to send and receive very large messages with
HornetQ. HornetQ supports the sending and receiving of huge messages, much larger than can
fit in available RAM on the client or server. Effectively the only limit to message size is the amount
of disk space you have on the server.
Large messages are persisted on the server so they can survive a server restart. In other words
HornetQ doesn't just do a simple socket stream from the sender to the consumer.
11.1.31. Last-Value Queue
The last-value-queue example shows you how to define and deal with last-value queues. Last-
value queues are special queues which discard any messages when a newer message with the
same value for a well-defined last-value property is put in the queue. In other words, a last-value
queue only retains the last value.
A typical example for last-value queue is for stock prices, where you are only interested by the
latest price for a particular stock.

Chapter 11. Examples
48
11.1.32. Management
The management example shows how to manage HornetQ using JMS Messages to invoke
management operations on the server.
11.1.33. Management Notification
The management-notification example shows how to receive management notifications from
HornetQ using JMS messages. HornetQ servers emit management notifications when events
of interest occur (consumers are created or closed, addresses are created or deleted, security
authentication fails, etc.).
11.1.34. Message Counter
The message-counters example shows you how to use message counters to obtain message
information for a JMS queue.
11.1.35. Message Group
The message-group example shows you how to configure and use message groups with HornetQ.
Message groups allow you to pin messages so they are only consumed by a single consumer.
Message groups are sets of messages that has the following characteristics:
• Messages in a message group share the same group id, i.e. they have same JMSXGroupID
string property values
• The consumer that receives the first message of a group will receive all the messages that
belongs to the group
11.1.36. Message Group
The message-group2 example shows you how to configure and use message groups with
HornetQ via a connection factory.
11.1.37. Message Priority
Message Priority can be used to influence the delivery order for messages.
It can be retrieved by the message's standard header field 'JMSPriority' as defined in JMS
specification version 1.1.
The value is of type integer, ranging from 0 (the lowest) to 9 (the highest). When messages are
being delivered, their priorities will effect their order of delivery. Messages of higher priorities will
likely be delivered before those of lower priorities.
Messages of equal priorities are delivered in the natural order of their arrival at their destinations.
Please consult the JMS 1.1 specification for full details.

Multiple Failover
49
11.1.38. Multiple Failover
This example demonstrates how to set up a live server with multiple backups
11.1.39. Multiple Failover Failback
This example demonstrates how to set up a live server with multiple backups but forcing failover
back to the original live server
11.1.40. No Consumer Buffering
By default, HornetQ consumers buffer messages from the server in a client side buffer before you
actually receive them on the client side. This improves performance since otherwise every time
you called receive() or had processed the last message in a MessageListener onMessage()
method, the HornetQ client would have to go the server to request the next message, which would
then get sent to the client side, if one was available.
This would involve a network round trip for every message and reduce performance. Therefore,
by default, HornetQ pre-fetches messages into a buffer on each consumer.
In some case buffering is not desirable, and HornetQ allows it to be switched off. This example
demonstrates that.
11.1.41. Non-Transaction Failover With Server Data Replication
The non-transaction-failover example demonstrates two servers coupled as a live-backup
pair for high availability (HA), and a client using a non-transacted JMS session failing over from
live to backup when the live server is crashed.
HornetQ implements failover of client connections between live and backup servers. This is
implemented by the replication of state between live and backup nodes. When replication is
configured and a live node crashes, the client connections can carry and continue to send and
consume messages. When non-transacted sessions are used, once and only once message
delivery is not guaranteed and it is possible that some messages will be lost or delivered twice.
11.1.42. Paging
The paging example shows how HornetQ can support huge queues even when the server is
running in limited RAM. It does this by transparently paging messages to disk, and depaging them
when they are required.
11.1.43. Pre-Acknowledge
Standard JMS supports three acknowledgement modes: AUTO_ACKNOWLEDGE,
CLIENT_ACKNOWLEDGE, and DUPS_OK_ACKNOWLEDGE. For a full description on these modes please
consult the JMS specification, or any JMS tutorial.

Chapter 11. Examples
50
All of these standard modes involve sending acknowledgements from the client to the server.
However in some cases, you really don't mind losing messages in event of failure, so it would
make sense to acknowledge the message on the server before delivering it to the client. This
example demonstrates how HornetQ allows this with an extra acknowledgement mode.
11.1.44. Message Producer Rate Limiting
The producer-rte-limit example demonstrates how, with HornetQ, you can specify a maximum
send rate at which a JMS message producer will send messages.
11.1.45. Queue
A simple example demonstrating a JMS queue.
11.1.46. Message Redistribution
The queue-message-redistribution example demonstrates message redistribution between
queues with the same name deployed in different nodes of a cluster.
11.1.47. Queue Requestor
A simple example demonstrating a JMS queue requestor.
11.1.48. Queue with Message Selector
The queue-selector example shows you how to selectively consume messages using message
selectors with queue consumers.
11.1.49. Reattach Node example
The Reattach Node example shows how a client can try to reconnect to the same server instead of
failing the connection immediately and notifying any user ExceptionListener objects. HornetQ can
be configured to automatically retry the connection, and reattach to the server when it becomes
available again across the network.
11.1.50. Request-Reply example
A simple example showing the JMS request-response pattern.
11.1.51. Scheduled Message
The scheduled-message example shows you how to send a scheduled message to a JMS Queue
with HornetQ. Scheduled messages won't get delivered until a specified time in the future.
11.1.52. Security
The security example shows you how configure and use role based queue security with
HornetQ.

Send Acknowledgements
51
11.1.53. Send Acknowledgements
The send-acknowledgements example shows you how to use HornetQ's advanced asynchronous
send acknowledgements feature to obtain acknowledgement from the server that sends have
been received and processed in a separate stream to the sent messages.
11.1.54. Spring Integration
This example shows how to use embedded JMS using HornetQ's Spring integration.
11.1.55. SSL Transport
The ssl-enabled shows you how to configure SSL with HornetQ to send and receive message.
11.1.56. Static Message Selector
The static-selector example shows you how to configure a HornetQ core queue with static
message selectors (filters).
11.1.57. Static Message Selector Using JMS
The static-selector-jms example shows you how to configure a HornetQ queue with static
message selectors (filters) using JMS.
11.1.58. Stomp
The stomp example shows you how to configure a HornetQ server to send and receive Stomp
messages.
11.1.59. Stomp1.1
The stomp example shows you how to configure a HornetQ server to send and receive Stomp
messages via a Stomp 1.1 connection.
11.1.60. Stomp Over Web Sockets
The stomp-websockets example shows you how to configure a HornetQ server to send and
receive Stomp messages directly from Web browsers (provided they support Web Sockets).
11.1.61. Symmetric Cluster
The symmetric-cluster example demonstrates a symmetric cluster set-up with HornetQ.
HornetQ has extremely flexible clustering which allows you to set-up servers in many different
topologies. The most common topology that you'll perhaps be familiar with if you are used to
application server clustering is a symmetric cluster.

Chapter 11. Examples
52
With a symmetric cluster, the cluster is homogeneous, i.e. each node is configured the same as
every other node, and every node is connected to every other node in the cluster.
11.1.62. Temporary Queue
A simple example demonstrating how to use a JMS temporary queue.
11.1.63. Topic
A simple example demonstrating a JMS topic.
11.1.64. Topic Hierarchy
HornetQ supports topic hierarchies. With a topic hierarchy you can register a subscriber with a
wild-card and that subscriber will receive any messages sent to an address that matches the wild
card.
11.1.65. Topic Selector 1
The topic-selector-example1 example shows you how to send message to a JMS Topic, and
subscribe them using selectors with HornetQ.
11.1.66. Topic Selector 2
The topic-selector-example2 example shows you how to selectively consume messages using
message selectors with topic consumers.
11.1.67. Transaction Failover
The transaction-failover example demonstrates two servers coupled as a live-backup pair
for high availability (HA), and a client using a transacted JMS session failing over from live to
backup when the live server is crashed.
HornetQ implements failover of client connections between live and backup servers. This is
implemented by the sharing of a journal between the servers. When a live node crashes, the client
connections can carry and continue to send and consume messages. When transacted sessions
are used, once and only once message delivery is guaranteed.
11.1.68. Transactional Session
The transactional example shows you how to use a transactional Session with HornetQ.
11.1.69. XA Heuristic
The xa-heuristic example shows you how to make an XA heuristic decision through HornetQ
Management Interface. A heuristic decision is a unilateral decision to commit or rollback an XA
transaction branch after it has been prepared.

XA Receive
53
11.1.70. XA Receive
The xa-receive example shows you how message receiving behaves in an XA transaction in
HornetQ.
11.1.71. XA Send
The xa-send example shows you how message sending behaves in an XA transaction in HornetQ.
11.1.72. XA with Transaction Manager
The xa-with-jta example shows you how to use JTA interfaces to control transactions with
HornetQ.
11.2. Core API Examples
To run a core example, simply cd into the appropriate example directory and type ant
11.2.1. Embedded
The embedded example shows how to embed the HornetQ server within your own code.
11.3. Java EE Examples
Most of the Java EE examples can be run the following way. simply cd into the appropriate example
directory and type ant deploy. This will create a new JBoss AS profile and start the server. When
the server is started from a different window type ant run to run the example. Some examples
require further steps, please refer to the examples documentation for further instructions.
11.3.1. EJB/JMS Transaction
An example that shows using an EJB and JMS together within a transaction.
11.3.2. HAJNDI (High Availability)
A simple example demonstrating using JNDI within a cluster.
11.3.3. Resource Adapter Configuration
This example demonstrates how to configure several properties on the HornetQ JCA resource
adaptor.
11.3.4. Resource Adapter Remote Server Configuration
This example demonstrates how to configure the HornetQ resource adapter to talk to a remote
HornetQ server

Chapter 11. Examples
54
11.3.5. JMS Bridge
An example demonstrating the use of the HornetQ JMS bridge.
11.3.6. MDB (Message Driven Bean)
A simple set of examples of message driven beans, including failover examples.
11.3.7. Servlet Transport
An example of how to use the HornetQ servlet transport.
11.3.8. Servlet SSL Transport
An example of how to use the HornetQ servlet transport over SSL.
11.3.9. XA Recovery
An example of how XA recovery works within the JBoss Application server using HornetQ.

Chapter 12.
55
Routing Messages With Wild CardsHornetQ allows the routing of messages via wildcard addresses.
If a queue is created with an address of say queue.news.# then it will receive any messages
sent to addresses that match this, for instance queue.news.europe or queue.news.usa or
queue.news.usa.sport. If you create a consumer on this queue, this allows a consumer to
consume messages which are sent to a hierarchy of addresses.
Note
In JMS terminology this allows "topic hierarchies" to be created.
To enable this functionality set the property wild-card-routing-enabled in the hornetq-
configuration.xml file to true. This is true by default.
For more information on the wild card syntax take a look at Chapter 13, Understanding the HornetQ
Wildcard Syntax chapter, also see Section 11.1.64, “Topic Hierarchy”.

56

Chapter 13.
57
Understanding the HornetQ Wildcard
SyntaxHornetQ uses a specific syntax for representing wildcards in security settings, address settings
and when creating consumers.
The syntax is similar to that used by AMQP [http://www.amqp.org].
A HornetQ wildcard expression contains words delimited by the character '.' (full stop).
The special characters '#' and '*' also have special meaning and can take the place of a word.
The character '#' means 'match any sequence of zero or more words'.
The character '*' means 'match a single word'.
So the wildcard 'news.europe.#' would match 'news.europe', 'news.europe.sport',
'news.europe.politics', and 'news.europe.politics.regional' but would not match 'news.usa',
'news.usa.sport' nor 'entertainment'.
The wildcard 'news.*' would match 'news.europe', but not 'news.europe.sport'.
The wildcard 'news.*.sport' would match 'news.europe.sport' and also 'news.usa.sport', but not
'news.europe.politics'.

58

Chapter 14.
59
Filter ExpressionsHornetQ provides a powerful filter language based on a subset of the SQL 92 expression syntax.
It is the same as the syntax used for JMS selectors, but the predefined identifiers are different.
For documentation on JMS selector syntax please the JMS javadoc for javax.jms.Message [http://
java.sun.com/javaee/5/docs/api/javax/jms/Message.html].
Filter expressions are used in several places in HornetQ
• Predefined Queues. When pre-defining a queue, either in hornetq-configuration.xml or
hornetq-jms.xml a filter expression can be defined for a queue. Only messages that match
the filter expression will enter the queue.
• Core bridges can be defined with an optional filter expression, only matching messages will be
bridged (see Chapter 36, Core Bridges).
• Diverts can be defined with an optional filter expression, only matching messages will be
diverted (see Chapter 35, Diverting and Splitting Message Flows).
• Filter are also used programmatically when creating consumers, queues and in several places
as described in Chapter 30, Management.
There are some differences between JMS selector expressions and HornetQ core filter
expressions. Whereas JMS selector expressions operate on a JMS message, HornetQ core filter
expressions operate on a core message.
The following identifiers can be used in a core filter expressions to refer to attributes of the core
message in an expression:
• HQPriority. To refer to the priority of a message. Message priorities are integers with valid
values from 0 - 9. 0 is the lowest priority and 9 is the highest. E.g. HQPriority = 3 AND
animal = 'aardvark'
• HQExpiration. To refer to the expiration time of a message. The value is a long integer.
• HQDurable. To refer to whether a message is durable or not. The value is a string with valid
values: DURABLE or NON_DURABLE.
• HQTimestamp. The timestamp of when the message was created. The value is a long integer.
• HQSize. The size of a message in bytes. The value is an integer.
Any other identifiers used in core filter expressions will be assumed to be properties of the
message.

60

Chapter 15.
61
PersistenceIn this chapter we will describe how persistence works with HornetQ and how to configure it.
HornetQ ships with a high performance journal. Since HornetQ handles its own persistence, rather
than relying on a database or other 3rd party persistence engine it is very highly optimised for the
specific messaging use cases.
A HornetQ journal is an append only journal. It consists of a set of files on disk. Each file is pre-
created to a fixed size and initially filled with padding. As operations are performed on the server,
e.g. add message, update message, delete message, records are appended to the journal. When
one journal file is full we move to the next one.
Because records are only appended, i.e. added to the end of the journal we minimise disk head
movement, i.e. we minimise random access operations which is typically the slowest operation
on a disk.
Making the file size configurable means that an optimal size can be chosen, i.e. making each file
fit on a disk cylinder. Modern disk topologies are complex and we are not in control over which
cylinder(s) the file is mapped onto so this is not an exact science. But by minimising the number
of disk cylinders the file is using, we can minimise the amount of disk head movement, since an
entire disk cylinder is accessible simply by the disk rotating - the head does not have to move.
As delete records are added to the journal, HornetQ has a sophisticated file garbage collection
algorithm which can determine if a particular journal file is needed any more - i.e. has all its data
been deleted in the same or other files. If so, the file can be reclaimed and re-used.
HornetQ also has a compaction algorithm which removes dead space from the journal and
compresses up the data so it takes up less files on disk.
The journal also fully supports transactional operation if required, supporting both local and XA
transactions.
The majority of the journal is written in Java, however we abstract out the interaction with the actual
file system to allow different pluggable implementations. HornetQ ships with two implementations:
• Java NIO [http://en.wikipedia.org/wiki/New_I/O].
The first implementation uses standard Java NIO to interface with the file system. This provides
extremely good performance and runs on any platform where there's a Java 6+ runtime.
• Linux Asynchronous IO
The second implementation uses a thin native code wrapper to talk to the Linux asynchronous
IO library (AIO). With AIO, HornetQ will be called back when the data has made it to disk,
allowing us to avoid explicit syncs altogether and simply send back confirmation of completion
when AIO informs us that the data has been persisted.

Chapter 15. Persistence
62
Using AIO will typically provide even better performance than using Java NIO.
The AIO journal is only available when running Linux kernel 2.6 or later and after having
installed libaio (if it's not already installed). For instructions on how to install libaio please see
Section 15.5, “Installing AIO”.
Also, please note that AIO will only work with the following file systems: ext2, ext3, ext4, jfs,
xfs. With other file systems, e.g. NFS it may appear to work, but it will fall back to a slower
sychronous behaviour. Don't put the journal on a NFS share!
For more information on libaio please see Chapter 40, Libaio Native Libraries.
libaio is part of the kernel project.
The standard HornetQ core server uses two instances of the journal:
• Bindings journal.
This journal is used to store bindings related data. That includes the set of queues that are
deployed on the server and their attributes. It also stores data such as id sequence counters.
The bindings journal is always a NIO journal as it is typically low throughput compared to the
message journal.
The files on this journal are prefixed as hornetq-bindings. Each file has a bindings extension.
File size is 1048576, and it is located at the bindings folder.
• JMS journal.
This journal instance stores all JMS related data, This is basically any JMS Queues, Topics and
Connection Factories and any JNDI bindings for these resources.
Any JMS Resources created via the management API will be persisted to this journal. Any
resources configured via configuration files will not. The JMS Journal will only be created if JMS
is being used.
The files on this journal are prefixed as hornetq-jms. Each file has a jms extension. File size
is 1048576, and it is located at the bindings folder.
• Message journal.
This journal instance stores all message related data, including the message themselves and
also duplicate-id caches.
By default HornetQ will try and use an AIO journal. If AIO is not available, e.g. the platform is
not Linux with the correct kernel version or AIO has not been installed then it will automatically
fall back to using Java NIO which is available on any Java platform.
The files on this journal are prefixed as hornetq-data. Each file has a hq extension. File size
is by the default 10485760 (configurable), and it is located at the journal folder.

Configuring the bindings journal
63
For large messages, HornetQ persists them outside the message journal. This is discussed in
Chapter 23, Large Messages.
HornetQ can also be configured to page messages to disk in low memory situations. This is
discussed in Chapter 24, Paging.
If no persistence is required at all, HornetQ can also be configured not to persist any data at all to
storage as discussed in Section 15.6, “Configuring HornetQ for Zero Persistence”.
15.1. Configuring the bindings journal
The bindings journal is configured using the following attributes in hornetq-configuration.xml
• bindings-directory
This is the directory in which the bindings journal lives. The default value is data/bindings.
• create-bindings-dir
If this is set to true then the bindings directory will be automatically created at the location
specified in bindings-directory if it does not already exist. The default value is true
15.2. Configuring the jms journal
The jms config shares its configuration with the bindings journal.
15.3. Configuring the message journal
The message journal is configured using the following attributes in hornetq-configuration.xml
• journal-directory
This is the directory in which the message journal lives. The default value is data/journal.
For the best performance, we recommend the journal is located on its own physical volume in
order to minimise disk head movement. If the journal is on a volume which is shared with other
processes which might be writing other files (e.g. bindings journal, database, or transaction
coordinator) then the disk head may well be moving rapidly between these files as it writes
them, thus drastically reducing performance.
When the message journal is stored on a SAN we recommend each journal instance that is
stored on the SAN is given its own LUN (logical unit).
• create-journal-dir
If this is set to true then the journal directory will be automatically created at the location
specified in journal-directory if it does not already exist. The default value is true
• journal-type
Valid values are NIO or ASYNCIO.

Chapter 15. Persistence
64
Choosing NIO chooses the Java NIO journal. Choosing AIO chooses the Linux asynchronous
IO journal. If you choose AIO but are not running Linux or you do not have libaio installed then
HornetQ will detect this and automatically fall back to using NIO.
• journal-sync-transactional
If this is set to true then HornetQ will make sure all transaction data is flushed to disk on
transaction boundaries (commit, prepare and rollback). The default value is true.
• journal-sync-non-transactional
If this is set to true then HornetQ will make sure non transactional message data (sends and
acknowledgements) are flushed to disk each time. The default value for this is true.
• journal-file-size
The size of each journal file in bytes. The default value for this is 10485760 bytes (10MiB).
• journal-min-files
The minimum number of files the journal will maintain. When HornetQ starts and there is no
initial message data, HornetQ will pre-create journal-min-files number of files.
Creating journal files and filling them with padding is a fairly expensive operation and we want to
minimise doing this at run-time as files get filled. By precreating files, as one is filled the journal
can immediately resume with the next one without pausing to create it.
Depending on how much data you expect your queues to contain at steady state you should
tune this number of files to match that total amount of data.
• journal-max-io
Write requests are queued up before being submitted to the system for execution. This
parameter controls the maximum number of write requests that can be in the IO queue at any
one time. If the queue becomes full then writes will block until space is freed up.
When using NIO, this value should always be equal to 1
When using AIO, the default should be 500.
The system maintains different defaults for this parameter depening on whether it's NIO or AIO
(default for NIO is 1, default for AIO is 500)
There is a limit and the total max AIO can't be higher than what is configured at the OS level
(/proc/sys/fs/aio-max-nr) usually at 65536.
• journal-buffer-timeout
Instead of flushing on every write that requires a flush, we maintain an internal buffer, and flush
the entire buffer either when it is full, or when a timeout expires, whichever is sooner. This is

An important note on disabling disk write cache.
65
used for both NIO and AIO and allows the system to scale better with many concurrent writes
that require flushing.
This parameter controls the timeout at which the buffer will be flushed if it hasn't filled already.
AIO can typically cope with a higher flush rate than NIO, so the system maintains different
defaults for both NIO and AIO (default for NIO is 3333333 nanoseconds - 300 times per second,
default for AIO is 500000 nanoseconds - ie. 2000 times per second).
Note
By increasing the timeout, you may be able to increase system throughput at
the expense of latency, the default parameters are chosen to give a reasonable
balance between throughput and latency.
• journal-buffer-size
The size of the timed buffer on AIO. The default value is 490KiB.
• journal-compact-min-files
The minimal number of files before we can consider compacting the journal. The compacting
algorithm won't start until you have at least journal-compact-min-files
The default for this parameter is 10
• journal-compact-percentage
The threshold to start compacting. When less than this percentage is considered live data,
we start compacting. Note also that compacting won't kick in until you have at least journal-
compact-min-files data files on the journal
The default for this parameter is 30
15.4. An important note on disabling disk write cache.
Warning
Most disks contain hardware write caches. A write cache can increase the apparent
performance of the disk because writes just go into the cache and are then lazily
written to the disk later.
This happens irrespective of whether you have executed a fsync() from the
operating system or correctly synced data from inside a Java program!
By default many systems ship with disk write cache enabled. This means that even
after syncing from the operating system there is no guarantee the data has actually
made it to disk, so if a failure occurs, critical data can be lost.

Chapter 15. Persistence
66
Some more expensive disks have non volatile or battery backed write caches which
won't necessarily lose data on event of failure, but you need to test them!
If your disk does not have an expensive non volatile or battery backed cache and
it's not part of some kind of redundant array (e.g. RAID), and you value your data
integrity you need to make sure disk write cache is disabled.
Be aware that disabling disk write cache can give you a nasty shock performance
wise. If you've been used to using disks with write cache enabled in their default
setting, unaware that your data integrity could be compromised, then disabling it
will give you an idea of how fast your disk can perform when acting really reliably.
On Linux you can inspect and/or change your disk's write cache settings using the
tools hdparm (for IDE disks) or sdparm or sginfo (for SDSI/SATA disks)
On Windows you can check / change the setting by right clicking on the disk and
clicking properties.
15.5. Installing AIO
The Java NIO journal gives great performance, but If you are running HornetQ using Linux
Kernel 2.6 or later, we highly recommend you use the AIO journal for the very best persistence
performance.
It's not possible to use the AIO journal under other operating systems or earlier versions of the
Linux kernel.
If you are running Linux kernel 2.6 or later and don't already have libaio installed, you can easily
install it using the following steps:
Using yum, (e.g. on Fedora or Red Hat Enterprise Linux):
yum install libaio
Using aptitude, (e.g. on Ubuntu or Debian system):
apt-get install libaio
15.6. Configuring HornetQ for Zero Persistence
In some situations, zero persistence is sometimes required for a messaging system. Configuring
HornetQ to perform zero persistence is straightforward. Simply set the parameter persistence-
enabled in hornetq-configuration.xml to false.

Import/Export the Journal Data
67
Please note that if you set this parameter to false, then zero persistence will occur. That means
no bindings data, message data, large message data, duplicate id caches or paging data will be
persisted.
15.7. Import/Export the Journal Data
You may want to inspect the existent records on each one of the journals used by HornetQ, and
you can use the export/import tool for that purpose. The export/import are classes located at the
hornetq-core.jar, you can export the journal as a text file by using this command:
java -cp hornetq-core.jar org.hornetq.core.journal.impl.ExportJournal
<JournalDirectory> <JournalPrefix> <FileExtension> <FileSize> <FileOutput>
To import the file as binary data on the journal (Notice you also require netty.jar):
java -cp hornetq-core.jar:netty.jar org.hornetq.core.journal.impl.ImportJournal
<JournalDirectory> <JournalPrefix> <FileExtension> <FileSize> <FileInput>
• JournalDirectory: Use the configured folder for your selected folder. Example: ./hornetq/data/
journal
• JournalPrefix: Use the prefix for your selected journal, as discussed here
• FileExtension: Use the extension for your selected journal, as discussed here
• FileSize: Use the size for your selected journal, as discussed here
• FileOutput: text file that will contain the exported data

68

Chapter 16.
69
Configuring the TransportHornetQ has a fully pluggable and highly flexible transport layer and defines its own Service
Provider Interface (SPI) to make plugging in a new transport provider relatively straightforward.
In this chapter we'll describe the concepts required for understanding HornetQ transports and
where and how they're configured.
16.1. Understanding Acceptors
One of the most important concepts in HornetQ transports is the acceptor. Let's dive straight in and
take a look at an acceptor defined in xml in the configuration file hornetq-configuration.xml.
<acceptors>
<acceptor name="netty">
<factory-class>
org.hornetq.core.remoting.impl.netty.NettyAcceptorFactory
</factory-class>
<param key="port" value="5446"/>
</acceptor>
</acceptors>
Acceptors are always defined inside an acceptors element. There can be one or more acceptors
defined in the acceptors element. There's no upper limit to the number of acceptors per server.
Each acceptor defines a way in which connections can be made to the HornetQ server.
In the above example we're defining an acceptor that uses Netty [http://jboss.org/netty] to listen
for connections at port 5446.
The acceptor element contains a sub-element factory-class, this element defines the factory
used to create acceptor instances. In this case we're using Netty to listen for connections so we
use the Netty implementation of an AcceptorFactory to do this. Basically, the factory-class
element determines which pluggable transport we're going to use to do the actual listening.
The acceptor element can also be configured with zero or more param sub-elements. Each
param element defines a key-value pair. These key-value pairs are used to configure the specific
transport, the set of valid key-value pairs depends on the specific transport be used and are passed
straight through to the underlying transport.
Examples of key-value pairs for a particular transport would be, say, to configure the IP address
to bind to, or the port to listen at.

Chapter 16. Configuring the T...
70
16.2. Understanding Connectors
Whereas acceptors are used on the server to define how we accept connections, connectors are
used by a client to define how it connects to a server.
Let's look at a connector defined in our hornetq-configuration.xml file:
<connectors>
<connector name="netty">
<factory-class>
org.hornetq.core.remoting.impl.netty.NettyConnectorFactory
</factory-class>
<param key="port" value="5446"/>
</connector>
</connectors>
Connectors can be defined inside a connectors element. There can be one or more connectors
defined in the connectors element. There's no upper limit to the number of connectors per server.
You make ask yourself, if connectors are used by the client to make connections then why are
they defined on the server? There are a couple of reasons for this:
• Sometimes the server acts as a client itself when it connects to another server, for example
when one server is bridged to another, or when a server takes part in a cluster. In this cases
the server needs to know how to connect to other servers. That's defined by connectors.
• If you're using JMS and the server side JMS service to instantiate JMS ConnectionFactory
instances and bind them in JNDI, then when creating the HornetQConnectionFactory it needs
to know what server that connection factory will create connections to.
That's defined by the connector-ref element in the hornetq-jms.xml file on the server side.
Let's take a look at a snipped from a hornetq-jms.xml file that shows a JMS connection factory
that references our netty connector defined in our hornetq-configuration.xml file:
<connection-factory name="ConnectionFactory">
<connectors>
<connector-ref connector-name="netty"/>
</connectors>
<entries>
<entry name="ConnectionFactory"/>
<entry name="XAConnectionFactory"/>
</entries>
</connection-factory>

Configuring the transport directly from the client side.
71
16.3. Configuring the transport directly from the client
side.
How do we configure a core ClientSessionFactory with the information that it needs to connect
with a server?
Connectors are also used indirectly when directly configuring a core ClientSessionFactory
to directly talk to a server. Although in this case there's no need to define such a
connector in the server side configuration, instead we just create the parameters and tell the
ClientSessionFactory which connector factory to use.
Here's an example of creating a ClientSessionFactory which will connect directly to the
acceptor we defined earlier in this chapter, it uses the standard Netty TCP transport and will try
and connect on port 5446 to localhost (default):
Map<String, Object> connectionParams = new HashMap<String, Object>();
connectionParams.put(org.hornetq.core.remoting.impl.netty.TransportConstants.PORT_PROP_NAME,
5446);
TransportConfiguration transportConfiguration =
new TransportConfiguration(
"org.hornetq.core.remoting.impl.netty.NettyConnectorFactory",
connectionParams);
ServerLocator locator =
HornetQClient.createServerLocatorWithoutHA(transportConfiguration);
ClientSessionFactory sessionFactory = locator.createClientSessionFactory();
ClientSession session = sessionFactory.createSession(...);
etc
Similarly, if you're using JMS, you can configure the JMS connection factory directly on the client
side without having to define a connector on the server side or define a connection factory in
hornetq-jms.xml:
Map<String, Object> connectionParams = new HashMap<String, Object>();
connectionParams.put(org.hornetq.core.remoting.impl.netty.TransportConstants.PORT_PROP_NAME,
5446);

Chapter 16. Configuring the T...
72
TransportConfiguration transportConfiguration =
new TransportConfiguration(
"org.hornetq.core.remoting.impl.netty.NettyConnectorFactory",
connectionParams);
ConnectionFactory connectionFactory =
HornetQJMSClient.createConnectionFactoryWithoutHA(JMSFactoryType.CF,
transportConfiguration);
Connection jmsConnection = connectionFactory.createConnection();
etc
16.4. Configuring the Netty transport
Out of the box, HornetQ currently uses Netty [http://www.jboss.org/netty/], a high performance
low level network library.
Our Netty transport can be configured in several different ways; to use old (blocking) Java IO,
or NIO (non-blocking), also to use straightforward TCP sockets, SSL, or to tunnel over HTTP or
HTTPS, on top of that we also provide a servlet transport.
We believe this caters for the vast majority of transport requirements.
16.4.1. Configuring Netty TCP
Netty TCP is a simple unencrypted TCP sockets based transport. Netty TCP can be configured
to use old blocking Java IO or non blocking Java NIO. We recommend you use the Java NIO on
the server side for better scalability with many concurrent connections. However using Java old
IO can sometimes give you better latency than NIO when you're not so worried about supporting
many thousands of concurrent connections.
If you're running connections across an untrusted network please bear in mind this transport is
unencrypted. You may want to look at the SSL or HTTPS configurations.
With the Netty TCP transport all connections are initiated from the client side. I.e. the server does
not initiate any connections to the client. This works well with firewall policies that typically only
allow connections to be initiated in one direction.
All the valid Netty transport keys are defined in the class
org.hornetq.core.remoting.impl.netty.TransportConstants. Most parameters can be
used either with acceptors or connectors, some only work with acceptors. The following
parameters can be used to configure Netty for simple TCP:
• use-nio. If this is true then Java non blocking NIO will be used. If set to false then old blocking
Java IO will be used.

Configuring Netty TCP
73
If you require the server to handle many concurrent connections, we highly recommend that
you use non blocking Java NIO. Java NIO does not maintain a thread per connection so can
scale to many more concurrent connections than with old blocking IO. If you don't require the
server to handle many concurrent connections, you might get slightly better performance by
using old (blocking) IO. The default value for this property is false on the server side and false
on the client side.
• host. This specifies the host name or IP address to connect to (when configuring a connector)
or to listen on (when configuring an acceptor). The default value for this property is localhost.
When configuring acceptors, multiple hosts or IP addresses can be specified by separating
them with commas. It is also possible to specify 0.0.0.0 to accept connection from all the host's
network interfaces. It's not valid to specify multiple addresses when specifying the host for a
connector; a connector makes a connection to one specific address.
Note
Don't forget to specify a host name or ip address! If you want your server able to
accept connections from other nodes you must specify a hostname or ip address
at which the acceptor will bind and listen for incoming connections. The default
is localhost which of course is not accessible from remote nodes!
• port. This specified the port to connect to (when configuring a connector) or to listen on (when
configuring an acceptor). The default value for this property is 5445.
• tcp-no-delay. If this is true then Nagle's algorithm [http://en.wikipedia.org/wiki/
Nagle's_algorithm] will be enabled. The default value for this property is true.
• tcp-send-buffer-size. This parameter determines the size of the TCP send buffer in bytes.
The default value for this property is 32768 bytes (32KiB).
TCP buffer sizes should be tuned according to the bandwidth and latency of your network.
Here's a good link that explains the theory behind this [http://www-didc.lbl.gov/TCP-tuning/].
In summary TCP send/receive buffer sizes should be calculated as:
buffer_size = bandwidth * RTT.
Where bandwidth is in bytes per second and network round trip time (RTT) is in seconds. RTT
can be easily measured using the ping utility.
For fast networks you may want to increase the buffer sizes from the defaults.
• tcp-receive-buffer-size. This parameter determines the size of the TCP receive buffer in
bytes. The default value for this property is 32768 bytes (32KiB).

Chapter 16. Configuring the T...
74
• batch-delay. Before writing packets to the transport, HornetQ can be configured to batch up
writes for a maximum of batch-delay milliseconds. This can increase overall throughput for
very small messages. It does so at the expense of an increase in average latency for message
transfer. The default value for this property is 0 ms.
• direct-deliver. When a message arrives on the server and is delivered to waiting consumers,
by default, the delivery is done on the same thread as that on which the message arrived.
This gives good latency in environments with relatively small messages and a small number
of consumers, but at the cost of overall throughput and scalability - especially on multi-core
machines. If you want the lowest latency and a possible reduction in throughput then you can
use the default value for direct-deliver (i.e. true). If you are willing to take some small extra
hit on latency but want the highest throughput set direct-deliver to false .
• nio-remoting-threads. When configured to use NIO, HornetQ will, by default, use a
number of threads equal to three times the number of cores (or hyper-threads) as reported
by Runtime.getRuntime().availableProcessors() for processing incoming packets. If
you want to override this value, you can set the number of threads by specifying this
parameter. The default value for this parameter is -1 which means use the value from
Runtime.getRuntime().availableProcessors() * 3.
16.4.2. Configuring Netty SSL
Netty SSL is similar to the Netty TCP transport but it provides additional security by encrypting
TCP connections using the Secure Sockets Layer SSL
Please see the examples for a full working example of using Netty SSL.
Netty SSL uses all the same properties as Netty TCP but adds the following additional properties:
• ssl-enabled. Must be true to enable SSL.
• key-store-path. This is the path to the SSL key store on the client which holds the client
certificates. Although this value is configured on the server, it is downloaded and used
by the client. However, it can be overridden on the client-side by using the customary
"javax.net.ssl.keyStore" system property.
• key-store-password. This is the password for the client certificate key store on the
client. Although this value is configured on the server, it is downloaded and used by
the client. However, it can be overridden on the client-side by using the customary
"javax.net.ssl.keyStorePassword" system property.
• trust-store-path. This is the path to the trusted client certificate store on the server.
• trust-store-password. This is the password to the trusted client certificate store on the server.
16.4.3. Configuring Netty HTTP
Netty HTTP tunnels packets over the HTTP protocol. It can be useful in scenarios where firewalls
only allow HTTP traffice to pass.

Configuring Netty Servlet
75
Please see the examples for a full working example of using Netty HTTP.
Netty HTTP uses the same properties as Netty TCP but adds the following additional properties:
• http-enabled. Must be true to enable HTTP.
• http-client-idle-time. How long a client can be idle before sending an empty http request
to keep the connection alive
• http-client-idle-scan-period. How often, in milliseconds, to scan for idle clients
• http-response-time. How long the server can wait before sending an empty http response
to keep the connection alive
• http-server-scan-period. How often, in milliseconds, to scan for clients needing responses
• http-requires-session-id. If true the client will wait after the first call to receive a session
id. Used the http connector is connecting to servlet acceptor (not recommended)
16.4.4. Configuring Netty Servlet
We also provide a Netty servlet transport for use with HornetQ. The servlet transport allows
HornetQ traffic to be tunneled over HTTP to a servlet running in a servlet engine which then
redirects it to an in-VM HornetQ server.
The servlet transport differs from the Netty HTTP transport in that, with the HTTP transport
HornetQ effectively acts a web server listening for HTTP traffic on, e.g. port 80 or 8080, whereas
with the servlet transport HornetQ traffic is proxied through a servlet engine which may already
be serving web site or other applications. This allows HornetQ to be used where corporate
policies may only allow a single web server listening on an HTTP port, and this needs to serve
all applications including messaging.
Please see the examples for a full working example of the servlet transport being used.
To configure a servlet engine to work the Netty Servlet transport we need to do the following things:
• Deploy the servlet. Here's an example web.xml describing a web application that uses the
servlet:
<?xml version="1.0" encoding="UTF-8"?>
<web-app xmlns="http://java.sun.com/xml/ns/j2ee" xmlns:xsi="http://
www.w3.org/2001/XMLSchema-instance"
xsi:schemaLocation="http://java.sun.com/xml/ns/j2ee http://
java.sun.com/xml/ns/j2ee/web-app_2_4.xsd"
version="2.4">
<servlet>
<servlet-name>HornetQServlet</servlet-name>

Chapter 16. Configuring the T...
76
<servlet-
class>org.jboss.netty.channel.socket.http.HttpTunnelingServlet</servlet-
class>
<init-param>
<param-name>endpoint</param-name>
<param-value>local:org.hornetq</param-value>
</init-param>
<load-on-startup>1</load-on-startup>
</servlet>
<servlet-mapping>
<servlet-name>HornetQServlet</servlet-name>
<url-pattern>/HornetQServlet</url-pattern>
</servlet-mapping>
</web-app>
• We also need to add a special Netty invm acceptor on the server side configuration.
Here's a snippet from the hornetq-configuration.xml file showing that acceptor being
defined:
<acceptors>
<acceptor name="netty-invm">
<factory-class>
org.hornetq.core.remoting.impl.netty.NettyAcceptorFactory
</factory-class>
<param key="use-invm" value="true"/>
<param key="host" value="org.hornetq"/>
</acceptor>
</acceptors>
• Lastly we need a connector for the client, this again will be configured in the hornetq-
configuration.xml file as such:
<connectors>
<connector name="netty-servlet">
<factory-class>
org.hornetq.core.remoting.impl.netty.NettyConnectorFactory
</factory-class>
<param key="host" value="localhost"/>
<param key="port" value="8080"/>
<param key="use-servlet" value="true"/>
<param key="servlet-path" value="/messaging/HornetQServlet"/>
</connector>

Configuring Netty Servlet
77
</connectors>
Heres a list of the init params and what they are used for
• endpoint - This is the name of the netty acceptor that the servlet will forward its packets to. You
can see it matches the name of the host param.
The servlet pattern configured in the web.xml is the path of the URL that is used. The connector
param servlet-path on the connector config must match this using the application context of
the web app if there is one.
Its also possible to use the servlet transport over SSL. simply add the following configuration to
the connector:
<connector name="netty-servlet">
<factory-class>org.hornetq.core.remoting.impl.netty.NettyConnectorFactory</
factory-class>
<param key="host" value="localhost"/>
<param key="port" value="8443"/>
<param key="use-servlet" value="true"/>
<param key="servlet-path" value="/messaging/HornetQServlet"/>
<param key="ssl-enabled" value="true"/>
<param key="key-store-path" value="path to a keystoree"/>
<param key="key-store-password" value="keystore password"/>
</connector>
You will also have to configure the Application server to use a KeyStore. Edit the server.xml
file that can be found under server/default/deploy/jbossweb.sar of the Application Server
installation and edit the SSL/TLS connector configuration to look like the following:
<Connector protocol="HTTP/1.1" SSLEnabled="true"
port="8443" address="${jboss.bind.address}"
scheme="https" secure="true" clientAuth="false"
keystoreFile="path to a keystore"
keystorePass="keystore password" sslProtocol = "TLS" />
In both cases you will need to provide a keystore and password. Take a look at the servlet ssl
example shipped with HornetQ for more detail.

78

Chapter 17.
79
Detecting Dead ConnectionsIn this section we will discuss connection time-to-live (TTL) and explain how HornetQ deals with
crashed clients and clients which have exited without cleanly closing their resources.
17.1. Cleaning up Dead Connection Resources on the
Server
Before a HornetQ client application exits it is considered good practice that it should close its
resources in a controlled manner, using a finally block.
Here's an example of a well behaved core client application closing its session and session factory
in a finally block:
ServerLocator locator = null;
ClientSessionFactory sf = null;
ClientSession session = null;
try
{
locator = HornetQClient.createServerLocatorWithoutHA(..);
sf = locator.createClientSessionFactory();;
session = sf.createSession(...);
... do some stuff with the session...
}
finally
{
if (session != null)
{
session.close();
}
if (sf != null)
{
sf.close();
}
if(locator != null)
{
locator.close();
}

Chapter 17. Detecting Dead Co...
80
}
And here's an example of a well behaved JMS client application:
Connection jmsConnection = null;
try
{
ConnectionFactory jmsConnectionFactory =
HornetQJMSClient.createConnectionFactoryWithoutHA(...);
jmsConnection = jmsConnectionFactory.createConnection();
... do some stuff with the connection...
}
finally
{
if (connection != null)
{
connection.close();
}
}
Unfortunately users don't always write well behaved applications, and sometimes clients just crash
so they don't have a chance to clean up their resources!
If this occurs then it can leave server side resources, like sessions, hanging on the server. If these
were not removed they would cause a resource leak on the server and over time this result in the
server running out of memory or other resources.
We have to balance the requirement for cleaning up dead client resources with the fact that
sometimes the network between the client and the server can fail and then come back, allowing
the client to reconnect. HornetQ supports client reconnection, so we don't want to clean up "dead"
server side resources too soon or this will prevent any client from reconnecting, as it won't be able
to find its old sessions on the server.
HornetQ makes all of this configurable. For each ClientSessionFactory we define a connection
TTL. Basically, the TTL determines how long the server will keep a connection alive in the absence
of any data arriving from the client. The client will automatically send "ping" packets periodically to
prevent the server from closing it down. If the server doesn't receive any packets on a connection
for the connection TTL time, then it will automatically close all the sessions on the server that
relate to that connection.
If you're using JMS, the connection TTL is defined by the ConnectionTTL attribute on a
HornetQConnectionFactory instance, or if you're deploying JMS connection factory instances

Closing core sessions or JMS connections that you have failed to close
81
direct into JNDI on the server side, you can specify it in the xml config, using the parameter
connection-ttl.
The default value for connection ttl is 60000ms, i.e. 1 minute. A value of -1 for ConnectionTTL
means the server will never time out the connection on the server side.
If you do not wish clients to be able to specify their own connection TTL, you can override all values
used by a global value set on the server side. This can be done by specifying the connection-
ttl-override attribute in the server side configuration. The default value for connection-ttl-
override is -1 which means "do not override" (i.e. let clients use their own values).
17.1.1. Closing core sessions or JMS connections that you
have failed to close
As previously discussed, it's important that all core client sessions and JMS connections are
always closed explicitly in a finally block when you are finished using them.
If you fail to do so, HornetQ will detect this at garbage collection time, and log a warning similar
to the following in the logs (If you are using JMS the warning will involve a JMS connection not
a client session):
[Finalizer] 20:14:43,244 WARNING
[org.hornetq.core.client.impl.DelegatingSession] I'm closing a ClientSession
you left open. Please make sure you close all ClientSessions explicitly before
let
ting them go out of scope!
[Finalizer] 20:14:43,244 WARNING
[org.hornetq.core.client.impl.DelegatingSession] The session you didn't close
was created here:
java.lang.Exception
at
org.hornetq.core.client.impl.DelegatingSession.<init>(DelegatingSession.java:83)
at org.acme.yourproject.YourClass (YourClass.java:666)
HornetQ will then close the connection / client session for you.
Note that the log will also tell you the exact line of your user code where you created the JMS
connection / client session that you later did not close. This will enable you to pinpoint the error
in your code and correct it appropriately.
17.2. Detecting failure from the client side.
In the previous section we discussed how the client sends pings to the server and how "dead"
connection resources are cleaned up by the server. There's also another reason for pinging, and
that's for the client to be able to detect that the server or network has failed.

Chapter 17. Detecting Dead Co...
82
As long as the client is receiving data from the server it will consider the connection to be still alive.
If the client does not receive any packets for client-failure-check-period milliseconds then
it will consider the connection failed and will either initiate failover, or call any FailureListener
instances (or ExceptionListener instances if you are using JMS) depending on how it has been
configured.
If you're using JMS it's defined by the ClientFailureCheckPeriod attribute on a
HornetQConnectionFactory instance, or if you're deploying JMS connection factory instances
direct into JNDI on the server side, you can specify it in the hornetq-jms.xml configuration file,
using the parameter client-failure-check-period.
The default value for client failure check period is 30000ms, i.e. 30 seconds. A value of -1 means
the client will never fail the connection on the client side if no data is received from the server.
Typically this is much lower than connection TTL to allow clients to reconnect in case of transitory
failure.
17.3. Configuring Asynchronous Connection Execution
By default, packets received on the server side are executed on the remoting thread.
It is possible instead to use a thread from a thread pool to handle some packets so that the
remoting thread is not tied up for too long. However, please note that processing operations
asynchronously on another thread adds a little more latency. Please note that most short running
operations are always handled on the remoting thread for performance reasons. To enable
asynchronous connection execution, set the parameter async-connection-execution-enabled
in hornetq-configuration.xml to true (default value is true).

Chapter 18.
83
Resource Manager ConfigurationHornetQ has its own Resource Manager for handling the lifespan of JTA transactions. When a
transaction is started the resource manager is notified and keeps a record of the transaction and
its current state. It is possible in some cases for a transaction to be started but then forgotten
about. Maybe the client died and never came back. If this happens then the transaction will just
sit there indefinitely.
To cope with this HornetQ can, if configured, scan for old transactions and rollback any it finds.
The default for this is 3000000 milliseconds (5 minutes), i.e. any transactions older than 5
minutes are removed. This timeout can be changed by editing the transaction-timeout property
in hornetq-configuration.xml (value must be in milliseconds). The property transaction-
timeout-scan-period configures how often, in milliseconds, to scan for old transactions.
Please note that HornetQ will not unilaterally rollback any XA transactions in a prepared state -
this must be heuristically rolled back via the management API if you are sure they will never be
resolved by the transaction manager.

84

Chapter 19.
85
Flow ControlFlow control is used to limit the flow of data between a client and server, or a server and another
server in order to prevent the client or server being overwhelmed with data.
19.1. Consumer Flow Control
This controls the flow of data between the server and the client as the client consumes messages.
For performance reasons clients normally buffer messages before delivering to the consumer via
the receive() method or asynchronously via a message listener. If the consumer cannot process
messages as fast as they are being delivered and stored in the internal buffer, then you could end
up with a situation where messages would keep building up possibly causing out of memory on
the client if they cannot be processed in time.
19.1.1. Window-Based Flow Control
By default, HornetQ consumers buffer messages from the server in a client side buffer before the
client consumes them. This improves performance: otherwise every time the client consumes a
message, HornetQ would have to go the server to request the next message. In turn, this message
would then get sent to the client side, if one was available.
A network round trip would be involved for every message and considerably reduce performance.
To prevent this, HornetQ pre-fetches messages into a buffer on each consumer. The total
maximum size of messages (in bytes) that will be buffered on each consumer is determined by
the consumer-window-size parameter.
By default, the consumer-window-size is set to 1 MiB (1024 * 1024 bytes).
The value can be:
• -1 for an unbounded buffer
• 0 to not buffer any messages. See Section 11.1.40, “No Consumer Buffering” for working
example of a consumer with no buffering.
• >0 for a buffer with the given maximum size in bytes.
Setting the consumer window size can considerably improve performance depending on the
messaging use case. As an example, let's consider the two extremes:
Fast consumers
Fast consumers can process messages as fast as they consume them (or even faster)
To allow fast consumers, set the consumer-window-size to -1. This will allow unbounded
message buffering on the client side.

Chapter 19. Flow Control
86
Use this setting with caution: it can overflow the client memory if the consumer is not able to
process messages as fast as it receives them.
Slow consumers
Slow consumers takes significant time to process each message and it is desirable to prevent
buffering messages on the client side so that they can be delivered to another consumer
instead.
Consider a situation where a queue has 2 consumers; 1 of which is very slow. Messages are
delivered in a round robin fashion to both consumers, the fast consumer processes all of its
messages very quickly until its buffer is empty. At this point there are still messages awaiting
to be processed in the buffer of the slow consumer thus preventing them being processed
by the fast consumer. The fast consumer is therefore sitting idle when it could be processing
the other messages.
To allow slow consumers, set the consumer-window-size to 0 (for no buffer at all). This will
prevent the slow consumer from buffering any messages on the client side. Messages will
remain on the server side ready to be consumed by other consumers.
Setting this to 0 can give deterministic distribution between multiple consumers on a queue.
Most of the consumers cannot be clearly identified as fast or slow consumers but are in-between.
In that case, setting the value of consumer-window-size to optimize performance depends on
the messaging use case and requires benchmarks to find the optimal value, but a value of 1MiB
is fine in most cases.
19.1.1.1. Using Core API
If HornetQ Core API is used, the consumer window size is specified
by ClientSessionFactory.setConsumerWindowSize() method and some of the
ClientSession.createConsumer() methods.
19.1.1.2. Using JMS
if JNDI is used to look up the connection factory, the consumer window size is configured in
hornetq-jms.xml:
<connection-factory name="ConnectionFactory">
<connectors>
<connector-ref connector-name="netty-connector"/>
</connectors>
<entries>
<entry name="ConnectionFactory"/>
</entries>
<!-- Set the consumer window size to 0 to have *no* buffer on the client side -->

Rate limited flow control
87
<consumer-window-size>0</consumer-window-size>
</connection-factory>
If the connection factory is directly instantiated, the consumer window size is specified by
HornetQConnectionFactory.setConsumerWindowSize() method.
Please see Section 11.1.40, “No Consumer Buffering” for an example which shows how to
configure HornetQ to prevent consumer buffering when dealing with slow consumers.
19.1.2. Rate limited flow control
It is also possible to control the rate at which a consumer can consume messages. This is a form
of throttling and can be used to make sure that a consumer never consumes messages at a rate
faster than the rate specified.
The rate must be a positive integer to enable this functionality and is the maximum desired
message consumption rate specified in units of messages per second. Setting this to -1 disables
rate limited flow control. The default value is -1.
Please see Section 11.1.15, “Message Consumer Rate Limiting” for a working example of limiting
consumer rate.
19.1.2.1. Using Core API
If the HornetQ core API is being used the rate can be set via the
ClientSessionFactory.setConsumerMaxRate(int consumerMaxRate) method or alternatively
via some of the ClientSession.createConsumer() methods.
19.1.2.2. Using JMS
If JNDI is used to look up the connection factory, the max rate can be configured in hornetq-
jms.xml:
<connection-factory name="ConnectionFactory">
<connectors>
<connector-ref connector-name="netty-connector"/>
</connectors>
<entries>
<entry name="ConnectionFactory"/>
</entries>
<!-- We limit consumers created on this connection factory to consume messages
at a maximum rate
of 10 messages per sec -->
<consumer-max-rate>10</consumer-max-rate>
</connection-factory>

Chapter 19. Flow Control
88
If the connection factory is directly instantiated, the max rate size can be set via the
HornetQConnectionFactory.setConsumerMaxRate(int consumerMaxRate) method.
Note
Rate limited flow control can be used in conjunction with window based flow control.
Rate limited flow control only effects how many messages a client can consume
in a second and not how many messages are in its buffer. So if you had a slow
rate limit and a high window based limit the clients internal buffer would soon fill
up with messages.
Please see Section 11.1.15, “Message Consumer Rate Limiting” for an example which shows
how to configure HornetQ to prevent consumer buffering when dealing with slow consumers.
19.2. Producer flow control
HornetQ also can limit the amount of data sent from a client to a server to prevent the server
being overwhelmed.
19.2.1. Window based flow control
In a similar way to consumer window based flow control, HornetQ producers, by default, can only
send messages to an address as long as they have sufficient credits to do so. The amount of
credits required to send a message is given by the size of the message.
As producers run low on credits they request more from the server, when the server sends them
more credits they can send more messages.
The amount of credits a producer requests in one go is known as the window size.
The window size therefore determines the amount of bytes that can be in-flight at any one time
before more need to be requested - this prevents the remoting connection from getting overloaded.
19.2.1.1. Using Core API
If the HornetQ core API is being used, window size can be set via the
ClientSessionFactory.setProducerWindowSize(int producerWindowSize) method.
19.2.1.2. Using JMS
If JNDI is used to look up the connection factory, the producer window size can be configured
in hornetq-jms.xml:
<connection-factory name="ConnectionFactory">
<connectors>

Window based flow control
89
<connector-ref connector-name="netty-connector"/>
</connectors>
<entries>
<entry name="ConnectionFactory"/>
</entries>
<producer-window-size>10</producer-window-size>
</connection-factory>
If the connection factory is directly instantiated, the producer window size can be set via the
HornetQConnectionFactory.setProducerWindowSize(int producerWindowSize) method.
19.2.1.3. Blocking producer window based flow control
Normally the server will always give the same number of credits as have been requested.
However, it is also possible to set a maximum size on any address, and the server will never send
more credits than could cause the address's upper memory limit to be exceeded.
For example, if I have a JMS queue called "myqueue", I could set the maximum memory size
to 10MiB, and the the server will control the number of credits sent to any producers which are
sending any messages to myqueue such that the total messages in the queue never exceeds
10MiB.
When the address gets full, producers will block on the client side until more space frees up on
the address, i.e. until messages are consumed from the queue thus freeing up space for more
messages to be sent.
We call this blocking producer flow control, and it's an efficient way to prevent the server running
out of memory due to producers sending more messages than can be handled at any time.
It is an alternative approach to paging, which does not block producers but instead pages
messages to storage.
To configure an address with a maximum size and tell the server that you want to block
producers for this address if it becomes full, you need to define an AddressSettings (Section 25.3,
“Configuring Queues Via Address Settings”) block for the address and specify max-size-bytes
and address-full-policy
The address block applies to all queues registered to that address. I.e. the total memory for all
queues bound to that address will not exceed max-size-bytes. In the case of JMS topics this
means the total memory of all subscriptions in the topic won't exceed max-size-bytes.
Here's an example:
<address-settings>
<address-setting match="jms.queue.exampleQueue">
<max-size-bytes>100000</max-size-bytes>

Chapter 19. Flow Control
90
<address-full-policy>BLOCK</address-full-policy>
</address-setting>
</address-settings>
The above example would set the max size of the JMS queue "exampleQueue" to be 100000 bytes
and would block any producers sending to that address to prevent that max size being exceeded.
Note the policy must be set to BLOCK to enable blocking producer flow control.
Note
Note that in the default configuration all addresses are set to block producers after
10 MiB of message data is in the address. This means you cannot send more
than 10MiB of message data to an address without it being consumed before the
producers will be blocked. If you do not want this behaviour increase the max-
size-bytes parameter or change the address full message policy.
19.2.2. Rate limited flow control
HornetQ also allows the rate a producer can emit message to be limited, in units of messages per
second. By specifying such a rate, HornetQ will ensure that producer never produces messages
at a rate higher than that specified.
The rate must be a positive integer to enable this functionality and is the maximum desired
message consumption rate specified in units of messages per second. Setting this to -1 disables
rate limited flow control. The default value is -1.
Please see the Section 11.1.44, “Message Producer Rate Limiting” for a working example of
limiting producer rate.
19.2.2.1. Using Core API
If the HornetQ core API is being used the rate can be set via the
ClientSessionFactory.setProducerMaxRate(int consumerMaxRate) method or alternatively
via some of the ClientSession.createProducer() methods.
19.2.2.2. Using JMS
If JNDI is used to look up the connection factory, the max rate can be configured in hornetq-
jms.xml:
<connection-factory name="ConnectionFactory">
<connectors>
<connector-ref connector-name="netty-connector"/>

Rate limited flow control
91
</connectors>
<entries>
<entry name="ConnectionFactory"/>
</entries>
<!-- We limit producers created on this connection factory to produce messages
at a maximum rate
of 10 messages per sec -->
<producer-max-rate>10</producer-max-rate>
</connection-factory>
If the connection factory is directly instantiated, the max rate size can be set via the
HornetQConnectionFactory.setProducerMaxRate(int consumerMaxRate) method.

92

Chapter 20.
93
Guarantees of sends and commits
20.1. Guarantees of Transaction Completion
When committing or rolling back a transaction with HornetQ, the request to commit or rollback is
sent to the server, and the call will block on the client side until a response has been received
from the server that the commit or rollback was executed.
When the commit or rollback is received on the server, it will be committed to the journal, and
depending on the value of the parameter journal-sync-transactional the server will ensure
that the commit or rollback is durably persisted to storage before sending the response back to
the client. If this parameter has the value false then commit or rollback may not actually get
persisted to storage until some time after the response has been sent to the client. In event of
server failure this may mean the commit or rollback never gets persisted to storage. The default
value of this parameter is true so the client can be sure all transaction commits or rollbacks have
been persisted to storage by the time the call to commit or rollback returns.
Setting this parameter to false can improve performance at the expense of some loss of
transaction durability.
This parameter is set in hornetq-configuration.xml
20.2. Guarantees of Non Transactional Message Sends
If you are sending messages to a server using a non transacted session, HornetQ can be
configured to block the call to send until the message has definitely reached the server, and a
response has been sent back to the client. This can be configured individually for durable and
non-durable messages, and is determined by the following two parameters:
• BlockOnDurableSend. If this is set to true then all calls to send for durable messages on non
transacted sessions will block until the message has reached the server, and a response has
been sent back. The default value is true.
• BlockOnNonDurableSend. If this is set to true then all calls to send for non-durable messages
on non transacted sessions will block until the message has reached the server, and a response
has been sent back. The default value is false.
Setting block on sends to true can reduce performance since each send requires a network round
trip before the next send can be performed. This means the performance of sending messages will
be limited by the network round trip time (RTT) of your network, rather than the bandwidth of your
network. For better performance we recommend either batching many messages sends together
in a transaction since with a transactional session, only the commit / rollback blocks not every
send, or, using HornetQ's advanced asynchronous send acknowledgements feature described in
Section 20.4, “Asynchronous Send Acknowledgements”.

Chapter 20. Guarantees of sen...
94
If you are using JMS and you're using the JMS service on the server to load your JMS connection
factory instances into JNDI then these parameters can be configured in hornetq-jms.xml using
the elements block-on-durable-send and block-on-non-durable-send. If you're using JMS
but not using JNDI then you can set these values directly on the HornetQConnectionFactory
instance using the appropriate setter methods.
If you're using core you can set these values directly on the ClientSessionFactory instance
using the appropriate setter methods.
When the server receives a message sent from a non transactional session, and that message
is durable and the message is routed to at least one durable queue, then the server will persist
the message in permanent storage. If the journal parameter journal-sync-non-transactional
is set to true the server will not send a response back to the client until the message has been
persisted and the server has a guarantee that the data has been persisted to disk. The default
value for this parameter is true.
20.3. Guarantees of Non Transactional
Acknowledgements
If you are acknowledging the delivery of a message at the client side using a non transacted
session, HornetQ can be configured to block the call to acknowledge until the acknowledge has
definitely reached the server, and a response has been sent back to the client. This is configured
with the parameter BlockOnAcknowledge. If this is set to true then all calls to acknowledge on
non transacted sessions will block until the acknowledge has reached the server, and a response
has been sent back. You might want to set this to true if you want to implement a strict at most
once delivery policy. The default value is false
20.4. Asynchronous Send Acknowledgements
If you are using a non transacted session but want a guarantee that every message sent to the
server has reached it, then, as discussed in Section 20.2, “Guarantees of Non Transactional
Message Sends”, you can configure HornetQ to block the call to send until the server has received
the message, persisted it and sent back a response. This works well but has a severe performance
penalty - each call to send needs to block for at least the time of a network round trip (RTT) - the
performance of sending is thus limited by the latency of the network, not limited by the network
bandwidth.
Let's do a little bit of maths to see how severe that is. We'll consider a standard 1Gib ethernet
network with a network round trip between the server and the client of 0.25 ms.
With a RTT of 0.25 ms, the client can send at most 1000/ 0.25 = 4000 messages per second if
it blocks on each message send.
If each message is < 1500 bytes and a standard 1500 bytes MTU size is used on the network, then
a 1GiB network has a theoretical upper limit of (1024 * 1024 * 1024 / 8) / 1500 = 89478 messages

Asynchronous Send Acknowledgements
95
per second if messages are sent without blocking! These figures aren't an exact science but you
can clearly see that being limited by network RTT can have serious effect on performance.
To remedy this, HornetQ provides an advanced new feature called asynchronous send
acknowledgements. With this feature, HornetQ can be configured to send messages without
blocking in one direction and asynchronously getting acknowledgement from the server that
the messages were received in a separate stream. By de-coupling the send from the
acknowledgement of the send, the system is not limited by the network RTT, but is limited by
the network bandwidth. Consequently better throughput can be achieved than is possible using
a blocking approach, while at the same time having absolute guarantees that messages have
successfully reached the server.
The window size for send acknowledgements is determined by the confirmation-window-size
parameter on the connection factory or client session factory. Please see Chapter 34, Client
Reconnection and Session Reattachment for more info on this.
20.4.1. Asynchronous Send Acknowledgements
To use the feature using the core API, you implement the interface
org.hornetq.api.core.client.SendAcknowledgementHandler and set a handler instance on
your ClientSession.
Then, you just send messages as normal using your ClientSession, and as messages
reach the server, the server will send back an acknowledgement of the send asynchronously,
and some time later you are informed at the client side by HornetQ calling your handler's
sendAcknowledged(ClientMessage message) method, passing in a reference to the message
that was sent.
To enable asynchronous send acknowledgements you must make sure confirmation-window-
size is set to a positive integer value, e.g. 10MiB
Please see Section 11.1.53, “Send Acknowledgements” for a full working example.

96

Chapter 21.
97
Message Redelivery and Undelivered
MessagesMessages can be delivered unsuccessfully (e.g. if the transacted session used to consume them
is rolled back). Such a message goes back to its queue ready to be redelivered. However, this
means it is possible for a message to be delivered again and again without any success and
remain in the queue, clogging the system.
There are 2 ways to deal with these undelivered messages:
• Delayed redelivery.
It is possible to delay messages redelivery to let the client some time to recover from transient
failures and not overload its network or CPU resources
• Dead Letter Address.
It is also possible to configure a dead letter address so that after a specified number of
unsuccessful deliveries, messages are removed from the queue and will not be delivered again
Both options can be combined for maximum flexibility.
21.1. Delayed Redelivery
Delaying redelivery can often be useful in the case that clients regularly fail or rollback. Without a
delayed redelivery, the system can get into a "thrashing" state, with delivery being attempted, the
client rolling back, and delivery being re-attempted ad infinitum in quick succession, consuming
valuable CPU and network resources.
21.1.1. Configuring Delayed Redelivery
Delayed redelivery is defined in the address-setting configuration:
<!-- delay redelivery of messages for 5s -->
<address-setting match="jms.queue.exampleQueue">
<redelivery-delay>5000</redelivery-delay>
</address-setting>
If a redelivery-delay is specified, HornetQ will wait this delay before redelivering the messages
By default, there is no redelivery delay (redelivery-delayis set to 0).

Chapter 21. Message Redeliver...
98
Address wildcards can be used to configure redelivery delay for a set of addresses (see
Chapter 13, Understanding the HornetQ Wildcard Syntax), so you don't have to specify redelivery
delay individually for each address.
21.1.2. Example
See Section 11.1.17, “Delayed Redelivery” for an example which shows how delayed redelivery
is configured and used with JMS.
21.2. Dead Letter Addresses
To prevent a client infinitely receiving the same undelivered message (regardless of what is
causing the unsuccessful deliveries), messaging systems define dead letter addresses: after a
specified unsuccessful delivery attempts, the message is removed from the queue and send
instead to a dead letter address.
Any such messages can then be diverted to queue(s) where they can later be perused by the
system administrator for action to be taken.
HornetQ's addresses can be assigned a dead letter address. Once the messages have be
unsuccessfully delivered for a given number of attempts, they are removed from the queue and
sent to the dead letter address. These dead letter messages can later be consumed for further
inspection.
21.2.1. Configuring Dead Letter Addresses
Dead letter address is defined in the address-setting configuration:
<!-- undelivered messages in exampleQueue will be sent to the dead letter address
deadLetterQueue after 3 unsuccessful delivery attempts -->
<address-setting match="jms.queue.exampleQueue">
<dead-letter-address>jms.queue.deadLetterQueue</dead-letter-address>
<max-delivery-attempts>3</max-delivery-attempts>
</address-setting>
If a dead-letter-address is not specified, messages will removed after max-delivery-
attempts unsuccessful attempts.
By default, messages are redelivered 10 times at the maximum. Set max-delivery-attempts to
-1 for infinite redeliveries.
For example, a dead letter can be set globally for a set of matching addresses and you can set
max-delivery-attempts to -1 for a specific address setting to allow infinite redeliveries only for
this address.

Dead Letter Properties
99
Address wildcards can be used to configure dead letter settings for a set of addresses (see
Chapter 13, Understanding the HornetQ Wildcard Syntax).
21.2.2. Dead Letter Properties
Dead letter messages which are consumed from a dead letter address have the following property:
• _HQ_ORIG_ADDRESS
a String property containing the original address of the dead letter message
21.2.3. Example
See Section 11.1.16, “Dead Letter” for an example which shows how dead letter is configured
and used with JMS.
21.3. Delivery Count Persistence
In normal use, HornetQ does not update delivery count persistently until a message is rolled back
(i.e. the delivery count is not updated before the message is delivered to the consumer). In most
messaging use cases, the messages are consumed, acknowledged and forgotten as soon as
they are consumed. In these cases, updating the delivery count persistently before delivering the
message would add an extra persistent step for each message delivered, implying a significant
performance penalty.
However, if the delivery count is not updated persistently before the message delivery happens,
in the event of a server crash, messages might have been delivered but that will not have been
reflected in the delivery count. During the recovery phase, the server will not have knowledge of
that and will deliver the message with redelivered set to false while it should be true.
As this behavior breaks strict JMS semantics, HornetQ allows to persist delivery count before
message delivery but disabled it by default for performance implications.
To enable it, set persist-delivery-count-before-delivery to true in hornetq-
configuration.xml:
<persist-delivery-count-before-delivery>true</persist-delivery-count-before-
delivery>

100

Chapter 22.
101
Message ExpiryMessages can be set with an optional time to live when sending them.
HornetQ will not deliver a message to a consumer after it's time to live has been exceeded. If the
message hasn't been delivered by the time that time to live is reached the server can discard it.
HornetQ's addresses can be assigned a expiry address so that, when messages are expired, they
are removed from the queue and sent to the expiry address. Many different queues can be bound
to an expiry address. These expired messages can later be consumed for further inspection.
22.1. Message Expiry
Using HornetQ Core API, you can set an expiration time directly on the message:
// message will expire in 5000ms from now
message.setExpiration(System.currentTimeMillis() + 5000);
JMS MessageProducer allows to set a TimeToLive for the messages it sent:
// messages sent by this producer will be retained for 5s (5000ms) before
expiration
producer.setTimeToLive(5000);
Expired messages which are consumed from an expiry address have the following properties:
• _HQ_ORIG_ADDRESS
a String property containing the original address of the expired message
• _HQ_ACTUAL_EXPIRY
a Long property containing the actual expiration time of the expired message
22.2. Configuring Expiry Addresses
Expiry address are defined in the address-setting configuration:
<!-- expired messages in exampleQueue will be sent to the expiry address
expiryQueue -->

Chapter 22. Message Expiry
102
<address-setting match="jms.queue.exampleQueue">
<expiry-address>jms.queue.expiryQueue</expiry-address>
</address-setting>
If messages are expired and no expiry address is specified, messages are simply removed from
the queue and dropped. Address wildcards can be used to configure expiry address for a set of
addresses (see Chapter 13, Understanding the HornetQ Wildcard Syntax).
22.3. Configuring The Expiry Reaper Thread
A reaper thread will periodically inspect the queues to check if messages have expired.
The reaper thread can be configured with the following properties in hornetq-
configuration.xml
• message-expiry-scan-period
How often the queues will be scanned to detect expired messages (in milliseconds, default is
30000ms, set to -1 to disable the reaper thread)
• message-expiry-thread-priority
The reaper thread priority (it must be between 0 and 9, 9 being the highest priority, default is 3)
22.4. Example
See Section 11.1.22, “Message Expiration” for an example which shows how message expiry is
configured and used with JMS.

Chapter 23.
103
Large MessagesHornetQ supports sending and receiving of huge messages, even when the client and server
are running with limited memory. The only realistic limit to the size of a message that can be
sent or consumed is the amount of disk space you have available. We have tested sending and
consuming messages up to 8 GiB in size with a client and server running in just 50MiB of RAM!
To send a large message, the user can set an InputStream on a message body, and when that
message is sent, HornetQ will read the InputStream. A FileInputStream could be used for
example to send a huge message from a huge file on disk.
As the InputStream is read the data is sent to the server as a stream of fragments. The server
persists these fragments to disk as it receives them and when the time comes to deliver them to
a consumer they are read back of the disk, also in fragments and sent down the wire. When the
consumer receives a large message it initially receives just the message with an empty body, it
can then set an OutputStream on the message to stream the huge message body to a file on
disk or elsewhere. At no time is the entire message body stored fully in memory, either on the
client or the server.
23.1. Configuring the server
Large messages are stored on a disk directory on the server side, as configured on the main
configuration file.
The configuration property large-messages-directory specifies where large messages are
stored.
<configuration xmlns="urn:hornetq"
xmlns:xsi="http://www.w3.org/2001/XMLSchema-instance"
xsi:schemaLocation="urn:hornetq /schema/hornetq-configuration.xsd">
...
<large-messages-directory>/data/large-messages</large-messages-directory>
...
</configuration
By default the large message directory is data/largemessages
For the best performance we recommend large messages directory is stored on a different
physical volume to the message journal or paging directory.
23.2. Configuring Parameters
Any message larger than a certain size is considered a large message. Large messages will be
split up and sent in fragments. This is determined by the parameter min-large-message-size

Chapter 23. Large Messages
104
The default value is 100KiB.
23.2.1. Using Core API
If the HornetQ Core API is used, the minimal large message size is specified by
ClientSessionFactory.setMinLargeMessageSize.
ServerLocator locator = HornetQClient.createServerLocatorWithoutHA(new
TransportConfiguration(NettyConnectorFactory.class.getName()))
locator.setMinLargeMessageSize(25 * 1024);
ClientSessionFactory factory = HornetQClient.createClientSessionFactory();
Section 16.3, “Configuring the transport directly from the client side.” will provide more information
on how to instantiate the session factory.
23.2.2. Using JMS
If JNDI is used to look up the connection factory, the minimum large message size is specified
in hornetq-jms.xml
...
<connection-factory name="ConnectionFactory">
<connectors>
<connector-ref connector-name="netty"/>
</connectors>
<entries>
<entry name="ConnectionFactory"/>
<entry name="XAConnectionFactory"/>
</entries>
<min-large-message-size>250000</min-large-message-size>
</connection-factory>
...
If the connection factory is being instantiated directly, the minimum large message size is specified
by HornetQConnectionFactory.setMinLargeMessageSize.
23.2.3. Compressed Large Messages
If you specify the boolean property compress-large-message on the server locator or
ConnectionFactory The system will use the ZIP algorithm to compress the message body as the

Streaming large messages
105
message is transfered to the server's side. Notice that there's no special treatment at the server's
side, all the compressing and uncompressing is done at the client.
23.3. Streaming large messages
HornetQ supports setting the body of messages using input and output streams (java.lang.io)
These streams are then used directly for sending (input streams) and receiving (output streams)
messages.
When receiving messages there are 2 ways to deal with the output stream; you may choose to
block while the output stream is recovered using the method ClientMessage.saveOutputStream
or alternatively using the method ClientMessage.setOutputstream which will asynchronously
write the message to the stream. If you choose the latter the consumer must be kept alive until
the message has been fully received.
You can use any kind of stream you like. The most common use case is to send files stored in your
disk, but you could also send things like JDBC Blobs, SocketInputStream, things you recovered
from HTTPRequests etc. Anything as long as it implements java.io.InputStream for sending
messages or java.io.OutputStream for receiving them.
23.3.1. Streaming over Core API
The following table shows a list of methods available at ClientMessage which are also available
through JMS by the use of object properties.
Table 23.1. org.hornetq.api.core.client.ClientMessage API
Name Description JMS Equivalent Property
setBodyInputStream(InputStream)Set the InputStream used to
read a message body when
sending it.
JMS_HQ_InputStream
setOutputStream(OutputStream)Set the OutputStream that
will receive the body of a
message. This method does
not block.
JMS_HQ_OutputStream
saveOutputStream(OutputStream)Save the body of the message
to the OutputStream. It
will block until the entire
content is transferred to the
OutputStream.
JMS_HQ_SaveStream
To set the output stream when receiving a core message:

Chapter 23. Large Messages
106
...
ClientMessage msg = consumer.receive(...);
// This will block here until the stream was transferred
msg.saveOutputStream(someOutputStream);
ClientMessage msg2 = consumer.receive(...);
// This will not wait the transfer to finish
msg.setOutputStream(someOtherOutputStream);
...
Set the input stream when sending a core message:
...
ClientMessage msg = session.createMessage();
msg.setInputStream(dataInputStream);
...
Notice also that for messages with more than 2GiB the getBodySize() will return invalid values
since this is an integer (which is also exposed to the JMS API). On those cases you can use the
message property _HQ_LARGE_SIZE.
23.3.2. Streaming over JMS
When using JMS, HornetQ maps the streaming methods on the core API (see Table 23.1,
“org.hornetq.api.core.client.ClientMessage API”) by setting object properties . You can use the
method Message.setObjectProperty to set the input and output streams.
The InputStream can be defined through the JMS Object Property JMS_HQ_InputStream on
messages being sent:
BytesMessage message = session.createBytesMessage();
FileInputStream fileInputStream = new FileInputStream(fileInput);
BufferedInputStream bufferedInput = new BufferedInputStream(fileInputStream);
message.setObjectProperty("JMS_HQ_InputStream", bufferedInput);
someProducer.send(message);

Streaming Alternative
107
The OutputStream can be set through the JMS Object Property JMS_HQ_SaveStream on
messages being received in a blocking way.
BytesMessage messageReceived = (BytesMessage)messageConsumer.receive(120000);
File outputFile = new File("huge_message_received.dat");
FileOutputStream fileOutputStream = new FileOutputStream(outputFile);
BufferedOutputStream bufferedOutput = new
BufferedOutputStream(fileOutputStream);
// This will block until the entire content is saved on disk
messageReceived.setObjectProperty("JMS_HQ_SaveStream", bufferedOutput);
Setting the OutputStream could also be done in a non blocking way using the property
JMS_HQ_OutputStream.
// This won't wait the stream to finish. You need to keep the consumer active.
messageReceived.setObjectProperty("JMS_HQ_OutputStream", bufferedOutput);
Note
When using JMS, Streaming large messages are only supported on
StreamMessage and BytesMessage.
23.4. Streaming Alternative
If you choose not to use the InputStream or OutputStream capability of HornetQ You could still
access the data directly in an alternative fashion.
On the Core API just get the bytes of the body as you normally would.
ClientMessage msg = consumer.receive();
byte[] bytes = new byte[1024];
for (int i = 0 ; i < msg.getBodySize(); i += bytes.length)
{
msg.getBody().readBytes(bytes);
// Whatever you want to do with the bytes

Chapter 23. Large Messages
108
}
If using JMS API, BytesMessage and StreamMessage also supports it transparently.
BytesMessage rm = (BytesMessage)cons.receive(10000);
byte data[] = new byte[1024];
for (int i = 0; i < rm.getBodyLength(); i += 1024)
{
int numberOfBytes = rm.readBytes(data);
// Do whatever you want with the data
}
23.5. Large message example
Please see Section 11.1.30, “Large Message” for an example which shows how large message
is configured and used with JMS.

Chapter 24.
109
PagingHornetQ transparently supports huge queues containing millions of messages while the server is
running with limited memory.
In such a situation it's not possible to store all of the queues in memory at any one time, so HornetQ
transparently pages messages into and out of memory as they are needed, thus allowing massive
queues with a low memory footprint.
HornetQ will start paging messages to disk, when the size of all messages in memory for an
address exceeds a configured maximum size.
By default, HornetQ does not page messages - this must be explicitly configured to activate it.
24.1. Page Files
Messages are stored per address on the file system. Each address has an individual folder where
messages are stored in multiple files (page files). Each file will contain messages up to a max
configured size (page-size-bytes). The system will navigate on the files as needed, and it will
remove the page file as soon as all the messages are acknowledged up to that point.
Browsers will read through the page-cursor system.
Consumers with selectors will also navigate through the page-files and it will ignore messages
that don't match the criteria.
24.2. Configuration
You can configure the location of the paging folder
Global paging parameters are specified on the main configuration file (hornetq-
configuration.xml).
<configuration xmlns="urn:hornetq"
xmlns:xsi="http://www.w3.org/2001/XMLSchema-instance"
xsi:schemaLocation="urn:hornetq /schema/hornetq-configuration.xsd">
...
<paging-directory>/somewhere/paging-directory</paging-directory>
...
Table 24.1. Paging Configuration Parameters
Property Name Description Default
paging-directory Where page files are stored.
HornetQ will create one folder
data/paging

Chapter 24. Paging
110
Property Name Description Default
for each address being paged
under this configured location.
24.3. Paging Mode
As soon as messages delivered to an address exceed the configured size, that address alone
goes into page mode.
Note
Paging is done individually per address. If you configure a max-size-bytes for an
address, that means each matching address will have a maximum size that you
specified. It DOES NOT mean that the total overall size of all matching addresses
is limited to max-size-bytes.
24.3.1. Configuration
Configuration is done at the address settings, done at the main configuration file (hornetq-
configuration.xml).
<address-settings>
<address-setting match="jms.someaddress">
<max-size-bytes>104857600</max-size-bytes>
<page-size-bytes>10485760</page-size-bytes>
<address-full-policy>PAGE</address-full-policy>
</address-setting>
</address-settings>
This is the list of available parameters on the address settings.
Table 24.2. Paging Address Settings
Property Name Description Default
max-size-bytes What's the max memory the
address could have before
entering on page mode.
-1 (disabled)
page-size-bytes The size of each page file used
on the paging system
10MiB (10 * 1024 * 1024 bytes)
address-full-policy This must be set to PAGE
for paging to enable. If the
value is PAGE then further
PAGE

Dropping messages
111
Property Name Description Default
messages will be paged to
disk. If the value is DROP
then further messages will be
silently dropped. If the value
is FAIL then the messages
will be dropped and the
client message producers will
receive an exception. If the
value is BLOCK then client
message producers will block
when they try and send further
messages.
page-max-cache-size The system will keep up to
<page-max-cache-size page
files in memory to optimize IO
during paging navigation.
5
24.4. Dropping messages
Instead of paging messages when the max size is reached, an address can also be configured
to just drop messages when the address is full.
To do this just set the address-full-policy to DROP in the address settings
24.5. Dropping messages and throwing an exception to
producers
Instead of paging messages when the max size is reached, an address can also be configured to
drop messages and also throw an exception on the client-side when the address is full.
To do this just set the address-full-policy to FAIL in the address settings
24.6. Blocking producers
Instead of paging messages when the max size is reached, an address can also be configured
to block producers from sending further messages when the address is full, thus preventing the
memory being exhausted on the server.
When memory is freed up on the server, producers will automatically unblock and be able to
continue sending.
To do this just set the address-full-policy to BLOCK in the address settings
In the default configuration, all addresses are configured to block producers after 10 MiB of data
are in the address.

Chapter 24. Paging
112
24.7. Caution with Addresses with Multiple Queues
When a message is routed to an address that has multiple queues bound to it, e.g. a JMS
subscription in a Topic, there is only 1 copy of the message in memory. Each queue only deals
with a reference to this. Because of this the memory is only freed up once all queues referencing
the message have delivered it.
If you have a single lazy subscription, the entire address will suffer IO performance hit as all the
queues will have messages being sent through an extra storage on the paging system.
For example:
• An address has 10 queues
• One of the queues does not deliver its messages (maybe because of a slow consumer).
• Messages continually arrive at the address and paging is started.
• The other 9 queues are empty even though messages have been sent.
In this example all the other 9 queues will be consuming messages from the page system. This
may cause performance issues if this is an undesirable state.
24.8. Example
See Section 11.1.42, “Paging” for an example which shows how to use paging with HornetQ.

Chapter 25.
113
Queue AttributesQueue attributes can be set in one of two ways. Either by configuring them using the configuration
file or by using the core API. This chapter will explain how to configure each attribute and what
effect the attribute has.
25.1. Predefined Queues
Queues can be predefined via configuration at a core level or at a JMS level. Firstly lets look at
a JMS level.
The following shows a queue predefined in the hornetq-jms.xml configuration file.
<queue name="selectorQueue">
<entry name="/queue/selectorQueue"/>
<selector string="color='red'"/>
<durable>true</durable>
</queue>
This name attribute of queue defines the name of the queue. When we do this at a
jms level we follow a naming convention so the actual name of the core queue will be
jms.queue.selectorQueue.
The entry element configures the name that will be used to bind the queue to JNDI. This is a
mandatory element and the queue can contain multiple of these to bind the same queue to different
names.
The selector element defines what JMS message selector the predefined queue will have. Only
messages that match the selector will be added to the queue. This is an optional element with
a default of null when omitted.
The durable element specifies whether the queue will be persisted. This again is optional and
defaults to true if omitted.
Secondly a queue can be predefined at a core level in the hornetq-configuration.xml file. The
following is an example.
<queues>
<queue name="jms.queue.selectorQueue">
<address>jms.queue.selectorQueue</address>
<filter string="color='red'"/>
<durable>true</durable>
</queue>

Chapter 25. Queue Attributes
114
</queues>
This is very similar to the JMS configuration, with 3 real differences which are.
1. The name attribute of queue is the actual name used for the queue with no naming convention
as in JMS.
2. The address element defines what address is used for routing messages.
3. There is no entry element.
4. The filter uses the Core filter syntax (described in Chapter 14, Filter Expressions), not the JMS
selector syntax.
25.2. Using the API
Queues can also be created using the core API or the management API.
For the core API, queues can be created via the
org.hornetq.api.core.client.ClientSession interface. There are multiple createQueue
methods that support setting all of the previously mentioned attributes. There is one extra attribute
that can be set via this API which is temporary. setting this to true means that the queue will be
deleted once the session is disconnected.
Take a look at Chapter 30, Management for a description of the management API for creating
queues.
25.3. Configuring Queues Via Address Settings
There are some attributes that are defined against an address wildcard rather than a specific
queue. Here an example of an address-setting entry that would be found in the hornetq-
configuration.xml file.
<address-settings>
<address-setting match="jms.queue.exampleQueue">
<dead-letter-address>jms.queue.deadLetterQueue</dead-letter-address>
<max-delivery-attempts>3</max-delivery-attempts>
<redelivery-delay>5000</redelivery-delay>
<expiry-address>jms.queue.expiryQueue</expiry-address>
<last-value-queue>true</last-value-queue>
<max-size-bytes>100000</max-size-bytes>
<page-size-bytes>20000</page-size-bytes>
<redistribution-delay>0</redistribution-delay>
<send-to-dla-on-no-route>true</send-to-dla-on-no-route>
<address-full-policy>PAGE</address-full-policy>

Configuring Queues Via Address Settings
115
</address-setting>
</address-settings>
The idea with address settings, is you can provide a block of settings which will be applied against
any adresses that match the string in the match attribute. In the above example the settings would
only be applied to any addresses which exactly match the address jms.queue.exampleQueue, but
you can also use wildcards to apply sets of configuration against many addresses. The wildcard
syntax used is described here.
For example, if you used the match string jms.queue.# the settings would be applied to all
addresses which start with jms.queue. which would be all JMS queues.
The meaning of the specific settings are explained fully throughout the user manual, however here
is a brief description with a link to the appropriate chapter if available.
max-delivery-attempts defines how many time a cancelled message can be redelivered before
sending to the dead-letter-address. A full explanation can be found here.
redelivery-delay defines how long to wait before attempting redelivery of a cancelled message.
see here.
expiry-address defines where to send a message that has expired. see here.
expiry-delay defines the expiration time that will be used for messages which are using the
default expiration time (i.e. 0). For example, if expiry-delay is set to "10" and a message which
is using the default expiration time (i.e. 0) arrives then its expiration time of "0" will be changed to
"10." However, if a message which is using an expiration time of "20" arrives then its expiration time
will remain unchanged. Setting expiry-delay to "-1" will disable this feature. The default is "-1".
last-value-queue defines whether a queue only uses last values or not. see here.
max-size-bytes and page-size-bytes are used to set paging on an address. This is explained
here.
redistribution-delay defines how long to wait when the last consumer is closed on a queue
before redistributing any messages. see here.
send-to-dla-on-no-route. If a message is sent to an address, but the server does not route
it to any queues, for example, there might be no queues bound to that address, or none of the
queues have filters that match, then normally that message would be discarded. However if this
parameter is set to true for that address, if the message is not routed to any queues it will instead
be sent to the dead letter address (DLA) for that address, if it exists.
address-full-policy. This attribute can have one of the following values: PAGE, DROP, FAIL
or BLOCK and determines what happens when an address where max-size-bytes is specified
becomes full. The default value is PAGE. If the value is PAGE then further messages will be
paged to disk. If the value is DROP then further messages will be silently dropped. If the value is
FAIL then further messages will be dropped and an exception will be thrown on the client-side.

Chapter 25. Queue Attributes
116
If the value is BLOCK then client message producers will block when they try and send further
messages. See the following chapters for more info Chapter 19, Flow Control, Chapter 24, Paging.

Chapter 26.
117
Scheduled MessagesScheduled messages differ from normal messages in that they won't be delivered until a specified
time in the future, at the earliest.
To do this, a special property is set on the message before sending it.
26.1. Scheduled Delivery Property
The property name used to identify a scheduled message is "_HQ_SCHED_DELIVERY" (or the
constant Message.HDR_SCHEDULED_DELIVERY_TIME).
The specified value must be a positive long corresponding to the time the message must be
delivered (in milliseconds). An example of sending a scheduled message using the JMS API is
as follows.
TextMessage message = session.createTextMessage("This is a scheduled message
message which will be delivered in 5 sec.");
message.setLongProperty("_HQ_SCHED_DELIVERY", System.currentTimeMillis() +
5000);
producer.send(message);
...
// message will not be received immediately but 5 seconds later
TextMessage messageReceived = (TextMessage) consumer.receive();
Scheduled messages can also be sent using the core API, by setting the same property on the
core message before sending.
26.2. Example
See Section 11.1.51, “Scheduled Message” for an example which shows how scheduled
messages can be used with JMS.

118

Chapter 27.
119
Last-Value QueuesLast-Value queues are special queues which discard any messages when a newer message with
the same value for a well-defined Last-Value property is put in the queue. In other words, a Last-
Value queue only retains the last value.
A typical example for Last-Value queue is for stock prices, where you are only interested by the
latest value for a particular stock.
27.1. Configuring Last-Value Queues
Last-value queues are defined in the address-setting configuration:
<address-setting match="jms.queue.lastValueQueue">
<last-value-queue>true</last-value-queue>
</address-setting>
By default, last-value-queue is false. Address wildcards can be used to configure Last-Value
queues for a set of addresses (see Chapter 13, Understanding the HornetQ Wildcard Syntax).
27.2. Using Last-Value Property
The property name used to identify the last value is "_HQ_LVQ_NAME" (or the constant
Message.HDR_LAST_VALUE_NAME from the Core API).
For example, if two messages with the same value for the Last-Value property are sent to a Last-
Value queue, only the latest message will be kept in the queue:
// send 1st message with Last-Value property set to STOCK_NAME
TextMessage message = session.createTextMessage("1st message with Last-Value
property set");
message.setStringProperty("_HQ_LVQ_NAME", "STOCK_NAME");
producer.send(message);
// send 2nd message with Last-Value property set to STOCK_NAME
message = session.createTextMessage("2nd message with Last-Value property set");
message.setStringProperty("_HQ_LVQ_NAME", "STOCK_NAME");
producer.send(message);
...
// only the 2nd message will be received: it is the latest with
// the Last-Value property set

Chapter 27. Last-Value Queues
120
TextMessage messageReceived = (TextMessage)messageConsumer.receive(5000);
System.out.format("Received message: %s\n", messageReceived.getText());
27.3. Example
See Section 11.1.31, “Last-Value Queue” for an example which shows how last value queues are
configured and used with JMS.

Chapter 28.
121
Message GroupingMessage groups are sets of messages that have the following characteristics:
• Messages in a message group share the same group id, i.e. they have same group identifier
property (JMSXGroupID for JMS, _HQ_GROUP_ID for HornetQ Core API).
• Messages in a message group are always consumed by the same consumer, even if there
are many consumers on a queue. They pin all messages with the same group id to the same
consumer. If that consumer closes another consumer is chosen and will receive all messages
with the same group id.
Message groups are useful when you want all messages for a certain value of the property to be
processed serially by the same consumer.
An example might be orders for a certain stock. You may want orders for any particular stock
to be processed serially by the same consumer. To do this you can create a pool of consumers
(perhaps one for each stock, but less will work too), then set the stock name as the value of the
_HQ_GROUP_ID property.
This will ensure that all messages for a particular stock will always be processed by the same
consumer.
28.1. Using Core API
The property name used to identify the message group is "_HQ_GROUP_ID" (or the
constant MessageImpl.HDR_GROUP_ID). Alternatively, you can set autogroup to true on the
SessionFactory which will pick a random unique id.
28.2. Using JMS
The property name used to identify the message group is JMSXGroupID.
// send 2 messages in the same group to ensure the same
// consumer will receive both
Message message = ...
message.setStringProperty("JMSXGroupID", "Group-0");
producer.send(message);
message = ...
message.setStringProperty("JMSXGroupID", "Group-0");
producer.send(message);

Chapter 28. Message Grouping
122
Alternatively, you can set autogroup to true on the HornetQConnectonFactory which will pick a
random unique id. This can also be set in the hornetq-jms.xml file like this:
<connection-factory name="ConnectionFactory">
<connectors>
<connector-ref connector-name="netty-connector"/>
</connectors>
<entries>
<entry name="ConnectionFactory"/>
</entries>
<autogroup>true</autogroup>
</connection-factory>
Alternatively you can set the group id via the connection factory. All messages sent with producers
created via this connection factory will set the JMSXGroupID to the specified value on all messages
sent. To configure the group id set it on the connection factory in the hornetq-jms.xml config
file as follows
<connection-factory name="ConnectionFactory">
<connectors>
<connector-ref connector-name="netty-connector"/>
</connectors>
<entries>
<entry name="ConnectionFactory"/>
</entries>
<group-id>Group-0</group-id>
</connection-factory>
28.3. Example
See Section 11.1.35, “Message Group” for an example which shows how message groups are
configured and used with JMS.
28.4. Example
See Section 11.1.36, “Message Group” for an example which shows how message groups are
configured via a connection factory.
28.5. Clustered Grouping
Using message groups in a cluster is a bit more complex. This is because messages with a
particular group id can arrive on any node so each node needs to know about which group id's

Clustered Grouping
123
are bound to which consumer on which node. The consumer handling messages for a particular
group id may be on a different node of the cluster, so each node needs to know this information
so it can route the message correctly to the node which has that consumer.
To solve this there is the notion of a grouping handler. Each node will have its own grouping
handler and when a messages is sent with a group id assigned, the handlers will decide between
them which route the message should take.
There are 2 types of handlers; Local and Remote. Each cluster should choose 1 node to have a
local grouping handler and all the other nodes should have remote handlers- it's the local handler
that actually makes the decsion as to what route should be used, all the other remote handlers
converse with this. Here is a sample config for both types of handler, this should be configured
in the hornetq-configuration.xml file.
<grouping-handler name="my-grouping-handler">
<type>LOCAL</type>
<address>jms</address>
<timeout>5000</timeout>
</grouping-handler>
<grouping-handler name="my-grouping-handler">
<type>REMOTE</type>
<address>jms</address>
<timeout>5000</timeout>
</grouping-handler>
The address attribute refers to a cluster connection and the address it uses, refer to the clustering
section on how to configure clusters. The timeout attribute referes to how long to wait for a decision
to be made, an exception will be thrown during the send if this timeout is reached, this ensures
that strict ordering is kept.
The decision as to where a message should be routed to is initially proposed by the node that
receives the message. The node will pick a suitable route as per the normal clustered routing
conditions, i.e. round robin available queues, use a local queue first and choose a queue that has
a consumer. If the proposal is accepted by the grouping handlers the node will route messages to
this queue from that point on, if rejected an alternative route will be offered and the node will again
route to that queue indefinitely. All other nodes will also route to the queue chosen at proposal
time. Once the message arrives at the queue then normal single server message group semantics
take over and the message is pinned to a consumer on that queue.
You may have noticed that there is a single point of failure with the single local handler. If this node
crashes then no decisions will be able to be made. Any messages sent will be not be delivered
and an exception thrown. To avoid this happening Local Handlers can be replicated on another
backup node. Simple create your back up node and configure it with the same Local handler.

Chapter 28. Message Grouping
124
28.5.1. Clustered Grouping Best Practices
Some best practices should be followed when using clustered grouping:
1. Make sure your consumers are distributed evenly across the different nodes if possible. This is
only an issue if you are creating and closing consumers regularly. Since messages are always
routed to the same queue once pinned, removing a consumer from this queue may leave it
with no consumers meaning the queue will just keep receiving the messages. Avoid closing
consumers or make sure that you always have plenty of consumers, i.e., if you have 3 nodes
have 3 consumers.
2. Use durable queues if possible. If queues are removed once a group is bound to it, then it is
possible that other nodes may still try to route messages to it. This can be avoided by making
sure that the queue is deleted by the session that is sending the messages. This means that
when the next message is sent it is sent to the node where the queue was deleted meaning
a new proposal can succesfully take place. Alternatively you could just start using a different
group id.
3. Always make sure that the node that has the Local Grouping Handler is replicated. These
means that on failover grouping will still occur.
28.5.2. Clustered Grouping Example
See Section 11.1.8, “Clustered Grouping” for an example of how to configure message groups
with a HornetQ cluster

Chapter 29.
125
Extra Acknowledge ModesJMS specifies 3 acknowledgement modes:
• AUTO_ACKNOWLEDGE
• CLIENT_ACKNOWLEDGE
• DUPS_OK_ACKNOWLEDGE
HornetQ supports two additional modes: PRE_ACKNOWLEDGE and INDIVIDUAL_ACKNOWLEDGE
In some cases you can afford to lose messages in event of failure, so it would make sense to
acknowledge the message on the server before delivering it to the client.
This extra mode is supported by HornetQ and will call it pre-acknowledge mode.
The disadvantage of acknowledging on the server before delivery is that the message will be lost
if the system crashes after acknowledging the message on the server but before it is delivered to
the client. In that case, the message is lost and will not be recovered when the system restart.
Depending on your messaging case, pre-acknowledgement mode can avoid extra network traffic
and CPU at the cost of coping with message loss.
An example of a use case for pre-acknowledgement is for stock price update messages. With
these messages it might be reasonable to lose a message in event of crash, since the next price
update message will arrive soon, overriding the previous price.
Note
Please note, that if you use pre-acknowledge mode, then you will lose
transactional semantics for messages being consumed, since clearly they are
being acknowledged first on the server, not when you commit the transaction.
This may be stating the obvious but we like to be clear on these things to avoid
confusion!
29.1. Using PRE_ACKNOWLEDGE
This can be configured in the hornetq-jms.xml file on the connection factory like this:
<connection-factory name="ConnectionFactory">
<connectors>
<connector-ref connector-name="netty-connector"/>
</connectors>

Chapter 29. Extra Acknowledge...
126
<entries>
<entry name="ConnectionFactory"/>
</entries>
<pre-acknowledge>true</pre-acknowledge>
</connection-factory>
Alternatively, to use pre-acknowledgement mode using the JMS API, create a JMS Session with
the HornetQSession.PRE_ACKNOWLEDGE constant.
// messages will be acknowledge on the server *before* being delivered to the
client
Session session = connection.createSession(false,
HornetQJMSConstants.PRE_ACKNOWLEDGE);
Or you can set pre-acknowledge directly on the HornetQConnectionFactory instance using the
setter method.
To use pre-acknowledgement mode using the core API you can set it directly on the
ClientSessionFactory instance using the setter method.
29.2. Individual Acknowledge
A valid usecase for individual acknowledgement would be when you need to have your own
scheduling and you don't know when your message processing will be finished. You should prefer
having one consumer per thread worker but this is not possible in some circunstances depending
on how complex is your processing. For that you can use the individual Acknowledgement.
You basically setup Individual ACK by creating a session with the acknowledge mode with
HornetQJMSConstants.INDIVIDUAL_ACKNOWLEDGE. Individual ACK inherits all the semantics
from Client Acknowledge, with the exception the message is individually acked.
Note
Please note, that to avoid confusion on MDB processing, Individual
ACKNOWLEDGE is not supported through MDBs (or the inbound resource
adapter). this is because you have to finish the process of your message inside
the MDB.
29.3. Example
See Section 11.1.43, “Pre-Acknowledge” for an example which shows how to use pre-
acknowledgement mode with JMS.

Chapter 30.
127
ManagementHornetQ has an extensive management API that allows a user to modify a server configuration,
create new resources (e.g. JMS queues and topics), inspect these resources (e.g. how many
messages are currently held in a queue) and interact with it (e.g. to remove messages from a
queue). All the operations allows a client to manage HornetQ. It also allows clients to subscribe
to management notifications.
There are 3 ways to manage HornetQ:
• Using JMX -- JMX is the standard way to manage Java applications
• Using the core API -- management operations are sent to HornetQ server using core messages
• Using the JMS API -- management operations are sent to HornetQ server using JMS messages
Although there are 3 different ways to manage HornetQ each API supports the same functionality.
If it is possible to manage a resource using JMX it is also possible to achieve the same result
using Core messages or JMS messages.
This choice depends on your requirements, your application settings and your environment to
decide which way suits you best.
30.1. The Management API
Regardless of the way you invoke management operations, the management API is the same.
For each managed resource, there exists a Java interface describing what can be invoked for
this type of resource.
HornetQ exposes its managed resources in 2 packages:
• Core resources are located in the org.hornetq.api.core.management package
• JMS resources are located in the org.hornetq.api.jms.management package
The way to invoke a management operations depends whether JMX, core messages, or JMS
messages are used.
Note
A few management operations requires a filter parameter to chose which
messages are involved by the operation. Passing null or an empty string means
that the management operation will be performed on all messages.

Chapter 30. Management
128
30.1.1. Core Management API
HornetQ defines a core management API to manage core resources. For full details of the API
please consult the javadoc. In summary:
30.1.1.1. Core Server Management
• Listing, creating, deploying and destroying queues
A list of deployed core queues can be retrieved using the getQueueNames() method.
Core queues can be created or destroyed using the management operations createQueue()
or deployQueue() or destroyQueue())on the HornetQServerControl (with the ObjectName
org.hornetq:module=Core,type=Server or the resource name core.server)
createQueue will fail if the queue already exists while deployQueue will do nothing.
• Pausing and resuming Queues
The QueueControl can pause and resume the underlying queue. When a queue is paused,
it will receive messages but will not deliver them. When it's resumed, it'll begin delivering the
queued messages, if any.
• Listing and closing remote connections
Client's remote addresses can be retrieved using listRemoteAddresses(). It is also
possible to close the connections associated with a remote address using the
closeConnectionsForAddress() method.
Alternatively, connection IDs can be listed using listConnectionIDs() and all the sessions
for a given connection ID can be listed using listSessions().
• Transaction heuristic operations
In case of a server crash, when the server restarts, it it possible that some
transaction requires manual intervention. The listPreparedTransactions() method lists
the transactions which are in the prepared states (the transactions are represented
as opaque Base64 Strings.) To commit or rollback a given prepared transaction, the
commitPreparedTransaction() or rollbackPreparedTransaction() method can be used
to resolve heuristic transactions. Heuristically completed transactions can be listed using the
listHeuristicCommittedTransactions() and listHeuristicRolledBackTransactions
methods.
• Enabling and resetting Message counters
Message counters can be enabled or disabled using the enableMessageCounters() or
disableMessageCounters() method. To reset message counters, it is possible to invoke
resetAllMessageCounters() and resetAllMessageCounterHistories() methods.

Core Management API
129
• Retrieving the server configuration and attributes
The HornetQServerControl exposes HornetQ server configuration through all its attributes
(e.g. getVersion() method to retrieve the server's version, etc.)
• Listing, creating and destroying Core bridges and diverts
A list of deployed core bridges (resp. diverts) can be retrieved using the getBridgeNames()
(resp. getDivertNames()) method.
Core bridges (resp. diverts) can be created or destroyed using the management operations
createBridge() and destroyBridge() (resp. createDivert() and destroyDivert()) on
the HornetQServerControl (with the ObjectName org.hornetq:module=Core,type=Server
or the resource name core.server).
• It is possible to stop the server and force failover to occur with any currently attached clients.
to do this use the forceFailover() on the HornetQServerControl (with the ObjectName
org.hornetq:module=Core,type=Server or the resource name core.server)
NoteSince this method actually stops the server you will probably receive some sort
of error depending on which management service you use to call it.
30.1.1.2. Core Address Management
Core addresses can be managed using the AddressControl class (with the ObjectName
org.hornetq:module=Core,type=Address,name="<the address name>" or the resource
name core.address.<the address name>).
• Modifying roles and permissions for an address
You can add or remove roles associated to a queue using the addRole() or removeRole()
methods. You can list all the roles associated to the queue with the getRoles() method
30.1.1.3. Core Queue Management
The bulk of the core management API deals with core queues. The QueueControl
class defines the Core queue management operations (with the ObjectName
org.hornetq:module=Core,type=Queue,address="<the bound address>",name="<the
queue name>" or the resource name core.queue.<the queue name>).
Most of the management operations on queues take either a single message ID (e.g. to remove
a single message) or a filter (e.g. to expire all messages with a given property.)
• Expiring, sending to a dead letter address and moving messages

Chapter 30. Management
130
Messages can be expired from a queue by using the expireMessages() method. If an expiry
address is defined, messages will be sent to it, otherwise they are discarded. The queue's expiry
address can be set with the setExpiryAddress() method.
Messages can also be sent to a dead letter address with the
sendMessagesToDeadLetterAddress() method. It returns the number of messages which
are sent to the dead letter address. If a dead letter address is not defined, message are
removed from the queue and discarded. The queue's dead letter address can be set with the
setDeadLetterAddress() method.
Messages can also be moved from a queue to another queue by using the moveMessages()
method.
• Listing and removing messages
Messages can be listed from a queue by using the listMessages() method which returns an
array of Map, one Map for each message.
Messages can also be removed from the queue by using the removeMessages() method which
returns a boolean for the single message ID variant or the number of removed messages for the
filter variant. The removeMessages() method takes a filter argument to remove only filtered
messages. Setting the filter to an empty string will in effect remove all messages.
• Counting messages
The number of messages in a queue is returned by the getMessageCount() method.
Alternatively, the countMessages() will return the number of messages in the queue which
match a given filter
• Changing message priority
The message priority can be changed by using the changeMessagesPriority() method which
returns a boolean for the single message ID variant or the number of updated messages for
the filter variant.
• Message counters
Message counters can be listed for a queue with the listMessageCounter() and
listMessageCounterHistory() methods (see Section 30.6, “Message Counters”). The
message counters can also be reset for a single queue using the resetMessageCounter()
method.
• Retrieving the queue attributes
The QueueControl exposes Core queue settings through its attributes (e.g. getFilter() to
retrieve the queue's filter if it was created with one, isDurable() to know whether the queue
is durable or not, etc.)
• Pausing and resuming Queues

Core Management API
131
The QueueControl can pause and resume the underlying queue. When a queue is paused,
it will receive messages but will not deliver them. When it's resume, it'll begin delivering the
queued messages, if any.
30.1.1.4. Other Core Resources Management
HornetQ allows to start and stop its remote resources (acceptors, diverts, bridges, etc.) so that
a server can be taken off line for a given period of time without stopping it completely (e.g. if
other management operations must be performed such as resolving heuristic transactions). These
resources are:
• Acceptors
They can be started or stopped using the start() or. stop() method on the AcceptorControl
class (with the ObjectName org.hornetq:module=Core,type=Acceptor,name="<the
acceptor name>" or the resource name core.acceptor.<the address name>). The acceptors
parameters can be retrieved using the AcceptorControl attributes (see Section 16.1,
“Understanding Acceptors”)
• Diverts
They can be started or stopped using the start() or stop() method on the DivertControl
class (with the ObjectName org.hornetq:module=Core,type=Divert,name=<the divert
name> or the resource name core.divert.<the divert name>). Diverts parameters can be
retrieved using the DivertControl attributes (see Chapter 35, Diverting and Splitting Message
Flows)
• Bridges
They can be started or stopped using the start() (resp.
stop()) method on the BridgeControl class (with the ObjectName
org.hornetq:module=Core,type=Bridge,name="<the bridge name>" or the resource
name core.bridge.<the bridge name>). Bridges parameters can be retrieved using the
BridgeControl attributes (see Chapter 36, Core Bridges)
• Broadcast groups
They can be started or stopped using the start() or stop()
method on the BroadcastGroupControl class (with the ObjectName
org.hornetq:module=Core,type=BroadcastGroup,name="<the broadcast group name>"
or the resource name core.broadcastgroup.<the broadcast group name>). Broadcast
groups parameters can be retrieved using the BroadcastGroupControl attributes (see
Chapter 38, Clusters)
• Discovery groups
They can be started or stopped using the start() or stop()
method on the DiscoveryGroupControl class (with the ObjectName

Chapter 30. Management
132
org.hornetq:module=Core,type=DiscoveryGroup,name="<the discovery group name>"
or the resource name core.discovery.<the discovery group name>). Discovery groups
parameters can be retrieved using the DiscoveryGroupControl attributes (see Chapter 38,
Clusters)
• Cluster connections
They can be started or stopped using the start() or stop()
method on the ClusterConnectionControl class (with the ObjectName
org.hornetq:module=Core,type=ClusterConnection,name="<the cluster connection
name>" or the resource name core.clusterconnection.<the cluster connection name>).
Cluster connections parameters can be retrieved using the ClusterConnectionControl
attributes (see Chapter 38, Clusters)
30.1.2. JMS Management API
HornetQ defines a JMS Management API to manage JMS administrated objects (i.e. JMS queues,
topics and connection factories).
30.1.2.1. JMS Server Management
JMS Resources (connection factories and destinations) can be created using the
JMSServerControl class (with the ObjectName org.hornetq:module=JMS,type=Server or the
resource name jms.server).
• Listing, creating, destroying connection factories
Names of the deployed connection factories can be retrieved by the
getConnectionFactoryNames() method.
JMS connection factories can be created or destroyed using the createConnectionFactory()
methods or destroyConnectionFactory() methods. These connection factories are bound
to JNDI so that JMS clients can look them up. If a graphical console is used to create the
connection factories, the transport parameters are specified in the text field input as a comma-
separated list of key=value (e.g. key1=10, key2="value", key3=false). If there are multiple
transports defined, you need to enclose the key/value pairs between curly braces. For example
{key=10}, {key=20}. In that case, the first key will be associated to the first transport
configuration and the second key will be associated to the second transport configuration (see
Chapter 16, Configuring the Transport for a list of the transport parameters)
• Listing, creating, destroying queues
Names of the deployed JMS queues can be retrieved by the getQueueNames() method.
JMS queues can be created or destroyed using the createQueue() methods or
destroyQueue() methods. These queues are bound to JNDI so that JMS clients can look them
up

JMS Management API
133
• Listing, creating/destroying topics
Names of the deployed topics can be retrieved by the getTopicNames() method.
JMS topics can be created or destroyed using the createTopic() or destroyTopic()
methods. These topics are bound to JNDI so that JMS clients can look them up
• Listing and closing remote connections
JMS Clients remote addresses can be retrieved using listRemoteAddresses(). It is
also possible to close the connections associated with a remote address using the
closeConnectionsForAddress() method.
Alternatively, connection IDs can be listed using listConnectionIDs() and all the sessions
for a given connection ID can be listed using listSessions().
30.1.2.2. JMS ConnectionFactory Management
JMS Connection Factories can be managed using the ConnectionFactoryControl
class (with the ObjectName org.hornetq:module=JMS,type=ConnectionFactory,name="<the
connection factory name>" or the resource name jms.connectionfactory.<the
connection factory name>).
• Retrieving connection factory attributes
The ConnectionFactoryControl exposes JMS ConnectionFactory configuration through its
attributes (e.g. getConsumerWindowSize() to retrieve the consumer window size for flow
control, isBlockOnNonDurableSend() to know whether the producers created from the
connection factory will block or not when sending non-durable messages, etc.)
30.1.2.3. JMS Queue Management
JMS queues can be managed using the JMSQueueControl class (with the ObjectName
org.hornetq:module=JMS,type=Queue,name="<the queue name>" or the resource name
jms.queue.<the queue name>).
The management operations on a JMS queue are very similar to the operations on a core queue.
• Expiring, sending to a dead letter address and moving messages
Messages can be expired from a queue by using the expireMessages() method. If an expiry
address is defined, messages will be sent to it, otherwise they are discarded. The queue's expiry
address can be set with the setExpiryAddress() method.
Messages can also be sent to a dead letter address with the
sendMessagesToDeadLetterAddress() method. It returns the number of messages which
are sent to the dead letter address. If a dead letter address is not defined, message are

Chapter 30. Management
134
removed from the queue and discarded. The queue's dead letter address can be set with the
setDeadLetterAddress() method.
Messages can also be moved from a queue to another queue by using the moveMessages()
method.
• Listing and removing messages
Messages can be listed from a queue by using the listMessages() method which returns an
array of Map, one Map for each message.
Messages can also be removed from the queue by using the removeMessages() method which
returns a boolean for the single message ID variant or the number of removed messages for the
filter variant. The removeMessages() method takes a filter argument to remove only filtered
messages. Setting the filter to an empty string will in effect remove all messages.
• Counting messages
The number of messages in a queue is returned by the getMessageCount() method.
Alternatively, the countMessages() will return the number of messages in the queue which
match a given filter
• Changing message priority
The message priority can be changed by using the changeMessagesPriority() method which
returns a boolean for the single message ID variant or the number of updated messages for
the filter variant.
• Message counters
Message counters can be listed for a queue with the listMessageCounter() and
listMessageCounterHistory() methods (see Section 30.6, “Message Counters”)
• Retrieving the queue attributes
The JMSQueueControl exposes JMS queue settings through its attributes (e.g. isTemporary()
to know whether the queue is temporary or not, isDurable() to know whether the queue is
durable or not, etc.)
• Pausing and resuming queues
The JMSQueueControl can pause and resume the underlying queue. When the queue is paused
it will continue to receive messages but will not deliver them. When resumed again it will deliver
the enqueued messages, if any.
30.1.2.4. JMS Topic Management
JMS Topics can be managed using the TopicControl class (with the ObjectName
org.hornetq:module=JMS,type=Topic,name="<the topic name>" or the resource name
jms.topic.<the topic name>).

Using Management Via JMX
135
• Listing subscriptions and messages
JMS topics subscriptions can be listed using the listAllSubscriptions(),
listDurableSubscriptions(), listNonDurableSubscriptions() methods. These methods
return arrays of Object representing the subscriptions information (subscription name, client
ID, durability, message count, etc.). It is also possible to list the JMS messages for a given
subscription with the listMessagesForSubscription() method.
• Dropping subscriptions
Durable subscriptions can be dropped from the topic using the dropDurableSubscription()
method.
• Counting subscriptions messages
The countMessagesForSubscription() method can be used to know the number of
messages held for a given subscription (with an optional message selector to know the number
of messages matching the selector)
30.2. Using Management Via JMX
HornetQ can be managed using JMX [http://java.sun.com/javase/technologies/core/mntr-mgmt/
javamanagement/].
The management API is exposed by HornetQ using MBeans interfaces. HornetQ registers its
resources with the domain org.hornetq.
For example, the ObjectName to manage a JMS Queue exampleQueue is:
org.hornetq:module=JMS,type=Queue,name="exampleQueue"
and the MBean is:
org.hornetq.api.jms.management.JMSQueueControl
The MBean's ObjectName are built using the helper class
org.hornetq.api.core.management.ObjectNameBuilder. You can also use jconsole to find
the ObjectName of the MBeans you want to manage.
Managing HornetQ using JMX is identical to management of any Java Applications using JMX. It
can be done by reflection or by creating proxies of the MBeans.

Chapter 30. Management
136
30.2.1. Configuring JMX
By default, JMX is enabled to manage HornetQ. It can be disabled by setting jmx-management-
enabled to false in hornetq-configuration.xml:
<!-- false to disable JMX management for HornetQ -->
<jmx-management-enabled>false</jmx-management-enabled>
If JMX is enabled, HornetQ can be managed locally using jconsole.
Note
Remote connections to JMX are not enabled by default for security reasons. Please
refer to Java Management guide [http://java.sun.com/j2se/1.5.0/docs/guide/
management/agent.html#remote] to configure the server for remote management
(system properties must be set in run.sh or run.bat scripts).
By default, HornetQ server uses the JMX domain "org.hornetq". To manage several HornetQ
servers from the same MBeanServer, the JMX domain can be configured for each individual
HornetQ server by setting jmx-domain in hornetq-configuration.xml:
<!-- use a specific JMX domain for HornetQ MBeans -->
<jmx-domain>my.org.hornetq</jmx-domain>
30.2.1.1. MBeanServer configuration
When HornetQ is run in standalone, it uses the Java Virtual Machine's Platform MBeanServer
to register its MBeans. This is configured in JBoss Microcontainer Beans file (see Section 6.7,
“JBoss Microcontainer Beans File”):
<!-- MBeanServer -->
<bean name="MBeanServer" class="javax.management.MBeanServer">
<constructor factoryClass="java.lang.management.ManagementFactory"
factoryMethod="getPlatformMBeanServer" />
</bean>
When it is integrated in JBoss AS 5+, it uses the Application Server's own MBean Server so that
it can be managed using AS 5's jmx-console:

Example
137
<!-- MBeanServer -->
<bean name="MBeanServer" class="javax.management.MBeanServer">
<constructor factoryClass="org.jboss.mx.util.MBeanServerLocator"
factoryMethod="locateJBoss" />
</bean>
30.2.2. Example
See Section 11.1.29, “JMX Management” for an example which shows how to use a remote
connection to JMX and MBean proxies to manage HornetQ.
30.3. Using Management Via Core API
The core management API in HornetQ is called by sending Core messages to a special address,
the management address.
Management messages are regular Core messages with well-known properties that the server
needs to understand to interact with the management API:
• The name of the managed resource
• The name of the management operation
• The parameters of the management operation
When such a management message is sent to the management address, HornetQ server
will handle it, extract the information, invoke the operation on the managed resources and
send a management reply to the management message's reply-to address (specified by
ClientMessageImpl.REPLYTO_HEADER_NAME).
A ClientConsumer can be used to consume the management reply and retrieve the
result of the operation (if any) stored in the reply's body. For portability, results
are returned as a JSON [http://json.org] String rather than Java Serialization (the
org.hornetq.api.core.management.ManagementHelper can be used to convert the JSON
string to Java objects).
These steps can be simplified to make it easier to invoke management operations using Core
messages:
1. Create a ClientRequestor to send messages to the management address and receive replies
2. Create a ClientMessage
3. Use the helper class org.hornetq.api.core.management.ManagementHelper to fill the
message with the management properties

Chapter 30. Management
138
4. Send the message using the ClientRequestor
5. Use the helper class org.hornetq.api.core.management.ManagementHelper to retrieve the
operation result from the management reply
For example, to find out the number of messages in the core queue exampleQueue:
ClientSession session = ...
ClientRequestor requestor = new ClientRequestor(session,
"jms.queue.hornetq.management");
ClientMessage message = session.createMessage(false);
ManagementHelper.putAttribute(message, "core.queue.exampleQueue",
"messageCount");
session.start();
ClientMessage reply = requestor.request(m);
int count = (Integer) ManagementHelper.getResult(reply);
System.out.println("There are " + count + " messages in exampleQueue");
Management operation name and parameters must conform to the Java interfaces defined in the
management packages.
Names of the resources are built using the helper
class org.hornetq.api.core.management.ResourceNames and are straightforward
(core.queue.exampleQueue for the Core Queue exampleQueue, jms.topic.exampleTopic for
the JMS Topic exampleTopic, etc.).
30.3.1. Configuring Core Management
The management address to send management messages is configured in hornetq-
configuration.xml:
<management-address>jms.queue.hornetq.management</management-address>
By default, the address is jms.queue.hornetq.management (it is prepended by "jms.queue" so
that JMS clients can also send management messages).
The management address requires a special user permission manage to be able to receive and
handle management messages. This is also configured in hornetq-configuration.xml:
<!-- users with the admin role will be allowed to manage -->
<!-- HornetQ using management messages -->

Using Management Via JMS
139
<security-setting match="jms.queue.hornetq.management">
<permission type="manage" roles="admin" />
</security-setting>
30.4. Using Management Via JMS
Using JMS messages to manage HornetQ is very similar to using core API.
An important difference is that JMS requires a JMS queue to send the messages to (instead of
an address for the core API).
The management queue is a special queue and needs to be instantiated directly by the client:
Queue managementQueue = HornetQJMSClient.createQueue("hornetq.management");
All the other steps are the same than for the Core API but they use JMS API instead:
1. create a QueueRequestor to send messages to the management address and receive replies
2. create a Message
3. use the helper class org.hornetq.api.jms.management.JMSManagementHelper to fill the
message with the management properties
4. send the message using the QueueRequestor
5. use the helper class org.hornetq.api.jms.management.JMSManagementHelper to retrieve
the operation result from the management reply
For example, to know the number of messages in the JMS queue exampleQueue:
Queue managementQueue = HornetQJMSClient.createQueue("hornetq.management");
QueueSession session = ...
QueueRequestor requestor = new QueueRequestor(session, managementQueue);
connection.start();
Message message = session.createMessage();
JMSManagementHelper.putAttribute(message, "jms.queue.exampleQueue",
"messageCount");
Message reply = requestor.request(message);
int count = (Integer)JMSManagementHelper.getResult(reply);
System.out.println("There are " + count + " messages in exampleQueue");

Chapter 30. Management
140
30.4.1. Configuring JMS Management
Whether JMS or the core API is used for management, the configuration steps are the same (see
Section 30.3.1, “Configuring Core Management”).
30.4.2. Example
See Section 11.1.32, “Management” for an example which shows how to use JMS messages to
manage HornetQ server.
30.5. Management Notifications
HornetQ emits notifications to inform listeners of potentially interesting events (creation of new
resources, security violation, etc.).
These notifications can be received by 3 different ways:
• JMX notifications
• Core messages
• JMS messages
30.5.1. JMX Notifications
If JMX is enabled (see Section 30.2.1, “Configuring JMX”), JMX notifications can be received by
subscribing to 2 MBeans:
• org.hornetq:module=Core,type=Server for notifications on Core resources
• org.hornetq:module=JMS,type=Server for notifications on JMS resources
30.5.2. Core Messages Notifications
HornetQ defines a special management notification address. Core queues can be bound to this
address so that clients will receive management notifications as Core messages
A Core client which wants to receive management notifications must create a core queue bound
to the management notification address. It can then receive the notifications from its queue.
Notifications messages are regular core messages with additional properties corresponding to the
notification (its type, when it occurred, the resources which were concerned, etc.).
Since notifications are regular core messages, it is possible to use message selectors to filter out
notifications and receives only a subset of all the notifications emitted by the server.
30.5.2.1. Configuring The Core Management Notification Address
The management notification address to receive management notifications is configured in
hornetq-configuration.xml:

JMS Messages Notifications
141
<management-notification-address>hornetq.notifications</management-
notification-address>
By default, the address is hornetq.notifications.
30.5.3. JMS Messages Notifications
HornetQ's notifications can also be received using JMS messages.
It is similar to receiving notifications using Core API but an important difference is that JMS requires
a JMS Destination to receive the messages (preferably a Topic).
To use a JMS Destination to receive management notifications, you must change the server's
management notification address to start with jms.queue if it is a JMS Queue or jms.topic if
it is a JMS Topic:
<!-- notifications will be consumed from "notificationsTopic" JMS Topic -->
<management-notification-address>jms.topic.notificationsTopic</management-
notification-address>
Once the notification topic is created, you can receive messages from it or set a MessageListener:
Topic notificationsTopic = HornetQJMSClient.createTopic("notificationsTopic");
Session session = ...
MessageConsumer notificationConsumer =
session.createConsumer(notificationsTopic);
notificationConsumer.setMessageListener(new MessageListener()
{
public void onMessage(Message notif)
{
System.out.println("------------------------");
System.out.println("Received notification:");
try
{
Enumeration propertyNames = notif.getPropertyNames();
while (propertyNames.hasMoreElements())
{
String propertyName = (String)propertyNames.nextElement();
System.out.format(" %s: %s\n", propertyName,
notif.getObjectProperty(propertyName));
}

Chapter 30. Management
142
}
catch (JMSException e)
{
}
System.out.println("------------------------");
}
});
30.5.4. Example
See Section 11.1.33, “Management Notification” for an example which shows how to use a JMS
MessageListener to receive management notifications from HornetQ server.
30.6. Message Counters
Message counters can be used to obtain information on queues over time as HornetQ keeps a
history on queue metrics.
They can be used to show trends on queues. For example, using the management API, it would be
possible to query the number of messages in a queue at regular interval. However, this would not
be enough to know if the queue is used: the number of messages can remain constant because
nobody is sending or receiving messages from the queue or because there are as many messages
sent to the queue than messages consumed from it. The number of messages in the queue
remains the same in both cases but its use is widely different.
Message counters gives additional information about the queues:
• count
The total number of messages added to the queue since the server was started
• countDelta
the number of messages added to the queue since the last message counter update
• depth
The current number of messages in the queue
• depthDelta
The overall number of messages added/removed from the queue since the last message
counter update. For example, if depthDelta is equal to -10 this means that overall 10 messages
have been removed from the queue (e.g. 2 messages were added and 12 were removed)
• lastAddTimestamp
The timestamp of the last time a message was added to the queue

Configuring Message Counters
143
• udpateTimestamp
The timestamp of the last message counter update
30.6.1. Configuring Message Counters
By default, message counters are disabled as it might have a small negative effect on memory.
To enable message counters, you can set it to true in hornetq-configuration.xml:
<message-counter-enabled>true</message-counter-enabled>
Message counters keeps a history of the queue metrics (10 days by default) and samples all the
queues at regular interval (10 seconds by default). If message counters are enabled, these values
should be configured to suit your messaging use case in hornetq-configuration.xml:
<!-- keep history for a week -->
<message-counter-max-day-history>7</message-counter-max-day-history>
<!-- sample the queues every minute (60000ms) -->
<message-counter-sample-period>60000</message-counter-sample-period>
Message counters can be retrieved using the Management API. For example, to retrieve message
counters on a JMS Queue using JMX:
// retrieve a connection to HornetQ's MBeanServer
MBeanServerConnection mbsc = ...
JMSQueueControlMBean queueControl =
(JMSQueueControl)MBeanServerInvocationHandler.newProxyInstance(mbsc,
on,
JMSQueueControl.class,
false);
// message counters are retrieved as a JSON String
String counters = queueControl.listMessageCounter();
// use the MessageCounterInfo helper class to manipulate message counters more
easily
MessageCounterInfo messageCounter = MessageCounterInfo.fromJSON(counters);
System.out.format("%s message(s) in the queue (since last sample: %s)\n",
messageCounter.getDepth(),
messageCounter.getDepthDelta());

Chapter 30. Management
144
30.6.2. Example
See Section 11.1.34, “Message Counter” for an example which shows how to use message
counters to retrieve information on a JMS Queue.
30.7. Administering HornetQ Resources Using The
JBoss AS Admin Console
Its possible to create and configure HornetQ resources via the admin console within the JBoss
Application Server.
The Admin Console will allow you to create destinations (JMS Topics and Queues) and JMS
Connection Factories.
Once logged in to the admin console you will see a JMS Manager item in the left hand tree.
All HornetQ resources will be configured via this. This will have a child items for JMS Queues,
Topics and Connection Factories, clicking on each node will reveal which resources are currently
available. The following sections explain how to create and configure each resource in turn.
30.7.1. JMS Queues
To create a new JMS Queue click on the JMS Queues item to reveal the available queues. On
the right hand panel you will see an add a new resource button, click on this and then choose
the default(JMS Queue) template and click continue. The important things to fill in here are the
name of the queue and the JNDI name of the queue. The JNDI name is what you will use to
look up the queue in JNDI from your client. For most queues this will be the only info you will
need to provide as sensible defaults are provided for the others. You will also see a security roles
section near the bottom. If you do not provide any roles for this queue then the servers default
security configuration will be used, after you have created the queue these will be shown in the
configuration. All configuration values, except the name and JNDI name, can be changed via the
configuration tab after clicking on the queue in the admin console. The following section explains
these in more detail
After highlighting the configuration you will see the following screen

JMS Topics
145
The name and JNDI name cant be changed, if you want to change these recreate the queue with
the appropriate settings. The rest of the configuration options, apart from security roles, relate
to address settings for a particular address. The default address settings are picked up from the
servers configuration, if you change any of these settings or create a queue via the console a new
Address Settings enrty will be added. For a full explanation on Address Settings see Section 25.3,
“Configuring Queues Via Address Settings”
To delete a queue simply click on the delete button beside the queue name in the main JMS
Queues screen. This will also delete any address settings or security settings previously created
for the queues address
The last part of the configuration options are security roles. If non are provided on creation then the
servers default security settings will be shown. If these are changed or updated then new securty
settings are created for the address of this queue. For more information on securuty setting see
Chapter 31, Security
It is also possible via the metrics tab to view statistics for this queue. This will show statistics such
as message count, consumer count etc.
Operations can be performed on a queue via the control tab. This will allow you to start and stop
the queue, list,move,expire and delete messages from the queue and other useful operations. To
invoke an operation click on the button for the operation you want, this will take you to a screen
where you can parameters for the opertion can be set. Once set clicking the ok button will invoke
the operation, results appear at the bottom of the screen.
30.7.2. JMS Topics
Creating and configuring JMS Topics is almost identical to creating queues. The only difference
is that the configuration will be applied to the queue representing a subscription.

Chapter 30. Management
146
30.7.3. JMS Connection Factories
The format for creating connection factories is the same as for JMS Queues and topics apart
from the configuration being different. For as list of all the connection factory settings see the
configuration index

Chapter 31.
147
SecurityThis chapter describes how security works with HornetQ and how you can configure it. To
disable security completely simply set the security-enabled property to false in the hornetq-
configuration.xml file.
For performance reasons security is cached and invalidated every so long. To change this period
set the property security-invalidation-interval, which is in milliseconds. The default is
10000 ms.
31.1. Role based security for addresses
HornetQ contains a flexible role-based security model for applying security to queues, based on
their addresses.
As explained in Chapter 8, Using Core, HornetQ core consists mainly of sets of queues bound to
addresses. A message is sent to an address and the server looks up the set of queues that are
bound to that address, the server then routes the message to those set of queues.
HornetQ allows sets of permissions to be defined against the queues based on their address. An
exact match on the address can be used or a wildcard match can be used using the wildcard
characters '#' and '*'.
Seven different permissions can be given to the set of queues which match the address. Those
permissions are:
• createDurableQueue. This permission allows the user to create a durable queue under
matching addresses.
• deleteDurableQueue. This permission allows the user to delete a durable queue under
matching addresses.
• createNonDurableQueue. This permission allows the user to create a non-durable queue under
matching addresses.
• deleteNonDurableQueue. This permission allows the user to delete a non-durable queue under
matching addresses.
• send. This permission allows the user to send a message to matching addresses.
• consume. This permission allows the user to consume a message from a queue bound to
matching addresses.
• manage. This permission allows the user to invoke management operations by sending
management messages to the management address.
For each permission, a list of roles who are granted that permission is specified. If the user has
any of those roles, he/she will be granted that permission for that set of addresses.

Chapter 31. Security
148
Let's take a simple example, here's a security block from hornetq-configuration.xml or
hornetq-queues.xml file:
<security-setting match="globalqueues.europe.#">
<permission type="createDurableQueue" roles="admin"/>
<permission type="deleteDurableQueue" roles="admin"/>
<permission type="createNonDurableQueue" roles="admin, guest, europe-users"/>
<permission type="deleteNonDurableQueue" roles="admin, guest, europe-users"/>
<permission type="send" roles="admin, europe-users"/>
<permission type="consume" roles="admin, europe-users"/>
</security-setting>
The '#' character signifies "any sequence of words". Words are delimited by the '.' character.
For a full description of the wildcard syntax please see Chapter 13, Understanding the HornetQ
Wildcard Syntax. The above security block applies to any address that starts with the string
"globalqueues.europe.":
Only users who have the admin role can create or delete durable queues bound to an address
that starts with the string "globalqueues.europe."
Any users with the roles admin, guest, or europe-users can create or delete temporary queues
bound to an address that starts with the string "globalqueues.europe."
Any users with the roles admin or europe-users can send messages to these addresses
or consume messages from queues bound to an address that starts with the string
"globalqueues.europe."
The mapping between a user and what roles they have is handled by the security manager.
HornetQ ships with a user manager that reads user credentials from a file on disk, and can also
plug into JAAS or JBoss Application Server security.
For more information on configuring the security manager, please see Section 31.4, “Changing
the security manager”.
There can be zero or more security-setting elements in each xml file. Where more than one
match applies to a set of addresses the more specific match takes precedence.
Let's look at an example of that, here's another security-setting block:
<security-setting match="globalqueues.europe.orders.#">
<permission type="send" roles="europe-users"/>
<permission type="consume" roles="europe-users"/>
</security-setting>

Secure Sockets Layer (SSL) Transport
149
In this security-setting block the match 'globalqueues.europe.orders.#' is more specific
than the previous match 'globalqueues.europe.#'. So any addresses which match
'globalqueues.europe.orders.#' will take their security settings only from the latter security-setting
block.
Note that settings are not inherited from the former block. All the settings will be taken from
the more specific matching block, so for the address 'globalqueues.europe.orders.plastics'
the only permissions that exist are send and consume for the role europe-users.
The permissions createDurableQueue, deleteDurableQueue, createNonDurableQueue,
deleteNonDurableQueue are not inherited from the other security-setting block.
By not inheriting permissions, it allows you to effectively deny permissions in more specific
security-setting blocks by simply not specifying them. Otherwise it would not be possible to deny
permissions in sub-groups of addresses.
31.2. Secure Sockets Layer (SSL) Transport
When messaging clients are connected to servers, or servers are connected to other servers (e.g.
via bridges) over an untrusted network then HornetQ allows that traffic to be encrypted using the
Secure Sockets Layer (SSL) transport.
For more information on configuring the SSL transport, please see Chapter 16, Configuring the
Transport.
31.3. Basic user credentials
HornetQ ships with a security manager implementation that reads user credentials, i.e. user
names, passwords and role information from an xml file on the classpath called hornetq-
users.xml. This is the default security manager.
If you wish to use this security manager, then users, passwords and roles can easily be added
into this file.
Let's take a look at an example file:
<configuration xmlns="urn:hornetq"
xmlns:xsi="http://www.w3.org/2001/XMLSchema-instance"
xsi:schemaLocation="urn:hornetq ../schemas/hornetq-users.xsd ">
<defaultuser name="guest" password="guest">
<role name="guest"/>
</defaultuser>
<user name="tim" password="marmite">
<role name="admin"/>
</user>

Chapter 31. Security
150
<user name="andy" password="doner_kebab">
<role name="admin"/>
<role name="guest"/>
</user>
<user name="jeff" password="camembert">
<role name="europe-users"/>
<role name="guest"/>
</user>
</configuration>
The first thing to note is the element defaultuser. This defines what user will be assumed when
the client does not specify a username/password when creating a session. In this case they will
be the user guest and have the role also called guest. Multiple roles can be specified for a default
user.
We then have three more users, the user tim has the role admin. The user andy has the roles
admin and guest, and the user jeff has the roles europe-users and guest.
31.4. Changing the security manager
If you do not want to use the default security manager then you can specify a different one
by editing the file hornetq-beans.xml (or hornetq-jboss-beans.xml if you're running JBoss
Application Server) and changing the class for the HornetQSecurityManager bean.
Let's take a look at a snippet from the default beans file:
<bean name="HornetQSecurityManager"
class="org.hornetq.spi.core.security.HornetQSecurityManagerImpl">
<start ignored="true"/>
<stop ignored="true"/>
</bean>
The class org.hornetq.spi.core.security.HornetQSecurityManagerImpl is the default
security manager that is used by the standalone server.
HornetQ ships with two other security manager implementations you can use off-the-
shelf; one a JAAS security manager and another for integrating with JBoss Application
Sever security, alternatively you could write your own implementation by implementing the
org.hornetq.core.security.SecurityManager interface, and specifying the classname of
your implementation in the file hornetq-beans.xml (or hornetq-jboss-beans.xml if you're
running JBoss Application Server).
These two implementations are discussed in the next two sections.

JAAS Security Manager
151
31.5. JAAS Security Manager
JAAS stands for 'Java Authentication and Authorization Service' and is a standard part of the Java
platform. It provides a common API for security authentication and authorization, allowing you to
plugin your pre-built implementations.
To configure the JAAS security manager to work with your pre-built JAAS infrastructure you need
to specify the security manager as a JAASSecurityManager in the beans file. Here's an example:
<bean name="HornetQSecurityManager"
class="org.hornetq.integration.jboss.security.JAASSecurityManager">
<start ignored="true"/>
<stop ignored="true"/>
<property
name="ConfigurationName">org.hornetq.jms.example.ExampleLoginModule</
property>
<property name="Configuration">
<inject bean="ExampleConfiguration"/>
</property>
<property name="CallbackHandler">
<inject bean="ExampleCallbackHandler"/>
</property>
</bean>
Note that you need to feed the JAAS security manager with three properties:
• ConfigurationName: the name of the LoginModule implementation that JAAS must use
• Configuration: the Configuration implementation used by JAAS
• CallbackHandler: the CallbackHandler implementation to use if user interaction are required
31.5.1. Example
See Section 11.1.27, “JAAS” for an example which shows how HornetQ can be configured to
use JAAS.
31.6. JBoss AS Security Manager
The JBoss AS security manager is used when running HornetQ inside the JBoss Application
server. This allows tight integration with the JBoss Application Server's security model.
The class name of this security manager is
org.hornetq.integration.jboss.security.JBossASSecurityManager

Chapter 31. Security
152
Take a look at one of the default hornetq-jboss-beans.xml files for JBoss Application Server
that are bundled in the distribution for an example of how this is configured.
31.6.1. Configuring Client Login
JBoss can be configured to allow client login, basically this is when a JEE component such
as a Servlet or EJB sets security credentials on the current security context and these are
used throughout the call. If you would like these credentials to be used by HornetQ when
sending or consuming messages then set allowClientLogin to true. This will bypass HornetQ
authentication and propgate the provided Security Context. If you would like HornetQ to
authenticate using the propogated security then set the authoriseOnClientLogin to true also.
There is more info on using the JBoss client login module here [http://community.jboss.org/wiki/
ClientLoginModule]
Note
If messages are sent non blocking then there is a chance that these could arrive on
the server after the calling thread has completed meaning that the security context
has been cleared. If this is the case then messages will need to be sent blocking
31.6.2. Changing the Security Domain
The name of the security domain used by the JBoss AS security manager defaults to java:/jaas/
hornetq . This can be changed by specifying securityDomainName (e.g. java:/jaas/myDomain).
31.7. Changing the username/password for clustering
In order for cluster connections to work correctly, each node in the cluster must make connections
to the other nodes. The username/password they use for this should always be changed from the
installation default to prevent a security risk.
Please see Chapter 30, Management for instructions on how to do this.

Chapter 32.
153
Application Server Integration and
Java EEHornetQ can be easily installed in JBoss Application Server 4 or later. For details on installing
HornetQ in the JBoss Application Server please refer to quick-start guide.
Since HornetQ also provides a JCA adapter, it is also possible to integrate HornetQ as a JMS
provider in other JEE compliant app servers. For instructions on how to integrate a remote JCA
adaptor into another application sever, please consult the other application server's instructions.
A JCA Adapter basically controls the inflow of messages to Message-Driven Beans (MDBs) and
the outflow of messages sent from other JEE components, e.g. EJBs and Servlets.
This section explains the basics behind configuring the different JEE components in the AS.
32.1. Configuring Message-Driven Beans
The delivery of messages to an MDB using HornetQ is configured on the JCA Adapter via a
configuration file ra.xml which can be found under the jms-ra.rar directory. By default this is
configured to consume messages using an InVM connector from the instance of HornetQ running
within the application server. The configuration properties are listed later in this chapter.
All MDBs however need to have the destination type and the destination configured. The following
example shows how this can be done using annotations:
@MessageDriven(name = "MDBExample", activationConfig =
{
@ActivationConfigProperty(propertyName = "destinationType", propertyValue =
"javax.jms.Queue"),
@ActivationConfigProperty(propertyName = "destination", propertyValue =
"queue/testQueue")
})
@ResourceAdapter("hornetq-ra.rar")
public class MDBExample implements MessageListener
{
public void onMessage(Message message)...
}
In this example you can see that the MDB will consume messages from a queue that is mapped
into JNDI with the binding queue/testQueue. This queue must be preconfigured in the usual way
using the HornetQ configuration files.
The ResourceAdapter annotation is used to specify which adaptor should be used. To
use this you will need to import org.jboss.ejb3.annotation.ResourceAdapter for JBoss

Chapter 32. Application Serve...
154
AS 5.X and later version which can be found in the jboss-ejb3-ext-api.jar which
can be found in the JBoss repository. For JBoss AS 4.X, the annotation to use is
org.jboss.annotation.ejb.ResourceAdaptor.
Alternatively you can add use a deployment descriptor and add something like the following to
jboss.xml
<message-driven>
<ejb-name>ExampleMDB</ejb-name>
<resource-adapter-name>hornetq-ra.rar</resource-adapter-name>
</message-driven>
You can also rename the hornetq-ra.rar directory to jms-ra.rar and neither the annotation or the
extra descriptor information will be needed. If you do this you will need to edit the jms-ds.xml
datasource file and change rar-name element.
Note
HornetQ is the default JMS provider for JBoss AS 6. Starting with this AS version,
HornetQ resource adapter is named jms-ra.rar and you no longer need to
annotate the MDB for the resource adapter name.
All the examples shipped with the HornetQ distribution use the annotation.
32.1.1. Using Container-Managed Transactions
When an MDB is using Container-Managed Transactions (CMT), the delivery of the message is
done within the scope of a JTA transaction. The commit or rollback of this transaction is controlled
by the container itself. If the transaction is rolled back then the message delivery semantics will
kick in (by default, it will try to redeliver the message up to 10 times before sending to a DLQ).
Using annotations this would be configured as follows:
@MessageDriven(name = "MDB_CMP_TxRequiredExample", activationConfig =
{
@ActivationConfigProperty(propertyName = "destinationType", propertyValue =
"javax.jms.Queue"),
@ActivationConfigProperty(propertyName = "destination", propertyValue =
"queue/testQueue")
})
@TransactionManagement(value= TransactionManagementType.CONTAINER)
@TransactionAttribute(value= TransactionAttributeType.REQUIRED)
@ResourceAdapter("hornetq-ra.rar")
public class MDB_CMP_TxRequiredExample implements MessageListener

Using Container-Managed Transactions
155
{
public void onMessage(Message message)...
}
The TransactionManagement annotation tells the container to manage the transaction. The
TransactionAttribute annotation tells the container that a JTA transaction is required for this
MDB. Note that the only other valid value for this is TransactionAttributeType.NOT_SUPPORTED
which tells the container that this MDB does not support JTA transactions and one should not
be created.
It is also possible to inform the container that it must rollback the transaction by calling
setRollbackOnly on the MessageDrivenContext. The code for this would look something like:
@Resource
MessageDrivenContextContext ctx;
public void onMessage(Message message)
{
try
{
//something here fails
}
catch (Exception e)
{
ctx.setRollbackOnly();
}
}
If you do not want the overhead of an XA transaction being created every time but you would still
like the message delivered within a transaction (i.e. you are only using a JMS resource) then you
can configure the MDB to use a local transaction. This would be configured as such:
@MessageDriven(name = "MDB_CMP_TxLocalExample", activationConfig =
{
@ActivationConfigProperty(propertyName = "destinationType", propertyValue
= "javax.jms.Queue"),
@ActivationConfigProperty(propertyName = "destination", propertyValue =
"queue/testQueue"),
@ActivationConfigProperty(propertyName = "useLocalTx", propertyValue =
"true")
})
@TransactionManagement(value = TransactionManagementType.CONTAINER)
@TransactionAttribute(value = TransactionAttributeType.NOT_SUPPORTED)

Chapter 32. Application Serve...
156
@ResourceAdapter("hornetq-ra.rar")
public class MDB_CMP_TxLocalExample implements MessageListener
{
public void onMessage(Message message)...
}
32.1.2. Using Bean-Managed Transactions
Message-driven beans can also be configured to use Bean-Managed Transactions (BMT). In this
case a User Transaction is created. This would be configured as follows:
@MessageDriven(name = "MDB_BMPExample", activationConfig =
{
@ActivationConfigProperty(propertyName = "destinationType", propertyValue =
"javax.jms.Queue"),
@ActivationConfigProperty(propertyName = "destination", propertyValue =
"queue/testQueue"),
@ActivationConfigProperty(propertyName = "acknowledgeMode", propertyValue =
"Dups-ok-acknowledge")
})
@TransactionManagement(value= TransactionManagementType.BEAN)
@ResourceAdapter("hornetq-ra.rar")
public class MDB_BMPExample implements MessageListener
{
public void onMessage(Message message)
}
When using Bean-Managed Transactions the message delivery to the MDB will occur outside
the scope of the user transaction and use the acknowledge mode specified by the user with the
acknowledgeMode property. There are only 2 acceptable values for this Auto-acknowledge and
Dups-ok-acknowledge. Please note that because the message delivery is outside the scope of
the transaction a failure within the MDB will not cause the message to be redelivered.
A user would control the lifecycle of the transaction something like the following:
@Resource
MessageDrivenContext ctx;
public void onMessage(Message message)
{
UserTransaction tx;
try
{

Using Message Selectors with Message-Driven Beans
157
TextMessage textMessage = (TextMessage)message;
String text = textMessage.getText();
UserTransaction tx = ctx.getUserTransaction();
tx.begin();
//do some stuff within the transaction
tx.commit();
}
catch (Exception e)
{
tx.rollback();
}
}
32.1.3. Using Message Selectors with Message-Driven Beans
It is also possible to use MDBs with message selectors. To do this simple define your message
selector as follows:
@MessageDriven(name = "MDBMessageSelectorExample", activationConfig =
{
@ActivationConfigProperty(propertyName = "destinationType", propertyValue =
"javax.jms.Queue"),
@ActivationConfigProperty(propertyName = "destination", propertyValue =
"queue/testQueue"),
@ActivationConfigProperty(propertyName = "messageSelector", propertyValue =
"color = 'RED'")
})
@TransactionManagement(value= TransactionManagementType.CONTAINER)
@TransactionAttribute(value= TransactionAttributeType.REQUIRED)
@ResourceAdapter("hornetq-ra.rar")
public class MDBMessageSelectorExample implements MessageListener
{
public void onMessage(Message message)....
}
32.2. Sending Messages from within JEE components
The JCA adapter can also be used for sending messages. The Connection Factory to use is
configured by default in the jms-ds.xml file and is mapped to java:/JmsXA. Using this from within

Chapter 32. Application Serve...
158
a JEE component will mean that the sending of the message will be done as part of the JTA
transaction being used by the component.
This means that if the sending of the message fails the overall transaction would rollback and the
message be re-sent. Heres an example of this from within an MDB:
@MessageDriven(name = "MDBMessageSendTxExample", activationConfig =
{
@ActivationConfigProperty(propertyName = "destinationType", propertyValue =
"javax.jms.Queue"),
@ActivationConfigProperty(propertyName = "destination", propertyValue =
"queue/testQueue")
})
@TransactionManagement(value= TransactionManagementType.CONTAINER)
@TransactionAttribute(value= TransactionAttributeType.REQUIRED)
@ResourceAdapter("hornetq-ra.rar")
public class MDBMessageSendTxExample implements MessageListener
{
@Resource(mappedName = "java:/JmsXA")
ConnectionFactory connectionFactory;
@Resource(mappedName = "queue/replyQueue")
Queue replyQueue;
public void onMessage(Message message)
{
Connection conn = null;
try
{
//Step 9. We know the client is sending a text message so we cast
TextMessage textMessage = (TextMessage)message;
//Step 10. get the text from the message.
String text = textMessage.getText();
System.out.println("message " + text);
conn = connectionFactory.createConnection();
Session sess = conn.createSession(false, Session.AUTO_ACKNOWLEDGE);
MessageProducer producer = sess.createProducer(replyQueue);
producer.send(sess.createTextMessage("this is a reply"));
}
catch (Exception e)

MDB and Consumer pool size
159
{
e.printStackTrace();
}
finally
{
if(conn != null)
{
try
{
conn.close();
}
catch (JMSException e)
{
}
}
}
}
}
In JBoss Application Server you can use the JMS JCA adapter for sending messages from
EJBs (including Session, Entity and Message-Driven Beans), Servlets (including jsps) and custom
MBeans.
32.3. MDB and Consumer pool size
Most application servers, including JBoss, allow you to configure how many MDB's there are
in a pool. In Jboss this is configured via the MaxPoolSize parameter in the ejb3-interceptors-
aop.xml file. Configuring this has no actual effect on how many sessions/consumers there actually
are created. This is because the Resource Adaptor implementation knows nothing about the
application servers MDB implementation. So even if you set the MDB pool size to 1, 15 sessions/
consumers will be created (this is the default). If you want to limit how many sessions/consumers
are created then you need to set the maxSession parameter either on the resource adapter itself
or via an an Activation Config Property on the MDB itself
@MessageDriven(name = "MDBMessageSendTxExample", activationConfig =
{
@ActivationConfigProperty(propertyName = "destinationType", propertyValue =
"javax.jms.Queue"),
@ActivationConfigProperty(propertyName = "destination", propertyValue =
"queue/testQueue"),
@ActivationConfigProperty(propertyName = "maxSession", propertyValue = "1")
})
@TransactionManagement(value= TransactionManagementType.CONTAINER)
@TransactionAttribute(value= TransactionAttributeType.REQUIRED)
@ResourceAdapter("hornetq-ra.rar")

Chapter 32. Application Serve...
160
public class MyMDB implements MessageListener
{ ....}
32.4. Configuring the JCA Adaptor
The Java Connector Architecture (JCA) Adapter is what allows HornetQ to be integrated with JEE
components such as MDBs and EJBs. It configures how components such as MDBs consume
messages from the HornetQ server and also how components such as EJBs or Servlets can send
messages.
The HornetQ JCA adapter is deployed via the jms-ra.rar archive. The configuration of the
adapter is found in this archive under META-INF/ra.xml.
The configuration will look something like the following:
<resourceadapter>
<resourceadapter-class>org.hornetq.ra.HornetQResourceAdapter</
resourceadapter-class>
<config-property>
<description>The transport type. Multiple connectors can be configured
by using a comma separated list,
i.e.
org.hornetq.core.remoting.impl.invm.InVMConnectorFactory,org.hornetq.core.remoting.impl.invm.InVMConnectorFactory.</
description>
<config-property-name>ConnectorClassName</config-property-name>
<config-property-type>java.lang.String</config-property-type>
<config-property-
value>org.hornetq.core.remoting.impl.invm.InVMConnectorFactory</config-
property-value>
</config-property>
<config-property>
<description>The transport configuration. These values must be in the
form of key=val;key=val;,
if multiple connectors are used then each set must be separated by a
comma i.e. host=host1;port=5445,host=host2;port=5446.
Each set of params maps to the connector classname specified.</description>
<config-property-name>ConnectionParameters</config-property-name>
<config-property-type>java.lang.String</config-property-type>
<config-property-value>server-id=0</config-property-value>
</config-property>
<outbound-resourceadapter>
<connection-definition>
<managedconnectionfactory-
class>org.hornetq.ra.HornetQRAManagedConnection

Configuring the JCA Adaptor
161
Factory</managedconnectionfactory-class>
<config-property>
<description>The default session type</description>
<config-property-name>SessionDefaultType</config-property-name>
<config-property-type>java.lang.String</config-property-type>
<config-property-value>javax.jms.Queue</config-property-value>
</config-property>
<config-property>
<description>Try to obtain a lock within specified number of
seconds; less
than or equal to 0 disable this functionality</description>
<config-property-name>UseTryLock</config-property-name>
<config-property-type>java.lang.Integer</config-property-type>
<config-property-value>0</config-property-value>
</config-property>
<connectionfactory-interface>org.hornetq.ra.HornetQRAConnectionFactory
</connectionfactory-interface>
<connectionfactororg.hornetq.ra.HornetQConnectionFactoryImplonFactoryImpl
</connectionfactory-impl-class>
<connection-interface>javax.jms.Session</connection-interface>
<connection-impl-class>org.hornetq.ra.HornetQRASession
</connection-impl-class>
</connection-definition>
<transaction-support>XATransaction</transaction-support>
<authentication-mechanism>
<authentication-mechanism-type>BasicPassword
</authentication-mechanism-type>
<credential-interface>javax.resource.spi.security.PasswordCredential
</credential-interface>
</authentication-mechanism>
<reauthentication-support>false</reauthentication-support>
</outbound-resourceadapter>
<inbound-resourceadapter>
<messageadapter>
<messagelistener>
<messagelistener-type>javax.jms.MessageListener</messagelistener-type>
<activationspec>
<activationspec-class>org.hornetq.ra.inflow.HornetQActivationSpec
</activationspec-class>
<required-config-property>
<config-property-name>destination</config-property-name>
</required-config-property>
</activationspec>
</messagelistener>
</messageadapter>

Chapter 32. Application Serve...
162
</inbound-resourceadapter>
</resourceadapter>
There are three main parts to this configuration.
1. A set of global properties for the adapter
2. The configuration for the outbound part of the adapter. This is used for creating JMS resources
within EE components.
3. The configuration of the inbound part of the adapter. This is used for controlling the consumption
of messages via MDBs.
32.4.1. Global Properties
The first element you see is resourceadapter-class which should be left unchanged. This is
the HornetQ resource adapter class.
After that there is a list of configuration properties. This will be where most of the configuration is
done. The first two properties configure the transport used by the adapter and the rest configure
the connection factory itself.
Note
All connection factory properties will use the defaults if they are not provided,
except for the reconnectAttempts which will default to -1. This signifies that the
connection should attempt to reconnect on connection failure indefinitely. This is
only used when the adapter is configured to connect to a remote server as an InVM
connector can never fail.
The following table explains what each property is for.
Table 32.1. Global Configuration Properties
Property Name Property Type Property Description
ConnectorClassName String The Connector class name
(see Chapter 16, Configuring
the Transport for more
information). If multiple
connectors are needed this
should be provided as a
comma separated list.
ConnectionParameters String The transport configuration.
These parameters must
be in the form of
key1=val1;key2=val2; and

Global Properties
163
Property Name Property Type Property Description
will be specific to the
connector used. If multiple
connectors are configured
then params should be
supplied for each connector
separated by a comma.
hA boolean True if high availability is
needed.
useLocalTx boolean True will enable local
transaction optimisation.
UserName String The user name to use when
making a connection
Password String The password to use when
making a connection
DiscoveryAddress String The discovery group address
to use to autodetect a server
DiscoveryPort Integer The port to use for discovery
DiscoveryRefreshTimeout Long The timeout, in milliseconds, to
refresh.
DiscoveryInitialWaitTimeout Long The initial time to wait for
discovery.
ConnectionLoadBalancingPolicyClassNameString The load balancing policy
class to use.
ConnectionTTL Long The time to live
(in milliseconds) for the
connection.
CallTimeout Long the call timeout (in
milliseconds) for each packet
sent.
DupsOKBatchSize Integer the batch size (in bytes)
between acknowledgements
when using
DUPS_OK_ACKNOWLEDGE
mode
TransactionBatchSize Integer the batch size (in bytes)
between acknowledgements
when using a transactional
session

Chapter 32. Application Serve...
164
Property Name Property Type Property Description
ConsumerWindowSize Integer the window size (in bytes) for
consumer flow control
ConsumerMaxRate Integer the fastest rate a consumer
may consume messages per
second
ConfirmationWindowSize Integer the window size (in bytes) for
reattachment confirmations
ProducerMaxRate Integer the maximum rate of
messages per second that can
be sent
MinLargeMessageSize Integer the size (in bytes) before a
message is treated as large
BlockOnAcknowledge Boolean whether or not messages are
acknowledged synchronously
BlockOnNonDurableSend Boolean whether or not non-
durable messages are sent
synchronously
BlockOnDurableSend Boolean whether or not durable
messages are sent
synchronously
AutoGroup Boolean whether or not message
grouping is automatically used
PreAcknowledge Boolean whether messages are pre
acknowledged by the server
before sending
ReconnectAttempts Integer maximum number of retry
attempts, default for the
resource adpater is -1 (infinite
attempts)
RetryInterval Long the time (in milliseconds) to
retry a connection after failing
RetryIntervalMultiplier Double multiplier to apply to
successive retry intervals
FailoverOnServerShutdown Boolean If true client will reconnect to
another server if available
ClientID String the pre-configured client ID for
the connection factory
ClientFailureCheckPeriod Long the period (in ms) after which
the client will consider the

Adapter Outbound Configuration
165
Property Name Property Type Property Description
connection failed after not
receiving packets from the
server
UseGlobalPools Boolean whether or not to use a global
thread pool for threads
ScheduledThreadPoolMaxSize Integer the size of the scheduled
thread pool
ThreadPoolMaxSize Integer the size of the thread pool
SetupAttempts Integer Number of attempts to setup a
JMS connection (default is 10,
-1 means to attempt infinitely).
It is possible that the MDB
is deployed before the JMS
resources are available. In that
case, the resource adapter will
try to setup several times until
the resources are available.
This applies only for inbound
connections
SetupInterval Long Interval in milliseconds
between consecutive attemps
to setup a JMS connection
(default is 2000m). This
applies only for inbound
connections
32.4.2. Adapter Outbound Configuration
The outbound configuration should remain unchanged as they define connection factories that are
used by Java EE components. These Connection Factories can be defined inside a configuration
file that matches the name *-ds.xml. You'll find a default jms-ds.xml configuration under the
hornetq directory in the JBoss AS deployment. The connection factories defined in this file inherit
their properties from the main ra.xml configuration but can also be overridden. The following
example shows how to override them.
Note
Please note that this configuration only applies when HornetQ resource adapter
is installed in JBoss Application Server. If you are using another JEE application
server please refer to your application servers documentation for how to do this.

Chapter 32. Application Serve...
166
<tx-connection-factory>
<jndi-name>RemoteJmsXA</jndi-name>
<xa-transaction/>
<rar-name>jms-ra.rar</rar-name>
<connection-definition>org.hornetq.ra.HornetQRAConnectionFactory
</connection-definition>
<config-property name="SessionDefaultType" type="String">javax.jms.Topic</
config-property>
<config-property name="ConnectorClassName" type="String">
org.hornetq.core.remoting.impl.netty.NettyConnectorFactory
</config-property>
<config-property name="ConnectionParameters" type="String">
port=5445</config-property>
<max-pool-size>20</max-pool-size>
</tx-connection-factory>
overriding connectors
If the connector class name is overridden the all params must also be supplied.
In this example the connection factory will be bound to JNDI with the name RemoteJmsXA and can
be looked up in the usual way using JNDI or defined within the EJB or MDB as such:
@Resource(mappedName="java:/RemoteJmsXA")
private ConnectionFactory connectionFactory;
The config-property elements are what overrides those in the ra.xml configuration file. Any of
the elements pertaining to the connection factory can be overridden here.
The outbound configuration also defines additional properties in addition to the global
configuration properties.
Table 32.2. Outbound Configuration Properties
Property Name Property Type Property Description
SessionDefaultType String the default session type
UseTryLock Integer try to obtain a lock within
specified number of seconds.
less than or equal to 0 disable
this functionality

Adapter Inbound Configuration
167
32.4.3. Adapter Inbound Configuration
The inbound configuration should again remain unchanged. This controls what forwards
messages onto MDBs. It is possible to override properties on the MDB by adding an activation
configuration to the MDB itself. This could be used to configure the MDB to consume from a
different server.
The inbound configuration also defines additional properties in addition to the global configuration
properties.
Table 32.3. Inbound Configuration Properties
Property Name Property Type Property Description
Destination String JNDI name of the destination
DestinationType String type of the destination,
either javax.jms.Queue or
javax.jms.Topic (default is
javax.jms.Queue)
AcknowledgeMode String The Acknowledgment mode,
either Auto-acknowledge
or Dups-ok-acknowledge
(default is Auto-acknowledge).
AUTO_ACKNOWLEDGE and
DUPS_OK_ACKNOWLEDGE are
acceptable values.
MaxSession Integer Maximum number of session
created by this inbound
configuration (default is 15)
MessageSelector String the message selector of the
consumer
SubscriptionDurability String Type of the subscription, either
Durable or NonDurable
SubscriptionName String Name of the subscription
TransactionTimeout Long The transaction timeout in
milliseconds (default is 0, the
transaction does not timeout)
UseJNDI Boolean Whether or not use JNDI to
look up the destination (default
is true)

Chapter 32. Application Serve...
168
32.4.4. Configuring the adapter to use a standalone HornetQ
Server
Sometime you may want your messaging server on a different machine or separate from the
application server. If this is the case you will only need the hornetq client libs installed. This section
explains what config to create and what jar dependencies are needed.
There are two configuration files needed to do this, one for the incoming adapter used for MDB's
and one for outgoing connections managed by the JCA managed connection pool used by
outgoing JEE components wanting outgoing connections.
32.4.4.1.1. Configuring the Incoming Adaptor
Firstly you will need to create directory under the deploy directory ending in .rar. For this
example we will name the directory hornetq-ra.rar. This detail is important as the name of
directory is referred to by the MDB's and the outgoing configuration.
Note
The jboss default for this is jms-ra.rar, If you don't want to have to configure
your MDB's you can use this but you may need to remove the generic adaptor that
uses this.
Under the hornetq-ra.rar directory you will need to create a META-INF directory into which you
should create an ra.xml configuration file. You can find a template for the ra.xml under the config
directory of the HornetQ distribution.
To configure MDB's to consume messages from a remote HornetQ server you need to edit the
ra.xml file under deploy/hornet-ra.rar/META-INF and change the transport type to use a netty
connector (instead of the invm connector that is defined) and configure its transport params. Heres
an example of what this would look like:
<resourceadapter-class>org.hornetq.ra.HornetQResourceAdapter</resourceadapter-
class>
<config-property>
<description>The transport type</description>
<config-property-name>ConnectorClassName</config-property-name>
<config-property-type>java.lang.String</config-property-type>
<config-property-
value>org.hornetq.core.remoting.impl.netty.NettyConnectorFactory</config-
property-value>
</config-property>
<config-property>
<description>The transport configuration. These values must be in the form
of key=val;key=val;</description>

Configuring the adapter to use a standalone HornetQ Server
169
<config-property-name>ConnectionParameters</config-property-name>
<config-property-type>java.lang.String</config-property-type>
<config-property-value>host=127.0.0.1;port=5446</config-property-value>
</config-property>
If you want to provide a list of servers that the adapter can connect to you can provide a list of
connectors, each separated by a comma.
<resourceadapter-class>org.hornetq.ra.HornetQResourceAdapter</resourceadapter-
class>
<config-property>
<description>The transport type</description>
<config-property-name>ConnectorClassName</config-property-name>
<config-property-type>java.lang.String</config-property-type>
<config-property-
value>org.hornetq.core.remoting.impl.netty.NettyConnectorFactory,org.hornetq.core.remoting.impl.netty.NettyConnectorFactory</
config-property-value>
</config-property>
<config-property>
<description>The transport configuration. These values must be in the form
of key=val;key=val;</description>
<config-property-name>ConnectionParameters</config-property-name>
<config-property-type>java.lang.String</config-property-type>
<config-property-value>host=127.0.0.1;port=5446,host=127.0.0.2;port=5447</
config-property-value>
</config-property>
provide all params
Make sure you provide parameters for each connector configured. The position of
the params in the list maps to each connector provided.
This configures the resource adapter to connect to a server running on localhost listening on port
5446
32.4.4.1.2. Configuring the outgoing adaptor
You will also need to configure the outbound connection by creating a hornetq-ds.xml and
placing it under any directory that will be deployed under the deploy directory. In a standard
HornetQ jboss configuration this would be under horneq or hornetq.sar but you can place it
where ever you like. Actually as long as it ends in -ds.xml you can call it anything you like. You
can again find a template for this file under the config directory of the HornetQ distribution but
called jms-ds.xml which is the jboss default.

Chapter 32. Application Serve...
170
The following example shows a sample configuration
<tx-connection-factory>
<jndi-name>RemoteJmsXA</jndi-name>
<xa-transaction/>
<rar-name>hornetq-ra.rar</rar-name>
<connection-definition>org.hornetq.ra.HornetQRAConnectionFactory</
connection-definition>
<config-property name="SessionDefaultType"
type="java.lang.String">javax.jms.Topic</config-property>
<config-property name="ConnectorClassName"
type="java.lang.String">org.hornetq.core.remoting.impl.netty.NettyConnectorFactory</
config-property>
<config-property name="ConnectionParameters"
type="java.lang.String">host=127.0.0.1;port=5446</config-property>
<max-pool-size>20</max-pool-size>
</tx-connection-factory>
Again you will see that this uses the netty connector type and will connect to the HornetQ server
running on localhost and listening on port 5446. JEE components can access this by using JNDI
and looking up the connection factory using JNDI using java:/RemoteJmsXA, you can see that
this is defined under thejndi-name attribute. You will also note that the outgoing connection will
be created by the resource adaptor configured under the directory hornetq-ra.rar as explained
in the last section.
Also if you want to configure multiple connectors do this as a comma separated list as in the ra
configuration.
32.4.4.1.3. Jar dependencies
This is a list of the HornetQ and third party jars needed
Table 32.4. Jar Dependencies
Jar Name Description Location
hornetq-ra.jar The HornetQ resource adaptor
classes
deploy/hornetq-ra.rar or
equivelant
hornetq-core-client.jar The HornetQ core client
classes
either in the config lib, i.e.
default/lib or the common
lib dir, i.e. $JBOSS_HOME/
common lib
hornetq-jms-client.jar The HornetQ JMS classes as above
netty.jar The Netty transport classes as above

Configuring the JBoss Application Server to connect to Remote HornetQ Server
171
32.5. Configuring the JBoss Application Server to
connect to Remote HornetQ Server
This is a step by step guide on how to configure a JBoss application server that doesn't have
HornetQ installed to use a remote instance of HornetQ
32.5.1. Configuring Jboss 5
Firstly download and install JBoss AS 5 as per the JBoss installation guide and HornetQ as per
the HornetQ installation guide. After thatt he following steps are required
• Copy the following jars from the HornetQ distribution to the lib directory of which ever JBossAs
configuration you have chosen, i.e. default.
• hornetq-core-client.jar
• hornetq-jms-client.jar
• hornetq-ra.jar (this can be found inside the hornetq-ra.rar archive)
• netty.jar
• create the directories hornetq-ra.rar and hornetq-ra.rar/META-INF under the deploy
directory in your JBoss config directory
• under the hornetq-ra.rar/META-INF create a ra.xml file or copy it from the HornetQ
distribution (again it can be found in the hornetq-ra.rar archive) and configure it as follows
<?xml version="1.0" encoding="UTF-8"?>
<connector xmlns="http://java.sun.com/xml/ns/j2ee"
xmlns:xsi="http://www.w3.org/2001/XMLSchema-instance"
xsi:schemaLocation="http://java.sun.com/xml/ns/j2ee
http://java.sun.com/xml/ns/j2ee/connector_1_5.xsd"
version="1.5">
<description>HornetQ 2.0 Resource Adapter Alternate Configuration</
description>
<display-name>HornetQ 2.0 Resource Adapter Alternate Configuration</display-
name>
<vendor-name>Red Hat Middleware LLC</vendor-name>
<eis-type>JMS 1.1 Server</eis-type>
<resourceadapter-version>1.0</resourceadapter-version>
<license>
<description>

Chapter 32. Application Serve...
172
Copyright 2009 Red Hat, Inc.
Red Hat licenses this file to you under the Apache License, version
2.0 (the "License"); you may not use this file except in compliance
with the License. You may obtain a copy of the License at
http://www.apache.org/licenses/LICENSE-2.0
Unless required by applicable law or agreed to in writing, software
distributed under the License is distributed on an "AS IS" BASIS,
WITHOUT WARRANTIES OR CONDITIONS OF ANY KIND, either express or
implied. See the License for the specific language governing
permissions and limitations under the License.
</description>
<license-required>true</license-required>
</license>
<resourceadapter>
<resourceadapter-class>org.hornetq.ra.HornetQResourceAdapter</
resourceadapter-class>
<config-property>
<description>The transport type</description>
<config-property-name>ConnectorClassName</config-property-name>
<config-property-type>java.lang.String</config-property-type>
<config-property-
value>org.hornetq.core.remoting.impl.netty.NettyConnectorFactory</config-
property-value>
</config-property>
<config-property>
<description>The transport configuration. These values must be in
the form of key=val;key=val;</description>
<config-property-name>ConnectionParameters</config-property-name>
<config-property-type>java.lang.String</config-property-type>
<config-property-value>host=127.0.0.1;port=5445</config-property-
value>
</config-property>
<outbound-resourceadapter>
<connection-definition>
<managedconnectionfactory-
class>org.hornetq.ra.HornetQRAManagedConnectionFactory</
managedconnectionfactory-class>
<config-property>
<description>The default session type</description>
<config-property-name>SessionDefaultType</config-property-name>
<config-property-type>java.lang.String</config-property-type>
<config-property-value>javax.jms.Queue</config-property-value>
</config-property>
<config-property>
<description>Try to obtain a lock within specified number of
seconds; less than or equal to 0 disable this functionality</description>

Configuring Jboss 5
173
<config-property-name>UseTryLock</config-property-name>
<config-property-type>java.lang.Integer</config-property-type>
<config-property-value>0</config-property-value>
</config-property>
<connectionfactory-interface>org.hornetq.ra.HornetQRAConnectionFactory</
connectionfactory-interface>
<connectionfactory-impl-
class>org.hornetq.ra.HornetQRAConnectionFactoryImpl</connectionfactory-impl-
class>
<connection-interface>javax.jms.Session</connection-interface>
<connection-impl-class>org.hornetq.ra.HornetQRASession</connection-
impl-class>
</connection-definition>
<transaction-support>XATransaction</transaction-support>
<authentication-mechanism>
<authentication-mechanism-type>BasicPassword</authentication-
mechanism-type>
<credential-interface>javax.resource.spi.security.PasswordCredential</
credential-interface>
</authentication-mechanism>
<reauthentication-support>false</reauthentication-support>
</outbound-resourceadapter>
<inbound-resourceadapter>
<messageadapter>
<messagelistener>
<messagelistener-type>javax.jms.MessageListener</messagelistener-
type>
<activationspec>
<activationspec-
class>org.hornetq.ra.inflow.HornetQActivationSpec</activationspec-class>
<required-config-property>
<config-property-name>destination</config-property-name>
</required-config-property>
</activationspec>
</messagelistener>
</messageadapter>
</inbound-resourceadapter>
</resourceadapter>
</connector>
The important part of this configuration is the part in bold, i.e. <config-property-
value>host=127.0.0.1;port=5445</config-property-value>. This should be configured to the
host and port of the remote HornetQ server.

Chapter 32. Application Serve...
174
At this point you should be able to now deploy MDB's that consume from the remote
server. You will however, have to make sure that your MDB's have the annotation
@ResourceAdapter("hornetq-ra.rar") added, this is illustrated in the Section 32.1,
“Configuring Message-Driven Beans” section. If you don't want to add this annotation then you
can delete the generic resource adapter jms-ra.rar and rename the hornetq-ra.rar to this.
If you also want to use the remote HornetQ server for outgoing connections, i.e. sending
messages, then do the following:
• Create a file called hornetq-ds.xml in the deploy directory (in fact you can call this anything
you want as long as it ends in -ds.xml). Then add the following:
<connection-factories>
<!--
JMS XA Resource adapter, use this for outbound JMS connections.
Inbound connections are defined at the @MDB activation or at the resource-
adapter properties.
-->
<tx-connection-factory>
<jndi-name>RemoteJmsXA</jndi-name>
<xa-transaction/>
<rar-name>hornetq-ra.rar</rar-name>
<connection-definition>org.hornetq.ra.HornetQRAConnectionFactory</
connection-definition>
<config-property name="SessionDefaultType"
type="java.lang.String">javax.jms.Topic</config-property>
<config-property name="ConnectorClassName"
type="java.lang.String">org.hornetq.core.remoting.impl.netty.NettyConnectorFactory</
config-property>
<config-property name="ConnectionParameters"
type="java.lang.String">host=127.0.0.1;port=5445</config-property>
<max-pool-size>20</max-pool-size>
</tx-connection-factory>
</connection-factories>
Again you will see that the host and port are configured here to match the remote HornetQ
servers configuration. The other important attributes are:
• jndi-name - This is the name used to look up the JMS connection factory from within your
JEE client
• rar-name - This should match the directory that you created to hold the Resource Adapter
configuration

Configuring Jboss 5
175
Now you should be able to send messages using the JCA JMS connection pooling within an XA
transaction.
32.5.2. Configuring Jboss 5
The steps to do this are exactly the same as for JBoss 4, you will have to create a jboss.xml
definition file for your MDB with the following entry
<message-driven>
<ejb-name>MyMDB</ejb-name>
<resource-adapter-name>jms-ra.rar</resource-adapter-name>
</message-driven>
Also you will need to edit the standardjboss.xml and uncomment the section with the following
'Uncomment to use JMS message inflow from jmsra.rar' and then comment out the invoker-proxy-
binding called 'message-driven-bean'
32.6. High Availability JNDI (HA-JNDI)
If you are using JNDI to look-up JMS queues, topics and connection factories from a cluster of
servers, it is likely you will want to use HA-JNDI so that your JNDI look-ups will continue to work
if one or more of the servers in the cluster fail.
HA-JNDI is a JBoss Application Server service which allows you to use JNDI from clients without
them having to know the exact JNDI connection details of every server in the cluster. This service
is only available if using a cluster of JBoss Application Server instances.
To use it use the following properties when connecting to JNDI.
Hashtable<String, String> jndiParameters = new Hashtable<String, String>();
jndiParameters.put("java.naming.factory.initial",
"org.jnp.interfaces.NamingContextFactory");
jndiParameters.put("java.naming.factory.url.pkgs=",
"org.jboss.naming:org.jnp.interfaces");
initialContext = new InitialContext(jndiParameters);
For more information on using HA-JNDI see the JBoss Application Server
clustering documentation [http://www.jboss.org/file-access/default/members/jbossas/freezone/
docs/Clustering_Guide/5/html/clustering-jndi.html]

Chapter 32. Application Serve...
176
32.7. XA Recovery
XA recovery deals with system or application failures to ensure that of a transaction are
applied consistently to all resources affected by the transaction, even if any of the application
processes or the machine hosting them crash or lose network connectivity. For more information
on XA Recovery,please refer to JBoss Transactions [http://www.jboss.org/community/wiki/
JBossTransactions].
When HornetQ is integrated with JBoss AS, it can take advantage of JBoss Transactions to
provide recovery of messaging resources. If messages are involved in a XA transaction, in the
event of a server crash, the recovery manager will ensure that the transactions are recovered
and the messages will either be committed or rolled back (depending on the transaction outcome)
when the server is restarted.
32.7.1. XA Recovery Configuration
To enable HornetQ's XA Recovery, the Recovery Manager must be configured to connect to
HornetQ to recover its resources. The following property must be added to the jta section of
conf/jbossts-properties.xml of JBoss AS profiles:
<properties depends="arjuna" name="jta">
...
<property name="com.arjuna.ats.jta.recovery.XAResourceRecovery.HornetQ1"
value="org.hornetq.jms.server.recovery.HornetQXAResourceRecovery;
[connection configuration]"/>
<property name="com.arjuna.ats.jta.xaRecoveryNode" value="1"/>
</properties>
The [connection configuration] contains all the information required to connect to HornetQ
node under the form [connector factory class name],[user name], [password],
[connector parameters].
• [connector factory class name] corresponds to the
name of the ConnectorFactory used to connect to HornetQ.
Values can be org.hornetq.core.remoting.impl.invm.InVMConnectorFactory or
org.hornetq.core.remoting.impl.netty.NettyConnectorFactory
• [user name] is the user name to create a client session. It is optional
• [password] is the password to create a client session. It is mandatory only if the user name
is specified

XA Recovery Configuration
177
• [connector parameters] is a list of comma-separated key=value pair which are passed to
the connector factory (see Chapter 16, Configuring the Transport for a list of the transport
parameters).
Also note the com.arjuna.ats.jta.xaRecoveryNode parameter. If you want recovery enabled
then this must be configured to what ever the tx node id is set to, this is configured in the same
file by the com.arjuna.ats.arjuna.xa.nodeIdentifier property.
Note
HornetQ must have a valid acceptor which corresponds to the connector specified
in conf/jbossts-properties.xml.
32.7.1.1. Configuration Settings
If HornetQ is configured with a default in-vm acceptor:
<acceptor name="in-vm">
<factory-class>org.hornetq.core.remoting.impl.invm.InVMAcceptorFactory</
factory-class>
</acceptor>
the corresponding configuration in conf/jbossts-properties.xml is:
<property name="com.arjuna.ats.jta.recovery.XAResourceRecovery.HORNETQ1"
value="org.hornetq.jms.server.recovery.HornetQXAResourceRecovery;org.hornetq.core.remoting.impl.invm.InVMConnectorFactory"/
>
If it is now configured with a netty acceptor on a non-default port:
<acceptor name="netty">
<factory-class>org.hornetq.core.remoting.impl.netty.NettyAcceptorFactory</
factory-class>
<param key="port" value="8888"/>
</acceptor>
the corresponding configuration in conf/jbossts-properties.xml is:

Chapter 32. Application Serve...
178
<property name="com.arjuna.ats.jta.recovery.XAResourceRecovery.HORNETQ1"
value="org.hornetq.jms.server.recovery.HornetQXAResourceRecovery;org.hornetq.core.remoting.impl.netty.NettyConnectorFactory, , ,
port=8888"/>
Note
Note the additional commas to skip the user and password before connector
parameters
If the recovery must use admin, adminpass, the configuration would have been:
<property name="com.arjuna.ats.jta.recovery.XAResourceRecovery.HORNETQ1"
value="org.hornetq.jms.server.recovery.HornetQXAResourceRecovery;org.hornetq.core.remoting.impl.netty.NettyConnectorFactory,
admin, adminpass, port=8888"/>
Configuring HornetQ with an invm acceptor and configuring the Recovery Manager with an invm
connector is the recommended way to enable XA Recovery.
32.7.2. Example
See Section 11.3.9, “XA Recovery” which shows how to configure XA Recovery and recover
messages after a server crash.

Chapter 33.
179
The JMS BridgeHornetQ includes a fully functional JMS message bridge.
The function of the bridge is to consume messages from a source queue or topic, and send them
to a target queue or topic, typically on a different server.
The source and target servers do not have to be in the same cluster which makes bridging suitable
for reliably sending messages from one cluster to another, for instance across a WAN, and where
the connection may be unreliable.
A bridge can be deployed as a standalone application, with HornetQ standalone server or inside
a JBoss AS instance. The source and the target can be located in the same virtual machine or
another one.
The bridge can also be used to bridge messages from other non HornetQ JMS servers, as long
as they are JMS 1.1 compliant.
Note
Do not confuse a JMS bridge with a core bridge. A JMS bridge can be used to
bridge any two JMS 1.1 compliant JMS providers and uses the JMS API. A core
bridge (described in Chapter 36, Core Bridges) is used to bridge any two HornetQ
instances and uses the core API. Always use a core bridge if you can in preference
to a JMS bridge. The core bridge will typically provide better performance than
a JMS bridge. Also the core bridge can provide once and only once delivery
guarantees without using XA.
The bridge has built-in resilience to failure so if the source or target server connection is lost, e.g.
due to network failure, the bridge will retry connecting to the source and/or target until they come
back online. When it comes back online it will resume operation as normal.
The bridge can be configured with an optional JMS selector, so it will only consume messages
matching that JMS selector
It can be configured to consume from a queue or a topic. When it consumes from a topic it can
be configured to consume using a non durable or durable subscription
Typically, the bridge is deployed by the JBoss Micro Container via a beans configuration file. This
would typically be deployed inside the JBoss Application Server and the following example shows
an example of a beans file that bridges 2 destinations which are actually on the same server.
<?xml version="1.0" encoding="UTF-8"?>
<deployment xmlns="urn:jboss:bean-deployer:2.0">
<bean name="JMSBridge" class="org.hornetq.api.jms.bridge.impl.JMSBridgeImpl">

Chapter 33. The JMS Bridge
180
<!-- HornetQ must be started before the bridge -->
<depends>HornetQServer</depends>
<constructor>
<!-- Source ConnectionFactory Factory -->
<parameter>
<inject bean="SourceCFF"/>
</parameter>
<!-- Target ConnectionFactory Factory -->
<parameter>
<inject bean="TargetCFF"/>
</parameter>
<!-- Source DestinationFactory -->
<parameter>
<inject bean="SourceDestinationFactory"/>
</parameter>
<!-- Target DestinationFactory -->
<parameter>
<inject bean="TargetDestinationFactory"/>
</parameter>
<!-- Source User Name (no username here) -->
<parameter><null /></parameter>
<!-- Source Password (no password here)-->
<parameter><null /></parameter>
<!-- Target User Name (no username here)-->
<parameter><null /></parameter>
<!-- Target Password (no password here)-->
<parameter><null /></parameter>
<!-- Selector -->
<parameter><null /></parameter>
<!-- Failure Retry Interval (in ms) -->
<parameter>5000</parameter>
<!-- Max Retries -->
<parameter>10</parameter>
<!-- Quality Of Service -->
<parameter>ONCE_AND_ONLY_ONCE</parameter>
<!-- Max Batch Size -->
<parameter>1</parameter>
<!-- Max Batch Time (-1 means infinite) -->
<parameter>-1</parameter>
<!-- Subscription name (no subscription name here)-->
<parameter><null /></parameter>
<!-- Client ID (no client ID here)-->
<parameter><null /></parameter>
<!-- Add MessageID In Header -->
<parameter>true</parameter>
<!-- register the JMS Bridge in the AS MBeanServer -->
<parameter>
<inject bean="MBeanServer"/>
</parameter>

181
<parameter>org.hornetq:service=JMSBridge</parameter>
</constructor>
<property name="transactionManager">
<inject bean="RealTransactionManager"/>
</property>
</bean>
<!-- SourceCFF describes the ConnectionFactory used to connect to the source
destination -->
<bean name="SourceCFF"
class="org.hornetq.api.jms.bridge.impl.JNDIConnectionFactoryFactory">
<constructor>
<parameter>
<inject bean="JNDI" />
</parameter>
<parameter>/ConnectionFactory</parameter>
</constructor>
</bean>
<!-- TargetCFF describes the ConnectionFactory used to connect to the target
destination -->
<bean name="TargetCFF"
class="org.hornetq.api.jms.bridge.impl.JNDIConnectionFactoryFactory">
<constructor>
<parameter>
<inject bean="JNDI" />
</parameter>
<parameter>/ConnectionFactory</parameter>
</constructor>
</bean>
<!-- SourceDestinationFactory describes the Destination used as the source -->
<bean name="SourceDestinationFactory"
class="org.hornetq.api.jms.bridge.impl.JNDIDestinationFactory">
<constructor>
<parameter>
<inject bean="JNDI" />
</parameter>
<parameter>/queue/source</parameter>
</constructor>
</bean>
<!-- TargetDestinationFactory describes the Destination used as the target -->
<bean name="TargetDestinationFactory"
class="org.hornetq.api.jms.bridge.impl.JNDIDestinationFactory">
<constructor>
<parameter>
<inject bean="JNDI" />
</parameter>

Chapter 33. The JMS Bridge
182
<parameter>/queue/target</parameter>
</constructor>
</bean>
<!-- JNDI is a Hashtable containing the JNDI properties required -->
<!-- to connect to the sources and targets JMS resrouces -->
<bean name="JNDI" class="java.util.Hashtable">
<constructor class="java.util.Map">
<map class="java.util.Hashtable" keyClass="String"
valueClass="String">
<entry>
<key>java.naming.factory.initial</key>
<value>org.jnp.interfaces.NamingContextFactory</value>
</entry>
<entry>
<key>java.naming.provider.url</key>
<value>jnp://localhost:1099</value>
</entry>
<entry>
<key>java.naming.factory.url.pkgs</key>
<value>org.jboss.naming:org.jnp.interfaces"</value>
</entry>
<entry>
<key>jnp.timeout</key>
<value>5000</value>
</entry>
<entry>
<key>jnp.sotimeout</key>
<value>5000</value>
</entry>
</map>
</constructor>
</bean>
<bean name="MBeanServer" class="javax.management.MBeanServer">
<constructor factoryClass="org.jboss.mx.util.MBeanServerLocator"
factoryMethod="locateJBoss"/>
</bean>
</deployment>
33.1. JMS Bridge Parameters
The main bean deployed is the JMSBridge bean. The bean is configurable by the parameters
passed to its constructor.

JMS Bridge Parameters
183
Note
To let a parameter be unspecified (for example, if the authentication is anonymous
or no message selector is provided), use <null /> for the unspecified parameter
value.
• Source Connection Factory Factory
This injects the SourceCFF bean (also defined in the beans file). This bean is used to create
the source ConnectionFactory
• Target Connection Factory Factory
This injects the TargetCFF bean (also defined in the beans file). This bean is used to create
the target ConnectionFactory
• Source Destination Factory Factory
This injects the SourceDestinationFactory bean (also defined in the beans file). This bean
is used to create the source Destination
• Target Destination Factory Factory
This injects the TargetDestinationFactory bean (also defined in the beans file). This bean
is used to create the target Destination
• Source User Name
this parameter is the username for creating the source connection
• Source Password
this parameter is the parameter for creating the source connection
• Target User Name
this parameter is the username for creating the target connection
• Target Password
this parameter is the password for creating the target connection
• Selector
This represents a JMS selector expression used for consuming messages from the source
destination. Only messages that match the selector expression will be bridged from the source
to the target destination
The selector expression must follow the JMS selector syntax [http://java.sun.com/j2ee/1.4/docs/
api/javax/jms/Message.html]

Chapter 33. The JMS Bridge
184
• Failure Retry Interval
This represents the amount of time in ms to wait between trying to recreate connections to the
source or target servers when the bridge has detected they have failed
• Max Retries
This represents the number of times to attempt to recreate connections to the source or target
servers when the bridge has detected they have failed. The bridge will give up after trying this
number of times. -1 represents 'try forever'
• Quality Of Service
This parameter represents the desired quality of service mode
Possible values are:
• AT_MOST_ONCE
• DUPLICATES_OK
• ONCE_AND_ONLY_ONCE
See Section 33.4, “Quality Of Service” for a explanation of these modes.
• Max Batch Size
This represents the maximum number of messages to consume from the source destination
before sending them in a batch to the target destination. Its value must >= 1
• Max Batch Time
This represents the maximum number of milliseconds to wait before sending a batch to target,
even if the number of messages consumed has not reached MaxBatchSize. Its value must be
-1 to represent 'wait forever', or >= 1 to specify an actual time
• Subscription Name
If the source destination represents a topic, and you want to consume from the topic using a
durable subscription then this parameter represents the durable subscription name
• Client ID
If the source destination represents a topic, and you want to consume from the topic using a
durable subscription then this attribute represents the the JMS client ID to use when creating/
looking up the durable subscription
• Add MessageID In Header
If true, then the original message's message ID will be appended in the message sent to the
destination in the header HORNETQ_BRIDGE_MSG_ID_LIST. If the message is bridged more than

Source and Target Connection Factories
185
once, each message ID will be appended. This enables a distributed request-response pattern
to be used
Note
when you receive the message you can send back a response using the
correlation id of the first message id, so when the original sender gets it back it
will be able to correlate it.
• MBean Server
To manage the JMS Bridge using JMX, set the MBeanServer where the JMS Bridge MBean
must be registered (e.g. the JVM Platform MBeanServer or JBoss AS MBeanServer)
• ObjectName
If you set the MBeanServer, you also need to set the ObjectName used to register the JMS
Bridge MBean (must be unique)
33.2. Source and Target Connection Factories
The source and target connection factory factories are used to create the connection factory used
to create the connection for the source or target server.
The configuration example above uses the default implementation provided by HornetQ that looks
up the connection factory using JNDI. For other Application Servers or JMS providers a new
implementation may have to be provided. This can easily be done by implementing the interface
org.hornetq.jms.bridge.ConnectionFactoryFactory.
33.3. Source and Target Destination Factories
Again, similarly, these are used to create or lookup up the destinations.
In the configuration example above, we have used the default provided by HornetQ that looks up
the destination using JNDI.
A new implementation can be provided by implementing
org.hornetq.jms.bridge.DestinationFactory interface.
33.4. Quality Of Service
The quality of service modes used by the bridge are described here in more detail.
33.4.1. AT_MOST_ONCE
With this QoS mode messages will reach the destination from the source at most once. The
messages are consumed from the source and acknowledged before sending to the destination.

Chapter 33. The JMS Bridge
186
Therefore there is a possibility that if failure occurs between removing them from the source and
them arriving at the destination they could be lost. Hence delivery will occur at most once.
This mode is available for both durable and non-durable messages.
33.4.2. DUPLICATES_OK
With this QoS mode, the messages are consumed from the source and then acknowledged after
they have been successfully sent to the destination. Therefore there is a possibility that if failure
occurs after sending to the destination but before acknowledging them, they could be sent again
when the system recovers. I.e. the destination might receive duplicates after a failure.
This mode is available for both durable and non-durable messages.
33.4.3. ONCE_AND_ONLY_ONCE
This QoS mode ensures messages will reach the destination from the source once and only once.
(Sometimes this mode is known as "exactly once"). If both the source and the destination are on
the same HornetQ server instance then this can be achieved by sending and acknowledging the
messages in the same local transaction. If the source and destination are on different servers
this is achieved by enlisting the sending and consuming sessions in a JTA transaction. The JTA
transaction is controlled by JBoss Transactions JTA * implementation which is a fully recovering
transaction manager, thus providing a very high degree of durability. If JTA is required then both
supplied connection factories need to be XAConnectionFactory implementations. This is likely to
be the slowest mode since it requires extra persistence for the transaction logging.
This mode is only available for durable messages.
Note
For a specific application it may possible to provide once and only once semantics
without using the ONCE_AND_ONLY_ONCE QoS level. This can be done by using
the DUPLICATES_OK mode and then checking for duplicates at the destination
and discarding them. Some JMS servers provide automatic duplicate message
detection functionality, or this may be possible to implement on the application level
by maintaining a cache of received message ids on disk and comparing received
messages to them. The cache would only be valid for a certain period of time so
this approach is not as watertight as using ONCE_AND_ONLY_ONCE but may be
a good choice depending on your specific application.
33.4.4. Time outs and the JMS bridge
There is a possibility that the target or source server will not be available at some point in time.
If this occurs then the bridge will try Max Retries to reconnect every Failure Retry Interval
milliseconds as specified in the JMS Bridge definition.

Examples
187
However since a third party JNDI is used, in this case the JBoss naming server, it is possible for the
JNDI lookup to hang if the network were to disappear during the JNDI lookup. To stop this occuring
the JNDI definition can be configured to time out if this occurs. To do this set the jnp.timeout
and the jnp.sotimeout on the Initial Context definition. The first sets the connection timeout for
the initial connection and the second the read timeout for the socket.
Note
Once the initial JNDI connection has succeeded all calls are made using RMI. If
you want to control the timeouts for the RMI connections then this can be done via
system properties. JBoss uses Sun's RMI and the properties can be found here
[http://java.sun.com/j2se/1.5.0/docs/guide/rmi/sunrmiproperties.html]. The default
connection timeout is 10 seconds and the default read timeout is 18 seconds.
If you implement your own factories for looking up JMS resources then you will have to bear in
mind timeout issues.
33.4.5. Examples
Please see Section 11.3.5, “JMS Bridge” which shows how to configure and use a JMS Bridge
with JBoss AS to send messages to the source destination and consume them from the target
destination.
Please see Section 11.1.28, “JMS Bridge” which shows how to configure and use a JMS Bridge
between two standalone HornetQ servers.

188

Chapter 34.
189
Client Reconnection and Session
ReattachmentHornetQ clients can be configured to automatically reconnect or re-attach to the server in the
event that a failure is detected in the connection between the client and the server.
34.1. 100% Transparent session re-attachment
If the failure was due to some transient failure such as a temporary network failure, and the target
server was not restarted, then the sessions will still be existent on the server, asssuming the client
hasn't been disconnected for more than connection-ttl Chapter 17, Detecting Dead Connections.
In this scenario, HornetQ will automatically re-attach the client sessions to the server sessions
when the connection reconnects. This is done 100% transparently and the client can continue
exactly as if nothing had happened.
The way this works is as follows:
As HornetQ clients send commands to their servers they store each sent command in an in-
memory buffer. In the case that connection failure occurs and the client subsequently reattaches
to the same server, as part of the reattachment protocol the server informs the client during
reattachment with the id of the last command it successfully received from that client.
If the client has sent more commands than were received before failover it can replay any sent
commands from its buffer so that the client and server can reconcile their states.
The size of this buffer is configured by the ConfirmationWindowSize parameter, when the server
has received ConfirmationWindowSize bytes of commands and processed them it will send back
a command confirmation to the client, and the client can then free up space in the buffer.
If you are using JMS and you're using the JMS service on the server to load your JMS connection
factory instances into JNDI then this parameter can be configured in hornetq-jms.xml using the
element confirmation-window-size a. If you're using JMS but not using JNDI then you can set
these values directly on the HornetQConnectionFactory instance using the appropriate setter
method.
If you're using the core API you can set these values directly on the ServerLocator instance
using the appropriate setter method.
The window is specified in bytes.
Setting this parameter to -1 disables any buffering and prevents any re-attachment from occurring,
forcing reconnect instead. The default value for this parameter is -1. (Which means by default no
auto re-attachment will occur)

Chapter 34. Client Reconnecti...
190
34.2. Session reconnection
Alternatively, the server might have actually been restarted after crashing or being stopped. In
this case any sessions will no longer be existent on the server and it won't be possible to 100%
transparently re-attach to them.
In this case, HornetQ will automatically reconnect the connection and recreate any sessions and
consumers on the server corresponding to the sessions and consumers on the client. This process
is exactly the same as what happens during failover onto a backup server.
Client reconnection is also used internally by components such as core bridges to allow them to
reconnect to their target servers.
Please see the section on failover Section 39.2.1, “Automatic Client Failover” to get a full
understanding of how transacted and non-transacted sessions are reconnected during failover/
reconnect and what you need to do to maintain once and only once delivery guarantees.
34.3. Configuring reconnection/reattachment attributes
Client reconnection is configured using the following parameters:
• retry-interval. This optional parameter determines the period in milliseconds between
subsequent reconnection attempts, if the connection to the target server has failed. The default
value is 2000 milliseconds.
• retry-interval-multiplier. This optional parameter determines determines a multiplier to
apply to the time since the last retry to compute the time to the next retry.
This allows you to implement an exponential backoff between retry attempts.
Let's take an example:
If we set retry-interval to 1000 ms and we set retry-interval-multiplier to 2.0, then,
if the first reconnect attempt fails, we will wait 1000 ms then 2000 ms then 4000 ms between
subsequent reconnection attempts.
The default value is 1.0 meaning each reconnect attempt is spaced at equal intervals.
• max-retry-interval. This optional parameter determines the maximum retry interval that
will be used. When setting retry-interval-multiplier it would otherwise be possible that
subsequent retries exponentially increase to ridiculously large values. By setting this parameter
you can set an upper limit on that value. The default value is 2000 milliseconds.
• reconnect-attempts. This optional parameter determines the total number of reconnect
attempts to make before giving up and shutting down. A value of -1 signifies an unlimited
number of attempts. The default value is 0.

ExceptionListeners and SessionFailureListeners
191
If you're using JMS, and you're using the JMS Service on the server to load your JMS connection
factory instances directly into JNDI, then you can specify these parameters in the xml configuration
in hornetq-jms.xml, for example:
<connection-factory name="ConnectionFactory">
<connectors>
<connector-ref connector-name="netty"/>
</connectors>
<entries>
<entry name="ConnectionFactory"/>
<entry name="XAConnectionFactory"/>
</entries>
<retry-interval>1000</retry-interval>
<retry-interval-multiplier>1.5</retry-interval-multiplier>
<max-retry-interval>60000</max-retry-interval>
<reconnect-attempts>1000</reconnect-attempts>
</connection-factory>
If you're using JMS, but instantiating your JMS connection factory directly, you can specify
the parameters using the appropriate setter methods on the HornetQConnectionFactory
immediately after creating it.
If you're using the core API and instantiating the ServerLocator instance directly you can also
specify the parameters using the appropriate setter methods on the ServerLocator immediately
after creating it.
If your client does manage to reconnect but the session is no longer available on the server, for
instance if the server has been restarted or it has timed out, then the client won't be able to re-
attach, and any ExceptionListener or FailureListener instances registered on the connection
or session will be called.
34.4. ExceptionListeners and SessionFailureListeners
Please note, that when a client reconnects or re-attaches, any registered JMS
ExceptionListener or core API SessionFailureListener will be called.

192

Chapter 35.
193
Diverting and Splitting Message
FlowsHornetQ allows you to configure objects called diverts with some simple server configuration.
Diverts allow you to transparently divert messages routed to one address to some other address,
without making any changes to any client application logic.
Diverts can be exclusive, meaning that the message is diverted to the new address, and does not
go to the old address at all, or they can be non-exclusive which means the message continues
to go the old address, and a copy of it is also sent to the new address. Non-exclusive diverts can
therefore be used for splitting message flows, e.g. there may be a requirement to monitor every
order sent to an order queue.
Diverts can also be configured to have an optional message filter. If specified then only messages
that match the filter will be diverted.
Diverts can also be configured to apply a Transformer. If specified, all diverted messages will
have the opportunity of being transformed by the Transformer.
A divert will only divert a message to an address on the same server, however, if you want to
divert to an address on a different server, a common pattern would be to divert to a local store-
and-forward queue, then set up a bridge which consumes from that queue and forwards to an
address on a different server.
Diverts are therefore a very sophisticated concept, which when combined with bridges can be
used to create interesting and complex routings. The set of diverts on a server can be thought
of as a type of routing table for messages. Combining diverts with bridges allows you to create
a distributed network of reliable routing connections between multiple geographically distributed
servers, creating your global messaging mesh.
Diverts are defined as xml in the hornetq-configuration.xml file. There can be zero or more
diverts in the file.
Please see Section 11.1.18, “Divert” for a full working example showing you how to configure and
use diverts.
Let's take a look at some divert examples:
35.1. Exclusive Divert
Let's take a look at an exclusive divert. An exclusive divert diverts all matching messages that
are routed to the old address to the new address. Matching messages do not get routed to the
old address.

Chapter 35. Diverting and Spl...
194
Here's some example xml configuration for an exclusive divert, it's taken from the divert example:
<divert name="prices-divert">
<address>jms.topic.priceUpdates</address>
<forwarding-address>jms.queue.priceForwarding</forwarding-address>
<filter string="office='New York'"/>
<transformer-class-name>
org.hornetq.jms.example.AddForwardingTimeTransformer
</transformer-class-name>
<exclusive>true</exclusive>
</divert>
We define a divert called 'prices-divert' that will divert any messages sent to the address
'jms.topic.priceUpdates' (this corresponds to any messages sent to a JMS Topic called
'priceUpdates') to another local address 'jms.queue.priceForwarding' (this corresponds to a
local JMS queue called 'priceForwarding'
We also specify a message filter string so only messages with the message property office with
value New York will get diverted, all other messages will continue to be routed to the normal
address. The filter string is optional, if not specified then all messages will be considered matched.
In this example a transformer class is specified. Again this is optional, and if specified the
transformer will be executed for each matching message. This allows you to change the messages
body or properties before it is diverted. In this example the transformer simply adds a header that
records the time the divert happened.
This example is actually diverting messages to a local store and forward queue, which is
configured with a bridge which forwards the message to an address on another HornetQ server.
Please see the example for more details.
35.2. Non-exclusive Divert
Now we'll take a look at a non-exclusive divert. Non exclusive diverts are the same as exclusive
diverts, but they only forward a copy of the message to the new address. The original message
continues to the old address
You can therefore think of non-exclusive diverts as splitting a message flow.
Non exclusive diverts can be configured in the same way as exclusive diverts with an optional
filter and transformer, here's an example non-exclusive divert, again from the divert example:
<divert name="order-divert">
<address>jms.queue.orders</address>
<forwarding-address>jms.topic.spyTopic</forwarding-address>

Non-exclusive Divert
195
<exclusive>false</exclusive>
</divert>
The above divert example takes a copy of every message sent to the address
'jms.queue.orders' (Which corresponds to a JMS Queue called 'orders') and sends it to a local
address called 'jms.topic.SpyTopic' (which corresponds to a JMS Topic called 'SpyTopic').

196

Chapter 36.
197
Core BridgesThe function of a bridge is to consume messages from a source queue, and forward them to a
target address, typically on a different HornetQ server.
The source and target servers do not have to be in the same cluster which makes bridging suitable
for reliably sending messages from one cluster to another, for instance across a WAN, or internet
and where the connection may be unreliable.
The bridge has built in resilience to failure so if the target server connection is lost, e.g. due to
network failure, the bridge will retry connecting to the target until it comes back online. When it
comes back online it will resume operation as normal.
In summary, bridges are a way to reliably connect two separate HornetQ servers together. With
a core bridge both source and target servers must be HornetQ servers.
Bridges can be configured to provide once and only once delivery guarantees even in the event of
the failure of the source or the target server. They do this by using duplicate detection (described
in Chapter 37, Duplicate Message Detection).
Note
Although they have similar function, don't confuse core bridges with JMS bridges!
Core bridges are for linking a HornetQ node with another HornetQ node and do not
use the JMS API. A JMS Bridge is used for linking any two JMS 1.1 compliant JMS
providers. So, a JMS Bridge could be used for bridging to or from different JMS
compliant messaging system. It's always preferable to use a core bridge if you can.
Core bridges use duplicate detection to provide once and only once guarantees.
To provide the same guarantee using a JMS bridge you would have to use XA
which has a higher overhead and is more complex to configure.
36.1. Configuring Bridges
Bridges are configured in hornetq-configuration.xml. Let's kick off with an example (this is
actually from the bridge example):
<bridge name="my-bridge">
<queue-name>jms.queue.sausage-factory</queue-name>
<forwarding-address>jms.queue.mincing-machine</forwarding-address>
<filter-string="name='aardvark'"/>
<transformer-class-name>
org.hornetq.jms.example.HatColourChangeTransformer

Chapter 36. Core Bridges
198
</transformer-class-name>
<retry-interval>1000</retry-interval>
<ha>true</ha>
<retry-interval-multiplier>1.0</retry-interval-multiplier>
<reconnect-attempts>-1</reconnect-attempts>
<failover-on-server-shutdown>false</failover-on-server-shutdown>
<use-duplicate-detection>true</use-duplicate-detection>
<confirmation-window-size>10000000</confirmation-window-size>
<connector-ref connector-name="remote-connector" backup-connector-
name="backup-remote-connector"/>
<user>foouser</user>
<password>foopassword</password>
</bridge>
In the above example we have shown all the parameters its possible to configure for a bridge. In
practice you might use many of the defaults so it won't be necessary to specify them all explicitly.
Let's take a look at all the parameters in turn:
• name attribute. All bridges must have a unique name in the server.
• queue-name. This is the unique name of the local queue that the bridge consumes from, it's a
mandatory parameter.
The queue must already exist by the time the bridge is instantiated at start-up.
Note
If you're using JMS then normally the JMS configuration hornetq-jms.xml is
loaded after the core configuration file hornetq-configuration.xml is loaded.
If your bridge is consuming from a JMS queue then you'll need to make sure the
JMS queue is also deployed as a core queue in the core configuration. Take a
look at the bridge example for an example of how this is done.
• forwarding-address. This is the address on the target server that the message will be
forwarded to. If a forwarding address is not specified, then the original address of the message
will be retained.
• filter-string. An optional filter string can be supplied. If specified then only messages which
match the filter expression specified in the filter string will be forwarded. The filter string follows
the HornetQ filter expression syntax described in Chapter 14, Filter Expressions.
• transformer-class-name. An optional transformer-class-name can be specified.
This is the name of a user-defined class which implements the
org.hornetq.core.server.cluster.Transformer interface.

Configuring Bridges
199
If this is specified then the transformer's transform() method will be invoked with the message
before it is forwarded. This gives you the opportunity to transform the message's header or
body before forwarding it.
• ha. This optional parameter determines whether or not this bridge should support high
availability. True means it will connect to any available server in a cluster and support failover.
The default value is false.
• retry-interval. This optional parameter determines the period in milliseconds between
subsequent reconnection attempts, if the connection to the target server has failed. The default
value is 2000milliseconds.
• retry-interval-multiplier. This optional parameter determines determines a multiplier to
apply to the time since the last retry to compute the time to the next retry.
This allows you to implement an exponential backoff between retry attempts.
Let's take an example:
If we set retry-intervalto 1000 ms and we set retry-interval-multiplier to 2.0, then,
if the first reconnect attempt fails, we will wait 1000 ms then 2000 ms then 4000 ms between
subsequent reconnection attempts.
The default value is 1.0 meaning each reconnect attempt is spaced at equal intervals.
• reconnect-attempts. This optional parameter determines the total number of reconnect
attempts the bridge will make before giving up and shutting down. A value of -1 signifies an
unlimited number of attempts. The default value is -1.
• failover-on-server-shutdown. This optional parameter determines whether the bridge will
attempt to failover onto a backup server (if specified) when the target server is cleanly shutdown
rather than crashed.
The bridge connector can specify both a live and a backup server, if it specifies a backup
server and this parameter is set to true then if the target server is cleanly shutdown the bridge
connection will attempt to failover onto its backup. If the bridge connector has no backup server
configured then this parameter has no effect.
Sometimes you want a bridge configured with a live and a backup target server, but you don't
want to failover to the backup if the live server is simply taken down temporarily for maintenance,
this is when this parameter comes in handy.
The default value for this parameter is false.
• use-duplicate-detection. This optional parameter determines whether the bridge will
automatically insert a duplicate id property into each message that it forwards.
Doing so, allows the target server to perform duplicate detection on messages it receives from
the source server. If the connection fails or server crashes, then, when the bridge resumes it

Chapter 36. Core Bridges
200
will resend unacknowledged messages. This might result in duplicate messages being sent to
the target server. By enabling duplicate detection allows these duplicates to be screened out
and ignored.
This allows the bridge to provide a once and only once delivery guarantee without using
heavyweight methods such as XA (see Chapter 37, Duplicate Message Detection for more
information).
The default value for this parameter is true.
• confirmation-window-size. This optional parameter determines the confirmation-window-
size to use for the connection used to forward messages to the target node. This attribute is
described in section Chapter 34, Client Reconnection and Session Reattachment
WarningWhen using the bridge to forward messages from a queue which has a max-
size-bytes set it's important that confirmation-window-size is less than or equal
to max-size-bytes to prevent the flow of messages from ceasing.
• connector-ref. This mandatory parameter determines which connector pair the bridge will use
to actually make the connection to the target server.
A connector encapsulates knowledge of what transport to use (TCP, SSL, HTTP etc) as well as
the server connection parameters (host, port etc). For more information about what connectors
are and how to configure them, please see Chapter 16, Configuring the Transport.
The connector-ref element can be configured with two attributes:
• connector-name. This references the name of a connector defined in the core configuration
file hornetq-configuration.xml. The bridge will use this connector to make its connection
to the target server. This attribute is mandatory.
• backup-connector-name. This optional parameter also references the name of a connector
defined in the core configuration file hornetq-configuration.xml. It represents the
connector that the bridge will fail-over onto if it detects the live server connection has failed.
If this is specified and failover-on-server-shutdown is set to true then it will also attempt
failover onto this connector if the live target server is cleanly shut-down.
• user. This optional parameter determines the user name to use when creating the bridge
connection to the remote server. If it is not specified the default cluster user specified by
cluster-user in hornetq-configuration.xml will be used.
• password. This optional parameter determines the password to use when creating the bridge
connection to the remote server. If it is not specified the default cluster password specified by
cluster-password in hornetq-configuration.xml will be used.

Chapter 37.
201
Duplicate Message DetectionHornetQ includes powerful automatic duplicate message detection, filtering out duplicate
messages without you having to code your own fiddly duplicate detection logic at the application
level. This chapter will explain what duplicate detection is, how HornetQ uses it and how and
where to configure it.
When sending messages from a client to a server, or indeed from a server to another server, if
the target server or connection fails sometime after sending the message, but before the sender
receives a response that the send (or commit) was processed successfully then the sender cannot
know for sure if the message was sent successfully to the address.
If the target server or connection failed after the send was received and processed but before
the response was sent back then the message will have been sent to the address successfully,
but if the target server or connection failed before the send was received and finished processing
then it will not have been sent to the address successfully. From the senders point of view it's not
possible to distinguish these two cases.
When the server recovers this leaves the client in a difficult situation. It knows the target server
failed, but it does not know if the last message reached its destination ok. If it decides to resend
the last message, then that could result in a duplicate message being sent to the address. If each
message was an order or a trade then this could result in the order being fulfilled twice or the trade
being double booked. This is clearly not a desirable situation.
Sending the message(s) in a transaction does not help out either. If the server or connection fails
while the transaction commit is being processed it is also indeterminate whether the transaction
was successfully committed or not!
To solve these issues HornetQ provides automatic duplicate messages detection for messages
sent to addresses.
37.1. Using Duplicate Detection for Message Sending
Enabling duplicate message detection for sent messages is simple: you just need to set a special
property on the message to a unique value. You can create the value however you like, as long as
it is unique. When the target server receives the message it will check if that property is set, if it is,
then it will check in its in memory cache if it has already received a message with that value of the
header. If it has received a message with the same value before then it will ignore the message.
Note
Using duplicate detection to move messages between nodes can give you the
same once and only once delivery guarantees as if you were using an XA
transaction to consume messages from source and send them to the target, but
with less overhead and much easier configuration than using XA.

Chapter 37. Duplicate Message...
202
If you're sending messages in a transaction then you don't have to set the property for every
message you send in that transaction, you only need to set it once in the transaction. If the server
detects a duplicate message for any message in the transaction, then it will ignore the entire
transaction.
The name of the property that you set is given by the value of
org.hornetq.api.core.HDR_DUPLICATE_DETECTION_ID, which is _HQ_DUPL_ID
The value of the property can be of type byte[] or SimpleString if you're using the core API. If
you're using JMS it must be a String, and its value should be unique. An easy way of generating
a unique id is by generating a UUID.
Here's an example of setting the property using the core API:
...
ClientMessage message = session.createMessage(true);
SimpleString myUniqueID = "This is my unique id"; // Could use a UUID for this
message.setStringProperty(HDR_DUPLICATE_DETECTION_ID, myUniqueID);
...
And here's an example using the JMS API:
...
Message jmsMessage = session.createMessage();
String myUniqueID = "This is my unique id"; // Could use a UUID for this
message.setStringProperty(HDR_DUPLICATE_DETECTION_ID.toString(), myUniqueID);
...
37.2. Configuring the Duplicate ID Cache
The server maintains caches of received values of the
org.hornetq.core.message.impl.HDR_DUPLICATE_DETECTION_ID property sent to each
address. Each address has its own distinct cache.

Duplicate Detection and Bridges
203
The cache is a circular fixed size cache. If the cache has a maximum size of n elements, then the
n + 1th id stored will overwrite the 0th element in the cache.
The maximum size of the cache is configured by the parameter id-cache-size in hornetq-
configuration.xml, the default value is 2000 elements.
The caches can also be configured to persist to disk or not. This is configured by the parameter
persist-id-cache, also in hornetq-configuration.xml. If this is set to true then each id will
be persisted to permanent storage as they are received. The default value for this parameter is
true.
Note
When choosing a size of the duplicate id cache be sure to set it to a larger enough
size so if you resend messages all the previously sent ones are in the cache not
having been overwritten.
37.3. Duplicate Detection and Bridges
Core bridges can be configured to automatically add a unique duplicate id value (if there isn't
already one in the message) before forwarding the message to it's target. This ensures that if the
target server crashes or the connection is interrupted and the bridge resends the message, then
if it has already been received by the target server, it will be ignored.
To configure a core bridge to add the duplicate id header, simply set the use-duplicate-
detection to true when configuring a bridge in hornetq-configuration.xml.
The default value for this parameter is true.
For more information on core bridges and how to configure them, please see Chapter 36, Core
Bridges.
37.4. Duplicate Detection and Cluster Connections
Cluster connections internally use core bridges to move messages reliable between nodes of
the cluster. Consequently they can also be configured to insert the duplicate id header for each
message they move using their internal bridges.
To configure a cluster connection to add the duplicate id header, simply set the use-duplicate-
detection to true when configuring a cluster connection in hornetq-configuration.xml.
The default value for this parameter is true.
For more information on cluster connections and how to configure them, please see Chapter 38,
Clusters.

204

Chapter 38.
205
Clusters
38.1. Clusters Overview
HornetQ clusters allow groups of HornetQ servers to be grouped together in order to share
message processing load. Each active node in the cluster is an active HornetQ server which
manages its own messages and handles its own connections.
Note
The clustered parameter is deprecated and no longer needed for setting up a
cluster.
The cluster is formed by each node declaring cluster connections to other nodes in the core
configuration file hornetq-configuration.xml. When a node forms a cluster connection to
another node, internally it creates a core bridge (as described in Chapter 36, Core Bridges)
connection between it and the other node, this is done transparently behind the scenes - you don't
have to declare an explicit bridge for each node. These cluster connections allow messages to
flow between the nodes of the cluster to balance load.
Nodes can be connected together to form a cluster in many different topologies, we will discuss
a couple of the more common topologies later in this chapter.
We'll also discuss client side load balancing, where we can balance client connections across the
nodes of the cluster, and we'll consider message redistribution where HornetQ will redistribute
messages between nodes to avoid starvation.
Another important part of clustering is server discovery where servers can broadcast their
connection details so clients or other servers can connect to them with the minimum of
configuration.
Warning
Once a cluster node has been configured it is common to simply copy that
configuration to other nodes to produce a symmetric cluster. However, care must
be taken when copying the HornetQ files. Do not copy the HornetQ data (i.e. the
bindings, journal, and large-messages directories) from one node to another.
When a node is started for the first time and initializes its journal files it also persists
a special identifier to the journal directory. This id must be unique among nodes
in the cluster or the cluster will not form properly.

Chapter 38. Clusters
206
38.2. Server discovery
Server discovery is a mechanism by which servers can propagate their connection details to:
• Messaging clients. A messaging client wants to be able to connect to the servers of the cluster
without having specific knowledge of which servers in the cluster are up at any one time.
• Other servers. Servers in a cluster want to be able to create cluster connections to each other
without having prior knowledge of all the other servers in the cluster.
This information, lets call it the Cluster Topology, is actually sent around normal HornetQ
connections to clients and to other servers over cluster connections. This being the case we
need a way of establishing the initial first connection. This can be done using dynamic discovery
techniques like UDP [http://en.wikipedia.org/wiki/User_Datagram_Protocol] and JGroups [http://
www.jgroups.org/], or by providing a list of initial connectors.
38.2.1. Dynamic Discovery
Server discovery uses UDP [http://en.wikipedia.org/wiki/User_Datagram_Protocol] multicast or
JGroups [http://www.jgroups.org/] to broadcast server connection settings.
38.2.1.1. Broadcast Groups
A broadcast group is the means by which a server broadcasts connectors over the network. A
connector defines a way in which a client (or other server) can make connections to the server.
For more information on what a connector is, please see Chapter 16, Configuring the Transport.
The broadcast group takes a set of connector pairs, each connector pair contains connection
settings for a live and backup server (if one exists) and broadcasts them on the network.
Depending on which broadcasting technique you configure the cluster, it uses either UDP or
JGroups to broadcast connector pairs information.
Broadcast groups are defined in the server configuration file hornetq-configuration.xml. There
can be many broadcast groups per HornetQ server. All broadcast groups must be defined in a
broadcast-groups element.
Let's take a look at an example broadcast group from hornetq-configuration.xml that defines
a UDP broadcast group:
<broadcast-groups>
<broadcast-group name="my-broadcast-group">
<local-bind-address>172.16.9.3</local-bind-address>
<local-bind-port>5432</local-bind-port>
<group-address>231.7.7.7</group-address>

Dynamic Discovery
207
<group-port>9876</group-port>
<broadcast-period>2000</broadcast-period>
<connector-ref connector-name="netty-connector"/>
</broadcast-group>
</broadcast-groups>
Some of the broadcast group parameters are optional and you'll normally use the defaults, but we
specify them all in the above example for clarity. Let's discuss each one in turn:
• name attribute. Each broadcast group in the server must have a unique name.
• local-bind-address. This is the local bind address that the datagram socket is bound to. If
you have multiple network interfaces on your server, you would specify which one you wish to
use for broadcasts by setting this property. If this property is not specified then the socket will
be bound to the wildcard address, an IP address chosen by the kernel. This is a UDP specific
attribute.
• local-bind-port. If you want to specify a local port to which the datagram socket is bound you
can specify it here. Normally you would just use the default value of -1 which signifies that an
anonymous port should be used. This parameter is alawys specified in conjunction with local-
bind-address. This is a UDP specific attribute.
• group-address. This is the multicast address to which the data will be broadcast. It is a class
D IP address in the range 224.0.0.0 to 239.255.255.255, inclusive. The address 224.0.0.0
is reserved and is not available for use. This parameter is mandatory. This is a UDP specific
attribute.
• group-port. This is the UDP port number used for broadcasting. This parameter is mandatory.
This is a UDP specific attribute.
• broadcast-period. This is the period in milliseconds between consecutive broadcasts. This
parameter is optional, the default value is 2000 milliseconds.
• connector-ref. This specifies the connector and optional backup connector that will be
broadcasted (see Chapter 16, Configuring the Transport for more information on connectors).
The connector to be broadcasted is specified by the connector-name attribute.
Here is another example broadcast group that defines a JGroups broadcast group:
<broadcast-groups>
<broadcast-group name="my-broadcast-group">
<jgroups-file>test-jgroups-file_ping.xml</jgroups-file>
<jgroups-channel>hornetq_broadcast_channel</jgroups-channel>
<broadcast-period>2000</broadcast-period>
<connector-ref connector-name="netty-connector"/>

Chapter 38. Clusters
208
</broadcast-group>
</broadcast-groups>
To be able to use JGroups to broadcast, one must specify two attributes, i.e. jgroups-file and
jgroups-channel, as discussed in details as following:
• jgroups-file attribute. This is the name of JGroups configuration file. It will be used to initialize
JGroups channels. Make sure the file is in the java resource path so that HornetQ can load it.
• jgroups-channel attribute. The name that JGroups channels connect to for broadcasting.
Note
The JGroups attributes (jgroups-file and jgroups-channel) and UDP specific
attributes described above are exclusive of each other. Only one set can be
specified in a broadcast group configuration. Don't mix them!
The following is an example of a JGroups file
<config xmlns="urn:org:jgroups"
xmlns:xsi="http://www.w3.org/2001/XMLSchema-instance"
xsi:schemaLocation="urn:org:jgroups http://www.jgroups.org/schema/
JGroups-3.0.xsd">
<TCP loopback="true"
recv_buf_size="20000000"
send_buf_size="640000"
discard_incompatible_packets="true"
max_bundle_size="64000"
max_bundle_timeout="30"
enable_bundling="true"
use_send_queues="false"
sock_conn_timeout="300"
thread_pool.enabled="true"
thread_pool.min_threads="1"
thread_pool.max_threads="10"
thread_pool.keep_alive_time="5000"
thread_pool.queue_enabled="false"
thread_pool.queue_max_size="100"
thread_pool.rejection_policy="run"
oob_thread_pool.enabled="true"
oob_thread_pool.min_threads="1"
oob_thread_pool.max_threads="8"

Dynamic Discovery
209
oob_thread_pool.keep_alive_time="5000"
oob_thread_pool.queue_enabled="false"
oob_thread_pool.queue_max_size="100"
oob_thread_pool.rejection_policy="run"/>
<FILE_PING location="../file.ping.dir"/>
<MERGE2 max_interval="30000"
min_interval="10000"/>
<FD_SOCK/>
<FD timeout="10000" max_tries="5" />
<VERIFY_SUSPECT timeout="1500" />
<BARRIER />
<pbcast.NAKACK
use_mcast_xmit="false"
retransmit_timeout="300,600,1200,2400,4800"
discard_delivered_msgs="true"/>
<UNICAST timeout="300,600,1200" />
<pbcast.STABLE stability_delay="1000" desired_avg_gossip="50000"
max_bytes="400000"/>
<pbcast.GMS print_local_addr="true" join_timeout="3000"
view_bundling="true"/>
<FC max_credits="2000000"
min_threshold="0.10"/>
<FRAG2 frag_size="60000" />
<pbcast.STATE_TRANSFER/>
<pbcast.FLUSH timeout="0"/>
</config>
As it shows, the file content defines a jgroups protocol stacks. If you want hornetq to use this
stacks for channel creation, you have to make sure the value of jgroups-file in your broadcast-
group/discovery-group configuration to be the name of this jgroups configuration file. For example
if the above stacks configuration is stored in a file named "jgroups-stacks.xml" then your jgroups-
file should be like
<jgroups-file>jgroups-stacks.xml</jgroups-file>
38.2.1.2. Discovery Groups
While the broadcast group defines how connector information is broadcasted from a server, a
discovery group defines how connector information is received from a broadcast endpoint (a UDP
multicast address or JGroup channel).
A discovery group maintains a list of connector pairs - one for each broadcast by a different server.
As it receives broadcasts on the broadcast endpoint from a particular server it updates its entry
in the list for that server.

Chapter 38. Clusters
210
If it has not received a broadcast from a particular server for a length of time it will remove that
server's entry from its list.
Discovery groups are used in two places in HornetQ:
• By cluster connections so they know how to obtain an initial connection to download the topology
• By messaging clients so they know how to obtain an initial connection to download the topology
Although a discovery group will always accept broadcasts, its current list of avaliable live and
backup servers is only ever used when an initial connection is made, from then server discovery
is done over the normal HornetQ connections.
Note
Each discovery group must be configured with broadcast endpoint (UDP or
JGroups) that matches its broadcast group counterpart. For example, if broadcast
is configured using UDP, the discovery group must also use UDP, and the same
multicast address.
38.2.1.3. Defining Discovery Groups on the Server
For cluster connections, discovery groups are defined in the server side configuration file
hornetq-configuration.xml. All discovery groups must be defined inside a discovery-groups
element. There can be many discovery groups defined by HornetQ server. Let's look at an
example:
<discovery-groups>
<discovery-group name="my-discovery-group">
<local-bind-address>172.16.9.7</local-bind-address>
<group-address>231.7.7.7</group-address>
<group-port>9876</group-port>
<refresh-timeout>10000</refresh-timeout>
</discovery-group>
</discovery-groups>
We'll consider each parameter of the discovery group:
• name attribute. Each discovery group must have a unique name per server.
• local-bind-address. If you are running with multiple network interfaces on the same machine,
you may want to specify that the discovery group listens only only a specific interface. To do
this you can specify the interface address with this parameter. This parameter is optional. This
is a UDP specific attribute.

Dynamic Discovery
211
• group-address. This is the multicast ip address of the group to listen on. It should match
the group-address in the broadcast group that you wish to listen from. This parameter is
mandatory. This is a UDP specific attribute.
• group-port. This is the UDP port of the multicast group. It should match the group-port in
the broadcast group that you wish to listen from. This parameter is mandatory. This is a UDP
specific attribute.
• refresh-timeout. This is the period the discovery group waits after receiving the last broadcast
from a particular server before removing that servers connector pair entry from its list. You would
normally set this to a value significantly higher than the broadcast-period on the broadcast
group otherwise servers might intermittently disappear from the list even though they are still
broadcasting due to slight differences in timing. This parameter is optional, the default value is
10000 milliseconds (10 seconds).
Here is another example that defines a JGroups discovery group:
<discovery-groups>
<discovery-group name="my-broadcast-group">
<jgroups-file>test-jgroups-file_ping.xml</jgroups-file>
<jgroups-channel>hornetq_broadcast_channel</jgroups-channel>
<refresh-timeout>10000</refresh-timeout>
</discovery-group>
</discovery-groups>
To receive broadcast from JGroups channels, one must specify two attributes, jgroups-file and
jgroups-channel, as discussed in details as following:
• jgroups-file attribute. This is the name of JGroups configuration file. It will be used to initialize
JGroups channels. Make sure the file is in the java resource path so that HornetQ can load it.
• jgroups-channel attribute. The name that JGroups channels connect to for receiving
broadcasts.
Note
The JGroups attributes (jgroups-file and jgroups-channel) and UDP specific
attributes described above are exclusive of each other. Only one set can be
specified in a discovery group configuration. Don't mix them!
38.2.1.4. Discovery Groups on the Client Side
Let's discuss how to configure a HornetQ client to use discovery to discover a list of servers to
which it can connect. The way to do this differs depending on whether you're using JMS or the
core API.

Chapter 38. Clusters
212
38.2.1.4.1. Configuring client discovery using JMS
If you're using JMS and you're also using the JMS Service on the server to load your JMS
connection factory instances into JNDI, then you can specify which discovery group to use for
your JMS connection factory in the server side xml configuration hornetq-jms.xml. Let's take a
look at an example:
<connection-factory name="ConnectionFactory">
<discovery-group-ref discovery-group-name="my-discovery-group"/>
<entries>
<entry name="ConnectionFactory"/>
</entries>
</connection-factory>
The element discovery-group-ref specifies the name of a discovery group defined in hornetq-
configuration.xml.
When this connection factory is downloaded from JNDI by a client application and JMS
connections are created from it, those connections will be load-balanced across the list of servers
that the discovery group maintains by listening on the multicast address specified in the discovery
group configuration.
If you're using JMS, but you're not using JNDI to lookup a connection factory - you're instantiating
the JMS connection factory directly then you can specify the discovery group parameters directly
when creating the JMS connection factory. Here's an example:
final String groupAddress = "231.7.7.7";
final int groupPort = 9876;
ConnectionFactory jmsConnectionFactory =
HornetQJMSClient.createConnectionFactory(new
DiscoveryGroupConfiguration(groupAddress, groupPort), , JMSFactoryType.CF);
Connection jmsConnection1 = jmsConnectionFactory.createConnection();
Connection jmsConnection2 = jmsConnectionFactory.createConnection();
The refresh-timeout can be set directly on the DiscoveryGroupConfiguration by using the setter
method setDiscoveryRefreshTimeout() if you want to change the default value.
There is also a further parameter settable on the DiscoveryGroupConfiguration using the setter
method setDiscoveryInitialWaitTimeout(). If the connection factory is used immediately

Discovery using static Connectors
213
after creation then it may not have had enough time to received broadcasts from all the nodes in
the cluster. On first usage, the connection factory will make sure it waits this long since creation
before creating the first connection. The default value for this parameter is 10000 milliseconds.
38.2.1.4.2. Configuring client discovery using Core
If you're using the core API to directly instantiate ClientSessionFactory instances, then you
can specify the discovery group parameters directly when creating the session factory. Here's an
example:
final String groupAddress = "231.7.7.7";
final int groupPort = 9876;
ServerLocator factory = HornetQClient.createServerLocatorWithHA(new
DiscoveryGroupConfiguration(groupAddress, groupPort));
ClientSessionFactory factory = locator.createSessionFactory();
ClientSession session1 = factory.createSession();
ClientSession session2 = factory.createSession();
The refresh-timeout can be set directly on the DiscoveryGroupConfiguration by using the setter
method setDiscoveryRefreshTimeout() if you want to change the default value.
There is also a further parameter settable on the DiscoveryGroupConfiguration using the setter
method setDiscoveryInitialWaitTimeout(). If the session factory is used immediately after
creation then it may not have had enough time to received broadcasts from all the nodes in the
cluster. On first usage, the session factory will make sure it waits this long since creation before
creating the first session. The default value for this parameter is 10000 milliseconds.
38.2.2. Discovery using static Connectors
Sometimes it may be impossible to use UDP on the network you are using. In this case its possible
to configure a connection with an initial list if possible servers. This could be just one server that
you know will always be available or a list of servers where at least one will be available.
This doesn't mean that you have to know where all your servers are going to be hosted, you can
configure these servers to use the reliable servers to connect to. Once they are connected there
connection details will be propagated via the server it connects to
38.2.2.1. Configuring a Cluster Connection
For cluster connections there is no extra configuration needed, you just need to make sure that any
connectors are defined in the usual manner, (see Chapter 16, Configuring the Transport for more
information on connectors). These are then referenced by the cluster connection configuration.
38.2.2.2. Configuring a Client Connection
A static list of possible servers can also be used by a normal client.

Chapter 38. Clusters
214
38.2.2.2.1. Configuring client discovery using JMS
If you're using JMS and you're also using the JMS Service on the server to load your JMS
connection factory instances into JNDI, then you can specify which connectors to use for your
JMS connection factory in the server side xml configuration hornetq-jms.xml. Let's take a look
at an example:
<connection-factory name="ConnectionFactory">
<connectors>
<connector-ref connector-name="netty-connector"/>
<connector-ref connector-name="netty-connector2"/>
<connector-ref connector-name="netty-connector3"/>
</connectors>
<entries>
<entry name="ConnectionFactory"/>
</entries>
</connection-factory>
The element connectors contains a list of pre defined connectors in the hornetq-
configuration.xml file. When this connection factory is downloaded from JNDI by a client
application and JMS connections are created from it, those connections will be load-balanced
across the list of servers defined by these connectors.
If you're using JMS, but you're not using JNDI to lookup a connection factory - you're instantiating
the JMS connection factory directly then you can specify the connector list directly when creating
the JMS connection factory. Here's an example:
HashMap<String, Object> map = new HashMap<String, Object>();
map.put("host", "myhost");
map.put("port", "5445");
TransportConfiguration server1 = new
TransportConfiguration(NettyConnectorFactory.class.getName(), map);
HashMap<String, Object> map2 = new HashMap<String, Object>();
map2.put("host", "myhost2");
map2.put("port", "5446");
TransportConfiguration server2 = new
TransportConfiguration(NettyConnectorFactory.class.getName(), map2);
HornetQConnectionFactory cf =
HornetQJMSClient.createConnectionFactoryWithHA(JMSFactoryType.CF, server1,
server2);

Server-Side Message Load Balancing
215
38.2.2.2.2. Configuring client discovery using JMS
If you are using the core API then the same can be done as follows:
HashMap<String, Object> map = new HashMap<String, Object>();
map.put("host", "myhost");
map.put("port", "5445");
TransportConfiguration server1 = new
TransportConfiguration(NettyConnectorFactory.class.getName(), map);
HashMap<String, Object> map2 = new HashMap<String, Object>();
map2.put("host", "myhost2");
map2.put("port", "5446");
TransportConfiguration server2 = new
TransportConfiguration(NettyConnectorFactory.class.getName(), map2);
ServerLocator locator = HornetQClient.createServerLocatorWithHA(server1,
server2);
ClientSessionFactory factory = locator.createSessionFactory();
ClientSession session = factory.createSession();
38.3. Server-Side Message Load Balancing
If cluster connections are defined between nodes of a cluster, then HornetQ will load balance
messages arriving at a particular node from a client.
Let's take a simple example of a cluster of four nodes A, B, C, and D arranged in a symmetric
cluster (described in Section 38.7.1, “Symmetric cluster”). We have a queue called OrderQueue
deployed on each node of the cluster.
We have client Ca connected to node A, sending orders to the server. We have also have order
processor clients Pa, Pb, Pc, and Pd connected to each of the nodes A, B, C, D. If no cluster
connection was defined on node A, then as order messages arrive on node A they will all end up
in the OrderQueue on node A, so will only get consumed by the order processor client attached
to node A, Pa.
If we define a cluster connection on node A, then as ordered messages arrive on node A instead of
all of them going into the local OrderQueue instance, they are distributed in a round-robin fashion
between all the nodes of the cluster. The messages are forwarded from the receiving node to other
nodes of the cluster. This is all done on the server side, the client maintains a single connection
to node A.
For example, messages arriving on node A might be distributed in the following order between
the nodes: B, D, C, A, B, D, C, A, B, D. The exact order depends on the order the nodes started
up, but the algorithm used is round robin.

Chapter 38. Clusters
216
HornetQ cluster connections can be configured to always blindly load balance messages in a
round robin fashion irrespective of whether there are any matching consumers on other nodes,
but they can be a bit cleverer than that and also be configured to only distribute to other nodes if
they have matching consumers. We'll look at both these cases in turn with some examples, but
first we'll discuss configuring cluster connections in general.
38.3.1. Configuring Cluster Connections
Cluster connections group servers into clusters so that messages can be load balanced between
the nodes of the cluster. Let's take a look at a typical cluster connection. Cluster connections are
always defined in hornetq-configuration.xml inside a cluster-connection element. There
can be zero or more cluster connections defined per HornetQ server.
<cluster-connections>
<cluster-connection name="my-cluster">
<address>jms</address>
<retry-interval>500</retry-interval>
<use-duplicate-detection>true</use-duplicate-detection>
<forward-when-no-consumers>false</forward-when-no-consumers>
<max-hops>1</max-hops>
<discovery-group-ref discovery-group-name="my-discovery-group"/>
</cluster-connection>
</cluster-connections>
In the above cluster connection all parameters have been explicitly specified. The following shows
all the available configuration options
• address. Each cluster connection only applies to messages sent to an address that starts with
this value.
In this case, this cluster connection will load balance messages sent to address that start with
jms. This cluster connection, will, in effect apply to all JMS queue and topic subscriptions since
they map to core queues that start with the substring "jms".
The address can be any value and you can have many cluster connections with different values
of address, simultaneously balancing messages for those addresses, potentially to different
clusters of servers. By having multiple cluster connections on different addresses a single
HornetQ Server can effectively take part in multiple clusters simultaneously.
Be careful not to have multiple cluster connections with overlapping values of address, e.g.
"europe" and "europe.news" since this could result in the same messages being distributed
between more than one cluster connection, possibly resulting in duplicate deliveries.
This parameter is mandatory.

Configuring Cluster Connections
217
• max-retry-interval. This is how many times a cluster connection should try to reconnect if
the connection fails, -1 means for ever.
• retry-interval. We mentioned before that, internally, cluster connections cause bridges to
be created between the nodes of the cluster. If the cluster connection is created and the target
node has not been started, or say, is being rebooted, then the cluster connections from other
nodes will retry connecting to the target until it comes back up, in the same way as a bridge does.
This parameter determines the interval in milliseconds between retry attempts. It has the same
meaning as the retry-interval on a bridge (as described in Chapter 36, Core Bridges).
This parameter is optional and its default value is 500 milliseconds.
• retry-interval-multiplier. This is a multiplier used to increase the retry-interval after
each reconnect attempt, default is 1.
• use-duplicate-detection. Internally cluster connections use bridges to link the nodes, and
bridges can be configured to add a duplicate id property in each message that is forwarded. If
the target node of the bridge crashes and then recovers, messages might be resent from the
source node. By enabling duplicate detection any duplicate messages will be filtered out and
ignored on receipt at the target node.
This parameter has the same meaning as use-duplicate-detection on a bridge. For more
information on duplicate detection, please see Chapter 37, Duplicate Message Detection.
This parameter is optional and has a default value of true.
• forward-when-no-consumers. This parameter determines whether messages will be
distributed round robin between other nodes of the cluster irrespective of whether there are
matching or indeed any consumers on other nodes.
If this is set to true then each incoming message will be round robin'd even though the same
queues on the other nodes of the cluster may have no consumers at all, or they may have
consumers that have non matching message filters (selectors). Note that HornetQ will not
forward messages to other nodes if there are no queues of the same name on the other nodes,
even if this parameter is set to true.
If this is set to false then HornetQ will only forward messages to other nodes of the cluster
if the address to which they are being forwarded has queues which have consumers, and if
those consumers have message filters (selectors) at least one of those selectors must match
the message.
This parameter is optional, the default value is false.
• min-large-message-size. This parameters determines when a message should be splitted
with multiple packages when sent over the cluster.
This parameter is optional and its default is at 100K.

Chapter 38. Clusters
218
• reconnect-attempts".The number of times the system will try to connect a node on the cluster.
If the max-retry is achieved this node will be considered permanently down and the system will
stop routing messages to this node.
This parameter is optional and its default is at -1 (infinite retries).
• max-hops. When a cluster connection decides the set of nodes to which it might load balance
a message, those nodes do not have to be directly connected to it via a cluster connection.
HornetQ can be configured to also load balance messages to nodes which might be connected
to it only indirectly with other HornetQ servers as intermediates in a chain.
This allows HornetQ to be configured in more complex topologies and still provide message
load balancing. We'll discuss this more later in this chapter.
The default value for this parameter is 1, which means messages are only load balanced to
other HornetQ serves which are directly connected to this server. This parameter is optional.
• discovery-group-ref. This parameter determines which discovery group is used to obtain the
list of other servers in the cluster that this cluster connection will make connections to.
• connection-ttl. This is how long a cluster connection should stay alive if it stops receiving
messages from a specific node in the cluster
• check-period. The period (in milliseconds) used to check if the cluster connection has failed
to receive pings from another server
• call-timeout. When a packet is sent via a cluster connection and is a blocking call, i.e. for
acknowledgements, this is how long it will wait for the reply before throwing an exception
• call-failover-timeout. Similar to call-timeout but used when a call is made during a
failover attempt
• confirmation-window-size. The size of the window used for sending confirmations from the
server connected to, default is -1 which is no window.
Alternatively if you would like your cluster connections to use a static list of servers for discovery
then you can do it like this.
<cluster-connection name="my-cluster">
<address>jms</address>
<connector-ref>netty-connector</connector-ref>
<retry-interval>500</retry-interval>
<use-duplicate-detection>true</use-duplicate-detection>
<forward-when-no-consumers>true</forward-when-no-consumers>
<max-hops>1</max-hops>
<static-connectors>
<connector-ref>server0-connector</connector-ref>
<connector-ref>server1-connector</connector-ref>

Cluster User Credentials
219
</static-connectors>
</cluster-connection>
Here we have defined 2 servers that we know for sure will that at least one will be available. There
may be many more servers in the cluster but these will; be discovered via one of these connectors
once an initial connection has been made.
38.3.2. Cluster User Credentials
When creating connections between nodes of a cluster to form a cluster connection, HornetQ
uses a cluster user and cluster password which is defined in hornetq-configuration.xml:
<cluster-user>HORNETQ.CLUSTER.ADMIN.USER</cluster-user>
<cluster-password>CHANGE ME!!</cluster-password>
Warning
It is imperative that these values are changed from their default, or remote clients
will be able to make connections to the server using the default values. If they
are not changed from the default, HornetQ will detect this and pester you with a
warning on every start-up.
38.4. Client-Side Load balancing
With HornetQ client-side load balancing, subsequent sessions created using a single session
factory can be connected to different nodes of the cluster. This allows sessions to spread smoothly
across the nodes of a cluster and not be "clumped" on any particular node.
The load balancing policy to be used by the client factory is configurable. HornetQ provides four
out-of-the-box load balancing policies, and you can also implement your own and use that.
The out-of-the-box policies are
• Round Robin. With this policy the first node is chosen randomly then each subsequent node is
chosen sequentially in the same order.
For example nodes might be chosen in the order B, C, D, A, B, C, D, A, B or D, A, B, C, D, A,
B, C, D or C, D, A, B, C, D, A, B, C.
Use
org.hornetq.api.core.client.loadbalance.RoundRobinConnectionLoadBalancingPolicy
as the <connection-load-balancing-policy-class-name>.

Chapter 38. Clusters
220
• Random. With this policy each node is chosen randomly.
Use
org.hornetq.api.core.client.loadbalance.RandomConnectionLoadBalancingPolicy
as the <connection-load-balancing-policy-class-name>.
• Random Sticky. With this policy the first node is chosen randomly and then re-used for
subsequent connections.
Use
org.hornetq.api.core.client.loadbalance.RandomStickyConnectionLoadBalancingPolicy
as the <connection-load-balancing-policy-class-name>.
• First Element. With this policy the "first" (i.e. 0th) node is always returned.
Use
org.hornetq.api.core.client.loadbalance.FirstElementConnectionLoadBalancingPolicy
as the <connection-load-balancing-policy-class-name>.
You can also implement your own policy by implementing the interface
org.hornetq.api.core.client.loadbalance.ConnectionLoadBalancingPolicy
Specifying which load balancing policy to use differs whether you are using JMS or
the core API. If you don't specify a policy then the default will be used which is
org.hornetq.api.core.client.loadbalance.RoundRobinConnectionLoadBalancingPolicy.
If you're using JMS, and you're using JNDI on the server to put your JMS connection factories into
JNDI, then you can specify the load balancing policy directly in the hornetq-jms.xml configuration
file on the server as follows:
<connection-factory name="ConnectionFactory">
<discovery-group-ref discovery-group-name="my-discovery-group"/>
<entries>
<entry name="ConnectionFactory"/>
</entries>
<connection-load-balancing-policy-class-name>
org.hornetq.api.core.client.loadbalance.RandomConnectionLoadBalancingPolicy
</connection-load-balancing-policy-class-name>
</connection-factory>
The above example would deploy a JMS connection factory that uses the random connection
load balancing policy.
If you're using JMS but you're instantiating your connection factory directly on the client side then
you can set the load balancing policy using the setter on the HornetQConnectionFactory before
using it:

Specifying Members of a Cluster Explicitly
221
ConnectionFactory jmsConnectionFactory =
HornetQJMSClient.createConnectionFactory(...);
jmsConnectionFactory.setLoadBalancingPolicyClassName("com.acme.MyLoadBalancingPolicy");
If you're using the core API, you can set the load balancing policy directly on the ServerLocator
instance you are using:
ServerLocator locator = HornetQClient.createServerLocatorWithHA(server1,
server2);
locator.setLoadBalancingPolicyClassName("com.acme.MyLoadBalancingPolicy");
The set of servers over which the factory load balances can be determined in one of two ways:
• Specifying servers explicitly
• Using discovery.
38.5. Specifying Members of a Cluster Explicitly
Sometimes you want to explicitly define a cluster more explicitly, that is control which server
connect to each other in the cluster. This is typically used to form non symmetrical clusters such
as chain cluster or ring clusters. This can only be done using a static list of connectors and is
configured as follows:
<cluster-connection name="my-cluster">
<address>jms</address>
<connector-ref>netty-connector</connector-ref>
<retry-interval>500</retry-interval>
<use-duplicate-detection>true</use-duplicate-detection>
<forward-when-no-consumers>true</forward-when-no-consumers>
<max-hops>1</max-hops>
<static-connectors allow-direct-connections-only="true">
<connector-ref>server1-connector</connector-ref>
</static-connectors>
</cluster-connection>
In this example we have set the attribute allow-direct-connections-only which means that
the only server that this server can create a cluster connection to is server1-connector. This means
you can explicitly create any cluster topology you want.

Chapter 38. Clusters
222
38.6. Message Redistribution
Another important part of clustering is message redistribution. Earlier we learned how server
side message load balancing round robins messages across the cluster. If forward-when-no-
consumers is false, then messages won't be forwarded to nodes which don't have matching
consumers, this is great and ensures that messages don't arrive on a queue which has no
consumers to consume them, however there is a situation it doesn't solve: What happens if the
consumers on a queue close after the messages have been sent to the node? If there are no
consumers on the queue the message won't get consumed and we have a starvation situation.
This is where message redistribution comes in. With message redistribution HornetQ can be
configured to automatically redistribute messages from queues which have no consumers back
to other nodes in the cluster which do have matching consumers.
Message redistribution can be configured to kick in immediately after the last consumer on a queue
is closed, or to wait a configurable delay after the last consumer on a queue is closed before
redistributing. By default message redistribution is disabled.
Message redistribution can be configured on a per address basis, by specifying the redistribution
delay in the address settings, for more information on configuring address settings, please see
Chapter 25, Queue Attributes.
Here's an address settings snippet from hornetq-configuration.xml showing how message
redistribution is enabled for a set of queues:
<address-settings>
<address-setting match="jms.#">
<redistribution-delay>0</redistribution-delay>
</address-setting>
</address-settings>
The above address-settings block would set a redistribution-delay of 0 for any queue
which is bound to an address that starts with "jms.". All JMS queues and topic subscriptions
are bound to addresses that start with "jms.", so the above would enable instant (no delay)
redistribution for all JMS queues and topic subscriptions.
The attribute match can be an exact match or it can be a string that conforms to the HornetQ
wildcard syntax (described in Chapter 13, Understanding the HornetQ Wildcard Syntax).
The element redistribution-delay defines the delay in milliseconds after the last consumer is
closed on a queue before redistributing messages from that queue to other nodes of the cluster
which do have matching consumers. A delay of zero means the messages will be immediately
redistributed. A value of -1 signifies that messages will never be redistributed. The default value
is -1.

Cluster topologies
223
It often makes sense to introduce a delay before redistributing as it's a common case that a
consumer closes but another one quickly is created on the same queue, in such a case you
probably don't want to redistribute immediately since the new consumer will arrive shortly.
38.7. Cluster topologies
HornetQ clusters can be connected together in many different topologies, let's consider the two
most common ones here
38.7.1. Symmetric cluster
A symmetric cluster is probably the most common cluster topology, and you'll be familiar with if
you've had experience of JBoss Application Server clustering.
With a symmetric cluster every node in the cluster is connected to every other node in the cluster.
In other words every node in the cluster is no more than one hop away from every other node.
To form a symmetric cluster every node in the cluster defines a cluster connection with the attribute
max-hops set to 1. Typically the cluster connection will use server discovery in order to know what
other servers in the cluster it should connect to, although it is possible to explicitly define each
target server too in the cluster connection if, for example, UDP is not available on your network.
With a symmetric cluster each node knows about all the queues that exist on all the other nodes
and what consumers they have. With this knowledge it can determine how to load balance and
redistribute messages around the nodes.
Don't forget this warning when creating a symmetric cluster.
38.7.2. Chain cluster
With a chain cluster, each node in the cluster is not connected to every node in the cluster directly,
instead the nodes form a chain with a node on each end of the chain and all other nodes just
connecting to the previous and next nodes in the chain.
An example of this would be a three node chain consisting of nodes A, B and C. Node A is hosted
in one network and has many producer clients connected to it sending order messages. Due to
corporate policy, the order consumer clients need to be hosted in a different network, and that
network is only accessible via a third network. In this setup node B acts as a mediator with no
producers or consumers on it. Any messages arriving on node A will be forwarded to node B,
which will in turn forward them to node C where they can get consumed. Node A does not need
to directly connect to C, but all the nodes can still act as a part of the cluster.
To set up a cluster in this way, node A would define a cluster connection that connects to node
B, and node B would define a cluster connection that connects to node C. In this case we only
want cluster connections in one direction since we're only moving messages from node A->B->C
and never from C->B->A.
For this topology we would set max-hops to 2. With a value of 2 the knowledge of what queues
and consumers that exist on node C would be propagated from node C to node B to node A. Node

Chapter 38. Clusters
224
A would then know to distribute messages to node B when they arrive, even though node B has
no consumers itself, it would know that a further hop away is node C which does have consumers.

Chapter 39.
225
High Availability and FailoverWe define high availability as the ability for the system to continue functioning after failure of one
or more of the servers.
A part of high availability is failover which we define as the ability for client connections to migrate
from one server to another in event of server failure so client applications can continue to operate.
39.1. Live - Backup Groups
HornetQ allows servers to be linked together as live - backup groups where each live server can
have 1 or more backup servers. A backup server is owned by only one live server. Backup servers
are not operational until failover occurs, however 1 chosen backup, which will be in passive mode,
announces its status and waits to take over the live servers work
Before failover, only the live server is serving the HornetQ clients while the backup servers remain
passive or awaiting to become a backup server. When a live server crashes or is brought down
in the correct mode, the backup server currently in passive mode will become live and another
backup server will become passive. If a live server restarts after a failover then it will have priority
and be the next server to become live when the current live server goes down, if the current live
server is configured to allow automatic failback then it will detect the live server coming back up
and automatically stop.
39.1.1. HA modes
HornetQ supports two different strategies for backing up a server shared store and replication.
Note
Only persistent message data will survive failover. Any non persistent message
data will not be available after failover.
39.1.2. Data Replication
Replication is supported since version 2.3.
When using replication, the live and the backup servers do not share the same data directories, all
data synchronization is done through network traffic. Therefore all (persistent) data traffic received
by the live server will be duplicated to the backup.

Chapter 39. High Availability...
226
Notice that upon start-up the backup server will first need to synchronize all existing data from
the live server, before becoming capable of replacing the live server should it fail. So unlike the
shared store case, a replicating backup will not be a fully operational backup right after start, but
only after it finishes synchronizing the data. The time it will take for this to happen will depend on
the amount of data to be synchronized and the connection speed.
NoteSynchronization occurs in parallel with current network traffic so this won't cause
any blocking on current clients.
The replicating live and backup pair must be part of a cluster, meaning that even tho you may have
a single live/backup it is still regarded as a cluster and must have a cluster connection configured
in both the live and tha backup's for the same address. Also all servers must be on the same
cluster, and have the same cluster user and password.
There are two ways that a backup server will locate a live server to replicate from, these are:
• specifying a node group. You can specify a group of live servers that a backup server
can connect to. This is done by configuring backup-group-name in the main hornetq-
configuration.xml. A Backup server will only connect to a live server that shares the same
node group name
• connecting to any live. Simply put not configuring backup-group-name will allow a backup
server to connect to any live server
The backup will search for any live server that it is configured to connect to. It then tries to replicate
with each live server in turn until it finds a live server that has no current backup configured. If no
live server is available it will wait until the cluster topology changes and repeats the process.
Much like in the shared-store case, when the live server stops or crashes, its replicating backup
will become active and take over its duties. Specifically, the backup will become active when it
loses connection to its live server. This can be problematic because this can also happen because
of a temporary network problem. In order to address this issue, the backup will try to determine
whether it still can connect to the other servers in the cluster. If it can connect to more than half

Shared Store
227
the servers, it will become active, if more than half the servers also disappeared with the live, the
backup will wait and try reconnecting with the live. This avoids a split brain situation.
39.1.2.1. Configuration
To configure the live and backup servers to be a replicating pair, configure both hornetq-
configuration.xml to have:
<shared-store>false</shared-store>
.
.
.
<cluster-connections>
<cluster-connection name="my-cluster">
<cluster-user>fish<cluster-user>
<cluster-password>ILikeToSwim<cluster-password>
...
</cluster-connection>
</cluster-connections>
The backup server must be flagged explicitly as a backup.
<backup>true</backup>
<connectors>
<connector name="nameOfConfiguredLiveServerConnector">
<factory-class>
org.hornetq.core.remoting.impl.netty.NettyConnectorFactory
</factory-class>
<param key="port" value="5445"/>
</connector>
<!-- a real configuration could have more connectors here -->
<connectors>
39.1.3. Shared Store
When using a shared store, both live and backup servers share the same entire data directory
using a shared file system. This means the paging directory, journal directory, large messages
and binding journal.
When failover occurs and a backup server takes over, it will load the persistent storage from the
shared file system and clients can connect to it.
This style of high availability differs from data replication in that it requires a shared file system
which is accessible by both the live and backup nodes. Typically this will be some kind of high

Chapter 39. High Availability...
228
performance Storage Area Network (SAN). We do not recommend you use Network Attached
Storage (NAS), e.g. NFS mounts to store any shared journal (NFS is slow).
The advantage of shared-store high availability is that no replication occurs between the live and
backup nodes, this means it does not suffer any performance penalties due to the overhead of
replication during normal operation.
The disadvantage of shared store replication is that it requires a shared file system, and when the
backup server activates it needs to load the journal from the shared store which can take some
time depending on the amount of data in the store.
If you require the highest performance during normal operation, have access to a fast SAN, and
can live with a slightly slower failover (depending on amount of data), we recommend shared store
high availability
39.1.3.1. Configuration
To configure the live and backup servers to share their store, configure all hornetq-
configuration.xml:
<shared-store>true</shared-store>
Additionally, each backup server must be flagged explicitly as a backup:
<backup>true</backup>
In order for live - backup groups to operate properly with a shared store, both servers must have
configured the location of journal directory to point to the same shared location (as explained in
Section 15.3, “Configuring the message journal”)

Failing Back to live Server
229
Note
todo write something about GFS
Also each node, live and backups, will need to have a cluster connection defined even if not part
of a cluster. The Cluster Connection info defines how backup servers announce there presence
to it's live server or any other nodes in the cluster. refer to Chapter 38, Clusters for details on
how this is done.
39.1.4. Failing Back to live Server
After a live server has failed and a backup taken has taken over its duties, you may want to restart
the live server and have clients fail back. To do this simply restart the original live server and kill
the new live server. You can do this by killing the process itself or just waiting for the server to
crash naturally
It is also possible to cause failover to occur on normal server shutdown, to enable this set the
following property to true in the hornetq-configuration.xml configuration file like so:
<failover-on-shutdown>true</failover-on-shutdown>
By default this is set to false, if by some chance you have set this to false but still want to stop
the server normally and cause failover then you can do this by using the management API as
explained at Section 30.1.1.1, “Core Server Management”
You can also force the new live server to shutdown when the old live server comes back up
allowing the original live server to take over automatically by setting the following property in the
hornetq-configuration.xml configuration file as follows:
<allow-failback>true</allow-failback>
In replication HA mode you need to set an extra property check-for-live-server to true in
order to force the new live server to shutdown when the old live server comes back up in hornetq-
configuration.xml configuration file as follows:
<check-for-live-server>true</check-for-live-server>

Chapter 39. High Availability...
230
39.2. Failover Modes
HornetQ defines two types of client failover:
• Automatic client failover
• Application-level client failover
HornetQ also provides 100% transparent automatic reattachment of connections to the same
server (e.g. in case of transient network problems). This is similar to failover, except it's
reconnecting to the same server and is discussed in Chapter 34, Client Reconnection and Session
Reattachment
During failover, if the client has consumers on any non persistent or temporary queues, those
queues will be automatically recreated during failover on the backup node, since the backup node
will not have any knowledge of non persistent queues.
39.2.1. Automatic Client Failover
HornetQ clients can be configured to receive knowledge of all live and backup servers, so that
in event of connection failure at the client - live server connection, the client will detect this and
reconnect to the backup server. The backup server will then automatically recreate any sessions
and consumers that existed on each connection before failover, thus saving the user from having
to hand-code manual reconnection logic.
HornetQ clients detect connection failure when it has not received packets from the server within
the time given by client-failure-check-period as explained in section Chapter 17, Detecting
Dead Connections. If the client does not receive data in good time, it will assume the connection
has failed and attempt failover. Also if the socket is closed by the OS, usually if the server process
is killed rather than the machine itself crashing, then the client will failover straight away.
HornetQ clients can be configured to discover the list of live-backup server groups in a number of
different ways. They can be configured explicitly or probably the most common way of doing this
is to use server discovery for the client to automatically discover the list. For full details on how to
configure server discovery, please see Chapter 38, Clusters. Alternatively, the clients can explicitly
connect to a specific server and download the current servers and backups see Chapter 38,
Clusters.
To enable automatic client failover, the client must be configured to allow non-zero reconnection
attempts (as explained in Chapter 34, Client Reconnection and Session Reattachment).
By default failover will only occur after at least one connection has been made to the live server. In
other words, by default, failover will not occur if the client fails to make an initial connection to the
live server - in this case it will simply retry connecting to the live server according to the reconnect-
attempts property and fail after this number of attempts.

Automatic Client Failover
231
39.2.1.1. Failing over on the Initial Connection
Since the client doesn't learn about the full topology until after the first connection is made there
is a window where it doesn't know about the backup. If a failure happens at this point the client
can only try reconnecting to the original live server. To configure how many attempts the client will
make you can set the property initialConnectAttempts on the ClientSessionFactoryImpl
or HornetQConnectionFactory or initial-connect-attempts in xml. The default for this is 0,
that is try only once. Once the number of attempts has been made an exception will be thrown.
For examples of automatic failover with transacted and non-transacted JMS sessions, please
see Section 11.1.67, “Transaction Failover” and Section 11.1.41, “Non-Transaction Failover With
Server Data Replication”.
39.2.1.2. A Note on Server Replication
HornetQ does not replicate full server state between live and backup servers. When the new
session is automatically recreated on the backup it won't have any knowledge of messages
already sent or acknowledged in that session. Any in-flight sends or acknowledgements at the
time of failover might also be lost.
By replicating full server state, theoretically we could provide a 100% transparent seamless
failover, which would avoid any lost messages or acknowledgements, however this comes at
a great cost: replicating the full server state (including the queues, session, etc.). This would
require replication of the entire server state machine; every operation on the live server would
have to replicated on the replica server(s) in the exact same global order to ensure a consistent
replica state. This is extremely hard to do in a performant and scalable way, especially when one
considers that multiple threads are changing the live server state concurrently.
It is possible to provide full state machine replication using techniques such as virtual synchrony,
but this does not scale well and effectively serializes all operations to a single thread, dramatically
reducing concurrency.
Other techniques for multi-threaded active replication exist such as replicating lock states or
replicating thread scheduling but this is very hard to achieve at a Java level.
Consequently it has decided it was not worth massively reducing performance and concurrency
for the sake of 100% transparent failover. Even without 100% transparent failover, it is simple
to guarantee once and only once delivery, even in the case of failure, by using a combination
of duplicate detection and retrying of transactions. However this is not 100% transparent to the
client code.
39.2.1.3. Handling Blocking Calls During Failover
If the client code is in a blocking call to the server, waiting for a response to continue its execution,
when failover occurs, the new session will not have any knowledge of the call that was in progress.
This call might otherwise hang for ever, waiting for a response that will never come.
To prevent this, HornetQ will unblock any blocking calls that were in progress at the time of failover
by making them throw a javax.jms.JMSException (if using JMS), or a HornetQException with

Chapter 39. High Availability...
232
error code HornetQException.UNBLOCKED. It is up to the client code to catch this exception and
retry any operations if desired.
If the method being unblocked is a call to commit(), or prepare(), then
the transaction will be automatically rolled back and HornetQ will throw a
javax.jms.TransactionRolledBackException (if using JMS), or a HornetQException with
error code HornetQException.TRANSACTION_ROLLED_BACK if using the core API.
39.2.1.4. Handling Failover With Transactions
If the session is transactional and messages have already been sent or acknowledged in the
current transaction, then the server cannot be sure that messages sent or acknowledgements
have not been lost during the failover.
Consequently the transaction will be marked as rollback-only, and any subsequent attempt
to commit it will throw a javax.jms.TransactionRolledBackException (if using JMS), or a
HornetQException with error code HornetQException.TRANSACTION_ROLLED_BACK if using the
core API.
2 phase commit
The caveat to this rule is when XA is used either via JMS or through the core API.
If 2 phase commit is used and prepare has already been called then rolling back
could cause a HeuristicMixedException. Because of this the commit will throw
a XAException.XA_RETRY exception. This informs the Transaction Manager that
it should retry the commit at some later point in time, a side effect of this is that any
non persistent messages will be lost. To avoid this use persistent messages when
using XA. With acknowledgements this is not an issue since they are flushed to
the server before prepare gets called.
It is up to the user to catch the exception, and perform any client side local rollback code as
necessary. There is no need to manually rollback the session - it is already rolled back. The user
can then just retry the transactional operations again on the same session.
HornetQ ships with a fully functioning example demonstrating how to do this, please see
Section 11.1.67, “Transaction Failover”
If failover occurs when a commit call is being executed, the server, as previously described, will
unblock the call to prevent a hang, since no response will come back. In this case it is not easy for
the client to determine whether the transaction commit was actually processed on the live server
before failure occurred.
Note
If XA is being used either via JMS or through the core API then an
XAException.XA_RETRY is thrown. This is to inform Transaction Managers that

Getting Notified of Connection Failure
233
a retry should occur at some point. At some later point in time the Transaction
Manager will retry the commit. If the original commit hadn't occurred then it will still
exist and be committed, if it doesn't exist then it is assumed to have been committed
although the transaction manager may log a warning.
To remedy this, the client can simply enable duplicate detection (Chapter 37, Duplicate Message
Detection) in the transaction, and retry the transaction operations again after the call is unblocked.
If the transaction had indeed been committed on the live server successfully before failover, then
when the transaction is retried, duplicate detection will ensure that any durable messages resent
in the transaction will be ignored on the server to prevent them getting sent more than once.
Note
By catching the rollback exceptions and retrying, catching unblocked calls
and enabling duplicate detection, once and only once delivery guarantees for
messages can be provided in the case of failure, guaranteeing 100% no loss or
duplication of messages.
39.2.1.5. Handling Failover With Non Transactional Sessions
If the session is non transactional, messages or acknowledgements can be lost in the event of
failover.
If you wish to provide once and only once delivery guarantees for non transacted sessions too,
enabled duplicate detection, and catch unblock exceptions as described in Section 39.2.1.3,
“Handling Blocking Calls During Failover”
39.2.2. Getting Notified of Connection Failure
JMS provides a standard mechanism for getting notified asynchronously of connection failure:
java.jms.ExceptionListener. Please consult the JMS javadoc or any good JMS tutorial for
more information on how to use this.
The HornetQ core API also provides a similar feature in the form of the class
org.hornet.core.client.SessionFailureListener
Any ExceptionListener or SessionFailureListener instance will always be called by HornetQ on
event of connection failure, irrespective of whether the connection was successfully failed over,
reconnected or reattached, however you can find out if reconnect or reattach has happened by
either the failedOver flag passed in on the connectionFailed on SessionfailureListener or
by inspecting the error code on the javax.jms.JMSException which will be one of the following:

Chapter 39. High Availability...
234
Table 39.1. JMSException error codes
error code Description
FAILOVER Failover has occurred and we have
successfully reattached or reconnected.
DISCONNECT No failover has occurred and we are
disconnected.
39.2.3. Application-Level Failover
In some cases you may not want automatic client failover, and prefer to handle any connection
failure yourself, and code your own manually reconnection logic in your own failure handler. We
define this as application-level failover, since the failover is handled at the user application level.
To implement application-level failover, if you're using JMS then you need to set an
ExceptionListener class on the JMS connection. The ExceptionListener will be called by
HornetQ in the event that connection failure is detected. In your ExceptionListener, you would
close your old JMS connections, potentially look up new connection factory instances from JNDI
and creating new connections. In this case you may well be using HA-JNDI [http://www.jboss.org/
community/wiki/JBossHAJNDIImpl] to ensure that the new connection factory is looked up from
a different server.
For a working example of application-level failover, please see Section 11.1.2, “Application-Layer
Failover”.
If you are using the core API, then the procedure is very similar: you would set a FailureListener
on the core ClientSession instances.

Chapter 40.
235
Libaio Native LibrariesHornetQ distributes a native library, used as a bridge between HornetQ and linux libaio.
libaio is a library, developed as part of the linux kernel project. With libaio we submit writes
to the operating system where they are processed asynchronously. Some time later the OS will
call our code back when they have been processed.
We use this in our high performance journal if configured to do so, please see Chapter 15,
Persistence.
These are the native libraries distributed by HornetQ:
• libHornetQAIO32.so - x86 32 bits
• libHornetQAIO64.so - x86 64 bits
When using libaio, HornetQ will always try loading these files as long as they are on the library
path.
40.1. Compiling the native libraries
In the case that you are using Linux on a platform other than x86_32 or x86_64 (for example
Itanium 64 bits or IBM Power) you may need to compile the native library, since we do not distribute
binaries for those platforms with the release.
40.1.1. Install requirements
Note
At the moment the native layer is only available on Linux. If you are in a platform
other than Linux the native compilation will not work
The native library uses autoconf [http://en.wikipedia.org/wiki/Autoconf] what makes the
compilation process easy, however you need to install extra packages as a requirement for
compilation:
• gcc - C Compiler
• gcc-c++ or g++ - Extension to gcc with support for C++
• autoconf - Tool for automating native build process
• make - Plain old make

Chapter 40. Libaio Native Lib...
236
• automake - Tool for automating make generation
• libtool - Tool for link editing native libraries
• libaio - library to disk asynchronous IO kernel functions
• libaio-dev - Compilation support for libaio
• A full JDK installed with the environment variable JAVA_HOME set to its location
To perform this installation on RHEL or Fedora, you can simply type this at a command line:
sudo yum install automake libtool autoconf gcc-c++ gcc libaio libaio-devel make
Or on debian systems:
sudo apt-get install automake libtool autoconf gcc-g++ gcc libaio libaio-dev make
Note
You could find a slight variation of the package names depending on the version
and linux distribution. (for example gcc-c++ on Fedora versus g++ on Debian
systems)
40.1.2. Invoking the compilation
In the distribution, in the native-src directory, execute the shell script bootstrap. This script will
invoke automake and make what will create all the make files and the native library.
someUser@someBox:/messaging-distribution/native-src$ ./bootstrap
checking for a BSD-compatible install... /usr/bin/install -c
checking whether build environment is sane... yes
checking for a thread-safe mkdir -p... /bin/mkdir -p
...
configure: creating ./config.status
config.status: creating Makefile
config.status: creating ./src/Makefile
config.status: creating config.h
config.status: config.h is unchanged
config.status: executing depfiles commands
config.status: executing libtool commands

Invoking the compilation
237
...
The produced library will be at ./native-src/src/.libs/libHornetQAIO.so. Simply move that
file over bin on the distribution or the place you have chosen on the library path.
If you want to perform changes on the HornetQ libaio code, you could just call make directly at
the native-src directory.

238

Chapter 41.
239
Thread managementThis chapter describes how HornetQ uses and pools threads and how you can manage them.
First we'll discuss how threads are managed and used on the server side, then we'll look at the
client side.
41.1. Server-Side Thread Management
Each HornetQ Server maintains a single thread pool for general use, and a scheduled thread pool
for scheduled use. A Java scheduled thread pool cannot be configured to use a standard thread
pool, otherwise we could use a single thread pool for both scheduled and non scheduled activity.
When using old (blocking) IO, a separate thread pool is also used to service connections. Since
old IO requires a thread per connection it does not make sense to get them from the standard pool
as the pool will easily get exhausted if too many connections are made, resulting in the server
"hanging" since it has no remaining threads to do anything else. If you require the server to handle
many concurrent connections you should make sure you use NIO, not old IO.
When using new IO (NIO), HornetQ will, by default, use a number of threads
equal to three times the number of cores (or hyper-threads) as reported by
Runtime.getRuntime().availableProcessors() for processing incoming packets. If you want to
override this value, you can set the number of threads by specifying the parameter nio-remoting-
threads in the transport configuration. See the Chapter 16, Configuring the Transport for more
information on this.
There are also a small number of other places where threads are used directly, we'll discuss each
in turn.
41.1.1. Server Scheduled Thread Pool
The server scheduled thread pool is used for most activities on the server
side that require running periodically or with delays. It maps internally to a
java.util.concurrent.ScheduledThreadPoolExecutor instance.
The maximum number of thread used by this pool is configure in hornetq-configuration.xml
with the scheduled-thread-pool-max-size parameter. The default value is 5 threads. A small
number of threads is usually sufficient for this pool.
41.1.2. General Purpose Server Thread Pool
This general purpose thread pool is used for most asynchronous actions on the server side. It
maps internally to a java.util.concurrent.ThreadPoolExecutor instance.
The maximum number of thread used by this pool is configure in hornetq-configuration.xml
with the thread-pool-max-size parameter.

Chapter 41. Thread management
240
If a value of -1 is used this signifies that the thread pool has no upper bound and new threads
will be created on demand if there are not enough threads available to satisfy a request. If activity
later subsides then threads are timed-out and closed.
If a value of n where nis a positive integer greater than zero is used this signifies that the thread
pool is bounded. If more requests come in and there are no free threads in the pool and the pool
is full then requests will block until a thread becomes available. It is recommended that a bounded
thread pool is used with caution since it can lead to dead-lock situations if the upper bound is
chosen to be too low.
The default value for thread-pool-max-size is 30.
See the J2SE javadoc [http://java.sun.com/j2se/1.5.0/docs/api/java/util/concurrent/
ThreadPoolExecutor.html] for more information on unbounded (cached), and bounded (fixed)
thread pools.
41.1.3. Expiry Reaper Thread
A single thread is also used on the server side to scan for expired messages in queues. We cannot
use either of the thread pools for this since this thread needs to run at its own configurable priority.
For more information on configuring the reaper, please see Chapter 22, Message Expiry.
41.1.4. Asynchronous IO
Asynchronous IO has a thread pool for receiving and dispatching events out of the native layer.
You will find it on a thread dump with the prefix HornetQ-AIO-poller-pool. HornetQ uses one thread
per opened file on the journal (there is usually one).
There is also a single thread used to invoke writes on libaio. We do that to avoid context switching
on libaio that would cause performance issues. You will find this thread on a thread dump with
the prefix HornetQ-AIO-writer-pool.
41.2. Client-Side Thread Management
On the client side, HornetQ maintains a single static scheduled thread pool and a single static
general thread pool for use by all clients using the same classloader in that JVM instance.
The static scheduled thread pool has a maximum size of 5 threads, and the general purpose
thread pool has an unbounded maximum size.
If required HornetQ can also be configured so that each ClientSessionFactory instance does
not use these static pools but instead maintains its own scheduled and general purpose pool. Any
sessions created from that ClientSessionFactory will use those pools instead.
To configure a ClientSessionFactory instance to use its own pools, simply use the appropriate
setter methods immediately after creation, for example:

Client-Side Thread Management
241
ServerLocator locator = HornetQClient.createServerLocatorWithoutHA(...)
ClientSessionFactory myFactory = locator.createClientSessionFactory();
myFactory.setUseGlobalPools(false);
myFactory.setScheduledThreadPoolMaxSize(10);
myFactory.setThreadPoolMaxSize(-1);
If you're using the JMS API, you can set the same parameters on the ClientSessionFactory and
use it to create the ConnectionFactory instance, for example:
ConnectionFactory myConnectionFactory =
HornetQJMSClient.createConnectionFactory(myFactory);
If you're using JNDI to instantiate HornetQConnectionFactory instances, you can also set these
parameters in the hornetq-jms.xml file where you describe your connection factory, for example:
<connection-factory name="ConnectionFactory">
<connectors>
<connector-ref connector-name="netty"/>
</connectors>
<entries>
<entry name="ConnectionFactory"/>
<entry name="XAConnectionFactory"/>
</entries>
<use-global-pools>false</use-global-pools>
<scheduled-thread-pool-max-size>10</scheduled-thread-pool-max-size>
<thread-pool-max-size>-1</thread-pool-max-size>
</connection-factory>

242

Chapter 42.
243
LoggingHornetQ uses the JBoss Logging framework to do its logging and is configurable via the
logging.properties file found in the configuration directories. This is configured by Default to
log to both the console and to a file.
There are 6 loggers availabe which are as follows:
Table 42.1. Global Configuration Properties
Logger Logger Description
org.jboss.logging Logs any calls not handled by the HornetQ
loggers
org.hornetq.core.server Logs the core server
org.hornetq.utils Logs utility calls
org.hornetq.journal Logs Journal calls
org.hornetq.jms Logs JMS calls
org.hornetq.integration.bootstrap Logs bootstrap calls
42.1. Logging in a client or with an Embedded server
Firstly, if you want to enable logging on the client side you need to include the jboss logging jars
in your library. If you are using the distribution make sure the jnp-client.jar is included or if you are
using maven add the following dependencies.
<dependency>
<groupId>org.jboss.naming</groupId>
<artifactId>jnp-client</artifactId>
<version>5.0.5.Final</version>
<exclusions>
<exclusion>
<groupId>org.jboss.logging</groupId>
<artifactId>jboss-logging-spi</artifactId>
</exclusion>
</exclusions>
</dependency>
<dependency>
<groupId>org.jboss.logmanager</groupId>
<artifactId>jboss-logmanager</artifactId>
<version>1.3.1.Final</version>
</dependency>
<dependency>
<groupId>org.hornetq</groupId>

Chapter 42. Logging
244
<artifactId>hornetq-core-client</artifactId>
<version>2.3.0.Final</version>
</dependency>
The first dependency jnp-client is not actually needed for logging, however this is needed for
using JNDI and imports a previous version JBoss logging which needs to be excluded
There are 2 properties you need to set when starting your java program,
the first is to set the Log Manager to use the JBoss Log Manager,
this is done by setting the -Djava.util.logging.manager property i.e. -
Djava.util.logging.manager=org.jboss.logmanager.LogManager
The second is to set the location of the logging.properties file to use, this is done via
the -Dlogging.configuration for instance -Dlogging.configuration=file:///home/user/
projects/myProject/logging.properties.
NoteThe value for this needs to be valid URL
The following is a typical logging.properties for a client
# Root logger option
loggers=org.jboss.logging,org.hornetq.core.server,org.hornetq.utils,org.hornetq.journal,org.hornetq.jms,org.hornetq.ra
# Root logger level
logger.level=INFO
# HornetQ logger levels
logger.org.hornetq.core.server.level=INFO
logger.org.hornetq.utils.level=INFO
logger.org.hornetq.jms.level=DEBUG
# Root logger handlers
logger.handlers=FILE,CONSOLE
# Console handler configuration
handler.CONSOLE=org.jboss.logmanager.handlers.ConsoleHandler
handler.CONSOLE.properties=autoFlush
handler.CONSOLE.level=FINE
handler.CONSOLE.autoFlush=true
handler.CONSOLE.formatter=PATTERN
# File handler configuration
handler.FILE=org.jboss.logmanager.handlers.FileHandler
handler.FILE.level=FINE

Logging With The JBoss Application Server
245
handler.FILE.properties=autoFlush,fileName
handler.FILE.autoFlush=true
handler.FILE.fileName=hornetq.log
handler.FILE.formatter=PATTERN
# Formatter pattern configuration
formatter.PATTERN=org.jboss.logmanager.formatters.PatternFormatter
formatter.PATTERN.properties=pattern
formatter.PATTERN.pattern=%d{HH:mm:ss,SSS} %-5p [%c] %s%E%n
42.2. Logging With The JBoss Application Server
When HornetQ is deployed within the JBoss Application Server version 7.x or above then it will
still use JBoss Logging, refer to the AS7 documentation on how to configure AS7 logging.

246

Chapter 43.
247
REST InterfaceThe HornetQ REST interface allows you to leverage the reliability and scalability features of
HornetQ over a simple REST/HTTP interface. Messages are produced and consumed by sending
and receiving simple HTTP messages that contain the content you want to push around. For
instance, here's a simple example of posting an order to an order processing queue express as
an HTTP message:
POST /queue/orders/create HTTP/1.1
Host: example.com
Content-Type: application/xml
<order>
<name>Bill</name>
<item>iPhone 4</item>
<cost>$199.99</cost>
</order>
As you can see, we're just posting some arbitrary XML document to a URL. When the XML is
received on the server is it processed within HornetQ as a JMS message and distributed through
core HornetQ. Simple and easy. Consuming messages from a queue or topic looks very similar.
We'll discuss the entire interface in detail later in this docbook.
43.1. Goals of REST Interface
Why would you want to use HornetQ's REST interface? What are the goals of the REST interface?
• Easily usable by machine-based (code) clients.
• Zero client footprint. We want HornetQ to be usable by any client/programming language that
has an adequate HTTP client library. You shouldn't have to download, install, and configure a
special library to interact with HornetQ.
• Lightweight interoperability. The HTTP protocol is strong enough to be our message
exchange protocol. Since interactions are RESTful the HTTP uniform interface provides all the
interoperability you need to communicate between different languages, platforms, and even
messaging implementations that choose to implement the same RESTful interface as HornetQ
(i.e. the REST-* [http://rest-star.org] effort.)
• No envelope (e.g. SOAP) or feed (e.g. Atom) format requirements. You shouldn't have to learn,
use, or parse a specific XML document format in order to send and receive messages through
HornetQ's REST interface.
• Leverage the reliability, scalability, and clustering features of HornetQ on the back end without
sacrificing the simplicity of a REST interface.

Chapter 43. REST Interface
248
43.2. Installation and Configuration
HornetQ's REST interface is installed as a Web archive (WAR). It depends on the RESTEasy
[http://jboss.org/resteasy] project and can currently only run within a servlet container. Installing
the HornetQ REST interface is a little bit different depending whether HornetQ is already installed
and configured for your environment (e.g. you're deploying within JBoss AS 7) or you want the
HornetQ REST WAR to startup and manage the HornetQ server (e.g. you're deploying within
something like Apache Tomcat).
43.2.1. Installing Within Pre-configured Environment
The section should be used when you want to use the HornetQ REST interface in an environment
that already has HornetQ installed and running, e.g. JBoss AS 7. You must create a Web archive
(.WAR) file with the following web.xml settings:
<web-app>
<listener>
<listener-class>
org.jboss.resteasy.plugins.server.servlet.ResteasyBootstrap
</listener-class>
</listener>
<listener>
<listener-class>
org.hornetq.rest.integration.RestMessagingBootstrapListener
</listener-class>
</listener>
<filter>
<filter-name>Rest-Messaging</filter-name>
<filter-class>
org.jboss.resteasy.plugins.server.servlet.FilterDispatcher
</filter-class>
</filter>
<filter-mapping>
<filter-name>Rest-Messaging</filter-name>
<url-pattern>/*</url-pattern>
</filter-mapping>
</web-app>
Within your WEB-INF/lib directory you must have the hornetq-rest.jar file. If RESTEasy is not
installed within your environment, you must add the RESTEasy jar files within the lib directory as
well. Here's a sample Maven pom.xml that can build your WAR for this case.

Installing Within Pre-configured Environment
249
<project xmlns="http://maven.apache.org/POM/4.0.0"
xmlns:xsi="http://www.w3.org/2001/XMLSchema-instance"
xsi:schemaLocation="http://maven.apache.org/POM/4.0.0 http://
maven.apache.org/maven-v4_0_0.xsd">
<modelVersion>4.0.0</modelVersion>
<groupId>org.somebody</groupId>
<artifactId>myapp</artifactId>
<packaging>war</packaging>
<name>My App</name>
<version>0.1-SNAPSHOT</version>
<repositories>
<repository>
<id>jboss</id>
<url>http://repository.jboss.org/nexus/content/groups/public/</url>
</repository>
</repositories>
<build>
<plugins>
<plugin>
<groupId>org.apache.maven.plugins</groupId>
<artifactId>maven-compiler-plugin</artifactId>
<configuration>
<source>1.6</source>
<target>1.6</target>
</configuration>
</plugin>
</plugins>
</build>
<dependencies>
<dependency>
<groupId>org.hornetq.rest</groupId>
<artifactId>hornetq-rest</artifactId>
<version>2.3.0-SNAPSHOT</version>
</dependency>
</dependencies>
</project>
Note
JBoss AS 7 loads classes differently than previous versions. To work properly in
AS 7 the WAR will need this in its MANIFEST.MF:

Chapter 43. REST Interface
250
Dependencies: org.hornetq, org.jboss.netty
You can add this to the<plugins> section of the pom.xml to create this entry
automatically:
<plugin>
<groupId>org.apache.maven.plugins</groupId>
<artifactId>maven-war-plugin</artifactId>
<configuration>
<archive>
<manifestEntries>
<Dependencies>org.hornetq, org.jboss.netty</Dependencies>
</manifestEntries>
</archive>
</configuration>
</plugin>
43.2.2. Bootstrapping HornetQ Along with REST
You can bootstrap HornetQ within your WAR as well. To do this, you must have the HornetQ core
and JMS jars along with Netty, Resteasy, and the HornetQ REST jar within your WEB-INF/lib.
You must also have a hornetq-configuration.xml, hornetq-jms.xml, and hornetq-users.xml config
files within WEB-INF/classes. The examples that come with the HornetQ REST distribution show
how to do this. You must also add an additional listener to your web.xml file. Here's an example:
<web-app>
<listener>
<listener-class>
org.jboss.resteasy.plugins.server.servlet.ResteasyBootstrap
</listener-class>
</listener>
<listener>
<listener-class>
org.hornetq.rest.integration.HornetqBootstrapListener
</listener-class>
</listener>
<listener>
<listener-class>
org.hornetq.rest.integration.RestMessagingBootstrapListener

Bootstrapping HornetQ Along with REST
251
</listener-class>
</listener>
<filter>
<filter-name>Rest-Messaging</filter-name>
<filter-class>
org.jboss.resteasy.plugins.server.servlet.FilterDispatcher
</filter-class>
</filter>
<filter-mapping>
<filter-name>Rest-Messaging</filter-name>
<url-pattern>/*</url-pattern>
</filter-mapping>
</web-app>
Here's a Maven pom.xml file for creating a WAR for this environment. Make sure your hornetq
configuration files are within the src/main/resources directory so that they are stuffed within the
WAR's WEB-INF/classes directory!
<project xmlns="http://maven.apache.org/POM/4.0.0"
xmlns:xsi="http://www.w3.org/2001/XMLSchema-instance"
xsi:schemaLocation="http://maven.apache.org/POM/4.0.0 http://
maven.apache.org/maven-v4_0_0.xsd">
<modelVersion>4.0.0</modelVersion>
<groupId>org.somebody</groupId>
<artifactId>myapp</artifactId>
<packaging>war</packaging>
<name>My App</name>
<version>0.1-SNAPSHOT</version>
<repositories>
<repository>
<id>jboss</id>
<url>http://repository.jboss.org/nexus/content/groups/public/</url>
</repository>
</repositories>
<build>
<plugins>
<plugin>
<groupId>org.apache.maven.plugins</groupId>
<artifactId>maven-compiler-plugin</artifactId>
<configuration>
<source>1.6</source>
<target>1.6</target>
</configuration>

Chapter 43. REST Interface
252
</plugin>
</plugins>
</build>
<dependencies>
<dependency>
<groupId>org.hornetq</groupId>
<artifactId>hornetq-core</artifactId>
<version>2.3.0-SNAPSHOT</version>
</dependency>
<dependency>
<groupId>io.netty</groupId>
<artifactId>netty</artifactId>
<version>3.4.5.Final</version>
</dependency>
<dependency>
<groupId>org.hornetq</groupId>
<artifactId>hornetq-jms</artifactId>
<version>2.3.0-SNAPSHOT</version>
</dependency>
<dependency>
<groupId>org.jboss.spec.javax.jms</groupId>
<artifactId>jboss-jms-api_1.1_spec</artifactId>
<version>1.0.0.Final</version>
</dependency>
<dependency>
<groupId>org.hornetq.rest</groupId>
<artifactId>hornetq-rest</artifactId>
<version>2.3.0-SNAPSHOT</version>
</dependency>
<dependency>
<groupId>org.jboss.resteasy</groupId>
<artifactId>resteasy-jaxrs</artifactId>
<version>2.3.4.Final</version>
</dependency>
<dependency>
<groupId>org.jboss.resteasy</groupId>
<artifactId>resteasy-jaxb-provider</artifactId>
<version>2.3.4.Final</version>
</dependency>
</dependencies>
</project>
43.2.3. REST Configuration
The HornetQ REST implementation does have some configuration options. These are configured
via XML configuration file that must be in your WEB-INF/classes directory. You must set the
web.xml context-param rest.messaging.config.file to specify the name of the configuration
file. Below is the format of the XML configuration file and the default values for each.

REST Configuration
253
<rest-messaging>
<server-in-vm-id>0</server-in-vm-id>
<use-link-headers>false</use-link-headers>
<default-durable-send>false</default-durable-send>
<dups-ok>true</dups-ok>
<topic-push-store-dir>topic-push-store</topic-push-store-dir>
<queue-push-store-dir>queue-push-store</queue-push-store-dir>
<producer-time-to-live>0</producer-time-to-live>
<producer-session-pool-size>10</producer-session-pool-size>
<session-timeout-task-interval>1</session-timeout-task-interval>
<consumer-session-timeout-seconds>300</consumer-session-timeout-seconds>
<consumer-window-size>-1</consumer-window-size>
</rest-messaging>
Let's give an explanation of each config option.
• server-in-vm-id. The HornetQ REST impl uses the IN-VM transport to communicate with
HornetQ. It uses the default server id, which is "0".
• use-link-headers. By default, all links (URLs) are published using custom headers.
You can instead have the HornetQ REST implementation publish links using the Link
Header specification [http://tools.ietf.org/html/draft-nottingham-http-link-header-10] instead if
you desire.
• default-durable-send. Whether a posted message should be persisted by default if the user
does not specify a durable query parameter.
• dups-ok. If this is true, no duplicate detection protocol will be enforced for message posting.
• topic-push-store-dir. This must be a relative or absolute file system path. This is a directory
where push registrations for topics are stored. See Pushing Messages.
• queue-push-store-dir. This must be a relative or absolute file system path. This is a directory
where push registrations for queues are stored. See Pushing Messages.
• producer-session-pool-size. The REST implementation pools HornetQ sessions for
sending messages. This is the size of the pool. That number of sessions will be created at
startup time.
• producer-time-to-live. Default time to live for posted messages. Default is no ttl.
• session-timeout-task-interval. Pull consumers and pull subscriptions can time out. This
is the interval the thread that checks for timed-out sessions will run at. A value of 1 means it
will run every 1 second.
• consumer-session-timeout-seconds. Timeout in seconds for pull consumers/subscriptions
that remain idle for that amount of time.

Chapter 43. REST Interface
254
• consumer-window-size. For consumers, this config option is the same as the HornetQ one of
the same name. It will be used by sessions created by the HornetQ REST implementation.
43.3. HornetQ REST Interface Basics
The HornetQ REST interface publishes a variety of REST resources to perform various tasks on a
queue or topic. Only the top-level queue and topic URI schemes are published to the outside world.
You must discover all over resources to interact with by looking for and traversing links. You'll find
published links within custom response headers and embedded in published XML representations.
Let's look at how this works.
43.3.1. Queue and Topic Resources
To interact with a queue or topic you do a HEAD or GET request on the following relative URI
pattern:
/queues/{name}
/topics/{name}
The base of the URI is the base URL of the WAR you deployed the HornetQ REST server within as
defined in the Installation and Configuration section of this document. Replace the {name} string
within the above URI pattern with the name of the queue or topic you are interested in interacting
with. For example if you have configured a JMS topic named "foo" within your hornetq-jms.xml
file, the URI name should be "jms.topic.foo". If you have configured a JMS queue name "bar"
within your hornetq-jms.xml file, the URI name should be "jms.queue.bar". Internally, HornetQ
prepends the "jms.topic" or "jms.queue" strings to the name of the deployed destination. Next,
perform your HEAD or GET request on this URI. Here's what a request/response would look like.
HEAD /queues/jms.queue.bar HTTP/1.1
Host: example.com
--- Response ---
HTTP/1.1 200 Ok
msg-create: http://example.com/queues/jms.queue.bar/create
msg-pull-consumers: http://example.com/queues/jms.queue.bar/pull-consumers
msg-push-consumers: http://example.com/queues/jms.queue.bar/push-consumers
The HEAD or GET response contains a number of custom response headers that are URLs to
additional REST resources that allow you to interact with the queue or topic in different ways. It
is important not to rely on the scheme of the URLs returned within these headers as they are an
implementation detail. Treat them as opaque and query for them each and every time you initially

Queue Resource Response Headers
255
interact (at boot time) with the server. If you treat all URLs as opaque then you will be isolated
from implementation changes as the HornetQ REST interface evolves over time.
43.3.2. Queue Resource Response Headers
Below is a list of response headers you should expect when interacting with a Queue resource.
• msg-create. This is a URL you POST messages to. The semantics of this link are described
in Posting Messages.
• msg-create-with-id. This is a URL template you POST message to. The semantics of this
link are described in Posting Messages.
• msg-pull-consumers. This is a URL for creating consumers that will pull from a queue. The
semantics of this link are described in HornetQ REST Interface Basics.
• msg-push-consumers. This is a URL for registering other URLs you want the HornetQ REST
server to push messages to. The semantics of this link are described in Pushing Messages.
43.3.3. Topic Resource Respones Headers
Below is a list of response headers you should expect when interacting with a Topic resource.
• msg-create. This is a URL you POST messages to. The semantics of this link are described
in Posting Messages.
• msg-create-with-id. This is a URL template you POST messages to. The semantics of this
link are described in Posting Messages.
• msg-pull-subscriptions. This is a URL for creating subscribers that will pull from a topic. The
semantics of this link are described in Consuming Messages via Pull.
• msg-push-subscriptions. This is a URL for registering other URLs you want the HornetQ
REST server to push messages to. The semantics of this link are described in Pushing
Messages.
43.4. Posting Messages
This chapter discusses the protocol for posting messages to a queue or a topic. In HornetQ REST
Interface Basics, you saw that a queue or topic resource publishes variable custom headers that
are links to other RESTful resources. The msg-create header is the URL you post messages
to. Messages are published to a queue or topic by sending a simple HTTP message to the URL
published by the msg-create header. The HTTP message contains whatever content you want to
publish to the HornetQ destination. Here's an example scenario:
1. Obtain the starting msg-create header from the queue or topic resource.

Chapter 43. REST Interface
256
HEAD /queues/jms.queue.bar HTTP/1.1
Host: example.com
--- Response ---
HTTP/1.1 200 Ok
msg-create: http://example.com/queues/jms.queue.bar/create
msg-create-with-id: http://example.com/queues/jms.queue.bar/create/{id}
2. Do a POST to the URL contained in the msg-create header.
POST /queues/jms.queue.bar/create
Host: example.com
Content-Type: application/xml
<order>
<name>Bill</name>
<item>iPhone4</name>
<cost>$199.99</cost>
</order>
--- Response ---
HTTP/1.1 201 Created
msg-create-next: http://example.com/queues/jms.queue.bar/create/002
A successful response will return a 201 response code. Also notice that a msg-create-next
response header is sent as well. You must use this URL to POST your next message.
3. POST your next message to the queue using the URL returned in the msg-create-next
header.
POST /queues/jms.queue.bar/create/002
Host: example.com
Content-Type: application/xml
<order>
<name>Monica</name>
<item>iPad</item>
<cost>$499.99</cost>
</order>
--- Response --
HTTP/1.1 201 Created
msg-create-next: http://example.com/queues/jms.queue.bar/create/003

Duplicate Detection
257
Continue using the new msg-create-next header returned with each response.
Warning
It is VERY IMPORTANT that you never re-use returned msg-create-next headers
to post new messages. This URL may be uniquely generated for each message
and used for duplicate detection. If you lose the URL within the msg-create-next
header, then just go back to the queue or topic resource to get the msg-create URL.
43.4.1. Duplicate Detection
Sometimes you might have network problems when posting new messages to a queue or topic.
You may do a POST and never receive a response. Unfortunately, you don't know whether or
not the server received the message and so a re-post of the message might cause duplicates to
be posted to the queue or topic. By default, the HornetQ REST interface is configured to accept
and post duplicate messages. You can change this by turning on duplicate message detection
by setting the dups-ok config option to false as described in HornetQ REST Interface Basics.
When you do this, the initial POST to the msg-create URL will redirect you, using the standard
HTTP 307 redirection mechanism to a unique URL to POST to. All other interactions remain the
same as discussed earlier. Here's an example:
1. Obtain the starting msg-create header from the queue or topic resource.
HEAD /queues/jms.queue.bar HTTP/1.1
Host: example.com
--- Response ---
HTTP/1.1 200 Ok
msg-create: http://example.com/queues/jms.queue.bar/create
msg-create-with-id: http://example.com/queues/jms.queue.bar/create/{id}
2. Do a POST to the URL contained in the msg-create header.
POST /queues/jms.queue.bar/create
Host: example.com
Content-Type: application/xml
<order>
<name>Bill</name>
<item>iPhone4</name>

Chapter 43. REST Interface
258
<cost>$199.99</cost>
</order>
--- Response ---
HTTP/1.1 307 Redirect
Location: http://example.com/queues/jms.queue.bar/create/001
A successful response will return a 307 response code. This is standard HTTP protocol. It is
telling you that you must re-POST to the URL contained within the Location header.
3. re-POST your message to the URL provided within the Location header.
POST /queues/jms.queue.bar/create/001
Host: example.com
Content-Type: application/xml
<order>
<name>Bill</name>
<item>iPhone4</name>
<cost>$199.99</cost>
</order>
--- Response --
HTTP/1.1 201 Created
msg-create-next: http://example.com/queues/jms.queue.bar/create/002
You should receive a 201 Created response. If there is a network failure, just re-POST to the
Location header. For new messages, use the returned msg-create-next header returned with
each response.
4. POST any new message to the returned msg-create-next header.
POST /queues/jms.queue.bar/create/002
Host: example.com
Content-Type: application/xml
<order>
<name>Monica</name>
<item>iPad</name>
<cost>$499.99</cost>
</order>
--- Response --
HTTP/1.1 201 Created

Persistent Messages
259
msg-create-next: http://example.com/queues/jms.queue.bar/create/003
If there ever is a network problem, just repost to the URL provided in the msg-create-next
header.
How can this work? As you can see, with each successful response, the HornetQ REST server
returns a uniquely generated URL within the msg-create-next header. This URL is dedicated to the
next new message you want to post. Behind the scenes, the code extracts an identify from the URL
and uses HornetQ's duplicate detection mechanism by setting the DUPLICATE_DETECTION_ID
property of the JMS message that is actually posted to the system.
An alternative to this approach is to use the msg-create-with-id header. This is not an invokable
URL, but a URL template. The idea is that the client provides the DUPLICATE_DETECTION_ID and
creates it's own create-next URL. The msg-create-with-id header looks like this (you've see
it in previous examples, but we haven't used it):
msg-create-with-id: http://example.com/queues/jms.queue.bar/create/{id}
You see that it is a regular URL appended with a {id}. This {id} is a pattern matching substring.
A client would generate its DUPLICATE_DETECTION_ID and replace {id} with that generated id,
then POST to the new URL. The URL the client creates works exactly like a create-next URL
described earlier. The response of this POST would also return a new msg-create-next header.
The client can continue to generate its own DUPLICATE_DETECTION_ID, or use the new URL
returned via the msg-create-next header.
The advantage of this approach is that the client does not have to repost the message. It also only
has to come up with a unique DUPLICATE_DETECTION_ID once.
43.4.2. Persistent Messages
By default, posted messages are not durable and will not be persisted in HornetQ's journal. You
can create durable messages by modifying the default configuration as expressed in Chapter 2
so that all messages are persisted when sent. Alternatively, you can set a URL query parameter
called durable to true when you post your messages to the URLs returned in themsg-create,
msg-create-with-id, or msg-create-next headers. here's an example of that.
POST /queues/jms.queue.bar/create?durable=true
Host: example.com
Content-Type: application/xml
<order>
<name>Bill</name>
<item>iPhone4</item>

Chapter 43. REST Interface
260
<cost>$199.99</cost>
</order>
43.4.3. TTL, Expiration and Priority
You can set the time to live, expiration, and/or the priority of the message in the queue or topic
by setting an additional query parameter. The expiration query parameter is an long specify the
time in milliseconds since epoch (a long date). The ttl query parameter is a time in milliseconds
you want the message active. The priority is another query parameter with an integer value
between 0 and 9 expressing the priority of the message. i.e.:
POST /queues/jms.queue.bar/create?expiration=30000&priority=3
Host: example.com
Content-Type: application/xml
<order>
<name>Bill</name>
<item>iPhone4</item>
<cost>$199.99</cost>
</order>
43.5. Consuming Messages via Pull
There are two different ways to consume messages from a topic or queue. You can wait and
have the messaging server push them to you, or you can continuously poll the server yourself to
see if messages are available. This chapter discusses the latter. Consuming messages via a pull
works almost identically for queues and topics with some minor, but important caveats. To start
consuming you must create a consumer resource on the server that is dedicated to your client.
Now, this pretty much breaks the stateless principle of REST, but after much prototyping, this is
the best way to work most effectively with HornetQ through a REST interface.
You create consumer resources by doing a simple POST to the URL published by the msg-
pull-consumers response header if you're interacting with a queue, the msg-pull-subscribers
response header if you're interacting with a topic. These headers are provided by the main queue
or topic resource discussed in HornetQ REST Interface Basics. Doing an empty POST to one of
these URLs will create a consumer resource that follows an auto-acknowledge protocol and, if
you're interacting with a topic, creates a temporty subscription to the topic. If you want to use the
acknowledgement protocol and/or create a durable subscription (topics only), then you must use
the form parameters (application/x-www-form-urlencoded) described below.
• autoAck. A value of true or false can be given. This defaults to true if you do not pass this
parameter.

Auto-Acknowledge
261
• durable. A value of true or false can be given. This defaults to false if you do not pass this
parameter. Only available on topics. This specifies whether you want a durable subscription or
not. A durable subscription persists through server restart.
• name. This is the name of the durable subscription. If you do not provide this parameter, the
name will be automatically generated by the server. Only usable on topics.
• selector. This is an optional JMS selector string. The HornetQ REST interface adds HTTP
headers to the JMS message for REST produced messages. HTTP headers are prefixed with
"http_" and every '-' charactor is converted to a '$'.
• idle-timeout. For a topic subscription, idle time in milliseconds in which the consumer
connections will be closed if idle.
• delete-when-idle. Boolean value, If true, a topic subscription will be deleted (even if it is
durable) when an the idle timeout is reached.
43.5.1. Auto-Acknowledge
This section focuses on the auto-acknowledge protocol for consuming messages via a pull. Here's
a list of the response headers and URLs you'll be interested in.
• msg-pull-consumers. The URL of a factory resource for creating queue consumer resources.
You will pull from these created resources.
• msg-pull-subscriptions. The URL of a factory resource for creating topic subscription
resources. You will pull from the created resources.
• msg-consume-next. The URL you will pull the next message from. This is returned with every
response.
• msg-consumer. This is a URL pointing back to the consumer or subscription resource created
for the client.
43.5.1.1. Creating an Auto-Ack Consumer or Subscription
Here is an example of creating an auto-acknowledged queue pull consumer.
1. Find the pull-consumers URL by doing a HEAD or GET request to the base queue resource.
HEAD /queues/jms.queue.bar HTTP/1.1
Host: example.com
--- Response ---
HTTP/1.1 200 Ok

Chapter 43. REST Interface
262
msg-create: http://example.com/queues/jms.queue.bar/create
msg-pull-consumers: http://example.com/queues/jms.queue.bar/pull-consumers
msg-push-consumers: http://example.com/queues/jms.queue.bar/push-consumers
2. Next do an empty POST to the URL returned in the msg-pull-consumers header.
POST /queues/jms.queue.bar/pull-consumers HTTP/1.1
Host: example.com
--- response ---
HTTP/1.1 201 Created
Location: http://example.com/queues/jms.queue.bar/pull-consumers/auto-
ack/333
msg-consume-next: http://example.com/queues/jms.queue.bar/pull-consumers/
auto-ack/333/consume-next-1
The Location header points to the JMS consumer resource that was created on the server. It
is good to remember this URL, although, as you'll see later, it is transmitted with each response
just to remind you.
Creating an auto-acknowledged consumer for a topic is pretty much the same. Here's an example
of creating a durable auto-acknowledged topic pull subscription.
1. Find the pull-subscriptions URL by doing a HEAD or GET request to the base topic
resource
HEAD /topics/jms.topic.bar HTTP/1.1
Host: example.com
--- Response ---
HTTP/1.1 200 Ok
msg-create: http://example.com/topics/jms.topic.foo/create
msg-pull-subscriptions: http://example.com/topics/jms.topic.foo/pull-
subscriptions
msg-push-subscriptions: http://example.com/topics/jms.topic.foo/push-
subscriptions
2. Next do a POST to the URL returned in the msg-pull-subscriptions header passing in a
true value for the durable form parameter.
POST /topics/jms.topic.foo/pull-subscriptions HTTP/1.1

Auto-Acknowledge
263
Host: example.com
Content-Type: application/x-www-form-urlencoded
durable=true
--- Response ---
HTTP/1.1 201 Created
Location: http://example.com/topics/jms.topic.foo/pull-subscriptions/auto-
ack/222
msg-consume-next:
http://example.com/topics/jms.topic.foo/pull-subscriptions/auto-ack/222/
consume-next-1
The Location header points to the JMS subscription resource that was created on the server. It
is good to remember this URL, although, as you'll see later, it is transmitted with each response
just to remind you.
43.5.1.2. Consuming Messages
After you have created a consumer resource, you are ready to start pulling messages from the
server. Notice that when you created the consumer for either the queue or topic, the response
contained a msg-consume-next response header. POST to the URL contained within this header
to consume the next message in the queue or topic subscription. A successful POST causes the
server to extract a message from the queue or topic subscription, acknowledge it, and return it to
the consuming client. If there are no messages in the queue or topic subscription, a 503 (Service
Unavailable) HTTP code is returned.
Warning
For both successful and unsuccessful posts to the msg-consume-next URL, the
response will contain a new msg-consume-next header. You must ALWAYS use
this new URL returned within the new msg-consume-next header to consume new
messages.
Here's an example of pulling multiple messages from the consumer resource.
1. Do a POST on the msg-consume-next URL that was returned with the consumer or subscription
resource discussed earlier.
POST /queues/jms.queue.bar/pull-consumers/consume-next-1
Host: example.com
--- Response ---

Chapter 43. REST Interface
264
HTTP/1.1 200 Ok
Content-Type: application/xml
msg-consume-next: http://example.com/queues/jms.queue.bar/pull-
consumers/333/consume-next-2
msg-consumer: http://example.com/queues/jms.queue.bar/pull-consumers/333
<order>...</order>
The POST returns the message consumed from the queue. It also returns a new msg-consume-
next link. Use this new link to get the next message. Notice also a msg-consumer response
header is returned. This is a URL that points back to the consumer or subscription resource.
You will need that to clean up your connection after you are finished using the queue or topic.
2. The POST returns the message consumed from the queue. It also returns a new msg-consume-
next link. Use this new link to get the next message.
POST /queues/jms.queue.bar/pull-consumers/consume-next-2
Host: example.com
--- Response ---
Http/1.1 503 Service Unavailable
Retry-After: 5
msg-consume-next: http://example.com/queues/jms.queue.bar/pull-
consumers/333/consume-next-2
In this case, there are no messages in the queue, so we get a 503 response back. As per the
HTTP 1.1 spec, a 503 response may return a Retry-After head specifying the time in seconds
that you should retry a post. Also notice, that another new msg-consume-next URL is present.
Although it probabley is the same URL you used last post, get in the habit of using URLs
returned in response headers as future versions of HornetQ REST might be redirecting you or
adding additional data to the URL after timeouts like this.
3. POST to the URL within the last msg-consume-next to get the next message.
POST /queues/jms.queue.bar/pull-consumers/consume-next-2
Host: example.com
--- Response ---
HTTP/1.1 200 Ok
Content-Type: application/xml
msg-consume-next: http://example.com/queues/jms.queue.bar/pull-
consumers/333/consume-next-3

Manual Acknowledgement
265
<order>...</order>
43.5.1.3. Recovering From Network Failures
If you experience a network failure and do not know if your post to a msg-consume-next URL was
successful or not, just re-do your POST. A POST to a msg-consume-next URL is idempotent,
meaning that it will return the same result if you execute on any one msg-consume-next URL more
than once. Behind the scenes, the consumer resource caches the last consumed message so
that if there is a message failure and you do a re-post, the cached last message will be returned
(along with a new msg-consume-next URL). This is the reason why the protocol always requires
you to use the next new msg-consume-next URL returned with each response. Information about
what state the client is in is embedded within the actual URL.
43.5.1.4. Recovering From Client or Server Crashes
If the server crashes and you do a POST to the msg-consume-next URL, the server will return a
412 (Preconditions Failed) response code. This is telling you that the URL you are using is out of
sync with the server. The response will contain a new msg-consume-next header to invoke on.
If the client crashes there are multiple ways you can recover. If you have remembered the last msg-
consume-next link, you can just re-POST to it. If you have remembered the consumer resource
URL, you can do a GET or HEAD request to obtain a new msg-consume-next URL. If you have
created a topic subscription using the name parameter discussed earlier, you can re-create the
consumer. Re-creation will return a msg-consume-next URL you can use. If you cannot do any of
these things, you will have to create a new consumer.
The problem with the auto-acknowledge protocol is that if the client or server crashes, it is
possible for you to skip messages. The scenario would happen if the server crashes after auto-
acknowledging a message and before the client receives the message. If you want more reliable
messaging, then you must use the acknowledgement protocol.
43.5.2. Manual Acknowledgement
The manual acknowledgement protocol is similar to the auto-ack protocol except there is an
additional round trip to the server to tell it that you have received the message and that the server
can internally ack the message. Here is a list of the respone headers you will be interested in.
• msg-pull-consumers. The URL of a factory resource for creating queue consumer resources.
You will pull from these created resources
• msg-pull-subscriptions. The URL of a factory resource for creating topic subscription
resources. You will pull from the created resources.
• msg-acknowledge-next. URL used to obtain the next message in the queue or topic
subscription. It does not acknowledge the message though.
• msg-acknowledgement. URL used to acknowledge a message.

Chapter 43. REST Interface
266
• msg-consumer. This is a URL pointing back to the consumer or subscription resource created
for the client.
43.5.2.1. Creating manually-acknowledged consumers or
subscriptions
Here is an example of creating an auto-acknowledged queue pull consumer.
1. Find the pull-consumers URL by doing a HEAD or GET request to the base queue resource.
HEAD /queues/jms.queue.bar HTTP/1.1
Host: example.com
--- Response ---
HTTP/1.1 200 Ok
msg-create: http://example.com/queues/jms.queue.bar/create
msg-pull-consumers: http://example.com/queues/jms.queue.bar/pull-consumers
msg-push-consumers: http://example.com/queues/jms.queue.bar/push-consumers
2. Next do a POST to the URL returned in the msg-pull-consumers header passing in a false
value to the autoAck form parameter .
POST /queues/jms.queue.bar/pull-consumers HTTP/1.1
Host: example.com
Content-Type: application/x-www-form-urlencoded
autoAck=false
--- response ---
HTTP/1.1 201 Created
Location: http://example.com/queues/jms.queue.bar/pull-consumers/
acknowledged/333
msg-acknowledge-next: http://example.com/queues/jms.queue.bar/pull-
consumers/acknowledged/333/acknowledge-next-1
The Location header points to the JMS consumer resource that was created on the server. It
is good to remember this URL, although, as you'll see later, it is transmitted with each response
just to remind you.
Creating an manually-acknowledged consumer for a topic is pretty much the same. Here's an
example of creating a durable manually-acknowledged topic pull subscription.
1. Find the pull-subscriptions URL by doing a HEAD or GET request to the base topic
resource

Manual Acknowledgement
267
HEAD /topics/jms.topic.bar HTTP/1.1
Host: example.com
--- Response ---
HTTP/1.1 200 Ok
msg-create: http://example.com/topics/jms.topic.foo/create
msg-pull-subscriptions: http://example.com/topics/jms.topic.foo/pull-
subscriptions
msg-push-subscriptions: http://example.com/topics/jms.topic.foo/push-
subscriptions
2. Next do a POST to the URL returned in the msg-pull-subscriptions header passing in a
true value for the durable form parameter and a false value to the autoAck form parameter.
POST /topics/jms.topic.foo/pull-subscriptions HTTP/1.1
Host: example.com
Content-Type: application/x-www-form-urlencoded
durable=true&autoAck=false
--- Response ---
HTTP/1.1 201 Created
Location: http://example.com/topics/jms.topic.foo/pull-subscriptions/
acknowledged/222
msg-acknowledge-next:
http://example.com/topics/jms.topic.foo/pull-subscriptions/acknowledged/222/
consume-next-1
The Location header points to the JMS subscription resource that was created on the server. It
is good to remember this URL, although, as you'll see later, it is transmitted with each response
just to remind you.
43.5.2.2. Consuming and Acknowledging a Message
After you have created a consumer resource, you are ready to start pulling messages from the
server. Notice that when you created the consumer for either the queue or topic, the response
contained a msg-acknowledge-next response header. POST to the URL contained within this
header to consume the next message in the queue or topic subscription. If there are no messages
in the queue or topic subscription, a 503 (Service Unavailable) HTTP code is returned. A
successful POST causes the server to extract a message from the queue or topic subscription
and return it to the consuming client. It does not acknowledge the message though. The response
will contain the acknowledgement header which you will use to acknowledge the message.

Chapter 43. REST Interface
268
Here's an example of pulling multiple messages from the consumer resource.
1. Do a POST on the msg-acknowledge-next URL that was returned with the consumer or
subscription resource discussed earlier.
POST /queues/jms.queue.bar/pull-consumers/consume-next-1
Host: example.com
--- Response ---
HTTP/1.1 200 Ok
Content-Type: application/xml
msg-acknowledgement:
http://example.com/queues/jms.queue.bar/pull-consumers/333/acknowledgement/2
msg-consumer: http://example.com/queues/jms.queue.bar/pull-consumers/333
<order>...</order>
The POST returns the message consumed from the queue. It also returns amsg-
acknowledgement link. You will use this new link to acknowledge the message. Notice also a
msg-consumer response header is returned. This is a URL that points back to the consumer
or subscription resource. You will need that to clean up your connection after you are finished
using the queue or topic.
2. Acknowledge or unacknowledge the message by doing a POST to the URL contained in the
msg-acknowledgement header. You must pass an acknowledge form parameter set to true
or false depending on whether you want to acknowledge or unacknowledge the message on
the server.
POST /queues/jms.queue.bar/pull-consumers/acknowledgement/2
Host: example.com
Content-Type: application/x-www-form-urlencoded
acknowledge=true
--- Response ---
Http/1.1 200 Ok
msg-acknowledge-next:
http://example.com/queues/jms.queue.bar/pull-consumers/333/acknowledge-
next-2
Whether you acknowledge or unacknowledge the message, the response will contain a new
msg-acknowledge-next header that you must use to obtain the next message.

Blocking Pulls with Accept-Wait
269
43.5.2.3. Recovering From Network Failures
If you experience a network failure and do not know if your post to a msg-acknowledge-next
or msg-acknowledgement URL was successful or not, just re-do your POST. A POST to one of
these URLs is idempotent, meaning that it will return the same result if you re-post. Behind the
scenes, the consumer resource keeps track of its current state. If the last action was a call tomsg-
acknowledge-next, it will have the last message cached, so that if a re-post is done, it will return
the message again. Same goes with re-posting to msg-acknowledgement. The server remembers
its last state and will return the same results. If you look at the URLs you'll see that they contain
information about the expected current state of the server. This is how the server knows what
the client is expecting.
43.5.2.4. Recovering From Client or Server Crashes
If the server crashes and while you are doing a POST to the msg-acknowledge-next URL, just
re-post. Everything should reconnect all right. On the other hand, if the server crashes while you
are doing a POST tomsg-acknowledgement, the server will return a 412 (Preconditions Failed)
response code. This is telling you that the URL you are using is out of sync with the server and
the message you are acknowledging was probably re-enqueued. The response will contain a new
msg-acknowledge-next header to invoke on.
As long as you have "bookmarked" the consumer resource URL (returned from Location header
on a create, or the msg-consumer header), you can recover from client crashes by doing a GET or
HEAD request on the consumer resource to obtain what state you are in. If the consumer resource
is expecting you to acknowledge a message, it will return a msg-acknowledgement header in
the response. If the consumer resource is expecting you to pull for the next message, the msg-
acknowledge-next header will be in the response. With manual acknowledgement you are pretty
much guaranteed to avoid skipped messages. For topic subscriptions that were created with a
name parameter, you do not have to "bookmark" the returned URL. Instead, you can re-create the
consumer resource with the same exact name. The response will contain the same information
as if you did a GET or HEAD request on the consumer resource.
43.5.3. Blocking Pulls with Accept-Wait
Unless your queue or topic has a high rate of message flowing though it, if you use the pull
protocol, you're going to be receiving a lot of 503 responses as you continuously pull the server for
new messages. To alleviate this problem, the HornetQ REST interface provides the Accept-Wait
header. This is a generic HTTP request header that is a hint to the server for how long the client is
willing to wait for a response from the server. The value of this header is the time in seconds the
client is willing to block for. You would send this request header with your pull requests. Here's
an example:
POST /queues/jms.queue.bar/pull-consumers/consume-next-2
Host: example.com

Chapter 43. REST Interface
270
Accept-Wait: 30
--- Response ---
HTTP/1.1 200 Ok
Content-Type: application/xml
msg-consume-next: http://example.com/queues/jms.queue.bar/pull-consumers/333/
consume-next-3
<order>...</order>
In this example, we're posting to a msg-consume-next URL and telling the server that we would
be willing to block for 30 seconds.
43.5.4. Clean Up Your Consumers!
When the client is done with its consumer or topic subscription it should do an HTTP DELETE
call on the consumer URL passed back from the Location header or the msg-consumer response
header. The server will time out a consumer with the value of consumer-session-timeout-
seconds configured from REST configuration, so you don't have to clean up if you don't want
to, but if you are a good kid, you will clean up your messes. A consumer timeout for durable
subscriptions will not delete the underlying durable JMS subscription though, only the server-side
consumer resource (and underlying JMS session).
43.6. Pushing Messages
You can configure the HornetQ REST server to push messages to a registered URL either
remotely through the REST interface, or by creating a pre-configured XML file for the HornetQ
REST server to load at boot time.
43.6.1. The Queue Push Subscription XML
Creating a push consumer for a queue first involves creating a very simple XML document. This
document tells the server if the push subscription should survive server reboots (is it durable). It
must provide a URL to ship the forwarded message to. Finally, you have to provide authentication
information if the final endpoint requires authentication. Here's a simple example:
<push-registration>
<durable>false</durable>
<selector><![CDATA[
SomeAttribute > 1
]]>
</selector>
<link rel="push" href="http://somewhere.com" type="application/json"
method="PUT"/>
<maxRetries>5</maxRetries>

The Queue Push Subscription XML
271
<retryWaitMillis>1000</retryWaitMillis>
<disableOnFailure>true</disableOnFailure>
</push-registration>
The durable element specifies whether the registration should be saved to disk so that if there
is a server restart, the push subscription will still work. This element is not required. If left out it
defaults tofalse. If durable is set to true, an XML file for the push subscription will be created
within the directory specified by the queue-push-store-dir config variable defined in Chapter 2
(topic-push-store-dir for topics).
The selector element is optional and defines a JMS message selector. You should enclose it
within CDATA blocks as some of the selector characters are illegal XML.
The maxRetries element specifies how many times a the server will try to push a message to a
URL if there is a connection failure.
The retryWaitMillis element specifies how long to wait before performing a retry.
The disableOnFailure element, if set to true, will disable the registration if all retries have failed.
It will not disable the connection on non-connection-failure issues (like a bad request for instance).
In these cases, the dead letter queue logic of HornetQ will take over.
The link element specifies the basis of the interaction. The href attribute contains the URL you
want to interact with. It is the only required attribute. The type attribute specifies the content-type
of what the push URL is expecting. The method attribute defines what HTTP method the server
will use when it sends the message to the server. If it is not provided it defaults to POST. The
rel attribute is very important and the value of it triggers different behavior. Here's the values a
rel attribute can have:
• destination. The href URL is assumed to be a queue or topic resource of another HornetQ
REST server. The push registration will initially do a HEAD request to this URL to obtain a
msg-create-with-id header. It will use this header to push new messages to the HornetQ REST
endpoint reliably. Here's an example:
<push-registration>
<link rel="destination" href="http://somewhere.com/queues/jms.queue.foo"/>
</push-registration>
• template. In this case, the server is expecting the link element's href attribute to be a URL
expression. The URL expression must have one and only one URL parameter within it. The
server will use a unique value to create the endpoint URL. Here's an example:
<push-registration>

Chapter 43. REST Interface
272
<link rel="template" href="http://somewhere.com/resources/{id}/messages"
method="PUT"/>
</push-registration>
In this example, the {id} sub-string is the one and only one URL parameter.
• user defined. If the rel attributes is not destination or template (or is empty or missing), then
the server will send an HTTP message to the href URL using the HTTP method defined in the
method attribute. Here's an example:
<push-registration>
<link href="http://somewhere.com" type="application/json" method="PUT"/>
</push-registration>
43.6.2. The Topic Push Subscription XML
The push XML for a topic is the same except the root element is push-topic-registration. (Also
remember the selector element is optional). The rest of the document is the same. Here's an
example of a template registration:
<push-topic-registration>
<durable>true</durable>
<selector><![CDATA[
SomeAttribute > 1
]]>
</selector>
<link rel="template" href="http://somewhere.com/resources/{id}/messages"
method="POST"/>
</push-topic registration>
43.6.3. Creating a Push Subscription at Runtime
Creating a push subscription at runtime involves getting the factory resource URL from the msg-
push-consumers header, if the destination is a queue, or msg-push-subscriptions header, if the
destination is a topic. Here's an example of creating a push registration for a queue:
1. First do a HEAD request to the queue resource:
HEAD /queues/jms.queue.bar HTTP/1.1
Host: example.com

Creating a Push Subscription at Runtime
273
--- Response ---
HTTP/1.1 200 Ok
msg-create: http://example.com/queues/jms.queue.bar/create
msg-pull-consumers: http://example.com/queues/jms.queue.bar/pull-consumers
msg-push-consumers: http://example.com/queues/jms.queue.bar/push-consumers
2. Next POST your subscription XML to the URL returned from msg-push-consumers header
POST /queues/jms.queue.bar/push-consumers
Host: example.com
Content-Type: application/xml
<push-registration>
<link rel="destination" href="http://somewhere.com/queues/jms.queue.foo"/>
</push-registration>
--- Response ---
HTTP/1.1 201 Created
Location: http://example.com/queues/jms.queue.bar/push-consumers/1-333-1212
The Location header contains the URL for the created resource. If you want to unregister this,
then do a HTTP DELETE on this URL.
Here's an example of creating a push registration for a topic:
1. First do a HEAD request to the topic resource:
HEAD /topics/jms.topic.bar HTTP/1.1
Host: example.com
--- Response ---
HTTP/1.1 200 Ok
msg-create: http://example.com/topics/jms.topic.bar/create
msg-pull-subscriptions: http://example.com/topics/jms.topic.bar/pull-
subscriptions
msg-push-subscriptions: http://example.com/topics/jms.topic.bar/push-
subscriptions
2. Next POST your subscription XML to the URL returned from msg-push-subscriptions header
POST /topics/jms.topic.bar/push-subscriptions

Chapter 43. REST Interface
274
Host: example.com
Content-Type: application/xml
<push-registration>
<link rel="template" href="http://somewhere.com/resources/{id}"/>
</push-registration>
--- Response ---
HTTP/1.1 201 Created
Location: http://example.com/topics/jms.topic.bar/push-
subscriptions/1-333-1212
The Location header contains the URL for the created resource. If you want to unregister this,
then do a HTTP DELETE on this URL.
43.6.4. Creating a Push Subscription by Hand
You can create a push XML file yourself if you do not want to go through the REST interface
to create a push subscription. There is some additional information you need to provide though.
First, in the root element, you must define a unique id attribute. You must also define a destination
element to specify the queue you should register a consumer with. For a topic, the destination
element is the name of the subscription that will be reated. For a topic, you must also specify the
topic name within the topic element.
Here's an example of a hand-created queue registration. This file must go in the directory specified
by the queue-push-store-dir config variable defined in Chapter 2:
<push-registration id="111">
<destination>jms.queue.bar</destination>
<durable>true</durable>
<link rel="template" href="http://somewhere.com/resources/{id}/messages"
method="PUT"/>
</push-registration>
Here's an example of a hand-created topic registration. This file must go in the directory specified
by the topic-push-store-dir config variable defined in Chapter 2:
<push-topic-registration id="112">
<destination>my-subscription-1</destination
<durable>true</durable>
<link rel="template" href="http://somewhere.com/resources/{id}/messages"
method="PUT"/>
<topic>jms.topic.foo</topic>

Pushing to Authenticated Servers
275
</push-topic-registration>
43.6.5. Pushing to Authenticated Servers
Push subscriptions only support BASIC and DIGEST authentication out of the box. Here is an
example of adding BASIC authentication:
<push-topic-registration>
<durable>true</durable>
<link rel="template" href="http://somewhere.com/resources/{id}/messages"
method="POST"/>
<authentication>
<basic-auth>
<username>guest</username>
<password>geheim</password>
</basic-auth>
</authentication>
</push-topic registration>
For DIGEST, just replace basic-auth with digest-auth.
For other authentication mechanisms, you can register headers you want transmitted with each
request. Use the header element with the name attribute representing the name of the header.
Here's what custom headers might look like:
<push-topic-registration>
<durable>true</durable>
<link rel="template" href="http://somewhere.com/resources/{id}/messages"
method="POST"/>
<header name="secret-header">jfdiwe3321</header>
</push-topic registration>
43.7. Creating Destinations
You can create a durable queue or topic through the REST interface. Currently you cannot create
a temporary queue or topic. To create a queue you do a POST to the relative URL /queues with
an XML representation of the queue. The XML syntax is the same queue syntax that you would
specify in hornetq-jms.xml if you were creating a queue there. For example:
POST /queues

Chapter 43. REST Interface
276
Host: example.com
Content-Type: application/hornetq.jms.queue+xml
<queue name="testQueue">
<durable>true</durable>
</queue>
--- Response ---
HTTP/1.1 201 Created
Location: http://example.com/queues/jms.queue.testQueue
Notice that the Content-Type is application/hornetq.jms.queue+xml.
Here's what creating a topic would look like:
POST /topics
Host: example.com
Content-Type: application/hornetq.jms.topic+xml
<topic name="testTopic">
</topic>
--- Response ---
HTTP/1.1 201 Created
Location: http://example.com/topics/jms.topic.testTopic
43.8. Securing the HornetQ REST Interface
43.8.1. Within JBoss Application server
Securing the HornetQ REST interface is very simple with the JBoss Application Server. You turn
on authentication for all URLs within your WAR's web.xml, and let the user Principal to propagate
to HornetQ. This only works if you are using the JBossSecurityManager with HornetQ. See the
HornetQ documentation for more details.
43.8.2. Security in other environments
To secure the HornetQ REST interface in other environments you must role your own security
by specifying security constraints with your web.xml for every path of every queue and topic you
have deployed. Here is a list of URI patterns:
Table 43.1.
/queues secure the POST operation to secure queue
creation

Mixing JMS and REST
277
/queues/{queue-name} secure the GET HEAD operation to getting
information about the queue.
/queues/{queue-name}/create/* secure this URL pattern for producing
messages.
/queues/{queue-name}/pull-consumers/* secure this URL pattern for pulling messages
messages.
/queues/{queue-name}/push-consumers/* secure this URL pattern for pushing messages.
/topics secure the POST operation to secure topic
creation
/topics/{topic-name} secure the GET HEAD operation to getting
information about the topic.
/topics/{topic-name}/create/* secure this URL pattern for producing
messages.
/topics/{topic-name}/pull-subscriptions/* secure this URL pattern for pulling messages
messages.
/topics/{topic-name}/push-subscriptions/* secure this URL pattern for pushing messages.
43.9. Mixing JMS and REST
The HornetQ REST interface supports mixing JMS and REST producres and consumers. You
can send an ObjectMessage through a JMS Producer, and have a REST client consume it. You
can have a REST client POST a message to a topic and have a JMS Consumer receive it. Some
simple transformations are supported if you have the correct RESTEasy providers installed.
43.9.1. JMS Producers - REST Consumers
If you have a JMS producer, the HornetQ REST interface only supports ObjectMessage type. If
the JMS producer is aware that there may be REST consumers, it should set a JMS property to
specify what Content-Type the Java object should be translated into by REST clients. The HornetQ
REST server will use RESTEasy content handlers (MessageBodyReader/Writers) to transform
the Java object to the type desired. Here's an example of a JMS producer setting the content
type of the message.
ObjectMessage message = session.createObjectMessage();
message.setStringProperty(org.hornetq.rest.HttpHeaderProperty.CONTENT_TYPE,
"application/xml");
If the JMS producer does not set the content-type, then this information must be obtained from
the REST consumer. If it is a pull consumer, then the REST client should send an Accept header
with the desired media types it wants to convert the Java object into. If the REST client is a push

Chapter 43. REST Interface
278
registration, then the type attribute of the link element of the push registration should be set to
the desired type.
43.9.2. REST Producers - JMS Consumers
If you have a REST client producing messages and a JMS consumer, HornetQ REST has a simple
helper class for you to transform the HTTP body to a Java object. Here's some example code:
public void onMessage(Message message)
{
MyType obj = org.hornetq.rest.Jms.getEntity(message, MyType.class);
}
The way the getEntity() method works is that if the message is an ObjectMessage, it will try to
extract the desired type from it like any other JMS message. If a REST producer sent the message,
then the method uses RESTEasy to convert the HTTP body to the Java object you want. See the
Javadoc of this class for more helper methods.

Chapter 44.
279
Embedding HornetQHornetQ is designed as set of simple Plain Old Java Objects (POJOs). This means HornetQ can
be instantiated and run in any dependency injection framework such as JBoss Microcontainer,
Spring or Google Guice. It also means that if you have an application that could use messaging
functionality internally, then it can directly instantiate HornetQ clients and servers in its own
application code to perform that functionality. We call this embedding HornetQ.
Examples of applications that might want to do this include any application that needs very high
performance, transactional, persistent messaging but doesn't want the hassle of writing it all from
scratch.
Embedding HornetQ can be done in very few easy steps. Instantiate the configuration object,
instantiate the server, start it, and you have a HornetQ running in your virtual machine. It's as
simple and easy as that.
44.1. Simple Config File Embedding
The simplest way to embed HornetQ is to use the embedded wrapper classes and configure
HornetQ through its configuration files. There are two different helper classes for this depending
on whether your using the HornetQ Core API or JMS.
44.1.1. Core API Only
For instantiating a core HornetQ Server only, the steps are pretty simple. The example requires
that you have defined a configuration file hornetq-configuration.xml in your classpath:
import org.hornetq.core.server.embedded.EmbeddedHornetQ;
...
EmbeddedHornetQ embedded = new EmbeddedHornetQ();
embedded.start();
ClientSessionFactory nettyFactory = HornetQClient.createClientSessionFactory(
new TransportConfiguration(
InVMConnectorFactory.class.getName()));
ClientSession session = factory.createSession();
session.createQueue("example", "example", true);
ClientProducer producer = session.createProducer("example");
ClientMessage message = session.createMessage(true);

Chapter 44. Embedding HornetQ
280
message.getBody().writeString("Hello");
producer.send(message);
session.start();
ClientConsumer consumer = session.createConsumer("example");
ClientMessage msgReceived = consumer.receive();
System.out.println("message = " + msgReceived.getBody().readString());
session.close();
The EmbeddedHornetQ class has a few additional setter methods that allow you to specify a
different config file name as well as other properties. See the javadocs for this class for more
details.
44.1.2. JMS API
JMS embedding is simple as well. This example requires that you have defined the config
files hornetq-configuration.xml, hornetq-jms.xml, and a hornetq-users.xml if you have
security enabled. Let's also assume that a queue and connection factory has been defined in the
hornetq-jms.xml config file.
import org.hornetq.jms.server.embedded.EmbeddedJMS;
...
EmbeddedJMS jms = new EmbeddedJMS();
jms.start();
// This assumes we have configured hornetq-jms.xml with the appropriate config
information
ConnectionFactory connectionFactory = jms.lookup("ConnectionFactory");
Destination destination = jms.lookup("/example/queue");
... regular JMS code ...
By default, the EmbeddedJMS class will store component entries defined within your hornetq-
jms.xml file in an internal concurrent hash map. The EmbeddedJMS.lookup() method returns
components stored in this map. If you want to use JNDI, call the EmbeddedJMS.setContext()
method with the root JNDI context you want your components bound into. See the javadocs for
this class for more details on other config options.

POJO instantiation - Embedding Programmatically
281
44.2. POJO instantiation - Embedding Programmatically
You can follow this step-by-step guide to programmatically embed the core, non-JMS HornetQ
Server instance:
Create the configuration object - this contains configuration information for a HornetQ instance.
The setter methods of this class allow you to programmitcally set configuration options as describe
in the Section 49.1, “Server Configuration” section.
The acceptors are configured through ConfigurationImpl. Just add the NettyAcceptorFactory
on the transports the same way you would through the main configuration file.
import org.hornetq.core.config.Configuration;
import org.hornetq.core.config.impl.ConfigurationImpl;
...
Configuration config = new ConfigurationImpl();
HashSet<TransportConfiguration> transports = new
HashSet<TransportConfiguration>();
transports.add(new
TransportConfiguration(NettyAcceptorFactory.class.getName()));
transports.add(new
TransportConfiguration(InVMAcceptorFactory.class.getName()));
config.setAcceptorConfigurations(transports);
You need to instantiate an instance of
org.hornetq.api.core.server.embedded.EmbeddedHornetQ and add the configuration object
to it.
import org.hornetq.api.core.server.HornetQ;
import org.hornetq.core.server.embedded.EmbeddedHornetQ;
...
EmbeddedHornetQ server = new EmbeddedHornetQ();
server.setConfiguration(config);
server.start();
You also have the option of instantiating HornetQServerImpl directly:

Chapter 44. Embedding HornetQ
282
HornetQServer server = new HornetQServerImpl(config);
server.start();
For JMS POJO instantiation, you work with the EmbeddedJMS class instead as described earlier.
First you define the configuration programmatically for your ConnectionFactory and Destination
objects, then set the JmsConfiguration property of the EmbeddedJMS class. Here is an example
of this:
// Step 1. Create HornetQ core configuration, and set the properties accordingly
Configuration configuration = new ConfigurationImpl();
configuration.setPersistenceEnabled(false);
configuration.setSecurityEnabled(false);
configuration.getAcceptorConfigurations().add(new
TransportConfiguration(NettyAcceptorFactory.class.getName()));
// Step 2. Create the JMS configuration
JMSConfiguration jmsConfig = new JMSConfigurationImpl();
// Step 3. Configure the JMS ConnectionFactory
TransportConfiguration connectorConfig = new
TransportConfiguration(NettyConnectorFactory.class.getName());
ConnectionFactoryConfiguration cfConfig = new
ConnectionFactoryConfigurationImpl("cf", connectorConfig, "/cf");
jmsConfig.getConnectionFactoryConfigurations().add(cfConfig);
// Step 4. Configure the JMS Queue
JMSQueueConfiguration queueConfig = new JMSQueueConfigurationImpl("queue1",
null, false, "/queue/queue1");
jmsConfig.getQueueConfigurations().add(queueConfig);
// Step 5. Start the JMS Server using the HornetQ core server and the JMS
configuration
EmbeddedJMS jmsServer = new EmbeddedJMS();
jmsServer.setConfiguration(configuration);
jmsServer.setJmsConfiguration(jmsConfig);
jmsServer.start();
Please see Section 11.1.20, “Embedded” for an example which shows how to setup and run
HornetQ embedded with JMS.

Dependency Frameworks
283
44.3. Dependency Frameworks
You may also choose to use a dependency injection framework such as JBoss Micro Container™
or Spring Framework™. See Chapter 45, Spring Integration for more details on Spring and
HornetQ, but here's how you would do things with the JBoss Micro Contaier.
HornetQ standalone uses JBoss Micro Container as the injection framework.
HornetQBootstrapServer and hornetq-beans.xml which are part of the HornetQ distribution
provide a very complete implementation of what's needed to bootstrap the server using JBoss
Micro Container.
When using JBoss Micro Container, you need to provide an XML file declaring the HornetQServer
and Configuration object, you can also inject a security manager and a MBean server if you
want, but those are optional.
A very basic XML Bean declaration for the JBoss Micro Container would be:
<?xml version="1.0" encoding="UTF-8"?>
<deployment xmlns="urn:jboss:bean-deployer:2.0">
<!-- The core configuration -->
<bean name="Configuration"
class="org.hornetq.core.config.impl.FileConfiguration">
</bean>
<!-- The core server -->
<bean name="HornetQServer"
class="org.hornetq.core.server.impl.HornetQServerImpl">
<constructor>
<parameter>
<inject bean="Configuration"/>
</parameter>
</constructor>
</bean>
</deployment>
HornetQBootstrapServer provides an easy encapsulation of JBoss Micro Container.
HornetQBootstrapServer bootStrap = new HornetQBootstrapServer(new String[]
{"hornetq-beans.xml"});
bootStrap.run();

284

Chapter 45.
285
Spring IntegrationHornetQ provides a simple bootstrap class,
org.hornetq.integration.spring.SpringJmsBootstrap, for integration with Spring. To use
it, you configure HornetQ as you always would, through its various configuration files like
hornetq-configuration.xml, hornetq-jms.xml, and hornetq-users.xml. The Spring helper
class starts the HornetQ server and adds any factories or destinations configured within hornetq-
jms.xml directly into the namespace of the Spring context. Let's take this hornetq-jms.xml file
for instance:
<configuration xmlns="urn:hornetq"
xmlns:xsi="http://www.w3.org/2001/XMLSchema-instance"
xsi:schemaLocation="urn:hornetq /schema/hornetq-jms.xsd">
<!--the connection factory used by the example-->
<connection-factory name="ConnectionFactory">
<connectors>
<connector-ref connector-name="in-vm"/>
</connectors>
<entries>
<entry name="ConnectionFactory"/>
</entries>
</connection-factory>
<!--the queue used by the example-->
<queue name="exampleQueue">
<entry name="/queue/exampleQueue"/>
</queue>
</configuration>
Here we've specified a javax.jms.ConnectionFactory we want bound to a ConnectionFactory
entry as well as a queue destination bound to a /queue/exampleQueue entry. Using the
SpringJmsBootStrap bean will automatically populate the Spring context with references to those
beans so that you can use them. Below is an example Spring JMS bean file taking advantage
of this feature:
<beans xmlns="http://www.springframework.org/schema/beans"
xmlns:xsi="http://www.w3.org/2001/XMLSchema-instance"
xsi:schemaLocation="http://www.springframework.org/schema/beans
http://www.springframework.org/schema/beans/spring-beans-3.0.xsd">

Chapter 45. Spring Integration
286
<bean id="EmbeddedJms"
class="org.hornetq.integration.spring.SpringJmsBootstrap" init-method="start"/
>
<bean id="listener"
class="org.hornetq.tests.integration.spring.ExampleListener"/>
<bean id="listenerContainer"
class="org.springframework.jms.listener.DefaultMessageListenerContainer">
<property name="connectionFactory" ref="ConnectionFactory"/>
<property name="destination" ref="/queue/exampleQueue"/>
<property name="messageListener" ref="listener"/>
</bean>
</beans>
As you can see, the listenerContainer bean references the components defined in the
hornetq-jms.xml file. The SpringJmsBootstrap class extends the EmbeddedJMS class talked
about in Section 44.1.2, “JMS API” and the same defaults and configuration options apply. Also
notice that an init-method must be declared with a start value so that the bean's lifecycle is
executed. See the javadocs for more details on other properties of the bean class.

Chapter 46.
287
Intercepting OperationsHornetQ supports interceptors to intercept packets entering and exiting the server. Incoming and
outgoing interceptors are be called for any packet entering or exiting the server respectively.
This allows custom code to be executed, e.g. for auditing packets, filtering or other reasons.
Interceptors can change the packets they intercept. This makes interceptors powerful, but also
potentially dangerous.
46.1. Implementing The Interceptors
An interceptor must implement the Interceptor interface:
package org.hornetq.api.core.interceptor;
public interface Interceptor
{
boolean intercept(Packet packet, RemotingConnection connection) throws
HornetQException;
}
The returned boolean value is important:
• if true is returned, the process continues normally
• if false is returned, the process is aborted, no other interceptors will be called and the packet
will not be processed further by the server.
46.2. Configuring The Interceptors
Both incoming and outgoing interceptors are configured in hornetq-configuration.xml:
<remoting-incoming-interceptors>
<class-name>org.hornetq.jms.example.LoginInterceptor</class-name>
<class-name>org.hornetq.jms.example.AdditionalPropertyInterceptor</class-
name>
</remoting-incoming-interceptors>
<remoting-outgoing-interceptors>
<class-name>org.hornetq.jms.example.LogoutInterceptor</class-name>

Chapter 46. Intercepting Oper...
288
<class-name>org.hornetq.jms.example.AdditionalPropertyInterceptor</class-
name>
</remoting-outgoing-interceptors>
The interceptors classes (and their dependencies) must be added to the server classpath to be
properly instantiated and called.
46.3. Interceptors on the Client Side
The interceptors can also be run on the client side to intercept packets either sent
by the client to the server or by the server to the client. This is done by adding
the interceptor to the ServerLocator with the addIncomingInterceptor(Interceptor) or
addOutgoingInterceptor(Interceptor) methods.
As noted above, if an interceptor returns false then the sending of the packet is aborted which
means that no other interceptors are be called and the packet is not be processed further by the
client. Typically this process happens transparently to the client (i.e. it has no idea if a packet
was aborted or not). However, in the case of an outgoing packet that is sent in a blocking
fashion a HornetQException will be thrown to the caller. The exception is thrown because
blocking sends provide reliability and it is considered an error for them not to succeed. Blocking
sends occurs when, for example, an application invokes setBlockOnNonDurableSend(true)
or setBlockOnDurableSend(true) on its ServerLocator or if an application is using a JMS
connection factory retrieved from JNDI that has either block-on-durable-send or block-on-
non-durable-send set to true. Blocking is also used for packets dealing with transactions (e.g.
commit, roll-back, etc.). The HornetQException thrown will contain the name of the interceptor
that returned false.
As on the server, the client interceptor classes (and their dependencies) must be added to the
classpath to be properly instantiated and invoked.
46.4. Example
See Section 11.1.26, “Interceptor” for an example which shows how to use interceptors to add
properties to a message on the server.

Chapter 47.
289
Interoperability
47.1. Stomp
Stomp [http://stomp.codehaus.org/] is a text-orientated wire protocol that allows Stomp clients to
communicate with Stomp Brokers. HornetQ now supports both Stomp 1.0 and Stomp 1.1.
Stomp clients [http://stomp.codehaus.org/Clients] are available for several languages and
platforms making it a good choice for interoperability.
47.1.1. Native Stomp support
HornetQ provides native support for Stomp. To be able to send and receive Stomp messages,
you must configure a NettyAcceptor with a protocol parameter set to stomp:
<acceptor name="stomp-acceptor">
<factory-class>org.hornetq.core.remoting.impl.netty.NettyAcceptorFactory</
factory-class>
<param key="protocol" value="stomp"/>
<param key="port" value="61613"/>
</acceptor>
With this configuration, HornetQ will accept Stomp connections on the port 61613 (which is the
default port of the Stomp brokers).
See the stomp example which shows how to configure a HornetQ server with Stomp.
47.1.1.1. Limitations
Message acknowledgements are not transactional. The ACK frame can not be part of a transaction
(it will be ignored if its transaction header is set).
47.1.1.2. Stomp 1.1 Notes
47.1.1.2.1. Virtual Hosting
HornetQ currently doesn't support virtual hosting, which means the 'host' header in CONNECT
fram will be ignored.
47.1.1.2.2. Heart-beating
HornetQ specifies a minimum value for both client and server heart-beat intervals. The minimum
interval for both client and server heartbeats is 500 milliseconds. That means if a client sends a

Chapter 47. Interoperability
290
CONNECT frame with heartbeat values lower than 500, the server will defaults the value to 500
milliseconds regardless the values of the 'heart-beat' header in the frame.
47.1.2. Mapping Stomp destinations to HornetQ addresses and
queues
Stomp clients deals with destinations when sending messages and subscribing. Destination
names are simply strings which are mapped to some form of destination on the server - how the
server translates these is left to the server implementation.
In HornetQ, these destinations are mapped to addresses and queues. When a Stomp client sends
a message (using a SEND frame), the specified destination is mapped to an address. When a
Stomp client subscribes (or unsubscribes) for a destination (using a SUBSCRIBE or UNSUBSCRIBE
frame), the destination is mapped to a HornetQ queue.
47.1.3. STOMP and connection-ttl
Well behaved STOMP clients will always send a DISCONNECT frame before closing their
connections. In this case the server will clear up any server side resources such as sessions and
consumers synchronously. However if STOMP clients exit without sending a DISCONNECT frame
or if they crash the server will have no way of knowing immediately whether the client is still alive
or not. STOMP connections therefore default to a connection-ttl value of 1 minute (see chapter on
connection-ttl for more information. This value can be overridden using connection-ttl-override.
If you need a specific connection-ttl for your stomp connections without affecting the connection-
ttl-override setting, you can configure your stomp acceptor with the "connection-ttl" property, which
is used to set the ttl for connections that are created from that acceptor. For example:
<acceptor name="stomp-acceptor">
<factory-class>org.hornetq.core.remoting.impl.netty.NettyAcceptorFactory</
factory-class>
<param key="protocol" value="stomp"/>
<param key="port" value="61613"/>
<param key="connection-ttl" value="20000"/>
</acceptor>
The above configuration will make sure that any stomp connection that is created from that
acceptor will have its connection-ttl set to 20 seconds.
Note
Please note that the STOMP protocol version 1.0 does not contain any heartbeat
frame. It is therefore the user's responsibility to make sure data is sent within
connection-ttl or the server will assume the client is dead and clean up server side

Stomp and JMS interoperabilty
291
resources. With Stomp 1.1 users can use heart-beats to maintain the life cycle
of stomp connections.
47.1.4. Stomp and JMS interoperabilty
47.1.4.1. Using JMS destinations
As explained in Chapter 9, Mapping JMS Concepts to the Core API, JMS destinations are also
mapped to HornetQ addresses and queues. If you want to use Stomp to send messages to JMS
destinations, the Stomp destinations must follow the same convention:
• send or subscribe to a JMS Queue by prepending the queue name by jms.queue..
For example, to send a message to the orders JMS Queue, the Stomp client must send the
frame:
SEND
destination:jms.queue.orders
hello queue orders
^@
• send or subscribe to a JMS Topic by prepending the topic name by jms.topic..
For example to subscribe to the stocks JMS Topic, the Stomp client must send the frame:
SUBSCRIBE
destination:jms.topic.stocks
^@
47.1.4.2. Sending and consuming Stomp message from JMS or
HornetQ Core API
Stomp is mainly a text-orientated protocol. To make it simpler to interoperate with JMS and
HornetQ Core API, our Stomp implementation checks for presence of the content-length header
to decide how to map a Stomp message to a JMS Message or a Core message.
If the Stomp message does not have a content-length header, it will be mapped to a JMS
TextMessage or a Core message with a single nullable SimpleString in the body buffer.
Alternatively, if the Stomp message has a content-length header, it will be mapped to a JMS
BytesMessage or a Core message with a byte[] in the body buffer.

Chapter 47. Interoperability
292
The same logic applies when mapping a JMS message or a Core message to Stomp. A Stomp
client can check the presence of the content-length header to determine the type of the
message body (String or bytes).
47.1.4.3. Message IDs for Stomp messages
When receiving Stomp messages via a JMS consumer or a QueueBrowser, the messages have no
properties like JMSMessageID by default. However this may bring some inconvenience to clients
who wants an ID for their purpose. HornetQ Stomp provides a parameter to enable message ID
on each incoming Stomp message. If you want each Stomp message to have a unique ID, just
set the stomp-enable-message-id to true. For example:
<acceptor name="stomp-acceptor">
<factory-class>org.hornetq.core.remoting.impl.netty.NettyAcceptorFactory</
factory-class>
<param key="protocol" value="stomp"/>
<param key="port" value="61613"/>
<param key="stomp-enable-message-id" value="true"/>
</acceptor>
When the server starts with the above setting, each stomp message sent through this acceptor
will have an extra property added. The property key is hq-message-id and the value is a String
representation of a long type internal message id prefixed with "STOMP", like:
hq-message-id : STOMP12345
If stomp-enable-message-id is not specified in the configuration, default is false.
47.1.5. Stomp Over Web Sockets
HornetQ also support Stomp over Web Sockets [http://dev.w3.org/html5/websockets/]. Modern
web browser which support Web Sockets can send and receive Stomp messages from HornetQ.
To enable Stomp over Web Sockets, you must configure a NettyAcceptor with a protocol
parameter set to stomp_ws:
<acceptor name="stomp-ws-acceptor">
<factory-class>org.hornetq.core.remoting.impl.netty.NettyAcceptorFactory</
factory-class>
<param key="protocol" value="stomp_ws"/>
<param key="port" value="61614"/>

StompConnect
293
</acceptor>
With this configuration, HornetQ will accept Stomp connections over Web Sockets on the port
61614 with the URL path /stomp. Web browser can then connect to ws://<server>:61614/
stomp using a Web Socket to send and receive Stomp messages.
A companion JavaScript library to ease client-side development is available from GitHub [http://
github.com/jmesnil/stomp-websocket] (please see its documentation [http://jmesnil.net/stomp-
websocket/doc/] for a complete description).
The stomp-websockets example shows how to configure HornetQ server to have web browsers
and Java applications exchanges messages on a JMS topic.
47.1.6. StompConnect
StompConnect [http://stomp.codehaus.org/StompConnect] is a server that can act as a
Stomp broker and proxy the Stomp protocol to the standard JMS API. Consequently, using
StompConnect it is possible to turn HornetQ into a Stomp Broker and use any of the available
stomp clients. These include clients written in C, C++, c# and .net etc.
To run StompConnect first start the HornetQ server and make sure that it is using JNDI.
Stomp requires the file jndi.properties to be available on the classpath. This should look
something like:
java.naming.factory.initial=org.jnp.interfaces.NamingContextFactory
java.naming.provider.url=jnp://localhost:1099
java.naming.factory.url.pkgs=org.jboss.naming:org.jnp.interfaces
Make sure this file is in the classpath along with the StompConnect jar and the HornetQ jars and
simply run java org.codehaus.stomp.jms.Main.
47.2. REST
REST support coming soon!
47.3. AMQP
AMQP support coming soon!

294

Chapter 48.
295
Performance TuningIn this chapter we'll discuss how to tune HornetQ for optimum performance.
48.1. Tuning persistence
• Put the message journal on its own physical volume. If the disk is shared with other processes
e.g. transaction co-ordinator, database or other journals which are also reading and writing from
it, then this may greatly reduce performance since the disk head may be skipping all over the
place between the different files. One of the advantages of an append only journal is that disk
head movement is minimised - this advantage is destroyed if the disk is shared. If you're using
paging or large messages make sure they're ideally put on separate volumes too.
• Minimum number of journal files. Set journal-min-files to a number of files that would fit
your average sustainable rate. If you see new files being created on the journal data directory
too often, i.e. lots of data is being persisted, you need to increase the minimal number of files,
this way the journal would reuse more files instead of creating new data files.
• Journal file size. The journal file size should be aligned to the capacity of a cylinder on the disk.
The default value 10MiB should be enough on most systems.
• Use AIO journal. If using Linux, try to keep your journal type as AIO. AIO will scale better than
Java NIO.
• Tune journal-buffer-timeout. The timeout can be increased to increase throughput at the
expense of latency.
• If you're running AIO you might be able to get some better performance by increasing journal-
max-io. DO NOT change this parameter if you are running NIO.
48.2. Tuning JMS
There are a few areas where some tweaks can be done if you are using the JMS API
• Disable message id. Use the setDisableMessageID() method on the MessageProducer class
to disable message ids if you don't need them. This decreases the size of the message and
also avoids the overhead of creating a unique ID.
• Disable message timestamp. Use the setDisableMessageTimeStamp() method on the
MessageProducer class to disable message timestamps if you don't need them.
• Avoid ObjectMessage. ObjectMessage is convenient but it comes at a cost. The body of a
ObjectMessage uses Java serialization to serialize it to bytes. The Java serialized form of even
small objects is very verbose so takes up a lot of space on the wire, also Java serialization is
slow compared to custom marshalling techniques. Only use ObjectMessage if you really can't

Chapter 48. Performance Tuning
296
use one of the other message types, i.e. if you really don't know the type of the payload until
run-time.
• Avoid AUTO_ACKNOWLEDGE. AUTO_ACKNOWLEDGE mode requires an acknowledgement to be sent
from the server for each message received on the client, this means more traffic on the network.
If you can, use DUPS_OK_ACKNOWLEDGE or use CLIENT_ACKNOWLEDGE or a transacted session
and batch up many acknowledgements with one acknowledge/commit.
• Avoid durable messages. By default JMS messages are durable. If you don't really need durable
messages then set them to be non-durable. Durable messages incur a lot more overhead in
persisting them to storage.
• Batch many sends or acknowledgements in a single transaction. HornetQ will only require a
network round trip on the commit, not on every send or acknowledgement.
48.3. Other Tunings
There are various other places in HornetQ where we can perform some tuning:
• Use Asynchronous Send Acknowledgements. If you need to send durable messages non
transactionally and you need a guarantee that they have reached the server by the time the call
to send() returns, don't set durable messages to be sent blocking, instead use asynchronous
send acknowledgements to get your acknowledgements of send back in a separate stream,
see Chapter 20, Guarantees of sends and commits for more information on this.
• Use pre-acknowledge mode. With pre-acknowledge mode, messages are acknowledged
before they are sent to the client. This reduces the amount of acknowledgement traffic on the
wire. For more information on this, see Chapter 29, Extra Acknowledge Modes.
• Disable security. You may get a small performance boost by disabling security by setting the
security-enabled parameter to false in hornetq-configuration.xml.
• Disable persistence. If you don't need message persistence, turn it off altogether by setting
persistence-enabled to false in hornetq-configuration.xml.
• Sync transactions lazily. Setting journal-sync-transactional to false in hornetq-
configuration.xml can give you better transactional persistent performance at the expense
of some possibility of loss of transactions on failure. See Chapter 20, Guarantees of sends and
commits for more information.
• Sync non transactional lazily. Setting journal-sync-non-transactional to false in
hornetq-configuration.xml can give you better non-transactional persistent performance
at the expense of some possibility of loss of durable messages on failure. See Chapter 20,
Guarantees of sends and commits for more information.
• Send messages non blocking. Setting block-on-durable-send and block-on-non-durable-
send to false in hornetq-jms.xml (if you're using JMS and JNDI) or directly on the

Tuning Transport Settings
297
ClientSessionFactory. This means you don't have to wait a whole network round trip for every
message sent. See Chapter 20, Guarantees of sends and commits for more information.
• If you have very fast consumers, you can increase consumer-window-size. This effectively
disables consumer flow control.
• Socket NIO vs Socket Old IO. By default HornetQ uses old (blocking) on the server and the client
side (see the chapter on configuring transports for more information Chapter 16, Configuring
the Transport). NIO is much more scalable but can give you some latency hit compared to old
blocking IO. If you need to be able to service many thousands of connections on the server, then
you should make sure you're using NIO on the server. However, if don't expect many thousands
of connections on the server you can keep the server acceptors using old IO, and might get a
small performance advantage.
• Use the core API not JMS. Using the JMS API you will have slightly lower performance than
using the core API, since all JMS operations need to be translated into core operations before
the server can handle them. If using the core API try to use methods that take SimpleString
as much as possible. SimpleString, unlike java.lang.String does not require copying before
it is written to the wire, so if you re-use SimpleString instances between calls then you can
avoid some unnecessary copying.
48.4. Tuning Transport Settings
• TCP buffer sizes. If you have a fast network and fast machines you may get a performance
boost by increasing the TCP send and receive buffer sizes. See the Chapter 16, Configuring
the Transport for more information on this.
Note
Note that some operating systems like later versions of Linux include TCP auto-
tuning and setting TCP buffer sizes manually can prevent auto-tune from working
and actually give you worse performance!
• Increase limit on file handles on the server. If you expect a lot of concurrent connections on
your servers, or if clients are rapidly opening and closing connections, you should make sure
the user running the server has permission to create sufficient file handles.
This varies from operating system to operating system. On Linux systems you can increase
the number of allowable open file handles in the file /etc/security/limits.conf e.g. add
the lines
serveruser soft nofile 20000
serveruser hard nofile 20000

Chapter 48. Performance Tuning
298
This would allow up to 20000 file handles to be open by the user serveruser.
• Use batch-delay and set direct-deliver to false for the best throughput for
very small messages. HornetQ comes with a preconfigured connector/acceptor pair
(netty-throughput) in hornetq-configuration.xml and JMS connection factory
(ThroughputConnectionFactory) in hornetq-jms.xmlwhich can be used to give the very best
throughput, especially for small messages. See the Chapter 16, Configuring the Transport for
more information on this.
48.5. Tuning the VM
We highly recommend you use the latest Java JVM for the best performance. We test internally
using the Sun JVM, so some of these tunings won't apply to JDKs from other providers (e.g. IBM
or JRockit)
• Garbage collection. For smooth server operation we recommend using a parallel garbage
collection algorithm, e.g. using the JVM argument -XX:+UseParallelGC on Sun JDKs.
• Memory settings. Give as much memory as you can to the server. HornetQ can run in low
memory by using paging (described in Chapter 24, Paging) but if it can run with all queues
in RAM this will improve performance. The amount of memory you require will depend on the
size and number of your queues and the size and number of your messages. Use the JVM
arguments -Xms and -Xmx to set server available RAM. We recommend setting them to the
same high value.
• Aggressive options. Different JVMs provide different sets of JVM tuning parameters, for
the Sun Hotspot JVM the full list of options is available here [http://java.sun.com/javase/
technologies/hotspot/vmoptions.jsp]. We recommend at least using -XX:+AggressiveOpts and
-XX:+UseFastAccessorMethods. You may get some mileage with the other tuning parameters
depending on your OS platform and application usage patterns.
48.6. Avoiding Anti-Patterns
• Re-use connections / sessions / consumers / producers. Probably the most common messaging
anti-pattern we see is users who create a new connection/session/producer for every message
they send or every message they consume. This is a poor use of resources. These objects take
time to create and may involve several network round trips. Always re-use them.
Note
Some popular libraries such as the Spring JMS Template are known to use
these anti-patterns. If you're using Spring JMS Template and you're getting poor
performance you know why. Don't blame HornetQ! The Spring JMS Template
can only safely be used in an app server which caches JMS sessions (e.g.

Avoiding Anti-Patterns
299
using JCA), and only then for sending messages. It cannot be safely be used for
synchronously consuming messages, even in an app server.
• Avoid fat messages. Verbose formats such as XML take up a lot of space on the wire and
performance will suffer as result. Avoid XML in message bodies if you can.
• Don't create temporary queues for each request. This common anti-pattern involves the
temporary queue request-response pattern. With the temporary queue request-response
pattern a message is sent to a target and a reply-to header is set with the address of a local
temporary queue. When the recipient receives the message they process it then send back a
response to the address specified in the reply-to. A common mistake made with this pattern is to
create a new temporary queue on each message sent. This will drastically reduce performance.
Instead the temporary queue should be re-used for many requests.
• Don't use Message-Driven Beans for the sake of it. As soon as you start using MDBs you
are greatly increasing the codepath for each message received compared to a straightforward
message consumer, since a lot of extra application server code is executed. Ask yourself do you
really need MDBs? Can you accomplish the same task using just a normal message consumer?

300

Chapter 49.
301
Configuration ReferenceThis section is a quick index for looking up configuration. Click on the element name to go to the
specific chapter.
49.1. Server Configuration
49.1.1. hornetq-configuration.xml
This is the main core server configuration file.
Table 49.1. Server Configuration
Element Name Element Type Description Default
allow-failback Boolean Will this server
automatically
shutdown if the
original live server
comes back up
false
backup Boolean Is this server a backup
server
false
bindings-directory String the directory to store
the persisted bindings
to
data/bindings
clustered Boolean Deprecated. This
option is ignored. If
the configuration has
at least one cluster-
configuration, the
server will be
clustered
false
connection-ttl-
override
Long if set, this will override
how long (in ms)
to keep a connection
alive without receiving
a ping.
-1
create-bindings-dir Boolean true means that the
server will create the
bindings directory on
start up
true

Chapter 49. Configuration Ref...
302
Element Name Element Type Description Default
create-journal-dir Boolean true means that the
journal directory will
be created
true
Continued..
file-deployment-
enabled
Boolean true means that
the server will load
configuration from the
configuration files
true
failover-on-shutdown Boolean Will this backup server
come live on a normal
server shutdown
false
id-cache-size Integer the size of the
cache for pre creating
message id's
2000
journal-buffer-size Long The size of the internal
buffer on the journal.
128 KiB
journal-buffer-timeout Long The timeout (in
nanoseconds) used to
flush internal buffers
on the journal.
20000
journal-compact-min-
files
Integer The minimal number
of data files before we
can start compacting
10
journal-compact-
percentage
Integer The percentage of live
data on which we
consider compacting
the journal
30
journal-directory String the directory to store
the journal files in
data/journal
journal-file-size Long the size (in bytes) of
each journal file
10 * 1024 * 1024 (10
MiB)
journal-max-io Integer the maximum number
of write requests that
can be in the AIO
queue at any one time
500
journal-min-files Integer how many journal files
to pre-create
2

hornetq-configuration.xml
303
journal-sync-
transactional
Boolean if true wait for
transaction data to
be synchronized to
the journal before
returning response to
client
true
journal-sync-non-
transactional
Boolean if true wait for
non transaction data
to be synced to
the journal before
returning response to
client.
true
journal-type ASYNCIO|NIO the type of journal to
use
ASYNCIO
jmx-management-
enabled
Boolean true means that the
management API is
available via JMX
true
jmx-domain String the JMX domain
used to registered
HornetQ MBeans in
the MBeanServer
org.hornetq
log-delegate-factory-
class-name
String todo todo
large-messages-
directory
String the directory to store
large messages
data/largemessages
management-address String the name of the
management address
to send management
messages to
jms.queue.hornetq.management
cluster-user String the user used by
cluster connections
to communicate
between the clustered
nodes
HORNETQ.CLUSTER.ADMIN.USER
cluster-password String the password used
by cluster connections
to communicate
between the clustered
nodes
CHANGE ME!!
management-
notification-address
String the name of
the address that
hornetq.notifications

Chapter 49. Configuration Ref...
304
consumers bind to
receive management
notifications
message-counter-
enabled
Boolean true means that
message counters are
enabled
false
message-counter-
max-day-history
Integer how many days
to keep message
counter history
10
message-counter-
sample-period
Long the sample period
(in ms) to use for
message counters
10000
message-expiry-
scan-period
Long how often (in ms)
to scan for expired
messages
30000
message-expiry-
thread-priority
Integer the priority of
the thread expiring
messages
3
paging-directory String the directory to store
paged messages in
data/paging
persist-delivery-
count-before-delivery
Boolean true means that
the delivery count
is persisted before
delivery. False means
that this only happens
after a message has
been cancelled.
false
persistence-enabled Boolean true means that the
server will use the
file based journal for
persistence.
true
persist-id-cache Boolean true means that id's
are persisted to the
journal
true
remoting-interceptors todo todo todo
shared-store Boolean is this server using
a shared store for
failover
false
scheduled-thread-
pool-max-size
Integer the number of
threads that the main
5

hornetq-configuration.xml
305
scheduled thread pool
has.
security-enabled Boolean true means that
security is enabled
true
security-invalidation-
interval
Long how long (in
ms) to wait
before invalidating the
security cache
10000
thread-pool-max-size Integer the number of threads
that the main thread
pool has. -1 means no
limit
-1
async-connection-
execution-enabled
Boolean Should incoming
packets on the server
be handed off to a
thread from the thread
pool for processing
or should they be
handled on the
remoting thread?
true
transaction-timeout Long how long (in ms)
before a transaction
can be removed from
the resource manager
after create time
60000
transaction-timeout-
scan-period
Long how often (in ms)
to scan for timeout
transactions
1000
wild-card-routing-
enabled
Boolean true means that the
server supports wild
card routing
true
memory-measure-
interval
Long frequency to sample
JVM memory in ms (or
-1 to disable memory
sampling)
-1
memory-warning-
threshold
Integer Percentage of
available memory
which threshold a
warning log
25
connectors Connector a list of remoting
connectors

Chapter 49. Configuration Ref...
306
configurations to
create
connector.name
(attribute)
String Name of the
connector -
mandatory
connector.factory-
class
String Name of the
ConnectorFactory
implementation -
mandatory
connector.param A connector
configuration
parameter
A key-value pair
used to configure
the connector. A
connector can have
many param
connector.param.key
(attribute)
String Key of a configuration
parameter -
mandatory
connector.param.value
(attribute)
String Value of a
configuration
parameter -
mandatory
acceptors Acceptor a list of remoting
acceptors to create
acceptor.name
(attribute)
String Name of the acceptor
- optional
acceptor.factory-class String Name of the
AcceptorFactory
implementation -
mandatory
acceptor.param An acceptor
configuration
parameter
A key-value pair
used to configure the
acceptor. An acceptor
can have many param
acceptor.param.key
(attribute)
String Key of a configuration
parameter -
mandatory
acceptor.param.value
(attribute)
String Value of a
configuration
parameter -
mandatory

hornetq-configuration.xml
307
broadcast-groups BroadcastGroup a list of broadcast
groups to create
broadcast-
group.name (attribute)
String a unique name for
the broadcast group -
mandatory
broadcast-
group.local-bind-
address
String local bind address that
the datagram socket is
bound to
wildcard IP address
chosen by the kernel
broadcast-
group.local-bind-port
Integer local port to which
the datagram socket is
bound to
-1 (anonymous port)
broadcast-
group.group-address
String multicast address to
which the data
will be broadcast -
mandatory
broadcast-
group.group-port
Integer UDP port number
used for broadcasting
- mandatory
broadcast-
group.broadcast-
period
Long period in milliseconds
between consecutive
broadcasts
2000 (in milliseconds)
broadcast-
group.jgroups-file
String Name of JGroups
configuration file.
If specified, the
server uses JGroups
for broadcasting. -
Optional
broadcast-
group.jgroups-
channel
String Name of JGroups
Channel. If specified,
the server uses
the named channel
for broadcasting. -
Optional
broadcast-
group.connector-ref
A pair of connector A pair connector
and optional backup
connector that will
be broadcasted.
A broadcast-group
can have multiple
connector-ref

Chapter 49. Configuration Ref...
308
broadcast-
group.connector-
ref.connector-name
(attribute)
String Name of the
live connector -
mandatory
broadcast-
group.connector-
ref.backup-connector-
name (attribute)
String Name of the backup
connector - optional
discovery-groups DiscoveryGroup a list of discovery
groups to create
discovery-
group.name (attribute)
String a unique name for
the discovery group -
mandatory
discovery-group.local-
bind-address
String the discovery group
will be bound only to
this local address
discovery-
group.group-address
String Multicast IP address
of the group to listen
on - mandatory
discovery-
group.group-port
Integer UDP port of the
multicast group -
mandatory
discovery-
group.refresh-timeout
Integer Period the discovery
group waits after
receiving the last
broadcast from a
particular server
before removing that
servers connector pair
entry from its list.
5000 (in milliseconds)
discovery-
group.jgroups-file
String Name of JGroups
configuration file. If
specified, the server
uses JGroups for
discovery. - Optional
discovery-
group.jgroups-
channel
String Name of JGroups
Channel. If specified,
the server uses the
named channel for
discovery. - Optional
diverts Divert a list of diverts to use

hornetq-configuration.xml
309
divert.name (attribute) String a unique name for the
divert - mandatory
divert.routing-name String the routing name for
the divert - mandatory
divert.address String the address this divert
will divert from -
mandatory
divert.forwarding-
address
String the forwarding
address for the divert -
mandatory
divert.exclusive Boolean is this divert
exclusive?
false
divert.filter String an optional core filter
expression
null
divert.transformer-
class-name
String an optional class
name of a transformer
queues Queue a list of pre configured
queues to create
queues.name
(attribute)
String unique name of this
queue
queues.address String address for this queue
- mandatory
queues.filter String optional core filter
expression for this
queue
null
queues.durable Boolean is this queue durable? true
bridges Bridge a list of bridges to
create
bridges.name
(attribute)
String unique name for this
bridge
bridges.queue-name String name of queue that
this bridge consumes
from - mandatory
bridges.forwarding-
address
String address to forward
to. If omitted original
address is used
null
bridges.filter String optional core filter
expression
null

Chapter 49. Configuration Ref...
310
bridges.transformer-
class-name
String optional name of
transformer class
null
bridges.retry-interval Long period (in ms)
between successive
retries
2000 ms
bridges.retry-interval-
multiplier
Double multiplier to apply
to successive retry
intervals
1.0
bridges.reconnect-
attempts
Integer maximum number of
retry attempts, -1
signifies infinite
-1
bridges.failover-on-
server-shutdown
Boolean should failover be
prompted if target
server is cleanly
shutdown?
false
bridges.use-
duplicate-detection
Boolean should duplicate
detection headers be
inserted in forwarded
messages?
true
bridges.discovery-
group-ref
String name of discovery
group used by this
bridge
null
bridges.connector-
ref.connector-name
(attribute)
String name of connector to
use for live connection
bridges.connector-
ref.backup-connector-
name (attribute)
String optional name of
connector to use for
backup connection
null
cluster-connections ClusterConnection a list of cluster
connections
cluster-
connections.name
(attribute)
String unique name for this
cluster connection
cluster-
connections.address
String name of address
this cluster connection
applies to
cluster-
connections.forward-
when-no-consumers
Boolean should messages be
load balanced if there
are no matching
consumers on target?
false

hornetq-configuration.xml
311
cluster-
connections.max-
hops
Integer maximum number of
hops cluster topology
is propagated
1
cluster-
connections.retry-
interval
Long period (in ms)
between successive
retries
2000
cluster-
connections.use-
duplicate-detection
Boolean should duplicate
detection headers be
inserted in forwarded
messages?
true
cluster-
connections.discovery-
group-ref
String name of discovery
group used by this
bridge
null
cluster-
connections.connector-
ref.connector-name
(attribute)
String name of connector to
use for live connection
cluster-
connections.connector-
ref.backup-connector-
name (attribute)
String optional name of
connector to use for
backup connection
null
security-settings SecuritySetting a list of security
settings
security-
settings.match
(attribute)
String the string to use
for matching security
against an address
security-
settings.permission
Security Permission a permision to add to
the address
security-
settings.permission.type
(attribute)
Permission Type the type of permission
security-
settings.permission.roles
(attribute)
Roles a comma-separated
list of roles to apply the
permission to
address-settings AddressSetting a list of address
settings
address-
settings.dead-letter-
address
String the address to send
dead messages to

Chapter 49. Configuration Ref...
312
address-
settings.max-delivery-
attempts
Integer how many times to
attempt to deliver
a message before
sending to dead letter
address
10
address-
settings.expiry-
address
String the address to send
expired messages to
address-
settings.redelivery-
delay
Long the time (in ms) to wait
before redelivering a
cancelled message.
0
address-settings.last-
value-queue
boolean whether to treat the
queue as a last value
queue
false
address-
settings.page-size-
bytes
Long the page size (in
bytes) to use for an
address
10 * 1024 * 1024
address-
settings.max-size-
bytes
Long the maximum size (in
bytes) to use in paging
for an address
-1
address-
settings.redistribution-
delay
Long how long (in ms)
to wait after the
last consumer is
closed on a queue
before redistributing
messages.
-1
49.1.2. hornetq-jms.xml
This is the configuration file used by the server side JMS service to load JMS Queues, Topics
and Connection Factories.
Table 49.2. JMS Server Configuration
Element Name Element Type Description Default
connection-factory ConnectionFactory a list of connection
factories to create and
add to JNDI
Continued..

hornetq-jms.xml
313
connection-
factory.signature
(attribute)
String Type of connection
factory
generic
connection-factory.xa Boolean If it is a XA connection
factory
false
connection-
factory.auto-group
Boolean whether or not
message grouping is
automatically used
false
connection-
factory.connectors
String A list of connectors
used by the
connection factory
connection-
factory.connectors.connector-
ref.connector-name
(attribute)
String Name of the
connector to connect
to the live server
connection-
factory.connectors.connector-
ref.backup-connector-
name (attribute)
String Name of the
connector to connect
to the backup server
connection-
factory.discovery-
group-ref.discovery-
group-name
(attribute)
String Name of discovery
group used by this
connection factory
connection-
factory.discovery-
initial-wait-timeout
Long the initial time to wait
(in ms) for discovery
groups to wait for
broadcasts
10000
connection-
factory.block-on-
acknowledge
Boolean whether or not
messages are
acknowledged
synchronously
false
connection-
factory.block-on-non-
durable-send
Boolean whether or not non-
durable messages are
sent synchronously
false
connection-
factory.block-on-
durable-send
Boolean whether or not durable
messages are sent
synchronously
true
connection-
factory.call-timeout
Long the timeout (in ms) for
remote calls
30000

Chapter 49. Configuration Ref...
314
connection-
factory.client-failure-
check-period
Long the period (in ms)
after which the client
will consider the
connection failed after
not receiving packets
from the server
5000
connection-
factory.client-id
String the pre-configured
client ID for the
connection factory
null
connection-
factory.connection-
load-balancing-policy-
class-name
String the name of the load
balancing class
org.hornetq.api.core.client.loadbalance.RoundRobinConnectionLoadBalancingPolicy
connection-
factory.connection-ttl
Long the time to live (in ms)
for connections
1 * 60000
connection-
factory.consumer-
max-rate
Integer the fastest rate
a consumer may
consume messages
per second
-1
connection-
factory.consumer-
window-size
Integer the window size (in
bytes) for consumer
flow control
1024 * 1024
connection-
factory.dups-ok-
batch-size
Integer the batch size
(in bytes) between
acknowledgements
when using
DUPS_OK_ACKNOWLEDGE
mode
1024 * 1024
connection-
factory.failover-on-
initial-connection
Boolean whether or not to
failover to backup
on event that initial
connection to live
server fails
false
connection-
factory.failover-on-
server-shutdown
Boolean whether or not to
failover on server
shutdown
false
connection-
factory.min-large-
message-size
Integer the size (in bytes)
before a message is
treated as large
100 * 1024

hornetq-jms.xml
315
connection-
factory.cache-large-
message-client
Boolean If true clients using
this connection factory
will hold the large
message body on
temporary files.
false
connection-
factory.pre-
acknowledge
Boolean whether messages
are pre acknowledged
by the server before
sending
false
connection-
factory.producer-max-
rate
Integer the maximum rate of
messages per second
that can be sent
-1
connection-
factory.producer-
window-size
Integer the window size in
bytes for producers
sending messages
1024 * 1024
connection-
factory.confirmation-
window-size
Integer the window size
(in bytes) for
reattachment
confirmations
1024 * 1024
connection-
factory.reconnect-
attempts
Integer maximum number of
retry attempts, -1
signifies infinite
0
connection-
factory.retry-interval
Long the time (in ms) to
retry a connection
after failing
2000
connection-
factory.retry-interval-
multiplier
Double multiplier to apply
to successive retry
intervals
1.0
connection-
factory.max-retry-
interval
Integer The maximum retry
interval in the
case a retry-interval-
multiplier has been
specified
2000
connection-
factory.scheduled-
thread-pool-max-size
Integer the size of the
scheduled thread pool
5
connection-
factory.thread-pool-
max-size
Integer the size of the thread
pool
-1

Chapter 49. Configuration Ref...
316
connection-
factory.transaction-
batch-size
Integer the batch size
(in bytes) between
acknowledgements
when using a
transactional session
1024 * 1024
connection-
factory.use-global-
pools
Boolean whether or not to use a
global thread pool for
threads
true
queue Queue a queue to create and
add to JNDI
queue.name
(attribute)
String unique name of the
queue
queue.entry String context where the
queue will be bound
in JNDI (there can be
many)
queue.durable Boolean is the queue durable? true
queue.filter String optional filter
expression for the
queue
topic Topic a topic to create and
add to JNDI
topic.name (attribute) String unique name of the
topic
topic.entry String context where the
topic will be bound in
JNDI (there can be
many)
49.1.3. Using Masked Passwords in Configuration Files
By default all passwords in HornetQ server's configuration files are in plaintext form. This usually
poses no security issues as those files should be well protected from unauthorized accessing.
However, in some circumstances a user doesn't want to expose its passwords to more eyes than
necessary.
HornetQ can be configured to use 'masked' passwords in its configuration files. A masked
password is an obscure string representation of a real password. To mask a password a user will
use an 'encoder'. The encoder takes in the real password and outputs the masked version. A user
can then replace the real password in the configuration files with the new masked password. When
HornetQ loads a masked password, it uses a suitable 'decoder' to decode it into real password.

Using Masked Passwords in Configuration Files
317
Hornetq provides a default password encoder and decoder. Optionally users can use or implement
their own encoder and decoder for masking the passwords.
49.1.3.1. Password Masking in Server Configuration File
49.1.3.1.1. The password masking property
The server configuration file has a property that defines the default masking behaviors over the
entire file scope.
mask-password: this boolean type property indicates if a password should be masked or not. Set
it to "true" if you want your passwords masked. The default value is "false".
49.1.3.1.2. Specific masking behaviors
49.1.3.1.2.1. cluster-password
The nature of the value of cluster-password is subject to the value of property 'mask-password'.
If it is true the cluster-password is masked.
49.1.3.1.2.2. Passwords in connectors and acceptors
In the server configuration, Connectors and Acceptors sometimes needs to specify passwords.
For example if a users wants to use an SSL-enabled NettyAcceptor, it can specify a key-
store-password and a trust-store-password. Because Acceptors and Connectors are pluggable
implementations, each transport will have different password masking needs.
When a Connector or Acceptor configuration is initialised, HornetQ will add the "mask-
password" and "password-codec" values to the Connector or Acceptors params using the keys
hornetq.usemaskedpassword and hornetq.passwordcodec respectively. The Netty and InVM
implementations will use these as needed and any other implementations will have access to
these to use if they so wish.
49.1.3.1.2.3. Passwords in Core Bridge cofigurations
Core Bridges are configured in the server configuration file and so the masking of its 'password'
properties follows the same rules as that of 'cluster-password'.
49.1.3.1.3. Examples
The following table summarizes the relations among the above-mentioned properties
Table 49.3.
mask-password cluster-password acceptor/connector
passwords
bridge password
absent plain text plain text plain text

Chapter 49. Configuration Ref...
318
mask-password cluster-password acceptor/connector
passwords
bridge password
false plain text plain text plain text
true masked masked masked
Examples
Note: In the following examples if related attributed or properties are absent, it means they are
not specified in the configure file.
example 1
<cluster-password>bbc</cluster-password>
This indicates the cluster password is a plaintext value ("bbc").
example 2
<mask-password>true</mask-password>
<cluster-password>80cf731af62c290</cluster-password>
This indicates the cluster password is a masked value and HorentQ will use its built-in decoder to
decode it. All other passwords in the configuration file, Connectors, Acceptors and Bridges, will
also use masked passwords.
49.1.3.2. JMS Bridge password masking
The JMS Bridges are configured and deployed as separate beans so they need separate
configuration to control the password masking. A JMS Bridge has two password parameters in its
constructor, SourcePassword and TargetPassword. It uses the following two optional properties
to control their masking:
useMaskedPassword -- If set to "true" the passwords are masked. Default is false.
passwordCodec -- Class name and its parameters for the Decoder used to decode the masked
password. Ignored if useMaskedPassword is false. The format of this property is a full qualified
class name optionally followed by key/value pairs, separated by semi-colons. For example:
<property name="useMaskedPassword">true</property>
<property name="passwordCodec">com.foo.FooDecoder;key=value</property>
HornetQ will load this property and initialize the class with a parameter map containing the "key"-
>"value" pair. If passwordCodec is not specified, the built-in decoder is used.

Using Masked Passwords in Configuration Files
319
49.1.3.3. Masking passwords in HorentQ ResourceAdapters and
MDB activation configurations
Both ra.xml and MDB activation configuration have a 'password' property that can be masked.
They are controlled by the following two optional Resource Adapter properties in ra.xml:
UseMaskedPassword -- If setting to "true" the passwords are masked. Default is false.
PasswordCodec -- Class name and its parameters for the Decoder used to decode the masked
password. Ignored if UseMaskedPassword is false. The format of this property is a full qualified
class name optionally followed by key/value pairs. It is the same format as that for JMS Bridges.
Example:
<config-property>
<config-property-name>UseMaskedPassword</config-property-name>
<config-property-type>boolean</config-property-type>
<config-property-value>true</config-property-value>
</config-property>
<config-property>
<config-property-name>PasswordCodec</config-property-name>
<config-property-type>java.lang.String</config-property-type>
<config-property-value>com.foo.ADecoder;key=helloworld</config-property-
value>
</config-property>
With this configuration, both passwords in ra.xml and all of its MDBs will have to be in masked form.
49.1.3.4. Masking passwords in hornetq-users.xml
HornetQ's built-in security manager uses plain configuration files where the user passwords are
specified in plaintext forms by default. To mask those parameters the following two properties
are needed:
mask-password -- If set to "true" all the passwords are masked. Default is false.
password-codec -- Class name and its parameters for the Decoder used to decode the masked
password. Ignored if mask-password is false. The format of this property is a full qualified class
name optionally followed by key/value pairs. It is the same format as that for JMS Bridges.
Example:
<mask-password>true</mask-password>
<password-codec>org.hornetq.utils.DefaultSensitiveStringCodec;key=hello world</
password-codec>

Chapter 49. Configuration Ref...
320
When so configured, the HornetQ security manager will initialize a DefaultSensitiveStringCodec
with the parameters "key"->"hello world", then use it to decode all the masked passwords in this
configuration file.
49.1.3.5. Choosing a decoder for password masking
As described in the previous sections, all password masking requires a decoder. A decoder uses
an algorithm to convert a masked password into its original cleartext form in order to be used
in various security operations. The algorithm used for decoding must match that for encoding.
Otherwise the decoding may not be successful.
For user's convenience HornetQ provides a default built-in Decoder. However a user can if they
so wish implement their own.
49.1.3.5.1. The built-in Decoder
Whenever no decoder is specified in the configuration file, the built-in decoder is used. The
class name for the built-in decoder is org.hornetq.utils.DefaultSensitiveStringCodec. It has both
encoding and decoding capabilities. It uses java.crypto.Cipher utilities to encrypt (encode) a
plaintext password and decrypt a mask string using same algorithm. Using this decoder/encoder
is pretty straightforward. To get a mask for a password, just run the following in command line:
java org.hornetq.utils.DefaultSensitiveStringCodec "your plaintext password"
Make sure the classpath is correct. You'll get something like
Encoded password: 80cf731af62c290
Just copy "80cf731af62c290" and replace your plaintext password with it.
49.1.3.5.2. Using a different decoder
It is possible to use a different decoder rather than the built-in one. Simply make sure the decoder
is in HornetQ's classpath and configure the server to use it as follows:
<password-codec>com.foo.SomeDecoder;key1=value1;key2=value2</password-codec>
If your decoder needs params passed to it you can do this via key/value pairs when configuring.
For instance if your decoder needs say a "key-location" parameter, you can define like so:

Using Masked Passwords in Configuration Files
321
<password-codec>com.foo.NewDecoder;key-location=/some/url/to/keyfile</
password-codec>
Then configure your cluster-password like this:
<mask-password>true</mask-password>
<cluster-password>masked_password</cluster-password>
When HornetQ reads the cluster-password it will initialize the NewDecoder and use it to decode
"mask_password". It also process all passwords using the new defined decoder.
49.1.3.5.3. Implementing your own ocdecs
To use a different decoder than the built-in one, you either pick one from
existing libraries or you implement it yourself. All decoders must implement the
org.hornetq.utils.SensitiveDataCodec<T> interface:
public interface SensitiveDataCodec<T>
{
T decode(Object mask) throws Exception;
void init(Map<String, String> params);
}
This is a generic type interface but normally for a password you just need String type. So a new
decoder would be defined like
public class MyNewDecoder implements SensitiveDataCodec<String>
{
public String decode(Object mask) throws Exception
{
//decode the mask into cleartext passord
return "the password";
}
public void init(Map<String, String> params)
{
//initialization done here. It is called right after the decoder has
been created.

Chapter 49. Configuration Ref...
322
}
}
Last but not least, once you get your own decoder, please add it to the classpath. Otherwise
HornetQ will fail to load it!