hoppecke battery lifting equipment for single cells and ... · please read the documentation...
TRANSCRIPT

20160208_operating_instructions_battery_lifting_equipment_multi.docx
HOPPECKE battery lifting equipment
for single cells and monobloc batteries
Operating instructions

20160208_operating_instructions_battery_lifting_equipment_multi.docx
Index/Table of contents
Titel/Title Sprache/Language Seite/Page
HOPPECKE battery lifting equipment Englisch/English 2 – 11
HOPPECKE Batteriehebewerkzeug Deutsch/German 12 – 21

20160208_operating_instructions_battery_lifting_equipment_multi.docx
Foreword
Dear Customer,
Thank you for choosing one of our brand name products.
Please read this documentation carefully before working with the HOPPECKE battery lifting
equipment or its components. It contains important information on the safe and correct
operation.
Amendments to this documentation are subject to change without prior notice. Our products
undergo continuous development. As a result, there may be deviations between the
illustrations provided in this documentation and the purchased product. These operating
instructions are not covered by an amendment service.
Store this documentation so that it is available immediately to all those who need to carry
out work in connection with the battery system or its components.
Service hotline Germany:
0800 246 77 32
International service hotline:
+49 (0) 180 5 22 9999
Internet: www.HOPPECKE.com
Email: [email protected]
Copyright HOPPECKE Batterien GmbH & Co. KG
All rights reserved including those of patent and utility model applications.
Transmitting and reproducing this documentation, and the use or disclosure of its contents
is not permitted unless this has been expressly approved in writing by HOPPECKE
Batterien GmbH & Co. KG. Infringements will lead to liability for damages.

20160208_operating_instructions_battery_lifting_equipment_multi.docx 1
Table of contents / Inhaltsverzeichnis
1. MEANS OF REPRESENTATION 2
2. TARGET GROUP 2
3. SAFETY INSTRUCTIONS 2
3.1. General safety instructions 2
3.2. Personal protective equipment 3
3.3. Intended use 3
3.4. Directives, legislation and standards 4
3.5. Obligations of the operating company 4
3.6. Personnel and qualification 5
4. SCOPE OF DELIVERY 5
5. STORAGE 6
6. ASSIGNMENT OF LIFTING EQUIPMENT TO BATTERY 7
7. BATTERY INSTALLATION 9
_________________________________________________________________________________
1. DARSTELLUNGSMITTEL 12
2. ZIELGRUPPE 12
3. SICHERHEITSHINWEISE 12
3.1. Allgemeine Sicherheitsinformationen 12
3.2. Persönliche Schutzausrüstung 13
3.3. Bestimmungsgemäße Verwendung 13
3.4. Richtlinien, Gesetze und Normen 14
3.5. Pflichten des Betreibers 14
3.6. Personal und Qualifikation 15
4. LIEFERUMFANG 15
5. LAGERUNG 16
6. ZUORDNUNG HEBEWERKZEUG ZU BATTERIE 17
7. MONTAGE DER BATTERIEN 19
Means of representation
20160208_operating_instructions_battery_lifting_equipment_multi.docx 2
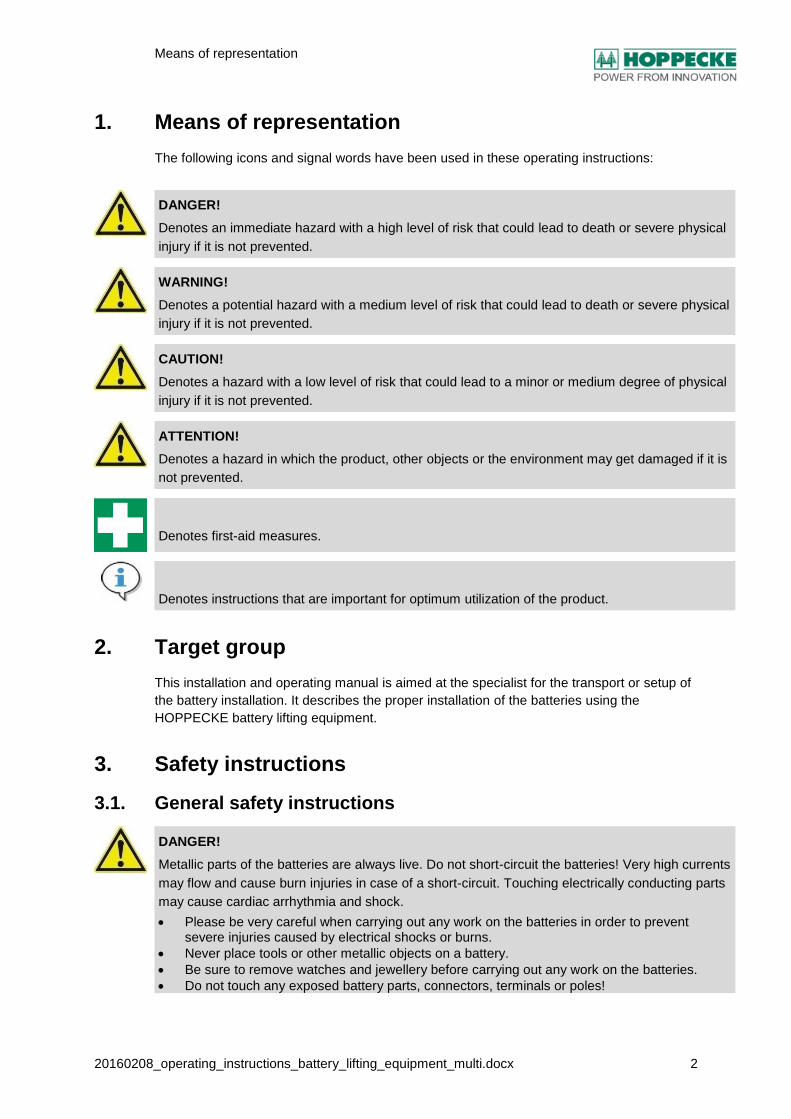
1. Means of representation
The following icons and signal words have been used in these operating instructions:
DANGER!
Denotes an immediate hazard with a high level of risk that could lead to death or severe physical
injury if it is not prevented.
WARNING!
Denotes a potential hazard with a medium level of risk that could lead to death or severe physical
injury if it is not prevented.
CAUTION!
Denotes a hazard with a low level of risk that could lead to a minor or medium degree of physical
injury if it is not prevented.
ATTENTION!
Denotes a hazard in which the product, other objects or the environment may get damaged if it is
not prevented.
Denotes first-aid measures.
Denotes instructions that are important for optimum utilization of the product.
2. Target group
This installation and operating manual is aimed at the specialist for the transport or setup of
the battery installation. It describes the proper installation of the batteries using the
HOPPECKE battery lifting equipment.
3. Safety instructions
3.1. General safety instructions
DANGER!
Metallic parts of the batteries are always live. Do not short-circuit the batteries! Very high currents
may flow and cause burn injuries in case of a short-circuit. Touching electrically conducting parts
may cause cardiac arrhythmia and shock.
Please be very careful when carrying out any work on the batteries in order to prevent severe injuries caused by electrical shocks or burns.
Never place tools or other metallic objects on a battery.
Be sure to remove watches and jewellery before carrying out any work on the batteries.
Do not touch any exposed battery parts, connectors, terminals or poles!

Safety instructions
20160208_operating_instructions_battery_lifting_equipment_multi.docx 3
DANGER!
Work on the batteries, and in particular their installation and maintenance, should only be carried
out by trained specialists who are well-versed in working with batteries and who are aware of the
necessary safety precautions.
RISK OF EXPLOSION!
Explosive hydrogen-oxygen gas mixture may escape from lead-acid batteries. If this mixture
explodes, it may cause severe personal injuries.
Always wear the prescribed protective clothing.
Only use proper tools ("non-sparking", with insulated grips etc.).
Prevent any ignition sources such as sparks, flames or electric arcs.
Prevent electrostatic discharge; wear cotton clothing and earth yourself if necessary when working directly on the batteries.
RISK OF EXPLOSION!
Never clean batteries with feather dusters or dry cloths made of artificial fibres. Risk of
electrostatic charge and electrolytic gas explosion! We recommend the use of slightly damp
cotton or paper towels for cleaning the batteries.
DANGER!
Never stand under suspended loads! The load must only be guided from the side.
DANGER!
The lifting equipment must only be used by two or more persons.
3.2. Personal protective equipment
Extreme care must be taken when lifting and moving batteries, as personal injury and
material damage may occur if a battery is dropped. For this reason, the following personal
protective equipment must be worn each time the HOPPECKE battery lifting equipment is
used:
Safety goggles
Safety boots
Acid-resistant and non-slip gloves
3.3. Intended use
The HOPPECKE battery lifting equipment must only be used as a lifting aid for the following
types of HOPPECKE batteries:
New product name Old product name
grid | power V L OPzS
grid | power V L bloc power.bloc OPzS
sun | power V L OPzS solar.power
sun | power V L bloc OPzS bloc solar.power
grid | power VR L OPzV
grid | power VR L bloc power.bloc OPzV
sun | power VR L OPzV solar.power
sun | power VR L bloc OPzV bloc solar.power
grid | power V M OSP.HC

Safety instructions
20160208_operating_instructions_battery_lifting_equipment_multi.docx 4
grid | power V H OSP.XC
grid | power V X GroE
grid | power V M bloc OGi.bloc
grid | power V H bloc OGi.bloc HC
sun | power VR M solar.bloc
grid | power VR M power.com SB
grid | power VR H power.com HC
grid | power VR X power.com XC
In the list above, the new battery names were shown together with the old names. The new
name is used in the following assignment lists. Because the name change has not been
completed at the time of preparing this documentation, a comparison between new and old
type names may be required.
DANGER!
Unintended use of the lifting equipment may result in personal injuries or damage to property.
In case of unintended use, HOPPECKE Batterien GmbH & Co. KG shall not assume any liability
for personal injuries or damage to property that result directly or indirectly from handling the lifting
equipment.
The operator shall be solely responsible for the risks arising from unintended use.
3.4. Directives, legislation and standards
The following regulations must be observed during the installation of batteries using the
HOPPECKE battery lifting equipment:
Current accident prevention regulations
DIN EN ISO 20345 ("Personal protective equipment - Safety footwear")
DIN EN 50272/VDE 0510 ("Safety requirements for secondary batteries and battery
installations")
Statutory checks of the operating safety of lifting gear
3.5. Obligations of the operating company
Please keep this installation and operating manual so that it is available immediately to all
persons who need to carry out work in connection with the batteries or their components.
DANGER!
Carry out a visual inspection of the lifting equipment before every use. If any type of damage is
detected, the lifting equipment must be decommissioned with immediate effect.
DANGER!
The lifting equipment must be inspected for operational safety in accordance with the relevant
statutory regulations by a qualified tester.

Scope of delivery
20160208_operating_instructions_battery_lifting_equipment_multi.docx 5
A check of the lifting gear must include the following points at a minimum:
Damage to the edges of the web or the web
Yarn breakage
Deformation caused by heat
Damage to the load-bearing seams
Damage due to exposure to aggressive substances (e.g. electrolyte)
Damage to the shackle
3.6. Personnel and qualification
Work on the battery system, especially its installation, maintenance and disassembly must
only be carried out by trained electricians in accordance with DIN VDE 1000-10.
The personnel must be
Well-versed with handling batteries,
Aware of the precautionary measures required
Trained in accordance with the country-specific accident prevention regulations, such as
DGUV regulation 3 (for Germany).
Please read the documentation carefully before using the HOPPECKE battery lifting
equipment. It contains important information on the safe and correct handling of the lifting
equipment.
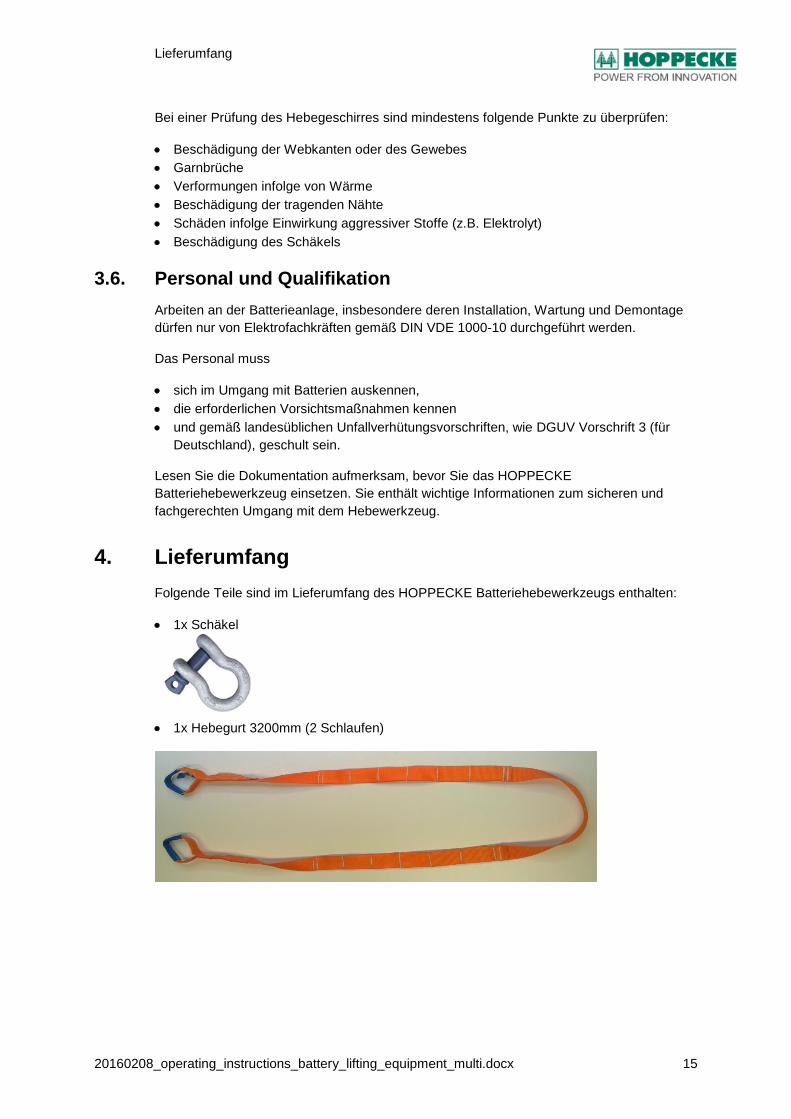
4. Scope of delivery
The following parts are included in the scope of delivery for the HOPPECKE battery lifting
equipment:
1 x shackle
1 x hoisting sling 3200 mm ( 2 loops)

Storage
20160208_operating_instructions_battery_lifting_equipment_multi.docx 6
1 x hoisting sling 3140 mm ( 8 loops)
1x lashing strap 1300 mm
1x lashing strap 1900 mm
5. Storage
The lifting equipment must be stored in a dry and frost-free location. It must be stored
separately from aggressive substances.
1. 2. 3. 4. loop

Assignment of lifting equipment to battery
20160208_operating_instructions_battery_lifting_equipment_multi.docx 7
6. Assignment of lifting equipment to battery
The following list is a guide for the correct installation of the lifting equipment to the battery.
Through different possible influences at the installation site (e.g. the order in which the loops are
brought into the shackle ) it is possible that the assignments in the list do not apply. In this case
please be aware of choosing the best fitting combination of loop and lashing strap yourself.
grid | power V L / grid | power VR L / sun | power V L / sun | power VR L
Battery Hoisting sling 3200mm
Hoisting sling 3140mm
Lashing strap 1900mm
Lashing strap 1300mm
grid | power V L 200 – 1500 Ah grid | power VR L 200 – 1500 Ah
X X - 1. loop X
grid | power V L 1750 – 2000 Ah grid | power VR L 1750 – 2000 Ah
X X - 2. loop X
grid | power V L 2250 – 2500 Ah grid | power VR L 2250 – 2500 Ah
X X - 3. loop X
grid | power V L 2750 – 3250 Ah grid | power VR L 2750 – 3250 Ah
X X - 4. loop X
sun | power V L 280 – 2170 Ah X X - 1. loop X
sun | power V L 2540 – 2900 Ah X X - 2. loop X
sun | power V L 3250 – 3610 Ah X X - 3. loop X
sun | power V L 3980 – 4700 Ah X X - 4. loop X
sun | power VR L 250 – 1700 Ah X X - 1. loop X
sun | power VR L 2000 – 2300 Ah X X - 2. loop X
sun | power VR L 2600 – 2900 Ah X X - 3. loop X
sun | power VR L 3200 – 3500 Ah X X - 4. loop X
grid | power V X
Battery Hoisting sling 3200mm
Hoisting sling 3140mm
Lashing strap 1900mm
Lashing strap 1300mm
grid | power V X 325 - 450 Ah X X - 2. loop X
grid | power V X 1200 – 2000 Ah X X - 1. loop X
grid | power V X 2100 – 2400 Ah X X - 2. loop X
grid | power V X 2500 – 2600 Ah X X - 3. loop X
grid | power V M / grid | power V H
Battery Hoisting sling 3200mm
Hoisting sling 3140mm
Lashing strap 1900mm
Lashing strap 1300mm
grid | power V M 1890 – 2100 Ah X X - 2. loop X
grid | power V M 2520 – 2940 Ah X X - 3. loop X
grid | power V M 3150 – 3780 Ah X X - 4. loop X
grid | power V H 120 – 1955 Ah X X - 1. loop X
grid | power V H 2070 – 2300 Ah X X - 2. loop X
grid | power V H 2760 – 3220 Ah X X - 3. loop X
grid | power V H 3450 – 4140 Ah X X - 4. loop X

Assignment of lifting equipment to battery
20160208_operating_instructions_battery_lifting_equipment_multi.docx 8
grid | power V M bloc / grid | power V H bloc
Battery Hoisting sling 3200mm
Hoisting sling 3140mm
Lashing strap 1900mm
Lashing strap 1300mm
grid | power V M bloc 12V 60 – 80 Ah X X - 2. loop X
grid | power V M bloc 12V 100 – 110 Ah X X - 4. loop X
grid | power V H bloc X X - 1. loop X
grid | power V L bloc / grid | power VR L bloc / sun | power V L bloc / sun | power VR L
bloc
Battery Hoisting sling 3200mm
Hoisting sling 3140mm
Lashing strap 1900mm
Lashing strap 1300mm
grid | power V L bloc 12V 150 Ah grid | power VR L bloc 12V 150 Ah
X X - 2. loop X
grid | power V L bloc 6V 200 Ah grid | power VR L bloc 6V 200 Ah
X X - 1. loop X
grid | power V L bloc 6V 250 - 300 Ah grid | power VR L bloc 6V 250 - 300 Ah
X X - 2. loop X
sun | power V L bloc 12V 70 – 130 Ah X X - 1. loop X
sun | power V L bloc 12V 200 Ah X X - 2. loop X
sun | power V L bloc 6V 270 Ah X X - 1. loop X
sun | power V L bloc 6V 330 – 400 Ah X X - 2. loop X
sun | power VR L bloc 12V 70 – 120 Ah X X - 1. loop X
sun | power VR L bloc 12V 180 Ah X X - 2. loop X
sun | power VR L bloc 6V 250 Ah X X - 1. loop X
sun | power VR L bloc 6V 300 – 370 Ah X X - 2. loop X
grid | power VR M / grid | power VR H / grid | power VR X
Battery Hoisting sling 3200mm
Hoisting sling 3140mm
Lashing strap 1900mm
Lashing strap 1300mm
grid | power VR H 123800, 124200, 125300 X X - 4. loop X
grid | power VR M 12V 50 – 60 Ah X X - 1. loop X
grid | power VR M 12V 80 – 100 Ah X X - 2. loop X
grid | power VR M 12V 110 – 140 Ah X X - 4. loop X
grid | power VR M 6V 170 X X - 1. loop X
grid | power VR M 6V 220 X X - 2. loop X
grid | power VR M 2V 600 X X - 1. loop X
grid | power VR X 122600, 123000, 123400 X X - 2. loop X
grid | power VR X 124100, 124400, 125100 X X - 4. loop X
grid | power VR X 22700 X X - 1. loop X
sun | power VR M
Battery Hoisting sling 3200mm
Hoisting sling 3140mm
Lashing strap 1900mm
Lashing strap 1300mm
sun | power VR M 12V 150 Ah X X - 4. loop X
sun | power VR M 6V 200 Ah X X - 1. loop X
sun | power VR M 6V 250 Ah X X - 2. loop X
Battery installation
20160208_operating_instructions_battery_lifting_equipment_multi.docx 9
7. Battery installation
Prior to using the HOPPECKE battery lifting equipment, the battery must be tested to
ensure it is in proper condition (visual inspection). Damaged batteries must not be moved
with the lifting equipment.
At least two people are required for the following procedure.
1. Take the hoisting sling with 2 loops and hold it in place at the long side of the
battery.
2. Tilt the battery slightly to the side and have the second person slide the hoisting
sling under the floor of the battery in the centre. Take the utmost care, as there is a
risk of crushing.
3. Take the hoisting sling with 8 loops and hold it in place at the short side of the
battery.
4. Tilt the battery to the side so that the second person can slide the hoisting sling
under the floor of the battery in the centre.
5. Check that both hoisting slings are placed along the centre of the battery and
correct their position if required.
6. Insert 2 loops of each of the hoisting slings into the shackle. For the shorted hoisting
sling, select the loop in accordance with chapter 6. If necessary you have to test
different loops to choose the right one.
7. Connect the shackle to a suitable crane.
The crane must be suitable for the weight of the battery, be in operating condition, and have a
suitable crane hook.

Battery installation
20160208_operating_instructions_battery_lifting_equipment_multi.docx 10
8. Secure the battery horizontally with the lashing strap supplied. Select the suitable
length in accordance with chapter 6. The lashing strap must be pulled through the
lateral loops of the hoisting slings to prevent slipping.
Figure 1: Lifting equipment mounted on battery
DANGER!
Always attach the lashing strap to the upper third of the battery. This is the only way to prevent
the battery from dropping out in a lateral direction.
9. Slowly lift the battery with the help of the crane while guiding the battery by hand to
prevent it from swinging and to keep the battery in a vertical position.
CAUTION!
As soon as the battery starts to swing, the transport must be interrupted. If necessary, reduce the
speed of the lifting movement or of the horizontal transport.
10. Transport the battery to its destination, such as a step frame, tier frame, or
earthquake frame.
11. Apply some grease on the rails of the frame so that the position of the battery can
still be adjusted afterwards. Only use a type of grease recommended by
HOPPECKE, such as Aeronix® (HOPPECKE material number: 7140200350).
The following process is recommended if it is to be expected that the hoisting sling will be
trapped between the battery and the frame when the battery is lowered onto the frame, due to the
weight of the battery, the size of the battery or the installation conditions:
Place flat spacers (e.g. wood) on the final position where the battery is to be placed (see Figure
2). After the battery has been positioned and the hoisting slings have been removed, the spacers
can be removed again.

Battery installation
20160208_operating_instructions_battery_lifting_equipment_multi.docx 11
Figure 2: Battery with spacer made of wood
12. Place the battery on the frame carefully.
13. Remove the lashing strap from the battery, the shackle from the crane hook and the
loops from the shackle.
14. To remove the hoisting slings, pull them through under the battery. It may be
necessary to tilt the battery slightly to do so.

Darstellungsmittel
20160208_operating_instructions_battery_lifting_equipment_multi.docx 12
1. Darstellungsmittel
In dieser Bedienungsanleitung werden folgende Symbole und Signalwörter verwendet:
GEFAHR!
Kennzeichnet eine unmittelbare Gefährdung mit hohem Risiko, die Tod oder schwere
Körperverletzung zur Folge haben wird, wenn sie nicht vermieden wird.
WARNUNG!
Kennzeichnet eine mögliche Gefährdung mit mittlerem Risiko, die Tod oder schwere
Körperverletzung zur Folge haben kann, wenn sie nicht vermieden wird.
VORSICHT!
Kennzeichnet eine Gefährdung mit geringem Risiko, die leichte oder mittlere Körperverletzungen
zur Folge haben könnte, wenn sie nicht vermieden wird.
ACHTUNG!
Kennzeichnet eine Gefährdung, bei der das Produkt, andere Gegenstände oder die Umwelt
Schaden nehmen können, wenn sie nicht vermieden wird.
Kennzeichnet Erste-Hilfe-Maßnahmen.
Kennzeichnet Hinweise, die für die optimale Nutzung des Produkts wichtig sind.
2. Zielgruppe
Diese Montage- und Betriebsanleitung richtet sich an die Fachkraft für den Transport bzw.
den Aufbau der Batterieanlage. Es wird zur korrekten Installation von stationären Batterien
die Verwendung des HOPPECKE Batteriehebewerkzeugs beschrieben.
3. Sicherheitshinweise
3.1. Allgemeine Sicherheitsinformationen
GEFAHR!
Metallteile der Batterien stehen immer unter Spannung. Batterien nicht kurzschließen! Im Falle
eines Kurzschlusses können sehr hohe Ströme fließen und Verbrennungen verursachen. Bei
Berührung leitender Teile kann es zu Herzrhythmusstörung und Schock kommen.
Seien Sie bei allen Arbeiten an den Batterien sehr vorsichtig, um schwere Verletzungen durch elektrischen Schlag und Verbrennungen zu vermeiden.
Legen Sie niemals Werkzeuge und andere Metallgegenstände auf einer Batterie ab.
Legen Sie vor Arbeiten an den Batterien Uhren und Schmuck auf jeden Fall ab.
Berühren Sie keine blanken Batterieteile, Verbinder, Klemmen und Pole!

Sicherheitshinweise
20160208_operating_instructions_battery_lifting_equipment_multi.docx 13
GEFAHR!
Arbeiten an Batterien, insbesondere deren Installation und Wartung, darf nur durch geschultes
Fachpersonal durchgeführt werden, welches sich im Umgang mit Batterien auskennt und die
erforderlichen Vorsichtsmaßnahmen kennt.
EXPLOSIONSGEFAHR!
Aus Blei-Säure-Batterien kann explosives Wasserstoff-Sauerstoff-Gasgemisch austreten. Im Fall
einer Explosion des Gemisches können schwere Personenschäden auftreten.
Tragen Sie immer die vorgeschriebene Schutzkleidung.
Benutzen Sie ausschließlich ordnungsgemäße Werkzeuge (nicht „funkenschlagend“, mit spannungsisolierten Griffen etc.).
Unterbinden Sie jegliche Zündquelle, wie Funken, Flammen, Lichtbögen.
Verhindern Sie elektrostatische Entladungen, Tragen Sie Baumwollkleidung und erden Sie sich gegebenenfalls, wenn Sie direkt an den Batterien arbeiten.
EXPLOSIONSGEFAHR!
Batterien niemals mit Staubwedel oder trockenen Tüchern aus Kunstfaser reinigen. Gefahr von
elektrostatischer Aufladung und Knallgasexplosion! Wir empfehlen für die Reinigung leicht
feuchte Baumwoll- oder Papiertücher.
GEFAHR!
Halten Sie sich niemals unter der schwebenden Last auf! Die Last darf nur von der Seite geführt
werden.
GEFAHR!
Das Hebewerkzeug darf nur mit zwei oder mehr Personen genutzt werden.
3.2. Persönliche Schutzausrüstung
Beim Anheben und Bewegen der Batterien muss mit größter Vorsicht vorgegangen werden,
da eine herabstürzende Batterie Personen- und Materialschäden nach sich ziehen kann.
Daher ist bei jeder Benutzung des HOPPECKE Batteriehebewerkzeugs folgende
persönliche Schutzausrüstung zu tragen:
Schutzbrille
Sicherheitsschuhe
Säurefeste und rutschhemmende Handschuhe
3.3. Bestimmungsgemäße Verwendung
Das HOPPECKE Batteriehebewerkzeug ist ausschließlich zur Hebehilfe für folgende
Batterietypen von HOPPECKE zugelassen:
Neue Produktbezeichnung Alte Produktbezeichnung
grid | power V L OPzS
grid | power V L bloc power.bloc OPzS
sun | power V L OPzS solar.power
sun | power V L bloc OPzS bloc solar.power
grid | power VR L OPzV
grid | power VR L bloc power.bloc OPzV
sun | power VR L OPzV solar.power
sun | power VR L bloc OPzV bloc solar.power

Sicherheitshinweise
20160208_operating_instructions_battery_lifting_equipment_multi.docx 14
grid | power V M OSP.HC
grid | power V H OSP.XC
grid | power V X GroE
grid | power V M bloc OGi.bloc
grid | power V H bloc OGi.bloc HC
sun | power VR M solar.bloc
grid | power VR M power.com SB
grid | power VR H power.com HC
grid | power VR X power.com XC
In der vorangehenden Auflistung wurden die neuen Batteriebezeichnungen den alten
Bezeichnungen gegenübergestellt. In nachfolgenden Zuordnungslisten wird die neue
Bezeichnung verwendet. Da zum Zeitpunkt der Erstellung dieser Dokumentation die
Namensumstellung noch nicht abgeschlossen ist, macht dies einen Abgleich zwischen
neuer und alter Typbezeichnung eventuell nötig.
GEFAHR!
Die nicht bestimmungsgemäße Verwendung des Hebewerkzeuges kann zu Personen- und
Sachschäden führen.
Bei nicht bestimmungsgemäßer Verwendung übernimmt HOPPECKE Batterien GmbH & Co. KG
keine Verantwortung und keine Haftung für Personen- und Sachschäden, die sich direkt oder
indirekt aus dem Umgang mit dem Hebewerkzeug ergeben.
Die Risiken bei nicht bestimmungsgemäßer Verwendung trägt allein der Betreiber.
3.4. Richtlinien, Gesetze und Normen
Bei der Montage von Batterien mit dem HOPPECKE Batteriehebewerkzeug sind folgende
Regelwerke zu beachten:
Geltende Unfallverhütungsvorschriften
DIN EN ISO 20345 („Persönliche Schutzausrüstung – Sicherheitsschuhe“)
DIN EN 50272/VDE 0510 („Sicherheitsanforderungen an Batterien und Batterieanlagen“)
Gesetzlich vorgeschriebene Überprüfungen der Betriebssicherheit von Hebegeschirren
3.5. Pflichten des Betreibers
Bewahren Sie diese Montage- und Betriebsanleitung so auf, dass sie für alle Personen
sofort zur Verfügung steht, die Tätigkeiten im Zusammenhang mit den Batterien oder ihren
Bestandteilen ausführen müssen.
GEFAHR!
Unterziehen Sie das Hebewerkzeug vor jedem Gebrauch einer Sichtprüfung. Sollten Sie hierbei
Beschädigungen jedweder Art erkennen, muss das Hebewerkzeug mit sofortiger Wirkung
stillgelegt werden.
GEFAHR!
Das Hebewerkzeug muss gemäß den geltenden gesetzlichen Vorschriften von einem dafür
befähigten Prüfer auf Betriebssicherheit geprüft werden.
Lieferumfang
20160208_operating_instructions_battery_lifting_equipment_multi.docx 15
Bei einer Prüfung des Hebegeschirres sind mindestens folgende Punkte zu überprüfen:
Beschädigung der Webkanten oder des Gewebes
Garnbrüche
Verformungen infolge von Wärme
Beschädigung der tragenden Nähte
Schäden infolge Einwirkung aggressiver Stoffe (z.B. Elektrolyt)
Beschädigung des Schäkels
3.6. Personal und Qualifikation
Arbeiten an der Batterieanlage, insbesondere deren Installation, Wartung und Demontage
dürfen nur von Elektrofachkräften gemäß DIN VDE 1000-10 durchgeführt werden.
Das Personal muss
sich im Umgang mit Batterien auskennen,
die erforderlichen Vorsichtsmaßnahmen kennen
und gemäß landesüblichen Unfallverhütungsvorschriften, wie DGUV Vorschrift 3 (für
Deutschland), geschult sein.
Lesen Sie die Dokumentation aufmerksam, bevor Sie das HOPPECKE
Batteriehebewerkzeug einsetzen. Sie enthält wichtige Informationen zum sicheren und
fachgerechten Umgang mit dem Hebewerkzeug.
4. Lieferumfang
Folgende Teile sind im Lieferumfang des HOPPECKE Batteriehebewerkzeugs enthalten:
1x Schäkel
1x Hebegurt 3200mm (2 Schlaufen)

Lagerung
20160208_operating_instructions_battery_lifting_equipment_multi.docx 16
1x Hebegurt 3140mm (8 Schlaufen)
1x Zurrgurt 1300mm
1x Zurrgurt 1900mm
5. Lagerung
Das Hebewerkzeug ist trocken und frostfrei zu lagern. Hierbei ist es getrennt von
aggressiven Stoffen unterzubringen.
1. 2. 3. 4. Schlaufe

Zuordnung Hebewerkzeug zu Batterie
20160208_operating_instructions_battery_lifting_equipment_multi.docx 17
6. Zuordnung Hebewerkzeug zu Batterie
Folgende Zuordnungsliste stellt eine Orientierungshilfe für die korrekte Anbringung des
Hebegeschirrs an die Batterie dar. Durch unterschiedliche Einflüsse am Montageort, wie z.B. die
Reihenfolge in der die Schlaufen in den Schäkel eingebracht werden, besteht die Möglichkeit,
dass folgende Angaben nicht zutreffen. In diesem Fall wählen Sie die passende Schlaufe und
den passenden Zurrgurt per Probe aus.
grid | power V L / grid | power VR L / sun | power V L / sun | power VR L
Batterie Hebegurt 3200mm Hebegurt 3140mm Zurrgurt 1900mm
Zurrgurt 1300mm
grid | power V L 200 – 1500 Ah grid | power VR L 200 – 1500 Ah
X X - 1. Schlaufe X
grid | power V L 1750 – 2000 Ah grid | power VR L 1750 – 2000 Ah
X X - 2. Schlaufe X
grid | power V L 2250 – 2500 Ah grid | power VR L 2250 – 2500 Ah
X X - 3. Schlaufe X
grid | power V L 2750 – 3250 Ah grid | power VR L 2750 – 3250 Ah
X X - 4. Schlaufe X
sun | power V L 280 – 2170 Ah X X - 1. Schlaufe X
sun | power V L 2540 – 2900 Ah X X - 2. Schlaufe X
sun | power V L 3250 – 3610 Ah X X - 3. Schlaufe X
sun | power V L 3980 – 4700 Ah X X - 4. Schlaufe X
sun | power VR L 250 – 1700 Ah X X - 1. Schlaufe X
sun | power VR L 2000 – 2300 Ah X X - 2. Schlaufe X
sun | power VR L 2600 – 2900 Ah X X - 3. Schlaufe X
sun | power VR L 3200 – 3500 Ah X X - 4. Schlaufe X
grid | power V X
Batterie Hebegurt 3200mm Hebegurt 3140mm Zurrgurt 1900mm
Zurrgurt 1300mm
grid | power V X 325 - 450 Ah X X - 2. Schlaufe X
grid | power V X 1200 – 2000 Ah X X - 1. Schlaufe X
grid | power V X 2100 – 2400 Ah X X - 3. Schlaufe X
grid | power V X 2500 – 2600 Ah X X - 4. Schlaufe X
grid | power V M / grid | power V H
Batterie Hebegurt 3200mm Hebegurt 3140mm Zurrgurt 1900mm
Zurrgurt 1300mm
grid | power V M 1890 – 2100 Ah X X - 2. Schlaufe X
grid | power V M 2520 – 2940 Ah X X - 3. Schlaufe X
grid | power V M 3150 – 3780 Ah X X - 4. Schlaufe X
grid | power V H 120 – 1955 Ah X X - 1. Schlaufe X
grid | power V H 2070 – 2300 Ah X X - 2. Schlaufe X
grid | power V H 2760 – 3220 Ah X X - 3. Schlaufe X
grid | power V H 3450 – 4140 Ah X X - 4. Schlaufe X

Zuordnung Hebewerkzeug zu Batterie
20160208_operating_instructions_battery_lifting_equipment_multi.docx 18
grid | power V M bloc / grid | power V H bloc
Batterie Hebegurt 3200mm Hebegurt 3140mm Zurrgurt 1900mm
Zurrgurt 1300mm
grid | power V M bloc 12V 60 – 80 Ah X X - 2. Schlaufe X
grid | power V M bloc 12V 100 – 110 Ah X X - 4. Schlaufe X
grid | power V H bloc X X - 1. Schlaufe X
grid | power V L bloc / grid | power VR L bloc / sun | power V L bloc / sun | power VR L
bloc
Batterie Hebegurt 3200mm Hebegurt 3140mm Zurrgurt 1900mm
Zurrgurt 1300mm
grid | power V L bloc 12V 150 Ah grid | power VR L bloc 12V 150 Ah
X X - 2. Schlaufe X
grid | power V L bloc 6V 200 Ah grid | power VR L bloc 6V 200 Ah
X X - 1. Schlaufe X
grid | power V L bloc 6V 250 - 300 Ah grid | power VR L bloc 6V 250 - 300 Ah
X X - 2. Schlaufe X
sun | power V L bloc 12V 70 – 130 Ah X X - 1. Schlaufe X
sun | power V L bloc 12V 200 Ah X X - 2. Schlaufe X
sun | power V L bloc 6V 270 Ah X X - 1. Schlaufe X
sun | power V L bloc 6V 330 – 400 Ah X X - 2. Schlaufe X
sun | power VR L bloc 12V 70 – 120 Ah X X - 1. Schlaufe X
sun | power VR L bloc 12V 180 Ah X X - 2. Schlaufe X
sun | power VR L bloc 6V 250 Ah X X - 1. Schlaufe X
sun | power VR L bloc 6V 300 – 370 Ah X X - 2. Schlaufe X
grid | power VR M / grid | power VR H / grid | power VR X
Batterie Hebegurt 3200mm Hebegurt 3140mm Zurrgurt 1900mm
Zurrgurt 1300mm
grid | power VR H 123800, 124200, 125300 X X - 4. Schlaufe X
grid | power VR M 12V 50 – 60 Ah X X - 1. Schlaufe X
grid | power VR M 12V 80 – 100 Ah X X - 2. Schlaufe X
grid | power VR M 12V 110 – 140 Ah X X - 4. Schlaufe X
grid | power VR M 6V 170 X X - 1. Schlaufe X
grid | power VR M 6V 220 X X - 2. Schlaufe X
grid | power VR M 2V 600 X X - 1. Schlaufe X
grid | power VR X 122600, 123000, 123400 X X - 2. Schlaufe X
grid | power VR X 124100, 124400, 125100 X X - 4. Schlaufe X
grid | power VR X 22700 X X - 1. Schlaufe X
sun | power VR M
Batterie Hebegurt 3200mm Hebegurt 3140mm Zurrgurt 1900mm
Zurrgurt 1300mm
sun | power VR M 12V 150 Ah X X - 4. Schlaufe X
sun | power VR M 6V 200 Ah X X - 1. Schlaufe X
sun | power VR M 6V 250 Ah X X - 2. Schlaufe X

Montage der Batterien
20160208_operating_instructions_battery_lifting_equipment_multi.docx 19
7. Montage der Batterien
Vor der Verwendung des HOPPECKE Batteriehebewerkzeugs ist die Batterie auf
einwandfreien Zustand zu prüfen (visuelle Prüfung). Beschädigte Batterien dürfen nicht mit
dem Hebewerkzeug bewegt werden.
Für die folgende Vorgehensweise sind immer mindestens zwei Personen erforderlich.
1. Nehmen Sie den Hebegurt mit 2 Schlaufen und halten Sie ihn an die lange Seite
der Batterie.
2. Kippen Sie die Batterie etwas zur Seite und lassen Sie die zweite Person den
Hebegurt mittig unter den Boden der Batterie schieben. Gehen Sie hierbei mit
größtmöglicher Sorgfalt vor, da hierbei Quetschgefahr besteht.
3. Nehmen Sie den Hebegurt mit 8 Schlaufen und halten Sie ihn an die kurze Seite
der Batterie.
4. Kippen Sie die Batterie soweit zur Seite, dass die zweite Person den Hebegurt
mittig unter den Boden der Batterie schieben kann.
5. Prüfen Sie ob beide Hebegurte mittig unter der Batterie verlaufen und korrigieren
Sie die Positionen bei Bedarf.
6. Bringen Sie die jeweils zwei Schlaufen der Hebegurte in den Schäkel ein. Wählen
Sie bei dem kürzeren Hebegurt die Schlaufe gemäß Kapitel 6. Ggf. müssen Sie
mehrere Schlaufen testen um die passende Schlaufe zu ermitteln.
7. Verbinden Sie den Schäkel mit einem geeigneten Kran.
Der Kran muss für das Gewicht der Batterie geeignet sein, sich in einem betriebsbereiten
Zustand befinden und über einen geeigneten Kranhaken verfügen.
8. Sichern Sie die Batterie horizontal durch den mitgelieferten Zurrgurt. Wählen Sie die
passende Länge gemäß Kapitel 6 aus. Der Zurrgurt muss durch die seitlichen
Laschen der Hebegurte durchgezogen werden, um ein Abrutschen zu verhindern
(siehe Abbildung 3).

Montage der Batterien
20160208_operating_instructions_battery_lifting_equipment_multi.docx 20
Abbildung 3: Hebewerkzeug montiert an Batterie
GEFAHR!
Bringen Sie den Zurrgurt immer im oberen Drittel der Batterie an. Nur so kann ein seitliches
Entweichen der Batterie sicher verhindert werden.
9. Heben Sie die Batterie mit Hilfe des Krans langsam an und führen Sie die Batterie
dabei mit der Hand, um ein Schwingen zu vermeiden und die Batterie in einer
senkrechten Position zu halten.
VORSICHT!
Sobald die Batterie anfängt zu schwingen muss der Transport unterbrochen werden. Verringern
Sie ggf. die Geschwindigkeit der Hubbewegung oder des horizontalen Transports.
10. Transportieren Sie die Batterie zu ihrem Bestimmungsort, wie z.B. Stufengestell,
Etagengestell oder Erdbebengestell.
11. Bringen Sie auf den Schienen des Gestells etwas Fett auf um die Position der
Batterie im Nachhinein noch anpassen zu können. Verwenden Sie ausschließlich
eine von HOPPECKE empfohlene Fettsorte, wie zum Beispiel die Fettsorte
Aeronix® (HOPPECKE Materialnummer: 7140200350).
Sollte durch Gewicht der Batterie, Größe der Batterie oder Einbausituation zu erwarten sein,
dass bei Ablassen der Batterie auf dem Gestell der Hebegurt zwischen Batterie und Gestell
eingeklemmt wird, empfiehlt sich folgendes Vorgehen:
Legen Sie auf die Position, in welcher die Batterie final positioniert werden soll, flache
Abstandshalter (z.B. Holz) unter (siehe Abbildung 4). Nach Positionierung der Batterie und
Entfernung der Hebegurte können die Abstandshalter wieder entfernt werden.

Montage der Batterien
20160208_operating_instructions_battery_lifting_equipment_multi.docx 21
Abbildung 4: Batterie mit Abstandshalter aus Holz
12. Setzen Sie die Batterie vorsichtig auf dem Gestell ab.
13. Entfernen Sie den Zurrgurt von der Batterie, den Schäkel vom Kranhaken und die
Schlaufen von dem Schäkel.
14. Ziehen Sie die Hebegurte unter der Batterie durch um diese zu entfernen. Evtl.
muss die Batterie hierfür leicht geneigt werden.