home > accessing features · · 2016-10-26home > accessing features ... - click this button...
TRANSCRIPT

Home > Accessing Features
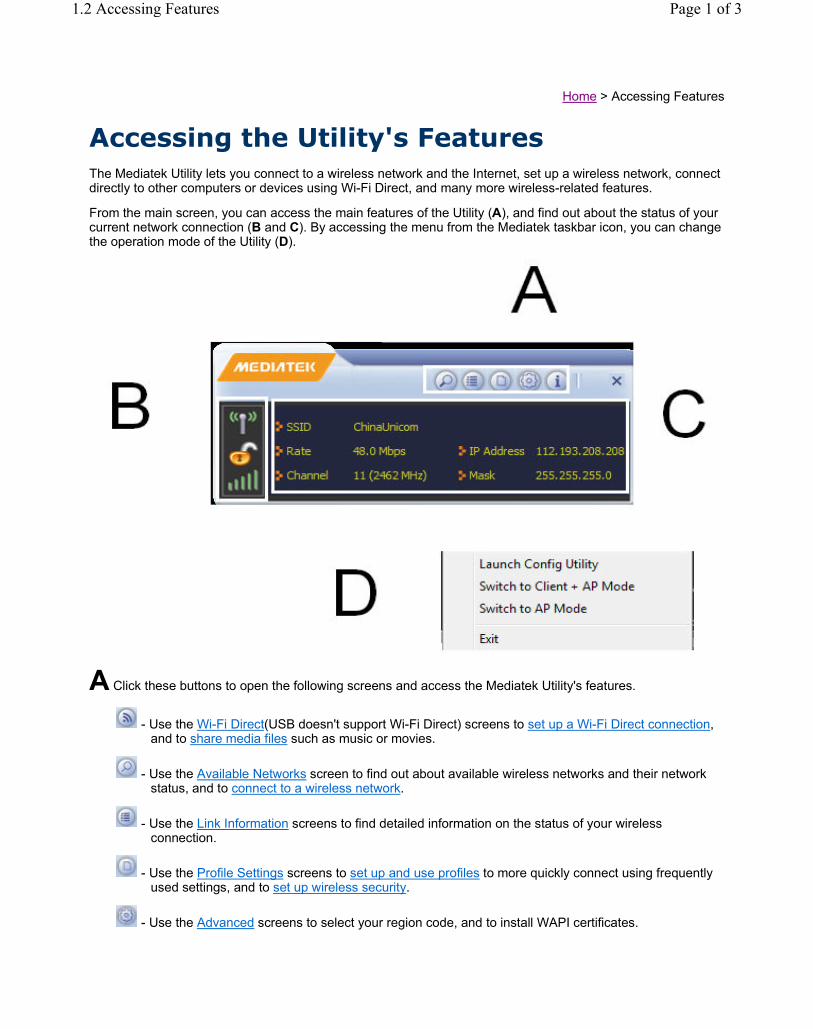
Accessing the Utility's Features
The Mediatek Utility lets you connect to a wireless network and the Internet, set up a wireless network, connect directly to other computers or devices using Wi-Fi Direct, and many more wireless-related features.
From the main screen, you can access the main features of the Utility (A), and find out about the status of your current network connection (B and C). By accessing the menu from the Mediatek taskbar icon, you can change the operation mode of the Utility (D).
A Click these buttons to open the following screens and access the Mediatek Utility's features.
- Use the Wi-Fi Direct(USB doesn't support Wi-Fi Direct) screens to set up a Wi-Fi Direct connection, and to share media files such as music or movies.
- Use the Available Networks screen to find out about available wireless networks and their network status, and to connect to a wireless network.
- Use the Link Information screens to find detailed information on the status of your wireless connection.
- Use the Profile Settings screens to set up and use profiles to more quickly connect using frequently used settings, and to set up wireless security.
- Use the Advanced screens to select your region code, and to install WAPI certificates.
Page 1 of 31.2 Accessing Features
2/25/2016mk:@MSITStore:C:\Program%20Files%20(x86)\MediatekWiFi\Common\Mediatek%20...

- Use the About screen to find version information for your Utility.
B Use these buttons and icons to manage transmission and to find information about your wireless
connection.
- Click this button to enable or disable wireless transmission.
- Indicates the security status of your connection.
- Indicates the quality of your wireless connection.
C Use this screen to find information on wireless network settings.
� SSID: This shows the name of your wireless network.
� Rate: This shows the speed of your connection.
� Channel: This is the channel assigned to your connection. Change this if interference is a problem on your network.
� IP Address: This identifies the Mediatek Adapter on your wireless network, much like a physical mailing address identifies a house on a street.
� Mask: The subnet mask hides your IP address from outside your wireless network.
D Lets you change the operation mode of the Utility.
� Launch Config Utility: Select this option to display the Utility's main screen.
� Use Zero Configuration as Config Utility: (Windows XP only) Select this option to use Windows to set up and manage your network connection. Selection of this mode is not necessary in Windows Vista, 7 or higher, as you can use Windows and the Mediatek Utility to manage the Adapter without changing operating modes.
� Switch to Client + AP Mode: (Windows 7 and higher only) Select this option to let computers and devices connected to the Mediatek AP access the Internet (or another network to which the Mediatek AP is connected).
� Switch to AP Mode: Select this option to use the Utility as an access point and to set up a wireless network of your own.
� Exit: Select this option to close the main screen and exit the program. Any wireless connections managed by the Mediatek Utility will be disconnected.
Page 2 of 31.2 Accessing Features
2/25/2016mk:@MSITStore:C:\Program%20Files%20(x86)\MediatekWiFi\Common\Mediatek%20...

Page 3 of 31.2 Accessing Features
2/25/2016mk:@MSITStore:C:\Program%20Files%20(x86)\MediatekWiFi\Common\Mediatek%20...

Home > Setting Up Wireless Security > Setting Up Home Wireless Security
Setting Up Wireless Security for Home Networks
Overview
To make your wireless connection more secure, choose the strongest security settings supported by the AP or wireless router to which you are connected. For home and small business networks, WPA-PSK, WPA2-PSK, and WEP are common security methods, and WAPI-PSK is a possible alternative.
Supported Security Methods
The following table shows the authentication and encryption methods supported by the Mediatek Utility.
Note: WAPI-PSK authentication with SMS4 encryption is also available, however, at the time of writing, it is a new Chinese standard and has yet to be made an ISO standard.
Instructions
To configure security settings on your network connection, use the profile function in the Mediatek Utility.
1. Click the Profile Settings button to display the Profile List screen.
Authentication Method Encryption Method Comments
WPA2-PSK (Wi-Fi Protected Access 2 -Pre-Shared Key)
WPA-PSK (Wi-Fi Protected Access -Pre-Shared Key)
AES (Advanced Encryption Standard)
TKIP (Temporal Key Integrity Protocol)
WPA2-PSK is a faster, more recent standard than WPA-PSK.
AES is a stronger, more recent standard than TKIP.
Open
Shared
WEP (Wireless Encrypted Privacy)
WEP is an older standard and is easily decrypted. If using WEP select Open as the authentication method for slightly stronger security.
Page 1 of 256.1 Setting Up Home Wireless Security
2/25/2016file:///C:/Users/Cable%20Matters/AppData/Local/Temp/~hh20BE.htm

2. To configure a wireless security profile, click the Add button to add a new profile, or click the
Edit button to edit an existing profile.
3. In the screen that displays, enter the following settings.
a. For 'Profile Name', type a name for the profile, or leave at its default value. b. In the SSID field, type the name of the network for which you are configuring security
settings, or select the name of the network from the drop-down list provided. c. For 'Network Type', select whether your network is an infrastructure or ad hoc network. If
uncertain, leave at its default setting (Infrastructure). � Select 'Infrastructure - Connect to AP' if you are connecting to a typical wireless
network maintained by an AP or wireless router. � Alternatively, select 'Ad Hoc - Connect to other computers' if you are connecting to a
distributed network with no AP or router.
Page 2 of 256.1 Setting Up Home Wireless Security
2/25/2016file:///C:/Users/Cable%20Matters/AppData/Local/Temp/~hh20BE.htm

4. Click the right arrow to save your settings. For instructions on setting up a security method, click on the corresponding link.
� WPA-PSK or WPA2-PSK� WEP� WAPI-PSK
Setting Up WPA-PSK or WPA2-PSK
a. For Authentication, select WPA-PSK or WPA2-PSK and for Encryption, select TKIP or AES. Click the right arrow to save your settings.
b. For 'WPA Preshared Key', type a passphrase 8-63 characters long made up of characters '0'-'9', 'a'-'z', 'A'-'Z', keyboard symbols and spaces. Click the right arrow to save your settings and finish setting up WPA-PSK or WPA2-PSK security.
Page 3 of 256.1 Setting Up Home Wireless Security
2/25/2016file:///C:/Users/Cable%20Matters/AppData/Local/Temp/~hh20BE.htm

Setting Up WEP
a. For Authentication, select Open or Shared, and for Encryption select WEP. Click the right arrow to save your settings.
b. In the screen that appears select a Key and Key Format setting supported by the wireless router or AP to which you are connecting.
� If you select 'Hex(10 or 26 hex digits)', in the WEP Key field type a security key 10 or 26 characters long made up of digits '0'-'9' and letters 'A'-'F'.
� If you select 'ASCII(5 or 13 ASCII characters)' in the WEP Key field, type a security key 5 or 13 characters long made up of digits '0'-'9' and letters 'a'-'z' and 'A'-'Z'.
Page 4 of 256.1 Setting Up Home Wireless Security
2/25/2016file:///C:/Users/Cable%20Matters/AppData/Local/Temp/~hh20BE.htm

c. Click the right arrow to save your settings and finish setting up WEP security.
Setting Up WAPI-PSK
a. For Authentication, select WAPI-PSK and for Encryption, select SMS4. Click the right arrow to save your settings.
b. In the screen that appears select a Key and Key Format setting supported by the wireless router or AP to which you are connecting.
� If, in the "Key Format" field, you select 'Hex(8 ~ 64 hex digits)', then in the 'WPA Preshared Key' field type a security key 8-64 characters long made up of digits '0'-'9' and letters 'A'-'F'.
� If, in the "Key Format" field, you select 'ASCII(8 ~ 64 ASCII characters)' in the 'WPA Preshared Key' field, type a security key 8-64 characters long made up of digits '0'-'9' and letters 'a'-'z' and 'A'-'Z'.
Page 5 of 256.1 Setting Up Home Wireless Security
2/25/2016file:///C:/Users/Cable%20Matters/AppData/Local/Temp/~hh20BE.htm

c. Click the right arrow to save your settings and finish setting up WAPI-PSK security. 5. With WEP, WPA-PSK or WPA2-PSK security, you can select 'Use Pre-logon Connection' to
automatically connect using the settings of this profile when logging in to Windows.
6. After you have set up security settings, it appears in the Profile Settings screen. To further edit
settings, click the Edit button , or to delete settings, click the delete button .
Troubleshooting
See Troubleshooting for suggestions on solving problems connecting to a wireless network.
Page 6 of 256.1 Setting Up Home Wireless Security
2/25/2016file:///C:/Users/Cable%20Matters/AppData/Local/Temp/~hh20BE.htm

For further information on the screens used in this procedure, see the Profile Settings screens.
Home > Setting Up Wireless Security > Setting Up Enterprise Wireless Security
Setting Up Wireless Security for Large Enterprises
Overview
Enterprise security is different from home user security in that an authentication server is used, and encryption keys are dynamically changed, making it more difficult for unauthorized users to access and read data on the network.
To make your wireless connection more secure, apply the strongest security settings supported by the AP or wireless router to which you are connected. For large enterprise networks, CCKM, 802.1X, WPA, and WPA2 are common security methods, and WAPI-CA is a possible alternative.
Supported Security Methods
The following table shows the enterprise security methods supported by the Mediatek Utility.
Security Protocol Encryption Method Comments
WPA (Wi-Fi Protected Access)
WPA2 (Wi-Fi Protected Access 2)
TKIP(MFP)* (Temporal Key Integrity Protocol (Management Frame Protection))
AES(MFP)* (Advanced Encryption Standard (Management Frame Protection))
AES (Advanced Encryption Standard)
TKIP (Temporal Key Integrity Protocol)
WPA and WPA2 are designed for large enterprises. They both require an authentication server.
WPA2 is a faster, more recent standard than WPA.
AES is a stronger, more recent standard than TKIP.
MFP (management frame protection) offers more security than no MFP.
CCKM (Cisco Centralized Key Management)
(not supported by Windows XP)
WEP (Wireless Encrypted Privacy)
AES
TKIP
CCKM allows roaming between APs with WDS (wireless domain services) enabled and access to the same RADIUS server.
802.1X WEP802.1X is designed for large enterprises and requires an authentication server. WEP is an
Page 7 of 256.1 Setting Up Home Wireless Security
2/25/2016file:///C:/Users/Cable%20Matters/AppData/Local/Temp/~hh20BE.htm

* Management frame protection (MFP) available for WPA2 only.
Note: The Utility also supports WAPI-CA authentication with SMS4 encryption, but at the time of writing, it is a new Chinese standard and has yet to be made an ISO standard.
Supported Authentication and Tunnel Methods
Enterprise security typically comprises an authentication method to ensure clients have authorization to access the network, and a tunnel method to encrypt data transmitted on the network. The following table describes the authentication and tunnel methods supported by the Mediatek Utility.
older standard and is easily decrypted.
Authentication Method
Tunnel Authentication Method
Comments
TLS/Smart Card n/a
Mutual authentication of client and server using client and server-side certificates make TLS (Transport Layer Security) very secure but also complex. Widely implemented.
PEAP
EAP-TLS/Smart Card
EAP-MS-CHAP v2
Generic Token Card
PEAP (Protect Extensible Authentication Protocol) uses server-side certificates for less complex support requirements than TLS, while still providing strong security. All PEAP methods described, and particularly PEAP-EAP-MS-CHAP v2 (commonly known as PEAP) are widely implemented.
TTLS
MS-CHAP v2
MS-CHAP
CHAP
PAP
EAP-MD5
TTLS (Tunneled Transport Layer Security) provides mutual authentication of client and server through an encrypted channel using server-side certificates. It has less complex support requirements than TLS, while still providing strong security. Often used in combination with a traditional network server without EAP capability. Less widely implemented.
Note: PAP and MD5 are not secure methods. MS-CHAP v2 is more secure than other authentication methods listed.
FAST
TLS/Smart Card
Generic Token Card
EAP-MS-CHAP v2
FAST (Flexible Authentication via Secure Tunneling) uses PAC (Protected Access Credential) instead of certificates for mutual authentication of client and server. PACs, like certificates, can be manually installed or distributed by the server. Suitable for large enterprises as investment in Cisco infrastructure is required.
MD5-Challenge n/a No server authentication. MD5 is easily decrypted. Not widely implemented.
Page 8 of 256.1 Setting Up Home Wireless Security
2/25/2016file:///C:/Users/Cable%20Matters/AppData/Local/Temp/~hh20BE.htm

Instructions
Follow these instructions to set up WPA/WPA2, 802.1X, or WAPI-CA wireless security on the Mediatek Adapter.
1. Click the Profile Settings button to display the Profile List screen.
2. To configure a wireless security profile, click the Add button to add a new profile, or click the
Edit button to edit an existing profile.
3. In the screen that appears, enter the following settings. � For 'Profile Name', type a name for the profile, or leave at its default value. � In the SSID field type the name of the network to which you are connecting, or select an
existing network name from the drop-down list provided. � For 'Network Type', select whether your network is an infrastructure or ad hoc network. If
LEAP n/a
LEAP (Light Extensible Authentication Protocol) provides mutual authentication of server and client and offers dynamic WEP key based encryption. However, it requires strong passwords for strong security. Suitable for large enterprises as investment in Cisco infrastructure is required.
WAI WPIPart of the WAPI-CA protocol, as yet unagreed upon level of security and not widely implemented outside China.
Page 9 of 256.1 Setting Up Home Wireless Security
2/25/2016file:///C:/Users/Cable%20Matters/AppData/Local/Temp/~hh20BE.htm

uncertain, leave at its default setting (Infrastructure). � Select 'Infrastructure - Connect to AP' if you are connecting to a typical wireless
network maintained by an AP or wireless router. � Alternatively, select 'Ad Hoc - Connect to other computers' if you are connecting to a
distributed network with no AP or router.
4. In the Profile Settings screen, click the right arrow to save your settings. For instructions on setting up a security method, click on the corresponding link.
� WAPI-CA� CCKM, 802.1X, WPA or WPA2
Setting Up WAPI-CA
a. To set up WAPI-CA security, for Authentication select WAPI-CA, and for Encryption select SMS4. Click the right arrow to save your settings.
b. WAPI-CA requires user, issuer and authentication server unit (ASU) certificates. To
install these certificates on your system, click the certificate installation button and follow the steps in the next screen. If these certificates are already installed on your system, skip the certificate installation procedure and go to the final step in these instructions on WAPI certificate installation.
Page 10 of 256.1 Setting Up Home Wireless Security
2/25/2016file:///C:/Users/Cable%20Matters/AppData/Local/Temp/~hh20BE.htm

c. To install WAPI certificates, first, in the certificate installation screen, in the 'User
Certificate' field, click on the folder icon to browse to and select a WAPI user
certificate. Then, in the 'Issuer Certificate' field, click on the folder icon to
browse to and select a WAPI issuer certificate. Next, click the first install button to verify the user and issuer certificate, and install the authentication server unit (ASU) certificate.
d. The ASU certificate and its details appear in the screen. � If the authentication server on your network is installed on your network's AP,
you have completed certificate installation. Close this screen and go to the final step in this set of instructions.
� If the authentication server on your network is external to your network's AP, click the second install button to install the ASU.
Page 11 of 256.1 Setting Up Home Wireless Security
2/25/2016file:///C:/Users/Cable%20Matters/AppData/Local/Temp/~hh20BE.htm

e. Click the 'Browse' button to browse to and select a ASU, and click 'Install'. The ASU appears in the list in this window. Click OK to close this screen.
f. The ASU appears in the certificate list. Close this window to complete the certificate installation procedure.
Page 12 of 256.1 Setting Up Home Wireless Security
2/25/2016file:///C:/Users/Cable%20Matters/AppData/Local/Temp/~hh20BE.htm

g. Select 'Auto' to let the Utility automatically detect a valid certificate for your connection, or select 'Manual' and from the drop-down list, select the name of the certificate to be used in your connection. Click the right arrow to complete setting up WAPI-CA security.
Setting Up CCKM, 802.1X, WPA or WPA2
a. In the Profile Settings security screen, select an authentication and encryption method.
� To set up WPA or WPA2 authentication, for Authentication select WPA or WPA2, and for Encryption select TKIP or AES. If WPA2 is selected, TKIP and AES are available with the added security of management frame protection (TKIP(MFP), AES(MFP)). Click the right arrow to save your settings.
Page 13 of 256.1 Setting Up Home Wireless Security
2/25/2016file:///C:/Users/Cable%20Matters/AppData/Local/Temp/~hh20BE.htm

� To set up CCKM authentication, for Authentication select CCKM, and for Encryption select WEP, TKIP, or AES. Click the right arrow to save your settings.
� To set up 802.1X authentication, for Authentication select 802.1X, and for Encryption select WEP. Click the right arrow to save your settings.
b. Select the EAP method (Extensible Authentication Protocol) supported by your network from the list below and follow the instructions given.
� PEAP
Page 14 of 256.1 Setting Up Home Wireless Security
2/25/2016file:///C:/Users/Cable%20Matters/AppData/Local/Temp/~hh20BE.htm

� TLS/Smart Card� TTLS (Windows XP only) � EAP-FAST� MD5-Challenge (Windows XP, 802.1X only) � LEAP
PEAP
i. If you select PEAP, for Tunnel Authentication select either EAP-MSCHAP v2, EAP-TLS/Smart Card, or Generic Token Card.
� If you select EAP-MSCHAP v2, in the Tunnel ID field type the name assigned to the user, and in the Tunnel Password field, type the password associated with the user name.
� If you select EAP-TLS/Smart Card, in the Tunnel ID field, select Authentication ID or Machine ID depending on whether user credentials are provided by a smart card or by the computer from which they are accessing the network. If Authentication ID is selected, in the adjacent field, type your user name.
� If you select Generic Token Card, in Tunnel Password/Mode, you can select Static Password or Soft Token and for Vista/Windows 7 users, Windows Logon or Prompt User, depending on the method used to supply user credentials.
Page 15 of 256.1 Setting Up Home Wireless Security
2/25/2016file:///C:/Users/Cable%20Matters/AppData/Local/Temp/~hh20BE.htm

� If you select the Static Password option, then in the Tunnel ID field, type your user name, and in the Tunnel Password field, type the password associated with your user name.
� If you select Soft Token, your user credentials are supplied by software.
� If you select Windows Logon, your user credentials are based on those of your Windows user account.
� If you select Prompt User, when connecting to a network, a popup window appears, asking for your user name and password.
Click the right arrow to save your settings.
ii. If you have selected PEAP > EAP-MSCHAP v2 or PEAP > Generic Token Card, then optionally select Use Server Certification, and from the drop-down box, select the certificate authority. Click the right arrow to save your settings.
iii. If you have selected PEAP > EAP-TLS/Smart Card, from the drop-down list, select the client certificate on your computer to be used by this security method, or for Vista and Windows 7 users, select "Use my smart card" to set up smart card-based user authentication. Click the right arrow to save your settings.
Page 16 of 256.1 Setting Up Home Wireless Security
2/25/2016file:///C:/Users/Cable%20Matters/AppData/Local/Temp/~hh20BE.htm

iv. You have completed setup of PEAP authentication.
TLS/Smart Card
i. If you select TLS/Smart Card, select Authentication ID or Machine ID depending on whether user credentials are provided by a smart card or by the computer from which they are accessing the network. If Authentication ID is selected, in the adjacent field, type your user name. Click the right arrow to save your settings.
ii. From the drop-down list, select the client certificate on your computer to be used by this security method, or for Vista and Windows 7 users, select "Use my smart card" to set up smart card-based user authentication. Click the right arrow to save your settings.
Page 17 of 256.1 Setting Up Home Wireless Security
2/25/2016file:///C:/Users/Cable%20Matters/AppData/Local/Temp/~hh20BE.htm

iii. Optionally select Use Server Certification, and from the drop-down box, select the certificate authority. Click the right arrow to save your settings.
iv. You have completed setup of TLS/Smart Card authentication.
TTLS
i. For Windows XP users only. To apply TTLS, select a Tunnel Authentication method from the drop-down list. Options include CHAP, MS-CHAP, MS-CHAP v2, PAP, and EAP-MD5. For Tunnel ID, select Authentication ID or Machine ID depending on whether user credentials are provided by the user or by the computer from which they are accessing the network. If Authentication ID is selected, in the adjacent field, type your user name. For either Authentication ID or Machine ID, in the Tunnel Password field, type a password. Click the right arrow to save your settings.
Page 18 of 256.1 Setting Up Home Wireless Security
2/25/2016file:///C:/Users/Cable%20Matters/AppData/Local/Temp/~hh20BE.htm
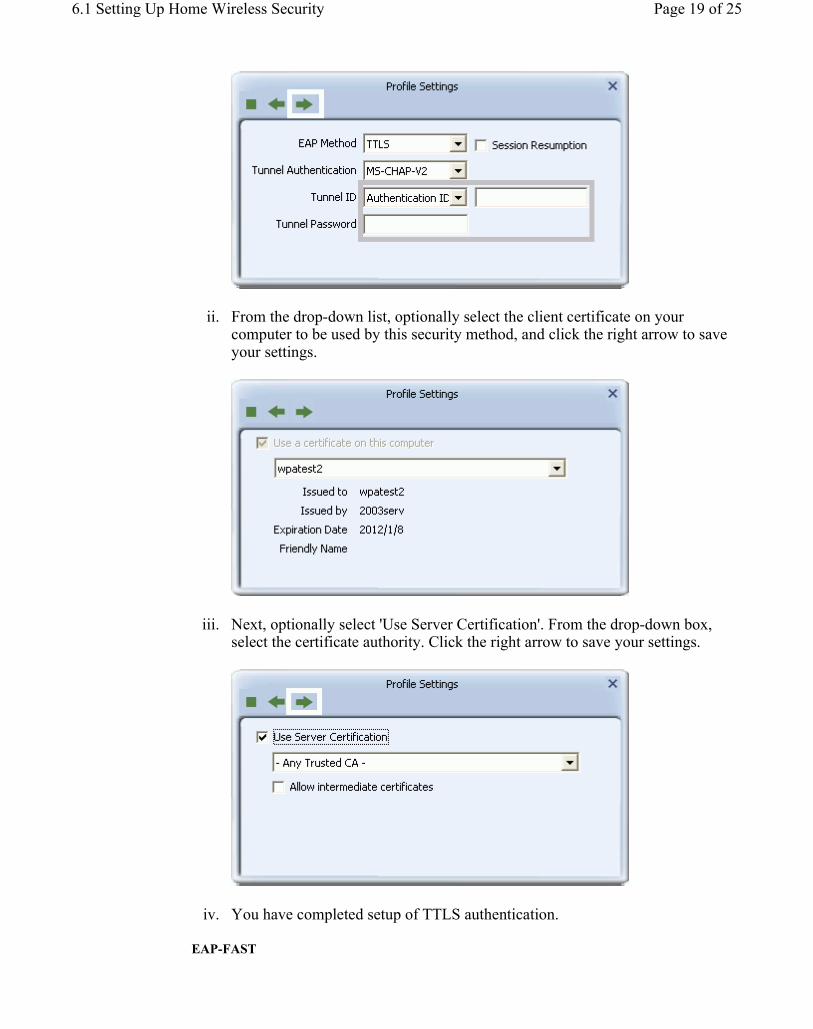
ii. From the drop-down list, optionally select the client certificate on your computer to be used by this security method, and click the right arrow to save your settings.
iii. Next, optionally select 'Use Server Certification'. From the drop-down box, select the certificate authority. Click the right arrow to save your settings.
iv. You have completed setup of TTLS authentication.
EAP-FAST
Page 19 of 256.1 Setting Up Home Wireless Security
2/25/2016file:///C:/Users/Cable%20Matters/AppData/Local/Temp/~hh20BE.htm

i. If you are applying EAP-FAST authentication using Vista or Windows 7, click the right arrow to finish setting up EAP-FAST.
ii. Otherwise, for Windows XP users only, select a Tunnel Authentication method from the drop-down list. Options include EAP-MS-CHAP v2, EAP-TLS/Smart Card, and Generic Token Card.
� If you select EAP-MSCHAP v2, for 'Tunnel ID', select Authentication ID or Machine ID depending on whether user credentials are provided by users or by the computer from which they are accessing the network. If Authentication ID is selected, in the adjacent field, type your user name. If either Authentication ID or Machine ID are selected, for Tunnel Password, type the associated password.
� If you select EAP-TLS/Smart Card, for 'Tunnel ID', select Authentication ID or Machine ID depending on whether user credentials are provided by a smart card or by the computer from which they are accessing the network. If Authentication ID is selected, in the adjacent field, type your user name.
� If you select Generic Token Card, for 'Tunnel ID', field requirements depend on the tunnel mode and identification method selected.
� If 'Static Password' is selected for Tunnel Mode, and either Authentication ID or Machine ID are selected, type a password. For Authentication ID a user name is also required in the adjacent field.
Page 20 of 256.1 Setting Up Home Wireless Security
2/25/2016file:///C:/Users/Cable%20Matters/AppData/Local/Temp/~hh20BE.htm
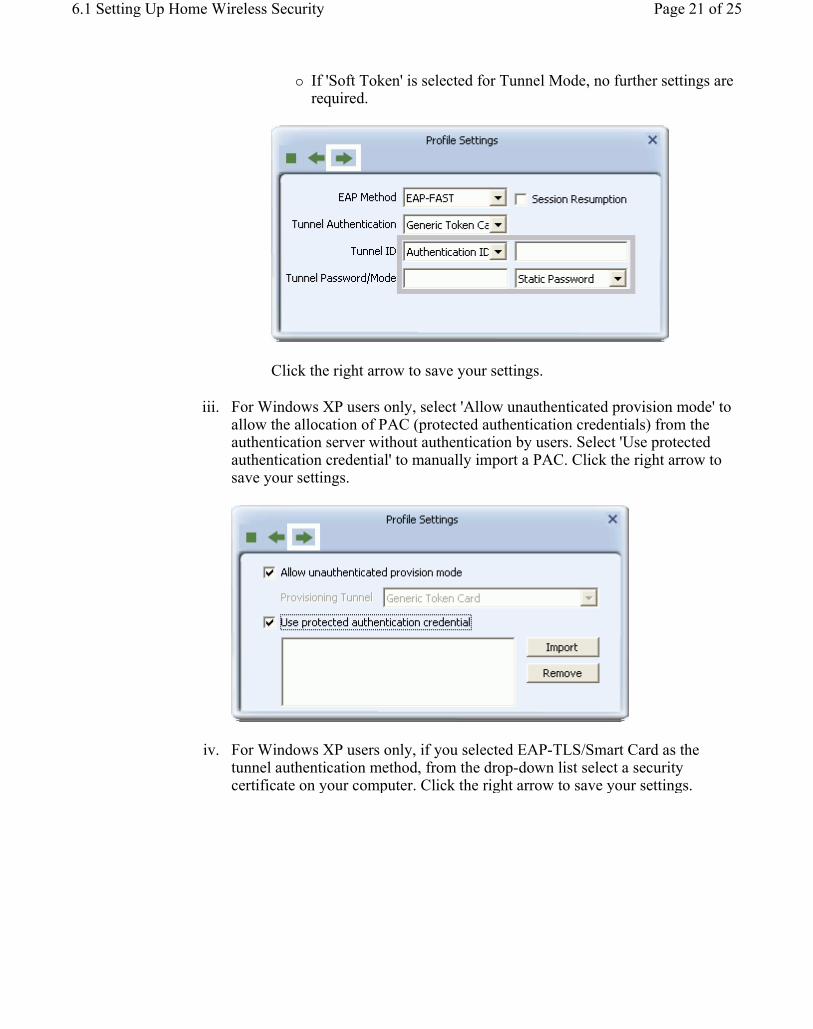
� If 'Soft Token' is selected for Tunnel Mode, no further settings are required.
Click the right arrow to save your settings.
iii. For Windows XP users only, select 'Allow unauthenticated provision mode' to allow the allocation of PAC (protected authentication credentials) from the authentication server without authentication by users. Select 'Use protected authentication credential' to manually import a PAC. Click the right arrow to save your settings.
iv. For Windows XP users only, if you selected EAP-TLS/Smart Card as the tunnel authentication method, from the drop-down list select a security certificate on your computer. Click the right arrow to save your settings.
Page 21 of 256.1 Setting Up Home Wireless Security
2/25/2016file:///C:/Users/Cable%20Matters/AppData/Local/Temp/~hh20BE.htm

v. For Windows XP, Vista and Windows 7, the Utility supports automatic login using your EAP-FAST settings on Windows startup. Select 'Use Pre-logon Connection' to enable this function. Click the right arrow to save your settings.
vi. You have completed setup of EAP-FAST authentication.
MD5-Challenge
i. MD5-Challenge is available in Windows XP only. To apply MD5-Challenge, you need to have selected 802.1X as the security method. Type the Tunnel ID and Tunnel Password, and click the right arrow to save your settings.
Page 22 of 256.1 Setting Up Home Wireless Security
2/25/2016file:///C:/Users/Cable%20Matters/AppData/Local/Temp/~hh20BE.htm
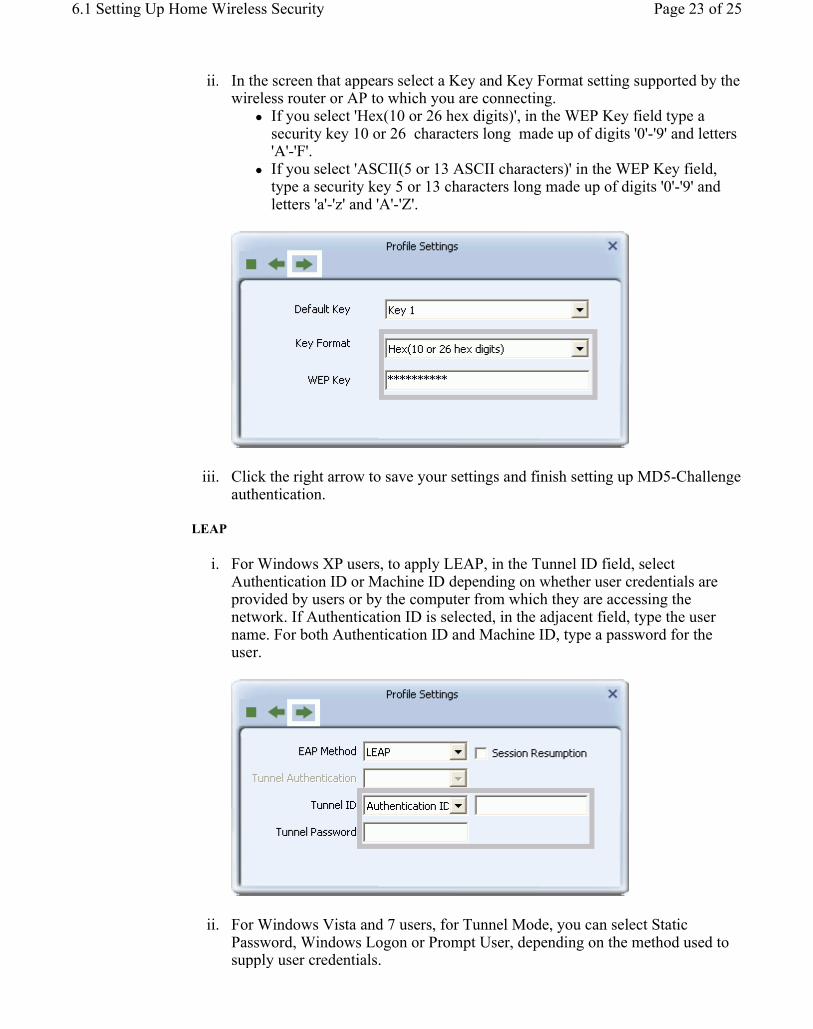
ii. In the screen that appears select a Key and Key Format setting supported by the wireless router or AP to which you are connecting.
� If you select 'Hex(10 or 26 hex digits)', in the WEP Key field type a security key 10 or 26 characters long made up of digits '0'-'9' and letters 'A'-'F'.
� If you select 'ASCII(5 or 13 ASCII characters)' in the WEP Key field, type a security key 5 or 13 characters long made up of digits '0'-'9' and letters 'a'-'z' and 'A'-'Z'.
iii. Click the right arrow to save your settings and finish setting up MD5-Challenge authentication.
LEAP
i. For Windows XP users, to apply LEAP, in the Tunnel ID field, select Authentication ID or Machine ID depending on whether user credentials are provided by users or by the computer from which they are accessing the network. If Authentication ID is selected, in the adjacent field, type the user name. For both Authentication ID and Machine ID, type a password for the user.
ii. For Windows Vista and 7 users, for Tunnel Mode, you can select Static Password, Windows Logon or Prompt User, depending on the method used to supply user credentials.
Page 23 of 256.1 Setting Up Home Wireless Security
2/25/2016file:///C:/Users/Cable%20Matters/AppData/Local/Temp/~hh20BE.htm

� If you select the Static Password option, then in the Tunnel ID field, type your user name, and in the Tunnel Password field, type the password associated with your user name.
� If you select Windows Logon, your user credentials are based on those of your Windows user account.
� If you select Prompt User, when connecting to a network, a popup window appears, asking for your user name and password.
iii. Click the right arrow to save your settings.
iv. The Utility supports automatic login using your LEAP settings on Windows startup. Select 'Use Pre-logon Connection' to enable this function. Click the right arrow to save your settings.
v. You have completed setup of LEAP authentication. 5. After you have set up security settings, a profile configured with your security settings appears in
the Profile screen. To edit settings, click the Edit button , or to delete settings, click the delete
button .
Page 24 of 256.1 Setting Up Home Wireless Security
2/25/2016file:///C:/Users/Cable%20Matters/AppData/Local/Temp/~hh20BE.htm

Troubleshooting
See Troubleshooting for suggestions on solving problems connecting to a wireless network.
For further information on the screens used in this procedure, see the Profile Settings screens.
Page 25 of 256.1 Setting Up Home Wireless Security
2/25/2016file:///C:/Users/Cable%20Matters/AppData/Local/Temp/~hh20BE.htm

Home > Screen Descriptions > Operating Modes
Operating Modes
The Mediatek Utility has three modes; client mode, access point mode, and client + AP Mode (Windows 7 only).
� Client mode allows you to use the Adapter as a wireless client, and to connect to an AP or wireless router and other clients in a wireless network.
� AP mode lets you use the Adapter as an access point and set up a wireless network, to which wireless clients can connect.
� Client and AP Mode lets you use the Adapter both as an AP and as a member of a wireless network at the same time (Windows 7 only).
Client Mode
Client mode is the default setting. To use client mode, leave settings at their defaults. Manually setting client mode is only required when switching from AP mode to client mode. Follow these steps to use manually set the Mediatek Utility to client mode.
1. Right-click on the Mediatek icon in the task bar in the bottom right hand corner of your screen. 2. In the menu that appears, select 'Switch to Client Mode'.
3. The Mediatek Utility appears in compact mode showing the connection status of the Mediatek Adapter.
See the Client Mode screens for information on the functions available in this mode.
AP Mode
To set to the Mediatek Utility to AP mode, follow these steps.
1. Right-click on the Mediatek icon in the task bar in the bottom right hand corner of your screen. 2. In the menu that appears, click "Switch to AP Mode". Wait several seconds for the Utility to appear in
AP mode.
3. The Mediatek Utility appears in compact mode showing the connection status of the Mediatek Adapter.
See the AP Mode screens for information on the functions available in this mode.
Page 1 of 407-0 Operating_Modes
2/25/2016file:///C:/Users/Cable%20Matters/AppData/Local/Temp/~hhCA8B.htm

Client + AP Mode
This mode is only available in Windows 7 or higher.
1. Right-click on the Mediatek icon in the task bar in the bottom right hand corner of your screen. 2. In the menu that appears, click "Switch to Client + AP Mode".
3. If configuring an AP for the first time, in the 'SSID' field, type a name for your wireless network, and in the 'WPA2 Pre-Shared Key' field, type a passphrase 8-63 characters long made up of characters '0'-'9', 'a'-'z', 'A'-'Z', keyboard symbols and spaces. Click OK.
4. See the Client + AP Mode screens for information on the functions available in this mode.
Home > Screen Descriptions > Client Mode > Compact Mode Screen
The Compact Mode Screen
From the compact mode screen, use the Mediatek Utility to connect to a wireless network, view connection status, set up profiles, and configure advanced networking features including connecting directly to another wireless-enabled computer or device.
The Mediatek Utility in compact mode shows the connection status of the Mediatek Adapter.
Page 2 of 407-0 Operating_Modes
2/25/2016file:///C:/Users/Cable%20Matters/AppData/Local/Temp/~hhCA8B.htm

For information on the information and features available in this screen see Accessing Features.
Home > Screen Descriptions > Client Mode > Wi-Fi Direct Screens
The Wi-Fi Direct Screens
Use these screens to connect directly to other Wi-Fi Direct enabled devices and to share media files such as music, images and videos.
� Wi-Fi Direct� Device Name� WPS Settings� Autonomous GO
Channel SelectionWPS Settings
� Media Sharing
Wi-Fi Direct Buttons
- Use the left and right arrows to work through the Profile screens.
- Click the Stop button to cancel setting up or editing a profile.
The Wi-Fi Direct Screen
Use this screen to find information about available Wi-Fi Direct-enabled devices and computers, and the status of your Wi-Fi Direct connection.
Page 3 of 407-0 Operating_Modes
2/25/2016file:///C:/Users/Cable%20Matters/AppData/Local/Temp/~hhCA8B.htm

My Device Information: Displays the name configured for your Mediatek Adapter for Wi-Fi Direct connections.
� SSID: Displays the name of the Wi-Fi Direct connection. � IP Address: Displays the IP address of your Mediatek Adapter on the Wi-Fi Direct network. � MAC Address: Displays the MAC address of your Mediatek Adapter.
- Indicates the group owner (GO). The GO allocates IP addresses in a Wi-Fi Direct connection. By default GO status is assigned automatically but can be manually assigned by enabling autonomous GO on a device.
- Indicates the Group Owner is connected to one or more devices using Wi-Fi Direct.
- Displayed only in group owner mode. Click this to configure WPS settings for connections managed by the Mediatek Utility in group owner mode.
- Displayed only in group owner mode. Click this to configure wireless security settings for connections managed by the Mediatek Utility in group owner mode. For more information, see the Autonomous GO screen.
-Right-click the notebook icon to display the following options.
� Scan: Select this option to refresh the list of available Wi-Fi Direct enabled devices. � Enable autonomous GO: Select this option to set your Adapter to act as group owner (GO) without
requiring negotiation with other devices. For more information, see the Autonomous GO screen. � Media Sharing: Select this option to enable devices connected with Wi-Fi Direct to access media
Page 4 of 407-0 Operating_Modes
2/25/2016file:///C:/Users/Cable%20Matters/AppData/Local/Temp/~hhCA8B.htm
files on your computer. For more information, see Media Sharing.
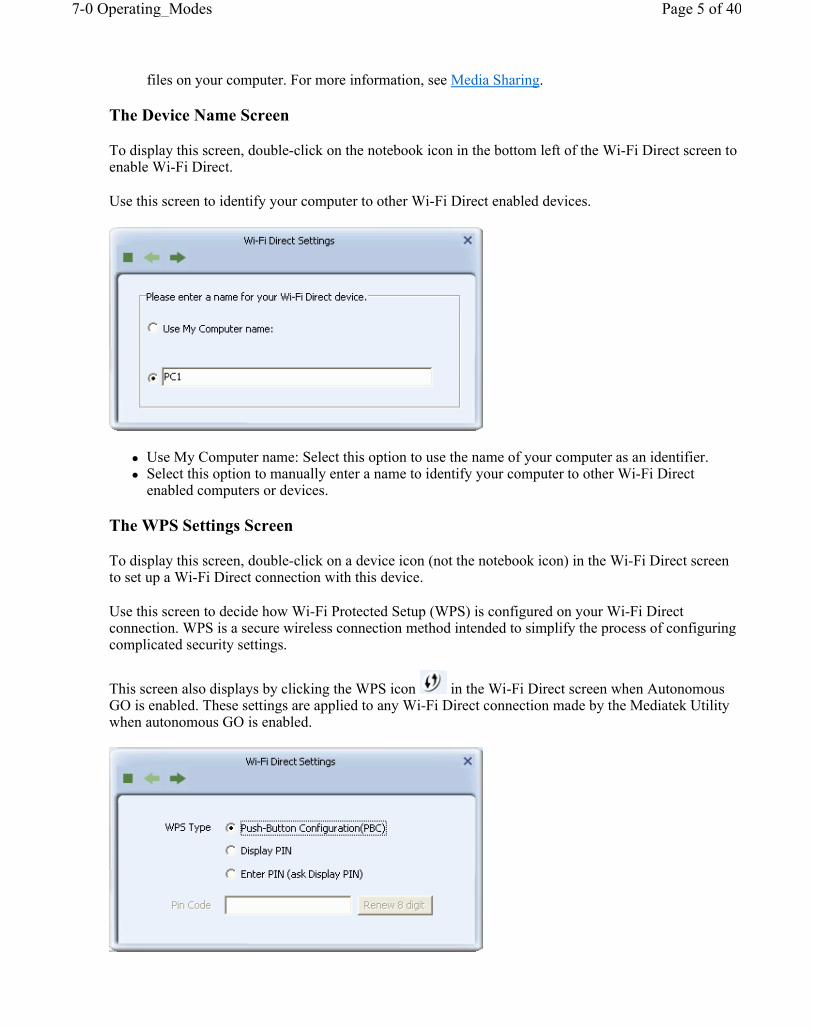
The Device Name Screen
To display this screen, double-click on the notebook icon in the bottom left of the Wi-Fi Direct screen to enable Wi-Fi Direct.
Use this screen to identify your computer to other Wi-Fi Direct enabled devices.
� Use My Computer name: Select this option to use the name of your computer as an identifier. � Select this option to manually enter a name to identify your computer to other Wi-Fi Direct
enabled computers or devices.
The WPS Settings Screen
To display this screen, double-click on a device icon (not the notebook icon) in the Wi-Fi Direct screen to set up a Wi-Fi Direct connection with this device.
Use this screen to decide how Wi-Fi Protected Setup (WPS) is configured on your Wi-Fi Direct connection. WPS is a secure wireless connection method intended to simplify the process of configuring complicated security settings.
This screen also displays by clicking the WPS icon in the Wi-Fi Direct screen when Autonomous GO is enabled. These settings are applied to any Wi-Fi Direct connection made by the Mediatek Utility when autonomous GO is enabled.
Page 5 of 407-0 Operating_Modes
2/25/2016file:///C:/Users/Cable%20Matters/AppData/Local/Temp/~hhCA8B.htm

� Push-Button Configuration(PBC): Select this option to securely connect two WPS enabled devices by manually pushing a physical or software WPS button.
� Display PIN: Select this option and use the PIN displayed to configure WPS on the device to which you are connecting.
� Enter PIN (ask Display PIN): Select this option and enter the WPS PIN provided by the device to which you are connecting.
� PIN Code: � If 'Display PIN' is selected, use the PIN displayed in this field to configure WPS on the
device to which you are connecting. To obtain a new PIN, click 'Renew 8 digit'. � If 'Enter PIN (ask Display PIN)' is selected, in this field type the 8-digit PIN provided by the
device to which you are connecting.
The Autonomous GO Screen
Enable Autonomous GO to set the Mediatek Adapter to automatically become group owner of any Wi-Fi Direct connection it has. This allows you to share a resource such as a network connection or access to media files to other computers or devices to which you are connected.
To display this screen, right-click on the own computer icon in the Wi-Fi direct screen and and click
'Enable autonomous GO'. To edit this setting later, click on the security icon in the Wi-Fi Direct screen.
WPA Preshared Key: In this field, type 8-63 alphanumeric characters.
The Channel Selection Screen
To display this screen, click the right arrow in the Autonomous GO screen.
Use this screen to select the preferred operating channel and to save your settings to a profile.
Page 6 of 407-0 Operating_Modes
2/25/2016file:///C:/Users/Cable%20Matters/AppData/Local/Temp/~hhCA8B.htm

� Preferred channel: For reduced interference select the channel least used by nearby wireless networks.
The Media Sharing Screen
To display this screen, right-click on the own computer icon in the Wi-Fi direct screen and click 'Media Sharing'.
� Service Status: Indicates the status of the Mediatek media server. � Server Name: Displays the name of the media server provided with the Utillity. Type an
alternative name, or leave it at its default setting.
� Sharing Folder: Click the browse icon to locate and load the folder to be shared.
� Click the right arrow to confirm settings and enable media sharing.
� Click the stop button to disable sharing.
Home > Screen Descriptions > Client Mode > Available Networks Screen
The Available Networks Screen
The Available Networks screen provides information on available networks and their settings. Use this screen to connect to a network and add a profile.
Page 7 of 407-0 Operating_Modes
2/25/2016file:///C:/Users/Cable%20Matters/AppData/Local/Temp/~hhCA8B.htm

Available Networks Buttons
The functions of the buttons in this screen are as follows.
- Click the Rescan button to update the list of available wireless networks.
- Click the Add Profile button to add the connection settings of the selected wireless network to the Utility's list of profiles.
- Click the Connect button to connect to the selected wireless network.
- Right-click the Available Networks screen to display the Sort menu. This option sorts the list of available networks according to network name, channel number, or signal strength.
Available Networks Icons
Site Survey icons provide information on the network setting of a profile.
From left to right the icons are as follows.
Page 8 of 407-0 Operating_Modes
2/25/2016file:///C:/Users/Cable%20Matters/AppData/Local/Temp/~hhCA8B.htm

1. Connection status
- Successfully connected to the network.
2. SSID or Network Name: The name of the network to which you are connected. 3. The network mode:
- Infrastructure mode: Indicates the network is maintained by an AP or wireless router. This is a typical wireless network.
- Ad-hoc mode: Indicates the network is a distributed wireless network with no AP or router.
4. Channel number 5. Wireless standards supported by the network:
- IEEE 802.11a
- IEEE 802.11b
- IEEE 802.11g
- IEEE 802.11n
6. The security status of the network.
- Indicates that WPS is available on this network.
- Indicates that a security method is configured on this network.
7. The strength of the signal received from with the specified network.
AP Information
For more detailed information on an available network, select a network to display AP Information.
AP Information
� SSID: The name of your network � MAC Address: A unique identifier of your Adapter, assigned by the manufacturer. � Authentication: Available authentication methods. � Encryption: Available encryption methods.
Page 9 of 407-0 Operating_Modes
2/25/2016file:///C:/Users/Cable%20Matters/AppData/Local/Temp/~hhCA8B.htm

Home > Screen Descriptions > Client Mode > Link Information Screens
The Link Information Screens
Use these screens to find detailed information on network settings, connection quality, and packet statistics.
The following screens are described.
� Link Status� Throughput� Statistics
TransmitReceive
Link Information Buttons
Click the following buttons to access the Link Information screens.
1. - Click this button to access the Link Status screen and find information on network settings.
2. - Click this button to access the Throughput screen and find information on connection quality.
3. - Click this button to access the Statistics screen and find information on packet statistics.
The Link Status Screen
Use this screen to find information on your network settings.
� Status: This displays the name of your network and the MAC address of the access point (AP) to which you are connected. If there is no connection, 'Disconnected' is displayed. If transmission is
disabled (indicated by the radio button icon ), "Turn off RF" is displayed. � Extra Info: If connected, 'Link is Up' and signal strength is displayed. If disconnected, 'Link is
Down' is displayed.
Page 10 of 407-0 Operating_Modes
2/25/2016file:///C:/Users/Cable%20Matters/AppData/Local/Temp/~hhCA8B.htm

� Authentication: Displays the authentication method used by your connection. The Utility supports Open, Shared, WPA-PSK, WPA2-PSK, WPA, WPA2, 802.1X, CCKM, WAPI-PSK, and WAPI-CA.
� Encryption: Displays the encryption method used by your connection. The Utility supports WEP, TKIP, AES, TKIP(MFP), AES(MFP), and SMS4.
� Network Type: Displays the type of network to which you are connected. Infrastructure indicates a typical network with an AP or router, ad hoc indicates a distributed network without an AP or router.
� Central Channel: This displays the channel used in this wireless connection. If multiple channels are used, for example, to increase the available bandwidth, this field displays the median channel number.
The Throughput Screen
Use this screen to find information on the quality of your connection.
� Link Quality: An indicator of the quality of the signal based on measurements of the strength of the received signal and the level of packet loss for both received and transmitted data.
� Signal Strength 1: Indicates the signal strength for each antenna supported by your Mediatek Adapter.
Transmit
� Link Speed: Shows the maximum transmission speed supported by your wireless connection given current network conditions.
� Throughput: Shows the amount of data transmitted by the Mediatek Adapter.
Receive
� Link Speed: Shows the maximum speed of signals received on your wireless connection given current network conditions.
� Throughput: Shows the amount of data received by the Mediatek Adapter.
The Statistics Screens
Use these screens to find information on the packets transmitted and received by the Mediatek Adapter.
The Transmit Screen
Page 11 of 407-0 Operating_Modes
2/25/2016file:///C:/Users/Cable%20Matters/AppData/Local/Temp/~hhCA8B.htm

� Transmit: Select this option to find information on packets transmitted by the Mediatek Adapter. � Receive: Select this option to find information on packets received by the Mediatek Adapter. � Transmitted Successfully: Shows the number of successfully transmitted packets on the current
wireless connection. � Retransmitted Successfully: Shows the number of successfully retransmitted packets on the current
wireless connection. A high number may indicate interference on your network. � Fail to Receive ACK After All Retries: Shows the number of packets that were transmitted without
an acknowledgement from a receiver. A high number may indicate interference on your network.
- Click this button to reset all packet statistics displayed in this screen to zero.
The Receive Screen
� Transmit: Select this option to find information on packets transmitted by the Mediatek Adapter. � Receive: Select this option to find information on packets received by the Mediatek Adapter. � Received Successfully: Shows the number of packets received on the current wireless connection. � Received With CRC Error: Shows the number of frames received with a CRC (Cyclical
Redundancy Check) or checksum error. A number much higher than the number of packets successfully received indicates interference is a problem on your network.
� Dropped Due To Out-Of-Resource: Shows the number of packets dropped due to an internal buffer overflow. An high number may indicate too much traffic on your network, or that your system is too slow to handle the current level of network traffic.
� Duplicate Frames Received: Shows the number of duplicate frames received. A high number may indicate computers and devices on your network are not receiving acknowledgement of their transmission and so are resending their data. Interference may be a cause of this problem. This value is typically higher for an ad hoc network than for a infrastructure network.
Page 12 of 407-0 Operating_Modes
2/25/2016file:///C:/Users/Cable%20Matters/AppData/Local/Temp/~hhCA8B.htm

- Click this button to reset all packet statistics displayed in this screen to zero.
Home > Screen Descriptions > Client Mode > Profile Settings Screens
The Profile Settings Screens
A profile is a set of network settings such as network name and security settings, which you can use to quickly set up a wireless connection instead of manually entering settings. Use these screens to configure a profile for a standard wireless connection or for a WPS-enabled network connection.
The following screens are described.
� Profile List� Wireless Connection Profile Setting Screens
1. Profile Details2. Profile Security Settings
1. WEP2. WPA-PSK or WPA2-PSK3. WAPI-PSK4. WAPI-CA5. 802.1X, CCKM, WPA or WPA2
1. EAP Method2. Server Certification3. User Certification4. PAC5. WEP6. Pre-Logon
� WPS Profile Setting Screens1. Profile Details2. Push-Button Method3. PIN Method
1. WPS Profile2. WPS WPA-PSK
4. Start PIN
The Profile List Screen
The Profile List screen lets you add, edit and delete profiles, and find information on existing profiles. Use this screen to set up a profile and to configure WPS and wireless security for easy connection to frequently used wireless networks.
Page 13 of 407-0 Operating_Modes
2/25/2016file:///C:/Users/Cable%20Matters/AppData/Local/Temp/~hhCA8B.htm

NOTE: When WZC is enabled, profile functions are unavailable.
Profile List Buttons
The Profile List screen provides the following buttons.
- Click the Add Profile button to add a new profile to the profile list.
- Click the Delete Profile button to remove a profile from the profile list.
- Click the Edit Profile button to change the details of the selected profile.
- Click the Import Profile button to import a profile in .prof file format.
- Click the Export Profile button to export the selected profile in .prof file format.
- Click the Add WPS Profile to set up a profile with Wireless Protected Setup (WPS) security settings.
- Click to connect using the network settings in the selected profile.
Profile Settings
The Profile List screen describes the following profile settings.
1. Connection Status
Page 14 of 407-0 Operating_Modes
2/25/2016file:///C:/Users/Cable%20Matters/AppData/Local/Temp/~hhCA8B.htm

- Indicates if a connection made from the currently activated profile.
- Indicates if the connection has failed on a currently activated profile.
2. Profile name: The name of this profile, default is PROF* (* indicating 1, 2, 3...). 3. Network name/SSID: The name of your network. 4. Security Status
- Security is enabled.
- Security is disabled.
5. Network Type:
- Infrastructure: Indicates that you are connecting to a typical wireless network maintained by an AP or wireless router. if uncertain, select this option.
- Ad Hoc: Indicates that you are connecting to a distributed network with no AP or router.
The Wireless Connection Profile Setting Screens
Use these screens to set up a profile or edit existing profile settings for a standard wireless connection.
Profile Buttons
- Use the left and right arrows to navigate through the Profile Setting screens.
- Click the Stop button to cancel setting up or editing a profile.
The Profile Details Screen
Use this screen to add or edit the name of the profile and its network name and type.
� Profile Name: Type a name for the profile, or leave at its default value: PROF*, where * is 1, 2, 3, and so on.
Page 15 of 407-0 Operating_Modes
2/25/2016file:///C:/Users/Cable%20Matters/AppData/Local/Temp/~hhCA8B.htm

� SSID: Type the name of the network to which you are connecting, or select an existing network name from the drop-down list provided.
� Network Type � Infrastructure: Select this if you are connecting to a typical wireless network maintained by
an AP or wireless router. If uncertain, select this option. � Ad Hoc: Select this if you are connecting to a distributed network with no AP or router.
� Channel: This drop-down list displays when the Ad Hoc radio button is selected.
The Profile Security Settings Screen
Use these screens to configure authentication and encryption settings on your profile.
� Authentication: Select the strongest security method supported by your network. Options include Open, Shared, WPA, WPA-PSK, WPA2, WPA2-PSK, 802.1X, CCKM, WAPI-PSK, WAPI-CA.
� Encryption: Select the strongest encryption supported by your network and the selected authentication method. Encryption method options for each authentication method are as shown.
Security Protocol Encryption Method Comments
Open
Shared
None
WEP
Not secure. WEP is an older standard and is easily decrypted. If using WEP select Open a the authentication method for slightly stronger security.
WPA (Wi-Fi Protected Access)
TKIP (Temporal Key Integrity Protocol)
AES (Advanced Encryption Standard)
Designed for large enterprises. Requires an authentication server. AES is a stronger, more recent standard than TKIP.
WPA-PSK (Wi-Fi Protected Access - Pre-Shared Key)
TKIP, AESDesigned for home or small business wireless networks. AES is a stronger, more recent standard than TKIP.
WPA2 (Wi-Fi Protected Access 2)
TKIP, AES
TKIP MFP (Temporal Key Integrity Protocol (Management Frame Protection))
AES MFP (Advanced Encryption Standard (Management Frame Protection))
Designed for large enterprises. Requires an authentication server. WPA2 is a stronger, more recent standard than WPA. AES is a stronger, more recent standard than TKIP. MFP (management frame protection) offers more security than no MFP.
Designed for home or small business
Page 16 of 407-0 Operating_Modes
2/25/2016file:///C:/Users/Cable%20Matters/AppData/Local/Temp/~hhCA8B.htm

Click on the following links for descriptions of the screens that follow for each type of security.
� WEP� WPA-PSK or WPA2-PSK� WAPI-PSK� WAPI-CA� 802.1X, CCKM, WPA or WPA2
The WEP Screen
Use this screen to configure WEP security.
� Default Tx Key: Options are 'Key 1' to 'Key 4'. Select one of these options. � Key Format: Select a character format for your security passphrase. Options are 'Hex(10 or
26 hex digits)' or 'ASCII(5 or 13 ASCII characters)'. � WEP Key: Type a security passphrase according to the option you select in the Key Format
field. � If you select a key format of 'Hex(10 or 26 hex digits)', in the WEP Key field type a
WPA2-PSK (Wi-Fi Protected Access 2 - Pre-Shared Key)
TKIP, AES
wireless networks. WPA2-PSK is a stronger, more recent standard than WPA-PSK. AES is a stronger, more recent standard than TKIP.
802.1X WEP
Designed for large enterprises. Requires an authentication server. WPA and WPA2 are more recent standards.
CCKM (Windows Vista or 7 only)
WEP, TKIP, AES
CCKM allows secured roaming between APs with WDS (wireless domain services) enabled and access to the same RADIUS server.
WAPI-PSK (WLAN Authentication and Privacy Infrastructure - Pre-Shared Key)
SMS4
Designed for home or small business wireless networks. At the time of writing, this standard has not yet been accepted by ISO.
WAPI-CA (WLAN Authentication and Privacy Infrastructure - Certification Authority)
SMS4
Designed for large enterprises. Requires an authentication server. At the time of writing, this standard has not yet been accepted by ISO.
Page 17 of 407-0 Operating_Modes
2/25/2016file:///C:/Users/Cable%20Matters/AppData/Local/Temp/~hhCA8B.htm

security key 10 or 26 characters long made up of digits '0'-'9' and letters 'A'-'F'. � If you select a key format of 'ASCII(5 or 13 ASCII characters)' in the WEP Key field,
type a security key 5 or 13 characters long made up of digits '0'-'9' and letters 'a'-'z' and 'A'-'Z'.
The WPA-PSK or WPA2-PSK Screen
Use this screen to configure WPA-PSK or WPA2-PSK security.
� WPA Preshared Key: Type a passphrase 8-63 characters long made up of characters '0'-'9', 'a'-'z', 'A'-'Z', keyboard symbols and spaces.
The WAPI-PSK Screen
Use this screen to configure WAPI-PSK security.
� WPA Preshared Key: Type a security passphrase according to the option you select in the Key Format field.
� If you select a Key Format of 'Hex(8~64 hex digits)', in the 'WPA Preshared Key' field type a security key 8-64 characters long made up of digits '0'-'9' and letters 'A'-'F'.
� If you select a Key Format of 'ASCII(8 or 64 ASCII characters)' in the 'WPA Preshared Key' field, type a security key 8-64 characters long made up of digits '0'-'9' and letters 'a'-'z' and 'A'-'Z'.
� Key Format: Options are 'Hex(8~64 hex digits)' or 'ASCII(8 or 64 ASCII characters)'.
The WAPI-CA Screen
Page 18 of 407-0 Operating_Modes
2/25/2016file:///C:/Users/Cable%20Matters/AppData/Local/Temp/~hhCA8B.htm
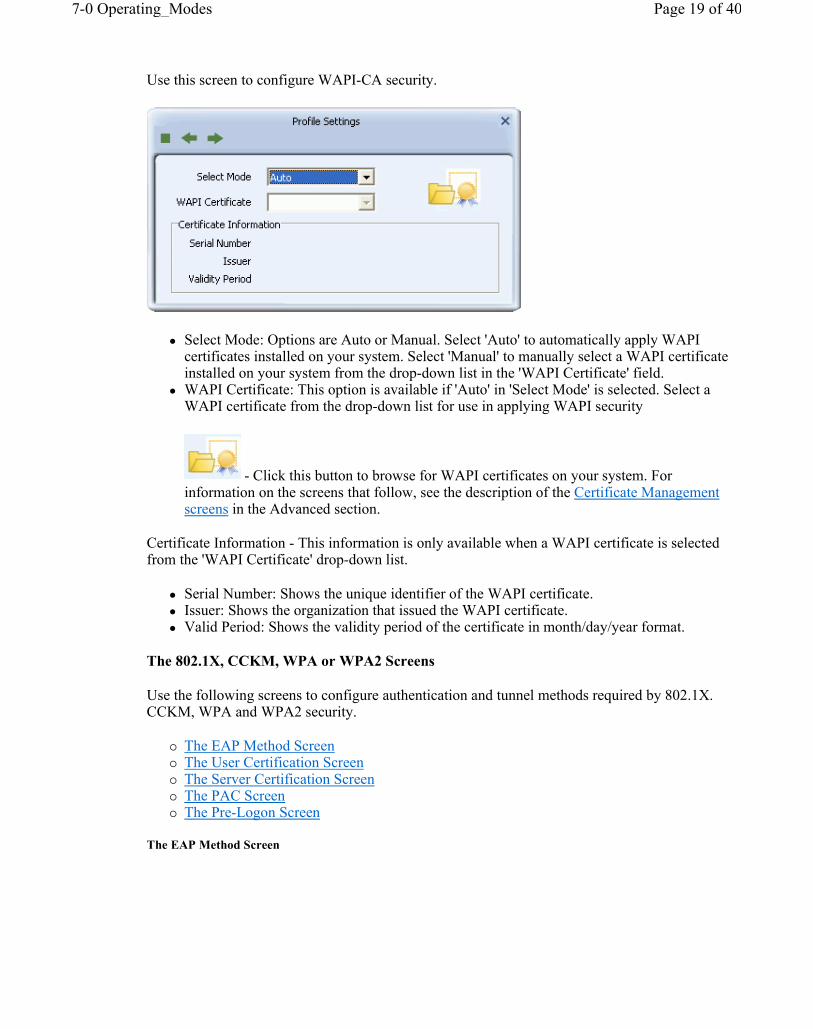
Use this screen to configure WAPI-CA security.
� Select Mode: Options are Auto or Manual. Select 'Auto' to automatically apply WAPI certificates installed on your system. Select 'Manual' to manually select a WAPI certificate installed on your system from the drop-down list in the 'WAPI Certificate' field.
� WAPI Certificate: This option is available if 'Auto' in 'Select Mode' is selected. Select a WAPI certificate from the drop-down list for use in applying WAPI security
- Click this button to browse for WAPI certificates on your system. For information on the screens that follow, see the description of the Certificate Management screens in the Advanced section.
Certificate Information - This information is only available when a WAPI certificate is selected from the 'WAPI Certificate' drop-down list.
� Serial Number: Shows the unique identifier of the WAPI certificate. � Issuer: Shows the organization that issued the WAPI certificate. � Valid Period: Shows the validity period of the certificate in month/day/year format.
The 802.1X, CCKM, WPA or WPA2 Screens
Use the following screens to configure authentication and tunnel methods required by 802.1X. CCKM, WPA and WPA2 security.
� The EAP Method Screen� The User Certification Screen� The Server Certification Screen� The PAC Screen� The Pre-Logon Screen
The EAP Method Screen
Page 19 of 407-0 Operating_Modes
2/25/2016file:///C:/Users/Cable%20Matters/AppData/Local/Temp/~hhCA8B.htm

� EAP Method: Select an EAP (Extensible Authentication Protocol) Method. Options are PEAP, TLS/Smart Card, TTLS (XP only), EAP-FAST, MD5-Challenge (available only with 802.1X using Windows XP), and LEAP.
� Session Resumption: Select this option to make use of the previous session's settings for faster re-authentication
� Tunnel Authentication: Select a security method to use when accessing the authentication server. Options depend on the the EAP method selected.
� Tunnel ID: Options are 'Authentication ID' and 'Machine ID'. If 'Authentication ID' is selected, user-based credentials are required. If 'Machine ID' is required, credentials are based on the computer requesting access to the authentication server.
� Tunnel Password/Mode: 'Tunnel Password' refers to the password set for the user or computer accessing the authentication server. 'Tunnel Mode' options may include 'Static Password', 'Soft Token', 'Windows Logon' (Windows Vista/7 only), and 'Prompt User'(Windows Vista/7 only). If tunnel mode is set to 'Static Password', the user authenticates once for the duration of the session. If tunnel mode is set to 'Soft Token', the user must authenticate, based on the time-out period of the soft token. If 'Windows Logon' is selected, user credentials are based on the user's Windows account. If 'Prompt User' is selected, user credentials are requested on connecting to the network.
The following table shows the options for this screen.
Authentication Method
Tunnel Authentication
Tunnel Mode Tunnel IDUser Name/ Password Required
PEAP
EAP-MS-CHAP v2
n/a n/a Y/Y
EAP-TLS/Smart Card
n/a
Authentication ID
Y/N (XP) N/N (Vista/7)
Machine ID N/N
Generic Token Card
Static Password
n/a
Y/Y
Soft Token N/N
Windows Logon (Vista/7)
N/N
Prompt User (Vista/7)
N/N
TLS/Smart Card
n/a n/aAuthentication ID
N/N
Page 20 of 407-0 Operating_Modes
2/25/2016file:///C:/Users/Cable%20Matters/AppData/Local/Temp/~hhCA8B.htm

The screens that follow depend on certification method employed.
The Server Certification Screen
This screen appears for all PEAP and TTLS (XP only) methods.
Use this screen to configure access to server certificates.
Machine ID N/N
TTLS (XP only)
CHAP, MS-CHAP, MS-CHAP v2, PAP, EAP-MD5
n/a
Authentication ID
N/Y
Machine ID N/Y
EAP-FAST
EAP-MSCHAP v2 (XP)
n/a
Authentication ID
N/Y
Machine ID N/Y
EAP-TLS/Smart Card (XP)
n/a
Authentication ID
N/N
Machine ID N/N
Generic Token Card (XP)
Static Password
Authentication ID
Y/Y
Machine ID N/Y
Soft Token
Authentication ID
N/N
Machine ID N/N
MD5-Challenge (XP, 802.1X)
n/a n/a n/a Y/Y
LEAP n/a
Static Password (Vista/7)
n/a (Vista/7)
Y/Y
Windows Logon (Vista/7)
N/N
Prompt User (Vista/7)
N/N
n/a (XP)
Authentication ID
N/Y
Machine ID N/Y
Page 21 of 407-0 Operating_Modes
2/25/2016file:///C:/Users/Cable%20Matters/AppData/Local/Temp/~hhCA8B.htm

� Use Server Certification: Select this to use certificates supplied by the authentication server. From the drop-down list, select the server that issues the certificate.
� Allow intermediate certificates: (For Windows XP users only) Select this to allow the use of certificates supplied by a computer located in the certificate chain connecting the server certificate and the server specified in the 'Server Name' field.
The User Certification Screen
This screen appears for the following EAP and tunnel methods.
� PEAP-EAP-TLS/Smart Card � TLS/Smart Card � All tunnel ID methods using TTLS (Windows XP only)
Use this screen to select a user certificate located on the user's computer.
� Use a certificate on this computer: Select this checkbox to set up security using a user certificate. This field may be greyed out with or without the checkbox selected, depending on whether you are using security which requires a user certificate or not. Otherwise the use of a user certificate is optional.
� Issued to: This read-only field indicates the name of the user to whom the certificate was issued.
� Issued by: This read-only field indicates the name of the authentication server which issued the certificate.
� Expiration Date: This read-only field indicates the date on which the user certificate expires. � Friendly Name: This read-only field indicates the name assigned to the certificate for easy
recognition.
Page 22 of 407-0 Operating_Modes
2/25/2016file:///C:/Users/Cable%20Matters/AppData/Local/Temp/~hhCA8B.htm

� Use my smart card: (Vista/Windows 7 only) Select this option to support smart card-based user authentication.
The PAC Screen
This screen appears for EAP-FAST authentication (for Windows XP users only).
� Allow unauthenticated provision mode: Select this option to allow unauthenticated users to obtain a PAC (protected authentication credential) from the authentication server.
� Provisioning Tunnel: This is the security method selected in the previous screen which is used to encrypt the PAC distribution procedure.
� Use protected authentication credential: Select this option to allow the manual installation of a PAC.
� Import: Click this button to locate and install a PAC. � Remove: Click this button to uninstall the selected PAC.
The WEP Screen
This screen appears for MD5-Challenge authentication (for Windows XP users only). See the WEP screen description above for details.
The Pre-Logon Screen
Use this screen to enable automatic connection using a profile upon starting Windows. This option is only available for profiles with WEP, WPA-PSK, WPA2-PSK, EAP-FAST, and EAP-LEAP configured.
Page 23 of 407-0 Operating_Modes
2/25/2016file:///C:/Users/Cable%20Matters/AppData/Local/Temp/~hhCA8B.htm
� Use Pre-logon Connection: Select this option to enable automatic connection on system startup to a wireless network based on your profile settings.
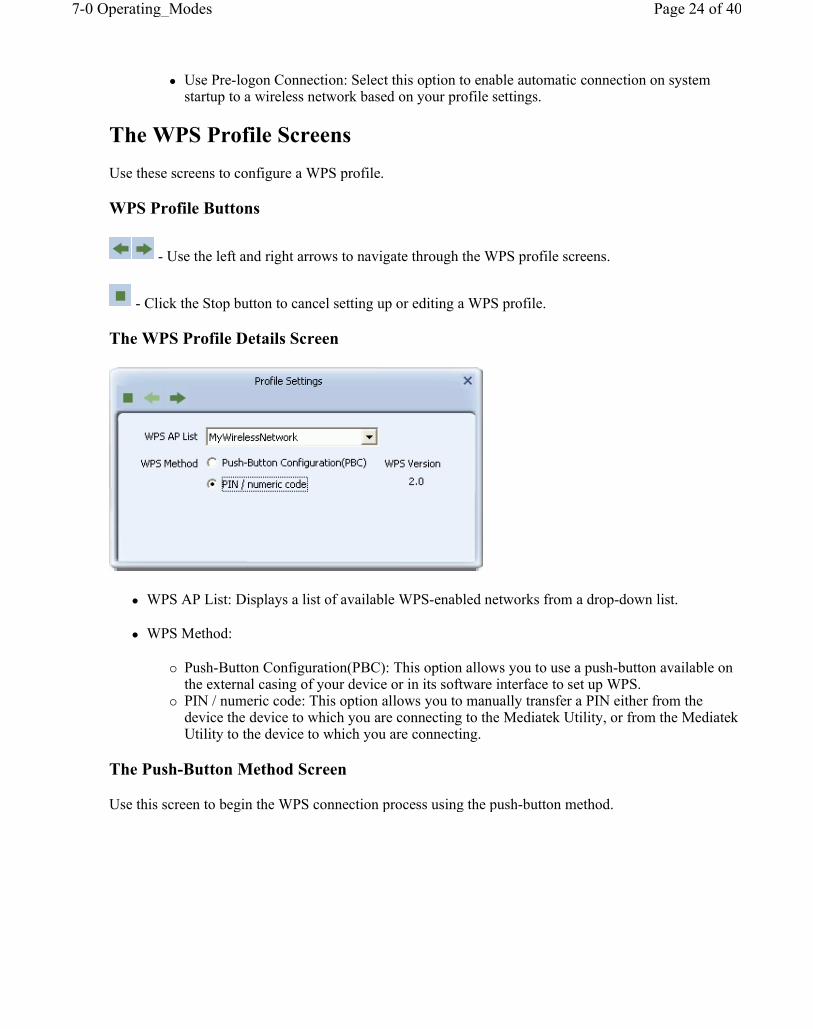
The WPS Profile Screens
Use these screens to configure a WPS profile.
WPS Profile Buttons
- Use the left and right arrows to navigate through the WPS profile screens.
- Click the Stop button to cancel setting up or editing a WPS profile.
The WPS Profile Details Screen
� WPS AP List: Displays a list of available WPS-enabled networks from a drop-down list.
� WPS Method:
� Push-Button Configuration(PBC): This option allows you to use a push-button available on the external casing of your device or in its software interface to set up WPS.
� PIN / numeric code: This option allows you to manually transfer a PIN either from the device the device to which you are connecting to the Mediatek Utility, or from the Mediatek Utility to the device to which you are connecting.
The Push-Button Method Screen
Use this screen to begin the WPS connection process using the push-button method.
Page 24 of 407-0 Operating_Modes
2/25/2016file:///C:/Users/Cable%20Matters/AppData/Local/Temp/~hhCA8B.htm

� Start PBC: Click this button to begin the WPS connection process. The corresponding WPS button available on the device to which you are connecting must be push within 120 seconds of this button.
The PIN Method Screen
Use this screen to set up a WPS connection using a PIN.
� PIN Code: Displays the PIN used in this WPS connection. � If 'Enrollee' is selected in the 'Config Mode' field, use this PIN to begin the WPS setup
procedure on the device to which you are connecting. � If 'Registrar' is selected in the 'Config Mode' field, locate the WPS PIN made available on
the device to which you are connecting and type the PIN in this field. � Renew 8 digit: Click this button to display a new 8 digit PIN in the 'PIN Code' field. � Renew 4 digit: Click this button to display a new 4 digit PIN in the 'PIN Code' field. � Config Mode: From the drop-down list select 'Enrollee' to use the PIN provided in the screen to set
up a WPS connection, or select 'Registrar' to use the PIN provided by the device to which you are connecting to set up a WPS connection.
� WPS Profile: This option is only available when 'Registrar' is selected in the 'Config Mode' field. Click this button to configure the name of the WPS connection and its security settings. These settings may be left at their default.
The WPS Profile Screen
Use this screen to configure the name of your WPS connection and its security settings.
Page 25 of 407-0 Operating_Modes
2/25/2016file:///C:/Users/Cable%20Matters/AppData/Local/Temp/~hhCA8B.htm

� SSID: Type the name of your WPS connection. The name of this connection does not affect the name given for the entire network to which you are connecting.
� BSSID: This is the MAC address of the Mediatek adapter. � Authentication: Select the strongest security method supported by your network. Options include
Open, Shared, WPA-PSK, or WPA2-PSK. � Encryption: Select the strongest encryption supported by your network and the selected
authentication method. Options for each authentication method are as shown in the following table
The WPS WPA-PSK Screen
Use this screen to configure a passphrase for your WPS connection.
� WPA Preshared Key:Type a passphrase 8-63 characters long made up of characters '0'-'9', 'a'-'z', 'A'-'Z', keyboard symbols and spaces.
The Start PIN Screen
Authentication Method Encryption Method Comments
WPA2-PSK (Wi-Fi Protected Access 2- Pre-Shared Key)
WPA-PSK/WPA2-PSK (Wi-Fi Protected Access - Pre-Shared Key/ Wi-Fi Protected Access 2 - Pre-Shared Key)
AES(Advanced Encryption Standard)
TKIP/AES (Temporal Key Integrity Protocol/ Advanced Encryption Standard)
Select WPA2-PSK and AES for faster and stronger wireless security.
Select WPA-PSK/WPA2-PSK and TKIP/AES if devices in your network do not support WPA2-PSK and AES.
Open None Not recommended.
Page 26 of 407-0 Operating_Modes
2/25/2016file:///C:/Users/Cable%20Matters/AppData/Local/Temp/~hhCA8B.htm

Use this screen to start the WPS connection process using a PIN.
� Start PIN: This screen appears for both PIN methods. Click this button to begin the WPS connection process using a PIN. At the same time (within 120 seconds) activate the corresponding WPS PIN connection function on the device to which you are connecting.
Home > Screen Descriptions > Client Mode > Advanced Screens
The Advanced Screens
Use these screens to configure advanced settings including channel selection, wireless mode, certificate management, and ad hoc mode.
The following screens are described.
� Advanced screen� Certificate Management screens
Certificate ManagementInstall AS
Advanced Buttons
Use the following buttons to navigate between the Advanced screens.
- Click this button to access the Certificate Management screen to install and manage WAPI certificates.
The Certificate Management Screens
Use these screens to manage WAPI certificates for use in authenticating users and handling encryption. See Setting Up Enterprise Security: WAPI-CA for instructions on using certificates for user authentication.
Page 27 of 407-0 Operating_Modes
2/25/2016file:///C:/Users/Cable%20Matters/AppData/Local/Temp/~hhCA8B.htm

The Certificate Management Screen
Use this screen to install WAPI user and issuer certificates.
Install Certificate
User certificate: Click on the browse icon to locate and load a WAPI user certificate. Only WAPI (.cer) certificates are supported.
Issuer certificate: Click on the browse icon to locate and load a WAPI issuer certificate. Only WAPI (.cer) certificates are supported.
- Click on the Install button to verify the user and issuer certificates. Once verified the authentication server unit (ASU) certificate is automatically downloaded and installed.
- If more than one ASU certificate is installed, click the Up and Down arrows to move the selected certificate up and down respectively. If the Mediatek Utility is set to automatically detect a valid ASU, ASUs are examined in the order indicated in this screen. (See the Profile Settings: WAPI-CA security screen for instructions on setting automatic detection of valid ASUs.
- Click on the Delete button to remove the selected certificate from the certificate list.
- If the authentication server is located on a device external to the network's AP, click on the second Install button to install an ASU certificate.
Window field descriptions
Page 28 of 407-0 Operating_Modes
2/25/2016file:///C:/Users/Cable%20Matters/AppData/Local/Temp/~hhCA8B.htm

1. The ID number for the ASU. 2. Issuer of the ASU. 3. Subject given for the ASU. 4. The date to which the ASU is valid.
Certificate Detail
� Issuer: The issuer of the selected ASU. � Subject: Subject given for the ASU. � Valid From: The date from which the ASU is valid. � Version: The certificate version. � Type: This shows the type of the certificate. � Valid To: The date to which the ASU is valid.
The Install AS Screen
Use this screen to install a WAPI authentication server certificate.
Install Certificate
� Issuer certificate: The authentication server unit (ASU) certificate. � Browse: Click this button to locate and select the ASU certificate to be installed. � Install: Click this to install the ASU certificate. � Delete: Click this to remove the ASU certificate from the list. � OK: Click this to save your settings.
Window field descriptions
1. The serial number for the selected ASU certificate. 2. The issuer of the selected ASU certificate.
Page 29 of 407-0 Operating_Modes
2/25/2016file:///C:/Users/Cable%20Matters/AppData/Local/Temp/~hhCA8B.htm

3. The given subject description for the selected ASU certificate. 4. The date to which the selected ASU certificate is valid.
Home > Screen Descriptions > Client Mode > About Screen
The About Screen
Use this screen to find information on the Mediatek Utility including version number and firmware.
Version
� Utility: Shows the version number of the Utility. Wi-Fi Direct is supported by versions 4.0.3.0 and above.
� Driver: Shows the driver version of this driver. Versions 3.1.14.0 and above support Wi-Fi Direct. � SDK: Shows the software development kit (SDK) provided for downstream developers. � Date: Shows the date of release for the utility version shown. � Date: Shows the date of release for the driver version shown. � Date: Shows the date of release for the SDK version shown
MAC Address: The unique hexadecimal hardware identifier assigned to your Adapter.
- Click to connect to the Mediatek web site.
Home > Screen Descriptions > AP Mode > Compact Mode Screen
The Compact Mode Screen (AP Mode)
From the compact mode screen in AP Mode, use the Mediatek Utility to set up an access point (AP), control access to the AP based on MAC address.
The Mediatek Utility in compact mode shows the AP status of the Mediatek Adapter.
Page 30 of 407-0 Operating_Modes
2/25/2016file:///C:/Users/Cable%20Matters/AppData/Local/Temp/~hhCA8B.htm

A Click these buttons to open the following screens.
- Use the AP Setup screen to set up a secure wireless network.
- Use the Access Control List screen to configure an access policy for your network based on a client's MAC address.
- Use the Connected Devices screen to find information on clients currently connected to your network.
- Use the About screen to find information on specifications for the Mediatek Utility.
B The Utility also provides information and tools to manage your wireless connection.
- Click the RF buttons to enable or disable wireless transmission.
- Indicates the security status of your connection.
- Indicates AP Mode is enabled.
C Provides information on network settings.
� SSID: This displays the name of your wireless network � Mode: Indicates the mode and hence frequency supported by your wireless connection. � Channel: The channel assigned to your connection. Default is 6, options are 1-12. � IP: The IP address identifies your Adapter on your wireless network. � Mask: The subnet mask hides your IP address from outside your wireless network.
Home > Screen Descriptions > AP Mode > AP Setup Screens
Page 31 of 407-0 Operating_Modes
2/25/2016file:///C:/Users/Cable%20Matters/AppData/Local/Temp/~hhCA8B.htm

The AP Setup Screens
The AP Setup screens let you configure access point settings when the Mediatek Utility is set to AP (access point) mode. Use these screens to set up a secure wireless network and manage access to the network.
The following screens are described.
� Network Settings� Channel Settings� Security Settings
WPA-PSK, WPA2-PSK or WPA-PSK/WPA2-PSKWEP
AP Setup Buttons
- Use the left and right arrows to navigate through the AP Setup screens.
- Click the Stop button to cancel setting up your AP.
The Network Settings Screen
� SSID: This is the name of your network. Leave it at its default setting, or type a name for ease of use when accessing your network.
The Channel Settings Screen
Page 32 of 407-0 Operating_Modes
2/25/2016file:///C:/Users/Cable%20Matters/AppData/Local/Temp/~hhCA8B.htm

� Channel: Leave at its default value, or if interference is a problem on your network, choose a channel which experiences less interference. If you select Enable 40 MHz Bandwidth', choose a channel with minimal interference on the four channels adjacent to your selected channel.
The Security Settings Screen
� Authentication: Select the strongest security method supported by your network. Options include Open, Shared, WPA-PSK, WPA2-PSK, or WPA-PSK/WPA2-PSK.
� Encryption: Select the strongest encryption supported by your network and the selected authentication method. Options for each authentication method are as shown in the following table.
Authentication Method Encryption Method Comments
WPA2-PSK (Wi-Fi Protected Access 2 - Pre-Shared Key)
WPA-PSK (Wi-Fi Protected Access - Pre-Shared Key)
WPA-PSK/WPA2-PSK
AES (Advanced Encryption Standard)
WPA2-PSK is a faster, more recent authenitcation standard than WPA-PSK.
AES is a stronger, more recent encryption standard than TKIP.
Selecting WPA-PSK/WPA2-PSK and BOTH allows the network to automatically adjust authentication and encryption methods to the strongest security supported by your network.
Open WEP WEP is an older standard and is easily decrypted. If using WEP select Open as the
Page 33 of 407-0 Operating_Modes
2/25/2016file:///C:/Users/Cable%20Matters/AppData/Local/Temp/~hhCA8B.htm

The WPA-PSK, WPA2-PSK or WPA-PSK/WPA2-PSK Security Screen
Use this screen to set up WPA-PSK, WPA2-PSK, or WPA-PSK/WPA2-PSK security on your network.
� WPA-PSK Key: Type a security key 8-63 characters long made up of characters '0'-'9', 'a'-'z', 'A'-'Z', keyboard symbols and spaces.
� Group Rekey Interval: The interval after which the AP resets the group key. This key supports wireless security on your network. If uncertain, leave at its default value.
� x 10 seconds: Sets the unit for the 'Group Key Interval' to 10 seconds. After the specified period the group key is reset.
� x 1000 packets:Sets the unit for theGroup Key Interval to 1000 packets. After sending the specified number of packets the group key is reset.
The WEP Security Screen
Use this screen to set up WEP security on your network.
Default Tx Key: Options are 'Key 1' to 'Key 4'. Select one of these options.
Key Format: Select a character format for your security passphrase. Options are 'Hex(10 or 26 hex digits)' or 'ASCII(5 or 13 ASCII characters)'.
WEP Key: Type a security passphrase according to the option you select in the Key Format field.
Shared (Wireless Encrypted Privacy) authentication method for slightly stronger security.
Page 34 of 407-0 Operating_Modes
2/25/2016file:///C:/Users/Cable%20Matters/AppData/Local/Temp/~hhCA8B.htm

� If you select a key format of 'Hex(10 or 26 hex digits)', in the WEP Key field type a security key 10 or 26 characters long made up of digits '0'-'9' and letters 'A'-'F'
� If you select a key format of 'ASCII(5 or 13 ASCII characters)' in the WEP Key field, type a security key 5 or 13 characters long made up of digits '0'-'9' and letters 'a'-'z' and 'A'-'Z'.
Home > Screen Descriptions > AP Mode > Access Control List Screen
The Access Control List Screen
The Access Control List records the MAC addresses of clients for use when allowing or disallowing transmission on the network. Use the Access Control List to configure an access policy for your network based on a client's MAC address.
� Access Policy: Options include Disable (default), Reject All, and Allow All. � Disable: Disables access control to your network based on MAC address. � Reject All: All packets with a source MAC address matching those in the access control list
cannot access your network. � Allow All: All packets with a source MAC address matching those in the access control list
have access to your network. � MAC Address: Type a MAC address in hexadecimal format without additional characters (e.g.
colons or hyphens).
- Adds the MAC address in the MAC Address field to the MAC address control list.
- Removes the selected MAC address from the MAC address control list.
Page 35 of 407-0 Operating_Modes
2/25/2016file:///C:/Users/Cable%20Matters/AppData/Local/Temp/~hhCA8B.htm

- Removes all MAC addresses from the MAC address control list.
� Apply: Saves all changes made to the MAC address control list.
Home > Screen Descriptions > AP Mode > Connected Devices Screen
The Connected Devices Screen
The Connected Devices screen shows detailed information on current connections.
� MAC Address: The unique hexadecimal manufacturer-assigned identifier of a device connected to the Mediatek AP.
� Client ID: An ID number assigned to each device on your AP's network, starting at 2 with a maximum of 32.
� Power Saving Mode: Indicates whether the connection with the associated device supports power-saving.
� Tx Rate (Mbits): Provides detailed information on factors affecting the data transfer rate. IEEE 802.11n specific information includes the MCS (modulation and coding scheme) index value applied in a connection, the BW (bandwidth), GI (guard interval), and the transmission rate of the current connection in megabits (Mbit).
Home > Screen Descriptions > AP Mode > About Screen
The About Screen (AP Mode)
Use this screen to find information on specifications for the Mediatek Utility
Page 36 of 407-0 Operating_Modes
2/25/2016file:///C:/Users/Cable%20Matters/AppData/Local/Temp/~hhCA8B.htm

� Utility Version: Shows the version number of the Utility (different from the utility version in station mode).
� Driver Version: Shows the version number of this driver (the same as that in station mode). � DLL Version: Displays the version number of the RaAPAPI.dll file, for use by downstream
developers. � Date: Shows the date of release for the utility version shown. � Date: Shows the date of release for the driver version shown. � Date: Shows the date of release for the DLL version shown. � MAC Address: The unique hexadecimal identifier assigned to the Mediatek Adapter.
Home > Screen Descriptions > Client + AP Mode > Compact Mode Screen
The Compact Mode Screen (Client + AP Mode)
From the compact mode screen in Client and AP Mode, use the Mediatek Utility to set up an access point (AP) which can access other wireless networks and the Internet, and control access to the AP based on MAC address.
The Mediatek Utility in compact mode shows the connection status of the Mediatek Adapter.
A Click these buttons to open the following screens.
- Use the AP screens to set up a network and find the MAC address of network members.
Page 37 of 407-0 Operating_Modes
2/25/2016file:///C:/Users/Cable%20Matters/AppData/Local/Temp/~hhCA8B.htm

- Use the Available Networks screen to connect to available networks.
- Use the Link Information screens to find detailed information on the status of your wireless connection.
- Use the Profile Settings screens to set up and use profiles to more quickly connect using frequently used settings, and to set up wireless security.
- Use the Advanced screen to select your region code, and to install WAPI certificates.
- Use the About screen to find version information for your Utility.
B The Utility also provides information and tools to manage your wireless connection.
- Click the RF buttons to enable or disable wireless transmission.
- Indicates the security status of your connection.
- Indicates the quality of your wireless connection.
C Provides information on network settings.
� SSID: This shows the name of your network. � Rate: This shows the speed of your connection. � Channel: This is the channel assigned to your connection. Change this if interference is a problem on
your network. � IP Address: This identifies the Mediatek Adapter on your wireless network, much like a physical mailing
address identifies a house on a street. � Mask: The subnet mask hides your IP address from outside your wireless network.
Home > Screen Descriptions > Client + AP Mode > AP Screens
The AP Screens
The AP screens let you configure access point settings when the Utility is set to Client + AP mode. Use these screens to set up a secure wireless network, share Internet access, and find information on computers and devices connected to your network.
The following screens are described.
� AP Configuration� MAC Table
Page 38 of 407-0 Operating_Modes
2/25/2016file:///C:/Users/Cable%20Matters/AppData/Local/Temp/~hhCA8B.htm

AP Buttons
Click the following buttons to access the AP screens.
- Click this button to access the AP Configuration screen and to set up a secure wireless network and share Internet access.
- Click this button to access the MAC Table screen and find the MAC addresses of devices and computers connected to your wireless network.
The AP Configuration Screen
Use the AP Configuration screen to set up a secure wireless network.
� SSID: The name of your wireless network. � WPA2 Pre-Shared Key: Type a passphrase 8-63 characters long made up of characters '0'-'9', 'a'-'z',
'A'-'Z', keyboard symbols and spaces. � IP Address: This indicates the IP address of the Mediatek Adapter on your wireless network. � Apply: Click this to save your settings.
The MAC Table Screen
Use the MAC Table screen to find information on computers and devices connected to your network.
Page 39 of 407-0 Operating_Modes
2/25/2016file:///C:/Users/Cable%20Matters/AppData/Local/Temp/~hhCA8B.htm

� BSSID: This is the MAC address of your AP which uniquely identifies your network. � MAC Table: This table shows a list of the MAC addresses of currently connected computers and
devices, as well as their security status. Security status options include 'Authenticated' and 'Invalid' respectively indicating a successful and unsuccessful connection.
Page 40 of 407-0 Operating_Modes
2/25/2016file:///C:/Users/Cable%20Matters/AppData/Local/Temp/~hhCA8B.htm

Home > Screen Descriptions > Client Mode > Compact Mode Screen
The Compact Mode Screen
From the compact mode screen, use the Mediatek Utility to connect to a wireless network, view connection status, set up profiles, and configure advanced networking features including connecting directly to another wireless-enabled computer or device.
The Mediatek Utility in compact mode shows the connection status of the Mediatek Adapter.
For information on the information and features available in this screen see Accessing Features.
Home > Screen Descriptions > Client Mode > Wi-Fi Direct Screens
The Wi-Fi Direct Screens
Use these screens to connect directly to other Wi-Fi Direct enabled devices and to share media files such as music, images and videos.
� Wi-Fi Direct� Device Name� WPS Settings� Autonomous GO
Channel SelectionWPS Settings
� Media Sharing
Wi-Fi Direct Buttons
- Use the left and right arrows to work through the Profile screens.
- Click the Stop button to cancel setting up or editing a profile.
The Wi-Fi Direct Screen
Page 1 of 287.1.1 Compact Mode Screen Client Mode
2/25/2016file:///C:/Users/Cable%20Matters/AppData/Local/Temp/~hh8EA6.htm

Use this screen to find information about available Wi-Fi Direct-enabled devices and computers, and the status of your Wi-Fi Direct connection.
My Device Information: Displays the name configured for your Mediatek Adapter for Wi-Fi Direct connections.
� SSID: Displays the name of the Wi-Fi Direct connection. � IP Address: Displays the IP address of your Mediatek Adapter on the Wi-Fi Direct network. � MAC Address: Displays the MAC address of your Mediatek Adapter.
- Indicates the group owner (GO). The GO allocates IP addresses in a Wi-Fi Direct connection. By default GO status is assigned automatically but can be manually assigned by enabling autonomous GO on a device.
- Indicates the Group Owner is connected to one or more devices using Wi-Fi Direct.
- Displayed only in group owner mode. Click this to configure WPS settings for connections managed by the Mediatek Utility in group owner mode.
- Displayed only in group owner mode. Click this to configure wireless security settings for connections managed by the Mediatek Utility in group owner mode. For more information, see the Autonomous GO screen.
-Right-click the notebook icon to display the following options.
� Scan: Select this option to refresh the list of available Wi-Fi Direct enabled devices.
Page 2 of 287.1.1 Compact Mode Screen Client Mode
2/25/2016file:///C:/Users/Cable%20Matters/AppData/Local/Temp/~hh8EA6.htm

� Enable autonomous GO: Select this option to set your Adapter to act as group owner (GO) without requiring negotiation with other devices. For more information, see the Autonomous GO screen.
� Media Sharing: Select this option to enable devices connected with Wi-Fi Direct to access media files on your computer. For more information, see Media Sharing.
The Device Name Screen
To display this screen, double-click on the notebook icon in the bottom left of the Wi-Fi Direct screen to enable Wi-Fi Direct.
Use this screen to identify your computer to other Wi-Fi Direct enabled devices.
� Use My Computer name: Select this option to use the name of your computer as an identifier. � Select this option to manually enter a name to identify your computer to other Wi-Fi Direct
enabled computers or devices.
The WPS Settings Screen
To display this screen, double-click on a device icon (not the notebook icon) in the Wi-Fi Direct screen to set up a Wi-Fi Direct connection with this device.
Use this screen to decide how Wi-Fi Protected Setup (WPS) is configured on your Wi-Fi Direct connection. WPS is a secure wireless connection method intended to simplify the process of configuring complicated security settings.
This screen also displays by clicking the WPS icon in the Wi-Fi Direct screen when Autonomous GO is enabled. These settings are applied to any Wi-Fi Direct connection made by the Mediatek Utility when autonomous GO is enabled.
Page 3 of 287.1.1 Compact Mode Screen Client Mode
2/25/2016file:///C:/Users/Cable%20Matters/AppData/Local/Temp/~hh8EA6.htm

� Push-Button Configuration(PBC): Select this option to securely connect two WPS enabled devices by manually pushing a physical or software WPS button.
� Display PIN: Select this option and use the PIN displayed to configure WPS on the device to which you are connecting.
� Enter PIN (ask Display PIN): Select this option and enter the WPS PIN provided by the device to which you are connecting.
� PIN Code: � If 'Display PIN' is selected, use the PIN displayed in this field to configure WPS on the
device to which you are connecting. To obtain a new PIN, click 'Renew 8 digit'. � If 'Enter PIN (ask Display PIN)' is selected, in this field type the 8-digit PIN provided by the
device to which you are connecting.
The Autonomous GO Screen
Enable Autonomous GO to set the Mediatek Adapter to automatically become group owner of any Wi-Fi Direct connection it has. This allows you to share a resource such as a network connection or access to media files to other computers or devices to which you are connected.
To display this screen, right-click on the own computer icon in the Wi-Fi direct screen and and click
'Enable autonomous GO'. To edit this setting later, click on the security icon in the Wi-Fi Direct screen.
WPA Preshared Key: In this field, type 8-63 alphanumeric characters.
The Channel Selection Screen
Page 4 of 287.1.1 Compact Mode Screen Client Mode
2/25/2016file:///C:/Users/Cable%20Matters/AppData/Local/Temp/~hh8EA6.htm

To display this screen, click the right arrow in the Autonomous GO screen.
Use this screen to select the preferred operating channel and to save your settings to a profile.
� Preferred channel: For reduced interference select the channel least used by nearby wireless networks.
The Media Sharing Screen
To display this screen, right-click on the own computer icon in the Wi-Fi direct screen and click 'Media Sharing'.
� Service Status: Indicates the status of the Mediatek media server. � Server Name: Displays the name of the media server provided with the Utillity. Type an
alternative name, or leave it at its default setting.
� Sharing Folder: Click the browse icon to locate and load the folder to be shared.
� Click the right arrow to confirm settings and enable media sharing.
� Click the stop button to disable sharing.
Home > Screen Descriptions > Client Mode > Available Networks Screen
Page 5 of 287.1.1 Compact Mode Screen Client Mode
2/25/2016file:///C:/Users/Cable%20Matters/AppData/Local/Temp/~hh8EA6.htm

The Available Networks Screen
The Available Networks screen provides information on available networks and their settings. Use this screen to connect to a network and add a profile.
Available Networks Buttons
The functions of the buttons in this screen are as follows.
- Click the Rescan button to update the list of available wireless networks.
- Click the Add Profile button to add the connection settings of the selected wireless network to the Utility's list of profiles.
- Click the Connect button to connect to the selected wireless network.
- Right-click the Available Networks screen to display the Sort menu. This option sorts the list of available networks according to network name, channel number, or signal strength.
Available Networks Icons
Site Survey icons provide information on the network setting of a profile.
Page 6 of 287.1.1 Compact Mode Screen Client Mode
2/25/2016file:///C:/Users/Cable%20Matters/AppData/Local/Temp/~hh8EA6.htm

From left to right the icons are as follows.
1. Connection status
- Successfully connected to the network.
2. SSID or Network Name: The name of the network to which you are connected. 3. The network mode:
- Infrastructure mode: Indicates the network is maintained by an AP or wireless router. This is a typical wireless network.
- Ad-hoc mode: Indicates the network is a distributed wireless network with no AP or router.
4. Channel number 5. Wireless standards supported by the network:
- IEEE 802.11a
- IEEE 802.11b
- IEEE 802.11g
- IEEE 802.11n
6. The security status of the network.
- Indicates that WPS is available on this network.
- Indicates that a security method is configured on this network.
7. The strength of the signal received from with the specified network.
AP Information
For more detailed information on an available network, select a network to display AP Information.
AP Information
Page 7 of 287.1.1 Compact Mode Screen Client Mode
2/25/2016file:///C:/Users/Cable%20Matters/AppData/Local/Temp/~hh8EA6.htm
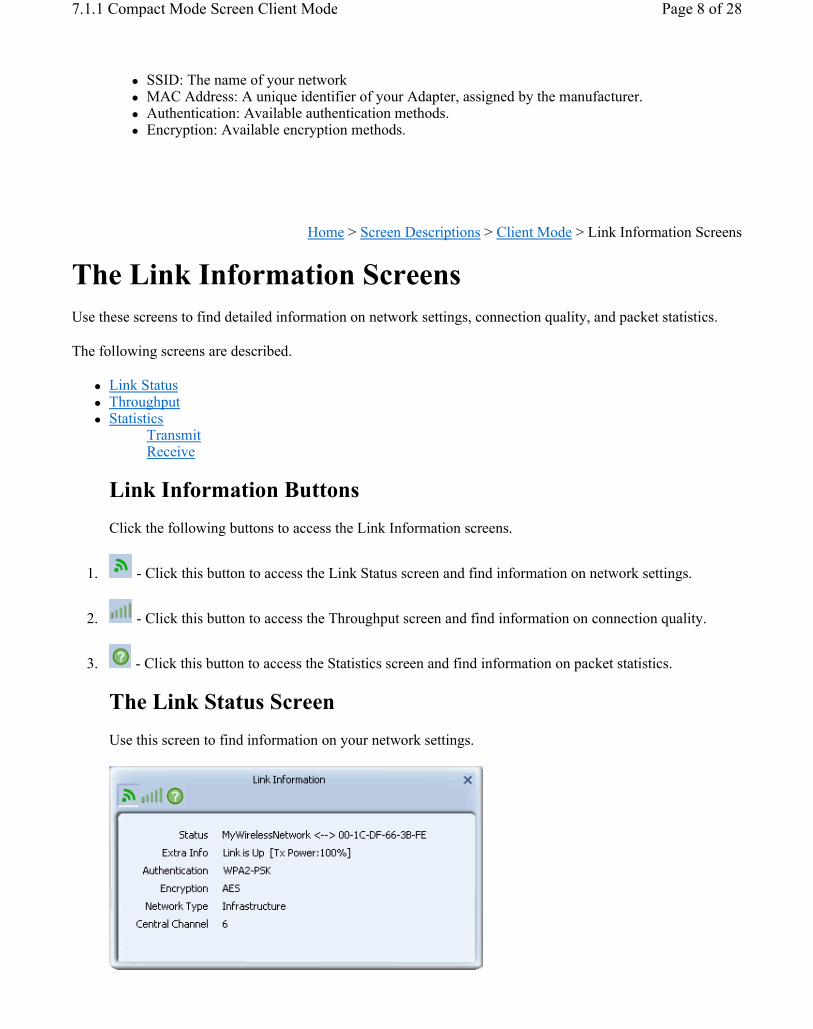
� SSID: The name of your network � MAC Address: A unique identifier of your Adapter, assigned by the manufacturer. � Authentication: Available authentication methods. � Encryption: Available encryption methods.
Home > Screen Descriptions > Client Mode > Link Information Screens
The Link Information Screens
Use these screens to find detailed information on network settings, connection quality, and packet statistics.
The following screens are described.
� Link Status� Throughput� Statistics
TransmitReceive
Link Information Buttons
Click the following buttons to access the Link Information screens.
1. - Click this button to access the Link Status screen and find information on network settings.
2. - Click this button to access the Throughput screen and find information on connection quality.
3. - Click this button to access the Statistics screen and find information on packet statistics.
The Link Status Screen
Use this screen to find information on your network settings.
Page 8 of 287.1.1 Compact Mode Screen Client Mode
2/25/2016file:///C:/Users/Cable%20Matters/AppData/Local/Temp/~hh8EA6.htm

� Status: This displays the name of your network and the MAC address of the access point (AP) to which you are connected. If there is no connection, 'Disconnected' is displayed. If transmission is
disabled (indicated by the radio button icon ), "Turn off RF" is displayed. � Extra Info: If connected, 'Link is Up' and signal strength is displayed. If disconnected, 'Link is
Down' is displayed. � Authentication: Displays the authentication method used by your connection. The Utility supports
Open, Shared, WPA-PSK, WPA2-PSK, WPA, WPA2, 802.1X, CCKM, WAPI-PSK, and WAPI-CA.
� Encryption: Displays the encryption method used by your connection. The Utility supports WEP, TKIP, AES, TKIP(MFP), AES(MFP), and SMS4.
� Network Type: Displays the type of network to which you are connected. Infrastructure indicates a typical network with an AP or router, ad hoc indicates a distributed network without an AP or router.
� Central Channel: This displays the channel used in this wireless connection. If multiple channels are used, for example, to increase the available bandwidth, this field displays the median channel number.
The Throughput Screen
Use this screen to find information on the quality of your connection.
� Link Quality: An indicator of the quality of the signal based on measurements of the strength of the received signal and the level of packet loss for both received and transmitted data.
� Signal Strength 1: Indicates the signal strength for each antenna supported by your Mediatek Adapter.
Transmit
� Link Speed: Shows the maximum transmission speed supported by your wireless connection given current network conditions.
� Throughput: Shows the amount of data transmitted by the Mediatek Adapter.
Receive
� Link Speed: Shows the maximum speed of signals received on your wireless connection given current network conditions.
� Throughput: Shows the amount of data received by the Mediatek Adapter.
Page 9 of 287.1.1 Compact Mode Screen Client Mode
2/25/2016file:///C:/Users/Cable%20Matters/AppData/Local/Temp/~hh8EA6.htm

The Statistics Screens
Use these screens to find information on the packets transmitted and received by the Mediatek Adapter.
The Transmit Screen
� Transmit: Select this option to find information on packets transmitted by the Mediatek Adapter. � Receive: Select this option to find information on packets received by the Mediatek Adapter. � Transmitted Successfully: Shows the number of successfully transmitted packets on the current
wireless connection. � Retransmitted Successfully: Shows the number of successfully retransmitted packets on the current
wireless connection. A high number may indicate interference on your network. � Fail to Receive ACK After All Retries: Shows the number of packets that were transmitted without
an acknowledgement from a receiver. A high number may indicate interference on your network.
- Click this button to reset all packet statistics displayed in this screen to zero.
The Receive Screen
� Transmit: Select this option to find information on packets transmitted by the Mediatek Adapter. � Receive: Select this option to find information on packets received by the Mediatek Adapter. � Received Successfully: Shows the number of packets received on the current wireless connection. � Received With CRC Error: Shows the number of frames received with a CRC (Cyclical
Redundancy Check) or checksum error. A number much higher than the number of packets successfully received indicates interference is a problem on your network.
� Dropped Due To Out-Of-Resource: Shows the number of packets dropped due to an internal
Page 10 of 287.1.1 Compact Mode Screen Client Mode
2/25/2016file:///C:/Users/Cable%20Matters/AppData/Local/Temp/~hh8EA6.htm

buffer overflow. An high number may indicate too much traffic on your network, or that your system is too slow to handle the current level of network traffic.
� Duplicate Frames Received: Shows the number of duplicate frames received. A high number may indicate computers and devices on your network are not receiving acknowledgement of their transmission and so are resending their data. Interference may be a cause of this problem. This value is typically higher for an ad hoc network than for a infrastructure network.
- Click this button to reset all packet statistics displayed in this screen to zero.
Home > Screen Descriptions > Client Mode > Profile Settings Screens
The Profile Settings Screens
A profile is a set of network settings such as network name and security settings, which you can use to quickly set up a wireless connection instead of manually entering settings. Use these screens to configure a profile for a standard wireless connection or for a WPS-enabled network connection.
The following screens are described.
� Profile List� Wireless Connection Profile Setting Screens
1. Profile Details2. Profile Security Settings
1. WEP2. WPA-PSK or WPA2-PSK3. WAPI-PSK4. WAPI-CA5. 802.1X, CCKM, WPA or WPA2
1. EAP Method2. Server Certification3. User Certification4. PAC5. WEP6. Pre-Logon
� WPS Profile Setting Screens1. Profile Details2. Push-Button Method3. PIN Method
1. WPS Profile2. WPS WPA-PSK
4. Start PIN
The Profile List Screen
The Profile List screen lets you add, edit and delete profiles, and find information on existing profiles. Use this screen to set up a profile and to configure WPS and wireless security for easy connection to frequently used wireless networks.
Page 11 of 287.1.1 Compact Mode Screen Client Mode
2/25/2016file:///C:/Users/Cable%20Matters/AppData/Local/Temp/~hh8EA6.htm

NOTE: When WZC is enabled, profile functions are unavailable.
Profile List Buttons
The Profile List screen provides the following buttons.
- Click the Add Profile button to add a new profile to the profile list.
- Click the Delete Profile button to remove a profile from the profile list.
- Click the Edit Profile button to change the details of the selected profile.
- Click the Import Profile button to import a profile in .prof file format.
- Click the Export Profile button to export the selected profile in .prof file format.
- Click the Add WPS Profile to set up a profile with Wireless Protected Setup (WPS) security settings.
- Click to connect using the network settings in the selected profile.
Profile Settings
The Profile List screen describes the following profile settings.
1. Connection Status
- Indicates if a connection made from the currently activated profile.
Page 12 of 287.1.1 Compact Mode Screen Client Mode
2/25/2016file:///C:/Users/Cable%20Matters/AppData/Local/Temp/~hh8EA6.htm

- Indicates if the connection has failed on a currently activated profile.
2. Profile name: The name of this profile, default is PROF* (* indicating 1, 2, 3...). 3. Network name/SSID: The name of your network. 4. Security Status
- Security is enabled.
- Security is disabled.
5. Network Type:
- Infrastructure: Indicates that you are connecting to a typical wireless network maintained by an AP or wireless router. if uncertain, select this option.
- Ad Hoc: Indicates that you are connecting to a distributed network with no AP or router.
The Wireless Connection Profile Setting Screens
Use these screens to set up a profile or edit existing profile settings for a standard wireless connection.
Profile Buttons
- Use the left and right arrows to navigate through the Profile Setting screens.
- Click the Stop button to cancel setting up or editing a profile.
The Profile Details Screen
Use this screen to add or edit the name of the profile and its network name and type.
� Profile Name: Type a name for the profile, or leave at its default value: PROF*, where * is 1, 2, 3, and so on.
� SSID: Type the name of the network to which you are connecting, or select an existing network name from the drop-down list provided.
� Network Type � Infrastructure: Select this if you are connecting to a typical wireless network maintained by
Page 13 of 287.1.1 Compact Mode Screen Client Mode
2/25/2016file:///C:/Users/Cable%20Matters/AppData/Local/Temp/~hh8EA6.htm

an AP or wireless router. If uncertain, select this option. � Ad Hoc: Select this if you are connecting to a distributed network with no AP or router.
� Channel: This drop-down list displays when the Ad Hoc radio button is selected.
The Profile Security Settings Screen
Use these screens to configure authentication and encryption settings on your profile.
� Authentication: Select the strongest security method supported by your network. Options include Open, Shared, WPA, WPA-PSK, WPA2, WPA2-PSK, 802.1X, CCKM, WAPI-PSK, WAPI-CA.
� Encryption: Select the strongest encryption supported by your network and the selected authentication method. Encryption method options for each authentication method are as shown.
Security Protocol Encryption Method Comments
Open
Shared
None
WEP
Not secure. WEP is an older standard and is easily decrypted. If using WEP select Open a the authentication method for slightly stronger security.
WPA (Wi-Fi Protected Access)
TKIP (Temporal Key Integrity Protocol)
AES (Advanced Encryption Standard)
Designed for large enterprises. Requires an authentication server. AES is a stronger, more recent standard than TKIP.
WPA-PSK (Wi-Fi Protected Access - Pre-Shared Key)
TKIP, AESDesigned for home or small business wireless networks. AES is a stronger, more recent standard than TKIP.
WPA2 (Wi-Fi Protected Access 2)
TKIP, AES
TKIP MFP (Temporal Key Integrity Protocol (Management Frame Protection))
AES MFP (Advanced Encryption Standard (Management Frame Protection))
Designed for large enterprises. Requires an authentication server. WPA2 is a stronger, more recent standard than WPA. AES is a stronger, more recent standard than TKIP. MFP (management frame protection) offers more security than no MFP.
WPA2-PSK (Wi-Fi Protected Access 2 - Pre-Shared Key)
TKIP, AES
Designed for home or small business wireless networks. WPA2-PSK is a stronger, more recent standard than WPA-PSK. AES is a stronger, more recent standard than TKIP.
Page 14 of 287.1.1 Compact Mode Screen Client Mode
2/25/2016file:///C:/Users/Cable%20Matters/AppData/Local/Temp/~hh8EA6.htm

Click on the following links for descriptions of the screens that follow for each type of security.
� WEP� WPA-PSK or WPA2-PSK� WAPI-PSK� WAPI-CA� 802.1X, CCKM, WPA or WPA2
The WEP Screen
Use this screen to configure WEP security.
� Default Tx Key: Options are 'Key 1' to 'Key 4'. Select one of these options. � Key Format: Select a character format for your security passphrase. Options are 'Hex(10 or
26 hex digits)' or 'ASCII(5 or 13 ASCII characters)'. � WEP Key: Type a security passphrase according to the option you select in the Key Format
field. � If you select a key format of 'Hex(10 or 26 hex digits)', in the WEP Key field type a
security key 10 or 26 characters long made up of digits '0'-'9' and letters 'A'-'F'. � If you select a key format of 'ASCII(5 or 13 ASCII characters)' in the WEP Key field,
type a security key 5 or 13 characters long made up of digits '0'-'9' and letters 'a'-'z' and 'A'-'Z'.
802.1X WEP
Designed for large enterprises. Requires an authentication server. WPA and WPA2 are more recent standards.
CCKM (Windows Vista or 7 only)
WEP, TKIP, AES
CCKM allows secured roaming between APs with WDS (wireless domain services) enabled and access to the same RADIUS server.
WAPI-PSK (WLAN Authentication and Privacy Infrastructure - Pre-Shared Key)
SMS4
Designed for home or small business wireless networks. At the time of writing, this standard has not yet been accepted by ISO.
WAPI-CA (WLAN Authentication and Privacy Infrastructure - Certification Authority)
SMS4
Designed for large enterprises. Requires an authentication server. At the time of writing, this standard has not yet been accepted by ISO.
Page 15 of 287.1.1 Compact Mode Screen Client Mode
2/25/2016file:///C:/Users/Cable%20Matters/AppData/Local/Temp/~hh8EA6.htm
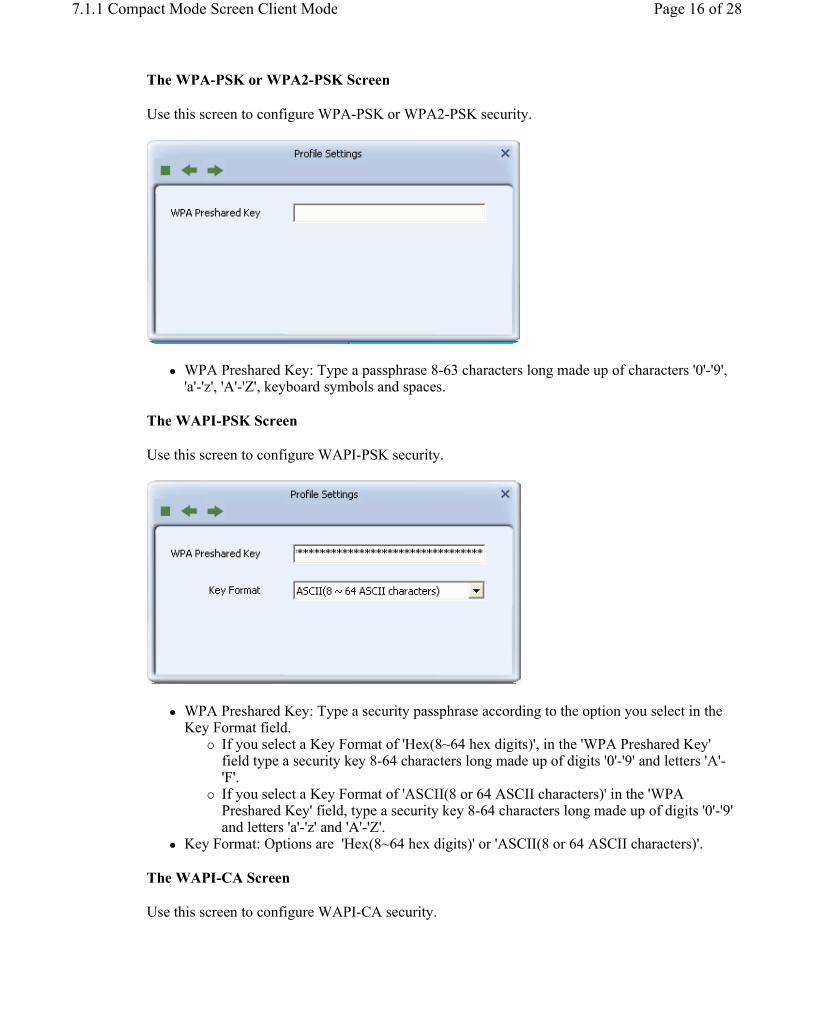
The WPA-PSK or WPA2-PSK Screen
Use this screen to configure WPA-PSK or WPA2-PSK security.
� WPA Preshared Key: Type a passphrase 8-63 characters long made up of characters '0'-'9', 'a'-'z', 'A'-'Z', keyboard symbols and spaces.
The WAPI-PSK Screen
Use this screen to configure WAPI-PSK security.
� WPA Preshared Key: Type a security passphrase according to the option you select in the Key Format field.
� If you select a Key Format of 'Hex(8~64 hex digits)', in the 'WPA Preshared Key' field type a security key 8-64 characters long made up of digits '0'-'9' and letters 'A'-'F'.
� If you select a Key Format of 'ASCII(8 or 64 ASCII characters)' in the 'WPA Preshared Key' field, type a security key 8-64 characters long made up of digits '0'-'9' and letters 'a'-'z' and 'A'-'Z'.
� Key Format: Options are 'Hex(8~64 hex digits)' or 'ASCII(8 or 64 ASCII characters)'.
The WAPI-CA Screen
Use this screen to configure WAPI-CA security.
Page 16 of 287.1.1 Compact Mode Screen Client Mode
2/25/2016file:///C:/Users/Cable%20Matters/AppData/Local/Temp/~hh8EA6.htm

� Select Mode: Options are Auto or Manual. Select 'Auto' to automatically apply WAPI certificates installed on your system. Select 'Manual' to manually select a WAPI certificate installed on your system from the drop-down list in the 'WAPI Certificate' field.
� WAPI Certificate: This option is available if 'Auto' in 'Select Mode' is selected. Select a WAPI certificate from the drop-down list for use in applying WAPI security
- Click this button to browse for WAPI certificates on your system. For information on the screens that follow, see the description of the Certificate Management screens in the Advanced section.
Certificate Information - This information is only available when a WAPI certificate is selected from the 'WAPI Certificate' drop-down list.
� Serial Number: Shows the unique identifier of the WAPI certificate. � Issuer: Shows the organization that issued the WAPI certificate. � Valid Period: Shows the validity period of the certificate in month/day/year format.
The 802.1X, CCKM, WPA or WPA2 Screens
Use the following screens to configure authentication and tunnel methods required by 802.1X. CCKM, WPA and WPA2 security.
� The EAP Method Screen� The User Certification Screen� The Server Certification Screen� The PAC Screen� The Pre-Logon Screen
The EAP Method Screen
Page 17 of 287.1.1 Compact Mode Screen Client Mode
2/25/2016file:///C:/Users/Cable%20Matters/AppData/Local/Temp/~hh8EA6.htm

� EAP Method: Select an EAP (Extensible Authentication Protocol) Method. Options are PEAP, TLS/Smart Card, TTLS (XP only), EAP-FAST, MD5-Challenge (available only with 802.1X using Windows XP), and LEAP.
� Session Resumption: Select this option to make use of the previous session's settings for faster re-authentication
� Tunnel Authentication: Select a security method to use when accessing the authentication server. Options depend on the the EAP method selected.
� Tunnel ID: Options are 'Authentication ID' and 'Machine ID'. If 'Authentication ID' is selected, user-based credentials are required. If 'Machine ID' is required, credentials are based on the computer requesting access to the authentication server.
� Tunnel Password/Mode: 'Tunnel Password' refers to the password set for the user or computer accessing the authentication server. 'Tunnel Mode' options may include 'Static Password', 'Soft Token', 'Windows Logon' (Windows Vista/7 only), and 'Prompt User'(Windows Vista/7 only). If tunnel mode is set to 'Static Password', the user authenticates once for the duration of the session. If tunnel mode is set to 'Soft Token', the user must authenticate, based on the time-out period of the soft token. If 'Windows Logon' is selected, user credentials are based on the user's Windows account. If 'Prompt User' is selected, user credentials are requested on connecting to the network.
The following table shows the options for this screen.
Authentication Method
Tunnel Authentication
Tunnel Mode Tunnel IDUser Name/ Password Required
PEAP
EAP-MS-CHAP v2
n/a n/a Y/Y
EAP-TLS/Smart Card
n/a
Authentication ID
Y/N (XP) N/N (Vista/7)
Machine ID N/N
Generic Token Card
Static Password
n/a
Y/Y
Soft Token N/N
Windows Logon (Vista/7)
N/N
Prompt User (Vista/7)
N/N
TLS/Smart Card
n/a n/a
Authentication ID
N/N
Page 18 of 287.1.1 Compact Mode Screen Client Mode
2/25/2016file:///C:/Users/Cable%20Matters/AppData/Local/Temp/~hh8EA6.htm

The screens that follow depend on certification method employed.
The Server Certification Screen
This screen appears for all PEAP and TTLS (XP only) methods.
Use this screen to configure access to server certificates.
Machine ID N/N
TTLS (XP only)
CHAP, MS-CHAP, MS-CHAP v2, PAP, EAP-MD5
n/a
Authentication ID
N/Y
Machine ID N/Y
EAP-FAST
EAP-MSCHAP v2 (XP)
n/a
Authentication ID
N/Y
Machine ID N/Y
EAP-TLS/Smart Card (XP)
n/a
Authentication ID
N/N
Machine ID N/N
Generic Token Card (XP)
Static Password
Authentication ID
Y/Y
Machine ID N/Y
Soft Token
Authentication ID
N/N
Machine ID N/N
MD5-Challenge (XP, 802.1X)
n/a n/a n/a Y/Y
LEAP n/a
Static Password (Vista/7)
n/a (Vista/7)
Y/Y
Windows Logon (Vista/7)
N/N
Prompt User (Vista/7)
N/N
n/a (XP)
Authentication ID
N/Y
Machine ID N/Y
Page 19 of 287.1.1 Compact Mode Screen Client Mode
2/25/2016file:///C:/Users/Cable%20Matters/AppData/Local/Temp/~hh8EA6.htm

� Use Server Certification: Select this to use certificates supplied by the authentication server. From the drop-down list, select the server that issues the certificate.
� Allow intermediate certificates: (For Windows XP users only) Select this to allow the use of certificates supplied by a computer located in the certificate chain connecting the server certificate and the server specified in the 'Server Name' field.
The User Certification Screen
This screen appears for the following EAP and tunnel methods.
� PEAP-EAP-TLS/Smart Card � TLS/Smart Card � All tunnel ID methods using TTLS (Windows XP only)
Use this screen to select a user certificate located on the user's computer.
� Use a certificate on this computer: Select this checkbox to set up security using a user certificate. This field may be greyed out with or without the checkbox selected, depending on whether you are using security which requires a user certificate or not. Otherwise the use of a user certificate is optional.
� Issued to: This read-only field indicates the name of the user to whom the certificate was issued.
� Issued by: This read-only field indicates the name of the authentication server which issued the certificate.
� Expiration Date: This read-only field indicates the date on which the user certificate expires. � Friendly Name: This read-only field indicates the name assigned to the certificate for easy
recognition. � Use my smart card: (Vista/Windows 7 only) Select this option to support smart card-based
Page 20 of 287.1.1 Compact Mode Screen Client Mode
2/25/2016file:///C:/Users/Cable%20Matters/AppData/Local/Temp/~hh8EA6.htm

user authentication.
The PAC Screen
This screen appears for EAP-FAST authentication (for Windows XP users only).
� Allow unauthenticated provision mode: Select this option to allow unauthenticated users to obtain a PAC (protected authentication credential) from the authentication server.
� Provisioning Tunnel: This is the security method selected in the previous screen which is used to encrypt the PAC distribution procedure.
� Use protected authentication credential: Select this option to allow the manual installation of a PAC.
� Import: Click this button to locate and install a PAC. � Remove: Click this button to uninstall the selected PAC.
The WEP Screen
This screen appears for MD5-Challenge authentication (for Windows XP users only). See the WEP screen description above for details.
The Pre-Logon Screen
Use this screen to enable automatic connection using a profile upon starting Windows. This option is only available for profiles with WEP, WPA-PSK, WPA2-PSK, EAP-FAST, and EAP-LEAP configured.
� Use Pre-logon Connection: Select this option to enable automatic connection on system startup to a wireless network based on your profile settings.
Page 21 of 287.1.1 Compact Mode Screen Client Mode
2/25/2016file:///C:/Users/Cable%20Matters/AppData/Local/Temp/~hh8EA6.htm

The WPS Profile Screens
Use these screens to configure a WPS profile.
WPS Profile Buttons
- Use the left and right arrows to navigate through the WPS profile screens.
- Click the Stop button to cancel setting up or editing a WPS profile.
The WPS Profile Details Screen
� WPS AP List: Displays a list of available WPS-enabled networks from a drop-down list.
� WPS Method:
� Push-Button Configuration(PBC): This option allows you to use a push-button available on the external casing of your device or in its software interface to set up WPS.
� PIN / numeric code: This option allows you to manually transfer a PIN either from the device the device to which you are connecting to the Mediatek Utility, or from the Mediatek Utility to the device to which you are connecting.
The Push-Button Method Screen
Use this screen to begin the WPS connection process using the push-button method.
Page 22 of 287.1.1 Compact Mode Screen Client Mode
2/25/2016file:///C:/Users/Cable%20Matters/AppData/Local/Temp/~hh8EA6.htm

� Start PBC: Click this button to begin the WPS connection process. The corresponding WPS button available on the device to which you are connecting must be push within 120 seconds of this button.
The PIN Method Screen
Use this screen to set up a WPS connection using a PIN.
� PIN Code: Displays the PIN used in this WPS connection. � If 'Enrollee' is selected in the 'Config Mode' field, use this PIN to begin the WPS setup
procedure on the device to which you are connecting. � If 'Registrar' is selected in the 'Config Mode' field, locate the WPS PIN made available on
the device to which you are connecting and type the PIN in this field. � Renew 8 digit: Click this button to display a new 8 digit PIN in the 'PIN Code' field. � Renew 4 digit: Click this button to display a new 4 digit PIN in the 'PIN Code' field. � Config Mode: From the drop-down list select 'Enrollee' to use the PIN provided in the screen to set
up a WPS connection, or select 'Registrar' to use the PIN provided by the device to which you are connecting to set up a WPS connection.
� WPS Profile: This option is only available when 'Registrar' is selected in the 'Config Mode' field. Click this button to configure the name of the WPS connection and its security settings. These settings may be left at their default.
The WPS Profile Screen
Use this screen to configure the name of your WPS connection and its security settings.
� SSID: Type the name of your WPS connection. The name of this connection does not affect the
Page 23 of 287.1.1 Compact Mode Screen Client Mode
2/25/2016file:///C:/Users/Cable%20Matters/AppData/Local/Temp/~hh8EA6.htm

name given for the entire network to which you are connecting. � BSSID: This is the MAC address of the Mediatek adapter. � Authentication: Select the strongest security method supported by your network. Options include
Open, Shared, WPA-PSK, or WPA2-PSK. � Encryption: Select the strongest encryption supported by your network and the selected
authentication method. Options for each authentication method are as shown in the following table
The WPS WPA-PSK Screen
Use this screen to configure a passphrase for your WPS connection.
� WPA Preshared Key:Type a passphrase 8-63 characters long made up of characters '0'-'9', 'a'-'z', 'A'-'Z', keyboard symbols and spaces.
The Start PIN Screen
Use this screen to start the WPS connection process using a PIN.
Authentication Method Encryption Method Comments
WPA2-PSK (Wi-Fi Protected Access 2- Pre-Shared Key)
WPA-PSK/WPA2-PSK (Wi-Fi Protected Access - Pre-Shared Key/ Wi-Fi Protected Access 2 - Pre-Shared Key)
AES(Advanced Encryption Standard)
TKIP/AES (Temporal Key Integrity Protocol/ Advanced Encryption Standard)
Select WPA2-PSK and AES for faster and stronger wireless security.
Select WPA-PSK/WPA2-PSK and TKIP/AES if devices in your network do not support WPA2-PSK and AES.
Open None Not recommended.
Page 24 of 287.1.1 Compact Mode Screen Client Mode
2/25/2016file:///C:/Users/Cable%20Matters/AppData/Local/Temp/~hh8EA6.htm

� Start PIN: This screen appears for both PIN methods. Click this button to begin the WPS connection process using a PIN. At the same time (within 120 seconds) activate the corresponding WPS PIN connection function on the device to which you are connecting.
Home > Screen Descriptions > Client Mode > Advanced Screens
The Advanced Screens
Use these screens to configure advanced settings including channel selection, wireless mode, certificate management, and ad hoc mode.
The following screens are described.
� Advanced screen� Certificate Management screens
Certificate ManagementInstall AS
Advanced Buttons
Use the following buttons to navigate between the Advanced screens.
- Click this button to access the Certificate Management screen to install and manage WAPI certificates.
The Certificate Management Screens
Use these screens to manage WAPI certificates for use in authenticating users and handling encryption. See Setting Up Enterprise Security: WAPI-CA for instructions on using certificates for user authentication.
The Certificate Management Screen
Page 25 of 287.1.1 Compact Mode Screen Client Mode
2/25/2016file:///C:/Users/Cable%20Matters/AppData/Local/Temp/~hh8EA6.htm

Use this screen to install WAPI user and issuer certificates.
Install Certificate
User certificate: Click on the browse icon to locate and load a WAPI user certificate. Only WAPI (.cer) certificates are supported.
Issuer certificate: Click on the browse icon to locate and load a WAPI issuer certificate. Only WAPI (.cer) certificates are supported.
- Click on the Install button to verify the user and issuer certificates. Once verified the authentication server unit (ASU) certificate is automatically downloaded and installed.
- If more than one ASU certificate is installed, click the Up and Down arrows to move the selected certificate up and down respectively. If the Mediatek Utility is set to automatically detect a valid ASU, ASUs are examined in the order indicated in this screen. (See the Profile Settings: WAPI-CA security screen for instructions on setting automatic detection of valid ASUs.
- Click on the Delete button to remove the selected certificate from the certificate list.
- If the authentication server is located on a device external to the network's AP, click on the second Install button to install an ASU certificate.
Window field descriptions
Page 26 of 287.1.1 Compact Mode Screen Client Mode
2/25/2016file:///C:/Users/Cable%20Matters/AppData/Local/Temp/~hh8EA6.htm
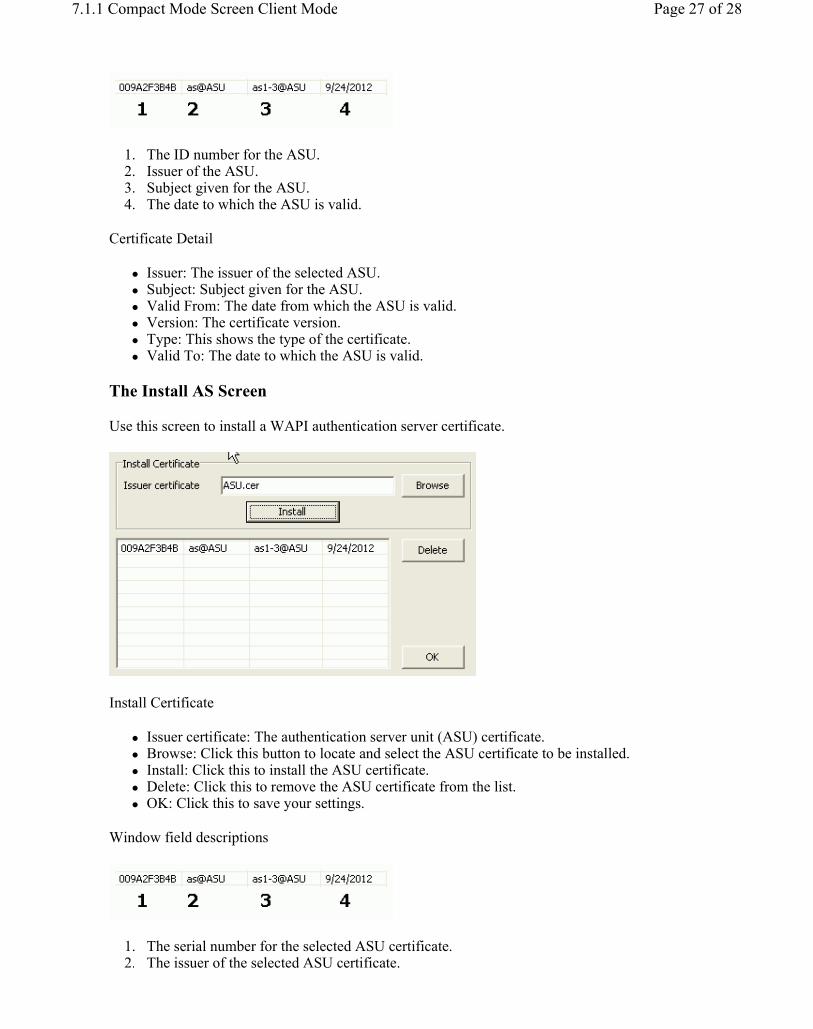
1. The ID number for the ASU. 2. Issuer of the ASU. 3. Subject given for the ASU. 4. The date to which the ASU is valid.
Certificate Detail
� Issuer: The issuer of the selected ASU. � Subject: Subject given for the ASU. � Valid From: The date from which the ASU is valid. � Version: The certificate version. � Type: This shows the type of the certificate. � Valid To: The date to which the ASU is valid.
The Install AS Screen
Use this screen to install a WAPI authentication server certificate.
Install Certificate
� Issuer certificate: The authentication server unit (ASU) certificate. � Browse: Click this button to locate and select the ASU certificate to be installed. � Install: Click this to install the ASU certificate. � Delete: Click this to remove the ASU certificate from the list. � OK: Click this to save your settings.
Window field descriptions
1. The serial number for the selected ASU certificate. 2. The issuer of the selected ASU certificate.
Page 27 of 287.1.1 Compact Mode Screen Client Mode
2/25/2016file:///C:/Users/Cable%20Matters/AppData/Local/Temp/~hh8EA6.htm

3. The given subject description for the selected ASU certificate. 4. The date to which the selected ASU certificate is valid.
Home > Screen Descriptions > Client Mode > About Screen
The About Screen
Use this screen to find information on the Mediatek Utility including version number and firmware.
Version
� Utility: Shows the version number of the Utility. Wi-Fi Direct is supported by versions 4.0.3.0 and above.
� Driver: Shows the driver version of this driver. Versions 3.1.14.0 and above support Wi-Fi Direct. � SDK: Shows the software development kit (SDK) provided for downstream developers. � Date: Shows the date of release for the utility version shown. � Date: Shows the date of release for the driver version shown. � Date: Shows the date of release for the SDK version shown
MAC Address: The unique hexadecimal hardware identifier assigned to your Adapter.
- Click to connect to the Mediatek web site.
Page 28 of 287.1.1 Compact Mode Screen Client Mode
2/25/2016file:///C:/Users/Cable%20Matters/AppData/Local/Temp/~hh8EA6.htm

Home > Screen Descriptions > AP Mode > Compact Mode Screen
The Compact Mode Screen (AP Mode)
From the compact mode screen in AP Mode, use the Mediatek Utility to set up an access point (AP), control access to the AP based on MAC address.
The Mediatek Utility in compact mode shows the AP status of the Mediatek Adapter.
A Click these buttons to open the following screens.
- Use the AP Setup screen to set up a secure wireless network.
- Use the Access Control List screen to configure an access policy for your network based on a client's MAC address.
- Use the Connected Devices screen to find information on clients currently connected to your network.
- Use the About screen to find information on specifications for the Mediatek Utility.
B The Utility also provides information and tools to manage your wireless connection.
- Click the RF buttons to enable or disable wireless transmission.
- Indicates the security status of your connection.
- Indicates AP Mode is enabled.
Page 1 of 77.2.1 Compact Mode Screen AP Mode
2/25/2016file:///C:/Users/Cable%20Matters/AppData/Local/Temp/~hh4D72.htm

C Provides information on network settings.
� SSID: This displays the name of your wireless network � Mode: Indicates the mode and hence frequency supported by your wireless connection. � Channel: The channel assigned to your connection. Default is 6, options are 1-12. � IP: The IP address identifies your Adapter on your wireless network. � Mask: The subnet mask hides your IP address from outside your wireless network.
Home > Screen Descriptions > AP Mode > AP Setup Screens
The AP Setup Screens
The AP Setup screens let you configure access point settings when the Mediatek Utility is set to AP (access point) mode. Use these screens to set up a secure wireless network and manage access to the network.
The following screens are described.
� Network Settings� Channel Settings� Security Settings
WPA-PSK, WPA2-PSK or WPA-PSK/WPA2-PSKWEP
AP Setup Buttons
- Use the left and right arrows to navigate through the AP Setup screens.
- Click the Stop button to cancel setting up your AP.
The Network Settings Screen
Page 2 of 77.2.1 Compact Mode Screen AP Mode
2/25/2016file:///C:/Users/Cable%20Matters/AppData/Local/Temp/~hh4D72.htm

� SSID: This is the name of your network. Leave it at its default setting, or type a name for ease of use when accessing your network.
The Channel Settings Screen
� Channel: Leave at its default value, or if interference is a problem on your network, choose a channel which experiences less interference. If you select Enable 40 MHz Bandwidth', choose a channel with minimal interference on the four channels adjacent to your selected channel.
The Security Settings Screen
� Authentication: Select the strongest security method supported by your network. Options include Open, Shared, WPA-PSK, WPA2-PSK, or WPA-PSK/WPA2-PSK.
� Encryption: Select the strongest encryption supported by your network and the selected authentication method. Options for each authentication method are as shown in the following table.
Authentication Method Encryption Method Comments
WPA2-PSK (Wi-Fi Protected Access 2 - Pre-Shared Key)
WPA-PSK (Wi-Fi Protected Access - Pre-Shared Key)
AES (Advanced Encryption Standard)
WPA2-PSK is a faster, more recent authenitcation standard than WPA-PSK.
AES is a stronger, more recent encryption standard than TKIP.
Selecting WPA-PSK/WPA2-PSK and BOTH allows the network to automatically
Page 3 of 77.2.1 Compact Mode Screen AP Mode
2/25/2016file:///C:/Users/Cable%20Matters/AppData/Local/Temp/~hh4D72.htm

The WPA-PSK, WPA2-PSK or WPA-PSK/WPA2-PSK Security Screen
Use this screen to set up WPA-PSK, WPA2-PSK, or WPA-PSK/WPA2-PSK security on your network.
� WPA-PSK Key: Type a security key 8-63 characters long made up of characters '0'-'9', 'a'-'z', 'A'-'Z', keyboard symbols and spaces.
� Group Rekey Interval: The interval after which the AP resets the group key. This key supports wireless security on your network. If uncertain, leave at its default value.
� x 10 seconds: Sets the unit for the 'Group Key Interval' to 10 seconds. After the specified period the group key is reset.
� x 1000 packets:Sets the unit for theGroup Key Interval to 1000 packets. After sending the specified number of packets the group key is reset.
The WEP Security Screen
Use this screen to set up WEP security on your network.
Default Tx Key: Options are 'Key 1' to 'Key 4'. Select one of these options.
WPA-PSK/WPA2-PSK adjust authentication and encryption methods to the strongest security supported by your network.
Open
Shared
WEP
(Wireless Encrypted Privacy)
WEP is an older standard and is easily decrypted. If using WEP select Open as the authentication method for slightly stronger security.
Page 4 of 77.2.1 Compact Mode Screen AP Mode
2/25/2016file:///C:/Users/Cable%20Matters/AppData/Local/Temp/~hh4D72.htm

Key Format: Select a character format for your security passphrase. Options are 'Hex(10 or 26 hex digits)' or 'ASCII(5 or 13 ASCII characters)'.
WEP Key: Type a security passphrase according to the option you select in the Key Format field.
� If you select a key format of 'Hex(10 or 26 hex digits)', in the WEP Key field type a security key 10 or 26 characters long made up of digits '0'-'9' and letters 'A'-'F'
� If you select a key format of 'ASCII(5 or 13 ASCII characters)' in the WEP Key field, type a security key 5 or 13 characters long made up of digits '0'-'9' and letters 'a'-'z' and 'A'-'Z'.
Home > Screen Descriptions > AP Mode > Access Control List Screen
The Access Control List Screen
The Access Control List records the MAC addresses of clients for use when allowing or disallowing transmission on the network. Use the Access Control List to configure an access policy for your network based on a client's MAC address.
� Access Policy: Options include Disable (default), Reject All, and Allow All. � Disable: Disables access control to your network based on MAC address. � Reject All: All packets with a source MAC address matching those in the access control list
cannot access your network. � Allow All: All packets with a source MAC address matching those in the access control list
have access to your network. � MAC Address: Type a MAC address in hexadecimal format without additional characters (e.g.
colons or hyphens).
Page 5 of 77.2.1 Compact Mode Screen AP Mode
2/25/2016file:///C:/Users/Cable%20Matters/AppData/Local/Temp/~hh4D72.htm

- Adds the MAC address in the MAC Address field to the MAC address control list.
- Removes the selected MAC address from the MAC address control list.
- Removes all MAC addresses from the MAC address control list.
� Apply: Saves all changes made to the MAC address control list.
Home > Screen Descriptions > AP Mode > Connected Devices Screen
The Connected Devices Screen
The Connected Devices screen shows detailed information on current connections.
� MAC Address: The unique hexadecimal manufacturer-assigned identifier of a device connected to the Mediatek AP.
� Client ID: An ID number assigned to each device on your AP's network, starting at 2 with a maximum of 32.
� Power Saving Mode: Indicates whether the connection with the associated device supports power-saving.
� Tx Rate (Mbits): Provides detailed information on factors affecting the data transfer rate. IEEE 802.11n specific information includes the MCS (modulation and coding scheme) index value applied in a connection, the BW (bandwidth), GI (guard interval), and the transmission rate of the current connection in megabits (Mbit).
Page 6 of 77.2.1 Compact Mode Screen AP Mode
2/25/2016file:///C:/Users/Cable%20Matters/AppData/Local/Temp/~hh4D72.htm

Home > Screen Descriptions > AP Mode > About Screen
The About Screen (AP Mode)
Use this screen to find information on specifications for the Mediatek Utility
� Utility Version: Shows the version number of the Utility (different from the utility version in station mode).
� Driver Version: Shows the version number of this driver (the same as that in station mode). � DLL Version: Displays the version number of the RaAPAPI.dll file, for use by downstream
developers. � Date: Shows the date of release for the utility version shown. � Date: Shows the date of release for the driver version shown. � Date: Shows the date of release for the DLL version shown. � MAC Address: The unique hexadecimal identifier assigned to the Mediatek Adapter.
Page 7 of 77.2.1 Compact Mode Screen AP Mode
2/25/2016file:///C:/Users/Cable%20Matters/AppData/Local/Temp/~hh4D72.htm

Home > Screen Descriptions > Client + AP Mode > Compact Mode Screen
The Compact Mode Screen (Client + AP Mode)
From the compact mode screen in Client and AP Mode, use the Mediatek Utility to set up an access point (AP) which can access other wireless networks and the Internet, and control access to the AP based on MAC address.
The Mediatek Utility in compact mode shows the connection status of the Mediatek Adapter.
A Click these buttons to open the following screens.
- Use the AP screens to set up a network and find the MAC address of network members.
- Use the Available Networks screen to connect to available networks.
- Use the Link Information screens to find detailed information on the status of your wireless connection.
- Use the Profile Settings screens to set up and use profiles to more quickly connect using frequently used settings, and to set up wireless security.
- Use the Advanced screen to select your region code, and to install WAPI certificates.
- Use the About screen to find version information for your Utility.
Page 1 of 47.3.1 Compact Mode Screen ClientAP Mode
2/25/2016file:///C:/Users/Cable%20Matters/AppData/Local/Temp/~hhD995.htm

B The Utility also provides information and tools to manage your wireless connection.
- Click the RF buttons to enable or disable wireless transmission.
- Indicates the security status of your connection.
- Indicates the quality of your wireless connection.
C Provides information on network settings.
� SSID: This shows the name of your network. � Rate: This shows the speed of your connection. � Channel: This is the channel assigned to your connection. Change this if interference is a problem
on your network. � IP Address: This identifies the Mediatek Adapter on your wireless network, much like a physical
mailing address identifies a house on a street. � Mask: The subnet mask hides your IP address from outside your wireless network.
Home > Screen Descriptions > Client + AP Mode > AP Screens
The AP Screens
The AP screens let you configure access point settings when the Utility is set to Client + AP mode. Use these screens to set up a secure wireless network, share Internet access, and find information on computers and devices connected to your network.
The following screens are described.
� AP Configuration� MAC Table
AP Buttons
Click the following buttons to access the AP screens.
- Click this button to access the AP Configuration screen and to set up a secure wireless network and share Internet access.
- Click this button to access the MAC Table screen and find the MAC addresses of devices
Page 2 of 47.3.1 Compact Mode Screen ClientAP Mode
2/25/2016file:///C:/Users/Cable%20Matters/AppData/Local/Temp/~hhD995.htm

and computers connected to your wireless network.
The AP Configuration Screen
Use the AP Configuration screen to set up a secure wireless network.
� SSID: The name of your wireless network. � WPA2 Pre-Shared Key: Type a passphrase 8-63 characters long made up of characters '0'-
'9', 'a'-'z', 'A'-'Z', keyboard symbols and spaces. � IP Address: This indicates the IP address of the Mediatek Adapter on your wireless
network. � Apply: Click this to save your settings.
The MAC Table Screen
Use the MAC Table screen to find information on computers and devices connected to your network.
� BSSID: This is the MAC address of your AP which uniquely identifies your network. � MAC Table: This table shows a list of the MAC addresses of currently connected
computers and devices, as well as their security status. Security status options include 'Authenticated' and 'Invalid' respectively indicating a successful and unsuccessful connection.
Page 3 of 47.3.1 Compact Mode Screen ClientAP Mode
2/25/2016file:///C:/Users/Cable%20Matters/AppData/Local/Temp/~hhD995.htm

Page 4 of 47.3.1 Compact Mode Screen ClientAP Mode
2/25/2016file:///C:/Users/Cable%20Matters/AppData/Local/Temp/~hhD995.htm

Home > Troubleshooting > Troubleshooting
Troubleshooting
The Troubleshooting section contains suggestions to problems using the Mediatek Utility. Click on the following links to navigate to a problem area.
� Not all features are available.
� I can't connect to a network.
� The quality of my connection is bad.
� I can't use WPS.
� I can't set up a wireless network.
� I can't use Wi-Fi Direct.
Not All Features are Available.
The Wi-Fi Direct button does not work.
� If the transmitter icon displays as shown , click on it to enable transmission and to enable Wi-Fi Direct functionality.
The Profile button , the Advanced button , and the Connect button do not work.
� The Utility is set to Windows Zero Configuration mode so these functions are unavailable while Windows manages the Adapter. To enable these features, right-click on the Mediatek Utility icon
in the bottom right corner of your screen. In the menu that displays, select 'Use RaConfig as Configuration Utility' to enable these buttons.
The Profile button and the Advanced button do not work.
� If you are logged on to Windows using a guest account, then these features are not available. Log out of Windows and log back in using an account with user or administrator permissions.
A warning message displays when I try to enable AP Mode and/or enable client mode.
� Disable other non-Mediatek wireless cards. In Windows go to Network Connections, right-click on all wireless connections displayed which do not use the Mediatek Adapter, and select Disable.
Client mode or AP mode options are not available.
� Ensure that you are not logged into Windows using the Guest account. When you are logged in to the Guest account in Windows XP or Vista, AP mode is not available. When you are logged in to
Page 1 of 138.0 Troubleshooting
2/25/2016file:///C:/Users/Cable%20Matters/AppData/Local/Temp/~hh9EAA.htm

the Guest account in Windows 7, neither client nor AP mode are available. To use these options, log out of Guest mode and log in as a user or administrator.
I Can't Connect to a Network.
I cannot find the name of my wireless network in the Available Networks screen.
� If the Available Networks screen shows no available networks, check the Mediatek icon in the
bottom right of your screen. If the 'Mediatek Wireless LAN Card Not exist' icon displays, ensure your Mediatek adapter is correctly installed. Alternatively, check transmission is enabled
as indicated by the transmission icon in the main screen .
� Check the AP (access point) for your wireless network is turned on and is transmitting.
� Click the Rescan button in the Available Networks screen.
� Check the network name (SSID) settings on your AP. Check you have the correct SSID name and that broadcasting of the SSID is enabled.
I can see the name of my wireless network, but I can not connect to it. The Mediatek icon displays as
shown , indicating a disconnected status.
� Check the network settings of your AP. You may be required to enter security settings.
� Check you have entered the correct security settings.
� Check the AP's MAC access policy has given you permission to access the AP.
� Check the AP has DHCP enabled.
I can not remember my security settings (e.g. security key or password).
� Check the security settings on your AP to find out its security settings.
� Reset the AP to its default settings, and access the AP using the default security settings.
The Quality of My Connection is Bad.
I am not sure whether signal quality is a problem.
� Check the Mediatek icon in the bottom right of your screen.
- Indicates a good connection and signal strength.
- Indicates a normal connection and signal strength.
Page 2 of 138.0 Troubleshooting
2/25/2016file:///C:/Users/Cable%20Matters/AppData/Local/Temp/~hh9EAA.htm

- Indicates a weak connection and signal strength.
� Alternatively, click on the Link Information button and then the Throughput button to check information on the link quality and signal strength.
The Mediatek Utility indicates I have a weak connection. How can I increase the signal strength of my wireless connection?
� Move the adapter closer to the AP. Avoid shielded locations, or locations experiencing interference.
� Set your wireless connection to the least used network channel.
� Upgrade your hardware to the latest wireless standards.
I Can't Use WPS.
When I start the WPS connection process, one of the following error messages displays.
� 'No PBC AP available' - Ensure you have started the WPS connection process on both devices, within 120 seconds of each other.
� 'Too Many PBC APs available' - There is more than one other device using WPS to connect to your device. Wait several minutes, then begin the WPS connection process on the two devices you are connecting.
� 'WPS EAP process failed' - You may have entered the wrong PIN. Repeat the WPS connection process, this time correctly, entering the PIN in the device to which you are connecting.
� 'An inappropriate EAP-FAIL received' - The device to which you were connecting was unable to process the WPS connection. Ensure it is turned on with WPS enabled.
� 'Error PIN Code' - Repeat the WPS connection process, this time correctly, entering the PIN in the device to which you are connecting.
Page 3 of 138.0 Troubleshooting
2/25/2016file:///C:/Users/Cable%20Matters/AppData/Local/Temp/~hh9EAA.htm

I Can't Set Up a Wireless Network.
Other devices cannot see my AP.
� Check the network name (SSID) settings on your AP. Check you have the correct SSID name and that transmission of the SSID is enabled.
Other devices cannot connect to my AP.
� Check the network settings of the AP match those of devices you are connecting to. Check DHCP is enabled and that the MAC addresses of connecting devices have permission to access the AP.
Other devices cannot connect to the Internet through my AP.
� Check you have correctly followed the instructions in Sharing Internet Access and have a working connection to the Internet from your AP.
I Can't Use Wi-Fi Direct.
I cannot see the Wi-Fi Direct button (Windows 7 only).
� Due to Windows behavior, sometimes the Wi-Fi Direct function is disabled in Windows 7. To enable Wi-Fi Direct and make the Wi-Fi Direct button visible, in Windows 7, go to Control Panel\Network and Internet\Network Connections, right-click on a Network Connection such as Bluetooth, and select "Disable".
The Wi-Fi Direct button does not work.
� If the transmitter icon displays as shown , click on it to enable transmission and to enable Wi-Fi Direct functionality.
I cannot see the computer or device to which I want to connect.
� Right-click on the notebook icon, and click Scan.
� Ensure Wi-Fi Direct is enabled on the device to which you connecting.
� Ensure the computer or device to which you are connecting is within range and not shielded in any way.
I can see a device in the Wi-Fi Direct screen, but I cannot connect to it.
� Check the GO (group owner) to which both devices belong (as indicated by the GO icon ). If the devices belong to different GOs then their connection settings are different and they cannot connect. To connect these devices, they must connect to the same GO.
When I use WPS to set up a Wi-Fi Direct connection, I cannot enter the PIN in the 'PIN Code' field.
Page 4 of 138.0 Troubleshooting
2/25/2016file:///C:/Users/Cable%20Matters/AppData/Local/Temp/~hh9EAA.htm

� In this version of WPS, this field is greyed out until the other WPS device begins the PIN connection process. Set the other WPS device to begin the PIN connection process. When the Mediatek Utility receives a WPS connection attempt, you can then type the PIN in this field.
Home > Troubleshooting > Error Messages
Error Messages
To understand a problem signified by an error message and to find suggested solutions, search for the error message in the following tables.
Error messages are organized into the following categories - Security, Profile, Wi-Fi Direct, AP Mode, and miscellaneous error messages.
Security Error Messages
ID Error Message Problem Description Suggested Solution
1
The maximum number of PACs allowed is %d. Delete unneeded PACs before importing additional PAC files.
The maximum number of PAC that can be installed in the Utility is 150.
Delete any unneeded PACs before importing the PAC to be installed.
2
Invalid WPA-PSK key. Enter a key using 8-63 printable ASCII characters or 64 hexadecimal digits.
The WPS security passphrase entered is too short or too long.
Type a security passphrase in the WPA-PSK field which is between 8-63 ASCII characters or 8-64 hexadecimal characters.
Invalid WPA2-PSK. Enter a key using 8-63 printable ASCII The WPA2 security passphrase
Type a security passphrase in the WPA2 Pre-Shared Key
Page 5 of 138.0 Troubleshooting
2/25/2016file:///C:/Users/Cable%20Matters/AppData/Local/Temp/~hh9EAA.htm
3characters or 64 hexadecimal digits.
entered is too short or too long. field which is between 8-63 ASCII characters or 8-64 hexadecimal characters.
4
Invalid WAPI key. Enter a key with an even length made up of 8-64 printable ASCII characters or hexadecimal digits.
The WAPI security passphrase entered is too short or too long.
Type a security passphrase in the WAPI PSK field which is between 8-64 keyboard characters.
5Invalid WAPI key. An even number of hexadecimal digits is required.
If entering a WAPI security passphrase using hexadecimal characters, the total number of characters must be an even number.
Enter a security passphrase using an even number of hexadecimal characters.
6Invalid WEP Key length. WEP key requires 10 or 26 hexadecimal characters.
If entering a WEP security passphrase using hexadecimal characters, the total number of characters must be 10 or 26 characters.
Enter a security passphrase using 10 or 26 hexadecimal characters.
7Invalid WEP key length. WEP key requires 5 or 13 ASCII characters.
If entering a WEP security passphrase using ASCII characters, the total number of characters must be 5 or 13 characters.
Enter a security passphrase using 5 or 13 ASCII characters.
8 Please enter SSID
When attempting to connect to a wireless network which does not broadcast its network name (SSID), you need to enter the network name.
Enter the name of the network to which you are connecting.
9 Must input IdentityWhen setting up EAP security, for Tunnel ID you need to enter your user name.
In the Tunnel ID field, enter the user name assigned you by the network administrator.
10 Must input Password
When setting up EAP security, for Tunnel Password you need to enter the password associated with your user name.
In the Tunnel Password field, enter the password assigned you by the network administrator.
11The network is configured with OPEN security. Do you want to connect?
The network to which you are connecting is open, and any data you send may be read or altered by others.
Click Yes to continue connecting to an unsecured network, or find a more secure network to which to connect.
12 No AP supported.
When setting up a WPS connection using the push button method, the Utility scans for APs that support WPS and reports an error message if none are found.
Check the AP to which you are connecting is turned on, with WPS enabled, and is in range.
The user name assigned you by In the Tunnel ID field, type the
Page 6 of 138.0 Troubleshooting
2/25/2016file:///C:/Users/Cable%20Matters/AppData/Local/Temp/~hh9EAA.htm

13Tunneled identity required for PEAP authentication!
the network administrator is required for PEAP authentication.
user name assigned you by the network administrator.
14Password required for MD5 authentication!
When setting up EAP-MD5, a password associated to your user name is required.
In the Tunnel Password field, type the password associated to your user name which was assigned you by the network administrator.
15Please select a client certificate to use!
When setting up user certification on your EAP method, you need to select a user certificate.
When setting up an EAP method, in the certificate screen, select a user certificate.
16The certificate's expiry date is invalid. Select a certificate with a valid expiry date.
The user certificate you selected is out of date.
Ask you network administrator for a new, valid user certificate.
17 Invalid User certificateThe WAPI user certificate was not accepted.
Check the expiry date of the certificate, a new certificate may be required. Alternatively, check the certificate is the correct one for the user.
18 Invalid Issuer certificateThe WAPI server certificate was not accepted.
Check the expiry date of the certificate, a new certificate may be required. Alternatively, check the certificate is the correct one for the authentication server.
19Issuer and subject are not matched in Issuer certificate.
For WAPI certificates, the subject in a server certificate must match the issuer.
Check you have installed the server certificate and not the user certificate instead.
20User certificate and Issuer certificate are not matched.
For WAPI server/user certificate pairs, the public key in both user and server certificates must match.
Manually examine the public key in server and user certificates to find matching pairs.
21 This setting already exists.You are attempting to select a certificate that has already been selected.
You do not need to install this certificate. Continue settng up security.
22The selected certificate is over the maximum length.
The certificate you have selected is too long.
Check you have selected the correct certificate. Alternatively, ask your network administrator for a new, valid certificate.
23Issuer and subject are matched in Issuer certificate.
The issuer cannot issue a user certificate for itself.
Check you are connected to the correct authentication server. Alternatively, check you have installed the correct certificates.
When setting up a WPS
Page 7 of 138.0 Troubleshooting
2/25/2016file:///C:/Users/Cable%20Matters/AppData/Local/Temp/~hh9EAA.htm
Profile Error Messages
24 Invalid Pin Codeconnection, a PIN with a length not equal to either 4 or 8 is entered.
Type a PIN with the correct length. This is either a total of 4 or 8 digits.
25 Pin Code error
When setting up a WPS connection, a PIN with the correct length is entered, but with the wrong digits.
Re-enter the correct PIN.
26This connected AP has been configured. You can select "YES" to try to reconfigure.
To set up a connection to an AP using a WPS profile, any existing WPS settings on the AP must be reset to those of your WPS profile.
Click YES to apply the settings of your WPS profle to the AP to which you are connecting. NOTE this feature is only available in WPS version 2.
27The AP is already configured. Your profile settings can not be applied.
If the WPS settings of the WPS profile you are using to connect to an AP are different from those configured on the AP, then the connection will fail.
Reset either the WPS settings on the AP or those of the WPS profile you are using to connect to the AP, so that they are the same.
28Your profile uses OPEN security to configure, and do you still want to configure?
You are attempting to set up a WPS connection using a WPS profile which has been configured with no security settings.
It is recommended that security is configured on any wireless connection used.
29AP's uuid is empty, please press rescan button to scan again!
The Utility failed to detect all required settings on the AP to which you are using WPS to connect.
Restart the WPS connection process by clicking the "Start PIN" button. Alternatively, in the Site Survey screen, click the "Rescan" button to detect AP settings.
ID Error Message Problem Description Suggested Solution
1 Please enter profile's nameWhen setting up a profile, a name is required in the profile name field.
In the profile name field, type a name for the profile.
2Profile name requires 1-32 characters.
When typing a name for the profile, the maximum size is 32 characters.
Type a name for the profile using no more than 32 characters.
2A profile name consisting only of spaces is not allowed.
When typing a name for the profile, the spacebar can only used in conjunction with printable characters.
If using the spacebar while typing a name for your profile, ensure you have also typed printable characters.
When leaving the profile
Page 8 of 138.0 Troubleshooting
2/25/2016file:///C:/Users/Cable%20Matters/AppData/Local/Temp/~hh9EAA.htm

Wi-Fi Direct Error Messages
3The integer value following by "PROF" should not exceed 4294967294
name to its default "PROF"+n+1, where n= number of profiles created, n may not exceed the stated maximum.
Enter an alternative profile name, for example, use hexadecimal to indicate high numbers of profiles.
4Not accept profile whose security is WEP or WPA or TKIP for WPS verion2
When setting up a WPS profile, you configured non-AES security. However, WPS version 2 only accepts AES security.
To connect to a WPS version 2 enabled device, you need to configure a WPS profile with AES security. Alternatively, with a WPS profile configured with non-AES security, try connecting to a device with WPS version 1 enabled.
5Failed to import! No profile in the file.
When importing a profile file, no profile settings were found in the file.
Try exporting a profile file, and use a text file editor to examine the settings. Any profile file you import should have similar settings.
6Failed to import! More than one profile in the file.
When importing a profile file, conflicting profile settings were found in the file.
Use a text file editor such as Notepad to examine the profile file and delete conflicting entries.
7Failed to import! This profile name already exists.
When importing a profile file, a profile with an identical profile name was found already configured.
Delete the existing profile with the matching name. Alternatively, using a text editor application such as Notepad, edit the name of the profile to be imported.
8The profile to delete is currently in use.
You are currently connected to a network using the profile to be deleted.
Disconnect from the network to which you are currently connected, then delete the profile.
9Please try again to save with another file name.
When exporting a profile which has the same name as an existing profile filename, and which is currently in use, the save will fail.
Rename the profile file you are exporting.
10The maximum number of profiles allowed is 100.
You have reached the maximum number of profiles supported by the Utility.
To add additional profiles, delete existing profiles in the profile list.
ID Error Message Problem Description Suggested Solution
Page 9 of 138.0 Troubleshooting
2/25/2016file:///C:/Users/Cable%20Matters/AppData/Local/Temp/~hh9EAA.htm
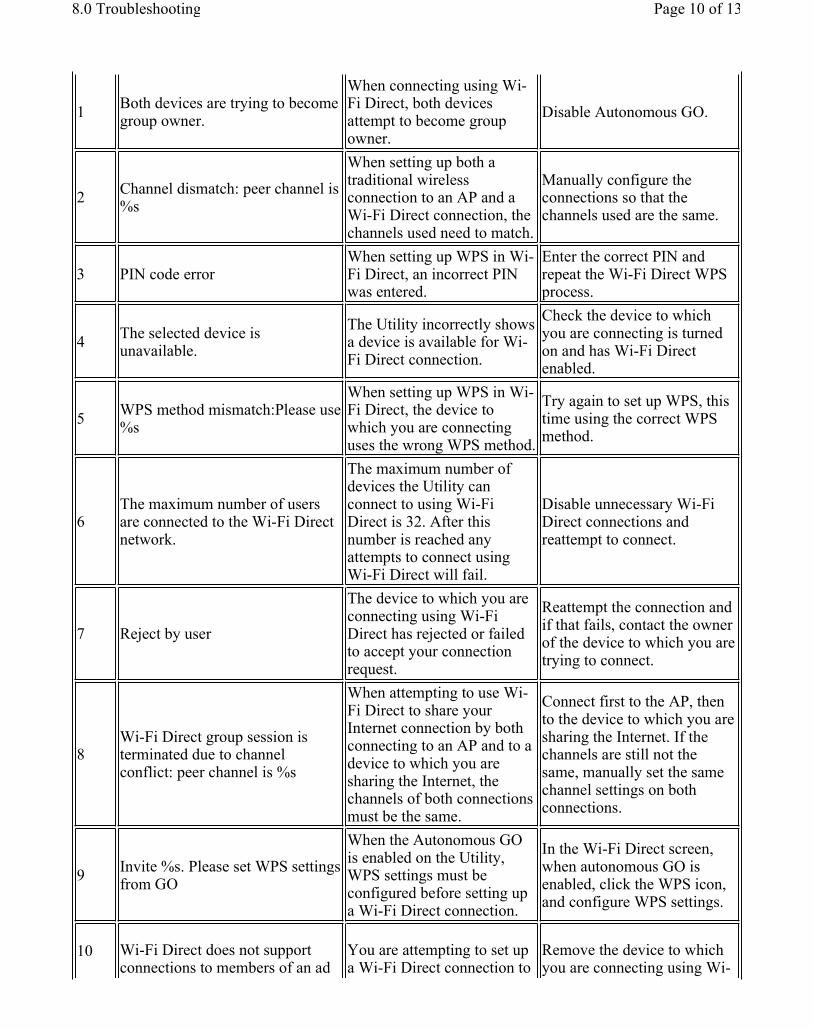
1Both devices are trying to become group owner.
When connecting using Wi-Fi Direct, both devices attempt to become group owner.
Disable Autonomous GO.
2Channel dismatch: peer channel is %s
When setting up both a traditional wireless connection to an AP and a Wi-Fi Direct connection, the channels used need to match.
Manually configure the connections so that the channels used are the same.
3 PIN code errorWhen setting up WPS in Wi-Fi Direct, an incorrect PIN was entered.
Enter the correct PIN and repeat the Wi-Fi Direct WPS process.
4The selected device is unavailable.
The Utility incorrectly shows a device is available for Wi-Fi Direct connection.
Check the device to which you are connecting is turned on and has Wi-Fi Direct enabled.
5WPS method mismatch:Please use %s
When setting up WPS in Wi-Fi Direct, the device to which you are connecting uses the wrong WPS method.
Try again to set up WPS, this time using the correct WPS method.
6The maximum number of users are connected to the Wi-Fi Direct network.
The maximum number of devices the Utility can connect to using Wi-Fi Direct is 32. After this number is reached any attempts to connect using Wi-Fi Direct will fail.
Disable unnecessary Wi-Fi Direct connections and reattempt to connect.
7 Reject by user
The device to which you are connecting using Wi-Fi Direct has rejected or failed to accept your connection request.
Reattempt the connection and if that fails, contact the owner of the device to which you are trying to connect.
8Wi-Fi Direct group session is terminated due to channel conflict: peer channel is %s
When attempting to use Wi-Fi Direct to share your Internet connection by both connecting to an AP and to a device to which you are sharing the Internet, the channels of both connections must be the same.
Connect first to the AP, then to the device to which you are sharing the Internet. If the channels are still not the same, manually set the same channel settings on both connections.
9Invite %s. Please set WPS settings from GO
When the Autonomous GO is enabled on the Utility, WPS settings must be configured before setting up a Wi-Fi Direct connection.
In the Wi-Fi Direct screen, when autonomous GO is enabled, click the WPS icon, and configure WPS settings.
10 Wi-Fi Direct does not support connections to members of an ad
You are attempting to set up a Wi-Fi Direct connection to
Remove the device to which you are connecting using Wi-
Page 10 of 138.0 Troubleshooting
2/25/2016file:///C:/Users/Cable%20Matters/AppData/Local/Temp/~hh9EAA.htm

AP Mode Error Messages
hoc network. a device which is part of an ad hoc network.
Fi Direct from the ad hoc network.
11
Conflict between 802.11N(20/40MHz) and 802.11BG mode: peer channel is %s%s will become number.
The device to which you are connecting supports a different Wi-Fi hardware standard from your device.
Wi-Fi Direct is an 802.11n standard. Set up a Wi-Fi Direct connection with an 802.11n device instead.
12 Please enter server friendly nameIn the Media Sharing screen, type a name for the media server.
13Start Wi-Fi Direct concurrent GO Fail
When operating in "client + AP" mode, enabling the group owner setting failed.
Retry enabling the GO function.
14Invalid Intent idex, Intent idex = 0~15
To decide the group owner in a Wi-Fi Direct connection, the intent index is used. The default for the Utility is 7 and within the valid range.
The default intent index value for the Mediatek Utility is in the valid range. Check the intent index on the device to which you are connecting and reset it to an integer between 0 and 15.
ID Error Message Problem Description Suggested Solution
1 URL unavailable.
When clicking on the Mediatek icon in the About screen, no connection to the Internet can be found.
Check you are connected to the Internet.
2Invalid MAC address format. Use 8 hexadecimal digits.
When setting up the Access Control List, MAC addresses need to be entered using 8 characters "0"-"9" and "A"-"F", i.e. hexadecimal characters.
Ensure you have entered 8 hexadecimal characters.
3Multicast MAC addresses are not accepted.
When entering MAC addresses in the Access Control screen, MAC addresses where the second character is odd are not accepted. Such a MAC address represents a group of devices, but the access control screen is intended to control individual access to the network.
Ensure the second character of the MAC address you are entering is not odd. This should not be an issue if you are entering the MAC address of a single device on your network.
As access to the network is
Page 11 of 138.0 Troubleshooting
2/25/2016file:///C:/Users/Cable%20Matters/AppData/Local/Temp/~hh9EAA.htm

Miscellaneous Error Messages
4Do not add the Mediatek AP's MAC address.
required by the AP, you may not enter the AP's MAC address.
Do not attempt to add the MAC address of your AP to this list.
5MAC address is already in the Access List.
The MAC address you are entering is already added to the access control list.
You do not need to add this MAC address.
6MAC address required in Access List
When "Allow All" or "Reject All" is selected from the drop-down list in the Access Control screen, one or more MAC addresses must be added to the list.
Ensure that one or more MAC addresses are added to the access control list before selecting "Allow All" or "Reject All" in the Access Control screen.
7The idle time should be between 60 - 3600 seconds.
In the Advanced screen, type an idle time between 60 and 3600 seconds.
8The beacon period should be between 20 - 1000 ms.
In the Advanced screen, type a beacon interval period between 20 and 1000 milliseconds.
9Invalid WPA-PSK security key. Use 8-63 printable ASCII characters or 64 hexadecimal
In the AP Setup screen, type a WPA-PSK security passphrase using either 8-63 ASCII characters ("a"-"z","A"-"Z", "0"-"9", plus keyboard symbols and the spacebar), or 8-64 hexadecimal characters ("0"-"9","A"-"F").
10Enter an integer value for the group rekey interval between 3 and 67108863.
In the AP Setup screen, if the "x 10 seconds" button displays, type a group rekey interval between 3-67108863 units of 10 seconds. If the "x 1000 packets" button displays, type a group rekey interval measured by the number of packets transmitted on the network between 3-67108863 x 1000 packets.
11Invalid WEP key length. WEP key %d requires 5 or 13 printable ASCII characters.
In the AP Setup screen, when setting up WEP security, when ASCII is selected, type a WEP security passphrase made up of 5 or 13 ASCII characters.
12Invalid WEP key length. WEP key %d requires 10 or 26 hexadecimal digits.
In the AP Setup screen, when setting up WEP security, when hexadecimal is selected, type a WEP security passphrase made up of 10 or 26 hexadecimal characters.
13Switch to client mode failed. Log out of other user accounts on your computer and retry.
When switching from AP mode to client mode, switching cannot complete if the Utility is running in another user account on the same computer.
Request the owner of the user account running the Utility to log in and close the Utility. Otherwise, try running the Utility as administrator.
ID Error Message Problem Description Suggested Solution
The Adapter cannot be Check whether you have permission by Windows to
Page 12 of 138.0 Troubleshooting
2/25/2016file:///C:/Users/Cable%20Matters/AppData/Local/Temp/~hh9EAA.htm

1 Switch radio failed!
turned on or off, i.e. radio transmission cannot be enabled or disable.
manage the Mediatek Utility. Click "run as Administrator". Alternatively, reinsert the Adapter, or reinstall the Utility.
2Before using SoftAP, please radio on...
When switching from client mode to AP mode, the radio transmission function has been disabled.
Click the radio (RF) icon in the main menu to enable radio transmission, then try again to switch to AP mode.
3Please turn on AutoConfig service
When switching to AP mode, the Windows AutoConfig service has been disabled.
For information on enabling AutoConfig, visit the Microsoft support web site http://support.microsoft.com/.
4 Start failed!You cannot start the Mediatek Utility.
Check the Windows service AutoConfig is enabled. Alternatively, reboot your computer.
5 No selected item
When saving changes to a screen, user input is still required in fields such as radio buttons or combo boxes.
Check the screen to ensure that all required selections have been made before saving changes.
6 Please enter SSID
When configuring settings for connecting to an ad hoc network, an SSID or name of the network is required.
In the SSID field, type the name of the ad hoc network to which you are connecting.
Page 13 of 138.0 Troubleshooting
2/25/2016file:///C:/Users/Cable%20Matters/AppData/Local/Temp/~hh9EAA.htm

Home > Connecting to a Wireless Network > Connecting to a Wireless Network
Connecting to a Wireless Network
The Mediatek Utility lets you connect to a wireless network, hotspot, access point (AP), or wireless router, and even lets you connect to the Internet. For alternative methods to connect wirelessly see Connecting Using Windows, Connecting Using WPS, or Connecting Using a Profile. Otherwise follow the steps below to connect to a wireless network using the Mediatek Utility.
Instructions
1. Open the Mediatek Utility by double-clicking on the Mediatek Utility icon in the taskbar in the bottom right corner of your screen, or by clicking Start > Programs > Mediatek Wireless Utility.
2. The Mediatek Utility appears, by default connected to an available open wireless network. Check the name of the network to which you are connected. If this is the correct network, no further steps are required.
3. To connect to an alternative network, click the Available Networks button.
4. In the Available Networks window that appears, select the name of the network to which you are
connecting. Then click the connect icon and wait several seconds while the Utility sets up a connection.
Page 1 of 192.1 Connecting Using the Mediatek Utility
2/25/2016file:///C:/Users/Cable%20Matters/AppData/Local/Temp/~hh960B.htm

5. The Mediatek Utility automatically detects and displays the security settings of the network to which you are connecting in the Profile Settings screens. For instructions on setting up security, click on the security method detected for your network.
� WPA-PSK or WPA2-PSK� WEP� 802.1X, WPA, or WPA2
� WAPI-PSK� WAPI-CA� No Security
WPA-PSK or WPA2-PSK
a. If the Utility shows that WPA-PSK or WPA2-PSK security is detected, click the right arrow to save your settings.
Page 2 of 192.1 Connecting Using the Mediatek Utility
2/25/2016file:///C:/Users/Cable%20Matters/AppData/Local/Temp/~hh960B.htm

b. In the screen that displays, in the 'WPA Preshared Key' field, type a security key, the same as that used by the AP or wireless router to which you are connecting. Click the right arrow to save your settings and connect to the network.
WEP
a. If the Utility shows that WEP security is detected, click the right arrow to save your settings
b. In the 'WEP Key' field, type the same WEP key as that configured on the AP or wireless router to which you are connecting, and ensure that 'Default Tx Key' and 'Key Format' settings are also the same. Click the right arrow to save your settings and connect to the network.
Page 3 of 192.1 Connecting Using the Mediatek Utility
2/25/2016file:///C:/Users/Cable%20Matters/AppData/Local/Temp/~hh960B.htm

802.1X, WPA, or WPA2
a. If the Utility shows that 802.1x, WPA, or WPA2 security is detected, click the right arrow to save your settings
b. Select the EAP Method (Extensible Authentication Protocol) and Tunnel Authentication method, and if required, the Tunnel ID method and Tunnel Mode, and enter the user name and password, using the settings provided by your organization's network administrator. For more information on settings for these fields and for those in the screens that follow, see Setting Up Enterprise Security. Click the right arrow to save your settings.
Page 4 of 192.1 Connecting Using the Mediatek Utility
2/25/2016file:///C:/Users/Cable%20Matters/AppData/Local/Temp/~hh960B.htm

WAPI-PSK
a. If the Utility shows that WAPI-PSK security is detected, click the right arrow to save your settings.
b. In the 'WPA Preshared Key' field, type a security key, and select a Key Format setting, the same as that used by the AP or wireless router to which you are connecting. Click the right arrow to save your settings and connect to the network.
WAPI-CA
a. If the Utility shows that WAPI-CA security is detected, click the right arrow to save your settings.
Page 5 of 192.1 Connecting Using the Mediatek Utility
2/25/2016file:///C:/Users/Cable%20Matters/AppData/Local/Temp/~hh960B.htm

b. If you have a WAPI certificate already installed, in the Select Mode field, select Auto and click the right arrow to save your settings and connect to the network. Otherwise, if there is no WAPI certificate in your system, go to Setting Up Enterprise Wireless Security: Setting Up WAPI-CA for information on installing a WAPI certificate.
No Security
If your network has no security (not recommended), no further settings are required. Click the right arrow to save your settings and connect to the network
6. Once you are connected the Available Networks screen shows the status of your connection.
Page 6 of 192.1 Connecting Using the Mediatek Utility
2/25/2016file:///C:/Users/Cable%20Matters/AppData/Local/Temp/~hh960B.htm

Troubleshooting
See Troubleshooting for solutions to problems connecting to a wireless network.
For further information on the screens used see the Available Networks screens and the Profile Settings screens.
Home > Connecting to a Wireless Network > Connecting Using Windows
Connecting to a Wireless Network Using Windows
You can also use Windows to manage the Mediatek Adapter and connect to a wireless network, hotspot, access point (AP), or wireless router, and even connect to the Internet.
Instructions
To connect to a wireless network, follow the steps provided for your computer's operating system (OS)
� Windows 7� Windows Vista� Windows XP
Page 7 of 192.1 Connecting Using the Mediatek Utility
2/25/2016file:///C:/Users/Cable%20Matters/AppData/Local/Temp/~hh960B.htm

Connecting using Windows 7
1. Click on the wireless networks icon in the task bar in the bottom right hand corner of your screen to display the available wireless networks.
2. Click the "Connect" button to connect to the selected network.
3. If your network has wireless security configured, enter the required settings. The following is an example only, your network settings may differ.
Page 8 of 192.1 Connecting Using the Mediatek Utility
2/25/2016file:///C:/Users/Cable%20Matters/AppData/Local/Temp/~hh960B.htm
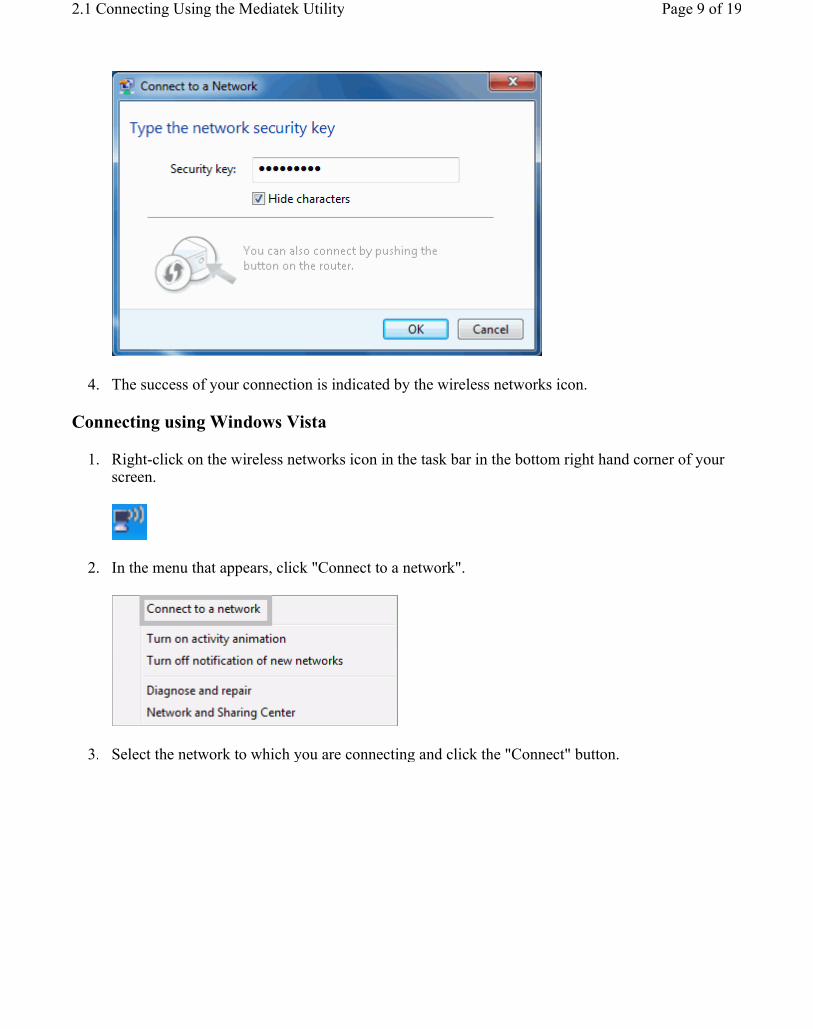
4. The success of your connection is indicated by the wireless networks icon.
Connecting using Windows Vista
1. Right-click on the wireless networks icon in the task bar in the bottom right hand corner of your screen.
2. In the menu that appears, click "Connect to a network".
3. Select the network to which you are connecting and click the "Connect" button.
Page 9 of 192.1 Connecting Using the Mediatek Utility
2/25/2016file:///C:/Users/Cable%20Matters/AppData/Local/Temp/~hh960B.htm

4. If your network has wireless security configured, enter the required settings. The following is an example only, your network settings may differ.
Page 10 of 192.1 Connecting Using the Mediatek Utility
2/25/2016file:///C:/Users/Cable%20Matters/AppData/Local/Temp/~hh960B.htm

5. A message displays indicating the success of your connection.
Connecting using Windows XP
1. Before you begin, ensure WZC is enabled, by right-clicking on the Mediatek icon in the task bar in the bottom right hand corner of your screen.
2. In the menu that appears, select "Use Zero Configuration as Configuration Utility" to use Windows's wireless management feature, Windows Zero Configuration (WZC), to manage your Mediatek Wireless Adapter.
3. Right-click on the wireless networks icon in the task bar in the bottom right hand corner of your screen.
4. In the menu that appears, click "View Available Wireless Networks".
Page 11 of 192.1 Connecting Using the Mediatek Utility
2/25/2016file:///C:/Users/Cable%20Matters/AppData/Local/Temp/~hh960B.htm
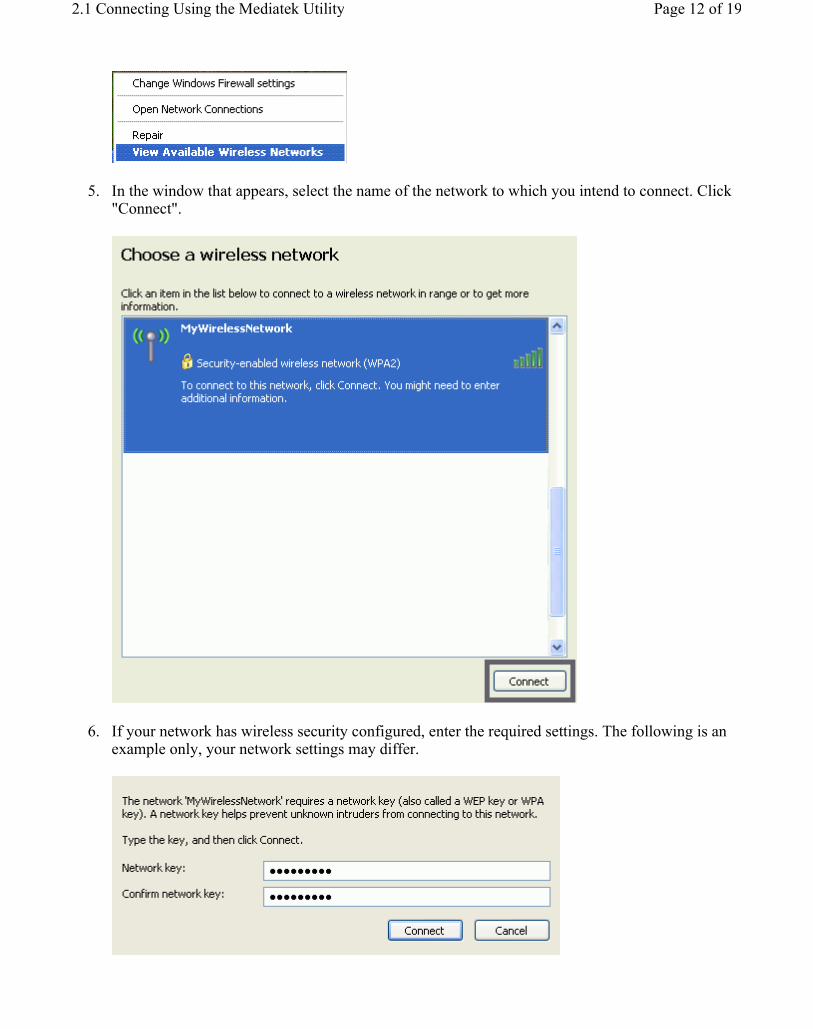
5. In the window that appears, select the name of the network to which you intend to connect. Click "Connect".
6. If your network has wireless security configured, enter the required settings. The following is an example only, your network settings may differ.
Page 12 of 192.1 Connecting Using the Mediatek Utility
2/25/2016file:///C:/Users/Cable%20Matters/AppData/Local/Temp/~hh960B.htm

7. If successfully connected, the "Connected" icon appears in the "Wireless Network Connection" screen, and a pop-up also indicates the connection status.
Troubleshooting
For suggestions on problems using Windows to connect to a wireless network, visit the Microsoft support web site http://support.microsoft.com/.
Home > Connecting to a Wireless Network > Connecting Using WPS
Connecting to a Wireless Network Using WPS
WPS (Wi-Fi Protected Setup) is the simplest and most secure way to connect to a wireless network. WPS is a wireless security method aimed at combining strong WPA or WPA2 security with a simple setup procedure. If the AP or wireless router to which you are connecting shows the WPS logo (shown below), you can set up a wireless connection simply and securely using WPS.
You can apply WPS in two ways.
� The Push-Button (PBC) method: (Recommended) The device to which you are connecting must have a WPS button available on its external casing or as part of its software interface.
� The PIN (personal identification number) method: Use this method if the device to which you are connecting has no WPS button.
Instructions
Follow these instructions to set up a WPS connection using either a push-button or a PIN.
1. Click the Profile Settings button in the Mediatek Utility.
Page 13 of 192.1 Connecting Using the Mediatek Utility
2/25/2016file:///C:/Users/Cable%20Matters/AppData/Local/Temp/~hh960B.htm
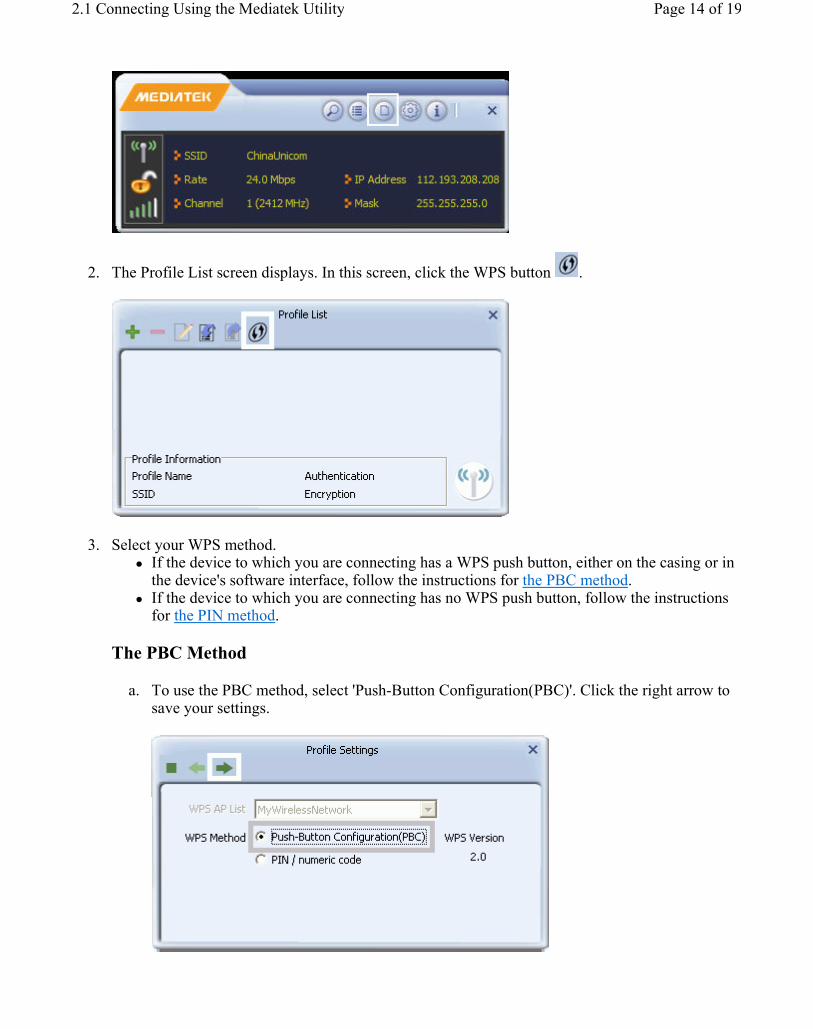
2. The Profile List screen displays. In this screen, click the WPS button .
3. Select your WPS method. � If the device to which you are connecting has a WPS push button, either on the casing or in
the device's software interface, follow the instructions for the PBC method. � If the device to which you are connecting has no WPS push button, follow the instructions
for the PIN method.
The PBC Method
a. To use the PBC method, select 'Push-Button Configuration(PBC)'. Click the right arrow to save your settings.
Page 14 of 192.1 Connecting Using the Mediatek Utility
2/25/2016file:///C:/Users/Cable%20Matters/AppData/Local/Temp/~hh960B.htm
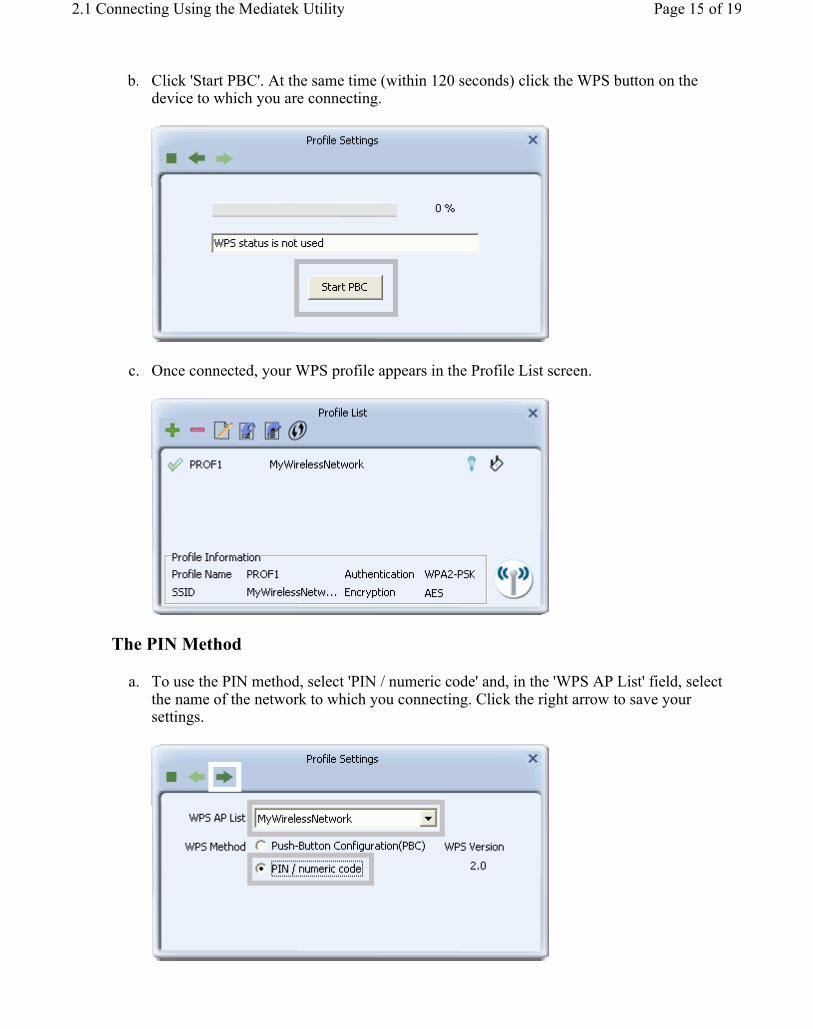
b. Click 'Start PBC'. At the same time (within 120 seconds) click the WPS button on the device to which you are connecting.
c. Once connected, your WPS profile appears in the Profile List screen.
The PIN Method
a. To use the PIN method, select 'PIN / numeric code' and, in the 'WPS AP List' field, select the name of the network to which you connecting. Click the right arrow to save your settings.
Page 15 of 192.1 Connecting Using the Mediatek Utility
2/25/2016file:///C:/Users/Cable%20Matters/AppData/Local/Temp/~hh960B.htm

b. You can use either the PIN provided by the Mediatek Utility or the PIN provided by the device to which you are connecting.
� PIN provided by the Mediatek Utility.
If the device to which you are connecting requires a PIN, in the 'Config Mode' field, from the drop-down list, select 'Enrollee'. Your PIN is displayed in the 'Pin Code' field on your Utility. Then in the corresponding WPS interface on the device to which you are connecting, enter your PIN in its PIN entry field.
� PIN provided by the device to which you connecting.
If the device to which you are connecting provides a PIN (e.g. on the device casing), in the 'Config Mode' field, select 'Registrar'. In the 'PIN Code' field, type the PIN provided by the device to which you are connecting.
To optionally configure the connection name and security type on your WPS connection, click the 'WPS Profile' button. Otherwise leave settings at their default and click the right arrow to save your settings.
� If you click on the 'WPS Profile' button, the following screen appears, allowing you to configure the name of your network connection and security method. In 'SSID' type a name for your WPS connection, and select an Authentication and Encryption method.
Page 16 of 192.1 Connecting Using the Mediatek Utility
2/25/2016file:///C:/Users/Cable%20Matters/AppData/Local/Temp/~hh960B.htm

� In the 'WPA Preshared Key' field, type a passphrase 8-63 characters long made up of characters '0'-'9', 'a'-'z', 'A'-'Z', keyboard symbols and spaces. Click the right arrow to save your settings.
c. For both PIN methods, the following screen displays. Click the Start PIN button. At the same time (within 120 seconds) activate the corresponding WPS PIN connection function on the device to which you are connecting.
d. Once connected, your WPS profile appears in the Profile List screen.
Page 17 of 192.1 Connecting Using the Mediatek Utility
2/25/2016file:///C:/Users/Cable%20Matters/AppData/Local/Temp/~hh960B.htm

Troubleshooting
See Troubleshooting for solutions to problems connecting using WPS.
For further information on the screens used in this procedure, see the Profile Settings screens.
Home > Connecting to a Wireless Network > Connecting Using a Profile
Connecting Using a Profile
You can also use a profile to connect to frequently used wireless networks. To do this you need to already have set up a profile as shown in Setting Up a Wireless Network Profile.
Instructions
1. In the Profile screen, select the profile for the network to which you are connecting. Click the
Connect button .
2. If the connection is successful, the tick icon appears .
Page 18 of 192.1 Connecting Using the Mediatek Utility
2/25/2016file:///C:/Users/Cable%20Matters/AppData/Local/Temp/~hh960B.htm

Troubleshooting
If a cross icon appears, indicating a failed connection, see the Troubleshooting for suggestions on problems connecting to a wireless network.
For further information on the screens used in this procedure, see the Profile Setting screens.
Page 19 of 192.1 Connecting Using the Mediatek Utility
2/25/2016file:///C:/Users/Cable%20Matters/AppData/Local/Temp/~hh960B.htm

Home > Setting Up a Wireless Network > Setting Up a Wireless Network
Setting Up a Wireless Network
You can use the Mediatek Utility to set up an access point (AP) for a wireless network. If your Adapter is connected to a computer with an Internet connection, any computer or device connected to your wireless network can also connect to the Internet.
Instructions
Follow these instructions to set up an AP for a wireless network.
1. To begin setting up the AP, set the Mediatek Utility to AP Mode. Right-click on the Mediatek icon in the task bar in the bottom right hand corner of your screen.
2. In the menu that appears, click "Switch to AP Mode". Wait several seconds for the Utility to appear in AP Mode.
3. The Mediatek Utility appears in compact mode. Click the AP Setup button to begin setting up your AP.
4. Set the name of your network (SSID) using up to 32 ASCII characters. Click the right arrow to navigate to the next screen.
Page 1 of 73.1 Setting Up a Wireless Network
2/25/2016file:///C:/Users/Cable%20Matters/AppData/Local/Temp/~hh7AEC.htm

5. Click the right arrow to navigate to the next screen.
6. Set up wireless security for your network. Select the strongest security supported by the devices using your network.
The following table shows the authentication and encryption methods available for your wireless network.
Authentication Method Encryption Method Comments
WPA2-PSK (Wi-Fi Protected Access 2 - Pre-Shared Key)
AES (Advanced Encryption Standard)
WPA2-PSK is a faster, more recent standard than WPA-PSK.
AES is a stronger, more recent standard
Page 2 of 73.1 Setting Up a Wireless Network
2/25/2016file:///C:/Users/Cable%20Matters/AppData/Local/Temp/~hh7AEC.htm
7. Depending on the wireless security you are using, follow the instructions for either WPA-PSK, WPA2-PSK or WPA-PSK/WPA2-PSK, WEP, or no security.
WPA-PSK, WPA2-PSK or WPA-PSK/WPA2-PSK
a. To set up WPA-PSK, WPA2-PSK or WPA-PSK/WPA2-PSK mixed mode on your network, in the Authentication field, select WPA-PSK, WPA2-PSK or WPA-PSK/WPA2-PSK, and in the Encryption field, select AES. Click the right arrow to save your settings.
b. In the 'WPA-PSK Key' field, type a security key 8-63 characters long made up of characters '0'-'9', 'a'-'z', 'A'-'Z', keyboard symbols and spaces.
NOTE: Record your wireless security key safely for use when adding other computers or devices to your wireless network.
c. Click the right arrow to save your settings.
WEP
WPA-PSK (Wi-Fi Protected Access - Pre-Shared Key)
than TKIP.
Open
Shared
WEP (Wireless Encrypted Privacy)
WEP is an older standard and is easily decrypted. If using WEP select Open as the authentication method for slightly stronger security.
Page 3 of 73.1 Setting Up a Wireless Network
2/25/2016file:///C:/Users/Cable%20Matters/AppData/Local/Temp/~hh7AEC.htm

a. To set up WEP security on your network, in the Authentication field, select Open or Shared, and in the Encryption field, select WEP. Click the right arrow to save your settings.
b. In the screen that displays, set up a WEP key. You can enter up to four keys, in hexadecimal or ASCII format, in four lengths. In the 'Default Tx Key' field, select the key number for the key you are setting up. In the 'Key Format' field select whether the key is in hexadecimal or ASCII format.
� If 'Hex(10 or 26 characters)' is selected, in the 'WEP Key' field, type a key 10 or 26 characters long, made up of digits "0' to '9' and letters 'A' to 'F'.
� If 'ASCII(5 or 13 characters)' is selected, in the 'WEP Key' field, type a key 5 or 13 characters long, made up of digits '0'-'9' and letters 'a'-'z' and 'A'-'Z'.
NOTE: Record your wireless security key safely for use when adding other computers or devices to your wireless network.
c. Click the right arrow to save your settings.
No Security
You can configure an open network although this is not recommended. In the Authentication field select 'Open'. In the Encryption field, select 'No Encryption'. Click the right arrow to save your settings.
Page 4 of 73.1 Setting Up a Wireless Network
2/25/2016file:///C:/Users/Cable%20Matters/AppData/Local/Temp/~hh7AEC.htm

8. Once your AP is set up, the Utility displays the name of your network and your AP's IP address for use when adding computers and devices to your network.
You have completed setting up a wireless network. Other wireless-enabled computers and devices may now join your network using the same wireless settings as those you configured on your Mediatek Utility.
Troubleshooting
See Troubleshooting for solutions to problems setting up a wireless network.
For further information on the screen used in this procedure, see the AP Setup screens.
Home > Setting Up a Wireless Network > Sharing Internet Access
Connecting your Network to the Internet
You can let computers and devices connected to the Mediatek AP access the Internet, as shown in the diagram below. This is done by setting up a wireless connection between the Mediatek AP and an AP connected to the Internet.
NOTE: This feature is only available in Windows 7 and above.
Page 5 of 73.1 Setting Up a Wireless Network
2/25/2016file:///C:/Users/Cable%20Matters/AppData/Local/Temp/~hh7AEC.htm

Instructions
Follow these instructions to let a device such as PDA access your network and use your Internet connection.
1. Right-click on the Mediatek icon in the task bar in the bottom right hand corner of your screen. 2. In the menu that appears, click "Switch to Client + AP Mode".
3. The following popup appears. In 'WAN Adapter Name', select the card you will use to access the Internet (or a network with Internet access). The adapter name given here is an example only, the name of your network card may differ.
4. To connect your computer to an AP (or wireless router) with an Internet connection, follow the instructions for Connecting to a Wireless Network. Once properly configured, your computer should have access to the Internet.
5. To set up a wireless network through which other devices access the Internet, click the 'AP' button .
Page 6 of 73.1 Setting Up a Wireless Network
2/25/2016file:///C:/Users/Cable%20Matters/AppData/Local/Temp/~hh7AEC.htm
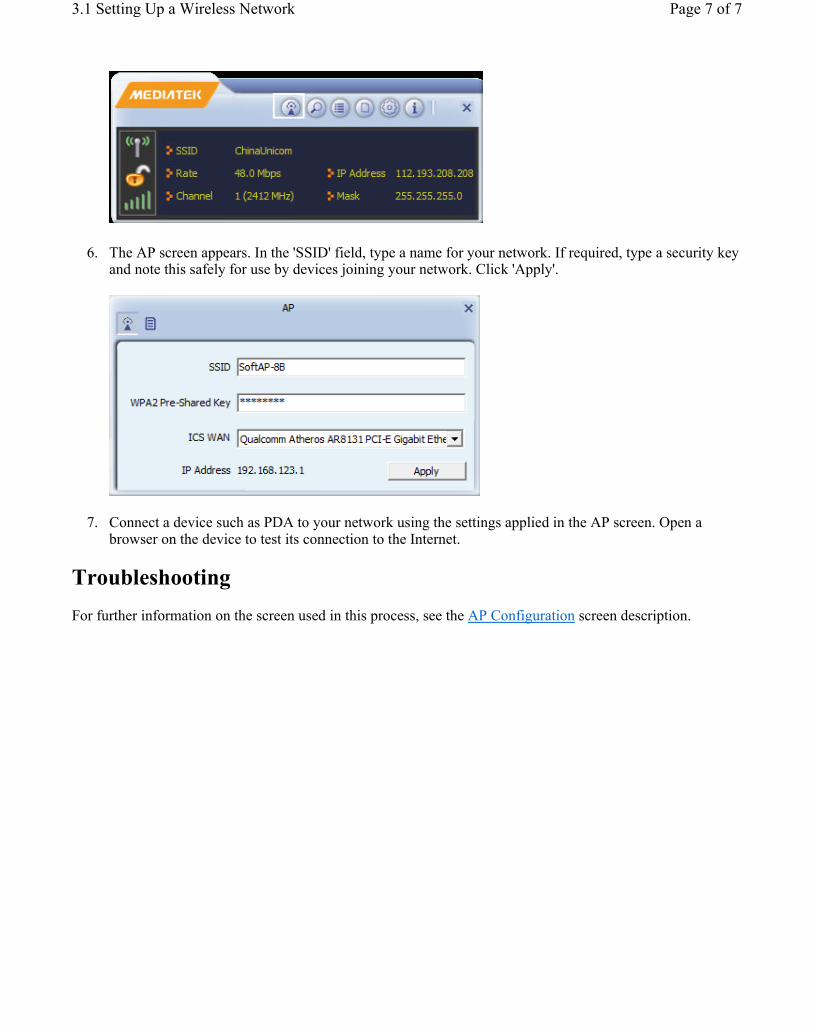
6. The AP screen appears. In the 'SSID' field, type a name for your network. If required, type a security key and note this safely for use by devices joining your network. Click 'Apply'.
7. Connect a device such as PDA to your network using the settings applied in the AP screen. Open a browser on the device to test its connection to the Internet.
Troubleshooting
For further information on the screen used in this process, see the AP Configuration screen description.
Page 7 of 73.1 Setting Up a Wireless Network
2/25/2016file:///C:/Users/Cable%20Matters/AppData/Local/Temp/~hh7AEC.htm

Home > Connecting Using Wi-Fi Direct > Connecting Using Wi-Fi Direct
Connecting Using Wi-Fi Direct(USB doesn't support Wi-Fi Direct)
Use Wi-Fi Direct to connect directly to another computer or device that also supports Wi-Fi Direct. With Wi-Fi Direct connections there is no need for an AP or wireless router. In addition, Wi-Fi Direct supports WPS (Wi-Fi Protected Security) for quick setup of strong wireless security. In comparison to alternatives such as Bluetooth, Wi-Fi Direct offers faster speeds (up to 250 Mbps depending on your network environment), with a greater range (up to 219 yards/ 200 metres) with stronger security (WPA2-PSK with AES encryption).
Instructions
To connect one computer or device with another using Wi-Fi Direct, you need to make a Wi-Fi Direct connection request which the other computer or device accepts. For instructions on making and accepting a Wi-Fi Direct connection using the Mediatek Utility, follow the steps given below.
1. To access the Wi-Fi Direct screens, click the Wi-Fi Direct button on the Mediatek Utility.
2. The Wi-Fi Direct screen displays. To enable Wi-Fi Direct, double-click the notebook icon.
Page 1 of 144.1 Connecting Using Wi-Fi Direct
2/25/2016file:///C:/Users/Cable%20Matters/AppData/Local/Temp/~hhAD3.htm

3. To identify your computer to other Wi-Fi Direct enabled devices, select 'Use My Computer name' or type a name. Click the right arrow to save your settings.
4. The following screen displays available, Wi-Fi Direct enabled computers and devices. Wait several seconds until all available devices are detected, or right-click the notebook icon and select 'Scan' to refresh this window.
To connect to a computer or device, double-click its icon in the screen.
Page 2 of 144.1 Connecting Using Wi-Fi Direct
2/25/2016file:///C:/Users/Cable%20Matters/AppData/Local/Temp/~hhAD3.htm

5. The Wi-Fi Direct Settings screen appears, with options to configure WPS (Wi-Fi Protected Setup) on your Wi-Fi Direct connection.
� If the device or computer to which you are connecting has a WPS push button, either on the device housing or in its software interface, follow the instructions for the Push Button Method.
� If the device or computer to which you are connecting has no WPS push button available, but can accept a WPS PIN, follow the instructions for the Display PIN Method.
� If the device or computer to which you are connecting is providing a PIN, follow the instructions in the Enter PIN Method.
The Push Button Method
To use the WPS push button method, follow these steps.
� For WPS Type, select 'Push-Button Configuration(PBC)' and click the right arrow in this screen.
Page 3 of 144.1 Connecting Using Wi-Fi Direct
2/25/2016file:///C:/Users/Cable%20Matters/AppData/Local/Temp/~hhAD3.htm

� At the same time (within 30 seconds) activate the WPS push button method on the computer or device to which you are connecting. Wait several seconds while a Wi-Fi Direct connection is set up.
The Display PIN Method
To set up WPS security by providing a PIN, follow these steps.
a. For WPS Type, select "Display PIN". Note the PIN displayed in the 'PIN Code' field. Click the right arrow.
b. The WPS connection process begins. Within 120 seconds, enter the PIN shown in the Mediatek Utility in the corresponding WPS PIN field on the interface of the device to which you are connecting.
Page 4 of 144.1 Connecting Using Wi-Fi Direct
2/25/2016file:///C:/Users/Cable%20Matters/AppData/Local/Temp/~hhAD3.htm

The Enter PIN Method
To set up WPS security using a PIN provided by the connecting device, follow these steps.
a. Once another computer or device makes a request to connect to your Mediatek adapter, the following screen appears. Type the PIN made available from the computer or device making the connection request, and click the right arrow.
b. Wait several seconds while a Wi-Fi Direct connection is set up.
c.
6. If your connection is successful, the connection details are shown in the screen that displays.
Page 5 of 144.1 Connecting Using Wi-Fi Direct
2/25/2016file:///C:/Users/Cable%20Matters/AppData/Local/Temp/~hhAD3.htm

7. See Sharing Files Using Wi-Fi Direct for instructions on sharing media files and documents with Wi-Fi Direct.
Troubleshooting
See Troubleshooting for suggestions on connecting using Wi-Fi Direct.
For further information on the screens used in this procedure, see the Wi-Fi Direct screens.
Home > Connecting Using Wi-Fi Direct > Sharing Files With Wi-fi Direct
Sharing Files With Wi-Fi Direct(USB doesn't support Wi-Fi Direct)
The Mediatek Utility lets you share files using Wi-Fi Direct. You can use the Mediatek Media Server to share media files such as music, video, and image files, or use Windows to share files.
Instructions
Follow these instructions to share media files using the Mediatek Media Server, or share all file types using Windows Vista/7 or Windows XP.
Sharing Media Files with the Mediatek Media Server
Page 6 of 144.1 Connecting Using Wi-Fi Direct
2/25/2016file:///C:/Users/Cable%20Matters/AppData/Local/Temp/~hhAD3.htm

1. Ensure you have a Wi-Fi Direct connection set up. See Connecting Using Wi-Fi Direct for instructions on how to do this.
2. In the Wi-Fi Direct screen, right-click on the notebook icon and select Media Sharing.
3. In the Media Sharing screen, cllick the right arrow to enable the server and begin sharing media files located in the Media Sharing folder.
4. The files shared by the media server can now be accessed on the connecting computer. Use a media player on the connecting computer to locate the server and the media files, and view them or begin playback.
Page 7 of 144.1 Connecting Using Wi-Fi Direct
2/25/2016file:///C:/Users/Cable%20Matters/AppData/Local/Temp/~hhAD3.htm
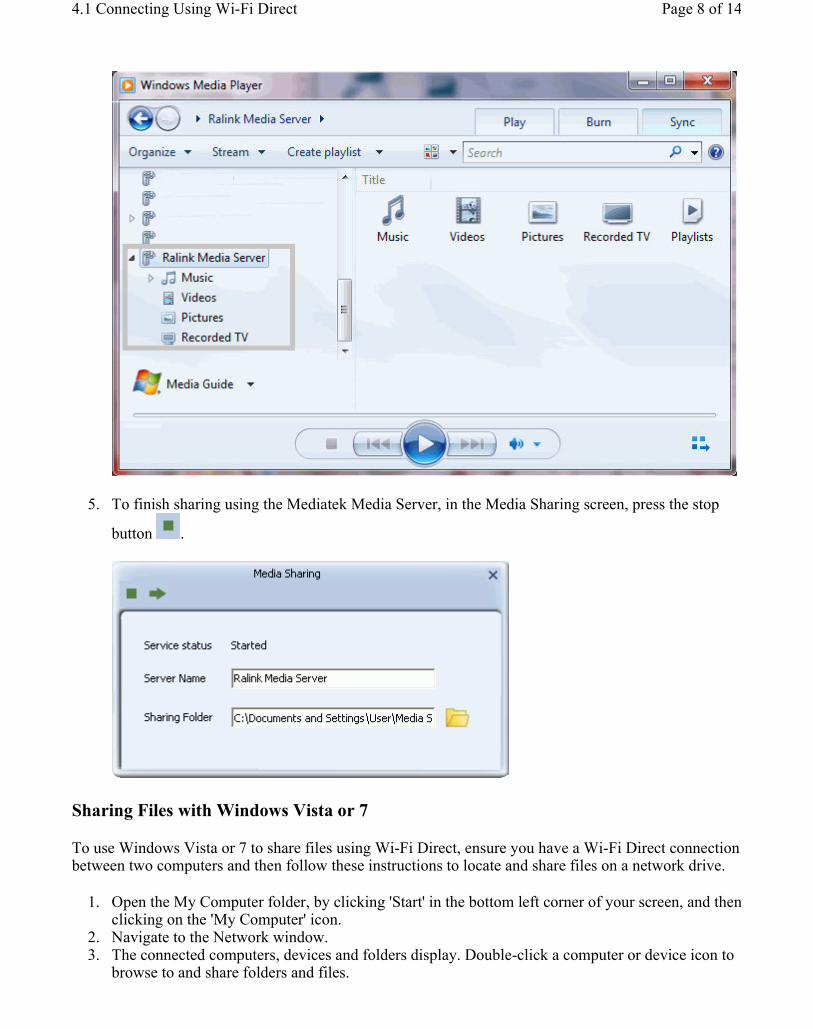
5. To finish sharing using the Mediatek Media Server, in the Media Sharing screen, press the stop
button .
Sharing Files with Windows Vista or 7
To use Windows Vista or 7 to share files using Wi-Fi Direct, ensure you have a Wi-Fi Direct connection between two computers and then follow these instructions to locate and share files on a network drive.
1. Open the My Computer folder, by clicking 'Start' in the bottom left corner of your screen, and then clicking on the 'My Computer' icon.
2. Navigate to the Network window. 3. The connected computers, devices and folders display. Double-click a computer or device icon to
browse to and share folders and files.
Page 8 of 144.1 Connecting Using Wi-Fi Direct
2/25/2016file:///C:/Users/Cable%20Matters/AppData/Local/Temp/~hhAD3.htm

Sharing Files with Windows XP
To use Windows XP to share files using Wi-Fi Direct, ensure you have a Wi-Fi Direct connection between two computers and then follow these instructions to locate and share files on a network drive.
1. Note the name of the computer you are accessing, and the workgroup of which it is part. Do this by right-clicking on the My Computer icon on your desktop and click "Properties" to display the following screen. The workgroups for both computers should be the same to allow file-sharing.
Page 9 of 144.1 Connecting Using Wi-Fi Direct
2/25/2016file:///C:/Users/Cable%20Matters/AppData/Local/Temp/~hhAD3.htm
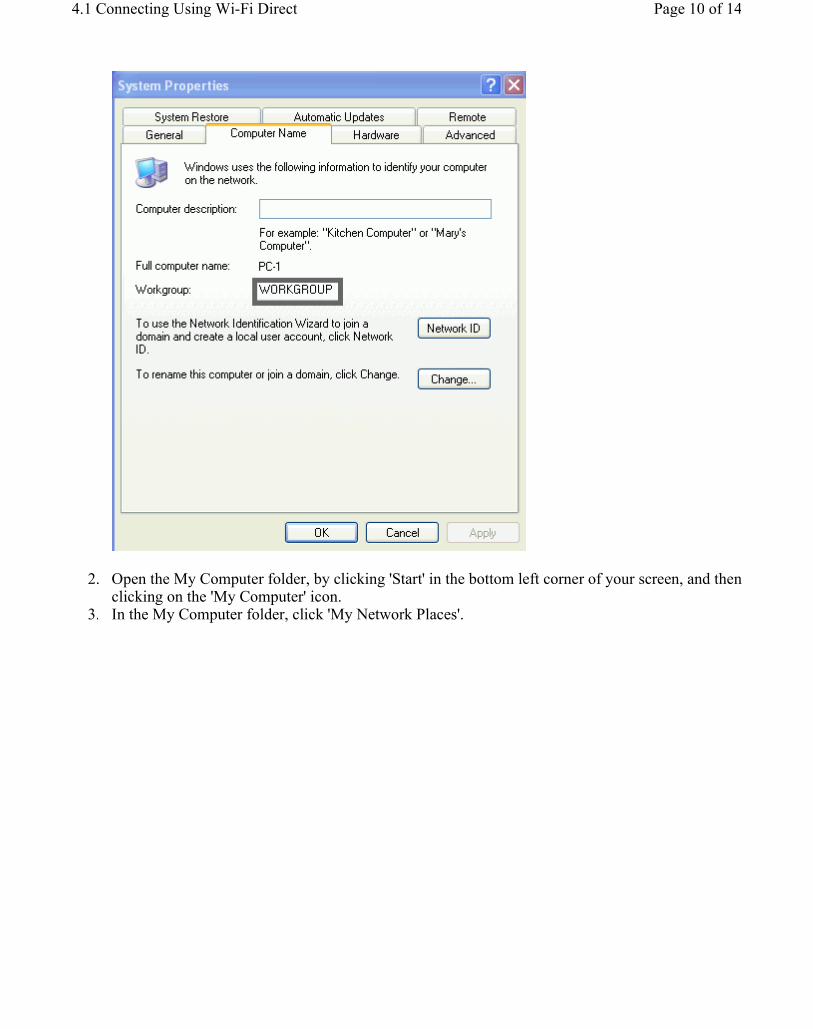
2. Open the My Computer folder, by clicking 'Start' in the bottom left corner of your screen, and then clicking on the 'My Computer' icon.
3. In the My Computer folder, click 'My Network Places'.
Page 10 of 144.1 Connecting Using Wi-Fi Direct
2/25/2016file:///C:/Users/Cable%20Matters/AppData/Local/Temp/~hhAD3.htm

4. Click 'Entire Network'.
Page 11 of 144.1 Connecting Using Wi-Fi Direct
2/25/2016file:///C:/Users/Cable%20Matters/AppData/Local/Temp/~hhAD3.htm

5. Double-click the Microsoft Windows Network icon.
Page 12 of 144.1 Connecting Using Wi-Fi Direct
2/25/2016file:///C:/Users/Cable%20Matters/AppData/Local/Temp/~hhAD3.htm

6. Double-click on the name of the workgroup assigned to your computer. In this case the workgroup name has been left to its default name 'Workgroup', but your settings may differ.
7. The connected computers, devices and folders display. Double-click an icon to browse to and share folders and files.
Page 13 of 144.1 Connecting Using Wi-Fi Direct
2/25/2016file:///C:/Users/Cable%20Matters/AppData/Local/Temp/~hhAD3.htm
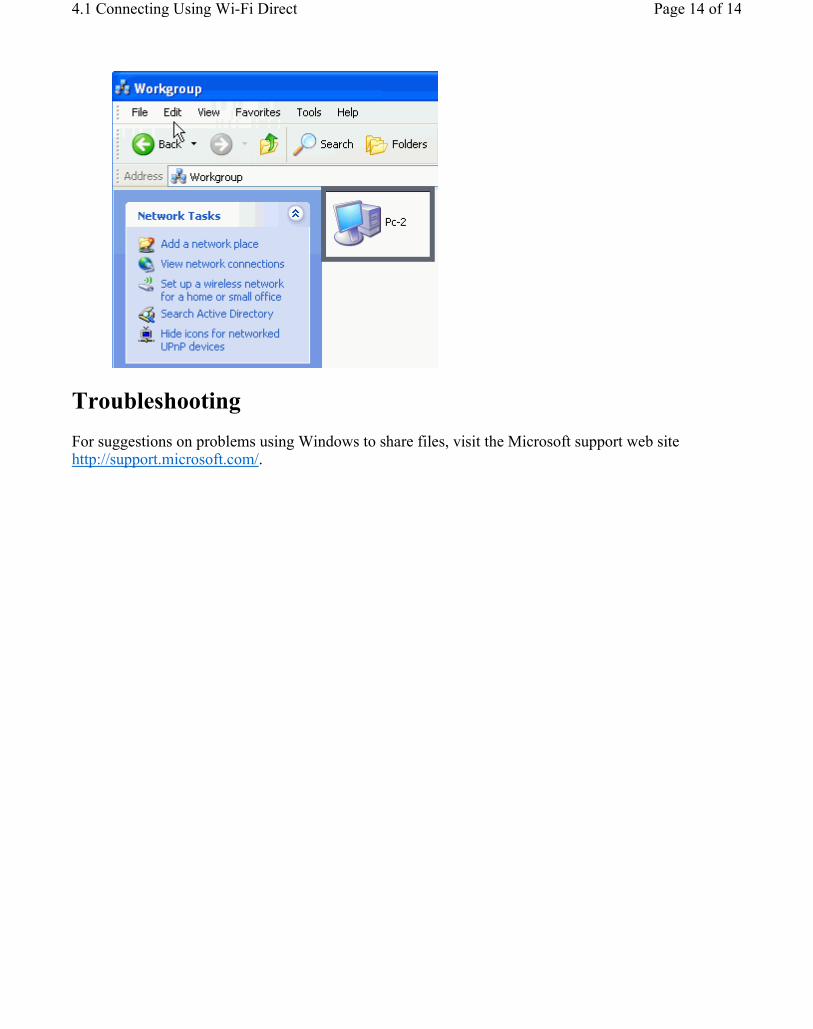
Troubleshooting
For suggestions on problems using Windows to share files, visit the Microsoft support web site http://support.microsoft.com/.
Page 14 of 144.1 Connecting Using Wi-Fi Direct
2/25/2016file:///C:/Users/Cable%20Matters/AppData/Local/Temp/~hhAD3.htm

Home > Connecting Using Wi-Fi Direct > Connecting Using Wi-Fi Direct
Connecting Using Wi-Fi Direct(USB
doesn't support Wi-Fi Direct)
Use Wi-Fi Direct to connect directly to another computer or device that also supports Wi-Fi Direct. With Wi-Fi Direct connections there is no need for an AP or wireless router. In addition, Wi-Fi Direct supports WPS (Wi-Fi Protected Security) for quick setup of strong wireless security. In comparison to alternatives such as Bluetooth, Wi-Fi Direct offers faster speeds (up to 250 Mbps depending on your network environment), with a greater range (up to 219 yards/ 200 metres) with stronger security (WPA2-PSK with AES encryption).
Instructions
To connect one computer or device with another using Wi-Fi Direct, you need to make a Wi-Fi Direct connection request which the other computer or device accepts. For instructions on making and accepting a Wi-Fi Direct connection using the Mediatek Utility, follow the steps given below.
1. To access the Wi-Fi Direct screens, click the Wi-Fi Direct button on the Mediatek Utility.
2. The Wi-Fi Direct screen displays. To enable Wi-Fi Direct, double-click the notebook icon.
Page 1 of 64.1 Connecting Using Wi-Fi Direct
2/25/2016mk:@MSITStore:C:\Program%20Files%20(x86)\MediatekWiFi\Common\Mediatek%20...
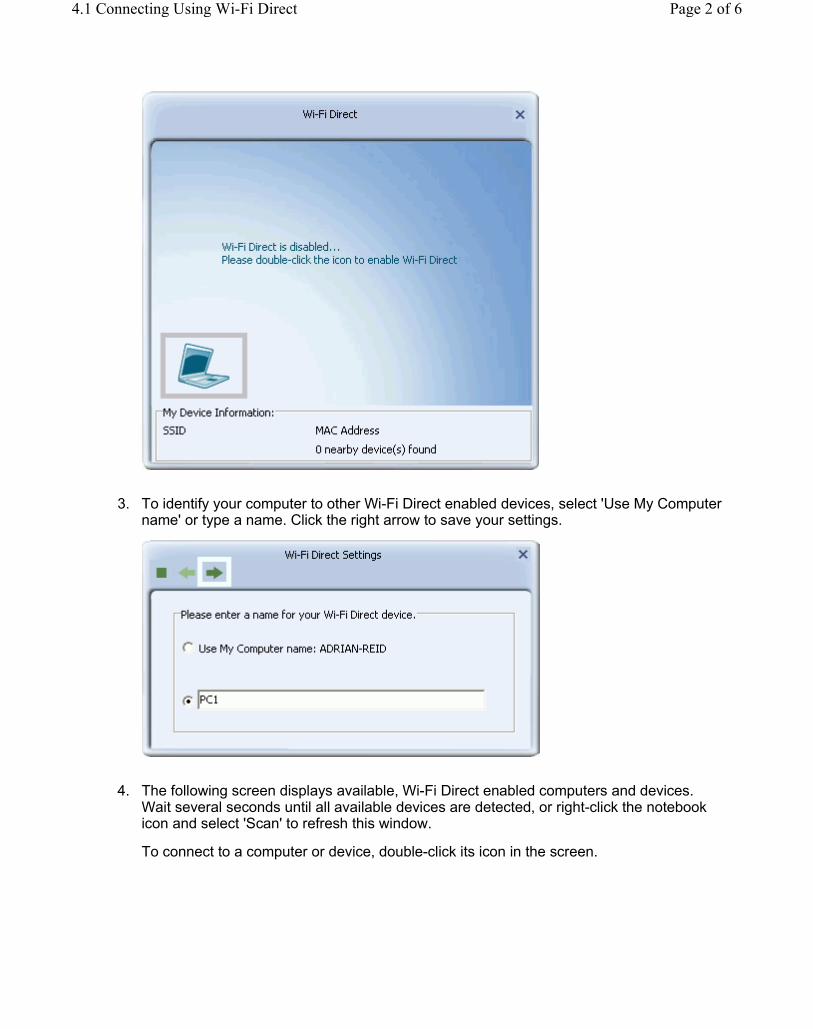
3. To identify your computer to other Wi-Fi Direct enabled devices, select 'Use My Computer name' or type a name. Click the right arrow to save your settings.
4. The following screen displays available, Wi-Fi Direct enabled computers and devices. Wait several seconds until all available devices are detected, or right-click the notebook icon and select 'Scan' to refresh this window.
To connect to a computer or device, double-click its icon in the screen.
Page 2 of 64.1 Connecting Using Wi-Fi Direct
2/25/2016mk:@MSITStore:C:\Program%20Files%20(x86)\MediatekWiFi\Common\Mediatek%20...

5. The Wi-Fi Direct Settings screen appears, with options to configure WPS (Wi-Fi Protected Setup) on your Wi-Fi Direct connection.
� If the device or computer to which you are connecting has a WPS push button, either on the device housing or in its software interface, follow the instructions for the Push Button Method.
� If the device or computer to which you are connecting has no WPS push button available, but can accept a WPS PIN, follow the instructions for the Display PIN Method.
� If the device or computer to which you are connecting is providing a PIN, follow the instructions in the Enter PIN Method.
The Push Button Method
To use the WPS push button method, follow these steps.
� For WPS Type, select 'Push-Button Configuration(PBC)' and click the right arrow in this screen.
Page 3 of 64.1 Connecting Using Wi-Fi Direct
2/25/2016mk:@MSITStore:C:\Program%20Files%20(x86)\MediatekWiFi\Common\Mediatek%20...

� At the same time (within 30 seconds) activate the WPS push button method on the computer or device to which you are connecting. Wait several seconds while a Wi-Fi Direct connection is set up.
The Display PIN Method
To set up WPS security by providing a PIN, follow these steps.
a. For WPS Type, select "Display PIN". Note the PIN displayed in the 'PIN Code' field. Click the right arrow.
b. The WPS connection process begins. Within 120 seconds, enter the PIN shown in the Mediatek Utility in the corresponding WPS PIN field on the interface of the device to which you are connecting.
Page 4 of 64.1 Connecting Using Wi-Fi Direct
2/25/2016mk:@MSITStore:C:\Program%20Files%20(x86)\MediatekWiFi\Common\Mediatek%20...

The Enter PIN Method
To set up WPS security using a PIN provided by the connecting device, follow these steps.
a. Once another computer or device makes a request to connect to your Mediatek adapter, the following screen appears. Type the PIN made available from the computer or device making the connection request, and click the right arrow.
b. Wait several seconds while a Wi-Fi Direct connection is set up.
c.
6. If your connection is successful, the connection details are shown in the screen that displays.
Page 5 of 64.1 Connecting Using Wi-Fi Direct
2/25/2016mk:@MSITStore:C:\Program%20Files%20(x86)\MediatekWiFi\Common\Mediatek%20...

7. See Sharing Files Using Wi-Fi Direct for instructions on sharing media files and documents with Wi-Fi Direct.
Troubleshooting
See Troubleshooting for suggestions on connecting using Wi-Fi Direct.
For further information on the screens used in this procedure, see the Wi-Fi Direct screens.
Page 6 of 64.1 Connecting Using Wi-Fi Direct
2/25/2016mk:@MSITStore:C:\Program%20Files%20(x86)\MediatekWiFi\Common\Mediatek%20...

Home > Connecting Using Wi-Fi Direct > Sharing Files With Wi-fi Direct
Sharing Files With Wi-Fi Direct(USB
doesn't support Wi-Fi Direct)
The Mediatek Utility lets you share files using Wi-Fi Direct. You can use the Mediatek Media Server to share media files such as music, video, and image files, or use Windows to share files.
Instructions
Follow these instructions to share media files using the Mediatek Media Server, or share all file types using Windows Vista/7 or Windows XP.
Sharing Media Files with the Mediatek Media Server
1. Ensure you have a Wi-Fi Direct connection set up. See Connecting Using Wi-Fi Direct for instructions on how to do this.
2. In the Wi-Fi Direct screen, right-click on the notebook icon and select Media Sharing.
3. In the Media Sharing screen, cllick the right arrow to enable the server and begin sharing media files located in the Media Sharing folder.
Page 1 of 94.2 Sharing Files Using Wi-Fi Direct
2/25/2016mk:@MSITStore:C:\Program%20Files%20(x86)\MediatekWiFi\Common\Mediatek%20...

4. The files shared by the media server can now be accessed on the connecting computer. Use a media player on the connecting computer to locate the server and the media files, and view them or begin playback.
5. To finish sharing using the Mediatek Media Server, in the Media Sharing screen, press the stop
button .
Page 2 of 94.2 Sharing Files Using Wi-Fi Direct
2/25/2016mk:@MSITStore:C:\Program%20Files%20(x86)\MediatekWiFi\Common\Mediatek%20...

Sharing Files with Windows Vista or 7
To use Windows Vista or 7 to share files using Wi-Fi Direct, ensure you have a Wi-Fi Direct connection between two computers and then follow these instructions to locate and share files on a network drive.
1. Open the My Computer folder, by clicking 'Start' in the bottom left corner of your screen, and then clicking on the 'My Computer' icon.
2. Navigate to the Network window.
3. The connected computers, devices and folders display. Double-click a computer or device icon to browse to and share folders and files.
Page 3 of 94.2 Sharing Files Using Wi-Fi Direct
2/25/2016mk:@MSITStore:C:\Program%20Files%20(x86)\MediatekWiFi\Common\Mediatek%20...

Sharing Files with Windows XP
To use Windows XP to share files using Wi-Fi Direct, ensure you have a Wi-Fi Direct connection between two computers and then follow these instructions to locate and share files on a network drive.
1. Note the name of the computer you are accessing, and the workgroup of which it is part. Do this by right-clicking on the My Computer icon on your desktop and click "Properties" to display the following screen. The workgroups for both computers should be the same to allow file-sharing.
Page 4 of 94.2 Sharing Files Using Wi-Fi Direct
2/25/2016mk:@MSITStore:C:\Program%20Files%20(x86)\MediatekWiFi\Common\Mediatek%20...

2. Open the My Computer folder, by clicking 'Start' in the bottom left corner of your screen, and then clicking on the 'My Computer' icon.
3. In the My Computer folder, click 'My Network Places'.
Page 5 of 94.2 Sharing Files Using Wi-Fi Direct
2/25/2016mk:@MSITStore:C:\Program%20Files%20(x86)\MediatekWiFi\Common\Mediatek%20...

4. Click 'Entire Network'.
Page 6 of 94.2 Sharing Files Using Wi-Fi Direct
2/25/2016mk:@MSITStore:C:\Program%20Files%20(x86)\MediatekWiFi\Common\Mediatek%20...

5. Double-click the Microsoft Windows Network icon.
Page 7 of 94.2 Sharing Files Using Wi-Fi Direct
2/25/2016mk:@MSITStore:C:\Program%20Files%20(x86)\MediatekWiFi\Common\Mediatek%20...
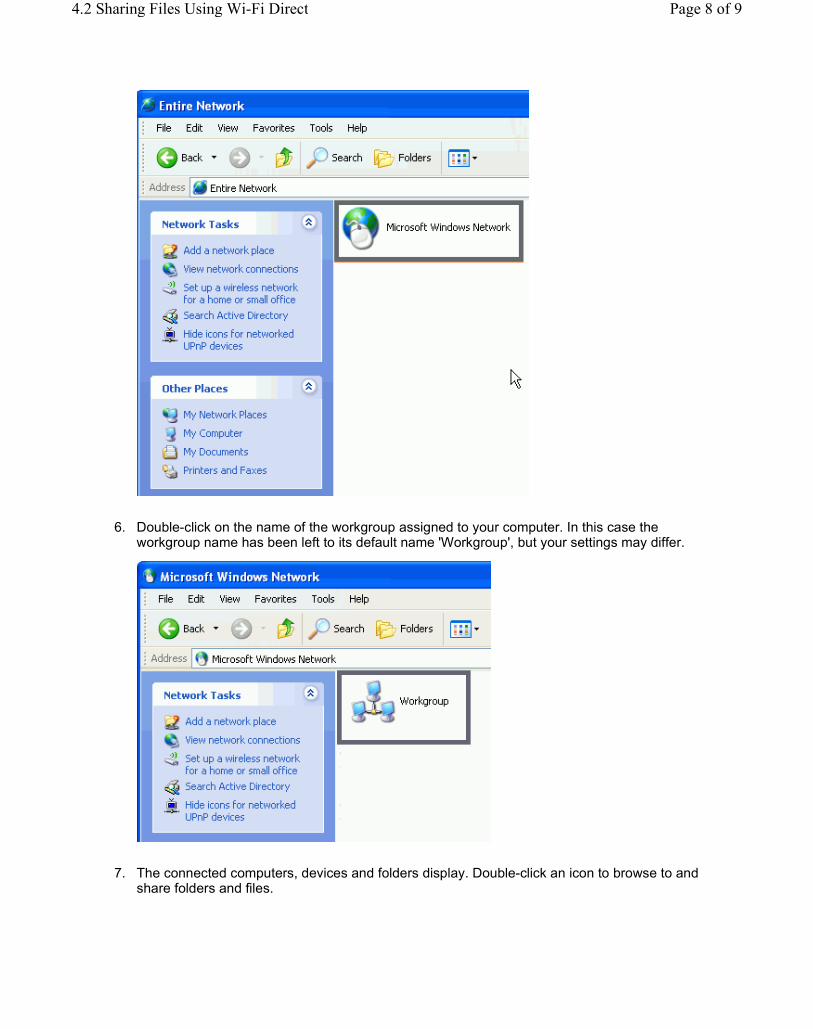
6. Double-click on the name of the workgroup assigned to your computer. In this case the workgroup name has been left to its default name 'Workgroup', but your settings may differ.
7. The connected computers, devices and folders display. Double-click an icon to browse to and share folders and files.
Page 8 of 94.2 Sharing Files Using Wi-Fi Direct
2/25/2016mk:@MSITStore:C:\Program%20Files%20(x86)\MediatekWiFi\Common\Mediatek%20...

Troubleshooting
For suggestions on problems using Windows to share files, visit the Microsoft support web site http://support.microsoft.com/.
Page 9 of 94.2 Sharing Files Using Wi-Fi Direct
2/25/2016mk:@MSITStore:C:\Program%20Files%20(x86)\MediatekWiFi\Common\Mediatek%20...

Home > Setting Up a Profile > Setting Up a Wireless Network Profile
Setting Up a Wireless Network Profile
A profile is a group of settings which you can use to quickly set up a wireless connection. The Mediatek Utility lets you set up profiles based on settings for a wireless network and for WPS (Wi-Fi Protected Setup) settings. To set up a WPS profile, follow the instructions provided for connecting using WPS with the PIN method. To set up a wireless network profile, follow the instructions below to set up a wireless network profile either by applying the settings of an available connection, or by configuring settings manually.
Instructions
Follow these instructions to set up a profile based on the settings of an available wireless network, or to manually add or edit profile settings.
Setting Up a Profile Based on the Settings of an Available Network
1. To quickly set up a profile by using the settings of an available network, click the Available
Networks button to display the Available Networks screen.
2. In this screen, select a network and click on the Add to Profile button .
Page 1 of 55.1 Setting Up a Wireless Network Profile
2/25/2016file:///C:/Users/Cable%20Matters/AppData/Local/Temp/~hh64A2.htm

3. The settings of the network you selected in the Available Networks screen are automatically displayed in the Profile Settings screens.
4. Click the right arrow in these screens to accept all settings. If required, enter security settings such as the security key for your network.
5. After you have set up a profile, it appears in the Profile List screen.
Page 2 of 55.1 Setting Up a Wireless Network Profile
2/25/2016file:///C:/Users/Cable%20Matters/AppData/Local/Temp/~hh64A2.htm

Manually Setting Up or Editing a Network Settings Profile
Alternatively, follow these instructions to manually set up or edit a network settings profile.
1. Click the Profile Settings button to display the Profile List screen.
2. To configure a wireless security profile, click the Add button to add a new profile, or click the
Edit button to edit an existing profile.
3. In the Profile Settings screen, enter the following settings. a. For 'Profile Name', type a name for the profile, or leave at its default value. b. In the SSID field type the name of the network to which you are connecting, or select an
Page 3 of 55.1 Setting Up a Wireless Network Profile
2/25/2016file:///C:/Users/Cable%20Matters/AppData/Local/Temp/~hh64A2.htm

existing network name from the drop-down list provided. c. For 'Network Type', select whether your network is an infrastructure or ad hoc network. If
uncertain, leave at its default setting (Infrastructure). � Select 'Infrastructure - Connect to AP' if you are connecting to a typical wireless
network maintained by an AP or wireless router. � Alternatively, select 'Ad Hoc - Connect to other computers' if you are connecting to a
distributed network with no AP or router. d. Click the right arrow to save your settings.
4. Configure the strongest security supported by your wireless network from the list below. Click on the appropriate link below for instructions on configuring a specific method for your profile, or go to the next step if not configuring security.
� WPA-PSK, WPA2-PSK� WEP� WAPI-PSK� CCKM, 802.1X, WPA, WPA2
� WAPI-CA. 5. After you have set up a profile, it appears in the Profile List screen.
6. To connect to the network associated with the profile, click the Connect button . A tick icon
appearing in the Profile List screen indicates a successful connection, while a cross icon indicates the connection was unsuccessful.
Page 4 of 55.1 Setting Up a Wireless Network Profile
2/25/2016file:///C:/Users/Cable%20Matters/AppData/Local/Temp/~hh64A2.htm

Troubleshooting
See Troubleshooting for suggestions on solving problems on connecting to a wireless network.
For further information on the screens used in this procedure, see the Profile Settings screens.
Page 5 of 55.1 Setting Up a Wireless Network Profile
2/25/2016file:///C:/Users/Cable%20Matters/AppData/Local/Temp/~hh64A2.htm