hitfilm manual – version 1
TRANSCRIPT
HitFilm Manual – Version 1.31
Last stand: 2012/01/11
This PDF was compiled by Majahr Pictures from the official
HitFilm documentation available at http://support.hitfilm.com
Please note that this PDF version is not created or supported by FXhome.
Page 1
1 HitFilm Manual – Version 1.31
Content
About this reference manual ............................................................................................................................. 6
Installation & activation .................................................................................................................................... 7
Activation ..................................................................................................................................................... 7
Installing on another computer ..................................................................................................................... 7
Interface basics ................................................................................................................................................. 8
Navigation bar .............................................................................................................................................. 9
File menu ................................................................................................................................................. 9
Quick tools ............................................................................................................................................... 9
Screen navigation buttons ...................................................................................................................... 10
Notification bar .......................................................................................................................................... 11
Project status ......................................................................................................................................... 11
Creating and opening projects .................................................................................................................... 11
From the File menu ................................................................................................................................ 11
From the Home screen ........................................................................................................................... 12
Saving projects ........................................................................................................................................... 12
How to save ........................................................................................................................................... 12
Undo .......................................................................................................................................................... 13
Undo & Redo .......................................................................................................................................... 14
History panel .......................................................................................................................................... 14
Options ...................................................................................................................................................... 14
General .................................................................................................................................................. 15
Cache ..................................................................................................................................................... 16
Activation ............................................................................................................................................... 17
Keyboard shortcuts ..................................................................................................................................... 17
General .................................................................................................................................................. 17
General timeline ..................................................................................................................................... 18
Viewer panel .......................................................................................................................................... 18
Editor sequence timeline ........................................................................................................................ 19
Composite shot timeline ......................................................................................................................... 19
Media panel (when panel is active) ......................................................................................................... 20
Home ............................................................................................................................................................. 20
Project bar .................................................................................................................................................. 20
Live web content ........................................................................................................................................ 20
Project ............................................................................................................................................................ 21
Understanding project properties ............................................................................................................... 21
Page 2
2 HitFilm Manual – Version 1.31
Editor sequence properties ......................................................................................................................... 22
Advanced properties .............................................................................................................................. 25
Edit & Effects .................................................................................................................................................. 26
Editing vs visual effects ............................................................................................................................... 26
Editor sequence .......................................................................................................................................... 26
Composite shots ......................................................................................................................................... 27
Finding your way around ............................................................................................................................ 27
Understanding the Edit & Effects screen ................................................................................................. 28
Default layout......................................................................................................................................... 28
Understanding timelines......................................................................................................................... 29
Suggested workflow ............................................................................................................................... 29
Changing between timelines ................................................................................................................... 30
Customizing the workspace ........................................................................................................................ 31
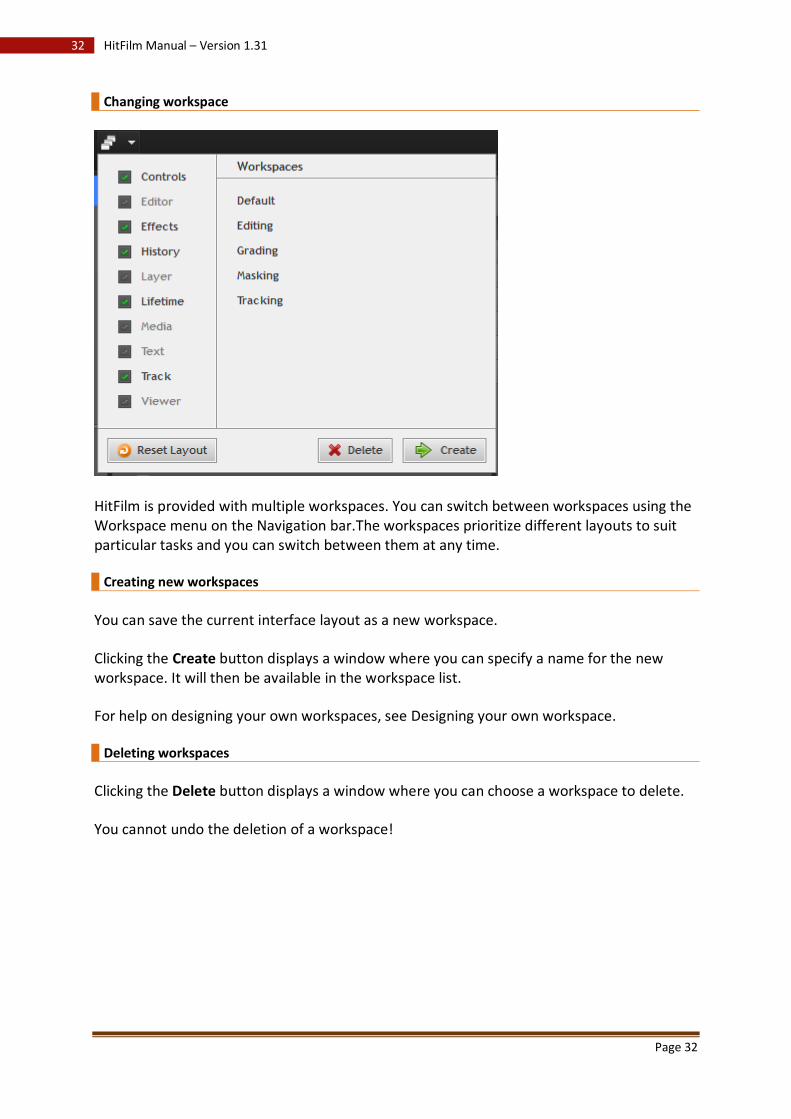
Changing workspace ............................................................................................................................... 32
Creating new workspaces ....................................................................................................................... 32
Deleting workspaces ............................................................................................................................... 32
Turning panels on and off ....................................................................................................................... 33
Designing your own workspace............................................................................................................... 33
Media panel ............................................................................................................................................... 36
Types of media ....................................................................................................................................... 36
How media works ................................................................................................................................... 37
Non-linear .............................................................................................................................................. 37
Non-destructive...................................................................................................................................... 37
Multiple use ........................................................................................................................................... 37
Supported formats ................................................................................................................................. 38
Importing files ........................................................................................................................................ 38
Relinking offline files .............................................................................................................................. 41
Generating new media ........................................................................................................................... 43
Finding and organizing media ................................................................................................................. 44
Media properties .................................................................................................................................... 47
Previewing and trimming ........................................................................................................................ 54
Timeline panels .......................................................................................................................................... 55
Editor sequence Vs. composite shots ...................................................................................................... 55
Editor sequence...................................................................................................................................... 56
Composite shots ..................................................................................................................................... 73
Viewer panel ............................................................................................................................................ 108
Page 3
3 HitFilm Manual – Version 1.31
Viewer & timelines ............................................................................................................................... 108
2D & 3D................................................................................................................................................ 109
Viewer display properties ..................................................................................................................... 109
Transforming layers .............................................................................................................................. 109
Controlling the 2D view ........................................................................................................................ 110
Playback controls.................................................................................................................................. 111
Transforming layers in 2D ..................................................................................................................... 112
Customizing the Viewer ........................................................................................................................ 114
Viewer tools ......................................................................................................................................... 116
Layer panel ............................................................................................................................................... 126
Accessing the Layer panel ..................................................................................................................... 126
Masking ............................................................................................................................................... 127
Tracking ............................................................................................................................................... 127
Effects panel ............................................................................................................................................. 128
Finding effects ...................................................................................................................................... 129
Using effects......................................................................................................................................... 129
Controls panel .......................................................................................................................................... 130
Changing the Controls panel focus ........................................................................................................ 130
Using controls ...................................................................................................................................... 131
Values .................................................................................................................................................. 131
Wheels ................................................................................................................................................. 131
Text panel................................................................................................................................................. 132
Character ............................................................................................................................................. 132
Paragraph............................................................................................................................................. 133
Lifetime panel ........................................................................................................................................... 133
About particle lifetime .......................................................................................................................... 133
Using the Lifetime panel ....................................................................................................................... 133
Track panel ............................................................................................................................................... 135
The tracking process ............................................................................................................................. 135
Creating a tracker ................................................................................................................................. 135
History panel ............................................................................................................................................ 139
Adjusting Layers ....................................................................................................................................... 140
Layer properties ................................................................................................................................... 140
Tracks................................................................................................................................................... 140
Masks ................................................................................................................................................... 141
Effects .................................................................................................................................................. 143
Page 4
4 HitFilm Manual – Version 1.31
Transform ............................................................................................................................................ 143
Material ............................................................................................................................................... 144
Audio ................................................................................................................................................... 145
3D effects ................................................................................................................................................. 145
Using 3D effects ................................................................................................................................... 145
Falling debris ........................................................................................................................................ 146
Fire explosion ....................................................................................................................................... 147
Flame explosion ................................................................................................................................... 147
Sci-Fi shockwave ................................................................................................................................... 147
Bonfire ................................................................................................................................................. 148
Missile smoke ....................................................................................................................................... 149
Smoke .................................................................................................................................................. 150
Sparks .................................................................................................................................................. 150
Fluffy cloud .......................................................................................................................................... 151
Rain ...................................................................................................................................................... 151
Storm cloud .......................................................................................................................................... 151
Gunfire ................................................................................................................................................. 151
Particle simulator ................................................................................................................................. 153
2D effects ................................................................................................................................................. 159
Using 2D effects ................................................................................................................................... 159
Reordering effects ................................................................................................................................ 160
Blur & sharpen ..................................................................................................................................... 160
Channel ................................................................................................................................................ 163
Color .................................................................................................................................................... 165
Distort .................................................................................................................................................. 172
Generate .............................................................................................................................................. 180
Keying .................................................................................................................................................. 191
Noise & grain ........................................................................................................................................ 193
Stylize................................................................................................................................................... 194
Temporal .............................................................................................................................................. 200
Audio effects ............................................................................................................................................ 203
Channel levels ...................................................................................................................................... 203
Tone ..................................................................................................................................................... 203
Transitions ................................................................................................................................................ 203
Audio ................................................................................................................................................... 203
Video ................................................................................................................................................... 203
Page 5
5 HitFilm Manual – Version 1.31
Presets ..................................................................................................................................................... 205
Using presets ........................................................................................................................................ 205
Creating presets ................................................................................................................................... 205
Export ........................................................................................................................................................... 207
Publishing to YouTube .............................................................................................................................. 207
Broadcast to the HitFilm Channel .......................................................................................................... 208
Exporting to your computer ...................................................................................................................... 208
General ................................................................................................................................................ 208
Video properties ................................................................................................................................... 208
Audio properties .................................................................................................................................. 210
Help .............................................................................................................................................................. 211
Getting more help .................................................................................................................................... 211

Page 6
6 HitFilm Manual – Version 1.31
About this reference manual
This reference manual is for both versions of HitFilm. Features exclusive to Ultimate will be marked accordingly as follows:
HitFilm Ultimate only
The term 'HitFilm' is used interchangeably to describe the Ultimate and Standard software, the HitFilm.com website and the HitFilm company. When referring to the software and without specifying Standard or Ultimate it can be assumed that the information applies to both versions.
Most sections include reminders of the main points at
the bottom of the page.
Need help?
If you do have a problem, don't worry - we've got your back:
• The support section of the HitFilm website is your first port of call. • The FAQs are the first place to check as your questions may already have been answered.
• Our online video tutorials are free to watch and cover all the basics of using the software. Watch and learn!
• When you want to ask your fellow users for help or advice you can do so in the Self-help forums.
• If you need an official response from the HitFilm team you can send us a question.
Page 7
7 HitFilm Manual – Version 1.31
Installation & activation
The latest versions of HitFilm Standard and HitFilm Ultimate can always be downloaded from HitFilm.com.
After installation HitFilm will run in demo mode. You can try out all the features but you are restricted to a 30 second export to YouTube. If you want to unlock the full version check out HitFilm.com for full details.
Activation
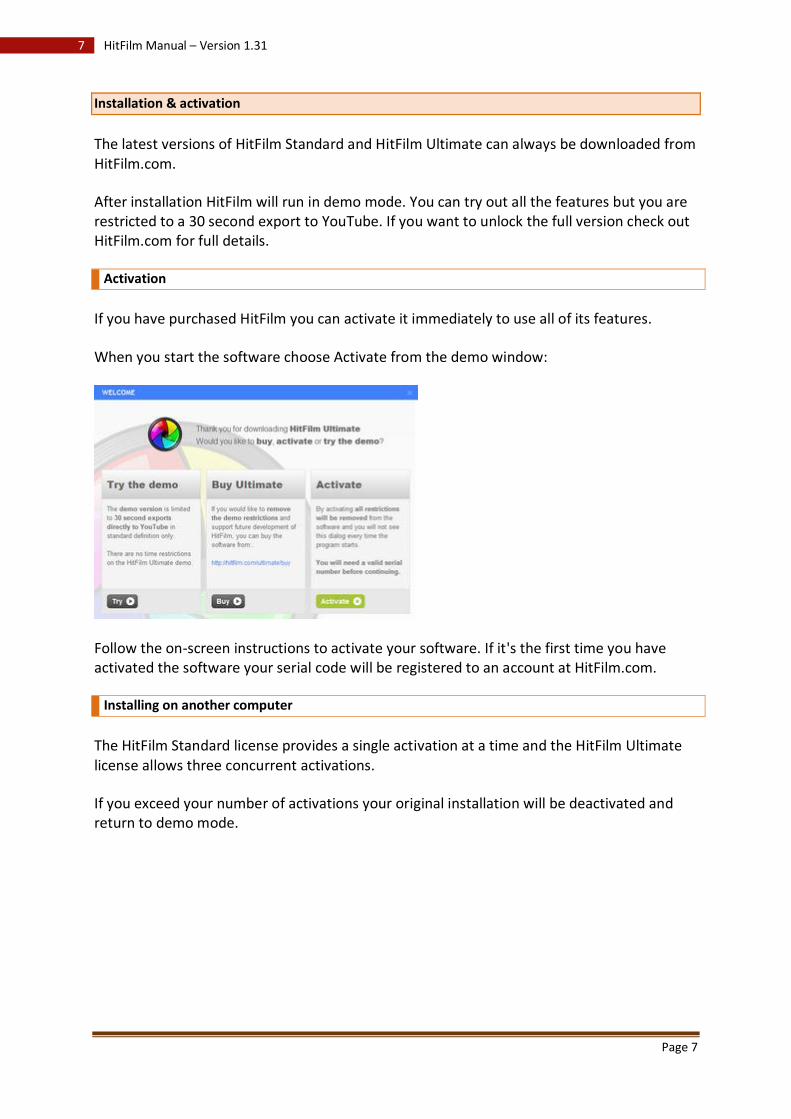
If you have purchased HitFilm you can activate it immediately to use all of its features.
When you start the software choose Activate from the demo window:
Follow the on-screen instructions to activate your software. If it's the first time you have activated the software your serial code will be registered to an account at HitFilm.com.
Installing on another computer
The HitFilm Standard license provides a single activation at a time and the HitFilm Ultimate license allows three concurrent activations.
If you exceed your number of activations your original installation will be deactivated and return to demo mode.
Page 8
8 HitFilm Manual – Version 1.31
Interface basics
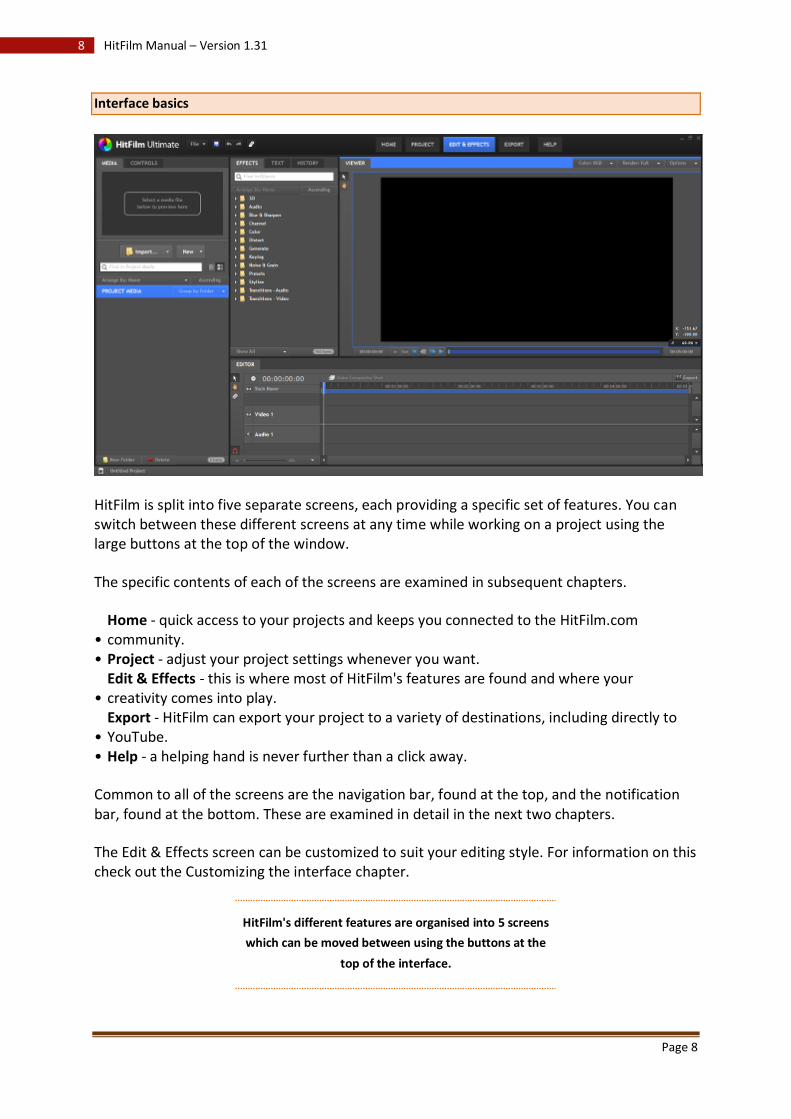
HitFilm is split into five separate screens, each providing a specific set of features. You can switch between these different screens at any time while working on a project using the large buttons at the top of the window.
The specific contents of each of the screens are examined in subsequent chapters.
• Home - quick access to your projects and keeps you connected to the HitFilm.com community.
• Project - adjust your project settings whenever you want.
• Edit & Effects - this is where most of HitFilm's features are found and where your creativity comes into play.
• Export - HitFilm can export your project to a variety of destinations, including directly to YouTube.
• Help - a helping hand is never further than a click away.
Common to all of the screens are the navigation bar, found at the top, and the notification bar, found at the bottom. These are examined in detail in the next two chapters.
The Edit & Effects screen can be customized to suit your editing style. For information on this check out the Customizing the interface chapter.
HitFilm's different features are organised into 5 screens
which can be moved between using the buttons at the
top of the interface.

Page 9
9 HitFilm Manual – Version 1.31
Navigation bar
The navigation bar runs horizontally along the top of the HitFilm window.
You can use the navigation bar to switch between the different HitFilm screens and to quickly manage your project files without needing to return to the Home screen.
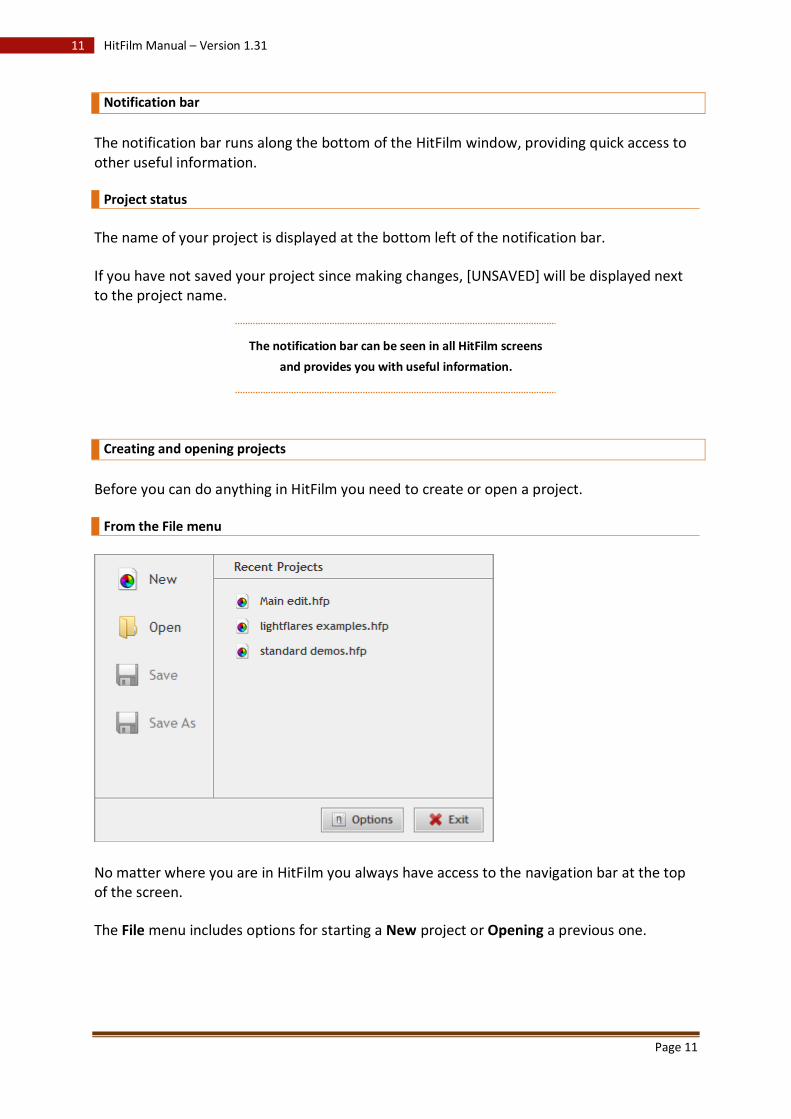
File menu
Looking after your projects is always important! The File menu makes it easy to create, open and save projects without having to change screen.
On the left of the menu you can see the main project commands:
• New - creates a new project. HitFilm can only have one project open at a time, so you will be asked to save your current project file before creating a new one.
• Open - opens a project file you've previously saved on your computer.
• Save - saves your current project so that your work is safe. If it is the first time you have saved the project you will need to choose a location for the file.
•
Save As - if you want to create an alternate version of your current project file, this will create a new project file under a different name. After using Save As, the Save option will use the new filename and location instead of the original.
On the right of the File menu is a handy list of your most recent projects so that you can quickly switch between different projects without having to find them on your computer.
The Options button is where you can change HitFilm's preferences.
The Exit button is another way to close the application when you've finished working on your masterpiece for the day.
Quick tools
To the right of the File menu are four small buttons.
• Save - saves your current project so that your work is safe. If it is the first time you have saved the project you will need to choose a location for the file.
•
Undo (Ctrl+Z) - if you've made a mistake or don't like what you just changed, click the Undo button to go back to where you were before. HitFilm logs every decision you make, so you can undo everything you've done since launching the application. The number of changes that are stored can be changed in Options.
•
Redo (Ctrl+Y) - after clicking Undo you can then click Redo to reinstate your previous decision. Note that if you undo a decision then make other changes you won't be able to use Redo to get back to the original state.
Page 10
10 HitFilm Manual – Version 1.31
If you hover the mouse over Undo or Redo a tooltip will be displayed showing exactly what will change if you click the buttons.
• Workspace - turn the interface panels on and off and change workspace. For more information see Customizing the workspace.
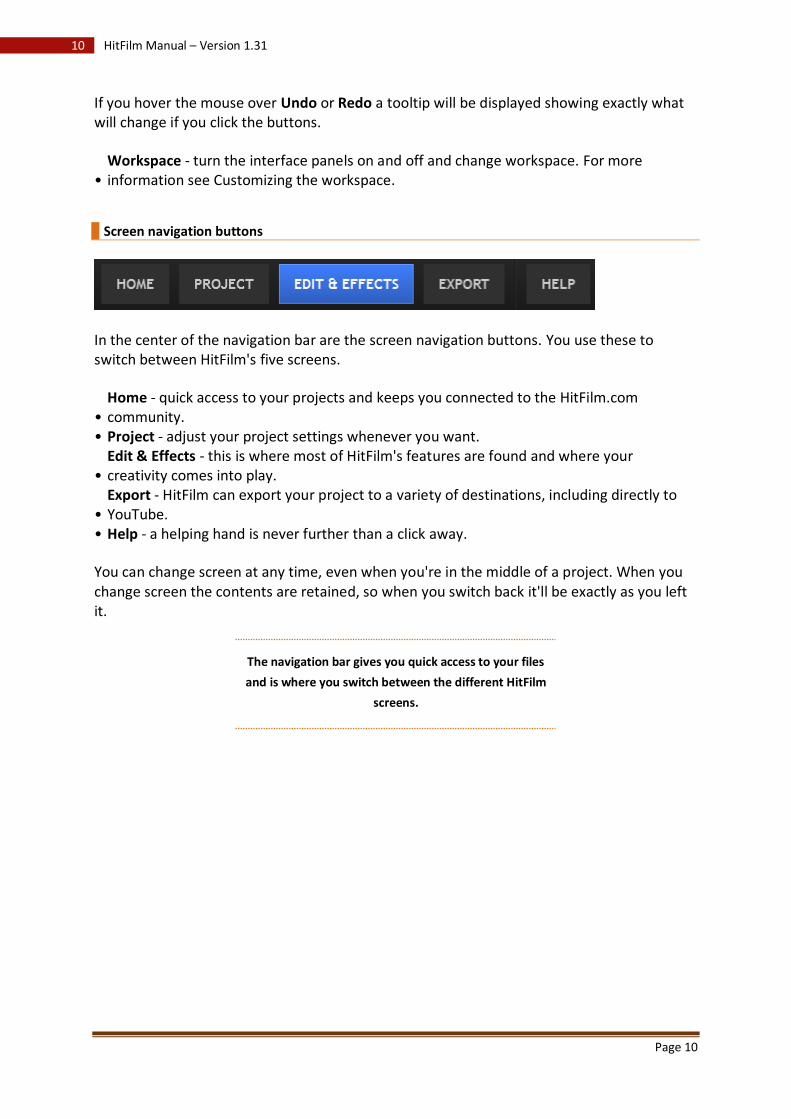
Screen navigation buttons
In the center of the navigation bar are the screen navigation buttons. You use these to switch between HitFilm's five screens.
• Home - quick access to your projects and keeps you connected to the HitFilm.com community.
• Project - adjust your project settings whenever you want.
• Edit & Effects - this is where most of HitFilm's features are found and where your creativity comes into play.
• Export - HitFilm can export your project to a variety of destinations, including directly to YouTube.
• Help - a helping hand is never further than a click away.
You can change screen at any time, even when you're in the middle of a project. When you change screen the contents are retained, so when you switch back it'll be exactly as you left it.
The navigation bar gives you quick access to your files
and is where you switch between the different HitFilm
screens.
Page 11
11 HitFilm Manual – Version 1.31
Notification bar
The notification bar runs along the bottom of the HitFilm window, providing quick access to other useful information.
Project status
The name of your project is displayed at the bottom left of the notification bar.
If you have not saved your project since making changes, [UNSAVED] will be displayed next to the project name.
The notification bar can be seen in all HitFilm screens
and provides you with useful information.
Creating and opening projects
Before you can do anything in HitFilm you need to create or open a project.
From the File menu
No matter where you are in HitFilm you always have access to the navigation bar at the top of the screen.
The File menu includes options for starting a New project or Opening a previous one.
Page 12
12 HitFilm Manual – Version 1.31
You can also choose from a list of recent projects on the right side of the File menu.
If you are already working on a project you will be asked to save it before the new project opens.
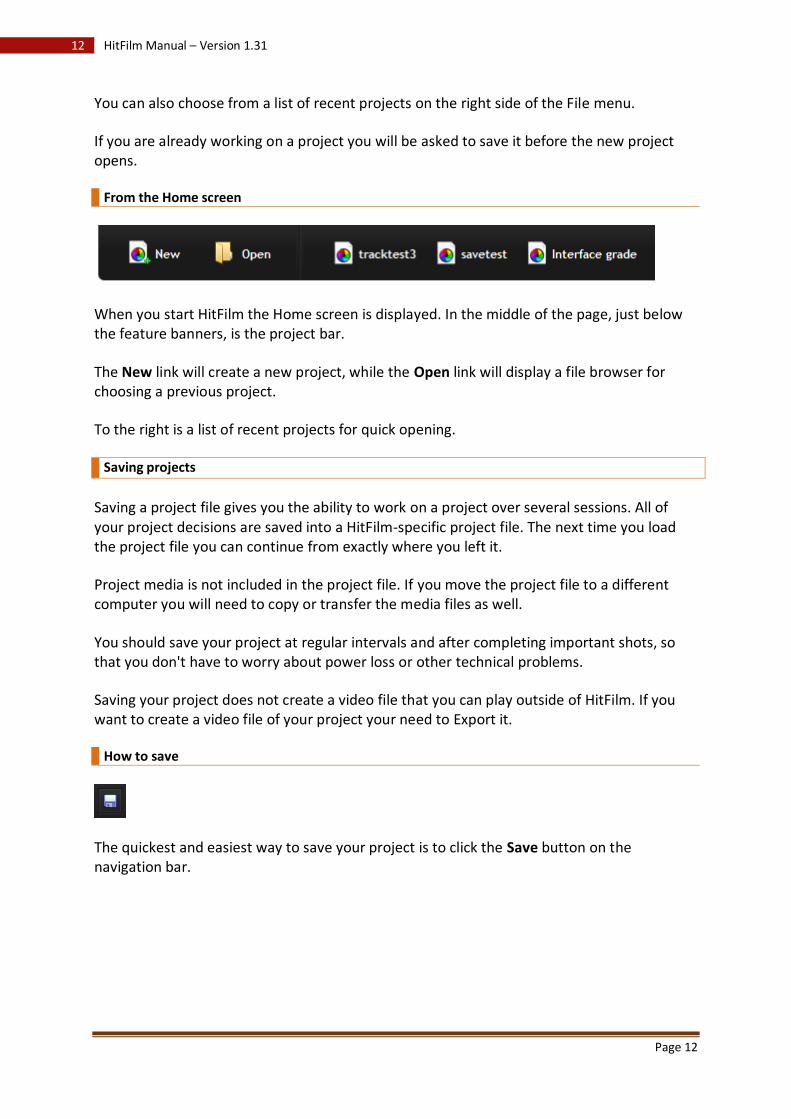
From the Home screen
When you start HitFilm the Home screen is displayed. In the middle of the page, just below the feature banners, is the project bar.
The New link will create a new project, while the Open link will display a file browser for choosing a previous project.
To the right is a list of recent projects for quick opening.
Saving projects
Saving a project file gives you the ability to work on a project over several sessions. All of your project decisions are saved into a HitFilm-specific project file. The next time you load the project file you can continue from exactly where you left it.
Project media is not included in the project file. If you move the project file to a different computer you will need to copy or transfer the media files as well.
You should save your project at regular intervals and after completing important shots, so that you don't have to worry about power loss or other technical problems.
Saving your project does not create a video file that you can play outside of HitFilm. If you want to create a video file of your project your need to Export it.
How to save
The quickest and easiest way to save your project is to click the Save button on the navigation bar.
Page 13
13 HitFilm Manual – Version 1.31
This will update your saved project file. If it is the first time you have saved the project you will need to specify a location for the file.
The File menu also has a Save option which works in the same way.
The Save As option creates an alternate version of your current project file, resulting in a new project file under a different name.
After using Save As, the Save option will use the new filename and location instead of the original.
With any software you use, save frequently and always
keep backups, preferably on multiple storage devices.
Undo
Everything you do in HitFilm is logged, so that you can always undo any mistakes, even over multiple steps.
This means that you are free to experiment with new features and settings without having to worry about spoiling your project. HitFilm won't ever punish you for experimenting or being creative.
Page 14
14 HitFilm Manual – Version 1.31
Undo & Redo
•
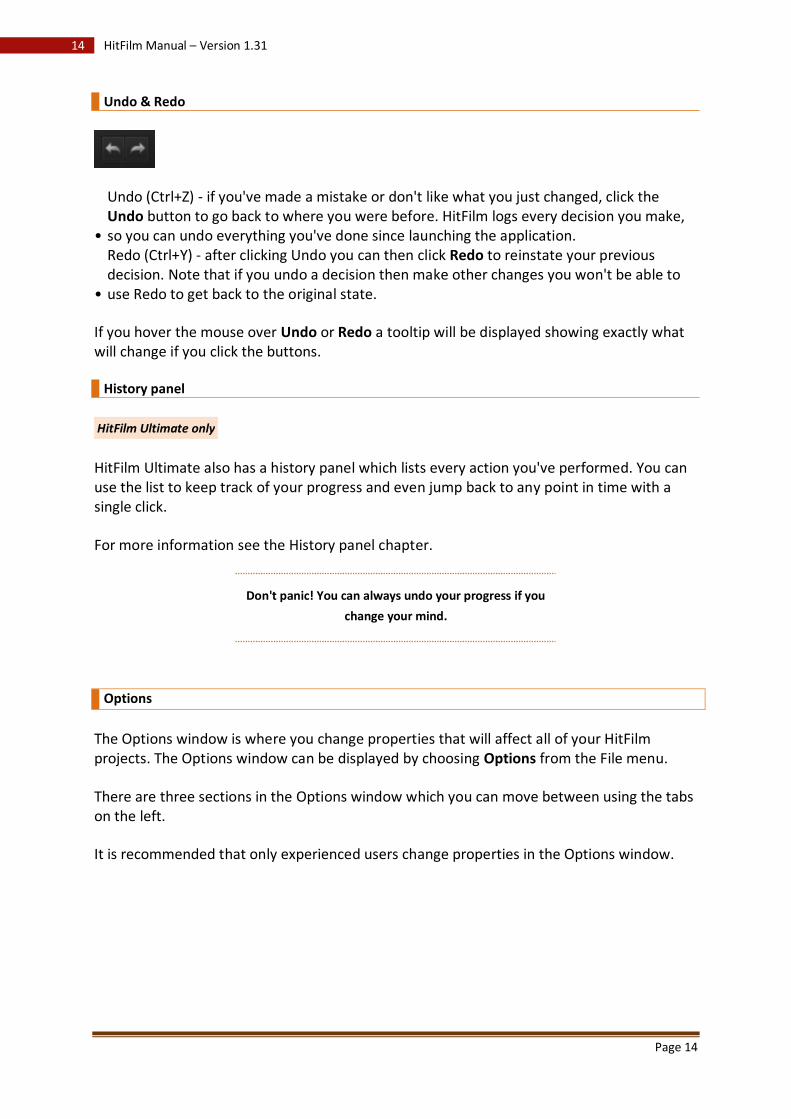
Undo (Ctrl+Z) - if you've made a mistake or don't like what you just changed, click the Undo button to go back to where you were before. HitFilm logs every decision you make, so you can undo everything you've done since launching the application.
•
Redo (Ctrl+Y) - after clicking Undo you can then click Redo to reinstate your previous decision. Note that if you undo a decision then make other changes you won't be able to use Redo to get back to the original state.
If you hover the mouse over Undo or Redo a tooltip will be displayed showing exactly what will change if you click the buttons.
History panel
HitFilm Ultimate only
HitFilm Ultimate also has a history panel which lists every action you've performed. You can use the list to keep track of your progress and even jump back to any point in time with a single click.
For more information see the History panel chapter.
Don't panic! You can always undo your progress if you
change your mind.
Options
The Options window is where you change properties that will affect all of your HitFilm projects. The Options window can be displayed by choosing Options from the File menu.
There are three sections in the Options window which you can move between using the tabs on the left.
It is recommended that only experienced users change properties in the Options window.
Page 15
15 HitFilm Manual – Version 1.31
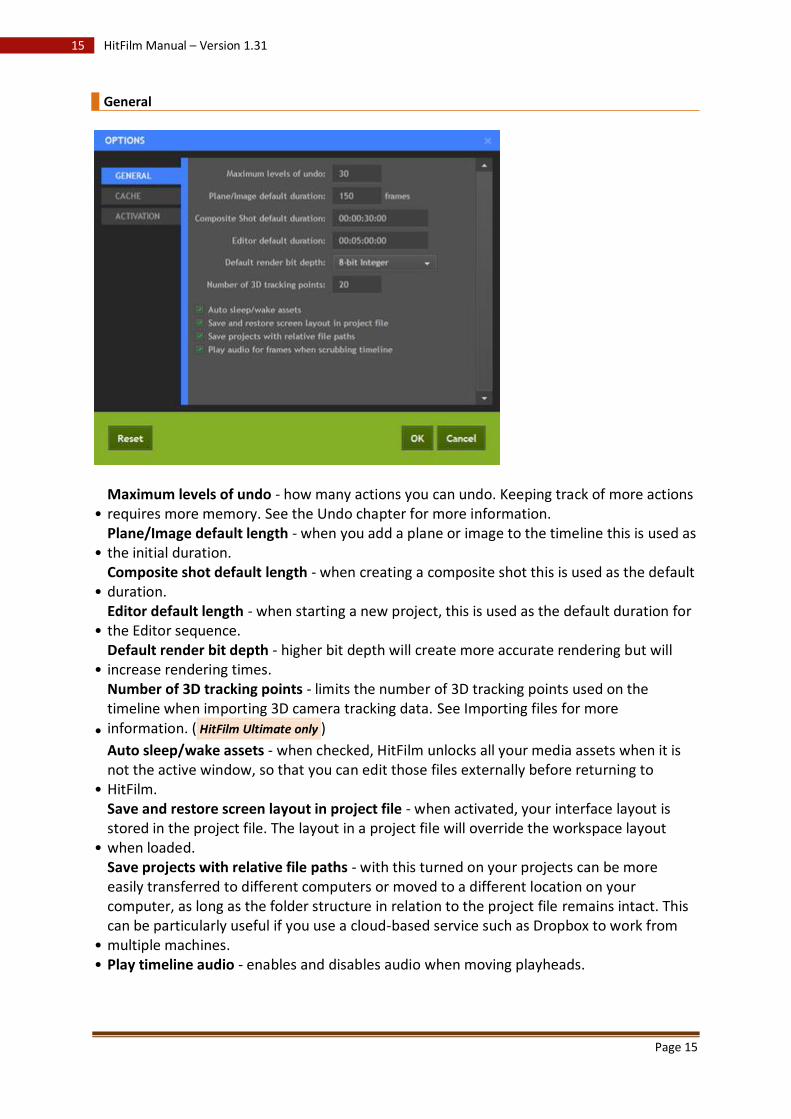
General
• Maximum levels of undo - how many actions you can undo. Keeping track of more actions requires more memory. See the Undo chapter for more information.
• Plane/Image default length - when you add a plane or image to the timeline this is used as the initial duration.
• Composite shot default length - when creating a composite shot this is used as the default duration.
• Editor default length - when starting a new project, this is used as the default duration for the Editor sequence.
• Default render bit depth - higher bit depth will create more accurate rendering but will increase rendering times.
•
Number of 3D tracking points - limits the number of 3D tracking points used on the timeline when importing 3D camera tracking data. See Importing files for more information. ( HitFilm Ultimate only )
•
Auto sleep/wake assets - when checked, HitFilm unlocks all your media assets when it is not the active window, so that you can edit those files externally before returning to HitFilm.
•
Save and restore screen layout in project file - when activated, your interface layout is stored in the project file. The layout in a project file will override the workspace layout when loaded.
•
Save projects with relative file paths - with this turned on your projects can be more easily transferred to different computers or moved to a different location on your computer, as long as the folder structure in relation to the project file remains intact. This can be particularly useful if you use a cloud-based service such as Dropbox to work from multiple machines.
• Play timeline audio - enables and disables audio when moving playheads.
Page 16
16 HitFilm Manual – Version 1.31
Cache
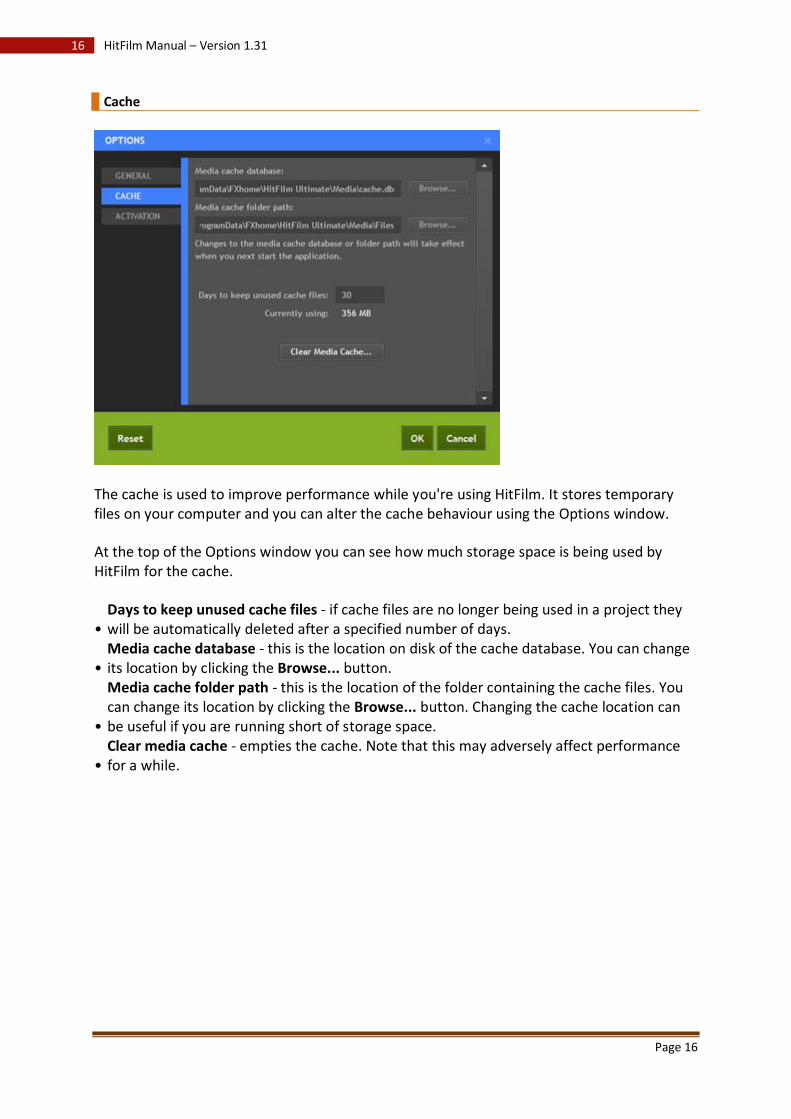
The cache is used to improve performance while you're using HitFilm. It stores temporary files on your computer and you can alter the cache behaviour using the Options window.
At the top of the Options window you can see how much storage space is being used by HitFilm for the cache.
• Days to keep unused cache files - if cache files are no longer being used in a project they will be automatically deleted after a specified number of days.
• Media cache database - this is the location on disk of the cache database. You can change its location by clicking the Browse... button.
•
Media cache folder path - this is the location of the folder containing the cache files. You can change its location by clicking the Browse... button. Changing the cache location can be useful if you are running short of storage space.
• Clear media cache - empties the cache. Note that this may adversely affect performance for a while.
Page 17
17 HitFilm Manual – Version 1.31
Activation
The activation section of the Options window displays details about your software's activation status.
This is where you can find your hardware ID, which you may need if you contact HitFilm technical support.
You can also choose to activate the software from here using your serial code.
The Options window gives you control over HitFilm's
behaviour.
Keyboard shortcuts
HitFilm can be operated using only the mouse but you will often find it faster to use a combination of mouse and keyboard.
Certain key combinations can be used as shortcuts to common functions. They are listed here.
General
• Undo - Ctrl+Z • Redo - Ctrl+Y • Reset - Ctrl+R • New project - Ctrl+N • Open project - Ctrl+O • Save project - Ctrl+S • Save as - Ctrl+Alt+S • Exit - Alt+F4 • Switch to Home screen - Ctrl+1 • Switch to Project screen - Ctrl+2 • Switch to Edit & Effects screen - Ctrl+3 • Switch to Export screen - Ctrl+4 • Switch to Help screen - Ctrl+5 • Select all - Ctrl+A • Remove selection - Delete • Rename selection - F2 • Cut selection - Ctrl+X • Copy selection - Ctrl+C • Paste selection - Ctrl+V • Duplicate selection - Ctrl+D
Page 18
18 HitFilm Manual – Version 1.31
General timeline
• Move playhead to start - Home • Move playhead to end - End • Jump to time - Ctrl+J (highlights current time indicator) • Play/pause - Space • Move playhead to previous frame - , or Ctrl+Left arrow • Move playhead to next frame - . or Ctrl+Right arrow • Move playhead back by 10 frames - Shift+, or Ctrl+Shift+Left arrow • Move playhead forward by 10 frames - Shift+. or Ctrl+Shift+Right arrow • Move playhead to previous edit point - Page up • Move playhead to next edit point - Page down • Set in point - I • Set out point - O • Set timeline in and out points to content - P • Increase timeline scale - Ctrl++ • Decrease timeline scale - Ctrl+- • Scroll timeline to playhead - Ctrl+Home
Viewer panel
• Move selected layer left by one pixel - Left arrow • Move selected layer right by one pixel - Right arrow • Move selected layer up by one pixel - Up arrow • Move selected layer down by one pixel - Down arrow • Move selected layer left by ten pixels - Shift+Left arrow • Move selected layer right by ten pixels - Shift+Right arrow • Move selected layer up by ten pixels - Shift+Up arrow • Move selected layer down by ten pixels - Shift+Down arrow • Select tool - V • Hand tool - H • Text tool - T • Rectangle mask tool - R • Ellipse mask tool - E • Freehand mask tool - F • Orbit tool - B • Set selected mask point to linear - Ctrl+Alt+Shift+L • Set selected mask point to curved - Ctrl+Alt+Shift+C
Page 19
19 HitFilm Manual – Version 1.31
Editor sequence timeline
• Select tool - V • Hand tool - H • Slice tool - C • Snap toggle - S • Ripple delete - Alt+Delete • Move selected clip left by one pixel - Left arrow • Move selected clip right by one pixel - Right arrow • Move selected clip up by one pixel - Up arrow • Move selected clip down by one pixel - Down arrow • Move selected clip left by ten pixels - Shift+Left arrow • Move selected clip right by ten pixels - Shift+Right arrow • Move selected clip up by ten pixels - Shift+Up arrow • Move selected clip down by ten pixels - Shift+Down arrow
Composite shot timeline
• Select tool - V • Hand tool - H • Slice tool - C • Snap toggle - S • Open New Layer menu - Ctrl+Alt+N • New plane - Ctrl+Alt+A • New camera - Ctrl+Alt+C • New light - Ctrl+Alt+L • New grade - Ctrl+Alt+G • New text - Ctrl+Alt+T • New point - Ctrl+Alt+P • Move playhead to previous keyframe of selected property - Alt+, • Move playhead to next keyframe of selected property - Alt+. • Move selected layer left by one pixel - Left arrow • Move selected layer right by one pixel - Right arrow • Move selected layer up by one pixel - Up arrow • Move selected layer down by one pixel - Down arrow • Move selected layer left by ten pixels - Shift+Left arrow • Move selected layer right by ten pixels - Shift+Right arrow • Move selected layer up by ten pixels - Shift+Up arrow • Move selected layer down by ten pixels - Shift+Down arrow
Page 20
20 HitFilm Manual – Version 1.31
Media panel (when panel is active)
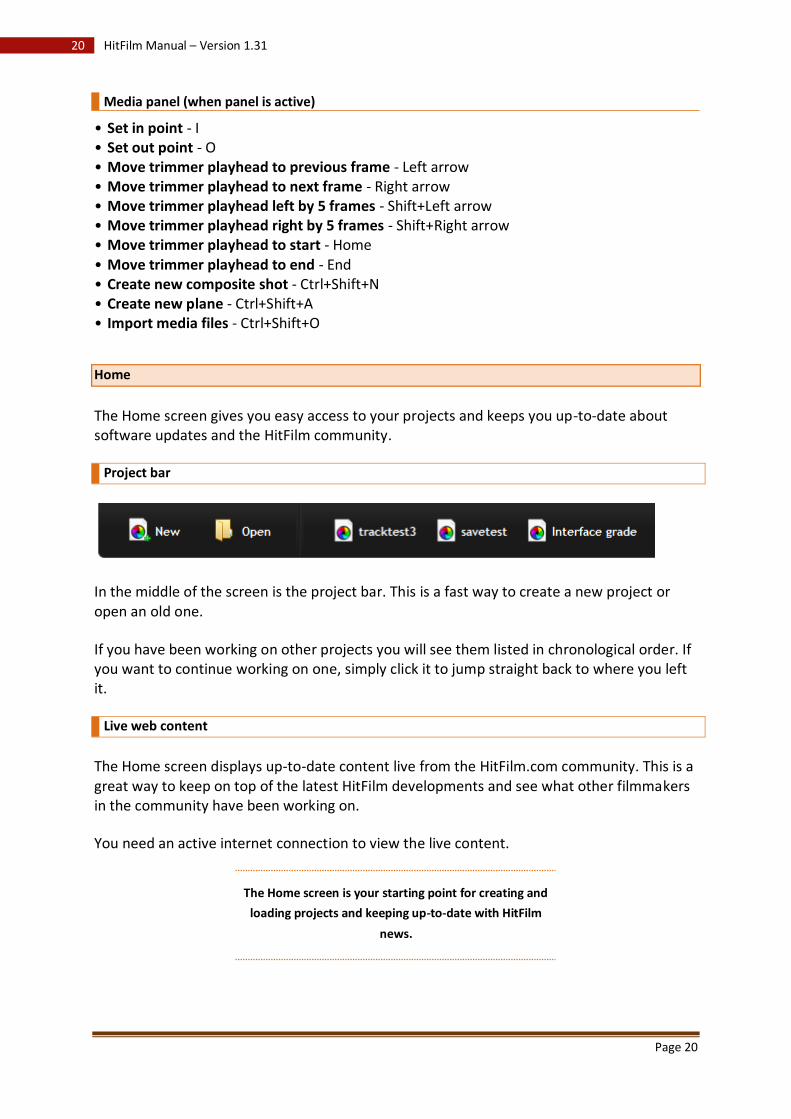
• Set in point - I • Set out point - O • Move trimmer playhead to previous frame - Left arrow • Move trimmer playhead to next frame - Right arrow • Move trimmer playhead left by 5 frames - Shift+Left arrow • Move trimmer playhead right by 5 frames - Shift+Right arrow • Move trimmer playhead to start - Home • Move trimmer playhead to end - End • Create new composite shot - Ctrl+Shift+N • Create new plane - Ctrl+Shift+A • Import media files - Ctrl+Shift+O
Home
The Home screen gives you easy access to your projects and keeps you up-to-date about software updates and the HitFilm community.
Project bar
In the middle of the screen is the project bar. This is a fast way to create a new project or open an old one.
If you have been working on other projects you will see them listed in chronological order. If you want to continue working on one, simply click it to jump straight back to where you left it.
Live web content
The Home screen displays up-to-date content live from the HitFilm.com community. This is a great way to keep on top of the latest HitFilm developments and see what other filmmakers in the community have been working on.
You need an active internet connection to view the live content.
The Home screen is your starting point for creating and
loading projects and keeping up-to-date with HitFilm
news.
Page 21
21 HitFilm Manual – Version 1.31
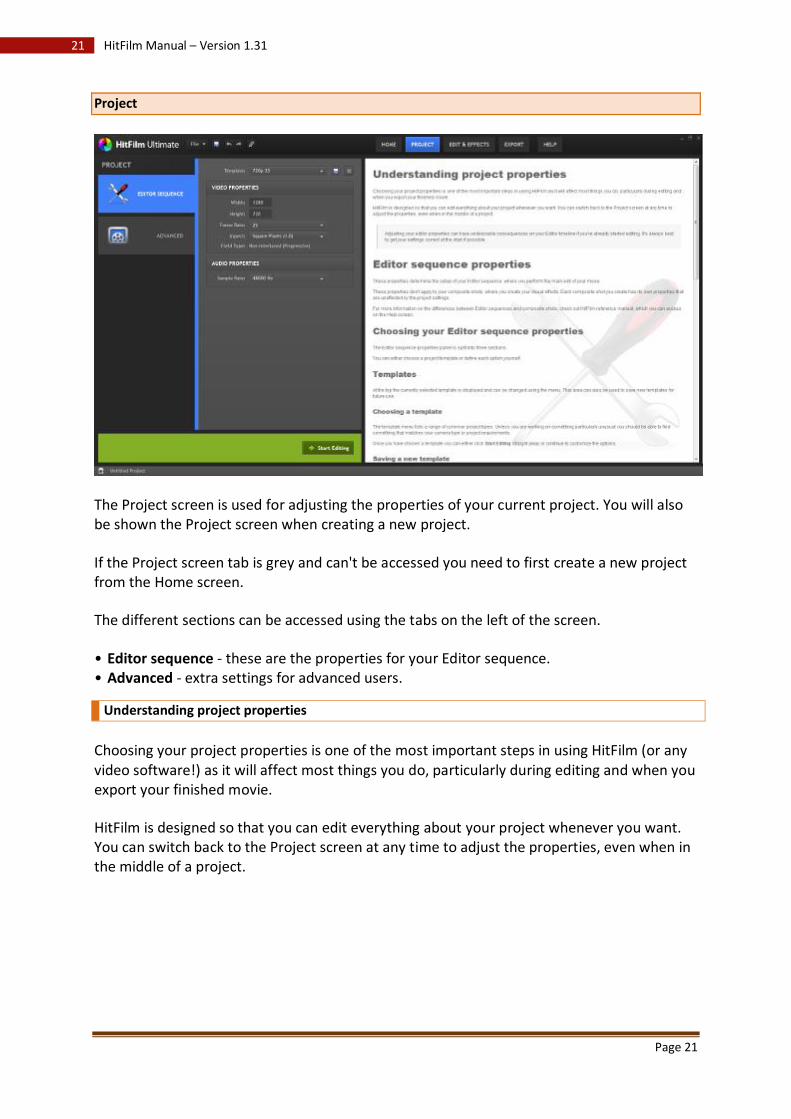
Project
The Project screen is used for adjusting the properties of your current project. You will also be shown the Project screen when creating a new project.
If the Project screen tab is grey and can't be accessed you need to first create a new project from the Home screen.
The different sections can be accessed using the tabs on the left of the screen.
• Editor sequence - these are the properties for your Editor sequence. • Advanced - extra settings for advanced users.
Understanding project properties
Choosing your project properties is one of the most important steps in using HitFilm (or any video software!) as it will affect most things you do, particularly during editing and when you export your finished movie.
HitFilm is designed so that you can edit everything about your project whenever you want. You can switch back to the Project screen at any time to adjust the properties, even when in the middle of a project.
Page 22
22 HitFilm Manual – Version 1.31
Adjusting your editor properties can have undesirable consequences on your Editor timeline if you've already started editing. It's always best to get your settings correct at the start if possible.
You can tweak and update your project settings
whenever you want.
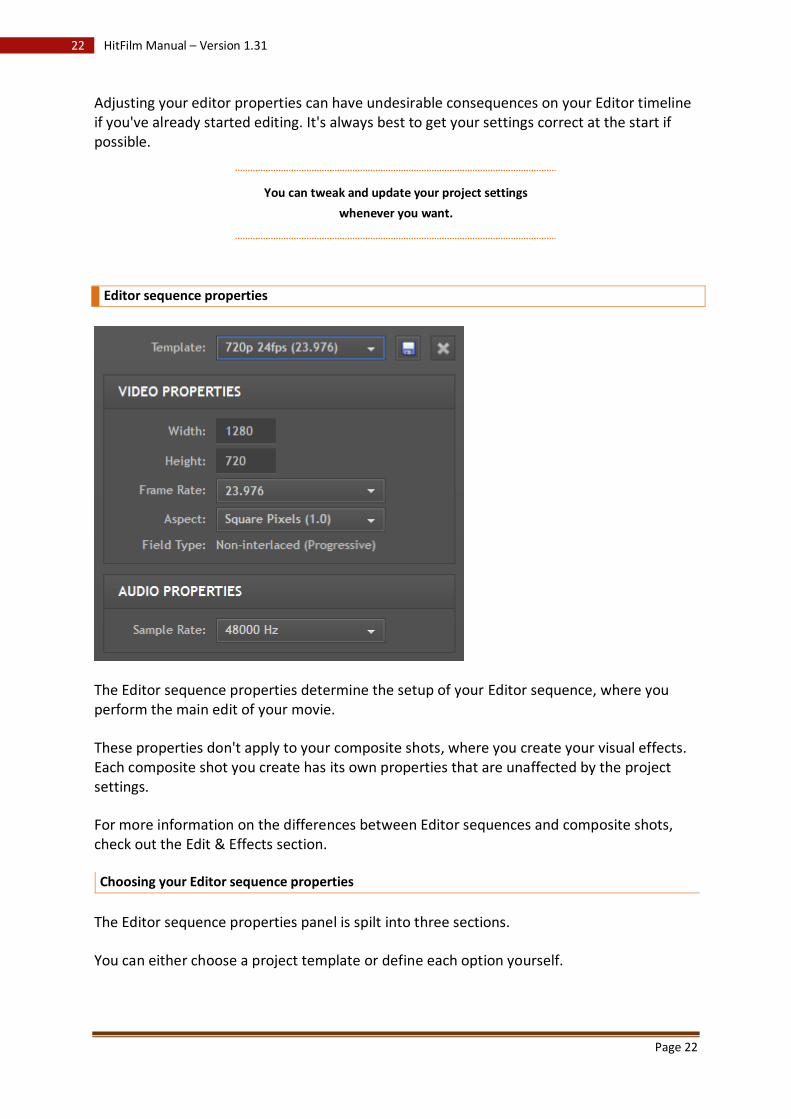
Editor sequence properties
The Editor sequence properties determine the setup of your Editor sequence, where you perform the main edit of your movie.
These properties don't apply to your composite shots, where you create your visual effects. Each composite shot you create has its own properties that are unaffected by the project settings.
For more information on the differences between Editor sequences and composite shots, check out the Edit & Effects section.
Choosing your Editor sequence properties
The Editor sequence properties panel is spilt into three sections.
You can either choose a project template or define each option yourself.

Page 23
23 HitFilm Manual – Version 1.31
Templates
At the top the currently selected template is displayed and can be changed using the menu. This area can also be used to save new templates for future use.
Choosing a template
The template menu lists a range of common project types. Unless you are working on something particularly unusual you should be able to find something that matches your camera type or project requirements.
Once you have chosen a template you can either click Apply straight away or continue to customize the options.
Saving a new template
After altering some of the video and audio properties you might want to save the setup to a new template so that you can easily use it again in future.
Clicking the Save template button to the right of the template menu will display a dialog in which you can specify a name for the new template. If a template already exists with that name you will be asked if you want to replace it.
The default templates cannot be changed or replaced.
The new template will then be available from the template menu.
Removing a template
The Remove template button will permanently remove the currently selected template from the list.
The default templates cannot be removed.
Video properties
These options affect how video is displayed on your editor sequence.
• Width & height - the resolution of the video frame in pixels. Make sure this matches your main video clips otherwise they might be displayed too big or too small.
HitFilm Standard supports projects up to 1080p resolutions.
• Frame rate - the number of frames displayed sequentially in each second of playback. If this does not match your video clips they may playback too fast or too slow.
•
Aspect - the shape of the individual pixels, which in turn affects the shape of the video frame. Some formats use non-square pixels to create widescreen aspect ratios, so make sure you check your camera's specification if your video looks stretched or squashed.
Page 24
24 HitFilm Manual – Version 1.31
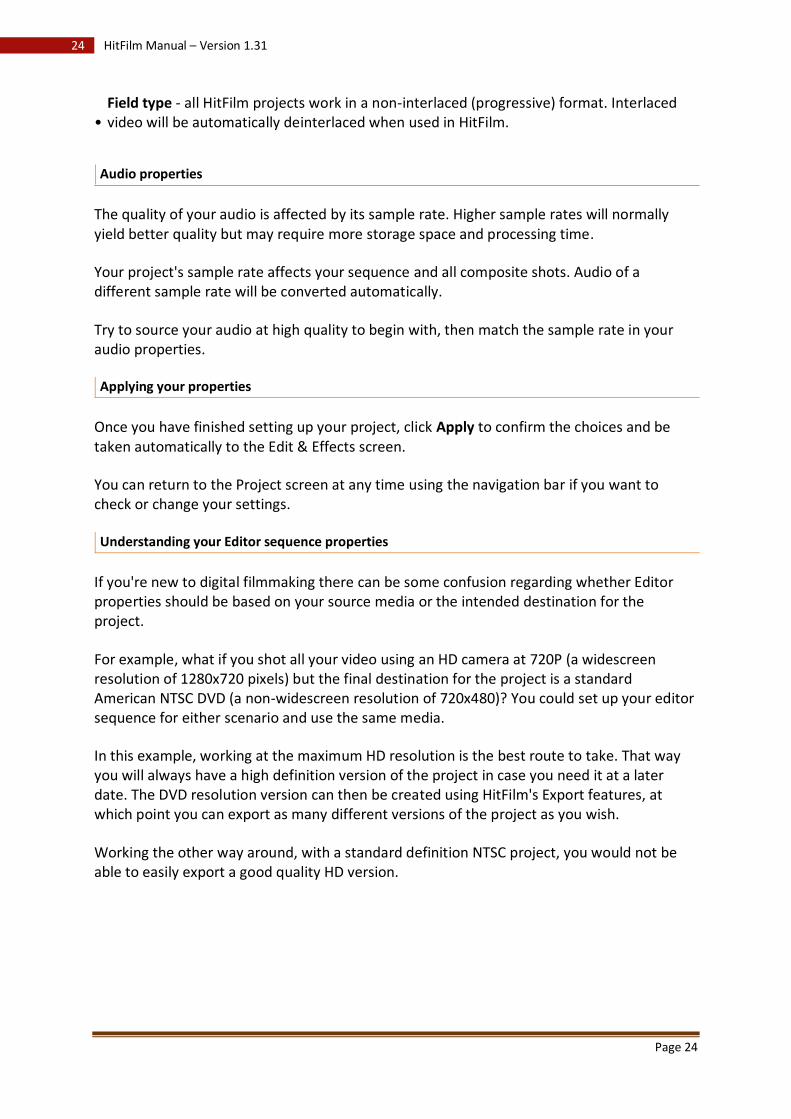
• Field type - all HitFilm projects work in a non-interlaced (progressive) format. Interlaced video will be automatically deinterlaced when used in HitFilm.
Audio properties
The quality of your audio is affected by its sample rate. Higher sample rates will normally yield better quality but may require more storage space and processing time.
Your project's sample rate affects your sequence and all composite shots. Audio of a different sample rate will be converted automatically.
Try to source your audio at high quality to begin with, then match the sample rate in your audio properties.
Applying your properties
Once you have finished setting up your project, click Apply to confirm the choices and be taken automatically to the Edit & Effects screen.
You can return to the Project screen at any time using the navigation bar if you want to check or change your settings.
Understanding your Editor sequence properties
If you're new to digital filmmaking there can be some confusion regarding whether Editor properties should be based on your source media or the intended destination for the project.
For example, what if you shot all your video using an HD camera at 720P (a widescreen resolution of 1280x720 pixels) but the final destination for the project is a standard American NTSC DVD (a non-widescreen resolution of 720x480)? You could set up your editor sequence for either scenario and use the same media.
In this example, working at the maximum HD resolution is the best route to take. That way you will always have a high definition version of the project in case you need it at a later date. The DVD resolution version can then be created using HitFilm's Export features, at which point you can export as many different versions of the project as you wish.
Working the other way around, with a standard definition NTSC project, you would not be able to easily export a good quality HD version.
Page 25
25 HitFilm Manual – Version 1.31
Your editor properties will have a major effect on your Editor timeline. Make sure you choose the correct options and consult your camera's documentation if you need to check any details.
Always work at the maximum quality possible and use
the Export screen to create alternate versions if
necessary.
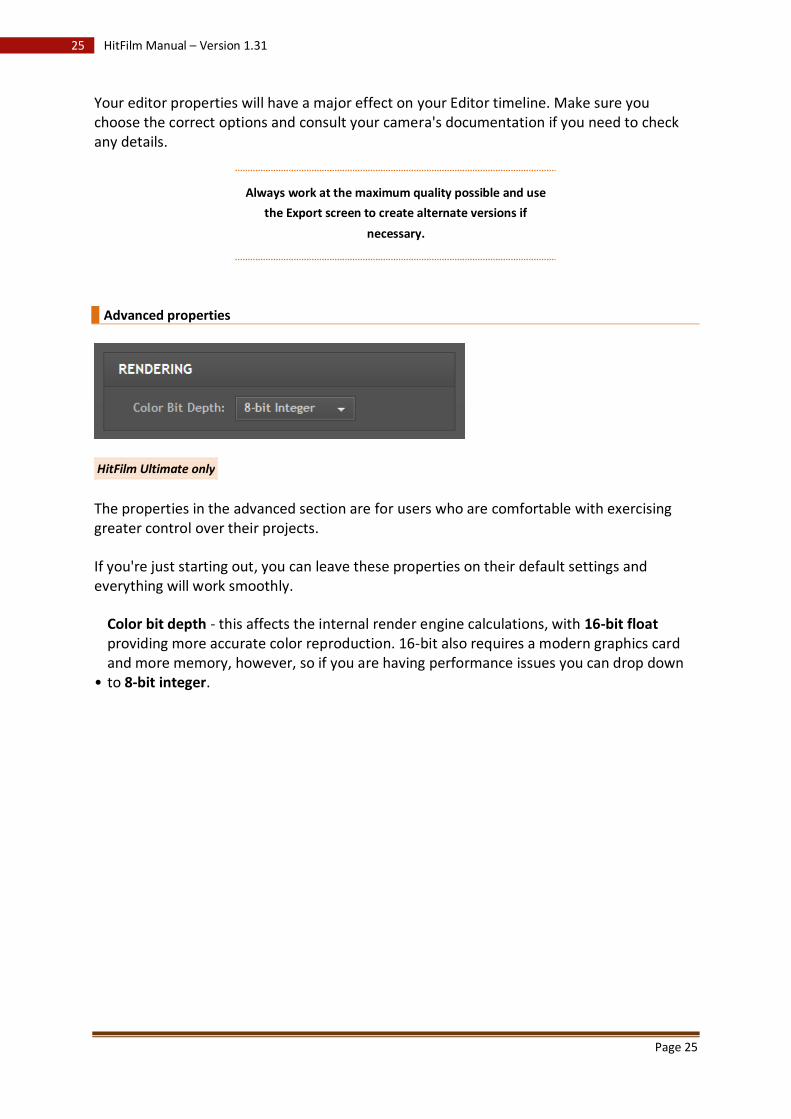
Advanced properties
HitFilm Ultimate only
The properties in the advanced section are for users who are comfortable with exercising greater control over their projects.
If you're just starting out, you can leave these properties on their default settings and everything will work smoothly.
•
Color bit depth - this affects the internal render engine calculations, with 16-bit float providing more accurate color reproduction. 16-bit also requires a modern graphics card and more memory, however, so if you are having performance issues you can drop down to 8-bit integer.
Page 26
26 HitFilm Manual – Version 1.31
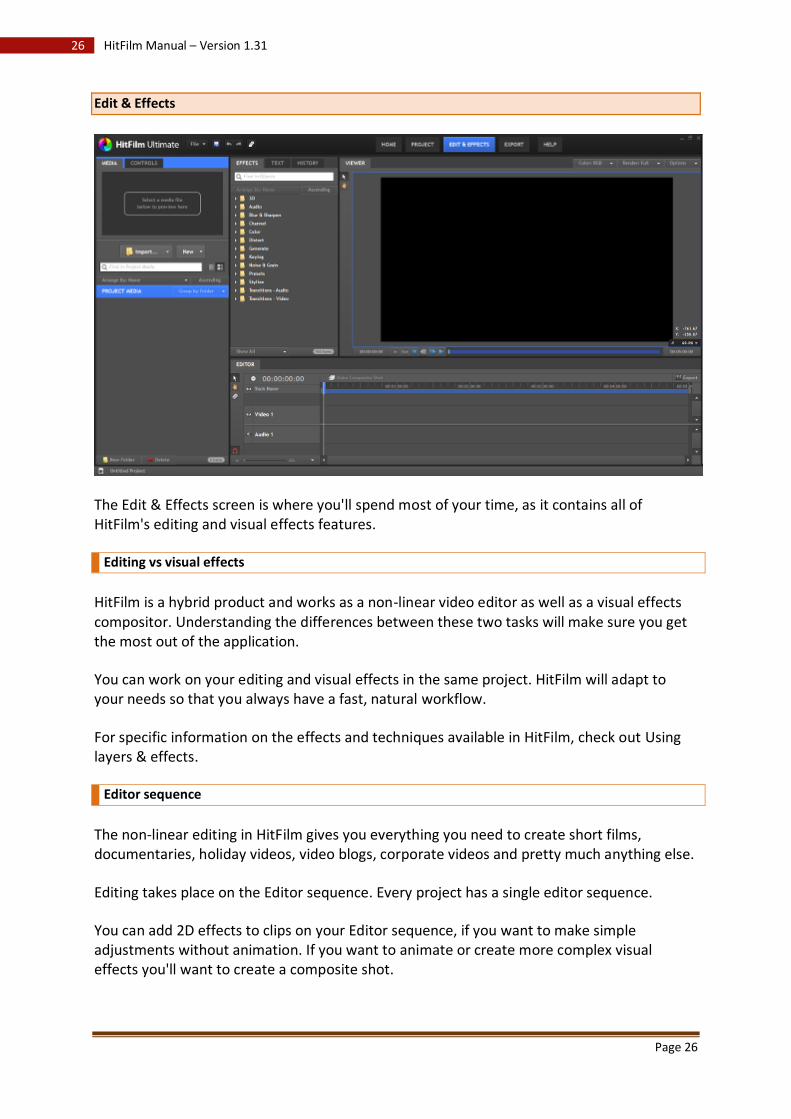
Edit & Effects
The Edit & Effects screen is where you'll spend most of your time, as it contains all of HitFilm's editing and visual effects features.
Editing vs visual effects
HitFilm is a hybrid product and works as a non-linear video editor as well as a visual effects compositor. Understanding the differences between these two tasks will make sure you get the most out of the application.
You can work on your editing and visual effects in the same project. HitFilm will adapt to your needs so that you always have a fast, natural workflow.
For specific information on the effects and techniques available in HitFilm, check out Using layers & effects.
Editor sequence
The non-linear editing in HitFilm gives you everything you need to create short films, documentaries, holiday videos, video blogs, corporate videos and pretty much anything else.
Editing takes place on the Editor sequence. Every project has a single editor sequence.
You can add 2D effects to clips on your Editor sequence, if you want to make simple adjustments without animation. If you want to animate or create more complex visual effects you'll want to create a composite shot.
Page 27
27 HitFilm Manual – Version 1.31
Composite shots
If your project needs sophisticated visual effects, motion graphics or color grading you can do it all right from within HitFilm. You don't need to worry about exporting videos and transferring files between different products.
Visual effects are created as composite shots. There can be multiple composite shots in a single project.
You can switch between your editor sequence and composite shots at any time.
If you are only working on composite shots you do not need to use the Editor sequence.
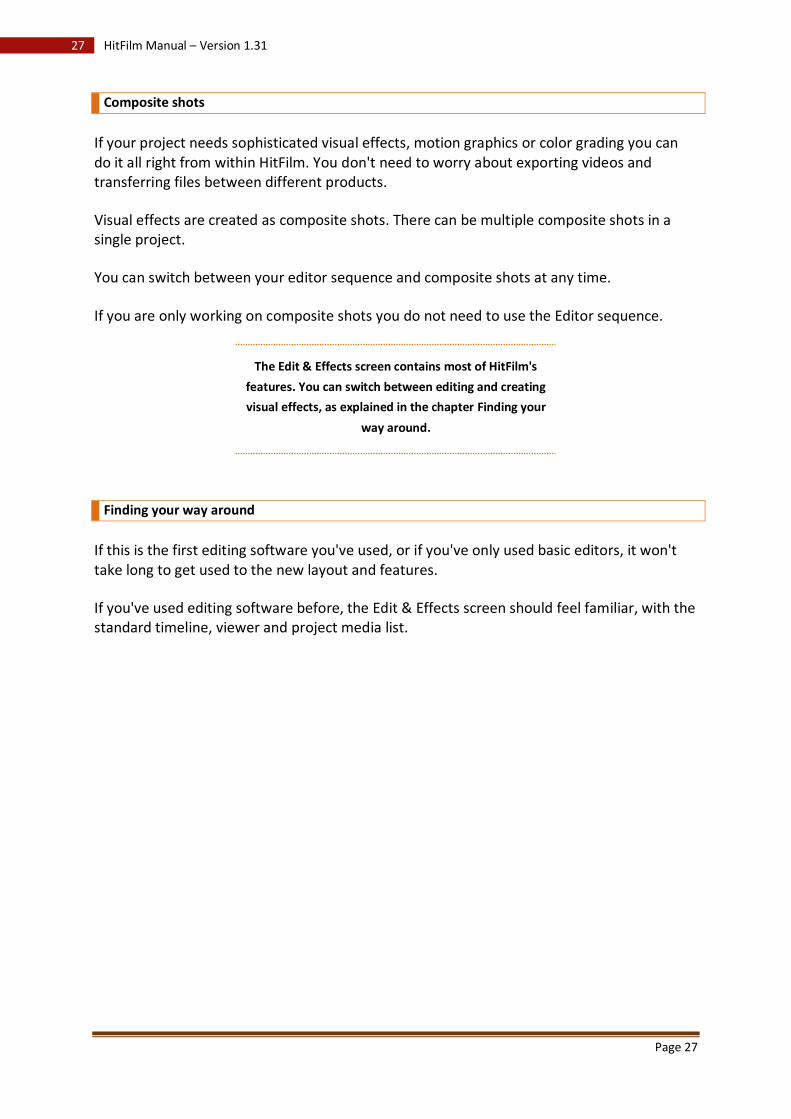
The Edit & Effects screen contains most of HitFilm's
features. You can switch between editing and creating
visual effects, as explained in the chapter Finding your
way around.
Finding your way around
If this is the first editing software you've used, or if you've only used basic editors, it won't take long to get used to the new layout and features.
If you've used editing software before, the Edit & Effects screen should feel familiar, with the standard timeline, viewer and project media list.
Page 28
28 HitFilm Manual – Version 1.31
Understanding the Edit & Effects screen
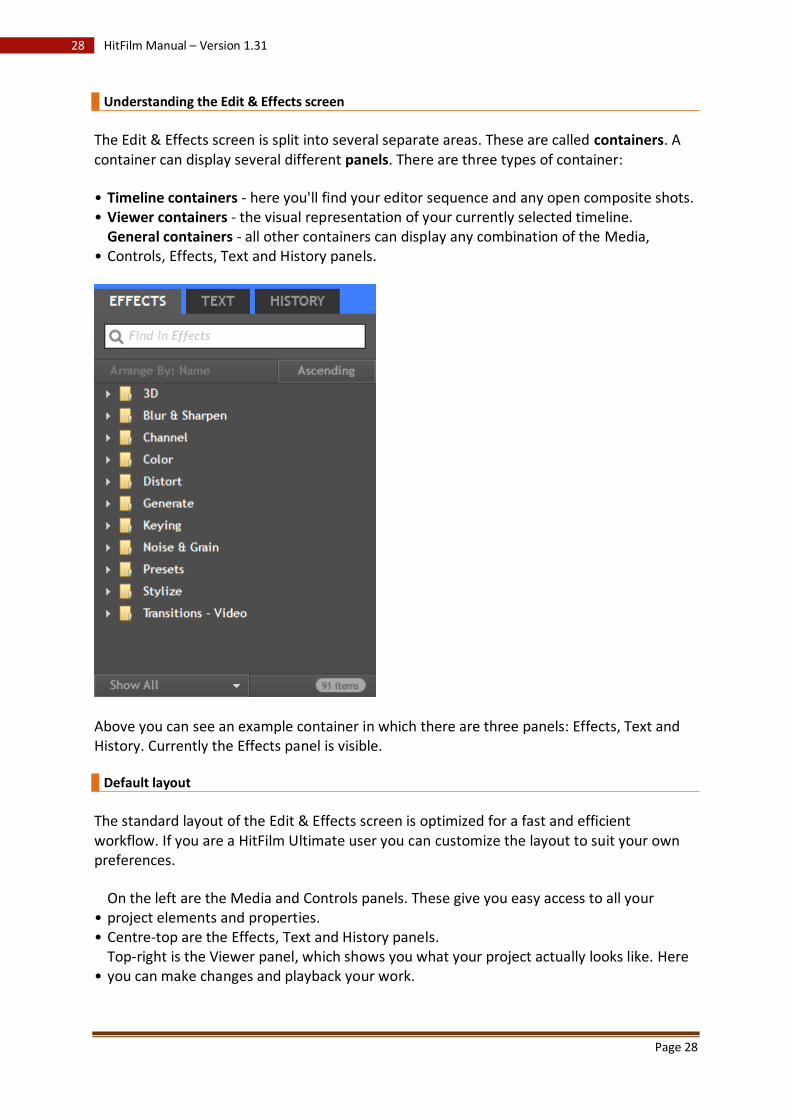
The Edit & Effects screen is split into several separate areas. These are called containers. A container can display several different panels. There are three types of container:
• Timeline containers - here you'll find your editor sequence and any open composite shots. • Viewer containers - the visual representation of your currently selected timeline.
• General containers - all other containers can display any combination of the Media, Controls, Effects, Text and History panels.
Above you can see an example container in which there are three panels: Effects, Text and History. Currently the Effects panel is visible.
Default layout
The standard layout of the Edit & Effects screen is optimized for a fast and efficient workflow. If you are a HitFilm Ultimate user you can customize the layout to suit your own preferences.
• On the left are the Media and Controls panels. These give you easy access to all your project elements and properties.
• Centre-top are the Effects, Text and History panels.
• Top-right is the Viewer panel, which shows you what your project actually looks like. Here you can make changes and playback your work.
Page 29
29 HitFilm Manual – Version 1.31
•
Running along the bottom is the Editor sequence. This is where you make all your decisions when editing your movie. Composite shots are also be displayed here when you are working on them.
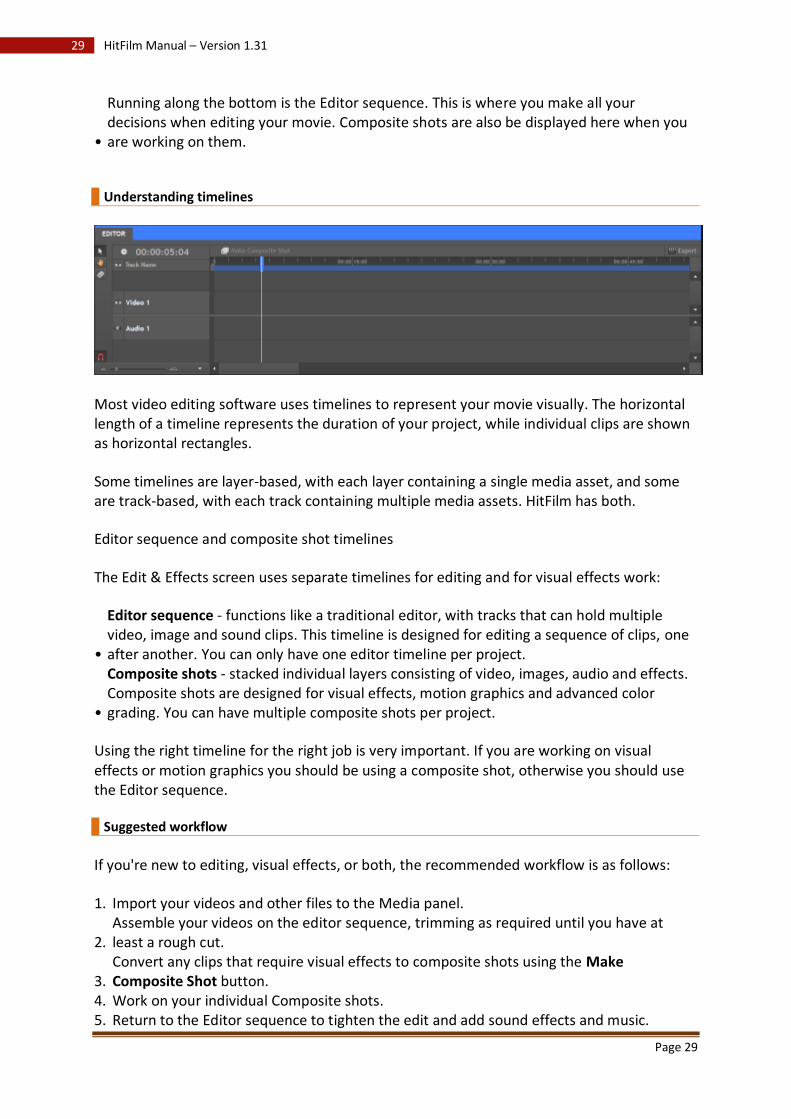
Understanding timelines
Most video editing software uses timelines to represent your movie visually. The horizontal length of a timeline represents the duration of your project, while individual clips are shown as horizontal rectangles.
Some timelines are layer-based, with each layer containing a single media asset, and some are track-based, with each track containing multiple media assets. HitFilm has both.
Editor sequence and composite shot timelines
The Edit & Effects screen uses separate timelines for editing and for visual effects work:
•
Editor sequence - functions like a traditional editor, with tracks that can hold multiple video, image and sound clips. This timeline is designed for editing a sequence of clips, one after another. You can only have one editor timeline per project.
•
Composite shots - stacked individual layers consisting of video, images, audio and effects. Composite shots are designed for visual effects, motion graphics and advanced color grading. You can have multiple composite shots per project.
Using the right timeline for the right job is very important. If you are working on visual effects or motion graphics you should be using a composite shot, otherwise you should use the Editor sequence.
Suggested workflow
If you're new to editing, visual effects, or both, the recommended workflow is as follows:
1. Import your videos and other files to the Media panel.
2. Assemble your videos on the editor sequence, trimming as required until you have at least a rough cut.
3. Convert any clips that require visual effects to composite shots using the Make Composite Shot button.
4. Work on your individual Composite shots. 5. Return to the Editor sequence to tighten the edit and add sound effects and music.

Page 30
30 HitFilm Manual – Version 1.31
You will no doubt tweak and improve this workflow to suit your own needs as you become more familiar with HitFilm.
Don't feel that there is a 'right' or 'wrong' way to do things in HitFilm - whatever gets you good results in as short a time as possible is the way to go.
Changing between timelines
Your Editor sequence is created when you start a new project and is always visible on the Edit & Effects screen.
When you create composite shots they will be added to your Project Media listing. Composite shots you're currently working on will be displayed as a timeline panel and you can switch between the Editor sequence and multiple composite shots at any time.
Only open composite shots will appear as a timeline. If you can't find your composite shot as a timeline, you can always find it in the Project Media list. Composite shots can be opened from the Media panel or dropped into another timeline like any other media item.
There are many ways to create a composite shot which are covered in the separate Creating composite shots chapter.
Your projects consist of an Editor sequence and
(optionally) multiple composite shots. The main edit of
your movie is done on the Editor sequence, while
composite shots are used for creating visual effects,
composites and motion graphics.
Page 31
31 HitFilm Manual – Version 1.31
Customizing the workspace
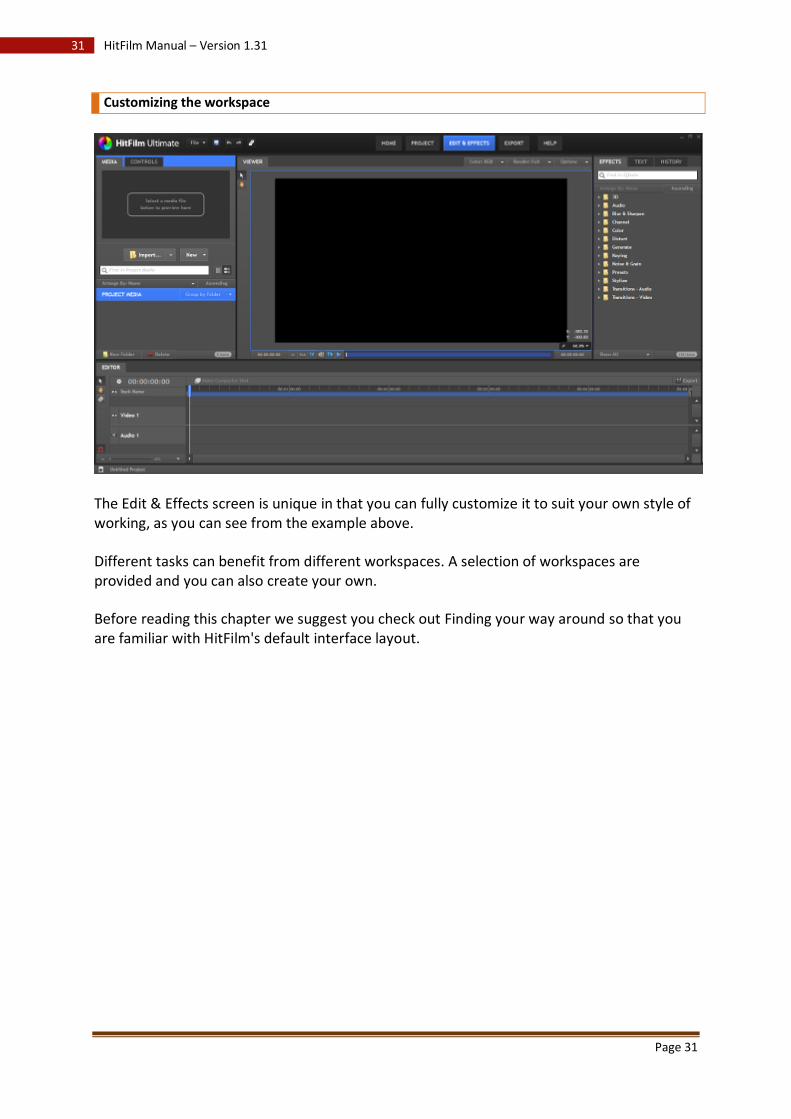
The Edit & Effects screen is unique in that you can fully customize it to suit your own style of working, as you can see from the example above.
Different tasks can benefit from different workspaces. A selection of workspaces are provided and you can also create your own.
Before reading this chapter we suggest you check out Finding your way around so that you are familiar with HitFilm's default interface layout.
Page 32
32 HitFilm Manual – Version 1.31
Changing workspace
HitFilm is provided with multiple workspaces. You can switch between workspaces using the Workspace menu on the Navigation bar.The workspaces prioritize different layouts to suit particular tasks and you can switch between them at any time.
Creating new workspaces
You can save the current interface layout as a new workspace.
Clicking the Create button displays a window where you can specify a name for the new workspace. It will then be available in the workspace list.
For help on designing your own workspaces, see Designing your own workspace.
Deleting workspaces
Clicking the Delete button displays a window where you can choose a workspace to delete.
You cannot undo the deletion of a workspace!

Page 33
33 HitFilm Manual – Version 1.31
Turning panels on and off
Some panels can be turned on and off using the Workspace menu. If you're not using a particular panel and want to free up some space on your screen you can turn it off - this can be particularly useful if you're working on a low resolution monitor.
Some panels cannot be turned off.
Workspaces give you quick access to different interface
layouts.
Designing your own workspace
If you want to create your own workspace it's important to know how each element of the workspace can be customized.
For information on creating, selecting and deleting workspaces read Customizing the workspace.
Adjusting containers
Containers can be customized in several ways:
Changing container size
The simplest change to the layout you can make is to adjust the size and shape of the containers.
You can grab the edge of any container with the mouse and drag to resize it. For example, if you need a bigger viewer you can drag the bottom and left edges of the default view to enlarge it.
There are some limits on how much you can resize containers.
Page 34
34 HitFilm Manual – Version 1.31
Moving containers
Entire containers can be moved by clicking and dragging on the title bar at the top of the container. Moving a container will also move all of its docked panels.
Make sure you click on an empty area of the title bar and not on a panel tab.
Containers can only be moved to defined locations, indicated by green lines as you drag. Dragging a container to the top, bottom, left or right of the screen will show a green line running the full width or height of that edge.
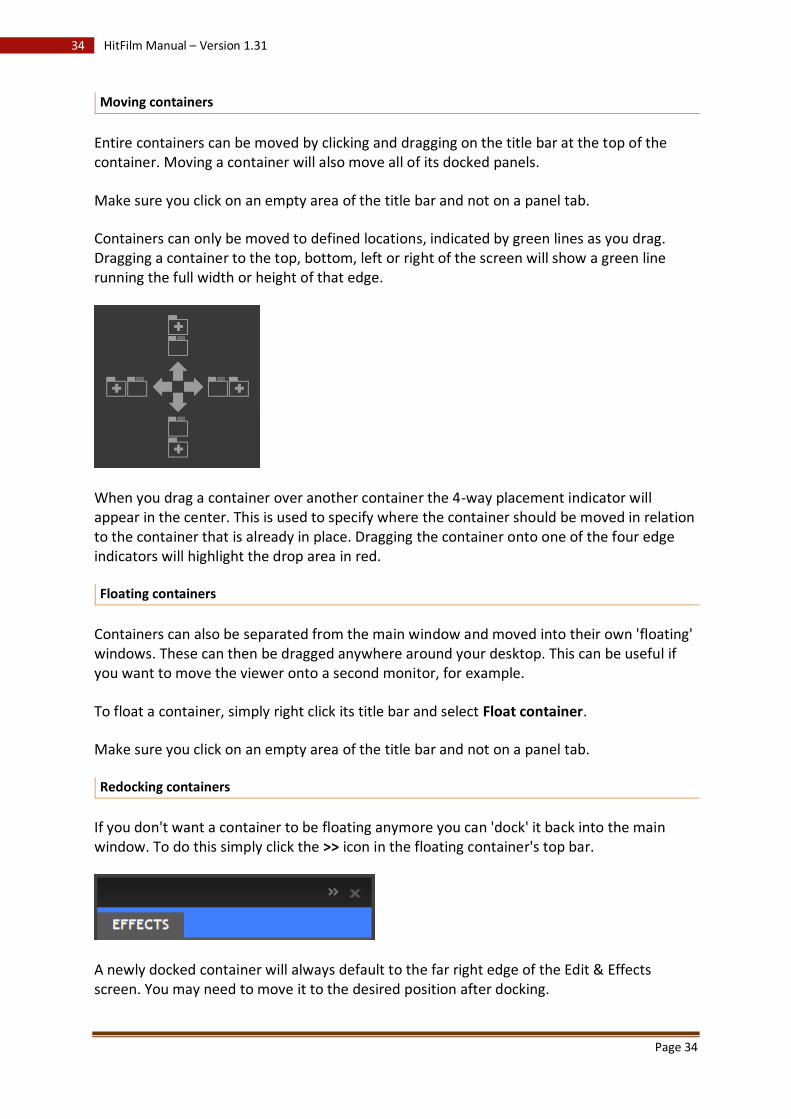
When you drag a container over another container the 4-way placement indicator will appear in the center. This is used to specify where the container should be moved in relation to the container that is already in place. Dragging the container onto one of the four edge indicators will highlight the drop area in red.
Floating containers
Containers can also be separated from the main window and moved into their own 'floating' windows. These can then be dragged anywhere around your desktop. This can be useful if you want to move the viewer onto a second monitor, for example.
To float a container, simply right click its title bar and select Float container.
Make sure you click on an empty area of the title bar and not on a panel tab.
Redocking containers
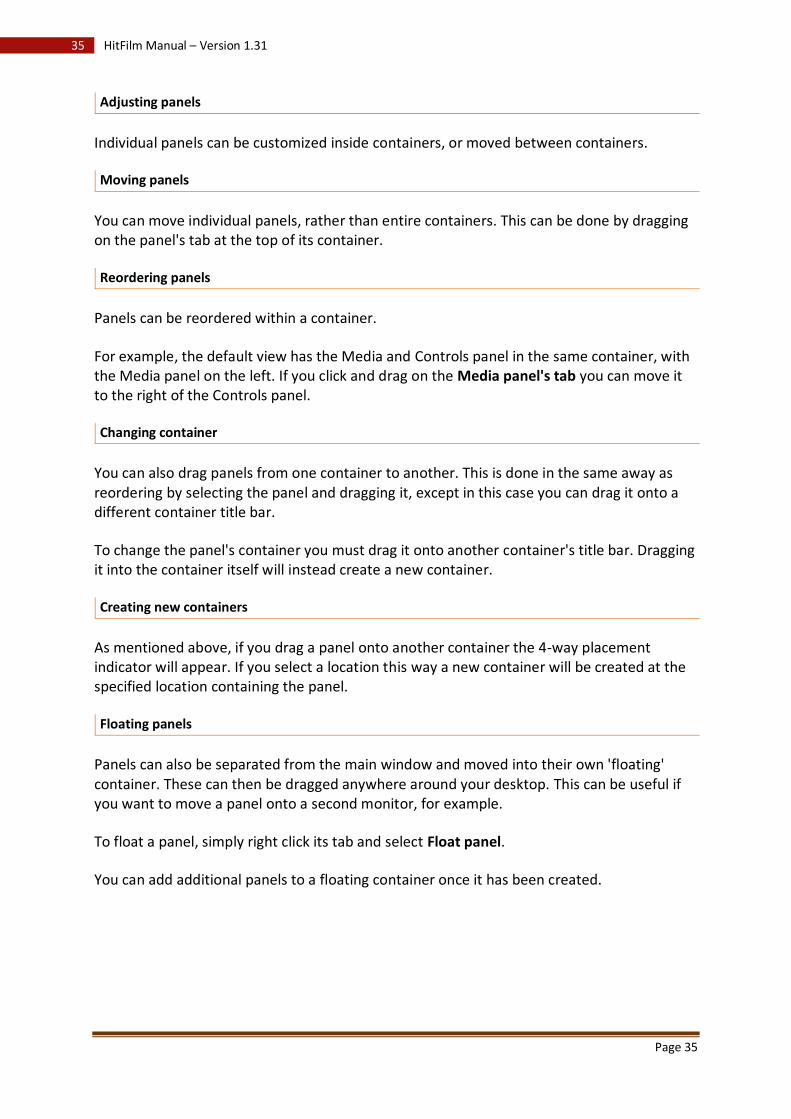
If you don't want a container to be floating anymore you can 'dock' it back into the main window. To do this simply click the >> icon in the floating container's top bar.
A newly docked container will always default to the far right edge of the Edit & Effects screen. You may need to move it to the desired position after docking.
Page 35
35 HitFilm Manual – Version 1.31
Adjusting panels
Individual panels can be customized inside containers, or moved between containers.
Moving panels
You can move individual panels, rather than entire containers. This can be done by dragging on the panel's tab at the top of its container.
Reordering panels
Panels can be reordered within a container.
For example, the default view has the Media and Controls panel in the same container, with the Media panel on the left. If you click and drag on the Media panel's tab you can move it to the right of the Controls panel.
Changing container
You can also drag panels from one container to another. This is done in the same away as reordering by selecting the panel and dragging it, except in this case you can drag it onto a different container title bar.
To change the panel's container you must drag it onto another container's title bar. Dragging it into the container itself will instead create a new container.
Creating new containers
As mentioned above, if you drag a panel onto another container the 4-way placement indicator will appear. If you select a location this way a new container will be created at the specified location containing the panel.
Floating panels
Panels can also be separated from the main window and moved into their own 'floating' container. These can then be dragged anywhere around your desktop. This can be useful if you want to move a panel onto a second monitor, for example.
To float a panel, simply right click its tab and select Float panel.
You can add additional panels to a floating container once it has been created.
Page 36
36 HitFilm Manual – Version 1.31
Redocking panels
If you don't want a panel to be in a floating container anymore you can 'dock' it back into the main window. To do this simply drag the floating panel back onto a docked container.
The default layout will provide an efficient workflow, but
advanced users may want to customize the Edit & Effects
screen to better suit their needs.
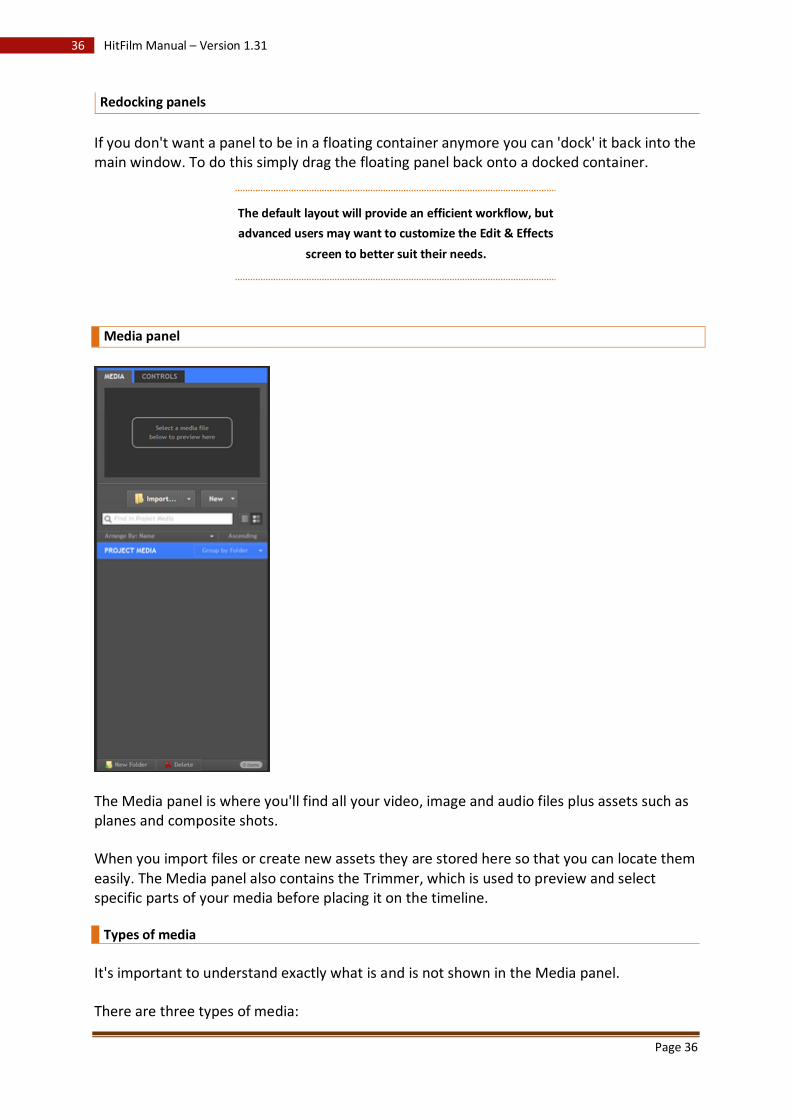
Media panel
The Media panel is where you'll find all your video, image and audio files plus assets such as planes and composite shots.
When you import files or create new assets they are stored here so that you can locate them easily. The Media panel also contains the Trimmer, which is used to preview and select specific parts of your media before placing it on the timeline.
Types of media
It's important to understand exactly what is and is not shown in the Media panel.
There are three types of media:
Page 37
37 HitFilm Manual – Version 1.31
• Files - these are created externally to the HitFilm application and are imported to the Media panel. Files can be video, images or audio.
• Composite shots - each composite shot you create is listed in the Media panel. • Planes - these are flat, colored, rectangular shapes that you can create inside HitFilm.
Collectively these are referred to as media or media assets.
How media works
If you're new to editing video on a computer there are a few key concepts that are worth mentioning.
Non-linear
Editing on a computer is described as 'non-linear' because of the ability to access any frame at any time. This is unique to editing digitally, as older editing methods required you to progress back and forth through the media to find a specific frame.
For example, on old tape-to-tape editing you would need to fast forward through an entire tape to get to the end. With digital editing you can jump straight there and back again in an instant.
Non-destructive
Decisions you make while using HitFilm never affect your source files. If you trim a clip or delete it from a timeline the original file is still exactly where it was on your hard disk, in its original state.
Combined with HitFilm's multi-step undo system, this means that you can experiment and take risks as much as you like without having to worry about damaging your source material or encountering an unfixable problem.
Multiple use
Anything that is in the Media panel can be used as many times as you want in your project. It can be used in different timelines and can be edited in a different way each time.
For example, if you want to use a red background for your opening titles you only need to create a single red plane in the Media panel. This can then be used whenever a title appears in the movie - there's no need to create several identical red planes for each title.

Page 38
38 HitFilm Manual – Version 1.31
When you add media to a timeline a 'clip' is created. They all come from the same media asset but exist separately on the timeline.
If you remove a media asset from the Media panel, all instances of it will be removed from your timelines as well. You will be warned before this happens, and can always undo it.
HitFilm includes all the benefits of a digital editing
workflow, which means you can innovate and
experiment as much as you like.
Supported formats
HitFilm supports the following file formats:
Supported Import Containers & File Formats
• ASF, AVCD, AVI, DV, M2T, M2TS, MOV, MP4, MPEG-1 & MPEG-2 Video (MPE, MPG, MPEG, M2V), MTS, MXF (DVCPro HD), WMV
• AAC, MP3, M4A, MPA, WAV, WMA • BMP, GIF, JPG, PNG, TIFF • Image Sequence
Supported Import Technologies & Codecs
• DV, HDV, DSLR • QuickTime • MPEG-1, MPEG-2 (TS, PS) & MP4 (AVC/H.264 & AAC) • Windows Media
Supported Export File Formats
• AVI (Uncompressed, PAL DV, NTSC DV) • MP4 (AVC/H.264 video and/or AAC audio) • Image Sequence (PNG, JPG, BMP)
Importing files
Files from anywhere on your computer can be imported to HitFilm for use in your project. Imported files are listed in the Project Media list in the Media panel.
About source files and media
When you import a file to HitFilm it creates a reference to the original file which is listed in the Project Media list.
Page 39
39 HitFilm Manual – Version 1.31
Anything you do with media in HitFilm will not affect the original source file - so you can delete, trim, cut and apply as many effects as you want without altering the file on your hard drive.
It should be noted that because HitFilm references the original file you should not move, delete or rename it as this will cause the imported files to go 'offline' in your projects. For more information on this have a read of the Relinking offline files chapter.
As projects only include references to the source files, if you want to transfer the project to a different computer or create a comprehensive backup, make sure you include all the source files as well!
Importing video, audio and image files
Video, audio and image files can all be imported into HitFilm. A variety of different formats are supported.
There are three ways to import files to HitFilm:
1.
Click the Import... button in the media panel to display a standard file browser window. You can use this to locate and import individual or multiple files.
2. Drag files from any Windows Explorer window into the HitFilm Media panel. 3. Right click in the Project Media list and choose Import... from the menu.
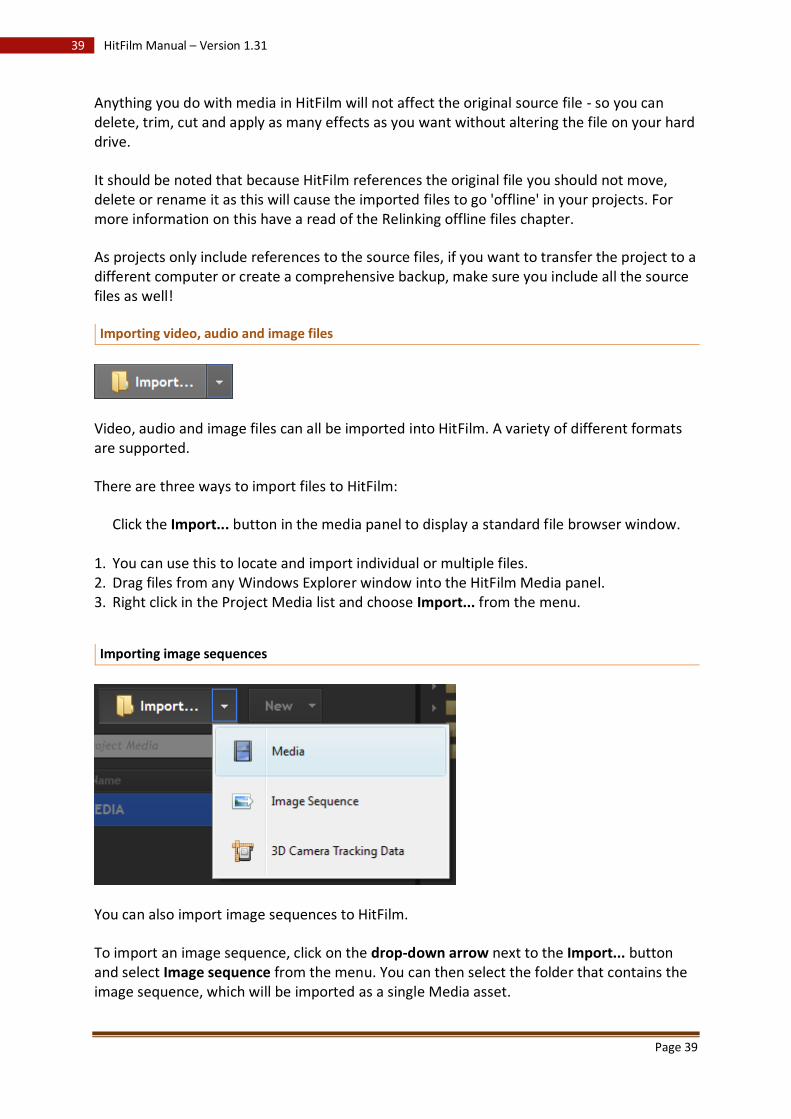
Importing image sequences
You can also import image sequences to HitFilm.
To import an image sequence, click on the drop-down arrow next to the Import... button and select Image sequence from the menu. You can then select the folder that contains the image sequence, which will be imported as a single Media asset.
Page 40
40 HitFilm Manual – Version 1.31
Image sequences are individual image files that are numbered in sequential order. When played one after another in order the images form the frames of a moving video sequence. Most video, 3D and animation software can export to image sequence formats.
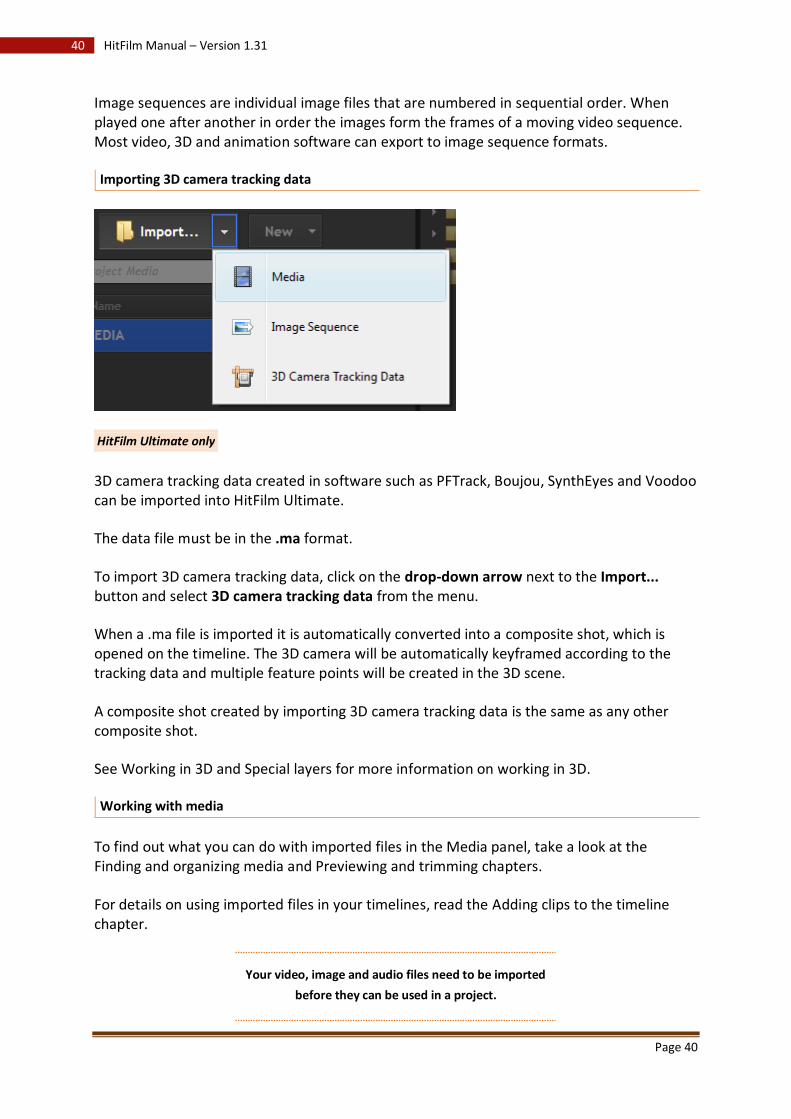
Importing 3D camera tracking data
HitFilm Ultimate only
3D camera tracking data created in software such as PFTrack, Boujou, SynthEyes and Voodoo can be imported into HitFilm Ultimate.
The data file must be in the .ma format.
To import 3D camera tracking data, click on the drop-down arrow next to the Import... button and select 3D camera tracking data from the menu.
When a .ma file is imported it is automatically converted into a composite shot, which is opened on the timeline. The 3D camera will be automatically keyframed according to the tracking data and multiple feature points will be created in the 3D scene.
A composite shot created by importing 3D camera tracking data is the same as any other composite shot.
See Working in 3D and Special layers for more information on working in 3D.
Working with media
To find out what you can do with imported files in the Media panel, take a look at the Finding and organizing media and Previewing and trimming chapters.
For details on using imported files in your timelines, read the Adding clips to the timeline chapter.
Your video, image and audio files need to be imported
before they can be used in a project.
Page 41
41 HitFilm Manual – Version 1.31
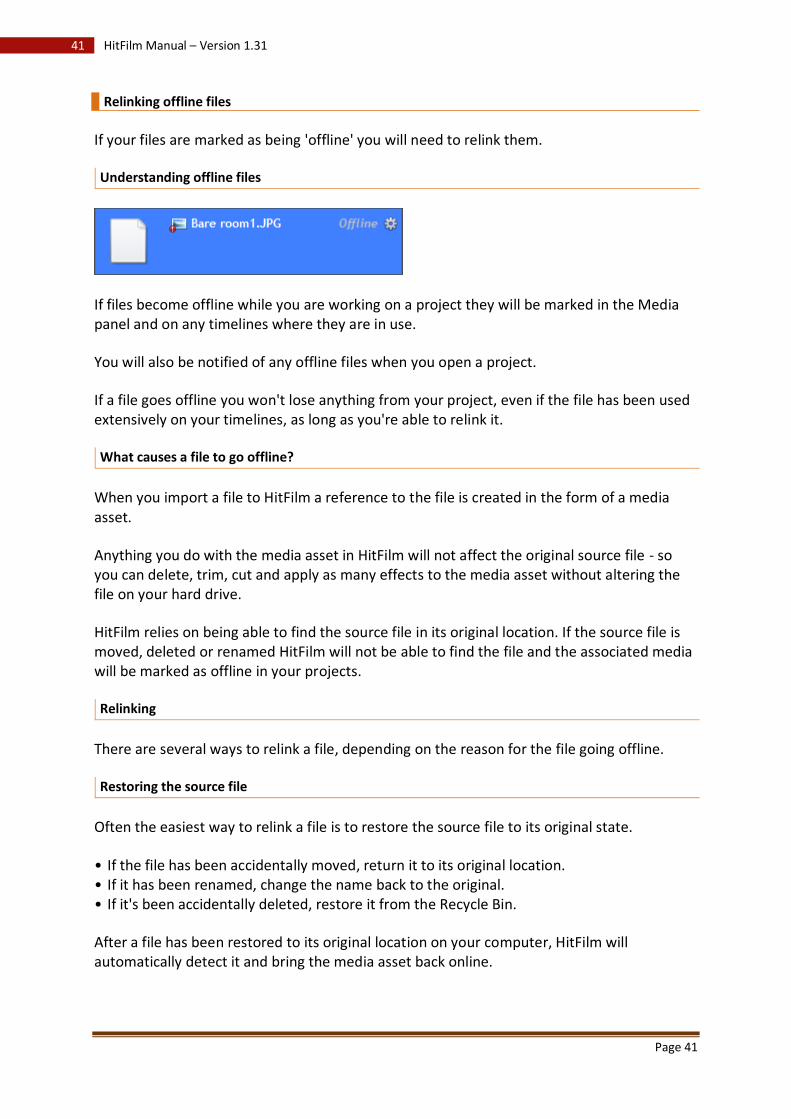
Relinking offline files
If your files are marked as being 'offline' you will need to relink them.
Understanding offline files
If files become offline while you are working on a project they will be marked in the Media panel and on any timelines where they are in use.
You will also be notified of any offline files when you open a project.
If a file goes offline you won't lose anything from your project, even if the file has been used extensively on your timelines, as long as you're able to relink it.
What causes a file to go offline?
When you import a file to HitFilm a reference to the file is created in the form of a media asset.
Anything you do with the media asset in HitFilm will not affect the original source file - so you can delete, trim, cut and apply as many effects to the media asset without altering the file on your hard drive.
HitFilm relies on being able to find the source file in its original location. If the source file is moved, deleted or renamed HitFilm will not be able to find the file and the associated media will be marked as offline in your projects.
Relinking
There are several ways to relink a file, depending on the reason for the file going offline.
Restoring the source file
Often the easiest way to relink a file is to restore the source file to its original state.
• If the file has been accidentally moved, return it to its original location. • If it has been renamed, change the name back to the original. • If it's been accidentally deleted, restore it from the Recycle Bin.
After a file has been restored to its original location on your computer, HitFilm will automatically detect it and bring the media asset back online.

Page 42
42 HitFilm Manual – Version 1.31
Relinking individual files
Offline files can be relinked from the Media panel by clicking the properties cog.
Instead of showing the properties information will be displayed about the offline file. Clicking the Relink button displays a file browser which can be used to locate the file's new location.
Batch relinking
When you open a project it will be checked for any offline files. If any are found they will be listed in the offline files dialogue.
You can start relinking the offline files in the list by double-clicking on them. This will display a standard file browser which you can use to locate the file's new location.
Page 43
43 HitFilm Manual – Version 1.31
Each time you relink a file in the list it will check the other files to see if they can also be found at the new location. Therefore if you have deliberately moved an entire folder of video files you can relink them all by relinking just one.
If any of your files go offline you can relink them easily
without losing any work.
Generating new media
Media can be generated inside HitFilm, instead of being importing as files.
Generated media only exists inside your project. You won't find generated media as separate files on your computer.
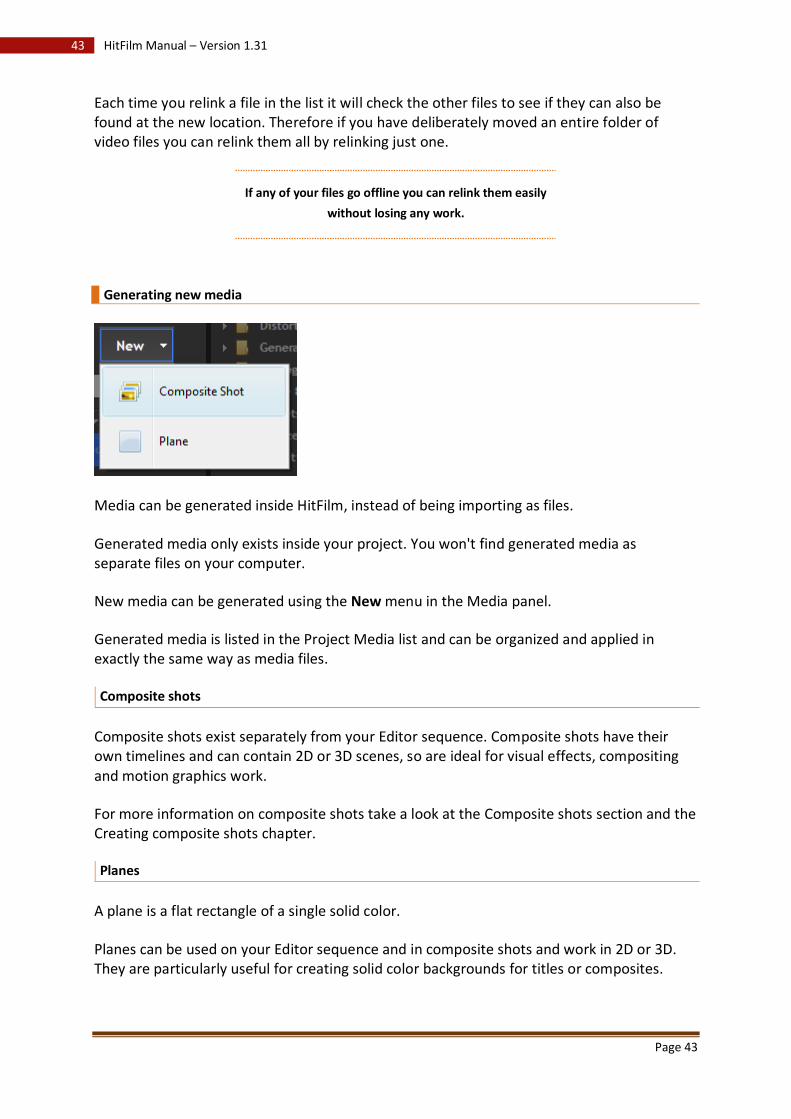
New media can be generated using the New menu in the Media panel.
Generated media is listed in the Project Media list and can be organized and applied in exactly the same way as media files.
Composite shots
Composite shots exist separately from your Editor sequence. Composite shots have their own timelines and can contain 2D or 3D scenes, so are ideal for visual effects, compositing and motion graphics work.
For more information on composite shots take a look at the Composite shots section and the Creating composite shots chapter.
Planes
A plane is a flat rectangle of a single solid color.
Planes can be used on your Editor sequence and in composite shots and work in 2D or 3D. They are particularly useful for creating solid color backgrounds for titles or composites.
Page 44
44 HitFilm Manual – Version 1.31
For detailed information go to the Plane layers chapter.
Planes can also be created from the New Layer menu on composite shot timelines.
Planes and composite shots are generated inside HitFilm.
They can then be used like any other media asset.
Finding and organizing media
Whether you're working on a single visual effects shot, a short film or an entire feature, the Project Media list can quickly become rather busy. HitFilm has a range of features to help you locate and organize specific media.
View modes
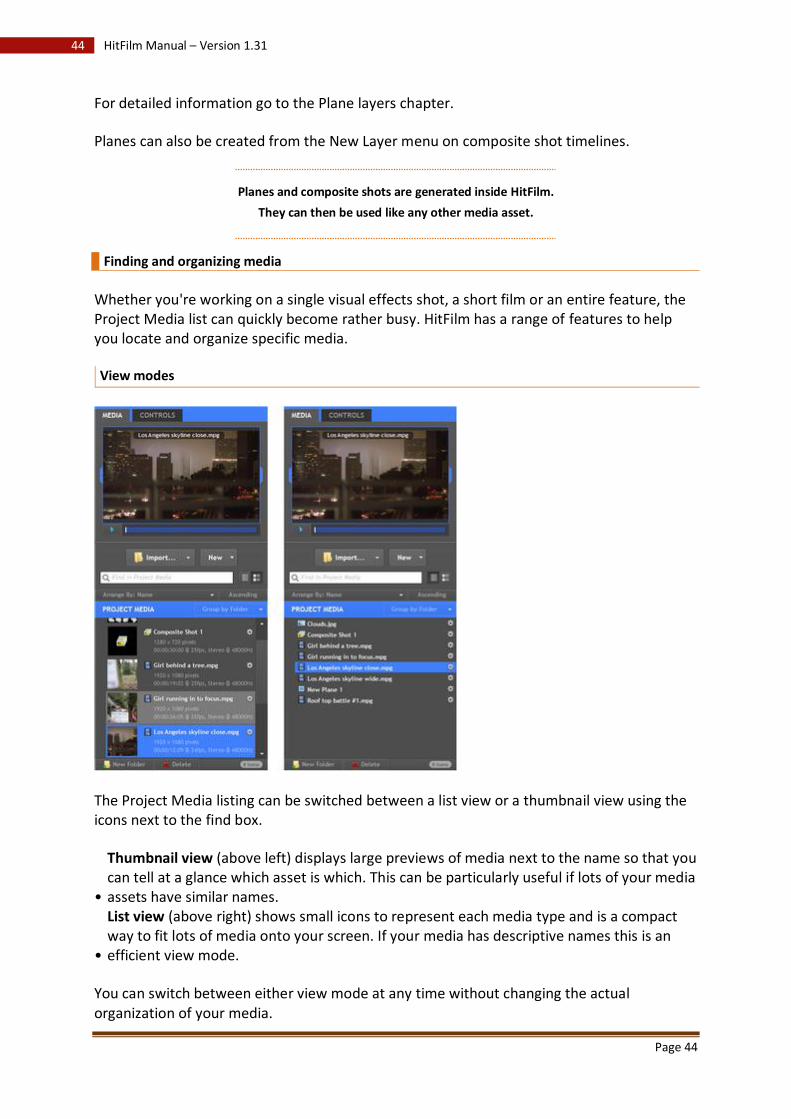
The Project Media listing can be switched between a list view or a thumbnail view using the icons next to the find box.
•
Thumbnail view (above left) displays large previews of media next to the name so that you can tell at a glance which asset is which. This can be particularly useful if lots of your media assets have similar names.
•
List view (above right) shows small icons to represent each media type and is a compact way to fit lots of media onto your screen. If your media has descriptive names this is an efficient view mode.
You can switch between either view mode at any time without changing the actual organization of your media.
Page 45
45 HitFilm Manual – Version 1.31
Filtering media
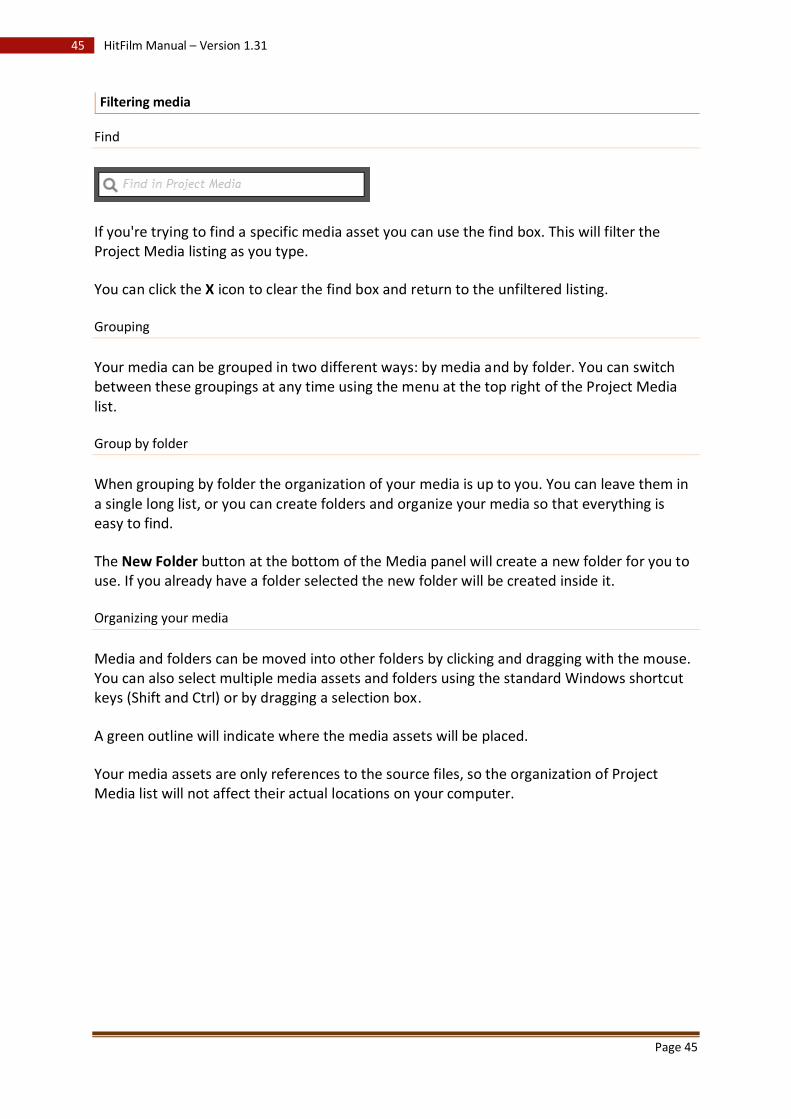
Find
If you're trying to find a specific media asset you can use the find box. This will filter the Project Media listing as you type.
You can click the X icon to clear the find box and return to the unfiltered listing.
Grouping
Your media can be grouped in two different ways: by media and by folder. You can switch between these groupings at any time using the menu at the top right of the Project Media list.
Group by folder
When grouping by folder the organization of your media is up to you. You can leave them in a single long list, or you can create folders and organize your media so that everything is easy to find.
The New Folder button at the bottom of the Media panel will create a new folder for you to use. If you already have a folder selected the new folder will be created inside it.
Organizing your media
Media and folders can be moved into other folders by clicking and dragging with the mouse. You can also select multiple media assets and folders using the standard Windows shortcut keys (Shift and Ctrl) or by dragging a selection box.
A green outline will indicate where the media assets will be placed.
Your media assets are only references to the source files, so the organization of Project Media list will not affect their actual locations on your computer.
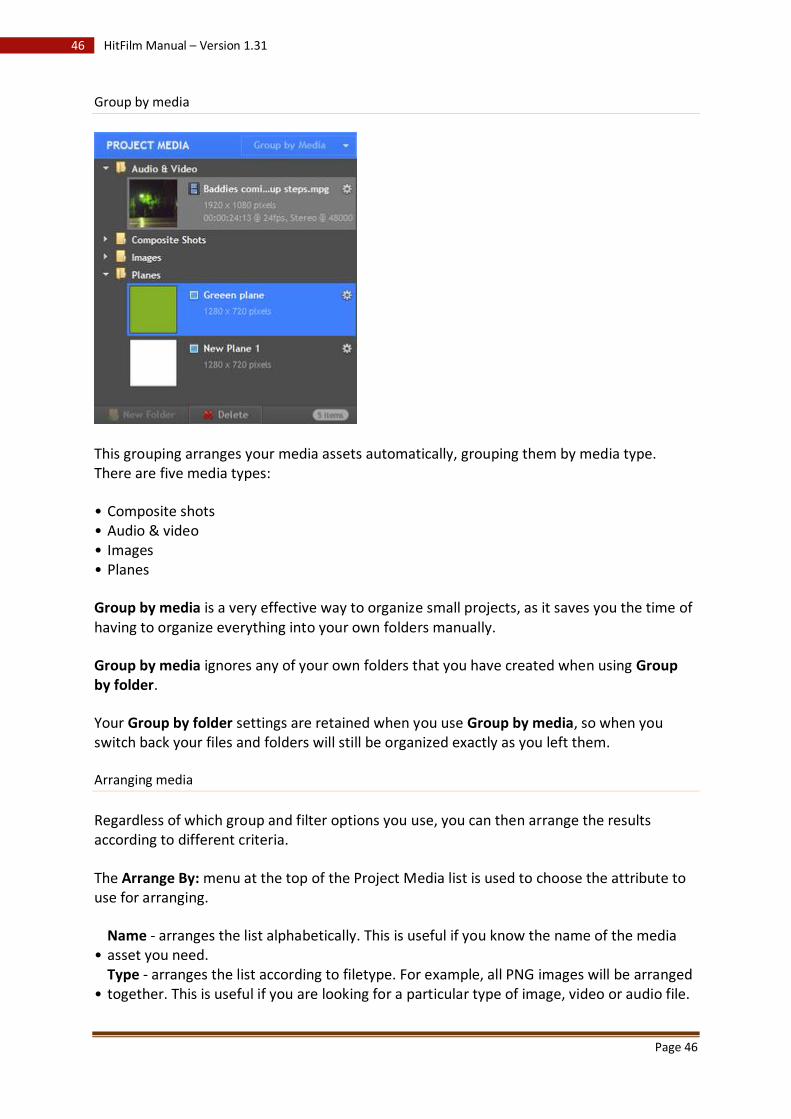
Page 46
46 HitFilm Manual – Version 1.31
Group by media
This grouping arranges your media assets automatically, grouping them by media type. There are five media types:
• Composite shots • Audio & video • Images • Planes
Group by media is a very effective way to organize small projects, as it saves you the time of having to organize everything into your own folders manually.
Group by media ignores any of your own folders that you have created when using Group by folder.
Your Group by folder settings are retained when you use Group by media, so when you switch back your files and folders will still be organized exactly as you left them.
Arranging media
Regardless of which group and filter options you use, you can then arrange the results according to different criteria.
The Arrange By: menu at the top of the Project Media list is used to choose the attribute to use for arranging.
• Name - arranges the list alphabetically. This is useful if you know the name of the media asset you need.
• Type - arranges the list according to filetype. For example, all PNG images will be arranged together. This is useful if you are looking for a particular type of image, video or audio file.
Page 47
47 HitFilm Manual – Version 1.31
The Ascending/Descending toggle changes the order of the arrangement.
Whether you have a handful of media assets or
hundreds, HitFilm's Media panel can be used to quickly
organize them and find what you need.
Media properties
Each media asset has its own properties, which are used to control its behaviour inside your project. Some of these properties can be edited.
An asset's properties can be displayed by clicking the cog next to its name in the Project Media list.
Different types of media have different settings.
Media properties should be set according to the media asset's original specifications, not according to your project specifications (which may be different).
Adjusting a media asset's properties will affect all instances of it on all timelines.
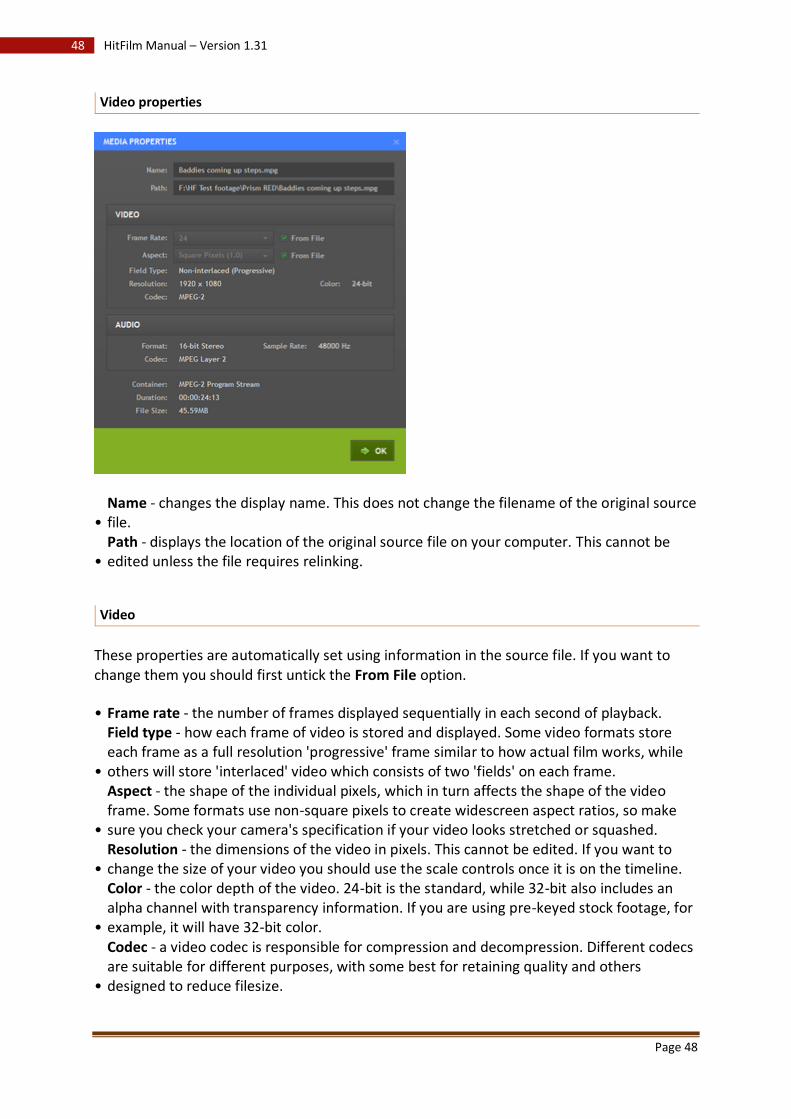
Page 48
48 HitFilm Manual – Version 1.31
Video properties
• Name - changes the display name. This does not change the filename of the original source file.
• Path - displays the location of the original source file on your computer. This cannot be edited unless the file requires relinking.
Video
These properties are automatically set using information in the source file. If you want to change them you should first untick the From File option.
• Frame rate - the number of frames displayed sequentially in each second of playback.
•
Field type - how each frame of video is stored and displayed. Some video formats store each frame as a full resolution 'progressive' frame similar to how actual film works, while others will store 'interlaced' video which consists of two 'fields' on each frame.
•
Aspect - the shape of the individual pixels, which in turn affects the shape of the video frame. Some formats use non-square pixels to create widescreen aspect ratios, so make sure you check your camera's specification if your video looks stretched or squashed.
• Resolution - the dimensions of the video in pixels. This cannot be edited. If you want to change the size of your video you should use the scale controls once it is on the timeline.
•
Color - the color depth of the video. 24-bit is the standard, while 32-bit also includes an alpha channel with transparency information. If you are using pre-keyed stock footage, for example, it will have 32-bit color.
•
Codec - a video codec is responsible for compression and decompression. Different codecs are suitable for different purposes, with some best for retaining quality and others designed to reduce filesize.
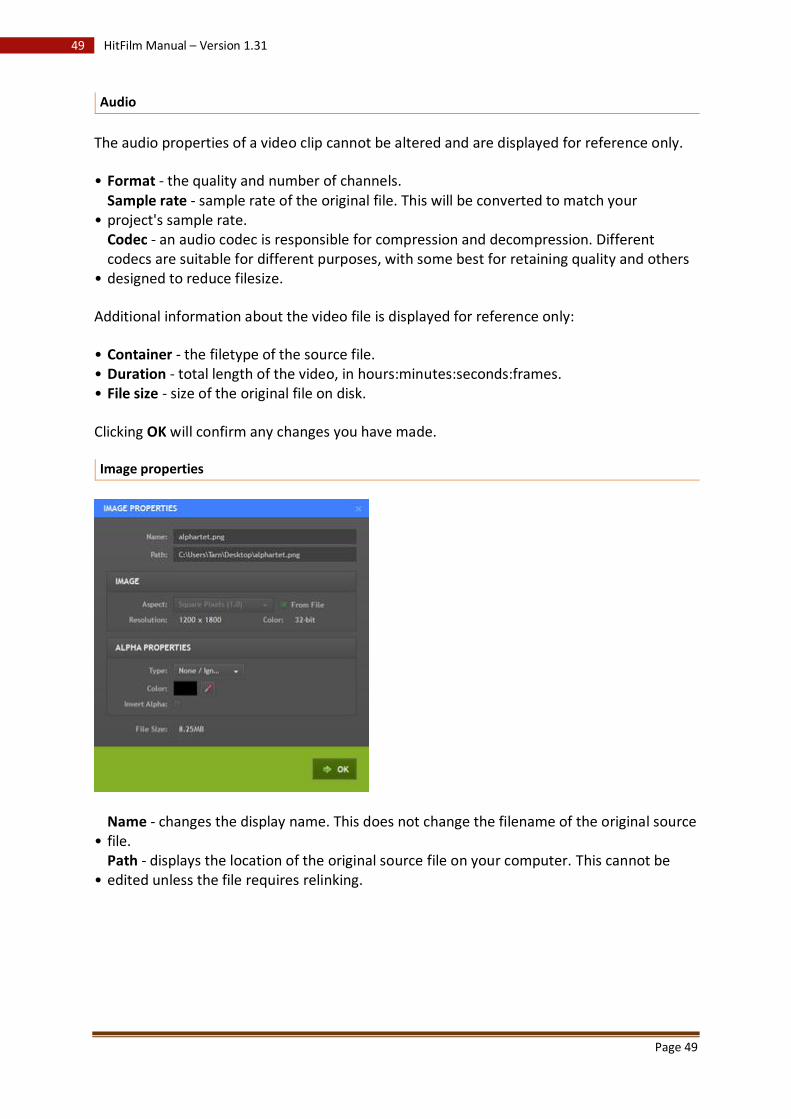
Page 49
49 HitFilm Manual – Version 1.31
Audio
The audio properties of a video clip cannot be altered and are displayed for reference only.
• Format - the quality and number of channels.
• Sample rate - sample rate of the original file. This will be converted to match your project's sample rate.
•
Codec - an audio codec is responsible for compression and decompression. Different codecs are suitable for different purposes, with some best for retaining quality and others designed to reduce filesize.
Additional information about the video file is displayed for reference only:
• Container - the filetype of the source file. • Duration - total length of the video, in hours:minutes:seconds:frames. • File size - size of the original file on disk.
Clicking OK will confirm any changes you have made.
Image properties
• Name - changes the display name. This does not change the filename of the original source file.
• Path - displays the location of the original source file on your computer. This cannot be edited unless the file requires relinking.
Page 50
50 HitFilm Manual – Version 1.31
Image
These properties are automatically set using information in the source file. If you want to change them you should first untick the From File option.
•
Aspect - the shape of the individual pixels, which in turn affects the shape of the video frame. Some formats use non-square pixels to create widescreen aspect ratios, so make sure you check your camera's specification if your video looks stretched or squashed.
• Resolution - the pixel dimensions of the image. These cannot be altered.
• Color - the color depth of the image. 32-bit images also include an alpha channel with transparency data.
• File size - size of the original file on disk.
Clicking OK will confirm any changes you have made.
Audio properties
Audio properties cannot be altered and are displayed for reference only.
• Format - the quality and number of channels.
• Sample rate - sample rate of the original file. This will be converted to match your editor sequence's sample rate.
•
Codec - an audio codec is responsible for compression and decompression. Different codecs are suitable for different purposes, with some best for retaining quality and others designed to reduce filesize.
Additional information about the video file is displayed for reference only:
• Container - the filetype of the source file. • Duration - total length of the video, in hours:minutes:seconds:frames. • File size - size of the original file on disk.
Clicking OK will close the properties window.
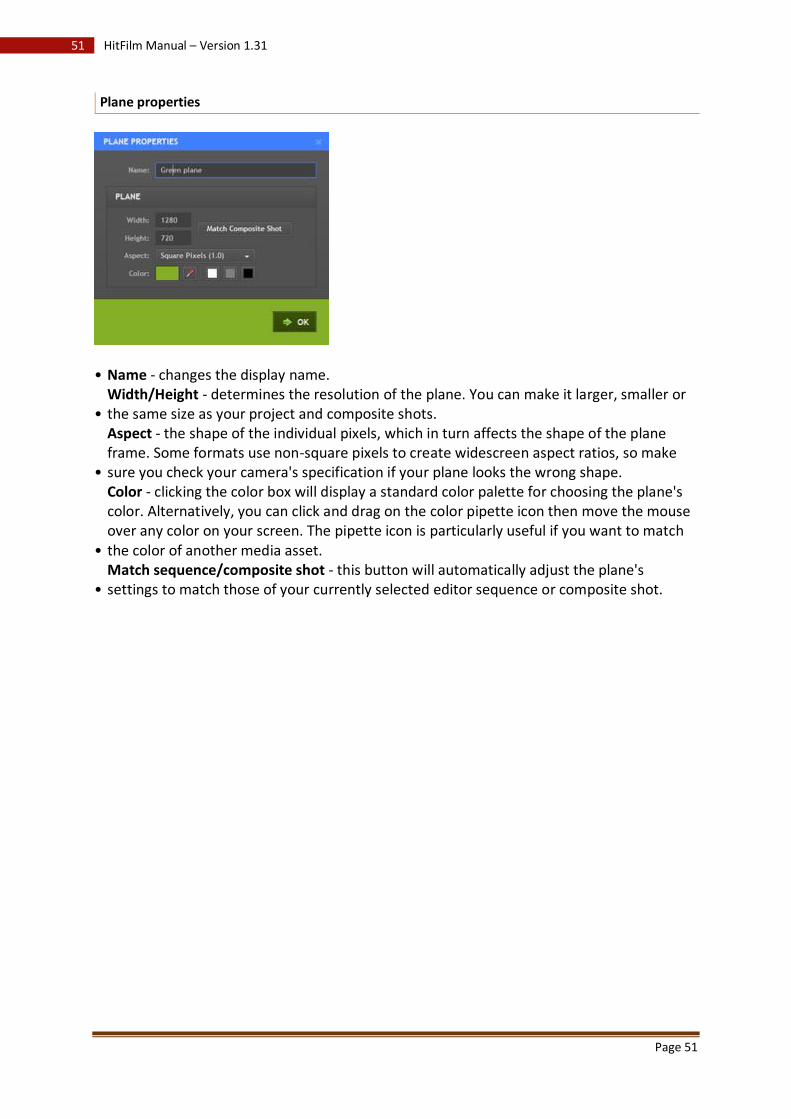
Page 51
51 HitFilm Manual – Version 1.31
Plane properties
• Name - changes the display name.
• Width/Height - determines the resolution of the plane. You can make it larger, smaller or the same size as your project and composite shots.
•
Aspect - the shape of the individual pixels, which in turn affects the shape of the plane frame. Some formats use non-square pixels to create widescreen aspect ratios, so make sure you check your camera's specification if your plane looks the wrong shape.
•
Color - clicking the color box will display a standard color palette for choosing the plane's color. Alternatively, you can click and drag on the color pipette icon then move the mouse over any color on your screen. The pipette icon is particularly useful if you want to match the color of another media asset.
• Match sequence/composite shot - this button will automatically adjust the plane's settings to match those of your currently selected editor sequence or composite shot.
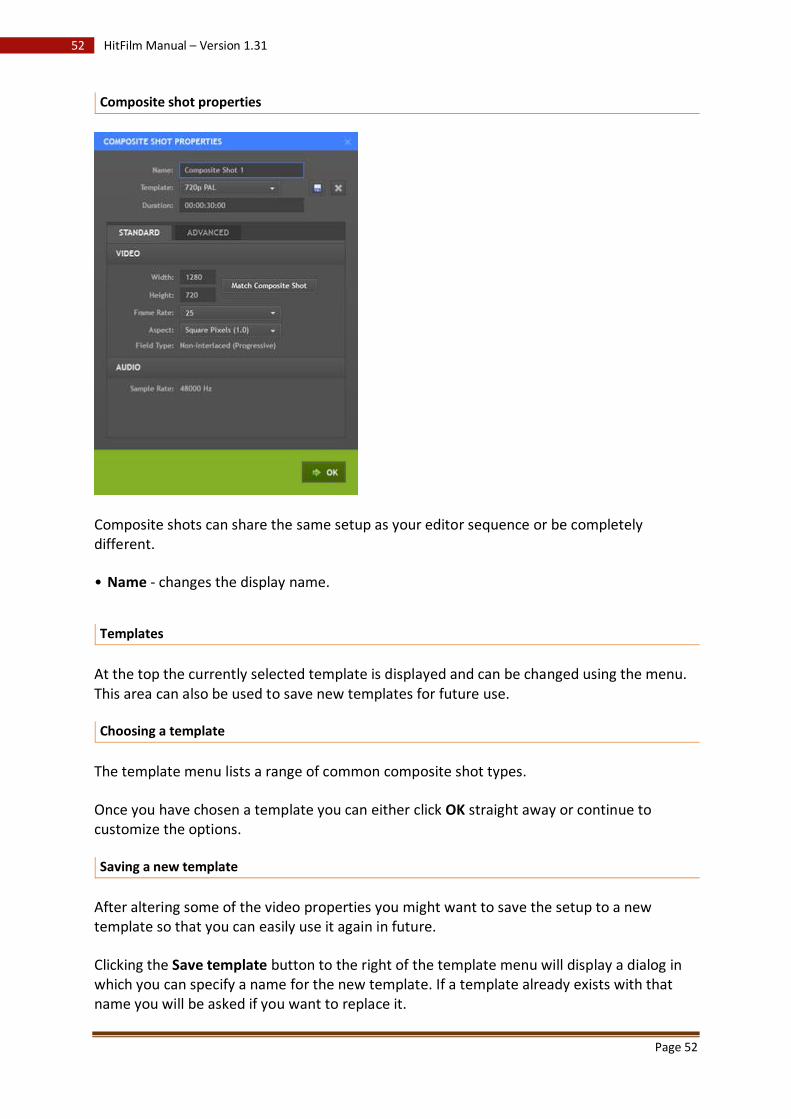
Page 52
52 HitFilm Manual – Version 1.31
Composite shot properties
Composite shots can share the same setup as your editor sequence or be completely different.
• Name - changes the display name.
Templates
At the top the currently selected template is displayed and can be changed using the menu. This area can also be used to save new templates for future use.
Choosing a template
The template menu lists a range of common composite shot types.
Once you have chosen a template you can either click OK straight away or continue to customize the options.
Saving a new template
After altering some of the video properties you might want to save the setup to a new template so that you can easily use it again in future.
Clicking the Save template button to the right of the template menu will display a dialog in which you can specify a name for the new template. If a template already exists with that name you will be asked if you want to replace it.
Page 53
53 HitFilm Manual – Version 1.31
The default templates cannot be changed or replaced.
The new template will then be available from the template menu.
Removing a template
The Remove template button will permanently remove the currently selected template from the list.
The default templates cannot be removed.
Standard
Video
These options affect how video is handled in your composite shot.
• Width & height - the resolution of the video frame in pixels. • Frame rate - the number of frames displayed sequentially in each second of playback.
• Aspect - the shape of the individual pixels, which in turn affects the shape of the video frame. Some formats use non-square pixels to create widescreen aspect ratios.
•
Match sequence/composite shot - this button will automatically adjust the composite shot's settings to match those of your currently selected editor sequence or composite shot.
Audio
• Sample rate - sample rate of the original file. This will be converted to match your editor sequence's sample rate.
Clicking OK will close the properties window.
All media types have unique properties, some of which
can be altered.
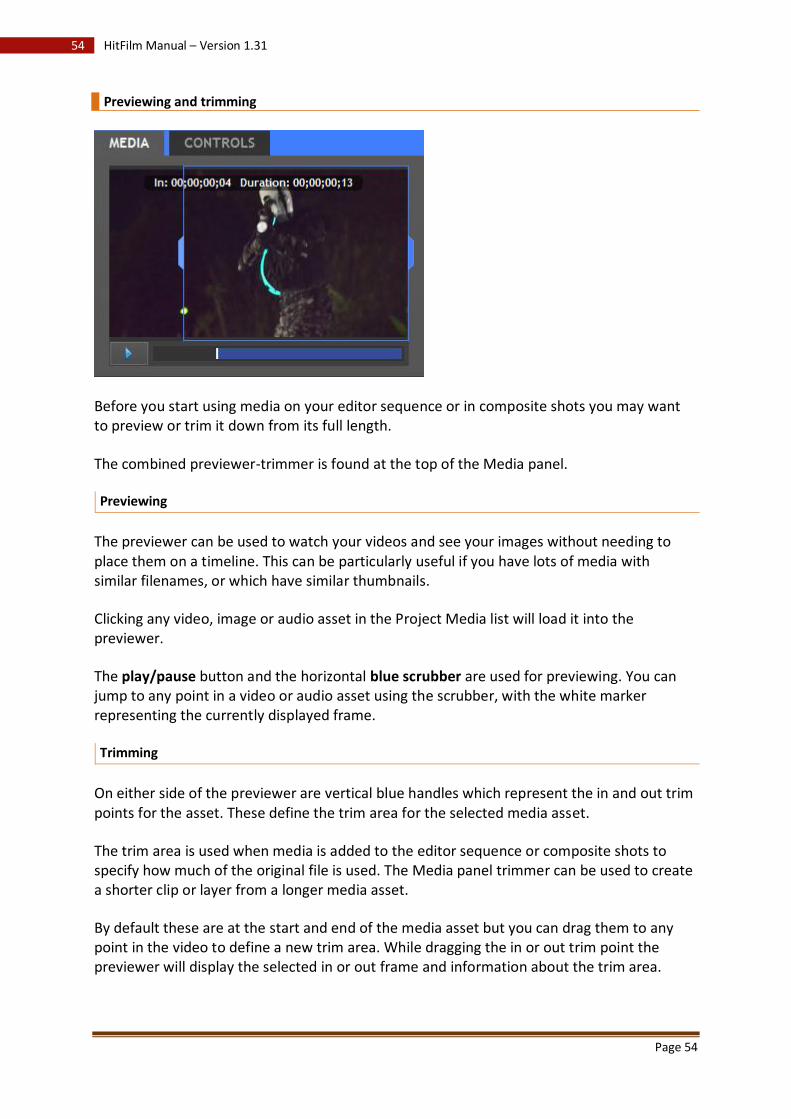
Page 54
54 HitFilm Manual – Version 1.31
Previewing and trimming
Before you start using media on your editor sequence or in composite shots you may want to preview or trim it down from its full length.
The combined previewer-trimmer is found at the top of the Media panel.
Previewing
The previewer can be used to watch your videos and see your images without needing to place them on a timeline. This can be particularly useful if you have lots of media with similar filenames, or which have similar thumbnails.
Clicking any video, image or audio asset in the Project Media list will load it into the previewer.
The play/pause button and the horizontal blue scrubber are used for previewing. You can jump to any point in a video or audio asset using the scrubber, with the white marker representing the currently displayed frame.
Trimming
On either side of the previewer are vertical blue handles which represent the in and out trim points for the asset. These define the trim area for the selected media asset.
The trim area is used when media is added to the editor sequence or composite shots to specify how much of the original file is used. The Media panel trimmer can be used to create a shorter clip or layer from a longer media asset.
By default these are at the start and end of the media asset but you can drag them to any point in the video to define a new trim area. While dragging the in or out trim point the previewer will display the selected in or out frame and information about the trim area.

Page 55
55 HitFilm Manual – Version 1.31
Using the right mouse button or holding the Ctrl key while dragging the in or out points will move them by single frame increments, enabling frame-accurate trimming even with longer media assets.
Your trim points will be remembered even after selecting other media.
To add a trimmed media asset to a timeline you need to drag it onto the timeline from the trimmer itself. If you drag the media asset from the Project Media list the entire duration will be used.
Changing the trim points in the previewer will not affect clips or layers that have already been placed on your timelines.
The previewer can be used to check the content of
media and you can use trimming to control which part of
a media asset is used on the timeline.
Timeline panels
HitFilm's timelines are where you'll make most of your project decisions.
There are actually two types of timeline: the Editor sequence, where you can do normal video editing, and composite shots, where you can create visual effects and motion graphics. Depending on your project you might use both types of timeline or just one.
HitFilm has one Editor sequence per project, but you can have as many composite shots as you need.
Editor sequence Vs. composite shots
HitFilm has two types of timeline: the Editor sequence and composite shots. Knowing which one to use is crucial to having an efficient workflow.
If HitFilm is your primary editing application, the Editor sequence should be used to create the bulk of your project. It is where you select media from your Media panel to assemble
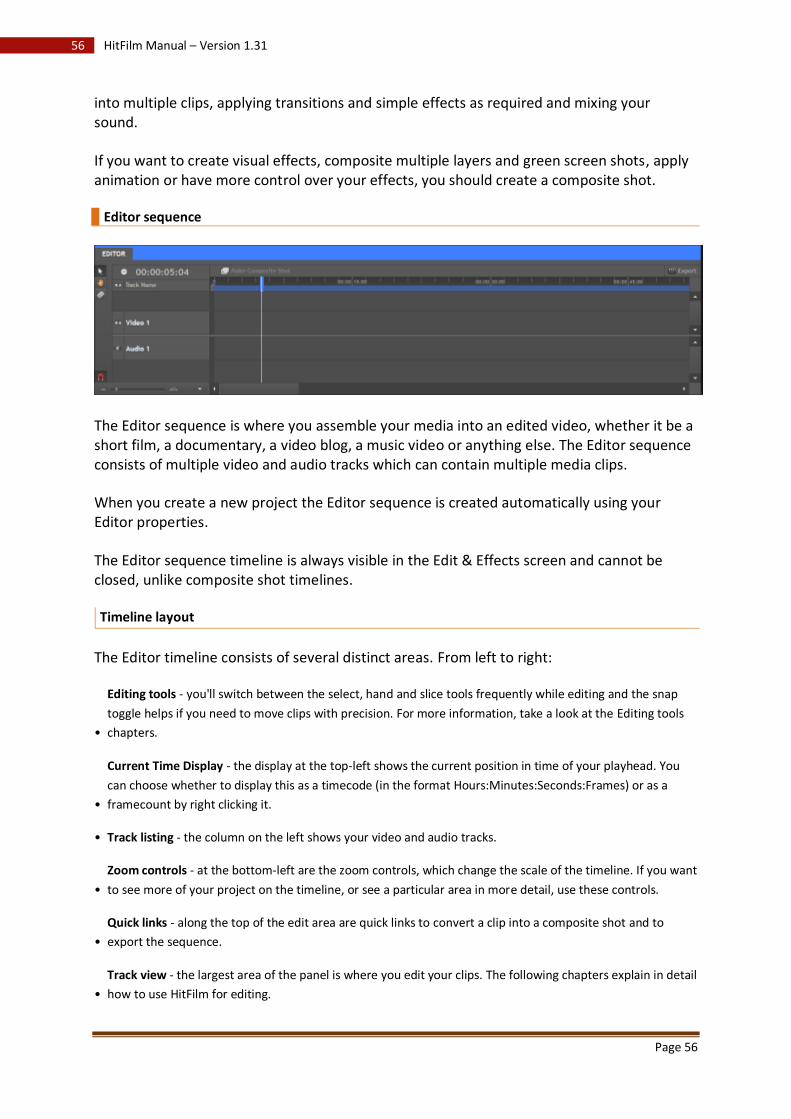
Page 56
56 HitFilm Manual – Version 1.31
into multiple clips, applying transitions and simple effects as required and mixing your sound.
If you want to create visual effects, composite multiple layers and green screen shots, apply animation or have more control over your effects, you should create a composite shot.
Editor sequence
The Editor sequence is where you assemble your media into an edited video, whether it be a short film, a documentary, a video blog, a music video or anything else. The Editor sequence consists of multiple video and audio tracks which can contain multiple media clips.
When you create a new project the Editor sequence is created automatically using your Editor properties.
The Editor sequence timeline is always visible in the Edit & Effects screen and cannot be closed, unlike composite shot timelines.
Timeline layout
The Editor timeline consists of several distinct areas. From left to right:
•
Editing tools - you'll switch between the select, hand and slice tools frequently while editing and the snap
toggle helps if you need to move clips with precision. For more information, take a look at the Editing tools
chapters.
•
Current Time Display - the display at the top-left shows the current position in time of your playhead. You
can choose whether to display this as a timecode (in the format Hours:Minutes:Seconds:Frames) or as a
framecount by right clicking it.
• Track listing - the column on the left shows your video and audio tracks.
• Zoom controls - at the bottom-left are the zoom controls, which change the scale of the timeline. If you want
to see more of your project on the timeline, or see a particular area in more detail, use these controls.
• Quick links - along the top of the edit area are quick links to convert a clip into a composite shot and to
export the sequence.
• Track view - the largest area of the panel is where you edit your clips. The following chapters explain in detail
how to use HitFilm for editing.

Page 57
57 HitFilm Manual – Version 1.31
Page 58
58 HitFilm Manual – Version 1.31
Basic video editing
There isn't enough room to explore editing theory in this manual (many, many books have been written on that subject!) but if you are completely new to video editing you will still need to know the basic concepts involved in editing on a computer.
The process of editing in HitFilm is as follows:
1. Shoot your video.
2. Transfer your video from your camera to your computer using the software provided with your camera.
3. Import your video and other media assets such as images and music into HitFilm.
4. Preview your media in the Previewer and select which parts you want to use in your project by trimming.
5. Drag your clips onto the Editor sequence. Because computer editing is non-linear you can do this in any
order you want, although if you're just starting out it is probably easiest to go from the beginning!
6. Move and trim your clips on the timeline to assemble your movie.
As you become familiar with the editing process and working with HitFilm you will develop your own preferred workflow.
Working with composite shots
HitFilm is a unique video product in that it provides you with editing tools as well as powerful compositing and visual effects features.
Although composite shots are explained in full detail in another section, it is important to understand how they can be used on the Editor sequence.
Once a composite shot has been created, it can be found in the Media panel like any other media asset and can be dragged onto the Editor sequence and adjusted in exactly the same ways as a video clip. At any point you can open the composite shot on a separate timeline to further adjust its layers and properties.
Creating composite shots
Any clip on your Editor sequence can be converted to a composite shot, which is a quick way to add visual effects to a specific shot without disrupting your editing flow. Check out the Converting clips to composite shots chapter for more information.
The Editor sequence is for editing your video projects. It
consists of multiple tracks, each able to contain multiple
clips.
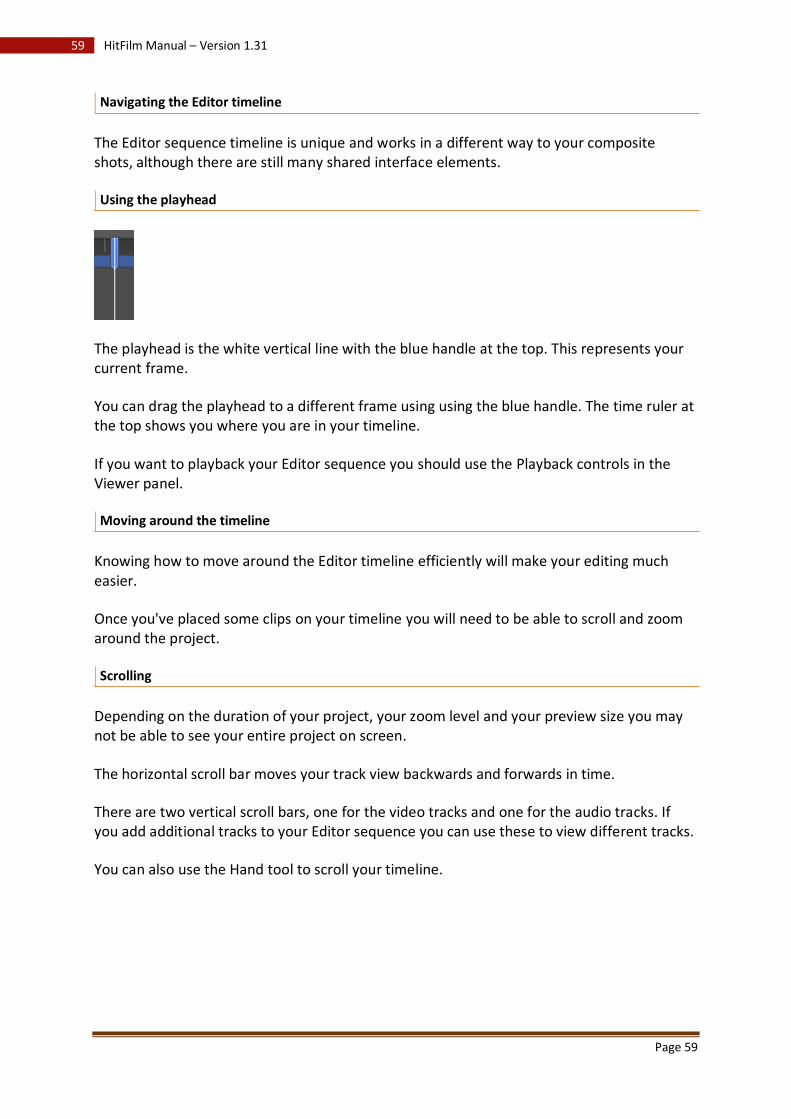
Page 59
59 HitFilm Manual – Version 1.31
Navigating the Editor timeline
The Editor sequence timeline is unique and works in a different way to your composite shots, although there are still many shared interface elements.
Using the playhead
The playhead is the white vertical line with the blue handle at the top. This represents your current frame.
You can drag the playhead to a different frame using using the blue handle. The time ruler at the top shows you where you are in your timeline.
If you want to playback your Editor sequence you should use the Playback controls in the Viewer panel.
Moving around the timeline
Knowing how to move around the Editor timeline efficiently will make your editing much easier.
Once you've placed some clips on your timeline you will need to be able to scroll and zoom around the project.
Scrolling
Depending on the duration of your project, your zoom level and your preview size you may not be able to see your entire project on screen.
The horizontal scroll bar moves your track view backwards and forwards in time.
There are two vertical scroll bars, one for the video tracks and one for the audio tracks. If you add additional tracks to your Editor sequence you can use these to view different tracks.
You can also use the Hand tool to scroll your timeline.
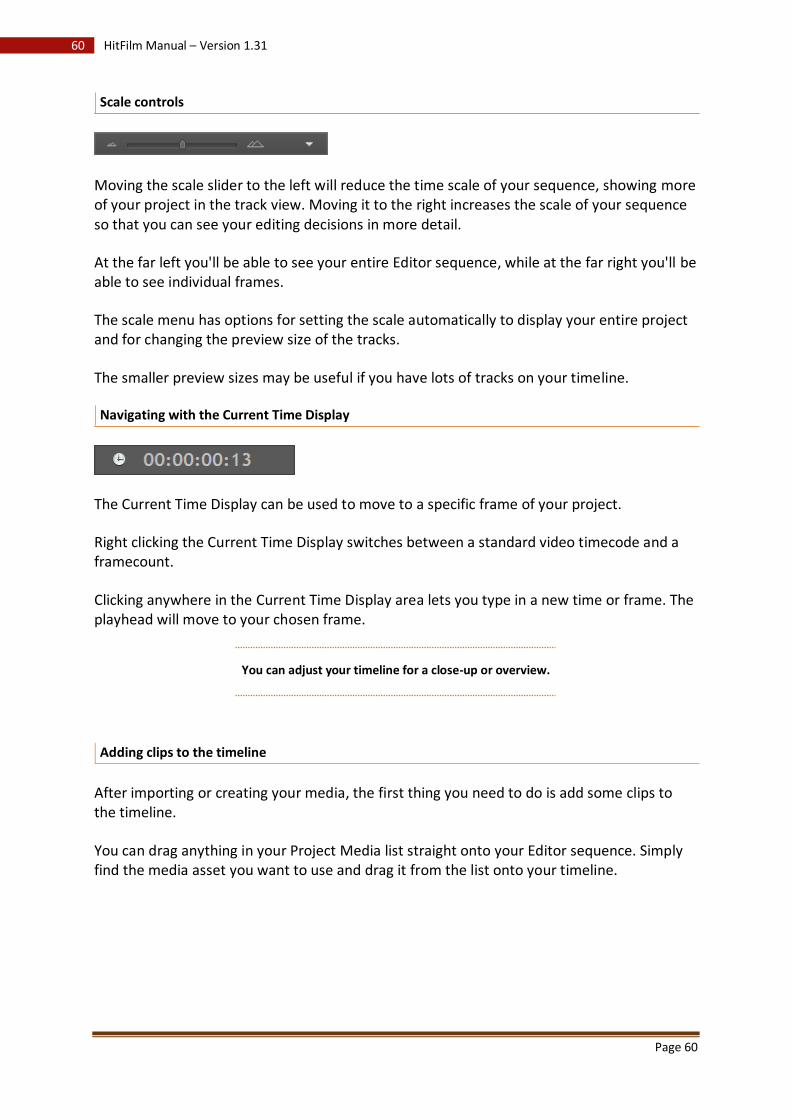
Page 60
60 HitFilm Manual – Version 1.31
Scale controls
Moving the scale slider to the left will reduce the time scale of your sequence, showing more of your project in the track view. Moving it to the right increases the scale of your sequence so that you can see your editing decisions in more detail.
At the far left you'll be able to see your entire Editor sequence, while at the far right you'll be able to see individual frames.
The scale menu has options for setting the scale automatically to display your entire project and for changing the preview size of the tracks.
The smaller preview sizes may be useful if you have lots of tracks on your timeline.
Navigating with the Current Time Display
The Current Time Display can be used to move to a specific frame of your project.
Right clicking the Current Time Display switches between a standard video timecode and a framecount.
Clicking anywhere in the Current Time Display area lets you type in a new time or frame. The playhead will move to your chosen frame.
You can adjust your timeline for a close-up or overview.
Adding clips to the timeline
After importing or creating your media, the first thing you need to do is add some clips to the timeline.
You can drag anything in your Project Media list straight onto your Editor sequence. Simply find the media asset you want to use and drag it from the list onto your timeline.
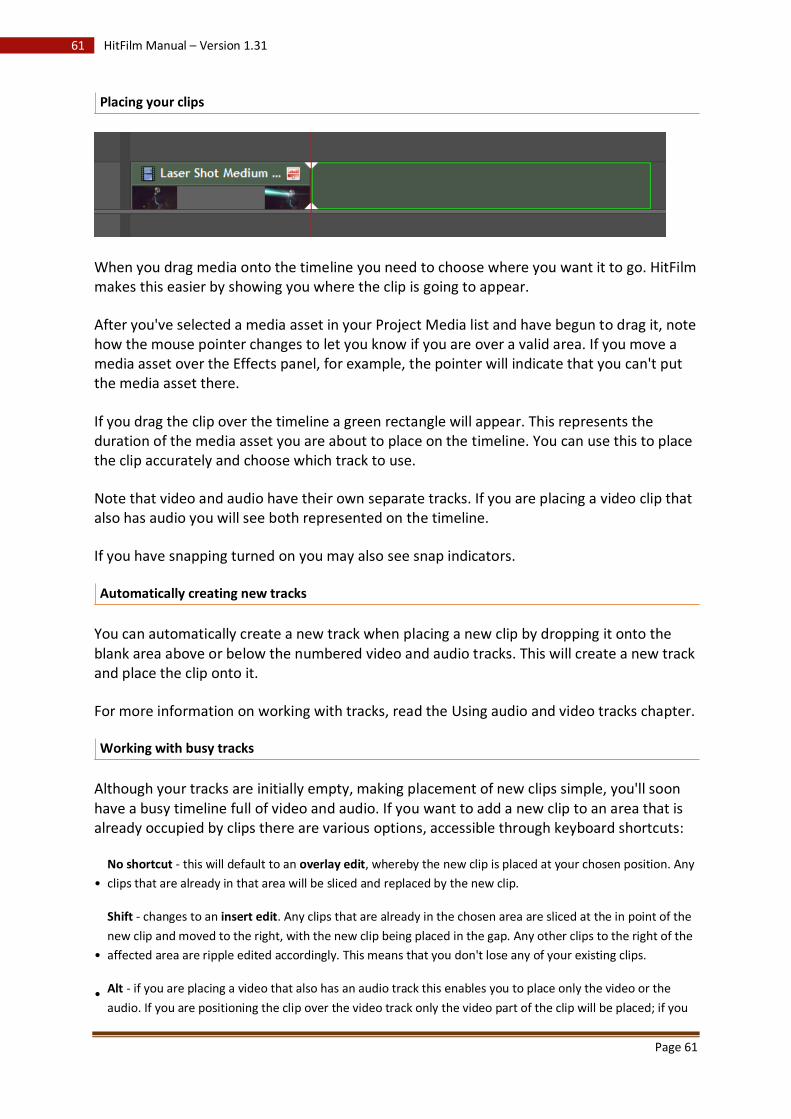
Page 61
61 HitFilm Manual – Version 1.31
Placing your clips
When you drag media onto the timeline you need to choose where you want it to go. HitFilm makes this easier by showing you where the clip is going to appear.
After you've selected a media asset in your Project Media list and have begun to drag it, note how the mouse pointer changes to let you know if you are over a valid area. If you move a media asset over the Effects panel, for example, the pointer will indicate that you can't put the media asset there.
If you drag the clip over the timeline a green rectangle will appear. This represents the duration of the media asset you are about to place on the timeline. You can use this to place the clip accurately and choose which track to use.
Note that video and audio have their own separate tracks. If you are placing a video clip that also has audio you will see both represented on the timeline.
If you have snapping turned on you may also see snap indicators.
Automatically creating new tracks
You can automatically create a new track when placing a new clip by dropping it onto the blank area above or below the numbered video and audio tracks. This will create a new track and place the clip onto it.
For more information on working with tracks, read the Using audio and video tracks chapter.
Working with busy tracks
Although your tracks are initially empty, making placement of new clips simple, you'll soon have a busy timeline full of video and audio. If you want to add a new clip to an area that is already occupied by clips there are various options, accessible through keyboard shortcuts:
• No shortcut - this will default to an overlay edit, whereby the new clip is placed at your chosen position. Any
clips that are already in that area will be sliced and replaced by the new clip.
•
Shift - changes to an insert edit. Any clips that are already in the chosen area are sliced at the in point of the
new clip and moved to the right, with the new clip being placed in the gap. Any other clips to the right of the
affected area are ripple edited accordingly. This means that you don't lose any of your existing clips.
• Alt - if you are placing a video that also has an audio track this enables you to place only the video or the
audio. If you are positioning the clip over the video track only the video part of the clip will be placed; if you
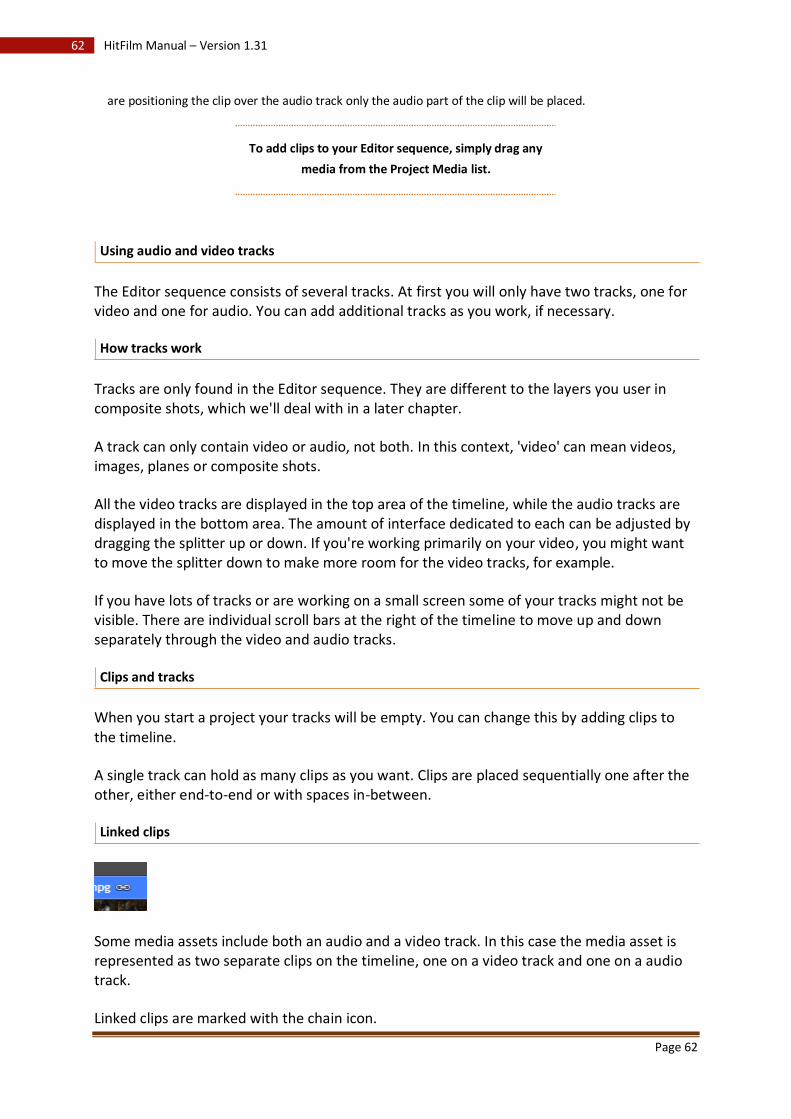
Page 62
62 HitFilm Manual – Version 1.31
are positioning the clip over the audio track only the audio part of the clip will be placed.
To add clips to your Editor sequence, simply drag any
media from the Project Media list.
Using audio and video tracks
The Editor sequence consists of several tracks. At first you will only have two tracks, one for video and one for audio. You can add additional tracks as you work, if necessary.
How tracks work
Tracks are only found in the Editor sequence. They are different to the layers you user in composite shots, which we'll deal with in a later chapter.
A track can only contain video or audio, not both. In this context, 'video' can mean videos, images, planes or composite shots.
All the video tracks are displayed in the top area of the timeline, while the audio tracks are displayed in the bottom area. The amount of interface dedicated to each can be adjusted by dragging the splitter up or down. If you're working primarily on your video, you might want to move the splitter down to make more room for the video tracks, for example.
If you have lots of tracks or are working on a small screen some of your tracks might not be visible. There are individual scroll bars at the right of the timeline to move up and down separately through the video and audio tracks.
Clips and tracks
When you start a project your tracks will be empty. You can change this by adding clips to the timeline.
A single track can hold as many clips as you want. Clips are placed sequentially one after the other, either end-to-end or with spaces in-between.
Linked clips
Some media assets include both an audio and a video track. In this case the media asset is represented as two separate clips on the timeline, one on a video track and one on a audio track.
Linked clips are marked with the chain icon.
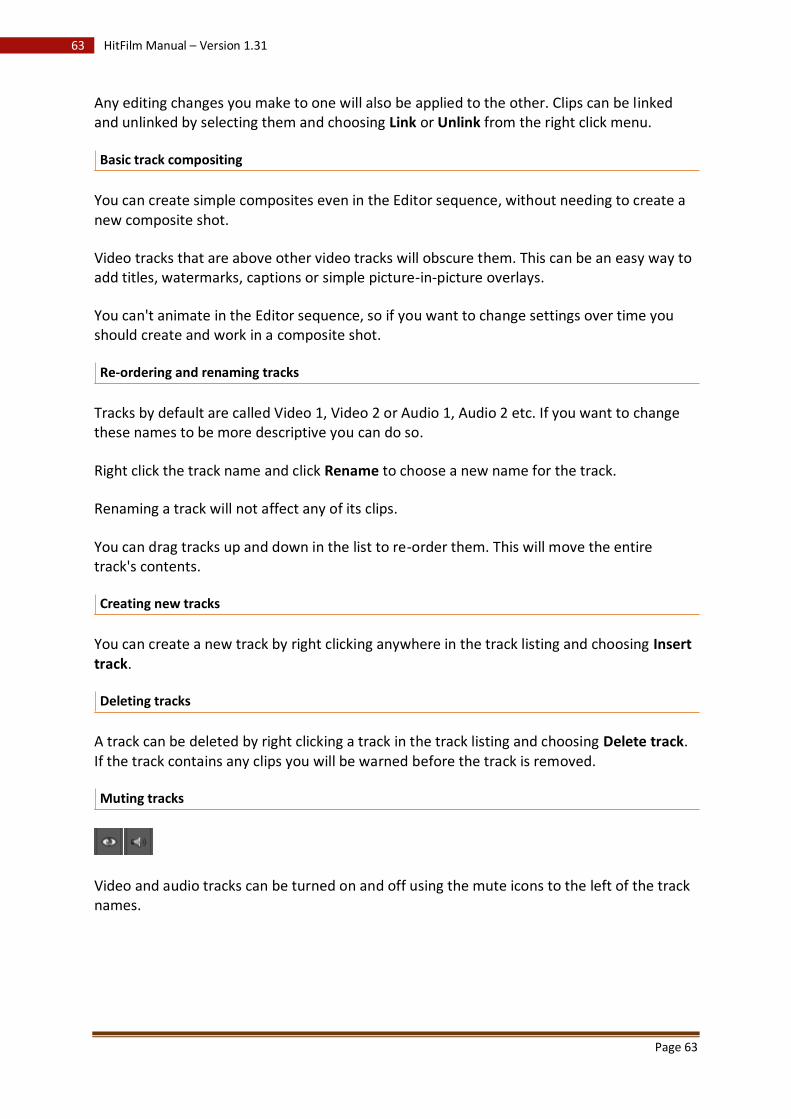
Page 63
63 HitFilm Manual – Version 1.31
Any editing changes you make to one will also be applied to the other. Clips can be linked and unlinked by selecting them and choosing Link or Unlink from the right click menu.
Basic track compositing
You can create simple composites even in the Editor sequence, without needing to create a new composite shot.
Video tracks that are above other video tracks will obscure them. This can be an easy way to add titles, watermarks, captions or simple picture-in-picture overlays.
You can't animate in the Editor sequence, so if you want to change settings over time you should create and work in a composite shot.
Re-ordering and renaming tracks
Tracks by default are called Video 1, Video 2 or Audio 1, Audio 2 etc. If you want to change these names to be more descriptive you can do so.
Right click the track name and click Rename to choose a new name for the track.
Renaming a track will not affect any of its clips.
You can drag tracks up and down in the list to re-order them. This will move the entire track's contents.
Creating new tracks
You can create a new track by right clicking anywhere in the track listing and choosing Insert track.
Deleting tracks
A track can be deleted by right clicking a track in the track listing and choosing Delete track. If the track contains any clips you will be warned before the track is removed.
Muting tracks
Video and audio tracks can be turned on and off using the mute icons to the left of the track names.
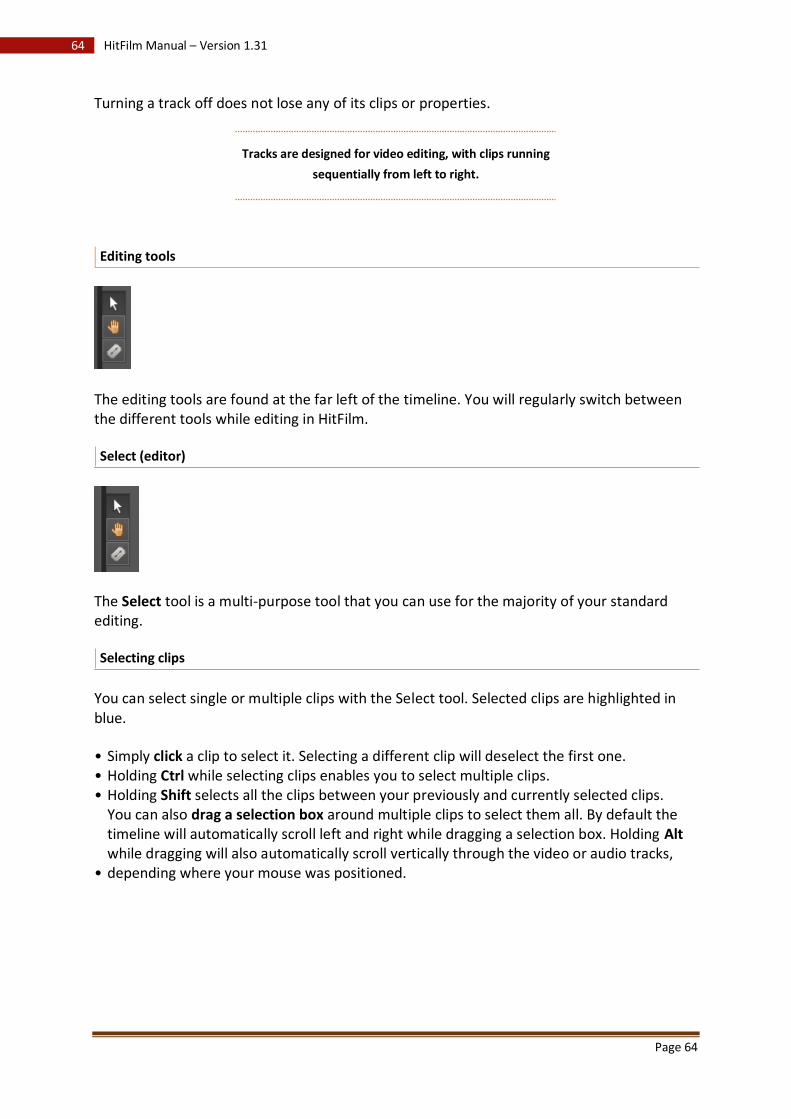
Page 64
64 HitFilm Manual – Version 1.31
Turning a track off does not lose any of its clips or properties.
Tracks are designed for video editing, with clips running
sequentially from left to right.
Editing tools
The editing tools are found at the far left of the timeline. You will regularly switch between the different tools while editing in HitFilm.
Select (editor)
The Select tool is a multi-purpose tool that you can use for the majority of your standard editing.
Selecting clips
You can select single or multiple clips with the Select tool. Selected clips are highlighted in blue.
• Simply click a clip to select it. Selecting a different clip will deselect the first one. • Holding Ctrl while selecting clips enables you to select multiple clips. • Holding Shift selects all the clips between your previously and currently selected clips.
•
You can also drag a selection box around multiple clips to select them all. By default the timeline will automatically scroll left and right while dragging a selection box. Holding Alt while dragging will also automatically scroll vertically through the video or audio tracks, depending where your mouse was positioned.
Page 65
65 HitFilm Manual – Version 1.31
Moving clips
You can move any clip to a new location on the timeline by dragging it with the mouse.
If you move a clip to a location which is already occupied by other clips, an overlay edit will be used by default. The existing clips are sliced according to the moved clip's in and out points and the moved clip replaces that section on the timeline. This means that the positions of other clips on your timeline are not affected.
By holding the Alt key you can instead perform an insert edit. The moved clip slices the existing clips at the in point, then moves all the affected clips to the right to make room.
Automatically creating new tracks
You can automatically create a new track when moving a clip by dropping it onto the blank area above or below the numbered video and audio tracks. This will create a new track and place the clip onto it.
Trimming clips
The Select tool is also used for simple trim edits, when you want to change a clip's in or out point.
When you move your mouse over the start or end of a clip it will change to the trim pointer. You can then drag with the mouse to change the in or out point.
As you change a clip's in or out point the surrounding clips will not be affected.
There needs to be enough room to make your trim edit. You can't move a clip's in or out point past the in or out point of another clip.
You can't trim a clip to be longer than its source media asset.
The Select tool is the most commonly used editing tool,
enabling you to select, move and trim clips.
Hand (editor)
The Hand tool is used for navigating around your Editor sequence timeline. It can be quicker and easier to navigate with the Hand tool than using the scroll bars.

Page 66
66 HitFilm Manual – Version 1.31
When the Hand tool is in use you can't interact with anything in the track view. This means you can click and drag anywhere on the track view part of the timeline to navigate, without changing any of your clips.
You can still interact with the track listing if you want to adjust any properties.
Slice (editor)
The Slice tool is for cutting individual clips into multiple clips.
When using the slice tool, clicking anywhere on a clip will cut it at that point, splitting it into two clips. You can slice a clip as many times as you want.
After a clip has been sliced, both pieces exist separately on the timeline and can be adjusted individually.
Snap (editor)
The Snap tool turns snapping on and off. With snapping turned on, clips will automatically 'snap' to other clips and timeline elements so that you can precisely align multiple items.
Snapping behaviour
When snapping is turned on your clips will snap to other items on the timeline when you move or trim them.
Valid snapping targets are:
• In and out points of any timeline clip. • The playhead. • The in and out points of the work area.
Note that clips do not have to be visible in the track view to be valid snapping targets.

Page 67
67 HitFilm Manual – Version 1.31
The Slice tool will also snap to edit points, which makes it easy to slice a clip at a specific frame. You can either move the playhead to the correct location before using the Slice tool, or align the slice with a clip on another track.
Snap is useful for aligning clips and ensuring that there
are no unintended gaps in your sequence. If you need
frame-accurate precision, turn snapping off.
Setting the work area (Editor sequence)
The work area is represented by the blue bar running along the time ruler at the top of the track view.
You can use the work area to specify a particular part of your Editor sequence to export, rather than exporting the entire timeline.
To set your Editor sequence work area, drag the grey tabs at the start and end of the blue work area bar. You can also press the I key or the O key on your keyboard to set the work area in and out points to your current playhead position.
Pressing the P key will set the work area to encompass the contents of your timeline.
Exporting the work area
To export your selected work area, click either the Export button at the top of the Editor sequence timeline, or switch to the Export screen.
In the Timeline menu, ensure that Editor is selected and that the Export Area menu is set to Work Area. Only your chosen work area will be exported.
For information on the rest of the export settings, take a look at the Export section.
The work area is useful for exporting a specific section of
your Editor sequence, rather than the entire timeline.
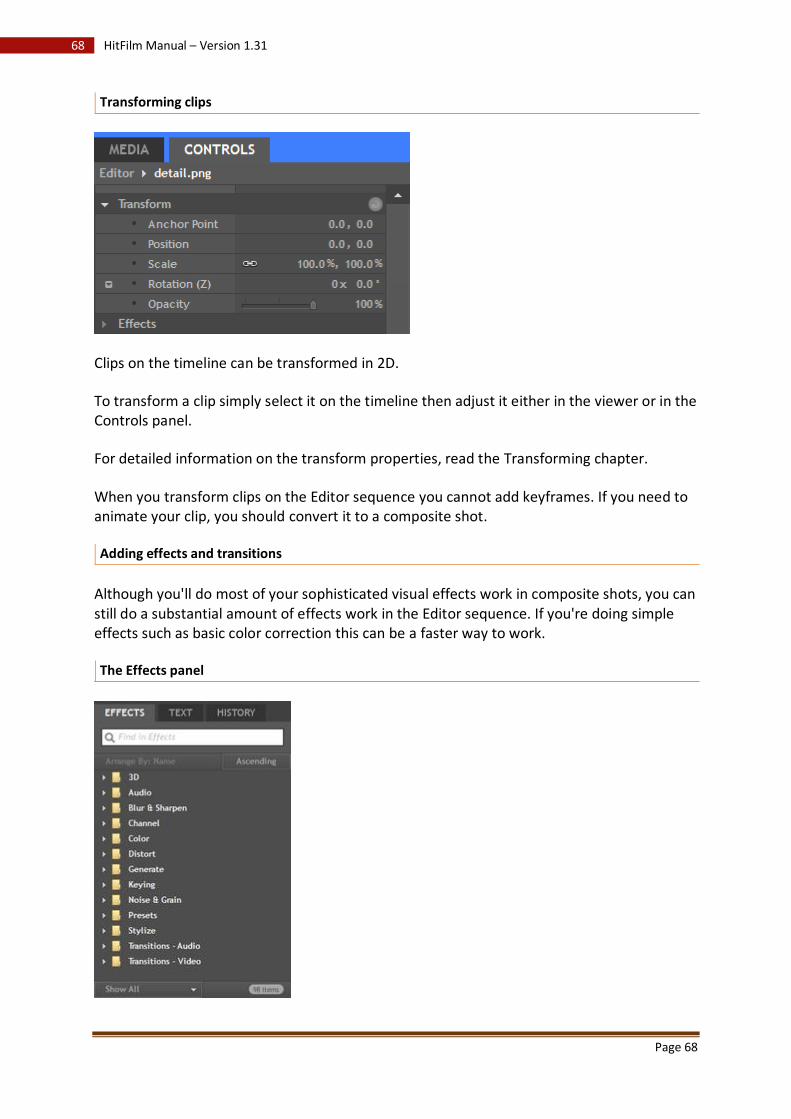
Page 68
68 HitFilm Manual – Version 1.31
Transforming clips
Clips on the timeline can be transformed in 2D.
To transform a clip simply select it on the timeline then adjust it either in the viewer or in the Controls panel.
For detailed information on the transform properties, read the Transforming chapter.
When you transform clips on the Editor sequence you cannot add keyframes. If you need to animate your clip, you should convert it to a composite shot.
Adding effects and transitions
Although you'll do most of your sophisticated visual effects work in composite shots, you can still do a substantial amount of effects work in the Editor sequence. If you're doing simple effects such as basic color correction this can be a faster way to work.
The Effects panel

Page 69
69 HitFilm Manual – Version 1.31
The Effects panel is covered in full detail in a later section, so this is only intended as a brief introduction on using effects in the Editor sequence.
All of the available 2D and 3D effects are listed in the Effects panel.
3D effects
These can only be used inside composite shots as they require a camera and their own layer.
You can still make use of them on the Editor sequence timeline, by dragging them from the Effects panel and onto a track like you would a media asset.
When you drag a 3D effect onto the Editor sequence timeline it will automatically create and open a new composite shot with the 3D effect and a camera in place.
The Composite shots section has more information about working in 3D.
2D effects
The majority of 2D effects can be applied to any clip on the Editor sequence. Simply drag the effect from the Effects panel and drop it onto a clip.
Clips that have applied effects are marked on the timeline with the effects icon.
Some 2D effects can only be used in composite shots because they require complex interactions with other layers.These effects are labeled Layer only in the Effects panel.
Controlling effects
All effects are controlled from the Controls panel.
Your currently selected clip is displayed in the Controls panel. All applied effects are listed in the Effects section, which can be expanded by clicking the white arrow.
Individual effects can be expanded in the same way, revealing their properties.
Effects cannot be keyframed on the Editor sequence. If you need to animate you need to create and use a composite shot.
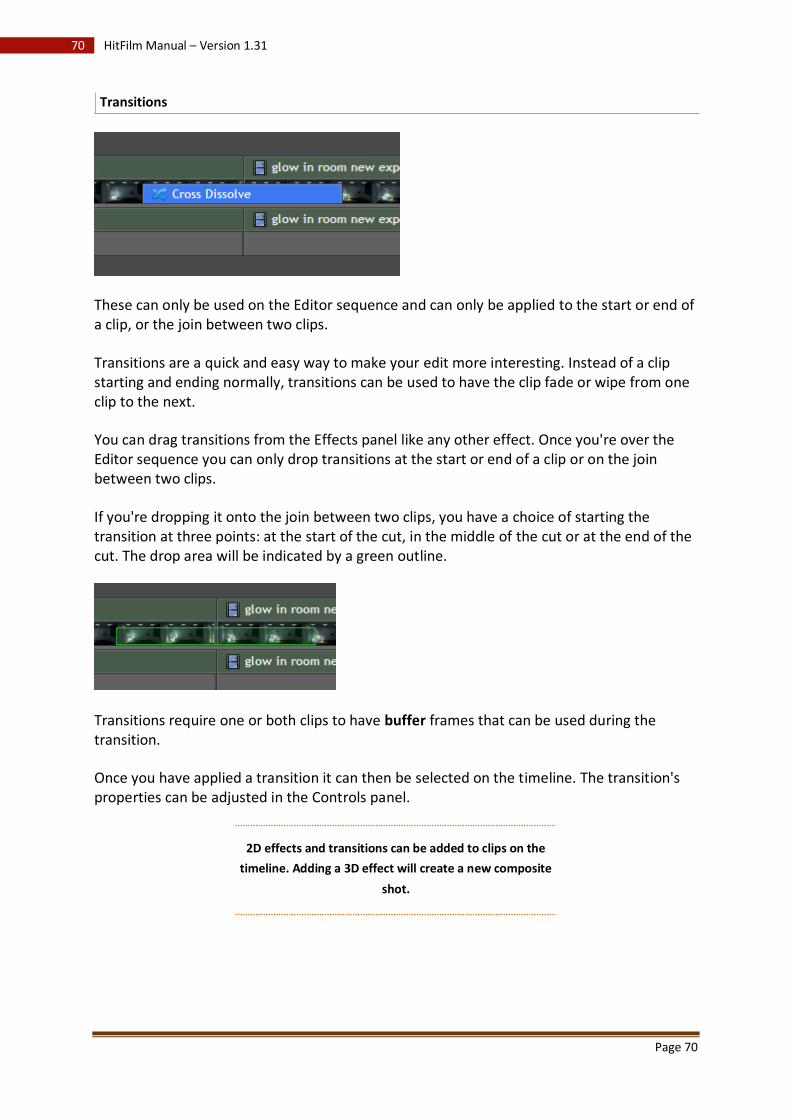
Page 70
70 HitFilm Manual – Version 1.31
Transitions
These can only be used on the Editor sequence and can only be applied to the start or end of a clip, or the join between two clips.
Transitions are a quick and easy way to make your edit more interesting. Instead of a clip starting and ending normally, transitions can be used to have the clip fade or wipe from one clip to the next.
You can drag transitions from the Effects panel like any other effect. Once you're over the Editor sequence you can only drop transitions at the start or end of a clip or on the join between two clips.
If you're dropping it onto the join between two clips, you have a choice of starting the transition at three points: at the start of the cut, in the middle of the cut or at the end of the cut. The drop area will be indicated by a green outline.
Transitions require one or both clips to have buffer frames that can be used during the transition.
Once you have applied a transition it can then be selected on the timeline. The transition's properties can be adjusted in the Controls panel.
2D effects and transitions can be added to clips on the
timeline. Adding a 3D effect will create a new composite
shot.
Page 71
71 HitFilm Manual – Version 1.31
Converting clips to composite shots
There are several ways to create composite shots, depending on what it is you want to do. One of the most convenient ways is to generate the composite shot from a clip on your Editor sequence.
A practical example
You have finished editing an action sequence in your new movie but one shot requires a CG muzzle flash to be added to the gun prop. You could create a composite shot that matches your Editor sequence settings, add the original video, create the muzzle flash, then edit the completed composite shot into your Editor sequence. In many cases this is a valid and efficient way to use HitFilm.
In this example, however, there is a faster, easier alternative. You've already edited your live action shot with the gun prop into your Editor sequence. By selecting the clip and using the Make Composite Shot option you can automatically convert it into a composite shot, add the muzzle flash effect, then switch back to the Editor sequence and carry on without needing to do any additional editing.
The conversion process
The Make Composite Shot option is found at the top of the Editor sequence timeline. You need to select a single clip on the timeline before you can use it.
After selecting a clip and clicking Make Composite Shot you will be shown the Make Composite Shot properties.
The selected clip will be replaced on the Editor sequence with a composite shot and the clip is automatically converted to a layer in the newly created composite shot.
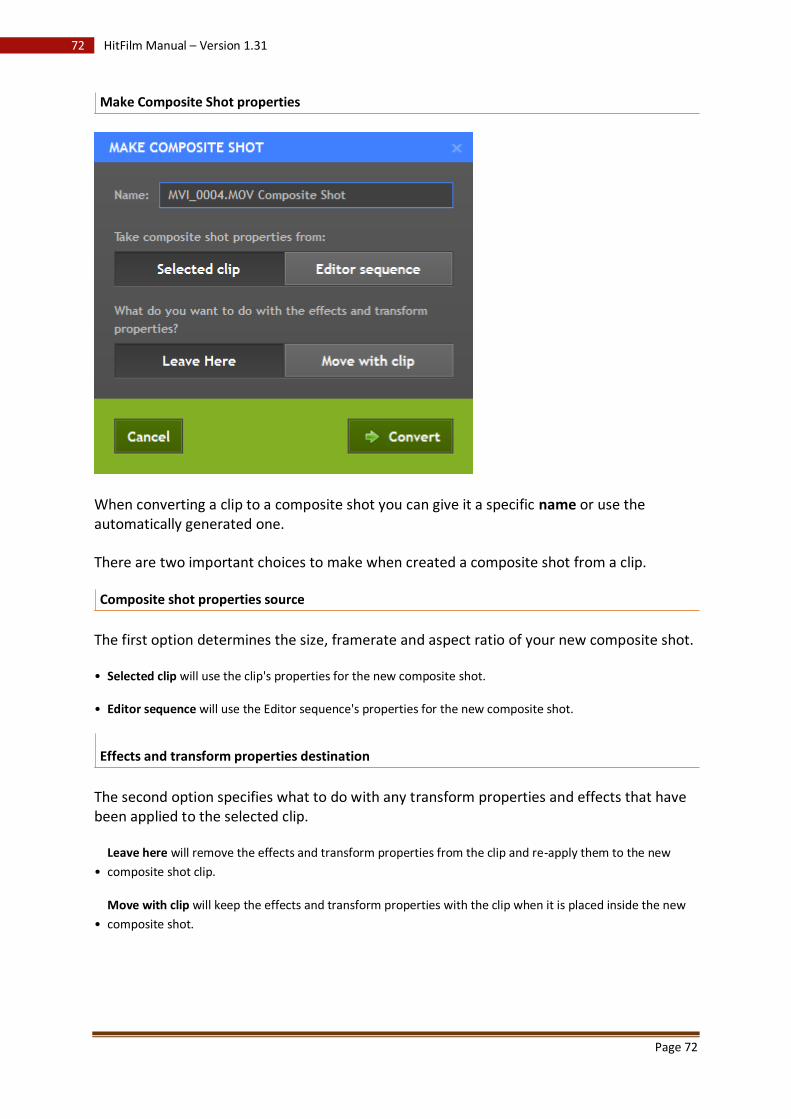
Page 72
72 HitFilm Manual – Version 1.31
Make Composite Shot properties
When converting a clip to a composite shot you can give it a specific name or use the automatically generated one.
There are two important choices to make when created a composite shot from a clip.
Composite shot properties source
The first option determines the size, framerate and aspect ratio of your new composite shot.
• Selected clip will use the clip's properties for the new composite shot.
• Editor sequence will use the Editor sequence's properties for the new composite shot.
Effects and transform properties destination
The second option specifies what to do with any transform properties and effects that have been applied to the selected clip.
• Leave here will remove the effects and transform properties from the clip and re-apply them to the new
composite shot clip.
• Move with clip will keep the effects and transform properties with the clip when it is placed inside the new
composite shot.
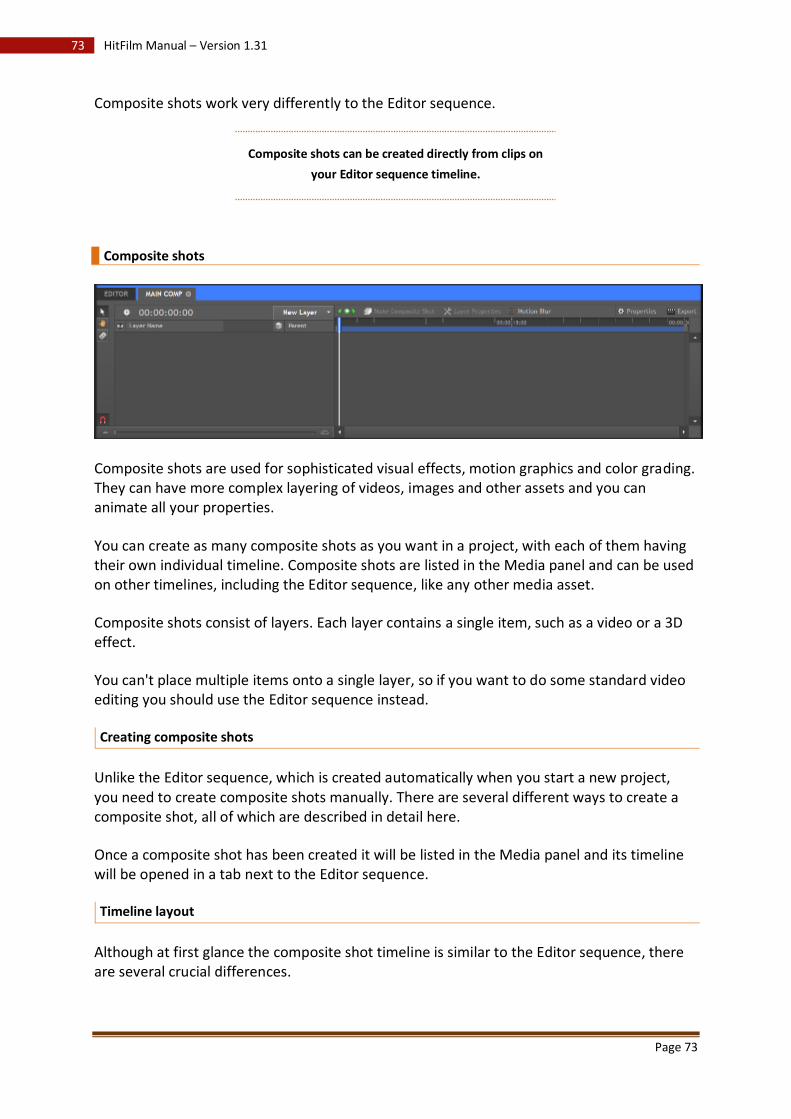
Page 73
73 HitFilm Manual – Version 1.31
Composite shots work very differently to the Editor sequence.
Composite shots can be created directly from clips on
your Editor sequence timeline.
Composite shots
Composite shots are used for sophisticated visual effects, motion graphics and color grading. They can have more complex layering of videos, images and other assets and you can animate all your properties.
You can create as many composite shots as you want in a project, with each of them having their own individual timeline. Composite shots are listed in the Media panel and can be used on other timelines, including the Editor sequence, like any other media asset.
Composite shots consist of layers. Each layer contains a single item, such as a video or a 3D effect.
You can't place multiple items onto a single layer, so if you want to do some standard video editing you should use the Editor sequence instead.
Creating composite shots
Unlike the Editor sequence, which is created automatically when you start a new project, you need to create composite shots manually. There are several different ways to create a composite shot, all of which are described in detail here.
Once a composite shot has been created it will be listed in the Media panel and its timeline will be opened in a tab next to the Editor sequence.
Timeline layout
Although at first glance the composite shot timeline is similar to the Editor sequence, there are several crucial differences.
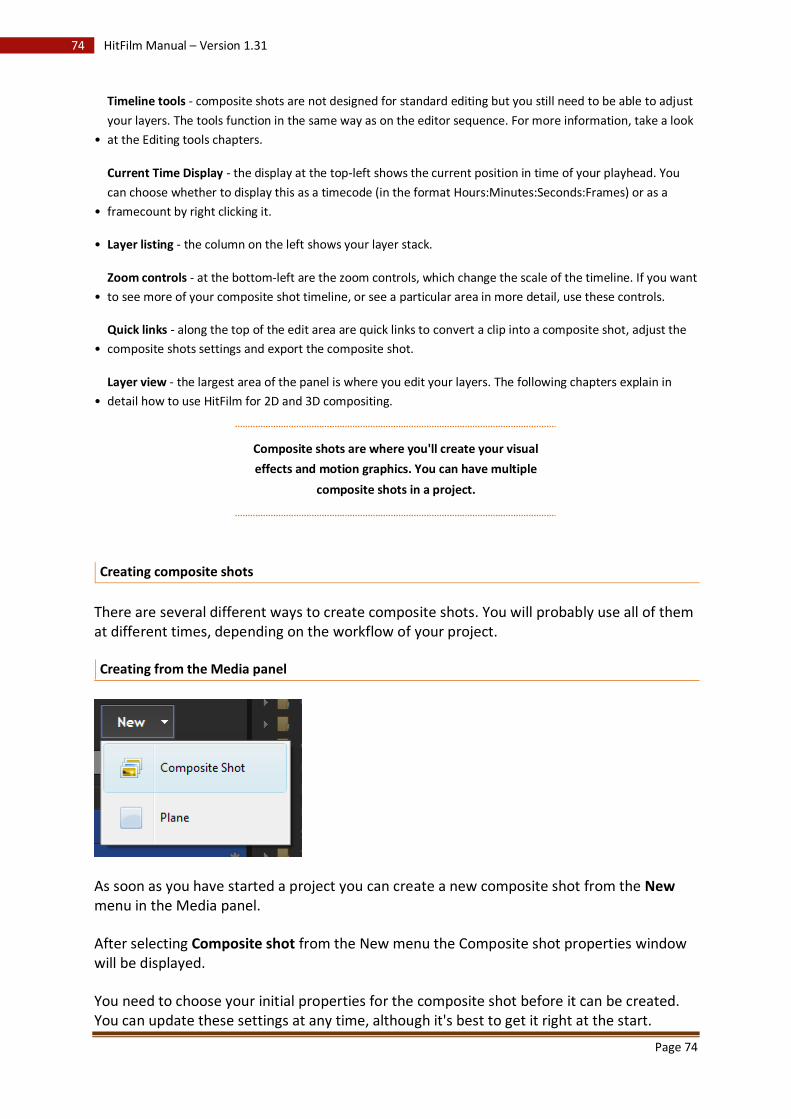
Page 74
74 HitFilm Manual – Version 1.31
•
Timeline tools - composite shots are not designed for standard editing but you still need to be able to adjust
your layers. The tools function in the same way as on the editor sequence. For more information, take a look
at the Editing tools chapters.
•
Current Time Display - the display at the top-left shows the current position in time of your playhead. You
can choose whether to display this as a timecode (in the format Hours:Minutes:Seconds:Frames) or as a
framecount by right clicking it.
• Layer listing - the column on the left shows your layer stack.
• Zoom controls - at the bottom-left are the zoom controls, which change the scale of the timeline. If you want
to see more of your composite shot timeline, or see a particular area in more detail, use these controls.
• Quick links - along the top of the edit area are quick links to convert a clip into a composite shot, adjust the
composite shots settings and export the composite shot.
• Layer view - the largest area of the panel is where you edit your layers. The following chapters explain in
detail how to use HitFilm for 2D and 3D compositing.
Composite shots are where you'll create your visual
effects and motion graphics. You can have multiple
composite shots in a project.
Creating composite shots
There are several different ways to create composite shots. You will probably use all of them at different times, depending on the workflow of your project.
Creating from the Media panel
As soon as you have started a project you can create a new composite shot from the New menu in the Media panel.
After selecting Composite shot from the New menu the Composite shot properties window will be displayed.
You need to choose your initial properties for the composite shot before it can be created. You can update these settings at any time, although it's best to get it right at the start.

Page 75
75 HitFilm Manual – Version 1.31
For more information read the Composite shot properties chapter.
Converting a clip or layer
Any clip on your Editor sequence and any layer in a composite shot can be converted to a new composite shot.
The Make Composite option is found at the top of the timeline panel. You need to select a single clip or layer in a timeline before you can use it.
After selecting a clip or layer and clicking Make Composite you will be shown the Make Composite Shot properties.
The selected clip or layer will be replaced on the timeline with a new composite shot and the original clip or layer is automatically converted to a layer in the newly created composite shot.
Converting a 3D layer will create a 2D composite shot. The contents of the composite shot will still be in 3D. You can change nested composite shots from 2D to 3D unrolled if you need to keep them in 3D. For more information read the 2D vs 3D compositing chapter.
Make Composite Shot properties
When converting a clip to a composite shot you can give it a specific name or use the automatically generated one.
There are two important choices to make when created a composite shot from a clip.
Page 76
76 HitFilm Manual – Version 1.31
Composite shot properties source
The first option determines the size, framerate and aspect ratio of your new composite shot.
• Select clip will use the clip's properties for the new composite shot.
• Editor sequence will use the Editor sequence's properties for the new composite shot.
Effects and transform properties destination
The second option specifies what to do with any transform properties and effects that have been applied to the selected clip.
• To the composite shot will remove the effects and transform properties from the clip and re-apply them to
the new composite shot.
• With the clip will keep the effects and transform properties with the clip when it is placed inside the new
composite shot.
You can create a composite shot using a clip of layer as a
source, or create an empty composite shot from scratch.
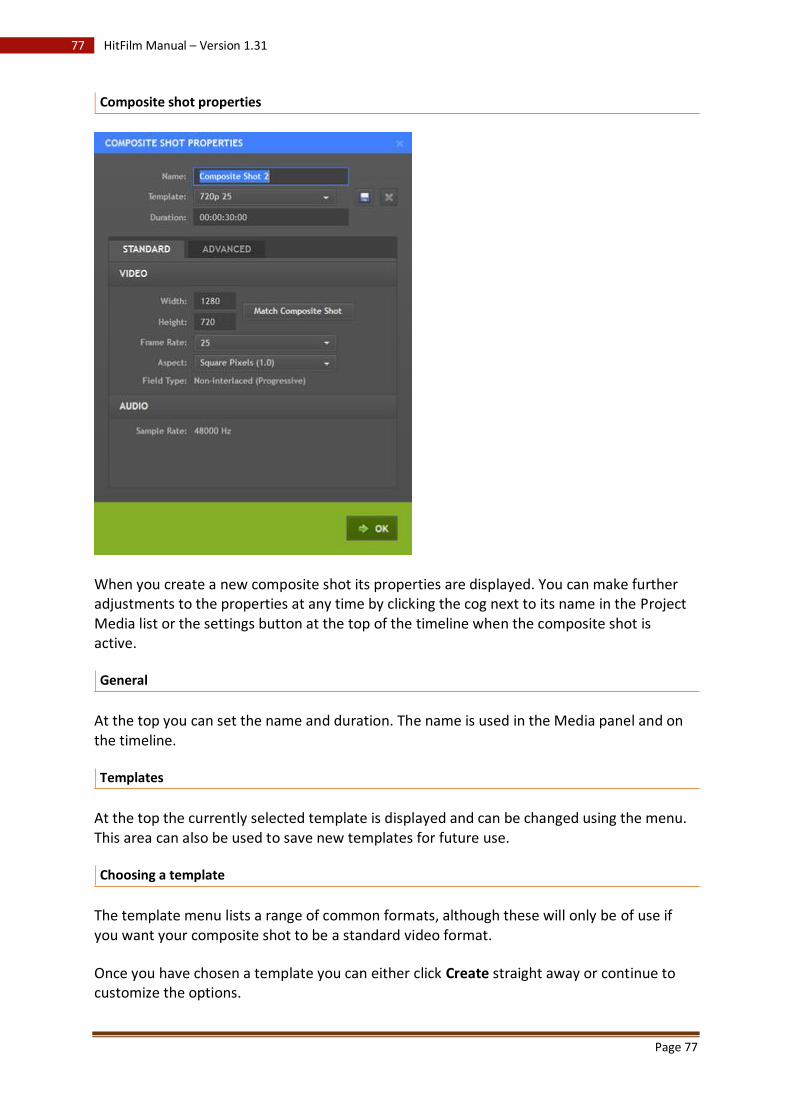
Page 77
77 HitFilm Manual – Version 1.31
Composite shot properties
When you create a new composite shot its properties are displayed. You can make further adjustments to the properties at any time by clicking the cog next to its name in the Project Media list or the settings button at the top of the timeline when the composite shot is active.
General
At the top you can set the name and duration. The name is used in the Media panel and on the timeline.
Templates
At the top the currently selected template is displayed and can be changed using the menu. This area can also be used to save new templates for future use.
Choosing a template
The template menu lists a range of common formats, although these will only be of use if you want your composite shot to be a standard video format.
Once you have chosen a template you can either click Create straight away or continue to customize the options.
Page 78
78 HitFilm Manual – Version 1.31
Saving a new template
After altering some of the video and audio properties you might want to save the setup to a new template so that you can easily use it again in future.
Clicking the Save template button to the right of the template menu will display a dialog in which you can specify a name for the new template. If a template already exists with that name you will be asked if you want to replace it.
The default templates cannot be changed or replaced.
The new template will then be available from the template menu.
Removing a template
The Remove template button will permanently remove the currently selected template from the list.
The default templates cannot be removed.
Standard
Video properties
These options affect how video is displayed in your composite shot.
• Width & height - the resolution of the video frame in pixels.
• Frame rate - the number of frames displayed sequentially in each second of playback. If this does not match
your video clips they may playback too fast or too slow.
•
Field type - how each frame of video is stored and displayed. Some video formats store each frame as a full
resolution 'progressive' frame similar to how actual film works, while others will store 'interlaced' video
which consists of two 'fields' on each frame.
•
Aspect - the shape of the individual pixels, which in turn affects the shape of the video frame. Some formats
use non-square pixels to create widescreen aspect ratios, so make sure you check your camera's
specification if your video looks stretched or squashed.
The Match Composite Shot/Match Editor Sequence button will automatically update the properties to match the currently active timeline, which can be a very useful shortcut if you want everything to use the same settings.
Audio properties
The audio sample rate is taken from your main project Editor sequence properties and cannot be changed for individual composite shots.
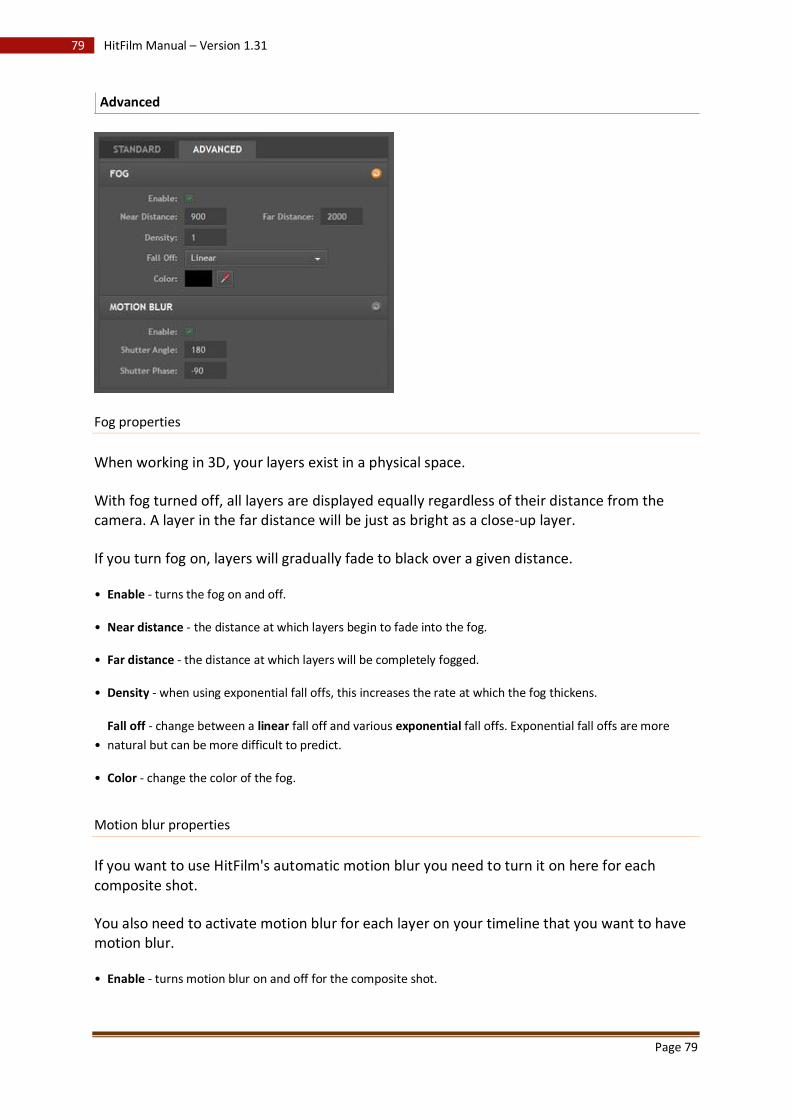
Page 79
79 HitFilm Manual – Version 1.31
Advanced
Fog properties
When working in 3D, your layers exist in a physical space.
With fog turned off, all layers are displayed equally regardless of their distance from the camera. A layer in the far distance will be just as bright as a close-up layer.
If you turn fog on, layers will gradually fade to black over a given distance.
• Enable - turns the fog on and off.
• Near distance - the distance at which layers begin to fade into the fog.
• Far distance - the distance at which layers will be completely fogged.
• Density - when using exponential fall offs, this increases the rate at which the fog thickens.
• Fall off - change between a linear fall off and various exponential fall offs. Exponential fall offs are more
natural but can be more difficult to predict.
• Color - change the color of the fog.
Motion blur properties
If you want to use HitFilm's automatic motion blur you need to turn it on here for each composite shot.
You also need to activate motion blur for each layer on your timeline that you want to have motion blur.
• Enable - turns motion blur on and off for the composite shot.
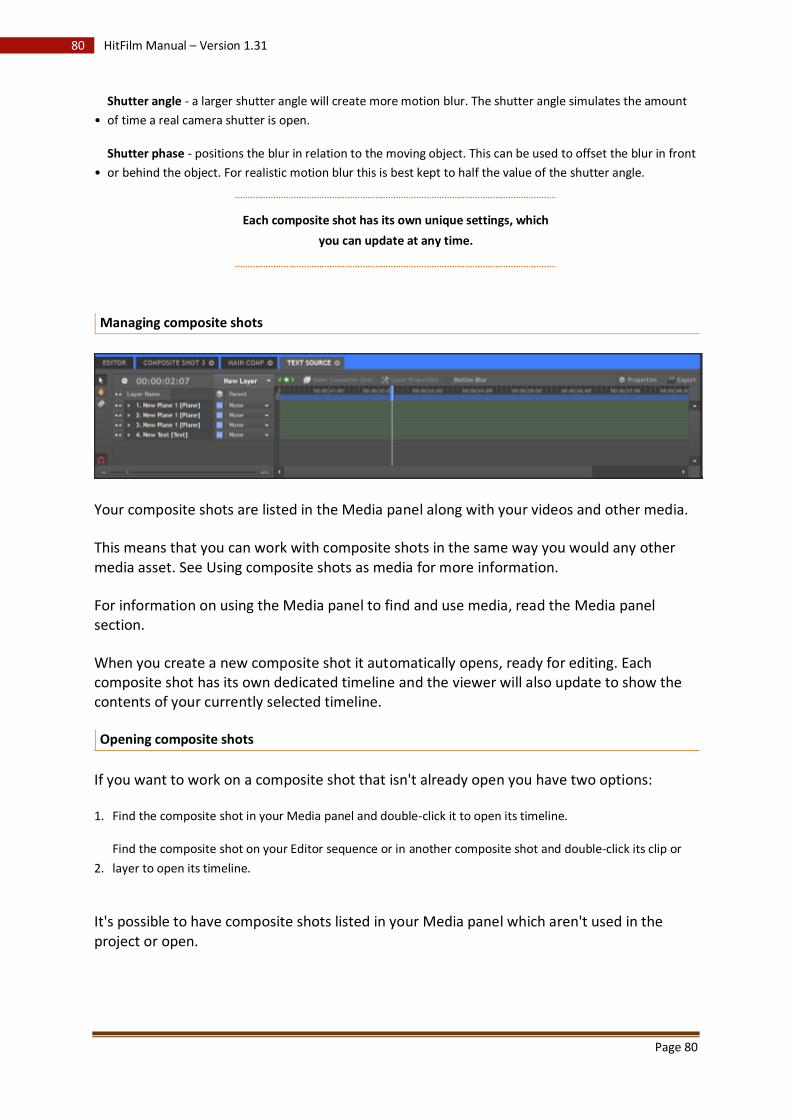
Page 80
80 HitFilm Manual – Version 1.31
• Shutter angle - a larger shutter angle will create more motion blur. The shutter angle simulates the amount
of time a real camera shutter is open.
• Shutter phase - positions the blur in relation to the moving object. This can be used to offset the blur in front
or behind the object. For realistic motion blur this is best kept to half the value of the shutter angle.
Each composite shot has its own unique settings, which
you can update at any time.
Managing composite shots
Your composite shots are listed in the Media panel along with your videos and other media.
This means that you can work with composite shots in the same way you would any other media asset. See Using composite shots as media for more information.
For information on using the Media panel to find and use media, read the Media panel section.
When you create a new composite shot it automatically opens, ready for editing. Each composite shot has its own dedicated timeline and the viewer will also update to show the contents of your currently selected timeline.
Opening composite shots
If you want to work on a composite shot that isn't already open you have two options:
1. Find the composite shot in your Media panel and double-click it to open its timeline.
2. Find the composite shot on your Editor sequence or in another composite shot and double-click its clip or
layer to open its timeline.
It's possible to have composite shots listed in your Media panel which aren't used in the project or open.
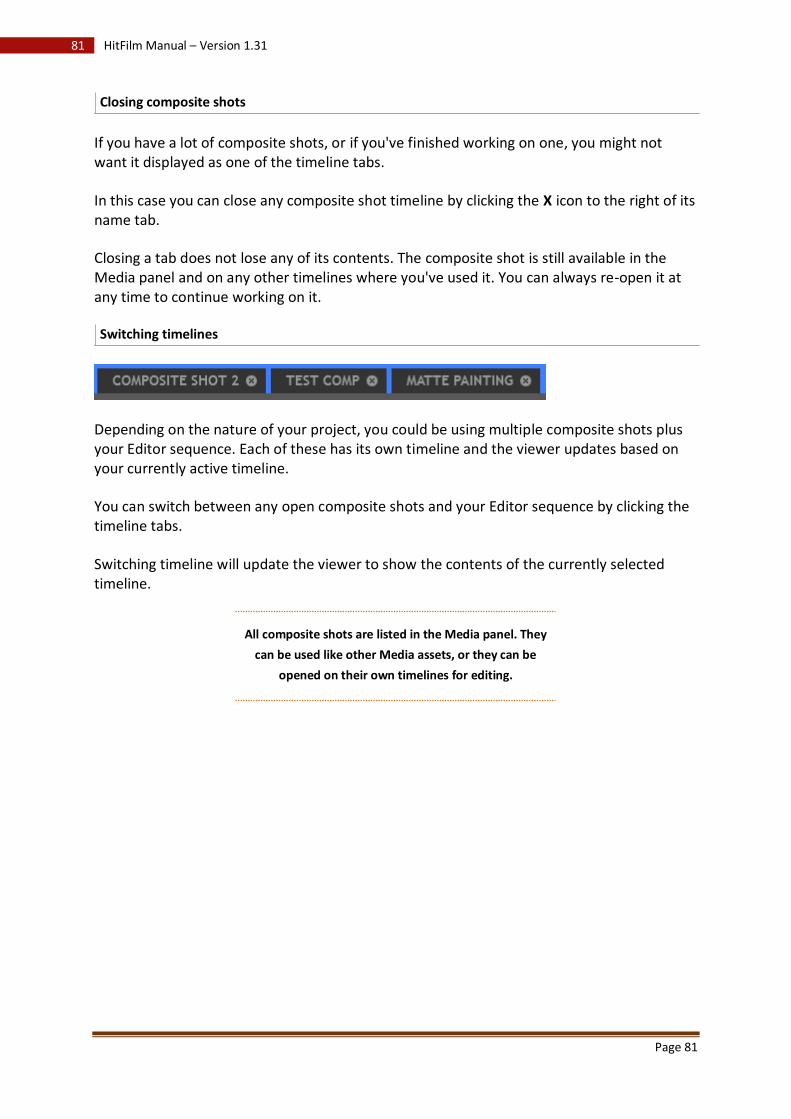
Page 81
81 HitFilm Manual – Version 1.31
Closing composite shots
If you have a lot of composite shots, or if you've finished working on one, you might not want it displayed as one of the timeline tabs.
In this case you can close any composite shot timeline by clicking the X icon to the right of its name tab.
Closing a tab does not lose any of its contents. The composite shot is still available in the Media panel and on any other timelines where you've used it. You can always re-open it at any time to continue working on it.
Switching timelines
Depending on the nature of your project, you could be using multiple composite shots plus your Editor sequence. Each of these has its own timeline and the viewer updates based on your currently active timeline.
You can switch between any open composite shots and your Editor sequence by clicking the timeline tabs.
Switching timeline will update the viewer to show the contents of the currently selected timeline.
All composite shots are listed in the Media panel. They
can be used like other Media assets, or they can be
opened on their own timelines for editing.
Page 82
82 HitFilm Manual – Version 1.31
Editing with composite shots
Composite shots can be used in the same way as other media, such as videos and images.
All of your composite shots are listed in the Media panel and can be added to other timelines, including other composite shots.
You can't place a composite shot inside itself. A composite shot can only go inside a different composite shot.
Composite shots on the Editor sequence
A composite shot that has been used on your Editor sequence can be edited using the same tools that you use for other media.
For more information on using the tools, check out the Editor sequence section.
Composite shot duration
If you trim the in and out points of a composite shot on the Editor sequence, this does not change its actual duration. Similarly, if you want to lengthen a composite shot you need to change its duration in its properties, as extending its out point will only work up to the specified duration of hte composite shot.
Opening composite shots
Even while a composite shot is being used on the Editor sequence, you can double-click on it at any time to open its timeline and make further adjustments.
This is a far more efficient workflow than having to constantly re-export your visual effects shots. If you use HitFilm for your editing and your effects, you'll only need to export when you've finished your project.
Embedding composite shots
You can place composite shots inside other composite shots. This is called embedding.
Embedded composite shots can be 2D, 3D or 3D Unrolled. For detailed information on each of these layer states and how to switch between them, please read Working with layers.
Embedding has many uses, including:
Organization
If your composite shot has lots of layers and is becoming unwieldy, it can be useful to split the overall shot into several smaller composite shots.
Page 83
83 HitFilm Manual – Version 1.31
For example, if you are working on a green screen shot and have 5 layers making up your background, it might be useful to have those 5 layers in their own composite shot. That way, once you're finished working on the background, it'll only take up a single layer in your main composite.
If you have been working in 3D, you can retain full 3D interactivity, even when using embedded composite shots, by setting its layer type to 3D Unrolled. For more information see Working with layers.
Grading
Embedding a composite shot can be a quick way to grade everything inside it in one go.
By applying your grading to the composite shot itself, rather than to the individual layers inside it, all the layers will receive the same grade.
You can also grade a composite shot that has been placed on the Editor sequence, but this will not give you access to animation features.
Flattening
Embedded composite shots that are set to 2D or 3D layer type are 'flattened', so that all the layers inside the composite shot are changed into a single layer.
Let's say you want to create a 3D particle effect in HitFilm and then composite it onto a computer monitor in your movie. Embedding a 3D composite shot makes this easy: you create the 3D particle effect inside the composite shot, then use the composite shot as a flattened 3D layer to display correctly on the computer monitor.
An embedded composite shot with its layer type set to 2D or 3D is essentially the same as exporting the composite shot and importing the rendered video file - except that you don't have to wait for anything to export, and you can re-open the composite shot at any point to make adjustments on the fly.
If you want to retain the full 3D positioning from the comp you should set it to 3D unrolled.
Embedding composite shots opens up creative
possibilities and provides a useful way to keep projects
tidy and organized.
Navigating the composite shot timeline
Composite shot timelines work in a different way to the Editor sequence, although there are still many shared interface elements.
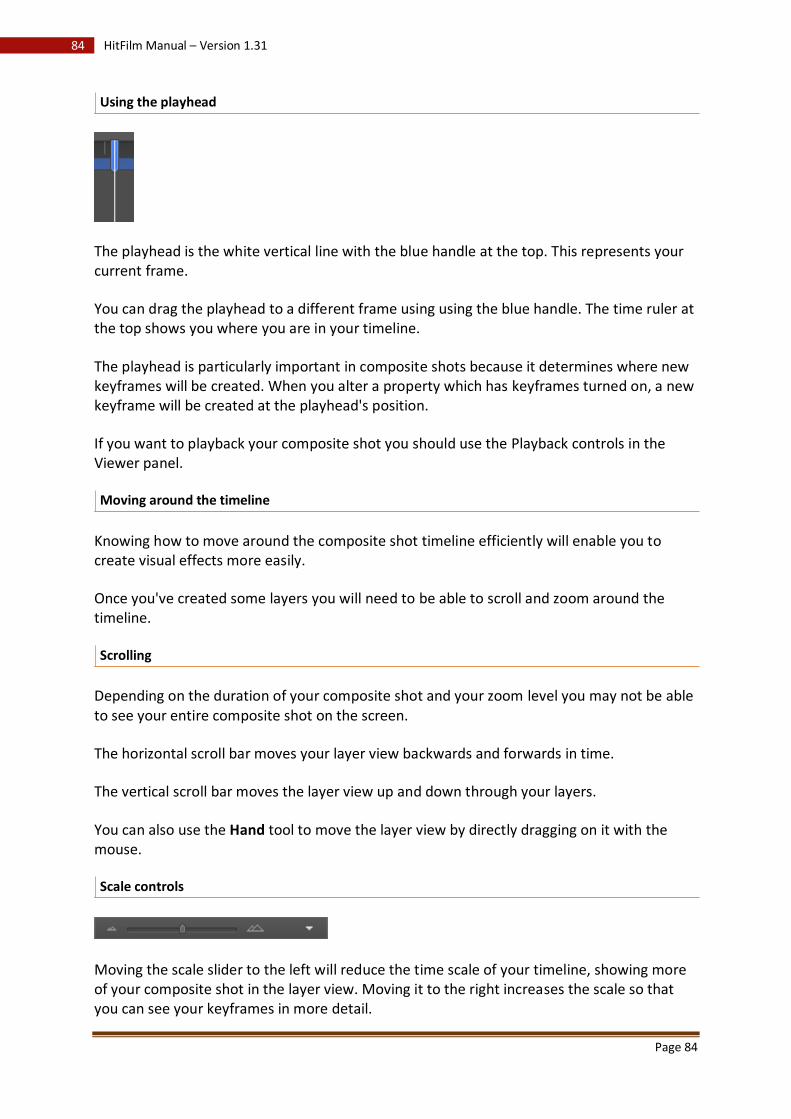
Page 84
84 HitFilm Manual – Version 1.31
Using the playhead
The playhead is the white vertical line with the blue handle at the top. This represents your current frame.
You can drag the playhead to a different frame using using the blue handle. The time ruler at the top shows you where you are in your timeline.
The playhead is particularly important in composite shots because it determines where new keyframes will be created. When you alter a property which has keyframes turned on, a new keyframe will be created at the playhead's position.
If you want to playback your composite shot you should use the Playback controls in the Viewer panel.
Moving around the timeline
Knowing how to move around the composite shot timeline efficiently will enable you to create visual effects more easily.
Once you've created some layers you will need to be able to scroll and zoom around the timeline.
Scrolling
Depending on the duration of your composite shot and your zoom level you may not be able to see your entire composite shot on the screen.
The horizontal scroll bar moves your layer view backwards and forwards in time.
The vertical scroll bar moves the layer view up and down through your layers.
You can also use the Hand tool to move the layer view by directly dragging on it with the mouse.
Scale controls
Moving the scale slider to the left will reduce the time scale of your timeline, showing more of your composite shot in the layer view. Moving it to the right increases the scale so that you can see your keyframes in more detail.
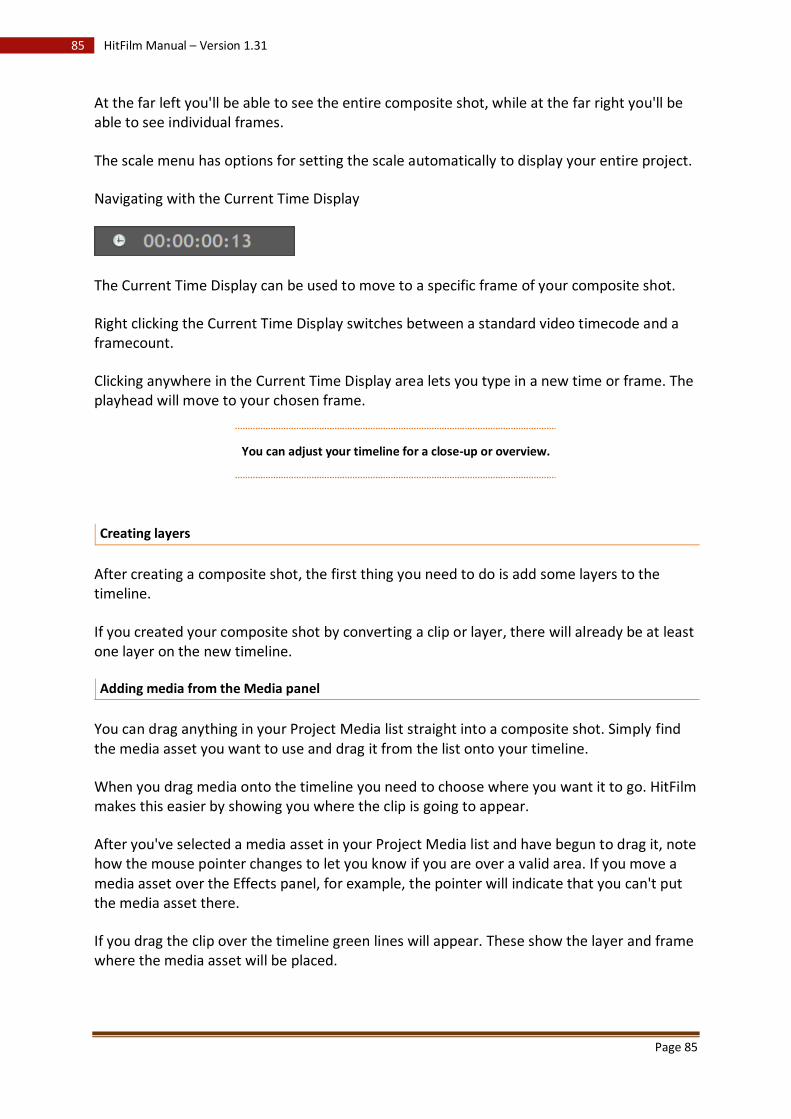
Page 85
85 HitFilm Manual – Version 1.31
At the far left you'll be able to see the entire composite shot, while at the far right you'll be able to see individual frames.
The scale menu has options for setting the scale automatically to display your entire project.
Navigating with the Current Time Display
The Current Time Display can be used to move to a specific frame of your composite shot.
Right clicking the Current Time Display switches between a standard video timecode and a framecount.
Clicking anywhere in the Current Time Display area lets you type in a new time or frame. The playhead will move to your chosen frame.
You can adjust your timeline for a close-up or overview.
Creating layers
After creating a composite shot, the first thing you need to do is add some layers to the timeline.
If you created your composite shot by converting a clip or layer, there will already be at least one layer on the new timeline.
Adding media from the Media panel
You can drag anything in your Project Media list straight into a composite shot. Simply find the media asset you want to use and drag it from the list onto your timeline.
When you drag media onto the timeline you need to choose where you want it to go. HitFilm makes this easier by showing you where the clip is going to appear.
After you've selected a media asset in your Project Media list and have begun to drag it, note how the mouse pointer changes to let you know if you are over a valid area. If you move a media asset over the Effects panel, for example, the pointer will indicate that you can't put the media asset there.
If you drag the clip over the timeline green lines will appear. These show the layer and frame where the media asset will be placed.
Page 86
86 HitFilm Manual – Version 1.31
If you drag over the layer listing you will only see a single line indicating the layer placement. In this case the layer will always begin at frame 0. If you want to specify a start frame, drag over the layer view.
Every item in a composite shot exists on its own layer, so each layer can only hold a single item. This means that each time you add something to the composite shot a new layer is created.
If you want to do normal video editing and create a sequence of end-to-end clips, you should use the Editor sequence instead.
For more information on what you can do with your layers, see the Working with layers chapter.
Adding 3D effects from the Effects panel
3D effects are used as layers in composite shots. 3D effects can be dragged from the Effects panel onto a composite shot timeline in the same way as media.
All of HitFilm's 3D effects are stored in the 3D folder in the Effects panel.
2D effects cannot be used as layers. Instead, they are applied to the Effects section of an existing layer or clip.
For more information on using 3D effects take a look at the 3D effects section.
Generating special layers
There is also a New Layer menu on the timeline itself which creates special layer types.
• Plane - a flat, colored, rectangular shape. Unlike the other special layers, planes are listed in your Media
panel.
• Text - highly customizable text of any font, color or size.
• Grade - applies effects to all other layers below it.
• Camera - virtual cameras are used when you work in 3D.
• Light - virtual lights are used when you work in 3D.
• Point - invisible reference layer for aiding positioning and adjustment of other layers.
Page 87
87 HitFilm Manual – Version 1.31
Each of these layers is explained in detail elsewhere in this manual. Click on their name above to find out more.
Composite shots consist of lots of separate layers. Layers
can be media from the Media panel or special layers
created on the timeline.
Working with layers
Composite shots consist of stacked layers. Each layer contains a single item.
In the case of media layers, the layer is a reference to the original media asset. Changing a layer in a composite shot timeline will not change the original media asset in the Media panel. In the case of media files the source file will also be unaffected.
The only exception is with the contents of a composite shot. In this case, any changes you make inside the composite shot will also affect the composite shot in the Media panel, and any other places where the composite shot has been used.
Layer controls
Every layer has the same set of controls for controlling its general behaviour.
Moving and reordering
Once you've created more than one layer you can reorder them be dragging them up and down in the track list (on the left side of the timeline).
To move a layer backwards or forwards in time drag its colored duration bar in the work area.
Further control over layers is provided by the Layer tools.
Visibility
Any layer can be made visible or invisible at any time.
Turning a layer invisible will not lose any of its properties, so you can turn layers on and off without losing anything.
Invisible layers will not appear in the viewer and will not be included in any exports.
Make sure you turn on layers you want to see before starting an export!

Page 88
88 HitFilm Manual – Version 1.31
You can still make adjustments to layers when they are invisible.
Duration
The duration of each layer is represented on the timeline by the green bars (blue when selected).
You can move and trim layers using the duration bar. See the Select tool for more information.
2D/3D
Text layers and media layers such as planes, video, audio and images all start out as 2D layers. These layers can be switched between 2D and 3D at any time using the icon next to the layer name.
3D layers have additional properties for changing the layer's depth position (the Z-axis). If you switch a 3D layer back to a 2D layer any properties you have set for the third dimension are lost, even if you then revert back to 3D.
Don't forget, you can easily use the Undo functionality if you need to restore 3D properties that you have lost by switching back to 2D.
3D unrolled
Composite shot layers have an additional option called 3D Unrolled.
If you set a composite shot to be a 3D layer it can be transformed in 3D dimensions, appearing as a flat rectangle. The contents of the composite shot are then displayed on that rectangle, in a similar way to videos, images and planes. Even if the composites shot contains 3D layers, they will still be displayed onto the flat plane of the composite shot layer once it is embedded.
3D unrolled works differently, retaining the full depth of the composite shot and not limiting it to a flat plane. The dimensions of the embedded composite shot are also ignored, with its contents displaying in full 3D.
3D unrolled is useful if you want to retain the full 3D depth of a composite shot, without having all of its layers cluttering up your timeline.
Page 89
89 HitFilm Manual – Version 1.31
Parenting
The menu at the right of the layer list is for parenting layers together. The menu shows a list of all the layers in the current composite shot and you can choose one to be the parent of the selected layer.
When a layer is parented, it takes its transform source from the 'parent' layer. If you move the parent layer, the 'child' layer also moves.
You can still transform the child layer on top of the transformation already applied from the parent layer.
This is extremely useful if you want to link the movement of layers together. As well as providing an extra level of control, it can also be a useful shortcut if you want several layers to behave in the same way, without having to animate them all individually.
Context menu
Additional options are available from the layer menu, which can be accessed by right clicking on any layer. Some of the options will apply to the layer you click on.
• New layer - behaves identically to the New Layer menu on the timeline.
• Cut, copy, paste - provides standard copy & paste features for layers, effects and masks.
• Duplicate - creates a separate copy of the layer. This is a useful shortcut alternative to copy and pasting the
layer.
• Make composite shot - creates a new composite shot from the selected layer. More details here.
• Remove - removes the layer from the composite shot. You can always undo this if you change your mind.
•
Rename - renames the selected layer. For layer types that are also listed in the Media panel, renaming here
does not affect the source. Similarly, renaming the source in the Media panel will not rename any existing
layers.
• Properties - opens the properties window for the selected layer. This option is only available for special
layers and composite shots.
Additional options are available if your layer has effects or masks. See the Effects and Masking chapters for more information.
You have fine control over the behaviour and
appearance of your layers.
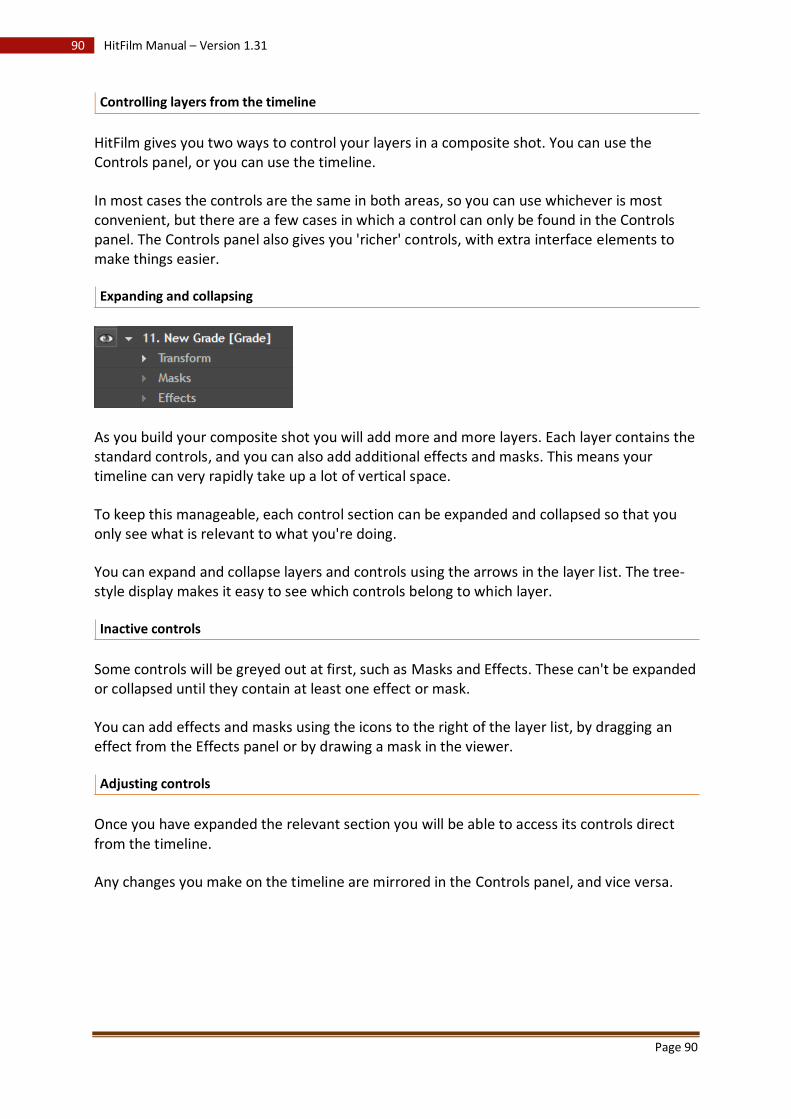
Page 90
90 HitFilm Manual – Version 1.31
Controlling layers from the timeline
HitFilm gives you two ways to control your layers in a composite shot. You can use the Controls panel, or you can use the timeline.
In most cases the controls are the same in both areas, so you can use whichever is most convenient, but there are a few cases in which a control can only be found in the Controls panel. The Controls panel also gives you 'richer' controls, with extra interface elements to make things easier.
Expanding and collapsing
As you build your composite shot you will add more and more layers. Each layer contains the standard controls, and you can also add additional effects and masks. This means your timeline can very rapidly take up a lot of vertical space.
To keep this manageable, each control section can be expanded and collapsed so that you only see what is relevant to what you're doing.
You can expand and collapse layers and controls using the arrows in the layer list. The tree-style display makes it easy to see which controls belong to which layer.
Inactive controls
Some controls will be greyed out at first, such as Masks and Effects. These can't be expanded or collapsed until they contain at least one effect or mask.
You can add effects and masks using the icons to the right of the layer list, by dragging an effect from the Effects panel or by drawing a mask in the viewer.
Adjusting controls
Once you have expanded the relevant section you will be able to access its controls direct from the timeline.
Any changes you make on the timeline are mirrored in the Controls panel, and vice versa.
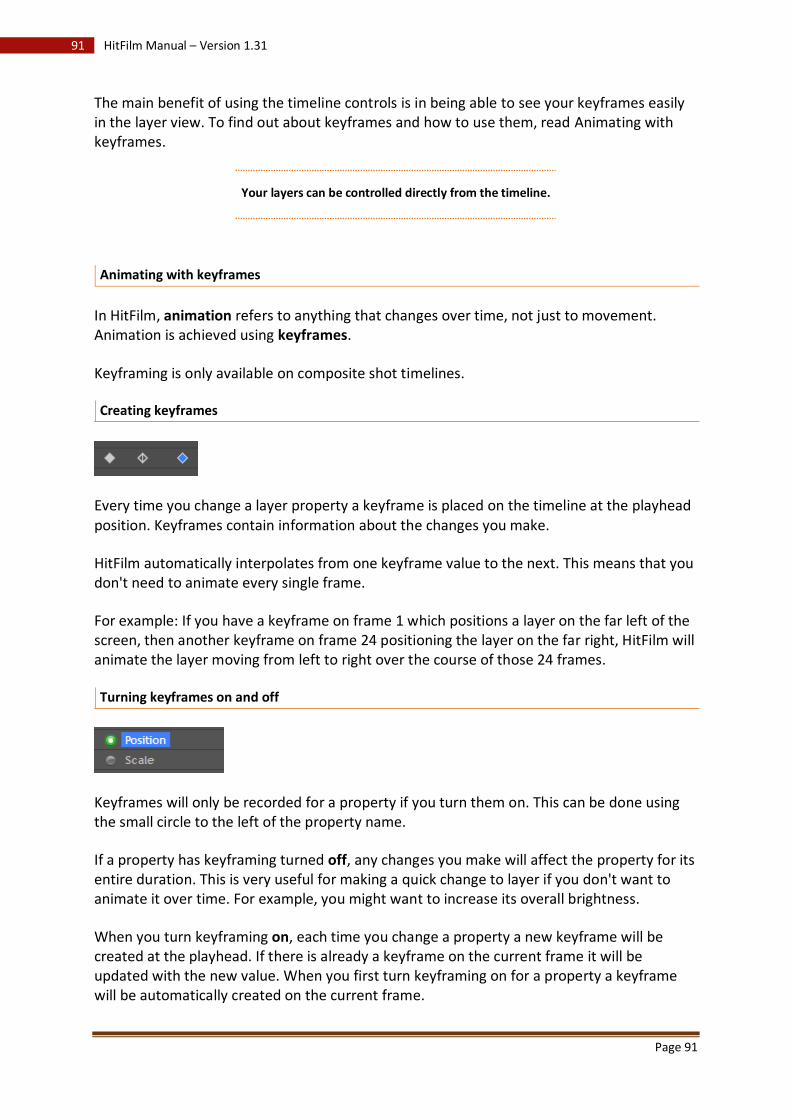
Page 91
91 HitFilm Manual – Version 1.31
The main benefit of using the timeline controls is in being able to see your keyframes easily in the layer view. To find out about keyframes and how to use them, read Animating with keyframes.
Your layers can be controlled directly from the timeline.
Animating with keyframes
In HitFilm, animation refers to anything that changes over time, not just to movement. Animation is achieved using keyframes.
Keyframing is only available on composite shot timelines.
Creating keyframes
Every time you change a layer property a keyframe is placed on the timeline at the playhead position. Keyframes contain information about the changes you make.
HitFilm automatically interpolates from one keyframe value to the next. This means that you don't need to animate every single frame.
For example: If you have a keyframe on frame 1 which positions a layer on the far left of the screen, then another keyframe on frame 24 positioning the layer on the far right, HitFilm will animate the layer moving from left to right over the course of those 24 frames.
Turning keyframes on and off
Keyframes will only be recorded for a property if you turn them on. This can be done using the small circle to the left of the property name.
If a property has keyframing turned off, any changes you make will affect the property for its entire duration. This is very useful for making a quick change to layer if you don't want to animate it over time. For example, you might want to increase its overall brightness.
When you turn keyframing on, each time you change a property a new keyframe will be created at the playhead. If there is already a keyframe on the current frame it will be updated with the new value. When you first turn keyframing on for a property a keyframe will be automatically created on the current frame.
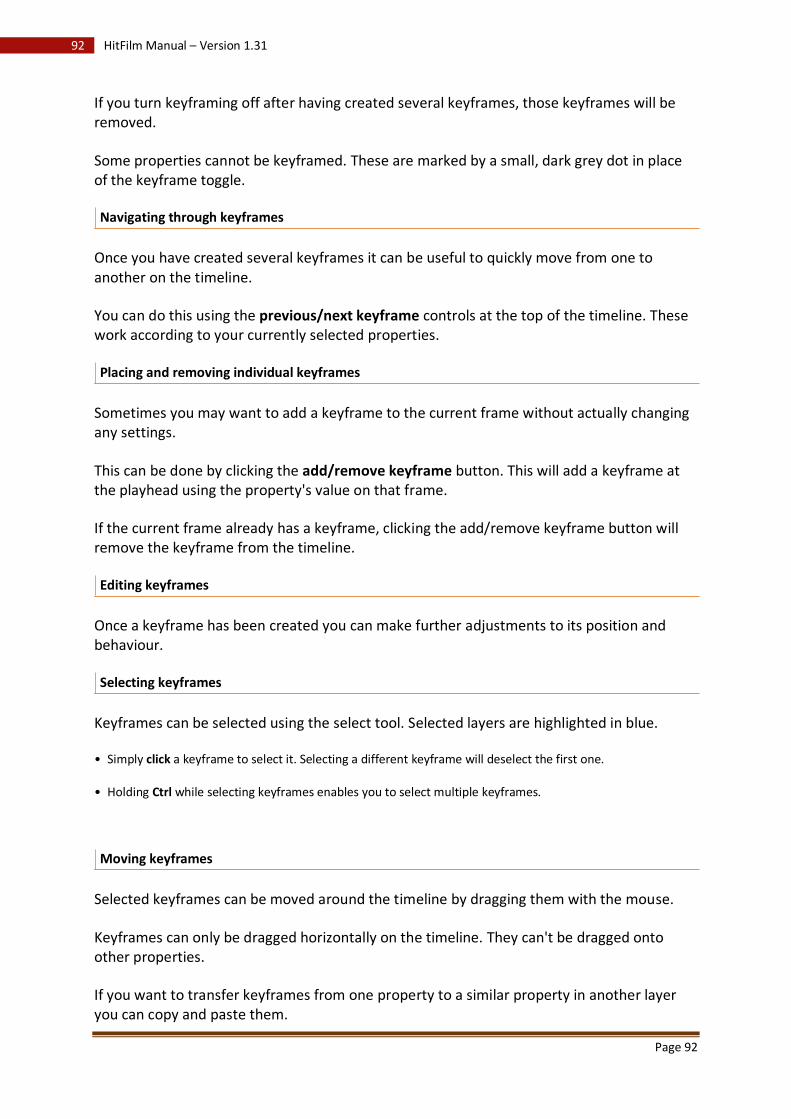
Page 92
92 HitFilm Manual – Version 1.31
If you turn keyframing off after having created several keyframes, those keyframes will be removed.
Some properties cannot be keyframed. These are marked by a small, dark grey dot in place of the keyframe toggle.
Navigating through keyframes
Once you have created several keyframes it can be useful to quickly move from one to another on the timeline.
You can do this using the previous/next keyframe controls at the top of the timeline. These work according to your currently selected properties.
Placing and removing individual keyframes
Sometimes you may want to add a keyframe to the current frame without actually changing any settings.
This can be done by clicking the add/remove keyframe button. This will add a keyframe at the playhead using the property's value on that frame.
If the current frame already has a keyframe, clicking the add/remove keyframe button will remove the keyframe from the timeline.
Editing keyframes
Once a keyframe has been created you can make further adjustments to its position and behaviour.
Selecting keyframes
Keyframes can be selected using the select tool. Selected layers are highlighted in blue.
• Simply click a keyframe to select it. Selecting a different keyframe will deselect the first one.
• Holding Ctrl while selecting keyframes enables you to select multiple keyframes.
Moving keyframes
Selected keyframes can be moved around the timeline by dragging them with the mouse.
Keyframes can only be dragged horizontally on the timeline. They can't be dragged onto other properties.
If you want to transfer keyframes from one property to a similar property in another layer you can copy and paste them.
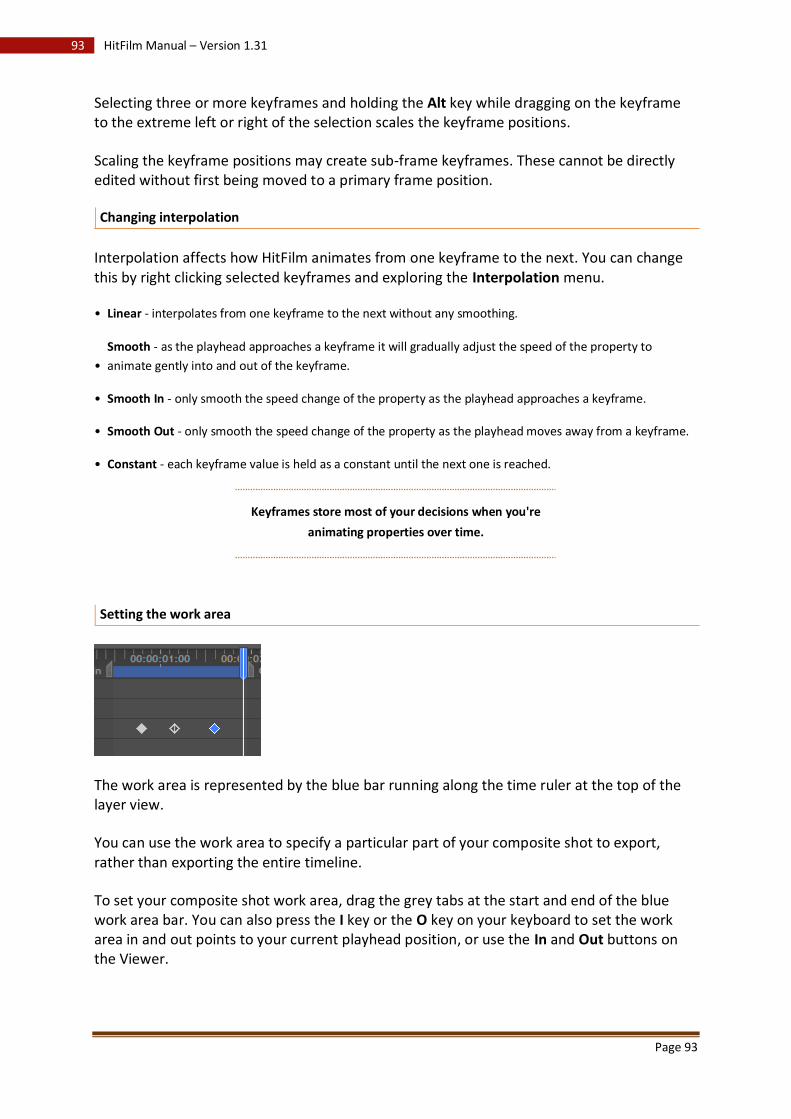
Page 93
93 HitFilm Manual – Version 1.31
Selecting three or more keyframes and holding the Alt key while dragging on the keyframe to the extreme left or right of the selection scales the keyframe positions.
Scaling the keyframe positions may create sub-frame keyframes. These cannot be directly edited without first being moved to a primary frame position.
Changing interpolation
Interpolation affects how HitFilm animates from one keyframe to the next. You can change this by right clicking selected keyframes and exploring the Interpolation menu.
• Linear - interpolates from one keyframe to the next without any smoothing.
• Smooth - as the playhead approaches a keyframe it will gradually adjust the speed of the property to
animate gently into and out of the keyframe.
• Smooth In - only smooth the speed change of the property as the playhead approaches a keyframe.
• Smooth Out - only smooth the speed change of the property as the playhead moves away from a keyframe.
• Constant - each keyframe value is held as a constant until the next one is reached.
Keyframes store most of your decisions when you're
animating properties over time.
Setting the work area
The work area is represented by the blue bar running along the time ruler at the top of the layer view.
You can use the work area to specify a particular part of your composite shot to export, rather than exporting the entire timeline.
To set your composite shot work area, drag the grey tabs at the start and end of the blue work area bar. You can also press the I key or the O key on your keyboard to set the work area in and out points to your current playhead position, or use the In and Out buttons on the Viewer.
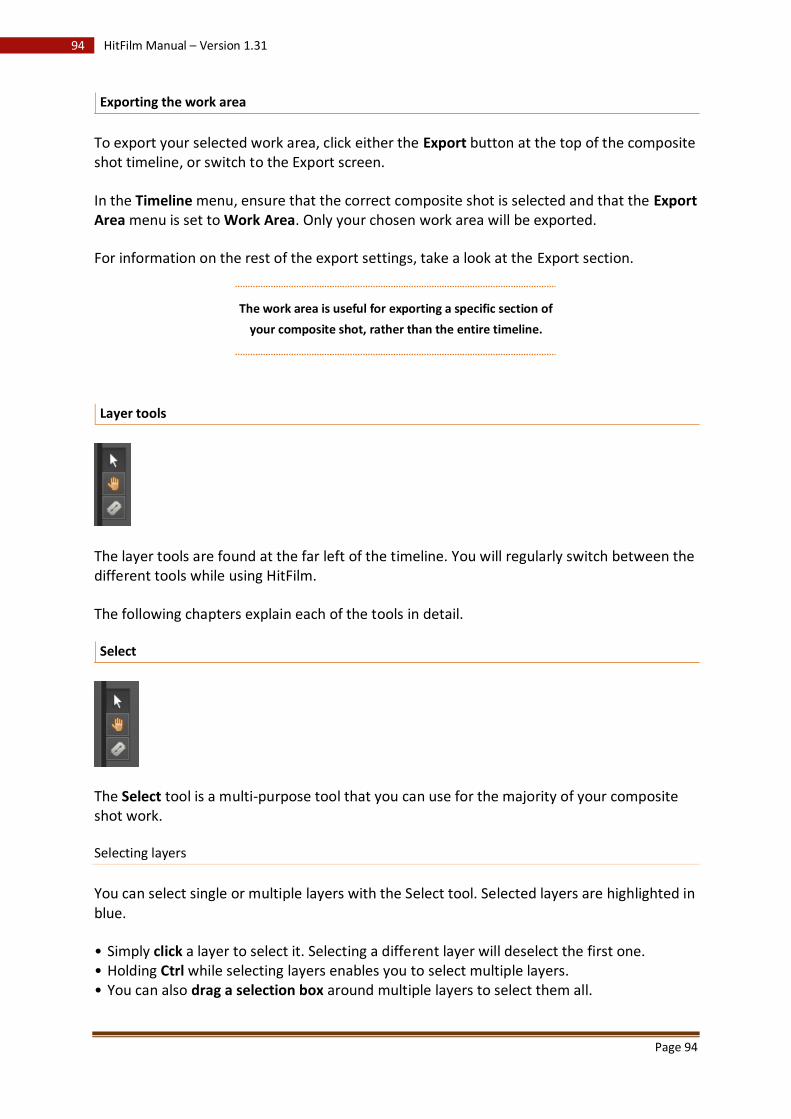
Page 94
94 HitFilm Manual – Version 1.31
Exporting the work area
To export your selected work area, click either the Export button at the top of the composite shot timeline, or switch to the Export screen.
In the Timeline menu, ensure that the correct composite shot is selected and that the Export Area menu is set to Work Area. Only your chosen work area will be exported.
For information on the rest of the export settings, take a look at the Export section.
The work area is useful for exporting a specific section of
your composite shot, rather than the entire timeline.
Layer tools
The layer tools are found at the far left of the timeline. You will regularly switch between the different tools while using HitFilm.
The following chapters explain each of the tools in detail.
Select
The Select tool is a multi-purpose tool that you can use for the majority of your composite shot work.
Selecting layers
You can select single or multiple layers with the Select tool. Selected layers are highlighted in blue.
• Simply click a layer to select it. Selecting a different layer will deselect the first one. • Holding Ctrl while selecting layers enables you to select multiple layers. • You can also drag a selection box around multiple layers to select them all.
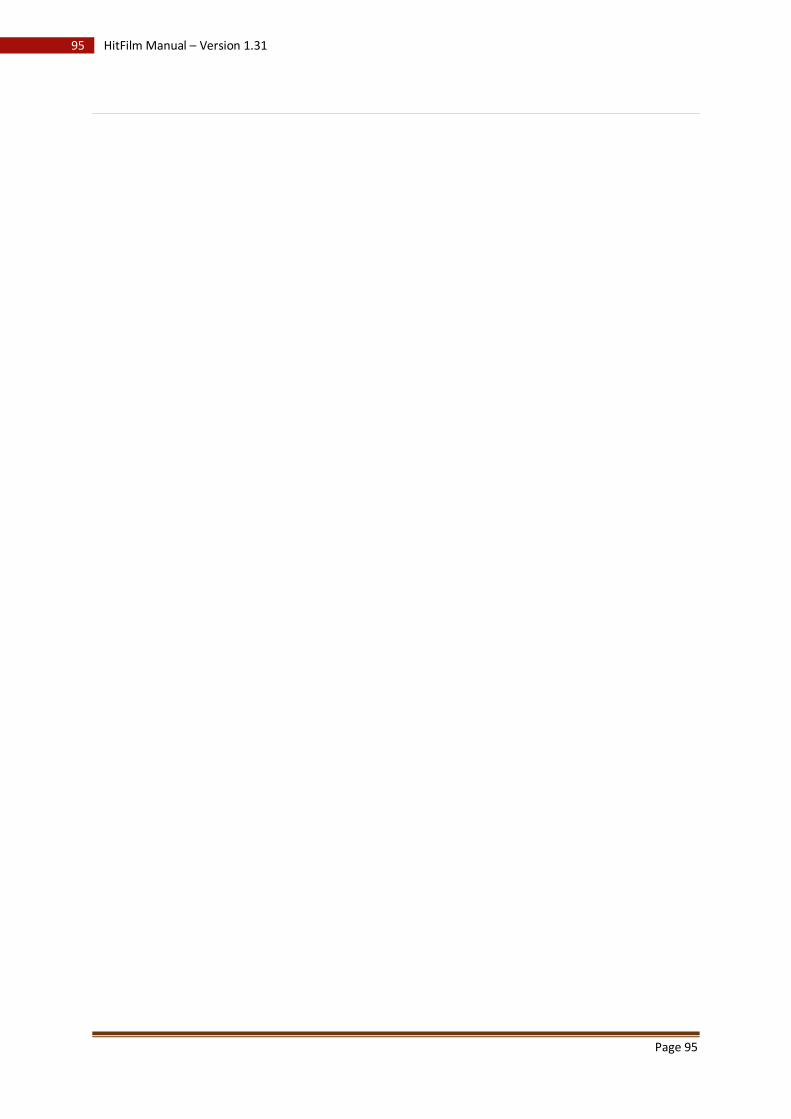
Page 95
95 HitFilm Manual – Version 1.31
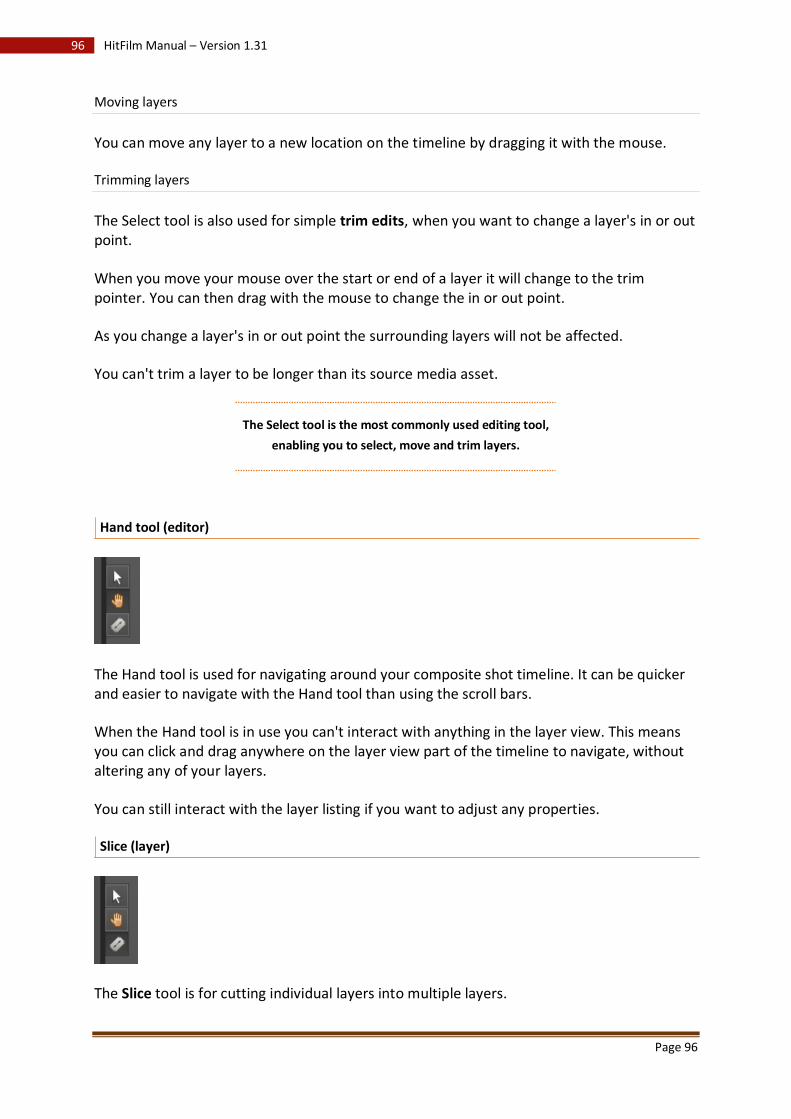
Page 96
96 HitFilm Manual – Version 1.31
Moving layers
You can move any layer to a new location on the timeline by dragging it with the mouse.
Trimming layers
The Select tool is also used for simple trim edits, when you want to change a layer's in or out point.
When you move your mouse over the start or end of a layer it will change to the trim pointer. You can then drag with the mouse to change the in or out point.
As you change a layer's in or out point the surrounding layers will not be affected.
You can't trim a layer to be longer than its source media asset.
The Select tool is the most commonly used editing tool,
enabling you to select, move and trim layers.
Hand tool (editor)
The Hand tool is used for navigating around your composite shot timeline. It can be quicker and easier to navigate with the Hand tool than using the scroll bars.
When the Hand tool is in use you can't interact with anything in the layer view. This means you can click and drag anywhere on the layer view part of the timeline to navigate, without altering any of your layers.
You can still interact with the layer listing if you want to adjust any properties.
Slice (layer)
The Slice tool is for cutting individual layers into multiple layers.
Page 97
97 HitFilm Manual – Version 1.31
When using the slice tool, clicking anywhere on a layer will cut it at that point, splitting it into two layers. You can slice a layer as many times as you want.
After a layer has been sliced, both pieces exist separately on the timeline and can be adjusted individually.
Snap (layer)
The Snap tool turns snapping on and off. With snapping turned on, layers will automatically 'snap' to other layers and timeline elements so that you can precisely align multiple items.
Snapping behaviour
When snapping is turned on your layers will snap to other items on the timeline when you move or trim them.
Valid snapping targets are:
• In and out points of any layer. • The playhead. • The in and out points of the work area.
Note that layers do not have to be visible in the track view to be valid snapping targets.
The Slice tool will also snap to edit points, which makes it easy to slice a layer at a specific frame. You can either move the playhead to the correct location before using the Slice tool, or align the slice with a layer on another track.
Snap is useful for aligning layers and ensuring that there
are no unintended gaps in your composite shot. If you
need frame-accurate precision, turn snapping off.
2D vs 3D compositing
In HitFilm you can composite in two dimensions, three dimensions, or a mixture of both.
Working in 3D is not necessarily better or more advanced, as 2D compositing will be faster and more appropriate for some projects. You can change layers from 2D to 3D and back again at any time, so you can experiment with different setups to see which best suit your project.
Page 98
98 HitFilm Manual – Version 1.31
2D
If all your layers are in 2D you will create composites by ordering your layers, with higher layers obscuring lower layers.
If you're new to 2D compositing, it is easiest to think of it like a stack of paper. Each piece of paper is a layer on your timeline. When you look down on the stack of paper you only see the top piece, which is exactly how HitFilm sees your 2D layers. If your top piece of paper is smaller than the rest, or if you cut a hole in it, you'll then be able to see the layers below.
Special layers
Most special layers can exist in 2D or 3D. When in 2D they will behave like any other 2D layer.
When you're working only in 2D light and camera layers do not have any effect.
3D
You can switch layers to 3D at any point using the 2D/3D toggle.
Additional properties become available when a layer is switch to 3D.
If any 3D layers are present in a composite shot there must be at least one camera. If you try to create a 3D layer without any camera layers you will be given the option of creating one automatically or switching back to 2D.
Detailed information on working in 3D can be found in subsequent chapters, particularly the Viewer panel section.
3D Layer order
When layers are in 3D their visibility is usually determined by their location in 3D space. If more than one layer occupies the exact same space the timeline's layer order is then used to determine the compositing order.
For example, if two images share the same 3D position and angle, the image on the higher timeline layer will be the visible one.
Special layers
All special layers can exist in 3D. Light and camera layers are always in 3D.
2D & 3D
You can mix 2D and 3D layers together in the same composite shot.
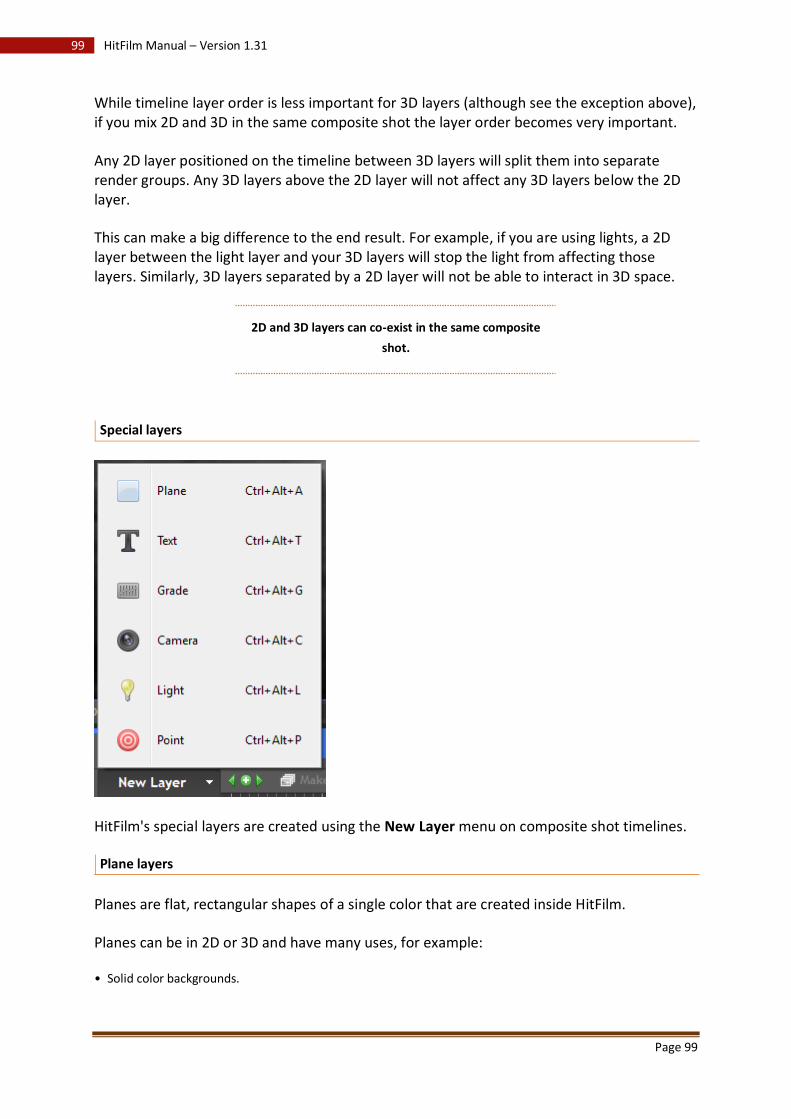
Page 99
99 HitFilm Manual – Version 1.31
While timeline layer order is less important for 3D layers (although see the exception above), if you mix 2D and 3D in the same composite shot the layer order becomes very important.
Any 2D layer positioned on the timeline between 3D layers will split them into separate render groups. Any 3D layers above the 2D layer will not affect any 3D layers below the 2D layer.
This can make a big difference to the end result. For example, if you are using lights, a 2D layer between the light layer and your 3D layers will stop the light from affecting those layers. Similarly, 3D layers separated by a 2D layer will not be able to interact in 3D space.
2D and 3D layers can co-exist in the same composite
shot.
Special layers
HitFilm's special layers are created using the New Layer menu on composite shot timelines.
Plane layers
Planes are flat, rectangular shapes of a single color that are created inside HitFilm.
Planes can be in 2D or 3D and have many uses, for example:
• Solid color backgrounds.
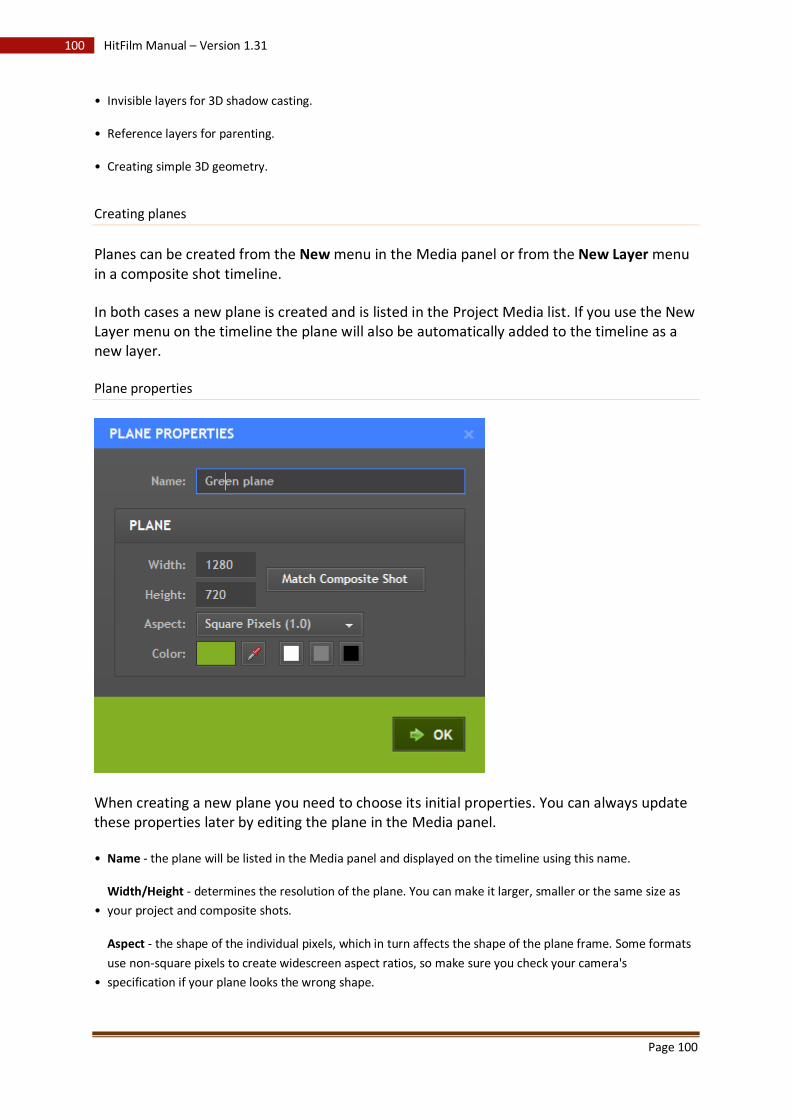
Page 100
100 HitFilm Manual – Version 1.31
• Invisible layers for 3D shadow casting.
• Reference layers for parenting.
• Creating simple 3D geometry.
Creating planes
Planes can be created from the New menu in the Media panel or from the New Layer menu in a composite shot timeline.
In both cases a new plane is created and is listed in the Project Media list. If you use the New Layer menu on the timeline the plane will also be automatically added to the timeline as a new layer.
Plane properties
When creating a new plane you need to choose its initial properties. You can always update these properties later by editing the plane in the Media panel.
• Name - the plane will be listed in the Media panel and displayed on the timeline using this name.
• Width/Height - determines the resolution of the plane. You can make it larger, smaller or the same size as
your project and composite shots.
•
Aspect - the shape of the individual pixels, which in turn affects the shape of the plane frame. Some formats
use non-square pixels to create widescreen aspect ratios, so make sure you check your camera's
specification if your plane looks the wrong shape.
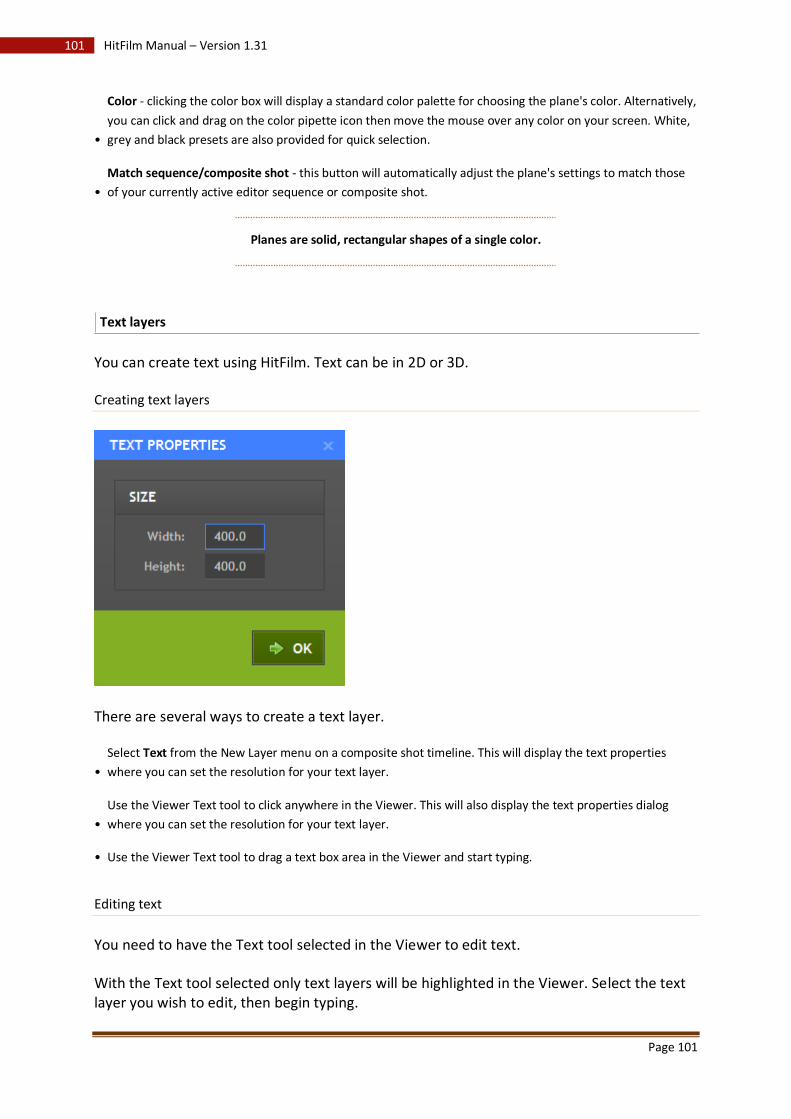
Page 101
101 HitFilm Manual – Version 1.31
•
Color - clicking the color box will display a standard color palette for choosing the plane's color. Alternatively,
you can click and drag on the color pipette icon then move the mouse over any color on your screen. White,
grey and black presets are also provided for quick selection.
• Match sequence/composite shot - this button will automatically adjust the plane's settings to match those
of your currently active editor sequence or composite shot.
Planes are solid, rectangular shapes of a single color.
Text layers
You can create text using HitFilm. Text can be in 2D or 3D.
Creating text layers
There are several ways to create a text layer.
• Select Text from the New Layer menu on a composite shot timeline. This will display the text properties
where you can set the resolution for your text layer.
• Use the Viewer Text tool to click anywhere in the Viewer. This will also display the text properties dialog
where you can set the resolution for your text layer.
• Use the Viewer Text tool to drag a text box area in the Viewer and start typing.
Editing text
You need to have the Text tool selected in the Viewer to edit text.
With the Text tool selected only text layers will be highlighted in the Viewer. Select the text layer you wish to edit, then begin typing.
Page 102
102 HitFilm Manual – Version 1.31
You can select text and move the cursor as you would in an ordinary text application.
You can continue to edit text even if it is in 3D.
Text properties are controlled from the Text panel.
Animating text
If you have the Viewer Select tool selected you can transform the text layer like any other layer in the viewer, with full rotation and position controls.
This can be used to create end credits scrolling text or opening sci-fi-style crawls in 3D.
Note that you will not be able to transform text layers if you have the Text tool selected.
HitFilm's text can be used for captions and titling and
works in 2D and 3D.
Grade layers
Grade layers are quick ways to color grade several layers at once.
The alternatives are to grade each layer individually (which gives you lots of control but can take some time!) or to put all the layers into an embedded composite shot and grade that (which can be inconvenient if you don't want to embed those layers). Using grade layers can be faster and easier.
Creating grade layers
You can create grade layers from the New Layer menu in composite shot timelines.
When they are first created, grade layers will be invisible and will have no effect on your project. Any 2D effects you add to the grade layer will affect all of the layers beneath it.
Grade layers are created at the same resolution as the currently open composite shot.
Grade layers flatten any 3D layers they are above. This means that any 3D layers above the grade layer will not be able to interact with 3D layers below.
Transforming Grade layers
Grade layers can be transformed like any other layer, in 2D or 3D.
By transforming a grade layer you can change the area affected by it. Only layers directly behind the grade layer will be affected.

Page 103
103 HitFilm Manual – Version 1.31
Masks can also be used to specify which parts of a grade layer affect the layers below.
3D transform & layer order
If you transform a grade layer in 3D, its position in 3D space does not directly affect which layers it grades. Even when in 3D, it is its position in the layer listing on the timeline which determines which layers are affected.
Grade layers are quick and easy ways to grade several
layers at once.
Camera layers
Cameras are used in 3D composite shots. If you have any 3D layers you must have a camera for them to be visible.
If you only have 2D layers in your composite shot, a camera will not have any effect.
When you add 3D effects to your timeline or switch 2D layers to 3D a camera will be created automatically.
Creating cameras
Cameras can be created manually from the New Layer menu on any composite shot timeline. The camera will be added to the timeline as a new layer.
Multiple cameras
You can create multiple cameras in the same composite shot. Each camera can be positioned separately, enabling multiple views of the same 3D scene.
Only one camera can be used at a time. HitFilm uses three methods to determine which camera is the active camera:
1. The timeline layer order - the camera on the highest layer is the active camera.
2. Camera layer visibility - only cameras that are visible can be active cameras. If you have turned off a camera
layer's visibility it won't be used as an active camera.
3.
Camera layer duration - the duration of the layer on the timeline determines whether a camera can be
active or not. If the layer duration does not cover the current frame, the camera will not be used as an
active camera.
Page 104
104 HitFilm Manual – Version 1.31
Properties
Camera layers have a number of unique properties.
Layer properties
• Depth of field - turns depth of field for this camera on or off.
Lens
The lens properties can be accessed through the Controls panel.
•
Aperture - size of the camera's virtual aperture in pixels. The larger the number, the larger the aperture, and
the shallower the depth of field. Note that this is different to real camera apertures, whereby a smaller
number represents a larger aperture. Only has an effect if Depth of field is turned on.
• Zoom - adjust the camera between wide angle and telephoto.
• Focus distance - moves the focal point closer or further away from the camera. This can be used to rack
focus, just like on a real camera. Only has an effect if Depth of field is turned on.
• Blur - changes how blurred out of focus areas are. Only has an effect if Depth of field is turned on.
Camera properties
Unlike Layer properties and Lens, Camera properties are found by choosing Properties from the layer's menu on the timeline.
• Name - the name of the camera on the timeline.
• Near clip distance - the closest point at which layers are rendered.
• Far clip distance - the farthest point at which layers are rendered.
Cameras are essential if you're working in 3D.
Light layers
Light layers are used for creating a custom lighting setup for your 3D scenes.
If you don't have any light layers, your 3D layers will not use the lighting system. Your layers will be equally lit from all sides and will look the same as 2D layers, other than their transformation.
Lights only affect 3D layers. You can add lights to a composite shot containing only 2D layers but they will not have any effect.
Page 105
105 HitFilm Manual – Version 1.31
Creating lights
Lights can only be created from the New Layer menu on composite shot timelines.
You can create as many lights as you want in a composite shot and they will all work together, just like using real lights on a set.
Promoting lights
Embedded composite shots have an additional option in their Layer properties called Promote lights.
When Promote lights is activated, any lights inside the embedded composite shot will also affect layers in the parent composite shot.
Shadows
Point, spot and directional lights can all cast shadows. These shadows will automatically update as lights and layers move around in 3D space.
To enable shadows you need to do the following:
1. Turn on Cast Shadows in the Light properties of any light layers which you want to be casting shadows.
2. Turn on Casts Shadows in the Material properties of any layers which you want to cast shadows. You need
to have at least one layer casting shadows.
3. Turn on Receives Shadows in the Material properties of any layers on which you want to see shadows. You
need to have at least one layer receiving shadows.
4. Turn on Shadows in the Viewer Render menu.
Layers do not have to be illuminated to receive shadows.
Properties
The Light properties change depending on the light type. There are 4 types of light, each with very different behaviour. The light type can be set in the light's layer properties.
Type: Ambient
An ambient light floods the entire composite shot with light from all sides. It is a non-directional light and does not have a source.
Ambient lights cannot cast shadows and do not have any falloff, so objects will be equally lit regardless of their position and orientation.
This makes it the least 'realistic' of the lights but it can be very useful to use as a fill light.
Page 106
106 HitFilm Manual – Version 1.31
• Color - changes the color of the light.
• Intensity - the higher the intensity, the brighter the light.
Point
A point light emanates from a single source point in all directions, behaving in a similar way to the sun, or to a flare.
Depending on your settings, layers farther away from the light will be less illuminated.
• Color - changes the color of the light.
• Intensity - the higher the intensity, the brighter the light.
• Cast shadows - turns shadows on and off for the selected light layer.
• Falloff - sets whether the light decreases over distance in a realistic manner.
• Reach - if Falloff is on, this adjusts how quickly the light loses intensity over distance.
• Shadow Opacity - if Cast Shadows is on, this adjusts the visibility of the shadows.
• Shadow Diffusion - if Cast Shadows is on, this changes the softness of the shadow edge.
Spot
Spot lights emit light in a single direction, emitting in a cone shape from a single source point, just like a real spotlight.
Depending on your settings, layers towards the edge of the light cone will be less illuminated.
• Color - changes the color of the light.
• Intensity - the higher the intensity, the brighter the light.
• Cast shadows - turns shadows on and off for the selected light layer.
• Falloff - sets whether the light decreases over distance in a realistic manner.
• Reach - if Falloff is on, this adjusts how quickly the light loses intensity over distance.
• Cone Angle - widens and narrows the size of the spot light cone.
• Feather - changes the softness of the edge of the spot light cone.
• Shadow Opacity - if Cast Shadows is on, this adjusts the visibility of the shadows.
• Shadow Diffusion - if Cast Shadows is on, this changes the softness of the shadow edge.
Page 107
107 HitFilm Manual – Version 1.31
Directional
Directional lights emit light in a single direction. Unlike spot and point lights, directional lights are emitted from an infinitely large source plane, with all the light rays moving parallel to each other.
This results in all objects in the chosen direction being lit equally from that angle.
A directional light requires the layer's Alignment property to be set to Towards Target Position.
• Color - changes the color of the light.
• Intensity - the higher the intensity, the brighter the light.
• Cast shadows - turns shadows on and off for the selected light layer.
• Falloff - sets whether the light decreases over distance in a realistic manner.
• Reach - if Falloff is on, this adjusts how quickly the light loses intensity over distance.
• Shadow Opacity - if Cast Shadows is on, this adjusts the visibility of the shadows.
• Shadow Diffusion - if Cast Shadows is on, this changes the softness of the shadow edge.
The target direction is set using the standard Transform Target property.
Just like on a real set, using lights will make your virtual
cinematography far more compelling.
Point layers
A point is an invisible layer which does not appear in your exported videos. The point exists in the viewer and can be transformed like any other layer. It can exist in 2D or 3D.
Point layers become particularly useful when you parent other layers to them. You can use them to pivot multiple layers around a specific point in space.
Creating Point layers
Point layers can only be created using the New Layer menu on a composite shot timeline.
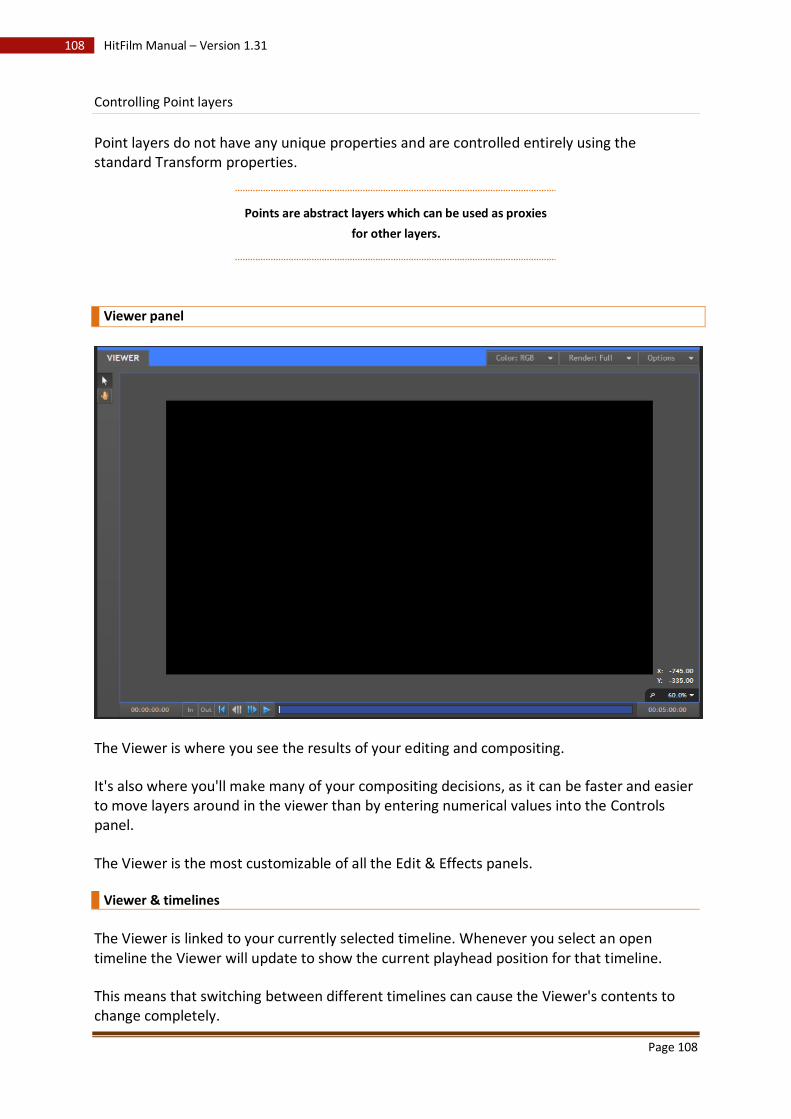
Page 108
108 HitFilm Manual – Version 1.31
Controlling Point layers
Point layers do not have any unique properties and are controlled entirely using the standard Transform properties.
Points are abstract layers which can be used as proxies
for other layers.
Viewer panel
The Viewer is where you see the results of your editing and compositing.
It's also where you'll make many of your compositing decisions, as it can be faster and easier to move layers around in the viewer than by entering numerical values into the Controls panel.
The Viewer is the most customizable of all the Edit & Effects panels.
Viewer & timelines
The Viewer is linked to your currently selected timeline. Whenever you select an open timeline the Viewer will update to show the current playhead position for that timeline.
This means that switching between different timelines can cause the Viewer's contents to change completely.
Page 109
109 HitFilm Manual – Version 1.31
2D & 3D
HitFilm's Viewer functions in both 2D and 3D. If you're working on the Editor sequence you will always see the 2D viewer. When you're creating composite shots you can work in 2D or 3D.
There are some differences between the 2D viewer and the 3D viewer. When you work in 3D you get additional controls for the z-depth of layers and the ability to control cameras in 3D space. You can also have multiple views from different points of view, making it easier to position layers in 3D.
Viewer display properties
Along the top of the Viewer are a row of menus. These are used to customize the Viewer for your particular needs. There any many useful features here:
• Change the visible channels.
• Switch between different rendering qualities.
• Turn different positioning guides on and off.
• Choose from different 3D views (when in a 3D composite shot).
You will continually adjust the Viewer depending on what you're doing. For full details head over to the Customizing the view chapter.
Transforming layers
One of the main features of the Viewer is being able to transform layers using a more visual method than adjusting numerical values in the Controls panel.
The transform widgets provide quick access to position, rotation and scale.
For more information on the transform widgets, see Transforming layers in 2D and Transforming layers in 3D.
The Viewer gives you visual feedback about your project
is used to control your layers in a more direct way.
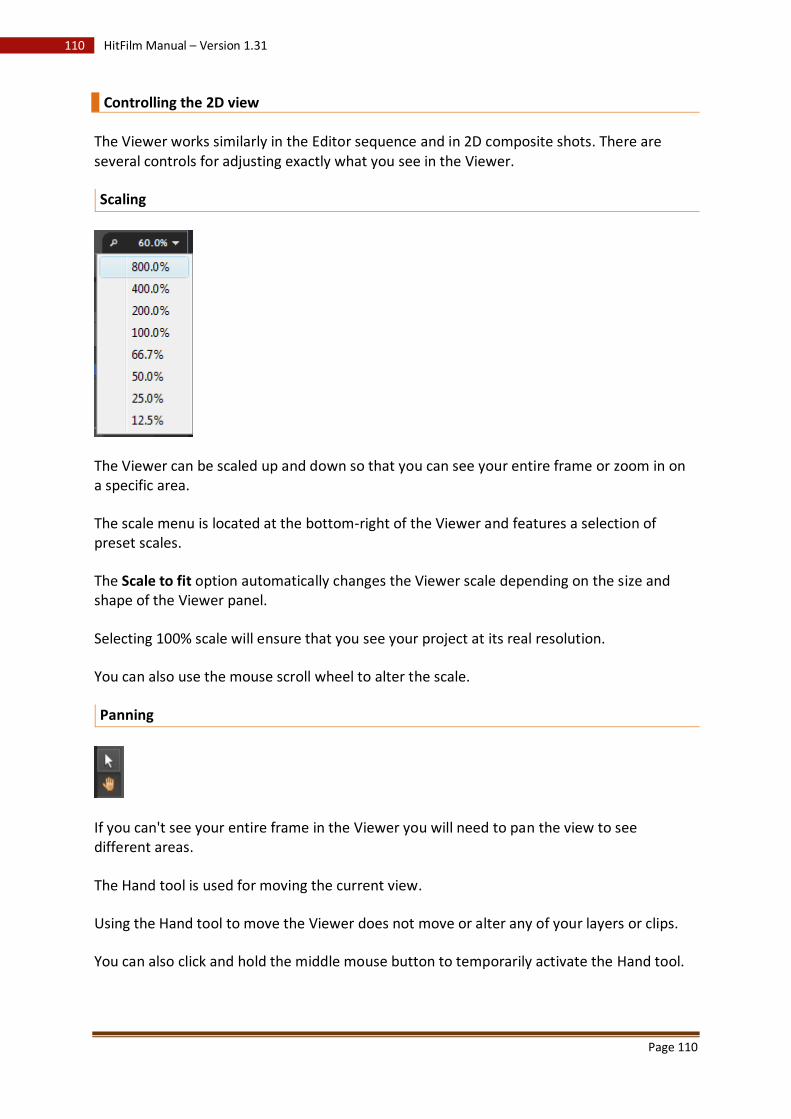
Page 110
110 HitFilm Manual – Version 1.31
Controlling the 2D view
The Viewer works similarly in the Editor sequence and in 2D composite shots. There are several controls for adjusting exactly what you see in the Viewer.
Scaling
The Viewer can be scaled up and down so that you can see your entire frame or zoom in on a specific area.
The scale menu is located at the bottom-right of the Viewer and features a selection of preset scales.
The Scale to fit option automatically changes the Viewer scale depending on the size and shape of the Viewer panel.
Selecting 100% scale will ensure that you see your project at its real resolution.
You can also use the mouse scroll wheel to alter the scale.
Panning
If you can't see your entire frame in the Viewer you will need to pan the view to see different areas.
The Hand tool is used for moving the current view.
Using the Hand tool to move the Viewer does not move or alter any of your layers or clips.
You can also click and hold the middle mouse button to temporarily activate the Hand tool.
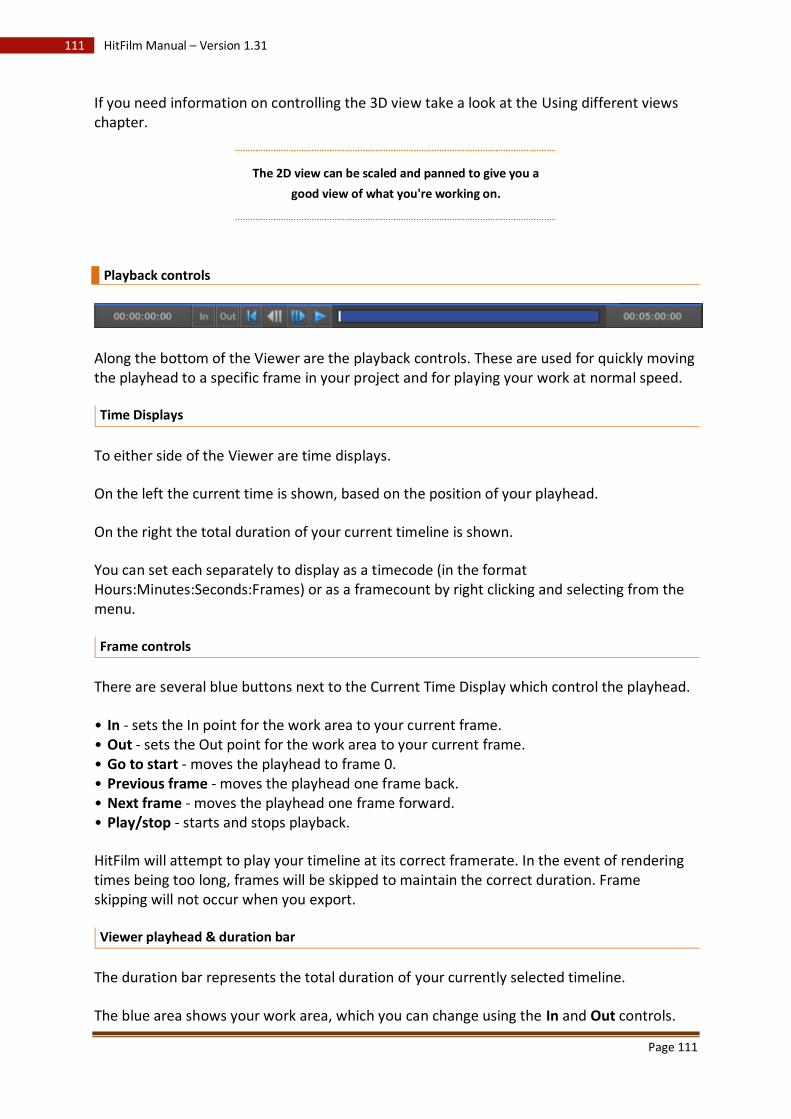
Page 111
111 HitFilm Manual – Version 1.31
If you need information on controlling the 3D view take a look at the Using different views chapter.
The 2D view can be scaled and panned to give you a
good view of what you're working on.
Playback controls
Along the bottom of the Viewer are the playback controls. These are used for quickly moving the playhead to a specific frame in your project and for playing your work at normal speed.
Time Displays
To either side of the Viewer are time displays.
On the left the current time is shown, based on the position of your playhead.
On the right the total duration of your current timeline is shown.
You can set each separately to display as a timecode (in the format Hours:Minutes:Seconds:Frames) or as a framecount by right clicking and selecting from the menu.
Frame controls
There are several blue buttons next to the Current Time Display which control the playhead.
• In - sets the In point for the work area to your current frame. • Out - sets the Out point for the work area to your current frame. • Go to start - moves the playhead to frame 0. • Previous frame - moves the playhead one frame back. • Next frame - moves the playhead one frame forward. • Play/stop - starts and stops playback.
HitFilm will attempt to play your timeline at its correct framerate. In the event of rendering times being too long, frames will be skipped to maintain the correct duration. Frame skipping will not occur when you export.
Viewer playhead & duration bar
The duration bar represents the total duration of your currently selected timeline.
The blue area shows your work area, which you can change using the In and Out controls.
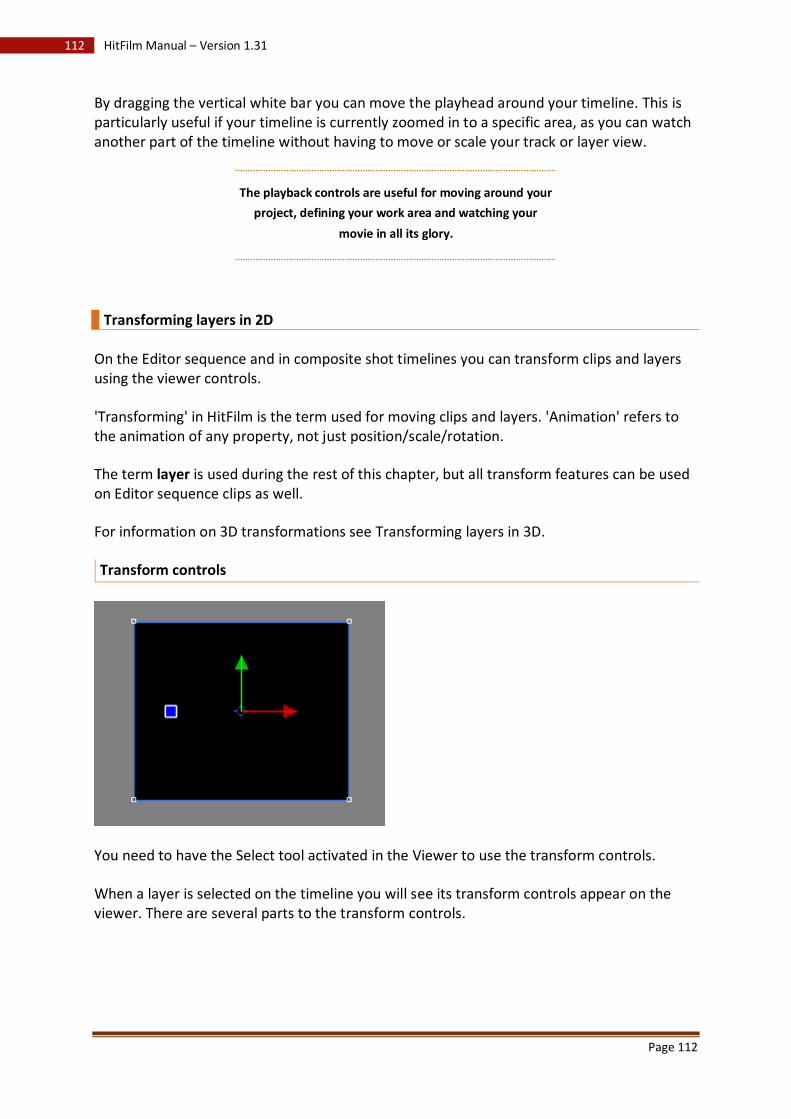
Page 112
112 HitFilm Manual – Version 1.31
By dragging the vertical white bar you can move the playhead around your timeline. This is particularly useful if your timeline is currently zoomed in to a specific area, as you can watch another part of the timeline without having to move or scale your track or layer view.
The playback controls are useful for moving around your
project, defining your work area and watching your
movie in all its glory.
Transforming layers in 2D
On the Editor sequence and in composite shot timelines you can transform clips and layers using the viewer controls.
'Transforming' in HitFilm is the term used for moving clips and layers. 'Animation' refers to the animation of any property, not just position/scale/rotation.
The term layer is used during the rest of this chapter, but all transform features can be used on Editor sequence clips as well.
For information on 3D transformations see Transforming layers in 3D.
Transform controls
You need to have the Select tool activated in the Viewer to use the transform controls.
When a layer is selected on the timeline you will see its transform controls appear on the viewer. There are several parts to the transform controls.
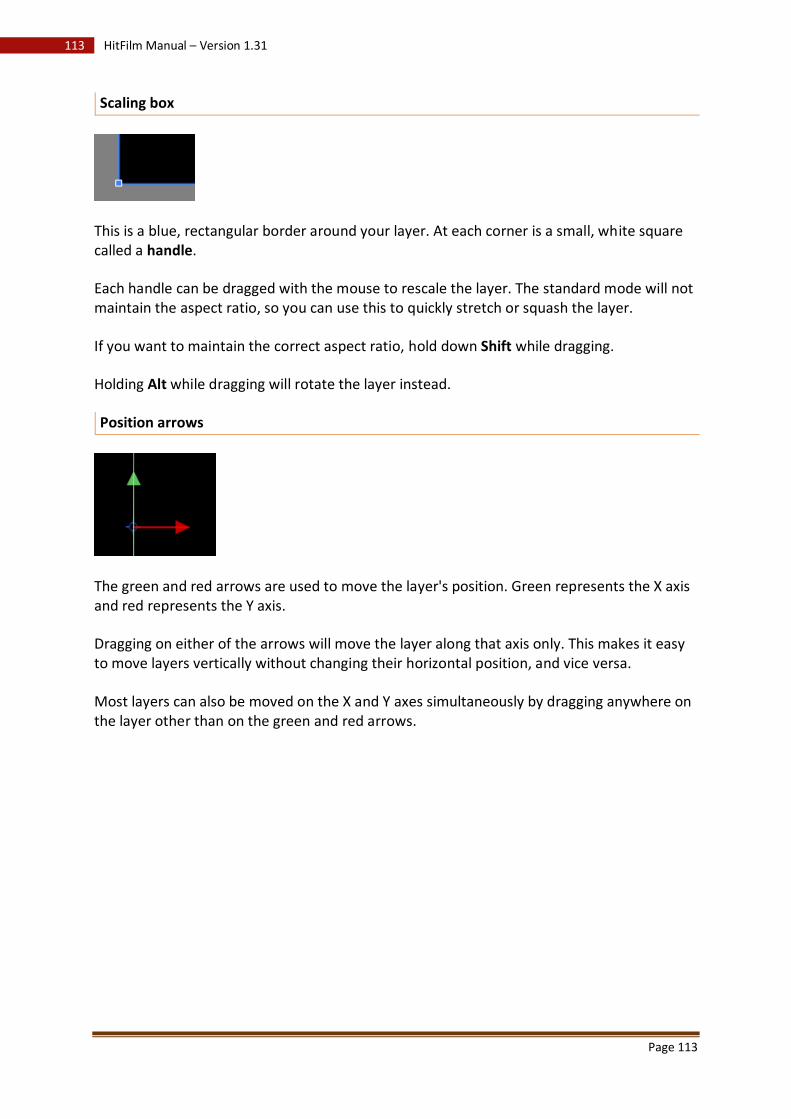
Page 113
113 HitFilm Manual – Version 1.31
Scaling box
This is a blue, rectangular border around your layer. At each corner is a small, white square called a handle.
Each handle can be dragged with the mouse to rescale the layer. The standard mode will not maintain the aspect ratio, so you can use this to quickly stretch or squash the layer.
If you want to maintain the correct aspect ratio, hold down Shift while dragging.
Holding Alt while dragging will rotate the layer instead.
Position arrows
The green and red arrows are used to move the layer's position. Green represents the X axis and red represents the Y axis.
Dragging on either of the arrows will move the layer along that axis only. This makes it easy to move layers vertically without changing their horizontal position, and vice versa.
Most layers can also be moved on the X and Y axes simultaneously by dragging anywhere on the layer other than on the green and red arrows.
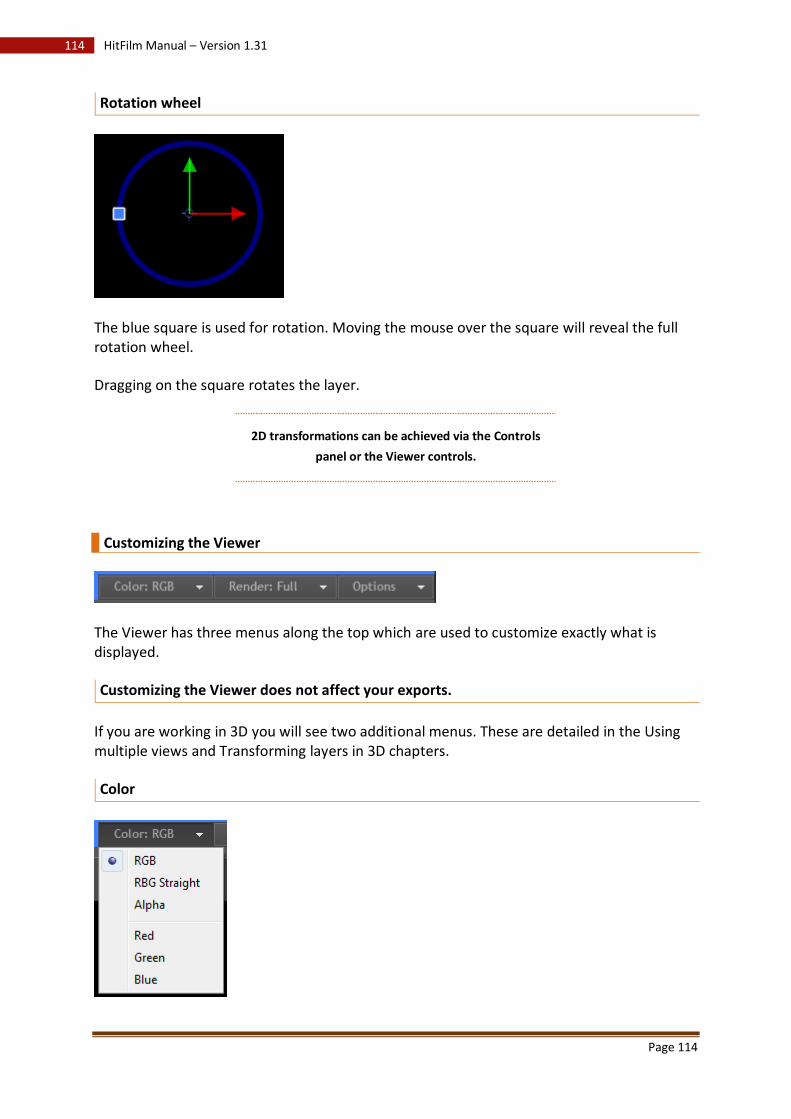
Page 114
114 HitFilm Manual – Version 1.31
Rotation wheel
The blue square is used for rotation. Moving the mouse over the square will reveal the full rotation wheel.
Dragging on the square rotates the layer.
2D transformations can be achieved via the Controls
panel or the Viewer controls.
Customizing the Viewer
The Viewer has three menus along the top which are used to customize exactly what is displayed.
Customizing the Viewer does not affect your exports.
If you are working in 3D you will see two additional menus. These are detailed in the Using multiple views and Transforming layers in 3D chapters.
Color

Page 115
115 HitFilm Manual – Version 1.31
The Color menu changes which color channels are shown in the Viewer.
• RGB - shows the full rendered output. This is what will be exported by HitFilm.
•
RGB Straight - show the RGB channels without alpha. Note that fully transparent areas
may be displayed with unexpected coloring.
•
Alpha - shows the alpha channel. This represents transparency, with white areas being
fully opaque and black areas being fully transparent. This can be useful during compositing
as it can be easier to assess the compositing quality from the alpha rather than the RGB.
• Red - shows only the red channel.
• Green - shows only the green channel.
• Blue - shows only the blue channel.
Render
The Render menu adjusts the quality of the display and turns key rendering features on and off.
Depending on the complexity of your project and the speed of your computer you may want to adjust the Render settings to maintain good performance.
•
Auto - HitFilm will attempt to adjust the visual quality of the Viewer display depending on
your current actions, in order to maintain good performance.
• Full - renders at maximum quality.
• Half - renders at half quality.
• Quarter - renders at quarter quality.
• Motion blur - turns motion blur on and off in the Viewer.

Page 116
116 HitFilm Manual – Version 1.31
Options
The Options menu turns visual guides and other useful features on and off. Whether you need these will depend on the nature of your project.
• Floor plane - overlays a 3D grid to aid positioning (when in a 3D composite shot).
•
Background color - changes the background color of the viewer. As with the other Viewer
customization settings, this does not affect your exported video and is only used as a guide
in the Viewer.
• Export frame - exports a single still image of the current frame.
The Viewer customization menus do not affect your
exported video and provide useful guides during editing
and compositing.
Viewer tools
The viewer tools are found at the far left of the Viewer. You will regularly switch between the different tools while using HitFilm.
Select (viewer)
The Select tool is a multi-purpose tool, used for selecting and transforming layers and clips.
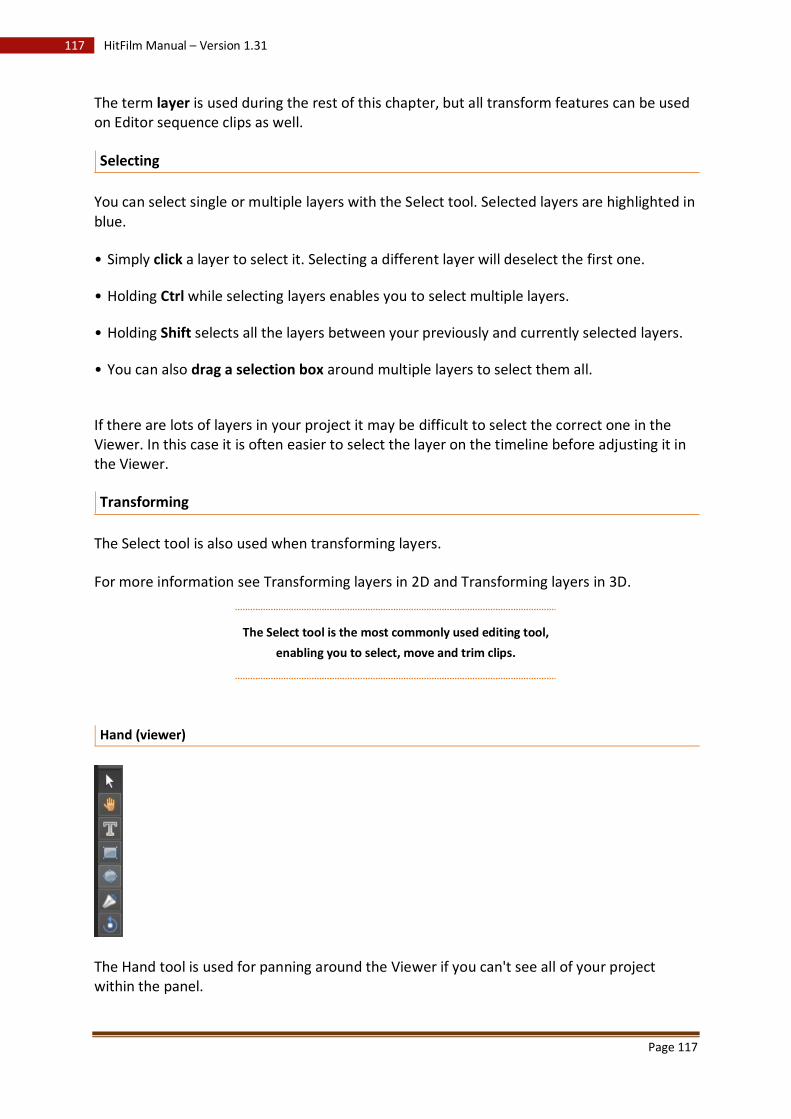
Page 117
117 HitFilm Manual – Version 1.31
The term layer is used during the rest of this chapter, but all transform features can be used on Editor sequence clips as well.
Selecting
You can select single or multiple layers with the Select tool. Selected layers are highlighted in blue.
• Simply click a layer to select it. Selecting a different layer will deselect the first one.
• Holding Ctrl while selecting layers enables you to select multiple layers.
• Holding Shift selects all the layers between your previously and currently selected layers.
• You can also drag a selection box around multiple layers to select them all.
If there are lots of layers in your project it may be difficult to select the correct one in the Viewer. In this case it is often easier to select the layer on the timeline before adjusting it in the Viewer.
Transforming
The Select tool is also used when transforming layers.
For more information see Transforming layers in 2D and Transforming layers in 3D.
The Select tool is the most commonly used editing tool,
enabling you to select, move and trim clips.
Hand (viewer)
The Hand tool is used for panning around the Viewer if you can't see all of your project within the panel.

Page 118
118 HitFilm Manual – Version 1.31
When the Hand tool is in use you can't interact with anything in the Viewer. This means you can click and drag anywhere to pan, without accidentally altering any of your layers.
Text
The Text tool is used for creating and editing text in the Viewer. It is the only way to edit the text content of a text layer.
Creating text layers
New text layers can be created in the Viewer when the Text tool is selected.
• Click anywhere in the Viewer that doesn't already have text and start typing.
• Drag a text box area in the Viewer and start typing.
You can also create text layers from the New Layer menu on a composite shot timeline.
Adjusting text boxes
Text is displayed inside text boxes. Text will automatically wrap to the next line of a text box.
If the text box is not large enough for its contents some text will be cropped.
The shape and size of the selected text box can be adjusted by dragging the handle on its bottom-right corner. The text will automatically update as the text box is changed.
Editing text
You need to have the Text tool selected in the Viewer to edit text.
With the Text tool selected only text layers will be highlighted in the Viewer. Select the text layer you wish to edit, then begin typing.
You can select text and move the cursor as you would in an ordinary text application.
You can continue to edit text even if it is in 3D.
Page 119
119 HitFilm Manual – Version 1.31
Text properties are controlled from the Text panel.
Transforming text
Text is transformed like any other layer. You need to use the Select tool to transform text in the Viewer.
If you have the Text tool selected you will not be able to transform the text layer on the Viewer. You can still transform it using the Controls panel or timeline.
The text tool us used for creating and manipulating text
layers.
Mask drawing
The mask tools are used for drawing masks directly onto layers in the Viewer.
Detailed information on creating and using masks can be found in the Masking chapter.
Mask tools
There are three mask tools for use in the Viewer, each creating different shapes.
You must have a layer selected on the timeline or in the Viewer to use the mask tools.
Rectangle shape
Click and drag on the Viewer to create a rectangular shape. This will create a new mask on the currently selected layer. Releasing the mouse will set the shape.
Ellipse shape
Click and drag on the Viewer to create an elliptical shape. This will create a new mask on the currently selected layer. Releasing the mouse will set the shape.
Page 120
120 HitFilm Manual – Version 1.31
Freehand shape & edit mask
The Freehand Mask tool is for creating your own mask shapes and editing shapes you have already created.
With the Freehand Mask tool selected you can click on the Viewer to draw points. Clicking and dragging creates a curved line, while clicking and releasing creates a linear, straight line.
The shape of curved points can be further adjusted using the extension handles.
You can change the type of any point by right clicking on it and choosing the required type from the menu:
•
Make Curved Locked - both extension handles work in tandem. Adjusting one will adjust
the other simultaneously. This is useful for maintaining smooth curves.
•
Make Curved Unlocked - the extension handles can be adjust separately. This is useful for
creating sharp corners while retaining a curved line.
• Make Linear - the point forms an angled corner and the line either side is straight.
To activate a freehand mask you must close it. To do this simply click again on the first point you created. The mask will close and activate.
For more information on mask properties and editing your masks, check out the Masking chapter.
The mask tools work together with the Masking controls.
You use them to draw your mask shapes directly onto
the Viewer.
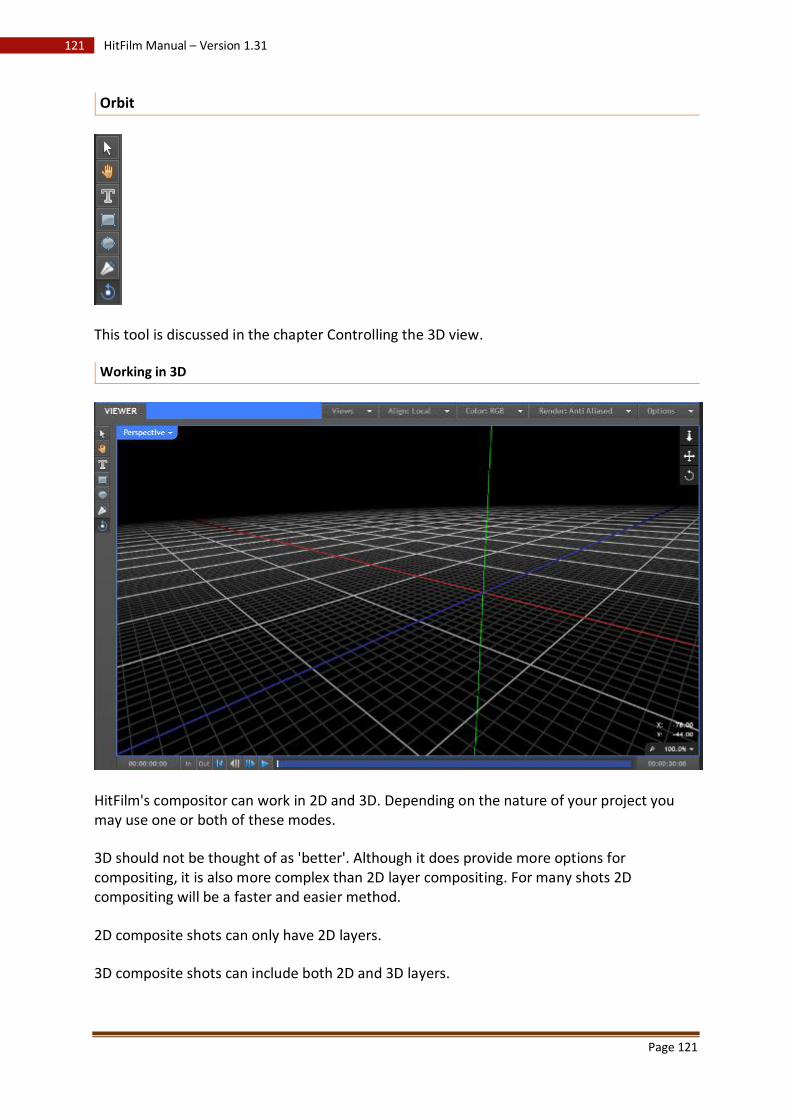
Page 121
121 HitFilm Manual – Version 1.31
Orbit
This tool is discussed in the chapter Controlling the 3D view.
Working in 3D
HitFilm's compositor can work in 2D and 3D. Depending on the nature of your project you may use one or both of these modes.
3D should not be thought of as 'better'. Although it does provide more options for compositing, it is also more complex than 2D layer compositing. For many shots 2D compositing will be a faster and easier method.
2D composite shots can only have 2D layers.
3D composite shots can include both 2D and 3D layers.
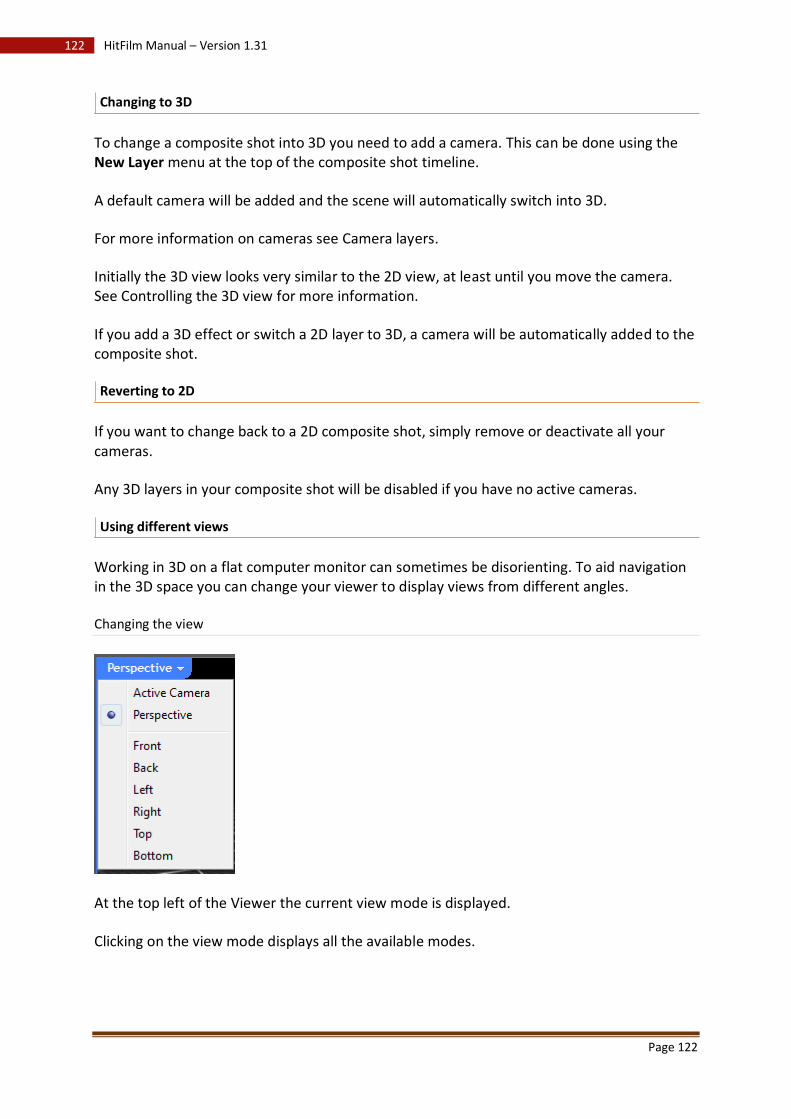
Page 122
122 HitFilm Manual – Version 1.31
Changing to 3D
To change a composite shot into 3D you need to add a camera. This can be done using the New Layer menu at the top of the composite shot timeline.
A default camera will be added and the scene will automatically switch into 3D.
For more information on cameras see Camera layers.
Initially the 3D view looks very similar to the 2D view, at least until you move the camera. See Controlling the 3D view for more information.
If you add a 3D effect or switch a 2D layer to 3D, a camera will be automatically added to the composite shot.
Reverting to 2D
If you want to change back to a 2D composite shot, simply remove or deactivate all your cameras.
Any 3D layers in your composite shot will be disabled if you have no active cameras.
Using different views
Working in 3D on a flat computer monitor can sometimes be disorienting. To aid navigation in the 3D space you can change your viewer to display views from different angles.
Changing the view
At the top left of the Viewer the current view mode is displayed.
Clicking on the view mode displays all the available modes.
Page 123
123 HitFilm Manual – Version 1.31
Active camera view
The active camera view shows what will be rendered when you export. This is what will appear in your videos.
Changing the position and orientation when in active camera view will change your camera's properties.
For more information on cameras see Camera layers.
Perspective view
The perspective view is a useful way to explore your scene without affecting the position of your camera.
This view works almost identically to the active camera view, with the exception of 2D layers which will not be visible.
Orthographic views
The orthographic views provide flat, 2D dimensional views of your 3D scene. The orthographic views do not show perspective or depth.
You can choose from front, back, left, right, top and bottom views.
As they are presented in a 2D 'blueprint' form, the orthographic views are very useful for precise positioning of layers in the 3D space.
The orthographic views are controlled in a similar way to the Viewer when it is in 2D mode.
Zoom and pan controls in the corner of the Viewer can be clicked and dragged for quick movements.
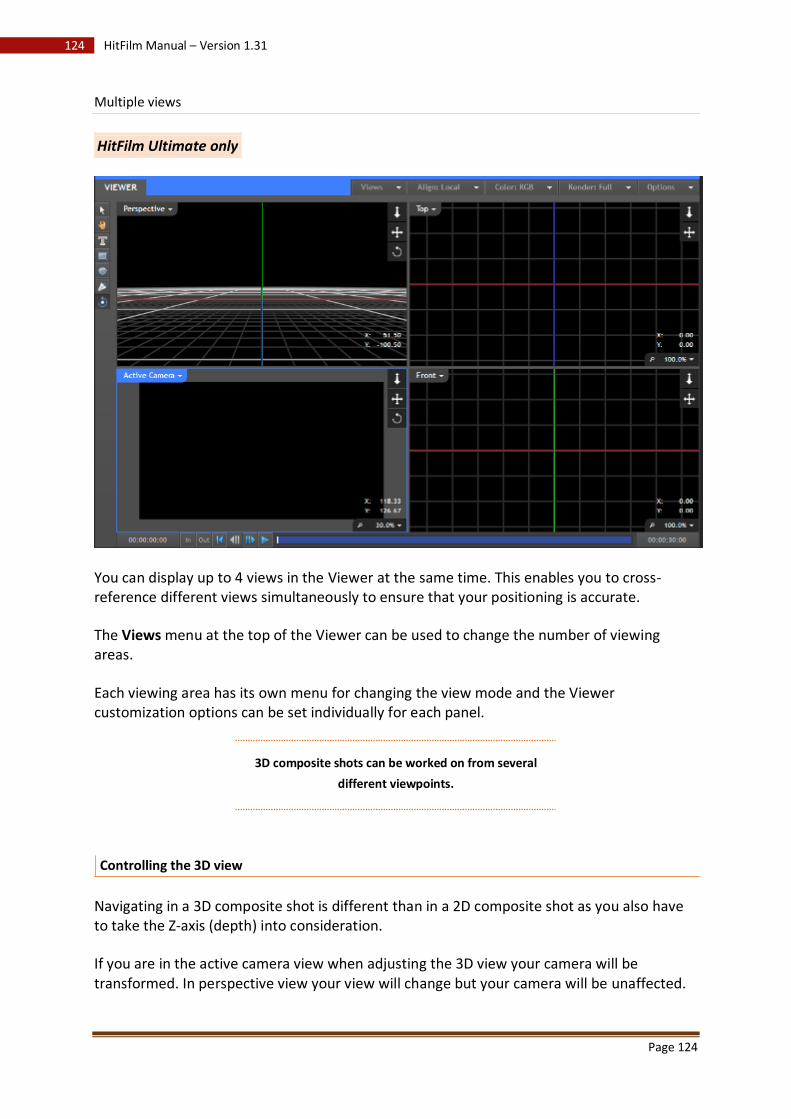
Page 124
124 HitFilm Manual – Version 1.31
Multiple views
HitFilm Ultimate only
You can display up to 4 views in the Viewer at the same time. This enables you to cross-reference different views simultaneously to ensure that your positioning is accurate.
The Views menu at the top of the Viewer can be used to change the number of viewing areas.
Each viewing area has its own menu for changing the view mode and the Viewer customization options can be set individually for each panel.
3D composite shots can be worked on from several
different viewpoints.
Controlling the 3D view
Navigating in a 3D composite shot is different than in a 2D composite shot as you also have to take the Z-axis (depth) into consideration.
If you are in the active camera view when adjusting the 3D view your camera will be transformed. In perspective view your view will change but your camera will be unaffected.

Page 125
125 HitFilm Manual – Version 1.31
Orbit tool
The quickest and easiest way to move around the 3D space is using the orbit tool. This is found in the Viewer tools and needs to be selected before it can be used.
When the orbit tool is selected, you will not see the wireframe outlines of your layers and you will not be able to use the Viewer transform controls. Change back to the Select tool to return to the normal mode.
With the orbit tool selected you can click anywhere in the 3D space to rotate around that point.
• If you click on a layer the view will rotate around the layer.
• If you click on an empty space it will rotate around that point on the 3D grid.
3D move controls
To the right of the 3D Viewer are three move controls. These are operated by clicking and dragging on them with the mouse.
• Track Z - moves the camera or view forwards and backwards along its own Z axis.
• Track XY - moves the camera or view horizontally and vertically along its own X and Y axes.
• Pan - rotates the camera or view without moving its position.
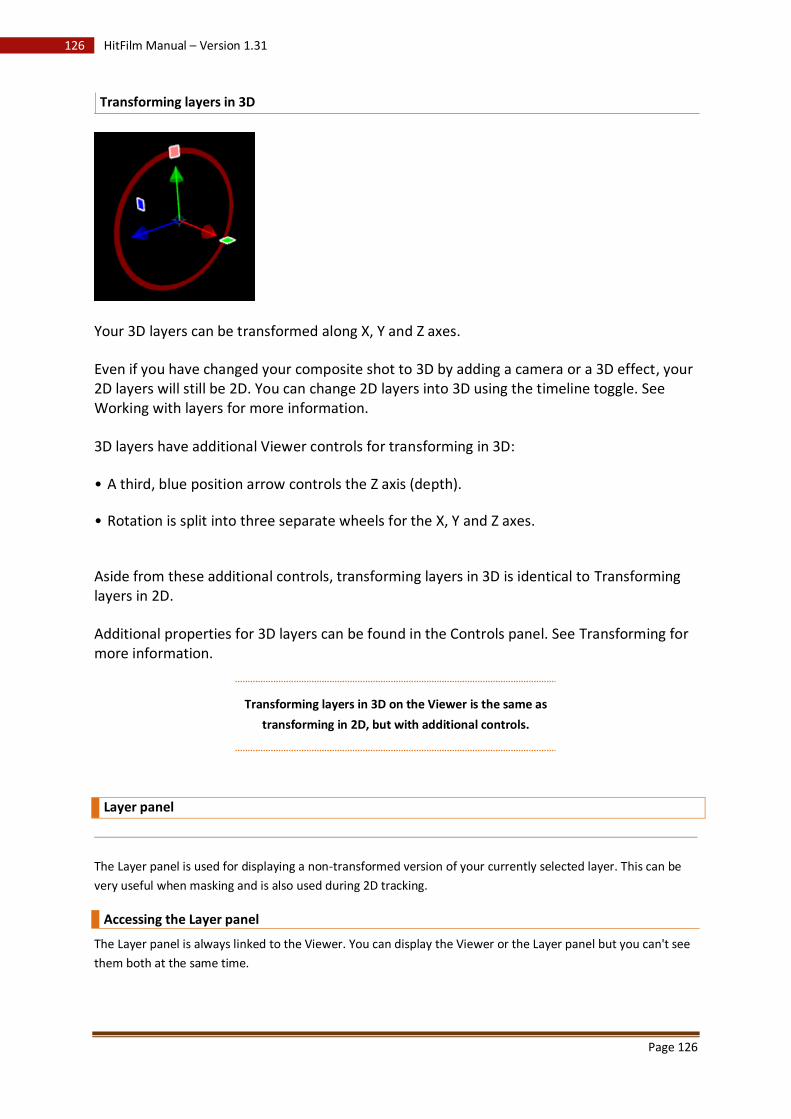
Page 126
126 HitFilm Manual – Version 1.31
Transforming layers in 3D
Your 3D layers can be transformed along X, Y and Z axes.
Even if you have changed your composite shot to 3D by adding a camera or a 3D effect, your 2D layers will still be 2D. You can change 2D layers into 3D using the timeline toggle. See Working with layers for more information.
3D layers have additional Viewer controls for transforming in 3D:
• A third, blue position arrow controls the Z axis (depth).
• Rotation is split into three separate wheels for the X, Y and Z axes.
Aside from these additional controls, transforming layers in 3D is identical to Transforming layers in 2D.
Additional properties for 3D layers can be found in the Controls panel. See Transforming for more information.
Transforming layers in 3D on the Viewer is the same as
transforming in 2D, but with additional controls.
Layer panel
The Layer panel is used for displaying a non-transformed version of your currently selected layer. This can be
very useful when masking and is also used during 2D tracking.
Accessing the Layer panel
The Layer panel is always linked to the Viewer. You can display the Viewer or the Layer panel but you can't see
them both at the same time.
Page 127
127 HitFilm Manual – Version 1.31
To use the Layer panel, simply switch to it using the tab next to the Viewer, then select a layer on the timeline.
You can switch between the Viewer and the Layer panel at any time when in a composite shot timeline.
Masking
The Layer panel shows your selected layer before any transformation is applied. This can be very useful when
compositing: even if you've animated your layer so that it is difficult to work on directly in the Viewer, you can
switch to the Layer panel to get an undistorted view.
The masking tools are identical to those in the Viewer panel. Check out the Mask drawing chapter for more
details.
Any masking you apply to the layer in the Layer panel will also affect the layer in the Viewer panel.
Tracking
HitFilm Ultimate exclusive
The Layer panel is where you can position your 2D tracking points. For details on HitFilm's 2D tracking head
over to the Track panel section.
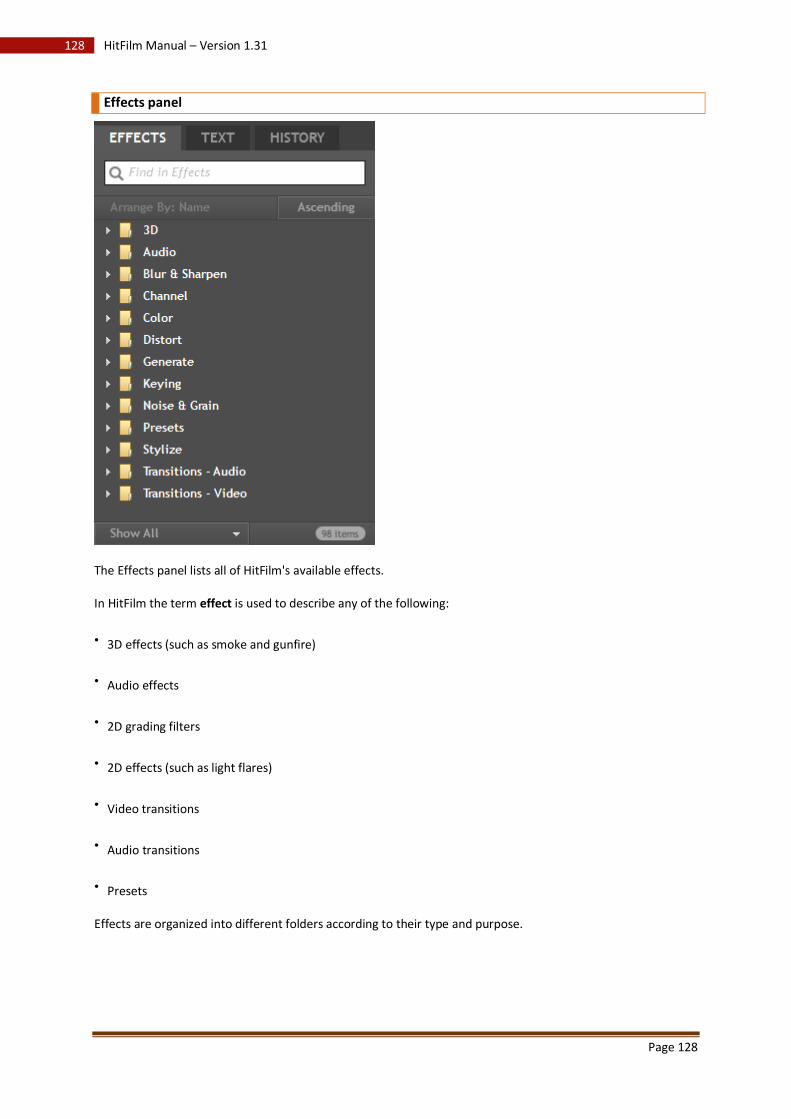
Page 128
128 HitFilm Manual – Version 1.31
Effects panel
The Effects panel lists all of HitFilm's available effects.
In HitFilm the term effect is used to describe any of the following:
• 3D effects (such as smoke and gunfire)
• Audio effects
• 2D grading filters
• 2D effects (such as light flares)
• Video transitions
• Audio transitions
• Presets
Effects are organized into different folders according to their type and purpose.
Page 129
129 HitFilm Manual – Version 1.31
Finding effects
If you're trying to find a specific effect you can use the find box. This will filter the effects listing as you type.
You can click the X icon to clear the find box and return to the unfiltered listing.
List filter
At the bottom of the Effects panel is a menu which can be used to filter the effects list based on the type of
effect.
Using effects
To use an effect in your project you drag it from the Effects panel onto your timeline.
2D effects
2D effects must be added to a clip or layer on the timeline and most can be used on the Editor sequence as well
as in composite shots. A clip or layer's applied 2D effects will be listed in the Controls panel and on the timeline
in composite shots.
Find out more about HitFilm's 2D effects.
2D effects cannot be added to 3D effect layers. If you want to add a 2D effect to a 3D effect layer you must first
turn the 3D effect layer into a composite shot. See Creating composite shots for more information.
Some 2D effects can only be used in composite shots. These are marked as Layer only in the Effects panel.
3D effects
3D effects can only be used in composite shots. If your composite shot is not already in 3D mode a camera will
be automatically added.
When a 3D effect is added to the timeline it creates a new 3D layer.
Find out more about HitFilm's 3D effects.
3D effects cannot be applied to other layers like 2D effects.
Transitions
Transitions are a special type of effect that can only be used on the Editor sequence. More information can be
found in Adding 2D effects and transitions.
Presets
There are 2D and 3D presets.
3D presets are customized versions of the 3D effects with their properties already adjusted. This is particularly
useful for the gunfire effect and in HitFilm Ultimate for use with the particle simulator.
2D presets are combinations of 2D effects. This can be a quick way to apply a particular film look to your clips
and layers without having to add each effect and set it up manually.
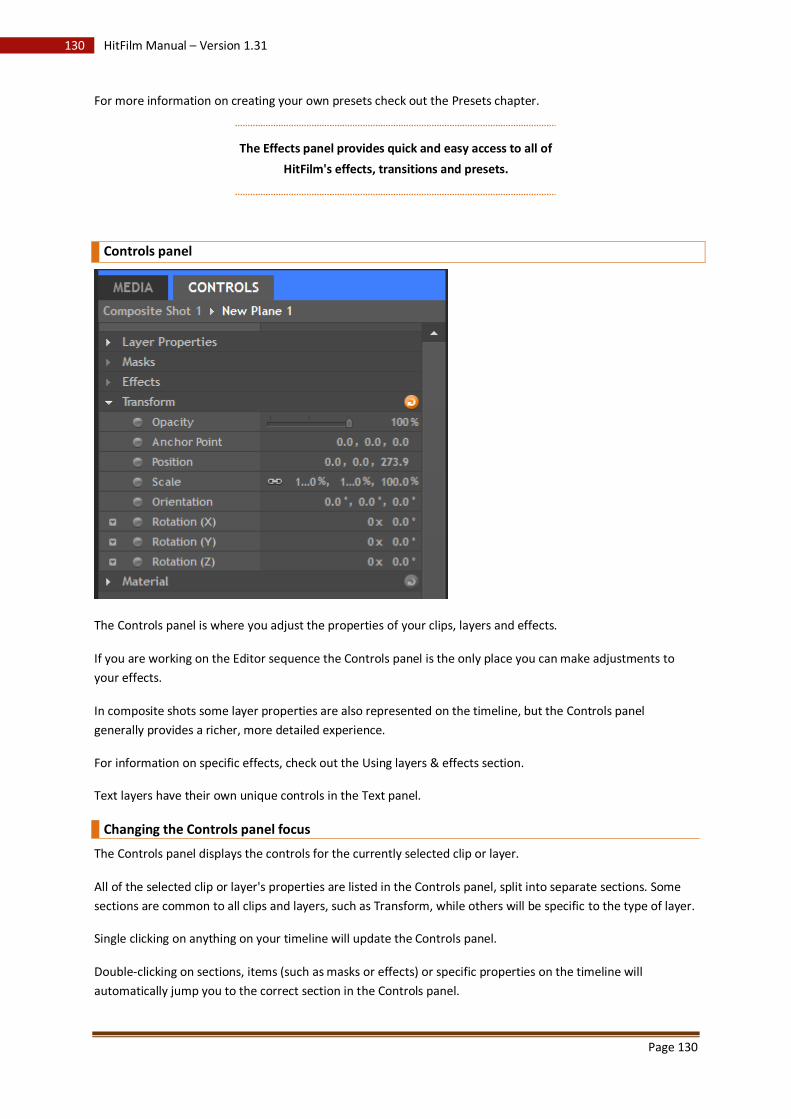
Page 130
130 HitFilm Manual – Version 1.31
For more information on creating your own presets check out the Presets chapter.
The Effects panel provides quick and easy access to all of
HitFilm's effects, transitions and presets.
Controls panel
The Controls panel is where you adjust the properties of your clips, layers and effects.
If you are working on the Editor sequence the Controls panel is the only place you can make adjustments to
your effects.
In composite shots some layer properties are also represented on the timeline, but the Controls panel
generally provides a richer, more detailed experience.
For information on specific effects, check out the Using layers & effects section.
Text layers have their own unique controls in the Text panel.
Changing the Controls panel focus
The Controls panel displays the controls for the currently selected clip or layer.
All of the selected clip or layer's properties are listed in the Controls panel, split into separate sections. Some
sections are common to all clips and layers, such as Transform, while others will be specific to the type of layer.
Single clicking on anything on your timeline will update the Controls panel.
Double-clicking on sections, items (such as masks or effects) or specific properties on the timeline will
automatically jump you to the correct section in the Controls panel.
Page 131
131 HitFilm Manual – Version 1.31
Using controls
Controls for your clips and layers are in the following forms:
• Sliders
• Values
• Wheels
• Menus
• Checkboxes
Some effects also have custom control systems, which are explained in the relevant chapter in Using layers &
effects.
Most sections and individual effects can be reset to their default values using the orange reset buttons.
For information on keyframing your properties see Animating with keyframes.
Values
Most properties are represented by one of more numerical values. Opacity is a single percentage value, while
the 2D position is determined by its X and Y pixel coordinates, for example.
Clicking and dragging on a value with the mouse will increase and decrease it, similar to using a slider.
Clicking once on a value enables you to type in a specific number.
You can move from one value to the next without using the mouse by pressing the Tab key.
Linked values
Some values are linked together, such as with the scale property. In this case, changing one of the values will
change the others as well.
If you want to adjust each of the values independently, first click the chain icon to unlink them.
Wheels
Properties involving degrees, such as rotation, use a wheel.
By default the wheel itself is hidden. To use the wheel first click the expand arrow next to the property's name.
Wheels usually store the number of turns as well as the degrees. For example, rather than displaying a rotation
of 400 degrees, HitFilm will instead display a rotation of 1x40.00 degrees.
The Controls panel is where you adjust the properties of
your clips and layers.
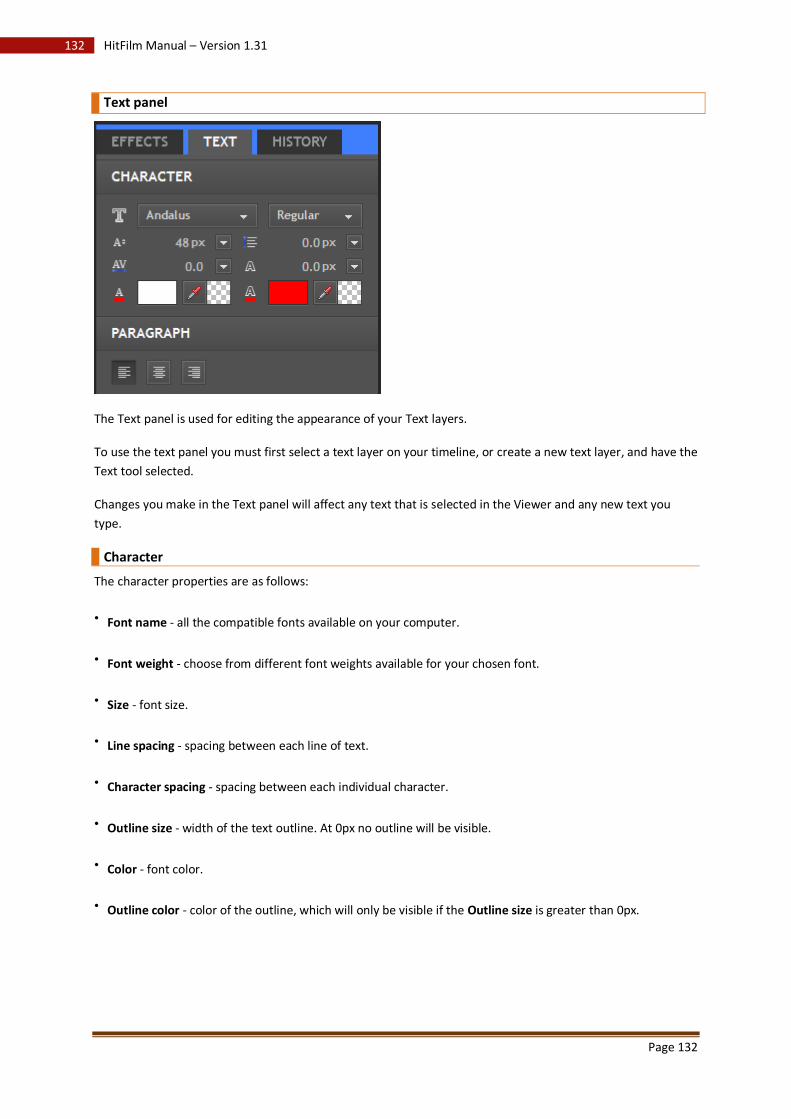
Page 132
132 HitFilm Manual – Version 1.31
Text panel
The Text panel is used for editing the appearance of your Text layers.
To use the text panel you must first select a text layer on your timeline, or create a new text layer, and have the
Text tool selected.
Changes you make in the Text panel will affect any text that is selected in the Viewer and any new text you
type.
Character
The character properties are as follows:
• Font name - all the compatible fonts available on your computer.
• Font weight - choose from different font weights available for your chosen font.
• Size - font size.
• Line spacing - spacing between each line of text.
• Character spacing - spacing between each individual character.
• Outline size - width of the text outline. At 0px no outline will be visible.
• Color - font color.
• Outline color - color of the outline, which will only be visible if the Outline size is greater than 0px.
Page 133
133 HitFilm Manual – Version 1.31
Paragraph
The selected text can be set to left aligned, centered or right aligned.
Text properties are always controlled in the Text panel,
not the Controls panel.
Lifetime panel
HitFilm Ultimate exclusive
The Lifetime panel is part of the particle simulator found only in HitFilm Ultimate. For details on other aspects
of the particle simulator go here.
The Lifetime panel shows the lifetime properties for the currently selected particle system.
A single particle simulator effect can contain multiple particle systems, so it is important to make sure you have
selected the correct one.
About particle lifetime
The term lifetime refers to the period between a particle's birth and death.
As particles can be spawned at any time and be of varying duration (depending on your emitter and particle
system properties), the lifetime properties do not refer to specific frames on your timeline.
The total lifetime of a particle is determined by the Life property in the Movement section of the particle
system.
Using the Lifetime panel
The Lifetime panel shows the lifetime properties for the currently selected particle system.
At the top of the panel are the various lifetime properties. Clicking a property will display its information below
the list.
There are two types of lifetime property: graph and gradient.
Graph properties
Most of the lifetime properties take the form of a graph.
The left side of the graph is the particle's birth and the right side is the particle's death.
Keyframes are represented on the graph as small, white squares. These can be moved around the graph.
Additional keyframes can be added by clicking on an empty area of the graph. Clicking and dragging will create
a curved keyframe.
Below the graph the position in time (Life) and value of the property are displayed. These update as you move
the keyframes, or you can click on them to enter numerical values directly.
Above the graph are a selection of preset shapes to help you draw common curves or reset the graph. Clicking
any of these will update the graph accordingly.
Page 134
134 HitFilm Manual – Version 1.31
Multiple properties can be displayed on the lifetime graph simultaneously. To do this, select the properties
using the checkboxes to the right of the property list. Each property will be displayed in the relevant color.
When displaying multiple properties on the graph, only the currently selected property can be edited.
Gradient properties
The Alpha and Color lifetime properties use a different interface based on a gradient.
The Type menu has three options:
• Off - the lifetime property has no effect. You are not able to adjust the other properties if the property is
turned off.
• Gradient - particles will cycle from left to right through your gradient.
• Random - particles will be born with a random property taken from your gradient.
Keyframes can be added to the gradient by clicking anywhere below the gradient bar.
You can then move keyframes left and right on the gradient by clicking and dragging on them. A keyframe's
position can also be set by entering a value into the Location property.
The color or alpha value is changed using the property below and to the left of the gradient bar.
Type: Gradient
With the Type menu set to Gradient additional options are available:
•
Mix with appearance - this includes the Color or Alpha property from the particle simulator's Appearance
section as part of the gradient. You can choose the Appearance property to work as the first or last keyframe
of the gradient.
• Loop number - by default the gradient represents from left to right a particle's lifetime from birth to death.
Increasing the loop number will make the gradient cycle multiple times during the particle's lifetime.
Type: Random
With the Type menu set to Random an additinal option is available:
• Key frame only - with this selected only the actual keyframe values will be applied to particles. If this option
is not selected the entire range of values available in the gradient will be used.
The Lifetime panel gives you control over how particles
change after they've been born.

Page 135
135 HitFilm Manual – Version 1.31
Track panel
HitFilm Ultimate exclusive
The Track panel is where you control all of your 2D tracking.
2D tracking is used when you need to track a specific feature in a shot, or to stabilize a shot. It is different to 3D
camera tracking, which is used to derive the movement of the live action camera. For information on importing
3D camera tracking data see Importing files.
You can track in 2D from inside HitFilm Ultimate. For 3D camera tracking you should use third party software
such as PFhoe, SynthEyes, Boujou or Voodoo.
The tracking process
Tracking is split into two steps. First you track parts of a video layer, then you apply that tracking data to a layer
either to stabilize or transform it.
Tracking can only be performed on video layers.
When you track a layer the information is stored in a Tracker on the timeline, under the Track section. A tracker
can then contain one or two tracking points, which store the actual animation keyframes.
Creating a tracker
The Track panel only displays information if you have a tracker selected on the timeline.
A new tracker can be added to any video layer by clicking the Insert tracker button on the timeline, found to
the right of the Tracks section.
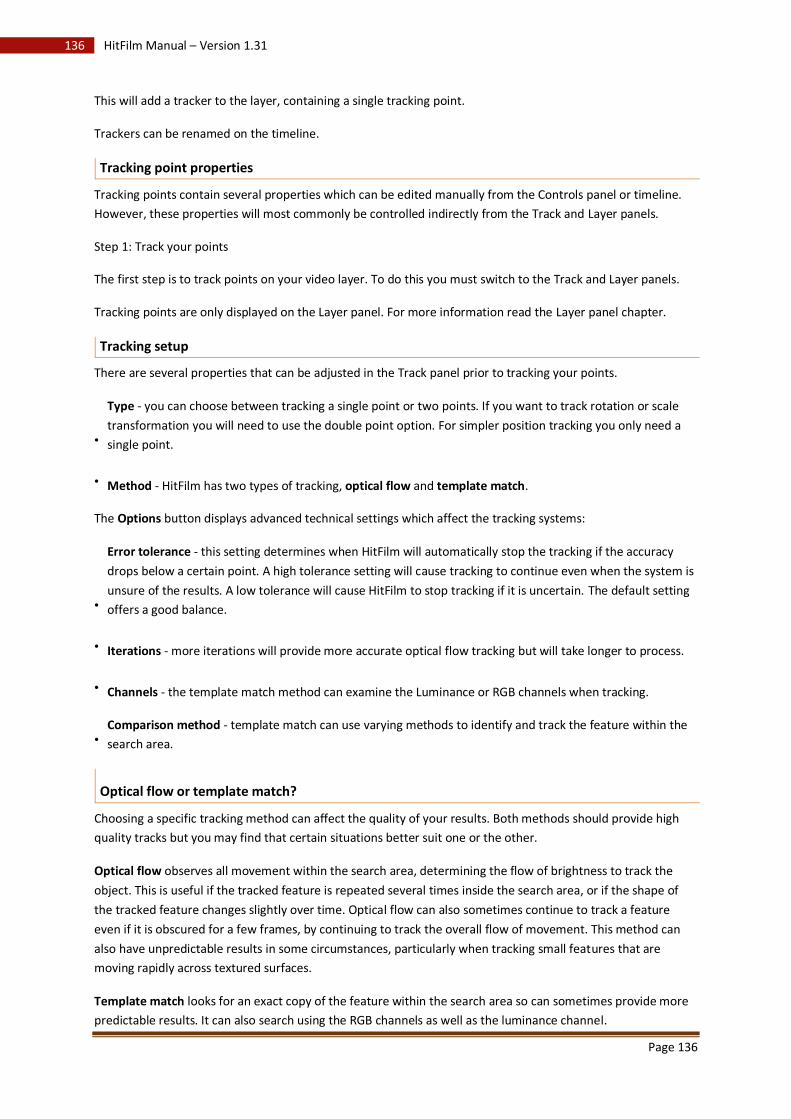
Page 136
136 HitFilm Manual – Version 1.31
This will add a tracker to the layer, containing a single tracking point.
Trackers can be renamed on the timeline.
Tracking point properties
Tracking points contain several properties which can be edited manually from the Controls panel or timeline.
However, these properties will most commonly be controlled indirectly from the Track and Layer panels.
Step 1: Track your points
The first step is to track points on your video layer. To do this you must switch to the Track and Layer panels.
Tracking points are only displayed on the Layer panel. For more information read the Layer panel chapter.
Tracking setup
There are several properties that can be adjusted in the Track panel prior to tracking your points.
•
Type - you can choose between tracking a single point or two points. If you want to track rotation or scale
transformation you will need to use the double point option. For simpler position tracking you only need a
single point.
• Method - HitFilm has two types of tracking, optical flow and template match.
The Options button displays advanced technical settings which affect the tracking systems:
•
Error tolerance - this setting determines when HitFilm will automatically stop the tracking if the accuracy
drops below a certain point. A high tolerance setting will cause tracking to continue even when the system is
unsure of the results. A low tolerance will cause HitFilm to stop tracking if it is uncertain. The default setting
offers a good balance.
• Iterations - more iterations will provide more accurate optical flow tracking but will take longer to process.
• Channels - the template match method can examine the Luminance or RGB channels when tracking.
• Comparison method - template match can use varying methods to identify and track the feature within the
search area.
Optical flow or template match?
Choosing a specific tracking method can affect the quality of your results. Both methods should provide high
quality tracks but you may find that certain situations better suit one or the other.
Optical flow observes all movement within the search area, determining the flow of brightness to track the
object. This is useful if the tracked feature is repeated several times inside the search area, or if the shape of
the tracked feature changes slightly over time. Optical flow can also sometimes continue to track a feature
even if it is obscured for a few frames, by continuing to track the overall flow of movement. This method can
also have unpredictable results in some circumstances, particularly when tracking small features that are
moving rapidly across textured surfaces.
Template match looks for an exact copy of the feature within the search area so can sometimes provide more
predictable results. It can also search using the RGB channels as well as the luminance channel.
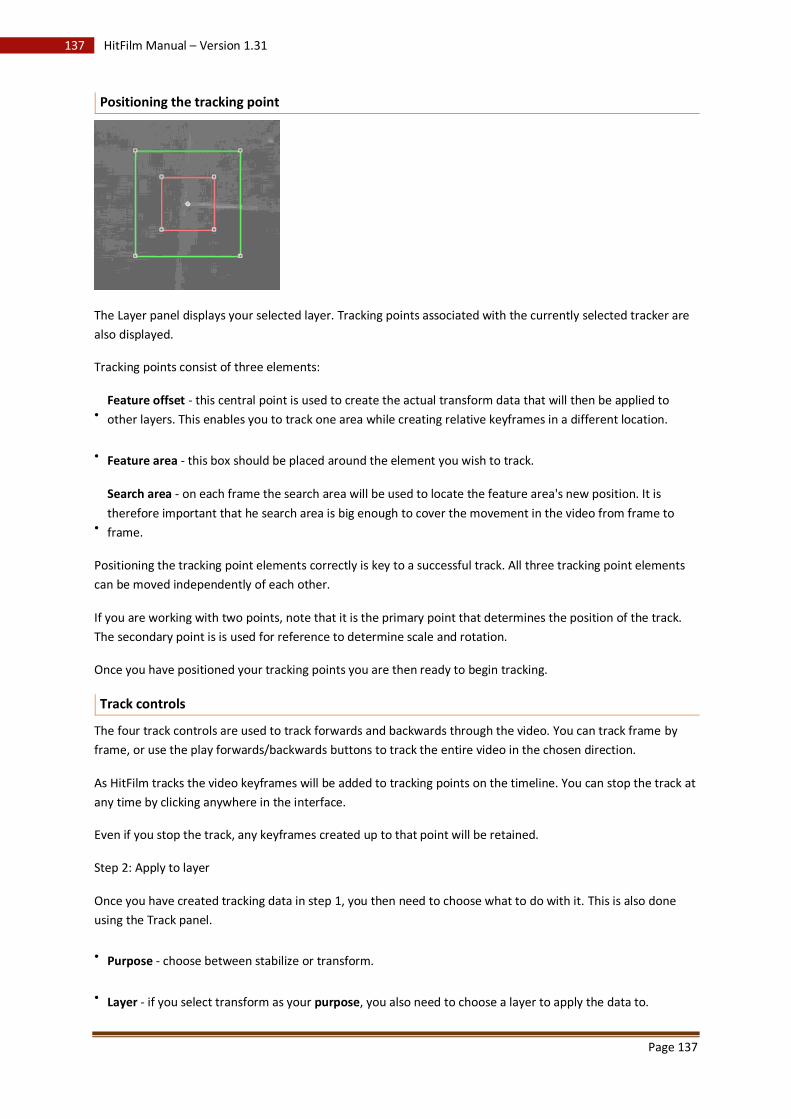
Page 137
137 HitFilm Manual – Version 1.31
Positioning the tracking point
The Layer panel displays your selected layer. Tracking points associated with the currently selected tracker are
also displayed.
Tracking points consist of three elements:
• Feature offset - this central point is used to create the actual transform data that will then be applied to
other layers. This enables you to track one area while creating relative keyframes in a different location.
• Feature area - this box should be placed around the element you wish to track.
•
Search area - on each frame the search area will be used to locate the feature area's new position. It is
therefore important that he search area is big enough to cover the movement in the video from frame to
frame.
Positioning the tracking point elements correctly is key to a successful track. All three tracking point elements
can be moved independently of each other.
If you are working with two points, note that it is the primary point that determines the position of the track.
The secondary point is is used for reference to determine scale and rotation.
Once you have positioned your tracking points you are then ready to begin tracking.
Track controls
The four track controls are used to track forwards and backwards through the video. You can track frame by
frame, or use the play forwards/backwards buttons to track the entire video in the chosen direction.
As HitFilm tracks the video keyframes will be added to tracking points on the timeline. You can stop the track at
any time by clicking anywhere in the interface.
Even if you stop the track, any keyframes created up to that point will be retained.
Step 2: Apply to layer
Once you have created tracking data in step 1, you then need to choose what to do with it. This is also done
using the Track panel.
• Purpose - choose between stabilize or transform.
• Layer - if you select transform as your purpose, you also need to choose a layer to apply the data to.
Page 138
138 HitFilm Manual – Version 1.31
• Property checkboxes - you can choose which aspects of the track you wish to apply to the layer using the
checkboxes. If you want to use rotation and scale tracking you need to select double points in step 1.
Stabilize
You can stabilize your tracked shot using HitFilm. When the stabilize option is selected, the tracking data will be
applied to the source layer. This will transform the layer so that the tracked point remains in the same position
in the frame.
You can stabilize based on any point in the frame. If you apply stabilize after tracking a person walking along,
the shot will be altered to keep the person perfectly centered in the frame. If you track an immobile
background element, the stabilize will eliminate any handheld wobble.
Anchor point keyframes are added to the selected layer, replacing any existing keyframes.
Stabilizing a shot will transform it within the composite shot. This is likely to reveal the edge of the layer as it
moves around. To counter this you should increase the scale of the shot so that it fills the frame at all times.
Transform
Selecting transform from the purpose menu enables you to then select a different layer. The tracking data will
then be applied to that layer.
This is useful if you want a layer to track to a particular part of your video. Perhaps you want to replace a sign,
or to track a light flare onto a street lamp. You can apply the tracking data to any layer, including point layers,
which can open up exciting visual effects possibilities.
Position keyframes are applied to the chosen layer, replacing any existing keyframes.
2D tracking offers hugely powerful possibilities for visual
effects and compositing.
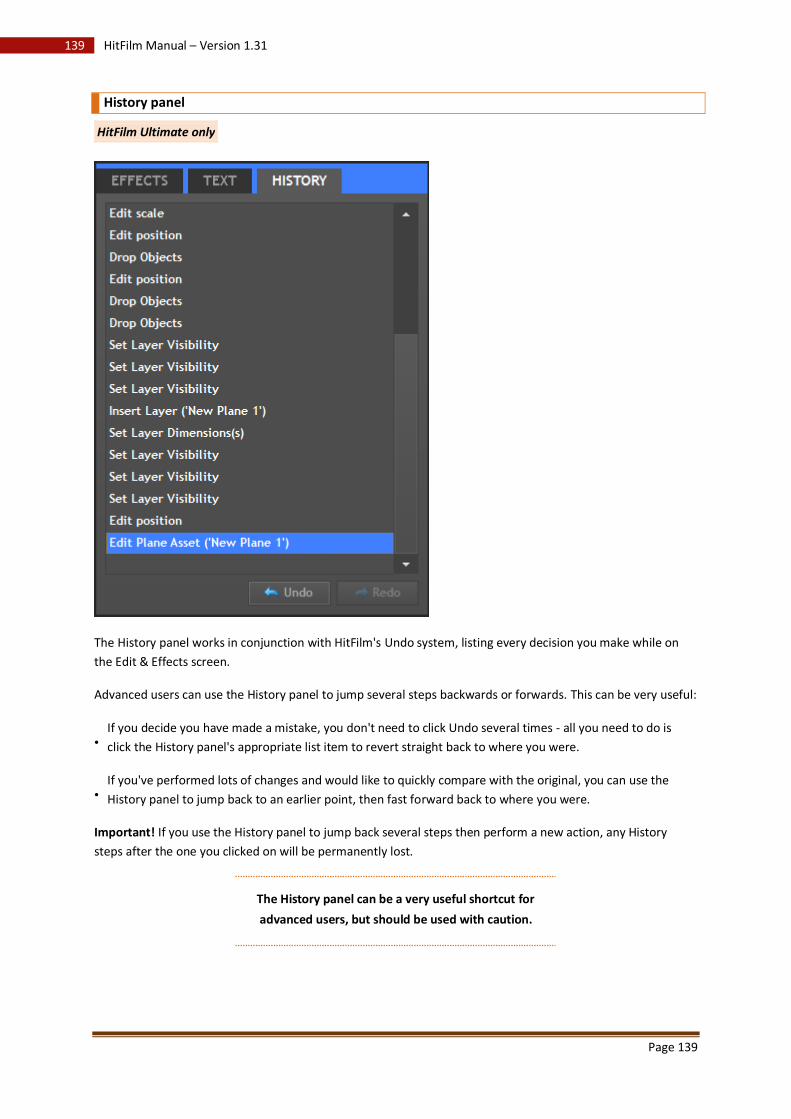
Page 139
139 HitFilm Manual – Version 1.31
History panel
HitFilm Ultimate only
The History panel works in conjunction with HitFilm's Undo system, listing every decision you make while on
the Edit & Effects screen.
Advanced users can use the History panel to jump several steps backwards or forwards. This can be very useful:
• If you decide you have made a mistake, you don't need to click Undo several times - all you need to do is
click the History panel's appropriate list item to revert straight back to where you were.
• If you've performed lots of changes and would like to quickly compare with the original, you can use the
History panel to jump back to an earlier point, then fast forward back to where you were.
Important! If you use the History panel to jump back several steps then perform a new action, any History
steps after the one you clicked on will be permanently lost.
The History panel can be a very useful shortcut for
advanced users, but should be used with caution.
Page 140
140 HitFilm Manual – Version 1.31
Adjusting Layers
Layers in a composite shot can be highly customized to create unique compositions and effects.
Each Layer has several property groups containing different properties that you can adjust. Depending on the
type of layer some property groups may not be available.
The following chapters describe each of the property groups.
Layer properties
All layers have a layer properties section. This is not visible on the timeline and must be accessed via the
Controls panel.
The Controls panel will always display the layer properties section for the currently selected clip or layer.
The contents of the layer properties section will vary depending on the type of layer.
• Visible - turns the layer's visibility on and off. Even if a layer is invisible it can still affect other linked layers.
•
Dimension - some layers can be switched between 2D or 3D. Composite shots can also be set to 3D unrolled,
which is explained in Working with layers.
•
Alignment - 3D layers can be set to align Along Motion Path, which changes the orientation based on the
layer's position keyframes, or Towards Active Camera, which orients the layer so it is always billboarded to
the camera.
•
Blend - different blend modes affect how layers combine with each other when occupying the same area of
the frame.
• Motion blur - motion blur can be enabled and disabled for each individual layer.
• Parent - a list of other layers in the composite shot, duplicating the parent menu on the timeline.
•
Promote lights - embedded 3D unrolled composite shots provide this property. Any lights inside the
composite shot will also affect layers in the parent composite shot.
Some layers have additional layer properties, such as cameras and lights. These are explained in the Special
layers section.
Layer properties can only be accessed through the
Controls panel.
Tracks
HitFilm Ultimate exclusive.
The Tracks group is only available for video layers. It stores your trackers and tracking points.
For information on tracking, see Track panel.
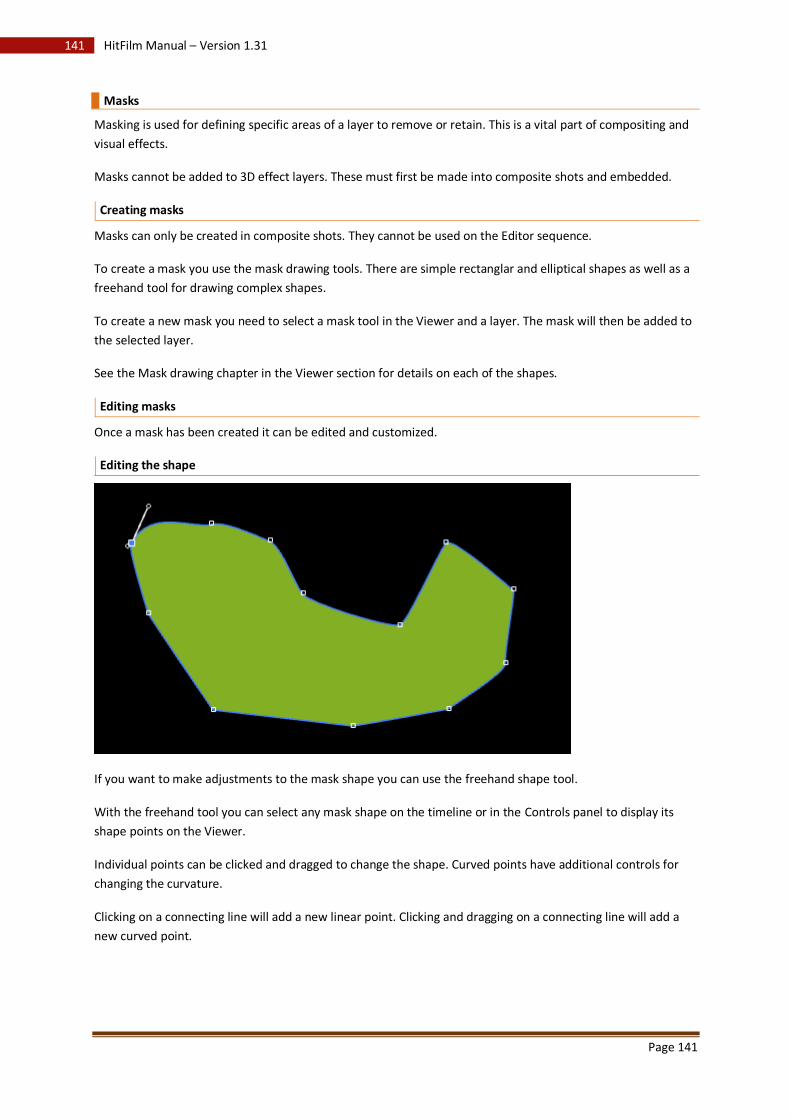
Page 141
141 HitFilm Manual – Version 1.31
Masks
Masking is used for defining specific areas of a layer to remove or retain. This is a vital part of compositing and
visual effects.
Masks cannot be added to 3D effect layers. These must first be made into composite shots and embedded.
Creating masks
Masks can only be created in composite shots. They cannot be used on the Editor sequence.
To create a mask you use the mask drawing tools. There are simple rectanglar and elliptical shapes as well as a
freehand tool for drawing complex shapes.
To create a new mask you need to select a mask tool in the Viewer and a layer. The mask will then be added to
the selected layer.
See the Mask drawing chapter in the Viewer section for details on each of the shapes.
Editing masks
Once a mask has been created it can be edited and customized.
Editing the shape
If you want to make adjustments to the mask shape you can use the freehand shape tool.
With the freehand tool you can select any mask shape on the timeline or in the Controls panel to display its
shape points on the Viewer.
Individual points can be clicked and dragged to change the shape. Curved points have additional controls for
changing the curvature.
Clicking on a connecting line will add a new linear point. Clicking and dragging on a connecting line will add a
new curved point.

Page 142
142 HitFilm Manual – Version 1.31
Transforming the shape
Using the Select tool in the Viewer you can transform the mask shape in the same way you would the layer
itself.
The currently selected mask on the timeline or in the Controls panel will also be selected in the Viewer, with a
bounding box around the shape. This can be used to scale and position the shape without changing the shape.
To animate the mask over time you must have the Path property's keyframes enabled.
Mask properties
A mask's properties can be customized in the Controls panel or on the timeline.
• Inverted - toggles whether the mask selection is inside or outside of your shape.
• Blend - multiple mask shapes can be blended together in various ways for different results.
• Path - if keyframing is turned on for this property the mask shape can then be animated over time.
You cannot add or remove mask points using keyframing. A mask shape will have the same number of points
for its entire duration.
• Opacity - adjusts the transparency of the mask.
• Expansion - this can be used to contract or expand the mask without needing to change its shape or position.
•
Feather - there are three types of feathering, working from inside the mask shape, outside, or both. Which
you use will depend on the specifics of your shot.
• Feather strength - a stronger feather creates a softer edge to the mask.
•
Roundness - this is a useful way to change a linear shape into a curved shape without needing to alter the
points.
Masks are an essential compositing tool. HitFilm gives
you fine control over mask creation and editing.
Page 143
143 HitFilm Manual – Version 1.31
Effects
Any effects you add to the layer will be listed in the Effects group. For information on the available effects see
the following chapters:
• 3D effects
• 2D effects
• Audio effects
• Transitions
• Presets
Transform
The term transforming is used to refer to the set of properties that control a layer's position, scale and
rotation.
Transform properties can be adjusted on composite shot timelines and in the Controls panel. The Viewer panel
can also be used to transform layers using a more visual method.
Anchor points
Every layer has an anchor point. This is the layer's origin around which it rotates. If you parent layers to each
other, it is the anchor point that is actually being linked.
The default anchor point for most layers is in the center. For most purposes this is the most useful location for
the anchor point but there are some circumstances where moving the anchor point would be beneficial.
For example, if you had a simple rectangular plane and wanted it to spin around one corner instead of its
center, you would move the anchor point to that corner then use the normal rotation controls.
2D properties
• Opacity - the transparency of the clip.
• Anchor point - sets the location of the anchor point, with 0,0 being the center of the layer.
• Position - moves the layer along the X and Y axes.
•
Scale - enlarges and shrink the layer. The X and Y scales are linked by default so that your layer retains its
original shape. You can unlink them using the chain icon.
•
Rotation - rotates the layer around its anchor point. See Controls panel for more information on rotation
wheels.
3D properties
3D layers have a few extra transform properties than 2D layers.
• Opacity - the transparency of the clip.
Page 144
144 HitFilm Manual – Version 1.31
• Anchor point - sets the location of the anchor point, with 0,0,0 being the center of the layer.
• Position - moves the layer along the X, Y and Z axes.
•
Scale - enlarges and shrink the layer. The X, Y and Z scales are linked by default so that your layer retains its
original shape. You can unlink them using the chain icon.
• Orientation - sets the starting orientation for the layer. This works separately to the rotation properties.
•
Rotation - rotates the layer around its anchor point. When in 3D the rotation properties are split into
separate properties for X, Y an Z axes. See Controls panel for more information on rotation wheels.
The Transform properties are used to position, scale and
rotate your layers.
Material
3D layers gain the Material section. This determines how the layer behaves in the 3D space if lights are present.
Lights and layers
HitFilm's lights are virtual, which means they are not bound by the same rules as real lights. This gives you fine
control over how they affect other layers.
For example, you can have a layer receive light but not shadows, or you can have a layer cast shadows even if
it's invisible.
Control over light behaviour is split between the light layer and the other layers in the scene. This means that
each layer in a composite shot can react to lights in a different way.
Particle simulator layers have additional material properties.
See Light layers for more information.
Material properties
• Illuminated - the layer will receive light from light layers.
• Receives shadows - the layer will show shadows cast by other layers.
• Cast shadows - the layer will cast shadows onto other layers.
• Cast shadows if layer disabled - the layer will still cast shadows even if its visibility has been disabled.
•
Billboarded lights - lights a 3D particle effect as if the individual particles are all facing towards the light. This
can be useful if you want an evenly lit particle effect.
•
Billboarded shadows - shadows are cast from a 3D particle effect as if the indivdual particles are all facing
towards the light. This can be useful if you want shadows to appear more solid.
•
Ambient - if you are using ambient lights this adjusts how much light the layer reflects. At 0% ambient lights
will have no effect. Ambient lighting is nondirectional.
Page 145
145 HitFilm Manual – Version 1.31
•
Diffuse - adjusts the reflectivity of the layer for all light types except ambient. At 0% all non-ambient light
types will have no effect. Diffuse lighting is omnidirectional.
•
Specular - all light types except ambient can create specular lighting, which acts like mirrored light being
reflected back at the camera. Specular lighting is directional.
• Shininess - when using specular lighting this adjusts the size and softness of the specular highlight.
•
Emissive - gives the layer a base lighting color that is visible even if ambient, diffuse and specular lighting is
all set to 0%. This color overrides the layer's original color, and lights can then be used to return the original
color.
Layers can be individually set up to react to lights in
different ways.
Audio
If a layer contains audio it will have an audio group.
Here you will find the Level property, which is used to control the volume of that layer's audio.
3D effects
All of HitFilm's 3D effects are listed in the 3D folder in the Effects panel.
The 3D effects use HitFilm's particle simulator and can interact with your other layers in full 3D.
3D effects can only be used on 3D Composite shots.
Using 3D effects
The effects in the various sub-folders are designed to be quick and easy to use: you can drag them onto your
timeline, make a couple of alterations and have a working effect. All of the Controls are set up to be intuitive
and relate to real world terms.
Gunfire and the Particle Simulator (HitFilm Ultimate only) provide you with full control and can be used to build
up entirely new effects from scratch.
The 3D effects also have their own presets which are also located in the Effects panel.
When a 3D effect is added to the timeline it will create a new layer.
If a 3D effect is added to the Editor sequence it will automatically create a new composite shot based on the
Editor sequence properties.
3D effects create new layers on the timeline and are
used for advanced particle simulations.
Page 146
146 HitFilm Manual – Version 1.31
Falling debris
Creates tumbling debris and dust, as if from an explosion or disintegration.
General
• Preview - toggles between textures and preview particles.
• Fall duration - how long the debris continues to be created.
• Scale fall area - size of the area the debris falls from.
•
Floor plane layer - a layer can be selected to use as the floor. Debris that hits the floor plane will collide with
it.
• Infinite floor plane - this will extend the selected floor plane layer beyond the bounds of the actual layer.
• Gravity strength - speed at which the debris falls.
• Color - color of the debris. Often best when matched to the live action source of the debris.
Debris
• Active - turns the debris element on and off.
• Life duration - how long the debris lasts for on-screen.
• Type - choose between brick, concrete and rock.
• Amount - how much debris do you want?
• Minimum size - debris will be no smaller than this.
• Maximum size - debris will be no larger than this.
Dust
• Active - turns the dust element on and off.
• Life duration - how long the dust should linger for.
• Density - adjusts the density of the dust.
Page 147
147 HitFilm Manual – Version 1.31
Fire explosion
Creates a fire explosion that rapidly spreads and grows in size.
General
• Preview - toggles between textures and preview particles.
• Duration - how long the explosion lasts.
Flame explosion
• Seed - each seed number creates a unique explosion.
• Ferocity - how rapidly the explosion generates new sub-explosions.
• Growth - how much the explosion expands.
• Dirtyness - creates a dirtier explosion.
• Color - alters the color of the explosion.
Sci-Fi shockwave
Creates a dramatic shockwave, as seen in sci-fi movies when planets and space stations explode (that's no
moon!).
General
• Preview - toggles between textures and preview particles.
• Duration - sets how long the shockwave lasts before fading away.
• Type - choose between a variety of different shockwave designs.
• Width - adjusts the densityof the shockwave along its radius.
• Height - choose between a thin sliver of a shockwave or a giant wall of plasma.
• Speed - speed at which the shockwave expands.
• Size - size of the individual shockwave particles.
Band
• Color - sets the color of the main band.
• Color variation - more variation creates more random coloring.

Page 148
148 HitFilm Manual – Version 1.31
Trail
• Amount - the trail is a separate element and its visibility can be adjusted here.
• Color - the trail color can be set separately to the band.
• Color variation - more variation creates more random coloring.
Bonfire
Creates a realistic bonfire.
General
Preview - toggles between textures and preview particles.
Target - the point towards which the fire and smoke moves. Changing the target position can create a
convincing illusion of the fire being influenced by wind.
Height - alters the height of the flame relative to the target position.
Fire
Active - each individual element of the bonfire can be turned on and off.
Spread - adjusts the fire between a small, intense base or a broad base.
Ferocity - changes the textures used by the fire.
Intensity - creates a stronger, brighter fire.
Size - adjusts the size of the individual fire particles.
Color - changes the color of the fire, which in turn affects the lighting on the smoke.
Smoke
Active - each individual element of the bonfire can be turned on and off.
Spread - adjusts the smoke between a thin or broad column.
Thickness - changes the textures used by the smoke.
Density - moves between thin, wispy smoke and dense, thick smoke.
Size - adjusts the size of the individual smoke particles.
Color from fire - determines how much of the smoke is illuminated by the fire.
Color - changes the color of the smoke when it isn't being affected by the fire.
Embers
Active - each individual element of the bonfire can be turned on and off.
Spread - adjusts whether the embers are generated over a small or large area.
Variation - changes the textures used by the embers.
Page 149
149 HitFilm Manual – Version 1.31
Amount - alters the number of embers visible at any one time.
Turbulence - increasing turbulence will cause the embers to move more erratically.
Size - adjusts the size of the individual ember particles.
Color - changes the color of the embers, without affecting the smoke and fire colors.
Missile smoke
The missile smoke effect is a great way to create quick smoke trails.
Animating a smoke trail
By default the smoke trail sits in the center of the screen, creating a smoke ball.
There are two ways of animating the smoke trail, each of which will create very different results.
• If you use the layer's Transform properties the entire effect will be moved. This will not create a smoke trail.
• If you want to create a smoke trail, you should use the Position property in the layer's General section.
General
• Preview - toggles between preview and textured particles.
• Active - turns the entire effect on and off.
• Attach to layer - the smoke's positioned can be linked to another layer.
• Position - the position of the smoke emitter.
Smoke
• Density - higher density creates thicker smoke.
• Linger - changes how long the smoke remains visible.
• Linger variation - increasing variation introduces a random variable to the linger.
• Size - adjusts the size of the smoke particles.
• Size variation - increasing variation introduces a random variable to the size.
• Speed - adjusts the speed of the individual smoke particles.
• Speed variation - increasing variation introduces a random variable to the speed.
• Color - the base color of the smoke.
Page 150
150 HitFilm Manual – Version 1.31
Smoke
The smoke effect is great for creating slowly drifting or falling smoke.
General
• Preview - toggles between preview and textured particles.
• Active - turns the entire effect on and off.
• Attach to layer - the smoke's positioned can be linked to another layer.
• Position - the position of the smoke emitter.
Smoke
• Thickness - adjusts the thickness by changing the texture set.
• Density - creates thin or thick smoke.
• Gravity strength - strong gravity will pull the smoke either up or down.
• Linger - adjusts how long the smoke lasts before fading away.
• Linger variation - introduces a random variable to the linger.
• Size - adjusts the size of the individual smoke particles.
• Speed - alters the speed of the smoke's movement.
• Speed variation - introduces a random variable to the speed.
• Turbulence - higher turbulence values will create a less smooth smoke animation.
• Color - change the base color of the smoke.
Sparks
The sparks effect is designed for sudden bursts of sparks, such as when a bullet hits a metal surface. It can be
rotated using the standard Transform properties to point in any direction.
General
• Preview - toggles between placeholder particles and textured particles.
• Duration - how long the sparks last before disappearing.
Sparks
• Spread - the sparks can be emitted in a tight, focused beam or a wide dispersal.
• Amount - adjusts the number of sparks.
Page 151
151 HitFilm Manual – Version 1.31
• Star ratio - adjusts how frequently stars are created.
• Color - changes the color of the entire effect.
Fluffy cloud
Creates a slow moving clump of cloud. The size and position of the cloud can be adjusted using the standard
Transform properties.
Cloud
• Preview - toggles between a placeholder particle and a textured particle.
• Density - the cloud can be thin or thick.
• Color - changes the color of the cloud.
Rain
HitFilm's rain creates realistic rainfall. The rain exists in a 3D rain box which can be moved around your scene -
you can even move your camera through the rain.
Rain
• Preview - toggles between placeholder particles and textured particles.
• Direction - the rain can be angled to fall in a particular direction.
•
Spread - a low spread will result in rain moving in the same direction. Higher spread values will cause the
rain to fall at more varied angles.
• Amount - changes the density of the rain.
• Color - adjusts the color of the rain.
Storm cloud
Creates a dark, ominous storm cloud.
Cloud
• Preview - toggles between a placeholder particle and a textured particle.
• Density - the cloud can be thin or thick.
• Color - changes the color of the cloud.
Gunfire
HitFilm's gunfire effect uses a highly customized version of the particle simulator and is the best tool available
for creating CG muzzle flashes. There are many benefits to creating your muzzle flashes in HitFilm:
• No need to use dangerous and expensive blank-firing weapons.
• You can shoot silently in areas that might not normally allow gunfire.
Page 152
152 HitFilm Manual – Version 1.31
• Complete artistic control over the look and behaviour of your weapons.
• You are no longer limited to re-using the same muzzle flash stock footage.
Important: Even if you're not using blank-firing weapons during shooting, always make sure you have notified
the police and informed local residents prior to filming. Don't assume that the presence of a camera is enough
to let people know you're making a movie.
Gunfire can be moved using the standard Transform properties. For realistic positioning the gunfire origin
should be positioned at the end of the gun barrel.
Appearance
• Preview - toggles between placeholder particles and textured particles.
• Textures - your choice of textures will make a huge difference to the appearance of your gunfire.
• Blend - changes how the textures blend together. Add will usually give the best results.
• Colorize - this overrides the texture's original colors with the Color property.
• Color - changes the texture's color when you have Colorize activated.
• Color variation - introduces random variation to the chosen color.
• Active - turns the entire muzzle flash on and off.
•
Rate of fire - percentage chance of the muzzle flash appearing on the current frame. 100 ensures the muzzle
flash is always visible. Lower values are useful for creating the appearance of automatic weapons fire,
without needing to manually keyframe the Active property.
•
Seed - this is used to generate random variations of the muzzle flash shape. Keyframing the seed will ensure
that your muzzle flash is different each time it appears, while retaining its basic shape.
Core flare
The core flare is the central part of the muzzle flash and is project directly out of the front of the barrel.
• Active - turns the core flare on and off.
• Scale - the size of the core flare.
• Barrel gap - the distance between the core and the barrel.
• Length - the length of the core.
• Length taper - changes the weighting of the core flare.
• Radius - the radius of the core flare.
• Radius taper - changes the weighting of the core flare.
• Jitter - creates a more dispersed and randomized appearance.
Page 153
153 HitFilm Manual – Version 1.31
• Intensity - creates a brighter core.
Side flares
• Active - turns the side flares on and off.
• Scale - the size of the side flares.
• Number of flares - adjusts how many side flares are visible.
• Barrel gap - the distance between the side flares and the barrel.
• Barrel angle - the angle of the side flares in relation to the barrel.
• Barrel rotation - all side flares can be rotated around the gun barrel.
• Length - the length of the side flares.
• Length taper - changes the weighting of the side flares.
• Radius - the radius of the side flares.
• Radius taper - changes the weighting of the side flares.
• Jitter - creates a more dispersed and randomized appearance.
• Intensity - creates a brighter core.
HitFilm's CG gunfire can create an unlimited variety of
muzzle flashes.
Particle simulator
HitFilm Ultimate only
HitFilm's particle simulator is truly cutting edge and there's no way we can represent its full abilities in this
manual. We recommend viewing our video tutorials, which you can find in the Support area of HitFilm.com.
Particle structure
A particle simulation contains a hierarchy of elements. Understanding how these work is key to designing and
creating your own particle effects.
Particle simulator layer
The top level is the particle simulator layer on your timeline. This is a 3D layer that contains your simulation.
You can of course have multiple particle simulators on your timeline.
Particle simulator effects can only be used in composite shots.
Page 154
154 HitFilm Manual – Version 1.31
The particle simulator has the standard Layer and Material properties, plus high level access to general
properties, deflectors and forces.
It also provides access to your Emitters.
Emitters
The Emitters section can contain multiple emitters. You can add additional emitters using the + icon. The
currently selected emitter can be renamed by pressing F2.
An emitter is where all particle effects begin, specifying where the particles appear and affecting their initial
trajectory.
Having multiple emitters in a single particle simulator layer (rather than using multiple particle simulators) is
that they can all share the same deflectors and forces. If you decide to move a deflector, all of the emitters will
update accordingly.
Due to the rendering pipeline in HitFilm, organizing your emitters under a single particle simulator can also
result in a performance boost.
Each emitter contains its own particle systems, which are detailed below.
Mobile emitters
Emitters can also contain mobile emitters. These are special types of emitter that are spawned in the same way
as particle systems, but which can then go on to spawn their own particle systems.
Particle systems
An emitter can contain multiple particle systems. A particle system is the visible part of the particle effect.
The currently selected particle system can be renamed by pressing F2.
The properties of a particle system will determine the visual appearance and behaviour of each individual
particle at its birth. Once a particle is born, its behaviour can be affected by multiple external factors such as
deflectors and forces.
Lifetime panel
You can also control how particles behave during their lifetime, using the Lifetime panel.
The Lifetime settings affect every particle within a particle simulator from its birth to its death. This can be
useful if you want to have particles fade out gradually, or increase in speed over time.
For more information take a look at the Lifetime panel section.
Deflectors & Forces
If you want your particles to interact in more interesting ways, deflectors and forces are what you need.
The currently selected deflector or force can be renamed by pressing F2.
Deflectors are collision areas for particles and can be shapes generated inside the particle simulator or other
layers on your timeline. This is a great way to simulate particles colliding with real world objects in your live
action footage.
Page 155
155 HitFilm Manual – Version 1.31
Forces can be used to affect particles once they have been birthed. Forces occupy specific areas in 3D space
and when a particle enters that area it will be affected accordingly.
Particle simulators are complex effects which give you
complete control over HitFilm's particle engine.
Emitter
An emitter is where all particle effects begin, specifying where the particles appear and affecting their initial trajectory.
Shape
Emitters can be several shapes. You can choose the emitter shape using the Shape menu.
• Each shape has its own properties to define its shape, size and position.
• Shapes can be attached to another layer in the same composite shot, such as a point layer. The emitter will then animate to stay in the same relative position to the parent layer.
• The Boundary option forces particles to only be birthed around the edge of the shape, rather than inside the shape.
Clicking on any shape properties will display a wireframe outline of the shape in the Viewer.
Trajectory
When particles are birthed they need an initial trajectory, to determine which direction they move in.
• Cone - emit in a funnel shape. • Explode - emit in a direction away from the centre of the shape. • Implode - emit in a direction towards the centre of the shape. • Disc - emit in a flattened disc shape. • Random - emit particles randomly within the shape in random directions. • Target - emit particles towards a specified 3D point.
Expanding the Trajectory group will give you access to the controls for your selected trajectory.
General
The general group contains a single Active property. This turns the emitter on and off and is used for controlling when particles are being birthed. It can be used to start and stop particle emission at any point on your timeline.
The emitter properties determine where particles
appear and in which direction they move.
Page 156
156 HitFilm Manual – Version 1.31
Particle systems
An emitter can contain multiple particle systems. A particle system is the visible part of the particle effect.
Properties for particle systems are split into several groups. Most settings only affect particles' initial birth state, after which they are unaffected by keyframed properties.
The Appearance and Movement groups also have variation properties in separate Variation groups. The variation properties increase the range of possible values. For example, if you set Scale to 100% and Scale variation to 10%, the actual scale of particles will vary randomly between 90% and 110%.
General
• Active - turns the particle system emission on and off. The particle system's parent emitter must also be active for particles to emit.
• Affected by Deflectors - whether the particle system reacts to deflectors. • Affected by Forces - whether the particle system reacts to forces.
• Seed - a random number used to generate the particle. Adjust this to vary the distribution of particles without changing the overall appearance.
• Particles per second - the number of particles birthed per second. For example, 25pps in a 25 frame per second timeline will result in 1 particle birthed every frame.
•
Emitter attachment - by default once a particle is birthed, it behaves independently of the emitter. So even if the emitter is animated, the particle will continue according to its own behaviour. By increasing the emitter attachment the already emitted particles will move relative to the emitter movement.
• Velocity from emitter - as particles are birthed they will inherit inertial velocity from the emitter's movement.
Appearance
• Textures - images can be imported to use as particle textures. Use the folder icon to import textures and the X to remove them.
•
Intersect layers - when disabled, particles can only be on side or another of another 3D layer. When enabled particles will be positioned more accurately when moving through other 3D layers, but this does take longer to render.
• Billboard - billboarding particles forces them to always face the camera, regardless of their movement. Disabling billboarding enables particles to tumble based
• Align to motion - orients the particle based on its direction. This can be useful for having an arrow texture follow a path, for example. Billboarding must be turned off for this to work correctly.
• Texture angle - with billboarding turned off, this rotates the texture on the particle. • Texture angle per second - causes the texture to rotate over time. • Blend - blend method for the particles. Add is useful for gas and light-based effects.
•
Color source - texture color takes the particle's color from the texture file. Birth color uses the color from each particle's birth frame. Current color adjusts all particles to the current color, which is useful for changing the color of all particles simultaneously.
• Alpha source - these settings work in the same way as the color source options above.
• Alpha boost - when using motion blur particles can become semi-transparent. The alpha boost can be used to return these to full solidity.
• Color - sets the color of particles. See also color source above. • Alpha - sets the alpha (transparency) of particles. See also alpha source above.
Movement
• Life - the duration of particles in seconds. • Scale - the size of particles. • Speed - the speed of particles.
Page 157
157 HitFilm Manual – Version 1.31
• Acceleration - applies constant acceleration to particles in the given direction. • Center of mass - offsets the texture itself from the origin of the particle. • Rotation (X, Y, Z) - rotates the particle. Requires billboard to be turned off in Appearance. • Rotation per second (X, Y, Z) - adds constant rotation over time. • Mass - adjusts how forces affect the particles. More mass will result in less impact from forces. • Bounce - the bounce of particles when they collide with a deflector.
• Friction - higher friction will cause particles to stop faster, while lower friction will let them continue moving along a deflector surface.
The particle system properties determine the look and
behaviour of each particle.
Deflectors
Deflectors are a hugely powerful part of the particle simulator. With deflectors you can have particles impact on shapes and surfaces and even simulate particles colliding with objects in a live action shot.
A particle simulation can include multiple deflectors, allowing for very complex setups.
Deflectors can be added from the timeline or from the Controls panel using the icon to the right of the Deflectors group.
The Bounce and Friction settings in the Particle system -> Movement properties directly affect how particles interact with deflectors.
General
• Active - turns the deflector on and off.
Shape
Deflectors can be cuboid shapes generated inside the simulator or you can use another layer on the current timeline. Therefore if you've already got a plane set up as your 'floor', you can use that same layer as a particle deflector.
Cuboid
The cuboid properties enable you to change the shape of the cube and transform it in 3D space.
The Mask option also uses the Deflector as a 3D mask for the particles. Any particles that are behind the deflector from the point of view of the camera will not be visible.
Layer
When using a layer as a deflector you need to select the source layer from the deflector's properties.
The infinite plane option extends the deflector along the axis of the plane in all directions. This can be considerably easier than having to enlarge the layer itself to cover the entire 3D scene.

Page 158
158 HitFilm Manual – Version 1.31
Layers will only deflect particles from the Z-up direction. If a deflector layer is having no effect, try flipping it 180 degrees in 3D space.
Deflectors can be used to block the path of particles and
create unique physics effects.
Forces
Forces are used to apply additional behaviour to particles based on realistic physics. They can be applied globally to a scene, or only affect a specific cuboid region.
Multiple forces can be added to a single particle simulator. Forces can be added to a particle simulator using the icon to the right of the Forces group on the timeline or in the Controls panel.
All forces are affected by the particle mass property in Particle system -> Movement. Particles with greater mass will be less affected by forces.
General
• Active - turns the force on and off.
Shape
• Global - affects the entire scene and cannot be positioned. All particles will be affected regardless of position.
•
Cuboid - force only acts within a specified area, defined by the cuboid. You can change the dimensions and transform the cuboid. The Mask option uses the cuboid as a mask, hiding any particles that pass behind it from the camera's point of view.
Type
There are several types of force.
Direction
Direction forces particles in a specific direction.
The strength and direction of this force can be adjusted and keyframed. By combining multiple direction forces you can simulate both gravity and wind in a single particle simulator.
Attraction
Attraction forces draw particles towards a point in 3D space. When using a global force, this is the center of the 3D scene at 0,0,0. With cuboids it is the center of the shape.
The strength of attraction forces can be adjusted.
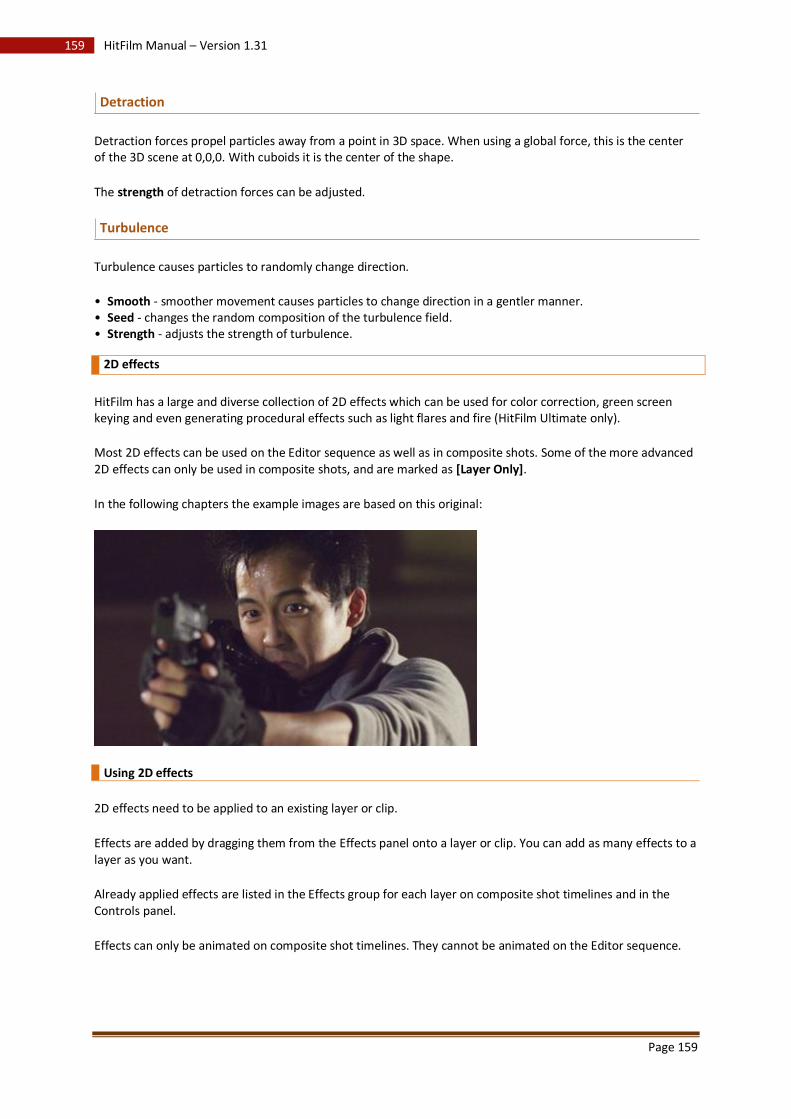
Page 159
159 HitFilm Manual – Version 1.31
Detraction
Detraction forces propel particles away from a point in 3D space. When using a global force, this is the center of the 3D scene at 0,0,0. With cuboids it is the center of the shape.
The strength of detraction forces can be adjusted.
Turbulence
Turbulence causes particles to randomly change direction.
• Smooth - smoother movement causes particles to change direction in a gentler manner. • Seed - changes the random composition of the turbulence field. • Strength - adjusts the strength of turbulence.
2D effects
HitFilm has a large and diverse collection of 2D effects which can be used for color correction, green screen keying and even generating procedural effects such as light flares and fire (HitFilm Ultimate only).
Most 2D effects can be used on the Editor sequence as well as in composite shots. Some of the more advanced 2D effects can only be used in composite shots, and are marked as [Layer Only].
In the following chapters the example images are based on this original:
Using 2D effects
2D effects need to be applied to an existing layer or clip.
Effects are added by dragging them from the Effects panel onto a layer or clip. You can add as many effects to a layer as you want.
Already applied effects are listed in the Effects group for each layer on composite shot timelines and in the Controls panel.
Effects can only be animated on composite shot timelines. They cannot be animated on the Editor sequence.

Page 160
160 HitFilm Manual – Version 1.31
Reordering effects
The order you apply effects to your layers can make a huge difference to the end result. Effects are processed from top to bottom, so the first effect in a layer's Effects section will be processed before the last.
You can reorder effects just like you reorder layers, by clicking and dragging on them with the mouse. A green line indicates where the effect will be placed.
2D effects can range from simple Brightness & Contrast
to procedural Fire.
Blur & sharpen
The Blur & Sharpen category contains all of the blur-related effects.
The Clamp to edge property ensures that the effect extends to the edge of the frame.
Angle blur
Blurs the layer in a specific direction.
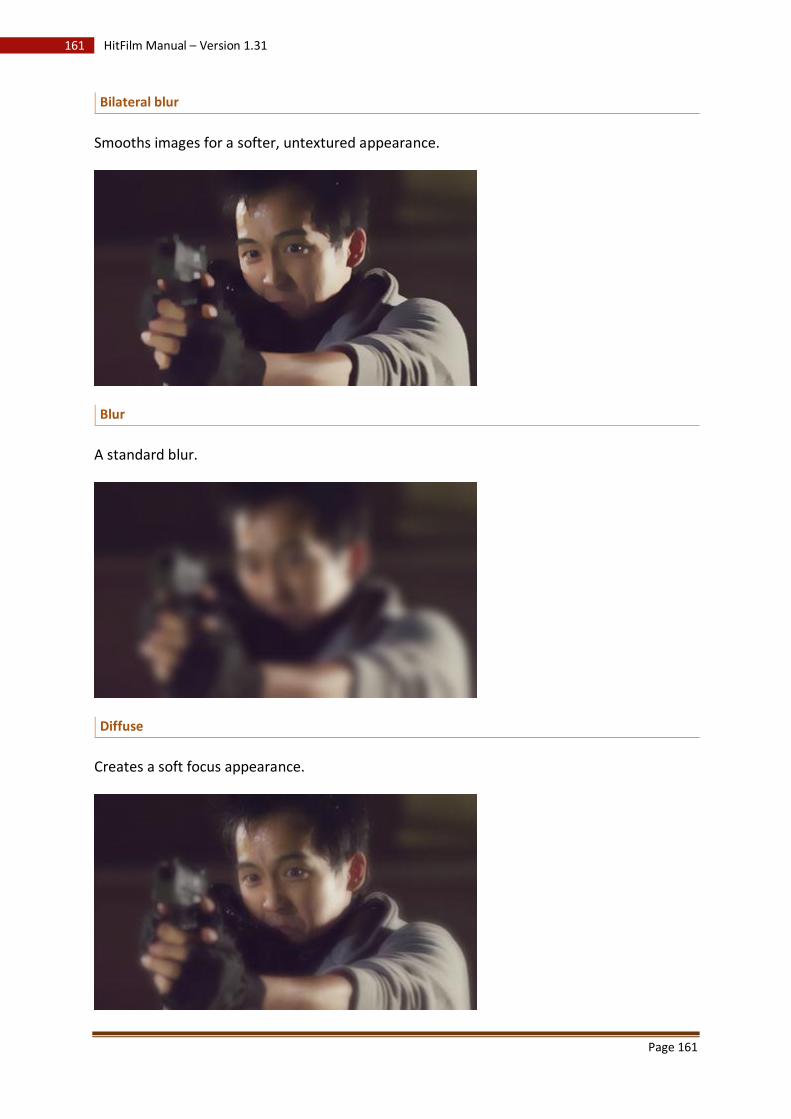
Page 161
161 HitFilm Manual – Version 1.31
Bilateral blur
Smooths images for a softer, untextured appearance.
Blur
A standard blur.
Diffuse
Creates a soft focus appearance.
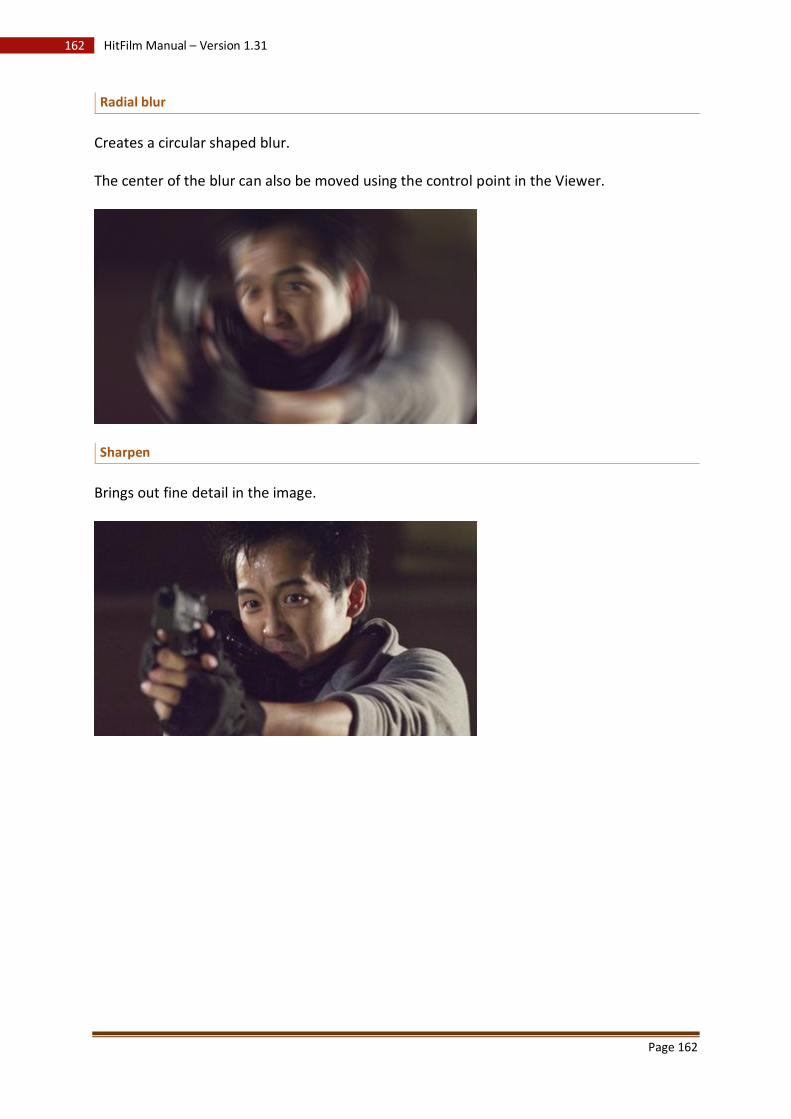
Page 162
162 HitFilm Manual – Version 1.31
Radial blur
Creates a circular shaped blur.
The center of the blur can also be moved using the control point in the Viewer.
Sharpen
Brings out fine detail in the image.

Page 163
163 HitFilm Manual – Version 1.31
Unsharpen
Alternative method for highlighting detail.
Zoom blur
A blur emanating out from a central point.
The center of the blur can also be moved using the control point in the Viewer.
Channel
Channel effects are used to manipulate the color and transparency channels in a layer.
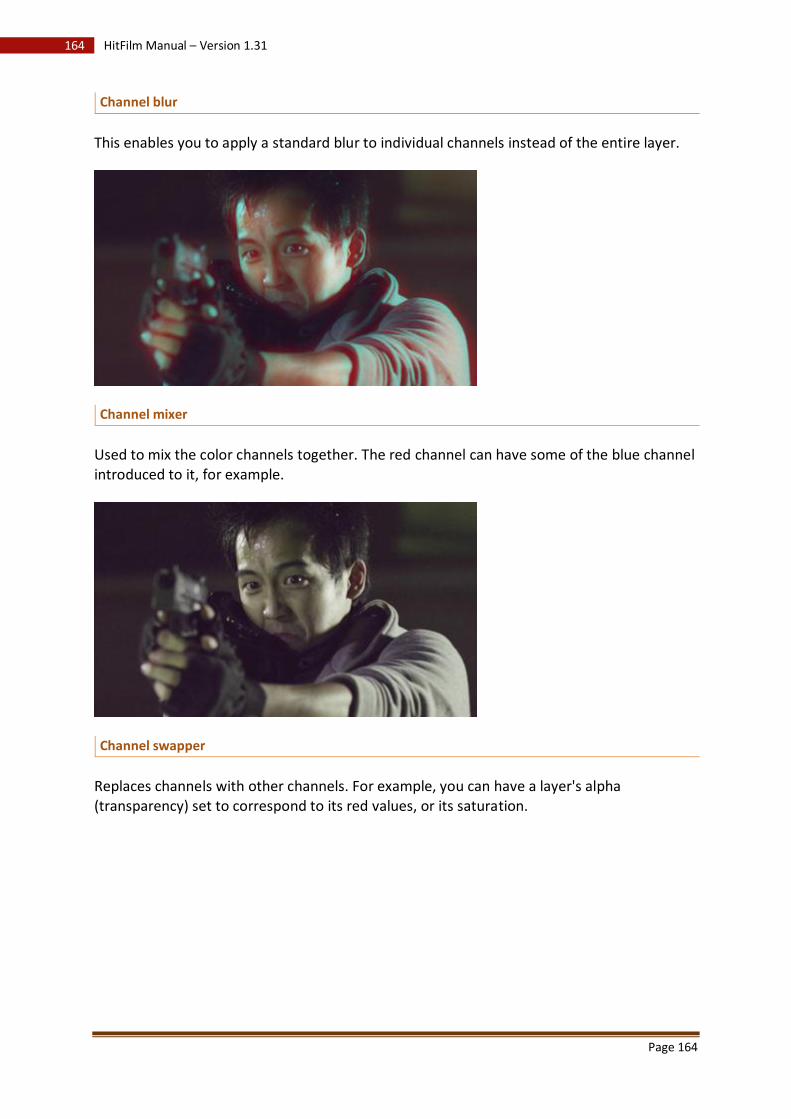
Page 164
164 HitFilm Manual – Version 1.31
Channel blur
This enables you to apply a standard blur to individual channels instead of the entire layer.
Channel mixer
Used to mix the color channels together. The red channel can have some of the blue channel introduced to it, for example.
Channel swapper
Replaces channels with other channels. For example, you can have a layer's alpha (transparency) set to correspond to its red values, or its saturation.

Page 165
165 HitFilm Manual – Version 1.31
In this example the alpha channel is mapped to the red channel, resulting in a semi-transparent layer. This reveal the layer beneath.
Color
The Color category contains the main color correction and grading effects.
Auto color, contrast & levels
These effects automatically adjust the layer's color, contrast or levels.
By default they update on each frame, which can cause fluctuations in the layer's appearance. By activating the Select frame property you can then manually choose a frame to use as the source for the automatic adjustment.
Brightness & contrast
Quick adjustment of the layer's brightness and contrast.
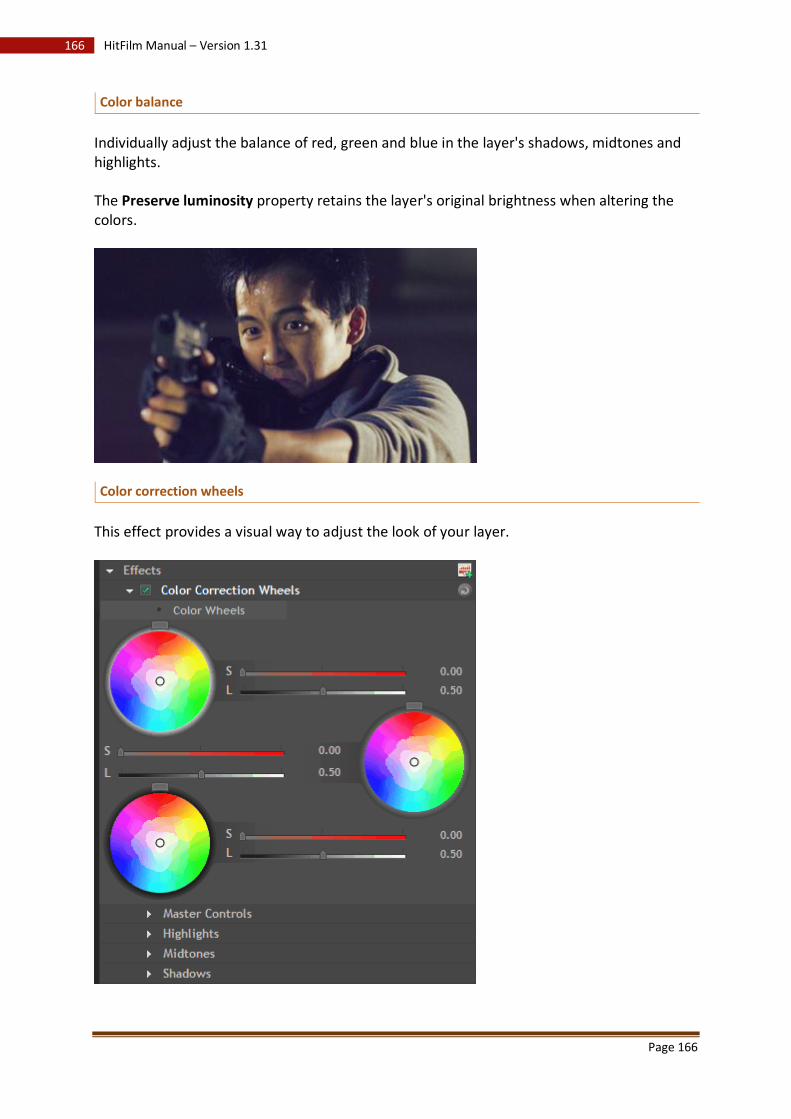
Page 166
166 HitFilm Manual – Version 1.31
Color balance
Individually adjust the balance of red, green and blue in the layer's shadows, midtones and highlights.
The Preserve luminosity property retains the layer's original brightness when altering the colors.
Color correction wheels
This effect provides a visual way to adjust the look of your layer.
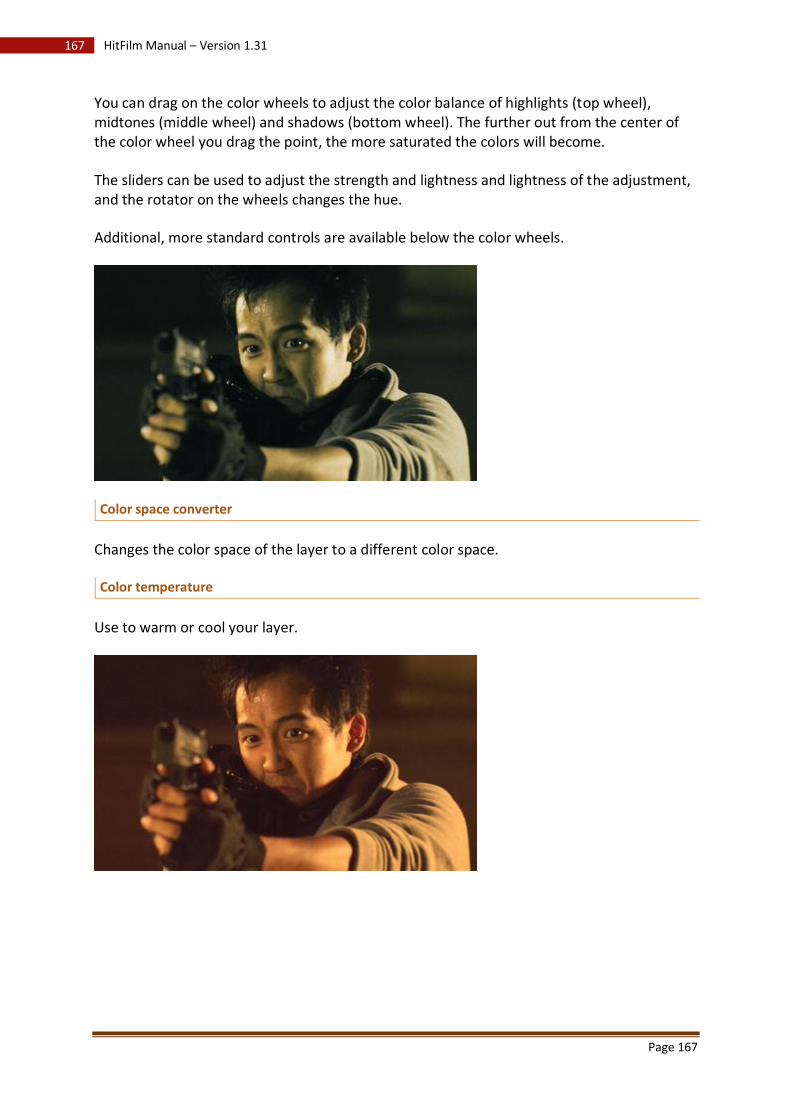
Page 167
167 HitFilm Manual – Version 1.31
You can drag on the color wheels to adjust the color balance of highlights (top wheel), midtones (middle wheel) and shadows (bottom wheel). The further out from the center of the color wheel you drag the point, the more saturated the colors will become.
The sliders can be used to adjust the strength and lightness and lightness of the adjustment, and the rotator on the wheels changes the hue.
Additional, more standard controls are available below the color wheels.
Color space converter
Changes the color space of the layer to a different color space.
Color temperature
Use to warm or cool your layer.
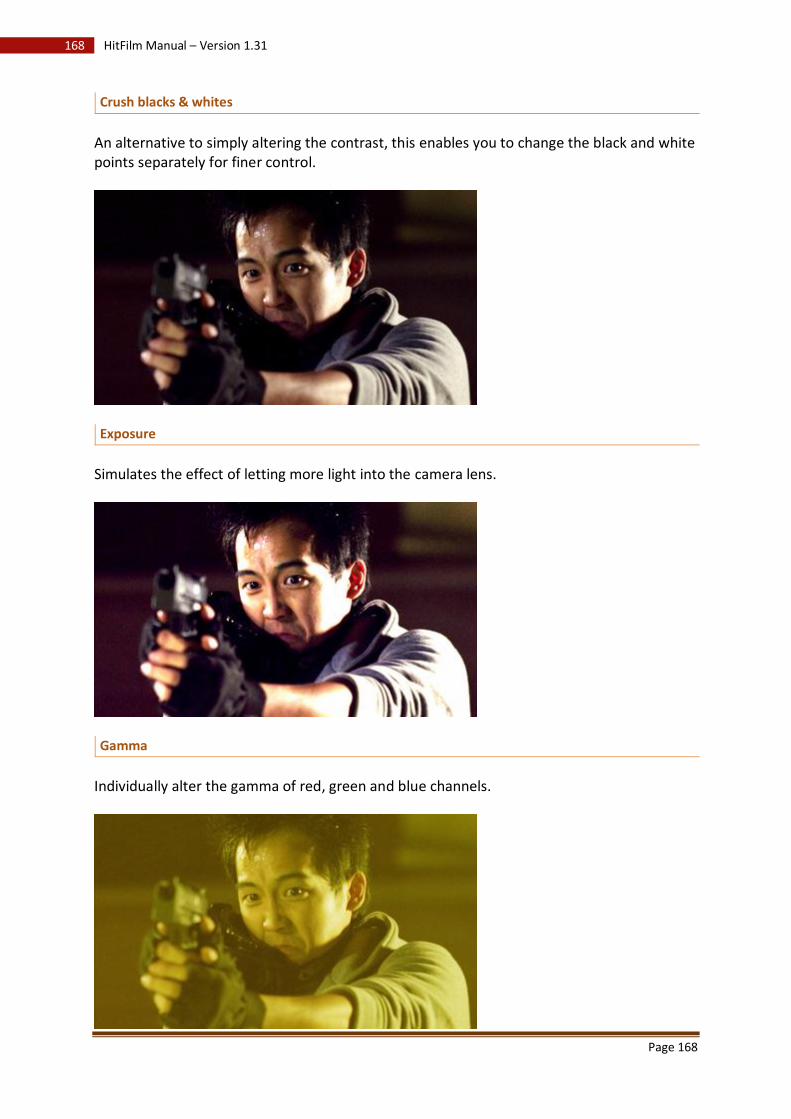
Page 168
168 HitFilm Manual – Version 1.31
Crush blacks & whites
An alternative to simply altering the contrast, this enables you to change the black and white points separately for finer control.
Exposure
Simulates the effect of letting more light into the camera lens.
Gamma
Individually alter the gamma of red, green and blue channels.
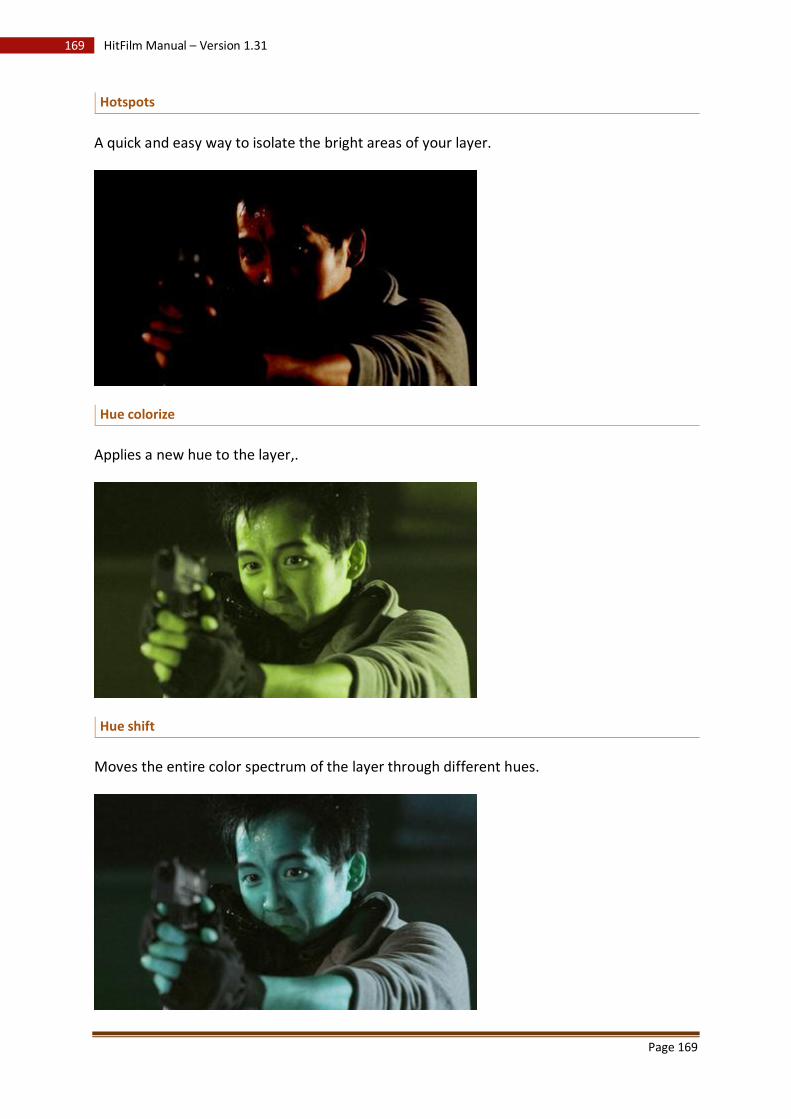
Page 169
169 HitFilm Manual – Version 1.31
Hotspots
A quick and easy way to isolate the bright areas of your layer.
Hue colorize
Applies a new hue to the layer,.
Hue shift
Moves the entire color spectrum of the layer through different hues.
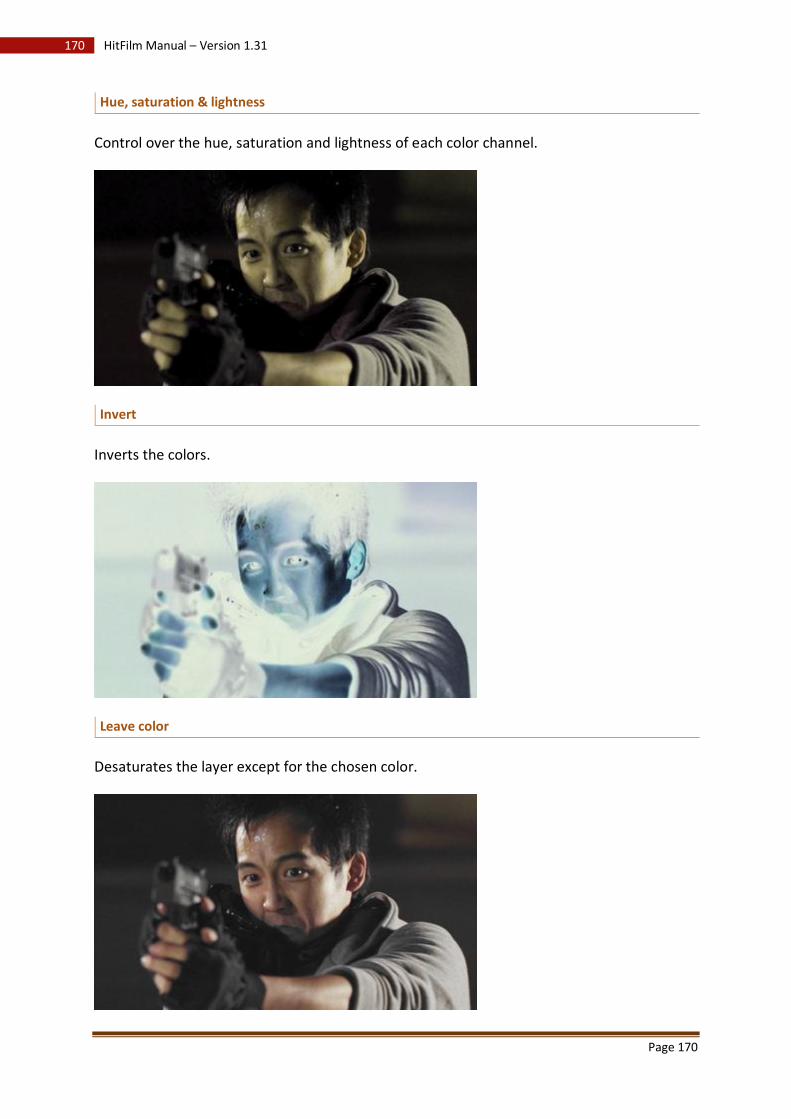
Page 170
170 HitFilm Manual – Version 1.31
Hue, saturation & lightness
Control over the hue, saturation and lightness of each color channel.
Invert
Inverts the colors.
Leave color
Desaturates the layer except for the chosen color.
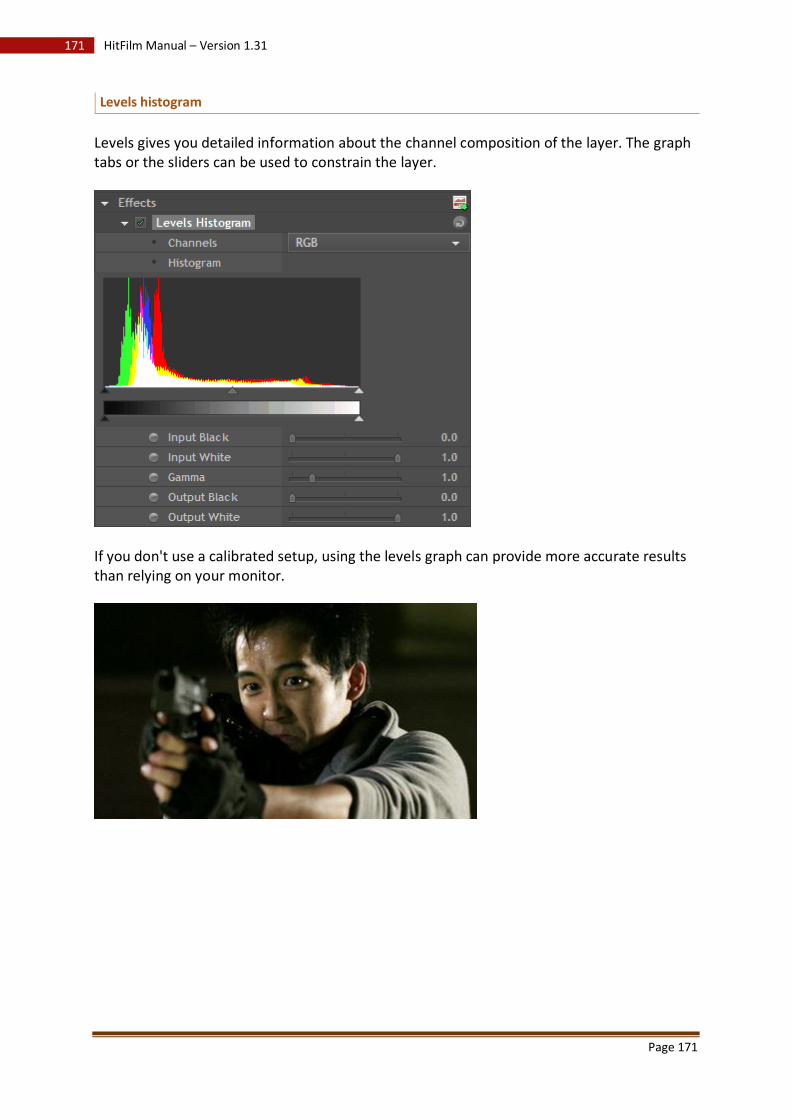
Page 171
171 HitFilm Manual – Version 1.31
Levels histogram
Levels gives you detailed information about the channel composition of the layer. The graph tabs or the sliders can be used to constrain the layer.
If you don't use a calibrated setup, using the levels graph can provide more accurate results than relying on your monitor.
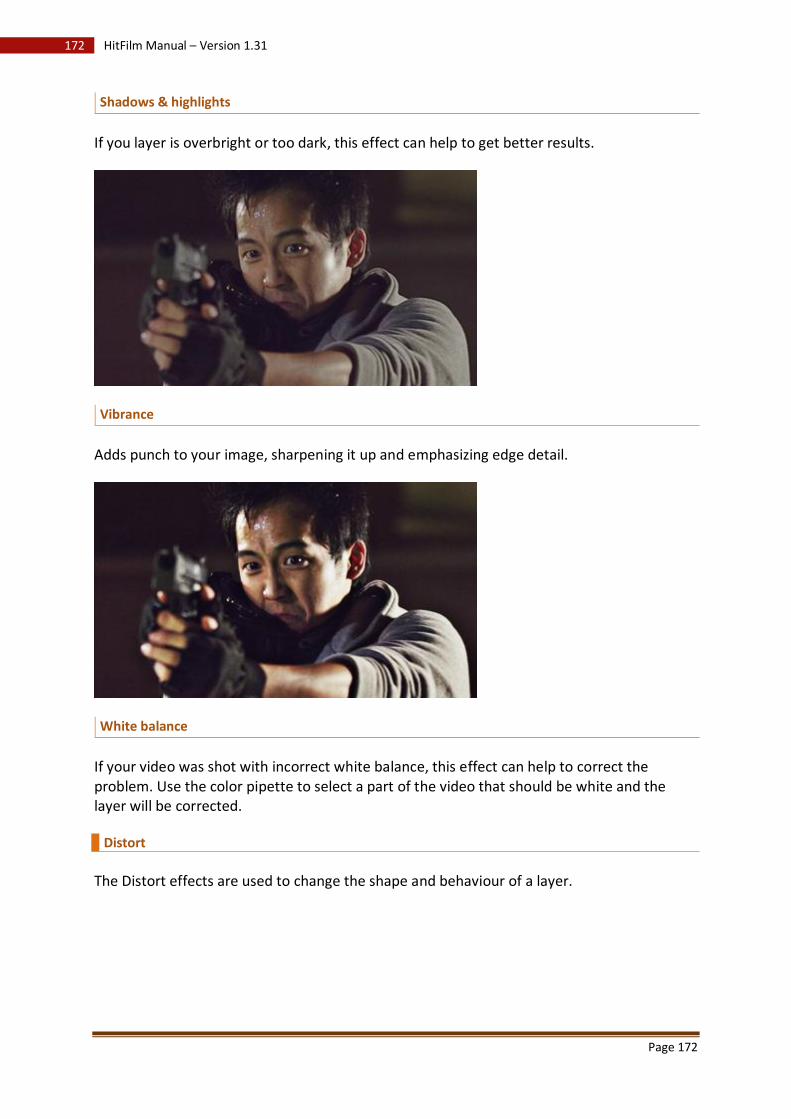
Page 172
172 HitFilm Manual – Version 1.31
Shadows & highlights
If you layer is overbright or too dark, this effect can help to get better results.
Vibrance
Adds punch to your image, sharpening it up and emphasizing edge detail.
White balance
If your video was shot with incorrect white balance, this effect can help to correct the problem. Use the color pipette to select a part of the video that should be white and the layer will be corrected.
Distort
The Distort effects are used to change the shape and behaviour of a layer.
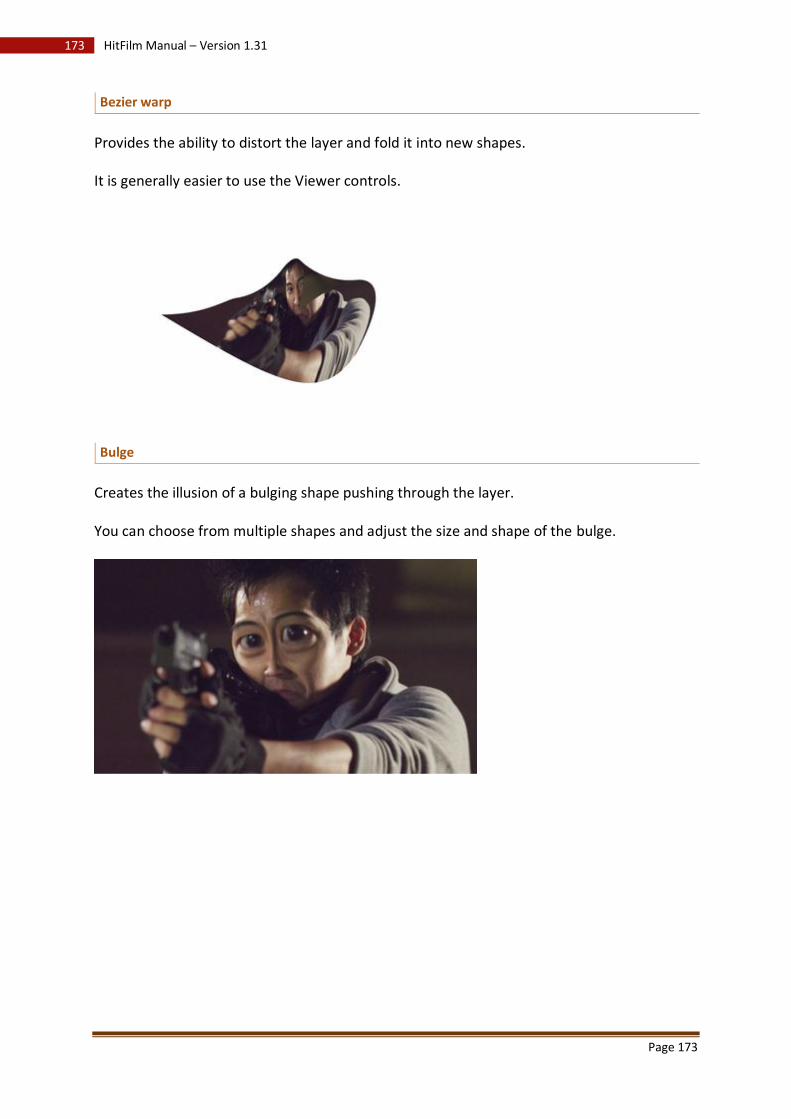
Page 173
173 HitFilm Manual – Version 1.31
Bezier warp
Provides the ability to distort the layer and fold it into new shapes.
It is generally easier to use the Viewer controls.
Bulge
Creates the illusion of a bulging shape pushing through the layer.
You can choose from multiple shapes and adjust the size and shape of the bulge.
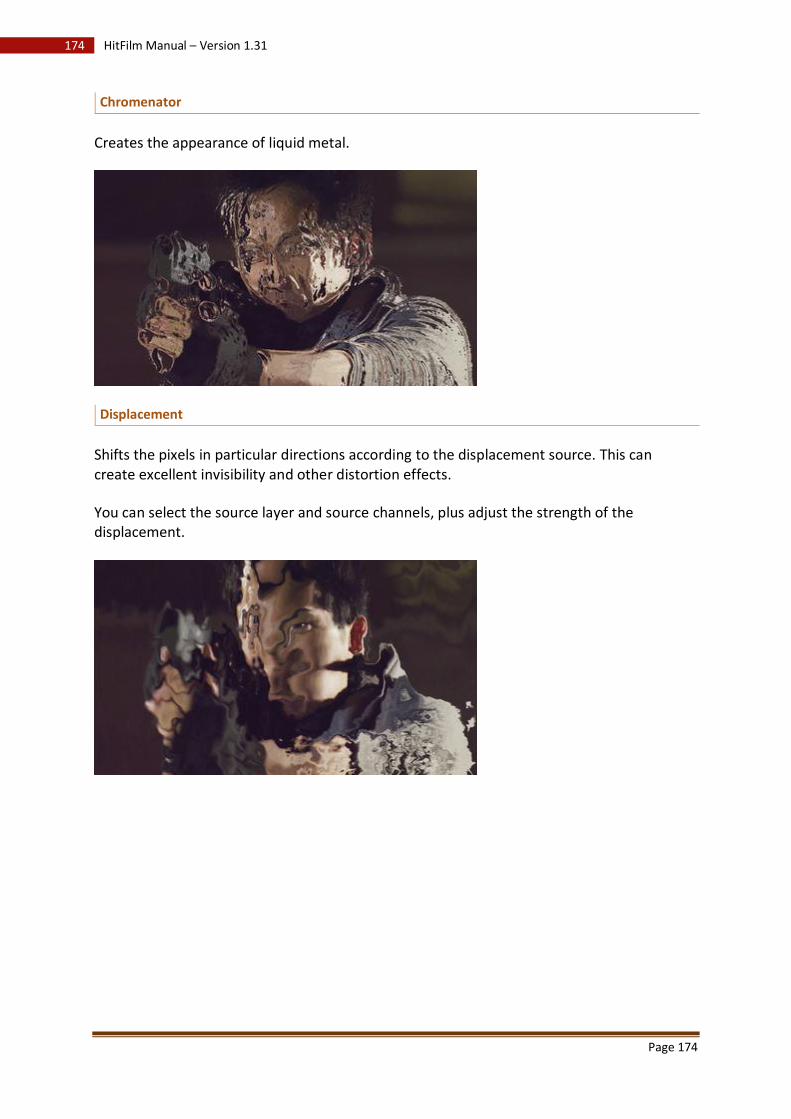
Page 174
174 HitFilm Manual – Version 1.31
Chromenator
Creates the appearance of liquid metal.
Displacement
Shifts the pixels in particular directions according to the displacement source. This can create excellent invisibility and other distortion effects.
You can select the source layer and source channels, plus adjust the strength of the displacement.
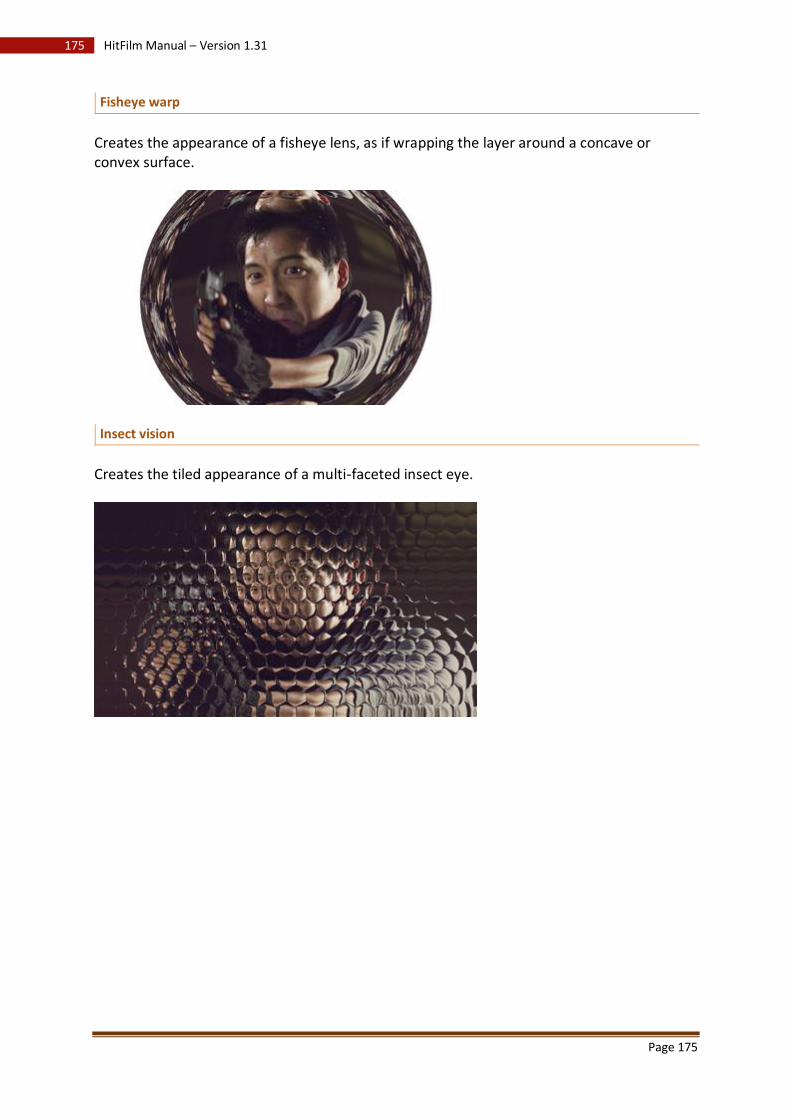
Page 175
175 HitFilm Manual – Version 1.31
Fisheye warp
Creates the appearance of a fisheye lens, as if wrapping the layer around a concave or convex surface.
Insect vision
Creates the tiled appearance of a multi-faceted insect eye.
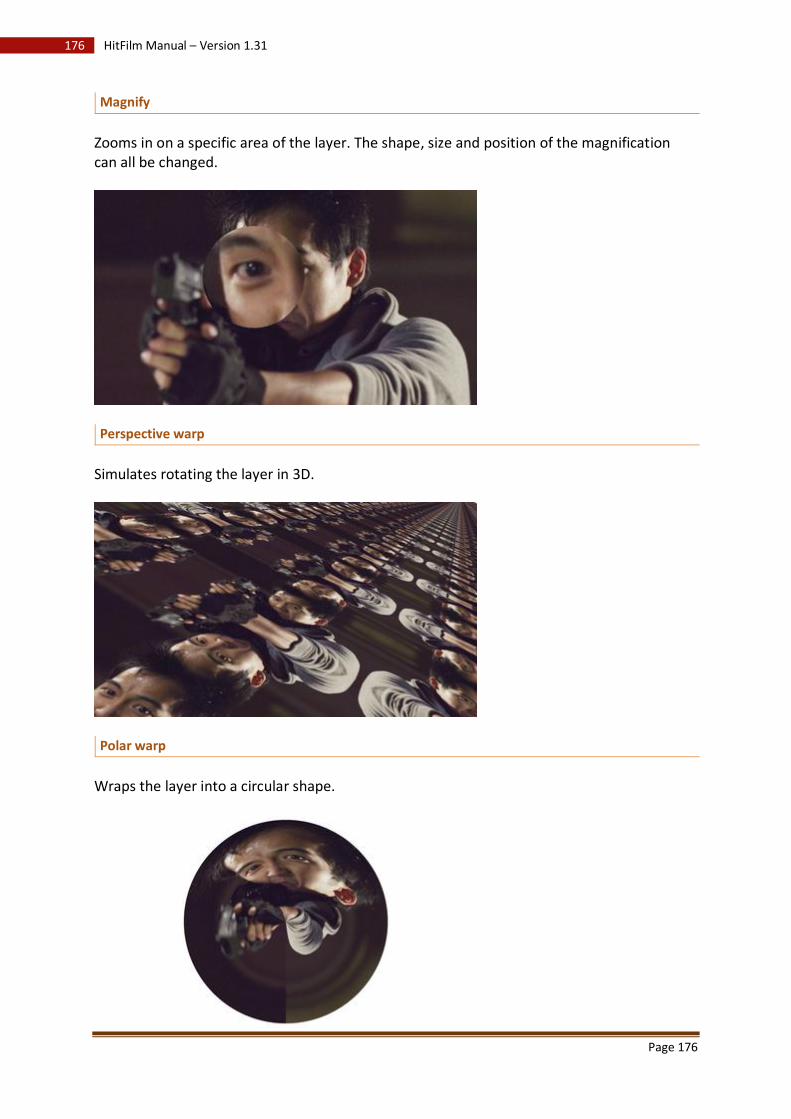
Page 176
176 HitFilm Manual – Version 1.31
Magnify
Zooms in on a specific area of the layer. The shape, size and position of the magnification can all be changed.
Perspective warp
Simulates rotating the layer in 3D.
Polar warp
Wraps the layer into a circular shape.
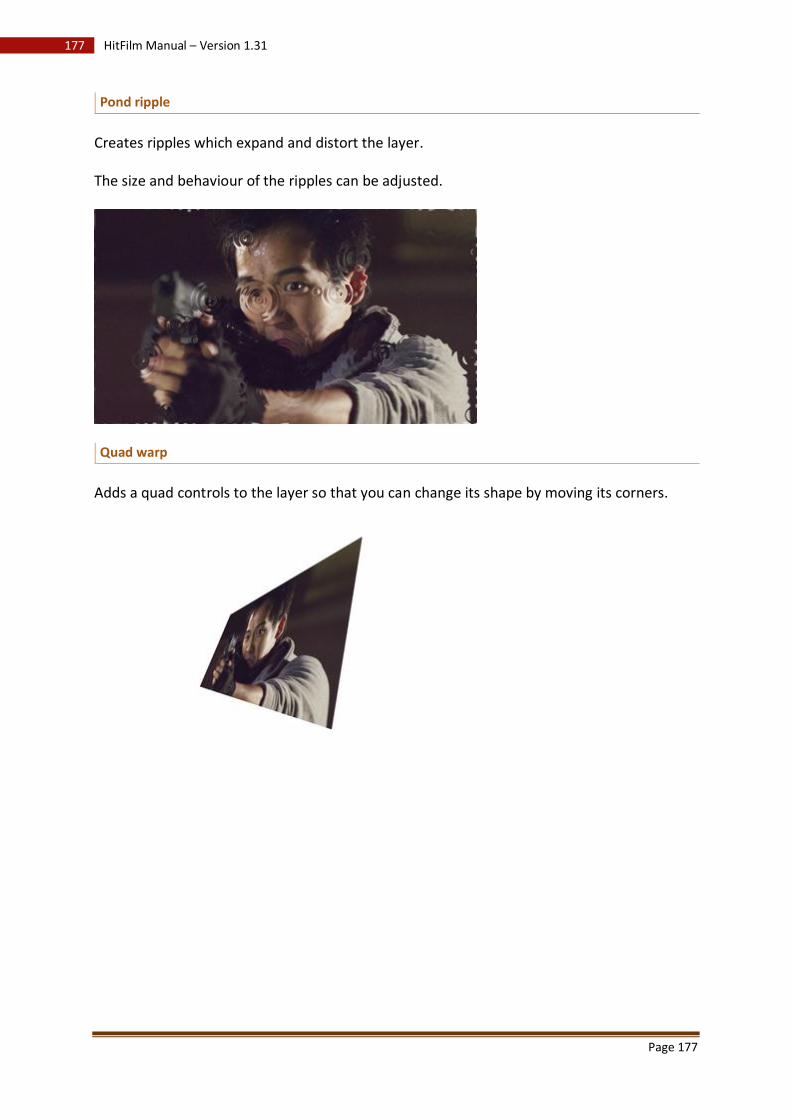
Page 177
177 HitFilm Manual – Version 1.31
Pond ripple
Creates ripples which expand and distort the layer.
The size and behaviour of the ripples can be adjusted.
Quad warp
Adds a quad controls to the layer so that you can change its shape by moving its corners.
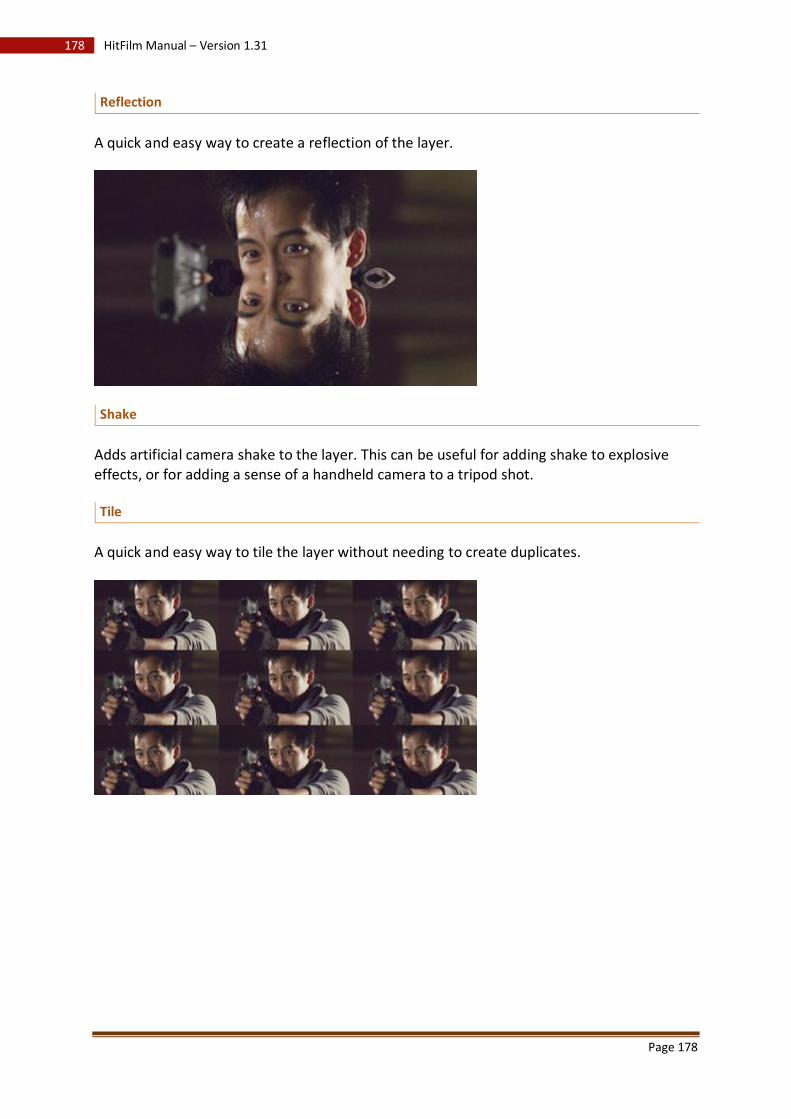
Page 178
178 HitFilm Manual – Version 1.31
Reflection
A quick and easy way to create a reflection of the layer.
Shake
Adds artificial camera shake to the layer. This can be useful for adding shake to explosive effects, or for adding a sense of a handheld camera to a tripod shot.
Tile
A quick and easy way to tile the layer without needing to create duplicates.
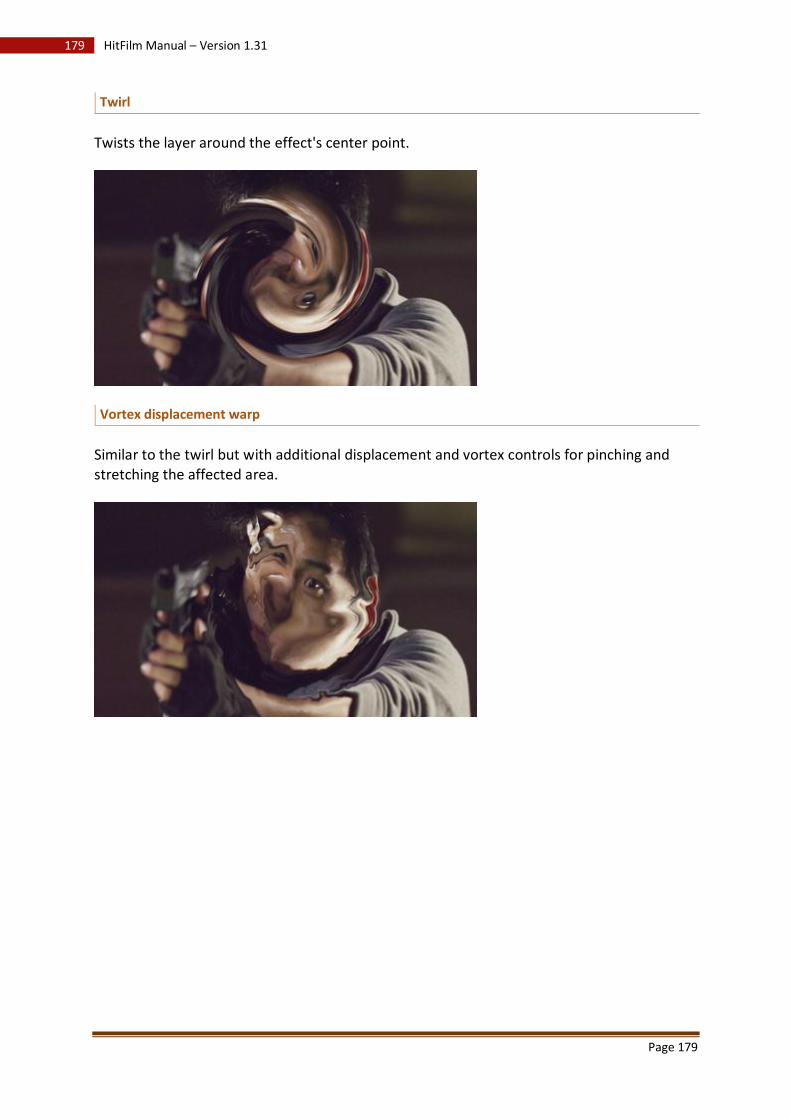
Page 179
179 HitFilm Manual – Version 1.31
Twirl
Twists the layer around the effect's center point.
Vortex displacement warp
Similar to the twirl but with additional displacement and vortex controls for pinching and stretching the affected area.

Page 180
180 HitFilm Manual – Version 1.31
Waves
Creates a corrugated effect. You can also choose another layer as the displacement source and alter the lighting on the bright and dark sides of the wave.
Generate
The Generate effects are used to create new elements. These can be applied to layers like any other effect, though you will often find it best to apply them to Plane layers or Grade layers so that they can be manipulated on a layer of their own.
4-point color gradient
Generates a 4-color gradient. The colors and mixing of the colors can be changed, as can the position of the gradient points.
Blood spray
Creates a spray of blood that jets out from the center point. The effect can also simulate the blood impacting on a surface.
For those of you not making action or horror films, this can also be used for interesting paint effects!
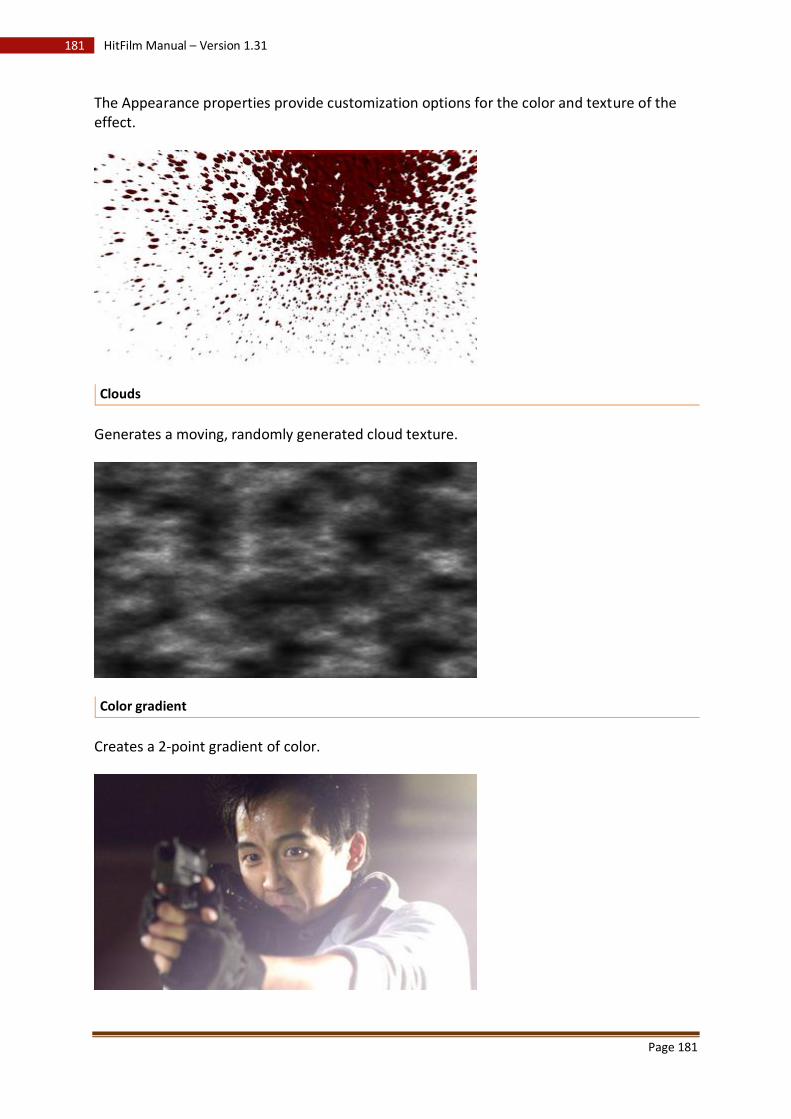
Page 181
181 HitFilm Manual – Version 1.31
The Appearance properties provide customization options for the color and texture of the effect.
Clouds
Generates a moving, randomly generated cloud texture.
Color gradient
Creates a 2-point gradient of color.
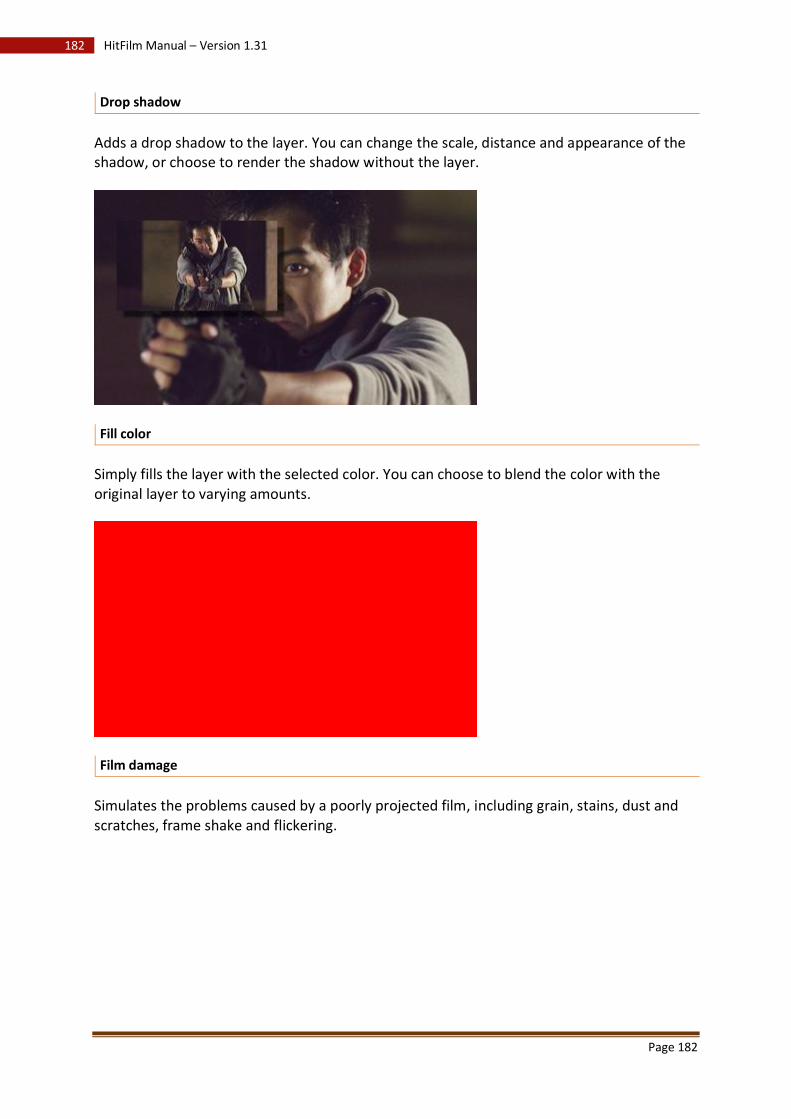
Page 182
182 HitFilm Manual – Version 1.31
Drop shadow
Adds a drop shadow to the layer. You can change the scale, distance and appearance of the shadow, or choose to render the shadow without the layer.
Fill color
Simply fills the layer with the selected color. You can choose to blend the color with the original layer to varying amounts.
Film damage
Simulates the problems caused by a poorly projected film, including grain, stains, dust and scratches, frame shake and flickering.
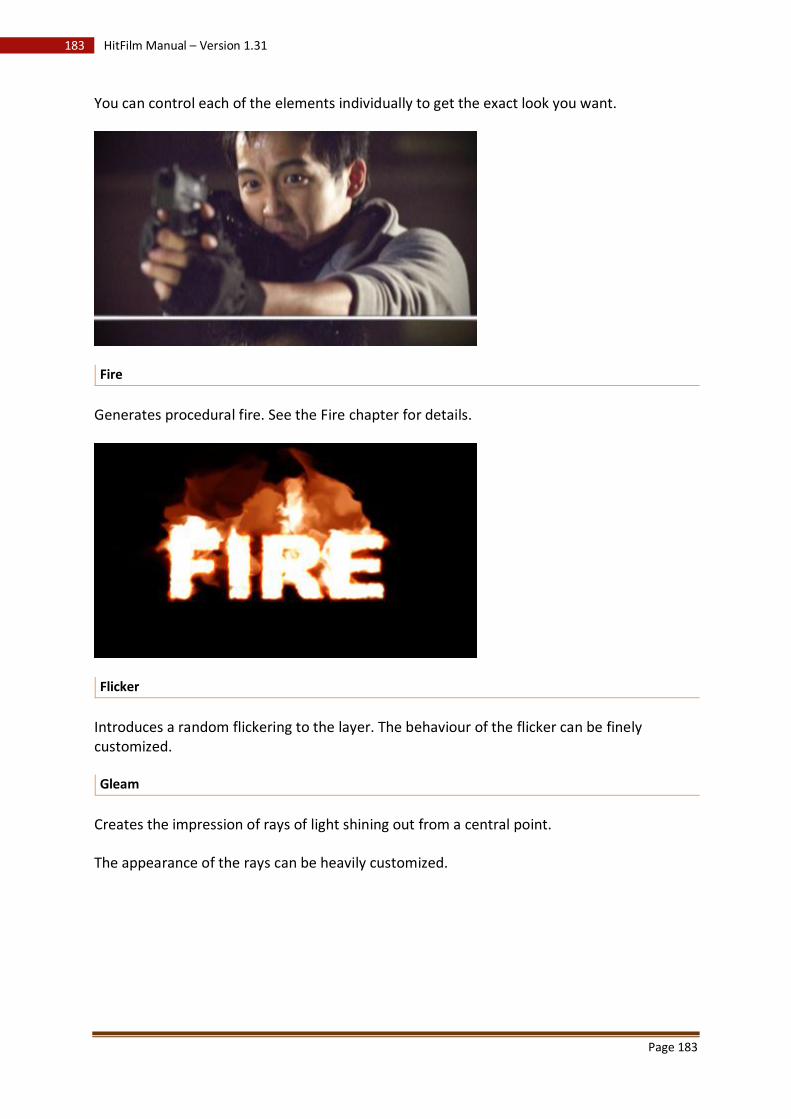
Page 183
183 HitFilm Manual – Version 1.31
You can control each of the elements individually to get the exact look you want.
Fire
Generates procedural fire. See the Fire chapter for details.
Flicker
Introduces a random flickering to the layer. The behaviour of the flicker can be finely customized.
Gleam
Creates the impression of rays of light shining out from a central point.
The appearance of the rays can be heavily customized.
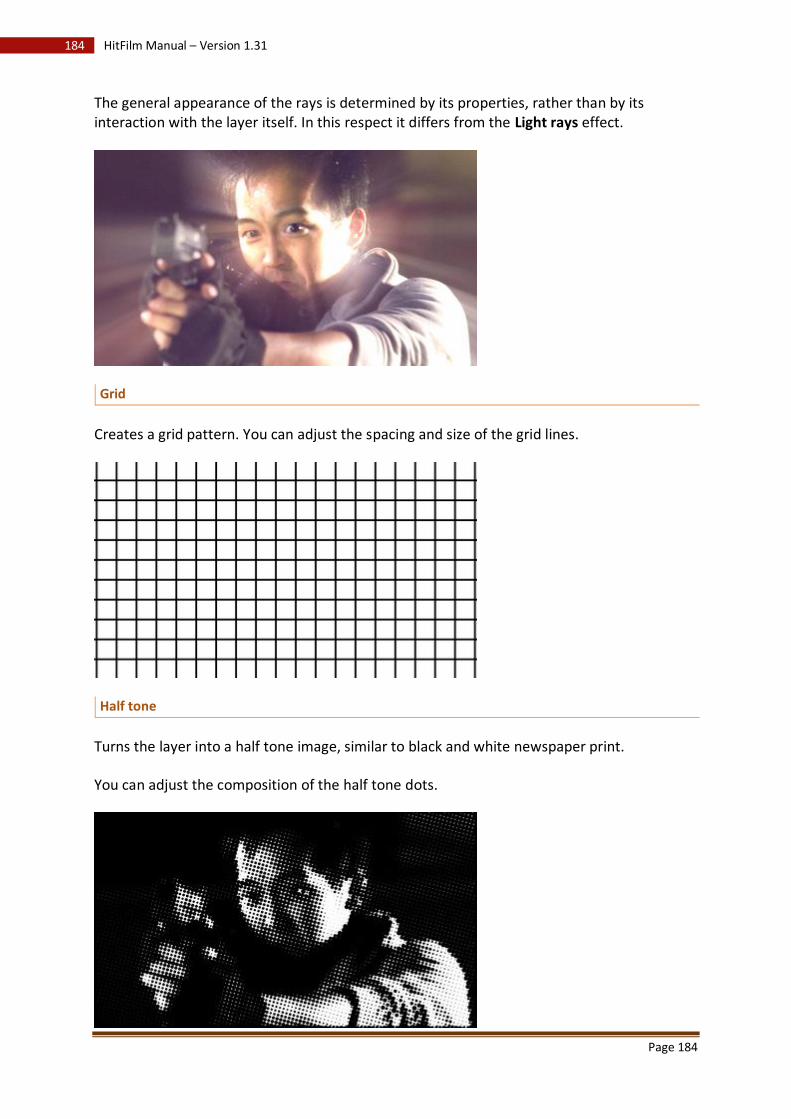
Page 184
184 HitFilm Manual – Version 1.31
The general appearance of the rays is determined by its properties, rather than by its interaction with the layer itself. In this respect it differs from the Light rays effect.
Grid
Creates a grid pattern. You can adjust the spacing and size of the grid lines.
Half tone
Turns the layer into a half tone image, similar to black and white newspaper print.
You can adjust the composition of the half tone dots.
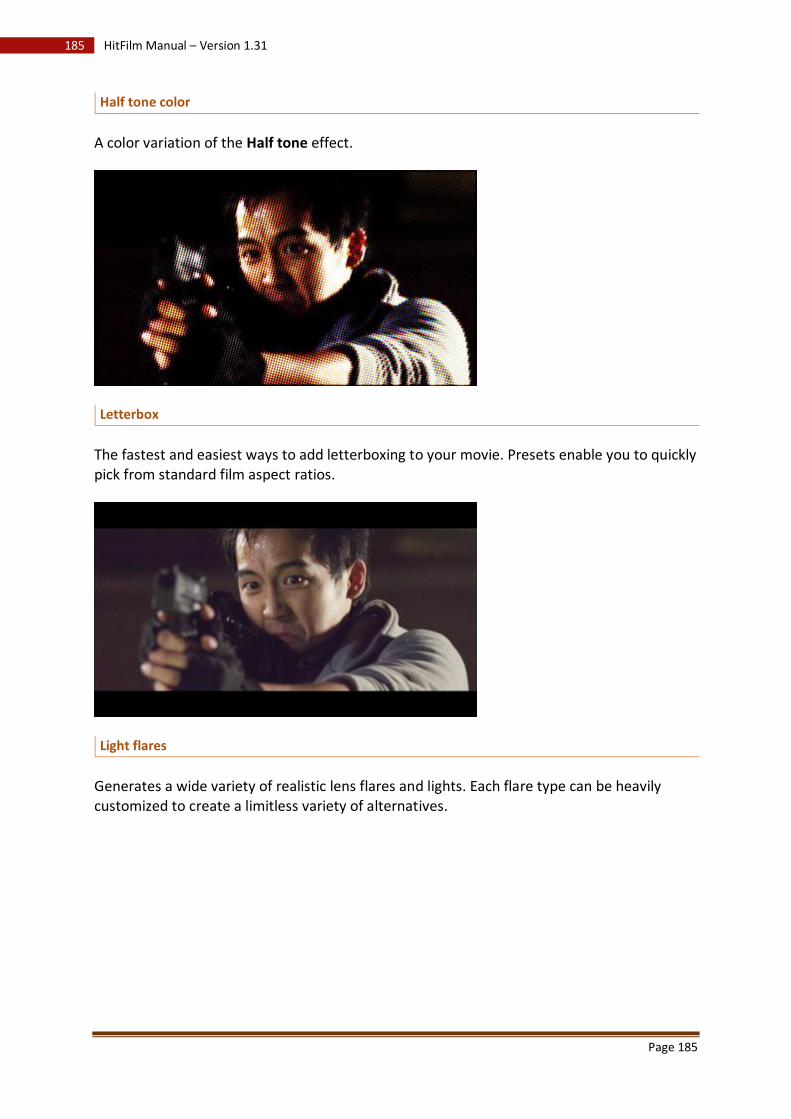
Page 185
185 HitFilm Manual – Version 1.31
Half tone color
A color variation of the Half tone effect.
Letterbox
The fastest and easiest ways to add letterboxing to your movie. Presets enable you to quickly pick from standard film aspect ratios.
Light flares
Generates a wide variety of realistic lens flares and lights. Each flare type can be heavily customized to create a limitless variety of alternatives.
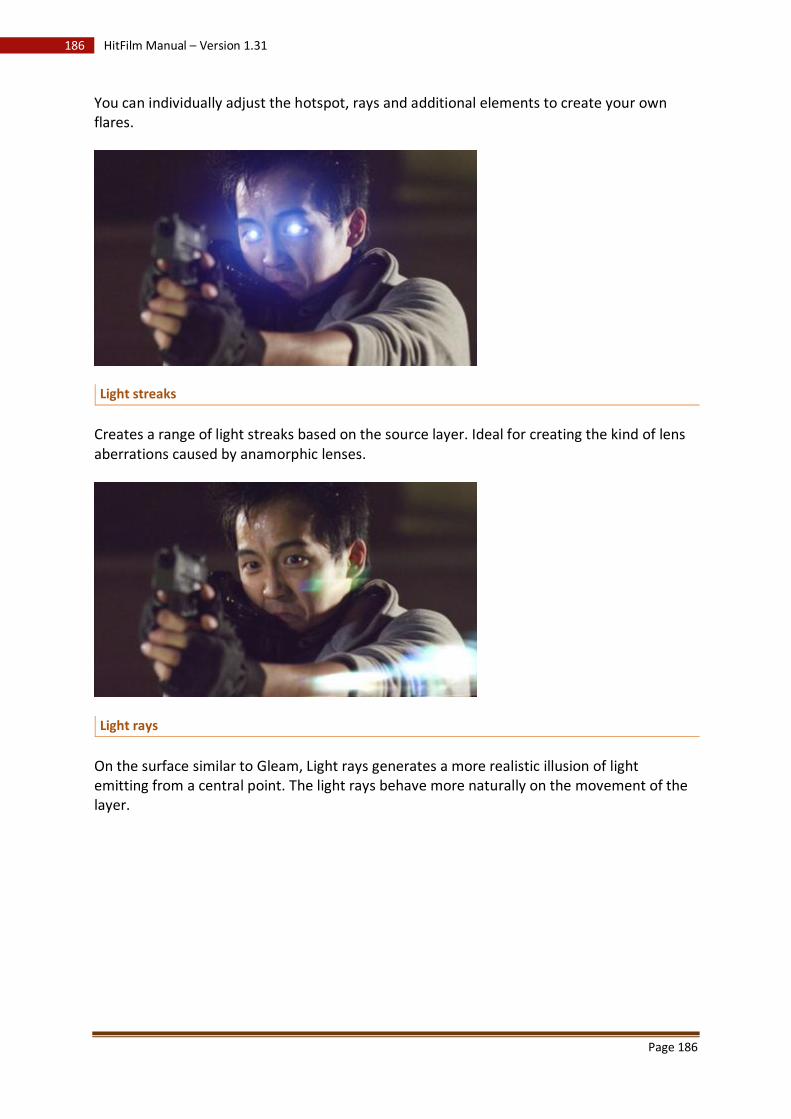
Page 186
186 HitFilm Manual – Version 1.31
You can individually adjust the hotspot, rays and additional elements to create your own flares.
Light streaks
Creates a range of light streaks based on the source layer. Ideal for creating the kind of lens aberrations caused by anamorphic lenses.
Light rays
On the surface similar to Gleam, Light rays generates a more realistic illusion of light emitting from a central point. The light rays behave more naturally on the movement of the layer.
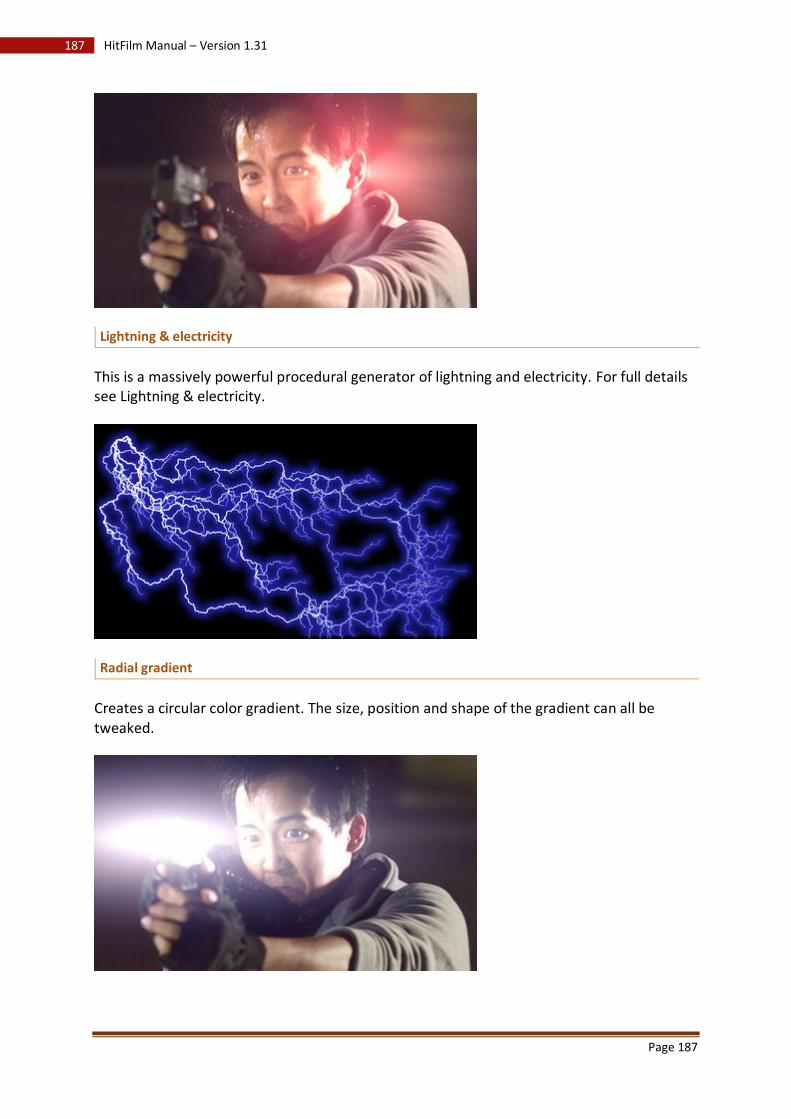
Page 187
187 HitFilm Manual – Version 1.31
Lightning & electricity
This is a massively powerful procedural generator of lightning and electricity. For full details see Lightning & electricity.
Radial gradient
Creates a circular color gradient. The size, position and shape of the gradient can all be tweaked.
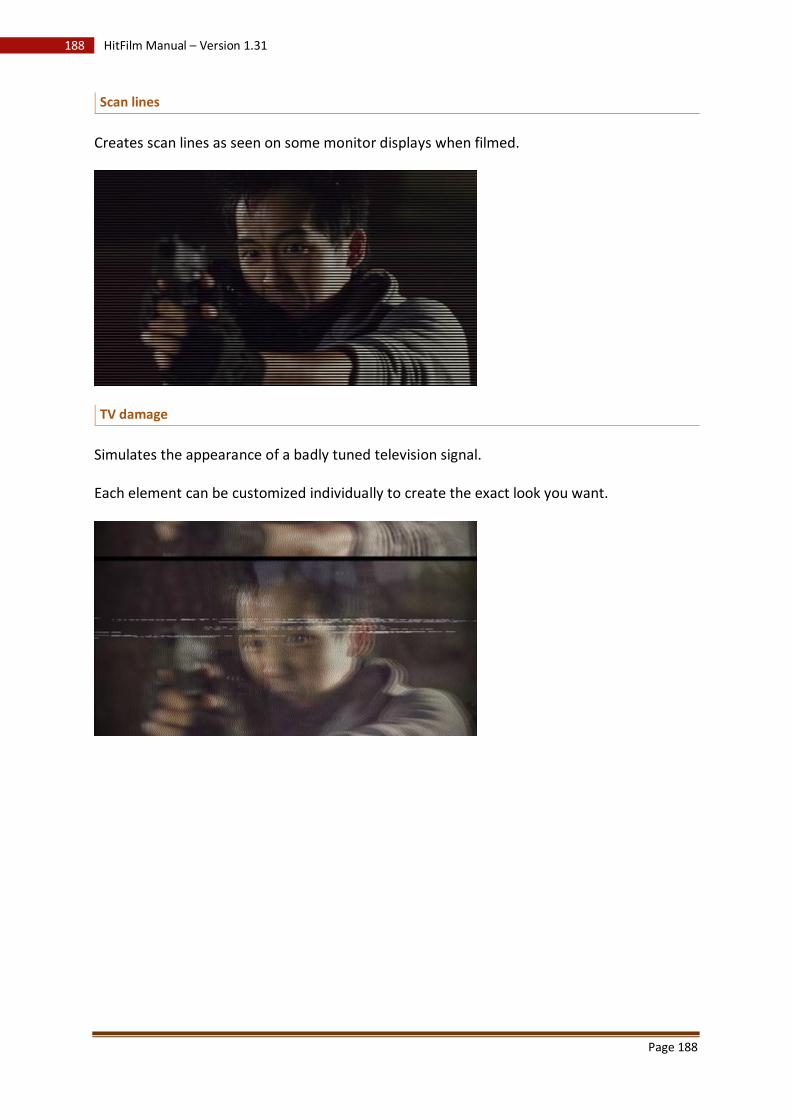
Page 188
188 HitFilm Manual – Version 1.31
Scan lines
Creates scan lines as seen on some monitor displays when filmed.
TV damage
Simulates the appearance of a badly tuned television signal.
Each element can be customized individually to create the exact look you want.
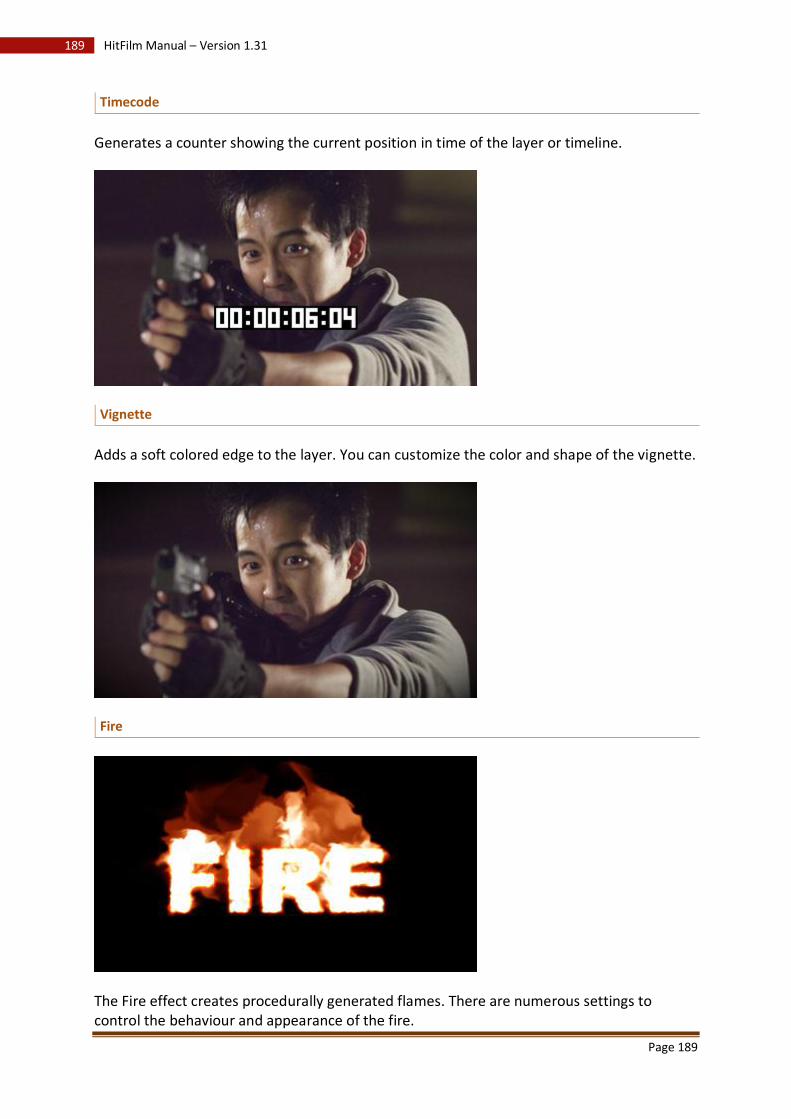
Page 189
189 HitFilm Manual – Version 1.31
Timecode
Generates a counter showing the current position in time of the layer or timeline.
Vignette
Adds a soft colored edge to the layer. You can customize the color and shape of the vignette.
Fire
The Fire effect creates procedurally generated flames. There are numerous settings to control the behaviour and appearance of the fire.

Page 190
190 HitFilm Manual – Version 1.31
Fire regions
There are three definable regions for the fire: flammable region, blocking region and burn direction. If you leave these blank the fire will use the entire layer as its source (excluding transparent areas).
If you select a layer and channel for any of the regions or the direction the fire will be influenced by those elements. This way you can use layers such as gradients to further control the fire's behaviour.
Simulation
• Seed - creates a different random variety of fire. • Iterations - more iterations will create a more realistic simulation of the fire's movement.
• Pre-start - by default the fire starts on the first frame of the layer. This enables you to start the fire before the first frame.
• Flammable end - determines when the fire is no longer visible. • Source scale - changes the size of the fire source elements.
• Source variation - adjusts how often the fire changes formation. Low variation will create a smoother, less volatile fire.
• Source fill - changes the density of the fire. • Movement - changes the length of the flames.
Wind
Wind can be applied to the fire to push the flames in a particular direction.
Appearance
The color and blend method of the fire can be altered here.
The temperature settings change the intensity of the fire. A lower low temperature will reveal more detail in the flame.
Lightning & electricity
Page 191
191 HitFilm Manual – Version 1.31
HitFilm's lightning generator can create a limitless variety of electrical effects.
Lightning consists of several main elements:
• The core is the solid color center of the effect. • The glow is the softer color around the edge of the effect. • Trunks are the primary lines used to draw the lightning. • Branches are created along trunks, adding detail to the effect. • Twigs are created along branches, adding fine detail to the effect.
You can adjust the number of trunks, branches and twigs in the effect using the relevant property groups. Changing these will drastically alter the appearance of the effect.
Wave & twitch
The wave and twitch properties determine the shape of the lightning.
• Wave creates a more undulating, curved line. • Twitch increases the number of twists and turns in the line.
Start & end
The start and end groups control the overall dimensions and animation of the lightning.
The Growth property is used to give the appearance of a lighting strike, causing the lightning to extend and travel down its length.
Animation
• Speed - the speed of the lightning's movement. • Jitter - how often the lightning regenerates to a completely new position. • Scale - how much the lightning moves from its central position.
Keying
HitFilm includes several effects for keying your layers.
Keying is the term used for automatically removing parts of an image or video, usually by identifying a specific color.
Alpha brightness & contrast
The brightness and contrast of a layer's alpha channel can be adjusted to tweak the edges of a composite.
Chroma UV blur
The UV blur can be essential depending on the way your video camera stores its data.
Page 192
192 HitFilm Manual – Version 1.31
After keying some video you may notice a pixellated 'stepping' around the edge of the key. If this occurs, add a chroma UV blur before the key itself. This will help to smooth out the edge.
Color difference key
This is the primary keying effect and is used for removing green screen and blue screen backgrounds from video and images.
If you need to key based on an arbitrary color use the Hue & RGB key.
The View matte option is a quick way to see the layer's alpha channel, making it easier to identify areas where the key needs to be cleaned up.
Erode white
The erode effect gradually removes the edge of a layer's alpha channel.
Hue & RGB key
This effect keys the layer based on a color of your choice. You can pick between using the hue or RGB values.
The View matte option is a quick way to see the layer's alpha channel, making it easier to identify areas where the key needs to be cleaned up.
Invert alpha
Inverts the layer's alpha channel.
Light wrap
You can often improve composites using light wrap, which enables light from another layer to bleed onto the keyed layer.
If you have transformed or added effects to the light wrap source layer, you will need to convert it to an embedded composite shot for the light wrap to take those changes into account.
Luminance key
This effect keys the layer based on its brightness. This can be particularly useful for sky replacement.

Page 193
193 HitFilm Manual – Version 1.31
Matte cleaner
After keying a layer you can use the matte cleaner to tidy up the composite.
• Smooth - makes the edge of the key smoother.
• Feather - makes the edge of the key softer.
• Choke - shrinks the edge of the key.
The View matte option is a quick way to see the layer's alpha channel, making it easier to identify areas where the key needs to be cleaned up.
Remove color matting
When using stock footage, this effect can be used to reduce dark areas in the composited element.
Most effective when used after stock has been composited using the channel swapper.
Set matte
Enables you to use channels from another layer on the current layer. This can be particularly useful if you want to use the alpha channel from another layer.
Spill removal
When working with green screen and blue screen you can sometimes find slight color fringing around the edge of a key after the screen has been removed. The spill removal effect removes or reduces this color fringing.
Noise & grain
In this category you'll find effects for adding and removing noise and grain. These effects can be vital for matching different elements together when creating realistic composites.
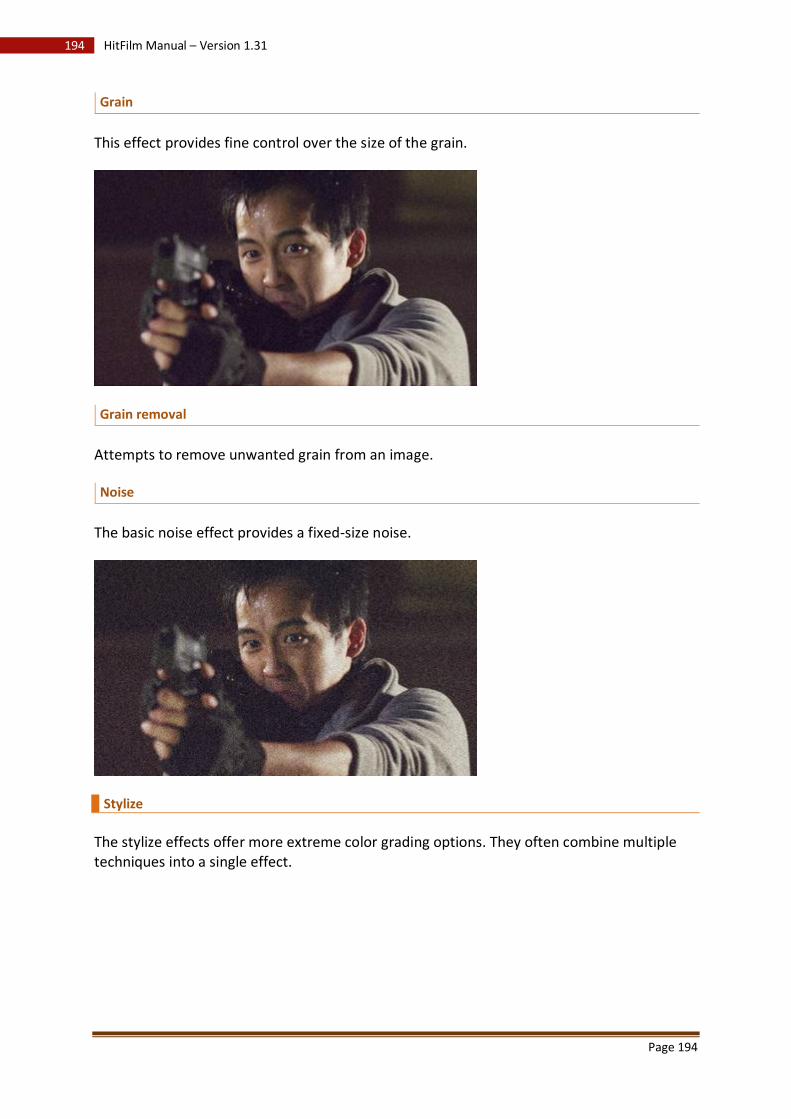
Page 194
194 HitFilm Manual – Version 1.31
Grain
This effect provides fine control over the size of the grain.
Grain removal
Attempts to remove unwanted grain from an image.
Noise
The basic noise effect provides a fixed-size noise.
Stylize
The stylize effects offer more extreme color grading options. They often combine multiple techniques into a single effect.

Page 195
195 HitFilm Manual – Version 1.31
Bleach bypass
Simulates the harsh, high contrast look of bleach bypass film processing. Often used for war movies.
Cartoon
Creates the appearance of a cartoon drawing, with smoothed colors and lines drawn over edges.
You can heavily customize the appearance of the edge lines and the fill.
Day for night
A quick way to convert a shot filmed in the day to having the appearance of being filmed at night.
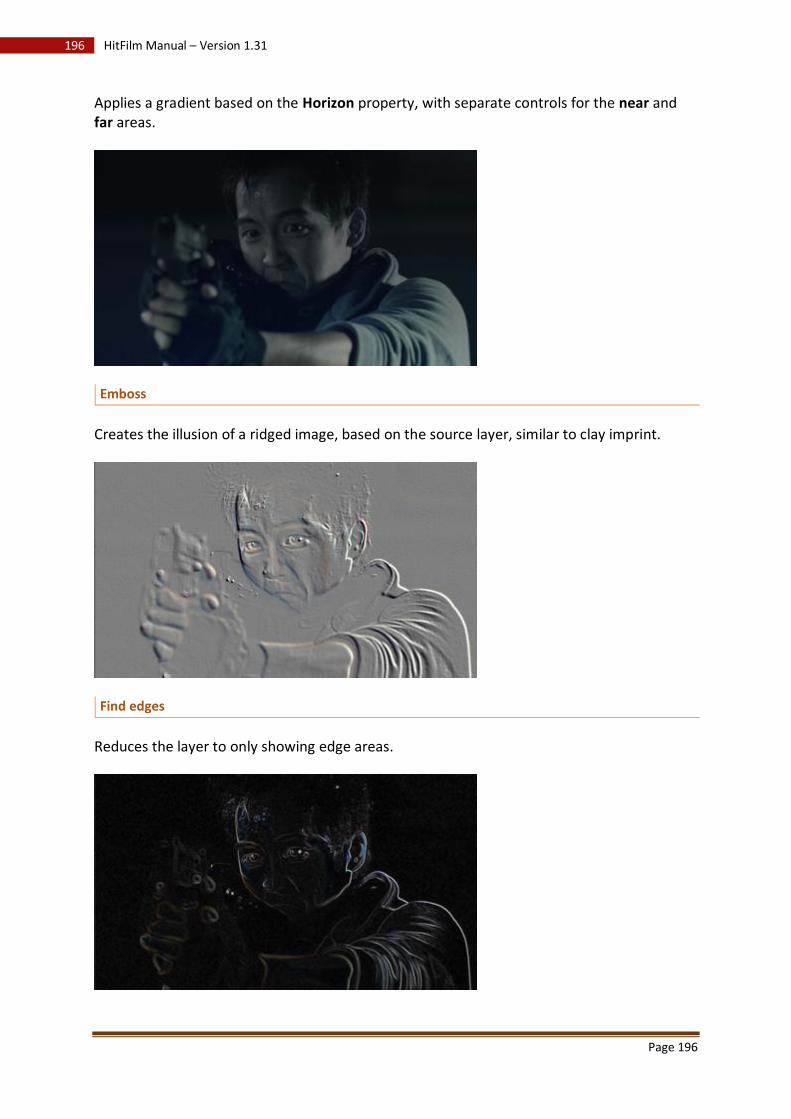
Page 196
196 HitFilm Manual – Version 1.31
Applies a gradient based on the Horizon property, with separate controls for the near and far areas.
Emboss
Creates the illusion of a ridged image, based on the source layer, similar to clay imprint.
Find edges
Reduces the layer to only showing edge areas.
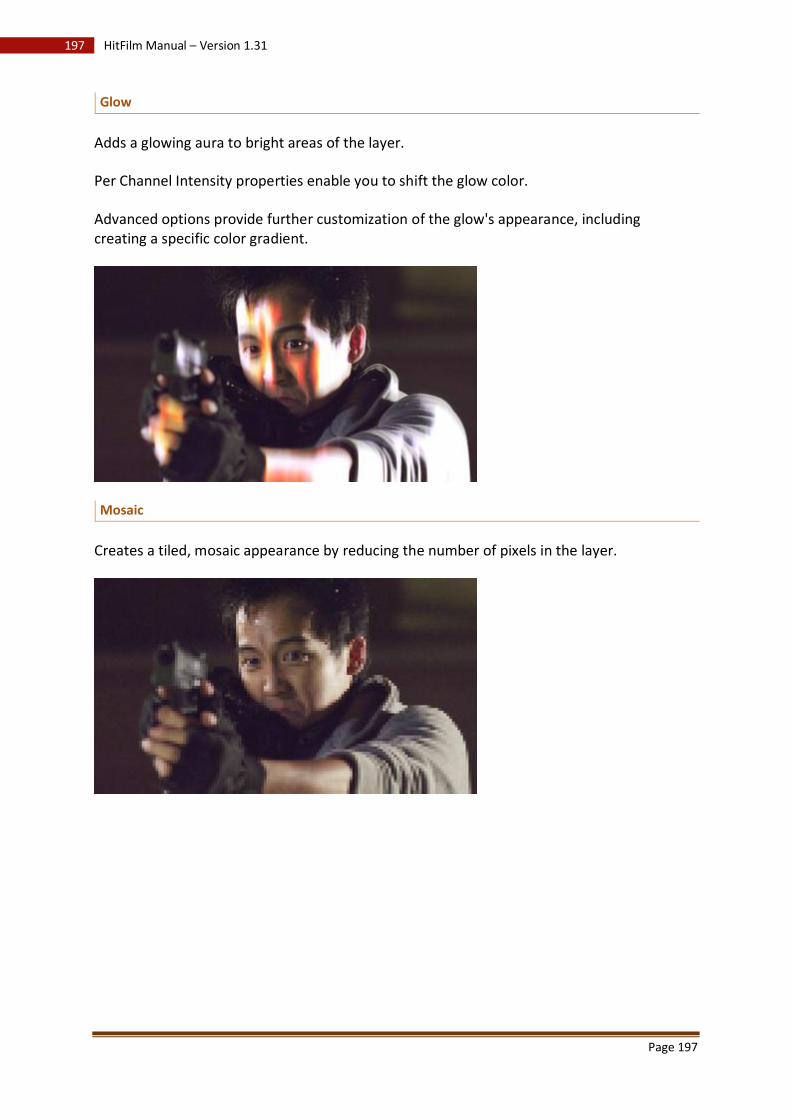
Page 197
197 HitFilm Manual – Version 1.31
Glow
Adds a glowing aura to bright areas of the layer.
Per Channel Intensity properties enable you to shift the glow color.
Advanced options provide further customization of the glow's appearance, including creating a specific color gradient.
Mosaic
Creates a tiled, mosaic appearance by reducing the number of pixels in the layer.
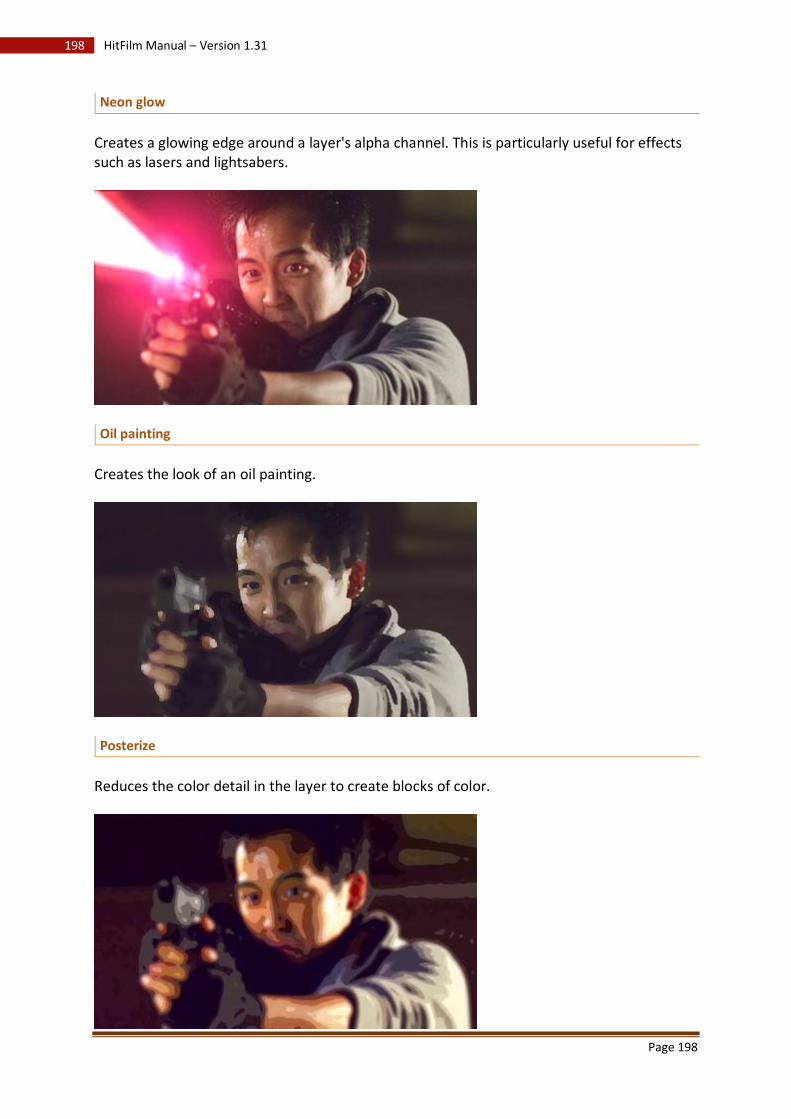
Page 198
198 HitFilm Manual – Version 1.31
Neon glow
Creates a glowing edge around a layer's alpha channel. This is particularly useful for effects such as lasers and lightsabers.
Oil painting
Creates the look of an oil painting.
Posterize
Reduces the color detail in the layer to create blocks of color.
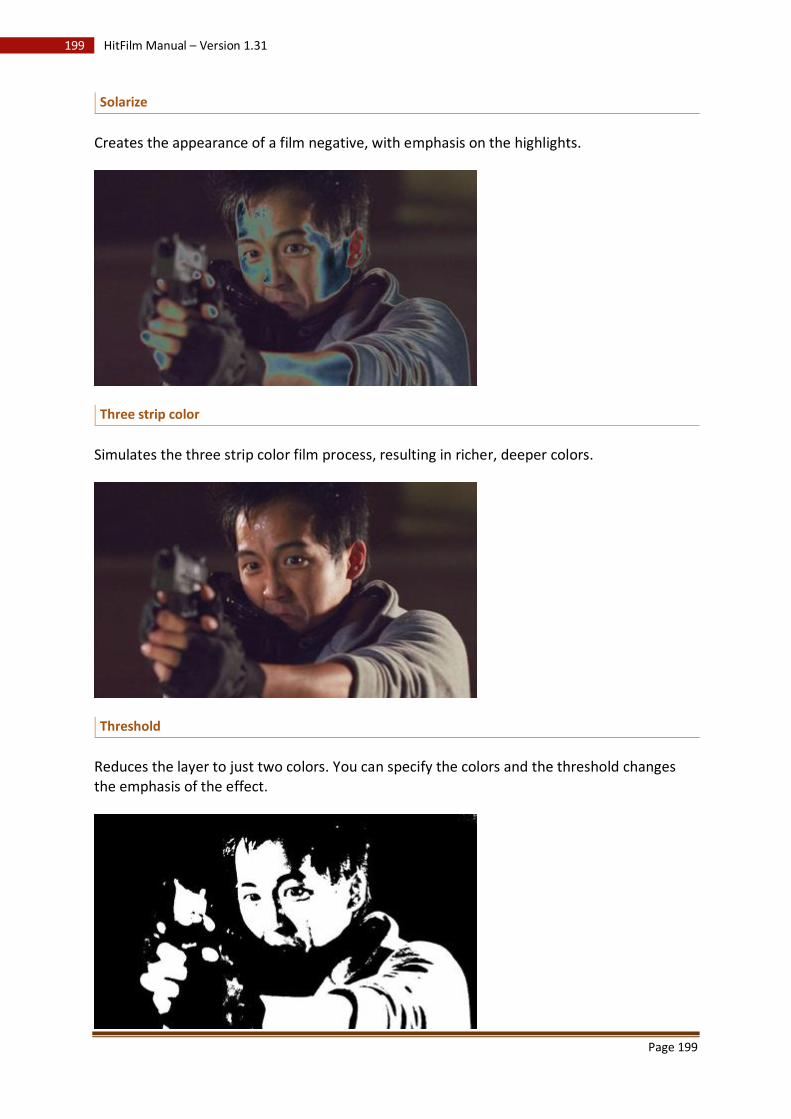
Page 199
199 HitFilm Manual – Version 1.31
Solarize
Creates the appearance of a film negative, with emphasis on the highlights.
Three strip color
Simulates the three strip color film process, resulting in richer, deeper colors.
Threshold
Reduces the layer to just two colors. You can specify the colors and the threshold changes the emphasis of the effect.
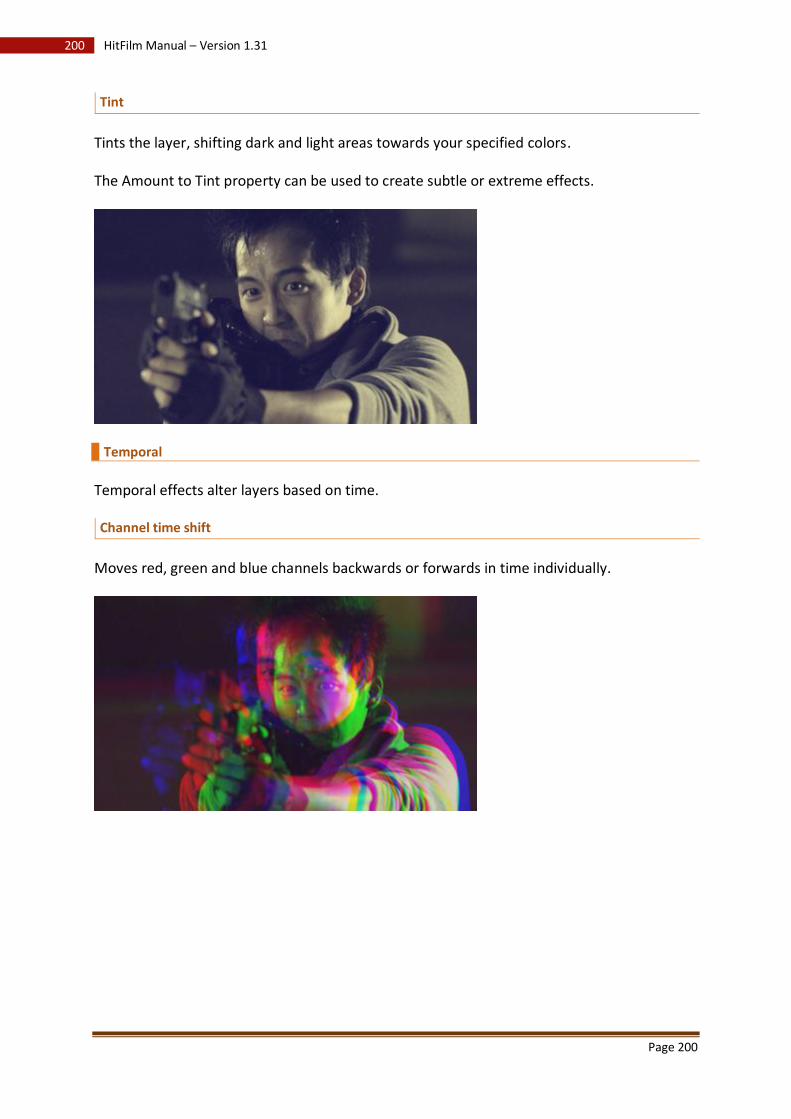
Page 200
200 HitFilm Manual – Version 1.31
Tint
Tints the layer, shifting dark and light areas towards your specified colors.
The Amount to Tint property can be used to create subtle or extreme effects.
Temporal
Temporal effects alter layers based on time.
Channel time shift
Moves red, green and blue channels backwards or forwards in time individually.

Page 201
201 HitFilm Manual – Version 1.31
Echo
Creates repeated versions of the layer, offset in time, which are blended onto the current frame.
• Echo Time - the time difference between each echo. • Decay - each subsequent echo will be less visible.
Jitter
Creates glitches in video playback order.
Motion trails
Adds a fake motion blur based on the movement of the layer.
Speed
Changes the playback speed of the layer.
The speed effect does not change the duration of the layer on the timeline. If you reduce the speed of the layer you will not be able to see any frames which are not played before the end of the layer.
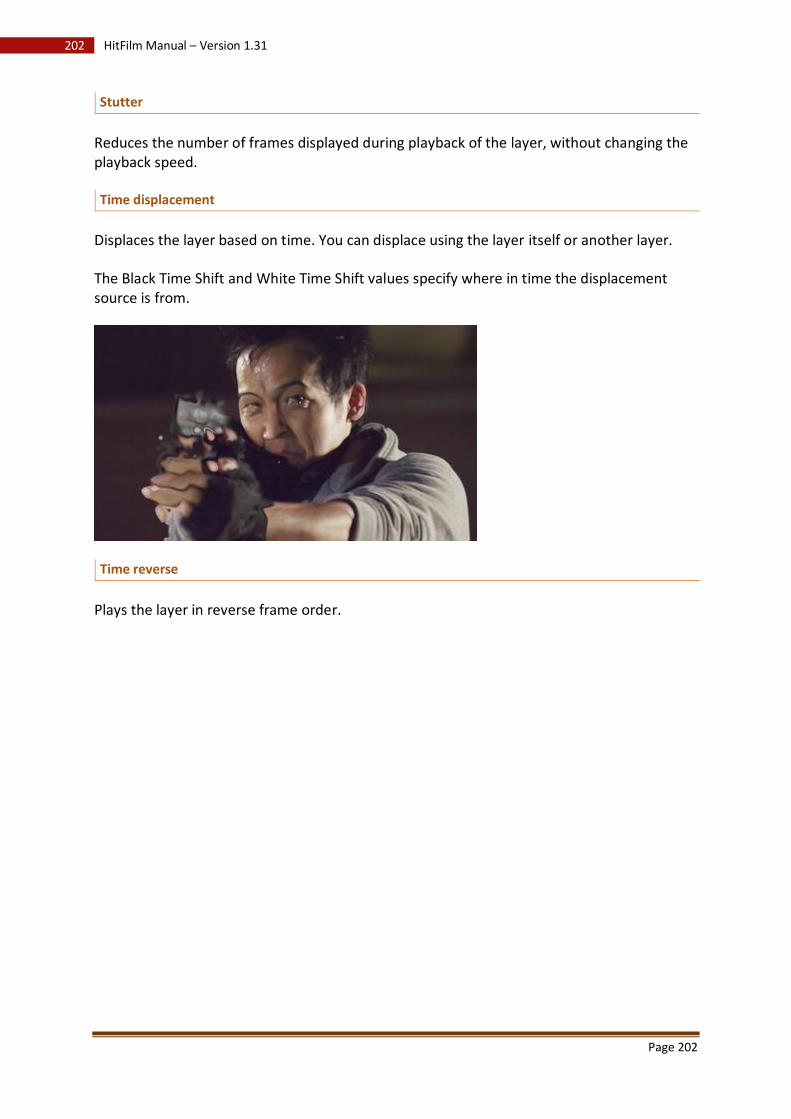
Page 202
202 HitFilm Manual – Version 1.31
Stutter
Reduces the number of frames displayed during playback of the layer, without changing the playback speed.
Time displacement
Displaces the layer based on time. You can displace using the layer itself or another layer.
The Black Time Shift and White Time Shift values specify where in time the displacement source is from.
Time reverse
Plays the layer in reverse frame order.
Page 203
203 HitFilm Manual – Version 1.31
Audio effects
HitFilm's audio effects can be used to alter and generate audio on your Editor sequence or in composite shots.
Audio effects are used in the same way as 2D and 3D effects. They are listed in the Effects panel and can be dragged onto audio clips and layers. Their properties can then be changed in the Controls panel.
Channel levels
Adjust the levels of the left and right stereo channels. Useful for panning your audio.
Tone
Generates a one-note, continuous tone based on a chosen frequency.
Transitions
Transitions are used on the Editor sequence for creating interesting and artistic changes from one shot to the next.
This chapter details each of the transitions available in HitFilm.
For information on applying transitions to your clips see Adding 2D effects and transitions.
Audio
Fade
Adjusts the volume of your audio clip at the start or end, either fading it in from silence or fading it out to silence.
Video
General
Fade to color
Fades from the video to a color of your choice.
Iris
An iris shape expands or contracts to reveal your video.
• Shape - choose from a variety of iris shapes.
• Rotation - rotate the iris shape.
• Curvature - alter the curve shape of the iris.
• Pinch - adjust the points of the shape.
• Shift - warp the shape clockwise or anticlockwise.
Page 204
204 HitFilm Manual – Version 1.31
• Direction - change the direction of the transition.
Dissolve
Additive dissolve
A dissolve that brightens the clips.
Cross dissolve
A smooth dissolve which is commonly used in video and film.
Dither dissolve
A pixellated dissolve.
Motion
Push
Animates your videos on or off the screen in a particular direction.
Slide
Animates one video over the other.
Split
Splits your video into two halves and moves them in opposite directions.
Wipe
Clock wipe
Traditional clock wipe, as if the moving hands of a clock were moving over the video.
Linear wipe
A simple directional wipe.
Radial wipe
A curved wipe like the movement of a vehicle's windscreen wiper.
Zoom
Cross zoom
Zooms in on the first clip and out of the next.
Page 205
205 HitFilm Manual – Version 1.31
Zoom
Zooms the clip in or out of the screen.
Presets
Making use of presets can massively speed up your workflow in HitFilm. Presets can be created for 3D effects and combinations of 2D effects.
Presets store your chosen settings so that you can quickly recreate them elsewhere in your project or even in completely different projects.
Using presets
The presets are organised into multiple folders in the Effects panel.
3D
All the default 3D effects presets are kept in the 3D Effects folder.
When dragged to the timeline, 3D presets create new 3D effect layers. The layer will be automatically set up according to the settings in the preset.
2D
2D effects presets need to be dragged to a layer or clip. They can store the settings for multiple 2D effects, providing a quick way to re-use specific combinations. This is especially useful for different film looks.
Some 2D effects presets can only be used on composite shot timelines. These are marked by [Layer Only] in the Effects panel.
Creating presets
You can create your own presets. These will be listed in the Presets folder of the Effects panel.
3D
To create a new 3D preset, simply right click the 3D effect in your layer list on your timeline and choose Create 3D Preset.
You can then choose a name for your new preset and specify which folder to store it in.
The Include layer transformation properties option will also include any Transform keyframes and values. This can be useful if you want to recreate the exact effect within the same project.
Page 206
206 HitFilm Manual – Version 1.31
2D
To create a 2D effects preset you first need to choose which effects to store in the preset.
Effects can be selected on the timeline by holding shift or ctrl and clicking on the effects you want.
The effects can only be from a single layer or clip.
Once you have selected your effects right click them and choose Create preset.
Presets are a useful way to store and quickly recreate
your favorite effects.
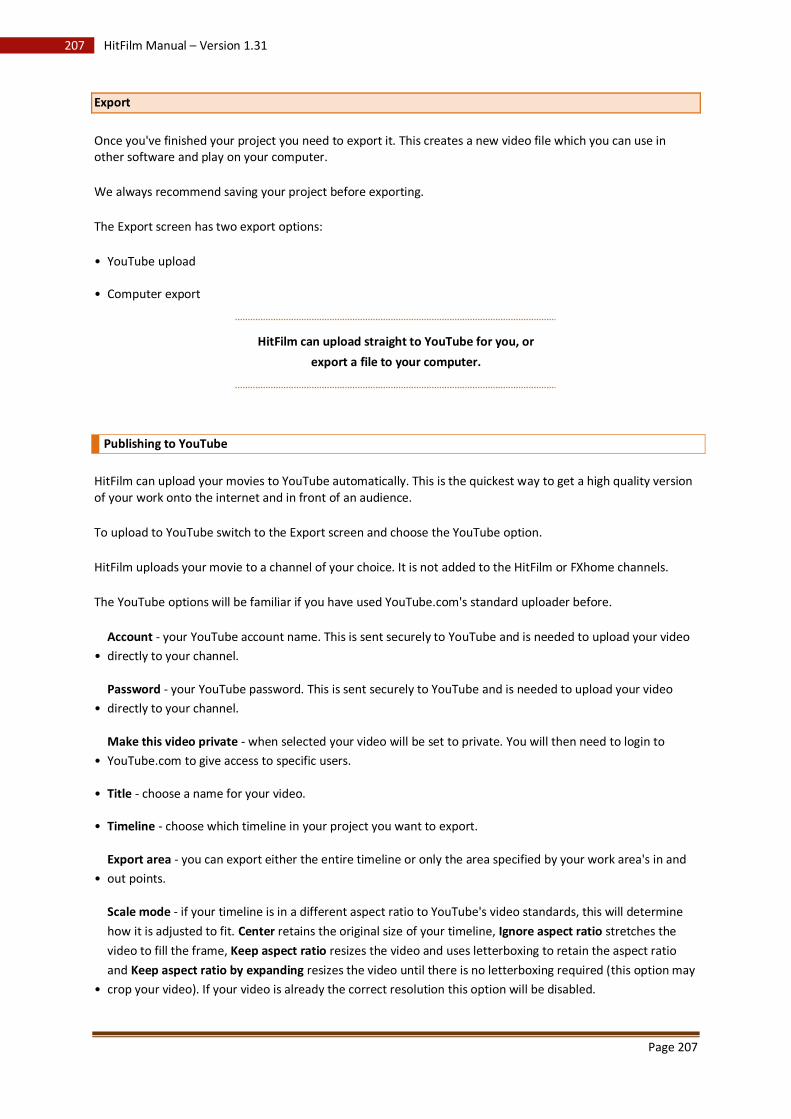
Page 207
207 HitFilm Manual – Version 1.31
Export
Once you've finished your project you need to export it. This creates a new video file which you can use in other software and play on your computer.
We always recommend saving your project before exporting.
The Export screen has two export options:
• YouTube upload
• Computer export
HitFilm can upload straight to YouTube for you, or
export a file to your computer.
Publishing to YouTube
HitFilm can upload your movies to YouTube automatically. This is the quickest way to get a high quality version of your work onto the internet and in front of an audience.
To upload to YouTube switch to the Export screen and choose the YouTube option.
HitFilm uploads your movie to a channel of your choice. It is not added to the HitFilm or FXhome channels.
The YouTube options will be familiar if you have used YouTube.com's standard uploader before.
•
Account - your YouTube account name. This is sent securely to YouTube and is needed to upload your video
directly to your channel.
•
Password - your YouTube password. This is sent securely to YouTube and is needed to upload your video
directly to your channel.
•
Make this video private - when selected your video will be set to private. You will then need to login to
YouTube.com to give access to specific users.
• Title - choose a name for your video.
• Timeline - choose which timeline in your project you want to export.
•
Export area - you can export either the entire timeline or only the area specified by your work area's in and
out points.
•
Scale mode - if your timeline is in a different aspect ratio to YouTube's video standards, this will determine
how it is adjusted to fit. Center retains the original size of your timeline, Ignore aspect ratio stretches the
video to fill the frame, Keep aspect ratio resizes the video and uses letterboxing to retain the aspect ratio
and Keep aspect ratio by expanding resizes the video until there is no letterboxing required (this option may
crop your video). If your video is already the correct resolution this option will be disabled.
Page 208
208 HitFilm Manual – Version 1.31
• Length - the duration of your video.
• Description - this description will be displayed on the video's YouTube page.
• Category - choose from YouTube's default categories.
• Tags - choose tags which describe the video's contents, separated by commas.
•
Resolution - choose between Standard and High definition. Unless you have a very slow internet connection
we would recommend using High definition.
The high definition option will be unavailable if your timeline dimensions are below 720p.
We do not store your YouTube login. It is sent straight to YouTube using Google's secure servers.
Broadcast to the HitFilm Channel
If you activate this option your movie will be automatically sent to the editors at HitFilm.com, where it might be chosen for the HitFilm Select YouTube playlist.
Featured movies are showcased on HitFilm.com, on the HitFilm YouTube channel and on the Home screen of the software.
This service is free. We add your video to a playlist, so you retain full control of the video on your own channel.
This option is unavailable if you have chosen to make your video private.
Exporting to your computer
HitFilm can export to your computer in a variety of formats. To export a file switch to the Export screen and choose the Computer option.
There are numerous options for exporting.
General
• Timeline - choose which timeline in your project you want to export.
•
Export area - you can export either the entire timeline or only the area specified by your work area's in and
out points.
• Length - the duration of your video.
• Format - the format of your export. HitFilm can export to MP4, AVI and image sequences.
• Export video/audio - you can enable and disable video and audio separately.
Video properties
These properties will vary depending on your Format choice.

Page 209
209 HitFilm Manual – Version 1.31
MP4
• Codec - the compressor/decompressor to use on your video.
• Width & Height - the resolution for your exported video file.
•
Scale mode - if your timeline is in a different aspect ratio to your chosen Width and Height, this will
determine how it is adjusted to fit. Center retains the original size of your timeline, Ignore aspect ratio
stretches it to fill the frame, Keep aspect ratio resizes it and uses letterboxing to retain the aspect ratio and
Keep aspect ratio by expanding resizes it until there is no letterboxing required (this option may crop your
project). If your timeline is already the correct resolution this option will be disabled.
• Frame rate - the frame rate of your exported video in frames per second.
•
Aspect ratio - the shape of the individual pixels, which in turn affects the shape of the video frame. Some
formats use non-square pixels to create widescreen aspect ratios, so make sure you check your camera's
specification if your video looks stretched or squashed.
•
Color depth - if you want to retain alpha channel (transparency) information in your exported file this should
be set to 32-bit (RGBA). If alpha channel is not important this can be set to 24-bit (RGB) to reduce filesize.
Some formats do not support 32-bit (RGBA).
• Profile - the quality of the compression. High provides the greatest potential quality export.
• Level - the performance of the decoder. Higher resolutions and framerates will require higher levels.
•
Encoding - constant bitrate encoding uses the same bitrate throughout the video. Variable bitrate encoding
adjusts the bitrate based on the amount of data being processed, which can result in better use of space but
longer export times.
• Bitrate - only available when using constant bitrate encoding.
• Target bitrate - when using variable bitrate encoding the video will aim to be close to this bitrate.
• Max bitrate - when using variable bitrate encoding the video bitrate will not increase above this value.
AVI
• Codec - the compressor/decompressor to use on your video.
Uncompressed video exports progressive video. The DV codecs always export interlaced video.
• Width & Height - the resolution for your exported video file.
•
Scale mode - if your timeline is in a different aspect ratio to your chosen Width and Height, this will
determine how it is adjusted to fit. Center retains the original size of your timeline, Ignore aspect ratio
stretches it to fill the frame, Keep aspect ratio resizes it and uses letterboxing to retain the aspect ratio and
Keep aspect ratio by expanding resizes it until there is no letterboxing required (this option may crop your
project). If your timeline is already the correct resolution this option will be disabled.
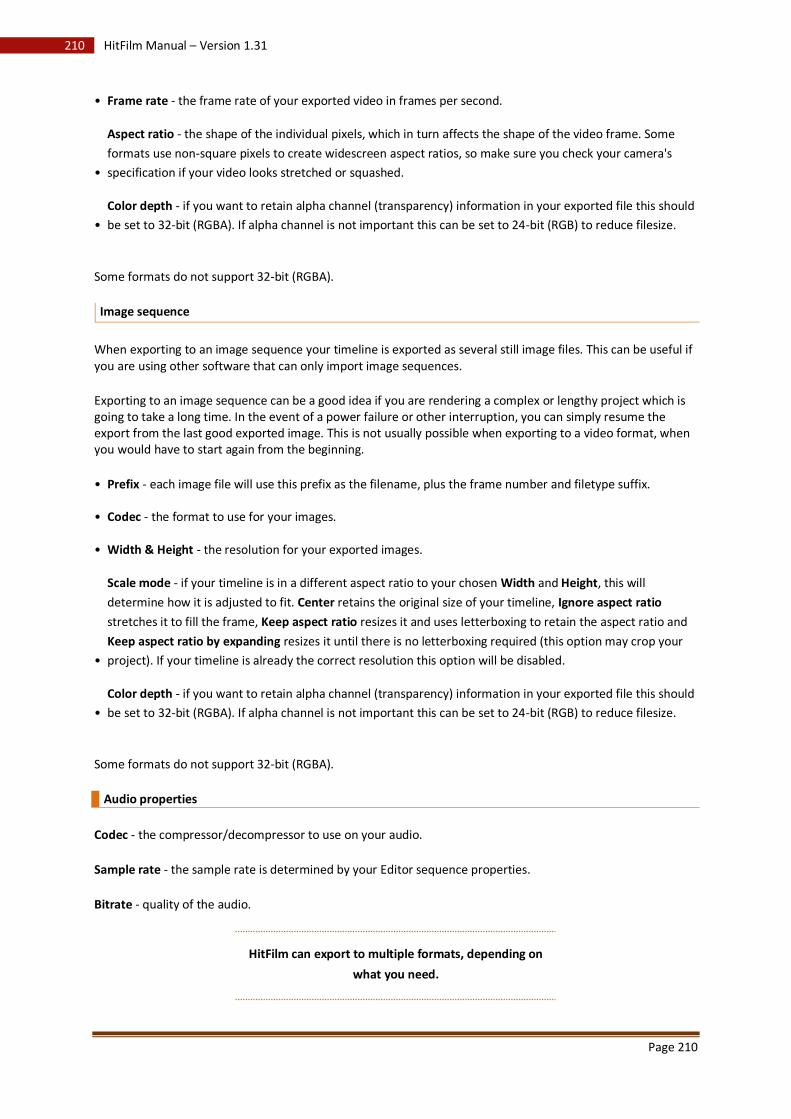
Page 210
210 HitFilm Manual – Version 1.31
• Frame rate - the frame rate of your exported video in frames per second.
•
Aspect ratio - the shape of the individual pixels, which in turn affects the shape of the video frame. Some
formats use non-square pixels to create widescreen aspect ratios, so make sure you check your camera's
specification if your video looks stretched or squashed.
•
Color depth - if you want to retain alpha channel (transparency) information in your exported file this should
be set to 32-bit (RGBA). If alpha channel is not important this can be set to 24-bit (RGB) to reduce filesize.
Some formats do not support 32-bit (RGBA).
Image sequence
When exporting to an image sequence your timeline is exported as several still image files. This can be useful if you are using other software that can only import image sequences.
Exporting to an image sequence can be a good idea if you are rendering a complex or lengthy project which is going to take a long time. In the event of a power failure or other interruption, you can simply resume the export from the last good exported image. This is not usually possible when exporting to a video format, when you would have to start again from the beginning.
• Prefix - each image file will use this prefix as the filename, plus the frame number and filetype suffix.
• Codec - the format to use for your images.
• Width & Height - the resolution for your exported images.
•
Scale mode - if your timeline is in a different aspect ratio to your chosen Width and Height, this will
determine how it is adjusted to fit. Center retains the original size of your timeline, Ignore aspect ratio
stretches it to fill the frame, Keep aspect ratio resizes it and uses letterboxing to retain the aspect ratio and
Keep aspect ratio by expanding resizes it until there is no letterboxing required (this option may crop your
project). If your timeline is already the correct resolution this option will be disabled.
•
Color depth - if you want to retain alpha channel (transparency) information in your exported file this should
be set to 32-bit (RGBA). If alpha channel is not important this can be set to 24-bit (RGB) to reduce filesize.
Some formats do not support 32-bit (RGBA).
Audio properties
Codec - the compressor/decompressor to use on your audio.
Sample rate - the sample rate is determined by your Editor sequence properties.
Bitrate - quality of the audio.
HitFilm can export to multiple formats, depending on
what you need.
Page 211
211 HitFilm Manual – Version 1.31
Help
The Help screen provides quick access to this reference manual and other resources.
If you are using HitFilm on a computer that is connected to the internet, the reference manual will always be up-to-date with the latest information.
Getting more help
If you need more help with HitFilm, head over to the official support website: http://support.hitfilm.com/