hitachi compute blade series · mk-99bds2k004-03 hitachi compute blade series logical partitioning...
TRANSCRIPT

MK-99BDS2K004-03
Hitachi Compute Blade Series Logical Partitioning Manager Version Upgrade /
Revision Update Guide
FASTFIND LINKS
Getting Help
Contents

ii
Hitachi Compute Blade Logical partitioning manager Version Upgrade / Revision Update Guide
© 2012-2013 Hitachi, Ltd. All rights reserved. No part of this publication may be reproduced or transmitted in any form or by any means, electronic or mechanical, including photocopying and recording, or stored in a database or retrieval system for any purpose without the express written permission of Hitachi, Ltd. Hitachi, Ltd., reserves the right to make changes to this document at any time without notice and assumes no responsibility for its use. This document contains the most current information available at the time of publication. When new or revised information becomes available, this entire document will be updated and distributed to all registered users. Some of the features described in this document might not be currently available. Refer to the most recent product announcement for information about feature and product availability, or contact Hitachi Data Systems Corporation at https://portal.hds.com. Notice: Hitachi, Ltd., products and services can be ordered only under the terms and conditions of the applicable Hitachi Data Systems Corporation agreements. The use of Hitachi, Ltd., products is governed by the terms of your agreements with Hitachi Data Systems Corporation. Hitachi is a registered trademark of Hitachi, Ltd., in the United States and other countries. Hitachi Data Systems is a registered trademark and service mark of Hitachi, Ltd., in the United States and other countries. Archivas, Essential NAS Platform, HiCommand, Hi-Track, ShadowImage, Tagmaserve, Tagmasoft, Tagmasolve, Tagmastore, TrueCopy, Universal Star Network, and Universal Storage Platform are registered trademarks of Hitachi Data Systems Corporation. AIX, AS/400, DB2, Domino, DS8000, Enterprise Storage Server, ESCON, FICON, FlashCopy, IBM, Lotus, OS/390, RS6000, S/390, System z9, System z10, Tivoli, VM/ESA, z/OS, z9, zSeries, z/VM, z/VSE are registered trademarks and DS6000, MVS, and z10 are trademarks of International Business Machines Corporation. All other trademarks, service marks, and company names in this document or website are properties of their respective owners. Microsoft product screen shots are reprinted with permission from Microsoft Corporation.

Contents iii
Hitachi Compute Blade Logical partitioning manager Version Upgrade / Revision Update Guide
Contents
Preface .................................................................................................... v
Intended Audience ............................................................................................... vi Release Notes ...................................................................................................... vi Document Conventions ......................................................................................... vi Getting Help........................................................................................................ viii Comments .......................................................................................................... viii
Before You Begin ................................................................................... 1-1
Definition of LP firmware update ......................................................................... 1-2 Supported LP Firmware Levels ............................................................................ 1-2 Tools for Version Upgrade and Revision Update ................................................... 1-3 Reverting Version Upgrade or Revision Update ..................................................... 1-3 Time Estimated for LP firmware update (Reference Only) ..................................... 1-4 Precautions for Dynamic Firmware Update ........................................................... 1-4 Prerequisites ...................................................................................................... 1-6
Dynamic Version Upgrade / Revision Update by HVM Navigator ................ 2-1
Procedure of upgrading/ updating LP firmware..................................................... 2-2 Notes on Firmware Update by Using HVM Navigator ........................................... 2-39 Icon List .......................................................................................................... 2-41
Dynamic Version Upgrade / Revision Update by LP Web System .............. 3-1
Procedure of upgrading / updating LP firmware ................................................... 3-2 Notes on Firmware Update by Using LP Web System .......................................... 3-10

iv Contents
Hitachi Compute Blade Logical partitioning manager Version Upgrade / Revision Update Guide
Static Version Upgrade/ Revision Update by LP Maintenance Tool ............. 4-1
Procedure of upgrading / updating LP firmware .................................................... 4-2 Prerequisites ...................................................................................................... 4-3 Notes on Firmware Update by Using LP Maintenance Tool..................................... 4-9

Preface v
Hitachi Compute Blade Logical partitioning manager Version Upgrade / Revision Update Guide
Preface
This document describes how to use the Compute Blade 2000/320 series.
This preface includes the following information: Intended Audience Release Notes Document Conventions Getting Help Comments
Notice: The use of Compute Blade 2000/320 series and all other Hitachi Data Systems products is governed by the terms of your agreement(s) with Hitachi Data Systems.

vi Preface
Hitachi Compute Blade Logical partitioning manager Version Upgrade / Revision Update Guide
Intended Audience This document is intended for the personnel who are involved in planning, managing, and performing the tasks to prepare your site for Compute Blade installation and to install the same.
This document assumes the following:
• The reader has a background in hardware installation of computer systems.
• The reader is familiar with the location where the Compute Blade will be installed, including knowledge of physical characteristics, power systems and specifications, and environmental specifications.
Release Notes
Release notes contain requirements and more recent product information that may not be fully described in this manual. Be sure to review the release notes before installation.
Document Conventions This term "Compute Blade" refers to all the models of the Compute Blade, unless otherwise noted.
The Hitachi Virtualization Manager (HVM) name has been changed to Hitachi logical partitioning manager (LPAR manager, or LP). If you are using HVM based logical partitioning feature, substitute references to Hitachi logical partitioning manager (LPAR manager, or LP) with HVM.
This document uses the following typographic conventions:
Convention Description
Bold Indicates text on a window, other than the window title, including menus, menu options, fields, and labels. Example: Click OK.
Italic Indicates a variable, which is a placeholder for actual text provided by the user or system. Example: copy source-file target-file
Note: Angled brackets (< >) are also used to indicate variables.
screen/code Indicates text that is displayed on screen or entered by the user. Example: # pairdisplay -g oradb
< > angled brackets Indicates a variable, which is a placeholder for actual text provided by the user or system. Example: # pairdisplay -g <group>
Note: Italic font is also used to indicate variables.
[ ] square brackets Indicates optional values. Example: [ a | b ] indicates that you can choose a, b, or nothing.
{ } braces Indicates required or expected values. Example: { a | b } indicates that you must choose either a or b.

Preface vii
Hitachi Compute Blade Logical partitioning manager Version Upgrade / Revision Update Guide
Convention Description
| vertical bar Indicates that you have a choice between two or more options or arguments. Examples:
[ a | b ] indicates that you can choose a, b, or nothing.
{ a | b } indicates that you must choose either a or b.
underline Indicates the default value. Example: [ a | b ]
This document uses the following icons to draw attention to information:
Icon Meaning Description
WARNING
WARNING This indicates the presence of a potential risk that might cause death or severe injury.
CAUTION
CAUTION This indicates the presence of a potential risk that might cause relatively mild or moderate injury.
NOTICE NOTICE This indicates the presence of a potential risk that might cause severe damage to the equipment and/or damage to surrounding properties.
Note This indicates notes not directly related to injury or severe
damage to equipment.
Tip This indicates advice on how to make the best use of the
equipment.

viii Preface
Hitachi Compute Blade Logical partitioning manager Version Upgrade / Revision Update Guide
Getting Help
If you purchased this product from an authorized HDS reseller, contact that reseller for support. For the name of your nearest HDS authorized reseller, refer to the HDS support web site for locations and contact information. To contact the Hitachi Data Systems Support Center, please visit the HDS website for current telephone numbers and other contact information: http://support.hds.com.
Before calling the Hitachi Data Systems Support Center, please provide as much information about the problem as possible, including:
• The circumstances surrounding the error or failure.
• The exact content of any error message(s) displayed on the host system(s).
Comments
Please send us your comments on this document: [email protected]. Include the document title, number, and revision, and refer to specific sections and paragraphs whenever possible. All comments become the property of Hitachi Data Systems Corporation. Thank you!

1
Before You Begin 1-1
Hitachi Compute Blade Logical partitioning manager Version Upgrade / Revision Update Guide
Before You Begin
This chapter provides necessary information before upgrading firmware version or updating firmware revision of Hitachi Virtualization Manager (LPAR manager).
Definition of LP firmware update Supported LP Firmware Levels Tools for Version Upgrade and Revision Update Reverting Version Upgrade or Revision Update Time Estimated for LP firmware update (Reference Only) Precautions for Dynamic Firmware Update Precautions when using Emulex 10Gb NIC Prerequisites

1-2 Before You Begin
Hitachi Compute Blade Logical partitioning manager Version Upgrade / Revision Update Guide
Definition of LP firmware update LP firmware levels are expressed in "VV-RR (TT-KK)" form. Each field denotes a classified level as follows:
VV: Functional level called version. RR: Bug fix level called revision. TT: Type designation for internal purpose only. KK: Build number for internal purpose only.
These fields are respectively controlled by a two-digit decimal number (00 to 99). Each digit may sometimes be substituted by the letter "x" that means any decimal number. "Version upgrade" of LP firmware means to change the version from a lower (older) level to a higher (newer) level for functional enhancement purposes. Version upgrade of LP firmware requires an appropriate LPAR manager Version Upgrade License Key (see Section "Prerequisites" of this Chapter). "Revision update" of LP firmware means to change the revision from a lower (older) level to a higher (newer) level for bug fix purposes within the same version. Revision update of LP firmware does not require any LPAR manager Version Upgrade License Key. Firmware version upgrade and firmware revision update may be collectively referred to as "firmware update."
Version Upgrade License Key is not needed when using LP Firmware version 59-3x/79-3x or later.
Supported LP Firmware Levels LP firmware levels supported by version upgrade and revision update are shown below.
Tool
Supported LP Firmware Version-Revision by Model
Hitachi Compute Blade 2000 Hitachi Compute Blade 320 Standard Server Blade High-Performance
Server Blade
HVM Navigator 58-1x or later 78-1x or later 17-4x or later
LP Web System 57-21 or later 78-1x or later 17-2x or later
LP Maintenance Tool 57-01 or later *1*2 78-1x or later *1 17-2x or later *1
*1 Only the method with a CD/DVD drive connectable to front USB port of subject Hitachi Compute Blade
model is supported (see Section "Prerequisites" of this Chapter)
*2 See "BladeSymphony 2000 HVM Version Upgrade Guide/ HVM Revision Update Guide Rev.4" or earlier for Version upgrading or Revision updating on LP firmware version 57-0X.

Before You Begin 1-3
Hitachi Compute Blade Logical partitioning manager Version Upgrade / Revision Update Guide
Tools for Version Upgrade and Revision Update LP firmware update, i.e., version upgrade or revision update of LP firmware is performed by one of the following tools: HVM Navigator V02-01 or later (hereafter simplified to "HVM Navigator" unless otherwise noted), LP Web System, and LP Maintenance Tool. Features of these tools are summarized below.
Tool
Feature
Status of LPAR manager at Firmware Update
Method of LPAR manager Reboot after Firmware Update
Firmware Update to Multiple LPAR managers at One Time
HVM Navigator Running Manual Yes LP Web System Running Manual No LP Maintenance Tool Stopped Automatic No
Reverting Version Upgrade or Revision Update A flow of revert the applied version upgrade or revision update is shown below; where solid boxes with green background indicate mandatory steps. This reverting process does not use any LP firmware update tool but utilizes manual firmware bank selection function conventionally provided for LPAR manager (see User's Guide of applicable Hitachi Compute Blade model). To reverting the applied version upgrade or revision update, a backup copy of the configuration information before applying the version upgrade or revision update is a must.
When you revert the applied version upgrade or revision update, functions or bug fixes introduced with version upgrade or revision update will be lost. Check the effect of such functions or bug fixes before revert the applied version upgrade or revision update.
Restore LP configuration information to previous
Shut down LPAR manager
Start LPAR manager
Manually switch active LP firmware bank to previous

1-4 Before You Begin
Hitachi Compute Blade Logical partitioning manager Version Upgrade / Revision Update Guide
Time Estimated for LP firmware update (Reference Only) Rough estimation of time required for LP firmware update by applicable tools is shown below for reference. Actual time may vary depending the system performance and the network environment.
Tool Time Estimated for Firmware Update
1 LPAR manager 10 LPAR managers
HVM Navigator 20 minutes 20 minutes
LP Web System 20 minutes 200 minutes
LP Maintenance Tool 20 minutes 200 minutes
Precautions when using Emulex 10Gb NIC Confirm that the following expansion cards are used or not used in the server blade before updating LPAR manager firmware to version 59-4X/79-4X or later. When using the following expansion cards, their firmware should be updated to version 4.2.433.604 or later. For confirmation method and updating method of the following expansion cards, see 10Gb Converged Network production Instruction Manual.
Emulex 10Gb 2-port LAN expansion card Emulex 10Gb 4-port LAN expansion card Emulex 10Gb 2-port converged network expansion card Emulex 10Gb 4-port converged network expansion card Emulex 10Gb 2-port converged network board
Precautions for Dynamic Firmware Update
Interim displays of new version-revision before rebooting LPAR manager As explained in Section "Version Upgrade and Revision Update" of this Chapter, all tools for firmware update apply changes on blank or alternate firmware bank, which turns into active firmware bank upon next start of the subject LPAR manager. Under HVM Navigator or LP Web System for dynamic firmware update, interim displays of new version-revision during the period after running the tool and before rebooting the LPAR manager will vary among tool windows and related consoles by model.
On Hitachi Compute Blade 2000 Assume revision update to destination version-revision 58-60 from source version-revision 58-50 on active bank and 58-31 on alternate bank. The final version-revision display after rebooting the LPAR manager will be in line with the actuality as shown below.
Before You Begin 1-5
Hitachi Compute Blade Logical partitioning manager Version Upgrade / Revision Update Guide
Firmware Bank
Actual and Displayed Version-Revision
Before Running Tool After Running Tool and Rebooting LPAR manager
Active 58-50 58-60
Alternate 58-31 58-50
Interim displays of new version-revision after running the tool and before rebooting the LPAR manager will vary among tool windows and related consoles despite the actuality as shown below.
ware Bank
Interim Version-Revision after Running Tool and before Rebooting LPAR manager
Actual Display on HVM Navigator
Display on LP Web System
Display on System Console in SVP Command Mode
Display on LPAR manager Screen
Active 58-50 58-50 58-60 58-60 58-50
Alternate 58-60 58-60 58-50 58-50 58-60
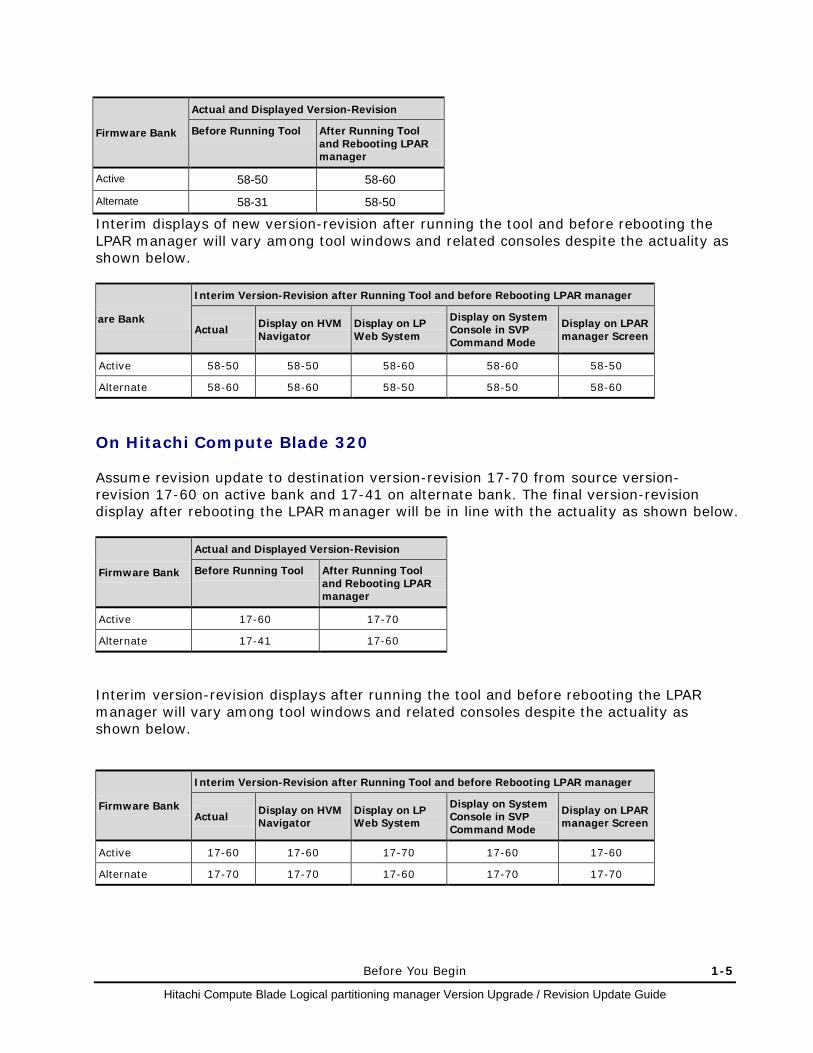
On Hitachi Compute Blade 320 Assume revision update to destination version-revision 17-70 from source version-revision 17-60 on active bank and 17-41 on alternate bank. The final version-revision display after rebooting the LPAR manager will be in line with the actuality as shown below.
Firmware Bank
Actual and Displayed Version-Revision
Before Running Tool After Running Tool and Rebooting LPAR manager
Active 17-60 17-70
Alternate 17-41 17-60
Interim version-revision displays after running the tool and before rebooting the LPAR manager will vary among tool windows and related consoles despite the actuality as shown below.
Firmware Bank
Interim Version-Revision after Running Tool and before Rebooting LPAR manager
Actual Display on HVM Navigator
Display on LP Web System
Display on System Console in SVP Command Mode
Display on LPAR manager Screen
Active 17-60 17-60 17-70 17-60 17-60
Alternate 17-70 17-70 17-60 17-70 17-70

1-6 Before You Begin
Hitachi Compute Blade Logical partitioning manager Version Upgrade / Revision Update Guide
Prerequisites For firmware update by using HVM Navigator, the following are required:
HVM Navigator Web browser
Supported Web browser CB 2000 CB 320
Internet Explorer 6 58-1X/78-1X or later 17-4X or later
Internet Explorer 7 58-1X/78-1X or later 17-4X or later
Internet Explorer 8 59-3X/79-3X or later N/A
Internet Explorer 9 59-3X/79-3X or later N/A
LP firmware in new version and/or revision saved in local disk folder For version upgrade only—LPAR manager Version Upgrade License Key for new
version saved in local disk folder or any form readable for manual input For firmware update by using LP Web System, the following are required:
Web browser
Supported Web browser CB 2000 CB 320
Internet Explorer 6 57-2X/78-1X or later 17-2X or later
Internet Explorer 7 57-2X/78-1X or later 17-2X or later
Internet Explorer 8 59-3X/79-3X or later N/A
Internet Explorer 9 59-3X/79-3X or later N/A
LP firmware in new version and/or revision saved in local disk folder For version upgrade only—LPAR manager Version Upgrade License Key for new
version in any form readable for manual input For firmware update by using LP Maintenance Tool, the following are required:
CD/DVD drive connectable to front USB port of subject Hitachi Compute Blade model
LP firmware in new version and/or revision saved in CD-R For version upgrade only—LPAR manager Version Upgrade License Key for new
version saved in CD-R or any form readable for manual input
Version Upgrade License Key is not needed when using LP Firmware version 59-3x/79-3x or later.
2
Dynamic Version Upgrade / Revision Update by HVM Navigator 2-1
Hitachi Compute Blade Logical partitioning manager Version Upgrade / Revision Update Guide
Dynamic Version Upgrade / Revision Update by HVM Navigator
This chapter describes how to upgrade HVM firmware version or update HVM firmware revision by means of HVM Navigator while HVM is running. Certain steps demonstrate Hitachi Compute Blade 2000, where you can assume their steps on Hitachi Compute Blade 320 or the different version by reading Hitachi Compute Blade 2000 as Hitachi Compute Blade320 or appropriate version.
Procedure of upgrading/ updating LP firmware
Notes on Firmware Update by Using HVM Navigator Icons List

2-2 Dynamic Version Upgrade / Revision Update by HVM Navigator
Hitachi Compute Blade Logical partitioning manager Version Upgrade / Revision Update Guide
Procedure of upgrading/ updating LP firmware Flows of version upgrade and revision update by means of HVM Navigator are shown below, where solid boxes with green background indicate steps commonly applicable to version upgrade and revision update while dotted boxes with blue background indicate steps unique to version upgrade.
Obtain LP Version Upgrade License Key*2
Obtain LP firmware
Re-save the configuration
Flow of revision update
Flow of version upgrade
Perform firmware update
Obtain LP firmware
Perform firmware update*1
*1: It is unnecessary to input "version up key" when updating a revision. *2: Version Upgrade License Key is not needed when using LP firmware
version 59-3x/79-3x or later and HVM Navigator version V03-02 or later.
Boot LPAR manager
Backup the configuration
Save the configuration
Shut down LPAR manager
Prepare of HVM navigator Prepare HVM navigator
Back up of the Configuration and reboot
LPAR manager time settings

Static Version Upgrade/Revision Update by LP Maintenance Tool 2-3
Hitachi Compute Blade Logical partitioning manager Version Upgrade / Revision Update Guide
Preparation of HVM Navigator Prepare HVM Navigator referring to Hitachi Compute Blade HVM Navigator User's Guide—Getting Started. It is also necessary to prepare Web browser for the procedures in this chapter. See Setting up Web Browser.
Obtaining LPAR manager Version Upgrade License Key (Required for Version Upgrade Only)
• This procedure is unnecessary when updating a revision. • Version Upgrade License Key is not needed when using LP Firmware
version 59-3x/79-3x or later and HVM Navigator version V03-02 or later. To obtain an appropriate HVM Version Upgrade License Key, contact your sales representative. If you prefer automatic license key input during version upgrade by using HVM Navigator, save obtained license key in a local disk folder in 'TSV' format. If you prefer automatic license key input during version upgrade by using HVM Maintenance Tool, save obtained license key in a CD-R in 'ISO' format. If you tolerate manual license key input during version upgrade by using HVM Navigator, HVM Web System, or HVM Maintenance Tool, prepare obtained license key in any form readable for manual input. You may be requested to notify new HVM version number in exchange for obtaining the license key, in which case you can find such information according to Section "Obtaining HVM Firmware in New Version and/or Revision" of this Chapter. You may also be requested to notify the blade serial number in exchange for obtaining the license key, in which case you can find such information by using DF command on System Console in SVP command mode according to the steps below. The screen image may partially differ depending on the firmware version of the management module.
Using DF command to find blade serial number (example on Hitachi Compute Blade 2000)

2-4 Dynamic Version Upgrade / Revision Update by HVM Navigator
Hitachi Compute Blade Logical partitioning manager Version Upgrade / Revision Update Guide
SVP>DF << DF - Show field replaceable unit information. >> - Detail field replaceable unit information menu C. Server chassis. M. Management module. S. Server blade. I. I/O board module. SW. Switch module. PS. Power supply module. T. Show mass of modules. A. All module. Q. Quit. (C,M,S,I,SW,PS,T,A,[Q]) : S Select server blade (0-7,A=All,[Q=Quit]) : 0 -- Server blade --- Slot : 0 - Board information -- Manufacturer : SUPERMICRO Product Name : X8DTE-HTC01 Serial Number : 91200021 -- Product information -- Manufacturer : HITACHI Product Name : Compute Blade E55 Part/Model Number : GVAE55A1-3NNN14X Product Version : 0020G55100
Serial Number : 4600B60 T901000001 : :
Obtaining LP Firmware in New Version and/or Revision To obtain HVM firmware in new version and/or revision, contact your sales representative. Upon receipt, check the version-revision from the file name of HVM firmware ("VV.RR" portion in the format below).
Standard Server Blade model of Hitachi Compute Blade 2000: hvm_bs2k_xeon_VV.RR.TT.KK.iso
High-Performance Server Blade model of Hitachi Compute Blade 2000: hvm_bs2k_mp_xeon_VV.RR.TT.KK.iso
Hitachi Compute Blade 320: hvm_bs320_xeon_VV.RR.TT.KK.iso
If you use HVM Navigator or HVM Web System in subsequent firmware update (version upgrade or revision update), save obtained HVM firmware in a local disk folder.
Don't change the filename of HVM firmware. When the filename was changed, Version Upgrade and Revision Update cannot be done.
Enter "DF"
Enter "S" Enter server blade number
Confirm blade serial number (Subsequent display omitted)

Static Version Upgrade/Revision Update by LP Maintenance Tool 2-5
Hitachi Compute Blade Logical partitioning manager Version Upgrade / Revision Update Guide
Setting up Web Browser If you use HVM Navigator or HVM Web System for dynamic firmware update (version upgrade or revision update), set up the Web browser configuration as the following procedure. Examples of Internet Explorer 6 and Internet Explorer 7 are shown below. The content of display may vary by Internet Explorer version. Follow the procedure below for registering the "trusted sites".
Steps to set up Internet Explorer 6 for use by HVM Navigator or HVM Web System 1. Enable JavaScript, Cookie, ActiveX, and Pop up windows. 2. Add URLs used by HVM Web System to trusted sites according to the sub-steps below.
a. From the menu-bar, click Tools and select Internet Options. In the "Internet Options" window opened, click Security tab.
2-6 Dynamic Version Upgrade / Revision Update by HVM Navigator
Hitachi Compute Blade Logical partitioning manager Version Upgrade / Revision Update Guide
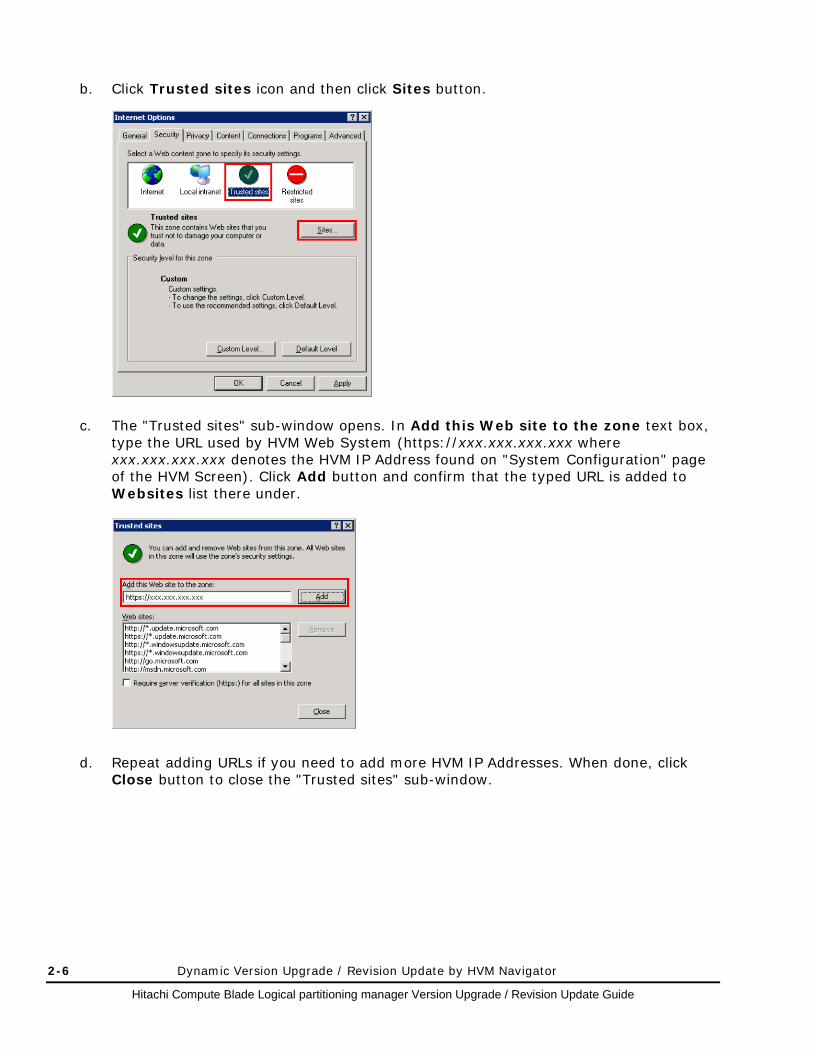
b. Click Trusted sites icon and then click Sites button.
c. The "Trusted sites" sub-window opens. In Add this Web site to the zone text box, type the URL used by HVM Web System (https://xxx.xxx.xxx.xxx where xxx.xxx.xxx.xxx denotes the HVM IP Address found on "System Configuration" page of the HVM Screen). Click Add button and confirm that the typed URL is added to Websites list there under.
d. Repeat adding URLs if you need to add more HVM IP Addresses. When done, click Close button to close the "Trusted sites" sub-window.

Static Version Upgrade/Revision Update by LP Maintenance Tool 2-7
Hitachi Compute Blade Logical partitioning manager Version Upgrade / Revision Update Guide
3. On Security tab in the "Internet Options" window returned, see if a particular security setting for the "Trusted sites" zone is appropriate according to the sub-steps below.
a. With Trusted sites icon still selected, click Custom Level button in the "Security
level for this zone" group box.
b. In the "Security Settings" sub-window opened, scroll down the "Settings" field until you find the "Active scripting" setting. Check if Enable radio button is selected for this setting and, if not, select Enable radio button for this setting. When done, click OK button to close the "Security Settings" sub-window.

2-8 Dynamic Version Upgrade / Revision Update by HVM Navigator
Hitachi Compute Blade Logical partitioning manager Version Upgrade / Revision Update Guide
4. In the "Internet Options" window returned, click OK button to close the window.
Steps to set up Internet Explorer 7 for use by HVM Navigator or HVM Web System 1. Enable JavaScript, Cookie, ActiveX, and Pop up windows. 2. Add URLs used by HVM Web System to trusted sites according to the sub-steps below.
a. From the menu-bar or toolbar, click Tools and select Internet Options. In the "Internet Options" window opened, click Security tab.

Static Version Upgrade/Revision Update by LP Maintenance Tool 2-9
Hitachi Compute Blade Logical partitioning manager Version Upgrade / Revision Update Guide
b. Click Trusted sites icon and then click Sites button.
c. The "Trusted sites" sub-window opens. In Add this Website to the zone text box, type the URL used by HVM Web System (https://xxx.xxx.xxx.xxx where xxx.xxx.xxx.xxx denotes the HVM IP Address found on "System Configuration" page of the HVM Screen). Click Add button and confirm that the typed URL is added to Websites list there under.
d. Repeat adding URLs if you need to add more HVM IP Addresses. When done, click Close button to close the "Trusted sites" sub-window.

2-10 Dynamic Version Upgrade / Revision Update by HVM Navigator
Hitachi Compute Blade Logical partitioning manager Version Upgrade / Revision Update Guide
3. On Security tab in the "Internet Options" window returned, see if particular security settings for the "Trusted sites" zone are appropriate according to the sub-steps below.
a. With Trusted sites icon still selected, click Custom level button in the "Security
level for this zone" group box.
b. In the "Security Settings - Trusted Sites Zone" sub-window opened, scroll down the "Settings" field until you find the "Active scripting" setting. Check if Enable radio button is selected for this setting and, if not, select Enable radio button for this setting.

Static Version Upgrade/Revision Update by LP Maintenance Tool 2-11
Hitachi Compute Blade Logical partitioning manager Version Upgrade / Revision Update Guide
c. Scroll down the "Settings" field further until you find the "Allow META REFRESH" setting. Check if Enable radio button is selected for this setting and, if not, select Enable radio button for this setting. When done, click OK button to close the "Security Settings - Trusted Sites Zone" sub-window.
4. In the "Internet Options" window returned, click OK button to close the window.

2-12 Dynamic Version Upgrade / Revision Update by HVM Navigator
Hitachi Compute Blade Logical partitioning manager Version Upgrade / Revision Update Guide
Performing Firmware Update by Using HVM Navigator
Starting HVM Navigator Start HVM Navigator according to the steps below. 1. Execute VNavigator.exe for starting HVM Navigator.
Find "VNavigator.exe" executable in "bin" subfolder in the HVM Navigator installation folder.
2. Run the executable. If HVM Navigator successfully starts, the log-in window below opens.

Static Version Upgrade/Revision Update by LP Maintenance Tool 2-13
Hitachi Compute Blade Logical partitioning manager Version Upgrade / Revision Update Guide
Logging in to HVM Navigator Log in to HVM Navigator according to the steps below. 1. Enter the authorized user ID "user00" (fixed) and password "pass00" (fixed), and then
click Login button. HVM Navigator starts loading necessary data for activation.
Registering any user ID and password is not allowed. Use the fixed user ID and password.
2. Upon completion, the "Main" window of HVM Navigator opens.

2-14 Dynamic Version Upgrade / Revision Update by HVM Navigator
Hitachi Compute Blade Logical partitioning manager Version Upgrade / Revision Update Guide
Adding HVMs to HVM Navigator Add HVMs to HVM Navigator according to the steps below. 1. On Profile tab of the "Main" window, click Add button.
2. In the "Configuration Registration" window opened, select "HVM" from Machinery combo
box, check IP Range Specification check box, type starting and ending IP address octets in From and To text boxes, type a new timeout limit in TimeOut Limit text box if you like, and click Search button. A progress bar will show during the search.

Static Version Upgrade/Revision Update by LP Maintenance Tool 2-15
Hitachi Compute Blade Logical partitioning manager Version Upgrade / Revision Update Guide
3. When one or more HVMs are found in the specified search range, Machinery List shows such HVM(s). Check the check box(es) preceding the HVM(s) you desire to add, and click Add button.
4. In response to a confirmation dialog, click OK button.
5. Ensure addition of the selected HVM(s) to System Configuration tree view.
2-16 Dynamic Version Upgrade / Revision Update by HVM Navigator
Hitachi Compute Blade Logical partitioning manager Version Upgrade / Revision Update Guide
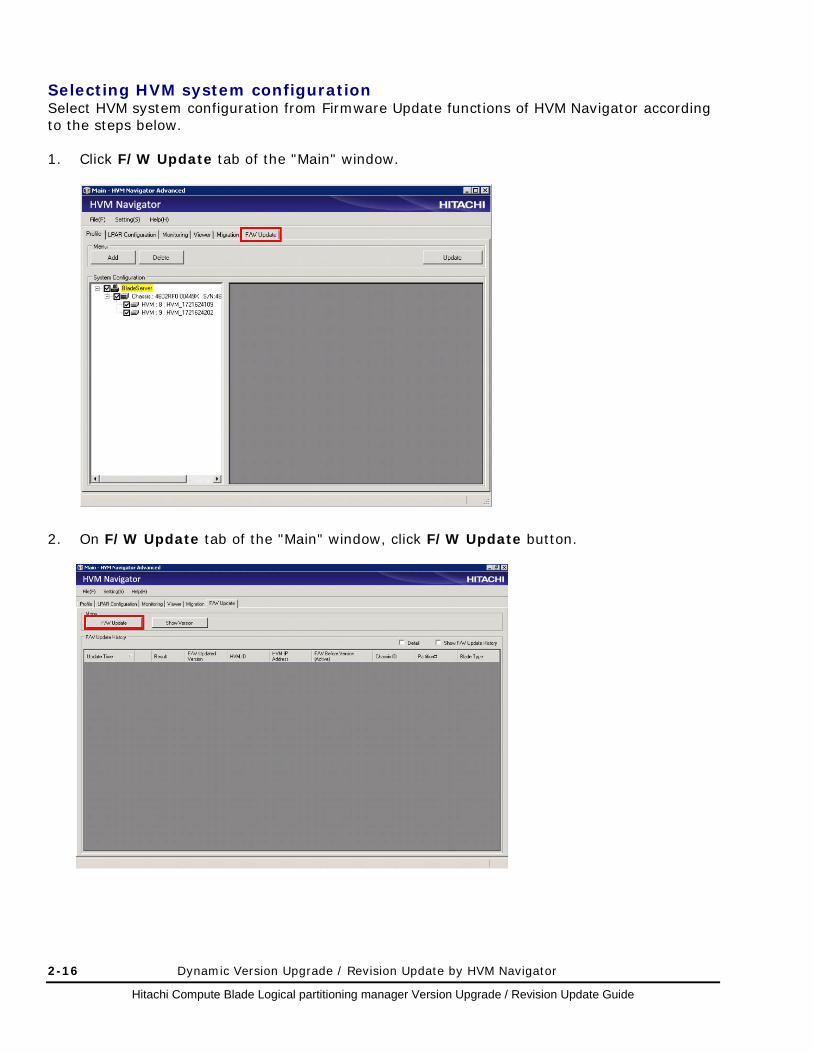
Selecting HVM system configuration Select HVM system configuration from Firmware Update functions of HVM Navigator according to the steps below. 1. Click F/W Update tab of the "Main" window.
2. On F/W Update tab of the "Main" window, click F/W Update button.

Static Version Upgrade/Revision Update by LP Maintenance Tool 2-17
Hitachi Compute Blade Logical partitioning manager Version Upgrade / Revision Update Guide
3. The wizard-type "HVM Firmware Update" window opens with "Step 1: Select System Config" page. Confirm that one or more target HVMs for version upgrade and/or revision update are included in HVM List. Click Update button.
4. Click Next button to proceed to the next step.

2-18 Dynamic Version Upgrade / Revision Update by HVM Navigator
Hitachi Compute Blade Logical partitioning manager Version Upgrade / Revision Update Guide
Selecting destination version-revision of HVM firmware Select the destination version-revision of HVM firmware according to the steps below. 1. On "Step 2: Select Updated Version" page, check the check box of the target model
(Hitachi Compute Blade 2000 in this example).
2. Select the destination firmware version-revision from the list (59-11 in this example). If the new HVM firmware for the destination version-revision is not saved in the default location under the install folder of HVM Navigator \VirNavi\FWUpdateFiles\HVM\CB2000, click Select button, select the new HVM firmware in the saved location, and retry selecting the destination firmware version-revision from the list. When done, click Next button to proceed to the next step.

Static Version Upgrade/Revision Update by LP Maintenance Tool 2-19
Hitachi Compute Blade Logical partitioning manager Version Upgrade / Revision Update Guide
Selecting source version-revision range of HVM firmware Select the source version-revision range of HVM firmware according to the steps below. 1. On "Step 3: Select Target Version" page, ensure that the check box of the target model
(Hitachi Compute Blade 2000 in this example) is checked and the destination version-revision (59-11 in this example) is displayed as a result of the previous step.
2. At the "From" list, select the beginning of source version-revision range for firmware
update (58-84 in this example). Check Target Range check box to specify range (otherwise, only one source version-revision selected in the "From" list takes effect). At the "To" list, select the end of source version-revision range for firmware update (58-84 in this example). When done, click Next button to proceed to the next step.

2-20 Dynamic Version Upgrade / Revision Update by HVM Navigator
Hitachi Compute Blade Logical partitioning manager Version Upgrade / Revision Update Guide
Selecting target HVMs for firmware update Select the target HVMs for firmware update according to the steps below. 1. On "Step 4: Select Target HVM" page, confirm the HVM content of Select HVM List field.
Deselect (uncheck) HVMs not intended for firmware update (none in this example). Upon confirming the content, click Next button to proceed to the next step.
2. If the specified firmware update includes version upgrade, "Step 5: Set Verup License
Key" page will appear. Otherwise, "Step 6: Check Connection" page will appear.
Static Version Upgrade/Revision Update by LP Maintenance Tool 2-21
Hitachi Compute Blade Logical partitioning manager Version Upgrade / Revision Update Guide
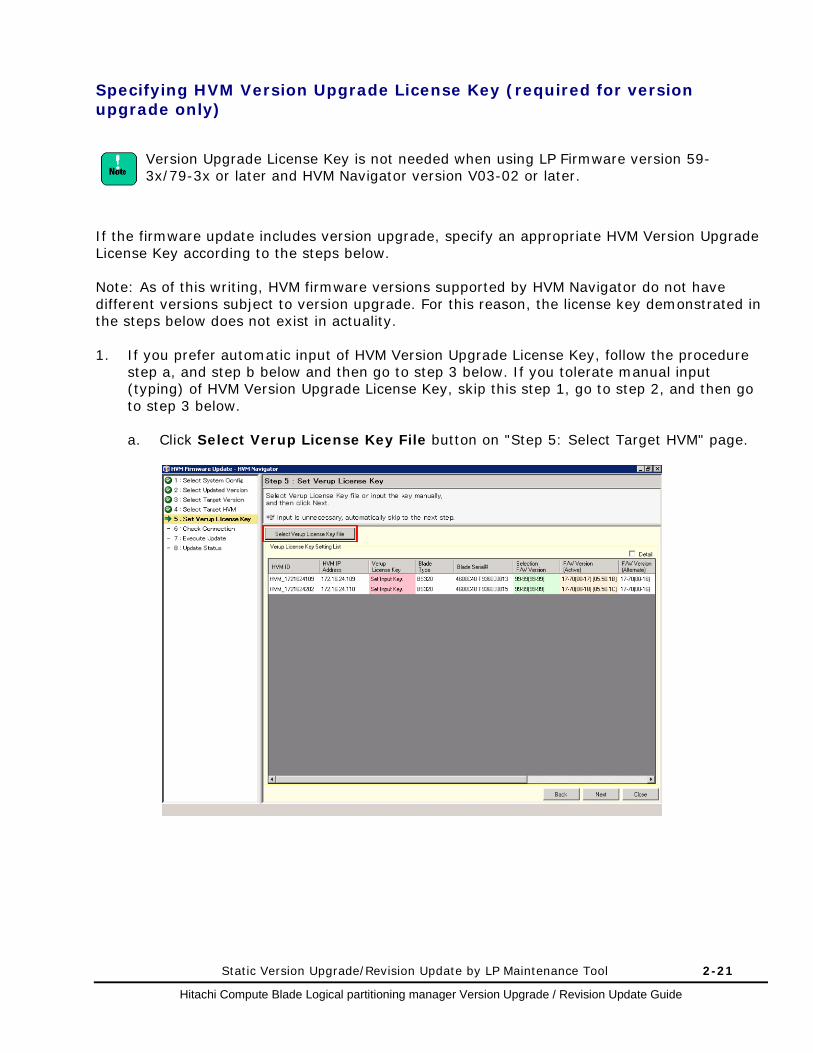
Specifying HVM Version Upgrade License Key (required for version upgrade only)
Version Upgrade License Key is not needed when using LP Firmware version 59-3x/79-3x or later and HVM Navigator version V03-02 or later.
If the firmware update includes version upgrade, specify an appropriate HVM Version Upgrade License Key according to the steps below. Note: As of this writing, HVM firmware versions supported by HVM Navigator do not have different versions subject to version upgrade. For this reason, the license key demonstrated in the steps below does not exist in actuality. 1. If you prefer automatic input of HVM Version Upgrade License Key, follow the procedure
step a, and step b below and then go to step 3 below. If you tolerate manual input (typing) of HVM Version Upgrade License Key, skip this step 1, go to step 2, and then go to step 3 below.
a. Click Select Verup License Key File button on "Step 5: Select Target HVM" page.

2-22 Dynamic Version Upgrade / Revision Update by HVM Navigator
Hitachi Compute Blade Logical partitioning manager Version Upgrade / Revision Update Guide
b. In the file selection dialog opened, select the applicable license key file and click Open button. The dialog closes and the content of the selected license key is automatically entered in VerUp License Key field.

Static Version Upgrade/Revision Update by LP Maintenance Tool 2-23
Hitachi Compute Blade Logical partitioning manager Version Upgrade / Revision Update Guide
2. To manually input (type) the Version Upgrade License Key, click the target VerUp License Key field on "Step 5: Select Target HVM" page and enter the key value.
3. When done, click Next button to proceed to the next step.

2-24 Dynamic Version Upgrade / Revision Update by HVM Navigator
Hitachi Compute Blade Logical partitioning manager Version Upgrade / Revision Update Guide
Checking connection HVM Navigator partly uses the function of HVM Web System in the background during execution of firmware update. To establish the network connection between HVM Navigator and HVM Web System for this purpose, you are prompted to check connectivity and login from HVM Navigator to HVM Web System using the password defined to HVM Web System. Follow the steps below to perform this checking. 1. On "Step 6: Check Connection" page, click Password field and type the password defined
to HVM Web System ("password" by default). If the default password is changed from default, type the new password after the change. When done, click Next button.
The password to HVM Web System once successfully logged in by HVM Navigator is remembered by HVM Navigator and input of the same password is not required at next firmware update under HVM Navigator. If such password is changed under HVM Web System, however, the new password needs to be entered from HVM Navigator.

Static Version Upgrade/Revision Update by LP Maintenance Tool 2-25
Hitachi Compute Blade Logical partitioning manager Version Upgrade / Revision Update Guide
3. The connection check process starts. While checking is in progress, Status field on the page shows "Run." When checking on all HVMs subject to firmware update is complete, the page automatically proceeds to the next step.
When HVM which failed in connection exists, search the HVM from Password Setting List, and click Information button of the HVM, and confirm the contents in Information window.

2-26 Dynamic Version Upgrade / Revision Update by HVM Navigator
Hitachi Compute Blade Logical partitioning manager Version Upgrade / Revision Update Guide
Conducting final review and executing firmware update Conduct final review and execute firmware update according to the steps below. 1. On "Step 7: Execute Update" page, review the content of HVM F/W Update List.
2. If you see no issue on HVM F/W Update List in the "Step 7: Execute Update" page, go
to the "Main" window and click Show Version button on F/W Update tab.

Static Version Upgrade/Revision Update by LP Maintenance Tool 2-27
Hitachi Compute Blade Logical partitioning manager Version Upgrade / Revision Update Guide
3. Check the content of the "Firmware Version List" window opened. If you see no issue, click Close button to close this window.
4. Go back to "Step 7: Execute Update" page and click Next button.

2-28 Dynamic Version Upgrade / Revision Update by HVM Navigator
Hitachi Compute Blade Logical partitioning manager Version Upgrade / Revision Update Guide
5. A confirmation dialog opens. Once started, you cannot interrupt the firmware update process that typically takes a little less than 10 minutes and may vary depending on the site specific factors such as network performance. If you are sure you want to start the process, click OK button. The dialog closes, the firmware update process starts, and "Step 7: Execute Update" page automatically proceeds to the next step. Hereafter, do not stop HVM Navigator before completion of the firmware update process.
Monitoring progress of firmware update and completion after execution You can monitor the progress of firmware update and complete the firmware update operation after execution according to the steps below. 1. On "Step 8: Update Status" page, Status field shows "Run" and Step field shows the
current step while firmware update execution is in progress.

Static Version Upgrade/Revision Update by LP Maintenance Tool 2-29
Hitachi Compute Blade Logical partitioning manager Version Upgrade / Revision Update Guide
2. Status field shows "Success" and Step field shows "-" when firmware update execution is finished. Click Finish button when execution of firmware update on all HVMs are complete.
3. A confirmation dialog opens on closing the "HVM Firmware Update" window. Click OK
button to close the dialog and the window.

2-30 Dynamic Version Upgrade / Revision Update by HVM Navigator
Hitachi Compute Blade Logical partitioning manager Version Upgrade / Revision Update Guide
4. Confirm successful completion of firmware update in F/W Update History list on F/W Update tab of the "Main" window.

Static Version Upgrade/Revision Update by LP Maintenance Tool 2-31
Hitachi Compute Blade Logical partitioning manager Version Upgrade / Revision Update Guide
Configuration backup
It is recommended to save the configuration after upgrading or updating HVM, and before booting HVM. To backup the configuration makes it possible to change the HVM firmware bank and restore the previous firmware version, even if some problem happened in upgrading or updating HVM firmware. The previous firmware version cannot be restored without the backup file.
[When upgrading/ updating CB2000 firmware 58-5X or earlier] [When upgrading/ updating CB2000 firmware 78-5X or earlier] [When upgrading/ updating CB320 firmware 17-5X or earlier]
(1) Save the configuration Save the configuration to management module. Press [F9] key on HVM screen.
(2) Shut down the server blade.
Press [Alt] +[r] to display a sub-window, select [Shut down] and press [Enter].
Perform the procedures (3)-(5) in [When upgrading/ updating CB2000 firmware 58-6X or later]

2-32 Dynamic Version Upgrade / Revision Update by HVM Navigator
Hitachi Compute Blade Logical partitioning manager Version Upgrade / Revision Update Guide
[When upgrading/ updating CB2000 firmware 58-6X or later] [When upgrading/ updating CB2000 firmware 78-6X or later] [When upgrading/ updating CB320 firmware 17-6X or later]
(1) Save the configuration
Save the configuration to management module. (a) Select [HVM configuration] tab.
(b) Select [HVM] in HVM select group box and click HVM Console button.

Static Version Upgrade/Revision Update by LP Maintenance Tool 2-33
Hitachi Compute Blade Logical partitioning manager Version Upgrade / Revision Update Guide
(c) Click Save Config button.
(d) Click OK button.

2-34 Dynamic Version Upgrade / Revision Update by HVM Navigator
Hitachi Compute Blade Logical partitioning manager Version Upgrade / Revision Update Guide
(e) Click OK button.
(2) Shut down the server blade
(a) Select System Service State.

Static Version Upgrade/Revision Update by LP Maintenance Tool 2-35
Hitachi Compute Blade Logical partitioning manager Version Upgrade / Revision Update Guide
(b) Click HVM shut down button.
(c) Click OK button.
2-36 Dynamic Version Upgrade / Revision Update by HVM Navigator
Hitachi Compute Blade Logical partitioning manager Version Upgrade / Revision Update Guide
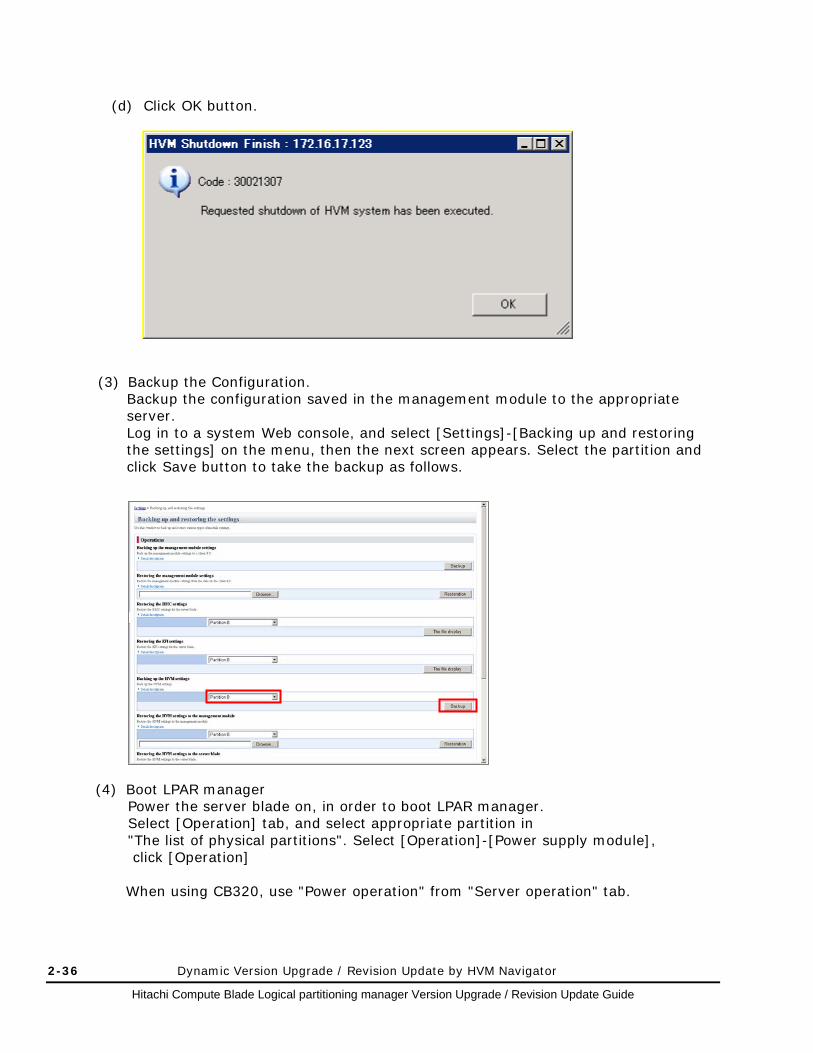
(d) Click OK button.
(3) Backup the Configuration. Backup the configuration saved in the management module to the appropriate server. Log in to a system Web console, and select [Settings]-[Backing up and restoring the settings] on the menu, then the next screen appears. Select the partition and click Save button to take the backup as follows.
(4) Boot LPAR manager Power the server blade on, in order to boot LPAR manager. Select [Operation] tab, and select appropriate partition in "The list of physical partitions". Select [Operation]-[Power supply module], click [Operation]
When using CB320, use "Power operation" from "Server operation" tab.

Static Version Upgrade/Revision Update by LP Maintenance Tool 2-37
Hitachi Compute Blade Logical partitioning manager Version Upgrade / Revision Update Guide
(5) Re-save the configuration
(a) Return to the HVM console window on HVM Navigator, click Update (U) button.
(b) Click Save Config button.

2-38 Dynamic Version Upgrade / Revision Update by HVM Navigator
Hitachi Compute Blade Logical partitioning manager Version Upgrade / Revision Update Guide
(c) Click OK button.
(d) Click OK button.
(6) Execute the above procedures (1) ~ (5) to all server blades which performed upgrade or update. Parallel executions to multiple server blades are allowed, as far as the order of procedures (1) ~ (5) is followed in each server blade.
LPAR manager time settings After updating LPAR manager firmware, implement the LPAR manager time settings while referring to "LPAR manager Initial Settings" of "CB2000 User's Guide" or "HVM Initial Settings" of "CB320 User's Guide".
Static Version Upgrade/Revision Update by LP Maintenance Tool 2-39
Hitachi Compute Blade Logical partitioning manager Version Upgrade / Revision Update Guide
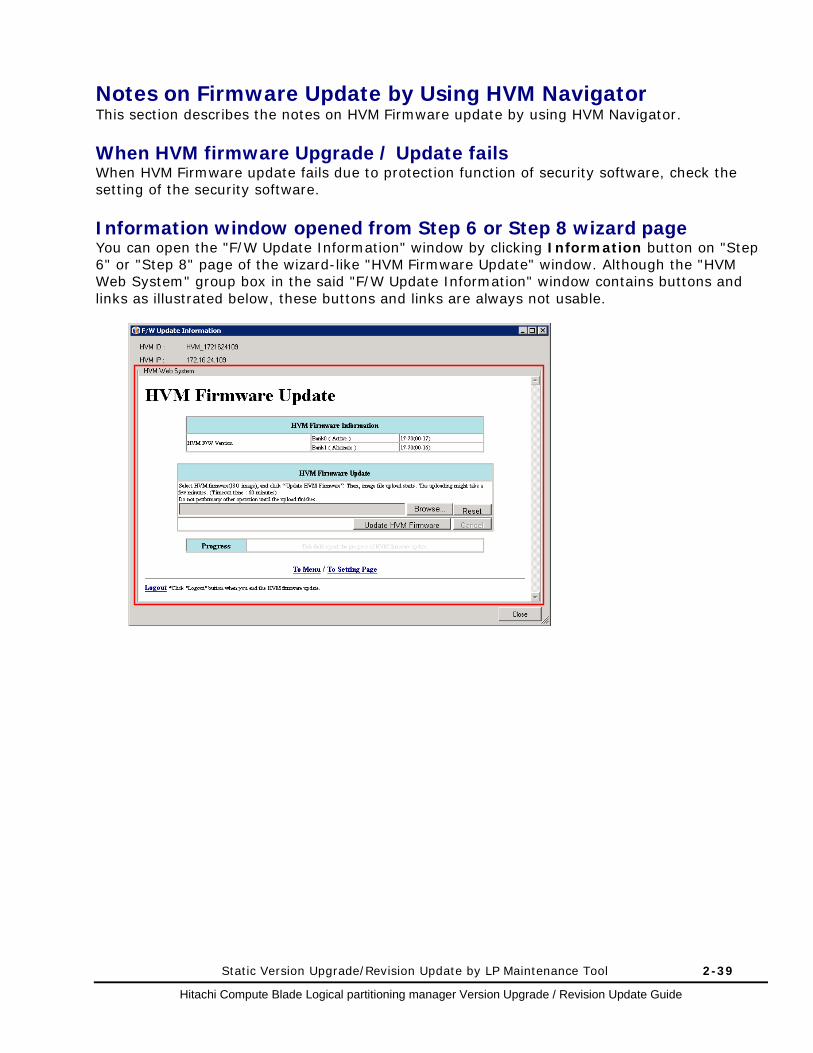
Notes on Firmware Update by Using HVM Navigator This section describes the notes on HVM Firmware update by using HVM Navigator.
When HVM firmware Upgrade / Update fails When HVM Firmware update fails due to protection function of security software, check the setting of the security software.
Information window opened from Step 6 or Step 8 wizard page You can open the "F/W Update Information" window by clicking Information button on "Step 6" or "Step 8" page of the wizard-like "HVM Firmware Update" window. Although the "HVM Web System" group box in the said "F/W Update Information" window contains buttons and links as illustrated below, these buttons and links are always not usable.

2-40 Dynamic Version Upgrade / Revision Update by HVM Navigator
Hitachi Compute Blade Logical partitioning manager Version Upgrade / Revision Update Guide
Information window showing "Login is inhibited now" The "F/W Update Information" window shows "Login is inhibited now" if the last firmware update on the subject HVM encountered a network-related error. When this message is displayed, every login to HVM Web System is rejected until operation timeout. Retry login after operation timeout (about 30 minutes after the last error on the last firmware update).
Manual shutdown by using Blade server manager (BSM) The following message may appear when shutting down the HVM manually by BSM. +-----------------------------------------------+ | An error occurred in the power-off request to | | HVM_XXXXXXXXX(HVM) | | KASM21805-E 029 | +-----------------------------------------------+
When this message appears, it is possible that HVM firmware is still being updated. Shut down HVM after the completion of the firmware update.
Static Version Upgrade/Revision Update by LP Maintenance Tool 2-41
Hitachi Compute Blade Logical partitioning manager Version Upgrade / Revision Update Guide
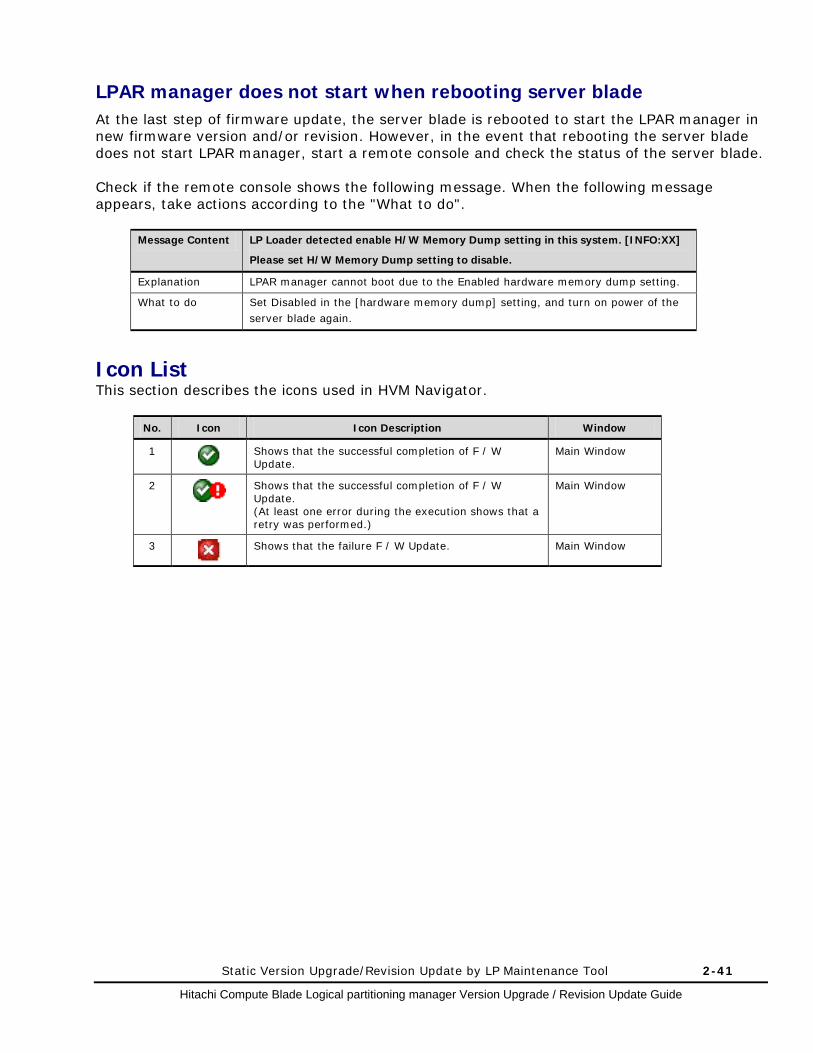
LPAR manager does not start when rebooting server blade At the last step of firmware update, the server blade is rebooted to start the LPAR manager in new firmware version and/or revision. However, in the event that rebooting the server blade does not start LPAR manager, start a remote console and check the status of the server blade. Check if the remote console shows the following message. When the following message appears, take actions according to the "What to do".
Message Content LP Loader detected enable H/W Memory Dump setting in this system. [INFO:XX]
Please set H/W Memory Dump setting to disable.
Explanation LPAR manager cannot boot due to the Enabled hardware memory dump setting.
What to do Set Disabled in the [hardware memory dump] setting, and turn on power of the server blade again.
Icon List This section describes the icons used in HVM Navigator.
No. Icon Icon Description Window
1
Shows that the successful completion of F / W Update.
Main Window
2
Shows that the successful completion of F / W Update. (At least one error during the execution shows that a retry was performed.)
Main Window
3
Shows that the failure F / W Update. Main Window
2-42 Dynamic Version Upgrade / Revision Update by HVM Navigator
Hitachi Compute Blade Logical partitioning manager Version Upgrade / Revision Update Guide
(This page is intentionally left blank)

3
Dynamic Version Upgrade / Revision Update by LP Web System 3-1
Hitachi Compute Blade Logical partitioning manager Version Upgrade / Revision Update Guide
Dynamic Version Upgrade / Revision Update by LP Web System
This chapter describes how to upgrade LP firmware version or update LP firmware revision by means of LP Web System while LPAR manager is running. Certain steps demonstrate Hitachi Compute Blade 2000, where you can assume their steps on Hitachi Compute Blade 320 or the different version by reading Hitachi Compute Blade 2000 as Hitachi Compute Blade 320 or appropriate version.
Procedure of upgrading / updating LP firmware
Notes on Firmware Update by Using LP Web System Error Screens
3-2 Dynamic Version Upgrade / Revision Update by LP Web System
Hitachi Compute Blade Logical partitioning manager Version Upgrade / Revision Update Guide
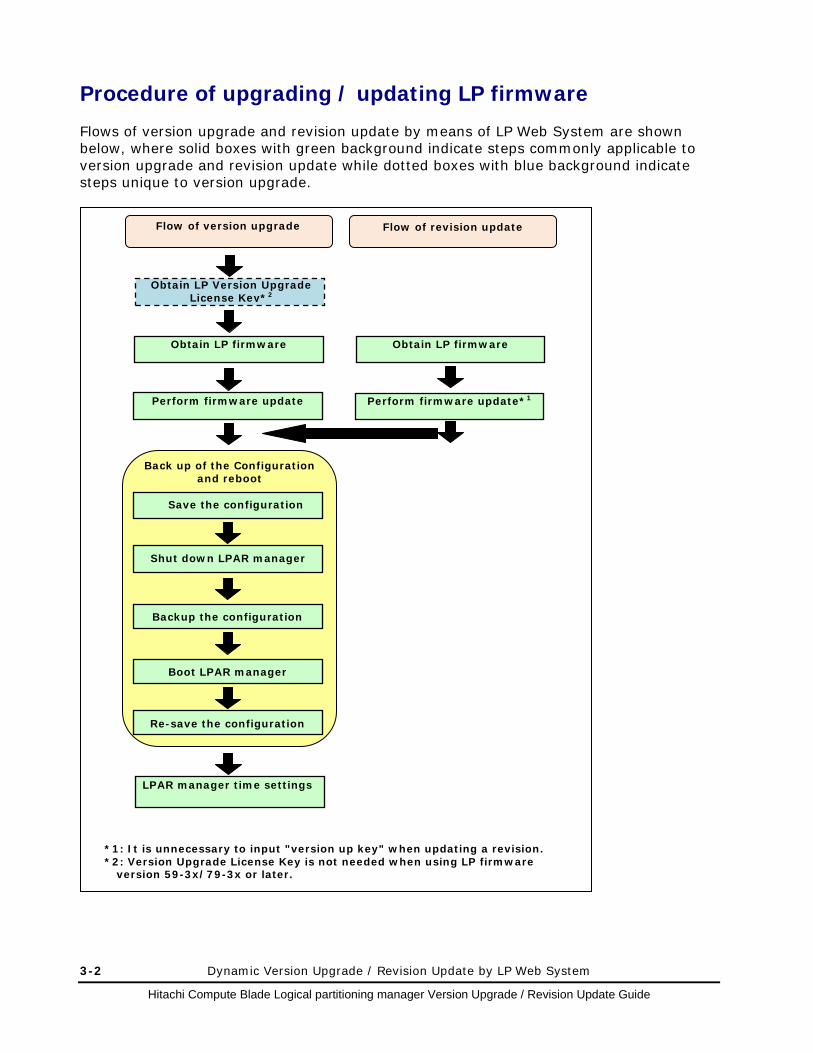
Procedure of upgrading / updating LP firmware Flows of version upgrade and revision update by means of LP Web System are shown below, where solid boxes with green background indicate steps commonly applicable to version upgrade and revision update while dotted boxes with blue background indicate steps unique to version upgrade.
Obtain LP Version Upgrade License Key*2
Obtain LP firmware
Re-save the configuration
Flow of revision update
Flow of version upgrade
Perform firmware update
Obtain LP firmware
Perform firmware update*1
*1: It is unnecessary to input "version up key" when updating a revision. *2: Version Upgrade License Key is not needed when using LP firmware
version 59-3x/79-3x or later.
Boot LPAR manager
Backup the configuration
Save the configuration
Shut down LPAR manager
Back up of the Configuration and reboot
LPAR manager time settings

Static Version Upgrade/Revision Update by LP Maintenance Tool 3-3
Hitachi Compute Blade Logical partitioning manager Version Upgrade / Revision Update Guide
Obtaining LP Version Upgrade License Key (Required for Version Upgrade Only) Obtain and prepare LP Version Upgrade License Key according to Section "Obtaining LP Version Upgrade License Key (Required for Version Upgrade Only)" of Chapter 2.
Version Upgrade License Key is not needed when using LP Firmware version 59-3x/79-3x or later.
Obtaining LP Firmware in New Version and/or Revision Obtain and prepare LP firmware in new version and/or revision according to Section "Obtaining LP Firmware in New Version and/or Revision" of Chapter 2.
Setting up Web Browser Set up the Web browser according to Section "Setting up Web Browser" of Chapter 2.
Performing Firmware Update by Using LP Web System 1. In order to access the target LPAR manager via the Web browser, enter the URL
"https://xxx.xxx.xxx.xxx/index.html" in the address bar of a newly opened browser window. Letters xxx.xxx.xxx.xxx denote the LPAR manager IP Address found on "System Configuration" page of the LPAR manager Screen.
2. In the login screen opened, enter your login user ID (fixed to "admin") and login
password ("password" by default but changeable). Then, click Login button.
To prevent high load, LP Web System allows only one user at a time. If a new user logs in while another user has already logged in, the new user becomes able to use LP Web System and the current user becomes unable to use LP Web System.

3-4 Dynamic Version Upgrade / Revision Update by LP Web System
Hitachi Compute Blade Logical partitioning manager Version Upgrade / Revision Update Guide
Always log in to LP Web System from a newly launched browser window. Do not log in to LP Web System from a browser window opened from another browser window, in which case double login may occur.
3. After a successful login, the "Menu" page of LP Web System appears.
Click LP Firmware Update button.
4. The "Top Page" of the "LP Firmware Update" window opens.

Static Version Upgrade/Revision Update by LP Maintenance Tool 3-5
Hitachi Compute Blade Logical partitioning manager Version Upgrade / Revision Update Guide
If the LP firmware version is 58-4x or later, 78-4x or later, or 17-6x or later, clicking To Setting Page opens the "Setting" page shown below. There you can change the timeout value for LP firmware update.
5. Click Browse button to open a file selection window for the new LP firmware.

3-6 Dynamic Version Upgrade / Revision Update by LP Web System
Hitachi Compute Blade Logical partitioning manager Version Upgrade / Revision Update Guide
6. In the file open window, select the LP firmware image file in new version and/or revision saved in the local disk folder. Upon selection, click Open button in the file open window.
Never select an LP firmware file for a different model or in version-revision not supported by LP Web System. Otherwise, the LPAR manager may not boot up after reboot.
7. Click Update LP Firmware button to upload the selected image file in new version
or revision. The uploading process will take 5 to 7 minutes to complete.
When clicking Update LP Firmware button, the dialog below may appear.
When this dialog is output, enable ActiveX according to the procedure below. a. From the browser menu bar, select Tools and select Internet Options. b. In the "Internet Options" window, click Security tab, click Trusted sites, and click
Custom Level… to open the "Security Settings" window. c. In the "Security Settings" window, check Enable checkbox at Initialize and script
ActiveX controls not marked as safe in ActiveX controls and plug-ins.

Static Version Upgrade/Revision Update by LP Maintenance Tool 3-7
Hitachi Compute Blade Logical partitioning manager Version Upgrade / Revision Update Guide
8. When uploading is complete and ready for version upgrade, the display below with the input field for the version upgrade license key of 32 figures will appear. Manually input (type) an appropriate LPAR manager Version Upgrade License Key in 8 digits by 4 fields. When done, click Start button. The version upgrade will take 2 to 4 minutes to complete. (Required for Version Upgrade Only)
• When updating LP Firmware revision, the message "Input a version up license key" and columns are not displayed on the screen.
• Version Upgrade License Key is not needed when using LP Firmware version 59-3x/79-3x or later.

3-8 Dynamic Version Upgrade / Revision Update by LP Web System
Hitachi Compute Blade Logical partitioning manager Version Upgrade / Revision Update Guide
9. The completion notice appears as soon as the firmware update is finished. Click Logout.
10. Reboot LPAR manager for enabling the updated firmware. Refer the procedure of
rebooting LPAR manager to Section "Rebooting LPAR manager" of this Chapter.
Active LP firmware version is not displayed correctly on the Server Blade Web Console and System Web Console until completion of rebooting LPAR manager. See "Precautions for Dynamic Firmware Update" of Chapter 1.

Static Version Upgrade/Revision Update by LP Maintenance Tool 3-9
Hitachi Compute Blade Logical partitioning manager Version Upgrade / Revision Update Guide
Configuration backup
It is recommended to save the configuration after upgrading or updating LPAR manager, and before booting LPAR manager. To backup the configuration makes it possible to change the LP firmware bank and restore the previous firmware version, even if some problem happened in upgrading or updating LP firmware. The previous firmware version cannot be restored without the backup file.
[When upgrading/ updating CB2000 firmware] [When upgrading/ updating CB320 firmware]
(1) Save the configuration Save the configuration to management module. Press [F9] key on LPAR manager screen.
(2) Shut down server blade.
Press [Alt] +[r] to display a sub-window, select [Shut down] and press [Enter].
(3) Backup the Configuration Backup the configuration saved in the management module to the appropriate server. Log in to a system Web console, and select [Settings]-[Backing up and restoring the settings] on the menu, then the next screen appears. Select the partition and click Save button to take the backup as follows.
3-10 Dynamic Version Upgrade / Revision Update by LP Web System
Hitachi Compute Blade Logical partitioning manager Version Upgrade / Revision Update Guide
(4) Boot LPAR manager
Power the server blade on, in order to boot LPAR manager. Select [Operation] tab, and select appropriate partition in "The list of physical partitions". Select [Operation]-[Power supply module], click [Operation] When using CB320, use "Power operation" from "Server operation" tab.
(5) Re-save the configuration
Return to the LP screen window, press [F9].
LPAR manager time settings After updating LPAR manager firmware, implement the LPAR manager time settings while referring to "LPAR manager Initial Settings" of "CB2000 User's Guide" or "HVM Initial Settings" of "CB320 User's Guide".
Notes on Firmware Update by Using LP Web System This section describes the note on LP Firmware update by using LP Web System.
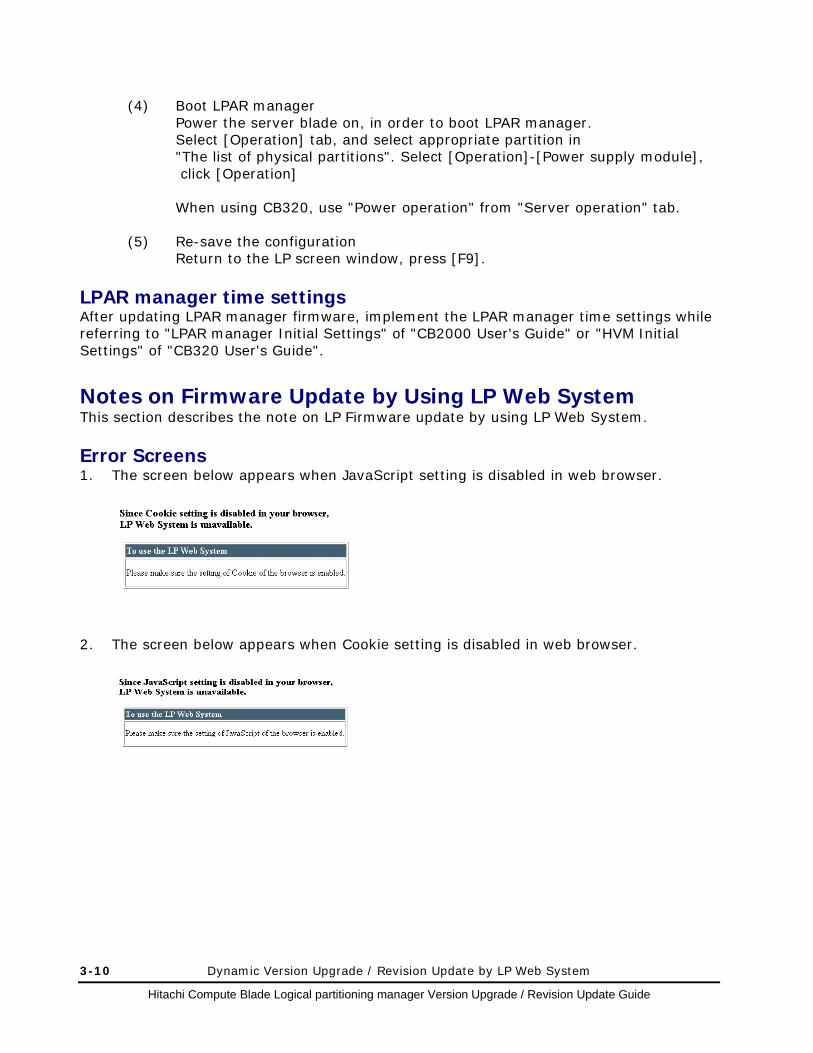
Error Screens 1. The screen below appears when JavaScript setting is disabled in web browser.
2. The screen below appears when Cookie setting is disabled in web browser.

Static Version Upgrade/Revision Update by LP Maintenance Tool 3-11
Hitachi Compute Blade Logical partitioning manager Version Upgrade / Revision Update Guide
3. The screen below appears when fails to login to LP Web System. Return to Login Page and input correct User ID or Password again.
4. The screen below appears when other user is upgrading LP firmware. Return to Login
Page and try again after a while.

3-12 Dynamic Version Upgrade / Revision Update by LP Web System
Hitachi Compute Blade Logical partitioning manager Version Upgrade / Revision Update Guide
5. The screen below appears when LP firmware is already upgraded. Click Logout to logout from LP Web System.
6. The screen below appears when you click Cancel button while upgrading. To try
again, click To Top Page of LP Firmware Update to return to the Top Page.

Static Version Upgrade/Revision Update by LP Maintenance Tool 3-13
Hitachi Compute Blade Logical partitioning manager Version Upgrade / Revision Update Guide
7. The screen below appears when LP firmware upgrade failed. When this message appears, take actions according to the "What to do" message.

3-14 Dynamic Version Upgrade / Revision Update by LP Web System
Hitachi Compute Blade Logical partitioning manager Version Upgrade / Revision Update Guide
Changing password on LP Web System You can change the password for LP Web System from default. However, keep in
mind that you must enter the new password when performing dynamic firmware update not only under LP Web System but also under HVM Navigator because the latter partly uses the function of the former in the background.
Be sure to save LP configuration information by pressing the "F9" key either from
Menu screen or Logical Partition Configuration screen before you change the password.
Unless you save LP configuration information before you change the password, the following will result: • EFI driver information set up in all LPARs will be lost. • Startup of Guest OS will always fail.
After the step above, change the password according to "How to Change
Passwords" in User's Guide of Hitachi Compute Blade 2000 or Hitachi Compute Blade320.
Notes on Firmware Update by Using LP Web System
LP firmware updating "LP F/W (Alt)" on LP Firmware Version Information screen temporarily goes blank
when you are updating the firmware. If this blank state continues, upgrade may have error stopped or forcibly stopped. Please check the LP firmware upgrading event status on LPAR manager System Log screen.
To avoid disruption of the update operation, do not close the Web browser or use
"F5" function while upgrading. If upgrade operation is disrupted, return to top page of LP Firmware Update and try again from uploading of an LP firmware (ISO image).
If upgrade operation has been forcibly or abnormally terminated, the Web browser may hang depending on your computer configuration. If this problem occurs, you cannot log in to LP Web System until operation times out (30 minutes).
Make sure to logout from the LP Web System when completing the LP firmware
upgrade.
If you close the web browser without logout, you may not be logged in to LP Web System until operation times out (30 minutes).
When LP Firmware update fails due to protection function of security software, check the setting of the security software.

Static Version Upgrade/Revision Update by LP Maintenance Tool 3-15
Hitachi Compute Blade Logical partitioning manager Version Upgrade / Revision Update Guide
Manual shutdown by Blade Server Manager (BSM) The following message may appear when manually shutting down the LPAR manager by BSM.
+-----------------------------------------------+ | An error occurred in the power-off request to | | LP_XXXXXXXXX(LP) | | KASM21805-E 029 | +-----------------------------------------------+
When this message appears, it is possible that LP firmware is still being updated. If it is still being updated, please shutdown LPAR manager when the update operation is completed.
LPAR manager does not start when rebooting server blade At the last step of firmware update by using LP Maintenance Tool, the server blade is rebooted to start the LPAR manager in new firmware version and/or revision. However, in the event that rebooting the server blade does not boot LPAR manager, start a remote console and check the status of the server blade. Check if the remote console shows the following message. When the following message appears, take actions according to the "What to do". Message Content LP Loader detected enable H/W Memory Dump setting in this system. [INFO:XX]
Please set H/W Memory Dump setting to disable.
Explanation LPAR manager cannot boot due to the Enabled hardware memory dump setting.
What to do Set Disabled in the [hardware memory dump] setting, and turn on power of the server blade again.

3-16 Dynamic Version Upgrade / Revision Update by LP Web System
Hitachi Compute Blade Logical partitioning manager Version Upgrade / Revision Update Guide
(This page is intentionally left blank)

4
Static Version Upgrade/Revision Update by LP Maintenance Tool 4-1
Hitachi Compute Blade Logical partitioning manager Version Upgrade / Revision Update Guide
Static Version Upgrade/ Revision Update
by LP Maintenance Tool
This chapter describes how to upgrade LP firmware version or update LP firmware revision by means of LP Maintenance Tool while LPAR manager is not running. Certain steps demonstrate Hitachi Compute Blade 2000, where you can assume their steps on Hitachi Compute Blade 320 or the different version by reading Hitachi Compute Blade 2000 as Hitachi Compute Blade 320 or appropriate version. Procedure of upgrading / updating LP firmware Performing Firmware Update by Using LP Maintenance Tool Notes on Firmware Update by Using LP Maintenance Tool

4-2 Static Version Upgrade/Revision Update by LP Maintenance Tool
Hitachi Compute Blade Logical partitioning manager Version Upgrade / Revision Update Guide
Procedure of upgrading / updating LP firmware Flows of version upgrade and revision update by means of LP Maintenance Tool are shown below, where solid boxes with green background indicate steps commonly applicable to version upgrade and revision update while dotted boxes with blue background indicate steps unique to version upgrade.
Obtain LP Version Upgrade License Key*2
Obtain LP firmware
Re-save the configuration
Flow of revision update
Flow of version upgrade
Perform firmware update *1
Obtain LP firmware
*1: It is unnecessary to input "version up key" when updating a revision. *2: Version Upgrade License Key is not needed when using LP firmware
version 59-3x/79-3x or later.
Boot LPAR manager
Backup the configuration
Save the configuration
Shut down LPAR manager
Back up of the Configuration
Reboot and re-save the Configuration
LPAR manager time settings

Static Version Upgrade/Revision Update by LP Maintenance Tool 4-3
Hitachi Compute Blade Logical partitioning manager Version Upgrade / Revision Update Guide
Prerequisites Item Remarks
Shutting down Server blades Deactivate all LPARs and shut down server blade.
Setting LP mode Set LP mode.
Setting EFI /BIOS Set "EFI/ BIOS" to the recommended value in LPmode.
Obtaining LPAR manager Version Upgrade License Key (Required for Version Upgrade Only)
Version Upgrade License Key is not needed when using LP Firmware version 59-3x/79-3x or later.
Obtain and prepare LPAR manager Version Upgrade License Key according to Section "Obtaining LPAR manager Version Upgrade License Key (Required for Version Upgrade Only)" of Chapter 2.
Obtaining LP Firmware in New Version and/or Revision Obtain and prepare LP firmware in new version and/or revision according to Section "Obtaining LP Firmware in New Version and/or Revision" of Chapter 2.
Configuration backup
It is recommended to save the configuration after upgrading or updating LPAR manager, and before booting LPAR manager. To backup the configuration makes it possible to change the LP firmware bank and restore the previous firmware version, even if some problem happened in upgrading or updating LP firmware. The previous firmware version cannot be restored without the backup file.
[When upgrading/ updating CB2000 firmware] [When upgrading/ updating CB320 firmware]
(1) Save configuration
Save the configuration to management module. Press [F9] key on LPAR manager screen.

4-4 Static Version Upgrade/Revision Update by LP Maintenance Tool
Hitachi Compute Blade Logical partitioning manager Version Upgrade / Revision Update Guide
(2) Shut down server blade.
Press [Alt] +[r] to display a sub-window, select [Shut down] and press [Enter].
(3) Backup the Configuration Backup the configuration saved in the management module to the appropriate server. Log in to a system Web console, and select [Settings]-[Backing up and restoring the settings] on the menu, then the next screen appears. Select the partition and click Save button to take the backup as follows.
(4) Boot LPAR manager Power the server blade on, in order to boot LPAR manager. Select [Operation] tab, and select appropriate partition in "The list of physical partitions". Select [Operation]-[Power supply module], click [Operation] When using CB320, use "Power operation" from "Server operation" tab.
(5) Re-save the configuration
Return to the LP screen window, press [F9].

Static Version Upgrade/Revision Update by LP Maintenance Tool 4-5
Hitachi Compute Blade Logical partitioning manager Version Upgrade / Revision Update Guide
Performing Firmware Update by Using LP Maintenance Tool This section describes the LP firmware update procedure by using a CD/DVD drive connected to the front USB port.
Note that the remote CD function cannot be used for LP firmware update. Make sure to connect a CD/DVD drive to the USB port at the front panel of the server blade.
1. Connect a CD/DVD drive to the USB port at front panel of the server blade and insert
the LP firmware CD into the CD/DVD drive. 2. Turn the server blade on. 3. The LP maintenance tool starts.
Select [1. Update LP firmware] and press [Enter].
<< LP Maintenance Tool (Version X.X) >> ---- LP Firmware Information ---- Bank# Version Select 0 VV-RR(TT-KK) Active 1 VV-RR(TT-KK) Alternate ---- LP License Information ---- LP License [Advanced] ---- Menu ---- 1. Update LP Firmware 2. Change LP F/W Active Bank 3. LP Model Upgrade 4. Show Verup License Key 5. Recover LP Configuration Q. Quit and Reboot Select : 1
Enter "1"

4-6 Static Version Upgrade/Revision Update by LP Maintenance Tool
Hitachi Compute Blade Logical partitioning manager Version Upgrade / Revision Update Guide
4. The <Before> section shows the old LP firmware version. The <After> section shows the new firmware version.
<< Update LP Firmware >> No. Version 1 VV-RR(TT-KK) <Before> Bank# Version Select 0 VV-RR(TT-KK) Active 1 VV-RR(TT-KK) Alternate <After > Bank# Version Select 0 VV-RR(TT-KK) Alternate 1 VV-RR(TT-KK) Active
5. If the firmware update is version upgrade, a prompt for entering LPAR manager
Version Upgrade License Key appears as shown below. Prepare the LPAR manager Version Upgrade License Key CD for automatic input or prepare any other form of the LPAR manager Version Upgrade License Key for manual input. (Applicable to version upgrade only)
Version Upgrade License Key is not needed when using LP Firmware version 59-3x/79-3x or later.
Option 1 to utilize automatic input of LPAR manager Version Upgrade License Key
a. Press the Enter key in blank.
Enter Verup License Key :_
b. Change the CD in CD/DVD drive to LPAR manager Version Upgrade License
Key CD created in Section "Prerequisites" of Chapter 1 and press Enter key.
Exchange for CD with Verup License Key. Ready[Enter]:_
c. Change the CD in CD/DVD drive to LP firmware CD and press Enter key.
Exchange for CD with LP Maintenance Tool. Ready[Enter]:_
Enter
Enter
Enter

Static Version Upgrade/Revision Update by LP Maintenance Tool 4-7
Hitachi Compute Blade Logical partitioning manager Version Upgrade / Revision Update Guide
Option 2 to do manual input of LPAR manager Version Upgrade License Key: Referring to the LPAR manager Version Upgrade License Key in any form
readable, enter the license key excluding spaces. Enter Verup License Key : XXXXXXXXXXXXXXXXXXXXXXXXXXXXXXXX
6. When ready, type "Y" at the "Confirm? (Y/[N])" prompt and press [Enter]. (Entering
"N" revert the screen display to step 3.)
Confirm? (Y/[N]) : Y
7. The LP firmware update progress is displayed by percentage. Wait until the update is
complete. The update takes three to five minutes.
0% ----- 20% ----- 40% ----- 60% ----- 80% ----- 100% |........................ |
8. A message appears when the update is complete. Press [Enter].
[0000] LP Firmware Updating is successfully finished. *** HIT ENTER KEY ***
If any error message below is displayed, contact your sales representative.
Completion Code Recommended Action
0001
Applicable to both version upgrade and revision update: LP firmware authentication is failed. Contact your sales representative.
Applicable to version upgrade only: LPAR manager version Upgrade License Key authentication is failed. Contact your sales representative.
0002 Applicable to version upgrade only: The LPAR manager Version Upgrade License Key may be wrong. Contact your sales representative.
FFFF LP firmware updating is failed. Contact your sales representative.
Enter "Y"
Enter the License Key

4-8 Static Version Upgrade/Revision Update by LP Maintenance Tool
Hitachi Compute Blade Logical partitioning manager Version Upgrade / Revision Update Guide
9. When the updated LP firmware version is displayed, make sure that the LP firmware version for the Active Bank number matches the updated LP firmware version. Thereafter, select [Q. Quit and Reboot] and press [Enter].
<< LP Maintenance Tool (Version X.X) >> ---- LP Firmware Information ---- Bank# Version Select 0 VV-RR(TT-KK) Alternate 1 VV-RR(TT-KK) Active ---- LP License Information ---- LP License [Advanced] ---- Menu ---- 1. Update LP Firmware 2. Change LP F/W Active Bank 3. LP Model Upgrade 4. Show Verup License Key 5. Recover LP Configuration Q. Quit and Reboot Select : Q
10. Remove the LP firmware CD from CD/DVD drive connecting to the USB port at the
front panel of the server blade, and then disconnect the CD/DVD drive from the USB port.
11. Type "Y" at the "Quit LP Maintenance Tool? (Y/[N])" prompt and press [Enter] for
rebooting the server blade. (Entering "N" revert the screen display to step 3.)
<< Quit and Reboot >> Quit LP Maintenance Tool? (Y/[N]) : Y
In the event that the last step fails to reboot the server blade, take action according to Section "Notes on Firmware Update by Using LP Maintenance Tool" of this Chapter.
The old LP firmware version may be displayed in Active bank on FV command of management module and Web Console right after LP firmware version is updated. (There is maximum five minutes time-lag to display the updated version.)
12. Resave the configuration.
Press [F9] key on LPAR manager screen.
LPAR manager time settings After updating LPAR manager firmware, implement the LPAR manager time settings while referring to "LPAR manager Initial Settings" of "CB2000 User's Guide" or "HVM Initial Settings" of "CB320 User's Guide".
Enter "Q"
Make sure that the LP firmware version for the Active Bank number matches the updated version.
Enter "Y"

Static Version Upgrade/Revision Update by LP Maintenance Tool 4-9
Hitachi Compute Blade Logical partitioning manager Version Upgrade / Revision Update Guide
Notes on Firmware Update by Using LP Maintenance Tool
LPAR manager does not start when rebooting server blade At the last step of firmware update by using LP Maintenance Tool, the server blade is rebooted to start the LPAR manager in new firmware version and/or revision. However, in the event that rebooting the server blade does not start LPAR manager, start a remote console and check the status of the server blade. Check if the remote console shows the following messages. When the following message appears, take actions according to the "What to do".
Message Content PMBR booter started.Ext INT 13h not available.Press key to reboot.
Explanation Booting LPAR manager failed.
What to do Turn off power of the server blade once, and then turn on power of the server blade.
Message Content LP Loader detected enable H/W Memory Dump setting in this system. [INFO:XX]
Please set H/W Memory Dump setting to disable.
Explanation LPAR manager cannot boot due to the Enabled hardware memory dump setting.
What to do Set Disabled in the [hardware memory dump] setting, and turn on power of the server blade again.

4-10 Static Version Upgrade/Revision Update by LP Maintenance Tool
Hitachi Compute Blade Logical partitioning manager Version Upgrade / Revision Update Guide
(This page is intentionally left blank)

Hitachi Compute Blade Logical partitioning manager Version Upgrade / Revision Update Guide

MK-99BDS2K004-03
Hitachi Data Systems
Corporate Headquarters 2845 Lafayette Street Santa Clara, California 95050-2639 U.S.A. www.hds.com
Regional Contact Information
Americas +1 408 970 1000 [email protected]
Europe, Middle East, and Africa +44 (0) 1753 618000 [email protected]
Asia Pacific +852 3189 7900 [email protected]