historic technical passport (htp) detailed guidelines · the historical technical passport, (the...
TRANSCRIPT
HISTORIC TECHNICAL PASSPORT (HTP)
DETAILED GUIDELINES
ALL FIA HISTORIC CONTENT AVAILABLE ON WWW.FIA.COM/HISTORIC
The texts and documents in the present brochure are for information only. The onlyregulations that are considered official are those published in the FIA Yearbook ofAutomobile Sport, in the periodical FIA Bulletins and on the FIA website.
**********************
FIA HISTORIC DATABASE ON WWW.HISTORICDB.FIA.COM

The Historical Technical Passport, (the “HTP”), is used by technical delegates to check the conformity of an historic competition car. It is a document that sets out the technical specification of the car for the homologation period requested.
When applying for an HTP, you will need to carry out the following steps:- Define the requested technical specification of the car (it needs to have existed in period).
- choose the discipline(s): Rally / Racing / Hill Climb;- choose the category: Production, Competition or Formula;- choose the period: A to J2.
- Refer to: - Appendix K and the relevant appendices relating to the car and its specification;- if applicable, Appendix J covering your specification;- the car’s Homologation Form and its extensions; - if applicable, the rules of the championship in which the model ran in period.
- Compile your application in accordance with the above.
For homologated cars, answers to most of the questions asked in the HTP template can be found on the HomologationForm of the car and its extensions.
In order to use the car in a different configuration from the one mentioned on the original HTP, one or multiple Variant requests need to be applied for, on the basis of a single HTP.
HISTORIC TECHNICAL PASSPORT GUIDELINES

GENERAL FEATURES
GENERAL FEATURES
FILL IN THE FORM
HOW TO TAKE YOUR PHOTOS
COMMON MISTAKESHOW NOT TO TAKE YOUR PHOTOSVALID ROPS CERTIFICATE
GENERAL FEATURESHISTORIC TECHNICAL PASSPORT GUIDELINES
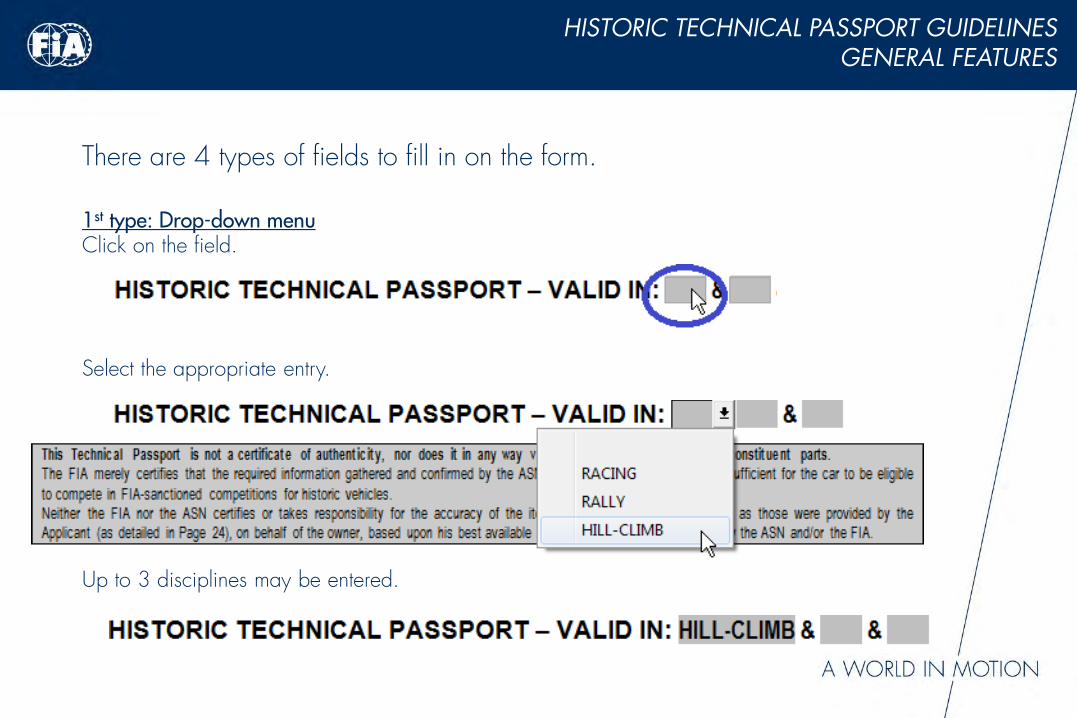
1st type: Drop-down menu Click on the field.
There are 4 types of fields to fill in on the form.
Select the appropriate entry.
Up to 3 disciplines may be entered.
GENERAL FEATURESHISTORIC TECHNICAL PASSPORT GUIDELINES
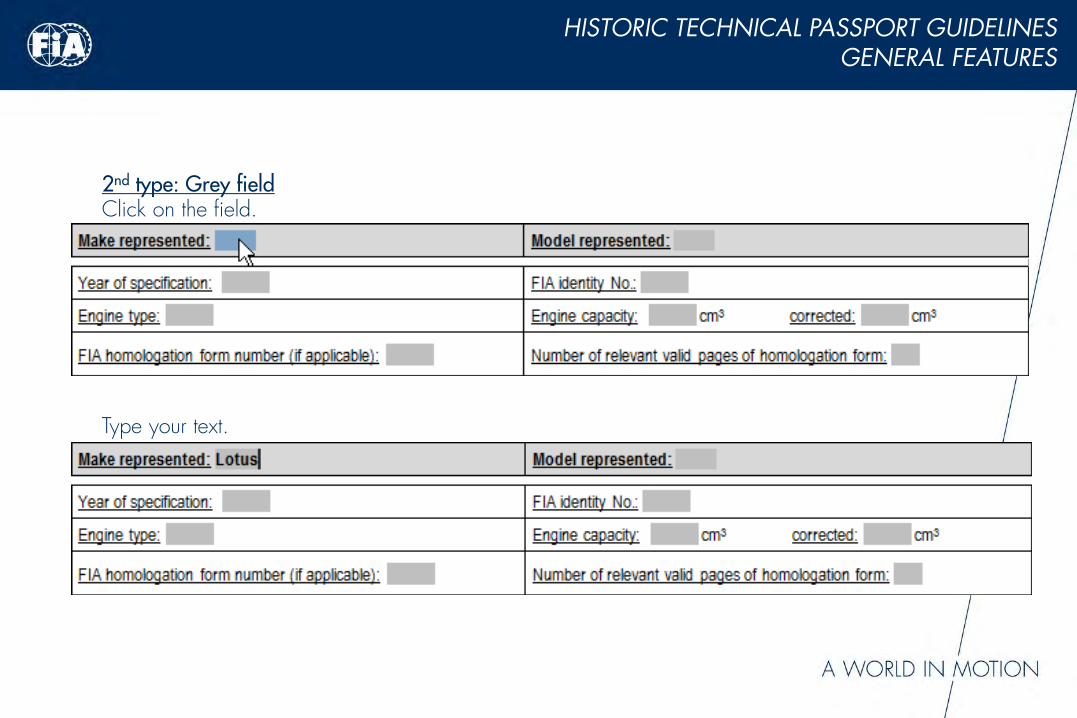
2nd type: Grey fieldClick on the field.
Type your text.
GENERAL FEATURESHISTORIC TECHNICAL PASSPORT GUIDELINES
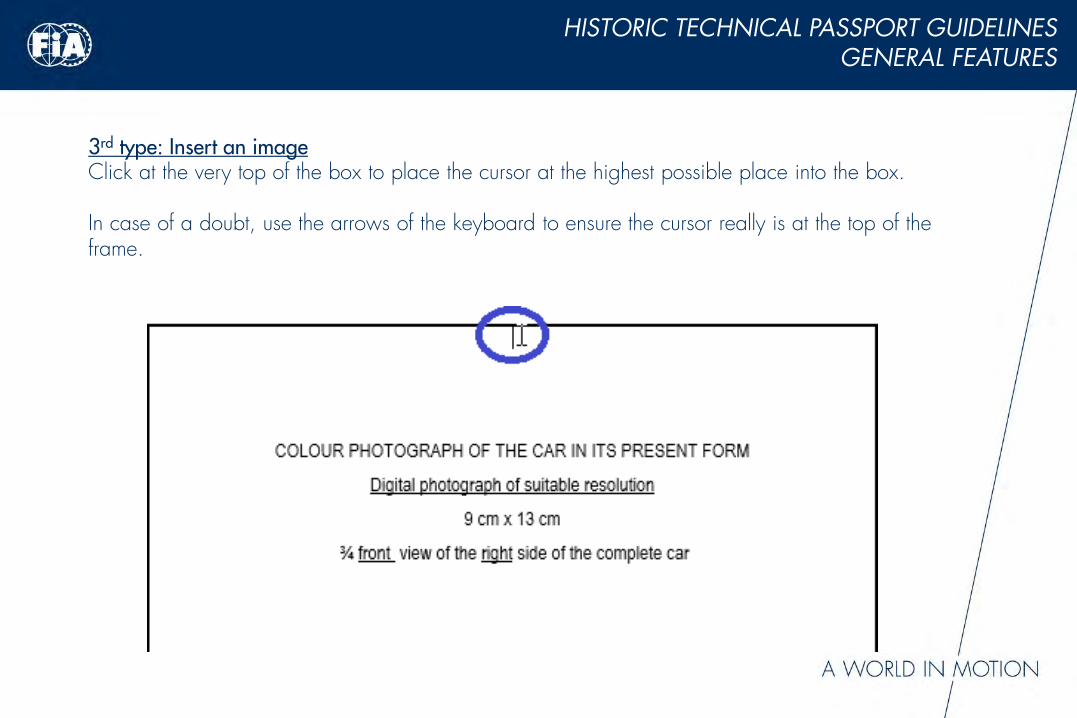
3rd type: Insert an imageClick at the very top of the box to place the cursor at the highest possible place into the box.
In case of a doubt, use the arrows of the keyboard to ensure the cursor really is at the top of the frame.
GENERAL FEATURESHISTORIC TECHNICAL PASSPORT GUIDELINES
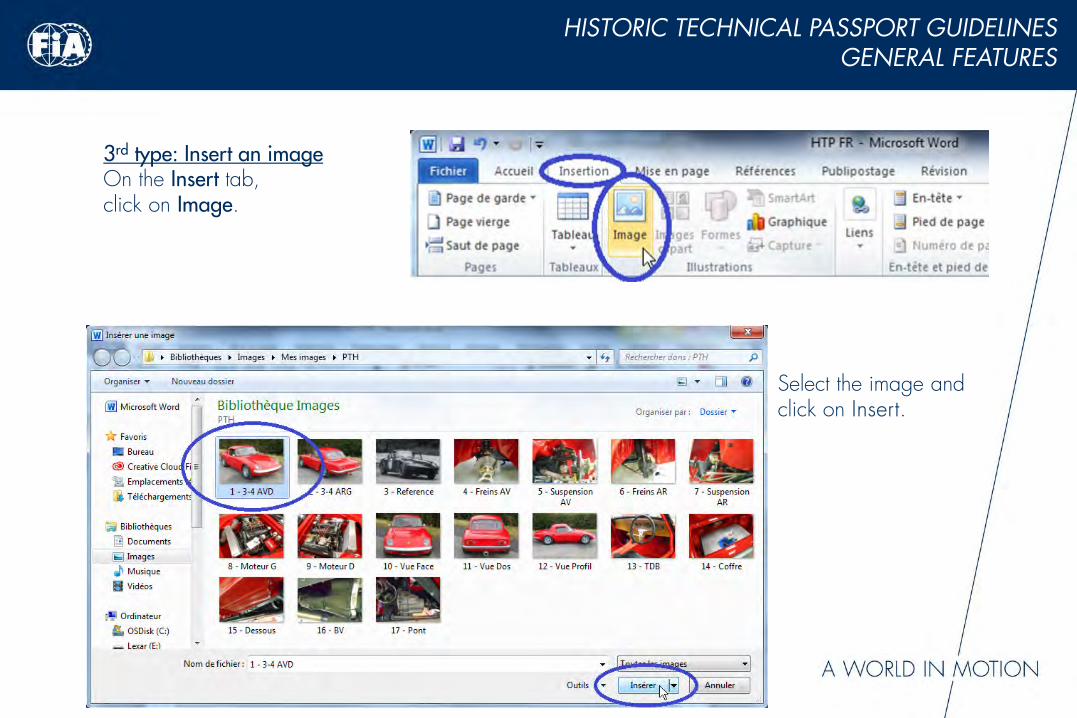
3rd type: Insert an image On the Insert tab,click on Image.
Select the image and click on Insert.
GENERAL FEATURESHISTORIC TECHNICAL PASSPORT GUIDELINES
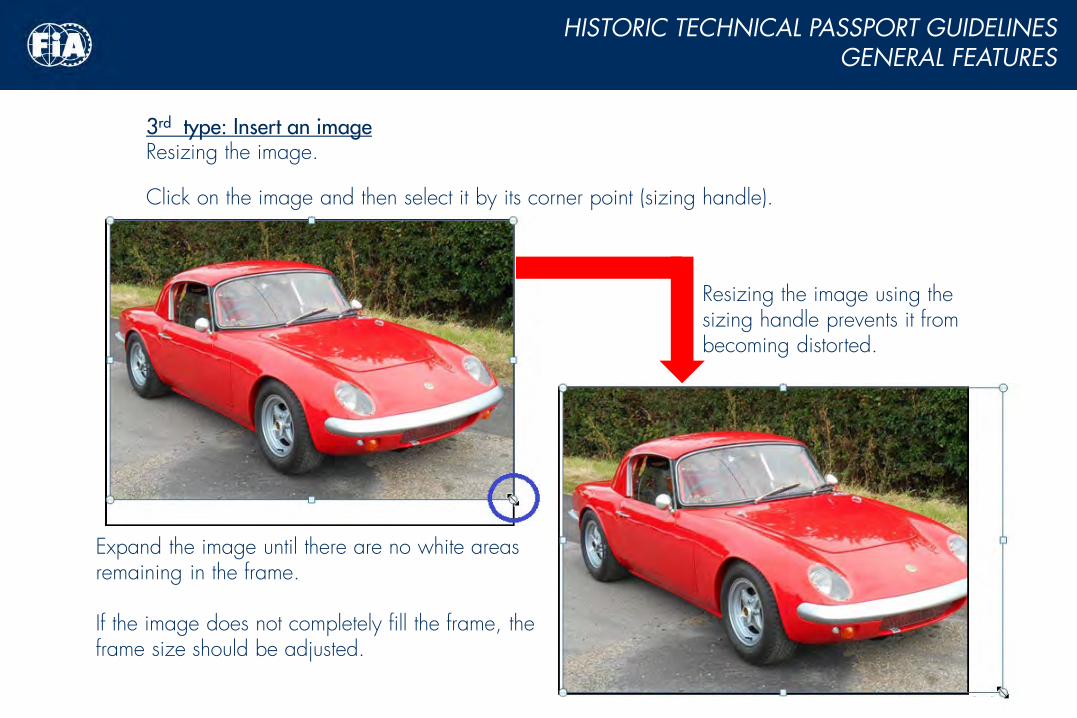
3rd type: Insert an image Resizing the image.
Click on the image and then select it by its corner point (sizing handle).
Expand the image until there are no white areas remaining in the frame.
If the image does not completely fill the frame, the frame size should be adjusted.
Resizing the image using the sizing handle prevents it from becoming distorted.
GENERAL FEATURESHISTORIC TECHNICAL PASSPORT GUIDELINES
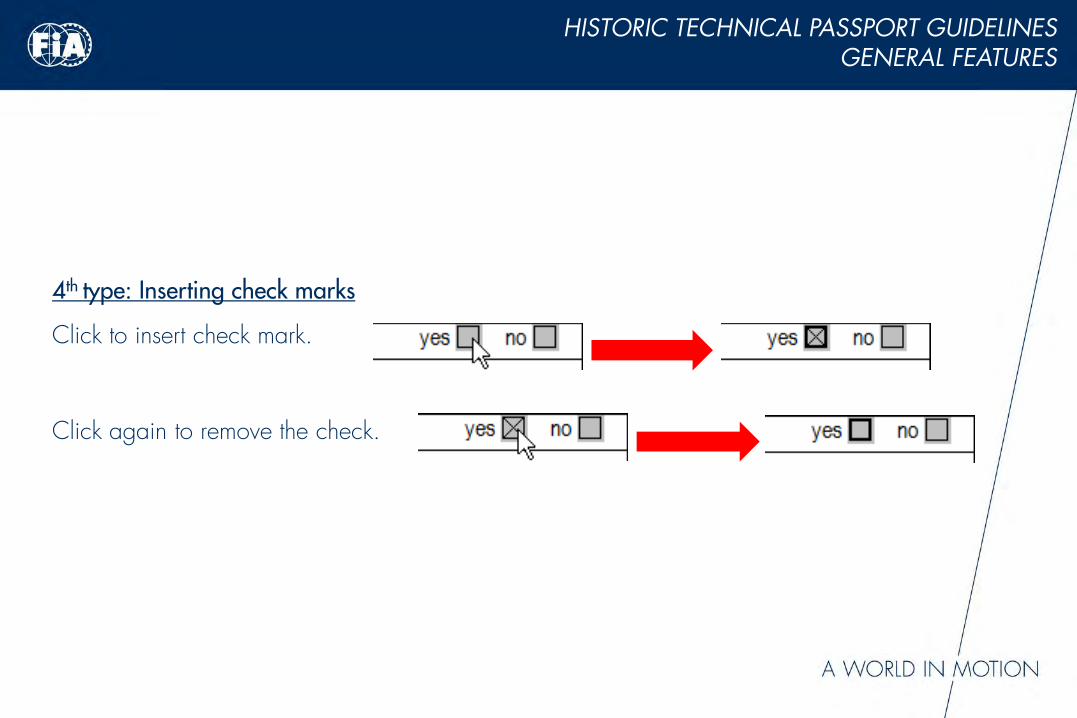
4th type: Inserting check marks
Click to insert check mark.
Click again to remove the check.
GENERAL FEATURESHISTORIC TECHNICAL PASSPORT GUIDELINES
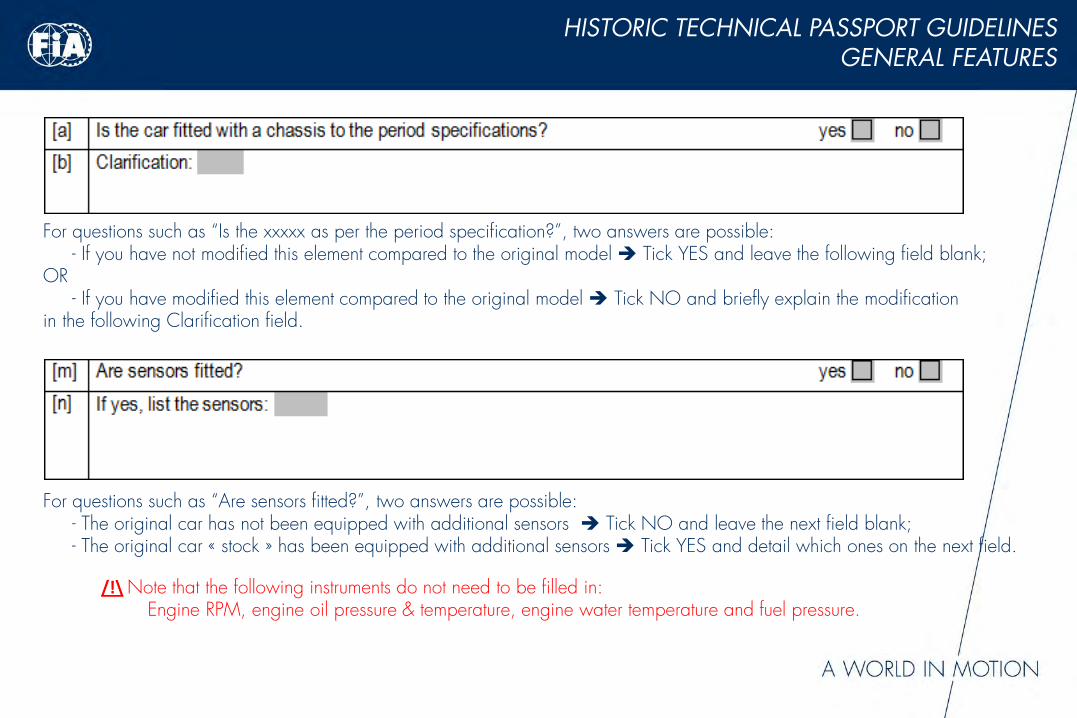
For questions such as “Is the xxxxx as per the period specification?”, two answers are possible: - If you have not modified this element compared to the original model Tick YES and leave the following field blank;
OR - If you have modified this element compared to the original model Tick NO and briefly explain the modification
in the following Clarification field.
For questions such as “Are sensors fitted?”, two answers are possible:- The original car has not been equipped with additional sensors Tick NO and leave the next field blank;- The original car « stock » has been equipped with additional sensors Tick YES and detail which ones on the next field.
/!\ Note that the following instruments do not need to be filled in: Engine RPM, engine oil pressure & temperature, engine water temperature and fuel pressure.
GENERAL FEATURESHISTORIC TECHNICAL PASSPORT GUIDELINES
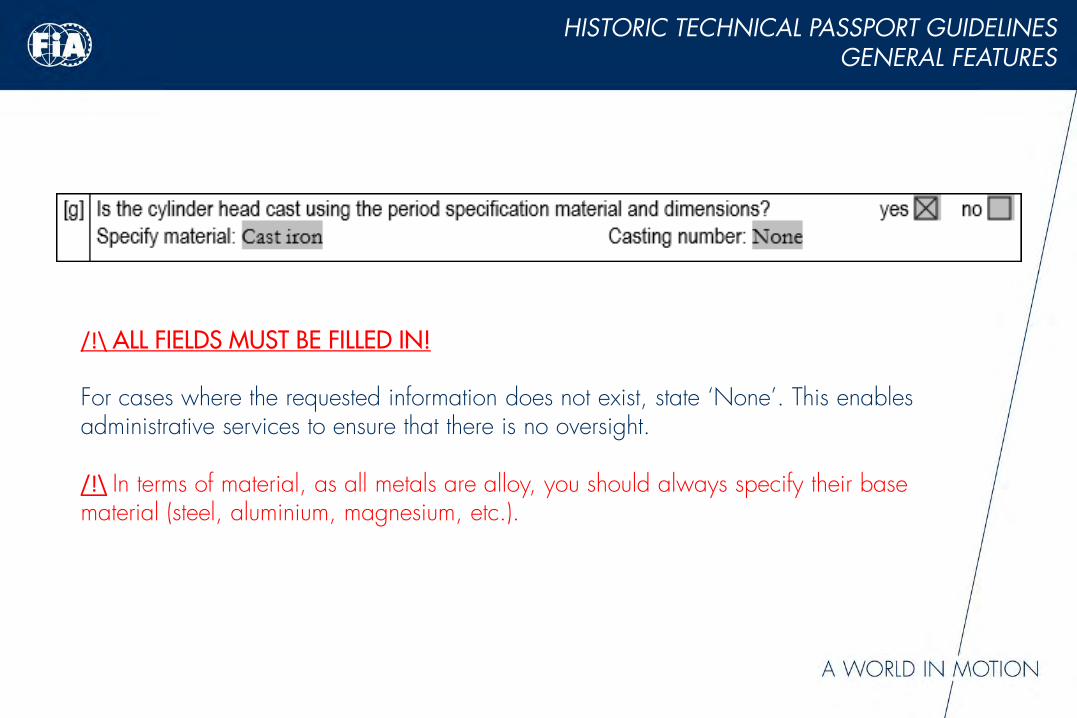
/!\ ALL FIELDS MUST BE FILLED IN!
For cases where the requested information does not exist, state ‘None’. This enablesadministrative services to ensure that there is no oversight.
/!\ In terms of material, as all metals are alloy, you should always specify their base material (steel, aluminium, magnesium, etc.).

FILL IN THE HTP FORM
GENERAL FEATURES
FILL IN THE FORM
HOW TO TAKE YOUR PHOTOS
COMMON MISTAKESHOW NOT TO TAKE YOUR PHOTOSVALID ROPS CERTIFICATE
FILL IN THE HTP FORM – PAGE 1HISTORIC TECHNICAL PASSPORT GUIDELINES
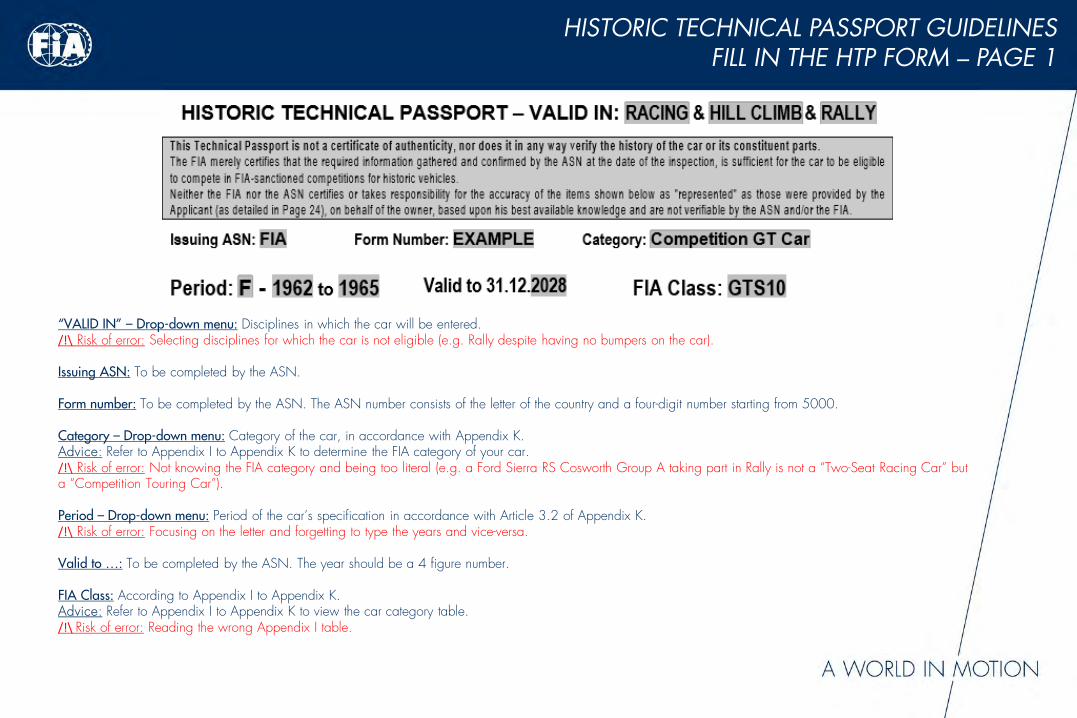
“VALID IN” – Drop-down menu: Disciplines in which the car will be entered./!\ Risk of error: Selecting disciplines for which the car is not eligible (e.g. Rally despite having no bumpers on the car).
Issuing ASN: To be completed by the ASN.
Form number: To be completed by the ASN. The ASN number consists of the letter of the country and a four-digit number starting from 5000.
Category – Drop-down menu: Category of the car, in accordance with Appendix K.Advice: Refer to Appendix I to Appendix K to determine the FIA category of your car./!\ Risk of error: Not knowing the FIA category and being too literal (e.g. a Ford Sierra RS Cosworth Group A taking part in Rally is not a “Two-Seat Racing Car” but a “Competition Touring Car”).
Period – Drop-down menu: Period of the car’s specification in accordance with Article 3.2 of Appendix K. /!\ Risk of error: Focusing on the letter and forgetting to type the years and vice-versa.
Valid to …: To be completed by the ASN. The year should be a 4 figure number.
FIA Class: According to Appendix I to Appendix K.Advice: Refer to Appendix I to Appendix K to view the car category table./!\ Risk of error: Reading the wrong Appendix I table.

FILL IN THE HTP FORM – PAGE 1HISTORIC TECHNICAL PASSPORT GUIDELINES
Make represented: This is the make "represented" by the person who applies for the car’s HTP (the "applicant", who can be either the owner of the car, or the person duly authorised by the owner of the car to submit the application). In this article and all the following ones, the word "represented" means that this entry is that which is declared by the applicant; this claim is therefore the sole responsibility of the applicant (see also grey box on Page 1 of the HTP).Advice: For homologated cars, enter the make written on the Homologation Form.
Model represented: Model as declared by the applicant. Always use the homologated make and model for homologated cars.Advice: For homologated cars, enter the model written on the Homologation Form.
Year of specification: The year in the FIA Appendix K Period in which the model was current. This year defines the technical specifications to which the applicant’s car is purported to comply.Advice: The year of specification is very important. It is defined according to the parts mounted on the car. If your car, manufactured in 1966, is equipped with a component contained in an extension of the Homologation Form issued in 1969, then your car’s year of specification is 1969. If you use several extensions to the Homologation Form, then the latest one will be the one setting the year of specification. The period filled in previously must correspond to the year of specification.
FIA identity No.: To be completed by the ASN, according to instructions from the FIA.
Engine type: Number of cylinders, configuration and distributor type (e.g. Straight 4 DOHC; V8 OHC; V6 OHV; etc.). If the engine manufacturer is different from the car manufacturer, or if the engine is of a particular type (Essex, Climax, DFV, BDG, etc.), that must be stated in this field./!\ Risk of error: Writing "turbo“ or the manufacturer’s engine code, etc.
Engine capacity and corrected engine capacity: The capacity filled in here must always be the real and actual capacity, not the original one. For naturally aspirated piston engines, there is no corrected cubic capacity. Corrected cubic capacity only apply to forced induction engines or rotary piston engines. Check the car’s Homologation Form or the period Appendix J for the coefficient that applies to your car, if relevant as in some periods, there was no equivalent.
FIA Homologation Form number (if applicable): If the car has a Homologation Form. A verified copy of it must always be attached to the HTP and brought to competitions.
Number of relevant valid pages of Homologation Form: If the car has a Homologation Form, complete the number of pages of the basic Homologation Form plus the number of extension pages that it is possible to use regarding the specification year and the chosen discipline(s).

Pages 1 and 2 - Presentation photographs – Photos must be sharp and represent:
- The complete car, ready to race with or without its numbers;- From ¾ front right (Page 1) and ¾ rear left (Page 2), the car must be presented in order to provide a complete view; - There must be adequate and uniform light, no shadows;- The stationary car with nobody on board;- A limited amount of stickers are authorised, in accordance with Article 2.1.9 to Appendix K as well as for cars replicating a period livery and justified by a reference picture on Page 2;- Windscreen strip are not allowed unless part of a period livery;- Cars competing in rallies must be fitted with bumpers to the period specification of the model unless the model was homologated in period without bumpers.
FILL IN THE HTP FORM – PAGE 1 & 2HISTORIC TECHNICAL PASSPORT GUIDELINES

FILL IN THE HTP FORM – PAGE 2HISTORIC TECHNICAL PASSPORT GUIDELINES
List of extensions to the Homologation Form used:List the different extensions to the Homologation Form on which the parts mounted on the car are listed.
1 – Form extensions are marked with a number (1).2 - Each extension lists the parts homologated by the manufacturer in period (2).3 - Each extension has a date of homologation (3).
The latest extension determines the year of specification (requestedon Page 1).
Advice: When listing the different extensions used on your car,count the number of extension pages permitted regarding your specification year and the disciplines required. The number of pages of the base Form plus the number ofextension pages permitted make up the number requestedon Page 1 in the section “Number of relevant valid pages of Homologation Form”.

FILL IN THE HTP FORM – PAGE 2HISTORIC TECHNICAL PASSPORT GUIDELINES
PERIOD IMAGE OF THE ORIGINAL CAR BODYWORK: The reference picture has to be of a model that shares the period specification claimed for the presented car. Any difference between the presented car and the reference picture have to be corrected so that the reference car and the presented car are identical. In the case were the car has a livery, the reference picture is necessary.
Event: Name of the event and/or, as a minimum, of the location. The caption must be accurate enough so that the car can be identified in the classification of the relevant event.Date of the event: Month and year formatted to DD.MM.YYYY.
Box to tick regarding its history: Under certain conditions, cars bearing a national history only may be issued with an HTP. In such cases, the ASN must avoid any ambiguity and indicate this clearly in the application. The box at the bottom of Page 2 must be ticked.
/!\ Do not forget to add your photo caption.

FILL IN THE HTP FORM – PAGE 3HISTORIC TECHNICAL PASSPORT GUIDELINES
1.1.[a]: Unless particular modifications are to be clarified, tick “YES”.
1.1.[b]: To be completed only if you have answered “NO” to question 1.1.[a].
1.1.[d]: Specify the main material(s) of which the chassis is constructed.
1.2.[f]: Specify if it is possible to adjust the hardness of the dampers.If yes, complete 1.2.[g].
1.2.[g]: State the number of adjusters per damper (/!\ the number of adjusters is not the number of adjustment settings but the number or range of settings).
1.2.[h]: Indicate the main material of the dampers.
1.2.[i]: Specify if the geometry or the height of suspension is adjustable by ticking “YES” or “NO”.
1.2.[j]: Specify the adjustment method for each of the above.Point [i1] is for the adjustment of the geometry and Point [i2] is for the ride height. The adjustments available depend on the parts mounted on the car. Two cars of the same model may not have the same setup possibilities if they are from a different group or period (even within the same period).
Section 1.3.: Same as Section 1.2.

FILL IN THE HTP FORM – PAGE 4HISTORIC TECHNICAL PASSPORT GUIDELINES
!
What must be visible:- Upper and lower damper mountings;- Ends of each pull rod;- Wishbone(s) or axle(s);- Mounted silent blocks and/or rose joints; - Pivot between the stabilizer and the arm.
This photo clearly shows both sides of the wishbones and the two damper mountings, but the mounting of the stabilising bar is not visible.
Even so, as these photos show most of the required points and are clear and well enlightened, they are acceptable.
/!\ If the car is fitted with drum brakes then for the side view photo the drum must be removed and included in the photo so that the inside of the drum is visible./!\ The suspension has to be free on the photo (do not put the jack or axle stand under the wishbone but under the chassis).

FILL IN THE HTP FORM – PAGE 6HISTORIC TECHNICAL PASSPORT GUIDELINES
!
What must be visible:- Upper and lower damper mountings;- Ends of each pull rod;- Wishbone(s) or axle(s);- Mounted silentblocks and/or rose joints; - Pivot between the stabilizer and the arm;- If applicable, the handbrake linkage.
These photos show most of the elements requested. It is clear and well enlightened. They are acceptable.
/!\ If the car is fitted with drum brakes then for the side view photo the drum must be removed and included in the photo so that the inside of the drum is visible./!\ The suspension has to be free on the photo (do not put the jack or axle stand on the triangle but on the chassis).
FILL IN THE HTP FORM – PAGE 7HISTORIC TECHNICAL PASSPORT GUIDELINES
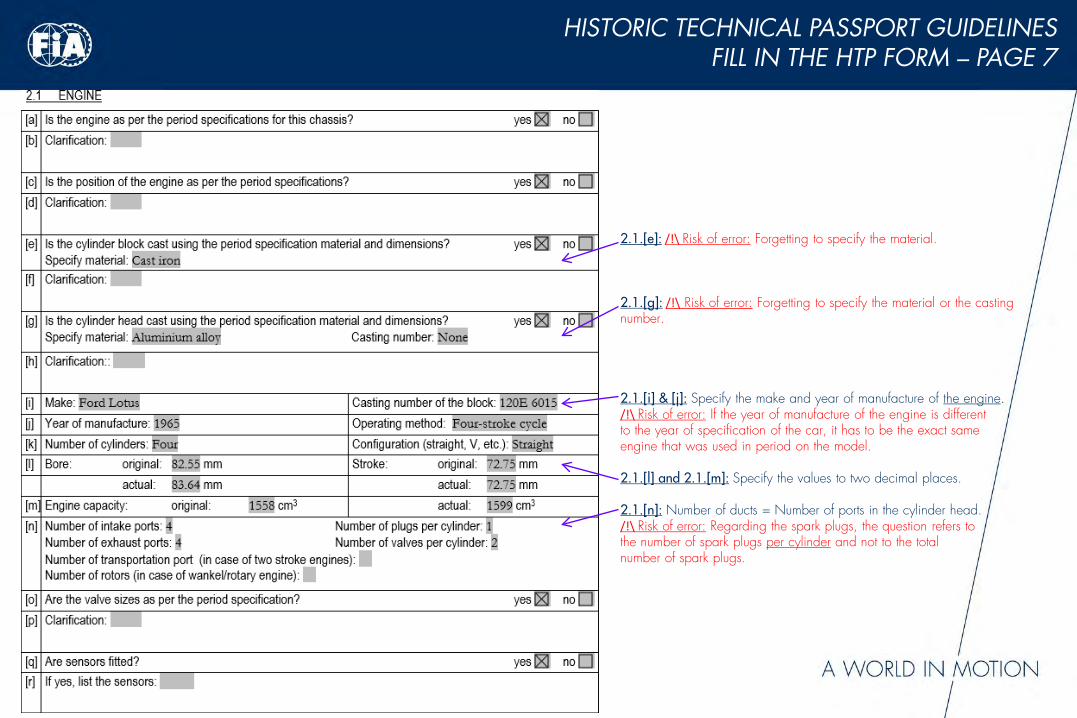
2.1.[e]: /!\ Risk of error: Forgetting to specify the material.
2.1.[g]: /!\ Risk of error: Forgetting to specify the material or the casting number.
2.1.[i] & [j]: Specify the make and year of manufacture of the engine./!\ Risk of error: If the year of manufacture of the engine is different to the year of specification of the car, it has to be the exact same engine that was used in period on the model.
2.1.[l] and 2.1.[m]: Specify the values to two decimal places.
2.1.[n]: Number of ducts = Number of ports in the cylinder head./!\ Risk of error: Regarding the spark plugs, the question refers to the number of spark plugs per cylinder and not to the total number of spark plugs.
FILL IN THE HTP FORM – PAGE 8HISTORIC TECHNICAL PASSPORT GUIDELINES
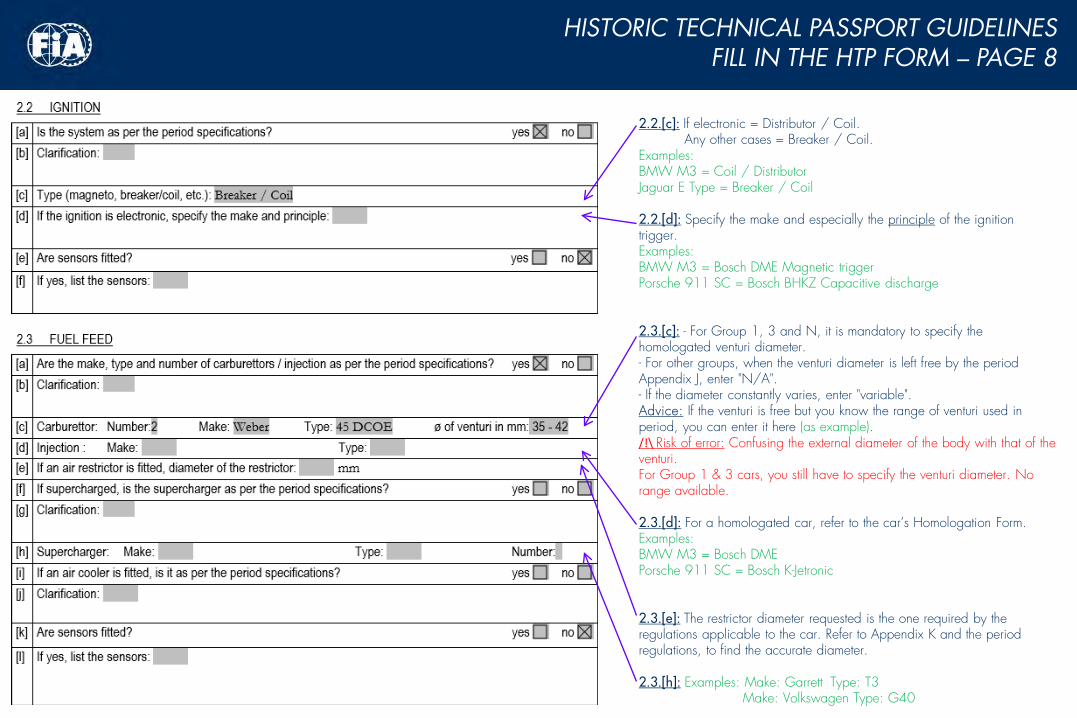
2.2.[c]: If electronic = Distributor / Coil.Any other cases = Breaker / Coil.
Examples:BMW M3 = Coil / DistributorJaguar E Type = Breaker / Coil
2.2.[d]: Specify the make and especially the principle of the ignition trigger.Examples:BMW M3 = Bosch DME Magnetic triggerPorsche 911 SC = Bosch BHKZ Capacitive discharge
2.3.[c]: - For Group 1, 3 and N, it is mandatory to specify the homologated venturi diameter.- For other groups, when the venturi diameter is left free by the period Appendix J, enter "N/A".- If the diameter constantly varies, enter "variable". Advice: If the venturi is free but you know the range of venturi used in period, you can enter it here (as example)./!\ Risk of error: Confusing the external diameter of the body with that of the venturi.For Group 1 & 3 cars, you still have to specify the venturi diameter. No range available.
2.3.[d]: For a homologated car, refer to the car’s Homologation Form. Examples:BMW M3 = Bosch DMEPorsche 911 SC = Bosch K-Jetronic
2.3.[e]: The restrictor diameter requested is the one required by the regulations applicable to the car. Refer to Appendix K and the period regulations, to find the accurate diameter.
2.3.[h]: Examples: Make: Garrett Type: T3Make: Volkswagen Type: G40

FILL IN THE HTP FORM – PAGE 9HISTORIC TECHNICAL PASSPORT GUIDELINES
2.4.[e]: Advice: If any doubt, see Appendix K Article 5.5.
2.5.[g]: /!\ Risk of error : Only for cars up to Period E included
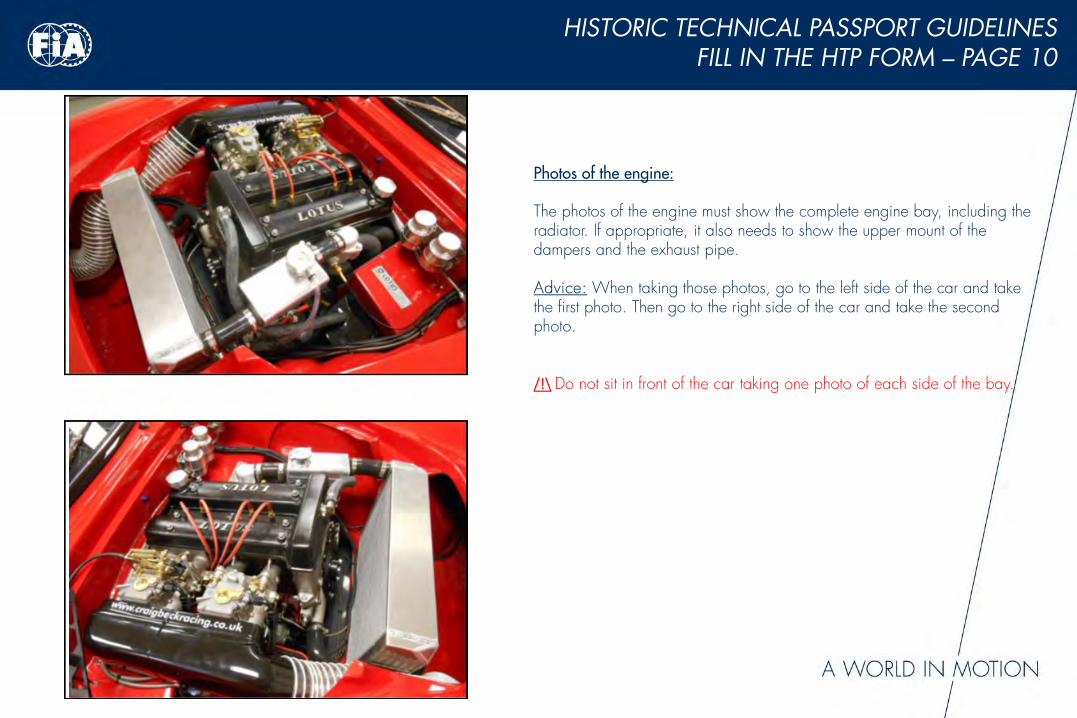
FILL IN THE HTP FORM – PAGE 10HISTORIC TECHNICAL PASSPORT GUIDELINES
Photos of the engine:
The photos of the engine must show the complete engine bay, including the radiator. If appropriate, it also needs to show the upper mount of the dampers and the exhaust pipe.
Advice: When taking those photos, go to the left side of the car and takethe first photo. Then go to the right side of the car and take the second photo.
/!\ Do not sit in front of the car taking one photo of each side of the bay.

FILL IN THE HTP FORM – PAGE 11HISTORIC TECHNICAL PASSPORT GUIDELINES
3.1.[c]: Type: Name of the gearbox (if known) + synchronised or not.Examples: BMW M3 = Make: Getrag Type: Synchro Formula Junior = Make: Renault Type: 318Porsche 911 SC = Make: Porsche Type: 915 synchro
3.1.[e]: For homologated cars, refer to the Homologation Form for the gearbox ratios.Enter the ratios in terms of the number of teeth. If you use severals gearbox ratios, list these in Section 9 on Page 14./!\ Risk of error: Forgetting to enter the Constant and/or entering the alternatives listed in Section 9 of the form.
3.2.[d]: Enter the number of teeth (XX/XX) and not the calculatedratio (X,XX).Advice: For 4WD cars that have a different ratio on the front, centre and rear differential, fill in:« F=XX/XX ; T=XX/XX ; R=XX/XX ».
3.2.[e]: Same as in point 3.2.[d].
3.2.[g]: If the model has no commercial name, fill in “None”.Example of systems: “cam & pawl”, “plate”, “roller”,“Torsen”, among others.

FILL IN THE HTP FORM – PAGE 12HISTORIC TECHNICAL PASSPORT GUIDELINES
4.1.[e]: Advice: Enter here the type of assisted braking system, if applicable. Example: vacuum, hydraulic, etc.
FILL IN THE HTP FORM – PAGE 13HISTORIC TECHNICAL PASSPORT GUIDELINES
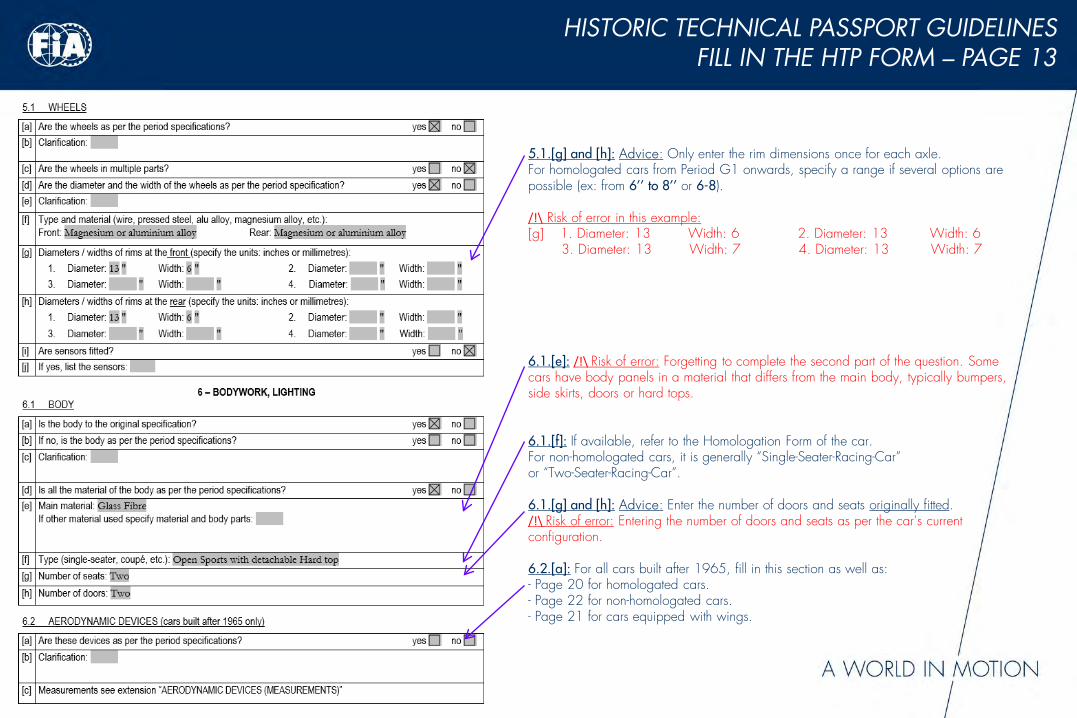
5.1.[g] and [h]: Advice: Only enter the rim dimensions once for each axle.For homologated cars from Period G1 onwards, specify a range if several options are possible (ex: from 6’’ to 8’’ or 6-8).
/!\ Risk of error in this example:[g] 1. Diameter: 13 Width: 6 2. Diameter: 13 Width: 6
3. Diameter: 13 Width: 7 4. Diameter: 13 Width: 7
6.1.[e]: /!\ Risk of error: Forgetting to complete the second part of the question. Some cars have body panels in a material that differs from the main body, typically bumpers, side skirts, doors or hard tops.
6.1.[f]: If available, refer to the Homologation Form of the car. For non-homologated cars, it is generally “Single-Seater-Racing-Car” or “Two-Seater-Racing-Car”.
6.1.[g] and [h]: Advice: Enter the number of doors and seats originally fitted. /!\ Risk of error: Entering the number of doors and seats as per the car’s current configuration.
6.2.[a]: For all cars built after 1965, fill in this section as well as: - Page 20 for homologated cars.- Page 22 for non-homologated cars.- Page 21 for cars equipped with wings.
FILL IN THE HTP FORM – PAGE 14HISTORIC TECHNICAL PASSPORT GUIDELINES
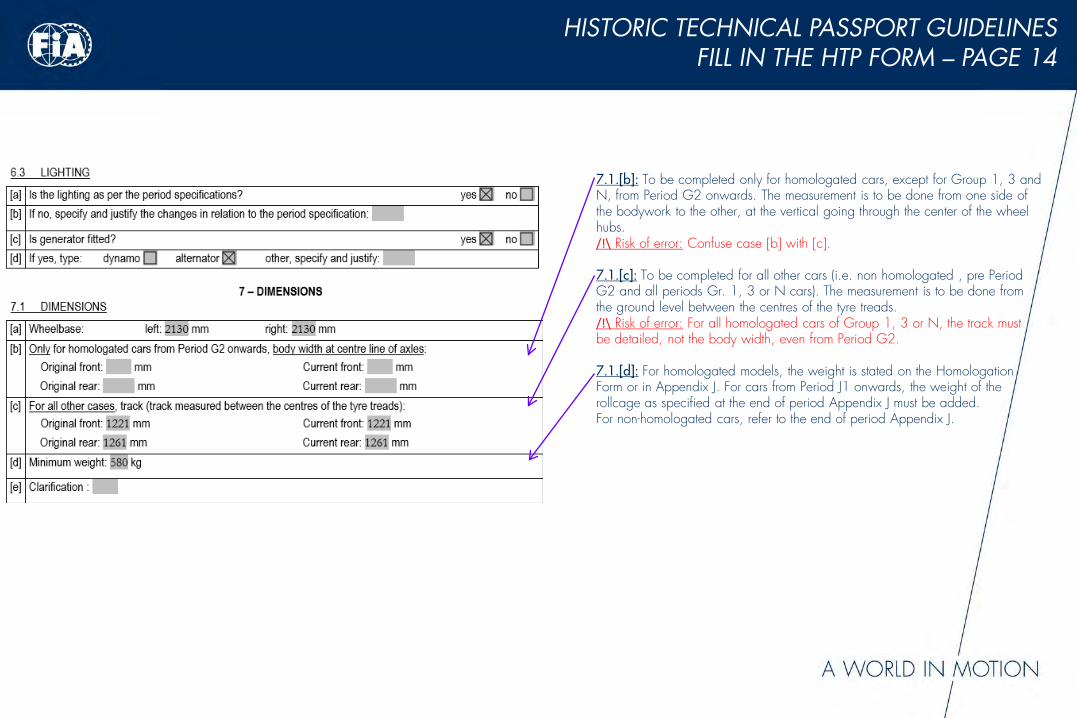
7.1.[b]: To be completed only for homologated cars, except for Group 1, 3 and N, from Period G2 onwards. The measurement is to be done from one side of the bodywork to the other, at the vertical going through the center of the wheel hubs. /!\ Risk of error: Confuse case [b] with [c].
7.1.[c]: To be completed for all other cars (i.e. non homologated , pre Period G2 and all periods Gr. 1, 3 or N cars). The measurement is to be done from the ground level between the centres of the tyre treads. /!\ Risk of error: For all homologated cars of Group 1, 3 or N, the track must be detailed, not the body width, even from Period G2.
7.1.[d]: For homologated models, the weight is stated on the Homologation Form or in Appendix J. For cars from Period J1 onwards, the weight of the rollcage as specified at the end of period Appendix J must be added. For non-homologated cars, refer to the end of period Appendix J.
FILL IN THE HTP FORM – PAGE 15HISTORIC TECHNICAL PASSPORT GUIDELINES
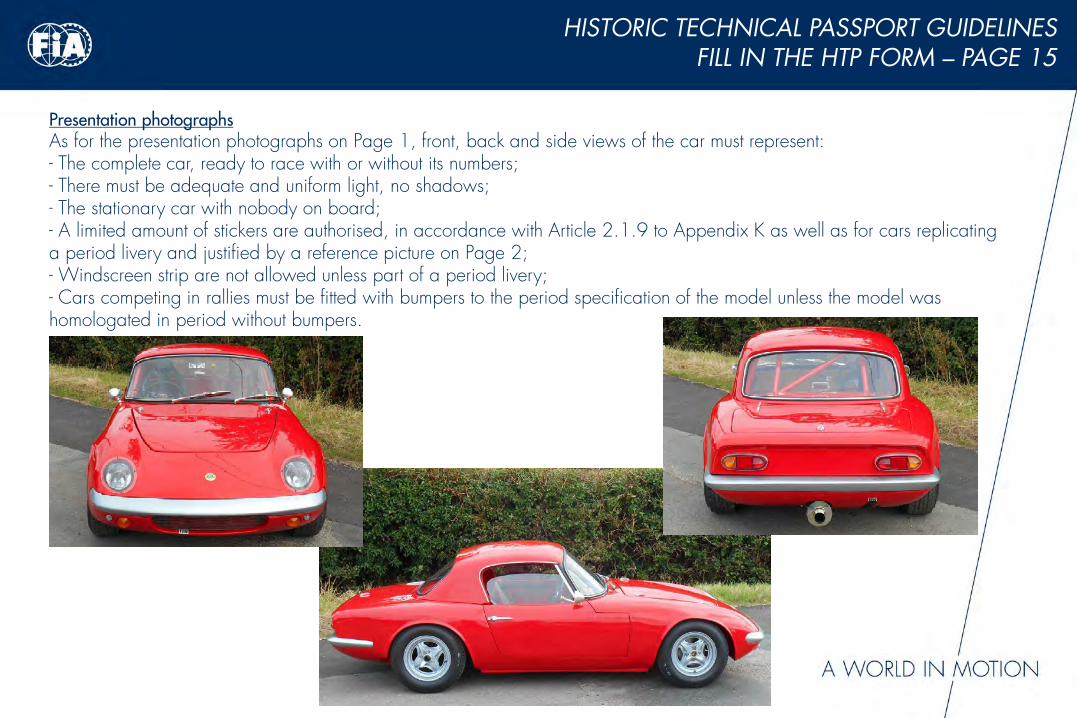
Presentation photographsAs for the presentation photographs on Page 1, front, back and side views of the car must represent:- The complete car, ready to race with or without its numbers;- There must be adequate and uniform light, no shadows;- The stationary car with nobody on board;- A limited amount of stickers are authorised, in accordance with Article 2.1.9 to Appendix K as well as for cars replicating a period livery and justified by a reference picture on Page 2;- Windscreen strip are not allowed unless part of a period livery;- Cars competing in rallies must be fitted with bumpers to the period specification of the model unless the model was homologated in period without bumpers.

FILL IN THE HTP FORM – PAGE 16HISTORIC TECHNICAL PASSPORT GUIDELINES
Photo of the dashboard:
The photo of the dashboard must show all the instruments used.
For homologated cars, the dashboard must conform to the homologation. For non-homologated cars, the dashboard must conform to the period specification.
The speedometer and/or original instruments may be replaced by an alternative to the original one providing it is of an analogue type and it remains in the original housing.
Digital instruments which cannot be proven to be part of the period specification and/or additional used for timekeeping or any sort of data logging are forbidden.

FILL IN THE HTP FORM – PAGE 17HISTORIC TECHNICAL PASSPORT GUIDELINES
Photo of the boot:
Mandatory for cars with a boot.
For cars without a boot and/or single/two seat racing cars, show the non engine end without body whenever possible.
Photo of the view from below:
The photo must show if the car is equipped with a flat bottom or not. This photo has been taken with a simplejack and axle stands.
Advice: Additionnally, this enables a few more details of the suspension and exhaust system to be viewed.

FILL IN THE HTP FORM – PAGE 18HISTORIC TECHNICAL PASSPORT GUIDELINES
Photo of the gearbox:
The photo must show the gearbox clearly and in colour to make it possible to identify the casing.
Photo of the axle:
The photo of the axle must show the final drive casing clearly.
/!\ We do not accept having twice the same photo.

FILL IN THE HTP FORM – PAGE 20HISTORIC TECHNICAL PASSPORT GUIDELINES
Article 12: A, B and C to be completed for all cars from 1966 onwards; D and E when the car isequipped with an aerodynamic device (wing, spoiler, splitter, etc.).

FILL IN THE HTP FORM – PAGE 22HISTORIC TECHNICAL PASSPORT GUIDELINES
For Two-Seaters-Racing-Car built after 1965, this section must imperatively be completed.
For Single-Seater-Racing-Car built after 1965, this section must imperatively be completed.

FILL IN THE HTP FORM – PAGE 23HISTORIC TECHNICAL PASSPORT GUIDELINES
A Roll Over Protection Structure (ROPS) may either be:
- Fabricated in compliance with the requirements of Appendix VI toAppendix K
o This is a « Current Appendix K » ROPS under 1.1.(a)o Materials and dimensions must be detailed under 1.4
- Homologated or Certified by an ASN in accordance with therequirements of Appendix V or VI as well as the currentHomologation Regulations for Historic ROPS
o This is an « ASN Certificate » ROPS under 1.1.(a)o Article 1.3.(a) must be completed and the relevant certificate
must be signed and transmitted through by the ASN with theApplication.
- Homologated in period by the FIA which is defined as beingpart of the original Homologation Form as an extension (VO).
o This is an « Homologation Form » ROPS under 1.1.(a)o Article 1.2.(a) must be completed and the relevant extension
must be attached and transmitted through by the ASN withthe Application.
- Period Specification, which is defined as one that was used incompetition, in period, on the actual make and model of car.
o This is a « Period Specification » ROPS under 1.1.(a)o Materials and dimensions must be detailed under 1.5o This is only applicable to non-homologated cars as well as
specific GT, GTS and GTP cars of Period F for Circuit/HillClimb ONLY.For any additional information and regulatory text, please refer to Appendix V
and VI to Appendix K for ROPS.
FILL IN THE HTP FORM – PAGE 23 ADDITIONAL INFORMATIONHISTORIC TECHNICAL PASSPORT GUIDELINES
Additional information and guidance regarding ROPS:
- The 50mm ruleo There is a mandatory clearance of 50mm between the top of the helmet and the ROPS which applies to all open cars
of Period F onwards.
- Extensionso Any ROPS extension fitted will render the structure as non-compliant unless certification can be produced.
- Period specification and Integral and/or Titanium ROPSo An integral and/or titanium ROPS may only be considered if period specification;o Additionally and for the integral one, it is defined as one that is part of the structure and that cannot be separated
without partial or total destruction of the car from one of its components. Rivet removal and/or monocoque disassemblyis however not considered as destruction;
o If any integral and/or titanium ROPS is a feature of the car, it is mandatory to mention it under Page 23/1.5.(b).
- Except for the addition of a horizontal bar to fix the harnesses, a diagonal member (orientation optional), or to fit door bars,any modification to a homologated, certified or period specification ROPS is forbidden.
o Other than the above, any additional elements, welding or machining will be considered a modification.
- « Elements used in period » is defined as design, not tube material specification and dimensions or joining methods.
For any additional information and regulatory text, please refer to Appendix V and VI to Appendix K for ROPS.

FILL IN THE HTP FORM – PAGE 24HISTORIC TECHNICAL PASSPORT GUIDELINES
Article 14: The various scenarios are:- The car corresponds to regulations for a defined group in a period Appendix J, for which the
year needs to be specified. - The car corresponds to an Appendix (VIII, IX, X or XI) to the current Appendix K.
- C/CT & GT/GTS of Period E, F & G1 Appendices VIII & IX.- Formula One from 1966 Appendix X.- Rally and Hill Climb cars of Period J1 & J2 Appendix XI.
- The car is not homologated Article 6 of Appendix K.
/!\ In case of a non-homologated ROPS, do not forget to complete and sign Page 27.

HOW TO TAKE YOUR PHOTOS
GENERAL FEATURES
FILL IN THE FORM
HOW TO TAKE YOUR PHOTOS
COMMON MISTAKESHOW NOT TO TAKE YOUR PHOTOSVALID ROPS CERTIFICATE

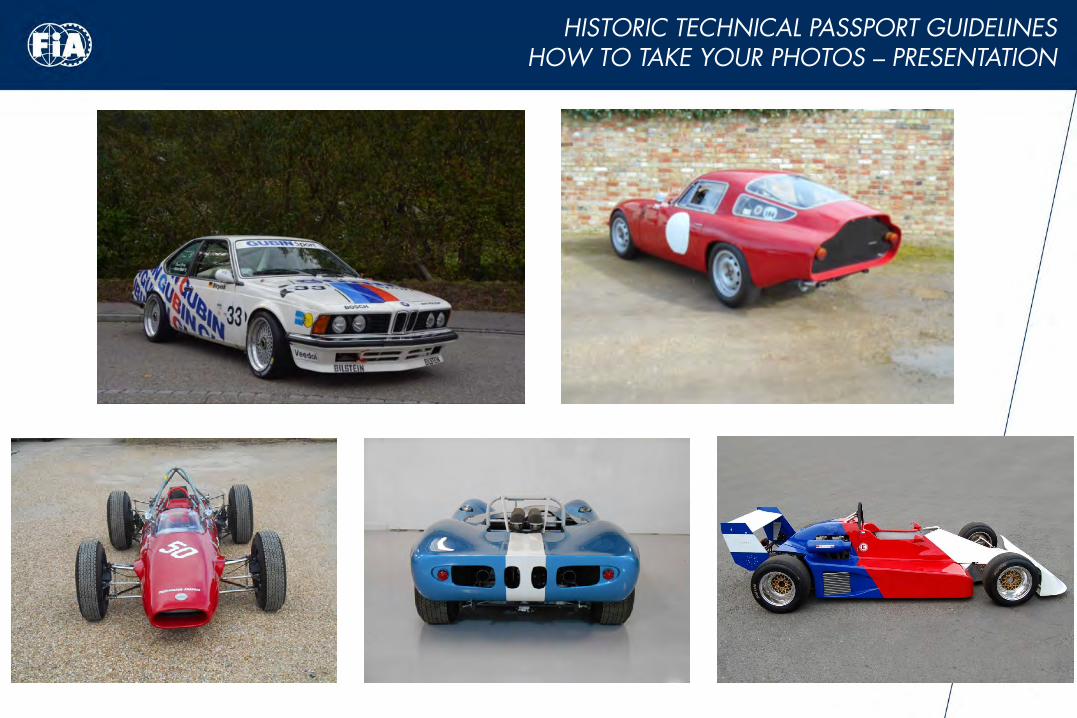
HOW TO TAKE YOUR PHOTOS – PRESENTATIONHISTORIC TECHNICAL PASSPORT GUIDELINES
Please take photos from a distance to provide a wide enough frame.
Too far away is OK – too close simply will not do.
The car should display a minimum amount of decals.
It should be standing on the ground with nobody inside.
Steering in the straight-ahead position and with side windows closed.
Clear and uncluttered background.
The photo has to be clear enough and without shadows.
Photos must always be in “landscape” format.
PRESENTATION PHOTOGRAPHSThey are necessary to assist Scrutineers
HOW TO TAKE YOUR PHOTOS – PRESENTATIONHISTORIC TECHNICAL PASSPORT GUIDELINES
HOW TO TAKE YOUR PHOTOS – SUSPENSIONHISTORIC TECHNICAL PASSPORT GUIDELINES
The purpose of these photos is to show the precise specification of the drivetrain of the car. The photos must be clear and accordingly framed.
Pay attention to the light on the photos. Photos that are too dark or blurred will be refused.
Show the whole suspension, especially the brake callipers and discs and the majority ofmounting points between the chassis and the wheel hubs. If possible, showing the calliper opening for the brake pads and its attachment system in place.
The suspension must be free. Put the jack or axle stand under the chassis, not the wishbone.
If the car is fitted with drum brakes, the drum must be removed and its inner face must appear on the photograph.
Photos must always be in “landscape” format.
SUSPENSION PHOTOGRAPHS

HOW TO TAKE YOUR PHOTOS – SUSPENSIONHISTORIC TECHNICAL PASSPORT GUIDELINES
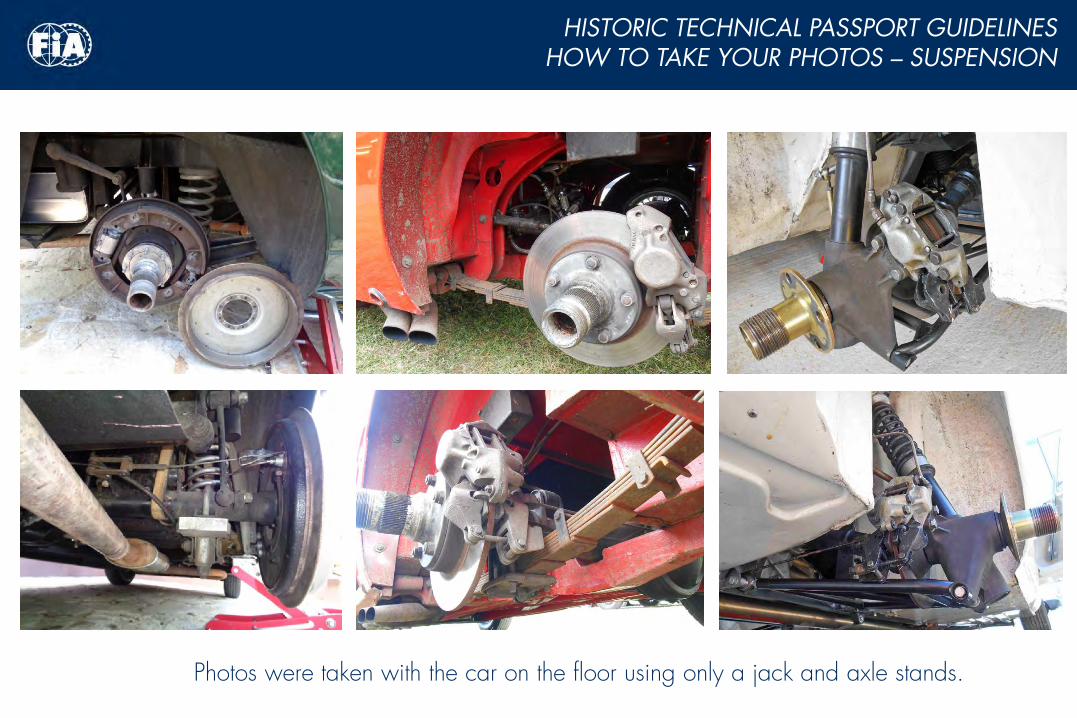
Photos were taken with the car on the floor using only a jack and axle stands.
HOW TO TAKE YOUR PHOTOS – SUSPENSIONHISTORIC TECHNICAL PASSPORT GUIDELINES
Photos were taken with the car on the floor using only a jack and axle stands.

HOW TO TAKE YOUR PHOTOS – ENGINEHISTORIC TECHNICAL PASSPORT GUIDELINES
These photos have to be taken from each side of the car.Not in front of it.
Please note that the whole engine bay must be displayed, not simply a close-up of the engine.
The content must display the car in ready-to-drive condition with all ancillary parts (battery, bonnet,…).
For cars having a large air filter housing (for example, American V8 cars), take one photo with(so that we can check its conformity to period specification) and the other without (so we can see more details, like the carburettor(s) for example).
Again, please take photos from a distance to provide a wide enough frame which willneed to be cropped to the required size. Too far away is OK – too close will not do.
ENGINE PHOTOGRAPHS

HOW TO TAKE YOUR PHOTOS – ENGINEHISTORIC TECHNICAL PASSPORT GUIDELINES
HOW TO TAKE YOUR PHOTOS – ENGINEHISTORIC TECHNICAL PASSPORT GUIDELINES
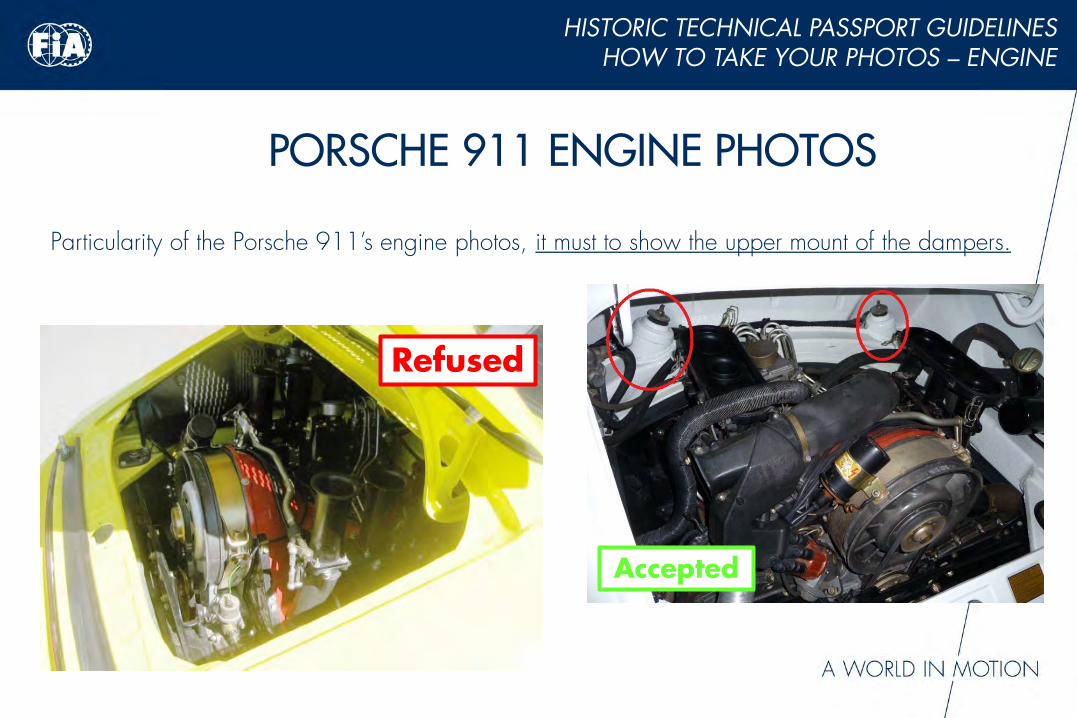
Particularity of the Porsche 911’s engine photos, it must to show the upper mount of the dampers.
PORSCHE 911 ENGINE PHOTOS
Refused
Accepted
HOW TO TAKE YOUR PHOTOS – GEARBOX AND AXLESHISTORIC TECHNICAL PASSPORT GUIDELINES
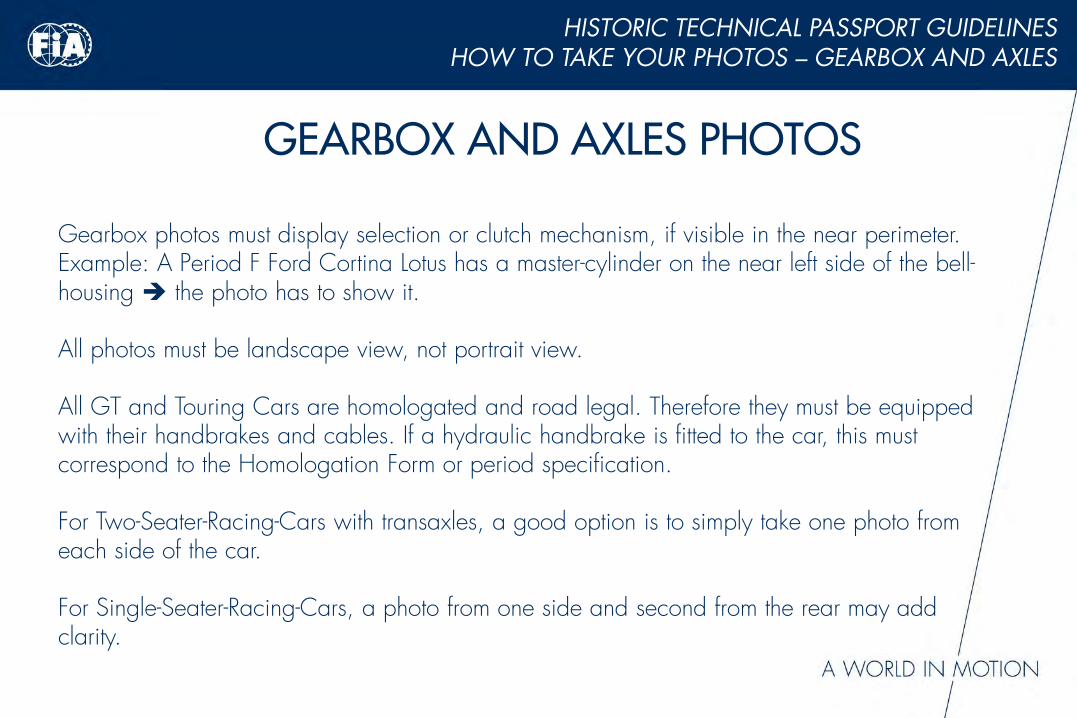
Gearbox photos must display selection or clutch mechanism, if visible in the near perimeter.Example: A Period F Ford Cortina Lotus has a master-cylinder on the near left side of the bell-housing the photo has to show it.
All photos must be landscape view, not portrait view.
All GT and Touring Cars are homologated and road legal. Therefore they must be equipped with their handbrakes and cables. If a hydraulic handbrake is fitted to the car, this must correspond to the Homologation Form or period specification.
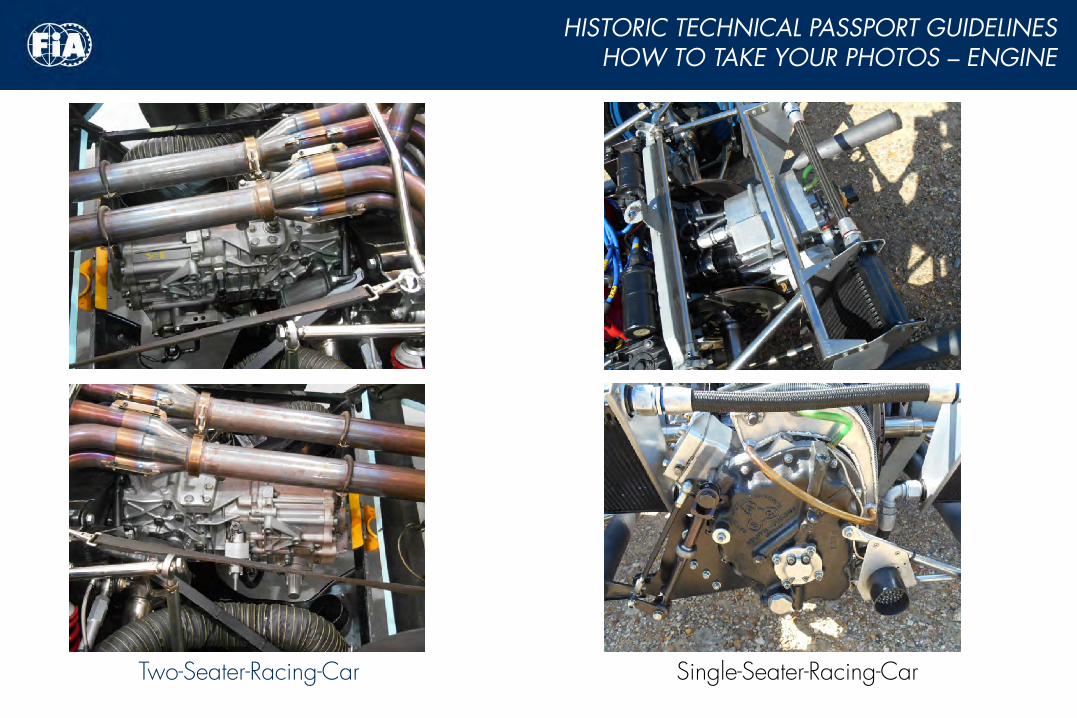
For Two-Seater-Racing-Cars with transaxles, a good option is to simply take one photo from each side of the car.
For Single-Seater-Racing-Cars, a photo from one side and second from the rear may addclarity.
GEARBOX AND AXLES PHOTOS
HOW TO TAKE YOUR PHOTOS – ENGINEHISTORIC TECHNICAL PASSPORT GUIDELINES
Two-Seater-Racing-Car Single-Seater-Racing-Car

HOW NOT TO TAKE YOUR PHOTOS
GENERAL FEATURES
FILL IN THE FORM
HOW TO TAKE YOUR PHOTOS
COMMON MISTAKESHOW NOT TO TAKE YOUR PHOTOSVALID ROPS CERTIFICATE

COMMON MISTAKES – PHOTOS GENERALITYHISTORIC TECHNICAL PASSPORT GUIDELINES
Insufficient quality of the photos.
Refused Refused
Refused

COMMON MISTAKES – PHOTOS GENERALITYHISTORIC TECHNICAL PASSPORT GUIDELINES
Photos always have to be on a landscape format.
Refused
Refused
COMMON MISTAKES – PRESENTATION PHOTOSHISTORIC TECHNICAL PASSPORT GUIDELINES
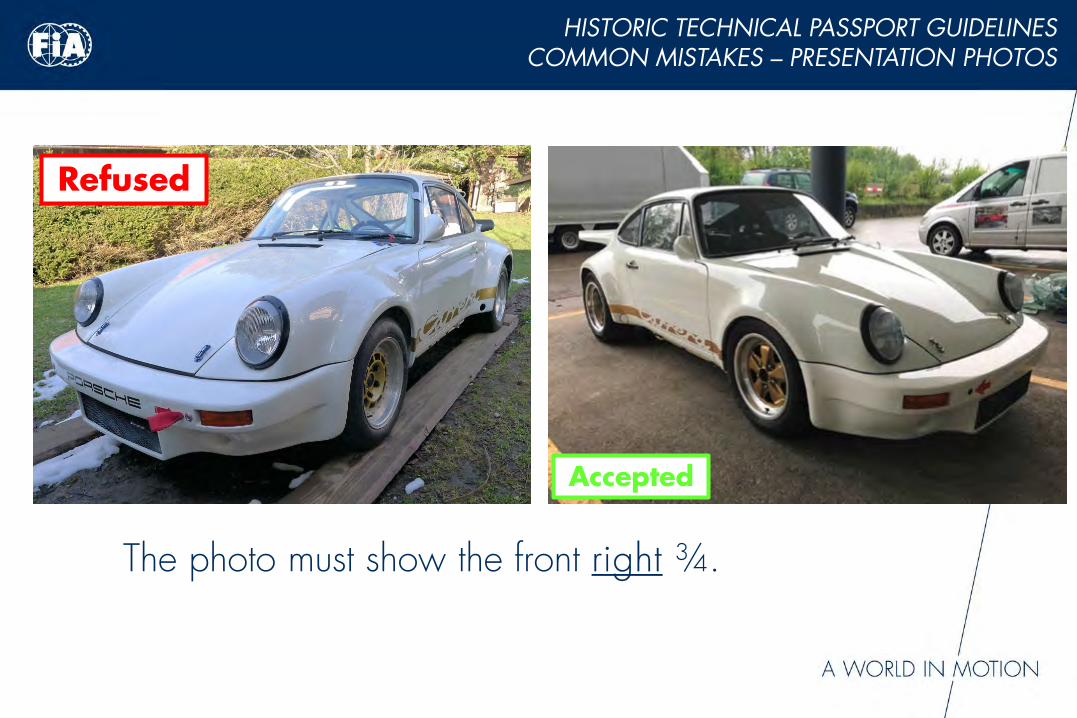
The photo must show the front right ¾.
Refused
Accepted

COMMON MISTAKES – PRESENTATION PHOTOSHISTORIC TECHNICAL PASSPORT GUIDELINES
The photo has to be takenwithout shadow on the car.Refused
Refused
COMMON MISTAKES – PRESENTATION PHOTOSHISTORIC TECHNICAL PASSPORT GUIDELINES
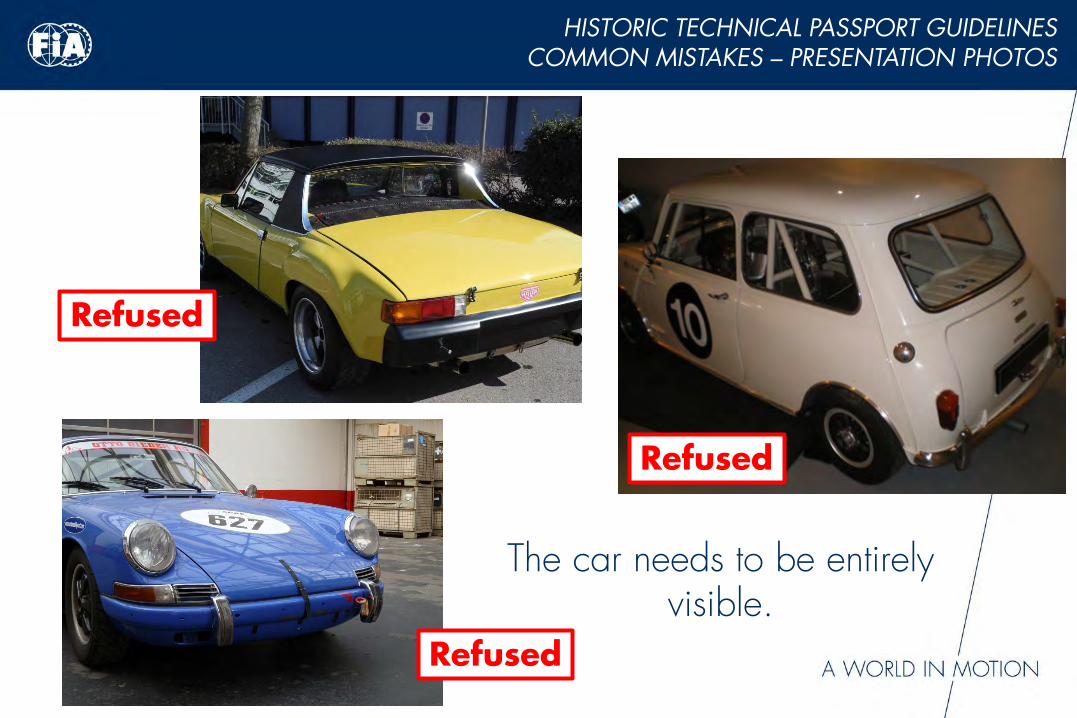
The car needs to be entirelyvisible.
Refused
Refused
Refused

COMMON MISTAKES – PRESENTATION PHOTOSHISTORIC TECHNICAL PASSPORT GUIDELINES
Those photos are not clearenough.Refused
Refused
COMMON MISTAKES – PRESENTATION PHOTOSHISTORIC TECHNICAL PASSPORT GUIDELINES
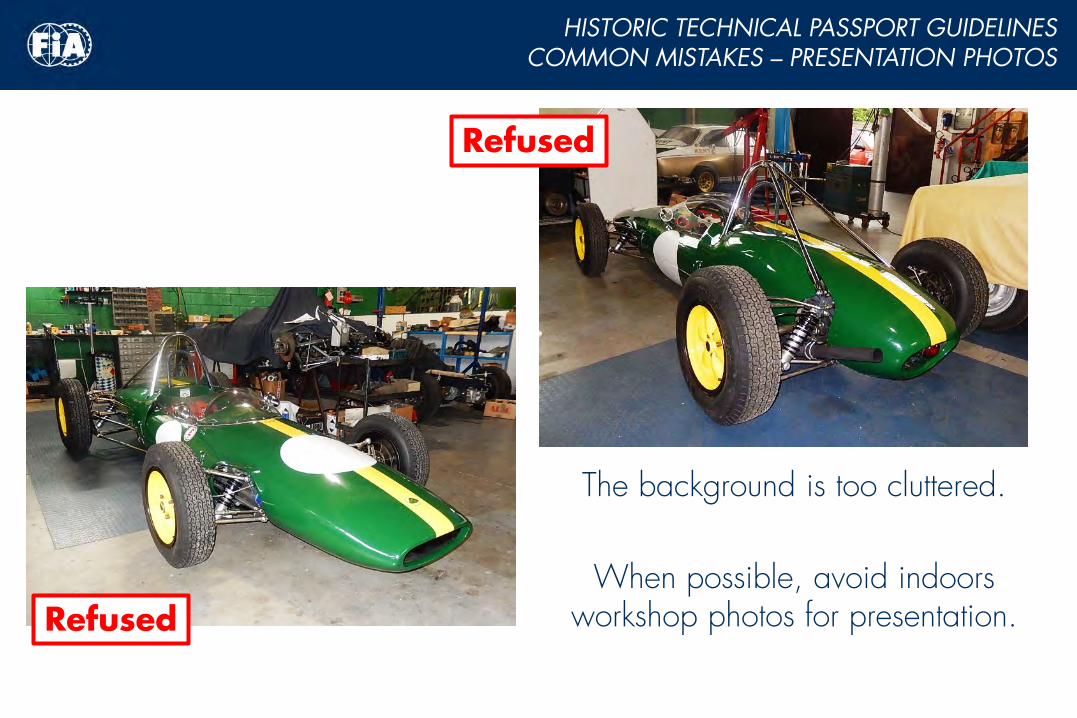
The background is too cluttered.
When possible, avoid indoorsworkshop photos for presentation.Refused
Refused

COMMON MISTAKES – PRESENTATION PHOTOSHISTORIC TECHNICAL PASSPORT GUIDELINES
The car has to be presented with limited amount of stickers or advertisement (except in case of period livery).
Refused

COMMON MISTAKES – PRESENTATION PHOTOSHISTORIC TECHNICAL PASSPORT GUIDELINES
The car has to be presented with limited amount of stickers or advertisement.
It needs to stand on the ground on the presentation photos.
Refused
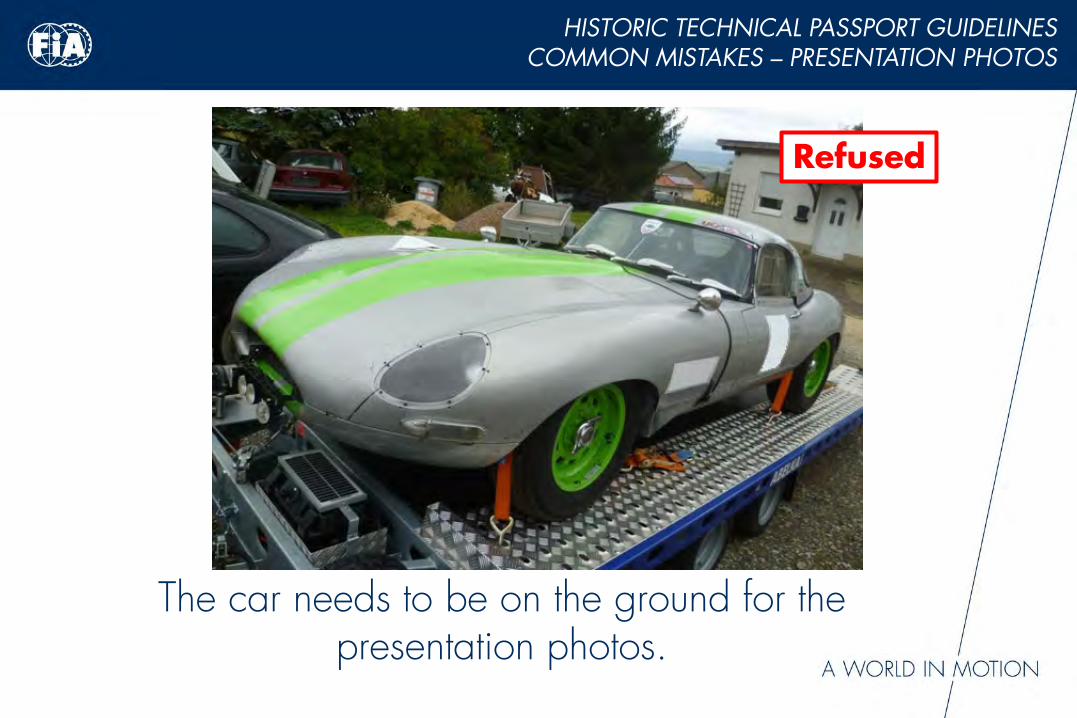
COMMON MISTAKES – PRESENTATION PHOTOSHISTORIC TECHNICAL PASSPORT GUIDELINES
The car needs to be on the ground for the presentation photos.
Refused
COMMON MISTAKES – PRESENTATION PHOTOSHISTORIC TECHNICAL PASSPORT GUIDELINES
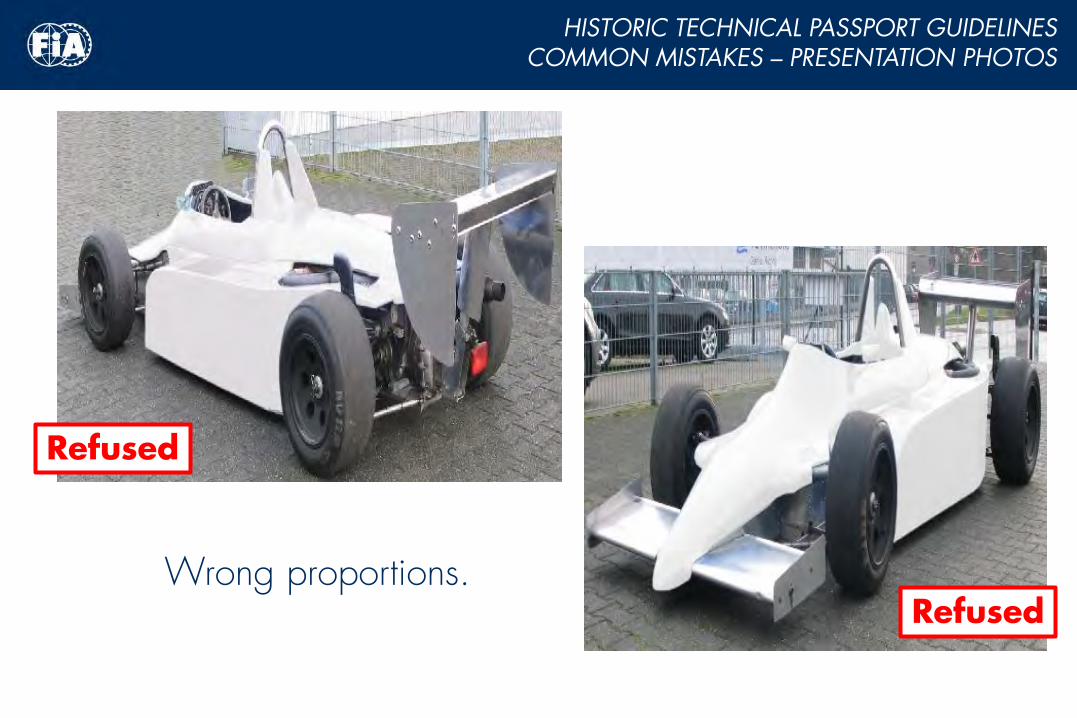
Wrong proportions.Refused
Refused
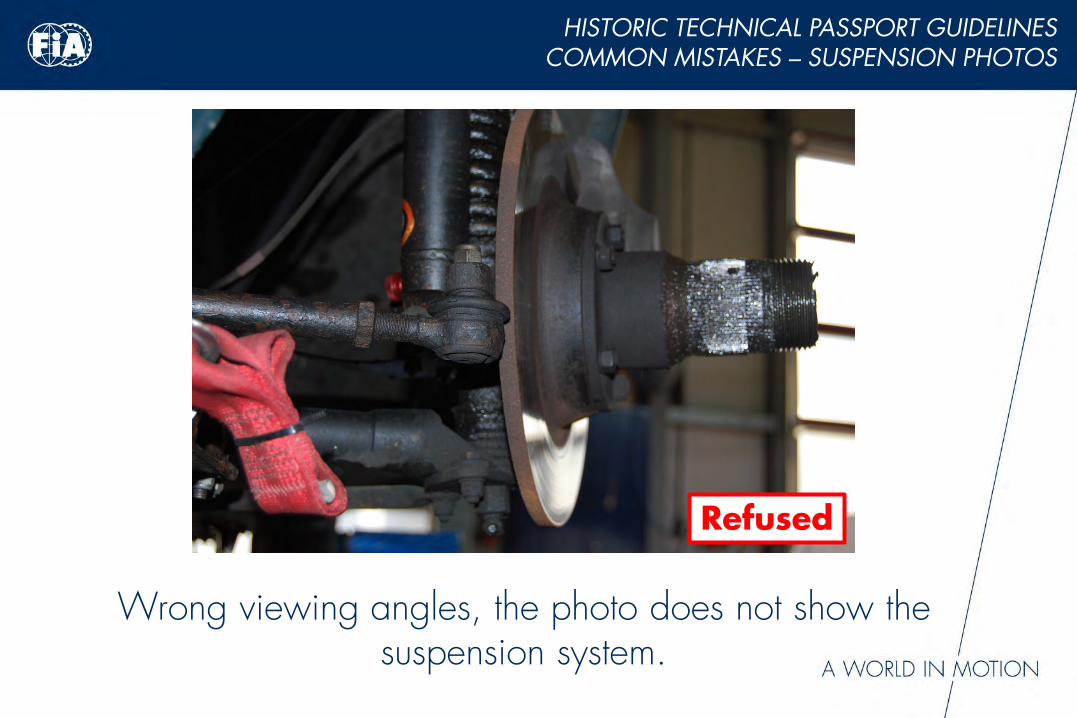
COMMON MISTAKES – SUSPENSION PHOTOSHISTORIC TECHNICAL PASSPORT GUIDELINES
Wrong viewing angles, the photo does not show the suspension system.
Refused
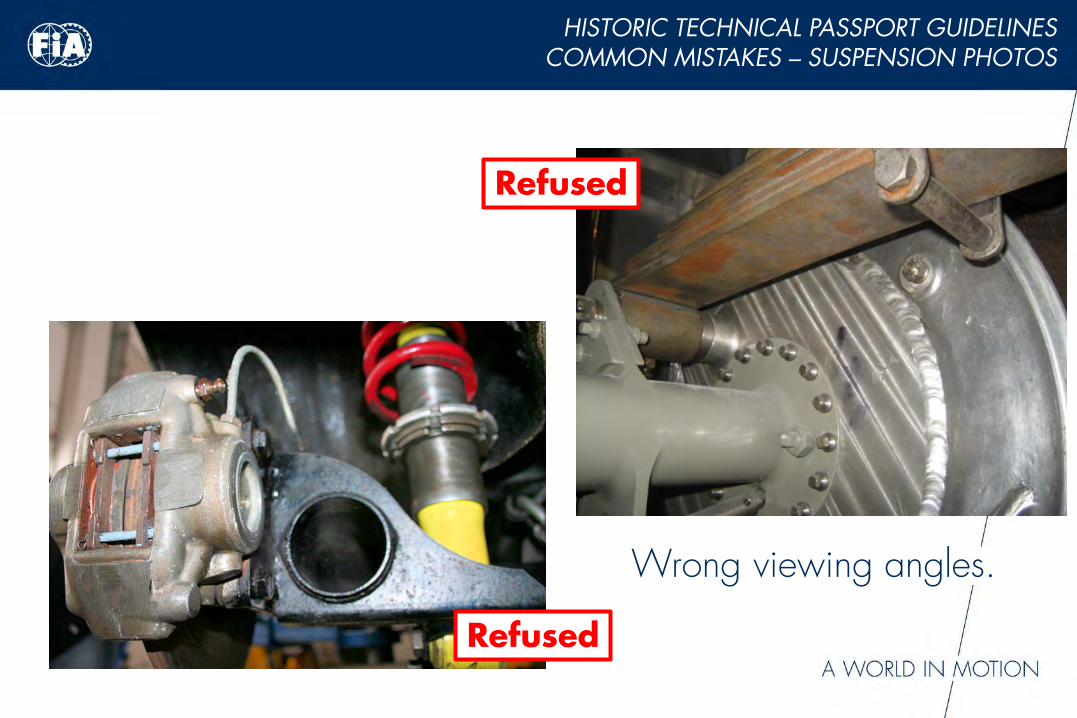
COMMON MISTAKES – SUSPENSION PHOTOSHISTORIC TECHNICAL PASSPORT GUIDELINES
Wrong viewing angles.
Refused
Refused

COMMON MISTAKES – SUSPENSION PHOTOSHISTORIC TECHNICAL PASSPORT GUIDELINES
Wrong viewing angles.
Refused
Refused

COMMON MISTAKES – SUSPENSION PHOTOSHISTORIC TECHNICAL PASSPORT GUIDELINES
We can’t see the suspension.
Same car, better view.
Refused Accepted

COMMON MISTAKES – SUSPENSION PHOTOSHISTORIC TECHNICAL PASSPORT GUIDELINES
Black suspension on a black car = Invisible.
Be carefull about clarity of the photos.
As much as possible, avoidindoors pictures.
Refused
Refused
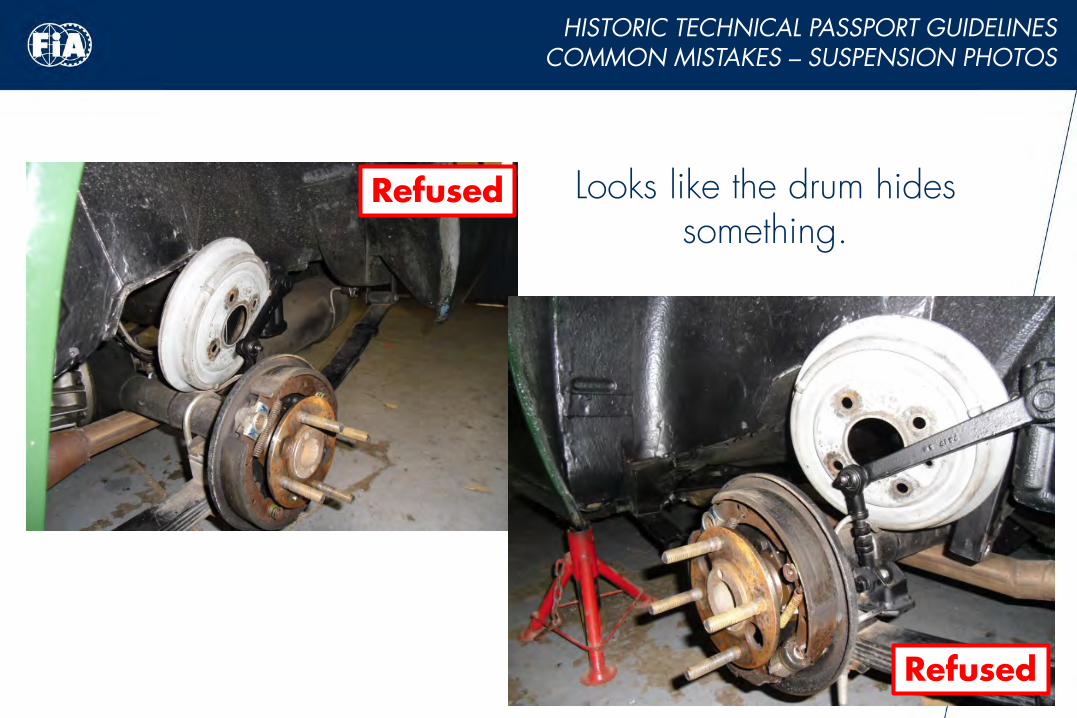
COMMON MISTAKES – SUSPENSION PHOTOSHISTORIC TECHNICAL PASSPORT GUIDELINES
Looks like the drum hidessomething.
Refused
Refused

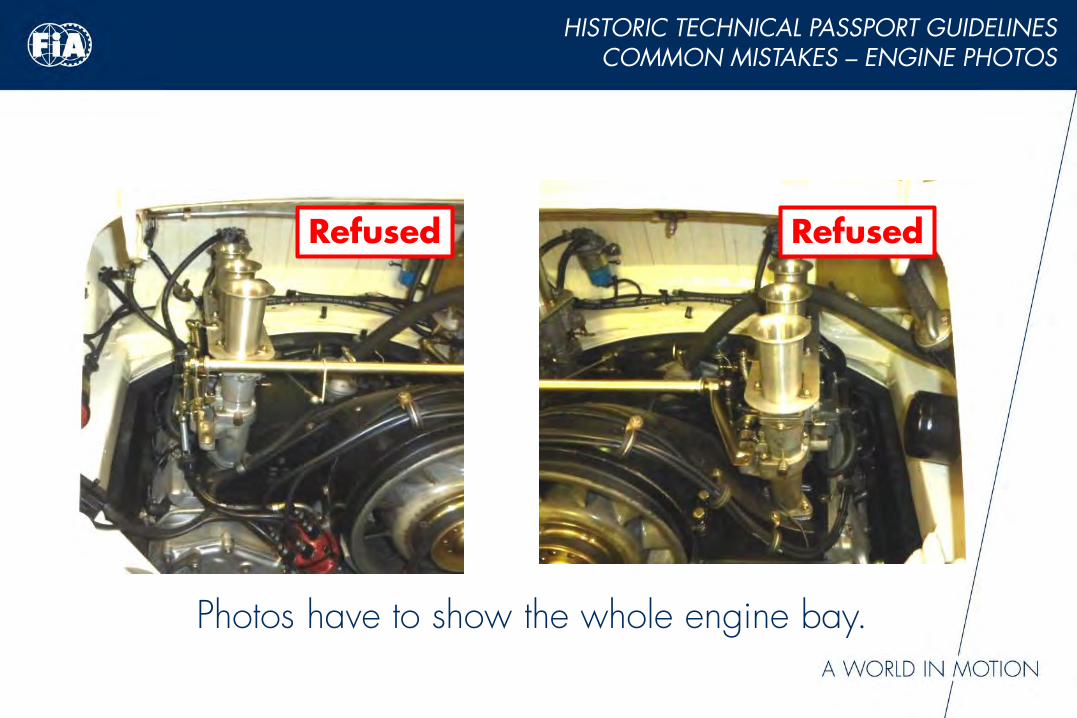
COMMON MISTAKES – ENGINE PHOTOSHISTORIC TECHNICAL PASSPORT GUIDELINES
Photos have to show the whole engine bay.
Refused
COMMON MISTAKES – ENGINE PHOTOSHISTORIC TECHNICAL PASSPORT GUIDELINES
Photos have to show the whole engine bay.
RefusedRefused

COMMON MISTAKES – ENGINE PHOTOSHISTORIC TECHNICAL PASSPORT GUIDELINES
Photos have to show the whole engine bay.
Refused
Refused

COMMON MISTAKES – ENGINE PHOTOSHISTORIC TECHNICAL PASSPORT GUIDELINES
The car must be on a ready-to-race condition on the photos. Nothing should be covered.
Refused

COMMON MISTAKES – COMPLEMENTARY PHOTOSHISTORIC TECHNICAL PASSPORT GUIDELINES
Photos have to show a standing car.
Refused
Refused
Refused
VALID ROPS CERTIFICATE
GENERAL FEATURES
FILL IN THE FORM
HOW TO TAKE YOUR PHOTOS
COMMON MISTAKESHOW NOT TO TAKE YOUR PHOTOSVALID ROPS CERTIFICATE
COMMON MISTAKES – ROPS CERTIFICATEHISTORIC TECHNICAL PASSPORT GUIDELINES
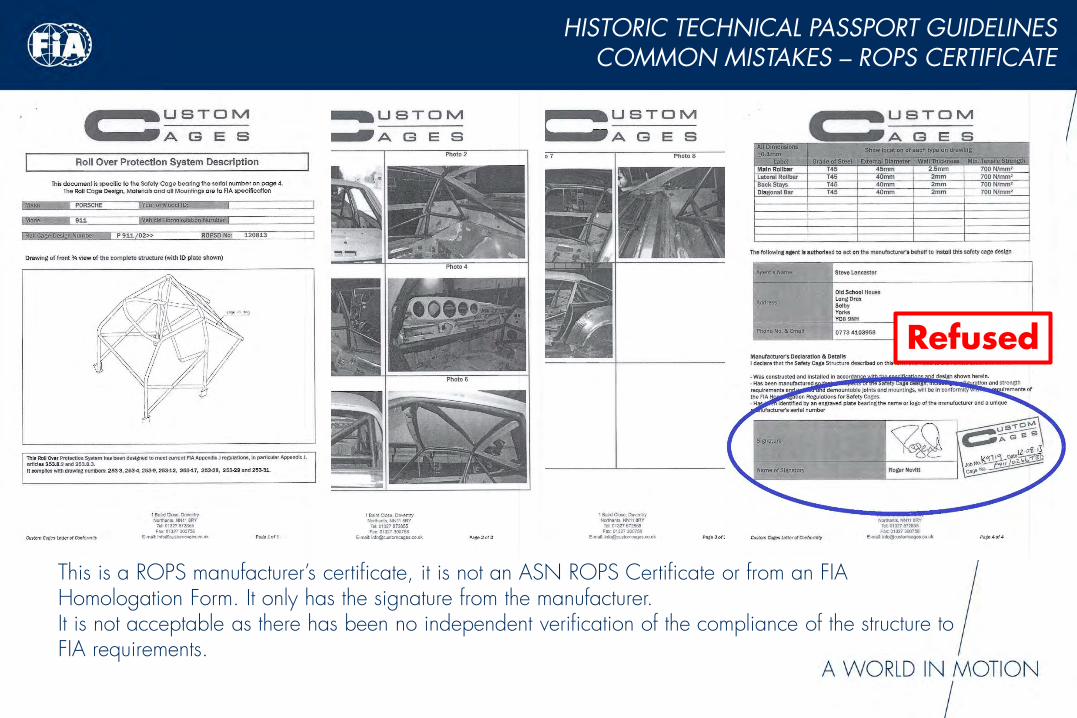
This is a ROPS manufacturer’s certificate, it is not an ASN ROPS Certificate or from an FIA Homologation Form. It only has the signature from the manufacturer.It is not acceptable as there has been no independent verification of the compliance of the structure to FIA requirements.
Refused
COMMON MISTAKES – ROPS CERTIFICATEHISTORIC TECHNICAL PASSPORT GUIDELINES
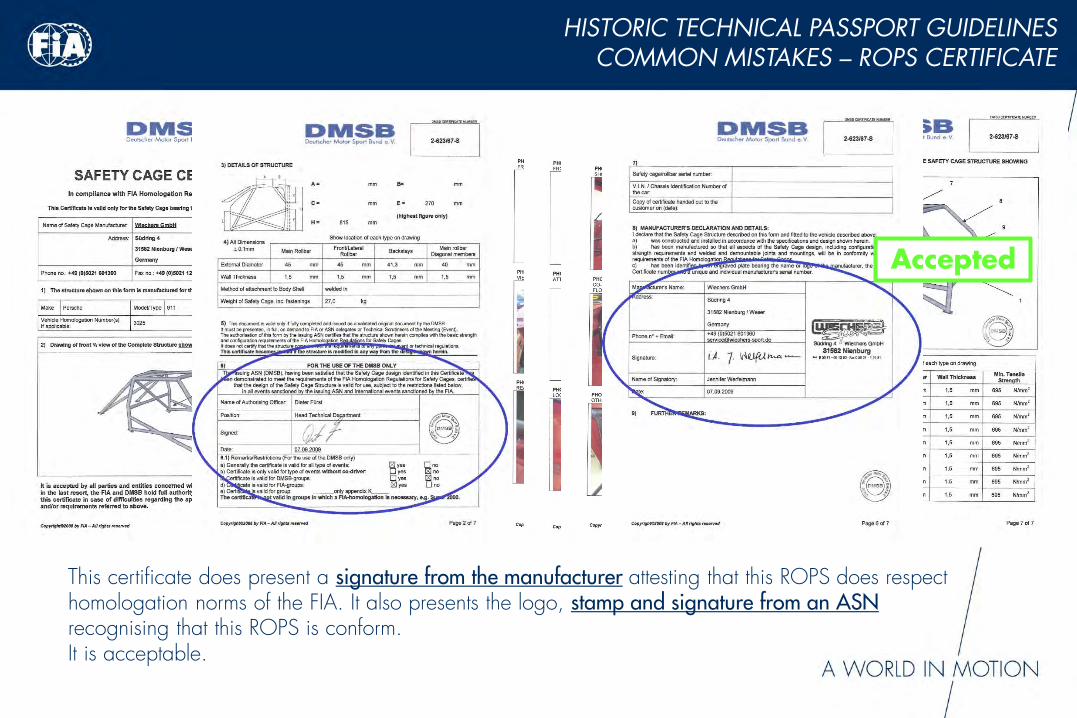
This certificate does present a signature from the manufacturer attesting that this ROPS does respect homologation norms of the FIA. It also presents the logo, stamp and signature from an ASN recognising that this ROPS is conform.It is acceptable.
Accepted