high resolution astrophotography
TRANSCRIPT

High Resolution AstrophotographyAIC 2009
by Volker Wendel
www.spiegelteam.de

Content:I. Some theoretical thoughts
II. What helps when starting High Resolution Imaging
III. High Resolution Image Processing
Image of Saturn and Eskimo Nebula, both at fl = 6000mm
We are looking for smallest details, but we should separate between Deep-Sky Imaging
with single exposures >10 seconds and planetary imaging with sub-second exposures.
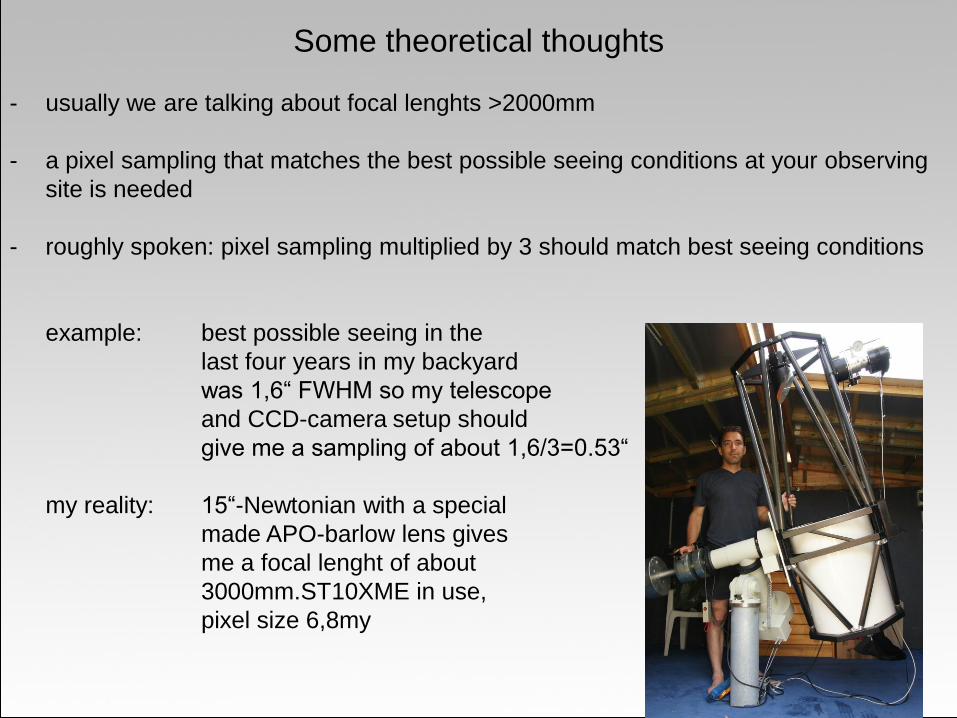
Some theoretical thoughts
- usually we are talking about focal lenghts >2000mm
- a pixel sampling that matches the best possible seeing conditions at your observing
site is needed
- roughly spoken: pixel sampling multiplied by 3 should match best seeing conditions
example: best possible seeing in the
last four years in my backyard
was 1,6“ FWHM so my telescope
and CCD-camera setup should
give me a sampling of about 1,6/3=0.53“
my reality: 15“-Newtonian with a special
made APO-barlow lens gives
me a focal lenght of about
3000mm.ST10XME in use,
pixel size 6,8my
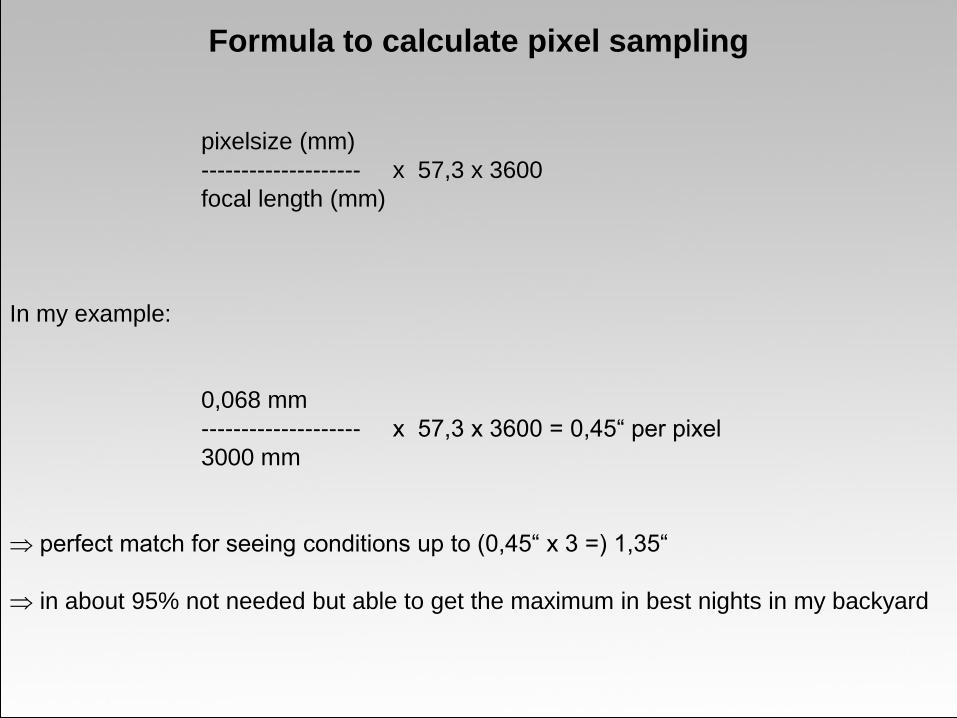
Formula to calculate pixel sampling
pixelsize (mm)
-------------------- x 57,3 x 3600
focal length (mm)
In my example:
0,068 mm
-------------------- x 57,3 x 3600 = 0,45“ per pixel
3000 mm
perfect match for seeing conditions up to (0,45“ x 3 =) 1,35“
in about 95% not needed but able to get the maximum in best nights in my backyard
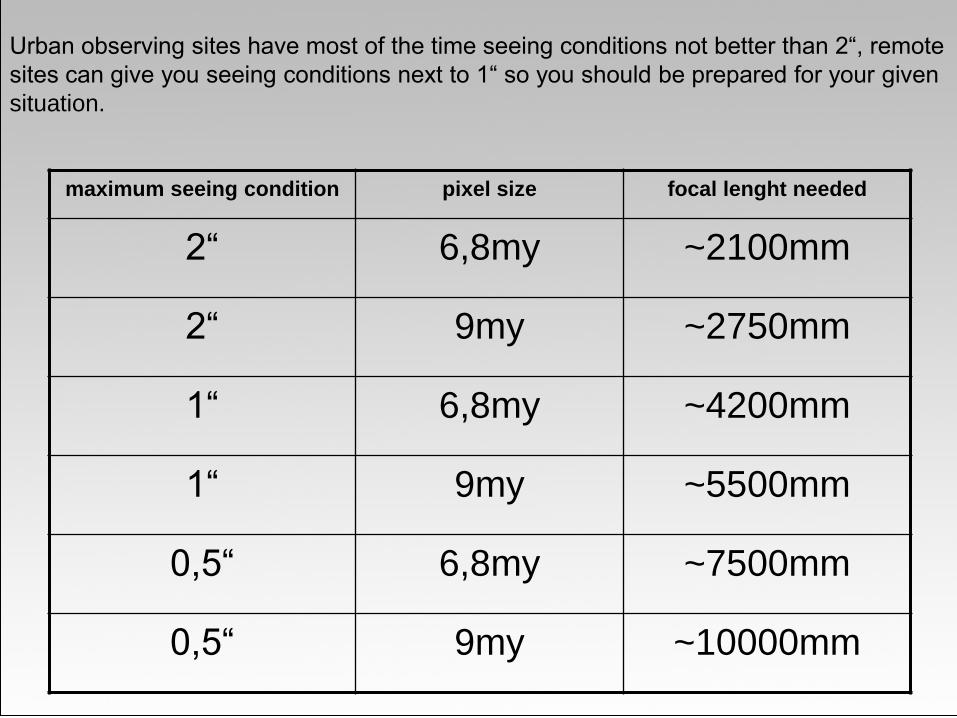
Urban observing sites have most of the time seeing conditions not better than 2“, remote
sites can give you seeing conditions next to 1“ so you should be prepared for your given
situation.
maximum seeing condition pixel size focal lenght needed
2“ 6,8my ~2100mm
2“ 9my ~2750mm
1“ 6,8my ~4200mm
1“ 9my ~5500mm
0,5“ 6,8my ~7500mm
0,5“ 9my ~10000mm
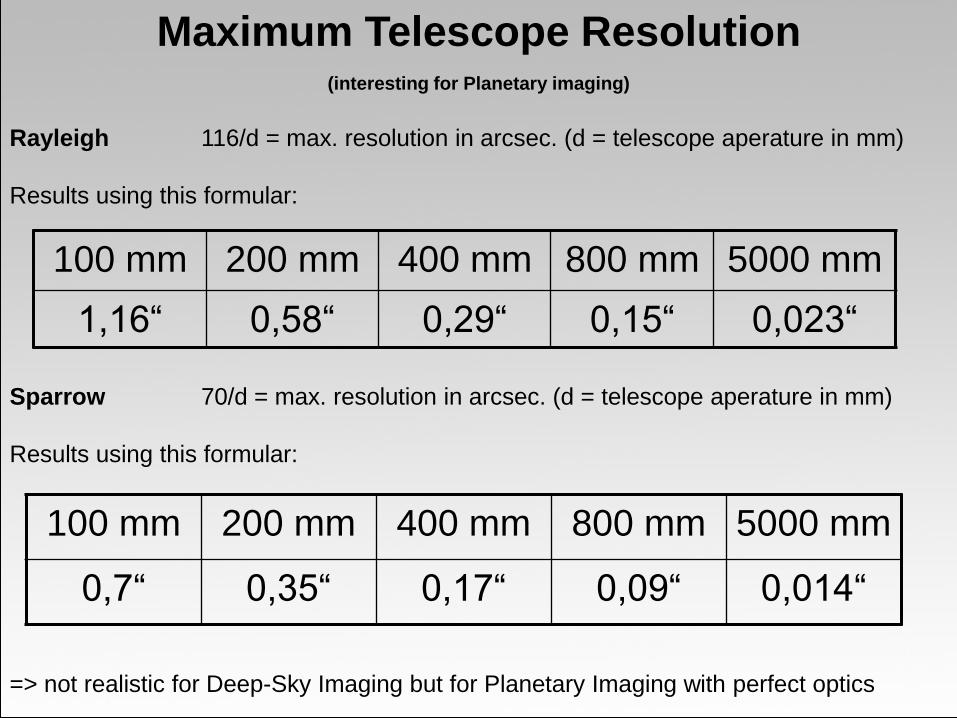
Maximum Telescope Resolution(interesting for Planetary imaging)
Rayleigh 116/d = max. resolution in arcsec. (d = telescope aperature in mm)
Results using this formular:
Sparrow 70/d = max. resolution in arcsec. (d = telescope aperature in mm)
Results using this formular:
=> not realistic for Deep-Sky Imaging but for Planetary Imaging with perfect optics
100 mm 200 mm 400 mm 800 mm 5000 mm
1,16“ 0,58“ 0,29“ 0,15“ 0,023“
100 mm 200 mm 400 mm 800 mm 5000 mm
0,7“ 0,35“ 0,17“ 0,09“ 0,014“
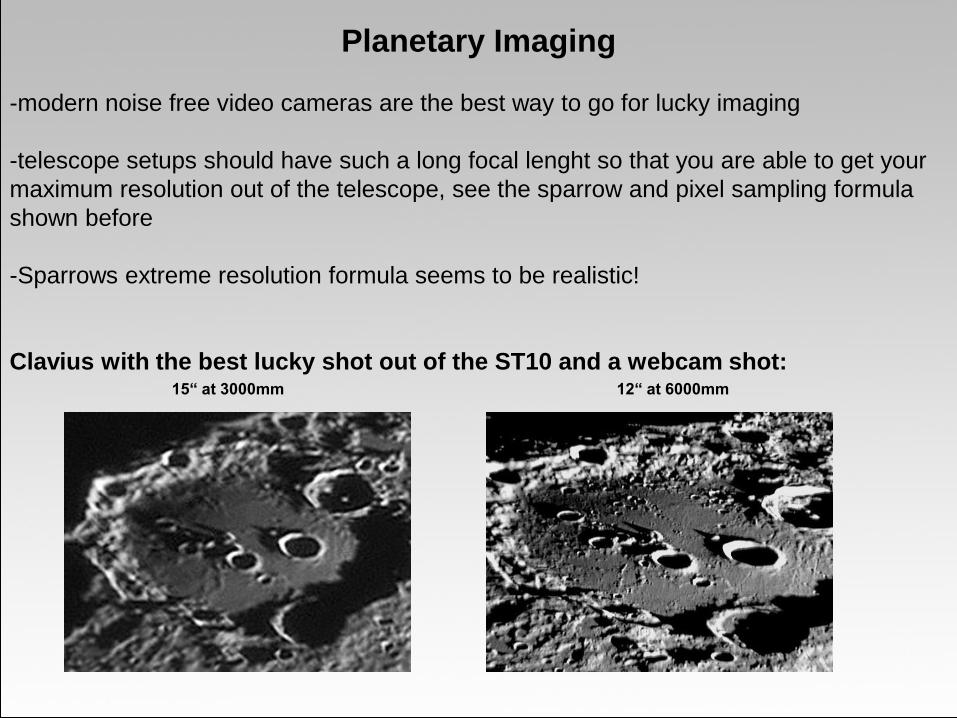
Planetary Imaging
-modern noise free video cameras are the best way to go for lucky imaging
-telescope setups should have such a long focal lenght so that you are able to get your
maximum resolution out of the telescope, see the sparrow and pixel sampling formula
shown before
-Sparrows extreme resolution formula seems to be realistic!
Clavius with the best lucky shot out of the ST10 and a webcam shot:15“ at 3000mm 12“ at 6000mm

My backyard observatory with the 15“-Newtonian in my backyard, mag 5.5 skies
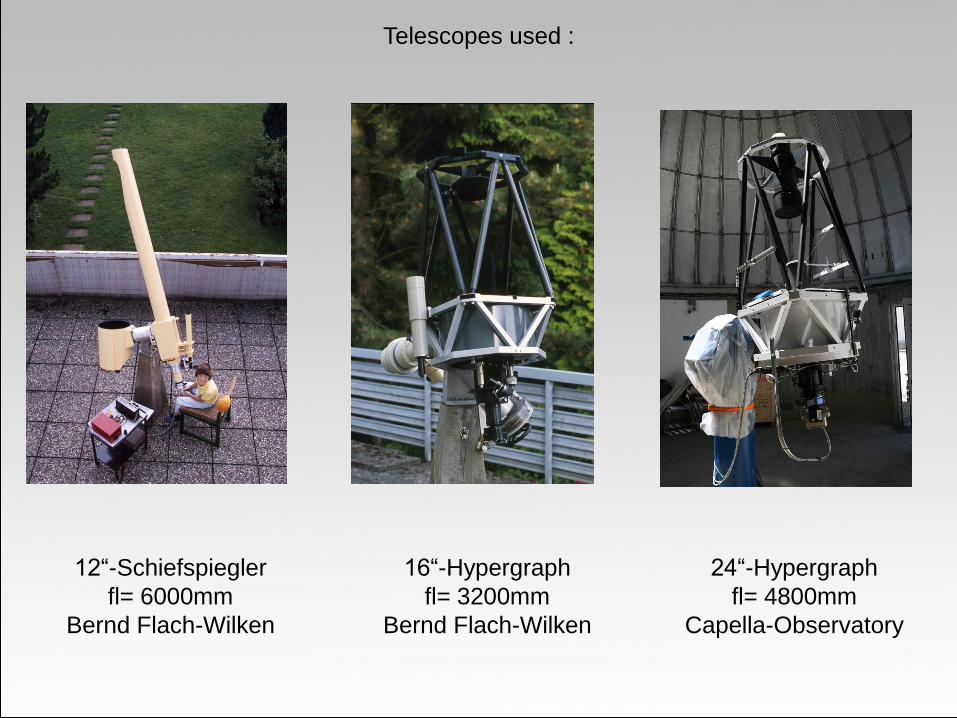
Telescopes used :
12“-Schiefspiegler
fl= 6000mm
Bernd Flach-Wilken
16“-Hypergraph
fl= 3200mm
Bernd Flach-Wilken
24“-Hypergraph
fl= 4800mm
Capella-Observatory

Where does the Spiegelteam shoot from? Germany and…

…Namibia and in cooperation with the Capella-Observatory team from Crete/Greece!
Namibia
Crete/Greece
Germany
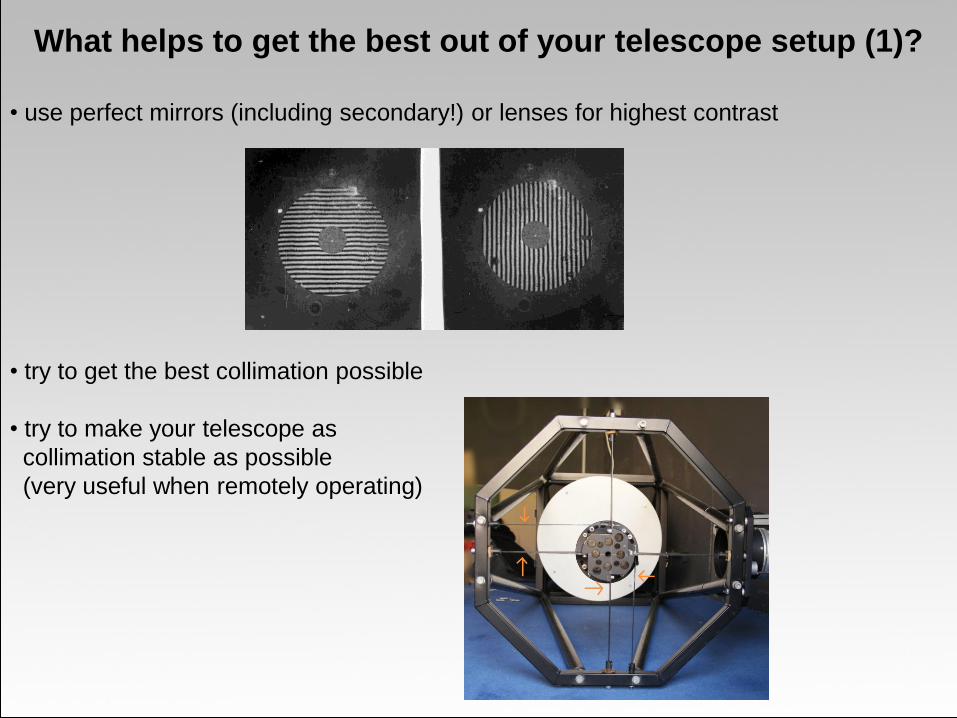
What helps to get the best out of your telescope setup (1)?
• use perfect mirrors (including secondary!) or lenses for highest contrast
• try to get the best collimation possible
• try to make your telescope as
collimation stable as possible
(very useful when remotely operating)
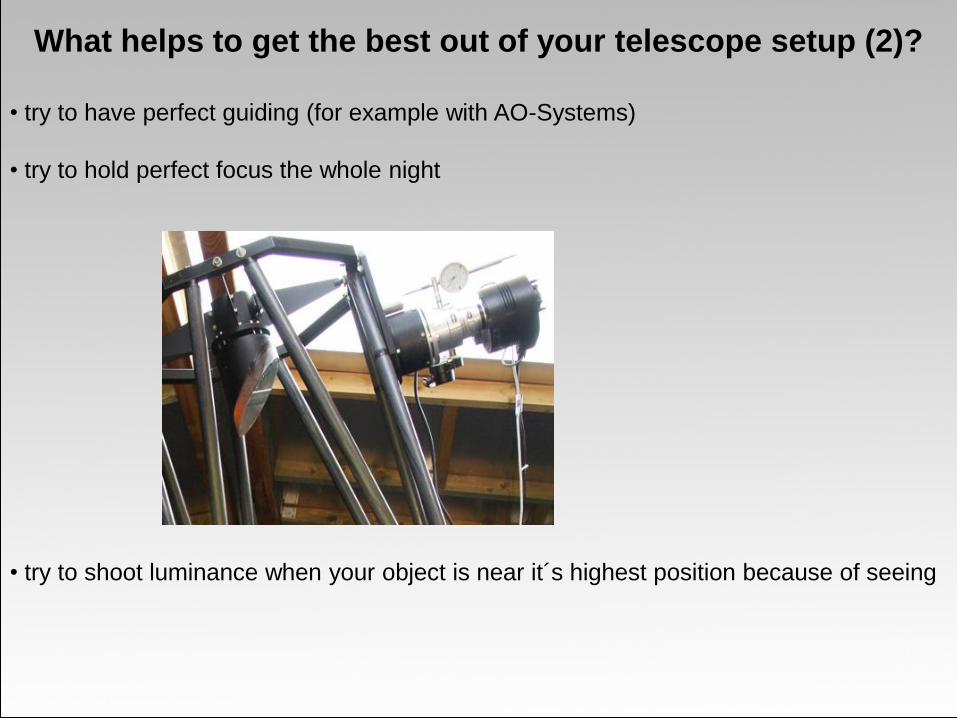
What helps to get the best out of your telescope setup (2)?
• try to have perfect guiding (for example with AO-Systems)
• try to hold perfect focus the whole night
• try to shoot luminance when your object is near it´s highest position because of seeing

What helps to get the best out of your telescope setup (3)?
• cool down your tube (and your dome) before starting imaging
example:
(source J.S.Schlimmer
www.epsylon-lyrae.de)
• optimize your local system
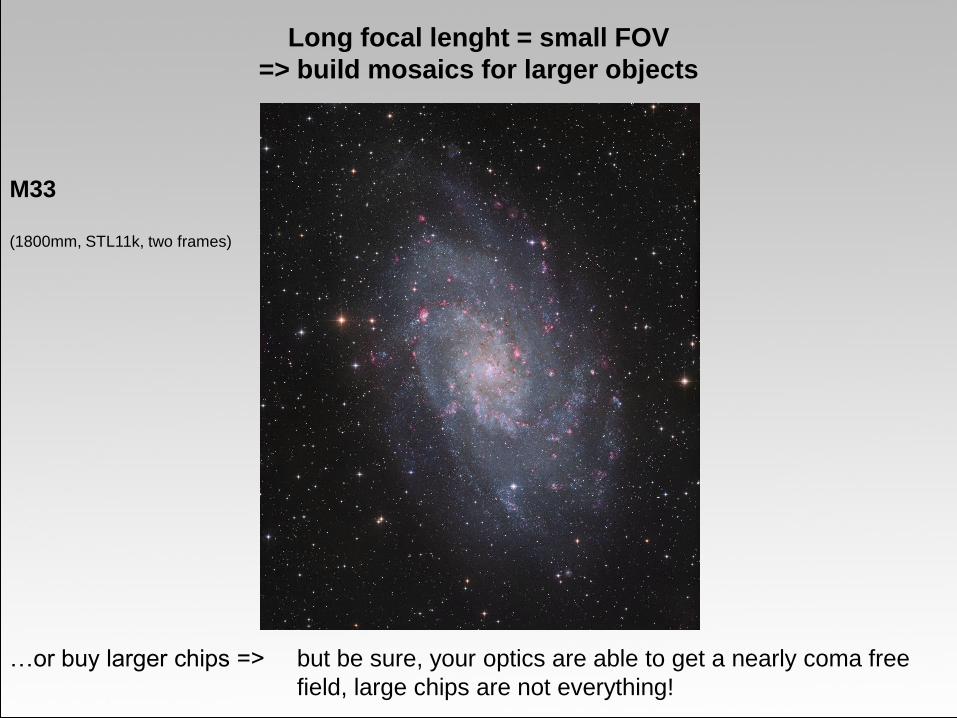
Long focal lenght = small FOV
=> build mosaics for larger objects
M33
(1800mm, STL11k, two frames)
…or buy larger chips => but be sure, your optics are able to get a nearly coma free
field, large chips are not everything!
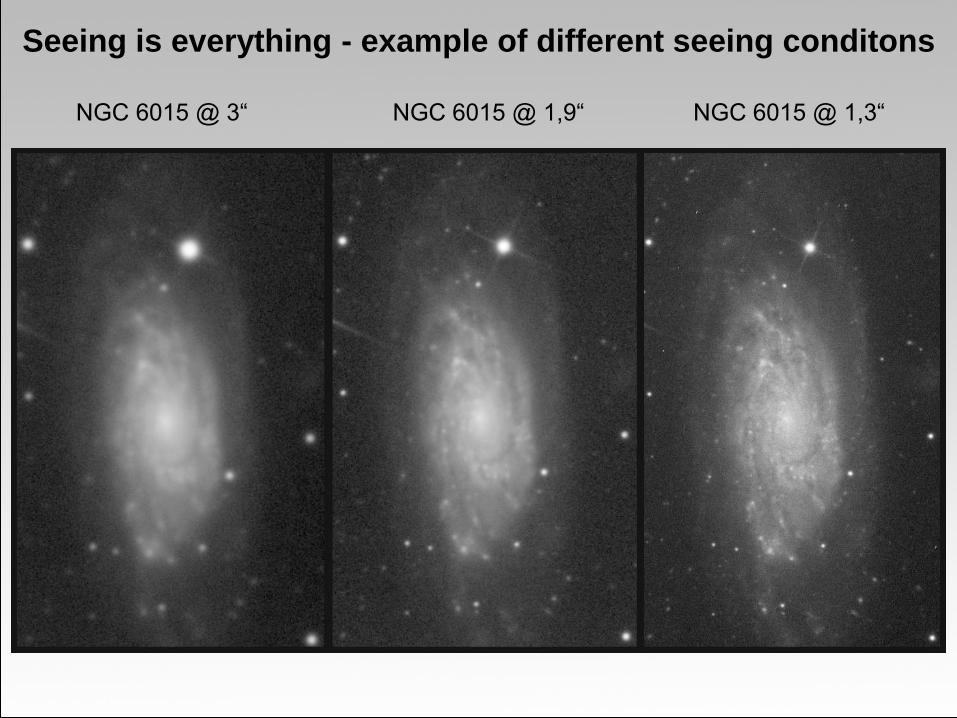
Seeing is everything - example of different seeing conditons
NGC 6015 @ 3“ NGC 6015 @ 1,9“ NGC 6015 @ 1,3“
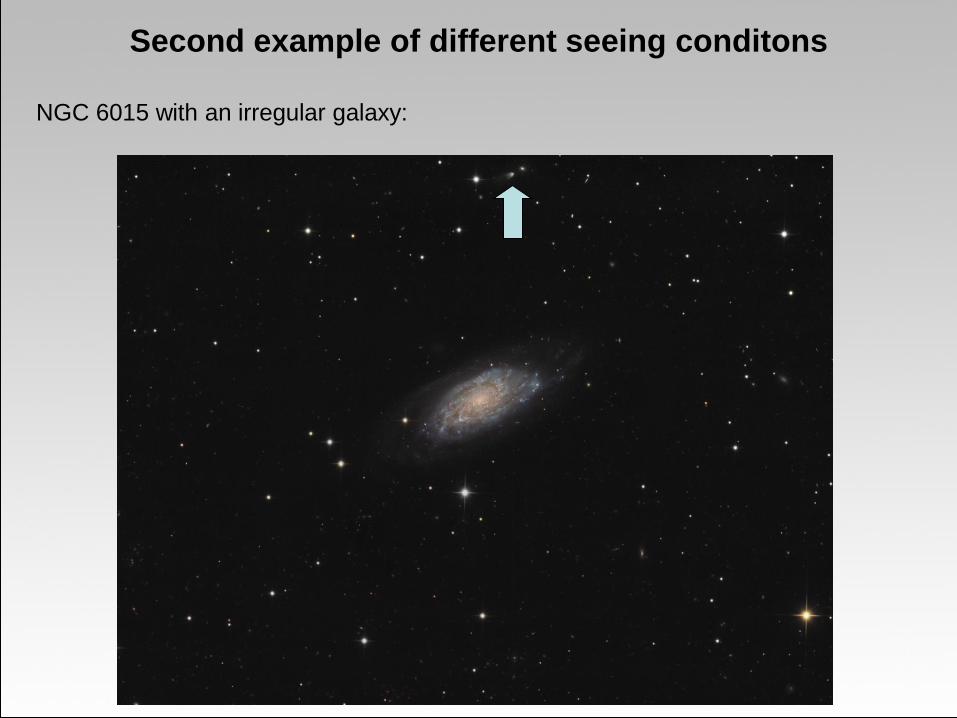
Second example of different seeing conditons
NGC 6015 with an irregular galaxy:
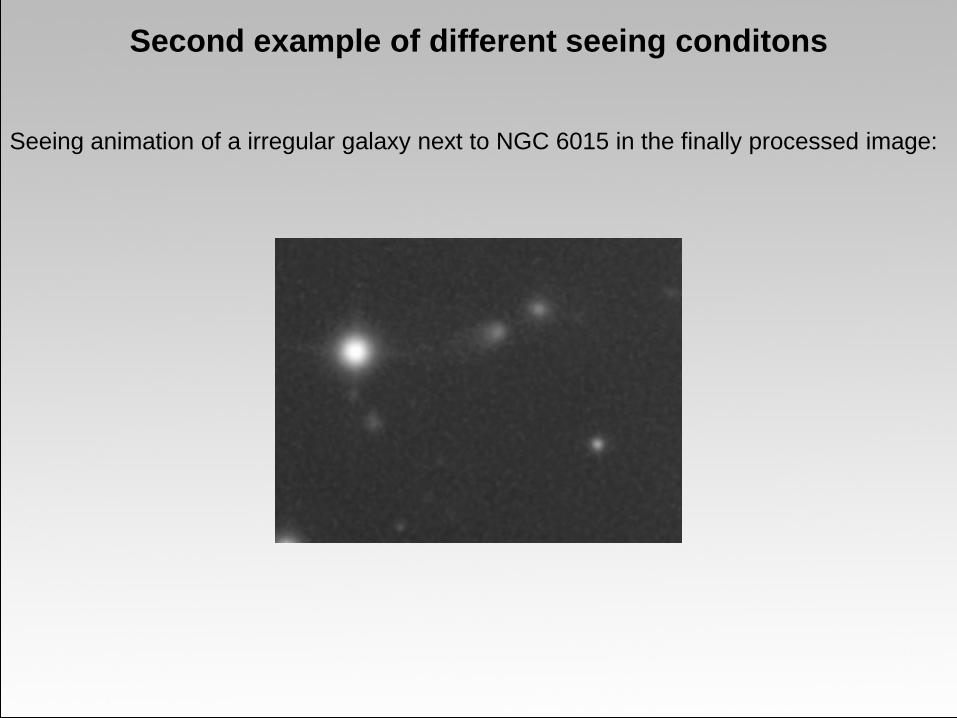
Second example of different seeing conditons
Seeing animation of a irregular galaxy next to NGC 6015 in the finally processed image:
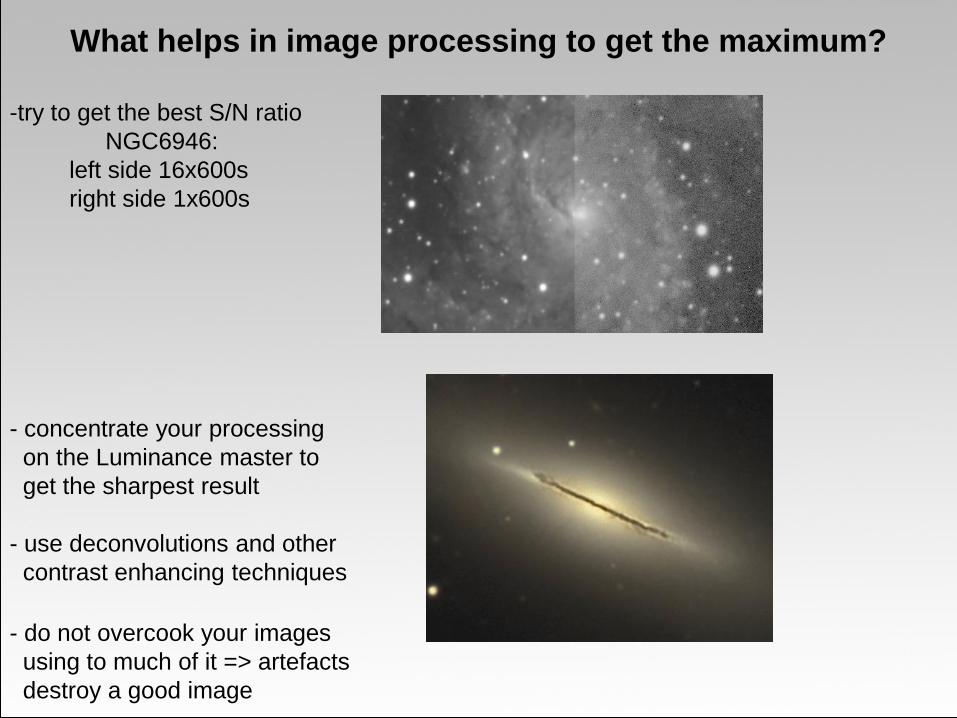
What helps in image processing to get the maximum?
-try to get the best S/N ratio
NGC6946:
left side 16x600s
right side 1x600s
- concentrate your processing
on the Luminance master to
get the sharpest result
- use deconvolutions and other
contrast enhancing techniques
- do not overcook your images
using to much of it => artefacts
destroy a good image
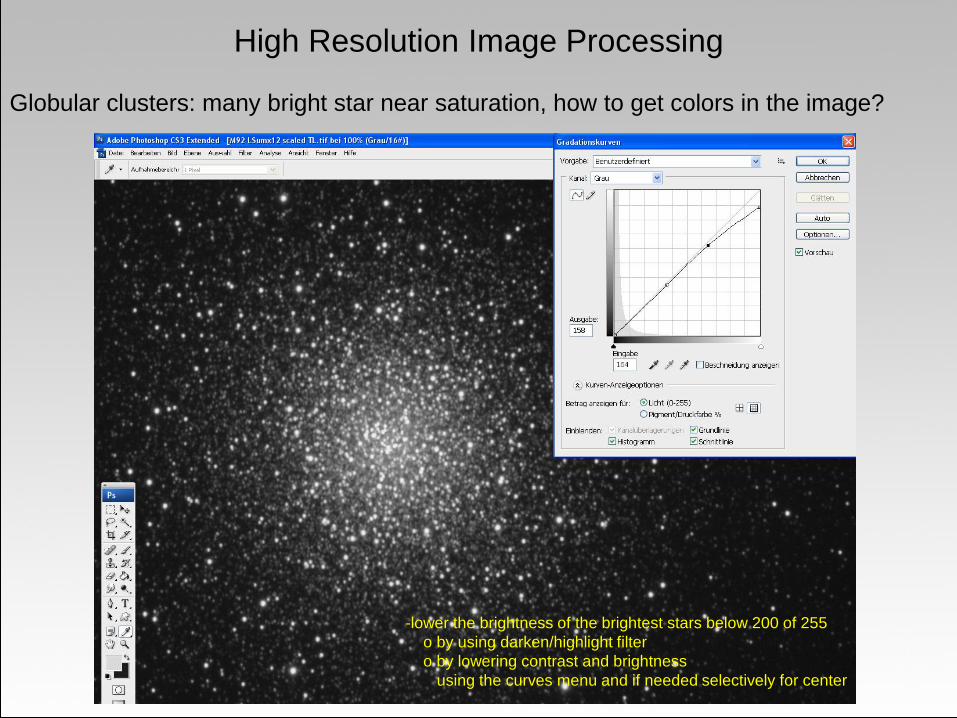
High Resolution Image Processing
Globular clusters: many bright star near saturation, how to get colors in the image?
-lower the brightness of the brightest stars below 200 of 255
o by using darken/highlight filter
o by lowering contrast and brightness
using the curves menu and if needed selectively for center

-Use the high pass filter for thightening up the stars
o holds the brightness of the stars the same
so they still can get color
o unsharp masking instead would raise the
brightness, this would make it harder to add color
Globular clusters: how to tighten up the stars without oversharpening them?
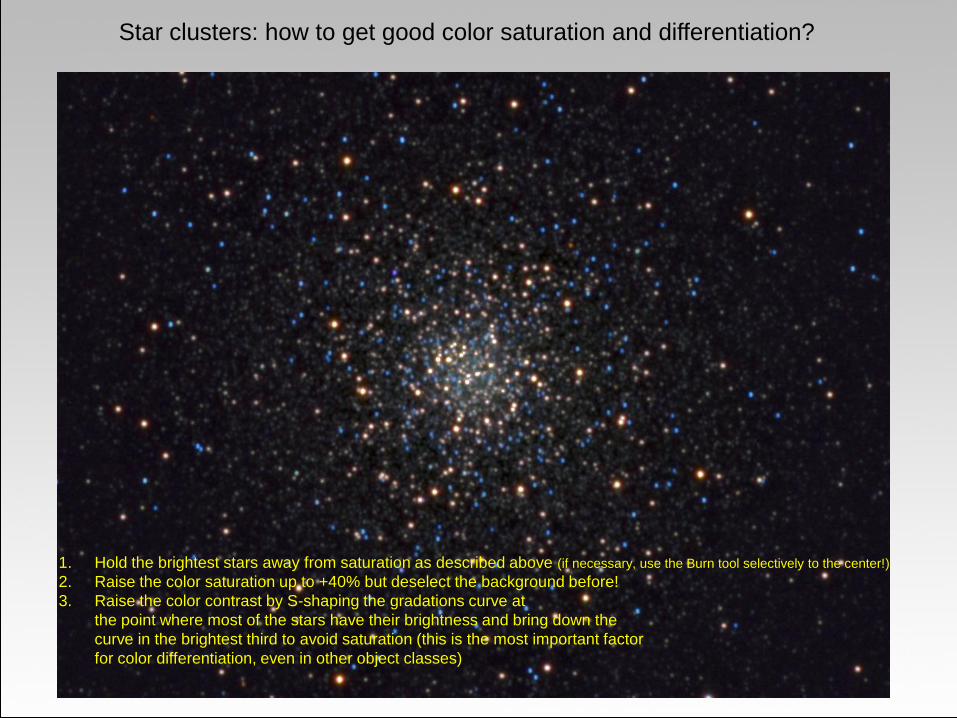
Star clusters: how to get good color saturation and differentiation?
1. Hold the brightest stars away from saturation as described above (if necessary, use the Burn tool selectively to the center!)
2. Raise the color saturation up to +40% but deselect the background before!
3. Raise the color contrast by S-shaping the gradations curve at
the point where most of the stars have their brightness and bring down the
curve in the brightest third to avoid saturation (this is the most important factor
for color differentiation, even in other object classes)

Final LRGB of M92 (in coop with Capella-Observatory team)
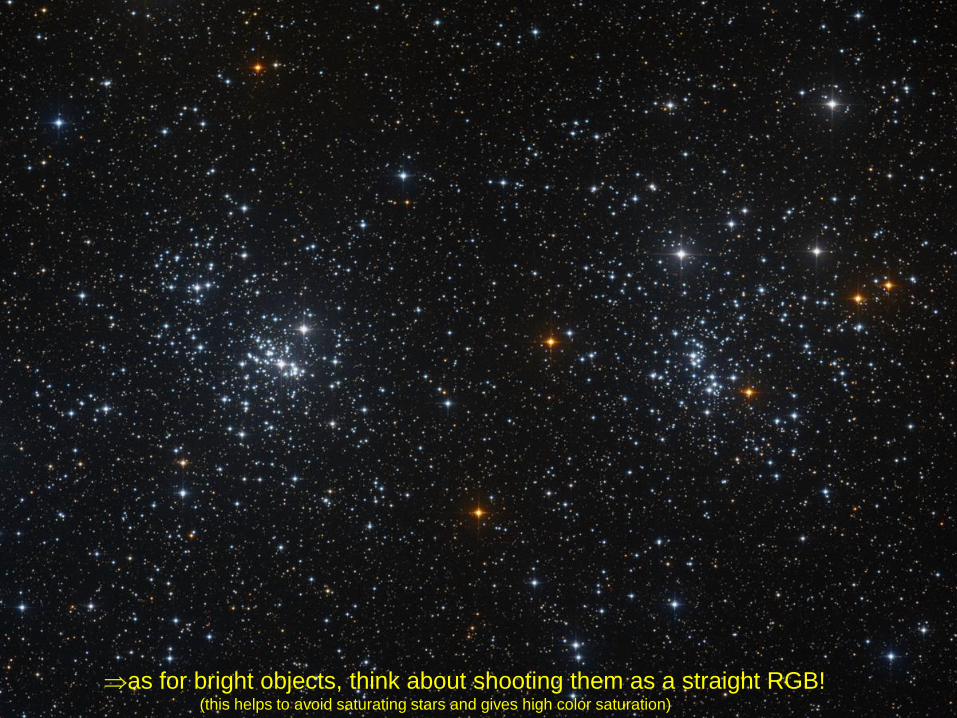
as for bright objects, think about shooting them as a straight RGB!(this helps to avoid saturating stars and gives high color saturation)

Galaxies, PN´s, Nebula: what can we do to let them look „high res“?
=> this image is reduced in CCDStack by using a flat, darks etc and saved as „16bit scaled data“ avoiding saturation in the object and clipping in the background
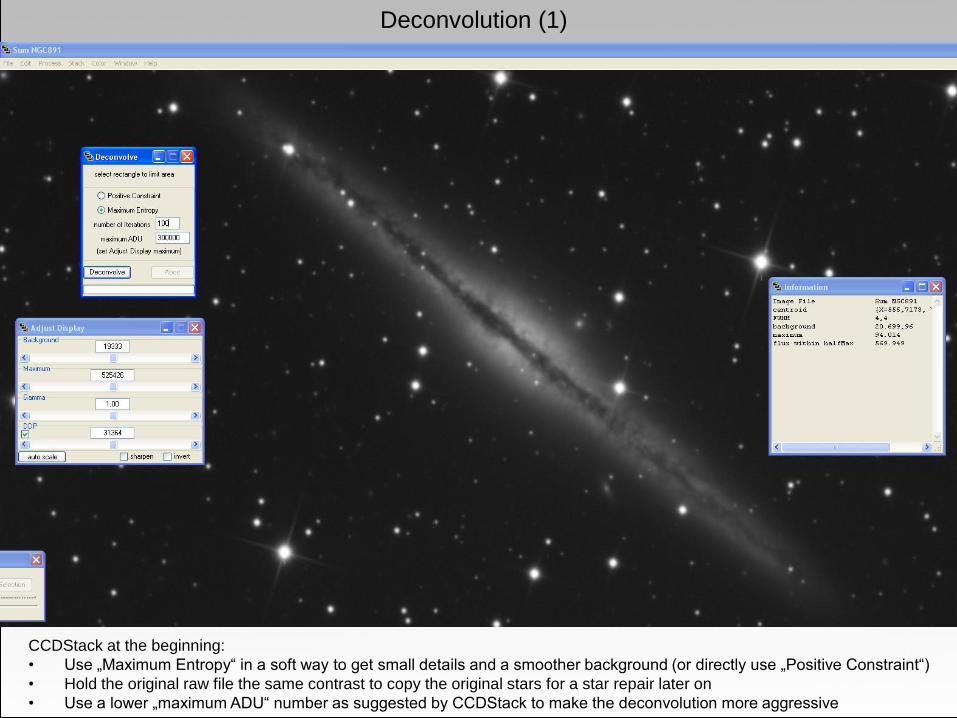
Deconvolution (1)
CCDStack at the beginning:
• Use „Maximum Entropy“ in a soft way to get small details and a smoother background (or directly use „Positive Constraint“)
• Hold the original raw file the same contrast to copy the original stars for a star repair later on
• Use a lower „maximum ADU“ number as suggested by CCDStack to make the deconvolution more aggressive
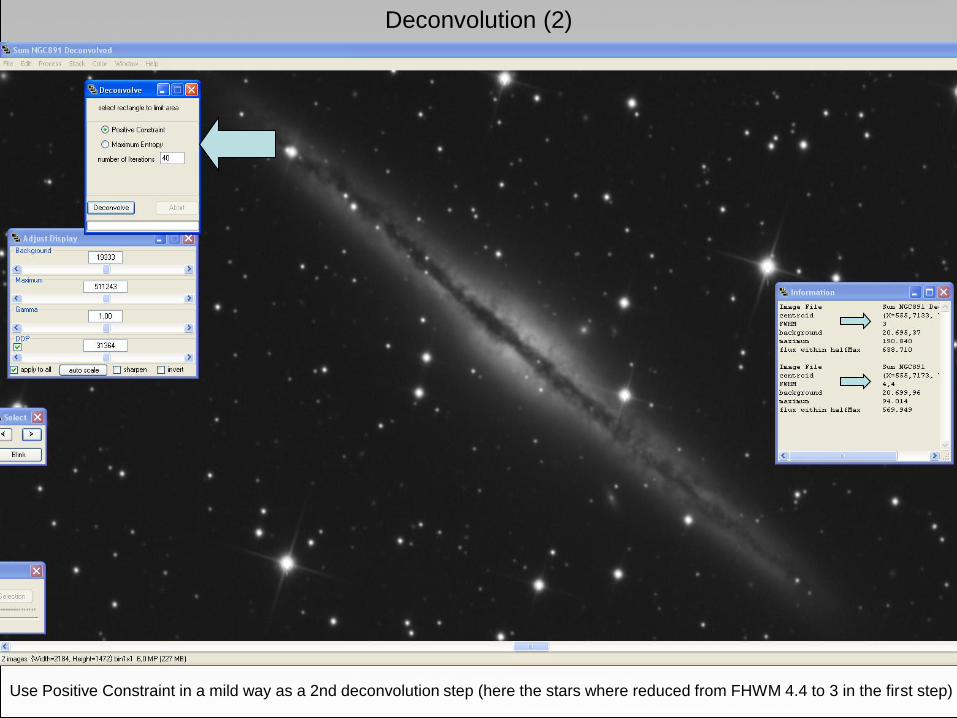
Deconvolution (2)
Use Positive Constraint in a mild way as a 2nd deconvolution step (here the stars where reduced from FHWM 4.4 to 3 in the first step)

Animation of raw file, Maximum Entropy and finally Positive Constraint deconvolution
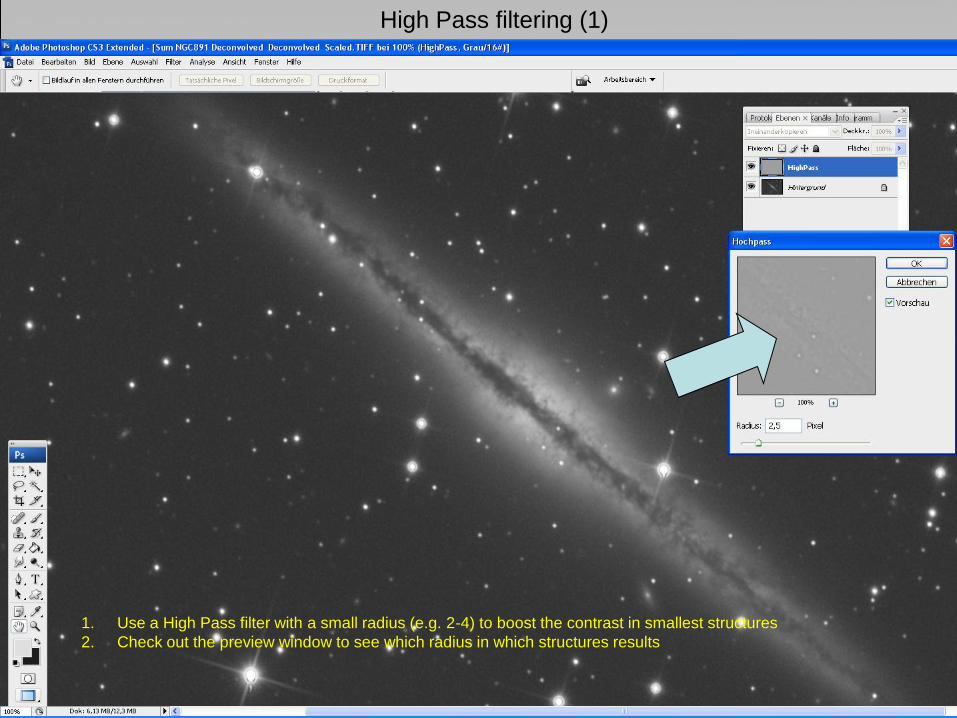
High Pass filtering (1)
1. Use a High Pass filter with a small radius (e.g. 2-4) to boost the contrast in smallest structures
2. Check out the preview window to see which radius in which structures results

High Pass filtering (2)
1. Now use the High Pass filter a second time with a larger radius
(you now have the chance to get contrast for medium sized
structures and for the structures you brought out in the first step)
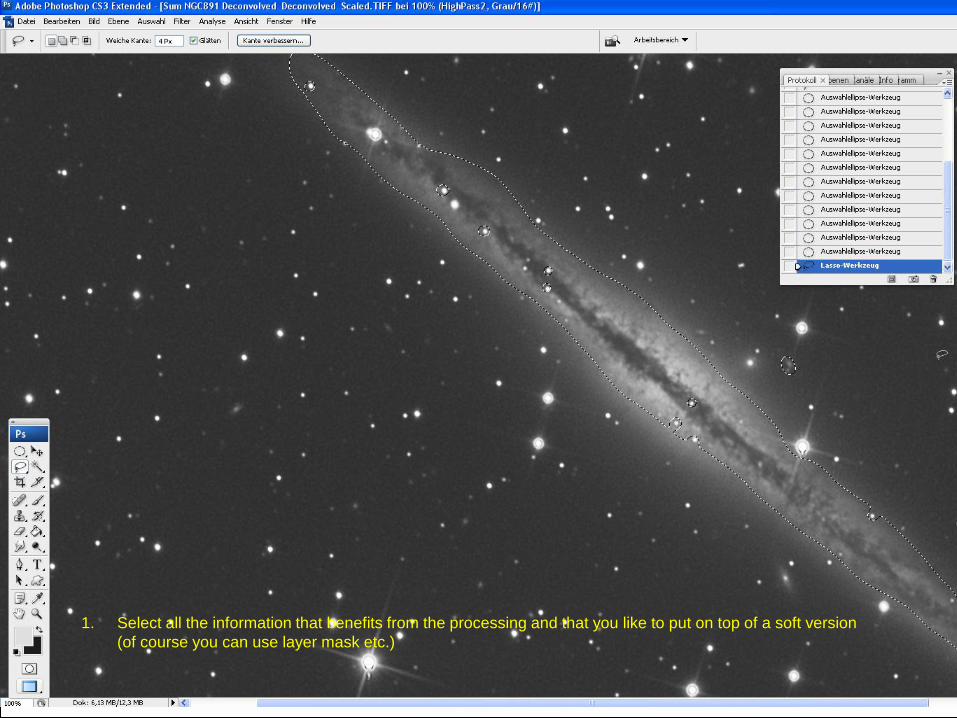
1. Select all the information that benefits from the processing and that you like to put on top of a soft version
(of course you can use layer mask etc.)
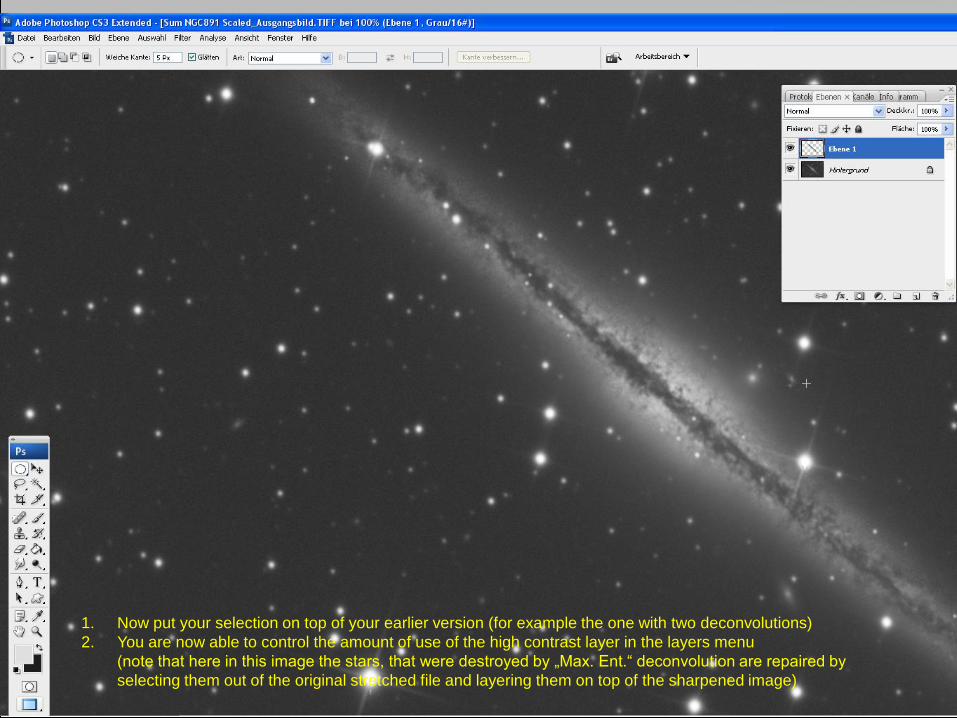
1. Now put your selection on top of your earlier version (for example the one with two deconvolutions)
2. You are now able to control the amount of use of the high contrast layer in the layers menu
(note that here in this image the stars, that were destroyed by „Max. Ent.“ deconvolution are repaired by
selecting them out of the original stretched file and layering them on top of the sharpened image)
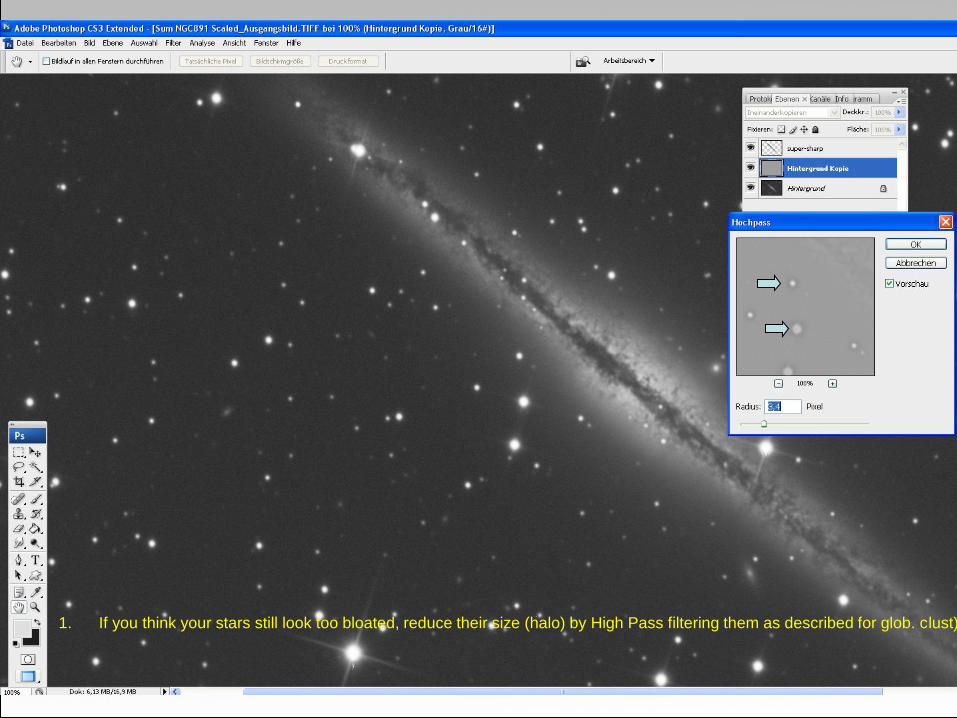
1. If you think your stars still look too bloated, reduce their size (halo) by High Pass filtering them as described for glob. clust)
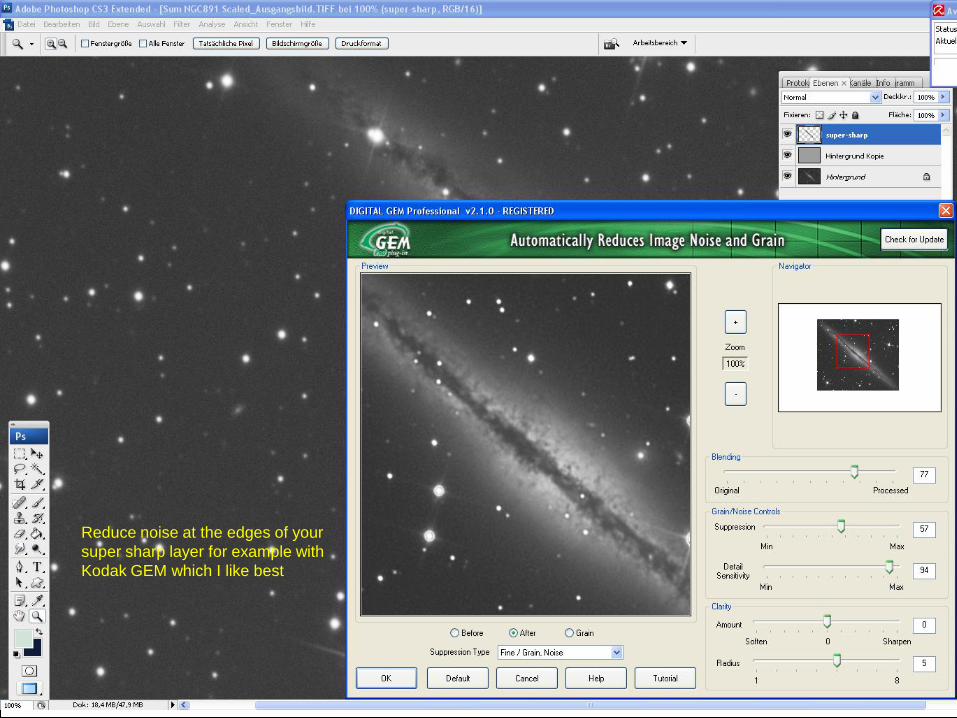
Reduce noise at the edges of your
super sharp layer for example with
Kodak GEM which I like best
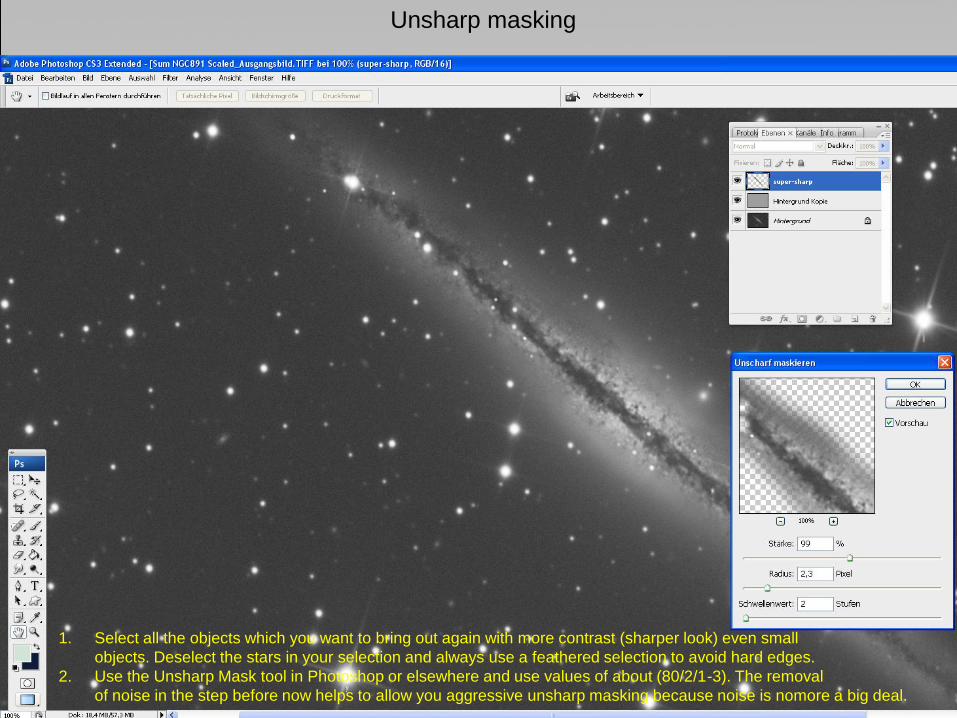
1. Select all the objects which you want to bring out again with more contrast (sharper look) even small
objects. Deselect the stars in your selection and always use a feathered selection to avoid hard edges.
2. Use the Unsharp Mask tool in Photoshop or elsewhere and use values of about (80/2/1-3). The removal
of noise in the step before now helps to allow you aggressive unsharp masking because noise is nomore a big deal.
Unsharp masking

1. If some noise comes up again, use for example dust&scratches to remove it.

NGC 891 compare raw and processed Luminance

Working on color files made under urban conditions
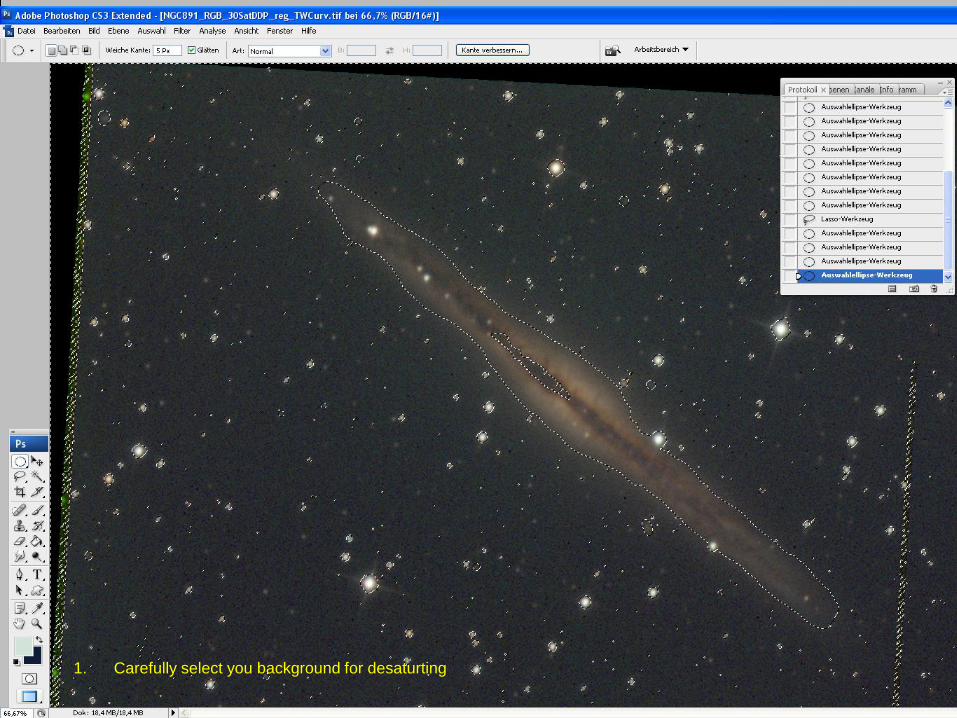
1. Carefully select you background for desaturting
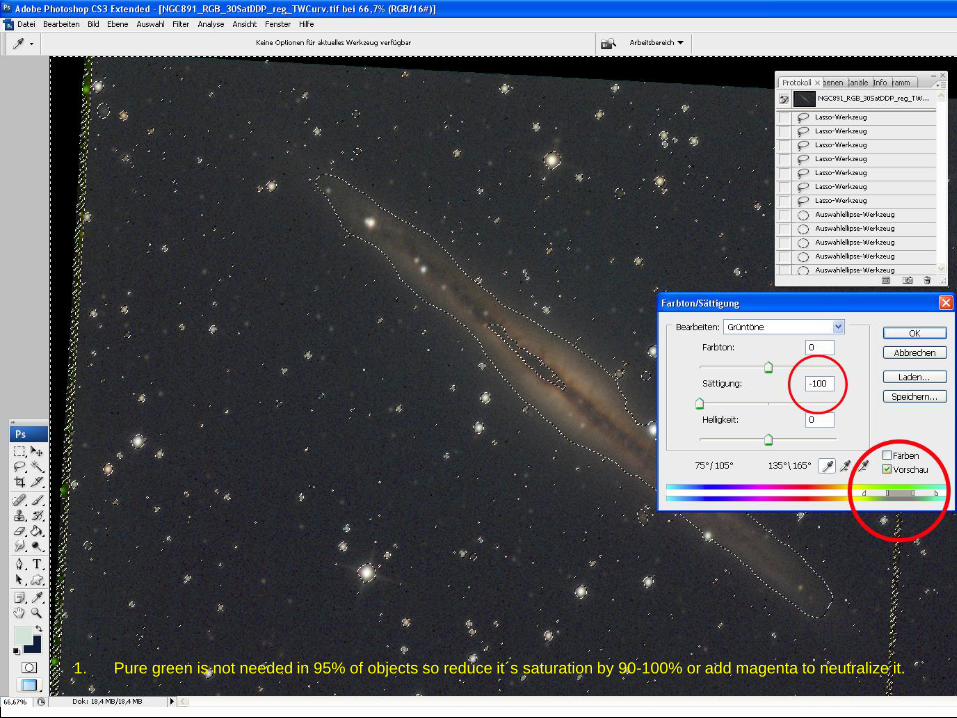
1. Pure green is not needed in 95% of objects so reduce it´s saturation by 90-100% or add magenta to neutralize it.
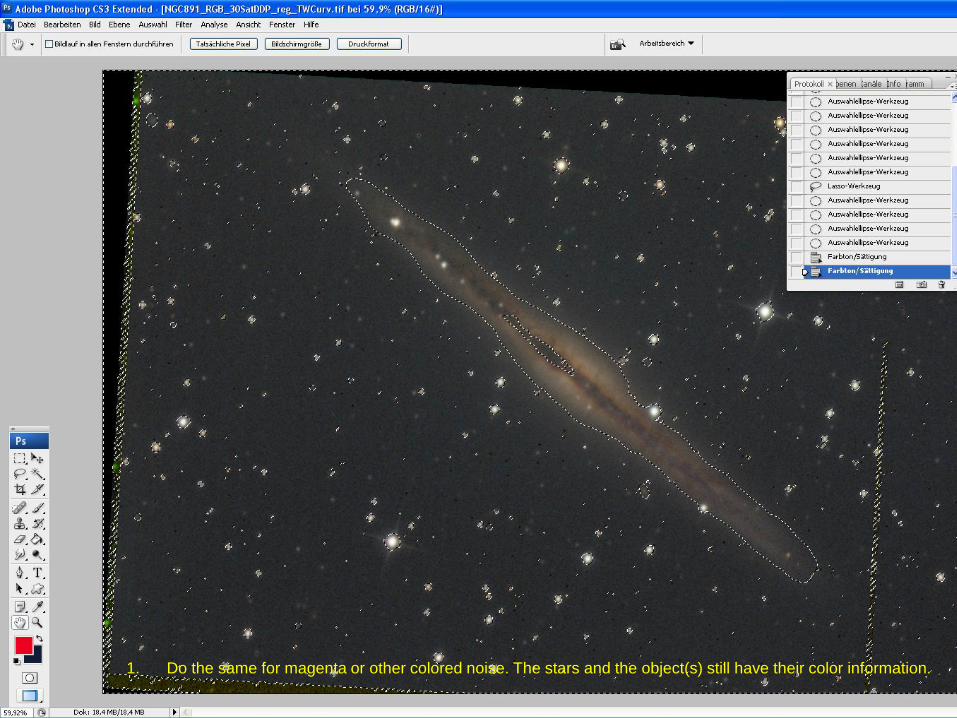
1. Do the same for magenta or other colored noise. The stars and the object(s) still have their color information.
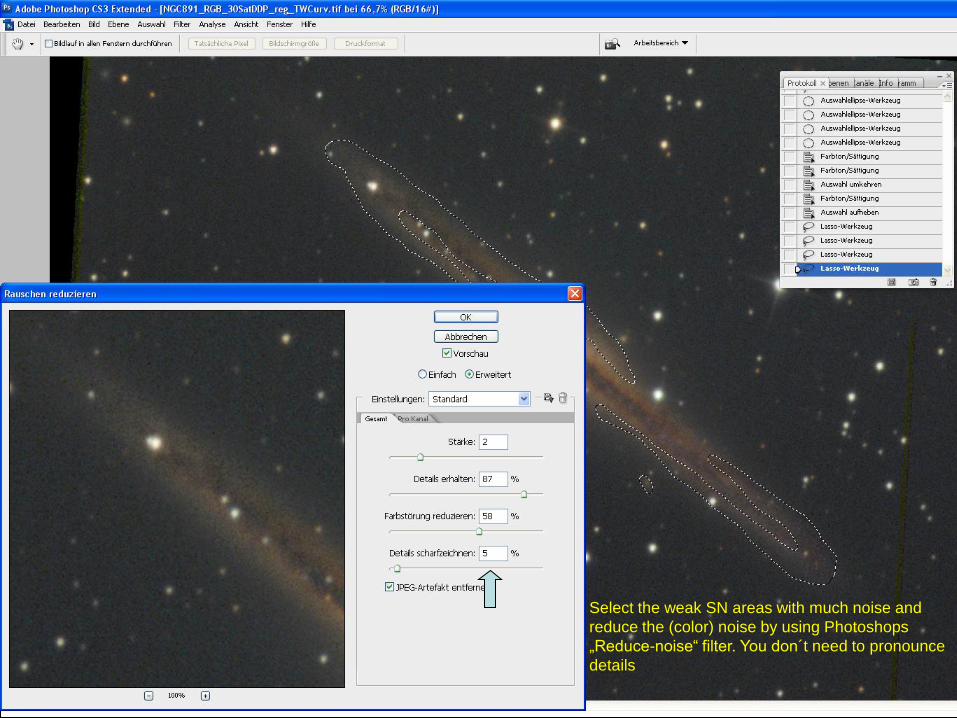
Select the weak SN areas with much noise and
reduce the (color) noise by using Photoshops
„Reduce-noise“ filter. You don´t need to pronounce
details
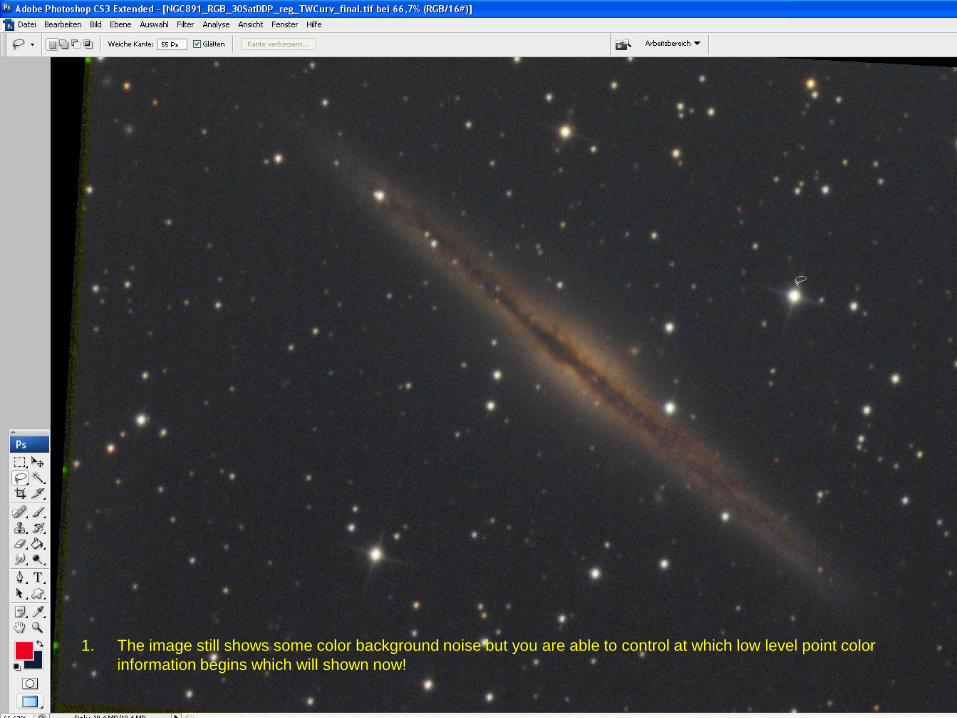
1. The image still shows some color background noise but you are able to control at which low level point color
information begins which will shown now!

1. Open the tonal correction tool and use the gamma slider to control the color information. If you move this slider next to the white
point, the background is completely grey and only the brightest objects part show a bit of color
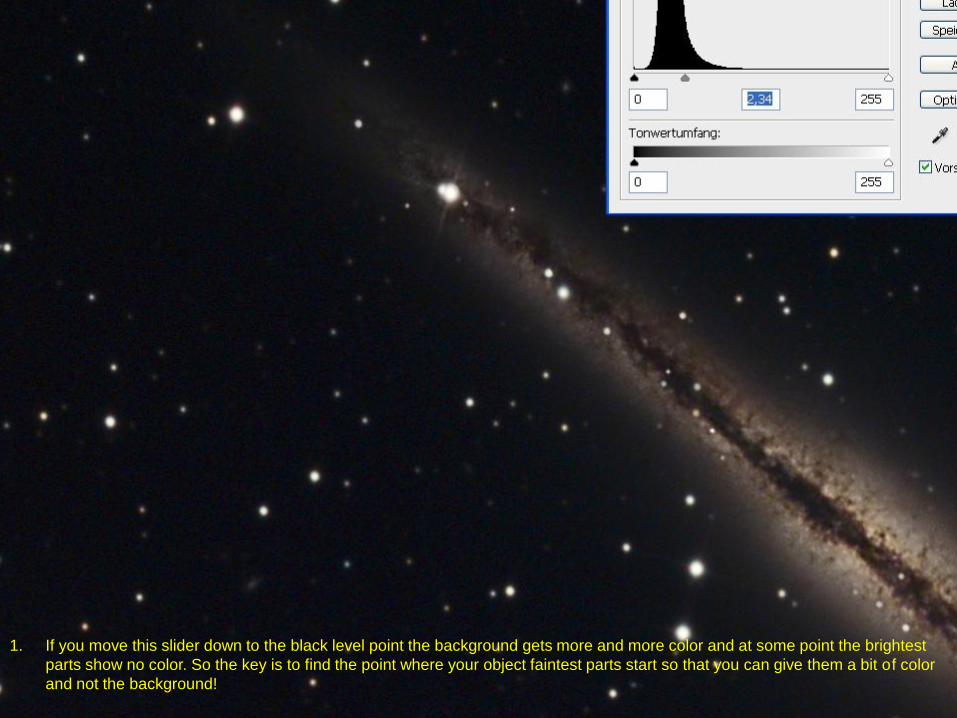
1. If you move this slider down to the black level point the background gets more and more color and at some point the brightest
parts show no color. So the key is to find the point where your object faintest parts start so that you can give them a bit of color
and not the background!
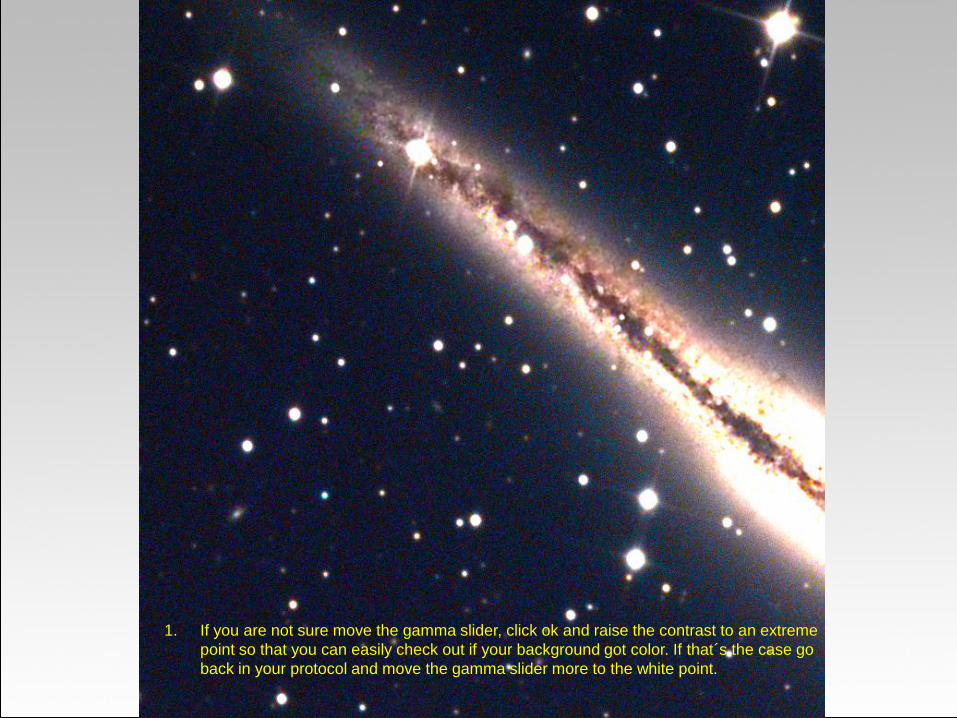
1. If you are not sure move the gamma slider, click ok and raise the contrast to an extreme
point so that you can easily check out if your background got color. If that´s the case go
back in your protocol and move the gamma slider more to the white point.
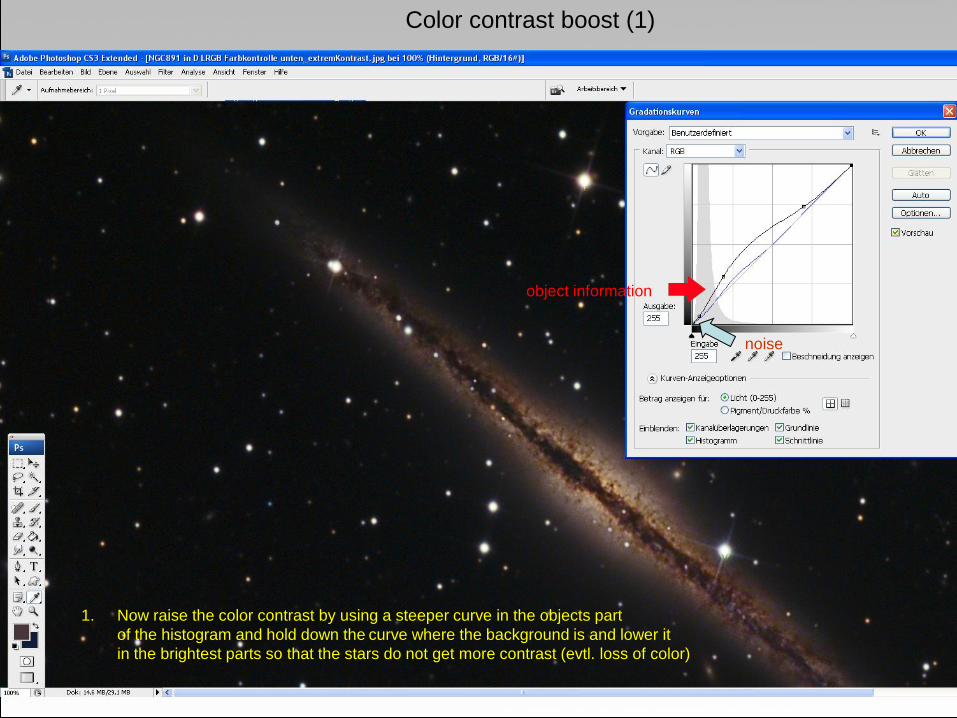
object information
noise
Color contrast boost (1)
1. Now raise the color contrast by using a steeper curve in the objects part
of the histogram and hold down the curve where the background is and lower it
in the brightest parts so that the stars do not get more contrast (evtl. loss of color)

Color correction of background
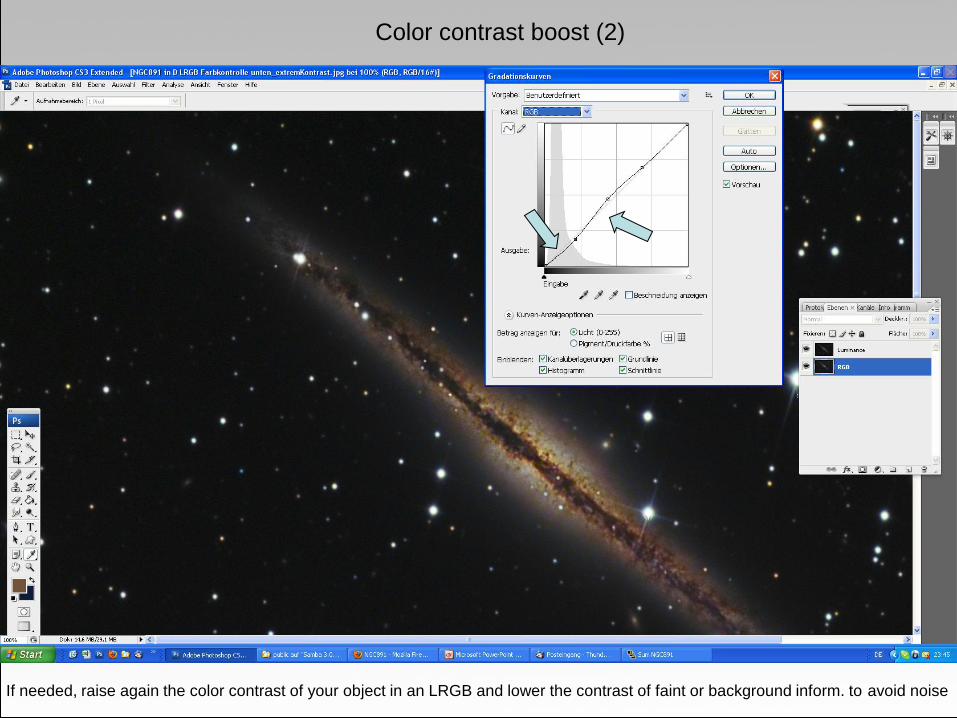
If needed, raise again the color contrast of your object in an LRGB and lower the contrast of faint or background inform. to avoid noise
Color contrast boost (2)

conclusion: the weaker the signal, the longer the image processing takes!(my workflow is nearly the same for all images, but getting good contrast, especially for color, is much easier with high SN=dark skies)

Comparison 15inch 1,9“ backyard to 24inch 1,3“ Crete(15“ image upsized to 24“ focal length)
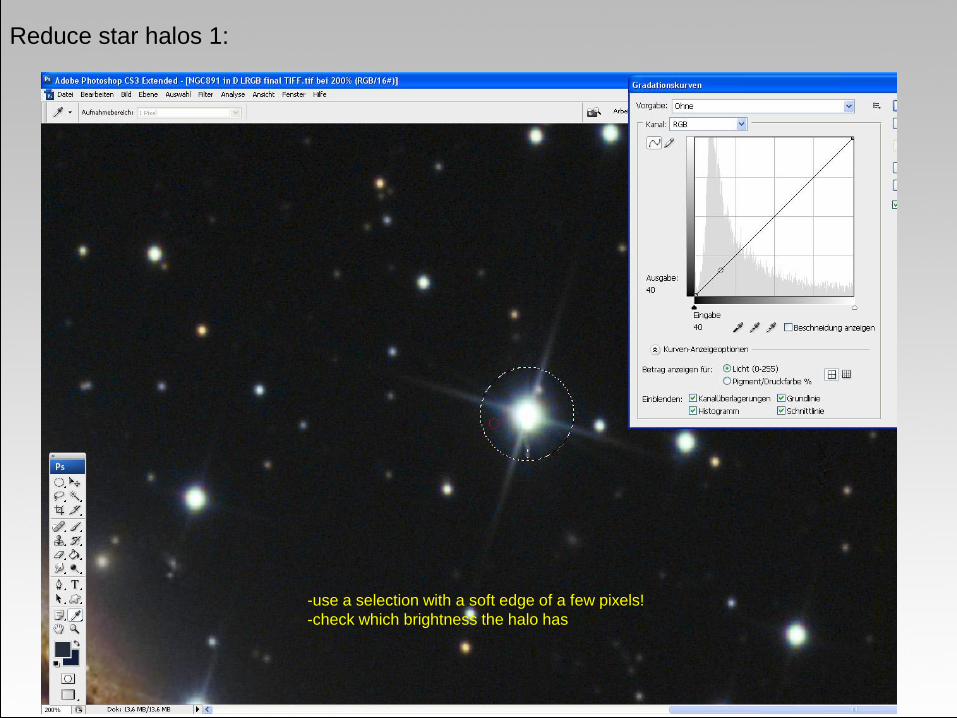
Reduce star halos 1:
-use a selection with a soft edge of a few pixels!
-check which brightness the halo has

Reduce star halos 2:
-lower the contrast at this point by moving down the curve
-raise the curve a bit at the darkest point to avoid a dark ring around the star
-do this for Luminance and for the special color of the halo (here blue)
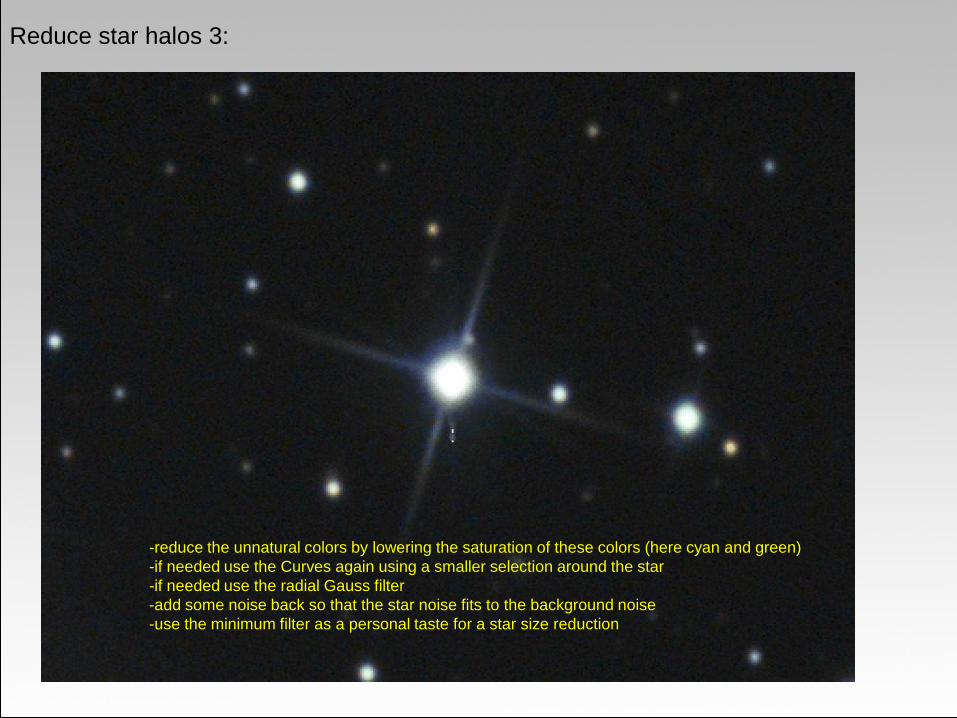
Reduce star halos 3:
-reduce the unnatural colors by lowering the saturation of these colors (here cyan and green)
-if needed use the Curves again using a smaller selection around the star
-if needed use the radial Gauss filter
-add some noise back so that the star noise fits to the background noise
-use the minimum filter as a personal taste for a star size reduction
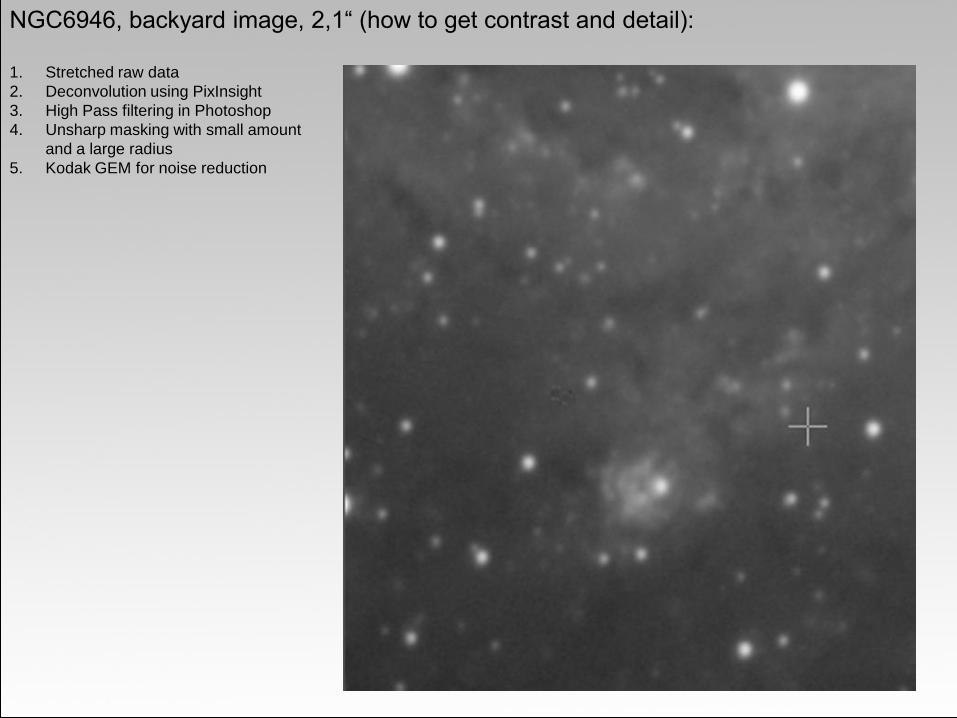
NGC6946, backyard image, 2,1“ (how to get contrast and detail):
1. Stretched raw data
2. Deconvolution using PixInsight
3. High Pass filtering in Photoshop
4. Unsharp masking with small amount
and a large radius
5. Kodak GEM for noise reduction
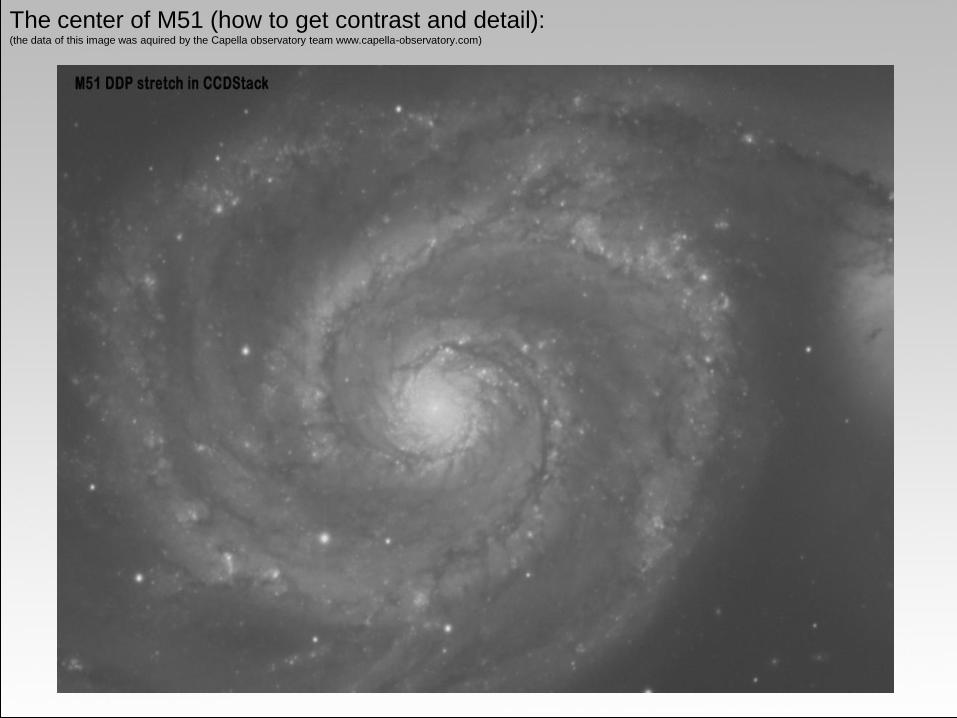
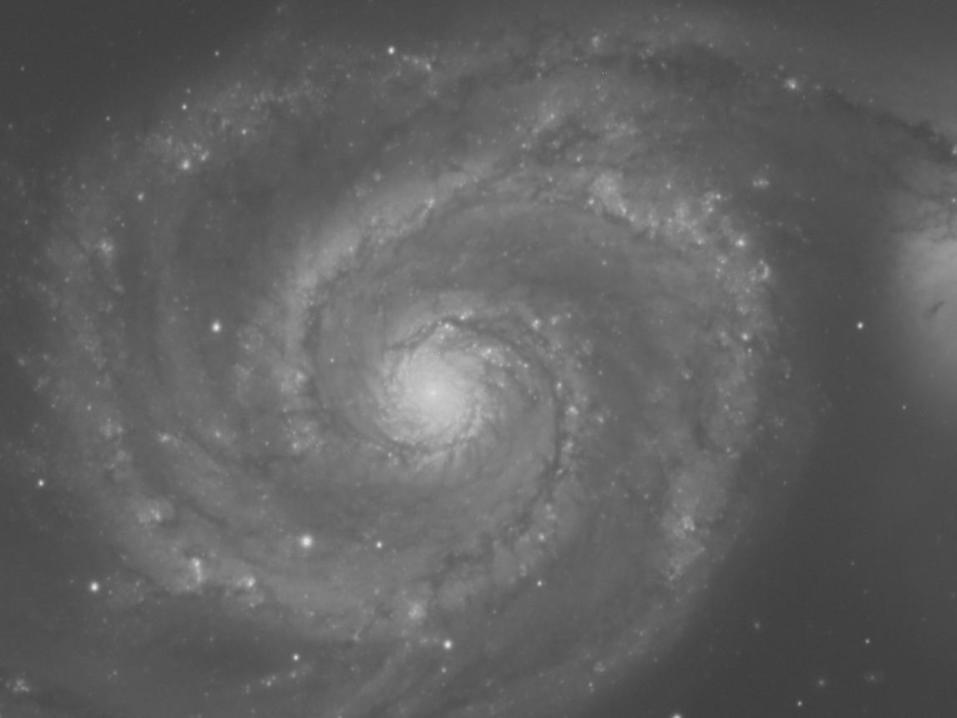
The center of M51 (how to get contrast and detail):(the data of this image was aquired by the Capella observatory team www.capella-observatory.com)

Synthetic flats using PixInsight (1) (www.plejades-astrophoto.com)
M51 with obviously visible vignetting:

Synthetic flats using PixInsight (2)
Open image in freeware PixInsight LE, use the Dynamic Background Extractor (DBE):
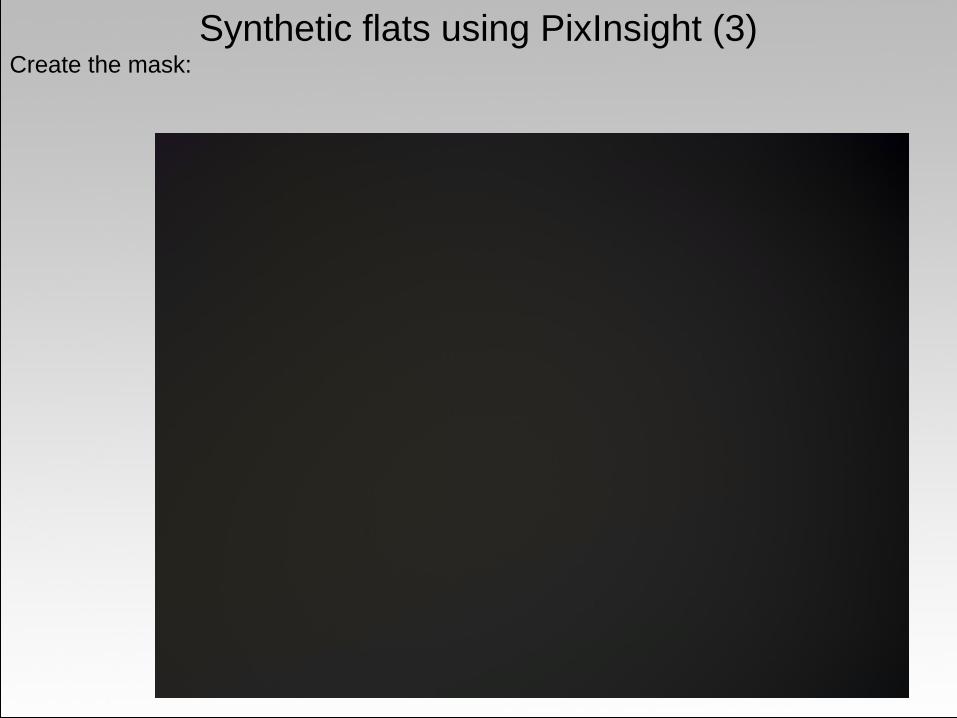
Synthetic flats using PixInsight (3)Create the mask:
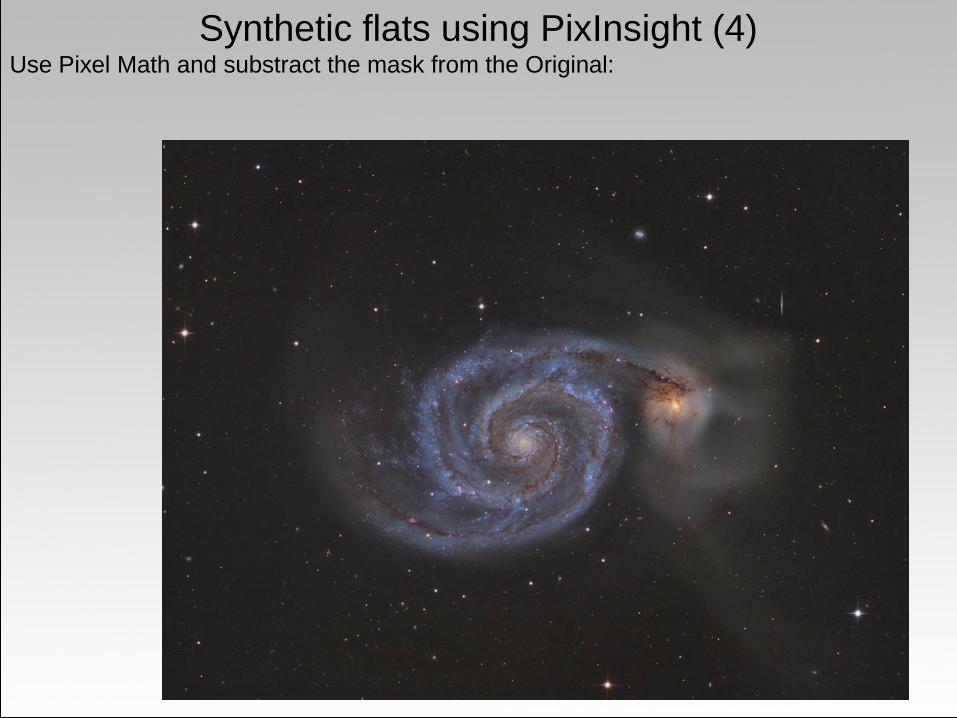
Synthetic flats using PixInsight (4)Use Pixel Math and substract the mask from the Original:


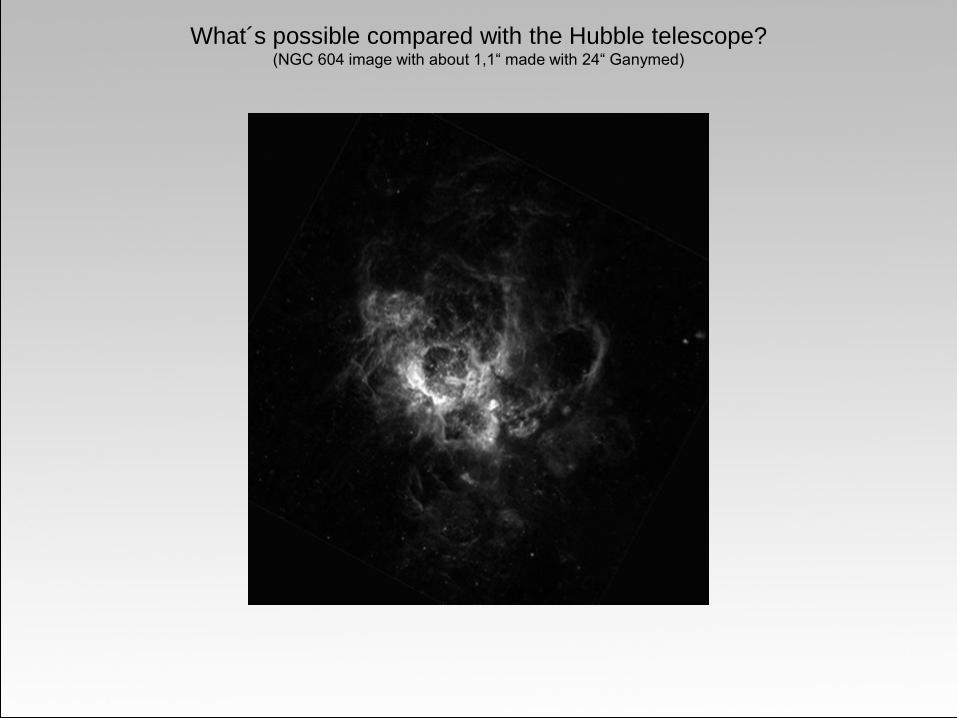
What´s possible compared with the Hubble telescope?(NGC 604 image with about 1,1“ made with 24“ Ganymed)
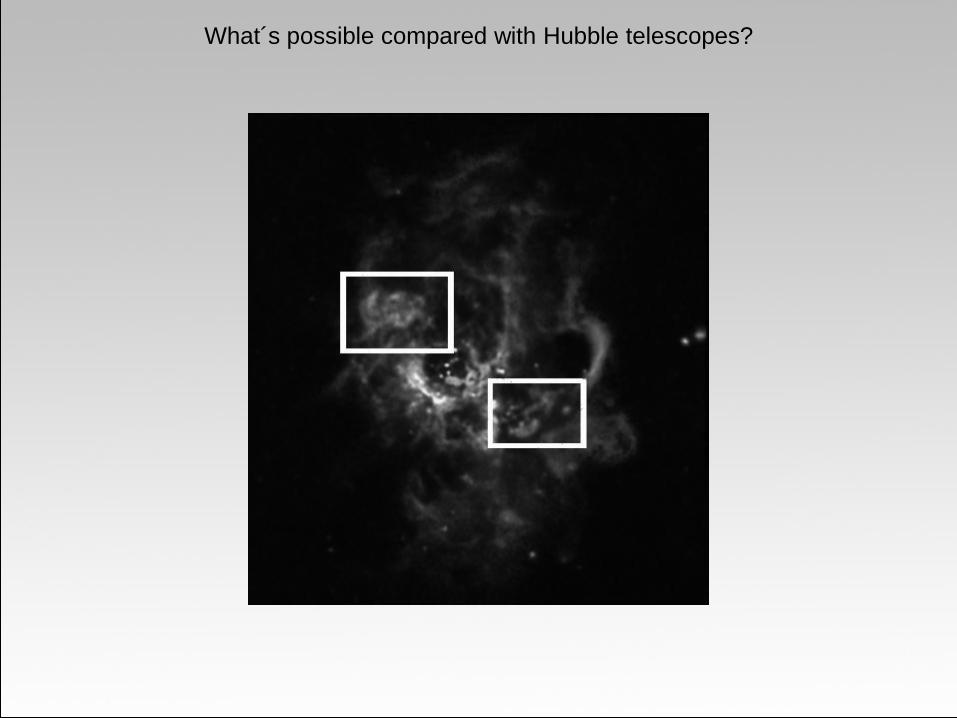
What´s possible compared with Hubble telescopes?
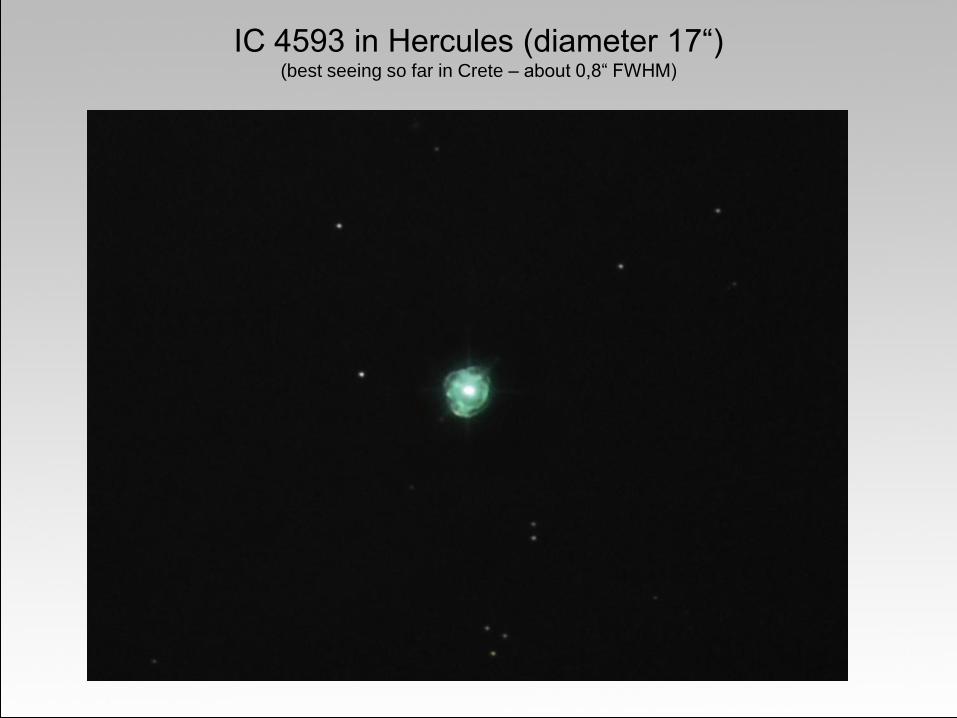
IC 4593 in Hercules (diameter 17“)(best seeing so far in Crete – about 0,8“ FWHM)
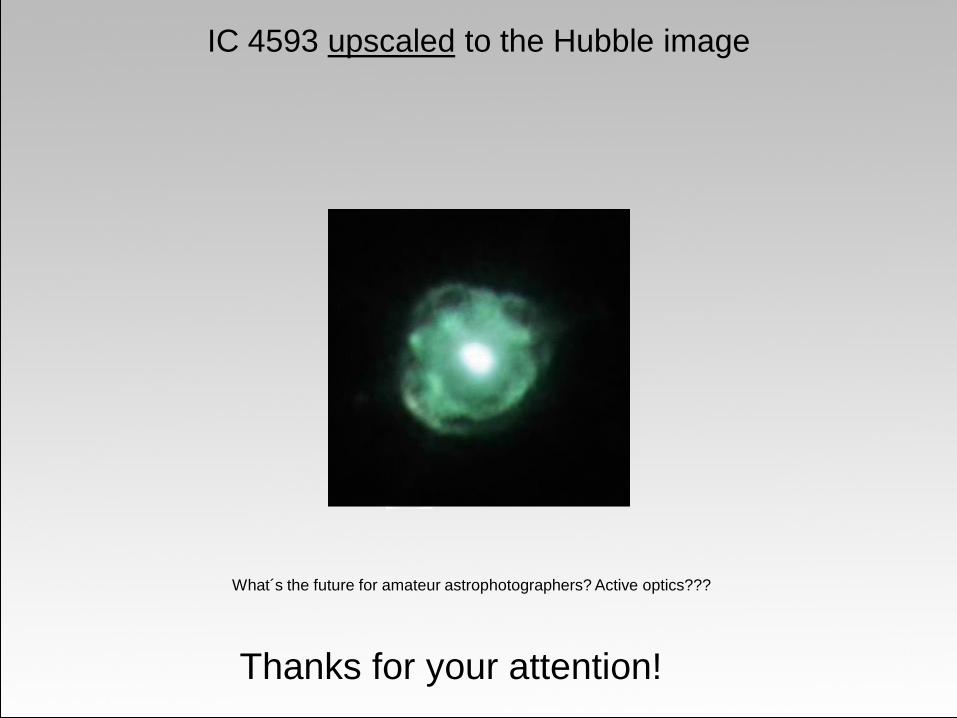
IC 4593 upscaled to the Hubble image
What´s the future for amateur astrophotographers? Active optics???
Thanks for your attention!