heliostat operators manual
TRANSCRIPT

2015
Heliostat 2014-2015
ERAU Senior Design
4/21/2015
Heliostat Operators Manual

P a g e | 1
Table of Contents 1. Heliostat Operators Manual Introduction ............................................................................................ 2
2. Hardware Overview .............................................................................................................................. 2
3. Standard Operating Procedure ............................................................................................................. 3
3.1. Accessing the classroom COAS 501 .............................................................................................. 3
3.2. Turn on the Control Computer ..................................................................................................... 3
3.3. Check to make sure power is connected to the power box ......................................................... 3
3.4. Click icon to run the Heliostat ....................................................................................................... 4
3.5. Choose an object to track ............................................................................................................. 4
3.6. Check local weather conditions .................................................................................................... 5
3.7. User Authentication ...................................................................................................................... 5
3.8. Power on “Smart Devices” ............................................................................................................ 6
3.9. Power on Auxiliary Devices ........................................................................................................... 6
3.10. Alignment Procedure ................................................................................................................ 6
3.11. Tracking Procedure ................................................................................................................... 7
3.12. Shutdown Procedure ................................................................................................................ 7
3.13. Power Off Electronics ................................................................................................................ 8
4. Troubleshooting .................................................................................................................................... 8
4.1. The microcontroller shows a red X ............................................................................................... 8
4.2. The LX200 shows a red X............................................................................................................... 9
4.3. The LX200 is stuck on the Initializing step .................................................................................... 9
4.4. The LX200 cannot find home position .......................................................................................... 9
4.5. The LX200’s cords are twisted .................................................................................................... 10
4.6. The program does not launch ..................................................................................................... 11
4.7. The alignment is very far off (more than normal) ...................................................................... 11
4.8. The image shakes excessively ..................................................................................................... 11
5. Maintenance ....................................................................................................................................... 11
5.1. Accessing the Dome .................................................................................................................... 11
5.2. Cleaning the Quartz Mirrors ....................................................................................................... 12
5.3. Reattaching a broken photogate ................................................................................................ 12

P a g e | 2
1. Heliostat Operators Manual Introduction This document steps a user through the proper methods to use, maintain, and troubleshoot the
Heliostat installed into the Embry-Riddle College of Arts and Sciences (COAS) classroom #501. This
device and it operating software are capable of tracking the Sun or the Moon and projecting a high
resolution image into the classroom below. The resulting image is approximately 24” in diameter and is
intended to be used as a visual aid for studying the sun or the moon.
2. Hardware Overview The Heliostat system consists of several components that will be referred to frequently throughout this
document. There are two mirrors in the system, a primary mirror which is mounted to a robotic
telescope mount, and a secondary mirror that is fixed in space. The robotic telescope mount is called the
Meade LX200 Classic and will simply be referred to as the LX200. The LX200 is an older device which
does not have GPS or home finding capabilities, however this device has been modified so that it can
find a home position via a microcontroller and photo gates which will be mentioned later. Other major
components include a telescope with a 72” objective lens, an eyepiece, the Heliostat’s protective dome,
and a control station computer in the COAS 501 classroom. These components are shown in the
following diagrams.
Figure 1: Schematic of Heliostat System with light rays passing through system. Note: Heliostat Dome NOT shown

P a g e | 3
Figure 2: Schematic of Heliostat in its protective dome housing
3. Standard Operating Procedure The standard method of operating the Heliostat is shown in the following procedure.
3.1. Accessing the classroom COAS 501 The COAS 501 classroom is located on the 5th floor of the College of Arts and Sciences. During the
school semester this classroom is often filled with students and ongoing classes. It is not
recommended to operate the Heliostat at this time since the Heliostat may be distracting to
students. During all other hours the classroom can be accessed via a faculty member of the Physical
Sciences Department or by arranging an appointment with Campus Safety by calling 386-226-6480.
3.2. Turn on the Control Computer Inside the classroom on the left side of the back wall (located next to the control room) there is a
computer sitting on the counter. This computer is the control computer for the Heliostat and this
device and its monitor should be turned on. Booting this computer may take several minutes.
3.3. Check to make sure power is connected to the power box Next to the computer there should be a grey colored electrical box with black switches. This is a
power control box which sends power to various devices in the Heliostat System. There should be a

P a g e | 4
three prong power extension cable connecting power from the wall to the power inlet on this box.
All switches should be powered off at this time.
Figure 3: Heliostat power control box
3.4. Click icon to run the Heliostat Once the computer has finished its startup procedure, click the icon on the desktop to
run the Heliostat.
3.5. Choose an object to track After several seconds, the user interface for
the Heliostat should launch. On the right
side, all real time information is shown to
the user, including webcams, a live radar,
and temperature readings of equipment in
various locations. There are also buttons for
controlling the dome which will become
available to the user at a later stage in the
process. On the left side of the screen the
user can choose to track the Sun or the
Moon. The user should choose the Sun if it
is daytime, and choose the moon if it is
night time and the moon is visible in the
sky. This is easy to verify by briefly stepping Figure 4: Start Screen - Select and object to track

P a g e | 5
outside onto the 5th floor veranda and
looking up in the sky.
3.6. Check local weather conditions After selecting an object, an enhanced
radar map with weather conditions will be
displayed. If the weather is deemed
acceptable by the user, then click next to
continue the process. NOTE: The heliostat
should not be operated in inclement
weather. Running the system in inclement
weather will likely cause severe and
permanent damage to the electronics and
optics in the dome.
3.7. User Authentication A dialog box will appear requesting the user
to enter a password to continue. The
password is: ERAUPhysics
Figure 5: Check local weather
Figure 6: User Authentication

P a g e | 6
3.8. Power on “Smart Devices” At this time, the user must turn on the
LX200 and the Microcontroller from the
grey power box mentioned in Section 3.3.
These switches are labeled appropriately on
the power box. Once the devices are
powered on and communicating, a green
checkmark will appear. When a green
checkmark appears by both devices, click
next to continue.
3.9. Power on Auxiliary Devices Now it is recommended to turn on the Lens
Cap Remover and the Focus Adjuster.
Turning on the Lens Cap Remover will
remove the protective shutter from above
the objective lens. This can be verified by
watching the webcams and by listening for
a distinct thud when the device is powered
on. Turning on the Focus Adjuster will
enable the user to move the focuser by the
eyepiece to adjust the focus of the image
when the Sun or Moon is being tracked.
During nighttime it may be helpful to also
turn on the light in the dome by switching
on the “LIGHT” on the power box. Click
Next when completed.
3.10. Alignment Procedure At this time the system will take over and
will move the equipment into position. It is
recommended to keep an eye on the
webcams for any weird behavior.
In the event of an emergency, i.e. if at any
time the LX200 begins to act erratically or if
the cords on the LX200 become noticeably
tangled, promptly turn off the LX200 from
the power control box.
Figure 7: Power on Smart Devices
Figure 8: Power on Auxiliary Devices
Figure 9: Alignment Procedure

P a g e | 7
3.11. Tracking Procedure The system will begin tracking the sun. If
the dome is not aligned properly the user
can move the dome via buttons in the
bottom right hand corner of the screen.
When the dome is aligned properly, the
LX200 should be visibly illuminated from
outside light.
There is no guarantee that the LX200 will be
exactly aligned to reflect light through the
telescope and into the classroom below. To
properly project an image will require the
user to adjust the alignment via left hand
side of the user interface. The user should
click the up and down adjustment buttons
by the altitude and azimuth to adjust the
position of the reflected sun, so that the
light goes through the telescope objective,
and so that the projected image is centered
below the eyepiece in the classroom below.
When the user is done with the system,
click Stop.
3.12. Shutdown Procedure The system will take control once again and
will move the LX200 to its stowed position
with the primary mirror pointing
downward. The dome will also be closed
automatically. This process takes 1-2
minutes. DO NOT TURN OFF POWER TO
ANY ELECTRONICS YET!
Figure 10: Tracking the Sun
Figure 11: Shutdown procedure

P a g e | 8
3.13. Power Off Electronics When instructed, power off all electronics
to the system and click the Close Program
Button
4. Troubleshooting Trouble shooting
4.1. The microcontroller shows a red X This means that the microcontroller is either not turned on or the computer is not able to
communicate with the microcontroller. Check to make sure power is turned on to the
microcontroller. If that does not work, try:
1. Turn off the microcontroller
2. Disconnect the red USB cable from the computer
3. Wait 5 seconds
4. Reconnect the red USB cable to the same port in the computer
5. Turn on the microcontroller
If this does not fix the problem, then the communication port may be blocked by another program
or by another instance of the Heliostat program. To fix that try:
1. Turn off the microcontroller
2. Close the Heliostat Program
3. Logout of Windows
4. Re-login to Windows
5. Restart the Heliostat Program
6. Turn on power to the microcontroller
7. Step through the start up procedure in the user interface
This should resolve the microcontroller issue. To farther troubleshoot, try opening TeraTerm,
connecting to COM3, setting the baud rate to 4800, and looking for outputs from the
microcontroller. Data packets should be formatted in this manner:
a11[1/2]11b11[3/4]11c11[5/6]11d11[7/8]11e[integer]f[integer]g[integer]h11[0/9]11i
where [1/2] means either a 1 or a 2 would appear, and [integer] means some number would appear.
Figure 12: Power off all electronics

P a g e | 9
Between Characters Reporting Device
a and b Photogate 1 (LX200 Right Ascension)
b and c Photogate 2 (LX200 Right Ascension)
c and d Photogate 3 (LX200 Declination)
d and e Photogate 4 (LX200 Declination)
e and f Thermistor 1
f and g Thermistor 2
G and h Thermistor 3
h and i Photogate 5 (Dome)
4.2. The LX200 shows a red X This means that the LX200 is either not turned on or the computer is not able to communicate with
the LX200. Check to make sure power is turned on to the LX200. NOTE: The LX200 takes about 10
seconds to boot up and the user should wait 10 seconds after turning on power to check for proper
communication.
If that does not work, try:
1. Turn off power to the LX200
2. Close the Heliostat Program
3. Logout of Windows
4. Re-login to Windows
5. Restart the Heliostat Program
6. Turn on power to the LX200
7. Step through the start up procedure in the user interface
4.3. The LX200 is stuck on the Initializing step This is a sign that the communication port with the LX200 somehow became blocked. Try these
steps to resolve the problem:
1. Turn off power to the LX200
2. Close the Heliostat Program
3. Logout of Windows
4. Re-login to Windows
5. Restart the Heliostat Program
6. Turn on power to the LX200
7. Step through the start up procedure in the user interface
4.4. The LX200 cannot find home position This problem is indicative of the microcontroller not working. If the LX200 is left on its own to spin, it
could twist the cables and cause permanent damage to the system. If this happens,
1. Turn off power to the LX200
2. Close the Heliostat Program
3. Logout of Windows

P a g e | 10
4. Re-login to Windows
5. Open TeraTerm
6. Connect to COM3 and set the baud rate to 4800
7. Verify the output from the microcontroller has the following output format
a11[1/2]11b11[3/4]11c11[5/6]11d11[7/8]11e[integer]f[integer]g[integer]h11[0/9]11i
where [1/2] means either a 1 or a 2 would appear, and [integer] means some number would
appear.
If the output is correct, then
8. Close TeraTerm
9. Restart the Heliostat Program
10. Turn on power to the LX200 and microcontroller
11. Step through the start up procedure in the user interface
If the output is not correct, then
1. Try replacing the USB communication chip
2. Try replacing the microcontroller
3. Try replacing the photogates attached to the LX200 inside the dome
4.5. The LX200’s cords are twisted In the event that the LX200 was shutdown improperly (i.e. the power was cycled when the LX200
was pointing at the Sun) then the cords could become twisted when the next user starts up the
system. Twisting the cords can cause permanent damage to the system!
If the user noticed that the LX200 is in abnormal state when the program is started, action can be
taken to untwist the cables before activating the Heliostat. If the cords are twisted:
1. Turn off power to the LX200
2. Close the Heliostat Program
3. Logout of Windows
4. Re-login to Windows
5. Restart the Heliostat program to view the webcams, but DO NOT click to track an object
6. Open TeraTerm and organize the windows so both the webcams and TeraTerm can be seen
on the screen
7. Connect to COM5 (Serial to USB Converter)
8. In the command prompt in TeraTerm type the following command. NOTE: all commands are
case-sensitve
9. Type: :Me#
10. The LX200 will begin to turn to untwist the cords
11. When the LX200 is untwisted either
a. Type: :Qe#
b. OR turn off the LX200, wait 3 seconds, then turn it back on
12. Close TeraTerm
13. Continue with using the Heliostat User Interface

P a g e | 11
4.6. The program does not launch This is a sign that one or more files are missing from the software package. It is recommended to re-
download the files for the Heliostat. On a computer connected to the ERAU network backup files
can be accessed from the following directory:
S:\COURSES\DesignLab\Heliostat 2014-2015\Backup Files
Transferring the folders in this directory to the host computer and running the file mainGUI.py
through the executable file Python-Portable.exe should run the program.
4.7. The alignment is very far off (more than normal) The program in its current state does not compensate automatically for daylight savings time
changes. To fix this, one value needs to be changed in the runLX200.py file. The line containing:
self.lx200.write(':SG+04.0#') #Set the number of hours added to local time to yield UTC
should be changed to either +04.0 hours or +05.0 hours depending on time of year.
4.8. The image shakes excessively It has been documented that the image from the Heliostat shakes from vibrations in the COAS
building. IT is recommended to operate the Heliostat with all guests in COAS 501 standing still. Also
operating the system when many people are moving throughout the building (as during passing
periods) is not recommended. It is also not recommended to run the system in excessive winds.
4.9. Webcams don’t work Webcams may become non-functional when other programs (or other instances of the Heliostat
Program) are using a webcam. Try:
1. Close the Heliostat Program
2. Logout of Windows
3. Re-login to Windows
4. Restart the Heliostat Program
If this does not work, try downloading and reinstalling the drivers for the webcams. The driver can
be found by googling: Logitech C310 webcam driver.
If this still does not fix the problem, one or more of the webcams may be permanently damaged and
may need to be replaced. Replacement webcams should operate on USB 2.0.
5. Maintenance
5.1. Accessing the Dome Accessing the dome will require the involvement of Campus Safety by calling 386-226-6480. The
dome is accessed by climbing up the ladder at the top of the central COAS stairwell. The hatch at the

P a g e | 12
top of the ladder uses the “MRM” key and is where campus safety is needed to get onto the roof.
Once on the roof climb down a short ladder to reach the Heliostat. The heliostat can be opened via
the remote control (acquired through Damon Burke) or by opening the dome from the control
computer in 501. Using a small step ladder, climb into the dome. DO NOT touch the high voltage
rails on the inside edge in the dome painted orange. Once inside the dome, power to the dome can
be turned off to prevent electrocution. Then the equipment can be serviced.
Before leaving the dome, be sure to turn the power back on and take extreme caution to exit the
dome without touching the high voltage orange rails on the inside edge of the dome.
5.2. Cleaning the Quartz Mirrors It is not recommended to clean any optics in this system. If, however this is deemed necessary—in
an extreme case—the mirrors can be removed then rinsed with distilled water. First remove the
primary mirror by unlocking the LX200 and pointing it upward. Unscrew the four hex head bolts, and
lift the mirror and its housing out of the LX200’s forks. Removing the secondary mirror will require
two people. Similarly unscrew the four bolts on the secondary mirror with a flat head screwdriver
and remove the housing from its mounting crossbar.
The mirrors can be removed from their housing by unscrewing the socket head cap screws that hold
on the retention ring. Flip the mirror and housing over onto a clean, dry cloth, remove the centering
socket head nylon cap screws, and lift the housing off of the mirror. Carefully rinse the mirrors with
distilled water and DO NOT touch the surface of the mirror with your hand or any solid object.
When clean, the mirrors can be re-installed to their housings, and then re-attached to the LX200 and
to the secondary mirror mount.
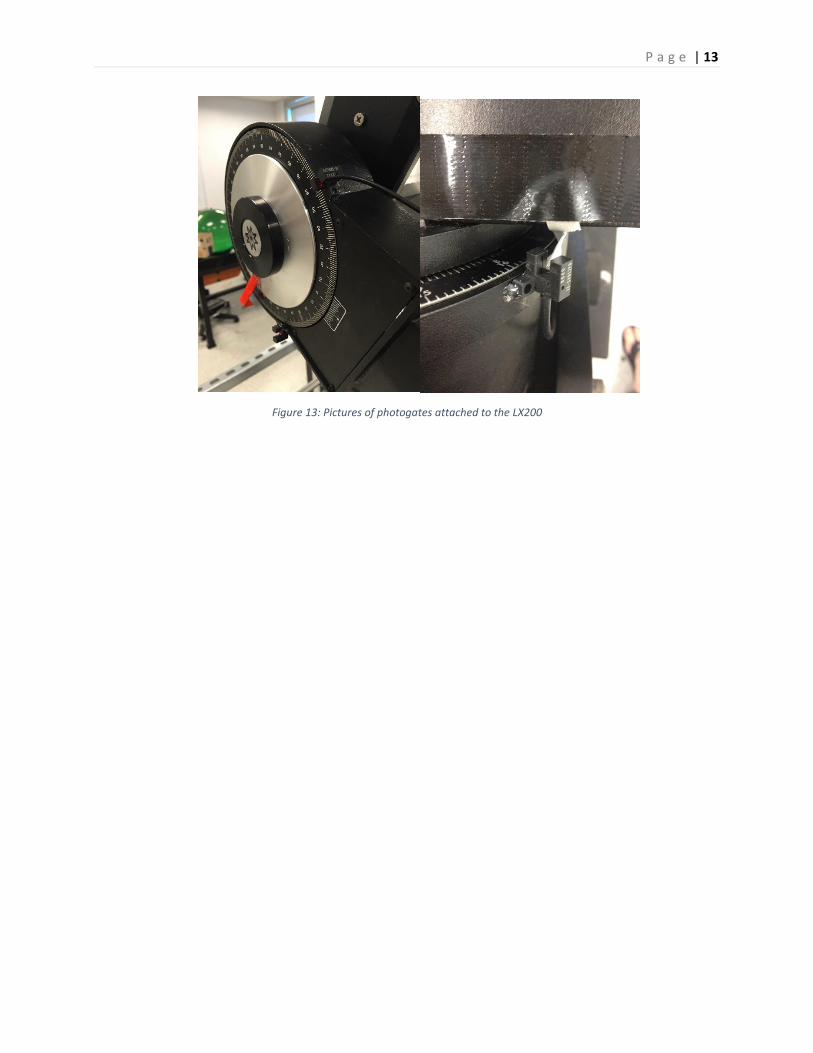
5.3. Reattaching a broken photogate If a photogate breaks for any reason, the photogate will need to be removed and replaced. This job
can be done from inside the dome and will require a pencil, epoxy, tape, soldering equipment, wire
strippers, and a hobby knife. The photogates are Ormon Electronics EE-SX91 P-Type sensors. Once
new sensors have been acquired, the sensors can be replaced. Using a hobby knife, break away the
epoxy holding the sensor to the LX200, and mark the position that the sensor was in with a pencil.
Cut off all of the wires from the sensor to the cable harnesses that run down into COAS 501. Then
solder on the wires of the new sensor to the cable harnesses, and attach the new sensor to the
LX200 with epoxy and tape to hold it in place. The sensors should be replaced in the exact same
position that the previous sensors were in previously, as depicted in the pictures below.
P a g e | 13
Figure 13: Pictures of photogates attached to the LX200