healthgear cpap and auto user manual v2 - cpap sales - making a great nights sleep ... ·...
TRANSCRIPT
User Manual MK/YF38-07 – V2.01CS
© 2019 All Rights Reserved
Page 1 of 60
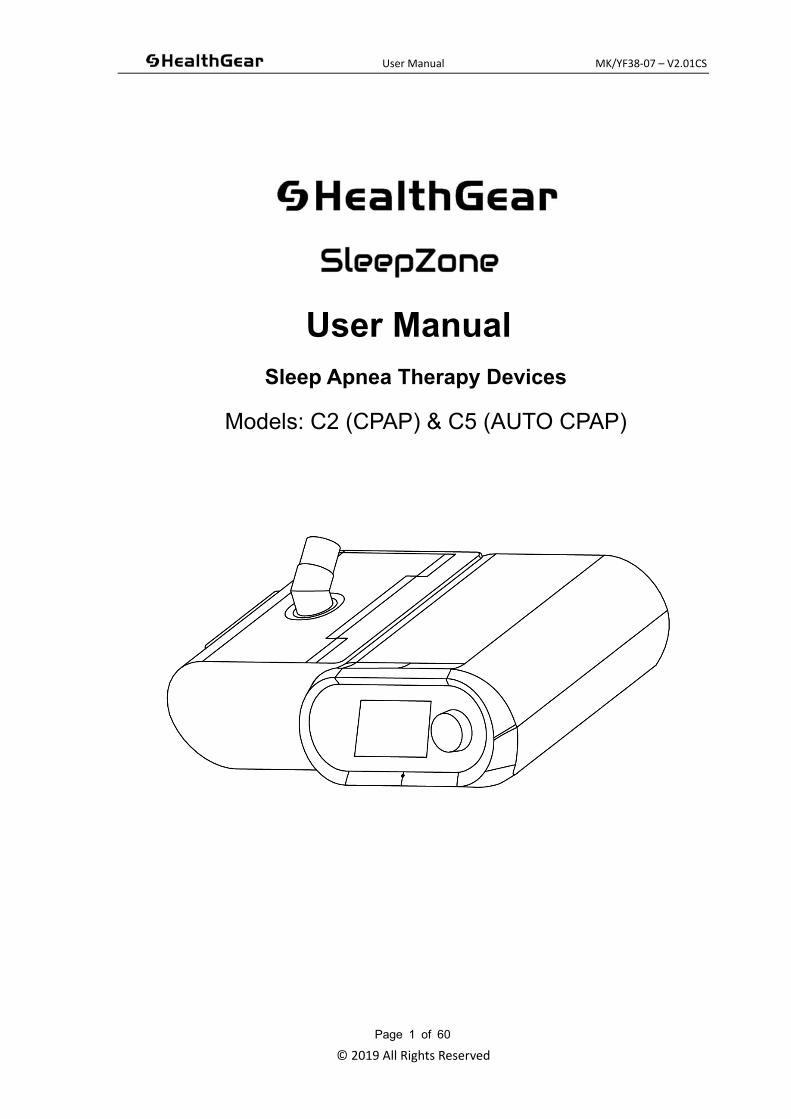
User Manual Sleep Apnea Therapy Devices
Models: C2 (CPAP) & C5 (AUTO CPAP)

User Manual MK/YF38-07 – V2.01CS
© 2019 All Rights Reserved
Page 2 of 60
(This page intentionally left blank)
User Manual MK/YF38-07 – V2.01CS
© 2019 All Rights Reserved
Page 3 of 60
Contents
PREFACE ................................................................................................................................. 6
CHAPTER 1 PRODUCT OVERVIEW ..................................................................................... 7
1.1 INTENDED PURPOSE, PRODUCT USAGE AND APPLICATION .................................................... 7
1.2 WORKING PRINCIPLE ............................................................................................................ 8
1.3 SAFETY TIPS ......................................................................................................................... 8
1.3.1 WARNING ................................................................................................................................... 8
1.3.2 CAUTIONS ................................................................................................................................ 10
1.3.3 CONTRAINDICATIONS .............................................................................................................. 11
1.3.4 POTENTIAL SIDE EFFECTS AND SOLUTIONS ........................................................................... 12
CHAPTER 2 APPEARANCE AND ACCESSORIES ........................................................... 13
2.1 ABOUT THE MODEL ............................................................................................................. 13
2.2 COMPONENT SUMMARY ...................................................................................................... 13
2.3 COMPONENTS AND PARTS .................................................................................................. 14
2.4 NOTES ABOUT TERMINOLOGIES AND ACRONYMS ................................................................ 16
2.5 ABOUT THE SIGNS .............................................................................................................. 16
CHAPTER 3 INSTALLATION AND OPERATION ................................................................ 18
3.1 PLACEMENT LOCATION ....................................................................................................... 18
3.2 SET UP ............................................................................................................................... 18
3.2.1 PRE-ASSEMBLY PREPARATION ................................................................................................ 18
3.2.2 CONNECT POWER TO THE MACHINE ...................................................................................... 18
3.2.3 CONNECT THE HOSE TO THE MASK ........................................................................................ 19
3.2.4 FILL THE WATER TANK ............................................................................................................. 19
3.2.5 CONNECT THE HOSE TO THE MACHINE .................................................................................. 21
User Manual MK/YF38-07 – V2.01CS
© 2019 All Rights Reserved
Page 4 of 60
CHAPTER 4 EQUIPMENT USE ............................................................................................ 22
4.1 PRE-START INSPECTION - MACHINE .................................................................................... 22
4.2 PRE-START INSPECTION - MASK ......................................................................................... 22
4.3 STARTING TREATMENT ....................................................................................................... 23
4.4 STOPPING TREATMENT ....................................................................................................... 23
4.5 PATIENT AND CLINICIAN MODES .......................................................................................... 24
4.6 PATIENT MODE ................................................................................................................... 24
4.6.1 ENTER PATIENT MODE ............................................................................................................. 24
4.6.2 PATIENT MENU ......................................................................................................................... 24
4.7 CLINICIAN MODE ................................................................................................................. 29
4.7.1 ENTER CLINICIAN MODE .......................................................................................................... 29
4.7.2 RETURN TO PATIENT MODE ..................................................................................................... 29
4.7.3 CLINICIAN MENU ...................................................................................................................... 29
4.8 TREATMENT SETTING PARAMETERS .................................................................................... 30
4.9 DATA OUTPUT ..................................................................................................................... 34
CHAPTER 5 HEATING HUMIDIFIER ................................................................................... 35
5.1 INTENDED USE .................................................................................................................... 35
5.2 SPECIFICATIONS ................................................................................................................. 35
CHAPTER 6 WIFI ................................................................................................................... 37
6.1 EXPECTED USAGE .............................................................................................................. 37
CHAPTER 7 ALERTS ............................................................................................................ 38
7.1 VISUAL AND AUDIBLE ALERTS ........................................................................................... 38
7.2 ALERT MESSAGES .............................................................................................................. 38
7.3 ALERT SUSPENSION ........................................................................................................... 40
CHAPTER 8 EQUIPMENT CLEANING AND MAINTENANCE .......................................... 41
User Manual MK/YF38-07 – V2.01CS
© 2019 All Rights Reserved
Page 5 of 60
8.1 REPAIR AND MAINTENANCE ................................................................................................ 41
8.2 FREQUENCY ....................................................................................................................... 41
8.3 CLEANING METHOD ............................................................................................................ 41
8.3.1 CLEANING OF CPAP MACHINE AND HOSE ............................................................................. 41
8.3.2 WATER TANK CLEANING .......................................................................................................... 42
8.3.3 AIR FILTER CLEANING AND REPLACEMENT ............................................................................. 42
CHAPTER 9 STORAGE AND TRANSPORTATION ............................................................ 45
CHAPTER 10 TROUBLESHOOTING ................................................................................... 46
CHAPTER 11 TECHNICAL INFORMATION ........................................................................ 49
11.1 PARAMETERS ................................................................................................................... 49
11.1.1 DEFAULT C2 CPAP MACHINE SETTINGS ............................................................................. 49
11.1.2 DEFAULT C5 AUTO CPAP MACHINE SETTINGS .................................................................. 49
11.1.3 AC ADAPTER PARAMETERS .................................................................................................. 50
11.1.4 MACHINE AMBIENT PARAMETERS ......................................................................................... 50
11.1.5 PHYSICAL AND ELECTRICAL PARAMETERS ........................................................................... 50
11.1.6 ELECTRIC SAFETY CLASS ..................................................................................................... 51
11.2 PNEUMATIC SCHEMATIC DIAGRAM .................................................................................... 52
11.3 EMC INFORMATION .......................................................................................................... 52
11.3.1 INSTRUCTIONS FOR USE ....................................................................................................... 52
11.3.2 TECHNICAL DESCRIPTION ..................................................................................................... 53
11.3.3 RF INFORMATION .................................................................................................................. 57
APPENDIX 1: MODEL COMPARISON TABLE ................................................................... 58
APPENDIX 2: WARRANTY AND DOWNLOADS ................................................................ 59
User Manual MK/YF38-07 – V2.01CS
© 2019 All Rights Reserved
Page 6 of 60
Preface
is a registered trademark of CPAP Sales Pty Ltd (hereinafter CPAP
Sales)
Models C2 (CPAP) and C5 (AUTO) are Sleep Apnea Therapy Devices (Non-invasive
ventilators) have been independently developed by Micomme Medical Technology
Development Co., Ltd (hereinafter referred to as Micomme Medical) exclusively for CPAP
Sales.
Micomme Medical reserves all the rights to information contained in the document. Unless
specially authorized by Micomme Medical in written form, nobody can copy any part of the
document in any way or save it into any electronic information retrieval system. No unit,
corporation or individual shall produce, sell or copy our products without being authorized by
our company; or it shall be deemed as an infringement of our protected patents, and our
company reserves the right to take any legal action against such infringement.
No additional notice shall be provided in case of any change in the information contained in
this document. Micomme Medical reserves the right to change equipment design,
performance, components and processes including any other circumstances to continually
improve product and quality assurance.
User Manual MK/YF38-07 – V2.01CS
© 2019 All Rights Reserved
Page 7 of 60
Chapter 1 Product overview
1.1 Intended purpose, product usage and application
This Class IIa Medical Device has been registered and approved by the Australian Therapeutic
Goods Administration (TGA) for supply by CPAP Sales Pty Ltd.
It is a portable, mains electricity (AC-powered) device, which may include rechargeable
batteries, intended to assist noninvasive ventilation (i.e., without use of an artificial airway)
using continuous positive airway pressure (CPAP) during spontaneous respiration, primarily to
treat adult patients affected by obstructive sleep apnea (OSA); it may also be intended to treat
snoring. It is a small desktop unit with controls, and may include a built-in humidifier; the airway
pressure may be automatically adjusted to help provide optimal CPAP through use of a sensor
(auto CPAP). The device is intended for use in the home but may also be used in healthcare
facilities.
Models C2 (CPAP) and C5 (AUTO) are Obstructive Sleep Apnea Therapy Devices (hereinafter
referred to as a “CPAP Machine”) providing non-invasive ventilation treatment for patients with
obstructive sleep apnea syndrome (OSAS). These CPAP Machines are for use by pediatric
patients aged over 7 (with a weight being over 18.1kg or 40lbs) and adult patients (with a
weight being over 30kg and 66lbs) only.
This CPAP Machine should be used by patients under the guidance of professionally trained
medical staff, with patient as the intended end user/operator. Patients with severe respiratory
failure but spontaneous breath should not use a CPAP Machine unless instructed to do so by a
medically trained professional.
CPAP Machines need to be used together with a breathing hose and a nasal/face mask
suitable to the patient.
To download this User Manual, please visit: cpapsales.com.au/manuals
User Manual MK/YF38-07 – V2.01CS
© 2019 All Rights Reserved
Page 8 of 60
1.2 Working principle
This CPAP Machine includes a power cord, ac adaptor, hose and Machine (including main
control panel, motor, display, control dial, buzzer, enclosure, humidifier, water tank and ozone
generator). Room air passes through a filter, and is sent out at a preset pressure and flow rate
through the controlled motor and heated humidifier, before reaching the respiratory tract and
finally the patient’s lungs. The CPAP Machine’s system can collect information about the
patient’s compliance use and Machine operating performance.
1.3 Safety tips
Warnings, cautions and notes apply to the whole User Manual.
1.3.1 Warning
The User Manual is for reference only. The description in it can’t substitute the
guidance of professional medical staff.
Before using the equipment, please read through and understand the User Manual.
The equipment is not designed to meet your complete ventilation demand or to be
used as life support system.
Since there is no circuit of expiration in the Ventilator, the user should be provided with
a face mask with at least 30LPM air-leaking holes to avoid repeated inhalation of the
carbon dioxide resulting from the breath.
The treatment parameters must be adjusted by trained professional medical staff.
In case of any discomfort in the equipment use, please immediately contact your
professional medical staff.
Use only the expiration circuit provided by your professional medical staff instead of
any anti-static or conductive hose or conduit.
Winding due to cables and breathing hoses, particularly due to excessive length.
Do not bend or wrap the breathing line during use.
When using the breath circuit integrated with expiration holes mask or circuit with
independent outlet device, do not bind or seal the air leaking holes, or block the fresh
air inlet with adhesive tape, seal or other substances, for it may stop the inspiration of
fresh air and even lead to suffocation.
When the equipment is working, do not cover it with any article, or else the fresh air
User Manual MK/YF38-07 – V2.01CS
© 2019 All Rights Reserved
Page 9 of 60
inlet may be blocked so that the user may get suffocated.
Do not try to wear the face mask before the equipment is turned on and works
normally; or repeated inspiration of carbon dioxide may be caused. In some case,
inspiration of exhaled gas for a few minutes can lead to suffocation.
In order to ensure normal use, the power supply must be inserted into the socket in a
vertical way.
Do not use this equipment alone for pediatric patients over 7 years old.
Please keep the equipment away from children and pets.
Against servicing and maintenance while the equipment is in use.
Regularly check if there is any damage or wearing sign in the electric wire, cable or
power supply device; if there is any, please stop using the device and arrange a
replacement.
The plug is used as disconnect device to the mains supply, do not to position the ME
EQUIPMENT so that it is difficult to operate the disconnection device.
To avoid electric shock, please disconnect the plug before cleaning the equipment.
The equipment maintenance and repair can only be done by the professional
repairman authorized by Micomme Medical.
No modification of this equipment is allowed.
Do not use the equipment when the room temperature is above 35℃, for the
temperature of the air flow in such case may exceed 43℃, and stimulus or damage
may be caused to your air passage.
Keep the equipment from sunshine or heating device when using it, for the air
discharged from the equipment in such case may have an elevated temperature.
Before using the equipment, please check if the present warning SET is suitable for
the patient. Improper warning preset in different areas may bring damage to the
patient.
When using the equipment, please prepare simple respirator or other Machine that
can substitute the equipment for the time being so that the normal treatment of patient
will not be interrupted and no damage is caused to the patient in case of sudden
failure with the equipment.
When noticing an unexplainable change or abnormal or annoying noise with the
working equipment,
If necessary, our company (Micomme Medical) may provide the technical files (e.g.
circuit diagram, list of elements, legends, and detailed rules and regulations about
calibration) required for the purpose of repair for the qualified technical maintenance
and repair staff either designed by us or of other types.
User Manual MK/YF38-07 – V2.01CS
© 2019 All Rights Reserved
Page 10 of 60
The product must be used as specified in IEC 60601-1:2005+A1:2012 Medical
electrical equipment - Part 1: General requirements for basic safety and essential
performance.
Additional equipment connected to medical electrical equipment through the
network/data coupling must comply with the respective IEC or ISO standards (e.g. IEC
60950 for data processing equipment). Furthermore all configurations shall comply
with the requirements for medical electrical systems (see IEC 60601-1-1 or clause 16
of the 3Ed. of IEC 60601-1, respectively).
Anybody connecting additional equipment to medical electrical equipment
configurations a medical system and is therefore responsible that the system complies
with the requirements for medical electrical systems. Attention is drawn to the fact that
local laws take priority over the above mentioned requirements. If in doubt, consult
your local representative or the technical service department.
Sources of oxygen must be located more than 1 m from the equipment to avoid the
risk of fire and burns.
1.3.2 Cautions
The equipment can only be operated in the ambient environment of 5℃-35℃.
To assure normal working, an undamaged reusable sponge filter should be properly
fixed at the air inlet.
The equipment should not be immersed in any liquid, and no liquid is allowed to enter
into its enclosure or inlet filter.
Condensation may damage the equipment. Please raise the equipment temperature to
the room temperature before using it.
Do not cover the equipment with such objects as blanket; or the fresh air intake may
be blocked so that the Machine become overheated to affect the treatment or damage
the equipment.
The equipment isn’t provided with power-off alert or power-off-resistant design. Within
it, there is no battery supply. Therefore, during the use, please ensure the adapter
power plug and equipment are properly connected, the power line is reasonably
placed in order to prevent the power plug from falling off from the equipment under
external force and consequent patient suffocation with harder respiration.
In case of recovery of power supply after an interruption, the equipment should be
restarted in treatment in order to assure normal working.
The waste and residue generated by the equipment as well as the expiry equipment
and its accessories should be classified before treatment so as to prevent
environmental pollution or other hazards.
The pressure sensor of the equipment remains as a key pressure test device, so it
User Manual MK/YF38-07 – V2.01CS
© 2019 All Rights Reserved
Page 11 of 60
should be sent to the maintenance staff passing the training organized by Micomme
Medical for maintenance every half a year; or the accuracy of the equipment’s
pressure output may be affected.
All the parameters of the ventilator are stored in non-volatile memory, so disconnection
of equipment with mains will not affect the SET of all such parameters.
Replacement of parts shall be made by the parts specified by the manufacturer of the
equipment and by the maintenance personnel designated by the manufacturer.
1.3.3 Contraindications
When having severe respiratory failure and no spontaneous breath, please do not use the
equipment.
When any of following situations applies to you, please consult professional medical staff
before using the equipment;
Insufficient respiratory drive to tolerate the intermittence of non-invasive ventilation
treatment;
Acute sinusitis and otitis media;
Some diseases that may cause intake of stomach contents;
Inability to clear the secretion;
Hypotension or apparent hypovolemia within blood vessel;
Pneumothorax or mediastinal emphysema;
Craniocerebral trauma or surgery;
receiving airway neostomy in the past;
Pulmonary bulla.
User Manual MK/YF38-07 – V2.01CS
© 2019 All Rights Reserved
Page 12 of 60
1.3.4 Potential side effects and solutions
The non-invasive PAP (positive airway pressure) may have following potential side effects:
Dry mouth, nose or throat;
Abdominal distension;
Discomfort with ear or sinus;
Eye irritation;
Skin irritation caused by face mask;
Chest discomfort.
When having any discomfort during the use, please immediately seek medical advice from
professional medical staff or consult with the supplier.
User Manual MK/YF38-07 – V2.01CS
© 2019 All Rights Reserved
Page 13 of 60
Chapter 2 Appearance and accessories
2.1 About the model
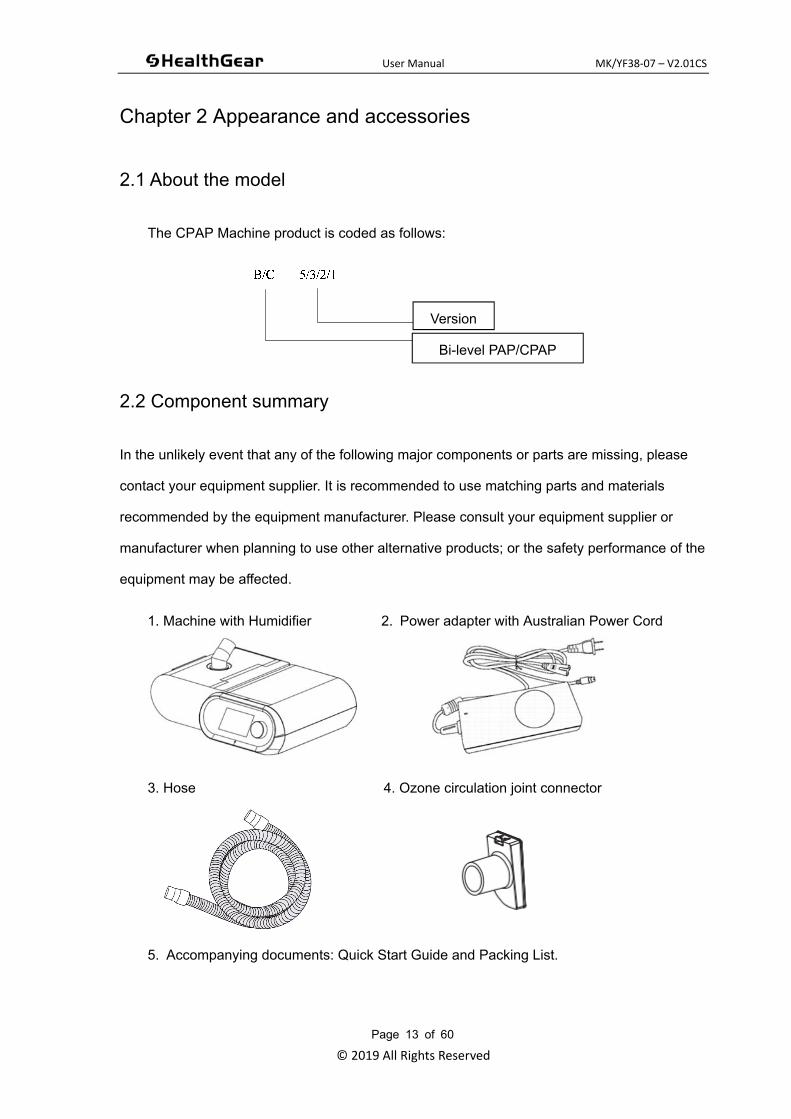
The CPAP Machine product is coded as follows:
2.2 Component summary
In the unlikely event that any of the following major components or parts are missing, please
contact your equipment supplier. It is recommended to use matching parts and materials
recommended by the equipment manufacturer. Please consult your equipment supplier or
manufacturer when planning to use other alternative products; or the safety performance of the
equipment may be affected.
1. Machine with Humidifier 2. Power adapter with Australian Power Cord
3. Hose 4. Ozone circulation joint connector
5. Accompanying documents: Quick Start Guide and Packing List.
Version
Bi-level PAP/CPAP
User Manual MK/YF38-07 – V2.01CS
© 2019 All Rights Reserved
Page 14 of 60
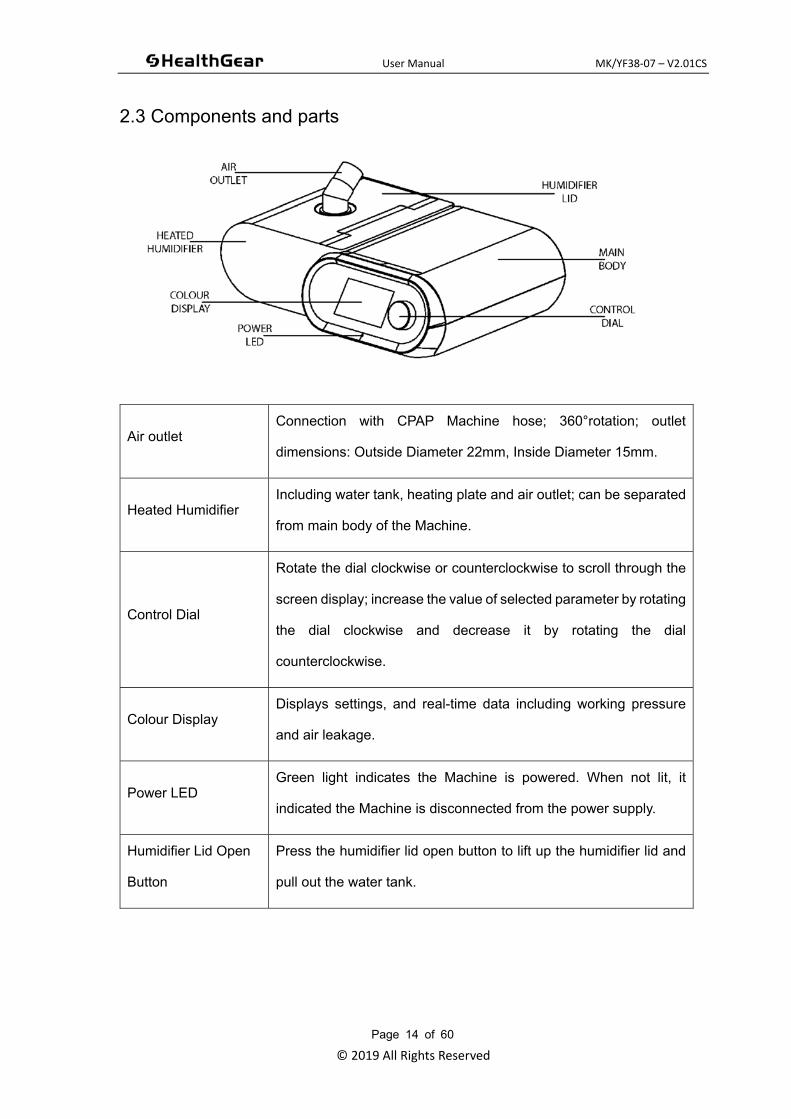
2.3 Components and parts
Air outlet Connection with CPAP Machine hose; 360°rotation; outlet
dimensions: Outside Diameter 22mm, Inside Diameter 15mm.
Heated Humidifier Including water tank, heating plate and air outlet; can be separated
from main body of the Machine.
Control Dial
Rotate the dial clockwise or counterclockwise to scroll through the
screen display; increase the value of selected parameter by rotating
the dial clockwise and decrease it by rotating the dial
counterclockwise.
Colour Display Displays settings, and real-time data including working pressure
and air leakage.
Power LED Green light indicates the Machine is powered. When not lit, it
indicated the Machine is disconnected from the power supply.
Humidifier Lid Open
Button
Press the humidifier lid open button to lift up the humidifier lid and
pull out the water tank.
User Manual MK/YF38-07 – V2.01CS
© 2019 All Rights Reserved
Page 15 of 60
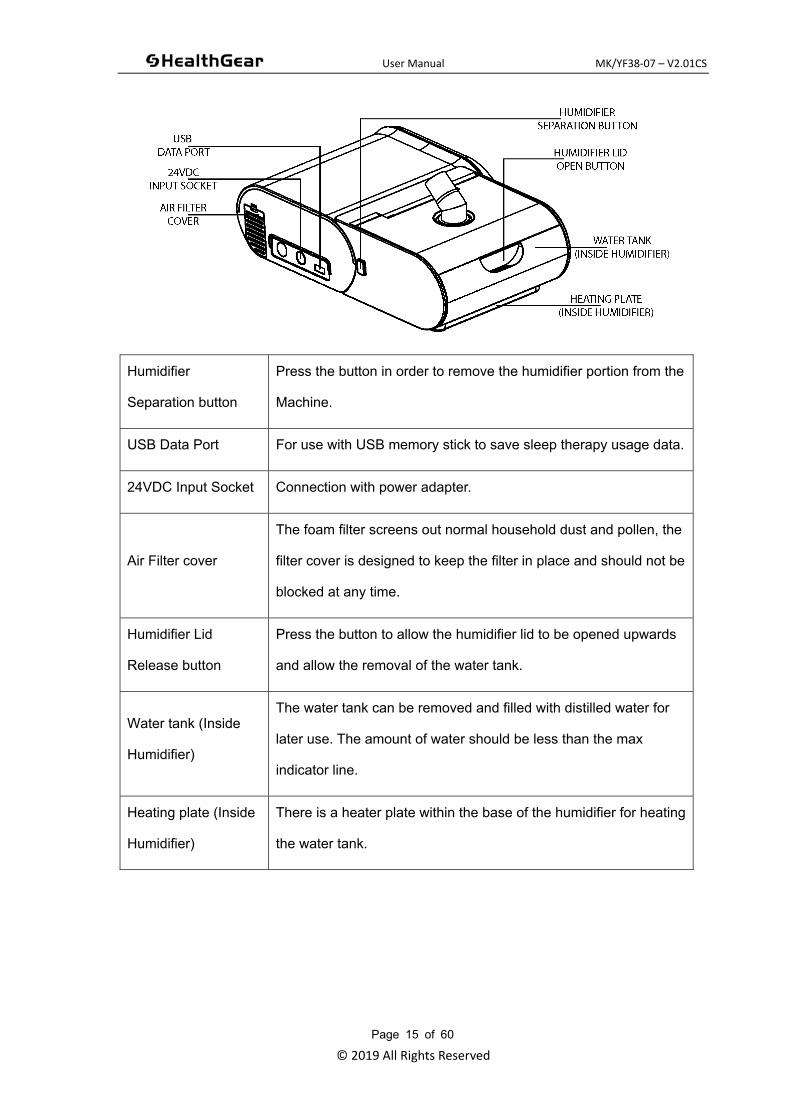
Humidifier
Separation button
Press the button in order to remove the humidifier portion from the
Machine.
USB Data Port For use with USB memory stick to save sleep therapy usage data.
24VDC Input Socket Connection with power adapter.
Air Filter cover
The foam filter screens out normal household dust and pollen, the
filter cover is designed to keep the filter in place and should not be
blocked at any time.
Humidifier Lid
Release button
Press the button to allow the humidifier lid to be opened upwards
and allow the removal of the water tank.
Water tank (Inside
Humidifier)
The water tank can be removed and filled with distilled water for
later use. The amount of water should be less than the max
indicator line.
Heating plate (Inside
Humidifier)
There is a heater plate within the base of the humidifier for heating
the water tank.
User Manual MK/YF38-07 – V2.01CS
© 2019 All Rights Reserved
Page 16 of 60
2.4 Notes about terminologies and acronyms
You may encounter the following terminologies and acronyms when using the device. Please
read carefully before use.
Terminology/acronym Definition
cmH2O Pressure unit, cmH2O.
AHI Apnea and hypopnea index: the frequency of apnea and
hypopnea incidence in each hour.
95% pressure This is a value of pressure. In a period of treatment the
treatment pressure of the Machine is lower than this value for
95% of the treatment time.
LEAK Air leakage: the air flow leaking from the hose or face mask
during the treatment.
2.5 About the signs
You may find following signs on the equipment or when using the device.
Please read carefully before use.
Sign Definition
Attention
BF application component
Category II (double insulation)
IP21 Dustproof waterproof level
User Manual MK/YF38-07 – V2.01CS
© 2019 All Rights Reserved
Page 17 of 60
Component beyond repair by user.
It is in line with the rules about recycling and reusing of waste electrical
and electronic Machines/limited use of toxic substances in Waste
Electrical and Electronic Equipment/Restriction of the Use of Certain
Hazardous Substances (WEEE/RoHS)
Ramp function.
Comfort level function.
Icon indicating startup of heating and humidifying Machine.
WIFI on
Hot surface
User Manual MK/YF38-07 – V2.01CS
© 2019 All Rights Reserved
Page 18 of 60
Chapter 3 Installation and operation
3.1 Placement location
The CPAP Machine should be placed on a solid and flat table or fixed on support. The user
should operate the equipment in a position where it is easy to access the equipment and see
clearly the information displayed on it. A distance of at least 5cm should be kept between the
equipment and wall to ensure the equipment’s air inlet is not covered by curtains, quilts or
other objects. The air around the equipment should keep moving smoothly and away from any
heating or cooling device (such as forced vent, radiator, and air conditioning) to ensure the
system can work normally.
3.2 Set up
Your Machine will already have been pre-set by your equipment provider and should be ready
to use without any adjustments. A Quick Start Guide was supplied with this Machine to help you
get started.
3.2.1 Pre-assembly preparation
The Machine with humidifier are already assembled. No pre-assembly is required.
3.2.2 Connect power to the Machine
Fit the power cord and power supply together. Connect the mains plug to the AC wall socket and
the 24VDC plug into the back of the Machine.
Caution: please ensure the power line is inserted firmly to prevent the power supply becoming
loose in case of equipment movement.
Attention! Do not connect the device to any unauthorised devices unless recommended by
the manufacturer or your health care provider.
User Manual MK/YF38-07 – V2.01CS
© 2019 All Rights Reserved
Page 19 of 60
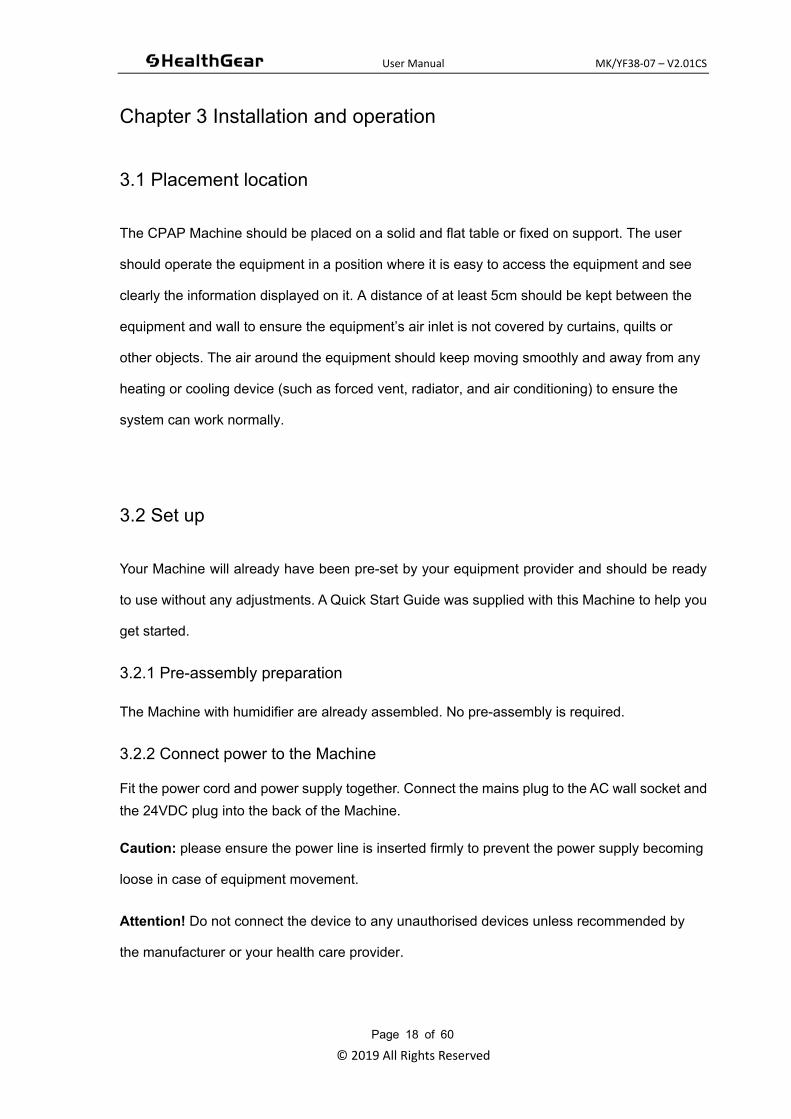
3.2.3 Connect the hose to the mask
Connect either end of the hose tubing supplied with your equipment to your mask.
The mask may have been included as part of a package, or can be purchase separately.
Any brand of mask will fit on this hose.
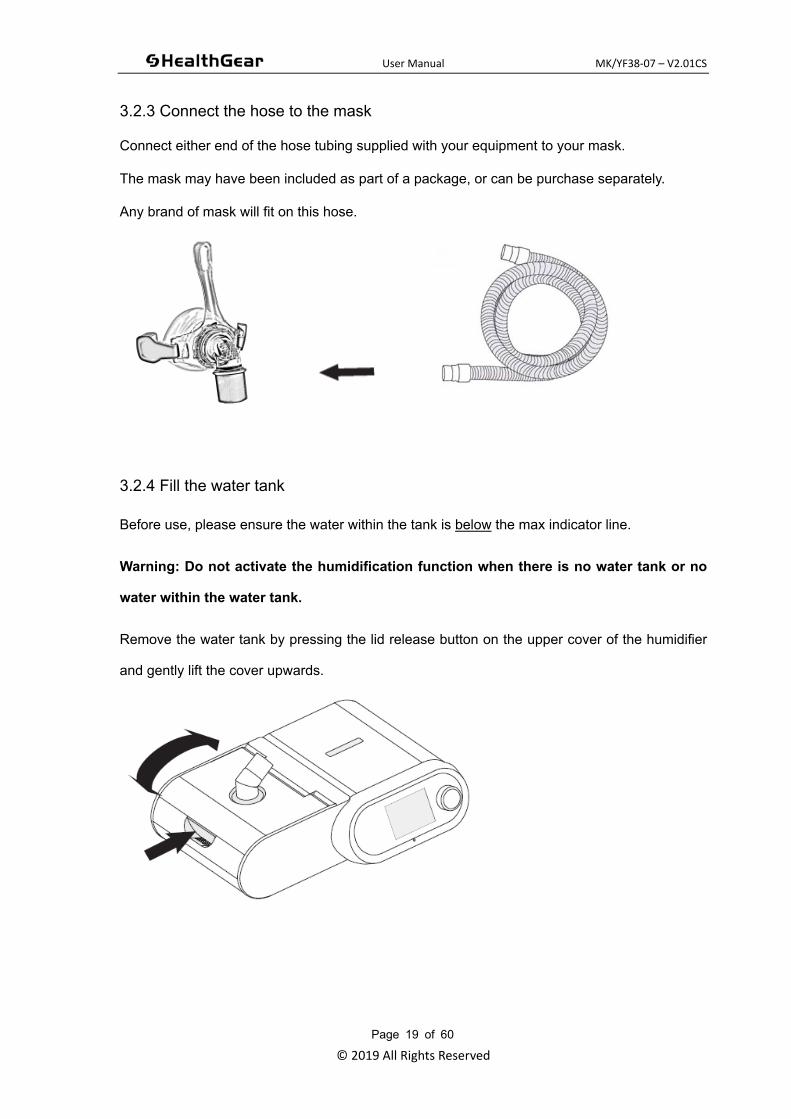
3.2.4 Fill the water tank
Before use, please ensure the water within the tank is below the max indicator line.
Warning: Do not activate the humidification function when there is no water tank or no
water within the water tank.
Remove the water tank by pressing the lid release button on the upper cover of the humidifier
and gently lift the cover upwards.

User Manual MK/YF38-07 – V2.01CS
© 2019 All Rights Reserved
Page 20 of 60
Fully open the humidifier cover lid and slide the water tank out of the main unit.
Carefully add distilled water into the water tank. Do not over-fill and do not operate without water,
unless the humidifier heating is set to OFF.
Slide the water tank back into the humidifier.
User Manual MK/YF38-07 – V2.01CS
© 2019 All Rights Reserved
Page 21 of 60
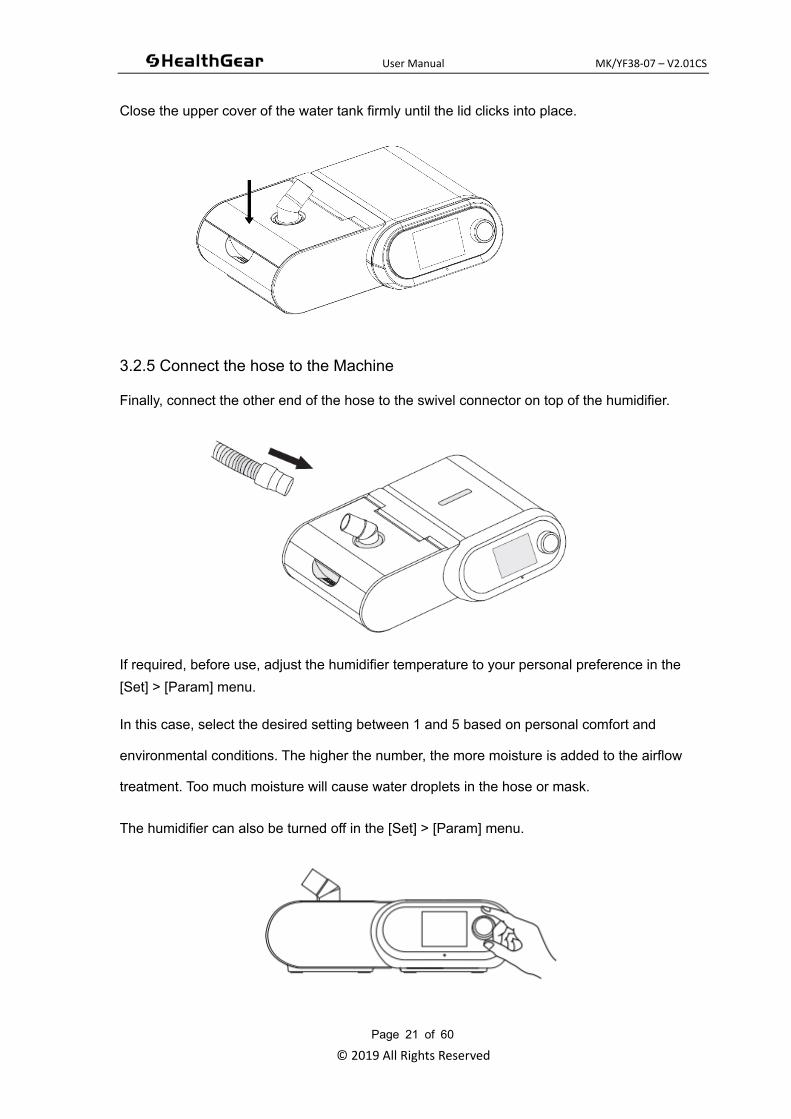
Close the upper cover of the water tank firmly until the lid clicks into place.
3.2.5 Connect the hose to the Machine
Finally, connect the other end of the hose to the swivel connector on top of the humidifier.
If required, before use, adjust the humidifier temperature to your personal preference in the
[Set] > [Param] menu.
In this case, select the desired setting between 1 and 5 based on personal comfort and
environmental conditions. The higher the number, the more moisture is added to the airflow
treatment. Too much moisture will cause water droplets in the hose or mask.
The humidifier can also be turned off in the [Set] > [Param] menu.
User Manual MK/YF38-07 – V2.01CS
© 2019 All Rights Reserved
Page 22 of 60
Chapter 4 Equipment use
Before starting treatment, please check the equipment and accessories to ensure they are
intact and free from any damage.
4.1 Pre-start inspection - Machine
After the CPAP Machine is properly connected with the power supply, its LCD will show the
main startup menu, where treatment parameters can be checked and set. In the event that the
CPAP Machine fails to display this menu after 2 seconds, please check all power connections
points. After the main menu appears, the [Treat] option should be highlighted, indicating the
CPAP Machine is ready for use.
4.2 Pre-start inspection - Mask
The CPAP Machine is designed to be used together with a CPAP mask. For further information
regarding the mask, please use the manual provided with the mask.
Please wear the face mask by following the steps below:
1. Connect the headband with the face mask (ensuring the headgear is correctly orientated);
2. Position the mask on the face;
3. Adjust the tightness of the headgear so that face mask is slightly pressing on the face
without causing any indentations;
4. The mask should be worn firmly but not uncomfortably to avoid leaks.
Attention! If the Machine is not in proper working condition, sufficient fresh air cannot be
provided. In this case carbon dioxide can build within the mask and cause discomfort. When
applying the mask prior to sleep, please ensure the air flow starts correctly on the Machine.
User Manual MK/YF38-07 – V2.01CS
© 2019 All Rights Reserved
Page 23 of 60
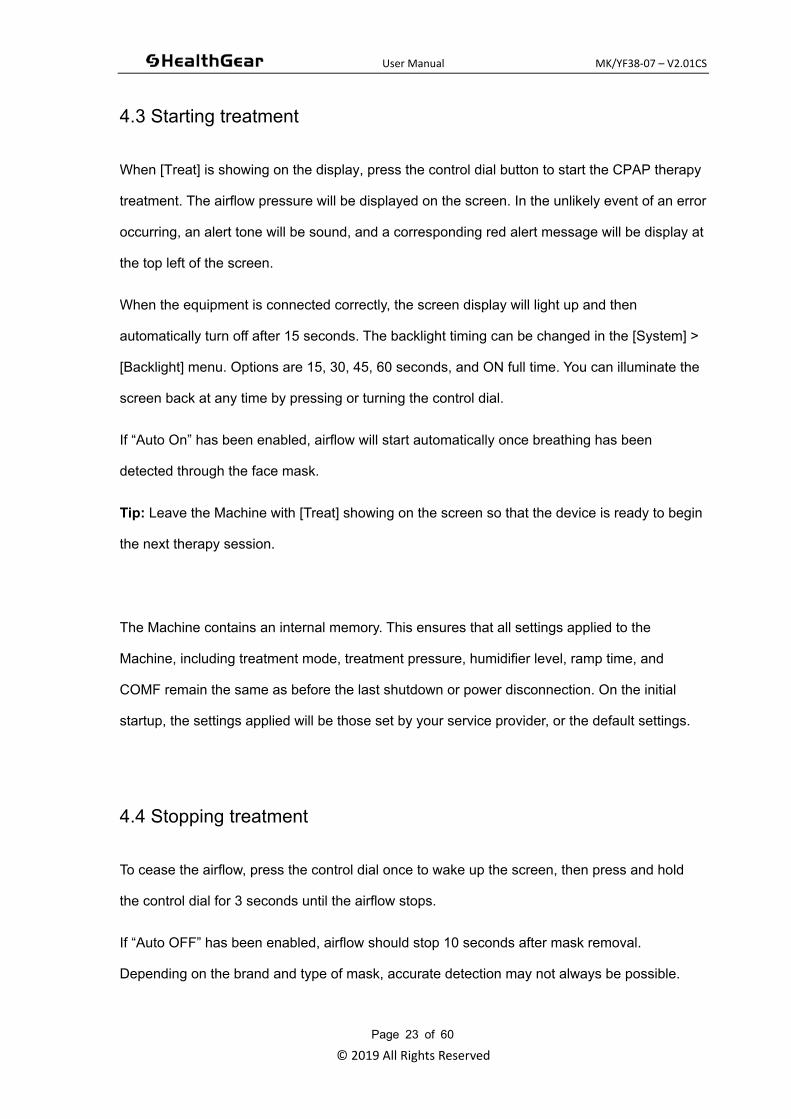
4.3 Starting treatment
When [Treat] is showing on the display, press the control dial button to start the CPAP therapy
treatment. The airflow pressure will be displayed on the screen. In the unlikely event of an error
occurring, an alert tone will be sound, and a corresponding red alert message will be display at
the top left of the screen.
When the equipment is connected correctly, the screen display will light up and then
automatically turn off after 15 seconds. The backlight timing can be changed in the [System] >
[Backlight] menu. Options are 15, 30, 45, 60 seconds, and ON full time. You can illuminate the
screen back at any time by pressing or turning the control dial.
If “Auto On” has been enabled, airflow will start automatically once breathing has been
detected through the face mask.
Tip: Leave the Machine with [Treat] showing on the screen so that the device is ready to begin
the next therapy session.
The Machine contains an internal memory. This ensures that all settings applied to the
Machine, including treatment mode, treatment pressure, humidifier level, ramp time, and
COMF remain the same as before the last shutdown or power disconnection. On the initial
startup, the settings applied will be those set by your service provider, or the default settings.
4.4 Stopping treatment
To cease the airflow, press the control dial once to wake up the screen, then press and hold
the control dial for 3 seconds until the airflow stops.
If “Auto OFF” has been enabled, airflow should stop 10 seconds after mask removal.
Depending on the brand and type of mask, accurate detection may not always be possible.
User Manual MK/YF38-07 – V2.01CS
© 2019 All Rights Reserved
Page 24 of 60
4.5 Patient and clinician modes
The equipment can be adjusted in two modes: namely Patient and Clinician.
Patient Mode: in this mode, users can adjust a limited number of parameters which relate to
comfort, convenience and day to day device usage.
Clinicians Mode: in this mode, professional technicians and medical staff can adjust all
parameters, including treatment pressure and CPAP/Auto mode selection (for C5 Auto
Machine only).
Warning: non-professional staff are forbidden to access the Clinicians Mode.
4.6 Patient mode
4.6.1 Enter patient mode
Power on the equipment and wait for 2s or so, the equipment will automatically enter the
Patient Mode and display the idle menu.
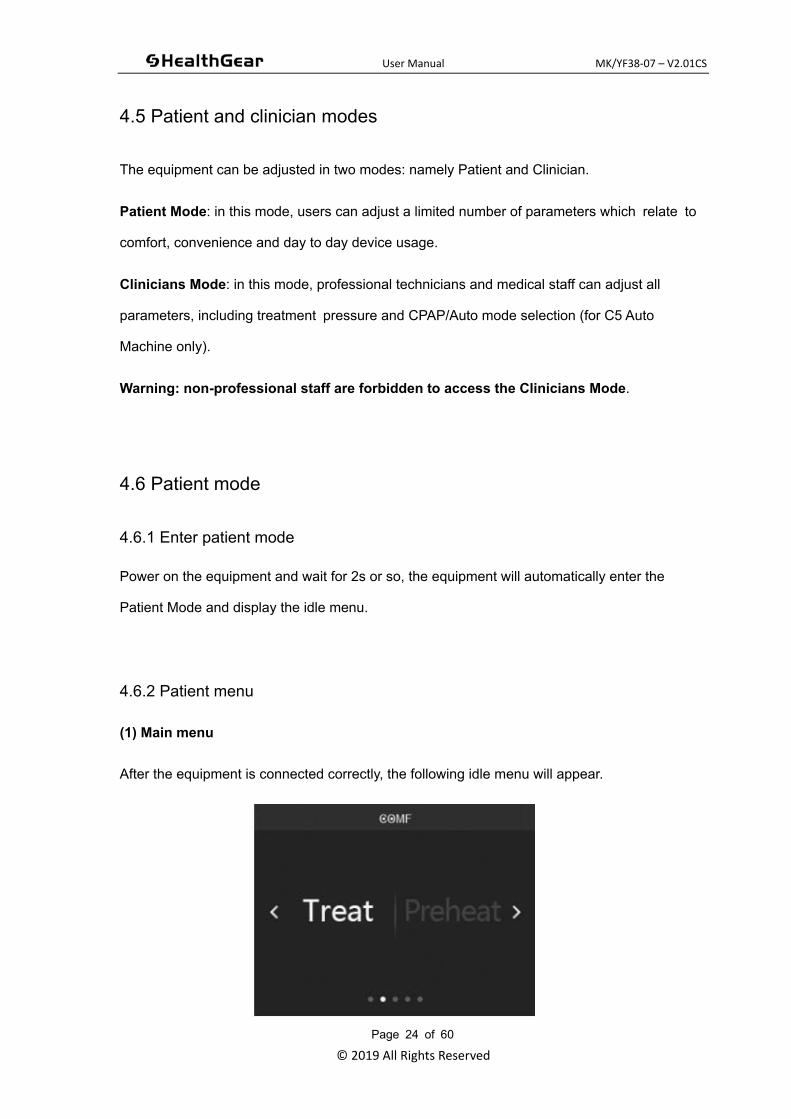
4.6.2 Patient menu
(1) Main menu
After the equipment is connected correctly, the following idle menu will appear.
User Manual MK/YF38-07 – V2.01CS
© 2019 All Rights Reserved
Page 25 of 60
(2) Status Bar
The grey status bar in the upper part of the display is used to show symbols of features that
have been enabled and any alert messages.
The symbols in status bar have following meanings:
Comfort. This icon will appear when exhalation pressure relief comfort setting
between 1 and 3 has been enabled and set. With this setting enabled, it will be easier to breath
out against the airflow coming in. This can be helpful for some patients, especially those using
nasal pillow masks.
Heated Humidifier: This icon will appear when the heated humidifier has been
enabled. The number relates to the level of humidification that has been set, from 1 (minimum
moisture) to 5 (maximum moisture). The factory default setting is 2. Select the desired setting
based on personal comfort and environmental conditions.
The higher the number, the more moisture is added to the airflow treatment. Too much
moisture will cause water droplets in the hose or mask.
Tip: If the Machine is to be used without the humidifier, the humidifier setting must be set to
OFF in the [Set] > [Param] menu.
WIFI: This icon will be displayed when the Machine has been successfully connected
to a home WiFi network (2.4GHz only) in the [System] > [Network] menu.
When this function is set up and activated, the equipment will be automatically connected with
WIFI to upload the treatment data to a remote server so that the medical staff can learn about
the Machine use state.
Tip: This feature is not currently used in Australia.

User Manual MK/YF38-07 – V2.01CS
© 2019 All Rights Reserved
Page 26 of 60
(3) Operation menu
[Treat]: used to start and stop the therapy (airflow) treatment.
[Preheat]: the humidifier can be turned on in advance of treatment to pre-heat the distilled
water, ready to provide the soonest humidification.
[Set]: used to set the device;
Param: Parameters such as Comfort, Humidifier, Auto ON, Auto OFF and;
Time: Date settings including Year, Month, Date, Hour and Minutes.
[System]: used to;
Output: Save historical therapy data to the USB stick;
Network: Set up and check device connection to a 2.4GHz home WiFi
Update: only use if instructed by your service provider to download new
operating software;
Diagnose: used to display simple percentage feedback of therapy use;
Clean: used to start ozone cleaning cycle;
Backlight: used to set time for display to stay lit;
Language: English or Chinese options;
Reset: used to reset Machine settings back to factory default settings. Usage
and compliance data cannot be reset.
Version: used to display current software version of the device;
[Info]: used to show key information relating to the CPAP therapy treatment including AHI,
P95, Leakage, Treatment Time and Treatment Days over the following time periods; 1
Day: 7 Days: 30 Days. Total Work Time (Run Time) can also be viewed here. At 9am each
morning, this information updates. Eg. The 1 day info resets to zero.
User Manual MK/YF38-07 – V2.01CS
© 2019 All Rights Reserved
Page 27 of 60
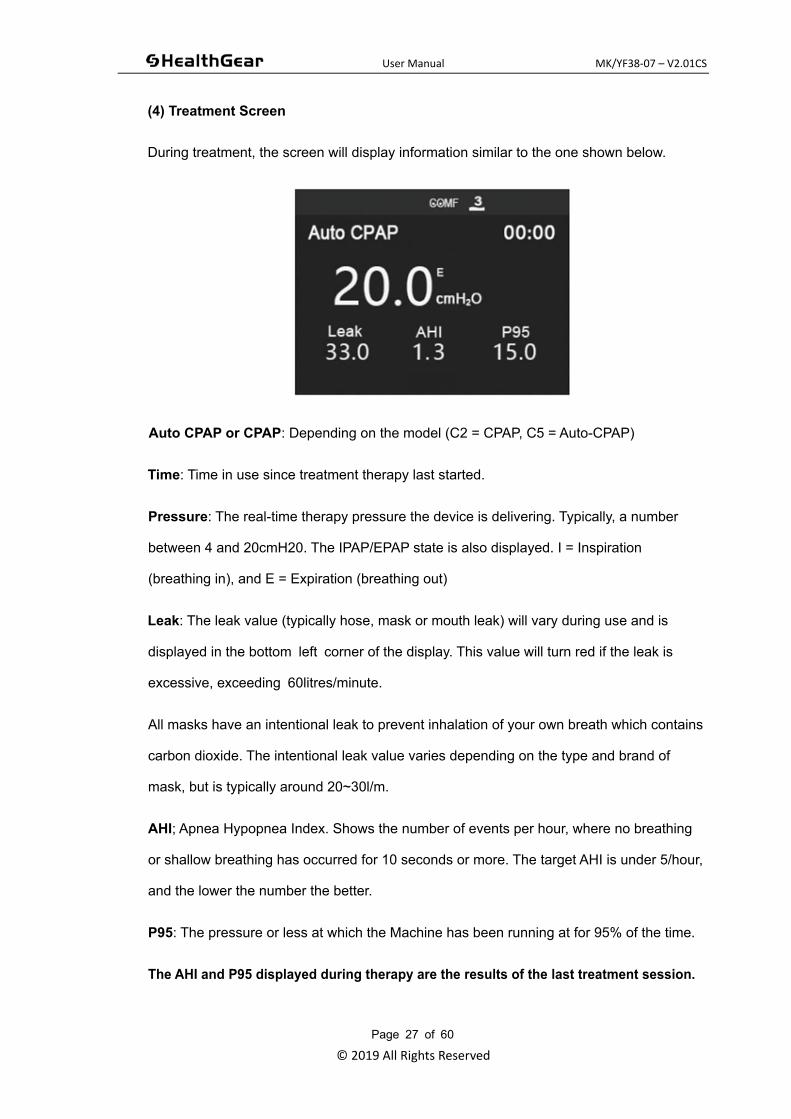
(4) Treatment Screen
During treatment, the screen will display information similar to the one shown below.
Auto CPAP or CPAP: Depending on the model (C2 = CPAP, C5 = Auto-CPAP)
Time: Time in use since treatment therapy last started.
Pressure: The real-time therapy pressure the device is delivering. Typically, a number
between 4 and 20cmH20. The IPAP/EPAP state is also displayed. I = Inspiration
(breathing in), and E = Expiration (breathing out)
Leak: The leak value (typically hose, mask or mouth leak) will vary during use and is
displayed in the bottom left corner of the display. This value will turn red if the leak is
excessive, exceeding 60litres/minute.
All masks have an intentional leak to prevent inhalation of your own breath which contains
carbon dioxide. The intentional leak value varies depending on the type and brand of
mask, but is typically around 20~30l/m.
AHI; Apnea Hypopnea Index. Shows the number of events per hour, where no breathing
or shallow breathing has occurred for 10 seconds or more. The target AHI is under 5/hour,
and the lower the number the better.
P95: The pressure or less at which the Machine has been running at for 95% of the time.
The AHI and P95 displayed during therapy are the results of the last treatment session.
User Manual MK/YF38-07 – V2.01CS
© 2019 All Rights Reserved
Page 28 of 60
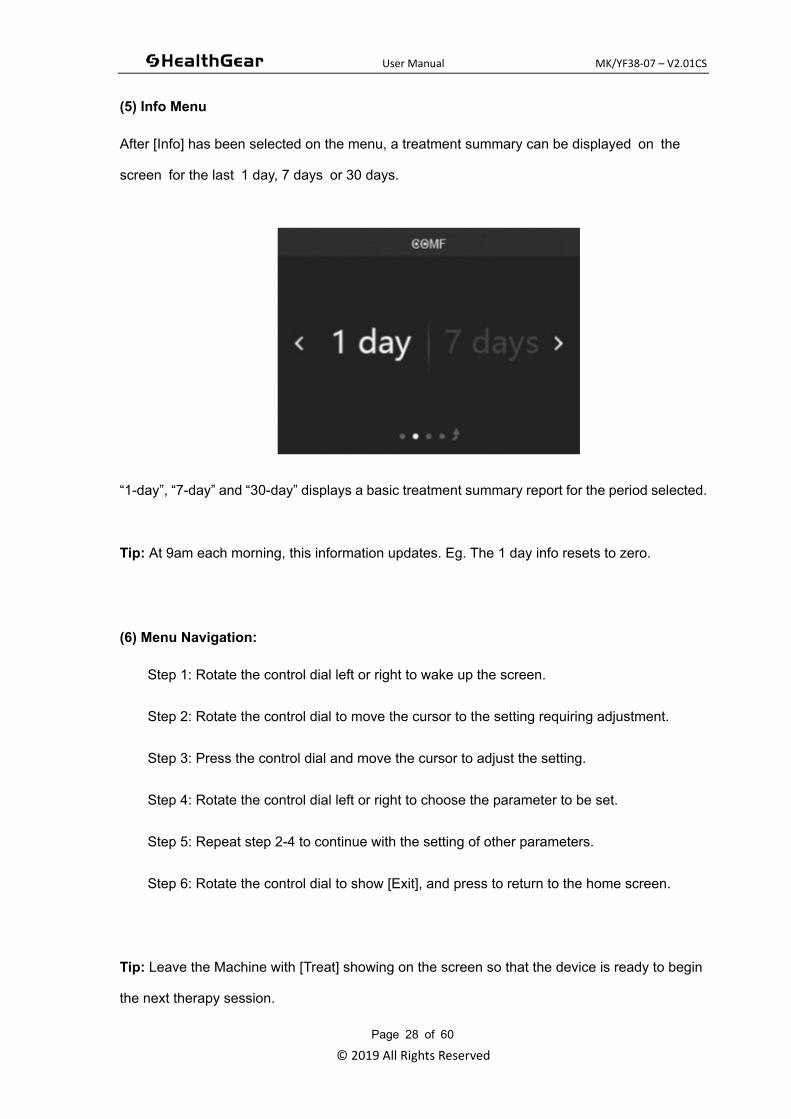
(5) Info Menu
After [Info] has been selected on the menu, a treatment summary can be displayed on the
screen for the last 1 day, 7 days or 30 days.
“1-day”, “7-day” and “30-day” displays a basic treatment summary report for the period selected.
Tip: At 9am each morning, this information updates. Eg. The 1 day info resets to zero.
(6) Menu Navigation:
Step 1: Rotate the control dial left or right to wake up the screen.
Step 2: Rotate the control dial to move the cursor to the setting requiring adjustment.
Step 3: Press the control dial and move the cursor to adjust the setting.
Step 4: Rotate the control dial left or right to choose the parameter to be set.
Step 5: Repeat step 2-4 to continue with the setting of other parameters.
Step 6: Rotate the control dial to show [Exit], and press to return to the home screen.
Tip: Leave the Machine with [Treat] showing on the screen so that the device is ready to begin
the next therapy session.
User Manual MK/YF38-07 – V2.01CS
© 2019 All Rights Reserved
Page 29 of 60
4.7 Clinician mode
Warning: non-professional staff are forbidden to access the Clinicians Mode.
4.7.1 Enter clinician mode
(1) Power up the equipment, then move the cursor to display [Set] on the screen
(2) Press and hold the control dial for 5 seconds until [Mode] is displayed
(3) The clinician can now make setting adjustments
4.7.2 Return to patient mode
(1) Rotate the control dial until [Exit] shows on the screen, then press the control dial. Repeat
this process until “Exit” can no longer be seen when rotating the control dial.
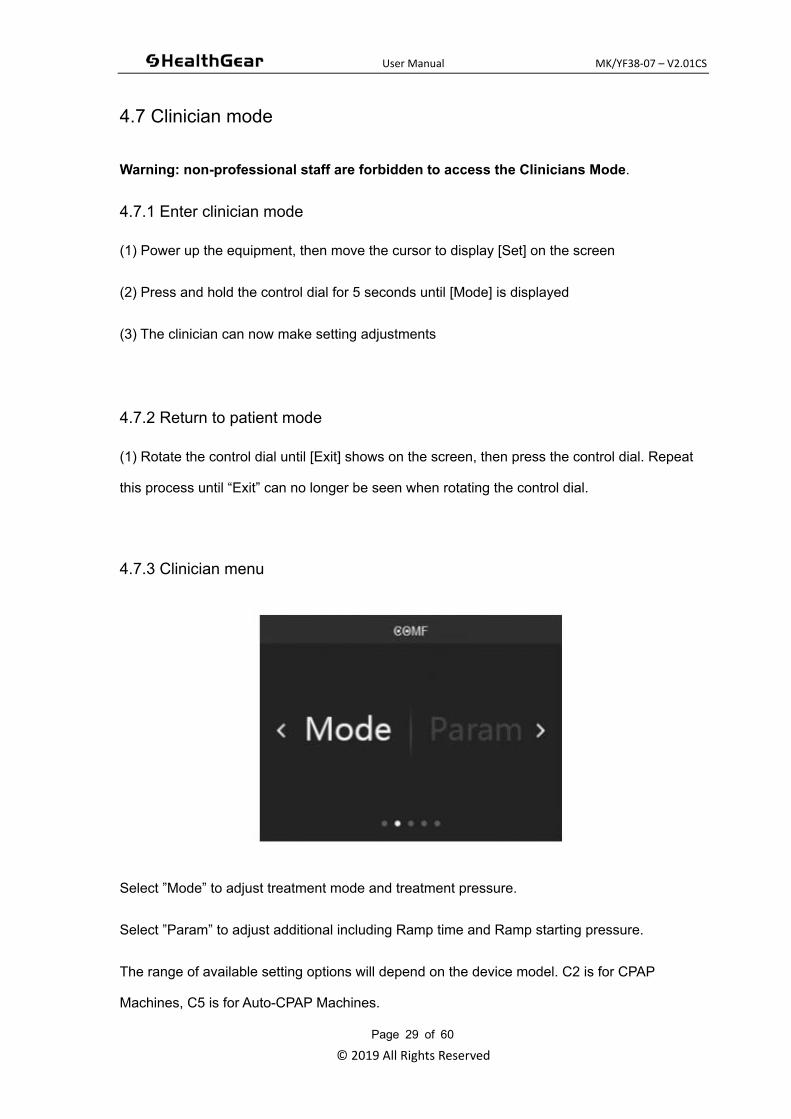
4.7.3 Clinician menu
Select ”Mode” to adjust treatment mode and treatment pressure.
Select ”Param” to adjust additional including Ramp time and Ramp starting pressure.
The range of available setting options will depend on the device model. C2 is for CPAP
Machines, C5 is for Auto-CPAP Machines.
User Manual MK/YF38-07 – V2.01CS
© 2019 All Rights Reserved
Page 30 of 60
4.8 Treatment setting parameters
Parameter Setting range Description Mode
Exit Return to the previous menu Patient Mode
Clinician Mode
Treatment
Mode
selection
CPAP
Auto CPAP
CPAP Mode: provides
continuous positive airway
pressure ventilation.
Auto-CPAP Mode (C5 only):
provides automatic adjustment
varying the positive airway
pressure as per the airway
obstruction state.
Clinician Mode
CPAP 4~20cmH20
Select the Treatment Pressure
based on the patient’s
prescription. This will be one
value between 4cmH20 and
20cmH20 in 0.5cmH20
increments.
Clinician Mode
Max CPAP 4~20cmH20 Set the upper pressure limit for
automatic CPAP ventilation Clinician Mode
Min CPAP 4~20cmH20 Set the lower pressure limit for
automatic CPAP ventilation. Clinician Mode
COMF OFF, 1, 2, 3
Switch exhalation pressure relief
comfort technology OFF, or
choose a setting of 1, 2 and 3.
The higher the number, the
Patient Mode
Clinician Mode
User Manual MK/YF38-07 – V2.01CS
© 2019 All Rights Reserved
Page 31 of 60
easier it will be to breathe out
against the airflow.
Ramp time OFF or 5~45
minutes
Typically used in CPAP Mode,
the Ramp feature allows the
Machine to start at a lower
pressure and slowly ramp up to
the treatment pressure over the
Ramp time selected.
Patient Mode
Clinician Mode
Ramp start
4cmH2O ~ CPAP
Pressure
4cmH20 ~ min
CPAP pressure
When a Ramp time has been
selected, choose the starting
pressure. Over the Ramp time
selected, the Machine pressure
will slowly rise until;
a) The CPAP Treatment
Pressure has been reached
(CPAP Mode only)
or
b) The min CPAP pressure has
been reached (Auto CPAP Mode
only)
Stop and restart the Machine to
begin the Ramp time again.
Patient Mode
Clinician Mode
Humidifier OFF. 1,2,3,4,5
Select the desired setting based
on personal comfort and
environmental conditions.
The higher the number, the more
Patient Mode
Clinician Mode
User Manual MK/YF38-07 – V2.01CS
© 2019 All Rights Reserved
Page 32 of 60
moisture is added to the airflow
treatment. Too much moisture will
cause water droplets in the hose
or mask. If the Machine is to be
used without the humidifier, the
humidifier setting must be set to
OFF.
Preheat ON or OFF
Select ON to preheat the
humidifier to level 1 in advance of
starting the treatment.
Patient Mode
Clinician Mode
Auto on ON or OFF
If “Auto on” function is turned on:
In idle state with [Treat] showing
on the display, the Machine will
detect and automatically start
the airflow when breathing
through the connected mask is
detected.
If “Auto on” function is turned off:
The Machine will not
automatically start.
Patient Mode
Clinician Mode
Auto off ON or OFF
If “Auto off” function is turned on:
During use, the Machine will
detect if the mask has been
removed and stop the airflow.
Detecting mask removal and
stopping the airflow will take
Patient Mode
Clinician Mode
User Manual MK/YF38-07 – V2.01CS
© 2019 All Rights Reserved
Page 33 of 60
around 10 seconds. Depending
on the type of mask, accurate
detection of the mask being
removed may not always be
possible.
If “Auto off” function is turned off:
During use, the Machine will not
automatically stop the airflow
when the mask has been
removed.
Backlight ON,15,30,45,60
If “Backlight” ON is selected, the
screen will stay on all the time.
Alternatively, the backlight can be
set to automatically turn off after
15, 30, 45 or 60 seconds.
Note: Regardless of the backlight
setting, the green power LED is
always illuminated, as long as
power is applied to the Machine.
Patient Mode
Clinician Mode
WIFI setting Off/on
This feature is not currently used.
When this function is set up and
connected, the device can
automatically connect via WIFI to
upload treatment data to a
remote server, so that medical
staff can learn about treatment
therapy use.
Patient Mode
Clinician Mode
User Manual MK/YF38-07 – V2.01CS
© 2019 All Rights Reserved
Page 34 of 60
Language Chinese/English Choose the language you prefer.
Patient Mode
Clinician Mode
Reset ON
To reset the Machine back to the
factory default settings, select
ON.
Compliance Use is not reset.
Patient Mode
Clinician Mode
Version Display the software version of
the equipment.
Patient Mode
Clinician Mode
Clean Yes or No
Select Yes, to start the cleaning
cycle. Before running the clean
cycle, please refer to section
8.3.4 of this User Manual for
detailed instructions.
Patient Mode
Clinician Mode
4.9 Data output
1. Ensure that the supplied USB memory flash drive is inserted into the rear of the Machine.
2. In the "System" menu, press the control dial to select "Output".
3. After the copy process has been completed, the CPAP Machine prompts “Copy completed,
exit”. Press the control dial button to complete this process.
The daily usage data files will be saved to the ”HEALDATA” folder of the USB memory flash drive.
Note: Do not remove the USB memory flash drive during the data output process.
User Manual MK/YF38-07 – V2.01CS
© 2019 All Rights Reserved
Page 35 of 60
Chapter 5 Heating humidifier
5.1 Intended use
The heated humidifier uses a sprung metal plate to transfer heat to distilled water in the water
tank. This provides heated and humidified air to ensure a more comfortable therapy experience
for the user. It is not intended for use with patients whose upper airways have been bypassed.
5.2 Specifications
Working voltage: 24VDC
Water tank volume: 270ml
Maximum working pressure: 30cmH2O
Air supply pressure range: 1-30cmH2O
Working environment range: 5℃ - 35℃
Range of input air temperature: 5℃ - 35℃
Transmitted air temperature: no higher than 37℃ (as recommended)
Statically humidified water temperature range: 35℃ - 45 (±5)℃
Preheat time: 5 minutes from 23℃ to 45℃
Heating time: When humidifier is at level 1, it takes 5 minutes to heat from 23℃ to
45℃. In level 2, it takes 5 minutes to heat from 23℃ to 55℃. In level 3, it takes 7
minutes to heat from 23℃ to 65℃.In level 4, it takes 10 minutes to heat from 23℃ to
75℃. In level 5, it takes 15 minutes to heat from 23℃ to 85℃.
Protection against over-hot heating plate: 125±10℃
Humidification ability: Under the premise of a flow rate of 20 to 40 L/min, it is more
than 10 mg/L. If the flow rate exceeds 40 L/min, the humidification ability cannot be
guaranteed for more than 10 mg/L.
Recommended flow rate range: 20-40L/min
Maximum leak: less than 20ml/min (maximum working pressure: 30cmH2O)
User Manual MK/YF38-07 – V2.01CS
© 2019 All Rights Reserved
Page 36 of 60
5.3 Cautions
It is advised to only use distilled water to prevent scale and calcification occurring which
can result in corrosive holes.
It is necessary to clean the heating humidifier and change the water in it every day so
as to prevent breeding of bacteria.
When filling the water tank, it should first be removed from the humidifier. After the tank
is emptied after use, ensure the tank is dry before re-inserting to the humidifier.
Do not overfill the water chamber as water may backflow into the Machine, damaging
the motor or other components.
It is necessary to regularly check if there is any sign of damage or wear on the heating
humidifier. If damage is detected do not use the humidification function and contact your
service provider before using it again.
When removing the water tank after use, it is important to remember the base plate will
be hot and to take precautions to avoid burning yourself.
Do not use a humidifier or water chamber or humidifier that has not been designed for
this unit.
Certain unpredictable risks may arise when the equipment uses externally connected
humidifier or its humidifier is connected to other CPAP Machine.
The use of humidifier beyond the specified ambient temperature and humidity may affect
the humidification performance.
When the humidifier is exposed to electric cautery, electro surgery, defibrillation, X-ray
(γ-ray), infrared radiation, and transient electromagnetic field (such as MRI and radio
disturbance), it may affect the normal working of the temperature sensor in it, and
eventually the humidification ability of the device.
The output hose of the heating humidifier should be lower than the user as much as
possible to prevent the condensate within hose from flowing backward into the face
mask.
It is not recommended to use the humidifier if the room temperature exceeds the
maximum temperature specifications.
Tip: If the Machine is to be used without the humidifier, the humidifier setting must be set to
OFF in the [Set] > [Param] menu, otherwise an alert message will occur after 40 seconds.

User Manual MK/YF38-07 – V2.01CS
© 2019 All Rights Reserved
Page 37 of 60
Chapter 6 WIFI
6.1 Expected usage
This equipment is provided with an in-built 2.4GHz WIFI module that can connect with the M+
cloud service platform provided by the manufacturer. This platform can collect data including
but not limited to the setup parameters, treatment information, and treatment report generated
during the user treatment process for analysis of user treatment effect and supply of better
subsequent service.
The manufacturer shall strictly keep those collected data confidential and shall not use them
for any commercial purpose related to a third party.
Note: This feature is not currently available in Australia.
If this feature becomes available in the future, details will be provided on our website.
Purchasers of this equipment and subscribers of our support services will be notified of
available options.
To opt-in, set up and register your interest for this service, please visit:
www.cpapsales.com.au/wifi-setup
User Manual MK/YF38-07 – V2.01CS
© 2019 All Rights Reserved
Page 38 of 60
Chapter 7 Alerts
7.1 Visual and Audible Alerts
If an unexpected fault event occurs with the Machine during use, an alert message in red text
will be displayed in the upper left corner of the screen, accompanied by an audible beeping
sound.
If power is disconnected from the Machine during use (Eg. A power cut), 2 beeps will sound,
followed by a 15 second pause. This will continue until power has been restored, or until the
internal device power has been exhausted.
7.2 Alert messages
Name Alert description Alert principle Handling measures
Turbine The turbine blower /
motor stops working
A sensor detects rotation
of the turbine rotor. If
rotation is not detected
within a certain period of
time, an alert will be given.
Immediately disconnect
from the power and contact
your service provider.
Heating
humidifier
The temperature in
heating humidifier
becomes too high
When the temperature of
heater element is over
90℃ for more than 10
seconds, an alert will be
given.
Immediately disconnect
from the power and contact
your service provider.
Humidifier
fault
Humidifier is
disconnected
If the machine is to be
used without the
humidifier connected, it
Disconnect the power, wait
for 30 seconds. Before
trying again, turn the
User Manual MK/YF38-07 – V2.01CS
© 2019 All Rights Reserved
Page 39 of 60
must be switched off
electronically first,
otherwise an alert will be
given after 40 seconds.
humidifier off in the [Set] >
[Param] menu.
If the problem persists,
contact your service
provider.
Pressure
sensor
The pressure sensor
fails
If the pressure sensor
reads a negative value for
30 seconds or more, an
alert will be given.
Disconnect the power
supply, wait for 1 minute,
then re-apply the power and
run the Machine again. If
the problem persists,
immediately disconnect
from the power and contact
your service provider.
Flow sensor The flow sensor fails
The flow sensor reads
error data for over 30
seconds, an alert will be
given.
Disconnect the power
supply, wait for 1 minute,
then re-apply the power and
run the Machine again. If
the problem persists,
immediately disconnect
from the power and contact
your service provider.
High-
pressure
The air flow output
pressure exceeds
35cmH20
If the pressure sensor
detects the hose pressure
is over 35cmH20 for 6
seconds or more, an alert
will be given.
Immediately disconnect
from the power and contact
your service provider.
User Manual MK/YF38-07 – V2.01CS
© 2019 All Rights Reserved
Page 40 of 60
Disconnecti
on
The mask or tubing
hose is
disconnected from
the CPAP Machine
The pressure sensor
detects a problem for over
30 seconds, an alert will
be given.
Check if there is any
damage to the hose or face
mask; ensure the
connection between the air
outlet and hose is normal
and the face mask is
correctly worn; Mask leaks
should be under 60l/m
if the problem persists,
contact your service
provider.
Tubing block
The flow in the air
outlet tubing
becomes nearly 0
due to
obstruction/blockage
The flow sensor reads an
incorrect value for more
than 30 seconds, an alert
will be given.
Check if the hose or face
mask is blocked; ensure the
hose is not crushed or bent.
If problem persists, contact
your service provider.
7.3 Alert Suspension
If an alert is shown or heard, press the dial button during the alert to suspend it.
If the problem is not rectified within 30 seconds, the alert reminder will reoccur.
If you cannot resolve the alert, please contact your equipment provider for assistance.
User Manual MK/YF38-07 – V2.01CS
© 2019 All Rights Reserved
Page 41 of 60
Chapter 8 Equipment cleaning and maintenance
8.1 Repair and maintenance
If the equipment or accessories are damaged, or their original functions can’t be guaranteed,
discontinue use of the equipment.
If you need to have the equipment repaired, cleaned, preventively checked or maintained, please
contact your equipment provider or manufacturer (Micomme Medical)
8.2 Frequency
Based on standard hygiene considerations, the manufacturer recommends the following
maintenance schedule:
Clean the equipment, mask and hose before the initial use, then weekly;
Empty any remaining water in the water tank each morning and clean the tank thoroughly at least once per week to prevent the growth of bacteria;
Check and clean the air filter once a month and replace it every six months;
Replace the face mask and hose every 6-12 months or as required.
8.3 Cleaning method
8.3.1 Cleaning of CPAP machine and hose
Disconnect the equipment from the power supply before cleaning it or carrying out regular
maintenance.
Clean the front panel and exterior enclosure with soft damp cloth, moistened with warm water or
mild disinfectant or CPAP cleaning wipes. Dry the equipment completely before inserting the
power connection.
User Manual MK/YF38-07 – V2.01CS
© 2019 All Rights Reserved
Page 42 of 60
Warnings: 1.When the equipment is used by more than one user, the filter should be
replaced for each user.
2. Clean the respiration hose and face mask by referring to the individual
cleaning instructions included with these accessories.
8.3.2 Water tank cleaning
Remove the water tank from the humidifier and wash in warm soapy water with a mild liquid
disinfectant. Rinse with clean water, then wipe clean the components, and air dry.
After each clean, check the seal of the water tank is intact.
8.3.3 Air filter cleaning and replacement
The air filter should be cleaned in warm water and mild disinfectant, and the disinfectant
residue should be completely washed away. The filter should be completely dried before being
returned to the Machine. If the air filter is damaged in any way, please replace it immediately.
1. Disconnect the power supply of equipment.
2. Remove the filter cover.
3. Squeeze the middle part of the filter to remove it.
4. Check the cleanliness and completeness of the filter.
5. Clean the filter with warm water mixed with neutral disinfectant, wash it with water to
remove the disinfectant residue, completely dry the filter and then re-fix it; or change
the filter upon finding any damage.
Attention: Never install a wet/damp filter into the Machine. We recommend you clean the filter
in the morning and alternate with a spare filter to ensure adequate drying time for cleaned filter.
User Manual MK/YF38-07 – V2.01CS
© 2019 All Rights Reserved
Page 43 of 60
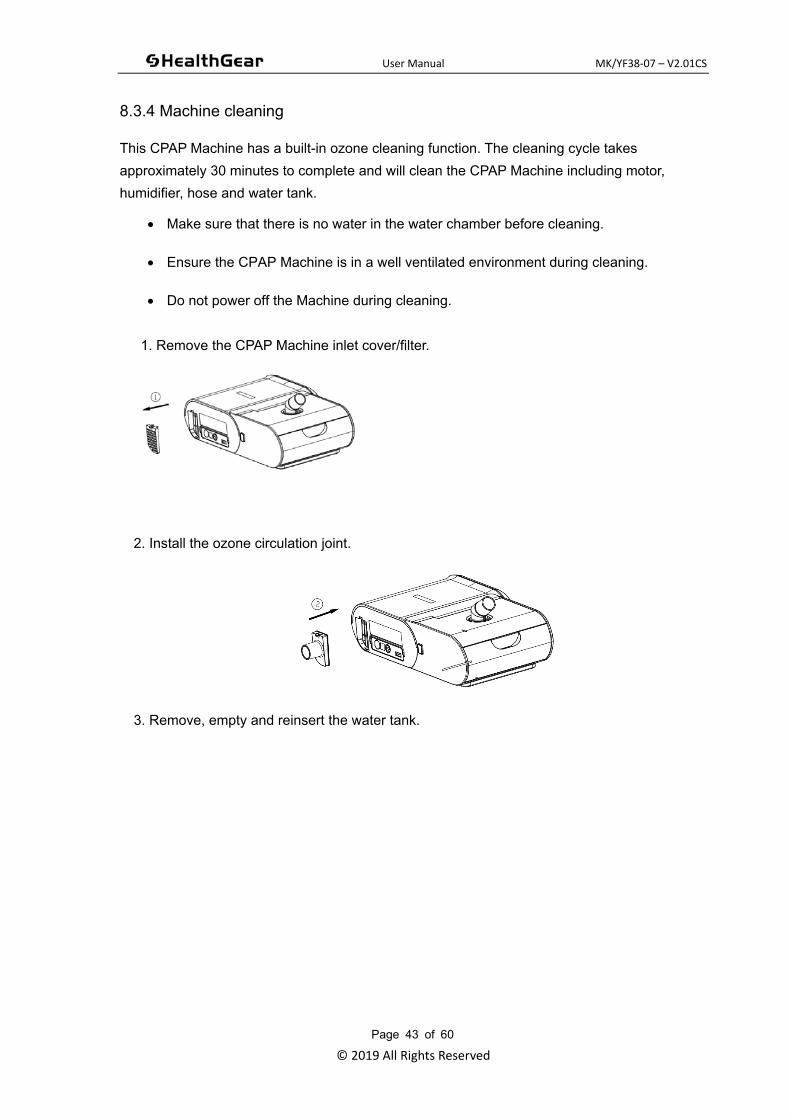
8.3.4 Machine cleaning
This CPAP Machine has a built-in ozone cleaning function. The cleaning cycle takes
approximately 30 minutes to complete and will clean the CPAP Machine including motor,
humidifier, hose and water tank.
Make sure that there is no water in the water chamber before cleaning.
Ensure the CPAP Machine is in a well ventilated environment during cleaning.
Do not power off the Machine during cleaning.
1. Remove the CPAP Machine inlet cover/filter.
2. Install the ozone circulation joint.
3. Remove, empty and reinsert the water tank.
User Manual MK/YF38-07 – V2.01CS
© 2019 All Rights Reserved
Page 44 of 60
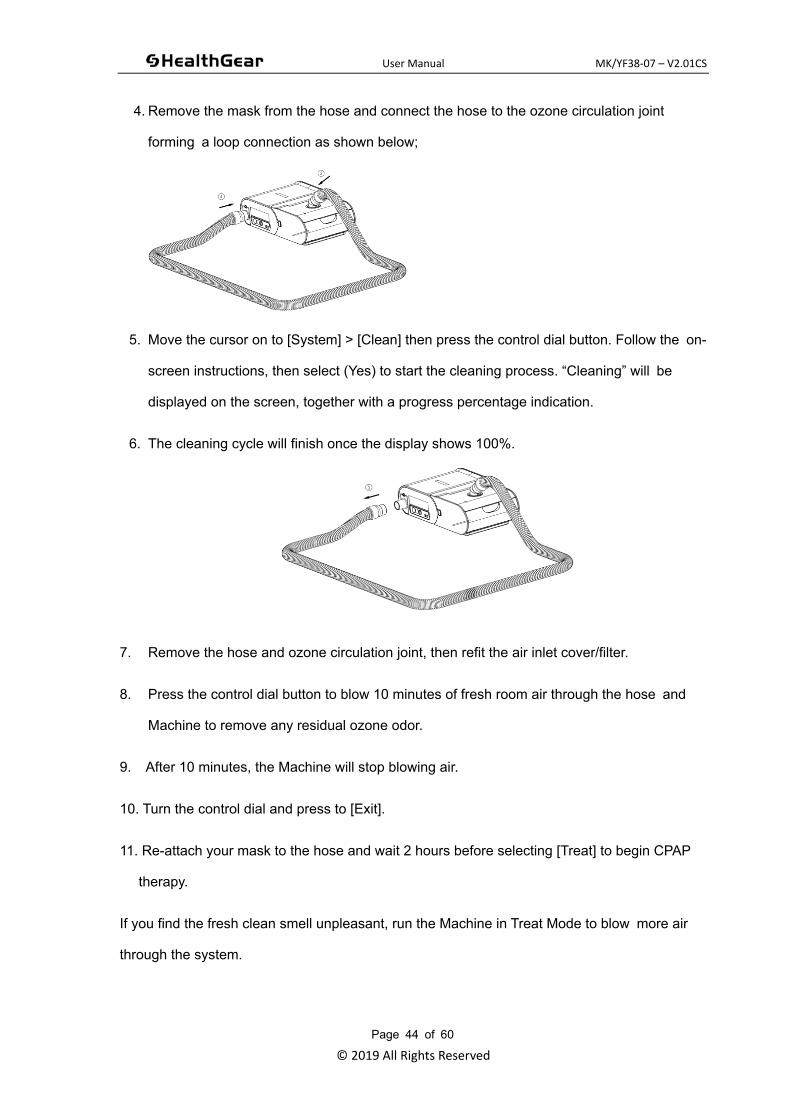
4. Remove the mask from the hose and connect the hose to the ozone circulation joint
forming a loop connection as shown below;
5. Move the cursor on to [System] > [Clean] then press the control dial button. Follow the on-
screen instructions, then select (Yes) to start the cleaning process. “Cleaning” will be
displayed on the screen, together with a progress percentage indication.
6. The cleaning cycle will finish once the display shows 100%.
7. Remove the hose and ozone circulation joint, then refit the air inlet cover/filter.
8. Press the control dial button to blow 10 minutes of fresh room air through the hose and
Machine to remove any residual ozone odor.
9. After 10 minutes, the Machine will stop blowing air.
10. Turn the control dial and press to [Exit].
11. Re-attach your mask to the hose and wait 2 hours before selecting [Treat] to begin CPAP
therapy.
If you find the fresh clean smell unpleasant, run the Machine in Treat Mode to blow more air
through the system.
User Manual MK/YF38-07 – V2.01CS
© 2019 All Rights Reserved
Page 45 of 60
Chapter 9 Storage and transportation
9.1 Storage
The packed CPAP Machine can be stored in a clean and well ventilated room that has an
ambient temperature of -10-55℃ and relative humidity of 15-95%, and is free from any
corrosive gas.
9.2 Transportation
After being packed into the case, the CPAP Machine can be transported in a common way, but
should be protected from moisture, sunlight and shock during the process.
Important: When travelling with the Machine, ensure the water tank is completely dry before
packing up your Machine.
User Manual MK/YF38-07 – V2.01CS
© 2019 All Rights Reserved
Page 46 of 60
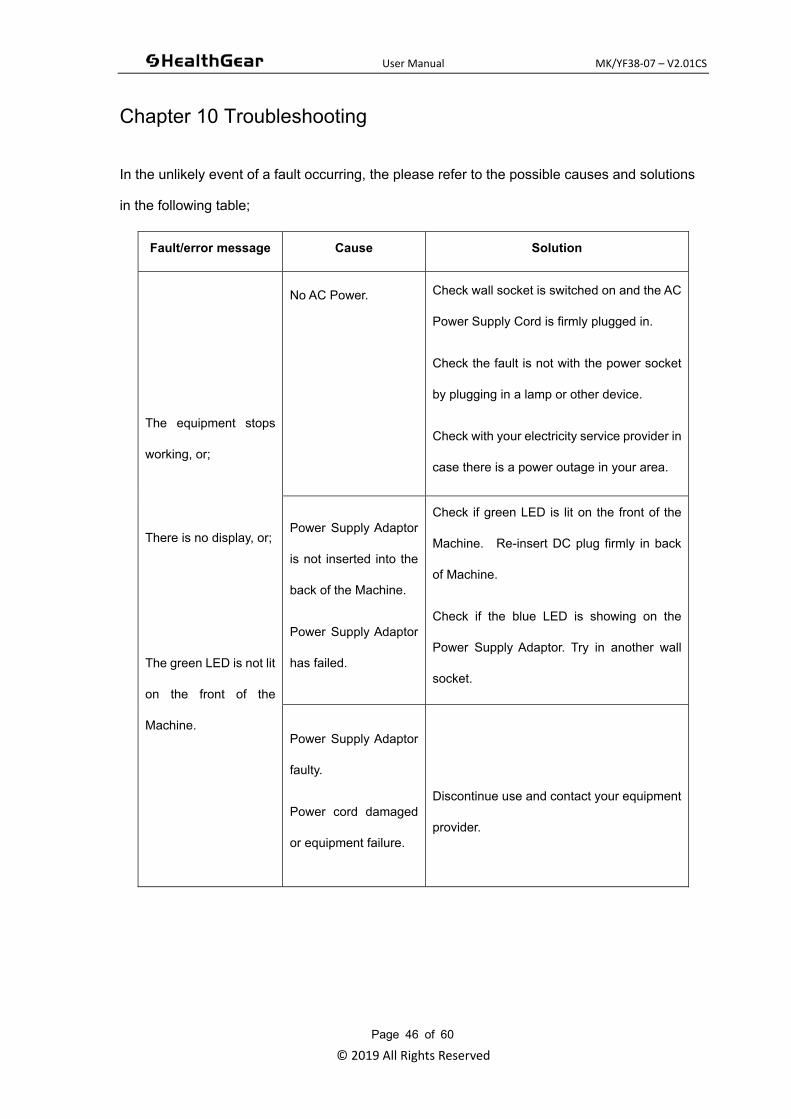
Chapter 10 Troubleshooting
In the unlikely event of a fault occurring, the please refer to the possible causes and solutions
in the following table;
Fault/error message Cause Solution
The equipment stops
working, or;
There is no display, or;
The green LED is not lit
on the front of the
Machine.
No AC Power.
Check wall socket is switched on and the AC
Power Supply Cord is firmly plugged in.
Check the fault is not with the power socket
by plugging in a lamp or other device.
Check with your electricity service provider in
case there is a power outage in your area.
Power Supply Adaptor
is not inserted into the
back of the Machine.
Power Supply Adaptor
has failed.
Check if green LED is lit on the front of the
Machine. Re-insert DC plug firmly in back
of Machine.
Check if the blue LED is showing on the
Power Supply Adaptor. Try in another wall
socket.
Power Supply Adaptor
faulty.
Power cord damaged
or equipment failure.
Discontinue use and contact your equipment
provider.
User Manual MK/YF38-07 – V2.01CS
© 2019 All Rights Reserved
Page 47 of 60
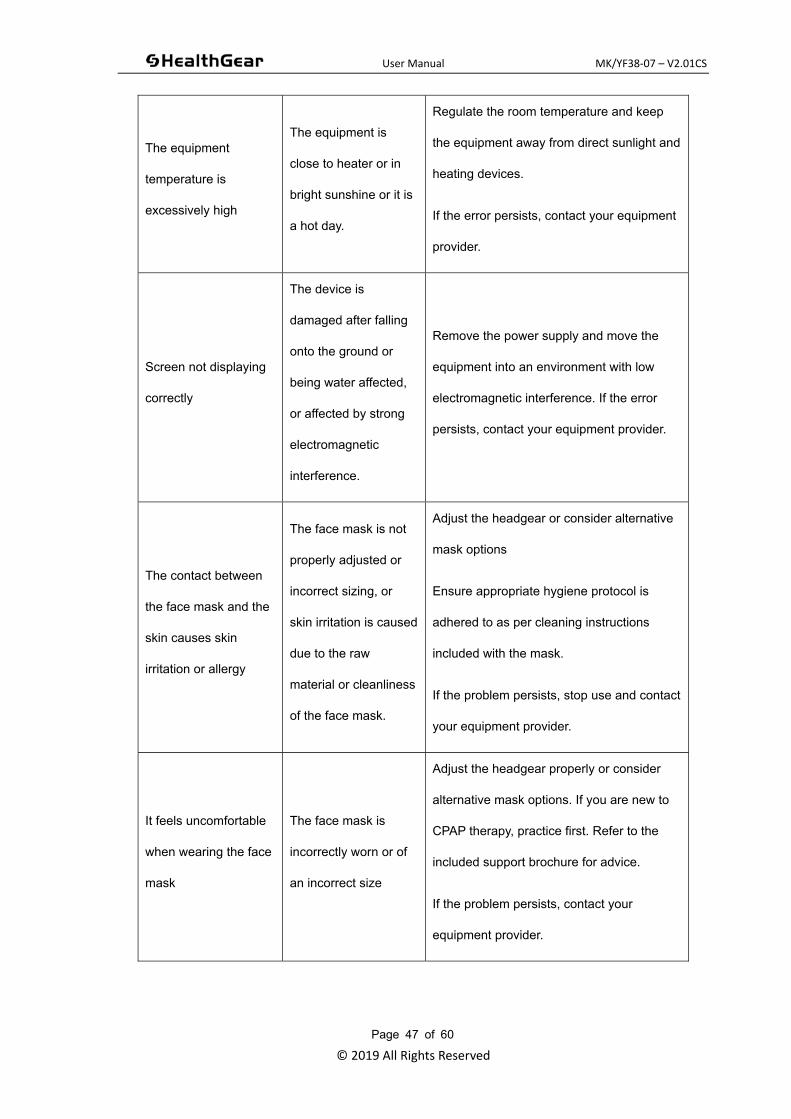
The equipment
temperature is
excessively high
The equipment is
close to heater or in
bright sunshine or it is
a hot day.
Regulate the room temperature and keep
the equipment away from direct sunlight and
heating devices.
If the error persists, contact your equipment
provider.
Screen not displaying
correctly
The device is
damaged after falling
onto the ground or
being water affected,
or affected by strong
electromagnetic
interference.
Remove the power supply and move the
equipment into an environment with low
electromagnetic interference. If the error
persists, contact your equipment provider.
The contact between
the face mask and the
skin causes skin
irritation or allergy
The face mask is not
properly adjusted or
incorrect sizing, or
skin irritation is caused
due to the raw
material or cleanliness
of the face mask.
Adjust the headgear or consider alternative
mask options
Ensure appropriate hygiene protocol is
adhered to as per cleaning instructions
included with the mask.
If the problem persists, stop use and contact
your equipment provider.
It feels uncomfortable
when wearing the face
mask
The face mask is
incorrectly worn or of
an incorrect size
Adjust the headgear properly or consider
alternative mask options. If you are new to
CPAP therapy, practice first. Refer to the
included support brochure for advice.
If the problem persists, contact your
equipment provider.
User Manual MK/YF38-07 – V2.01CS
© 2019 All Rights Reserved
Page 48 of 60
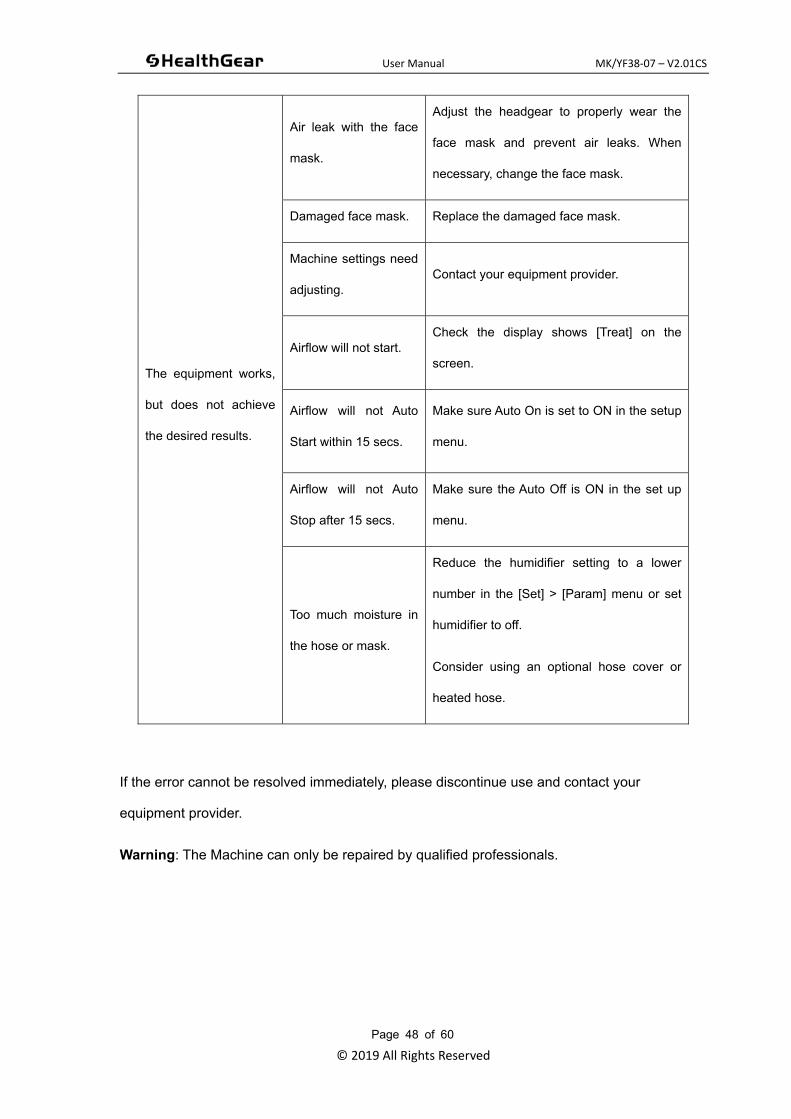
The equipment works,
but does not achieve
the desired results.
Air leak with the face
mask.
Adjust the headgear to properly wear the
face mask and prevent air leaks. When
necessary, change the face mask.
Damaged face mask. Replace the damaged face mask.
Machine settings need
adjusting. Contact your equipment provider.
Airflow will not start. Check the display shows [Treat] on the
screen.
Airflow will not Auto
Start within 15 secs.
Make sure Auto On is set to ON in the setup
menu.
Airflow will not Auto
Stop after 15 secs.
Make sure the Auto Off is ON in the set up
menu.
Too much moisture in
the hose or mask.
Reduce the humidifier setting to a lower
number in the [Set] > [Param] menu or set
humidifier to off.
Consider using an optional hose cover or
heated hose.
If the error cannot be resolved immediately, please discontinue use and contact your
equipment provider.
Warning: The Machine can only be repaired by qualified professionals.
User Manual MK/YF38-07 – V2.01CS
© 2019 All Rights Reserved
Page 49 of 60
Chapter 11 Technical information
11.1 Parameters
11.1.1 Default C2 CPAP Machine Settings
CPAP Mode
CPAP: 10cmH20
Humidifier: 2
Pre-Heat: Off
Comf: Off
Auto on: On
Auto off: On
Ramp time: 10 minutes
Ramp start: 4cmH20
Backlight: 15 seconds
Language: English
Time and Date: Australian Eastern Standard Time (AEST = UTC+10h)
11.1.2 Default C5 Auto CPAP Machine Settings
Auto-CPAP Mode
Max: 16cmH20
Min: 6cmH20
Humidifier: 2
Pre-Heat: Off
Comf: Off
Auto on: On
Auto off: On
Ramp time: Off
Ramp start: 4cmH20
Backlight: 15 seconds

User Manual MK/YF38-07 – V2.01CS
© 2019 All Rights Reserved
Page 50 of 60
Language: English
Time and Date: Australian Eastern Standard Time (AEST = UTC+10h)
11.1.3 AC Adapter parameters
Specified Adapter Model: HY72-024
Specified Adapter Manufacture: ShenZhen Hongyi Electronic Technology CO. Ltd.
11.1.4 Machine ambient parameters
Parameter Working conditions Storage conditions
Temperature 5ºC ~ 35ºC -10ºC ~ 55ºC
Relative humidity 15% ~ 95% (non-condensate) 15% ~ 95% (non-condensate)
Atmospheric pressure 83~102kPa (5,600 feet above
the sea level)
11.1.5 Physical and electrical parameters
Parameter Value
Outer dimensions 28.8cm L x 20.2cm W x 8.4cm H
Weight 1.9kg
AC power supply 100 ~ 240VAC,50/60 Hz
AC 1.5A (max)
DC 2.5A (max)
Fuse rating T3.15A 250V, interrupting rating:100A
User Manual MK/YF38-07 – V2.01CS
© 2019 All Rights Reserved
Page 51 of 60
11.1.6 Electric safety class
Parameter Value
Safety class against electric shock Class II
Electric shock protection degree BF application component
Waterproof level IP21
Mode of operation Continuous operation
Safety class when used in combustible
anesthetics mixed with air or oxygen or helium
oxide
It can’t be used in combustible
anesthetics mixed with air or oxygen or
helium oxide
Extreme environment statement:
When the environment and power supply (or gas supply) exceed the extreme values in the
following ranges, the change of one parameter and keeping of other parameters within the
normal ranges will severely affect the equipment performance, and even cause certain harm to
the user.
—— Ambient temperature range: 5℃-35℃;
—— Relative humidity range: 15% - 95%;
—— Atmospheric pressure range: 83 ~ 102kPa;
—— AC power voltage: -15% - +10% of rated voltage;
—— DC power voltage: -15% - +25% of rated voltage.
User Manual MK/YF38-07 – V2.01CS
© 2019 All Rights Reserved
Page 52 of 60
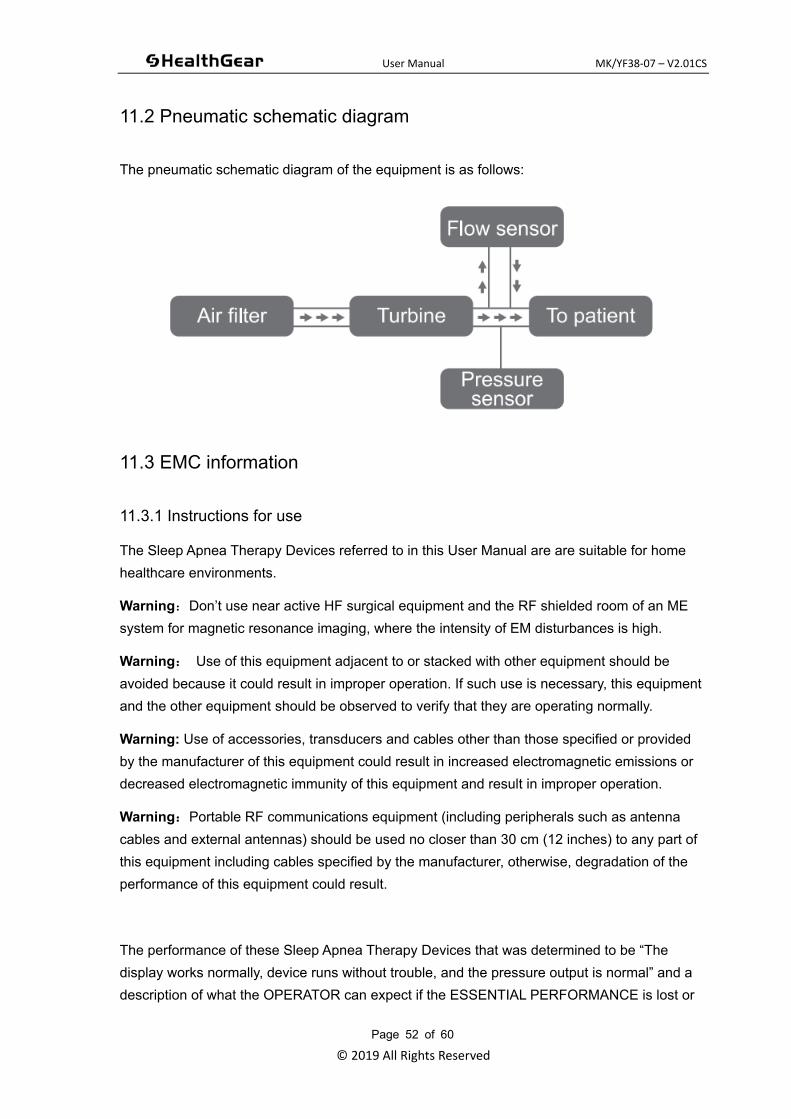
11.2 Pneumatic schematic diagram
The pneumatic schematic diagram of the equipment is as follows:
11.3 EMC information
11.3.1 Instructions for use
The Sleep Apnea Therapy Devices referred to in this User Manual are are suitable for home
healthcare environments.
Warning:Don’t use near active HF surgical equipment and the RF shielded room of an ME
system for magnetic resonance imaging, where the intensity of EM disturbances is high.
Warning: Use of this equipment adjacent to or stacked with other equipment should be
avoided because it could result in improper operation. If such use is necessary, this equipment
and the other equipment should be observed to verify that they are operating normally.
Warning: Use of accessories, transducers and cables other than those specified or provided
by the manufacturer of this equipment could result in increased electromagnetic emissions or
decreased electromagnetic immunity of this equipment and result in improper operation.
Warning:Portable RF communications equipment (including peripherals such as antenna
cables and external antennas) should be used no closer than 30 cm (12 inches) to any part of
this equipment including cables specified by the manufacturer, otherwise, degradation of the
performance of this equipment could result.
The performance of these Sleep Apnea Therapy Devices that was determined to be “The
display works normally, device runs without trouble, and the pressure output is normal” and a
description of what the OPERATOR can expect if the ESSENTIAL PERFORMANCE is lost or
User Manual MK/YF38-07 – V2.01CS
© 2019 All Rights Reserved
Page 53 of 60
degraded due to EM DISTURBANCES.(For details, see Chapter 9 Fault Analysis and
Troubleshooting)
11.3.2 Technical description
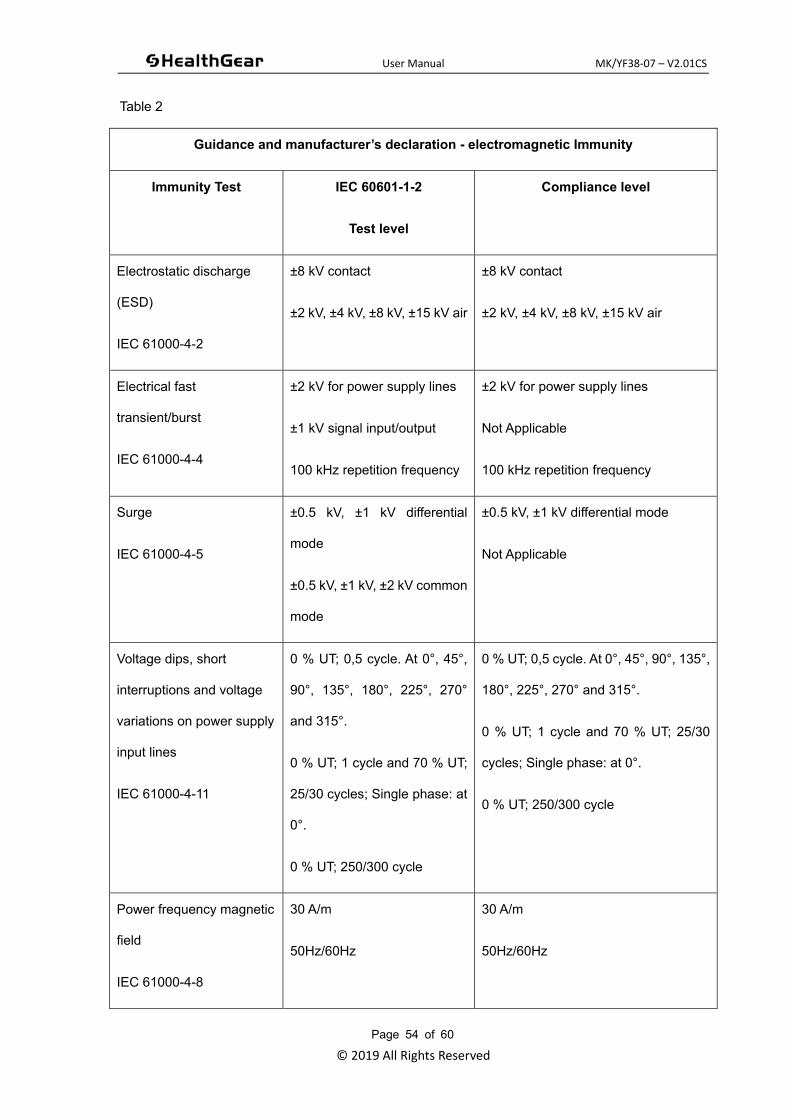
Table 1
Guidance and manufacturer’s declaration - electromagnetic emissions
Emissions test Compliance
RF emissions
CISPR 11
Group 1
RF emissions
CISPR 11
Class [B]
Harmonic emissions
IEC 61000-3-2
Not Applicable
Voltage fluctuations/ flicker
emissions
IEC 61000-3-3
Not Applicable
User Manual MK/YF38-07 – V2.01CS
© 2019 All Rights Reserved
Page 54 of 60
Table 2
Guidance and manufacturer’s declaration - electromagnetic Immunity
Immunity Test IEC 60601-1-2
Test level
Compliance level
Electrostatic discharge
(ESD)
IEC 61000-4-2
±8 kV contact
±2 kV, ±4 kV, ±8 kV, ±15 kV air
±8 kV contact
±2 kV, ±4 kV, ±8 kV, ±15 kV air
Electrical fast
transient/burst
IEC 61000-4-4
±2 kV for power supply lines
±1 kV signal input/output
100 kHz repetition frequency
±2 kV for power supply lines
Not Applicable
100 kHz repetition frequency
Surge
IEC 61000-4-5
±0.5 kV, ±1 kV differential
mode
±0.5 kV, ±1 kV, ±2 kV common
mode
±0.5 kV, ±1 kV differential mode
Not Applicable
Voltage dips, short
interruptions and voltage
variations on power supply
input lines
IEC 61000-4-11
0 % UT; 0,5 cycle. At 0°, 45°,
90°, 135°, 180°, 225°, 270°
and 315°.
0 % UT; 1 cycle and 70 % UT;
25/30 cycles; Single phase: at
0°.
0 % UT; 250/300 cycle
0 % UT; 0,5 cycle. At 0°, 45°, 90°, 135°,
180°, 225°, 270° and 315°.
0 % UT; 1 cycle and 70 % UT; 25/30
cycles; Single phase: at 0°.
0 % UT; 250/300 cycle
Power frequency magnetic
field
IEC 61000-4-8
30 A/m
50Hz/60Hz
30 A/m
50Hz/60Hz
User Manual MK/YF38-07 – V2.01CS
© 2019 All Rights Reserved
Page 55 of 60
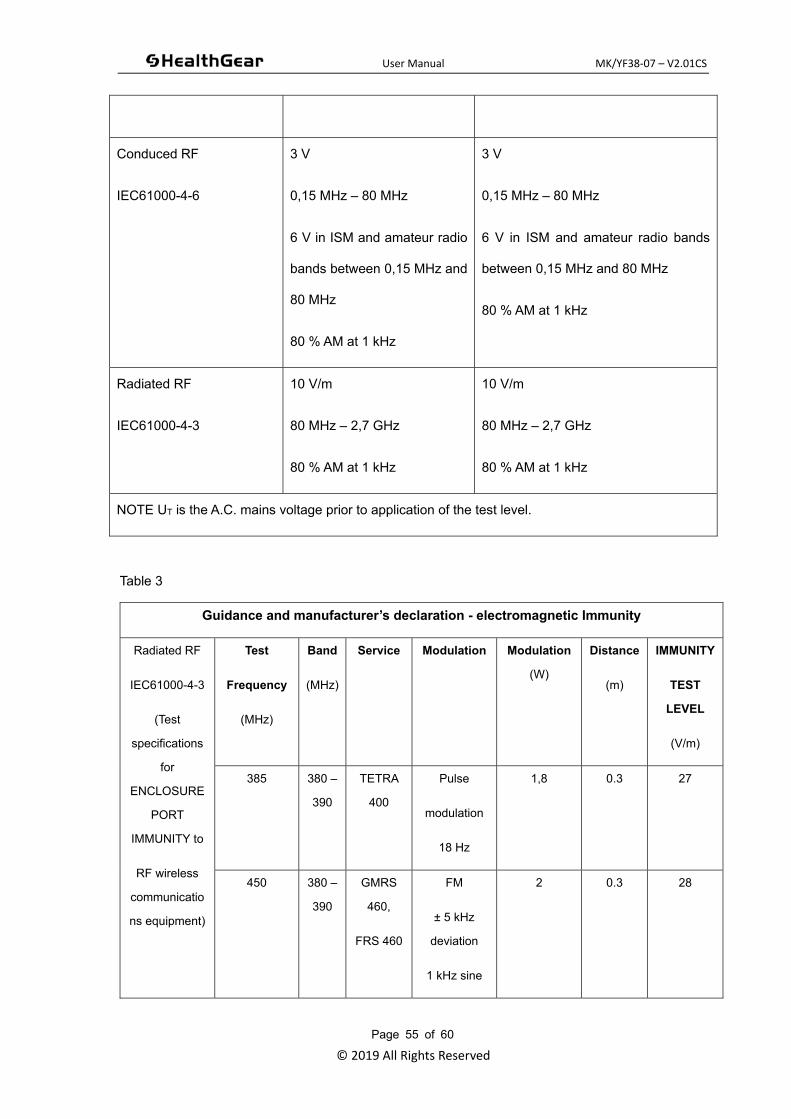
Conduced RF
IEC61000-4-6
3 V
0,15 MHz – 80 MHz
6 V in ISM and amateur radio
bands between 0,15 MHz and
80 MHz
80 % AM at 1 kHz
3 V
0,15 MHz – 80 MHz
6 V in ISM and amateur radio bands
between 0,15 MHz and 80 MHz
80 % AM at 1 kHz
Radiated RF
IEC61000-4-3
10 V/m
80 MHz – 2,7 GHz
80 % AM at 1 kHz
10 V/m
80 MHz – 2,7 GHz
80 % AM at 1 kHz
NOTE UT is the A.C. mains voltage prior to application of the test level.
Table 3
Guidance and manufacturer’s declaration - electromagnetic Immunity
Radiated RF
IEC61000-4-3
(Test
specifications
for
ENCLOSURE
PORT
IMMUNITY to
RF wireless
communicatio
ns equipment)
Test
Frequency
(MHz)
Band
(MHz)
Service Modulation Modulation
(W)
Distance
(m)
IMMUNITY
TEST
LEVEL
(V/m)
385 380 –
390
TETRA
400
Pulse
modulation
18 Hz
1,8 0.3 27
450 380 –
390
GMRS
460,
FRS 460
FM
± 5 kHz
deviation
1 kHz sine
2 0.3 28
User Manual MK/YF38-07 – V2.01CS
© 2019 All Rights Reserved
Page 56 of 60
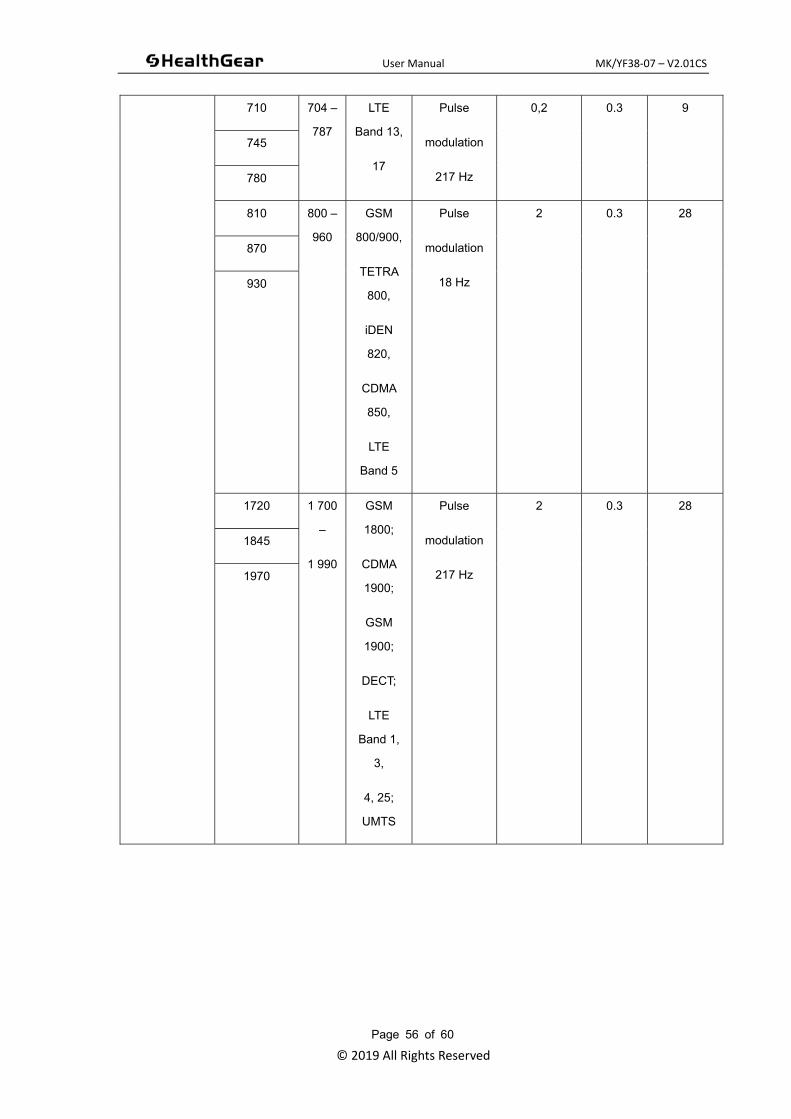
710 704 –
787
LTE
Band 13,
17
Pulse
modulation
217 Hz
0,2 0.3 9
745
780
810 800 –
960
GSM
800/900,
TETRA
800,
iDEN
820,
CDMA
850,
LTE
Band 5
Pulse
modulation
18 Hz
2 0.3 28
870
930
1720 1 700
–
1 990
GSM
1800;
CDMA
1900;
GSM
1900;
DECT;
LTE
Band 1,
3,
4, 25;
UMTS
Pulse
modulation
217 Hz
2 0.3 28
1845
1970

User Manual MK/YF38-07 – V2.01CS
© 2019 All Rights Reserved
Page 57 of 60
2450 2 400
–
2 570
Bluetooth
,
WLAN,
802.11
b/g/n,
RFID
2450,
LTE
Band 7
Pulse
modulation
217 Hz
2 0.3 28
5240 5 100
–
5 800
WLAN
802.11
a/n
Pulse
modulation
217 Hz
0,2 0.3 9
5240
5785
11.3.3 RF information
For WIFI
Operating Frequency: 2400~2483.5MHz
Max. Transmitter Power: 17.66dBm
For BLE
Operating Frequency: 2400~2483.5MHz
Max. Transmitter Power: 0.18dBm
User Manual MK/YF38-07 – V2.01CS
© 2019 All Rights Reserved
Page 58 of 60
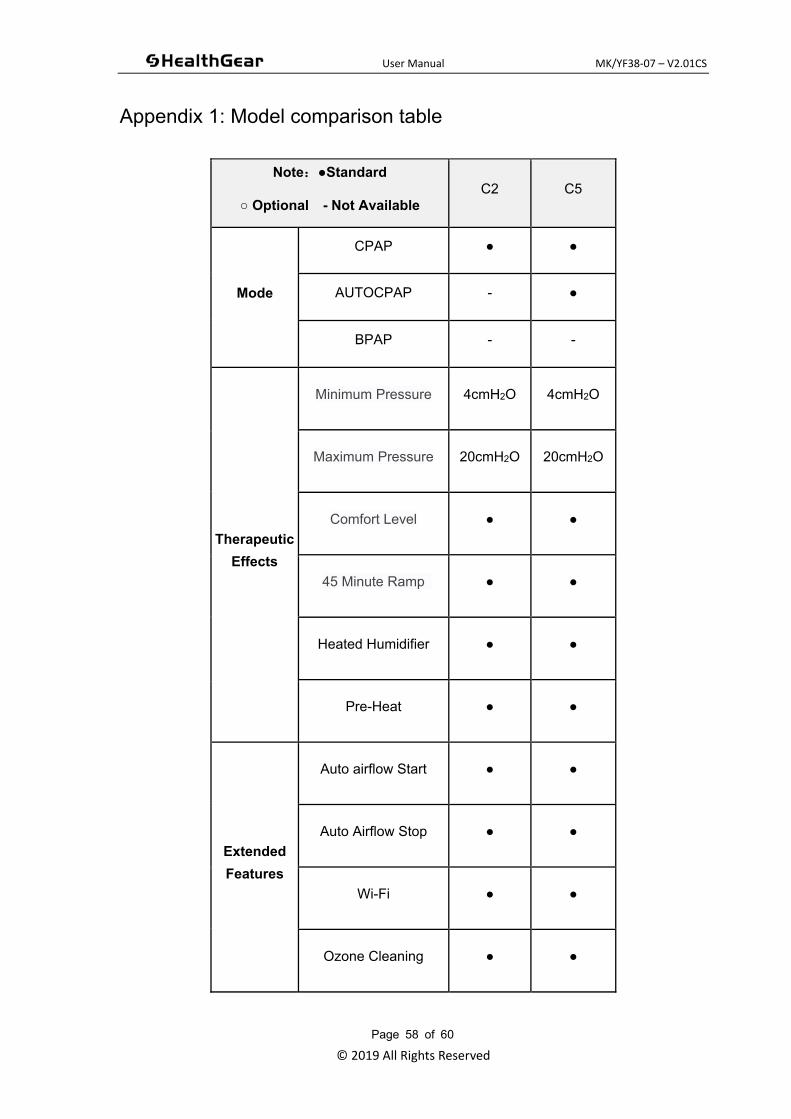
Appendix 1: Model comparison table
Note:●Standard
○ Optional - Not Available C2 C5
Mode
CPAP ● ●
AUTOCPAP - ●
BPAP - -
Therapeutic
Effects
Minimum Pressure 4cmH2O 4cmH2O
Maximum Pressure 20cmH2O 20cmH2O
Comfort Level ● ●
45 Minute Ramp ● ●
Heated Humidifier ● ●
Pre-Heat ● ●
Extended
Features
Auto airflow Start ● ●
Auto Airflow Stop ● ●
Wi-Fi ● ●
Ozone Cleaning ● ●
User Manual MK/YF38-07 – V2.01CS
© 2019 All Rights Reserved
Page 59 of 60
Appendix 2: Warranty and Downloads
Review and download latest content as shown below;
Warranty Policy
www.cpapsales.com.au/refunds-warranty-and-returns
Quick Start Guide
www.cpapsales.com.au/manuals
User Manual
www.cpapsales.com.au/manuals
WiFi Setup
www.cpapsales.com.au/wifi-setup
FAQ (Frequently Asked Questions)
https://cpapsales.freshdesk.com/support/home
User Manual MK/YF38-07 – V2.01CS
© 2019 All Rights Reserved
Page 60 of 60
Manufactured by: Micomme Medical Technology
Development Co. Ltd Room 101-102, North 1st Floor,
Superstar Enterprise Center, No 8, Lujing Road,
High-Tech Zone, Changsha, Hunan, P.R.China
ARTG Number: 319236
Distributed by: CPAP Sales Pty Ltd
ABN: 81 164 927 539
PO Box 118, Riverstone,
NSW 2765, Australia
Phone: 1300 04 2727
Email: [email protected]
Website: www.cpapsales.com.au